unit 8 - amazon web services€¦ · velonis used screen-printing to create posters and ... the...
TRANSCRIPT

Unit 8

Author: Keith Rosko, B.S./M.A.Editor: Alan Christopherson, M.S.
Annette M. Walker, B.S.Illustrators: Keith Rosko, B.S./M.A.
Lauren Durain, A.S.T.Alpha Omega Graphics
CONTENTS
I. STENCIL MAKING . . . . . . . . . . . . . . . . . . . . . . . . . . . . . 5
II. RELIEF PRINTING . . . . . . . . . . . . . . . . . . . . . . . . . . . . . 12
III. INTAGLIO PRINTING . . . . . . . . . . . . . . . . . . . . . . . . . . . 17
IV. MONOPRINTING . . . . . . . . . . . . . . . . . . . . . . . . . . . . . . . 24
CLOSING . . . . . . . . . . . . . . . . . . . . . . . . . . . . . . . . . . . . . . 30
EVALUATION . . . . . . . . . . . . . . . . . . . . . . . . . . . . . . . . . . 32
GLOSSARY . . . . . . . . . . . . . . . . . . . . . . . . . . . . . . . . . . . . . 33
ART I: UNIT EIGHTPRINTMAKING
804 N. 2nd Ave. E., Rock Rapids, IA 51246-1759© MM by Alpha Omega Publications, Inc. All rights reserved.
LIFEPAC is a registered trademark of Alpha Omega Publications, Inc.All trademarks and/or service marks referenced in this material are the property of their respective owners. Alpha Omega Publications, Inc.makes no claim of ownership to any trademarks and/or service marks other than their own and their affiliates’, and makes no claim of affilia-
tion to any companies whose trademarks may be listed in this material, other than their own.

1
Printmaking is an extremely old and very popular form of art, involving the creation of multiple dupli-cates of a piece of art. It is one of the few arts that is used as both a form of fine art, commercial art andas an applied or industrial art.
Printmaking began in Asia thousands ofyears ago, in two main ways. The first wasthe form of Gyo-Taku, or Oriental FishRubbing. Chinese fishermen would paintink on a fish and then press paper on it topreserve the image and record the dayscatch. Printing was also used to glaze pot-tery. A cloth stencil (most often made of silk,hence the name Serigraphy, which meansto draw on silk or as it is commonly known,silkscreen printing) was used to paint theglaze on the pots, insuring that many potscould be made with an identical design.
Printmaking became popular with the IndustrialRevolution, as a means of mass production of allsorts of materials. It remains popular even today,especially in the computer and electronics indus-tries, where serigraphy is used to create circuitboards.
Screen-printing is probably most well known for itsuse on printed T-shirts and hats. Chances are youare wearing an article of clothing right now thathas a screen-printed image on it.
Screen-printing was first used as a form of fine artsin the 1920s, by an artist named Anthony Velonis.Velonis used screen-printing to create posters andprints, and even today it is still used to reproducelimited edition fine art prints and posters. 60s Popicon Andy Warhol popularized the medium. Warholcreated art from common, everyday objects whichreflected the culture at the time. He felt the indus-trial/commercial aspects of screen-printing, as wellas its emphasis on mass production, lent itself tohis work and made it a medium that reflected theattitude of the time. Some examples of Warhol’ssilkscreen images are on the following page.
Although serigraphy is probably the most commonand well-known form of printmaking, there aremany other methods of creating multiple, identicalimages. We will explore many of these processes inthis Unit.
AN EXAMPLE OF GYO-TAKU.
CIRCUIT BOARD
PRINTMAKING

There are three main types of printing processes,and each has its own unique look and characteris-tics. Professional printmakers and illustratorsneed to be well-versed in all the three typesbecause certain designs are more easily renderedin one type than in another.
The first type of printmaking, and probably the eas-iest to work with is called relief printing. In a relief
print, the image is printed from a raised surface.The image would be drawn on a piece of wood orlinoleum for example, and the background removed.The image would then have ink painted or rolledonto it, and either be pressed onto a surface, or havethe surface pressed onto the block. Where the back-ground cannot come into contact with the surface, itremains clean and free of ink. Where the raisedarea comes into contact with the surface, the ink isdeposited and an image is produced. This is theprocess by which rubber stamps work.
The second type is the opposite, called intaglioprinting. In an intaglio print, the lines of an imageare carved into the printing surface. Ink is thensmeared across the surface and forced into thegrooves. The surface is wiped clean, leaving the inkin the depressions only. When pressure is applied
Relief Block
Printing Surface
2
WARHOL’S GREEN COCA-COLA
BOTTLES ©2000, ANDY WARHOL FOUNDATIONFOR THE VISUAL ARTS/ARS, NEW YORK.
WARHOL’S BIG ELECTRIC CHAIR, ©2000, ANDY WARHOLFOUNDATION FOR THE VISUAL ARTS/ARS, NEW YORK.
RELIEF PRINTING PLATE
STEPS USED IN THESILK SCREEN PROCESS

to a paper or other object which is placed on thissurface it forces the paper into the grooves, whereit picks up the ink. When the paper is peeled away,the inked lines remain on its surface.
The third type of printing process is the stencilprocess. In this process, a hole or opening is cut intoa piece of solid material. When this stencil is placed
in contact with a surface, and ink is dabbed ordrawn across it, the ink will only be applied to thesurface through the cut away opening, leaving theshape of the opening on the surface to be printed.
The final printing process is called planographicprinting, and is a chemical process. The plano-
graphic process involves treating a surface orplate so that it is water repellent in certain areas.When the surface is covered with water, printingink will not stick to the water, but will stick to thewater-repellent areas. When a paper is pressedonto the surface, the ink is transferred to the paper,creating an image.
We will explore the first three areas of printing inthe following examples:
InkStencil
Paper
3
STENCIL PRINTING PLATE
The activities in this Unit will be of two types. Thefirst will be experiments in media, wherein theprocess will be explained and it will be up to thestudent to create a design that will be printed. Thisallows a higher degree of creative freedom, but canresult in some frustration if the student is a bitinsecure in the area of idea generation. To helpwith this, some of the activities will also have anadded intellectual challenge. This will encouragethe student to create design work that meets cer-tain criteria, and will force them to use good prob-lem-solving skills and thinking processes.
If the parent or teacher wishes to add this intellec-tual challenge to all the project activities, or toemphasize a particular problem solving skill,guidelines and ideas for creative design problemsare included in the teachers guide. These are struc-tured to encourage flexible, creative thinking andyet allow the highest degree of creative freedomand possibilities for self-expression. Parents andteachers should feel free to use these project ideasin this, or any of the previous Units, as a substitutefor other ideas or assignments or as additional sup-plementary work.
Intaglio Block
Printing Area
Ink
PlatePLANOGRAPHIC PRINTING PLATE
INTAGLIO PRINTING PLATE

4
OBJECTIVES
Read these objectives. The objectives tell you what you should be able to do when you havesuccessfully completed this Unit.
When you have finished this Unit, you will:
1. Understand a new aspect of fine art: printmaking.
2. Have observed some crossover between fine and applied arts.
3. Understand the concepts of multiple images, limited editions, and posters.
4. Have acquired a working knowledge of different printmaking techniques.
5. Understand the link between past and present, in terms of artistic process.
In the space provided below, write what you think you will learn from this Unit, what you wouldlike to learn, and why you are interested in this topic.
__________________________________________________________________________________________________
__________________________________________________________________________________________________
__________________________________________________________________________________________________
__________________________________________________________________________________________________
__________________________________________________________________________________________________
__________________________________________________________________________________________________
__________________________________________________________________________________________________
__________________________________________________________________________________________________
__________________________________________________________________________________________________
__________________________________________________________________________________________________
Note: All vocabulary words in this Unit appear in boldface the first time they are used. If you are unsure of the meaning when you are reading, studythe definitions given.
5
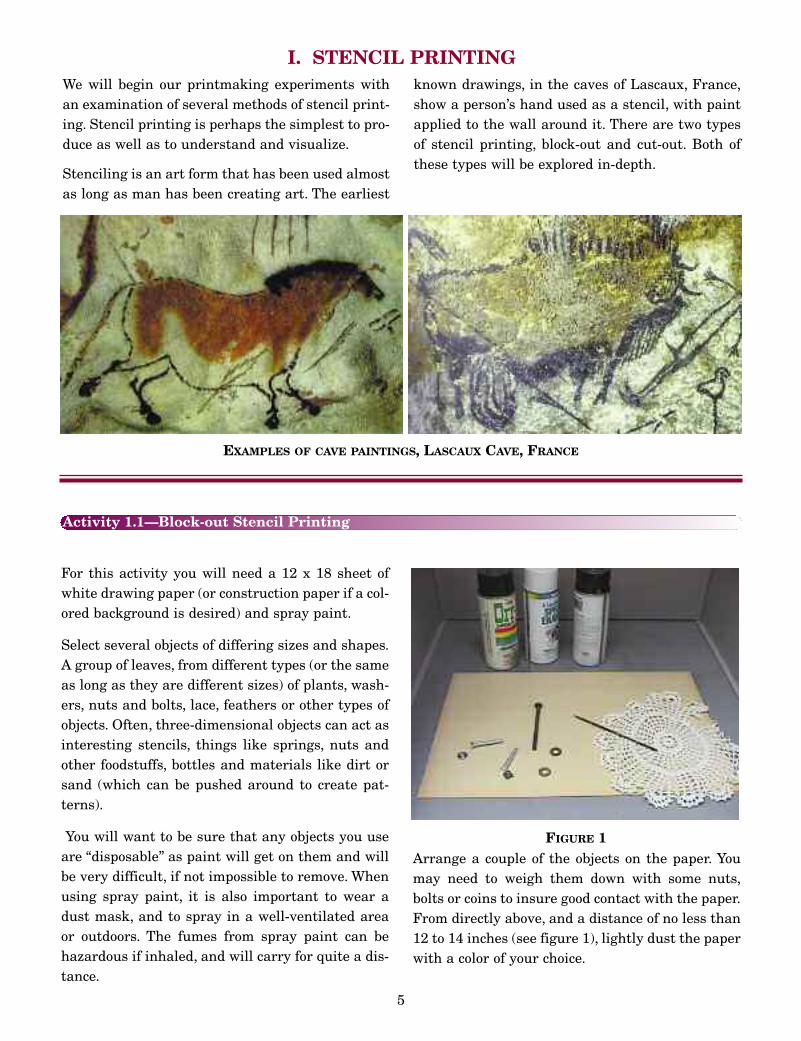
I. STENCIL PRINTINGWe will begin our printmaking experiments withan examination of several methods of stencil print-ing. Stencil printing is perhaps the simplest to pro-duce as well as to understand and visualize.
Stenciling is an art form that has been used almostas long as man has been creating art. The earliest
known drawings, in the caves of Lascaux, France,show a person’s hand used as a stencil, with paintapplied to the wall around it. There are two typesof stencil printing, block-out and cut-out. Both ofthese types will be explored in-depth.
For this activity you will need a 12 x 18 sheet ofwhite drawing paper (or construction paper if a col-ored background is desired) and spray paint.
Select several objects of differing sizes and shapes.A group of leaves, from different types (or the sameas long as they are different sizes) of plants, wash-ers, nuts and bolts, lace, feathers or other types ofobjects. Often, three-dimensional objects can act asinteresting stencils, things like springs, nuts andother foodstuffs, bottles and materials like dirt orsand (which can be pushed around to create pat-terns).
You will want to be sure that any objects you useare “disposable” as paint will get on them and willbe very difficult, if not impossible to remove. Whenusing spray paint, it is also important to wear adust mask, and to spray in a well-ventilated areaor outdoors. The fumes from spray paint can behazardous if inhaled, and will carry for quite a dis-tance.
Arrange a couple of the objects on the paper. Youmay need to weigh them down with some nuts,bolts or coins to insure good contact with the paper.From directly above, and a distance of no less than12 to 14 inches (see figure 1), lightly dust the paperwith a color of your choice.
EXAMPLES OF CAVE PAINTINGS, LASCAUX CAVE, FRANCE
FIGURE 1
Activity 1.1—Block-out Stencil Printing

6
When the paint is dry (spray paint dries veryquickly in light coats), remove the objects andobserve the outline. Now place more objects overthis design and repeat the process. Do this severaltimes until the pattern is pleasing to the eye.
In this particular exercise, there are several factorsthe artist has to weigh in creating a pleasing over-all design. The overall appearance should be wellcomposed (focal point, balance, negative space etc.),remember that color can also affect the composi-tion. The artist will need to consider the size of theobjects, in relation to each other and to the paper.
The shape, size and thickness of the paint will alsobe a factor, as the over-spray will become a visibleshape. The order in which shapes become dustedwith paint will also be important, as this will cre-ate areas that are open or clear of paint and areasthat will have one or more layers of paint on them.Visually, this will create even more shapes, whichwill in turn alter the composition (especially interms of focal point and balance).
As you work and consider these factors, you will seewhat at first is an interesting experiment in media,becomes a quite challenging design problem.
The reverse of the block out technique is the moretraditional and better known stencil technique. Inthis method, the design is cut out of a sheet of paperor plastic, or some similar protective material. Thestencil is then applied to a surface and the ink orpaint is rolled or dabbed onto the surface. Theresult is a design in the shape of the cut out area.This is the technique that we will explore next.
START WITH A DOILY.

For this activity, you will need a spray bottle (thepump type used to spray hair spray or gel is ade-quate), a colored T-shirt, some straight pins andseveral sheets of 12 x 18 construction paper. Wewill be spraying bleach on the shirt, so it is a goodidea to also have a smock or apron, and to coveryour working area with newspapers several lay-ers thick. The bleach will act as a color remover togradually lighten the surface of the shirt, inreverse of laying down layers of opaque paint. Theresult is like painting with white, or working in amonochromatic color scheme, as different layersbecome gradually lighter with additional spray-ings of bleach.
There are some additional factors that one needsto consider when designing for a piece of clothing.The design should not only be well composed andattractive to the eye, it needs to read well on theshirt. If the design is too large and becomestucked into the pants, it will not be seen. Likewiseif the design is to big it will fall into the folds ofthe clothing and be obscured. If the design isplaced too high or too low, it will be distractingand difficult to view. Traditionally, designs forshirts are printed just above the middle, withdesigns on the front being printed higher thanthose on the back. You may want the design towrap around the side or over the shoulder anddeliberately become obscured. However, if thisoption is chosen, one should make it apparent thedesign is off-center, by moving it a substantialamount.
Since the shape of the shirt is instrumental in cre-ating the negative space around the design, thesketches should be done in a shirt-shaped space,and attention paid to how the outside areas of thedesign fall in relation to the edges of the shirt.Note the examples on the next page.
7
Activity 1.2—Cut-out stencil printing

8
EXAMPLE OF T-SHIRT MAKE SURE THE DESIGN IS NOT OBSCUREDWHEN THE SHIRT IS TUCKED IN.
EXAMPLE OF T-SHIRT
EXAMPLE OF T-SHIRT
For this design, plan on making a visual statementabout one of the senses. We all have five senses thatenable us to perceive and appreciate the worldaround us. As artists, we have an additional gift: theability to attend to these senses in a more profoundway. Chose one of the five, and use your design tocelebrate this sense, BUT…without actually show-
ing that particular sense in an obvious way. Avoidthe easy cliché. If you choose sight, refrain fromusing the eye, glasses or any other motif commonlyassociated with sight; for touch; avoid using handsor fingers. Try to think of other ways to show thesesenses, clearly, but in a new way.
There is plenty of room for your sketches on the following page.
EXAMPLE OF T-SHIRT

9
Sketches
10
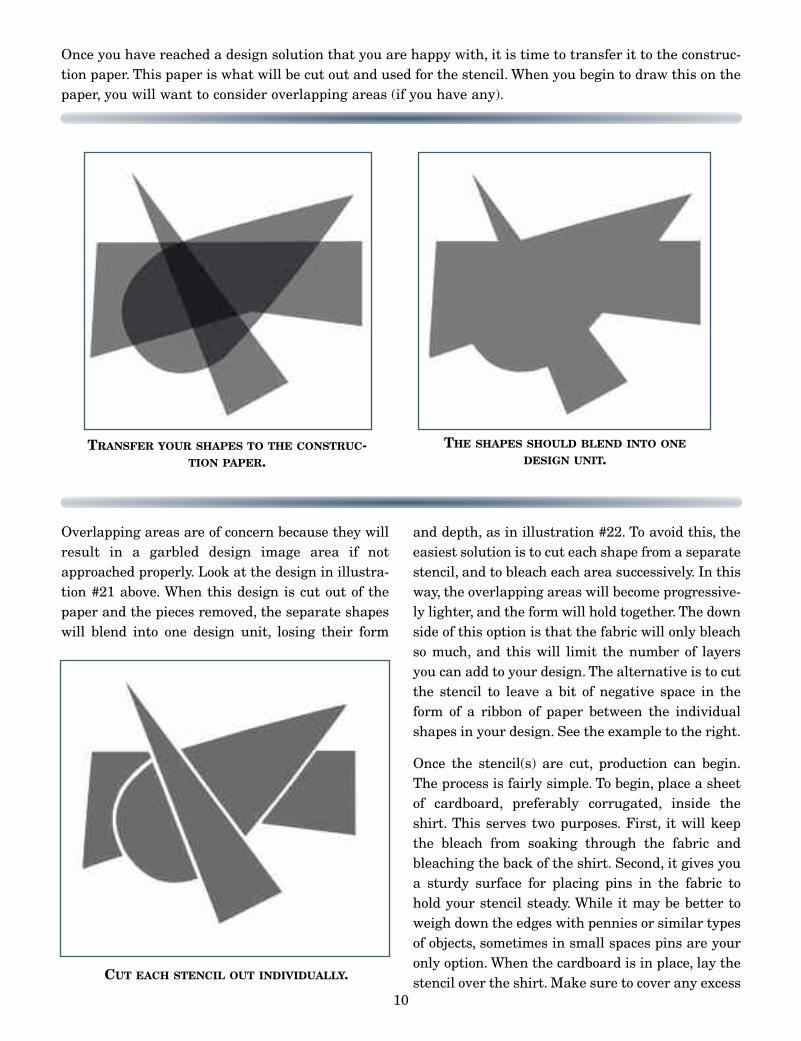
Once you have reached a design solution that you are happy with, it is time to transfer it to the construc-tion paper. This paper is what will be cut out and used for the stencil. When you begin to draw this on thepaper, you will want to consider overlapping areas (if you have any).
Overlapping areas are of concern because they willresult in a garbled design image area if notapproached properly. Look at the design in illustra-tion #21 above. When this design is cut out of thepaper and the pieces removed, the separate shapeswill blend into one design unit, losing their form
and depth, as in illustration #22. To avoid this, theeasiest solution is to cut each shape from a separatestencil, and to bleach each area successively. In thisway, the overlapping areas will become progressive-ly lighter, and the form will hold together. The downside of this option is that the fabric will only bleachso much, and this will limit the number of layersyou can add to your design. The alternative is to cutthe stencil to leave a bit of negative space in theform of a ribbon of paper between the individualshapes in your design. See the example to the right.
Once the stencil(s) are cut, production can begin.The process is fairly simple. To begin, place a sheetof cardboard, preferably corrugated, inside theshirt. This serves two purposes. First, it will keepthe bleach from soaking through the fabric andbleaching the back of the shirt. Second, it gives youa sturdy surface for placing pins in the fabric tohold your stencil steady. While it may be better toweigh down the edges with pennies or similar typesof objects, sometimes in small spaces pins are youronly option. When the cardboard is in place, lay thestencil over the shirt. Make sure to cover any excess
TRANSFER YOUR SHAPES TO THE CONSTRUC-TION PAPER.
THE SHAPES SHOULD BLEND INTO ONEDESIGN UNIT.
CUT EACH STENCIL OUT INDIVIDUALLY.

11
fabric that shows with more paper (newspaper willwork fine).
When the bleach is sprayed, it must be sprayeddirectly from above if possible, to keep it fromspraying under the edges of the stencil. Lightly dustthe surface with bleach, and wait 5-10 minutesbefore moving on. The main reason to wait is thatthe bleach will take some time to lighten the fabric.
If you become impatient, and spray too much bleachat once, you will over bleach the shirt, and will notbe able to lighten it further. In addition, sprayingtoo much bleach at once runs the risk of curling theedges of your stencil, causing drips or runs that willdribble onto the fabric, or bleach to run down thepin and create a large white dot in a portion of yourdesign.
When you are finished spraying your design, allow the shirt to dry overnight before removing it from thecardboard. The shirt should be laundered before wearing.
THE FINISHED PRODUCT.
PAPER TO PROTECT THE RESTOF THE SHIRT
PUSH PINS OR SOMETHING TOHOLD DESIGN IN PLACE
TAPE TO SECUREPIECES OF PAPER
TOGETHER
CARDBOARD INSIDESHIRT