university of bolton. · word 2003 is a powerful word processing package, ... © university of...
TRANSCRIPT


Text University of Bolton.
The screen shots used in this workbook are from copyrighted licensed works and the copyright for them is most likely owned by the publishers of the content. It is believed that the use of a limited number of web-resolution screenshots for training purposes qualifies under educational purposes to: “display, download and print parts of the Licensed Work for the purpose of promotion of the Licensed Work, testing the Licensed Work, or for training Authorised users”. Any other uses of these screenshots may be copyright infringement.

© University of Bolton 2008 1
Your guide to Word 2003
About this workbook
This workbook is designed to introduce you to Microsoft Word 2003. In this workbook you will learn how to create, save and print documents, how to create tables, and how to alter the appearance of your document with different font sizes and types. Each section has exercises to help you find your way around Word 2003. Work through them at your own pace and repeat as necessary. Happy Word Processing!
© University of Bolton 2008 2
Contents
What is Word 2003? ........................................................................................... 3
Getting started – how to log on ........................................................................... 3
Getting into Word 2003 ...................................................................................... 4
Word 2003 main page ........................................................................................ 5
The toolbar and shortcut keys ............................................................................ 5
How do I create a document?............................................................................. 6
How do I save my document? ............................................................................ 7
How to select text ............................................................................................. 10
Moving text around – ........................................................................................ 11
How do I delete text? ........................................................................................ 14
How do I make my document look attractive? .................................................. 15
Changing font ................................................................................................... 15
How do I tidy up the text? ................................................................................. 17
How do I spell check my document? ................................................................ 19
How do I put in page numbers? ........................................................................ 20
How do I put pictures in my document? ........................................................... 20
Text wrapping ................................................................................................... 22
How do I print my document? ........................................................................... 23
How do I create a table? .................................................................................. 25
Superscript and Subscript ................................................................................ 29
Symbols............................................................................................................ 31
How do I get out of Word 2003? ....................................................................... 32

© University of Bolton 2008 3
What is Word 2003?
Word 2003 is a powerful word processing package, part of the Microsoft Office 2003 suite. A word processor is like an electronic typewriter. You can use it to type up assignments and create forms and CVs. Using Word 2003 is straightforward and easy.
Getting started – how to log on
You can access Word 2003 from any of the computers in the libraries. You will need your username and password to log on to the network. To find your username your student ID card should be placed on the card reader at the Information Desk. Your password will be based on your date of birth and six randomly generated digits, but you can change this to something you‟ll be able to remember more easily.
1. Press Control, Alt and Delete simultaneously to log on.
A Windows Dialog Box will appear.
2. Enter your username in the first space (in lower case letters).
3. Press tab or click with your computer mouse in the password
box (left hand click).
4. Type in your password.
5. Press return .
TopTip To change your password, press Control, Alt and Delete after you have logged on. A Windows security box will appear on screen. Click on the Change Password button. In the Change Password dialog box, type the password you have just used to log on in the Old Password box, then type what you want your new password to be in the New Password box. Retype this in the Confirm New Password box, then click OK. Your new password should be at least eight digits long and a mixture of upper and lower case letters and numbers.

© University of Bolton 2008 4
Getting into Word 2003 First load Word 2003. To do this, you must click on the Start button in the bottom left-hand corner of your screen Then click on All Programs, then Microsoft Office. Word 2003 is in here. Click on Microsoft Office Word 2003.
TopTip If you prefer not to use the mouse, press the Start key (or hold down CTRL and press ESC) to get the Start menu. Then simply use the cursor keys (up, down, left & right arrows) to move up to All Programs, Microsoft Office and Microsoft Word 2003 and press Enter to select.

© University of Bolton 2008 5
Word 2003 main page When Word 2003 loads, it looks like the picture below.
Top Tip Use Microsoft Office Online to access all of the Help topics, templates, training, articles, and clip art. You must have access to the Internet. If you do not wish to use this, click on the x to close it. You will then have a full screen to use for your work.
The toolbar and shortcut keys
Toolbars contain shortcut keys to commonly used functions. The toolbar at the top of the screen in Word 2003 contains shortcuts (known as "hotkeys”) to the most commonly used commands – you simply click on the relevant button to carry out a particular command. e.g. saving or printing.
Toolbar
Main Menu Rulers
Status Bar Scroll Bars
Click here to close
Title Bar
saving printing

© University of Bolton 2008 6
Because there isn‟t space for all of the shortcut buttons, not all are shown at once. Clicking on the chevron buttons on the toolbars gives you more options
Below are the most commonly used hotkeys. As you become more confident and your documents become more sophisticated, you can try out the rest at your leisure.
Click this button to begin a New document Style
Open an existing document Font
Save your work Font Size
Print your work
Bold
Print Preview your work before you print it
Italic
Spelling and Grammar
Underline
Cut – remove a section of your work
Align Left
Copy a section of your work
Center
Paste in some text or other work
Align Right
Word Help – Microsoft Office Word Help
Justify
Top Tip If you move your mouse pointer slowly over each button, a label will appear to tell you what that button does. Try this now to see.
How do I create a document?
The text we are going to use to create the following document is taken from David Rudd‟s „Essay Writing : A brief guide‟ available in printed formats in the LSCs and available online at http://www.bolton.ac.uk/learning/helpguides/studyskills/essays.pdf Simply load Word 2003 and start typing.
© University of Bolton 2008 7
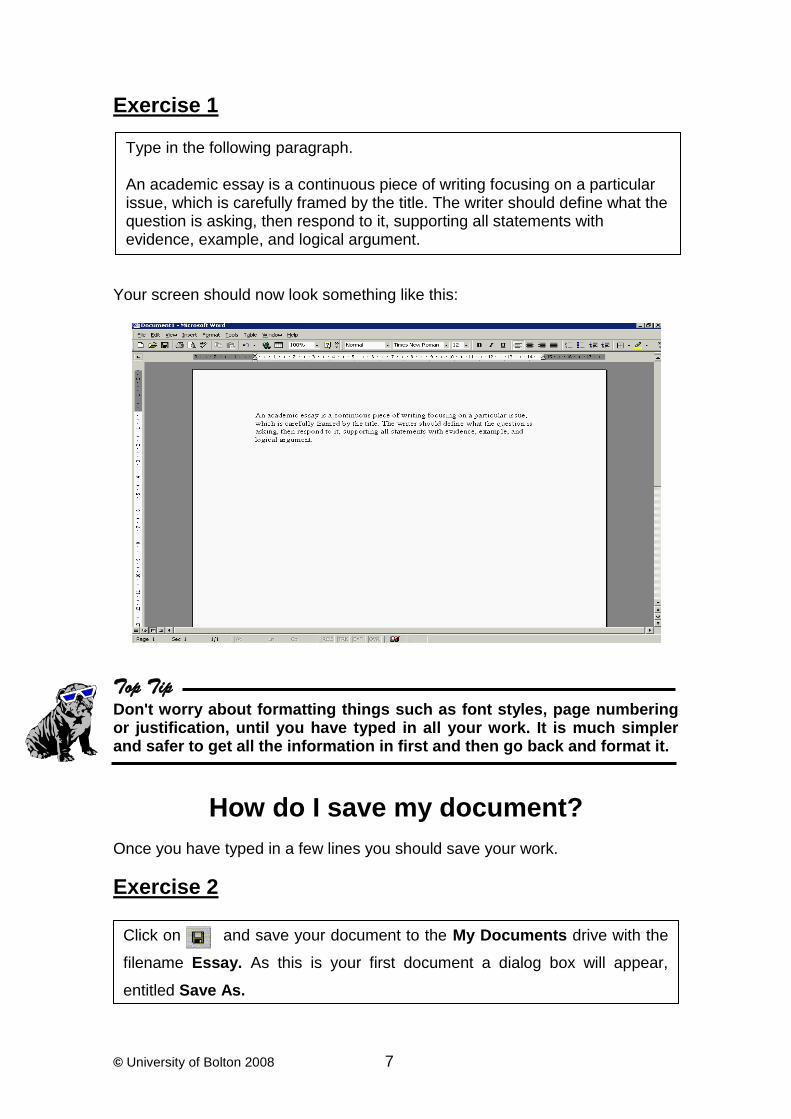
Exercise 1
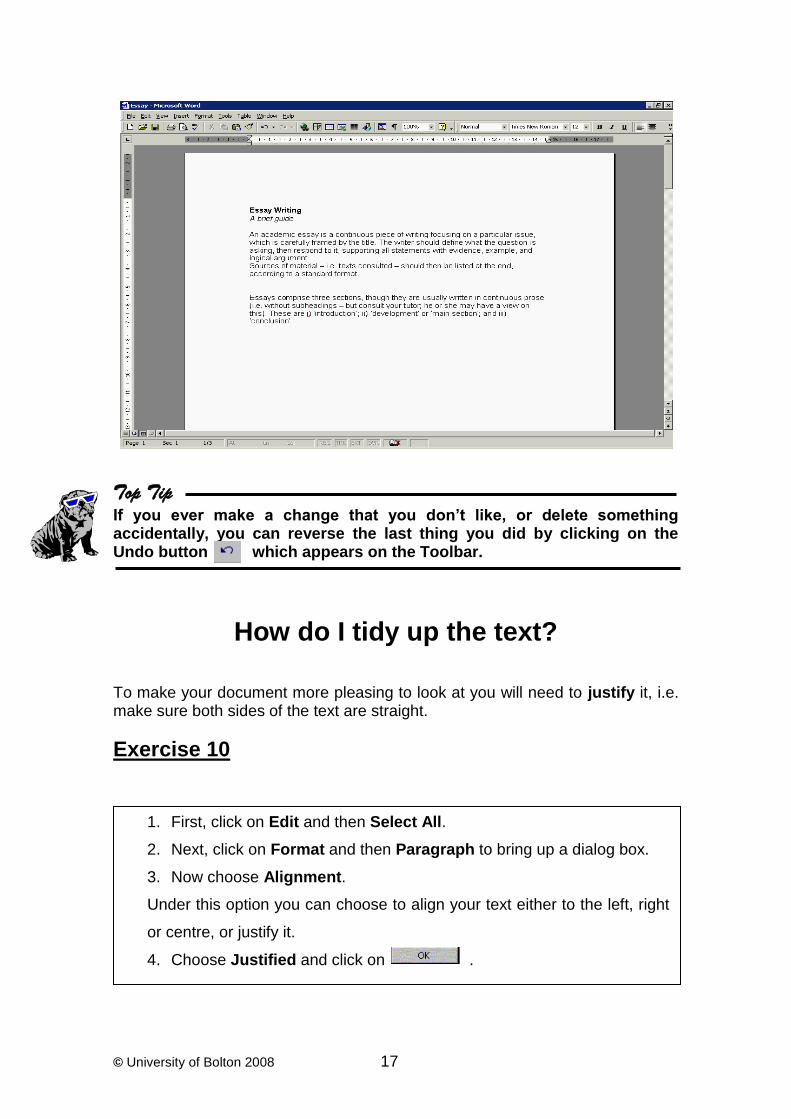
Your screen should now look something like this:
Top Tip
Don't worry about formatting things such as font styles, page numbering or justification, until you have typed in all your work. It is much simpler and safer to get all the information in first and then go back and format it.
How do I save my document?
Once you have typed in a few lines you should save your work.
Exercise 2
Type in the following paragraph. An academic essay is a continuous piece of writing focusing on a particular issue, which is carefully framed by the title. The writer should define what the question is asking, then respond to it, supporting all statements with evidence, example, and logical argument.
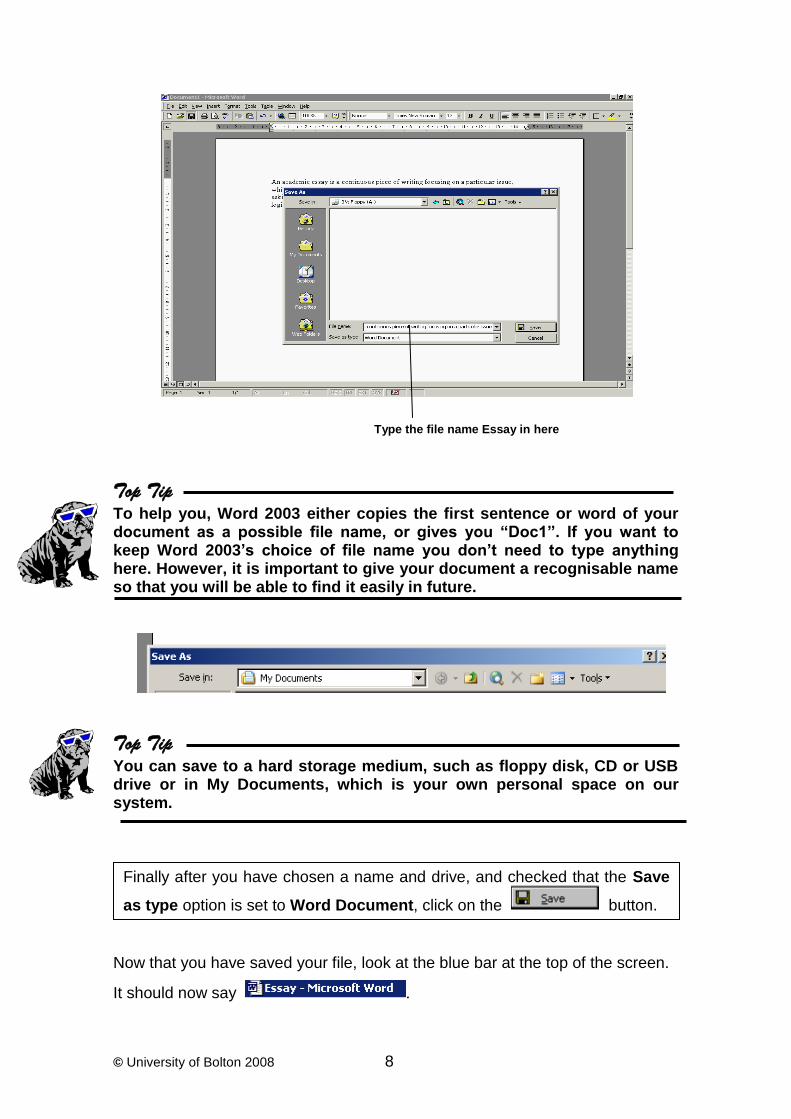
Click on and save your document to the My Documents drive with the
filename Essay. As this is your first document a dialog box will appear,
entitled Save As.
© University of Bolton 2008 8
Top Tip To help you, Word 2003 either copies the first sentence or word of your document as a possible file name, or gives you “Doc1”. If you want to keep Word 2003’s choice of file name you don’t need to type anything here. However, it is important to give your document a recognisable name so that you will be able to find it easily in future.
Top Tip You can save to a hard storage medium, such as floppy disk, CD or USB drive or in My Documents, which is your own personal space on our system.
Now that you have saved your file, look at the blue bar at the top of the screen.
It should now say .
Finally after you have chosen a name and drive, and checked that the Save
as type option is set to Word Document, click on the button.
Type the file name Essay in here

© University of Bolton 2008 9
Top Tip Once you have saved your work and given it a name, all you need to do to save fresh changes is to click on , and all your work will automatically be saved under that filename. Remember to save your work after typing every 100 words or so.
Exercise 3
Sources of material – i.e. texts consulted – should then be listed at the end, according to a standard format. Essay Writing A brief guide Essays comprise three sections, though they are usually written in continuous prose (i.e. without subheadings – but consult your tutor; he or she may have a view on this). These are i.) „introduction‟; ii.) „development‟ or „main section‟; and iii.) „conclusion‟.
You‟ll have probably noticed the green wiggly lines underneath some of the words in the text you have typed.
1. Continue typing in the following paragraphs, underneath the one you
have already typed. (Don't worry that it doesn't make sense - all will
become clear in the next section).
2. Click on to save your work.

© University of Bolton 2008 10
Word 2003 uses this to highlight possible grammatical mistakes. It also highlights possible spelling mistakes in red – words not contained in its dictionary.
Top Tip Don’t worry about this feature, as we will look at it in more detail, further on in this workbook.
How to select text
A crucial tool in most Windows packages is the Select function. In Word 2003 you can select portions of text in order to move or delete them, or to alter the font type in some way.
There are two ways to select text: 1. Click at the beginning of the word or section you want to select, hold down
the left mouse button and drag the mouse over to the end of the relevant word or section.
2. To select the whole document, click on Edit, then Select All.
Top Tip You can also select text by placing your cursor at the beginning of the text you want, and holding the shift key and an arrow key: together.
© University of Bolton 2008 11
Exercise 4
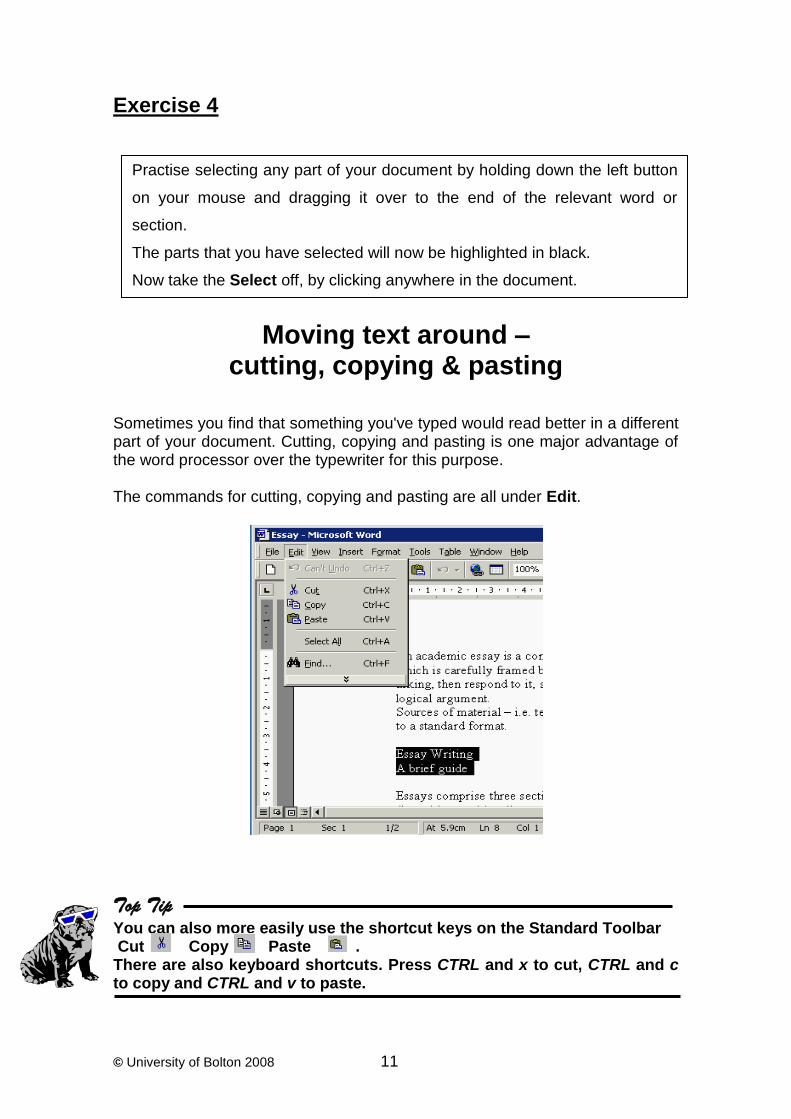
Moving text around – cutting, copying & pasting
Sometimes you find that something you've typed would read better in a different part of your document. Cutting, copying and pasting is one major advantage of the word processor over the typewriter for this purpose. The commands for cutting, copying and pasting are all under Edit.
Top Tip
You can also more easily use the shortcut keys on the Standard Toolbar Cut Copy Paste . There are also keyboard shortcuts. Press CTRL and x to cut, CTRL and c to copy and CTRL and v to paste.
Practise selecting any part of your document by holding down the left button
on your mouse and dragging it over to the end of the relevant word or
section.
The parts that you have selected will now be highlighted in black.
Now take the Select off, by clicking anywhere in the document.
© University of Bolton 2008 12
Cutting and pasting
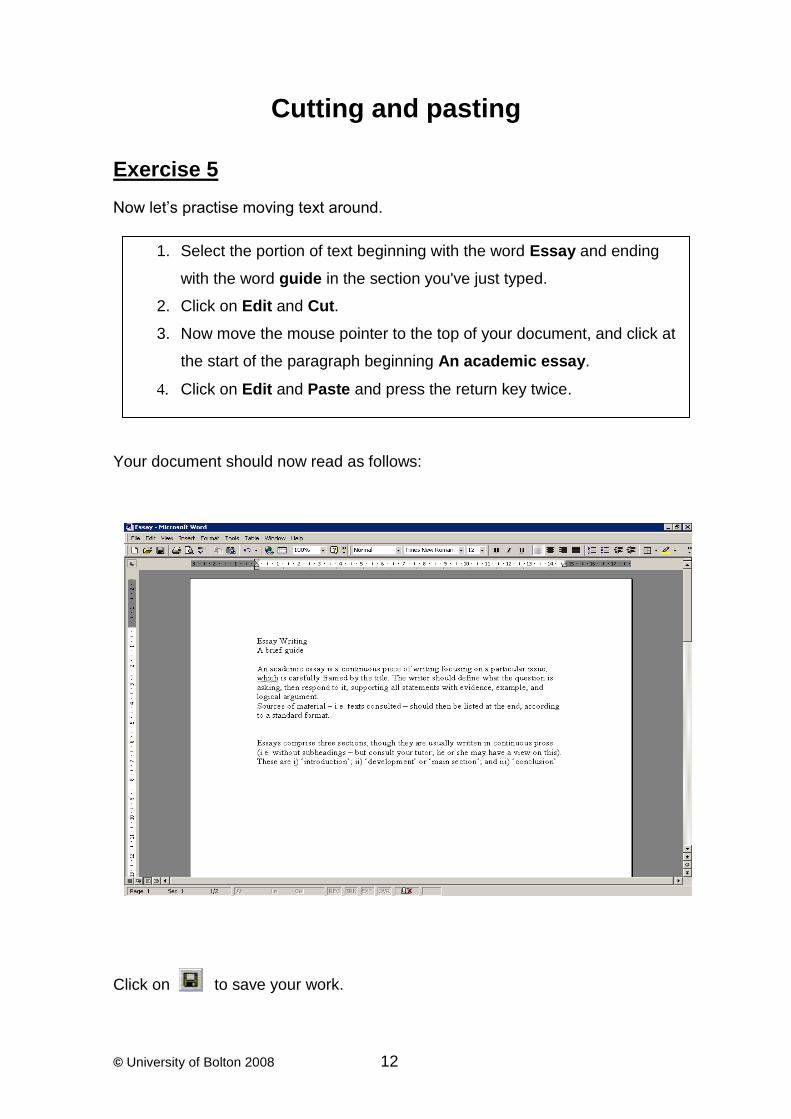
Exercise 5
Now let‟s practise moving text around.
Your document should now read as follows:
Click on to save your work.
1. Select the portion of text beginning with the word Essay and ending
with the word guide in the section you've just typed.
2. Click on Edit and Cut.
3. Now move the mouse pointer to the top of your document, and click at
the start of the paragraph beginning An academic essay.
4. Click on Edit and Paste and press the return key twice.

© University of Bolton 2008 13
Copying and pasting Copy can be used to duplicate sections of text.
Exercise 6
You now have a duplicate of the first paragraph at the bottom of your document.
Click on to save your work.
1. Select the paragraph beginning with the word An and ending with the
word argument.
2. Click on Copy . Now move the mouse pointer to the bottom of
your document, below the paragraph beginning Essays comprise
three sections.
3. Press Return twice to make some space, then Click on Paste .
© University of Bolton 2008 14
How do I delete text?
To delete text go to the end of the last word you wish to delete and press the Backspace key until all the text has gone. Otherwise select the section of text you wish to delete and press the Delete key.
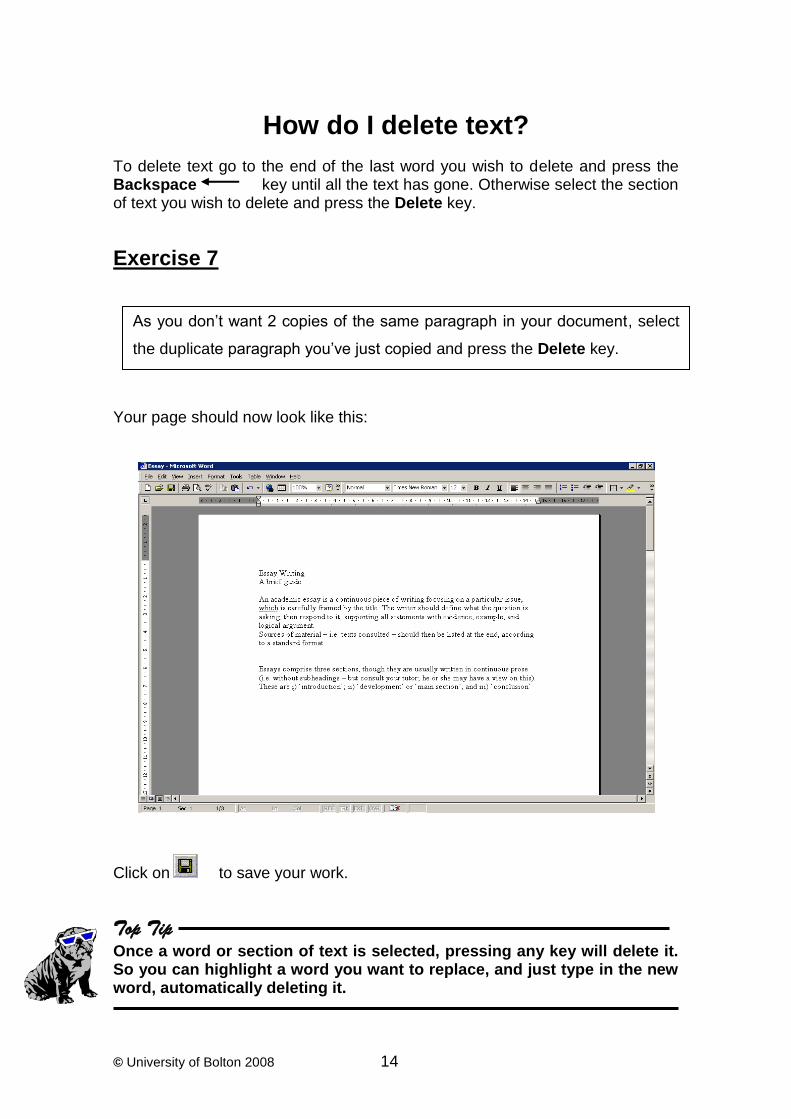
Exercise 7
Your page should now look like this:
Click on to save your work.
Top Tip Once a word or section of text is selected, pressing any key will delete it. So you can highlight a word you want to replace, and just type in the new word, automatically deleting it.
As you don‟t want 2 copies of the same paragraph in your document, select
the duplicate paragraph you‟ve just copied and press the Delete key.
© University of Bolton 2008 15
How do I make my document look attractive?
Now that you‟ve typed in your work and saved it, you may want to make it look neater and more impressive by changing the font and size of print etc.
Changing font
Exercise 8
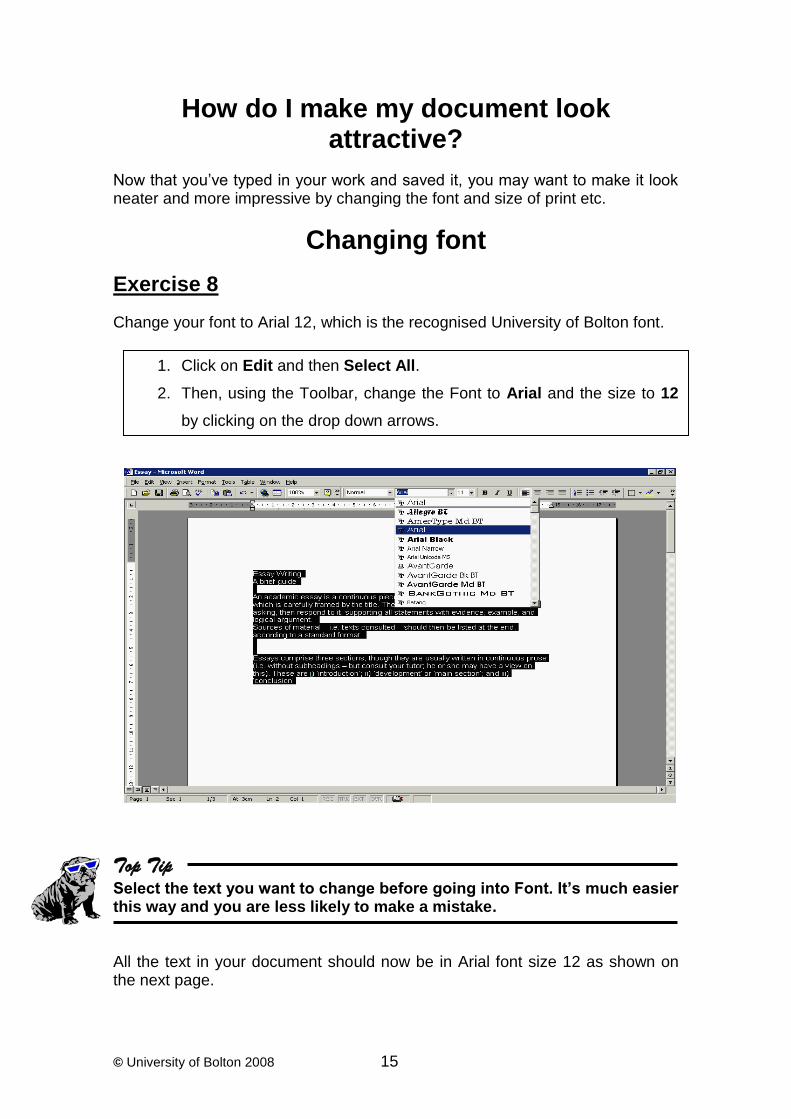
Change your font to Arial 12, which is the recognised University of Bolton font.
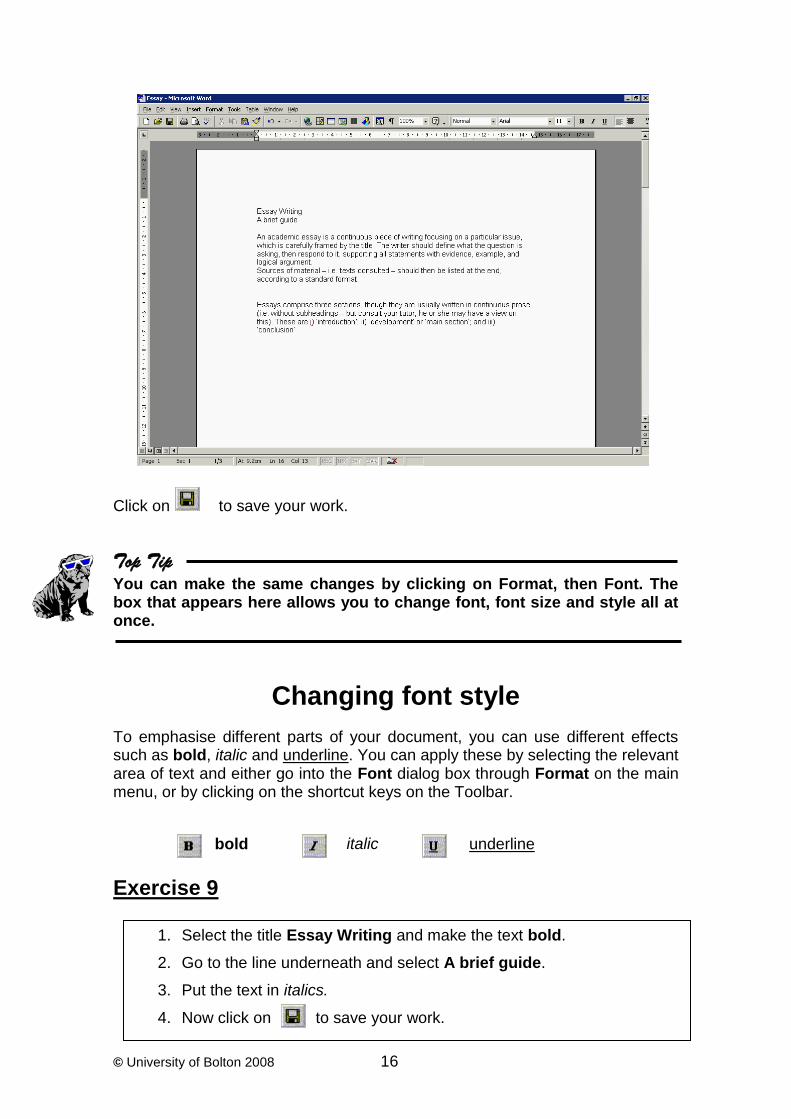
Top Tip Select the text you want to change before going into Font. It’s much easier this way and you are less likely to make a mistake. All the text in your document should now be in Arial font size 12 as shown on the next page.
1. Click on Edit and then Select All.
2. Then, using the Toolbar, change the Font to Arial and the size to 12
by clicking on the drop down arrows.
© University of Bolton 2008 16
Click on to save your work.
Top Tip You can make the same changes by clicking on Format, then Font. The box that appears here allows you to change font, font size and style all at once.
Changing font style
To emphasise different parts of your document, you can use different effects such as bold, italic and underline. You can apply these by selecting the relevant area of text and either go into the Font dialog box through Format on the main menu, or by clicking on the shortcut keys on the Toolbar.
bold
italic
underline
Exercise 9
1. Select the title Essay Writing and make the text bold.
2. Go to the line underneath and select A brief guide.
3. Put the text in italics.
4. Now click on to save your work.
© University of Bolton 2008 17
Top Tip If you ever make a change that you don’t like, or delete something accidentally, you can reverse the last thing you did by clicking on the Undo button which appears on the Toolbar.
How do I tidy up the text? To make your document more pleasing to look at you will need to justify it, i.e. make sure both sides of the text are straight.
Exercise 10
1. First, click on Edit and then Select All.
2. Next, click on Format and then Paragraph to bring up a dialog box.
3. Now choose Alignment.
Under this option you can choose to align your text either to the left, right
or centre, or justify it.
4. Choose Justified and click on .

© University of Bolton 2008 18
Top Tip You can also use the Format option to change the spacing between lines. Click on Format, Paragraph, Indents and Spacing, click on the Line Spacing drop down menu, choose the type of line spacing you require and then click on OK.
As before, there are shortcut keys on the Toolbar to speed things up.
Align Left
Center
Align Right
Justify
Exercise 11
Your document about essay writing should now have the left and right hand margins aligned evenly, with the title in the centre, as shown on the next page.
1. Select the title Essay Writing
A brief guide.
2. Click on to centre your work.
3. Now click on to save your work.

© University of Bolton 2008 19
Top Tip You can change the left, right, top and bottom margins to any size you want using the Page Setup option. Click on File, Page Setup, then Margins. Click on the up or down arrows of the margin(s) to increase or decrease the size and then click on OK.
How do I spell check my document?
It‟s always a good idea to spell check your work before printing it out and, if you have a particular word limit for your assignment, an accurate count is also useful. The Word 2003 spell checker and word count facilities are both under Tools in the main menu or under the shortcut key .
Exercise 12
1. Go to the second sentence of your document which begins, The
writer should define..., and change the f in define to an s (so you
have at least one genuine spelling mistake).
2. Click on Tools, then click on Spelling and Grammar.
3. When the spell checker picks up desine, click on the correct spelling
displayed in the suggestion box, and click on .
4. Click on to save your work.

© University of Bolton 2008 20
Top Tip The grammar check is an optional feature of the spell checker. To switch it off, click on the tick box entitled “Check grammar” so that the tick disappears. To re-enable the grammar check, just click in the box so that the tick reappears.
How do I put in page numbers?
Page numbers are always useful in any document with more than one page.
Exercise 13
How do I put pictures in my document?
Diagrams, graphs and pictures are often essential in the documents you‟ll need to produce during your course.
Exercise 14
Insert a picture about writing into your document.
1. To insert page numbers, click on Insert, then Page Numbers.
2. In the box that appears click on Position and choose Bottom of Page
(Footer).
3. Then click on Alignment and choose Right.
4. Now click on .
5. Click on to save your work.

© University of Bolton 2008 21
First, click at the beginning of the paragraph starting with Essays comprise three sections… in your document. Then click on Insert, Picture, and Clip Art.
Top Tip Clip Art contains hundreds of copyright-free images which can be used to decorate and illustrate your documents. These range from cartoon pictures (such as Bertie the Bulldog here with his sunglasses!), to full colour photographs and sound and video clips.
Your picture about writing will now appear in your document. If you want to edit your picture once it is in your document, click anywhere on the picture so that “anchor points” are inserted around it.
The Clip Art pane which is shown opposite will appear on the right hand side of your word screen. In the Search for box type writing and then click on Go. Scroll through the pictures displayed until you find a picture appropriate to essay writing. Click on the picture, and then on Insert as shown below:
Clip Art Pane
Click here
Type here
Click here
Then here

© University of Bolton 2008 22
You can make your picture smaller by clicking on one of the corner anchor points, holding the left-hand mouse key down and dragging.
Text wrapping
As you can see in the previous exercise, the picture about writing appears above your text. If you want to put pictures next to text you need to use text wrapping. Text wrapping enables you to put your picture next to your text. The
Text wrapping button can be found on the picture toolbar.
There are a variety of wrapping types to choose from. The most useful one is Square, which gets the text to wrap neatly around the picture. For large pictures, Top and Bottom is useful, as it puts the text above and below the image.
Anchor point Picture toolbar
Square
Text wrapping

© University of Bolton 2008 23
Exercise 15
Top Tip As well as using Clip Art you can also insert pictures you have on disk. To do this, choose Insert, then Picture, and From File, then select the file name of your picture.
How do I print my document?
Before printing, you should check how your document looks. Print Preview shows you exactly how your document will look when it‟s printed.
Exercise 16
1. Click on Text Wrapping .
2. Click on Square .
3. Click outside the picture to deselect it.
4. Click on to save your work.
1. Click on Print Preview on the Standard Toolbar.
Check that you are happy with how your document looks.

© University of Bolton 2008 24
If you are happy with the way your document looks you can now print it out.
Make sure you save your work before printing.
Exercise 17
This is the local printer in the room where you are working i.e. this is the local printer for Topaz.
3. Also make sure that the Page range is set to All, and the Number of
Copies is 1.
You can change this to increase the number of copies if you need to.
4. Then click on .
Top Tip You have a print quota of 50 pages per semester. For information about printing costs, ask at the Information Desk in the Library.
1. To print, click on File and then Print .
2. In the box that appears check that the selected printer is
\\PRINT\ROOMNAME HP LaserJet 4100.
2. Click on to leave Print Preview and go back to your document.
© University of Bolton 2008 25
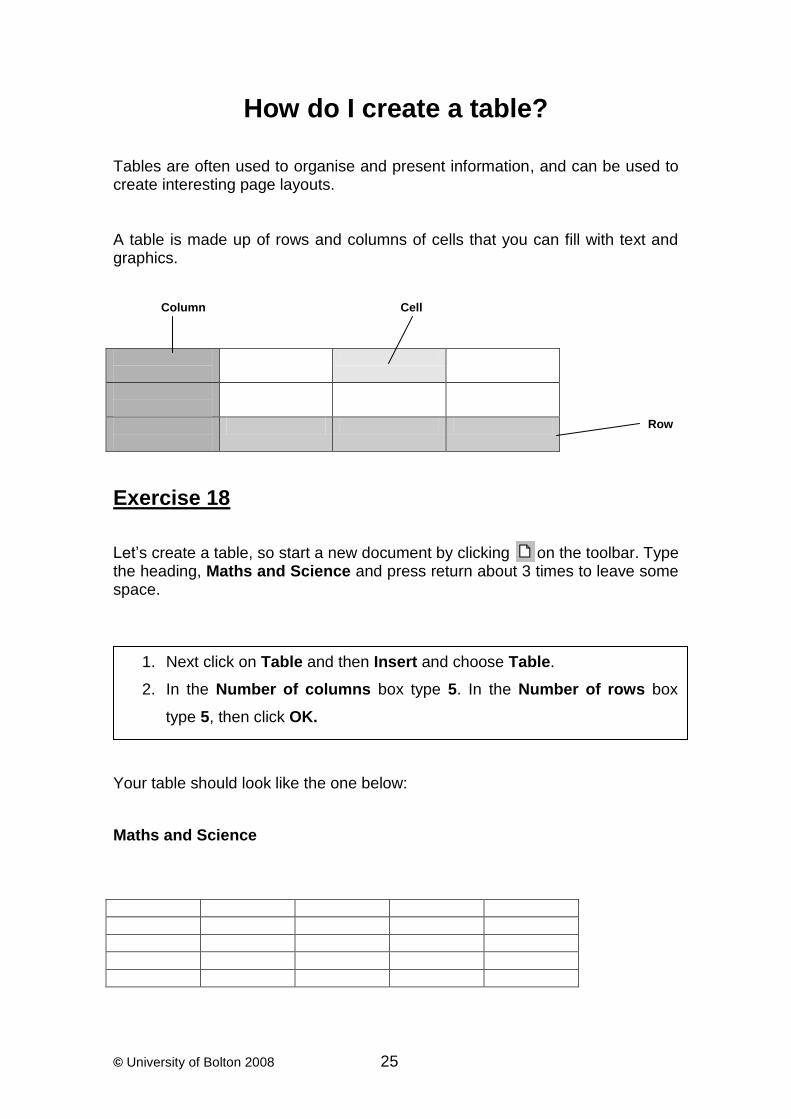
How do I create a table?
Tables are often used to organise and present information, and can be used to create interesting page layouts. A table is made up of rows and columns of cells that you can fill with text and graphics. Column Cell
Row
Exercise 18
Let‟s create a table, so start a new document by clicking on the toolbar. Type the heading, Maths and Science and press return about 3 times to leave some space.
Your table should look like the one below:
Maths and Science
1. Next click on Table and then Insert and choose Table.
2. In the Number of columns box type 5. In the Number of rows box
type 5, then click OK.
© University of Bolton 2008 26
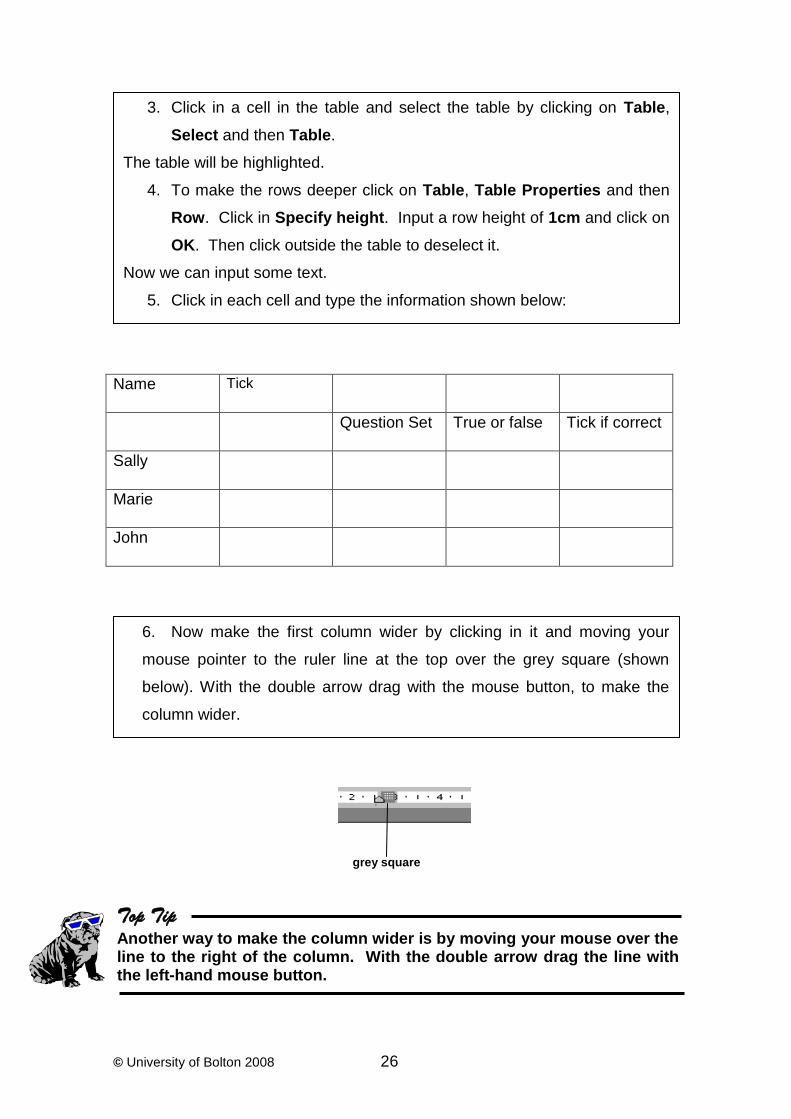
Name Tick
Question Set True or false Tick if correct
Sally
Marie
John
grey square
Top Tip Another way to make the column wider is by moving your mouse over the line to the right of the column. With the double arrow drag the line with the left-hand mouse button.
3. Click in a cell in the table and select the table by clicking on Table,
Select and then Table.
The table will be highlighted.
4. To make the rows deeper click on Table, Table Properties and then
Row. Click in Specify height. Input a row height of 1cm and click on
OK. Then click outside the table to deselect it.
Now we can input some text.
5. Click in each cell and type the information shown below:
6. Now make the first column wider by clicking in it and moving your
mouse pointer to the ruler line at the top over the grey square (shown
below). With the double arrow drag with the mouse button, to make the
column wider.

© University of Bolton 2008 27
Click here
Name Tick
Merge these three cells
Rubber tool
Rub these 2 lines out
Name Tick
Name Tick Class Test – Year 8
Question Set True or False
Tick if correct
Sally
Marie
John
7. Now merge some cells. Click in the blank cell next to Tick on the top
row.
8. Then click Table and Draw Tab
The toolbar will be displayed as shown below:
9. Click on the rubber tool and rub out the two lines shown below, by
clicking over the line with the mouse.
This will merge the cells.
10. Close the toolbar by clicking on the .
11. In the larger cell that you have created type Class Test – Year 8
Your table should now look like this :

© University of Bolton 2008 28
Name Class Test – Year 8
Question Set True or False Tick if correct
Sally
Marie
John
Name Class Test – Year 8
Question Set True or False
Tick if correct
Sally
Marie
John
12. Now that we can see the table taking shape, we can see that we don‟t
need the column headed Tick. We can easily delete this by clicking
anywhere in this column and then clicking on Table, Delete and
Column.
This column will be deleted and your table should look like the one below:
13. Now centre all the headings by highlighting them and clicking on
the toolbar.
14. Highlight the first two rows and make these headings bold by clicking
on the toolbar.
Your table should now look like this:

© University of Bolton 2008 29
Maths and Science
Name Class Test – Year 8
Question Set True or False
Tick if correct
Sally
Marie
John
Superscript and Subscript
Sometimes in Word you may also need to type graphics, formulas or reference marks in your document, for example Creative Writing 12 or X2. As you can see the 12 of Creative Writing sits slightly higher than the text which is known as superscript, and the 2 of X2 sits slightly below the text which is known as subscript. In the next section we shall look at these in more detail:
Exercise 19
You now need to enter some numbers and text into the Question Set
column cells of your table.
For Sally type 42=16
For Marie type H20=water
For John type 300003000
15. Now shade the first row by highlighting it, then click on Table, Draw
Table, and click on the arrow next to on the toolbar. Then click
on the shading or colour you require.
16. Now make the font size bigger on the heading Maths and Science.
Also make it bold and centre it.
Your table should now look like this:

© University of Bolton 2008 30
Your table should now look like this:
Name Class Test – Year 8
Question Set True or False
Tick if correct
Sally 42=16
Marie H20=water
John 300003000
Exercise 20
Sally‟s question should read 42=16. In order to incorporate this font,
highlight the 2 of 42, click on format, font, tick the superscript box, and
click on .
Marie‟s question should read H20=water. In order to incorporate this font,
highlight the 2 of H20, click on format, font, tick the subscript box and click
on .
Click in the
Appropriate box
Click here

© University of Bolton 2008 31
Symbols
There are a variety of symbols and special characters which you can use in
Word to represent letters, numbers and graphics, for example +,=, and . In this next exercise we shall look at using the symbols option on Word 2003.
Exercise 21
Your table should now look like this
Name Class Test – Year 8
Question Set True or False
Tick if correct
Sally 42=16
Marie H20=water
John 300003000
Click here
Then here
John‟s question should read 30000>3000. In order to incorporate this
symbol, put the cursor between the 0 and 3 as shown by the black line, i.e.
.
Click on insert and then Symbol. Make sure the Subset is set to Basic
Latin. Click on the > symbol, then Insert and Close.

© University of Bolton 2008 32
How do I get out of Word 2003?
Now you‟ve finished, you can close down your document and leave Word 2003. To do this, click on File and then Exit. Click here
And then here
Or you can click on the exit button at the end of the blue title bar. Click here
Top Tip If you’re saving to a hard storage medium, such as a floppy disk or USB drive, don’t remove your storage device from the computer until after the green light next to the drive has gone off or you may lose your work.

© University of Bolton 2008 33
And finally...
Well done! You have made it to the end of this workbook. You should now feel more confident using Microsoft Word 2003. You will have a better idea of what it is and what it can be used for. You have created a document, edited it, learnt how to print and save your work, and made your document look more attractive by changing font styles and adding pictures. You have also learnt how to create tables, incorporate superscript, subscript and symbols. This workbook is only an introduction to Word 2003. The package also contains other useful functions. Now that you have the basics, it is just a matter of spending time practising and developing your skills. If you need any extra assistance using Microsoft Word, do not hesitate to ask for help. Once again, Happy Word Processing!!