universityofcapetown proceduresinobstetricsandgynaecology-ccbyncsa-2010-lo-res-111011083146-phpapp02
TRANSCRIPT

1
Cover Design: Luan Serfontein
Editor : Stephen Jeffery

2
Procedures in Obstetrics and Gynaecology
Editor
Stephen Jeffery
Editorial assistants Anne Horak
Kendall O’Callaghan

3
Developed by the
Department of Obstetrics and Gynaecology
University of Cape Town
Edited by Stephen Jeffery
Editorial assistants Anne Horak and Kendall O’Callaghan
Creative Commons Attributive Licence 2010
This publication is part of the CREATIVE COMMONS You are free: to Share – to copy, distribute and transmit the work to Remix – to adapt the work Under the following conditions:
Attribution. You must attribute the work in the manner specified by the author or licensor (but not in any way that suggests that they endorse you or your use of the work)
Non-‐commercial. You may not use this work for commercial purposes.
Share Alike. If you alter, transform, or build upon this work, you may distribute the resulting work but only under the same or similar license to this one.
• For any reuse or distribution, you must make clear to others the license terms of this work. One way to do this is with a link to the license web page: http://creativecommons.org/licenses/by-‐nc-‐sa/2.5/za/
• Any of the above conditions can be waived if you get permission from the copyright holder.
• Nothing in this license impairs or restricts the authors’ moral rights. • Nothing in this license impairs or restricts the rights of authors whose work is referenced
in this document • Cited works used in this document must be cited following usual academic conventions • Citation of this work must follow normal academic conventions

4
http://za.creativecommons.org Preface Obstetrics and gynaecology is a practical subject. In order to be a competent practitioner, the trainee needs to acquire a broad range of skills. Learning the art and science of surgery and medicine has not changed over the centuries and most procedures are learnt by patient mentoring by senior colleagues. The purpose of this book is to provide the trainee with a step by step practical approach to a number of everyday procedures in Obstetrics and Gynaecology. The trainee will be able to use the text to familiarise him or herself with the steps involved in the safe performance of various techniques prior to commencing hands on training. The techniques described in this volume are by no means exhaustive but they represent tried and tested techniques by an individual who has a wealth of experience in the procedure. It would be advisable to read a specific chapter prior to commencing the practical learning process. Surgery is mastered by repetition and this book can be used to retrace your steps and remind yourself of the various important principles involved in the procedure. I hope that this book will help to become master of the procedures we describe. I wish you well on your journey in becoming a competent Obstetrician and Gynaecologist. Dr Stephen Jeffery Cape Town January 2010

5
Overview As doctors practicing Obstetrics and Gynaecology, we care for women on a daily basis who are dependant on our level of practical competence. Our ability to perform a broad range of procedures enables us to in the very least improve the quality of life in women and often save the lives of mothers and babies. The essence of this book is that it provides a practical approach to a broad range of procedures in Obstetrics and Gynaecology. Authors have been selected by virtue of their experience with the procedure and the reader is therefore allowed to glean from their experience. This book is aimed at any physician requiring a practical approach to performing procedures in Obstetrics and Gynaecology. Houseman, interns, residents, registrars and junior specialists will find it very useful.

6
Contributors Saadiqa Allie Specialist Obstetrician & Gynaecologist Mowbray Maternity Hospital, Groote Schuur Hospital and University of Cape Town Cape Town Elmarie Basson Specialist Obstetrician & Gynaecologist Christiaan Barnard Memorial Hospital Cape Town Alison Boutall Medical Officer Department of Obstetrics and Gynaecology Ultrasound Groote Schuur Hospital and University of Cape Town Sonia Constantatos Medical Officer Department of Obstetrics and Gynaecology Ultrasound Groote Schuur Hospital and University of Cape Town Peter de Jong Specialist Obstetrician & Gynaecologist and Urogynaecologist Groote Schuur Hospital and University of Cape Town Douglas Dumbrill Specialist Obstetrician & Gynaecologist Vincent Pallotti Hospital Cape Town Sachia Edelstein Specialist Obstetrician & Gynaecologist and Reproductive Medicine Subspecialist Groote Schuur Hospital and University of Cape Town and Christiaan Barnard Hospital Susan Fawcus Specialist Obstetrician & Gynaecologist Professor and Head of Department Mowbray Maternity Hospital, Groote Schuur Hospital and University of Cape Town Anne Horak Specialist Obstetrician & Gynaecologist Mowbray Maternity Hospital, Groote Schuur Hospital and University of Cape Town Cape Town

7
Stephen Jeffery Specialist Obstetrician, Gynaecologist & Urogynaecologist Groote Schuur Hospital and University of Cape Town Paul Le Roux Reproductive Medicine Sub-‐Specialist Director – Cape Fertility Clinic Honorary Specialist Obstetrician and Gynaecologist – University of Cape Town Jason Marcus Advanced Midwifery Practitioner and Lecturer Mowbray Maternity Hospital and University of Cape Town Tam Tam Matebese Specialist Obstetrician & Gynaecologist and Reproductive Medicine Subspecialist Groote Schuur Hospital and University of Cape Town Tham Matinde Specialist Obstetrician & Gynaecologist Somerset Hospital and University of Cape Town Cape Town Nomonde Mbatani Specialist Obstetrician & Gynaecologist Gynaecology Oncology Subspecialist Groote Schuur Hospital and University of Cape Town Kendall O’Callaghan Specialist Obstetrician & Gynaecologist Somerset Hospital and University of Cape Town Cape Town Malika Patel Specialist Obstetrician & Gynaecologist Reproductive Medicine Subspecialty Trainee Groote Schuur Hospital and University of Cape Town Linda Rogers Specialist Obstetrician & Gynaecologist Gynaecology Oncology Subspecialist Groote Schuur Hospital and University of Cape Town Noluyolo Sigcu Specialist Obstetrician & Gynaecologist, Reproductive Medicine Subspecialist Groote Schuur Hospital and University of Cape Town

8
Waheba Slamang Specialist Paediatrician Cape Medi-‐clinic Part-‐time lecturer University of Cape Town Valentin Stefan Specialist Obstetrician & Gynaecologist Somerset Hospital and University of Cape Town Cape Town

9
Acknowledgements Peter de Jong Editorial support Gregory Doyle IT support and project liaison Shamiel Salie Photography chapter 23 Resuscitation of the newborn Valentin Stefan Editorial support Luan Serfontein Illustrations: Cover design Chapter 34 Vaginal Hysterectomy Chapter 36 Anterior Repair

10
Contents Preface ______________________________________________________________________ 4
Overview ____________________________________________________________________ 5
Contributors __________________________________________________________________ 6
Acknowledgements ____________________________________________________________ 9
Contents ___________________________________________________________________ 10
1. _________________________________________________________________________ Assisted Vaginal Delivery: Anne Horak ________________________________________ 13
2. _________________________________________________________________________ Repair of Episiotomy: Anne Horak ____________________________________________ 24
3. _________________________________________________________________________ Suturing of Third and Fourth Degree tears: Stephen Jeffery _______________________ 26
4. _________________________________________________________________________ Suture of cervical and vaginal tears: Valentin Stefan _____________________________ 29
5. _________________________________________________________________________ Manual Removal of the placenta: Valentin Stefan ________________________________ 31
6. _________________________________________________________________________ Shoulder Dystocia: Jason Marcus _____________________________________________ 33
7. _________________________________________________________________________ Breech Delivery: Anne Horak ________________________________________________ 35
8. _________________________________________________________________________ External Cephalic Version: Anne Horak ________________________________________ 44
9. _________________________________________________________________________ Delivery of Twins: Susan Fawcus ______________________________________________ 47
10. ________________________________________________________________________ Simple Caesarean section: Nomonde Mbatani __________________________________ 56
11. ________________________________________________________________________ Classical Caesarean Section:Kendall O’Callaghan ________________________________ 58
12. ________________________________________________________________________ The difficult Caesarean Section: Elmarie Basson _________________________________ 65
13. ________________________________________________________________________ Uterine Packing in Primary Post Partum Hemorrhage: Tham Matinde _______________ 71
14. ________________________________________________________________________ B-‐Lynch Brace Suture for Post Partum Hemorrhage: Tham Matinde _________________ 75
15. ________________________________________________________________________ Caesarean Hysterectomy: Nomonde Mbatani ___________________________________ 78

11
16. ________________________________________________________________________ Pelvic packing following hysterectomy: Nomonde Mbatani _______________________ 80
17. ________________________________________________________________________ Ligation of Internal Iliac and Uterine Arteries: Valentin Stefan _____________________ 81
18. ________________________________________________________________________ Background to Blood Transfusion Products: Kendall O’Callaghan ___________________ 84
19. ________________________________________________________________________ The use of blood products in Obstetric Haemorrhage: Kendall O’Callaghan ___________ 91
20. ________________________________________________________________________ Fetal Blood Sampling (scalp pH): Linda Rogers __________________________________ 94
21. ________________________________________________________________________ Interpretation of CTG’s: Saadiqa Allie _________________________________________ 97
22. ________________________________________________________________________ Basic Obstetric Ultrasound: Alison Boutall and Sonia Constantatos ________________ 111
23. ________________________________________________________________________ Resuscitation of the Newborn: Waheba Slamang _______________________________ 144
24. ________________________________________________________________________ Cervical cerclage: Sachia Edelstein ___________________________________________ 160
25. ________________________________________________________________________ Evacuation of the Uterus: Saadiqa Allie _______________________________________ 162
26. ________________________________________________________________________ Open Management of Tubal Ectopic Pregnancy: Tam Tam Matebese _______________ 166
27. ________________________________________________________________________ Laparoscopic management of ectopic pregnancy: Paul Le Roux ___________________ 168
28. ________________________________________________________________________ Female Sterilisation: Noluyolo Sigcu _________________________________________ 179
29. ________________________________________________________________________ Ultrasound in Early Pregnancy: Douglas Dumbrill _______________________________ 182
30. ________________________________________________________________________ Surgery for Benign Adnexal Conditions: Linda Rogers ___________________________ 191
31. ________________________________________________________________________ Abdominal Hysterectomy: Valentin Stefan ____________________________________ 195
32. ________________________________________________________________________ Hysterosalpingography: Malika Patel ________________________________________ 211
33. ________________________________________________________________________ Open abdominal myomectomy: Kendall O’Callaghan ____________________________ 213
34. ________________________________________________________________________ Vaginal Hysterectomy: Stephen Jeffery _______________________________________ 218

12
35. ________________________________________________________________________ Suburethral sling procedures for the treatment of Stress Urinary Incontinence: Peter de Jong ________________________________________________________________ 226
36. ________________________________________________________________________ Anterior Repair: Stephen Jeffery _____________________________________________ 233
37. ________________________________________________________________________ Posterior Repair: Stephen Jeffery ____________________________________________ 245
38. ________________________________________________________________________ Uterine and vaginal vault prolapse: Stephen Jeffery _____________________________ 250
39. ________________________________________________________________________ Suture Options in Gynaecological Surgery: Peter de Jong ________________________ 259

13
Chapter 1
Assisted Vaginal Delivery Anne Horak Forceps and ventouse delivery have become an integral part of obstetric practice. In experienced hands, they offer an effective means of expediting delivery in the second stage, and thereby avoiding the morbidity associated with caesarean delivery. Both forceps and ventouse deliveries are associated with significant maternal and infant morbidity, and interventions such as companionship in labour are essential in ensuring that assisted vaginal delivery rates are kept to a safe minimum. Optimal results with either instrument can be anticipated when careful attention is given to the indications, prerequisites, and performance of the respective procedures. Indications Maternal Indications
1. Medical disorders that require shortening of the second stage - Cardiac disease - Severe hypertensive conditions - Respiratory disease
2. Maternal exhaustion 3. Previous caesarean section (relative indication) 4. Undue prolongation of the second stage
- In cases of regional anaesthesia, an extra hour is allowed, provided both maternal and fetal condition is satisfactory
Fetal Indications
1. Fetal distress 2. Prematurity
- Forceps provides a protective frame and ensures good control over the delivery of the soft head
3. Breech - Delivery of the after coming head
4. Malposition - Ventouse delivery may facilitate rotation and delivery of malpositions such as
occipito posterior (OP), occipito transverse (OT), and asynclitism

14
Forceps Delivery Classification of Forceps Delivery Outlet/Low Forceps Delivery
- Fetal head not palpable abdominally - Sagittal suture in anterior-‐posterior diameter - Fetal head is on the perineum
Midpelvic Forceps Delivery - Fetal head 1/5 palpable abdominaly - Position of fetal head may vary from anterior-‐posterior to transverse - Station 0 to +2
High Forceps Delivery - Fetal head not engaged - Caesarean section safer
Types of Forceps There are over 600 variants in obstetric forceps. A few of the most useful examples are shown here: Wrigley Forceps
- Outlet or low forceps - Caesarean section
Neville Barnes Forceps - Midpelvic and outlet forceps
Pijper Forceps - Aftercoming head of breech
Kielland Forceps - Rotational forceps
Prerequisites for Forceps Delivery
1. Informed patient 2. Experienced operator 3. Adequate analgesia – local infiltration or regional 4. Empty bladder 5. Episiotomy 6. Membranes must be ruptured 7. Cervix must be fully dilated 8. Adequate uterine contractions 9. Head must be engaged – at or below spines 10. No evidence of cephalo-‐pelvic disproportion (CPD) 11. Sagittal suture should be in the anterior –posterior diameter
Procedure (See Figures A, B, C, D, and E)
15
Preparation 1. Counsel patient about the procedure 2. Prepare the necessary equipment – assemble the forceps prior to application, ensuring
that the parts fit together and lock well. Cover the blades of the forceps with antiseptic cream/ gel
Procedure
1. The patient should preferably be in the lithotomy position 2. Ensure adequate analgesia 3. Determine the exact position and station of the fetal head – ensuring that it meets the
above-‐mentioned requirements 4. Clean and drape the patient, and employ aseptic measures for the rest of the procedure 5. An episiotomy should be cut – this can be done before or after application of the
forceps 6. With the left hand, hold the left blade of the forceps vertically over the patient’s pubis.
See Figure A 7. Insert two fingers of the right hand into the vagina alongside the fetal head, and slide
the left blade of the forceps between the fetal head and hand, rotating it to rest in a horizontal position. See Figure B.
8. Repeat the same maneuver on the other side, using the right hand to insert the right blade of the forceps between the fetal head and the left hand. See Figure C.
9. Depress the handles and lock the forceps. Difficulty locking the forceps implies either incorrect application, or incorrect position of the fetal head. Force should never be applied to lock the forceps, but rather remove the blades, confirm the correct position of the fetal head, and reapply only if easily possible.
10. Once the blades are locked, apply steady traction in a horizontal and posterior direction with each contraction. See Figure D
11. The fetal heart and correct positioning of the forceps should be checked between contractions
12. There should be descent of the fetal head with each pull, and only two or three pulls should be necessary to achieve delivery of the fetal head
13. Once the head is delivered, disengage the forceps by removing the right blade first, followed by the left
14. Perform active management of the third stage of labour to deliver the placenta, and repair the episiotomy – checking the perineum thoroughly for any additional tears
Failed Forceps A forceps delivery should be classified as failed if:
1. There is no descent of the fetal head with each pull 2. The fetus remains undelivered after either three pulls, or after 30 minutes
In the event of a failed forceps delivery, a caesarean section should be preformed Complications of Forceps Delivery Maternal
1. Trauma

16
- Perineal, vaginal, cervical laceration/ haematoma - Bladder, urethral injury - Rectal injury
2. Haemorrhage - Tears - Uterine atony
3. Infection 4. Neurological injuries – drop-‐foot 5. Long term – pelvic floor prolapse, incontinence, fistula formation
Fetal
1. Death 2. Neurological injuries
- Intracranial haemorrhage - Facial nerve palsy/paralysis - Brachial plexus injury
3. Trauma - Skull fracture - Damage to facial bones - Lacerations and bruising
4. Transmission of HIV Ventouse/ Vacuum Delivery Prerequisites for Ventouse Delivery Same criteria for forceps delivery, except:
1. Cooperative mother 2. Uterine contractions must be strong 3. Episiotomy not always essential 4. Can be used for malpositions such as OP, OT, and asynclitism
Contraindications to Ventouse delivery
1. Preterm fetus (< 36 weeks) 2. Face and breech presentations 3. Fetal head not engaged 4. Possible bleeding tendency of the fetus 5. Fetal distress – relative contraindication
Procedure (See Figure F) Preparation
1. Counsel and reassure the patient 2. Prepare the necessary equipment – checking all the connections on the vacuum
extractor, and testing the vacuum on a gloved hand 3. Cover the cup of the vacuum with aseptic cream/ gel

17
Procedure 1. The patient should be in the lithotomy or lateral position 2. Ensure adequate analgesia 3. Clean and drape the patient, and employ aseptic measures for the rest of the procedure 4. Determine the exact position of the fetal head, identifying the posterior fontanelle 5. Between contractions, pass the largest possible cup through the introitus, and place it
on the fetal head – with the centre of the cup over the posterior fontanelle 6. Confirm correct application of the vacuum, ensuring that no maternal soft tissue is
caught within the rim of the cup 7. Ask the assistant to activate the pump – creating a vacuum of – 0,2kg/cm3 8. Again, check application of the cup, ensuring that no maternal tissue has been drawn
under the rim. 9. Have the assistant increase the vacuum to – 0,8kg/cm3 10. Once this maximum negative pressure has been established, with contractions,
commence traction -‐ in the line of the pelvic axis, and perpendicular to the cup. 11. Place a gloved hand on the fetal scalp next to the cap to assess for descent of the fetal
head and potential slippage of the cup during traction 12. Only pull during contractions 13. The fetal heart rate should be monitored continuously, and the correct application of
the cup should be confirmed between contractions 14. Support the perineum during the delivery of the fetal head 15. As soon as the fetal head has been delivered, release the vacuum, remove the cap, and
complete the delivery f the baby 16. Perform active management of the third stage of labour, repair the episiotomy if
performed, and check the birth canal for any additional trauma Failed Vacuum A vacuum extraction should be classified as failed if:
1. There is no descent of the fetal head with each pull 2. The fetus remains undelivered after three pulls or after 30 minutes 3. The cup slips off the head twice with correct application and maximum negative
pressure In the event of a failed vacuum extraction, a caesarean section must be performed. Complications of Ventouse Delivery Maternal Trauma to the birth canal
- As with forceps delivery, but to a lesser extent Haemorrhage
- Secondary to trauma - Uterine atony
Fetal - Scalp injury – bruising, abrasion, laceration - Cephalhaematoma, Subgalealhaematoma, Intracranial haemorrhage - Retinal haemorrhage

18
- Neonatal jaundice - Transmssion of HIV
Figure A

19
Figure B

20
Figure C

21
Figure D

22
Figure E

23
Figure F

24
Chapter 2
Repair of Episiotomy Anne Horak Degrees of Vaginal Tears There are four degrees of tear that can occur during vaginal delivery:
- First-‐degree tear: Involves the vaginal mucosa and connective tissue - Second-‐degree tear and Episiotomy: Involves the vaginal mucosa, connective tissue,
and the underlying muscles - Third-‐degree tear: Involves the vaginal mucosa, connective tissue, underlying
muscles, and the anal sphincter - Fourth-‐degree: Involves the anal sphincter as well as the rectal mucosa
Materials for Repair
- Absorbable sutures should always be used for repair - Polyglycolic/ polyglactin sutures are preferred over chromic catgut as they have
superior tensile strength, non-‐allergenic properties, and are associated with a lower probability of infectious complications
- A tapering/ round-‐bodied needle should be used, as a cutting needle is more traumatic and causes more bleeding
- A curved needle is preferred over a straight needle General Principles
1. It is always best to repair vaginal tears within the first few hours after delivery, as further delay is associated with infective complications and poor healing
2. First degree tears that are not bleeding do not need to be sutured, as most of them will heal spontaneously
3. It is important to perform an initial detailed examination of the vagina, perineum, and cervix to make sure that the full extent of any tears is correctly assessed and that any damage to the anal sphincter is identified
4. Haemorrhage from the lower genital tract should always be suspected when there is ongoing bleeding in the presence of a well-‐contracted uterus. This may require more detailed examination in theatre under anaesthetic

25
Technique of Repair
1. Good light is paramount, and in the presence of more extensive tears, assistance may be necessary to provide adequate exposure
2. Position the women in lithotomy, or at least with her buttocks towards the lower end of the bed
3. Clean the perineum with antiseptic solution 4. Anaesthetize the perineum early to provide sufficient time for effect:
-‐ Use +/-‐ 10ml of 0.5% lignocaine solution to infiltrate beneath the skin of the perineum, beneath the vaginal mucosa, and deeply into the perineal muscle
-‐ Insert the needle along each side of the vaginal tear/ incision and slowly inject the lignocaine solution while withdrawing the needle
-‐ The vaginal tissues should swell as you inject the lignocaine 5. Insert a tampon into the upper vagina to absorb any blood from the uterus, thereby
ensuring a clear suturing field. Do not forget to remove this at the end of the procedure Repair of the Perineal muscle Layer
1. Repair the perineal muscles using an interrupted 2-‐0 suture 2. Attempt to identify and ligate any bleeding blood vessel 3. If the tear is deep, a second layer may required 4. It is important that any potential dead space is obliterated, as this can later lead to
haematoma formation Repair of the Vaginal Mucosa
1. Repair the vaginal mucosa using a continuous 2-‐0 suture 2. Ensure that the first suture is placed above the apex of the tear or episiotomy incision 3. Continue the continuous suture to the level of the vaginal opening, obliterating any
dead spaces, yet ensuring that the sutures are not inserted too tightly 4. At the level of the vaginal opening, bring the needle out through the perineal tear and
tie Repair of the Skin
1. Repair the perineal skin using either an interrupted or subcuticular 2-‐0 suture 2. Start at the level of the vaginal opening 3. Ensure that the sutures are not inserted too tightly
End of Procedure A rectal examination should be performed in the case of deep vaginal tears – to ensure that no sutures have been place in the rectum. If suture material is felt in the rectum, the sutures must be removed, and the repair repeated.

26
Chapter 3
Suturing of Third and Fourth Degree tears Stephen Jeffery Obstetric anal sphincter injuries (OASI) are unfortunately a common event associated with vaginal delivery. If these third and fourth degree tears are not recognised and managed appropriately, these women are at high risk for developing a number of significant long-‐term complications including faecal incontinence, perineal pain and dyspareunia. Importance Anal sphincter tears are associated with significant morbidity. Failure to recognise and repair an anal sphincter injury is one of the top four reasons for complaint and litigation arising in labour ward practice in the UK. The sequelae of OASI affect women not only physically but psychologically as well. A large amount of work has been done in an attempt to more clearly define risk factors for developing an OASI. Risk factors for sphincter injury include low parity, prolonged first and second stage, high birth weight, occipitoposterior positions, forceps and vacuum delivery. The relationship between episiotomy and sphincter injury remains unclear. Overall, 50% of third degree tears are associated with episiotomy and midline episiotomy is 50 times more likely to result in third degree tear. The greater the angle the episiotomy makes with the vertical, the smaller the risk of sphincter injury. Recognition and diagnosis All women, following vaginal delivery, must be thoroughly examined with a systematic inspection of the vulva, vagina and perineum. If any injuries are detected, a rectal examination must always be performed. If the patient has had an instrumental delivery or if a large episiotomy was performed, she should be examined by someone who is experienced in the diagnosis of sphincter injury. If in doubt, it is useful to ask the women to contract her anal sphincter while performing a gentle PR examination and any loss of tone will suggest an underlying sphincter defect. Another useful manoeuvre is to “pill-‐roll” the sphincter with the index finger in the rectum and the thumb in the vagina. This will enable the clinician to detect any loss of sphincter bulk – again suggesting an underlying third or fourth degree tear. If there is still a significant amount of uncertainty, it would be prudent to perform the repair under anaesthesia. Classification of injuries The standardization of sphincter injury has made it easier to compare data on outcomes and repair techniques.

27
The anal sphincter comprises: External Anal Sphincter (EAS) • Subcutaneous • Superficial • Deep Internal Anal Sphincter (IAS) • Thickened continuation of circular smooth muscle of bowel The classification of tears is as follows: First degree: laceration of the vaginal epithelium or perineal skin only. Second degree: involvement of the vaginal epithelium, perineal skin, perineal muscles and fascia but not the anal sphincter. Third degree: disruption of the vaginal epithelium, perineal skin, perineal body and anal sphincter muscles. This should be further subdivided into: 3a: partial tear of the external sphincter involving less than 50% thickness. 3b: complete tear of the external sphincter. 3c: internal sphincter torn as well Fourth degree: a third degree tear, with disruption of the anal epithelium. Rectal mucosal tear (buttonhole) without involvement of the anal sphincter is rare and not included in the above classification. Repair of Third and Fourth degree tears General Principles All third and fourth degree tear repairs should be done in an operating theatre. This recommendation is made for a number of reasons. Firstly, in theatre one has access to proper anaesthesia. A general or spinal anaesthetic makes it much easier to inspect the tissues and to adequately visualise the tear. The sphincter is usually more relaxed which makes it easier to retrieve if the ends are retracted. In theatre it is possible to position the patient in a more appropriate way. The surgeon also has access to better lighting and proper instrumentation and often it is easier to get an assistant if the procedure is being performed in theatre. Overlap or end to – end repair of the Sphincter. Repair of the sphincter following an acute obstetric injury has undergone a significant change over the past decade. Traditionally, the repair was done by an end-‐to-‐end approximation of the torn sphincter. The outcomes following acute repair of sphincter injuries are poor with some studies reporting faecal incontinence rates of up to 37% (range 15-‐ 59%). Many women later require secondary repair of the sphincter. This is usually done by a colorectal surgeon and an

28
overlapping technique is employed in the majority of cases. The reported success rates with an overlapping technique are better, with continence outcomes between 74 and 100%. For this reason an overlapping technique for acute OASI has been suggested. A separate repair of the internal anal sphincter has also been recommended and this may also profoundly impact on outcomes. Specifics of repair
• The anal mucosa is repaired with interrupted vicryl 3-‐0 sutures with the knots tied in the lumen.
• The torn muscle, including the internal and external sphincter, should always be
repaired with a monofilamentous delayed absorbable suture such as PDS or Maxon 3/0.
• The internal anal sphincter should first be identified and then repaired using an interrupted suture. It is not possible or necessary to overlap the IAS and it is adequate to suture this muscle using an end-‐to-‐end technique. It is often difficult to identify the IAS, but usually it is paler in colour than the external sphincter.
• If it is a Grade 3A tear, ie. Less than 50% of the EAS is torn; the muscle is repaired using
and end-‐to end technique.
• If it is a 3B, an overlap technique is probably better and this is done as follows: The ends of the torn muscle are identified and clamped using Allis forceps. A double breasted technique is used to approximate these ends. It is important to identify the full length of the sphincter and this can stretch for up to 4-‐5cm.
• Whether an end-‐to-‐end or overlap technique is used, between three and four sutures
are inserted and these are tied following insertion of all the sutures.
• After the sphincter has been repaired, the vaginal skin is closed much like one would close an episiotomy, making every effort to reconstruct the perineal body.
• Every woman should be given antibiotics and stool softeners following the repair.
• Women sustaining third and fourth degree tears should always be offered a follow up
appointment to assess them for faecal incontinence, perineal pain and dyspareunia.

29
Chapter 4
Suture of cervical and vaginal tears Valentin Stefan Indications Superficial vaginal tears that do not involve the whole thickness of the wall and do not bleed may not need to be sutured. The same conservative management applies to cervical tears shorter than 2 cm that do not bleed. All other lacerations require suturing. Exploration Lacerations of the cervix or vagina should be suspected when the post-‐partum bleeding continues in spite of a well-‐retracted uterus. The exploration of the birth canal with right-‐angle retractors, under good light, will identify the tears. The inspection of the cervix is made easier if an assistant presses the uterine fundus downwards through the abdominal wall, thus bringing the cervix into view. The operator uses two sponge forceps to “walk” the circumference of the cervix and expose the tears. These are most often found at 3 and 9 o’clock and are parallel with the axis of the cervix. Sometimes they may have a more unusual spiral or circular traject. Vaginal tears are most of the time associated with perineal ruptures, in complex patterns, but generally following the axis of the organ. However, mainly after forceps applications, they may be found high in the upper third or in the vaginal fornices. Procedure Cervical tears should be sutured with continuous locked or separate stitches of absorbable material (catgut, Vicryl) on a tapered needle. The first stitch should be placed above the upper end of the laceration, to obliterate the larger bleeding vessels which often are found there. For optimum exposure in view of suturing, one sponge forceps is applied next to the rim of the cervix, on each side of the tear. Vaginal lacerations should be closed with the same type of suture, starting from the cranial end. Special precautions Cervical tears extending above the insertion of the vagina If the upper end of the lesion cannot be seen, the uterus should be explored manually to evaluate the extent of the laceration. What appears as a cervical rupture may be in fact a rupture of the uterus and thus require an abdominal approach. A laparotomy is also indicated when the tear extends to the peritoneal cavity or to the parametrium and it bleeds profusely. In the latter case, the uterine artery or its branches may be torn. Attempts to obtain haemostasis by placing sutures from the vagina to compress large bundles of parametrial tissue may fail to stop the bleeding but may injure the ureter.
30
Vaginal ruptures extending into the ischiorectal fossa. This is easy to diagnose, as the fat that fills the fossa is visible through the opening in the vaginal wall. The fat should not be sutured. If a major bleeder is seen, it should be ligated. If the haemostasis is not satisfactory, due to small vessels that are hidden among the fat lobules, a closed suction drain may be left in the area. Vaginal tears extending around the urethral meatus should be better left to heal unsutured, if they do not bleed. However, most lacerations in this area will bleed freely and require suturing. It is necessary to insert a catheter in the bladder before starting the repair, to avoid suturing the urethral meatus and to facilitate micturition, as the postoperative oedema and pain may make voiding difficult. Postoperative care Douching is not necessary. If Vicryl Rapide was used, it should be absorbed by the time of complete healing of the tears, which is in 3-‐4 weeks. The other sutures last longer and may need to be removed if intercourse is desired.

31
Chapter 5
Manual Removal of the placenta Valentin Stefan Definition Manoeuvre performed by inserting a hand through the vagina into the uterine cavity after delivery, in order to separate the placenta from the uterine wall and extract it. Indications
1) Active haemorrhage before the placenta is expelled, in excess of 500ml. It is important to be aware of the widespread tendency to underestimate the blood loss at delivery, often by as much as 50%.
2) When the placenta is not expelled after 30 minutes from the delivery of the foetus. Delays of over 30 minutes are associated with increased risk of post-‐partum haemorrhage.
Technique
1) The removal of the placenta should be done under aseptic precautions and should be followed by an inspection of the birth canal using retractors, under good lighting. These requirements, combined with the need for adequate analgesia, are only satisfied in the operating theatre.
2) Analgesia. If the patient has already an epidural catheter, the analgesia may need to be topped up. Otherwise, a spinal or general anaesthesia would be indicated.
3) Attention to resuscitation. Should the patient bleed heavily, energic resuscitation measures need to be instituted, while she is readied for theatre
4) Consent. Informed consent is required as for any intervention. 5) Positioning the patient. The patient should be in lithotomy position. 6) Scrubbing, dressing and draining the bladder. The skin of the perineum, thighs, buttocks
and lower abdomen are cleaned with antiseptics. The patient is draped in sterile surgical towels. The surgeon is scrubbed, gowned and gloved. General precautions in the presence of bodily fluids should be observed: together with the above protection attire, the surgeon should wear goggles, a waterproof apron and waterproof theatre shoes/boots. To facilitate the manoeuvre, the bladder should be emptied by Foley catheter. This would also enable the monitoring of urinary output during resuscitation.
7) The manoeuvre. The operator grasps and steadies the fundus of the uterus, through the abdominal wall, with the non-‐dominant hand. For ease of insertion in the birth canal, the fingers of the dominant hand are extended and their tips are brought together in the shape of a cone (the accoucheur’s hand). The hand is then inserted in the vagina, with the tips of the fingers towards the sacrum. Once inside the vagina, the hand is turned in supination to bring the fingers in the direction of the cervix. While the uterine fundus is

32
held steady, the hand is inserted into the uterus and, by tearing through the membranes, the operator would start to separate the placenta from the uterine wall. The placenta is then completely freed by using the cubital margin of the palm like a wedge that opens the cleavage space. During the manoeuvre, the fingers are kept together, parallel this time, and the back of the palm is in constant contact with the uterine wall. When the organ is completely free, it is grasped by the operating hand and pulled out through the cervix and vagina. A manual control of the uterine cavity is then done, to evacuate possible remaining cotyledons and membranes. This is followed by an inspection of the vagina and cervix with right-‐angled retractors; any bleeding lacerations should be sutured.
Accidents and incidents
1) Cervical retraction. Sometimes the cervix is spastic, forming a ring that prevents the insertion of the hand in the uterus. This is usually transitory and in a minute or two will disappear. If it persists for longer, any oxytocin drips should be stopped. As the half-‐life of oxytocin in the blood is only 3 minutes, the uterus should relax soon afterwards. Alternatively, the inhalatory anaesthetic rate could be increased, which results in uterine relaxation.
2) Placenta accreta. If no cleavage between the placenta and the decidua can be initiated, consider the possibility of placenta accreta. Stop performing the manoeuvre as it may produce intractable bleeding. Hysterectomy would be the usual solution in such cases. Sometimes, however, only a few cotyledons are adhering morbidly, and it is difficult to remove them by hand. An instrumental evacuation of the adherent tissue with a large blunt Bumm curette, together with continued utero-‐constrictive medication, will usually control the bleeding.
Postoperative care If indicated, the resuscitation for post-‐partum bleeding should continue. Remember to check the Rh status of the mother and baby, as the manual extraction might increase the likelihood of iso-‐immunization. Administer anti-‐Rh immunoglobulins in case of Rh incompatibility. If the manoeuvre was executed under aseptic circumstances, antibiotics are not necessary.

33
Chapter 6 Shoulder Dystocia Jason Marcus Definition A delivery that needs additional obstetric manoeuvres to deliver the shoulders, after gentle downward traction on the fetal head has failed, because the fetal anterior shoulder is impacted against the maternal pubic symphysis. Risk Factors
• Increased maternal BMI • Diabetes • Assisted delivery • Previous shoulder dystocia • Post-‐dates pregnancy • Fetal macrosomia
Risk factors have poor predictive value, but the more risk factors there are, the greater the chance of shoulder dystocia. Diagnosis Failure of the shoulders to deliver with the standard amount of maternal effort and moderate traction on the fetal head Retraction of the fetal head against the perineum, called the “turtle sign”. The earlier the diagnosis is made the better the chances of a positive outcome for mother and baby. Management It is important to remain calm and to act quickly. The HEELPERR mnemonic has been devised as a clinical tool to provide a structured framework in managing shoulder dystocia. It does not serve as an algorithm but as an aid to memory about what to do. The sequence of the manoeuvres has not yet been systematically reviewed. The baby needs to be delivered within 5 minutes. H Call for Help
Be sure to state that you’re dealing with a dystocia and not just saying you need help. It would be beneficial to also call for someone who is competent in neonatal resuscitation.
E Patient’s buttocks to the Edge of the bed E Evaluate for Episiotomy To make space when performing the entry manoeuvres but it does not reduce the dystocia. L Lift the Legs (McRobert’s manoeuvre) Flex and abduct maternal legs so that the thighs rest on the maternal abdomen. P SupraPubic pressure

34
Pressure is applied over the fetal anterior shoulder by an assistant while maintaining downward traction on the fetal head. If possible, ask the assistant apply the pressure in the direction that the baby is facing so as to push the impacted shoulder forward.
E Entry manoeuvres Attempt to rotate the anterior shoulder forward into the oblique diameter and under the pubic symphysis. If this does not help, attempt rotation of the shoulders by applying pressure posteriorly on the anterior shoulder and anteriorly on the posterior shoulder. If unsuccessful attempt rotation in the opposite direction.
R Remove the posterior arm This may help in decreasing the bisacromial diameter. Flex the fetal elbow and deliver the arm by sweeping the arm over the anterior fetal chest wall. Be mindful of potentially causing a fractured humerus.
R Roll the patient Roll the patient onto all-‐fours which may help dislodge the impaction by means of gravity.
Radical manoeuvres may need to be considered if the preceding measures fail. Seek expert, experienced advice. The importance of documenting the sequence of events is extremely important along with effective communication with the parents after what is a very traumatic event for all. It remains paramount to be extremely vigilant in all births and to be familiar with the various manoeuvres so that the management of such an unpredictable emergency can ensure a positive outcome for mother and baby.

35
Chapter 7
Breech Delivery Anne Horak Breech presentation is the most common fetal malpresentation. It refers to the presentation of the fetal buttocks with or without part of the fetal lower limb at the maternal cervix.
Incidence The incidence of breech presentation varies with gestational age – decreasing from approximately 20% at 28 weeks of gestation to 3 – 4% at term. Risks and Significance Breech presentation is associated with a higher perinatal morbidity and mortality rate due to factors such as prematurity, congenital malformations, birth asphyxia, and trauma.

36
Types (See Figure A)
A. Complete Breech: Both hips and both knees are flexed B. Incomplete/ Frank Breech: Both hips are flexed with one/ both knees extended C. Footling Breech: One or both hips extended with knee(s) extended D. Kneeling Breech: Both hips extended with both knees flexed
Aetiology
1. Prematurity 2. Congenital fetal abnormalities – especially neurological abnormalities 3. Multiple pregnancy 4. Polyhydramnios 5. Oligohydramnios 6. Placenta praevia 7. Short umbilical cord 8. Multiparity 9. Uterine abnormalities 10. Contracted pelvis 11. Maternal anticonvulsants or substance abuse 12. Idiopathic
Management Antenatal
1. Recognition 2. Ultrasound scan to exclude: i) Congenital abnormalities
ii) Multiple pregnancies iii) Placenta praevia
3. External Cephalic Version if not contraindicated (See Chapter on ECV) 4. Delivery Plan
Delivery Plan In cases where external cephalic version is unsuccessful or contraindicated, the mode of delivery will need to be decided. A systematic review of randomized trials comparing a policy of planned caesarean section with that of planned vaginal birth for breech presentation at term found that planned caesarean section was associated with a significant reduction in death or serious morbidity for the baby. Elective caesarean section is therefore the method of choice for delivery of a breech at term. Some women, however, may still choose to deliver vaginally, and others may present too late in the second stage for a caesarean section to be performed. For these reasons, as well as the fact that many second twin deliveries are often breech, obstetricians and midwives still need to learn the techniques of vaginal breech delivery.

37
Assessment for Vaginal Breech Delivery Although there is a place for vaginal breech delivery -‐ especially if experienced operators are present, there are also several contraindications:
1. Estimated fetal weight > 3,5kg 2. Estimated fetal weight 1,0 – 1,5kg 3. Footling breech 4. Kneeling breech 5. Extended fetal head – “star gazer” 6. Maternal conditions that would preclude vaginal delivery
Conduct of a Breech Delivery First Stage
1. Labour should be conducted in a hospital with facilities for caesarean section immediately available
2. Spontaneous labour enhances the chance of successful vaginal delivery. Induction of labour is best avoided
3. An intravenous line should be sited 4. There should be continuous electronic fetal heart rate monitoring 5. Uterine activity should be monitored. Oxytocin augmentation is best avoided 6. Membranes should not be ruptured too early, and spontaneous rupture of membranes
at any point in the labour should prompt immediate vaginal examination to exclude cord prolapse
7. Analgesia must be adequate. An epidural is advantageous as it helps prevent the urge to push prior to full dilatation
8. The latent phase should not exceed 8 hours 9. Progress in the active phase should be monitored on the partogram, and cervical
dilatation should not exceed 1cm/hour 10. An experienced doctor or midwife should be available for the delivery, as well as an
Anaethetist and Paediatrician Second Stage The essence of the vaginal breech delivery is to allow as much spontaneous delivery by uterine contractions and maternal effort as possible. The less operator interference, the lower the morbidity and mortality associated with the delivery.
1. Position the patient in the lithotomy position 2. Empty the bladder 3. Allow the mother to bear down with contractions 4. When the breech distends the perineum, cut an episiotomy 5. Allow the fetal buttocks, legs and abdomen to deliver spontaneously to the level of the
umbilicus. 6. A loop of cord should be gently pulled down to minimize traction and possible tearing.
From this point, the cord is compressed in the birth canal and the fetus cannot receive

38
oxygenated blood from the placenta. Only 5 to 10 minutes should be allowed to elapse until delivery of the mouth
7. The only intervention recommended to this point is correction of the breech to sacro-‐anterior position if it is not this already. Rotation of the fetal trunk should be achieved by holding the baby in two hands -‐ with thumbs on the sacrum and index fingers over the femoral head. Pressure on the fetal abdomen must be avoided as this may cause rupture of the abdominal organs
8. Allow the baby to hang down and descend spontaneously until the wing of the scapula is seen
9. The arms are often found folded across the fetal chest, and should deliver spontaneously without intervention
10. If there is delay in delivery of the arms, gentle downward traction with insertion of the operator’s finger to sweep the limb down, may deliver the anterior arm. Similarly, gentle upward traction should facilitate delivery of the posterior arm
11. Allow the baby to hang down again until the nape of the neck is visible under the symphysis. This will aid flexion of the fetal head
12. The baby’s body can be supported on the right hand of the doctor or midwife 13. As the fetal face appears, apply suction to the mouth and nostrils to clear the airways 14. Slowly control delivery of the fetal head over the perineum. The mother should not
push too hard, or even at all, as sudden explosive delivery and subsequent decompression of the fetal skull may cause intracranial injuries
15. Clamp and cut the cord 16. Complete the third stage and repair the episiotomy
Problems at Vaginal Breech Delivery Delivery of a vaginal breech should be slowly and carefully conducted, with as little interference from the obstetrician as possible. Unfortunately, however, not all breech deliveries proceed in the manner described above, and it is sometimes necessary to intervene. Once a particular complication has been resolved, spontaneous breech delivery may be allowed to continue. Frank Breech – Extended Legs (See Figure D) Extended legs tend to splint the fetal trunk and delay descent. To relieve this problem, the operator must insert a finger behind the fetal knee into the popliteal fossa. Pressure is then exerted in order to flex the knee over the trunk. This will cause descent of the fetal foot -‐ which is then grasped and pulled down. This procedure may be repeated with the opposite leg if necessary. Extended Arms If unnecessary traction is exerted in order to achieve hasty delivery of the breech, one or both arms may become extended over the fetal head. This will prevent engagement of the fetal head into the maternal pelvis and is a potentially serious complication, as the cord is already compressed.
1. The operator must try and deliver the fetal arm by inserting a finger into the cubital fossa, flexing the elbow and pulling the arm down across the fetal chest
2. If this is unsuccessful, Lovsett’s maneuver may be used to free the arm. The fetus is wrapped in a warm towel and the body grasped over the bony pelvis with the

39
operator’s thumbs along the sacrum. The body is then rotated 180o with constant downward traction so that the posterior arm comes to lie anteriorly under the symphysis pubis. It can then be delivered by sweeping it across the fetal chest. The other arm can be delivered by repeating this maneuver in the opposite direction.
3. Occasionally, the extended fetal arm becomes displaced posteriorly behind the fetal head. This may be corrected by rotating the fetal back through 180o -‐ in the direction of the trapped arm. If successful, the elbow will be drawn forward toward the fetal face, and over the fetal head. Lovsett’s maneuver may now be used to deliver the fetal arms.
Assisted Delivery of the Fetal Head Assisting the delivery of the after coming head of a breech allows for better control over the rate of delivery, and thereby helps prevent the explosive “popping out” of the head. There are several techniques that have been described: Mauriceau-‐Smellie-‐Veit Method (See Figure B) The principle is to present the most favourable diameters of the fetal head to the pelvis by encouraging flexion.
1. The fetus is supported on the right forearm of the obstetrician 2. The middle finger of the right hand is placed in the baby’s mouth, with the index and
ring finger’s on the cheeks 3. The fingertips of the left hand exert pressure upward and posteriorly on the fetal
occiput to encourage flexion, whilst the 2nd and 5th fingers can pull on the shoulders 4. The baby is delivered be downward traction along the axis of the birth canal whilst
flexing the baby’s head Wigand-‐Martin Method As above, but alternatively, the obstetrician’s right hand applies suprapubic pressure to encourage flexion and descent of the fetal head. Burns-‐Marshall Method
1. The obstetrician stands on the right hand side of the patient, facing her feet 2. The baby’s feet are held with the left hand whilst traction is exerted in a horizontal
direction, towards the mother’s feet 3. Whilst maintaining this outward traction, the baby’s feet are rotated in a wide circle,
towards the mother’s abdomen 4. Delivery of the fetal head is controlled by placing the index and middle fingers of the
obstetrician’s right hand on the baby’s maxilla 5. Care must be taken to protect the perineum as the body of the baby is swung and
rotated upward 6. The baby’s mouth can be suctioned as soon as it emerges over the perineum
Forceps Delivery (See Figure C) Sometimes, additional assistance is required to deliver the fetal head. This can be achieved by applying a forceps to the after coming fetal head.
1. An assistant elevates the baby’s body in a sterile cloth

40
2. The obstetrician applies the forceps to the fetal head from below. Either a Wrigley’s or Neville-‐Barne’s forceps may be used
3. First, the left blade of the forceps is applied over the baby’s face, and rotated to the right side of the baby’s head. Care must be taken not to traumatize the baby
4. The right blade of the forceps is then inserted in the same way, and rotated to the left side
5. The forceps is then locked and the head is delivered with slight outward traction while rotating the forceps around the symphysis pubis towards the mother’s abdomen
6. The baby’s mouth may be suctioned as soon as it appears over the perineum Figure A
COMPLETE BREECH INCOMPLETE BREECH FRANK BREECH

41
Figure B

42
Figure C

43
Figure D

44
Chapter 8
External Cephalic Version Anne Horak Breech presentation complicates 3 to 4 % of all deliveries at term, and an even higher percentage of preterm deliveries. The incidence of caesarean section increased markedly following the publication of the Multicenter Term Breech Trial, which concluded that elective caesarean section was associated with a better fetal outcome than planned vaginal delivery. Given that caesarean section is associated with higher maternal morbidity and mortality, especially in developing countries, measures to reduce the incidence of breech presentation of at term have become increasingly important. External cephalic version (ECV) refers to the manipulation of a fetus lying in a breech presentation to cephalic presentation through the maternal abdomen. It is effective in reducing the incidence of breech presentation at term, and therefore also in reducing the caesarean section rate. The success of external cephalic version depends largely on the experience of the obstetrician, as well as on the selection of cases. Overall, a success rate of 40% for nulliparous and 60% for multiparous women can be achieved. The use of tocolysis improves the chance of success, and is recommended, especially if a prior attempt at ECV without it has failed. ECV is associated with a very low rate of complications. These include placental abruption, uterine rupture, and fetomaternal haemorrhage. The literature reports a rate of 0,5% for emergency caesarean section following ECV, and for this reason, the procedure should only be performed where facilities for fetal monitoring and immediate delivery are available. ECV should be offered from 36 weeks in nulliparous women, and from 37 weeks in multiparous women. There is no upper time limit on the gestational age at which ECV can be performed, and provided the membranes are intact the procedure can even be performed in early labour. Case Selection Absolute Contraindications
1. Ruptured membranes 2. Antepartum haemorrhage 3. Placenta praevia 4. Major uterine anomaly 5. Multiple pregnancy 6. Significant fetal abnormality 7. Abnormal cardiotocograph (CTG) 8. Need for caesarean section for other indications

45
Relative Contraindications 1. Previous caesarean section or uterine surgery 2. Severe proteinuric hypertension 3. Intrauterine growth restriction 4. Rhesus isoimmunization 5. HIV 6. Obesity 7. Oligohydramnios
Prior to Procedure 1. Ultrasound to assess placental position, liquor volume and fetal attitude 2. Confirm normal and reassuring fetal heart rate pattern 3. Ensure you have the facility for an emergency Caesarean section if a fetal complication
develops. Procedure (See Figure A)
1. Reassure the mother 2. Position the patient in a semi-‐right lateral or Trendelenburg position 3. Administer tocolysis 4. Apply talcum powder to the abdomen to enhance smooth and free movement of the
hands 5. Disimpact the breech from the pelvis 6. Compress the baby into a ball, flexing the fetal head and encourage a forward
somersault. The essence of the procedure revolves around manipulating the baby’s head down toward the pelvis. Once the baby is half turned, it usually kicks itself into a cephalic presentation if it is indeed going to turn.
7. If unsuccessful, try the opposite direction 8. Uterine manipulation should be limited to < 10 minutes 9. Confirm fetal well-‐being immediately after the procedure, whether successful or not 10. Administer anti-‐D serum if Rhesus negative
NB -‐ Labour with a cephalic presentation following ECV is associated with a higher rate of obstetric intervention than when ECV has not been required, and the labour should therefore be managed at an institution where facilities for caesarean section are available.

46
Figure A
47
Chapter 9
Delivery of Twins Susan Fawcus Introduction The delivery of twins poses a great challenge to the obstetrician, requiring good clinical judgment, quick responses, and additional practical skills Twin pregnancies are associated with a four to five fold increase in perinatal mortality compared to singletons. This is chiefly due to the high rate of preterm delivery and intra-‐uterine growth restriction (IUGR) which occurs in multiple pregnancies. In addition antenatal fetal demise and congenital anomalies contribute to this increased mortality. This mortality is greater for monochorionic compared to dichorionic twins and occurs at earlier gestations. Also neonatal morbidity is increased for monochorionic twins with a greater chance of cerebral palsy and neurological sequelae than for dichorionic. Thus many of the neonatal problems in twins are independent of the delivery process. However, the actual process of delivery of twins can present additional complications, which lead to poor perinatal outcome, and therefore needs to be carefully managed. The second twin (twin B) has a greater risk of perinatal mortality compared to the first twin (twin A). Twin B is particularly at risk from hypoxia following delivery of the twin A. This may be due to placental separation following delivery of the first twin, cord prolapse, malpresentation and the manouvres required to correct malpresentation and facilitate delivery. The above problems for the second twin may be exacerbated by it being more at risk of IUGR and thus more vulnerable to hypoxic insults. Rarely there can be a mechanical obstruction to delivery of the first twin (twin A) by twin B; this is called locked twins and is more likely with a first twin which is non vertex presentation. Anaemia, pre-‐eclampsia and postpartum haemorrhage are additional complications that may affect the mother of a multiple pregnancy. What is the optimal mode of delivery in twins? This depends on the following factors:
l Presentations of each twin (Vertex-‐Vertex ; Vertex-‐Non vertex ; Non vertex-‐Vertex ; Non vertex-‐ Non vertex ; Conjoined) l Gestational age l Chorionicity and amnionicity l Previous caesarean section l HIV status of mother l Presence of major maternal complication such as eclampsia.

48
l Presence of severe fetal complications such as IUGR with fetal compromise, Twin to Twin Transfusion Syndrome (TTTS)
l Maternal preferences l Expertise of the attending doctor
Fig.1. Frequency of different twin-‐twin combinations
NONVERTEX
(19.1%)(19.1%)
VERTEX VERTEX –– VERTEXVERTEX
(42.5%)(42.5%)
VERTEX – NONVERTEX
(38.4%)(38.4%)
NONVERTEX
(19.1%)(19.1%)
VERTEX VERTEX –– VERTEXVERTEX
(42.5%)(42.5%)
VERTEX – NONVERTEX
(38.4%)(38.4%)
Figure 2 Pictures of different twin-‐twin pairs (permission pending) a. vertex-‐vertex

49
b. vertex-‐breech vertex-‐transverse
c. breech-‐cephalic transverse-‐ transverse
PLANNED CAESAREAN SECTION or CAESAREAN SECTION AT THE ONSET OF LABOUR
This is recommended in the following situations: • Leading twin is Non Vertex • Previous Caesarean section • Second twin -‐ large non-‐vertex (ie. >3000gms)

50
-‐ Non-‐vertex and mother has contracted pelvis -‐ Severe preterm non-‐vertex (estimated fetal weight <1500gms) • Monoamniotic twins • Fetal problems eg. -‐ Severe IUGR. -‐ TTTS -‐ Growth discordance • HIV positive mother • Placenta praevia • Triplets and higher order pregnancies • Maternal choice NB: A Non vertex second twin is not a contra indication to planned vaginal delivery. The position of the second twin may change after delivery of the first twin so, for example, a transverse second twin may become vertex. Also vaginal breech delivery may be allowed for a second twin. Monochorionic twins may be allowed to deliver vaginally provided they are diamniotic, there is no TTTS, and no growth discordance C section is recommended for HIV positive women with twins because of concern that the additional manipulations and instrumentation that may be necessary for twin B could aggravate HIV transmission to the fetus. Intrapartum management of twins
SUITABLE FOR VAGINAL DELIVERY: Vertex / Vertex. Vertex / Non Vertex Appropriate site for labour and delivery This should occur in a hospital with a functioning theatre available. Appropriate anaesthetic and neonatal expertise needs to be available It is recommended that dichorionic twins should deliver at a secondary hospital. Ideally, monochorionic twins should be managed and deliver at a tertiary hospital. Severe preterm twins <32 weeks gestation need to be managed where there is a neonatal unit with facilities for ventilation.
Appropriate referrals therefore need to be made, but it is not uncommon for labour to progress rapidly so that delivery may occur at the entry site in labour of the patient.
Management of labour in twins Intravenous access Check patient’s Haemoglobin (Hb). Send blood for ‘group and save’ if Hb is less than 10gms/dl Monitor both fetuses with a cardiotocograph (CTG). It is important to ascertain that the CTGs are not detecting the same twin. A special CTG machine for twins in which both traces appear on the same paper is useful. In HIV negative woman a fetal scalp electrode can be

51
placed for monitoring the twin A, allowing more space on the abdomen for the transducers for the twin B and the tocograph. Epidural anaesthesia can be useful particularly if manipulations for twin B are anticipated. Alert the anaesthetist and paediatrician. Delivery: in theatre if possible. Experienced obstetrician present at delivery of twin A and should stay with mother until twin B is delivered. Portable Ultrasound machine available Anaesthetist available. 2 Paediatricians available 2 midwives Resuscitation equipment available for two babies Acceptable modes of delivery in different circumstances Twin A -‐ Normal Vertex Delivery (NVD) Instrumental delivery Twin B -‐ NVD Instrumental delivery External cephalic version (ECV) Breech Delivery Internal podalic version plus breech extraction Caesarean Section (exceptional circumstances)
Twin to twin delivery interval It is very important to perform continuous fetal heart monitoring of twin B. Urgent delivery is required if any abnormality. If fetal heart of Twin B is reassuring then it is acceptable to wait up to 30 minutes for delivery of twin B.
Management of twin delivery: details
When cervix is fully dilated: 1. Shift patient to theatre. 2. Ensure intravenous line is running, bladder is empty, CTG is in process and ultrasound
machine is present in theatre 3. Ensure Anaesthetist and Paediatrician present 4. Inform patient of all events and provide support and encouragement 5. Place patient in lithotomy position

52
Delivery of twin A:
1. Proceed to deliver twin A as per singleton delivery. 2. If evidence of fetal distress of twin A and/or if second stage prolonged can assist with
vacuum or forceps provided no evidence of cephalopelvic disproportion (unlikely with twins). Vacuum delivery should not be performed if fetus less than 36 weeks. Forceps can be used in this situation provided the vertex is occipito anterior.
3. Clamp the cord but do not administer oxytocin and do not attempt delivery of the placenta at this stage.
After delivery of twin A:
1. Ensure CTG running to monitor fetal condition of twin B using an external transducer or fetal scalp electrode (if HIV negative)
2. Abdominal palpation to ascertain lie and presentation of twin B 3. If uncertain of lie and presentation perform ultrasound 4. Do a vaginal examination to check nature of presenting part, its level and whether the
membranes have ruptured and to exclude a cord presentation 5. Do not rupture membranes before ascertaining presentation of twin B, or if twin B is
transverse and/or the presenting part is high 6. Monitor contractions: an oxytocin infusion can be given if the contractions have
diminished, provided that twin B is longitudinal lie and CTG is reassuring,
Delivery of Twin B: Vertex
1. Encourage patient to push with contractions 2. Continue monitoring fetal heart 3. Rupture membranes when head has descended into pelvis. 4. Proceed with vertex delivery. 5. If fetal distress or prolonged second stage, can then proceed on to instrumental vaginal
delivery provided head is engaged. 6. NB: If fetal distress is detected while the vertex is still high (three-‐fifths or more above
the brim) emergency C section is indicated. Delivery of Twin B: Breech
1. External cephalic version is not indicated 2. Vaginal delivery can be allowed provided the second twin is not estimated to be larger
than the first and/or is not more than 3000gms 3. Encourage patient to push with contractions. 4. Infiltrate maternal perineum with local anaesthetic and prepare to perform
episiotomy 5. Rupture membranes when buttocks have descended into pelvis. 6. Perform assisted breech delivery 7. If fetal distress is detected while the presenting part is high, a breech extraction can be
performed Breech extraction: Sterile procedure

53
Grasp the feet of the fetus and pull the legs gently into the vagina, maintaining the traction until the buttocks are at the vulva. This step can be performed with or without intact membranes. Perform a breech delivery as the buttocks distend the perineum. NB: this procedure is only ever done for a second twin breech, never for a singleton breech. Delivery of Twin B: Transverse or oblique. 1. Ultrasound to confirm the lie and whether fetal back is uppermost or facing down. 2. Do not rupture membranes while lie is still transverse or oblique 3. Attempt external cephalic version: if successful, proceed with vertex delivery 3. If ECV unsuccessful, fetal back is facing uppermost and attendant has the necessary
experience, can proceed with internal podalic version and breech extraction. If not experienced, do Caesarean section
4. If ECV unsuccessful and fetal back is facing down, perform emergency Caesarean section.
5. If membranes have been ruptured inadvertently with transverse or oblique lie proceed to emergency caesarean section.
6. Internal podalic version: Sterile procedure With membranes intact and fetal back facing up, insert hand gently through cervix and identify fetal foot (NB; the foot can be distinguished from the hand by its heel). Between contractions, grasp one or both feet and pull them into the vagina in so doing the membranes will rupture but the fetus will be secured in your grasp and will turn from transverse to a breech presentation with longitudinal lie. Then proceed with breech extraction. NB: Never pull on a hand or arm.

54
Figure 3: Internal podalic version (permission pending) 7. If fetal distress is detected before any manouvres have occurred, proceed to emergency
caesarean section unless the attendant is experienced, the back is facing up and a quick Internal Podalic Version and breech extraction can be performed.
Delivery of Twin B: Compound presentation (Hands, head and feet) Proceed to emergency Caesarean section Delivery of Twin B: Cord prolapse If this is detected after rupture of the membranes, can expedite vaginal delivery if engaged vertex (forceps or vacuum) or if breech, by breech extraction. However, if a high vertex or if transverse lie do emergency Caesarean section. Delivery of Locked twins This is a very rare complication in which the head of the leading twin which is delivering by the breech becomes obstructed by the head of the second twin which is cephalic. It leads to death of the leading twin and often the second twin and poses serious difficulties for delivery. Provided that one or both twins are still alive, then emergency caesarean section is probably the best option. Vaginal manoeuvres that may be attempted include: -‐ inserting a hand between the chins of the two foetuses and trying to push the twin B’s head up and away from that of the leading twin; then proceed with delivering the first twin. With the hand elevate the buttocks of the second twin and try and push it up past the second twin into the uterus and deliver the second twin first. Decapitation of the dead first twin

55
Emergency Caesarean section for the Second twin * Retained second twin (usually undiagnosed and oxytocin inadvertently given). * Failed internal podalic version (Back facing down) * Transverse lies and ruptured membranes (+/-‐ arm prolapse) before attempts at version * Cord prolapse with very high presenting part. * Fetal distress with high presenting part of twin B vertex * Locked or conjoined twins
Management of the third stage of labour After twin B is delivered, clamp the cord and proceed with active management of the third stage of labour (im oxytocin 10 iu and controlled cord traction). Since Postpartum haemorrhage (PPH) is more common after twin delivery, it is advisable to prophyllactically administer an oxytocin infusion (20 iu oxytocin in one litre of normal saline) Do not send immediately to a postnatal ward. Watch in the labour ward area for at least 2 hours, monitoring for excessive bleeding and abnormal vital signs. Documentation Make detailed notes of all procedures performed with time sequence
Skills training and mock scenarios There is a need to provide practical skills training in twin delivery manouvres for all doctors and midwives working in labour wards. Models and simulated scenarios are aids to training. References
1. Life Saving Skills Manual. Essential Obstetric and Newborn Care. RCOG press 2007.
2. Managing Obstetric Emergencies and Trauma. Eds Johanson R, Cox C, Grady K, Howell C.RCOG press 2003
3. High Risk pregnancy. Management options. Ch 60. Eds James D, Steer P, Weiner C, Gonik B. Elsevier 2006
4. RCOG Green top guideline 51: Management of monochorionic twin pregnancy

56
Chapter 10
Simple Caesarean section Nomonde Mbatani The indication for the caesarean section often dictates the type of uterine incision, speed of procedure and method of delivery of the fetus GENERAL RULES
• Ensure that the fetal heart is still present • For elective cases, ensure that the correct patient, the indication for the caesar,
gestational age is correct. You do not want to deliver a premature baby simply because of somebody else’s incorrect date calculation
• The Pediatrician should be informed whenever doubt exists about the condition of the baby post delivery. Arrangements should be made to have a nursery bed available when needed or the delivery should be performed somewhere else where facilities would be available
The lower segment Caesar 1. After draping, the skin incision should be made with a knife and cautery can be
used there-‐after to avoid skin burns 2. Care should be taken to cauterise the inferior epigastric vessels. In cases of
emergency, tearing of the fat using fingers may help to temporarily reduce blood loss. These can be cauterised after the delivery of the baby. Some people perform a midline incision to speed the procedure and to prevent excessive bleeding
3. The incision through the sheath is made using scissors. The extension of the delivery area is made by freeing the sheath from muscle from above and below the incision. Care must be taken to cauterise or tie-‐ off any bleeders under the sheath and in the rectus musle layer as hematomas can lead to increased morbidity
4. The parietal peritoneum is the next layer and can be opened digitally or by use of scissors. The bladder may be high up in cases of Cephalo-‐pelvic Disproportion or in previous caesarean section, the higher up this incision is made, the better. Identification of the Urachus helps as this is often found above the bladder area. It is safe to make the incision in this fibrous band.
5. The lower segment may be identified as the lower part where the uterus meets
with the bladder. The overlying peritoneum here is very easy to lift, especially in term babies. A transverse incision is made on this area. The lower segment of the uterus would be the thinned out part of the uterus and a transverse incision can be made here. The more prolonged and obstructed the labour ,the safer it is

57
to make the incision quite higher in the lower segment as this area tends to be friable when labour has been prolonged
6. The presenting part is scooped out of the pelvis and delivered first. Wrigley’s forceps can be used if the head is high up and not engaged. When the presenting part is deep in the pelvis, an assistant can be asked to push the presenting part up to help dislodge the head. Antisepsis should be maintained as much as necessary
7. The delivery of the extremely small baby may be challenging and an experienced person should be involved. Delays in delivering the tiny and slippery neonate is not just stressful to the baby but rather to all that are watching and expecting immediate delivery and transfer of the baby. I sometimes find it easier to deliver the baby as a breech especially if it slips up to the fundus of the uterus
8. The placenta is delivered by gentle traction on the cord and squeezing of the uterine fundus. In cases of posterior placenta, figure of 8 stitches can be put on the lower segment to avoid post partum bleeding on the non-‐contracting lower segment
9. The uterus, after expelling all products of conception is the sutured in 1 or 2 continuous layers using Cromic, Vicryl, or Monocryl on a big and round needle.
10. The visceral peritoneum is not routinely sutured. 11. Bleeders on the uterine incision line can be cauterised or large figure of 8
sutures can be inserted. If bleeding continues, it helps to put in figure of 8 stitches that run parallel to the incision as most vessels run in an up and down fashion
12. The sheath is then closed with a Vicryl continuous stitch 13. Clips, continuous or intermittent stitches could be used for skin 14. The use of drains is optional

58
Chapter 11
Classical Caesarean Section Kendall O Callaghan Definition -‐ a method for surgically delivering a baby through a vertical midline incision into the body of the uterus which extends from above the lower segment and reaches the uterine fundus. Indications for Classical Caesarean section • In circumstances where exposure to the lower uterine segment is inadequate
o Leiomyomata (fibroids) or adhesions making it technically difficult or impossible to reach lower uterine segment
• Transverse lie with fetus in non-‐correctable back-‐down position or very narrow lower uterine segment
• Premature deliveries with a poorly formed lower segment, esp. if breech presentation. o Decision best made after abdomen has been opened and the lower uterine
segment carefully inspected (De Lee incision may suffice) • Elective caesarean hysterectomy • Invasive carcinoma of the cervix • Post-‐mortem caesarean section • Relative – anterior placenta praevia Advantages • Permits rapid delivery through a larger opening • Reduces risk of bladder injury as bladder is not dissected Disadvantages (resulting in its limited use today) • Incision more complicated and time consuming to repair • More bleeding occurs during surgery because the upper segment is thicker and more
vascular • Higher incidence of infection • Adhesion formation common • Greater risk of incision rupture during subsequent pregnancies (risk 4X higher with
classical incision) o If rupture occurs -‐ Bleeding and risk of expulsion of fetus into peritoneal cavity
greater than with lower segment caesarean section VS Lower segment incisions
Low transverse uterine incision Used in over 90% of cases

59
Advantages: § Easy to repair § Reduced adhesion formation § Decreased blood loss § Low risk of dehiscence or rupture in subsequent pregnancies
Disadvantages: § Greater chance of lateral extension of the incision into major uterine vessels
resulting in maternal morbidity due to haemorrhage in situations where lower uterine segment is poorly developed (prematurity, transverse lie)
§ Incision can be extended into the upper uterine segment as a J or U or inverted T which then have the same risks as classical incision
Low vertical uterine incision (De Lee) § Used when transverse incision inappropriate – usually if underdeveloped lower
segment § Avoids risk of unintentional extension of incision into lateral vessels § Incision can be extended upwards into the body of the uterus (i.e. classical incision)
if more room is needed -‐ then with same risks as classical incision § Extensive dissection of the bladder is necessary to keep the uterine incision in the
lower uterine segment, if incision extends downwards it may tear through the cervix into the vagina and possibly the bladder
Preparation • Written informed consent
o In addition to risks and benefits which should be discussed before a transverse lower uterine segment caesarean section, the patient should also be informed about § the increased risk of blood loss and need for blood transfusion (esp. if CS done
for placenta praevia) § increased risk of uterine rupture with subsequent pregnancy and therefore the
need for elective caesarean section • Left lateral tilt to minimize maternal inferior vena caval compression
o Reduces risk of hypotension and reduction in uteroplacental perfusion • Indwelling urinary catheter • Shave suprapubic hair as close to time of procedure as possible
o Minimises risk of infection in small lacerations • Clean skin with antiseptic solution – usually povidine-‐iodine • Drape patient in sterile linen or plastic adhesive drapes • Maternal antibiotics to reduce risk of endomyometritis and wound sepsis
o Single dose first or second generation cephalosporin given before skin incision Procedure Abdominal incision • If a classical uterine incision is planned then the abdominal cavity should be opened with
a vertical skin incision. This will allow better access to the upper uterine segment than

60
the more commonly used transverse suprapubic skin incisions (Pfanenstiel incision or Joel Cohen incision)
• A low vertical uterine incision (De Lee) can be done through a transverse skin incision • In the case where the need for a classical uterine incision has not been predicted
preoperatively, the Joel-‐Cohen incision may allow sufficient access to the upper segment in preterm pregnancies, however a Pfannenstiel incision will most likely not. In this case the abdominal wall incision will need to be converted into an inverted T incision.
• The length of the incision will correspond with the estimated fetal size • A term classical caesarean section will require a high vertical abdominal skin incision,
this may be midline, or paramedian to access above the umbilicus Fig 1 Uterine incision Classical Caesarean Section • The classical uterine incision is a vertical incision through the thick upper segment of the
uterus which reaches the uterine fundus. • Using a scalpel, a 2-‐3cm incision is made in the upper part of the lower uterine segment. • Deepen the incision steadily and stop once the membranes are visible • Once the uterine cavity in entered, 2 fingers are placed inside to protect the fetal parts
and using either the scalpel or the scissors, the incision is extended 10 – 12cm upwards in the longitudinal plane.
• Although it is not routinely required, the uterovesical peritoneum can by dissected in order to reflect the bladder down if there is concern that the incision may extend inferiorly. The lower angle of the incision can also be secured with single suture
• If the placenta is anterior, it may be encountered once through the myometrium. If this is the case, blunt dissection can continue around the placenta or careful sharp dissection can continue through the placenta to deliver the fetus.
Low vertical caesarean section • Dissection of the bladder is necessary in order to reflect the bladder below the lower
uterine segment; this will prevent damage to the bladder if the incision tears downwards through the cervix into the vagina. o Loose visceral peritoneum is picked up with forceps about 1cm below uterine
attachment and incised in the midline o The peritoneum is separated from the uterus laterally with the closed scissors and
then divided laterally o Bluntly separated the lower flap and the posterior bladder wall from the lower
uterine segment by applying pressure to the uterus • An initial 2cm incision is made in the lower uterine segment in the midline • With a finger through the incision to protect the fetus, scissors are used to extend the
incision downwards and upwards • The length of the incision is approximately 10cm, from the upper limit of the cervix,
assessed by palpation, to the peritoneal reflection on the uterus • Care should be taken to avoid the upper segment upwards and the bladder downwards

61
• The lower end of the incision should be captured with a stay suture Fig 2 Surgical closure technique Classical Caesarean Section • Exteriorisation may be helpful as it assists with visualisation and technically facilitates
repair of the classical incision • The assistant uses both hands to encircle and compress the incision, fingers on one side
and thumbs on the other. o this reduces blood loss and reduces compression on the sutures as they are placed
• A classical incision needs to be closed in 3 layers (2 deep and 1 outer layer) • The 2 deep layers are repaired with 0 polyglactin (vicryl) • 1 deep layer may be sufficient depending on the thickness of the incised muscle • A continuous suture should be used for the first deep layer, which should not include
the endometrial lining, • Some surgeons place interrupted sutures for the second deep layer, however others
prefer continuous sutures. • These 2 deep layers should bring the deep muscles together and should aim to leave
about 1cm of the outer layer of the uterine muscle gaping • The final layer is closed with a sero-‐muscular ‘herring-‐bone’ suture using absorbable
suture material with minimal potential for tissue reaction, eg. polyglycolic acid (Dexon) • The advantage of the ‘herring-‐bone’ suture is that it inverts the wound edges therefore
further decreasing the risk of adhesions. Fig 3, 4, 5 Low vertical caesarean section • Green-‐Armytage forceps are applied to each side of the uterine wall • Closed in 2 layers with continuous 0 polyglactin (vicry) sutures. • First layer incorporates the inner 2/3 of the wall thickness, avoiding the endometrium • Second layer approximates the outer 1/3 of the uterine wall

62
Fig 1:
Fig 2:

63
Fig 3:
Fig 4:

64
Fig 5:

65
Chapter 12
The difficult Caesarean Section Elmarie Basson The incidence of caesarean section is roughly 15-‐25% of all deliveries in developed countries, and is regarded as a safe route of delivery, with an associated maternal mortality of less than 1:10, 000. The safety of the lower uterine segment technique has increased due to the development and administration of safe regional (and general) anaesthesia, the availability of blood products, the appropriate use of the correct suture material, better surgical techniques, the availability of antibiotics and post operative thromboprophylaxis. Unfortunately, there are still situations where the caesarean section is a surgical challenge, with fetal and or maternal morbidity (see table 1).
Prior to skin disinfection and operative field draping, always catheterize the patient and ascertain the fetal presenting part. Breech presentation and transverse lie present specific problems – glance at the ultrasound report to ensure the placenta is not praevia, which may account for these situations. MATERNAL FACTORS
1. The fibroid uterus
Fibroids are well known for being very vascular, even more so when encountered at caesarean section. Consensus supports the fact that myomectomies must never be carried out at
Table 1 The difficult caesarean section Maternal factors:
1. Fibroid uterus 2. Previous surgery with extensive adhesions 3. Poor haemostasis 4. Absence of a lower uterine segment 5. Placenta praevia
Fetal factors: 1. Breech presentation 2. Twin pregnancy 3. Transverse lie

66
caesarean section. Unfortunately, if the fibroid is situated near the lower segment at the uterine incision line, it becomes a potential life-‐threatening problem. Always aim to do a transverse lower uterine segment incision (figure 1), but if the fibroid is over the intended incision line, then rather opt for a vertical lower uterine incision (figure 2), or a classical caesarean section incision (figure 3). Figure 1 Transverse lower uterine segment incision Figure 2 Vertical lower uterine segment incision (Delee incision) Figure 3 Classical caesarean section incision

67
Care must be taken to avoid the actual fibroid, as incisions in the vicinity of a fibroid can lead to haemorrhage. If a vertical lower uterine segment incision is planned, there needs to be more extensive dissection of the bladder in order to keep the vertical incision within the lower segment. If the incision extends downwards, it may tear through the cervix to the vagina and possibly the bladder. The advantage of this incision is a lower risk of lateral extension into the uterine vessels. The classical caesarean section has a limited place in modern obstetrics, and is only performed if there is no lower segment of the uterus, or with a difficult transverse lie. However, if a large fibroid obscures the whole lower segment, this may be your only option. After delivery of the baby and placenta, the uterus is closed in two to three layers – usually with a classical caesarean section the muscle is relatively thick, and therefore needs to be sutured in multiple layers. The serosa is then closed with a suture material that would not cause adhesion formation, for example monocryl (if available).
Carefully monitor this patient for blood loss, as a fibroid can interfere with myometrial contraction. Give the patient one Misoprostil per os (200µg) during the procedure, and instruct the anaethetist to give 5-‐10 IU Syntocinon as a stat dose, and a further 10-‐20 IU Syntocinon in the drip as a continuous infusion. Post operatively administer 400µg Misoprostil per rectum. The Misoprostil can be used for a further 1-‐2 days depending on the vaginal blood loss.
PREVIOUS CAESAREAN SECTION / SURGERY WITH EXTENSIVE PELVIC ADHESIONS This procedure is often fraught with unexpected difficulties. The rule is to expect the worst and to approach the surgery with great caution. Procedure After the skin and the fascia have been opened, gently approach the sheath. Be very careful with the sheath, because bladder, bowel or even the uterus might be adherent. Sometimes the sheath might be fibrous and unyielding, but with the cautery on “cutting” (at 40 watts) one can easily get through it. If omentum is adherent to the sheath and peritoneum, clamp the adhesion, cut and tie it off with vicryl (or similar) If the bladder is adherent to the sheath and peritoneal surface, try to open the peritoneal cavity by cutting cephalad, and adequate exposure is safely achieved. In the unlikely event of bowel adhesions, gently try to separate the bowel from the adherent tissue by using a Russian forceps and a fine dissecting scissors. The most important aspect of adhesions is trying to restore normal anatomy as far as possible. One often has thick fibrous bands extending from the uterus to the rectus muscle. Those are also tied and cut through, in order to secure easy access to the lower uterine segment. Don’t hesitate to call in the help of other specialists, i.e. a surgeon, vascular surgeon or even a urologist. In the event of poor exposure and access to the lower uterine segment, it may sometimes be necessary to incise the belly of the rectus muscle laterally; this is safe and easy, and affords excellent exposure. Repair the muscle with interrupted vicryl sutures, after delivery of the baby.

68
ABSENCE OF A LOWER SEGMENT This is usually encountered at the delivery of a premature infant (<30weeks, gestation), at placenta praevia or at breech presentation. The safest entry would be to employ a classical caesarean section, as this allows adequate exposure. The most common problem with a classical caesarean is securing adequate haemostasis, and care should be taken to ensure that the muscle of the uterus is closed properly (usually 2-‐3 layers of suturing is required). Most importantly, one needs to prevent the formation of adhesions, and thus the serosal layer should be closed with a PDS or monocryl suture. (if available)
Placenta praevia This is probably one of the most difficult caesarean sections as the risk of haemorrhage is high. The prudent doctor will have access to O neg blood, which may be life – saving in the event of catastrophic bleeding. If the patient has an anterior placenta praevia, try to enter the uterus above the placenta, via the lower segment. If this is not possible, make a lower segment uterine incision and with blunt dissection (using your fingers), go through the placenta until you reach the baby. This is extremely “nerve-‐ wrecking” as it can bleed substantially. A better bet would be to do a classical uterine incision, to avoid damage to the placenta. Don’t be afraid to extend the uterine incision into a J or a T incision (see picture). There is no time to waste in a situation like this, so get to the baby as quickly as possible, and clamp the umbilical cord immediately. J incision T incision
If the placenta praevia is posterior, delivery of the baby can usually be done via the lower uterine segment. The other problem with a placenta praevia is that the lower segment doesn’t contract very well, and the patient is at risk of post partum haemorrhage. If haemostasis is suboptimal, try deep figure-‐8 stitches into the placental bed in order to tie off the bleeders. Don’t forget the simultaneous use of Pitocin (Oxytocin) and Misoprostil, as previously described. Another option is to inject diluted Prostaglandin f2x directly into the muscle of the uterus.

69
CAESAREAN SECTION IN THE CASE OF A TRANSVERSE LIE When a transverse lie is encounted, it is possible to deliver via a transverse skin incision. If the obstetrician is inexperienced, it is prudent to consider delivery through a midline subumbillical skin incision. Good free access to the lower uterine segment is important: if this is limited and more space is thought necessary, cut the rectus muscle with a scissors from the medial margin laterally, as this increases exposure markedly. Once in the abdomen, review the fetal lie by gentle uterine palpation and manipulation. If the uterus is relaxed, with plenty of liquor, it may be feasible to coax a head or a breech into a longitudinal position. Beware of large caliber vessels coursing over the lower segment – these may indicate a placenta praevia and should be tied off with 2/0 vicryl, 441 or monocryl 3463 3/0 sutures. Incise and displace the uterine peritoneum with a Russians forceps and Mayo scissors. Have a forceps or vacuum extractor ready to deliver the fetal head. Commence wall suction, to keep the operative field clear of fluids, and gently incise the lower uterine segment. Open the final few millimeters with a mayo scissors or digitally; and manually feel for the fetal presenting part. If a head is felt, call for fundal pressure and deliver either with Wrigley’s forceps or by vacuum extraction. If you feel feet, seize these and perform gentle breech extraction, keeping the fetal back uppermost. If a cord, hand or shoulder emerges, pop these back and feel for the feet. If you feel only the fetal back, then remove your hand, straighten the baby into a longitudinal lie, and re introduce your hand, and deliver the baby. If you open the lower uterine segment and find a placenta praevia, proceed as under “placenta praevia”. Close in the usual manner. If the rectus abdominus muscle was cut, close the muscle with a haemostatic repair using a few figure of 8 sutures – “left overs” from the uterine closure are excellent for this purpose. CAESAREAN SECTION IN THE CASE OF BREECH PRESENTATION It is always wise to ensure the breech presentation is not caused by a placenta praevia: reference to an ultrasound report should clear this. The breech delivery needs more space and better lower uterine segment exposure. Don’t believe that breech deliveries at caesarean section are necessarily easy because the head cannot get stuck!! There is much more to delivery of a breech baby than merely delivery of the aftercoming head. If necessary, increase exposure of the lower uterine segment by incision of the rectus abdominus muscle as previsouly described. Open the uterus, and draw the incision laterally by digital traction. Introduce the right hand and feel for the feet: grasp the feet and firmly draw these downwards. Perform a gentle breech extraction, similar in technique to a conventional vaginal breech delivery. Always keep the baby’s back upwards. Close in the conventional way.

70
CAESAREAN SECTION IN THE CASE OF A TWIN PREGNANCY Don’t assume that twins are small little babies and hence the space and exposure to the lower uterine segment needs to be limited. Give twins the same respect as for a singleton pregnancy, and this prudence will be rewarded. If ever the operator finds space and exposure limited, extend the skin incision – within reason – and if muscle relaxation is insufficient, resort to cutting the rectus muscles. The idea of a caesarean section is to deliver a baby gently and swiftly – and if access to the infant is limited, then the delivery will be neither gentle not swift. Bear in mind that after a twin delivery, women are prone to a PPH, so it is prudent to administer 1 or 2 misoprostil tablets, orally or rectally, to contract the uterus and prevent blood loss.

71
Chapter 13
Uterine Packing in Primary Post Partum Hemorrhage Tham Matinde
Primary Post Partum Hemorrhage Primary Post Partum Hemorrhage ranks as one of the top 5 causes of maternal mortality in most 3rd World countries. Management of this condition is primarily medical, with surgical options reserved for those severe cases where medical management has proved a failure. First and foremost is preservation of the woman’s life, followed by preservation of her reproductive potential. Radical surgical intervention may lead to hysterectomy and this should be avoided where possible. UTERINE PACKING This procedure was quite common in the early 20th century. It fell out of favour in the 1940s because its distractors sighted that
1. it was unphysiological to pack a uterus that should be contracted so as to get the “living ligatures” at their most efficient in controlling hemorrhage
2. it lead to concealed hemorrhage 3. it introduced infection in the uterus 4. it could lead to adherence of the packed material to the raw uterine surface triggering a
bleed when the pack was removed. Needless to say, there has been a resurgence of this technique in the first decade of this millennium. Indeed, all obstetricians should familiarise themselves with this fairly easy and potentially life-‐saving, as well as uterus-‐sparing technique. Equipment:
1. A Dilatation and Curettage Tray 2. A Bozemann Uterine Packing Forceps or Swab holding forceps 3. Povidone Iodine solution 4. A gauze swab or Pediatric Abdominal Swab.
Technique:
1. Make sure the 3rd Stage of Labour is complete ( No retained placenta or membranes) 2. Wet the Sterile swabs or gauze swabs( tied together into one long ribbon) in Povidone
iodine solution

72
3. Pack the uterus gently with a Packing Forceps or Swab holding forceps 4. Maintain supra-‐fundal pressure during the packing. 5. Give the patient a uterotonic agent ( oxytocin infusion/ergometrine injection(if not
contra-‐indicated) or misoprostol 6. Give the patient intravenous antibiotics 7. Continue resuscitating the patient with blood products.
NB: Packs should be removed within 24 hours UTERINE BALLOON TAMPONADE
Uterine balloon tamponade has become the modern way of tamponading the uterus in controlling primary PPH non responsive to medical treatment. Basically, a hand rubber glove, condoms or a specially designed catheter can be used. The Bakri Balloon has been tried and tested with excellent results thus far.

73
BAKRI BALLOON (permission pending) The Bakri Balloon can be used
1. after vaginal delivery or 2. after caesarean delivery 3. Or at the time of caesarean delivery as a prophylactic intervention (e.g. Caesar for
Placenta praevia or as active treatment for intra-‐operative on-‐going primary PPH. The technique is simple: POST VAGINAL DELIVERY:
1. Exclude local causes of primary PPH 2. Make sure the 3rd Stage of labor is complete( i.e. placenta and membranes complete) 3. Measure 500mls of Normal Saline into a sterile bowl 4. Catheterise the UTERUS ( just like one catheterises the urinary bladder) 5. Insufflate with the measured 500mls of normal Saline. 6. Strap the catheter to the thigh 7. Connect a urinary bag to the Bakri catheter.
From the author’s experience, the balloon tends to be expelled by the uterus at times. One has two options to manage this

74
(a)pack the vagina with tied swabs ( if this procedure is being done out of the Operating Room otherwise if the procedure is being done under an anaesthetic, I recommend a loose Cervical Cerclage Suture ( just like the Mc Donald Stitch which most obstetricians should be familiar with) with an absorbable suture material. AT CAESAREAN SECTION (Trans-‐abdominal Placement)
1. Via the hysterotomy incision, Pass tamponade balloon through cervix ( inflation port-‐end first)
2. Have Assistant do a vaginal Examination and pull the catheter. 3. Make sure the balloon is correctly positioned in uterus. The inferior end of the balloon
should be at level of internal os. 4. Suture hysterotomy incision the usual way you close the uterus after a Caesar. NB: DO
NOT SUTURE THROUGH THE CATHETER OR CATHETER BULB!!!) 5. Insufflate the balloon with a predetermined volume of sterile Normal Saline (
Maximum 500mls for BAKRI balloon 6. Give the patient ivi antibiotics 7. Continue other resuscitative measures, blood and blood products, correcting DIC,
shock etc NB: Maximum duration of Bakri Tamponade Ballon is 24 hours in situ. To remove, deflate balloon and pull catheter out gently. In the author’s experience, no hysterectomies have been done for primary PPH where the balloon has been used.

75
Chapter 14 B-‐Lynch Brace Suture for Post Partum Hemorrhage Tham Matinde In 1997, Christopher Lynch published a novel conservative surgical for the management of uncontrolled post-‐partum hemorrhage. Whereas, other surgical techniques still have a role in this condition, hysterectomy does not preserve fertility and internal iliac artery ligation is not a skill familiar with most primary obstetric surgeons. It tends to be a special skill that is second nature to Gynae Oncologists and other trained surgeons. In the traditional B-‐Lynch suture technique, the abdomen has to be open and a hysterotomy incision has to be made on the uterus so as to access the uterine cavity.
B-‐Lynch procedure (permission for use of image pending)

76
PRE-‐REQUISITES:
1. Place patient in Lloyd-‐Davis position or supine as for a caesarean section 2. Abdomen is opened 3. A transverse lower segment hysterotomy incision is made in uterus (just like for a
caesarean section) after reflecting the bladder peritoneum inferiorly Or the previous hysterotomy incision is opened
4. The uterine cavity is evacuated of any potential retained products 5. An experienced assistant bimanually compresses uterus and vagina swabbed and
examined to see if bleeding abates. If bleeding stops, then a B-‐Lynch suture is likely to help and one can proceed with procedure.
EQUIPMENT:
1. A rapidly absorbable suture material (e.g. vicryl or chromic catgut or any other monofilament) and a big hand-‐held needle (70cm needle better). A 30 cm needle on a needle driver can also be used. This is readily available in most Obstetric Theatres that perform caesarean sections. It in fact might be the same suture material used to suture the index uterus at caesarean section!( Author’s experience)
TECHNIQUE: For a right handed surgeon standing on the right hand side of the patient, the brace suture material entry points are basically an “IN – OUT (then round the fundus) IN – OUT IN – OUT” technique through 6 points. (See and note B-‐Lynch picture above) Each point is used ONCE. IN is INTO the uterine cavity and OUT is OUT of the uterine cavity. 3 of the points are on the right hand side of the uterus and the other 3 on the left hand side. 4 of the entry points are on the anterior aspect of the uterus (2 above and 2 below the hysterotomy incision); and two posteriorly. Proceed as follows: On the right hand side of the uterus
1. Go IN ( into uterine cavity), 3 cm below and 3 cm medial to lateral border of uterus then

77
2. Come OUT (of uterine cavity) 3 cm above the hysterotomy incision and 4 cm medial to lateral border of uterus (uterus is wider as one approaches fundus hence the 4cm now). Then go around the fundus and
3. Go IN (into uterine cavity posteriorly), opposite the corresponding surface marking anteriorly where you came OUT of. Then
4. Go OUT (of uterine cavity) posteriorly at corresponding point as in 3 above. Then around the fundus and
5. Go IN ( into uterine cavity ) 4 cm medial to Left uterine border and 3 cm above hysterotomy incision, then
6. Go OUT (of uterine cavity) 3 cm below and 3 cm medial to left uterine border. 7. Assistant compresses uterus and tie the two ends together as the uterus is braced and
bunched together as shown above. 8. The abdomen is closed the usual way. 9. Resuscitation and post-‐operative care should still remain vigilant. By now it should be apparent that STEPS 4, 5 and 6 are a mirror image of STEPS 1, 2 and 3. It should also be easy to remember thatit is an “In-‐out, In-‐Out, In-‐out” technique though 6 points. In the authors experience and indeed published data to date this technique is simple, easy to learn, life saving and fertility preserving. It should be within the scope of even the most junior obstetric surgeon.

78
Chapter 15
Caesarean Hysterectomy Nomonde Mbatani
• Often performed as an emergency procedure but can be planned e.g Cervical cancer in pregnancy
• The speed with which this type of hysterectomy is carried often poses more risks than when this is done electively
• Consent should ideally be taken pre-‐operatively whereever recourse to a hysterectomy is thought to be highly likely.
• Usual cause for concern include an anticipated Post partum haemorrhage, possible rupture of the uterus in pregnancy or labour, cancer diagnosis
• All the possible risks of surgery should be discussed DURING SURGERY
• In emergency situations where bleeding control seems to be problem, continuous communication with the anaesthetist as well as the scrubbing nurse assistant should take place so that conversion to a hysterectomy should take place expeditiously
• The decision to proceed should be made ideally whilst the patient is still haemodynamically stable and at the same time all conservative methods for the control of bleeding have failed. This decision is easier to make in patients of high parity
• Where possible, the family may need to be involved in decision making • Blood products should be available • The procedure is done similar to a routine Hysterectomy • The ureter is likely to be injured during the following steps of a Hysterectomy
1. Where the ureter passes below the uterine vessels 2. Below the infindibulo-‐pelvic ligament 3. At the lateral borders of the utero-‐sacral ligaments 4. Close to the anterior vaginal wall as the ureters enter the base of the bladder
• Attempts should be made to push the bladder as low down as possible before the uterine pedicles are severed. This is one way of ensuring that the ureters are out of the way
• Performing a subtotal hysterectomy is another way of avoiding ureteric damage and usually suffices to stop the bleeding.
• Cauterise the endocervix of the cervical stump left behind during a subtotal hysterectomy to avoid late onset problems such as bleeding and chronic vaginal discharge from the stump
• About 2/3 of ureteric injuries are not recognised intra operatively. Early recognition and a high index of suspicion is critical to avoid further compromise of renal function
• Where there are concerns about possible ureteric injuries intra operatively, a urologist should be called into theatre
• Post operative signs of a possible unrecognised bleeding include: Fever, chills, flank pain, abdominal distension, haematuria and oliguria.

79
Remember: Not all patients with urological injuries will present with classic signs and symptoms • One should aim to remove the cervix in cases of uterine Sepsis, cervical lesions or where
bleeding seems to be coming from the cervical stump. • In cases of Cervical carcinoma, the correct type of hysterectomy should be performed by the
appropriate surgeons • It is often difficult to confidently tell intra-‐operatively whether a Total Hysterectomy has been
done on a patient who was in labour as the cervix may be too soft and difficult to feel. Patients should be re-‐examined six weeks post delivery to establish whether the patient will still require cervical smears in future

80
Chapter 16
Pelvic packing following hysterectomy Nomonde Mbatani
• Packing should be considered when the bleeding is venous in origin or for the peritoneal bleeds that are not amenable to cautery
• The decision should be made whilst the patient is still hemodynamically stable • An ICU bed for further ventilation of the patient should preferably be available
especially if the packs are going to cause some splinting of the diaphragm PROCEDURE
• All packs that have been used for the preceding procedure should be removed from the abdomen and a new swab count done
• A thorough count of the fresh swabs is done • Mobilise bowel away from the area to be packed to avoid causing ischemic pressure to
bowel • For small spaces, the smaller Pediatric swabs are preferable • The swabs are rolled in a sausage shape and are packed firmly over the bleeding areas.
There should be no free space available after the packing as the idea is to cause tight pressure over the bleeding area
• There is no need to stitch the sheath completely as the packs have to be removed after 24 to 48 hrs
• The skin can also be apposed using a few stitches The swab count is re-‐ confirmed to avoid unnecessary abdominal imaging during pack removal 24 to 48 hrs later

81
Chapter 17
Ligation of Internal Iliac and Uterine Arteries Valentin Stefan Indications These techniques are useful in order to stop post-‐partum haemorrhage where other measures have failed and the conservation of the uterus is desired: poor uterine retraction where the B-‐Lynch sutures are not efficient, bleeding from the lower segment after delivery of a placenta praevia or bleeding from a partial placenta accreta, for instance. The ligature of the internal iliac artery might also serve to control bleeding from a torn uterine artery whose end is enclosed in a broad ligament haematoma and cannot be identified. Rarely, bleeding from vaginal tears that did not stop after suture or even after ligature of the uterine artery, may be controlled by ligature of the internal iliac, as sometimes the vaginal artery is a direct branch of the internal iliac and not of the uterine artery. In gynaecology, the ligature of the internal iliac may be useful to stop pelvic haemorrhage where the bleeding vessels are difficult to identify or for haemorrhage from pelvic tumours. When performed bilaterally, the procedure reduces the pulse pressure just below the ligature by 85% and this is believed to allow for the initiation of coagulation in the bleeding branches of the internal iliac. The blood flow of the uterus, however, is only reduced by 48%, due to numerous vascular communications within the pelvis. This makes a subsequent pregnancy possible. The ligature of the uterine artery serves the same purpose of achieving haemostasis post-‐partum. Technique
A. The ligature of the internal iliac. - The peritoneum is incised along the external iliac artery, from the round ligament to the
infundibulo-‐pelvic ligament. The surgeon usually operates from the patient side which is opposite to the artery to be ligated.
- The peritoneum covering the pelvic wall is reflected medially. The ureter will be seen adhering to this peritoneal sheet and should be left undisturbed.
- The bifurcation of the common iliac artery is now identified and the internal iliac is isolated from its lax areolar connective tissue covering, by blunt dissection. As lateral and posterior to the internal iliac are the external iliac and internal iliac veins, this dissection should be carried out with care in order not to injure them.
- The posterior division of the internal iliac should not be ligated, otherwise ischaemia of the areas irrigated by it is a real danger (skin and fat of the buttocks).
- A right-‐angled forceps is passed under the internal iliac, below the level where the posterior division exits, from lateral to medial, in order to avoid injuring the veins mentioned above.

82
- A loop of non-‐absorbable suture (braided silk or nylon) is grasped using the forceps and brought out on the other side of the artery. The loop is then cut and the artery is doubly ligated, about 5 mm apart.
- The procedure is repeated on the other internal iliac. The surgeon may find it convenient to move to the other side of the patient.
- If the uterine bleeding is not entirely controlled, the procedure may be supplemented by ligating the ovarian artery as described below.
B. The ligature of the uterine artery. - The site of the ligature is 2-‐3 cm below the level of the caesarean incision on the lower
segment (or where it should have been). - The bladder should be dissected from the uterine segment and retracted downwards to
expose the area described above. - The ligature consists of a 1x0 absorbable stitch, passed with a tapered needle from
anterior to posterior some 1-‐2 cm deep through the uterine side, to intercept any large blood vessels circulating through the uterine wall. The stitch is then brought back to the anterior side through the broad ligament, 1-‐2 cm lateral to the uterine vessels, and tied. Both artery and veins are thus occluded.
- The procedure is repeated on the other side of the uterus. - Should the bleeding not be properly controlled, the ovarian artery may be ligated, as its
anastomosis with the uterine artery may still supply some blood to the organ. This ligature is also passed with the needle through the broad ligament and encompasses the utero-‐ovarian ligament and the blood vessels around it, close to the uterine margin.
- The round ligaments and utero-‐sacral ligaments may be also tied, in a similar fashion, to maximize the vascular isolation of the uterus. A stepwise de-‐vascularization is thus performed. When ligating the uterosacral ligaments, care should be taken that the stitch does not injure or include the ureter, which travels lateral to the ligament.
Incidents and accidents
A. With ligature of the internal iliac. -‐ Ureteral injury or ligature. The ureter should be attracted medially together with the
peritoneal sheet to which it adheres. This manoeuvre should protect it from injury during the procedure. If the ureter was tied, the patient will complain of loin pain. A kidney ultrasound scan will reveal unilateral uretero-‐hydronephrosis and at cystoscopy there will be no urine ejection into the bladder through the ureteral meatus on the side of the ligature. A urologist should be consulted in view of taking over the management.
-‐ Ligature of the external iliac. If the external iliac was pulsating before the procedure, it should continue to do so after it. At the end of the operation, if the external iliac was tied, the respective leg will be pale and pulseless. A vascular surgeon will need to reconstitute the continuity of the circulation with a venous bypass.
-‐ Injury of the large external or internal iliac veins. This is followed by abundant haemorrhage. The bleeding may be stopped by digital pressure. The veins should be occluded both above and below the laceration site with vascular clamps. The defect in the venous wall may be sutured with a 4x0 monofilament non-‐absorbable stitch on a tapered needle. This is best done by a vascular surgeon.

83
B. With ligature of the uterine artery. - The needle should pass at safe distance from the uterine vessels when it transfixes the
broad ligament, otherwise a uterine vein may be punctured, sometimes with considerable haemorrhage, rapidly constituting a broad ligament haematoma.
- Advance the bladder sufficiently before placing the ligature. This avoids injury to the bladder or the terminal segment of the ureter during the procedure.

84
Chapter 18 Background to Blood Transfusion Products Kendall O Callaghan 1. WHOLE BLOOD Whole blood is a complex tissue and many of the components (esp. platelets and clotting factors) deteriorate within hours of donation. Components are therefore usually separated soon after donation so that they are available for use in the appropriate clinical situation. The indications for using whole blood are limited since red cell concentrates are more appropriate in most situations where increased 02-‐carrying capacity is needed. Indications:
• Massive haemorrhage • Exchange transfusion in neonates 2. PACKED RED CELLS Red cell concentrates (RCC's) are prepared by the removal of most of the plasma, and the buffy layer (which is rich in leucocytes and platelets) from a unit of whole blood. A preservative solution is added to the residual red cells. It contains adenine which helps maintain ATP levels during storage; glucose, which provides a substrate for RBC energy pathways plus saline and mannitol which reduces the haemolysis of the banked red cells during the 42 day storage period. Separating off the buffy layer results in the removal of approximately 70-‐80% of leukocytes present in the original whole blood donation and significantly decreases the risk of non-‐haemolytic febrile transfusion reactions. The volume of a unit of red cell concentrate is approximately 300-‐350ml (including the adenine additive solution) and the haematocrit is between 0.55 and 0.70. One unit of red cell concentrate (at a dose of 4ml/kg) can be expected to increase the haemoglobin level of an average (70kg) adult by approximately 1-‐2g/dl. Stored red cells experience deformability; on day 42 of storage about 75% of red cells are viable.
Red cell transfusions must be ABO compatible. As far as possible, red cell transfusions should also be Rh-‐D compatible. Rh-‐D positive blood should also be avoided in females of childbearing age who are Rh-‐D negative. Antigen negative blood should always be transfused to patients with specific and clinically significant red cell antibodies. As far as possible, compatibility tests should be performed prior to transfusion of red cells.
Indications:
The primary indication for red blood cell (RBC) transfusion is the restoration of oxygen-‐carrying capacity, to improve tissue oxygenation when this is impaired by haemorrhage or anaemia.

85
• Acute blood loss / Obstetric haemorrhage Acute blood loss of greater than 20% of blood volume (about 1000-‐1200ml) will usually result in the need for a red cell transfusion. Crystalloid solutions should be used initially in volume resuscitation.
• Surgery Consider transfusion if: o The pre-‐operative haemoglobin level is less than 8g/dl and the surgery is associated with
major blood loss (>500ml). o The intra-‐ or post-‐operative haemoglobin falls below 7g/dl.
Storage of red blood cells: Red cell products are preserved and stored at between 1° and 6 °C for up to 42 days. During the storage period, changes occur which may be clinically significant. The characteristics of stored blood should be taken into account when transfusing red cell products.
Anticoagulant Donated blood is collected into a solution containing sodium citrate which is a stable, minimally toxic anticoagulant with pH buffering properties. Citrate is metabolized in the Krebs cycle of respiration and, after transfusion, is rapidly metabolized by most cells in the body, particularly in the liver, muscle and renal cortex. Certain clinical conditions such as liver disease, hypothermia and hyperparathyroidism may place patients at risk for 'citrate toxicity' during massive or rapid transfusion of whole blood, red cell concentrates or fresh frozen plasma. Citrate can cause cardiac arrhythmias and a prolonged QT interval. The flow rate of citrate determines the degree of toxicity. If possible the ionized calcium levels should be monitored and 10ml of 10% calcium gluconate administered intravenously (a rule of thumb is 10 ml for every 2 units whole blood given in under 10 minutes). Calcium and any other drug or solution should never be directly added to blood components. 2,3 Diphosphoglycerate (2,3 DPG). The concentration of erythrocyte 2,3 DPG decreases with storage. The function of 2,3 DPG is to facilitate oxygen transport by shifting the oxygen dissociation curve to the right. With significantly decreased 2,3 DPG levels (as occurs in stored blood after approximately one week of storage) the oxygen dissociation curve is shifted to the left, decreasing oxygen delivery to tissues. After transfusion, levels of 2,3 DPG are, however, regenerated in-‐vivo, with approximately 50% being regenerated within 7 hours, although full restoration of RBC 2,3 DPG can take up to 72 hours. In clinical situations of hypoxia and lactic acid production, and with decreasing pH, the oxygen dissociation curve is also shifted to the right, increasing oxygen delivery. It is therefore generally considered that low 2,3 DPG levels in stored blood are not usually clinically significant. However, in certain clinical situations, such as in those patients in shock who cannot increase cardiac output to compensate, patients receiving large volumes of stored blood such as occurs in massive transfusion, or in patients undergoing red cell exchange procedures, transfusion of blood which has been stored for less than 5 days may be optimal.

86
Electrolyte changes Red cell concentrates must be stored between 1o and 6 oC. At these temperatures, the sodium-‐potassium pump is essentially non-‐functional and intracellular and extracellular levels gradually equilibrate. Plasma potassium concentration increases nearly eightfold over 28 days of storage although, at expiry, the total potassium load in red cell concentrates is only about 5.5mEq. Therefore, the potassium load is rarely a clinical problem except in the setting of pre-‐existing hyperkalaemia. In these situations fresh (<5 days) or washed red cell concentrates should be used.
Warming blood for transfusion: Blood should not be warmed when individual units are being transfused slowly (over a period of 2-‐4 hours per unit). Blood should be warmed to between 35 o and 37 oC when large volumes of blood are being transfused rapidly. Transfusing ice cold blood rapidly has been associated with an increased incidence of cardiac arrest. The best method of warming blood is to use a heat exchanger in which coils of tubing are warmed by electric heating plates. Microwave ovens must never be used to warm blood for transfusion. 3. PLATELETS Platelet transfusions are required for the treatment or prevention of bleeding due to reduced platelet numbers or function. In general, the risk of bleeding increases only when the platelet count falls to below 50x109/l and spontaneous bleeding seldom occurs at platelet counts above 20x109/l. Indications: • Transfusion of platelet concentrates is standard treatment for bleeding associated with
thrombocytopenia and /or defective platelet function in conditions such as: o Massive transfusion with dilutional thrombocytopenia (maintain platelet count at >50x
109 /l.). o Acute disseminated intravascular coagulation. o Pre-‐eclampsia with HELLP syndrome (may also be associated with acquired disorder of
platelet function) o Congenital disorders of platelet function. o Bone marrow failure e.g. aplastic anaemia, acute leukaemia.
• The role and clinical efficacy of prophylactic platelet transfusions is less well defined. The
following transfusion triggers are widely accepted: o Threshold of 10x109 /l for adult stable patients. o Threshold of 20x109 /l for patients at increased bleeding risk:
§ Severe uncontrolled hypertension § Anatomic lesions e.g. peptic ulcer. § Fever/sepsis. § Recent severe haemorrhage or bleeding from mucous membranes. § Anticoagulant therapy. § On drugs affecting platelet function. § Severe anaemia.
o Threshold of 50 x109 /l for most surgical procedures and at the time of vaginal delivery

87
Contraindications to platelet transfusions: Platelet transfusions are generally contraindicated in patients with immune causes of thrombocytopenia unless there is severe life threatening haemorrhage. • Immune Thrombocytopenic Purpura (ITP): Transfused platelets will be destroyed by the
autoantibodies. • Thrombotic Thrombocytopenic Purpura (TTP): Platelet transfusion may potentiate
thrombotic tendency. • Heparin Induced Thrombocytopenia (HIT): May potentiate thrombosis. Platelet products: Random donor pooled platelets • Random donor platelets are indicated for patients with acute causes of thrombocytopenia
e.g. DIC and who are unlikely to require long term platelet transfusion therapy. • Prepared from the buffy layers of whole blood donations within 8 hours of collection. • Stored with continuous agitation for up to 5 days at 22 oC. • Adult dose consists of platelets from 5 individual donations pooled together to produce 1
platelet concentrate. • Each unit contains a minimum of >2.4 x 10¹¹ platelets with a volume of 200-‐300mls.
Single donor apheresis platelet concentrates. • Complete dose derived from 1 donor with minimum yield of 2,4 x 10¹¹ platelets and volume
of 200 -‐ 300ml. • Leukocyte reduction occurs during apheresis procedure; therefore recommended for
patients who experience febrile reactions as a result of sensitisation to leukocyte antigens. • Reduced donor exposure and therefore reduced risk of alloimmunisation to HLA antigens. • Recommended for patients who are on long term therapy e.g. leukaemia. Platelets should be transfused through a platelet giving set over a period of 15-‐30 minutes. Transfusion through a standard red cell giving set will reduce the number of platelets received. The platelet count should increase by 20-‐40 x 109/L per standard adult dose. The increment will vary, however, and be lower in patients with:
o Splenomegaly o DIC o Septicaemia
Compatibility: As far as possible, group specific platelet concentrates should be administered. However, good clinical outcome is usually attained in patients that receive platelet transfusions that are not ABO matched. This is because as ABO antigens are weakly expressed on platelets. Platelet concentrates may contain a small number of red cells. Therefore Rh-‐D negative platelets should be given to Rh-‐D negative women. If this is not possible, administration of anti-‐D immunoglobulin should be considered, once the platelet count is corrected.
4. PLASMA COMPONENTS
i. FRESH FROZEN PLASMA (FFP) Plasma for FFP is separated from anticoagulated whole blood within 18 hours of donation. It contains all the coagulation factors at normal physiological levels.

88
Coagulation factors in FFP: • Fibrinogen • Factor II • Factor V • Factor VII • Factor VIII • Factor IX • Factor X • Factor XI • Antithrombin III • Plasma pseudo-‐cholinesterase
FFP is hyperosmolar due to the solutes it contains. In pre-‐eclamptic patients care should be taken not to precipitate pulmonary oedema especially if cardiopulmonary function is compromised and tissue oedema is present. Hypernatraemia and hypokalemia may occur if large volumes are transfused. Indications: • Multiple coagulation factor deficiencies (DIC, massive blood transfusion, liver disease) in
presence of active bleeding and abnormal coagulation screening tests. • Thrombotic thrombocytopenic purpura (TTP) • Reversal of Warfarin if active bleeding • Replacement of inherited single factor deficiencies if single factor concentrate not
available. • Vitamin K deficiency associated with active bleeding • Scoline Apnoea Administration: FFP must be administered through a blood giving set after thawing at 30-‐37 oC. The unit should be transfused as rapidly as possible (15-‐20 minutes per unit) with a recommended maximum delay after thawing of up to 4 hours, as labile coagulation factors deteriorate within a few hours of thawing or reconstitution. The first choice is to administer FFP of the same ABO blood group as the patient. If not available, a different ABO group can be given provided the anti-‐A and B titres are low. Blood group 0 FFP should preferably be given only to group 0 patients.
ii. CRYOPRECIPITATE This is the cold insoluble fraction of FFP and is obtained by thawing FFP at 0-‐4 oC. It is stored at ‹-‐18 oC for up to 1 year and the mean volume is 0-‐15ml. It contains the following proteins in concentrated amounts:
• Factor VIII and von Willebrand Factor • Fibrinogen • Fibronectin • Factor XIII

89
Indications: It is indicated primarily for treating hypofibrinogenaemia (acquired e.g. DIC, or congenital). It may also be used for treating hereditary Factor XIII deficiency. Administration: It is usually administered in pools of 10 units and is given through a standard blood administration set. iii. RECOMBINANT ACTIVATED FACTOR VII The mechanism of action of rFVIIa remains unclear. It has been suggested that it binds to the surface of activated platelets and directly activates Factor X, thus bypassing the early steps of the coagulation cascade. Activated Factor X (Xa) then combines with activated Factor V (Va) on the platelet surface, leading to rapid conversion of prothrombin to thrombin. Haemostasis is promoted through high concentrations of thrombin generated near activated platelets at the site of vascular injury. Indications: There is a rationale for using rFVIIa to treat massive bleeding in certain indications, but only adjunctively to the surgical control of bleeding once conventional therapies have failed. Lack of data from randomized, controlled clinical trials, and possible publication bias of the case series data, limits the strength of the recommendations that can be made. • postpartum haemorrhage • uncontrolled bleeding in surgical patients • blunt trauma • bleeding after cardiac surgery Monitoring: No specific method is currently available to indicate the need for rFVIIa or to monitor its efficacy. Monitoring of rFVIIa efficacy should therefore be performed visually to assess the level of bleeding after rFVIIa administration, and by an assessment of the transfusion requirements after dosing. Administration: FVII is given as a bolus dose of 90 mcg/kg, with a second dose of 90 mcg/kg 6 hours after the first if necessary. rFVIIa should not be administered to patients with hypersensitivity to mouse, hamster, or bovine proteins.
Transfusion reactions
Definition: A transfusion reaction may be defined as ‘any potentially adverse sign or symptom which occurs after the start of any transfusion of blood or blood products’. In order to notice any adverse effect, the patient's condition prior to, during and after the transfusion must be monitored. Most of these can be avoided by crossmatch and compatibility testing and strict attention to details of patient name, number, and identification procedures.

90
Monitoring: Patients must be monitored at the start of the transfusion and every 15 minutes thereafter. Transfusions should be stopped immediately should there be any signs of a transfusion reaction. The basic monitoring should cover: • Pulse • Blood pressure • Temperature • Respiration rate • General visual observation • Verbal enquiry as to the patient's well being
Any abnormal symptoms existing at the start of transfusion should be noted e.g. dyspnoea, chills, oliguria, etc. Changes in intensity of these symptoms may also indicate the potential for a transfusion reaction and should be assessed clinically. Extra care must be taken in the unconscious patient to monitor and react to changes in vital signs. Excessive oozing from the operative site or venous access points and unexplained hypotension may indicate that a haemolytic transfusion reaction is occurring. In cases of severe haemorrhage the rate of transfusion precludes monitoring individual units at specific intervals, and the effect of one unit may only be seen at the time of the transfusion of the second or third unit
The steps to be taken if there is any sign that a reaction may be occurring are simple and apply in all instances. • Stop the transfusion immediately. • Maintain venous access with normal saline in a new drip set. • Contact the transfusion service for advice. Signs and symptoms that are highly suggestive of a serious transfusion reaction: • Chills/rigors • Tachycardia/bradycardia • Hypertension/hypotension • Chest/flank pain • Haemoglobinuria • Agitation • Fever/sweating • Dyspnoea/bronchospasm • Urticaria/pruritus • Nausea/vomiting • Oliguria/anuria • Jaundice Transfusion reaction classification: The list of potential reactions is lengthy, and there are many different ways of classification. Reactions include those due to incompatibility, transmissible disease, bacterial contamination and storage lesions due to the age of the transfused blood products.

91
Chapter 19
The use of blood products in Obstetric Haemorrhage Kendall O’Callaghan Although there are numerous indications for the use of blood and blood products in obstetrics and gynaecology, discussion in this chapter will focus on their use in obstetric haemorrhage. The essential management of major bleeding is the same, regardless of the underlying cause of the bleeding. This includes:
1. stop the bleeding 2. restore circulating blood volume and oxygen carrying capacity 3. correct any coagulation defect 4. Maintain vigilance for and manage the consequences of hypovolaemia.
Every labour ward should have a readily assessable protocol for the management of obstetric haemorrhage and it should contain the following principles: • Insert 2 large bore intravenous cannulas (at least 16 gauge, but preferably 14 gauge). The
rate of fluid infusion is determined by the bore and length of the cannulas, with short large-‐bore peripheral cannulas preferable to long central lines.
• Take 20ml of blood for full blood count, clotting studies and crossmatch and order 4 units
of packed red blood cells and 2 units of fresh frozen plasma. • Give oxygen via face mask. • Start fluid replacement quickly to restore circulating blood volume and reperfuse ischaemic
organs. Acellular fluids (crystalloids and colloids) can be infused more rapidly than cellular fluids as they have a lower viscosity and should therefore be used to initiate resuscitation. Colloids have not been shown to have any benefit over crystalloids except in clinical situations associated with low plasma oncotic pressure (preeclampsia, abruption placenta). Commonly used crystalloids include Ringers lactate and normal saline, while commonly used colloids include voluven. As a rule of thumb, the volume of crystalloid required will be 3 times the volume of blood lost.
• Intravenous fluids must be infused as rapidly as possible until the pulse rate begins to
become slower. The volume infused should be titrated against a number of clinical parameters, including blood pressure (keep mean arterial pressure > 60mmHg), peripheral capillary filling, urinary output and central venous pressure. Central venous pressure measurement after resuscitation should rise to between 10-‐12mmHg and fluid should be administered as a bolus challenge against the CVP until a sustained rise in pressure beyond

92
these levels can be demonstrated. Inotropic support may be necessary to maintain cardiac output if there is severe persistent hypotension despite fluid resuscitation.
• Correction of red blood cell mass is guided by the rule that each unit of packed red cells will
restore haemoglobin concentration by 1g/dl. Haemoglobin less than or equal to 6g/dl merits transfusion, however in obstetric patients with ongoing bleeding a more liberal policy is necessary. Ideally blood should be fully crossmatched, however in severe haemorrhage, type O-‐negative blood or type-‐specific partially crossmatched blood can be used.
• Correction of the coagulation defect usually requires the administration of Fresh Frozen
Plasma (FFP) in a ratio of 1:1 for every unit of packed red cells considered necessary to restore the oxygen carrying capacity. Each unit of FFP will restore procoagulant activity by 10% and will raise the fibrinogen level by 40mg/dl. Cryoprecipitate should be given when the fibrinogen levels fall below 100mg/dl. Each unit of cryoprecipitate will raise the fibrinogen level by 100mg/dl. Platelets do not need to be transfused to restore haemostasis until the count falls to below 50x109/L provided the platelets are functionally normal. Each unit of platelet concentrate will raise the platelet count by 5x10⁹/L. Administration of FFP should be continued until aPTT and INR levels are normal.
• Recombinant activated factor VII (rFVIIa) may be considered as a treatment for life-‐
threatening post-‐partum haemorrhage. Although no controlled clinical studies investigating rFVIIa use in patients with post-‐partum haemorrhage have been performed, several individual case reports have demonstrated that rFVIIa may be effective in controlling bleeding in patients with severe post-‐partum haemorrhage. Every attempt should be made to control bleeding by conventional means. rFVIIa should not replace and/or delay surgery or any other methods used to control the source of bleeding. rFVIIa should not replace the use of blood products (RBCs, platelets, FFP, and cryoprecipitate and should be considered only if first-‐line treatment with a combination of blood products and surgical approaches fails to control bleeding. It should be remembered that for rFVIIa to promote coagulation, sufficient levels of platelets and fibrinogen are required. To ensure maximal rFVIIa efficacy, attempts should be made to achieve the following: platelets more than 50,000 × 109/l; fibrinogen 0.5 to 1.0 g/l; pH ≥ 7.20; haematocrit more than 24%.
Massive transfusion The replacement of the equivalent of the total blood volume in 24 hours with red blood cells and crystalloid and/or colloid solutions is defined as massive transfusion. Massive transfusion can also be defined as transfusion of 50% of total blood volume within 3 hours. In massive transfusion, when blood loss is being replaced by red cell concentrates (packed cells), it may be necessary for red cell transfusions to be supplemented with fresh frozen plasma, cryoprecipitate and platelet concentrates. Whenever possible, the haemostatic profile of the patient should be monitored and the above components transfused only if there is a specific haemostatic defect. Massively transfused patients manifest a profound haemostatic disorder as demonstrated by prolonged PT, APTT and thrombocytopenia less than 50x109/µL. This is due, in part, to

93
haemodilution. Increases in PT or APTT greater than 1.5 to 1.8 times control values are associated with decreases in some coagulation factors, particularly fibrinogen, FV and FVIII, and should be treated with FFP, especially if there is active bleeding. Although FFP contains fibrinogen, the amount provided in FFP is usually insufficient to maintain adequate levels and cryoprecipitate should be given early in the course of massive haemorrhage, along with FFP. In general, FFP and cryoprecipitate should be considered when more than 50% of blood volume has been replaced, and it is mandatory when more than 120%-‐150% of the blood volume has been replaced with red cell concentrate, crystalloid and/or colloid. In situations of massive transfusion, replacement of RBC's, FFP and platelets in a ratio of 1:1:1 is recommended.

94
Chapter 20 Fetal Blood Sampling (scalp pH) Linda Rogers Indication To confirm/exclude fetal hypoxia in the presence of an abnormal CTG Risks -‐ Trauma to the fetus -‐ Vertical transmission of HIV (so only do if mother known to be HIV negative) Accepted normal values: pH > 7.25 normal; repeat every 30 minutes if the abnormal CTG pattern continues pH 7.2 – 7.25 repeat as indicated (usually every 30 minutes) pH 7.1 – 7.19 fetal acidosis – expedite delivery pH < 7.1 severe fetal acidosis – deliver immediately You will need: Mother to be at least 4cm dilated Conical Speculum/Amnioscope and KY jelly Ethyl chloride Sponge-‐holder Cotton wool / 4 x 3cm swabs Petroleum jelly Heparinised capillary tube Blood gas machine Large gauge needle/stylette Method This can be done with the mother in lithotomy, or in the left lateral position with the legs drawn up. Insert the speculum/amnioscope into the vagina, so that the narrow end rests on the fetal scalp (away from any fontanelles). Clean any blood/mucous off the fetal scalp, and spray with ethyl chloride. Dab with petroleum jelly (prevents the fetal blood from flowing away), and make a small nick in the fetal scalp with the needle/stylette. Collect the resulting blood in the heparinised capillary tube, insert into the blood gas machine in order to obtain the pH. Interpret results as above.

95

96

97
Chapter 21 Interpretation of CTG’s Saadiqa Allie INTRODUCTION Electronic fetal heart monitoring (EFM) has been defined as electronic fetal heart rate monitoring for the evaluation of fetal wellbeing in labour. Intrapartum asphyxia can result in long term neurological complications, cerebral palsy and rarely neonatal death. EFM was introduced with the aim of reducing perinatal morbidity and mortality even though this has not been proven in randomised controlled trials. The cardiotocograph (CTG) is a screening tool used to assess the possibility of asphyxia. Accurate interpretation of the CTG is vital as it is important to recognise a fetus with a pathological trace as it may imply possible hypoxia and birth asphyxia. Taking into account the clinical picture as well as the CTG findings and instituting appropriate action may help prevent birth asphyxia. CTG has a high false positive rate and hence is a poor predictor of fetal hypoxia and metabolic acidosis. Even with significant abnormalities on the CTG, the risk of fetal acidosis as determined by fetal blood sampling (FBS) is only about 50%. WHO TO MONITOR? Any pregnancy at high risk of intrapartum asphyxia requires CTG monitoring. Both maternal and fetal risk factors may predispose to the development of asphyxia as well as intrapartum factors. Table 1 lists some of these risk factors. Table 1. Risk factors associated with intrapartum hypoxia MATERNAL INTRAPARTUM Previous Caesarean section Oxytocin/ Prostagladin use Pre-‐eclampsia Epidural analgesia Prolonged pregnancy Induction of labour Antepartum haemorrhage Diabetes (and other medical diseases such as SLE,renal disease Maternal pyrexia FETAL Intra-‐uterine growth restriction Prematurity Oligohydramnios Multiple pregnancy Meconium stained liquor Chorioamnionitis Abnormal umbilical artery Doppler

98
WHAT IS A NORMAL CTG? There are four basic characteristics which should be assessed when interpreting any CTG. These are baseline heart rate, baseline variability, the presence of accelerations (and the type) and the presence of decelerations (and the type). It is important for clinicians to have a standardised classification of CTGs so that information relating to fetal well-‐being can be communicated and recorded in an objective manner. This is particularly important for medico-‐legal purposes. The National Institute of Health and Clinical Excellence (NICE) UK has developed such a classification (table 2). All four features should fall into the reassuring category in order for the CTG to be classified as normal. CLASSIFICATION OF FETAL HEART RATE FEATURES ON CTG (NICE)* TABLE 2 FEATURE BASELINE HEART RATE VARIABILITY DECELERATIONS
ACCELERATIONS
Reassuring 120-‐160 bpm >5 None present Non-‐reassuring 100-‐120bpm <5 for >40 early min but<90 variable min single prolonged up to 3 min
Absence of accelerations with otherwise normal CTG is of uncertain significance
abnormal <100 bpm <5 for >90 atypical variable minutes late single prolonged > 3minutes >80bpm sinusoidal pattern> 10 min
*slightly modified
F FIGURE 1: A NORMAL CTG

99
Once the CTG features have been defined, a classification can be made into normal, suspicious and pathological. Other terms used respectively which are more familiar are: reactive, non-‐reassuring and non-‐ reactive. TABLE 3. CLASSIFICATION OF CTGs (NICE ) CATEGORY DEFINITION Normal a CTG where all 4 features fall into the ‘reassuring’ category Suspicious a CTG where one of the features falls into ‘non-‐reassuring category and the remainder are reassuring
Pathological a CTG whose features fall into 2 or more non-‐reassuring categories or one or more abnormal categories
Important aspects to remember:
• Ensure all CTGs have the correct date and time as well as patient identification • Ensure the paper is running at the correct speed i.e. 1cm/minute • Record on the tracing any events that may have occurred eg epidural sited, oxytocin
commenced, artificial rupture of membranes • Any staff member asked to comment on a CTG should sign their names with the date
and time • A CTG consist of a cardio component which records the fetal heart rate and the toco
component which documents uterine contraction • It is important to assess the toco component carefully as well as this may provide clues
to the cause for an abnormal CTG (eg.uterine hyperstimulation) • In order to make a comprehensive assessment of the CTG and plan further management
it is important to consider other factors such as the gestational age of the fetus, progress of labour, ability of the fetus to withstand hypoxia (growth restricted fetus), presence of meconium, antepartum haemorrhage and use of prostaglandins or oxytocin
• Intervention for an abnormal CTG does not necessarily mean delivery • Other interventions include fluid therapy, changing maternal position, cessation of
oxytocin or administration of a tocolytic agent
FETAL HEART RATE ABNORMALITIES
1. BASELINE HEART RATE
Baseline tachycardia : fetal heart rate > 160 beats/minute Causes
• Physiological eg immaturity of the parasympathetic system in a preterm fetus • Infection : maternal pyrexia secondary to any infective process eg
chorioamnionitis (may result in neurological damage) • Epidural analgesia may also be associated with a pyrexia

100
• Fetal hypoxia as a result of placental insufficiency
• Medication eg tocolytics such as β2 agonists
FIGURE 2 CTG showing baseline tachycardia MANAGEMENT
• Compare CTG with the previous tracing in order to establish what the normal baseline fetal heart rate is
• Establish gestational age of fetus • If maternal pyrexia present, administer paracetamol, tepid sponging and fluids • Establish underlying cause of pyrexia and treat infection with appropriate antibiotics • The fetus is not able to withstand long periods of tachycardia and if the above measures
do not improve the CTG, the fetus should be delivered by Caesarean section • If the CTG shows a complicated tachycardia (associated decelerations or reduced
variability), intrauterine resuscitative measures should be taken i.e. left lateral position to relieve supine hypotension and administration of intravenous fluids.
• If no improvement in the CTG and delivery is not imminent, a Caesarean section is indicated

101
FIGURE 3 COMPLICATED TACHYCARDIA (with reduced variability and late decelerations) BRADYCARDIA
• A reduction in the fetal heart below 120 beats/minute • May be physiological as a sign of maturity of the fetus • A heart rate of 110-‐120 beats/minute may be regarded as normal if associated with
accelerations and good baseline variability • A bradycardia may be as a result of drugs or rarely congenital heart block eg patients
with SLE who have anti-‐Ro / La antibodies • If the bradycardia is associated with reduced variability and/or decelerations it is a sign
of hypoxia which may be due to number of causes • Epidural analgesia may be associated with a prolonged period of bradycardia especially
after a top-‐up. This is as result of hypotension following the epidural • Repeated decelerations can lead rapidly to hypoxia and acidosis
MANAGEMENT OF FETAL BRADYCARDIA • Intra-‐uterine resuscitation: left lateral position and intravenous fluids • The administration of face mask oxygen is controversial as currently there is no
evidence to suggest that it improves perinatal outcome. • Assess the progress of labour • Exclude cord prolapse, abruption placenta or uterine rupture as a cause for the
bradycardia • Stop any oxytocin infusion which may result in hyperstimulation • Ascertain that the CTG tracing is indeed fetal and not maternal as may occasionally
occur with an intra-‐uterine death. Check the maternal pulse and if in doubt confirm presence/absence of a fetal heart with ultrasound
• If bradycardia follows epidural administration, increase intravenous fluid infusion • If the patient is fully dilated, expedite delivery otherwise perform a Caesarean section • There is no place for doing a fetal blood sample in cases of fetal bradycardia as attempts
should preferably be made to resuscitate the fetus, ascertain the cause and treat appropriately

102
FIGURE 4 CTG showing a reactive bradycardia BASELINE VARIABILITY
• Baseline variability is defined as the variation of the fetal heart rate above and below the baseline
• The normal baseline variability is 5-‐25 beats and is controlled by the autonomic nervous system of the fetus ( parasympathetic and sympathetic)
Reduced variability
• Reduced variability may be due to the fetal sleep state which may last up to 40 minutes • Certain drugs may also affect variability e.g. opioids such as Morphine and
Betamethasone • Fetal immaturity • Fetal hypoxia especially if associated with decelerations
Management: If hypoxia suspected – needs urgent delivery

103
FIGURE 6 CTG showing reduced baseline variability
Increased variability: > 25 beats/min is also abnormal and may be as a result of increased catecholamine release by the fetus as a stress response to hypoxia ACCELERATIONS
• An acceleration is defined as an increase in the fetal heart rate > 15 beats/min above the baseline lasting more than 15 seconds
• A reactive CTG has >2 accelerations in a 15 minute period • The presence of accelerations confirms fetal wellbeing and indicates that the somatic
nervous system is intact and that the fetus is well oxygenated • Often associated with fetal movement • Excludes fetal acidosis

104
FIGURE 7 CTG SHOWING ACCELERATIONS DECELERATIONS DEFINITION: Transient slowing of the fetal heart rate below the baseline > 15 beats/min lasting > 15 seconds in duration Classified as (in relation to the uterine contractions)
Ø Early Ø Late Ø Variable
EARLY DECELERATIONS • Commence with onset of uterine contractions and appear as a mirror image of the
contraction and return to the baseline at the end of the contraction • Associated with head compression during labour but may be a sign of fetal hypoxia if
occur during early labour • Occur as a result of stimulation of the vagus nerve due to pressure on the fetal skull • If persist more than an hour fetal blood sample should be performed or the fetus should
be delivered if this is contra-‐indicated • Alter maternal position and administer face mask oxygen • Decelerations in the second stage of labour may occur as a result of head compression
but if these continue, the second stage should be expedited as this is the stage of labour during which the fetus is most at risk of intrapartum hypoxia and ischaemic encephalopathy

105
FIGURE 8 CTG showing early decelerations
LATE DECELERATIONS
• The peak of these decelerations occur after the contraction hence the term “late” • They reach the baseline at least 20 seconds after the contraction • Their presence suggest underlying placental insufficiency resulting in fetal hypoxia via
the chemoreceptor mechanism • Blood rich in oxygen needs to reach the uteroplacental bed in order to remove the
stimulus of hypoxia to the chemoreceptors • If these decelerations occur late in labour,they may be a sign of obstructed labour or
excessive uterine contractions
MANAGEMENT: • Change maternal position • Intravenous fluids • Stop oxytocin infusion if in progress • If hyperstimulation occurs, consider use of a tocolytic agent • If decelerations persist despite these measures, delivery should be expedited • If the patient is fully dilated, an instrumental delivery may be appropriate. if not ,
a Caesarean section should be performed

106
FIGURE 9 CTG showing late decelerations caused by uterine hyperstimulation. note the recovery in the fetal heart rate after administration of a β2 stimulant PROLONGED DECELERATIONS
• Prolonged decelerations lasting more than 3 minutes require immediate intervention to prevent birth asphyxia
• May be as a result of abruption placenta, CTG recovers intra-‐uterine resuscitation should occur with the aim to deliver the fetus within 20 minutes

107
FIGURE 10 CTG showing fetal tachycardia, reduced variability and a prolonged deceleration VARIABLE DECELERATIONS
• These decelerations vary in shape, size and duration as well as their relationship to contractions
• Occur as a result of cord compression and are seen more commonly in cases with oligohydramnios
• Typically have an acceleration before and after the deceleration, termed ‘shouldering’ • Usually of short duration with a sharp drop and rise to the baseline • If no other CTG abnormalities, these decelerations are usually not a sign of hypoxia and
acidosis

108
FIGURE 11 CTG showing variable decelerations MANAGEMENT
Ø Change maternal position to relieve cord compression Ø Consider amnioinfusion-‐ recommended for repeated uncomplicated variable
decelerations or thick meconium stained liquor Ø Has been shown by a recent Cochrane review to reduce variable decelerations and
reduce Caesarean section for fetal distress
• Atypical variable decelerations are often associated with hypoxia and acidosis • These decelerations often have a wider complexes and may have a biphasic (or W)
shape with reduced variability and delayed recovery • These foetuses often require urgent delivery to prevent neurological damge

109
FIGURE 12 CTG showing variable decelerations with reduced variability and fetal tachycardia FETAL BLOOD SAMPLING
• pH estimation of the fetal blood may help to detect acidosis and reduce the false positive rate of CTGs
• contra-‐indicated in foetuses with bleeding disorders • contra-‐indicated in women who have hepatitis B or C infections are those women who
are HIV positive , in those who have unknown HIV status or who have not had a recent HIV test( within 3 months of delivery)
• The progress of labour and any other risk factors should be taken into account when interpreting fetal scalp pH results
TABLE 3 INTEPRETATION OF FETAL BLOOD SAMPLES pH intervention Normal >7.25 Repeat in 30 minutes if CTG remains
abnormal Suspicious 7.20-‐7.24 Repeat in 30-‐minutes Abnormal< 7.20 Immediate delivery CONCLUSION
• Correct interpretation of CTGs is essential in order to institute the correct intervention and avoid fetal hypoxia and neurological insult
• The gestational age, presence of risk factors, administration of drugs and stage of labour should be considered when interpreting CTGs

110
• All four features i.e.baseline heart rate, presence of accelerations, presence of decelerations and baseline variability should be considered when interpreting any CTG
• Intrauterine resuscitation measures such as altering position, fluid administration and stopping any oxytocic infusions may improve the CTG
• The use of face mask oxygen therapy is controversial and is not being advocated in some centres (larger studies are required to ascertain the benefit or harm thereof)
111
Chapter 22
Basic Obstetric Ultrasound Alison Boutall and Sonia Constantatos Introduction
1. Obstetric ultrasound is safe, non-‐invasive, cost effective, and provides accurate information.
2. It can be used to date pregnancies, screen for fetal abnormalities, diagnose placenta praevia and detect multiple pregnancies.
3. It is important to familiarise yourself with your machine, realise your limitations as a scanner, and know when to refer a patient for a second opinion
4. South African Society of Ultrasound in Obstetrics and Gynaecology (SASUOG) has proposed that any person who performs obstetric scanning receive accreditation to perform a level 1, level 2 or level 3 scan as tabled below. More detailed information is available on the SASUOG website.
Level 1-‐ Basic Obstetric scan Confirm intrauterine pregnancy
Exclude multiple pregnancy Presentation Basic Fetal Biometry Placental location Assessment of liquor
Level 2 – Basic Anatomy scan Level 1 and Detailed anatomical head to toe assessment of the fetus Chorionicity of twins
Level 3-‐ Advanced Fetal scan Level 1 and 2 and Screening for chromosomal abnormality (nuchal translucency and markers) Cervical length Doppler studies Invasive procedures
5. If a patient makes an appointment early and the resources are available, she should be
referred for a Nuchal Translucency (NT) scan between 11 and 13+6 weeks and a Level 2 detailed fetal anatomy (FA) scan between 18 and 23 weeks.
6. It is the aim of this chapter to introduce you to BASIC “level 1” ultrasound LEVEL 1 SCAN “Basic obstetric scan”

112
1. Confirm LIVE pregnancy -‐identify the fetus
-‐fetal heart pulsations -‐fetal movement 2. Confirm INTRAUTERINE localisation -‐identify the maternal bladder -‐identify the cervical canal
-‐identify the myometrium and follow the wall of the uterus to the fundus 3. Determine the NUMBER OF FETUSES -‐identify the lie of the fetus -‐identify multiple pregnancies 4. PRESENTING PART -‐cephalic, breech, transverse 5. FETAL BIOMETRY to date the pregnancy -‐Crown rump length (CRL)
-‐Biparietal diameter (BPD) -‐Head Circumference (HC) -‐Abdominal circumference (AC) -‐Femur length (FL)
6. Examine the PLACENTA
-‐Locate the position (anterior, posterior, fundal, right and left lateral) -‐Exclude a low lying placenta and placenta praevia 7. AMNIOTIC FLUID VOLUME -‐Quantitative assessment
-‐Before 24 weeks: “eyeball” -‐After 24 weeks: Measure amniotic fluid index or the deepest vertical pool.
YOUR ULTRASOUND MACHINE There are many different makes of ultrasound machines. Although the details may differ from machine to machine, the basic principles are the same. It is not necessary to have a complete understanding of the physics of ultrasound, rather get to know the machine you are using and how to acquire the best image using a few basic principles:

113
The probes: For the purpose of routine obstetric ultrasound, 2 standard probes are used: -‐Transabdominal probe: Low frequency probe (3-‐5 Hz) that allows one to see deeper structures better i.e. they have better penetration, but poorer resolution
Figure 1: transabdominal probe -‐Transvaginal probe: High frequency probe (7 Hz) that has a narrower beam width that allows better resolution for structures nearest to the probe, but has poor penetration.
Figure 2: transvaginal probe The controls: Each machine should have the following controls and functions. Orientate yourself with these. 1. Depth-‐ adjusting the depth will help to optimise the image. Adjust the depth until the area of interest is at the level of the focal point (the arrow on the right hand side of the screen). 2. Zoom – this will enlarge the area of focus without decreasing the resolution. Some machines have a “zoom box”. Use the zoom function until the image that is being measured fills at least 75% of the screen. 3. Gain – this is the amplification applied to the signal that is received by the probe. Use gain to bring up the image more clearly. There are 2 ways in which the gain can be altered:
- STC (Swept Time Compensation): The sliders represent different depths of the image. By altering these, the amplification to a specific depth will be adjusted. For the purposes of this basic course, keep the sliders in midline.

114
- Overall Gain: Usually a dial on the control board. Adjust this when the whole image is too dark or too light.
4. Freeze button – this is usually located at the bottom right hand corner of the controls board. 5. Measurements program–your machine will be programmed with software for doing basic measurements. Ensure you are familiar with the charts that are being used to calculate gestational age. 6. Set/mark reference/enter – when the callipers have been placed in the correct position, press set/mark reference/enter (depends on machine). This will enter the measurements into the machine. 7. Report – The machine will generate a report which will include the calculated gestational age, estimated fetal weight and the estimated date of delivery. A PRACTICAL APPROACH TO THE LEVEL 1 SCAN POSITION the PATIENT 1. Patient must be lying in a supine position 2. Bladder must not be full 3. Stand or sit on the right hand side of the patient 4. Make sure the room is darkened 5. Expose the mother’s abdomen fully and apply ultrasound gel 6. Place the transducer on the patient’s abdomen. 7. All transducers have a marker/dot on one side of the probe. This marker should face you (patient’s right hand side) when the transducer is held in a horizontal (transverse) position, or be pointing to the patients head when the transducer is in the vertical (longitudinal) position. 8. The right hand side of the patient appears on the left hand side of the screen. You can check this by rubbing your finger at the top of the probe, and check that the image appears in the upper left hand corner. CONFIRM a VIABLE PREGNANCY Visualize the fetal heart beating
CONFIRM an INTRAUTERINE PREGNANCY
Hold the transducer longitudinally in the midline to the abdomen at the level of the pubic symphysis. Visualize the cervix, vagina, bladder and uterine wall. If the presenting part obscures the cervix try gently displacing it superiorly.
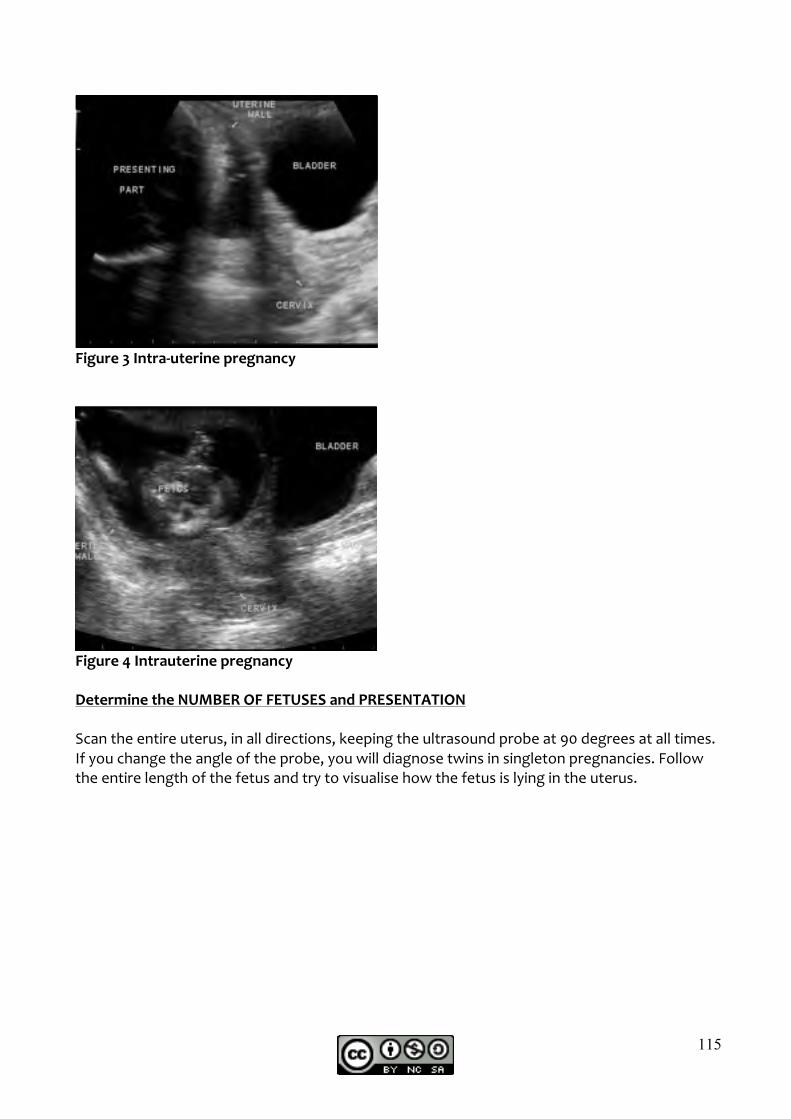
115
Figure 3 Intra-‐uterine pregnancy
Figure 4 Intrauterine pregnancy Determine the NUMBER OF FETUSES and PRESENTATION
Scan the entire uterus, in all directions, keeping the ultrasound probe at 90 degrees at all times. If you change the angle of the probe, you will diagnose twins in singleton pregnancies. Follow the entire length of the fetus and try to visualise how the fetus is lying in the uterus.

116
Figure 5 a) Cephalic Lie b) Breech Lie
c) Transverse Lie
FETAL BIOMETRY It is important to recognise the following fetal planes when doing biometry and more detailed fetal assessments.

117
Figure 6: Fetal planes CROWN RUMP LENGTH (CRL) • The fetus must be lying in a NEUTRAL position -‐ not too flexed or extended. • Obtain a mid sagittal section • Optimise your image by adjusting the depth and/or zooming until the fetus fills more
than 75% of your screen. • Adjust the gain so that both skin and bone can be easily seen • Measure from the top of the head to the rump of the fetus. • Be careful to not include the yolk sac or fetal limbs
Figure 7: The Crown Rump Length (CRL) (Google images www.fetal.com/NT%20Screening/02%20NT%20Imaging.html)
SAGITTAL TRANSVERSE CORONAL

118
Figure 8: The CRL at 10 weeks gestational age
Figure 9: The CRL at 13 weeks gestational age
Figure 10: The CRL at 13 weeks gestational age

119
COMMON ERRORS:
Figure 11: Embryo and yolk sac measured – overestimation of CRL
Figure 12: Fetus in extended position – overestimation of CRL BIPARIETAL DIAMETER (BPD)
• Obtain a transverse section of the fetal head • Optimise the image by adjusting the depth and/or zoom until the head fills more than
75%of the screen • Adjust the gain so that the skull bones and brain are clearly seen • The midline (falx) of the brain should be parallel to the top of the screen • In the correct BPD plane:
• -‐the skull must be ovoid, with clear smooth margins • -‐the midline (falx) is interrupted • -‐the cavum septum pellucidum (CSP) is visible in the anterior 1/3 of
the fronto-‐occipital distance

120
• -‐the thalami are seen as 2 hypo-‐echoic structures on either side of the midline.
• If the 2 hemispheres of the brain are not symmetrical then the plane of the brain being imaged is too oblique
• If the cerebellum is visible then the plane is too low at the occiput • If the orbits are visible then the plane is too low at the forehead • Measure the BPD:
-‐at the widest diameter -‐perpendicular to the midline -‐from the outer proximal parietal bone to the inner distal parietal bone
• Do not include the fetal skin HEAD CIRCUMFERENCE (HC) The head circumference is measured in the same plane as the BPD Place the callipers on either end of the occipito-‐frontal diameter and use the ellipse function of the ultrasound machine to position an ellipse around the circumference of the skull excluding the skin.
Figure 13: Schematic diagram of BPD and calliper placement
BIPARIETAL DIAMETER
F CSP F T
T
F -Falx CSP -Cavum Septum Pallucidum T -Thallamus

121
Figure 14: BPD view
Figure 15: BPD calliper placement

122
Figure 16: Schematic diagram of HC and calliper placement
Figure 17: HC calliper placement
HEAD CIRCUMFERENCE

123
Figure 18: Axial planes of the fetal head
COMMON ERRORS:
Figure 19: Image too small

124
Figure 20: Incorrect calliper placement – line not perpendicular to midline
Figure 21: Incorrect calliper placement – line not placed over widest diameter
Figure 22: Incorrect calliper placement – skin included in BPD measurement

125
Figure 23: Incorrect calliper placement – skin included in HC measurement
Figure 24: Incorrect plane – cerebellum visible
Figure 25: Incorrect plane – orbits visible

126
Figure 26: Too much pressure on maternal abdomen
ABDOMINAL CIRCUMFERENCE (AC)
• Get a transverse section of the fetal abdomen. • Adjust the depth or zoom until the image fills 75% of the screen • Adjust the gain until the fetal skin can be visualised. • Move the probe cephalid or caudally until the stomach bubble is visible on the left of the
fetal abdomen. • Rotate the probe concentrically around the fetal abdomen until the 3 ossification
centres of the spine are visible at 3 o’clock or 9 o’clock. • Gently tilt the probe until the crescent shaped junction of the left and right portal vein is
visible on the right hand side of the fetal abdomen (or a cross section of the umbilical vein is seen a third of the way from the abdominal wall).
• Two symmetrical ribs should be visible on either side of the spine. • Ensure the AC is as circular as possible and that you are not pressing too hard. • Place one calliper on the skin behind the spine and the other on the skin directly
opposite and use the ellipse function on the machine to poison the ellipse around the AC including the skin.
• If an exact tracing is not possible ensure any overestimation on one side is balanced by an underestimation on the other side.

127
Figure 27: Schematic diagram of abdominal circumference (AC)
Figure 28: Correct plane for AC measurement
ABDOMINAL CIRCUMFERENCE
SP
ST
P
R
R
R -Ribs SP -Spine ST -Stomach P -Junction of left and right portal vein

128
Figure 29: Correct calliper placement
COMMON ERRORS:
Figure 30: Incorrect calliper placement -‐Skin not included

129
Figure 31: Incorrect plane -‐ Visible kidneys
Figure 32: Oblique plane – Multiple ribs visible

130
Figure 33: Oblique plane -‐ Long section of the vein visible to the umbilicus FEMUR LENGTH (FL)
• After obtaining the AC measurement, rotate the probe 90 degrees and follow the fetal spine to its tip.
• Rotate the probe 90 degrees away from the spine and the shaft of the femur should become visible.
• Tilt the probe until the entire shaft is visible. • The length of the bone should be parallel to the top of the monitor screen. • The mid-‐shaft should be mid beam. • Zoom or adjust the depth so that the bone occupies at least 50% of the screen • Decrease the gain until the interface between ossified bone and soft tissue is clearly
defined • Both blunt ends of the diaphysis should be clearly defined • The femur length is measured from mid diaphysis to mid diaphysis. • The extension to the greater trochanter and the head of the femur are not included
Figure 34: Schematic of correct FL and calliper placement
FEMUR LENGTH

131
Figure 35: Correct calliper placement COMMON ERRORS:
Figure 36: Not blunt end too blunt end
Figure 37: Bone too oblique – blunt ends not well defined

132
Figure 38: Incorrect bone – fetal heart visible -‐ HUMERUS
Figure 39: Bowing of the distant femur resulting in underestimation EXAMINE THE PLACENTA The following information needs be obtained when examining the placenta: PLACENTAL POSITION: The placental may be ANTERIOR, POSTERIOR, FUNDAL or RIGHT or LEFT LATERAL.

133
Figure 40 a) anterior placenta at 13 weeks
b) Anterior placenta

134
c) Posterior placenta DISTANCE FROM THE INTERNAL OS:
Before 28 weeks: Placenta is reported as
-‐low lying and not covering os -‐low lying and covering os -‐not low lying
The lower segment of the uterus develops late in the third trimester. If placenta is low lying before 28 weeks, it is recommended that you bring the patient back at 32 weeks to exclude placenta praevia. After 28 weeks:
Placenta Praevia is graded from Grade 1 – Grade IV Grade 1 Placenta within 5cm of the os Grade 2 Marginal edge of placenta reaches internal os Grade 3 Placenta partially covers the internal os Grade 4 Placenta completely covers the internal os It is becoming increasingly common to classify placenta praevia as: Placenta praevia MINOR Grades 1 + 2 Placenta praevia MAJOR Grades 3 + 4 Some practical points when looking at the placenta:
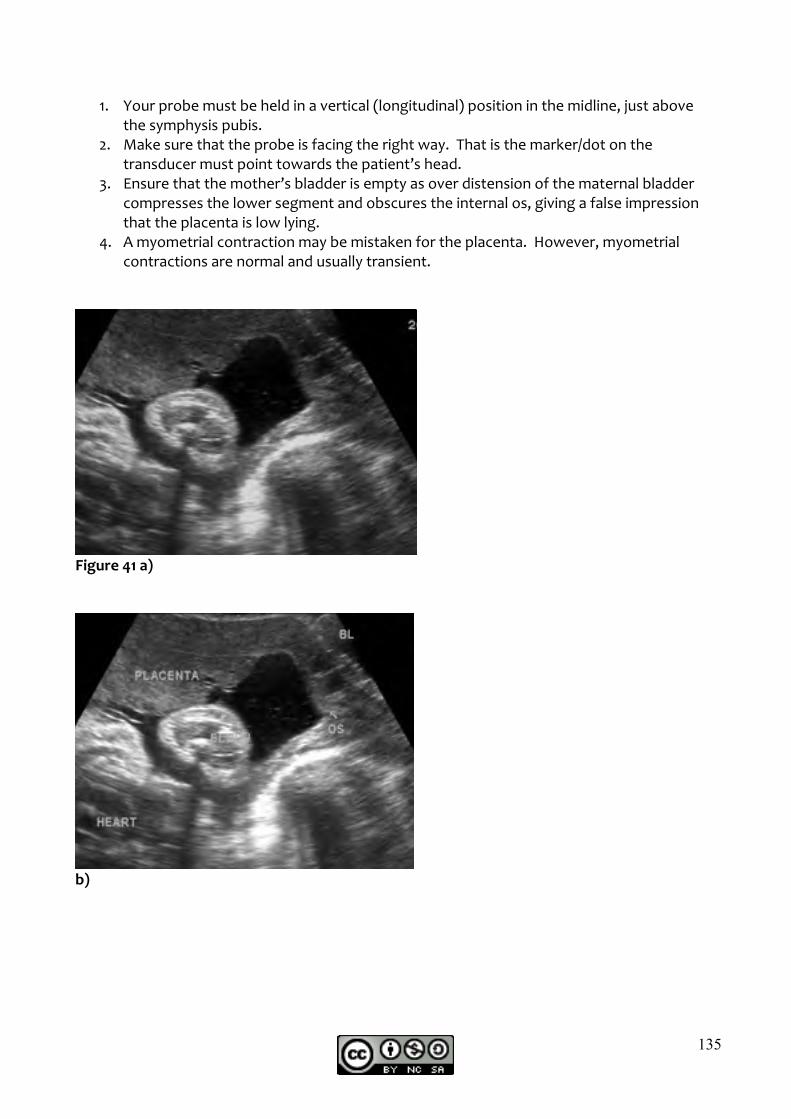
135
1. Your probe must be held in a vertical (longitudinal) position in the midline, just above the symphysis pubis.
2. Make sure that the probe is facing the right way. That is the marker/dot on the transducer must point towards the patient’s head.
3. Ensure that the mother’s bladder is empty as over distension of the maternal bladder compresses the lower segment and obscures the internal os, giving a false impression that the placenta is low lying.
4. A myometrial contraction may be mistaken for the placenta. However, myometrial contractions are normal and usually transient.
Figure 41 a)
b)

136
c) Minor Placenta Praevia
Figure 42 a)
b) Major Placenta Praevia
41mm mmmmmm

137
Figure 43 Placenta posterior, myometrial contraction anterior
AMNIOTIC FLUID VOLUME Before 24 weeks this is a subjective “eye ball” assessment. After 24 weeks, the amount of amniotic fluid is measured objectively by one of two methods: DEEPEST VERTICAL POOL
• The single deepest uninterrupted pocket of amniotic fluid is measured.
Amniotic fluid volume Deepest Pool (cm) Increased 8 Normal >2 <8 Borderline 1-‐2 Decreased <1 AMNIOTIC FLUID INDEX (AFI)
• The maternal abdomen is divided into 4 quadrants • The probe must be kept parallel to the maternal sagittal plane and perpendicular to
the maternal coronal plane throughout the scan • Measure the deepest, uninterrupted pool of liquor which is free from fetal parts and
umbilical cord in each of the 4 quadrants • The callipers are placed in a strictly vertical direction
Myometrial contraction
Posterior placenta

138
Figure 44 a) correct calliper placement
b) Incorrect calliper placement
• The measurement in each quadrant is measured in centimetres and added together to obtain the amniotic fluid index.
Polyhydramnios AFI > 25cm Oligohydramnios AFI < 5cm

139
Figure 45 Some practical points when measuring AFI
1. Ensure that the probe is held in the correct way throughout measuring the AFI. 2. Do not exert too much pressure on the maternal abdomen as this decreases the size of
the pool of liquor that is being measured.
Figure 46 a)
AFI: Correct measurement AFI: Correct measurement tt echnique echnique
1 2
4 3
-Patient supine -Abdomen divided into 4 quadrants by 2 perpendicular lines on the maternal abdomen, traversing the umbilicus -transducer must be kept parallel to maternal sagittal plane and perpendicular to maternal coronal plane at all times
-the deepest, unobstructed and clear pocket of amniotic fluid is visualized and the image frozen -The pocket is measured in a strictly vertical direction -Repeat process in all 4 quadrants -Measurements are added to obtain AFI

140
b)
3. Ensure that each pool of liquor is free from fetal parts and umbilical cord by adjusting the overall gain or using colour flow doppler
Figure 47 a)

141
b)
4. Exclude reverberation artefact from the maternal abdominal wall when measuring each pocket
CALCULATE THE GESTATIONAL AGE (GA) AND ESTIMATED DATE OF DELIVERY (EDD) There are several methods for assessing GA. These include calculations from menstrual history, clinical examination and ultrasound biometry. As many women are unsure of their dates, ultrasound provides a reliable and accurate assessment of GA if the scan is done early enough in the pregnancy. Before 14 weeks -‐CRL is accurate to within 5 days Between 14-‐24 weeks -‐ A combination of BPD, HC, AC and FL is accurate to within 7 days. Beyond 24 weeks –biological variability increases and with advancing GA accuracy reduces to +/-‐3 weeks There are numerous charts and formulas available for dating pregnancies by biometry. At GSH we use Robinson charts for CRL and Chitty charts for BPD, HC, AC and FL (Altman D G and Chitty LS: Ultrasound in Obstetrics & Gynaecology 10[1997] 174-‐191). The graphs commonly used to plot growth should NOT be used to date pregnancies (Chitty et al. British journal of Obstetrics and Gynaecology [Feb 1994]). Certain BPD charts are based on measurements taken from outer to inner and others from outer to outer. Ensure that the charts your ultrasound machine uses are appropriate for the way you take your measurements and that you know whose charts you are using. BPD, HC and FL can be used individually to date a pregnancy. Formulae which use multiple parameters tend to be more accurate and have the advantage that reader error and biological outliers are probably cancelled out. Modern ultrasound machines have built in soft-‐ware to calculate GA and EDD – this varies from machine to machine.

142
If the US EDD is within 7 days of the sure last menstrual period (LMP) EDD, then use the LMP to date the pregnancy. If there is a greater difference then the ultrasound should be used (seven day rule). The first scan EDD is the definitive one and it should not be changed on subsequent scans. Remember that in the third trimester GA based on ultrasound biometry becomes increasingly inaccurate and an EDD should be given as a date range. CALCULATING THE ESTIMATED FETAL WEIGHT (EFW) Computer software and look up charts are available for calculating EFW. Multi-‐parameter formulas tend to give more accurate estimations. The Hadlock C multi-‐parameter formula (BPD, HC, AC and FL) is commonly used and gives an estimated weight within 10-‐15% of actual weight for fetal weights between 1000 and 4000g. Outside these margins the range error increases. Shepard’s formula is more accurate for fetuses less than 2kg. Multi-‐parameter formulas can be programmed into your ultrasound machine. In the absence of computer software look up charts can be used (Shepard MJ, Richards VA, Berkowitz RL et al: an evaluation of two equations form predicting fetal weight by ultrasound. Am J Obstetric Gynaecology 142:47, 1982). The AC is the single most important parameter in the assessment of weight. REPORTING, COUNSELLING AND REFERRAL The ultrasound report should contain the following information:
• Patient name, date of birth and/or hospital number • Date of examination • Level of scan performed (i.e. Level 1) • Intrauterine? • Number of fetuses • Fetal heart • Presentation • Biometry (CRL or BPD, HC, AC and FL) • EFW • Placental location • AFI • GA (specify by dates or ultrasound or both if they concur) • Name of ultrasonographer
Review, or referral for a second opinion, should be considered in the following cases: Ultrasound findings Reason for referral CRL of 45 to 84mm NT scan GA of 18 – 22 weeks Fetal anomaly scan Inability to obtain any of the measurements
Exclude anomaly (i.e. acrania, oesophageal atresia, phocomelia)
Significant disproportion of measurements
Exclude intrauterine growth restriction (IUGR), chromosomal abnormality and fetal abnormality

143
Any observed structural abnormality Second opinion and management Reduced or increased AFI Exclude fetal abnormality, placental
insufficiency and gestational diabetes Low lying placenta beyond 28 weeks Transvaginal scan and further
management Multiple pregnancy Further management The patient needs to be aware of the limitations of a level 1 scan and that the fetal anatomy has not been assessed in detail. CONCLUSION Remember: Measurements:
BPD-‐Outer to Inner HC-‐Circumference of bone excluding skin AC-‐Circumference including skin FL-‐Blunt end to blunt end
Date range: Less than 14 weeks -‐EDD +/-‐ 5 days 14-‐24 weeks -‐EDD +/-‐ 7 days Beyond 24 weeks -‐EDD +/-‐ 3 weeks
Seven day rule First scan definitive scan Past concerns regarding the ill effects of obstetric ultrasound such as low birth weight, speech and hearing deficits and left-‐handedness have not been confirmed in large trials. However the data is complex, and there is still uncertainty over the long term effects of repeated exposure. Vigilance is still required. Pulse wave Doppler in particular should be used with caution in the first trimester. Possibly the greatest risk is under-‐ or over-‐diagnosis of problems due to inexperience or inadequate training. Ultrasound should only be performed with a clear clinical indication.

144
Chapter 23
Resuscitation of the Newborn
Waheba Slamang All medical personnel working in an obstetric/ neonatal setting should be familiar with life support equipment and have basic resuscitation skills. 1. Equipment The equipment will vary from unit to unit but the requirements for a neonatal resuscitation area should include: • disposable gloves • flat surface • overhead heating source • warm, dry towels
Overhead heating source
Flat surface
Warm, dry towels
Resuscitaire

145
• pre-‐cut plastic bags for preterm babies • oxygen supply • connection tubing • self-‐inflating ambubag size 500–1500 ml (Some units use the Neopuff as a newer method of delivering breaths It has an advantage over the Laerdal ambubag, as it delivers both PEEP and PIP.) • appropriate-‐sized mask
Pressure settings
Connection tubing
Mask
Occlude and release hole to deliver breaths
Neopuff

146
• suction catheters at least 12 fr to 14 fr
Suction apparatus • laryngoscope – 2 blades sizes 0 and 1 • spare batteries (for laryngoscope) • Mcgill’s Forceps • endotracheal tubes internal diameter sizes 2.5 to 4.0 mm
2 blades for laryngoscope, Mcgill’s endotracheal tubes with side port

147
• nasogastric tube
Cord clamp • scissors • umbilical venous catheters • suture material for ties • resuscitation fluid
o 0.9% saline, ringers lactate o 5% glucose
• 10 ml syringes and needles • drugs:
o adrenaline 1:1000 o naloxone o 50% glucose o atropine (rarely used) o Adrenaline, naloxone and atropine vials may look very similar. Carefully label all syringes once drugs are drawn.
Naloxone and adrenaline vials.

148
2. Practical points Appoint someone to:
1. Check equipment with each shift change. 2. Clean / sterilize and replace equipment after use. 3. Ensure working oxygen supply. 4. Ensure effective suctioning system.
3. Resuscitation skills 3.1 Background Remember: neonates are not mini adults A major physiological change needs to occur at birth: fluid filled lungs need to become air-‐filled within minutes. Some fluid is expelled during normal delivery but much less during caesarean section. The first cry is essential: it generates pressures greater than 10 to 15 times what is required for normal breathing and expels fluid out of the lungs. The head needs to be maintained in the neutral position, to ensure adequate ventilation. This may be hampered by: • The large occiput (sometimes exaggerated by moulding) often causes the neck to
flex, with consequent airway obstruction. Hyperextension of the neck may also cause pharyngeal collapse and airway obstruction.
• The relatively large tongue may cause obstruction in floppy/apnoeic babies requiring resuscitation.

149
Use the chin lift and jaw thrust manoeuvre to maintain the neutral position and bring the tongue forward. Chin lift – place left hand on the forehead gently tilting the head backward
Jaw thrust – place hands at side of face and push upward on mandible

150
Hypoxia is usually the cause of cardiac arrest in babies. In adults an intrinsic cardiac cause usually results in cardiac arrest.
HENCE proper airway management in the newborn is critical for a successful outcome. 3.2 How to do cardiopulmonary resuscitation (CPR) CPR in the newborn is done at a rate of 3 compressions to 1 breath at a speed giving around 60 breaths per minute. Once intubated, the breaths given and cardiac compressions no longer need to be co-‐ordinated. Cardiac compressions are generally best given by the hand encircling method:
Hand-‐encircling method Both thumbs are placed on the sternum at the nipple line while the hands encircle the chest, round to the back. Compressions are at a depth of 2/3 the chest cavity.

151
3.3 How to insert an umbilical venous catheter
1. Prepare the catheter: • Fill a 10 ml syringe with saline. • Flush the catheter until fluid appears at the tip. • Ensure that there are no air bubbles in the catheter.
2. Identify the umbilical vein: 3. Three vessels are usually visualized in the umbilical stump – two thick-‐walled arteries
and a single thin-‐walled vein.with a wider diameter. Cross-‐section of umbilicus
4. Stabilize the umbilical stump with non-‐toothed forceps. 5. Insert the catheter into the umbilical vein, drawing back on the syringe. 6. The catheter should not be inserted further than 2/3rds the distance from the shoulder
to the umbilicus. 7. As soon as blood is drawn back freely into the catheter stop insertion. 8. Flush the catheter. 9. Secure with a tie around the umbilical stump. 10. The umbilical catheter is ready for use. 11. Check position with an abdominal Xray – catheter tip should not be beyond the level of
diaphragm
NB! If blood is “pumping back” through the catheter with each heart beat, you may have inserted the catheter into an umbilical artery
12. Remove the catheter and try again.
Umbilical vein
Umbilical arteries

152
3.4 Preterm babies Babies less than 29 weeks gestation are more likely to become hypothermic and hypoglycaemic. Large food grade plastic bags are recommended to prevent evaporative heat loss. It does not prevent conductive nor radiant heat loss and should not replace warm ambient temperatures. • The bag is prepared by cutting a “V” in the closed end (Picture A) • A hand is slipped into the “V”, baby’s head positioned in the hand (Picture B) and the bag
slipped over the length of the baby (Picture C), immediately after birth, with the face exposed.
Picture A
Picture B. Picture C • CPR can be done over the bag. A hole may be cut if an umbilical venous catheter needs to
be inserted.

153
4. Practical resuscitation 4.1 Guidelines
1. Call for help. 2. Start the clock. 3. Wear gloves to protect yourself. 4. Assess the baby.
A. Breathing rate and quality B. Heart rate: >100, <100, absent C. Listen at the cardiac apex
DO NOT palpate peripheral pulses, they are unreliable and impractical D. Colour: pink, blue, pale E. Tone: vigorous, unconscious, floppy
(Apnoeic babies are floppy)
An assessment tool often cited when discussing resuscitation, is the apgar score. Devised by Virginia Apgar in 1949, it is recorded retrospectively and therefore cannot guide resuscitation. Its practical use is limited
4.2 Poor response to resuscitation
1. CHECK airway and breathing for TECHNICAL faults: • Proper mask ventilation – is chest moving • Proper tracheal tube position • Is the tracheal tube blocked • Is the oxygen connected
2. CONSIDER: • A pneumothorax • A cyanotic cardiac condition • Maternal drugs • Excessive blood loss

154
If the response remains poor after 3 doses of adrenaline or after 20 min of resuscitation under optimum conditions, abandon resuscitation efforts in discussion with senior team members. 4.3 Discontinuation of resuscitation Outcomes are poor when there has been no response to resuscitation attempts after 10 min. Most units would continue resuscitation for 20 min. Also consider whether resuscitation is appropriate? Extremely premature infants (<23 weeks) OR those born with severe lethal congenital abnormalities e.g. anencephaly or Trisomy 13 should probably not be resuscitated. Resuscitation efforts should be discussed with parents pre-‐delivery, if the diagnosis is known. Discussion with parents Parents need to know that every effort had been made to resuscitate, their baby – where possible, inform parents as the resuscitation progresses. End of life decisions need to involve the parents. Medicolegally, all aspects of the resuscitation must to be documented, including all communications / discussions with parents.

155
ALGORITHMS
The following algorithms 1 to 4 are based on practical experience and attempt to follow the
guidelines as set out by the British Resuscitation Council.
These are guidelines only and always begin with the
assessment of the baby.
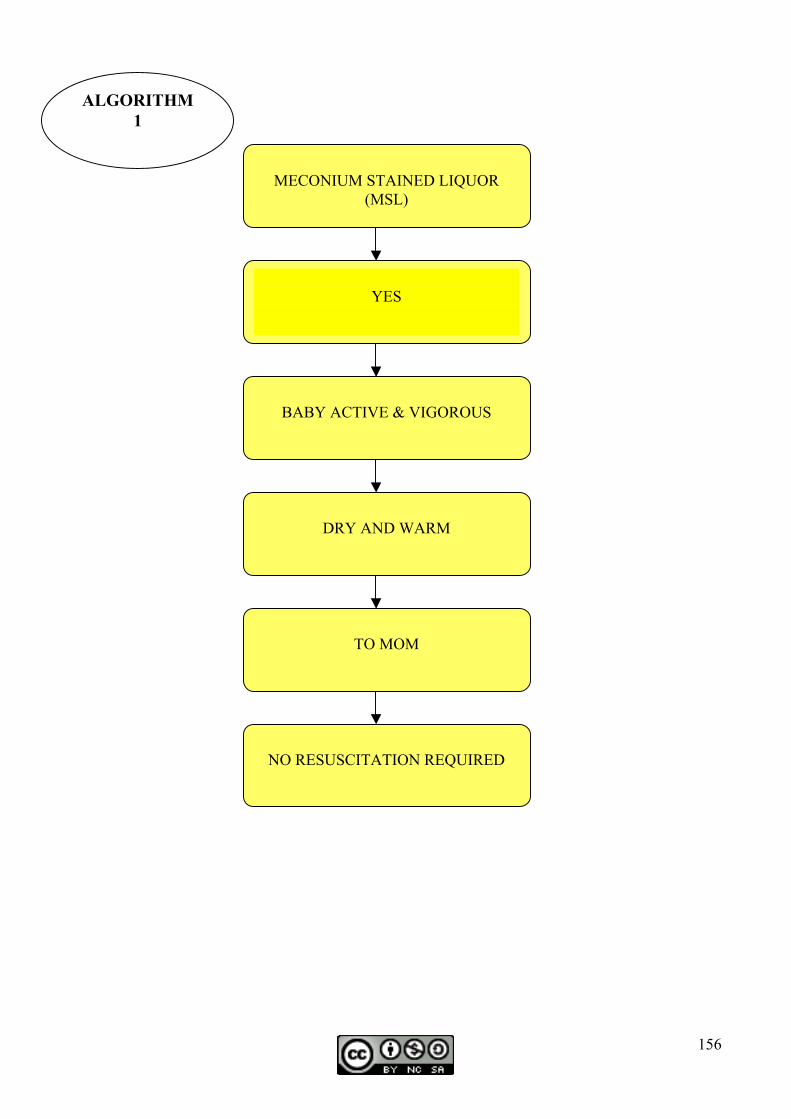
156
YES
BABY ACTIVE & VIGOROUS
DRY AND WARM
TO MOM
NO RESUSCITATION REQUIRED
MECONIUM STAINED LIQUOR
(MSL)
ALGORITHM 1

157
Bagmask ventilation: Breathe rate 60/min
Good response
Crying and active, normal breathing
OBSERVE
TO MOM
Good response: Active, pink, HR > 100,
Normal respiration
Poor response
Floppy, blue, HR < 100, poor resp. effort
YES
Floppy, blue, HR < 100
DO NOT STIMULATE
Gently suction meconium from nostrils
Suction oropharynx under laryngoscope vision
DRY AND WARM
MECONIUM STAINED LIQUOR
POOR RESPONSE: SEE WORST-CASE
SCENARIO
ALGORITHM 2

158
HR > 100, some spontaneous effort
Transfer to NICU
Commence CPR (Over plastic bag if preterm)
RATE: 3 compressions to one breath
Assess response: HR < 100, No spontaneous resp. effort
Continue CPR for 1 min
STILL Poor response HR < 100, No resp. effort
Intubate if able, else continue with bag mask ventilation
FAILED BASIC RESUS: HR < 100
NO respiratory effort
Assess response after 1 min
HR < 60 No resp. effort
Adrenaline 1: 10 000 via UVC, 0.1 ml/kg
CPR
Assess response after 1 min
CPR
No response after 20 min Consider stopping
HR < 60 No resp. effort
Repeat cycle, total 3 doses adrenaline
HOW TO MIX ADRENALINE 1: 10 000
• 1 ml adrenaline 1: 1000 • plus 9 ml of 0.9% saline
WORST CASE SCENARIO
ALGORITHM 3

159
POOR RESPONSE: SEE WORST-CASE
SCENARIO
ALGORITHM 4
Blue, floppy, HR < 100
CLEAR AIRWAY
BAG MASK VENTILATION
ASSESS RESPONSE
Pink, HR > 100,
Good respiratory effort
TRANSFER TO NICU,
MAY NEED CPAP/SURFACTANT
Place preterm infant in plastic bag, face
exposed
POOR RESPONSE: SEE WORST-CASE
SCENARIO

160
Chapter 24 Cervical cerclage Sachia Edelstein McDonalds’ technique: Step 1 Put patient in a lithotomy position. Disinfect the vagina. Step 2 Insert a retractor (Sims/Wertheims) to adequately expose cervix. Step 3 Clean cervix and with vulsellum, gently grasp anterior lip of cervix. Step 4 Permanent suture (e.g. Mersilene tape) with double-‐ended atraumatic needle
placed in purse-‐string fashion around cervix. Starting in the middle of the suture, take the first bite by entering at 12 o’clock and exiting at 10 o’clock, followed by entering at 8 o’clock and exiting at 6 o’clock. With the 2nd needle, enter at 12 o’clock and exit at 2 o’clock, then enter at 4 o’clock and exit at 6 o’clock. Care is taken to avoid entering the cervical canal and to avoid cervical blood vessels located at 3 o’clock and 9 o’clock.
Step 5 The suture is now tied at 6 o’clock and cut, leaving at least 2cm suture length (in order to assist with suture removal).
Step 6 Inspect cervix, to make sure that there is adequate haemostasis and no evidence of rupture of membranes. If there is any bleeding, this usually stops when the purse-‐string suture is tied. If there is rupture of membranes, then the suture must be removed and the procedure aborted.
Step 7 Post-‐operatively: Bed-‐rest and pad checks for 2 days
Prophylactic anti-‐prostaglandins (e.g. indocid suppository) for 2 days Prophylactic antibiotic cover (e.g. erythromycin and metronidazole) for 5 days. Ultrasound prior to discharge from hospital to confirm presence fetal heart and assess amniotic fluid index
Step 8 Suture removed electively at 37 weeks. Suture removal:
Pull on the suture to expose knot and cut one side, then gently remove suture. Shirodkar technique: Step 1-‐3 As above with McDonald technique. Step 4 The cervix is gently pulled downwards (posteriorly) to expose the reflection of
the bladder. Then, as if performing anterior colporrhaphy, a transverse incision is made below the level of the bladder reflection. Using single raytex gauze, the bladder is pushed superiorly to a level above the anticipated internal os.
Step 5 The cervix is gently pushed upwards to expose the posterior fornix. An incision is made on the posterior surface of the cervix and using single raytex gauze, the peritoneal reflection of the pouch of Douglas and rectum are pushed superiorly to a level above the anticipated internal os.
Step 6 Permanent suture (e.g. Mersilene tape) with double-‐ended atraumatic needle is used. The suture is then passed from anterior to posterior submucosally
161
between the vagina and the cervix, entering at the corner of the anterior incision and exiting at the corner of the posterior incision. The tape is laid across the anterior aspect of the cervix and then brought backwards on the other side of the anterior incision to the posterior incision. When placing the suture, the path should be just lateral to the cervix and care should be taken not to enter the cervical canal.
Step 7 The two ends of the suture are brought together and tied, thereby closing the internal os. Only a fingertip should be able to enter the external os.
Step 8 The anterior and posterior incisions are closed with continuous absorbable suture (e.g. Vicryl). The knot is left exposed to facilitate removal at a later stage.
Step 9 As per step 6-‐7 of MacDonald technique. Step 10 Suture removed electively at 37 weeks or patient offered elective caesarean
section and suture removed post-‐partum. References: Operative Gynaecology, 2nd Edition (2001). Ed. Geshenson DM, DeCherney AH, Curry SL and Brubaker L.

162
Chapter 25 Evacuation of the Uterus Saadiqa Allie
• Evacuation of retained products of conception (ERCP) involves the dilatation of the cervix( if required) and removal of the products using a suction device or through sharp curettage of the uterus
• Indications for ERCP include : incomplete miscarriage, molar pregnancy, retained products of conception, termination of pregnancy(<13 weeks gestation), septic miscarriage
• The patient should be adequately counselled about the procedure and potential complications. Written consent should be obtained
• Vital signs such as pulse , blood pressure should be checked as well as relevant blood investigations performed such as haemoglobin, blood group/ Rhesus status and syphilis serology
• Preoperative priming of the cervix with prostaglandins such as Misoprostol enables easier dilatation of the cervix eg in patient s with missed miscarriages or those having a termination of pregnancy
• Misoprostol can be administered either orally or vaginally(400-‐600μg) about 4 hours prior to the procedure
• ERCP can usually be performed under conscious sedation or paracervical block but there are circumstances in which a general anaesthetic is preferable. These include a shocked patient who is actively bleeding , septic miscarriages, molar pregnancies and patients who are anxious or would not tolerate conscious sedation
• Suction curettage is the preferred method of choice as it has several advantages over sharp curettage : less bleeding and pain, shorter operating time, less risk of endometrial damage and reduced chance of uterine perforation
PROCEDURE • Ensure that the patient has an intravenous line inserted • A medical or nursing staff member should reassure the patient during the procedure
and be available should any complication occur • Resuscitation equipment should be readily accessible if required • Pulse , blood pressure and oxygen saturation via pulse oximetry should be monitored
throughout the procedure • Adequate pain control can be achieved with conscious sedation from a combination of a
short acting opioid such as Fentanyl (usually 100μg IV) and a sedation agent such as

163
Midazolam (Dormicum) 2-‐5 mg IV depending on the patient’s weight. Care should be taken to administer the correct dose as overdose may lead to respiratory depression
• A paracervical block using 1% Lignocaine can also provide effective analgesia • The patient is placed in lithotomy postion and the vulva and vagina cleaned • The bladder is emptied and a vaginal examination is performed to ascertain the size and
position of the uterus as well as the dilatation of the cervix • A Sims or Auvard speculum is introduced into the vagina and the cervix is visualised • The cervix is grasped using a Vulsellum placed on the anterior lip of the cervix • If the cervix needs to be dilated, Hegar dilators should be used, commencing with the
smallest one and progressively increasing in size until the cervix is dilated enough to allow the appropriate size suction cannula to be comfortably inserted
• The size of the cannula used is usually equal to the gestation of the pregnancy • The manual vacuum aspirator is attached to the appropriate size Karman cannula
Figure 1: The manual vacuum aspirator and Karman cannulae
• Prior to insertion of the cannula into the cervix, the plunger of the syringe is pulled back in order to create the vacuum
• The syringe is then inserted into the uterine cavity and the products aspirated gently
• When the syringe is full or the vacuum lost, it should be removed and the procedure repeated until the uterus is empty
164
• If a sharp curette is used , the largest one available and which can be inserted into the cervix must be used as these carry a increased risk of uterine perforation
• The uterus is curetted until a “gritty” feeling is obtained and will usually start to contract once it is empty
• An oxytocin bolus should be administered at this point to ensure that the uterus remains contracted
• Products should be sent for histology if suspected molar pregnancy or if recurrent pregnancy loss, for genetic analysis. If sepsis is present, specimens should be sent for microscopy, culture and sensitivity in normal saline.
• If there is any concern that perforation has occurred eg bowel or omentum pulled down or seen in the suction cannulae , the procedure should be stopped immediately and preparations made to do a laparotomy under general anaesthesia in theatre
• Once the evacuation is complete, the patient is observed for any excessive bleeding and vital signs are checked
• If the procedure was performed under conscious sedation, the patient can usually be discharged after 4-‐6 hours observation if all vital signs are normal
• The patient should be counselled to return if she develops any signs and symptoms of excessive bleeding, abdominal pain, foul smelling discharge or fever.
• Appropriate contraception advice should be given as necessary as well as Rhogam or Benzathine penicillin if required
• The patient should also be offered supportive counselling if recurrent miscarriage and referral to a Reproductive Failure clinic for further investigation
• Oral antibiotics such as Doxycycline and Metronidazole should be given upon discharge if the patient is not allergic to these medications to cover organisms such as Chlamydia or anaerobes

165
FIGURE 2 INSTRUMENTS USED IN EVACUATION OF THE UTERUS: Left to Right: manual vacuum aspirator with Karman cannula attached , Hegar dilators, ovum forceps, sponge-‐holding forceps, Jacques catheter(above), uterine sound , curettes, multiple toothed Vulsellum, single toothed vulsellum, Sims speculum, Auvard speculum CONCLUSION Evacuation of the uterus is a simple often performed procedure in gynaecological units but does carry certain complications. If properly performed with adherence to simple principles it should be a procedure which junior doctors are trained to perform.

166
Chapter 26 Open Management of Tubal Ectopic Pregnancy Tam Tam Matebese
Introduction The incidence of ectopic pregnancy is about 1 – 2%. Ectopic pregnancy is the leading cause of death in the first trimester of pregnancy. The diagnosis of ectopic pregnancy can be made early with ultrasound and serum human chorionic gonadotrophin (HCG) measurements. The management of ectopic pregnancy includes conservative management with follow up of HCG levels, medical treatment and surgical management. Surgical management is reserved for those cases of ectopic pregnancy that do not fulfill the criteria for medical management. This chapter will only focus on surgical management of tubal ectopic pregnancy. The choice of surgical approach (Laparotomy versus Laparoscopy) The choice of surgical approach is determined by the following factors: Heamodynamic status of the patient Skill of the surgeon and assistants Availability of equipment Site of the ectopic pregnancy – Ampullary, Isthmic, fimbrial or corneal The subsequent intra-‐uterine pregnancy rate is similar following laparotomy or laparoscopy (RR 1.2, 95% CI 0.88 – 1.15) Pre-‐operative assessment Prior to surgery for ectopic pregnancy the haemodynamic status of the patient should be assessed. This should include monitoring of vital signs such as the pulse, the blood pressure, level of consciousness of the patient, the urine output and haemoglobin level. All patients should be adequately resuscitated prior to surgery. This includes intravenous administration of crystalloids or colloids and blood products if necessary. Adequate counseling of patient is necessary including history of desire for future pregnancies. Laparoscopy Laparoscopy is the recommended surgical option of choice in patients who are haemodynamically stable but not suitable for medical treatment. The advantages of laparoscopy versus laparotomy for the management of ectopic pregnancy includes less intra-‐operative blood loss, less analgesic requirements, shorter hospital stay and hence lower costs and less adhesion formation. The presence of a haemoperitoneum in a haemodynamically stable patient is not a contra-‐indication to laparoscopy provided the surgery is being performed by an adequately skilled surgeon.
167
Laparoscopic salpingostomy vs laparoscopic salpingectomy The decision to perform a laparoscopic salpingostomy or salpingectomy depends on the desire for future fertility, the size of the ectopic pregnancy and the health of the contralateral fallopian tube. The Royal College of Obstetricians and Gynaecologists recommend laparoscopic salpingectomy if the contralateral tube is normal even if future fertility is desired. (Grade A recommendation). If the contralateral tube is damaged laparoscopic salpingostomy is the surgery of choice if fertility is desired. (Grade B recommendations) The possibility of persistent trophoblastic tissue is higher with salpingostomy versus salpingectomy. Follow up with HCG levels is advised following laparoscopic salpingostomy. Laparotomy Laparotomy for surgical management of ectopic pregnancy is reserved for those patients who are haemodynamically unstable. The aim is to prevent further blood loss as quickly as possible. Adequate resuscitation is mandatory prior to surgery. The options at laparotomy include salpingectomy, salpingostomy and fimbrial expression. The decision for each option is similar to those for laparoscopy as mentioned in the previous text. Post operative management Monitoring of patient following surgery for ectopic pregnancy is mandatory. The patient should be monitored for both haemorrhage and complications relating to surgery. The vital signs should be monitored and intake/output monitoring is necessary in some cases. Anti-‐D immunoglobulin should be administered to those patients who are Rhesus negative. Follow up for persistent throphoblastic tissue is necessary following salpingostomy. A 50% fall in pre-‐operative HCG levels is associated with a less than 15% chance of persistent trophoblastic tissue. Adequate counseling of the patient is necessary before discharge from hospital about the risk of future ectopic pregnancy. Interstitial or Cornual ectopic pregnancy Interstitial or Cornual ectopic pregnancy is very rare. The incidence is 2.4% of all ectopic pregnancies. Medical treatment is the first line of treatment for those patients who fulfill the criteria. Most patients with a ruptured cornual ectopic pregnancy will present in hypovolaemic shock and will require resuscitation and a laparotomy.At laparotomy a cornual resection or salpingostomy can be performed. Maintaing haemostasis is often difficult with cornual resection. Clamping the uterine wall proximal to the normal pregnancy with long-‐jaw forceps before incising the cornua has been advocated. The myometrial defect should then be sutured thoroughly. The patient should be advised to have an elective caesarean section in subsequent pregnancies due to the increased risk of uterine rupture

168
Chapter 27
Laparoscopic management of ectopic pregnancy Paul Le Roux Introduction: Ectopic pregnancy is a significant health problem for women of reproductive age and warrants an urgent well planned therapeutic strategy. It can be a life threatening condition and is the leading cause of first trimester mortality for women living in the developed world. In the developing world the total number of deaths from ectopic pregnancy is much higher due to late presentation and poor healthcare resources. The long term sequelae of ectopic pregnancy are infertility. Critical decisions need to be taken during the initial management of a woman with ectopic pregnancy to ensure safety and to optimally preserve future fertility. The management of ectopic pregnancy can be expectant, medical or surgical. Pathogenesis and course of the disease: The word “ectopic” is derived from the Greek word “ektopos” meaning out of place. Ectopic pregnancy refers to a pregnancy which is implanted outside the uterine cavity. Ectopic pregnancies implant in the fallopian tube in 99% of cases with more rare sites including the ovary, cervix and abdominal cavity. Within the fallopian tube the ampulla is the most common site of implantation (approx 65%) compared with implantation in the isthmic or interstitial portion of the fallopian tube. There are numerous predisposing factors for ectopic pregnancy and most of these causes and associations are well known eg. Previous pelvic inflammatory disease, progestin only contraceptives, previous tubal / pelvic surgery, previous induced abortion, previous ectopic pregnancy, increased maternal age. Most patients however, present with no obvious predisposing cause for ectopic pregnancy. Fertility treatment increases the odds of ectopic pregnancy considerably and also the incidence of rare heterotopic pregnancies (one normal gestational sac implanted in the uterine cavity combined with an ectopic gestation). Presentation and diagnosis of ectopic pregnancy Ectopic pregnancies either rupture or end in tubal abortion. In the patients with tubal abortion expectant management may be sufficient and active intervention may not be necessary. The difficulty is correlating the clinical, ultrasound and endocrine values to decide whether a tubal

169
abortion has occurred and expectant management is acceptable, or whether tubal rupture is likely and active medical or surgical intervention is required. The classic clinical triad of symptoms: amenorrhoea, pain and bleeding only occur in about half the cases of ectopic pregnancy. Vaginal bleeding is due to shedding of the endometrium due to decreasing beta HCG and progesterone levels. The abdominal pain may be due to either rupture or a tubal abortion. When there are symptoms of pain there is no place for expectant or medical management of the ectopic pregnancy, and surgery is indicated. Transvaginal ultrasound is useful to assess whether a pregnancy is in the uterine cavity. Although the ultrasound findings of a gestation sac seen outside the uterus, free fluid in the Pouch of Douglas, a fetal heart pulsation in a sac outside the uterine cavity and an adnexal mass are useful predictors of an ectopic pregnancy, they are not absolute. The presence or absence of an intrauterine sac is still the key diagnostic marker for ectopic pregnancy. A pseudosac in the uteus which is usually fluid / blood in the endometrial cavity can confuse the ultrasound diagnosis. A true gestational sac has an echocentric ring around it (decidual reaction) and a more rounded shape. If the Beta HCG is more than 1500 IU/l, the generally accepted “discrimination zone” level of beta HCG, and there is no intrauterine pregnancy visible then the diagnosis of an ectopic pregnancy can be made. In some centers the discrimination zone level of beta HCG may be adjusted higher or lower due to the quality of ultrasound equipment, skill of the operator and knowledge of the exact gestational dates of the patient 1, 2, 3. It is important to remember that early ectopic pregnancies can missed at laparoscopy and therefore it may be better to ensure that the beta HCG levels have reached the discrimination zone or at least failed to increase at lower levels over a few days, prior to proceeding to surgery in the absence of any symptoms. In the case where the beta HCG levels are lower than the discrimination zone level and the patient is aymptomatic, it is acceptable to follow up the patient expectantly with serial 48 hourly beta HCG levels. If the Beta HCG levels reach the discrimination zone with no intrauterine sac visible or the patient becomes symptomatic, then expectant management should be abandoned and active management instituted. The rate of increase of beta HCG in a viable intrauterine pregnancy should be a minimum of 66% over 48 hours4, and when the rate of increase is less than this rate the diagnosis of an ectopic pregnancy should be considered. In cases where the beta HCG is decreasing and expectant management is being followed, this should be continued until the beta HCG reaches 20 IU/l since tubal rupture has been shown to occur at low levels of beta HCG. Sometimes the tubal abortion that occurs with expectant management can present with abdominal pain which may be difficult to differentiate from a tubal rupture. If there is any suspicion of tubal rupture, then a laparoscopy procedure should be performed.

170
Medical management of ectopic pregnancy: Methotrexate is most successfully used when the patient is aymptomatic and the beta HCG levels are lower than 3000 IU/l. The woman should be counselled that there is a failure rate associated with medical therapy and tubal rupture may still occur in 7% of cases 5, 6. The patient should be counselled and consent signed regarding the need for careful follow up with medical treatment. The side effects and contraindications to the use of methotrexate should also be discussed. Blood tests for full blood count, and renal /liver function should be performed prior to administering methotrexate. Contraindications to the use of methotrexate include fetal cardiac activity, beta HCG greater than 15 000 IU/l, free fluid in the cul de sac, documented hypersensitivity to methotrexate, breastfeeding, immunodeficiency, alcoholic or other liver disease, anaemia, leucocytopenia, thrombocytopenia, active pulmonary disease, peptic ulcer disease, renal or hepatic dysfunction. Single dose treatment of IM methotrexate using 50mg/ m 2 (most patients required 75 – 90 mg) is effective in most cases. Beta HCG levels can be performed on day 4 and 7 after methotrexate therapy and a minimum of 15% drop in beta HCG would be considered acceptable between day 4 and 77,8,9
Methotrexate therapy can also be used to treat patients with persistent trophoblastic tissue found after a laparoscopic salpingotomy procedure. The Beta HCG levels should be decreasing by approximately 50% every 48 hours after the salpingotomy procedure. Surgical treatment of ectopic pregnancy: Ectopic pregnancies can be managed surgically either by laparotomy or laparoscopy. Most cases should be managed laparoscopically as best practice. Laparoscopy versus laparotomy has been compared in three small randomised clinical trials which included a total of 228 women10, 11, 12. Although there was a no statistical difference in future intrauterine pregnancy rates with laparoscopy, there was a trend towards lower repeat ectopic pregnancy rates probably due to less adhesion formation. The obvious benefit of laparoscopic surgery was demonstrated convincingly in these trials – shorter operation times, less blood loss, shorter hospital stays and lower analgesic requirements. It has been standard teaching in the past that laparotomy should be used for women with a haemoperitoneum. This is no longer true in the case of the experienced laparoscopic surgeons with good operating facilities. However, in general terms the surgical procedure that will prevent further blood loss most quickly should be used, and in many centers laparotomy may still be the preferred choice.

171
The two procedures usually performed on tubal ectopics are salpingectomy and salpingotomy. In some cases with an isthmic ectopic pregnancy, a segment of the tube can be removed which will leave sufficient tubal length for reanastomosis at a later stage since these cases have a poorer outcome with conventional salpingostomy. The management of ecopic in other sites will not be discussed in this chapter eg. Cornua ectopics, ovary, cervix, abdominal cavity etc Equipment and port placement for laparoscopic treatment of ectopic pregnancy: There are many different preferences for laparoscopic equipment for the treatment of an ectopic pregnancy, and the choice has little relevance to outcome as long as the surgeon is comfortable using the equipment. A 10mm or 5mm port can be used for subumbilical camera placement depending on which camera system is available. A minimum of 2 accessory ports should be placed in the iliac fossae. Some surgeons prefer a suprapubic midline port but better access is usually obtained by having a port in each iliac fossae. One of the two iliac ports should be a 10mm port so that the ectopic tissue and / or fallopian tube can be removed through the port and access is available for a 10mm Babcock atraumatic grasper or 10mm suction irrigator. Good suction irrigation equipment is essential and a 10mm diameter probe is best in cases where there is a large haemoperitoneum. For a salpingectomy procedure many different instruments can be used to incise the mesosalpinx and induce haemostasis. The most commonly used and safest are probably bipolar electrocautery, a harmonic scalpel and laser. Although a laparoscopic bag can be used with a large ectopic pregnancy to prevent trophoblast dropping into the abdominal cavity which may reimplant, this is usually not necessary. The tissue is usually easy to remove through the 10mm accessory port. Diluted ornipressin (Por-‐8 – Ferring) is useful in cases of salpingostomy – 5units ornipressin is diluted in 40ml saline. In some countries these vasoconstrictors are not allowed due to the risk of direct blood vessel injection which can lead to fatal cardiovascular compromise. It should be used with care and aspiration should always be performed prior to injection to ensure that the needle tip is not in a blood vessel. A long spinal needle can be used to inject the ornipressin through the anterior abdominal wall. Jean Pouly from France has also described the technique of placing a vascular clamp on the mesosalpinx to achieve haemostasis during salpingostomy. A 10mm Babcock locking grasper is ideal for grasping the tube atraumatically proximal to the ectopic pregnancy. A monopolar needle is useful for opening the fallopian tube during salpingostomy. Some surgeons prefer the laser, harmonic scalpel or monopolar scissors for this step. These instruments can also useful during for adhesiolysis and mobilisation of the tube prior to salpingostomy or salpingectomy.

172
Technique for salpingectomy: Once entry has been obtained and vision of the fallopian tubes is obtained, both tubes should be inspected carefully. Sometimes there is a haematosalpinx due to backflow from uterine bleeding and this can be mistaken as a tubal ectopic. It is therefore essential to visualise both tubes to ensure the correct tube is removed. The condition of the contralateral tube is important and should be visualised at the outset of the laparoscopic procedure. The tube containing the ectopic pregnancy can be removed by cutting along the mesosalpinx as close to the fallopian tube as possible with the instrument of choice (bipolar cautery, harmonic scalpel or laser). This is done to preserve the accessory blood supply to the ovary. Practically this is easily done by grasping the distal end of the tube containing the ectopic from the contralateral port and pulling it across the midline. The meosalpinx is then easily visible and can be accessed with a bipolar cautery and scissors (or alternatives) from the ipsilateral port. Once the mesosalppinx has been divided up till the uterus, the tube can then be cauterised and cut. The tube should be divided as close to the uterus as possible to prevent a future tubal stump ectopic pregnancy. Below are illustrations of a salpingectomy procedure for a ruptured ectopic pregnancy (Figures 1-‐4)
Figure1: Division of the mesosalpinx close to the fallopian tube.

173
Figure 2: The ruptured fallopian tube about to be removed through a 10mm port. There is a haematoperitoneum present.
Figure 3: The mesosalpinx is inspected for any bleeding after the haemoperitoeum has been washed out.

174
Figure 4: The contralateral tube is normal. Technique for salpingostomy: Linear salingostomy along the antimesenteric border of the fallopian tube can be used successfully for unruptured ampullary ectopic pregnancies. Although ectopic pregnancies can be “milked” out of the end of the tube, there is a higher incidence of persistent trophoblastic tissue and this is not recommended. The fallopian tube can be held with a 10mm Babcock grasper inserted via the ipsilateral port just proximal to the ectopic pregnancy. A spinal needle attached to a syringe with diluted omnipressin can then be inserted through abdominal wall from the lower midline. The needle tip can be guided with a grasper. The needle tip should be inserted in the mesosalpinx just under the ectopic pregnancy. It is very important to first draw back on the syringe to ensure that the tip is not in a blood vessel. There have been fatalities associated with direct venous injection of vasoconstrictors. Once in a safe place, the area can be infiltrated. The tube can be incised using a monopolar needle, scissors, a harmonic scalpel or laser in the thinnest portion of the tube (antimesenteric side) directly over the ectopic pregnancy (Figure 5). At this time the pregnancy usually extrudes itself spontaneously. A grasper can be used to gently squeeze the tube to encourage this extrusion. Once the pregnancy sac is extruded, it can be grasped carefully and removed (Figure 6). The pregnancy should be carefull removed through the 10mm port and sent for histological examination. A suction irrigation probe can then be inserted into the opening to use the hydrostatic pressure of the irrigation to flush the tube and hopefully dislodge any remaining trophoblastic tissue. If there is bleeding at the implantation site inside the tubal lumen, then microbipolar cautery can be used to coagulate the bleeding. However, there is a risk of tubal damage with cautery

175
and therefore it is best to avoid any electrocautery. The injection of ornipressin reduces the need for cautery in the tubal lumen, and usually oozing will cease spontaneously after a few minutes. Jean Pouly from France decribes a technique where a vascular clamp is temporarily placed over the mesosalpinx instead of using ornipressin to reduce blood flow to the fallopian tube during surgery, because the drug is not available in France. Using this technique spontenous coagulation occurs from the small implantation site with the clamp in situ, and the clamp can be released with no need for cautery of the fallopian tube after approximately 7 minutes. The incision in the fallopian tube closes spontaneously and there is no need for suturing. All patients should have follow up beta HCG tests done a few days after the surgery to check that there is no persistence trophoblastic disease. If the level has not dropped by approximately 50% of the pre-‐surgery level after 48 hours then further treatment is necessary. Methotrexate can be administered to treat persistent trophoblastic disease. In the rare cases where medical treatment is not successful, repeat sugery with salpingectomy is indicated.
Figure 5: Opening the anti-‐mesenteric border with a monopolar needle.
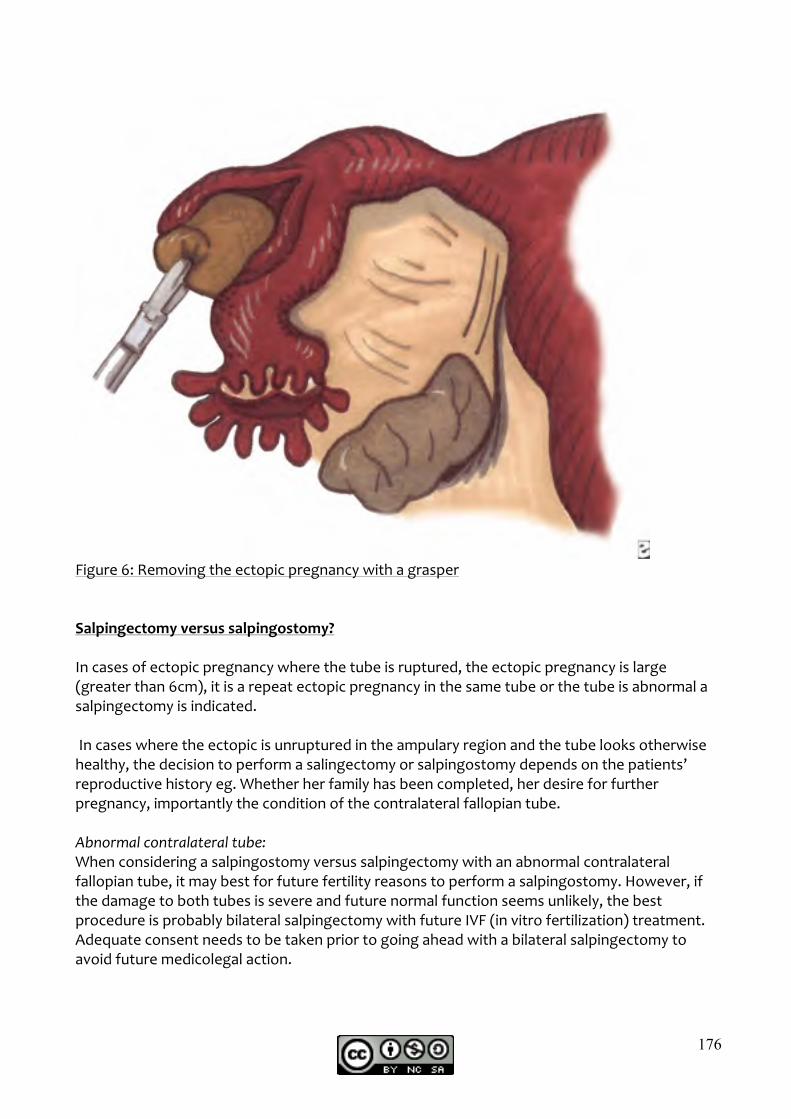
176
Figure 6: Removing the ectopic pregnancy with a grasper Salpingectomy versus salpingostomy? In cases of ectopic pregnancy where the tube is ruptured, the ectopic pregnancy is large (greater than 6cm), it is a repeat ectopic pregnancy in the same tube or the tube is abnormal a salpingectomy is indicated. In cases where the ectopic is unruptured in the ampulary region and the tube looks otherwise healthy, the decision to perform a salingectomy or salpingostomy depends on the patients’ reproductive history eg. Whether her family has been completed, her desire for further pregnancy, importantly the condition of the contralateral fallopian tube. Abnormal contralateral tube: When considering a salpingostomy versus salpingectomy with an abnormal contralateral fallopian tube, it may best for future fertility reasons to perform a salpingostomy. However, if the damage to both tubes is severe and future normal function seems unlikely, the best procedure is probably bilateral salpingectomy with future IVF (in vitro fertilization) treatment. Adequate consent needs to be taken prior to going ahead with a bilateral salpingectomy to avoid future medicolegal action.

177
Normal contralateral tube: Where the contralateral tube is normal and future fertility is required, there is no clear evidence that salpingostomy results in a higher future intrauterine pregnancy rate. The complications related to salpingostomy such as persistent trophoblastic disease post-‐surgery and increased repeat ectopic pregnancy rates have led some groups including the Royal College of Obstetricians and Gynaecologists (RCOG) to recommend salpingectomy when the contralateral tube is normal. However, the studies in this area need to be interpreted with caution since they are small studies. In addition, many of these studies suggest a trend to higher future intrauterine pregnancy rates with salpingostomy which is critically important13,14,15,16. For this reason it may be better to do salpingostomy even if the contralateral tube is normal until such time as published randomised controlled trials are available. At the time of writing this article, there is a randomised controlled trial on salpingostomy versus salpingectomy with a normal contralateral tube in progress called the ESEP (European Surgery in Ectopic Pregnancy) conducted from the Netherlands. Although the financial cost of salpingostomy is higher than salpingectomy, when taking into consideration the added cost of assisted conception it would mean that an increased intrauterine pregnancy rate of only 3% with salpingostomy would justify its use15. Use of anti-‐D immunoglobulin in ectopic pregnancy: In non-‐sensitised women who are rhesus negative it is recommended that they receive 250 IU (50 microgrammes) of anti-‐A immunoglobulin17. Training for gynaecological registrars in South Africa: It would be ideal that by the time registrars complete their training in South Africa they are familiar with both the laparoscopic and laparotomy techniques to remove an ectopic pregnancy. In addition, they should be familiar with the diagnostic and therapeutic algorithms for treating ectopic pregnancies, and be able to counsel their patients prior to treatment. In South Africa there is a shortage of skilled staff to teach registrars the laparoscopic method of treating ectopic pregnancies, and teaching institutions lack adequate theatre equipment. This situation is not acceptable and poses direct risks to women’s fertility and safety. Urgent intervention is therefore required to remedy this situation and make a real difference to women’s health in the future. References:
1) Mol B, Van der Veen F. Role of transvaginal ultrasonography in the diagnosis of ectopic pregnancy. Fertil Steril 1998; 70: 594-‐5
2) Ankum W, Hajenius P, Schrevel L, Van der Veen F. Management of suspected ectopic pregnancy: impact of new diagnostic tools in 686 consecutive cases. J Reprod Med 1996; 41:724-‐8
178
3) Cacciatore B, Stenman U, Ylostolalo P. Diagnosis of ectopic pregnancy by vaginal ultrasonography in combination with a discriminatory serum HCG level of 1000 in/l Br J Obstet Gynaecol 1990; 97: 904-‐8
4) Kadar N, Bohrer M, Kemmann E, Shelden R. The discriminatory human chorionic gonadotrophin zone for endovaginal sonography: a prospective, randomized study. Fertil Steril. 1994; 61(6): 1016-‐20
5) Sowter M, Farquar C, Gudex G. An economic evaluation of single dose systemic methotrexate and laparoscopic surgery for the treatment of unruptured ectopic pregnancy. Br J Obstet Gynaecol 2001;108: 204-‐12
6) Mol B, Hajenius P, Engelsbel S, Ankum W, Hemrika D, van der Veen F, et al. Treatment of tubal pregnancy in the Netherlands: an economic comparison of systemic methotrexate administration and laparoscopic salpingostomy. Am J Obstet Gynaecol 1999; 181: 945-‐51
7) Sowter M, Frappell J. The role of laparoscopy in the management of ectopic pregnancy. Rev Gynaecol Practice 2002; 2:73-‐82
8) Saraj A, Wilcox J, Najmabadi S, Stein S, Johnson M, Paulson R. Resolution of hormonal markers of ectopic gestation: a randomized trial comparing single dose intramuscular methotrexate with salpingostomy. Obstet Gynaecol 1998; 92:989-‐94
9) Sowter M, Farquhar C, Petrie K, Gudex G. A randomised trial comparing single dose systemic methotrexate and laparoscopic surgery for the treatment of unruptured ectopic pregnancy. Br J Obstet Gynaecol 2001; 108:192-‐203
10) Vermesh M, Silva P, Rosen G, Stein AL, Fossum GT, Sauer MV. Management of unruptured ectopic gestation by linear salpingostomy: a prospective, randomised clinical trial of laparoscopy versus laparotomy. Obstet Gynaecol 1989; 73: 400-‐4
11) Lundorff P, Thorburn J, Hahlin M, Kallfelt B, Lindblom B. Laparoscopic surgery in ectopic pregnancy: a randomised trial versus laparotomy. Acta Obstet Gynaecol Scand 1991; 70: 343-‐8
12) Gray D, Thorburn J, Lundorff P, Strandell A, Lindblom A. A cost-‐effectiveness study of a randomised trial of laparoscopy versus laparotomy for ectopic pregnancy. Lancet 1995; 345: 1139-‐43
13) Silva P, Schaper A, Rooney B. Reproductive outcome after 143 laparoscopic procedure for ectopic pregnancy. Fertil Steril 1993; 81: 710-‐5
14) Job-‐Spira N, Bouyer J, Pouly J, Germain E, Coste J, Aublet-‐Cuvelier B, et al. Fertility after ectopic pregnancy: first results of a population based cohort study in France. Hum Reprod 1996; 11: 99-‐104
15) Mol B Matthijsse H, Tinga D, Huynh T, Hajenius P, Ankum W, et al. Fertility after conservative and radical surgery for tubal pregnancy. Hum Reprod 1998; 13: 1804-‐9
16) Bangsgaard N, Lund C, Ottesen B, Nilas L. Improved fertility following conservative surgical treatment of ectopic pregnancy. Br J Obstet Gynaecol 2003; 110: 765-‐70
17) Royal College of Obstetricians and Gynaecologists. The use of anti-‐D immunoglobulin for rhesus prophylaxis. Guideline No. 22. London: RCOG Press; 2002

179
Chapter 28 Female Sterilisation Noluyolo Sigcu Sterilisation is one of the most reliable methods of family planning , immediately effective, less side effects and mostly permanent What you need:
• Informed consent • Decide on the entry method you will use • i.e Laparotom, Laparoscopy or
Hysteroscopy( not offered in South africa presently)
LAPAROTOMY ( MINILAP) Incision: Pfanennstiel if at or more than 6 weeks postpartum If immediately postpartum then a 4cm transverse incision is made about 2cm below
the umbilicus. Instruments
Langenbeck retractor Babcock forceps Artery forceps Curved Mayo scissors Polyglactin suture / Chromic 2-‐0
Methods available There are various methods but just to name a few:
1. Pomeroy / Modified Pomeroy 2. Parkland 3. Irving 4. Viennese 5. Uchida
For the purpose of this only a few will be described Pomeroy

180
Identify the fallopian tube, identify the less vascular area and take a loop using a Babcock / artery forceps. Tie the loop using chromic, twice about 0.5 -‐1 cm apart Transect the loop and send for histology Check for haemostasis, and see that you can adentify the lumen on each side. Close the sheath using vicryl then skin using subcut suture with vicryl/ maxon. Parkland Once the fallopian tube has been identified look for the avascular area in the mesosalpinx, pierce it with the forceps, then ligate the fallopian tube in 2 places about 3 cm apart. Irving Mostly done at caesarean section, the fallopian tube is ligated in 2 areas as above and the distal part is buried in the broad ligament and the proximal part onto the myometrium. LAPAROSCOPIC TUBAL LIGATION WHAT YOU WILL NEED
1. A 10mm primary port, and a 7 mm port 2. Veres needle 3. Filshie clip and applicator or 4. Falope ring and applicator 5. Hulka clip or a RUMI.
Method Follow the steps for diagnostic laparoscopy instead of using a 5mm port use a 7mm port. Your second port may be inserted in the midline just above the suprapubic area . Make sure the bladder is empty as the risk of bladder injury is high with this method. Make sure when using the falope ring that the applicator is set correctly. It’s always advisable to practise how the apllicator works before inserting it in. The mid isthmic identified, release the tongs of applicator and grasp the tube. Now slowly pull the grasped part of the tube into the apllicator then release the falope ring. Make sure the setting is correct and repeat on the other tube. The ring may be more difficult to apply . Filshie clip Has a better chance of successful tubal reversal. Once the midisthmic portion of the tube is identified the simple apply the clip. Avoid pressing to hard when applying the clip. HYSTEROSCOPIC STERILISATION

181
Essure method is not yet available in South Africa.
182
Chapter 29 Ultrasound in Early Pregnancy Douglas Dumbrill Introduction: Since the early 1980’s ultrasound has been used in clinical practice to facilitate the diagnosis and management of obstetrical and gynaecological conditions. High frequency transducers (5-‐7 Hz) have markedly improved the quality of transvaginal imaging, especially in early pregnancy, enabling earlier diagnosis, less intervention (surgery) and improved patient care. Ultrasound is an investigation which is complimentary, and not a replacement, to a thorough history and methodical clinical examination. In learning to perform an ultrasound one needs to have a good understanding of the anatomy and pathophysiology of the gynaecological organs, one needs to develop laterality and orientation of the pelvic structures to analyze and interpret the ultrasound images and finally one should have a knowledge of extend of pathology one can delineate from the information provided by an ultrasound. , Steps to be taken before commencing any ultrasound 1) Familiarize yourself with your equipment Before commencing an ultrasound you should familiarize yourself with the controls of your machine e.g. On/off button, gain controls, magnification, depth of field and measurement buttons Most ultrasound probes have a groove, depression or elevation on one side. . This corresponds to a “dot “ on the screen, which enables the sonographer to orientate him or herself when looking at the screen. Always match the probe and screen markings .By placing your thumb on this part of the probe, you will know whether to supinate or pronate your arm to match these markings. Ideally one should place the dot on the right hand side of the screen and then supinate your arm when viewing the transverse sections of the pelvis. 2) Image Orientation:

183
If viewing the uterus in the sagital plane then by convention the image displayed on the screen is in one of two ways. Either the image is displayed from the top resembling the abdominal scan i.e. cervix is at the top of the screen (fig 1).
Fig 1.
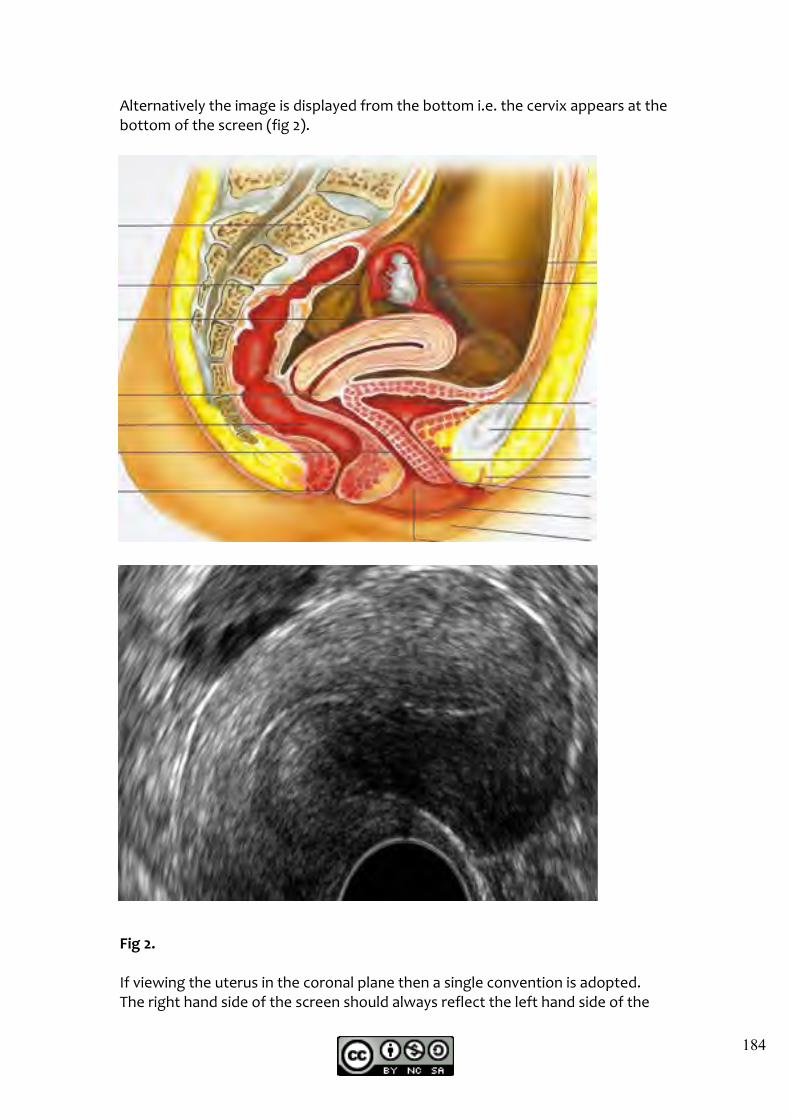
184
Alternatively the image is displayed from the bottom i.e. the cervix appears at the bottom of the screen (fig 2).
Fig 2. If viewing the uterus in the coronal plane then a single convention is adopted. The right hand side of the screen should always reflect the left hand side of the

185
patient and visa versa i.e. the left hand side of the screen should always correspond to the right hand side of the patient. 3) Anatomical Orientation Important anatomical structures within the female pelvis are the bladder, uterus and the iliac vessels. The bladder is the most easily identifiable landmark. In contrast to abdominal scanning where a full bladder is necessary to elevate the pelvic structures out of the pelvis, in early pregnancy scanning an empty bladder is required. Ovaries can be difficult to visualize if the bladder is full. The uterus is important structure as it facilitates easy recognition of the different ultrasound planes e.g. sagital /longitudinal, and transverse / coronal planes. The internal iliac vessels are situated on the pelvic sidewalls and the ovaries are usually found anterior and medial to these structures. . 4) Patient Orientation One should explain the purpose and technique of the scan to the patient to assure them that the procedure is not too painful. Be professional and respectful to the patient. 5) Techniques Before commencement of a vaginal scan, the probe should b e thoroughly cleaned and cleaned after each examination. The probe should be covered in a protective sheath (condom / plastic sheath and the sonographers should be gloved during the procedure. Sufficient gel must be placed between the probe and protective covering to ensure that no air is present between the probe and the covering. The overlaying sheath should also be covered in gel for lubrication .net gel Steps to be taken oncee commencing the ultrasound Having gently introduced the vaginal probe into the vagina, progressive pushing on the probe will reveal the cervix and uterus, which are usually midline structures. There is always a tendency when first learning to scan to apply too little pressure on the probe therefore affecting your image quality. Slight rotatory movements of your wrist should bring the entire uterus and endometrium (sagital plane) into view. By rotating the probe 90 degrees, a coronal view of the uterus is

186
obtained and the uterus should then be examined from the fundus to the cervical region. While in the coronal plane, the tip of the transducer is tilted to the right and by following the broad ligament (s shaped) the right ovary is usually seen above or below the iliac vessels (depending on which orientation you use). All structure should be viewed and measured in both the transverse and sagital planes .The corresponding ovary is viewed in the identical manner. Careful manipulation of the vaginal probe during imaging allows the sonographer to see a dynamic image especially if use is made of the corresponding hand (like one would perform a bimanual examination. In this way you gather more information about the pelvis then one would with a static image. e.g. blood clots from an incomplete miscarriage will be seen to move within the uterine cavity as apposed to a cervical ectopic which is a fixed structure within the endo cervical canal. A systematic approach should be employed in the examination of the pelvic structures and if any abnormality is seen rather complete the rest of the examination before concentrating on the pathology, in such a way nothing can be missed. Transvaginal ultrasound in early pregnancy: Transvaginal scanning should ideally be used in all in early pregnancy / first trimester ultrasound. This is important for a number of reasons .It confirms the presence of a viable intrauterine pregnancy and facilitates the accurate assessment of gestational age. It can accurately diagnose multiple pregnancies and determines the chorionicity; it can facilitate the diagnosis of early pregnancy abnormalities, for example molar pregnancy, miscarriage or an extra uterine pregnancy Diagnosis of a viable intrauterine pregnancy A gestational sac, which appears as a ring like structure with an echogenic rim, which is eccentrically situated within the endometrial cavity, is usually seen as early as 5 weeks and 2 days (by transvaginal ultrasound). Depending on the quality of you ultrasound machine this usually corresponds to a serum bHCG level of 1000 iu/L and this refereed to a discriminatory zone. (See fig 3)

187
Fig 3: gestational sac The yolk sac appears between the 4-‐6 weeks and the embryo 5 weeks and 4 days to 6 weeks and 4 days. These two structures are found adjacent to each other and care should be taken when measuring the crown rump length (CRL) so as not to include the yolk sac in this measurement. (Fig 4). This is important as the accuracy of the CRL measurement is within 5 days of the EDD and in the absence of accurate menstrual dates; this is used to date the pregnancy. If the EDD from the menstrual dates is within one week of the EDD from the CRL then the date should remain unchanged. If however there is more than a week’s discrepancy between the two, then the ultrasound CRL measurement is used.
Fig 4: yolk sac and embryo (CRL) Other structures that become visible at 7 weeks include the amnion, vitelline duct and umbilical cord. (Fig 5)

188
Fig 5: gestational sac, amniotic cavity and yolk sac The diagnosis of multiple pregnancy is relatively simple in the first trimester as in early pregnancy the amnion and chorion are not fused. By visualizing two amniotic cavities and two gestational an accurate diagnosis of chorionicity, in this case dichorionic diamnionitic can be made confidently by the end of the 8th week. A thickened membrane is also seen between the developing embryo. In contrast a single gestational sac with two amniotic sacs is found in monochorionic and diamniotic pregnancies (fig 6)
Fig6: dichorionic diamnionic pregnancy

189
Diagnosis of abnormal pregnancy complications Miscarriage: Miscarriage occurs when there is either failure of embryonic growth or when a viable pregnancy dies. Presentation is varied (asymptomatic to pain and bleeding) and it depends on where in the natural cycle the patient presents. . The RCR/RCOG redefined certain definitions and diagnostic criteria for ultrasound diagnosis of early pregnancy loss. Early embryonic demise (previously called blighted ovum or anembryonic pregnancy) occurs if the gestational sac is greater than 20 mm in mean diameter with the absence of internal echoes.( fig 7) Fig7: early embryonic demise Early fetal demise is said to occur if the crown rump; length (CRL) is > 6 mm and no fetal heart is present (fig 8). If neither of these criteria is met, then a further scan is indicated in 7-‐10 days No definitive ultrasound a diagnosis is used to diagnoses an incomplete or complete miscarriage. Numerous anterior-‐posterior (AP values have been used in the literature (2-‐ 15 mm) to define the upper, most values for AOP thickness Values of 5-‐15 have been used in studies. A diagnosis of an incomplete miscarriage is usually named with a combination of history and examination. Retained products of conception can be diagnosed on ultrasound in the presence thickened AP diameter with areas of mixed echgenicity. Sometime a disordered irregular sac is seen sidisordered sac of a disorganized, irregular sac is usually seen area mixed echogenic intrauterine contents. Occsinternal echoes present. No echo included definitions for the ultrasound guidelines fee

190
Fig 8: early fetal demise

191
Chapter 30
Surgery for Benign Adnexal Conditions Linda Rogers 1) Simple ovarian cystectomy 2) Adnexectomy for (benign) adnexal mass 3) Surgery for Pelvic Inflammatory Disease (PID) Pre-‐operatively: In addition to a full history and physical examination, it is essential to know the results of the following investigations:
- haemoglobin - urinalysis - pregnancy test - pap smear
And consider/check the following:
-‐ Consent - antibiotics - anticoagulation
The incision:
- lower transverse incision for young women with benign adnexal pathology - lower midline incision for PID, or when difficulty or cancer is anticipated
1) Simple ovarian cystectomy
Indication: Benign simple ovarian cyst that persists or causes symptoms in a younger (less than 40 years) woman. Incision: Lower transverse You will need: Knife Electrocautery Gilley’s forceps Abdominal retractor (Balfour) Swabs Babcock forceps McIndoe’s/Stilley’s scissors Needleholder Non-‐braided suture such as Maxon or PDS

192
Straight Mayo scissors Procedure: Pack bowel in to the upper abdomen and identify the abnormal adnexum. The operation should be done in such a way that as much ovarian tissue as possible is preserved. The capsule of the cyst is opened with great care in order to avoid rupturing the cyst itself, and the edge held with Babcocks. The capsule is separated from the cyst and normal ovarian tissue with a combination of blunt and sharp dissection, and the cyst removed. The edges of the capsule should be oversewn with a non-‐braided suture, such as Maxon or PDS, to ensure that there is a low incidence of post-‐operative adhesions, and good haemostasis. It is important to remember to inspect the other ovary before closing the incision in layers.
2) Adnexectomy
Indication: Benign adnexal mass Incision: Lower transverse You will need: Knife Electrocautery Gilley’s forceps Abdominal retractor (Balfour) Swabs Straight Kocher’s forceps Russian forceps Heavy pedicle clamps (Maingots or Zeppelins) McIndoe’s/Stilley’s scissors Needleholder Vicryl sutures (1 or 2:0 on a round-‐bodied needle) Straight Mayo scissors Procedure: Pack bowel in to the upper abdomen and identify the abnormal adnexum. Restore normal anatomy by adhesiolysis if necessary. Identify the round ligament on the same side of the mass, grasp it with 2 straight Kochers, divide it using scissors or cautery, and ligate the lateral end with vicryl. Open the posterior leaf of the broad ligament, and identify the ureter. The infundibulopelvic ligament (containing the ovarian blood and nerve supply) can then be clamped with 2 heavy pedicle clamps, divided, and the distal end ligated with vicryl. The mesosalpinx, ovarian ligament

193
and fallopian tube can then be clamped, divided and ligated in a similar manner, thereby separating the adnexum from the uterus. Ensure good haemostasis, wash out the pelvis with body-‐temperature saline or sterile water, and close the incision in layers.
3) Surgery for PID Indications: Suspected pelvic inflammatory disease with:
- a tubo-‐ovarian abscess - failure to respond to conservative/medical therapy - generalised peritonitis - septic shock - uncertainty regarding the diagnosis
Surgery for acute PID is a life-‐saving procedure, where the goal is to drain any pus collections, and preserve ovarian function if possible. Definitive surgery, eg: to remove hydrosalpinges prior to IVF, is usually best done once the acute infection has resolved, as excessive haemorrhage due to tissue inflammation is otherwise likely. Incision: Lower midline (can be extended above the umbilicus if necessary) You will need: Knife Electrocautery Gilley’s forceps Abdominal retractor (Goligher) Swabs Straight Kocher’s forceps Russian forceps Heavy pedicle clamps (Maingots or Zeppelins) McIndoe’s/Stilley’s scissors Needleholder Vicryl sutures (1 or 2:0 on a round-‐bodied needle) Straight Mayo scissors
Procedure: Two main types of surgical treatment can be performed:
- laparotomy with drainage of any pelvic abscess(es), eg: in a young patient who still wants to have children
- laparotomy with total abdominal hysterectomy and bilateral salpingo-‐oophorectomy, eg: in an older patient whose family is complete, or in a patient with septic shock

194
During the laparotomy: - examine the entire peritoneal cavity thoroughly for abscesses, which, if
found, should be opened and irrigated - wash out the peritoneal cavity with body-‐temperature saline at the end of
the procedure
A relook-‐procedure may be required after 24 hours if there is on-‐going sepsis and formation of pus.

195
Chapter 31
Abdominal Hysterectomy Valentin Stefan Definition Surgical removal of the uterus, or only of the uterine corpus in the case of subtotal hysterectomy, through an abdominal incision. Indications Hysterectomy is the most frequently performed gynaecological operation on women. The majority of hysterectomies are performed for symptomatic or large uterine leiomyomata. Other, more rare indications are endometriosis, adenomyosis, uterine (including cervical) cancer, ovarian and tubal cancer, pelvic inflammatory disease and abnormal uterine bleeding. The prolapsed uterus is most often removed through the vagina. Total or subtotal hysterectomy? The evidence accumulated so far does not indicate a difference in outcome, regarding the postoperative recovery, sexual function, urinary tract and bowel problems or pelvic organ prolapse between the two techniques. The decision remains to be taken considering the postoperative fate of the remaining cervix (will regular Pap smears be done?), the technical difficulty of removing it, for instance due to tight adhesions and the need for speedy surgery due to an unforeseen intraoperative complication. Should ovaries be removed at hysterectomy after the age of 45? This debate is still continuing. The results of the follow-‐up of a large cohort of women who had hysterectomy for benign conditions showed that the removal of the gonads protects against cancer of the ovary and of the breast whilst increasing the risk for hypertension, coronary heart disease and osteoporosis. A decision should be made in consultation with the patient and her family, considering the existing family risks for breast and ovarian cancer and the prospects of the patient of regularly taking oestrogens in the years following the operation. Preoperative preparations Obtaining informed consent. It is important that the patient and her family understand the operation and its consequences. Intra-‐ and postoperative possible complications should be presented and discussed in detail. The mortality from hysterectomy for benign conditions is very low, at 1-‐2/1000 cases, but death remains a possible, though remote, consequence of the operation. Another very real issue is the emotional response that women, in all cultural contexts, may develop to the absence of the uterus. The organ is a symbol of feminity and fertility and its loss may have an impact on the patient’s self-‐esteem

196
and possibly be perceived as a diminution of her position in the family and social group she lives in. At other times, hysterectomy is associated with fears of libido and sexual gratification decline, or a diminished sexual attractiveness. These issues must be addressed during counselling, even if the patient does not raise them herself. Clinical and laboratory evaluation. A thorough history and clinical examination would detect all pathology that needs to be optimised before surgery. Investigations should be tailored according to the clinical findings and may include chest radiographs, electrocardiograms, pelvic ultrasound scans or magnetic resonance imaging. Many patients are anaemic due to chronic blood loss; the extent of the problem should be evaluated by a complete blood count and corrected to at least a haemoglobin concentration of 10 g/dL, by haematinics or transfusion prior to surgery. The kidney function tests and random or fasting blood sugar levels should be checked. A preoperative pregnancy test in fertile women and a recent Pap smear are also part of the work-‐up. Women over the age of 40 with a history of irregular vaginal bleeding should have a preoperative endometrial histologic examination to rule out malignancy. Last but not least, a HIV test should be proposed to the patient before surgery. The pre-‐anaesthetic visit. While all patients should be seen, special care should be taken to inform the anaesthetist of all potential problems detected during the preoperative evaluation. Further investigations or additional treatments might need to be done after the pre-‐anaesthetic visit. Preparation of the bowel. A laxative such as Bisacodyl given early in the morning before surgery would contribute to empty the rectum. More extensive preparation should be done if possible bowel involvement during surgery (extensive adhesions, edometriosis of the rectovaginal septum) is foreseen. Anaesthesia The type of anaesthesia should be decided by the specialty team. It will be mostly always general anaesthesia due to good airway control, good relaxation and a flexible duration, corresponding to surgical needs. Intravenous prophylactic antibiotics. Administering a single dose of prophylactic cephalosporin of the first or second generation, just before the anaesthetic induction, has been shown to reduce substantially the infective complications of surgery. Should the operation last longer than 3 hours, a second dose will need to be given. Surgical technique
1) Positioning the patient. For an abdominal hysterectomy for benign disease, the patient is usually positioned in dorsal decubitus. The right-‐handed surgeon stands next to the left side of the patient, to use better his dominant hand. A left-‐handed surgeon will stand on the opposite side.

197
2) Pubic hair. The shaving of the pubic hair should be done on the operating table. This is often not necessary and may be replaced by clipping. Shaving opens small excoriations in the skin which, depending on the duration of exposure, may harbour bacteria and increase the risk of wound infection.
3) Antiseptic measures. The skin is prepped with antiseptics from the upper third of the thighs to just under the coastal margin. The vulva and vagina are cleansed with non-‐irritating antiseptics. The patient is covered in sterile surgical towels. A Foley catheter, draining in a closed bag, should be inserted in the bladder, to be left in situ until the next day.
4) Examination under anaesthesia. Sometimes the anaesthesia offers the opportunity to evaluate the pathology again, under optimal circumstances, to enable a more adequate operative plan.
5) Choice of incision. Most of the uteri that are not larger than a post-‐partum one may be removed through a transversal suprapubic incision, usually a Pfannenstiel coeliotomy. Should the organ be larger or should exploration of the upper abdomen be required, such as in ovarian malignancy staging, a midline sub-‐umbilical incision, possibly extended above the umbilicus, would be suited.
6) Incision technique. For a Pfannenstiel incision, the skin is opened transversally with the scalpel, in a slightly arcuate line, some 3 cm above the cranial margin of the symphisis of the pubic bones. The subcutaneous fat is incised in the same fashion. Some surgeons prefer the electrocautery for fat incision. Haemostasis of larger bleeders is done by coagulation. Towards the ends of the fat incision, the superficial epigastric vessels will be encountered and care should be taken to coagulate these thoroughly. A couple of short (2 cm) transversal incisions are made into the recti abdomini sheath on both sides of the midline, with the scalpel or cautery. The scissors are now inserted under the sheath, then opened and retracted, in order to initiate the separation of the sheath from the rectus muscle. The aponeurosis is then incised with scissors in lateral direction, also following a slightly arcuate line. The cranial edge of the sheath is now lifted with a couple of Allis clamps and it is digitally separated from the recti, in the direction of the umbilicus, taking care to coagulate thoroughly the arteries that circulate between the muscles and the sheath, least they retract and continue to bleed even postoperatively, producing subaponeurotic or subcutaneous haematomas. To perform this dissection the connective tissue uniting sheath with muscles in the midline should be incised with scissors. The same dissection should take place downwards towards the symphisis. The recti are now separated digitally in the midline, revealing a narrow strip of peritoneum covered by the fascia properitonealis. The peritoneum is elevated with two forceps placed 1-‐2 cm from each other, as close as possible to the upper end of the interstice in the recti and opened carefully with the scalpel or the scissors, avoiding any injury to the bowel. The latter will separate itself from the peritoneum as soon as some air enters the virtual peritoneal cavity. The incision is now enlarged downwards with scissors, taking care not to cut open the bladder.

198
7) Exploration of the abdomen. The anatomy and pathological changes of the pelvic organs should be noted. Adhesions should be dissected as far as possible, in order to reconstitute the normal anatomy of the uterus, adnexa and surrounding structures. The organs situated in the upper abdomen should be palpated: bowel, omentum, stomach, liver, gallbladder, pancreas, spleen, paraaortic nodes and kidneys. Should significant anomalies be found, a surgeon may need to be consulted.
8) Exposing the pelvic cavity. The bowel is packed and repealed out of the pelvis with wet gauze swabs. A self-‐retaining retractor is installed.
9) Installing traction forceps on the uterus. Two straight long Kocher forceps are grasping the round ligaments, tubes and uteroovarian ligaments on each side of the uterus, close to the uterine horns.
10) Sectioning the round ligaments. One round ligament is clamped with a Meingot forceps, some 5 cm from its uterine insertion, then cut with scissors and tied with 1x0 Vicryl passed with a tapered needle through the fold of the broad ligament. The same type of suture and needle will be used for the rest of the hysterectomy. The peritoneal incision thus created is continued in the direction of the uterine isthmus by inserting the scissors closed under the peritoneum, with the tip towards the ventral direction, then opening and retracting them whilst open and cutting the dissected peritoneum. This incision is aimed at the point where the peritoneum is no longer adherent to the isthmus. The same technique is used to extend the incision dorsally, parallel with the infundibulo-‐pelvic ligament, for 3-‐4 cm. The manoeuvre is repeated on the opposite side.
11) Exploring the retroperitoneal organs. Some authors recommend at this point opening the broad ligament through the incision made as above, by blunt dissection, and identifying the external and internal iliac vessels, as well as the ureter.
12) Separating the adnexa from the uterus. A hole is now made in the posterior sheath of the broad ligament, by blunt dissection with the tip of a finger from posterior in anterior direction, right under the adnexal blood vessels; the avascular spot may be identified when holding the ligament in such a manner that the operative light transilluminates it. The adnexal pedicle thus isolated is clamped with a Heaney (or Maingot) forceps and sectioned with scissors. Care should be taken not to crush the ovary, but to clamp only the uteroovarian ligament. Haemostasis is achieved by tying the pedicle with 1x0 Vicryl anchored with the needle. Should the ovary and tube need to be removed with the uterus, the broad ligament is perforated more laterally and the infundibulo-‐pelvic ligament is clamped, sectioned and tied as above.
13) Dissecting the bladder. The incision of the anterior sheath of the broad ligament is completed in front of the isthmus. The peritoneum is then held with a Russian forceps and the dissection plane between bladder and isthmus is opened with scissors. The bladder is then advanced by blunt dissection, with the fingers or a sponge on a forceps. This dissection should not be extended laterally beyond the margins of the cervix, least large blood vessels or the ureter may be lacerated. During the manoeuvre,

199
the finger or swab is permanently in contact with -‐ and exerts some pressure on -‐ the cervix, to avoid perforating the bladder. The bladder is freed until below the tip of the cervix.
14) Sectioning the uterine vessels. The uterine pedicle is now prepared, by incising the posterior sheath of the broad ligament towards the isthmus and dissecting off some of the connective tissue that surrounds the uterine vessels. A Heaney clamp is applied perpendicular on the pedicle, at the level of the isthmus, initially grasping a little of the uterine side and letting the tip of the clamp slide off the uterus as it is closed, to make sure that all vessels, even the closest to the uterus, were clamped. Some recommend a second Kelly forceps to be installed slightly cranial to the Heaney. Another Kelly clamp will be put on the vessels somewhat higher, to prevent retrograde bleeding. The pedicle is now sectioned with scissors, leaving a few millimetres above the lower forceps, to prevent the tissue from sliding off the clamp. A ligature is passed with the needle under the tip of the lower forceps and tied. The same procedure is followed for the other uterine pedicle, except that there will be no retrograde bleeding.
15) Subtotal hysterectomy. Should a subtotal hysterectomy be desired, the isthmus would now be cut with the cautery in a slightly wedged shape, just above the level where the uterine arteries were tied. The stump would be sutured with figure-‐of-‐eight stitches.
16) Sectioning the cardinal ligaments. The parametrial tissue in the base of the broad ligaments is now clamped with a Heaney or Maingot forceps, this time placed parallel with the axis of the cervix and as close as possible to it, using the same sliding technique described in 13 above, to ensure that the instrument is as far as possible from the ureter (which is some 2 cm lateral from the cervical side). The pedicles thus clamped are cut from the uterus, again leaving 2-‐3 mm from the side of the forceps jaws, to prevent it from sliding off. Haemostasis is then secured with anchored ligatures passed with the needle under the tip of the forceps. The same is done on the opposite side. This procedure may need to be repeated should the cervix be long.
17) Sectioning the vagina. When the cervix was freed close enough to its end, two Heaney forceps may be placed across the uterosacral ligaments, remaining parametrial tissue and the vaginal fornices, just under the cervix, as horizontal as possible. The rectum is usually much lower and does not need to be dissected; otherwise its separation from the vagina should be done before applying the Heaney forceps. The vagina is then sectioned and the uterus removed; it should be inspected and sectioned before the end of the operation, to ensure that it has no malignancy that might change the operation plan. Sometimes, when the intravaginal portion of the cervix is very long, this procedure would shorten the conduit excessively. It is then better to incise the organ just below the cervix and then to clamp the sides of the conduit starting from the incision made.
18) Closing the vagina. The two Heaney forceps are replaced by anchored ligatures. The rest of the vagina is closed with a running continuous Vicryl

200
suture, whose ends may be left long to serve as traction sutures during inspection for haemostasis control.
19) Haemostasis control. The blood that may have accumulated in the pelvis is suctioned as far as possible, and then the area is washed with warm saline. After suctioning the washing fluid, each tied pedicle and dissection surface is inspected for bleeding. Electrocoagulation or ligatures may be used to complete the haemostasis.
20) Closure. The pelvic peritoneum is not sutured. The parietal peritoneum also does not need to be sutured. The sheath is closed with a continuous running Vicryl or Nylon (or PDS) 1x0 stitch, on a cutting edge needle. Should the adipose layer be thicker than 2 cm, it would need to be sutured separately with Vicryl 1x0 or 2x0. The skin is closed with Nylon, staples or intradermic Vicryl Rapide.
Tactical myomectomy Sometimes, a myoma is situated on the side of the uterus and prevents access to the uterine pedicle, which may also be spread on the surface of the tumour. Removing only this particular myoma would restore the normal anatomy of the area and enable a safe clamping of the uterine vessels. The same may apply to a large myoma that is grown in the broad ligament or in the cervix. Tactical subtotal hysterectomy This may be considered when a large uterus renders the removal of the cervix excessively difficult. The remaining cervix is grasped with one or two long Kocher forceps and the hysterectomy continues as usual. Intraoperative complications Slipping of pedicles out of clamps. This happens sometimes with very thick and short pedicles, when the forceps has not been closed with maximum pressure, when the wrong forceps was used or when the pedicle was cut too short. There is usually abundant bleeding, requiring efficient suctioning. Ideally, two right-‐angled cholecystectomy forceps should be used to pick up the short pedicle and clamp it before installing a ligature passed with the needle. The danger of using other types of forceps is that the ureter may be involved in clamping or in the subsequent ligature. Ligating the ureter. Should precautions be taken when clamping an infundibulo-‐pelvic pedicle or the parametria, the ureter would be spared. The diagnosis is established by cystoscopy, when one of the ureters is not seen to eject any urine. A re-‐laparotomy with the assistance of an urologist is necessary. Perforating the bladder. The organ should be closed in two layers with Vicryl 2x0: a first musculo-‐submucous layer and a second one, musculo-‐musculous. Sutures could be separate or continuous running. The Foley catheter should now be kept in place for 10 days. Perforating the bowel. The lesion should be sutured in two layers of separate stitches, with Vicryl 2x0 on a tapered needle, perpendicular on the axis of the intestine to prevent stenosis. The first layer is sero-‐submucous and the second sero-‐musculous. A general surgeon should be called for assistance.

201
Postoperative care. The general prescriptions of postoperative care would apply. The vital parameters should be monitored closely until recovery from anaesthesia, thereafter two-‐hourly. Good hydration should be ensured by infusing Maintelyte at a rate of 150 mL/hour, until the patient starts to drink again. Vaginal bleeding should be noted and quantified. Good analgesia should be ensured. The patient should be able to drink and eat the day after surgery. She should ambulate and the catheter and drip can be removed. Discharge from hospital may occur on day 3, even if she has not passed stools or gas as long as she eats well, there are bowel sounds and there is no gross abdominal distension to suggest ileus. She can resume usual activities in four weeks, including intercourse.
Fig. 1: Myomatous uterus

202
Fig.2: Self-‐retaining retractor in place. Two straight Kocher forceps are attached to the sides of the uterus to enable traction.
Fig. 3: The left round ligament was clamped and is being cut.

203
Fig. 4: The peritoneum of the anterior leaf of the broad ligament is being dissected before incision.
Fig. 5. A window is created in the left broad ligament by digital perforation, to isolate the tube, utero-‐ovarian ligament and their vessels.

204
Fig. 6: The tube and utero-‐ovarian ligament, together with the accompanying blood vessels, were clamped.
Fig. 7: The adnexa were cut off from the uterus, retaining their blood supply form the infundibulo-‐pelvic ligament. A suture is passed with the needle through the cut pedicle.

205
Fig. 8: The peritoneal incision is completed in front of the isthmus.
Fig.9: The separation of the bladder from the cervix is initiated by sharp dissection.

206
Fig.10: The dissection of the bladder is continued with a swab held by forceps.
Fig.11: The left uterine pedicle was double-‐clamped. Another forceps is placed cranial to the site of clamping of the uterine pedicle, to prevent retrograde bleeding.

207
Fig. 12: The right uterine pedicle was cut and a ligature is being passed with the needle under the lowermost forceps.
Fig. 13: The left cardinal ligament is clamped as close to the cervix as possible, to avoid ureteral involvement.

208
Fig. 14: A ligature is passed under the tip of the forceps.
Fig. 15: The left utero-‐sacral ligament is clamped separately this time. It will be sectioned and tied.

209
Fig. 16: An incision is being made in the anterior wall of the vagina, at the top of the vaginal fornix. This technique preserves maximum vaginal length when the cervix is long or tumoral.
Fig. 17: The side of the vagina was clamped, together with the adjacent parametrium and is being sectioned.

210
Fig. 18: The sectioned vagina is being lifted with two Allis clamps. The suture secures haemostasis of the forceps holding the vaginal side, where most of the blood vessels are found.
Fig.19: The vagina was closed with a continuous suture.

211
Chapter 32
Hysterosalpingography
Malika Patel
A hysterosalpingogram is a radiological examination that involves the injection of a radio-‐opaque dye through the cervix in order to visualize the uterus and tubes and to assess tubal patency. Indications: Infertility workup Detect uterine abnormalities Assessment of tubal patency Evaluate results of tubal surgery Preparation: Done in the first half of the cycle Antibiotics to be started 1 day prior to procedure and to complete 5 day course Doxycycline 100mg bd Flagyl 400mg tds Analgesia
Indocid 100mg pr 30 minutes before procedure to alleviate spasm when dye is injected
Complications: Infection: 0.3%-‐1.3% in low risk settings and up to 3% in high risk populations Allergic reaction to dye: skin rash, itching, shortness of breath, swelling of the throat or in other parts of the body Vasovagal reaction Damage to uterus or fallopian tubes Extravasation of contrast medium Instruments: Speculum Leech-‐wilkinson cannula Tenaculum Radio-‐opaque contrast medium Procedure Patient should be counseled and consent obtained Lies supine on bed

212
Control Xray taken Vulva cleaned Speculum inserted Cervix cleaned Anterior lip of cervix grasped with tenaculum Leech Wilkinson cannula used to cannulate cervix Speculum pulled back slightly in order to visualize cervix and endocervical canal on contrast films Contrast injected and this fills the uterus and fallopian tubes and should spill out into the peritoneal cavity. Serial X-‐Rays taken by radiologist Instruments removed post procedure.

213
Chapter 33 Open abdominal myomectomy Kendall O’Callaghan Indications: Used for the surgical treatment of symptomatic uterine fibroids in a woman who wishes to retain her uterus and in whom medical treatment, laparoscopic myomectomy or hysteroscopic fibroid resection is not appropriate. Surgical procedure The general technique of abdominal myomectomy was introduced more that 150 years ago, but it was not until the advent of blood transfusion and safer anaesthesia that it became more commonly practiced. More that 70 years ago, Bonney and others developed many of the practical technical components of the procedure. • Pre-‐operative assessment
o Imaging An ultrasound scan should be done to determine the size and location (subserosal, intramural, submucosal, broad ligament or cervical) of the fibroids. It might be necessary to perform outpatient hysteroscopy to determine if there are submucosal fibroids.
o Pre-‐operative counselling In addition to routine pre-‐operative counselling, women need to be informed of the small risk of the need to proceed to hysterectomy in the event of uncontrollable haemorrhage. This risk is quoted as 1-‐2%.
o Prophylactic antibiotics The routine use of prophylactic antibiotics should be considered good and standard practice. A single preoperative dose of a cephalosporin and metronidazole should cover the full range of potential pathogens.
o Bowel preparation It is good practice to perform bowel preparation before major abdominal surgery where there is a potential for bowel injury (previous extensive surgery, known adhesions, extensive endometriosis), however, this approach is not based on research evidence.
o Thromboprophylaxis The use of thromboprophylaxis is considered standard practice. This should include fitted thrombo-‐embolic stockings and the application of pneumatic calf compression during the operation, and the use of low-‐molecular-‐weight heparin until the patient has established full mobility postoperatively.
o Pre-‐operative anaemia

214
Any pre-‐existing anaemia should be corrected before the procedure and all women undergoing myomectomy should have 2 units of packed cells crossmatched for the procedure.
• Intra-‐operative measures and surgical technique o Adequate exposure
Abdominal myomectomy can be performed through a transverse suprapubic (modified Pfannenstiel) incision for small myomas, or a vertical midline incision for larger myomas. Once the peritoneal cavity is opened, the pelvis is explored and the uterus with the fibroid is exteriorised. A myoma screw is useful in steadying the fibroid and manipulating the uterus. Warm, moist abdominal packs are used to push the intestines up into the upper abdominal cavity, out of the operative field. The Pouch of Douglas can be packed with warm moist swabs to keep the uterus elevated. An abdominal retractor may be used, but is not always necessary.
o Reduction of intraoperative blood loss 20units vasopressin in 100ml normal saline is injected into the myometrium and around the fibroids (see later). This decreases blood loss by causing vasoconstriction, and in addition assists with hydrodissection of the cleavage plane.
o Uterine incision The position of the uterine serosal incision is determined by the size, number and location of the fibroids and their proximity to the uterine vessels and fallopian tubes. A single, anterior, midline vertical incision to remove as many of the fibroids as possible without breaching the uterine cavity is ideal. Adjacent fibroids can be mobilised towards the initial incision and removed without making a separate uterine incision. Adhesion formation is minimised by limiting the number of uterine incisions. Posterior wall fibroids will require a posterior vertical incision. The uterine incision should be performed with cutting diathermy and should extend through the serosa, myometrium and into the capsule of the fibroid.
o Dissection Once identified, the fibroid should be grasped with a myoma screw or single toothed tenaculum to apply appropriate traction. Once the cleavage plan between the fibroid and the surrounding myometrium is determined with the aid of a dissecting scissors, a finger can be used to enucleate the fibroid from its bed. Dissection of the fibroid from its pseudocapsule with electrocautery reduces blood loss. Ideally the endometrial cavity should not the breached. If the endometrial cavity is breached it should be repaired with fine interrupted extramural 2/0 vicryl sutures. The patient should be informed about this postoperatively and advised to deliver her subsequent pregnancies by caesarean section in order to avoid uterine rupture. An effort should be made to identify and remove all fibroids in order to prevent re-‐operation.
o Closure
215
In order to avoid the formation of a haematoma, the dead space should be adequately closed. This can be done with interrupted figure of 8 sutures using 1/0 vicryl. Be careful not to remove too much redundant myometrium as this will leave the final serosal wound under tension which could promote the development of a fibrous weak scar in the uterus. The serosa is approximated using a continuous subserosal suture (herringbone suture) using vicryl 1/0 – see classical caesarean section. This results in almost no suture material exposed on the surface, minimising the risk of adhesion formation. Finally, the peritoneal cavity is lavarged with warm water to wash out any remaining collection of blood.
• Postoperative management
Adequate hydration, adequate analgesia and early mobilisation are mandatory as in any other case of laparotomy.
Fibroids in challenging locations • Cervical fibroids
o Occur in +/-‐ 3% of cases o Pre-‐operative localization is important as it guides counselling of patient
regarding increased risk of hysterectomy o Challenging for several reasons:
§ Complex blood supply § May involve distal part of ureter § May displace the uterus upwards if the fibroid is central and
circumferential o If fibroid is central and anterior, divide uterovesical peritoneum transversly
and reflect bladder down. Then bisect uterus downwards from above to remove the fibroid.
• Broad ligament fibroids
o Increased potential for ureteric injury o Ureter must be identified before any attempt to remove fibroid as fibroids
can alter the course of ureter o When ureter cannot be identified, the fibroid should be approached from
above and the capsule entered to a deeper level than usual with enucleation from within the capsule. This ensures that ureter is kept out of operative field.
o Adequate closure of dead space and closure of visceral peritoneum will aid haemostasis.
Risks and complications Early
• Bleeding o see techniques to minimise blood loss o Risk of uncontrollable haemorrhage leading to hysterectomy 1-‐2%
• Infectious morbidity, atelectasis, urinary tract complications, bowel injury, paralytic ileus, venous thromboembolism -‐ rare

216
Late • Adhesions, leading to:
o Pain, infertility, ectopic pregnancy, bowel obstruction Important aspects of myomectomy:
• Minimise intraoperative blood loss • Minimise adhesion formation • Prevent recurrence
1) Minimise blood loss
• Physical occlusion o Intra-‐operative myomectomy clamps / tourniquets to occlude
uterine and ovarian arteries o Intra-‐operative uterine artery ligation o Preoperative uterine artery embolisation
• Preoperative drugs o Preoperative GnRH agonists
§ Pre and post operative haemoglobin were significantly improved by the use of GnRH analogues prior to surgery, however it has been shown to increase the risk of recurrence of fibroids because smaller fibroids shrink and are ignored at the time of surgery
• Chemical haemostatics o Intramyometrial vasopressin
§ Vasopressin causes contraction of all smooth muscles (including vascular smooth muscle), leading to vasoconstriction which reduces blood flow from the uterine artery to the peripheral blood vessels.
§ Vasopressin is injected into the myometrium and around the fibroids – 20units vasopressin in 100ml normal saline
§ Intravascular injection should be avoided as it had the potential to cause bradycardia and raised blood pressure.
§ Haemostatic effect lasts 30 – 45 min o Intravenous tranexamic acid
§ No difference in peri-‐operative blood loss and blood transfusion requirements when compared with placebo
§ 1g tranexamic acid by slow IV injection at the time of induction of anaesthesia
• Surgical dissection techniques o Use of electrocautery
§ Dissection of the fibroid from its pseudocapsule with electrocautery reduces blood loss
o Morcellation of the fibroid § Morcellation techniques have not been found to be
advantageous in conventional open abdominal myomectomy.
2) Minimise adhesion formation

217
• Prophylactic antibiotics • Minimise number of uterine incisions • Closure of uterus with continuous subserosal sutures (absorptive and
minimally reactive) • Keep uterus and fallopian tubes moist and avoid touching
unnecessarily during the procedure • Flush the fallopian tubes regularly with heparin to prevent clot
formation • Use of anti –adhesion agents (interceed) • Meticulous haemostasis during the surgical procedure.
3) Prevent recurrence
• Ensure removal of all fibroids

218
Chapter 34
Vaginal Hysterectomy Stephen Jeffery The vaginal hysterectomy is arguably the most elegant operation in gynaecology. When compared to the abdominal approach, the vaginal hysterectomy has significant advantages for women undergoing this operation. Pre-‐operative assessment Prior to embarking on a vaginal hysterectomy, ensure that the woman is suitable for removal of the uterus using this approach. The following aspects need to be considered: Indication for hysterectomy Some women may require additional intra-‐abdominal procedures and assessment. This should be borne in mind, particularly when the hysterectomy is being done for gynaecological malignancy. It is occasionally difficult to remove the ovaries vaginally and if the surgeon is not comfortable with this and an oopherectomy is necessary, then the abdominal approach should be chosen. Likewise, if there is a large ovarian mass or cyst then the uterus should not be removed vaginally. Other abdominal procedures such as omentectomy and lymph node dissection would obviously preclude vaginal hysterectomy. The role of the laparoscope is expanding and the Laparoscopic Assisted Vaginal Hysterectomy is an option under these circumstances. Parity If the woman is nulliparous, vaginal hysterectomy is still possible but it may be difficult and this should be borne in mind especially in the hands of an inexperienced vaginal surgeon. Previous Caesarean Section This is not a contra-‐indication but it may result in a difficult anterior dissection and the inexperienced surgeon should bear this in mind Uterine size It is possible to remove a large uterus vaginally. The larger the uterus, the greater the difficulty of the surgery, however, and simply because it is possible does not mean one should proceed via the vaginal route. A simple and quick abdominal hysterectomy may be associated with fewer complications than a long, difficult vaginal hysterectomy. Most surgeons would consider 14 week as a size cut off for uterine size for vaginal hysterectomy.

219
The operation Equipment
• Infiltration Solution • Tissue clamps
I like using Allis forceps since they tend to grasp the vaginal tissues firmly without causing trauma. Some surgeons use Kochers forceps or Littlewood forceps. Make sure you have at least 8 – 10 of these tissue clamps.
• Catheter with bag • Knife (Scalpel-‐ I like using a no. 11 blade but a no. 15 is suitable) • Sharp Metzenbaum or Stillis scissors • Gillis forceps • Side wall retractors. I like Landon retractors but a Simms speculum or a
Wertheims retractor will also work. • Heaneys or Maingots clamps x 2 • Vicryl 1 x 4 • PDS 0 x 3 • Vicryl 2/0 • Loose mayo needle • Vulsella x 2
The operation
• Catheterise the bladder and ensure that it is empty. I prefer to perform the surgery with the catheter in situ. This reduces the risk of inadvertent bladder injury.
• Perform a bimanual vaginal examination to assess the uterine size and exclude any adnexal masses that may have been missed in the pre-‐operative work up
• Place a vulsellum on the anterior part of the cervix and another on the
posterior aspect.
• Inject the infiltration solution into the peri-‐cervical tissues going around the full circumference –remember to inform the anaesthetist
• The next step involves a circumferential incision around the cervix. The
manner in which this part of the operation is done varies. One option is to make an inverted –V at 12 o’clock. The apex of this can extend some length onto the anterior vaginal wall especially if there is significant anterior compartment prolapse that needs repairing following the vaginal hysterectomy. If there is no anterior prolapse, a simple circular incision will be adequate. Experience will give you an idea as to high far you should make this from the cervical os but usually the incision is about 2 to 3 cm up

220
onto the cervix. The incision can be made with a knife or a diathermy blade. The depth of incision will be learnt by experience.
• Once the incision has been made, place an Allis forceps on the 12 o’clock
upper edge of the incision and ask an assistant to retract upwards.
• Place the teeth of the upper vulsellum in the cervix side (lower edge) of the anterior part of the incision and ask your assistant to retract upwards.
• Take a Metzenbaum or Stillis scissors in your dominant hand and a Gillis
forceps in the other.
• Retract the bladder tissue away from the cervix and commence the dissection in that plane with the curve of the scissors pointing towards the cervix.
• Dissect onto the cervix while looking for the peritoneal reflection of the
bladder onto the uterus. I prefer sharp dissection for this step but many experienced surgeons use one layer of a Raytec swab (Figure 1) over the index finger and with gentle pressure on the cervix and pushing upwards the plane and reflection as described can be found (Figure 1). The disadvantage of this technique is that there is a greater risk of bladder injury.
Figure 1

221
• The peritoneal reflection between the uterus and the bladder is a clear shiny membrane and once this is clearly seen, a bold incision into this layer will take you into the vesico-‐uterine pouch.
• Once you have made your incision and are sure you are in the peritoneal
cavity, place the end of the retractor (Wertheims or Landon or equivalent) inside the peritoneum and ask your assistant to retract anteriorly.
• Accessing the peritoneal cavity anterior to the uterus is potentially a
difficult aspect of the vaginal hysterectomy. If you are having difficulty, continue with sharp dissection. It helps if your assistant provides good retraction anteriorly with the Wertheims or equivalent retractor. This pulls the bladder out of the operative field and provides good traction on the peritoneal tissues as you dissect upwards towards the fundus of the uterus. Make sure the assistant is also providing firm downward traction on the cervix by pulling on the vulsella. If you continue to experience difficulty stop the attempt at getting in anteriorly and move to the posterior dissection.
• Place two Allis clamps on the bottom edge of the posterior part of the
circumferential incision.
• Ask your assistant to retract firmly downwards on these Allis clamps.
• Ask the assistant to pull firmly upwards on the lower vulsellum
• With the scissors in the dominant hand again and the Gillis in the other retract the peri-‐rectal tissue down and dissect in an attempt to access the Pouch of Douglas
• Once a hole has been made in the Pouch of Douglas, it can be extended
laterally by opening the tips of a pair of scissors or using two index fingers and extending it laterally.
• Once you are in this pouch place a Simms speculum into it and ask your
assistant to provide downward traction.
• If you have not been able to access the anterior peritoneal cavity as yet, place a finger posteriorly into the pouch of Douglas and curl it over the fundus if possible. You will then be able to see where a safe incision can be made that is clear of the bladder
• If you are still not “in” in the front (anteriorly) or back (posteriorly) or both
defer this for a later step and proceed with the uterosacral ligament ligation. You will need to be more vigilant for bladder and rectal injury.

222
• Using an index finger covered by a Raytec swab in the dominant hand and by placing traction on the cervix by pulling the two vulsella with the other, clean off the remaining tissue on the cervix and Uterosacral ligament by pushing cephalad.
• Ask for a Maingots clamp. Open the jaws widely and insert or hook the
lower blade firmly under the Uterosacral ligament and then rotate the instrument up in your hand and get a good bite of the anterior part of the ligament at right angles to the cervix. (figure 2)
Figure 2
• Take the vulsella that are on the cervix in your hand opposite to the side
you are ligating. Ask your assistant stabilse the Maingot clamp and using a curved Mayo scissors or a scalpel, cut the ligament.
• Using a PDS 0 suture, take a bite at the tip of the clamp and then another
bite out of the ‘heel’ and then tie the suture while your assistant takes the clamp from you and releases it when you are satisfied that the suture is secure
• Keep the end of the uterosacral stitch long. This will be used to support
the vaginal vault at a later stage in the operation. Clamp this to the drape with an artery forceps
• Proceed with the Uterosacral ligament on the opposite side and ligate it
similarly.
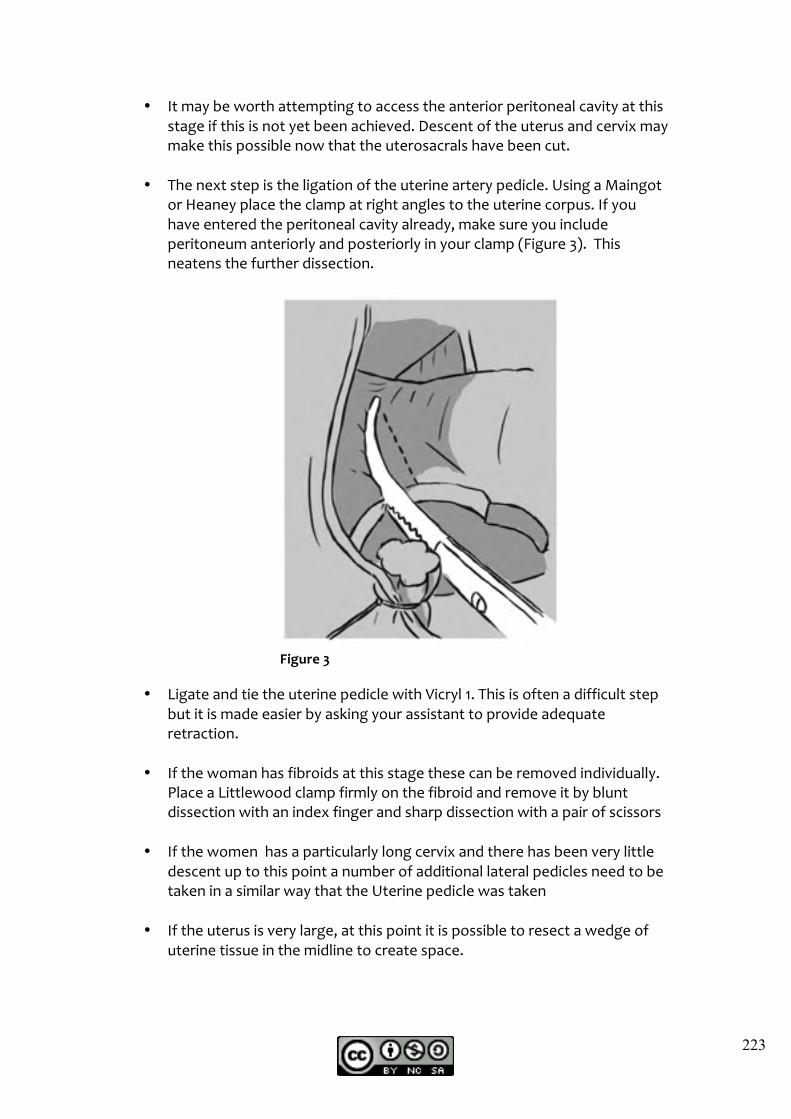
223
• It may be worth attempting to access the anterior peritoneal cavity at this stage if this is not yet been achieved. Descent of the uterus and cervix may make this possible now that the uterosacrals have been cut.
• The next step is the ligation of the uterine artery pedicle. Using a Maingot
or Heaney place the clamp at right angles to the uterine corpus. If you have entered the peritoneal cavity already, make sure you include peritoneum anteriorly and posteriorly in your clamp (Figure 3). This neatens the further dissection.
Figure 3
• Ligate and tie the uterine pedicle with Vicryl 1. This is often a difficult step but it is made easier by asking your assistant to provide adequate retraction.
• If the woman has fibroids at this stage these can be removed individually.
Place a Littlewood clamp firmly on the fibroid and remove it by blunt dissection with an index finger and sharp dissection with a pair of scissors
• If the women has a particularly long cervix and there has been very little
descent up to this point a number of additional lateral pedicles need to be taken in a similar way that the Uterine pedicle was taken
• If the uterus is very large, at this point it is possible to resect a wedge of
uterine tissue in the midline to create space.

224
• Another very useful step is to bisect the uterus. This enables the surgeon to access the top of the uterus more easily and safely and is a particularly indicated when the uterus large and not descending easily. Place the two vulsella on the lateral aspects of the cervix and use a knife to cut the uterus in half from anterior to posterior. Continue up towards the fundus. It is essential to have retractors anteriorly and posteriorly in place. Once you are close to the fundus, place the forefinger of your non-‐dominant had in the back and over the top of the uterus and onto the fundus and pull down towards yourself. Cut the uterus onto your finger and it will now be easy to complete the bisection.
• The next step is to clamp the Infundibulo-‐pelvic ligaments and remaining
attachments.
• Place two Maingots or Heaneys clamps on the remaining pedicle and cut the uterus out on both sides. (Figure 4) Use Vicryl 1 for this step. It is useful to do two ties of this pedicle since slippage of this knot could result in haemorrhage which is difficult to access vaginally.
Figure 4
• Inspect all your pedicles once the uterus is out and place additional sutures on any bleeding areas.
• Inspect the ovaries carefully. • It is important to consider the potential for future vault prolapse and I
usually perform a Mccall Culdoplasty at this point. This and other techniques to support the vault are described in the chapter on apical prolapse.

225
• Tie your Uterosacral ligament sutures together in the midline.
• Using a Mayo needle bring the Uterosacral ligaments through the vault
edge on either side of the midline and keep these to be tied at the end after closing the vault.
• Opinion is divided regarding the advantages of closing the peritoneum.
Proponents of this practice suggest that if any further bleeding occurs it is kept outside the peritoneal cavity and there may be a tamponade effect.
• Closure of the peritoneum is performed by making a purse-‐string using
Vicryl 2/0.
• The vault is now closed using vicryl 2/0 starting in one of the lateral corners and doing a continuous locking stitch to the opposite corner.
• If an anterior repair is to be performed in the same patient, this should be
done as follows prior to closure. Place your Allis clamps in the midline and extend your vault incision as necessary. Perform the repair as described in chapter on anterior repair. The closure of the anterior repair and the vault incisions is done vertically ie in the sagittal plane using Vicryl 2/0.
• A vaginal pack should be placed. Some surgeons omit this when there has
been very little bleeding during the operation

226
Chapter 35 Suburethral sling procedures for the treatment of Stress Urinary Incontinence Peter de Jong Introduction Since the introduction of suburethral sling operations to clinical gynaecology in the 1990’s, and with the recent publication of excellent robust 11 years data, this form of surgery for stress urinary incontinence has become the benchmark procedure. The original procedure was the retropubic tension free transvaginal tape, or TVT-‐r, designed by Ulmsten and Petros; the principle of surgical cure depended on – • Mid -‐ urethral placement of the mesh without tension – hence the “Tension
free” description • Type 1 loosely knitted prolene tape of about 10mm width • Cystoscopy after the procedure to confirm bladder integrity These principles have been maintained for all the subsequent procedures, with a few variations. The original procedure is safe and easily mastered with excellent clinical results. A huge number of TVT-‐r operations were done, and still are done by many. It is of particular use in women with intrinsic sphincter defects and limited urethral mobility. However there have been several deaths following TVT-‐r due to bowel perforation and major blood vessel damage. To prevent these problems, the transobturator approach was designed to obviate these complications, by avoiding the possibility of needle passage through, or near the pelvis. The transobturator “outside – in” or “TOT” was described early in the new millennium. Initially this TOT procedure suffered from tape problems – but switching to Type 1 amid material, reduced the problems of tape erosion. Subsequently the transobturator “inside out” procedure “TVT-‐O”, using the original TVT-‐r tape was introduced. These new generation procedures utilize the same principles of tension – free mid urethral tape placement, and are probably safer in that they avoid the possibility of bowel and large – vessel damage. They
227
enjoy the same cure rate as the original TVT-‐r, but because their orientation is more horizontal than “U” shaped, patients have fewer post – operative obstructive lower urinary tract symptoms. If the surgeon is comfortable with the original TVT-‐r, with an acceptable complication rate, there may be little reason to change to an obturator approach. The beginner will find an obturator technique easier to master, with fewer bladder perforations than a TVT-‐r. Recently a new technique of “single incision mini sling” has been described, with short arms locating under the inferior pubic ramus into the obturator muscles. Since the data on these procedures is still very limited, the option of “mini slings” will not be discussed. The following procedures will be described. • TVT-‐r (tension free vaginal tape – retropubic) • TOT (Transobturator tape: outside in ) • TVT-‐O (Tension free vaginal tape – obturator : inside out) Prior to surgery, it is assumed that all patients have clinically demonstrable stress urinary incontinence, void normally, and don’t carry an excess post residual urine volume. Tension Free Vaginal tape – retropubic approach (TVT-‐r) Patient positioning The woman is positioned in lithotomy, with her buttocks on the edge of the theatre table. The hips must be well flexed to 100° or 110°, to reduce the risk of complications. [Tip: to prevent orthopaedic hip discomfort post – operatively, ask if she could do squatting exercises twice daily for a week pre – operatively. If she is old, obese or infirm, this may not be possible. Pre – op squats will help reduce post – op hip discomfort.] Anaesthetic Local, spinal or general anaesthetic is acceptable, depending on patient’s preference. Pre – operative preparation Carefully position the patient, avoiding pressure on any bony prominence. Thromboprophylaxis is not indicated. Clean, drape and pass a Foley’s catheter on free drainage. Infiltrate with 100ml of saline mixed with an ampoule of marcaine and adrenalin. A suitable prophylactic antibiotic with gram negative activity may be given. TVT-‐r : The procedure Infiltrate 10 – 15mm below the external urethral meatus, with a green needle, below the fascia. If a bleb is raised with white blanching, the infiltration is too

228
superficial. After generous central infiltration, angle the needle laterally and infiltrate towards the inferior pubic ramus, bilaterally. About 50 – 60ml in the area is sufficient. Now infiltrate suprapubically behind the symphysis vertically downwards, at a point 2cm lateral to the midline, left and right sides. Be generous – 50mls each side of the midline is preferable. All the infiltration will reduce post – op pain and also assist with dissection. The first incision begins 10 – 15mm below the external urethral orifice, extending for 12mm downwards, in the midline. Use a small #15 scalpel blade to begin the dissection laterally, below the level of the fascia, since there is no natural plane and dissection is needed. With a dissecting scissors (Stilles or Metzenbaum) use a “push and spread” technique to dissect laterally and in the direction of the patients’ shoulder, until under the inferior pubic ramus. Take care not to “buttonhole” the vaginal skin, especially if the vaginal sulcus is deep. When one feels the border of the inferior pubic ramus, stop dissecting. Assemble the TVT-‐r with its introducer, and balancing the device lightly in the hand, place the tip in the position previously dissected. Begin on the right side, and advance the TVT “needle” cephalad, in the direction of the ipsilateral shoulder, hugging (but not gauging) the posterior aspect of the symphysis. Emerge through the skin just one finger – width lateral to the patient’s midline: in essence, the left and right needles should be 2 fingers apart. Do not draw the needle upward until you have done a cystoscopy to ensure integrity to the bladder – its easy to spot a large silver object in the bladder. If necessary the device may need to be repositioned. Once you are satisfied the needle is well clear of the bladder (not too close as the tape would erode through the bladder wall if too close), draw the needle cephalad. Repeat this step bilaterally, then focus on correct tension of the tape below the urethra. There are many ways to ensure tension free placement, but an easy way is to place a 5mm dilator between the urethra and the tape. Since the plastic sheaths still cover the tape, adjustments are easily made to ensure correct tension – free placement. Cut the needles off, secure the plastic sheath – ends with artery forceps, and then draw the plastic covers upwards. Keep a scissors or similar instrument between the urethra and tape, to prevent tensioning during this step. Since the tape is elastic, don’t allow tightening of the tape during placement. Check for haemostatis – beware of arterial bleeding suprapubically. Close the skin with continuous vicryl 2/0 or 3/0: it is not necessary to suture the suprapubic incisions since they are no more than 3mm in length. Apply suitable dressing to the skin exit wounds. Post op – What to do. Since the bladder integrity has been verified, the next step is to check for adequate haemostasis. Apply 5 minutes pressure to minor oozing, but if a troublesome bleeder persists, give strong pressure for 10 min (timed on the theatre clock). This will arrest most bleeding, but if not, you may need to open the skin to explore the area. Major complications such as arterial bleeding not arrested by 10min strong pressure are rare. Always be aware of the position of the tips of the needle introducers. Wafting these devices unchecked around the pelvis

229
is a recipe for catastrophe, so mentally visualize the progress of the introducers at all times. Most patients don’t need a saline vaginal pack, but troublesome ooze may require this. Packs are uncomfortable and necessitate a Foley’s bladder catheter. They may (if placed) be removed after 24 hours. After catheter removal, allow the patient to void and if needed check residual sonographically. She may be dismissed if the residual volume is less than 100mls urine. If post void residual exceeds this, she may de discharged with instructions for clean intermittent self catheterization, twice or three times daily. Alternatively depending on surgeon’s or patient’s preference a suprapubic catheter may be placed until spontaneous voiding without excessive residual is achieved. If obstructed voiding persists longer than 4 weeks to 6 weeks, then the tape needs to be cut. This may de done in theatre under local anaesthetic without much trouble. Gently undo the vaginal sutures and cut the tape in the midline. The tape’s free ends will retract markedly. Normal voiding will be restored quickly without too much residual. Obstructed voiding will be restored quickly without too much residual. Obstructed voiding will, sooner or later, cause complications, so cutting the tape after a month is advisable to prevent long – term lower urinary tract symptoms LUTS (previously known as “irritative symptoms”). If the patient complains of LUTS months after the operation, it is worth performing cystoscopy to exclude a tape erosion into the bladder – tape in the bladder will certainly cause a stone, and must be managed perhaps with the help of an urological colleague. The TOT procedure “outside – in” When employing the obturator approaches (outside in or inside out) the hips must be well flexed. This procedure under local anaesthetic will be painful and a spinal or general anasesthetic is preferred. The pre – op preparation is similar to that of the TVT-‐r. The initial incision and dissection is as before, but the surgeon must appreciate that the direction is towards the medial border of the inferior pubic ramus, and not as cephalad. Feel the lateral border of the inferior pubic ramus, and use this as a guide when doing the vaginal dissection. Insert a finger – the left index finger – vaginally along the tract on the left hand side dissection to locate the left subpubic ramus laterally. Make a nick in the skin over the lateral margin of the left inferior pubic ramus, insert the device introducer and locate the tip of the left index finger below the ramus, and draw the tape through medially. Repeat the step on the right side, and arrange the tape suburethrally, tension free, as previously described. Close the vaginal skin; post – op management is as for the TVT-‐r. The vaginal dissection is obviously more extensive than TVT-‐r, since the finger is needed to guide the introducer. This procedure has a higher incidence of vaginal erosions than other methods.

230
The TVT-‐O (“inside – out” procedure) The patient positioning is with hips well flexed the same as that of the TOT, as is the initial incision and vaginal dissection more or less laterally in the direction of the obturator fossa. Since the surgeon’s finger does not have to be introduced, dissection is not as extensive. It is important to use the “winged guide”, which enhances safety. A variety of introducers have been designed for the obturator procedures. The most commonly used for the TVT-‐O is a helical device. When the vaginal dissection is complete, the winged guide is introduced, defining the direction of introduction. The point of the guide may, or may not, puncture the obturator fascia below the inferior pubic ramus. Introduce the tape, impaled on its helical introducer with the handle of the introducer of the device at 45° to the vertical. With one movement, rotate the helical device and bring the handle into the vertical position, with a smooth wrist action. The tip of the TVT-‐O will emerge from the obturator fossa, just lateral to the ramus, at the level of the clitoris. Do not allow the tip of the TVT-‐O to wander out laterally and if so, reposition the tape properly. Close the skin as previously described. It is probably wise to mark the skin pre – operatively with a blue marker, as a guide and insurance – if the exit / entrance points deviate markedly from the correct position, redo the tape placement. In obese subjects the procedures are more challenging, with a greater risk of incorrect placement. The winged guide and skin marking are not only for beginner surgeons, but add an element of safety to the procedures, particularly in the obese patient. Eternal vigilance is the price of safety. Postoperative management of the TOT and TVT-‐O are as previously described. Obstructive voiding is less common than in the TVT-‐r, since tape placement is more horizontal, with less urethral occlusion possible. However, it is for this reason that in cases of intrinsic sphincter deficiency (ISD), the TVT-‐r is probably more suitable. Success rates for obturator tapes are equal to that of retropubic procedures, but the incidence of complications is lower. The TVT-‐O may occasionally be accompanied by non significant thigh pain, which is transient and treated with simple anti – inflammatory agents. It is not invariable necessary to perform routine cystoscopy after obturator procedures, unless some form of complication is suspected. The design of obturator tapes and slings is continuously evolving. The general trend today is to perform obturator procedures – at present, further data on mini single – incision slings is awaited. The complicated caesarean section In this chapter, a surgical approach to difficult caesarean deliveries will be suggested. The cases of –
• Caesarean section for placenta praevia • Caesarean section for poor lower segment access • Caesarean section for breech presentation • Caesarean section for transverse lie

231
• Caesarean section for twins • Caesarean section in cases of extensive adhesions will be described.
Caesarean section in the case of a transverse lie Prior to skin disinfection and operative field draping, always catheterize the patient and ascertain the fetal presenting part. Breech presentation and transverse lie present specific problems – glance at the ultrasound report to ensure the placenta is not praevia, which may account for these situations. When a transverse lie is encounted, it is possible to deliver via a transverse skin incision. If the obstetrician is inexperienced, it is prudent to consider delivery through a midline subumbillical skin incision. Good free access to the lower uterine segment is important: if this is limited and more space is thought necessary, cut the rectus muscle with a scissors from the medial margin laterally, as this increases exposure markedly. Once in the abdomen, review the fetal lie by gentle uterine palpation and manipulation. If the uterus is relaxed, with plenty of liquor, it may be feasible to coax a head or a breech into a central position. Beware of large caliber vessels coursing over the lower segment – these may indicate a placenta praevia and should be tied off with 2/0 vicryl 441 or monocryl 3463 3/0 sutures. Incise and displace the uterine peritoneum with a Russians forceps and Mayo scissors. Have a forceps or vacuum extractor ready to deliver the fetal head. Commence wall suction, and gently incise the lower uterine segment. Open the final few millimeters with a mayo scissors or digitally; and manually feel for the fetal presenting part. If a head is felt, call for fundal pressure and deliver either with Wrigley’s forceps or by vacuum extraction. If you feel feet, seize these and perform gentle breech extraction, keeping the fetal back uppermost. If a cord hand or shoulder emerges, pop these back and feel for the feet. If you feel only the fetal back, then remove your hand, straighten the baby into a longitudinal lie, and re introduce your hand, and deliver the baby. If you open the lower uterine segment and find a placenta praevia, proceed as under “placenta praevia”. Close in the usual manner, if the rectus abdominus muscle was cut, close the muscle with a haemostatic repair using a few figure of 8 sutures – left overs from the uterine closure are excellent for this purpose. Caesarean section in the case of breech presentation It is always wise to ensure the breech presentation is not caused by a placenta praevia: reference to an ultrasound report should clear this. The breech delivery needs more space and better lower uterine segment exposure. Don’t believe that breech deliveries at caesarean section are necessarily easy because the head cannot get stuck!! There is much more to delivery of a breech baby than merely delivery of the aftercoming head. If necessary, increase

232
exposure of the lower uterine segment by incision of the rectus abdominus muscle as previsouly described. Open the uterus, and draw the incision laterally by digital traction. Introduce the right hand and feel for the feet: grasp the feet and firmly draw these downwards. Perform a gentle breech extraction, similar in technique to a conventional vaginal delivery. Always keep the babies back upwards. Close in the conventional way. Caesarean section in the case of a twin pregnancy Don’t assume that twins are small little babies and hence the space and exposure to the lower uterine segment needs to be limited. Give twins the same respect as for a single pregnancy, and this prudence will be rewarded. If ever the operator finds space and exposure limited, extend the skin incision – within reason – and if muscle relaxation is insufficient, resort to cutting the rectus muscles. The idea of a caesarean section is to deliver a baby gently and swiftly – and if access to the infant is limited, then the delivery will be neither gentle not swift. Bear in mind that after a twin delivery, women are prone to a PPH, so it is prudent to administer 1 or 2 misoprostil tablets, orally or rectally, to contract the uterus and prevent blood loss.

233
Chapter 36
Anterior Repair Stephen Jeffery Introduction The surgical repair of the cystocele has a number of variations and techniques differ extensively between surgeons. The technique is also often called anterior colporrhaphy. Keep in mind that recurrence rates for this operation have been quoted to be in excess of 30% and therefore adequate pre-‐operative counselling is necessary prior to embarking on the surgery. Always discuss the option of a pessary with the woman and ensure that the indication for surgery is robust. Pre-‐operative considerations Any women presenting with a cystocele may have other pelvic floor pathology and it is essential to adequately assess her for stress incontinence. Always examine the patient properly to ensure she does not have uterine or vault prolapse that requires attention at the time of addressing the anterior compartment prolapse. The surgical technique for apical (uterine and vault) prolapse and posterior compartment prolapse are addressed in separate chapters. It is very unusual to have an isolated cystocele without prolapse in any other compartment. Operative technique The gynaecologist has three surgical options for repair of the cystocele.
• Traditional native tissue repair • Repair with mesh • Repair with a kit
The advantages and disadvantages of the different techniques are well described in other sources and the reader is encouraged to consult these. In this chapter we will focus on the various techniques. 1. Traditional native tissue repair Equipment
• Infiltration solution

234
• Tissue clamps I like using Allis forceps since they tend to grasp the vaginal tissues firmly without causing trauma. Some surgeons use Kochers forceps or Littlewood forceps. Make sure you have at least 8 – 10 of these tissue clamps.
• Catheter with bag • Knife (Scalpel-‐ I like using a no. 11 blade but a no. 15 is also suitable) • Sharp Metzenbaum or Stillis scissors • Gillis forceps • Side wall retractors. I like Landon retractors but a Simms speculum or a
Wertheims retractor will also work. • Vicryl 3/0 suture on a round body x 2 • PDS 0 on a round body x 2 or 3 • Vicryl 2/0 on a round body
The operation
• It is a good idea to catheterise the women prior to commencing the operation. This will reduce the risk of injury to the bladder. Some surgeons will keep the catheter in-‐situ to keep the bladder empty.
• Place a retractor in the vagina and ask your assistant to pull posteriorly as
you identify the prolapse as it extends from the urethra towards the vault or cervix.
• Starting at the part of the prolapse that is closest to the urethra, place an
Allis clamp (or equivalent) in the midline.
• Place about 5 or 6 Allis clamps in the anterior vaginal wall in the midline about 2 -‐ 3 cm apart over the extent of the prolapse
• If the woman has a cervix, it is useful to place a vulsellum on the anterior
lip.
• If there is no cervix, place a Vicryl 0 suture at the vault on either side so that you can identify the apex or cuff while performing the repair This step is very useful to retain your orientation.
• Inject the infiltrate along the course of the prolapse.
• Make an incision in the midline of the prolapse extending from the top Allis
to the bottom Allis.
• Once you have a continuous incision, place an Allis at the top and bottom corners of your incision.

235
• Place your Allis clamps on the edges of the incision line so as to expose the underlying tissue.
• Ask your assistant to retract firmly on the side. You are going to
commence your dissection and to spread the Allis clamps for you on that side so as to create tension in the vaginal skin edge. This facilitates the dissection.
• With your assistant providing firm traction away from the incision line, use
your Gillis forceps to grasp the tissue underlying the vaginal skin (we will call it bladder fascia) and gently dissect it away from the skin with the Metzenbaum or Stillis scissors. The point of the scissors should be curved towards the skin (Figure 1)
Figure 1
• Dissection using the scissors (sharp dissection) is often considered to be
safer than the alternate technique that employs blunt dissection with swab and/or finger. Nonetheless, many experienced gynaecologists use the blunt dissection technique with relatively few complications. It is easier to perforate the bladder by doing this, however, and it should especially be avoided when the women has had previous surgery.

236
• The initial aim of the dissection is to dissect the underlying bladder fascia off the vaginal skin.
• Subsequent to this, further dissection will lead the surgeon into the tissues
beneath the sulcus.
• If you place your forefinger into your dissection you will feel the inferior ramus of the pubis and, cephalad to that, the soft tissue lateral to your dissection is the medial part of the levator muscle which is covered by levator fascia.
• Going even more cephalad, lateral to your dissection, you will eventually
get to the so-‐called “White line” which is the insertion of the levator on the pelvic side wall and stretches from the pubic bone to the Ischial spine.
• If you have done an extensive dissection, you may be able to feel the
Ischial spine and the Sacrospinous Ligament.
• You will notice once you have completed the dissection that the bladder and its overlying fascia are now free of the lateral attachments to the skin and levator muscle.
• The next step is the bladder fascial plication which involves placing a
number of sutures from side to side so as to reduce the prolapse.
• Start at the top of the bladder mucosa and place five or six vicryl 3/0 sutures from side to side. These can be either continuous or interrupted (Figure 2).
Figure 2

237
• The next step is to place three to four sutures into the Levator fascia. I like to use PDS 2/0 or PDS 0 for this step.
• Using a retractor, ask your assistant to hold the bladder away from the
pelvic side wall and thereby expose the medial aspect of the Levator Muscle and its fascia.
• A PDS 0 or PDS 2/0 suture is placed on the medial aspect of Levator Fascia
and muscle and this is repeated on the other side with the same suture which is cut and the ends left long and clamped for tying at a later stage.
• Additional two or three sutures are placed in the same manner (figure 3).
Figure 3
• The PDS sutures are now tied individually and hereby creating and extra
layer of support
• The excess vaginal skin should be trimmed if necessary at this point
• The skin incision is closed with a locking vicryl 2/0 suture

238
Concomitant stress mid-‐urethral sling procedure When a stress incontinence tape procedure (TVT, TOT, or TVT-‐O) is to be done at the same time as a cystocele repair, the most important point of technique is that it should be done through a separate incision. If one uses the same incision as the anterior repair, the sling is at risk of migrating up towards the bladder neck and this can result in voiding problems and failure of the procedure since it will not be at the mid-‐urethra. My preference is to perform the sling operation first and then to continue with the anterior repair. Since two incisions are required for the sling and the anterior repair, performing the sling operation first allows you to leave an adequate bridge of tissue between the two incisions. 2. Anterior Repair with mesh When placing a mesh into the anterior compartment, it is important to bear in mind that these synthetic materials are associated with significant adverse events including erosion into the bladder or vagina, dyspareunia and infection. The correct technique of mesh placement is essential to avoid the risk of developing complications. Mesh selection is also important. The only suitable grafts are Polypropylene Type 1 grafts. General surgeons routinely employ the use of grafts in hernia repair surgery. Try to avoid using these grafts if possible since they are often very rigid with small pores and may result in unpleasant vaginal scar formation. The ideal graft is a product that has specifically been designed to be placed vaginally. If you are not sure, discuss this with a representative of a devices company such as Johnson and Johnson, American Medical Systems or Boston Scientific. The operation Equipment
• Infiltration ( 60ml) • Tissue clamps
I like using Allis forceps since they tend to grasp the vaginal tissues firmly without causing trauma. Some surgeons use Kochers forceps or Littlewood forceps. Make sure you have at least 8 – 10 of these tissue clamps.
• Catheter with bag • Knife (Scalpel-‐ I like using a no. 11 blade but a no. 15 is also suitable) • Sharp Metzenbaum or Stillis scissors • Gillis forceps

239
• Side wall retractors. I like Landon retractors but a Simms speculum or a Wertheims retractor will also work.
• PDS 0 x 6 • Vicryl 2/0 on a round body
The operation
• Place the tissue clamps in the midline as described for native tissue repair.
• Infiltrate the anterior vaginal wall along the length and breadth of the prolapse. The depth of infiltration is most important. The surgeon should aim to inject deep enough so that no blanching of the skin is seen and no force is required on the syringe.
• A deep incision is made through the vaginal skin and through the white
vesical facsia so that a shiny membranous layer is noted where the infiltration fliuid has collected. You will obviously be a little anxious about the potential bladder injury but the extensive infiltration will enable you to find the correct plane. You will notice that you now have a very thick layer of tissue on the vaginal skin side and no facia on the bladder side of your dissection
• Dissection is then continued, as described above, so that the medial aspect
of the Levator muscle is palpated. Use an index finger to sweep away the tissues off the Levator muscle laterally between the pubic bone and the Ischial spine.
• Because the depth of the incision is deeper almost no fascia is left on the
bladder and therefore no fascial plication is performed. (see native tissue repair)
• Using a retractor, ask your assistant to hold the bladder away from the
pelvic side wall and thereby expose the medial aspect of the Levator Muscle and its fascia.
• A PDS 0 suture is placed on the medial aspect of Levator Fascia and
muscle. The needle is cut off and the stitch left long and secured to the drape on the ipsilateral side.
• An additional two or three sutures are placed in the same manner and then
this is repeated on the other side (Figure 4)

240
Figure 4
• The surgeon will now have four sutures on each side that will be attached
to the mesh.
• Ensure the mesh is the appropriate width. It will be trimmed to length after it has been placed. The mesh should not be left under any tension and it is better for it to be left too loose than too tight.
• Place an artery forceps on the centre of the mesh and place the PDS
sutures you have secured to the Levator Fascia through the mesh on both sides.
• The mesh and sutures will now resemble a parachute and this technique is
often called “parachuting the mesh into the incision”
• Tie the sutures now and thereby you will be securing the mesh in place (Figure 5).

241
Figure 5
• Trim any excess mesh at the top or bottom if necessary
• A Vicryl 2/0 suture should be placed at the bottom of the mesh in the
midline to secure it to the cervix or vaginal vault. This will prevent any apical recurrences.
• Similarly, place a Vicryl 2/0 suture in the midline at the top of the mesh to
prevent a low vaginal recurrence.
• It is convention to refrain from skin resection and the vagina is closed with a locking vicryl suture
• A vaginal pack and catheter are placed for 48 hours
3. Anterior Repair with Mesh Kits (Prolift, Perigee, Avaulta) Prolapse surgery has been revolutionised by the introduction of a number of mesh kit procedures. Any surgeon embarking on prolapse surgery using these devices should ensure that he or she has been adequately trained. Representatives from the various companies are usually able to arrange training opportunities.

242
These kits include the Anterior Prolift (Johnson and Johnson), Apogee (American Medical Systems) and Anterior Avaulta (Bard). These devices have a central mesh portion and two arms on either side that go through the obturator foramen (Figure 6). These transobturator arms are inserted using trocars and this aspect of the technique increases the risk of bladder injury. Emphasis on training and appropriate supervision is therefore necessary when embarking on these operations.
Figure 6: Anterior Mesh Kit
The operation
• The infiltration technique, incision and initial dissection is similar to that described for the anterior repair with mesh. Many surgeons are making use of smaller incisions to minimise the risk of vaginal erosion.
• Use at least 60ml of fluid infiltration and ensure it is at the correct depth
when injecting. Remember that if the skin blanches or it is difficult to inject you are at the incorrect depth.
• The incision is deep and full thickness to reveal the fluid – filled space
created by your infiltration.
• Sharp dissection is employed to take you laterally and then blunt dissection, using a forefinger, should be used to feel the inner aspect of the obturator foramen again stretching from the inferior pubic ramus to the ischial spine
• Firmly sweep your forefinger along the upper medial border of the inferior
pubic ramus and hereby clear the tissues. Remember, this is also the insertion of the Levator Muscle and Levator Fascia
• You now need to identify your two external entry points for insertion of
the trocars on either side. The first or anterior entry point corresponds to the crossing point of a line drawn through the clitoral hood from right to left and another line taken in the thigh fold from up to down (anterior to posterior). Experience will eventually enable you to identify a dimple or

243
indentation at this point which is lateral and anterior to the pubic arch. A small incision should be made at this point on both sides.
• The location of the second entry point is along the border of the pubic
bone and towards the ischial tuberosity. Try rolling your thumb over the tuberosity and again feel for the dimple or indentation anterior and lateral to the inferior pubic bone. Try and place your two insertion points as wide as possible to allow the mesh to spread out. The full length of the bone is almost 11cm and there should be enough space to leave at least 4cm between the arms of the mesh. This point is often located by measuring 2cm posteriorly and 1cm laterally to the first point (Figure 7).
Figure 7: depicts entry points for anterior kit (as described in this chapter) and posterior kit
• Once you have located your four entry points and made an incision over each one you are ready to insert the mesh using the trocars.
• Start with your proximal arms (ie the arm closest to the cervix or vaginal
vault).
• Place the trocar in through the external posterior-‐lateral incision. At least one finger from the other hand should be in the vaginal incision pushing the bladder away from the point where the trocar will pierce the obturator foramen. This finger will also feel for the entry of the trocar.
• The Prolift, Apogee and Avaulta systems differ slightly in the technique of
final mesh deployment and the surgeon is once again strongly advised to receive appropriate training for the product he or she is using. The trocars are, however, inserted in the same way and the arms with all three systems are pulled from inside the vaginal incision and out the small skin lateral incisions.
• The distal arms are then placed in a similar way.

244
• Pull on all four arms to gently lay the mesh flat against the bladder.
• Secure the top of the mesh to the cervix or vault in the midline using PDS 2/0.
• Secure the bottom middle part of the mesh to the periurethral tissues in
the midline.
• Close the vaginal skin with a locking PDS 2/0 suture.
• Pull on the proximal arms (ie those closest to the cervix or uterus) of the mesh now and tighten appropriately
• The distal arms should now be tightened.
• The remaining ends of the arms should now be cut.
• Place a vaginal pack and urethral catheter for 48 hours

245
Chapter 37 Posterior Repair Stephen Jeffery The posterior repair or posterior colporrhaphy is the standard approach to correcting posterior compartment prolapse. It is essential that the surgeon is satisfied that the indication necessitates the surgery prior to embarking on a posterior repair. Always enquire about bowel habits and if the patient has significant complaints of constipation or defaecatory dysfunction, then it may be worthwhile referring her for further investigation to exclude a more proximal disturbance such as rectal intussusception or a motility disorder. Operative technique There are three basic techniques for posterior:
• Traditional native tissue repair • Repair with mesh • Repair with a kit
The advantages and disadvantages of each technique are well described in other texts and in this chapter we will focus specifically on the technique. 1. Native tissue posterior repair Equipment
• Infiltration • Tissue clamps
I like using Allis forceps since they tend to grasp the vaginal tissues firmly without causing trauma. Some surgeons use Kochers forceps or Littlewood forceps. Make sure you have at least 6-‐8 of these tissue clamps.
• Knife (Scalpel-‐ I like using a no. 11 blade but a no. 15 is suitable) • Sharp Metzenbaum or Stilles scissors • Gillis forceps • Side wall retractors. I like Landon retractors but a Simms speculum or a
Wertheims retractor will also work. • Vicryl 2/0 x1 • Vicryl 1 • Vicryl 3/0

246
The operation
• I like to start by making a trianglar incision in the lower part of the posterior vagina and then extending this incision upwards towards the cervix or vault. The base of the triangle is at the introitus. This may not be necessary if the introitus is really tight or if the rectocele is relatively high up in the vagina. Therefore the technique described here is my preference but I will allude to the variations in technique.
• Place two Allis forceps on either side of the midline on the posterior
vaginal introitus about 2-‐3 cm apart. Two littlewoods will also work.
• Place a second Allis about 3cm into the vagina in the midline-‐ this will create a triangular area of vaginal skin that you will dissect off as you commence your dissection
• Place additional Allis clamps in the midline above the apex of the triangle
towards the vault or cervix.
• Inject your infiltration making sure to get enough fluid into the perineal area to facilitate the dissection. Inform the anaesthetist when you inject.
• Ask your assistant to pull on the two lower Allis clamps laterally and hold
the apical Allis clamp with your own non dominant hand
• Using the scalpel, dissect the skin off the triangular area you have created.
• Some surgeons do not include this triangular step, but simply commence the operation by making a midline incision from the introitus. The advantage of doing it my way is that you are able to routinely perform a “perineorrhaphy” at the end of the posterior repair and this is discussed in detail at the end of this section
• Once you have dissected the triangular piece of skin off the vagina, place
two more Allis clamps on the vaginal skin edges.
• With a Gillis forceps in the one hand and a Stillis or Metzenbaum scissors in the other, dissect the peri-‐rectal tissue off the vaginal skin. This is most easily done by asking your assistant to pull on the vaginal skin edge with the Allis and retracting the peri-‐rectal tissue with a Gillis in your other hand and cutting with the scissors pointing towards the vaginal skin edge. Dissect the skin off the underlying rectal tissue in this way
• Once the skin edges on the sides of the vaginal triangle are separated from
the underlying peri-‐rectal tissues, using a Raytec swab push the peri-‐rectal tissues away and hereby advance your dissection away from the rectum.

247
• You are now ready to extend your dissection up the posterior vaginal wall. • Remove the Allis at the apex of the triangular incision and place it about 1
cm away from the Apex on the right side
• Place another Allis on the left side about 1cm away from the apex
• Ask you assistant to pull and spread both of these Allis’ and using a scissors in the one hand and a Gillis in the other hand, dissect the underlying rectal fascia off the skin by undermining and spreading with your scissors
• Aim towards the apex as you dissect the skin off the underlying fascia
• Experience will help you decide how far up in the vagina you must go with
your dissection – do not go too far since that may create a vaginal constriction ring
• A finger should now be placed in the vagina between the dissected skin
edge and the peri-‐rectal tissues. Push towards the side wall and advance the dissection with this finger
A number of techniques have been described to complete the posterior repair. Essentially, the rectal fascia needs to now be reduced. This is done in three ways: Levator placation This technique was very popular until it was shown to be associated with significant dyspareunia in about 45% of women undergoing the operation. When doing this procedure, the surgeon places a number of sutures very laterally into the levator muscle and hereby pulls (plicates) the muscle and the overlying fascia into the midline. Fascial placation This technique is associated with good results and should be one of the procedures of choice.
• Start at the apex and place a midline vicryl 3/0 suture into the peri-‐rectal fascia.
• Take another bite on the lateral side of the fascia below the bite in the
midline and then take a bite from the opposite side.
• Go progressively downwards and hereby reduce the prolapse by suturing across the midline until you get to the bottom part where you should tie a knot

248
Site-‐specific repair This technique is also associated with good anatomical outcomes.
• Place a finger in the rectum and push the prolapse out to identify the defects-‐ these will be identified as small tears in the tissue overlying the rectum
• Remove your finger from the rectum and replace the glove carefully
• Place individual vicryl 3/0 sutures in the fascial tears to close off the
prolapse. Completing the posterior repair
• You can now resect any additional vaginal skin-‐ experience will give you an idea as to the amount that should be cut away
• Starting at the apex, place a vicryl 2/0 suture into the vaginal skin and close
the vagina from top to bottom using a continuous locking technique.
• If you started your incision using the triangular perineal incision you can now do the ‘perineorrhaphy’ as described in the beginning of this section. Stop the skin suturing about 2 -‐3 cm from the end but keep your suture since this will be necessary to complete closure at the end.
• Using a large vicryl suture, eg vicryl 1 or vicryl 0, take a large bite of the
perineal muscles on either side and tie this in the midline.
• A separate second and third perineal suture can now be taken if necessary.
• This closes the introitus very nicely and creates about 2-‐3 cm of extra vaginal length
• Complete your vaginal closure now.
2. Repair with mesh There is no evidence to support the use of mesh for posterior repair alone. In conjunction with an apical support operation, however, mesh is acceptable in the posterior compartment. This would include posterior repair with Prolift, Apogee, Posterior Avaulta, Elevate, Ascend and Pinnacle. The reader is referred to the section on apical prolapse. 3. Repair with kit These are usually done when the women has an apical (vault or uterine) prolapse as well as a posterior compartment prolapse.

249
See the chapter on Apical Prolapse

250
Chapter 38
Uterine and vaginal vault prolapse Stephen Jeffery The vaginal apex, or middle compartment, is the most important point of vaginal support. The cervix and uterus demarcate the apex, but in a woman who has had a hysterectomy it is identified by the vault or cuff which forms a scar tissue line that can be identified on examination as a tissue thickening, dimple or discolouration. Prolapse of the apex usually occurs in association with a prolapse of the anterior and posterior vaginal wall. The techniques we will describe in this chapter should therefore be read in conjunction with the chapters on anterior and posterior repair and vaginal hysterectomy. Uterine prolapse managed by vaginal hysterectomy Start and complete the removal of the uterus as described in the chapter on vaginal hysterectomy. Make sure you keep your Uterosacral sutures since these will be used as part of the vault support. I also prefer to use PDS 0 for the Uterosacral ligament pedicle The options now include McCall culdoplasty, High Uterosacral ligament suspension, Sacrospinous ligament suspension and Illiocococcygeus fixation. Most surgeons use either McCall culdoplasty or High Uterosacral ligament suspension and we will therefore describe these in detail in this section on vaginal hysterectomy and prolapse. McCall Culdoplasty
• You will need a PDS 1 or PDS 0 for this procedure.
• Place a Littlewood clamp on the remnant of the Right Uterosacral ligament. Place two artery forceps on the posterior vaginal vault edge about 1 cm from the midline on either side.
• Place a Wertheim retractor or equivalent in the posterior vagina outside
the incision so that you can easily identify the posterior skin edge of the vault.

251
• Pull on the two artery forceps that are attached to the vault and place a suture in the vagina from exterior to interior at about a 4 o’clock position. Include some peritoneum in this bite as you come out on the inside of the incision.
• Place the Wertheims now into the incision and ask your assistant to retract
posteriorly so that you can see the left uterosacral ligament clearly
• Take a decent bite from the left uterosacral ligament with the PDS suture that has come through the vaginal edge at the 4 o’clock position
• Now take a bite of the inside aspect of the posterior vaginal vault in the
midline including peritoneum and vaginal tissue in the bite. This closes off the cul de sac (hence the term culdoplasty) and prevents the recurrence of an enterocele
• Using the same suture, take another bite from the Uterosacral ligament on
the right side and then come out again through the vagina on that side at about 8 o’clock
• Cut off the needle and place an artery on the end of this suture that has
entered at 4 o’clock and exited the vault 8 o’clock
• Once this has been completed, you can proceed with the anterior repair if necessary
• The McCall culdoplasty suture should be tied at the end of the operation
after the vaginal vault has been closed High Uterosacral ligament suspension
• A moist vaginal pack is inserted into the peritoneal cavity to keep the bowel out of the operative field. Additional exposure is achieved using two retractors on the contralateral vaginal walls.
• A Littlewood clamp is placed on the distal portion of the ligated
uterosacral ligament and the ligament is held under tension in a caudad direction with the one hand while the ligament is palpated intraperitoneally with the other hand so as to determine the most appropriate site for the suspension suture placement. This is at the level of the ischial spine approximately three to four centimeters from the distal end of the ligament.
• Using a PDS 0 suture and starting on the vaginal side of the vault at about
the 4 ‘o clock position a bite is taken through the vagina to include the parietal peritoneum.

252
• Under direct vision, another bite is taken from high on the uterosacral ligament at a depth of 0.5cm. A proximal and lateral placement has been shown to be associated with lower risk to the ureter. The bite is taken in an anteroposterior direction (away from the ureter) to further minimise ureteric injury.
• Using the first bite to place traction on the uterosacral ligament a second more proximal bite is taken through the ligament using the same suture.
• The stitch is then brought back out through the vagina on the ipsilateral
side, about 1 cm from the entrance point, in an inside-‐out fashion. • This is repeated on the opposite side, using a new suture entering the vault
at the 8 o’clock position.
• These sutures are tagged using an artery forceps for later use.
• If there is an anterior compartment defect, this is repaired by extending the vaginal vault incision and an anterior repair is performed.. The vaginal vault is then closed using a vicryl suture.
• It is only after the vault has been closed that the right and left high
uterosacral sutures are tied separately and in a fashion resembling a pulley system, elevating the vaginal vault.
• If the patient requires a posterior repair it is performed at this point.
• At the end of the operation, a cystoscopy is performed to confirm ureteric
patency by observing urinary jets from the orifices. These jets can be enhanced by asking the anaesthetist to inject either Methylene Blue or Indigo Carmine intravenously 15 minutes prior to completion of the operation. If no jet is seen and there is a high suspicion of a ureteric injury, the suspension suture is easily removed on that side.
Vault prolapse A large number of options are now available to manage vault prolapse. The following techniques will be discussed:
1. Classic Sacrospinous fixation
2. Illiococccygeus Fixation
3. Trocar-‐ based posterior kits

253
1. Traditional Sacrospinous Fixation The Sacrospinous ligament can be approached either through an anterior or posterior vaginal incision. The operation can therefore be done as a part of an anterior or posterior repair. It can also be performed with the uterus in –situ and in these circumstances, approaching the ligament through an anterior incision is quite easy. This forms part of an operation termed sacrospinous hysteropexy
• Before making a vaginal incision, use two vicryl 1 sutures to mark the vault. This greatly eases orientation once you have done your dissection and indicates to you where you should exit the vagina with the suspension suture
• Once either the anterior or posterior dissection has been made, using a
forefinger push laterally into the vaginal incision, with the bladder on your fingernail side and the skin on the other side of your finger. Do this until you feel the Ischial Spine.
• Once you have felt the Ischial spine start pushing posteriorly along the
ligament and gently wipe your finger along it to “clean” it off. You are now in the para-‐rectal space and should aim to fit two fingers comfortable in this space over the ligament
• It may be necessary to dissect a bit more above and below the ligament
using your scissors to obtain adequate exposure of the ligament. Method of securing the suture to the ligament: This can be a difficult part of the operation and a number of methods have been described for this. 1.1 Needle holder technique It is useful having at least two long –bladed sidewall retractors for this operation
• Place a PDS 0 suture on a long needle holder (+/-‐ 23cm)
• Place a retractor on the medial side of the vaginal opening and ask your assistant to retract firmly to expose the ligament
• Place another retractor either anteriorly or posteriorly to provide
additional exposure. A third retractor may be useful if you have one and you will also need a second assistant to help you
• Once the ligament is adequately exposed and visualized, place a suture
through the body of the ligament, about 2 cm away from the spine. Avoid

254
going too close to the Ischial spine since the Pudendal Nerve and Internal Pudendal Artery are at risk.
• Another suture can be placed in the ligament on the opposite side but
there is very little evidence to suggest that a bilateral suspension has better outcomes than a unilateral suture.
1.2. Miya hook This instrument (Figure 1) is available in many operating theatres and makes the placement of the suture easier. Instead of using the needle holder place the loaded hook onto the ligament about 2 cm from the spine and drive it through the ligament by elevating and closing the handle.
Figure 1 Miya Hook 1.3. Deschamps Ligature carrier This hook-‐shaped device also enables an easier placement of the sacrospinous ligament suture. Expose the ligament as described above and place the suture using the hook. 1.4. Capio Device (Figure 2)
Figure 2 This is a new disposable instrument that greatly enhances suture placement with minimal dissection

255
• Once you have exposed and cleaned off the ligament, the Capio device enables you to place the suture by palpation rather than by difficult direct vision
• If you are placing a suture on the patient’s right side, place your right
forefinger on the sacrospinous ligament.
• Make sure the rectum is well clear of the ligament. Keeping your right forefinger on the ligament protects the rectum as you slide the Capio device into the vagina along the lateral side of your forefinger
• Position the notch of the device over the ligament and close the device
handle while ensuring the suture will be placed about 2cm from the Ischial spine. (Figure 3)
Figure 3 Insertion of Capio Suture
• Check the placement by pulling on the suture and palpating the postion with the other hand. The greatest risk is failing to recognize a suture that is too superior or lateral. If you are not entirely satisfied, remove the suture and perform the placement again.
• A mesh can be incorporated into the above procedures by creating long
arms that are placed onto the Sacrospinous ligament.

256
2. Illiococccygeus Fixation This is a simpler technique than the sacrospinous fixation. During this operation, the vaginal vault is fixed onto the Iliococcygeus muscle on one or both sides.
• Proceed with your dissection as for the Sacroscpinous fixation. Once in the para-‐rectal space, the Illiococcygeus muscle belly will be felt inferior to the Ischial spine and the sacrospinous ligament.
• Using retraction as described for the sacrospinous ligament, place your
suspension suture through the muscle
• Once the support sutures have been placed using any of the above methods, use a loose Mayo needle to bring your suture through the vault at the point previously marked using the vicryl 1 suture. This are tied at the end of the operation when the vaginal skin edges are closed.
3. Kit based procedures These are relatively new devices that are now in widespread use. The anterior kit device is described in the anterior repair chapter. The posterior kits comprise the Posterior Prolift, the Apogee and the Posterior Avaulta. They all have a similar design (Figure 4).
Figure 4: the posterior Mesh Kit These devices provide excellent apical support, in contrast to the anterior kits that only support the anterior compartment and are not suitable for vault or uterine prolapse The disadvantage of the posterior kit systems is that the women is left with a relatively large piece of mesh in the posterior compartment

257
The operation The Posterior prolift, Apogee and Avaulta differ slightly in the technique of insertion and the surgeon is advised to seek appropriate supervision and training before embarking on this operation. The infiltration technique, incision and initial dissection are similar to that described for the posterior repair. A simple midline posterior incision is usually employed from the introitus towards the apex. The triangular perineal body incision is not done when placing a posterior kit Many surgeons are making use of smaller incisions to minimise the risk of vaginal erosion.
• Place an Allis clamp (or littlewood) on the midline of the posterior vaginal wall at the introitus
• Place additional Allis clamps 2-‐3 cm apart towards the vault
• Inject the infiltration fluid now. Use at least 60ml of fluid infiltration and
ensure it is at the correct depth when injecting. Remember that if the skin blanches or it is difficult to inject you are at the incorrect depth.
• Make a midline incision. The incision is deep and full thickness to reveal the
fluid – filled space created by your infiltration.
• Sharp dissection is employed to take you laterally and then blunt dissection, using a forefinger, should be used to feel for the sacrospinous ligament
• Firmly sweep your forefinger along the medial border of the sacrospinous
ligament and hereby clear the tissues off the ligament
• The mesh that will be placed has two long superior arms that will be placed into the Sacrospinous ligament and brought out through the Ischio-‐rectal fossa postero-‐lateral to the anus.
• Make an incision into the buttock at a point 3cm posterior and 3cm lateral
to the anus
• If you are starting on the patient’s left side, place your left index finger onto the sacrospinous ligament and take the inserting trocar as depicted and drive it up through the ischiorectal fossa towards the ligament.
• You will eventually feel the trocar perforate the ligament and at this point,
rotate the device towards the index finger and push it through the ligament

258
• The Posterior prolift, Apogee and Avaulta differ slightly in the technique of completing the insertion. All three devices have a system where the arms are pulled through the vagina and sacrospinous ligament and out through the ischiorectal fossa.
• The upper part of the mesh is secured in the midlineto the vault or cervix
• The incision is now closed with a continuous locking suture
• The mesh arms are now pulled downwards through their exit points and
this pulley system elevates the vault
• When the correct tension is achieved, the ends are cut and the exit incisions are closed
• A vaginal pack is placed and left in situ for 48 hours.

259
Chapter 39
Suture Options in Gynaecological Surgery P de Jong INTRODUCTION The gynaecologist is presented with a bewildering array of sutures and needles for pelvic surgery and wound closure. The article aims to narrow the choice to a few logical options that will meet most surgical requirements. WOUND HEALING Healing begins as soon as an incision is made, when platelets are activated and release a series of growth factors. Within minutes, the wound displays a mild inflammatory reaction characterised by the migration of neutrophils which are attracted by degradation products of fibrin and fibrinogen. During this time, and until the proliferative phase of healing begins, wound strength is low. Macrophages peak at 24 hours and produce lactate. This promotes the release of angiogenic endothelial chemo-‐attractants and increases the rate of collagen synthesis by fibroblasts. By the fifth day, fibroblasts are found in high numbers and the formation of a microcirculation begins. After the second week, although collagen synthesis and angiogenesis are reduced, the pattern of repair is reorganized and the strength of the wound increases, although never to its original level. Collagen synthesis and lysis are delicately balanced. During the first 12-‐14 days the rate at which wound strength increases is the same, irrespective of the type of tissue. Thus, relatively weak tissue, such as bladder mucosa, may have regained full strength, whereas fascia will only have recovered by 15%. Moreover, it takes three months for an aponeurosis to recover 70% of its strength and it probably never regains its full strength. FACTORS AFFECTING HEALING Many factors influence healing, including age, nutrition, vascularity, sepsis and hypoxia. Some medical conditions, such as diabetes malnutrition, use of steroids, uraemia, jaundice and anaemia effect healing adversely. Another factor of relevance to the gynaecologist is the menopause, since it has been shown that oestrogen accelerates cutaneous healing by increasing local growth factors. Postmenopausal women having vaginal surgery are therefore advised to use pre-‐operative topical oestrogen. Cigarette smoking can also affect healing adversely. With regard to infection, the main source of contamination is endogenous, with only about 5% of infections being airborne. Most gynaecological operations are clean (0-‐2% rate of infection) or clean/contaminated when the vagina is incised (2-‐5% rate of infection). Other surgical factors in infection include local trauma from

260
excessive retraction, over-‐zealous diathermy and operations lasting more than two hours. SURGICAL PRINCIPLES Basic surgical principles influence the healing process, and the best sutures are useless unless meticulous attention to surgical detail is observed. There are a number of surgical guidelines which promote better outcomes of surgery: 1. The incision
A thoughtful surgeon plans the length, direction and position of the incision in such a way as to provide maximal exposure and a good cosmetic result, with a minimum of tissue disruption.
2. Maintenance of a sterile field and aseptic technique
Infection deters healing, and the surgeon and theatre team must observe all proper precautions to avoid contamination of the operative field. Laparoscopic surgery affords a favorable environment to prevent contamination by extraneous debris and airborne infection. Gentle handling of tissue and precise dissection causes less tissue damage, with resultant fewer adhesions; and reduced post operative pain.
3. Dissection Technique A clean incision with minimal tissue trauma promotes speedy healing. Avoid careless ripping of tissue planes and extensive cautery burns. Atraumatic tissue handling is the hallmark of a good surgeon. Pressure from retractors devitalizes structures, causes necrosis and traumatizes tissue and this predisposes to infection. Swabs are remarkably abrasive, and if used to pack off bowel, must be soaked in saline.
4. Haemostasis Good haemostasis allows greater surgical accuracy of dissection, prevents haematomas, and promotes better healing. When clamping, tying, or cauterizing vessels: prevent excessive tissue damage.
5. Avoid tissue dessication Long procedures may result in tissue surface drying out, with fibrinogen deposition and ultimately adhesion formation. Periodic flushing with Ringer’s lactate solution is a sound surgical principle.
6. Removal of surgical debris Debride devitalised tissue, and remove blood clots, necrotic debris, foreign material, and charred tissue (secondary to cautery) to reduce the likelihood of scarring , adhesion formation and infection.
7. Foreign bodies Avoid strangulating tissue with excessive surgical sutures. This represents a significant foreign body challenge and reduces tissue oxygen tension.

261
Certain sutures such as chromic gut provoke mdore inflammatory reaction than others, for example nylon.
8. Wound closure a. Choice of material:
The appropriate needle and suture combination allows atraumatic tension, free tissue approximation, with minimal reaction, and sufficient tensile strength.
b. Elimination of dead space: Separation of wound edges permits the collection of fluid which promotes infection and wound breakdown. Surgical drains help reduce fluid collections.
c. Stress on wounds: Postoperative activity may stress the wound during the healing phase. Coughing stresses abdominal fascia, and careful wound closure prevents disruption. Excessive tension causes tissue necrosis, oedema and discomfort. The length of the suture for wound closure should be six times length of the incision to prevent excessive suture tension.
CHOICE OF SUTURE Many surgeons have a personal preference for sutures both as a result of proficiency in a particular technique and the suitable handling characteristics of a suture and needle. Knowledge of the physical characteristics of suture material, the requirements of wound support, and the type of tissue involved, is important to ensure a suture used which will retain its strength until the wound heals sufficiently to withstand stress. While most suture material cause some tissue reaction, synthetic materials such as polyglactin 910 tend to be less reactive than natural fibers like silk. SUTURE CHARACTERISTICS The properties and characteristics of the “ideal” suture are listed in Table I
Table I THE IDEAL SUTURE • Good handling and knotting characteristics • High tensile strength • Minimally reactive to tissue • Non capillary, non allergenic. The capillary action of braided Material promotes infection, as opposed to non-‐braided sutures • Resistant to shrinkage and contraction • Complete absorption after predictable interval • Available in desired diameters and lenght

262
• Available with desired needle sizes
In general terms, the thinnest suture to support the healing tissue is best. This limits trauma and, as a minimum of foreign material is used, reduces local tissue reaction and speeds re-‐absorption. The tensile strength of the material need not exceed that of the tissue.
Table II
SUTURE PROPERTIES
Material Property Composition
Made from
Trade Name
Tissue Reactivity
Strength Retention
Absorption
Natural Absorbable Spun Plain gut
Considerable 7-‐10 days 70 days
Chromic gut Moderate 10-‐14 days 90 days
Non absorbable
Braided Silk Acute Inflammation
6 months 2 years
Monofilament
Stainless steel wire
Minimal Maintained Nil
Synthetic
Absorbable Braided
Polyglactin Vicryl* Minimal
50% at 21 days 70 days
Monofilament
Co-‐polymer
Monocryl* Minimal
40% at 14 days 4 months
Co-‐polymer
PDS II* Slight 50% at 28 days
6 months
Non absorbable
Braided Polyester
Ethibond* Mersilene
Minimal Maintained Nil
Monofilament Nylon Minimal
20% per year Years
Polypropylene
Prolene*
Minimal Maintained Nil
* Trademark
Minimal="very little", Slight="some"
263
Monofilament vs. braided material Monofilament sutures (for example nylon) are made from a single strand of material, and are less likely to harbor organisms than multifilament braided material (table II). Because of its composition monofilament material may have a “memory” and care should be taken when handling and tying monofilament sutures – perhaps a few extra throws on a proper surgical knot would prevent unraveling. Avoid nicking or crushing a monofilament strand, as this may create a point of weakness. They have a smooth surface and so pass easily though tissue. Nylon sutures have high tensile strength and very low tissue reactivity and degrade in vivo at 15% per year by hydrolysis. Fine nylon sutures are suitable for use in micro-‐surgery applications, and slightly heaver grades are appropriate for skin closure. Multifilament sutures consist of several filament braided together, affording greater tensile strength, pliability and flexibility with good handling as a result. They must be coated to reduce tissue resistance and improve handling characteristics. Because of their inherent capillarity they are more susceptible to harbouring organisms than monofilament sutures. Absorbable vs. non-‐absorbable materials Absorbable sutures are prepared from the collagen of animals or from synthetic polymers. Catgut is manufactured from sheep submucosa or bovine serosa and may be treated with chromium salts to prolong absorption time. Enzymes degrade the suture, with an inflammatory response. The loss of tensile strength and the rate of absorption are separate phenomena. A suture can lose tensile strength rapidly and yet be absorbed slowly. If a patient is febrile or has a protein deficiency, the suture absorption process may accelerate, with a rapid loss of tensile strength. Non-‐absorbable sutures may be processed from single or multiple filaments of synthetic or organic fibers rendered into a strand by spinning, twisting or braiding. They may be coated or uncoated, uncoloured or dyed. SPECIFIC SUTURES AND APPLICATIONS Surgical gut

264
Absorbable surgical gut may be plain or chromic, and spun from strands of highly purified collagen. The non –collagenous material in surgical gut causes the tissue reaction. Ribbons of collagen are spun into polished strands, but most protein-‐based absorbable sutures have a tendency to fray when tied. Surgical gut may be used in the presence of infection, but will then be more rapidly absorbed. Surfaces may be irregular and so traumatise tissue during suturing. Plain surgical gut is absorbed within 70 days, but tensile strength is maintained for only 7-‐10 days post operation. Chromic gut is collagen fiber tanned with chrome tanning solution before being spun into strands. Absorbsion is prolonged to over 90 days, with tensile strength preserved for 14 days. Chromic sutures produce less tissue reaction than plain gut during the early stages of wound healing, but are unsuitable for certain procedures , such as in fertility surgery. Recently, the use of sutures of animal origin has been abandoned in many countries because of the theoretical possibility of prion protein transmission, thought to be responsible for Creutzfieldt-‐Jakob disease. Synthetic absorbable sutures Synthetic absorbable sutures were developed to counter the suture antigenicity of surgical gut, with its excess tissue reaction and unpredictable rates of absorption. Polyglactin 910 (i.e. Vicryl) is braided copolymer of lactide and glycolide, allowing approximation of tissue during wound-‐healing followed by rapid absorbsion. At 3 weeks post-‐surgery 50% of its tensile strength is retained. The sutures may be coated with a lubricant to facilitate better handling properties of the material. Absorption is minimal until day 40, completed about 2 months after suture placement, with only a mild tissue reaction. Occasionally it is desirable to have a rapid-‐absorbing synthetic suture, such as Vicryl Rapide™. The suture retains 50% of tensile strength at 5 days, and since the knot “falls off” in 7 to 10 days, suture removal is eliminated. It is only suitable for superficial soft tissue approximation where short-‐term support is desired, for example for episiotomy repair. Polyglecaprone 25 (i.e. monocryl™) is a synthetic monofilament co-‐polymer that is virtually tissue inert, with predictable absorption completed by 4 months. It has high tensile strength initially, but all strength is lost after one month. It is useful for subcuticular skin closure and soft-‐tissue approximation, for example during Caesarean Section. Polydioxanone (i.e. PDS II™) is absorbable and also monofilament composition, but has more tissue reaction than monocryl. It supports wounds for up to 6 weeks, and is absorbed by 6 months. Synthetic absorbable monofilament sutures are useful for subcutaneous skin closure since they do not require removal. This suture is suitable for sheath closure at laparotomy.

265
Non absorbable sutures Surgical silk consists of filaments spun by silkworms, braided into a suture which is dyed then coated with wax or silicone. It loses most its strength after a year, and disappears after about 2 years. Although it has superior handling qualities, it elicits considerable tissue reaction, so is seldom used in gynaecology nowadays. Synthetic non absorbable sutures Nylon sutures consist of a polyamide monofilament with very low tissue reactivity. Their strength degrades at 20% per year, and the sutures are absorbed after several years. Because of the "memory" of nylon, more throws of the knot are required to secure a monofilament suture than braided sutures. Nylon sutures in fine gauges are suitable for micro-‐surgery because of the properties of high tensile strength and low tissue reactivity. Polyester sutures are composed of braided fibers in a multifilament strand. They are stronger than natural fibres and exhibit less tissue reaction. Mersilene* synthetic braided sutures last indefinitely, and Ethibond* is coated with an inert covering that improves suture handling, minimises tissue reaction and maintains suture strength. They are unsuitable for suturing vaginal epithelium, as they are non-‐absorbable. Polypropylene monofilament sutures are synthetic polymers that are not degraded or weakened by tissue enzymes. They exhibit minimal tissue reactivity, and maintain tensile strength. Prolene*, for example, has better suture handling properties than nylon, and may be used in contaminated or infected wounds to minimize sinus formation and suture extrusion. They do not adhere to tissue and are easily removed. Topical skin adhesions Where skin edges appose under low tension, it is possible to glue edges together with glue, such as Dermabond™. It is a sterile liquid, and when applied onto the skin (not into the wound) seals in three minutes. It protects and seals out common bacteria that is commonly associated with wound infections, and promotes a favourable, moist, wound healing environment, speeding the rate of epithelialisation. The adhesive gradually peels off after 5 – 10 days with a good cosmetic result. Subcutaneous sutures need to be placed to appose skin edges if topical skin adhesions are to be used. It may especially be used in cases of Laparoscopy to close several small skin incisions, and obviate the need for suture removal. Skin adhesive use eliminates the pain occasionally associated with skin sutures, but is unsuitable for vaginal use. Adhesive Tapes Adhesive tapes are used approximating the edge of lacerations or to provide increased wound edge support and less skin tension. This is important if patients

266
tend to cause keloids during scar healing. In this case, the wound is closed with monofilament absorbable sutures, carefully cleaned, and sprayed with surgical spray to promote adhesive tape adhesion to the skin. The wound is closed with a sterile waterproof dressing after adhesive tapes are placed to provide skin support. The dressing is removed after a week, but the adhesive tapes are allowed to fall off at a later stage. They have minimal tissue reactivity and yield the lowest infection rates of any closure method. Tapes do not approximate deeper tissues, do not control bleeding, and are unsuitable for use on hairy areas or in the vagina. Apply them gently to avoid unequal distribution of skin tension, which may result in blistering. CHOOSING A SURGICAL NEEDLE A cutting needle is designed to penetrate tough tissue such as the sheath or skin. Conventional cutting needles have an inside cutting edge on the concave curve of the needle, with the triangular cutting blade changing to a flattened body. The curvature of the body is flattened in the needle grasping area for stability in the needle holder, and longitudinal ridges may be present to reduce rocking or twisting in the needle holder. Reverse cutting needles have a third cutting edge on the outer convex curvature of the needle, making for a strong needle able to penetrate very tough skin or tissue. Taper point needles are round, and so pierce and spread tissue without cutting it. The body profile flattens to an oval or rectangular shape to prevent needle rotation in the needle holder. They are preferred for atraumatic work with the smallest hole being desirable, in easily penetrated tissue, but are not suitable for stitching skin. Tapercut needles combine the features of the reverse – cutting edge tip and taper point needle. The trochar point readily penetrates tough tissue, with a round body, moving smoothly through tissue without cutting surrounding tissue. Blunt point needles have a rounded, blunt point that does not cut through tissue. They are used for general closure of tissue and fascia especially when performing procedures on at-‐risk patients. Tissue trauma is increased if the needle bends during tissue penetration, and a weak needle damages structures and may snap. Reshaping a bent needle may make it less resistant to bending and breaking. Needles are not designed to manipulate tissue or to be used as retractors to lift tissue. Ensure the needle is stable in the grasp of a needle holder. The grasping area is usually flattened, and heavier needles are ribbed as well as flattened to resist rotating in the needle holder.

267
Most sutures are attached to swaged needles, without the need for an “eye” in the needle. Eyed needles need to be threaded, and create a larger hole with greater tissue disruption than a swaged needle. The swaged end of needle is securely crimped over the suture material, and may be available with the controlled release option. This feature allows rapid suture placement and a slight, straight tug will release it from the needle to allow tying. Avoid grasping the needle holder at the swaged end. This may be weaker than the flattened body and cause disintegration of the needle. Abdominal wound closure Modern sutures are uniform and strong and wound dehiscence will only be due to suture failure in exceptional circumstances, with improper tying of knots or damage to the suture by instruments. The suture can cut through if wide enough bites are not taken and if the suture is too tight. Premature loss of strength only occurs with absorbable sutures, especially catgut. The closure of low transverse incisions is simplified by the fact that they generally heal well, with a low incidence of dehiscence and hernia whatever suture is used. Closure of midline incisions presents more problems. The integrity of any wound is completely dependant on the suture until reparative tissue has bridged the wound. First principles therefore indicate that rapidly absorbable sutures will have a greater tendency to fail than non-‐absorbable sutures. Studies have shown that catgut is associated with an unacceptably high risk of evisceration and incisional hernia and should not be used. Experimental work on rats has shown that mass closure with monofilament nylon significantly reduces the dehiscence rate compared with braided suture, as bacteria reside in the interstices of infected multifilament sutures. However, in some patients, removal of suture material will be required due to sinus formation. Delayed absorbable sutures have been assessed for abdominal wound closure and it was found that wound dehiscence is similar without the problem of sinus formation. A randomised controlled trial of polyglyconate (Maxon™) verses nylon in 225 patients showed that polyglyconate was as effective at two-‐year follow-‐up. Suture length should be approximately four times to six times the length of the wound to allow for the 30% increase in abdominal circumference postoperatively. Permanent sutures should still be considered where the risk of wound failure is particularly high. Closure of the peritoneum was shown in 1977 to be unnecessary; this was confirmed in 1990 by a randomised controlled trial. Skin closure In gynaecological practice, there are many options for skin closure, but cosmesis is more important than in general surgery where the avoidance of infection is more of a concern. Lower transverse incisions heal well because of the lack of tension. Full-‐thickness interrupted stitches must not be too tight as oedema may lead to disfiguring crosshatching, particularly if infection forms along the track. Very thin monofilament absorbable or non-‐absorbable sutures are preferable but a subcuticular stitch leaves less

268
of a scar (Figure I). Similar assessment of laparoscopy scars suggests that subcuticular polyglactin (Vicryl™) is better thatn transdermal nylon. Staples are popular because there is less chance of bacterial migration into the wound, although the risk of infection in most gynaecological surgery is low. Properly conducted clinical trials have shown the only benefit of staples to be speed, s there is more wound pain and a worse cosmetic result compared with subcuticular sutures. HINTS AND TIPS Personal preference will always play a part in needle and suture selection, but the final choice will depend on various factors that influence the healing process, the characteristics of the tissue and potential post-‐operative complications. Close slow-‐healing tissues (i.e. fascia or sheath) with non-‐absorbable or long-‐lasting absorbable material, i.e. Pds or vicryl. Close fast-‐healing tissue such as a bladder with rapidly absorbed sutures. Non-‐absorbable sutures such as nylon form a nidus for stone formation. Foreign bodies in potentially contaminated tissue may convert contamination into infection. So avoid multifilament, braided sutures under these circumstances – rather use monofilament material. Where cosmetic results are important, close and prolonged skin opposition is desired, so thin, inert material such as nylon or polypropylene is best. Close subcutaneously when possible, and use sterile skin closure strips to secure close opposition of skin edges when circumstances permit. Try to use the finest suture size commensurate with the inherent tissue strength to be sutured. CONCLUSION With a little thought and preparation we should use the suture and needle best suited to the surgery which is being performed. It is essential that we are aware of what is available and how it may best be utilized. Surgical training should include the characteristics and applications of sutures and needles.