upgrade and update procedure - schneider electric · upgrade and update procedure . 07/2011 eng ....
TRANSCRIPT
Upgrade and Update Procedure
Quantum Operating System Upgrade and Update procedure 07/2011 eng Edition V2.2
www.schneider-electric.com EIO000000006403

Upgrade and Update Procedure
Purpose
Subject of this Chapter
This user’s guide explains how to upgrade Quantum PLC’s Operating System but also the firmware of Ethernet modules
Upgrade a PLC from Concept to Unity. Update a PLC from Unity to Unity. Restore Concept IEC / LL984 on a Unity processor Update Quantum NOE modules and embedded Ethernet modules. Upgrade Remote I/O Head and Drop for Change Config On The Fly
Implementation. Note: Examples and screen shots are provided in this documentation using OSLoader version 3.0. However, other versions, ranging from 2.0 to latest versions, may be used. The procedures described hereafter match all versions from 2.0, and the operating modes are the same for all versions. Please refer to chapter "Preparing a Quantum update" for more information.
EIO000000006403 2/95

Upgrade and Update Procedure
EIO000000006403 3/95
Summary
1. Preparing a Quantum update ................................................................................................... 4
2. Upgrading a Quantum PLC from Concept to Unity .............................................................. 7
3. Updating a Quantum PLC from Unity to Unity ................................................................... 22
4. Restoring a Quantum PLC from Unity to Concept.............................................................. 32
5. Upgrading a Quantum Hot Standby PLC............................................................................. 46
Appendix 1: NOE Module Upgrade Procedure ........................................................................ 49
Appendix 2: Quantum CoPro Ethernet Port Upgrade Procedure.......................................... 57
Appendix 3: FactoryCast NOE 77111 Module Upgrade Procedure....................................... 65
Appendix 4: 140CPU67160/140CPU 67261 HotStandby CPU Copro Upgrade Procedure .73
Appendix 5: 140CRP93x00 S908 RIO Head Upgrade Procedure........................................... 82
Appendix 6: 140CRA93x00 S908 RIO Drop Upgrade Procedure........................................... 89

Preparing a Quantum update
1. Preparing a Quantum update
Object of this Chapter
This chapter describes how to prepare a Quantum PLC in order to update or upgrade PLC’s Operating System and / or Ethernet modules.
Prerequisites This update requires a PC with Unity installed and the binary file containing
the OS firmware to download.
Software The following softwares are required:
Unity Version 2.0 mini must be installed on the PC (note that it is not necessary to launch Unity for an OS upgrade).
The eCD “Unity OS firmware” is provided on www.schneider-electric.com and contains all the OS for Quantum, Premium and M340 PLC’s.
The OS loader (provided with Unity). This tool allows the user to download PLC’s Operating System and Ethernet modules firmware.
EIO000000006403 4/95
Preparing a Quantum update
Connecting the PC to the PLC for an OS update or upgrade
The Quantum CPU OS can only be downloaded by a direct connection between the PC and the CPU by the MODBUS or MODBUS+ ports. Note that MODBUS+ is faster and takes significantly less time to download a binary. The CPU USB port doesn’t allow downloading an OS. Important: Using Modbus or Modbus Plus, only address 1 is allowed for downloading. Ensure that no other device on the network is using address 1. Several possibilities can be proposed to connect the PC to the PLC depending on the mix processor/protocol: For Quantum CPU 140CPU 311 10, 140CPU 434 12U and 140CPU 534 14 BU: • Using the RS232 COM port 1 of the PC by connecting the cable 990
NAA 263 20 (3.7 m) or 990 NAA 263 50 (15 m) to the MODBUS 9 pin sub-D of the Quantum PLC. The protocol used in this case is MODBUS.
• Using the cables 990NAD21110 (2.4m) or 990NAD21130 (6m)
connected to the MODBUS+ 9 pin sub-D of the Quantum PLC. The protocol used in this case is MODBUS+.
For Quantum CPU 140 CPU 6x1y0 (65150, 65160, 65160S, 65260, 67160,67261, 67160S): • Using the adapter 110XCA20300 connected to the RS232 9 pin sub-D
connector of the PC (COM port) and to the RJ45 Modbus port of the PLC via a cable 110 XCA28201 (1m) , 110 XCA28202 (3m) or 110XCA28203 (6m). The protocol used in this case is MODBUS.
• Using the cables 990NAD21810 (2.4m) or 990NAD21830 (6m). The
protocol used in this case is MODBUS+. In any case the right communication driver must be first installed on the PC. Note: All the examples given in this document are using the Modbus protocol.
EIO000000006403 5/95
Preparing a Quantum update
EIO000000006403 6/95
Connecting the PC to the Ethernet module or PLC coprocessor to update the Ethernet firmware
Although Ethernet allows a remote access via the network and then the upload / download procedure, we strongly recommend installing the processor with the embedded Ethernet module in a system consisting of only the CPU, Power Supply and Rack. Once done,
Configure the PLC system with an empty program containing only the IP address configuration. Note that the Ethernet module must be on the same logical Ethernet network than the PC with the OS loader (for that both IP address, Subnet mask and default gateway must be compatible).
Ensure the only devices connected to the Ethernet network are the PC running the OS loader and the CPU or NOE module.
The CPU must be in Stop mode and the NOE module must have no TCP traffic.
The physical connection between the PC running the OS loader and the CPU or NOE module can be performed:
by connecting directly a “crossed” Ethernet cable between the PC and the NOE module
by connecting the PC and the CPU or NOE module with two “non crossed” Ethernet cables via a Hub. In these 2 cases, FTP protocol is used and only the Ethernet Coprocessor firmware of the CPU can be updated by this way.

Upgrading a Quantum PLC from Concept to Unity
2. Upgrading a Quantum PLC from Concept to Unity
Object of this Chapter
This chapter describes how to upgrade a Quantum PLC from Concept to Unity. The screens shots given below show how to upgrade a 140 CPU 434 12A (Concept) to 140 CPU 434 12U (Unity). The procedure is similar for an upgrade of 140 CPU 534 14A/B (Concept) to 140 CPU 534 14U/BU (Unity).
Important Upgrading a PLC from Concept to Unity requires to perform three main
phases:
Phase 1 - Upgrade the PLC to Unity with an intermediate OS Phase 2 - Power OFF then ON the PLC Phase 3 - Update the Operating System with the appropriate file
Those phases are mandatory and cannot be by-passed. Each phase is described in the following procedure.
EIO000000006403 7/95

Upgrading a Quantum PLC from Concept to Unity
Connecting the PC to the PLC
Refer to chapter “Prepare a Quantum Update / Connecting the PC to the PLC for an OS update or upgrade.”
Launching the OS loader
The OS loader (provided with Unity) allows the user to download the Operating System to the PLC. To open it click on Start/Program/Schneider-Electric/Unity-PRO/OS loader. Once done, the following screen appears:
EIO000000006403 8/95

Upgrading a Quantum PLC from Concept to Unity
Select the communica-tion protocol
From the main screen of the OS loader, click on the button. The following screen appears, the list of communication ways depends of the drivers installed:
To download the Operating System into the PLC select the right communication protocol (MODBUS01 or MBPLUS01, in accordance with
established physical link) and click on the button.
EIO000000006403 9/95

Upgrading a Quantum PLC from Concept to Unity
Select the Target Device
On the Device Type field, select Processor.
Knowing which Concept version is installed on the processor could be useful if for any reason a restore function from Unity to Concept is needed. For that proceed as follows:
1 Select the PLC
2 Click on the button to connect the PC to PLC.
Get the Concept version (Optional)
3 Click on the button to get info from the PLC.
EIO000000006403 10/95

Upgrading a Quantum PLC from Concept to Unity
4
The following screen gives to the user some information regarding the PLC status:
Not configured, Started, stopped Processor type (in this example: 140CPUx341x) The Hardware identification (for Schneider internal use only) The OS version (in this example the OS version is 1.35)
5 Note this version number to avoid compatibility issues between the application program and the OS if Concept has to be restored.
6 Press the button to return back to the OS update process.
EIO000000006403 11/95
Upgrading a Quantum PLC from Concept to Unity
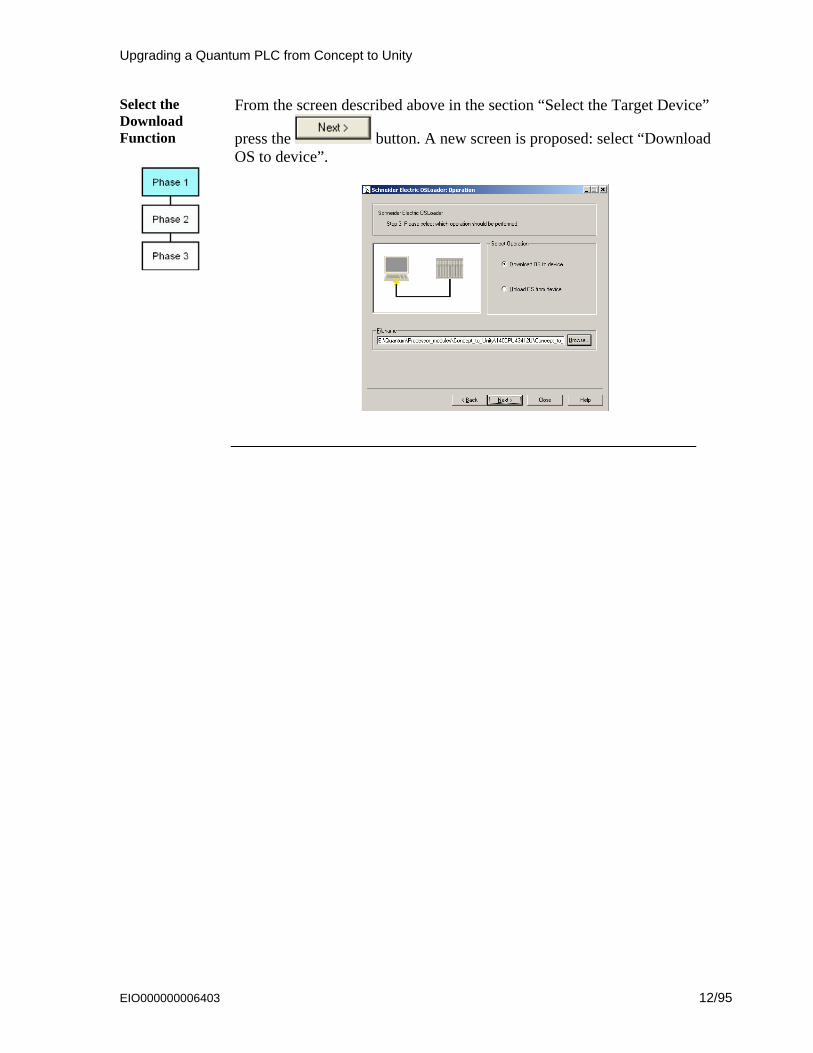
Select the Download Function
From the screen described above in the section “Select the Target Device”
press the button. A new screen is proposed: select “Download OS to device”.
EIO000000006403 12/95

Upgrading a Quantum PLC from Concept to Unity
Select the file to download
Click on the button in order to select the file to download into the PLC. In this example we will update the OS from 140CPU43412A to 140CPU43412U. For that select the folder: Quantum\Processor_modules\Concept to_Unity (in your case, select the folder according to your processor).
For an upgrade from Concept to Unity two binary files can be selected:
Concept_to_Unity_43412U.bin (allows to “format” the processor for Unity)
140CPU43412U_V240.bin is the OS that will finally be download in the processor.
In our example we have to “format” the processor (remember, we still are in the Phase 1) then select and validate “Concept_to_Unity_43412U.bin”.
Once done click on the button.
EIO000000006403 13/95
Upgrading a Quantum PLC from Concept to Unity
Download the intermediate OS
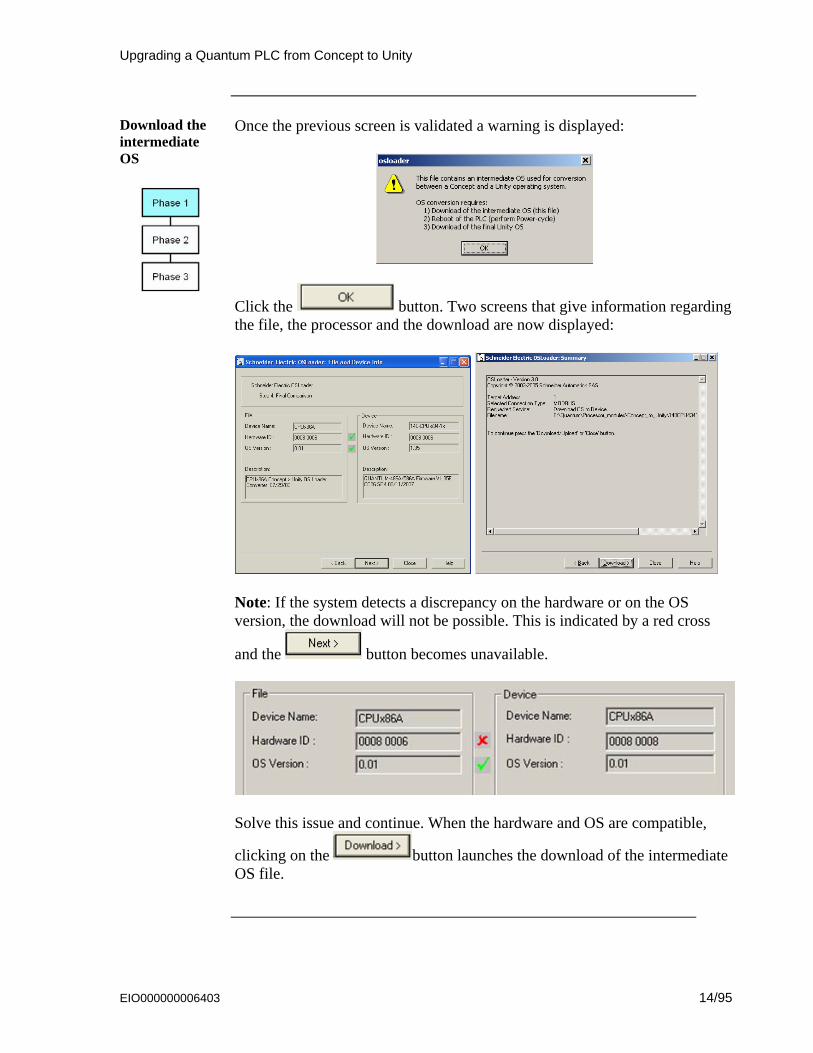
Once the previous screen is validated a warning is displayed:
Click the button. Two screens that give information regarding the file, the processor and the download are now displayed:
Note: If the system detects a discrepancy on the hardware or on the OS version, the download will not be possible. This is indicated by a red cross
and the button becomes unavailable.
Solve this issue and continue. When the hardware and OS are compatible,
clicking on the button launches the download of the intermediate OS file.
EIO000000006403 14/95

Upgrading a Quantum PLC from Concept to Unity
Download the intermediate OS file (cnt’d)
During the download the remaining time is displayed:
Once the download has successfully completed, the screen below is
displayed. Click twice on the button and go to the Phase 2 (Power OFF then ON or reset the PLC).
Note: During intermediate download of OS, CPU LEDs do not change state, Ready LED remains steady and RUN LED keeps blinking.
EIO000000006403 15/95
Upgrading a Quantum PLC from Concept to Unity
CAUTION
EQUIPMENT DAMAGE During the download:
• Do not power OFF the PLC • Do not power OFF the PC • Do not disconnect the cable • Do not shut down OS loader
Any loss of communication during the update procedure can cause severe damage to the CPU or NOE module.
Failure to follow these instructions can result in injury or equipment damage.
Reset the PLC
Once the download of the intermediate binary file has completed, the PLC has to be initialized. This task can be performed by one of the two following actions:
Reset the PLC by pushing on the Restart button located on the CPU (for more information, refer to the PLC technical documentation.
Power OFF then ON the PLC. Once the PLC has restarted, If steady Run light and no connection with OS loader, Reset the PLC. If State of PLC is steady Ready and blinking Run light, Proceed for phase 3: download the final Unity OS file.
Presentation
The final binary file “140CPU43412U.bin” (For the selected CPU in our example) has to be downloaded. For that, follow the same procedure as the one described in the Phase 1.
EIO000000006403 16/95

Upgrading a Quantum PLC from Concept to Unity
As all the necessary actions to download the final Unity OS have been already fully described in the Phase 1, they are shortly reminded here after:
1 Open the OS loader (the PC should be still connected to the PLC).
2 Select the Protocol – Refer to Phase 1.
3
Select the target device and click on the button. The next screen appears after few seconds.
Download procedure
4
Click on the button and select (in our example) the file 140CPU43412U_Vxyz.bin located on the CD OS. Then validate this screen.
EIO000000006403 17/95
Upgrading a Quantum PLC from Concept to Unity
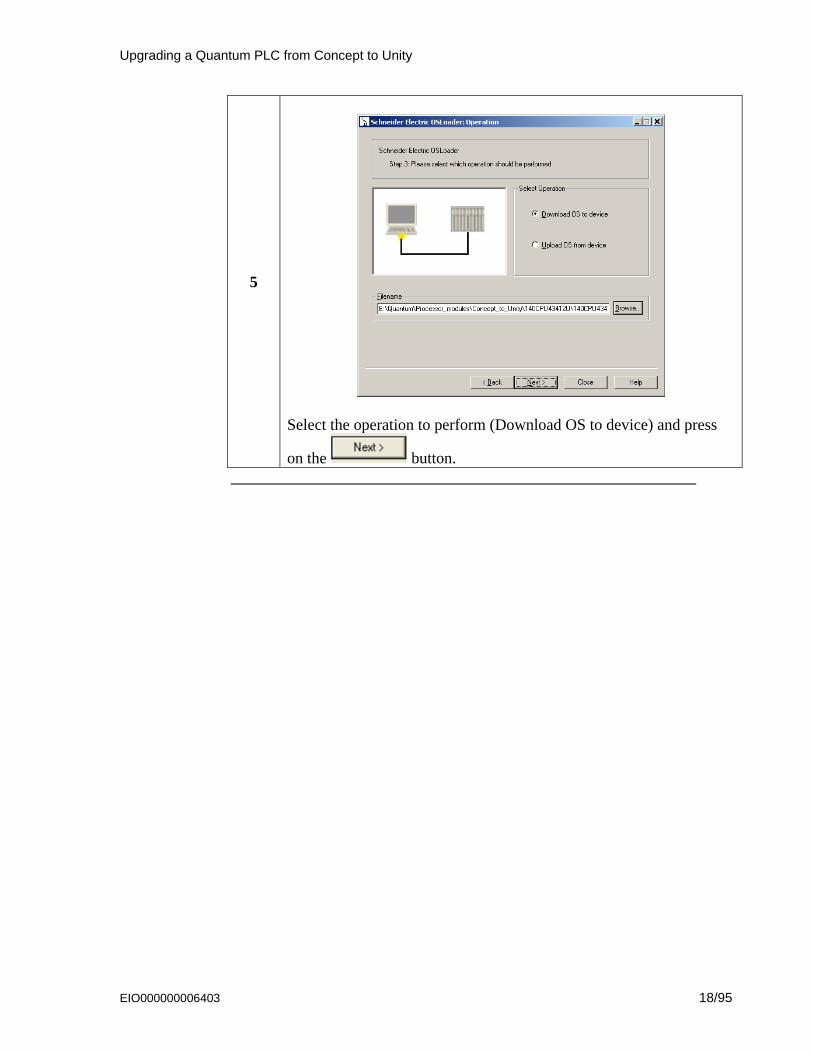
5
Select the operation to perform (Download OS to device) and press
on the button.
EIO000000006403 18/95

Upgrading a Quantum PLC from Concept to Unity
Download procedure (cnt’d)
6
At this stage, and if no functional Operating System is present in the PLC the screen may display “???” in the field “OS Version” and an
error message. Click to validate this message.
Then click on the button.
7
Click on and validate the warning message displayed on the screen to launch the download of the final OS file.
EIO000000006403 19/95

Upgrading a Quantum PLC from Concept to Unity
8
During the download (duration may vary according to the protocol) the remaining time is displayed:
Once the download has successfully completed, the screen below is displayed:
Click twice on the button to exit from the OS loader tool.
9 Reset or power OFF then ON the PLC.
EIO000000006403 20/95
Upgrading a Quantum PLC from Concept to Unity
EIO000000006403 21/95
CAUTION
EQUIPMENT DAMAGE During the download:
• Do not power OFF the PLC • Do not power OFF the PC • Do not disconnect the cable • Do not shut down OS loader
Any loss of communication during the update procedure can cause severe damage to the CPU or NOE module.
Failure to follow these instructions can result in injury or equipment damage.
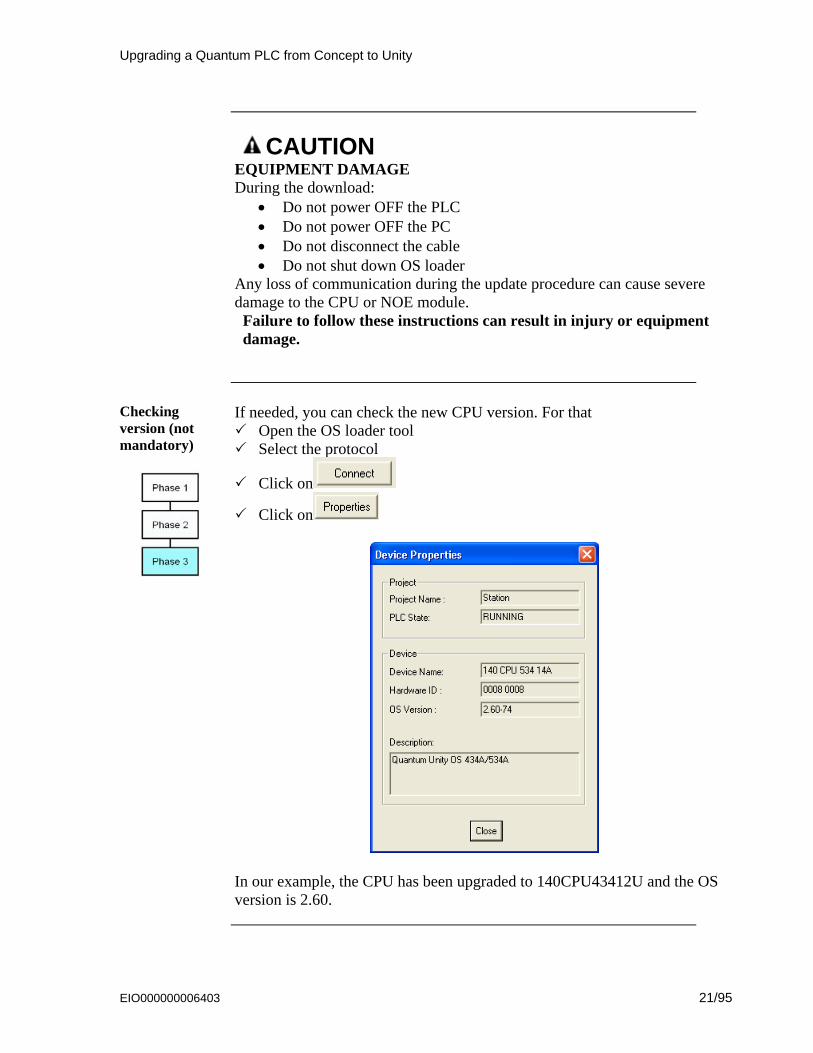
Checking version (not mandatory)
If needed, you can check the new CPU version. For that Open the OS loader tool Select the protocol
Click on
Click on
In our example, the CPU has been upgraded to 140CPU43412U and the OS version is 2.60.

Updating a Quantum PLC from Unity to Unity
3. Updating a Quantum PLC from Unity to Unity Object of this Chapter
This chapter describes how to update a Quantum PLC from Unity version higher than V2.0 to a more recent one. Note that the update from Unity V1.0 to V2 and above is not covered by this document. The screens shots given below show how to update a 140CPU65150 processor. Note: This procedure can be adopted for all Quantum platforms (High End and Legacy platforms).
Connecting the PC to the PLC
Refer to chapter “Prepare a Quantum Update / Connecting the PC to the PLC for an OS update or upgrade.”
Launching the OS loader
The OS loader (provided with Unity) allows the user to download the Operating System to the PLC. To open it click on Start/Program/Schneider-Electric/Unity-PRO/OS loader. Once done, the following screen appears:
EIO000000006403 22/95
Updating a Quantum PLC from Unity to Unity
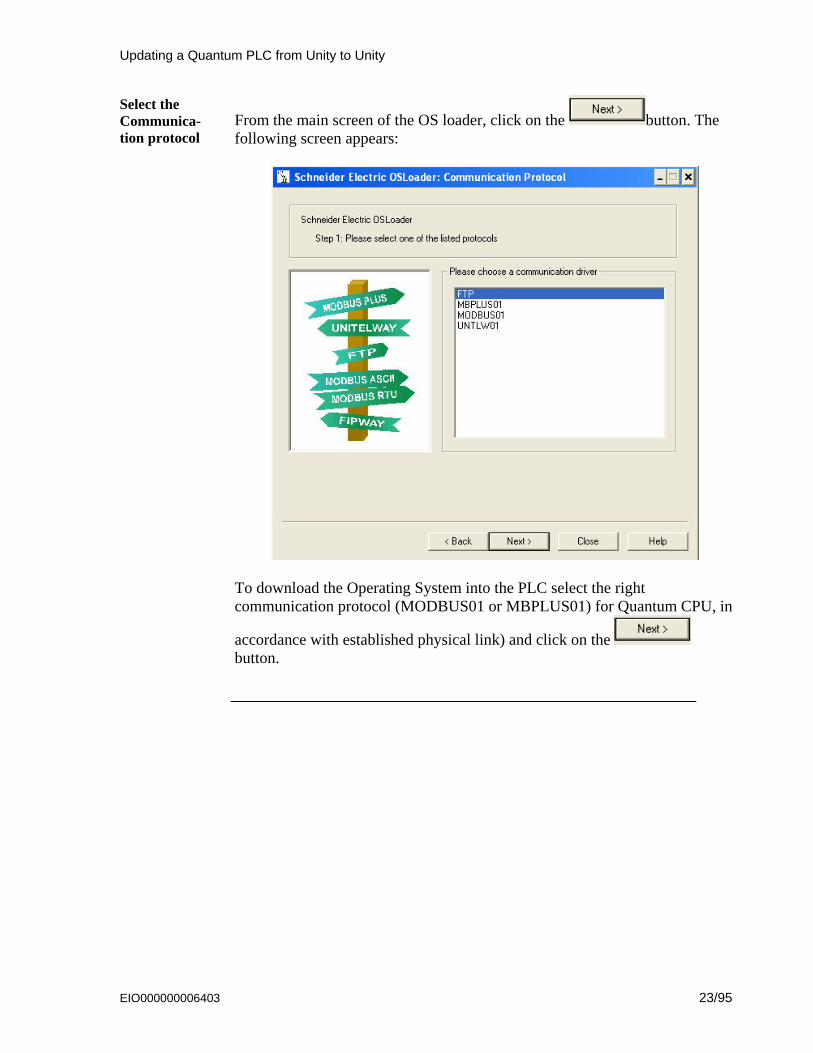
Select the Communica-tion protocol
From the main screen of the OS loader, click on the button. The following screen appears:
To download the Operating System into the PLC select the right communication protocol (MODBUS01 or MBPLUS01) for Quantum CPU, in
accordance with established physical link) and click on the button.
EIO000000006403 23/95
Updating a Quantum PLC from Unity to Unity
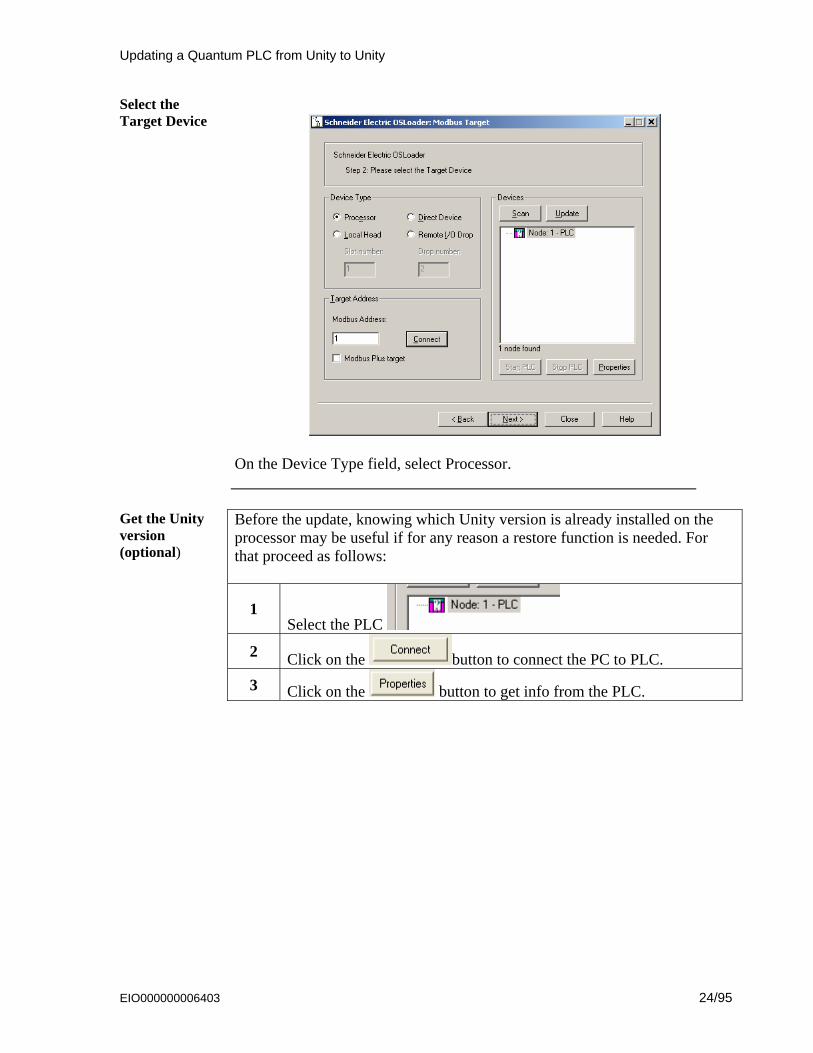
Select the Target Device
On the Device Type field, select Processor.
Before the update, knowing which Unity version is already installed on the processor may be useful if for any reason a restore function is needed. For that proceed as follows:
1 Select the PLC
2 Click on the button to connect the PC to PLC.
Get the Unity version (optional)
3 Click on the button to get info from the PLC.
EIO000000006403 24/95

Updating a Quantum PLC from Unity to Unity
4
The following screen gives the user some information regarding the PLC status
Started, stopped, Not Configured Processor type (in this example: 140CPU65150 The Hardware identification (for Schneider internal use only) The OS version (in this example the OS version is 2.6)
5 Note this version number to avoid compatibility issues between the application program and the OS if the previous version has to be restored.
6 Press the button to return back to the OS update process.
EIO000000006403 25/95
Updating a Quantum PLC from Unity to Unity
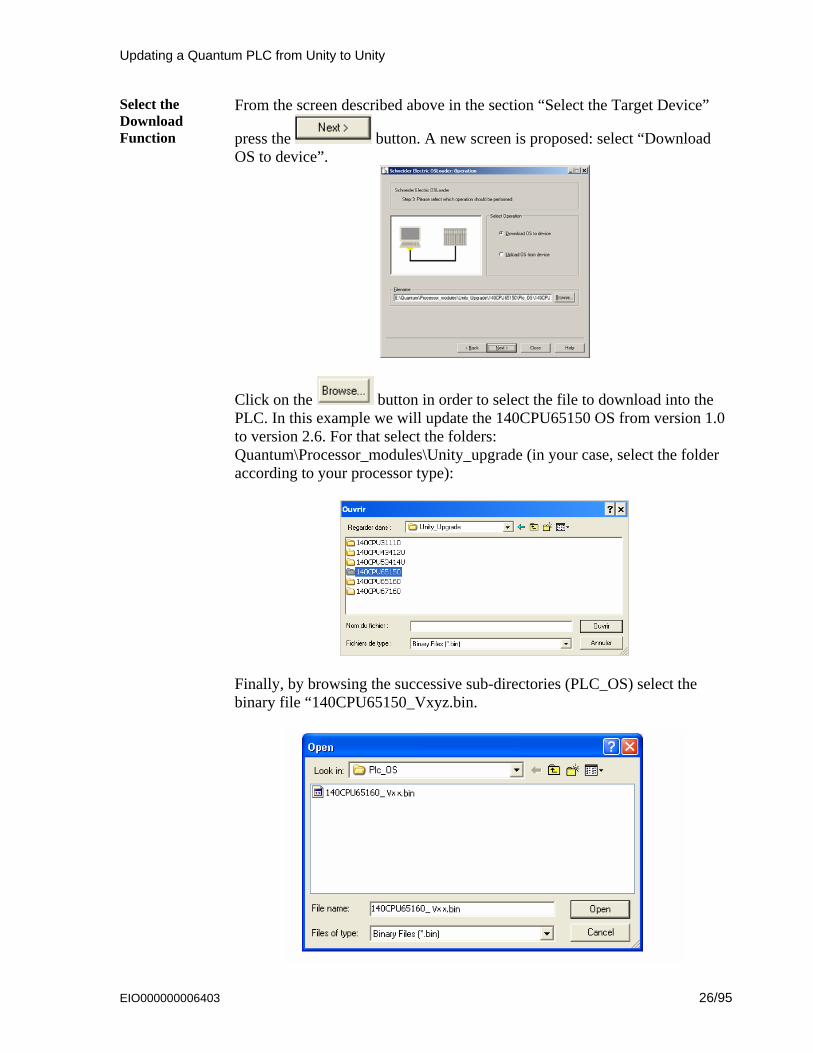
Select the Download Function
From the screen described above in the section “Select the Target Device”
press the button. A new screen is proposed: select “Download OS to device”.
Click on the button in order to select the file to download into the PLC. In this example we will update the 140CPU65150 OS from version 1.0 to version 2.6. For that select the folders: Quantum\Processor_modules\Unity_upgrade (in your case, select the folder according to your processor type):
Finally, by browsing the successive sub-directories (PLC_OS) select the binary file “140CPU65150_Vxyz.bin.
EIO000000006403 26/95
Updating a Quantum PLC from Unity to Unity
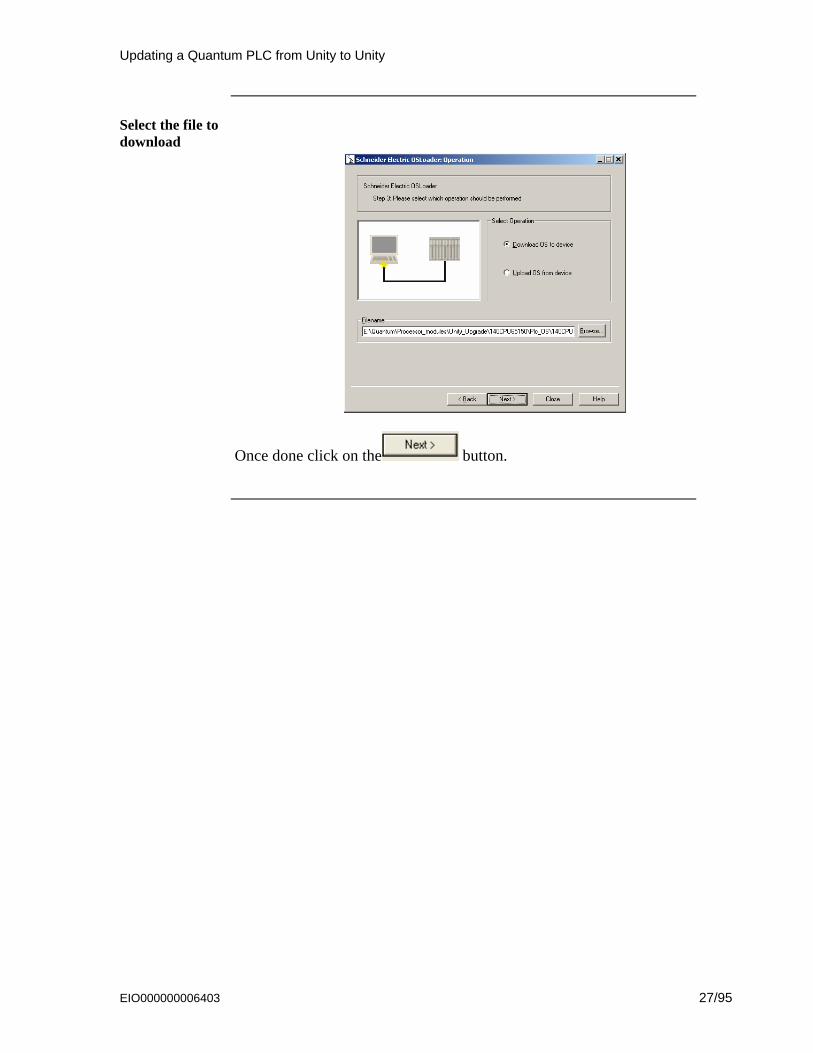
Select the file to download
Once done click on the button.
EIO000000006403 27/95
Updating a Quantum PLC from Unity to Unity
Download the OS file
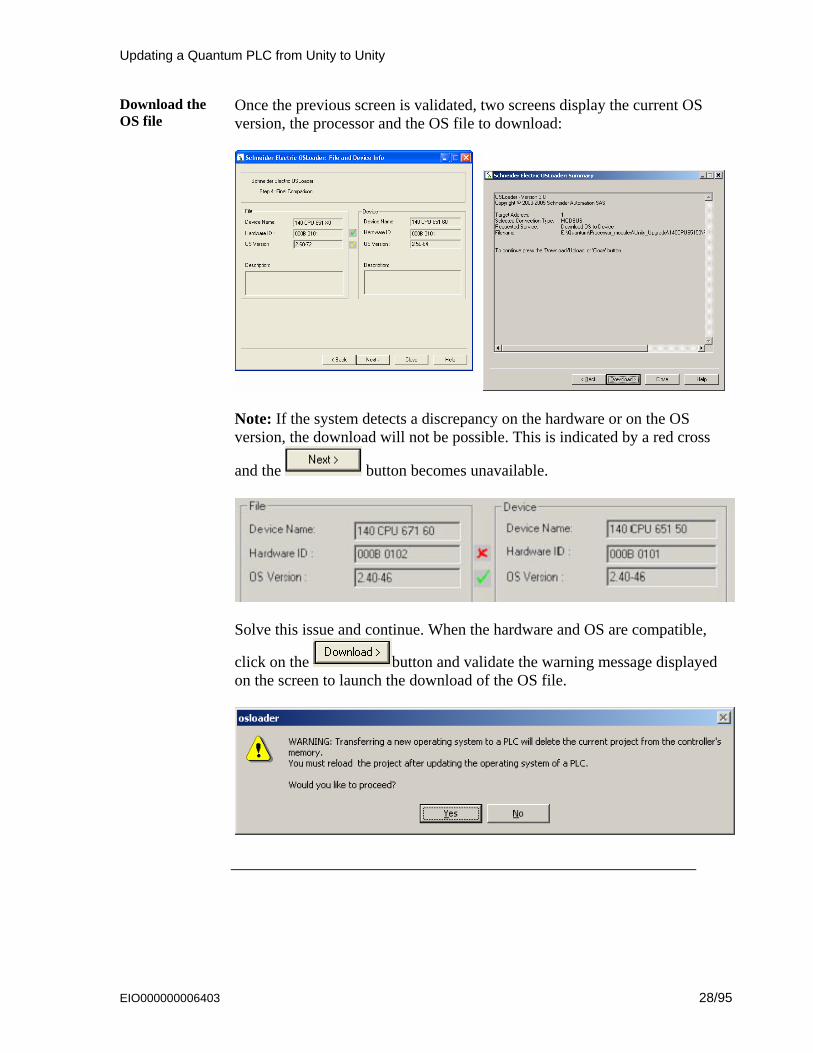
Once the previous screen is validated, two screens display the current OS version, the processor and the OS file to download:
Note: If the system detects a discrepancy on the hardware or on the OS version, the download will not be possible. This is indicated by a red cross
and the button becomes unavailable.
Solve this issue and continue. When the hardware and OS are compatible,
click on the button and validate the warning message displayed on the screen to launch the download of the OS file.
EIO000000006403 28/95
Updating a Quantum PLC from Unity to Unity
Download the OS file (cnt’d)
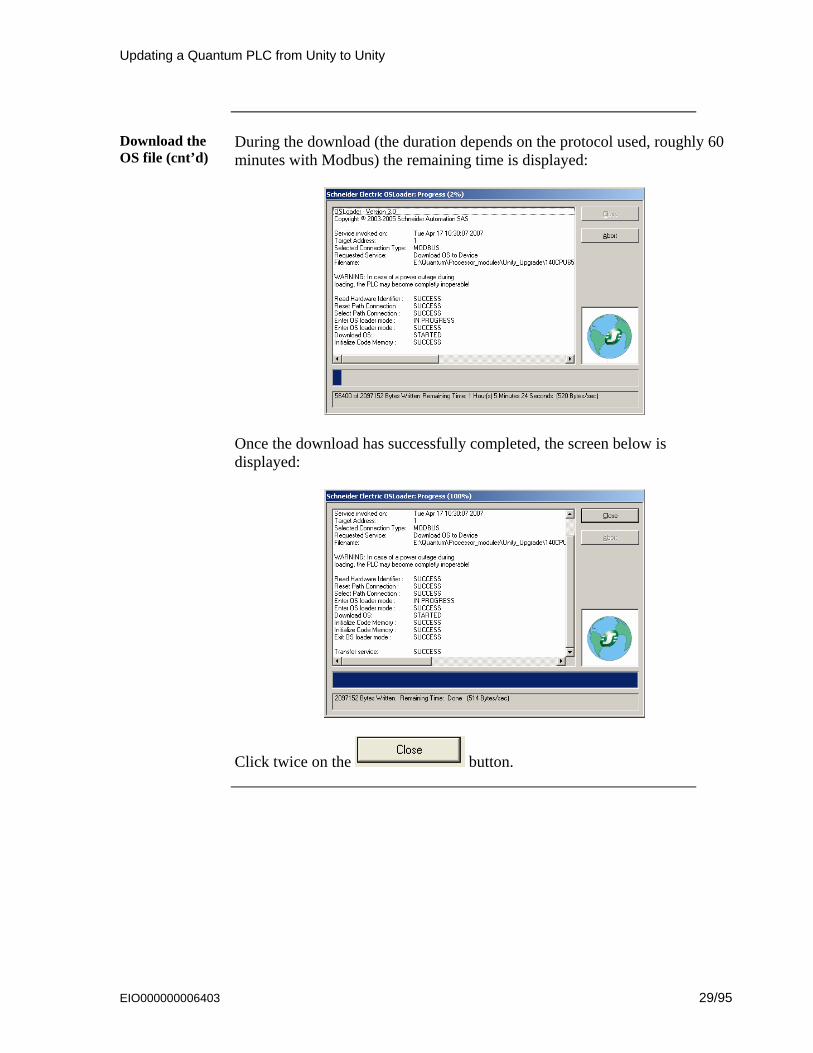
During the download (the duration depends on the protocol used, roughly 60 minutes with Modbus) the remaining time is displayed:
Once the download has successfully completed, the screen below is displayed:
Click twice on the button.
EIO000000006403 29/95

Updating a Quantum PLC from Unity to Unity
CAUTION
EQUIPMENT DAMAGE During the download:
• Do not power OFF the PLC • Do not power OFF the PC • Do not disconnect the cable • Do not shut down OS loader
Any loss of communication during the update procedure can cause severe damage to the CPU or NOE module.
Failure to follow these instructions can result in injury or equipment damage.
Reset the PLC
Once the download of the OS file has completed, the PLC has to be initialized. This task can be performed by one of the two following actions:
Reset the PLC by pushing on the Reset button located on the CPU (for more information, refer to the PLC technical documentation).
Power OFF then ON the PLC.
EIO000000006403 30/95
Updating a Quantum PLC from Unity to Unity
EIO000000006403 31/95
Checking version (optional)
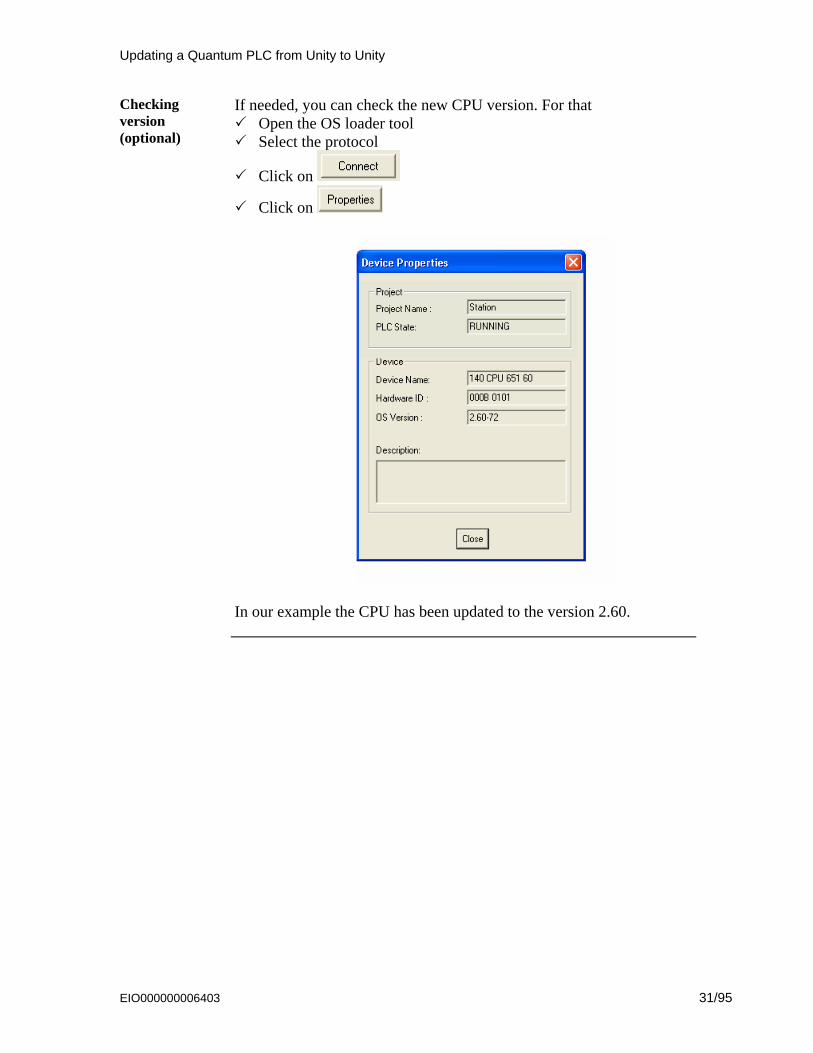
If needed, you can check the new CPU version. For that Open the OS loader tool Select the protocol
Click on
Click on
In our example the CPU has been updated to the version 2.60.

Restoring a Quantum PLC from Unity to Concept
4. Restoring a Quantum PLC from Unity to Concept
Object of this Chapter
This chapter describes how to restore a Quantum PLC from Unity to Concept. The screen shots given below show how to restore a 140CPU43412U (Unity) to 140CPU43412A (Concept).
Important Restoring a PLC from Unity to Concept requires to perform three main
phases:
Phase 1 – Restore the PLC to Concept with an intermediate OS. Phase 2 - Power OFF then ON the PLC. Phase 3 – Restore the Operating System with the appropriate file.
Those phases are mandatory and cannot be by-passed. Each phase is described in the following procedure.
Connecting the PC to the PLC
Refer to chapter “Prepare a Quantum Update / Connecting the PC to the PLC for an OS update or upgrade.”
EIO000000006403 32/95

Restoring a Quantum PLC from Unity to Concept
Launching the OS loader
The OS loader (provided with Unity) allows the user to download the Operating System to the PLC. To open it click on Start/Program/Schneider-Electric/Unity-PRO/OS loader. Once done, the following screen appears:
The next steps are fully described later in this document.
EIO000000006403 33/95

Restoring a Quantum PLC from Unity to Concept
Select the Communica-tion protocol
From the main screen of the OS loader, click on the button. The following screen appears:
To download the Operating System into the PLC select the right communication protocol (in accordance with established physical link) and
click on the button.
EIO000000006403 34/95
Restoring a Quantum PLC from Unity to Concept
Select the Target Device
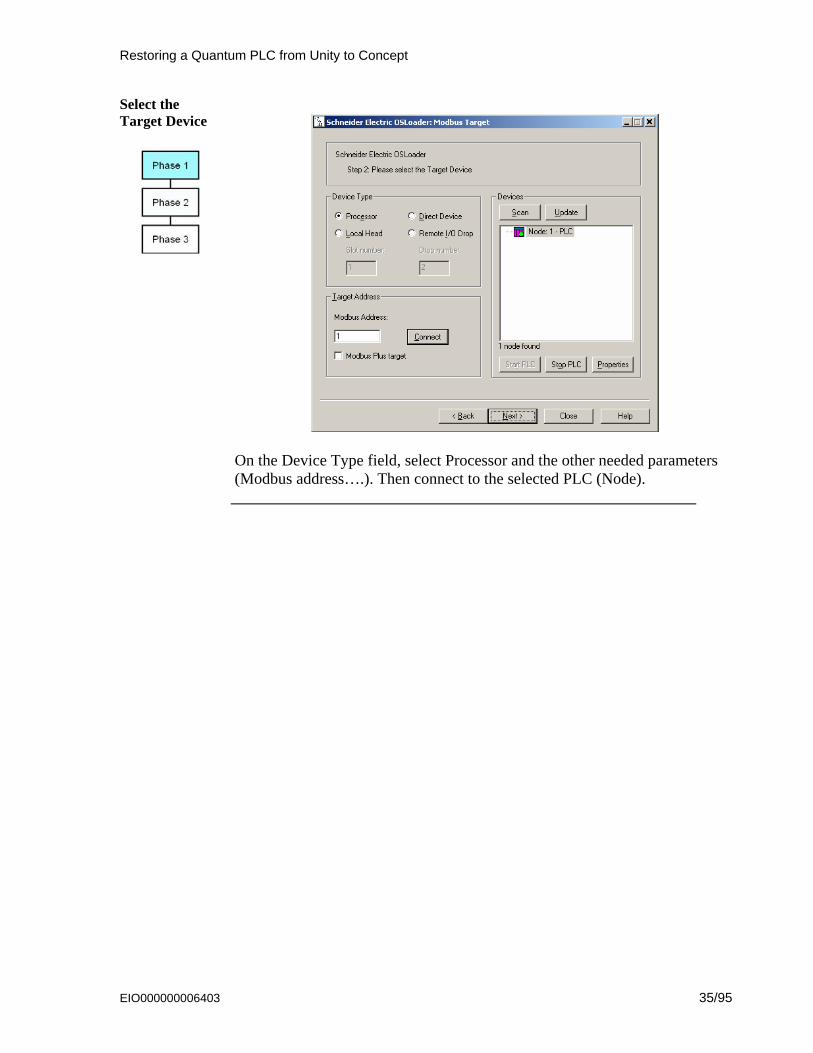
On the Device Type field, select Processor and the other needed parameters (Modbus address….). Then connect to the selected PLC (Node).
EIO000000006403 35/95
Restoring a Quantum PLC from Unity to Concept
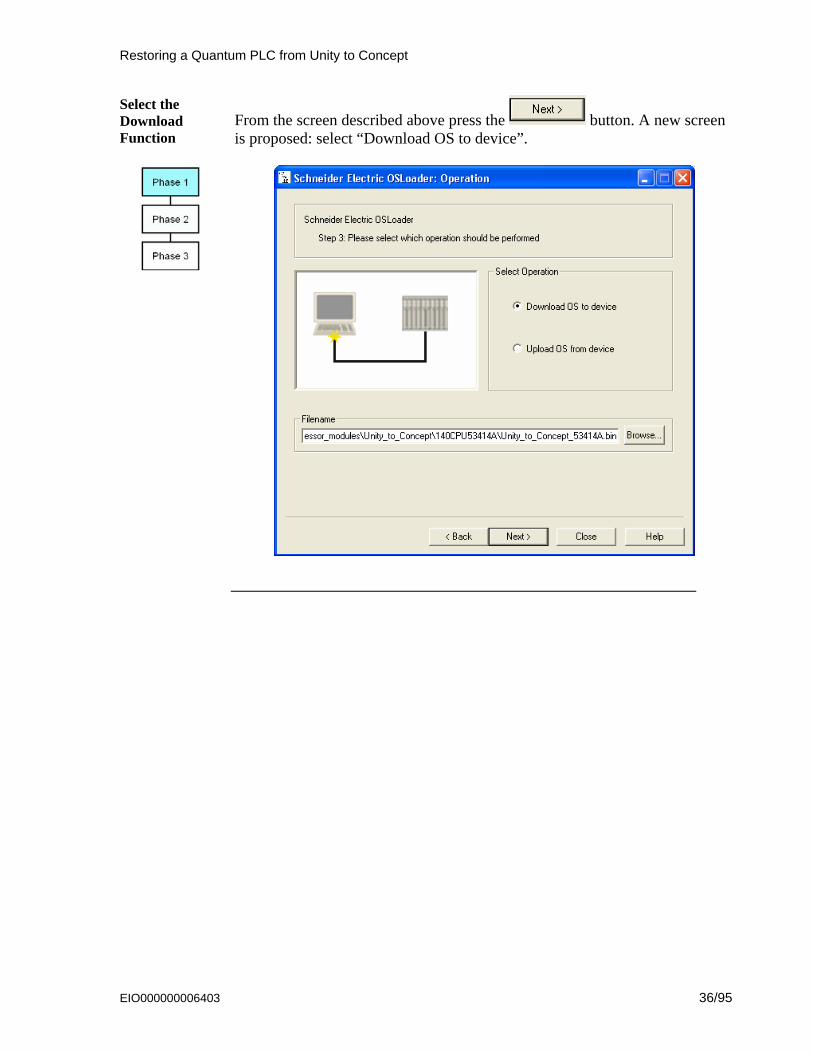
Select the Download Function
From the screen described above press the button. A new screen is proposed: select “Download OS to device”.
EIO000000006403 36/95

Restoring a Quantum PLC from Unity to Concept
Select the file to be downloaded
Click on the button in order to select the file to download into the PLC. In this example we will restore the OS from 140CPU43412U to 140CPU43412A. For that select the following folders: Quantum\Processor_modules\Unity_to_Concept.
To restore the OS from Unity to Concept, two binary files can be selected: Unity_to_Concept_43412A.bin (allows to “format” the processor to
Concept) q5rv135E.bin is the OS that will finally be downloaded in the processor
In our example we have to “format” the processor (remember, we still are in the Phase 1) then select and Validate “Unity_to_Concept_43412A.bin”.
Once done click on the button.
EIO000000006403 37/95

Restoring a Quantum PLC from Unity to Concept
Download the intermediate OS
Once the previous screen is validated a warning is displayed:
Click the button. Two screens that give information regarding the file, the processor and the download are now displayed:
Note: If the system detects a discrepancy on the hardware or on the OS version, the download will not be possible. This is indicated by a red cross
and the button becomes unavailable.
Solve this issue and continue. When the hardware - OS are compatible, click
on the to launch the download of the intermediate OS file.
EIO000000006403 38/95
Restoring a Quantum PLC from Unity to Concept
Download the intermediate OS file (cnt’d)
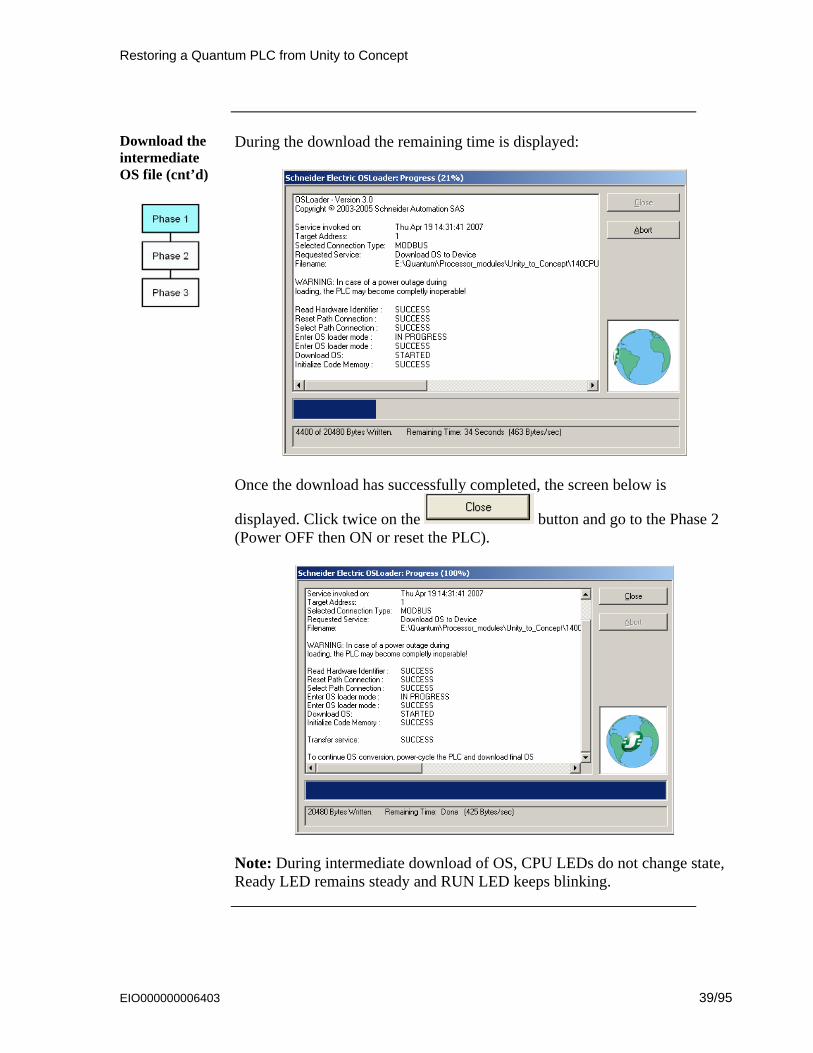
During the download the remaining time is displayed:
Once the download has successfully completed, the screen below is
displayed. Click twice on the button and go to the Phase 2 (Power OFF then ON or reset the PLC).
Note: During intermediate download of OS, CPU LEDs do not change state, Ready LED remains steady and RUN LED keeps blinking.
EIO000000006403 39/95
Restoring a Quantum PLC from Unity to Concept
CAUTION
EQUIPMENT DAMAGE During the download:
• Do not power OFF the PLC • Do not power OFF the PC • Do not disconnect the cable • Do not shut down OS loader
Any loss of communication during the update procedure can cause severe damage to the CPU or NOE module.
Failure to follow these instructions can result in injury or equipment damage.
Reset the PLC
Once the download of the intermediate binary file has completed, the PLC has to be initialized. This task can be performed by one of the two following actions:
Reset the PLC by pushing on the Restart button located on the CPU (for more information, refer to the PLC technical documentation).
Power OFF then ON the PLC. Once the PLC has restarted, go to Phase 3: download the final Concept OS.
Presentation
The final binary file “q5rv135E.bin ” (140CPU34312 in our example) has to be downloaded. For that, follow the same procedure as the one described in the Phase 1.
EIO000000006403 40/95
Restoring a Quantum PLC from Unity to Concept
As all the necessary actions to download the final Concept OS have been already fully described in the Phase 1, they are shortly reminded here after:
1 Open the OS loader (the PC should be still connected to the PLC).
2 Select the Communication Protocol – Refer to Phase 1.
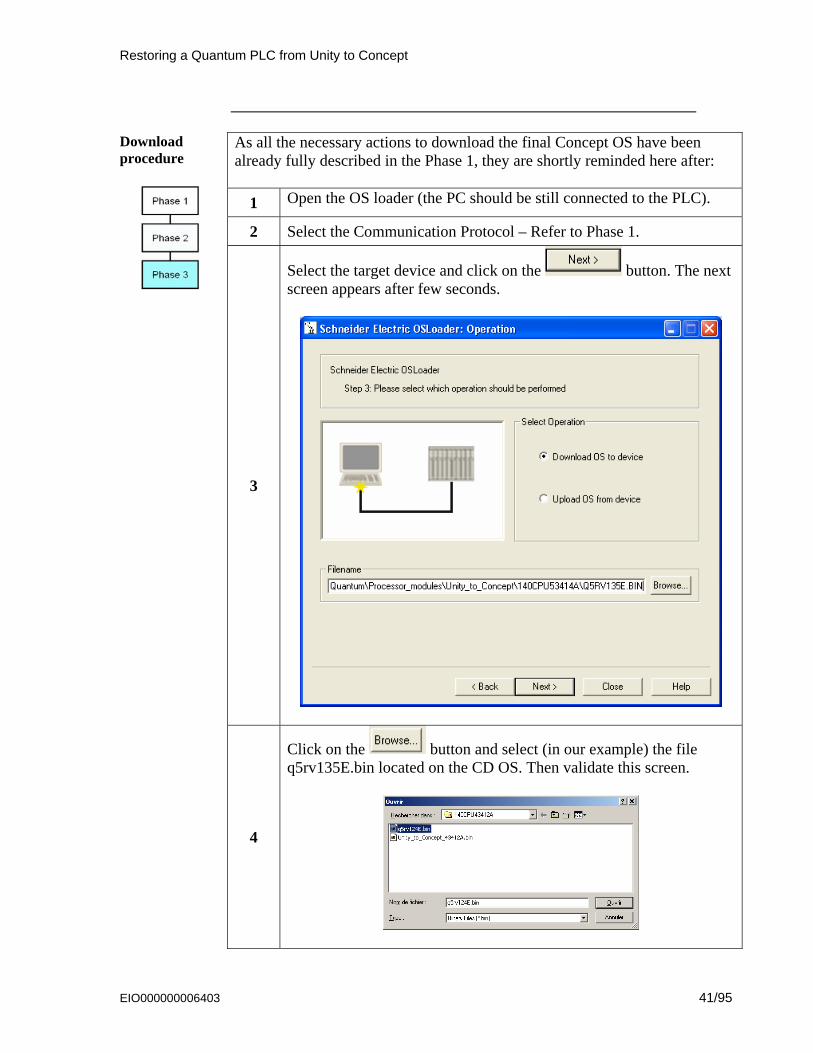
3
Select the target device and click on the button. The next screen appears after few seconds.
Download procedure
4
Click on the button and select (in our example) the file q5rv135E.bin located on the CD OS. Then validate this screen.
EIO000000006403 41/95

Restoring a Quantum PLC from Unity to Concept
5
Select the operation to perform (Download OS to device) and press
on the button.
Download procedure (cnt’d)
6
Then click on the button.
EIO000000006403 42/95
Restoring a Quantum PLC from Unity to Concept
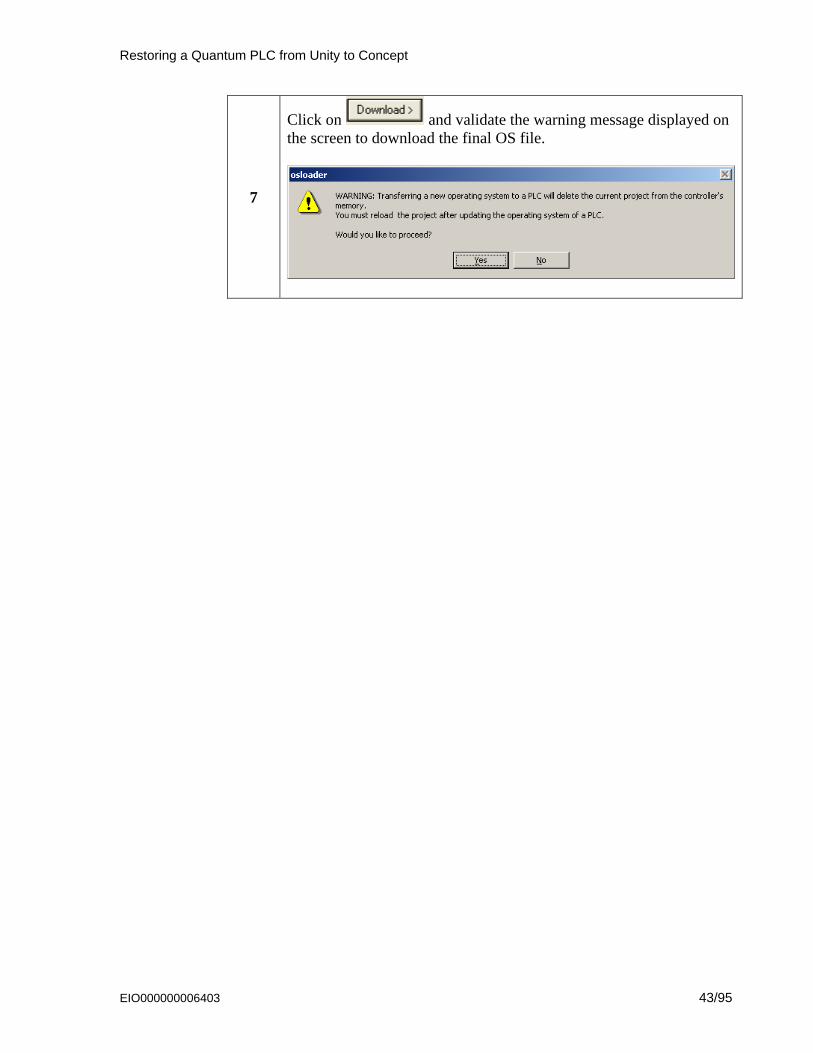
7
Click on and validate the warning message displayed on the screen to download the final OS file.
EIO000000006403 43/95

Restoring a Quantum PLC from Unity to Concept
8
During the download (duration may vary according to the protocol) the remaining time is displayed:
Once the download has successfully completed, the screen below is displayed:
Click twice on the button to exit the OS loader tool.
9 Reset or power OFF then ON the PLC.
EIO000000006403 44/95
Restoring a Quantum PLC from Unity to Concept
EIO000000006403 45/95
CAUTION EQUIPMENT DAMAGE During the download:
• Do not power OFF the PLC • Do not power OFF the PC • Do not disconnect the cable • Do not shut down OS loader
Any loss of communication during the update procedure can cause severe damage to the CPU or NOE module.
Failure to follow these instructions can result in injury or equipment damage.
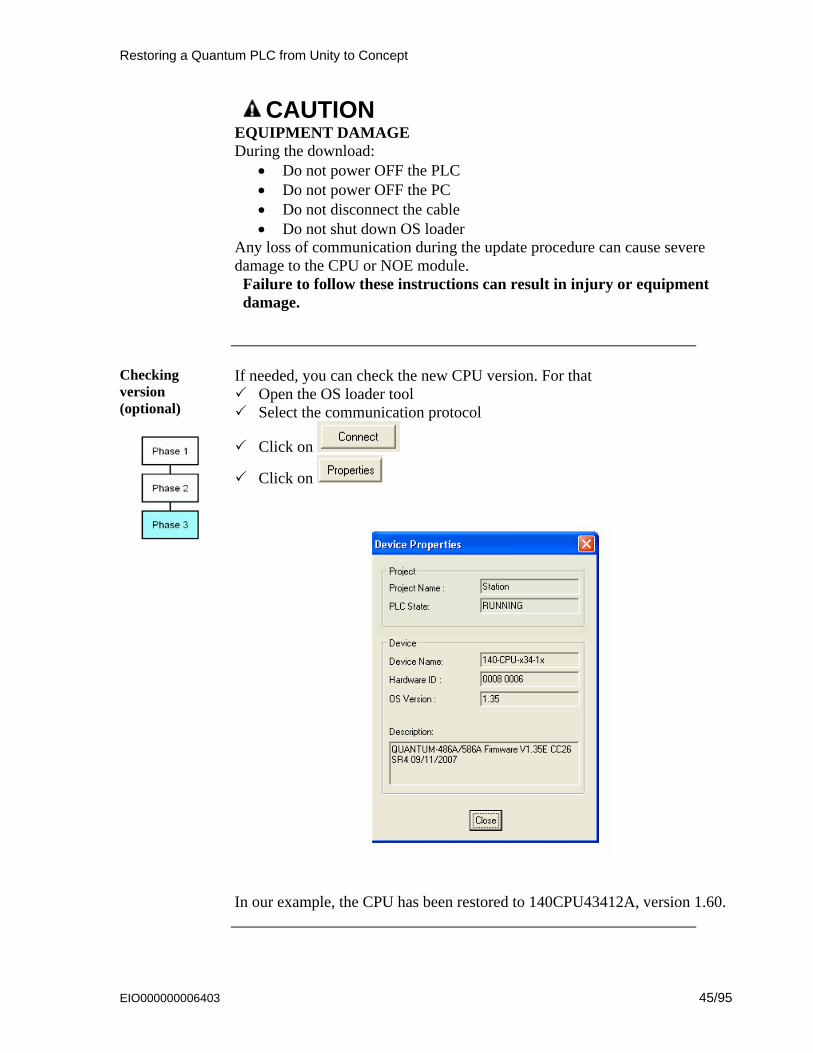
Checking version (optional)
If needed, you can check the new CPU version. For that Open the OS loader tool Select the communication protocol
Click on
Click on
In our example, the CPU has been restored to 140CPU43412A, version 1.60.
Upgrading a Quantum Hot Standby PLC
5. Upgrading a Quantum Hot Standby PLC
Object of this Chapter
This chapter describes how to upgrade a Quantum Hot Stand By PLCs (CPU 67160 , CPU 67261). This Upgrade can be managed by one of the two communications methods available in the OS loader:
Modbus Modbus Plus
Important: the procedure below only gives, step by step, the procedure to follow. The upgrade procedure itself is described in the chapter 3 of this document.
Compatibility issues
Important: To upgrade a Modicon Quantum Hot Standby with Unity OS loader without shutting down the process, the current application program must be executable by the new OS. Observe this requirement when installing minor revisions targeted for bug fixes or minor enhancements. When a major function enhancement needs to be made, maintaining this compatibility may not be possible. In this case, to perform an OS upgrade requires a system shut down. Connecting Hot Standby without RIO drop. The error A and error B leds of the RIO Head (CRP) indicate the communication status between RIO Head and RIO Drop. When using CRP module with firmware version lower than 2.00, the led ‘fault’ is on but this has no impact on communication between the two RIO heads. To have the error leds not returning a detected error, it is mandatory to:
• update the CRP module with a firmware 2.00 or higher (on both Primary and Standby side).
• update the Quantum Hot Standby processor with a firmware 2.70 or higher (on both Primary and Standby side).
• install Unity Pro V4.1 or higher. Select the HotStandby processor V2.70 in the Unity Pro application and take the processor into account through a ‘Rebuild All’. Make the full download in both PLCs.
• CPU 67261 is compatible with Unity Pro V5.0 or higher with a firmware 2.80 or higher.
Upgrading PLC while the process is running
The Executive Upgrade feature allows upgrading the OS of the Standby controller while the Primary controller continues to control the process. However, during the upgrade, the system can no longer be considered as redundant. That is, there is no Standby available to assume control if the Primary should fail before the Standby upgrade is complete.
EIO000000006403 46/95
Upgrading a Quantum Hot Standby PLC
Upgrading the OS without stopping
Under normal operating conditions, both controllers in a redundant system must have the same versions of firmware. In fact, there are checks done by the controllers to detect if there is a mismatch in firmware. Normally, when a mismatch exists, performing a switchover would not be possible because the Secondary controller would not be allowed to be Standby. However, to allow an OS Upgrade without stopping the application, it is possible to set the “upgrade without stopping” command in Command Register system word %SW60 (bit %SW60.4 - Details on the Modicon Quantum Hot Standby with Unity command register can be found in Understanding the Unity Command Register, p. 113). Note:
Enabling OS upgrade without stopping the application disable the checking between the Primary and Standby configuration. Disable the “upgrade without stopping” bit as soon as the OS upgrade is finished.
OS upgrade is possible only with compatible firmware.
Upgrade procedure
Important: Using Modbus or Modbus Plus, only address 1 is allowed for downloading. Ensure that no other device on the network is using address 1. 1. Connect to the Primary (through Modbus, Modbus Plus or USB). 2. Access the Command Register system bit %SW60.4 and set this bit to 1. 3. Disconnect the PC from the Primary CPU. 4. Depending on the communication media chosen for the upgrade
procedure, note the Modbus or Modbus Plus address of the Standby CPU using the keyboard functions (in “PLC Communications / Communications Serial Port” for Modbus or in “PLC Communications / Communications Modbus Plus” for Modbus Plus).
5. Stop the Standby CPU with the keyboard functions. Note: The standby CPU goes to STOP Offline mode; the Primary operates without a Standby.
6. Disconnect all the communication links (Hot Standby fiber optic cable, Ethernet cables, Modbus Plus cables …) from the Standby rack and remove the CRP module from the Standby rack.
7. Switch off the power of the Standby rack. 8. When using an application in the PCMCIA card:
8.1. Remove the PCMCIA card from the Standby CPU. 8.2. Remove the PCMCIA batteries to empty the card content.
EIO000000006403 47/95
Upgrading a Quantum Hot Standby PLC
EIO000000006403 48/95
9. Power on the Standby CPU. 10. If not set to 1, change the Modbus or Modbus Plus address of the Standby
CPU to 1 with the keyboard functions (in “PLC Communications / Communications Serial Port” for Modbus or in “PLC Communications / Communications Modbus Plus” for Modbus Plus).
11. Coprocessor Upgrade Step: please see “Appendix 4: 140CPU67160/140CPU 67261 HotStandby CPU Copro Upgrade Procedure”. Don’t forget to power cycle the CPU at the end of the procedure.
12. CPU OS Upgrade Step: please see “3. Updating a Quantum PLC from Unity to Unity” 12.1. Connect the PC to the Standby CPU using Modbus or Modbus Plus. 12.2. Open the OSLoader tool. 12.3. Select the Modbus or Modbus Plus communication option. 12.4. Connect to the Standby using address 1. 12.5. Download the OS to the Standby.
13. Disconnect the PC from the Standby CPU. 14. Switch off the power of the Standby CPU. 15. When using an Application in the PCMCIA :
15.1. Insert the PCMCIA batteries. 15.2. Insert the PCMCIA card in the Standby CPU.
16. Power on the Standby CPU. Note: the CPU must be in “No Conf” state.
17. Check the Copro and OS versions in the LCD Screen. 18. Reconnect all the communication cables (CRP module, Ethernet
cables, …) but not the Hot Standby fiber optic cable. 19. At last, reconnect the fiber optic cable to both CPUs. 20. Check the application program is automatically transferred to the Standby
CPU ("Transfer ..." on screen for a short time and then "Run Standby CPU"). If not, perform the transfer with the keyboard. Note: Ensure that the Modbus or Modbus Plus address is the same as the address noted in Step 4.
21. Put in RUN mode. Note: Ensure Primary CPU is in Run Primary Mode and Standby CPU is in RUN Standby Mode.
22. Perform a switchover by stopping the Primary CPU with the keyboard. Note: Ensure Standby CPU becomes Primary CPU on the LCD screen.
23. Repeat Steps 4 through 21 on the new Standby. 24. Connect to the new Primary CPU with the PC and Unity Pro (through
Modbus, Modbus Plus or USB). 25. Access Command Register system bit %SW60.4; set bit to 0. 26. Disconnect the PC and ensure Primary CPU is in RUN Primary Mode and
Standby CPU is in RUN Standby Mode.
NOE Module Upgrade Procedure
Appendix 1: NOE Module Upgrade Procedure
Purpose To outline the steps required to upgrade a NOE module using Unity Pro 2.2 or higher OS loader. Please note that prior version of the OS loader are not compatible with this revision of the firmware. You MUST be at the proper OS loader revision of 2.2 or higher. Applicable Modules 140NOE77101 / 140NOE77111 Kernel 1.0 or higher with any version of Firmware. Resulting Module after upgrade 140NOE77101 Kernel 2.0 or higher, Firmware V4.9. Note: The 140NOE77101 reference is given as an example, but the same procedure with the same steps can be used for upgrading a 140NOE77111. Overview The upgrade of a NOE module requires multiple steps. Two components must be considered to be upgraded, the Kernel and the Firmware version. Not all steps listed below may be required depending on the version of the NOE module before this upgrade procedure is started. Pre-conditions The CPU module must be in STOP mode and the NOE must have NO TCP traffic. A loss of power during the upgrade may cause the NOE module to be inoperable. Make sure the power supply on the NOE module rack will not be interrupted during the upgrade.
EIO000000006403 49/95
NOE Module Upgrade Procedure
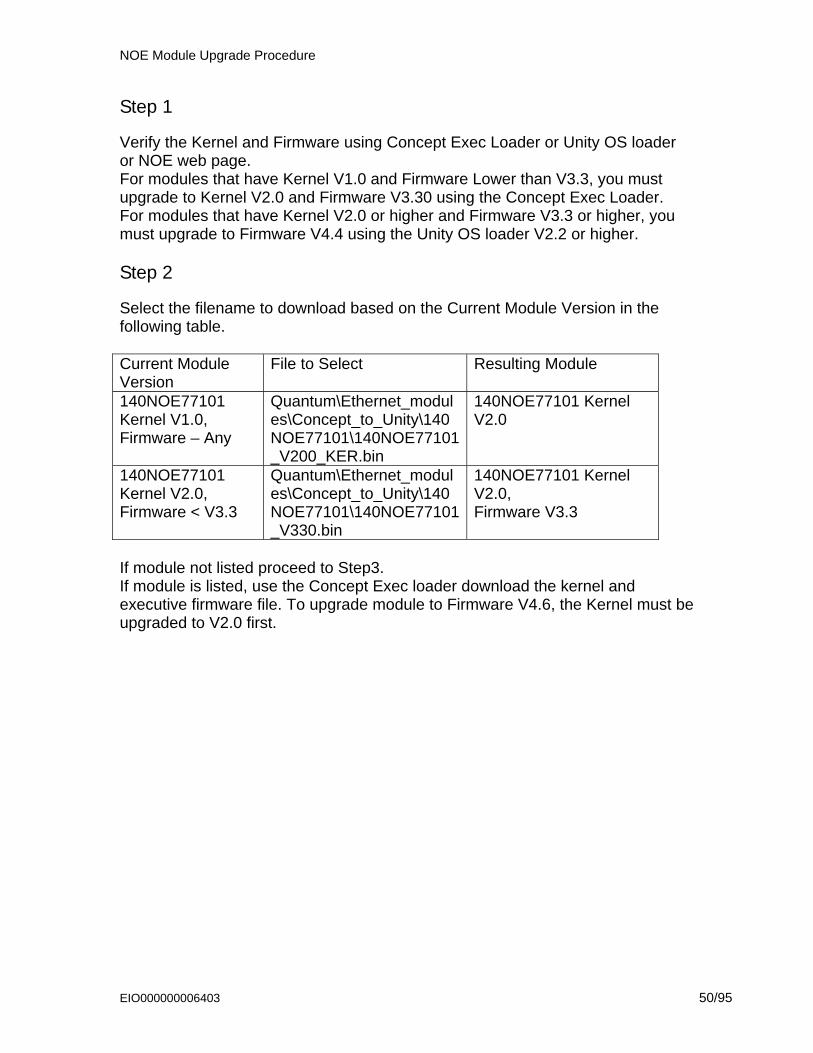
Step 1 Verify the Kernel and Firmware using Concept Exec Loader or Unity OS loader or NOE web page. For modules that have Kernel V1.0 and Firmware Lower than V3.3, you must upgrade to Kernel V2.0 and Firmware V3.30 using the Concept Exec Loader. For modules that have Kernel V2.0 or higher and Firmware V3.3 or higher, you must upgrade to Firmware V4.4 using the Unity OS loader V2.2 or higher. Step 2 Select the filename to download based on the Current Module Version in the following table. Current Module Version
File to Select Resulting Module
140NOE77101 Kernel V1.0, Firmware – Any
Quantum\Ethernet_modules\Concept_to_Unity\140NOE77101\140NOE77101_V200_KER.bin
140NOE77101 Kernel V2.0
140NOE77101 Kernel V2.0, Firmware < V3.3
Quantum\Ethernet_modules\Concept_to_Unity\140NOE77101\140NOE77101_V330.bin
140NOE77101 Kernel V2.0, Firmware V3.3
If module not listed proceed to Step3. If module is listed, use the Concept Exec loader download the kernel and executive firmware file. To upgrade module to Firmware V4.6, the Kernel must be upgraded to V2.0 first.
EIO000000006403 50/95

NOE Module Upgrade Procedure
Step 3 Upgrade the Firmware and Web pages to the current V4.4 using the Unity V2.2 OS loader or higher. Ethernet OS Files to Update: 140NOE771x1 Kernel V2.0 or higher, Firmware at least V3.3.
EIO000000006403 51/95

NOE Module Upgrade Procedure
Step4 Select the FTP Driver. Select ‘Next’.
EIO000000006403 52/95

NOE Module Upgrade Procedure
Step5 Select ‘Direct Device’ and enter the device IP address and select Connect. If requested enter the module’s MAC address, the MAC address can be found on the front of the module. Note: If your module is located remotely, you can get the MAC address by pinging the module's IP address, then using the arp-a command to display the module's physical MAC address. Select ‘Next’.
In this example, the IP address used is 192.168.1.11. Adapt this address for the one of your PLC.
EIO000000006403 53/95

NOE Module Upgrade Procedure
Step6 Select Operation ‘Download OS to Device’ Select the filename to download based on the Current Module Version in the following table. Current Module Version
File to Select Resulting Module
140NOE77101 Kernel V2.0 or higher, Firmware at least V3.3
Quantum\Ethernet_modules\Unity\140NOE77101\140NOE77101_Vxyz.bin xyz stand for the version of the OS that has to be downloaded for update. It can be for instance 440
140NOE77101 Kernel V2.0 or higher, Firmware Vx.yz (4.40 for instance)
Note: For NOE77101 with kernel V4.5 or higher, the compatible firmware is a V4.0 or higher. Note: Please read file "Quantum Compatibility Rules" for more version compatibility information.
EIO000000006403 54/95
NOE Module Upgrade Procedure
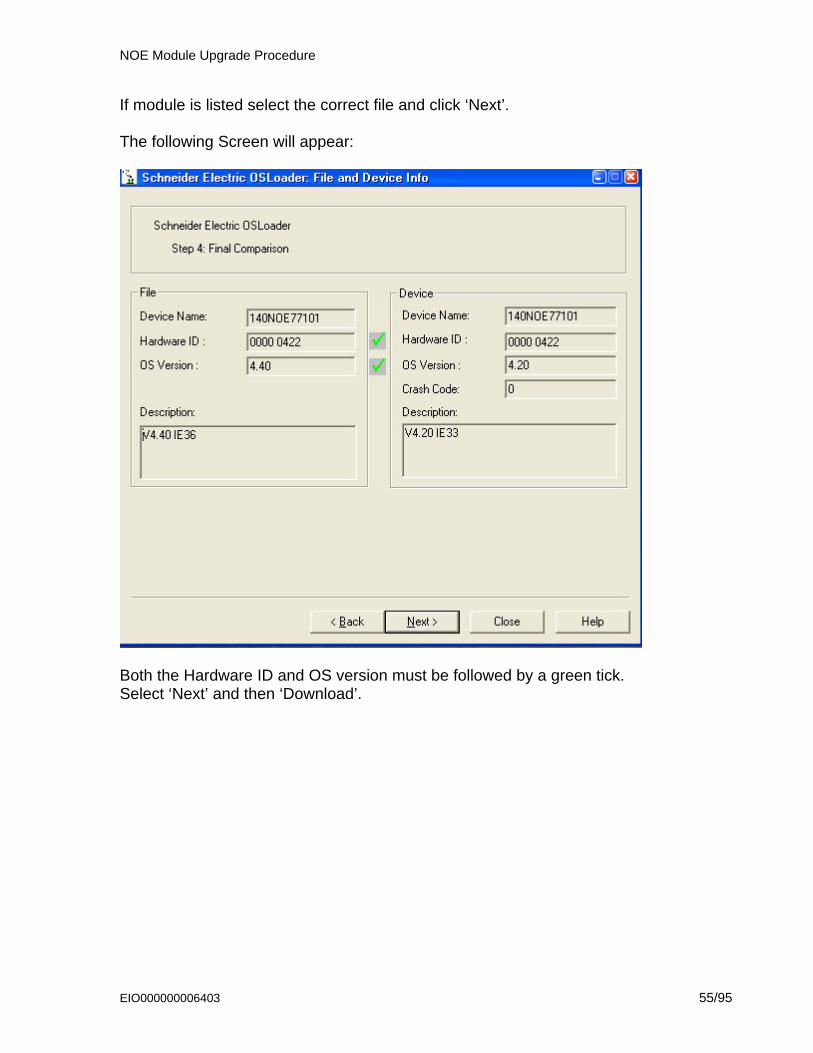
If module is listed select the correct file and click ‘Next’. The following Screen will appear:
Both the Hardware ID and OS version must be followed by a green tick. Select ‘Next’ and then ‘Download’.
EIO000000006403 55/95

NOE Module Upgrade Procedure
EIO000000006403 56/95
After the download is completed the following screen will appear.
If this screen does not appear recheck each step and contact your local Schneider office for assistance if required. Select ‘Close’ and ‘Back’ in the OS loader. Exit the OS loader. Allow the module 60 seconds to complete any actions and power cycle the module to allow the new Firmware to be loaded. Note: NOE modules should be upgraded to at least Kernel V2.0, Firmware V3.30 while installed in a PLC rack containing a CPU running a Concept Level Executive. Modules running Kernels and Firmwares without this upgrade may not complete their boot sequence in a PLC rack containing a Unity CPU.
Quantum CoPro Ethernet Port Upgrade Procedure
Appendix 2: Quantum CoPro Ethernet Port Upgrade Procedure
Applicable Modules 140CPU65150 140CPU65160 140CPU65260
Overview The upgrade of the CoPro Ethernet Port is complete by installing a single file using the Unity Pro v2.2 or higher OS loader. Please note that prior version of the OS loader are not compatible with this revision of the firmware. You MUST be at the proper OS loader revision of 2.2 or higher. Note: If the CoPro firmware version is less than v2.2, you must upgrade to v2.2 using Unity OS loader v2.2 only. Note: the CPU Firmware MUST be at OS2.31 or higher before the Ethernet port is upgraded. If the CPU is not at this revision level the Ethernet port of the CoPro will be at its default IP address (as defined by the MAC address). For Quantum configurations, it is imperative that the update is being carried out in the following order:
• Update of Ethernet coprocessors for 140CPU65150/ 140CPU65160/ 140CPU65260.
• Update of PLC processors. Special Case: channel not configured. If the Ethernet channel is not configured in the Unity Pro application, it takes the IP address built from its MAC address: 085.016.xxx.yyy where xxx and yyy are the last two numbers of the MAC address. Example: The MAC address is (in hexadecimal): 00 80 F4 01 12 20. In this case the default IP address is (in decimal): 085.016.018.032.
EIO000000006403 57/95
Quantum CoPro Ethernet Port Upgrade Procedure
Step1
Ensure the CoPro Ethernet port to be upgraded is listed in the Applicable Modules section of this document. Refer to the CoPro Ethernet port web pages for version numbers. Step2
Install the CoPro module in a system consisting of only the PLC CPU, Power Supply, and Rack. Configure the PLC system with an ‘empty’ program containing only the module’s Ethernet link IP address configuration. Ensure the CoPro Ethernet port has a configured IP address. Ensure the only devices connected to the Ethernet network are the PC running the OS loader and the CoPro Ethernet port module.
EIO000000006403 58/95

Quantum CoPro Ethernet Port Upgrade Procedure
Step3
Ensure the PC is running OS loader V2.2 or higher. To identify this, the first screen of the OS loader should look like the screen bellow. Select ‘Next’.
EIO000000006403 59/95
Quantum CoPro Ethernet Port Upgrade Procedure
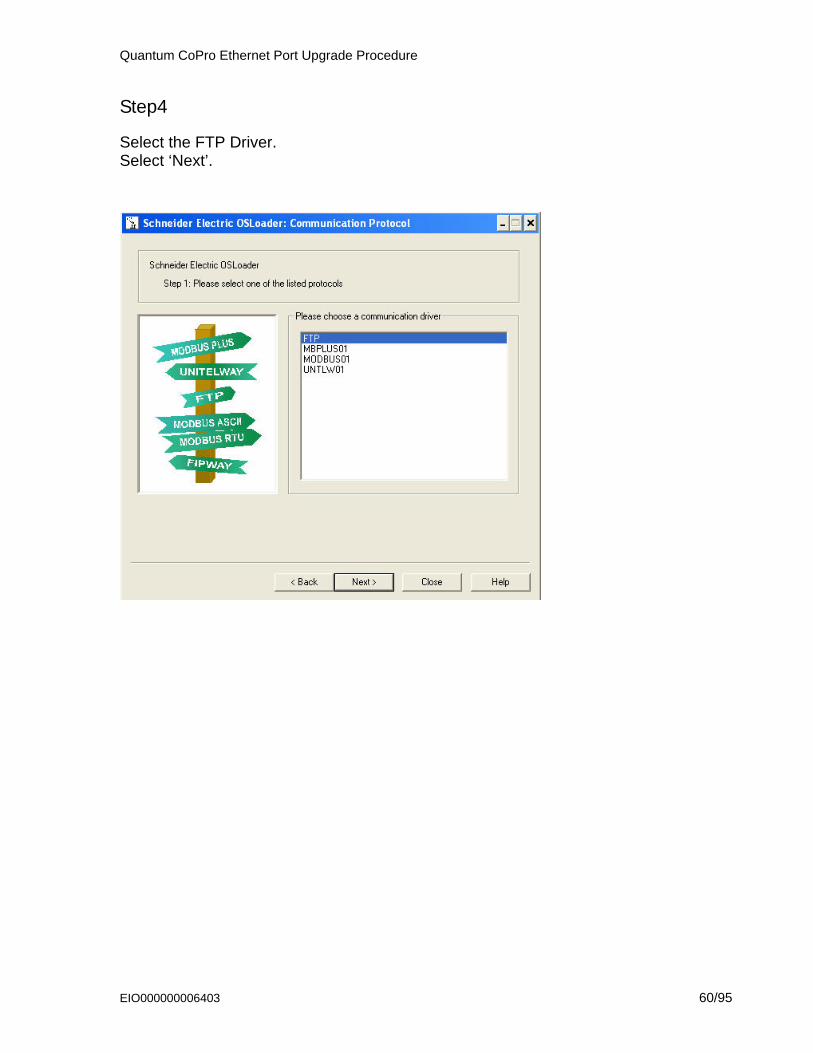
Step4
Select the FTP Driver. Select ‘Next’.
EIO000000006403 60/95

Quantum CoPro Ethernet Port Upgrade Procedure
Step5
Select ‘Direct Device’ and enter the device IP address and select connect. If requested enter the module’s MAC address, the MAC address can be found on the front of the module. Note: If your module is located remotely, you can get the MAC address by pinging the module's IP address, then using the arp -a command to display the module's physical MAC address. Select ‘Next’.
In this example, the IP address used is 192.168.1.50. Adapt this address for the one of your PLC.
EIO000000006403 61/95

Quantum CoPro Ethernet Port Upgrade Procedure
EIO000000006403 62/95
Step6
Select Operation ‘Download OS to Device’ Select the filename to download based on the Current Module Version in the following table. Current Module Version
File to Select Resulting Module
140CPU65150 140CPU65160 V2.2 or higher
Quantum \ Processor_modules \ Unity_Upgrade\ 140CPU651x0 \Eth_OS\140CPU651x0_EthCopro_V350.bin
Eth Embedded link V3.5
140CPU65260 V2.4 or higher
Quantum \ Processor_modules \ Unity_Upgrade\ 140CPU65260 \Eth_OS\140CPU65260_EthCopro_V350.bin
Eth Embedded link V3.5
Note: Please read file "Quantum Compatibility Rules" for more version compatibility information.
Quantum CoPro Ethernet Port Upgrade Procedure
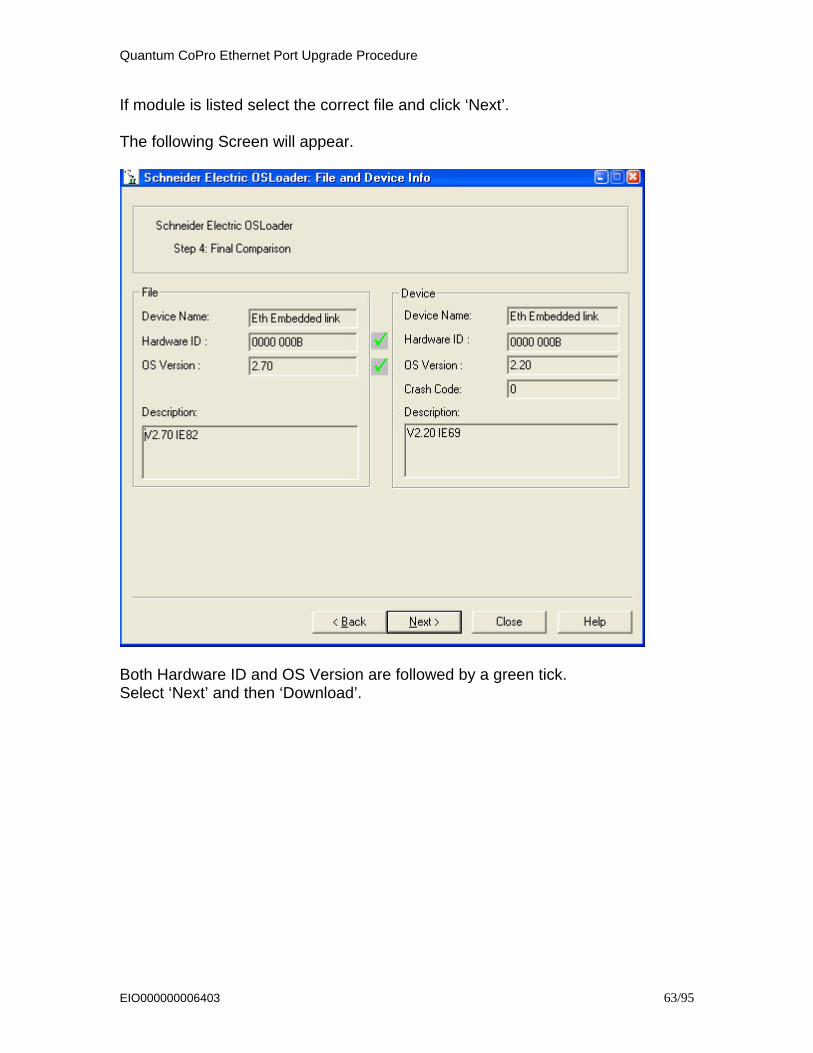
If module is listed select the correct file and click ‘Next’. The following Screen will appear.
Both Hardware ID and OS Version are followed by a green tick. Select ‘Next’ and then ‘Download’.
EIO000000006403 63/95

Quantum CoPro Ethernet Port Upgrade Procedure
EIO000000006403 64/95
After the download is completed the following screen will appear.
Select ‘Close’ and exit the OS loader. Allow the CoPro Ethernet port at least 60 seconds to reboot and implement the new Firmware Files. This process will be complete once the module again shows the ‘‘STS” LED on solid for at least 30 seconds continuously. If the STS LED does not come on continuously after 2 minutes but instead is flashing, proceed by power cycling the module. Verify the Boot and Firmware versions by viewing the web pages or connecting again with the OS loader.

FactoryCast NOE 77111 Module Upgrade Procedure
Appendix 3: FactoryCast NOE 77111 Module Upgrade Procedure
Purpose To outline the steps required to upgrade a NOE module using Unity Pro 2.2 or higher OS loader. Please note that prior version of the OS loader are not compatible with this revision of the firmware. You MUST be at the proper OS loader revision of 2.2 or higher. Applicable Modules 140NOE77111 Kernel 1.0 or higher with any version of Firmware. Resulting Module after upgrade 140NOE77111 Kernel 2.0 or higher, Firmware V5.0. Overview The upgrade of a NOE module requires multiple steps. Two components must be considered to be upgraded, the Kernel and the Firmware version. Not all steps listed below may be required depending on the version of the NOE module before this upgrade procedure is started. Pre-conditions The CPU module must be in STOP mode and the NOE must have NO TCP traffic. A loss of power during the upgrade may cause the NOE module to be inoperable. Make sure the power supply on the NOE module rack will not be interrupted during the upgrade. Note: OS Version numbers displayed in screenshots of following steps are only examples.
EIO000000006403 65/95

FactoryCast NOE 77111 Module Upgrade Procedure
Step 1
Verify the Kernel and Firmware using Concept Exec Loader or Unity OS loader or NOE web page. For modules that have Kernel V1.0 and Firmware lower than V3.0, you must upgrade to Kernel V2.0 and Firmware V3.30 using the Concept Exec Loader. For modules that have Kernel V2.0 or higher and Firmware V3.0 or higher, you must upgrade to Firmware V4.2 using the Unity OS loader v2.2 or higher.
Step 2
Select the filename to download based on the Current Module Version in the following table:
Current Module Version
File to Select Resulting Module
140NOE77111 Kernel V1.0, Firmware – Any
Quantum\Ethernet_modules\Concept_to_Unity\140NOE77111\140NOE77111_V200_KER.bin
140NOE77111 Kernel V2.0
140NOE77111 Kernel V2.0, Firmware < V3.10
Quantum\Ethernet_modules\Concept_to_Unity\140NOE77111 \140NOE77111_V330.bin
140NOE77111 Kernel V2.0, Firmware V3.30
If module not listed proceed to Step3. If module is listed, use the Concept Exec loader download the kernel and executive firmware file. To upgrade module to Firmware V4.6, the Kernel must be upgraded to V2.0 first.
EIO000000006403 66/95
FactoryCast NOE 77111 Module Upgrade Procedure
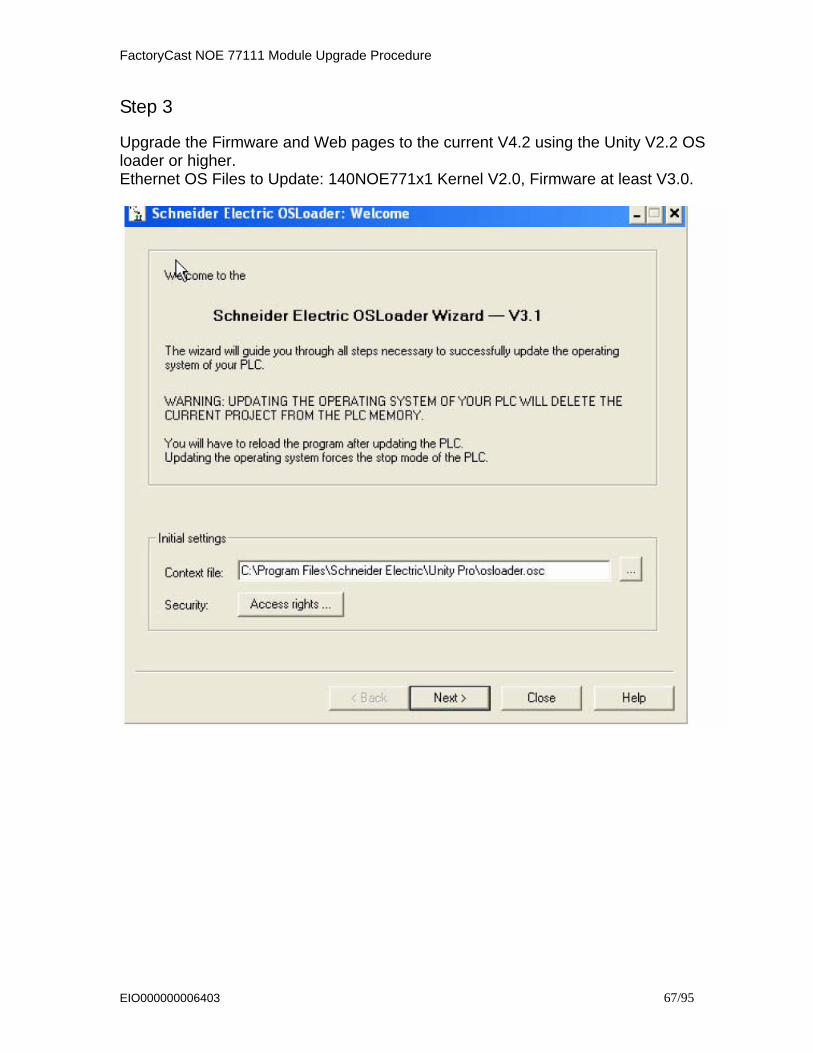
Step 3
Upgrade the Firmware and Web pages to the current V4.2 using the Unity V2.2 OS loader or higher. Ethernet OS Files to Update: 140NOE771x1 Kernel V2.0, Firmware at least V3.0.
EIO000000006403 67/95
FactoryCast NOE 77111 Module Upgrade Procedure
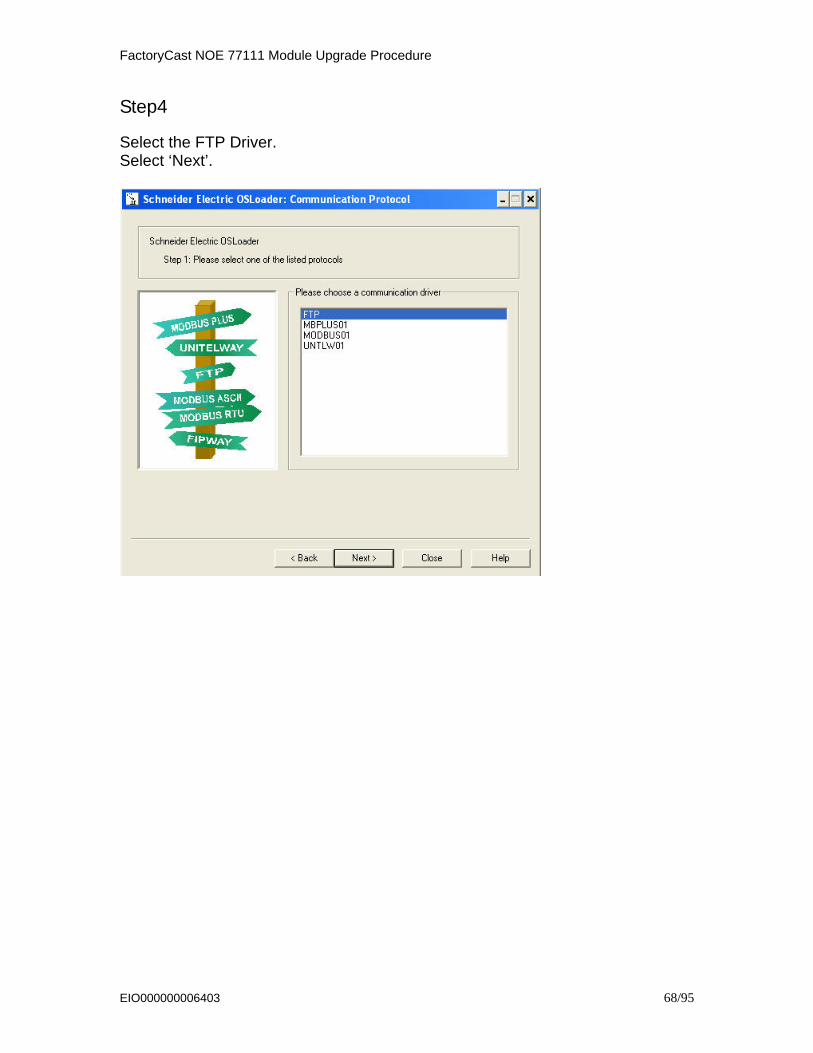
Step4
Select the FTP Driver. Select ‘Next’.
EIO000000006403 68/95

FactoryCast NOE 77111 Module Upgrade Procedure
Step5
Select ‘Direct Device’ and enter the device IP address and select Connect. If requested enter the module’s MAC address, the MAC address can be found on the front of the module. Note: If your module is located remotely, you can get the MAC address by Pinging the module's IP address, then using the arp -a command to display the module's physical MAC address. Select ‘Next’
In this example, the IP address used is 192.168.1.11. Adapt this address for the one of your PLC.
EIO000000006403 69/95
FactoryCast NOE 77111 Module Upgrade Procedure
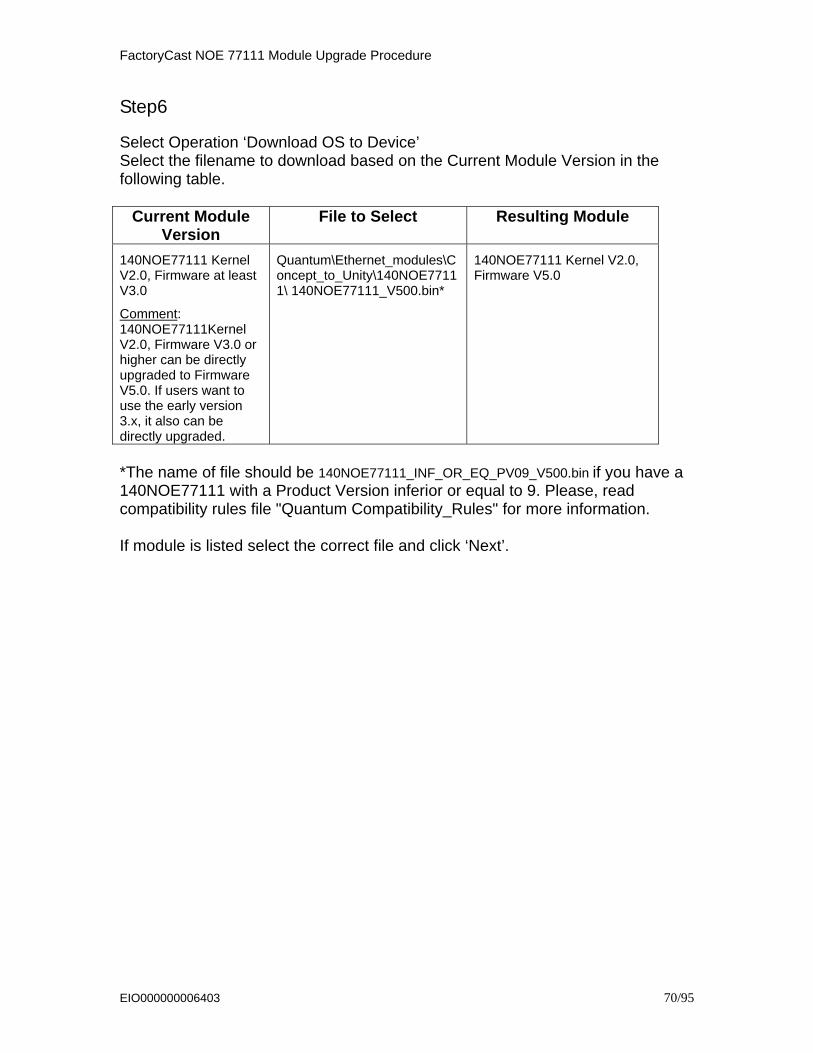
Step6
Select Operation ‘Download OS to Device’ Select the filename to download based on the Current Module Version in the following table.
Current Module Version
File to Select Resulting Module
140NOE77111 Kernel V2.0, Firmware at least V3.0
Comment: 140NOE77111Kernel V2.0, Firmware V3.0 or higher can be directly upgraded to Firmware V5.0. If users want to use the early version 3.x, it also can be directly upgraded.
Quantum\Ethernet_modules\Concept_to_Unity\140NOE77111\ 140NOE77111_V500.bin*
140NOE77111 Kernel V2.0, Firmware V5.0
*The name of file should be 140NOE77111_INF_OR_EQ_PV09_V500.bin if you have a 140NOE77111 with a Product Version inferior or equal to 9. Please, read compatibility rules file "Quantum Compatibility_Rules" for more information. If module is listed select the correct file and click ‘Next’.
EIO000000006403 70/95

FactoryCast NOE 77111 Module Upgrade Procedure
The following Screen will appear.
Both the Hardware ID and OS version must be followed by a green tick. Select ‘Next’ and then ‘Download’.
EIO000000006403 71/95
FactoryCast NOE 77111 Module Upgrade Procedure
EIO000000006403 72/95
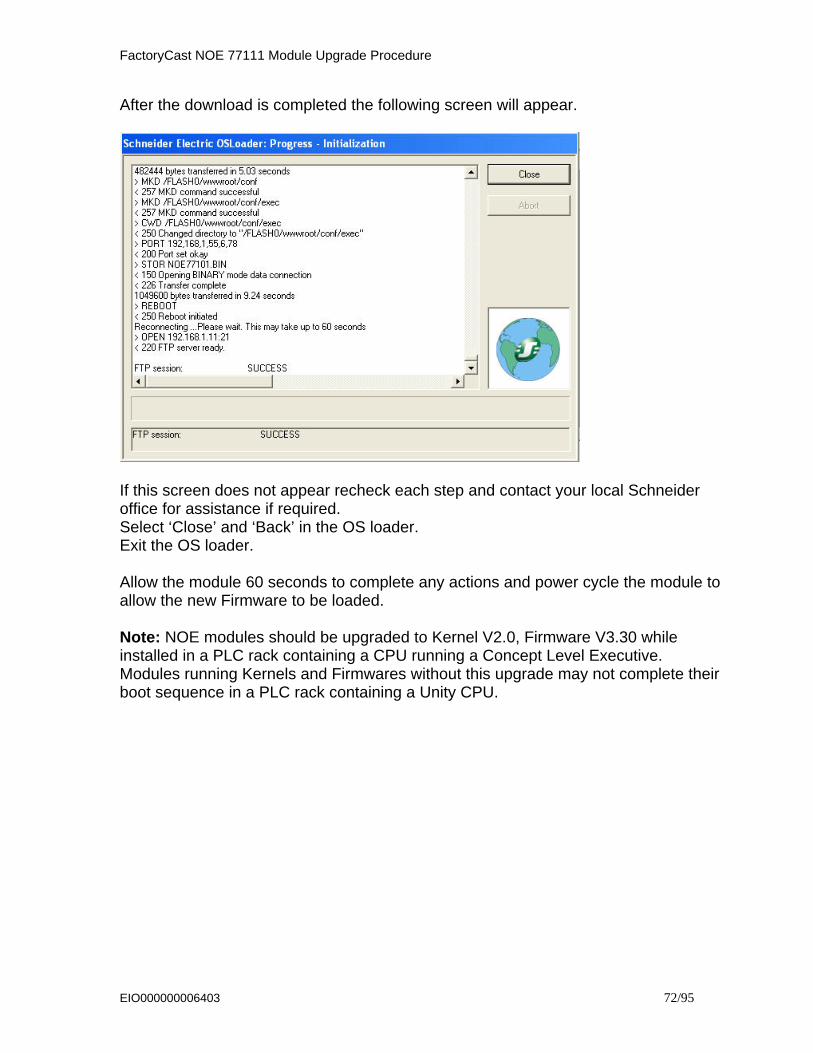
After the download is completed the following screen will appear.
If this screen does not appear recheck each step and contact your local Schneider office for assistance if required. Select ‘Close’ and ‘Back’ in the OS loader. Exit the OS loader. Allow the module 60 seconds to complete any actions and power cycle the module to allow the new Firmware to be loaded. Note: NOE modules should be upgraded to Kernel V2.0, Firmware V3.30 while installed in a PLC rack containing a CPU running a Concept Level Executive. Modules running Kernels and Firmwares without this upgrade may not complete their boot sequence in a PLC rack containing a Unity CPU.

140CPU67160 HotStandby CPU Copro upgrade procedure
Appendix 4: 140CPU67160/140CPU 67261 HotStandby CPU Copro Upgrade Procedure
Important: Before Upgrading the Copro of a 140CPU67160/ CPU67261 CPU needs to be in STOP mode. Procedure The procedure needs 2 preliminary steps before the upgrade operation: (Each step is detailed in the following pages)
• Preliminary step 1: If necessary, download the Copro firmware from www.schneider-electric.com
• Preliminary step 2: PC IP address modification • Step 3: Upgrade Copro firmware of the CPU using Unity OS loader • Step 4: Powercycle the CPU Connection diagram for CPU 67160 COPRO Upgrade.
Connection diagram for CPU 67261 COPRO Upgrade
24 Vdc
Switch TCSESM083F2CU0 140CPU67160
PC + ETH card
490NOC00005 fiber optic cable RJ45/RJ45
direct cable
24 Vdc
Switch TCSESM083F2CS0 140CPU67261
PC + ETH card
RJ45/RJ45 direct cable
VDIF0626463505 fiber optic cable
EIO000000006403 73/95

140CPU67160 HotStandby CPU Copro upgrade procedure
Upgrade operation needs the following equipments:
• PC equipped with an ETH network card with an electric output (RJ45) • An electric / optic switch Modicon TCSESM083F2CU0 (CPU 67160) /
TCSESM043F1CS0 ( CPU 67261) • An RJ45 - RJ45 direct cable
For CPU 67160 A SC – MTRJ duplex optic cable 490NOC000 05.
For CPU 67261 A LC - SC duplex optic cable VDIF0626463505.
• A 24Vdc power supply
Note: if the upgrade operation is planned to be done when the process is under HotStandby system control, it is mandatory to do it according to the following sequence detailed in this document, part ‘Upgrade using Modbus/ModbusPlus protocol’.
EIO000000006403 74/95

140CPU67160 HotStandby CPU Copro upgrade procedure
Preliminary step 1: Download firmware from www.schneider-electric.com
Connect to www.schneider-electric.com. Click successively on Products and Services / Automation and Control/ Product offers/ Automation / PLCs, PC based control, I/O / Modicon Quantum /Firmware-Updates.
Select “Quantum 140CPU67160 HSBY Copro firmware”.
Note: Copro Firmware is common for CPU 67160 and CPU 67261.
EIO000000006403 75/95

140CPU67160 HotStandby CPU Copro upgrade procedure
Download the file into the PC (in this example HSBY Copro Firmware 2.11IE80).
EIO000000006403 76/95
140CPU67160 HotStandby CPU Copro upgrade procedure
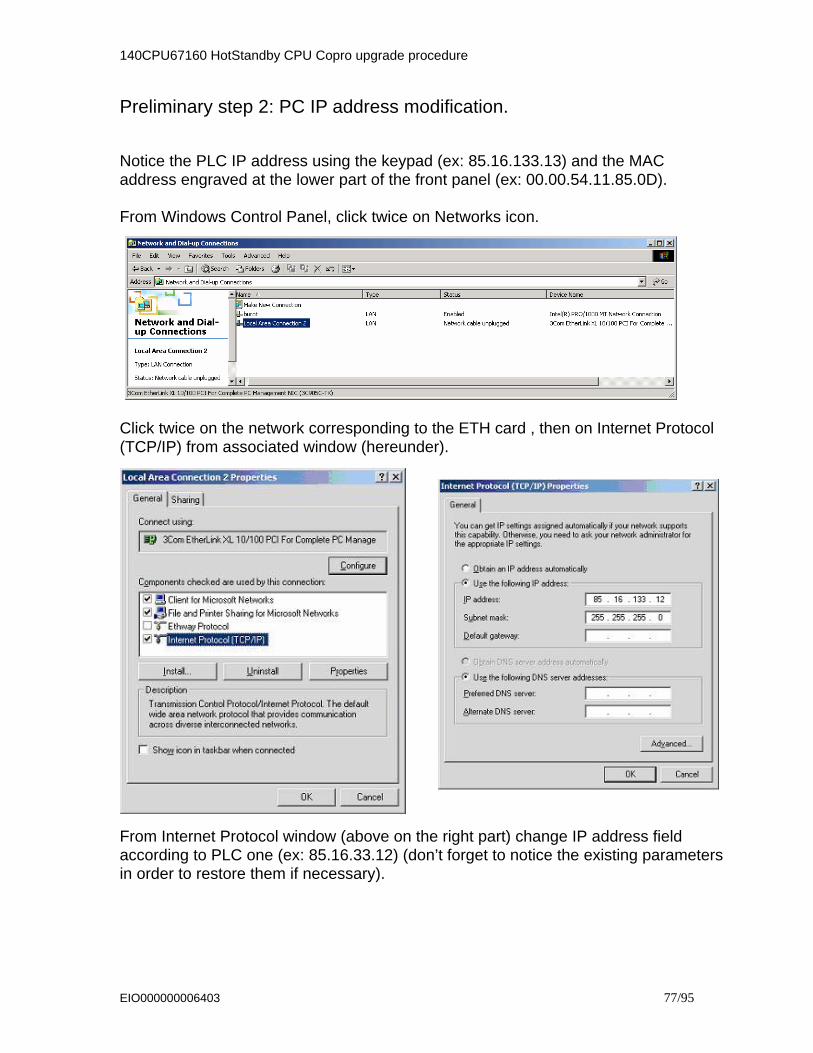
Preliminary step 2: PC IP address modification.
Notice the PLC IP address using the keypad (ex: 85.16.133.13) and the MAC address engraved at the lower part of the front panel (ex: 00.00.54.11.85.0D). From Windows Control Panel, click twice on Networks icon.
Click twice on the network corresponding to the ETH card , then on Internet Protocol (TCP/IP) from associated window (hereunder).
From Internet Protocol window (above on the right part) change IP address field according to PLC one (ex: 85.16.33.12) (don’t forget to notice the existing parameters in order to restore them if necessary).
EIO000000006403 77/95

140CPU67160 HotStandby CPU Copro upgrade procedure
Step 3: Upgrade CPU Copro firmware using Unity OS loader
Activate Unity OS loader.
Select FTP protocol then click on Next.
EIO000000006403 78/95

140CPU67160 HotStandby CPU Copro upgrade procedure
Fill the FTP Address field with the PLC IP address (available by the LCD Screen) then:
Click on Connect. Fill the MAC Address field with the PLC MAC Address then click on OK.
Click on Next.
EIO000000006403 79/95

140CPU67160 HotStandby CPU Copro upgrade procedure
Choose ‘Download OS to Device’ and Retrieve the firmware file using the Browse facility (in this example “hsby copro fw_ie80.bin”). Valid by clicking on Next.
The Device identification screen is displayed. Check that the right Copro Firmware will be downloaded in the device.
EIO000000006403 80/95

140CPU67160 HotStandby CPU Copro upgrade procedure
EIO000000006403 81/95
Click on Next then on Download and wait end of transfer.
Step 4: Powercycle the CPU
Power off the CPU. Power it on. The change of Copro has been done for this CPU. Now you can go on and upgrade the OS version for this CPU.

RIO Head Firmwares (140 CRP 93X00) upgrade procedure
Appendix 5: 140CRP93x00 S908 RIO Head Upgrade Procedure
Purpose To outline the steps required for upgrading a RIO Head to make RIO System CCOTF (Change Config On The Fly) compatible.This Upgrade can be managed by one of the two communications methods available in the OS loader: Modbus Modbus Plus Follow the steps below to download a new CRP Firmware using Osloader. Note : Here is the configuration used for the procedure.
EIO000000006403 82/95

RIO Head Firmwares (140 CRP 93X00) upgrade procedure
Upgrade using Modbus/ModbusPlus protocol. Step Action
1 Activate the OSloader program. 2 Click Next to start the OSloader process. 3 Click the MBPLUS01 button, and click Next.
EIO000000006403 83/95
RIO Head Firmwares (140 CRP 93X00) upgrade procedure
Step Action
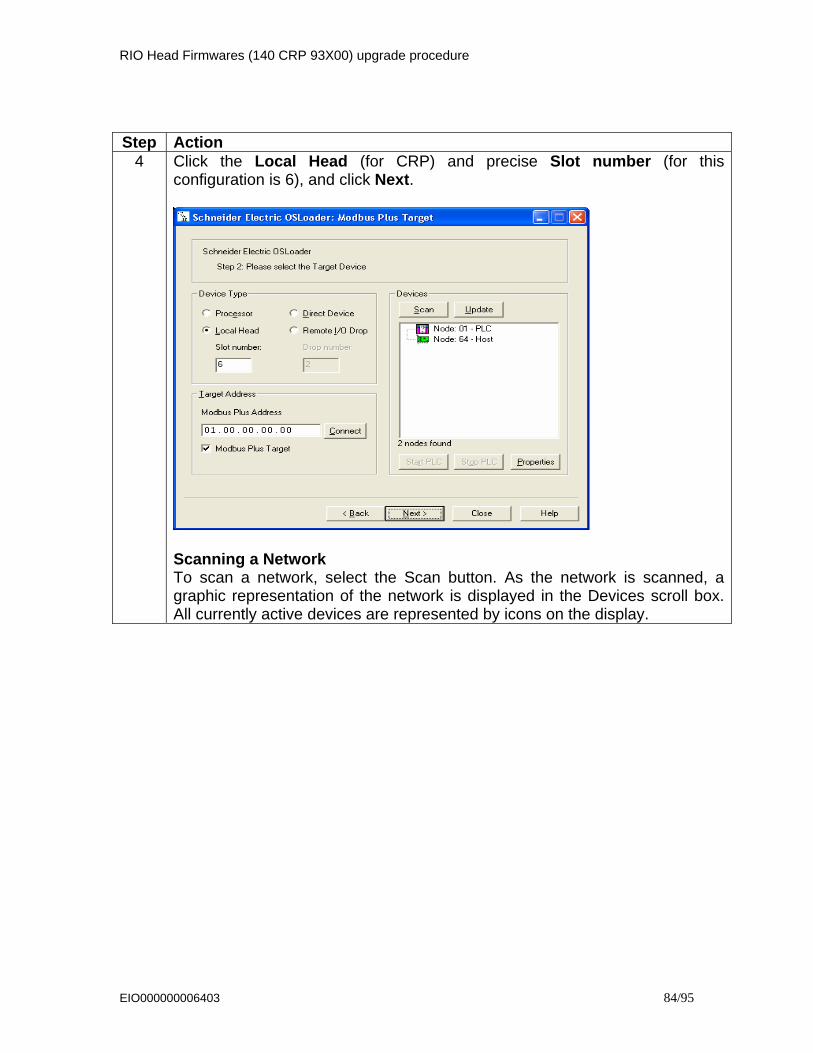
4 Click the Local Head (for CRP) and precise Slot number (for this configuration is 6), and click Next.
Scanning a Network To scan a network, select the Scan button. As the network is scanned, a graphic representation of the network is displayed in the Devices scroll box. All currently active devices are represented by icons on the display.
EIO000000006403 84/95

RIO Head Firmwares (140 CRP 93X00) upgrade procedure
Step Action
5 Click the Download OS to device button.
6 Click Browse to select the file name, and click Next.
EIO000000006403 85/95

RIO Head Firmwares (140 CRP 93X00) upgrade procedure
Step Action
7 The OSloader – File and Device info dialog box opens. Click Next.
EIO000000006403 86/95
RIO Head Firmwares (140 CRP 93X00) upgrade procedure
Step Action
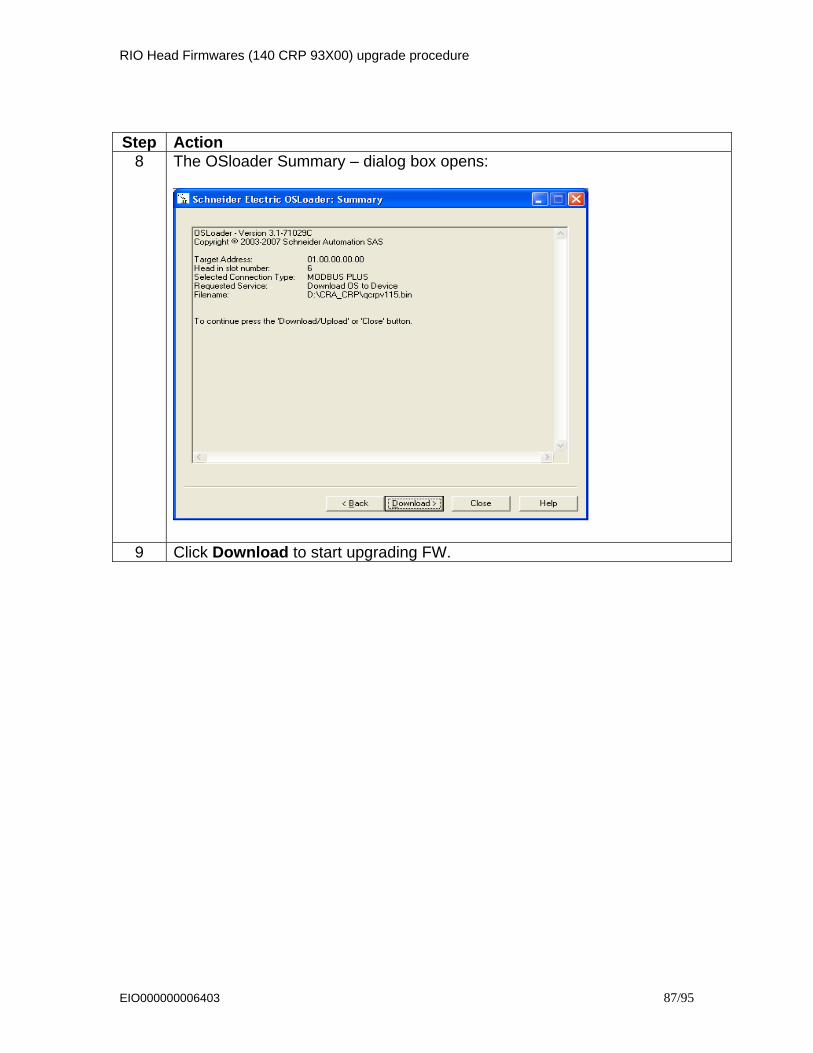
8 The OSloader Summary – dialog box opens:
9 Click Download to start upgrading FW.
EIO000000006403 87/95
RIO Head Firmwares (140 CRP 93X00) upgrade procedure
EIO000000006403 88/95
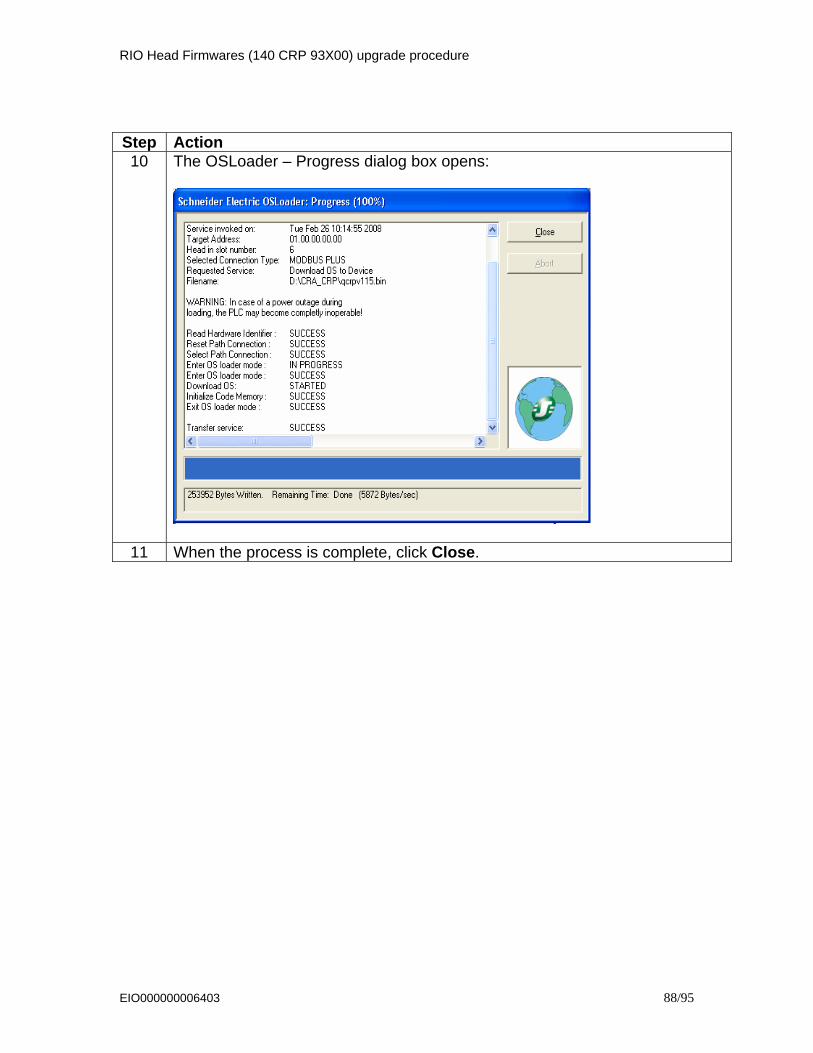
Step Action 10 The OSLoader – Progress dialog box opens:
11 When the process is complete, click Close.

RIO Drop Firmwares (140 CRA 93X00) upgrade procedure
Appendix 6: 140CRA93x00 S908 RIO Drop Upgrade Procedure
Purpose To outline the steps required for upgrading a RIO Drop to make RIO System CCOTF (Change Config On The Fly) compatible.This Upgrade can be managed by one of the two communications methods available in the OS loader: Modbus Modbus Plus Follow the steps below to download a new CRA Firmware using OS loader and CRP 93X00. Note: Configuration used for the procedure is as follows.
EIO000000006403 89/95

RIO Drop Firmwares (140 CRA 93X00) upgrade procedure
Upgrade using Modbus/ModbusPlus protocol Step Action
1 Activate the OSloader program. 2 Click Next to start the OSloader process. 3 Click the MBPLUS01 button, and click Next.
EIO000000006403 90/95

RIO Drop Firmwares (140 CRA 93X00) upgrade procedure
Step Action
4 Click the Remote I/O Drop (for CRA) and precise Slot number (for this configuration is 6) and drop number (for this configuration is 2), and click Next.
Scanning a Network To scan a network, select the Scan button. As the network is scanned, a graphic representation of the network is displayed in the Devices scroll box. All currently active devices are represented by icons on the display.
EIO000000006403 91/95

RIO Drop Firmwares (140 CRA 93X00) upgrade procedure
Step Action
5 Click the Download OS to device button.
6 Click Browse to select the file name, and click Next.
EIO000000006403 92/95
RIO Drop Firmwares (140 CRA 93X00) upgrade procedure
Step Action
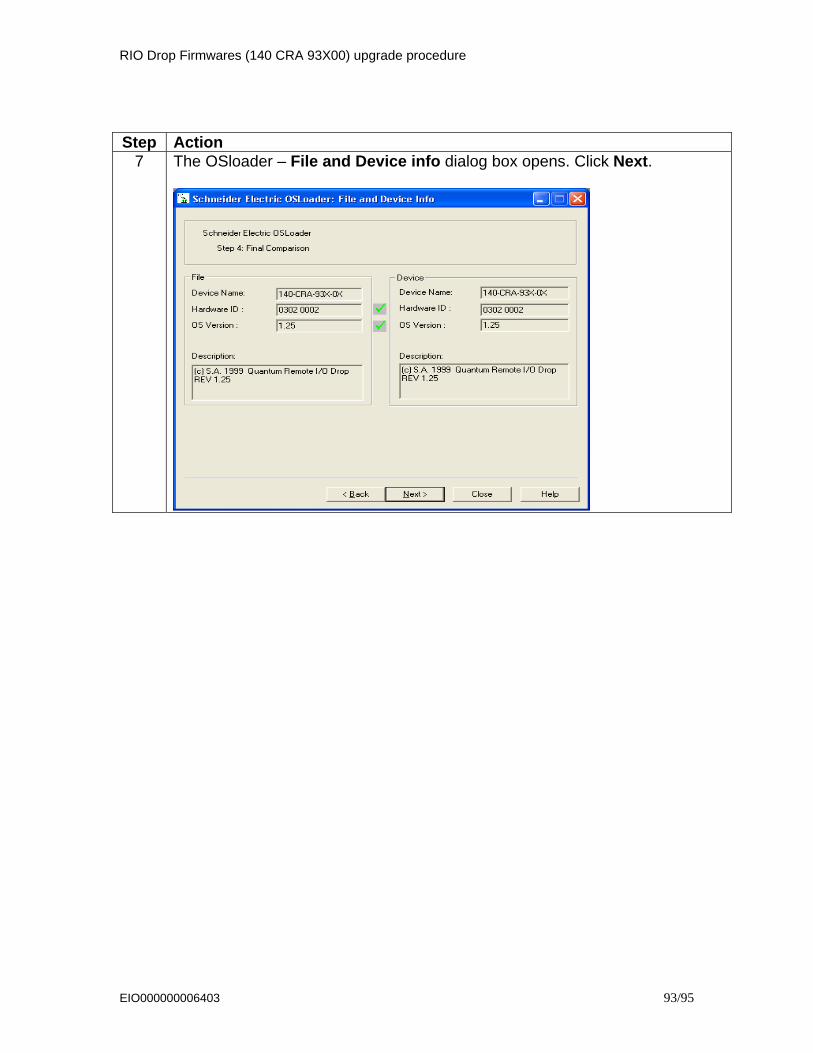
7 The OSloader – File and Device info dialog box opens. Click Next.
EIO000000006403 93/95
RIO Drop Firmwares (140 CRA 93X00) upgrade procedure
Step Action
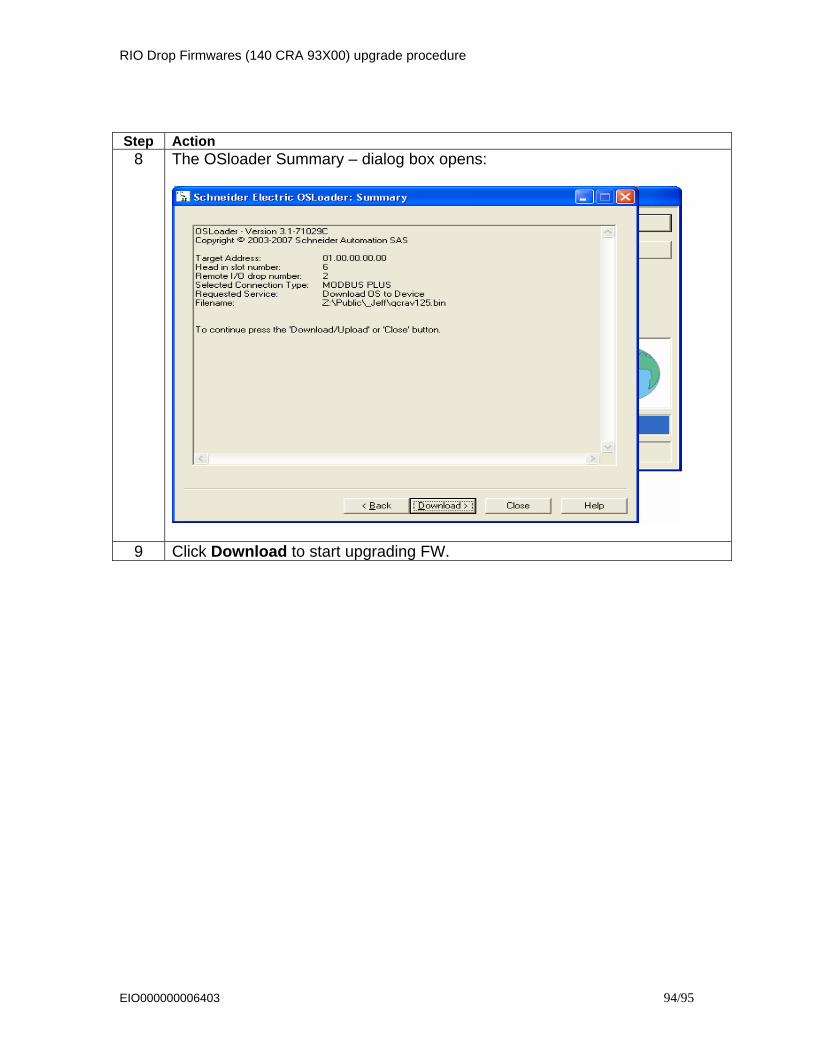
8 The OSloader Summary – dialog box opens:
9 Click Download to start upgrading FW.
EIO000000006403 94/95

RIO Drop Firmwares (140 CRA 93X00) upgrade procedure
EIO000000006403 95/95
Step Action 10 The OSLoader – Progress dialog box opens:
11 When the process is complete, click Close.