upgrade guide - xenyasup.xenya.si/sup/info/juniper/ssg/screenos_v6.2.0/upgrade guide... ·...
TRANSCRIPT
Security Products
Upgrade Guide
ScreenOS 6.2.0, Rev. 03
Juniper Networks, Inc.1194 North Mathilda AvenueSunnyvale, CA 94089USA408-745-2000
www.juniper.net
Part Number: 530-023779, Revision 03
2
Copyright NoticeCopyright © 2009 Juniper Networks, Inc. All rights reserved.
Juniper Networks, the Juniper Networks logo, JUNOS, NetScreen, ScreenOS, and Steel-Belted Radius are registered trademarks of Juniper Networks, Inc. in the United States and other countries. JUNOSe is a trademark of Juniper Networks, Inc. All other trademarks, service marks, registered trademarks, or registered service marks are the property of their respective owners.
All specifications are subject to change without notice. Juniper Networks assumes no responsibility for any inaccuracies in this document or for any obligation to update information in this document. Juniper Networks reserves the right to change, modify, transfer, or otherwise revise this publication without notice.
FCC StatementThe following information is for FCC compliance of Class A devices: This equipment has been tested and found to comply with the limits for a Class A digital device, pursuant to part 15 of the FCC rules. These limits are designed to provide reasonable protection against harmful interference when the equipment is operated in a commercial environment. The equipment generates, uses, and can radiate radio-frequency energy and, if not installed and used in accordance with the instruction manual, may cause harmful interference to radio communications. Operation of this equipment in a residential area is likely to cause harmful interference, in which case users will be required to correct the interference at their own expense.
The following information is for FCC compliance of Class B devices: The equipment described in this manual generates and may radiate radio-frequency energy. If it is not installed in accordance with Juniper Networks’ installation instructions, it may cause interference with radio and television reception. This equipment has been tested and found to comply with the limits for a Class B digital device in accordance with the specifications in part 15 of the FCC rules. These specifications are designed to provide reasonable protection against such interference in a residential installation. However, there is no guarantee that interference will not occur in a particular installation.
If this equipment does cause harmful interference to radio or television reception, which can be determined by turning the equipment off and on, the user is encouraged to try to correct the interference by one or more of the following measures:
Reorient or relocate the receiving antenna.
Increase the separation between the equipment and receiver.
Consult the dealer or an experienced radio/TV technician for help.
Connect the equipment to an outlet on a circuit different from that to which the receiver is connected.
Caution: Changes or modifications to this product could void the user's warranty and authority to operate this device.
DisclaimerTHE SOFTWARE LICENSE AND LIMITED WARRANTY FOR THE ACCOMPANYING PRODUCT ARE SET FORTH IN THE INFORMATION PACKET THAT SHIPPED WITH THE PRODUCT AND ARE INCORPORATED HEREIN BY THIS REFERENCE. IF YOU ARE UNABLE TO LOCATE THE SOFTWARE LICENSE OR LIMITED WARRANTY, CONTACT YOUR JUNIPER NETWORKS REPRESENTATIVE FOR A COPY.
Table of Contents
About This Guide 5Conventions ..................................................................................................................5Web User Interface Conventions...........................................................................5Command Line Interface Conventions..................................................................6Naming Conventions and Character Types...........................................................6
Requesting Technical Support......................................................................................7Self-Help Online Tools and Resources .................................................................7Opening a Case with JTAC ...................................................................................8
Document Feedback .....................................................................................................8
ScreenOS Upgrade Procedures 9
Device-Specific Requirements ...................................................................................11Requirements for Upgrading Device Firmware .........................................................11Upgrading Boot Loaders ............................................................................................12
Method 1..............................................................................................................13High-End Devices ........................................................................................13Low-End Devices.........................................................................................14
Method 2..............................................................................................................16Downloading New Firmware .....................................................................................18Upgrading to the New Firmware ................................................................................19
Upgrading Using the WebUI...............................................................................19Upgrading Using the CLI ....................................................................................21Upgrading Using the Boot Loader ......................................................................22
Upgrading Devices in an NSRP Configuration ..........................................................23Upgrading Devices in an NSRP Active/Passive Configuration ..........................24Upgrading Devices in an NSRP Active/Active Configuration ...........................27
Upgrading Devices Operating in FIPS Mode.............................................................32Additional Information ...............................................................................................32
Scan Manager Profile ..........................................................................................32AV Pattern Update URL .....................................................................................33
Table of Contents 3

4 T
ScreenOS 6.2.0 Upgrade Guide
able of Contents
About This Guide
This guide contains procedures for upgrading existing firmware to ScreenOS 6.2.0.
Conventions
This guide uses the conventions described in the following sections:
Web User Interface Conventions on page 5
Command Line Interface Conventions on page 6
Naming Conventions and Character Types on page 6
Web User Interface ConventionsThe Web user interface (WebUI) contains a navigational path and configuration settings. To enter configuration settings, begin by clicking a menu item in the navigation tree on the left side of the screen. As you proceed, your navigation path appears at the top of the screen, with each page separated by angle brackets.
The following example shows the WebUI path and parameters for defining an address:
Policy > Policy Elements > Addresses > List > New: Enter the following information, then click OK:
Address Name: addr_1IP Address/Domain Name:
IP/Netmask: (select), 10.2.2.5/32Zone: Untrust
To open online Help for configuration settings, click on the question mark (?) in the upper left of the screen.
The navigation tree also provides a Help > Config Guide configuration page to help you configure security policies and Internet Protocol Security (IPSec). Select an option from the list, and follow the instructions on the page. Click the ? character in the upper left for online Help on the Config Guide.
Conventions 5
ScreenOS 6.2.0 Upgrade Guide
6 C
Command Line Interface ConventionsThe following conventions are used to present the syntax of command line interface (CLI) commands in text and examples.
In text, commands are in boldface type and variables are in italic type.
In examples:
Variables are in italic type.
Anything inside square brackets [ ] is optional.
Anything inside braces { } is required.
If there is more than one choice, each choice is separated by a pipe ( | ). For example, the following command means “set the management options for the ethernet1, the ethernet2, or the ethernet3 interface”:
set interface { ethernet1 | ethernet2 | ethernet3 } manage
Naming Conventions and Character TypesScreenOS employs the following conventions regarding the names of objects—such as addresses, admin users, auth servers, IKE gateways, virtual systems, VPN tunnels, and zones—defined in ScreenOS configurations:
If a name string includes one or more spaces, the entire string must be enclosed within double quotes; for example:
set address trust “local LAN” 10.1.1.0/24
Any leading spaces or trailing text within a set of double quotes are trimmed; for example, “ local LAN ” becomes “local LAN”.
Multiple consecutive spaces are treated as a single space.
Name strings are case-sensitive, although many CLI keywords are case-insensitive. For example, “local LAN” is different from “local lan”.
ScreenOS supports the following character types:
Single-byte character sets (SBCS) and multiple-byte character sets (MBCS). Examples of SBCS are ASCII, European, and Hebrew. Examples of MBCS—also referred to as double-byte character sets (DBCS)—are Chinese, Korean, and Japanese.
ASCII characters from 32 (0x20 in hexadecimals) to 255 (0xff), except double quotes ( “ ), which have special significance as an indicator of the beginning or end of a name string that includes spaces.
NOTE: When entering a keyword, you only have to type enough letters to identify the word uniquely. Typing set adm u whee j12fmt54 will enter the command set admin user wheezer j12fmt54. However, all the commands documented in this guide are presented in their entirety.
onventions
Requesting Technical Support
Technical product support is available through the Juniper Networks Technical Assistance Center (JTAC). If you are a customer with an active J-Care or JNASC support contract, or are covered under warranty, and need postsales technical support, you can access our tools and resources online or open a case with JTAC.
JTAC policies—For a complete understanding of our JTAC procedures and policies, review the JTAC User Guide located at http://www.juniper.net/customers/support/downloads/710059.pdf.
Product warranties—For product warranty information, visit http://www.juniper.net/support/warranty/.
JTAC hours of operation—The JTAC centers have resources available 24 hours a day, 7 days a week, 365 days a year.
Self-Help Online Tools and ResourcesFor quick and easy problem resolution, Juniper Networks has designed an online self-service portal called the Customer Support Center (CSC) that provides you with the following features:
Find CSC offerings—http://www.juniper.net/customers/support/
Find product documentation—http://www.juniper.net/techpubs/
Find solutions and answer questions using our Knowledge Base— http://kb.juniper.net/
Download the latest versions of software and review your release notes— http://www.juniper.net/customers/csc/software/
Search technical bulletins for relevant hardware and software notifications— http://www.juniper.net/alerts/
Join and participate in the Juniper Networks Community Forum—http://www.juniper.net/company/communities/
Open a case online in the CSC Case Manager—http://www.juniper.net/customers/cm/
To verify service entitlement by product serial number, use our Serial Number Entitlement (SNE) Tool—https://tools.juniper.net/SerialNumberEntitlementSearch/
NOTE: A console connection supports only SBCS. The WebUI supports both SBCS and MBCS, depending on the character sets that your browser supports.
Requesting Technical Support 7
ScreenOS 6.2.0 Upgrade Guide
8 D
Opening a Case with JTACYou can open a case with JTAC on the Web or by telephone.
Use the Case Manager tool in the CSC at http://www.juniper.net/customers/cm/.
Call 1-888-314-JTAC (1-888-314-5822—toll free in USA, Canada, and Mexico).
For international or direct-dial options in countries without toll-free numbers, visit us at http://www.juniper.net/customers/support/requesting-support/.
Document Feedback
If you find any errors or omissions in this document, contact Juniper Networks at [email protected].
ocument Feedback
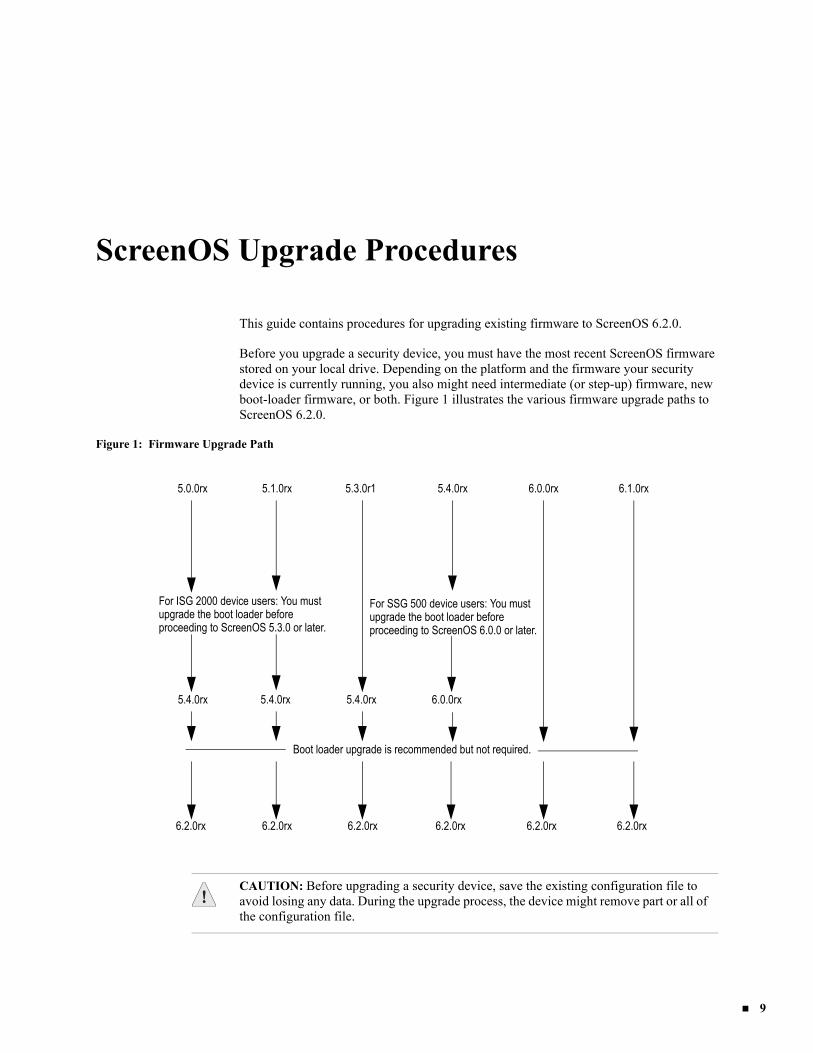
ScreenOS Upgrade Procedures
This guide contains procedures for upgrading existing firmware to ScreenOS 6.2.0.
Before you upgrade a security device, you must have the most recent ScreenOS firmware stored on your local drive. Depending on the platform and the firmware your security device is currently running, you also might need intermediate (or step-up) firmware, new boot-loader firmware, or both. Figure 1 illustrates the various firmware upgrade paths to ScreenOS 6.2.0.
Figure 1: Firmware Upgrade Path
5.0.0rx 5.1.0rx 5.3.0r1
5.4.0rx 5.4.0rx5.4.0rx
For ISG 2000 device users: You must upgrade the boot loader before proceeding to ScreenOS 5.3.0 or later.
Boot loader upgrade is recommended but not required.
5.4.0rx 6.0.0rx
6.2.0rx 6.2.0rx 6.2.0rx 6.2.0rx 6.2.0rx
6.1.0rx
6.2.0rx
For SSG 500 device users: You must upgrade the boot loader before proceeding to ScreenOS 6.0.0 or later.
6.0.0rx
CAUTION: Before upgrading a security device, save the existing configuration file to avoid losing any data. During the upgrade process, the device might remove part or all of the configuration file.
9
ScreenOS 6.2.0 Upgrade Guide
10
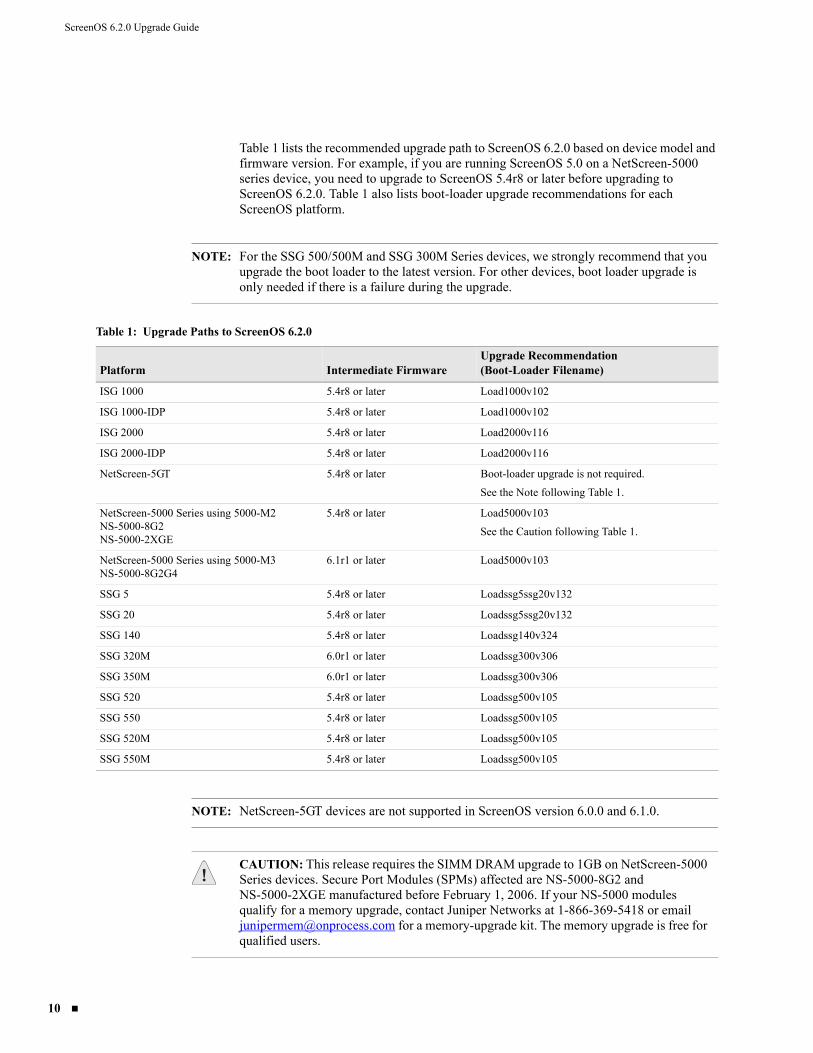
Table 1 lists the recommended upgrade path to ScreenOS 6.2.0 based on device model and firmware version. For example, if you are running ScreenOS 5.0 on a NetScreen-5000 series device, you need to upgrade to ScreenOS 5.4r8 or later before upgrading to ScreenOS 6.2.0. Table 1 also lists boot-loader upgrade recommendations for each ScreenOS platform.
NOTE: For the SSG 500/500M and SSG 300M Series devices, we strongly recommend that you upgrade the boot loader to the latest version. For other devices, boot loader upgrade is only needed if there is a failure during the upgrade.
Table 1: Upgrade Paths to ScreenOS 6.2.0
Platform Intermediate Firmware Upgrade Recommendation (Boot-Loader Filename)
ISG 1000 5.4r8 or later Load1000v102
ISG 1000-IDP 5.4r8 or later Load1000v102
ISG 2000 5.4r8 or later Load2000v116
ISG 2000-IDP 5.4r8 or later Load2000v116
NetScreen-5GT 5.4r8 or later Boot-loader upgrade is not required.
See the Note following Table 1.
NetScreen-5000 Series using 5000-M2NS-5000-8G2NS-5000-2XGE
5.4r8 or later Load5000v103
See the Caution following Table 1.
NetScreen-5000 Series using 5000-M3NS-5000-8G2G4
6.1r1 or later Load5000v103
SSG 5 5.4r8 or later Loadssg5ssg20v132
SSG 20 5.4r8 or later Loadssg5ssg20v132
SSG 140 5.4r8 or later Loadssg140v324
SSG 320M 6.0r1 or later Loadssg300v306
SSG 350M 6.0r1 or later Loadssg300v306
SSG 520 5.4r8 or later Loadssg500v105
SSG 550 5.4r8 or later Loadssg500v105
SSG 520M 5.4r8 or later Loadssg500v105
SSG 550M 5.4r8 or later Loadssg500v105
NOTE: NetScreen-5GT devices are not supported in ScreenOS version 6.0.0 and 6.1.0.
CAUTION: This release requires the SIMM DRAM upgrade to 1GB on NetScreen-5000 Series devices. Secure Port Modules (SPMs) affected are NS-5000-8G2 and NS-5000-2XGE manufactured before February 1, 2006. If your NS-5000 modules qualify for a memory upgrade, contact Juniper Networks at 1-866-369-5418 or email [email protected] for a memory-upgrade kit. The memory upgrade is free for qualified users.
ScreenOS Upgrade Procedures
Device-Specific Requirements
The NetScreen-5400 device supports two million sessions (the default) in version 6.1.0. When upgrading from 5.4 or 6.0r1 to 6.1 or 6.0r2, make sure your device has a minimum of 450 MB of free memory. One million sessions requires approximately 340 MB of memory.
Requirements for Upgrading Device Firmware
This section lists what is required to perform the upgrade of security device firmware.
The information in this section and the procedures in this guide apply whether you are moving to a later release than what you are currently running or to an earlier release. However, it is not recommended that you downgrade because some configuration can be lost.
You can use any of the following methods to upgrade a security device:
WebUI
CLI
Boot loader
To use the WebUI, you must have the following access:
Root privilege to the security device
Network access to the security device from a computer that has a browser
New ScreenOS firmware (downloaded from the Juniper Networks Web site and saved locally)
To use the CLI, you must have the following access:
Root or read-write privileges to the security device
Console connection or Telnet access to the security device from a computer
TFTP server installed locally and to which the security device has access
NOTE: You can upgrade some security devices locally or remotely, but we recommend that you perform the upgrade of a security device at the device location.
NOTE: After upgrading to ScreenOS 6.2 from a previous release of ScreenOS, you might need to either clear the cookies in your Web browser or press the default Help Link Path button in the WebUI, located in Configuration>Admin>Management. Because of cookies set when managing a device, you might receive the prior version of the Help files when selecting WebUI online Help if you do not clear the cookies in your browser.
Device-Specific Requirements 11
ScreenOS 6.2.0 Upgrade Guide
12
New ScreenOS firmware (downloaded from the Juniper Networks Web site and saved to a local TFTP server directory)
To upgrade through the boot loader, you must have the following access:
Root or read-write privileges to the security device
TFTP server installed locally that has an IP address in the same subnet as the security device (255.255.255.0)
Ethernet connection from a computer to the security device (to transfer data, namely from a local TFTP server)
Console connection from the computer to the security device (to manage the device)
New ScreenOS firmware saved to a local TFTP server directory
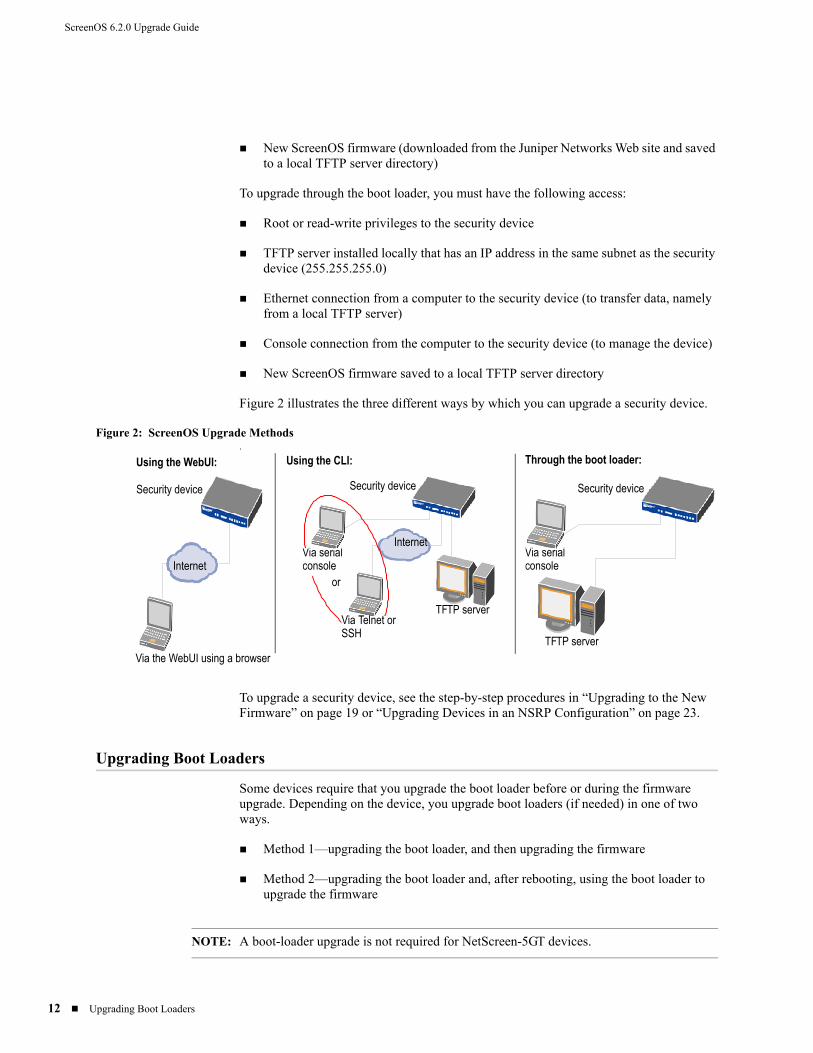
Figure 2 illustrates the three different ways by which you can upgrade a security device.
Figure 2: ScreenOS Upgrade Methods.
To upgrade a security device, see the step-by-step procedures in “Upgrading to the New Firmware” on page 19 or “Upgrading Devices in an NSRP Configuration” on page 23.
Upgrading Boot Loaders
Some devices require that you upgrade the boot loader before or during the firmware upgrade. Depending on the device, you upgrade boot loaders (if needed) in one of two ways.
Method 1—upgrading the boot loader, and then upgrading the firmware
Method 2—upgrading the boot loader and, after rebooting, using the boot loader to upgrade the firmware
TFTP Server
Telnet , SSH
Serial Console9600,8 N, 1
OR
or
WebUI
TFTP Server
Serial Console9600, 8 , N, 1
Via Telnet or SSH
TFTP server
TFTP server
Via serial console
Security device Security device Security device
Internet
Internet
Using the CLI: Through the boot loader:Using the WebUI:
Via serial console
Via the WebUI using a browser
NOTE: A boot-loader upgrade is not required for NetScreen-5GT devices.
Upgrading Boot Loaders
ScreenOS Upgrade Procedures
You can view the boot-loader version for ISG and NS-5000 Series devices by entering the get envar command. For SSG devices, reboot the device by using the console connection, and then check the boot messages.
Method 1The devices for which you upgrade the boot loader, and then upgrade the firmware are categorized as high end and low end.
High-End DevicesThe high-end devices are as follows:
ISG 1000, ISG 2000, NS-5200/NS-5400
The sample procedure shows the boot loader upgrade steps for an ISG 2000.
To upgrade the boot loader for an ISG 2000 device to v1.1.6:
1. Download the boot loader from the Juniper Networks support site.
a. Navigate your browser to http://www.juniper.net/customers/support/. The Support page appears.
b. Locate the Download Software section, and click ScreenOS. Enter your user ID and password in the login page that appears, and then click the LOGIN button. The ScreenOS page appears.
c. In the table of software download versions, locate ISG-2000 and click version 6.2.
d. In the Software tab (under Package), click ISG-2000_Boot_loader.
2. Save and extract the boot loader zip file and put it in the root directory of your TFTP server.
3. Start the TFTP server, if necessary.
4. Make an Ethernet connection from the device hosting the TFTP server to the MGT port on the ISG 2000 and a serial connection from your workstation to the console port on the ISG 2000.
5. Restart the ISG 2000 by entering the reset command. When prompted to confirm the command, press y. The following system output appears:
Juniper Networks ISG Series BootROM V1.0.0 (Checksum: 8796E2F3)Copyright (c) 1997-2005 Juniper Networks, Inc.
NOTE: You cannot upgrade boot loaders remotely. A console connection and TFTP server are required to upgrade the boot loader.
NOTE: For these devices, boot loader upgrade is only needed if there is a failure during the upgrade.
Upgrading Boot Loaders 13
ScreenOS 6.2.0 Upgrade Guide
14
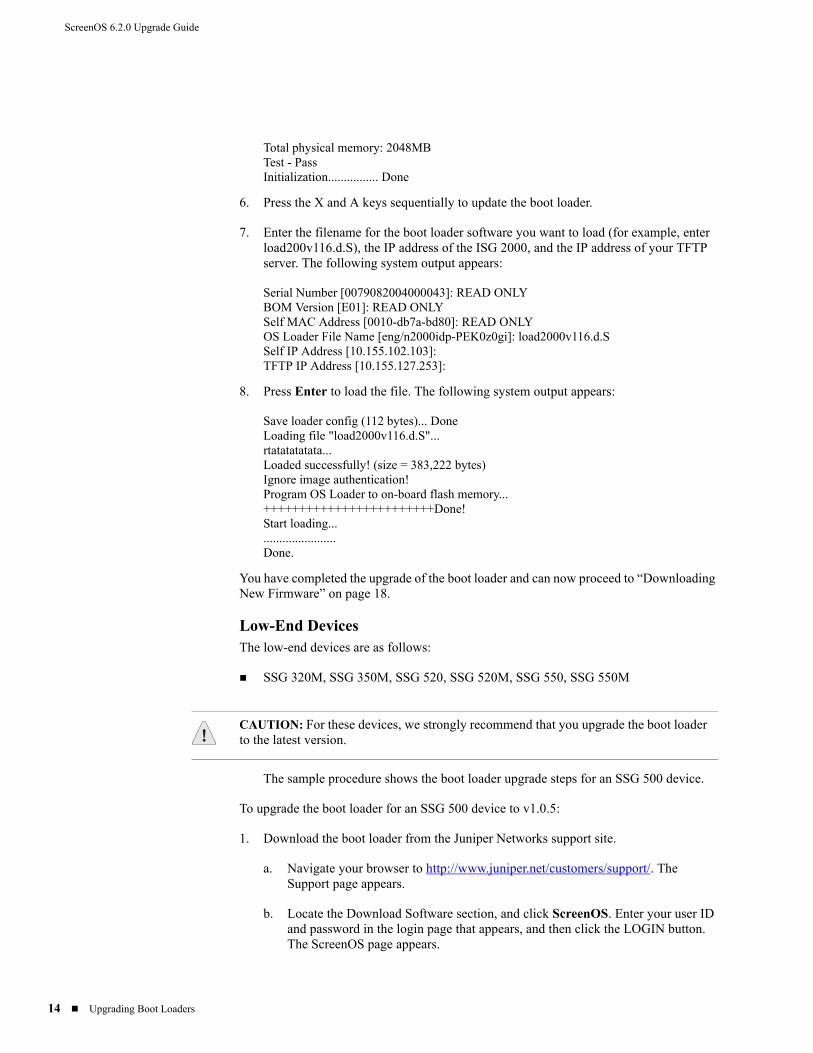
Total physical memory: 2048MBTest - PassInitialization................ Done
6. Press the X and A keys sequentially to update the boot loader.
7. Enter the filename for the boot loader software you want to load (for example, enter load200v116.d.S), the IP address of the ISG 2000, and the IP address of your TFTP server. The following system output appears:
Serial Number [0079082004000043]: READ ONLYBOM Version [E01]: READ ONLYSelf MAC Address [0010-db7a-bd80]: READ ONLYOS Loader File Name [eng/n2000idp-PEK0z0gi]: load2000v116.d.SSelf IP Address [10.155.102.103]: TFTP IP Address [10.155.127.253]:
8. Press Enter to load the file. The following system output appears:
Save loader config (112 bytes)... DoneLoading file "load2000v116.d.S"...rtatatatatata...Loaded successfully! (size = 383,222 bytes)Ignore image authentication!Program OS Loader to on-board flash memory...++++++++++++++++++++++++Done!Start loading... .......................Done.
You have completed the upgrade of the boot loader and can now proceed to “Downloading New Firmware” on page 18.
Low-End DevicesThe low-end devices are as follows:
SSG 320M, SSG 350M, SSG 520, SSG 520M, SSG 550, SSG 550M
The sample procedure shows the boot loader upgrade steps for an SSG 500 device.
To upgrade the boot loader for an SSG 500 device to v1.0.5:
1. Download the boot loader from the Juniper Networks support site.
a. Navigate your browser to http://www.juniper.net/customers/support/. The Support page appears.
b. Locate the Download Software section, and click ScreenOS. Enter your user ID and password in the login page that appears, and then click the LOGIN button. The ScreenOS page appears.
CAUTION: For these devices, we strongly recommend that you upgrade the boot loader to the latest version.
Upgrading Boot Loaders
ScreenOS Upgrade Procedures
c. In the table of software download versions, locate SSG-500 and click version 6.2.
d. In the Software tab (under Package), click SSG-500_Boot_loader.
2. Save and extract the boot loader zip file and put it in the root directory of your TFTP server.
3. Start the TFTP server, if necessary.
4. Make an Ethernet connection from the device hosting the TFTP server to the MGT port on the SSG 500 and a serial connection from your workstation to the console port on the SSG 500.
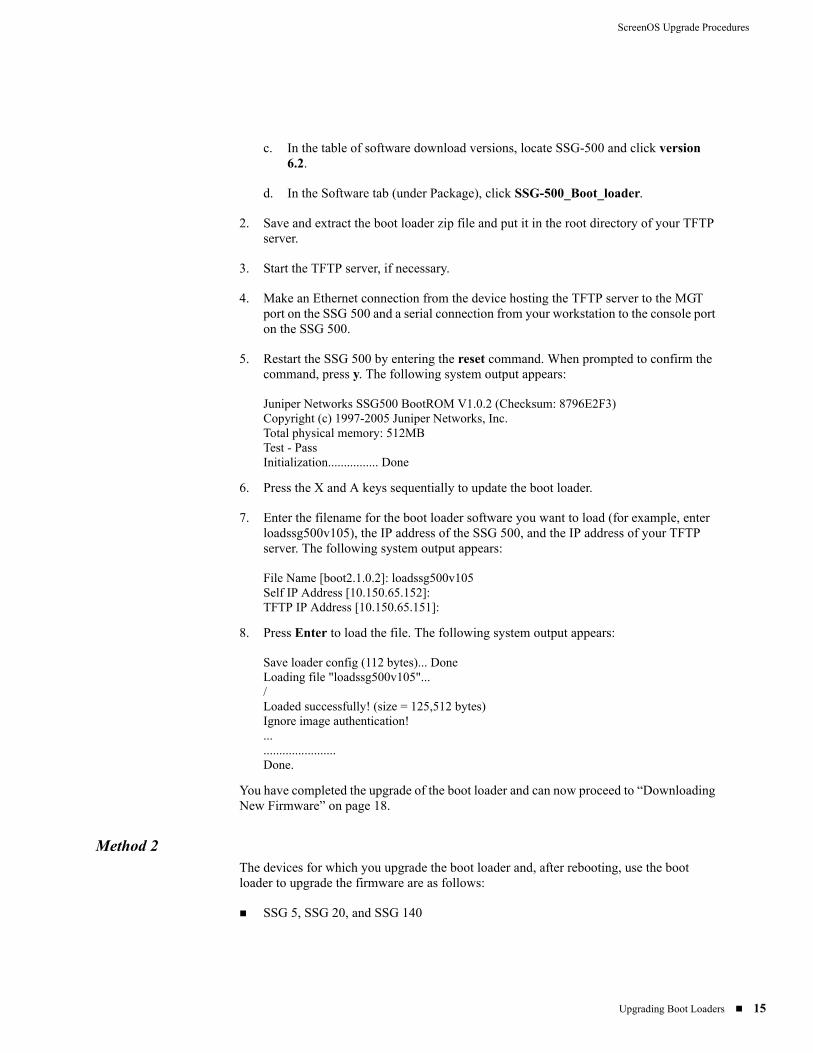
5. Restart the SSG 500 by entering the reset command. When prompted to confirm the command, press y. The following system output appears:
Juniper Networks SSG500 BootROM V1.0.2 (Checksum: 8796E2F3)Copyright (c) 1997-2005 Juniper Networks, Inc.Total physical memory: 512MBTest - PassInitialization................ Done
6. Press the X and A keys sequentially to update the boot loader.
7. Enter the filename for the boot loader software you want to load (for example, enter loadssg500v105), the IP address of the SSG 500, and the IP address of your TFTP server. The following system output appears:
File Name [boot2.1.0.2]: loadssg500v105Self IP Address [10.150.65.152]: TFTP IP Address [10.150.65.151]:
8. Press Enter to load the file. The following system output appears:
Save loader config (112 bytes)... Done Loading file "loadssg500v105".../Loaded successfully! (size = 125,512 bytes) Ignore image authentication! ..........................Done.
You have completed the upgrade of the boot loader and can now proceed to “Downloading New Firmware” on page 18.
Method 2The devices for which you upgrade the boot loader and, after rebooting, use the boot loader to upgrade the firmware are as follows:
SSG 5, SSG 20, and SSG 140
Upgrading Boot Loaders 15
ScreenOS 6.2.0 Upgrade Guide
16
The sample procedure shows the boot loader upgrade steps for an SSG 140 device.
To upgrade the boot loader for an SSG 140 device to v3.2.4:
1. Download the boot loader from the Juniper Networks support site.
a. Navigate your browser to http://www.juniper.net/customers/support/. The Support page appears.
b. Locate the Download Software section, and click ScreenOS. Enter your user ID and password in the login page that appears, and then click the LOGIN button. The ScreenOS page appears.
c. In the table of software download versions, locate SSG-140 and click version 6.2.
d. In the Software tab (under Package), click SSG-140_6.2.0r1_Upgrade.
2. Save and extract the upgrade zip file and put it in the root directory of your TFTP server.
3. Start the TFTP server, if necessary.
4. Make an Ethernet connection from the device hosting the TFTP server to the MGT port on the SSG 140 and a serial connection from your workstation to the console port on the SSG 140.
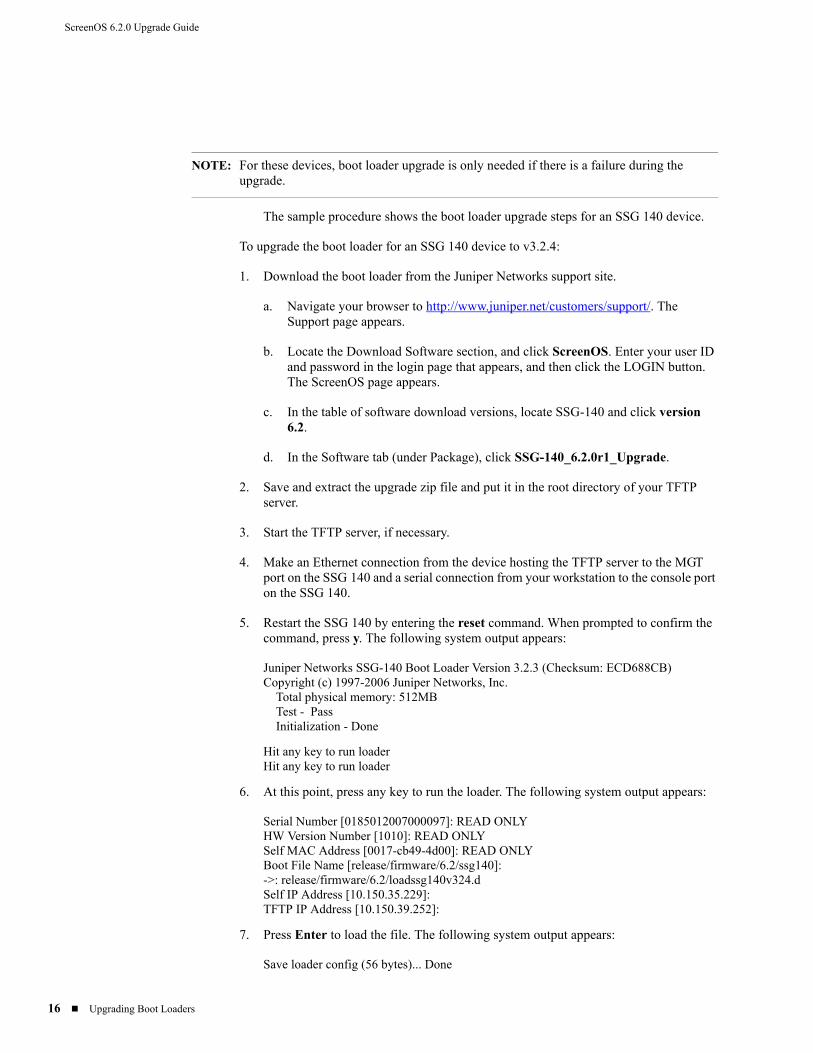
5. Restart the SSG 140 by entering the reset command. When prompted to confirm the command, press y. The following system output appears:
Juniper Networks SSG-140 Boot Loader Version 3.2.3 (Checksum: ECD688CB)Copyright (c) 1997-2006 Juniper Networks, Inc. Total physical memory: 512MB Test - Pass Initialization - Done
Hit any key to run loaderHit any key to run loader
6. At this point, press any key to run the loader. The following system output appears:
Serial Number [0185012007000097]: READ ONLYHW Version Number [1010]: READ ONLYSelf MAC Address [0017-cb49-4d00]: READ ONLYBoot File Name [release/firmware/6.2/ssg140]:->: release/firmware/6.2/loadssg140v324.dSelf IP Address [10.150.35.229]: TFTP IP Address [10.150.39.252]:
7. Press Enter to load the file. The following system output appears:
Save loader config (56 bytes)... Done
NOTE: For these devices, boot loader upgrade is only needed if there is a failure during the upgrade.
Upgrading Boot Loaders
ScreenOS Upgrade Procedures
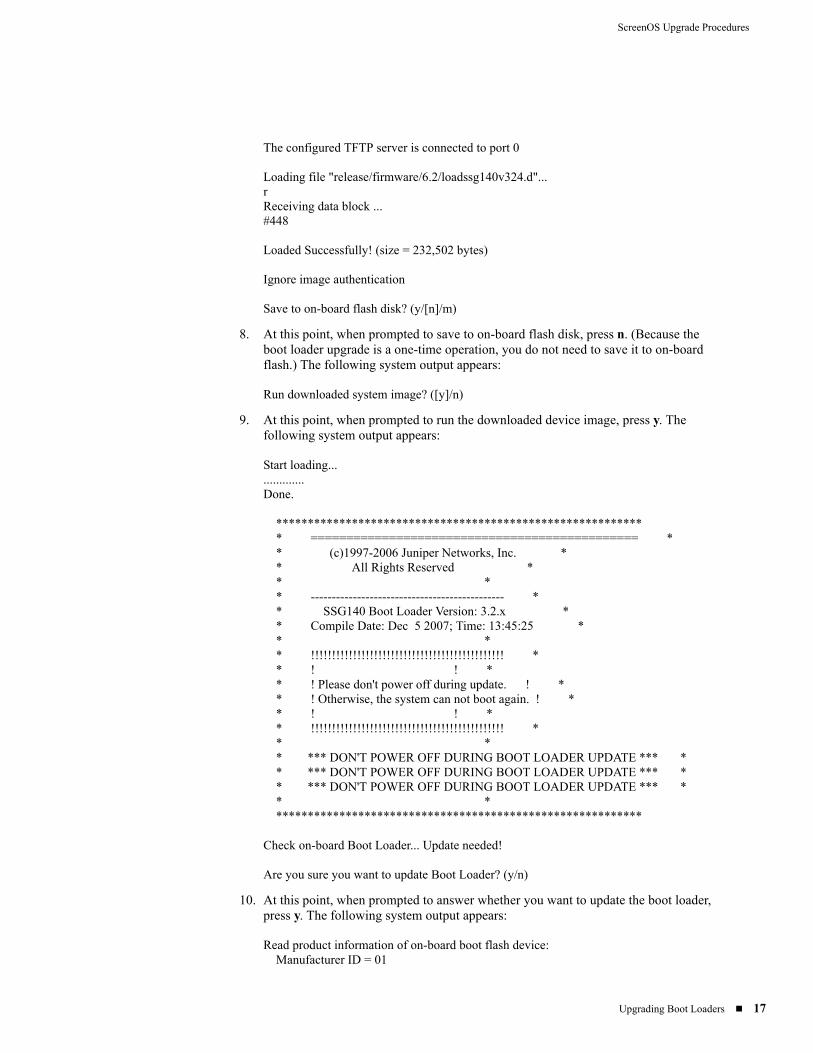
The configured TFTP server is connected to port 0
Loading file "release/firmware/6.2/loadssg140v324.d"...rReceiving data block ...#448
Loaded Successfully! (size = 232,502 bytes)
Ignore image authentication
Save to on-board flash disk? (y/[n]/m)
8. At this point, when prompted to save to on-board flash disk, press n. (Because the boot loader upgrade is a one-time operation, you do not need to save it to on-board flash.) The following system output appears:
Run downloaded system image? ([y]/n)
9. At this point, when prompted to run the downloaded device image, press y. The following system output appears:
Start loading................Done. ********************************************************** * ============================================== * * (c)1997-2006 Juniper Networks, Inc. * * All Rights Reserved * * * * ---------------------------------------------- * * SSG140 Boot Loader Version: 3.2.x * * Compile Date: Dec 5 2007; Time: 13:45:25 * * * * !!!!!!!!!!!!!!!!!!!!!!!!!!!!!!!!!!!!!!!!!!!!!! * * ! ! * * ! Please don't power off during update. ! * * ! Otherwise, the system can not boot again. ! * * ! ! * * !!!!!!!!!!!!!!!!!!!!!!!!!!!!!!!!!!!!!!!!!!!!!! * * * * *** DON'T POWER OFF DURING BOOT LOADER UPDATE *** * * *** DON'T POWER OFF DURING BOOT LOADER UPDATE *** * * *** DON'T POWER OFF DURING BOOT LOADER UPDATE *** * * * **********************************************************
Check on-board Boot Loader... Update needed!
Are you sure you want to update Boot Loader? (y/n)
10. At this point, when prompted to answer whether you want to update the boot loader, press y. The following system output appears:
Read product information of on-board boot flash device: Manufacturer ID = 01
Upgrading Boot Loaders 17
ScreenOS 6.2.0 Upgrade Guide
18
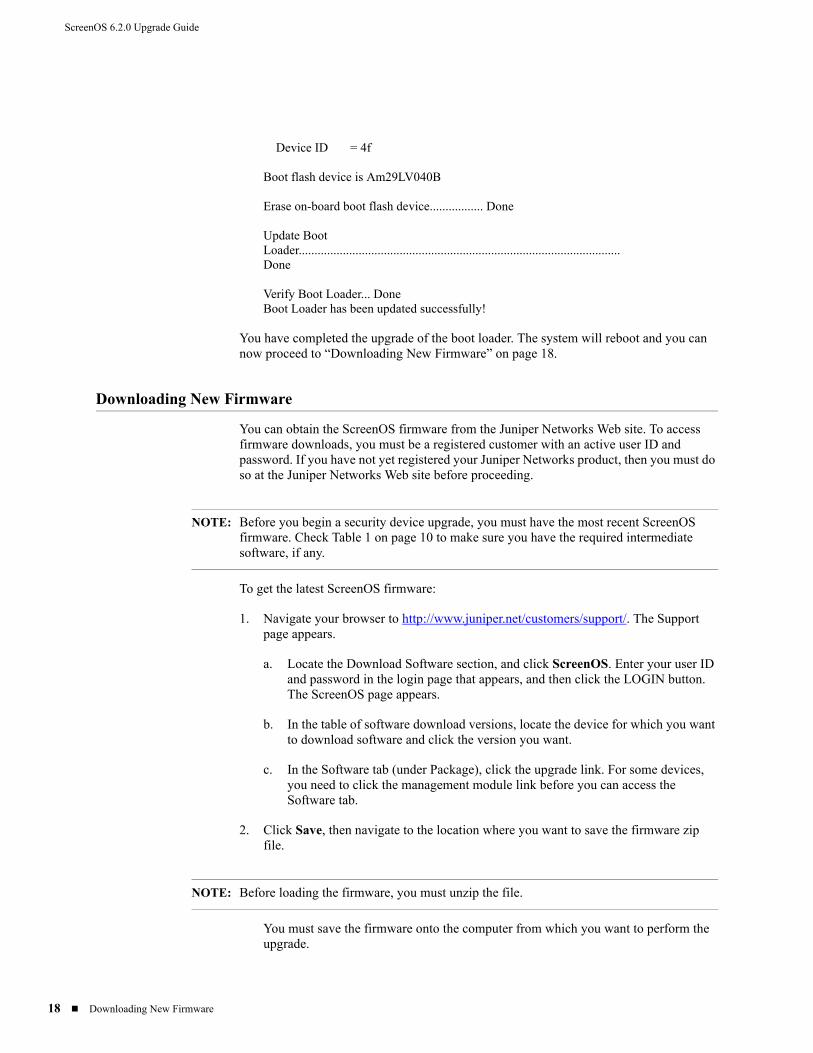
Device ID = 4f Boot flash device is Am29LV040B Erase on-board boot flash device................. Done
Update BootLoader......................................................................................................Done
Verify Boot Loader... DoneBoot Loader has been updated successfully!
You have completed the upgrade of the boot loader. The system will reboot and you can now proceed to “Downloading New Firmware” on page 18.
Downloading New Firmware
You can obtain the ScreenOS firmware from the Juniper Networks Web site. To access firmware downloads, you must be a registered customer with an active user ID and password. If you have not yet registered your Juniper Networks product, then you must do so at the Juniper Networks Web site before proceeding.
To get the latest ScreenOS firmware:
1. Navigate your browser to http://www.juniper.net/customers/support/. The Support page appears.
a. Locate the Download Software section, and click ScreenOS. Enter your user ID and password in the login page that appears, and then click the LOGIN button. The ScreenOS page appears.
b. In the table of software download versions, locate the device for which you want to download software and click the version you want.
c. In the Software tab (under Package), click the upgrade link. For some devices, you need to click the management module link before you can access the Software tab.
2. Click Save, then navigate to the location where you want to save the firmware zip file.
You must save the firmware onto the computer from which you want to perform the upgrade.
NOTE: Before you begin a security device upgrade, you must have the most recent ScreenOS firmware. Check Table 1 on page 10 to make sure you have the required intermediate software, if any.
NOTE: Before loading the firmware, you must unzip the file.
Downloading New Firmware
ScreenOS Upgrade Procedures
If you want to upgrade the security device using the WebUI, save the firmware anywhere on the computer.
If you want to upgrade the security device using the CLI, save the firmware in the root TFTP server directory on the computer. If you do not have a TFTP server installed on your computer, then you can download one from the Internet. If no TFTP server is available, then you must use the WebUI to load the new firmware onto the security device.
Upgrading to the New Firmware
This section provides instructions for upgrading firmware on the security device using the WebUI, the CLI, and the boot loader. This section also describes how to save multiple firmware images with the boot loader.
Check Table 1 on page 10 to determine whether you need to install intermediate firmware or a boot-loader upgrade before installing ScreenOS 6.2.0. Use either the WebUI or CLI procedure to first install intermediate firmware (if required), and then install ScreenOS 6.2.0 firmware.
Upgrading Using the WebUIThis section describes how to upgrade the firmware on the security device using the WebUI. Instructions include upgrading to an intermediate version of firmware, if required, and then upgrading to ScreenOS 6.2.0.
To upgrade firmware using the WebUI:
1. Log into the security device by opening a browser.
a. Enter the management IP address in the Address field.
b. Log in as the root admin or an admin with read-write privileges.
2. Save the existing configuration.
a. Go to Configuration > Update > Config File, and then click Save to File. The File Download dialog box appears.
b. Click Save.
c. Navigate to the location where you want to save the configuration file (cfg.txt), and then click Save.
3. Upgrade to intermediate firmware, if required.
See Table 1 on page 10 to determine if intermediate firmware is required. If intermediate firmware is required, perform the following steps. Otherwise, proceed to Step 4.
CAUTION: Before upgrading a security device, save the existing configuration file to avoid losing any data.
Upgrading to the New Firmware 19
ScreenOS 6.2.0 Upgrade Guide
20
a. Go to Configuration > Update > ScreenOS/Keys, and then select Firmware Update.
b. Click Browse to navigate to the location of the intermediate firmware. For example, if you upgrade a NetScreen-5000 running ScreenOS 5.4r1, you must upgrade to ScreenOS 5.4r8 or later and then continue this procedure.
c. Click Apply.
d. Click OK to continue.
The security device restarts automatically. The upgrade is complete when the device displays the login page in the browser.
e. Log into the security device. You can verify the version of the security device ScreenOS firmware in the Device Information section of the WebUI page.
4. Upgrade to the new ScreenOS firmware.
a. Go to Configuration > Update > ScreenOS/Keys, and then select Firmware Update.
b. Click Browse to navigate to the location of the new ScreenOS firmware, or enter the path to its location in the Load File field.
c. Click Apply.
A message box appears with information about the upgrade time.
d. Click OK to continue.
The security device restarts automatically. The upgrade is complete when the device displays the login page in the browser.
e. Log into the security device. You can verify the version of the security device ScreenOS firmware in the Device Information section of the WebUI page.
5. If necessary, upload the configuration file that you saved in Step 4.
a. Go to Configuration > Update > Config File.
b. Select Merge to Current Configuration.
c. Enter the path and name of the configuration file, or click Browse to navigate to the file location.
d. Click Apply.
NOTE: This process takes some time. Do not click Cancel or the upgrade will fail. If you do click Cancel and the upgrade fails, power off the device, then power it on again. Restart the upgrade procedure beginning with Step 3.
Upgrading to the New Firmware
ScreenOS Upgrade Procedures
Upgrading Using the CLIThis section describes how to upgrade the firmware on the security device using the CLI. Instructions include upgrading to an intermediate version of the firmware, if required, and upgrading to ScreenOS 6.2.0.
To upgrade firmware using the CLI:
1. Make sure you have the new ScreenOS firmware (or the intermediate firmware, if required) in the TFTP root directory. For information about obtaining the new firmware, see “Downloading New Firmware” on page 18.
2. Run the TFTP server on your computer by double-clicking the TFTP server application. You can minimize this window, but it must be active in the background.
3. Log into the security device using an application such as Telnet or SSH (or HyperTerminal if connected directly through the console port). Log in as the root admin or an admin with read-write privileges.
4. Save the existing configuration by running the following command:
save config to { flash | slot1 | tftp }...
5. Enter the following command on the security device and specify the filename of the firmware (if you are installing intermediate firmware, specify the filename of the intermediate firmware):
save soft from tftp ip_addr screenos_filename to flash
where ip_addr is the IP address of your computer and screenos_filename is the filename of the ScreenOS 6.2.0 firmware.
6. Reset the security device when the upgrade is complete. Run the reset command and enter y at the prompt to reset the device.
7. Wait a few minutes, and then log into the security device again.
8. Use the get system command to verify the version of the security device ScreenOS firmware.
If you upgraded to intermediate firmware, repeat Steps 5 through 8 to install the ScreenOS 6.2.0 firmware.
9. If necessary, upload the configuration file that you saved in Step 4 by executing the following command:
save config from tftp to { flash | slot1 | tftp }...
Upgrading Using the Boot LoaderThe boot loader brings up the hardware system, performs basic and sometimes critical hardware configurations, and loads system software used to run a security device.
NOTE: If this upgrade requires intermediate firmware and you have not already upgraded to that firmware, enter the intermediate firmware filename when entering this command.
Upgrading to the New Firmware 21

ScreenOS 6.2.0 Upgrade Guide
22
To upgrade firmware using the boot loader:
1. Connect your computer to the security device.
a. Using a serial cable, connect the serial port on your computer to the console port on the security device (refer to your hardware manual for console settings). This connection, in combination with a terminal application, enables you to manage the security device.
b. Using an Ethernet cable, connect the network port on your computer to port 1 or to the management port on the security device. This connection enables the transfer of data among the computer, the TFTP server, and the security device.
2. Make sure you have the new ScreenOS firmware stored in the TFTP server directory on your computer. For information about obtaining the new firmware, see “Downloading New Firmware” on page 18.
3. Run the TFTP server on your computer by double-clicking the TFTP server application. You can minimize this window, but it must be active in the background.
4. Log into the security device using a terminal emulator such as HyperTerminal. Log in as the root admin or an admin with read-write privileges.
5. Restart the security device.
6. Press any key on your computer when you see “Hit any key to run loader” or “Hit any key to load new firmware” on the console display. This interrupts the startup process.
7. Enter the filename of the ScreenOS firmware that you want to load at the Boot File Name prompt.
If you enter slot1: before the specified filename, then the loader reads the specified file from the external compact flash or memory card. If you do not enter slot1: before the filename, then the file is downloaded from the TFTP server. If the security device does not support a compact flash card, then an error message is displayed and the console prompts you to reenter the filename.
8. Enter an IP address that is on the same subnet as the TFTP server at the Self IP Address prompt.
9. Enter the IP address of the TFTP server at the TFTP IP Address prompt.
NOTE: If you do not interrupt the security device in time, it loads the firmware saved in flash memory.
NOTE: If Table 1 on page 10 lists an intermediate firmware requirement, enter that filename at this step.
NOTE: The self IP address and TFTP IP address must be in the same subnet; otherwise, the TFTP loader rejects the self IP address and then prompts you to reenter it.
Upgrading to the New Firmware
ScreenOS Upgrade Procedures
An indication that the firmware is loading successfully is the display of a series of “rtatatatatatata...” running on the terminal-emulator screen and a series of symbols running on the TFTP server window. When the firmware installation is complete, a message informs you that the installation was successful. Repeat these steps if your first firmware upgrade was to an intermediate version.
Upgrading Devices in an NSRP Configuration
For security devices in a NetScreen Redundancy Protocol (NSRP) configuration, you must upgrade each device individually. There are two different NSRP configurations: NSRP active/passive and NSRP active/active.
The upgrade paths shown in Table 1 on page 10 are valid for each of these NSRP configurations, but for no-downtime upgrades, you must follow the information shown in Table 2. For example, if you are running ScreenOS 5.0 on an ISG 2000 device, you need to upgrade both units of the cluster to ScreenOS 5.4r10, 6.0r7, or 6.1r3 before upgrading to ScreenOS 6.2.0. Table 2 also lists boot-loader upgrade recommendations for the ScreenOS platform.
The following sections describe the procedures for both the NSRP active/passive and NSRP active/active configurations. The procedures apply only to firmware upgrades, and assume that the devices are identical and that there are no hardware changes. If there is any hardware change, you should consult the corresponding hardware guide for each platform.
.
Upgrading Devices in an NSRP Active/Passive ConfigurationThis section describes the steps for upgrading—with no downtime—a basic NSRP active/passive configuration, where device A is the primary device and device B is the backup device. Such an upgrade is supported for identical devices only, and for the
Table 2: Upgrade Paths to ScreenOS 6.2.0 for No-Downtime NSRP Upgrades
Platform Intermediate Firmware Upgrade Recommendation (Boot-Loader Filename)
ISG 1000 Series 5.4r10, 6.0r7, 6.1r3 Load1000v102
ISG 2000 Series 5.4r10, 6.0r7, 6.1r3 Load2000v116
NetScreen-5000 Series using 5000-M2 5.4r11, 6.0r7, 6.1r3 Load5000v103
NetScreen-5000 Series using 5000-M3 6.1r3 Load5000v103
SSG 5 5.4r10, 6.0r7, 6.1r3 Loadssg5ssg20v132
SSG 20 5.4r10, 6.0r7, 6.1r3 Loadssg5ssg20v132
SSG 140 5.4r11, 6.0r7, 6.1r3 Loadssg140v324
SSG 300M Series 6.0r7, 6.1r3 Loadssg300v306
SSG 500/500M Series 6.0r7, 6.1r3 Loadssg500v105
CAUTION: Before upgrading a security device, save the existing configuration file to avoid losing any data.
Upgrading Devices in an NSRP Configuration 23
ScreenOS 6.2.0 Upgrade Guide
24
platforms listed in Table 2. These steps are also valid when you follow the information shown in Table 1 on page 10, but a no-downtime upgrade is not guaranteed.
Before you begin, read “Requirements for Upgrading Device Firmware” on page 11. Also make sure you download the ScreenOS firmware to which you are upgrading each device.
To upgrade two devices in an NSRP active/passive configuration (some steps require CLI use):
1. Upgrade device B to ScreenOS 6.2.0.
From the WebUIa. Make sure you have the new ScreenOS firmware (and the intermediate firmware,
if required). For information about obtaining the firmware, see “Downloading New Firmware” on page 18.
b. Log into device B by opening a browser and entering the management IP address in the Address field. Log in as the root admin or an admin with read-write privileges.
c. Save the existing configuration:
1. Go to Configuration > Update > Config File, and then click Save to File.
2. Click Save in the File Download dialog box.
3. Navigate to the location where you want to save the configuration file (cfg.txt), and then click Save.
d. Click Configuration > Update > ScreenOS/Keys, and then select Firmware Update.
e. Click Browse to navigate to the location of the ScreenOS 6.2.0 firmware, or enter the path to its location in the Load File box.
f. Click Apply.
A message box appears with information about the upgrade time.
g. Click OK to continue.
The security device restarts automatically. The upgrade is complete when the device displays the login page in the browser.
h. Verify the version of the ScreenOS firmware, by logging into the security device and locating the Device Information section of the WebUI page.
WARNING: Do not power off your security device while it is upgrading to new firmware. Doing so could permanently damage the device.
Upgrading Devices in an NSRP Configuration
ScreenOS Upgrade Procedures
From the CLIa. Make sure you have the ScreenOS 6.2.0 firmware (and the intermediate
firmware, if required). For information about obtaining the firmware, see “Downloading New Firmware” on page 18.
b. Log into device B using an application such as Telnet or SSH (or HyperTerminal if directly connected through the console port). Log in as the root admin or an admin with read-write privileges.
c. Save the existing configuration by running the following command:
save config to { flash | slot1 | tftp }...
d. Run the TFTP server on your computer by double-clicking the TFTP server application.
e. Enter the following command on the security device:
save soft from tftp ip_addr screenos_filename to flash
where ip_addr is the IP address of your computer, and screenos_filename is the filename of the ScreenOS 6.2.0 firmware.
f. Enter the reset command when the upgrade is complete, and then enter y at the prompt to reset the device.
g. Wait a few minutes, and then log into the security device.
h. Enter the get system command to verify the version of the security device ScreenOS firmware.
2. Manually fail over the primary device to the backup device (CLI only).
From the CLIa. Log into the primary device (device A).
b. Issue one of the following CLI commands. The command that you need to run depends on whether or not the preempt option is enabled on the primary device.
If the preempt option is enabled:
exec nsrp vsd-group 0 mode ineligible
If the preempt option is not enabled:
exec nsrp vsd-group 0 mode backup
Either command forces the primary device to step down and the backup device to immediately assume the primary device role.
3. Upgrade the primary device (device A) to ScreenOS 6.2.0.
From the WebUIa. Make sure you have the ScreenOS 6.2.0 firmware. For information about
obtaining the firmware, see “Downloading New Firmware” on page 18.
Upgrading Devices in an NSRP Configuration 25

ScreenOS 6.2.0 Upgrade Guide
26
b. Log into security device A.
c. Save the existing configuration:
1. Go to Configuration > Update > Config File, and then click Save to File.
2. Click Save in the File Download dialog box.
3. Navigate to the location where you want to save the configuration file (cfg.txt), and then click Save.
d. Click Configuration > Update > ScreenOS/Keys, and then select Firmware Update.
e. Click Browse to navigate to the location of the ScreenOS 6.2.0 firmware, or enter the path to its location in the Load File box.
f. Click Apply.
A message box appears with information about the upgrade time.
g. Click OK to continue.
The security device restarts automatically. The upgrade is complete when the device displays the login page in the browser.
h. Verify the version of the ScreenOS firmware, by logging into the security device and locating the Device Information section of the WebUI page.
From the CLIa. Make sure you have the ScreenOS 6.2.0 firmware. For information about
obtaining the firmware, see “Downloading New Firmware” on page 18.
b. Log into security device A.
c. Save the existing configuration by running the following command:
save config to { flash | slot1 | tftp }...
d. Run the TFTP server on your computer by double-clicking the TFTP server application.
e. Run the following command on the security device:
save soft from tftp ip_addr screenos_filename to flash
where ip_addr is the IP address of your computer, and screenos_filename is the filename of the ScreenOS 6.2.0 firmware.
f. Reset the security device when the upgrade is complete. Run the reset command and enter y at the prompt to reset the device.
g. Wait a few minutes, and then log into the security device again. You can verify the security device ScreenOS firmware version by using the get system command.
Upgrading Devices in an NSRP Configuration
ScreenOS Upgrade Procedures
4. Synchronize device A (CLI only).
From the CLIAfter you complete the upgrade of device A to ScreenOS 6.2.0, manually synchronize the two devices. On device A (backup), issue the exec nsrp sync rto all from peer command from the peer CLI to synchronize the RTOs from device B (primary device).
5. Manually fail over the primary device to the backup device (CLI only).
From the CLIa. Log into the primary device (device B).
b. If the preempt option is enabled on device A, no action is needed. If the preempt option is not enabled on device A, issue the following command:
exec nsrp vsd-group 0 mode backup
Either command forces the primary device to step down and the backup device to immediately assume the primary device role.
Upgrading Devices in an NSRP Active/Active ConfigurationThis section describes the steps for upgrading—with no downtime—an NSRP configuration where you paired two security devices into two virtual security device (VSD) groups, with each physical device being the primary in one group and the backup in the other. Such an upgrade is supported for identical devices only, and for the platforms listed in Table 2. These steps are also valid when you follow the information shown in Table 1 on page 10, but a no-downtime upgrade is not guaranteed.
To upgrade, you first have to fail over one of the devices so that only one physical device is the primary of both VSD groups. You then upgrade the backup device first and the primary device second.
The following illustrates a typical NSRP active/active configuration where device A is the primary device for VSD 0 and the backup for VSD 1, and device B is the primary device for VSD 1 and the backup for VSD 0.
Before you begin, see “Requirements for Upgrading Device Firmware” on page 11. Also make sure you download the ScreenOS 6.2.0 firmware (and intermediate firmware, if required).
To upgrade two devices in an NSRP active/active configuration (some steps require CLI use):
From the CLI1. Manually fail over the master device B in VSD group 1 to the backup device A in
VSD group 1 (CLI only):
WARNING: Do not power off your security device while it is upgrading to new firmware. Doing so could permanently damage the device.
Upgrading Devices in an NSRP Configuration 27
ScreenOS 6.2.0 Upgrade Guide
28
a. Log into device B using an application such as Telnet or SSH (or HyperTerminal if directly connected through the console port). Log in as the root admin or an admin with read-write privileges.
b. Issue one of the following CLI commands. The command you need to run depends on whether or not the preempt option is enabled on the master device.
If the preempt option is enabled:
exec nsrp vsd-group 1 mode ineligible
If the preempt option is not enabled:
exec nsrp vsd-group 1 mode backup
Either command forces device B to step down and device A to immediately assume the primary role of VSD 1. At this point, device A is the primary of both VSD 0 and 1 and device B is the backup for both VSD 0 and 1.
2. Upgrade device B to the ScreenOS 6.2.0 firmware.
From the WebUIa. Make sure you have the ScreenOS 6.2.0 firmware (and the intermediate
firmware, if required). Check Table 1 on page 10 for details. For information about obtaining the firmware, see “Downloading New Firmware” on page 18.
b. Log into security device B by opening a browser and entering the management IP address in the Address box. Log in as the root admin or an admin with read-write privileges.
c. Save the existing configuration:
1. Go to Configuration > Update > Config File, and then click Save to File.
2. Click Save in the File Download dialog box.
3. Navigate to the location where you want to save the configuration file (cfg.txt), and then click Save.
d. Click Configuration > Update > ScreenOS/Keys, and then select Firmware Update.
e. Click Browse to navigate to the location of the ScreenOS 6.2.0 firmware, or enter the path to its location in the Load File box.
f. Click Apply.
A message box appears with information about the upgrade time.
g. Click OK to continue.
The security device restarts automatically. The upgrade is complete when the device displays the login page in the browser.
h. Verify the version of the ScreenOS firmware, by logging into the security device and locating the Device Information section of the WebUI page.
Upgrading Devices in an NSRP Configuration
ScreenOS Upgrade Procedures
From the CLIa. Make sure you have the ScreenOS 6.2.0 firmware. For information about
obtaining the firmware, see “Downloading New Firmware” on page 18.
b. Log into device B.
c. Save the existing configuration by running the following command:
save config to { flash | slot1 | tftp }...
d. Run the TFTP server on your computer by double-clicking the TFTP server application.
e. Enter the following command on the security device:
save soft from tftp ip_addr screenos_filename to flash
where ip_addr is the IP address of your computer, and screenos_filename is the filename of the ScreenOS 6.2.0 firmware.
f. Reset the security device when the upgrade is complete. Run the reset command and enter y at the prompt to reset the device.
g. Wait a few minutes, and then log into the security device again. You can verify the security device ScreenOS firmware version by using the get system command.
3. Manually fail over device A completely to device B (CLI only).
From the CLIa. Log into device A.
b. Fail over primary device A in VSD 0 to backup device B in VSD 0 by issuing one of the following CLI commands. The command you need to run depends on whether or not the preempt option is enabled on the primary device.
If the preempt option is enabled:
exec nsrp vsd-group 0 mode ineligible
If the preempt option is not enabled:
exec nsrp vsd-group 0 mode backup
c. If the preempt option is enabled on device A, no action is needed. If the preempt option is not enabled on device A, issue the following command:
exec nsrp vsd-group 1 mode backup
At this point, device B is the primary device for both VSD 0 and 1, and device A is backup for both VSD 0 and 1.
4. Upgrade device A to ScreenOS 6.2.0.
Upgrading Devices in an NSRP Configuration 29
ScreenOS 6.2.0 Upgrade Guide
30
From the WebUIa. Make sure you have the ScreenOS 6.2.0 firmware (and the intermediate
firmware, if required). Check Table 1 on page 10 for software details. For information about obtaining the firmware, see “Downloading New Firmware” on page 18.
b. Log into security device A.
c. Save the existing configuration:
1. Go to Configuration > Update > Config File, and then click Save to File.
2. Click Save in the File Download dialog box.
3. Navigate to the location where you want to save the configuration file (cfg.txt), and then click Save.
d. Click Configuration > Update > ScreenOS/Keys, and then select Firmware Update.
e. Click Browse to navigate to the location of the ScreenOS 6.2.0 firmware, or enter the path to its location in the Load File box.
f. Click Apply.
A message box appears with information about the upgrade time.
g. Click OK to continue.
The security device restarts automatically. The upgrade is complete when the device displays the login page in the browser.
h. Verify the version of the ScreenOS firmware, by logging into the security device and locating the Device Information section of the WebUI page.
From the CLIa. Make sure you have the ScreenOS 6.2.0 firmware. For information about
obtaining the firmware, see “Downloading New Firmware” on page 18.
b. Log into device A.
c. Save the existing configuration by running the following command:
save config to { flash | slot1 | tftp }...
d. Run the TFTP server on your computer by double-clicking the TFTP server application.
e. Enter the following command on the security device:
save soft from tftp ip_addr screenos_filename to flash
where ip_addr is the IP address of your computer, and screenos_filename is the filename of the ScreenOS 6.2.0 firmware.
Upgrading Devices in an NSRP Configuration
ScreenOS Upgrade Procedures
f. Reset the security device when the upgrade is complete. Run the reset command, and then enter y at the prompt to reset the device.
g. Wait a few minutes, and then log into the security device again. You can verify the security device ScreenOS firmware version by using the get system command.
5. Synchronize device A (CLI only).
From the CLIAfter you complete the upgrade of device A to ScreenOS 6.2.0, manually synchronize the two devices. On device A, issue the exec nsrp sync rto all command from the peer to synchronize the RTOs from device B.
6. Fail over device B in VSD 0 to device A in VSD 0 (CLI only).
As the final step, return the devices to an active/active configuration.
a. Log into device A.
If the preempt option is enabled on device A, no action is needed. If the preempt option is not enabled on device A, issue the following command:
exec nsrp vsd-group 1 mode backup
Now device A is the primary device for VSD 0 and the backup for VSD 1, and device B is the primary device for VSD 1 and the backup for VSD 0.
Upgrading Devices Operating in FIPS Mode
A security device operating in FIPS mode can be upgraded by following the instructions given in “Upgrading Using the CLI” on page 21 or “Upgrading Using the Boot Loader” on page 21, with one exception: FIPS mode prevents the configuration from being exported from the device.
Additional Information
Scan manager profiles and AV pattern updates are described in the next two sections.
Scan Manager ProfileThe global scan-mgr command controls the embedded scan manager, which is the AV component that interacts with the scan engine. For example, the set av scan-mgr CLI command sets the global commands that control parameters, such as max-content-size, max-msgs, pattern-type, pattern-update, and queue-size. You can view global AV settings by using the get av scan-mgr command.
In ScreenOS 5.3.0 and later, some of the previous global settings are configured from within a profile context. For example, global commands such as timeout and max-decompress-layer are no longer global; they are now set within the profile for each protocol. Commands such as max-content-size and max-msgs, which configure the embedded scan manager, are global and are now set using the set av scan-mgr command.
Upgrading Devices Operating in FIPS Mode 31
ScreenOS 6.2.0 Upgrade Guide
32
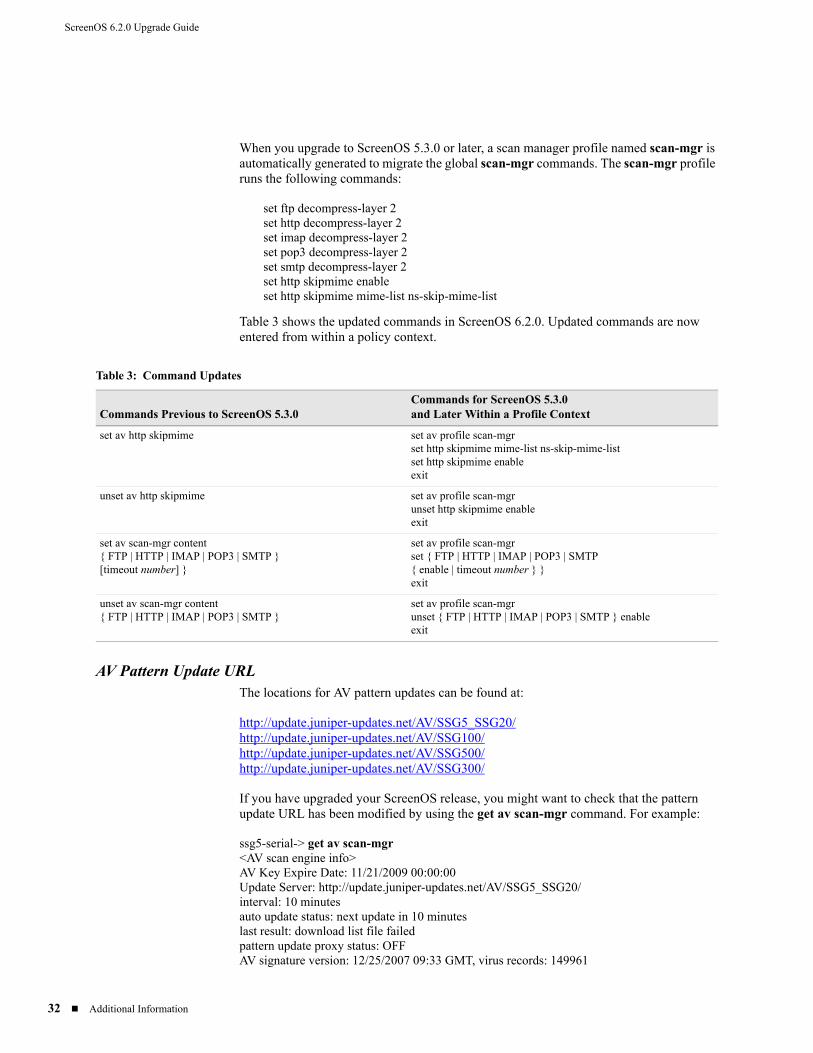
When you upgrade to ScreenOS 5.3.0 or later, a scan manager profile named scan-mgr is automatically generated to migrate the global scan-mgr commands. The scan-mgr profile runs the following commands:
set ftp decompress-layer 2set http decompress-layer 2set imap decompress-layer 2set pop3 decompress-layer 2set smtp decompress-layer 2set http skipmime enableset http skipmime mime-list ns-skip-mime-list
Table 3 shows the updated commands in ScreenOS 6.2.0. Updated commands are now entered from within a policy context.
AV Pattern Update URLThe locations for AV pattern updates can be found at:
http://update.juniper-updates.net/AV/SSG5_SSG20/http://update.juniper-updates.net/AV/SSG100/http://update.juniper-updates.net/AV/SSG500/http://update.juniper-updates.net/AV/SSG300/
If you have upgraded your ScreenOS release, you might want to check that the pattern update URL has been modified by using the get av scan-mgr command. For example:
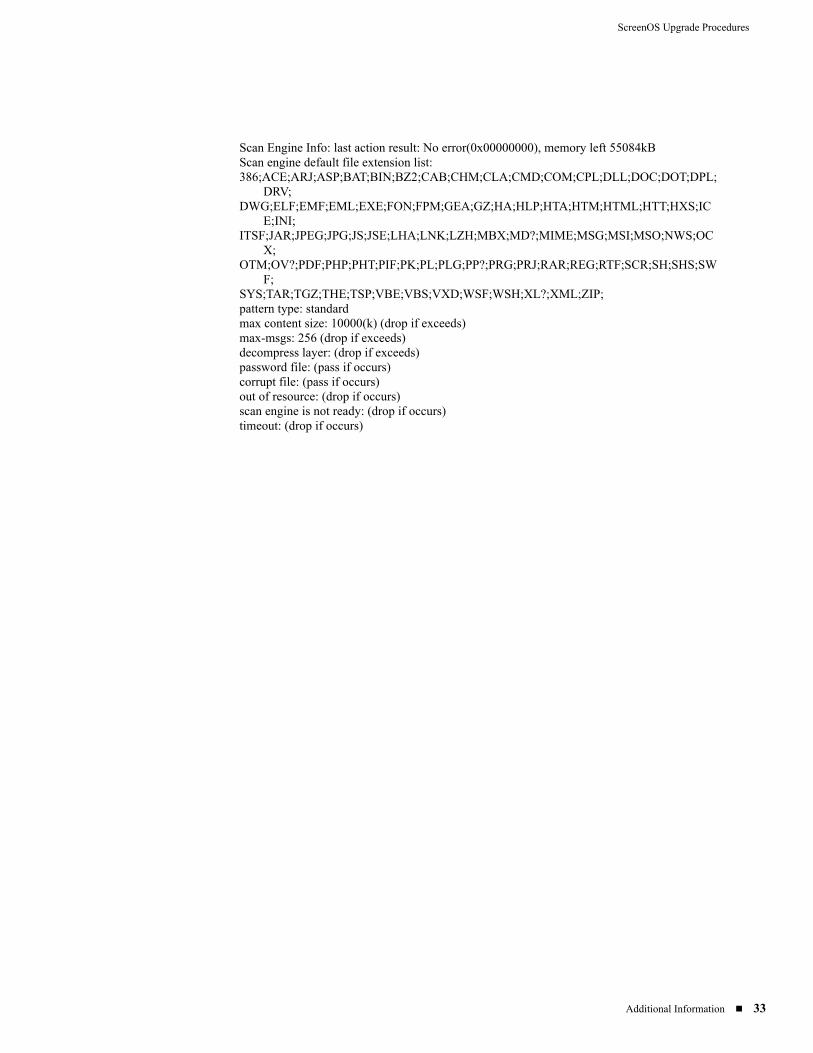
ssg5-serial-> get av scan-mgr<AV scan engine info>AV Key Expire Date: 11/21/2009 00:00:00Update Server: http://update.juniper-updates.net/AV/SSG5_SSG20/interval: 10 minutesauto update status: next update in 10 minuteslast result: download list file failedpattern update proxy status: OFFAV signature version: 12/25/2007 09:33 GMT, virus records: 149961
Table 3: Command Updates
Commands Previous to ScreenOS 5.3.0Commands for ScreenOS 5.3.0and Later Within a Profile Context
set av http skipmime set av profile scan-mgrset http skipmime mime-list ns-skip-mime-listset http skipmime enableexit
unset av http skipmime set av profile scan-mgrunset http skipmime enableexit
set av scan-mgr content { FTP | HTTP | IMAP | POP3 | SMTP } [timeout number] }
set av profile scan-mgrset { FTP | HTTP | IMAP | POP3 | SMTP{ enable | timeout number } }exit
unset av scan-mgr content{ FTP | HTTP | IMAP | POP3 | SMTP }
set av profile scan-mgrunset { FTP | HTTP | IMAP | POP3 | SMTP } enable exit
Additional Information
ScreenOS Upgrade Procedures
Scan Engine Info: last action result: No error(0x00000000), memory left 55084kBScan engine default file extension list:386;ACE;ARJ;ASP;BAT;BIN;BZ2;CAB;CHM;CLA;CMD;COM;CPL;DLL;DOC;DOT;DPL;
DRV;DWG;ELF;EMF;EML;EXE;FON;FPM;GEA;GZ;HA;HLP;HTA;HTM;HTML;HTT;HXS;IC
E;INI;ITSF;JAR;JPEG;JPG;JS;JSE;LHA;LNK;LZH;MBX;MD?;MIME;MSG;MSI;MSO;NWS;OC
X;OTM;OV?;PDF;PHP;PHT;PIF;PK;PL;PLG;PP?;PRG;PRJ;RAR;REG;RTF;SCR;SH;SHS;SW
F;SYS;TAR;TGZ;THE;TSP;VBE;VBS;VXD;WSF;WSH;XL?;XML;ZIP;pattern type: standardmax content size: 10000(k) (drop if exceeds)max-msgs: 256 (drop if exceeds)decompress layer: (drop if exceeds)password file: (pass if occurs)corrupt file: (pass if occurs)out of resource: (drop if occurs)scan engine is not ready: (drop if occurs)timeout: (drop if occurs)
Additional Information 33

ScreenOS 6.2.0 Upgrade Guide
34
Additional Information