uploading the soldier database - army mwr
TRANSCRIPT

Uploading the Sponsor Database
The Army SFRG system allows SFRG Administrators to automate the approval of
subscriptions to the SFRG by Sponsors and Family Members. It does this through the use of
the Sponsor Database. Everyone who wishes to subscribe to the SFRG must identify their
connection to the SFRG by submitting the name of a Sponsor of Interest and the last four digits
of the Social Security Number of that Sponsor. That information is checked against the
Sponsor Database.
Go to your SFRG
Log into the Army SFRG site and go to your SFRG by clicking on Switch Unit Site, selecting
your site from the dialog box, and clicking Go.

Go to the Upload Sponsor Database section
Click on Control Panel at the very top of the screen.
In the Control Panel, click on the Sponsor link in the Custom Modules section.
In the Sponsor Module, click on the Upload Sponsor Database link at the top of the screen.

Download the Template
You’ll be taken to the page to upload your Sponsor Database. Click on the appropriate template
to download a copy of the Sponsor Database Template. If you are using Excel 2003, you will
want the 2003 version. If you are using Excel 2007 or later, you will want the 2007 version.

Pull the Sponsor name information from your Alpha Roster
You’ll now want to pull the required information from your Alpha Roster. The Template only
requires four pieces of information: The Sponsor’s first name, last name, last four digits of the
Social Security Number, and the UIC of the SFRG. Note that this means the UIC will be the
same for every single entry in the Sponsor Database. If you do not know your SFRG’s UIC,
your Unit Commander will be able to assist you.
To pull the information from your Alpha Roster, open it up in Excel. For this manual, the
examples will be of Excel 2013. Excel 2007 and 2010 screens will be similar. For those
using Excel 2003, please note that where the screenshots and descriptions refer to tabs,
you’ll want to use the corresponding menu. For example, when referring to the Data tab,
you’ll want to go to the Data menu.
Depending on how the roster is formatted, the names of the Sponsors may be listed in a single
cell. That is, rather than having a column of just first names and a column of just last names, the
roster may have both the first and last names in a single cell. If this is the case, you can use
Excel to split that cell in two.
Your roster may look something like this:

Since we don’t want to alter the original document, cut and paste the column that contains the
names into a new workbook. To do this, click on the column header (in this case, the letter A at
the top of the column.) The entire column should highlight.
Copy the column.

Go into the File tab, click New, and create a blank workbook.


Paste the column into the new workbook by going into the Paste button and selecting Paste
Special....
This will bring up a dialog box asking how you wish to paste. Click the Values radio button and
then click OK.
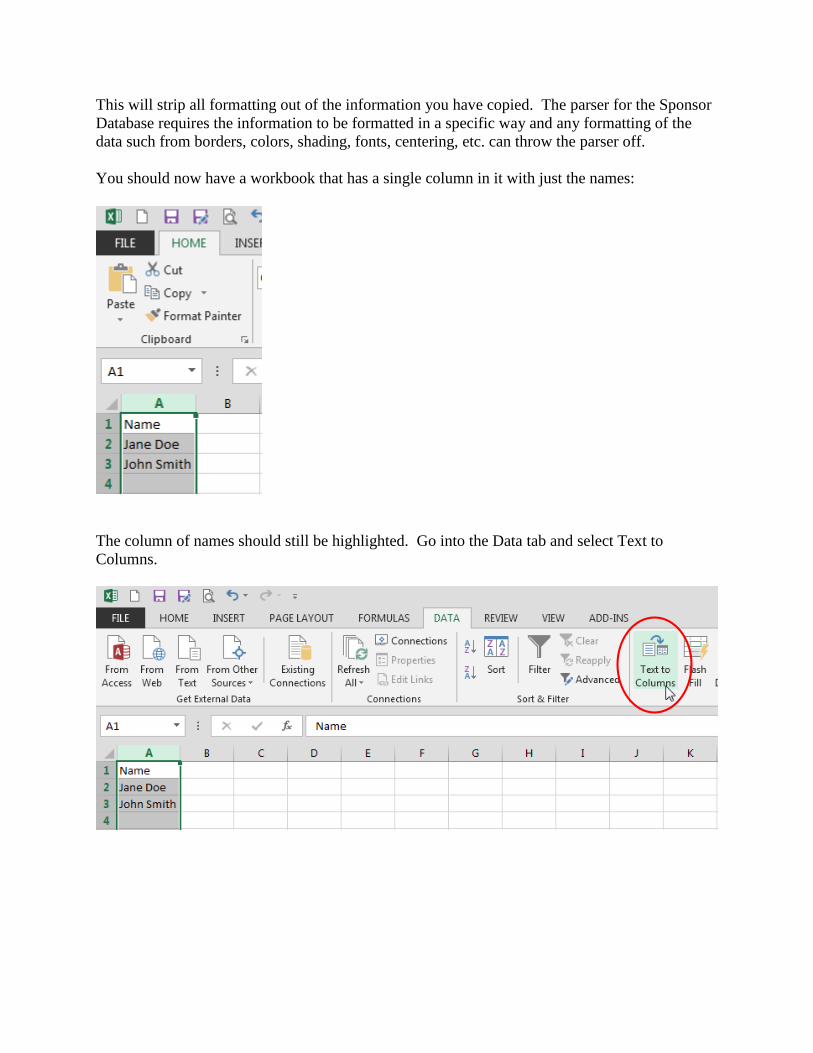
This will strip all formatting out of the information you have copied. The parser for the Sponsor
Database requires the information to be formatted in a specific way and any formatting of the
data such from borders, colors, shading, fonts, centering, etc. can throw the parser off.
You should now have a workbook that has a single column in it with just the names:
The column of names should still be highlighted. Go into the Data tab and select Text to
Columns.

In the dialog box that appears, set the radio button to Delimited and then click Next.

In the Delimiters section, check the boxes for the characters that are used to separate the names.
In this example, the names are listed “First Last” with only a space between them. Thus, you
would uncheck the “Tab” box and check the “Space” box.
If your Alpha Roster lists the names as “Last, First” with a comma and space between the two,
uncheck the “Tab” box and check both the “Comma” and “Spaces” boxes.
Be sure to leave the “Treat consecutive delimiters as one” checkbox checked. Then click
“Next.”

The first column should be highlighted. Set the radio button to text.

Do the same with the second column by clicking on it to highlight and then setting the radio
button to Text.
If you have a third column, repeat the process. When you have set all columns to Text, click on
Finish and you should have separated columns.

Depending upon the specific names in your Alpha Roster, you may have more than just two
columns such as when your roster includes middle names or initials or if suffixes such as Jr. or
III are used. If this is the case, you will need to do some manual clean up of the split so that you
have a column of just first names and a column of just last names. Too, look over the entries for
anything that may be unusual such as stray punctuation marks that might be attached to a name.
This is important because the name that is entered in the Sponsor Database is what must be used
when the person is subscribing. That is, if the original name was “John Smith, Jr.” and you are
only splitting on the spaces, then Excel will have included the comma on the end of Smith when
splitting the names into separate columns. If you don’t remove that comma, then anybody
subscribing to the SFRG will have to enter “Smith,” with a comma on the end or be rejected.
You will also note that we specifically told Excel to format the split columns as Text. This is
because the upload process is expecting text fields. The Template is set to Text and we want to
keep that formatting.

Copy the names over to the Template
Open the Template that you downloaded from the site.
Back in the worksheet that has the columns of names, select the cell that holds the initial first
name in the column so that it is selected.

Next, shift-click on the final first name in the column, meaning hold the Shift key down on your
keyboard and while you are holding it down, click on the final cell. All the intervening cells
should highlight.
You can also do this by just dragging over the cells that have the first names. If you do this,
make sure you only select names. Do not include any header cells
In the Home tab, select Copy.

Go to the Template and select the first cell under the “First Name” column header (cell A2).
In the Home tab, click Paste.

This will paste the first names into the First Name column.
Repeat the copy and paste process with the last names.

Pull the Sponsor SSN last four information from your Alpha Roster
Just as we split the names into separate columns, we can split the Social Security Number so that
you are left with a single column of last fours. Go back to your Alpha Roster and click on the
column header for the SSNs (in this case, the letter B at the top of the column.) The entire
column should highlight.
Copy the column.

Go to your workbook where you worked on the names and select the first cell in a blank column.
Paste the column into the new workbook by going into the Paste button and selecting Paste
Special....

This will bring up a dialog box asking how you wish to paste. Click the Values radio button and
then click OK.
This will strip all formatting out of the information you have copied. The parser for the Sponsor
Database requires the information to be formatted in a specific way and any formatting of the
data such from borders, colors, shading, fonts, centering, etc. can throw the parser off.
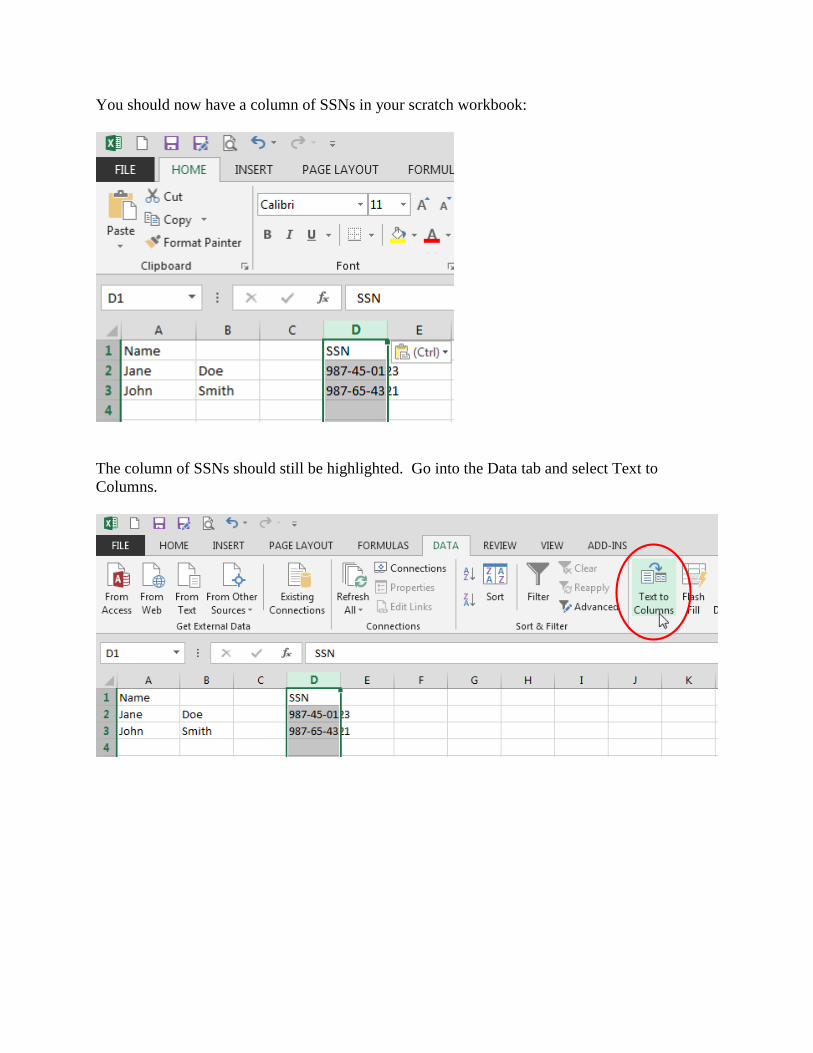
You should now have a column of SSNs in your scratch workbook:
The column of SSNs should still be highlighted. Go into the Data tab and select Text to
Columns.
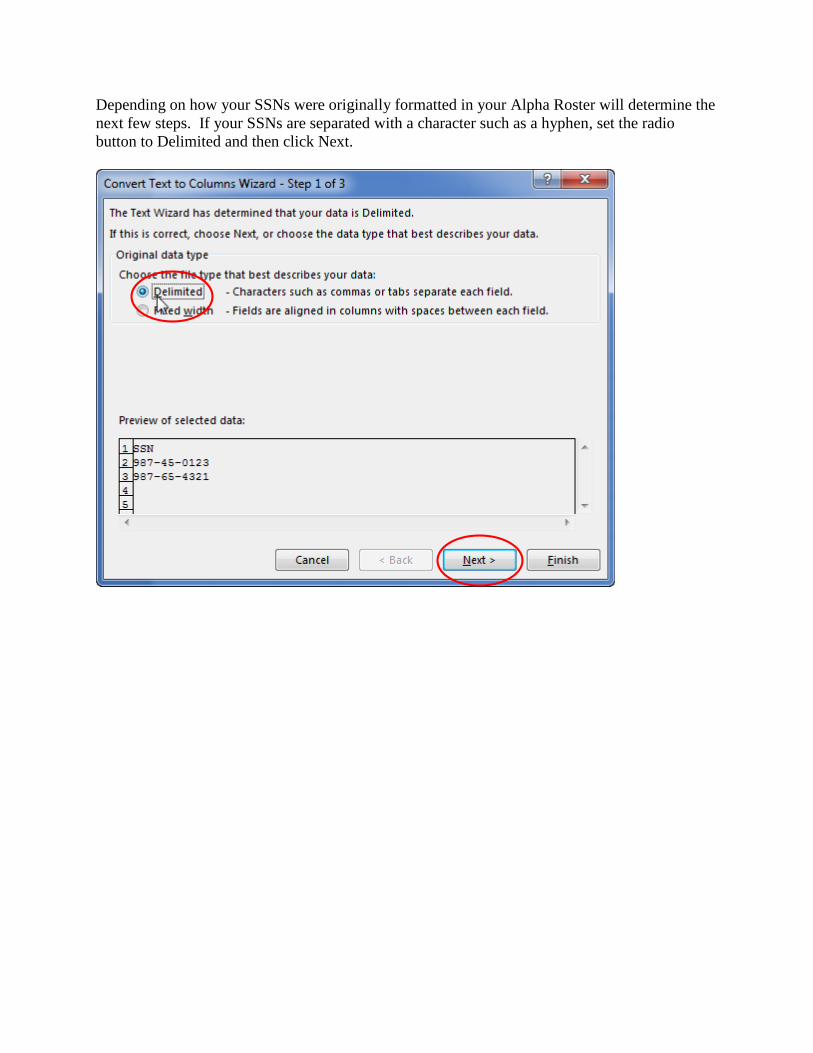
Depending on how your SSNs were originally formatted in your Alpha Roster will determine the
next few steps. If your SSNs are separated with a character such as a hyphen, set the radio
button to Delimited and then click Next.
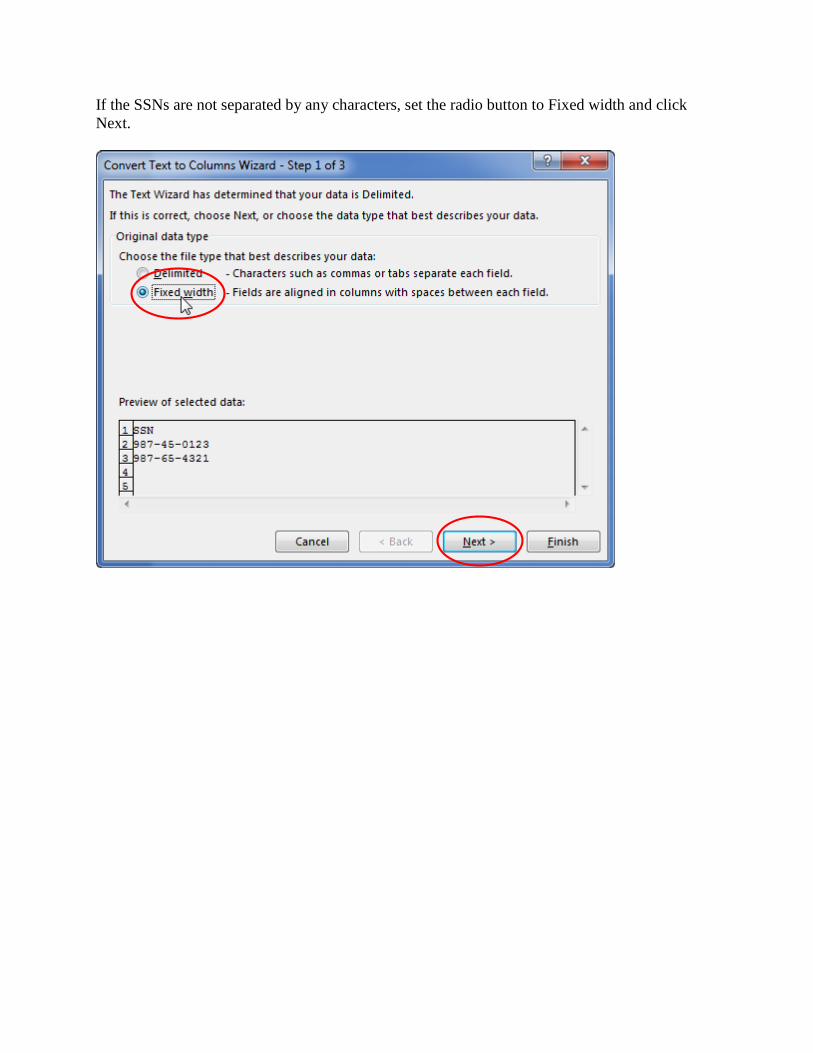
If the SSNs are not separated by any characters, set the radio button to Fixed width and click
Next.
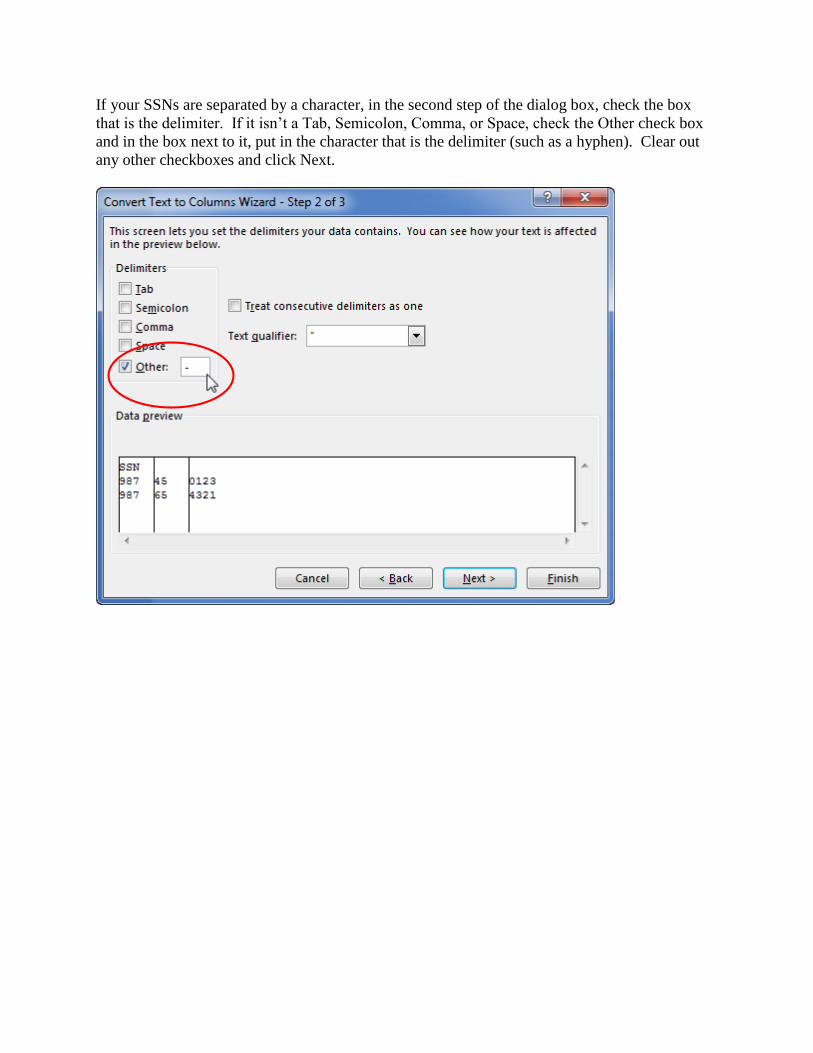
If your SSNs are separated by a character, in the second step of the dialog box, check the box
that is the delimiter. If it isn’t a Tab, Semicolon, Comma, or Space, check the Other check box
and in the box next to it, put in the character that is the delimiter (such as a hyphen). Clear out
any other checkboxes and click Next.

If your SSNs are not separated by characters, in the second step of the dialog box, click between
the first five and last four digits of the SSN. A line will appear showing that a break will be
made there. If you misclick, you can drag the line to the appropriate spot. After setting the line,
click on Next.

In both cases (Delimited or Fixed width), click on the final column that contains the last four
digits so that it highlights and set the radio button to Text.
When the last column is set to Text, click on Finish and you should have separated columns with
the last four digits isolated from the others.

Notice that because the column of last fours has been set to Text, any leading zeroes in the last
four will be kept. Too, notice that Excel has a little green triangle in the upper left corner of each
cell. This is to let you know that the cell is formatted as Text.
Copy the last fours over to the Template
Select the cell that holds the initial last four in the column so that it is selected.
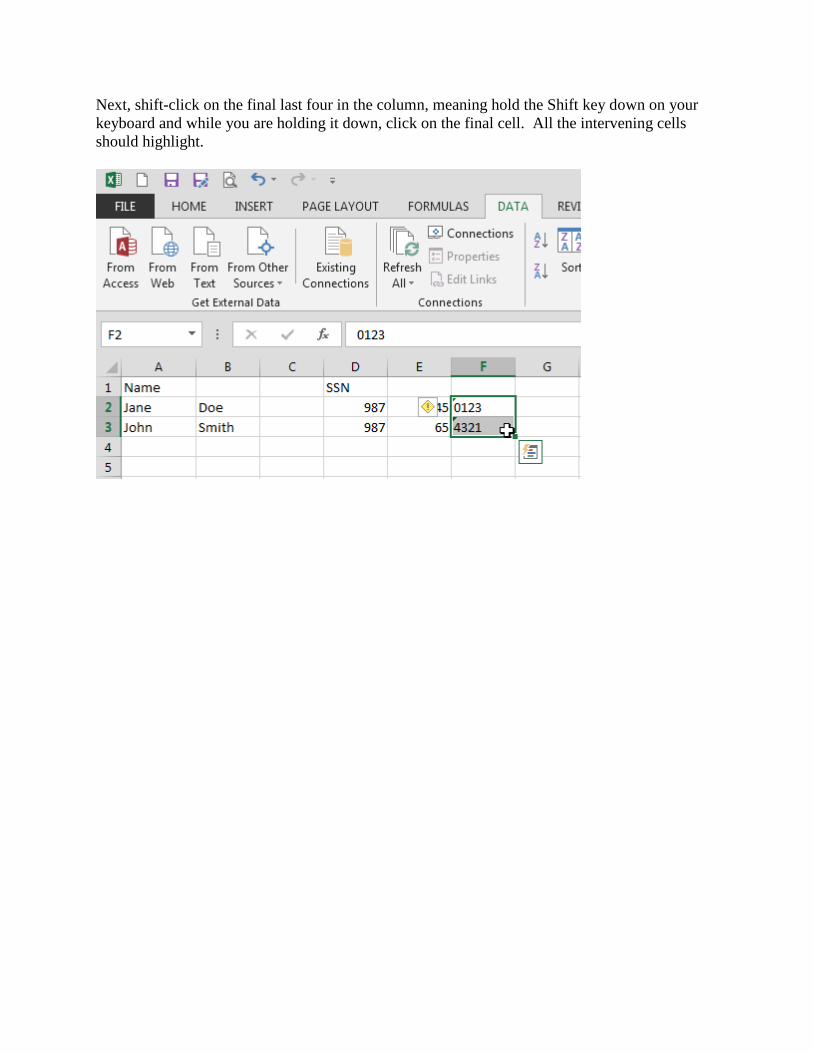
Next, shift-click on the final last four in the column, meaning hold the Shift key down on your
keyboard and while you are holding it down, click on the final cell. All the intervening cells
should highlight.

In the Home tab, select Copy.
Go into the Template and select the first cell under the SSNLastFour column header (cell C2).
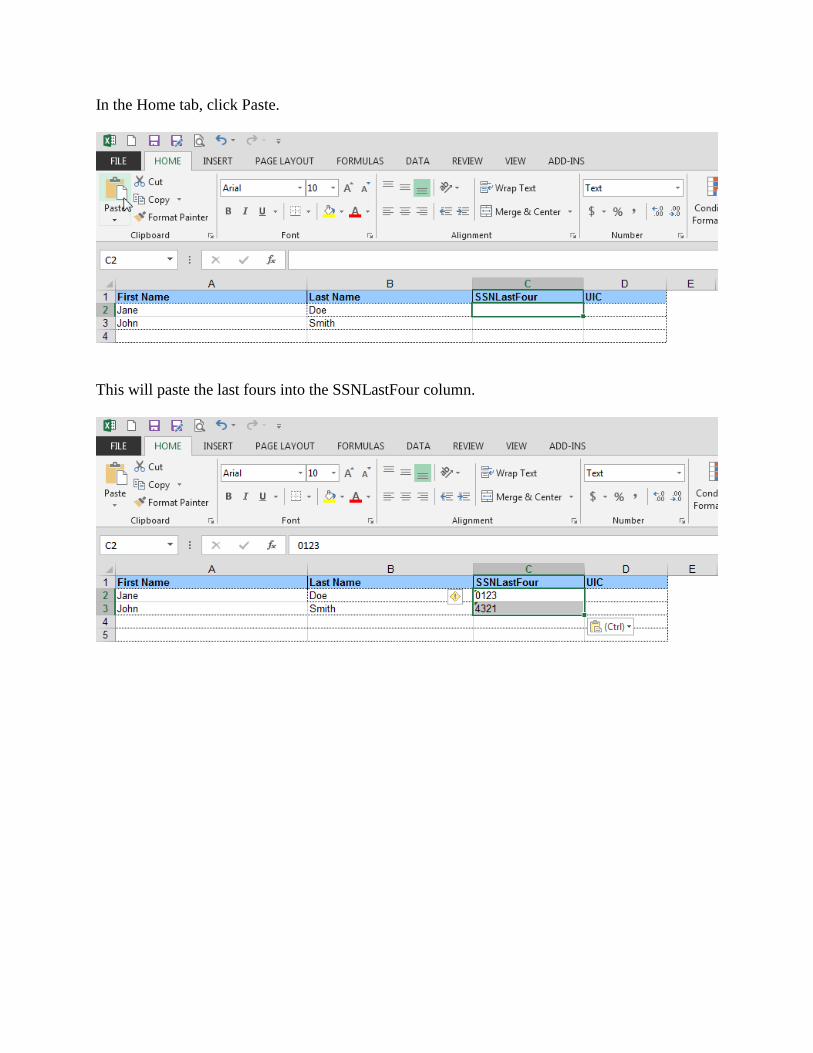
In the Home tab, click Paste.
This will paste the last fours into the SSNLastFour column.

Copy the SFRG’s UIC into the Template
In the UIC column, copy the SFRG’s UIC into the cell for each Sponsor. Note, this is the UIC
of the SFRG, not the UIC of the Company the Sponsor is in. Thus, every entry will have the
same UIC. If you do not know your SFRG’s UIC, your Unit Commander can assist you.
Now that you have a completed Template, save it.
Please note: The parser for the Sponsor Database can only handle 2000 entries at a time. If you
have more than 2000 Sponsors to upload, you will need to split them into multiple files and
upload them separately.

Upload the Sponsor Database
Now that you have a saved Sponsor Database in the right format, you can upload it to the
Sponsor Database. Go back to your SFRG and into the Upload Sponsor DB section where
you downloaded the template. This time, click on the “Browse” button.

A dialog box appears asking you to choose what file to upload. Navigate to where you saved
your Sponsor Database, select it, and click on Open.
Once you have selected your Sponsor Database, click on the “Add New Sponsors” button or the
“Delete and Replace” button.
“Add New Sponsors” will process the Sponsor Database for new names and add them to your
current Sponsor Database. Duplicate entries will be skipped and no names will be removed.
“Delete and Replace” will delete all names in your current Sponsor Database and replace them
with the names in the new Sponsor Database you are uploading. Be careful when using this
option as all accounts associated with deleted Sponsors will show a Sponsor of Interest of
“(none)” in the Subscription List. If you accidentally delete someone out of the Sponsor
Database, you can put the person back into the database using the exact same information and
everything will sync back up.

The system will process your file in the background. When it is done, you should receive an
email message regarding the results, either letting you know that the file was processed
successfully or giving you a notice as to why the upload failed.
Things to Note
Some things to be aware of when uploading the Sponsor Database:
1) The UIC for all entries in the Sponsor Database should be the same: That of your Unit
and not any parent or child Unit. The Sponsor Database was not designed to be a look-up
tool to determine which Company a Sponsor is in. Instead, it is used to associate your
Sponsors with your Unit. If you are at the Brigade, then every entry in the Sponsor
Database will use the Brigade’s UIC; if you are at the Battalion, then every entry in the
Sponsor Database will use the Battalion’s UIC, and so on. This UIC should be the same
one that is listed in your FRG module (Control Panel -> FRG -> Edit FRG). If your UIC
has changed, just make a corrected version of your Sponsor Database and upload it.
2) The parser for the Sponsor Database can only handle 2000 entries at a time. If you have
more than 2000 people to add, you will need to break them up into multiple files and
upload them separately.
3) If you are using the “Delete and Replace” option and you have more than 2000 Sponsors
to add, only do so for the first file. Otherwise, you will be deleting the Sponsors you just
added. Instead, upload the first file using the “Delete and Replace” option and allow it to
process completely where you receive the email summary. After you receive that
summary, you can go ahead and use the “Add New Sponsors” option for the other files.
4) Do not change the formatting of the Template in any way. Do not add borders, colors,
shading, fonts, centering, or any other type of formatting. Because the information in the
Sponsor Database is used to validate the identities of your subscribers, the parser for the
Sponsor Database requires the information to be formatted in a specific way in order to
ensure an accurate upload. Changing the formatting of the Template in any way can
throw the parser off and your file will not upload.
5) Do not put in partial entries. Every single entry for your Sponsor Database must be
complete. This means it must have a First Name, a Last Name, a Last Four, and a UIC.
You cannot upload partial entries such as having a line with no First Name or with just a
UIC. All entries must be complete.
6) Please note that the Template has the First Name first and the Last Name second.