usa hockey - sportsengine · usa hockey basic officials manual ... then rest for a couple of...
TRANSCRIPT

USA HockeyBASICOFFICIALSMANUALUpdated August 2017


USA HOCKEY BASIC OFFICIALS MANUAL
Updated August 2017
AUTHOR AND EDITORMATT LEAF
USA Hockey Director, Officiating Education Program
ARTWORKGraphics
MATT LEAF
IllustrationsMIKE CURTI
PhotographyTED GEE
LayoutDANA AUSEC
© USA Hockey, Inc.

ii USA Hockey Basic Officials Manual
TABLE OF CONTENTS
Personal Appearance .................................................... 1
Physical Conditioning .................................................. 3
Fundamentals of Skating ............................................. 6
Pre-Game Duties and Responsibilities ........................ 9
Conducting Face-Offs .................................................. 11
Legend .......................................................................... 15
Positioning ................................................................... 16
Positioning Referee (Three-Official System) .............. 17
Positioning Linesmen (Three-Official System) ........... 22
Positioning (Two-Official System) .............................. 27
Calling Off-Side Violations ......................................... 32
Calling Icing Infractions .............................................. 36
Establishing Face-Off Locations ................................. 40
Assessing Penalties and Other Infractions .................. 43
Judgment ...................................................................... 50
Awarding Goals and Assists ........................................ 51
Injured Players ............................................................. 53
Equipment Regulations ................................................ 55
Change of Players ........................................................ 57
Altercations .................................................................. 58
Penalty Shot Procedures .............................................. 61
Off-Ice Officials and Their Role ................................. 63
Post-Game Duties and Responsibilities ....................... 64
Communication with Players and Coaches ................. 66
Role of the Supervisor ................................................. 68
Answers to Review Questions ..................................... 70
Acknowledgements ...................................................... 73
FOREWORD
For many of the people reading this Basic Level Officiating Manual, their involvement is an extension of their participation with the sport of ice hockey while others may be entering into the hockey world for the first time. In either instance, you will discover an interesting activity known as the art of officiating.
The growing sport of ice hockey has increased the demands on our grassroots officials. Thus far, the USA Hockey Officiating Program has kept up with those demands in most areas of the country. Although the quality of officiating has improved dramatically over the last several years, there is still a long way to go in order to provide the best possible officiating service to the youth hockey programs which they deserve and should come to expect. This continued commitment to an education program has helped USA Hockey maintain its position as leaders in the worldwide officiating community, both on the ice and off.
The USA Hockey Basic Level Officiating Manual is designed to provide you the most simple concepts behind officiating ice hockey. From dropping the puck to calling the first penalty, all facets of officiating are described in a thorough, yet simple manner. The foundation to becoming a successful official is contained in this publication.
A complete mastery of all procedures and methods outlined is this manual is a must for advancement to higher levels of officiating. Each procedure and guideline has been carefully thought out and practiced by experienced officials who understand the art of officiating. As you explore these procedures, it is important you try to understand the why behind each concept in addition to the how and what. This understanding will enhance your ability and enjoyment in officiating.
The format for the Basic Manual has recently changed in order to create an even greater learning experience. Review questions have been added to the end of each chapter for the reader to use as a learning tool. The answers to each question can then be found at the end of the manual. Be sure to take advantage of this format to better retain the necessary information for successful officiating.
For those who are entering the officiating world for the first time, welcome. USA Hockey is honored to have you as a member of our team. Those of you who are reviewing the material presented in this manual, thank you. Your continued dedication to improving as an official and your involvement with hockey is greatly appreciated and does not go unnoticed.
Good luck. Enjoy your experience as an ice hockey official.

1USA Hockey Basic Officials Manual
PERSONAL APPEARANCE
Importance of Looking Like an OfficialWe have all heard the old adage “Image is everything” or “you have to look good in order to be good.” Although these phrases certainly aren’t the only factors that determine whether an official is going to be successful, there is some merit to the message that they portray. Your personal appearance as an official does play a major role in how you are perceived by players, coaches and spectators.
There are several advantages to looking like an official. Just as with anything else in life, it is important to leave a positive first impression. Oftentimes, the first impression of you as an official will be the way you look. When you first walk into the rink, your appearance will be the first thing that everyone will notice about you. After all, you haven’t had any opportunity to perform your duties yet. This first impression will go a long way in building credibility, a must in order to be successful in managing the game.
By displaying good personal appearance, you can also define your role as an official. At the lower levels of hockey, the official is seen as a teacher while at higher levels the official becomes more of a game manager. Simply being the only people on the ice without a stick in your hand does not establish the roles mentioned above. Looking like an official will allow you to command instant respect which will make your job easier.
Finally, good looks will complement good skills. Your skills as an official will ultimately determine whether you are successful. Skating ability, positioning and knowledge of rules and procedures will affect your ability to advance your officiating career to higher levels. In addition, your judgment as a referee will dictate much of your success. All of these skills will need to come together equally well to guarantee overall improvement as an official. A positive personal appearance is also necessary to complement these skills and help establish much needed credibility. Looking like an official is not everything, but it is part of the total package of being a successful official.
Physical CharacteristicsA good official needs to be in excellent physical condition. Whereas players may skate a one-minute shift and then rest for a couple of minutes, the official is called upon to skate the entire game. An official deemed to be overweight and not in shape will have a difficult time keeping up with the play and will oftentimes be out of position.
Another important area that effects your personal appearance includes
your face and hair. A clean-shaven individual with no facial hair will look neater and more professional. In addition, neatly kept hair that is short and appropriately groomed will also earn more respect and credibility with the teams. A well groomed official in good condition gives the impression he/she takes pride in his/her appearance and this will carry over to taking pride in his/her officiating. This perception will reflect on his/her overall ability to successfully officiate.
Officiating EquipmentThe following is a list and brief description of the necessary equipment that should be worn by all officials. Please contact your Local Supervisor of Officials for information as to where officiating equipment and supplies may be purchased in your area.• helmet (mandatory) – A
black hockey helmet with chin strap properly fastened.
• sweater – Black and white traditional sweater with clean white stripes and properly fitted. The current USA Hockey Official’s Crest should be properly sewn on the left chest. Sweater should be designed for hockey and only a black T-shirt should be worn underneath, if visible. Red or orange arm bands should be used when acting as a Referee in the three-official system.
• trousers – Black trousers neatly pressed and loose fitting. Suspenders should be used instead of a belt to properly position trousers and promote safety. Proper length to the top of the toes will help prevent the trousers from getting caught in the tendon guards of the skates.
• girdle protection – A protective girdle should be worn to protect the upper legs and mid-section of the body. A referee girdle is generally lighter than what is normally worn by hockey players.
• skates – Properly fitted skates with clean white laces. The skates should be polished and maintained on a regular basis. Tendon guards should be taped to help prevent the trousers from getting caught in them.
• cup and supporter or pelvic protector – Properly fitted to provide the necessary protection.
• shin guards and knee pads – Lightweight shin guards and knee pads that allow for maximum protection and mobility.
• elbow pads – Lightweight elbow pads that fit nicely under the sweater and offer full protection.
• visor (mandatory) – A half-shield visor that is properly fastened to the helmet and covers the eyes.

2 USA Hockey Basic Officials Manual
Officials’ SuppliesThese are some additional items that each official will need to perform to their best ability and be prepared for any situation that may take place.
• Whistles (at least two) – Whistles should be finger type that provide a deep, loud blast. White tape should be placed on the mouthpiece and finger clasps to protect you from the sharp and hard edges. Always be prepared with the second whistle in case the first one falters.
• Official Rulebook/ Casebook – Will be provided by USA Hockey upon registration. The current year rulebook/ casebook should be reviewed prior to every game to ensure a complete knowledge and understanding of the rules.
• Basic Level Officials Manual – Provided by USA Hockey. Should be reviewed periodically to ensure a complete knowledge of officiating procedures.
• Equipment Bag – A black bag that has sufficient space to carry all of your officiating gear and supplies.
• Tape (both white and black) – For use on your whistles and to tape your tendon guards.
• Telephone Numbers of Assignors, Supervisors and Officials – Will come in handy in case of an emergency such as your partner failing to show up or a severe penalty is assessed.
• Cut Skate Laces – Old laces that are cut to various lengths. These laces should be carried in your back pocket and used to repair holes in the nets.
• Soap and Towel – To clean up and feel fresh after a well worked game.
Off-Ice Dress For Regular Season GamesAs with your on-ice appearance, the way you look off the ice before and after the game will also leave a lasting impression on players, coaches, and spectators. A good first impression as you walk into the arena will supplement the perception of you while on the ice. Nice clothing that is clean, neat, and tidy is preferred and will portray a positive image. Avoid wearing team jackets, jeans and T-shirts, if at all possible. Team jackets may give the impression that you are partial to one of the participating teams while jeans and T-shirts may look sloppy and unprofessional. Looking professional and neat both before and after the game demonstrates that you take pride in your work and are attempting to be the best official that you can be.
Your personal appearance both on and off the ice is something that you can control as an official. By taking control of your own appearance, you can promote a positive image that will give you instant respect and credibility and will make your job as an official much easier. Remember another old adage, “you only have one chance to leave a good first impression,” and take pride in your officiating appearance.
Personal Appearance ReviewThe following questions highlight some of the key points you should have picked up from this chapter. Take a few minutes to review what you have learned about personal appearance. When finished, you can compare your answers to the correct answers that appear in the back of this manual.
1. How will a good personal appearance benefit you as an official?
2. What are the mandatory pieces of equipment that an on ice official must wear?
3. Where does the current USA Hockey official’s crest go on your officiating sweater?
4. List three officials’ supplies that an official will need to perform to their best ability and be prepared for any situation that may occur?
5. How does off-ice dress affect your role as an official?

3USA Hockey Basic Officials Manual
PHYSICAL CONDITIONING
Another area that pertains to personal appearance is the physical condition of the official. An official who is not in good physical condition will not look sharp and will tire easily. In addition, a poorly conditioned official will be more susceptible to injury and will have a difficult time moving up the officiating ladder. The physical expectations of an official are really no different than that of a hockey player, except the official is expected to skate the entire game with the only rest coming during brief stoppages. Although an experienced official has learned to conserve energy at appropriate times, there is no guarantee the players are going to cooperate by slowing down so you can catch up.
Purpose of StretchingAs with any athlete, stretching is an important part of establishing flexibility and minimizing injury. The official very seldom gets a warm-up period on the ice that can effectively prepare the official for the game. Off-ice stretching prior to getting dressed allows the official to physically prepare for the start of the game and will help eliminate muscle pulls, strains and soreness.
A standard stretching program will also enhance the official’s flexibility. More flexibility will allow for the official to skate more efficiently and escape difficult situations without injury. An official who has good flexibility and is physically prepared for the game will have better concentration on the ice and will perform better.
Basic StretchesExcerpt from STRETCHING 1980, by Bob and Jean Anderson, Shelter Publications, Inc. Bolinas, CA. Distributed in book stores by Random House, reprinted by permission.
To stretch your calf, stand a little ways from a solid support and lean on it with your forearms, head resting on hands. Bend one leg and place your foot on the ground in front of you, with the other leg straight behind. Slowly move your hips forward, keeping your lower back flat. Be sure to keep the heel of the straight leg flat on the ground, with toes pointed straight ahead or slightly turned as you hold the stretch. Hold an easy stretch for 30 seconds. Do not bounce. Stretch the other leg.
Put the soles of your feet together and hold onto your toes. Gently pull yourself forward, bending from the
hips, until you feel a good stretch in your groin. You may also feel a stretch in the back. Hold for 40 seconds. Do not make initial movement for the stretch from the shoulders. Move from the hips.
From a standing position, squat down with your feet flat and toes pointed out at approximately a 15-degree angle. Your heels should be 4-12 inches apart, depending on how limber you are. The squat stretches the front part of the lower legs, the knees, back, ankles, Achilles tendons and deep groin. Keep the knees to the outside of the shoulders. The knees should be directly over the big toes in the squat position. Hold comfortably for 30 seconds.
Straighten the right leg with the sole of your left foot slightly touching the inside of the right thigh. You are now in the straight leg, bent knee position. Slowly bend forward from the hip toward the foot of the straight leg until you create the slightest feeling of a stretch. Hold this for 20 seconds. Then, switch sides and stretch the left leg in the same manner. During this stretch, keep the foot of the straight leg upright with the ankle and toes relaxed.
To stretch the muscles in the front of the hip, move one leg forward until the knee of that leg is directly over the ankle. The other knee should be resting on the floor. Now, without changing the position of the knee on the floor or the forward foot, lower the front of your hip downward to create an easy stretch. Hold for 30 seconds. You should feel this stretch in front of the hip and possibly in the hamstrings and groin. This is an excellent stretch for lower back problems. Repeat the stretch, reversing the legs.
After gently stretching the groin, bring the knees together and rest your feet on the floor. Interlace your finger behind your head and rest your arms on the floor. Now lift the left leg over the right leg. From here, use left leg to pull right leg toward floor until you feel a good stretch along the side of the hip or in the lower back. Stretch and be relaxed. Keep the upper back, back of head, shoulders, and elbows flat on the floor. Hold for 30 seconds. The idea is not to touch the floor with your right knee, but to stretch within your limits.

4 USA Hockey Basic Officials Manual
Assume a bent-knee position with your heels flat, toes pointed straight ahead about shoulder width apart. Hold this position for 30 seconds. In this bent-knee position you are tightening the quadriceps and relaxing the hamstrings.
First sit with your right leg bent, with your right heel just to the outside of your right hip. The left leg is bent and the sole of your left foot is next to the inside of our upper right leg. (You could also do this stretch with your left leg straight out in front of you). In this stretch position your foot should be extended back with the ankle flexed. If your ankle is tight and restricts the stretch, move your foot just enough to the side to lessen the tension in your ankle.
Bring the toes of one foot almost even or parallel to the knee of the other leg. Let the heel of the bent knee come off the ground one-half inch or so. Lower heel toward ground while pushing forward on your thigh (just above the knee) with your chest and shoulder. The idea is not to get the heel flat, but to use the forward pressure from your shoulder on your thigh to give an easy stretch to the Achilles tendon. All that is needed to adequately stretch the Achilles tendon is a very slight stretch. Hold for 15 seconds.
From a standing position, with your knees slightly bent (1 inch), gently pull your elbow behind your head as you bend from your hips to the side. Hold an easy stretch for 10 seconds. Do both sides. Keeping your knees slightly bent will give you better balance, while you stretch.
Sit with your left leg straight. Bend your right leg, cross your right foot over and rest it to the inside of your left knee. Then bend your left elbow and rest it on the outside of your upper right thigh, just above the knee. During the stretch use the elbow to keep this leg stationary with controlled pressure to the inside. Now, with your right hand resting behind you, slowly turn your head to look over your right shoulder, and at the same time rotate your upper body toward your right hand and arm.
Start on all fours. Support yourself on your hands and knees. Thumbs should be pointed to the outside with fingers pointed toward knees. Keep palms flat as you lean back to stretch the front part of your forearms. Hold an easy stretch for 20 seconds. Relax, then stretch again.
Sit with your feet a comfortable distance apart. To stretch the inside of your upper legs and hips, slowly move forward from your hips. Be sure to keep your quadriceps relaxed and feet upright. Hold for 35 seconds. Keep your hands out in front of you for balance and stability.
Relax, with knees bent and soles of your feet together. This comfortable position will stretch the groin. Hold for 30 seconds. Let the pull of gravity do the stretching.
Interlace your fingers behind your head at about ear level. Now, use the power of your arms to slowly pull your head forward until you feel a slight stretch in the back of the neck. Hold for 5-10 seconds, then slowly return to the original starting position. Do this 3-4 times to gradually loosen up the upper spine and neck.
Interlace your fingers above your head. Now, with your palms facing upward, push your arms slightly back and up. Feel the stretch in arms, shoulders, and upper back. Hold the stretch for 15 seconds. Do not hold your breath.

5USA Hockey Basic Officials Manual
The Importance of General FitnessGeneral fitness of the official will enhance performance on the ice and promotes overall good health. An official who is physically fit will gain instant credibility on the ice through his/her physical appearance. The following exercises can be used in conjunction with the stretching exercises mentioned above to help the official maintain an adequate level of physical fitness. This type of program is, by no means, a complete fitness program. However, utilizing these exercises and stretches will be extremely beneficial in maintaining a good physical condition throughout the season. Following this program on a daily basis will be a good start to improving fitness.
Arm Circles - Do several large and small arm circles in a forward and backward direction.
Trunk Rotation - With hands on hips, bend to a 90-degree angle at the waist and rotate upper body several times in each direction.
Push Ups - Lie on floor with chest down and hands shoulder width apart. Keep the body stiff and extend the arms full length with the chest touching the floor each time down.
Sit Ups - Lie on the floor with back on the ground and hands held behind the head. With knees bent and feet raised off of the floor, lift the head and chest as far off the ground as possible.
Running or Jogging - Start slowly and increase distance and speed over time. Sprints twice per week are very beneficial. Running in place and skipping rope can also be used indoors, before a game.
General Fitness ExercisesGeneral fitness exercises can be broken down into two main areas; aerobic and anaerobic. For maximum efficiency in maintaining conditioning, it is best to combine the two forms of exercise on an average of three times per week. The following table describes the exercise types and gives examples of each.
AEROBIC ANAEROBIC
Purpose Cardiovascular Muscle based. Uses based. Establishes shorts bursts of a high heart rate for cardiovascular a longer period of activity. time.Examples walking, jogging skiing, weight lifting, running, step racquetball, sprinting aerobics, biking, skating
*USA Hockey strongly recommends you consult your physician prior to starting a physical fitness program.
Physical Conditioning ReviewThe following questions highlight some of the key points you should have picked up from this chapter. Take a few minutes to review what you have learned about physical conditioning. When finished, you can compare your answers to the correct answers that appear in the back of this manual.
1. Why is physical condition important to on-ice officials?
2. Why is stretching important to on official?
3. What are the two main areas of general fitness exercises? Give an example of each.

6 USA Hockey Basic Officials Manual
FUNDAMENTALS OF SKATING
Importance of Skating Well Skating is the building block to successful officiating, just as it is with players. An official who skates efficiently with excellent balance will be able to get into position and his/her credibility will be enhanced when up with the play. This ability to be in position and skate smoothly will also contribute to the official’s ability to see the play (field of vision), which in turn enhances judgment. An official who skates poorly will find officiating extremely difficult as the concentration shifts from watching the play and reacting to standing up and getting out of the way. Excellent skating skills are a must in order for an official to advance to the highest levels of hockey.
Referee Skating Versus Player SkatingOne of the most important things a new official needs to recognize is that officials need to skate differently than players. Their objectives are different; therefore, a different style is needed to meet those objectives. Officials are always turning and stopping facing the play while players will turn and stop in either direction as is necessary. While a player may skate with his/her head down at times to watch the puck, the official must always have his/her head up in order to maintain full field of vision.
Officials stay close to the boards in tight skating lanes to stay out of the way of the play, utilizing tight control turns and minimizing stops and starts to conserve energy. A player needs to keep both hands on the stick which forces his/her arm swing into a side to side motion. Meanwhile, an official utilizes a more efficient arm swing by motioning his/her arms in a front-to-back manner. These are just some of the differences in skating styles between players and officials.
BalanceAn efficient skater will always be in good balance. The player who is difficult to knock off of his/her feet always maintains excellent balance. An official must also be in proper balance at all times in order to stay out of the way of the play, avoid injury and have the best possible field of vision.
The most important element of balance is knee bend. Proper knee bend will allow the hips and ball of the foot to be in alignment and will provide the best balance. As always, the head must be up and the official will be on the inside edge of each skate.
Key Elements• knee bend • shoulder-hips-ball of the foot are in
alignment • knees are out over the toes of the
skates • head up• weight on inside edges • arms relaxed
Common Errors• legs are straight (knees locked) • feet too close together or too far apart • head down • bend at the waist• use of outside edges
Ready PositionThe ready position is the most basic and important of all stances. The ready position allows the official to assume a stable stance and, therefore, enables him/her to move in any direction. There are two types of stances that are used by officials during stoppages of play. In either stance, the key elements remain the same. During play, the official will always stand upright with the body angled toward the play.
Key Elements• skates are shoulder width apart• weight is on inside edges of skates• knee bend• back is straight and the head (chest) is up• shoulders are level and in alignment with the hips and ball
of foot• knees are out over the toes of the skates

7USA Hockey Basic Officials Manual
Common Errors• skates are greater than shoulder width apart (limits ability
to move quickly)• bend at the waist instead of the knees• skates too close together (limits mobility and stability)• head is down• body is flat, backed against the boards
Arm SwingThe correct arm swing for an official is similar to that of a runner. In comparison to a player, an official’s arm swing should be more front to back (45 degree angle) rather than side to side. The arms should be relaxed and follow a natural motion. A side-to-side motion affects your momentum as your arm movement and your shoulders contradict your desire to go forward or backward.
Key Elements • front-to-back motion
(45-degree angle in front of your body)
• arms relaxed and in a natural position
Common Errors• stick-carrying posture• side-to-side arm swing• arms bent at elbow while stopped (dog paw)• clenched fists• arms are tense or rigid
Forward StrideAn official must use a long and powerful forward skating stride. The forward stride starts with a thrust off of the inside edge of the skate. The pressure (weight) starts on the heel and extends through the blade to the toe while using full extension of the leg. A powerful stride will thrust down through the ice and at full extension will snap out with the toe while straightening the leg and locking the knee. At full extension. the back is in a straight line with the extended leg.
While the one leg is thrusting out, the weight must be gradually transferred to the bent glide leg. The skate on this leg must be pointed in the desired direction and an exaggerated knee bend is necessary to maintain proper balance and direction. The thrusting leg is then brought back to full recovery (keeping skates low to the ice) while the opposite leg begins to thrust. During this process, the upper body stays disciplined as all of the skating is done from the hips down. When the forward stride is executed correctly, the official should feel the pressure in the thigh.
Key Elements• knee bend on the glide leg (over the toe of the glide skate)• full extension of the thrust leg (knee locked)• upper body discipline (straight alignment of the trunk and
thrust leg at full extension)• thrust and glide legs alternate• glide skate points in the desired direction• full recovery of the thrust leg• head is up and shoulders are level• transfer of weight from the thrust leg to the glide leg
Common Errors• failing to place weight on the glide leg• not bending the knees• thrusting backward off the toe instead of outward toward
the side (walking)• high kick to start the recovery phase• straighten the glide leg after each stride (bobbing up and
down)• not extending the thrusting leg fully and snapping with the
toe• not returning thrusting leg to full recovery (railroading)

8 USA Hockey Basic Officials Manual
Fundamentals of Skating ReviewThe following questions highlight some of the key points you should have picked up from this chapter. Take a few minutes to review what you have learned about the fundamentals of skating. When finished, you can compare your answers to the correct answers that appear in the back of this manual.
1. Why is it important to be a good skater as on official?
2. What is the most important element of balance?
3. Describe the ready position for officials.
4. How is the pressure (weight) distributed during the forward stride?
5. Where is the weight distributed at the conclusion of the forward stride?

9USA Hockey Basic Officials Manual
PRE-GAME DUTIES AND RESPONSIBILITIES
As you start accepting game assignments as an official, you will quickly learn that your responsibilities begin long before the puck is ever dropped. Preparation for each game really begins as you review the USA Hockey Official Playing Rules and officiating manuals prior to completing the exam. The one-time review of the rule book is not enough preparation as you step on the ice to conduct your first face-off. A brief review of the playing rules and the Playing Rules Handbook prior to every game is necessary to have a complete and thorough understanding of the rules and their interpretations. However, you will find out in this section that your pre-game responsibilities do not end there.
Officiating EtiquetteAn official should adhere to the following etiquette guidelines for each game in order to be fully prepared and to develop a team environment for you and your partner(s). The first step is to be punctual. Plan on arriving at the rink at least 30 minutes prior to the start of the game. Allow for traffic and weather conditions prior to your departure to compensate for any extra time that is needed for travel. Once you arrive at the rink, check to ensure that all of your equipment is with you. The early arrival time will allow you to make the necessary adjustments or secure the proper equipment if it does not appear in your bag.
The official’s dressing room is designed to be your private quarters. In here, you can discuss situations and get to know your partner(s) prior to taking the ice. Visitors in your dressing room need to be kept to a minimum and you should politely ask unwanted visitors to leave. The final minutes before the start of a game is an important time for you as an official to dress properly and to make last minute mental preparations. Visitors will only add an unnecessary distraction that will disrupt your preparation.
It is also important to be prepared to practice common courtesy when it comes to sharing the dressing room with partners of a different gender. When no additional dressing rooms are available, extra time may be necessary to allow for each individual to quickly dress in private, prior to final preparations and pre-game meetings. Everyone must be careful to avoid any off-color humor or insensitive comments that may be offensive to partner(s). Just as in all other areas of communication as an official, the dressing room is an extension of our space where professionalism, consideration and common courtesy will go a long way in creating a positive hockey environment.
SociabilityWhen officials arrive at the rink early, they often will walk around the arena or grab something to drink from the concession stand. This time provides the official an excellent opportunity to inspect certain aspects such as, where the scoreboard is located, the access to the rink for players and officials, and other rink characteristics that may come into play during the game.
During this time, an official may also run into some of the coaches or players. Although you hope to avoid lengthy conversations with participants prior to the game, a short conversation is encouraged and may help establish rapport with players and coaches. When talking to players or coaches, be sure to be polite and courteous in answering any questions they might have regarding rules and interpretations. Be brief in your explanation and keep the discussion away from controversial topics. As always, it is important to avoid any discussions about fellow officials.
StretchingPrepare yourself physically prior to every game by properly stretching before you get dressed. Once you’re on the ice, you will have very little time to warm up to the extent that is necessary to avoid injury and step right into a fast paced game. While stretching, be sure to work every muscle group and attempt to heighten your heart rate by jumping in place or going for a light jog. Your physical preparation prior to going on the ice will enable you to perform to your maximum ability and will help prevent injury. Consult your physician for recommendations on how to best prepare yourself physically prior to stepping on the ice.
On-Ice Warm-UpThe on-ice warm-up is an important part of an official’s responsibility. Not only will the official use this time to physically prepare for the game, but the official will also carefully inspect the rink conditions while monitoring the players for infractions or illegal equipment.
The officials should enter the ice surface three to five minutes prior to the teams, if at all possible. In many cases the teams will be waiting for the ice resurface to be completed. The officials also need to be ready to ensure that they are the first

10 USA Hockey Basic Officials Manual
game participants to go on the ice. When you first enter the ice surface, skate at a strong warm-up pace while skating in the officials skating lanes and monitoring the players. Be sure to practice turns, stops, and starts both forward and backward. Work both inside and outside skate edges and include crossunders as part of your warm-up routine. This is your chance to get in the best physical condition to successfully work the game.
Visual Inspection of Playing AreaThe on-ice warm-up is also an important time for the officials to inspect the playing area. Check the condition of the ice and repair any defective areas prior to the start of the game. Closely look at the glass and boards for any protrusions or cracks that need to be attended to in order to create a safe playing environment. Attend to the door openings to the boards to ensure that they are working properly and are properly secured.
This warm-up period offers the official an excellent opportunity to ensure that the off-ice officials are in their proper position and to locate the position of the clock and timekeepers bench. Potential problems during the game regarding equipment should also be addressed during the warm-up period. Players with improper equipment should be identified and warned so the problem can be resolved prior to the start of the game. A simple reminder to the coaches to ask their players to make sure their chin straps are properly fastened and their mouthpieces are in place will help avoid dealing with those minor problems during the game.
Each linesman (three-official system) or referee (two-official system) should be responsible for checking one goal prior to the start of the game. Check for holes that are big enough for the puck to pass through and fix problem areas immediately. Make sure the goal posts are properly anchored and inspect the frame to look for warping or any other condition that will allow a puck to pass through. If a condition exists that is unsafe, delay the start of the game until the situation can be corrected. Careful inspection of the goal frame and nets before the start of the game and each period will help eliminate potential controversial situations that make your job as an official much more difficult.
Finally, the on-ice warm-up will provide you with one last chance to familiarize yourself with the arena. Knowledge of emergency exits, entrances and the entire playing area will create a safer environment for everyone.
Pre-Game Duties and Responsibilities ReviewThe following questions highlight some of the key points you should have picked up from this chapter. Take a few minutes to review what you have learned about pre-game duties and responsibilities. When finished, you can compare your answers to the correct answers that appear in the back of this manual.
1. List some of the guidelines that form officiating etiquette?
2. When should the officials be on the ice before a game?
3. Why is it important to visually inspect the playing area during warm-ups?

11USA Hockey Basic Officials Manual
CONDUCTING FACE-OFFS
One of the most routine but important duties of an official is conducting face-offs. Since this duty occurs frequently, an official can benefit by conducting the face-off properly and consistently, which establishes a standard for game control. A good face-off helps keep the game moving and helps control players’ emotions. If officials use good, strict standards from the beginning of the game and enforce them throughout, then face-offs conducted at crucial times in the game are more likely to be performed fairly. Poorly conducted face-offs convey a lack of confidence by an official and can give an unfair advantage to one of the teams involved.
There are a variety of skills an official should master so that each player has a fair and equal chance to win the face-off. The first skill involves body mechanics.
StanceStart the stance with a solid foundation. Skates should be approximately shoulder width apart, shins parallel and knees slightly bent, putting the official in a “ready” position. The back and spine are kept straight which allows the official to direct the players into position. The puck is held in the non-whistle hand, and the forearm rests on the hip with the puck held close to the body and just below the waist. The other arm hangs comfortably at the side of the body. This stance positions the official to be “ready” to move quickly and efficiently in any direction.
Holding The PuckUSA Hockey has two acceptable
methods of holding the puck. In the first method the thumb is placed on top,
the forefinger along the side of the puck, with the other fingers underneath.
The weight of the puck rests on the side of the middle finger.
In the second method the thumb and index finger are wrapped on the side of
the puck. The remaining three finger tips rest on the bottom.
The official should experiment with both methods to find the one that is most comfortable and provides maximum control. With either method it is important that both players at the face-off have an equal view of the puck, and that the puck lands flat when hitting the ice.
Dropping The Puck (Execution)The official should be in the “ready” position before the players. The puck is dropped at the instant both players are in the proper position for a fair face-off. To drop the puck, simultaneously bring the arm out and down while bending the knees. When the arm becomes fully extended, the puck is released.
Bending the knees during the arm extension enables the official to get closer to the face-off spot before releasing the puck. After the release, the object is to get the puck to land flat and remain stationary in the center of the face-off spot. Avoid cocking the wrist or bringing the hand up before starting the out-and-down motion.
At the end of the arm extension, some force should be used during the release instead of letting gravity take over. Use just enough momentum to get the puck to the ice quickly. Otherwise, a “lazy” release may result in the puck hitting a player’s stick on the way down, resulting in a false or unfair face-off.
Two mechanics to avoid are throwing the puck down and bending at the waist. Aside from creating an appearance of a lazy, unprofessional official, throwing the puck may result in a bouncing puck, or a puck that shoots through and out of the face-off spot. Bending at the waist puts an official in a position of being off-balance or in line to be hit by an errant stick.
The stance and execution of dropping the puck are used at every face-off, including those held at center ice.
Players’ Positions (Centers, Wings)At the conclusion of the player changes, the linesman conducting the face-off will blow his/her whistle. This signals to both teams that they have five seconds to properly line up for the face-off prior to the puck being dropped. During this time, the official should check to see if each team has the correct number of players on the ice, and make sure his/her partner is in the proper position to begin play. Attention is now turned to fine tuning the player’s positioning within the five seconds.
CentersEach center must place the blade of his/her stick on the ice and in contact with the white part of the face-off spot. If

12 USA Hockey Basic Officials Manual
neither puts his/her stick down first, direct the “attacking” player to get his/her stick down. Centers should be “squared-off,” meaning their shoulders should be square with the end boards of their opponent’s defending goal and their skates should be clear of the face-off “L’s”. For face-offs that occur where no spot exists, the centers’ stick blades should be one stick blade length apart from each other to provide an area in which to drop the puck.
WingsOther players may not be within the fifteen-foot radius face-off circle and must be on the same side of the circle as their team center. The two lines located at the side of the circle, referred to as the “hash marks,” are used to keep a distance of four feet between opposing players. All skates and sticks must be kept outside the circle and behind the lines.
When face-offs take place where the markings do not exist, the official must make sure the players line up in a position similar to that described above. All guidelines concerning players’ positions during a face-off apply to any face-off, regardless of the location.
Each official has a responsibility for different players when they line up for a face-off. The official conducting the face-off is responsible for the centers and all other players in front of him/her. His/her partner watches the players behind the official handling the face-off. Any player not properly positioned must be corrected before the face-off takes place.
Provided all players are properly lined up prior to the conclusion of the five seconds, the puck should be dropped and play continued. If not completed within five seconds, the official may drop the puck to start play, but only if it is obvious one team is delaying the face-off while all players are properly on-sides.
Moving Into Position After The Face-OffOnce the official drops the puck, he/she should pause to view the play. When the area is clear he/she will back up to the side boards and out of the flow of the play. In returning to his/her normal position he/she should avoid interfering with the puck and the players. Although the direction in which the puck moves will dictate his/her actions, the official will try to back up to the boards as soon as possible, keeping play in front of him/her. At no time should he/she turn his/her back to the play while moving away from the face-off. When he/she reaches the side boards, the official should proceed to the position that is appropriate for the system being used (two- or three-official system).
13USA Hockey Basic Officials Manual
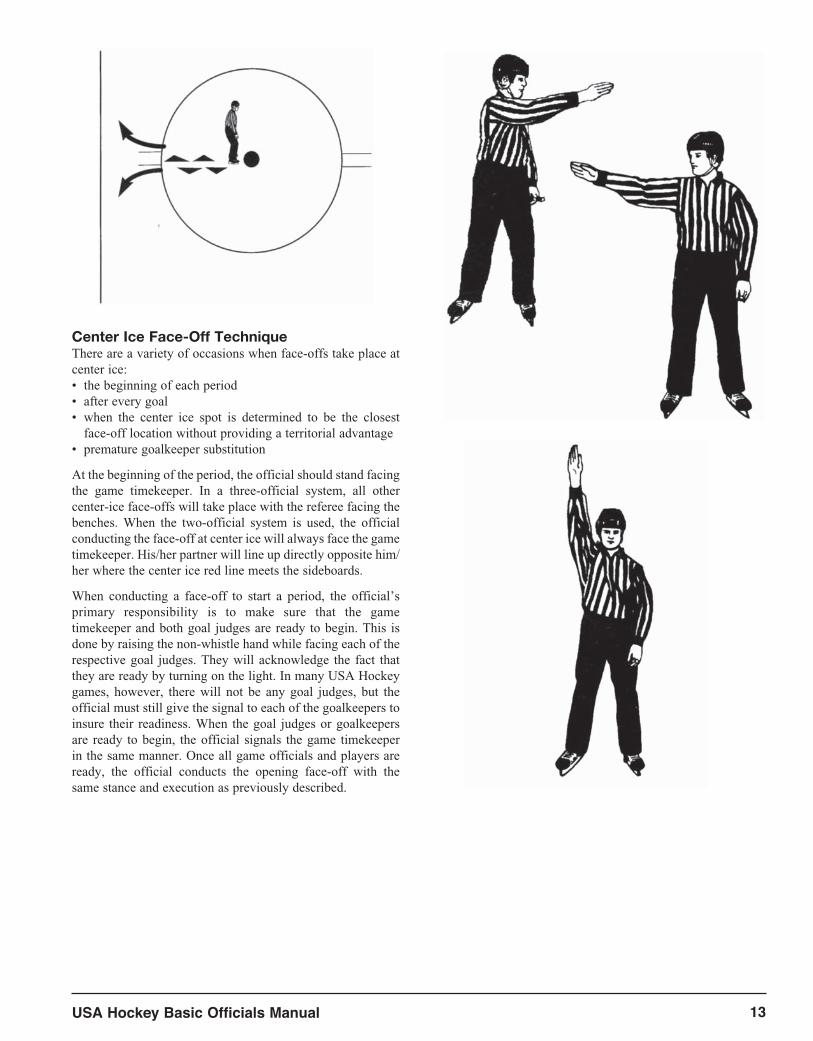
Center Ice Face-Off TechniqueThere are a variety of occasions when face-offs take place at center ice:• the beginning of each period • after every goal• when the center ice spot is determined to be the closest
face-off location without providing a territorial advantage• premature goalkeeper substitution
At the beginning of the period, the official should stand facing the game timekeeper. In a three-official system, all other center-ice face-offs will take place with the referee facing the benches. When the two-official system is used, the official conducting the face-off at center ice will always face the game timekeeper. His/her partner will line up directly opposite him/her where the center ice red line meets the sideboards.
When conducting a face-off to start a period, the official’s primary responsibility is to make sure that the game timekeeper and both goal judges are ready to begin. This is done by raising the non-whistle hand while facing each of the respective goal judges. They will acknowledge the fact that they are ready by turning on the light. In many USA Hockey games, however, there will not be any goal judges, but the official must still give the signal to each of the goalkeepers to insure their readiness. When the goal judges or goalkeepers are ready to begin, the official signals the game timekeeper in the same manner. Once all game officials and players are ready, the official conducts the opening face-off with the same stance and execution as previously described.
14 USA Hockey Basic Officials Manual
Handing The Puck To Your PartnerWhenever the whistle blows, one official will skate to the point of the ensuing face-off and his/her partner will be responsible for retrieving the puck. In order to guarantee a successful hand-off without dropping the puck, the following method must be used.
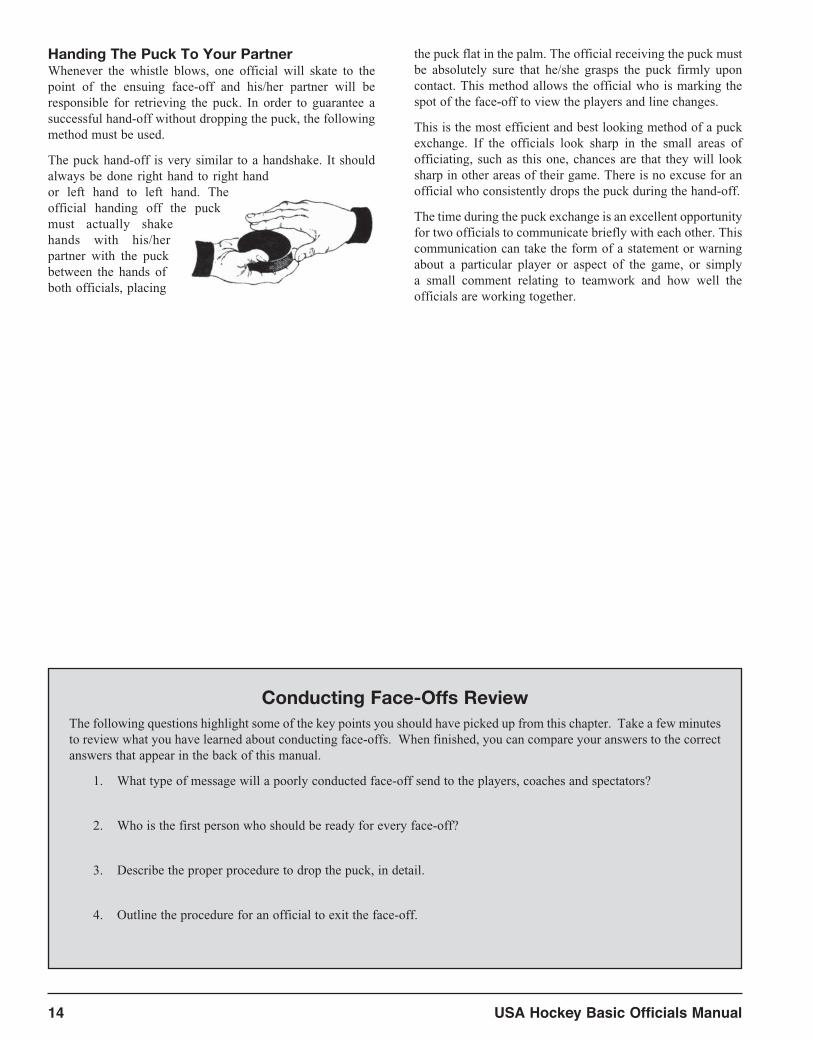
The puck hand-off is very similar to a handshake. It should always be done right hand to right hand or left hand to left hand. The official handing off the puck must actually shake hands with his/her partner with the puck between the hands of both officials, placing
the puck flat in the palm. The official receiving the puck must be absolutely sure that he/she grasps the puck firmly upon contact. This method allows the official who is marking the spot of the face-off to view the players and line changes.
This is the most efficient and best looking method of a puck exchange. If the officials look sharp in the small areas of officiating, such as this one, chances are that they will look sharp in other areas of their game. There is no excuse for an official who consistently drops the puck during the hand-off.
The time during the puck exchange is an excellent opportunity for two officials to communicate briefly with each other. This communication can take the form of a statement or warning about a particular player or aspect of the game, or simply a small comment relating to teamwork and how well the officials are working together.
Conducting Face-Offs ReviewThe following questions highlight some of the key points you should have picked up from this chapter. Take a few minutes to review what you have learned about conducting face-offs. When finished, you can compare your answers to the correct answers that appear in the back of this manual.
1. What type of message will a poorly conducted face-off send to the players, coaches and spectators?
2. Who is the first person who should be ready for every face-off?
3. Describe the proper procedure to drop the puck, in detail.
4. Outline the procedure for an official to exit the face-off.

15USA Hockey Basic Officials Manual
LEGEND
Here is a brief description of symbols used in the USA Hockey Officiating Manual Series.
NOTE: The “o” player is always defending the goal at the bottom of the diagram. The “x” player is attacking the goal at the bottom of the diagram.
FORWARD SKATING
BACKWARD SKATING
DIRECTION OF THE PLAY
PUCK IS PASSED OR SHOT
OPPOSING PLAYERS
REFERENCE POINTS
AREA BEING DESCRIBED

16 USA Hockey Basic Officials Manual
POSITIONING
The Importance Of Being In The Proper PositionThe fundamental building block of officiating is positioning. Proper positioning allows the official to see as much action as possible in a safe viewing area out of the way of the play. Without the knowledge of where to be on the ice and the ability to get there, the official will struggle in all aspects of officiating. Proper positioning of the official is a must for maintaining an adequate field of vision and officiating success.
The USA Hockey Officiating Program has developed some positioning guidelines and procedures that must be followed by all officials. These procedures have been thoroughly thought out and researched in order to provide the official the best possible view of every situation that may occur on
the ice. If the official is not in the proper position and fails to see the action, it becomes impossible to make the proper call. An official who works hard to always be in the proper position will earn instant respect from the players, coaches, and spectators. Proper positioning makes it difficult for them to question your judgment.
There are some areas of the ice where an official should never venture into. These areas are known as “no man’s land.” During play, an official who ventures into these areas will oftentimes find themselves in the way of the play or in an area that is unsafe. For example, an official who skates behind the goal is in a perfect position to get hit with an errant shot. Moreover, the area described as “no mans land” will minimize the potential field of vision of the official.

17USA Hockey Basic Officials Manual
POSITIONING REFEREE (Three-Official System)
The next several diagrams illustrate the proper positioning of a referee in the three-official system.
Starting The GameAt the start of the game and each period, the referee will conduct the face-off at the center ice face-off spot. The referee must face the game timekeeper while conducting the face-off. Once the face-off has been conducted, the referee will skate backwards towards the side boards keeping play within his/her field of vision.
Positioning Following The PlayAs play develops and leaves the neutral zone, the referee will follow the play keeping a distance of 10-15 feet behind the play. This position allows the referee to stay out of the way and also provides the best sight lines to view the action.
The referee should stay along the boards when play is on the same side of the ice and move forward only when a path is clear. When play is on the opposite side of the ice, the referee should skate in the referee lane (five-ten feet off of the boards) to avoid being in the linesman’s way and also to be somewhat closer to the action.

18 USA Hockey Basic Officials Manual
When play is in the neutral zone (transitional play) the referee should skate slowly until play develops in a definite direction or when possible, come to a complete stop and watch the play develop. Stopping will allow the referee to maintain the maximum field of vision and carefully read the play.
When play reverses direction, stop along the boards to allow the play to pass in front of you and follow at the recommended distance.
Positioning In The End Zone And On The Goal LineThe referee must skate- hard into the end zone in order to be in the best position to view a potential goal and establish the maximum field of vision. Keep your feet moving and get to the goal line quickly when the path is clear. The referee should take at least two more strides once he/she has reached the top of the face-off circles in order to get to the goal line.
When play is in front of the referee on the same side of the ice, he/she should pause to allow play to exit the area and then hustle to the position on the goal line. Never cut through the circle closer to center than the face-off spot or skate in front of the players along the boards.

19USA Hockey Basic Officials Manual
Once on the goal line, the referee must use the position of “home base” properly. Home base is where a line connecting the face-off spot would intersect the goal line. When the referee is at home base, the best possible view of the goal and the play is established. This position also allows the referee to easily move towards the goal when action is around the goal or to move back to the corner when play moves to the referee’s side.
The referee must be a strong enough skater to work the goal line effectively and should avoid letting players pass between him/her and the boards. If necessary, the referee may skate up the side boards a short distance to allow play to pass in front. Once play has passed, the referee must again hustle to the proper goal line position.
The proper goal line positioning of the referee is often referred to as the “Golden Triangle.”
As play is about to exit the end zone, the referee must be patient in order to be sure the play is definitely leaving the zone. Once confident that play is heading up the ice, the referee will follow the play maintaining the proper distance.

20 USA Hockey Basic Officials Manual
Positioning During Face-OffsDuring neutral zone face-offs, the referee should be in a position that is closer to the nearest goal on the opposite side of the ice. The referee should be at a 30-degree angle from the face-off location and out 15 feet from the boards. This position allows the referee to have a good field of vision while maintaining a certain presence to the face-off participants.
During end zone face-offs that occur at one of the face-off spots, the referee should be positioned on the opposite side of the ice at home base. Here, the referee should be in the ready position to be prepared for action to begin.
After goals, the referee will conduct the face-off at center ice while facing the players benches, allowing the referee to view the line changes and the majority of players.
Post Game/Between Period PositioningAs the buzzer sounds, the Referee must be aware of any potential altercations or disputes and attend to them immediately. Once confident that everything is calm, the referee then focuses on the players’ benches and the players leaving that area.

21USA Hockey Basic Officials Manual
During the handshake line, the referee should be positioned in the area of the referee’s crease facing all of the players and carefully watching for any potential problems.

22 USA Hockey Basic Officials Manual
POSITIONING LINESMEN (Three-Official System)
Starting The GamePrior to the start of each game, the linesmen should designate which half of the ice each will work for the first half of the game. Professional courtesy suggests that the more experienced linesman shall choose which end first. Each linesman will conduct all face-offs in their half of the ice and will be responsible for the blue line in their half. At a stoppage of play near the mid-point of the second period, the linesmen will switch ends to balance out the amount of time spent in each team’s defending half of the ice.
During the face-off at the start of the game and each period, the linesmen will position themselves on opposite sides of the ice at each blue line. The linesman on the bench side of the ice should always line up directly in front of the visiting team’s bench. This procedure will help erase any pre-game thoughts of the linesmen playing favorites to the home team.
Positioning During PlayWhen play is in the neutral zone, both linesmen should position themselves just inside their respective bluelines diagonally across from one another. Their most common call in this situation will be a potential off-sides, and this position puts them in the best position to make that call without having to move. Their skates should be completely in the end zone as to not to prevent the puck from entering the zone.
When play leaves the neutral zone and enters an attacking zone, the linesman must be in position at the blue line prior to play crossing the line. This allows the linesman to be in excellent position to make the appropriate call.

23USA Hockey Basic Officials Manual
Once play has entered the attacking zone, the front linesman will back out of the zone to a position just outside (6-18 inches) the blue line. This position gives the linesman the best possible view of the determining edge of the blue line and will also prevent the linesman from keeping the puck inside the zone if the puck were to strike the linesman. The back linesman (or partner) will move up to a position halfway between the attacking blue line and the center red line.
As play reverses, the back linesman will skate backwards to the opposite blue line, making sure to be in position prior to the play crossing the line.
The partner will wait for all attacking players to exit the zone before moving up to assume the proper position.
Positioning During Face-OffsThe linesman designated for each half of the ice will conduct every face-off that takes place on that half. During an end-zone face-off, the linesman not conducting the face-off will be positioned diagonally across the ice from the face-off just inside the blue line.

24 USA Hockey Basic Officials Manual
Once the face-off has been conducted, the back official will immediately skate backwards to the appropriate position just outside the blue line. The linesman conducting the face-off will hesitate to monitor the play before skating backwards out of the zone.
When the linesman who conducted the face-off reaches the proper blue line position, a release signal will be given to his/her partner who will backwards skate to the position between the blue line and center red line. This release signal is simply a motion outward and diagonally down with the arm closest to center ice. This signal will communicate to your partner that you are in position to assume the potential off-side calls at the blue line.
During neutral-zone face-offs at one of the neutral-zone face-off spots, the official not conducting the face-off will assume a position on the opposite side of the ice and just inside the nearest blue line. This positioning allows the linesman to already be in position for the most critical immediate call, the off-side at the closest blue line.
Once the puck has been dropped, the free linesman must be prepared to go in the other direction with the play to be in position to make a call at the opposite blue line.

25USA Hockey Basic Officials Manual
If play enters the defending zone, the free linesman must wait for the partner to give the release signal prior to assuming normal positioning.
For neutral zone face-offs not conducted at a face-off spot, the official not conducting the face-off should line up directly opposite of the face-off location. This position will allow the free linesman to move quickly in either direction when play begins. This linesman will assume all of the calls at the closest blue line of the play until released by his/her partner or play moves to the other end of the ice.
After a goal is scored, one linesman will always line up on the blue line directly in front of the scoring team’s bench. His/her partner will line up diagonally across the ice on the opposite blue line. This positioning prevents a linesman from having to line up directly in front of an unhappy bench, especially after a controversial goal.
Retrieving The PuckWhen a stoppage of play occurs, the linesman responsible for the half of the ice where the face-off will be conducted will skate to the appropriate face-off location while monitoring all the players. His/her partner will retrieve the puck, hand off to the linesman conducting the face-off and hustle to the proper face-off position.

26 USA Hockey Basic Officials Manual
After a goal is scored, the linesman responsible for that half of the ice will retrieve the puck after monitoring the players for potential altercations. After handing off to the referee, the linesman will skate to the proper position, opposite of the other linesman. The back linesman will also be aware of the players for potential altercations while skating to an area in the center of the zone in which the goal was scored. As players leave the zone, the free linesman will skate backwards to center ice, maintaining full view of the players, before skating to the proper position.
During the assessment of a penalty, the linesman responsible for conducting the face-off will skate to the location of the face-off while his/her partner retrieves the puck. The free official should always watch all player movement and be ready to step into any potential altercation situations.
Positioning At End Of Period Or After GameAs the buzzer sounds to end the period or the game, both linesmen should be aware of the players to prevent potential altercations. Once the situation is calm, the linesmen should position themselves in front of the benches to keep players separated.
During the handshake line, one linesman should be positioned on each side of the line diagonally across from each other.

27USA Hockey Basic Officials Manual
POSITIONING (Two-Official System)
When using the two-official system, you will notice that positioning requires the officials to combine the goal line positioning of a referee and the blue line positioning of a linesman. Much of the positioning material covered under the three-official system will be the same as we discuss the two-official system. Please review the techniques and procedures outlined for referees and linesmen also as you study the two-official system. The two-official system requires a tremendous amount of communication and teamwork among the officials.
Starting The GameAt the start of each game and period, the official conducting the face-off will stand at center ice facing the timekeeper. His/her partner will be in a position directly across from the official conducting the face-off and must be prepared to move in either direction once the puck is dropped. Unlike the linesmen in the three-official system, the officials in the two-official system will continually switch ends according to the play.
Positioning During PlayWhen play leaves the neutral zone and enters an attacking zone, the free official must hustle to be at the proper blue line position prior to the play. Once the call has been made at the blue line, the front official skates into the zone to assume the goal line position (referee in three-official system). The back official will skate up and assume the position just outside the blue line (linesman in the three-official system).
As a general rule of thumb, the deep official will be responsible for watching the entire play and will stop play for goals or if the puck is frozen by the goalkeeper. The back official will be responsible for calling off-sides and will also watch play in front of the goal and players away from the play or farthest away from the deep official.

28 USA Hockey Basic Officials Manual
As play reverses and moves in the opposite direction, the back official must hold the blue line until positive the play is leaving the zone. When play is definitely leaving the zone, the back official skates backwards to the opposite blue line in order to maintain full view of the play. After making the call at the blue line, he/she will follow play into the zone and take up the proper goal line positioning, now becoming the deep official. The other official will skate quickly out of the zone as players leave the zone and assume the proper position on the blue line, now becoming the back official.
When play is in the neutral zone, the officials should be on opposite blue lines with their skates in the attacking zone. Notice in all instances, the officials are always positioned diagonally across from each other.
Positioning During Face-OffsDuring end-zone face-offs, one official will conduct the face-off while the other official assumes a position on the blue line. The back official should move 10 feet off of the boards and five feet inside the zone in order to have a better view of the face-off. Once the face-off is conducted, the back official will skate to the proper blue line position (six-18 inches outside of the zone) and maintain that position until play leaves the zone. The official conducting the face-off will move to the goal line if play stays inside the zone or will follow the play as it leaves the end zone.
When a neutral zone face-off occurs, the official not conducting the face-off shall line up directly across from the face-off. This official must be free to go in either direction as the play develops. The official conducting the face-off will react to the play and the position of the free official.

29USA Hockey Basic Officials Manual
After a goal is scored, the officials will be in the same position as to start a game or period with the official conducting the face-off facing the timekeeper.
Positioning In The End Zone And On The Goal LinePlease refer to the goal line positioning described for the referee in the three-official system. The deep official in the two-official system must also be familiar with the terms “home base” and “golden triangle” and will follow the same procedures and techniques employed by the referee in the three-official system.
Positioning At End Of Period Or After GameAt the completion of each period or the game, the primary responsibility of the officials is to monitor the players for potential altercations. The officials should immediately skate to any area where an altercation could take place as the horn sounds to end the period. Once satisfied that no altercations will occur, the officials should skate to the bench areas to monitor players coming off of the bench.
During the handshake line, the officials should be positioned on each side of the line diagonally across from each other. The officials should also be somewhat removed from the players in order to maintain maximum field of vision.

30 USA Hockey Basic Officials Manual
Retrieving The PuckDuring a normal stoppage of play for a frozen puck or off-sides, the official who stops play shall immediately skate to the face-off location, after checking the players for potential altercations, to spot the face-off. His/her partner will retrieve the puck, hand off and hustle to the proper face-off position.
After a goal is scored, the deep official will report the goal and assists to the scorekeeper while the back official will retrieve the puck and conduct the ensuing face-off. Both officials are maintaining full awareness by monitoring the players.
When a penalty is being assessed, the official who is assessing the penalty will report the penalty to the penalty timekeeper while his/her partner retrieves the puck and conducts the ensuing face-off.

31USA Hockey Basic Officials Manual
Positioning ReviewThe following questions highlight some of the key points you should have picked up from this chapter. Take a few minutes to review what you have learned about positioning in both the three-official and two-official systems. When finished, you can compare your answers to the correct answers that appear in the back of this manual.
1. What is the fundamental building block of officiating and why?
2. List some examples why officials should not be caught in “no mans land”?
3. Where is the referee (three-official system) skating lane when play is on the opposite side of the ice?
4. Where is home base for a referee?
5. The proper end zone positioning of the referee is often referred to as what?
6. After goals and at the start of the 2nd and 3rd period, which direction does the referee face to drop the puck?
7. Where is the proper position for a linesman in the three-official system when play is crossing the blue line into the attacking zone?
8. Why does the front linesman stand completely outside the blue line when the puck is in the attacking zone?
9. When does the back linesman leave his/her line as play enters the opposite end zone?
10. After an end zone face-off, the official who is dropping the puck skates backwards to his/her blue line. When does his/her partner know when to leave the blue line?
11. Who has the immediate responsibility of making an offside call at either blue line after an end zone face off?
12. After a goal is scored, one linesman will always line up on the blue line directly in front of which team?
13. In the two-official system, what is the proper skating technique for the back official (the one on the blue line) when play is leaving the end zone?
14. The deep official in the two-official system follows procedures and techniques employed by which official in the three-official system?

32 USA Hockey Basic Officials Manual
CALLING OFF-SIDE VIOLATIONS
Positioning On The Blue Line (Any Officiating System)Proper positioning around the blue line is a must for accurate off-sides calls, whether you are an official in the two-official system or a linesman in the three-official system. The official making the call should be inside the blue line as play enters the attacking zone. There is no set-in-stone exact position the official must be in every time. Instead, some latitude is given to allow the official to find the position that gives the best angle on the play entering the zone and gives a clear view of the determining edge of the blue line. His/her partner (official in two-official system, or linesman in three-official system) must also be aware of the play and move quickly into position and be prepared to cover for the partner who gets knocked off of the line or has an obstructed view.
Signaling At The Blue LineThere are three basic signals that are used when play crosses the blue line and a potential off-sides occurs. They are:
• slow “delayed” whistle used in classifications where “tag-up” off-sides is used – non-whistle arm is raised straight above the head with a flat palm and fingers together.
• point to the face-off location – a full palm point with the fingers together.
• washout – signal comes from the chest and then out, arms straight with palms flat and fingers together.

33USA Hockey Basic Officials Manual
Stopping The Play For Off-SideThe first thing to remember when calling off-sides is the blue line is always considered part of the zone in which the puck is in. Therefore, the determining edge of the blue line for off-sides is constantly changing. Another basic rule is the puck must completely cross the determining edge of the blue line for an off-sides to occur.
When the puck is carried into the attacking zone with one or more teammates off-side, the official will immediately blow his/her whistle and point to the location of the ensuing face-off. The official stopping play will then skate to the spot where the face-off will take place while his/her partner (always being aware of the players) retrieves the puck, hands off and hustles into the proper face-off position.
A puck shot or passed into the attacking zone with one or more teammates off-side will call for an immediate whistle (unless “tag-up” off-sides is used) by the official.
An immediate whistle should occur (unless “tag-up off-sides is used) in every situation where the puck is shot into the attacking zone with one or more players off-side.
Intentional off-sides should be called in every case where the official deems there was no opportunity to complete a legal play. An intentional off-sides calls for an end zone face-off of the offending team.

34 USA Hockey Basic Officials Manual
Special Off-Sides SituationsThese situations are special situations where awareness by the official is a must to insure the proper call is made.
• The defending team shoots or carries the puck back into the defending zone with attacking players in the zone. In this case, off-side does not occur and play should be allowed to continue. The official should give the washout signal in these instances to acknowledge witnessing the play.
• If the puck leaves the defensive zone and deflects off of an official, any player or defective boards and re-enters the attacking zone with attacking players off-side, an off-side (immediate whistle) will be applicable in all situations.
These off-sides situations (tag-up options) apply to those playing in the classifications where delayed off-sides is used.
• all players of the attacking team clear the zone by making skate contact with the blue line. For this to nullify the off-sides, the entire attacking team must be clear of the zone or in skate contact with the blue line for one instant.
• play shall be stopped when the puck is immediately shot on goal. A goal cannot be scored during a delayed off-side situation.
• play shall also be stopped when the attacking team plays or attempts to play the puck.

35USA Hockey Basic Officials Manual
Calling Off-Side Violations ReviewThe following questions highlight some of the key points you should have picked up from this chapter. Take a few minutes to review what you have learned about calling off-sides violations. When finished, you can compare your answers to the correct answers that appear in the back of this manual.
1. There are three basic signals that are used when play crosses the blue line and a potential off-sides occurs. What are they and when are they used?
2. Describe where the determining edge of the blue line is when the puck is in the neutral zone. When the puck is in the attacking zone?
3. When calling off-sides, the blue line is considered part of which zone?
36 USA Hockey Basic Officials Manual
CALLING ICING INFRACTIONS
Calling Icing (Any Officiating System)The procedure for calling icing is the same, whether the two-official or three-official system is used. This section will carefully review the procedure and mechanics of calling icing. First, let’s review the criteria for calling an icing infraction:
• The puck must be shot from behind the center red line.• The center red line is considered part of the zone from
where the puck comes from.• The puck must cross the opposing team’s goal line without
going into the goal.• The puck is not touched or played beyond the center red
line.• The defending team, excluding the goalkeeper, has no
opportunity to play the puck prior to crossing the goal line.
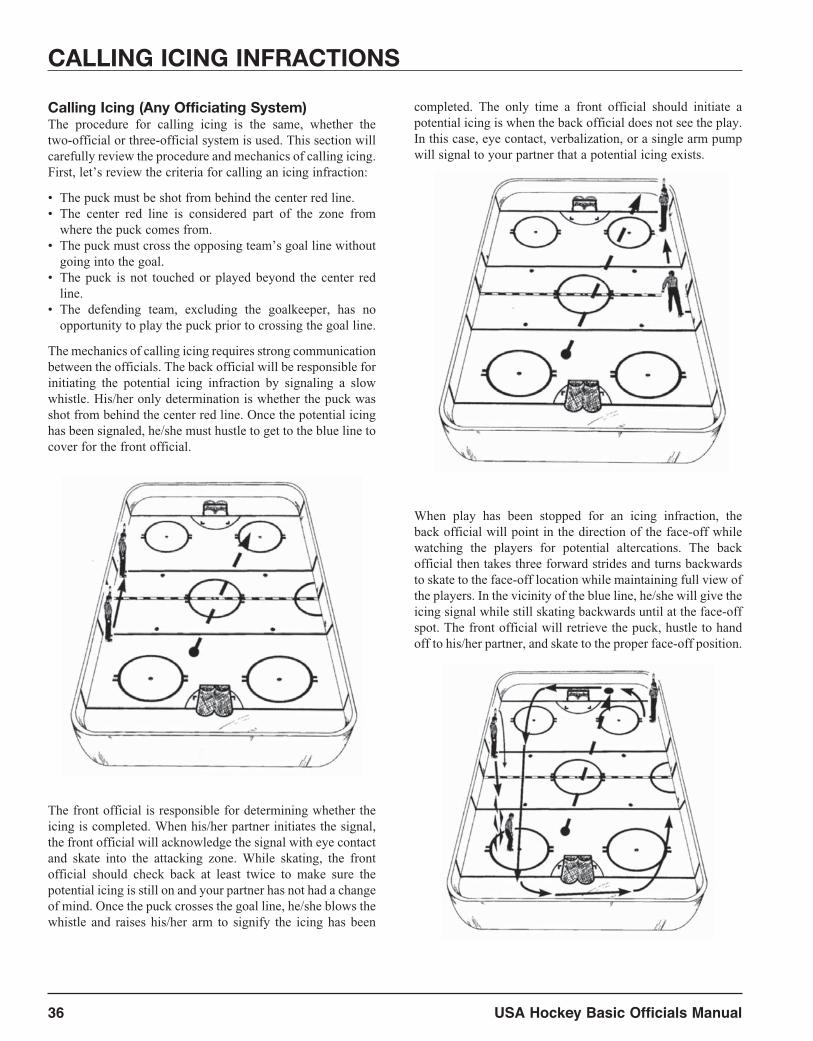
The mechanics of calling icing requires strong communication between the officials. The back official will be responsible for initiating the potential icing infraction by signaling a slow whistle. His/her only determination is whether the puck was shot from behind the center red line. Once the potential icing has been signaled, he/she must hustle to get to the blue line to cover for the front official.
The front official is responsible for determining whether the icing is completed. When his/her partner initiates the signal, the front official will acknowledge the signal with eye contact and skate into the attacking zone. While skating, the front official should check back at least twice to make sure the potential icing is still on and your partner has not had a change of mind. Once the puck crosses the goal line, he/she blows the whistle and raises his/her arm to signify the icing has been
completed. The only time a front official should initiate a potential icing is when the back official does not see the play. In this case, eye contact, verbalization, or a single arm pump will signal to your partner that a potential icing exists.
When play has been stopped for an icing infraction, the back official will point in the direction of the face-off while watching the players for potential altercations. The back official then takes three forward strides and turns backwards to skate to the face-off location while maintaining full view of the players. In the vicinity of the blue line, he/she will give the icing signal while still skating backwards until at the face-off spot. The front official will retrieve the puck, hustle to hand off to his/her partner, and skate to the proper face-off position.

37USA Hockey Basic Officials Manual
When the three-official system is used, the referee will be uninvolved with the calling of icing. The sole responsibility of the referee is to watch the players. The positioning of the referee during an icing will depend on the location of the players, but a general rule of thumb is to skate as deep as the furthest attacking player before turning around to assume the proper face-off positioning.
SignalsThe following signals are used during potential icing situations:
• Slow “Delayed” Whistle – non-whistle arm is raised straight above the head with a flat palm and fingers together
• Icing – arms folded at chest with elbows pointed out
• Washout – signal comes from the chest and then out, arms straight with palms flat and fingers together
• Point to the face-off location – a full palm point with the fingers together
• Release signal – arm extended out from side pointing diagonally down, used by linesman in the three-official system

38 USA Hockey Basic Officials Manual
Washing Out Icing InfractionsThe responsibility to wash out a potential icing or determine whether an icing is completed is that of the front official. The back official initiates the icing and does not wash out an icing unless a shorthanded situation is realized or his/her partner is screened from seeing the play. The back official must also remember to hustle to the blue line in order to make an off-sides call if play is reversed or the icing is not completed.
The front official will ultimately make the call by giving the washout signal and verbalizing “no.” When the two-official system is used, the front official then continues on to assume the proper goal line position. When the three-official system is used, the front official (linesman) will wash out the icing and return to the blue line to release his/her partner.
Basic Icing JudgmentPlease review the following basic icing situations. A complete knowledge of the rules and potential situations is important. The visual graphics may also help you better understand the situations and the proper call.
• When a defending player has an opportunity to play the puck on a potential icing and chooses not to, the icing shall be nullified and play will be allowed to continue.
• Icing will be completed when the puck crosses the goal line, regardless as to whether contact is made with the crease.

39USA Hockey Basic Officials Manual
• When the puck is touched or deflected by an opposing player anywhere on the ice prior to crossing the goal line, the icing shall be nullified.
• If the puck is touched or deflected by a member of the shooting team prior to crossing the center red line, the potential icing still exists. However, when the puck is touched or deflected by a member of the shooting team after crossing the center line, the icing shall be waved off and play allowed to continue.
Calling Icing Infractions Review The following questions highlight some of the key points you should have picked up from this chapter. Take a few minutes to review what you have learned about calling icing infractions. When finished, you can compare your answers to the correct answers that appear in the back of this manual.
1. What are the back official’s responsibilities when calling icing?
2. What are the front official’s responsibilities when calling icing?
3. How many times should the front official check back with his/her partner during a potential icing situation?
4. Should the back official ever wash out an icing situation?

40 USA Hockey Basic Officials Manual
ESTABLISHING FACE-OFF LOCATIONS
Basic Determination Of Face-Off LocationWhenever a stoppage of play occurs, the playing rules call for a specific location for the face-off that follows. For the purpose of determining where a face-off is to take place, the official should adhere to the following guidelines.
General Rule – All face-offs will take place at one of the nine designated face-off spots.
End Zone/Neutral Zone – Face-offs can take place only on one of the designated face-off spots, never in the middle of ice. The only exception to this is at the center ice face-off spot.
Frozen Puck – If the puck becomes frozen at or behind the goal line area and the defending team has frozen it, the face-off takes place at the nearest end zone face-off spot. If the attacking team freezes it, the face-off is held at the nearest neutral zone face-off spot.
If the puck is frozen along the side boards by the defending team in their end zone, the face-off takes place at the nearest end zone face-off spot. If it is frozen along the side boards by the attacking team, the face-off is at the nearest neutral zone face-off spot.

41USA Hockey Basic Officials Manual
Whenever the puck is frozen in the neutral zone, the face-off takes place at the nearest neutral zone face-off spot.
Icing – The face-off takes place at the defensive end zone face-off spot of the team that committed the icing infraction. It should be on the same side of the ice from where the puck was last shot or played.
Off-Side – If the attacking team passes the puck to create an off-side situation, the face-off takes place at the face-off spot closest to the location from which the puck was passed without providing a territorial advantage. If the puck is carried over the blueline and off-side occurs, the nearest neutral zone face-off spot is the proper location. The position of the player who was off-side has no bearing on the location.
Goalkeeper Freezes Puck – Always face-off at the end zone face-off spot- nearest to where the puck was originally shot from. This is not necessarily the side of the ice on which the goalkeeper holds or freezes the puck.

42 USA Hockey Basic Officials Manual
Penalty Call – Face-offs take place at the nearest face-off spot in the zone where play was stopped, unless the penalty is called on the attacking team in their attacking end zone. Then the face-off is conducted at the nearest neutral zone face-off spot.
Puck Shot Out Of The Rink (Any Officiating System)Play must stop immediately when a puck is shot out of the rink. Any official may blow the whistle to stop play. The official who stops play spots the face-off location and his/her partner retrieves a puck. In a three-official system, if the referee stops play he/she may indicate the face-off spot for his/her nearest linesman, if uncertain.
Who Determines Face-Off Location (Different Systems)In the two-official system, the official who stops play will mark the face-off location by skating to the spot. If he/she stops play but did not see where the puck was last played, he/she should ask his/her partner for help. It is important to work together so the call is made fairly and correctly. While the official skates to the proper face-off location, the partner will retrieve the puck unless the puck is within reach of the “marking” official.
In a three-official system, the procedure is different. The linesmen are responsible for marking all routine face-offs to allow the referee to concentrate on the play. The referee need only determine whether the face-off takes place “inside” or “outside” the end zone or when the face-off location is not obvious.
Establishing Face-Off Locations Review
The following questions highlight some of the key points you should have picked up from this chapter. Take a few minutes to review what you have learned about establishing face-off locations. When finished, you can compare your answers to the correct answers that appear in the back of this manual.
1. Face-offs can only take place at which face-off spots?
2. For an off-sides stoppage, where are the possible face-off locations to resume play?
3. Where does the face-off take place when the goalkeeper freezes the puck?
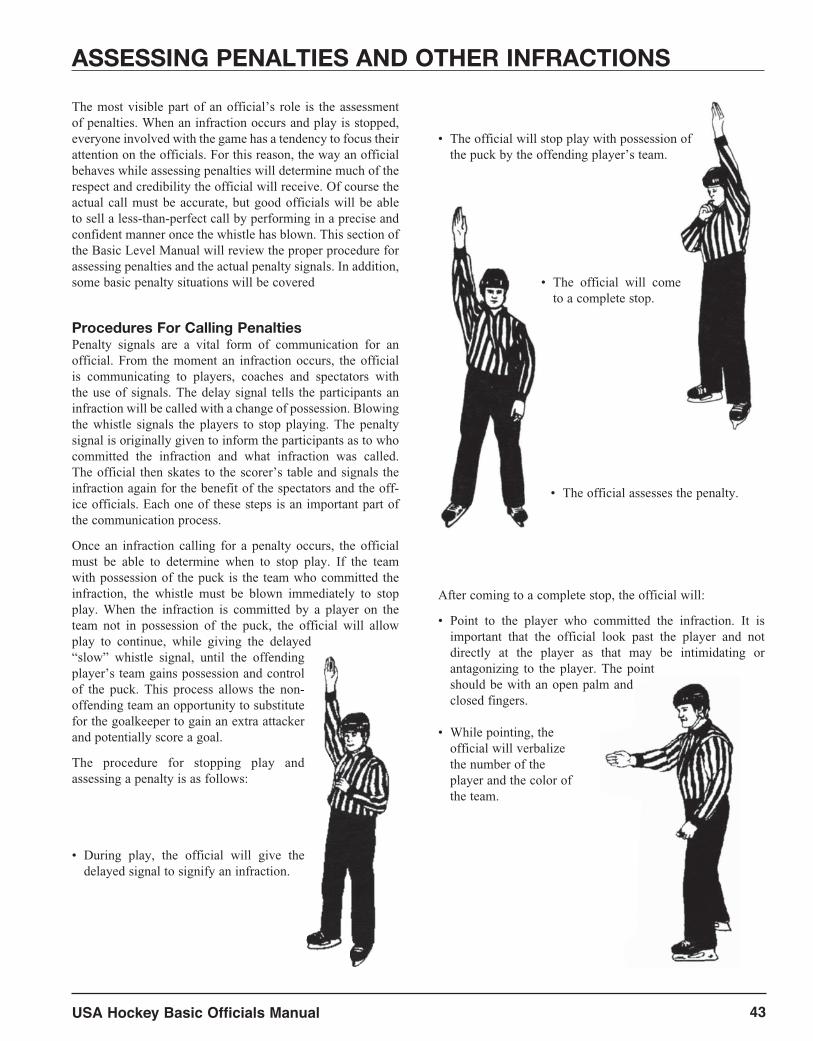
43USA Hockey Basic Officials Manual
ASSESSING PENALTIES AND OTHER INFRACTIONS
The most visible part of an official’s role is the assessment of penalties. When an infraction occurs and play is stopped, everyone involved with the game has a tendency to focus their attention on the officials. For this reason, the way an official behaves while assessing penalties will determine much of the respect and credibility the official will receive. Of course the actual call must be accurate, but good officials will be able to sell a less-than-perfect call by performing in a precise and confident manner once the whistle has blown. This section of the Basic Level Manual will review the proper procedure for assessing penalties and the actual penalty signals. In addition, some basic penalty situations will be covered
Procedures For Calling PenaltiesPenalty signals are a vital form of communication for an official. From the moment an infraction occurs, the official is communicating to players, coaches and spectators with the use of signals. The delay signal tells the participants an infraction will be called with a change of possession. Blowing the whistle signals the players to stop playing. The penalty signal is originally given to inform the participants as to who committed the infraction and what infraction was called. The official then skates to the scorer’s table and signals the infraction again for the benefit of the spectators and the off-ice officials. Each one of these steps is an important part of the communication process.
Once an infraction calling for a penalty occurs, the official must be able to determine when to stop play. If the team with possession of the puck is the team who committed the infraction, the whistle must be blown immediately to stop play. When the infraction is committed by a player on the team not in possession of the puck, the official will allow play to continue, while giving the delayed “slow” whistle signal, until the offending player’s team gains possession and control of the puck. This process allows the non-offending team an opportunity to substitute for the goalkeeper to gain an extra attacker and potentially score a goal.
The procedure for stopping play and assessing a penalty is as follows:
• During play, the official will give the delayed signal to signify an infraction.
• The official will stop play with possession of the puck by the offending player’s team.
• The official will come to a complete stop.
• The official assesses the penalty.
After coming to a complete stop, the official will:
• Point to the player who committed the infraction. It is important that the official look past the player and not directly at the player as that may be intimidating or antagonizing to the player. The point should be with an open palm and closed fingers.
• While pointing, the official will verbalize the number of the player and the color of the team.

44 USA Hockey Basic Officials Manual
The official then signals and verbalizes the infraction.
The official now performs the following procedure when reporting the infraction to the penalty timekeeper:
• The official will take three quick forward strides before turning and skating backwards to the penalty bench. This procedure allows the official to watch the penalized player and the other players. The official may choose to take a path to the penalty bench away from the penalized player or other players to avoid an unnecessary situation involving an upset player.
• The official will stop at the penalty bench and will repeat the number, color, and infraction while giving the penalty signal once again. This must be done in a position that still gives the official a good view of the players and is still visible to the penalty timekeeper.
An important part of assessing penalties is the cadence. The official should establish a rhythm that is followed each time a penalty is assessed. The proper cadence and rhythm will allow the official to portray confidence while maintaining maximum awareness of the players. This rhythm should be slow and deliberate. Many times, officials have a tendency to rush the signals or not come to a complete stop. When this occurs, the signal is often missed by the players and spectators in addition to indicating the official may be nervous or is in a hurry. Practice your cadence in assessing penalties in the mirror. You will find a comfort zone which will seem natural to you and will look positive to those involved with the game.
Blowing The WhistleWhat one may consider to be a little thing in the total scheme of officiating is actually an important cog in creating the proper image. Stopping play by blowing the whistle is a form of communication that is noticed by everybody. As with verbal intonation, the way the whistle is blown will also be interpreted as being negative or positive.
Let’s review the do’s and don’t’s of blowing the whistle:
DO / WHY? Use one loud, sharp blast - One short, loud, and sharp blast
will be heard by everybody and portray confidence. Standing Still - whistle at chest Skating - Whistle at side Blow with same intensity with each stoppage - confidence,
consistency, positive image
DON’T / WHY? Blow more than once - not in control, nervous Blow soft whistle - indecisive Blow long, loud blast - angry, arrogant Put whistle in mouth until ready to blow - may blow whistle
inadvertently, may knock out teeth if bumped or fall down Blow louder when angry - out of control, lets things bother
him/her, intimidates players
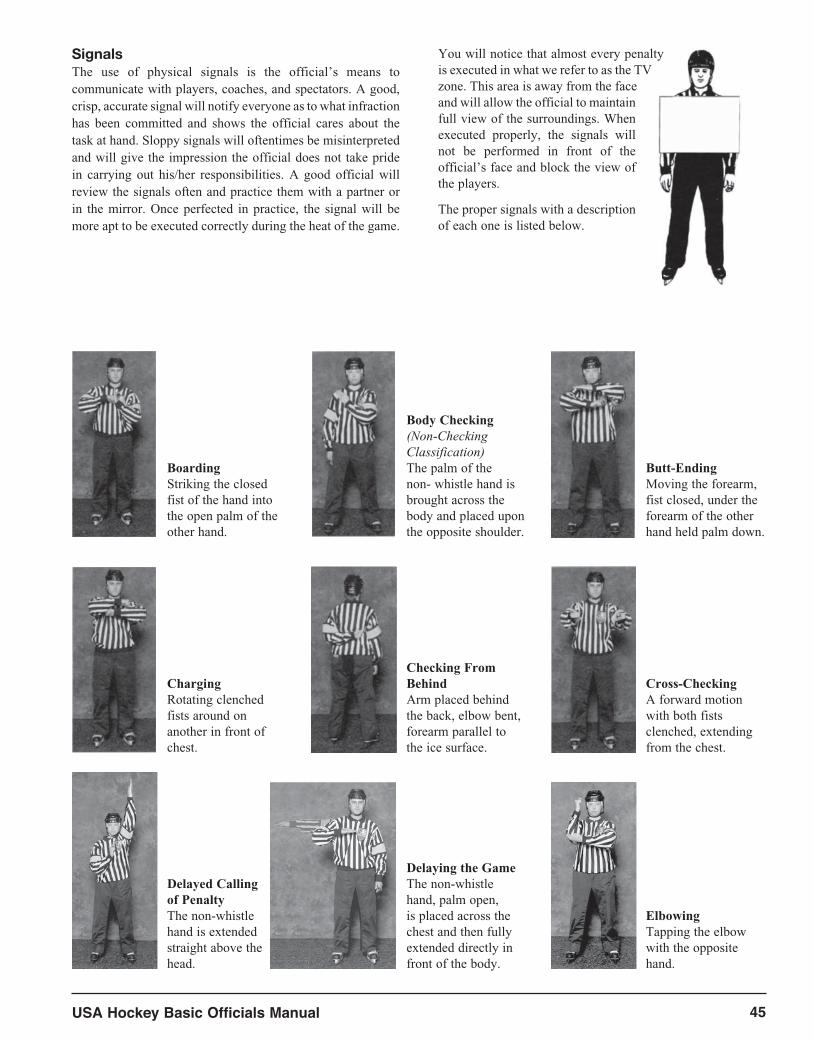
45USA Hockey Basic Officials Manual
SignalsThe use of physical signals is the official’s means to communicate with players, coaches, and spectators. A good, crisp, accurate signal will notify everyone as to what infraction has been committed and shows the official cares about the task at hand. Sloppy signals will oftentimes be misinterpreted and will give the impression the official does not take pride in carrying out his/her responsibilities. A good official will review the signals often and practice them with a partner or in the mirror. Once perfected in practice, the signal will be more apt to be executed correctly during the heat of the game.
You will notice that almost every penalty is executed in what we refer to as the TV zone. This area is away from the face and will allow the official to maintain full view of the surroundings. When executed properly, the signals will not be performed in front of the official’s face and block the view of the players.
The proper signals with a description of each one is listed below.
Boarding Striking the closed fist of the hand into the open palm of the other hand.
Body Checking (Non-Checking Classification) The palm of the non- whistle hand is brought across the body and placed upon the opposite shoulder.
Butt-Ending Moving the forearm, fist closed, under the forearm of the other hand held palm down.
Charging Rotating clenched fists around on another in front of chest.
Checking From Behind Arm placed behind the back, elbow bent, forearm parallel to the ice surface.
Cross-Checking A forward motion with both fists clenched, extending from the chest.
Delayed Calling of Penalty The non-whistle hand is extended straight above the head.
Delaying the Game The non-whistle hand, palm open, is placed across the chest and then fully extended directly in front of the body.
Elbowing Tapping the elbow with the opposite hand.

46 USA Hockey Basic Officials Manual
High-Sticking Holding both fists, clenched, one immediately above the other, at the side of the head.
Holding Clasping the wrist of the whistle hand well in front of the chest.
Holding the Face Mask Closed fist held in front of the face, palm in, and pulled down in one straight motion.
Icing Arms folded across the chest. When the puck is shot or deflected in such a manner as to produce a possible icing of the puck, the back Linesman will signal to his/her partner by raising his/her “non-whistle” hand over his/her head (same as in Slow Whistle). The instant the conditions required to establish “icing the puck” have occurred, the front Linesman will blow his/her whistle to stop the play. The back Linesman will give the “icing” signal.
Hooking A tugging motion with both arms, as if pulling something toward the stomach.
Head Contact The non-whistle hand placed palm-inward to the back of the helmet.
Interference Crossed arms stationary in front of chest with fists closed.
Kneeing A single tap of the right knee with the right hand, keeping both skates on the ice.
Fighting (Roughing) One punching motion to the side with the arm extending from the shoulder.
Goal Scored A single point, with the non-whistle hand, directly at the goal in which the puck legally entered, while simultaneously blowing the whistle.
Hand Pass The non-whistle hand (open hand) and arm are placed straight down alongside the body and swung forward and up once in an underhand motion.

47USA Hockey Basic Officials Manual
Match Penalty Pat flat of hand on the top of head.
Misconduct Placing of both hands on hips one time.
Penalty Shot Arms crossed (fists clenched) above head.
Slow (Delayed) Whistle (Blue Line Delayed Off-Sides When Used) The non-whistle hand is extended straight above head. If play returns to Neutral Zone without stoppage, the arm is drawn down the instant the puck crosses the line, or as soon as the offending team clears the zone.
Slashing One chop of the hand across the straightened forearm of the other hand.
Spearing A single jabbing motion with both hands together, thrust forward from in front of the chest, then dropping hands to the side.
Tripping Strike the side of the knee and follow through once, keeping the head up and both skates on the ice.
Timeout and Unsportsmanlike Conduct Using both hands, form a “T”.
Washout Both arms swung laterally across the body at shoulder level with palms down.
1. When used by the Referee, it means no goal or violation so play shall continue.2. When used by the Linesmen, it means there is no icing, off-side, hand pass or high sticking violation.

48 USA Hockey Basic Officials Manual
Verbal CommunicationIn addition to signals, the official must communicate verbally to the players as well. Verbal communication is the means of identifying the team color and number of the offending player and will also be used to specify what type of penalty has been called to the penalty timekeeper. Continuing in the role of a teacher at younger levels of hockey, the official may also choose to verbally communicate with the player to explain the reason for the penalty. When doing so, the official should be brief and to the point and avoid debating the merits of the call.
After an infraction has been called, the official may need to speak with the captains or coaches to briefly explain the call, especially in cases where an unusual situation occurred or multiple penalties are called. An official may also choose to quickly answer appropriate questions from other reasonable players, even though they may not be an appointed captain. Good verbal communication, when necessary, will help educate the players and coaches on the rules while also assisting the official with developing a positive rapport with game participants
Special SituationsAs with other areas of an official’s responsibility, there may be some special situations which call for the official to vary the standard procedure or spend some extra time with the off-ice officials. The following are some examples in assessing penalties.
• When a bench minor penalty is assessed, the official will point in the vicinity of the offending bench and verbalize “bench minor.” This may also be done at the time of the
infraction while the delayed signal is given in order to notify the teams of the delayed infraction. Any player, except a goalkeeper, who must be on the ice at the time of the infraction, is eligible to serve the bench minor penalty.
• When a goalkeeper has committed an infraction that calls for a minor, major or misconduct, the penalty must be served by a teammate on the ice at the time of the infraction. Goalkeepers are not required to serve their own penalties unless they receive a game misconduct or match penalty in which they will be sent off the ice. Once the official has signaled a delayed penalty on the goalkeeper, a mental note of the players on the ice should be made to minimize confusion when play is stopped.
• A player receiving a misconduct penalty will not be eligible to return to the ice until the first stoppage after the conclusion of the penalty.
• When players from opposing teams are assessed an equal number of penalties of equal duration, the on-ice numerical strength of the teams shall go unchanged and the penalized players will be eligible to return to the ice during the first stoppage of play after the expiration of their penalties.
• A player who has been assessed a penalty but is unable to serve the penalty because of an injury must be replaced on the penalty bench by a substitute. The substitute must serve the entire penalty, unless the injured player returns, in which case he/she may take the place of the substitute on the penalty bench.
• When a player receives a minor or major penalty coupled with a misconduct, game misconduct or match penalty, an additional player must also be placed in the penalty bench and would be eligible to return to the ice at the conclusion of the minor or major penalty.
DO DON’T BECAUSE
Assess the penalty in a slow, controlled cadence when all attention is on the official.
Rush the assessment of the penalty. The participants and spectators may miss the signal or think the official is nervous or lazy.
Give the signal within the TV zone.
Perform the signal outside of the TV zone.
May block your view of the players.
Keep a consistent and serious facial expression.
Laugh, smile or appear angry. May antagonize or intimidate the player or give the impression of not being serious.
Perform the correct signal properly.
Apply creative signaling. Could be confusing or give the impression of sloppiness.
Verbalize color, number and infraction.
Verbalize a minor or major penalty when initially assessing.
Will lock the official into making an incorrect call; use the time skating to the penalty bench to finalize the decision on severity of infraction.
Come to complete stop Continue skating or skate past penalty bench
Gives appearance of laziness and is more difficult to see.
Always repeat signal at penalty bench.
Fail to give signal. The penalty timekeeper may not have been able to see the original signal, also informs spectators who were unable to see the original signal.

49USA Hockey Basic Officials Manual
Assessing Penalties and Other Infractions ReviewThe following questions highlight some of the key points you should have picked up from this chapter. Take a few minutes to review what you have learned about assessing penalties and other infractions. When finished, you can compare your answers to the correct answers that appear in the back of this manual.
1. When an infraction occurs, what is the procedure for stopping play and assessing a penalty?
2. When calling a penalty, how many times, and what locations, will an official signal the penalty?
3. Where is the TV zone on an official? Why do we use the TV zone when assessing penalties?
4. When initially assessing a penalty, do you ever verbalize whether it is a minor or major penalty? Why or why not?

50 USA Hockey Basic Officials Manual
JUDGMENT
Success for new officials will mostly depend on the official’s knowledge of the rules and the ability to be in the proper position. Almost everyone has good, basic-level judgment. Even a new official will be able to determine whether an off-sides has occurred, provided the official is in good position to make the call. In regards to identifying penalties, very little judgment is necessary at the lowest levels of hockey. In these instances, knowledge of the rules is the key ingredient to exercising good judgment and being able to teach the rules of the game, by enforcing the rules, to everyone involved.
Officials are TeachersThe role of the official at lower levels of hockey is simply one of a teacher. Players, coaches, parents and spectators all rely on the official to know the rules and learn from the official’s application of the rules. They may often be involved with hockey for the first time and have very little knowledge of the rules of the game. A good official will not only apply the rules at this level, but will also make an effort to ensure all game participants have a better understanding of the rules as they leave the rink.
Very little judgment is necessary in lower age classifications. Penalties are always a penalty when they occur at the mite and squirt levels and must always be assessed. This concept results in correctly interpreting the rules rather than an official using good judgment. For example, at the lower levels:
Tripping accidental or intentional q always a penalty
High Sticking accidental or intentional q always a penalty
Checking or Roughing accidental or intentional q always a penalty
Holding accidental or intentional q always a penalty
Slashing accidental or intentional q always a penalty
Judgment will come more into play and is taught as officials progress to higher levels. One thing that never changes is the importance of rule knowledge. You will soon learn as you gain experience that good judgment does not hide a lack of rule knowledge, and a complete and thorough understanding of the rules does not make up for poor judgment. As a new official, concentrate on the rule knowledge for now and good judgment will come with experience.
When first starting to officiate, you should realize that exercising judgment will generally be positive. When in doubt about a judgment call, go with your gut feeling which will most often turn out to be the correct call. The important thing to do is be sure not to pre-judge a situation and react prior to receiving all of the information. Let the situation run its course before reacting appropriately.
Judgment ReviewThe following questions highlight some of the key points you should have picked up from this chapter. Take a few minutes to review what you have learned about judgement. When finished, you can compare your answers to the correct answers that appear in the back of this manual.
1. What is the role of the official at the lower levels of hockey?
2. Does your rule knowledge change as your judgment changes? Why or why not?
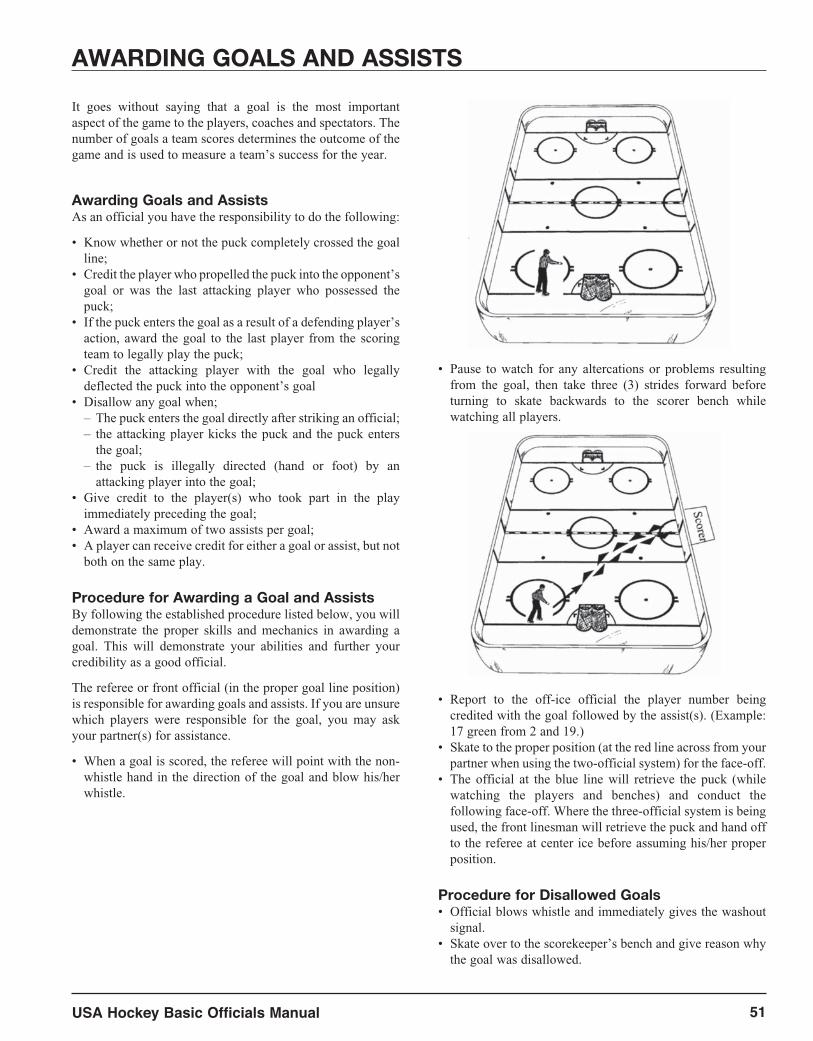
51USA Hockey Basic Officials Manual
AWARDING GOALS AND ASSISTS
It goes without saying that a goal is the most important aspect of the game to the players, coaches and spectators. The number of goals a team scores determines the outcome of the game and is used to measure a team’s success for the year.
Awarding Goals and AssistsAs an official you have the responsibility to do the following:
• Know whether or not the puck completely crossed the goal line;
• Credit the player who propelled the puck into the opponent’s goal or was the last attacking player who possessed the puck;
• If the puck enters the goal as a result of a defending player’s action, award the goal to the last player from the scoring team to legally play the puck;
• Credit the attacking player with the goal who legally deflected the puck into the opponent’s goal
• Disallow any goal when;– The puck enters the goal directly after striking an official;– the attacking player kicks the puck and the puck enters
the goal;– the puck is illegally directed (hand or foot) by an
attacking player into the goal;• Give credit to the player(s) who took part in the play
immediately preceding the goal;• Award a maximum of two assists per goal;• A player can receive credit for either a goal or assist, but not
both on the same play.
Procedure for Awarding a Goal and AssistsBy following the established procedure listed below, you will demonstrate the proper skills and mechanics in awarding a goal. This will demonstrate your abilities and further your credibility as a good official.
The referee or front official (in the proper goal line position) is responsible for awarding goals and assists. If you are unsure which players were responsible for the goal, you may ask your partner(s) for assistance.
• When a goal is scored, the referee will point with the non-whistle hand in the direction of the goal and blow his/her whistle.
• Pause to watch for any altercations or problems resulting from the goal, then take three (3) strides forward before turning to skate backwards to the scorer bench while watching all players.
• Report to the off-ice official the player number being credited with the goal followed by the assist(s). (Example: 17 green from 2 and 19.)
• Skate to the proper position (at the red line across from your partner when using the two-official system) for the face-off.
• The official at the blue line will retrieve the puck (while watching the players and benches) and conduct the following face-off. Where the three-official system is being used, the front linesman will retrieve the puck and hand off to the referee at center ice before assuming his/her proper position.
Procedure for Disallowed Goals• Official blows whistle and immediately gives the washout
signal.• Skate over to the scorekeeper’s bench and give reason why
the goal was disallowed.

52 USA Hockey Basic Officials Manual
Awarding Goals and Assists ReviewThe following questions highlight some of the key points you should have picked up from this chapter. Take a few minutes to review what you have learned about awarding goals and assists. When finished, you can compare your answers to the correct answers that appear in the back of this manual.
1. Does the puck have to completely cross the goal line for a goal to be scored?
2. When a goal is scored, the official blows his/her whistle while signaling a goal and takes three hard strides forward before what? Why?
3. What are the three procedures that should be followed for disallowing a goal?

53USA Hockey Basic Officials Manual
INJURED PLAYERS
One of the main responsibilities of an on-ice official is to maintain a safe and fun environment for all participants. Although no one likes to see a player get injured, there are cases when a youth hockey player suffers a minor or severe injury. An official must be able to respond appropriately in these instances to not only protect the injured player from further or more serious injuries, but also to maintain a fair playing environment. The following section will carefully outline the officiating procedures for dealing with an injury situation.
Stopping PlayWhen a player becomes injured, the officials must be aware of everything that is occurring on the ice. If the official has any doubts as to whether the injury is of a serious nature, the official must stop play immediately and attend to the injured player. It is always a good idea to err on the side of caution and stop play when a question as to the severity of the injury is present.
When the official is confident that a serious injury has not taken place, he/she should wait to stop play until the team of the injured player is in possession of the puck in a non-scoring position. This procedure is followed to be fair to the opponent who may have a reasonable scoring opportunity. The player may have been injured as a result that is of no fault of an opponent or the player may fake the injury once knocked down in order to get a stoppage of play or prevent the other team from scoring.
Once Play Has Been StoppedWhen play has been stopped for an injured player, the closest official should immediately skate to the injured player. This is done to ensure the injury is not serious and will let the player know that help is on the way. This official should also waive the coach or trainer onto the ice when it is determined the injured player needs assistance.
The official may also calm the frightened player down by talking to the player and may ask the player where on the body the injury is located. This information may be helpful when the coach or team trainer arrives.
While this is taking place, your partner(s) should monitor the other players to make sure a potential altercation will not take place. A good policy for the free official is to assist the coach and or trainer onto the ice to ensure they do not slip or fall and become injured themselves. However, common sense should tell us to avoid a coach who is upset.
The official should be sure not to provide medical assistance to the player unless absolutely necessary and the proper
training is possessed. The coach or the trainer is ultimately responsible for the care of the player and they often times have the necessary training to successfully attend to the player. When in doubt, the best policy for the official is to not touch or move the player unless the player’s life is in danger. A wrong move, even though well intended, may cause greater injury and will put the official in a difficult liability situation. Simply communicating your presence will be an effective means of letting the player know that proper care is forthcoming.
Once the team personnel has arrived at the injured player, the officials should back away and let them attend to the player. Stay close enough to provide emergency assistance, if necessary, and be prepared to call for medical assistance. It is a good idea for every official to be aware of the phone number for emergency service and the official should also be aware of the location of the phones available at the rink.
However, the officials should be far enough away from the injured player and team personnel to avoid unnecessary verbal abuse by the player or coach. They may be upset that a penalty was not called or simply frustrated that the injury occurred. The officials tend to be a pretty good target for this frustration. The officials should position themselves far enough away to minimize the potential for verbal abuse and avoid unpleasant situations. If the officials are close enough for the coach or player to verbally abuse them without anyone else hearing, it will be difficult to assess a penalty. In this case, you may wish to remind the coach to attend to the injured player.
Enough time to properly assess the injury and care for the player should be allowed before removing the player from the ice. In most cases, the injured player will also want to get off of the ice surface as soon as possible and play can then continue. The official who is in a hurry to push an injured player off of the ice is perceived to be someone who is in a hurry to get the game done and does not care about the safety of the players.
There are a couple of rules an official should be aware of prior to starting play. If play was stopped as a result of the injured player, that player must leave the ice until play resumes, even if the player was not seriously injured or the official erred in stopping play. The other rule pertaining to injured players concerns the presence of blood. A player or goalkeeper who is bleeding should be ruled off the ice until the bleeding has stopped and the wound has been covered. It is also required that any affected equipment be replaced or decontaminated before the player is allowed to participate in the game.
These issues regarding the presence of blood also apply to officials and are carefully presented in the USA Hockey Official Playing Rules.

54 USA Hockey Basic Officials Manual
Injured Players ReviewThe following questions highlight some of the key points you should have picked up from this chapter. Take a few minutes to review what you have learned about injured players. When finished, you can compare your answers to the correct answers that appear in the back of this manual.
1. Does an official always have to wait until the injured player’s team has control of the puck before he/she stops play?
2. While you are attending to the injured player, what should your partner do?
3. Why is it a good idea to back away after a coach has come onto the ice to attend to his/her injured player?

55USA Hockey Basic Officials Manual
EQUIPMENT REGULATIONS
Although the ultimate responsibility to wear the proper protective equipment falls on the player, the officials must be aware of and respond to any equipment violations. There are four pieces of protective equipment that must be worn by players at all times. These items must adhere to a certain standard of performance as specified by the Hockey Equipment Certification Council. The only
requirement on the other pieces of protective equipment (elbow pads, shin guards, etc.) is that the equipment is worn in the manner in which it was intended.
Protective EquipmentExamine the following chart for information on required protective equipment.
EQUIPMENT MUST BE WORN BY KEY POINTS FOR A VIOLATION
Skates All players • Must be hockey skates• Must have protective safety
heel tip, if applicable
Player is removed from the ice until corrected.
Helmets All players must wear helmet designed for hockey; all players must wear HECC-approved helmets except:
1. Junior classification players who have reached the age of majority and signed a waiver.
2. Adult players.
• Chin strap must be properly fastened
• Must wear helmet/ facemask on player/ penalty bench
• Officials must wear a black hockey helmet
• Goalkeeper must wear HECC-approved goalkeeper’s headgear or HECC-approved helmet and facemask
• Ear pieces must be attached
Player is removed from the ice until corrected
Violation on player/penalty bench• Warning for first violation
and misconduct for subsequent violations
• Player helmet/facemask comes off during play – immediate whistle, minor penalty if deliberate.
Mouthpiece All players Youth 12 & Under through Junior and Girls/Women 12 & Under through 19 & Under age classifications.
• Must cover remaining teeth of one jaw
• Must be non-clear• Recommended to be form-
fitted by a dentist
Misconduct Penalty after one team warning
Facemask All players must wear HECC-approved except:
1. Junior players who have reached the age of majority
2. Adult players.
• Junior players who have reached the age of majority may also choose to wear a HECC-approved half-shield visor.
Player is removed from the ice until corrected
Miscellaneous All players must wear the required protective equipment in the manner in which it is intended.
• When a helmet or facemask is in doubt, look for the HECC sticker, which must be attached to the equipment.
For not wearing the protective equipment properly – misconduct after a warning by the referee.

56 USA Hockey Basic Officials Manual
Dangerous EquipmentThe on-ice official also has the responsibility to be alert for dangerous or illegal equipment at all times. Remember, one of your top priorities as an official is to promote a safe environment for all participants. Some examples of equipment which may be deemed illegal or dangerous include:
• gloves in which all or part of the palm has been removed• pads or protectors made of metal, or of materials likely to
cause injury• casts or splints made of hard or unyielding material or not
covered with protective foam padding• sticks that are partially broken at the tip of the blade• jewelry that is not covered by equipment or taped to the
body
Once a piece of equipment is observed to be dangerous by the official, the player must be removed from the ice until the equipment is replaced or the dangerous portion is corrected.
Equipment MeasurementIn some instances, an official may be asked to conduct an equipment measurement. The complete procedure for
measuring equipment will be discussed in the Intermediate Level Manual. However, there are a few basic rules and procedures that must be followed that all officials need to be aware of. Let’s review those now.
• Only the captain of a team can request an equipment measurement and only during a stoppage of play.
• An official can measure any piece of equipment when first used in a game. However, the official should use this particular rule only in extreme cases.
• There can be a maximum of one equipment measurement request per team per stoppage of play.
• The player whose equipment is to be measured must be on the ice at the time of the request.
• Anytime a request for an equipment measurement is made and the piece of equipment is found to be legal, a bench minor penalty shall be imposed on the team making the request.
These are some basic rules regarding the measurement of equipment that will help a new official respond to a request for an equipment measurement. Hopefully, the teams will simply play the game without any unnecessary delays for measuring equipment.
Equipment Regulations ReviewThe following questions highlight some of the key points you should have picked up from this chapter. Take a few minutes to review what you have learned about equipment regulations. When finished, you can compare your answers to the correct answers that appear in the back of this manual.
1. Who has the ultimate responsibility to wear the proper protective equipment?
2. What does H.E.C.C. stand for?
3. Why is it important for officials to be aware of potentially dangerous equipment?

57USA Hockey Basic Officials Manual
CHANGE OF PLAYERS
During the course of a game there are four situations when a team will changes its players. They are:
• During play• Premature substitution• Penalty expiration• During stoppages
Each of these situations have their own procedures and mechanics. As an official this is another opportunity to demonstrate your knowledge of the rules and display your ability to execute the proper procedures.
During PlayPlayers may be changed on the ice any time from the players’ bench during play. (This is known as free substitution). The official must make sure the player going to the bench is at the bench and out of play before the substitute participates in the play. If the substitute participates in the play before the retiring player is at the bench and out of play, a bench minor for too many players on the ice violation will be called. Whenever either player is accidentally struck by the puck, there is no penalty, and play continues. The initial responsibility for this play is with the back official but may be called by any on-ice official. As the linesman in the three-official system, you will stop play and report the violation to the referee who will assess the penalty.
Premature SubstitutionSubstitution for the goalkeeper can occur anytime, but occurs most often when there is a delayed penalty on the opposing team or when the team needs an extra attacker at the end of the game because they are behind in goals. The back official or the rear linesman in the three-official system is responsible for this play. The official points at the goalkeeper to acknowledge that a substitution is taking place. If the changes take place when the goalkeeper is at the players’ bench, this is considered a legal substitution. The linesman drops his/her arm and lets play continue. If the goalkeeper is not at the bench when the substitution is made, the back official (linesman in the three-official system) will stop play when the offending team has possession of the puck.
Once play has been stopped, the official will point to the face-off spot and report the infraction to the referee while skating to the spot to conduct the resulting face-off. His/her partner will retrieve the puck and assume the normal face-off position. If play was stopped on the attacking side of the center red line of the offending team, the face-off location is at the center ice face-off spot. When play is stopped on the defending side of the center red line of the offending team, the face-off will be a last play face-off at the nearest face-off spot in the zone in which play was stopped.
Penalty ExpirationUpon expiration of a penalty, the penalized player must proceed by way of the ice to the players’ bench for a substitution. For a violation, a bench minor penalty for illegal substitution shall be assessed.
During StoppagesAfter play has been stopped, each team is allowed to change players, within a reasonable amount of time, with the home team entitled to make the last change. A change of one player or more constitutes a line change. Unless permission is given by the referee, the goalkeeper cannot go to the players’ bench during stoppages. For a violation of this rule, the team must either substitute for the goalkeeper or be assessed a bench minor.
Change of Players ReviewThe following questions highlight some of the key points you should have picked up from this chapter. Take a few minutes to review what you have learned about change of players. When finished, you can compare your answers to the correct answers that appear in the back of this manual.
1. If players are changing during play and the puck accidentally strikes one of the changing players, what is the correct call?
2. Whose responsibility is it to watch when the goalkeeper changes for an additional attacking player?

58 USA Hockey Basic Officials Manual
ALTERCATIONS
Altercations are a part of the game where the safety of players and officials IS in jeopardy. A situation which is perceived to be pretty mild such as two squirt-aged players pushing each other along the boards could escalate into a more serious altercation involving several players where the potential for injury is great. That is why the official’s response to even the most innocent altercation is critical to protecting the overall safe environment of the game.
The procedures and concepts outlined in this manual are designed to handle potential altercations with efficiency and the safety of all game participants as a top priority. Familiarize yourself with these basic procedures as they will become the cornerstone to your ability to successfully handle altercations at higher levels of hockey.
AwarenessThe most successful means an official has to deal with altercations is to prevent them from happening. Good awareness will prevent almost all altercations and especially those at lower levels of hockey. A good official will anticipate potential problems between players and will recognize when players are not getting along. For example, a recipient of a cheap shot earlier in the game may be looking for an opportunity to get back at the player as the game goes along. An official with good awareness will pay special attention to these players and will be prepared to quickly step between them when play is stopped.
When the whistle blows, the officials must hustle to get in between players before an altercation can get started. Control those areas of the ice that tend to lead to altercations such as in front of the goal or along the boards during a frozen puck. An official with good awareness will be cognizant of difficult areas at all times and will be quick to patrol those areas when play has been stopped.
SafetyThe absolute top priority of the officials during an altercation is the safety of the players and officials. The following safety procedures should be followed every time a fight breaks out on the ice. Failure to do so will put the players and your safety in jeopardy.
• Immediately instruct the non-participating players to go to their bench or goal crease in the case of a goalkeeper. If the altercation is taking place in front of the benches or in the goal crease, instruct the players to go to a neutral part of the ice, away from the other team. This procedure is followed to minimize the potential for additional altercations and to clear the area for the players fighting.
• Move all equipment (sticks, gloves, helmets) out of the area so the equipment is out of the way of the players and officials who are breaking up the fight. This will prevent a participant from accidentally tripping over the debris.
• The officials should remove their whistles from their hand and place in their pockets. This prevents your whistle from getting caught on a piece of equipment or injuring a player.
• Communicate with your partner and the players. Let them know that you are there and the fight needs to end. Decide which player each official will take prior to going in to separate the players. This will avoid confusion and prevent both officials from taking the same player. A simple “I’ll take white” is all that is necessary.
• Never enter an altercation by yourself. You are putting yourself in danger of being punched by a player and may also give a player a free shot at the player you are holding onto. Always wait until your partner is there to go in together.
• Never grab a player from behind. Always enter an altercation from the side or from the front of a player. A player who is grabbed from behind may think an opponent is grabbing him/her and will respond accordingly. The other concern is that when you grab the arms from behind you are exposing the player, in a vulnerable position, to the opponent.
• Wait for the fight to slow down or until one player gains an advantage. Entering a fight while sticks or fists are still flying will only get yourself or your partner injured. Eventually, the players will tire and they can be separated safely and with minimum effort. However, when one player gains a definite advantage, the officials must consider the safety of the disadvantaged player and enter the altercation to prevent an unnecessary injury. This most often occurs when the combatants fall to the ice with one player on top.
• Always be cautious of skate blades, face masks and other sharp objects. Always be in control of yourself and make the players aware of any dangers.
• Talk to the players to let them know you are there and the fight has ended. A firm but soothing voice will be effective in calming the players down and letting them know that you are now in control.

59USA Hockey Basic Officials Manual
Intervening During AltercationsOnce all of the safety precautions have been looked after and the officials are ready to enter the altercation, the following procedures must be followed to efficiently and safely separate the players.
• Communicate with your partner. Work on opposite sides of the altercation and decide which player will be taken by which official. One official needs to communicate by saying “I got blue” to specify he/she is responsible for the player in the blue jersey.
• Both officials should enter the altercation together by placing one arm over the top of the player’s arms and one arm underneath. Squeeze your arms together. This procedure will limit the mobility of the player you are separating.
• Work your body between the players while facing the player (officials are back to back). This allows the officials to actually get in between the players.
• Once you are between the separated players, let go of your player but continue to stay in between him/her and the opponent. Always be prepared to stop the player from going after the opposing player. This can easily be done by grabbing the jersey in the chest area or by the suspenders. When calm again, the official should always let go to avoid frustrating the player.
• Escort your player all the way over to the penalty bench, constantly remaining between him/her and the opponent. Once at the penalty bench, shut the door behind the player. We then have rules to govern the player leaving the penalty bench.
• When the players involved in an altercation are ejected from the game, avoid additional altercations off the ice by escorting players off of the ice separately. Watch the player enter the dressing room, if necessary.
These procedures are designed to protect you and the players from a potential injury during an altercation. Carefully following the prescribed procedures will help ensure your role in maintaining a safe environment is accomplished to the best of your ability.

60 USA Hockey Basic Officials Manual
Altercations ReviewThe following questions highlight some of the key points you should have picked up from this chapter. Take a few minutes to review what you have learned about altercations. When finished, you can compare your answers to the correct answers that appear in the back of this manual.
1. What will prevent almost all altercations, especially those at lower levels of hockey?
2. List five safety procedures every official should follow each time an altercation occurs?
3. What is the proper procedure that should be followed after you have broken up an altercation?

61USA Hockey Basic Officials Manual
PENALTY SHOT PROCEDURES
One of the most exciting times during a hockey game for spectators, and certainly a tense moment for the players, is when an official awards a penalty shot. The one-on-one confrontation between the goalkeeper and a single opponent can be a dramatic moment that determines the outcome of the game.
The officials are also under the spotlight during these situations. The infraction that occurred and the response of the officials will be closely scrutinized by everyone involved with the game. In addition, the manner in which the officials manage the penalty shot procedure could remove any questions concerning their judgment call and enhance their credibility.
This section will discuss some basic aspects of calling penalty shot infractions and thoroughly review the correct procedures.
Criteria: When Fouled From BehindThe most common infraction for rewarding a penalty shot is when a player is fouled from behind on a breakaway. This rule is often one of the most misunderstood rules by players, coaches, spectators and officials. Any time a player misses a breakaway or is knocked off of the puck, there tends to be teammates and spectators immediately calling for the official to award a penalty shot. Let’s review the five important criteria necessary for awarding a penalty shot.
1. The player must be in possession and control of the puck. The key word here is control. For example, a player who shoots the puck slightly ahead in a controlled manner in order to skate faster is still considered in possession and control of the puck.
2. The player must be beyond his/her defending blueline.3. There is no opponent present between the player and the
opposing goalkeeper.4. The player must be fouled directly from behind or
diagonally from behind (beyond his peripheral vision). An opponent who has an angle on the breakaway player and commits the foul from the side should be penalized, but no penalty shot shall be awarded.
5. The player must have been deprived of a reasonable scoring opportunity. A player who still has a reasonable scoring opportunity, even though fouled from behind, should not be awarded a penalty shot. This, of course, is some what subjective. The key question that must be asked is what effect did the infraction have on the play?
You will notice these criteria happen in a sequence when a potential penalty situation is occurring. A good official will anticipate a potential penalty shot call by checking off each of these criteria as the breakaway is occurring. When the play is completed and the official has answered all of the questions as they occurred, a quick and decisive call can be made. This process helps the official avoid having to go back and rethink
each of the criteria when play has been completed, causing a brief delay and portraying a message of uncertainty.
Procedure For Calling A Penalty ShotThe procedure for awarding a penalty shot is very similar to the normal penalty call procedure. However, there are a couple of important steps that are added in situations where a penalty shot has been awarded. Let’s review the entire procedure.
• When the infraction occurs, the front official (referee in three-official system) will give the delayed penalty signal.
• Once possession of the puck is gained by the offending team, the whistle will be blown to stop play and the official will come to a complete stop and give the penalty shot signal.
• The official then skates, in the normal penalty assessment procedure, to the penalty bench to report the violation and the player designated to take the shot to the penalty timekeeper. If the player designated is not known at this time, the official will only report the violation and the player who committed the infraction.
• In cases where the infraction would normally have resulted in a minor penalty, the official must present the option of a minor penalty being assessed in lieu of the penalty shot to the non-offending team’s captain or coach. If the infraction would normally incur a major penalty, the non-offending team will be awarded a penalty shot and the player still will be penalized for the major penalty.
• If the player to take the shot is not designated by the official according to the rules, the captain of the non-offending team must be informed to immediately designate a player who was on the ice at the time of the infraction to take the shot. For this reason, it is a good idea for the official(s) not making the penalty shot call to make a note of the players on the ice for the non-offending team at the time of the infraction.
Penalty Shot MechanicsOnce the penalty shot has been announced and the player designated to take the shot has been identified, the officials have a procedure which needs to be followed to ensure a fair and legal penalty shot takes place. When the two-official system is used, the official making the call will be responsible for managing the penalty shot attempt while the referee in the three-official system is responsible when that system is used. The following procedure must be followed:
• The puck is placed on the center ice face-off spot.• All non-participating players are instructed to move to the
sideboards and behind the center red line.• The referee will give the following instructions to the
shooter: “You may start the penalty shot on my whistle. Once you touch the puck, you must proceed in a forward
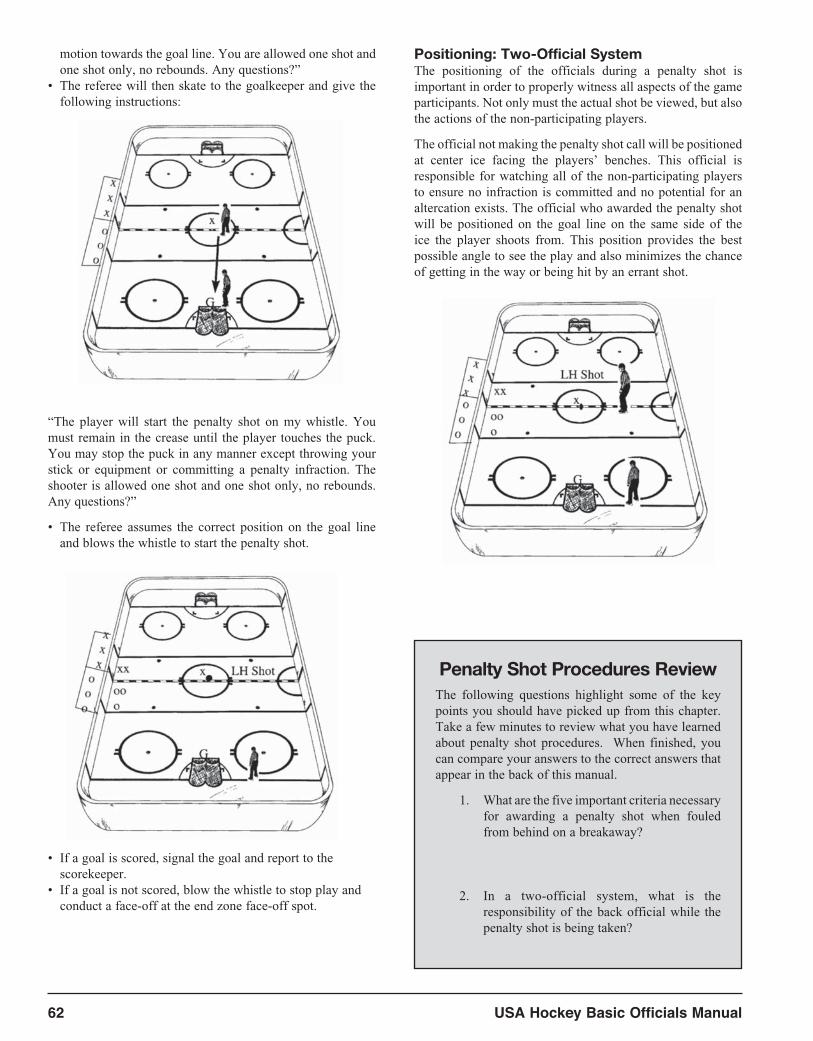
62 USA Hockey Basic Officials Manual
motion towards the goal line. You are allowed one shot and one shot only, no rebounds. Any questions?”
• The referee will then skate to the goalkeeper and give the following instructions:
“The player will start the penalty shot on my whistle. You must remain in the crease until the player touches the puck. You may stop the puck in any manner except throwing your stick or equipment or committing a penalty infraction. The shooter is allowed one shot and one shot only, no rebounds. Any questions?”
• The referee assumes the correct position on the goal line and blows the whistle to start the penalty shot.
• If a goal is scored, signal the goal and report to the scorekeeper.
• If a goal is not scored, blow the whistle to stop play and conduct a face-off at the end zone face-off spot.
Positioning: Two-Official SystemThe positioning of the officials during a penalty shot is important in order to properly witness all aspects of the game participants. Not only must the actual shot be viewed, but also the actions of the non-participating players.
The official not making the penalty shot call will be positioned at center ice facing the players’ benches. This official is responsible for watching all of the non-participating players to ensure no infraction is committed and no potential for an altercation exists. The official who awarded the penalty shot will be positioned on the goal line on the same side of the ice the player shoots from. This position provides the best possible angle to see the play and also minimizes the chance of getting in the way or being hit by an errant shot.
Penalty Shot Procedures ReviewThe following questions highlight some of the key points you should have picked up from this chapter. Take a few minutes to review what you have learned about penalty shot procedures. When finished, you can compare your answers to the correct answers that appear in the back of this manual.
1. What are the five important criteria necessary for awarding a penalty shot when fouled from behind on a breakaway?
2. In a two-official system, what is the responsibility of the back official while the penalty shot is being taken?
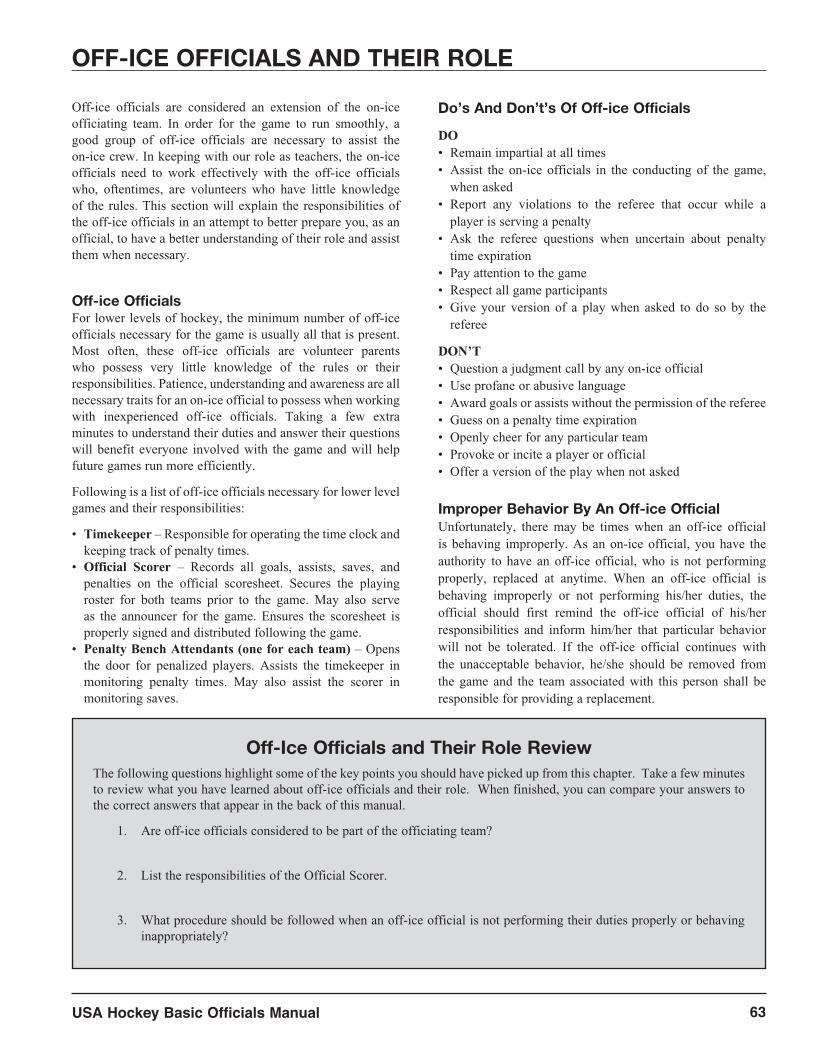
63USA Hockey Basic Officials Manual
OFF-ICE OFFICIALS AND THEIR ROLE
Off-ice officials are considered an extension of the on-ice officiating team. In order for the game to run smoothly, a good group of off-ice officials are necessary to assist the on-ice crew. In keeping with our role as teachers, the on-ice officials need to work effectively with the off-ice officials who, oftentimes, are volunteers who have little knowledge of the rules. This section will explain the responsibilities of the off-ice officials in an attempt to better prepare you, as an official, to have a better understanding of their role and assist them when necessary.
Off-ice OfficialsFor lower levels of hockey, the minimum number of off-ice officials necessary for the game is usually all that is present. Most often, these off-ice officials are volunteer parents who possess very little knowledge of the rules or their responsibilities. Patience, understanding and awareness are all necessary traits for an on-ice official to possess when working with inexperienced off-ice officials. Taking a few extra minutes to understand their duties and answer their questions will benefit everyone involved with the game and will help future games run more efficiently.
Following is a list of off-ice officials necessary for lower level games and their responsibilities:
• Timekeeper – Responsible for operating the time clock and keeping track of penalty times.
• Official Scorer – Records all goals, assists, saves, and penalties on the official scoresheet. Secures the playing roster for both teams prior to the game. May also serve as the announcer for the game. Ensures the scoresheet is properly signed and distributed following the game.
• Penalty Bench Attendants (one for each team) – Opens the door for penalized players. Assists the timekeeper in monitoring penalty times. May also assist the scorer in monitoring saves.
Do’s And Don’t’s Of Off-ice Officials
DO• Remain impartial at all times• Assist the on-ice officials in the conducting of the game,
when asked• Report any violations to the referee that occur while a
player is serving a penalty• Ask the referee questions when uncertain about penalty
time expiration• Pay attention to the game• Respect all game participants• Give your version of a play when asked to do so by the
referee
DON’T• Question a judgment call by any on-ice official• Use profane or abusive language• Award goals or assists without the permission of the referee• Guess on a penalty time expiration• Openly cheer for any particular team• Provoke or incite a player or official• Offer a version of the play when not asked
Improper Behavior By An Off-ice OfficialUnfortunately, there may be times when an off-ice official is behaving improperly. As an on-ice official, you have the authority to have an off-ice official, who is not performing properly, replaced at anytime. When an off-ice official is behaving improperly or not performing his/her duties, the official should first remind the off-ice official of his/her responsibilities and inform him/her that particular behavior will not be tolerated. If the off-ice official continues with the unacceptable behavior, he/she should be removed from the game and the team associated with this person shall be responsible for providing a replacement.
Off-Ice Officials and Their Role ReviewThe following questions highlight some of the key points you should have picked up from this chapter. Take a few minutes to review what you have learned about off-ice officials and their role. When finished, you can compare your answers to the correct answers that appear in the back of this manual.
1. Are off-ice officials considered to be part of the officiating team?
2. List the responsibilities of the Official Scorer.
3. What procedure should be followed when an off-ice official is not performing their duties properly or behaving inappropriately?

64 USA Hockey Basic Officials Manual
POST-GAME DUTIES AND RESPONSIBILITIES
One of the most common mistakes made by officials is to believe their job is done once the final horn sounds to end the game. There are still several responsibilities that need to be taken care of and each one is as important as officiating the actual game. Remember how we discussed the importance of completing the pre-game responsibilities? Although there may not be as much to do when the game ends, the manner in which the officials complete their post-game responsibilities will leave a lasting impression on each of the participants.
Handshake ResponsibilitiesEven though the horn has sounded, the officials must still devote their attention to the players. A game which results in an altercation after the game will leave a bad taste in everyone’s mouth, especially since the altercation could have been avoided with strong work by the officials. Awareness is still very much the key to managing the post-game activities.
When the horn sounds, the officials should immediately skate to get in between the opposing players. The teams will generally separate then and eventually will form a line for the handshake. One official should be positioned on each side of the handshake line and they should stagger themselves in order to have one official towards each end of the line. Be sure to monitor the entire line as all it takes is for one player to say something or make unnecessary contact with an opponent for action to develop.
Watch for potential problem areas. For instance, two players who were on each other the entire game need to be watched carefully as they meet in the handshake line. Another potential problem area involves a player who committed a violent infraction and injured an opponent. The injured player’s teammates may look at the handshake as a good opportunity to seek revenge. A quiet presence by the officials during this time will be all that is needed to prevent potential altercations. Also, keep in mind that a player may be penalized after the game and be sure to do so when deserved.
Escorting Teams Off The IceWhen the handshakes are completed, both teams will be in a hurry to exit the ice. When a common exit is used for both teams, one team must be held back until the opposing team has completely left the ice. The team whose bench is farthest from the exit is the team who will be held by the officials. One official must be positioned in front of the team being held, signaling and communicating to please wait. This is done to prevent a log jam of opposing players at the exit door, where an altercation can easily be started and should be followed each time the teams leave the ice during an intermission.
Be sure to monitor all of the players leaving the ice all the way until they enter their dressing room. This quiet presence and awareness will help prevent off-ice situations from occurring and will enable the officials to identify players who incite opponents or spectators. While players are leaving the ice, limit conversations with players and coaches to rules questions or other pertinent topics. Avoid discussions about judgment calls or your partner. Maintain a professional and courteous appearance at all times and compliment players on a nice game as they stop to offer their respect with a handshake for a job well done.
Leaving The IceAs you leave the ice surface, be sure to maintain a professional appearance and demeanor. Keep your helmet on and your sweater zipped until you have entered your dressing room. Move quickly to your dressing room and avoid conversations with spectators. It is also tempting to make a comment directed at a spectator who was hounding you the entire game. Refraining from doing so will uphold your integrity and not give the spectator the satisfaction that you were affected by the remarks. Maintaining a professional attitude until behind closed doors will portray officials who are in control and take pride in their work.
Officials’ Dressing RoomThe officials’ dressing room after the game is the place where the official can finally relax and let it all hang out. The time spent in here getting changed can also be used as a time to review the game with your partner(s). Discuss any unusual situations and review those areas where you thought you could have performed better. Be sure to also praise your partner(s) for those areas where the job was done well. As before the game, be sure to respect your partners’ privacy by not allowing any visitors into the dressing room. There will be plenty of time after you are changed to catch up on the latest or discuss the game with your guest.
Clean up the dressing area prior to leaving the room to enable the next officiating team to experience the same clean atmosphere you were entitled to prior to your game. Respecting the cleanliness of the officials’ dressing room will also be appreciated by the arena staff who will show you the same respect the next time you are in the arena. Finally, if a game is scheduled immediately following your game, be sure the next officiating team is present to work the game. If not, your willingness to stick around and fill in for the missing official(s) will be greatly appreciated and may prevent an embarrassing situation for your local group of officials.

65USA Hockey Basic Officials Manual
Signing The ScoresheetAs simple as it may seem, officials often have a difficult time following the proper procedure for signing the scoresheet. Remember, the scoresheet is an official record for the game which was just completed. League standings, statistics, and possible suspensions are all documented on the scoresheet and must be legible enough to interpret at a later time. Your signature acknowledges all of the information is accurate and the game was contested before registered and qualified officials. The following guidelines outline the proper procedure for scoresheet maintenance.
• Check for accuracy and completeness. Make certain any unusual penalties or situations were documented correctly.
• Note any special circumstances in the comment area. These include game misconducts, match penalties or other unusual occurrences which cause a delay (broken glass, injured player, etc.)
• Cross off any blank areas such as the players’ roster, penalty section, and goals and assists records. This prevents anything from being added after the fact.
• Sign your name legibly. Your signature verifies the accuracy of the scoresheet and you may need to be contacted if any questions arise.
• Keep a copy of the scoresheet for your records. This will enable you to keep track of your games and will also provide you with a reference when a league administrator contacts you with a question.
Post-Game Duties and Responsibilities ReviewThe following questions highlight some of the key points you should have picked up from this chapter. Take a few minutes to review what you have learned about post-game duties and responsibilities. When finished, you can compare your answers to the correct answers that appear in the back of this manual.
1. Is the official’s job done once the horn sounds to conclude the game?
2. Where should the officials position themselves while viewing the handshake line?
3. List three things you should do before you sign the scoresheet?

66 USA Hockey Basic Officials Manual
COMMUNICATION WITH PLAYERS AND COACHES
Much of this manual has focused on the official’s non-verbal communication techniques such as penalty signals and body language. Although the majority of an official’s communication with the players, coaches and spectators is done non-verbally, there are instances where effective verbal communication is necessary during the course of the game. This may occur both during the play and during stoppages and will be an effective way for the official to gain credibility.
Why Use Verbal Communication?The answer to this question is really quite simple. Verbal communication is the most effective way of communicating. An official who offers a brief, precise and accurate explanation will minimize confusion and gain credibility by showing the participants he/she knows what is going on. Communicating verbally also promotes the spirit of cooperation and is consistent with the official’s role as a teacher.
The manner in which an official verbally communicates will be a reflection of the attitude of the official. An official who refuses to explain a rule interpretation to a team captain appears to be authoritative and is not willing to cooperate with the participants.
On the other hand, an official who is willing to give a brief and accurate interpretation is seen as an official who is willing to give the same respect to the participants that is expected from them. The communicating official is always honest and open to filling his/her role as a teacher of the game. This becomes an effective way to gain respect and improve the overall acceptability of the official.
When To Use Verbal CommunicationVerbal communication can be an effective tool both during play and during stoppages. Here are some examples when verbal communication by the official may be necessary.:
• During the assessment of a penalty – As outlined in the procedure for assessing penalties, an official should verbally communicate the team color, player number and the infraction when a penalty is assessed. This notifies the players as to who committed the infraction while also explaining the stoppage to the penalty timekeeper.
• Close plays at the blue line or icings – Verbal communication in these instances will notify your partner(s) and the players as to the proper call while reinforcing the fact that you saw the play and are confident in your decision.
• When a rule or ruling needs to be explained – Often, a call may be made or a situation occurs where the players or coaches simply do not understand what happened.
Offering them a brief explanation as to your interpretation or a clarification on the rule will help them understand the situation better while giving you an opportunity to let them know you know what you are doing.
• To explain multiple penalty situations and penalty expirations – Participants are often confused during multiple penalty situations or as to the proper expiration of penalties after a goal is scored. A brief explanation as to the penalty situation (especially involving coincident penalties) will go a long way to eliminate confusion and promote credibility of the officiating team. An explanation may also be necessary to the off-ice officials in order to eliminate mistakes.
Examples of communicating during play could include: “Move the puck” when play stops along the boards; “Keep your sticks down” to players who are jostling for position in front of the goal; and “Let go” to a player who briefly grabs another player or holds him/her against the boards. The use of this type of verbal communication may prevent an unnecessary stoppage or the need to assess a penalty.
A common mistake is to over-verbalize in these situations. Doing so in every instance gives the impression the official is coaching the players or does not want to assess a penalty. When a verbal warning is given, the official must be prepared to stop play and assess the appropriate penalty if the action continues. Failure to do so will simply create a “boy who cried wolf” syndrome that will confuse the players.
Talking To Coaches vs. CaptainsThe Official Playing Rules clearly state the captain of the team is the only participant who is eligible to talk to the officials. However, common sense tells us that in the spirit of cooperation, there may be instances when the official should communicate with the coach or other players. The following chart describes some instances when it may be best to communicate with one or the other.
Talk to the coach when:• Younger level of players are involved• There is a complicated situation that will be difficult
for the captain to translate• The coach is calm and has a reasonable question or genuine
concern• The captain is unruly or unreasonable
Talk to the captain when:• Older players are involved• A simple situation occurs that can easily be translated to the
coach• The coach is unruly or unreasonable

67USA Hockey Basic Officials Manual
Communication TipsEffective communication skills require a wide range of qualities. Although officials who are effective communicators tend to be more successful, following these communication tips will help every official become a more effective communicator.
• When speaking one-on-one, be soft-spoken and honest. There is no reason other participants need to hear your conversation. In addition, a soft-spoken style will serve as a calming effect on the player or coach.
• If you make a mistake, admit it. A simple “I’m sorry, Coach, I made a mistake” will let the coach know you are honest and that you make mistakes too. However, if you find yourself admitting you made a mistake on a regular basis, you may want to take a close look at your officiating skills. Officials who are constantly apologizing lack credibility and put themselves in difficult situations.
• Make an effort to answer all reasonable questions briefly and accurately. A team or player who does not understand a rule or interpretation will only become frustrated when the official refuses to answer a legitimate question.
• Avoid discussions on judgment. Limit your communication to issues regarding the rules or their interpretation. Your judgment is not fair game for questioning and officials who discuss their judgment generally end up in difficult situations.
• Avoid undermining other officials. Keep in mind you are an officiating team. Criticizing your teammates will only put the team’s credibility in question. Remember, the chances are you will be scheduled to officiate together again.
• Be as specific as possible when verbalizing. The more specific you are, the more easily the situation will be understood. Being specific will also minimize the misinterpretation of your statements.
• Avoid threatening players and coaches. When you threaten to assess a penalty or tell the players and coaches that you will call every infraction prior to the game, you are putting yourself in a difficult situation that you must be prepared to back up every time. For example, telling the players before the game that you are going to call every high-stick infraction may be effective up until the point when what they perceive to be a high stick occurs and you did not see it or choose not to call it. In this instance, you have lost credibility. Instead, remind the players to keep their sticks down so we can have a nice clean game. This approach sends the same message without backing the official into a corner.
• Avoid the “high-and-mighty syndrome” where you are always right and they have no right to question your calls. This will only frustrate the players and make your job more difficult.
• Never use obscene or vulgar language. We penalize players for using foul language and we should certainly hold ourselves to the same standard.
Communication with Players and Coaches ReviewThe following questions highlight some of the key points you should have picked up from this chapter. Take a few minutes to review what you have learned about communication with players/coaches. When finished, you can compare your answers to the correct answers that appear in the back of this manual.
1. How does an official look when they refuse to explain a rule interpretation to a team captain?
2. When are some good times to use verbal communication?
3. Are there times you should talk to a coach and not to a captain? If yes, give examples.

68 USA Hockey Basic Officials Manual
ROLE OF THE SUPERVISOR
As an official, you will find many different avenues to learn. Attending seminars, reading manuals and actually working games will be valuable experiences for the new official to draw from. The most important avenue an official has to learn from may be the supervisor. In the case of a new or younger official, the supervisor role may actually be taken by a variety of people. This section will take a look at the various sources of supervisors and what the new officials should expect from them.
The Game AssignorThe game assignor is the first person an official should get to know. A good relationship with the assignor is important to provide the opportunity to work games and advance. Many areas actually assign by committee in order to eliminate preferential treatment and treat all officials fairly. This process is unnecessary provided the game assignor is doing his/her job well.
The following guidelines are what should be expected from every game assignor. Assignors who do not adhere to these guidelines are doing a disservice to the teams and the officials.
• The game assignor must be willing to involve everybody.• The game assignor should make a special effort to involve
new officials by assigning them with mentors or experienced officials. This may take a little extra time, but the short-term and long-term benefits are enormous.
• The game assignor should communicate with the youth hockey administrators regarding the assignments and address their concerns in a timely manner.
• The game assignor must be fair in assigning officials. No one benefits from an official who works several games a day when other qualified officials are available.
• The game assignor must only assign officials to the appropriate skill levels of each game. An official who is not skilled enough to work a particular level should not be assigned to that level. Doing so affects the official’s ability to develop and also affects the environment of the game. The game assignor should check with the local supervisor of officials when in doubt as to the registration status of any official.
• The game assignor must allow for the development of officiating skills.
• The game assignor should avoid over exposing an official to a particular team and vice versa. The team does not want to see the same official every game and most officials find it difficult to work a particular team more than a few times a season.
Experienced OfficialsAnother source of information for the new official will be the senior (or experienced) officials in the local area. Your first games should be spent working with these experienced officials and they will be in an excellent position to provide constructive feedback. They have already learned a great deal from their mistakes and more often than not will be willing to answer your questions and help you become a better official. Here are some things you should expect from experienced officials.
Senior officials should:• Provide support and information that will help you in your
officiating.• Be willing to work with less experienced levels.• Be a source of information in regards to locating equipment
and other officiating supplies.• Be available to help you with the exam and answer rules
questions during the course of the season.• Help you work with the game assignor to ensure you are
assigned an adequate number of games.• Make a special effort to create a positive officiating
experience.• Only teach approved USA Hockey procedures and
techniques.• Use a soft-spoken (not intimidating) approach when
working with younger officials.• Be honest when discussing performance and provide the
means to improve your skills.• Only use other officials as positive examples.
USA Hockey EvaluatorsThe final piece of the supervisor puzzle for new officials is the USA Hockey evaluator. These individuals are trained by USA Hockey to provide performance feedback to all officials. In the ideal setting, each official will be evaluated at least once per season by one of the trained personnel. Some key points about evaluators are listed below and should be a basic understanding of all officials.

69USA Hockey Basic Officials Manual
Evaluators:• Are really considered “coaches” of the officiating team.• Will provide instructional follow-up which reinforces
materials presented at the seminar and are covered in the officiating manuals.
• Are dedicated to improving the quality and consistency of officiating.
• Are trained to provide positive feedback.• Are trained to provide tips on how to overcome
weaknesses.• Should encourage continued development and
improvement.
• Are objective in their assessment.• Have a thorough understanding of USA Hockey rules and
procedures.• Are trained to develop and encourage a positive
relationship.• Should be good listeners and are sympathetic to the needs
of the official.• Must be honest in their assessment.• Must promote enthusiasm towards the perfection of
officiating skills.• Should help officials establish goals for future
assignments.
Role of the Supervisor ReviewThe following questions highlight some of the key points you should have picked up from this chapter. Take a few minutes to review what you have learned about the role of the supervisor. When finished, you can compare your answers to the correct answers that appear in the back of this manual.
1. Why is it important for an official to get to know his/her assignor?
2. What are some of the things expected from senior officials when working with newer officials?
3. Who is considered to be the “coaches” of our officiating team?

70 USA Hockey Basic Officials Manual
ANSWERS TO REVIEW QUESTIONS
The following consists of the correct answers to the review questions that have appeared at the end of each chapter. Compare these correct answers to your answers for each of the questions in order to find out how well you understand basic officiating philosophies and procedures.
Personal Appearance Review1. Create a positive perception by players, coaches and
spectators. Create a positive first impression. Assists in defining your role as an official.
2. Helmet (designed for ice hockey) and ice hockey skates.3. The current USA Hockey crest should be sewn on the left
chest of the sweater.4. Whistles (at least two), Official Rule Book, Officiating
Manuals, Playing Rules Handbook, equipment bag, tape (both white and black), telephone numbers of assignors/ supervisors/officials, cut skate laces, soap and towel.
5. Your personal appearance both on and off the ice is something that you can control as an official. By taking control of your own appearance, you can promote a positive image that will give you instant respect and credibility and will make your job as an official much easier.
Physical Conditioning Review1. An official who is not in good physical condition will not
look sharp, will be more susceptible to injury and will have a difficult time moving up the officiating ladder.
2. Stretching will establish flexibility, help minimize injury and maximize performance.
3. Aerobic – Cardiovascular based – walking and jogging Anaerobic – Muscle based – weight lifting and sprinting.
Fundamentals of Skating Review1. Skating is the building block to successful officiating.
An official who skates efficiently will be able to get into position. The ability to be in position and skate smoothly will also contribute to the official’s ability to see the play and enhance judgment.
2. Knee bend.3. Skates shoulder width apart, weight on inside edges,
knees bent, head up.4. Heel and extends through the blade to the toe5. The weight is completely shifted to the glide leg.
Pre-Game Duties and Responsibilities Review1. Be punctual, check equipment upon arrival at rink,
officials’ dressing room is designed to be your private quarters. Use common courtesy when working with partners of different gender.
2. Three to five minutes prior to the teams.
3. To be able to repair any defective areas prior to the start of the game.
Conducting Face-offs Review1. Poorly conducted face-offs convey a lack of confidence
by an official and can give an unfair advantage to one of the teams involved.
2. The official who will be dropping the puck.3. To drop the puck, simultaneously bring the arm out and
down while bending at the knees.4. The official should pause and view the play. When the
area is clear, the official will backwards skate to the boards and then react to the play to assume the proper position.
Positioning Review1. Positioning. Without the knowledge of where to be on the
ice and the ability to get there, the official will struggle in all aspects of officiating. Proper positioning is a must to maintain adequate field of vision and stay out of the way of play..
2. Officials will find themselves in the way of play. It is an unsafe area and will minimize their potential field of vision
3. 5-10 feet off the boards4. Home base is where a line connecting the end zone face-
off spot would intersect the goal line.5. Golden Triangle.6. Face players benches after goals, and timekeeper at the
start of periods.7. Inside the end zone with both skates completely in the
attacking zone.8. This position gives the linesman the best possible view
of the determining edge of the blue line and will also prevent the linesman from keeping the puck inside the zone if the puck were to strike the linesman.
9. When the last attacking player leaves the end zone.10. When his/her partner gives the release signal.11. The linesman who did not conduct the face-off must be
prepared to make the call at either line.12. The scoring team’s bench.13. Backwards skate to the other blue line to keep play in
front of him/her and to be in the proper position to call off-sides.
14. The referee.
Calling Off-Side Violations Review1. Point at the face-off location for when an off-sides
occurs. Washout – when a legal play has been completed. Delayed Whistle – used in those classifications where the delayed off-sides rule is used.

71USA Hockey Basic Officials Manual
2. Puck in neutral zone – The determining edge is the edge that is closest to the end zone. Puck in end zone – The determining edge is the edge that is closest to the neutral zone.
3. The zone in which the puck is.
Calling Icing Infractions Review1. The back official is responsible for initiating the potential
icing infraction by signaling a slow whistle. His/her only determination is whether the puck was shot from behind the center red line.
2. The front official is responsible for determining whether the icing is completed.
3. Twice.4. Yes, but only when a shorthanded situation is realized or
his/her partner is screened from seeing the play. All other opinions on icing are left up to his/her partner to tell if the player could have played the puck or if the team not icing the puck played it.
Establishing Face-Off Locations Review1. Any of the nine designated face-off spots.2. The nearest face-off spot from where the puck was shot
or passed. At a neutral zone face-off spot. At an end zone face-off spot for intentional off-sides.
3. The end zone face-off spot nearest to where the puck was originally shot.
Assessing Penalties and Other Infractions Review1. In this order: Give delayed signal, when offending team
gains possession of the puck, the official will stop, blow whistle, point to player who committed the infraction, verbalize the number of the player and color of the team, and signal the infraction.
2. Twice. Once where play has been stopped, and once when reporting the infraction to the penalty timekeeper.
3. From the top of the shoulders to the officials waist. It keeps the official from blocking his/her view of the players.
4. No. It will lock the official into making an incorrect call. Use the time skating to the penalty bench to finalize a decision on the severity of the infraction.
Judgment Review1. The role of the official at the lower levels of hockey is
simply one of a teacher.2. No. The importance of rule knowledge never changes.
Awarding Goals and Assists Review1. Yes2. Pivoting backwards in order to watch all the players and
maintain vision.3. Blow whistle to stop play – give washout signal – skate
over to scorekeeper’s bench and explain why the goal was disallowed.
Injured Players Review1. No. If the official has any doubts as to whether the
injury is of a serious nature, the official must stop play immediately and attend to the injured player. It is always a good idea to err on the side of caution and stop play when a question to the severity of the injury is present.
2. He/she should be monitoring the other players to make sure a potential altercation will not take place.
3. Officials tend to be a pretty good target for a coach’s frustration. The officials should position themselves far enough away to minimize the potential for verbal abuse and avoid unpleasant situations.
Equipment Regulations Review1. The individual player.2. Hockey Equipment Certification Council3. One of our top priorities is to promote a safe environment
for all participants.
Change of Players Review1. Allow play to continue as this does not call for a penalty
for too many players on the ice to be assessed.2. The back official.
Altercations Review1. Awareness and hustle.2. Instruct non-participating players to go to their bench,
move equipment out of the way, officials remove their whistles, communicate with your partner, never enter an altercation by yourself, never grab a player from behind, wait for the fight to slowdown, always be cautious of skate blades, talk to the players.
3. Let go of the player. Escort your player all the way over to the penalty bench constantly remaining between him/her and the opponent. Once at the penalty bench, shut the door behind the player.
Penalty Shot Procedures Review1. The player must be in possession and control of the puck,
beyond the defending blue line, no opponent present between the player and opposing goalkeeper, the player must be fouled directly from behind, the player must have been deprived of a reasonable scoring opportunity.
2. The back official is positioned at center ice facing the benches. This official is responsible for watching all the non-participating players to ensure no infraction is committed and no potential for an altercation exists.
Off-Ice Officials and Their Role Review1. Off-ice officials are an extension of the officiating team
and are necessary for the successful completion of the game.

72 USA Hockey Basic Officials Manual
2. Records all pertinent information on the official scoresheet, including the teams’ rosters, goals-assists and penalties. Makes sure the scoresheet is properly completed and distributed to the appropriate people. May also serve as the announcer.
3. First remind the off-ice official of their duties and responsibilities and inform them that inappropriate behavior will not be tolerated. If the behavior continues, remove them from the game.
Post-Game Duties and Responsibilities Review1. No. There are still several responsibilities that need to be
taken care of and each one is as important as officiating the game.
2. One on each side of the handshake line staggering themselves in order to have one official towards each end of the line.
3. Check for accuracy, note any special circumstances, cross off any blank areas, sign your name legibly and keep a copy for your records.
Communication with Players/Coaches Review1. Authoritative and not willing to cooperate with the
participants.2. During the assessment of a penalty, close plays at the
blue line, when a rule or ruling needs to be explained, to explain multiple penalty situations.
3. Yes. In the younger age groups, to explain a complicated situation, when the coach is calm and has a reasonable question or the captain is unruly and unreasonable.
Role of the Supervisor Review1. A good relationship with the assignor will be necessary
to provide an opportunity to work games and advance to higher levels.
2. Provide support and helpful information, willing to work with lesser experienced officials, give direction as to where to obtain equipment, answer rules questions, work with the assignor to make sure you are getting an opportunity to work games, make special effort to create a positive officiating experience, teach proper procedures and mechanics, be patient and soft-spoken, be honest when providing feedback and provide a positive example of a successful official.
3. The USA Hockey Evaluators.
Congratulations on the successful completion of the USA Hockey Basic Officials Manual.

73USA Hockey Basic Officials Manual
ACKNOWLEDGEMENTS
A special thanks goes out to the following individuals who contributed to this publication. Your commitment and dedication to making this program a success is greatly appreciated.
Pete Anderson
Scott Brunton
Lyman Dimond
Jim Doyle
Wayne Fleming
Bob Hayden
Milt Kaufman
David Kemp
Bill Leslie
Dave LaBuda
Chris Milles
Brett Parson
Perry Petterle
Dan Rampino
Mike Shapey
Mike Sultzbach
Mark Wilkins


1775 Bob Johnson Drive • Colorado Springs • Colorado • 80906-4090(719) 576-USAH
www.usahockey.com