use and care manual grill-l ge with self-cleaning ... · self-cleaning conventional and convection...
TRANSCRIPT

mmmJENN.AIRUse and Care Manual
Grill-l__ge withSelf-Cleaning Conventional
and Convection OvenModels SVE47500 and SVE47600
Model SVE47600

Congratulations on your choice of a Jenn-Air grill-range. The indoor grillingof meats, fish or fowl is one of the most attractive and succulent methodsof preparing these foods ... a unique flexibility made possible byJenn-Air'spatented integral ventilation system.
Your Jenn-Air self-cleaning oven combinesthe best of fourcooking methods,conventional baking or roasting, convection baking, convection roasting andbroiling. (Note: Only Model SVE47600 has the convection options.)
The Jenn-Air convection oven is actually a conventional oven that circulatesheated air within the oven. As both bake and broil heating elements cycle onand off with the thermostat, a fan keeps the heated air circulating around thefood, The constantly recirculating heated air in the convection oven stripsaway the layer of cooler air that surrounds the food. Consequently, manyfoods cook more quickly. Evenly distributed heat makes multiple rackcooking possible. Convection roasted meats retain their natural flavor andjuiciness with less shrinkage than conventional roasting.
In addition to the many exclusive benefits of convection cooking, your Jenn-Air oven is also a fine full featured conventional bake and broil oven. You cancook your "old favorite" recipes as you have in the past. The conventionalbake oven also gives you the flexibility of preparing various foods whenconvection cooking may not be as beneficial, as when cooking foods incovered casseroles or clay pots. The broil element is convenient for topbrowning and oven broiling of foods.
Before you begin cooking with your new range, please take a few minutes toread and become familiar with the instructions in this book. On the followingpages you will find a wealth of information regarding all aspects of using yournew range. By following the instructions carefully, you will be able to fullyenjoy and properly maintain your range and achieve excellent results with thefood you prepare.
Should you have any questions about using your Jenn-Air range or need aUse and Care manual for your cooktop cartridge, write to us. Be sure toprovide the model number.
Jenn-Air Customer Assistancecto Maytag Customer ServiceP.O. Box 2370Cleveland, TN 37320-2370

ApplianceUsageBeforeYou CallforService..........................................................................................46-48
CaringforyourRangeAccessPanel.............................................................................................................44
AdjustOven Temperature..........................................................................................44ChildProtectionLock.................................................................................................43
Cleaning Other Parts ofYour Range ..................................................................... 42-43Oven Light Bulb ......................................................................................................... 45
Range Components............................................................................................................. 8Safety Precautions ........................................................................................................... 4-7
Using the Cooktop and GrillAccessories.................................................................................................................. 50-51
CooktopCartridgesHomeCanning ........................................................................................................... 11Installation ................................................................................................................. 11
Cookware .......................................................................................................................... 12
DuctingInformation ........................................................................................................... 49Gritling
Cleaning ................................................................................................................ 16-17GrillingGuide .............................................................................................................. 15GrillingTips ................................................................................................................ !6Installation .................................................................................................................. 13Usage ......................................................................................................................... 14
Surface Controls................................................................................................................ 10VentilationSystem ............................................................................................................... 9
Using the OvenBaking
BakingChart .............................................................................................................. 27Causes of Cake Failure ............................................................................................. 28Convect Baking..................................................................................................... 28-29General Recommendations ....................................................................................... 26
Broiling ......................................................................................................................... 34-35Clock Controls
Clock Controlled Baking or Roasting .................................................................... 24-25Time of Day Clock ..................................................................................................... 22Timer ......................................................................................................................... 23
Oven CleaningSelf-CleaningProcess .......................................................................................... 3641
Oven OperationOven ControlPanel ............................................................................................... 18-19Rack Positions ........................................................................................................... 21Setting Controls ......................................................................................................... 20
RoastingConvect Roasting ...................................................................................................... 32FrozenConvenience Foods ....................................................................................... 33Roasting Chart ........................................................................................................... 31General RoastingRecommendations ........................................................................ 30
3

Read before operating your range
All appliances -- regardless of the manufacturer -- have the potentialthrough improper or careless use to create safety problems. There-fore the following safety precautions should be observed:
1. Be sure your appliance is properly installed and grounded by aqualified technician.
2, Never use your appliance for warming or heating the room.3. Children should not be left alone or unattended in area where
appliance is in use. They should never be allowed to sit or standon any part of the appliance.
4, Wear proper apparel, Loose-fitting or hanging garments shouldnever be worn while using the appliance.
5. Do not repair or replace any part of the appliance unless
specifically recommended in this manual. All other servicingshould be referred to an authorized Jenn-Air Service Contractor.
6, Flammable materials should not be stored in an oven or nearsurface units.
7, Do not use water on grease fires. Smother fire or flame or usedry chemical or foam-type extinguisher,
8, Use only dry potholders. Moist or damp potholders on hot
surfaces may result in bums from steam. Do not let potholdertouch hot heating elements. Do not use a towel or other bulkycloth,
g, Use proper pan size, Many appliances are equipped with one
or more surface units of different size. Select cookware havingflat bottoms large enough to cover the surface unit heating
element. The use of undersized cookware wiltexpose a portionof the heating element to direct contact and may result in
ignition of clothing, Proper relationship of cookware to heatingelement will also improve efficiency and performance,
10. Never leave surface units unattended at high heat settings. Boil
over causes smoking and greasy spitlovers that may ignite,

11. Glazed cookware -- only certain types of glass, glass-ceramic,
ceramic, earthenware or other glazed cookpots are suitable forrangetop surface without breaking due to the sudden change
in temperature. Use only such cookware as you know has beenapproved for this purpose.
12.Cookware handles should be turned inward and not extend
over adjacent surface heating elements to avoid bums, ignitionof flammable mate rials and spillage due to un intentional contactwith the cookware.
13.CAUTION -- Do not store items of interest to children in
cabinets above a range or on the backguard of a range --children climbing on the range to reach items could be seriouslyinjured.
14. Do not soak or immerse removable heating elements in water.15. Do not touch surface units or areas near units, heating eJements
or intedor surfaces of oven. Surface units or heating elements
may be hot even though they are dark in color. Areas nearsurface units and intedor surfaces of an oven may become hotenough to cause burns. During and after use, do not touch or
let clothing or other flammable materials contact these areasuntil they have had sufficient time to cool. Other surfaces may
become hot enough to cause burns --among these surfacesare the cooktop, the upper door frame and glass, oven vent
opening and surfaces near the opening, and the top edge of thecontrol panel.
16. Use care when opening oven door. Let hot air or steam escapebefore removing or replacing food.
17.Do not heat unopened food containers. Build-up of pressure
may cause container to burst and result in injury.18. Keep oven vent ducts unobstructed. The oven vent is located
underneath the air grille.19.Always place oven racks in desired location while oven is cool.
If rack must be moved while oven is hot, do not let potholder
contact hot heating element in oven.20.Do not clean door gasket. The door gasket is essential for a
good seal. Care should be taken not to rub, damage or move
the gasket.
21.Do not use oven cleaners. No commercial oven cleaner or
oven liner protective coating of any kind should be used in or
around any part of the oven.22.Clean only parts listed in this manual and use procedures
recommended.
23. CAUTION: BEFORE SELF-CLEAN ING THE OVEN, REMOVEFOOD, BROILER PAN AND OTHER UTENSILS.
24. Listen for fan. A fan noise should be heard during the broil and
cleaning cycles. If not, call a serviceman before self-cleaning
again.25. Do not cook on glass-ceramic cooking surface if the cooktop is
broken. Cleaning solutions and spillovers may penetrate thebroken cooktop and create a shock hazard. Contact anauthorized Jenn-Air Service Contractor.
26.Clean glass-ceramic cooktops with caution. If wet sponge orcloth is used to wipe spills on a hot cooking area, be careful to
avoid steam burns. Some cleansers can produce noxiousfumes if applied to a hot surface.
27.Do not operate with damaged cooking element after anyproduct malfunction until proper repair has been made.
28.Keep all switches "OFF' when unit is not in use.
29. Do not allow aluminum foil to contact heating elements.30. On conventional element cartridges make sure that drip pans
are in place. Absence of these pans during cooking maysubject wiring or components underneath to damage.
31. Do not use aluminum foil to line surface unit drip pans, grill basinor oven bottom. Installation of these liners may result in electricshock or fire hazard.
32.WARNING. To reduce the risk of tipping of the appliance, the
appliance must be secured by properly installed anti-tip devices.To check if devices are installed properly, remove the access
panel and verify that the anti-tip devices are engaged.
6

33.This appliance has been tested for safe performance using
conventional cookware. Do not use any devices or accessoriesthat are not specifically recommended in this manual. Do not
use eyelid covers for the surface units, stovetop grills, or add-on convection systems. The use of devices or accessories thatare not expressly recommended in this manual can create
serious safety hazards, result in performance problems, andreduce the life of the components of the appliance.
34. PREPARED FOOD WARNING: Follow food manufacturer's
instructions, if a plastic frozen food container and/or its filmcover distorts, warps or is otherwise damaged during cooking,immediately discard the food and its container. The food couldbe contaminated.
IMPORTANT SAFETY NOTICE AND WARNING
The California Safe Drinking Water and Toxic Enforcement Act of 1986(Proposition 65) requires the Governor of California to publish a list ofsubstances known to the State of California to cause cancer or repro-ductive harm, and requires businesses to warn customers of potential
exposures to such substances. Users of this appliance are herebywarned that when the range is engaged in the self-clean cycle, theremay be some low level exposure to some of the listed substances,
including Carbon Monoxide. Exposure to these substances can beminimized by properly venting the range to the outdoors during the
self-clean cycle.
- SAVE THESE INSTRUCTIONS -
7

VentilationSystemandAir OvenVent
Clock_d Oven
Controls
Surface. ,SurfaceIndicator Indicator
Lights Lights
Controls Controls
• Use to capture smoke and steam. (See p. 9.)
• Will glow when a surface unit is on. (See p. 10.)
• UsetoprovideflexibLlityinsettingselectionwhenusingthecooktopelements°rgrillelements. (See p. 10.)
• Use the electronic touch controls to set Clock or Oven functions. (Clock - see pp.
22-25, Oven Operation - see pp, 18-21.)

Thebuilt-inventilationsystemremovescookingvapors,odorsandsmoke fromfoods preparedon the cooktop, grill and grill accessories, Regular use of this system will insure a morecomfortableand less humidkitchenwhichisfree ofheavy cookingodorsand fumes thatnormallycreate a frequent need for cleaningand redecorating.
• The downdraftventilationsystem featuresa two speed fan.The fan positionsare: HI, Lo, and OFF. To turn on theventilationsystem, touchthe Fan Pad. The fan wiltcomeonat the Hi speed. To set on Lo speed, touchthe Fan Pad(once from Hi settingor twice from theOFF position).
:_ _'_ " : ' _. _ .............. :_........ '_ •...... _ _ _ '_i _ ......... _ ..... _ : ; _!" ......... ' _ ::_' ! _ _,'_!_i_ !
• A beep will soundevery time theFan Pad is touched.• ToturntheventitationsystemOFF, touch theFanPad (oncefrom Lospeedor twice from
Hi speed).• The ventilationsystem wiltoperateautomatica/iy on Hi speed when thegrillelement is in
use. During grilling,the fan speed is automaticallyset for the Hi setting AND cannotbechangedto Lo speed.
• Use the Hi fan speed for capturingsteam. Use Lo fan speed for capturing smoke whenpan frying.
• Thefancanbeusedtoremovestrongodorsfromthekitchenaswhenchoppingonionsnearthe fan.
• Besides usingthe ventilationsystem to remove cookingvaporsand fumes, itcan be usedtocool bakedpiesor cakes. To coolan item, set itonthe air grilleand turnon the fan. Theair beingpulledover the item willquickly coolit. Be carefulnot to cover the oven vent orthe entire air grille.
Air GrilleThe air grille liftsoffeasily. Wipe dean orwash insink withmildhouseholddetergents, ttmaybe cleaned in thedishwasher. Note: The ovenvent is located undertheair grille, When usingorcleaningtheoven,hotand moist airmay be noticedin thisarea. Becarefulnotto spillanythingintothis vent, Remove theair griUebefore self-cleaning the oven, (See p, 36.)FilterTurn offventilationsystem beforeremoving. The filterisa permanenttypeandshouldbecleanedwhensoiled. Clean in sinkwithwarmwaterand liquiddishwashingdetergent or in dishwasher. Important: Filtershouldalways be placedat anangle. As youfacethefrontofthe range,thetopof the filtershouldrestagainst the leftsideofthe vent openingand the bottom of the filter shouldrest against the right side of theventilationchamberat the bottom.DO NOT OPERATE SYSTEM WITHOUT FILTER.Ventilation ChamberThisarea, whichhousesthefilter,st_ouldbe cleanedintheeventof spitlsorwheneveritbecomescoatedwitha filmof grease. It maybe cleanedwithpapertowel,dampcloth,or spongeand mild
householddetergent. 9

• Since the controlsare a push-turn type, they must be pushed down before turning. To set(fromthe OFF position),push down on the controlknoband turn in either directiontodesired setting.
• When thecontrolisinany position,other thanOFF, itmaybetumed in anydirectionwithoutpushingdown.
• A green indicatorlight willglow when a surface heating element is ON. There are fourindicatorlights,one for each element.
1. 2.
1. Left rear element (rear Energy-Saver orstandard grill)2. Left front element (front Energy-Saver)3. Rightfront element (front Energy-Saver or standard grill)4. Right rearelement (rear Energy-Saver)
NOTE: The "Energy-Saver" grill element (right) is included with Model-!
SVE47600 and may bepurchased as an option for other models, itpermitsutilizing onlyha fofthe grill area, f desired, orus ng different settings for thefront and rear position of the element. When using this element, both
i cooktop controls, front and rear, must be turned on in order to use the fu/!grill area.NOTE SVE47500 Model. Only the left rear or the right front controls mustbe turned on to use the futl grill.
The sizeand type of cookwareandthe amountand typeof food being cookedwiltinfluencethesettingneeded for best cooking results. Electricalvoltagemay alsovary, whichwillaffect theneededcontrolsetting. The settingindicated shouldserveasa guidewhileyoubecomefamiliarwithyour range.
Hi
7-10
5-6
3-4Lo-2
A fast heat to stal_cooking quickly, to bring liquidsto a boil, to preheat oil for deepfat frying. Use for most grilling.(Medium High) For fast frying or browning foods, to maintain rapid boil of largeamounts of food, to maintain oil temperature for deep fat frying.(Medium) For foods cooked in a double boiler, saut6ing, stow boil of largeamounts of food, and most frying.(Medium Lo) To continue cooking foods started on higher settings.Maintaining serving temperatures of foods, simmering foods, melting butter orchocolate.
The controlsoffer flexibility insettingselection. On settingsother thanHi, you may adjustthecontrolaboveorbelowthenumberedsettingfor best results. Thisappllestosettingswhenusingcooktop cartridgesorwhen usingthegrillorany ofthe gritlaccessories. Suggestedsettingsareprovidedasgeneral guidelines.
10

Cooktopcartridges,either conventional coil, halogen, radiant or solid element, can beinstalled on either side of the range. (See page 51 for all available cartridges and modelnumbers.)
To Install Cartridges1. Jfthe grill element, grill-rocks or grates are in place, remove before instaJlinga
cooktop cartridge. Clean porcelain basin pan of any grease accumulation. (Seepage 17 for cleaning recommendations.)
2. To install any of the optional cooktop cartridges, be sure controls are turned OFF.
Positionthe cartridge terminal plug towards the terminal receptacle. This receptacleis located at the front of the left side and at the back of the right side of the range.
3. Slide the cartridge towards the receptacle until the cartridge terminal plug iscompletely engaged.
4. Lower the opposite end of the cartridge into the rangetop until it is flush with thesurface. Your range is now ready to use.
To Remove Cartridges1. Controls must be OFF and the cartridge should be cool.
2. Lift up on the "tab" located on the cartridge until top of cartridge clears the openingon the range by about 2 inches. Lifting the cartridge too high while still engaged inthe receptacle could damage the terminal plug.
3. To disengage terminal, hold cartridge by the sides and slide away from the terminalreceptacle. Lift out when fully unpiugged.
4. A storage tray, Model A350, is available and can be used for storing a cartridge,5. Do not stack cartridges where they may fall or be damaged. Never store other
materials on top of the glass-ceramic cartridges since this could damage or scratchthe surface.
Canning should be done on the conventional coil cartridge only. Canning elementaccessory, Model A145A, makes itpossible to use large canners with the conventionalcoil cartridge.
11
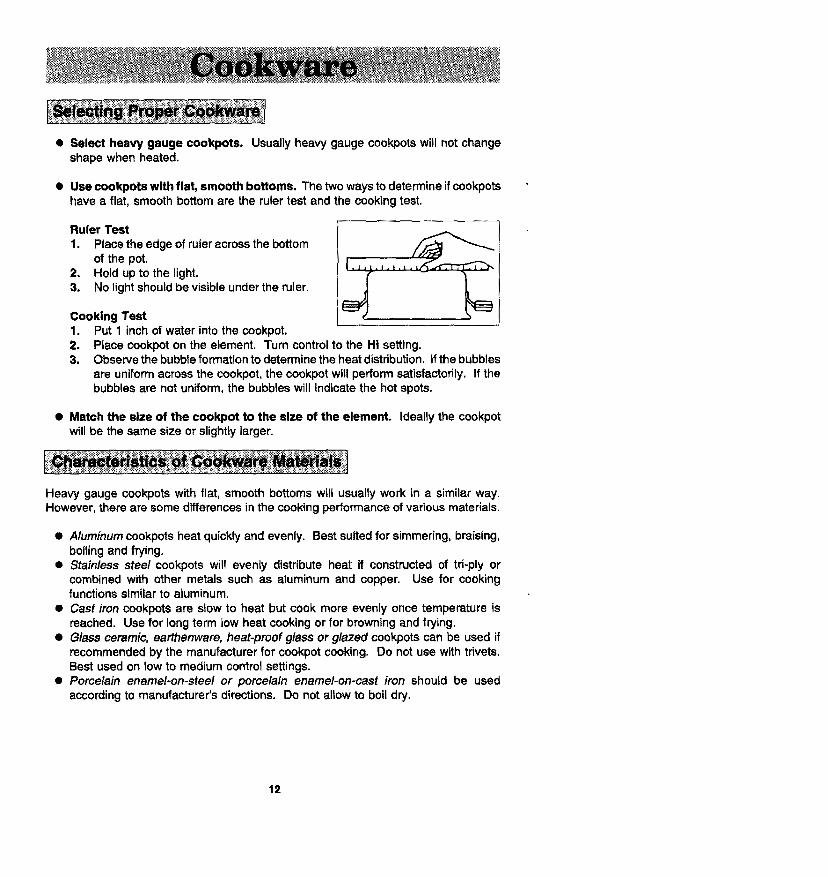
• Select heavy gauge cookpots. Usuallyheavy gauge cookpotswill notchangeshapewhen heated.
• Use cookpots with flat, smooth bottoms. The two ways to determine if cookpotshave a flat, smooth bottom are the ruler test and the cooking test.
Ruler Test
1. Place the edge of ruler across the bottomof the pot.
2. Hold up to the light.3. No light should be visible under the ruler.
Cooking Test1. Put 1 inchof water intothe cookpot,2.3.
Place cookpot on the element. Turn control to the Hi setting.Observe the bubble formation to determine the heat distribution, tfthe bubbles
are uniform across the cookpot, the cookpot will perform satisfactorily. If thebubbles are not uniform, the bubbles will indicate the hot spots.
• Match the size of the cookpot to the size of the element, ideally the cookpotwill be the same size or slightly larger.
Heavy gauge cookpots with flat, smooth bottoms will usually work in a similar way.However, there are some differences in the cooking performance of various materials.
• Aluminumcookpotsheat quicklyandevenly. Best suitedforsimmering,braising,boiling and frying.
• Stainlesssteel cookpotswil! evenly distributeheat if constructedof td-ply orcombinedwith other metals such as aluminum and copper. Use for cookingfunctions similarto aluminum.
• Cast ironcookpotsare slow to heat but cook more evenlyonce temperatureisreached. Use for longterm lowheat cookingor for browningand frying.
• Glassceramic,earthenware, heat-proofglassorglazed cookpotscan be used ifrecommendedby the manufacturer for cookpotcooking. Do notuse withtrivets.Best usedon low to mediumcontrolsettings.
• Porcelain enamel-on-steel or porcelain enamel-on-cast iron should be usedaccordingto manufacturer'sdirections. Do notallow to boildry.
12
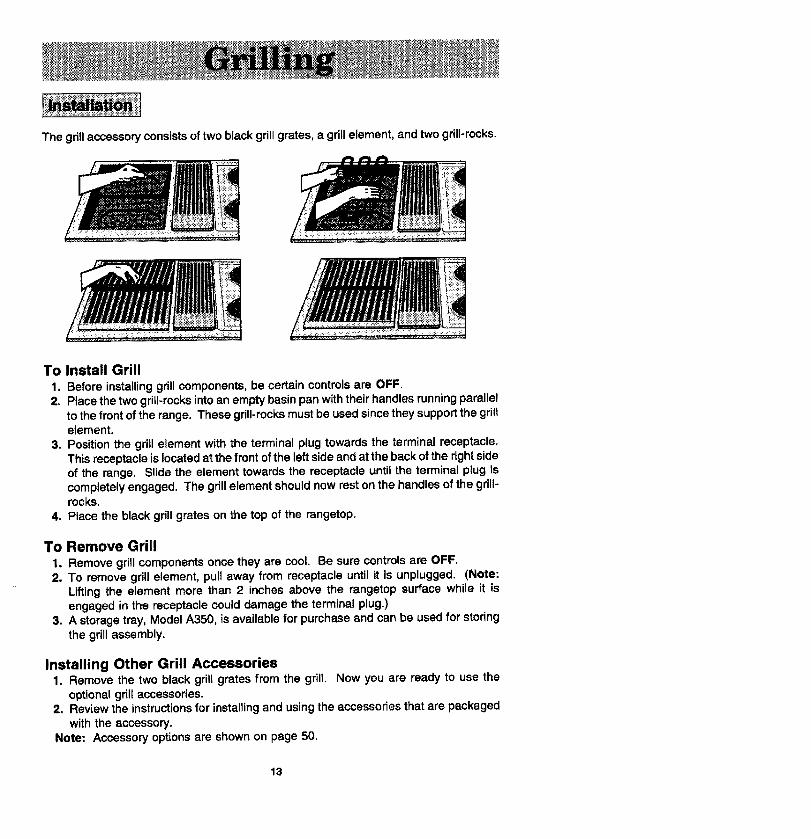
Thegrillaccessoryconsistsoftwoblackgrillgrates,a grill element, and two grill-rocks.
To Install Grill1. Before installing grill components, be certain controls are OFF.2. Place the two grill-rocks into an empty basin pan with their handles running parallel
to the front of the range. These grill-rocks must be used since they support the grillelement.
3. Position the grill element with the terminal plug towards the terminal receptacle.This receptacle is located at the front of the left side and at the back of the right sideof the range. Slide the element towards the receptacle until the terminal plug iscompletely engaged. The gdll element should now rest on the handles of the grill-rocks.
4. Place the black grill grates on the top of the rangetop.
To Remove Grill1. Remove grill components once they are cool. Be sure controls are OFF.2. To remove grill element, pull away from receptacle until it is unplugged. (Note:
Lifting the element more than 2 inches above the rangetop surface while it isengaged in the receptacle could damage the terminal plug.)
3. A storage tray, Model A350, is available for purchase and can be used for storing
the grill assembly.
Installing Other Grill Accessories1. Remove the two black grill grates from the grill. Now you are ready to use the
optional gdll accessories.2. Review the instructions for installing and using the accessories that are packaged
with the accessory.Note: Accessory options are shown on page 50.
13
Beforethefirstuse,washyournewgrillgratesinhotsoapywater,rinseanddry.Then"season" the surface by wiping on a thin coating of cooking oil, Removeexcess oil by wiping again with another paper towel. This procedure should berepeated when either: a) cleaning in the dishwasher since the detergent mayremove seasoning, or b) anytime a sugar-based marinade (,forexample, barbecuesauce) is going to be used.
• Preheat the grill on Hi for 5 minutes, Preheating improvesthe flavor andappearanceof meats and quickly sears the meat to help retain the juices, Theheatingelementshouldglowa brightcherryred,
• Use nonmetallic spatulas or utensils to prevent damaging the Excalibur ® nonstickgrill grate finish.
• Excessiveamountsof fat shouldbe trimmedfrommeats. Only a normal amountis necessaryto producethe smoke needed for that smoked, "outdoor" flavor.Excessivefat can create cleaningand flare-upproblems.
Allowing excessive amounts of grease or drippings to constantly flame voids thewarranty on the grill grates. Excessive flare-ups indicate that either the griU interiorneeds to be cleaned or that excessive amounts of fat are in the meat or the meat
was not propedy tdmmed.
• Grease drippings will occasionally ignite to produce harmless puffs of flame for asecond or two. This is a normal part of the cooking process.
• NEVER LEAVE GRILL UNATTENDED DURING GRILL OPERATION.
Should excess grease cause sustained flare-up1. Turn on FAN manually.2. Immediately turn grill controt(,s}to OFF,3. Remove meat from grill.
IMPORTANT
• Do not use aluminum foil inside the grill area.• Do not use charcoal or wood chips in the grill area.• Do not allow grill-rocks to become overloaded with grease. Clean frequently.• Do not cover grates completely with meat. Leave air space between each steak,
etc. to aIfow proper ventilation as well as prevent flare-ups.
14

PreheatgrillonHI,5minutes, for best flavor,
Note: This chart is a suggestedquide. Cooking times and control settingsareapproximate dueto variationsin meats andvoltage.
15

WithyourJenn-Air grilland accessories, literally any food you've considered "at itsbest" whenpreparedoutdoorscan now be preparedindoorswithless fuss and greatflavor. The followingsuggestionsare good rulesto follow and will increase your enjoymentof the equipment.
• Be sure to follow directionson page 14 for usingthe gdlL• Suggested cookingtimesandcontrotsettings areapproximate duetovariationsinmeats.
Experience willquicklyindicatecookingtimes aswell as whichsettings work best.• Usethe Energy-Savergrillelementforgrilling smallamountsoffoodon halfofthegrillor
for keepingcookedfoods warmorpreparingfoods requiringdifferentcontrolsettings.NoteSVE47500 Owners: The Energy-Saver grill element can be purchased as an optionalaccessory. (See p. 50°)
• Forbest results,buytop grade meat. Meat that is at least 3/_inch thickwillgrillbetter thanthinnercuts,
• Score fat on edges of steak, but do notcut into meat, to preventcudingwhile cooking.• Forthe attractive "branded" look on steaks, be sure grillis preheated. Allow one side of
meat tocook todesireddoneness,oruntiljuicesappearon thetopsutrace,before turuing.Tum steaksand hamburgersjustonce. Manipulatingfood causes lossofjuices.
• When bastingmeats orapplyingsaucestofoods, rememberthat excessive amountswindup insideyourgrilland do not improvethefood flavor. Applysauces duringthe last 15 to20minutesof cookingtimeunlessrecipespecifiesotherwise. Sugar-basedsauces, whenused excessively, will carmelize on the grill-rocksand create extra cleaning.
• There are many meat marinadeswhichwiilhelptenderize lessexpensive cutsof meat forcooking on the grill.
• Certain foods, such as poultryand non-oilyfish, may need someextra fat. Brushwithoilormelted butteroccasionallywhilegrilling.
• Usetongs withlonghandlesorspatulasfor turningmeats. Do notuseforksas thesepiercethe meat, allowingjuices to be lost,
• To help retain meat juices, salt after cookingis completed.• Shouldgrilledfoods be preparedand ready beforeyou're readyto serve, turncontrolto a
Iowsettingandcovermeatwithasinglesheetofaluminumfoll, Foodwillcontinuetocook.
Be sure the grillis cool and controls areOFF.
Grill GratesThese are made fromcast aluminumandare coated withtheExcalibur) nonstickfinish.
• Afterthegrillgrateshave cooled,wipe offgrateswitha paper towel. Wash coolgrates(DONOT IMMERSEHOTGRILL GRATES INWATER) withsoapordetergent inhotwaterinthesinkorwashthem inthe dishwasher.Be sureto removeal! food residuebeforecookingonthe gril!gratesagain.
• Remove stubbornspotswitha plasticmeshpuffor pad. For best results,use only thosecleaning productswhich state they are recommended for use when cleaning nonsticksurfaces.
• tf grateswere washed inthe dishwasher, season with oilpriorto grilting. (See p. 14.)• Donotusemetalbrushesorabrasivescouringpadsorotherscrubbersintendedtoc/ean
outdoorcharcoa/gri//s. These will removethe finish as wellas scratchthe grates. Do notclean in self-cleaningoven or use oven cleaners on thegrates.
16

Grill ElementFollow instructionson page t3 for removingthegrillelement. The grillelement shouldneverbe immersed inwater. Most soil willburn offduring use. The terminal blockmay be cleanedwitha soapy sponge. Dry thoroughly before reinserting inthe range.
Grill-RocksThese are made from cast-iron which have been coated with porcelain enamel.
• The grill-rocksshould be cleaned frequently or after any excessive build-up of grease.To clean lightsoil,use detergent and a plasticscrubber, such as Tufty, or wash inthedishwasherif burnedon residue isfirst removed. Forheavy soil,soak inhot, soapywaterto which a cleanser, such as household ammonia, has been added. Stubborn spotsongrill-rocks,such as burned on residue from sauces, can be scrubbed with a stiffbristlebrush.
• An ovencleaner, suchas Easy-Off,can be used forburnedonsoil, Followmanufacturer'sdirections;spray on cleaner and letsoak overnight. Do not clean grill=rocksin theself-cleaning oven.
Porcelain Basin PanThis area located under the grill-rocks and/or cartridges. Ctean after each use of the grill.
• To remove tightsoil, clean with soapy water or spray with cleansers such as Fantastikor 409. For easier cleanup: a) spray with a household cleanser; b) cover with papertowels; c) add small amount of hot water to keep the paper towels moist; d) cover andwait 15 minutes; and e) wipe clean.
• To remove moderate soil,scrub with Comet, Bon Ami, a soft scrub cleanser or plasticscrubber.
• To remove stubborn soil, spray with an oven cleaner such as Easy-Off; let soakovernight, wipe clean, rinse and dry.
Note: Clean the grease drain after each use. To clean: Pour about 1/3 cup of very hot tapwater mixedwith1 teaspoon dishdetergent downthe drain. Intheevent the drainis clogged,due to large food particles being trapped, use the nylon stringthat was packaged with yourrange. To use thenylon string,simply insertone end intothe drain opening inthe basinpan.Feed the nylonstringdown untilit isvisibleunderthe range. Nowpullup on the end extendingoutfrom thetop whileholdinga paper towel aroundthe string,toctean thestringas it is beingpulled. Thisshouldfreeanytrappedparticlesoffood. Pouranother ti3cupofveryhotwatermixed with dish detergent to assure the drain is opened and clear.
Grease ContainersThe containersare locatedbehindthebottomaccess panel, underneaththe range. (See page44 foropeningaccess panel.) There is one containerfor the leftsideand onefor the rightside.They collect grease and other liquidscreated while grillingor usingsome of the accessories.Checkeach time after grillingand empty when grease is noticeable. To remove, simplygraspthe handle,and pullfrom the bracket holdingthe container.
• Checkthecontainer periodicallyto preventgrease from spillingover. If this should happen, the grease will flow over thecontainer and ontothefloor.The containerandscrew-onhandle
can be washed inhot, soapy water or in the dishwasher. Thecontainer can be replacedwith any heat tempered jar, such asa canning jar, which has a standard screw neck.
17

The control panel is designed for ease in programming. The Display Window featuresIndicator Words which wit! flash to prompt you for the next step.
To program1. Touch the function pad to give command desired_
2. Touch the appropriate number pads to enter time or temperature.
Note: Four to fifteen seconds after entering the number, the time or temperature
will automatica!ly be entered. If more than fifteen seconds elapse between touchinga function pad and touching a number pad, the control is not set and Display will
return to previous Display.
Oven Controls i_n l_mer
Function Pads
Use for conventional baking or roasting.
Use for top browning or oven broiling.
Use to set self-cleaning process.
Use for convect roasting, (Model SVE47600 only)
Use for convect baking. (Model SVE47600 only)
Use for clock controlled cooking and cleaning when delayed start is desired.(For lock function see page 43,)
Use for clock controlled cooking.(For lock function see page 43.)
Cancels alt programming except Timer.
Use to turn the Ventilation System on or off. (See p. 9.)
Use to signal expiration of a time period up to 11 hours and 55 minutes.
Use to signal expiration of a time period up to 11 hours and 55 minutes,
Use to set time of day.
Use to turn oven light on and off,
18

Number PadsUse to set time or temperature.
Oven Light Pad (Control Panel)The oven light automatically comes on whenever the oven door is opened. When dooris closed, touch the Oven Light Pad to turn oven light on or off.
Display WindowShows time of day, timer, and oven functions.
rtrt... ,., °°. _DELAY START COOK TIMED GLEANBlimLSTOP TIMES [_[_ OVEN LOCK PRIMAT
888:
Display Numbers:• Show time of day.• Countdown of time remaining when using time functions.• Show temperature of oven as it rises to reach programmed temperature and the
set temperature once it is reached.
• Recall programmed temperature or time when commanded.• Rounding of Display Numbers: Temperature range is 100° to 550°F and can be set
in 50 increments. When setting temperature, the control will round it to the nearest100. For example, if 237 ° is entered, the control will round the temperature to 240 °.
Prompts:• Serve as a reminder to shut oven door, if it is open, for self-cleaning operation when
the word, door, is displayed.• "Err" will appear in the Display when an improper temperature or time has been
entered. "Err" will flash and a beep wilt be heard three times. Then, the Display willreturn to the previous Display before the error was entered.
Indicator Words:
• Flash to prompt next step.
• Indicate status of programmed function.• Show programmed function when recalled.
Chimes vs. Beeps• A chime sound is used to designate the end of a timing or cooking operation.• A beep sound is used to designate an incorrect entry, door is open when set for a
self-clean, and a fault code.
l NOTE: To change the oven to a 24 hour clock or Celsius (C) degrees, contact your|
/
authorized Jenn-Air service contractor or installer.
19

To set oven on Bake or Convect Bake or Convect Roast1. Place oven racks on proper rack positions. (See p. 21.)2, Touch Bake Pad or Convect Bake Pad or Convect Roast Pad,
indicator Words BAKE or CONV BAKE or CONV ROAST will flash and threedashes will be shown.
Note: If more than fifteen seconds elapse between touching a pad and touching anumber pad, Display will return to previous Display.
3. Touch the appropriate number pads for desired oven temperature,Allowable temperature range is 100° to 550°F. After four seconds the oven will beginto preheat. The indicator Words ON, PREHEAT, and either BAKE or CONV BAKE
or CONV ROAST wilt appear in the Display. The temperature shown will be 100°or the oven temperature whichever is higher.
Example: If at 10 o'clock you set the oven for 350 ° for convect baking, after fourseconds the Display will show:
10:00 Ioo°COf,NSN_.
During the preheat, the Display will show a rise in 5° increments until programmedtemperature is reached. When the oven is preheated, the oven will chime, the ONand PREHEAT Indicator Words wit1go off, and programmed oven temperature willbe displayed.
Note: Oven will preheat for approximately 7 to 11 minutes.Important: Whenever ON appears in the Display, the oven is heating.
To recall temperature set during preheat: Touch the appropriate Bake orConvect Bake Pad or Convect Roast Pad, Temperature will be briefly displayed,then will automatically return to on-going program.
_;_qhang_.temperatura set: Touch appropriate Bake Pad or Convect Bake Pador Convect Roast Pad and the appropriate number pads for the new desired
temperature.Note: Ifyou are _owering the temperature below the current oven temperature, theword PREHEAT and ON will appear briefly inthe Display and the preheat chime willsound. Then, the Display wi!l show programmed temperature and indicator wordBAKE or CONV BAKE or CONV ROAST only.
4. Touch Cancel Off Pad to turn oven off at end of baking. The oven will continueoperating until the Cancel Off Pad is touched.
2O

The rack positions noted are generally recommended for the best browning results andmost efficient cooking times. For many food items, excellent results can be achievedwhen using one of several different rack positions. Refer to baking and roasting sectionsfor recommendations for specific foods.
Different RacksOne flat rack and one offset rack was packaged with your oven. The use of the offsetrack is denoted in the list below and the charts as an "o" after the rack number. NoteSVE47600 Owners: An additional flat rack was packaged in your oven.
_4 (flat rack)
_3o (offset rack)
_1 (flat rack)
Rack UsesRack Position #4o (offset rack on #4):
Most broiling.Rack Position #3:
Most baked goods on cookie sheets, cakes (sheet and layer).Rack Position #3o (offset rack on #3):
Most baked goods on cookie sheets, frozen convenience foods, fresh fruit pie,cream pie, layer cakes, mafn dish souffle.
Rack Position #2:
Roasting small cuts of meat, cakes (tube, bundt or layer), frozen fruit pie, pie sheil,large casseroles.
Rack Position #2o (offset rack on #2):Roasting small cuts of meat, loaves of bread, angel food cake.
Rack Position #1:
Large cuts of meat and large poultry, angel food cake, loaves of bread, custard pie,dessert souffle.
Multiple Reck Cooking:Two racks, use #20 and#4. Three racks, use #1,#3o, and #4.
21

When electrical power is supplied or after power interruption, the last clock timedisplayed before power was interrupted will flash, Time will advance and continue toflash until clock is reset.
To set Time of Day1. Touch Clock Pad.
Indicator word TIME wilt flash and time digits will appear in the Display. (If more thanfifteen seconds elapse between touching Clock Pad and touching a number pad,the Clock Pad must be touched again in order to set clock.)
2. Touch the appropriate number pads until correct time of day appears in Display.
Note: Four to fifteen seconds after touching the number pads, the time of day willautomatically be entered.
IMPORTANT
• To recall time of day when another time function is showing: Touch Clock Pad.
• Clock time cannot be changed when oven has been programmed for Timed Bake,Timed Convect Bake, Timed Convect Roast or Self-clean. Cancel program before
reprogramming clock.
22

Important: This interval Timer can be used to remind you when a period, up to 11 hoursand 55 minutes, expires. It can be used independently of any other oven activity andcan be set while another oven function is operating. 3"beTime[.._oes not control the oven.
To set Timer1. Touch a Timer Pad,
The indicator Word Timer and either 1 or 2 flashes and "0Hr:00" appears in theDisplay.
2. Touch the appropriate number pads until the desired number of minutes or hoursand minutes appear in the Display.Note: If more than fifteen seconds elapse between touching a Timer Pad and anumber pad, the Timer Pad must be touched again.
Example: To set Timer One for 5 minutes, touch the Timer One Pad and thenumber 5 pad. After fifteen seconds, the display will show:
J IExample: To set Timer Two for 1 hour and 30 minutes, touch the Timer Two Padand the numbers 1, 3, 0 pads. After fifteen seconds, the Display will show:
Countdown will start after fifteen seconds. Countdown will have display precedenceover other time functions, If both timers are set, the timer with the least amount of
time remaining will have display precedence.
At the end of time set, the Timer will chime four times and "End" wil! appear in the
Display. If timer is not cancelled (see below), "End" will remain in the Display andthere wilt be two chimes every thirty seconds for five minutes.
To cancel Timer1. Touch and hotd the Timer Pad for four seconds.
OR
2. A, Touch the Timer Pad.
B. Touch "0" number pad. Fifteen seconds later the Timer will be cancelled,
INOTE: Touching Cancel Off Pad to cancel chimeswitlcancelALL selected ovenprogramming.
23

steps 5 & 6 you want baking to start immediately.
To set oven to start immediately and shut off automatically1. Touch Bake Pad or Convect Bake Pad or Convect Roast Pad.
Indicator Words BAKE orCONV BAKE orCONV ROAST will flash and three dasheswill be shown,
2. Touch the appropriate number pads for desired oven temperature.After four seconds the oven will begin to preheat. The Indicator Words ON,PREHEAT, and BAKE or CONV BAKE or CONV ROAST will appear in the Display.The temperature shown will be 100 ° or the temperature of the oven, whichever ishigher. Example: If at 10 o'clock you set the oven for 350 ofor convection baking,the Display will show:
I '°°°During the preheat, the Display will show a rise in 50 increments until programmedtemperature is reached. When the oven is preheated, the oven will beep, the ONand PREHEAT Indicator Words will go off, and programmed oven temperature wil!be displayed. Important: Whenever ON appears inthe Display, the oven is heating.
3. Touch Cook Time Pad.Indicator Words COOK TIME will flash and Display will show "0 HR:00".
4, Touch the appropriate number pads to enter cooking hours in five minuteincrements. Hours are to left of colon and minutes to right of colon, (Allowable rangeis 5 minutes to 11 hours and 55 minutes.) Example: If cooking time selected forthe oven is 2 hours and 30 minutes, the Display will show:
After fifteen seconds, the time of day returns to the Display.Important: Oven wilt preheat for approximately 7 to 11 minutes. At end ofprogrammed Cook Time, oven will shutoff automatically; retained heat will continuetocook food. Clock controlled cooking is not recommended for baked items thatrequire a preheated oven, such as cakes, cookies, pies, breads. For these foods,place food in preheated oven, then use Timer to signal end of baking time.
At the end of programmed Cook Time, the oven will shut off automatically and a"chime" will be heard four times and "End" will appear in the Display, If oven is not
cancelled, "End" will remain in the Display and there will be a chime every minutefor one hour.
24

To set oven to start at future time and shut off automatically1-4. Follow preceding Steps 1-4 on page 24.
5. Touch Stop Time Pad,indicator Words STOP and TIME will flash. Display wi]i show the calculatedstop time based on current time of day and cook tJme.
6. Touch the appropriate number pads to enter desired stop time.A stop time can only be accepted for later in the day. Note: Since food continuesto cook if left in the oven, it is suggested that the clock controls be used primarilyto start the oven when no one is in the kitchen. Provisions should be made to havethe food removed as soon as the chime has sounded.
Example: If at 10 o'clock you set the oven for 350 Qconvection baking and 2 hoursand 30 minutes cooking time, the calculated stop time would be "12:30". TheDisplay would show:
I I2:30 I oo°S'TO.PI't_
If you want the stop time to be 1 o'clock, touch the number pads "1,0,0". Fifteenseconds later, the Display will briefly show the start time:
t 0:90 o°After four seconds, the Display will return to current time of day, thus showing:
I0:00 IAt the end of the delayed period, the DELAY Indicator Word wilt 9o off and the ovenwilt begin to heat. 100_wit1be shown. As the oven heats, the Display will showa rise in increments of 5° until programmed temperature is reached.
At the end of programmed Cook Time, the oven wil! shut off automatically and a"chime" wilt be heard four times and "End" will appear in the Display. If oven isnot cancelled, "End" wilt remain in the Display and there will be one chime everyminute for one hour.
IMPORTANT
• To recalStime function programmed: Touch the appropriate time pad.
• To cancel timed function only: Hold Cool(Time Pad forfour seconds, This willonlycancel cook time and stop time, not programmed bake mode.
• If more than fifteen seconds elapse between touching a function pad and touchingappropriate number pads, the oven is not set and Display will return to previousDisplay,
25

• When cooking foods for the first time in your new oven, use recipe cooking timesand temperatures as a guide.
• Use tested recipes from reliable sources.• Preheat the oven only when necessary. For baked foods that rise and for richer
browning, a preheated oven is better. Casseroles can be started in a cold oven.Preheating takes from 7 to 11 minutes; place food inoven after PREHEAT IndicatorWord cycles off.
• Arrange oven racks before turning on oven. Follow suggested rack positions on
page 21 and in various baking charts.• Allow about I to l½ inches of space between the oven side waits and pans to allow
proper air circulation.• When baking foods in more than one pan, place them on opposite corners of the
rack. Stagger pans when baking on two racks so that one pan does not shieldanother unless shielding is intended. (See above left.)
• To conserve energy, avoid frequent or prolonged door openings. At the end ofcooking, turn oven off before removing food.
• Always test for doneness (fingertip, toothpick, sides pulling away from pan). Do notrely on time or brownness as only indicators.
• Use good quality baking pans and the size recommended in the recipe.• Dull, dark, enameled or glass pans will generally produce a brown, crisp crust. Shiny
metal pans produce a light, golden crust,• Frozen pies in shiny aluminum pans should be baked on a cookie sheet on rack 2
or be removed to a dull or glass pan.• If edge of pie crust browns too quickly, fold a strip of foil around rim of crust, covering
edge. (See above right.)
26

For Conventional Bake use the Bake Pad.
i!iii!i_ni!iiiiill
!!_!i!!!_i!ili!ili!!:_!
* An "o" after a rack number implies that the offset rack should be used.
** The times given are based on specific brands of mixes or recipes tested. Actualtimes will depend on the ones you bake.
*** The Convect Bake temperature is 25°F lower than recommended on package mixor recipe.
27
• Use convection baking for breads, cakes, cookies and pies.• As a general rule, when using recipes or prepared mixes developed for a
conventional bake oven, set the oven temperature 25°F lower than the reciperecommended temperature. Times will be similar to or a few minutes less thanrecipe recommended times. The chart on page 27 compares times and temperaturesof many baked foods. Use this as a reference.
• For better browning, place cookie sheets and baking pans lengthwise, side to sideon the rack.
• Cookie sheets should be without sides and made of shiny aluminum. The best sizeto use for cookie sheets is 16" x 12" or smaller.
28

1For best results, bake foods on one rack at a time as described in this manual. However,very good resu!ts can be obtained when baking quantities of foods on multiple racks.Quantity cooking provides both time and energy savings.
Convect Bake is suggested for most multiple rack cooking, especially three rackcooking, because the circulating heated air results in more even browning. For two rackcooking, the conventional bake oven provides very good baking results especially whenpans can be staggered, such as with layer cakes and fresh pies,
Many foods can be prepared on three racks at the same time. These are just a fewexamples: cookies, cupcakes, rolls, biscuits, muffins, pies, pizzas, appetizers, andsnack foods.
To obtain the best results in multiple rack cooking, follow these suggestions:
• Use temperature and times in this manual as a guide for best results.• For two rack baking, rack positions #20 and 4 are best for most baked products but
positions #2 and 4 also provide acceptable results.• For three rack baking use positions #1,3o and 4. One exception is pizza. {See p.
33.)• Since foods on positions #1 and 4 will usually be done before foods on position #30,
additional cooking time will be needed for browning foods on the middle rack. Anadditional minute is needed for thin foods such as cookies. For foods such as
biscuits, rolls, or muffins, allow 1 to 2 more minutes. Frozen pies and pizzas, whichshould be baked on a cookie sheet, need about 2 to 4 more minutes.
• Stagger smal! pans, such as layer cake pans, in the oven.• Frozen pies in shiny aluminum pans should be placed on cookie sheets and baked
on rack positions #1, 3o and 4.• Cookie sheets should be placed lengthwise, side to side, in front of the fan for more
even browning.• Oven meals are recommended for energy conservation. Use rack positions #t and
3o or #2o and 4 and Convect Roast.
29

• Preheating is not necessary.• For open pan roasting, place meat or poultry on the slotted portion of the two-piece
pan included with the oven. Do not add water to the pan. Use open pan roastingfor tender cuts of meat. Less tender cuts of meat need to be cooked by moist heatin a covered pan.
• For best results, a meat thermometer is the most accurate guide to degree ofdoneness. The tip of the thermometer should be located in the thickest part of aroast, not touching fat, bone, or gdstle. For turkeys and 1arge poultry products,insert the tip of the thermometer into the thickest part of the inner thigh.
• Place roast fat side up to allow self basting of meat during roasting.• Since meats continue to cook after being removed from the oven, remove roast
from oven when it reaches an internal temperature about 5 degrees below thetemperature desired.
• For less loss of juices and easier carving, allow about 15 minutes "standing time"after removing meat from oven.
• For best results in roasting poultry, thaw completely. Due to the structure of poultry,partially thawed poultry will cook unevenly.
• If preferred, tender cuts of meat can be roasted in the conventional bake oven byfollowing the general recommendations given above. However, meats will roastmore quickly in the convect oven using Convect Roast.
• Conventional bake is best for less tender cuts of meat that.require a longer, moistheat method of cooking. Follow your recipe fortimes and temperatures for coveredmeats.
• Meats cooked in oven cooking bags, dutch ovens, or covered roasting pans are bestcooked in the conventional bake oven using the Bake Pad,
• Use meat roasting charts in standard cookbooks for recommended times andtemperatures for roasting in a conventional bake oven.
3O

Chart time is based on thawed meats only. For Conventional Roasting use the BakePad.
*When using the Convect Roast mode, there is no need to preheat the oven or to lower the tem-perature from conventional roast temperatures.
**Not recommended for convection cooking. Most precooked hams have to be covered whileroasting, thus there would be no time savings from using the convect mode.
31

• Tender cuts of moat and poultry can be roasted to a rich golden brown in theconvection oven. Follow generat recommendations for roasting and use ConvectRoast,
• Refer to convection meat roasting chart for recommended cooking temperatureand time. The chart can serve as a guide to help plan meal serving time.
• Minutes per pound will vary according to the size, shape, quality, and initialtemperature of meat as well as the electrical voltage in your area. Times are based
on refrigerator cold meat.• A large cut of meat wiU usually require fewer minutes per pound to roast than a
smaller cut of meat.
• Do not use a roasting pan with high sides; use pan provided with oven.• Do not cover meat. Allow the circulating hot air to surround the meat and seal in
the juices.• Since the breast meat on a large turkey cooks more quickly than the thigh area,
place a "foil cap" over the breast area after desired brownness is reached to preventoverbrowning. (See above.)
• A stuffed turkey will require an extra 30 to 60 minutes, depending on size. Stuffingshould reach an internal temperature of 165°F.
Convect Roasting: Frozen to FinishMeats (except poultry) may be roasted frozen to finish. Follow these guidelines for themost satisfactory results.
• Use temperatures for roasting fresh meats as recommended by most cookbooks.GeneralLy, most meats are roasted at 325°F. For best resutts do not usetemperatures below 300°F.
• Use times for roasting fresh meats given in your favorite cookbooks as approximateguides for roasting frozen meats. Roasting times wit1vary due to factors such ascoldness of meat, size, quality, or cut. In general, roasting times for frozen to finishin the convection oven will be approximately the same as fresh to finish in aconventional bake oven.
• The guidelines given for roasting fresh meats in the convection oven also apply toroasting frozen meats.
• Insert meat thermometer midway during the cooking process.
32

l I
• Use the Convect Roast Pad for best results.
• Preheating the oven is not necessary.• Follow package recommendations for oven temperature, foil covering and use of
cookie sheets. Cooking times willbe similar. See chart below for some exceptionsand examples,
• Center foods inthe oven. If more than one food item is being cooked or if foods arebeing cooked on multiple racks, stagger foods for proper air circulation.
• Most foods are cooked on rack position #30.• For multiple rack cooking, use racks #1, 30 and 4. However, pizzas should be
placed on cookie sheets and baked on rack position #2o, 3 and 4.
Here are a few examples of times and temperatures
*An "o" after a rack number implies that the offset rack should be used.**Conventional Bake uses the Bake Pad.
Note: Convect roasting times wil! be similar to the conventional times because the ovenis not preheated. The time savings comes from not having to preheat the oven.
33

1. Place oven rack on the rack position suggested in the chart on page 35.Distance from broiling element depends on foods being prepared, Rack position4o (offset rack in position #4) is usually recommended unless otherwise stated.
2. Touch Broil Pad.
Indicator Word BROIL will flash and Display will show three dashes.
Note: If more than fifteen seconds elapses between touching Broil Pad andtouching a number pad, the oven is not set and Display will return to previousDisplay.
3, Touch the appropriate number pad(s).The first number pad touched witl enter "HI" in the Display.
The oven has a variable broil feature which means that a lower temperature can beselected. After "HI" appears in the Display, touch the appropriate number pads forthe desired temperature. Temperature can be entered in 5° increments.
Fifteen seconds after entering "HI" or four seconds after entering a temperature,the broil element will come on and the Indicator Words BROIL and ON will remain
inthe Display. If the variable broil feature was selected, the Indicator Word ON willcycle with the element.
Example: if at 4 o'clockyouset the oven for broil ("HI"), the Displaywiltshow:
4:00 HI4. Place food on broiler pan provided with oven. Broil element witl preheat in 2 to 3
minutes. After broil element is red, place food in oven. Oven door MUST be leftopen at broil stop position.
5. Touch Cancel Off Pad to turn off oven when food is cooked.
NOTE: A fan comes on during the BROLL cycle. If it does not, the oven broil elementwitl cycle on and off. If the fan does not operate, contact your authorized Jenn-Air Service Contractor for repair.
34

• Tender cuts of meat or marinated meats are best for broiling, This includes rib andloin cuts of steak, ground beef, ham steaks, poultry pieces or fish. For best results,steaks shourd be at least 1" thick. Thinner steaks should be pan-broiled.
• Do not cover broiler grid with foi! since this prevents fat drippings from draining intobottom of pan.
• Before broiling, remove excess fat from meat and score edges of fat (do not cut intomeat) to prevent meat from curling. Salt after cooking.
• To prevent dry surface on fish or lean meats, brush melted butter on top.• Foods that require turning should be turned only once during broiling. Turn meat
with tongs to avoid piercing and loss of juices.
Chart time is based on a preheated broil element using the "HI" setting.
*An "o" after a rack number implies that the offset rack should be used.
Note: This chart is a suggested guide. The times may vary with food being cooked.
35

When the oven controls are set to CLEAN, the oven heats to temperatures that arehigher than those used for cooking. The high temperatures cause food soil to burn offand substantially disappear. While this occurs, a device in the oven vent helps toconsume normal amounts of smoke. The oven is vented through an opening under theair gdlte.
I Remove the broiler pan and any other utensils from the oven. These utensils cannotwithstand the high temperatures of the cleaning process.
• Clean spatters and spi!ls from those areas which will not be cleaned during the self-cleaning process:
center front of oven and door near opening in door gasket.porcelain oven door liner (area outside the door gasket).oven front frame.
Note: DO NOT CLEAN serial plate located on theoven front.
To clean these areas, use hot water and detergent,nonabrasive cleansers or soap filled steel wool pads.Rinse thoroughly, being careful notto use an excessiveamount of water that would dampen the door gasket,Soil/eft in these areas will be more difficult to remove
after the self-cleaning process since the high heat willbake on any soil that is present. DO NOT USE COMMERCIAL OVEN CLEANERSTO CLEAN THESE AREAS.
• DO NOT ATTEMPT TO CLEAN, RUB, OR APPLY'WATER TO GASKET ON OVENDOOR. The gasket is essential for a good door seal. Rubbing or cleaning willdamage the gasket and may affect the seal.
• Wipe up excess grease and food spillovers which have not baked on the bottom ofthe oven. Large accumulations of soil can cause heavy smoke or fire in the ovenduring the cleaning process. For ease of cleaning, the heating element can be liftedslightly.
• Although smoke or fire in the oven is a normal occurrence and there is no safetyproblem, there wLIt be venting of excessive smoke and odor.
• Remove the air grille before self-cleaning. Since the oven vent is located justbeneath the air grille, soot from the vent could discolor white colored air grilles.
36

The oven racks can be cleaned in the oven. However, the oven racks will discofor,lose shininess, and become difficult to st!de in and out if left in the oven during thecleaning process. REMOVE RACKS FROM OVEN IF THIS DISCOLORATION
WiLL BE OBJECTIONABLE. As a suggestion, do not leave the racks in the ovenduring each self-cleaning process if they do not need to be cleaned since they willdiscolor to a dull silver after one cleaning. Moderately soiled racks can be cleanedwith a soapy S,O.S. pad or Scotch-Brite scour pad. Stubborn stains need to beremoved in the self-cleaning process. Be sure to read special tips on page 40 if ovenracks are cleaned during the self-cleaning process.
*Omit steps 4 & 5 if you wish cleaning to begin immediately.
To set oven to start cleaning immediately1. Close the oven door.
2=
=
Touch Clean Pad.
indicator Words CLEAN TIME will flash and Display will show" _HR:
Touch the appropriate number pad(s),The first number pad touched will enter "3:00" in the Display for an average soiledoven. The cleaning time can be varied depending on the amount of soil. 8et"2:00"for light soi! or "4:00" for heavy soil.Note: if more than fifteen seconds elapse between touching a Clean Pad andtouching a number pad, the oven is not set and time of day will automatically returnto the Display.
Example: If at 9 o'clock you selected to self-clean your oven for3 hours, the Displaywill show:
3:00Fifteen seconds after entering "3:00" or four seconds after entering a different time,the oven door will start to automatically latch and the cooling fan will come on. TheLOCK Indicator Word wil! come on when the door is latched.
Note: If oven door was left open, "door" will flash in Display and a signal willcontinuously beep until the door is closed and the Clean Pad is touched.
The Indicator Word ON comes on when the door is latched and will remain until the
clean temperature is reached. The Indicator Word ON will cycle with the elementsto maintain the clean temperature.
37

Whenthe clean function has been completed, the Indicator Words CLEAN and ONwill go off. The Indicator Word LOCK and the cooling fan will remain on untilthe ovenhas cooled down and the door has unlocked.
To set oven to start cleaning at a later time1-3. Follow Steps 1-3 in previous section on page 37.
4. Touch Stop Time Pad.
Indicator Words STOP TIME will flash in the Display, The Indicator Word CLEANand the calculated stop time will also appear in Display.
5. Touch the appropriate number pads to enter stop time.A stop time can only be accepted for later in the day. If an unacceptable stop timeis entered, "Err" will flash briefly in the Display and then Display will return to previousacceptable Stop Time.
Example: If at 9 o'clock you set the oven to clean for three hours, the calculatedstop time would be "12:00". The Display would show:
If you want the stop tLme to be t o'clock, touch the number pads "1,0,0". Fifteenseconds tater, the Display would show Start Time:
I 0:00[Y_Lltt_ _ O.F.M4
After four seconds, the display will return to current time of day, thus showing:
The LOCK Indicator Word will come on and the cooling fan will go off as soon asthe oven door has latched.
When the oven begins to clean, the Indicator Word ON and the cooling fan will comeon and the Indicator Word DELAY will go off.
When the clean time has been completed, the Indicator Words CLEAN and ON willgo off. The Indicator Word LOCK and the cooling fan will remain on until the ovenhas cooled down and the door has unlocked.
38

To cancel self-clean• Touch Cancel Off Pad.
• The oven door wilt be locked while the LOCK Indicator Word remains in the Display.
Depending on the length of time the oven had been self-cleaning, it may take up to45 minutes for the oven to cool down, the door to unlock and cooling fan to turn off.
IMPORTANT
• To reca_tcleaning time or stop time: Touch the appropriate pad (Clean Pad orStopTime Pad).
• To change cleaning time or stop time before cleaning begins: Repeat the precedingsteps.
• When the Clean Pad is touched, a fan comes on. If this fan is not operating, the
oven will go through the cleaning process at a reduced oven temperature and theoven will not clean effectively. If the fan does not operate, contact your authorizedJenn-Air Service Contractor for service.
39

• A slight odormay be detected, and if an oven is heaviTysoiled, some smoke maybe visible. Some smoke and odor during the cleaning process is a normaloccurrence. Since the oven vent is located underthe air grille,vapors,moisture,etc. may be seen comingfrom thisarea. Ifthe odoris strongorobjectionable,turnon the ventilationsystemto exhaustodorsto the outdoors. (See p, 9.)
• During the cleaning process, do not be alarmed if an occasional flame Lsvisiblethrough the oven window. This is caused by excessive food soil that was notremoved before the oven was set to clean.
O SINCE THE DOOR AND WINDOW OF THE OVEN WILL GET WARM DURING
THE SELF-CLEANING PROCESS, AVOID CONTACT.
• Some types of soil may disintegrate but leave a light film or heavier deposit of ash.The amount of ash depends on the amount of soil which was in the oven. After ovenhas cooled, this ash may be removed with a damp sponge. If other dark depositsremain after wiping with a sponge, the time set for the length of cleaning was notenough. Increase the cleaning time for future cleanings or clean more frequently.The normal cleaning time is 3 hours. A maximum of 4 hours may be selected ifnecessary.
• If racks have been left in oven during the cleaning process, they should be treatedas follows. After the cleaning process is completed and the oven has cooled, buffthe underside of rack edges with Scotch-BrUtescour pad or rub lightlythe undersLdeof rack edges with a coating of vegetable oil. Use a light application of oil so it doesnot soil the oven. This will make the cleaned racks slide more easily.
• To remove occasional spillovers between cleanings, use a soap-filled scouring pador mild cleanser; rinse well.
40

• It is better to clean the oven regularly rather than wait until there is a heavy build-
up of soil in the oven.
• During the cleaning process, the kitchen should be well ventilated to help eliminatenormal odors associated with cleaning.
• DO NOT USE COMMERCIAL OVEN CLEANERS.
• DO NOT USE ALUMINUM FOIL OR OTHER LINERS IN THE OVEN.
41

Stainless Steel RangetopOn the white ranges, the top of the range (the trim around the porcelain basin areas),is made of stainless steel.
• To clean Lightsoil, wipe with soapy cloth or nonabrasive cleanser, such as SoftScrub. Rinse, buff with soft cloth; polish with glass cleaner if necessary.
• To clean moderate soil or discoloration of the surface (excessive heat will cause agolden discoloration), clean with Zud, Bar Keepers Friend, or Luneta (Jenn-AirModel A912, Part No. 712191 ). With a sponge or cloth, rub cleanser with the grainto avoid streaking the surface. Rinse well, buff dr:/; polish with a glass cleaner ifnecessary to remove cleanser residue and smudge marks.
• Heavy soil, such as burned on food soil, can be removed by first cleaning as per theinstructions for moderate soil. Stubborn stains can be removed with a dampScotch-Brite scour pad; rub evenly with the grain to avoid streaking the surface.Rinse well, buff with dry cloth; polish with glass cleaner if necessary to removecleanser residue and smudge marks. Scotch-Brite is also useful in buffing andremoving minor scratches.
• Stubborn food stains may also be removed by spraying with an oven cleaner. Allowto set overnight, then rinse. If stains remain, clean with recommended cleanserssuch as Zud, Luneta (Jenn-Air Model A912, Part No. 712191), or Scotch-BriteScour pad.
Textured Black RangetopsOn the black ranges, the top of the range (the trim around the porcelain basin areas),is made of painted steel.
• To clean light soil, wipe with a soapy cloth or nonabrasive cleanser, such asFantastik or 409.
• To clean moderate to heavy soil, spray the area with a household cleaner, such asFantastik or 409 and allow to soak. If necessary, spray the area with cleanser, coverwith plastic wrap and allow to soak for a few hours. Donot use any abrasivecleansers, oven cleaners, or scrub with any abrasive materia!_, such as S.O.S.Pads, Scotch-Brite _ads. etc.
42

Control KnobsThe knobs on the control panel can be removed with the controls in the OFF position.Pull each knob straight from the shaft. Wash knobs in warm soapy water or dishwasher;do not use abrasive cleansers or materials. To replace each knob, match flat part of
knob opening with the spring on the shaft, returning in OFF position.
Control Panel Area and Display WindowWipe with paper towels dampened with soapy water or glass cleaner. Do not spray anycleaning solutions directly onto the display window or use large amounts of soap andwater. Do not scrub with S.O.S pads or abrasive c/eansers.
Glass on Oven Door FrontUse any suitable glass cleaner or soapy water.
Oven Door TrimSlightly dampen a cloth or paper towel with soapy water or glass cleaner. Do not useexcessive amounts of water or allow water to run down through the air vents in the doorsince this will cause streaks which will be visible through the glass door.
The oven operation controls can be locked in the "OFF" position during cleaning or toprevent a child from accidentally turning them on. The oven functions which can belocked inthe "OFF" position are: Bake, Convect Bake, Convect Roast, Broil and Clean.The control functions which can always be used regardless of lockout are: Timer, Clock,
Fan and Oven Light.
To setTouch and hold the Cook Time Pad and the Stop Time Pad simultaneously for fourseconds. The Indicator Word "OFF" will appear and remain in the temperature digitsfor fifteen seconds.
Note: If an oven function is currently being used, the controls cannot be locked off.
Note: If someone touches an oven function pad, the Indicator Word "OFF" will again
appear in the temperature digits for fifteen seconds.
To cancelTouch and hold the Cook Time Pad and the Stop Time Pad simultaneously for fourseconds. The Indicator Word"OFF" will appear briefly in the temperature digitsand then
go off.
43

The access panel iseasilyopenedor removed. Toopen panel, grasp upper corners and pull forwardand down. To close panel, lift up and insert prongsinto catches in the range.
To avoid the possibility of accidentally disconnect-ing any part of the ventilation system, do not usethe area behind the access panel for storage.
To remove, pull forward to the "stop" position; liftup on the front of the rack and pull out.
The oven temperature can be adjusted if all oven temperatures are too low or too highand the length of time to cook ALL foods is too long or too short. Do NOT adjust thetemperature if only one or two items are not baking properly.
To adjust1. Touch the Bake Pad.2. Enter 500 ° by touching the number pads: "5,0,0."3. Touch and hold the Bake Pad for 8 seconds until "00 °'' appears in the Display.4. Touch the appropriate number pads to enter the offset temperature. (Allowable
range is -35° to +35°.) Note: Touching the Broil Pad will change the - sign to apositive number or back to a negative number.
Note: Do not change the temperature setting more than 10° before checking theoven.
5. Touch the Cancel Off Pad to return to the previous Display.
Important: The oven should be adjusted only 10° and the oven should be tested.(We recommend baking two 9" yellow layer cakes using a purchased box mix.) If theoven temperature is still too low or too high, repeat the procedure described above.
44

Before replacing bulb, disconnect power to oven at the main fuse or circuit breaker panelandat the electric receptacle. Be sure that the entire oven cavity including the light bulbis cool before attempting to remove.
To replace light bulb1. Carefully unscrew the glass light lens.2. To obtain firm grasp on the bulb, wear protective
rubber gloves. Remove by turning bulb to the left.Do not touch a hot oven light bulb with a damp clothas bulb will break. Note: If the bulb does break and
you wish to remove it, be certain power supply isdisconnected and wear protective gloves, You
may contact your authorized Jenn-Air ServiceContractor for service.
3. Replace bulb with a 40 watt oven-rated appliancebulb, A bulb with a brass base is recommended to
prevent fusing of bulb into socket.4. Replace bulb cover and reconnect power to oven.
Reset clock.
45
Check the following list to be sure a service call is reaIly necessary. A quick referenceof this manual may prevent an unneeded service call.
If nothing on the range operates:
• check for a blown circuit fuse or a tripped main circuit breaker.• check if range is properly connected to electric circuit in house.
if ventilation fan does not operate but everything else on the rangedoes:
• check behind lower access panel if power cord to blower assembly has beendisconnected.
If grill heating element or cooktop does not get hot enough:a check if heating element is plugged in solidly.• surface controls may not be set properly.• voltage to house may be low.
If ventilation system is not capturing smoke efficiently:
• check on cross ventilation in room or make up air.• excessive amount of smoke is being created; check instructions for grilling,
trimming meats. (See pp. 14-16.)• outside wail cap may be trapped shut,• range may be improperly installed; check ducting information. (See p. 49.)• air filter may be improperly installed (See p. 9.)
If oven does not heat:
• the oven controls may be set incorrectly.• clock controls may be set for delayed start of oven.
If the oven light doe• not work:• the light bulb is toose or defective.• oven light does not work during self-cleaning process.
if oven will not go through self-cleaning process:
• controls may be improperly set.• check the clock contro!led settings and the current time of day on the clock.
If oven did not clean properly:
• oven may need longer cleaning time.• excessive spitlswere not removed prior to self-c_eaning process.
46

If oven door will not unlock:
• oven may not have cooled to safe temperature after self-cleaning process,• electric current coming into the oven may be off.
If foods do not broil properly:• the oven controls may not be set properly.• check rack position.• voltage into house may be low.
If baked food is burned or too brown on top:
• food may be positioned incorrectly in oven.• oven not preheated properly.
if foods bake unevenly:
• the range may be installed improperly.a check the oven rack with a level,
• stagger pans, do not allow pans to touch each other or oven wall.• check instructions for suggested placement of pans on oven rack.
If oven baking results are less than expected:
s the pans being used may not be of the size or material recommended for bestresults.
• there may not be sufficient room around sides of the pans for proper air circulationin the oven.
• check instructions for preheating, rack position and oven temperature.• oven vent may have been blocked or covered.
If baking results differ from previous oven:• oven thermostat calibration may differ between old and new ovens. Follow recipe
and use and care directions before calling for service since the calibration on the
previousoven may have drifted to a too highortoo lowsetting, (See p.44- AdjustingOven Temperature.)
Fault Codes
• Fault codes are shown in the Display as "F" and a number. If a fautt code appears
inthe Display and a continuous beep sounds, touch theCancel Off Pad. tf the faultcode reappears, disconnect power to the range and calf an authorized Jenn-AirService Contractor.
47

48
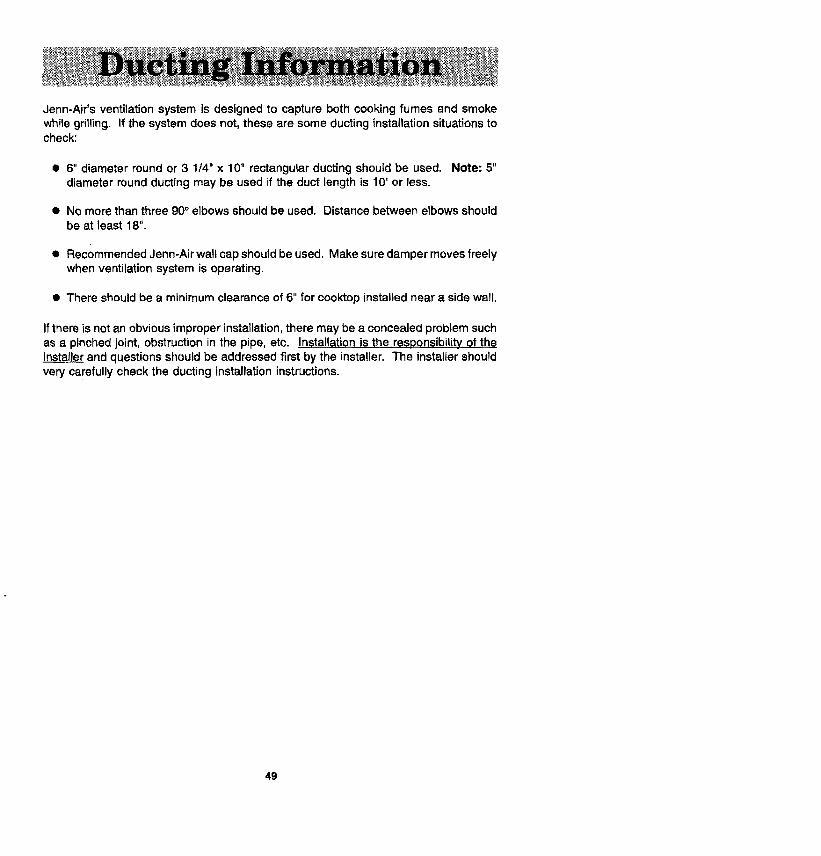
Jenn-Air's ventilation system is designed to capture both cooking fumes and smokewhile grilling. If the system does not, these are some ducting installation situations tocheck:
• 6" diameter round or 3 1/4" x 10" rectangular ducting should be used. Note: 5"diameter round ducting may be used if the duct length is 10' or less.
• No more than three 90° elbows should be used. Distance between elbows shouldbe at least 18".
• Recommended Jenn-Air walt cap should be used. Make sure damper moves freelywhen ventilation system is operating.
i There should be a minimum clearance of 6" for cooktop installed near a side wall.
If there is not an obvious improper installation, there may be a concealed problem suchas a pinched joint, obstruction in the pipe, etc. Insta!_ation is the..responsibility of theinstaller and questions should be addressed first by the installer. The installer shouldvery carefully check the ducting installation instructions.
49
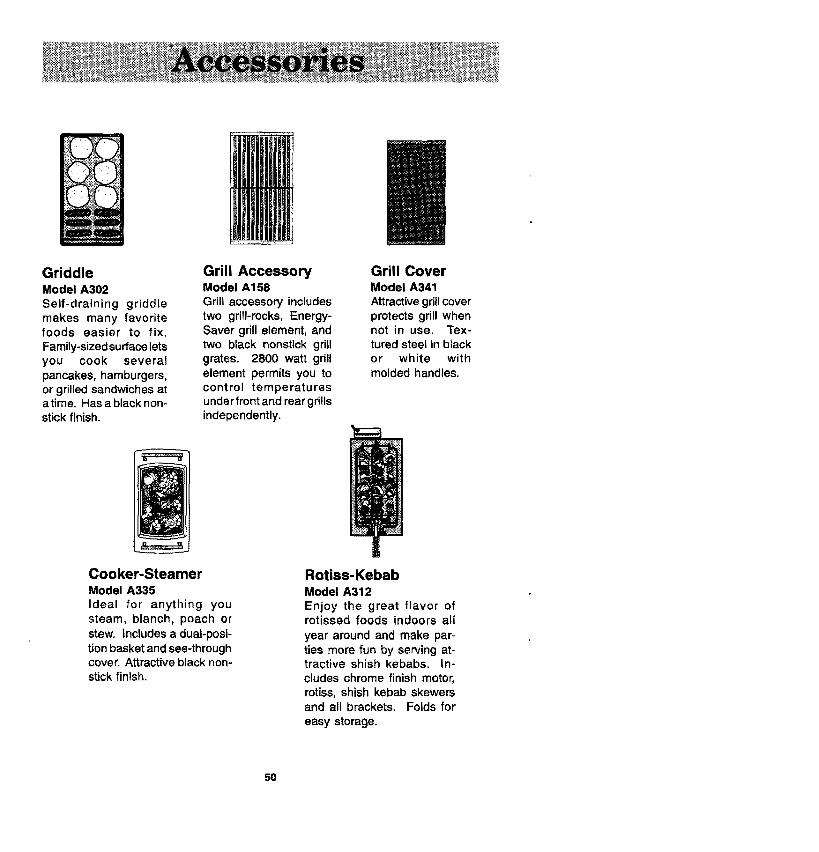
GriddleModel A302
Self-draining griddlemakes many favoritefoods easier to fix.
Family-sized surface letsyou cook severalpancakes, hamburgers,or grilled sandwiches atatime. Has a black non-stick finish.
Grill AccessoryModel A158
Grill accessory includestwo grill-rocks, Energy-Saver grill element, andtwo black nonstick grillgrates. 2800 watt grillelement permits you tocontrol temperaturesunder front and rear grillsindependently.
//Grill CoverModel A341
Attractive grillcoverprotects grill whennot in use. Tex-tured steel in blackor white withmolded handles.
Cooker-SteamerModel A335
Ideal for anything yousteam, blanch, poach orstew. Includes a dual-posi-tion basket and see-throughcover. Attractive black non-stick finish.
Rotiss-KebabModel A312
Enjoy the great flavor ofrotissed foods indoors all
year around and make par-ties more fun by serving at-tractive shish kebabs. In-cludes chrome finish motor,rotiss, shish kebab skewersand all brackets. Folds for
easy storage.
5O

WokModel AO142
Ideal for stir-frying, steaming,braising and stewing. Wok hasnonstick finish, wood handles,cover, steaming rack, rice paddlesand cooking tips. Flat bottom wokcan be used on ALL cartridges.
Canning ElementModel A145A
Special canning element plugs intoconventional coil oooktop /cartridgeraising the heating element abovethe cooking surface. Allows use ofoversized utensils and those with
warped or rippled bottoms.
ConventionalCoil
Halogen Radiant SolidElement
Conventional Coil*Rated 240 volts........................... A100B-Black Porcelain
A100S- Stainless SteelA100W-White Porcelain
HalogenRated for 240 volts ........................ A125B-Black
A125W-White
Radiant*Rated for 240 volts ........................ A121B-Black
A121 W-White
Solid ElementRated for 240 volts ........................ A106B-Black
A106W-Wh ite
* To order 208 volt cartridges, add -8 to the model number.
51