use and maintenance manual key cutting machine “bianchi … · the user's and maintenance...
TRANSCRIPT

Use and Maintenance Manual
KEY CUTTING MACHINE“BIANCHI 303”
Code: LIBBI 303Version 0.1Printed May 2003

LIST OF CONTENTS
0List of contents
1 General Information . . . . . . . . . . . . . . . . . . . . . . . . . . . . . . . . . . . . . 4
1.0.1 Scope and contents of the manual. . . . . . . . . . . . . . . . . . . . . . .41.0.2 How to keep the manual. . . . . . . . . . . . . . . . . . . . . . . . . . . . . . .41.0.3 Reference material . . . . . . . . . . . . . . . . . . . . . . . . . . . . . . . . . . .41.0.4 Graphic symbols. . . . . . . . . . . . . . . . . . . . . . . . . . . . . . . . . . . . .4
1.1.0 Machine data plate . . . . . . . . . . . . . . . . . . . . . . . . . . . . . . . . . . . . . . . .5
1.2.0 Working conditions . . . . . . . . . . . . . . . . . . . . . . . . . . . . . . . . . . . . . . . .6
1.2.1 Intended use. . . . . . . . . . . . . . . . . . . . . . . . . . . . . . . . . . . . . . . .61.2.2 Improper Use . . . . . . . . . . . . . . . . . . . . . . . . . . . . . . . . . . . . . . .6
1.3.0 Terms and Conditions of Technical Assistance . . . . . . . . . . . . . . . . . . .6
1.3.1 Technical service and maintenance . . . . . . . . . . . . . . . . . . . . . .61.3.2 Manufacturer's address . . . . . . . . . . . . . . . . . . . . . . . . . . . . . . .6
2 Safety instructions . . . . . . . . . . . . . . . . . . . . . . . . . . . . . . . . . . . . . . 7
2.1.0 Safety legislation . . . . . . . . . . . . . . . . . . . . . . . . . . . . . . . . . . . . . . . . . .7
2.2.0 Safety devices . . . . . . . . . . . . . . . . . . . . . . . . . . . . . . . . . . . . . . . . . . . .7
2.2.1 Protection devices . . . . . . . . . . . . . . . . . . . . . . . . . . . . . . . . . . .72.2.2 Personal protective equipment. . . . . . . . . . . . . . . . . . . . . . . . . .82.2.3 Safety signs . . . . . . . . . . . . . . . . . . . . . . . . . . . . . . . . . . . . . . . .82.2.4 General safety requirements . . . . . . . . . . . . . . . . . . . . . . . . . . .8
2.3.0 Residual risks . . . . . . . . . . . . . . . . . . . . . . . . . . . . . . . . . . . . . . . . . . . .9
3 Machine description . . . . . . . . . . . . . . . . . . . . . . . . . . . . . . . . . . . . 10
3.1.0 Main features . . . . . . . . . . . . . . . . . . . . . . . . . . . . . . . . . . . . . . . . . . . .10
3.2.0 Parts- Machine. . . . . . . . . . . . . . . . . . . . . . . . . . . . . . . . . . . . . . . . . . .12
3.3.0 Machine accessories . . . . . . . . . . . . . . . . . . . . . . . . . . . . . . . . . . . . . .15
3.4.0 Optional Adaptors . . . . . . . . . . . . . . . . . . . . . . . . . . . . . . . . . . . . . . . .17
3.5.0 Milling cutters and tracers . . . . . . . . . . . . . . . . . . . . . . . . . . . . . . . . . .19
3.6.0 Electric circuit. . . . . . . . . . . . . . . . . . . . . . . . . . . . . . . . . . . . . . . . . . . .20
3.7.0 Technical features . . . . . . . . . . . . . . . . . . . . . . . . . . . . . . . . . . . . . . . .20
3.7.1 Noise . . . . . . . . . . . . . . . . . . . . . . . . . . . . . . . . . . . . . . . . . . . .20
4 Packing, transport and installation . . . . . . . . . . . . . . . . . . . . . . . . 21
4.1.0 Packing . . . . . . . . . . . . . . . . . . . . . . . . . . . . . . . . . . . . . . . . . . . . . . . .21
4.2.0 Transport . . . . . . . . . . . . . . . . . . . . . . . . . . . . . . . . . . . . . . . . . . . . . . .21
4.2.1 Unloading and handling the machine . . . . . . . . . . . . . . . . . . . .214.2.2 Item ckecklist and detection of damage . . . . . . . . . . . . . . . . . .224.2.3 Opening the package . . . . . . . . . . . . . . . . . . . . . . . . . . . . . . . .22
4.3.0 Placing the machine . . . . . . . . . . . . . . . . . . . . . . . . . . . . . . . . . . . . . .22
4.3.1 Temporary storing. . . . . . . . . . . . . . . . . . . . . . . . . . . . . . . . . . .22
KEYLINE S.r.l. KEY CUTTING MACHINE BIANCHI 303 - Man. cod. LIBBI 303 page 1

LIST OF CONTENTS ENGLISH
5 Installation . . . . . . . . . . . . . . . . . . . . . . . . . . . . . . . . . . . . . . . . . . . .24
5.1.0 General Instructions . . . . . . . . . . . . . . . . . . . . . . . . . . . . . . . . . . . . . . 24
5.1.1 Characteristics of the place of installation. . . . . . . . . . . . . . . . 245.1.2 Work station . . . . . . . . . . . . . . . . . . . . . . . . . . . . . . . . . . . . . . 24
5.2.0 Environmental conditions . . . . . . . . . . . . . . . . . . . . . . . . . . . . . . . . . . 24
5.2.1 Temperature and humidity . . . . . . . . . . . . . . . . . . . . . . . . . . . 245.2.2 Working environment . . . . . . . . . . . . . . . . . . . . . . . . . . . . . . . 245.2.3 Lighting . . . . . . . . . . . . . . . . . . . . . . . . . . . . . . . . . . . . . . . . . . 255.2.4 Vibrations . . . . . . . . . . . . . . . . . . . . . . . . . . . . . . . . . . . . . . . . 25
5.3.0 Connections . . . . . . . . . . . . . . . . . . . . . . . . . . . . . . . . . . . . . . . . . . . . 25
5.3.1 Grounding . . . . . . . . . . . . . . . . . . . . . . . . . . . . . . . . . . . . . . . . 25
6 Adjustment and use . . . . . . . . . . . . . . . . . . . . . . . . . . . . . . . . . . . . .26
6.1.0 Instructions for the operator . . . . . . . . . . . . . . . . . . . . . . . . . . . . . . . . 26
6.1.1 General instructions for use . . . . . . . . . . . . . . . . . . . . . . . . . . 266.1.2 Preliminary checks and start-up . . . . . . . . . . . . . . . . . . . . . . . 27
6.2.0 Parts- Machine . . . . . . . . . . . . . . . . . . . . . . . . . . . . . . . . . . . . . . . . . . 28
6.3.0 Changing the tools . . . . . . . . . . . . . . . . . . . . . . . . . . . . . . . . . . . . . . . 29
6.3.1 Changing the tracer and the milling cutter . . . . . . . . . . . . . . . 296.3.2 Adjusting the milling cutter-tracer assembly . . . . . . . . . . . . . . 306.3.3 Replacing the carriage . . . . . . . . . . . . . . . . . . . . . . . . . . . . . . 31
6.4.0 Key duplication . . . . . . . . . . . . . . . . . . . . . . . . . . . . . . . . . . . . . . . . . . 32
6.4.1 Cutting dimple keys. . . . . . . . . . . . . . . . . . . . . . . . . . . . . . . . . 326.4.2 Cutting laser-type keys . . . . . . . . . . . . . . . . . . . . . . . . . . . . . . 336.4.3 Cutting laser-type keys with thin shank (mercedes) . . . . . . . . 346.4.4 Cutting OPEL keys . . . . . . . . . . . . . . . . . . . . . . . . . . . . . . . . . 346.4.5 Cutting AUDI / VW keys . . . . . . . . . . . . . . . . . . . . . . . . . . . . . 346.4.6 Slanting cutting . . . . . . . . . . . . . . . . . . . . . . . . . . . . . . . . . . . . 346.4.7 Cutting MCM keys. . . . . . . . . . . . . . . . . . . . . . . . . . . . . . . . . . 356.4.8 Cutting tibbe (ford) keys . . . . . . . . . . . . . . . . . . . . . . . . . . . . . 356.4.9 Code cutting for JIS keys . . . . . . . . . . . . . . . . . . . . . . . . . . . . 366.4.10 Cutting tubular and muzzle keys. . . . . . . . . . . . . . . . . . . . . . . 376.4.11 Cutting Fichet keys . . . . . . . . . . . . . . . . . . . . . . . . . . . . . . . . . 38
7 Maintenance . . . . . . . . . . . . . . . . . . . . . . . . . . . . . . . . . . . . . . . . . . .39
7.1.0 General information . . . . . . . . . . . . . . . . . . . . . . . . . . . . . . . . . . . . . . 39
7.1.1 Skills of maintenanace personnel . . . . . . . . . . . . . . . . . . . . . . 397.1.2 Type of Maintenance. . . . . . . . . . . . . . . . . . . . . . . . . . . . . . . . 40
7.2.0 Ordinary maintenance . . . . . . . . . . . . . . . . . . . . . . . . . . . . . . . . . . . . 41
7.2.1 Replacing the belts . . . . . . . . . . . . . . . . . . . . . . . . . . . . . . . . . 417.2.2 Adjusting and replacing the vertical tension spring of the carriage .427.2.3 Inspecting and replacing the fuses . . . . . . . . . . . . . . . . . . . . . 43
7.3.0 Cleaning the machine. . . . . . . . . . . . . . . . . . . . . . . . . . . . . . . . . . . . . 44
8 Dismantling and disposal . . . . . . . . . . . . . . . . . . . . . . . . . . . . . . . .45
8.0.1 Waste disposal . . . . . . . . . . . . . . . . . . . . . . . . . . . . . . . . . . . . 458.0.2 Disposal of the packing material . . . . . . . . . . . . . . . . . . . . . . . 45
8.1.0 Dismantling the machine . . . . . . . . . . . . . . . . . . . . . . . . . . . . . . . . . . 45
page 2 KEY CUTTING MACHINE BIANCHI 303 - Man. cod. LIBBI 303 KEYLINE S.r.l.
ENGLISH LIST OF CONTENTS
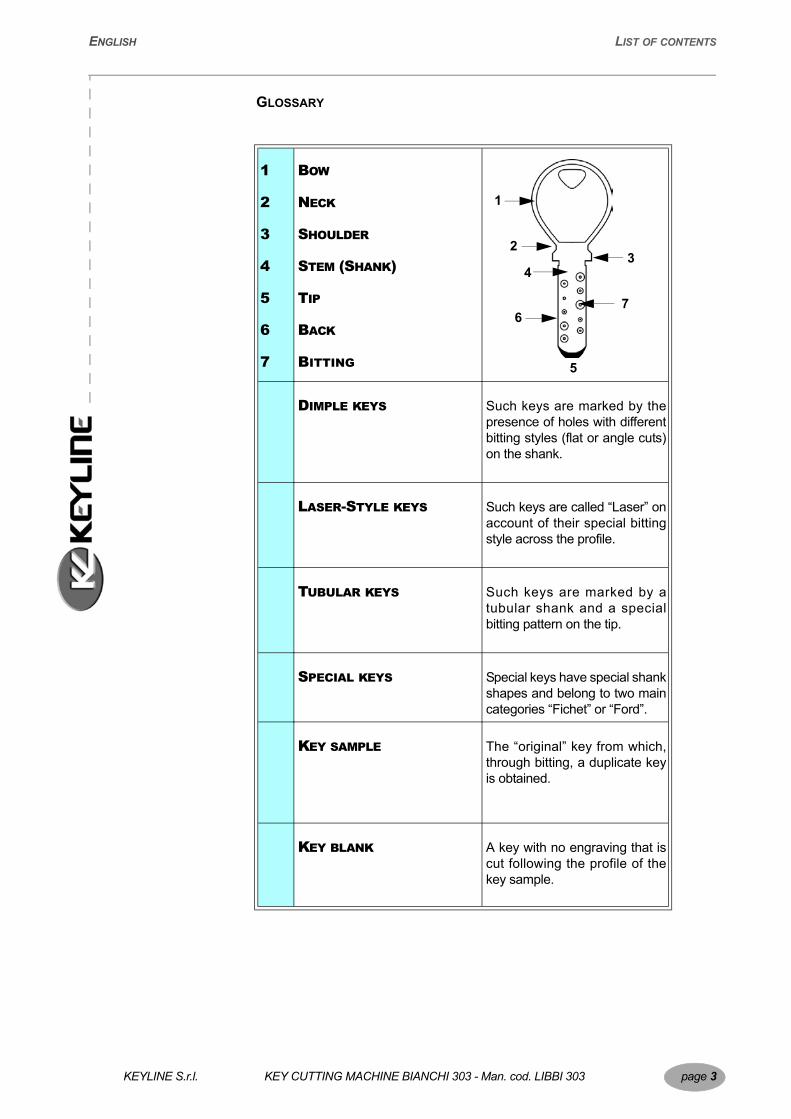
GLOSSARY
1
2
3
4
5
6
7
BOW
NECK
SHOULDER
STEM (SHANK)
TIP
BACK
BITTING
DIMPLE KEYS Such keys are marked by the presence of holes with different bitting styles (flat or angle cuts) on the shank.
LASER-STYLE KEYS Such keys are called “Laser” on account of their special bitting style across the profile.
TUBULAR KEYS Such keys are marked by a tubular shank and a special bitting pattern on the tip.
SPECIAL KEYS Special keys have special shank shapes and belong to two main categories “Fichet” or “Ford”.
KEY SAMPLE The “original” key from which, through bitting, a duplicate key is obtained.
KEY BLANK A key with no engraving that is cut following the profile of the key sample.
1
2
4
7
5
3
6
KEYLINE S.r.l. KEY CUTTING MACHINE BIANCHI 303 - Man. cod. LIBBI 303 page 3

GENERAL INFORMATION
1General InformationThe user's and maintenance manual of the key cutting machine “BIANCHI 303” for the duplication of dimple keys and laser keys (henceforth 'key cutting machine") contains all operation instructions on how to use the machine at best while guaranteeing the safety of operators.
1.0.1 SCOPE AND CONTENTS OF THE MANUAL
This manual provides basic information on the installation, operation and maintenance of the key-cutting machine. It is addressed to machine operators and it enables them to use the machine efficiently, even if they do not have any previous specific knowledge of it.This manual describes the characteristics of the machine at the time it is being put on the market; therefore it may not capture later technological improvements introduced by KEYLINE S.r.l. as part of its constant endeavour to enhance the performance, ergonomics, safety and functionality of its products.KEYLINE S.r.l., reserves the right not to update the manuals of previous versions of the machine. Users must follow the instructions contained in this manual scrupulously, especially those concerning safety norms and ordinary maintenance.
1.0.2 HOW TO KEEP THE MANUAL
The manual must be stored in a safe place, away from dust and moisture and it must be accessible to all users who shall consult it any time they are in doubt on how to operate the machine.KEYLINE S.r.l. reserves the right to modify its production and related manuals without necessarily updating previous versions of the reference materials. The customer shall store any updated copy of the manual -or parts of it -delivered by the manufacturer as an attachment to this manual.For any further information regarding this manual or the use and maintenance of the machines please contact KEYLINE S.r.l.
1.0.3 REFERENCE MATERIAL
A "Spare parts folder" is attached to this manual.
1.0.4 GRAPHIC SYMBOLS
- Indicates operations that can be either dangerous for people and/or disrupt the correct functioning of the machine.
- Indicates prohibited operations.
page 4 KEY CUTTING MACHINE BIANCHI 303 - Man. cod. LIBBI 303 KEYLINE S.r.l.

ENGLISH GENERAL INFORMATION
1.1.0 MACHINE DATA PLATE
KEYLINE S.r.l.Via Camillo Bianchi31020 Scomigo di Conegliano (TV) - ITALYTel.: +39.0438.202511Fax: +39.0438.202520Sito Internet: www.keyline.itE-mail: [email protected]
Key cutting machine “BIANCHI 303”voltage: *absorbed power: *absorbed current: * *See “Technical features” page 20.
Figure 1: Location of the machine data plate
KEYLINE S.r.l. KEY CUTTING MACHINE BIANCHI 303 - Man. cod. LIBBI 303 page 5
GENERAL INFORMATION ENGLISH
1.2.0 WORKING CONDITIONS
1.2.1 INTENDED USE
The key cutting machine described in this manual has been designed to duplicate dimple keys and laser-type keys (thin shank laser-type keys, tubular keys, Fichet keys, Ford keys with the use of accessories).
1.2.2 IMPROPER USE
The improper use of the machine includes using the machine to obtain a larger or different production than the foreseen one. Should this occur the manufacturer shall take no responsibility for damage to materials or persons and shall consider all warranties on the machine expired.
1.3.0 TERMS AND CONDITIONS OF TECHNICAL ASSISTANCE
1.3.1 TECHNICAL SERVICE AND MAINTENANCE
The manufacturer shall be accountable for servicing during the warranty period and for causes related to the use of the machine.Ordinary maintenance operations shall be performed by the personnel who use the key cutting machine.Any other operation (special maintenance, repairs, replacements etc..) shall be carried out by qualified personnel or contractors. KEYLINE S.r.l. is available for said assistance.
KEYLINE S.r.l. is at your disposal for:• clarification and advice;• delivery of spare parts;• direct assistance through in-house technical team;• direct assistance through authorised personnel.
Any servicing by the customer during the warranty period must be previously authorised by KEYLINE S.r.l.
The warranty will become void in case of:• unauthorised operations;• use of non-original spare-parts.
1.3.2 MANUFACTURER'S ADDRESS
For any further information or technical service related to extraordinary maintenance or repairs, please contact:
KEYLINE S.r.l.Via Camillo Bianchi31020 Scomigo di Conegliano (TV) - ITALYTel.: +39.0438.202511Fax: +39.0438.202520Sito Internet: www.keyline.itE-mail: [email protected]
To facilitate communication please state:• the name of the customer;• the machine identification data contained in the machine data plate.
page 6 KEY CUTTING MACHINE BIANCHI 303 - Man. cod. LIBBI 303 KEYLINE S.r.l.

SAFETY INSTRUCTIONS
2Safety instructions
2.1.0 SAFETY LEGISLATION
The key cutting machine and its safety devices comply with Council Directive 89/392/EEC known as "Machine Directive".This manual lists all safety instructions (“Safety devices” page 7) that the operator must follow during the installation and functioning of the machine.Failing to respect the instructions may compromise the safety conditions envisaged during design and testing phases.When employed for their intended use all machines marked CE comply with EU 'machine' directive 89/392/EEC and later amendments (directives 91/368/EEC, 93/44/EEC, 93/68/EEC).
Warning: Important!
Users must be informed about the instructions contained in the following pages.
Users must carefully follow the instructions contained in this manual.
2.2.0 SAFETY DEVICES
The key cutting machine is equipped with safety devices and machine guards that delimit the field of action of the operators to guarantee their safety.
2.2.1 PROTECTION DEVICES
- Ground Connection (A).- The machine will stop immediately as you release the carriage handle: power
will be cut off and all electrical devices will be de-energised (B).- Guard to protect the operator from projected metal chips or scrap (C).
Figure 2: Location of protection devices
B Stop lever
A Ground connectionC Eye guard
KEYLINE S.r.l. KEY CUTTING MACHINE BIANCHI 303 - Man. cod. LIBBI 303 page 7

SAFETY INSTRUCTIONS ENGLISH
2.2.2 PERSONAL PROTECTIVE EQUIPMENT
When operating and maintaining the key cutting machine users must wear the following personal protective equipment:
• Protective clothing:Maintainers and key cutting machine operators must wear protective clothing that complies with the basic safety requirements currently in force.In case of slippery floors users must wear safety shoes with anti-slip soles.
• Safety glasses:During key cutting operations operators must wear eye protection (glasses or goggles).
2.2.3 SAFETY SIGNS
The key cutting machine bears the following safety signs.
• Wear safety glasses.
2.2.4 GENERAL SAFETY REQUIREMENTS
Warning: IMPORTANT!
Make sure that the grounding system is well connected.
During key cutting operations keep always your hands on the operating handles that control the horizontal movement of the carriage.
Always de-energise the machine (turn off the main switch) before servicing mobile parts that are electrically operated.
Do not pour water or other liquids onto the engine or electrical connections.
page 8 KEY CUTTING MACHINE BIANCHI 303 - Man. cod. LIBBI 303 KEYLINE S.r.l.

ENGLISH SAFETY INSTRUCTIONS
2.3.0 RESIDUAL RISKS
The machine has been designed with the utmost care to make it safe throughout production, transport, adjustment and maintenance operations. Nevertheless not all risks for either operators or the environment could be eliminated, be it for technological reasons (material reliability) or management-related issues (overcomplicated operations).
Therefore, when operating the machine the following residual risks - as well as those connected with its use - must be taken into due consideration:
• Risks related to the place of installationThe place where the machine is installed might present hazards that could disrupt the correct functioning of the machine (see paragraph 5.2.0 at page 24).
• Electrical hazard (A)Since the machine is equipped with electrical devices, in case of faults there might be a risk of electrocution. The power line must be fitted with the appropriate control and protection devices (circuit breaker, thermal overload switch and differential switch).
• Mechanical hazard (B)The machine is fitted with milling cutters and tracer points used in key cutting operations. Operators must watch out to avoid cutting their hands when they are cutting keys or changing tools. Operators shall also prevent clothes, necklaces/bracelets/rings and/or long hair from becoming trapped or entangled in the moving parts of the machine. The use of caps to contain hair is recommended.
Figure 3: Location of residual risks
B
A
KEYLINE S.r.l. KEY CUTTING MACHINE BIANCHI 303 - Man. cod. LIBBI 303 page 9

MACHINE DESCRIPTION
3Machine description
3.1.0 MAIN FEATURES
The key cutting machine described in this manual is used to duplicate dimple and laser keys; it fulfils the highest quality, reliability and accuracy standards.It can also facilitate the duplication of keys with different characteristics even without changing the clamp or using fixed adaptors.
Key cutting machine BIANCHI 303 is used to duplicate the following types of key:
• Dimple keys with flat bit • Laser-type keys • Laser-type keys with thin shank • Tubular keys • Fichet keys• Ford keys
Figure 4: Dimple keys with flat and angle cuts
Figure 5: Laser-type keys
DIMPLE KEYS WITH FLAT AND ANGLE CUTS
Flat bit 15° angle cut 45° angle cut
With
adap
torWith
adap
tor
LASER-TYPE KEYS
4 External cuts Double internal bitting Double external bitting
With
adap
tor
page 10 KEY CUTTING MACHINE BIANCHI 303 - Man. cod. LIBBI 303 KEYLINE S.r.l.

ENGLISH MACHINE DESCRIPTION
Figure 6: Laser-type keys with thin shank
Figure 7: Tubular and muzzle keys
Figure 8: Special keys
LASER-TYPE KEYS WITH THIN SHANK
Double external bitting Double external bitting
With
adap
tor
With
adap
tor
TUBULAR AND MUZZLE KEYS
Tubular keys Muzzle keys
With
adap
torWith
adap
tor
SPECIAL KEYS
Fichet keys Ford keys
With
adap
tor
With
adap
tor
KEYLINE S.r.l. KEY CUTTING MACHINE BIANCHI 303 - Man. cod. LIBBI 303 page 11

MA
CH
INE
DES
CR
IPTI
ON
ENG
LISH
page
12
KEY
CU
TTIN
G M
ACH
INE
BIAN
CH
I 303
- M
an. c
od. L
IBBI
303
KEYL
INE
S.r.l
.
3.2.
0PA
RTS
- MA
CH
INE
Figu
re 9
:Pa
rts- M
achi
ne26
27
25
1 2 3
4 5
6 7
8
16
13
12
20
21
11
14
15
17
19
9 10
22 23 24
18
PA
RT
S-
MA
CH
INE
1M
ain
switc
h8
Cla
mps
15C
arria
ge p
rote
ctiv
e sh
ield
22Le
d -O
N
2Po
wer
soc
ket
9Le
vers
to c
lam
p ja
ws
16Le
ver t
o st
art a
nd o
pera
te th
e m
illing
cut
ter-
trace
r ass
embl
y23
Led
- cal
ibra
tion
cutti
ng d
epth
for m
illing
cu
tter-t
race
r ass
embl
y
3Fu
ses
hold
er10
Stop
nut
s to
sec
ure
clam
p ho
ldin
g ca
rriag
e17
Leve
r for
car
riage
radi
al m
ovem
ent
24Le
d - c
alib
ratio
n m
ode
OK
4Tr
acer
hol
der
11Kn
ob to
con
trol c
arria
ge la
tera
l spr
ingi
ng
syst
em -
For l
aser
key
s18
Mac
hine
cov
er25
Prot
ectiv
e ey
e gu
ard
5St
op n
ut to
sec
ure
trace
r12
Push
but
ton
- cal
ibra
tion
mod
e19
Dev
ice to
sto
p m
illing
cut
ter m
otor
26To
ol c
ompa
rtmen
t
6M
illing
cut
ter
13Pu
sh b
utto
n - c
uttin
g m
ode
20Kn
ob to
cal
ibra
te tr
acer
ass
embl
y27
Lam
p
7D
oubl
e st
op n
ut to
sec
ure
milli
ng c
utte
r14
Leve
r to
secu
re th
e ca
rriag
e21
Lock
ing
ring
for t
race
r spr
ingi
ng s
yste
m

ENGLISH MACHINE DESCRIPTION
1 ON/OFF SWITCH
When the switch is in the ON position the LED will turn on and the machine is in the stand-by mode ready for use
2 POWER SOCKET
3 FUSES HOLDER
4 TRACER POINT
The tracer point detects the bitting of the 'key sample', i.e. it follows the profile of the original key to be copied
5 STOP NUT TO SECURE TRACER
6 MILLING CUTTER
The milling cutter moves parallel to the tracer and performs the cutting of the "blank" key (duplicate key).
7 DOUBLE STOP NUT TO SECURE MILLING CUTTER
8 CLAMPS
The machine is fitted with 2 clamp sets: the left clamp is for the key sample, whereas the right one is for the key blank. Moreover, it is possible to insert adaptors for the duplication of special keys.
8A CLAMPING JAWS
Part of the clamp that locks the processed keys in place
8B FIXED BACKSTOP ON TIP
9 LEVERS TO CLAMP JAWS
These levers clamp jaws to lock processed keys in place
10 STOP NUTS TO SECURE CLAMP-HOLDING CARRIAGE
11 KNOB TO CONTROL LATERAL SPRINGING SYSTEM OF THE CARRIAGE This knob allows you to adjust the lateral springing system of the carriage when duplicating laser keys.
1
2
3
5
4
7
6
8B8
8A
10
9 9
11
KEYLINE S.r.l. KEY CUTTING MACHINE BIANCHI 303 - Man. cod. LIBBI 303 page 13

MACHINE DESCRIPTION ENGLISH
12 PUSHBUTTON- CALIBRATION MODE
It controls the electromechanical calibration system
13 PUSH BUTTON - CUTTING MODE
It starts the motor14 HANDLE TO SECURE THE CARRIAGE
15 CARRIAGE PROTECTIVE SHIELD
The carriage is fitted with a large protective shield that covers the entire cutting and pre-vents the operator from inserting his/her hands or other objects into moving parts of the ma-chine.
16 LEVER TO START, OPERATE AND SECURE THE MILLING CUTTER-TRACER ASSEMBLY
This lever allows you to shift the milling cutter-tracer assembly up and down. If you move the lever downwards, the machine will start automatically, if you rotate it clock-wise you can lock the assembly in the required position.
17 LEVER FOR CARRIAGE RADIAL MOVEMENT
Use this lever to control the carriage radial movement
18 MACHINE COVER
19 DEVICE TO STOP MILLING CUTTER MOTOR
The lever to control the milling cutter-tracer assembly is equipped with a device to stop the motor. Such device becomes active as you release the lever.
20 KNOB TO CALIBRATE TRACER ASSEMBLY
Micrometric tracer adjustment through a-cen-tesimal ring nut for the accurate alignment of the tracer depth; with very small and controlla-ble depth variations (+/- 0,02 mm) you can cor-rect the defects of worn key samples.
21 LOCKING RING FOR TRACER SPRINGING SYSTEM
Rotate this device counter-clockwise to lock the tracer springing system. This is necessary to duplicate Laser keys.
22 LED -ONThe orange pilot light turns on when the machine is working.
23 LED - CALIBRATION CUTTING DEPTH FOR MILLING CUTTER-TRACER ASSEMBLY
The red illuminated arrows indicate in which direction you must turn knob (20) to calibrate the cutting depth.
24 LED - CALIBRATION MODE OKThe green pilot light turns on when the machine has been calibrated correctly.
15
1214
13
16
18
19
17
20
21
23 24 23
22
page 14 KEY CUTTING MACHINE BIANCHI 303 - Man. cod. LIBBI 303 KEYLINE S.r.l.

ENGLISH MACHINE DESCRIPTION
3.3.0 MACHINE ACCESSORIES
The key cutting machine is supplied with a kit of accessories and tools (shown in table 1) used for adjusting, running and maintaining the machine.
• nr. 1 all-purpose clamp to duplicate the majority of commercial keys;• nr. 2 adaptors (see table 3);• nr. 2 special tracers (see table 3);• nr. 2 special milling cutters (see table 3).
Such tools will be used according to the type of key to duplicate.
Accessories and tools can be stored in the front tool compartment (see figure 10).
Figure 10: Tool compartment
25 PROTECTIVE EYE GUARD
The key cutting machine is equipped with a protective screen that prevents operators from being hit by projected metal chips during machining.
26 TOOL COMPARTMENT
It is used to store all tools used for calibration, cutting and duplication. 27 LAMP
The machine is equipped with a lamp for improved visibility during regular key cutting operations
KEYLINE S.r.l. KEY CUTTING MACHINE BIANCHI 303 - Man. cod. LIBBI 303 page 15

MACHINE DESCRIPTION ENGLISH
Table 1: Kit of accessories
ABACKSTOP PLATES2 pcs
BHEXAGON SPANNERSD= 2 - 2,5 - 3 - 4 - 5 - 6 mm6 pcs
CT-SHAPE SPANNERD = 3 mm1 pc.
DPOWER CABLE1 pc.
EFUSES1 pc.
DBRUSH1 pc.
page 16 KEY CUTTING MACHINE BIANCHI 303 - Man. cod. LIBBI 303 KEYLINE S.r.l.

ENGLISH MACHINE DESCRIPTION
3.4.0 OPTIONAL ADAPTORS
TYPE OF ADAPTOR KEYS
MK 15
MM
MK 5 - 45
MO
MCM
KEYLINE S.r.l. KEY CUTTING MACHINE BIANCHI 303 - Man. cod. LIBBI 303 page 17

MACHINE DESCRIPTION ENGLISH
Table 2: Optional Adaptors
TYPE OF ADAPTOR KEYS
MT
MF
MTB
MJ
MA
page 18 KEY CUTTING MACHINE BIANCHI 303 - Man. cod. LIBBI 303 KEYLINE S.r.l.

ENGLISH MACHINE DESCRIPTION
3.5.0 MILLING CUTTERS AND TRACERS
Table 3: Milling cutters and tracers supplied with the machine
For instructions on how to change the tools, refer to chapter 6.3.0 at page 29.
MILLING CUTTERS TRACERS
MAT. USE
MOD. REF. MOD. REF. L (mm) α° φ (mm)F1 FR57011A T1 5R26005A 40 90 0,45 - HSS
F8 FR57023 T8 5R26026 40 - - 2,4 HSS
α°
φ (mm)
KEYLINE S.r.l. KEY CUTTING MACHINE BIANCHI 303 - Man. cod. LIBBI 303 page 19

MACHINE DESCRIPTION ENGLISH
3.6.0 ELECTRIC CIRCUIT
Figure 11: Diagram of the electric circuit
3.7.0 TECHNICAL FEATURES
Table 4: Technical features
3.7.1 NOISE
Table 5: Noise
1
2
3
4
5
6
7
8
9
10
11
12
13
14
MACHINE DIMENSIONS
Width 230 mm
Height 435 mm
Depth (Length) 375 mm
Weight 210 N (21 Kg)
TECHNOLOGY FEATURES
Power voltage 230 V - 50 Hz110 V - 60 Hz
Absorption 1,2 Amp.
Motor Single-phase 230 V - 50 HzSingle-phasee 110 V - 60 Hz
- Motor capacity 0,22 kW
Milling cutter speed 4.500 rpm
Working strokes
- Axis x 45 mm
- Axis y 60 mm
- Axis z 30 mm
Lighting Incandescent lamp 12V - 20W
Working temperature 0°C ÷+ 40°C
Acoustic pressure level Lp (A) dB(A) 81,5Acoustic power level Lw (A) dB(A) 88,5
page 20 KEY CUTTING MACHINE BIANCHI 303 - Man. cod. LIBBI 303 KEYLINE S.r.l.

PACKING, TRANSPORT AND INSTALLATION
4Packing, transport and installation
4.1.0 PACKING
Prior to transport the machine and its component parts are packed in a carton and fixed in it with polystyrene foam covers that allow a safe and damage-free handling of the goods.
The dimensions of the carton are shown below.
Figure 12: Package size
4.2.0 TRANSPORT
As a rule the key cutting machine is despatched with component parts already assembled.
The markings on the packing materials indicate how to handle the machine during transport.
4.2.1 UNLOADING AND HANDLING THE MACHINE
The machine can be unloaded manually; no hoisting equipment is required.
Warning:
Be careful not to throw the machine off balance, let it tip over and fall. Even a small damage would impair its correct functioning.
560mm
560mm
360mm
KEYLINE S.r.l. KEY CUTTING MACHINE BIANCHI 303 - Man. cod. LIBBI 303 page 21
PACKING, TRANSPORT AND INSTALLATION ENGLISH
4.2.2 ITEM CKECKLIST AND DETECTION OF DAMAGE
Upon delivery, check that all items listed in the consignment note or in the packing list are in good condition. If any items are missing, the packing has been tampered with or the goods are damaged write a statement in the delivery note, sign it and have the carrier sign it too. Notify KEYLINE S.r.l.immediately and wait for the relevant instructions.Please note that if you fail to notify the damage immediately you will lose your rights to damage compensation. Do not remove protective covers before the installation - unless they are damaged. Packages that were opened to examine the contents must be handled with care to avoid damaging the goods; re-pack the parts and store them in a safe place until the installation. For more detailed information on how to handle these parts refer to the chapter “Temporary storing” page 22.
4.2.3 OPENING THE PACKAGE
Remove the machine from the packing materials following the instructions below:
1. Cut the straps;2. Remove staples;3. Remove the machine from the carton.
4.3.0 PLACING THE MACHINE
After removing the packing materials, take hold of the machine base and move the BIANCHI 303 key cutting machine onto the workstation.
4.3.1 TEMPORARY STORING
If the installation of the machine does not occur immediately, store the machine in a dry and properly ventilated place.
• Apply an appropriate coating to prevent corrosion of surfaces that may suffer oxidation and corrosion.
• Check regularly for corrosion.• Rubber parts must be protected against too low temperatures. Never
store them outdoors, not even for short periods. Keep them well ventilated in case of hot temperatures.
Warning:
If the machine is stored or remains unused for long periods or if it is started a long time after delivery, gaskets or retaining rings may undergo hardening thus causing leaks or seizures.
If the period of inactivity is longer than 6 months, inspect the machine carefully and replace any gaskets or parts that may have decayed during storing or downtime.
page 22 KEY CUTTING MACHINE BIANCHI 303 - Man. cod. LIBBI 303 KEYLINE S.r.l.

ENGLISH PACKING, TRANSPORT AND INSTALLATION
To avoid that inaccurate operations or re-assembling may damage the equipment at the time of start-up, the utmost care must be used in performing such inspection, that shall be carried out by qualified and skilled personnel.
Warning: IMPORTANT! Make sure that:
there is no dripping from iron and metal structures;
the transit of equipment, goods or people near the machine does not damage it.
KEYLINE S.r.l. KEY CUTTING MACHINE BIANCHI 303 - Man. cod. LIBBI 303 page 23

INSTALLATION
5Installation
5.1.0 GENERAL INSTRUCTIONS
5.1.1 CHARACTERISTICS OF THE PLACE OF INSTALLATION
The key cutting machine must be placed on a smooth level bench about 90 - 110 cm high, suitable for bearing the weight of the machine and keep it horizontal, thus avoiding vibrations and stress.
Allow a 30-cm clearance around and above the key cutting machine for correct functioning and maintenance.
5.1.2 WORK STATION
The key cutt ing machine wil l be operated only by one operator who will stand in front of the machine and do the following:- Hold his/her hands on the control
levers during key cutting operations;- Keep the work station tidy and free
from objects that may hamper regular machine operations;
- Make sure that environmental conditions allow to work safely (appropriate lighting, temperature and humidity );
- Remove scrap and metal chips from the desk;
- Keep unauthorised personnel out of the area.
Figure 13: Position of the hands
5.2.0 ENVIRONMENTAL CONDITIONS
5.2.1 TEMPERATURE AND HUMIDITY
The machine should be used in rooms with a temperature range of 0 - 40 °C and a relative humidity lower than 60%.
5.2.2 WORKING ENVIRONMENT
The machine must be used in a place protected from bad weather (rain, hail, snow etc.).
Warning:
If the machine is used in places exposed to corrosion, maintenance shall be scheduled in such a way as to prevent extreme wear of the components.
Do not use the machine in explosive or partially explosive atmo-sphere or in the presence of inflammable liquids of gases.
page 24 KEY CUTTING MACHINE BIANCHI 303 - Man. cod. LIBBI 303 KEYLINE S.r.l.

ENGLISH INSTALLATION
5.2.3 LIGHTING
In the place of installation lighting must be appropriate, in order to allow the correct use and maintenance of the machine. The user shall be responsible for complying with the legislation in force regarding lighting.
5.2.4 VIBRATIONS
The normal use of the machine - according to the instructions of this manual does not cause vibrations that can be dangerous for people.
5.3.0 CONNECTIONS
5.3.1 GROUNDING
Key cutting machines BIANCHI 303 have been designed in compliance with the safety legislation in force and feature appropriate safety devices to prevent work accidents.
In particular the machine was built with materials that:• are self-extinguishing;• protect against electrocution;
The machine must be grounded through the centralised circuit of the place of installation.
The system must be connected to a ground plate. Access to such plate must be guaranteed for inspection and assessment of the state of connection.
Warning:
Do not touch the machine when your hands and/or feet are wet or humid.
Avoid any contact with grounded plates.
Figure 14: Ground Connection
KEYLINE S.r.l. KEY CUTTING MACHINE BIANCHI 303 - Man. cod. LIBBI 303 page 25

ADJUSTMENT AND USE
6Adjustment and use
6.1.0 INSTRUCTIONS FOR THE OPERATOR
This section describes the working procedures for the safe use of the key cutting machine.
Warning:
Wear personal protective equipment (safety glasses) and follow safety instructions carefully.
Warning:
During key cutting ALWAYS keep your hands on the levers of the control milling cutters and tracers and of the carriage movement, as shown in figure 15.
Figure 15: Position of the hands
6.1.1 GENERAL INSTRUCTIONS FOR USE
Here is a list of instructions that operators must follow in order to guarantee steadily efficient and safe machine operations.
• Avoid using tools and cutters for improper uses as this can damage them;• Keep the power cable away from heat, humidity, oil, water and sharp
cutting items; • Keep the machine cutters sharp and clean for better and safer
performance;• Follow the instructions regarding lubrication and replacement of machine
parts;• Check wires, belts, extension cables and patch cords regularly; if they are
damaged or worn let the authorised servicing personnel repair or replace them;
• Keep handles dry and clean;• Do not expose the machine to bad weather;• Disconnect the machine power cable from the mains before any
maintenance or repair operation or whenever the machine remains unused for a long time;
• Use only original spare parts.
page 26 KEY CUTTING MACHINE BIANCHI 303 - Man. cod. LIBBI 303 KEYLINE S.r.l.

ENGLISH ADJUSTMENT AND USE
6.1.2 PRELIMINARY CHECKS AND START-UP
Before starting the machine the operator must: • Check that individual electric connections are correctly linked to the mains.• Check that the machine is levelled;• Carry out a visual inspection of the machine to make sure that no part has
been removed or modified;• Check that the machine and the surrounding area are tidy and no clothes,
tools, spare parts and other objects may hamper machine operations.
KEYLINE S.r.l. KEY CUTTING MACHINE BIANCHI 303 - Man. cod. LIBBI 303 page 27

AD
JUST
MEN
T A
ND U
SEEN
GLI
SH
page
28
KEY
CU
TTIN
G M
ACH
INE
BIAN
CH
I 303
- M
an. c
od. L
IBBI
303
KEYL
INE
S.r.l
.
6.2.
0PA
RTS
- MA
CH
INE
Figu
re 1
6:Pa
rts- M
achi
ne26
27
25
1 2 3
4 5
6 7
8
16
13
12
20
21
11
14
15
17
19
9 10
22 23 24
18
PA
RT
S-
MA
CH
INE
1M
ain
switc
h8
Cla
mps
15C
arria
ge p
rote
ctiv
e sh
ield
22Le
d -O
N
2Po
wer
soc
ket
9Le
vers
to c
lam
p ja
ws
16Le
ver t
o st
art a
nd o
pera
te th
e m
illing
cut
ter-
trace
r ass
embl
y23
Led
- cal
ibra
tion
cutti
ng d
epth
for m
illing
cu
tter-t
race
r ass
embl
y
3Fu
ses
hold
er10
Stop
nut
s to
sec
ure
clam
p ho
ldin
g ca
rriag
e17
Leve
r for
car
riage
radi
al m
ovem
ent
24Le
d - c
alib
ratio
n m
ode
OK
4Tr
acer
hol
der
11Kn
ob to
con
trol c
arria
ge la
tera
l spr
ingi
ng
syst
em -
For l
aser
key
s18
Mac
hine
cov
er25
Prot
ectiv
e ey
e gu
ard
5St
op n
ut to
sec
ure
trace
r12
Push
but
ton
- cal
ibra
tion
mod
e19
Dev
ice to
sto
p m
illing
cut
ter m
otor
26To
ol c
ompa
rtmen
t
6M
illing
cut
ter
13Pu
sh b
utto
n - c
uttin
g m
ode
20Kn
ob to
cal
ibra
te tr
acer
ass
embl
y27
Lam
p
7D
oubl
e st
op n
ut to
sec
ure
milli
ng c
utte
r14
Leve
r to
secu
re th
e ca
rriag
e21
Lock
ing
ring
for t
race
r spr
ingi
ng s
yste
m

ENGLISH ADJUSTMENT AND USE
6.3.0 CHANGING THE TOOLS
Before starting the machine the operator shall choose the tools needed for key duplication (tools are described in chapter 3.3.0 at page 15) and install them, if required.
6.3.1 CHANGING THE TRACER AND THE MILLING CUTTER
Warning: IMPORTANT
Before carrying out the operation below, press the main switch to turn OFF the power and disconnect the power cable from the mains.
WARNING: when you are changing milling cutters and tracers DO NOT seize the tools by their bit.
1. Loosen the tracer stop nut (5) and the two nuts that lock the milling cutter (7), remove the tracer and the milling cutter to be changed;
2. Check that the tracer/ milling cutter to insert are perfectly clean;3. Insert the tracer/milling cutter in its seat and push it against the stop;4. Secure the tracer/ milling cutter by fastening the tracer stop nut (5) and
the two milling cutter stop nuts (7), avoid over-tightening them.
Figure 17: Changing the milling cutter/tracer
5 7
KEYLINE S.r.l. KEY CUTTING MACHINE BIANCHI 303 - Man. cod. LIBBI 303 page 29
ADJUSTMENT AND USE ENGLISH
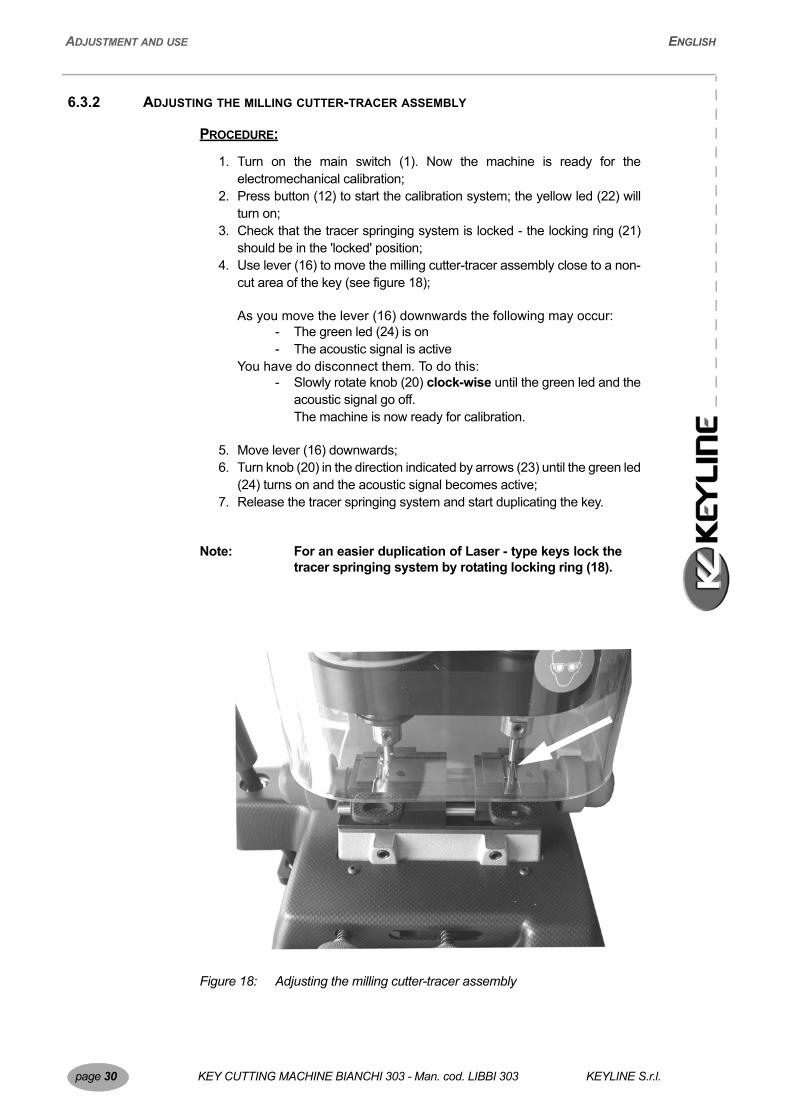
6.3.2 ADJUSTING THE MILLING CUTTER-TRACER ASSEMBLY
PROCEDURE:
1. Turn on the main switch (1). Now the machine is ready for the electromechanical calibration;
2. Press button (12) to start the calibration system; the yellow led (22) will turn on;
3. Check that the tracer springing system is locked - the locking ring (21) should be in the 'locked' position;
4. Use lever (16) to move the milling cutter-tracer assembly close to a non-cut area of the key (see figure 18);
As you move the lever (16) downwards the following may occur:- The green led (24) is on- The acoustic signal is active
You have do disconnect them. To do this:- Slowly rotate knob (20) clock-wise until the green led and the
acoustic signal go off.The machine is now ready for calibration.
5. Move lever (16) downwards;6. Turn knob (20) in the direction indicated by arrows (23) until the green led
(24) turns on and the acoustic signal becomes active;7. Release the tracer springing system and start duplicating the key.
Note: For an easier duplication of Laser - type keys lock the tracer springing system by rotating locking ring (18).
Figure 18: Adjusting the milling cutter-tracer assembly
page 30 KEY CUTTING MACHINE BIANCHI 303 - Man. cod. LIBBI 303 KEYLINE S.r.l.

ENGLISH ADJUSTMENT AND USE
6.3.3 REPLACING THE CARRIAGE
CARRIAGE FOR TUBULAR AND FICHET KEYS
Warning: IMPORTANT
Before carrying out the operation below, press the main switch to turn OFF the power and disconnect the power cable from the mains.
1. Loosen the two stop nuts (10);2. Remove the STD clamp holding carriage from its seat;3. Insert the new carriage and align it with the sliding guides;4. Fasten the carriage through stop nuts (10).
KEYLINE S.r.l. KEY CUTTING MACHINE BIANCHI 303 - Man. cod. LIBBI 303 page 31

ADJUSTMENT AND USE ENGLISH
6.4.0 KEY DUPLICATION
6.4.1 CUTTING DIMPLE KEYS
Dimple keys are marked by holes of different shapes across the shank.
REQUIRED TOOLS
• See table 3 at page 19.
PROCEDURE
1. Insert the key sample in the left clamp;2. Place the key in such a way that the key shoulder (see “Glossary” at
page 3) is against the clamp as shown in figure 19;3. Secure the key in the clamp by means of knob (9);4. Insert the key blank in the right clamp;5. Place and secure the key blank as described under points 2 and 3
above;6. Adjust the cutting depth as indicated in paragraph 6.3.2 at page 30;7. Start the machine by turning switch (1) to “ON”;8. You can now start duplication.
Figure 19: How to place the keys
9
KEY SHOULDER
page 32 KEY CUTTING MACHINE BIANCHI 303 - Man. cod. LIBBI 303 KEYLINE S.r.l.

ENGLISH ADJUSTMENT AND USE
6.4.2 CUTTING LASER-TYPE KEYS
“Laser” type keys have a special bitting across their profile.
REQUIRED TOOLS
• See table 3 at page 19.
PROCEDURE
1. Insert the key sample in the left clamp;2. Place the key in such a way that the key shoulder (see “Glossary” at
page 3) is against the clamp as shown in figure 19;
In case of keys having the shoulder on the tip, you will have to use an appropriate plate - to be inserted into the clamp groove (figure 20).
Figure 20:Shoulder on the tip
3. Secure the key in the clamp by means of knob (9);4. Insert the key blank in the right clamp;5. Place and secure the key blank as described under points 2 and 3
above;6. Adjust the cutting depth as indicated in paragraph 6.3.2 at page 30;7. To use the lateral springing system of the carriage you need to:
- align the tracer t on the point indicated in figure 21, according to the bitting style of the key (four external cuts, double internal bitting, double external bitting);
- lock the carriage by means of knob (11);8. Press button (13) to turn to the cutting mode;9. You can now start duplication.
Note: Lock the milling cutter-tracer assembly in cutting position by rotating lever (16) clock-wise.
Figure 21: Styles of laser-type keys- Duplication
CENTRAL BITTING RIGHT BITTING LEFT BITTING
KEYLINE S.r.l. KEY CUTTING MACHINE BIANCHI 303 - Man. cod. LIBBI 303 page 33

ADJUSTMENT AND USE ENGLISH
6.4.3 CUTTING LASER-TYPE KEYS WITH THIN SHANK (MERCEDES)
To duplicate keys with thin shank you will have to use MM adaptors (See table 2 at page 18).
PROCEDURE
1. Insert the key in the MM adaptor and make it fit;2. Insert key and adaptor into the clamp and move them against the clamp
stop, then lock them in place by means of the adjusting knobs (9);3. You can not start duplication. Proceed as indicated in paragraph 6.4.2 at
page 33.
6.4.4 CUTTING OPEL KEYS
For an easier duplication of OPEL keys, use MO adaptors (See table 2 at page 18).
PROCEDURE
1. Insert the key in the MO adaptor and make it fit;2. Insert the stop plate in the clamp groove;3. Insert key and adaptor into the clamp and move them against the stop
plate, then lock them in place by means of the adjusting knobs (9);4. You can not start duplication. Proceed as indicated in paragraph 6.4.2 at
page 33.
6.4.5 CUTTING AUDI / VW KEYS
To use AUDI/VW keys, use MA adaptors (See table 2 at page 18).
PROCEDURE
1. Insert the key in the MA adaptor and make it fit;2. Insert key and adaptor into the clamp and move them against the clamp
stop, then lock them in place by means of the adjusting knobs (9);3. You can not start duplication. Proceed as indicated in paragraph 6.4.2 at
page 33.
6.4.6 SLANTING CUTTING
To duplicate keys with slanting bitting you will need to use three different types of adaptors MK5 - MK15 - MK45 (See table 2 at page 18) according to the inclination angle:
- Bitting 5° = Keso 5°- Bitting 15° = Kaba gemini- Bitting 45° = Kaba 20
PROCEDURE
1. IInsert the key in the MK adaptor and make it fit;2. Insert key and adaptor into the clamp and move them against the clamp
stop, then lock them in place by means of the adjusting knobs (9);3. You can not start duplication. Proceed as indicated in paragraph 6.4.2 at
page 33.
page 34 KEY CUTTING MACHINE BIANCHI 303 - Man. cod. LIBBI 303 KEYLINE S.r.l.

ENGLISH ADJUSTMENT AND USE
6.4.7 CUTTING MCM KEYS
To duplicate MCM keys you will have to use MCM adaptors (See table 2 at page 18).
PROCEDURE
1. Insert the key in the MCM adaptor and make it fit;2. Insert key and adaptor into the clamp and move them against the clamp
stop, then lock them in place by means of the adjusting knobs (9);3. You can not start duplication. Proceed as indicated in paragraph 6.4.2 at
page 33.
6.4.8 CUTTING TIBBE (FORD) KEYS
To duplicate TIBBE keys you will have to use MTB adaptors (See table 2 at page 18).
PROCEDURE
1. Insert the MTB adaptors in the clamps and move them against the clamp stop, then lock them in place by means of the adjusting knobs (9);
2. Insert the key blank in the right adaptor so that the key shoulder is against it;
3. Secure the key with stop nut (G);4. Make sure that the key bow is perfectly horizontal and that it is matching
position "1" on the front side of the adaptor (see figure 22b);
Figure 22: Adaptor for TIBBE keys (FORD)
5. Move tracer and milling cutter against the mandrels, then adjust the milling cutter-tracer assembly (see paragraph 6.3.2 at page 30) with respect to the key and the adaptor bottom;
Figure 23: Adaptor for TIBBE keys (FORD)M
G
A B
V
N
KEYLINE S.r.l. KEY CUTTING MACHINE BIANCHI 303 - Man. cod. LIBBI 303 page 35

ADJUSTMENT AND USE ENGLISH
6. You can now start duplicating the key: rotate knob (V) that controls the pitch and align it with points “A-C-E”, then fix them with ratchet (N) (see figure 23);
7. Carry out cutting corresponding to letters “A-C-E”;
EVERY PITCH INDICATED BY A LETTER IS ASSOCIATED TO 4 INCLINED CUTS HAVING THE SAME CHARACTERISTICS BUT LOCATED OPPOSITE TO EACH OTHER. CUT THE FIRST TWO SLANTING CUTS TURNING THE KEY BOW TO-WARDS THE REQUIRED NUMBER. DO ONE SIDE FIRST THEN TURN THE KEY(SEE FIGURE 22B).
8. Rotate the key 180° and the repeat the steps above for the other two slanting cuts;
9. Now rotate knob (V) that controls the pitch and align it with points “B-D-F”, then complete cutting as described under points 7 and 8 above.
6.4.9 CODE CUTTING FOR JIS KEYS
To duplicate JIS keys, use MJ adaptors (See table 2 at page 18).
PROCEDURE
1. Insert the MJ adaptors in the clamps and move them against the clamp stop, then lock them in place by means of the adjusting knobs (9);
2. Insert the keys in the left groove of the corresponding adaptors;3. Place the key in such a way that the adaptor stop (F) is against the key
shoulder (see figure 24);4. Secure the keys to the adaptors by using nut (R);5. Now start duplicating the first side of the key;6. Once the first side has been cut, remove the keys from the adaptors and
insert them in the right grooves;7. Place the keys and secure them as described under points 3 and 4
above;8. You can now duplicate the other side of the key.
Figure 24: Adaptor for JIS keys
FR
page 36 KEY CUTTING MACHINE BIANCHI 303 - Man. cod. LIBBI 303 KEYLINE S.r.l.

ENGLISH ADJUSTMENT AND USE
6.4.10 CUTTING TUBULAR AND MUZZLE KEYS
REQUIRED TOOLS
• See table 3 at page 19.
PROCEDURE
1. Replace the Standard clamp holding carriage with the Optional MTcarriage for the duplication of tubular keys as described in paragraph 6.3.3 at page 31;
2. Loosen screws (28) and the rear knob (30);3. Insert the keys in the corresponding clamps;4. Arrange the keys in such a way that the part protruding from the clamp is
high enough as to allow duplication (the alignment of the keys is irrelevant);
5. Make sure that the two keys are inserted in the clamp with both shoulders either on the right or on the left;
6. You can align the keys with respect to the clamp by adjusting the two pushing pins (29) located in the back part of the clamps;
7. Fix the keys to the clamps by tightening screws (28) and knob (30);8. Adjust the cutting depth on the upper part of the keys, as described in
paragraph 6.3.2 at page 30;9. Press button (13) to turn to the cutting mode;10.Start the motor by moving lever (16) downwards;11. Start duplication by inserting the tracer in the cuts of the key sample.
Cutting must be carried out in top-down direction to avoid bending the milling cutter/tracer.
Figure 25: MT carriage for tubular and muzzle keys
30
29
2828
29
KEYLINE S.r.l. KEY CUTTING MACHINE BIANCHI 303 - Man. cod. LIBBI 303 page 37

ADJUSTMENT AND USE ENGLISH
6.4.11 CUTTING FICHET KEYS
REQUIRED TOOLS
• See table 3 at page 19.
PROCEDURE
1. Replace the Standard clamp holding carriage with the Optional MFcarriage for the duplication of Fichet keys as described in paragraph 6.3.3 at page 31;
2. Insert the keys in the corresponding clamps;3. Insert the keys in their seats and make them fit;4. Fix the keys to the clamps by means of knobs (31);5. Adjust the milling cutter-tracer assembly as described in paragraph 6.3.2
at page 30;6. Press button (13) to turn to the cutting mode;7. Move lever (16) downwards, so that milling cutter and tracer touch the
upper part of the keys;8. Lock the tracer springing system;9. Move the carriage so as to align the key with the tracer;;10.Lock both the milling cutter and the tracer with lever (16) making sure
that the milling cutter does not touch the clamp;11. You can now start duplication.
Figure 26: MF carriage for Fichet keys
3131
page 38 KEY CUTTING MACHINE BIANCHI 303 - Man. cod. LIBBI 303 KEYLINE S.r.l.

MAINTENANCE
7Maintenance
Warning: IMPORTANT!
Before carrying out any maintenance operation you must turn OFF the power and disconnect the machine from the mains. The operator must make sure that nobody can energise to the machine.
When carrying out maintenance follow the instructions of this manual with care to prevent any injuries to people and damage to the equipment.
Maintenance must be carried out only by qualified personnel equipped with appropriate protective devices for a safe work .
Always use original spare parts.
7.1.0 GENERAL INFORMATION
7.1.1 SKILLS OF MAINTENANACE PERSONNEL
Maintainers must have specific theoretical and practical skills, that is, they must be qualified.
OPERATOR
The machine operator must be knowledgeable about machine operation.
PERSONNEL AUTHORIZED BY KEYLINE S.R.L.
Personnel from KEYLINE S.r.l. Technical Support Service or else officially authorised by KEYLINE S.r.l. Technical Support Service.
KEYLINE S.r.l. KEY CUTTING MACHINE BIANCHI 303 - Man. cod. LIBBI 303 page 39

MAINTENANCE ENGLISH
7.1.2 TYPE OF MAINTENANCE
Maintenance can be subdivided into the following types, according to the operations involved:
• Ordinary maintenance• Extraordinary maintenance
ORDINARY MAINTENANCE
Servicing operations that must be carried out periodically by the machine operator.
The purpose of ordinary maintenance is guarantee regular functioning of the machine and a consistent quality of the product.
The maintenance schedule may vary in relation to work or environmental conditions in the place of installation
EXTRAORDINARY MAINTENANCE
Extraordinary maintenance consists of actions to be taken only when given conditions occur (break downs, failures, replacement of parts );
On account of the complex nature of such actions and the special tools required, we recommend you should contact qualified personnel from or authorised by KEYLINE S.r.l..
page 40 KEY CUTTING MACHINE BIANCHI 303 - Man. cod. LIBBI 303 KEYLINE S.r.l.

ENGLISH MAINTENANCE
7.2.0 ORDINARY MAINTENANCE
The following is a list of the most common ordinary maintenance activities that can be carried out by the machine operator. We recommend inspecting the machine periodically and replace worn parts.
7.2.1 REPLACING THE BELTS
In case of vibrations originating from the top part of the duplicating machine, replace the belt.
REQUIRED TOOLS
• Screwdriver
PROCEDURE
Warning: IMPORTANT
Press the main switch to turn OFF the power and disconnect the power cable from the mains before carrying out the operation below.
1. Loosen the 2 screws (32) and remove the top cover (18);2. Remove the belt (33) by rotating it slowly and replace it;3. Re-install the top cover, securing it with the 2 screws (32).
Figure 27: Replacing the belts
18
32
33
KEYLINE S.r.l. KEY CUTTING MACHINE BIANCHI 303 - Man. cod. LIBBI 303 page 41

MAINTENANCE ENGLISH
7.2.2 ADJUSTING AND REPLACING THE VERTICAL TENSION SPRING OF THE CARRIAGE
In case of reduced tension of the carriage vertical movement, it is necessary to adjust or replace the spring.
REQUIRED TOOLS
• Screwdriver
PROCEDURE
Warning: IMPORTANT
Press the main switch to turn OFF the power and disconnect the power cable from the mains before carrying out the operation below.
1. Loosen the 2 screws (32) and remove the top cover (18);2. Spring Tension adjustment:
- Increase or reduce the spring tension by adjusting the stop nut of the pin that supports the spring (34).
3. Replacing the spring:- Repeat the operations described under points 1 and 2 above;- Remove the spring by loosening the stop nut of the pin that
supports it (34) - replace the spring;- Adjust the spring tension as described in point 2 above.
4. Re-install the top cover, securing it with the 2 screws (32).
Figure 28: Adjusting and replacing the vertical tension spring of the carriage
18
32
34
page 42 KEY CUTTING MACHINE BIANCHI 303 - Man. cod. LIBBI 303 KEYLINE S.r.l.

ENGLISH MAINTENANCE
7.2.3 INSPECTING AND REPLACING THE FUSES
BIANCHI 303 duplicating machine is equipped with 2 fuses located in the power socket next to the main switch (1). They protect the machine from current surges and short circuits. Types of fuses used:
• 4 Amp rapid fuses in 230 Volt duplicating machines • 8 Amp rapid fuses in 110 Volt duplicating machines
If the machine does not start when you turn on the main switch, check that the fuses located in the power socket are in good condition and replace them, if need be.
TOOLS REQUIRED TO REPLACE THE FUSES
• Tester, ohm meter and multimeter (to measure fuses' continuity).• Screwdriver
PROCEDURE
Warning: IMPORTANT
Press the main switch to turn OFF the power and disconnect the power cable from the mains before carrying out the operation below.
1. Gently press the side tabs to remove the fuse carrier from its seat;2. Inspect the fuses to check their integrity;3. New fuses must have the same characteristics as the replaced ones in
terms of capacity (Ampere) and type (rapid);4. Insert the fuses holder back into its seat.
Figure 29: Replacing the fuses
KEYLINE S.r.l. KEY CUTTING MACHINE BIANCHI 303 - Man. cod. LIBBI 303 page 43

MAINTENANCE ENGLISH
7.3.0 CLEANING THE MACHINE
At the end of each working day clean the machine removing scrap and burrs to ensure proper functioning of the machine and to prevent any damage to its parts.
page 44 KEY CUTTING MACHINE BIANCHI 303 - Man. cod. LIBBI 303 KEYLINE S.r.l.

DISMANTLING AND DISPOSAL
8Dismantling and disposal8.0.1 WASTE DISPOSAL
The disposal of waste generated by the machine shall be managed in compliance with the legislation in force in the user's country.In Europe machine shop rejections are classified as special waste and are assimilated to metal wool when it comes to managing municipal solid waste (MSW).Such waste must be disposed of according to the legislation in force in the user's country. If machine shop rejections have been contaminated or contain toxic or harmful substances they are considered as toxic -harmful waste and disposed of accordingly in compliance with the legislation in force.
The user is responsible for a correct waste management.
8.0.2 DISPOSAL OF THE PACKING MATERIAL
Our key cutting machines are delivered in cardboard packages that can be recycled as packing material.In case of disposal, packing material is treated as municipal solid waste (MSW) and is usually collected together with paper materials.Protective covers are made of polystyrene and must be sent to suitable waste disposal sites as other municipal solid waste of the same type.
8.1.0 DISMANTLING THE MACHINE
Our key duplicators are durable machines that can be used over many years provided they are regularly maintained and overhauled.
Eventually, dismantling and disposal can be managed either by qualified firms or by the customer and must comply with the legislation in force.
If dismantling is carried out by the customer in- house, the machine must be disassembled sorting out machine parts by type of material. The disposal must occur through specialist and authorised firms.
The machine is primarily made of:- steel- electric wires- plastic- rubber
In particular, it is forbidden to disperse machine products in the environment.
If scrapping does not occur at the same time as dismantling but only at a later stage the machine and its parts must be stored in a protected space to avoid any contamination.
KEYLINE S.r.l. KEY CUTTING MACHINE BIANCHI 303 - Man. cod. LIBBI 303 page 45

DISMANTLING AND DISPOSAL ENGLISH
page 46 KEY CUTTING MACHINE BIANCHI 303 - Man. cod. LIBBI 303 KEYLINE S.r.l.