user and reference manual - altovav42.sw.altova.com/spymanual42.pdf · schema editing ..... 12 xsl...
TRANSCRIPT

User and Referencemanual

All rights reserved. No parts of this work may be reproduced in any form or by any means- graphic, electronic, or mechanical, including photocopying, recording, taping, orinformation storage and retrieval systems - without the written permission of the publisher.
Products that are referred to in this document may be either trademarks and/or registeredtrademarks of the respective owners. The publisher and the author make no claim tothese trademarks.
While every precaution has been taken in the preparation of this document, the publisherand the author assume no responsibility for errors or omissions, or for damages resultingfrom the use of information contained in this document or from the use of programs andsource code that may accompany it. In no event shall the publisher and the author beliable for any loss of profit or any other commercial damage caused or alleged to havebeen caused directly or indirectly by this document.
Printed: Freitag, 07. Dezember 2001
XML Spy Suite 4.2
© 2001 Altova Ges.m.b.H

Table of Contents
Part I Introduction 1
................................................................................................................................... 11 Introduction to XML
................................................................................................................................... 22 Welcome to XML Spy
................................................................................................................................... 33 What is XML
... .... ... .... .... ... .... ... .... ... .... .... ... .... ... .... .... ... .... ... .... ... .... .... ... .... ... .... ... .... .... ... .... ... .... .... ... .... ... .... ... .... .... 6Why XML
... .... ... .... .... ... .... ... .... ... .... .... ... .... ... .... .... ... .... ... .... ... .... .... ... .... ... .... ... .... .... ... .... ... .... .... ... .... ... .... ... .... .... 8The XML Standards Puzzle
................................................................................................................................... 104 XML Spy user interface
. .... ... .... .... ... .... ... .... ... .... .... ... .... ... .... .... ... .... ... .... ... .... .... ... .... ... .... ... .... .... ... .... ... .... .... ... .... ... .... ... .... .... .. 11XML Editing
. .... ... .... .... ... .... ... .... ... .... .... ... .... ... .... .... ... .... ... .... ... .... .... ... .... ... .... ... .... .... ... .... ... .... .... ... .... ... .... ... .... .... .. 12Schema Editing
. .... ... .... .... ... .... ... .... ... .... .... ... .... ... .... .... ... .... ... .... ... .... .... ... .... ... .... ... .... .... ... .... ... .... .... ... .... ... .... ... .... .... .. 14XSL Editing
. .... ... .... .... ... .... ... .... ... .... .... ... .... ... .... .... ... .... ... .... ... .... .... ... .... ... .... ... .... .... ... .... ... .... .... ... .... ... .... ... .... .... .. 16Project Management
Part II XML SPY Tutorial 17
................................................................................................................................... 181 XML Spy Overview
................................................................................................................................... 192 Creating a schema from scratch
. .... ... .... .... ... .... ... .... ... .... .... ... .... ... .... .... ... .... ... .... ... .... .... ... .... ... .... ... .... .... ... .... ... .... .... ... .... ... .... ... .... .... .. 20Creating a new Schema file
. .... ... .... .... ... .... ... .... ... .... .... ... .... ... .... .... ... .... ... .... ... .... .... ... .... ... .... ... .... .... ... .... ... .... .... ... .... ... .... ... .... .... .. 23Adding elements to a schema
. .... ... .... .... ... .... ... .... ... .... .... ... .... ... .... .... ... .... ... .... ... .... .... ... .... ... .... ... .... .... ... .... ... .... .... ... .... ... .... ... .... .... .. 26Adding elements with drag and drop
. .... ... .... .... ... .... ... .... ... .... .... ... .... ... .... .... ... .... ... .... ... .... .... ... .... ... .... ... .... .... ... .... ... .... .... ... .... ... .... ... .... .... .. 27Configuring the schema view
. .... ... .... .... ... .... ... .... ... .... .... ... .... ... .... .... ... .... ... .... ... .... .... ... .... ... .... ... .... .... ... .... ... .... .... ... .... ... .... ... .... .... .. 28Completing the basic schema
................................................................................................................................... 313 Making schema components reusable
. .... ... .... .... ... .... ... .... ... .... .... ... .... ... .... .... ... .... ... .... ... .... .... ... .... ... .... ... .... .... ... .... ... .... .... ... .... ... .... ... .... .... .. 32Globals, extending simple and complex types
. .... ... .... .... ... .... ... .... ... .... .... ... .... ... .... .... ... .... ... .... ... .... .... ... .... ... .... ... .... .... ... .... ... .... .... ... .... ... .... ... .... .... .. 38References, attributes and enumerations
. .... ... .... .... ... .... ... .... ... .... .... ... .... ... .... .... ... .... ... .... ... .... .... ... .... ... .... ... .... .... ... .... ... .... .... ... .... ... .... ... .... .... .. 41Navigation shortcuts in schema documents
................................................................................................................................... 444 Generating Schema documentation
................................................................................................................................... 485 Creating an XML document
. .... ... .... .... ... .... ... .... ... .... .... ... .... ... .... .... ... .... ... .... ... .... .... ... .... ... .... ... .... .... ... .... ... .... .... ... .... ... .... ... .... .... .. 49Creating and completing a new XML file
. .... ... .... .... ... .... ... .... ... .... .... ... .... ... .... .... ... .... ... .... ... .... .... ... .... ... .... ... .... .... ... .... ... .... .... ... .... ... .... ... .... .... .. 52Editing in Text- and Enhanced Grid view
. .... ... .... .... ... .... ... .... ... .... .... ... .... ... .... .... ... .... ... .... ... .... .... ... .... ... .... ... .... .... ... .... ... .... .... ... .... ... .... ... .... .... .. 55Validating and entering data
. .... ... .... .... ... .... ... .... ... .... .... ... .... ... .... .... ... .... ... .... ... .... .... ... .... ... .... ... .... .... ... .... ... .... .... ... .... ... .... ... .... .... .. 59Manipulating data - Entry helpers
. .... ... .... .... ... .... ... .... ... .... .... ... .... ... .... .... ... .... ... .... ... .... .... ... .... ... .... ... .... .... ... .... ... .... .... ... .... ... .... ... .... .... .. 61Database/Table view
................................................................................................................................... 676 XSL Transformation
. .... ... .... .... ... .... ... .... ... .... .... ... .... ... .... .... ... .... ... .... ... .... .... ... .... ... .... ... .... .... ... .... ... .... .... ... .... ... .... ... .... .... .. 68Transforming XML to HTML
................................................................................................................................... 717 Importing and exporting database data
. .... ... .... .... ... .... ... .... ... .... .... ... .... ... .... .... ... .... ... .... ... .... .... ... .... ... .... ... .... .... ... .... ... .... .... ... .... ... .... ... .... .... .. 72Exporting XML data to external databases
. .... ... .... .... ... .... ... .... ... .... .... ... .... ... .... .... ... .... ... .... ... .... .... ... .... ... .... ... .... .... ... .... ... .... .... ... .... ... .... ... .... .... .. 74Importing database data
................................................................................................................................... 778 Creating a database schema
. .... ... .... .... ... .... ... .... ... .... .... ... .... ... .... .... ... .... ... .... ... .... .... ... .... ... .... ... .... .... ... .... ... .... .... ... .... ... .... ... .... .... .. 78Converting a database to a schema
................................................................................................................................... 829 Creating a project
. .... ... .... .... ... .... ... .... ... .... .... ... .... ... .... .... ... .... ... .... ... .... .... ... .... ... .... ... .... .... ... .... ... .... .... ... .... ... .... ... .... .... .. 83Adding files to a project
................................................................................................................................... 8510 That's it !
I© 2001 Altova Ges.m.b.H

Part III User Reference 86
................................................................................................................................... 871 Windows
. .... ... .... .... ... .... ... .... ... .... .... ... .... ... .... .... ... .... ... .... ... .... .... ... .... ... .... ... .... .... ... .... ... .... .... ... .... ... .... ... .... .... .. 88Main Window
.... ... .... .... ... .... ... .... ... .... .... ... .... ... .... .... ... .... ... .... ... .... .... ... .... ... .... ... .... .... ... .... ... .... .... ... .... ... .... ... .... .... .. 88Enhanced Grid View
.... ... .... .... ... .... ... .... ... .... .... ... .... ... .... .... ... .... ... .... ... .... .... ... .... ... .... ... .... .... ... .... ... .... .... ... .... ... .... ... .... .... .. 91Database/Table View
.... ... .... .... ... .... ... .... ... .... .... ... .... ... .... .... ... .... ... .... ... .... .... ... .... ... .... ... .... .... ... .... ... .... .... ... .... ... .... ... .... .... .. 94Schema Design View
.... ... .... .... ... .... ... .... ... .... .... ... .... ... .... .... ... .... ... .... ... .... .... ... .... ... .... ... .... .... ... .... ... .... .... ... .... ... .... ... .... .... .. 97Schema design content model
.... ... .... ... .... .... ... .... ... .... .... ... .... ... .... ... .... .... ... .... ... .... ... .... .... ... .... ... .... .... ... .... ... .... ... .... .... ... . 100Schema, Content model
.. ... .... .... ... .... ... .... ... .... .... ... .... ... .... .... ... .... ... .... ... .... .... ... .... ... .... ... .... .... ... .... ... .... .... ... .... ... .... ... .... .... ... . 104Text View
.. ... .... .... ... .... ... .... ... .... .... ... .... ... .... .... ... .... ... .... ... .... .... ... .... ... .... ... .... .... ... .... ... .... .... ... .... ... .... ... .... .... ... . 106Document Editor view
.. ... .... .... ... .... ... .... ... .... .... ... .... ... .... .... ... .... ... .... ... .... .... ... .... ... .... ... .... .... ... .... ... .... .... ... .... ... .... ... .... .... ... . 107Browser View
... ... .... .... ... .... ... .... ... .... .... ... .... ... .... .... ... .... ... .... ... .... .... ... .... ... .... ... .... .... ... .... ... .... .... ... .... ... .... ... .... .... ... . 109Project Window
... ... .... .... ... .... ... .... ... .... .... ... .... ... .... .... ... .... ... .... ... .... .... ... .... ... .... ... .... .... ... .... ... .... .... ... .... ... .... ... .... .... ... . 110Entry Helper Windows
.. ... .... .... ... .... ... .... ... .... .... ... .... ... .... .... ... .... ... .... ... .... .... ... .... ... .... ... .... .... ... .... ... .... .... ... .... ... .... ... .... .... ... . 110Element Entry-Helper
.. ... .... .... ... .... ... .... ... .... .... ... .... ... .... .... ... .... ... .... ... .... .... ... .... ... .... ... .... .... ... .... ... .... .... ... .... ... .... ... .... .... ... . 111Attribute Entry-Helper
.. ... .... .... ... .... ... .... ... .... .... ... .... ... .... .... ... .... ... .... ... .... .... ... .... ... .... ... .... .... ... .... ... .... .... ... .... ... .... ... .... .... ... . 112Entity Entry-Helper
... ... .... .... ... .... ... .... ... .... .... ... .... ... .... .... ... .... ... .... ... .... .... ... .... ... .... ... .... .... ... .... ... .... .... ... .... ... .... ... .... .... ... . 114Info Window
................................................................................................................................... 1152 Menus
... ... .... .... ... .... ... .... ... .... .... ... .... ... .... .... ... .... ... .... ... .... .... ... .... ... .... ... .... .... ... .... ... .... .... ... .... ... .... ... .... .... ... . 116File Menu
.. ... .... .... ... .... ... .... ... .... .... ... .... ... .... .... ... .... ... .... ... .... .... ... .... ... .... ... .... .... ... .... ... .... .... ... .... ... .... ... .... .... ... . 116New...
.. ... .... .... ... .... ... .... ... .... .... ... .... ... .... .... ... .... ... .... ... .... .... ... .... ... .... ... .... .... ... .... ... .... .... ... .... ... .... ... .... .... ... . 118Open...
.. ... .... .... ... .... ... .... ... .... .... ... .... ... .... .... ... .... ... .... ... .... .... ... .... ... .... ... .... .... ... .... ... .... .... ... .... ... .... ... .... .... ... . 119Open URL...
.. ... .... .... ... .... ... .... ... .... .... ... .... ... .... .... ... .... ... .... ... .... .... ... .... ... .... ... .... .... ... .... ... .... .... ... .... ... .... ... .... .... ... . 121Reload
.. ... .... .... ... .... ... .... ... .... .... ... .... ... .... .... ... .... ... .... ... .... .... ... .... ... .... ... .... .... ... .... ... .... .... ... .... ... .... ... .... .... ... . 122Encoding...
.. ... .... .... ... .... ... .... ... .... .... ... .... ... .... .... ... .... ... .... ... .... .... ... .... ... .... ... .... .... ... .... ... .... .... ... .... ... .... ... .... .... ... . 122Close
.. ... .... .... ... .... ... .... ... .... .... ... .... ... .... .... ... .... ... .... ... .... .... ... .... ... .... ... .... .... ... .... ... .... .... ... .... ... .... ... .... .... ... . 122Close All
.. ... .... .... ... .... ... .... ... .... .... ... .... ... .... .... ... .... ... .... ... .... .... ... .... ... .... ... .... .... ... .... ... .... .... ... .... ... .... ... .... .... ... . 122Save
.. ... .... .... ... .... ... .... ... .... .... ... .... ... .... .... ... .... ... .... ... .... .... ... .... ... .... ... .... .... ... .... ... .... .... ... .... ... .... ... .... .... ... . 123Save As...
.. ... .... .... ... .... ... .... ... .... .... ... .... ... .... .... ... .... ... .... ... .... .... ... .... ... .... ... .... .... ... .... ... .... .... ... .... ... .... ... .... .... ... . 123Save to URL...
.. ... .... .... ... .... ... .... ... .... .... ... .... ... .... .... ... .... ... .... ... .... .... ... .... ... .... ... .... .... ... .... ... .... .... ... .... ... .... ... .... .... ... . 124Save All
.. ... .... .... ... .... ... .... ... .... .... ... .... ... .... .... ... .... ... .... ... .... .... ... .... ... .... ... .... .... ... .... ... .... .... ... .... ... .... ... .... .... ... . 125Send by Mail...
.. ... .... .... ... .... ... .... ... .... .... ... .... ... .... .... ... .... ... .... ... .... .... ... .... ... .... ... .... .... ... .... ... .... .... ... .... ... .... ... .... .... ... . 126Print...
.. ... .... .... ... .... ... .... ... .... .... ... .... ... .... .... ... .... ... .... ... .... .... ... .... ... .... ... .... .... ... .... ... .... .... ... .... ... .... ... .... .... ... . 128Print Setup...
.. ... .... .... ... .... ... .... ... .... .... ... .... ... .... .... ... .... ... .... ... .... .... ... .... ... .... ... .... .... ... .... ... .... .... ... .... ... .... ... .... .... ... . 129Most Recently Used Files
.. ... .... .... ... .... ... .... ... .... .... ... .... ... .... .... ... .... ... .... ... .... .... ... .... ... .... ... .... .... ... .... ... .... .... ... .... ... .... ... .... .... ... . 129Exit
... ... .... .... ... .... ... .... ... .... .... ... .... ... .... .... ... .... ... .... ... .... .... ... .... ... .... ... .... .... ... .... ... .... .... ... .... ... .... ... .... .... ... . 131Edit Menu
.. ... .... .... ... .... ... .... ... .... .... ... .... ... .... .... ... .... ... .... ... .... .... ... .... ... .... ... .... .... ... .... ... .... .... ... .... ... .... ... .... .... ... . 131Undo
.. ... .... .... ... .... ... .... ... .... .... ... .... ... .... .... ... .... ... .... ... .... .... ... .... ... .... ... .... .... ... .... ... .... .... ... .... ... .... ... .... .... ... . 132Redo
.. ... .... .... ... .... ... .... ... .... .... ... .... ... .... .... ... .... ... .... ... .... .... ... .... ... .... ... .... .... ... .... ... .... .... ... .... ... .... ... .... .... ... . 132Cut
.. ... .... .... ... .... ... .... ... .... .... ... .... ... .... .... ... .... ... .... ... .... .... ... .... ... .... ... .... .... ... .... ... .... .... ... .... ... .... ... .... .... ... . 132Copy
.. ... .... .... ... .... ... .... ... .... .... ... .... ... .... .... ... .... ... .... ... .... .... ... .... ... .... ... .... .... ... .... ... .... .... ... .... ... .... ... .... .... ... . 132Paste
.. ... .... .... ... .... ... .... ... .... .... ... .... ... .... .... ... .... ... .... ... .... .... ... .... ... .... ... .... .... ... .... ... .... .... ... .... ... .... ... .... .... ... . 132Delete
.. ... .... .... ... .... ... .... ... .... .... ... .... ... .... .... ... .... ... .... ... .... .... ... .... ... .... ... .... .... ... .... ... .... .... ... .... ... .... ... .... .... ... . 133Copy as XML-Text
.. ... .... .... ... .... ... .... ... .... .... ... .... ... .... .... ... .... ... .... ... .... .... ... .... ... .... ... .... .... ... .... ... .... .... ... .... ... .... ... .... .... ... . 133Copy as Structured Text
.. ... .... .... ... .... ... .... ... .... .... ... .... ... .... .... ... .... ... .... ... .... .... ... .... ... .... ... .... .... ... .... ... .... .... ... .... ... .... ... .... .... ... . 135Copy XPath
.. ... .... .... ... .... ... .... ... .... .... ... .... ... .... .... ... .... ... .... ... .... .... ... .... ... .... ... .... .... ... .... ... .... .... ... .... ... .... ... .... .... ... . 135Pretty-Print XML Text
.. ... .... .... ... .... ... .... ... .... .... ... .... ... .... .... ... .... ... .... ... .... .... ... .... ... .... ... .... .... ... .... ... .... .... ... .... ... .... ... .... .... ... . 136Select All
.. ... .... .... ... .... ... .... ... .... .... ... .... ... .... .... ... .... ... .... ... .... .... ... .... ... .... ... .... .... ... .... ... .... .... ... .... ... .... ... .... .... ... . 136Find...
.. ... .... .... ... .... ... .... ... .... .... ... .... ... .... .... ... .... ... .... ... .... .... ... .... ... .... ... .... .... ... .... ... .... .... ... .... ... .... ... .... .... ... . 137Find next
.. ... .... .... ... .... ... .... ... .... .... ... .... ... .... .... ... .... ... .... ... .... .... ... .... ... .... ... .... .... ... .... ... .... .... ... .... ... .... ... .... .... ... . 137Replace...
... ... .... .... ... .... ... .... ... .... .... ... .... ... .... .... ... .... ... .... ... .... .... ... .... ... .... ... .... .... ... .... ... .... .... ... .... ... .... ... .... .... ... . 138Project Menu
.. ... .... .... ... .... ... .... ... .... .... ... .... ... .... .... ... .... ... .... ... .... .... ... .... ... .... ... .... .... ... .... ... .... .... ... .... ... .... ... .... .... ... . 138New Project
II
XML Spy Suite 4.2
© 2001 Altova Ges.m.b.H

.. ... .... .... ... .... ... .... ... .... .... ... .... ... .... .... ... .... ... .... ... .... .... ... .... ... .... ... .... .... ... .... ... .... .... ... .... ... .... ... .... .... ... . 138Open Project...
.. ... .... .... ... .... ... .... ... .... .... ... .... ... .... .... ... .... ... .... ... .... .... ... .... ... .... ... .... .... ... .... ... .... .... ... .... ... .... ... .... .... ... . 139Reload Project
.. ... .... .... ... .... ... .... ... .... .... ... .... ... .... .... ... .... ... .... ... .... .... ... .... ... .... ... .... .... ... .... ... .... .... ... .... ... .... ... .... .... ... . 139Close Project
.. ... .... .... ... .... ... .... ... .... .... ... .... ... .... .... ... .... ... .... ... .... .... ... .... ... .... ... .... .... ... .... ... .... .... ... .... ... .... ... .... .... ... . 139Save Project
.. ... .... .... ... .... ... .... ... .... .... ... .... ... .... .... ... .... ... .... ... .... .... ... .... ... .... ... .... .... ... .... ... .... .... ... .... ... .... ... .... .... ... . 139Source control
.... ... .... ... .... .... ... .... ... .... .... ... .... ... .... ... .... .... ... .... ... .... ... .... .... ... .... ... .... .... ... .... ... .... ... .... .... ... . 140Open project
.... ... .... ... .... .... ... .... ... .... .... ... .... ... .... ... .... .... ... .... ... .... ... .... .... ... .... ... .... .... ... .... ... .... ... .... .... ... . 143Enable Source code control
.... ... .... ... .... .... ... .... ... .... .... ... .... ... .... ... .... .... ... .... ... .... ... .... .... ... .... ... .... .... ... .... ... .... ... .... .... ... . 143Get Latest Version
.... ... .... ... .... .... ... .... ... .... .... ... .... ... .... ... .... .... ... .... ... .... ... .... .... ... .... ... .... .... ... .... ... .... ... .... .... ... . 144Check Out
.... ... .... ... .... .... ... .... ... .... .... ... .... ... .... ... .... .... ... .... ... .... ... .... .... ... .... ... .... .... ... .... ... .... ... .... .... ... . 144Check In
.... ... .... ... .... .... ... .... ... .... .... ... .... ... .... ... .... .... ... .... ... .... ... .... .... ... .... ... .... .... ... .... ... .... ... .... .... ... . 145Undo Check Out...
.... ... .... ... .... .... ... .... ... .... .... ... .... ... .... ... .... .... ... .... ... .... ... .... .... ... .... ... .... .... ... .... ... .... ... .... .... ... . 146Add to Source Control
.... ... .... ... .... .... ... .... ... .... .... ... .... ... .... ... .... .... ... .... ... .... ... .... .... ... .... ... .... .... ... .... ... .... ... .... .... ... . 148Remove from Source Control
.... ... .... ... .... .... ... .... ... .... .... ... .... ... .... ... .... .... ... .... ... .... ... .... .... ... .... ... .... .... ... .... ... .... ... .... .... ... . 148Show History
.... ... .... ... .... .... ... .... ... .... .... ... .... ... .... ... .... .... ... .... ... .... ... .... .... ... .... ... .... .... ... .... ... .... ... .... .... ... . 149Show Differences
.... ... .... ... .... .... ... .... ... .... .... ... .... ... .... ... .... .... ... .... ... .... ... .... .... ... .... ... .... .... ... .... ... .... ... .... .... ... . 150Properties
.... ... .... ... .... .... ... .... ... .... .... ... .... ... .... ... .... .... ... .... ... .... ... .... .... ... .... ... .... .... ... .... ... .... ... .... .... ... . 151Refresh Status
.... ... .... ... .... .... ... .... ... .... .... ... .... ... .... ... .... .... ... .... ... .... ... .... .... ... .... ... .... .... ... .... ... .... ... .... .... ... . 151Run Native Interface
.. ... .... .... ... .... ... .... ... .... .... ... .... ... .... .... ... .... ... .... ... .... .... ... .... ... .... ... .... .... ... .... ... .... .... ... .... ... .... ... .... .... ... . 151Add Files to Project...
.. ... .... .... ... .... ... .... ... .... .... ... .... ... .... .... ... .... ... .... ... .... .... ... .... ... .... ... .... .... ... .... ... .... .... ... .... ... .... ... .... .... ... . 152Add URL to Project...
.. ... .... .... ... .... ... .... ... .... .... ... .... ... .... .... ... .... ... .... ... .... .... ... .... ... .... ... .... .... ... .... ... .... .... ... .... ... .... ... .... .... ... . 152Add Active File to Project
.. ... .... .... ... .... ... .... ... .... .... ... .... ... .... .... ... .... ... .... ... .... .... ... .... ... .... ... .... .... ... .... ... .... .... ... .... ... .... ... .... .... ... . 152Add Active And Related Files to Project
.. ... .... .... ... .... ... .... ... .... .... ... .... ... .... .... ... .... ... .... ... .... .... ... .... ... .... ... .... .... ... .... ... .... .... ... .... ... .... ... .... .... ... . 152Add Folder to Project...
.. ... .... .... ... .... ... .... ... .... .... ... .... ... .... .... ... .... ... .... ... .... .... ... .... ... .... ... .... .... ... .... ... .... .... ... .... ... .... ... .... .... ... . 152Project Properties...
.. ... .... .... ... .... ... .... ... .... .... ... .... ... .... .... ... .... ... .... ... .... .... ... .... ... .... ... .... .... ... .... ... .... .... ... .... ... .... ... .... .... ... . 154Most Recently Used Projects
... ... .... .... ... .... ... .... ... .... .... ... .... ... .... .... ... .... ... .... ... .... .... ... .... ... .... ... .... .... ... .... ... .... .... ... .... ... .... ... .... .... ... . 155XML Menu
.. ... .... .... ... .... ... .... ... .... .... ... .... ... .... .... ... .... ... .... ... .... .... ... .... ... .... ... .... .... ... .... ... .... .... ... .... ... .... ... .... .... ... . 155Insert
.... ... .... ... .... .... ... .... ... .... .... ... .... ... .... ... .... .... ... .... ... .... ... .... .... ... .... ... .... .... ... .... ... .... ... .... .... ... . 156Insert Attribute
.... ... .... ... .... .... ... .... ... .... .... ... .... ... .... ... .... .... ... .... ... .... ... .... .... ... .... ... .... .... ... .... ... .... ... .... .... ... . 156Insert Element
.... ... .... ... .... .... ... .... ... .... .... ... .... ... .... ... .... .... ... .... ... .... ... .... .... ... .... ... .... .... ... .... ... .... ... .... .... ... . 156Insert Text
.... ... .... ... .... .... ... .... ... .... .... ... .... ... .... ... .... .... ... .... ... .... ... .... .... ... .... ... .... .... ... .... ... .... ... .... .... ... . 157Insert CDATA
.... ... .... ... .... .... ... .... ... .... .... ... .... ... .... ... .... .... ... .... ... .... ... .... .... ... .... ... .... .... ... .... ... .... ... .... .... ... . 157Insert Comment
.... ... .... ... .... .... ... .... ... .... .... ... .... ... .... ... .... .... ... .... ... .... ... .... .... ... .... ... .... .... ... .... ... .... ... .... .... ... . 157Insert XML
.... ... .... ... .... .... ... .... ... .... .... ... .... ... .... ... .... .... ... .... ... .... ... .... .... ... .... ... .... .... ... .... ... .... ... .... .... ... . 157Insert Processing Instruction
.... ... .... ... .... .... ... .... ... .... .... ... .... ... .... ... .... .... ... .... ... .... ... .... .... ... .... ... .... .... ... .... ... .... ... .... .... ... . 157Insert DOCTYPE
.... ... .... ... .... .... ... .... ... .... .... ... .... ... .... ... .... .... ... .... ... .... ... .... .... ... .... ... .... .... ... .... ... .... ... .... .... ... . 158Insert ExternalID
.... ... .... ... .... .... ... .... ... .... .... ... .... ... .... ... .... .... ... .... ... .... ... .... .... ... .... ... .... .... ... .... ... .... ... .... .... ... . 158Insert ELEMENT
.... ... .... ... .... .... ... .... ... .... .... ... .... ... .... ... .... .... ... .... ... .... ... .... .... ... .... ... .... .... ... .... ... .... ... .... .... ... . 158Insert ATTLIST
.... ... .... ... .... .... ... .... ... .... .... ... .... ... .... ... .... .... ... .... ... .... ... .... .... ... .... ... .... .... ... .... ... .... ... .... .... ... . 158Insert ENTITY
.... ... .... ... .... .... ... .... ... .... .... ... .... ... .... ... .... .... ... .... ... .... ... .... .... ... .... ... .... .... ... .... ... .... ... .... .... ... . 158Insert NOTATION
..... .... .... ... .... ... .... ... .... .... ... .... ... .... .... ... .... ... .... ... .... .... ... .... ... .... ... .... .... ... .... ... .... .... ... .... ... .... ... .... .... ... . 158Append
.... ... .... ... .... .... ... .... ... .... .... ... .... ... .... ... .... .... ... .... ... .... ... .... .... ... .... ... .... .... ... .... ... .... ... .... .... ... . 159Append Attribute
.... ... .... ... .... .... ... .... ... .... .... ... .... ... .... ... .... .... ... .... ... .... ... .... .... ... .... ... .... .... ... .... ... .... ... .... .... ... . 159Append Element
.... ... .... ... .... .... ... .... ... .... .... ... .... ... .... ... .... .... ... .... ... .... ... .... .... ... .... ... .... .... ... .... ... .... ... .... .... ... . 159Append Text
.... ... .... ... .... .... ... .... ... .... .... ... .... ... .... ... .... .... ... .... ... .... ... .... .... ... .... ... .... .... ... .... ... .... ... .... .... ... . 159Append CDATA
.... ... .... ... .... .... ... .... ... .... .... ... .... ... .... ... .... .... ... .... ... .... ... .... .... ... .... ... .... .... ... .... ... .... ... .... .... ... . 160Append Comment
.... ... .... ... .... .... ... .... ... .... .... ... .... ... .... ... .... .... ... .... ... .... ... .... .... ... .... ... .... .... ... .... ... .... ... .... .... ... . 160Append XML
.... ... .... ... .... .... ... .... ... .... .... ... .... ... .... ... .... .... ... .... ... .... ... .... .... ... .... ... .... .... ... .... ... .... ... .... .... ... . 160Append Processing Instruction
.... ... .... ... .... .... ... .... ... .... .... ... .... ... .... ... .... .... ... .... ... .... ... .... .... ... .... ... .... .... ... .... ... .... ... .... .... ... . 160Append DOCTYPE
.... ... .... ... .... .... ... .... ... .... .... ... .... ... .... ... .... .... ... .... ... .... ... .... .... ... .... ... .... .... ... .... ... .... ... .... .... ... . 160Append ExternalID
.... ... .... ... .... .... ... .... ... .... .... ... .... ... .... ... .... .... ... .... ... .... ... .... .... ... .... ... .... .... ... .... ... .... ... .... .... ... . 160Append ELEMENT
.... ... .... ... .... .... ... .... ... .... .... ... .... ... .... ... .... .... ... .... ... .... ... .... .... ... .... ... .... .... ... .... ... .... ... .... .... ... . 161Append ATTLIST
.... ... .... ... .... .... ... .... ... .... .... ... .... ... .... ... .... .... ... .... ... .... ... .... .... ... .... ... .... .... ... .... ... .... ... .... .... ... . 161Append ENTITY
.... ... .... ... .... .... ... .... ... .... .... ... .... ... .... ... .... .... ... .... ... .... ... .... .... ... .... ... .... .... ... .... ... .... ... .... .... ... . 161Append NOTATION
III© 2001 Altova Ges.m.b.H

.. ... .... .... ... .... ... .... ... .... .... ... .... ... .... .... ... .... ... .... ... .... .... ... .... ... .... ... .... .... ... .... ... .... .... ... .... ... .... ... .... .... ... . 161Add Child
.... ... .... ... .... .... ... .... ... .... .... ... .... ... .... ... .... .... ... .... ... .... ... .... .... ... .... ... .... .... ... .... ... .... ... .... .... ... . 162Add Child Attribute
.... ... .... ... .... .... ... .... ... .... .... ... .... ... .... ... .... .... ... .... ... .... ... .... .... ... .... ... .... .... ... .... ... .... ... .... .... ... . 162Add Child Element
.... ... .... ... .... .... ... .... ... .... .... ... .... ... .... ... .... .... ... .... ... .... ... .... .... ... .... ... .... .... ... .... ... .... ... .... .... ... . 162Add Child Text
.... ... .... ... .... .... ... .... ... .... .... ... .... ... .... ... .... .... ... .... ... .... ... .... .... ... .... ... .... .... ... .... ... .... ... .... .... ... . 162Add Child CDATA
.... ... .... ... .... .... ... .... ... .... .... ... .... ... .... ... .... .... ... .... ... .... ... .... .... ... .... ... .... .... ... .... ... .... ... .... .... ... . 162Add Child Comment
.... ... .... ... .... .... ... .... ... .... .... ... .... ... .... ... .... .... ... .... ... .... ... .... .... ... .... ... .... .... ... .... ... .... ... .... .... ... . 162Add Child XML
.... ... .... ... .... .... ... .... ... .... .... ... .... ... .... ... .... .... ... .... ... .... ... .... .... ... .... ... .... .... ... .... ... .... ... .... .... ... . 162Add Child Processing Instruction
.... ... .... ... .... .... ... .... ... .... .... ... .... ... .... ... .... .... ... .... ... .... ... .... .... ... .... ... .... .... ... .... ... .... ... .... .... ... . 163Add Child DOCTYPE
.... ... .... ... .... .... ... .... ... .... .... ... .... ... .... ... .... .... ... .... ... .... ... .... .... ... .... ... .... .... ... .... ... .... ... .... .... ... . 163Add Child ExternalID
.... ... .... ... .... .... ... .... ... .... .... ... .... ... .... ... .... .... ... .... ... .... ... .... .... ... .... ... .... .... ... .... ... .... ... .... .... ... . 163Add Child ELEMENT
.... ... .... ... .... .... ... .... ... .... .... ... .... ... .... ... .... .... ... .... ... .... ... .... .... ... .... ... .... .... ... .... ... .... ... .... .... ... . 163Add Child ATTLIST
.... ... .... ... .... .... ... .... ... .... .... ... .... ... .... ... .... .... ... .... ... .... ... .... .... ... .... ... .... .... ... .... ... .... ... .... .... ... . 163Add Child ENTITY
.... ... .... ... .... .... ... .... ... .... .... ... .... ... .... ... .... .... ... .... ... .... ... .... .... ... .... ... .... .... ... .... ... .... ... .... .... ... . 163Add Child NOTATION
..... .... .... ... .... ... .... ... .... .... ... .... ... .... .... ... .... ... .... ... .... .... ... .... ... .... ... .... .... ... .... ... .... .... ... .... ... .... ... .... .... ... . 164Convert To
.... ... .... ... .... .... ... .... ... .... .... ... .... ... .... ... .... .... ... .... ... .... ... .... .... ... .... ... .... .... ... .... ... .... ... .... .... ... . 164Convert To Attribute
.... ... .... ... .... .... ... .... ... .... .... ... .... ... .... ... .... .... ... .... ... .... ... .... .... ... .... ... .... .... ... .... ... .... ... .... .... ... . 164Convert To Element
.... ... .... ... .... .... ... .... ... .... .... ... .... ... .... ... .... .... ... .... ... .... ... .... .... ... .... ... .... .... ... .... ... .... ... .... .... ... . 164Convert To Text
.... ... .... ... .... .... ... .... ... .... .... ... .... ... .... ... .... .... ... .... ... .... ... .... .... ... .... ... .... .... ... .... ... .... ... .... .... ... . 165Convert To CDATA
.... ... .... ... .... .... ... .... ... .... .... ... .... ... .... ... .... .... ... .... ... .... ... .... .... ... .... ... .... .... ... .... ... .... ... .... .... ... . 165Convert To Comment
.... ... .... ... .... .... ... .... ... .... .... ... .... ... .... ... .... .... ... .... ... .... ... .... .... ... .... ... .... .... ... .... ... .... ... .... .... ... . 165Convert To XML
.... ... .... ... .... .... ... .... ... .... .... ... .... ... .... ... .... .... ... .... ... .... ... .... .... ... .... ... .... .... ... .... ... .... ... .... .... ... . 165Convert To Processing Instruction
.... ... .... ... .... .... ... .... ... .... .... ... .... ... .... ... .... .... ... .... ... .... ... .... .... ... .... ... .... .... ... .... ... .... ... .... .... ... . 165Convert To DOCTYPE
.... ... .... ... .... .... ... .... ... .... .... ... .... ... .... ... .... .... ... .... ... .... ... .... .... ... .... ... .... .... ... .... ... .... ... .... .... ... . 165Convert To ExternalID
.... ... .... ... .... .... ... .... ... .... .... ... .... ... .... ... .... .... ... .... ... .... ... .... .... ... .... ... .... .... ... .... ... .... ... .... .... ... . 165Convert To ELEMENT
.... ... .... ... .... .... ... .... ... .... .... ... .... ... .... ... .... .... ... .... ... .... ... .... .... ... .... ... .... .... ... .... ... .... ... .... .... ... . 165Convert To ATTLIST
.... ... .... ... .... .... ... .... ... .... .... ... .... ... .... ... .... .... ... .... ... .... ... .... .... ... .... ... .... .... ... .... ... .... ... .... .... ... . 166Convert To ENTITY
.... ... .... ... .... .... ... .... ... .... .... ... .... ... .... ... .... .... ... .... ... .... ... .... .... ... .... ... .... .... ... .... ... .... ... .... .... ... . 166Convert To NOTATION
..... .... .... ... .... ... .... ... .... .... ... .... ... .... .... ... .... ... .... ... .... .... ... .... ... .... ... .... .... ... .... ... .... .... ... .... ... .... ... .... .... ... . 166Move Left
.. ... .... .... ... .... ... .... ... .... .... ... .... ... .... .... ... .... ... .... ... .... .... ... .... ... .... ... .... .... ... .... ... .... .... ... .... ... .... ... .... .... ... . 166Move Right
.. ... .... .... ... .... ... .... ... .... .... ... .... ... .... .... ... .... ... .... ... .... .... ... .... ... .... ... .... .... ... .... ... .... .... ... .... ... .... ... .... .... ... . 166Enclose in Element
.. ... .... .... ... .... ... .... ... .... .... ... .... ... .... .... ... .... ... .... ... .... .... ... .... ... .... ... .... .... ... .... ... .... .... ... .... ... .... ... .... .... ... . 166Check Well-Formedness
.. ... .... .... ... .... ... .... ... .... .... ... .... ... .... .... ... .... ... .... ... .... .... ... .... ... .... ... .... .... ... .... ... .... .... ... .... ... .... ... .... .... ... . 167Validate
.... ... .... ... .... .... ... .... ... .... .... ... .... ... .... ... .... .... ... .... ... .... ... .... .... ... .... ... .... .... ... .... ... .... ... .... .... ... . 168Validate XML
.... ... .... ... .... .... ... .... ... .... .... ... .... ... .... ... .... .... ... .... ... .... ... .... .... ... .... ... .... .... ... .... ... .... ... .... .... ... . 168Validate Schema
.. ... .... .... ... .... ... .... ... .... .... ... .... ... .... .... ... .... ... .... ... .... .... ... .... ... .... ... .... .... ... .... ... .... .... ... .... ... .... ... .... .... ... . 168Update Entry-Helpers
.. ... .... .... ... .... ... .... ... .... .... ... .... ... .... .... ... .... ... .... ... .... .... ... .... ... .... ... .... .... ... .... ... .... .... ... .... ... .... ... .... .... ... . 168Namespace Prefix...
... ... .... .... ... .... ... .... ... .... .... ... .... ... .... .... ... .... ... .... ... .... .... ... .... ... .... ... .... .... ... .... ... .... .... ... .... ... .... ... .... .... ... . 170DTD/Schema Menu
.. ... .... .... ... .... ... .... ... .... .... ... .... ... .... .... ... .... ... .... ... .... .... ... .... ... .... ... .... .... ... .... ... .... .... ... .... ... .... ... .... .... ... . 170Assign DTD...
.. ... .... .... ... .... ... .... ... .... .... ... .... ... .... .... ... .... ... .... ... .... .... ... .... ... .... ... .... .... ... .... ... .... .... ... .... ... .... ... .... .... ... . 170Assign Schema...
.. ... .... .... ... .... ... .... ... .... .... ... .... ... .... .... ... .... ... .... ... .... .... ... .... ... .... ... .... .... ... .... ... .... .... ... .... ... .... ... .... .... ... . 171Include another DTD...
.. ... .... .... ... .... ... .... ... .... .... ... .... ... .... .... ... .... ... .... ... .... .... ... .... ... .... ... .... .... ... .... ... .... .... ... .... ... .... ... .... .... ... . 171Go to DTD
..... .... .... ... .... ... .... ... .... .... ... .... ... .... .... ... .... ... .... ... .... .... ... .... ... .... ... .... .... ... .... ... .... .... ... .... ... .... ... .... .... ... . 171Go to Schema
.. ... .... .... ... .... ... .... ... .... .... ... .... ... .... .... ... .... ... .... ... .... .... ... .... ... .... ... .... .... ... .... ... .... .... ... .... ... .... ... .... .... ... . 171Go to Definition
.. ... .... .... ... .... ... .... ... .... .... ... .... ... .... .... ... .... ... .... ... .... .... ... .... ... .... ... .... .... ... .... ... .... .... ... .... ... .... ... .... .... ... . 172Generate DTD/Schema...
.. ... .... .... ... .... ... .... ... .... .... ... .... ... .... .... ... .... ... .... ... .... .... ... .... ... .... ... .... .... ... .... ... .... .... ... .... ... .... ... .... .... ... . 173Convert DTD/Schema...
.. ... .... .... ... .... ... .... ... .... .... ... .... ... .... .... ... .... ... .... ... .... .... ... .... ... .... ... .... .... ... .... ... .... .... ... .... ... .... ... .... .... ... . 173Generate sample XML file
.. ... .... .... ... .... ... .... ... .... .... ... .... ... .... .... ... .... ... .... ... .... .... ... .... ... .... ... .... .... ... .... ... .... .... ... .... ... .... ... .... .... ... . 174Flush Memory Cache
... ... .... .... ... .... ... .... ... .... .... ... .... ... .... .... ... .... ... .... ... .... .... ... .... ... .... ... .... .... ... .... ... .... .... ... .... ... .... ... .... .... ... . 175Schema design Menu
.. ... .... .... ... .... ... .... ... .... .... ... .... ... .... .... ... .... ... .... ... .... .... ... .... ... .... ... .... .... ... .... ... .... .... ... .... ... .... ... .... .... ... . 175Schema settings
.. ... .... .... ... .... ... .... ... .... .... ... .... ... .... .... ... .... ... .... ... .... .... ... .... ... .... ... .... .... ... .... ... .... .... ... .... ... .... ... .... .... ... . 176Save Diagram...
.. ... .... .... ... .... ... .... ... .... .... ... .... ... .... .... ... .... ... .... ... .... .... ... .... ... .... ... .... .... ... .... ... .... .... ... .... ... .... ... .... .... ... . 177Generate Documentation
.. ... .... .... ... .... ... .... ... .... .... ... .... ... .... .... ... .... ... .... ... .... .... ... .... ... .... ... .... .... ... .... ... .... .... ... .... ... .... ... .... .... ... . 180View config
.. ... .... .... ... .... ... .... ... .... .... ... .... ... .... .... ... .... ... .... ... .... .... ... .... ... .... ... .... .... ... .... ... .... .... ... .... ... .... ... .... .... ... . 182Zoom
IV
XML Spy Suite 4.2
© 2001 Altova Ges.m.b.H

.. ... .... .... ... .... ... .... ... .... .... ... .... ... .... .... ... .... ... .... ... .... .... ... .... ... .... ... .... .... ... .... ... .... .... ... .... ... .... ... .... .... ... . 183Display all Globals
.. ... .... .... ... .... ... .... ... .... .... ... .... ... .... .... ... .... ... .... ... .... .... ... .... ... .... ... .... .... ... .... ... .... .... ... .... ... .... ... .... .... ... . 183Display Diagram
..... .... .... ... .... ... .... ... .... .... ... .... ... .... .... ... .... ... .... ... .... .... ... .... ... .... ... .... .... ... .... ... .... .... ... .... ... .... ... .... .... ... . 183Enable Oracle Schema extensions
.. ... .... .... ... .... ... .... ... .... .... ... .... ... .... .... ... .... ... .... ... .... .... ... .... ... .... ... .... .... ... .... ... .... .... ... .... ... .... ... .... .... ... . 184Oracle Schema settings
... ... .... .... ... .... ... .... ... .... .... ... .... ... .... .... ... .... ... .... ... .... .... ... .... ... .... ... .... .... ... .... ... .... .... ... .... ... .... ... .... .... ... . 185XSL Menu
.. ... .... .... ... .... ... .... ... .... .... ... .... ... .... .... ... .... ... .... ... .... .... ... .... ... .... ... .... .... ... .... ... .... .... ... .... ... .... ... .... .... ... . 185XSL Transformation
.. ... .... .... ... .... ... .... ... .... .... ... .... ... .... .... ... .... ... .... ... .... .... ... .... ... .... ... .... .... ... .... ... .... .... ... .... ... .... ... .... .... ... . 185XSL:FO Transformation
.... ... .... ... .... .... ... .... ... .... .... ... .... ... .... ... .... .... ... .... ... .... ... .... .... ... .... ... .... .... ... .... ... .... ... .... .... ... . 186Transforming with XSL:FO
..... .... .... ... .... ... .... ... .... .... ... .... ... .... .... ... .... ... .... ... .... .... ... .... ... .... ... .... .... ... .... ... .... .... ... .... ... .... ... .... .... ... . 188Assign XSL...
.. ... .... .... ... .... ... .... ... .... .... ... .... ... .... .... ... .... ... .... ... .... .... ... .... ... .... ... .... .... ... .... ... .... .... ... .... ... .... ... .... .... ... . 188Go to XSL
... ... .... .... ... .... ... .... ... .... .... ... .... ... .... .... ... .... ... .... ... .... .... ... .... ... .... ... .... .... ... .... ... .... .... ... .... ... .... ... .... .... ... . 189Document Editor Menu
.. ... .... .... ... .... ... .... ... .... .... ... .... ... .... .... ... .... ... .... ... .... .... ... .... ... .... ... .... .... ... .... ... .... .... ... .... ... .... ... .... .... ... . 189Assign configuration file...
.. ... .... .... ... .... ... .... ... .... .... ... .... ... .... .... ... .... ... .... ... .... .... ... .... ... .... ... .... .... ... .... ... .... .... ... .... ... .... ... .... .... ... . 189Hide markup
.. ... .... .... ... .... ... .... ... .... .... ... .... ... .... .... ... .... ... .... ... .... .... ... .... ... .... ... .... .... ... .... ... .... .... ... .... ... .... ... .... .... ... . 190Show small markup
.. ... .... .... ... .... ... .... ... .... .... ... .... ... .... .... ... .... ... .... ... .... .... ... .... ... .... ... .... .... ... .... ... .... .... ... .... ... .... ... .... .... ... . 190Show large markup
.. ... .... .... ... .... ... .... ... .... .... ... .... ... .... .... ... .... ... .... ... .... .... ... .... ... .... ... .... .... ... .... ... .... .... ... .... ... .... ... .... .... ... . 190Show mixed markup
.. ... .... .... ... .... ... .... ... .... .... ... .... ... .... .... ... .... ... .... ... .... .... ... .... ... .... ... .... .... ... .... ... .... .... ... .... ... .... ... .... .... ... . 190Append row
.. ... .... .... ... .... ... .... ... .... .... ... .... ... .... .... ... .... ... .... ... .... .... ... .... ... .... ... .... .... ... .... ... .... .... ... .... ... .... ... .... .... ... . 190Insert row
.. ... .... .... ... .... ... .... ... .... .... ... .... ... .... .... ... .... ... .... ... .... .... ... .... ... .... ... .... .... ... .... ... .... .... ... .... ... .... ... .... .... ... . 190Duplicate row
.. ... .... .... ... .... ... .... ... .... .... ... .... ... .... .... ... .... ... .... ... .... .... ... .... ... .... ... .... .... ... .... ... .... .... ... .... ... .... ... .... .... ... . 190Move row up
.. ... .... .... ... .... ... .... ... .... .... ... .... ... .... .... ... .... ... .... ... .... .... ... .... ... .... ... .... .... ... .... ... .... .... ... .... ... .... ... .... .... ... . 191Move row down
.. ... .... .... ... .... ... .... ... .... .... ... .... ... .... .... ... .... ... .... ... .... .... ... .... ... .... ... .... .... ... .... ... .... .... ... .... ... .... ... .... .... ... . 191Delete row
... ... .... .... ... .... ... .... ... .... .... ... .... ... .... .... ... .... ... .... ... .... .... ... .... ... .... ... .... .... ... .... ... .... .... ... .... ... .... ... .... .... ... . 192Convert Menu
.. ... .... .... ... .... ... .... ... .... .... ... .... ... .... .... ... .... ... .... ... .... .... ... .... ... .... ... .... .... ... .... ... .... .... ... .... ... .... ... .... .... ... . 192Import Text file...
.. ... .... .... ... .... ... .... ... .... .... ... .... ... .... .... ... .... ... .... ... .... .... ... .... ... .... ... .... .... ... .... ... .... .... ... .... ... .... ... .... .... ... . 193Import Database data...
.... ... .... ... .... .... ... .... ... .... .... ... .... ... .... ... .... .... ... .... ... .... ... .... .... ... .... ... .... .... ... .... ... .... ... .... .... ... . 195ADO connection string
.. ... .... .... ... .... ... .... ... .... .... ... .... ... .... .... ... .... ... .... ... .... .... ... .... ... .... ... .... .... ... .... ... .... .... ... .... ... .... ... .... .... ... . 197Import Microsoft Word document...
.. ... .... .... ... .... ... .... ... .... .... ... .... ... .... .... ... .... ... .... ... .... .... ... .... ... .... ... .... .... ... .... ... .... .... ... .... ... .... ... .... .... ... . 197Create Database Schema
.. ... .... .... ... .... ... .... ... .... .... ... .... ... .... .... ... .... ... .... ... .... .... ... .... ... .... ... .... .... ... .... ... .... .... ... .... ... .... ... .... .... ... . 202XML Import based on DB Schema
.. ... .... .... ... .... ... .... ... .... .... ... .... ... .... .... ... .... ... .... ... .... .... ... .... ... .... ... .... .... ... .... ... .... .... ... .... ... .... ... .... .... ... . 206Create DB Structure based on Schema
.. ... .... .... ... .... ... .... ... .... .... ... .... ... .... .... ... .... ... .... ... .... .... ... .... ... .... ... .... .... ... .... ... .... .... ... .... ... .... ... .... .... ... . 208Export to Text files / Database...
.... ... .... ... .... .... ... .... ... .... .... ... .... ... .... ... .... .... ... .... ... .... ... .... .... ... .... ... .... .... ... .... ... .... ... .... .... ... . 210Export Database
.... ... .... ... .... .... ... .... ... .... .... ... .... ... .... ... .... .... ... .... ... .... ... .... .... ... .... ... .... .... ... .... ... .... ... .... .... ... . 210Export Text File
.. ... .... .... ... .... ... .... ... .... .... ... .... ... .... .... ... .... ... .... ... .... .... ... .... ... .... ... .... .... ... .... ... .... .... ... .... ... .... ... .... .... ... . 211Convert - How to...
.... ... .... ... .... .... ... .... ... .... .... ... .... ... .... ... .... .... ... .... ... .... ... .... .... ... .... ... .... .... ... .... ... .... ... .... .... ... . 211Exporting hierarchical data
.... ... .... ... .... .... ... .... ... .... .... ... .... ... .... ... .... .... ... .... ... .... ... .... .... ... .... ... .... .... ... .... ... .... ... .... .... ... . 213Setting up the ADO or ODBC connection using the ODBC Data SourceAdministrator
.... ... .... ... .... .... ... .... ... .... .... ... .... ... .... ... .... .... ... .... ... .... ... .... .... ... .... ... .... .... ... .... ... .... ... .... .... ... . 216Importing a table using ODBC
.... ... .... ... .... .... ... .... ... .... .... ... .... ... .... ... .... .... ... .... ... .... ... .... .... ... .... ... .... .... ... .... ... .... ... .... .... ... . 219Importing hierarchical data - Data shaping (ADO)
.... ... .... ... .... .... ... .... ... .... .... ... .... ... .... ... .... .... ... .... ... .... ... .... .... ... .... ... .... .... ... .... ... .... ... .... .... ... . 223Shape strings
.... ... .... ... .... .... ... .... ... .... .... ... .... ... .... ... .... .... ... .... ... .... ... .... .... ... .... ... .... .... ... .... ... .... ... .... .... ... . 227Creating Identity constraints
... ... .... .... ... .... ... .... ... .... .... ... .... ... .... .... ... .... ... .... ... .... .... ... .... ... .... ... .... .... ... .... ... .... .... ... .... ... .... ... .... .... ... . 232Table Menu
.. ... .... .... ... .... ... .... ... .... .... ... .... ... .... .... ... .... ... .... ... .... .... ... .... ... .... ... .... .... ... .... ... .... .... ... .... ... .... ... .... .... ... . 232Display as Table
.. ... .... .... ... .... ... .... ... .... .... ... .... ... .... .... ... .... ... .... ... .... .... ... .... ... .... ... .... .... ... .... ... .... .... ... .... ... .... ... .... .... ... . 233Insert Row
.. ... .... .... ... .... ... .... ... .... .... ... .... ... .... .... ... .... ... .... ... .... .... ... .... ... .... ... .... .... ... .... ... .... .... ... .... ... .... ... .... .... ... . 233Append Row
..... .... .... ... .... ... .... ... .... .... ... .... ... .... .... ... .... ... .... ... .... .... ... .... ... .... ... .... .... ... .... ... .... .... ... .... ... .... ... .... .... ... . 233Ascending Sort
.. ... .... .... ... .... ... .... ... .... .... ... .... ... .... .... ... .... ... .... ... .... .... ... .... ... .... ... .... .... ... .... ... .... .... ... .... ... .... ... .... .... ... . 234Descending Sort
... ... .... .... ... .... ... .... ... .... .... ... .... ... .... .... ... .... ... .... ... .... .... ... .... ... .... ... .... .... ... .... ... .... .... ... .... ... .... ... .... .... ... . 235View Menu
.. ... .... .... ... .... ... .... ... .... .... ... .... ... .... .... ... .... ... .... ... .... .... ... .... ... .... ... .... .... ... .... ... .... .... ... .... ... .... ... .... .... ... . 235Enhanced Grid View
.. ... .... .... ... .... ... .... ... .... .... ... .... ... .... .... ... .... ... .... ... .... .... ... .... ... .... ... .... .... ... .... ... .... .... ... .... ... .... ... .... .... ... . 236Schema Design View
.. ... .... .... ... .... ... .... ... .... .... ... .... ... .... .... ... .... ... .... ... .... .... ... .... ... .... ... .... .... ... .... ... .... .... ... .... ... .... ... .... .... ... . 238Text View
.. ... .... .... ... .... ... .... ... .... .... ... .... ... .... .... ... .... ... .... ... .... .... ... .... ... .... ... .... .... ... .... ... .... .... ... .... ... .... ... .... .... ... . 238Browser View
.. ... .... .... ... .... ... .... ... .... .... ... .... ... .... .... ... .... ... .... ... .... .... ... .... ... .... ... .... .... ... .... ... .... .... ... .... ... .... ... .... .... ... . 239Synchronize
.. ... .... .... ... .... ... .... ... .... .... ... .... ... .... .... ... .... ... .... ... .... .... ... .... ... .... ... .... .... ... .... ... .... .... ... .... ... .... ... .... .... ... . 240Expand
.. ... .... .... ... .... ... .... ... .... .... ... .... ... .... .... ... .... ... .... ... .... .... ... .... ... .... ... .... .... ... .... ... .... .... ... .... ... .... ... .... .... ... . 240Collapse
V© 2001 Altova Ges.m.b.H

.. ... .... .... ... .... ... .... ... .... .... ... .... ... .... .... ... .... ... .... ... .... .... ... .... ... .... ... .... .... ... .... ... .... .... ... .... ... .... ... .... .... ... . 240Expand fully
.. ... .... .... ... .... ... .... ... .... .... ... .... ... .... .... ... .... ... .... ... .... .... ... .... ... .... ... .... .... ... .... ... .... .... ... .... ... .... ... .... .... ... . 240Collapse unselected
.. ... .... .... ... .... ... .... ... .... .... ... .... ... .... .... ... .... ... .... ... .... .... ... .... ... .... ... .... .... ... .... ... .... .... ... .... ... .... ... .... .... ... . 241Optimal widths
.. ... .... .... ... .... ... .... ... .... .... ... .... ... .... .... ... .... ... .... ... .... .... ... .... ... .... ... .... .... ... .... ... .... .... ... .... ... .... ... .... .... ... . 241Word wrap
.. ... .... .... ... .... ... .... ... .... .... ... .... ... .... .... ... .... ... .... ... .... .... ... .... ... .... ... .... .... ... .... ... .... .... ... .... ... .... ... .... .... ... . 241Go to line/char...
.. ... .... .... ... .... ... .... ... .... .... ... .... ... .... .... ... .... ... .... ... .... .... ... .... ... .... ... .... .... ... .... ... .... .... ... .... ... .... ... .... .... ... . 242Go to File
... ... .... .... ... .... ... .... ... .... .... ... .... ... .... .... ... .... ... .... ... .... .... ... .... ... .... ... .... .... ... .... ... .... .... ... .... ... .... ... .... .... ... . 243Browser Menu
.. ... .... .... ... .... ... .... ... .... .... ... .... ... .... .... ... .... ... .... ... .... .... ... .... ... .... ... .... .... ... .... ... .... .... ... .... ... .... ... .... .... ... . 243Back
.. ... .... .... ... .... ... .... ... .... .... ... .... ... .... .... ... .... ... .... ... .... .... ... .... ... .... ... .... .... ... .... ... .... .... ... .... ... .... ... .... .... ... . 243Forward
.. ... .... .... ... .... ... .... ... .... .... ... .... ... .... .... ... .... ... .... ... .... .... ... .... ... .... ... .... .... ... .... ... .... .... ... .... ... .... ... .... .... ... . 243Stop
.. ... .... .... ... .... ... .... ... .... .... ... .... ... .... .... ... .... ... .... ... .... .... ... .... ... .... ... .... .... ... .... ... .... .... ... .... ... .... ... .... .... ... . 243Refresh
.. ... .... .... ... .... ... .... ... .... .... ... .... ... .... .... ... .... ... .... ... .... .... ... .... ... .... ... .... .... ... .... ... .... .... ... .... ... .... ... .... .... ... . 244Fonts
.. ... .... .... ... .... ... .... ... .... .... ... .... ... .... .... ... .... ... .... ... .... .... ... .... ... .... ... .... .... ... .... ... .... .... ... .... ... .... ... .... .... ... . 244Separate Window
... ... .... .... ... .... ... .... ... .... .... ... .... ... .... .... ... .... ... .... ... .... .... ... .... ... .... ... .... .... ... .... ... .... .... ... .... ... .... ... .... .... ... . 245Soap Menu
.. ... .... .... ... .... ... .... ... .... .... ... .... ... .... .... ... .... ... .... ... .... .... ... .... ... .... ... .... .... ... .... ... .... .... ... .... ... .... ... .... .... ... . 245Create new SOAP request
.. ... .... .... ... .... ... .... ... .... .... ... .... ... .... .... ... .... ... .... ... .... .... ... .... ... .... ... .... .... ... .... ... .... .... ... .... ... .... ... .... .... ... . 246Send request to server
.. ... .... .... ... .... ... .... ... .... .... ... .... ... .... .... ... .... ... .... ... .... .... ... .... ... .... ... .... .... ... .... ... .... .... ... .... ... .... ... .... .... ... . 247Edit SOAP request parameters
... ... .... .... ... .... ... .... ... .... .... ... .... ... .... .... ... .... ... .... ... .... .... ... .... ... .... ... .... .... ... .... ... .... .... ... .... ... .... ... .... .... ... . 249Tools
.. ... .... .... ... .... ... .... ... .... .... ... .... ... .... .... ... .... ... .... ... .... .... ... .... ... .... ... .... .... ... .... ... .... .... ... .... ... .... ... .... .... ... . 249Switch to scripting environment
.. ... .... .... ... .... ... .... ... .... .... ... .... ... .... .... ... .... ... .... ... .... .... ... .... ... .... ... .... .... ... .... ... .... .... ... .... ... .... ... .... .... ... . 249Show macros
.. ... .... .... ... .... ... .... ... .... .... ... .... ... .... .... ... .... ... .... ... .... .... ... .... ... .... ... .... .... ... .... ... .... .... ... .... ... .... ... .... .... ... . 250Project
.... ... .... ... .... .... ... .... ... .... .... ... .... ... .... ... .... .... ... .... ... .... ... .... .... ... .... ... .... .... ... .... ... .... ... .... .... ... . 250Assign script to Project
.... ... .... ... .... .... ... .... ... .... .... ... .... ... .... ... .... .... ... .... ... .... ... .... .... ... .... ... .... .... ... .... ... .... ... .... .... ... . 250Unassign Scripts from Project
.... ... .... ... .... .... ... .... ... .... .... ... .... ... .... ... .... .... ... .... ... .... ... .... .... ... .... ... .... .... ... .... ... .... ... .... .... ... . 250Project Scripts active
.. ... .... .... ... .... ... .... ... .... .... ... .... ... .... .... ... .... ... .... ... .... .... ... .... ... .... ... .... .... ... .... ... .... .... ... .... ... .... ... .... .... ... . 250Customize...
.... ... .... ... .... .... ... .... ... .... .... ... .... ... .... ... .... .... ... .... ... .... ... .... .... ... .... ... .... .... ... .... ... .... ... .... .... ... . 251Commands
.... ... .... ... .... .... ... .... ... .... .... ... .... ... .... ... .... .... ... .... ... .... ... .... .... ... .... ... .... .... ... .... ... .... ... .... .... ... . 252Toolbars
.... ... .... ... .... .... ... .... ... .... .... ... .... ... .... ... .... .... ... .... ... .... ... .... .... ... .... ... .... .... ... .... ... .... ... .... .... ... . 253Keyboard
.... ... .... ... .... .... ... .... ... .... .... ... .... ... .... ... .... .... ... .... ... .... ... .... .... ... .... ... .... .... ... .... ... .... ... .... .... ... . 256Menu
.... ... .... ... .... .... ... .... ... .... .... ... .... ... .... ... .... .... ... .... ... .... ... .... .... ... .... ... .... .... ... .... ... .... ... .... .... ... . 258Macros
.... ... .... ... .... .... ... .... ... .... .... ... .... ... .... ... .... .... ... .... ... .... ... .... .... ... .... ... .... .... ... .... ... .... ... .... .... ... . 259Plug-Ins
.... ... .... ... .... .... ... .... ... .... .... ... .... ... .... ... .... .... ... .... ... .... ... .... .... ... .... ... .... .... ... .... ... .... ... .... .... ... . 261Options
.... ... .... ... .... .... ... .... ... .... .... ... .... ... .... ... .... .... ... .... ... .... ... .... .... ... .... ... .... .... ... .... ... .... ... .... .... ... . 261Customize context menu
.. ... .... .... ... .... ... .... ... .... .... ... .... ... .... .... ... .... ... .... ... .... .... ... .... ... .... ... .... .... ... .... ... .... .... ... .... ... .... ... .... .... ... . 264Options
.... ... .... ... .... .... ... .... ... .... .... ... .... ... .... ... .... .... ... .... ... .... ... .... .... ... .... ... .... .... ... .... ... .... ... .... .... ... . 264File
.... ... .... ... .... .... ... .... ... .... .... ... .... ... .... ... .... .... ... .... ... .... ... .... .... ... .... ... .... .... ... .... ... .... ... .... .... ... . 265File types
.... ... .... ... .... .... ... .... ... .... .... ... .... ... .... ... .... .... ... .... ... .... ... .... .... ... .... ... .... .... ... .... ... .... ... .... .... ... . 267Editing
.... ... .... ... .... .... ... .... ... .... .... ... .... ... .... ... .... .... ... .... ... .... ... .... .... ... .... ... .... .... ... .... ... .... ... .... .... ... . 268View
.... ... .... ... .... .... ... .... ... .... .... ... .... ... .... ... .... .... ... .... ... .... ... .... .... ... .... ... .... .... ... .... ... .... ... .... .... ... . 269Grid fonts
.... ... .... ... .... .... ... .... ... .... .... ... .... ... .... ... .... .... ... .... ... .... ... .... .... ... .... ... .... .... ... .... ... .... ... .... .... ... . 269Schema fonts
.... ... .... ... .... .... ... .... ... .... .... ... .... ... .... ... .... .... ... .... ... .... ... .... .... ... .... ... .... .... ... .... ... .... ... .... .... ... . 270Text fonts
.... ... .... ... .... .... ... .... ... .... .... ... .... ... .... ... .... .... ... .... ... .... ... .... .... ... .... ... .... .... ... .... ... .... ... .... .... ... . 271Colors
.... ... .... ... .... .... ... .... ... .... .... ... .... ... .... ... .... .... ... .... ... .... ... .... .... ... .... ... .... .... ... .... ... .... ... .... .... ... . 272Encoding
.... ... .... ... .... .... ... .... ... .... .... ... .... ... .... ... .... .... ... .... ... .... ... .... .... ... .... ... .... .... ... .... ... .... ... .... .... ... . 273XSL
.... ... .... ... .... .... ... .... ... .... .... ... .... ... .... ... .... .... ... .... ... .... ... .... .... ... .... ... .... .... ... .... ... .... ... .... .... ... . 275Scripting
... ... .... .... ... .... ... .... ... .... .... ... .... ... .... .... ... .... ... .... ... .... .... ... .... ... .... ... .... .... ... .... ... .... .... ... .... ... .... ... .... .... ... . 277Window Menu
.. ... .... .... ... .... ... .... ... .... .... ... .... ... .... .... ... .... ... .... ... .... .... ... .... ... .... ... .... .... ... .... ... .... .... ... .... ... .... ... .... .... ... . 277Cascade
.. ... .... .... ... .... ... .... ... .... .... ... .... ... .... .... ... .... ... .... ... .... .... ... .... ... .... ... .... .... ... .... ... .... .... ... .... ... .... ... .... .... ... . 277Tile horizontally
.. ... .... .... ... .... ... .... ... .... .... ... .... ... .... .... ... .... ... .... ... .... .... ... .... ... .... ... .... .... ... .... ... .... .... ... .... ... .... ... .... .... ... . 277Tile vertically
.. ... .... .... ... .... ... .... ... .... .... ... .... ... .... .... ... .... ... .... ... .... .... ... .... ... .... ... .... .... ... .... ... .... .... ... .... ... .... ... .... .... ... . 277Project Window
.. ... .... .... ... .... ... .... ... .... .... ... .... ... .... .... ... .... ... .... ... .... .... ... .... ... .... ... .... .... ... .... ... .... .... ... .... ... .... ... .... .... ... . 278Info Window
.. ... .... .... ... .... ... .... ... .... .... ... .... ... .... .... ... .... ... .... ... .... .... ... .... ... .... ... .... .... ... .... ... .... .... ... .... ... .... ... .... .... ... . 278Entry Helpers
.. ... .... .... ... .... ... .... ... .... .... ... .... ... .... .... ... .... ... .... ... .... .... ... .... ... .... ... .... .... ... .... ... .... .... ... .... ... .... ... .... .... ... . 278All on/off
.. ... .... .... ... .... ... .... ... .... .... ... .... ... .... .... ... .... ... .... ... .... .... ... .... ... .... ... .... .... ... .... ... .... .... ... .... ... .... ... .... .... ... . 278Currently open window list
VI
XML Spy Suite 4.2
© 2001 Altova Ges.m.b.H

... ... .... .... ... .... ... .... ... .... .... ... .... ... .... .... ... .... ... .... ... .... .... ... .... ... .... ... .... .... ... .... ... .... .... ... .... ... .... ... .... .... ... . 279Help Menu
.. ... .... .... ... .... ... .... ... .... .... ... .... ... .... .... ... .... ... .... ... .... .... ... .... ... .... ... .... .... ... .... ... .... .... ... .... ... .... ... .... .... ... . 279XML Spy Quick Help
.. ... .... .... ... .... ... .... ... .... .... ... .... ... .... .... ... .... ... .... ... .... .... ... .... ... .... ... .... .... ... .... ... .... .... ... .... ... .... ... .... .... ... . 279Table of contents...
.. ... .... .... ... .... ... .... ... .... .... ... .... ... .... .... ... .... ... .... ... .... .... ... .... ... .... ... .... .... ... .... ... .... .... ... .... ... .... ... .... .... ... . 280Index...
.. ... .... .... ... .... ... .... ... .... .... ... .... ... .... .... ... .... ... .... ... .... .... ... .... ... .... ... .... .... ... .... ... .... .... ... .... ... .... ... .... .... ... . 281Search...
.. ... .... .... ... .... ... .... ... .... .... ... .... ... .... .... ... .... ... .... ... .... .... ... .... ... .... ... .... .... ... .... ... .... .... ... .... ... .... ... .... .... ... . 282Registration...
.. ... .... .... ... .... ... .... ... .... .... ... .... ... .... .... ... .... ... .... ... .... .... ... .... ... .... ... .... .... ... .... ... .... .... ... .... ... .... ... .... .... ... . 283Order form...
.. ... .... .... ... .... ... .... ... .... .... ... .... ... .... .... ... .... ... .... ... .... .... ... .... ... .... ... .... .... ... .... ... .... .... ... .... ... .... ... .... .... ... . 283Support Center...
.. ... .... .... ... .... ... .... ... .... .... ... .... ... .... .... ... .... ... .... ... .... .... ... .... ... .... ... .... .... ... .... ... .... .... ... .... ... .... ... .... .... ... . 284FAQ on the web
.. ... .... .... ... .... ... .... ... .... .... ... .... ... .... .... ... .... ... .... ... .... .... ... .... ... .... ... .... .... ... .... ... .... .... ... .... ... .... ... .... .... ... . 284Components download
.. ... .... .... ... .... ... .... ... .... .... ... .... ... .... .... ... .... ... .... ... .... .... ... .... ... .... ... .... .... ... .... ... .... .... ... .... ... .... ... .... .... ... . 284XML Spy on the Internet...
.. ... .... .... ... .... ... .... ... .... .... ... .... ... .... .... ... .... ... .... ... .... .... ... .... ... .... ... .... .... ... .... ... .... .... ... .... ... .... ... .... .... ... . 284XML Spy Training
.. ... .... .... ... .... ... .... ... .... .... ... .... ... .... .... ... .... ... .... ... .... .... ... .... ... .... ... .... .... ... .... ... .... .... ... .... ... .... ... .... .... ... . 284Japanese distributor...
.. ... .... .... ... .... ... .... ... .... .... ... .... ... .... .... ... .... ... .... ... .... .... ... .... ... .... ... .... .... ... .... ... .... .... ... .... ... .... ... .... .... ... . 284About XML Spy...
................................................................................................................................... 2853 Dialogs
Part IV Scripting 287
................................................................................................................................... 2871 The XMLSpyFormEditor
................................................................................................................................... 2922 Main scripting features
................................................................................................................................... 2943 Calling macros from XMLSpy
................................................................................................................................... 2964 Projects and Scripts
................................................................................................................................... 2975 Scripting Settings
................................................................................................................................... 2986 How To
... ... .... .... ... .... ... .... ... .... .... ... .... ... .... .... ... .... ... .... ... .... .... ... .... ... .... ... .... .... ... .... ... .... .... ... .... ... .... ... .... .... ... . 298How to write a macro
... ... .... .... ... .... ... .... ... .... .... ... .... ... .... .... ... .... ... .... ... .... .... ... .... ... .... ... .... .... ... .... ... .... .... ... .... ... .... ... .... .... ... . 300How to handle an event
... ... .... .... ... .... ... .... ... .... .... ... .... ... .... .... ... .... ... .... ... .... .... ... .... ... .... ... .... .... ... .... ... .... .... ... .... ... .... ... .... .... ... . 303How to create a Form
Part V Programmer's Reference 307
................................................................................................................................... 3081 Object model
................................................................................................................................... 3092 Simple document access
................................................................................................................................... 3113 Import and Export
................................................................................................................................... 3144 Using XMLData
................................................................................................................................... 3185 Error handling
................................................................................................................................... 3206 Interfaces
... ... .... .... ... .... ... .... ... .... .... ... .... ... .... .... ... .... ... .... ... .... .... ... .... ... .... ... .... .... ... .... ... .... .... ... .... ... .... ... .... .... ... . 321Application
... ... .... .... ... .... ... .... ... .... .... ... .... ... .... .... ... .... ... .... ... .... .... ... .... ... .... ... .... .... ... .... ... .... .... ... .... ... .... ... .... .... ... . 323Document
... ... .... .... ... .... ... .... ... .... .... ... .... ... .... .... ... .... ... .... ... .... .... ... .... ... .... ... .... .... ... .... ... .... .... ... .... ... .... ... .... .... ... . 325Documents
... ... .... .... ... .... ... .... ... .... .... ... .... ... .... .... ... .... ... .... ... .... .... ... .... ... .... ... .... .... ... .... ... .... .... ... .... ... .... ... .... .... ... . 326GridView
... ... .... .... ... .... ... .... ... .... .... ... .... ... .... .... ... .... ... .... ... .... .... ... .... ... .... ... .... .... ... .... ... .... .... ... .... ... .... ... .... .... ... . 327SpyProject
... ... .... .... ... .... ... .... ... .... .... ... .... ... .... .... ... .... ... .... ... .... .... ... .... ... .... ... .... .... ... .... ... .... .... ... .... ... .... ... .... .... ... . 328SpyProjectItem
... ... .... .... ... .... ... .... ... .... .... ... .... ... .... .... ... .... ... .... ... .... .... ... .... ... .... ... .... .... ... .... ... .... .... ... .... ... .... ... .... .... ... . 329SpyProjectItems
... ... .... .... ... .... ... .... ... .... .... ... .... ... .... .... ... .... ... .... ... .... .... ... .... ... .... ... .... .... ... .... ... .... .... ... .... ... .... ... .... .... ... . 330XMLData
... ... .... .... ... .... ... .... ... .... .... ... .... ... .... .... ... .... ... .... ... .... .... ... .... ... .... ... .... .... ... .... ... .... .... ... .... ... .... ... .... .... ... . 331DatabaseConnection
... ... .... .... ... .... ... .... ... .... .... ... .... ... .... .... ... .... ... .... ... .... .... ... .... ... .... ... .... .... ... .... ... .... .... ... .... ... .... ... .... .... ... . 332ExportSettings
... ... .... .... ... .... ... .... ... .... .... ... .... ... .... .... ... .... ... .... ... .... .... ... .... ... .... ... .... .... ... .... ... .... .... ... .... ... .... ... .... .... ... . 333TextImportExportSettings
... ... .... .... ... .... ... .... ... .... .... ... .... ... .... .... ... .... ... .... ... .... .... ... .... ... .... ... .... .... ... .... ... .... .... ... .... ... .... ... .... .... ... . 334ElementListItem
... ... .... .... ... .... ... .... ... .... .... ... .... ... .... .... ... .... ... .... ... .... .... ... .... ... .... ... .... .... ... .... ... .... .... ... .... ... .... ... .... .... ... . 335ElementList
... ... .... .... ... .... ... .... ... .... .... ... .... ... .... .... ... .... ... .... ... .... .... ... .... ... .... ... .... .... ... .... ... .... .... ... .... ... .... ... .... .... ... . 336Enumerations
VII© 2001 Altova Ges.m.b.H

Part VI Document Editor 339
................................................................................................................................... 3401 Overview
................................................................................................................................... 3422 Symbols and icons
................................................................................................................................... 3453 Document Editor Browser Plug-in
................................................................................................................................... 3464 Document Editor Tutorial
... ... .... .... ... .... ... .... ... .... .... ... .... ... .... .... ... .... ... .... ... .... .... ... .... ... .... ... .... .... ... .... ... .... .... ... .... ... .... ... .... .... ... . 347Opening a document template *.sps
... ... .... .... ... .... ... .... ... .... .... ... .... ... .... .... ... .... ... .... ... .... .... ... .... ... .... ... .... .... ... .... ... .... .... ... .... ... .... ... .... .... ... . 349Adding data in Document Editor
... ... .... .... ... .... ... .... ... .... .... ... .... ... .... .... ... .... ... .... ... .... .... ... .... ... .... ... .... .... ... .... ... .... .... ... .... ... .... ... .... .... ... . 354Table types
................................................................................................................................... 3575 Document Editor Reference
... ... .... .... ... .... ... .... ... .... .... ... .... ... .... .... ... .... ... .... ... .... .... ... .... ... .... ... .... .... ... .... ... .... .... ... .... ... .... ... .... .... ... . 358Menus and Dialogs
.. ... .... .... ... .... ... .... ... .... .... ... .... ... .... .... ... .... ... .... ... .... .... ... .... ... .... ... .... .... ... .... ... .... .... ... .... ... .... ... .... .... ... . 358File
.... ... .... ... .... .... ... .... ... .... .... ... .... ... .... ... .... .... ... .... ... .... ... .... .... ... .... ... .... .... ... .... ... .... ... .... .... ... . 358New
.... ... .... ... .... .... ... .... ... .... .... ... .... ... .... ... .... .... ... .... ... .... ... .... .... ... .... ... .... .... ... .... ... .... ... .... .... ... . 359Open
.... ... .... ... .... .... ... .... ... .... .... ... .... ... .... ... .... .... ... .... ... .... ... .... .... ... .... ... .... .... ... .... ... .... ... .... .... ... . 359Save
.... ... .... ... .... .... ... .... ... .... .... ... .... ... .... ... .... .... ... .... ... .... ... .... .... ... .... ... .... .... ... .... ... .... ... .... .... ... . 359Save as...
.... ... .... ... .... .... ... .... ... .... .... ... .... ... .... ... .... .... ... .... ... .... ... .... .... ... .... ... .... .... ... .... ... .... ... .... .... ... . 359Exit
.. ... .... .... ... .... ... .... ... .... .... ... .... ... .... .... ... .... ... .... ... .... .... ... .... ... .... ... .... .... ... .... ... .... .... ... .... ... .... ... .... .... ... . 359Document Editor
.... ... .... ... .... .... ... .... ... .... .... ... .... ... .... ... .... .... ... .... ... .... ... .... .... ... .... ... .... .... ... .... ... .... ... .... .... ... . 360Assign configuration file...
.... ... .... ... .... .... ... .... ... .... .... ... .... ... .... ... .... .... ... .... ... .... ... .... .... ... .... ... .... .... ... .... ... .... ... .... .... ... . 360Hide markup
.... ... .... ... .... .... ... .... ... .... .... ... .... ... .... ... .... .... ... .... ... .... ... .... .... ... .... ... .... .... ... .... ... .... ... .... .... ... . 360Show small markup
.... ... .... ... .... .... ... .... ... .... .... ... .... ... .... ... .... .... ... .... ... .... ... .... .... ... .... ... .... .... ... .... ... .... ... .... .... ... . 360Show large markup
.... ... .... ... .... .... ... .... ... .... .... ... .... ... .... ... .... .... ... .... ... .... ... .... .... ... .... ... .... .... ... .... ... .... ... .... .... ... . 360Show mixed markup
.... ... .... ... .... .... ... .... ... .... .... ... .... ... .... ... .... .... ... .... ... .... ... .... .... ... .... ... .... .... ... .... ... .... ... .... .... ... . 360Append row
.... ... .... ... .... .... ... .... ... .... .... ... .... ... .... ... .... .... ... .... ... .... ... .... .... ... .... ... .... .... ... .... ... .... ... .... .... ... . 361Insert row
.... ... .... ... .... .... ... .... ... .... .... ... .... ... .... ... .... .... ... .... ... .... ... .... .... ... .... ... .... .... ... .... ... .... ... .... .... ... . 361Duplicate row
.... ... .... ... .... .... ... .... ... .... .... ... .... ... .... ... .... .... ... .... ... .... ... .... .... ... .... ... .... .... ... .... ... .... ... .... .... ... . 361Move row up
.... ... .... ... .... .... ... .... ... .... .... ... .... ... .... ... .... .... ... .... ... .... ... .... .... ... .... ... .... .... ... .... ... .... ... .... .... ... . 361Move row down
.... ... .... ... .... .... ... .... ... .... .... ... .... ... .... ... .... .... ... .... ... .... ... .... .... ... .... ... .... .... ... .... ... .... ... .... .... ... . 361Delete row
.. ... .... .... ... .... ... .... ... .... .... ... .... ... .... .... ... .... ... .... ... .... .... ... .... ... .... ... .... .... ... .... ... .... .... ... .... ... .... ... .... .... ... . 361Help
.... ... .... ... .... .... ... .... ... .... .... ... .... ... .... ... .... .... ... .... ... .... ... .... .... ... .... ... .... .... ... .... ... .... ... .... .... ... . 362About Document Editor
... ... .... .... ... .... ... .... ... .... .... ... .... ... .... .... ... .... ... .... ... .... .... ... .... ... .... ... .... .... ... .... ... .... .... ... .... ... .... ... .... .... ... . 363Context menus
Part VII Technical Background Information 364
................................................................................................................................... 3651 XML Parser
................................................................................................................................... 3662 Schema Dialects
................................................................................................................................... 3673 XSLT Processor
................................................................................................................................... 3684 OS & Memory Requirements
................................................................................................................................... 3695 Internet Usage
................................................................................................................................... 3706 Unicode Support
... ... .... .... ... .... ... .... ... .... .... ... .... ... .... .... ... .... ... .... ... .... .... ... .... ... .... ... .... .... ... .... ... .... .... ... .... ... .... ... .... .... ... . 371Windows NT 4.0 & Windows 2000
... ... .... .... ... .... ... .... ... .... .... ... .... ... .... .... ... .... ... .... ... .... .... ... .... ... .... ... .... .... ... .... ... .... .... ... .... ... .... ... .... .... ... . 372Windows 95/98/ME
... ... .... .... ... .... ... .... ... .... .... ... .... ... .... .... ... .... ... .... ... .... .... ... .... ... .... ... .... .... ... .... ... .... .... ... .... ... .... ... .... .... ... . 374Right-to-Left Writing Systems
................................................................................................................................... 3757 RichEdit Component
................................................................................................................................... 3768 License Metering
Part VII Appendix 377
................................................................................................................................... 3781 Electronic Software Distribution
VII
XML Spy Suite 4.2
© 2001 Altova Ges.m.b.H

................................................................................................................................... 3792 Copyright
................................................................................................................................... 3803 Software Product License
Index 385
IX© 2001 Altova Ges.m.b.H


Page 1© 2001 Altova Ges.m.b.H
XML Spy Suite 4.2 Introduction
1 Introduction
Introduction to XML
The eXtensible Markup Language (XML) is a subset of SGML (the Structured GeneralizedMarkup Language) that has been defined by the World Wide Web Consortium (W3C) in 1998(see http://www.w3.org/TR/REC-xml). Its goal is to enable generic SGML to be served,received, and processed on the Web in the way that is now possible with HTML. XML has beendesigned for ease of implementation and for interoperability with both SGML and HTML.
The XML Spy online help and printable documentation contain a Tutorial section that give you ageneral overview of XML and XML Spy.
To learn more about XML and its associated protocols, please also visit our list ofrecommended links to various XML-related information resources on the XML Spy web server.
We will take a short tour to discuss the various aspects of XML and the other related W3Cstandards, before explaining the various features of XML Spy that will help you make the mostof XML.
If you are already familiar with XML, you may wish to skip to the Using XML Spy section.

Page 2
XML Spy Suite 4.2 Introduction
Welcome to XML Spy
XML Spy is the first true Integrated Development Environment (IDE) for the eXtensible MarkupLanguage (XML) and contains many useful functions that can simplify typical XML editing tasksfor you. This help system is provided to help you get started with using our software andprovides detailed information on all aspects of the product.
It includes a Tutorial section that shows you how to use XML Spy for the major aspects of XML:
· XML editing & validation· Schema/DTD editing & validation· XSL editing & transformation
The Reference section explains each window and menu command in detail and can easily beaccessed through the Contents, Index and context-sensitive help (F1) from any menu or dialogbox.
You may also want to periodically check our XML Spy web-server for news, updates, and newexamples:
If you encounter an occasional error or, perhaps, some incomplete information in this onlinehelp or the printed documentation and you need help with XML Spy, please don't hesitate to visitour Support Center on the Internet, where you'll find additional links to the FAQ pages as well asour online Support Form. Also, please feel free to send us any feedback regarding the newdocumentation.
We will also be providing periodic free updates to the online help system and the printabledocumentation on the Download page on our web server.

Page 3© 2001 Altova Ges.m.b.H
XML Spy Suite 4.2 Introduction
What is XML
If you are new to XML, perhaps the most confusing aspect is it's similarity to HTML, whichmakes XML seem familiar at first, but also tends to obscure the view for the finer details of whatmakes XML tick.
We will, therefore, start by looking at what XML really is and why you need XML.
The XML SpecificationThe W3C specification defines XML as a subset of SGML, so to properly understand XML, it isuseful to take a closer look at SGML first.
SGML stands for Standard Generalized Markup Language, and was developed for large scaleapplications, aircraft maintenance or power plant documentation, and intended to be maintainedover the long term .
The reason why XML seems to be so similar to HTML lies in the fact that HTML is defined as asubset of SGML. XML is actually a lot more similar to SGML than to HTML, because HTML isonly one specific subset of SGML used to describe web pages.
As XML was created to simplify SGML, it is no wonder that the W3C has now decided toredefine HTML 4.0 as an XML application, thereby creating XHTML 1.0. But this shall be of noconcern for us at the moment, because we are still faced with the fundamental question "Whatis XML?".
To answer this, let us define what XML is not:
· It is not a programming language.
· It is not the next generation of HTML.· It is not a database.· It is not specific to any horizontal or vertical market.· It is not the solution to all your problems, but it can be a very powerful tool in building such
a solution.
XML is a clearly defined way to structure, describe, and interchange data.
Data in this context really means every conceivable kind of data! You can use XML for suchdiverse things as describing mathematical formulas, chemical compounds, astronomicalinformation, financial derivatives, architectural blueprints, annotating Shakespearean plays,collecting Buddhist wisdoms, or voice-processing in telephone systems!
To get a feeling for XML, let us take a look at a simple XML document:
<product><name>Apple</name><price>0.10</price>
</product>
The < and > angle brackets are used to distinguish between the so-called "markup" (betweenthe brackets) and the actual data of the document (outside of the brackets).
The XML document consist of individual elements that are marked by start- and end-tags(hence the term markup). Tags contain the name of the element, so that they can bedistinguished from one another more easily.

Page 4
XML Spy Suite 4.2 Introduction
The start-tag is bracketed by < > and the end-tag by </ > - both the start- and end-tag mustalways occur in pairs. The example XML document contains one element called "product",which consists of two elements: "name" (which contains the data "Apple") and "price" (whichcontains the data "0.10"). Unlike HTML, XML does not enforce a predefined set of elementnames (such as "body", "h1", and "p") - you can make up your own to suit the particular needs ofyour data.
This simple XML document also shows a very important aspect of XML - it is "self-describing".In addition to structuring the actual data, the XML element names (sometimes also called tagnames) serve to describe the information provided in the document (in our case the price of anApple). If you compare this to the way such data is traditionally exchanged between differentapplications (e.g. comma-separated value or CSV files), you can easily see the benefit:
"Apple";0.10
This is even more obvious, if you look at a slightly more complicated XML example document(as shown as in the Text View of XML Spy):
<invoice due="2000-09-22"><product>
<name>Apple</name><price>0.10</price>
</product><product>
<name>Orange</name><price>0.08</price>
</product><product>
<name>Strawberries</name><price>0.20</price>
</product><product>
<name>Banana</name><price>0.14</price>
</product><total currency="US$">0.52</total>
</invoice>
You can immediately see another crucial property of XML here: the elements can be nested inany way that is useful to show the semantic structure of the data contained, and elements canbe repeated, if more than one item of data of the same kind needs to be listed. Our examplenow describes an invoice with four products and a total.
Also note that some elements contain additional information within the start-tag: attributesalways have a name and a value and are written as name="value" (E.g. currency="US$").Attributes are used to further specify additional information that augments the data of theelement (in our example, the currency of the total).
A disadvantage of XML is that the bigger an XML document is, the more markup it contains.This can make it difficult to find the data contained in the document. This slight disadvantage istypically more than compensated by the flexibility of XML, and by the fact that XML is inherentlysuitable for reading by both humans and machines.
XML Spy offers a concise presentation of a XML document - called the Enhanced Grid View.This view allows you to see and directly manipulate elements in your XML document, such asthe actual data it contains:
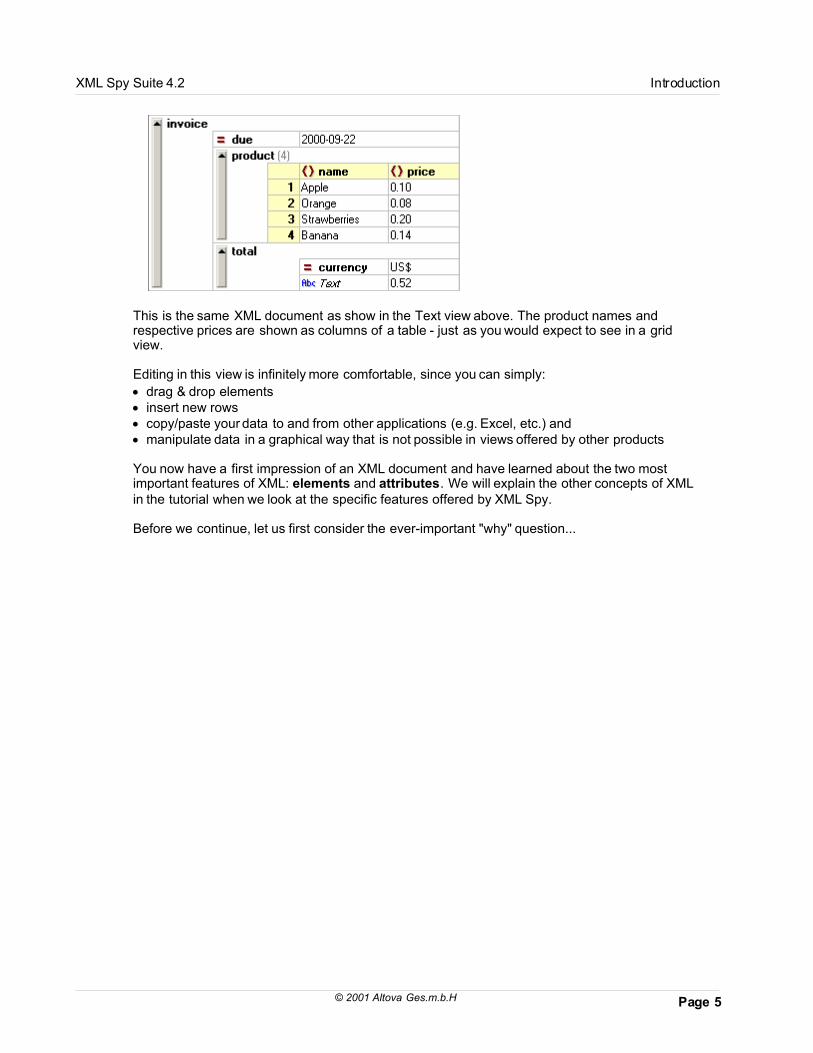
Page 5© 2001 Altova Ges.m.b.H
XML Spy Suite 4.2 Introduction
This is the same XML document as show in the Text view above. The product names andrespective prices are shown as columns of a table - just as you would expect to see in a gridview.
Editing in this view is infinitely more comfortable, since you can simply:
· drag & drop elements· insert new rows· copy/paste your data to and from other applications (e.g. Excel, etc.) and· manipulate data in a graphical way that is not possible in views offered by other products
You now have a first impression of an XML document and have learned about the two mostimportant features of XML: elements and attributes. We will explain the other concepts of XMLin the tutorial when we look at the specific features offered by XML Spy.
Before we continue, let us first consider the ever-important "why" question...

Page 6
XML Spy Suite 4.2 Introduction
Why XML
The reasons for using XML typically are as diverse as the different forms of data that existtoday. We will, therefore, not consider specific benefits for certain vertical markets - such asengineering, e-commerce, mathematics, or others - but will instead try to focus on severalindividual properties of XML that are of universal advantage to all applications.
XML is easily readable by both humans and machinesUntil now, most formats for storing data were either suitable for interpretation by softwareprograms (e.g. dBase, GIF, etc.), or human readable (text or CSV files) - but not both.
XML defines a set of rules that make interpretation by computer very simple. It thus satisfiesboth needs, because XML documents remain text-based and can still be easily manipulatedby a human being.
XML is object-orientedWhile the relational data model is very successful for processing large amounts of table-likedata, manipulation of other kinds of data - such as hypertext (i.e. text plus hyperlinks),multimedia, graphics, mathematical or chemical formulas, hierarchical information - are notso straightforward.
In contrast, XML is object-oriented in the sense of being suitable for describing objects ofthe real world or any abstract problem domain by modeling their properties as they are,instead of enforcing a normalized decomposition into various tables linked by relations. Thismakes XML documents more intuitively understandable and thereby reduces both the timerequired to design and implement computing systems based on XML.
XML is being widely adopted by the computer industryOne key factor in the success of the Internet was the wide adoption of the TCP/IP protocolsuite by many corporations. This resulted in huge sales volumes and consequently everdecreasing prices for all network components used.
XML is widely accepted and implemented by many vendors, this fact will result in highervolumes and lower prices for software components. This is why XML's predecessor, SGML,was never successful on a broad scale. SGML products were typically priced in the ten-thousand dollar range, whereas XML products are today priced in the hundreds.
XML is globalTo better understand the attention that XML has received, it is useful to recall anotherwidely-adopted data standard that everybody takes for granted today: ASCII, the AmericanStandard Code for Information Interchange.
While ASCII was restricted to a certain alphabet and writing system, it was still crucial inallowing different computer types and operating systems to freely exchange data. With theadoption of Unicode 1.0 and its continuing evolution. The idea of ASCII was expanded toencompass all languages and writing systems of the world.
Today, it is taken for granted that computers are capable of reading and processing textdocuments based on ASCII or Unicode. XML takes this approach one step further, bybuilding on Unicode and defining a universal way to describe structured data for all differentpurposes.
All XML documents are per definition Unicode-based, but may be stored on disk ortransmitted over the network in various different "encodings", such as ISO-8859-1 or UTF-8. This is, why some people today call XML the "ASCII of the future".

Page 7© 2001 Altova Ges.m.b.H
XML Spy Suite 4.2 Introduction
Now that we have investigated some of the reasons why XML makes sense, we will turn to theXML "Acronym Puzzle".

Page 8
XML Spy Suite 4.2 Introduction
The XML Standards Puzzle
In addition to XML, you will also encounter one or more of the following standards or acronymsclosely associated with XML:
DTDThe "Document Type Definition" is a part of the original XML 1.0 specification that allows adeveloper, or standards body, to specify what elements and attributes may be used in aparticular type of XML document and what their structure and nesting may be. This is alsocalled the content model or schema of an XML document.
If an XML document conforms with the content model defined by a DTD, it is said to be validwith respect to that DTD.
XSLTThe "eXtensible Stylesheet Language Transformation" is a programming language thatallows XML documents to be transformed from one schema to another or into entirelydifferent forms, such as HTML pages, WML cards, or PDF files.
XPathThe "XML Path Language" is a language for addressing and querying the content of XMLdocuments.
XLinkThe "XML Linking Language" describes hyperlinking in XML documents and extends thehyperlinking concepts of HTML.
XPointerThe "XML Pointer Language" is a companion standard to Xlink and describes mechanismsfor addressing particular parts of a document.
XML SchemaThe "XML Schema" is an ongoing effort by the W3C to supplant DTDs with a more flexibleand powerful system to describe the structure of conforming XML documents, includingprovisions for defining datatypes.
XHTMLThe "Extensible HyperText Markup Language" is the reformulation of HTML 4.0 based uponXML and will soon supplant HTML as the de-facto standard of the Internet.
WMLThe "Wireless Markup Language" is used for WAP phone systems to enable a mobileInternet environment and is entirely based on XML - it is described by one particular DTD,which is part of the WML specification.
SVGScalable Vector Graphics. SVG is an XML application used to describe 2D vector graphics,text and raster images. This enables vector graphics to be defined solely in XML.
SMILThe "Synchronized Media Integration Language" is a XML document type designed todescribe multimedia presentations.
DOMThe "Document Object Model" describes how some XML parsers return the informationcontained in an XML document. The elements of the XML document are described as

Page 9© 2001 Altova Ges.m.b.H
XML Spy Suite 4.2 Introduction
nodes of a tree that can be traversed by a programmer.
SAXThe "Simple API for XML" provides another programming model used by some parsers,which is based on events instead of a traversable tree.
This list does not attempt to be a complete list of all XML-based standards, as there are newproposals emerging on an almost daily basis and many standards are very specific to a certainmarket or problem domain. Please feel free to visit our XML Spy Home Page to learn aboutrecommended links, news, and other XML related information.

Page 10
XML Spy Suite 4.2 Introduction
XML Spy user interface
This screen shot shows the XML Spy application window.
The Enhanced Grid View is enabled, and the Altova.xml file is the active document.
The Database/Table view has been activated for the Division element. This view is availablewherever the Enhanced Grid view can be activated, and can be used when editing any type ofXML file - XML, XSD, XSL etc.
Clicking the "Display as Table" icon, activates the Database/Table view.

Page 11© 2001 Altova Ges.m.b.H
XML Spy Suite 4.2 Introduction
XML Editing
This screen shot shows the main window containing a XML document, and the same documentin Browser view.
Click on the Browser view icon, to open the Browser view of an XML Document.
For the Browser view to display/render a XML document correctly:· The XML Document must contain a reference to a XSL stylesheet, or· A XSL Stylesheet has to be assigned to the to the XML folder or project.

Page 12
XML Spy Suite 4.2 Introduction
Schema Editing
This screen shot shows the main window containing an XML Schema document (XSDL - XMLSchema Definition Language).
Click on the Schema Design View icon to open Schema Overview. The main window thendisplays all Global "definitions" (elements, complex types etc.) in list form.
To see the content model in graphical form:
1. Click on the icon next to the definition you want to display.The content model for that component appears in a tree view.
To return to the Schema overview:
· Click the "Show Globals" icon to return to the Schema Overview.· Select the menu option Schema design | Display All Globals to return to the Display
All Globals view.

Page 13© 2001 Altova Ges.m.b.H
XML Spy Suite 4.2 Introduction

Page 14
XML Spy Suite 4.2 Introduction
XSL Editing
This screen shot shows the main window containing a XSL (eXtensible Stylesheet Language)document, in Text view.
Clicking on the Enhanced Grid View icon, displays the same XSL document in grid form.

Page 15© 2001 Altova Ges.m.b.H
XML Spy Suite 4.2 Introduction

Page 16
XML Spy Suite 4.2 Introduction
Project Management
XML Spy uses the familiar tree view display to manage your XML projects.
Project folders allow you to:· Group XML files by their extension· Assign XSL transformation parameters to specific folders, enabling you to view XML
documents with "default" stylesheets
· Validate XML files by assigning DTDs or Schemas to specific folders.

Page 17© 2001 Altova Ges.m.b.H
XML Spy Suite 4.2 XML SPY Tutorial
2 XML SPY Tutorial
This tutorial gives a short overview of XML, and takes you through several tasks which providean overview of how to use XML Spy to its fullest.
You will learn how to:· Create a simple schema from scratch· Generalize the schema using simple and complex types· Create schema documentation
· Create an XML document based on the schema file· Copy data XML data to a third party product (Excel) and reinsert it in XML Spy· Validate the XML document against its schema· Update Schema settings while editing the XML document· Transform the XML document into HTML using XSLT, and see the result in the
Browser view· Import and export database data to and from XML Spy· Create a schema from a MS Access database· Create an XML Spy project to organize all your XML documents
XML Spy installation and configurationThis tutorial assumes that you have successfully installed XML Spy on your computer andreceived a free evaluation key-code, or are a registered user of XML Spy.
The evaluation version of XML Spy is fully functional but time-limited to 30 days. You canrequest a regular license from our secure web server or through any one of our resellers.
Tutorial example filesThe tutorial files are available in the ...\XML Spy Suite\Examples\Tutorial folder.
Tutorial example files:AddressFirst.xsdAddressLast.xsdCompanyFirst.xmlCompanyLast.xmlCompany.xslCompany.htmlCompany.mdbDB2schema.mdbDB2schema.xsdPerson-import.xml
The Examples folder contains various XML files for you to experiment with, while the Tutorialfolder contains all the files used in this tutorial.
The Template folder contains all the XML template files that are used whenever you select themenu option File | New. These files supply the necessary data (namespaces and XMLdeclarations) for you to start working with the respective XML document immediately.

Page 18
XML Spy Suite 4.2 XML SPY Tutorial
XML Spy Overview
XML Spy provides several windows that show various aspects of your XML document:
· The left area consists of the Project and Info windows.
· The central area, called Main window, is where you edit and view all types of XMLdocuments.You can choose from different views: Enhanced Grid view, Schema view, Text view,Document Editor view or Browser view. The Enhanced Grid view incorporates a specialview, called the Database/Table view, which collapses recurring XML data into tableform.
· The right area contains the three Entry helper windows which allow you to insert orappend: elements, attributes, and entities.

Page 19© 2001 Altova Ges.m.b.H
XML Spy Suite 4.2 XML SPY Tutorial
Creating a schema from scratch
A Schema describes what one or more XML documents can look like,and defines:
· The elements the document contains, and the order in which they appear· The element content, and element attributes if any
The purpose of a schema is to allow machine validation of document structure. Instead of usingthe syntax of XML 1.0 DTD declarations, schema definitions use XML element syntax. A correctXML schema definition is, therefore, a well-formed XML document.
Goal of this section:The goal of this section is to create a simple schema describing a company and its employees.The company is to consist of an address and an unlimited number of persons.
This will be achieved by:· Adding elements to the schema· Defining element sequences· Adding sub-elements to an element (child elements)· Creating elements using drag and drop· Configuring the schema view· Making an element optional· Defining an element facet
Functions (and their icons) in this section:
File | New, creates a new type of XML file.
Schema design | Display diagram, the component icon displays the contentmodel of the active global component.
Schema design | Display all globals, takes you back to the schema overview.
TAB Takes you to the next field and automatically opens a drop-down list if one exists.
CTRL + Drag&Drop, enables you to copy existing elements.
Append icon, allows you to append an element to the schema or add a new line inthe "View config." dialog (Schema design | View config.)

Page 20
XML Spy Suite 4.2 XML SPY Tutorial
Creating a new Schema file
To create a new schema file:
1. Start XML Spy by double clicking on the XML Spy icon.
You are presented with an empty environment. There are no XML documents in themain window.
2. Select the menu option File | New and select the .xsd W3C Schema entry from thedialog and confirm with OK.

Page 21© 2001 Altova Ges.m.b.H
XML Spy Suite 4.2 XML SPY Tutorial
An empty schema file appears in the main window. You are prompted to enter the nameof the root element.
3. Click in the highlighted field and enter "Company", confirm with Enter.Company is now the "root" element of this schema and is automatically a "globalelement" as well.
This view is the Schema overview and displays the global components in the topwindow and the attributes of the currently selected component, in the lower one.
The top entry helper window, the Component Navigator, displays Company in the"Elm" tab. The entries in these tabs can be used to navigate your schema by doubleclicking on them.
4. Click the menu option File | Save as , and name your schema (AddressFirst forexample).

Page 22
XML Spy Suite 4.2 XML SPY Tutorial
Defining your own namespace:1. Select the menu option Schema Design | Schema settings.2. Click the Target namespace radio button, and enter http://my-
company.com/namespace.
3. Confirm with the OK button.

Page 23© 2001 Altova Ges.m.b.H
XML Spy Suite 4.2 XML SPY Tutorial
Adding elements to a schema
To add elements to a schema:
1. Click the component icon next to the Company element, in the main window, todisplay the content model (or double click on the Company entry in the ComponentNavigator).The text below the company element is annotation text. Double click the text if you wantto edit it. (shortened to "Root element" here.)
2. Right click the Company element to open the context menu, and select Add Child |Sequence.
This inserts the Sequence compositor, and defines that the following elements mustappear in the same sequence (in the XML document).
3. Right click the Sequence compositor and select Add Child | Element.4. Enter "Address" as the name of the element, and confirm with the Enter key.

Page 24
XML Spy Suite 4.2 XML SPY Tutorial
5. Right click the Sequence compositor again, select Add Child | Element, and enter"Person" as the name of the element.
We have now defined a schema which allows for one address and one person percompany. As this is too restrictive, we want to make sure that we can include as manypersons per company as necessary.
6. Right click the Person element, and select Unbounded from the context menu.The Person element changes at this point, showing the range in which it can occur, inthis case 1 to infinity.
Please note:You can also edit the minOcc and maxOcc fields in the Details entry helper directly.
We will now add the sub-elements which define the address structure.
To add sub-elements to an element:1. Right click the Address element to open the context menu, and select Add Child |
Sequence.2. Right click the Sequence compositor, and select Add Child | Element. Enter "Name"
as the element name.

Page 25© 2001 Altova Ges.m.b.H
XML Spy Suite 4.2 XML SPY Tutorial
Defining element parameters:At this point we want to define that the Name element is to occur only once, and contain onlytextual data.
1. Click the Name element, if not currently selected.2. Click on the type combo box of the middle entry helper, and select the entry xs:string
from the drop down list.
This entry helper is called "Details" in the Schema view, and provides information onthe currently selected element. All data can be edited directly in the Details window!
An icon appears in the top left of the element , indicating that this elementcontains text.
Both "minOcc" and "maxOcc" fields contain 1, showing that there is only oneoccurrence of this element (this is the default setting when creating a new element).

Page 26
XML Spy Suite 4.2 XML SPY Tutorial
Adding elements with drag and drop
To add elements using drag and drop:There is a quicker method of adding new elements to a schema, which avoids multiple menucommands:
1. Click the Name element, hold down the CTRL key, and drag "slightly" with the mouse.A marquee with a small "plus" icon appears, showing that you are about to copy theelement.
2. Release the mouse button to create the new element. If the new element appearssomewhere else, just drag it near to the Name element and drop it there.This method creates an element of the same type, with the same settings as the onecopied.
3. Type "Street" to change the element name.4. Use the same method to create a third element, "City".
The content model should now look like this:

Page 27© 2001 Altova Ges.m.b.H
XML Spy Suite 4.2 XML SPY Tutorial
Configuring the schema view
Configuring the Schema view enables you to see specific settings in the content model, andalso edit them directly.
To configure the schema view:1. Select the menu option Schema Design | View config.
A dialog opens at the bottom right of XML Spy, giving you room to see your selectionsappear in the content model immediately.
2. Click the Append icon to add a line, and use the combo box to select "type" fromthe drop-down list (or double click in the line and enter "type").
The delete button deletes a line from the dialog.The dialog remains open, and each element symbol has been enlarged by a "type" field.The type field displays the element "type".
3. Click OK to confirm the changes.
Please note:The settings you define here, apply to the schema documentation output as well theprinter output.

Page 28
XML Spy Suite 4.2 XML SPY Tutorial
Completing the basic schema
At this point we want to add those sub elements to the Person element, which make up thepersonal data. All these elements will be simple types (with simple content models).
Person sub-elements: First, Last, Title, PhoneExt, and Email.
Requirements:Title element: should be optionalPhoneExt: should be an integer and limited to 99 digits
1. Right click the Person element to open the context menu, and select Add Child |Sequence. This inserts the Sequence compositor.
2. Right click the Sequence compositor, and select Add Child | Element.3. Enter "First" as the name of the element, and hit the "Tab" key. This automatically
places you in the type field.
4. Select (or enter) the xs:string entry from the drop down list.5. Use the drag and drop method to create four more elements, and name them: Last,
Title, PhoneExt, and Email respectively.
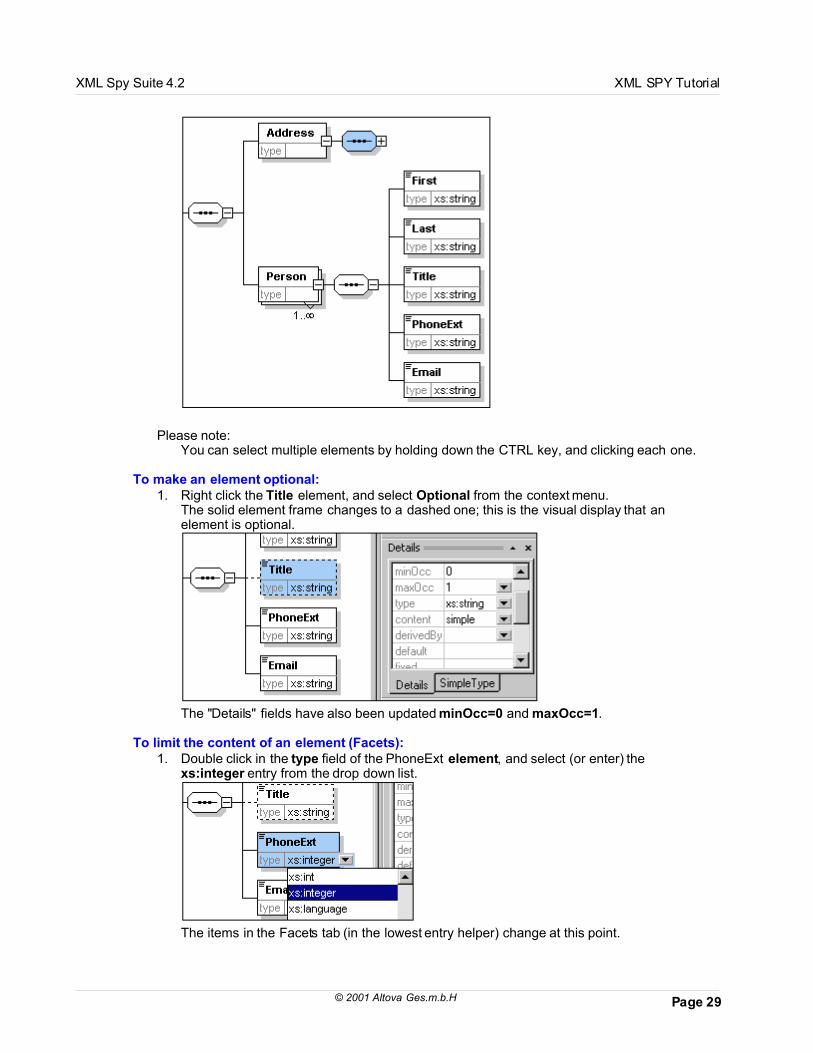
Page 29© 2001 Altova Ges.m.b.H
XML Spy Suite 4.2 XML SPY Tutorial
Please note:You can select multiple elements by holding down the CTRL key, and clicking each one.
To make an element optional:1. Right click the Title element, and select Optional from the context menu.
The solid element frame changes to a dashed one; this is the visual display that anelement is optional.
The "Details" fields have also been updated minOcc=0 and maxOcc=1.
To limit the content of an element (Facets):1. Double click in the type field of the PhoneExt element, and select (or enter) the
xs:integer entry from the drop down list.
The items in the Facets tab (in the lowest entry helper) change at this point.

Page 30
XML Spy Suite 4.2 XML SPY Tutorial
2. Double click in the "maxIncl" field of the Facets tab (in the lowest entry helper) andenter 99, confirm with Enter.
This defines that all phone extensions up to, and including 99, are valid.3. Select the menu option File | Save to save the changes to the schema.
Please note:· Selecting a predefined simple type "text" (i.e. xs:string, xs:date etc.) for an element,
automatically changes the content model to: content = simple, in the Details entryhelper.
· Adding a compositor to an element (selection, choice or all), automatically changesthe content model to: content = complex, in the Details entry helper.
· This schema is available as 'AddressFirst' in the ..\Tutorial folder.

Page 31© 2001 Altova Ges.m.b.H
XML Spy Suite 4.2 XML SPY Tutorial
Making schema components reusable
Goal of this section:To create generic schema components which can be reused by other elements.
This will be achieved by:· Creating a global AddressType component, which will be the basis for specific country
addresses (a complex type)· Creating two specific address templates for UK-, and US Adresses by extending the
global address element (extend the complex type)· Creating a global US-State element, by restriction (simpleType)· Creating a global person element by reference· Defining person attributes that supply information about the persons position in the
company· Limiting the attribute contents to a predefined set of attribute values (enumeration)
Functions (and their icons) in this section:
Schema design | Display all globals, takes you back to the schema overview.
Append icon, allows you to append an element, attribute or enumeration to aschema.
Schema design | Display diagram, the component icon displays the contentmodel of the active global component in the schema overview.

Page 32
XML Spy Suite 4.2 XML SPY Tutorial
Globals, extending simple and complex types
Having defined an element, you may then realize that you want to reuse it somewhere else inyour schema. In XML Spy this is achieved by creating a global component.
To create a global component:1. Right click the Address element, and select Make Global | Complex type.
The Address elements appear in a yellow box.
2. Click on the "Display all Globals" icon.The schema overview now displays two global components: the Company element andthe complexType "AddressType".
Click on the Com(plex) tab of the Component Navigator to see that AddressType isalso visible there.
3. Click on the AddressType component icon , to see the content model.
4. Click the "Display all Globals" icon to return to the schema overview.

Page 33© 2001 Altova Ges.m.b.H
XML Spy Suite 4.2 XML SPY Tutorial
Extending a "complex type" definitionWe now want to use the global AddressType component, to create two kinds of country specificaddresses. For this purpose we will define a new complex type based on the AddressTypecomponent.
To extend a "complex type" definition:1. Switch to the schema overview, if not already visible (Display all globals).2. Click the Append icon, at the top left of the component window.3. Select ComplexType from the context menu.
A new line appears in the component list, and the cursor is set for you to enter thecomponent name.
4. Enter "US-Address" and confirm with Enter. (If you forget to enter the hyphen character"-", the element name will appear in red, signalling an illegal character.)
5. Click the US-Address component icon to see the content model.6. Click the "base" combo box in the Details entry helper, and select the "AddressType"
entry.

Page 34
XML Spy Suite 4.2 XML SPY Tutorial
The content model view changes immediately and displays the previously definedgeneric address.
7. Right click the US-Address element, and select Add Child | Sequence.A new sequence compositor is displayed outside of the AddressType box. This is avisual indication that this is an extension to the element.

Page 35© 2001 Altova Ges.m.b.H
XML Spy Suite 4.2 XML SPY Tutorial
8. Right click the new sequence compositor, and select Add Child | Element.9. Name the element "Zip", and hit the "Tab" button.10. Select (or enter) xs:positiveInteger from the "type" field combo box, and confirm with
Enter.
Creating reusable "simple type" elementsSimple type elemets can also be made generic. In this case we want to make the State elementreusable, so that an abbreviated version could also be included in address labels at a later time(GA for Georgia, for example).
To create reusable "simple type" elements:
1. Switch to the Schema overview (Display all Globals).2. Click the append icon, select SimpleType, and enter "US-State" as the element name
(Enter to confirm).3. Select xs:string in the "restr." value field of the Details entry helper.
This completes the definition. This element can now be used in the US-Addressdefinition.

Page 36
XML Spy Suite 4.2 XML SPY Tutorial
4. Click the US-Address component icon , then right click the lower sequencecompositor and select Add Child | Element.
5. Enter "State" for the element name, and hit the "Tab" key.6. Select (or enter) "US-State" from the "type" combo box (click Enter to confirm).
Please note:Global simple types can only be created from the schema overview.
Creating the second Address templateUsing the method described above, define the global complex type "UK-Address".
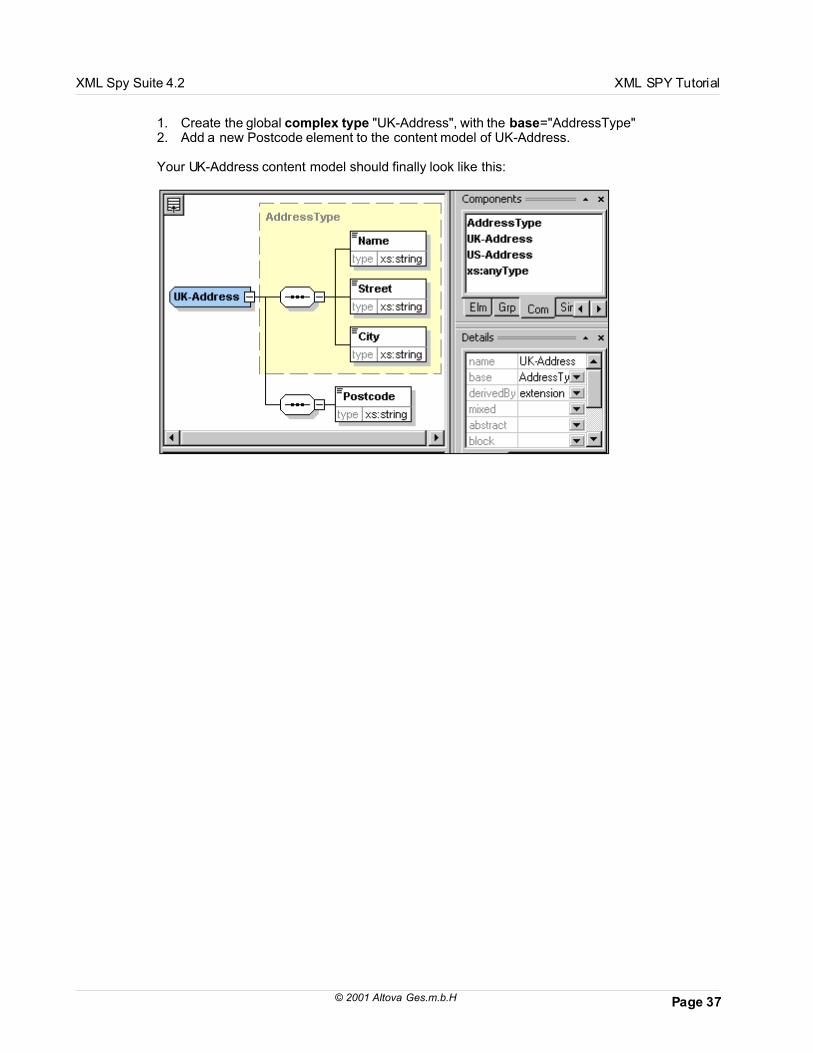
Page 37© 2001 Altova Ges.m.b.H
XML Spy Suite 4.2 XML SPY Tutorial
1. Create the global complex type "UK-Address", with the base="AddressType"2. Add a new Postcode element to the content model of UK-Address.
Your UK-Address content model should finally look like this:

Page 38
XML Spy Suite 4.2 XML SPY Tutorial
References, attributes and enumerations
To finish off the schema definition we will make the Person element global, define specificelement attributes and limit the attribute selection.
To create a reference:
1. Switch to the Schema overview (Display all Globals).
2. Click on the component icon of the Company element.3. Right click the Person element, and select Make Global | Element.
A small "link" icon appears in the Person element, showing that this element nowreferences the globally declared "Person" element. The "isRef" field in the Details entryhelper is set active.
4. Click the "Display all Globals" icon to return to the schema overview.The Person element is now also visible in the component list, as well as in the "Elm" tabof the Component navigator. Click the Elm tab to see the global elements.

Page 39© 2001 Altova Ges.m.b.H
XML Spy Suite 4.2 XML SPY Tutorial
Please note:Global declarations do not describe where an element is to be used in an XMLdocument, they only describe what it contains. Global definitions have to be referencedfrom within a complex type, or another element, to determine their position in the XMLdocument.
To define Element attributes:1. Click the Person element to make it active.2. Click the Append icon, in the top left of the attribute tab (the lower window of the
schema overview), and select the "Attribute" entry.
3. Enter "Manager" as the attribute name in Name field.4. Use the Type combo box to select "xs:boolean".5. Use the Use combo box to select "required".
6. Use the same method to:Add a "Programmer" attribute in the Name field (type="xs:boolean), and set its Use to"optional".

Page 40
XML Spy Suite 4.2 XML SPY Tutorial
To limit the contents of an attribute (Enumerations):1. Click the Append icon in the top left of the attribute window, and select the "attribute"
entry.2. Enter "Degree" as the attribute name, and select "xs:string" as the attribute type.3. Click the Enumerations tab of the Facets entry helper.
4. Click the Append icon of the Enumerations tab and enter "BA", confirm with Enter.5. Use the same method to add two more items to the enumerations list ("MA" and
"Ph.D").
The finished schema should look like this:
6. Select the menu command File | Save, and save the file as AddressLast.xsd.
Please note:This schema is available as 'AddressLast.xsd' in the Tutorial folder.

Page 41© 2001 Altova Ges.m.b.H
XML Spy Suite 4.2 XML SPY Tutorial
Navigation shortcuts in schema documents
This section is designed to show you how you can navigate the Schema view efficiently.
Displaying the content model of any element:· Select the element type you want to see by clicking the specific Component navigator
tab e.g. Com(plex).
Elm=global elements, Grp=element group, Com=Complex type, Sim=Simple type,Att=Attribute, AGrp=Attribute group. The Component navigator entries are independentof the content model currently visible in the main window.
· Double click the element name in the Com tab e.g. UK-Address.
The content model of the UK-Address element is displayed. The specific settings areshown in the Details tab.
Go to "ElementType" definition:E.g. While viewing the Company content model:· Double clicking the AddressType text in the yellow box, takes you to the AddressType
definition.

Page 42
XML Spy Suite 4.2 XML SPY Tutorial
The AddressType definition:
Go to element definition:E.g. While viewing the Company content model:· Press and hold down the CTRL keyboard key, and· Double click on any element definition you want to see (here, the element Last).
The element Last, which is a sub-element of the Person element, is displayed. Thespecific settings are shown in the Details tab.

Page 43© 2001 Altova Ges.m.b.H
XML Spy Suite 4.2 XML SPY Tutorial

Page 44
XML Spy Suite 4.2 XML SPY Tutorial
Generating Schema documentation
Goal of this section:To generate detailed documentation on our current schema and select the specific elements wewant to include in it.
You can generate an HTML or Word document, whereby related schema elements (childelements, complex types etc.) are hyperlinked, enabling you to navigate from element toelement.
To generate Microsoft Word documentation, you have to have Microsoft Word installed on yourcomputer (network).
To create schema documentation (of the AddressLast schema):1. Select the menu option Schema design | Generate documentation.2. Select the Output format, HTML or Word, and confirm with OK.3. Select the folder and enter the name of HTML file you want to output, in the Save as...
dialog, then click the Save button.
If you select HTML, the HTML document appears in the Browser view of XML Spy.Selecting Microsoft Word creates and displays the Word document.

Page 45© 2001 Altova Ges.m.b.H
XML Spy Suite 4.2 XML SPY Tutorial
The diagram above, shows the first page of the schema documentation in HTML form.If components from other schemas have been included, then those schemas are alsodocumented.

Page 46
XML Spy Suite 4.2 XML SPY Tutorial
The diagram above, shows how ComplexTypes are documented.

Page 47© 2001 Altova Ges.m.b.H
XML Spy Suite 4.2 XML SPY Tutorial
The diagram above, shows how elements and simpleTypes are documented.

Page 48
XML Spy Suite 4.2 XML SPY Tutorial
Creating an XML document
Goal of this section:To create a new XML document and use the various XML Spy views and intelligent editingcapabilities, to rapidly enter and validate data.
This will be achieved by:· Creating a new XML document based on the AddressLast schema· Making elementType definitions available to an XML document· Adding elements using intelligent entry helpers in the Text and Enhanced Grid view· Copying XML data to Excel, adding new data there, and pasting it back to XML Spy
(Enhanced Grid-, and Database/Table view)· Sorting table data by Last name in the Database/Table view· Validating the XML document· Updating the schema definition to allow for three digit phone extensions
Functions (and their icons) in this section:
File | New, creates a new type of XML file.
View | Text View, switches to the text view.
View | Enhanced Grid view, switches to the Enhanced Grid view.
Table | Display as Table, displays recurring elements and attributes in table form.Hotkey: F9 switches between the Table and Enhanced Grid view.
expand, displays sub elements, in the Enhanced Grid view.
Checks for well-formedness. Hotkey: F7.
Validate the XML file against the associated DTD or Schema. Hotkey F8.
Opens the associated DTD or Schema file.

Page 49© 2001 Altova Ges.m.b.H
XML Spy Suite 4.2 XML SPY Tutorial
Creating and completing a new XML file
To create a new XML document:1. Select the menu option File | New, and select the .xml XML Document entry from the
dialog, then confirm with OK.
A prompt appears, asking if you want to base the XML document on a DTD or Schema.2. Click the Schema radio button, and confirm with OK.
A further dialog appears, asking you to select the schema file your XML document is tobe based on.
3. Use the Browse or Window buttons to find the schema file, in our case theAddressLast schema, and confirm the selection with OK.
An XML document containing the main elements defined by the schema, opens in themain window. XML documents are automatically opened in the Enhanced Grid View.
Please note:XML Spy tries to find the root element of a schema automatically. The "Select a rootelement" dialog box is opened, if it is unclear which is the root element. You can thenselect the root element manually.

Page 50
XML Spy Suite 4.2 XML SPY Tutorial
4. Click on any element to deselect the data.5. Click on the icon next to Address, to view the Address sub-elements.
Making elementType definitions available in XML documentsThe Address elements we see in the grid view are those that were defined by the globalcomplex type "AddressType". We would, however, like to access the specific AddressTypes wedefined: UK- and US-Address.
1. Right click the Name element, and select Insert | Attribute from the context menu.An attribute field is added to the Address element, and a popup containing xsi:typeautomatically opens.
2. Hit the "Tab" key to move into the next field.3. Select US-Address from the drop-down list, and confirm with Enter.

Page 51© 2001 Altova Ges.m.b.H
XML Spy Suite 4.2 XML SPY Tutorial
Please note:The xsi prefix allows you to use special XML Schema related commands in your XMLdocument instance. Please see the W3C website at http://www.w3.org/TR/2001/REC-xmlschema-0-20010502 for more information.
Entering (and deleting) data1. Double click in the Name value field (or use the arrow keys) and enter "US
dependency", confirm with Enter.
2. Use the same method to enter a Street and City name (e.g. Noble Ave. and Dallas).3. Click the Person element, and hit the "Del" key to delete it (we will add it again in a few
moments in the Text view!).4. Click on any Address element to deselect the elements.
Your XML document should look like this:

Page 52
XML Spy Suite 4.2 XML SPY Tutorial
Editing in Text- and Enhanced Grid view
XML Spy Text view When it comes down to low-level work, the text view of XML Spy is suitable for editing any typeof XML files in textual or source code form, and provides intelligent editing capabilities if youare working with an XML document based on a DTD or XML Schema.
Viewing and entering data in the Text view1. Select the menu item View | Text view, or click on the Text view icon.
You now see the XML document in its raw text form (with syntax coloring).
2. Place the text cursor after the </Address> | end tag, and hit Enter to add a new line.3. Enter the "less than" angle bracket < at this position.
4. A drop-down list appears; select the Person entry.The element name "Person" as well as the attribute "Manager", are inserted.

Page 53© 2001 Altova Ges.m.b.H
XML Spy Suite 4.2 XML SPY Tutorial
5. Enter the letter "t" and hit Enter.
This opens a drop down list where "true" is highlighted. Enter, inserts the value (true) atthe cursor positon.
6. Move the cursor to the end of the line (End key), and hit the space bar.This opens the drop-down list again. There are now fewer entries available in the list;"Manager" is grayed out in the Attribute entry helper.
7. Select "Degree" with the Down arrow key, and enter the equals character ( = ).
8. Enter any character. This opens another list box from which you can select one of thepredefined enumerations (BA, MA or Ph.D).
9. Select "BA" with the Down arrow key (confirm with OK), move the cursor to the end ofthe line (End key), and hit the space bar. Manager and Degree are now grayed out inthe Attribute entry helper.
10. Select "Programmer" with the Down arrow key, and hit Enter.

Page 54
XML Spy Suite 4.2 XML SPY Tutorial
11. Enter a "f" character and hit Enter.12. Move the cursor to the end of the line (End key), and enter the "greater than" angle
bracket >.
XML Spy automatically inserts all the Person element tags. Each element is suppliedwith start and end tags.
You could now enter the Person data here in the text view, but why do so? TheEnhanced Grid view is a lot more comfortable, and contains a special view enablingrecurring data to be presented in tabular form: the Database/Table view.
Enhanced Grid view
· Select the menu item View | Enhanced Grid View, or click the Enhanced Grid viewicon. The Person attributes (and data) entered in the Text view, are also visible in theEnhanced Grid view.

Page 55© 2001 Altova Ges.m.b.H
XML Spy Suite 4.2 XML SPY Tutorial
Validating and entering data
At this point let's check if the document is well-formed and valid, there might still be work to do.
To check for well-formedness: 1. Select the menu option XML | Check well-formedness or hit the F7 key.
A message appears at the bottom of the main window declaring that the document iswell formed. Click OK to confirm and close the message.
Being well-formed, means that the XML document syntax is correct (i.e. there is a rootelement, each start tag has a corresponding end tag, all elements are nested correctlyetc.).
This check does not check against a schema file (or any other external file). Elementsequence or element content are not checked either.
To check for validity: 1. Select the menu option XML | Validate or hit the F8 key.
An error message appears: "This file is not valid: Mandatory elements expected after'City' (Zip, State).The error message describes in detail what is currently wrong with our XML document.
Fixing the invalid document (intelligent help):At this point the element which is the "cause" of the error message is highlighted (City).Take note of the Element entry helper (top right). The Zip element is prefixed by anexclamation mark. This is the symbol for a mandatory element, and means that the US-Address element must contain the Zip sub-element.

Page 56
XML Spy Suite 4.2 XML SPY Tutorial
1. Double click the !Zip element in the Element entry helper.This inserts the Zip element under the City element (Append tab is active by default).
2. Hit the Tab key, enter the Zip Code of the State (04812), and confirm with Enter.The Element entry helper now contains the !State entry, which is also a mandatoryelement and must also appear with the Zip element.
3. Double click the !State element, hit the Tab key and enter the name of the state (e.g.Texas), confirm with Enter.The Element entry helper now contains only grayed-out elements. This shows that allthe required Address sub-elements have been inserted.

Page 57© 2001 Altova Ges.m.b.H
XML Spy Suite 4.2 XML SPY Tutorial
Filling in the rest of the XML document data & revalidating1. Click the empty element content field (right of element name) of the element First, enter
the persons first name (e.g. Fred), and hit the Enter key.
2. Hit the Down arrow key, and fill in the next field, Last (e.g. Smith)3. Use the same method to enter PhoneExt (e.g. 22) and the persons e-mail address (e.g.
[email protected]). You XML document should look like this:

Page 58
XML Spy Suite 4.2 XML SPY Tutorial
4. Click the Revalidate button to check if the document is valid.The "This file is valid" message appears. The XML document is now valid against itsschema. Click OK to confirm and close the message.
Being valid, means that the XML document adheres to the assigned schema i.e. theelements and the sequence they appear in is correct, as well as the element "contents"and their attributes.
5. Select the menu option File | Save As... and name the XML document (e.g.CompanyFirst.xml)
This XML document is available as 'CompanyFirst.xml' in the Tutorial folder.
Please note:An XML document does not have to be valid in order to save it. Saving an invaliddocument causes a prompt to appear which then allows you to select "Save anyway",the document is then saved in its current state.

Page 59© 2001 Altova Ges.m.b.H
XML Spy Suite 4.2 XML SPY Tutorial
Manipulating data - Entry helpers
At this point we want to enter more person data in our XML document. XML Spy incorporates aspecial view (within the Enhanced Grid view), which allows you to enter data in tabular form - theDatabase/Table view.
Inserting elements and attributes (intelligent entry help):We now want to add a new Person element to the document, as well as define specific personattributes.
1. Click the gray side bar to the left of the Address element, to collapse the Addresselements.
2. Click on or below, the "Person" element text in the grid view.This marks the Person and all its sub-elements. Notice that !Person is now available inthe Element entry helper.
3. Double click the !Person element in the Element entry helper (Append tab active).A new Person element with all required sub-elements is appended.
4. Click on the Manager attribute of the new Person element. Notice the attributesavailable in the Attribute entry helper.
The underlying schema document delivers information to the Entry helpers, specificallythe elements or attributes that can be inserted at specific points in the XML document.
Clicking the Update Entry Helpers icon , refreshes the Entry helper contents.

Page 60
XML Spy Suite 4.2 XML SPY Tutorial
The "Manager" attribute has been grayed out, as it already exists in the Personelement. Looking in the Info window, you can see all the Manager attribute information:Datatype=boolean, Occurrence=required (which means mandatory).
5. Double click the Programmer attribute in the Attribute entry helper.This inserts an empty Programmer attribute after the Manager attribute (append tab isactive).
The Programmer attribute is now grayed out in the Attribute entry helper.We could continue entering data here, but let's be more efficient and activate theDatabase/Table view.

Page 61© 2001 Altova Ges.m.b.H
XML Spy Suite 4.2 XML SPY Tutorial
Database/Table view
Database/Table view: The Database /Table view is available wherever the Enhanced Grid view can be activated, andcan be used when editing any type of XML file - XML, XSD, XSL etc.
Advantages:· Drag and drop column headers· Sort column (table) data using the menu command Table | Ascending Sort· Append (or insert) rows using the menu command Table | Insert Row.
· Copy and paste structured data to and from third party products· Intelligent entry help
Activating the Database/Table view:1. Click on or near, Person element text in the grid view (this marks the person element).
2. Select the menu option Table | Display as table, or click the Display as table icon(Hotkey F9).The Person elements have now been combined into a single table. The Element andAttribute names are now the column headers, and the element contents (values) arenow the rows of the table.
3. Select the menu option View | Optimal widths, or click the Optimal widths icon, tooptimize the table view.

Page 62
XML Spy Suite 4.2 XML SPY Tutorial
Please note:The element and attribute entry helpers also function in the Database/Table view. Theelement entry helper now displays the mandatory !Person element; double clicking itwould add a new row to the table.
4. Double click in the "Manager" cell of row 2, and select "false". Use the Tab key to get tothe next cells, and select the following data: Degree=MA, Programmer=true,First=Alfred, Last=Aldrich, PhoneExt=33 and EMail=Aldrich@work.
Please note:The F9 key switches between Grid view and Database/Table view, of the currentlyselected table or recurring element.
Copying XML data to and from third party productsXML Spy allows you to easily copy data to and from third party products. The copied data canbe used within XML Spy as well as third-party products, enabling you to transfer XML data tospreadsheet-like applications (e.g. Microsoft Excel).
Copying XML data to and from Excel:1. Click on the row label 1, hold down the CTRL key and click on row label 2.
This marks both rows of the table.
2. Select the menu option Edit | Copy as Structured text.The "Copy as Structured Text" command, copies elements to the clipboard as theyappear on screen.
3. Switch to Excel and paste the XML data in an Excel worksheet.

Page 63© 2001 Altova Ges.m.b.H
XML Spy Suite 4.2 XML SPY Tutorial
4. Enter a new row of data in Excel. Make sure that you enter a three digit number for thePhoneExt element (e.g. 444).
5. Mark the table data in Excel, select Edit | Copy, and switch back to XML Spy.6. Click in the top left cell of the table data in XML Spy, and select Edit | Paste.
The updated table data is now visible in the table.
7. Change the uppercase boolean values, "TRUE/FALSE", to lowercase "true/false" usingthe menu option Edit | Replace (Hotkey CTRL+H).
Sorting data in the Database/Table view The Database/Table view allows you to sort your XML table data by any column you wish. In thiscase we want to sort our table by last names.
1. Click on the Last column header. This marks the whole column.
2. Select the menu option Table | Ascending sort, or click on the "Ascending sort" icon.The column and whole table are now been sorted alphabetically (the column remainsmarked).
This sorting procedure affects your data at source level. (Click the Text view icon if you

Page 64
XML Spy Suite 4.2 XML SPY Tutorial
want to see the changes there.)3. Select the menu option XML | Validate, or hit the F8 key.
An error message appears: "This file is not valid: Value does not match facetmaxInclusive="99" in element 'PhoneExt'.
The offending element is automatically marked in the Database/table view. We needmore telephone extensions!
Updating a schema definition At this point that we realize that two digit phone extensions are definitely not enough, and thatwe would like to allow for three digits. To do this we have to make a change to the underlyingschema document.
1. Select the menu option DTD/Schema | Go to definition or click the "Go to definition"icon.The associated schema document, in this case AddressLast.xsd, is opened in theSchema overview.
2. Click the "component" icon of the global Person element, and then click thePhoneExt element. You can now see the facet data in the facets tab.

Page 65© 2001 Altova Ges.m.b.H
XML Spy Suite 4.2 XML SPY Tutorial
3. Click the "maxIncl" cell containing the facet data, enter 999, and confirm with Enter.
4. Hit CTRL+TAB to switch back to the XML document.5. Click the "Revalidate" button to revalidate the XML document.
The "This file is valid" message appears. The XML document now conforms to thechanged schema definition!

Page 66
XML Spy Suite 4.2 XML SPY Tutorial
6. Select the menu option File | Save As... and name the XML document (e.g.CompanyLast.xml).
7. Hit CTRL+TAB to switch back to the schema document, and save the schemadocument.
The XML document is available as 'CompanyLast.xml' in the Tutorial folder.

Page 67© 2001 Altova Ges.m.b.H
XML Spy Suite 4.2 XML SPY Tutorial
XSL Transformation
Goal of this section:To generate a Company HTML document which can then be posted on the corporate web site.
This will be achieved by:· Assigning a predefined Company.xsl file to the XML document· Using the XSL file to transform the XML file into an HTML document
Functions (and their icons) in this section:
XSL | Assign XSL, assigns an XSL file to an XML document.XSL | Go to XSL, opens the XSL file referenced by the XML document.
XSL | XSL Transformation, transforms the XML document(s) into the filesspecified by the XSL Transformation document, in this case into an HTML file.Hotkey: F10.
Please note:If you encounter a problem while generating the HTML file, you only see the tableheader and no XML data, please download and install the MSXML Parser 3.0 (649 kB)from the component download center athttp://www.xmlspy.com/download_components.html.

Page 68
XML Spy Suite 4.2 XML SPY Tutorial
Transforming XML to HTML
To assign an XSL file to the CompanyLast XML file:1. Click the CompanyLast.xml tab on the main window, to make it the active document.2. Select the menu option XSL | Assign XSL.3. Click the Browse button, select the Company.xsl file, and confirm with Open.
4. Click the OK button to assign the XSL file to the XML document.
A XML-stylesheet reference is placed in the XML document.
To transform the XML document into HTML:
1. Select the menu option XSL | XSL Transformation or click the icon (Hotkey: F10)This creates a new document in the Browser view with the name XSL Output.html. Itshows the Company data in one block down the left, and the Person data in tabularform below.

Page 69© 2001 Altova Ges.m.b.H
XML Spy Suite 4.2 XML SPY Tutorial
Changing the output of the HTML file:You can change the appearance/output of the HTML file by editing the underlying XSL file. Inthis case, we want to change the table background color from lime to yellow.
1. Click the CompanyLast.xml tab to make it the active document.2. Select the menu option XSL | Go to XSL.
The command opens the Company.XSL file referenced in the XML document.3. Find the line <table border="1" bgcolor="lime">, and change the entry bgcolor="lime" to
bgcolor="yellow".

Page 70
XML Spy Suite 4.2 XML SPY Tutorial
4. Select the menu option File | Save to retain the changes made to the XSL file.5. Click the CompanyLast.xml tab to make the XML file active, and select XSL | XSL
Transformation, or hit the F10 key.
A new XSL Output.html file appears in the Browser view. The table background nowappears in yellow.
6. Select the menu option File | Save, and save the document as Company.html.

Page 71© 2001 Altova Ges.m.b.H
XML Spy Suite 4.2 XML SPY Tutorial
Importing and exporting database data
Goal of this section:To export Person data from our address list to MS Access, and reimport the Person table intoXML Spy.
This will be achieved by:· using the menu option Convert, and then selecting the export or import process.
Functions (and their icons) in this section:
Convert | Export to Text files / Database, enables you to export XML data as text orfor use in third party databases.
Convert | Import Database data, enables you to import database data into XML Spy.
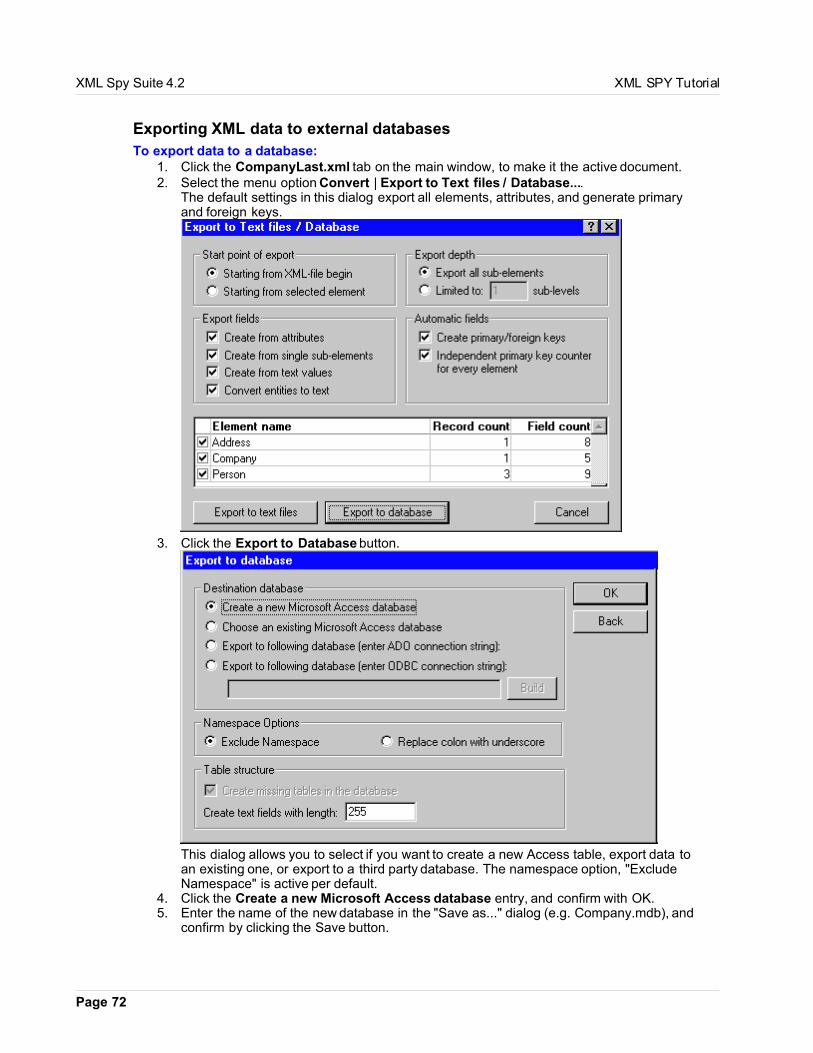
Page 72
XML Spy Suite 4.2 XML SPY Tutorial
Exporting XML data to external databases
To export data to a database:1. Click the CompanyLast.xml tab on the main window, to make it the active document.2. Select the menu option Convert | Export to Text files / Database....
The default settings in this dialog export all elements, attributes, and generate primaryand foreign keys.
3. Click the Export to Database button.
This dialog allows you to select if you want to create a new Access table, export data toan existing one, or export to a third party database. The namespace option, "ExcludeNamespace" is active per default.
4. Click the Create a new Microsoft Access database entry, and confirm with OK.5. Enter the name of the new database in the "Save as..." dialog (e.g. Company.mdb), and
confirm by clicking the Save button.
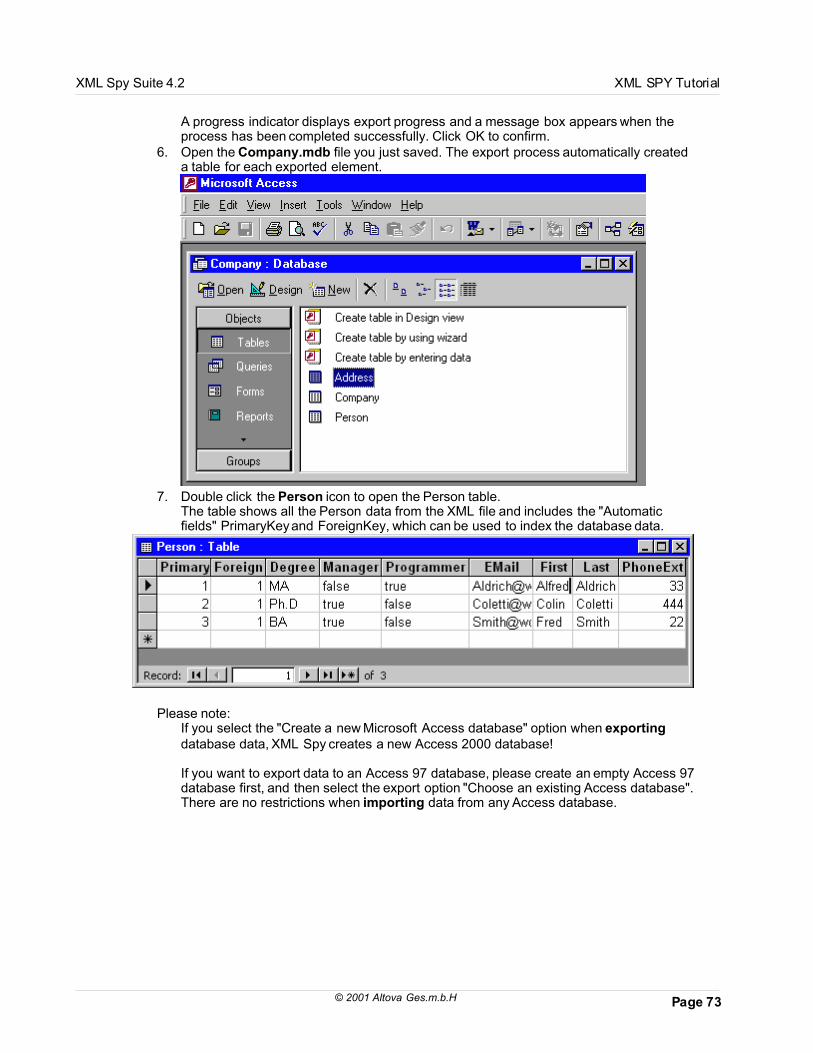
Page 73© 2001 Altova Ges.m.b.H
XML Spy Suite 4.2 XML SPY Tutorial
A progress indicator displays export progress and a message box appears when theprocess has been completed successfully. Click OK to confirm.
6. Open the Company.mdb file you just saved. The export process automatically createda table for each exported element.
7. Double click the Person icon to open the Person table.The table shows all the Person data from the XML file and includes the "Automaticfields" PrimaryKey and ForeignKey, which can be used to index the database data.
Please note:If you select the "Create a new Microsoft Access database" option when exportingdatabase data, XML Spy creates a new Access 2000 database!
If you want to export data to an Access 97 database, please create an empty Access 97database first, and then select the export option "Choose an existing Access database".There are no restrictions when importing data from any Access database.

Page 74
XML Spy Suite 4.2 XML SPY Tutorial
Importing database data
To import data into XML Spy:1. Select the menu option Convert | Import Database data....
2. Click the Choose file button, and select the Company.mdb file.The cursor is placed in the Selection statement text box.
3. Click the Choose database table button, select Person and confirm with OK.The SELECT * from [Person] statement is now visible in the text box. You can extendthe select statement, using standard SQL statements, to further filter the imported data.
4. Click the Preview button to see an example of the table data you intend to import. ThePreview window displays only those records that fulfill the select criteria.

Page 75© 2001 Altova Ges.m.b.H
XML Spy Suite 4.2 XML SPY Tutorial
Importing fields as: attributes, elements, or skip importThe preview window allows you to directly select and define the field data you want to import.
Clicking repeatedly on the element symbol to the left of the element name, cycles throughthe available possibilities:
Define and import this field as an Element.
Define and import this field as an Attribute.
Skip, do not import this field.
5. Click the Element symbol of the PrimaryKey column, until the skip symbol appears. Dothe same for the ForeignKey column.
6. Click the Element symbol of the Degree column, until the attribute symbol appears. Dothe same for the Manager and Programmer columns.
7. Click the OK button to start the import process.8. Select the menu option File | Save and name the XML document (e.g. Person-
Import.xml)
XML Spy creates an untitled XML file containing the Person table data. The root element iscalled Import, and each Person element has become a Row element.

Page 76
XML Spy Suite 4.2 XML SPY Tutorial
Click on the Text view icon, to get another view of the imported data.
For more information on importing data, please see the following sections in thereference section under Menus | Convert Menu | Convert How to...
· Setting up an ADO or ODBC connection· Importing a table using ODBC· Importing hierarchical data - ADO Data shaping· Shape string examples

Page 77© 2001 Altova Ges.m.b.H
XML Spy Suite 4.2 XML SPY Tutorial
Creating a database schema
XML Spy enables you to create a schema based upon an external database file. MicrosoftAccess databases, as well as ADO and ODBC compatible databases, are supported.
Goal of this section:To convert an existing MS Access database into a schema file, having the same table structure.
This will be achieved by:· Using the menu option Convert | Create Database Schema, to create the schema in
XML Spy.
· This example uses the DB2Schema.mdb file supplied with this tutorial. TheRelationships view of the DB2schema.mdb file is visible in the diagram below. Use themenu option Tools | Relationships in MS Access, to view the relationships.

Page 78
XML Spy Suite 4.2 XML SPY Tutorial
Converting a database to a schema
To create a schema from a database file:1. Select the menu option Convert | Create Database Schema.
2. Select Microsoft Access database, and click the Choose file button.3. Select the DB2schema.mdb file supplied with XML Spy, and click the Open button.4. Click the OK button of the Create Database Schema dialog, to start the conversion
process.
The generated schema appears in the Schema Design View. Click the "Identityconstraints" tab, to see the keyref and key fields of the respective elements.
5. Click the component icon next to the Altova global element, to see the contentmodel.

Page 79© 2001 Altova Ges.m.b.H
XML Spy Suite 4.2 XML SPY Tutorial
6. Select the menu option File | Save as , and save the new schema e.g.DB2schema.xsd.
7. Click the Display all globals icon , to return to the schema overview.
Please note:When generating the schema, all namespace prefix colons are automatically convertedinto underscore characters.
Databases currently supporting the key and keyref fields:MS Access and several other databases are able to automatically provide the key and keyref

Page 80
XML Spy Suite 4.2 XML SPY Tutorial
information for the ADO driver, used to create the database hierarchy.
Please note:The following text describes in condensed form, how to create a database schemausing other types of databases. This text is added for the sake of completeness, and isnot a tutorial task. Please contact your database administrator for further informationregarding the setup and use of these databases!
To create relationships for NON MS Access databases:1. Click the "ADO connection string" radio button in the Create Database Schema dialog
box.
2. Click the Build button that has now become active.This opens the Data Link Properties dialog box.
3. Select the corresponding Microsoft OLE DB Provider (or vendor specific provider) forthe database you use, do not select one of the generic drivers. Please see the "Toconvert from..." list at the end of this section.
4. Click the Next button to switch to the Connection tab and fill in the required information:the data source, the user name and password, and activate the Allow savingpassword check box.
5. Click the Test Connection button to test the connection, and Click OK to confirm thesettings.

Page 81© 2001 Altova Ges.m.b.H
XML Spy Suite 4.2 XML SPY Tutorial
6. Click OK in the Create Database Schema dialog box, to create the schema.
To convert from... SQL server databases:· Select the Microsoft OLE DB provider for SQL server provider.
To convert from Oracle... databases:· Select the Microsoft OLE DB provider for Oracle provider.
To convert from... MS Access:· Click the Microsoft Access Database radio button in the Create Database Schema
dialog box. This selects the correct provider, there is no need to use the ADOconnection string and Data Link Properties dialog box.
· If however, you want to build the connection string yourself, please use theMicrosoftJet 4.0 OLE DB provider.
To convert from... Other databases:· Select the corresponding Microsoft OLE DB, or vendor specific provider, from the Data
Link Properties dialog box.
To convert from... databases without a specific provider:Other databases will create a flat structured schema, including all tables and their correspondingdatatypes.
· Use drag and drop in the schema overview, to create the necessary relations betweenthe imported elements.
· To create an element hierarchy you have to directly edit the key and keyref fields, visiblein the Identity constraints tab. Please see "Creating Identity Constraints" in theReference manual for more information.
Page 82
XML Spy Suite 4.2 XML SPY Tutorial
Creating a project
Goal of this section:To create an XML Spy project that includes all the files currently open in the main window.
This will be achieved by:· using the menu option Project to create a project folder· using the specific Project commands to add files to the project
Functions (and their icons) in this section:
Project | New ProjectProject | Add active and related files to projectProject | Add active file to project
Advantages of Projects:· Files and URLs can be grouped into folders by common extension or any other criteria· Batch processing can be applied to specific folders, or the project as a whole· A DTD / Schema can be assigned to specific folder, allowing immediate validation· XSL transformations can be assigned to specific folders, allowing immediate
transformations· The destination folders of XSL transformation files can be specified
These settings can all be defined by using the menu option Project | ProjectProperties.
· XML files can be placed unter Souce control using the menu option Project | Sourcecontrol | Add to source control (Please see the Reference manual or online help formore information).

Page 83© 2001 Altova Ges.m.b.H
XML Spy Suite 4.2 XML SPY Tutorial
Adding files to a project
Creating and adding files to a Project:There are now many different files open in the main window. You can access these files as anunit by grouping them into an XML Spy project.
1. Select the menu option Project | New Project.
The project window now contains several folders under the New Project folder.2. Click the CompanyLast.xml tab, to make it the active file in the main window.3. Select the menu option Project | Add active and related files to project.
Three files have been added to the New Project folder: CompanyLast.xml, Company.xsland AddressLast.xsd.
4. Click the Person-import.xml tab, and then select the menu option Project | Add activefile to project.
5. Use the same method to add the Company.html and DB2schema.xsd files to the

Page 84
XML Spy Suite 4.2 XML SPY Tutorial
project. The project should now look like the diagram below.
6. Select the menu option Project | Save Project and enter "Tutorial" as the projectname.
To delete files from a project:1. Click on the file you want to delete in the project window, and hit the Delete key.
To add new folders to a project:1. Select the menu option Project | Add folder to Project, and fill in the Properties dialog.
To add a file to a specific folder:1. Click the file to make it active in the main window.2. Right click the folder you want to place the active file into (in the Project window), and
select the menu option "Add active file".This method allows you to add a file to any folder in the current project.

Page 85© 2001 Altova Ges.m.b.H
XML Spy Suite 4.2 XML SPY Tutorial
That's it !
If you have come this far congratulations, and thank you!
We hope that this tutorial has been helpful in introducing you to the basics of XML Spy. If youneed more information please use the context-sensitive online help system, or print out theTutorial.PDF file that accompanied your version of XML Spy.
If you have any comments regarding the tutorial, please feel free to contact us [email protected].

Page 86
XML Spy Suite 4.2 User Reference
3 User Reference
The reference section contains a complete description of all XML Spy windows and menucommands and explains their use in general.
We've tried to make this user manual as comprehensive as possible. If you have questionswhich are not covered by this documentation and you are a registered user, please don'thesitate to contact us through the Support Center on the XML Spy web site.

Page 87© 2001 Altova Ges.m.b.H
XML Spy Suite 4.2 User Reference
Windows
The XML Spy user interface provides several windows that show both your document, projectand intelligent editing "entry-helper" windows, that can be freely arranged to suit your personalworking style.
The central area shows the main window, where you edit (and view) your XML, XML Schema,or XSL documents in the Enhanced Grid view, Schema view, Text view, Document Editor view,embedded Database/table view, or Browser view.
The left area contains the project and info windows; the right area contains the entry helpers forintelligent editing of elements, attributes, and entities.

Page 88
XML Spy Suite 4.2 User Reference
Main Window
The Main Window is where you view and edit all documents in XML Spy. XML Spy allows you toopen any number of XML documents simultaneously. To switch between them click on the anypart of the window you wish to bring to the front.
You can also use the commands on the Window menu to organize your windows. If yourwindows are maximized, XML Spy also provides tabs, letting you switch between all openwindows. Keyboard equivalents are: CTRL+TAB and CTRL+F6.
Right click on a tab, opens the context-menu enabling you to perform various functions on thatXML document. (e.g. print, close, mail etc.).
XML Spy provides advanced views on your documents:· An Enhanced Grid View for structured editing· An embedded Database/Table view, available from within the Enhanced Grid view, that
shows repeated elements in a tabular fashion· A Schema Design View for viewing and editing XML Schemas· A Text View with syntax-coloring for source-level work,· A Document Editor view allowing you to edit XML documents based on templates
created in XSLT Designer, and· An integrated Browser View that supports both CSS and XSL style-sheets.
To switch any main window between the different views, use the commands on the View menuor the corresponding toolbar buttons.
Please note:You can set your personal default viewing preferences on a per-file-type basis in theFile Types tab on the Tools | Options dialog. Select the menu option Tools | Options to openthis dialog box.
Enhanced Grid View
Click the Enhanced Grid View icon to open this view.
The Enhanced Grid View is the core presentation and editing view of XML Spy. It shows thehierarchical structure of any XML-compliant document through a set of nested containers, thatcan be easily expanded and collapsed to get a clear picture of the document's structure.

Page 89© 2001 Altova Ges.m.b.H
XML Spy Suite 4.2 User Reference
All items contained in an XML document are displayed in a structured way that allows for easymanipulation of contents and structure at the same time.
An hierarchical item (such as the XML declaration, document type declaration, or any elementthat contains child elements) is represented with a gray side bar and a tiny arrow. Clicking theside bar expands or collapses the item.
Please note:
An element is denoted with the icon, eg. header
An attribute is denoted with the icon, eg. style
Display & NavigatingThe contents of an hierarchical item depend on its kind and � in the case of elements � mostlyconsists of attributes, character data, comments and child elements.
Element and Attribute orderTo emphasize the strong coupling between attributes and the respective parent element,attributes are always listed first and cannot be preceded by comments, character data orchild elements. The order of the individual attributes is, however, preserved from the input fileand can be modified if necessary.
Following the attributes, the remaining items within an element appear exactly in the order foundin the source file, and can be rearranged without restriction using drag & drop.
Elements and character dataIf an element contains only character data, the data will be shown in the same line as theelement and the element will not be considered hierarchical by nature. The character data forany other element will be shown indented with the attributes and potential child elements andwill be labeled as "Text".
If an element is collapsed, its attributes can be shown in the same line in a different color. Thisattribute preview is especially helpful, when editing XML documents that contain a huge numberof elements of the same kind that only differ by their contents and attributes (e.g. database-like

Page 90
XML Spy Suite 4.2 User Reference
applications).
Customizing the grid viewThe grid view can easily be customized using the mouse to adjust column widths.
To resize a column to the width of its largest entry:1. Double-click on the grid line to the right of that column.
To adjust the column widths to display all content:1. Select the menu item View | Optimal widths command, or click on the Optimal widths
icon .
The heights of the cells are generally determined by their contents and can only be adjusted bythe user using the menu option Tools | Options| View tab | Enhanced Grid view, "Limit cellheight to xx lines".
You can also use the keyboard to navigate an XML document in the Enhanced Grid View.· The arrow keys move the selection bar in the tree and grid views· the + and � keys on the numeric keypad allow you to expand and collapse items.
Please note:You can activate the Text view icon at any time, to see marked data in the source file forexample.
Embedded Database/Table viewXML Spy allows you to display recurring elements in a Database/Table view. This function isavailable wherever the Enhanced Grid view can be activated, and can be used when editing anytype of XML file - XML, XSD, XSL etc.
Intelligent editingWhen editing an XML document based on a DTD or Schema, the Enhanced Grid View providesmany Intelligent Editing features based on the information gathered from the Schema or DTD.
Whenever editing the name of an element or attribute, a popup menu opens. The optionsavailable depend on the position of the element and the content model defined by the Schemaor DTD. A similar popup is displayed, if the contents of an element or attribute are restricted byan enumeration or choice of some sort.
To edit an element or attribute name:1. Double click on the element name.2. Edit the name (XML Spy chooses the best match from the menu).3. Accept the selection by hitting the Return key (Esc. abandons the change).
To insert or append elements or attribute names:1. Click on the respective icon in the Attr. & Element toolbar, or

Page 91© 2001 Altova Ges.m.b.H
XML Spy Suite 4.2 User Reference
2. Double click on an element or attribute name in one of the Entry Helpers.
You will notice that the various Entry Helpers are constantly updated depending on the currentselection in the Enhanced Grid View. The Info Window constantly shows important informationregarding the selected element or attribute.
Enhanced Grid View context menuIn addition to the commands available through menus and toolbars, the Enhanced Grid Viewalso provides a context-menu, activated by the right mouse-button. It contains the most usefulcommands in one convenient place:
Enhanced Grid View context menu:
Database/Table View
Having clicked the Enhanced Grid View icon, click on the "Display as Table" icon .

Page 92
XML Spy Suite 4.2 User Reference
The Database/Table View is integrated into the Enhanced Grid View, and allows you to viewrecurring elements in grid or compressed into table form. The Database /Table view is availablewherever the Enhanced Grid view can be activated, and can be used when editing any type ofXML file - XML, XSD, XSL etc.
You can switch between both views, grid and table, by clicking the "Display as Table" icon orpressing the F9 hotkey.
Editing in the table view supports drag&drop and intelligent editing functions. You can also usetable-specific commands to sort elements or insert new rows.
XML documents often contain sequences of repeating elements of the same kind. XML Spyautomatically detects such sequences and rearranges the presentation to show these elementsin a tabular fashion - common to database- or spreadsheet-like applications.
XML Spy achieves this database/table view by taking the respective attributes and sub-elementsof the repeating element, and showing them as columns of the table.
To display recurring elements in a table view:1. Click on the recurring element in the Enhanced Grid View (flag, in this example).
The "Display as table" icon is now active.

Page 93© 2001 Altova Ges.m.b.H
XML Spy Suite 4.2 User Reference
2. Click the "Display as table" icon to activate the Table View, or select the menuoption Table | Display as Table . The keyboard shortcut for this function is F9.
The nine "flag" elements are displayed in table form. Click in a cell to demark the table.
To return to the grid view, from the table view:1. Click on the table "name" (flag (9) in this eg.). This selects the whole table.2. Click the "Display as Table" icon, to deactivate the Table view and return to the Grid
view.
Manipulating table data:
· Drag and drop column headers to move columns· Sort column data using the menu command Table | Ascending Sort· Append (or insert) rows using the menu command Table | Insert Row.
Exchanging data from the Database/Table viewTo exchange with other applications, select elements in this table and use thecopy as structured text option to copy/paste them directly into Excel for example. Dataexchange works in both ways. You can therefore copy data from any spreadsheet-likeapplication and insert it directly into XML Spy.

Page 94
XML Spy Suite 4.2 User Reference
For more complex data exchange tasks, XML Spy also offers a set of unique conversionfunctions that let you directly import or export XML data from any text file, Word document ordatabase.
Schema Design View
This is the default view when you double click an .XSD file.
Click the Schema Design view icon, to display W3C conformant schemas.
A Schema is a model describing the structure of information. A Schema in XML, describes thepossible arrangement of tags and text in a valid document. The purpose of a schema is to allowmachine validation of document structure, to enable large volume XML transactions over theweb.
Schemas are defined in terms of constraints:· The content model constraint, describes order and sequence of elements· The datatype constraint, defines the valid units of data in the content model
Instead of using the syntax of XML 1.0 DTD declarations, schema definitions use XML elementsyntax. A correct XML schema definition is, therefore, a well-formed XML document.
XML Spy features:· Supports the Final XML Schema Recommendation of May 2nd 2001, and the ability to
convert schemas from the April 7th 2000 Working Draft, or Oct. 24th CandidateRecommendation to the Final Recommendation.
· Generation of DTD/Schema from an XML document· Conversion of DTD/Schema to different Schema flavors (DTD, DCD, XML-Data,
BizTalk, W3C-Schema)· Generation of XML Schema documentation in Word or HTML format

Page 95© 2001 Altova Ges.m.b.H
XML Spy Suite 4.2 User Reference
Viewing and editing XML Schema documentsXML Spy Schema editor allows you to view and edit schemas in two different ways:
· As a Schema overview, in list form· In a graphical view of specific schema components
Schema overviewOpen a XSD document in the DTD/Schemas folder of the project window, or double click on anXSD document in Explorer. The main window then displays the Schema overview.
The top window displays all Global "definitions" (elements, complex types etc.) in list form. Thebottom window displays the corresponding attributes of the currently selected component (eg.Mgr. Prg etc.).
Content modelThe content model is a graphical representation of a component. The tree structure as well asannotations etc. are shown for each element. This view supports drag and drop. Configure thisview by selecting the menu option Schema design | View config.
To see graphical representation (Content model) of a component:
· Click on the icon next to the component you want to display, or· Select the menu option Schema design | Display Diagram, or· Double click on a component name in the "Component Navigator" (Top right entry
helper).
The content model for that component, appears in a tree view.
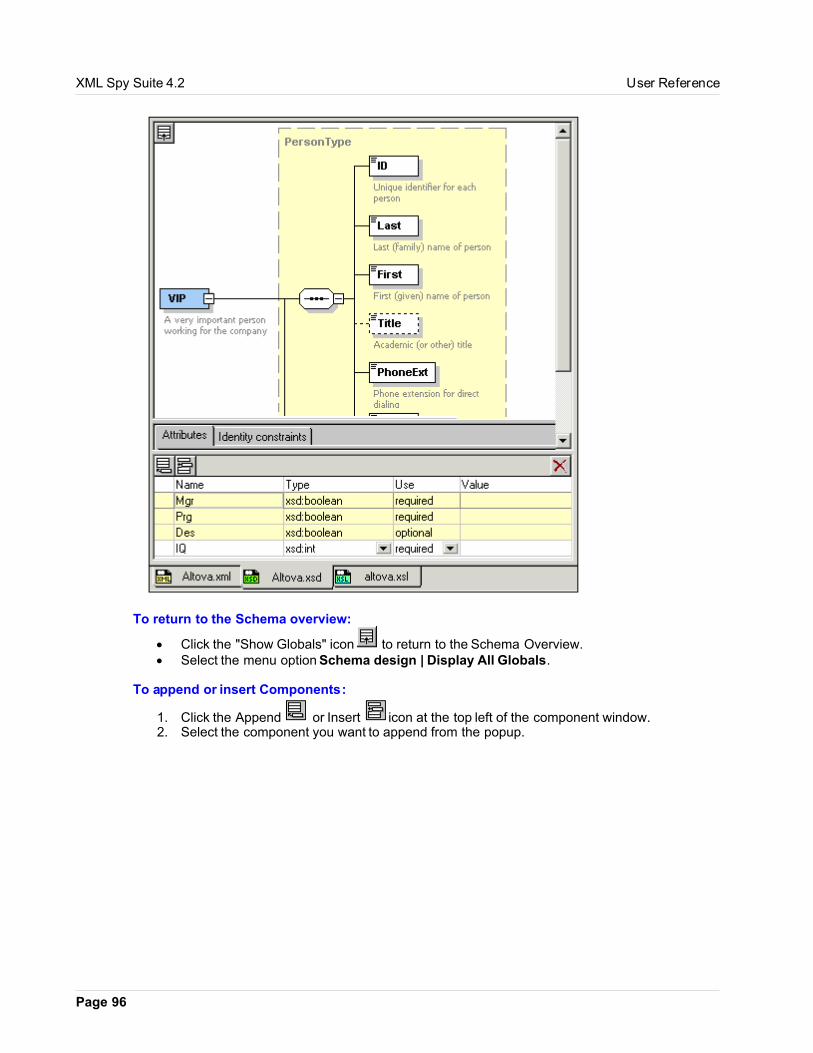
Page 96
XML Spy Suite 4.2 User Reference
To return to the Schema overview:
· Click the "Show Globals" icon to return to the Schema Overview.· Select the menu option Schema design | Display All Globals.
To append or insert Components:
1. Click the Append or Insert icon at the top left of the component window.2. Select the component you want to append from the popup.

Page 97© 2001 Altova Ges.m.b.H
XML Spy Suite 4.2 User Reference
To append or insert Attributes to a component:
1. Click the Append or Insert icon at the top left of the attribute window.2. Select the attribute you want to append/insert from the popup.
Schema design content model
The content model view, enables you to directly manipulate the symbols depicting your schema.You can insert or append elements, as well as change their parameters directly.

Page 98
XML Spy Suite 4.2 User Reference
Element Symbols
Mandatory single element. Details: MinOcc=1, MaxOcc=1
Mandatory single element, containing Parsed Character Data (#PC-Data).The content may be simple content or mixed complex content.Details: MinOcc=1, MaxOcc=1, type=xsd:string, content=simple.
Single optional element. Details: MinOcc=0, MaxOcc=1The context menu option Optional, converts a mandatory element into an optional one.
Mandatory multiple element. Details MinOcc=1, MaxOcc=5.
Mandatory multiple element containing child elements.Details: MinOcc=1, MaxOcc=unbounded, type=DivisionType, content=complex.The context menu option Unbounded, changes the max. occurrence of an element tounbounded.
Clicking on the + character of the element expands the tree view and shows the child elements.
Group element. Details: name=Subsidiaries.A named collection of elements to allow reuse in the construction of different complex types.

Page 99© 2001 Altova Ges.m.b.H
XML Spy Suite 4.2 User Reference
"Any" can be a placeholder for any element from a certain namespace.
Please note:To display the definition of any element, hold down the CTRL key, and double click on theelement you want to see the definition of.
To add / insert / append, elements or child elements:1. Click right on the element (or "model type" symbol), to open the context menu.2. Select the operation you want to carry out from the menu.
Please note:Only those operations that are possible with the element, appear in the context menu.Invalid operations are grayed out in the context menu and cannot be selected.
Simple types:A "simple type" element, is defined as a datatype that only contains values and no element orattributes. The element type is usually prefixed by the namespace prefix xsd: string, indicatingthat it is a predefined XML Schema datatype.
Details: name=Name, type=xsd:string, content=simple.
Complex types:"Complex type" is a datatype which may contain attributes, elements and text.Adding sub elements to an element, automatically defines the element with the content modelas complex (Details entry helper content=complex.). Click on the "Com" tab of the componentnavigator, to see the complex types.
XML Spy displays references to "external" complex types with a yellow background. In theexample below, the Person element references the PersonType complex element.

Page 100
XML Spy Suite 4.2 User Reference
To view the referenced complex type element:1. Double click the complex type name in the yellow box (here, PersonType), or2. Click on the "Com" tab of the Component Navigator, and double click on the
PersonType entry.
The PersonType element definition, appears in the main window.
Schema, Content model
XML Spy enables you to define your content model with a few mouse clicks. All element typesand methods of combining them can be defined in the content model.
CompositorsA "Compositor" defines an ordered sequence of sub elements (child elements).

Page 101© 2001 Altova Ges.m.b.H
XML Spy Suite 4.2 User Reference
To insert a compositor:1. Click right on the element you want to add sub elements to.2. Select Add Child | Sequence (Choice or All).3. Click right on the compositor symbol and select Add Child | Element, to add further
sub elements.
Sequence:
Choice:
All:
To change the compositor (model)1. Click right on the compositor.2. Select Change Model | Sequence (Choice or All).
Global componentsThere are two methods of defining global components: creating a new component from scratch,or changing an existing element into global component.
To create a global component from scratch:1. Click the Insert / Append icon in the Schema Overview, and select the type of
component you want (Element, Group, SimpleType, ComplexType etc.)2. Enter the name of the component in the global list, and confirm with OK.
The global component appears in the respective tab (Elm, Grp, Com, Sim etc.) of theComponent navigator. Double clicking on the component, displays the tree view of thatcomponent in the main window.
Please note:You can create a global element while viewing a component in the content model. Clickright in the main window, and select the option New Global | Element.
To delete a global component:1. Switch to the Schema global overview, select the component and hit the delete key, or
2. Click the Delete icon of the component window.
To change an element into a global component:

Page 102
XML Spy Suite 4.2 User Reference
1. Click right on the element and select Make Global | Element.
If the element is a complex type, then the option Make Global | Complex type becomesavailable.
References to global componentsA reference to a global component can be created in two ways:
· You add a component to a schema which has the same name as an existing globalcomponent. This causes a dialog box to appear, prompting you if you want to referencethe element to it. Confirming with OK, references the component to the componentdefinition.
· You right click an element and select the option Reference from the context menu.
In both cases, a link icon appears at the bottom left of the element symbol and checkbox "isRef" is set active in the Details entry helper.
Please note:If you create a reference to a component that does not exist, the element name appearsin red as a warning that there is no definition to refer to.
To view the definition of an element:· Use the Hotkey CTRL+Double click on an element.
The element definition appears, along with the corresponding info in the details window,or
· Right click the element and select Go to Definition from the context menu.
To edit the name of an element:1. Right click the element2. Select the context menu option Edit | Name and edit the name. (Double clicking the
element name, also enables you to edit the name.)
To edit the annotation of an element:1. Right click the element.2. Select the context menu option Edit Annotation. (Double clicking the element
annotation, also enables you to edit the annotation.)

Page 103© 2001 Altova Ges.m.b.H
XML Spy Suite 4.2 User Reference
To edit (or create) appinfo for an element:1. Right click the element.2. Select the context menu option Whole Annotation Data.
This opens the Annotation dialog box. If an element contains annotation text, then a rowis visible when the dialog box is opened. The annotation type "doc", is displayed in theKind column and the annotation text is visible in the Content text box.
3. Click the append or insert icon at the top left, to insert a new line. This automaticallyinserts a new "doc" line.
4. Click the drop down arrow next to the new doc line, and select "app".5. Double click in the Source column to enter a URI, it is not mandatory that you enter one
however.6. Enter the appinfo content text, in the Content text box.
Configuring the content model view
· Select the menu command Schema design | View config.
This command allows you to configure the content model view. The dialog box opens at thebottom right of the XML Spy window, giving you room to see changes reflected in the contentmodel immediately. The settings you define here, apply to the schema documentation output aswell the printer output.
Changing element parameters/values directly in the content model
· Double click the cell of the element (table) you want to edit and start entering data. If aselection is possible, a drop down list appears if not, enter the parameter or value andconfirm the entry with the Return key.
The entry helpers will be updated at this point, reflecting the data you entered.
Documenting the content model

Page 104
XML Spy Suite 4.2 User Reference
· Select the menu command Schema design | Generate documentation.
This command generates detailed documentation about your schema. Documentation isgenerated for each element using the settings you define in the dialog box. Related elements(child elements, complex types etc.) are hyperlinked, enabling you to navigate from element toelement.
Text View
Click the Text view icon, to open this view.
When it comes down to low-level work, the text view of XML Spy is ideally suited for XML editingin its textual or source form.
The text view can be used to edit any kind of text file (even non-XML conforming documents)and offers customizable syntax-coloring (including the ability to highlight server-side VBScript orJScript code in ASP pages) as well as an automatic display of the current line and characterposition in the status bar.
You can use the Find and Replace commands to quickly locate or change any information, andXML Spy offers unlimited levels of Undo and Redo for all your editing operations.
Intelligent EditingIf you are working with an XML document based on a DTD or XML Schema, XML Spy providesyou with various intelligent editing capabilities.
1. Type the "<" less-than character at the position you want to insert an XML element,attribute, or attribute value.This opens a popup list.
2. Enter the first few characters of the item you want to insert.An item containing those characters is highlighted.
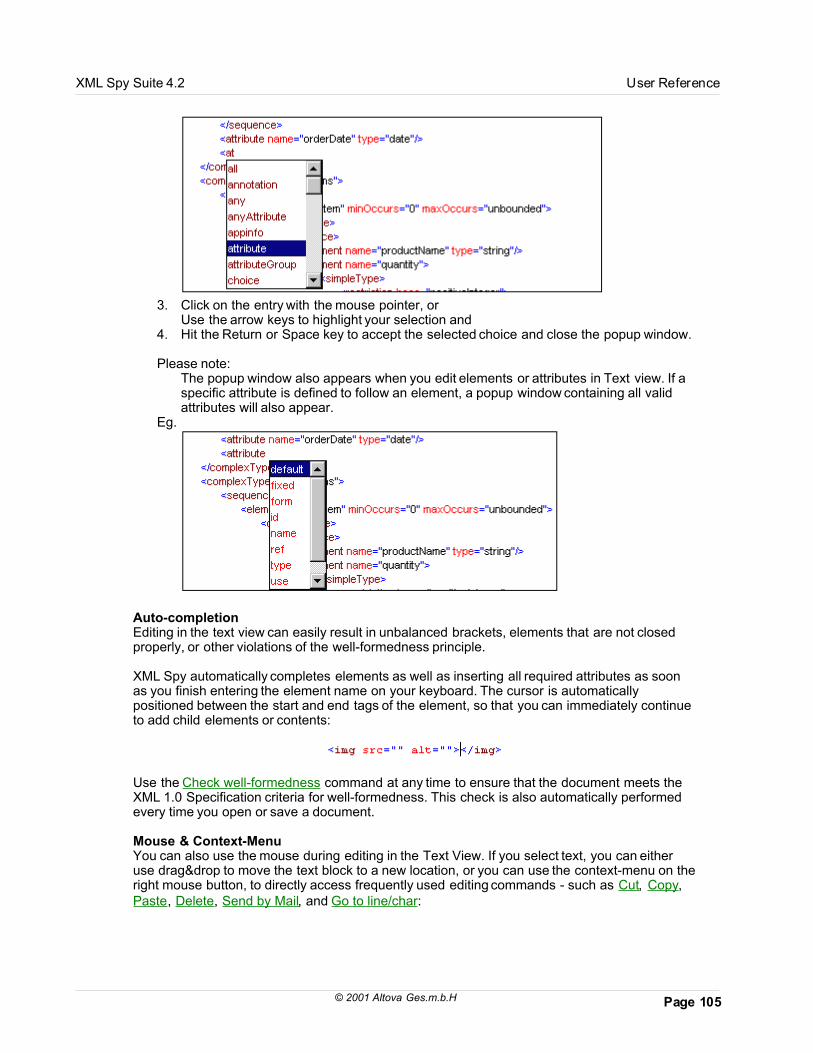
Page 105© 2001 Altova Ges.m.b.H
XML Spy Suite 4.2 User Reference
3. Click on the entry with the mouse pointer, orUse the arrow keys to highlight your selection and
4. Hit the Return or Space key to accept the selected choice and close the popup window.
Please note:The popup window also appears when you edit elements or attributes in Text view. If aspecific attribute is defined to follow an element, a popup window containing all validattributes will also appear.
Eg.
Auto-completionEditing in the text view can easily result in unbalanced brackets, elements that are not closedproperly, or other violations of the well-formedness principle.
XML Spy automatically completes elements as well as inserting all required attributes as soonas you finish entering the element name on your keyboard. The cursor is automaticallypositioned between the start and end tags of the element, so that you can immediately continueto add child elements or contents:
Use the Check well-formedness command at any time to ensure that the document meets theXML 1.0 Specification criteria for well-formedness. This check is also automatically performedevery time you open or save a document.
Mouse & Context-MenuYou can also use the mouse during editing in the Text View. If you select text, you can eitheruse drag&drop to move the text block to a new location, or you can use the context-menu on theright mouse button, to directly access frequently used editing commands - such as Cut, Copy,Paste, Delete, Send by Mail, and Go to line/char:

Page 106
XML Spy Suite 4.2 User Reference
While most customers prefer the Enhanced Grid or Database/Table view for every-day work onXML data files, the text view can occasionally be very handy when editing XSL files or if you areusing Active Server Pages (ASP) or any other non-XML files for your web application.
Document Editor view
Click the Document Editor icon, to open this view.
XML Spy Document Editor enables you to edit XML documents based on templates created inXSLT Designer! The templates in XSLT Designer are saved as *.sps files, and supply all thenecessary information needed by Document Editor.
Templates are opened by Selecting the File | New command and then clicking the "Select aDocument Editor template..." button. Please see the Document Editor documentation for furtherinformation.
Document Editor features:
· Free-flow WYSIWYG text editing· Form-based data input· Presentation and editing of repeating XML elements as tables· Real-time validation, and consistency checking using XML Schema
XML Spy Document Editor is available in three versions: As a stand-alone application,integrated as a separate view within the XML Spy IDE user-interface (if you purchase the XMLSpy Suite product), or as a Browser Plug-In for Internet Explorer.
Document Editor has two main areas: the main window, and the entry helpers at right. Thegraphic below shows the OrgChart template with all the markup info hidden.
· The main window allows you to display the document in several different views: theDocument Editor view which is the default view for this type of document template, theEnhanced Grid view or Text view. The Enhanced Grid view incorporates a special view,called the Database/Table view, which collapses recurring XML data into table form.
· The right area contains three Entry helper windows, which allow you to insert specificelements (or attributes) depending on the current cursor position in the document.
Example of a partially filled in Orgchart template document.

Page 107© 2001 Altova Ges.m.b.H
XML Spy Suite 4.2 User Reference
Browser View
Click the Browser View icon, to open this view.
The Browser view requires Microsoft Internet Explorer 5, and we highly recommend you to alsodownload the MSXML3 if you intend to work with XSLT in XML Spy, as MSXML3 alreadysupports most of the W3C XSLT Recommendation. Please see our Download Center for moredetails.
Use the integrated browser view of XML Spy to preview any XML file with an XSL stylesheet, orview the output from an XSLT transformation to HTML.

Page 108
XML Spy Suite 4.2 User Reference
Displaying source code and Browser views:If you are using XML Spy for XHTML editing or if you have an XSL stylesheet associated withyour XML document, you can display the browser view in a separate window.
This allows you to take a look at the document source in the Enhanced Grid or Text views andhave the browser preview side-by-side, so that it can easily be refreshed directly from theediting view (just hit F5 in the editing view and the browser view is automatically updated).
The browser view also supports find and printing functions for when you want to document XMLfiles that use CSS or XSL style-sheets, and offers the typical browser commands from both theBrowser menu and toolbar: Back, Forward, Stop, Refresh.
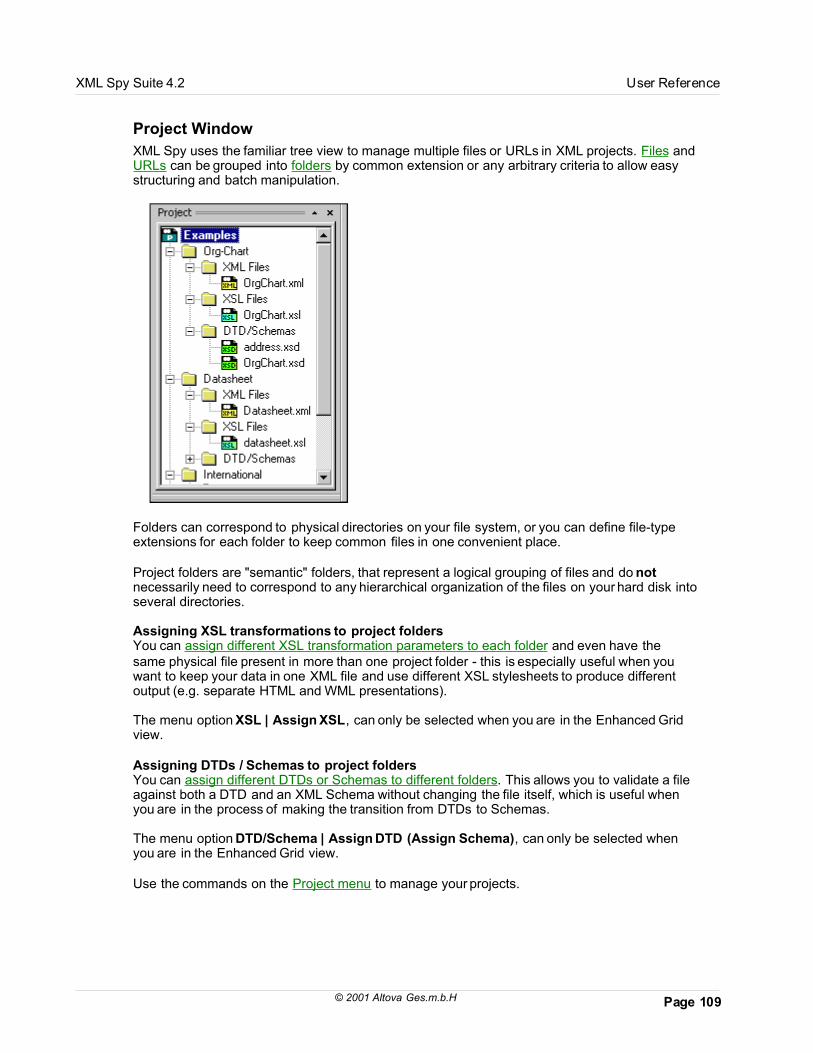
Page 109© 2001 Altova Ges.m.b.H
XML Spy Suite 4.2 User Reference
Project Window
XML Spy uses the familiar tree view to manage multiple files or URLs in XML projects. Files andURLs can be grouped into folders by common extension or any arbitrary criteria to allow easystructuring and batch manipulation.
Folders can correspond to physical directories on your file system, or you can define file-typeextensions for each folder to keep common files in one convenient place.
Project folders are "semantic" folders, that represent a logical grouping of files and do notnecessarily need to correspond to any hierarchical organization of the files on your hard disk intoseveral directories.
Assigning XSL transformations to project foldersYou can assign different XSL transformation parameters to each folder and even have thesame physical file present in more than one project folder - this is especially useful when youwant to keep your data in one XML file and use different XSL stylesheets to produce differentoutput (e.g. separate HTML and WML presentations).
The menu option XSL | Assign XSL, can only be selected when you are in the Enhanced Gridview.
Assigning DTDs / Schemas to project foldersYou can assign different DTDs or Schemas to different folders. This allows you to validate a fileagainst both a DTD and an XML Schema without changing the file itself, which is useful whenyou are in the process of making the transition from DTDs to Schemas.
The menu option DTD/Schema | Assign DTD (Assign Schema), can only be selected whenyou are in the Enhanced Grid view.
Use the commands on the Project menu to manage your projects.

Page 110
XML Spy Suite 4.2 User Reference
Entry Helper Windows
XML Spy helps you create valid XML documents by providing three palette-like windows that wecall "entry helpers".
When you are working on an XML document based on a DTD or Schema, the built-in IntelligentEditing module constantly displays information on elements, attributes, and entities that can beinserted at the current cursor position, based on the information gathered from the Schema orDTD content model.
Element Entry-Helper
The element entry helper, allows you to insert a new element into your document by showingwhat elements are permissible at the current location.
You can choose to append an element, insert it before the selected element or add a child-element to the currently selected element. Depending on this context, the entry helper willautomatically adjust its list of available choices.
Mandatory elements are automatically highlighted by an exclamation mark "!"
Elements that are allowed within the current parent element, but not at the position of thecurrent selection, are shown in gray.
To insert an element:· Double-click on the desired item.
The corresponding element is inserted into the XML document, and the entry helper isautomatically updated to reflect your new options.
Should you create a sequence of elements that violate the content model specified by yourschema or DTD, the built-in incremental validating parser automatically detects this violation anddisplays its error message directly in the entry helper window.

Page 111© 2001 Altova Ges.m.b.H
XML Spy Suite 4.2 User Reference
In the Schema Design View, this window is called the Component Navigator , and displaysinformation on Global Components: elements, groups, complex types, simple types, attributesand attribute groups.
To display the content model of a component:· Click the component type tab (Elm, Grp. etc.), and· Double click on the desired component, in the respective tab.
The content model appears in the main window as a graphic.
Attribute Entry-Helper
A list of available attributes for the element you are currently editing, are shown in the secondpalette-window and offer the same functionality as the element entry helper.
Mandatory attributes are automatically highlighted by an exclamation mark "!"

Page 112
XML Spy Suite 4.2 User Reference
Existing attributes that cannot be added to the current element a second time - are shown ingray.
In the Schema Design View, this window is called Details, and displays information on thecurrently selected element of the content model.
To change content model parameters:1. Use the combo boxes to select different parameters, or2. Double click into the respective row, and edit/enter text directly.
Entity Entry-Helper
The entity entry helper presents a list of defined entities or parameter entities that you caninsert within your document.
In the Schema Design View, this window displays further information on the currently selectedelement of the content model.
To change these content model parameters:1. Use the combo boxes to select different parameters, or2. Double click into the respective row, and edit/enter text directly

Page 113© 2001 Altova Ges.m.b.H
XML Spy Suite 4.2 User Reference

Page 114
XML Spy Suite 4.2 User Reference
Info Window
In addition to the entry helper windows, XML Spy provides a handy information window thatshows the detailed information about the attribute or element that you are working on.
This information is available in all three editing views and can be a tremendous help inconjunction with the xsd:annotation feature of the new XML Schema draft, which allows aschema author to include comments or documentation on the use of each individual element orattribute into the schema itself.

Page 115© 2001 Altova Ges.m.b.H
XML Spy Suite 4.2 User Reference
Menus
XML Spy supports all standard Windows commands on the File and Edit menus to enable theuser to quickly exploit all capabilities of the program.
Wherever appropriate, additional commands have been added to support special XML- orInternet-related features (e.g. such as opening documents directly from an URL).
In addition to the standard menus, XML Spy contains many XML-specific menus that cover thedifferent aspects of XML editing tasks.

Page 116
XML Spy Suite 4.2 User Reference
File Menu
The File menu contains all commands relevant to manipulating files with XML Spy, in the ordercommon to most Windows software products.
In addition to the standard New, Open, Save, Print, Print Setup, and Exit commands, XML Spyoffers special commands:· open a document directly from a URL· reload a file that may have changed
· switch the character-set encoding used by a file, and· send a file by e-mail (only available, if a MAPI-compliant mail system, such as Microsoft
Outlook, is installed).· save file to URL
New...
The "New..." command is used to create a new document with XML Spy. You are presented alist of predefined document types that you can create:

Page 117© 2001 Altova Ges.m.b.H
XML Spy Suite 4.2 User Reference
Since XML is such a versatile and universal concept, there are many different kinds of XMLdocuments that you can create and edit with XML Spy.
Creating files not available in the Create new document dialog boxIf the document you want to create is not listed, simply select ".xml" and change the fileextension when you save the file. You can also add new file types to this list using theTools | Options | File types tab.
Assigning a DTD / Schema to a new XML documentXML Spy contains built-in templates for most XML-based document types and automaticallyprovides you with a meaningful starting point instead of a totally empty file (e.g. a ".xhtml" fileautomatically includes the correct DOCTYPE reference to the XHTML DTD as well as an empty<html> element to start with).
The predefined templates are placed in the \Template directory, automatically created one levelbelow the XML Spy installation directory. You can only assign a DTC/Schema to a documentfrom within the Enhanced Grid view.
If you select the ".xml XML Document" entry, (typically a new XML instance document) in theabove dialog box, XML Spy prompts you for a DTD or Schema for the new file to be basedupon:
To create an empty XML document:· Select the File | New menu entry, and
· Click the "Cancel" button in the New file dialog box, which prompts for a DTD/Schema.

Page 118
XML Spy Suite 4.2 User Reference
Defining the root elementIf you want to assign a DTD / Schema and the content model of the Schema or DTD containsmore than one potential root element candidate, XML Spy asks you to select a root elementfrom the list of possible candidates:
The new document is created with this element as its document root.
Open...
The "Open..." command opens any XML-related document or text file from your PC. The familiarWindows "Open" dialog box appears and allows you to select one or more files.
Use the "Files of type" combo box to select which kind of files you want to be displayed in thedialog box (the list of available file types can be configured through theFile Types tab on the Tools | Options dialog).
After the file has been read into memory, the character-set encoding used within the file will beauto-detected by XML Spy and the file decoded accordingly.If the character-set used to encode the file, differs from the encoding-specification in the XML-declaration in the prolog, an error message is displayed and the file is automatically openedusing the correct encoding.

Page 119© 2001 Altova Ges.m.b.H
XML Spy Suite 4.2 User Reference
Auto-checks on openingYou may get an error message if your file is either not well-formed or invalid, and you haveselected to perform automatic validation upon opening.
In this case the document will be opened in the appropriate view, an error message popup willbe displayed with the details about the error detected, and the offending item will be highlightedin the window.
In such a case simply fix the error and click on the or button tocontinue opening the file.
Opening Unicode filesIf you are using the Windows 95/98 version of XML Spy and have chosen to open a Unicodefile, XML Spy converts the file to a Windows 98 code-page to be used for viewing and editing,as Windows 95/98 do not support Unicode on the operating system layer (for further informationplease see the Unicode chapter in the background information section). The conversion is doneautomatically according to the settings you provide in the"Encoding" tab of the Tools | Options dialog.
Open URL...
The "Open URL..." command allows you to open non-local files from a URL (uniform resourcelocator) address.
To open an URL address:1. Enter the URL in the URL field2. Click the Browse button to optionally view and navigate the directory structure of the
server.3. Double click the file you want to load, or select the file and click the OK button.
The file you open appears in the main window. If the XML file refers to a schema file that is alsoavailable in the same server directory, then the schema file will also be loaded into XML Spy.

Page 120
XML Spy Suite 4.2 User Reference
The Up button moves you up one directory in the directory structure, while the New Folderbutton creates a new directory on the server if your access rights permit it.
The Browse function is only available on servers which support the following protocols:
· FTP· HTTP and HTTPS, if the server supports WebDAV· or servers supporting WebDAV
Password protected serversIf the server you connect to is password protected the following dialog box appears. Enter therequired data and click the OK button to connect. You can also enter these data in the User andPassword fields of the Open URL dialog box, the Save check box, supplies these for the logonattempt.
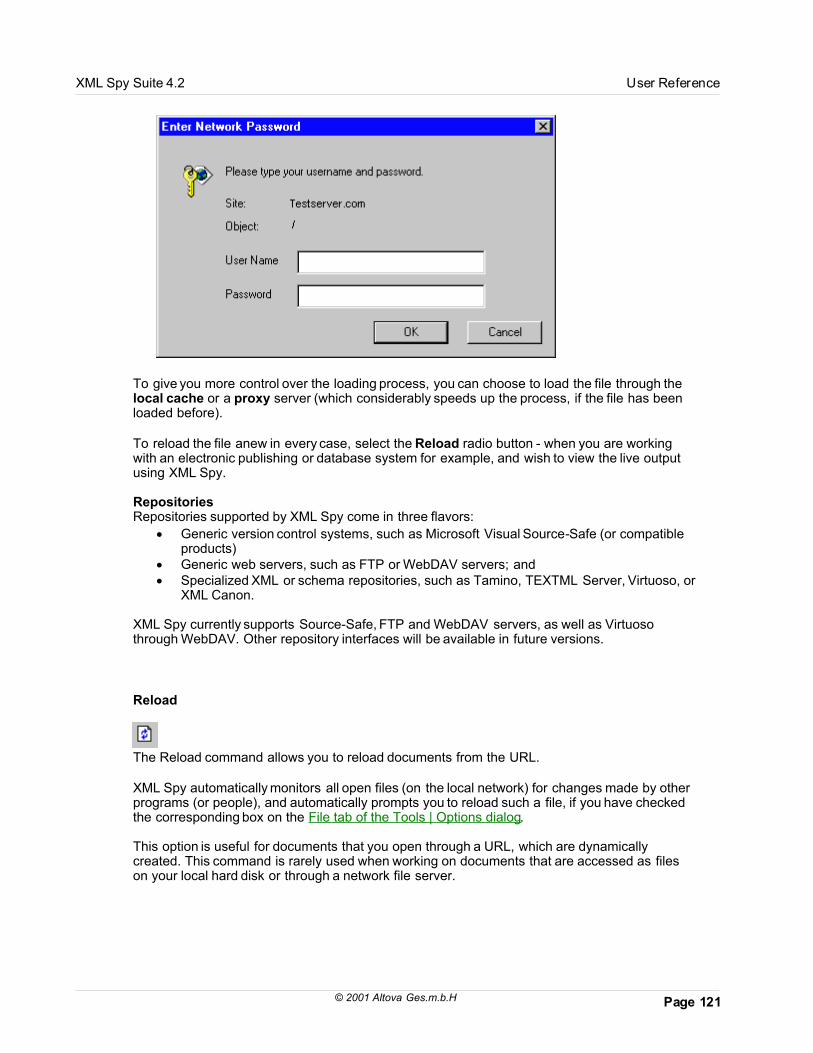
Page 121© 2001 Altova Ges.m.b.H
XML Spy Suite 4.2 User Reference
To give you more control over the loading process, you can choose to load the file through thelocal cache or a proxy server (which considerably speeds up the process, if the file has beenloaded before).
To reload the file anew in every case, select the Reload radio button - when you are workingwith an electronic publishing or database system for example, and wish to view the live outputusing XML Spy.
RepositoriesRepositories supported by XML Spy come in three flavors:
· Generic version control systems, such as Microsoft Visual Source-Safe (or compatibleproducts)
· Generic web servers, such as FTP or WebDAV servers; and· Specialized XML or schema repositories, such as Tamino, TEXTML Server, Virtuoso, or
XML Canon.
XML Spy currently supports Source-Safe, FTP and WebDAV servers, as well as Virtuosothrough WebDAV. Other repository interfaces will be available in future versions.
Reload
The Reload command allows you to reload documents from the URL.
XML Spy automatically monitors all open files (on the local network) for changes made by otherprograms (or people), and automatically prompts you to reload such a file, if you have checkedthe corresponding box on the File tab of the Tools | Options dialog.
This option is useful for documents that you open through a URL, which are dynamicallycreated. This command is rarely used when working on documents that are accessed as fileson your local hard disk or through a network file server.

Page 122
XML Spy Suite 4.2 User Reference
Encoding...
The "Encoding..." command lets you view the current encoding of a file and select a differentencoding when saving the current document the next time.
If you select a different encoding than the one in use before, the encoding-specification in theXML-declaration in the prolog will be adjusted accordingly. For 16-bit and 32-bit per characterencodings (UTF-16, UCS-2, and UCS-4) you can also specify the byte-order to be used for thefile.
You can also enter the new encoding into the encoding-specification of the XML-declaration.When saving a document, XML Spy automatically checks the encoding-specification and opensa dialog box if it cannot recognize the encoding name entered by the user.
If your document contains characters that cannot be represented in the selected encoding, youwill get a warning message as soon as you save your file.
Close
The "Close" command closes the active document window. If the file was modified (the filename is appended with an asterisk "*" in the title bar ), you will be asked if you wish to save thefile first.
Close All
The "Close All" command closes all open document windows. If any document has beenmodified (asterisk "*" appended to the file name in the title bar), you will be asked if you wish tosave the file first.
Save
The "Save" command saves the contents of the active document to the file it has been openedfrom.
When saving a document in XML Spy, the file is automatically checked for well-formedness. AllXML documents must be well-formed � otherwise they could not be interpreted by any otherXML application. The XML-Declaration is also checked for an encoding specification and it is

Page 123© 2001 Altova Ges.m.b.H
XML Spy Suite 4.2 User Reference
applied to the document when the file is saved.
You can optionally have XML Spy automatically validate a document upon saving (this can bedefined in the File tab on the Tools | Options dialog).
If a validation error occurs, XML Spy will bring up a popup message with a detailed errorexplanation and will highlight the offending item. You can then choose to fix the problem or savethe document as is. In the latter case, you will be prompted to correct the error the next time youopen the file with XML Spy.
Save As...
The "Save As..." command shows the familiar Windows "Save as..." dialog box to prompt for thename and location of the file that is to be saved. The same checks and validations occur as forthe "Save" command.
Save to URL...
The "Save to URL..." command allows you to save non-local files to a specified URL (uniformresource locator) address.
To save an XML document to a URL address:1. Make sure the file you want to save is active in the XML Spy main window.2. Select the menü option File | Save to URL3. Click the Browse button to see and navigate the directory structure of the server.4. Enter the file name in the URL field, or mark the file in the "Available files" list box, if you
want to overwrite it.

Page 124
XML Spy Suite 4.2 User Reference
The Browse function is only available on servers which support the following protocols:· FTP· HTTP and HTTPS, if the server supports WebDAV· or servers supporting WebDAV
Password protected serversIf the server you connect to is password protected, enter the required data and click the OKbutton to connect. You can also enter these data in the User and Password fields. The Savecheck box, supplies the password data for the logon attempt.
RepositoriesRepositories supported by XML Spy come in three flavors:
· Generic version control systems, such as Microsoft Visual Source-Safe (or compatibleproducts)
· Generic web servers, such as FTP or WebDAV servers; and· Specialized XML or schema repositories, such as Tamino, TEXTML Server, Virtuoso, or
XML Canon.
XML Spy currently supports Source-Safe, FTP and WebDAV servers, as well as Virtuosothrough WebDAV. Other repository interfaces will be available in future versions.
Save All
The "Save All" command saves all modifications that have been made to any open documents.The command is useful if you edit multiple documentations simultaneously.
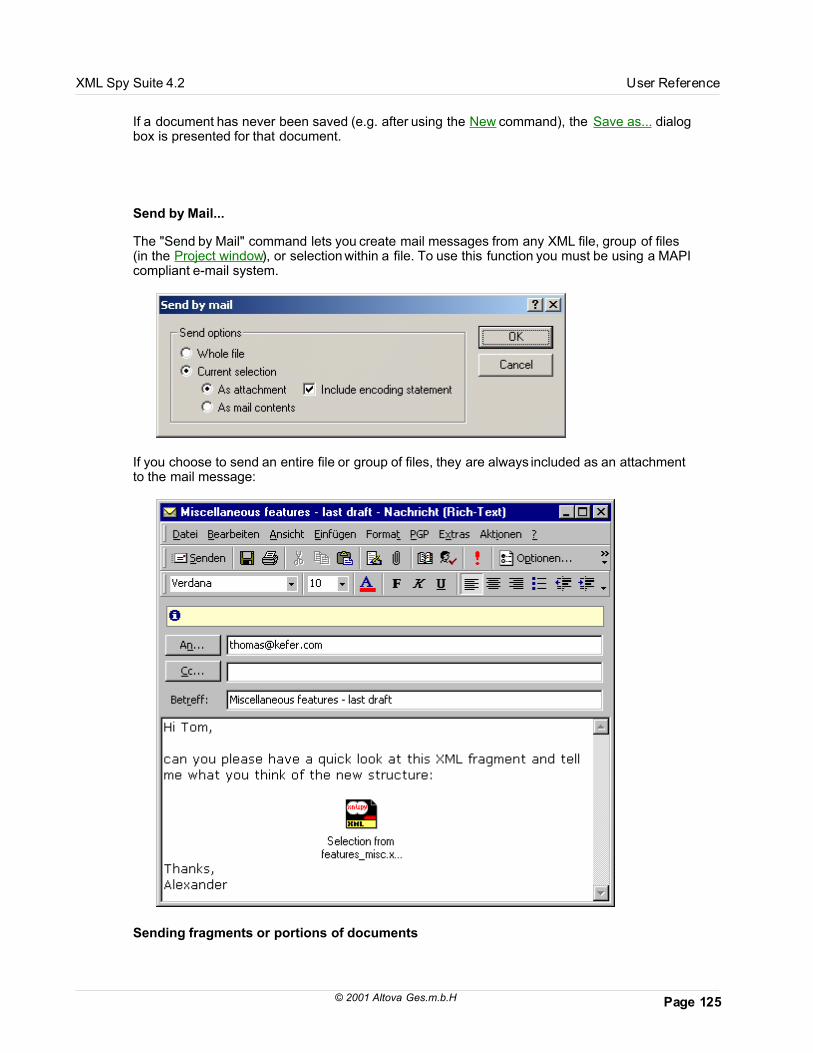
Page 125© 2001 Altova Ges.m.b.H
XML Spy Suite 4.2 User Reference
If a document has never been saved (e.g. after using the New command), the Save as... dialogbox is presented for that document.
Send by Mail...
The "Send by Mail" command lets you create mail messages from any XML file, group of files(in the Project window), or selection within a file. To use this function you must be using a MAPIcompliant e-mail system.
If you choose to send an entire file or group of files, they are always included as an attachmentto the mail message:
Sending fragments or portions of documents

Page 126
XML Spy Suite 4.2 User Reference
When you want to send a fragment of an XML file, select the elements you wish to send ineither Enhanced Grid View or Text View.
XML Spy gives you the choice of either creating an attachment file that contains only yourcurrent selection or simply sending the selection as XML text in the contents of the mailmessage.
Sending URLs by mailWhen you send an URL (from the project window) you are prompted if you want to first retrievethe document referred to by the URL and then send the file as an attachment, or if you wish tojust include the URL so that the recipient of your message can access the document throughthe URL:
Print...
The "Print..." command opens the "Print" dialog box where you can control what appears on theprintout. This dialog box contains different items, depending on the current view mode.
Enhanced Grid View options:
· The "Types" group box allows you to select the items you wish to appear in the output.You can hide comments as well as processing instructions or DTD items. For anexplanation of the item types, please refer to the XML specification.
· The "What" group box allows you to print the entire file or just the current selection.· The "Expand" group box allows you to print the document as is, or as a document with
all child elements expanded fully.

Page 127© 2001 Altova Ges.m.b.H
XML Spy Suite 4.2 User Reference
· The "Contents" group box you can decide to print the contents of all elements in adocument, or you may also print only those elements that form the hierarchical "tree"structure of the document.This should, however, not be confused with the optional tree view on the left side ofeach document window, which is only used as a navigation aid on the screen andcannot be printed.
· In the "If contents are wider than page" group box you can decide what to do if thedocument is larger than one page of paper.
- The "Split pages" option, prints the entire document in its regular size and splits thecontents on as many pages (both horizontally and vertically) as are required. Thesepages can later be glued together to form a poster.
- The "First page" option, is useful if your page is slightly narrow and most of the importantinformation is contained on the left side, anyway. This will result in output that is splitinto vertical pages (as necessary). Only the first page is printed horizontally - thedocument is printed as one huge vertical strip.
- The "Shrink horizontally" option, reduces the size of the output, until it fits horizontally onthe page. The output may, however, still span several pages vertically and is splitaccordingly.
- The "Shrink both" option, shrinks the document in both directions until it fits exactly on onesheet, thus making it useful for overviews.
· The "Print" button prints the document with the selected options.· The "Preview" button opens a print preview window that lets you view the final output
before committing it to paper.· The "Print Setup" button opens the "Print Setup" dialog box and allows you to adjust the
paper format, orientation, and other printer options for this print job only.
If you choose the Preview button, XML Spy will show a miniature image of the pages to beprinted:

Page 128
XML Spy Suite 4.2 User Reference
You can navigate within the preview mode using the "Next Page" and "Prev Page" buttons or"Zoom In" to take a close look at some details.
The "Print..." button lets you print the pages, whereas the "Close" button allows you to return tothe previous dialog box without starting the print process.
Print Setup...
The "Print Setup..." command, displays the printer-specific "Print Setup" dialog box, enablingyou to set the paper format, orientation, and other printer options for all successive print jobs.

Page 129© 2001 Altova Ges.m.b.H
XML Spy Suite 4.2 User Reference
This is an example using an HP LaserJet 4 printer attached to the parallel port (LPT1:).
Most Recently Used Files
The list of most recently used files, shows the file name and path information for the nine mostrecently used files, which you can select with the mouse.
To access these files using the keyboard, press:ALT+F,1 to open the File menu, and select the first file in the list.
Exit
The exit command is used to quit XML Spy when you are finished working with your documents.If you have any open files with unsaved changes, XML Spy will automatically prompt you to savethese changes.

Page 130
XML Spy Suite 4.2 User Reference
XML Spy also saves modifications you have made to program settings, as well as informationabout the most recently used files and projects to the Registry, a message box appears duringthis process.

Page 131© 2001 Altova Ges.m.b.H
XML Spy Suite 4.2 User Reference
Edit Menu
The Edit menu contains all commands relevant to editing operations within XML Spy in the ordercommon to most Windows software products.
In addition to the standard Undo, Redo, Cut, Copy, Paste, Delete, Select All, Find, Find nextand Replace commands, XML Spy offers special commands to:
· copy the selection to the clipboard as XML-Text,· Copy as structured text, or· copy an XPath selector to the selected item to the clipboard.
All commands can be applied while editing text, as well as while operating on whole items oreven discontinuous selections of more than one item.
Undo
Hotkey: CTRL + Z
The "Undo" command contains support for unlimited levels of Undo! Every action in XML Spycan be undone and it is possible to undo one command after another. The Undo history isretained after using the "Save" command, enabling you go back to a state the document was inbefore you saved your changes.
Please note:when you have turned on dynamic syntax coloring updates in the Text View and youroperating system is using RichEdit 2.0 (i.e. earlier versions of Windows 95/98 and

Page 132
XML Spy Suite 4.2 User Reference
Windows NT 4.0), syntax coloring changes appear as undoable operations. If you wantto avoid this, please update to RichEdit 3.0 or disable the dynamic syntax coloringupdate feature (for further information please see thebackground information on the RichEdit Component).
Redo
Hotkey: CTRL + Y
The "Redo" command allows you to redo previously undone commands � thereby giving you acomplete history of the work you have completed. You can step back and forward through thishistory using the Undo and Redo commands.
Cut
Hotkey: Shift + Delete, or CTRL + X
The Cut command copies the selected text or items to the clipboard and deletes them from theirpresent location.
Copy
Hotkey: CTRL + C
The Copy command copies the selected text or items to the clipboard. This can be used toduplicate data within XML Spy or to move data to another application.
Please note:XML Spy provides two different commands for copying elements to the clipboard in atextual form: Copy as XML-Text and Copy as Structured Text.
You can use the Editing tab on the Tools | Options dialog, to choose which operation should beperformed when you use the copy command on the Edit menu or the Ctrl-C shortcut.
Paste
Hotkey: CTRL + V
The Paste command inserts the contents of the clipboard at the current cursor position.
Delete
Keyboard: Del.
The Delete command deletes the currently selected text or items without placing them in the

Page 133© 2001 Altova Ges.m.b.H
XML Spy Suite 4.2 User Reference
clipboard.
Copy as XML-Text
The "Copy as XML-Text command lets you exchange data easily with other products that allowdata manipulation on the XML source layer.
While editing your document in Enhanced Grid View, you may occasionally want to copy someelements to the clipboard in their XML-Text representation:
<row> <para align="left"> <bold>Check the FAQ</bold> </para> <para> <link mode="internal"> <link_section>support</link_section> <link_subsection>faq30</link_subsection> <link_text>XML Spy 4.0 FAQ</link_text> </link> <link mode="internal"> <link_section>support</link_section> <link_subsection>faq25</link_subsection> <link_text>XML Spy 3.5 FAQ</link_text> </link> </para> </row>
This command automatically formats text using the currently active settings for saving a file.These settings can be modified in the "Save File" section of theFile tab of the Tools | Options dialog).
Copy as Structured Text
The " Copy as Structured Text" command copies elements to the clipboard as they appear onscreen. This command is useful for copying table-like data from the Enhanced Grid View as wellas the integrated Database/Table View.
The copied data can be used within XML Spy as well as third-party products, enabling you totransfer XML data to spreadsheet-like applications (e.g. Microsoft Excel).

Page 134
XML Spy Suite 4.2 User Reference
If you copy this table and paste it into Excel, the data will appear in the following way:
Please note:The results of this command depend on the way the information is currently laid out onscreen. Using the same XML data (that served as an example for the Copy as XML-Text command) in the Enhanced Grid view with the Table view active, would result inthe following:
row para

Page 135© 2001 Altova Ges.m.b.H
XML Spy Suite 4.2 User Reference
align bold link left Check the FAQ link mode link_section link_subsection link_text internal support faq30 XML Spy 3.5FAQ internal support faq25 XML Spy 2.5FAQ
The same data would be copied to the clipboard in the following format, with the Table viewdeactivated in the Enhanced Grid View.
row para align left bold Check the FAQ para link mode internal link_section support link_subsection faq30 link_text XML Spy 3.5 FAQ link mode internal link_section support link_subsection faq25 link_text XML Spy 2.5 FAQ
Copy XPath
The "Copy XPATH" command copies the corresponding XPath Selector to the clipboardenabling you to paste it into XSLT documents or any other file that uses XPath.
When using XSLT it is very often necessary to enter so-called Selector strings that help inselecting an element or attribute from within another XML document. Selector strings are builtaccording to the XPath definition, and XML Spy helps you to create XPath Selectors, byselecting the item you wish to address and choosing Copy XPATH from the Edit menu.
Pretty-Print XML Text
The "Pretty-Print XML Text command reformats your XML document in the text view, giving youa structured display. Note that the XML document must be well formed for this command towork.

Page 136
XML Spy Suite 4.2 User Reference
Select All
Hotkey: CTRL + A
The "Select All" command selects all the text of an item or all the items in an XML document,enabling successive commands to operate on the entire text or document at once.
Find...
Hotkey: CTRL + F
The "Find" command allows you to search for any occurrence of a text string in your XMLdocument. Depending on the view you are using, the Find command will have different options.
Enhanced Grid View find options:
· Enter the text string to be searched for in the "Find what" field, or use the combo box toselect from one of the last 10 search criteria. The Find what field can be left empty, tosearch for elements, attributes etc.
· The "Types" group box, allows you to select what kind of items you wish to include inthe search. This allows you to e.g. skip comments as well as processing instructions orDTD items. For an explanation of the item types, please refer to the XML specification.
· The "Search in" group box, allows you to define if you want to search for the specifiedtext in the (element or attribute) names of items, in their contents, or in both.
· The "Settings" group box, allows you to define a case-sensitive and/or match stringsearch.
· The "Where" group box, allows you to define your the scope of the search.· The "Direction" group box, allows you to specify the search direction.· The "Set all" button, activates all the check boxes in the Types group box, the "Clear all"
deactivates them.

Page 137© 2001 Altova Ges.m.b.H
XML Spy Suite 4.2 User Reference
Find next
Hotkey: F3
The "Find next" command repeats the last Find command to search for the next occurrence ofthe requested text.
Replace...
Hotkey: CTRL + H
The "Replace" command is only available in the Text and Enhanced Grid View, it features thesame options as the Find... command and allows you to replace the target text by any other textstring of your choice.
You can replace each item individually, or you can use the "Replace All" button to perform aglobal search and replace operation.
Please note:As a security precaution, the "Replace all" command shows each individual replacementoperation in the Enhanced Grid view. You can interrupt the operation by pressing the <ESC>key. Each replacement, is recorded as a single operation that can be undone individually.

Page 138
XML Spy Suite 4.2 User Reference
Project Menu
XML Spy uses the familiar tree view to manage multiple files or URLs in XML projects. Files andURLs can be grouped into folders by common extension or any arbitrary criteria, allowing foreasy structuring and batch manipulation.
Please see the description of the Project Window for a general introduction to the XML Spyproject management.
Please note:most project-related commands are also available on the context-menu, when you right-clickon any item in the project window.
New Project
This command creates a new project in XML Spy.
If you are currently working with another project, a prompt appears asking if you want to close alldocuments belonging to the current project.
Open Project...
This command opens an existing project in XML Spy.

Page 139© 2001 Altova Ges.m.b.H
XML Spy Suite 4.2 User Reference
If you are currently working with another project, the previous project is closed first.
Reload Project
This command reloads the current project from disk.
If you are working in a multi-user environment, it can sometimes become necessary to reloadthe project from disk, as other users might have made changes to the project.
Please note:XML Spy project (.spp) files are actually XML documents that you can edit like any regular XMLFile. This should only be attempted by advanced users!
Close Project
This command closes the active project.
If the project has been modified, you will be asked if you want to save the project first.
When a project, or XML file is modified, an asterisk "*" is automatically appended to the filename in the title bar.
Save Project
This command saves the current project.
Source control
XML Spy supports Microsoft Source-Safe and other compatible repositories.
A source control project is, however, not the same as a XML Spy project. Source controlprojects are extremely directory dependent, whereas XML Spy projects are logical constructionswithout direct directory dependence.
The following text uses Microsoft Source-Safe as the Source Control provider.

Page 140
XML Spy Suite 4.2 User Reference
Open project
The Open Project command mirrors (or creates) an existing source control project locally. Thiscommand can only take effect if an XML Spy project has previously been added to sourcecontrol provider using the menu option Add to Source Control.
1. Select a source control provider from the list of those installed on your PC, and confirmwith the OK button.
2. Enter your login data in the Source Control Login dialog box, and confirm with OK.

Page 141© 2001 Altova Ges.m.b.H
XML Spy Suite 4.2 User Reference
3. Define the directory to contain the local project.4. Select the Source control project you want to download.
If the folder you define does not exist at the location, a dialog box opens prompting youto create it there. Click Yes to confirm the new directory.
5. Click the OK button to download the source control project.
6. XML Spy now displays the Open dialog box, and attempts to find the XML Spy projectfile (*.spp) in the local directory. Click the project file you want to create, if there areseveral to choose from.
A message box might appear at this point stating that the directory is under sourcecontrol, offering you the option of checking it out or not.
7. Click the OK, if you want source control to be enabled.The Check out dialog box opens, allowing you to check out the *.spp file.
8. Add any comments to the file in the Comment text box and Click OK, to check out theXML Spy project file. Depending on your source control provider, the dialog box mightcontain extra command buttons. In this case the Advanced... button opens theAdvanced Check Out Options dialog box.

Page 142
XML Spy Suite 4.2 User Reference
The *.spp file is checked out, and all the XML files contained in the XML Spy project, are copiedto the local directory.
Result in XML Spy:The AltovaTest directory has been created locally, and all files included in the XML Spy projectare made available in the project window. You can now work with these files as you normally do.
Source control symbols in XML Spy
The red check mark denotes checked out, i.e. the AltovaTest project file has been checkedout.

Page 143© 2001 Altova Ges.m.b.H
XML Spy Suite 4.2 User Reference
The asterisk denotes that changes have been made to the file, and you will be prompted to saveit when you exit.
The lock symbol, at the top right corner the XML symbol, denotes that the file is under sourcecontrol, but is currently not checked out.
This URL document is part of the AltovaTest project but is not under source control.Documents opened via URL, cannot be placed under source control.
Enable Source code control
This command allows you to enable or disable source control for a project.
To disable source control for a project:1. Click on the project file or any other file in the project window.2. Select the menu option Project | Source control and deactivate the Enable Source
Code Control check box.
To provisionally disable source control for the project select YES.
To permanently disable source control for the project select NO.
Get Latest Version
This command gets the latest source control version of file you select.
The file is a copy of the source control file and is placed in your local working directory.

Page 144
XML Spy Suite 4.2 User Reference
Check Out
This command checks out the latest source control version of file(s) you select, and flags it as"checked out" for all other users.
Shortcut: Right click an item in the project window, and select "Check out" from the contextmenu.
The following items can be checked out:· Single files, click on the respective files (CTRL + click, for several)· XML Spy project folders, click on the folders (CTRL + click, for several)· XML Spy project, click on the project file icon.
The red check mark denotes that the file has been checked out.
Check In
This command checks in the previously checked out files, i.e. your locally updated files, andplaces them in the source control project.
Shortcut: Right click a checked out item in the project window, and select "Check in" from theContext menu.

Page 145© 2001 Altova Ges.m.b.H
XML Spy Suite 4.2 User Reference
The following items can be checked in:· Single files, click on the respective files (CTRL + click, for several)· XML Spy project folders, click on the folders (CTRL + click, for several)· A complete XML Spy project, click on the project file icon.
The lock symbol denotes that the file is under source control, but is currently not checked out.
Undo Check Out...
This command rejects changes made to previously checked out files, i.e. your locally updatedfiles, and retains the old files in the source control project.
Shortcut: Right click a checked out item in the project window, and select "Undo Check out"from the Context menu.
The Undo check out option can apply to the following items:· Single files, click on the respective files (CTRL + click, for several)· XML Spy project folders, click on the folders (CTRL + click, for several)· XML Spy project, click on the project file icon.

Page 146
XML Spy Suite 4.2 User Reference
Add to Source Control
This command adds an XML Spy project to your Source Control provider.
To add an XML project to the source control provider:1. Click the XML Spy project icon and select the menu option Project | Source control |
Add to Source control.2. Select your source control provider from the list box.3. Enter the source control login data.4. Select the source control project (directory) to which your XML project should be added,
and confirm with the OK button.
If the project does not exist, the following dialog box opens, prompting for moreinformation.

Page 147© 2001 Altova Ges.m.b.H
XML Spy Suite 4.2 User Reference
5. Select Yes to create the new project and NO to cancel.
6. Select the XML Spy project files that you want to be placed under control of the sourcecontrol provider, and confirm with OK.
The files are transferred to the source control provider and are now under source control. Thesefiles are marked with the "lock symbol" in the project window. The files you did not transfer donot have the lock symbol (datatypes.dtd and XMLschema.dtd in this example).

Page 148
XML Spy Suite 4.2 User Reference
Remove from Source Control
This command removes previously added files, from the source control provider.
The following items can be removed from source control:· Single files, click on the respective files (CTRL + click, for several)· XML Spy project folders, click on the folders (CTRL + click, for several)· A complete XML Spy project, click on the project file icon.
Show History
This command displays the history of a file, it can only be used on single files.
To show the history of a file:1. Click on the file in the project window2. Select the menu option Project | Source control | Show history.
A dialog box prompting for more information may appear at this time (this example usesMS Source-Safe).
3. Select the appropriate entries and confirm with OK.

Page 149© 2001 Altova Ges.m.b.H
XML Spy Suite 4.2 User Reference
Show Differences
This command displays the differences between the file currently in the source controlrepository, and the file of the same name that you have checked out.
This command can only be used on single files.
To show the differences between two files:Having checked out a file from your project,
1. Click on the file in the project window.2. Select the menu option Project | Source control | Show Differences.
A dialog box prompting for more information may appear at this time.
3. Select the appropriate entries and confirm with OK.

Page 150
XML Spy Suite 4.2 User Reference
The differences between the two files are highlighted in both windows (this exampleuses MS Source-Safe).
Properties
This command displays the properties of the currently selected file, and is dependent on thesource control provider you use.
This command can only be used on single files.

Page 151© 2001 Altova Ges.m.b.H
XML Spy Suite 4.2 User Reference
Refresh Status
This command refreshes the status of all project files independent of their current status.
Run Native Interface
This command starts your source control software with its usual user interface.
Add Files to Project...
This command adds files to the current project.
Use this command to add files to any folder in your project. You can either select a single file orany group of files (using CTRL + click) in the Open dialog box.
If you are adding files to the project, they will be distributed among the respective folders basedon the File Type Extensions defined in the Project Properties dialog box.

Page 152
XML Spy Suite 4.2 User Reference
Add URL to Project...
This command adds an URL to the current project.
XML Spy also allows you to add URLs to a project. Whenever a batch operation is performed ona URL or on a folder that contains a URL item, XML Spy will retrieve the document from theURL , and perform the requested operation.
Add Active File to Project
This command adds the active file to the current project.
If you have just opened a file from your hard disk or through an URL, you can add the file to thecurrent project using this command.
Add Active And Related Files to Project
This command adds the currently active XML document and all related files to the project.
When working on an XML document that is based on a DTD or Schema, XML Spy also lets youadd both the XML document and all related files (e.g. the DTD and all external parsed entities itrefers to) to the current project.
Add Folder to Project...
This command adds a new folder to the current project.
Use this command to add a new folder to the current project. You can also access thiscommand from the context-menu when you right-click on a folder in the project window.
Project Properties...
The Properties command lets you define important settings for any of the specific folders in yourproject.
To define the Project Properties for a folder:1. Right click on the folder you want to define the properties for, and2. Select the Properties... command from the context menu.
Please note:if your project file is under source control, a prompt appears asking if you want to checkout the project file (*.spp). Click OK, if you want to edit settings and be able to savethem.

Page 153© 2001 Altova Ges.m.b.H
XML Spy Suite 4.2 User Reference
File extensionsThe File extensions help to determine the automatic file-to-folder distribution that occurs whenyou add new files to the project (as opposed as to one particular folder).
ValidateDefine the DTD or Schema document that should be used to validate all files in the currentfolder (Main Pages in this example).
XSL transformation of XML filesYou can define the XSL Stylesheet to be used for XSL Transformation of all files in the folder.
If you are developing XSL Stylesheets yourself, you can also assign an example XML documentto be used to preview the XSL Stylesheet in response to an XSL Transformation commandissued from the stylesheet document, instead of the XML instance document.
Destination files of XSL transformationFor batch XSL Transformations, you can define the destination directory the transformed filesshould be placed in.
If you have added one file or URL to more than one folder in your project, you can use theproperties command to set the default folder, whose settings should be used when you chooseto validate or transform the file in non-batch mode.
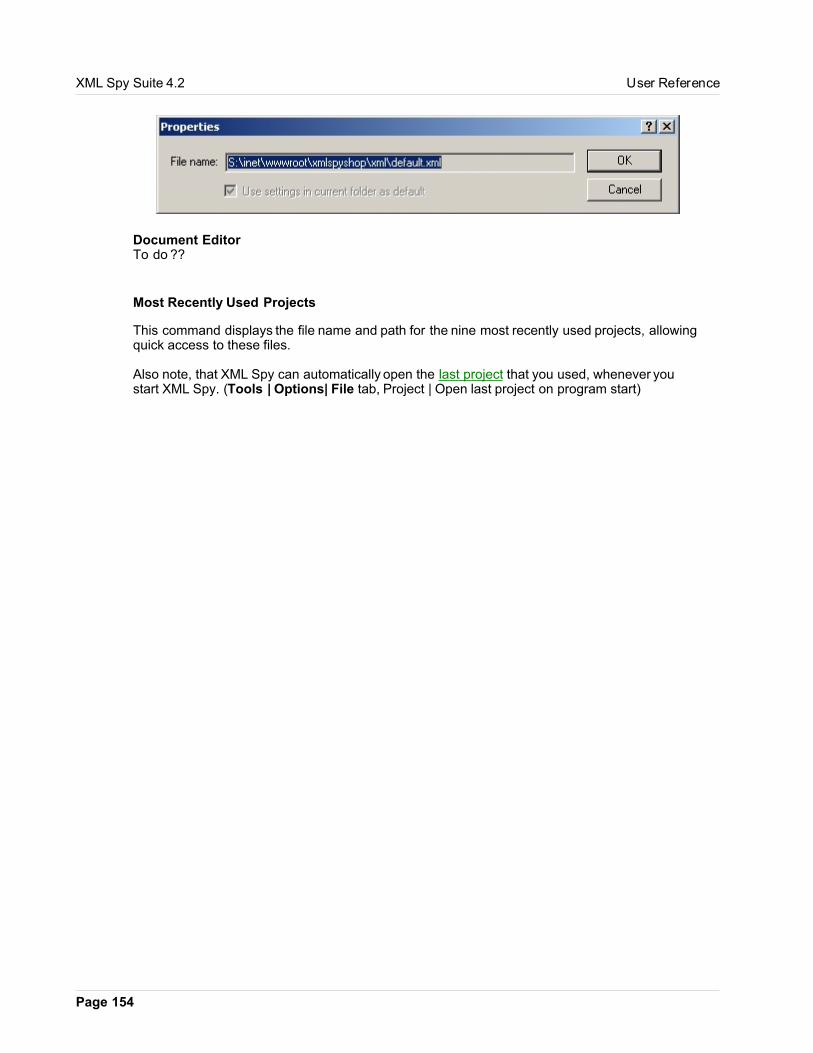
Page 154
XML Spy Suite 4.2 User Reference
Document EditorTo do ??
Most Recently Used Projects
This command displays the file name and path for the nine most recently used projects, allowingquick access to these files.
Also note, that XML Spy can automatically open the last project that you used, whenever youstart XML Spy. (Tools | Options| File tab, Project | Open last project on program start)

Page 155© 2001 Altova Ges.m.b.H
XML Spy Suite 4.2 User Reference
XML Menu
The XML menu contains all commands necessary for manipulating XML documents with XMLSpy. You will find commands to insert or append elements, modify the element hierarchy, andset a namespace prefix for items.
You can also check documents for well-formedness or validate them against any Schema orDTD.
Insert
The Insert command inserts a new item directly before the currently selected one. In case of anattribute, it may appear a few lines before the current item, as all attributes must immediatelyfollow their parent element.

Page 156
XML Spy Suite 4.2 User Reference
Insert Attribute
Hotkey: CTRL+SHIFT+I
This command inserts a new attribute before the selected item.
If the current selection is any element other than the first element, the attribute is inserted beforethe first element to satisfy the well-formedness constraints of XML.
Insert Element
Hotkey: CTRL+SHIFT+E
This command inserts a new element before the selected item.
If the current selection is an attribute, the new element is inserted before the first element tosatisfy the well-formedness constraints of XML.
Insert Text
Hotkey: CTRL+SHIFT+T
This command inserts new text content before the selected item.
If the current selection is an attribute, the text is inserted before the first element to satisfy thewell-formedness constraints of XML.
Page 157© 2001 Altova Ges.m.b.H
XML Spy Suite 4.2 User Reference
Insert CDATA
Hotkey: CTRL+SHIFT+D
This command inserts a new CDATA block before the selected item.
If the current selection is an attribute, the CDATA is inserted before the first element to satisfythe well-formedness constraints of XML.
Insert Comment
Hotkey: CTRL+SHIFT+M
This command inserts a new comment before the selected item.
If the current selection is an attribute, the Comment is inserted before the first element to satisfythe well-formedness constraints of XML.
Insert XML
This command inserts new XML declaration<?xml version="1.0" encoding="UTF-8"?> before the selected item.
Please note:Each XML document may only contain one XML declaration and it must appear at thevery top of the file.
Insert Processing Instruction
This command inserts a new Processing Instruction (PI) before the selected item.
If the current selection is an attribute, the PI is inserted before the first element to satisfy thewell-formedness constraints of XML.
Insert DOCTYPE
This command inserts a Document Type Declaration - or more precisely, the DOCTYPE blockfor the internal subset of a Document Type Declaration (DTD) - before the selected item.
Please note:The DOCTYPE block may only appear at the top of an XML instance documentbetween the XML Declaration and the root element of the XML document.
You could also use the Assign DTD command instead, which lets you create a DOCTYPEstatement that refers to an external DTD document.

Page 158
XML Spy Suite 4.2 User Reference
Insert ExternalID
This command inserts an external ID (SYSTEM or PUBLIC) into a DOCTYPE declaration,before the selected item.
Insert ELEMENT
This command inserts an element declaration into a DOCTYPE declaration or into an externalDocument Type Definition (DTD), before the selected item.
Insert ATTLIST
This command inserts an attribute list declaration into a DOCTYPE declaration or into anexternal Document Type Definition (DTD), before the selected item.
Insert ENTITY
This command inserts an entity declaration into a DOCTYPE declaration or into an externalDocument Type Definition (DTD) before the selected item.
Insert NOTATION
This command inserts a notation declaration into a DOCTYPE declaration or into an externalDocument Type Definition (DTD) before the selected item.
Append
The Append command appends an item as the last item inside the parent of the currentlyselected item. This is useful whenever you want to add more than one item in sequence.

Page 159© 2001 Altova Ges.m.b.H
XML Spy Suite 4.2 User Reference
Append Attribute
Hotkey: CTRL+I
This command appends a new attribute after the last element within the same parent.
Append Element
Hotkey: CTRL+E
This command appends a new element after the last element within the same parent.
Append Text
Hotkey: CTRL+T
This command appends a new text content block after the last element within the sameparent.
Append CDATA
Hotkey: CTRL+D

Page 160
XML Spy Suite 4.2 User Reference
This command appends a new CDATA block after the last element within the same parent.
Append Comment
hotkey: CTRL+M
This command appends a new comment after the last element within the same parent.
Append XML
This command inserts a new XML declaration<?xml version="1.0" encoding="UTF-8"?> as the first item in a document.
Please note:Each XML document may only contain one XML declaration and it must appear at thevery top of the file.
Append Processing Instruction
This command appends a new Processing Instruction (PI) after the last element within thesame parent.
Append DOCTYPE
This command appends a new Document Type Declaration - or more precisely, the DOCTYPEblock for the internal subset of a Document Type Declaration (DTD) - after the last elementwithin the same parent.
Please note:A DOCTYPE block may only appear at the top of an XML instance document betweenthe XML Declaration and the root element of the XML document.
Append ExternalID
This command appends an external ID (SYSTEM or PUBLIC) in a DOCTYPE declaration afterthe last element of the same parent.
Append ELEMENT

Page 161© 2001 Altova Ges.m.b.H
XML Spy Suite 4.2 User Reference
This command appends an element declaration in a DOCTYPE declaration or in an externalDocument Type Definition (DTD).
Append ATTLIST
This command appends an attribute list declaration in a DOCTYPE declaration or in anexternal Document Type Definition (DTD).
Append ENTITY
This command appends an entity declaration in a DOCTYPE declaration or in an externalDocument Type Definition (DTD).
Append NOTATION
This command appends a notation declaration in a DOCTYPE declaration or in an externalDocument Type Definition (DTD).
Add Child
The Add Child command adds a child item to the currently selected element. This is useful foradding attributes to an item, or creating child elements.

Page 162
XML Spy Suite 4.2 User Reference
Add Child Attribute
Hotkey: CTRL+ALT+I
This command inserts a new attribute as a child of the selected item.
Add Child Element
Hotkey: CTRL+ALT+E
This command inserts a new element as a child of the selected item.
Add Child Text
Hotkey: CTRL+ALT+T
This command inserts new text content as a child of the selected item.
Add Child CDATA
Hotkey: CTRL+ALT+D
This command inserts a new CDATA block as a child of the selected item.
Add Child Comment
Hotkey: CTRL+ALT+M
This command inserts new Comment as a child of the selected item.
Add Child XML
This command is only available, when you are looking at a totally empty file...
This command inserts a new XML declaration<?xml version="1.0" encoding="UTF-8"?> as a child of the selected item.
Add Child Processing Instruction

Page 163© 2001 Altova Ges.m.b.H
XML Spy Suite 4.2 User Reference
This command inserts a new Processing Instruction (PI) as a child of the selected item.
Add Child DOCTYPE
This command is only available, if you are looking at a total empty file.
This command inserts a Document Type Declaration - or more precisely, the DOCTYPEblock for the internal subset of a Document Type Declaration (DTD) - as a child of the selecteditem.
Please note:A DOCTYPE block may only appear at the top of an XML instance document between the XMLDeclaration and the root element of the XML document.
Add Child ExternalID
This command inserts an external ID (SYSTEM or PUBLIC) into a DOCTYPE declaration asa child of the selected item.
Add Child ELEMENT
This command inserts an element declaration into a DOCTYPE declaration or into an externalDocument Type Definition (DTD) as a child of the selected item.
Add Child ATTLIST
This command inserts an attribute list declaration into a DOCTYPE declaration or into anexternal Document Type Definition (DTD) as a child of the selected item.
Add Child ENTITY
This command inserts an entity declaration into a DOCTYPE declaration or into an externalDocument Type Definition (DTD) as a child of the selected item.
Add Child NOTATION

Page 164
XML Spy Suite 4.2 User Reference
This command inserts a notation declaration into a DOCTYPE declaration or into an externalDocument Type Definition (DTD) as a child of the selected item.
Convert To
The convert to command converts an item to a different item type. Depending on the location ofthe item (not on its current kind), some or all options on the item type submenu may or may notbe available. This operation can only be performed on one individual item, not on an elementthat contains any child elements.
If the operation would result in the loss of data (e.g. converting an attribute to a comment loosesthe attribute name), a brief warning dialog box will appear.
Convert To Attribute
This command converts the selected item into a new attribute.
Convert To Element
This command converts the selected item into an element.
Convert To Text
This command converts the selected item into text content.

Page 165© 2001 Altova Ges.m.b.H
XML Spy Suite 4.2 User Reference
Convert To CDATA
This command converts the selected item into a CDATA block.
Convert To Comment
This command converts the selected item into a comment.
Convert To XML
This command converts the selected item to an XML declaration<?xml version="1.0" encoding="UTF-8"?>.
Please note:Each XML document may only contain one XML declaration and it must appear at thevery top of the file.
Convert To Processing Instruction
This command converts the selected item to a new Processing Instruction (PI)
Convert To DOCTYPE
This command converts the selected item to a Document Type Declaration - or moreprecisely, the DOCTYPE block for the internal subset of a Document Type Declaration (DTD).
Please note:A DOCTYPE block may only appear at the top of an XML instance document between the XMLDeclaration and the root element of the XML document.
Convert To ExternalID
This command converts the selected item to an external ID (SYSTEM or PUBLIC) in aDOCTYPE declaration.
Convert To ELEMENT
This command converts the selected item to an element declaration in a DOCTYPEdeclaration or in an external Document Type Definition (DTD).
Convert To ATTLIST
This command converts the selected item to an attribute list declaration in a DOCTYPEdeclaration or in an external Document Type Definition (DTD).

Page 166
XML Spy Suite 4.2 User Reference
Convert To ENTITY
This command converts the selected item to an entity declaration in a DOCTYPE declarationor in an external Document Type Definition (DTD).
Convert To NOTATION
This command converts the selected item to a notation declaration in a DOCTYPEdeclaration or in an external Document Type Definition (DTD).
Move Left
Hotkey: CTRL+L
This command moves the current element to the left by one level, thereby changing a childelement into a sibling of its parent. This is also often referred to as the "Promote" command.
Move Right
Hotkey: CTRL+R
This command moves the current element to the right by one level, thereby turning it into a childelement of the element directly above. This is also often referred to as the "Demote" command.
Enclose in Element
When editing textual data, it is often convenient to insert a new sub-element that contains sometext, which is already present in the document.
The Enclose in Element command lets you accomplish this with any text selection withinanother element. Once you select this command from the menu or toolbar, the currentlyselected text is cut from its parent element and inserted into a newly created child element.
If you are editing a document based on a Schema or DTD, you will automatically be presentedwith a list of valid choices for the kind of element you are allowed to insert in this position.
Check Well-Formedness
This command checks the document for well-formedness by the definitions of the XML 1.0specification.
Every XML document must be well-formed and therefore XML Spy automatically checks forwell-formedness whenever a document is opened, saved, or the view mode is switched fromText to any other view.
If the well-formedness check succeeds, a brief message is displayed at the bottom of the mainwindow:

Page 167© 2001 Altova Ges.m.b.H
XML Spy Suite 4.2 User Reference
If any error is encountered during the well-formedness check, the source of the problem ishighlighted and a corresponding error message is shown:
It is generally not permitted to save a mal-formed XML document, but XML Spy gives you a"Save anyway" option when the automatic well-formedness check upon saving fails. This isuseful, when you want to suspend your work temporarily and resume it later, without being ableto make the intermediate version of the file well-formed.
The Check well-formedness command normally operates on the active main window. You canalso use the Check well-formedness command on any file, folder, or group of files in the activeproject window. Click on the respective folder, and then on the "Check well-formedness" icon.
Validate
This command validates an XML document against the rules set forth in its Schema orDocument Type Definition (DTD) or it can validate any XML Schema or DTD against the rulesset forth in the corresponding specification.
XML Spy uses its built-in incremental validating parser that supports all major Schema dialects,such as DTD, DCD, XDR, XML-Data, BizTalk, and the new W3C XML Schema DefinitionLanguage (XSD) .
If the validation succeeds, a brief message is displayed at the bottom of the main window:
If an error is encountered during the validation, the source of the problem is highlighted and acorresponding error message is shown:
The Validate command also automatically includes a well-formedness check, so there is noneed to first use the Check well-formedness command manually before validating a file.
Please note that you can use this command to validate XML instance documents and forvalidating XML schemas or DTDs.

Page 168
XML Spy Suite 4.2 User Reference
This command normally operates on the active main window, but you can also use the Validatecommand on any file, folder, or group of files in the active project window, where you can alsodefine the Schema or DTD to validate with on a per-folder basis in the project properties. Clickon the respective folder, and then on the "Validate" icon.
Validate XML
When you validate an XML document, XML Spy first tries to locate any reference to a supportedschema dialect within the document. It then loads the corresponding schema or DTD intomemory, and uses its definitions to validate your XML instance document.
Once the Schema or DTD has been loaded into memory, XML Spy also provides you withintelligent editing functions in the Info Window and Entry-Helpers.
As long as the XML instance document is open, XML Spy will also keep the Schema or DTD inmemory (see the Flush Memory Cache command on the DTD/Schema menu).
Validate Schema
XML Spy supports all major Schema dialects, such as DTD, DCD, XDR, XML-Data, BizTalk,and the new W3C XML Schema Definition Language (XSDL)
Validate these schemas against their specification by clicking on the Validate button. You canthen be sure that they can be used to create, edit, and validate XML instance documents thatare based on these schemata.
Update Entry-Helpers
This command updates the Entry-Helper windows, by reloading the underlying DTD or Schema.
If you have modified the Schema or DTD that an open XML document is based upon, it isadvisable to reload that Schema or DTD to update the intelligent editing information (such as theEntry-Helper and Info windows) presented in the XML document, to reflect your changes.
Namespace Prefix...
This command lets you set the namespace prefix (identifier) for a group of selected elements(including their child elements).

Page 169© 2001 Altova Ges.m.b.H
XML Spy Suite 4.2 User Reference
You can choose to set the namespace prefix on either elements, attributes, or both.
Please note:Attributes don't need to have the same prefix as their parent elements, since attributesalways inherit the element's namespace, if no prefix is given.

Page 170
XML Spy Suite 4.2 User Reference
DTD/Schema Menu
XML Spy contains many commands that let you operate with Schemas and Document TypeDefinitions (DTDs) efficiently.
You can:· Assign DTDs or Schemas to be used for validation with any XML instance document· Generate a Schema from an example XML document (or from a group of files in the
project window)· Convert between all major schema dialects, and
· Locate the definition of any element or attribute in the corresponding schema whileediting your XML documents.
· Generate a sample XML file based on an existing schema.
Assign DTD...
This command assigns a Document Type Definition (DTD) to an XML document to enableValidation and Intelligent editing.
The command opens the Assign File dialog to let you specify the DTD file you wish to assign,and inserts the required DOCTYPE statement into your XML document:
<!DOCTYPE main SYSTEM "http://link.xmlspy.com/spyweb.dtd">
Assign Schema...
This command assigns a Schema to an XML document to enable Validation and Intelligentediting.

Page 171© 2001 Altova Ges.m.b.H
XML Spy Suite 4.2 User Reference
The command opens the Assign File dialog to let you specify the XSD, XDR, or BizTalk schemafile you wish to assign, inserts the required namespace declaration attributes into your XMLdocument:
xmlns="http://www.xmlspy.com/schemas/icon/orgchart"xmlns:xsi="http://www.w3.org/1999/XMLSchema-instance"xsi:schemaLocation="http://www.xmlspy.com/schemas/icon/orgchart
http://schema.xmlspy.com/schemas/icon/orgchart.xsd"
The declarations generated by XML Spy depend on the Schema kind and - in case of the newW3C XML Schemas - also on the potential use of a targetNamespace in the Schemadocument.
Include another DTD...
This command allows you to include another Document Type Definition (DTD) or externalparsed entity into the internal subset of a document type definition, or in any DTD document.This is done by defining a corresponding external parsed entity declaration and using that entityin the following line:
<!ENTITY % navigation.dtd SYSTEM "S:\xml\navigation.dtd">%navigation.dtd;
The command opens the Assign File dialog to let you specify the DTD file you want to include inyour DTD.
Go to DTD
This command opens the Document Type Definition document (DTD) on which the currentXML document is based.
Go to Schema
This command opens the Schema document (XSD) on which the current XML document isbased.
Go to Definition
.
This command displays the exact definition of an element or attribute in the correspondingDocument Type Definition or Schema document.
To see the item definition in Enhanced Grid view:1. Click left on the item.2. Select the menu item DTD/Schema | Go to Definition, or click on the icon.

Page 172
XML Spy Suite 4.2 User Reference
To see the item definition in Schema design view:1. Use CTRL + Double click on the item you want to see the definition of, or2. Click the item and select menu option DTD/Schema | Go to Definition, or click on the
icon.
In both cases, the corresponding DTD or Schema file is opened, and the item definitionis highlighted.
Generate DTD/Schema...
This command generates a new DTD or Schema from an XML document (or from a set ofdocuments in the project window).
Use this function when you are defining a new schema or DTD, as it is often helpful to use anexample XML document as a starting point.
If you are targeting one of the modern schema kinds (e.g. XSD or BizTalk), XML Spy canautomatically detect datatypes (such as date, time, number, uri, etc.) being used in your XMLdocuments and create the corresponding restrictions in the schema.
XML Spy will also optionally detect typical enumeration scenarios, where an element or attribute

Page 173© 2001 Altova Ges.m.b.H
XML Spy Suite 4.2 User Reference
can only contain items from a predefined list of values. You can also decide how to representcomplex elements and how elements that only appear only once should be treated.
This command normally operates on the active main window, but you can also use theGenerate DTD/Schema command on any file, folder, or group of files in the activeproject window.
Convert DTD/Schema...
This command converts an existing DTD (or Schema) into an XML Schema compliant with theMay 2nd 2001 Recommendation, or any of the other available schema dialects.
Generate sample XML file
This command generates an XML file based on the currently active schema in the mainwindow.
Page 174
XML Spy Suite 4.2 User Reference
Generate non-mandatory attributesActivating this option generates all mandatory and non-mandatory attributes defined in theschema.
Generate non-mandatory elementsActivating this option generates all mandatory and non-mandatory elements defined in theschema.
Generate first choice of mandatory choiceActivating this option generates/inserts the first choice of a mandatory choice.
Generate "1" elements if marked repeatable in Schema/DTDActivating this option generates the number of repeatable elements you enter in the text box.
Fill elements and attributes with dataActivating this option inserts the data type descriptors/values for the respectiveelements/attributes. Eg. Boolean = 1, xsd:string = string, Max/Min inclusive = the value definedin the schema.
Flush Memory Cache
This command flushes all cached Schema and DTD documents from memory.
To speed up validation and intelligent editing, XML Spy caches all recently used DTD, externalparsed entity, and Schema documents in memory. Information from these documents is alsodisplayed, when you are using the Go to Definition command.
Use this command if memory is tight on your system, or if you have been using many differentdocuments based on different schemas recently.

Page 175© 2001 Altova Ges.m.b.H
XML Spy Suite 4.2 User Reference
Schema design Menu
The Schema design menu allows you to:· Define your schema settings· Save a component diagram· Generate Schema documentation in as much detail as you wish, and
· Define how much element information you want to display during editing.
Schema settings
This command lets you define the global schema settings.
You set the Default Element Form to Qualified or Unqualified. The same can be defined for theDefault Attribute form. These defaults can be changed for each element or form in the Detailsentry helper.
Enter the Block and Final defaults in the respective text boxes, and enter the schema versionnumber in the Version field.
Click on the "Target namespace" radio button, and enter the namespace if you want to includeit.

Page 176
XML Spy Suite 4.2 User Reference
You can see these settings if you switch to the Text view of XML Spy.
Save Diagram...
This command saves the component graphic (content model in the main window) in PNGformat.

Page 177© 2001 Altova Ges.m.b.H
XML Spy Suite 4.2 User Reference
Generate Documentation
This command generates detailed documentation about your schema.
Documentation is generated for each element using the settings you define in the dialog box.Related elements (child elements, complex types etc.) are hyperlinked, enabling you to navigatefrom element to element. The element symbols in the content model diagrams are alsohyperlinked, enabling you to see their definitions by clicking on them.
Schema documentation is also generated for schema components included in a schemadocument.
Output format:You can output your schema documentation in HTML or Word format.
Include:Select which items you want to include in the documentation: index (if you include otherschemas components) global elements, groups, complex types etc.
Details:Select the details you want to include in the documentation: diagram, attributes, facets, sourcecode etc. The Diagram option includes the graphical representation of each schema item in thedocument.

Page 178
XML Spy Suite 4.2 User Reference
Show result after export:Activating this option generates the documentation and displays it immediately after the exportprocess is complete. If you select HTML, the HTML document appears in the Browser view ofXML Spy. Selecting Word creates and displays the Word document.

Page 179© 2001 Altova Ges.m.b.H
XML Spy Suite 4.2 User Reference
Example 1:

Page 180
XML Spy Suite 4.2 User Reference
Example 2:Schema documentation showing the index and the included schema components from theaddress.xsd schema.
View config
This command allows you to configure the content model view.
The dialog box opens at the bottom right of the XML Spy window, giving you room to seechanges reflected in the content model immediately.
The settings you define here, apply to the schema documentation output as well the printeroutput.
To define the data to appear in the content model:
1. Click the Append or Insert icon to add a line.2. Select the parameter you want to display from the combo box.
The content model view is updated, showing the parameter(s) you selected.
To delete a line/parameter from the content model:1. Select the line you want to delete.
2. Click the Delete icon .

Page 181© 2001 Altova Ges.m.b.H
XML Spy Suite 4.2 User Reference
Single line settings:You can define if the lines are to contain single or double content, and the parameters to bedisplayed in each case. You can also define if the line is mandatory or only visible if it containsdata.
Please note:You can define the single/double setting for each line. Select the line you want toconfigure and click the single or double content radio button.
Common line settingsThis option toggles the line descriptions on and off.

Page 182
XML Spy Suite 4.2 User Reference
WidthsThese sliders enable you to set the min. and max. size of the element rectangles in the contentmodel view. Change the sizes if parameter text is not fully visible, or you want to standardizeyour display.
DistancesThese sliders let you define the horizontal and vertical distances between various elements onscreen.
Show in diagramThe Annotations check box toggles the display of annotation text on or off, as well as theannotation text width with the slider. You can also toggle the display of the substitution groupson or off.
Draw directionThese options define the orientation of the element tree on screen, horizontal or vertical.
The Load/Save button allows you to load and retrieve the settings you make here.The Predefined button, resets the display configuration to default values.The Clear all button empties the list box of all entries.
Content model editingYou can change element parameters/values directly in the content model.
· Double click the cell of the element (table) you want to edit and start entering data. If aselection is possible, a drop down list appears if not, enter the parameter or value and confirmthe entry with the Return key.
The entry helpers will be updated at this point, reflecting the data you entered.
Zoom
This command controls the zoom factor of the content model view.
Drag the slider to see to change the zoom factor directly, or click in the entry box and enter thenumeric value.

Page 183© 2001 Altova Ges.m.b.H
XML Spy Suite 4.2 User Reference
Display all Globals
This command displays the global components in the Schema overview, and is only availablewhen you are viewing the content model of a component.
Alternatively:
· Click the "Show Globals" icon to return to the Schema Overview.
Display Diagram
This command displays the content model of the currently selected component.
To see the content model of a component:
· Click on the icon next to the component you want to display, or· Select the menu option Schema design | Display Diagram, or· Double click on a component name in the "Component Navigator" (Top right entry
helper).
Enable Oracle Schema extensions
XML Spy provides preliminary support for Oracle schema extensions for use with "Project XDB".
Using these extensions will allow you to configure and customize how the Project XDB versionof Oracle 9i, will store XML documents internally. These XML documents are then accessiblefrom an XML perspective as well as through SQL queries and legacy tools.
Please see the Oracle.com website for more information.
Selecting this menu option inserts an Oracle.com/xdb namespace into the schema file
and makes an Oracle tab available in the Details entry helper.
Oracle extensions can be defined for elements, attributes and complex types. Use the entryhelpers to define the schema settings in the same was as you normally would with XML Spy.
Please note:

Page 184
XML Spy Suite 4.2 User Reference
Disabling this menu option deletes all the Oracle schema extension information fromyour schema file. A warning message appears, allowing you to reconsider. Confirmingthis action with OK, deletes all the info. This action cannot be undone!
Oracle Schema settings
This command allows you to define the global settings for Oracle schema extensions.
You have to have previously enabled the Oracle schema extensions, using the menu option"Enable Oracle schema extensions", to be able to access this menu option.

Page 185© 2001 Altova Ges.m.b.H
XML Spy Suite 4.2 User Reference
XSL Menu
The eXtensible Stylesheet Language (XSL) and in particular the XSL Transformation (XSLT),lets you specify let you specify how an XML document should be converted into other XMLdocuments or text files, such a HTML, XHTML, or WML pages.
XML Spy supports XSL and XSLT through both its Intelligent editing features in the Text andEnhanced Grid Views, as well as through a set of commands that lets you perform commonXSL-related operations.
Please see the technical background information on XSLT Processors for further details.
XSL Transformation
Hotkey: F10
This command performs an XSL Transformation of any XML document.
XML Spy can either use the Microsoft-supplied MSXML module or you can specify an externalXSLT processor in the XSL tab on the Tools | Options dialog. You can also download otherXSLT processors using the Help | Components Download menu option.
If your XML document contains a reference to an XSL stylesheet, which can be assigned usingthe Assign XSL command, the it is automatically used by the XSLT transformation command.Alternatively, you can also define the XSLT stylesheet to transform from, on a per-folder basis inthe project properties (Select Project | Project Properties to open this dialog).
This command generally operates on the currently active main window, but you can also use theXSL Transformation command in batch-processing mode on any file, folder, or group of files inthe active project window.
Please see the technical background information ons XSLT Processors for further details.
XSL:FO Transformation
Hotkey: CTRL+F10
This command performs an XSL: FO Transformation of an XML document containing XSLFormatting Object markup. XSL Formatting Objects let you specify document layout: margins,text direction, pagination etc. of your XML documents.
XML Spy uses Apache Software Foundation's FOP tool to transform the FO file.

Page 186
XML Spy Suite 4.2 User Reference
You can output the FO file:
· Directly onto screen using the built-in FOP viewer· or generate an output file enabling you to create a PDF file, a TXT file, an Area tree
(XML), a MIF file, a PCL or PS (postscript) file.
You can download the Apache FOP processor using the Help | Components Download menuoption.
The FOP batch file path needed to start the FOP processor can be edited in theXSL tab on the Tools | Options dialog.
This XSL:FO command generally operates on the currently active main window, but you canalso right click any file, folder, or group of files in the active project window and select theXSL:FO Transformation command to transform and display or output the document.
Transforming with XSL:FO
As an XSL FO file is an XML document, it must begin with the standard XML processinginstruction and the FO root element.
To create a new FO document:1. Select the Menu option File | New.2. Click the .fo Formatting Objects entry, and confirm with OK.
This creates an empty FO document containing the XSL FO declaration.
3. Enter the FO markup between the <fo:root> start and </fo:root> end tag.
To transform an existing FO document:1. Open a FO document in XML Spy. This example uses the tiger.fo document in the
tutorial folder:2. Select the menu option XSL | XSL:FO or click the FO icon in the title bar.
This opens the "Choose XSL:FO output" dialog box.

Page 187© 2001 Altova Ges.m.b.H
XML Spy Suite 4.2 User Reference
3. Clicking OK, causes the FO document to be transformed and displayed in the FOPviewer. Click the Next icon in the viewer, to see the next page of this document.
4. Close the window viewer window when you want to return to XML Spy. Click the printicon to print icon if you want to print the document.
5. Clicking the "Generate output file" radio button enables you to select the specific type ofoutput you want to create. Confirming with OK creates the output you choose.
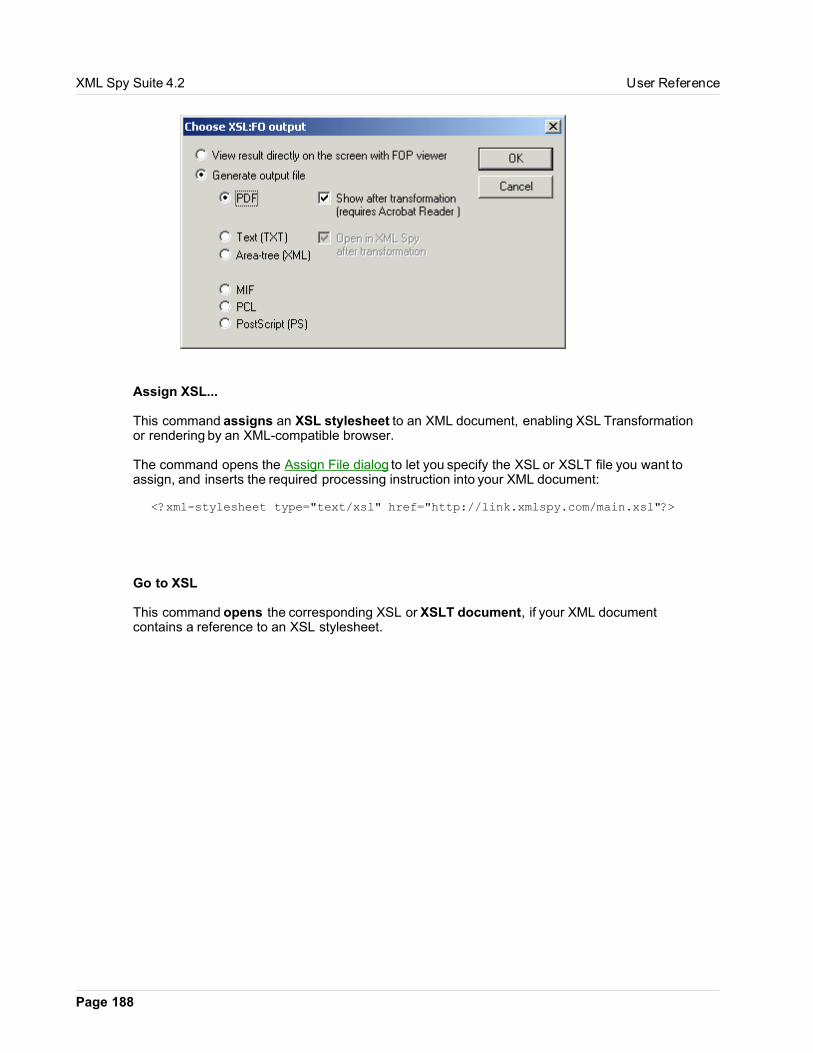
Page 188
XML Spy Suite 4.2 User Reference
Assign XSL...
This command assigns an XSL stylesheet to an XML document, enabling XSL Transformationor rendering by an XML-compatible browser.
The command opens the Assign File dialog to let you specify the XSL or XSLT file you want toassign, and inserts the required processing instruction into your XML document:
<?xml-stylesheet type="text/xsl" href="http://link.xmlspy.com/main.xsl"?>
Go to XSL
This command opens the corresponding XSL or XSLT document, if your XML documentcontains a reference to an XSL stylesheet.

Page 189© 2001 Altova Ges.m.b.H
XML Spy Suite 4.2 User Reference
Document Editor Menu
XML Spy Document Editor enables you to edit XML documents based on templates created inXSLT Designer! The templates in XSLT Designer are saved as *.sps files, and supply all thenecessary information needed by Document Editor.
Templates are opened by Selecting the File | New command and then clicking the "Select aDocument Editor template..." button. Please see the Document Editor documentation for furtherinformation.
XML Spy Document Editor is available in three versions:· As a stand-alone application,· Integrated as a separate view within the XML Spy IDE user-interface (if you purchase
the XML Spy Suite product), or· As a Browser Plug-In for Internet Explorer.
Assign configuration file...
This command assigns a Spy Structure file (SPS) to an XML document to enable viewing andediting in the Document Editor view.
The command opens a dialog box enabling you to specify the SPS file you wish to assign, andinserts the required SPS statement into your XML document.
Hide markup
This command hides markup symbols in the Document Editor view.

Page 190
XML Spy Suite 4.2 User Reference
Show small markup
This command shows small markup symbols in the Document Editor view.
Show large markup
This command shows large markup symbols in the Document Editor view.
Show mixed markup
This command shows mixed markup symbols in the Document Editor view.
Append row
This command appends a row to the current table in the Document Editor view.
Insert row
This command inserts a row into the current table in the Document Editor view.
Duplicate row
This command duplicates the current table row in the Document Editor view.
Move row up
This command moves current row up by one row in the Document Editor view.

Page 191© 2001 Altova Ges.m.b.H
XML Spy Suite 4.2 User Reference
Move row down
This command moves the current row down by one row in the Document Editor view.
Delete row
This command deletes the currently active row in the Document Editor view.

Page 192
XML Spy Suite 4.2 User Reference
Convert Menu
XML Spy provides powerful data exchange functions that allow you to convert back and forthbetween text, word processor, database, and XML files. You can also create a schema from anexisting database as well as create a database, based on an existing schema.
Import Text file...
This command lets you import any structured text file into XML Spy and convert it to XMLformat immediately. This is useful when you want to import legacy data from older systems, asmost software products support a text export interface of some kind.
Unicode conversionIn order to convert the data into Unicode (the basis of all XML documents), you need to specifywhich character-set the file is currently encoded in.

Page 193© 2001 Altova Ges.m.b.H
XML Spy Suite 4.2 User Reference
For US or Western European Windows systems this will most likely be Codepage 1252, alsoreferred to as the ANSI encoding. If you are importing 16-bit or 32-bit Unicode (UCS-2, UTF-16,or UCS-4) files, you can also switch between little-endian and big-endian byte order.
Field DelimiterTo successfully import a text file, you need to specify the field delimiter that is used to separatecolumns or fields within the file. XML Spy will auto-detect common row separators (CR, LF, orCR+LF).
Text enclosed inText files exported from legacy systems sometimes enclose textual values in quotes to betterdistinguish them from numeric values. If this is the case, XML Spy lets you specify what kind ofquotes are being used in your file, and removes them automatically when the data is imported.
First row contains field namesIt is also very common for text files to contain the field names in the first row within the file. XMLSpy allows you to define your XML element or attribute names according to this information.
Choose fileClick on the "Choose file" button to select the specific file to be imported, after having definedthe import parameters. The file name will be retained the next time you use this dialog box,allowing you to change settings and re-import the same file if the resulting XML file does notmatch your expectations.
Having selected the file to be imported, XML Spy provides a preview of the data import. Anychanges in the above options will be reflected in the preview immediately.
Renaming field or column namesRename a field or column name by clicking on its title and editing the name.
Attribute, Element, or no columnsXML Spy lets you choose if you want to import a column as an attribute, element, or if you'drather skip the column entirely.
Click on the icons to the left of the column titles to, toggle between these three options. In theexample above,
ContactID and CallDate - are imported as attributesCallTime - is not importedSubject - is imported as an element.
Import Database data...
This command lets you import database data from many sources.
You can select:· an existing database: such as Microsoft Access (i.e. Jet Engine), SQL Server, Oracle,
or any other ODBC or ADO-conformant database).

Page 194
XML Spy Suite 4.2 User Reference
Source databaseOnce you have selected your data source, you can choose the database table to be importedfrom a list. If you need help in entering an ADO connection string, click the Build button, whichopens the ADO Data Link properties dialog box.To define the ODBC connection string, please see:Setting up the ADO or ODBC connection string using the Data Source Administrator.
Selection statementClick on the "Choose database table" button, to select the database, or enter an arbitrarySELECT statement to create the record-set you intend to import. You can also enter aADO shape string (selection statement) if you selected the ADO connection string radio button.
Having configured the data source, click the Preview button to verify that this is indeed thecorrect data that you wish to import. For security reasons, the OK button is only enabled afteryou have previewed the data.
Please note:If you used the menu option Convert | XML Import based on DB Schema prior toopening this dialog box, the automatically generated select statement (used in thatprocess) will appear in Select statement text box. You can now reuse or edit the selectstatement and start a new import.
Format of Number, Date and Time valuesXML Spy lets you choose different representations for date and number formats - depending on

Page 195© 2001 Altova Ges.m.b.H
XML Spy Suite 4.2 User Reference
whether you intend to use the resultant XML file in conjunction with the new unified datatypesproposed by the most recent XML Schema draft, or if you want to keep those formatscorresponding to the locale in use in your country.
Import data as Elements/AttributesThese options let you specify how you want the parent and child elements to be imported: aselements or attributes. The preview is updated when you select one of these options.
Exclude Primary/Foreign keysThis option enables you to exclude the primary or foreign keys for all the tables you areimporting.
Please note:This option only affects the keys of database tables that have been exported using the XMLSpy Conversion option "Export to Text files / Database...", with the "Create Primary/Foreignkeys" being active. The key names are PrimaryKey and ForeignKey respectively.
Create empty elements from empty fieldsThis option lets you create empty elements for all the empty fields that exist in the tables youimport.
Attribute, Element, or no columnsXML Spy lets you choose if you want to import a parent column as an attribute, element, or ifyou'd rather skip the column entirely.
Click on the icons to the left of the column titles, to toggle between these three options. In theexample above,
ContactID - is imported as an attributeContacts.Company - is not importedFirstName, LastName - are imported as elements.
Please note:The selections you make here initially apply to the parent items as well. Changingparent items directly, takes precedence over these settings, but only applies to theparent elements and not to any child elements.Clicking the Preview button, resets any changes made to the parent elements in thePreview view.
ADO connection string
If you need help in entering an ADO connection string, click the Build button, which opens theADO Data Link properties dialog box.
ADO Data Link properties dialog box:

Page 196
XML Spy Suite 4.2 User Reference
Select the corresponding OLE DB Provider from the list and click on the Next button to enter theconnection properties:

Page 197© 2001 Altova Ges.m.b.H
XML Spy Suite 4.2 User Reference
XML Spy relies on the ActiveX Data Object (ADO) interface for much of the basic databaseconnectivity. ADO is included with Windows 2000 and Microsoft Office 2000, but you may needto install it if you are using an older version of Windows or Office.
Please see the Setting up the ADO or ODBC connection... for an alternative method of doingthe same thing.
Please note:Activate the "Allow saving password" check box, to enter your password info into theconnection string, and avoid an error message when the connection takes place.
Please refer to our FAQ for more information on ADO and to download the Microsoft DataAccess Components (MDAC) which allow you to upgrade to the latest ADO version. We alsorecommend that you visit the Microsoft Universal Data Access site on the Internet.
After you have imported your data and converted it to XML format, you may also want to use theGenerate DTD/Schema function to get all the datatype information you need from yourdatabase into your XML documents.
XML Spy now makes it possible for you to convert a database into a schema. MS Access andseveral other databases are able to automatically provide the key and keyref information for theADO driver, used to create the database hierarchy.
Please see the section under the Convert menu | Create Database Schema for moreinformation.
Import Microsoft Word document...
This command enables the direct import of any Word document and conversion into XMLformat, if you have been using paragraph styles in Microsoft Word. This option requiresMicrosoft Word or Microsoft Office (Version 97 or 2000).
When you select this command, the Open dialog box appears. Select the Word document youwant to import.
XML Spy automatically generates an XML document with included CSS stylesheet. Each Wordparagraph generates an XML element, whose name is defined as the name of thecorresponding paragraph style in Microsoft Word.
Create Database Schema
XML Spy enables you to create a schema based upon an external database file. MicrosoftAccess databases, as well as ADO and ODBC compatible databases, are supported.
To create a schema from a database file:1. Select the menu option Convert | Create Database Schema.

Page 198
XML Spy Suite 4.2 User Reference
2. Select Microsoft Access database, and click the Choose file button.3. Select the DB2schema.mdb file supplied with XML Spy, and click the Open button.4. Click the OK button of the Create Database Schema dialog box, to start the conversion
process.
The generated schema appears in the Schema Design View. Click the "Identityconstraints" tab, to see the keyref and key fields of the respective elements.
5. Click the component icon next to the Altova global element, to see the contentmodel.

Page 199© 2001 Altova Ges.m.b.H
XML Spy Suite 4.2 User Reference
6. Select the menu option File | Save as , and save the new schema e.g.DB2schema.xsd.
7. Click the Display all globals icon , to return to the schema overview.
Please note:When generating the schema, all namespace prefix colons are automatically convertedinto underscore characters.
Databases currently supporting the key and keyref fields:MS Access and several other databases are able to automatically provide the key and keyref

Page 200
XML Spy Suite 4.2 User Reference
information for the ADO driver, used to create the database hierarchy.
To create relationships for NON MS Access databases:1. Click the "ADO connection string" radio button in the Create Database Schema dialog
box box.
2. Click the Build button that has now become active.This opens the Data Link Properties dialog box.
3. Select the corresponding Microsoft OLE DB Provider (or vendor specific provider) forthe database you use, do not select one of the generic drivers.
4. Click the Next button to switch to the Connection tab and fill in the required information:the data source, the user name and password, and activate the Allow savingpassword check box.
5. Click the Test Connection button to test the connection, and Click OK to confirm thesettings.

Page 201© 2001 Altova Ges.m.b.H
XML Spy Suite 4.2 User Reference
6. Click OK in the Create Database Schema dialog box, to create the schema.
To convert from... SQL server databases:· Select the Microsoft OLE DB provider for SQL server provider.
To convert from Oracle... databases:· Select the Microsoft OLE DB provider for Oracle provider.
To convert from... MS Access:· Click the Microsoft Access Database radio button in the Create Database Schema
dialog box. This selects the correct provider, there is no need to use the ADOconnection string and Data Link Properties dialog box.
· If however, you want to build the connection string yourself, please use theMicrosoftJet 4.0 OLE DB provider.
To convert from... Other databases:· Select the corresponding Microsoft OLE DB, or vendor specific provider, from the Data
Link Properties dialog box.
To convert from... databases without a specific provider:Other databases will create a flat structured schema, including all tables and their correspondingdatatypes.
· Use drag and drop in the schema overview, to create the necessary relations betweenthe imported elements.
· To create an element hierarchy you have to directly edit the key and keyref fields, visiblein the Identity constraints tab. Please see "Creating Identity Constraints" in the

Page 202
XML Spy Suite 4.2 User Reference
Reference manual for more information.
XML Import based on DB Schema
XML Spy allows you to create an XML document containing database data based on an existingXML Schema. You must currently create the schema (on which the import is based) using themenu option Convert | Create Database schema.
In the case of an MS Access database the Identity constraints, which define the databasehierarchy, are automatically created in the generated schema. For other databases you have todefine the identity constraints in the schema file yourself, please seeCreating identity constraints.
Specifying the data you want to importYou can specify the data set you want to import, by defining which table is to act as the roottable of the imported data set. This then automatically creates a shape string which is placed inthe Selection statement text box. The database data is then imported into XML Spy with allhierarchical relationships intact.
The source database can be a Microsoft Access database or you can build an ADO connectionstring to connect to the database of your choice.
To import XML data from a Microsoft Access database:1. Open the DBschema2xml.xsd schema file supplied with XML Spy (Tutorial folder).
2. Select the menu option Convert | XML Import based on DB Schema.This opens the "Select root table from database schema" dialog box. This is where youdefine which tables you want to import. The root table becomes the top level table in thetable hierarchy you import.

Page 203© 2001 Altova Ges.m.b.H
XML Spy Suite 4.2 User Reference
3. Click the OK button when you have selected the root table.The "Database import based on Schema" dialog box opens. The select statement,based on your root element choice, is automatically generated and placed in the Selectstatement text box.
Please note:You cannot edit the select statement here! You can however, start a new import usingthe Convert | Import database data... command. The same shape string will thenappear in the Select statement text box, where it can be edited.
4. Click the Microsoft Access database radio button.
5. Click the Choose file button, and select and select the "DB2schema.mdb" file as thesource of the database data (in the Tutorial folder).
6. Click the OK button to import the database data.The XML document appears as an "Untitledx.xml" file in the main window.

Page 204
XML Spy Suite 4.2 User Reference
7. Click the Altova element and select the menu option Table | Display as table, or pressthe F9 function key, to remove the table formatting and display the data vertically. TheDivision elements were treated the same way to produce the screen shot below.

Page 205© 2001 Altova Ges.m.b.H
XML Spy Suite 4.2 User Reference
In this case the complete database was imported, the root table being Altova. The itemAltova Name, was imported as an attribute in keeping with the schema definitionDBschema2xml.xsd (visible in the attribute tab of the schema at the beginning of thissection).
Importing a partial data set:1. Repeat the above sequence and select Division as the root table.2. Use the DB2schema.mdb file as the data source.
The screen shot shows the resulting XML document. The Person table is expanded andthe Division table formatting is disabled for a better overview.

Page 206
XML Spy Suite 4.2 User Reference
Create DB Structure based on Schema
XML Spy allows you to create an empty database (or skeleton database) based on an existingschema file. The schema structure, defined by the identity constraints, is mirrored in theresulting database.
To create a Database based on a schema:1. Open the schema file DB2Schema.xsd in the Tutorial folder.2. Select the menu option Convert | Create DB Structure based on Schema.3. Click the "Create a new MS Access database" radio button and confirm with OK.

Page 207© 2001 Altova Ges.m.b.H
XML Spy Suite 4.2 User Reference
4. Enter the database name in the Save as... dialog box (eg. DB-based-xsd.mdb).The message "Export has been successfully completed" appears when the export hasbeen completed successfully, confirm with OK.
Viewing the generated Database:1. Double click the DB-based-xsd.mdb file in Explorer, or open the file in MS Access.
2. Double click the Division entry to see the Division Table.
3. Select the menu option View | Design view, or click the "View" icon to change into theDesign view.

Page 208
XML Spy Suite 4.2 User Reference
The Design view supplies information on the field properties of the database table: thefield names, data types, etc. The parameter settings you see here have beentransferred from the schema definition.
Export to Text files / Database...
This command exports XML data into other formats for exchange with databases or legacysystems.
Depending on the output data format required, you may want to use eitherXSLT Transformations or this Export command to export your XML data.
You first need to define the structure of the data to be exported. Since XML is structuredhierarchically and most database and legacy systems use the relational model, XML Spy willhelp you in producing output that can be interpreted in a relational context.

Page 209© 2001 Altova Ges.m.b.H
XML Spy Suite 4.2 User Reference
Start point of exportYou can choose to export the entire XML document or restrict your export to the data startingfrom the currently selected element (and its child items).
Export fieldsDepending on your XML data, you may want to export only elements, attributes, or the textualcontent of your elements into the fields common to structured text files or databases.
The list of available element types, in the preview window, lets you choose which elements youwant to export, and also displays you how many records and fields this will produce once theexport operation is started.
Export depthYou can choose to export all sub-elements, or limit the number of sub-element levels.
Automatic fieldsXML Spy will produce one output file or table for each element type selected. You can choose toautomatically create primary/foreign key pairs to link your data in the relational model, or definea primary key for each element.
When you are finished defining the scope of your export operation, click one of the two "Export"buttons, to export your data to a set of text files or to a database.
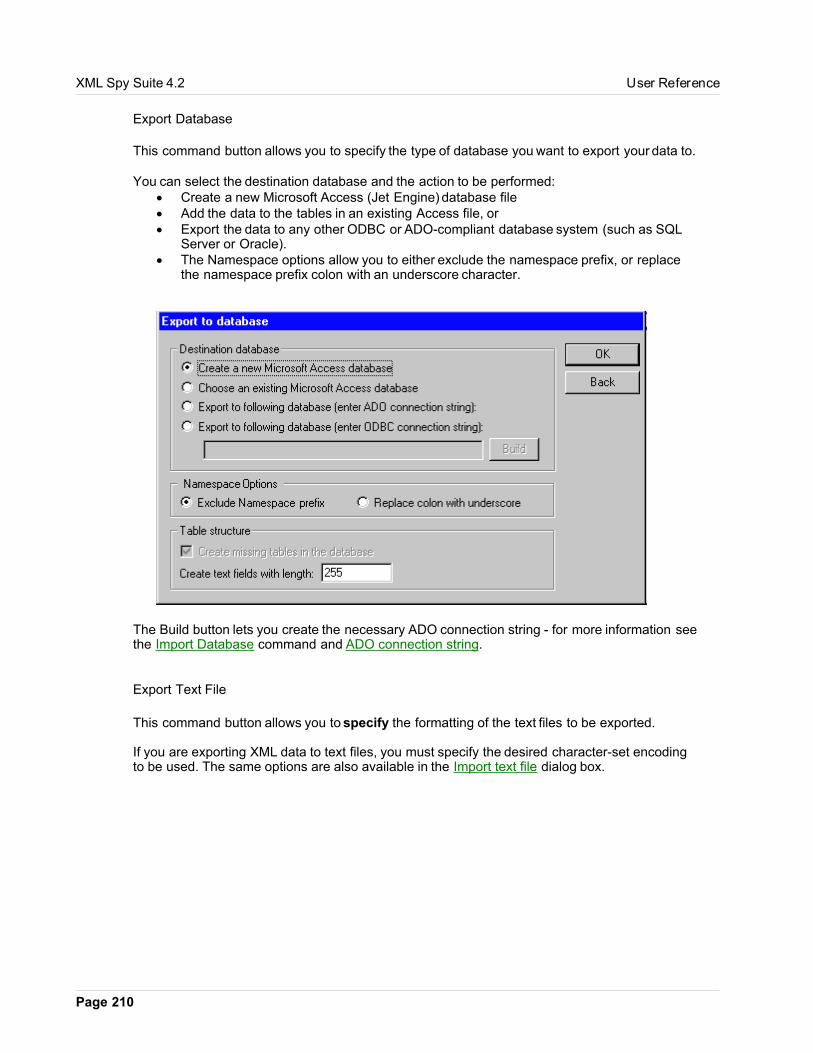
Page 210
XML Spy Suite 4.2 User Reference
Export Database
This command button allows you to specify the type of database you want to export your data to.
You can select the destination database and the action to be performed:· Create a new Microsoft Access (Jet Engine) database file· Add the data to the tables in an existing Access file, or· Export the data to any other ODBC or ADO-compliant database system (such as SQL
Server or Oracle).· The Namespace options allow you to either exclude the namespace prefix, or replace
the namespace prefix colon with an underscore character.
The Build button lets you create the necessary ADO connection string - for more information seethe Import Database command and ADO connection string.
Export Text File
This command button allows you to specify the formatting of the text files to be exported.
If you are exporting XML data to text files, you must specify the desired character-set encodingto be used. The same options are also available in the Import text file dialog box.
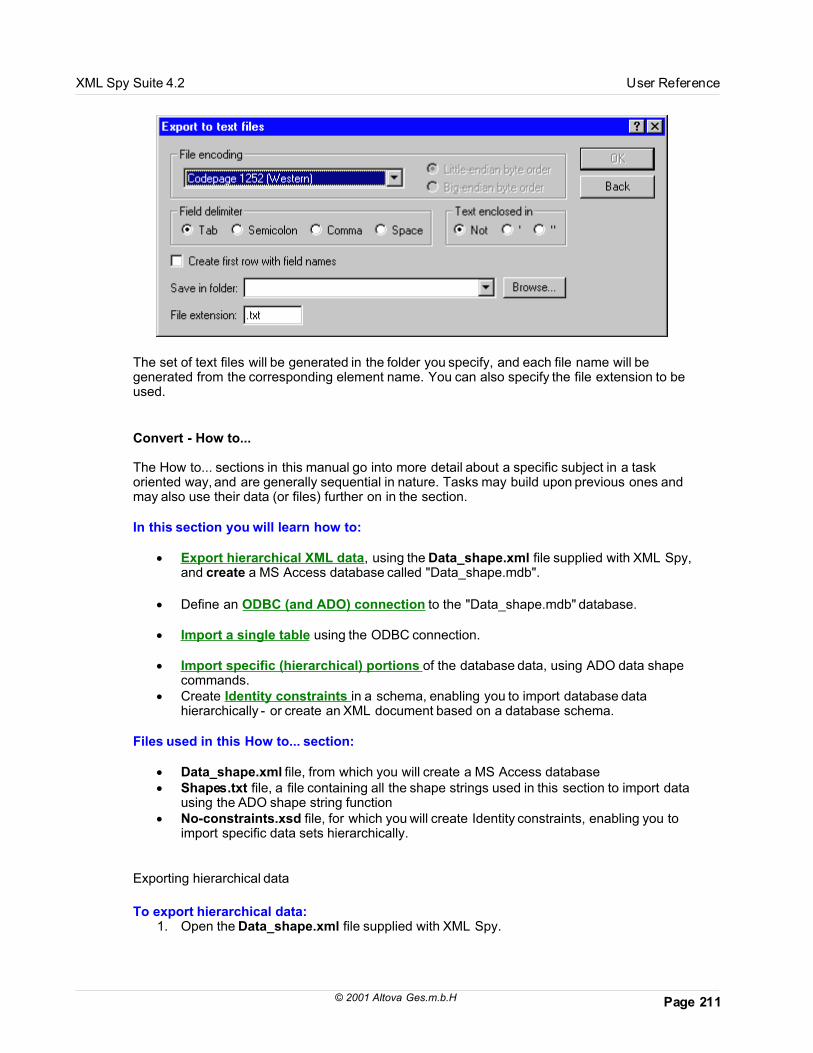
Page 211© 2001 Altova Ges.m.b.H
XML Spy Suite 4.2 User Reference
The set of text files will be generated in the folder you specify, and each file name will begenerated from the corresponding element name. You can also specify the file extension to beused.
Convert - How to...
The How to... sections in this manual go into more detail about a specific subject in a taskoriented way, and are generally sequential in nature. Tasks may build upon previous ones andmay also use their data (or files) further on in the section.
In this section you will learn how to:
· Export hierarchical XML data, using the Data_shape.xml file supplied with XML Spy,and create a MS Access database called "Data_shape.mdb".
· Define an ODBC (and ADO) connection to the "Data_shape.mdb" database.
· Import a single table using the ODBC connection.
· Import specific (hierarchical) portions of the database data, using ADO data shapecommands.
· Create Identity constraints in a schema, enabling you to import database datahierarchically - or create an XML document based on a database schema.
Files used in this How to... section:
· Data_shape.xml file, from which you will create a MS Access database· Shapes.txt file, a file containing all the shape strings used in this section to import data
using the ADO shape string function· No-constraints.xsd file, for which you will create Identity constraints, enabling you to
import specific data sets hierarchically.
Exporting hierarchical data
To export hierarchical data:1. Open the Data_shape.xml file supplied with XML Spy.

Page 212
XML Spy Suite 4.2 User Reference
2. Select the menu option Convert | Export to Text files / Database.
Retain the default settings as they are, all check boxes are active.3. Click the "Export to database" button, and select the Create a new Microsoft Access
Database radio button. Confirm with OK.

Page 213© 2001 Altova Ges.m.b.H
XML Spy Suite 4.2 User Reference
4. Enter the name of the new database in the "Save as..." dialog box (eg.Data_shape.mdb), and confirm by clicking on the Save button.
5. Once the export process has been successfully completed, click OK to confirm.
· Double clicking the Data_shape.mdb file, opens it in MS Access. The exporteddatabase appears in this form:
Setting up the ADO or ODBC connection using the ODBC Data Source Administrator
This example uses Microsoft Access as the target database. The exported data can beimported using either an ODBC or an ADO data connection.
To set up a Database connection:

Page 214
XML Spy Suite 4.2 User Reference
1. Click the Start button and select Settings | Control Panel. Then double click theAdministrative tools folder.
2. Double click the Data Sources (ODBC) icon, to open the ODBC Data SourceAdministrator dialog box.
3. Click the Add... button to define a new data source.

Page 215© 2001 Altova Ges.m.b.H
XML Spy Suite 4.2 User Reference
4. Select the Microsoft Access Driver (*.mdb) driver for the data source, and click theFinish button.
5. Enter "shape" as the Data Source Name, and enter a description in the Descriptionfield.
6. Click the Select button and select the previously exported database (Data_shape.mdb).Confirm the selection with OK.The file name and path appear above the Select button.
7. Click the OK button to confirm these settings. The Data Source Name "shape" appearsin the User Data Sources list.

Page 216
XML Spy Suite 4.2 User Reference
8. Click the OK button to complete the connection setup, and close or minimize theAdministrative Tools folder.You are now ready to import MS Access table data hierarchically into XML Spy.
9. Switch back to XML Spy to start the import process.
Importing a table using ODBC
ODBC currently only supports the importing of a single database table, hierarchical data cannotbe imported using this method.
To import a table using ODBC:1. Select the menu option Convert | Import Database data...
2. Click the ODBC connection string radio button, and then the Build button.

Page 217© 2001 Altova Ges.m.b.H
XML Spy Suite 4.2 User Reference
3. Click the Machine Data Source tab, select the previously defined "shape" data source,and click the OK button. The ODBC connection string now appears in the text box.If a User name and Password dialog box is opened at this point, enter the informationas requested.
4. Click the Choose database table button and select the database table you want toimport (in this case Person). The select statement SELECT * FROM "Person", appearsin the Selection statement text box.
5. Click the Preview button to see the database data.6. Activate the Exclude Primary/Foreign Keys check box, to avoid importing the key
fields (this only applies to key fields that were created by XML Spy during the exportprocess).

Page 218
XML Spy Suite 4.2 User Reference
Defining which fields to import:The preview window allows you to directly select and define the field data you want to import.
Clicking repeatedly on the element symbol to the left of the element name, cycles throughthe available possibilities:
Define and import this field as an Element.
Define and import this field as an Attribute.
Skip, do not import this field.
Starting the data import:1. Click the OK button of the database import dialog box, when you have decided which
fields you want to import (no changes in this example).
XML Spy creates an untitled XML file containing the Person table data. The root

Page 219© 2001 Altova Ges.m.b.H
XML Spy Suite 4.2 User Reference
element is called Import, and each Person element is a table row.
Importing hierarchical data - Data shaping (ADO)
XML Spy allows you to import hierarchical database data using the ADO data shaping function.This allows you to re-import specific parts of external databases.
You can either write your own selection strings or have XML Spy automatically create themusing the Create Database schema and then theXML Import based on DB Schema commands.
To be able to use data shaping you have to use:· The MSDataShape provider· The special Data shape language, which is a subset of SQL
Both these modules are available if you have installed Microsoft Data Access ComponentsVersion 2.6 or later.
To import hierarchical data into XML Spy:1. Select the menu option Convert | Import Database data...
2. Click the ADO connection string radio button, and then the Build button.

Page 220
XML Spy Suite 4.2 User Reference
3. Double click the MSDataShape entry in the list box.This automatically switches you to the Connection tab.
4. Enter "shape" in the Data Source field.5. Click on the "Test Connection" button (at the bottom of the dialog box), if you want to
make sure you can connect to the database - and then click OK to close the Testconnection message box.
6. Click OK to close the Data Link Properties dialog box.

Page 221© 2001 Altova Ges.m.b.H
XML Spy Suite 4.2 User Reference
The ADO connection string now appears in the text box.7. Open the shape.txt file supplied with the tutorial; copy the first Shape select statement,
and paste it into the Selection statement text box.
8. Click the "Preview" button to see a portion of the database data.

Page 222
XML Spy Suite 4.2 User Reference
· Only the top level (parent) of the database data, defined by the shape command, isvisible in the preview window.
Defining how the parent elements will be importedThe preview window allows you to directly select and define the field data you want to import.
Clicking repeatedly on the element symbol to the left of the element name, cycles throughthe available possibilities:
Define and import this field as an Element.
Define and import this field as an Attribute.
Skip, do not import this field.
Please note:You can only directly influence the parent elements that you see here. You cannotchange or choose to skip any elements below these ones (i.e. child elements).
Defining how the child elements will be importedWhile the shape string allows you to import child objects, you can only define that all child itemsare to be imported as Elements or Attributes.
· Select either the Elements by default or Attributes by default option, to define howyou want to import the child elements. The preview is updated when you select one ofthese options.
· Activate or deactivate the "Exclude Primary/Foreign keys" check box, to define if youwant to import the data with or without primary or foreign keys.
· Activate or deactivate the "Create empty elements from empty fields" check box, todefine if you want empty elements to be created for those fields that do not contain anydata.
Please note:The selections you make here initially apply to the parent items as well. Changingparent items directly, takes precedence over these settings, but only applies to theparent elements and not to any child elements.Clicking the Preview button, resets any changes made to the parent elements in thePreview view.
Starting the data import1. Click the OK button of the Database import dialog box, when you have completed your
definition of the data you want to import.
XML Spy creates an untitled XML file containing the Division and Person table data.The root element is called Import, and each Division element is a table row. EachDivision element also contains the Person child elements, displayed in table form.

Page 223© 2001 Altova Ges.m.b.H
XML Spy Suite 4.2 User Reference
Click the Row element and press F9 (or click the Display as Table icon ) to removethe table formatting. Each Division element is now displayed separately.
Shape strings
Data shaping is one of the new features of ADO 2.6. The basic idea behind data shaping, is thehierarchical record set. Data shaping allows a column of a master record set to itself containanother record set - a child record set.
It is important to distinguish between hierarchical record sets and hierarchical databases.· Hierarchical record sets are standard record sets, where the data is represented
hierarchically by parent, child or even grandchild tables.
· Hierarchical databases actually store data in an hierarchical format.
Please note:To be able to use the Shape language, you must have Microsoft Data AccessComponents Version 2.1 or later, installed on your computer. Please contact your IT-department for help if this is not the case.
Please see: the link http://support.microsoft.com/support/kb/articles/Q189/6/57.ASP for more

Page 224
XML Spy Suite 4.2 User Reference
information on Shape commands in general.
Importing hierarchical dataTo import hierarchical data you can construct you own shape commands manually and enterthem into the Selection statement text box, or have XML Spy automatically create them usingthe Create Database schema and then the XML Import based on DB Schema commands.The Shape commands are included in the Shapes.txt file, and on the following pages.
Please note:· The Data_shape.mdb file was created by exporting to an Access database from the
Data_shape.xml file (this XML file is included with XML Spy)· All these examples are imported without external primary and foreign key values· All the imported data are defined as Elements by default· The "Create empty elements from empty fields" check box is inactive· The preview window of the Database import dialog box of the data is included· The resulting import file is displayed vertically, allowing you to see the data structure
more clearly (the Display as table function is deactivated for the respective rowelement)
· Child elements (eg. Persons) are expanded
Shape string to import Division and PersonsShape {SELECT * FROM Division} as Division APPEND ({SELECT * FROM Person} as Person RELATE PrimaryKey to ForeignKey) as Person
Preview window:
Result on import into XML Spy
Shape String to import Company, Division and Persons

Page 225© 2001 Altova Ges.m.b.H
XML Spy Suite 4.2 User Reference
SHAPE {SELECT * FROM Company} as Company APPEND((Shape {SELECT * FROM Division} as Division APPEND ({SELECT * FROM Person} as Person RELATE PrimaryKey to ForeignKey) as Person) as Division RELATE PrimaryKey to ForeignKey) as Division
Preview window:
Please note:The name space prefix has been suppressed in these examples because the option"Exclude Namespace" was activated during the export process. Thus xmlns:xsibecomes xsi, and xsi:SchemaLocation becomes SchemaLocation.
Result on import into XML Spy
Shape string to import Company, Address and DivisionSHAPE {SELECT * FROM Company} as Company APPEND ({SELECT * FROM Address} as Address RELATE PrimaryKey to ForeignKey) as Address, ({SELECT * FROM Division} as Division RELATE PrimaryKey to ForeignKey) as Division
Preview window:
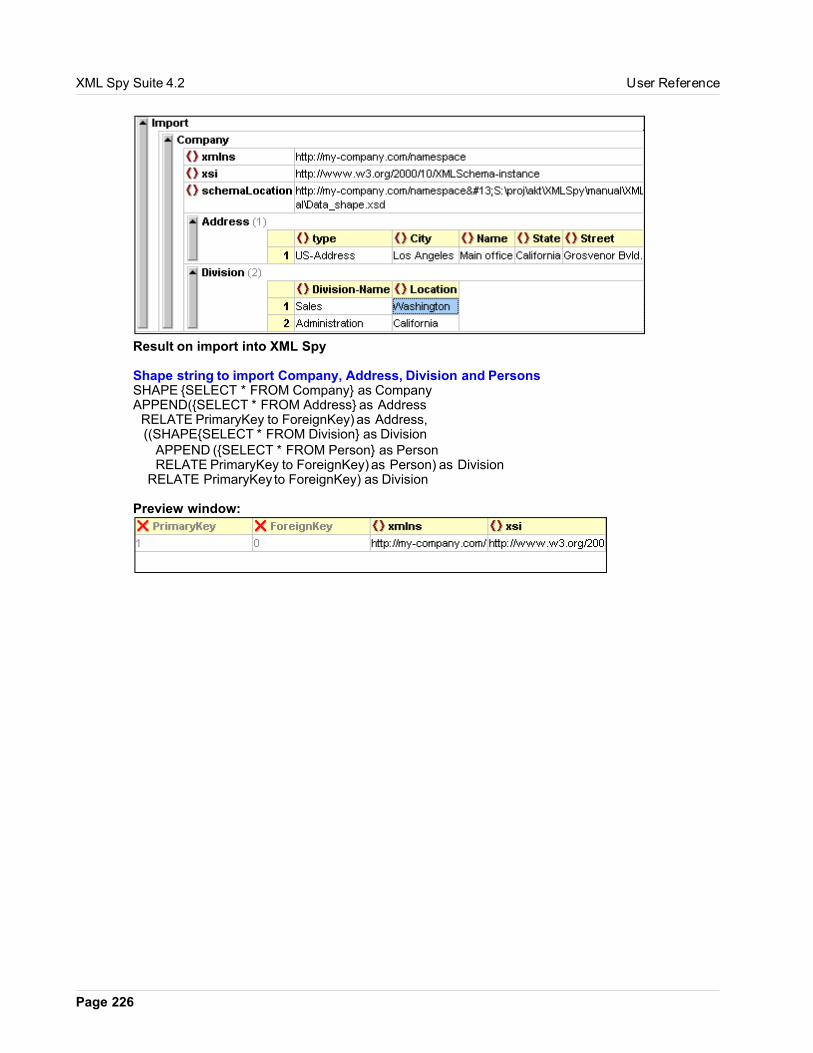
Page 226
XML Spy Suite 4.2 User Reference
Result on import into XML Spy
Shape string to import Company, Address, Division and PersonsSHAPE {SELECT * FROM Company} as CompanyAPPEND({SELECT * FROM Address} as Address RELATE PrimaryKey to ForeignKey) as Address, ((SHAPE{SELECT * FROM Division} as Division APPEND ({SELECT * FROM Person} as Person RELATE PrimaryKey to ForeignKey) as Person) as Division RELATE PrimaryKey to ForeignKey) as Division
Preview window:

Page 227© 2001 Altova Ges.m.b.H
XML Spy Suite 4.2 User Reference
Result on import into XML Spy
Creating Identity constraints
MS Access databases automatically generate Identity constraints when you use theConvert | Create Database Schema command to create a schema.
Defining identity constraints:The aim of this section is to be able to import XML data based upon a schema, using theConvert | XML Data Import based on DB Schema. This command uses the active schemafile as a base for importing data from an external database. The schema file delivers some ofthe necessary information needed to automatically generate a select statement string.
1. Open the No-constraints.xsd file in the Tutorial folder of XML Spy.2. Click the Altova element to select it and click the Identity constraints tab.3. Click the Append icon and select the Key entry.
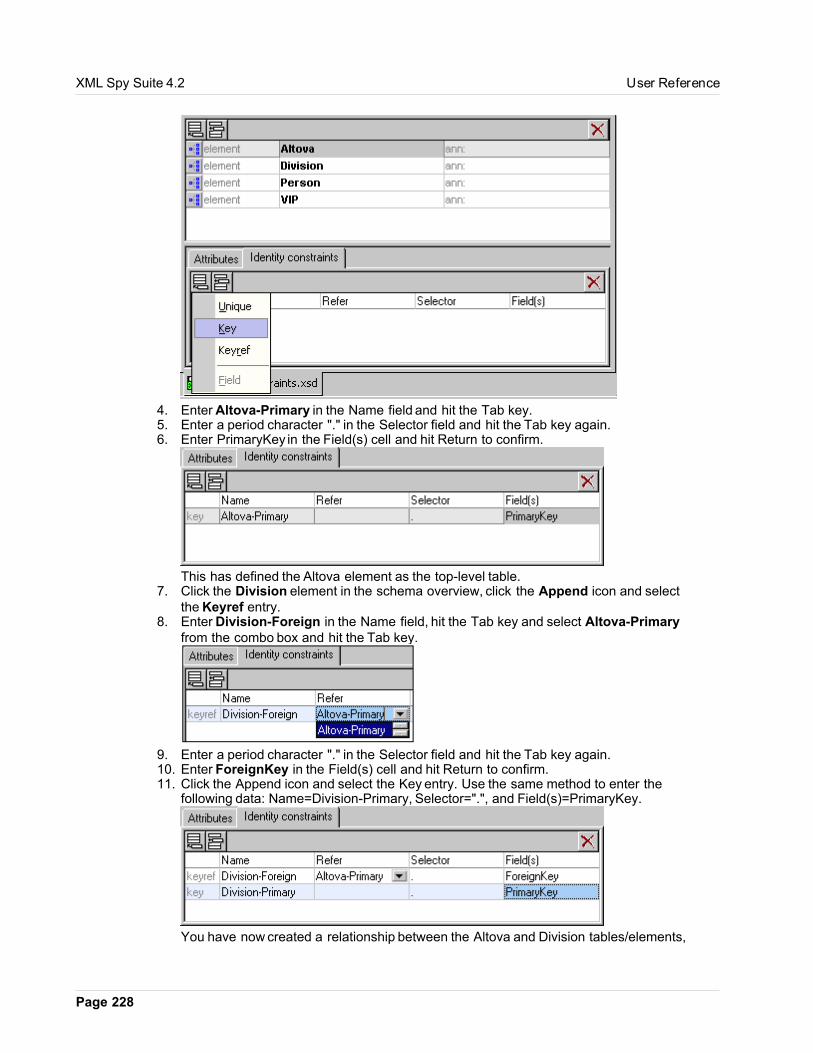
Page 228
XML Spy Suite 4.2 User Reference
4. Enter Altova-Primary in the Name field and hit the Tab key.5. Enter a period character "." in the Selector field and hit the Tab key again.6. Enter PrimaryKey in the Field(s) cell and hit Return to confirm.
This has defined the Altova element as the top-level table.7. Click the Division element in the schema overview, click the Append icon and select
the Keyref entry.8. Enter Division-Foreign in the Name field, hit the Tab key and select Altova-Primary
from the combo box and hit the Tab key.
9. Enter a period character "." in the Selector field and hit the Tab key again.10. Enter ForeignKey in the Field(s) cell and hit Return to confirm.11. Click the Append icon and select the Key entry. Use the same method to enter the
following data: Name=Division-Primary, Selector=".", and Field(s)=PrimaryKey.
You have now created a relationship between the Altova and Division tables/elements,

Page 229© 2001 Altova Ges.m.b.H
XML Spy Suite 4.2 User Reference
where the Division table is linked to the Altova table.
Checking the relationship1. Select the menu option Convert | XML import based on DB Schema.2. Select Altova as the root table in the dialog box that opens.
This opens the "Database import based on Schema" dialog box. The automaticallygenerated shape string appears in the Select statement text box. The select stringshows that the Altova table is related to the Division table.
3. Click the Cancel button to close the dialog box for the moment.
Completing the identity constraintsWe now have to define the rest the remaining identity constraints for the Person and VIP tables(elements in the schema). Use the method outlined above to add Key and Keyref fields to thePerson and VIP elements.
Person element:
VIP element:

Page 230
XML Spy Suite 4.2 User Reference
Importing data using a schema (with identity constraints)1. Select the menu option Convert | XML import based on DB Schema.2. Select Altova as the root table in the dialog box that opens. (You can choose any one
of the entries as the root table, Division, Person or VIP.)This opens the "Database import based on Schema" dialog box. The automaticallygenerated shape string appears in the Select statement text box.
3. Click the "Choose file" button, select the DB2schema.mdb file in the Tutorial folder,and click the Open button. This enables the OK button in the Database import... dialogbox.
4. Click the OK button to start the data import.The XML document appears as an "Untitledx.xml" file in the main window. Scroll right tosee the complete structure.

Page 231© 2001 Altova Ges.m.b.H
XML Spy Suite 4.2 User Reference
Please note:If you want to edit the select statement, start a new data import using the menu optionConvert | Import database data. The select statement is automatically made availableto Select statement text box after having used the Convert | XML Import based on DBSchema. You can now edit the select statement and import the data from here.

Page 232
XML Spy Suite 4.2 User Reference
Table Menu
The Table menu contains all commands relevant to the Database/Table View in XML Spy.
The Database/Table commands can only be selected if the Enhanced Grid view is active!
Display as Table
Hotkey: F9
This command allows you switch between two views of repeated elements in the EnhancedGrid view. The Grid view (default view, in the Enhanced Grid view) and the Database/Tableview.
1. Select one of the repeated elements in the grid view.The Displays as Table icon is only made active when you make the correct selection.
2. Click the icon or press the F9 Hotkey.

Page 233© 2001 Altova Ges.m.b.H
XML Spy Suite 4.2 User Reference
This effectively breaks out all attributes and sub-elements, and show them as columns similar toany spreadsheet- or database-like application.
Insert Row
Hotkey: SHIFT+F9
This command inserts new rows to the table in the Database/Table View:
1. Click a row number in the table (or one of the cells), and2. Select the menu option Table | Insert row (or Shift+F9).
This inserts a new row (i.e. a new element) before the currently selected row.
Append Row
Hotkey: CTRL+F9
This command appends new rows to the table in the Database/Table View
1. Click a row number in the table (or one of the cells), and2. Select the menu option Table | Insert row (or Ctrl+F9)
This appends a new row (i.e. a new element) to the end of the table.
Ascending Sort
This command sorts column elements in ascending order (in the table) in theDatabase/Table View:
1. Click a column header in the table, and2. Select the menu option Table | Ascending sort (or clicking on the A-Z icon)
XML Spy will automatically try to determine what kind of data you are using in the selectedcolumn, and choose an alphabetic or numeric sort method accordingly.
If XML Spy is not sure which sort order to use, it opens this dialog box to prompt for help:

Page 234
XML Spy Suite 4.2 User Reference
Descending Sort
This command sorts column elements in descending order (in the table) in theDatabase/Table View
1. Click a column header in the table, and2. Select the menu option Table | Descending sort (or clicking on the Z-A icon)
XML Spy will automatically try to determine what kind of data you are using in the selectedcolumn, and choose an alphabetic or numeric sort method accordingly.
If XML Spy is not sure which sort order to use, it opens a dialog box to prompt for help.

Page 235© 2001 Altova Ges.m.b.H
XML Spy Suite 4.2 User Reference
View Menu
The View menu controls the display of the active Main window and allows you to change theway XML Spy displays your XML documents.
Enhanced Grid View
This command switches the current document into Enhanced Grid View.
This view includes an (optional) tree and structured grid display and is the preferred view forediting XML documents. If the previous view was the Text View, the document is automaticallychecked for well-formedness.

Page 236
XML Spy Suite 4.2 User Reference
Embedded Database/Table viewXML Spy allows you to display recurring elements in a Database/Table view from within theEnhanced Grid view. This function is available wherever the Enhanced Grid view can beactivated, and can be used when editing any type of XML file - XML, XSD, XSL etc.
For further information on this view, please see the detailed description of the various views inthe Main Window section in the XML Spy Reference.
Schema Design View
This command switches the current document into Schema Design view.
XML Spy Schema editor allows you to view and edit schemas in two different ways:· As a Schema overview, in list form· In a graphical view of specific schema components
Schema overviewOpen a XSD document in the DTD/Schemas folder of the project window, or double click on anXSD document in Explorer. The main window then displays the Schema overview.
The top window displays all Global "components" (elements, complex types etc.) in list form.The bottom window displays the corresponding attributes of the currently selected component(eg. VIP Mgr. Prg etc.).
Schema overview:

Page 237© 2001 Altova Ges.m.b.H
XML Spy Suite 4.2 User Reference
To see graphical representation (Content model) of a component:
· Click on the icon next to the component you want to display, or· Select the menu option Schema design | Display Diagram, or· Double click on a component name in the "Component Navigator" (Top right entry
helper).
The content model for that component, appears in a tree view.
Graphical content model view

Page 238
XML Spy Suite 4.2 User Reference
Text View
This command switches the current document into Text View.
This view allows you to edit the XML source in a source-code fashion and includes syntax-coloring.
If the previous view was the Enhanced Grid View, the document is automatically formattedaccording to the settings defined when saving a file (these can be modified in the "Save File"section of the File tab of the Options dialog). Use the menu command Tools | Options to openthis dialog.
For further information on this view, see the detailed description of the various views in theMain Window section in the XML Spy Reference.
Browser View
This command switches the current document into Browser View.
This view uses an XML-enabled browser (preferably Internet Explorer 5) to render the XMLdocument using information from potential CSS or XSL style-sheets.
When switching to browser view, the document is first checked for validity, if you have selectedValidate upon saving in the File tab of the I Options dialog. Use the menu command Tools |Options to open this dialog.

Page 239© 2001 Altova Ges.m.b.H
XML Spy Suite 4.2 User Reference
For further information on this view, please see the detailed description of the various views inthe Main Window section in the XML Spy Reference.
Synchronize
This command synchronizes the Enhanced Grid view and Tree view in the main window.
To see the Tree view, you must activate the "Show Tree" check box in theFile tab of the Options dialog). Use the menu command Tools | Options to open this dialogbox.
Click an item in the Tree or Grid view, and select the menu option View | Synchronize. Theview in the other window is opened to the same level, and the item is highlighted.

Page 240
XML Spy Suite 4.2 User Reference
You can also double-click on an element in the tree view, to navigate to that item in the grid.
Expand
Hotkey: Num +
This command expands the selected element by one level.
The command can be used in the Tree and Enhanced Grid views. The keyboard shortcut is the+ key on the numeric keypad.
In the Enhanced Grid view, the element and all its children remain selected after expansion.This allows you to expand a large element by pressing the + key repeatedly.
You can expand and collapse any element by clicking on the gray bar to the left of eachelement.
Collapse
Hotkey: Num -
This command collapses the selected element by one level.
The command can be used in the Tree and Enhanced Grid views. The keyboard shortcut is the- key on the numeric keypad.
You can expand and collapse any element by clicking on the gray bar to the left of eachelement.
Expand fully
Hotkey: Num *
This command expands all child items of the selected element, down to the last level ofnesting.
The command can be used in the Tree and Enhanced Grid views. The keyboard shortcut is the* key on the numeric keypad.
Collapse unselected
Hotkey: CTRL Num -
This command allows you to focus on one element and its children, and ignore all the othersurrounding elements.
The command can be used in the Tree and Enhanced Grid views. The keyboard shortcut is theCTRL and - key on the numeric keypad.

Page 241© 2001 Altova Ges.m.b.H
XML Spy Suite 4.2 User Reference
Simply select the item that you want to work with and choose this command to collapse all other(unselected) elements.
Optimal widths
This command adjusts the widths of all columns so that the text of the entire document fit intothe designated columns.
If you expand and collapse several elements, select the "Optimal widths" command, as onlyvisible items are taken into account when calculating the optimum column widths.
Word wrap
This command enables or disables word wrapping in the Text view.
Go to line/char...
Hotkey: CTRL+G
This command goes to a specific line number and/or character position in an XML documentin the Text view.
If you are working with an external XSLT processor (see theXSL page on the Tools | Options dialog for details) you may often get error messages by linenumber and character position. XML Spy lets you quickly navigate to that spot, using thiscommand:
This command works in both the Text View and Enhanced Grid View, but will only be able toshow an approximate position in the grid view by highlighting the element closest to thecharacter position specified.

Page 242
XML Spy Suite 4.2 User Reference
Go to File
This command opens a document that is being referred to, from within the file you are currentlyediting.
Select the file name, path name, or URL you are interested in, and choose this command fromthe View menu.
You can select:· An entire element or attribute in the Enhanced Grid View· Some characters from within any item in the Text or Enhanced Grid Views.· An enclosed string. If you text cursor is between quotes, XML Spy will automatically use
the entire string that is enclosed in the quotes.
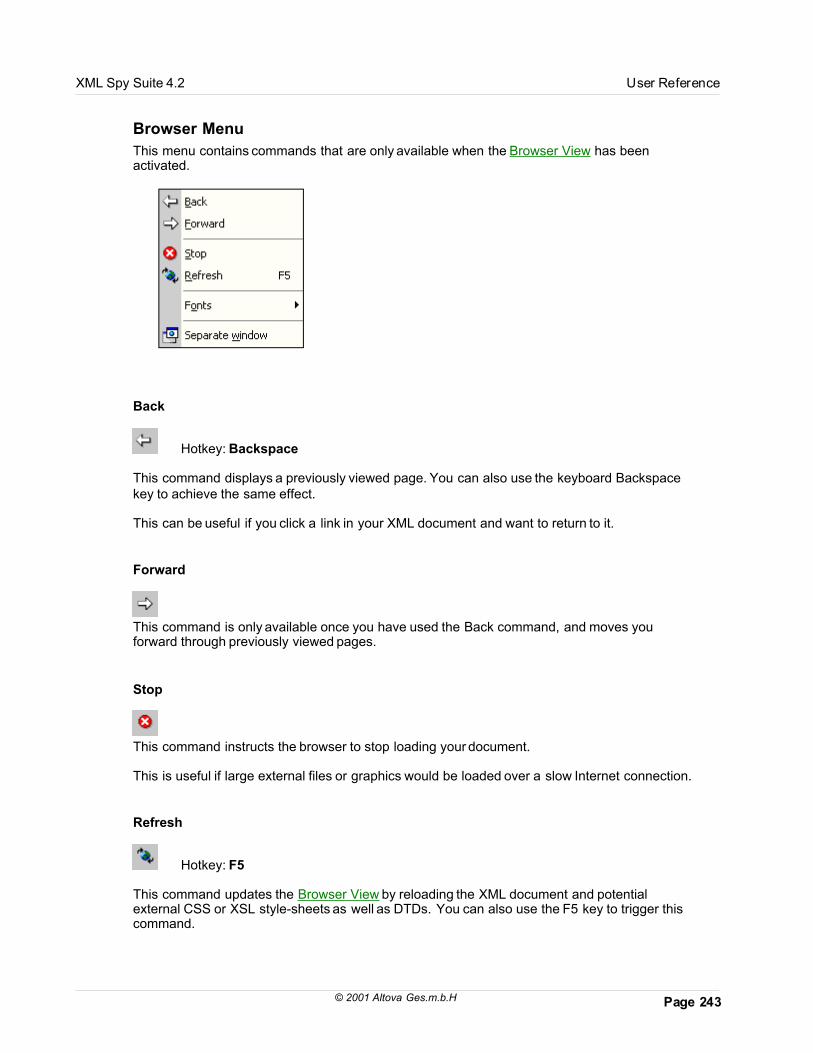
Page 243© 2001 Altova Ges.m.b.H
XML Spy Suite 4.2 User Reference
Browser Menu
This menu contains commands that are only available when the Browser View has beenactivated.
Back
Hotkey: Backspace
This command displays a previously viewed page. You can also use the keyboard Backspacekey to achieve the same effect.
This can be useful if you click a link in your XML document and want to return to it.
Forward
This command is only available once you have used the Back command, and moves youforward through previously viewed pages.
Stop
This command instructs the browser to stop loading your document.
This is useful if large external files or graphics would be loaded over a slow Internet connection.
Refresh
Hotkey: F5
This command updates the Browser View by reloading the XML document and potentialexternal CSS or XSL style-sheets as well as DTDs. You can also use the F5 key to trigger thiscommand.

Page 244
XML Spy Suite 4.2 User Reference
Fonts
This command allows you to select the default font site for rendering the text of your XMLdocument. It is similar to the Font-Size command in most browsers.
Separate Window
This command opens the browser view in a separate window, so that side-by-side viewing ispossible. (eg. text or enhanced grid) view.
If you have separated the browser view, press F5 in the editing view to automatically refresh thecorresponding browser view.

Page 245© 2001 Altova Ges.m.b.H
XML Spy Suite 4.2 User Reference
Soap Menu
XML Spy supports SOAP Version 1.1 and WSDL Version 1.1.
Please note that the SOAP interface is only available in the XML Spy Suite version!
Use the SOAP functionality:· To test your webservices without having to implement client applications
· For quick testing of third party webservices
For more info on these specifications please see:SOAP http://www.w3.org/TR/SOAP/WSDL http://www.w3.org/TR/wsdl
Create new SOAP request
This command creates a new SOAP request document in XML Spy.
Creating a new SOAP request:1. Select the menu option Soap | Create new SOAP request.
This opens a dialog box where you have to enter the local path or URL of a WSDL filedescribing the webservice. In this example thecapescience.com AirportWeather websevice. The URL for this webservice is:http://www.capescience.com/webservices/airportweather/AirportWeather.wsdl
2. Click OK to confirm the selection and connect to the capescience.com server.This opens a dialog box from which you select a specific SOAP operation.
Please note:If the connection fails or the URL is incorrect, an error message will appear at this point.
3. Click the getSummary (string arg0) entry, and confirm with OK.This creates an Untitled.xml document in XML Spy containing the SOAP request data.

Page 246
XML Spy Suite 4.2 User Reference
4. Click one of the fields to deselect the table highlighting.Before the request can be sent, we have to specify the airfield for which we want theweather summary.
5. Click the arg0 field, and enter KJFK for the JFK weather report.
This completes the definition of this SOAP request, all we have to do now is send the requestand see if we receive an answer. Please see "Send request to server".
Send request to server
This command sends a SOAP request to a webservice from within XML Spy.
Having defined your SOAP request document, see Create new SOAP request, the request canbe sent off using this command.
Previously defined SOAP request document:

Page 247© 2001 Altova Ges.m.b.H
XML Spy Suite 4.2 User Reference
Sending a SOAP Request:1. Making sure that the SOAP request document is active, select the menu option Soap |
Send request to server.
After a few seconds wait, a new XML document is automatically created in XML Spycontaining the SOAP Response from the respective server. In this example, the locationand weather status of JFK are displayed in the new document.
To change the SOAP request parameters not displayed in the request document (owing to thefact that they are transferred in the HTTP header) please see "Edit SOAP request parameters".
Edit SOAP request parameters
This command allows you to change the currently defined SOAP parameters of theSOAP request document. This example uses the previously defined SOAP request document.
To edit the SOAP request parameters:1. Making sure that the SOAP request document is active, select the menu option Soap |
Edit SOAP request parameters.This opens the SOAP request settings dialog box. You can now either change theConnection end point or SOAP action settings. Confirm the changes with OK.
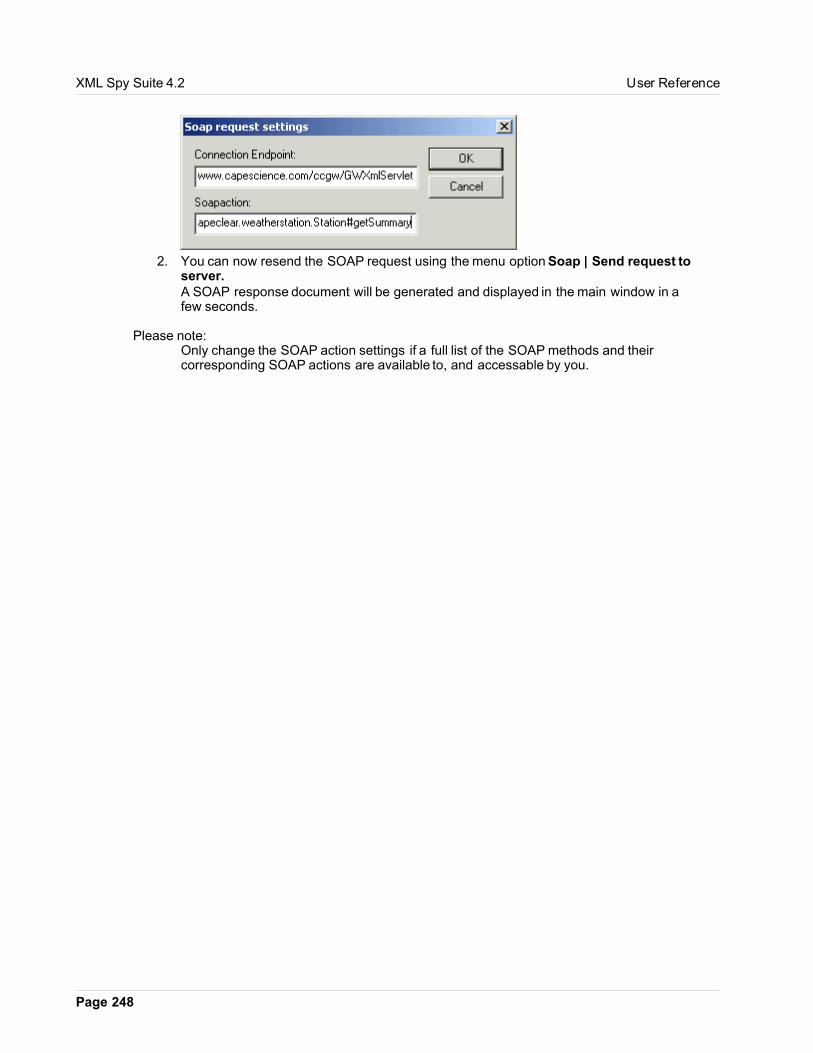
Page 248
XML Spy Suite 4.2 User Reference
2. You can now resend the SOAP request using the menu option Soap | Send request toserver.A SOAP response document will be generated and displayed in the main window in afew seconds.
Please note:Only change the SOAP action settings if a full list of the SOAP methods and theircorresponding SOAP actions are available to, and accessable by you.

Page 249© 2001 Altova Ges.m.b.H
XML Spy Suite 4.2 User Reference
Tools
The tools menu allows you to:· Access the scripting environment of XML Spy. You can create, manage and store your
own forms, macros and event handlers.· View the currently assigned macros
· Assign (or deassign) scripts to a project· Customize your version of XML Spy: define your own toolbars, keyboard shortcuts,
menus, and macros· Define the global XML Spy program settings
Switch to scripting environment
The scripting environment is currently available as a downloadable component. If you have notdownloaded and installed the scripting component, you will be prompted to do so when youselect the "Switch to Scripting environment" menu item.
Clicking OK, connects you with the Altova Component Download Center from where you canchoose to download the "XML Spy Scripting Environment".
Having downloaded the component, double click on the Spyscripting.exe to install it.
This command switches to the scripting environment, a predefined global scripting project isactive the first time you start the form editor. Please see the Scripting section in this manual formore information.
Show macros
This command opens a dialog box which displays a list of all macros defined in the globalscripting project and in the scripting project associated with the current project opened inXMLSpy.

Page 250
XML Spy Suite 4.2 User Reference
The "Run" button in the dialog box, calls the selected macro.
Project
This command opens a further submenu from where you can assign (or deassign) scripts to aproject.
Please note:You have to have a XML Spy project open for these menu items to become active.
Assign script to Project
This command enables you to assign scripts to an scripting project.
Unassign Scripts from Project
This command enables you to de-assign scripts from a scripting project.
Project Scripts active
This command allows you to activate or temporarily deactivate project scripts.
Customize...
The customize command lets you customize XML Spy to suit your personal needs.

Page 251© 2001 Altova Ges.m.b.H
XML Spy Suite 4.2 User Reference
Commands
The Commands tab allows you customize your menus or toolbars.
To add a command to a toolbar or menu:1. Open this dialog box using Tools | Customize.2. Select the command category in the Categories list box. The commands available
appear in the Commands list box.3. Click on a command in the commands list box and drag "it" to an to an existing menu or
toolbar.
4. An I-beam appears when you place the cursor over a valid position to drop thecommand.
5. Release the mouse button at the position you want to insert the command.
· A small button appears at the tip of mouse pointer when you drag a command. Thecheck mark below the pointer means that the command cannot be dropped at thecurrent cursor position.
· The check mark disappears whenever you can drop the command (over a tool bar ormenu).
· Placing the cursor over a menu when dragging, opens it, allowing you to insert thecommand anywhere in the menu.
· Commands can be placed in menus or tool bars. If you created you own toolbar you canpopulate it with your own commands/icons.
Please note:You can also edit the commands in the context menus (right click anywhere opens thecontext menu), using the same method. Click the Menu tab and then select the specificcontext menu available in the Context Menus combo box.
To delete a command or menu:

Page 252
XML Spy Suite 4.2 User Reference
1. Open this dialog box using Tools | Customize.2. Click on the menu entry or icon you want to delete, and drag with the mouse.3. Release the mouse button whenever the check mark icon appears below the mouse
pointer.The command, or menu item is deleted from the menu or tool bar.
Toolbars
The Toolbars tab allows you to activate or deactive specific toolbars, as well as create your ownspecialized ones.
XML Spy toolbars contain symbols for the most frequently used menu commands.For each symbol you get a brief "tool tip" explanation when the mouse cursor is directly over theitem and the status bar shows a more detailed description of the command.
You can drag the toolbars from their standard position to any location on the screen, where theyappear as a floating window. Alternatively you can also dock them to the left or right edge of themain XML Spy window.
· Toolbar settings defined in the Grid, Schema design and Text view are valid in thoseviews. The Browser view toolbars are independent of all the other views.
To activate or deactivate a toolbar:1. Click the check box to activate (or deactivate) the specific toolbar.
To create a new toolbar:1. Click the New... button, and give the toolbar a name in the Toolbar name dialog box.2. Add commands to the toolbar using the Commands tab of the Customize dialog box.
To reset the Menu Bar

Page 253© 2001 Altova Ges.m.b.H
XML Spy Suite 4.2 User Reference
· Click the Menu Bar entry and· Click the Reset button, to reset the menu commands to the state they were in when
XML Spy was installed.
To reset all toolbar and menu commands· Click the Reset All button, to reset all the toolbar commands to the state they were
when XML Spy was installed. A prompt appears stating that all toolbars and menus willbe reset.
· Click Yes to confirm the reset.
To change a toolbar name:· Click the Rename... button to edit the name of the toolbar.
To delete a toolbar:· Click the Delete button to delete the currently highlighted toolbar in the Toolbars list
box.· A prompt appears, asking if you really want to delete the toolbar. Click Yes to confirm
the deletion.· or, click right on the menu or icon bar, and select the Delete entry in the popup menu.
Show text labels:This option places explanatory text below toolbar icons when activated.
Keyboard
The Keyboard tab allows you to define (or change) keyboard shortcuts for any XML Spycommand.
To assign a new Shortcut to a command:1. Select the commands category using the Category combo box.

Page 254
XML Spy Suite 4.2 User Reference
2. Select the command you want to assign a new shortcut to, in the Commands list box3. Click in the "Press New Shortcut Key:" text box, and press the shortcut keys that are
to activate the command.The shortcuts appear immediately in the text box. If the shortcut was assignedpreviously, then that function is displayed below the text box.
4. Click the Assign button to permanently assign the shortcut.The shortcut now appears in the Current Keys list box.(To clear this text box, press any of the control keys, CTRL, ALT or SHIFT).
To deassign (or delete a shortcut):1. Click the shortcut you want to delete in the Current Keys list box, and2. Click the Remove button (which has now become active).3. Click the Close button to confirm all the changes made in the Customize dialog box.
Set accelerator for:Currently no function.
Currently assigned keyboard shortcuts:Hotkeys by key
F1 Help MenuF3 Find NextF5 RefreshF7 Check well-formednessF8 Validate
F9 Database/Table viewSHIFT + F9 Insert table rowCTRL + F9 Append row
F10 XSL TransformationCTRL + F10 XSL:FO Transformation
Num + ExpandNum - CollapseNum * Expand fullyCTRL + Num- Collapse unselectedCTRL + G Goto line/char
CTRL+TAB and CTRL+F6 Cycle through open windowsArrow keys (up / down) Move selection barEsc. Abandon edits/close dialog box
Return /Space bar confirms a selection
Alt + F4 Closes XML SpyCTRL + F4 Closes active windowAlt + F, 1 Open last file
CTRL + Double click an element (Schema view)Display element definition
CTRL + N File NewCTRL + O File Open

Page 255© 2001 Altova Ges.m.b.H
XML Spy Suite 4.2 User Reference
CTRL + S File SaveCTRL + P File Print
CTRL + A Select AllShift + Del Cut (or CTRL + X)CTRL + C CopyCTRL + V Paste
CTRL + Z UndoCTRL + Y Redo
Del Delete (Delete item in Schema/Enhanced Grid view)
CTRL + F FindF3 Find NextCTRL + H Replace
CTRL + I Append AttributeCTRL + E Append ElementCTRL + T Append TextCTRL + D Append CDATACTRL + M Append Comment
CTRL + SHIFT + I Insert AttributeCTRL + SHIFT + E Insert ElementCTRL + SHIFT + T Insert Text contentCTRL + SHIFT + D Insert CDATACTRL + SHIFT + M Insert Comment
CTRL + ALT + I Add Child AttributeCTRL + ALT + E Add Child ElementCTRL + ALT + T Add Child TextCTRL + ALT + D Add Child CDATACTRL + ALT + M Add Child Comment
Hotkeys by functionAbandon edits Esc.Add Child Attribute CTRL + ALT + IAdd Child CDATA CTRL + ALT + DAdd Child Comment CTRL + ALT + MAdd Child Element CTRL + ALT + EAdd Child Text CTRL + ALT + TAppend Attribute CTRL + IAppend CDATA CTRL + DAppend Comment CTRL + MAppend Element CTRL + EAppend row CTRL + F9Append Text CTRL + TCheck well-formedness F7Closes active window CTRL + F4Closes XML Spy Alt + F4Collapse Num -Collapse unselected CTRL + Num-Confirms a selection Return / Space barCopy CTRL + CCut SHIFT + Del (or CTRL + X)

Page 256
XML Spy Suite 4.2 User Reference
Cycle through windows CTRL + TAB and CTRL + F6Database/Table view F9Delete item DelExpand Num +Expand fully Num *File New CTRL + NFile Open CTRL + OFile Print CTRL + PFile Save CTRL + SFind CTRL + FFind Next F3Goto line/char CTRL + GHelp Menu F1Insert Attribute CTRL + SHIFT + IInsert CDATA CTRL + SHIFT + DInsert Comment CTRL + SHIFT + MInsert Element CTRL + SHIFT + EInsert table row SHIFT + F9Insert Text content CTRL + SHIFT + TMove selection bar Arrow keys (up / down)Open last file Alt + F, 1Paste CTRL + VRedo CTRL + YRefresh F5Replace CTRL + HSelect All CTRL + ATo view an elementdefinition CTRL + Double click on an element.Undo CTRL + ZValidate F8XSL Transformation F10XSL:FO Transformation CTRL + F10
Menu
The Menu tab allows you to customize the main menu bars as well as the (popup - right click)context menus.

Page 257© 2001 Altova Ges.m.b.H
XML Spy Suite 4.2 User Reference
You can customize both the Default and XML Spy menu bars.
The Default menu is the one visible when no XML documents of any type are open in XML Spy.
The XML Spy menu is the menu bar visible when at least one XML document has beenopened.
To customize a menu:1. Select the menu bar you want to customize from the "Show Menus for:" combo box2. Click the Commands tab, and drag the commands to the menu bar of your choice.
To delete commands from a menu:1. Click right on the command, or icon representing the command, and2. Select the Delete option from the popup menu,
or,1. Select Tools | Customize to open the Customize dialog box, and2. Drag the command away from the menu, and drop it as soon as the check mark icon
appears below the mouse pointer.
To reset either of the menu bars:1. Select either the Default or XML Spy entry in the combo box, and2. Click the Reset button just below the menu name.
A prompt appears asking if you are sure you want to reset the menu bar.
To customize any of the Context menus (right click menus):1. Select the context menu from the combo box.2. Click the Commands tab, and drag the commands to context menu that is now open.

Page 258
XML Spy Suite 4.2 User Reference
To delete commands from a context menu:1. Click right on the command, or icon representing the command, and2. Select the Delete option from the popup menu
or,1. Select Tools | Customize to open the Customize dialog box, and2. Drag the command away from the context menu, and drop it as soon as the check mark
icon appears below the mouse pointer.
To reset any of the context menus:1. Select the context menu from the combo box, and2. Click the Reset button just below the context menu name.
A prompt appears asking if you are sure you want to reset the context menu.
To close an context menu window:1. Click on the Close icon at the top right of the title bar, or2. Click the Close button of the Customize dialog box.
Menu animations· Select one of the menu animations from the combo box, if you want animated menus.
Menu shadows· Click the Menu shadows check box, if you want all your menus to have shadows.
Macros
The Macros tab allows you to place macros (created using the XML scripting environment) in atoolbar or menu.

Page 259© 2001 Altova Ges.m.b.H
XML Spy Suite 4.2 User Reference
To place a macro (icon) into a toolbar or menu:1. Start the scripting environment using Tools | Switch to Scripting environment.2. Double click the XMLSpyMacros entry in the Modules folder of the
XMLSpyGlobalScripts project.Previously defined macros are then be visible in the right hand window.
3. Switch back to XML Spy, and select Tools | Customize and click on the Macros tab.The macros defined in the scripting environment are now visible in the Macros list boxat left.
4. Click the macro name and then the Add Command button. This places the macroname in the Associated commands list box.
5. Click the macro name in the Associated commands list box, and drag it to any tool baror menu.
· To edit a macro icon, click the Edit Icon button.
· To delete a macro from the Associated commands list box, click the Delete button.
Plug-Ins
The Plug-Ins tab allows you to place plug-ins in a toolbar or menu.
To place a plug-in icon into a toolbar or menu:1. Click the "Add Plug-In..." button.

Page 260
XML Spy Suite 4.2 User Reference
2. Select the folder and then click the plug-in file to mark it (XMLSpyPlugIn.dll in this case).
3. Click the Open button to install the plug-in.The plug-in name appears in the "list of active plug-ins" list, and the plug-in icon(s)appears in a new toolbar.
To remove a plug-in:1. Click the plug-in name in the "List of active plug-ins" list and click the "Remove Plug-in"
button.

Page 261© 2001 Altova Ges.m.b.H
XML Spy Suite 4.2 User Reference
Options
The Options tab allows you to set general environment settings.
ToolbarWhen active, the Show Tooltips on toolbars check box displays a popup when the mousepointer is placed over an icon in any of the icon bars. The popup contains a short description ofthe icon function, as well as the associated keyboard shortcut, if one has been assigned.
The Show shortcut keys in Tooltips check box, allows you to decide if you want to have theshortcut displayed in the tooltip.
When active, the Large icons check box switches between the standard size icons, and largerversions of the icons.
Customize context menu
The Customize context menu allows you to further customize icons and menu items.
To open the customize context menu:1. First open the Customize menu by selecting Tools | Customize.2. Then place the mouse pointer over an icon (or menu) and click right to open the
context menu.

Page 262
XML Spy Suite 4.2 User Reference
Reset to defaultCurrently no function.
Copy Button imageThis option copies the icon you right click, to the clipboard.
DeleteThis option deletes the icon or menu you right click. Deleting a menu, deletes all menu optionscontained in it!
To restore a deleted menu:
· Select the Menu tab· Select the menu you want to restore (XML Spy or Default).· Click the Reset button below the menu selection combo box.
Button Appearance...This option allows you to edit the button image as well as the button text. Currently only themacro icons can be edited (default XML Spy icon).
The Image only, Text only and Image and text radio buttons, let you define what you want toedit. Click the Select User-defined Image radio button and click one of the icons.

Page 263© 2001 Altova Ges.m.b.H
XML Spy Suite 4.2 User Reference
Click the Edit... button, to open the Edit button image dialog box. The Button text can be edited ifyou select either Text only or Image and text options.
ImageThis option changes the graphical display of an icon to the text representing it.
TextThis option changes the textual description of a function to the graphical image (icon)representing that function.
Image and TextThis option enables the simultaneous display of an icon and its text.

Page 264
XML Spy Suite 4.2 User Reference
Start groupThis option inserts a vertical divider to the left of the icon you right clicked.
Options
The "Options" command allows you to define the global program settings in a tabbed dialog box.These settings are saved in the registry, and apply to all current and future document windows.
The Apply button displays the changes in the currently open documents, and fixes the currentsettings. The changes are seen immediately in the background windows.
File
The "File" tab defines the way XML Spy opens and saves XML documents. You can also findrelated settings in the Encoding tab.
Open/New file in Grid viewYou can choose to open an existing file or create a new file either in the Enhanced Grid View orin the text view. If you select the grid view, you can optionally show the tree structure, andautomatically expand all lines at the same time.
Automatic reload of changed filesIf you are working in a multi-user environment, or if you are working on files that are dynamicallygenerated on a server, you can instruct XML Spy to watch for changes to the files that you arecurrently editing. XML Spy will then prompt you to reload the file, whenever a change isdetected.

Page 265© 2001 Altova Ges.m.b.H
XML Spy Suite 4.2 User Reference
ValidationIf you are using document type definitions (DTDs) or schemas to define the structure of yourXML documents, you can automatically check the document for validity whenever it is opened orsaved.
XML Spy can also cache these files in memory to save any unnecessary reloading (e.g. whenthe Schema being referred to, is accessed through a URL).
ProjectWhen you start XML Spy, you can open the last-used project automatically.
Save FileXML Spy uses TAB-characters (0x09) to indent the individual elements forming the structure ofthe XML document. In certain situations this may be undesirable. Deactivate the "Indentelements using tabs" check box, if this is the case.
No formatting output forYou can selectively turn off output formatting for certain elements, by entering them in the listbox (e.g. necessary for xsl:attribute when you are editing XSL Stylesheets).
When saving an XML document, XML Spy includes a short comment <!-- Edited with XML Spy4.x http://www.xmlspy.com --> near the top of the file. This option can only be deactivated bylicensed users.
When saving a content model diagram (using the menu option Schema design | GenerateDocumentation), XML Spy includes a comment <!-- Generated with XML Spy 4.x Schema Editor- http://www.xmlspy.com -->) at the bottom of the diagram. This option can only be deactivatedby licensed users.
Line breaksLine-breaks in the document file can be preserved so that the same characters will be used thatwere found when opening the file. You can choose to encode line breaks in any of the threepossible forms (CR&LF for PCs, CR for the MacOS, or LF for Unix).
File types
The "File types" tab allows you to customize the behavior of XML Spy on a per-file-type basis.
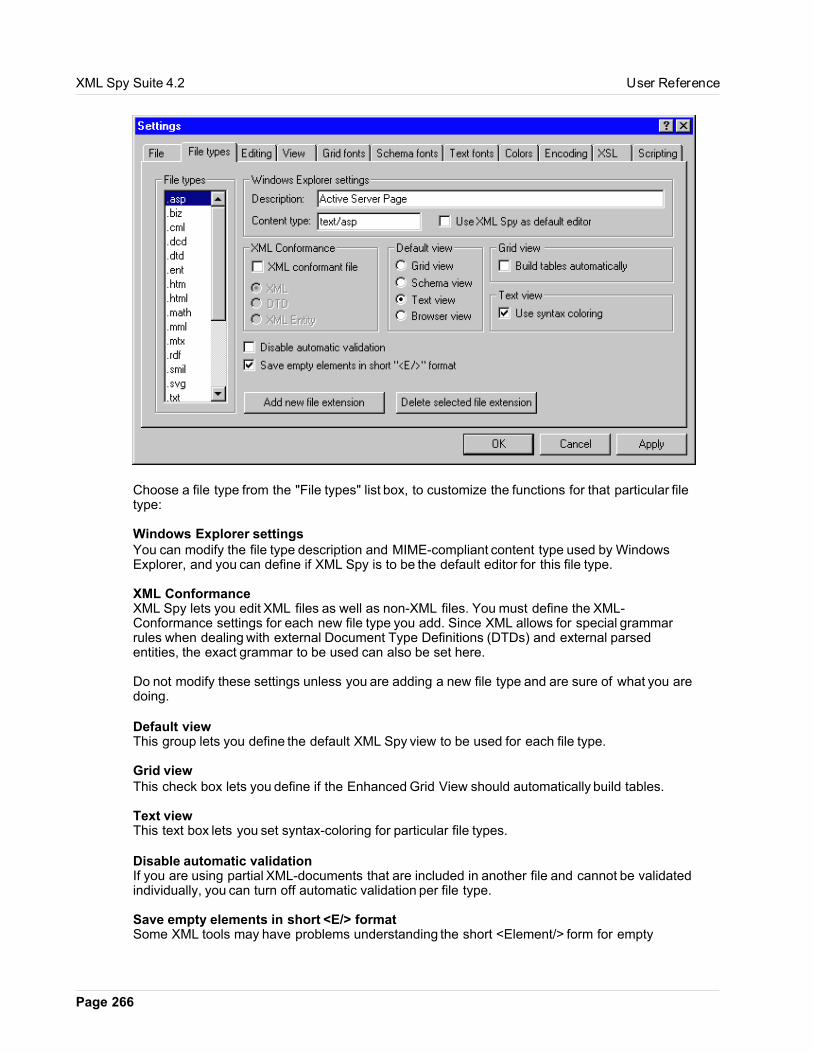
Page 266
XML Spy Suite 4.2 User Reference
Choose a file type from the "File types" list box, to customize the functions for that particular filetype:
Windows Explorer settingsYou can modify the file type description and MIME-compliant content type used by WindowsExplorer, and you can define if XML Spy is to be the default editor for this file type.
XML ConformanceXML Spy lets you edit XML files as well as non-XML files. You must define the XML-Conformance settings for each new file type you add. Since XML allows for special grammarrules when dealing with external Document Type Definitions (DTDs) and external parsedentities, the exact grammar to be used can also be set here.
Do not modify these settings unless you are adding a new file type and are sure of what you aredoing.
Default viewThis group lets you define the default XML Spy view to be used for each file type.
Grid viewThis check box lets you define if the Enhanced Grid View should automatically build tables.
Text viewThis text box lets you set syntax-coloring for particular file types.
Disable automatic validationIf you are using partial XML-documents that are included in another file and cannot be validatedindividually, you can turn off automatic validation per file type.
Save empty elements in short <E/> formatSome XML tools may have problems understanding the short <Element/> form for empty
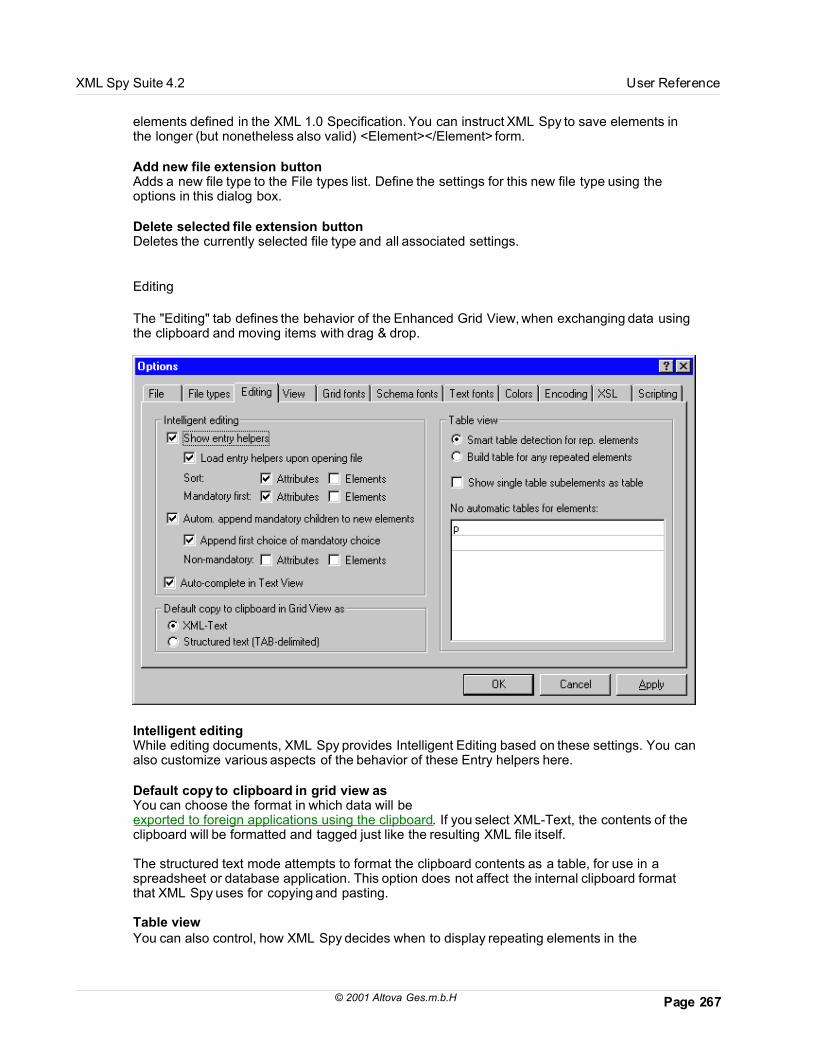
Page 267© 2001 Altova Ges.m.b.H
XML Spy Suite 4.2 User Reference
elements defined in the XML 1.0 Specification. You can instruct XML Spy to save elements inthe longer (but nonetheless also valid) <Element></Element> form.
Add new file extension buttonAdds a new file type to the File types list. Define the settings for this new file type using theoptions in this dialog box.
Delete selected file extension buttonDeletes the currently selected file type and all associated settings.
Editing
The "Editing" tab defines the behavior of the Enhanced Grid View, when exchanging data usingthe clipboard and moving items with drag & drop.
Intelligent editingWhile editing documents, XML Spy provides Intelligent Editing based on these settings. You canalso customize various aspects of the behavior of these Entry helpers here.
Default copy to clipboard in grid view asYou can choose the format in which data will beexported to foreign applications using the clipboard. If you select XML-Text, the contents of theclipboard will be formatted and tagged just like the resulting XML file itself.
The structured text mode attempts to format the clipboard contents as a table, for use in aspreadsheet or database application. This option does not affect the internal clipboard formatthat XML Spy uses for copying and pasting.
Table viewYou can also control, how XML Spy decides when to display repeating elements in the

Page 268
XML Spy Suite 4.2 User Reference
Table View.
View
The "View" tab allows you customize the XML documents presentation.
Enhanced Grid viewCollapsed elements in the Enhanced Grid View can be displayed in preview form. This displaysthe attributes and their values in gray in the same line as the element.
XML Spy lets you automatically apply the Optimal Widths command while editing, and lets youlimit the maximum cell width and height.
Text viewThe Text View supports syntax-coloring, which can be updated dynamically while typing or bedisabled entirely.
Program logoYou can turn off the splash screen upon program startup, to speed up XML Spy.
Window titleThe window title for each document window can contain only file name, or the full path name.
Document Editor viewXML files based on a document template (*.sps), are automatically opened in the DocumentEditor view when this option is active.
Browser viewYou can choose to see the browser view in a separate window, enabling side-by-side placementof the edit and browser views.

Page 269© 2001 Altova Ges.m.b.H
XML Spy Suite 4.2 User Reference
Grid fonts
The "Grid fonts" tab allows you to customize the appearance of text in the Enhanced Grid view.
Font face and scriptYou can select the font face and size to be used for displaying the various items in theEnhanced Grid View. The same fonts are also used for printing and consequently only TrueTypefonts can be selected.
SizeIf you want to use the same font size for all items, click on the "Use same for all" check box.
StylesThe style and color can be set using the combo boxes. The current settings are immediatelyreflected in the list, so that you can preview the way your document is going to look.
In the Windows 95/98 version of XML Spy, it is possible to select a "Script" for some fonts. Thisis especially necessary when editing documents with a non-Roman writing systems. The scriptselected in the font settings dialog box, needs to match the character set code-page selectedwhen opening a document (i.e. when editing a Cyrillic ISO-8859-5 document, the code-pagebeing used to edit the file should be set to 1251 and the font script needs to be set to "Cyrillic").
Schema fonts
The "Schema fonts" tab allows you to customize the appearance of text in the Text view.

Page 270
XML Spy Suite 4.2 User Reference
Font face and scriptYou can select the font face and size to be used for displaying the various items in the SchemaDesign view. The same fonts are used when printing and creating schema documentation,consequently only TrueType fonts can be selected.
The "Doc." Schema and Element headers, are the fonts that are used when creating schemadocumentation.
SizeIf you want to use the same font size for all items, click on the "Use same for all" check box.
StylesThe style and color can be set using the combo boxes. The current settings are immediatelyreflected in the list, so that you can preview the way your document is going to look.
In the Windows 95/98 version of XML Spy, it is possible to select a "Script" for some fonts. Thisis especially necessary when editing documents with a non-Roman writing systems. The scriptselected in the font settings dialog box, needs to match the character set code-page selectedwhen opening a document (i.e. when editing a Cyrillic ISO-8859-5 document, the code-pagebeing used to edit the file should be set to 1251 and the font script needs to be set to "Cyrillic").
Text fonts
The "Text fonts" tab allows you to customize the appearance of text in the Text view.
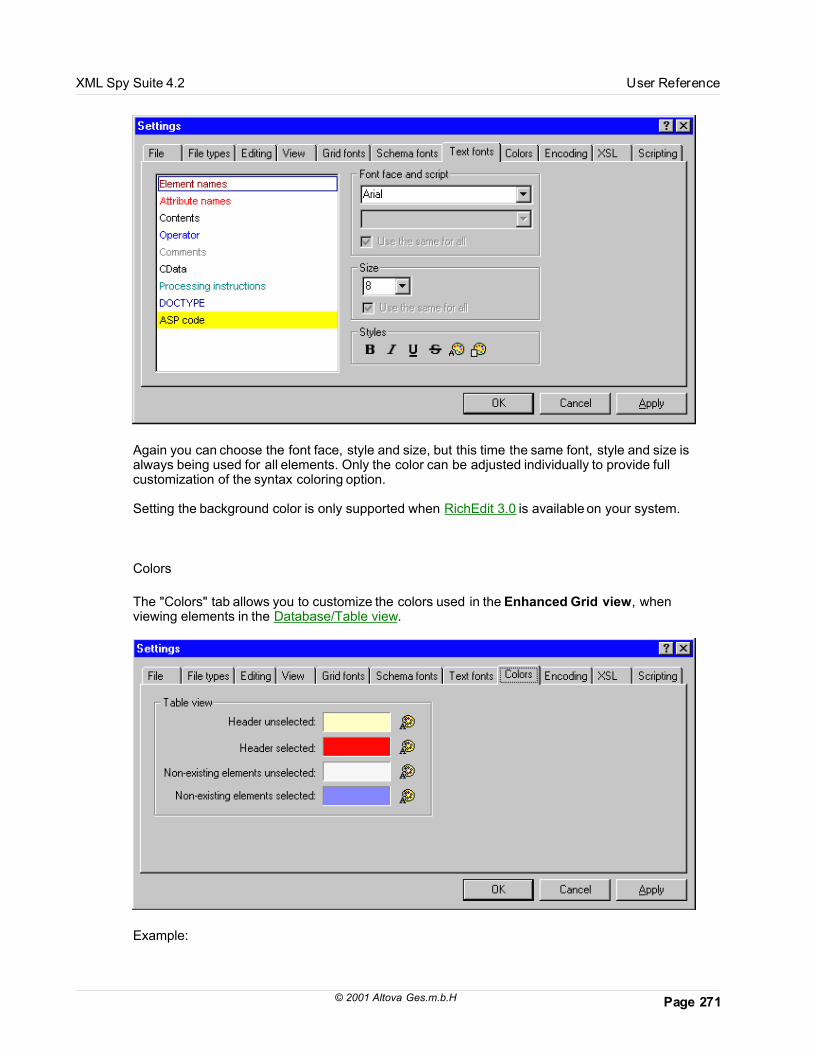
Page 271© 2001 Altova Ges.m.b.H
XML Spy Suite 4.2 User Reference
Again you can choose the font face, style and size, but this time the same font, style and size isalways being used for all elements. Only the color can be adjusted individually to provide fullcustomization of the syntax coloring option.
Setting the background color is only supported when RichEdit 3.0 is available on your system.
Colors
The "Colors" tab allows you to customize the colors used in the Enhanced Grid view, whenviewing elements in the Database/Table view.
Example:

Page 272
XML Spy Suite 4.2 User Reference
Header unselectedThis option defines the color of the table header when deselected.
Header selectedThis option defines the color of the table header when selected.
Non-existing elements unselectedThis option defines the color of the empty elements when deselected.
Non-existing elements selectedThis option defines the color of the empty elements when selected.
In addition to the colors you define here, XML Spy uses the regular selection and menu colorpreferences set in the Display Settings on the Control Panel of your Windows installation.
Encoding
The "Encoding" tab specifies the kind of character-set encoding to be used when creating newfiles, as well as the encoding to be assumed, when opening files that lack an encodingdeclaration.

Page 273© 2001 Altova Ges.m.b.H
XML Spy Suite 4.2 User Reference
Default encoding for new filesThe default encoding for new files can be pre-determined in the Settings dialog box so that eachnew document is automatically created with a proper XML-declaration and includes theencoding-specification that you most commonly need.
The encoding for existing files will, of course, always be remembered independently of thissetting and can only be changed by the "Encoding" command on the "File" menu.If a two- or four-byte encoding is selected as the default encoding (i.e. UTF-16, UCS-2, or UCS-4) you can also choose between little-endian and big-endian byte-ordering for the XML files.
Open/save files with unknown encoding asYou can choose how an XML file is to be interpreted if the encoding-specification is missing,and the encoding cannot be auto-detected. In most cases this will very likely be UTF-8 or ISO-8895-1, even though the XML specification theoretically only allows UTF-8 files to lack anencoding-specification.
Open/save non-XML files inSometimes is can be convenient to also use XML Spy for editing non-XML files (such as ActiveServer Pages (ASP) or similar web-related documents. Since these files do not contain anyencoding statements, you must specify a default Windows Code Page to be used for accessthese files.
XSL
The "XSL" tab allows you to define which program to use for XSL Transformations.
XML Spy includes full support for XSL Transformations, and can either use the MSXML 3.0 or4.0 parser (which is pre-installed) or any external XSLT processor for this purpose. The"Choose version automatically" option is active per default. XML Spy first tries to use version 4.0

Page 274
XML Spy Suite 4.2 User Reference
and if not available version 3.0. You can however, manually choose either version by clicking therespective radio button.
Use Microsoft XML Parser (MSXML) 3.0 or 4.0If you are using Internet Explorer 5 or above (i.e. the MSXML module) for XSLT processing, youmust specify if the resulting output is to be transformed as an XML-compliant document (suchas XHTML or WML), or non-XML compliant text files.
Installing other XML ParsersThe Component Download Center, accessible through the menu option Help | ComponentsDownload, allows you to download and use different XSL processors. The XSL tab below,shows that Infoteria iXSLT 2.0c has been installed.

Page 275© 2001 Altova Ges.m.b.H
XML Spy Suite 4.2 User Reference
External XSL transformation programIf you are using an external XSL processor, you must specify a command-line string that is to beexecuted by XML Spy in order to initiate the XSL Transformation. In this case, use the followingvariables to build your command-line string:
%1 the XML instance document that is to be processed%2 the output file that is to be generated%3 the XSL Stylesheet to be used (optional, if the document contains an <?xsl-
stylesheet ...?> reference
You can also choose to show the result of the external XSLT processor directly within XML Spyin a message box.
Please see the technical background information ons XSLT Processors for further details.
Scripting
The "Scripting" tab allows you to select the scripting environment and other scripting specificparameters.

Page 276
XML Spy Suite 4.2 User Reference
Activation:Define if the scripting environment is to be active when XML Spy starts. Click the Browse...button to select the scripting project file.
Standard script language:Select the scripting language you want to use, JavaScript or VBscript.
Automatic script processing:This section defines if auto-macros have the right to run, and if event processing is to beenabled.

Page 277© 2001 Altova Ges.m.b.H
XML Spy Suite 4.2 User Reference
Window Menu
To organize the individual document windows in an XML Spy session, the Window menucontains standard commands common to most Windows applications.
You can cascade the open document windows, tile them, or arrange document icons once youhave minimized them. You can also switch the various Entry Helper windows on or off (such asProject, Info, or Entry-Helpers) or switch to each open document window directly from themenu.
Cascade
This command rearranges all open document windows so that they are all cascaded (i.e.staggered) on top of each other.
Tile horizontally
This command rearranges all open document windows as horizontal tiles, making them allvisible at the same time.
Tile vertically
This command rearranges all open document windows as vertical tiles, making them all visibleat the same time.
Project Window
This command lets you switch the Project Window on or off.
This is a dockable window. Dragging on its title bar detaches it from its current position andmakes it a floating window. Click right on the title bar, to allow docking or hide the window.

Page 278
XML Spy Suite 4.2 User Reference
Info Window
This command lets you switch the Info Window on or off.
This is a dockable window. Dragging on its title bar detaches it from its current position andmakes it a floating window. Click right on the title bar, to allow docking or hide the window.
Entry Helpers
This command lets you switch all three Entry-Helper Windows on or off.
All three Entry helpers are dockable windows. Dragging on a title bar detaches it from its currentposition and makes it a floating window. Click right on the title bar, to allow docking or hide thewindow.
All on/off
This command lets you switch all dockable windows on, or off:
· the Project Window· the Info Window· the three Entry-Helper Windows
This is useful if you want to hide all non-document windows quickly, to get the maximum viewingarea for the document you are working on.
Currently open window list
This list shows all currently open windows, and lets you quickly switch between them.
You can also use the Ctrl-TAB or CTRL F6 keyboard shortcuts to cycle through the openwindows.

Page 279© 2001 Altova Ges.m.b.H
XML Spy Suite 4.2 User Reference
Help Menu
The Help menu contains all commands required to get help or more information on XML Spy, aswell as links to information and support pages on our web server.
The Help menu also contains the Registration dialog, which lets you enter your license key-code, once you have purchased the product.
XML Spy Quick Help
XML Spy includes a context-sensitive online help system that is based on the MicrosoftHTML Help Viewer and lets you directly access information on each menu command, dialogbox and window from within XML Spy.
Press the "F1" button on your keyboard to access the context-sensitive help for the currentlyopen dialog box, or press "F1" while you are browsing through the menus with your mouse.
All dialogs include a small question mark symbol (?) in their window title bar. Click on thissymbol to access the context-sensitive help topic for that dialog box.
If you would like to learn more about any topic, you can also use the Table of contents andIndex commands on the Help menu or search through the entire text of the electronicdocumentation using the Search command.
Table of contents...
This command displays a hierarchical representation of all chapters and topics contained inthe online help system. Use this command to jump to the table of contents directly from withinXML Spy.

Page 280
XML Spy Suite 4.2 User Reference
Once the help window is open, use the three tabs to toggle between the table of contents, index,and search panes. The Favorites tab lets you bookmark certain pages within the help system.
Index...
This command accesses the keyword index of XML Spy Online Help. You can also use theIndex tab in the left pane of the online help system.

Page 281© 2001 Altova Ges.m.b.H
XML Spy Suite 4.2 User Reference
The index, lists all relevant keywords and lets you navigate to a topic by double-clicking therespective keyword. If more than one topic matches the selected keyword, you are presented alist of available topics to choose from:
Search...
The Search command performs a full-text search in the entire online help system.

Page 282
XML Spy Suite 4.2 User Reference
· Once you enter your search term into the query field and hit the Return key.The online help system displays a list of available topics that contain the search termyou've entered.
· Double-click on any item in the list to display the corresponding topic.
Registration...
When you start XML Spy for the first time, you are automatically presented with the Registrationdialog box, which lets you register your software product in order to be eligible for technicalsupport and activate your license, which is done by entering a unique key-code to unlock thesoftware.
FREE Evaluation Version
If you have downloaded the XML Spy from our web server and would like to activate your FREE30-day evaluation version, please enter your name, company, and e-mail address and click onthe "Request FREE evaluation key..." button. XML Spy then uses your Internet connection totransmit the information you have just entered to our web server, where a personal uniqueevaluation license will be generated for you. The license key-code, which is necessary to unlockyour software, will then be sent to the e-mail address you have entered - it is thereforeimportant, that you enter your real e-mail address in the registration dialog box!
Once you have clicked the request button, please go to your favorite mail software and retrieve

Page 283© 2001 Altova Ges.m.b.H
XML Spy Suite 4.2 User Reference
the license key-code from our e-mail message, which you should be receiving in a matter of afew minutes (depending on transient Internet conditions).
If you requested a key-code and it didn't arrive in a short space of time, the process may havefailed due to Firewall restrictions in your network. If this is the case, please send a shortmessage with your information via e-mail to [email protected] and our support staff willgenerate a key-code for you manually.
When you have received your evaluation key-code, please enter it into the key-code field in theregistration dialog box and click on OK to start working with XML Spy.
Whenever you want to place an order for a licensed version of XML Spy, you can also use the"Order license key..." button in the registration dialog box or the Order form menu command toproceed to the Secure XML Spy Online Shop on the Internet.
Licensed Version
If you have purchased a single-user license for XML Spy, you will receive an e-mail messagefrom us that contains your license-data and includes your name, company and key-code. Pleasemake sure that you enter all fields from your license e-mail into the registration dialog box. Thekey-code will only be able to unlock your software installation, if the entries in the name andcompany fields match the name and company entered into our order form.
If your company has purchased a multi-user license for XML Spy, you will receive an e-mailmessage from us that contains your license-data and includes your company name and key-code.
Please make sure that you enter the company name and key-code from your license e-mail intothe registration dialog box and also enter your personal name into the name field. The key-codewill only be able to unlock your software installation, if the value in the company field match thecompany name entered into our order form.
Please note that the XML Spy License-Agreement does not allow you to install more than thelicensed number of copies of XML Spy on the computers in your organization (per-seat license).
Order form...
When you want to place an order for a licensed version of XML Spy, use this command or the"Order license key..." button in the registration dialog to proceed to the Secure XML Spy OnlineShop on the Internet, where you can choose between different single- and multi-user licensepacks.
Once you have placed your order, you can choose to pay by credit card, send a check by mail,or use a bank wire transfer.
Support Center...
If you have any questions regarding our product, please feel free to use this command to queryto our support center on the Internet at any time. This is the place where you'll find links to theFAQ, support form, and e-mail addresses for contacting our support staff directly.

Page 284
XML Spy Suite 4.2 User Reference
FAQ on the web
To help you in getting the best support possible, we are providing a list ofFrequently Asked Questions (FAQ) on the Internet, that is constantly updated as our supportstaff encounters new issues that are raised by our customers.
Please make sure to check the FAQ before contacting our technical support team. This willallow you to get help more quickly.
We regret that we are not able to offer technical support by phone at this time, but our supportstaff will typically answer your e-mail incidents within one business day.
If you would like to make a feature suggestion for a future version of XML Spy or if you wish tosend us any other general feedback, please use the questionnaire form.
Components download
The Components download option, currently lets you to download the latest Microsoft XMLParser, as well as an alternate XSLT Transformation System, and will be expanded in thefuture.
XML Spy on the Internet...
This command takes you directly to the XML Spy web-server http://www.xmlspy.com where youcan find out about news, product updates and additional offers from the XML Spy team.
XML Spy Training
This command takes you directly to the XML Spy web-server http://www.xmlspy.com where youcan find out about our authorized XML Spy Training Partners who provide courses on usingXML Spy and Advanced XML Application Development (AXAD).
Japanese distributor...
If you are located in Japan, you may prefer to contact our Japanese distributor on the Internet byusing this menu command.
About XML Spy...
This command shows the XML Spy splash screen and copyright information dialog box, whichincludes the XML Spy logo.
Please note that this dialog box shows the version number - to find the number of the actualbuild you are using, please look at the status bar, which always includes the full version andbuild number.

Page 285© 2001 Altova Ges.m.b.H
XML Spy Suite 4.2 User Reference
Dialogs
Most dialog boxes in XML Spy are shown in response to a certain menu command or click on atoolbar button and are, therefore, explained in the individual chapters that describe therespective commands.
This section describes standard dialog boxes, that are used by more than one command.
Assign FileThe Assign File dialog box is opened by the Assign DTD, Assign Schema, or Assign XSLcommands and prompts you for a file or path name to be used for the requested process:
You can either:· enter a path name into the text box· select from a list of most recently used filenames using the drop-down list· browse for a file on your computer (using the common Open dialog box), or· use the Window button to select any currently open window or any file that is part of the
current project.
Select fileThe Select File dialog box lets you choose any currently open window or any file from yourcurrent project, as a convenient way to locate a file to be used for the various Assigncommands.
Double clicking an entry in either window, places the file name in the Assign File dialog box.

Page 286
XML Spy Suite 4.2 User Reference
Both windows show the available files based on their extensions depending on which commandwas selected: Assign DTD, Assign Schema, or Assign XSL.

Page 287© 2001 Altova Ges.m.b.H
XML Spy Suite 4.2 Scripting
4 Scripting
The XMLSpyFormEditor
XMLSpyFormEditor is the scripting environment of XMLSpy. It gives you the ability to create,manage and store your own forms, macros and event handlers.
Before you can start using the scripting environment, you must download it from the ComponentDownload Center on our web site http://www.xmlspy.com. Afterwards you can start theinstallation.
To invoke the scripting environment select "Switch to scripting environment" from the "Scripting"menu of XMLSpy. There is a predefined global scripting project active the first time you start theform editor. This project is installed with the scripting component of XMLSpy and contains asample that interacts with the Altova.xml file.
The screen shot below shows the "FormDate" form and the implementation of theOn_BeforeStartEditing event handler. Both are part of the provided Altova sample.

Page 288
XML Spy Suite 4.2 Scripting
The graphic also shows the main parts of the XMLSpyFormEditor. The "Project window" (left),the "Property Sheet" (left), the client area with any open forms or modules (in the middle) andthe "Tool Bar" on the right.
To test the sample, switch back to XMLSpy and open the file Altova.xml. Activate the EnhancedGrid View and try to start editing the "/a:Altova/Division/Established" (XPath) element.
Project Window
The Project window gives you access to the forms and modules of a all open scripting projects.There is always one active scripting project. The title of the active project is printed in bold.Several commands of the File and Project menus refer to the currently active project only.

Page 289© 2001 Altova Ges.m.b.H
XML Spy Suite 4.2 Scripting
Two context-sensitive popup menus are available within the Project Bar. The first appears if youright-click the title of a project, and the second if you click a form or module. These popupmenus gives you access to functions also available in the "File" and "Project" menus in themenu bar.
The Property Sheet
The Property Sheet lists all properties and events of the selected user interface element(buttons, list-boxes, ActiveX controls, etc.) of the active form.
It gives you the ability to modify these properties and to add code to the empty event handlers.The combo-box at the top lists all controls of the form.
The pictures below shows the three pages of the Microsoft DatePicker ActiveX control. Pleasenote that different controls have different properties, and not all controls have three tabs in theProperty Sheet.

Page 290
XML Spy Suite 4.2 Scripting
The name of a control is specified by the (ObjectCode) property (here MScomCtl21). If you writesome scripting code and need access to methods or properties of the control, you must use thisname. Example:
var strTmp;strTmp = "";strTmp = MSComCtl21.Year + '-' + MSComCtl21.Month + '-' +
MSComCtl21.Day;
The "How to create a form" page gives you an example on adding some code to the click-eventof a control.
The Tool Bar
Use the Tool Bar to add controls to your forms. Select a control from the bar and draw arectangle in your form, to set its place and size.

Page 291© 2001 Altova Ges.m.b.H
XML Spy Suite 4.2 Scripting
The most common controls from the Tool Bar are:
Static Text - Adds text fields like captions or field descriptions.
Button - Adds a button to your form. It is possible to assign bitmaps to thesebuttons.
CheckBox - Enables Yes-No style elements
ComboBox - Gives the user the ability to enter text or to select an entry from thedrop-down list.
ListBox - Displays a list of items for selection.
EditBox - Defines a single line of text.
MultiEditBox - Defines multiple lines of text.
ActiveX - Allows the integration of an ActiveX control in the form.
All of these controls have their own properties and events. Select a control in your form and usethe Property Sheet to modify the properties and add some scripting code to the provided events.

Page 292
XML Spy Suite 4.2 Scripting
Main scripting features
With the introduction of the COM API, the possibilities of XMLSpy became substantiallyexpanded. It is the combination of common programming techniques using functions,recursions, global variables, error handling and so on, that gives the user the ability to deal withcomplex problems, to automate repetitive jobs or to realize completely new tasks. The scriptingenvironment is the tool for creating and organizing these scripts.
Macros
Macros are used to implement complex or repetitive tasks and for direct user input via forms(dialogs). Macros don't have parameters and return values. It is possible to access all variablesand functions which are declared in the global declarations and to display forms. Please see"How to write a macro" for a simple example. See also " Calling macros from XMLSpy".
Events
Events are a powerful way to react to user input and modify the behaviour of XMLSpy. Allscripting code of an event is executed immediately, and gives you the ability to directly influenceon the users handling of XMLSpy.
Most events have parameters which inform the script about the currently modified data. Thereturn value informs the application how to continue its own processing (eg. forbid editing). SeeHow to handle an event to learn more about the implementation of events.
Forms
Dialog boxes enable your scripts and XMLSpy to interact with the user. You are free to add anytype of control to your forms. These controls use their own event handlers for theimplementation of their functionality. A list of supported events for the selected control appearsin the Property Sheet on the "Events" page. See "How to create a form" for a description ofcreating forms.
Programming details
1. Because macros don't have parameters or return values, a function header should notexist in the macro implementation.
2. Event handlers need function headers with the correct spelling of the event name, or theevent handler won't get called.
3. It is possible to declare local variables and helper functions within macros and eventhandlers.Example:
//return value: true allows editing// false forbids editing
var txtLocal;
function Helper(){
txtMessage = txtLocal;Application.ShowForm( "MsgBox" );
}

Page 293© 2001 Altova Ges.m.b.H
XML Spy Suite 4.2 Scripting
function On_BeforeStartEditing(objXMLData){
txtLocal = "On_BeforeStartEditing()" ;Helper();
}
4. Recursive functions are supported. The function DeleteXMLElements() from"How to create a Form" calls itself recursively.
5. A form can display another form with the function Application.ShowForm().
6. Out-parameters from methods of the XMLSpy API require special variables inJavaScript.Example:
// use JavaScript method to access out-parametersvar strError = new Array(1);var nErrorPos = new Array(1);var objBadData = new Array(1);
bOK = objDoc.IsValid(strError,nErrorPos,objBadData);
7. While a macro is executed, event handlers from XMLSpy are not processed.

Page 294
XML Spy Suite 4.2 Scripting
Calling macros from XMLSpy
Once you have written your own macros (see also " How to write a macro"), you will want toexecute them from XMLSpy. There are two ways to run macros.
Calling macros from the "Show macros..." dialog
To show this dialog select "Show macros..." from the "Scripting" menu.
The dialog displays a list of all macros defined in the global scripting project and in the scriptingproject associated with the current project opened in XMLSpy.
Additionally, there is a "Run" button to call any selected macro. Before the macro is executed,the "Show macros..." dialog is closed.
The "Project" - list box lets you switch between the global scripting project and the projectscripts.
Calling macros from the "Scripting" menu
The XMLSpy API includes a function to add menu items with associated macros to the"Scripting" menu.
To add a menu item call the XMLSpy API function AddMacroMenuItem().
To reset the "Scripting" menu call ClearMacroMenu(). This removes all previously added menuitems. These commands will generally be called from the "Autorun" macro of the global scriptingproject, or during the "On_OpenProject" event.
Example:
Application.AddMacroMenuItem("DeleteElements","Delete ElementsDialog");

Page 295© 2001 Altova Ges.m.b.H
XML Spy Suite 4.2 Scripting
The first parameter is the name of the macro. If you run the macro and there is an open projectwith scripts associated to it, XMLSpy searches for the macro in the project scripts first. If thereare no project scripts, or XMLSpy can't find the macro, it tries to find the macro in the globalscripts.
The second parameter is the display text for the menu item.

Page 296
XML Spy Suite 4.2 Scripting
Projects and Scripts
It is possible to assign scripts to a normal XMLSpy project.
The assigned scripts will be loaded each time XMLSpy opens the project. The scripting projectis closed when XMLSpy closes its project.
To assign and unassign scripts to a project, use the menu items from the "Project" submenu ofthe "Scripting" menu. These menu items are not active if there is no currently active XMLSpyproject.
To assign a script, select the "Assign Scripts to Project" menu item. A standard file dialogappears enabling you to choose the scripting project file. The scripts are loaded and you areable to edit them if you switch to the scripting environment.
If you want to see the path of a scripting project after you have assigned it, select "ProjectInformation" from the "Project" menu of the XMLSpyFormEditor.
To unassign the current scripts from the project select "Unassign Scripts from Project".XMLSpyFormEditor closes the scripting project immediately.
It is possible to temporarily deactivate the project scripts with the "Project Scripts active" menuitem. The associated scripting project file will not be unassigned.
Any forms, macros and events which are defined in the project scripts, "override" any existingdefinitions from the global scripts.
Example:If the event handler for On_BeginEditing() exists in the project and global scripts, and XMLSpyraises this event, the event handler from the project scripts will be called.
You have to remove the predefined (but empty) event handlers from the project scriptsmanually, if you want the event handlers from the global scripts to get called. This is also true forthe ShowForm() method of the Application object, to show a form and the AddMacroMenuItem()method to add a macro to the "Scripting" menu.

Page 297© 2001 Altova Ges.m.b.H
XML Spy Suite 4.2 Scripting
Scripting Settings
The picture below shows the settings page for the scripting environment of XMLSpy:
Activate scripting environment when XMLSpy starts
If this checkbox is not selected, the scripting environment is not activated until the user selects"Switch to scripting environment" from the Scripting menu of XML Spy, for the first time.
Global scripting project file
This property sets the global scripting project file. If this file does not exist when the scriptingenvironment starts, a new project will be created.
Run auto-macros
Enables or disables the execution of auto-macros. Currently "Autorun" from the global scripts isthe only supported automatic macro. "Autorun" executes when the scripting environment starts.
Process events
Enables or disables the execution of event handlers.
Standard script language
A new global scripting project created from XMLSpy will use this scripting language.

Page 298
XML Spy Suite 4.2 Scripting
How To
How to write a macro
The goal of this tutorial is to write a macro that removes all namespace prefixes from the activedocument. To add a macro you have to switch to the XMLSpyFormEditor. Use "Switch toscripting environment" from the scripting menu to show the main window of the form editor. Ifthe scripting environment was not installed before, you have to do it now.
Open the XMLSpyMacros module with a double-click on the tree item in the project window.Use the "Add Function" command either from the "Project" menu, or from the popup menuwhich appears if you right-click the module in the project bar:
Type in "RemoveNamespaces" for the macro name in the following dialog. XMLSpyFormEditorcreates a new macro and adds it to the (XMLSpyMacros) module.
Note that macros don't support parameters or return values. There is therefore no functionheader. Enter the code below in the macros window:
if (Application.ActiveDocument != null ) {RemoveAllNamespaces(Application.ActiveDocument.RootElement);Application.ActiveDocument.UpdateViews();
}
We now have to write the RemoveNamespaces function. Place this function into the globaldeclarations module, so that it is accessible from our macros, events and forms.
Activate the (GlobalDeclarations) module and add the RemoveNamespaces() function to any

Page 299© 2001 Altova Ges.m.b.H
XML Spy Suite 4.2 Scripting
previously defined global variables and functions as follows:
function RemoveAllNamespaces(objXMLData){
if (objXMLData == null )return ;
if (objXMLData.HasChildren) {var objChild;
// spyXMLDataElement := 4objChild = objXMLData.GetFirstChild(4);
while (objChild) {RemoveAllNamespaces(objChild);
try {var nPos,txtName;txtName = objChild.Name;
if ((nPos = txtName.indexOf(":")) >= 0) {objChild.Name =
txtName.substring(nPos+1);}
objChild = objXMLData.GetNextChild();}catch (Err) {
objChild = null ;}
}}
}
This completes the creation of the new macro. You can run it from the "Show macros..." dialogin the "Scripting" menu of XMLSpy.
The sample can be easily extended to perform renaming instead of removing of thenamespaces. Design a form (see also "How to create a form") where the user can specify theold and the new namespace names. Then change the try-catch-block of theRemoveAllNamespaces() function to something like this:
try {var nPos,txtName;txtName = objChild.Name;
if ((nPos = txtName.indexOf(":")) >= 0) {var txtOld;txtOld = txtName.substring(0,nPos);
if (txtOld == txtOldNamespace)objChild.Name = txtNewNamespace + ":" +txtName.substring(nPos+1);
}
objChild = objXMLData.GetNextChild();}catch (Err) {
objChild = null ;}
This code assumes that txtOldNamespace and txtNewNamespace are declared as globals andare set with the proper values.

Page 300
XML Spy Suite 4.2 Scripting
How to handle an event
To handle an event you have to switch to the XMLSpyFormEditor. Use "Switch to scriptingenvironment" from the scripting menu, to show the main window of the form editor.
Open the (XMLSpyEvents) module with a double-click at the tree item in the project bar.
Normally all events should be predefined in this module. If the event you want to write code fordoes not have an entry in the event list box, use the "Add Function" command either from the"Project" menu, or from the popup menu which appears if you right-click the module in theproject bar to create it again.
Note that you must use the exact same spelling as was used when XMLSpyFormEditor createdthe new project and inserted the predefined event handlers for you. You must also fill in possibleparameters into the function header. The best way to recreate a deleted event handler is tocreate a new scripting project and copy name and function definition from there.
The screen shot shows you the (XMLSpyEvents) module and the list of predefined events.Choose On_OpenProject to add some scripting code which will be executed each time XMLSpyopens a project.
The script sequentially opens all XML files located in the XML folder of the project and validatesthem. If the validation fails the scripts stops and shows the validation error. If the file passes thevalidation it will be closed.
We now need to add some code to the On_OpenProject event handler:
function On_OpenProject(){
var bOK;var nIndex,nCount;var objItems,objXMLFolder = null ;
objItems = Application.CurrentProject.RootItems;

Page 301© 2001 Altova Ges.m.b.H
XML Spy Suite 4.2 Scripting
nCount = objItems.Count;
// search for XML folderfor (nIndex = 0;nIndex < nCount;nIndex++) {
var txtExtensions;txtExtensions = objItems.Item(nIndex).FileExtensions;
if (txtExtensions.indexOf("xml") >= 0) {objXMLFolder = objItems.Item(nIndex);break ;
}}
// does XML folder exist?if (objXMLFolder) {
var objChild,objDoc;
nCount = objXMLFolder.ChildItems.Count;
// step through associated xml filesfor (nIndex = 0;nIndex < nCount;nIndex++) {
objChild = objXMLFolder.ChildItems.Item(nIndex);
try {objDoc = objChild.Open();
// use JScript method to access out-parametersvar strError = new Array(1);var nErrorPos = new Array(1);var objBadData = new Array(1);
bOK =objDoc.IsValid(strError,nErrorPos,objBadData);
if (!bOK) {/ / if the validation fails, we should display
the// message from XMLSpy// of course we have to create the form
"MsgBox" and// define the global txtMessage variable//// txtMessage = Position:" + nErrorPos[0] +
"\n" + // strError[0];// txtMessage += "\n\nXML:\n" +
objBadData[0].Name + ", " +// objBadData[0].TextValue;//// Application.ShowForm("MsgBox");
break ;}
objDoc.Close( true );objDoc = null ;
}catch (Err) {
// displaying the error description here is a goodidea
// txtMessage = Err.Description;// Application.ShowForm("MsgBox");
break ;}

Page 302
XML Spy Suite 4.2 Scripting
}}
}
That's all. Switch to XMLSpy, open a project and see what happens.

Page 303© 2001 Altova Ges.m.b.H
XML Spy Suite 4.2 Scripting
How to create a Form
This section explains how to create a new Form in the XMLSpyFormEditor and how to display itin XMLSpy. The sample builds a dialog where the user can type in the name of elements thatare to be deleted from the active XML file in XMLSpy.
To create a form, switch to the XMLSpyFormEditor. Use "Switch to scripting environment" fromthe scripting menu, to show the main window of the form editor. There is at least one projectopen, the global project.
There are two ways for adding a new form to a project. You can use the "Add Form" commandfrom the "Project" menu, or click the "New Form" Button in the project window. In both cases,the new form is added immediately and appears as a separate window.
The screen shot shows the XMLSpyFormEditor right after the creation of a new form:
You could change the name of the new form now. To do so, enter a new name in the PropertySheet in the line (FormCode). For our example type in "RemoveDlg". Type in the form-title youlike in the "Title" line of the Property Sheet.

Page 304
XML Spy Suite 4.2 Scripting
We then insert an edit box where the user can type in the name of the elements to remove from
the XML file. Select the edit box icon from the tool bar on the right side of the main window.Define a rectangle with the mouse for the edit box in the display area of our RemoveDlg form.
In the (ObjectCode) line of the Property Sheet, type in "EditElements" as the name of the new
edit box. Add a caption for the edit box with the static text icon from the tool bar. The editwindow of the form should look like this:
We now need two buttons in our form, "Delete" and "Cancel". Use the button icon to drawthem in our form window. Type in "BtnDelete" and "BtnCancel" as names in the (ObjectCode)lines of the button properties.
Set the button text in the Text fields to "Delete" and "Cancel". Additionally set the type of theCancel - Button to "0 - OK" in the ButtonType field of the properties.
After we have designed our form we need some scripting code to make it useful.
We need a function that recursively steps through the XML file, and deletes all XMLData objectswith a given name. We declare this in the (GlobalDeclarations) module of the project. If themodule is not visible, double-click it in the project bar. Type in the following code:
var txtElementName;
function DeleteXMLElements(objXMLData){
if (objXMLData == null )return ;
if (objXMLData.HasChildren) {var objChild;objChild = objXMLData.GetFirstChild(-1);

Page 305© 2001 Altova Ges.m.b.H
XML Spy Suite 4.2 Scripting
while (objChild) {DeleteXMLElements(objChild);
try {if (objChild.Name == txtElementName)
objXMLData.EraseCurrentChild();
objChild = objXMLData.GetNextChild();}catch (Err) {
objChild = null ;}
}}
}
After this your global declarations module should look like this:
Select the BtnDelete button and choose the "Events" tab from the property sheet. Click on the

Page 306
XML Spy Suite 4.2 Scripting
edit code icon in the "EventClick" line of the tab. The Mini-Editor window pops up with thepredefined function header of the click-event. This function will be executed every time the userclicks the "Delete" button. Add the following code to the event:
if (EditElements.Text != "") {txtElementName = EditElements.Text;DeleteXMLElements(Application.ActiveDocument.RootElement);
}
The Delete - Button sets the global variable txtElementName to the string from the edit box andcalls DeleteXMLElements() with the root element of the active document.
There is not much left to do.Select the (XMLSpyMacros) module, create a new macro (see also "How to write a macro")called "DeleteElements" and enter this code:
var a;
if (Application.ActiveDocument != null )a = Application.ShowForm("RemoveDlg");
Run the macro from the "Show macros..." dialog of the "Scripting" menu within XMLSpy.

Page 307© 2001 Altova Ges.m.b.H
XML Spy Suite 4.2 Programmer's Reference
5 Programmer's Reference
Basic concepts
The introduction of the COM based API makes the functionality of XMLSpy available to otherapplications. It is now possible to automate a wide range of tasks from simple file validations tocomplex XML content modifications using the XMLData interface. The API is also the mainrequirement for the built-in scripting environment of XMLSpy. See the chapter "Scripting" in thismanual for further documentation.
XMLSpy and the XMLSpyAPI, follow the common specifications for automation servers fromMicrosoft. It is possible to access the methods and properties from most developmentenvironments such as C, C++, VisualBasic, Delphi and from scripting languages like VBScriptand JavaScript.
To support scripting, concessions had to be made to make all parameters compatible to theVARIANT structure and allow special handling of JavaScript out-parameters (see"How to handle an event" for an example).
The following limitations have to be considered in your client code:
1. Don't hold references to objects in memory longer than you need them, especially those from theXMLData interface. If the user interacts between two calls of your client, then there is noguarantee that these references are still valid.
2. Free references explicitly.
3. Be aware that if your client code crashes instances of XMLSpy may still remain in the system.
4. Don't forget to disable dialogs if the user interface is not visible.
5. See "Error handling" to avoid annoying error messages.
6. Terminate XMLSpy with the "Application.Quit" method.

Page 308
XML Spy Suite 4.2 Programmer's Reference
Object model
The starting point for every application which uses the XMLSpy API is the "Application" object.This object contains general methods like import/export support and references to the opendocuments and any open project.
To create an instance of the Application object, call CreateObject("XMLSpy.Application") fromVisualBasic or a similar function from your preferred development environment to create a COMobject. There is no need to create any other objects, to use the complete XMLSpy API (It is infact not even possible). All other interfaces are accessed through other objects with theApplication object as the starting point.
The picture below shows you the links between the main objects of the XMLSpy API:
The application object consists of the following parts:
1. Document collection and reference to the active document.
2. Reference to current project and methods for creating and opening of projects.
3. Methods to support the export to and import from databases, text files and Worddocuments.
4. URL management.
5. Methods for macro menu items.
Once you have created an Application object you can start using the functionality of XMLSpy.Most of the times you either open a project and access the documents from there or you directlyopen a document via the "Documents" interface.

Page 309© 2001 Altova Ges.m.b.H
XML Spy Suite 4.2 Programmer's Reference
Simple document access
Create and open files
Use the methods of the "Documents" interface to create and open documents. This interface isaccessible via the "Application.Documents" property.
Example:
Dim objDoc As DocumentSet objDoc = objSpy.Documents.OpenFile("C:\xmlfiles\myfile.xml",
False )
Sometimes it is necessary to show a file dialog to the user to select a file. This usually happensin the scripting environment and you only need to pass True as the second parameter toOpenFile().
To create a new file use "Documents.NewFile()". Any existing file with the same path will beoverwritten during the next Document.Save() call.
Documents collection
All open documents are accessible via the "Documents" collection. All collection objects in theXMLSpy API conform to the Microsoft specifications. So it is possible to use the For-Each loopin VisualBasic to iterate through the open documents.
Example:
Dim objDocs As DocumentsDim objDoc As Document
Set objDocs = objSpy.Documents
For Each objDoc In objDocs'do something useful with your documentobjDoc.AssignXSL "C:\myXSL.xsl", False
Next
Another way to access a document is the "Documents.Item" method. The method takes anindex as a parameter and gets the corresponding document object from the collection. Pleasenote that 0 (zero) is the first index value. "Documents.Count" retrieves the total number ofdocuments.
Example:
Dim objDocs As DocumentsDim objDoc As Document
Set objDoc = objDocs.Item(1) 'gets the first document
Validation
One common task on documents is to validate them against an assigned schema or DTD. If theXML file has no schema or DTD already assigned, use "Document.AssignSchema" or

Page 310
XML Spy Suite 4.2 Programmer's Reference
"Document.AssignDTD" to add the necessary references to the document.
Examples:
objSpy.ActiveDocument.AssignSchema "C:\mySchema.xsd", False
or
objSpy.ActiveDocument.AssignDTD "C:\myDTD.dtd", False
If you want the user to select a schema or DTD, pass True as the second parameter to thesefunctions to display a file-dialog. These methods only put the reference into the document anddo not check the existence of the specified file. If the file path is not valid, the validation will fail.
After you have assigned a valid schema or DTD reference to your file, you are able to validate itwith "Document.IsValid". IsValid needs some out-parameters that must be declared asVARIANTs to be accessible from script languages like VBScript and JavaScript.
Example:
Dim bValid As BooleanDim strMsg As VariantDim nPos As VariantDim objBadXMLData As Variant
bValid = objSpy.ActiveDocument.IsValid(strMsg, nPos,objBadXMLData)
If bValid = False Thena = MsgBox("The document is not valid:" & Chr (13) &
strMsg & Chr(13) & "position: " & nPos &Chr (13) & "XMLData name: " &
objBadXMLData.Name)Else
a = MsgBox("The document is valid")End If

Page 311© 2001 Altova Ges.m.b.H
XML Spy Suite 4.2 Programmer's Reference
Import and Export
Before you implement your import and export tasks with the XMLSpy API, it is a good practice totest the connections, parameters, SLQ queries and so on in XML Spy. This way, you are able toverify the results and to make quick adjustments to all import or export parameters.
Most of the methods for importing and exporting data are placed in the "Application" object, theremaining functions are accessible via the "Document" interface.
There is some preparatory work necessary, before the actual import or export can be started.Every import/export job consists of two parts. You need to define a connection to your data andthe specific behaviour for the import/export process.
In case of an import, the connection is either a database, a text-file or a Word document. Thebehaviour is basically which data (columns) should be imported in XMLSpy.
In case of an export, the connection is either a database or a text file. Specify which data(elements of the XML file) and additional parameters (e.g. automatic key generation or numberof sub-levels) to use from the XML-structure for the behaviour.
The properties in the DatabaseConnection, TextImportExportSettings and ExportSettingsinterfaces have default values. See the corresponding descriptions in the "Interfaces" chapterfor further information.
Import from database
These are the steps to establish a connection to an existing database for import:
1. Use a "DatabaseConnection" object and set the properties:The method "Application.GetDatabaseSettings" returns a new object for a databaseconnection:
Dim objImpSettings As DatabaseConnectionSet objImpSettings = objSpy.GetDatabaseSettings
You have to set either a ADO connection string,
objImpSettings.ADOConnection = strADOConnection
or the path to an existing database file:
objImpSettings.File = "C:\myDatabase.mdb"
To complete the settings you create a SQL select statement to define the data to be queried:
objImpSettings.SQLSelect = "SELECT * FROM myTable"
2. Call "Application.GetDatabaseImportElementList" to get a collection of the resultingcolumns of the SQL query:
Dim objElementList As ElementListSet objElementList =
objSpy.GetDatabaseImportElementList(objImpSettings)
This collection gives you the opportunity to control which columns should be importedand what type the new elements will become. Each item of the collection represents

Page 312
XML Spy Suite 4.2 Programmer's Reference
one column to import. If you remove an item, the corresponding column will not beimported. You can additionally modify the "ElementListItem.ElementKind" property, toset the type of the created XML elements for each column.
Please consider that GetDatabaseImportElementList() executes the SQL query andcould initiate a time consuming call. To avoid this, it is possible to pass a null-pointer(Nothing in VisualBasic) as the second parameter to ImportFromDatabase() to importall columns as plain XML elements.
3. Start the import with "Application.ImportFromDatabase":
Dim objImpDoc As DocumentSet objImpDoc =
objSpy.ImportFromDatabase(objImpSettings,objElementList)
Import from Text
Importing data from a text file is similar to the import from a database. You must use otherinterfaces (described in steps 1-3 below) with different methods and properties:
1. Use a "TextImportExportSettings" object and set the properties:The method "Application.GetTextImportExportSettings" returns a new object to specifya text file for import.
Dim objImpSettings As TextImportExportSettingsSet objImpSettings = objSpy.GetTextImportExportSettings
You have to set at least the ImportFile property to the path of the file for the import.Another important property is HeaderRow. Set it to False, if the text file does not containa leading line as a header row.
objImpSettings.ImportFile = "C:\myFile.txt"objImpSettings.HeaderRow = False
2. Call "Application.GetTextImportElementList" to get a collection of all columns inside thetext file:
Dim objElementList As ElementListSet objElementList =
objSpy.GetTextImportElementList(objImpSettings)
3. Start the import with "Application.ImportFromText":
Dim objImpDoc As DocumentSet objImpDoc =
objSpy.ImportFromText(objImpSettings,objElementList)
Export to database
1. Use a "DatabaseConnection" object and set the necessary properties.All properties except "SQLSelect" are important for the export. "ADOConnection" or"File" defines the target for the output. You need to set only one of them.
2. Fill an "ExportSettings" object with the required values.These properties are the same options as those available in the export dialog ofXMLSpy. Select the menu option Convert | Export to Text files/Database to see the
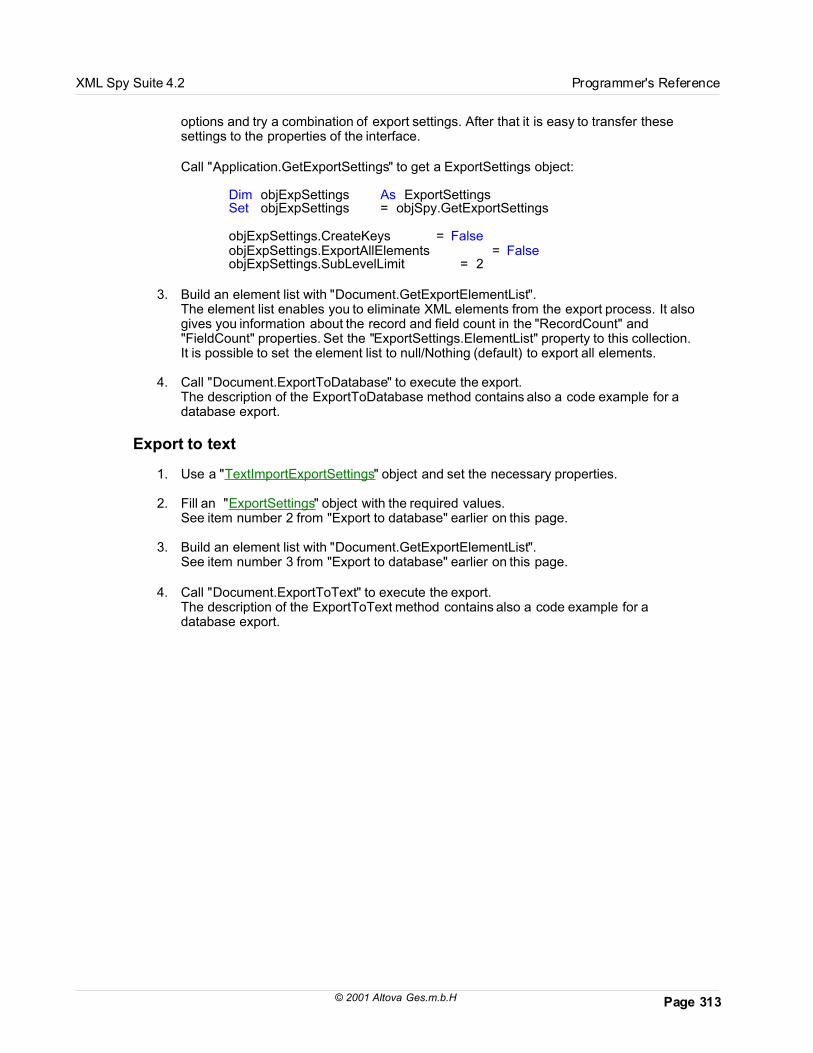
Page 313© 2001 Altova Ges.m.b.H
XML Spy Suite 4.2 Programmer's Reference
options and try a combination of export settings. After that it is easy to transfer thesesettings to the properties of the interface.
Call "Application.GetExportSettings" to get a ExportSettings object:
Dim objExpSettings As ExportSettingsSet objExpSettings = objSpy.GetExportSettings
objExpSettings.CreateKeys = FalseobjExpSettings.ExportAllElements = FalseobjExpSettings.SubLevelLimit = 2
3. Build an element list with "Document.GetExportElementList".The element list enables you to eliminate XML elements from the export process. It alsogives you information about the record and field count in the "RecordCount" and"FieldCount" properties. Set the "ExportSettings.ElementList" property to this collection.It is possible to set the element list to null/Nothing (default) to export all elements.
4. Call "Document.ExportToDatabase" to execute the export.The description of the ExportToDatabase method contains also a code example for adatabase export.
Export to text
1. Use a "TextImportExportSettings" object and set the necessary properties.
2. Fill an "ExportSettings" object with the required values.See item number 2 from "Export to database" earlier on this page.
3. Build an element list with "Document.GetExportElementList".See item number 3 from "Export to database" earlier on this page.
4. Call "Document.ExportToText" to execute the export.The description of the ExportToText method contains also a code example for adatabase export.

Page 314
XML Spy Suite 4.2 Programmer's Reference
Using XMLData
XMLData gives you access to the elements of an currently open XML file. It enables you toperform all necessary modifications to the elements of the XML structure. The main functionalityof XMLData is:
1. Access to the names and values of all kinds of elements (e.g. elements, attributes)
2. Creation of new elements of all kinds.
3. Insertion and appending of new elements.
4. Erasing of existing child elements.
Structure of XMLData
Before you can use the XMLData interface, you have to know how an existing XML file ismapped into a XMLData structure. One major thing you must be aware of is, that XMLData hasno seperate branch of objects for attributes.
The attributes of an element are also children of the element. The "XMLData.Kind" property,gives you the opportunity to distinguish between the different types of children of an element.
Example:
This XML code,
<ParentElement ><FirstChild attr1 ="Red" attr2 ="Black" >
This is the value of FirstChild</ FirstChild ><SecondChild >
<!-- Your Comment--></ DeepChild >
</ SecondChild >This is Text
</ ParentElement >
is mapped to the following XMLData object structure:

Page 315© 2001 Altova Ges.m.b.H
XML Spy Suite 4.2 Programmer's Reference
The parent of all XML elements inside of a document is the property "Document.RootElement".Use this XMLData object to get references to all other XML elements in the structure.
Name and value of elements
To get and to modify the name and value of all types of XML elements use the"XMLData.Name" and "XMLData.TextValue" properties. It is possible that several kinds ofXMLData objects and empty elements do not have a text value associated.
Creation and insertion of new XMLData objects
The creation of a new XML language entity requires the following steps:
1. Create the new XMLData object:Use the "Document.CreateChild" method to create a new XMLData object. Set nameand value after you have inserted the new XML entity (see point 3).
2. Find the correct location for the new XMLData object:To insert a new XMLData object you have to get a reference to the parent first. If thenew child is to become the last child of the parent, use the "XMLData.AppendChild"method to insert the XMLData object.If the new child should be located elsewhere in the sequence of child objects, use the"XMLData.GetFirstChild" and "XMLData.GetNextChild" to move the iterator to the childbefore which the new child should be inserted.

Page 316
XML Spy Suite 4.2 Programmer's Reference
3. Insert the new child with "XMLData.InsertChild"The new child will be inserted immediately before the current child.
The following example adds a third child between <FirstChild> and the <SecondChild>element:
Dim objParent As XMLDataDim objChild As XMLDataDim objNewChild As XMLData
Set objNewChild =objSpy.ActiveDocument.CreateChild(spyXMLDataElement)
'objParent is set to <ParentElement>'GetFirstChild(-1) gets all children of the parent element'and move to <SecondChild>Set objChild = objParent.GetFirstChild(-1)Set objChild = objParent.GetNextChild
objParent.InsertChild objNewChildobjNewChild.Name = "OneAndAHalf"Set objNewChild = Nothing
Copying of existing XMLData objects
If you want to insert existing XMLData objects at a different place in the same document or intoanother document you can't use the XMLData.InsertChild and XMLData.AppendChild methods.These methods only work for new XMLData objects.
Instead of using InsertChild or AppendChild you have to copy the object hierarchy manually. Thefollowing function written in JavaScript is an example for recursively copying XMLData:
// this function returns a complete copy of the XMLData objectfunction GetCopy(objXMLData){
var objNew;objNew =
Application.ActiveDocument.CreateChild(objXMLData.Kind);
objNew.Name = objXMLData.Name;objNew.TextValue = objXMLData.TextValue;
if (objXMLData.HasChildren) {var objChild;objChild = objXMLData.GetFirstChild(-1);
while (objChild) {try {
objNew.AppendChild(GetCopy(objChild));objChild = objXMLData.GetNextChild();
}catch (e) {
objChild = null ;}
}}

Page 317© 2001 Altova Ges.m.b.H
XML Spy Suite 4.2 Programmer's Reference
return objNew;}
Erasing of XMLData objects
XMLData provides two methods for the deletion of child objects, "XMLData.EraseAllChildren"and "XMLData.EraseCurrentChild".
To erase XMLData objects you need access to the parent of the elements you want to remove.Use "XMLData.GetFirstChild" and "XMLData.GetNextChild" to get a reference to the parentXMLData object.
See the method descriptions of "EraseAllChildren" and "EraseCurrentChild" for examples howto erase XML elements.

Page 318
XML Spy Suite 4.2 Programmer's Reference
Error handling
The XMLSpy API returns errors in two different ways. Every API method returns a HRESULT.This return value informs the caller about any malfunctions during the execution of the method.If the call was successful, the return value is equal to S_OK. C/C++ programmers generally useHRESULT to detect any errors.
VisualBasic, scripting languages and other high-level development environments, don't give theprogrammer access to the returning HRESULT of a COM call. They use the second errorraising mechanism also supported by the XMLSpy API, the IErrorInfo interface. If an erroroccurs the API creates a new object that implements the IErrorInfo interface. The developmentenvironment takes this interface, and fills its own error handling mechansim with the providedinformations.
The next paragraphs describes how to deal with errors raised from the XMLSpy API in differentdevelopment environments.
VisualBasic
A common way to handle errors in VisualBasic is to define an error handler. This error handlercan be set with the On Error statement. Usually the handler displays a error message and doessome cleanup to avoid spare references and any kind of resource leaks. VisualBasic fills its ownErr object with the information from the IErrorInfo interface.
Example:
Sub Validate()'place variable declarations here
'set error handlerOn Error GoTo ErrorHandler
'if IsValid() fails, program execution continues'at ErrorHandler:bValid =
objSpy.ActiveDocument.IsValid(strMsg,nPos,objBadXMLData)
'additional code comes here
'exitExit Sub
ErrorHandler:Set objBadXMLData = Nothing
MsgBox("Error: " & (Err.Number - vbObjectError) & Chr(13)&
"Description: " & Err.Description)End Sub
JavaScript
The Microsoft implementation of JavaScript (JScript) provides a try - catch mechanism to dealwith errors raised from COM calls. It is very similar to the VisualBasic approach, because youalso declare an error object containing the necessary informations.

Page 319© 2001 Altova Ges.m.b.H
XML Spy Suite 4.2 Programmer's Reference
Example:
function Validate(){
// please insert variable declarations here
try {bValid =
objSpy.ActiveDocument.IsValid(sMsg,nPos,objBad);}catch (Error) {
objBad = null ;sError = Error.description;nErrorCode = Error.number;return false ;
}
return bValid;}
C/C++
C/C++ gives you easy access to the HRESULT of the COM call and to the IErrorInterface.
HRESULT hr;
// call IsValid() from the XMLSpy APIif (FAILED(hr = ipDoc-
>IsValid(&varMsg,&varPos,&varBadData))) {IErrorInfo *ipErrorInfo = NULL;
if (SUCCEEDED(::GetErrorInfo(0,&ipErrorInfo))) {BSTR bstrDescr;ipErrorInfo->GetDescription(&bstrDescr);
// handle error informationwprintf(L"Error message:\t%s\n",bstrDescr);::SysFreeString(bstrDescr);
// release error infoipErrorInfo->Release();
}}

Page 320
XML Spy Suite 4.2 Programmer's Reference
Interfaces
ObjectsApplicationDatabaseConnectionDocumentDocumentsElementListElementListItemExportSettingsGridViewSpyProjectSpyProjectItemSpyProjectItemsTextImportExportSettingsXMLData
Enumerations
DescriptionThis chapter contains the reference of the XMLSpy 1.0 Type Library.
Most of the given examples are written in VisualBasic. These code snippets assume that thereis a variable defined and set called objSpy of type Application. There are also some codesamples written in JavaScript.

Page 321© 2001 Altova Ges.m.b.H
XML Spy Suite 4.2 Programmer's Reference
Application
See also
MethodsGetDatabaseImportElementListGetDatabaseSettingsGetDatabaseTablesImportFromDatabase
GetTextImportElementListGetTextImportExportSettingsImportFromText
ImportFromWord
ImportFromSchema
GetExportSettings
NewProjectOpenProject
AddMacroMenuItemClearMacroMenu
ShowForm
ShowApplication
URLDeleteURLMakeDirectory
Quit
PropertiesActiveDocumentDocuments
CurrentProject
WarningNumberWarningText
DescriptionApplication is the root for all other objects. It is the only object you can create by CreateObject

Page 322
XML Spy Suite 4.2 Programmer's Reference
(VisualBasic) or other similar COM related functions.
Example
Dim objSpy As ApplicationSet objSpy = CreateObject("XMLSpy.Application")

Page 323© 2001 Altova Ges.m.b.H
XML Spy Suite 4.2 Programmer's Reference
Document
See also
MethodsAssignDTDAssignSchemaAssignXSLTransformXSL
GenerateDTDOrSchemaConvertDTDOrSchemaCreateSchemaDiagram
CreateChild
ExportToDatabaseExportToTextGetExportElementList
IsValidIsWellFormed
SaveSaveToURLSaveInString
SetActiveDocument
SetEncoding
SetPathNameGetPathName
StartChangesEndChanges
SwitchViewModeUpdateViews
Close
PropertiesGridViewRootElementTitle

Page 324
XML Spy Suite 4.2 Programmer's Reference
CurrentViewMode
DescriptionDocument Class

Page 325© 2001 Altova Ges.m.b.H
XML Spy Suite 4.2 Programmer's Reference
Documents
See also
MethodsNewFileOpenFileOpenURLOpenURLDialogNewFileFromText
PropertiesCountItem
DescriptionDocuments Class

Page 326
XML Spy Suite 4.2 Programmer's Reference
GridView
See also
MethodsDeselectSelect
SetFocus
PropertiesCurrentFocus
IsVisible
DescriptionGridView Class

Page 327© 2001 Altova Ges.m.b.H
XML Spy Suite 4.2 Programmer's Reference
SpyProject
See also
MethodsCloseProjectSaveProjectSaveProjectAs
PropertiesRootItemsProjectFile
DescriptionSpyProject Class

Page 328
XML Spy Suite 4.2 Programmer's Reference
SpyProjectItem
See also
MethodsOpen
PropertiesChildItemsParentItemFileExtensionsItemTypeNamePathValidateWithXMLForXSLTransformationXSLForXMLTransformationXSLTransformationFileExtensionXSLTransformationFolder
DescriptionSpyProjectItem Class

Page 329© 2001 Altova Ges.m.b.H
XML Spy Suite 4.2 Programmer's Reference
SpyProjectItems
See also
MethodsAddFileAddFolderAddURLRemoveItem
PropertiesCountItem
DescriptionSpyProjectItems Class

Page 330
XML Spy Suite 4.2 Programmer's Reference
XMLData
See also
MethodsInsertChildAppendChild
EraseAllChildrenEraseCurrentChild
GetCurrentChildGetFirstChildGetNextChild
PropertiesNameTextValue
HasChildrenMayHaveChildren
KindParent
DescriptionXMLData Class

Page 331© 2001 Altova Ges.m.b.H
XML Spy Suite 4.2 Programmer's Reference
DatabaseConnection
See also
PropertiesADOConnectionODBCConnectionFile
CreateMissingTablesCreateNew
SQLSelect
NumberDateTimeFormatTextFieldLenAsAttributesExcludeKeysIncludeEmptyElements
DescriptionDatabaseConnection specifies a database connection.
Please note that the properties of the DatabaseConnection interface are referring to the settingsof the import and export dialogs of XMLSpy.

Page 332
XML Spy Suite 4.2 Programmer's Reference
ExportSettings
See also
Properties
ElementList
EntitiesToText
ExportAllElementsSubLevelLimit
FromAttributesFromSingleSubElementsFromTextValues
CreateKeysIndependentPrimaryKey
Namespace
DescriptionExportSettings Class

Page 333© 2001 Altova Ges.m.b.H
XML Spy Suite 4.2 Programmer's Reference
TextImportExportSettings
See also
PropertiesHeaderRow
FieldDelimiterEnclosingCharacter
EncodingEncodingByteOrder
ImportFileFileExtensionDestinationFolder
DescriptionTextImportExportSettings Class

Page 334
XML Spy Suite 4.2 Programmer's Reference
ElementListItem
See also
PropertiesElementKindName
FieldCountRecordCount
DescriptionElementListItem Class

Page 335© 2001 Altova Ges.m.b.H
XML Spy Suite 4.2 Programmer's Reference
ElementList
See also
MethodsRemoveElement
PropertiesCountItem
DescriptionElementList Class

Page 336
XML Spy Suite 4.2 Programmer's Reference
Enumerations
This is a list of all enumerations used by the XMLSpy API. Some API methods take them as aninput parameter. If your scripting environment does not support enumerations use the number-values instead.
SPYProjectItemTypes:
spyUnknownItem = 0spyFileItem = 1spyFolderItem = 2spyURLItem = 3
SPYURLTypes:
spyURLTypeAuto = -1spyURLTypeXML = 0spyURLTypeDTD = 1
SPYXMLDataKind:
spyXMLDataXMLDocStruct = 0spyXMLDataXMLEntityDocStruct = 1spyXMLDataDTDDocStruct = 2spyXMLDataXML = 3spyXMLDataElement = 4spyXMLDataAttr = 5spyXMLDataText = 6spyXMLDataCData = 7spyXMLDataComment = 8spyXMLDataPI = 9spyXMLDataDefDoctype = 10spyXMLDataDefExternalID = 11spyXMLDataDefElement = 12spyXMLDataDefAttlist = 13spyXMLDataDefEntity = 14spyXMLDataDefNotation = 15spyXMLDataKindsCount = 16
SPYDTDSchemaFormat:
spyDTD = 0spyDCD = 1spyXMLData = 2spyBizTalk = 3spyW3C = 4
SPYTypeDetection:
spyBestPossible = 0spyNumbersOnly = 1spyNoDetection = 2

Page 337© 2001 Altova Ges.m.b.H
XML Spy Suite 4.2 Programmer's Reference
SPYFrequentElements:
spyGlobalElements = 0spyGlobalComplexType = 1
SPYNumberDateTimeFormat:
spySystemLocale = 0spySchemaCompatible = 1
SPYEncodingByteOrder:
spyNONE = 0spyLITTLE_ENDIAN = 1spyBIG_ENDIAN = 2
SPYTextDelimiters:
spyTabulator = 0spySemicolon = 1spyComma = 2spySpace = 3
SPYTextEnclosing:
spyNoEnclosing= 0spySingleQuote = 1spyDoubleQuote= 2
SPYLoading:
spyUseCacheProxy = 0spyReload = 1
SPYViewModes:
spyViewGrid = 0spyViewText = 1spyViewBrowser = 2spyViewSchema = 3spyViewContent = 4
SPYSchemaDefKind:
spyKindElement = 0spyKindComplexType = 1spyKindSimpleType = 2spyKindGroup = 3spyKindModel = 4spyKindAny = 5

Page 338
XML Spy Suite 4.2 Programmer's Reference
spyKindAttr = 6spyKindAttrGroup = 7spyKindAttrAny = 8
spyKindIdentityUnique = 9spyKindIdentityKey = 10spyKindIdentityKeyRef = 11spyKindIdentitySelector = 12spyKindIdentityField = 13
spyKindNotation = 14
spyKindInclude = 15spyKindImport = 16spyKindRedefine = 17
spyKindFacet = 18
spyKindSchema = 19
spyKindCount = 20
SPYExportNamespacespyNoNamespace = 0spyReplaceColonWithUnderscore = 1

Page 339© 2001 Altova Ges.m.b.H
XML Spy Suite 4.2 Document Editor
6 Document Editor
XML Spy Document Editor enables you to edit XML documents based on templates created inXSLT Designer!
The templates in XSLT Designer are saved as *.sps files, and supply all the necessaryinformation needed by Document Editor. These templates are placed in the ...\XML SpySuite\sps\Template\Examples folder and are available when you select theFile | New command and click the "Select a Document Editor template..." button.
Document Editor features:· Free-flow WYSIWYG text editing· Form-based data input· Presentation and editing of repeating XML elements as tables· Real-time validation, and consistency checking using XML Schema
XML Spy Document Editor is available in three versions:· As a stand-alone application
· Integrated as a separate view within the XML Spy IDE user-interface (if you purchasethe XML Spy Suite product)
· As a Browser Plug-In for Internet Explorer

Page 340
XML Spy Suite 4.2 Document Editor
Overview
Document Editor has two main areas: the main window, and the entry helpers at right. Thegraphic below shows the OrgChart template with all the markup info hidden.
· The main window allows you to display the document in several different views: theDocument Editor view which is the default view for this type of document template, theEnhanced Grid view or Text view. The Enhanced Grid view incorporates a special view,called the Database/Table view, which collapses recurring XML data into table form.
· The right area contains three Entry helper windows, which allow you to insert specificelements (or attributes) depending on the current cursor position in the document.
Orgchart template document

Page 341© 2001 Altova Ges.m.b.H
XML Spy Suite 4.2 Document Editor
Datasheet template document

Page 342
XML Spy Suite 4.2 Document Editor
Symbols and icons
Document Editor uses easily recognizable symbols to display the various XML elements.There are different ways to customize the Document Editor view: hide all markup, show smallmarkup, show large markup and show mixed markup.
Clicking this icon switches to the Document Editor view in XML Spy. This view isautomatically opened when you open a template file (*.sps). Clicking the iconcauses a dialog box to appear if the active file is not a template file. You can thenselect the template file of your choice.
Template files (*.sps) can only be created in XSLT Designer, please see the XSLTDesigner documentation for more information on how to do this.
You can of course, click the Enhanced Grid view or Text view icon, and edit your documentthere.
"Content" icon bar icons:
Hide markup symbols
Show small markup symbols
Show large markup symbols
Show mixed markup symbols
Append row to table
Insert row into table
Duplicate current table row
Move current row up by one row
Move current row down by one row
Deletes the currently active row
User defined icons. These two apply bold or italic formatting to marked text. Userdefined icons are defined in XSLT Designer, and are made available to DocumentEditor as icons in the icon bar.
Please see the XSLT Designer documentation for more information.
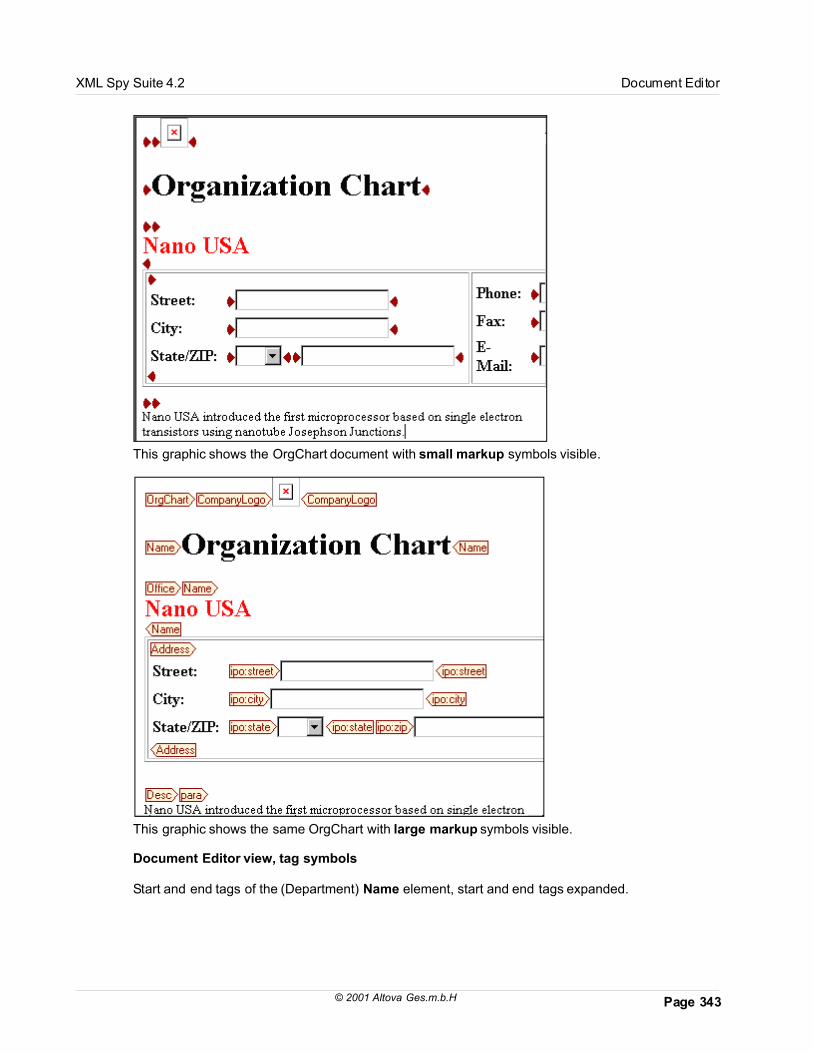
Page 343© 2001 Altova Ges.m.b.H
XML Spy Suite 4.2 Document Editor
This graphic shows the OrgChart document with small markup symbols visible.
This graphic shows the same OrgChart with large markup symbols visible.
Document Editor view, tag symbols
Start and end tags of the (Department) Name element, start and end tags expanded.

Page 344
XML Spy Suite 4.2 Document Editor
(Department) Name tag, contracted. To expand or contract tags, double click the specific tag.
Operation attribute, as a combo box.
Documentid element, as a text box.
The "Title" field is defined as an optional element in the (referenced) schema. Clicking the "addTitle" text, allows you to enter data into this field.

Page 345© 2001 Altova Ges.m.b.H
XML Spy Suite 4.2 Document Editor
Document Editor Browser Plug-in
The Document Editor Browser Plug-In is a unique solution that allows live XML content editingfrom any desktop in your enterprise, which dramatically eases deployment and reduces totalcost of ownership (TCO).
This is the first browser-based XML editing solution in the entire industry, and it is based uponopen standards, such as XML Schema and XSLT! It is also fully Unicode compatible!
Please follow the link http://plugin.xmlspy.com for more information.
Page 346
XML Spy Suite 4.2 Document Editor
Document Editor Tutorial
The aim of this tutorial is to fill in the OrgChart template supplied with XML Spy IDE.
This will be achieved by:· Entering data into the predefined tables· Adding additional persons to the department table· Adding a new company and filling in all the relevant data.
Prerequisites:· The OrgChart template necessary for this tutorial is supplied with XML Spy IDE.· Any other templates you want to edit must have been created using
XSLT Designer and saved there (thus creating a *.sps file).

Page 347© 2001 Altova Ges.m.b.H
XML Spy Suite 4.2 Document Editor
Opening a document template *.sps
To open a document template:XML Spy Document Editor enables you to edit XML documents based on templates created inXSLT Designer! You cannot create a new template using Document Editor, this must be donein XSLT Designer.
1. Start XML Spy by double clicking the XML Spy icon (or your stand-alone DocumentEditor icon).
2. Select the menu option File | New and click the "Select a Document Editortemplate..." button.
This opens the "New" dialog box.
3. Double click the OrgChart.sps icon to open the orgchart template in Document Editor(or click the Browse... button to open a different *.sps file). Please see File | New formore information on how *.sps template icons are created.
The orgchart template is now on screen and can be edited directly within this view. Youcan also edit it in the Enhanced Grid and Text view if you wish.

Page 348
XML Spy Suite 4.2 Document Editor
Please note:You cannot open a Document Editor template (*.sps file) in the Document Editor viewusing the File | Open command. If you do so, the file will be opened in the EnhancedGrid view as a normal XML document.
You have to select a Document Editor template created in XSLT Designer, using theFile | New command in Document Editor.
All *.sps templates supplied with XML Spy are placed in the folder you installed XMLSpy in +...+ Altova\XML Spy Suite\sps\Template\Examples.

Page 349© 2001 Altova Ges.m.b.H
XML Spy Suite 4.2 Document Editor
Adding data in Document Editor
This section deals with entering data in the XML document based on the OrgChart template.The diagram below, shows you where to click in the following example.
Adding data to the document:1. Click at position 1. and enter the name of the document (e.g. Organization Chart).2. Click at position 2. and the company name (e.g. Nano USA).
3. Press the TAB key, to place the text cursor in the address table.4. Fill in the address data of the company, using TAB to step through all the fields.

Page 350
XML Spy Suite 4.2 Document Editor
5. Click at position 3. and enter a short company description (between the Desc | Paratags - if visible). You can hit the Enter key to add a new line from anywhere within thedescription text.
6. Click at position 4. and enter the Department name.7. Hit the TAB key and fill in the Person table, using TAB to step through the fields.
Auto- and manual validationWhen entering text in the e-mail field, you will notice that it initially appears in red.Document Editor uses the schema, on which the template is based, to provide real-timevalidation. When the data has been entered correctly, the text changes to black.
The e-mail field is valid as soon as the address contains an @, another character,followed by a period (defined as a pattern in the schema file).
You can validate the whole document by selecting the menu option XML | Validate, orhitting the F8 key.

Page 351© 2001 Altova Ges.m.b.H
XML Spy Suite 4.2 Document Editor
Optional fields:Pressing the TAB key in the Person table, skips the "Title" field. The Title field wasdefined as optional in the schema file, and is displayed as a link in a templatedocument. To add data in this field, click the "add Title" text and enter your data.
Hints:Placing the text cursor in, or above the "e-mail" field (in the Person table) causes a hintpopup to appear. These hints were defined in XSLT Designer and are designed to aidusers when filling in the document.
Hints can be defined for any element using the "Node Settings" function in XSLTDesigner.

Page 352
XML Spy Suite 4.2 Document Editor
Orgchart with Large Markup visible.
To add a new row to the Person table:1. When the text cursor is in the last cell (Email) of the Person table, hit TAB to add a new
row, or2. Right click and select Insert | Person.
Fill in the new row with the person data.

Page 353© 2001 Altova Ges.m.b.H
XML Spy Suite 4.2 Document Editor

Page 354
XML Spy Suite 4.2 Document Editor
Table types
Tables in Document EditorThere are two types of table available in the Document Editor, fixed and dynamic tables.
An example of a fixed table is the company Address table. The structure of this type of tablecannot be changed; you cannot add or delete rows or columns.
The Person table is an example of a dynamic table. You can change the structure of this tableat will. You can insert, append, duplicate, move, and delete rows, using the respective icons.Hitting the TAB key in the last field of such a table, automatically adds a new row.
Please note:The two tables in this example are colored differently, this does not however, have anybearing on the type of table they are. The table type and color scheme were defined inXSLT Designer.
To add a new office to the orgchart:1. Click the append Office icon (leftmost icon of the pair) in the entry helper, to append a
new office.Empty address and person tables, as well as all other related tags, are automaticallyinserted at the end of the document.
The element entry helper contains elements that can be appended or inserted to thedocument, depending on the current cursor position.
You can of course, right click to open the context menu and select Insert or Append |Office. The context menu supplies the same options as the element entry helper.
Please note:The context menu also allows you to apply formatting to text, or clear previously appliedformatting. The options depend on where you right click.
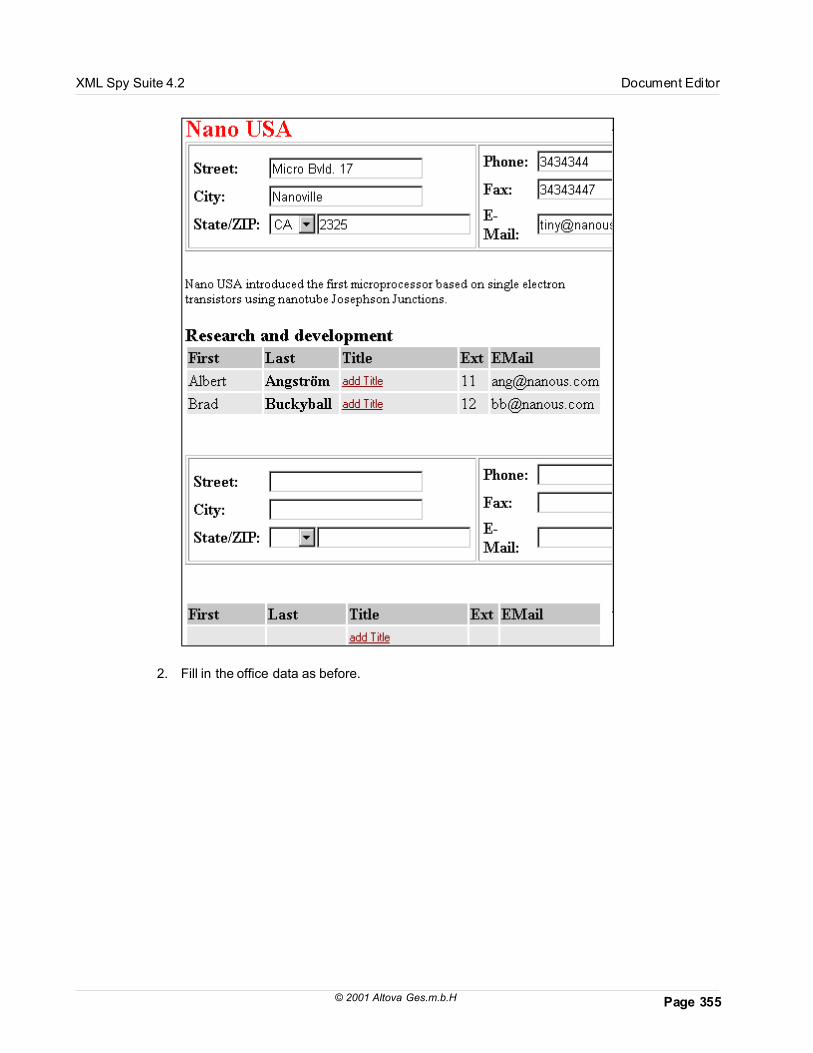
Page 355© 2001 Altova Ges.m.b.H
XML Spy Suite 4.2 Document Editor
2. Fill in the office data as before.

Page 356
XML Spy Suite 4.2 Document Editor
Changing text attributes:The Company description text can be made bold or italic.
1. Mark the text you want to make bold or italic, and2. Click the bold or italic icons in the icon bar, to apply these attributes.
The marked text is displayed as bold, and strong and/or italic tags are inserted on eachside of the marked text (visible when Show large markup is active).
Please note:
are user-defined icons. These two apply bold or italic formatting to marked text.User defined icons are defined in XSLT Designer (Text State icons), and are madeavailable to Document Editor as icons in the icon bar. Please see the XSLTDesigner documentation for more information.

Page 357© 2001 Altova Ges.m.b.H
XML Spy Suite 4.2 Document Editor
Document Editor Reference
The reference section contains a complete description of all Document Editor windows andmenu commands.

Page 358
XML Spy Suite 4.2 Document Editor
Menus and Dialogs
This section describes the menu, dialog box and context menu options.
File
The File menu contains all commands relevant to manipulating files in the order common tomost Windows software products.
New
The "New..." command is used to create a new type of XML document, or open a predefinedDocument Editor template file created by XSLT Designer. Template files can only be opened inDocument Editor, they have to be created in XSLT Designer.
To open a Document Editor template file (*.sps)
· Click the "Select a Document Editor template..." button and select a file from the dialogbox.
This opens the New dialog box.
· The two *.sps icons you see here are supplied with XML Spy Suite. and areautomatically placed in the folder you installed XML Spy in +...+ Altova\XML Spy
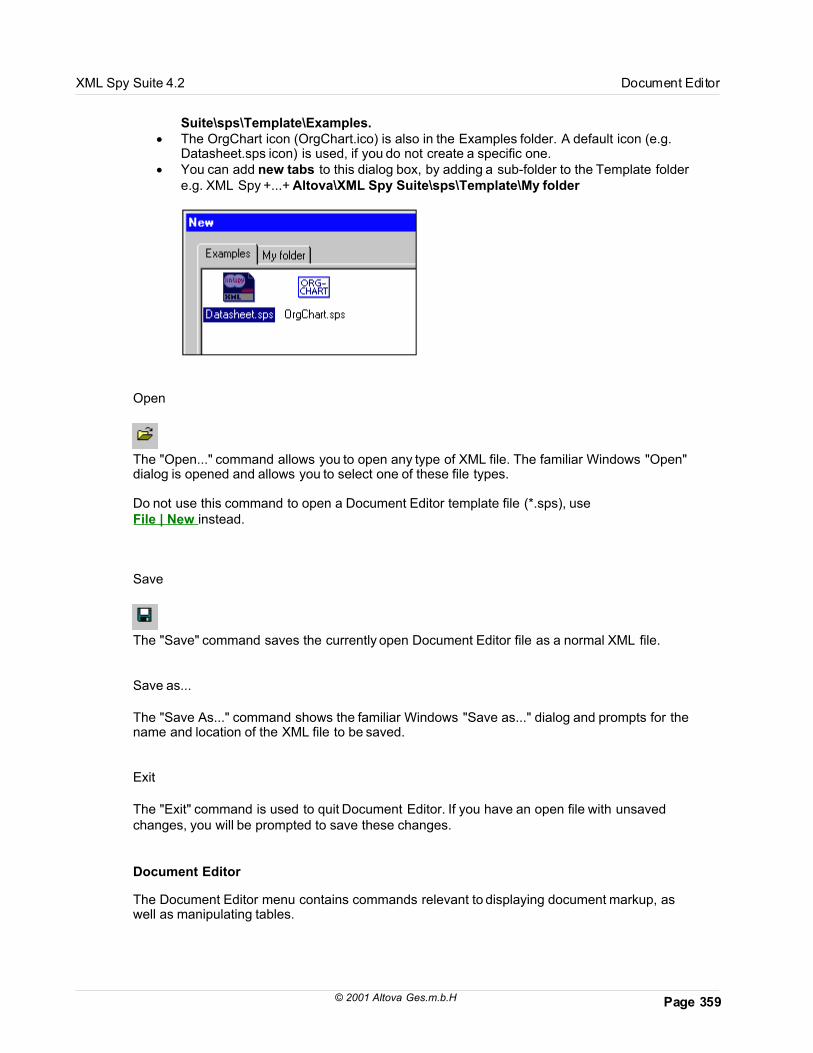
Page 359© 2001 Altova Ges.m.b.H
XML Spy Suite 4.2 Document Editor
Suite\sps\Template\Examples.· The OrgChart icon (OrgChart.ico) is also in the Examples folder. A default icon (e.g.
Datasheet.sps icon) is used, if you do not create a specific one.· You can add new tabs to this dialog box, by adding a sub-folder to the Template folder
e.g. XML Spy +...+ Altova\XML Spy Suite\sps\Template\My folder
Open
The "Open..." command allows you to open any type of XML file. The familiar Windows "Open"dialog is opened and allows you to select one of these file types.
Do not use this command to open a Document Editor template file (*.sps), useFile | New instead.
Save
The "Save" command saves the currently open Document Editor file as a normal XML file.
Save as...
The "Save As..." command shows the familiar Windows "Save as..." dialog and prompts for thename and location of the XML file to be saved.
Exit
The "Exit" command is used to quit Document Editor. If you have an open file with unsavedchanges, you will be prompted to save these changes.
Document Editor
The Document Editor menu contains commands relevant to displaying document markup, aswell as manipulating tables.

Page 360
XML Spy Suite 4.2 Document Editor
Assign configuration file...
This command assigns a Spy Structure file (SPS) to an XML document to enable viewing andediting in the Document Editor view.
The command opens a dialog box allowing you to specify the SPS file you wish to assign, andinserts the required SPS statement into your XML document.
Hide markup
This command hides markup symbols in the Document Editor view.
Show small markup
This command shows small markup symbols in the Document Editor view.
Show large markup
This command shows large markup symbols in the Document Editor view.
Show mixed markup
This command shows mixed markup symbols in the Document Editor view.
Append row
This command appends a row to the current table in the Document Editor view.

Page 361© 2001 Altova Ges.m.b.H
XML Spy Suite 4.2 Document Editor
Insert row
This command inserts a row into the current table in the Document Editor view.
Duplicate row
This command duplicates the current table row in the Document Editor view.
Move row up
This command moves current row up by one row in the Document Editor view.
Move row down
This command moves the current row down by one row in the Document Editor view.
Delete row
This command deletes the currently active row in the Document Editor view.
Help
Document Editor includes a online help system that is based on the Microsoft HTML HelpViewer, and let you currently access the table of contents, index and search function of thesupplied help file.
Page 362
XML Spy Suite 4.2 Document Editor
About Document Editor
This command displays the current Document Editor splash window.
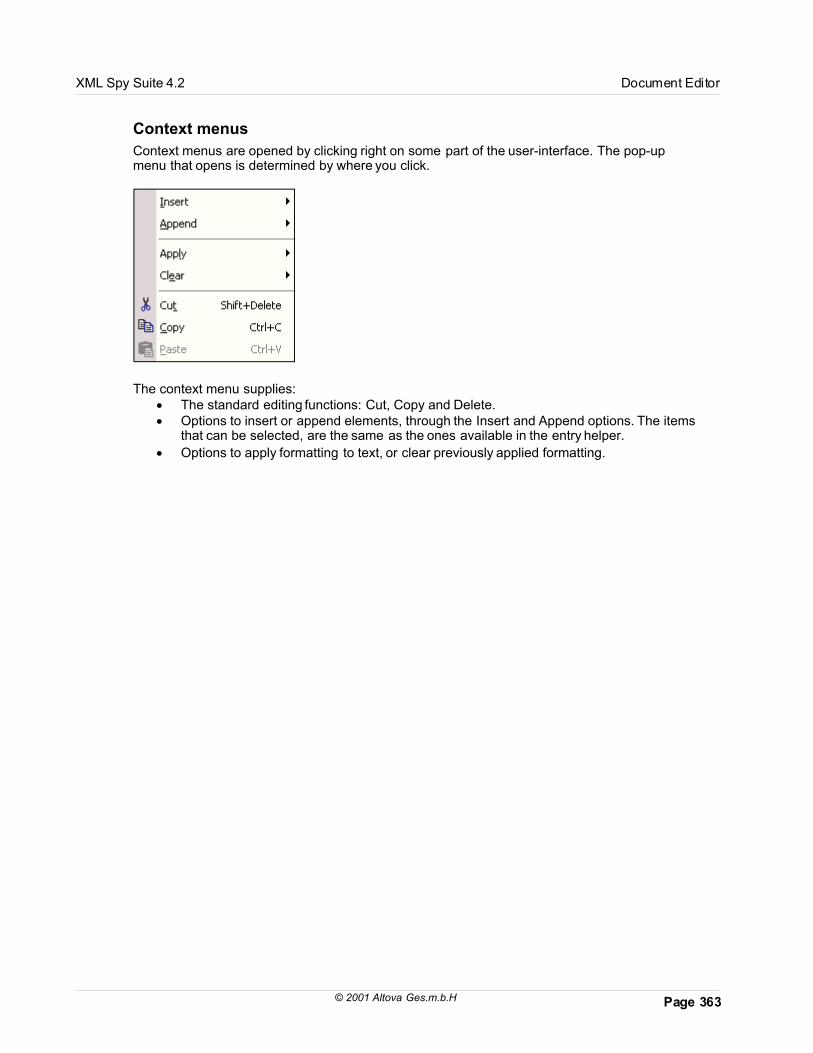
Page 363© 2001 Altova Ges.m.b.H
XML Spy Suite 4.2 Document Editor
Context menus
Context menus are opened by clicking right on some part of the user-interface. The pop-upmenu that opens is determined by where you click.
The context menu supplies:· The standard editing functions: Cut, Copy and Delete.· Options to insert or append elements, through the Insert and Append options. The items
that can be selected, are the same as the ones available in the entry helper.
· Options to apply formatting to text, or clear previously applied formatting.

Page 364
XML Spy Suite 4.2 Technical Background Information
7 Technical Background Information
This chapter contains useful background information on the technical aspects of XML Spy. Ifyou run across a technical term in the remainder of this help system you may occasionally find alink to some of the background materials provided here.

Page 365© 2001 Altova Ges.m.b.H
XML Spy Suite 4.2 Technical Background Information
XML Parser
When opening any XML document, XML Spy uses its built-in incremental validating parser toboth check the document for well-formedness and validate it against any specified DTD, DCD,XDR, BizTalk, or XSD Schema.
The same parser is also used while editing a document that refers to a DTD, DCD, XDR,BizTalk, or XSD Schema to provide intelligent editing help and immediately display anyvalidation error that is encountered.
This is possible through the incremental design of the new parser that is optimized for thespecial needs of an integrated development environment.
The built-in parser implements the new May 2nd Final Recommendation XML Schema from theW3C and we are constantly tracking the W3C Schema Group's efforts and are activelyparticipating in all Schema-related discussions to provide you with a state-of-the-artdevelopment environment.

Page 366
XML Spy Suite 4.2 Technical Background Information
Schema Dialects
An important aspect of XML is the area of schemas and DTDs that define the logical structure(or content model) of an XML document - XML Spy is the ideal tool that integrates schema andDTD creation while working with XML instance documents.
XML Spy supports both editing and schema-validation of the following schema kinds:
· Document Type Definitions (DTD)· Document Content Descriptions (DCD)· XML-Data Reduced (XDR)· BizTalk· XML Schema Definition (XSD) draft April 7, 2000, CR Oct. 24 2000, May 2nd 2001 Final
Recommendation
and can validate an XML instance document against any of the above schema dialects.
Since the XML Schema definition is still only available as a "last call" draft, the correspondingimplementation in the built-in validating parser in XML Spy is a preliminary version. It does,however, already include - among other functions - all of the following important aspects of XMLSchemas:
· simpleType & complexType· element, attribute, attributeGroup· group, sequence, choice, any· all datatype facets, including user-defined patterns (!)· notation, annotation, documentation, include

Page 367© 2001 Altova Ges.m.b.H
XML Spy Suite 4.2 Technical Background Information
XSLT Processor
To use the full power of XSLT for XSL Transformations, you will need to download and installany XSLT transformation engine, which supports the current XSLT standard from W3C and hasa command line interface.
Please note, that we provide some of the most well known XSLT engines on our Componentsweb page http://www.xmlspy.com/components, including Microsoft XML Parser MSXML 3.0 or4.0.
To use XSLT successfully, please make sure that your XSL Stylesheet correctly refers to thenamespace defined in the final XSLT recommendation:
<xsl:stylesheet version="1.0" xmlns:xsl="http://www.w3.org/1999/XSL/Transform">

Page 368
XML Spy Suite 4.2 Technical Background Information
OS & Memory Requirements
XML Spy is a modern 32-bit Windows application that runs on Windows 95, 98, NT 4.0, andWindows 2000. It requires a fair amount of memory to be installed in the system, because itloads each document fully into memory.
On the other hand it typically requires less memory than many Java-based applications,because it is written entirely in C++ and thus does not require the overhead of a Java runtimeenvironment.
Having documents in main memory is necessary to completely parse and analyze eachdocument, and to also improve the viewing and editing speed during normal work. While editinga small to medium sized document (up to 512kB) is possible in as little as 2MB of RAM, openinga 5MB document can consume up to 50MB during the initial parsing process.
Memory requirements are also influenced by the unlimited Undo history. When repeatedlycutting and pasting large selections in large documents, memory can rapidly be depleted.

Page 369© 2001 Altova Ges.m.b.H
XML Spy Suite 4.2 Technical Background Information
Internet Usage
XML Spy is an integrated development environment for XML and as such will, also initiateInternet connections on your behalf in the following situations:
a) if you click the "Request evaluation key-code" in the registration dialog the three fields in theregistration dialog box are transferred to our web server by means of a regular http (port 80)connection and the free evaluation key-code is sent back to the customer via regular SMTP e-mail.
b) if you use the Open URL... dialog box to open a document directly from a URL, thatdocument is retrieved through a http (port 80) connection.
c) if you open an XML document that refers to an XML Schema or DTD and the document isspecified through a URL, it is also retrieved through a http (port 80) connection, once youvalidate the XML document. This may also happen automatically upon opening a document, ifyou have instructed XML Spy to automatically validate files upon opening in theFile tab of the Tools | Options dialog.
d) if you are using the Send by mail... command, the current selection or file is sent by means ofany MAPI-compliant mail program installed on the user's PC.
All this communication is, of course, only initiated in response to a direct request from you! XMLis, after all, related to the Internet and thus any XML development tool must have accessInternet protocols to provide an efficient environment for the everyday duties of any XMLdeveloper.

Page 370
XML Spy Suite 4.2 Technical Background Information
Unicode Support
Unicode is the new 16-bit character-set standard defined by the Unicode Consortium thatprovides a unique number for every character,
· no matter what the platform,· no matter what the program,· no matter what the language.
Fundamentally, computers just deal with numbers. They store letters and other characters byassigning a number for each one. Before Unicode was invented, there were hundreds ofdifferent encoding systems for assigning these numbers. No single encoding could containenough characters: for example, the European Union alone requires several different encodingsto cover all its languages. Even for a single language like English, no single encoding wasadequate for all the letters, punctuation, and technical symbols in common use.
These encoding systems used to conflict with one another. That is, two encodings used thesame number for two different characters, or different numbers for the same character. Anygiven computer (especially servers) needs to support many different encodings; yet wheneverdata is passed between different encodings or platforms, that data always runs the risk ofcorruption.
Unicode is changing all that!Unicode provides a unique number for every character, no matter what the platform, no matterwhat the program, and no matter what the language. The Unicode Standard has been adoptedby such industry leaders as Apple, HP, IBM, JustSystem, Microsoft, Oracle, SAP, Sun, Baseand many others.
Unicode is required by modern standards such as XML, Java, ECMAScript (JavaScript), LDAP,CORBA 3.0, WML, etc., and is the official way to implement ISO/IEC 10646. It is supported inmany operating systems, all modern browsers, and many other products. The emergence of theUnicode Standard, and the availability of tools supporting it, are among the most significantrecent global software technology trends.
Incorporating Unicode into client-server or multi-tiered applications and web sites offerssignificant cost savings over the use of legacy character sets. Unicode enables a singlesoftware product or a single web site to be targeted across multiple platforms, languages andcountries without re-engineering. It allows data to be transported through many differentsystems without corruption.
Even though XML is clearly defined to be based on the Unicode standard, XML Spy is still oneof the few XML development tools that fully implements Unicode!

Page 371© 2001 Altova Ges.m.b.H
XML Spy Suite 4.2 Technical Background Information
Windows NT 4.0 & Windows 2000
Starting with version 2.0 XML Spy provided full Unicode support in the Windows NT andWindows 2000 version of the software. To edit any XML document from a non-roman writingsystem you will, however, also need a font that supports the Unicode characters being used bythat document.
Windows NT typically includes support for all common single-byte writing-systems in its Arial,Times, and Courier New fonts and will additionally include all required fonts for the writing-system in your own country (i.e. if you install the Japanese version of Windows NT you willautomatically have fonts that support the Katakana, Hiragana, and Kanji writing-systems as wellas the input-methods and dictionaries to enter Kanji and to switch between Katakana andHiragana). If you wish to edit any document from a foreign writing-system, you may want toinstall additional Windows NT components for that writing-system or purchase special Unicodefonts for these writing-systems (such fonts are available from all leading type vendors).
Please note that most fonts only contain a very specific subset of the entire Unicode range andare therefore typically targeted at the corresponding writing system. Consequently you mayencounter XML documents that contain "unprintable" characters, because the font you haveselected does not contain the required glyphs. Therefore it can sometimes be very useful tohave a font that covers the entire Unicode range - especially when editing XML documents fromall over the world.
The most universal font we have encountered is a typeface called "Arial Unicode MS" that hasbeen created by Agfa Monotype for Microsoft. This font contains over 50.000 glyphs and coversthe entire set of characters specified by the Unicode 2.1 standard. It needs 23MB and isincluded with Microsoft Office 2000.
We highly recommend that you install this font on your system and use it with XML Spy, if youare often editing documents in different writing systems. This font is not installed with the"typical" setting of the Microsoft Office setup program, but you can choose the Custom Setupoption to install this font.
In the "Examples" folder you will also find a new XHTML file called "Unicode-UTF8.xml" thatcontains the sentence "When the world wants to talk, it speaks Unicode" in many differentlanguages ("Wenn die Welt miteinander spricht, spricht sie Unicode") and writing-systems
(" Unicode ") - this line has been adopted from the 10th Unicodeconference in 1997 and is a beautiful illustration of the importance of Unicode for the XMLstandard. Opening this file will give you a quick impression on what is possible with Unicode andwhat writing systems are supported by the fonts available on your PC installation.

Page 372
XML Spy Suite 4.2 Technical Background Information
Windows 95/98/ME
These Windows versions do not include full Unicode capabilities on the operating system layer.Instead support for non-roman writing-systems is provided through so-called code-pages thatcontain all the required characters mapped to either the available byte-values in the range of0x80 to 0xFF (in case of single-byte systems, such as Cyrillic or Hebrew) or as double-bytevalues, where the first most significant bit of the first byte is typically used to indicate that this isa so-called "wide character" (in case of CJK writing-systems).
We therefore provider a special Windows 95/98/ME version of XML Spy that is automaticallyinstalled whenever you are using the Setup program on these operating systems. This versionof XML Spy supports the following code-pages for viewing and editing XML documents (forexcellent background information about code-pages please refer tohttp://czyborra.com/charsets/codepages.html):
Code-page Equivalent XML Encoding1252 ISO-8859-1 (Western, Latin-1)1250 ISO-8859-2 (Eastern Europe, Latin-2)1251 ISO-8859-5 (Cyrillic)1253 ISO-8859-7 (Greek)1254 ISO-8859-9 (Turkish)1255 ISO-8859-8 (Hebrew)1256 ISO-8859-6 (Arabic)874 ISO-8859-11/TIS-620 (Thai)932 Shift-JIS (Japanese)936 GB2312 (Chinese)949 EUC-KR (Korean)950 Big5 (Taiwanese)
Whenever you open an XML file, XML Spy detects the character-set encoding used in that file,expands the file to an internal full Unicode representation and then transforms the document toa code-page supported by Windows 95/98 in order to enable viewing and editing of thedocument.
In most cases this process will be entirely automatic, as the available ISO-8895-x encodings aswell as some of the CJK encodings often correspond with a certain code-page. However, if youopen a Unicode encoded file (e.g. UTF-8 or UTF-16) XML Spy will be unable to determine whichcode-page to use and will thus bring up a dialog box that asks you to specify a code-page to beused for editing.
In order to correctly view and edit a Unicode file under Windows 95/98/ME it is extremelyimportant that you use this dialog box to:
a) choose the correct code-page that includes all characters contained in the file andb) later select a font and script from the settings dialog box that also supports the samecode-page.
If the file contains any characters that are not available in the selected code-page, the user willreceive an error message including a detailed list of offending characters before they will bereplaced by a '_' (underscore).

Page 373© 2001 Altova Ges.m.b.H
XML Spy Suite 4.2 Technical Background Information
We therefore highly recommend using only the Windows NT/2000 version of XML Spy forediting XML files that make full use of Unicode!

Page 374
XML Spy Suite 4.2 Technical Background Information
Right-to-Left Writing Systems
Please note that even under Windows NT 4.0 any text from a right-to-left writing-system (suchas Hebrew or Arabic) is not rendered correctly except in those countries that actually use right-to-left writing-systems. This is due to the fact that only the Hebrew and Arabic versions ofWindows NT contains support for rendering and editing right-to-left text on the operating systemlayer.

Page 375© 2001 Altova Ges.m.b.H
XML Spy Suite 4.2 Technical Background Information
RichEdit Component
XML Spy uses the Microsoft-supplied "RichEdit" component for editing documents in theText View. The version of RichEdit that is available in Windows 98 and Windows NT 4.0 iscalled RichEdit 2.0 and contains many known limitations.
Windows 2000 contains a new and vastly improved version called RichEdit 3.0, that not onlyfixes most known bugs, but also contains special support for finer Undo-Control as well asbetter international capabilities with foreign writing systems.
XML Spy already contains full support for RichEdit 3.0 and takes advantage of the new features,if it detects the presence of RichEdit 3.0.
Altova is a registered MCSP (Microsoft Certified Solution Provider), we are unfortunately notallowed to distribute the RichEdit 3.0 component to our customers (RichEdit is only available aspart of the operating system and is not redistributable).
We are, however, allowed to suggest that if you have access to a Windows 2000 CD-ROM youshould install Windows 2000 on some machine and copy the file "riched20.dll" from theWindows\System directory of that machine to the Windows NT 4.0 or Windows 98 Windowsinstallation (thereby replacing the old RichEdit 2.0 version) that you wish to use XML Spy on.
This will get you all the benefits of RichEdit 3.0 now and will - in our experience - not cause anycompatibility problems, since the RichEdit 3.0 component is fully compatible with Windows 98and Windows NT 4.0.

Page 376
XML Spy Suite 4.2 Technical Background Information
License Metering
XML Spy has a built-in license metering module that helps you in avoiding any unintentionalviolation of our license agreement. XML Spy can be licensed either as a single-user or multi-user software and depending on your license, this license-metering module makes sure, that nomore than the licensed number of users are using XML Spy concurrently.
This license-metering technology uses your local area network (LAN) to communicate betweeninstances of XML Spy running on different computers.
Single licenseWhen XML Spy starts up, it sends a short broadcast datagram to find any other instance of theproduct running on another computer in the same network segment. If it doesn't get anyresponse, it will open a port for listening to other instances of XML Spy. Other than that, it will donothing at all in a single-user situation. If you are not connected to a LAN or are using dial-upconnections to connect to the Internet, XML Spy will NOT generate any network traffic at all.
Multi licenseIf more than one copy of XML Spy is used within the same LAN, they will briefly communicatewith each other on startup, to exchange their key-codes to ensure that the number of concurrentlicenses purchased is not accidentally violated, as additional copies of the product are launchedby more users.
This is the same kind of license metering technology, that is common in the Unix world and withmany other database development tools and allows our customers to purchase reasonably-priced concurrent-use multi-user licenses (see http://www.xmlspy.com/order for our price list).
Please note, that XML Spy is at no time attempting to send any information out of your LAN, orover the Internet. We are also deliberately sending very few and small network packets so as tonot put a burden on any network. The TCP/IP ports (2799) used by XML Spy are officiallyregistered with the IANA see http://www.isi.edu/in-notes/iana/assignments/port-numbers fordetails) and our license-metering module is a proven and tested technology.
If you are using a firewall, you may notice communications on port 2799 between the computersthat are running XML Spy. You are, of course, free to block such traffic between different groupsin your organization, as long as you can ensure by other means, that your license agreement isnot violated.
You will also notice, that XML Spy contains many useful functions thatmake use of your Internet connection, but these are unrelated to the license-meteringtechnology.

Page 377© 2001 Altova Ges.m.b.H
XML Spy Suite 4.2 Appendix
8 Appendix
This appendix contains important legal information concerning your rights to use this softwareproduct. Please read carefully - this information is binding, as you have agreed to these termsupon installation of this software product.

Page 378
XML Spy Suite 4.2 Appendix
Electronic Software Distribution
We are making XML Spy available through electronic software distribution only, because thismethod offers many unique benefits for our customers:
· you can freely evaluate the software before making a purchasing decision· once you decide to buy the software, you can place your order online and immediately get
a fully licensed product within minutes· you can be sure to always get the latest version of our software· we include both a comprehensive integrated online-help system and an electronic manual
that you can also print out, if you prefer to read your documentation on paper
Once you download this software product, you may evaluate the XML Spy for a period of up to30 days free of charge. During this evaluation period the software will start to remind you afterabout 20 days that it has not been licensed yet. The reminder message will, however, only bedisplayed once every time you start the program.
If you would like to continue using the program after the 30 day evaluation period, you have topurchase a license, which is delivered in the form of a key-code that you enter into theRegistration dialog to unlock the product.
You can register and purchase your license on-line by directing your browser to access our web-shop at http://www.xmlspy.com/order. On this page you will get detailed pricing information(including multi-user discounts) and also find a list of authorized distributors and resellers.
If you want to share XML Spy with others, please make sure that only the installation program isever distributed. It contains the application program, grammar description, sample files, and thisonline manual as well as a quick Read-Me file in one neat package. Any person that receivesthe XML Spy software from you is also automatically entitled to a 30 day evaluation period. Afterthe expiration of said period, any other user must also purchase a license in order to be able touse XML Spy.
For further details, please refer to the SOFTWARE PRODUCT LICENSE at the end of thismanual.

Page 379© 2001 Altova Ges.m.b.H
XML Spy Suite 4.2 Appendix
Copyright
All title and copyrights in and to the SOFTWARE PRODUCT (including but not limited to anyimages, photographs, animations, video, audio, music, text, and "applets" incorporated into theSOFTWARE PRODUCT), the accompanying printed materials, and any copies of theSOFTWARE PRODUCT are owned by Altova GmbH or its suppliers. The SOFTWAREPRODUCT is protected by copyright laws and international treaty provisions. Therefore, youmust treat the SOFTWARE PRODUCT like any other copyrighted material.
Copyright ©1998-2001 Altova GmbH
All rights reserved.

Page 380
XML Spy Suite 4.2 Appendix
Software Product License
THIS IS A LEGAL DOCUMENT -- RETAIN FOR YOUR RECORDS
ALTOVA SOFTWARE LICENSE AGREEMENT
Licensor:
Altova GmbHSalzgries 1A-1010 WienAustria
Notice to User:This is a legal document between you and Altova GmbH ("Altova"). It is important that you readthis document before using the Altova-provided software ("Software") and any accompanyingdocumentation ("Documentation"). By using the Software, you agree to be bound by the termsof this Agreement whether or not you decide to purchase the Software. If you do not agree, youare not licensed to use the Software, and you must destroy any downloaded copies of theSoftware in your possession or control. Please go to our Web site to download and print a copyof this Agreement for your files.
1. SOFTWARE LICENSE(a) License Grant. Altova grants you a non-exclusive, non-transferable (except as providedbelow), limited license to install and use a copy of the Software on your compatible computer, upto the Permitted Number of computers. The Permitted Number of computers shall bedelineated at such time as you elect to purchase the Software.
(b) Server Use. Your rights with respect to server use depend on the version of the productyou have purchased:(b.1) If you have purchased the "XML Spy B2B Server" version of the Software, you may installa copy of the Software on your compatible server computer up to the Permitted Number ofcomputers, for the sole and exclusive purpose of using the Software through commands, dataor instructions (e.g., scripts) from an unlimited number of computers on your internal network oron the Internet.(b.2) If you have purchased any other version of the Software, you may install one copy of theSoftware on your computer file server for the purpose of downloading and installing the Softwareonto other computers within your internal network up to the Permitted Number. No other networkuse is permitted, including without limitation using the Software either directly or throughcommands, data or instructions from or to a computer not part of your internal network, forInternet or Web-hosting services or by any user not licensed to use this copy of the Softwarethrough a valid license from Altova.
(c) Concurrent Use. If you have purchased a "Concurrent-User" version of the Software,you may install the Software on any compatible computers, up to ten (10) times the PermittedNumber of users, provided that only the Permitted Number of users actually use the Software atthe same time. The Permitted Number of concurrent users shall be delineated at such time asyou elect to purchase the Software.
(d) Backup and Archival Copies. You may make one backup and one archival copy of theSoftware, provided your backup and archival copies are not installed or used on any computerand further provided that all such copies shall bear the original and unmodified copyright, patentand other intellectual property markings that appear on or in the Software. You may not transfer

Page 381© 2001 Altova Ges.m.b.H
XML Spy Suite 4.2 Appendix
the rights to a backup or archival copy unless you transfer all rights in the Software as providedunder Section 3.
(e) Home Use. You, as the primary user of the computer on which the Software isinstalled, may also install the Software on one of your home computers. However, the Softwaremay not be used on your home computer at the same time as the Software is being used on theprimary computer.
(f) Key Codes. You will receive a key code when you elect to purchase the Software. Thekey code will enable you to activate the Software after an initial thirty (30)-day evaluation period.You may not relicense, reproduce or distribute a key code except with the express writtenpermission of Altova.
(g) Title. Title to the Software is not transferred to you. Ownership of all copies of theSoftware and of copies made by you is vested in Altova, subject to the rights of use granted toyou in this Agreement.
(h) Reverse Engineering. You may not reverse engineer, decompile, disassemble orotherwise attempt to discover the source code, underlying ideas, underlying user interfacetechniques or algorithms of the Software by any means whatsoever, directly or indirectly, ordisclose any of the foregoing, except to the extent you may be expressly permitted to decompileunder applicable law, it is essential to do so in order to achieve operability of the Software withanother software program, and you have first requested Altova to provide the informationnecessary to achieve such operability and Altova has not made such information available.Altova has the right to impose reasonable conditions and to request a reasonable fee beforeproviding such information. Any information supplied by Altova or obtained by you, as permittedhereunder, may only be used by you for the purpose described herein and may not be disclosedto any third party or used to create any software which is substantially similar to the expressionof the Software. Requests for information should be directed to the Altova Customer SupportDepartment.
(i) Other Restrictions. You may not loan, rent, lease, sublicense, distribute or otherwisetransfer all or any portion of the Software to third parties except to the limited extent set forth inSection 3. You may not copy the Software except as expressly set forth above, and any copiesthat you are permitted to make pursuant to this Agreement must contain the same copyright,patent and other intellectual property markings that appear on or in the Software. You may notmodify, adapt or translate the Software. You may not, directly or indirectly, encumber or suffer toexist any lien or security interest on the Software; knowingly take any action that would causethe Software to be placed in the public domain; or use the Software in any computerenvironment not specified in this Agreement. You will comply with applicable law and Altova'sinstructions regarding the use of the Software. You agree to notify your employees and agentswho may have access to the Software of the restrictions contained in this Agreement and toensure their compliance with these restrictions. THE SOFTWARE IS NOT INTENDED FORUSE IN THE OPERATION OF NUCLEAR FACILITIES, AIRCRAFT NAVIGATION,COMMUNICATION SYSTEMS OR AIR TRAFFIC CONTROL EQUIPMENT, WHERE THEFAILURE OF THE SOFTWARE COULD LEAD TO DEATH, PERSONAL INJURY OR SEVEREPHYSICAL OR ENVIRONMENTAL DAMAGE.
(j) License Metering. Altova has a built-in license metering module that helps you to avoidany unintentional violation of this Agreement. Altova may use your internal network for licensemetering between installed versions of the Software.
2. INTELLECTUAL PROPERTY RIGHTS
Acknowledgement of Altova's Rights. You acknowledge that the Software and any copies that

Page 382
XML Spy Suite 4.2 Appendix
you are authorized by Altova to make are the intellectual property of and are owned by Altovaand its suppliers. The structure, organization and code of the Software are the valuable tradesecrets and confidential information of Altova and its suppliers. The Software is protected bycopyright, including without limitation by United States Copyright Law, international treatyprovisions and applicable laws in the country in which it is being used. You acknowledge thatAltova retains the ownership of all patents, copyrights, trade secrets, trademarks and otherintellectual property rights pertaining to the Software, and that Altova's ownership rights extendto any images, photographs, animations, videos, audio, music, text and "applets" incorporatedinto the Software and all accompanying printed materials. You will take no actions, whichadversely affect Altova's intellectual property rights in the Software. Trademarks shall be usedin accordance with accepted trademark practice, including identification of trademark owners'names. Trademarks may only be used to identify printed output produced by the Software, andsuch use of any trademark does not give you any right of ownership in that trademark. XML Spyand Altova are trademarks of Altova GmbH (registered in numerous countries). Unicode andthe Unicode Logo are trademarks of Unicode, Inc. Windows, Windows 95, Windows 98,Windows NT and Windows 2000 are trademarks of Microsoft. W3C, CSS, DOM, MathML, RDF,XHTML, XML and XSL are trademarks (registered in numerous countries) of the World WideWeb Consortium (W3C); marks of the W3C are registered and held by its host institutions, MIT,INRIA and Keio. Except as expressly stated above, this Agreement does not grant you anyintellectual property rights in the Software.
3. LIMITED TRANSFER RIGHTSNotwithstanding the foregoing, you may transfer all your rights to use the Software to anotherperson or legal entity provided that: (a) you also transfer each of this Agreement, the Softwareand all other software or hardware bundled or pre-installed with the Software, including allcopies, updates and prior versions, and all copies of font software converted into other formats,to such person or entity; (b) you retain no copies, including backups and copies stored on acomputer; (c) the receiving party secures a personalized key code from Altova; and (d) thereceiving party accepts the terms and conditions of this Agreement and any other terms andconditions upon which you legally purchased a license to the Software. Notwithstanding theforegoing, you may not transfer education, pre-release, or not-for-resale copies of the Software.
4. PRE-RELEASE PRODUCT ADDITIONAL TERMS
If the product you have received with this license is pre-commercial release or beta Software("Pre-release Software"), then this Section applies. To the extent that any provision in thisSection is in conflict with any other term or condition in this Agreement, this Section shallsupersede such other term(s) and condition(s) with respect to the Pre-release Software, but onlyto the extent necessary to resolve the conflict. You acknowledge that the Software is a pre-release version, does not represent final product from Altova, and may contain bugs, errors andother problems that could cause system or other failures and data loss. CONSEQUENTLY,THE PRE-RELEASE SOFTWARE IS PROVIDED TO YOU "AS-IS", AND ALTOVA DISCLAIMSANY WARRANTY OR LIABILITY OBLIGATIONS TO YOU OF ANY KIND EXPRESS ORIMPLIED. WHERE LEGALLY LIABILITY CANNOT BE EXCLUDED FOR PRE-RELEASESOFTWARE, BUT IT MAY BE LIMITED, ALTOVA'S LIABILITY AND THAT OF ITSSUPPLIERS SHALL BE LIMITED TO THE SUM OF FIFTY DOLLARS (U.S.$50) IN TOTAL.You acknowledge that Altova has not promised or guaranteed to you that Pre-release Softwarewill be announced or made available to anyone in the future, that Altova has no express orimplied obligation to you to announce or introduce the Pre-release Software and that Altova maynot introduce a product similar to or compatible with the Pre-release Software. Accordingly, youacknowledge that any research or development that you perform regarding the Pre-releaseSoftware or any product associated with the Pre-release Software is done entirely at your ownrisk. During the term of this Agreement, if requested by Altova, you will provide feedback toAltova regarding testing and use of the Pre-release Software, including error or bug reports. Ifyou have been provided the Pre-release Software pursuant to a separate written agreement,your use of the Software is governed by such agreement. You may not sublicense, lease, loan,
Page 383© 2001 Altova Ges.m.b.H
XML Spy Suite 4.2 Appendix
rent, distribute or otherwise transfer the Pre-release Software. Upon receipt of a laterunreleased version of the Pre-release Software or release by Altova of a publicly releasedcommercial version of the Software, whether as a stand-alone product or as part of a largerproduct, you agree to return or destroy all earlier Pre-release Software received from Altova andto abide by the terms of the license agreement for any such later versions of the Pre-releaseSoftware.
5. WARRANTY AND LIMITATION OF LIABILITY
(a) Limited Warranty. Altova warrants that (a) the Software will perform substantially inaccordance with the accompanying written materials for a period of ninety (90) days from thedate of receipt, and (b) any support services provided by Altova shall be substantially asdescribed in applicable written materials provided to you by Altova, and Altova supportengineers will make commercially reasonable efforts to solve any problem issues. Some statesand jurisdictions do not allow limitations on duration of an implied warranty, so the abovelimitation may not apply to you. To the extent allowed by applicable law, implied warranties onthe Software, if any, are limited to ninety (90) days.
(b) Customer Remedies. Altova's and its suppliers' entire liability and your exclusiveremedy shall be, at Altova's option, either (a) return of the price paid, if any, or (b) repair orreplacement of the Software that does not meet Altova's Limited Warranty and which is returnedto Altova with a copy of your receipt. This Limited Warranty is void if failure of the Software hasresulted from accident, abuse or misapplication. Any replacement Software will be warranted forthe remainder of the original warranty period or thirty (30) days, whichever is longer.
(c) No Other Warranties. TO THE MAXIMUM EXTENT PERMITTED BY APPLICABLELAW, ALTOVA AND ITS SUPPLIERS DISCLAIM ALL OTHER WARRANTIES ANDCONDITIONS, EITHER EXPRESS OR IMPLIED, INCLUDING, BUT NOT LIMITED TO,IMPLIED WARRANTIES OF MERCHANTABILITY, FITNESS FOR A PARTICULAR PURPOSE,INFORMATIONAL CONTENT OR ACCURACY, QUIET ENJOYMENT, TITLE AND NON-INFRINGEMENT, WITH REGARD TO THE SOFTWARE, AND THE PROVISION OF ORFAILURE TO PROVIDE SUPPORT SERVICES. THIS LIMITED WARRANTY GIVES YOUSPECIFIC LEGAL RIGHTS. YOU MAY HAVE OTHERS, WHICH VARY FROMSTATE/JURISDICTION TO STATE/JURISDICTION.
(d) Limitation Of Liability. TO THE MAXIMUM EXTENT PERMITTED BY APPLICABLELAW, IN NO EVENT SHALL ALTOVA OR ITS SUPPLIERS BE LIABLE FOR ANY SPECIAL,INCIDENTAL, DIRECT, INDIRECT OR CONSEQUENTIAL DAMAGES WHATSOEVER(INCLUDING, WITHOUT LIMITATION, DAMAGES FOR LOSS OF BUSINESS PROFITS,BUSINESS INTERRUPTION, LOSS OF BUSINESS INFORMATION, OR ANY OTHERPECUNIARY LOSS) ARISING OUT OF THE USE OF OR INABILITY TO USE THESOFTWARE OR THE PROVISION OF OR FAILURE TO PROVIDE SUPPORT SERVICES,EVEN IF ALTOVA HAS BEEN ADVISED OF THE POSSIBILITY OF SUCH DAMAGES. IN ANYCASE, ALTOVA'S ENTIRE LIABILITY UNDER ANY PROVISION OF THIS AGREEMENTSHALL BE LIMITED TO THE GREATER OF THE AMOUNT ACTUALLY PAID BY YOU FORTHE SOFTWARE PRODUCT OR U.S.$50.00; PROVIDED, HOWEVER, IF YOU HAVEENTERED INTO AN ALTOVA SUPPORT SERVICES AGREEMENT, ALTOVA'S ENTIRELIABILITY REGARDING SUPPORT SERVICES SHALL BE GOVERNED BY THE TERMS OFTHAT AGREEMENT. Because some states and jurisdictions do not allow the exclusion orlimitation of liability, the above limitation may not apply to you. In such states and jurisdictions,Altova's liability shall be limited to the greatest extent permitted by law.
(e) Infringement Claims. Altova will indemnify and hold you harmless and will defend orsettle any claim, suit or proceeding brought against you that is based upon a claim that thecontent contained in the Software infringes a copyright or violates an intellectual or proprietaryright protected by United States or European Union law ("Claim"), but only to the extent the

Page 384
XML Spy Suite 4.2 Appendix
Claim arises directly out of the use of the Software. You must notify Altova in writing of anyClaim within ten (10) business days after you first receive notice of the Claim, and you shallprovide to Altova at no cost with such assistance and cooperation as Altova may reasonablyrequest from time to time in connection with the defense of the Claim. Altova shall have solecontrol over any Claim (including, without limitation, the selection of counsel and the right tosettle on your behalf on any terms Altova deems desirable in the sole exercise of its discretion).You may, at your sole cost, retain separate counsel and participate in the defense or settlementnegotiations. Altova shall pay actual damages and costs awarded against you (or payable byyou pursuant to a settlement agreement) in connection with a Claim to the extent such damagesand costs are not reimbursed to you by insurance or a third party, to an aggregate maximum ofUS$1,000. If the Software or its use becomes the subject of a Claim or its use is enjoined, or ifin the opinion of Altova's legal counsel the Software is likely to become the subject of a Claim,Altova shall attempt to resolve the Claim by using commercially reasonable efforts to modify theSoftware or obtain a license to continue using the Software. If in the opinion of Altova's legalcounsel the Claim, the injunction or potential Claim cannot be resolved through reasonablemodification or licensing, Altova, at its own election, may terminate this Agreement withoutpenalty, and will refund to you on a pro rata basis any fees paid in advance by you to Altova.THE FOREGOING CONSTITUTES ALTOVA'S SOLE AND EXCLUSIVE LIABILITY FORINTELLECTUAL PROPERTY INFRINGEMENT.
6. TERM AND TERMINATIONThis Agreement may be terminated (a) by your giving Altova written notice of termination; or (b)by Altova, at its option, giving you written notice of termination if you commit a breach of thisAgreement and fail to cure such breach within ten (10) days after notice from Altova. Upon anytermination of this Agreement, you must cease all use of the Software, destroy all copies then inyour possession or control and take such other actions as Altova may reasonably request toensure that no copies of the Software remain in your possession or control.
7. GENERAL PROVISIONS
If there is a local subsidiary of Altova in the country in which the Software was obtained, then thelocal law of the jurisdiction in which the subsidiary is located shall govern this Agreement.Otherwise, this Agreement shall be governed by the laws of the Republic of Austria and, to theextent applicable, the European Union. This Agreement contains the entire agreement andunderstanding of the parties with respect to the subject matter hereof, and supersedes all priorwritten and oral understandings of the parties with respect to the subject matter hereof. Anynotice or other communication given under this Agreement shall be in writing and shall havebeen properly given by either of us to the other if sent by certified or registered mail, returnreceipt requested, or by overnight courier to the address shown on Altova's Web site for Altovaand the address shown in Altova's records for you, or such other address as the parties maydesignate by notice given in the manner set forth above. This Agreement will bind and inure tothe benefit of the parties and our respective heirs, personal and legal representatives, affiliates,successors and permitted assigns. The failure of either of us at any time to requireperformance of any provision hereof shall in no manner affect such party's right at a later time toenforce the same or any other term of this Agreement. This Agreement may be amended onlyby a document in writing signed by both of us. In the event of a breach or threatened breach ofthis Agreement by either party, the other shall have all applicable equitable as well as legalremedies. The Software and its related documentation may not be exported or reexported inviolation of the U.S. Export Administration Act and its implementing regulations or the laws ofthe jurisdiction in which the Software was obtained. Each party is duly authorized andempowered to enter into and perform this Agreement. If, for any reason, any provision of thisAgreement is held invalid or otherwise unenforceable, such invalidity or unenforceability shallnot affect the remainder of this Agreement, and this Agreement shall continue in full force andeffect to the fullest extent allowed by law. The parties knowingly and expressly consent to theforegoing terms and conditions.

Index- A -Abort 243
Access 91, 193, 208, 210
elementTypes 49
Activate 282
license 282
Activate project scripts 250
Active Server Pages 104
ActiveX Data Object 193
Add 152
active and related files 152
active file to project 152
child element 23
elements with drag and drop 26
files to project 83, 151
folder to project 152
project to source control 146
sequence compositor 23
to source control 146
URL to project 152
Add Child 161, 162, 163
Add Child | Sequence 100
Add to source control 82
ADO 192, 193, 208, 210
connection string 195
data Link properties 195
data shaping 219
importing hierarchical data 219
setting up a connection 213
shape string examples 223
ADO connection string 78
ADOX 208, 210
Agreement 379, 380
Annotation 114
appinfo 100
editing 100
Append 110, 155, 158, 159, 160, 161, 233
attribute 38, 111
attribute / element 59
child elements schema 97
row (Document Editor) 190
Appendix 377
Appinfo 100inserting 100
Apply 264
April 7 366
Arabic 374
Arial Unicode MS 371
Ascending 233
ASCII 122
ASP 104
Assign 109
DTD 170
DTDs to folders 109
Schema 170
script to project 250
shortcut to a command 253
XSL 68, 188
XSL transformations to folders 109
Assign DTD 157
Assign DTD/Schema 116
Assign file 285
Attachment 125
ATTLIST Declaration 158
Add Child 163
Appending 161
Convert To 165
Inserting 158
Attribute 156, 159, 162, 366Add Child 162
adding 38
append 38
Appending 111, 159
Convert To 164
defining which to import 219
Definition 171
element 38
entry helper 52, 59
enumerations 38
icon 88
import 74
insert / append 94
Inserting 111, 156
limiting contents 38
mandatory 111
namespace prefix 168
order 88
window 38
Attribute List 158Add Child 163
Index
© 2001 Altova Ges.m.b.H

Appending 161
Convert To 165
Inserting 158
Attribute preview 268
AttributeGroup 366
Attributes 232
Attributes by default 193
Auto 202
generation of shape string 202
text view enable/disable 267
Auto-completion 104
Automatic validation 265
Autovalidation 349
- B -Back 107, 243
Background Information 364
Base 32
element 32
Batch manipulation 109
Batch-processing 185
Big-endian 272
BizTalk 167, 168, 170, 172, 365, 366
Bookmark 279
Broadcast 376
Browser 268
back 243
Document Editor plug-in 345
font 244
forward 243
Menu 243
referesh 243
separate window 244
stop 243
View 238, 243
Browser and XML 11
Browser menu 107
Browser view 68, 107
- C -C++ 368
Cache 174
Cancel 243
Cascade 277Window 277
CDATA 157, 159Add Child 162
Appending 159
Convert To 165
Inserting 157
Chapters 279
Character 241position 241
Character-Set 118, 122, 192, 372encoding 272
Character-set encoding 372
Check 104
validity 55
well-formedness 55
Check in 144
Check Out 144
Check well-formedness 166
Child element 166
adding 23
importing with ADO 219
insert 97
Choices 114
Choose file 192
CJK 372
Clipboard 132copy 132
cut 132
paste 132
Close 122
Close All 122
Close project 139
Code fragments 125
send by mail 125
Code page 269
Code-page 372
Collapse 88
unselected 240
Color 269, 270
tab 271
table 271
Column widths 88resizing 88
Columns 91, 232
COM 376
Com(plex) tab 32
Command 115
add to toolbar/menu 251
context menu 256
© 2001 Altova Ges.m.b.H

delete from menu 256
reset menu 256
shape commands ADO 223
Comment 157, 160
Add Child 162
Appending 160
Convert To 165
Inserting 157
Comments 114, 136
Common Dialog 285
Compare source files 149
Complex 32
type 32
type extending 32
referenced 97
ComplexType 366
Component 185Download XSLT 185
global 32, 100
icon 23
insert / append 94
inserting 94
navigator 20, 94
save graphic 176
Component download 284
Component navigator 110
Compositor 23sequence 23
Compositors 100
Concurrent-use 282, 376
Configure 180content model 180
schema design view 27
Connection 213
setting up a database connection 213
Connection string 193, 210
ADO - create DB Schema 78
Constraint 94
schema 94
identity 78
Content model 12, 94, 114, 173, 183, 366configure view 180
display 97
editing 180
sizing 182
Context menu 256
commands 256
during customize 261
Context-menu 88, 104
Context-sensitive 279
Contract 377
Convert 170
create database from a schema 78
export database 210
export hierarchical data 211
export text file 210
export to text / database 72
export to text files 208
How to... 211
import database data 74
importing database data 195
Menu 192
schema to DB structure 206
Convert To 164
ATTLIST 165
Attribute 164
CDATA 165
Comment 165
DOCTYPE 165
Element 164, 165
ENTITY 166
externalID 165
NOTATION 166
PI 165
Text 164
XML 165
Copy 132, 133data to/from 3rd party prod. 61
Structured Text 133
to clipboard 132
XML-Text 133
XPath 135
Copyright 284, 377, 379, 380
Core presentation 88
Courses 284training 284
CPU 368
CR&LF 264
Create 83addtnl. project folder 83
DB based on schema 206
empty elements on import 193
new schema 20
new XML document 49
project 83
template file 358
Index
© 2001 Altova Ges.m.b.H
CSS 107, 197
Customize 256
context menu 256
customization contex menu 261
Enhanced Grid View 88
macros 258
menu 256
toolbar/menu commands 251
Cut 132
- D -Data 223
shaping examples 223
Data Access Components 193
Data exchange 192, 193, 197, 208, 210
Table view 91
Data format 208
Data Link properties 195
Data shaping 219
ADO 219
Data Source 213
Administrator 213
Name 213
Database 133, 192, 193, 210, 232
connection - setting up 213
create DB based on schema 206
create schema from 78
creating empty fields on import 219
export 208
export restrictions 72
export XML data to 72
hierarchy - keyref 78
import attribute 74
import element 74
OLE DB provider 78
primary / secondary key 74
setting up a connection 213
skip field 74
SQL ,Oracle etc. 78
Database / Table view 61
sort data 61
Database import 195
ADO 195
Database/Table View 88, 91, 232, 233, 234
Datatype 94
DB Provider 193
DCD 167, 168, 365, 366
Declarations 38global 38
Default 256menu 256
schema settings 175
Default editor 265
Defining a new schema 172
Delete 132
command from context menu 256
command from toolbar 251
element 49
file from project 83
icon from toolbar 251
row (Document Editor) 191
shortcut 253
toolbar 252
Delete particle 100
Demote 166
Descending 234
Details 23
entry helper 23
tab 28
Diagram 183Display 183
Dialog 285
Direction 136
Directories 109
Disable source control 143
Display 88
Display All Globals 12, 183
icon 23
Display as Table 61
Display diagram 183
Display Settings 271
Distribution 378
Distributor 284
Dockable window 277, 278
DOCTYPE 116, 157
DOCTYPE Declaration 157Add Child 163
Appending 160
Convert To 165
Inserting 157
Document 87, 118
save invalid doc. 55
save to URL 123
Document Content Description 366
© 2001 Altova Ges.m.b.H

Document Editor 345plug-in 345
Document Type 157, 160, 163
Document Type Declaration 157
Document Type Definition 170, 171, 366
Documentation 114, 279
appinfo 100
multiple schemas 177
schema 177
Documenting 44
schema 44
Download 284
components 284
Download source control project 140
Drag and drop 26add elements with 26
DTD 116, 165, 166, 365, 366add child ATTLIST 163
add child DOCTYPE 163
add child ELEMENT 163
add child ENTITY 163
add Child ExternalID 163
Add child NOTATION 163
append DOCTYPE 160
append ExternalID 160
assign 170
ATTLIST Declaration 158
convert to 173
DOCTYPE declaration 157
Generate 172
go to 171
go to definition 171
NOTATION Declaration 158
DTD / Schema 49
DTD/Schema 170Menu 170
DTDs 264, 265
Duplicate 190
row (Document Editor) 190
- E -EBCDIC 122
Edit 180
content model 180
intelligent editing 52
macro button 261
Menu 131
Edited with XML Spy 264
Editing 88
Editing element/attribute names 88
Electronic Software Distribution 378
Element 366Add Child 162
adding 23
Appending 110, 159, 233
attributes 38
base 32
Convert To 164
create empty fields 219
defining which to import 219
Definition 171
definition view 100
deleting 49
display (shortcut) 41
facet 28
identity constraint 227
import 74
Inserting 110, 156, 233
make global 100
mandatory 55, 110
namespace prefix 168
optional 28
reference 38
restricting definition 32
ELEMENT Declaration 158
Add Child 163
Appending 160
Convert To 165
Inserting 158
Element icon 88
Element types 97
Elements 136search for 136
Elements by default 193
ElementTypes 49
accessing 49
Elm 20
Element (global) 20
E-Mail 125, 282
Empty element 193create on import 193
Empty elements 265
Empty fields 219
create during import 219
Empty File 116
Index
© 2001 Altova Ges.m.b.H

Enable source control 143
Enclose in Element 166
Encoding 118, 122, 372
Enhanced Grid 61
Database / Table view 61
Tree view 239
view 52
Enhanced Grid View 232, 235, 265
customization 88
Entity 112
append 112
entry helper 112
insert 112
ENTITY Declaration 158, 171
Add Child 163
Appending 161
Convert To 166
Inserting 158
Entry helper 18attribute 52, 59
component navigator 20, 94
Details 23
facet 28
insert attribute / element 59
update 59
Entry-Helper 110, 111, 112, 168, 278
info 114
Schema Design View 110
Enumeration 114attribute 38
Error 166
ESD 378
EUC-JP 122
EUC-KR 122
Evaluation Version 282
Example files 17
tutorial 17
Example XML documents 172
Excel 91, 133copy data to/from 61
Exchange 133xml text 133
Exit 129
Exlude 193
primary/foreign keys 193
Expand 88
fully 240
Explorer 265
Export 192, 208database 210
database data 72
parameters 72
restrictions 72
text file 210
Export hierarchical data 211
Extend 32
complex type definition 32
Extensible Markup Language 155
Extensible Stylesheet Language 185
Extension 183
Oracle schema extension 183
External parsed entites 265
External parsed entity 171, 174
External XSL processor 273
ExternalID Declaration 158Add Child 163
Appending 160
Convert To 165
Inserting 158
- F -F5 244
Facet 28
element 28
entry helper 28
updating schema 61
Facets 366
FAQ 193, 284
Favorites 279
Fetch file 143
source control 143
Field 349
optional 349
File 116
add active and related 152
add to project 152
Close 122
Close All 122
Encoding 122
Exit 129
Menu 116
MRU 129
New 116
Open 118, 129
Open URL 119
© 2001 Altova Ges.m.b.H

opening options 264
Print 126
Print Setup 128
Reload 121
Save 122
Save All 124
Save As 123
Save to URL 123
Send by Mail 125
tab 264
File types 116, 265
Find 136, 137
Find Defintion 171
Flush 174
Folder 167create addtnl. project folder 83
Folders 109
Folder-tree 109
Font 244, 371schema 269
Schema Documentation 269
Font Size 244
Foreign key 208
Foreign/primary key 193
exclude 193
Format 135
XML doc in text view 135
Forward 107, 243
Fragments 125send by mail 125
Full-text 281search 281
- G -GB2312 122
Generate 206
DB structure based on schema 206
DTD 172
sample XML file 173
Schema 172
schema documentation 177
Get latest version 143
Getting started 1
Global 370
component 32
declarations 38
settings 264
reference 100
Globals 94
show 183
Go to 171, 188
Element definitions (schema) 41
Schema definition 171
XSL 68
Go to Definition 171
Go to File 242
Go to line/char 241
Grammar 265
Graphic 176
save 176
Graphic view of component 183
Gray bar 240
Grayed-out 52
attribute / element 52
Grid fonts 269
Grid View 88, 235, 240
Grouping files 82
project 82
- H -Hebrew 374
Help 279
contents 279
context-sensitive 279
index 280
Menu 279
search 281
Help system 279
Help topic 279
Hide 277, 278
markup 189
Hierarchical data 211
export 211
import (ADO - data shaping) 219
Hierarchical Display 88
Hint 349
popup 349
Hiragana 371
History 132
redo 132
undo 131
Hotkey 253
view element 100
Index
© 2001 Altova Ges.m.b.H

How to 279get help 279
Converting data 211
export hierarchical data 211
import a table using ODBC 216
import hierarchical data (ADO data shaping) 219set up a database connection 213
HTML 185
from XML doc. 68
HTML Help 279
- I -IANA 376
ICComNet 376
Icon 251
add to toolbar/menu 251
show large 261
Icons 342
IDE 2
defining 227
Identity constraints 78
Import 192
a table using ODBC 216
all as attributes 193
all as elements 193
attribute 74
auto root element 74
child elements 219
create empty elements 193
data using shape strings 223
database 195
database data 74, 193
element 74
hierarchical data 219
parent elements 219
partial hierarchical datasets 202
primary & secondary keys 74
select statement 74
skip field 74
text column selection 192
text file 192
Word document 197
XML based on schema 202
Incremental validating parser 110
Index 280
help 280
Info 18window 18
Info window 114, 278
Info windows 168
Input-methods 371
Insert 110, 155, 156, 157, 158, 233
attribute 111
attribute / element 59
processing instruction 157
row (Document Editor) 190
table row 91
attribute 94
particle 94
Insert child elements 97
Insert row (table view) 233
Installation 282
Instance 167
Instance document 170
Intelligent editing 52, 88, 104, 110, 170, 267Attribute window 111
element window 110
Entity window 112
info window 114
update entry helper 168
Intermediate version 166
Internal Subset 160, 161, 163, 165, 166, 171
ATTLIST 158
DOCTYPE 157
ELEMENT 158
ENTITY 158
ExternalID 158
NOTATION 158
Internet 2, 119, 123, 282, 283, 284, 369
Internet Explorer 107, 367
Introduction 2, 3
Invalid 55
document - save 55
ISO/IEC 10646 370
ISO-8859-x 122
ISO-8895-x 372
isRef 38reference 38
- J -Japan 284
Jet Engine 193, 208, 210
JScript 104
© 2001 Altova Ges.m.b.H

- K -Kanji 371
Katakana 371
Key 193
exclude primary/foreign key 193
identity constraints 197
Keyboard 104
Keyboard shortcut 253
Key-code 282, 378
Keyref 78
and key - database hierarchy 78
identity constraints 197
- L -LAN 376
Large markup 190
show 190
Last project 154
open 154
Left 166
Legacy data 192
Legal information 377
Liability 380Limitation of 380
License 129, 282, 377, 378, 379, 380Agreement 379, 380
Metering 376
Licensed Version 282
License-metering 282
Limit 38
attribute contents 38
Line 241
go to 241
word wrap in text view 241
Line-breaks 264
Little-endian 272
Local project 140
Low-level 104
- M -Macro 258
add to menu/toolbar 258
edit button 261
Mail 369
Main window 18, 88, 167
Make global 100
Mandatory 55, 110
element 55, 110
Mandatory attribute 111
MAPI 125, 369
Markup 189
hide 189
show large 190
show mixed 190
show small 190
Marquee 26drag and drop 26
Maximum cell width 268
maxIncl 28
facet 28
maxOcc 23, 28
details 23, 28
MDAC 193
Memory 168, 174, 368
Menu 115
add macro to 258
add/delete command 251
Browser 243
Commands 115
Convert 192
customize 256
Default/XML Spy 256
delete commands from 256
DTD 170
Edit 131
File 116
Help 279
Project 138
Schema 170
Schema design 175
Table 232
View 235
Window 277
XML 155
XSL 185
Menu Command 115, 285
Microsoft Access 193, 208, 210
Microsoft Excel 133
Microsoft Office 197
Microsoft Word 192, 197
MIME 265
Index
© 2001 Altova Ges.m.b.H

minOcc 23, 28details 23, 28
Mixed markup 190show 190
Model | Sequence 100
Modify 155
Most recently used project 154
Mouse 104
Move 166Left 166
Right 166
row (Document Editor) 191
Move up 190row (Document Editor) 190
MSXML 273
MSXML.DLL 367
MSXML3 107, 367
Multiple schemas 177
Multi-user 264, 282, 376
- N -Namespace 367
schema 20
Namespace declaration 170
Namespace Prefix 168
Navigating 88
Navigation 41
shortcuts in schemas 41
Network 129, 369
communications 369, 376
traffic 369, 376
New 116
template 358
para tag 349
New Project 138
Next occurrence 137
Non-roman writing system 371
Non-XML 104
Non-XML files 265
NOTATION Declaration 158
Add Child 163
Appending 161
Convert To 166
Inserting 158
- O -ODBC 193, 208, 210
importing a table 216
setting up a connection 213
Office 2000 193
OLE DB 193
OLE DB Provider 78, 195
Online help 1, 2, 279
Online Shop 283
Open 118, 129
last project 154
template document 347
Open project 138
source control 140
Open URL 119
Opening options 264
file 264
Optimal widths 241, 268
Optional 28
element 28
field 349
Oracle 192, 193, 208, 210
create DB Schema 78
schema extensions 183
schema settings 184
Order 378
Order Form 283
OS 368
Outlook 125
Output data format 208
Output formatting 264
Overview 18, 340
- P -Paragraph 349
para tag 349
Paragraph style 197
Parameter entities 112
Parent element 166importing with ADO 219
Parsed entity 171
Parser 365
XSLT 273
Parser download 284
© 2001 Altova Ges.m.b.H

Password protection 119, 123URL 119, 123
Paste 132
Patterns 366
PI 157, 160, 162, 165Add Child 162
Appending 160
Convert To 165
Inserting 157
Plug-in 345
PNG 176save graphic 176
Popup 349hint 349
port 3762799 376
80 369
Position 241
Character 241
Line 241
Premium 168
Presentation 268
Pretty print 135in text view 135
Preview 107, 126, 192
Price list 378
Primary 74& secondary key - import 74
Primary key 208
Primary/foreign key 193
exlude 193
Print 128
Command 126
Preview 126
Setup 128
Print Setup 128
Processing instruction 188Add Child 162
Append 160
Convert To 165
Insert 157
Processing instructions 136
Program settings 264
Project 138, 139, 151, 152, 154, 170
Add active and related files 152
Add file 152
Add files to project 151
Add folder 152
add to source control 146
Add URL to project 152
adding files to 83
advantages 82
assign script to 250
assigning DTDs 109
assigning XSL transformations 109
Close Project 139
create 83
create addtnl. folder 83
delete file from 83
management 138
Menu 138
Most recently used 154
New 138
Open project 138
properties 82, 152, 167
Reload project 139
remove from source control 148
save 83
Save Project 139
scripting 250
scripts active 250
unassign scripts from 250
window 18
source control 140
Project window 16, 138, 277, 278
Promote 166
Properties 152and source control 152
Project 152
source control 150
Protocols 1
Provider 78
OLE DB and vendor specific 78
select 140
source control 139
- Q -Question mark 279
Quit 129
- R -RAM 368
Recently used files 129
Index
© 2001 Altova Ges.m.b.H
Recommended links 1
Record-set 193
Redo 104, 132
Reference 86
complex type 97
element 38
to global particle 100
Refresh 107, 243, 244
entry helper 59
source control 151
Registration 282, 369, 378
Registry 264
settings 264
Reject source edits 145
Relational model 208
Relations 227
creating between tables 227
Reload 121, 243, 264
entry helper data 168
Reload project 139
Remove 148from source control 148
Rendering 374
Repeated elements 91, 232, 233, 234, 267
Replace 137All 137
Repositories 119, 123, 139
Requirements 368
Reseller 378
Reset 256
menu commands 256
shortcut 253
toolbar & menu commands 252
Restriction 32
element 32
export 72
Resume 166
Revalidate 55
RichEdit 131
RichEdit 3.0 270
RichEdit component 375
Right mouse button 104
Right-to-left 374
Root 202
table 202
Root element 116, 157
on importing data 74
schema 20
selecting 49
Row 233
Append 233
append (Document Editor) 190
delete (Document Editor) 191
duplicate (Document Editor) 190
Insert 233
insert (Document Editor) 190
move down (Document Editor) 191
move up 190
Run native interface 151
- S -Sample 173
generate sample XML file 173
Save 122
and well-formedness 122
anyway 55
Diagram 176
Documentation 177
invalid document 55
project 83
Save All 124
Save As 123
Save URL 123
Save project 139
Schema 116, 167, 168, 170, 171, 174, 366
adding elements 23
basis for XML import 202
constraints 94
convert 173
create DB based on schema 206
creating from a database 78
creating from a database - Overview 77
creating new 20
defaults 175
definition 19
design view 94
Design view 236
Design View - entry helper 110
dialect 168
dialects 173, 366
documentation 44
Documentation font 269
DTD/Schema menu 170
Editing 12
extensions Oracle 183
© 2001 Altova Ges.m.b.H

generate documentation 177
generate XML file based on schema 173
Generation 172
go to 171
namespace 20
root element 20
Schema / DTD 49
settings 20, 175, 264
settings Oracle 184
shortcuts 41
view 20
Display all globals 183
Display diagram 183
menu 175
save diagram 176
save documentation 177
view config 180
zoom 182
Schema fonts 269
Schema overview 12, 20, 183
(Globals) 94
configuring 27
display all globals 23
Script language 275
Scripting 275Assign script to project 250
project 250
Project scripts active 250
Show macros 249
Swtich to scripting environment 249
Unassign scripts from Project 250
Search 136, 137
for attributes ,elements ,text 136
help 281
Secondary 74& primary key - import 74
Secure Online Shop 283
Select All 136
Select file 285
SELECT statement 193
import 74
Selection 125
Selector 135
Semantic 109
Send by Mail 125
Separate window 244
Browser 244
Sequence 232
compositor 23
unbounded 23
Set Namespace prefix 168
Settings 264
Oracle schema 184
schema 20, 175
scripting 275
SGML 1
Shape string 202automatically generate 202
examples 223
Shift-JIS 122
Shortcut 253assigning/deleting 253
show in tooltip 261
in schema documents 41
Show 277, 278Database / Table view 61
Show differences 149
Show globals 12
displays all globals 12
icon 183
Show history 148
Show macros 249
scripting 249
Side-by-side 244, 268
Simple type 28, 97
SimpleType 366
Single-user 282, 376
Size 270
Sizing content model 182
Skip 74
database field 74
Small markup 190
show 190
SMTP 369
Software Product 376, 379, 380
Sort 233
Ascending 233
Descending 234
elements 91
table columns 61
Source 125send by mail 125
Source control 139add to source control 146
changing properties 152
Check In 144
Index
© 2001 Altova Ges.m.b.H

Check Out 144
enable 143
get latest version 143
open project 140
properties 150
refresh status 151
remove from 148
run native interface 151
show differences 149
show history 148
Undo Check out 145
Splash screen 268
Spreadsheet 133, 232
SQL 78
create DB schema 78
select statements import 74
SQL Server 192, 193, 208, 210
Start 1, 2
add (context menu) 261
Stop 107, 243
String 78connection string 78
Structured Display 88
Structured Text 133, 267
Structuring 109
Style 269, 270
Stylesheet 107, 188
Sub-Element 91, 166, 232
Support 284
Support Center 283
Suspend 166
Switch 249
to scripting environment 249
Symbols 342
Synchronize 239Tree and Grid view 239
Syntax check 55well-formedness 55
Syntax-coloring 104, 131, 265, 268
- T -Tab 32
Com(plex) element 32
details 28
Elm (global element) 20
Tab characters 264
Table 265build automatically 265
colors 271
creating relationships 227
display as 232
import using ODBC 216
insert row 91
Menu 232
root table 202
Sort 233, 234
Table view 91
View 233, 234
Table of contents 279
Table View 91, 233, 267
Tags 342
TargetNamespace 170
TCP 376
Technical Information 364
Technical Support 283, 284
Template 358
create 358
directory 116
open 347
Template folder 17
Terminate 129, 243
Text 156, 159, 185, 192
Add Child 162
Appending 159
Convert To 164
editing text files 104
export 210
find text string 136
font 270
Inserting 156
pretty print 135
Text view 52, 104, 238
auto-complete enable/disable 267
RichEdit component 375
schema fonts 269
Tile 277
horizontally 277
vertically 277
Toggle 277, 278
Toolbar 252
activate/deactivate 252
add command to 251
add macro to 258
button 285
© 2001 Altova Ges.m.b.H
create new 252
reset toolbar & menu commands 252
show large icons 261
Tools 249
menu 249
Tooltip 261
show 261
show shortcuts in 261
Topic 279help 279
view on TOC 279
Training 284
courses 284
Transfer 133
data from Grid view 133
Transformation 68
XSL - HTML 68
Tree view 239
Enhanced Grid 239
Turn off automatic validation 265
Tutorial 1example files 17
goals 17
Type 32
AddressType 32
complex 32
simple 28
- U -UCS-2 122, 272, 370
UCS-4 122, 370
UDP 376
Unassign 250
scripts from project 250
Unbounded 23
element 23
Undo 104, 131, 132
history 131
Undo Check out 145
Unicode 118, 122, 192, 370
capabilities 372
consortium 370
standard 370
support 371
Unicode characters 371
Universal font 371
Unlimited levels of Undo 131
Unlock 282
Unselected 240
Update 59entry helper 59
schema facet 61
Updates 2
URL 119, 123, 369add to project 152
US-ASCII 122
Use 376, 380
license 376, 380
Using XML 10
UTF-16 272, 372
UTF-7 122
UTF-8 122, 370, 372
- V -Valid 55
invalid document - save 55
check validity 55
DTD 168
marks incorrect data 61
revalidate 55
Schema 168
XML 168
XML document 55, 167
Validating parser 110, 365
Validation 170
auto- manual 349
projects 109
Validator 365
VBScript 104
Version Number 284
View 240, 241
View 240
Browser view 68, 238
Collapse 240
content model (shortcut) 41
Database / Table view 61
element definition 100
Enhance Grid view 235
Enhanced Grid 52
Expand 240
Go to File 242
Go to line/char 241
Grid 88
Menu 235
Index
© 2001 Altova Ges.m.b.H

Optimal widths 241
Schema Design view 236
Schema view 20
Synchronize 239
Text view 52, 238
Tree 239
XSL 14
schema design 180
View element definition 100
- W -W3C 1, 168, 365, 366
Warranty 380
Watch for changes 264
Web 119, 123
Web Server 283, 284
Web Shop 283
Web solution 104
Web-server 2
Welcome 2
Well-formedness 55, 104, 166
and saving 122
Where 136
Window 278
Cascade 277
Entry-Helper 278
Info 278
Menu 277
Open 278
Project 277, 278
Tile horizontally 277
Tile vertically 277
select file 285
Windows 87
overview 18
Windows 2000 193, 368, 371, 375
Windows 95 368, 375
Windows 95/98 372
Windows 98 368, 375
Windows NT 368, 371, 375
WML 185
Word 192, 197
Word document 197
Word wrap 241
enable/disable 241
Working directory 140
source control 140
Wrap 241word wrap enable/disable 241
Writing-systems 374
Wwriting-system 371
- X -XDR 167, 168, 170, 365, 366
XHTML 107, 116, 185
XML 1, 2, 197, 370
Add Child 162
Appending 160
Convert To 165
copying to 3rd party prod. 61
document and icons 48
generate sample XML file 173
Inserting 157
Introduction 3
Menu 155
new document 49
Parser 365
reformat doc in text view 135
Schema 170
sorting data 61
standards 8
using 10
validate document 55
why 6
XML data 104
XML declaration 157
XML File 118
send by mail 125
XML format 192
XML Import 202
based on schema 202
XML instance 167
XML instance document 168
XML overview 11
XML Schema 114, 167, 168, 170, 173, 365, 366
XML Spy 2, 86, 284
training 284
XML-Conformance 265
XML-Data 167, 168, 366
XMLINST.EXE 367
XMLSpyLib 307, 321, 323, 325, 326, 327, 328,329, 330, 331, 332, 333, 334, 335
XMLSpyApplication 321
XMLSpyDatabaseConnection 331
© 2001 Altova Ges.m.b.H

XMLSpyDocument 323
XMLSpyDocuments 325
XMLSpyElementList 335
XMLSpyElementListItem 334
XMLSpyExportSettings 332
XMLSpyGridView 326
XMLSpyPrj 327
XMLSpyPrjItem 328
XMLSpyPrjItems 329
XMLSpyTextImportExportSettings 333
XMLSpyXMLData 330
XML-Text 133, 267
XPath 135copy 135
xs 38xs:boolean 38
xs:date 28
xs:integer 28
xs:positiveInteger 32
xs:string 23, 28
XSD 168, 170, 172, 365, 366
xsd:annotation 114
xsi 49xsi:type 49
XSL 107, 188assigning to an XML doc. 68
go to XSL 68
Menu 185
transformation 68
XSL stylesheet 185, 367
XSL Transformation 109, 367
XSL views 14
XSLT 107, 135, 185, 188, 241, 367processor 273
XSLT processor 367
XSLT Transformation System 284
download 284
XSLT Transformations 208
- Z -Zoom 182
schema design 182
Index
© 2001 Altova Ges.m.b.H