user guide - bethel school districtmedia.bethelsd.org/.../act/downloads/macconnectuser… · ·...
TRANSCRIPT

Copyright 2011
User Guide

Qwizdom Mac Connect User GuideI
Qwizdom Mac Connect 2011
Table of Contents
Part I Introduction 1
Part II Getting Started 2................................................................................................................................... 31 Notice ................................................................................................................................... 42 Installing Qwizdom Connect ................................................................................................................................... 53 Hardware Setup ................................................................................................................................... 74 Launching Qwizdom Mac Connect
Part III Remote Setup 8................................................................................................................................... 111 Notice ................................................................................................................................... 122 Q2RF ................................................................................................................................... 133 Q4RF ................................................................................................................................... 154 Q5RF ................................................................................................................................... 185 Q6RF
Part IV Q7RF Tablet 20................................................................................................................................... 231 Using the Q7RF Tablet ................................................................................................................................... 242 Using the Stylus ................................................................................................................................... 253 Drawing and Editing Tools ................................................................................................................................... 274 WizTeach ................................................................................................................................... 335 Hot-Key Editor
Part V Creating & Organizing Content 36................................................................................................................................... 371 Importing and Exporting ................................................................................................................................... 382 Printing ................................................................................................................................... 393 Standards
Part VI Live Editor 40................................................................................................................................... 461 Creating Slides ................................................................................................................................... 642 Equation Tool ................................................................................................................................... 653 Styles and Templates ................................................................................................................................... 714 Multimedia
Part VII Participants 73................................................................................................................................... 751 Groups
Part VIII Presentation 76

IIContents
II
Qwizdom Mac Connect 2011
................................................................................................................................... 771 Presentation Setup .......................................................................................................................................................... 78Saving Results .......................................................................................................................................................... 78Remote Login
................................................................................................................................... 802 Presentation Toolbar .......................................................................................................................................................... 80Presentation Features
................................................................................................................................... 823 Using Remotes in Presentation
................................................................................................................................... 874 Response Graph
................................................................................................................................... 895 Posing Spontaneous Questions
................................................................................................................................... 926 Games
Part IX Results/Reports 95
Part X Answer Key/Paper-Based 97
Part XI Question Toolbar 100
Part XII Survey Bar 102
Part XIII Qwizdom Online 105................................................................................................................................... 1061 Online Search ................................................................................................................................... 1072 Share Content ................................................................................................................................... 1083 My Page
Part XIV Online Reporting 109................................................................................................................................... 1101 Teacher Tools
.......................................................................................................................................................... 110Manage Online Classes
.......................................................................................................................................................... 112Manage Online Results ................................................................................................................................... 1132 Admin Tools
.......................................................................................................................................................... 113Site/School Management
.......................................................................................................................................................... 114Teacher Management
.......................................................................................................................................................... 115Student Management
.......................................................................................................................................................... 116Class Management ................................................................................................................................... 1193 Online Results
.......................................................................................................................................................... 120District Admin
.......................................................................................................................................................... 121Teachers
Part XV Software Updates 123

Qwizdom Mac Connect User Guide1
Qwizdom Mac Connect 2011
1 Introduction
This is a user guide for Qwizdom Mac Connect. This guide provides information andtips on using Qwizdom Mac Connect.
If you need assistance, please contact Technical Support.
Website www.qwizdom.com
Tech Support (800) 347-3050
Email [email protected]
Support Hours 6 a.m. to 4:30 p.m. PST
Address Qwizdom, Inc.12617 Meridian EastPuyallup, WA 98373

Getting Started 2
Qwizdom Mac Connect 2011
2 Getting Started
Contents of Remote SetQ2RF, Q4RF, Q5RF, or Q6RF remotes*1 HID or RF host1 Q5RF instructor remote or 1 Q7RF instructor tablet*1 USB cable1 Charger (Q5RF Instructor Remote)*1 Multi-charger (Q5RF Remotes)*1 ScrewdriverAA Batteries (Q4RF and Q6RF) or AAA Batteries (Q2RF)*1 Remote carrying case1 Quick Reference guide1 Software; Qwizdom Mac Connect
*Remote types and accessories based on actual order. This device complies with part 15 of the FCC Rules.Operation is subject to the following two conditions: (1) This device may not cause harmful interference, and (2)this device must accept any interference received, including interference that may cause undesired operation.

Qwizdom Mac Connect User Guide3
Qwizdom Mac Connect 2011
2.1 Notice
Notices of Compliance for Qwizdom's RF Response Devices
Note: This equipment has been tested and found to comply with the limits for a Class Bdigital device, pursuant to part 15 of the FCC Rules. These limits are designed toprovide reasonable protection against harmful interference in a residential installation.This equipment generates, uses, and can radiate radio frequency energy and, if notinstalled and used in accordance with the instructions, may cause harmful interferenceto radio communications. However, there is no guarantee that interference will not occurin a particular installation. If this equipment does cause harmful interference to radio ortelevision reception, which can be determined by turning the equipment off and on, theuser is encouraged to try to correct the interference by one or more of the followingmeasures:
Reorient or relocate the receiving antenna.Increase the separation between the equipment and receiver.Connect the equipment into an outlet on a circuit different from that to which thereceiver is connected.Consult the dealer or an experienced radio/TV technician for help.
Caution: Changes or modifications to Qwizdom's RF hardware that are not expresslyapproved by Qwizdom could void the user's authority to operate the equipment.
This product is designed for the 2.4 Ghz WLAN network throughout the EC region and Switzerland withrestrictions in France.

Getting Started 4
Qwizdom Mac Connect 2011
2.2 Installing Qwizdom Connect
System RequirementsPPC G4 Processor and IntelOS X 10.4 and later512 MB RAM 134 MB Free Disk SpaceCD-ROM driveOpen USB Port
Installing Qwizdom Mac Connect from CD1. Insert the Qwizdom Mac Connect disc into the CD-ROM drive, follow the Install
Connect wizard.2. Click Continue in the Introduction. 3. Click Continue in the Read Me.4. Read the Software License Agreement and click Continue.5. Click on Agree to agree to the terms of the Software License Agreement.6. In Select a Destination, select where Mac Connect will be installed and click
Continue.7. Click Install to begin installation. This will take a few moments. 8. Once the installation is complete, click Close and restart your computer (if
necessary).

Qwizdom Mac Connect User Guide5
Qwizdom Mac Connect 2011
2.3 Hardware Setup1. Q2 Remotes-place two AAA batteries and insert the screw (optional) into the
back of the remote.2. Q4 Remotes-place two AA batteries and insert the screw (optional) into the
back of the remote.3. Q5 Remotes-plug the Q5RF participant and instructor remotes into the multi-
charger and/or single charger for 24 hours before first use.
5. Q6 Remotes-place two AA batteries and insert the screw (optional) into theback of the remote.
6. Q7 Presenter Tablet-the tablet needs to be charged a full 24 hours for the firsttime or after a long period of inactivity. The pen may take slightly longer to fullycharge. Generally, the tablet will only need to be charged about 6 hours to befully charged after the initial charge. To charge the pen and tablet, place the peninto the pen tray located at the top of the Q7RF Tablet. Using the USB cable,plug the tablet into the computer. The battery icon will be full when the tablet isfully charged.
If your computer goes into power saving mode, the charging of the Q7RFTablet may be interrupted.
Installing the HID (Black) Host
*This device complies with part 15 of the FCC Rules Operation is subject to the following twoconditions:(1) This device may not cause harmful interference, and (2) this device must accept anyinterference received, including interference that may cause undesired operation.
1. The HID Host is located in the back compartment of the Q7RF Tablet or in thefront pocket of remote bag.
2. Plug the HID Host into an open USB port on the computer.3. The computer will automatically detect and configure the new hardware device.

Getting Started 6
Qwizdom Mac Connect 2011
Installing the (Red) RF Host1. Plug the (red) RF host into an open USB port on the computer using the
supplied USB cable.2. The computer will automatically detect and configure the new hardware device.

Qwizdom Mac Connect User Guide7
Qwizdom Mac Connect 2011
2.4 Launching Qwizdom Mac Connect1. Once the software has been successfully installed go to Finder/Applications
and double-click the Qwizdom Connect folder. 2. Plug in host and force quit any IWB applications prior to opening Content
Manager.
3. Double-click on the Content Manager button to launch Qwizdom Connect.
For Quick access to Qwizdom Programs, you may choose to drag-and-drop program shortcuts from the Qwizdom Connect Folder into your Dock.

Remote Setup 8
Qwizdom Mac Connect 2011
3 Remote Setup
Follow the steps below to set up remotes. Be sure the HID or RF host* is properlyinstalled before proceeding. v.938 host or higher is required for Qwizdom Connect. If the host isnot v.938 host or higher, please contact Technical Support.
1. Click the Remotes menu.2. Select Configuration Preferences. The Remote Preferences window opens.
Estimated Maximum Number of Remotes-the number of remotes thatwill be in use for the presentation. Class/group sizes vary, so it's best toenter the highest estimated amount of remotes rather than accommodatingeach class/group.Enable Backlight-activates the backlight on the Q5RF participant andQ5RF Instructor remotes.
RF host (Red)HID RF host (Black)-most commonly used host.
Set with fixed remote ID-select this mode if you are in a K-12 orCorporate setting. Fixed Set is where the remotes are assigned with aninternal number (assigning fixed numbers) where logging in by ID is notmandatory.Roaming Set or Participant Owned-check this option if the participantsown the remotes. This mode is best suited for Higher Ed/Universitysettings. Participants are required to enter a session ID and participant IDto join a presentation.
3. Enter the maximum number of remotes that will be used.4. (Optional) Check the Enable backlight on Q5 Remotes box.5. Select the HID (Black) host type (most commonly used host).6. K-12 or Corporate Settings (Option)-select Set with Fixed Remote ID.
Qwizdom Mac Connect User Guide9
Qwizdom Mac Connect 2011
Read the instructions and click the Start button.Turn the remotes on. When the remotes communicates with the host, the serialnumber and the remote's assigned ID number will appear in the window. If theremotes are prompting for the session ID, enter the session ID that isdisplayed at the bottom of the Assign Fixed Remote ID window. (Note: Ifremotes have been labeled with numbers, turn on remotes in sequence. Be sure towait until the remote has connected before turning on the next remote.)After all the remotes have been assigned, click Done to exit the AssignedFixed Remote IDs window.
You only have to assign fixed numbers once, unless you changecomputers or hosts.
7. Higher Ed/University Settings (Option)-select Roaming Set or ParticipantOwned.
8. Click OK to save and close window.
What is a Session ID?When using Remotes for the first time, the remotes may ask for a Session ID. Each hosthas a unique six-digit Session ID. Session IDs "assign" the remote to the host, allowingthe remote to only communicate with that specific host.
The session IDs can be found:
For both HID (Black) and RF (Red) host, the session ID can be found in the Assigned Fixed Remote IDs window and the Login tab in the PresentationSetup window.
For the HID (Black) Host, click Qwizdom Tools, found in the top right-handbar. The Session ID will be displayed at the top of the menu.For the RF host, the session ID can be found on the bottom of the device on awhite sticker.
You can also create your own session ID in the Presentation Setup window by enteringa session ID you want to use in the User Session column. Creating your own sessionID does not change the host's default session ID. The session ID must be uniquebecause if there are other hosts in the same building, the remotes will become confusedas to with which host to communicate.
Changing Session IDsIf the RF remote or tablet displays No Net, Not Found, Not Active, or Inactive, it couldbe that the session ID is not correct.
For Q2RF remotes: wait for the remote to time out and turn off. When you turn itback on, press the Help key. When you see --S on the display, it is prompting youfor the session ID. Enter it and press the Send key to confirm.For Q4RF remotes: press the Menu key, use the right arrow to scroll to Sess.

Remote Setup 10
Qwizdom Mac Connect 2011
ID., and press the Send (double arrows) key to select the option. You will see thecurrent session ID and will be asked if you want to change the session ID. Press T(Yes) to change. Enter the session ID and press the Send (double arrows) key tosend.For Q5RF remotes: wait for the remote to display No Net, Not Active, or NotFound. Press the Menu key and select Enter Session ID using the Send(double arrows) key or the circle key on the thumb pad. Enter the session ID andpress the Send (double arrows) key.For Q6RF remotes: press the Menu key, scroll to Enter Session ID, press the
Menu Select key, re-enter the Session ID, and press the Search Again key. For Q7RF Tablet: press the Menu key and use the Scroll button to select EnterSession ID. Press the Enter key to select it and enter the session ID. Press the Enter key toconfirm.

Qwizdom Mac Connect User Guide11
Qwizdom Mac Connect 2011
3.1 Notice
FCC 15.19:
(3) All other devices shall bear the following statement in a conspicuouslocation on the device.
This device complies with Part 15 of the FCC Rules. Operation is subjectto the following two conditions: (1) this device may not cause harmfulinterference, and (2) this device must accept any interference received,including interference that may cause undesired operation.
FCC 15.21:
The user's manual or instruction manual for an intentional or unintentionalradiator shall caution the user that changes or modifications not expresslyapproved by the party responsible for compliance could void the user'sauthority to operate the equipment. In cases where the manual is providedonly in a form other than paper, such as on a computer disk or over theInternet, the information required by this section may be included in themanual in that alternative form, provided the user can reasonably beexpected to have the capability to access information in that form.
FCC 15.105:
(b) For a Class B digital device or peripheral, the instructions furnishedthe user shall include the following or similar statement, placed in aprominent location in the text of the manual:
NOTE: This equipment has been tested and found to comply with thelimits for a Class B digital device, pursuant to Part 15 of the FCC Rules.These limits are designed to provide reasonable protection againstharmful interference in a residential installation. This equipmentgenerates, uses and can radiate radio frequency energy and, if notinstalled and used in accordance with the instructions, may cause harmfulinterference to radio communications. However, there is not guaranteethat interference will not occur in a particular installation. If this equipmentdoes cause harmful interference to radio or television reception, whichcan be determined by turning the equipment off and on, the user isencouraged to try to correct the interference by one or more of thefollowing measures:
-- Reorient or relocate the receiving antenna.-- Increase the separation between the equipment and receiver.-- Connect the equipment into an outlet on a circuit different from that to
which the receiver is connected.-- Consult the dealer or an experienced radio/TV technician for help.

Remote Setup 12
Qwizdom Mac Connect 2011
3.2 Q2RF
Participant Remote1. E-ink display-displays the remote's ID number
when it is turned off; displays remote's IDnumber and battery icon when it is turned on.
2. Navigation arrows-scroll through
question numbers. Left arrow is alsoused as a backspace.
3. True/Yes, False/No keys-use to answer True/False and Yes/No questions.
4. Multiple Choice and Numeric keypad-answer multiple choice and numericquestions (with single digit answers).
5. Join key-press to turn remote on/off orconfirm session and/or user IDs.
6. Help key-press to request assistance orpress to change session ID when the remotecannot find the host.
This device complies with part 15 of the FCC Rules. Operation is subject to the following two conditions:(1) This device may not cause harmful interference, and (2) this device must accept any interferencereceived, including interference that may cause undesired operation.
Q2 Common Screen Displays
_ _ S : Enter Session ID. See Remote Setup for details. _ _U : The remote is asking for a Participant ID. This applies to remotes
configured for Roaming Set or Participant Owned. See Remote Setup fordetails.
_ _ A : Displays when the remote is requesting an Answer Key activity number.Prompt only appears when multiple test versions are being presented. Activitynumbers should be noted on the test sheets before presenting; numberscannot be viewed while in presentation mode.
- - - : Remote cannot find host and will power down. - - : Remote is searching for the host.
: Battery icon indicates battery charge when remote is on.

Qwizdom Mac Connect User Guide13
Qwizdom Mac Connect 2011
3.3 Q4RF
Participant Remote1. Send key-press to submit answer or
select menu options.2. Menu [power] key-
Holding the Menu key for two seconds willturn the remote on/off. Press to view menu options. Use the scroll
keys to scroll through options (Search, Sess. ID, User ID, and Exit) and
press the Send key to select. Whenyou're in presentation, the menu items are Help, Login, User Id, and Exit. To request help during presentation, pressthe Menu key, scroll to select Help, and
press the Send key to select it.3. [C] Clear key-press to delete response or
change answers if instructor has enabled thefeature.
4. Scroll keys-scroll through menuoptions, answer choices, or questionnumbers.
5. True/Yes and False/No keys-use to answerTrue/False and Yes/No questions.
This device complies with part 15 of the FCC Rules.Operation is subject to the following two conditions:(1) This device may not cause harmful interference, and (2) this device must accept any interferencereceived, including interference that may cause undesired operation.

Remote Setup 14
Qwizdom Mac Connect 2011
Q4 Common Screen DisplaysQwizdom: Remote has found the host and is ready for a question slide.Activity: Displays when the remote is requesting an Answer Key activity number.Prompt only appears when multiple test versions are being presented. Activitynumbers should be noted on the test sheets before presenting; numbers cannotbe viewed while in presentation mode.Sess. ID: Your remote may ask you to enter the Session ID. See Remote Setupfor details.User ID: The remote is asking for a Participant ID. This applies to remotesconfigured for Roaming Set or Participant Owned. See Remote Setup fordetails. Loading: An Answer Key is loading; may take a few moments.Push Key: Remote is idle. Press any key, (except MENU) to reactivate.Inactive: Remote senses the host is not in use or does not recognize the session.If remote remains inactive after starting a presentation, re-enter Session ID bypressing MENU, scrolling right to "Sess.ID," and pressing SEND. Whenprompted, re-enter the Session ID and press SEND.No Net: Remote cannot find the host. Re-enter the Session ID. If "No Net"continues, enter User ID and Session ID.Denied: User denied due to incorrect User ID or a duplicate User ID. Re-enterUser ID. Press MENU, scroll to "User ID," press SEND, enter the User ID, andpress SEND again.

Qwizdom Mac Connect User Guide15
Qwizdom Mac Connect 2011
3.4 Q5RF
Participant Remote
This device complies with part 15 of the FCC Rules. Operation is subject to the following two conditions:(1) This device may not cause harmful interference, and (2) this device must accept any interferencereceived, including interference that may cause undesired operation.
1. Send key-press to submit answer.2. [C] Clear key-press to delete response or change an answer in a presentation
(if option to change responses is allowed).3. Thumb pad-press to navigate between letters when keying in answer, press the
circle key in the middle to select a letter or to select menu options or to scrollthrough question numbers during answer keys (paper-based tests).
4. Question [?] key-signals help to instructor during presentation.5. Menu key-displays menu options Search Again, Enter Session ID, and Exit.
Use the thumb pad to scroll through the menu options and the Send key orcircle key to select an option.
6. True/Yes and False/No keys-use to answer True/False and Yes/No questions.7. Power switch-turns remote on/off. The remotes do not automatically turn off. Turn
off remotes if they are not in use.8. Light switch-turns Backlight on/off.

Remote Setup 16
Qwizdom Mac Connect 2011
Q5RF Instructor Remote
This device complies with part 15 of the FCC Rules. Operation is subject to the following two conditions:(1) This device may not cause harmful interference, and (2) this device must accept any interferencereceived, including interference that may cause undesired operation.
1. Send key-press to submit command.2. C [Clear] key-press to clear names from the Help Request list.3. Thumb pad-press right/left to navigate between slide sets, up/down for menu
options, and spontaneous question choices. Press the circle key (in the middle)to select an option, advance slides, exit the presentation, and show/hide correctresponses on the response graph.
4. ? [Help List] key-displays list of participants who requested help on the LCDscreen.
5. Menu key-view menu options such as entering session ID and search again forhost.
6. True/Right and False/Wrong keys-use to select answer for True/False andYes/No questions.
7. New Q [-] key-press to pose a spontaneous question.8. Pick (.) key-press to display/hide a random participant's name on the computer
screen.9. Private Graph (0) key-displays the results of the class responses as a
graph on the LCD screen of the instructor's remote. (See Response Graph fordetails.)
10. Public Graph (/) key-displays the results of the class responses as agraph on the computer (projector, television screen, etc.) screen for everyone toview. Use the right/left controls on the thumb pad to scroll through the differentgraphs. Use the circle key (in middle of thumb pad) to show/hide correctresponses. (See Response Graph for details.)
11. Play [8] key-will play animation/sound in Connect only.

Qwizdom Mac Connect User Guide17
Qwizdom Mac Connect 2011
12. Fn [Function] key-allows you to re-pose a question. The previous answers areoverwritten.
13. Power switch-turns remote on/off.14. Light switch-turns Backlight on/off. The "Enable Backlight" box in the
Configuration Settings window needs to be checked to turn on the Backlightfeature (see Remote Setup).

Remote Setup 18
Qwizdom Mac Connect 2011
3.5 Q6RF
Participant Remote1. Menu/Power-press and hold on to power
remote on/off. Press to view menu options: Help, Sea rch, Sess. ID , User ID , Adjust Contra st,and Exit.
2. Enter-press to submit commands from LCDmenu choices.
3. Directional Arrows-press to navigatebetween menu options, answer choices, andquestions.
4. Multi-function-serves as multi-function forSend/Change.
5. Symbols-select to enter fraction, punctuation,etc.
6. Delete-press to delete the last character.7. Q#-displays the current question number.8. Help Request-indicates you requested help.9. Battery Power-displays battery charge.10. ID#-displays the remote ID number.11. Right/Wrong Feedback-displays a check
mark for correct answer, X for incorrectanswer, and both check mark/X for responsereceived.
12. Shift-changes case options: ABC/Abc/a bc/123/Superscript/Subscript.
This device com plies with pa rt 15 of the FC C Rules. Opera tion is subject to the following two conditions: (1) This device m a y notca use ha rm ful interference, a nd (2) this device m ust a ccept a ny interference received, including interference tha t m a y ca useundesired opera tion.

Qwizdom Mac Connect User Guide19
Qwizdom Mac Connect 2011
Q6 Common Screen Displays
Searching for Session ID: Remote is searching for the host.Ready: Remote has found the host and is ready for a question slide.Power Save Mode: Remote is idle. Click RESUME, to reactivate.?: Indicates that you have requested help.Session ID Not Found: Remote cannot find the host. Re-enter the "Session ID ."Press MENU, scroll to "Enter Session ID ," click , enter the Session ID , and pressSEARCH AGAIN.Session ID Login Denied: User denied due to incorrect User ID, or a duplicateID. Re-enter User ID. Press MENU, scroll to "Enter User ID," click , re-enter theUser ID, and press JO IN.Enter User ID: The remote is asking for a Participant ID. This applies to remotes configured for Roa ming Set or Pa rticipa nt Ow ned. Loading: Loading an Answer Key; may take a few moments.Enter Activity ID: Requesting an Answer Key activity number. Prompt onlyappears when multiple test versions are being presented. Activity numbers shouldbe noted on the test sheets before presenting; numbers cannot be viewed while inpresentation mode.
To send question text to Q6 RF remotes, click on the Adva nced Options buttona nd check the Send Question Text to Remotes box. This option is set per question slide ifdesired. See Crea ting Slides for deta ils.

Q7RF Tablet 20
Qwizdom Mac Connect 2011
4 Q7RF Tablet
Instructor Tablet
This device complies with part 15 of the FCC Rules. Operation is subject to the following two conditions: (1) Thisdevice may not cause harmful interference, and (2) this device must accept any interference received,including interference that may cause undesired operation.
The Q7RF Presenter Tablet comes with two inserts. Located underneath theoverlay.
Standard Insert (Includes icons on the left and right side)- great for any anytimeyou wish to use the tablet as a simple drawing slate or mouse.Presentation Insert (Shown Above)- when using the Q7RF Presenter withQwizdom response devices (remotes).
The active area of the Q7RF Instructor Tablet acts as an absolute positionmouse or standard mouse, controlling standard keyboard shortcuts such as:
copy, paste, and deletenavigating presentations
Open Application-opens filebrowser window
Time-adds additional time to timer

Qwizdom Mac Connect User Guide21
Qwizdom Mac Connect 2011
New Item-creates new slide, file,or document depending onapplication (acts like Command+N)
Private Graph-displays private graph ofresponses on tablet (See Response Graph fordetails.)
Open-browse and open files(acts like Command + O)
Public Graph-displays response graph toparticipants (See Response Graph for details.)
Copy-copies selected object(s)(acts like Command+C)
LCD Backlight-turns backlight on or off
Paste-pastes copied object(s)(acts like Command+V)
Pen-use to draw and annotate
Undo-undo last action(s) (actslike Command+Z)
Highlighter-use to highlight
Redo-redo previous action(s)(acts like Command + Y)
Line tool-use to draw lines
Delete-deletes selected object(s)
Text tool-use to create text
Media Control-play and pausepresentations and multimediafiles
Insert Multimedia-inserts images, audio, andvideo files
Pick-picks random participants Window Shade-covers (hides) what is displayedon the computer screen (portion or all)
Show Presentation-displaysgame animation when in a gamemode presentation
Laser Pointer-displays laser dot when using thestylus
Help Requests-displays list ofparticipants who requested helpon LCD screen
Absolute Position Mouse-displays arrowheadwhen using the stylus and works as an absoluteposition mouse.*
Insert Slide-creates slides forpresentation (See PosingSpontaneous Questions fordetails.)
Mouse-operates stylus with mouse functions asit changes to standard mouse mode fromabsolute position.*
Pose-use to pose or repose aquestion
Keyboard-activates keyboard region
Stop-stops the question beingposed
Function- Access user-defined list of functions(see Hot-Key Editor)

Q7RF Tablet 22
Qwizdom Mac Connect 2011
*Absolute position mouse is where the cursor will appear on the screen exactly wherethe stylus is positioned on the tablet.
Quick Pose Controls (See Posing Spontaneous Questions for details.) For Numeric question types
For Multiple Choice question types
For Rating question types
For Yes/No or True/False question types
Stylus (for Q7RF Instructor Tablet)
This device complies with part 15 of the FCC Rules. Operation is subject to the following two conditions: (1) Thisdevice may not cause harmful interference, and (2) this device must accept any interference received,including interference that may cause undesired operation.The stylus is used as a mouse that can left-click, right-click, and double-click to executecommands and actions on the Q7RF Presenter Tablet.
HID host (for Instructor Tablet)
*This device complies with part 15 of the FCC Rules. Operation is subject to the following two conditions: (1)This device may not cause harmful interference, and (2) this device must accept any interference received,including interference that may cause undesired operation.The USB host is used to collect data from the remotes and record into the Qwizdomsoftware. This HID host does not require driver installation. The HID Host is located inthe back compartment of the Q7RF Tablet or in the front pocket of remote bag.

Qwizdom Mac Connect User Guide23
Qwizdom Mac Connect 2011
4.1 Using the Q7RF TabletThe following options are available doing an active presentation. See PresentationSetup for details.
New Item-creates new slide, file, or document depending on application
Open-browse and open files
File Browser-opens file browser window
Copy-copies selected object(s)
Paste-pastes copied object(s)
Delete-deletes selected object(s)
Pose-pose or repose a question
Insert Slide-creates slides for presentation
Stop-stops the question being posed
Window Shade-hides portion of displayed screen
Quick Pose Spontaneous Question See Spontaneous Questions for details.
1. Click New Item to insert a blank slide.
2. Click the pen icon on the toolbar or tablet and annotate question. 3. Using the stylus, touch on any answer on the bottom of the tablet.
If you are posing a numeric question, touch the answer and then press the Send key to pose it.If you are posing a survey (no answer) question, touch the Any icon for thespecific question type.
4. Click the Public Graph icon to display the response graph.
Window ShadeWindow Shade hides (covers) what is being displayed on the computer screen (portionor all).
1. Press the Window Shade icon on the tablet. A window shade will cover thecomputer screen.
2. Grab and drag the handles of the image to resize to desired size.

Q7RF Tablet 24
Qwizdom Mac Connect 2011
4.2 Using the StylusThe stylus is used (with the tablet) to write, draw, and control mouse movements.
Stylus tip-same as a mouse cursor.Left-click button-same as double-clicking with left button on the mouse.Right-click button-same as the right-click button on the mouse.
Stylus ActionsPress, Tap, Push Down with Stylus tip-activates tablet icons, similar to left-clicking with mouse.Double tap with Stylus tip-is similar to double-clicking with mouse.Left-click-activates tablet icons, similar to double-clicking with mouse.Right-click-similar to right-clicking with the mouse.
Sleep ModeThe stylus goes into sleep mode after a minute of inactivity. Touching the stylus to theQ7RF tablet surface or pressing the Left/Right buttons on the stylus will reactivate it.

Qwizdom Mac Connect User Guide25
Qwizdom Mac Connect 2011
4.3 Drawing and Editing Tools
Pen Tool-draw and write
Highlighter-highlight items
Line Tool-draw straight lines
Text Tool-type text using the tablet's keyboard
Laser Pointer-displays a laser dot when using the stylus
Absolute Position Mouse-the cursor will appear on the screen exactly wherethe stylus is positioned on the tablet.
Mouse-operates stylus with mouse functions
Keyboard-activates keyboard region
Absolute Position Mouse ToolUse to change the mode of the stylus to Absolute Positioning. The cursor will appear onthe screen exactly where the stylus is positioned on the tablet.
1. Press the Absolute Position Mouse icon on the tablet.
MouseUse to change the mode of the stylus to replicate the movement of a computer mouse.
1. Press the Mouse Tool icon on the tablet. 2. Press the stylus tip anywhere on the tablet's surface as if you were using a
computer mouse.
Drawing and WritingPen Tool is used to draw objects and write text.
1. Press the Pen Tool icon on the tablet. 2. Place the stylus tip on the tablet's surface to draw or write with the Pen Tool.
3. (Optional) Click the Pen tool drop-down arrow on the PresentationToolbar to change the pen style.
HighlightingHighlighter Tool is used to highlight text and/or objects.
1. Press the Highlighter icon on the tablet. 2. Place the stylus tip onto the tablet's surface to highlight text and/or objects.

Q7RF Tablet 26
Qwizdom Mac Connect 2011
Entering TextThe combination of the Text Tool and Keyboard allows you to create text without theuse of the desktop/laptop keyboard.
1. Press the Text Tool icon on the tablet. 2. Use the stylus to create a text box on the computer screen by touching the stylus
tip onto the tablet surface and drawing out the text box.3. Press the left-click button on the stylus inside of the text box.
4. Press the Keyboard icon on the tablet to activate the keyboard region. 5. Use the stylus tip to enter the text into the text box using the keyboard on the
tablet.
6. Press the Mouse to deactivate the keyboard region on the tablet.
Drawing LinesDraws straight lines with or without arrowheads.
1. Press the Line Tool icon on the tablet. 2. Place the stylus tip onto the tablet's surface to draw a line.
3. (Optional) Click the Line tool drop-down arrow on the PresentationToolbar to change the line style.
Laser PointerChanges the computer cursor into a laser pointer.
1. Press the Laser icon on the tablet. 2. Place the stylus tip onto the tablet's surface to activate the laser.

Qwizdom Mac Connect User Guide27
Qwizdom Mac Connect 2011
4.4 WizTeachWizTeach includes over 70 interactive tools designed to enhance teaching and learningacross multiple subject areas.
Installing WizTeach
1. Insert the Qwizdom Mac WizTeach disk into the CD-ROM drive.2. Double-click the WizTeach icon/CD on your desktop. This will bring up the
WizTeach install window.3. Drag and drop the WizTeachApp into the Application folder. WizTeach will
install. 4. Once the software has been successfully installed, go to Finder/Applications
and double-click the WizTeach icon. 5. This will bring up the Product Key Activation window. Enter in the product key
located on the CD sleeve. Click OK. 6. A window will appear letting you know that WizTeach was successfully
activated.
You may be prompted to update. The minimum requirements to installupdates are as follows: Mac OSX Version 10.4 (INTEL) and higher. 512 MBRam. 500 MB Free space and 128 MB graphics memory.
WizTeach tools are set by default to activate when using the drawing andediting tools on the Tablet using Qwizdom Tools and outside of QwizdomConnect.
1. Press any of the drawing tools on the Tablet with the stylus.
2. The WizTeach Paw will appear.
3. Click the Tools icon. 4. Select Standard Tools and then Drawing. The drawing tools menu appears on
the computer screen. Palettes vary depending on Version; go to www.wizteach.com to check for updates. The minimum requirements to installupdates are as follows: Mac OSX Version 10.4 (INTEL) and higher. 512 MBRam. 500 MB Free space and 128 MB graphics memory.

Q7RF Tablet 28
Qwizdom Mac Connect 2011
Curser: controls mouse functions; selects single objectsUndo: removes last actionSelect: selects multiple objectsPencil: use to drawLine: creates linesErase: erases selected objectsShape: creates shapesText: adds a text box to create text (using the Keyboard feature on the Tablet)Color: changes color of drawn objectsHighlighter: use to highlight objects on screenSpotlight: shows a small portion of the computer screenMagnifying Glass: enlarges a select portion of the computer screenImage Gallery: select either image or animation from a galleryWindow Shade: covers (hides) what is displayed on the computer screen (portionor all)
Curser ToolUse to select drawing and text objects such as text boxes, shapes, lines, etc.
1. Click Curser to use pen as mouse.

Qwizdom Mac Connect User Guide29
Qwizdom Mac Connect 2011
Undo
1. Click Undo to undo the last action(s).
Select
1. Click and drag the Select tool over multiple drawn objects. 2. Click the center of selected objects to move objects as a group.
Pencil (Drawing and Writing)
1. Click the Pencil tool.2. This will bring up the Pencil option palette. Select line color and thickness. 3. Place the Stylus Tip on the Tablet's surface to draw or write with the Pencil tool.
Drawing LinesChoose from a variety of line styles, including straight, arrowheads, jagged, anddashed.
1. Click the Line tool. 2. This will bring up the Line palette. Select color, transparency (alpha), thickness,
and line style.3. Place the Stylus Tip onto the Tablet's surface to draw a line.
Eraser
1. Click the Eraser tool.
2. Select to erase a certain object , erase the selected area , or erase all
objects .
Shapes
1. Use the Color tool to change the fill and stroke color of the shapes.
2. Click the Shapes tool. 3. This will bring up the Shape palette. Select a shape or choose Shape
Recognition. Shape Recognition automatically generates a shape based on an objectdrawn with the stylus tool.
4. Place the Stylus Tip onto the Tablet's surface to draw the selected shape.5. For additional options, including rotate, copy, paste, resize, etc., click on the
Curser and then click on the shape.

Q7RF Tablet 30
Qwizdom Mac Connect 2011
6. This will bring up additional icons for the following actions.Close: Erases shapeRotate: Rotates shapeExpand: Grab and drag to resize shapeShape Palette: This palette includes many additional options: copy, paste,cut, etc.
Entering Text
1. Click the Text tool. 2. Click the Move icon to position the text box.3. Grab and drag the Expand icon resize the text box.
4. Click inside the text box and click the Keyboard icon on the Tablet toactivate the keyboard region.
5. Use the Stylus Tip to enter the text into the text box using the keyboard on theTablet.
6. Click the Mouse icon on the Tablet to deactivate the keyboard region.
Color PaletteColor palette is used to set the color of the Pencil, Line, Highlighter, and Shape tools.
1. Click the Color Palette. 2. Select a tool, color, transparency(alpha), and style. These settings will become
the default style of the selected tool.
3. The Paint Bucket tool can be used to change the style of an already drawn item.Select a tool. Change the color, line thickness, and transparency (alpha).Select the drawn item you would like to change.Click the Paint Bucket tool. The curser will change into a paint bucket.Click on the item.
4. The Eyedropper tool allows you to quickly change the style of an item to matchanother drawn item.

Qwizdom Mac Connect User Guide31
Qwizdom Mac Connect 2011
Click on the Eyedropper. The curser will change into an eyedropper. Click ona drawn shape/line that has the desired style.The Fill and Line color palettes will reflect the style change.Use the Paint Bucket to change already drawn objects or draw a new object.
5. Click the X in the color palette to close the color palette.
HighlightingHighlighter tool is used to highlight text and/or objects.
1. Click Highlighter. 2. The Highlighter palette will appear. Select the color and thickness. 3. Place the Stylus Tip onto the Tablet's surface to highlight text and/or objects.
SpotlightThis allows you to focus your audience's attention on a small section of the computerscreen.
1. Press the Spotlight tool. 2. The computer screen turns black except for a small portion.3. Click in the center of the highlighted area to move the spotlight.4. Click and drag the Expand icon to resize the spotlight area.
Magnifying GlassThis allows you to magnify a small section of the computer screen.
1. Press the Magnifying Glass tool. 2. Click in the center of the magnified area to move.3. Grab and drag the Expand icon to resize the magnified area.
Image GalleryThis allows you to insert images and animations from a gallery into your presentation.
1. Press the Image Gallery tool. 2. This brings up the Browse window.

Q7RF Tablet 32
Qwizdom Mac Connect 2011
3. Click [+] to expand the folders and browse for a media item.4. Drag and drop selected item(s) onto your computer screen.
5. Click the Import icon to open a media file located outside of WizTeach. 7. For additional options, including rotate, copy, paste, resize, etc., click on the
Curser and then click on the media item. 8. This will bring up additional icons for the following actions.
Close: Erases imageRotate: Rotates imageExpand: Grab and drag to resize imageShape Palette: This palette includes many additional options: copy, paste,cut, etc.
Window ShadeWindow Shade hides (covers) what is being displayed on the computer screen (portionor all).
1. Press the Window Shade icon. A window shade will cover the computerscreen.
2. Grab and drag the handles of the image to resize to desired size.
For more information on using WizTeach tools, visit www.wizteach.com/tutorials.

Qwizdom Mac Connect User Guide33
Qwizdom Mac Connect 2011
4.5 Hot-Key EditorThe Hot-Key Editor controls the default commands for the soft-keys on the Tablet,allowing users to customize some of the default commands and set up alternatecommands that are automatically used with other applications.
1. Click Qwizdom Tools.2. Go to Utilities / Hot Key Editor.3. Hot Key Manager opens.
List of ActionsThese are the actions that can be set for the Hot Key Editor.
NoneOpen ApplicationOpen FileOpen WebsiteKeystrokeKeystroke: CMD +Keystroke: ALT +Keystroke: CMD + ALT +Keystroke: CMD + SHIFT +Keystroke: ALT + SHIFT +Keystroke: CMD + ALT + SHIFT +

Q7RF Tablet 34
Qwizdom Mac Connect 2011
Editing a KeySoft-keys can be customized to perform specific commands.
1. Click the List Hot-Keys for drop-down list and select the program you want toedit the keys for:
Default is Connect: keys 2-8, 19Add New Application: when you add an application, it will be keys 2-8, 19
2. Select a key number.
3. Click the Edit button. The Hot-Key Editor opens.
4. Click the Action Type drop-down list and select the keystroke you want toassociate the Action Name (key) with.
Qwizdom Mac Connect User Guide35
Qwizdom Mac Connect 2011
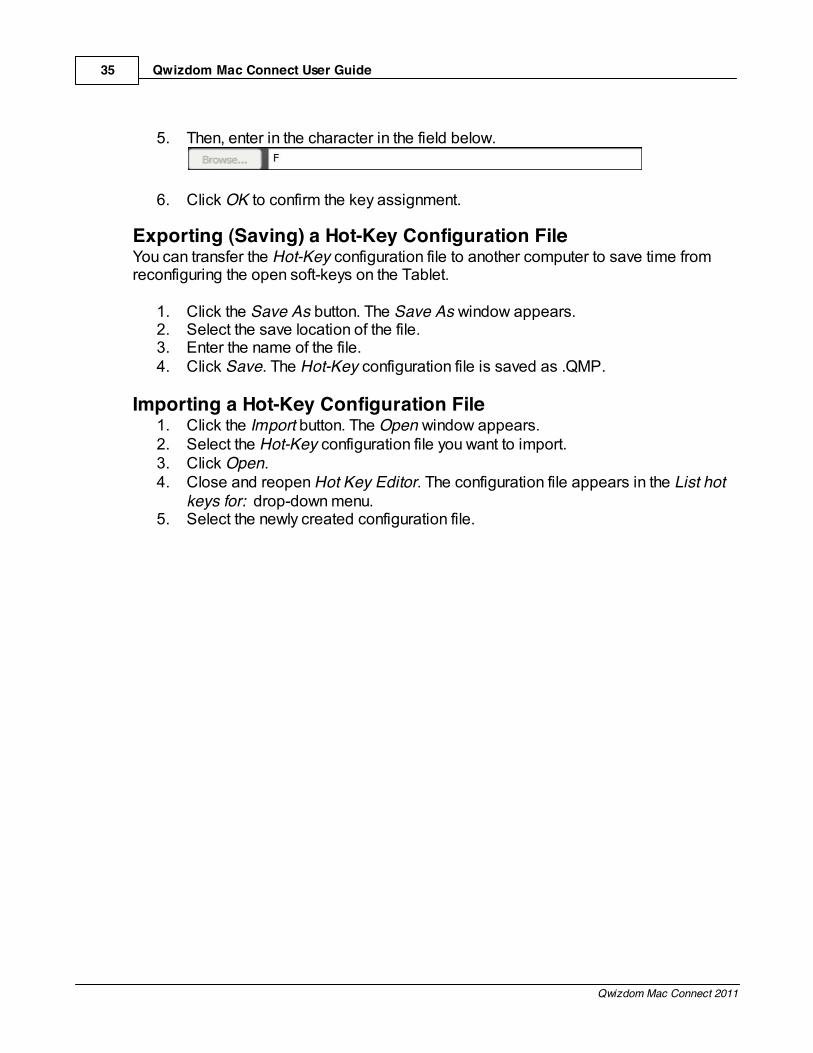
5. Then, enter in the character in the field below.
6. Click OK to confirm the key assignment.
Exporting (Saving) a Hot-Key Configuration FileYou can transfer the Hot-Key configuration file to another computer to save time fromreconfiguring the open soft-keys on the Tablet.
1. Click the Save As button. The Save As window appears.2. Select the save location of the file. 3. Enter the name of the file.4. Click Save. The Hot-Key configuration file is saved as .QMP.
Importing a Hot-Key Configuration File1. Click the Import button. The Open window appears.2. Select the Hot-Key configuration file you want to import.3. Click Open.4. Close and reopen Hot Key Editor. The configuration file appears in the List hot
keys for: drop-down menu. 5. Select the newly created configuration file.

Creating & Organizing Content 36
Qwizdom Mac Connect 2011
5 Creating & Organizing Content
Content Manager is where all created and imported activities are stored. Double-click
Content Manager found in the Finder/Applications window or in the Dock to launchContent Manager.
Create a New Folder
1. Click the Add Folder button.2. Enter a name for the folder and click Done.3. The folder appears in the Content Tree on the left.
Create a New Activity
1. Click the Add File button.2. Select Create and Add Live Editor File.3. Enter a name for the activity and click Done.4. The activity appears in the Content Tree on the left.5. Double-click the newly created activity. This will launch Live Editor. Create
slides in Live Editor. See Creating Slides for more information.
Edit an Activity1. Double-click the activity you wish to edit in the Content Tree on the left.2. This will launch Live Editor. Edit your activity in Live Editor. See Creating
Slides for more information.
Create a New Answer Key
1. Click the black arrow to the right of the Add File button.2. Select Create and Add Answer Key file and enter a name. 3. Click Done and the answer key will appear in the Content Tree on the left.4. Double-click the answer key file to launch the Answer Key window.

Qwizdom Mac Connect User Guide37
Qwizdom Mac Connect 2011
5.1 Importing and Exporting
Importing Activities (.QAP and .QXA)1. Go to the File menu and select Import / Qwizdom Activity. The Open window
appears.2. Select the Qwizdom activity you would like to import and click Open. The activity
will import into the Content Tree.
Importing External Documents1. Go to the File menu and select Import / External Document. The Open window
appears.2. Select the file you would like to import and click Open. The external document
will import into the Content Tree.
Exporting Activities1. Select the activity you want to export.2. Go to the File menu and select Export. The Export Activity window appears.3. Choose the location to which to export your file and select Save.

Creating & Organizing Content 38
Qwizdom Mac Connect 2011
5.2 Printing1. Select an activity.2. Select Print. A preview of the activity will appear.3. Click Print, located in the top right hand corner to print the activity.

Qwizdom Mac Connect User Guide39
Qwizdom Mac Connect 2011
5.3 Standards
Installing StandardsStandards will auto-install during the first use.
Applying StandardsStandards can be applied to a whole activity or to individual slides.
Apply standards to whole activity.1. Click on the Content tab. 2. Select an activity in the Content Tree.
3. Click the Standards button. The Standards window appears.4. Select the desired set of standards you wish to use. Located in the lower left
hand corner of the window.5. Select the standard at the level you want to apply to the activity.6. Click Link and then Close. The standards will appear in the Standards tab at
the bottom of the Content Manager window.
Apply standards to individual slide/s.1. Click on the Content tab. 2. Select an activity in the Content Tree. Click on a slide in the Activity Preview
window.
3. Click the Standards button.The Standards window appears.4. Select the desired set of standards you wish to use. Located in the lower left
hand corner of the window.5. Select the standard at the level you want to apply to the slide(s).6. Click Link and then Close. The standards will appear in the Standards tab at
the bottom of the Content Manager window.

Live Editor 40
Qwizdom Mac Connect 2011
6 Live Editor
Create and present multimedia activities, lessons, and tests in Live Editor. Usepremade styles, tools, and templates or create your own.
1. Go to the Connect Apps menu and select Live Editor.

Qwizdom Mac Connect User Guide41
Qwizdom Mac Connect 2011
Editor Toolbar
Creates new question slide Text tool
Adds new answer slide Pen tool
Copies selected slide Line tool
Deletes selected slide Shapes tool
Launches Presentation Setupwindow
Equation tool
Activity Properties Insert image and multimedia
Change viewing mode (full screen,glass mode, integrated)
Deletes selected objects
Selects objects on slide
Text Tool1. Click the Text tool drop-down arrow and choose a styled font.2. (Optional) Select Customize. The Customize Text window appears.3. Click Add. Scroll down and select the newly added font style. Set the font
type, size, and attributes.Click Delete to delete the custom font.
4. Close window when finished. Pen Tool
1. Click the Pen tool drop-down arrow choose a pen style.2. (Optional) Select Customize. The Customize Pens window appears.3. Click Add. Scroll down and select the newly added pen style. Set thickness,
color, and transparency. Click Delete to delete a pen style.
4. Close window when finished.

Live Editor 42
Qwizdom Mac Connect 2011
Line Tool
1. Click the Line tool drop-down arrow.2. (Optional) Select Customize. The Customize Line window appears.
3. Click Add. Scroll down and select the newly added line style. Setthickness, color, and transparency.
Click Delete to delete a line style.4. Click OK to save the line style(s).
Shapes Tool
1. Click the Shapes tool drop-down arrow.2. (Optional) Select Customize. The Customize Shapes window appears.3. Click Add. Scroll down and select the newly added shape. Set thickness,
color, and transparency. Click Delete to delete a shape.
4. Close window when finished.
Answer Toolbar - see Creating Slides for details

Qwizdom Mac Connect User Guide43
Qwizdom Mac Connect 2011
Font ToolbarTo view Font toolbar either click an active text box or the Text tool.
Question TypesNone-non question slide (no remote)Multiple Choice-multiple choice question slide (up to six choices); Use withQ2RF, Q4RF, Q5RF, and Q6RF.Yes/No-yes/no question slide; use with Q2RF, Q4RF, Q5RF and Q6RF.True/False-true/false question slide; use with Q2RF, Q4RF, Q5RF, and Q6RF.Numeric-numeric question slide; single digit numeric answer allowed for Q2RF;nine digit numeric answer allowed for Q4RF; eight digit numeric answer allowedfor Q5RF; fourteen digit numeric answer allowed for Q6RF.Sequence-place item choices in the specified order; use with Q4RF, Q5RF, andQ6RF.Multiple Mark-this question type enables two or more correct answers (up to sixchoices); use with Q4RF, Q5RF, and Q6RF.Rating Scale/Survey-rating/opinions/polling using scales from 1-5, 1-10, etc.;use with Q2RF, Q4RF, Q5RF, and Q6RF.Short Text Response-(Q5RF and Q6RF remotes) answer can be up to 32characters long.Text Response-(Q6RF remotes) answer can be up to 102 characters.Text Edit-(Q6RF remotes) participants are given a sentence, phrase, or item thatthey can correct on the Q6RF remote. Equation-(Q6RF remotes) create questions that allows participants to respondwith numeric answers, including special characters.

Live Editor 44
Qwizdom Mac Connect 2011
Slides TabDisplays thumbnails of all slides in the activity.
Media TabAllows you to search and use images in the Qwizdom database and/ or your computer.

Qwizdom Mac Connect User Guide45
Qwizdom Mac Connect 2011
Templates TabDisplays slide templates.
Styles TabDisplays slide styles.

Live Editor 46
Qwizdom Mac Connect 2011
6.1 Creating SlidesTo create a new activity:
1. Click the Content tab.
2. Click Add File and select Create and Add Live Editor File.3. Name the new activity and click Done. 4. In the Content Tree, double-click on the newly created activity to launch Live
Editor.
To edit a Live Editor file, double-click any activity to launch Live Editor.
InformationNone-question slide (non-remote).
1. Click the New Question button. A blank slide will appear on the right anda thumbnail preview of the slide will appear in the Slides tab on the left.
2. Click the Question drop-down list and select None as the slide type.3. (Optional) Click on the Templates tab. Select a template; click and drag the
template onto the slide. See Applying Templates for more details.4. Enter text onto the slide. 5. (Optional) Add multimedia such as images, movies, and sound. Click on the
Media tab. Select the Search (Online) tab. Type in a keyword/s, and clickSearch. Drag and drop multimedia items onto slide.
6. (Optional) Add custom style to slide. Click the Styles tab, browse styles bycategory, and select a style. Drag and drop style onto slide. See ApplyingStyles for more details.
7. When the slide is complete, either go to the File menu, select Save, and close
the window; or click the New Question button to create a new slide set.
Multiple Choice (Q2RF, Q4RF, & Q5RF)Multiple choice question slide (up to six choices).
1. Click the New Question button. A blank slide will appear on the right anda thumbnail preview of the slide will appear in the Slides tab on the left.
2. Click the Type drop-down list and select Multiple Choice as the slide type.3. Select the correct answer.4. (Optional) Set the time limit and number of points.5. (Optional) Click on the Templates tab. Select a template; click and drag the
template onto the slide. See Applying Templates for more details.6. Enter text onto the slide.7. (Optional) Add multimedia such as images, movies, and sound. Click on the
Media tab. Select the Search (Online) tab. Type in a keyword/s, and clickSearch. Drag and drop multimedia items onto slide.
8. (Optional) Add custom style to slide. Click the Styles tab, browse styles by

Qwizdom Mac Connect User Guide47
Qwizdom Mac Connect 2011
category, and select a style. Drag and drop style onto slide. See ApplyingStyles for more details.
9. (Optional) Create an answer slide. Click the Add Slide button to add a blank slide within the slide set.Right-click (control-click) on the thumbnail of the question slide. Select AddSlide/Add Copy of This Slide to copy the question slide to the answerslide.
10. When the slide/slide set is complete, either go to the File menu, select Save,
and close the window; or click the New Question button to create a newslide set.
Multiple Choice (Q6RF)Multiple choice question slide (up to six choices).
1. Click the New Question button. A blank slide will appear on the right anda thumbnail preview of the slide will appear in the Slides tab on the left.
2. Click the Type drop-down list and select Multiple Choice as the slide type.3. Select the correct answer.4. (Optional) Click on the Templates tab. Select a template; click and drag the
template onto the slide. See Applying Templates for more details.5. Enter text onto the slide.6. (Optional) Add multimedia such as images, movies, and sound. Click on the
Media tab. Select the Search (Online) tab. Type in a keyword/s, and clickSearch. Drag and drop multimedia items onto slide.
7. (Optional) Add custom style to slide. Click the Styles tab, browse styles bycategory, and select a style. Drag and drop style onto slide. See ApplyingStyles for more details.
8. (Optional) Set the time limit.
9. (Optional) Click the Advanced Options button. This will bring up theQuestion Properties window.
Check the Send Question Text to Remotes box to send questions to Q6RFLCD screens. *Check the Send Answer Choices to Remotes box. *Click OK to save changes and close window.
10. (Optional) Create an answer slide. Click the Add Slide button to add a blank slide within the slide set.Right-click (control-click) on the thumbnail of the question slide. Select AddSlide/Add Copy of This Slide to copy the question slide to the answerslide.
11. When the slide/slide set is complete, either go to the File menu, select Save,
and close the window; or click the New Question button to create a newslide set.
Live Editor 48
Qwizdom Mac Connect 2011
Yes/No (Q2RF, Q4RF, & Q5RF)Yes/No question slide.
1. Click the New Question button. A blank slide will appear on the right anda thumbnail preview of the slide will appear in the Slides tab on the left.
2. Click the Type drop-down list and select Yes/No as the slide type.3. Select the correct answer.4. (Optional) Set the time limit and number of points.5. (Optional) Click on the Templates tab. Select a template; click and drag the
template onto the slide. See Applying Templates for more details.6. Enter text onto the slide.7. (Optional) Add multimedia such as images, movies, and sound. Click on the
Media tab. Select the Search (Online) tab. Type in a keyword/s, and clickSearch. Drag and drop multimedia items onto slide.
8. (Optional) Add custom style to slide. Click the Styles tab, browse styles bycategory, and select a style. Drag and drop style onto slide. See ApplyingStyles for more details.
9. (Optional) Create an answer slide. Click the Add Slide button to add a blank slide within the slide set.Right-click (control-click) on the thumbnail of the question slide. Select AddSlide/Add Copy of This Slide to copy the question slide to the answerslide.
10. When the slide/slide set is complete, either go to the File menu, select Save,
and close the window; or click the New Question button to create a newslide set.
Yes/No (Q6RF)1. Click the New Question button. A blank slide appears on the right and the
thumbnail preview of the slide appears in the Slides tab on the left.2. Click the Type drop-down list and select Yes/No as the slide type.3. Select the correct answer.4. (Optional) Set the time limit and number of points.5. (Optional) Click on the Templates tab. Select a template; click and drag the
template onto the slide. See Applying Templates for more details.6. Enter text onto the slide.7. (Optional) Add multimedia such as images, movies, and sound. Click on the
Media tab. Select the Search (Online) tab. Type in a keyword/s, and clickSearch. Drag and drop multimedia items onto slide.
8. (Optional) Add custom style to slide. Click the Styles tab, browse styles bycategory, and select a style. Drag and drop style onto slide. See ApplyingStyles for more details.
9. (Optional) Send text questions to Q6RF remotes.
Click the Advanced Options button. This will bring up the Question

Qwizdom Mac Connect User Guide49
Qwizdom Mac Connect 2011
Properties window.(Optional) Check the Send Question Text to Remotes box to sendquestions to Q6RF. *Click OK to save changes and close window.
10. (Optional) Create an answer slide. Click the Add Slide button to add a blank slide within the slide set.Right-click (control-click) on the thumbnail of the question slide. Select AddSlide/Add Copy of This Slide to copy the question slide to the answerslide.
11. When the slide/slide set is complete, either go to the File menu, select Save,
and close the window; or click the New Question button to create a newslide set.
True/False (Q2RF, Q4RF, & Q5RF)True/False question slide. Use with Q2RF, Q4RF, and Q5RF.
1. Click the New Question button. A blank slide will appear on the right anda thumbnail preview of the slide will appear in the Slides tab on the left.
2. Click the Question drop-down list and select True/False as the slide type.3. Select the correct answer in the Answer field.4. (Optional) Set the time limit and number of points.5. (Optional) Click on the Templates tab. Select a template; click and drag the
template onto the slide. See Applying Templates for more details.6. Enter text onto the slide.7. (Optional) Add multimedia such as images, movies, and sound. Click on the
Media tab. Select the Search (Online) tab. Type in a keyword/s, and clickSearch. Drag and drop multimedia items onto slide.
8. (Optional) Add custom style to slide. Click the Styles tab, browse and select astyle. Drag and drop style onto slide. See Applying Styles for more details.
9. (Optional) Create an answer slide. Click the Add Slide button to add a blank slide within the slide set.Right-click (control-click) on the thumbnail of the question slide. Select AddSlide/Add Copy of This Slide to copy the question slide to the answerslide.
10. When the slide/slide set is complete, either go to the File menu, select Save,
and close the window; or click the New Question button to create a newslide set.
True/False (Q6RF)1. Click the New Question button. A blank slide appears on the right and the
thumbnail preview of the slide appears in the Slides tab on the left.2. Click the Type drop-down list and select True/False as the slide type.3. Select the correct answer.

Live Editor 50
Qwizdom Mac Connect 2011
4. (Optional) Set the time limit and number of points.5. (Optional) Click on the Templates tab. Select a template; click and drag the
template onto the slide. See Applying Templates for more details.6. Enter text onto the slide.7. (Optional) Add multimedia such as images, movies, and sound. Click on the
Media tab. Select the Search (Online) tab. Type in a keyword/s, and clickSearch. Drag and drop multimedia items onto slide.
8. (Optional) Add custom style to slide. Click the Styles tab, browse and select astyle. Drag and drop style onto slide. See Applying Styles for more details.
9. (Optional) Send text questions to Q6RF remotes.
Click the Advanced Options button. This will bring up the QuestionProperties window. (Optional) Check the Send Question Text to Remotes box to sendquestions to Q6RF. *Click OK to save changes and close window.
10. (Optional) Create an answer slide. Click the Add Slide button to add a blank slide within the slide set.Right-click (control-click) on the thumbnail of the question slide. Select AddSlide/Add Copy of This Slide to copy the question slide to the answerslide.
11. When the slide/slide set is complete, either go to the File menu, select Save,
and close the window; or click the New Question button to create a newslide set.
Numeric (Q2RF, Q4RF, & Q5RF)Numeric question slide. Single digit numeric answer allowed for Q2RF; nine digitnumeric answer allowed for Q4RF; eight digit numeric answer allowed for Q5RF.
1. Click the New Question button. A blank slide will appear on the right anda thumbnail preview of the slide will appear in the Slides tab on the left.
2. Click the Type drop-down list and select Numeric as the slide type.3. Enter the correct answer in the Numeric Value field and press the Return key on
the keyboard to save it.

Qwizdom Mac Connect User Guide51
Qwizdom Mac Connect 2011
4. (Optional) Set partial grading options. Click the Advance Options button.This brings up the Question Properties window. Enter the answer/s and pointvalue/s. Click OK to save and close.
Numeric - Select Numeric to add in standard numeric answer/s. (Optional)Enter in multiple answers and point values to give students partial credit.(Optional) Check the Convert fractions to numbers box to allow both fractionand decimal answers to be counted as correct. If this box is unchecked onlythe answer that is typed into the above field will be counted as correct. Numeric Range - Select Numeric Range to add an answer for rounding,number set, algebraic and other problems with a varying answer range.(Optional) Check the Require Precision to box and select a place value fromthe drop-down menu.
5. (Optional) Set the time limit and/or points.6. (Optional) Click on the Templates tab. Select a template; click and drag the
template onto the slide. See Applying Templates for more details.7. Enter text onto the slide.8. (Optional) Add multimedia such as images, movies, and sound. Click on the
Media tab. Select the Search (Online) tab. Type in a keyword/s, and clickSearch. Drag and drop multimedia items onto slide.
9. (Optional) Add custom style to slide. Click the Styles tab, browse and select astyle. Drag and drop style onto slide. See Applying Styles for more details.
10. (Optional) Create an answer slide. Click the Add Slide button to add a blank slide within the slide set.Right-click (control-click) on the thumbnail of the question slide. Select AddSlide/Add Copy of This Slide to copy the question slide to the answer

Live Editor 52
Qwizdom Mac Connect 2011
slide. 11. When the slide/slide set is complete, either go to the File menu, select Save,
and close the window; or click the New Question button to create a newslide set.
Numeric (Q6RF)Numeric question slide. Fourteen digit numeric answer allowed for Q6RF.
1. Click the New Question button. A blank slide appears on the right and thethumbnail preview of the slide appears in the Slides tab on the left.
2. Click the Type drop-down list and select Numeric as the slide type.3. (Optional) Click on the Templates tab. Select a template; click and drag the
template onto the slide. See Applying Templates for more details.4. Enter text onto the slide.5. (Optional) Add multimedia such as images, movies, and sound. Click on the
Media tab. Select the Search (Online) tab. Type in a keyword/s, and clickSearch. Drag and drop multimedia items onto slide.
6. (Optional) Add custom style to slide. Click the Styles tab, browse and select astyle. Drag and drop style onto slide. See Applying Styles for more details.
7. (Optional) Set the time limit and/or points.
8. Click the Advance Options button. This brings up the Question Propertieswindow. (Optional) Check the Send Question Text to Remotes box to sendquestions to Q6RF. * Enter the answer/s and point value/s. Click OK to saveand close.
Send Question Text to Remotes - check to send question text to Q6RF

Qwizdom Mac Connect User Guide53
Qwizdom Mac Connect 2011
remotes. Numeric - select Numeric to add in standard numeric answer/s.(Optional) Enter in multiple answers and point values to give studentspartial credit. (Optional) Check the Convert fractions to numbers box toallow both fraction and decimal answers to be counted as correct. If thisbox is unchecked only the answer that is typed into the above field will becounted as correct. Numeric Range - select Numeric Range to add an answer for rounding,number set, algebraic and other problems with a varying answer range.(Optional) Check the Require Precision to box and select a place valuefrom the drop-down menu.
9. (Optional) Create an answer slide.Click the Add Slide button to add a blank slide within the slide set.Right-click (control-click) on the thumbnail of the question slide. Select AddSlide/Add Copy of This Slide to copy the question slide to the answerslide.
10. When the slide/slide set is complete, either go to the File menu, select Save,
and close the window; or click the New Question button to create a newslide set.
Sequence (Q4RF & Q5RF)Place item choices in the specified order.
1. Click the New Question button. A blank slide will appear on the right anda thumbnail preview of the slide will appear in the Slides tab on the left.
2. Click the Type drop-down list select Sequence and number of items.3. Enter the correct answer in the Enter Sequence field and press the Return key
on the keyboard to save it.
4. (Optional) Set partial grading options. Click the Advance Options button.This brings up the Question Properties window. In the Answer field, type in thecorrect sequence. Check the Give 1 Point for every item in the correct positionbox for partial grading. Click OK to save and close.
5. (Optional) Set the time limit and/or points.6. (Optional) Click on the Templates tab. Select a template; click and drag the
template onto the slide. See Applying Templates for more details.7. Enter text onto the slide.8. (Optional) Add multimedia such as images, movies, and sound. Click on the
Media tab. Select the Search (Online) tab. Type in a keyword/s, and clickSearch. Drag and drop multimedia items onto slide.
9. (Optional) Add custom style to slide. Click the Styles tab, browse and select astyle. Drag and drop style onto slide. See Applying Styles for more details.
10. (Optional) Create an answer slide. Click the Add Slide button to add a blank slide within the slide set.

Live Editor 54
Qwizdom Mac Connect 2011
Right-click (control-click) on the thumbnail of the question slide. Select AddSlide/Add Copy of This Slide to copy the question slide to the answerslide.
11. When the slide/slide set is complete, either go to the File menu, select Save,
and close the window; or click the New Question button to create a newslide set.
Sequence (Q6RF)Place item choices in the specified order.
1. Click the New Question button. A blank slide appears on the right and thethumbnail preview of the slide appears in the Slides tab on the left.
2. Click the Type drop-down list select Sequence and number of items.3. (Optional) Click on the Templates tab.Select a template; click and drag the
template onto the slide. See Applying Templates for more details.4. Enter text onto the slide.5. (Optional) Add multimedia such as images, movies, and sound. Click on the
Media tab. Select the Search (Online) tab. Type in a keyword/s, and clickSearch. Drag and drop multimedia items onto slide.
6. (Optional) Add custom style to slide. Click the Styles tab, browse and select astyle. Drag and drop style onto slide. See Applying Styles for more details.
7. (Optional) Set the time limit.
8. Click the Advance Options button. This brings up the Question Propertieswindow.
(Optional) Check Send Question Text to Remotes to send question text toQ6RF remotes. * Enter the answer and point value. (Optional) Check the Give 1 Point for every item in the correct position boxfor partial grading. Click OK to save and close.
9. (Optional) Create an answer slide. Click the Add Slide button to add a blank slide within the slide set.Right-click (control-click) on the thumbnail of the question slide. Select AddSlide/Add Copy of This Slide to copy the question slide to the answer slide.
10. When the slide/slide set is complete, either go to the File menu, select Save,
and close the window; or click the New Question button to create a newslide set.
Multiple Mark (Q4RF & Q5RF)This question type enables two or more correct answers (up to six choices). Use withQ4RF and/or Q5RF.
1. Click the New Question button. A blank slide will appear on the right anda thumbnail preview of the slide will appear in the Slides tab on the left.

Qwizdom Mac Connect User Guide55
Qwizdom Mac Connect 2011
2. Click the Type drop-down list and select Multiple Mark as the slide type.3. Enter the correct answers .
4. Click the Advance Options button. This brings up the Question Propertieswindow.
Set the number of points. (Optional) Set partial grading options. Check the Give one Point for each correct item box to give participantspartial credit for every correct answer entered. Click OK to save and close.
5. (Optional) Set the time limit.6. (Optional) Click on the Templates tab. Select a template; click and drag the
template onto the slide. See Applying Templates for more details.3. Enter text onto the slide.4. (Optional) Add multimedia such as images, movies, and sound. Click on the
Media tab. Select the Search (Online) tab. Type in a keyword/s, and clickSearch. Drag and drop multimedia items onto slide.
5. (Optional) Add custom style to slide. Click the Styles tab, browse and select astyle. Drag and drop style onto slide. See Applying Styles for more details.
6. (Optional) Create an answer slide. Click the Add Slide button to add a blank slide within the slide set.Right-click (control-click) on the thumbnail of the question slide. Select AddSlide/Add Copy of This Slide to copy the question slide to the answer slide.
7. When the slide/slide set is complete, either go to the File menu, select Save,
and close the window; or click the New Question button to create a new

Live Editor 56
Qwizdom Mac Connect 2011
slide set.
Multiple Mark (Q6RF)This question type enables two or more correct answers (up to six choices).
1. Click the New Question button. A blank slide appears on the right and thethumbnail preview of the slide appears in the Slides tab on the left.
2. Click the Type drop-down list and select Multiple Mark as the slide type.3. (Optional) Click on the Templates tab. Select a template; click and drag the
template onto the slide. See Applying Templates for more details.4. Enter text onto the slide.5. (Optional) Add multimedia such as images, movies, and sound. Click on the
Media tab. Select the Search (Online) tab. Type in a keyword/s, and clickSearch. Drag and drop multimedia items onto slide.
6. (Optional) Add custom style to slide. Click the Styles tab, browse and select astyle. Drag and drop style onto slide. See Applying Styles for more details.
7. (Optional) Set the time limit.
8. Click the Advance Options button. This brings up the Question Propertieswindow.
(Optional) Check the Send Question Text to Remotes box to send questionsto Q6RF LCD screens. *Select the correct answers. Set the number of points. (Optional) Set partialgrading options. Check the Give one Point for each correct item box to giveparticipants partial credit for every correct answer entered. Click OK to save changes and close window.
9. (Optional) Create an answer slide.

Qwizdom Mac Connect User Guide57
Qwizdom Mac Connect 2011
Click the Add Slide button to add a blank slide within the slide set.Right-click (control-click) on the thumbnail of the question slide. Select AddSlide/Add Copy of This Slide to copy the question slide to the answerslide.
10. When the slide/slide set is complete, either go to the File menu, select Save,
and close the window; or click the New Question button to create a newslide set.
Rating Scale / Survey (Q2RF, Q4RF, & Q5RF)Create a slide for collecting rating/opinions/polling using scales from 1-5, 1-10, etc. TheQ2RF remote handles only single digit rating scale input/
1. Click the New Question button. A blank slide will appear on the right anda thumbnail preview of the slide will appear in the Slides tab on the left.
2. Click the Question drop-down list and select Rating Scale as the slide type.3. (Optional) Click on the Templates tab. Select a template; click and drag the
template onto the slide. See Applying Templates for more details.4. Enter text onto the slide.5. (Optional) Add multimedia such as images, movies, and sound. Click on the
Media tab. Select the Search (Online) tab. Type in a keyword/s, and clickSearch. Drag and drop multimedia items onto slide.
6. (Optional) Add custom style to slide. Click the Styles tab, browse and select astyle. Drag and drop style onto slide. See Applying Styles for more details.
7. When the slide is complete, either go to the File menu, select Save, and close
the window; or click the New Question button to create a new slide set.
Rating Scale / Survey (Q6RF)Rating scale question slide (i.e. rating/opinions/polling using scales from 1-5, 1-10,etc.).
1. Click the New Question button. A blank slide appears on the right and thethumbnail preview of the slide appears in the Slides tab on the left.
2. Click the Question drop-down list and select Rating Scale as the slide type.3. (Optional) Click on the Templates tab. Select a template; click and drag the
template onto the slide. See Applying Templates for more details.4. Enter text onto the slide.5. (Optional) Add multimedia such as images, movies, and sound. Click on the
Media tab. Select the Search (Online) tab. Type in a keyword/s, and clickSearch. Drag and drop multimedia items onto slide.
6. (Optional) Add custom style to slide. Click the Styles tab, browse and select astyle. Drag and drop style onto slide. See Applying Styles for more details.
7. Send questions to Q6RF. Click the Advanced Options button. This brings upthe Question Text window. Check the Send Question Text to Remotes box. *

Live Editor 58
Qwizdom Mac Connect 2011
Click OK to save and close the window.8. When the slide/slide set is complete, either go to the File menu, select Save,
and close the window; or click the New Question button to create a newslide set.
Short Text Response (Q5RF)Answer can be up to 32 characters long on the Q5RF remote.
1. Click the New Question button. A blank slide will appear on the right anda thumbnail preview of the slide will appear in the Slides tab on the left.
2. Click the Question drop-down list and select Short Text Response as the slidetype.
3. Click the Answer field, type in answer, and press enter when finished. 4. (Optional) Set time limit and number of points.5. (Optional) Click on the Templates tab. Select a template; click and drag the
template onto the slide. See Applying Templates for more details.6. Enter text onto the slide.7. (Optional) Add multimedia such as images, movies, and sound. Click on the
Media tab. Select the Search (Online) tab. Type in a keyword/s, and clickSearch. Drag and drop multimedia items onto slide.
8. (Optional) Add custom style to slide. Click the Styles tab, browse and select astyle. Drag and drop style onto slide. See Applying Styles for more details.
9. (Optional) Create an answer slide.Click the Add Slide button to add a blank slide within the slide set.Right-click (control-click) on the thumbnail of the question slide. Select AddSlide/Add Copy of This Slide to copy the question slide to the answerslide.
10. When the slide is complete, either go to the File menu, select Save, and close
the window; or click the New Question button to create a new slide set.
Short Text Response (Q6RF)Use this question type for fill-in-the-blank and/or any other short answer questions.
1. Click the New Question button. A blank slide appears on the right and thethumbnail preview of the slide appears in the Slides tab on the left.
2. Click the Type drop-down list and select Short Text Response as the slide type.3. Click the Answer field, type in answer, and press enter when finished. 4. (Optional) Click on the Templates tab. Select a template; click and drag the
template onto the slide. See Applying Templates for more details.5. Enter text onto the slide.6. (Optional) Add multimedia such as images, movies, and sound. Click on the
Media tab. Select the Search (Online) tab. Type in a keyword/s, and clickSearch. Drag and drop multimedia items onto slide.
7. (Optional) Add custom style to slide. Click the Styles tab, browse and select a

Qwizdom Mac Connect User Guide59
Qwizdom Mac Connect 2011
style. Drag and drop style onto slide. See Applying Styles for more details.8. (Optional) Set time limit and number of points.
9. (Optional) Send questions to Q6RF. Click the Advanced Options button.Check the Send Question Text to Remotes box. * Click OK to save and closethe window.
10. (Optional) Create an answer slide.Click the Add Slide button to add a blank slide within the slide set.Right-click (control-click) on the thumbnail of the question slide. Select AddSlide/Add Copy of This Slide to copy the question slide to the answerslide.
11. When the slide is complete, either go to the File menu, select Save, and close
the window; or click the New Question button to create a new slide set.
Text Response (only applicable to Q6RF)Answer can be up to 143 characters on the Q6RF remote.
1. Click the New Question button. A blank slide appears on the right and thethumbnail preview of the slide appears in the Slides tab on the left.
2. Click the Type drop-down list and select Text Response as the slide type.3. (Optional) Click on the Templates tab. Select a template; click and drag the
template onto the slide. See Applying Templates for more details.4. Enter text onto the slide.5. (Optional) Add multimedia such as images, movies, and sound. Click on the
Media tab. Select the Search (Online) tab. Type in a keyword/s, and clickSearch. Drag and drop multimedia items onto slide.
6. (Optional) Add custom style to slide. Click the Styles tab, browse and select astyle. Drag and drop style onto slide. See Applying Styles for more details.
7. (Optional) Set the time limit.
8. Click the button. This brings up the Question Properties window.

Live Editor 60
Qwizdom Mac Connect 2011
(Optional) Send questions to Q6RF. Check the Send Question Text toRemotes box. *Fill in answer/s in the Answer field. Enter the number of points. Multipleanswers and point values can be added for partial grading (whole numbersonly).(Optional) Set grading options. Participant's answers will be marked right orwrong based on these options.Click OK when finished.
9. (Optional) Create an answer slide.Click the Add Slide button to add a blank slide within the slide set.Right-click (control-click) on the thumbnail of the question slide. Select AddSlide/Add Copy of This Slide to copy the question slide to the answer slide.
10. When the slide is complete, either go to the File menu, select Save, and close
the window; or click the New Question button to create a new slide set.
Text Edit (only applicable to Q6RF)1. Click the New Question button. A blank slide appears on the right and the
thumbnail preview of the slide appears in the Slides tab on the left.2. Click the Type drop-down list and select Text Edit as the slide type.3. (Optional) Click on the Templates tab. Select a template; click and drag the
template onto the slide. See Applying Templates for more details.4. Enter text onto the slide.

Qwizdom Mac Connect User Guide61
Qwizdom Mac Connect 2011
5. (Optional) Add multimedia such as images, movies, and sound. Click on theMedia tab. Select the Search (Online) tab. Type in a keyword/s, and clickSearch. Drag and drop multimedia items onto slide.
6. (Optional) Add custom style to slide. Click the Styles tab, browse and select astyle. Drag and drop style onto slide. See Applying Styles for more details.
7. (Optional) Set the time limit.
8. Click the button. This brings up the Question Properties window.
(Optional) Send questions to Q6RF. Check the Send Question Text toRemotes box. *Enter the correct answer in the Correct Answer Text field.Enter the text to be edited by participant in the Text Displayed on Devicefield. Click OK when finished.
13. (Optional) Create an answer slide.Click the Add Slide button to add a blank slide within the slide set.Right-click (control-click) on the thumbnail of the question slide. Select AddSlide/Add Copy of This Slide to copy the question slide to the answer slide.
14. When the slide is complete, either go to the File menu, select Save, and close
the window; or click the New Question button to create a new slide set.
Equation (only applicable to Q6RF)Create questions that allow participants to respond with numeric answers, includingspecial characters.
1. Click the New Question button. A blank slide appears on the right and thethumbnail preview of the slide appears in the Slides tab on the left.
2. Click the Type drop-down list and select Equation as the slide type.

Live Editor 62
Qwizdom Mac Connect 2011
3. (Optional) Click on the Templates tab. Select a template; click and drag thetemplate onto the slide. See Applying Templates for more details.
4. Enter text onto the slide.5. (Optional) Add multimedia such as images, movies, and sound. Click on the
Media tab. Select the Search (Online) tab. Type in a keyword/s, and clickSearch. Drag and drop multimedia items onto slide.
6. (Optional) Add custom style to slide. Click the Styles tab, browse and select astyle. Drag and drop style onto slide. See Applying Styles for more details.
7. (Optional) Set the time limit.
8. Click the button. This brings up the Question Properties window.
(Optional) Send questions to Q6RF. Check the Send Question Text toRemotes box. *(Optional) Fill in answer/s in the Answer field. Enter the number of points.Multiple answers and point values can be added for partial grading (wholenumbers only). (Optional) Add an equation to be edited by participant in the Text Display onDevice field.(Optional) Set grading options. Participant's answers will be marked right orwrong based on these options.Click OK when finished.
14. (Optional) Create an answer slide. Click the Add Slide button to add a blank slide within the slide set.Right-click (control-click) on the thumbnail of the question slide. Select AddSlide/Add Copy of This Slide to copy the question slide to the answer slide.

Qwizdom Mac Connect User Guide63
Qwizdom Mac Connect 2011
15. When the slide is complete, either go to the File menu, select Save, and close
the window; or click the New Question button to create a new slide set.
* Q6RF remotes can be sent a maximum of 153 characters, includingpunctuation and spacing. This number varies depending on question type.

Live Editor 64
Qwizdom Mac Connect 2011
6.2 Equation Tool
1. Click the Equation button. The Equation from Live Editor window opens.2. Create an equation in the window.3. Close window when finished.4. The equation will appear on the slide as an object.5. You can resize the equation by stretching the handles (click and drag).

Qwizdom Mac Connect User Guide65
Qwizdom Mac Connect 2011
6.3 Styles and TemplatesLive Editor makes creating, editing, and applying styles and templates easy.
Applying Styles1. Create a slide with or without text.2. Click the Styles tab. You can either select a style to use by browsing all the
available styles or select a Category from the drop-down menu to select from aparticular set of styles.
3. There are two ways to apply a style. Click and drag the style to the slide (on the right) to apply.Right-click or control-click the style and select Apply to Slide, Apply toQuestion, or Apply to Activity.
4. You are able to change the font style, size, and color (if applicable) afterapplying the style.
Creating Styles1. Click the Styles tab.2. Click Edit Styles. This will bring up the Styles window.
3. Click New. An untitled style row will appear.4. Double-click on the untitled style to rename it and press the Return key to save
it.
Create a unique name for each style to make it easier and moreaccurate for importing, exporting, and applying styles.

Live Editor 66
Qwizdom Mac Connect 2011
5. Click each tab to customize text, shapes & media, and backgrounds of yournewly created style.
6. Create as many styles as you like. Click Done when finished.
Text tab:
Select font type, color, accent color (highlight), and style (bold, italic, and/orunderline)

Qwizdom Mac Connect User Guide67
Qwizdom Mac Connect 2011
Shapes & Media tab:
Line thickness-determines the size of stroke applied to drawn shapes. To selectthickness, click Line Thickness and select the thickness of the line. Fill Color- applies selected color to all shapes drawn on an activity. To selectcolor, check the Fill Color box (if Fill Color box is unselected, the default colorwill be applied to any drawn shapes), and double-click the Color box.Border Color-applies selected color to outline/stroke of any drawn shape. Toselect color, check the Border Color box (if fill Border Color box is unselected, thedefault color will be applied to any drawn shapes).

Live Editor 68
Qwizdom Mac Connect 2011
Background tab:
Background Image- check the Background Image button to browse for theimage. Click Open and a preview will appear in the Sample window.Background Color- click inside the Background Color box to changebackground color .Filter- applies a tint to your background image. Select the Content andBackground Filter Opacity.Layout- changes the color behind your content. Select the layout and how itshould be scaled on the slide.
Edit Styles1. Click the Styles tab.2. Select the style you want to edit and edit the style settings. See Creating Styles
above for options.3. Click Edit Styles. The Styles window appears.4. Click Done when finished editing.5. Reapply the style to view the updated style.
Delete Styles1. Click the Styles tab.2. Select the style you want to delete. 3. Click Edit Styles. The Styles window appears.4. Click Delete. A prompt will appear asking if you want to delete. 5. Click Yes. 6. Click Done to exit the Styles window.

Qwizdom Mac Connect User Guide69
Qwizdom Mac Connect 2011
Import Styles1. Click the Styles tab. 2. Click Edit Styles.The Styles window appears. 3. Click Import. The Import Styles window appears. 4. Select the .QSP (styles) file you want to import.5. Click Open. The style will import into the Styles window.
If there is a style of the same name that already exists in the Styleswindow, it will ask you to Overwrite or Ignore.
Export StylesExporting styles exports all styles as a .QSP file.
1. Click the Styles tab.2. Click Edit Styles.The Styles window opens. 3. Click Export. The Export All Styles window opens. 5. Select the location where you want to save the styles. 6. Enter the name with which you want the styles to be saved. 7. Click Save. The styles are saved in the selected location.

Live Editor 70
Qwizdom Mac Connect 2011
Applying Templates1. Click the Templates tab.2. There are two ways to apply a template.
Click and drag the template onto the slide.Press the Control key on the keyboard and click the template and selectLoad Template.
Templates must be applied before adding text and multimedia to a slide.
Creating Templates1. Create a slide with text and/or images and multimedia.2. Click the Templates tab.3. Click Create Template.4. The template will be created and added to the Templates tab.
Check the Filter for selected question type box to sort and display thetemplates for a specified question type. By default, there are nopredetermined template categories. You must create categories, see Creating Categories for Templates below for more information.
Creating Categories for Templates1. Click the Templates tab.2. Click the Browse button that is located next to the Category drop-down.
The Categories Editor window appears. 3. Click Add and it will add an untitled category.4. Double-click on the untitled category to enter a category name. 5. Click Close to exit.

Qwizdom Mac Connect User Guide71
Qwizdom Mac Connect 2011
6.4 Multimedia
Insert an Image1. Click the Add Media button in the toolbar. The Open window appears.2. Select the image and click Open.3. The image will appear on the slide.4. Grab and drag the handles of the image to resize to desired size.
Insert Multiple Files (My Media Tab)Use this tool if you wish to import multiple images into Live Editor for easy access andorganization.
1. Click the Media tab.2. Under the My Media tab, click the Import button and browse to the folder in
which you would like to import to Live Editor. 3. Click Open to import. 4. In the upper window, click on the recently imported folder to populate the
preview window below.5. To add an image, drag and drop it onto the slide (on the right).6. Grab and drag the handles of the image to resize to desired size.
Online Media Search1. Click the Media tab.2. Click Search (online).3. Enter the keyword(s) in the Keyword field to search for an image.4. Click Search.5. Images matching the keyword(s) you entered will appear in the Media tab.6. Select an image by dragging and dropping it onto the slide (on the right).7. Grab and drag the handles of the image to resize to desired size.
Inserting a Movie1. Click the Add Media button in the toolbar. The Open window appears.2. Select the movie and click Open.3. The movie will appear on the slide.4. Double-click the movie to play or stop it; or set the media properties.
Adding Sound1. Click the Add Media button in the toolbar. The Open window appears.2. Select the sound file and click Open.3. The sound file will appear on the slide.4. Double-click the sound file to play or stop it; or set the media properties.

Live Editor 72
Qwizdom Mac Connect 2011
Media ControlMedia Control is used for presentation when the Q5RF Instructor Remote or Q7RFtablet will not be used.
1. Go to the Tools menu and select Movie Controls. The Movie Controls windowappears.
Play-black triangleMedia Properties-multimedia settings
Media Properties
Hide during presentation-options do not apply during presentationShow Movie Controls-displays a box of the movie and/or sound file nameswith play and stop buttons.Play Continuously-repeats movie or sound file continuously when the slideis displayed. Full Screen-plays movie in full size; displays sound in colors (best used withonly the sound file on the slide).Play Automatically-plays the movie or sound file upon slide display.Delay ---- seconds before playing-enter number of seconds to pause beforethe movie or sound file plays.

Qwizdom Mac Connect User Guide73
Qwizdom Mac Connect 2011
7 Participants
Creating a Participant List1. Click the Participants tab.
2. Click the Participant Wizard. The Participant wizard will appear.3. Select Create a new participant list.4. Enter a name for the class and click Next. 5. In the Template Selection, select the template you would like to use (optional).
Templates are commonly used fields to allow you to customize aparticipant list you create or an existing one.
6. Click Next.7. Select the different fields you would like to use and click Next. If you do not see
a field you would like in the participant list, you can create a customized fieldand add it to your template.
8. Click Next. The participant list template will appear. 9. Fill in the fields and click Finish. The participant list will save into the
Participants Tree.
Importing a .CSV (Comma Separated Values) FileYou can import .CSV class list and convert it into Qwizdom participant lists (.QPL).
If you have a class list in Microsoft Excel® you would like to import, save itas a .CSV file. It is recommended that your class list includes the followingcolumns First Name, Last Name, and Participant ID.
1. Click the Participants tab.

Participants 74
Qwizdom Mac Connect 2011
2. Click the Participant Wizard. The Participant wizard will appear.3. Select Import .CSV file.4. Click Next. 5. Click Browse.The Open window will appear.6. Search for the .CSV file you want to import.7. Select the .CSV file and click Open. 8. Match the fields on the left to the fields on the right. If you don't know what the
field is, select None. Templates are commonly used fields to allow you tocustomize a participant list you create or an existing one. You can also use thepredefined ones that are available.
9. If the information on the left are headers, check the First Record is Header box,otherwise leave it unchecked. For example, if the imported information on the leftshows column headers such as Last Name, First Name, Remote ID, etc., thoseare headers so you would check the First Record is Header box. If theinformation on the left shows the actual name, Remote ID, etc., uncheck FirstRecord is Header because those are not headers.
10. Click Next when all the fields have been matched. The participant list willappear.
11. Click Finish. The participant list will save into the Participants Tree.
Editing an Existing Participant List1. Click the Participants tab. 2. Select a participant list.
3. Click the Participant Wizard. The participant wizard will appear.4. The Browse for and modify an existing list is selected by default. If the .QPL is
outside of Connect, then go to step 5. If it's a participant list that is located in theParticipants Tree, then skip to step 8.
5. Click Browse. The Open window will appear.6. Search for the participant list you want to edit.7. Select it and click Open.The name of the participant list will appear in the Name
field.8. Click Next. You will be taken to Participant Field Selection. You may add new
fields or remove existing fields. If you do not want to change anything, skip tostep 9.
9. Click Next. The participant list will appear.
You can renumber the remotes by click the Renumber Remotes button.
10. Make the necessary changes and click Finish when done. A prompt will appearasking if you want to overwrite or rename the participant list.
11. Select Overwrite if you want to save the changes to the original participant list,or select Rename to create a new participant list.
12. Once finished, the changes to the participant list will appear in the ParticipantsTree.

Qwizdom Mac Connect User Guide75
Qwizdom Mac Connect 2011
7.1 GroupsAutomatically organize students into groups based on Ability, Odd and Even Numbers,Activity Score, or Performance.
Creating Groups1. Click the Participants tab. The Users/Participants window appears.2. Select the class for which you want to create groups.
3. Click the Show Grouping Options button. The Groups window will open.4. Select the Grouping Action and set the number of students per group. One
group may be odd depending on the number of students in your class.
Balance-groups students by ability. Each group will have an equal number ofhigh, medium, and low performing students.Group Similar-groups students by ability; high together, medium together,low together.Random-groups students randomly; groups may be odd/even.Group Size-specifies the number of students in each group.Activity Score-groups students based on overall grade on a particularactivity.
5. Click Generate to create the groups. 6. (Optional)To manually alter groups, click a student and then drag and drop the
selected student into the desired group.7. Click OK when finished.
Presentation 76
Qwizdom Mac Connect 2011
8 Presentation
Presenting an Activity1. Click on the Content tab. 2. Select an activity to present.3. Click the Present button. The Presentation Setup window appears. 4. Click the Participant List drop-down arrow and select what type of participant list
you would like to use.Browse for Participant List-browse to a participant list that is saved outside ofQwizdom Connect. Anonymous Participant-tracks results by remotes numbers; instructor does notneed to create a participant list.Self-Forming List-tracks results based on User ID/Participant ID, while keeping theuser's name anonymous. Login by User ID is required and the instructor does notneed to create a participant list.
5. Click the Save Results drop-down arrow and select how you would like to savethe results.
6. Select a presentation type in the Present As drop-down.Normal Presentation - Manually progress through presentation using thePresentation Toolbar, Q5RF, or Q7RF. Autopilot - Automatically advances to the next slide based on timer settings. Thedefault timer setting is 20 seconds per slide. Game - Select Baseball, Fast Track, Mission to Mars, or Quandary
7. Select the options you would like available during presentation in the Generaland Login tabs in the lower half of the Presentation Setup window.
8. Click Continue to begin the presentation.9. Have the participants turn on their remotes.10. Either the answer choices or a blank screen will appear on the remote,
depending on the question type.11. Available items in a presentation include:
Display the public response graph or private graph.
Randomly call upon a participant. (Click the Pick button on the Q7RF Tablet orthe (.) Pick button on the Q5RF Instructor remote.)Pose a spontaneous question.
12. Use the Scroll on the Q7RF or the right arrow button on the Q5RF to advance tothe next slide.
13. Click the Enter button on the Q7RF or the Circle key (in middle of the thumbpad) of the Q5RF to view answer slides.
See Using Remotes in Presentation for more helpful presentation tips.
14. When all the slides have been presented, a prompt will appear asking if youwould like to finish the presentation or continue (review). Click Finish thePresentation to exit the presentation.

Qwizdom Mac Connect User Guide77
Qwizdom Mac Connect 2011
8.1 Presentation SetupThere are many options you can apply to your presentation. Not all options will beapplicable.
General tab:
Send right/wrong feedback to remotes after answering-remotes will receivea check mark if answer is correct and an X if answer is incorrect. Remotes willreceive both a check mark and X to indicate that the response has beenreceived if feedback is turned off.Allow participants to change their answer-checking this option allowsparticipants to change submitted answers.Override question point value with global point value of ---- points-enter thenew amount of points that will be temporarily applied to the question slides forthat presentation.Timer-allows options of No Timer, Use Question Defined Time, or Use GlobalTime Value of – seconds.
Login tab:
Require login by ID-checking this option will have remotes prompt participantsto enter their participant ID.Show login screen-displays the login screen so the instructor can view theparticipants that are logging in.

Presentation 78
Qwizdom Mac Connect 2011
Add and allow unregistered participants(Recommended for HigherEducation) - participants will be added to the participant list by logging in withtheir participant ID. Deny login after ---- minutes-logins after the set amount of time will not beaccepted.Host--displays the host type (RF or HID)Host Session--displays the host's default session IDUser Session--this is where you can enter your own session ID. This willoverride the host's default session ID (see Session ID ).
8.1.1 Saving Results
All results are saved as a .QRX file but can be converted into a .CSV (CommaSeparated Values) file. Manual Save
1. Click the Present button. The Presentation Setup window will appear.2. Select Browse for Save Location.3. Click the Browse button.The Save As window appears.4. Select a location in which to save the results.5. Enter the name with which you want the results to be saved.6. Click Save. The file name and location will appear in the Save Results field. 7. The results will save in the selected location.
Auto-save1. Click the Present button. The Presentation Setup window will appear.2. Select Auto Save as 'Filename + List + Date.'3. The Browse for Folder window appears.4. Select the location and click OK.5. The file name will contain the location, name of the participant list, date, and time
under the Save Results field.6. The results will save when the presentation is complete.
Auto-Save to Results Manager1. Click the Present button. The Presentation Setup window will appear.2. Select Auto-Save to Results Manager.3. The results will save in the Results/Reports window when the presentation is
complete.
8.1.2 Remote Login
Logging in with IDs allows participants to use any remote. This mode is best suited forHigher Ed/University settings. If you use participant IDs from a participant list, the IDwill link the remote to the participant's information in the list. Therefore, participants arerequired to enter a session ID and participant ID to join a presentation.

Qwizdom Mac Connect User Guide79
Qwizdom Mac Connect 2011
To have participants log in, they must have a participant ID. Participant IDs are setupwhen creating participant lists. (Go to Participant Lists for more information). Eachparticipant should have a unique ID assigned to his or her name.
Participant IDs can only be numeric.The maximum number of digits allowed for IDs using the Q2RF remotes is 8.The maximum number of digits allowed for IDs using the Q4RF remotes is 9.The maximum number of digits allowed for IDs using the Q5RF remotes is 8.The maximum number of digits allowed for IDs using the Q6RF remotes is 16.
1. Select an activity or create one to present.2. Click the Present button. The Presentation Setup window will appear.3. Select a participant list from the Participant List drop-down menu.4. Click the Login tab.5. Check the Require Login by ID option.6. Checking the Show Login Screen is optional. 7. Select all other preferred options and click Continue to present (see
Presentation Setup). The presentation will begin.8. The remotes will prompt students to enter a User ID. 9. Participants will enter their ID and press the Send or Join key.

Presentation 80
Qwizdom Mac Connect 2011
8.2 Presentation ToolbarThis is the defaulted toolbar view during presentation:
Click to expand the toolbar to display all:
8.2.1 Presentation Features
Response Indicator
The response indicator displays the percentage of participants who have answered andis enabled by default when a question slide is in view.
TimerTo view the timer during presentation, click the Timer drop-down list in the General tabto view the timer options.
The countdown timer counts appears in the right corner of the screen.Remotes will not be able to answer when time is up.
You can set the timer two ways; use the time from each slide (go to Creating a Slide for more information) or apply a new time to the presentation in the PresentationSetup window.
Qwizdom Mac Connect User Guide81
Qwizdom Mac Connect 2011
To set a new timer for the presentation:1. Click the Present icon. This will bring up the Presentation Setup window.2. Click the Timer drop-down list and select Use Global Timer Value of---.3. Enter the number of seconds.4. Click Continue to present the presentation with the newly set time.
PointsYou can set the point value two ways; use the point value from each slide or apply a newpoint value to all the questions in the presentation in the Presentation Setup window.When you create a slide, you enter the number of points the correct response will beawarded) go to Creating a Slide for more information).
To apply a new point value to all the questions in the presentation:1. Click the Present icon. This will bring up the Presentation Setup window.2. Check the Override Question Point Value with Global Point value of --- points
option.3. Enter the number of points. 4. Click Continue to present the presentation with the newly set point value.
Right/Wrong FeedbackThis allows participants to see if their response is correct or incorrect. Feedback willappear on the LCD screen of the participant's remote during presentation. A checkmark will indicate a correct response, an X will indicate an incorrect response. If thefeedback is disabled, a check mark and X will appear on the LCD screen indicatingthat a response was received.
1. Click the Present icon. This will bring up the Presentation Setup window.2. Check the Send right/wrong feedback to remotes after answering box in the
General tab.

Presentation 82
Qwizdom Mac Connect 2011
8.3 Using Remotes in Presentation
Q5RF Instructor Remote TipsThe Q5RF Instructor remote will display Ready when the remote is ready to startan activity.
Use the right directional arrow on thumb pad to advance to the next slide.
Press the Circle key (in middle of the thumb pad) or the up directional arrow toview Answer slides.
Press the / key on the Q5RF Instructor remote to display the public responsegraph. Press the / key again to close.
Press the 0 key on the Q5RF Instructor remote to display the graph on theinstructor's LCD. Press the 0 key again to close.
Press the Pick (.) key on the Q5RF Instructor remote to randomly call upon aparticipant during presentation. Press again to close.
Press the New Q (-) key to pose a spontaneous question. A list of question typesappear on the LCD. Use the up/down arrows on the thumb pad to navigatethrough the question types. Press the Send key to select the question type.Select the correct answer and press Send; if the answer is survey only, press theSend key without selecting an answer.
Press the (?) key to display the list of participants who have requested help.Press C to clear all help requests or scroll to select and remove an individualstudent request.
Presenting Fast Track or Mission to Mars games:Press the right arrow to view Rankings, Scores, and Response Times.There are multiple short cut keys that can be used in this window.
Press the 1(A) key on the Q5RF Instructor remote to go to the nextquestion and skip animation.Press 2(B) key to view score board.Press 3(C) key to view Track/Mission animation. Press 4(D) key to end game and view final scores.
Q7RF Instructor Remote TipsThe Q7RF Instructor remote will display Ready when the remote is ready to startan activity.
Scroll right advance to the next slide.

Qwizdom Mac Connect User Guide83
Qwizdom Mac Connect 2011
Click the Enter button or toggle up to view Answer Slides.
Click to display public results graph, click again to hide.
Click to display private results graph on LCD screen, click again to hide.
Click to randomly call on a participant, click again to close.
Presenting Fast Track or Mission to Mars games:Press the Enter key or scroll right to view Rankings, Scores, and ResponseTimes. There are multiple short cut keys that can be used in this window.
Press the 1 to go to the next question and skip animation.Press 2 to view score board.Press 3 to view Track/Mission animation. Press 4 key to end game and view final scores.
Participant Remote Tips
Remotes' displays will vary when they are ready to start an activity/presentationor when a lesson (non-question) slide is in view.
Q2RF: Displays a battery icon with remote number.Q4RF/Q5RF: Qwizdom will be displayed. Q6: Ready will be displayed.
Remotes' displays will change during an activity/presentation depending onwhich question type is selected. See Creating Slides for information on setting upthe different question types.
Q2RF: Participants will see a blank screen with a battery icon and remotenumber. Q4RF/Q5RF: Participants will either see answer choices or a blank screen ontheir remote during a question slide. Q6RF: The display will be blank, show question text, and/or answer choicesdepending on settings.
Send Request Help-Q2RF: Press the Help key. Q4RF, Q5RF, and Q6RF: Press the Menu key to select Help and press Send.
Change Session ID-Q2RF: Turn remote is on, wait for the remote to time out and turn off. When youturn it back on, press the Help key. When you see --S on the display, enter theSession ID and press the Join key to confirm.
Presentation 84
Qwizdom Mac Connect 2011
Q4RF: Press the Menu key and use the right arrow to scroll through the menuoptions. Press the Send key to select Sess. ID. An existing Session ID mayappear and the remote will ask if you want to change it. Press T for yes and enterthe new Session ID. Press the Send key to confirm.
Q5RF: Press the Menu key when the remote displays Not Found. Use the thumbpad to navigate through the menu options and press the Send key to select EnterSession ID. Enter the new Session ID and press Send to confirm.
Q6RF: Press the Menu key when remote displays Not Found, scroll to EnterSession ID, press the Menu Select key, re-enter the Session ID, and pressthe Join key.
Troubleshooting Tips-
Q4 LCD screen may read Push Key, Inactive, or Not Active, press the Send(double arrows) key to "wake up" the remote. If the remote still displays Not Active, re-enter the Session ID. Go to Changing Session IDs for more information.
If the Q4RF displays No Net, or the Q5RF remote displays Not Found, Session IDNot Found, or the Q2RF remote displays - - - and turns off, re-enter the SessionID. Go to Changing Session IDs for more information.
If the Q4RF remote displays Denied, or the Q5RF remote displays AccessDenied, or the Q6RF displays Session ID Login Denied, or the Q2RF remotedisplays --U, the Participant ID is incorrect, or the Remote ID attempting toparticipate isn't in the participant list that was loaded. Re-enter the Participant ID,and check to make sure that Remote ID is in the participant list.
The Q6 LCD screen may display Power Save Mode. This indicates that theremote is idle. Click RESUME, to reactivate.
Below are the procedures on how to respond for each question type duringpresentation for Q2RF remotes:
True/False-press T or F key.
Yes/No-press T (Yes) or F (No) key .
Multiple Choice-press A, B, C, D, E, or F.
Single Numeric-enter the number.
Qwizdom Mac Connect User Guide85
Qwizdom Mac Connect 2011
Below are the procedures on how to respond for each question type duringpresentation for Q4RF and Q5RF remotes:
True/False-press T or F key and then press the Send key.
Yes/No-press T (Yes) or F (No) key and than press the Send key.
Multiple Choice-press A, B, C, D, E, or F and then press the Send key.
Multiple Mark-select multiple letter choices and than press the Send key.
Numeric-enter the numbers and than press the Send key.
Sequence-enter the numbers in the correct order and press the Send key.
Short Text Response (Q5 remotes only). The alphabet menu will automaticallyappear when this question type is displayed. Use the arrows on the thumb pad tonavigate through the letters, using the Circle key to select the letter(s). Press theSend key to confirm your answer.
Below are the procedures on how to respond for each question type duringpresentation for Q6RF remotes:
True/False-use up/down arrows to scroll to True or False and then press theSend key.
Yes/No-use up/down arrows to scroll to Yes or No and then press the Send key.
Multiple Choice-use up/down arrows to scroll to A, B, C, D, E, or F and thenpress the Send key.
Multiple Mark-use up/down arrows to scroll to answer choice, click the MenuSelect key to select multiple answer choices, and then press the Send key.
Numeric-enter the numeric answer and then press the Send key.
Sequence-enter the numbers in the correct order and then press the Send key.
Short Text Response-enter in the appropriate answer and then press the Sendkey.
Text Response-enter in the appropriate answer and then press the Send key.
Text Edit-press the down arrow, then use directional arrows to scroll to the text

Presentation 86
Qwizdom Mac Connect 2011
that needs editing, press Delete to remove incorrect characters, enter correction,and press the Send key when finished.
Equation-enter the numeric answer; add special characters by pressing the Symbutton or use the Shift button to change the case (subscript and superscript).Press the Send key when finished.
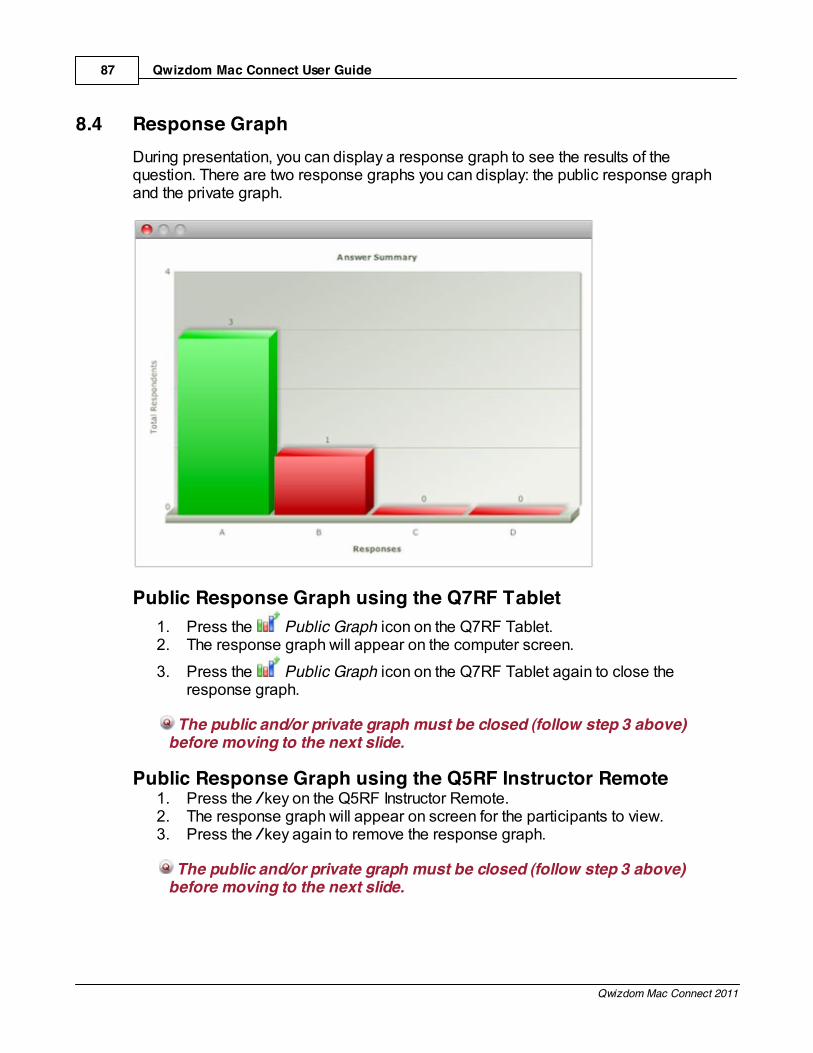
Qwizdom Mac Connect User Guide87
Qwizdom Mac Connect 2011
8.4 Response GraphDuring presentation, you can display a response graph to see the results of thequestion. There are two response graphs you can display: the public response graphand the private graph.
Public Response Graph using the Q7RF Tablet1. Press the Public Graph icon on the Q7RF Tablet.2. The response graph will appear on the computer screen.
3. Press the Public Graph icon on the Q7RF Tablet again to close theresponse graph.
The public and/or private graph must be closed (follow step 3 above)before moving to the next slide.
Public Response Graph using the Q5RF Instructor Remote1. Press the / key on the Q5RF Instructor Remote.2. The response graph will appear on screen for the participants to view.3. Press the / key again to remove the response graph.
The public and/or private graph must be closed (follow step 3 above)before moving to the next slide.
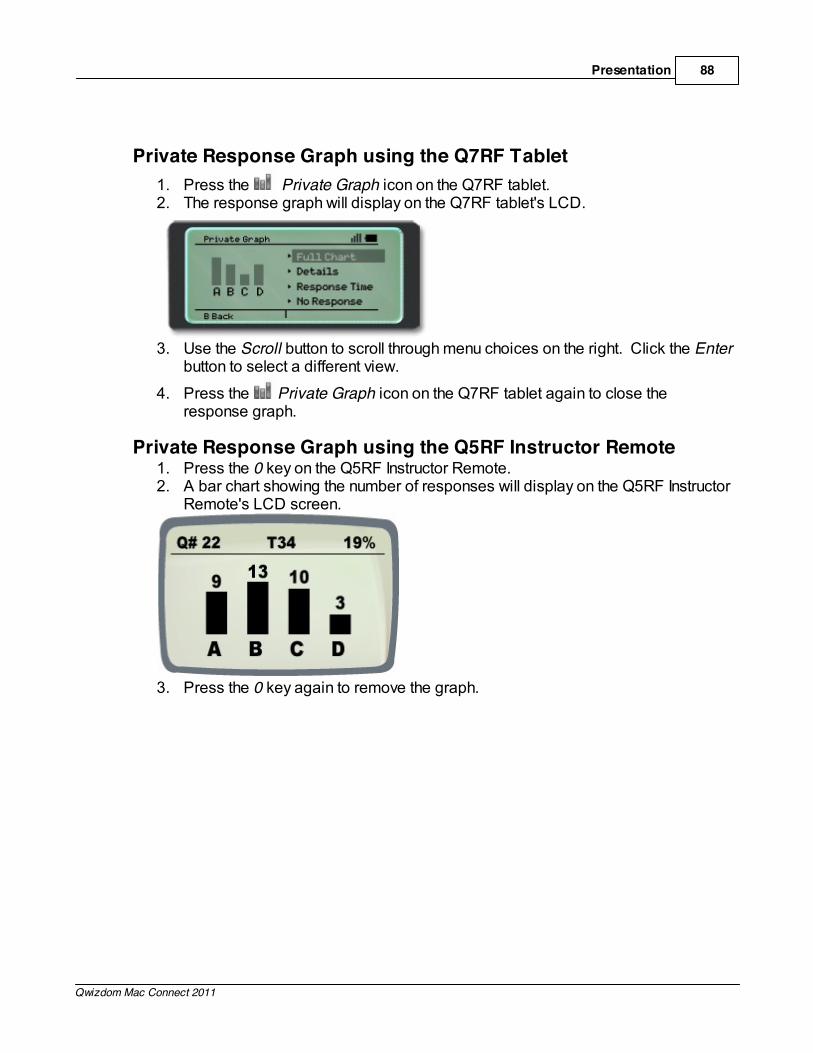
Presentation 88
Qwizdom Mac Connect 2011
Private Response Graph using the Q7RF Tablet1. Press the Private Graph icon on the Q7RF tablet.2. The response graph will display on the Q7RF tablet's LCD.
3. Use the Scroll button to scroll through menu choices on the right. Click the Enterbutton to select a different view.
4. Press the Private Graph icon on the Q7RF tablet again to close theresponse graph.
Private Response Graph using the Q5RF Instructor Remote1. Press the 0 key on the Q5RF Instructor Remote.2. A bar chart showing the number of responses will display on the Q5RF Instructor
Remote's LCD screen.
3. Press the 0 key again to remove the graph.

Qwizdom Mac Connect User Guide89
Qwizdom Mac Connect 2011
8.5 Posing Spontaneous QuestionsSpontaneous questions can be posed during a presentation with or without an instructordevice. Question slides can be saved at the end of the presentation.
Pose Question (with Q7RF Tablet)1. During a presentation, click New Item to insert a blank slide.
2. Click the pen icon on the toolbar or tablet and annotate question. 3. Use the stylus to select Quick Pose icons at the bottom of Q7 tablet, if
appropriate.Numeric answers - click on correct number.
Multiple choice - click on the correct letter. Select appropriate Yes/No choice. Select rating question. If you are posing a survey (no answer) question, touch the Any icon for thespecific question type.
4. A Question type will be displayed on Q7RF LCD screen and answer choice willbe highlighted.
Yes/No Example:
5. Scroll to change highlighted answer if necessary.6. Press the Send button on the Q7RF Tablet.
Sends the question to the remotes.Takes and save the screen shot for reports and subsequent use.
7. Click the Enter button to clear the LCD screen on the Q7RF Tablet.
8. (Optional) Click the Public Graph icon to display the response graph.9. Scroll right to move to the next slide. 10. May need to manually move to next screen on webpage etc…11. If a needed type of question (True/False, Multiple Mark, Fill in the Blank,
Equation, etc.) is not found on the bottom row of Q7, press Insert Slideicon. This will display additional question types on Q7 LCD screen. Scrollthough, highlight, select, and send to student remotes.
12. At the end of the presentation a prompt will appear asking you if you would liketo save your presentation. Click Save to save all spontaneous questions asslides in your presentation.

Presentation 90
Qwizdom Mac Connect 2011
Spontaneous data will be recorded if you chose to save the results.
Pose Spontaneous Question (with Q5RF Instructor Remote)An activity must be in presentation mode before following these instructions below.
1. Press the New Q key on the Q5RF Instructor remote. Question type listings will appear on Q5 LCD screen.
Scroll to highlight desired question type, then press Circle key (in middleof the thumb pad) to select.Select correct answer choice with same process.For survey questions (no correct answer), press the Send key withoutselecting an answer.
2. Press Send (double arrow button).Sends the question to the participant remotes.Takes and save the screen shot for reports and subsequent use.
3. After all participants have responded, press the Public Graph [ / ] key to displaythe response graph. Press the Public Graph [ / ] again to close the responsegraph.
4. Press the right arrow key to move to the next slide.May need to manually move to next screen on webpage etc…
5. At the end of the presentation a prompt will appear asking you if you would liketo save your presentation. Click Save to save all spontaneous questions asslides in your presentation.
Spontaneous data will be recorded if you chose to save the results.
Pose Spontaneous Question (without Instructor Remote)An activity must be in presentation mode before following the instructions below.
1. Click the New Question drop-down arrow on the Presentation Toolbar.2. Click the Pen icon on the toolbar annotate question.3. Select the question type you want to pose.4. Select or enter the correct answer.
5. Click the Pose icon.6. Participants will either see the answer choices or a blank on their remotes. At
this time, they would select or enter their response and press the Send key toconfirm.

Qwizdom Mac Connect User Guide91
Qwizdom Mac Connect 2011
7. Click the Stop icon when time is up or after everyone has responded.8. At the end of the presentation a prompt will appear asking you if you would like
to save your presentation. Click Save to save all spontaneous questions asslides in your presentation.

Presentation 92
Qwizdom Mac Connect 2011
8.6 GamesThere are different ways to display the game animations during presentation:
Using computer mouse--click the right arrow in the Presentation toolbar toadvance to the next slide.Q5RF Instructor--press the right arrow key.
For Fast Track and Mission to Mars press 3(C) key to view race animation. Q7RF Presenter Tablet--press the Enter key or scroll right.
For Fast Track and Mission to Mars press 3)Track/Mission to view raceanimation.
BaseballTwo teams are needed to play Baseball, which the program will automatically group byremote numbers: odd number remotes vs. even number remotes. The outcome of thegame depends on the number of correct responses of each team for each question.
1. Click the Present button.2. The Presentation Setup window appears.3. Click the Participant List drop-down arrow and select what type of participant list
you would like to use.4. Click the Save Results drop-down arrow and select how you would like to save
the results.5. Click the Present As drop-down arrow and select Baseball.6. Select the options you would like available during presentation in the General
and Login tabs in the lower half of the Presentation Setup window.7. Click Continue to start the presentation.8. The Baseball setup window will display the odd and even remote numbers in
their respective teams.9. A batter will appear for the team that is up; a question slide will follow.10. Participants from both teams will send in their responses.11. The outcome of each play is determined by the number of correct responses
from each team. The game will go in favor of the team with the most correctresponses in the least amount of time.
12. The winning team will be displayed when all questions have been answered orwhen the game has ended.
Fast TrackFast Track is a race car game in which points are rewarded based on the responsetime of each remote.
1. Click the Present button.2. The Presentation Setup window appears.3. Click the Participant List drop-down arrow and select what type of participant list
you would like to use.4. Click the Save Results drop-down arrow and select how you would like to save
the results.5. Click the Present As drop-down arrow and select Fast Track.

Qwizdom Mac Connect User Guide93
Qwizdom Mac Connect 2011
6. Select the options you would like available during presentation in the Generaland Login tabs in the lower half of the Presentation Setup window.
7. Click Continue to start the presentation.8. A question slide will appear.9. Participants will send in their responses.10. Points are awarded by correct responses sent in the least amount of time. 11. The winner will be displayed when all questions have been answered or when
the game has ended.
Mars MissionMars Mission is a space ship game in which points are rewarded based on theresponse time of each remote.
1. Click the Present button.2. The Presentation Setup window appears.3. Click the Participant List drop-down arrow and select what type of participant list
you would like to use.4. Click the Save Results drop-down arrow and select how you would like to save
the results.5. Click the Present As drop-down arrow and select Mars Mission.6. Select the options you would like available during presentation in the General
and Login tabs in the lower half of the Presentation Setup window.7. Click Continue to start the presentation.8. A question slide will appear.9. Participants will send in their responses.10. Points are awarded by correct responses sent in the least amount of time. 11. The winner will be displayed when all questions have been answered or when
the game has ended.
QuandaryQuandary is a Jeopardy-like game where users select various dollar amount questionsfrom a game board. 25 slides (questions) are recommended in order to fill the gameboard.
1. Click the Present button.2. The Presentation Setup window appears.3. Click the Participant List drop-down arrow and select what type of participant list
you would like to use.4. Click the Save Results drop-down arrow and select how you would like to save
the results.5. Click the Present As drop-down arrow and select Quandary.6. Select the options you would like available during presentation in the General
and Login tabs in the lower part of the Presentation Setup window.7. Click Settings. The Quandary Configuration window appears. Quandary
Configuration is where the game options are set up for presentation.8. Enter the name of each topic. Each topic represents a category of questions.9. Enter the slide numbers related to the particular topic. Each slide represents a

Presentation 94
Qwizdom Mac Connect 2011
different dollar amount in each category (starting from 100 to 500). 10. Select the scoring option for the game.11. You can use pre-existing groups (created in the Participants tab) or have the
game create temporary groups (which the program will assign) for the currentpresentation.
12. Click OK. You will be taken back to the Presentation Setup window. 13. Click Continue to start the presentation.14. The Team Members screen appears displaying remote numbers in each group.15. Press or click 1 Categories to start the game.16. The game board will display with the categories and dollar amounts.17. Select a dollar amount from a category. A question slide appears.18. Participants will use the remotes to send in their responses. 19. Team points are based on the number of correct responses from each team
member. Individual scores are based on how fast the user was able to send inthe correct answer because the first remote to send in the correct answerreceives all the points for that question.
20. The winning team will be displayed when all questions have been answered orwhen the game has been manually ended. The individual winner can bedetermined in the Player Scores screen.

Qwizdom Mac Connect User Guide95
Qwizdom Mac Connect 2011
9 Results/Reports
You can generate reports using existing saved results.
1. Click the Results/Reports tab.
2. Select a results file. Click the Report Wizard button. The Reporting Wizard window will appear.
3. Click the Choose Report to Run drop-down and select the type of report youwant to generate.
4. The report will appear in the window.
Double-click on any .QRX file saved outside of Connect software to launchthe reporting wizard.
Saving a Report as PDF1. Click the Print button in the Reporting Wizard after the selected report type is
displayed. The Print window appears. 2. Click the PDF drop-down and select Save as PDF. The Save window
appears.3. Enter the name with which you want the results to be saved.4. Click Save. The report is saved as a .PDF.
Export to .CSV (Comma Separated Values) 1. Click the Results/Reports tab.2. Select a results file.
3. Click the Report Wizard button. The Reporting Wizard window will appear.4. Click on the Export button, located in the top right hand corner of the window.

Results/Reports 96
Qwizdom Mac Connect 2011
5. The Save Results window will appear. Name and select where you would liketo save the .csv file.
6. Click Save.
Printing a Report1. Click the Print button in the Reporting Wizard after the selected report type is
displayed. The Print window appears. 2. Click the Printer drop-down and select the printer to use.3. Click Print. The report will print to the printer you selected.
ReportsAttendance Report--displays participant information with their remote login time.Participant Group List Report--displays participant group information .Participant List Report--displays participant information.Overall Score Report--displays participant information with various point totalsand scores.Overall Answer Report--displays the class average score bar chart, participantresponses, correct answers, and scores.Summary Report--displays bar chart of class scores.Question Detail Report--displays participant responses on a selected question.Question Summary Report--displays a thumbnail preview of each questionwithin an activity with a bar chart indicating question responses next to eachquestion.Standards Mastery Report--displays percentage of class that met eachstandard in the activity.Participant Comparison Report--displays a comparison of the participant'squestion responses, correct answer, and score to the whole class' results.Participant Standards Report--displays how the individual participant met eachstandard in the activity.
Online ReportsFor information on how to upload results see Manage Online Results. For informationon viewing online reports, please see Online Results.

Qwizdom Mac Connect User Guide97
Qwizdom Mac Connect 2011
10 Answer Key/Paper-Based
Present and automatically grade existing class worksheets, paper-based tests, andtextbook material by creating an answer key in the software and utilizing studentremotes.
Creating an Answer Key1. Click the Add File button.2. Select Create and Add Answer Key File.3. Enter a name for the activity and click Done. 4. Double-click on the newly created activity. The Answer Key window will open.5. Click the [+] button on the lower left part of the window to add a question.6. In the right-hand column, click the Type drop-down to select the question type.7. Enter the number of points (if applicable).8. Enter or select the correct answer (if applicable).9. (Optional) Click the Advanced Options button to set partial grading options
and/or send question text to Q6RF student remotes. 10. (Optional) Click Duplicate Question to create a copy of a question type and
settings. 11. Click Save when done. The answer key will save in the Content Tree.
Presenting an Answer Key Student-Paced Mode See Survey Bar for details on how to present an Answer Activity as a
class/teacher lead activity.
1. Click the Present button. The Presentation Setup window appears.2. Click the Participant List drop-down arrow and select what type of participant
list you would like to use.3. Click the Save Results drop-down arrow and select how you would like to save
the results.4. Select the options you would like available during presentation in the General
and Login tabs. 5. Click Continue to begin the presentation.6. The Paper-Based Activity Monitor window appears.7. The participants will turn on their remotes at this time. 8. The answer key will load into the remotes and participants will begin to answer.9. The progress can be tracked by following the activity on the Paper-Based
Activity Monitor window.10. When all answer keys have been completed, click Close.
Instruct students to push the right directional arrow key after answeringthe last question to complete the answer key activity. The student remote

Answer Key/Paper-Based 98
Qwizdom Mac Connect 2011
LCD screen will ask the student to confirm that they have completed theactivity. If activity is not complete, the students' scores will not be recorded.
11. A prompt will appear asking if you want to Stop the session. Click Stop toconfirm.
12. You will be taken back to the Answer Key Maker window.13. The results will save in the location you selected.
Presenting Odd-Numbered Questions1. Double-click the answer key. The Answer Key window appears.2. Go to the Edit menu and choose Select Odd Numbered Questions. Only the
odd-numbered questions will be checked. 3. Click the Present button.4. Participants will only see and answer the odd-numbered questions during their
answer key.
Presenting Even-Numbered Questions1. Double-click the answer key in the Content Tree. The Answer Key window
opens the answer key.2. Go to the Edit menu and choose Select Even Numbered Questions. Only the
even-numbered questions will be checked. 3. Click the Present button.4. Participants will only see and answer the even-numbered questions during their
answer key.
Presenting Selected Question Numbers1. Double-click the answer key in the Content Tree. The Answer Key window
opens the answer key.2. Check the question numbers you want to present.3. Click the Present button.4. Participants will only see and answer the selected question numbers during their
answer key.
Presenting Multiple Answer Keys1. Double-click Content Manager found in the Finder/Applications window or
in the Dock to launch Content Manager. 2. Create a new Answer Key activity as described above or use previously
created ones within the Content Tree. When presenting Multiple Answer Keys, the student will need to enter theappropriate Test Number (Activity ID), found right above Question Number in theQwizdom Answer Key Maker.It is helpful to include this number in the activity’s title upon saving.
3. Click the Add Folder button. Enter a name for the folder and click Done.3. The folder appears in the Content Tree on the left. Move the Answer Keys you
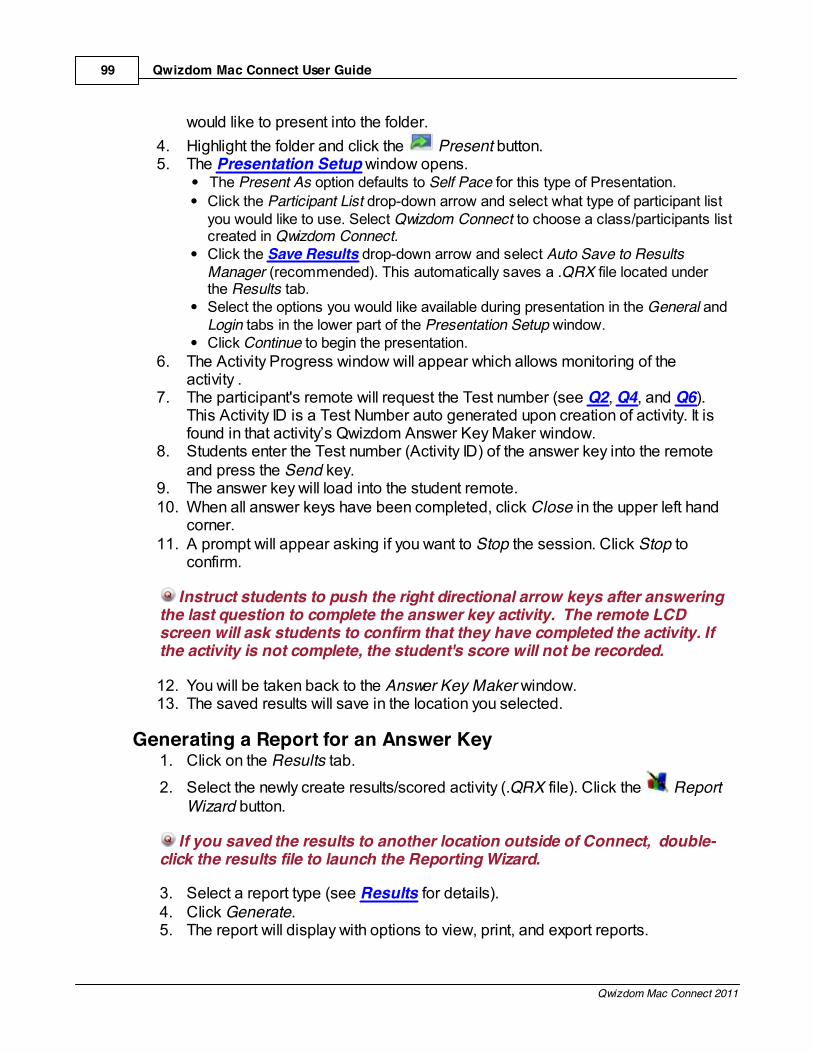
Qwizdom Mac Connect User Guide99
Qwizdom Mac Connect 2011
would like to present into the folder. 4. Highlight the folder and click the Present button.5. The Presentation Setup window opens.
The Present As option defaults to Self Pace for this type of Presentation.Click the Participant List drop-down arrow and select what type of participant listyou would like to use. Select Qwizdom Connect to choose a class/participants listcreated in Qwizdom Connect.Click the Save Results drop-down arrow and select Auto Save to ResultsManager (recommended). This automatically saves a .QRX file located underthe Results tab.Select the options you would like available during presentation in the General andLogin tabs in the lower part of the Presentation Setup window. Click Continue to begin the presentation.
6. The Activity Progress window will appear which allows monitoring of theactivity .
7. The participant's remote will request the Test number (see Q2, Q4, and Q6).This Activity ID is a Test Number auto generated upon creation of activity. It isfound in that activity’s Qwizdom Answer Key Maker window.
8. Students enter the Test number (Activity ID) of the answer key into the remoteand press the Send key.
9. The answer key will load into the student remote.10. When all answer keys have been completed, click Close in the upper left hand
corner.11. A prompt will appear asking if you want to Stop the session. Click Stop to
confirm.
Instruct students to push the right directional arrow keys after answeringthe last question to complete the answer key activity. The remote LCDscreen will ask students to confirm that they have completed the activity. Ifthe activity is not complete, the student's score will not be recorded.
12. You will be taken back to the Answer Key Maker window.13. The saved results will save in the location you selected.
Generating a Report for an Answer Key1. Click on the Results tab.
2. Select the newly create results/scored activity (.QRX file). Click the ReportWizard button.
If you saved the results to another location outside of Connect, double-click the results file to launch the Reporting Wizard.
3. Select a report type (see Results for details).4. Click Generate.5. The report will display with options to view, print, and export reports.

Question Toolbar 100
Qwizdom Mac Connect 2011
11 Question Toolbar
Question Toolbar allows you to turn any activity into an interactive presentation. Thisfloating toolbar appears over any application (including web pages, written documents,lessons, slide shows, etc.) allowing you to ask verbal questions or create content on-the-fly, while students respond in using student remotes. You may choose to save results toassess student understanding or simply save your presentations.
Exits the presentation Pen tool
Slide navigator Line tool
Create new question Shapes tool Indicates information slide
Text tool Indicates question slide
Add equation Indicates answer slide
Insert image
Copies current slide into slide set Deletes a selected object on the slide
Pose Questions Switch views to Full Screen or Integrated
Undo/redo Expands/contracts toolbar
Selects objects on slide
1. Go to the Connect Apps menu and select Question Toolbar. A prompt willappear for you to enter the name of the activity that will be created during thepresentation.
2. Name the activity and click Done. The activity will be saved in the Content Tree. 3. The Presentation Setup window will appear. (See Presentation Setup for
details.) Click the Participant List drop-down arrow and select what type of participantlist you would like to use.Click the Saved Results drop-down arrow and select how you would like tosave the results.Select the options you would like available during presentation in the

Qwizdom Mac Connect User Guide101
Qwizdom Mac Connect 2011
General and Login tabs in the lower half of the Presentation Setup window.Click Continue to begin the presentation.
4. Have the participants turn on their remotes.5. Open any computer program, application, movie, graphic, etc. you wish to use.6. Choose any of the tools located on the Question Toolbar or Q7RF Presenter
Tablet to start creating content. A screen capture of your desktop will be madeinto the background of your presentation, once a tool is selected.
7. When finished, you can Pose questions spontaneously using the Q5 or Q7instructor device or select a question type from the Question menu (MultipleChoice, True/False, Yes/No, etc.) on the toolbar. See below for details.
Choose the correct answer.
(Optional) Click the Advanced Options button to send question textto Q6RF participant remotes only or set partial grading options. (Optional) Set points and timer.
Click the Pose button to send the question to the participantremotes.
Once all participants have answered click the Stop Pose button.8. (Optional) Click the public graph button on the Q5RF or Q7RF Presenter Tablet
to view results graph. See Response Graph for more information.
9. Click New Question and select a question type to ask another question orto create another slide.
10. When finished presenting, click the Utilities button and select Quit.11. The activity will save the in the tree of the Content Manager.

Survey Bar 102
Qwizdom Mac Connect 2011
12 Survey Bar
The Survey Bar is a toolbar that floats over the top of any application (including webpages, written documents, lessons, slide shows, etc.) allowing you to ask verbalquestions while participants respond using Student Response Systems (remotes). Itcan also be used to present an Answer Key file as a classroom/teacher-led activity.
Survey Bar Overview
Pose: Sends a new question to participant remotes
Stop Pose: Stops question; participants can no longer answer the question
Next: Used to move to the next Answer Key Question (only appears when presenting anAnswer Key)
Public Graph: Displays public graph
Settings: Load Answer Keys, change presentation settings, and close presentation
Participants: Displays the number of active participants
Timer: Tracks the amount of time spent on a question
Present an Answer Key as a classroom/teacher-led activity:
1. Click Qwizdom Tools. 2. Select Survey Bar. The Survey Bar Setup window appears.

Qwizdom Mac Connect User Guide103
Qwizdom Mac Connect 2011
3. Select the type of participant list you wish to use.
Select Choose list from Participant Manager to use a participant list savedinside of Qwizdom Connect. Select Browse for Qwizdom Participant List to browse to a participant listsaved outside of Qwizdom Connect. (Recommended for Higher Education) Check Add and allow unregisteredparticipants to allow users who are not on class list to participate inpresentation. Click Anonymous if you would like to track results only by remotes numbers;instructor does not need to create a participant list.Click Self-Forming List to track results based on User ID/Participant ID, whilekeeping the user's name anonymous. Login by User ID is required and theinstructor does not need to create a participant list.
4. Select how you would like to save results (See Saving Results for details.) 5. Select None from the Pose Question menu. 6. Click OK to launch presentation. 7. Click Qwizdom Settings. Choose Answer Key/Load Answer Key.8. Browse to the location of the Answer Key you wish to use. The Answer Key will
load. (See Creating Answer Keys for details.)9. Click Next to send first question to participant remotes.
10. Click Stop Pose when time is up or after everyone has responded.
11. (Optional) Click the Graph to show a public response graphic.

Survey Bar 104
Qwizdom Mac Connect 2011
12. Click Next to pose the next question on the Answer Key.13. (Optional) At any time during the presentation, you can pose a spontaneous
question using the Q5 Instructor or Q7 Presenter Tablet. 14. Continue to the end of the answer key. Once at the end, you can load another
Answer Key or click Qwizdom Settings/Close to end presentation.
Non-Graded Spontaneous Presentation:The Survey Bar can be used as a quick and easy way to make any interactivepresentation. The presenter verbally asks questions and participants can respond usingQwizdom response systems (remotes). These presentations cannot be graded orsaved.
1. Click Qwizdom Tools. 2. Select Survey Bar. The Survey Bar Set Up window appears.3. Select the type of participant list you wish to use.
Select Choose list from Participant Manager to use a participant list savedinside of Qwizdom Connect. Select Browse for Qwizdom Participant List to browse to a participant listsaved outside of Qwizdom Connect. (Recommended for Higher Education) Check Add and allow unregisteredparticipants to allow users who are not on class list to participate inpresentation. Click Anonymous if you do wish to track results by remotes numbers.Click Self-Forming List to track results based on User ID/Participant ID, whilekeeping the user's name anonymous. Login by User ID is required and theinstructor does not need to create a participant list.
4. Select Do Not Save Results (default).5. Select the type of question type you would like to use throughout the
presentation (Multiple Choice, Text Response, etc.).6. Click OK to launch presentation.
7. Ask your question and click Pose. 8. The question type you selected in step 10 will appear on participant remotes.
15. Click Stop Pose when time is up or after everyone has responded.
16. Click the Graph to show a public response graphic. 17. Pose as many questions as you like. You can use the Q5 Instructor or Q7
Presenter Tablet to change the question type during the presentation. (See Posing Spontaneous Questions for details.)
18. Click Qwizdom Settings/Close to end presentation.

Qwizdom Mac Connect User Guide105
Qwizdom Mac Connect 2011
13 Qwizdom Online
Qwizdom Online allows you to access and share online content and media. Registrationmust be completed in order to download or share images and/or content.
Online Registration1. Check to see if there is a Safe Senders List and add @qwizdom.com and add
Qwizdom to your email's safe senders list. If not, after you register, check yourJunk or Spam folder for emails sent by Qwizdom.
2. Go to the Qwizdom Online menu and select Log into Qwizdom Online. 3. Click New User. This will bring you to the Qwizdom registration page. 4. Fill out all required fields.
You must use a valid educational email address to create your QwizdomAccount.
5. You will receive an email with an activation link.6. Click the activation link.7. You will receive a second email within 48 hours with your Qwizdom Connect
username and password.8. Open Qwizdom Connect and log on to Qwizdom Online with your username and
password.
Log in1. Go to the Qwizdom Online menu and select Log into Qwizdom Online.2. Type in your username and password.

Qwizdom Online 106
Qwizdom Mac Connect 2011
13.1 Online SearchThere are multiple ways to search for activities, multimedia, etc. Certain activities andcurriculum packages require a product code (license), which can be acquired throughthe purchase of Qwizdom Connect Premium Service. Restricted content may bepreviewed but not downloaded.
Indicates Premium Content.
Keyword Search1. Click the Qwizdom Online tab. 2. Enter keyword/s into the Keywords field. 3. Click Search.4. Activities, documents, and multimedia materials will appear.5. Preview, Recommend, and/or Download curriculum and materials.
Browse Collections1. Click the Qwizdom Online tab. 2. Go to the Browse tab and select Collections.This allows you to view multiple
lessons and activities within a package.3. Select Subject, Grade, and Package to view content. 4. Preview, Recommend, and/or Download curriculum and materials.
Browse by Standards1. Click the Qwizdom Online tab. 2. Click the Browse tab and select Standards. This allows you to view multiple
lessons and activities by state standards.3. Select Subject, Grade, and Packages to view content. 4. Preview, Recommend, and/or Download curriculum and materials.

Qwizdom Mac Connect User Guide107
Qwizdom Mac Connect 2011
13.2 Share Content1. Go to the Login menu and enter your username and password. (See Qwizdom
Online to create a username and password. )2. Click the Connect Online tab. 3. Click on Share .4. Fill out the form and click the Submit button when finished.5. This brings up the My Page window. Click on the Uploads bar to view your
recently uploaded materials and status (pending or complete).6. When the content has been successfully uploaded, a preview or icon will appear
with a description of the item.
To quickly find your recently uploaded item, select Most Recent in the SortBy drop-down menu.
7. You can Preview Content, Recommend, Download, Edit, or Remove youruploaded content.

Qwizdom Online 108
Qwizdom Mac Connect 2011
13.3 My Page1. Go to the Login menu and enter your username and password. (See Qwizdom
Online for instructions on creating a username and password.)2. Click the Connect Online tab. 3. Click on My Page.4. Click Uploads to view all your recently uploaded items.

Qwizdom Mac Connect User Guide109
Qwizdom Mac Connect 2011
14 Online Reporting
District reporting is part of Qwizdom Connect Premium Service. If you would like topurchase Connect Premium Service, please call our sales department at1.877.794.9366.
Teachers and administrators can view district, school, class, and individual studentreports by score, performance comparison across schools, activities, demographics,standards mastery, and skills. All these reports provide instant student performancedata, enabling teachers to quickly identify specific needs and follow up with modifiedinstruction.
There are two separate tool sets - one for teachers and one for district administrators.
Teachers - See Teacher Tools
District Administrators - See Admin Tools

Online Reporting 110
Qwizdom Mac Connect 2011
14.1 Teacher ToolsMust have Qwizdom Premium Service to access the following features and options.Please contact Sales at 1.877.794.9366 for order information.
Getting StartedYour district administrator will set up your online account for you. Contact youradministrator to find out your username and password.
1. Click the Qwizdom Connect icon. 2. Click the Qwizdom Online menu and select Login to Qwizdom Online.3. Type in your username and password.
14.1.1 Manage Online Classes
Editing Online ClassesIf your classes were created through a district bulk import, they will appear in your Participants tab. You can edit the class information, add/remove students, and editstudent information.
Edit Class Info1. Log into Qwizdom Online using your username and password. 2. Click the Online Classes icon. 3. Select a class to edit.4. Click the Edit Class link. This brings up the Edit Class window.5. Change the Class Name, Select Subjects, and Grade.6. Click Next to save changes.

Qwizdom Mac Connect User Guide111
Qwizdom Mac Connect 2011
7. Click the Local Classes icon to change back to your local participants view.
Add a Student 1. Log into Qwizdom Online using your username and password. 2. Click the Online Classes icon. 3. Select a class. 4. Click the Add Student link. The Find Accounts window will open.5. Add new student data, or enter appropriate data into any field to locate and
select previously added students.Student/User ID must be unique for each student in all created classes.Student/User ID is the student's unique identification number. We recommendusing a school/district ID number if one is available.Complete all fields, or select a previously created student.Click Finish.
6. To add additional students, click Add Student and repeat process.
7. When finished, click the Local Classes icon to change back to your localparticipants view.
Edit Student Info1. Log into Qwizdom Online using your username and password. 2. Click the Online Classes icon. 3. Select a class. 4. Select a student in the lower table.5. Click on Edit Info.
Manually Creating Online ClassesIn some cases, you made need to manually create your classes. Follow the steps belowto set up your online classes.
1. Log into Qwizdom Online using your username and password. 2. Click the Online Classes icon. 3. Click Create Class. The New Class window appears; enter Class Name,
Subject Area(s), and Grade Range. 4. Click Next. Edit Class List window appears.5. Click Add Student. The Find Accounts window will open.6. Add new student data, or enter appropriate data into any field to locate and
select previously added studentsStudent/User ID must be unique for each student in all created classes. Werecommend using a school/district ID number if one is available.Username will be used for student login.Complete all fields, or select a previously created student.Click Finish.
7. Edit Class List window will appear with the student’s information.

Online Reporting 112
Qwizdom Mac Connect 2011
8. To add additional students, click Add Student and repeat process.9. When all students are added, click Finish to complete the list.
10.Click the Local Classes icon to change back to your local participants view.
14.1.2 Manage Online Results
Uploading Results After you have presented an activity (see Presentations for details).
1. Click the Results/Reports tab.2. Right-click or control-click the online results file you wish to upload. Only files
with the Online Reporting icon will be able to be uploaded. 3. Select Upload to Qwizdom Online.
Common Icons:
Online Class Results- indicates all results files can be uploaded into the onlinereporting system.
Pending Results - indicates the results file is currently being uploaded. Complete - indicates the results have been successfully uploaded into the onlinesystem.
Error - indicates there was an error uploading the file.
Delete Results Deleting results from your local view will not delete items that are in the online system. Ifyou wish to delete the results from your local Results Manager and from the OnlineReporting system, you will need to delete results from both places.
Delete Results from local Results Manager :1. Click the Results tab. 2. Right-click or control-click the online results file you wish to delete. Select
Delete.3. A window will appear asking if you are sure you want to delete the results file.
Click OK to confirm.
Delete Results from Online Reporting:1. Click the Results tab.
2. Click Online Reports.3. Click the results you wish to delete. A Delete link will appear.4. Click Delete.5. A window will appear asking if you are sure you want to delete the results file.
Click OK to confirm.

Qwizdom Mac Connect User Guide113
Qwizdom Mac Connect 2011
14.2 Admin ToolsMust have Qwizdom Premium Service to access the following features and options.Please contact Sales at 1.877.794.9366 for order information.
Getting StartedUse the administration tools to create and manage schools (sites), teachers, students,and classes.
1. Go to the Qwizdom Online menu and select Log into Qwizdom Online.2. Enter the district administrator username and password. 3. Go to the Qwizdom Online menu and select District Management. 4. This will bring up the Home page of the District Admin Tools.5. Read the instructions under the Getting Started tab.6. Download the Bulk Import Sample Templates zip file, if you are importing all
school, teacher, student, and class information into the system.
If you plan to bulk import all student, teacher, student, and classinformation into the system, please call our support line (800) 347-3050 andwe will do this for you.
14.2.1 Site/School Management
School/Site ManagementYou can create, edit, and delete sites/schools using district admin tools.
If you plan to bulk import all student, teacher, student, and classinformation into the system, please call our support line (800) 347-3050 andwe will do this for you.
Manually Create a Site/School1. Go to the Qwizdom Online menu and select Log into Qwizdom Online.2. Enter the district administrator username and password. 3. Go to the Qwizdom Online menu and select District Management. 4. This will bring up the Home page of the District Admin Tools. Click School
Management.5. Click Create School.6. Enter a name.7. Enter Site ID. The Site ID will be the school's unique identification number. 8. Select a state. 9. (Optional) Enter in Address, Zip, and Phone Number.10. Click Create.
Updating a Site Information

Online Reporting 114
Qwizdom Mac Connect 2011
1. Go to the Qwizdom Online menu and select Log into Qwizdom Online.2. Enter the district administrator username and password. 3. Go to the Qwizdom Online menu and select District Management. 4. This will bring up the Home page of the District Admin Tools. Click School
Management.5. Select Manage Schools.6. Click Find to view all schools or type in a school name to locate a specific
school.7. Select a school.8. Click Edit.9. Update the site name, address, etc.10. Click Save Changes when finished.
Deleting a Site1. Go to the Qwizdom Online menu and select Log into Qwizdom Online.2. Enter the district administrator username and password. 3. Go to the Qwizdom Online menu and select District Management. 4. This will bring up the Home page of the District Admin Tools. Click School
Management.5. Select Manage Schools.6. Click Find to view all schools or type in a school name to locate a specific
school.7. Select a school.8. Click Delete. 9. A window will appear asking if you are sure you want to delete the site. Click
OK to confirm.
14.2.2 Teacher Management
Teacher ManagementYou can create, edit, and delete teachers using district admin tools.
If you plan to bulk import all student, teacher, student, and classinformation into the system, please call our support line (800) 347-3050 andwe will do this for you.
Manually Create a Teacher1. Go to the Qwizdom Online menu and select Log into Qwizdom Online.2. Enter the district administrator username and password. 3. Go to the Qwizdom Online menu and select District Management. 4. This will bring up the Home page of the District Admin Tools. Click Teacher
Management.5. Click Create Teacher.6. Select a school from the drop-down menu.

Qwizdom Mac Connect User Guide115
Qwizdom Mac Connect 2011
7. Enter in the User ID. The User ID is the teacher's unique identification number. 8. Enter in First Name, Last Name, Username, and Password. 9. (Optional) Enter in the teacher's email address.10. Click Create.
Update Teacher Information1. Go to the Qwizdom Online menu and select Log into Qwizdom Online.2. Enter the district administrator username and password. 3. Go to the Qwizdom Online menu and select District Management. 4. This will bring up the Home page of the District Admin Tools. Click Teacher
Management.5. Click Manage Teachers.6. (Optional) Select a school from the drop-down menu. 7. Click Find to view all teachers or type in a teacher's name to locate a specific
teacher.8. Select a teacher and click Edit. 9. Change the teacher's First Name, Last Name, Username, and Password. 10. Click Update when finished.
Delete a Teacher1. Go to the Qwizdom Online menu and select Log into Qwizdom Online.2. Enter the district administrator username and password. 3. Go to the Qwizdom Online menu and select District Management. 4. Enter the district administrator username and password. Click Login.5. This will bring up the Home page of the District Admin Tools. Click Teacher
Management.6. Click Manage Teachers.7. (Optional) Select a school from the drop-down menu. 8. Click Find to view all teachers or type in a teacher's name to locate a specific
teacher. 9. Select a teacher and click Delete. 10. A window will appear asking if you are sure you want to delete the teacher.
Click OK to confirm.
14.2.3 Student Management
Student ManagementYou can create, edit, and delete students using district admin tools.
If you plan to bulk import all student, teacher, student, and classinformation into the system, please call our support line (800) 347-3050 andwe will do this for you.
Manually Create a Student1. Go to the Qwizdom Online menu and select Log into Qwizdom Online.

Online Reporting 116
Qwizdom Mac Connect 2011
2. Enter the district administrator username and password. 3. Go to the Qwizdom Online menu and select District Management. 4. This will bring up the Home page of the District Admin Tools. Click Student
Management.5. Click Create Student.6. Select a school from the drop-down menu.7. Enter in the User ID. The User ID is the student's unique identification number.
We recommend using a school/district ID number if one is available.8. Enter in First Name, Last Name, Username, and Password. 9. (Optional) Enter in the student's email address.10. Click Create.
Update Student Information1. Go to the Qwizdom Online menu and select Log into Qwizdom Online.2. Enter the district administrator username and password. 3. Go to the Qwizdom Online menu and select District Management. 4. This will bring up the Home page of the District Admin Tools. Click Student
Management.5. Click Manage Students.6. (Optional) Select a school from the drop-down menu. 7. (Optional) Select a class from the drop-down menu. 8. Click Find to view all students or type in a student's name to locate a specific
student. 9. Select a student and click Edit. 10. Change the student's First Name, Last Name, Username, and Password. 11. Click Update when finished.
Delete a Student1. Go to the Qwizdom Online menu and select Log into Qwizdom Online.2. Enter the district administrator username and password. 3. Go to the Qwizdom Online menu and select District Management. 4. This will bring up the Home page of the District Admin Tools. Click Student
Management.5. Click Manage Students.6. (Optional) Select a school from the drop-down menu. 7. (Optional) Select a class from the drop-down menu. 8. Click Find to view all students or type in a student's name to locate a specific
student.9. Select a student and click Delete. 10. A window will appear asking if you are sure you want to delete the student.
Click OK to confirm.
14.2.4 Class Management
Class ManagementYou can create, edit, and delete classes using district admin tools.

Qwizdom Mac Connect User Guide117
Qwizdom Mac Connect 2011
If you plan to bulk import all student, teacher, student, and classinformation into the system, please call our support line (800) 347-3050 andwe will do this for you.
Manually Create a Class1. Go to the Qwizdom Online menu and select Log into Qwizdom Online.2. Enter the district administrator username and password. 3. Go to the Qwizdom Online menu and select District Management. 4. This will bring up the Home page of the District Admin Tools. Click Class
Management.5. Click Create Class. 6. Create New Class window appears. Enter in Class Name.7. Select a school and teacher from the drop-down menus.8. (Optional) Select a Subject Area(s) and Grade Range. 9. Click Next. 10. Click Add Student. 11. Find Accounts window will open. Add new student data, or enter appropriate
data into any field to locate and select previously added students.Student/User ID must be unique for each student in all created classes.Username will be used for student login.Complete all fields, or select a previously created student.
12. Click Finish.
Import Class1. Go to the Qwizdom Online menu and select Log into Qwizdom Online.2. Enter the district administrator username and password. 3. Go to the Qwizdom Online menu and select District Management. 4. This will bring up the Home page of the District Admin Tools. Click Class
Management.5. Click Create Class. 6. Create New Class window appears, enter Class Name, Subject Area(s), and
Grade Range 7. Click I have an existing class list I’d like to import box.
Excel® documents need to be saved as .csv file type before beingimported.
8. Click Next.9. Import Class window will appear; select Browse to search for class list.10. Double-click on the appropriate class list to upload.11. Click Next.12. Map Class List Fields window appears.13. Use the drop-down arrow to choose appropriate Student/User ID, First Name,
and Last Name items.14. Select Generate from the drop-down menu to create Usernames and
Passwords.

Online Reporting 118
Qwizdom Mac Connect 2011
If you do not wish to have an auto-generated password for animported list, you can include that column into the spreadsheet beforeuploading (.csv).
15. Click Next.16. Edit Class List window will appear and will display students’ information.17. Click Finish to complete class list.
Edit Classes1. Go to the Qwizdom Online menu and select Log into Qwizdom Online.2. Enter the district administrator username and password. 3. Go to the Qwizdom Online menu and select District Management. 4. This will bring up the Home page of the District Admin Tools. Click Class
Management.5. Click Manage Classes. 6. (Optional) Select a school from the drop-down menu. 7. (Optional) Select a teacher from the drop-down menu. 8. Click Find to view all classes or type in a class name to locate a specific class. 9. Select the class you wish to edit and click Next. 10. Edit Class Name or re-select School, Teacher, Subject, and Grade for class.11. Click Add Student to add additional student(s).12. Select a student and remove or update student information. 13. Click Finished to update the class.

Qwizdom Mac Connect User Guide119
Qwizdom Mac Connect 2011
14.3 Online ResultsMust have Qwizdom Premium Service to access the following features and options.Please contact Sales at 877-794-9366 for order information.
Home Page - Overview When you first enter the reporting site, you will see all submitted activities, either from allschools (district administrator view) or from all classes (teacher view).
Search 1. Use the filters in the Search Criteria section to sort data by school, teacher,
class, student, or date. 2. Type in an Activity Name to find results for a specific activity.
Export Data to .CSV1. Click Export.2. Name the File.3. (Optional) Select Include Header to add a district name, date, and time to the
top of the spreadsheet. 4. Click OK. 5. The File Download window will appear. 6. Click Save and browse to the location where you wish to save the .csv file.

Online Reporting 120
Qwizdom Mac Connect 2011
7. Click Save to confirm.
14.3.1 District Admin
Compare School Performance on an ActivityCompare school performance at a quick glance.
1. Log into Qwizdom Online using your username and password. 2. Click the Results tab.
3. Click Online Reports.4. The Online Reporting home page appears. (See Online Results for more
info).5. Click an activity link.6. A window will appear listing the performance of all schools on the select
activity. 7. (Optional) Click Export to save results to a .csv. (See Online Results for more
info).8. Click Reset to compare results on another activity. 9. Click Local Reports to return to the local results view.
Viewing ReportsStandards, Overall Score Report, and Reports are only available at a class level. If youare a district administrator you need to select a school, teacher, class, and activitybefore you can view report.
1. Log into Qwizdom Online using your username and password. 2. Click the Results tab.
3. Click Online Reports.4. The Online Reporting home page appears. (See Online Results for more
info).5. Use the filters in the Search Criteria section to select a school, teacher, and
class. 6. Click an activity link to select an activity. 7. Use the View by drop-down menu to select one of the following reports:
Standards Report--displays percentage of class that met each standard inthe activity.Overall Score Report--displays participant information with various pointtotals and scores.Answer Distribution Report--displays the class average score bar chart,participant responses, correct answers, and scores.
8. (Optional) Click Export to save results to a .csv. (See Online Results for more

Qwizdom Mac Connect User Guide121
Qwizdom Mac Connect 2011
info).9. Click Local Reports to return to the local results view.
View Individual Student Performance on an Activity1. Log into Qwizdom Online using your username and password. 2. Click the Results tab.
3. Click Online Reports.4. The Online Reporting home page appears. (See Online Results for more
info).5. Use the filters in the Search Criteria section to select a school, teacher, class,
and student. 6. Click an activity link. 7. View student's responses on each question.8. Use the View by drop-down menu to view the Question Thumbnail or
Standards report.9. (Optional) Click Export to save results to a .csv. (See Online Results for
more info).10. Click Local Reports to return to the local results view.
14.3.2 Teachers
Compare Class Performance on an ActivityCompare class performance at a quick glance.
1. Log into Qwizdom Online using your username and password. 2. Click the Results tab.
3. Click Online Reports.4. The Online Reporting home page appears. (See Online Results for more
info).5. Click an activity link. You will be taken to the Classes view. This view allows
you to compare overall class performance on a selected item.6. (Optional) Export data to a .csv. (See Online Results for more info).7. Click Local Reports to return to the local results view.
Compare Student Performance on an ActivityCompare students at a quick glance.
1. Log into Qwizdom Online using your username and password. 2. Click the Results tab.
3. Click Online Reports.4. The Online Reporting home page appears. (See Online Results for more
info).5. Click an activity link. The Classes view appears.

Online Reporting 122
Qwizdom Mac Connect 2011
6. Click a Class link. This view allows you to compare student performance onselected activity.
7. (Optional) Export data to a .csv. (See Online Results for more info).8. View Class Reports including Overall Score, Answer Distribution, and
Standards Mastery Reports.Standards Report--displays percentage of class that met each standardin the activity.Overall Score Report--displays participant information with various pointtotals and scores.Answer Distribution Report--displays the class average score barchart, participant responses, correct answers, and scores.
9. Click Local Reports to return to the local results view.
View Individual Student Performance on an Activity1. Log into Qwizdom Online using your username and password. 2. Click the Results tab.
3. Click Online Reports.4. The Online Reporting home page appears. (See Online Results for more
info).5. Click an activity link. The Classes view appears.6. Click a Class link and then click a Student link.7. View student's responses on each question.8. Use the View by drop-down menu to view the Question Thumbnail or
Standards report.

Qwizdom Mac Connect User Guide123
Qwizdom Mac Connect 2011
15 Software Updates
1. Close all Qwizdom software applications.
2. Click Qwizdom Tools.
3. Select Check For Updates.4. If there are any updates available, the Software Update window will appear and
list the release version, date, and the list of fixes.5. Click Install Update. The update will download.6. Once the update is done downloading, it is ready to be installed.7. Click Install and Relaunch. The Install Qwizdom Connect window appears.8. Click Continue in the Introduction.9. Read the information in the Read Me section and click Continue.10. Read the Licensing Agreement in the License section and click Continue.11. Click Agree when the "To continue installing the software, you must agree to the
terms of the software license agreement" prompt appears.12. Select a destination to install Qwizdom Mac Connect in the Destination Select
section. Click Continue.13. Click Install in the Installation Type section.14. Your computer may or may not prompt you for a password (depending on
permission levels). Enter a password (if applicable) and click OK; or just clickOK if no password is required.
15. The update will begin to install.16. Follow the wizard as it guides you to apply the update.