user guide computer sony notebook
TRANSCRIPT

n N
Sony NotebookComputerUser GuidePCG-SR11K
© 2000 by Sony Corporation.

k C
om
pu
ter
Use
r G
uid
e2n N
Notice to Users
© 2000 Sony Corporation. All rights reserved. This manual and the software described herein, in whole orin part, may not be reproduced, translated, or reduced to any machine-readable form without prior writtenapproval.
Sony Corporation provides no warranty with regard to this manual, the software, or other informationcontained herein and hereby expressly disclaims any implied warranties or merchantability or fitness forany particular purpose with regard to this manual, the software or such other information. In no event shallSony Corporation be liable for any incidental, consequential, or special damages, whether based on tort,contract, or otherwise, arising out of or in connection with this manual, the software, or other informationcontained herein or to use thereof.
cation to this manual or the information containedherein is governed by the terms of a separate user
r, Memory Stick and the Memory Stick logo, VAIOWindows and the Windows 2000 logo are
l Corporation.
owners.
So
ny
No
teb
oo
Sony Corporation reserves the right to make any modifiherein at any time without notice. The software describedlicense agreement.
Sony, DVgate, i.LINKTM, JogDialTM , Mavica, PictureGeaand the VAIO logo are trademarks of Sony Corporation.registered trademarks of Microsoft Corporation.Intel, MMX, Celeron and Pentium are trademarks of Inte
All other trademarks are trademarks of their respective
Specifications are subject to change without notice.

k C
om
pu
ter
Use
r G
uid
e3n N
Safety Information
Owner’s Record
The model number and serial number are located on the bottom of your Sony notebook computer. Recordthe serial number in the space provided here. Refer to the model and serial number when you call VAIO-Link.Serial number:________________________Model number:
PCG-3216
o damages that are not covered by the guarantee.efer servicing to qualified personnel only.
pment is positioned in close proximity to any
r VAIO notebook computer to rain or moisture.lightning storm.s the jack is specifically designed for wet locationsls unless the telephone line has been disconnected
e lines..s leak in the vicinity of the leak.ter. To disconnect your notebook completely from
essible.
So
ny
No
teb
oo
WARNING� Opening the unit, for whatever reason, could lead t� To avoid electrical shock, do not open the cabinet. R� Audio and picture distortion may occur if this equi
equipment emitting electromagnetic radiation.� To prevent fire or shock hazard, do not expose you� Never install modem or telephone wiring during a� Never install telephone jacks in wet locations unles� Never touch uninsulated telephone wire or termina
at the network interface.� Use caution when installing or modifying telephon� Avoid using the modem during an electrical storm� Do not use the modem or a telephone to report a ga� Use your notebook only with the supplied AC adap
mains voltage, unplug the AC adapter.� Please make sure that the socket outlet is easily acc

So
ny
No
teb
oo
k C
om
pu
ter
Use
r G
uid
e4n N
Regulatory Information
This product conforms to the following European Directives:
73/23/EEC (Low Voltage Directive)
89/336/EEC, 92/31/EEC (EMC Directives)
93/68/EEC (CE Marking Directive)
1999/5/EC (radio equipment and telecommunications terminal equipment Directive)
This product complies with EN 55022 Class B and EN 50082-1 for use in following areas: residential,
the limits set out in the EMC Directive for using
CT and complies with the Laser Product Safetyuthorized Sony technicians. Improper repairs and
1 DUCT 25-1
commercial and light-industrial.
This product has been tested and found compliant withconnection cables shorter than 3 metres (9.8 feet)
The CD-ROM is classified as a CLASS 1 LASER PRODUStandard EN 60825-1. Repair and maintenance only by ause can create safety hazards.
CLASSLASER PRO
TO EN 608

k C
om
pu
ter
Use
r G
uid
e5n N
As an ENERGY STAR Partner, Sony has determined that this product meets the ENERGY STAR guidelines forenergy efficiency.
The International ENERGY STAR Office Equipment Program is an international program that promotesenergy saving through the use of computers and their office equipment. The program backs thedevelopment and dissemination of products with functions that effectively reduce energy consumption. Itis an open system in which business proprietors can participate voluntarily. The targeted products are officeequipment such as computers, displays, printers, facsimiles and copiers. Their standards and logos areuniform among participating nations.
ENERGY STAR is a U.S. registered mark.
So
ny
No
teb
oo

k C
om
pu
ter
Use
r G
uid
e6n N
Disposal of Lithum Ion battery! Do not handle damaged or leaking Lithium ion batteries. Dispose of promptly and properly.
! Danger of explosion if battery is incorrectly replaced. Replace only with the same or equivalent type recommended by the manufacturer. Discard used batteries according to the manufacturer’s instructions (see below).
! The battery pack used in this device may present a fire or chemical burn hazard if mistreated. Do not disassemble, heat above 100°C (212°F) or incinerate. Dispose of used battery promptly.
! Keep away from children.
mory battery. For changing this battery, please contact
� Dispose of properly at end-of-life.
� In some areas the disposal of lithium ion batteries in household or business waste may be prohibited.
� Please use the public collection system.
So
ny
No
teb
oo ! Your notebook is equipped with an internal backup me
VAIO-Link.

WelcomeS
on
y N
ote
bo
ok
Co
mp
ute
r U
ser
Gu
ide
7n N
WelcomeCongratulations on purchasing a Sony VAIO notebook computer. Sony has combinedleading-edge technology in audio, video, computing and communications to provideyou with state-of-the-art personal computing.Here are just some of the features your VAIO notebook computer has to offer (read thedetails in the Specifications chapter of this guide).
� Exceptional performance - Your PC includes a fast processor, a fast CD-ROM and
ck provides hours of use without AC
solution LCD screen enables you to takeia applications, games, and
test operating system from Microsoft.
services, send and receive e-mails,
any problem with your computer, you-mail (see your Customer Service Guideink, you may try to solve the problem byg chapter) or the manuals and Help files
an internal modem.� Portability - The rechargeable battery pa
power.
� Sony audio and video quality - A high-readvantage of today’s advanced multimedentertainment software.
� Windows® - Your system includes the la
� Communications - Access popular onlinebrowse the Internet...
� Excellent customer support - If you havecan contact VAIO-Link by Internet and efor addresses). Before contacting VAIO-Lreading your User Guide (troubleshootinfor the peripherals or software.

WelcomeAbout the User Guides
k C
om
pu
ter
Use
r G
uid
e8n N
About the User GuidesYour Documentation Pack contains paper and on-line user guides on a DocumentationCD-ROM:
Printed Documentation:� A Setting Up poster in colour and a Getting Started brochure; a Customer Guide,
where you will find all the basic information to start using your notebookcomputer;
ation poster;the modem;
hows you how to use the standard
how you can add functionality by
ns available to you, and offers basic
bout using your notebook computer.omputer, drivers and accessories. The
ices are compatible with your notebook.
So
ny
No
teb
oo � A complete Regulatory and safety inform
� A Modem Regulations Flyer applying to
� Your Sony Guarantee conditions.
Online Documentation:
1 This User Guide:
� Using Your Sony Notebook Computer scomponents of your system.
� Connecting Peripheral Devices explainsconnecting various peripherals.
� Getting Help explains the support optiotroubleshooting tips.
� Notes on Use provides facts and advice a� Specifications provides details on your c
Compatibility Table indicates which dev

WelcomeAbout the User Guides
k C
om
pu
ter
Use
r G
uid
e9n N
2 Refer to your Software Guide for information on the bundled software and theSony applications.
� About the Software is a short description of the features of the software pre-installed on your system.
� Customizing your notebook explains how to set your system and powermanagement with Sony Notebook Setup, VAIO Action Setup, PowerPanel, etc.
� Using the Product Recovery CD-ROMs explains how to perform a system andapplication recovery.
are you are using for detailedting.
So
ny
No
teb
oo 3 Consult the Online Help files of the softw
information on features and troubleshoo

WelcomeUnpacking Your Notebook Computer
k C
om
pu
ter
Use
r G
uid
e10n N
Unpacking Your Notebook ComputerRemove the following hardware items from the box:
Rechargeable battery pack
hone plug (country specific) Phone cable
Main unit
Documentation Pack
Display Adapter
So
ny
No
teb
oo
Product Recovery CD-ROMs
AC adapter P
CD-ROM drive
Power cord
WelcomeErgonomic Considerations
k C
om
pu
ter
Use
r G
uid
e11n N
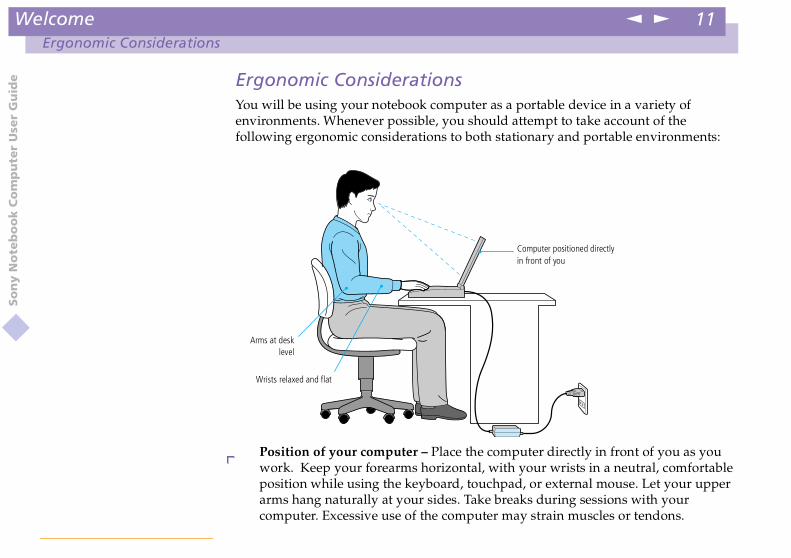
Ergonomic ConsiderationsYou will be using your notebook computer as a portable device in a variety ofenvironments. Whenever possible, you should attempt to take account of thefollowing ergonomic considerations to both stationary and portable environments:
mputer directly in front of you as youith your wrists in a neutral, comfortablepad, or external mouse. Let your upperreaks during sessions with yourmay strain muscles or tendons.
Computer positioned directly in front of you
So
ny
No
teb
oo
� Position of your computer – Place the cowork. Keep your forearms horizontal, wposition while using the keyboard, toucharms hang naturally at your sides. Take bcomputer. Excessive use of the computer
Arms at desklevel
Wrists relaxed and flat
WelcomeErgonomic Considerations
k C
om
pu
ter
Use
r G
uid
e12n N
� Furniture and posture – Sit in a chair with good back support. Adjust the level ofthe chair so your feet are flat on the floor. A footrest may make you morecomfortable. Sit in a relaxed, upright posture and avoid slouching forward orleaning far backwards.
� Viewing angle of the computer’s display – Use the display’s tilting feature to findthe best position. You can reduce eye strain and muscle fatigue by adjusting the tiltof the display to the proper position. Adjust the brightness setting of the displayas well.
� Lighting – Choose a location where windows and lights do not create glare andting to avoid bright spots on the display.r display that help reduce glare. Proper
effectiveness.
using an external display, set the displaysure the display screen is at eye level ornt of the monitor.
So
ny
No
teb
oo reflection on the display. Use indirect ligh
You can also purchase accessories for youlighting adds to your comfort and work
� Placement of an external display – Whenat a comfortable viewing distance. Makeslightly lower when you are sitting in fro

Using Your Notebook ComputerLocating the Controls and Connectors
k C
om
pu
ter
Use
r G
uid
e13n N
Using Your Notebook ComputerThis section describes how to start using your computer and how to use yourcomputer’s internal devices, such as the touchpad, the disk drives and the battery...
Locating the Controls and Connectors
Right
(page 40) Phone Line jack (page 45)
(page 40)
(page 54)
� Phone cable and connectors are TNV (Telecommunication Network Voltage), according to EN60950.
7
So
ny
No
teb
oo
i Headphone connector
(page 57)PC Card eject button
Line in/mic connector
(page 58) PC card slot
Jog Dial (page 31) S400 i.LINKTM connector
1 4
2 5
3 6
Using Your Notebook ComputerLocating the Controls and Connectors
k C
om
pu
ter
Use
r G
uid
e14n N
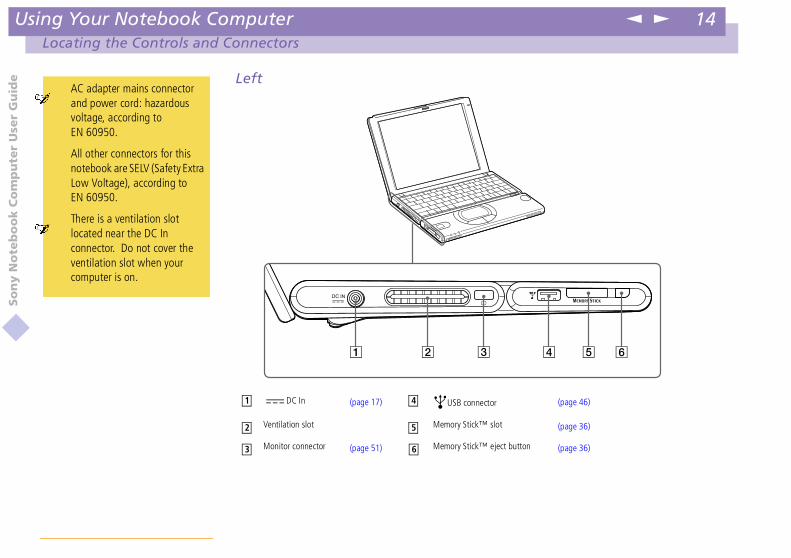
Left
(page 46)
t (page 36)
ct button (page 36)
� AC adapter mains connector and power cord: hazardous voltage, according to EN 60950.
All other connectors for this notebook are SELV (Safety Extra Low Voltage), according to EN 60950.
� There is a ventilation slot
So
ny
No
teb
oo
DC In (page 17) USB connector
Ventilation slot Memory Stick™ slo
Monitor connector (page 51) Memory Stick™ eje
located near the DC In connector. Do not cover the ventilation slot when your computer is on.
1 4
2 5
3 6
Using Your Notebook ComputerLocating the Controls and Connectors
k C
om
pu
ter
Use
r G
uid
e15n N
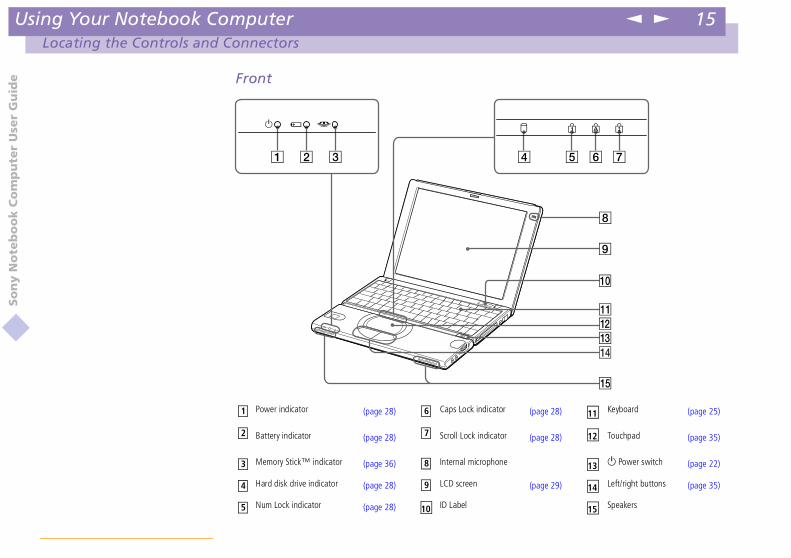
Front
or (page 28) Keyboard (page 25)
tor (page 28) Touchpad (page 35)
ne 1 Power switch (page 22)
(page 29) Left/right buttons (page 35)
Speakers
11
12
13
14
15
So
ny
No
teb
oo
Power indicator (page 28) Caps Lock indicat
Battery indicator (page 28) Scroll Lock indica
Memory Stick™ indicator (page 36) Internal micropho
Hard disk drive indicator (page 28) LCD screen
Num Lock indicator (page 28) ID Label
1 6
2 7
3 8
4 9
5 10

Using Your Notebook ComputerLocating the Controls and Connectors
k C
om
pu
ter
Use
r G
uid
e16n N
Back
Battery connector (page 18)
r (page 18) Ventilation slot
1
3
So
ny
No
teb
oo
Bottom
Battery lock lever (page 18) Battery release leve1 2

Using Your Notebook ComputerConnecting a Power Source
k C
om
pu
ter
Use
r G
uid
e17n N
Connecting a Power SourceYou can use either AC power or a rechargeable battery pack as a power source.
Using the AC Adapter
1 Plug the cable attached to the AC adapter into the DC In connector on thecomputer.
2 Plug one end of the power cord into the AC adapter.
an AC outlet.
� Use your notebook only with the supplied AC adapter.
To disconnect your notebook completely from mains voltage, unplug the AC adapter.
Please make sure that the socket outlet is easily accessible.
3
2
r
Power cord (hazardous voltage according to EN 60950)(supplied)
So
ny
No
teb
oo 3 Plug the other end of the power cord into
1
SELV according to EN 60950
Notebook compute
AC adapter
(supplied)
DC in
Using Your Notebook ComputerConnecting a Power Source
k C
om
pu
ter
Use
r G
uid
e18n N
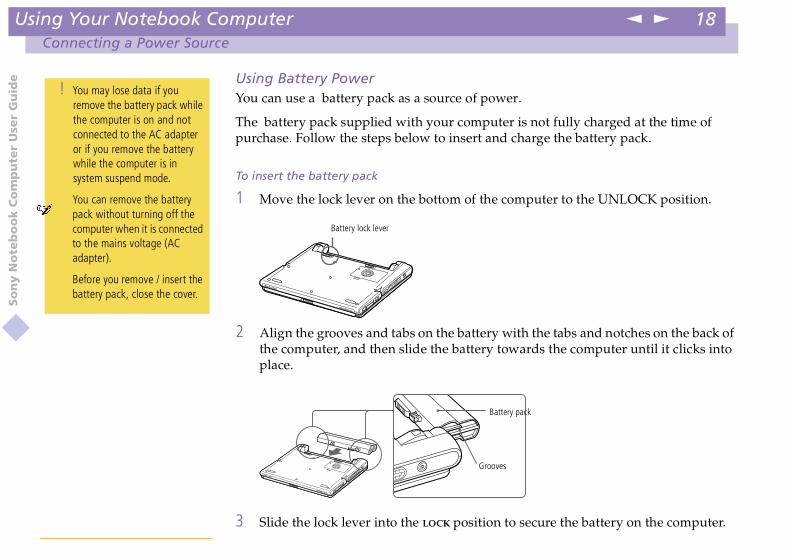
Using Battery PowerYou can use a battery pack as a source of power.
The battery pack supplied with your computer is not fully charged at the time ofpurchase. Follow the steps below to insert and charge the battery pack.
To insert the battery pack
1 Move the lock lever on the bottom of the computer to the UNLOCK position.
with the tabs and notches on the back oftowards the computer until it clicks into
to secure the battery on the computer.
! You may lose data if you remove the battery pack while the computer is on and not connected to the AC adapter or if you remove the battery while the computer is in system suspend mode.
� You can remove the battery pack without turning off the
ttery pack
es
So
ny
No
teb
oo
2 Align the grooves and tabs on the batterythe computer, and then slide the batteryplace.
3 Slide the lock lever into the LOCK position
computer when it is connected to the mains voltage (AC adapter).
Before you remove / insert the battery pack, close the cover.
Battery lock lever
Ba
Groov
Using Your Notebook ComputerConnecting a Power Source
k C
om
pu
ter
Use
r G
uid
e19n N
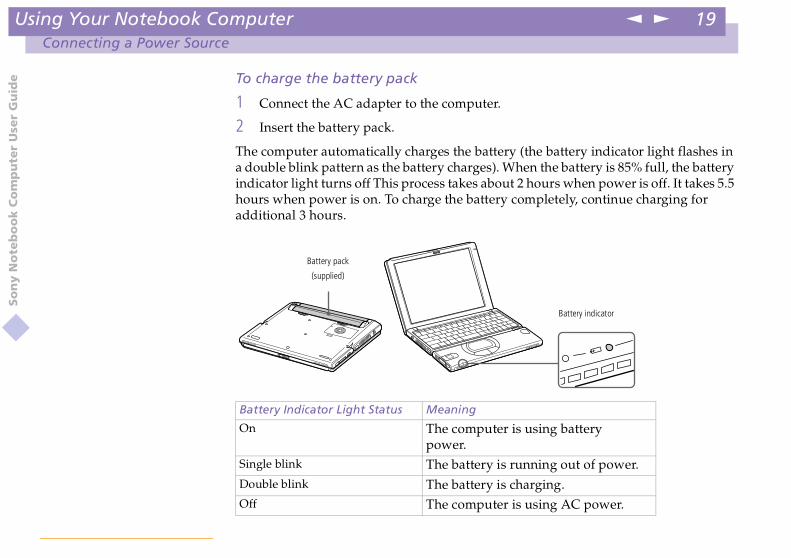
To charge the battery pack
1 Connect the AC adapter to the computer.
2 Insert the battery pack.
The computer automatically charges the battery (the battery indicator light flashes ina double blink pattern as the battery charges). When the battery is 85% full, the batteryindicator light turns off This process takes about 2 hours when power is off. It takes 5.5hours when power is on. To charge the battery completely, continue charging foradditional 3 hours.
er is using battery
is running out of power.
s charging.er is using AC power.
Battery indicator
So
ny
No
teb
oo
Battery Indicator Light Status Meaning
On The computpower.
Single blink The batteryDouble blink The battery iOff The comput
Battery pack
(supplied)
Using Your Notebook ComputerConnecting a Power Source
k C
om
pu
ter
Use
r G
uid
e20n N
� For some software applications and some peripheral devices, your computer may not enter system hibernation mode when battery life is low. To avoid loss of data when using battery power, you should save your data frequently and manually activate a power management mode, such as system suspend or system hibernation.
When the battery is running out of power, both the battery and power indicators blink.
To determine the time the battery lasts, please refer to Displaying Battery information in your Software Guide.
Keep the battery pack in the computer while it is directly connected to AC power. The battery pack continues
r attach the AC adapter to recharge the battery or shut .
nagement modes in the PowerPanel utility. See your t.
um ion battery and can be recharged at any time. battery life.
ry pack as a power source. When battery life is nearly
and has a battery pack inserted in the battery bay, it
So
ny
No
teb
oo
to charge while you are using the computer.
If the battery level falls to below 10%, you should eithedown your computer and insert a fully charged battery
You can extend battery life by changing the power maSoftware guide, in Controlling Power Managemen
The battery pack supplied with your computer is a lithiCharging a partially discharged battery does not affect
The battery indicator light is on while you use the battedepleted, the battery indicator starts flashing.
When the computer is directly connected to AC poweruses power from the AC outlet.
Using Your Notebook ComputerConnecting a Power Source
k C
om
pu
ter
Use
r G
uid
e21n N
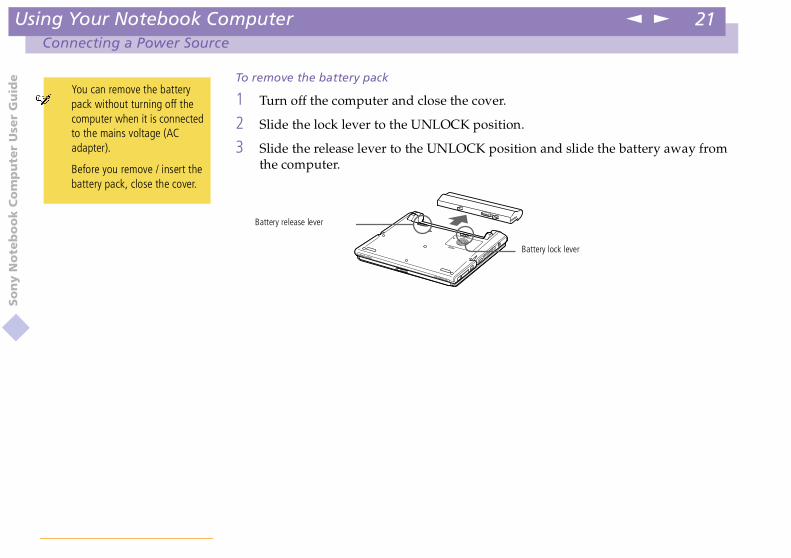
To remove the battery pack
1 Turn off the computer and close the cover.
2 Slide the lock lever to the UNLOCK position.
3 Slide the release lever to the UNLOCK position and slide the battery away fromthe computer.
� You can remove the battery pack without turning off the computer when it is connected to the mains voltage (AC adapter).
Before you remove / insert the battery pack, close the cover.
Battery lock lever
So
ny
No
teb
oo Battery release lever

Using Your Notebook ComputerStarting Your Computer
k C
om
pu
ter
Use
r G
uid
e22n N
Starting Your Computer1 Slide the LCD lock lever in the direction of the arrow, and lift the cover.
ntil the green power indicator light turns
ls for the LCD display with Fn+F5. Tot arrow keys. To decrease use the down
LCD lock lever
Power switch
So
ny
No
teb
oo
2 Slide the power switch of the computer uon.
3 If necessary, adjust the brightness controincrease the brightness, use the up or righor left arrow keys.
� If you hold the power switch in the on position for more than four seconds, the computer will turn off.
Power indicator

Using Your Notebook ComputerShutting Down Your Computer
k C
om
pu
ter
Use
r G
uid
e23n N
Shutting Down Your Computer
1 Click the Start button on the Windows® taskbar.
2 Click Shut Down at the bottom of the Start menu to display the Shut DownWindows dialog box.
3 Select Shut down.
4 Click OK.
atically. The power indicator will turn off.
r computer.
e steps described above:
ting section of this User Guide.
life by using System Suspend mode. See Controlling details.
! To avoid potential loss of data, follow these steps to shut down your computer.
� Respond to any prompts warning you to save documents.
So
ny
No
teb
oo
5 Wait for your computer to turn off autom
6 Turn off any peripheral connected to you
� If you are unable to shut down your computer using th
- close all software in use,
- remove the PC cards if inserted,
- disconnect any USB devices,
then restart the computer.
If the previous steps do not work, see the Troubleshoo
During a period of inactivity, you can conserve battery Power Management in your Software Guide for further

Using Your Notebook ComputerRegistering Your Computer
k C
om
pu
ter
Use
r G
uid
e24n N
Registering Your ComputerYou can take advantage of Sony’s commitment to quality customer support andreceive the following benefits by registering your computer with Sony:
� VAIO-Link – You can contact VAIO-Link by Internet or e-mail (see your CustomerService Guide for addresses).
� Guarantee – Protect your investment. See the Guarantee sheet for the terms andconditions and please refer to your Customer Service Guide for more information.
Follow these steps to use the Sony Notebook Computer’s online registration service:
sktop,
d click Send,
� You must connect your phone line before using any online services, including the online registration service.
� To access the online Registration web page, you must have a connection to the Internet.
So
ny
No
teb
oo
1 Click on the Welcome button on your de
2 Click Next,
3 Click Internet,
4 Fill in your Registration card fields,
5 Scroll down to the bottom of the form an
6 Click OK.

Using Your Notebook ComputerUsing the Keyboard
k C
om
pu
ter
Use
r G
uid
e25n N
Using the KeyboardYour keyboard is very similar to a desktop computer’s, but the keyboard hasadditional keys that perform specific notebook computer-related tasks.
a typical calculator. Use the numerics or to perform mathematical calculationsction. Note that you must press the Num
eric keypad. When you do so, the Num
Print screen key Correction keys
Navigation keysad area
Function keysEscape key
Application key
Fn key
So
ny
No
teb
oo
Keys Descriptions
Numeric keypadarea
Contains the keys found onkeypad area to type numbersuch as addition and subtraLock key to activate the numLock light will illuminate.
Shift key
Fn key
Ctrl key
Windows® key
Alt key
Numeric keyp

Using Your Notebook ComputerUsing the Keyboard
k C
om
pu
ter
Use
r G
uid
e26n N
Correction keys The Insert, Back Space, and Delete keys enable you to makecorrections in your documents.
Navigation keys Several keys are devoted to moving the cursor on the screen.
Function keys The twelve function keys along the top of the keyboard are used toperform designated tasks. For example, in many applications, F1 is theHelp key. The task associated with each function key may vary fromone application to the next.
to cancel commands.
an electronic snapshot of the screen andboard. You can then paste the screen shot
t.
with at least one other key: Ctrl, Alt, andh another key, the Ctrl (Control) and Altr way to give commands. For example, in
of choosing the Save command from atrl and press S (referred to as Ctrl+S). Thecapital letters or special symbols such as
logo displays the Windows® Start menu;g the Start button on the task bar. Sees with the Windows® key for further
ation with other keys to issue commands.tions with the Fn key.
Keys Descriptions
So
ny
No
teb
oo
Escape key The Esc (Escape) key is used
Print Screen key The Print Screen key takesplaces it in the Windows Clipinto a document and print i
Operator keys Several keys are always usedShift. When held down wit(Alternate) keys offer anothemany applications, insteadmenu, you can hold down CShift key is used to produce@ and $.
Windows® key The key with the Windows®
it’s the equivalent of clickinCombinations and functiondetails.
Fn key The Fn key is used in combinSee Combinations and func

Using Your Notebook ComputerUsing the Keyboard
k C
om
pu
ter
Use
r G
uid
e27n N
Combinations and Functions with the Windows® Key
Applications key The Applications key displays a shortcut menu of context-sensitivechoices; pressing this key is the equivalent of clicking the right mousebutton.
Combinations Functions
tton on the taskbar.
orer.
earch to find a file or folder. This is theearch and then Files or Folders from the
earch for Computers window where youers.
windows.
indows to their previous size.
w. This is the equivalent of selecting Run
Keys Descriptions
So
ny
No
teb
oo
+ F1 Displays Windows Help
+ Tab Switches the selected bu
+ E Displays Windows Expl
+ F Displays the Windows Sequivalent of selecting SStart menu.
+ Ctrl + F Displays the Windows Scan locate other comput
+ M Minimizes all displayed
Shift + + M Returns all minimized w
+ R Displays the Run windofrom the Start menu.
Using Your Notebook ComputerUsing the Keyboard
k C
om
pu
ter
Use
r G
uid
e28n N
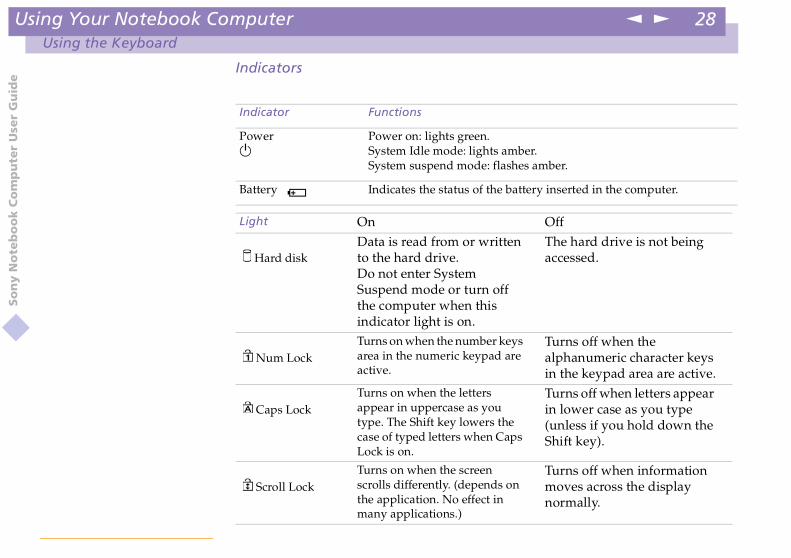
Indicators
Indicator Functions
Power1
Power on: lights green.System Idle mode: lights amber.System suspend mode: flashes amber.
Battery Indicates the status of the battery inserted in the computer.
Offn The hard drive is not being
accessed.
ysre
Turns off when thealphanumeric character keysin the keypad area are active.
eps
Turns off when letters appearin lower case as you type(unless if you hold down theShift key).
nTurns off when informationmoves across the displaynormally.
So
ny
No
teb
oo Light On
Hard diskData is read from or writteto the hard drive.Do not enter SystemSuspend mode or turn offthe computer when thisindicator light is on.
Num LockTurns on when the number kearea in the numeric keypad aactive.
Caps LockTurns on when the lettersappear in uppercase as youtype. The Shift key lowers thcase of typed letters when CaLock is on.
Scroll LockTurns on when the screenscrolls differently. (depends othe application. No effect inmany applications.)

Using Your Notebook ComputerUsing the Keyboard
k C
om
pu
ter
Use
r G
uid
e29n N
Combinations and Functions with the Fn Key
Combinations/Feature
Functions
Fn+ (ESC)System Suspend
Puts the system into System Suspend mode, a power managementstate. To return the system to the active state, press any key.
Fn+ (F3)* Toggles the built-in speaker on and off.
s’ volume.n+F4 and then V or b
n+F4 and then v or B
e LCD.ress Fn+F5 and then V or b
ress Fn+F5 and then v or B
xternal display (connected to the Monitornd external display.
l of power consumption. When youstates of the system and of the peripheralard disk and the system power is turned
riginal state, use the power switch to turn
� Some functions are not available until Windows launches.
� *You can carry out these functions using the Jog Dial. See your Software Guide in Setting up Jog Dial for more information.
xternal display
CD and external display
So
ny
No
teb
oo Speaker switch
Fn+ 2 (F4)*Speaker volume
Adjusts the built-in speakerTo increase volume, press FTo decrease volume, press F
Fn+ 8 (F5) *Brightnesscontrol
Adjusts the brightness of thTo increase light intensity, pTo decrease light intensity, p
Fn+ /(F7)Switch to theexternal display
Toggles between the LCD, econnector) and both LCD a.
Fn+ (F12)SystemHibernation
Provides for the lowest leveexecute this command, thedevices are written to the hoff.To return the system to its oon the power.
LCD
Only e
Only LCD L

Using Your Notebook ComputerUsing the Keyboard
k C
om
pu
ter
Use
r G
uid
e30n N
Fn+BBass Boost
Toggles the Bass Boost function off and on. This feature is availablewith headphones only.
Fn+FChange Displaysize
Zooms the display size in or out when the display is set to a lowresolution.
Fn+S Puts the system into Idle mode, a power management state. To returnkey.
Combinations/Feature
Functions
So
ny
No
teb
oo System Idle to the active state, press any

Using Your Notebook ComputerUsing the Jog Dial™
k C
om
pu
ter
Use
r G
uid
e31n N
Using the Jog Dial™Your computer is equipped with a Jog Dial on the right side of your computer. You canturn or / and press the Jog Dial to scroll the window, select a software, adjust theinternal speaker volume, etc.
isplay. The Jog Dial window is either in
turn
press
Sony
No
teb
oo
The Jog Dial window always appears in the dlauncher mode or in guide mode.
Jog Dial
Using Your Notebook ComputerUsing the Jog Dial™
So
ny
No
teb
oo
k C
om
pu
ter
Use
r G
uid
e32n N
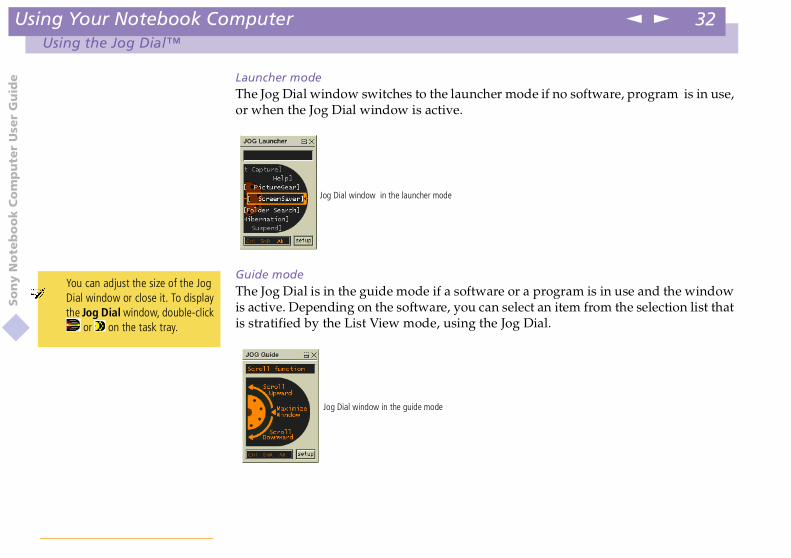
Launcher modeThe Jog Dial window switches to the launcher mode if no software, program is in use,or when the Jog Dial window is active.
e or a program is in use and the windowselect an item from the selection list thatJog Dial.
Jog Dial window in the launcher mode
�
Guide modeThe Jog Dial is in the guide mode if a softwaris active. Depending on the software, you canis stratified by the List View mode, using theYou can adjust the size of the Jog Dial window or close it. To display the Jog Dial window, double-click
or on the task tray.
Jog Dial window in the guide mode
Using Your Notebook ComputerUsing the Jog Dial™
So
ny
No
teb
oo
k C
om
pu
ter
Use
r G
uid
e33n N
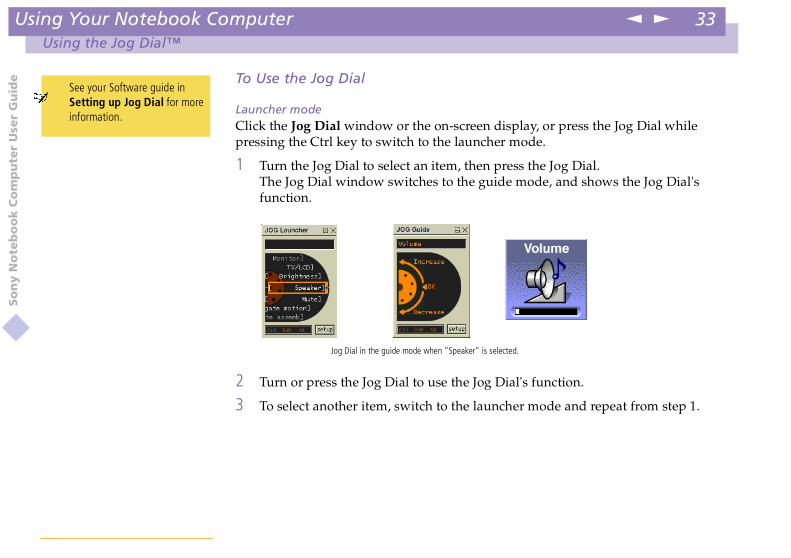
To Use the Jog Dial
Launcher modeClick the Jog Dial window or the on-screen display, or press the Jog Dial whilepressing the Ctrl key to switch to the launcher mode.
1 Turn the Jog Dial to select an item, then press the Jog Dial.The Jog Dial window switches to the guide mode, and shows the Jog Dial'sfunction.
ial's function.
cher mode and repeat from step 1.
ected.
� See your Software guide in Setting up Jog Dial for more information.
2 Turn or press the Jog Dial to use the Jog D
3 To select another item, switch to the laun
Jog Dial in the guide mode when "Speaker" is sel

Using Your Notebook ComputerUsing the Jog Dial™
k C
om
pu
ter
Use
r G
uid
e34n N
Software that support the Jog DialIf the Sony software supporting the Jog Dial is active, you can use the Jog Dial'sfunctions allocated to each software.
See Information on Using the Jog Dial in your Software Guide.
Software that do not support the Jog DialIf the software in use does not support the Jog Dial, you can scroll the window or adjustthe window size as described below:
indow vertically. When severaldisplayed in the on-screen display,
ted window will be scrolled.
he size of the active window. Pressrn to its normal size.e size of the active window. Pressthe Jog Dial again to return to its
re or programs in use.
So
ny
No
teb
oo
Action Description
Turn the Jog Dial Scrolls the wwindows arethe last selec
Press the Jog Dial Maximizes tagain to retu
Press Alt key and the Jog Dial Minimizes thboth Alt andnormal size.
Press Shift key and the Jog Dial Ends softwa

Using Your Notebook ComputerUsing the Touchpad
k C
om
pu
ter
Use
r G
uid
e35n N
Using the TouchpadThe keyboard contains a cursor-pointing device called a touchpad. You can point to,select, drag, and scroll objects on the screen using the built-in touchpad.
ad to place the pointer on an item or
many applications, this actionntext-sensitive choices.
the left button.ht edge of the touchpad to scrollng the bottom to scroll horizontally.only with applications that support
� See Mouse Help for information on touchpad features, such as clicking both buttons simultaneously, adjusting touchpad speed, Web Assist, Tap Off, and Easy Launcher functions. To access Mouse Help, press the Start button, select Settings, and then select Control Panel. Click the
Pointer
So
ny
No
teb
oo
Action Description
Point Slide one finger on the touchpobject.
Click Press the left button once.Double-click Press the left button twice.Right-click Press the right button once. In
displays a shortcut menu of coDrag Slide one finger while pressingScroll Move your finger along the rig
vertically. Move your finger alo(The scroll function is availablea touchpad scroll feature.)
Mouse icon and then click the Help button.
Left button
Right buttonTouchpad

Using Your Notebook ComputerUsing Memory Stick™
k C
om
pu
ter
Use
r G
uid
e36n N
Using Memory Stick™ This new compact, portable, and versatile IC recording medium has a data capacityexceeding that of a floppy disk. The Memory Stick™ is specially designed forexchanging and sharing digital data with compatible products. Because it isremovable, it can be used for external data storage.
To insert a Memory Stick™Insert it into the slot until the Memory Stick™ is fixed into the connector.
serted correctly, check the Removable
ter icon.
con is displayed in the window.
isplay the contents of the Memory Stick
! Hold the Memory Stick media with the arrow pointing in the correct direction when you insert it into the slot. To avoid damaging the computer or the Memory Stick media, do not force the Memory Stick media into the slot if it does not insert smoothly.
So
ny
No
teb
oo
To confirm that the Memory Stick media is inDisk (S:) drive.
1 On the desktop, double-click My Compu
2 Make sure that the Removable Disk (S:) i
3 Double-click the Removable Disk (S:) to dmedia.
RELEASE button
� You can enjoy video clips that you have recorded with Memory Stick-compatible video camera recorders. For details, see your Software Guide.

Using Your Notebook ComputerUsing Memory Stick™
k C
om
pu
ter
Use
r G
uid
e37n N
To remove a Memory Stick
1 Make sure that the Memory Stick media access indicator is off.
2 Push the Memory Stick media eject button.
3 When the button comes out, push the eject button again and remove the MemoryStick media.
So
ny
No
teb
oo
Eject button

Using Your Notebook ComputerUsing Memory Stick™
k C
om
pu
ter
Use
r G
uid
e38n N
! To prevent the possible loss of data, do not remove a Memory Stick media when the Memory Stick media access light is on. Large image files require more time to store on a Memory Stick media, so always check the Memory Stick media access indicator and make sure that it is off before you remove the Memory Stick media.
� When the Memory Stick's™ erasure prevention switch is set to LOCK, data cannot be recorded or erased.
Before using Memory Sticks™, you should back up important data.
� To avoid damaging data:
Do not remove a Memory Stick™ or turn off the power while the access light is on.
ect to static electricity or electrical noise.
finger or metallic objects.
Memory Stick™.
ticks™.
t is subject to:
in the sun
ed storage case.
™ for more information on use.
So
ny
No
teb
oo
Do not use Memory Sticks™ in locations that are subj
Do not touch the Memory Stick™ connector with your
Do not attach labels other than the supplied label to a
Do not bend, drop, or apply strong shock to Memory S
Do not disassemble or modify Memory Sticks™.
Do not allow Memory Sticks™ to get wet.
Do not use or store Memory Sticks™ in a location tha
- Extremely high temperatures, such as in a car parked
- Direct sunlight
- High humidity or places with corrosive substances
To prolong the life of Memory Sticks™, use the suppli
See the instructions that come with your Memory Stick
Using Your Notebook ComputerCD-ROM Drive
So
ny
No
teb
oo
k C
om
pu
ter
Use
r G
uid
e39n N
CD-ROM DriveYou can use the CD-ROM drive supplied* with your notebook computer to read CD-ROMs, Audio CDs, CD Extras and Video CDs.
To remove the deviceIf you unplug this device from the computer when turned on, your system might crashand you might lose data that you didn’t save before.
If your computer is turned off, you do not have to follow these instructions.
ppears.
nd click Stop.
, confirm the device to stop and click
ears, confirming the device can be.
ardware window.
� When the computer is in System Suspend or System Hibernation mode, you cannot insert a disk.
The procedures for connecting the CD-ROM drive may vary, depending on the CD-ROM drive.
See the manual supplied with
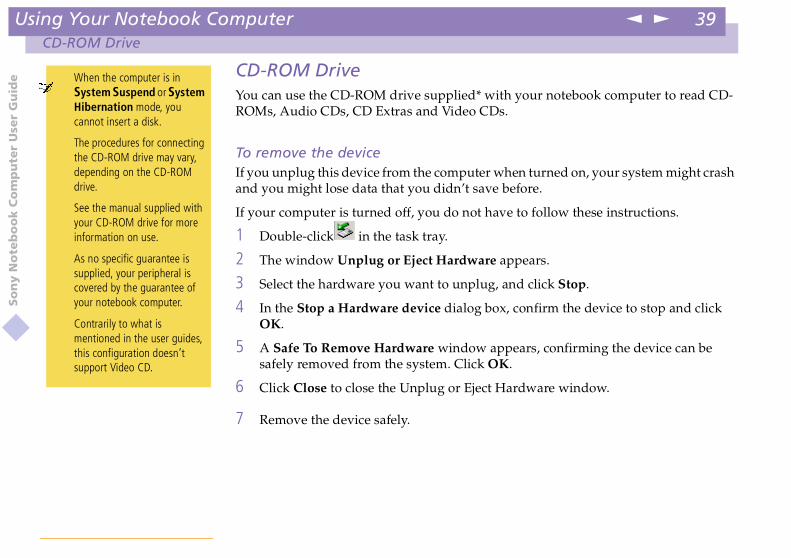
1 Double-click in the task tray.
2 The window Unplug or Eject Hardware a
3 Select the hardware you want to unplug, a
4 In the Stop a Hardware device dialog boxOK.
5 A Safe To Remove Hardware window appsafely removed from the system. Click OK
6 Click Close to close the Unplug or Eject H
7 Remove the device safely.
your CD-ROM drive for more information on use.
As no specific guarantee is supplied, your peripheral is covered by the guarantee of your notebook computer.
Contrarily to what is mentioned in the user guides, this configuration doesn’t support Video CD.

Using Your Notebook ComputerUsing PC Cards
k C
om
pu
ter
Use
r G
uid
e40n N
Using PC CardsYour computer includes a PC card slot. PC cards allow you to connect portable externaldevices.
Insert the PC card into the PC card slot, front label facing up. Gently push the card intothe slot until the card is fixed into the connector.
nnector pins. If you have difficulty inserting a card, rientation. See the manual supplied with your PC card
wer operation and the system suspend or system is inserted, you may find that a device connected to orrect the problem.
r the System Hibernation power management mode. It ed to remove the card when your computer enters the r by using the PowerPanel utility, and when it is set to e using a battery as the source of power.
Some PC cards may require you to disable idle devices when using the PC card. You can use Sony Notebook Setup to disable devices. Please refer to Sony Notebook Setup in your Software Guide for details.
Be sure to use the most recent software driver provided by the
Insert in the direction of the arrow
So
ny
No
teb
oo
� Do not force a card into the slot. It may damage the cocheck that you are inserting the card with the correct ofor more information on use.
For some PC cards, if you alternate between normal pohibernation power management modes while the cardyour system is not recognized. Reboot your system to c
While the card is inserted, your computer may not entemay enter the System Suspend mode. It is recommendSystem Hibernation mode by pressing Fn + F12 keys oenter the System Hibernation mode automatically whil
PC card manufacturer.
If an “!” mark appears on the Device Manager tab in the System Properties dialog, remove the software driver and then reinstall it.
You may not be able to use some PC cards or some functions within the PC card with this computer.
You do not need to shut down the computer before inserting or removing a PC card.

Using Your Notebook ComputerUsing PC Cards
Co
mp
ute
r U
ser
Gu
ide
41n N
To remove the deviceIf you unplug this device from the computer when turned on, your system might crashand you might lose data that you didn’t save before.
If your computer is turned off, you do not have to follow these instructions.
1 Double-click in the task tray.
2 The window Unplug or Eject Hardware appears.
3 Select the hardware you want to unplug, and click Stop.
, confirm the device to stop and click OK.
ears, confirming the device can be safely
ardware window.
press it to eject the card.
! Some devices may not function properly if you repeat Returning to Normal Mode from System Suspend Mode or System Hibernation mode.
! The computer will return to its original state if you restart it.
So
ny
No
teb
oo
k
4 In the Stop a Hardware device dialog box
5 A Safe To Remove Hardware window appremoved from the system. Click OK.
6 Click Close to close the Unplug or Eject H
7 Eject the PC card release button and then
8 Gently grasp the card and pull it out.
RELEASE button
Using Your Notebook ComputerUsing Power Saving Modes
k C
om
pu
ter
Use
r G
uid
e42n N
Using Power Saving ModesWhen you use a battery as the source of power for your computer, you can takeadvantage of power management settings to conserve battery life. In addition to thenormal operating mode, which allows you to turn off specific devices, your computerhas three distinct power saving modes: System Idle, System Suspend and SystemHibernation.When using battery power, you should be aware that the computer automaticallyenters System Hibernation mode when the remaining battery charge drops below 7percent, regardless of the power management setting you select. See your Software
or more information.
en it is in use. The green power indicatoran turn off a specific device such as the
se your computer for a short period. Thewer state and the CPU stops. The power
ode by using the PowerPanel utility.
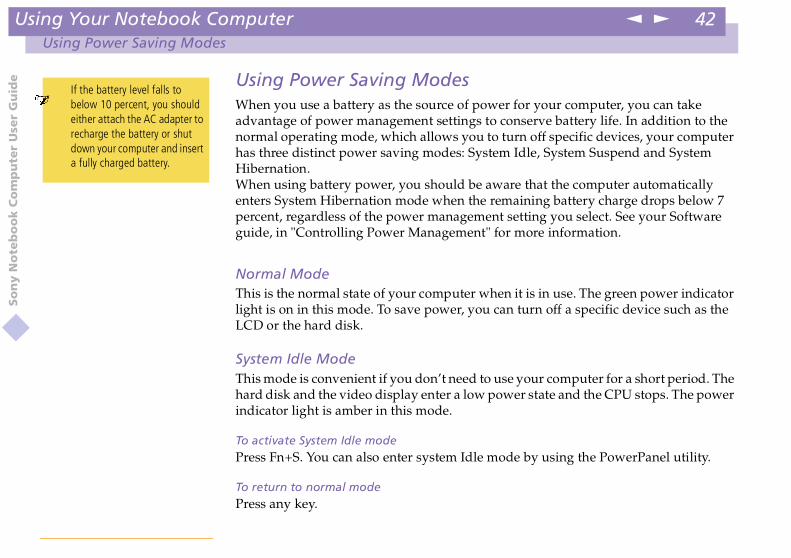
� If the battery level falls to below 10 percent, you should either attach the AC adapter to recharge the battery or shut down your computer and insert a fully charged battery.
So
ny
No
teb
oo
guide, in "Controlling Power Management" f
Normal ModeThis is the normal state of your computer whlight is on in this mode. To save power, you cLCD or the hard disk.
System Idle ModeThis mode is convenient if you don’t need to uhard disk and the video display enter a low poindicator light is amber in this mode.
To activate System Idle modePress Fn+S. You can also enter system Idle m
To return to normal modePress any key.

Using Your Notebook ComputerUsing Power Saving Modes
k C
om
pu
ter
Use
r G
uid
e43n N
System Suspend ModeThe computer saves the current state of the system in RAM and switches off power tothe CPU. The amber power light flashes in this mode.
To activate System Suspend modePress Fn+Esc, or slide the power switch quickly. You can also use the PowerPanelutility to enter System Suspend mode.
To return to normal mode
isk and power is turned off. The power
el utility to enter System Hibernation
witch. The computer returns to its
System Idleystem hibernation.
hibernationhibernation.
� If you slide the power switch and hold for more than four seconds, the computer will switch off automatically.
� When returning from System Hibernation mode, the system status stored on the hard disk is erased and the computer starts normally if you slide the
So
ny
No
teb
oo Press any key.
System Hibernation ModeThe state of the system is saved on the hard dindicator light is off in this mode.
To activate System Hibernation modePress Fn+F12. You can also use the PowerPanmode.
To return to normal modeTurn on the computer by sliding the power sprevious state.
� Steps to return to normal mode:System hibernation b System suspend b
System suspend requires less time than S
� Power consumption:System idle b System suspend b SystemSystem idle uses more power than System
power switch and hold for more than four seconds.

Connecting peripheral devicesk
Co
mp
ute
r U
ser
Gu
ide
44n N
Connecting peripheral devicesYou can add functionality to your computer by connecting or using any of theseperipherals and enjoy the software described in the About the Software user guide:
� Using the Modem (page 45)� Universal Serial Bus (USB) Device (page 46)
� Floppy Disk Drive (page 47)
So
ny
No
teb
oo
� Printer (page 50)
� External Display (page 51)� i.LINK™ device (page 54)
� External Speakers (page 57)� External Microphone (page 58)
Connecting peripheral devicesUsing the Modem
k C
om
pu
ter
Use
r G
uid
e45n N
Using the ModemYour notebook computer is equipped with an internal modem. Before using yourmodem, please read the instructions in Configuring the Modem for use in yourSoftware Guide.
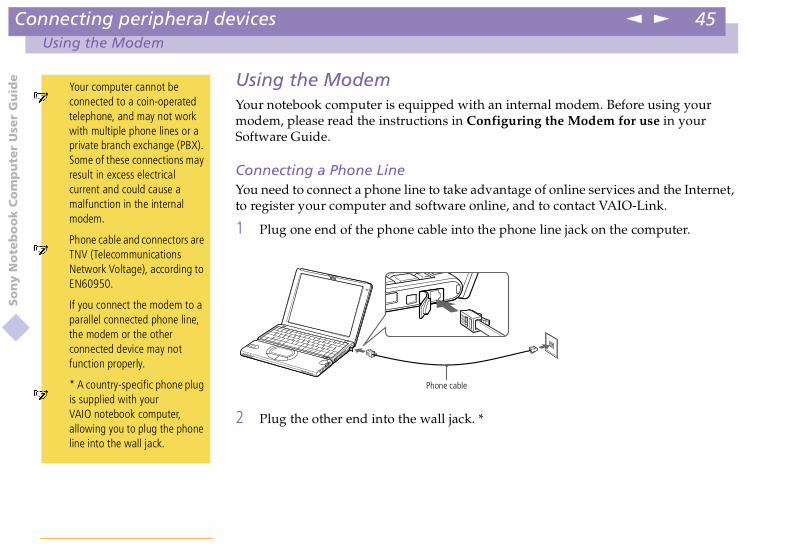
Connecting a Phone LineYou need to connect a phone line to take advantage of online services and the Internet,to register your computer and software online, and to contact VAIO-Link.
phone line jack on the computer.
� Your computer cannot be connected to a coin-operated telephone, and may not work with multiple phone lines or a private branch exchange (PBX). Some of these connections may result in excess electrical current and could cause a malfunction in the internal modem.
So
ny
No
teb
oo 1 Plug one end of the phone cable into the
2 Plug the other end into the wall jack. *
Phone cable
� Phone cable and connectors are TNV (Telecommunications Network Voltage), according to EN60950.
If you connect the modem to a parallel connected phone line, the modem or the other connected device may not function properly.
� * A country-specific phone plug is supplied with your VAIO notebook computer, allowing you to plug the phone line into the wall jack.
Connecting peripheral devicesUniversal Serial Bus (USB) Device
k C
om
pu
ter
Use
r G
uid
e46n N
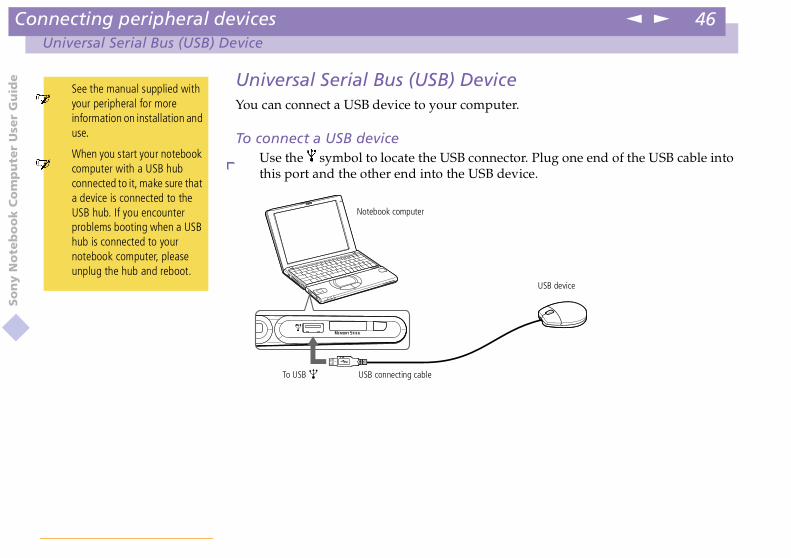
Universal Serial Bus (USB) DeviceYou can connect a USB device to your computer.
To connect a USB device� Use the symbol to locate the USB connector. Plug one end of the USB cable into
this port and the other end into the USB device.
� See the manual supplied with your peripheral for more information on installation and use.
� When you start your notebook computer with a USB hub connected to it, make sure that a device is connected to the USB hub. If you encounter Notebook computer
USB device
So
ny
No
teb
oo problems booting when a USB
hub is connected to your notebook computer, please unplug the hub and reboot.
USB connecting cableTo USB
Connecting peripheral devicesFloppy Disk Drive
k C
om
pu
ter
Use
r G
uid
e47n N
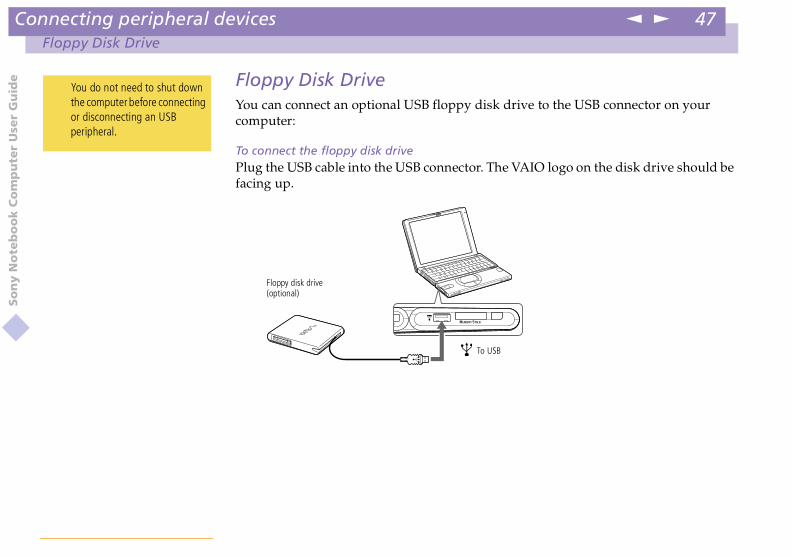
Floppy Disk DriveYou can connect an optional USB floppy disk drive to the USB connector on yourcomputer:
To connect the floppy disk drivePlug the USB cable into the USB connector. The VAIO logo on the disk drive should befacing up.
You do not need to shut down the computer before connecting or disconnecting an USB peripheral.
So
ny
No
teb
oo
To USB
Floppy disk drive(optional)

Connecting peripheral devicesFloppy Disk Drive
So
ny
No
teb
oo
k C
om
pu
ter
Use
r G
uid
e48n N
To insert a diskette
1 Hold the diskette with the label side facing up.
2 Gently push the diskette into the drive until it clicks into place.
l the LED indicator turns off and then
3.5" diskette
Floppy disk drive
�Do not presswhile the LEmay damage
If the diskettout by pressbutton, discodisk drive fro
To remove a disketteWhen you finish using the diskette, wait untipress the Eject button to remove the diskette.
the Eject button D indicator is on. It the diskette.
e does not come ing the Eject nnect the floppy m the computer. Eject button
LED indicator

Connecting peripheral devicesFloppy Disk Drive
k C
om
pu
ter
Use
r G
uid
e49n N
To remove the deviceIf you unplug this device from the computer when turned on, your system might crashand you might lose data that you didn’t save before.
If your computer is turned off, you do not have to follow these instructions.
1 Double-click in the task tray.
2 The window Unplug or Eject Hardware appears.
3 Select the hardware you want to unplug, and click Stop.
x, confirm the device to stop and click
ppears, confirming the device can beK.
ardware window.
ent on the side of the floppy disk drive.
So
ny
No
teb
oo
4 In the Stop a Hardware device dialog boOK.
5 A Safe To Remove Hardware window asafely removed from the system. Click O
6 Click Close to close the Unplug or Eject H
7 Remove the device safely.
To carry the floppy disk driveFold the floppy disk cable into the compartm.
Connecting peripheral devicesPrinter
k C
om
pu
ter
Use
r G
uid
e50n N
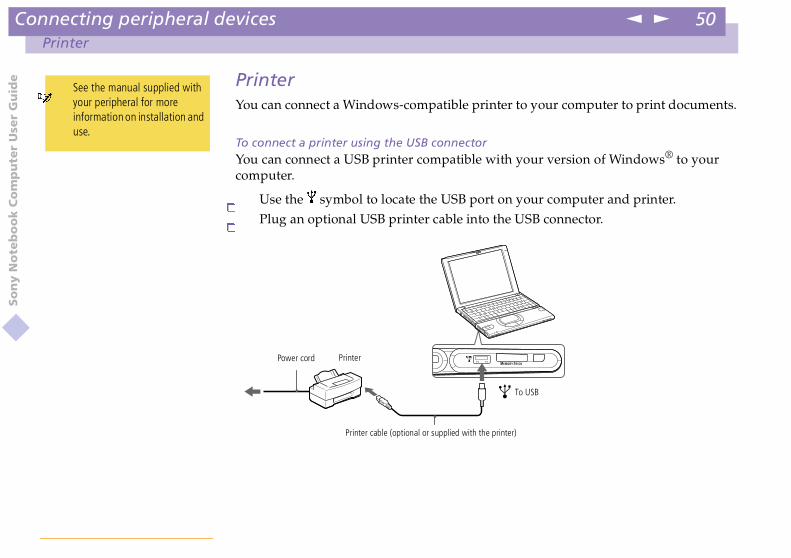
PrinterYou can connect a Windows-compatible printer to your computer to print documents.
To connect a printer using the USB connectorYou can connect a USB printer compatible with your version of Windows® to yourcomputer.
� Use the symbol to locate the USB port on your computer and printer.he USB connector.
� See the manual supplied with your peripheral for more information on installation and use.
inter)
To USB
So
ny
No
teb
oo � Plug an optional USB printer cable into t
Printer cable (optional or supplied with the pr
Power cord Printer

Connecting peripheral devicesExternal Display
k C
om
pu
ter
Use
r G
uid
e51n N
External DisplayYou can connect an external display to your notebook computer. For example, you canuse the computer with any of the following:
� Computer display (monitor)� Projector.
To connect a computer display Use the supplied Display Adapter to connect your external display to the computer.
e computer's Monitor connector and the
ower cord into the display, and the other
� Turn off your computer and the peripherals, unplug the AC adapter and the power cord before connecting the external display.
Connect the power cord after connecting all other cables.
Turn on the peripherals, then turn on your computer.
Display adapter
So
ny
No
teb
oo
1 Plug the supplied Display Adapter into thdisplay cable to the Display Adapter.
2 If necessary, plug one end of the display pend into an AC outlet.
Some computer displays or projectors may not be used as a monitor with the LCD on your computer display at the same time.
See the manual supplied with your computer display for more information on installation and use.
Power cord
Display cable
Computer display

Connecting peripheral devicesExternal Display
k C
om
pu
ter
Use
r G
uid
e52n N
To connect a projectorYou can use a projector as an external display, such as the Sony LCD Projector.
You can connect a projector using the supplied Display Adapter.
1 Plug the Display Adapter into the computer's Monitor connector and the displaysignal cable to the Display Adapter.
2 Use the i symbol to locate the Earphone connector. Plug the speaker audio cableinto this connector.
e display adapter connector and unplug
� See the manual supplied with your projector for more information on installation and use.
You may not be able to display the computer's LCD and the external display together, depending on the types of computer display and projector
o cableupplied)
ay adapter
So
ny
No
teb
oo
To remove the display adapterTurn off your computer, press both sides of thit from the computer.
used.Projector
Power cord
RGB signalcable
Audi(not s
Displ

Connecting peripheral devicesExternal Display
k C
om
pu
ter
Use
r G
uid
e53n N
To select a displayWhen you connect an external display to the monitor connector, you can press Fn+F7to toggle the output between the Liquid Crystal Display (LCD), the external monitor,or both devices.See your Software guide in “Selecting the Display Mode" for more information.
So
ny
No
teb
oo

Connecting peripheral devicesi.LINK™ device
k C
om
pu
ter
Use
r G
uid
e54n N
i.LINK™ deviceYour computer includes an i.LINK (IEEE1394) connector, which you can use to connectto an i.LINK™ device such as a digital video camera recorder or to connect two VAIOnotebooks in order to copy, delete or edit files.
To connect a digital video camera recorder
1 Plug one end of the i.LINK™ cable into the i.LINK™ connector of the computerand the other end into the DV Out connector on the digital video camera recorder.
fer to DVgate in your Software Guide for
The software limits the use of more than one digital video camera recorder or i.LINK™ device at the same time.
On Sony digital video cameras, connectors labeled “DV Out”, “DV In/Out” or “i.LINK™” are i.LINK™-compatible.
The i.LINK™ connector of your
Digital video camera recorder
ut
So
ny
No
teb
oo
2 Launch the DVgate application. Please refurther details.
notebook computer does not supply power to external devices generally powered by i.LINK™ connectors.
The i.LINK™ connector supports transfer rates up to 400 Mbps; however, the actual transfer rate depends on the transfer rate of the external device.
The i.LINK™ features available may vary depending on the software applications you use. Please refer to the documentation that came with your software for more information.
To DV O
To i.LINK™
i.LINK™ cable

Connecting peripheral devicesi.LINK™ device
k C
om
pu
ter
Use
r G
uid
e55n N
ct Monitorlete files on another VAIO computeryour computer with an i.LINK™ cable.
nnected to another VAIO computer.
ect and Smart Connect Monitor for more
� The Sony digital video camera recorder is taken as example; your digital video camera recorder may need to be connected differently.
See the manual supplied with your digital video camera recorder for more information on installation and use.
Do not connect more than one digital video camera at a time. The software supplied with your computer will not recognize multiple cameras.
For a list of i.LINK™ cables compatible with your computer, please contact your dealer.
� When you use Smart Connect to connect two VAIO computers, you must assign each computer a unique name by which it can be identified when the two computers are networked.
So
ny
No
teb
oo
To use Smart Connect and Smart ConneWith Smart Connect you can copy, edit or de(equipped with Smart Connect) connected to
You can also print a document on a printer co
See the online documentation of Smart Conninformation.
i.LINK™ cable
(not supplied)

Connecting peripheral devicesMemory Sticks™
k C
om
pu
ter
Use
r G
uid
e56n N
Memory Sticks™If your digital video camera recorder includes a Memory Stick™ slot, you can copyimages from it to your computer via a Memory Stick™.
Copy images on the Memory Stick™ and insert the card into the Memory Stick™ slot.
So
ny
No
teb
oo
See Using Memory Stick™ on page 36
Memory Stick

Connecting peripheral devicesExternal Speakers
k C
om
pu
ter
Use
r G
uid
e57n N
External SpeakersYou can enhance the sound quality of your computer by connecting external speakers.
To connect external speakers� Use the i symbol to locate the Headphone connector. Plug the speaker cable into
this connector.
� Make sure your speakers are designed for computer use.
Turn down the volume of the speakers before you turn them on.
Do not place diskettes on the speakers; the speaker’s magnetic field may damage the data on the diskettes.
To Headphone
So
ny
No
teb
oo
See the manual supplied with your speakers for more information on installation and use.
Speakers
(optional)

Connecting peripheral devicesExternal Microphone
k C
om
pu
ter
Use
r G
uid
e58n N
External MicrophoneYou can enhance the quality of sound input by using an external microphone.
To connect an external microphone� Use the to locate the Line-in connector. Plug the microphone cable into this
connector.
� Make sure your microphone is designed for computer use.
See the manual supplied with your peripheral for more information on installation and use.
Line-in
So
ny
No
teb
oo
Microphone
To

Getting HelpAbout Sony’s Support Options
k C
om
pu
ter
Use
r G
uid
e59n N
Getting HelpThis section describes how to get help and support from Sony, as well astroubleshooting tips for your computer.
See also the online FAQ provided on your Documentation CD-ROM.
About Sony’s Support Optionsur computer. When you have questions
oftware, check these places for answers:
your computerart your computer and use the basicmation to access VAIO-Link.
the contents you find in the box, ad the list of specifications of your
Documentation CD-ROMputer, connect peripheral devices. It
ecifications of your computer and
d software titles and explains how to useomputer tasks.complete information on the VAIO-Link
So
ny
No
teb
oo
Sony provides several support options for yoabout your computer and the pre-installed s
Printed documentation supplied with � The Customer Guide explains how to st
functions. This guide gives you the infor
� The Setting Up Poster gives you a list ofsummary of the bundled applications ancomputer and accessories.
Online user guides supplied with your � This guide explains how to use your com
gives you a packing list and the list of spaccessories.
� The Software guide lists the pre-installethe utility programs and perform basic c
� The Customer Service Guide gives youServices.

Getting HelpAbout Sony’s Support Options
k C
om
pu
ter
Use
r G
uid
e60n N
Other sources of information� The online help files that accompany your pre-installed software contain
instructions on using the software.� VAIO-Link website: if you have any problem with your computer, you can access
the VAIO-Link web site (see your Customer Service Guide for the address).
� The Sony e-mail support service answers your questions by electronic mail. Justsend your question in an e-mail message and a Customer Service Analyst will sendyou a reply with the answer. To send a question to Sony e-mail support, pleaserefer to the instructions in your Customer Service Guide.
tacting VAIO-Link Response Centre, tryr Guide (troubleshooting chapter) or theor software (See your Customer Service
� You need to plug the phone line into the modem to use the communication features described in this manual.
So
ny
No
teb
oo
� VAIO-Link Response Centre: Before conto solve the problem by reading your Usemanuals and helpfiles for the peripheralsGuide for the phone numbers).
k C
om
pu
ter
Use
r G
uid
eGetting Help
Troubleshooting
61n N
TroubleshootingThis section describes how to solve common problems you may encounter when usingyour computer. Many problems have simple solutions, so try these suggestions beforeyou contact VAIO-Link.
� About the computer and software, see page 61� About Digital Video Captures and DVgate, see page 64
� About the display, see page 65
68
ocumentation CD-ROM.
a power source and that it is turned on.ont panel of the computer indicates that
properly and that they are charged.py disk drive.
les are connected firmly.UPS, make sure the UPS is turned on and
� When you reconnect devices (other than USB devices), be sure to turn off the computer as described in Shutting down your computer. If you turn off the computer in other ways, it may result in data loss.
So
ny
No
teb
oo � About sound, see page 65
� About the modem, see page 66� About CD-ROMs and diskettes, see page
� About peripherals, see page 69See also the online FAQ provided on your D
About the computer and software
My computer does not start� Check that the computer is plugged into� Check that the power indicator on the fr
the power is on.
� Check that the battery packs are inserted� Make sure there is no diskette in the flop
� Confirm that the power cord and all cab� If you have plugged the computer into a
working.

k C
om
pu
ter
Use
r G
uid
eGetting Help
Troubleshooting
62n N
� If you are using an external display, check that it is plugged into a power sourceand turned on. Check that you have switched to the external display and that thebrightness and contrast controls are adjusted correctly. Please refer to the manualsupplied with your display for details.
� Moisture condensation may have occurred. Do not use the computer for at leastone hour and then turn it on.
� When the internal backup battery is low on power, it may not be able to start yoursystem properly.
to setup would appear at the bottom ofd to initialize the BIOS.F1> to resume, <F2> to setup’ appears at
setup appears at startupthe steps below to initialize the BIOS:
d to the computer,
n again,
y when the Sony logo appears. The BIOS
enu.
t Values and then press the Enter key. Thew? appears.
ss the Enter key.
Changes) and then press Enter.
So
ny
No
teb
oo � The message Press <F1> to resume, <F2>
the display. Should this happen, you nee� Follow the steps in The message ‘Press <
startup.
The message Press <F1> to resume, <F2> to � If the floppy disk drive is empty, follow
1 Remove any peripheral devices connecte
2 Turn the computer off and then turn it o
3 Turn on the computer and press the F2 kesetup menu screen appears.
4 Press the arrow keys to select the Exit m
5 Press the arrow keys to select Get Defaulmessage Load default configuration no
6 Check that [Yes] is selected and then pre
7 Press the arrow keys to select Exit (Save

k C
om
pu
ter
Use
r G
uid
eGetting Help
Troubleshooting
63n N
The message Save configuration changes and exit now? appears.
8 Check that [Yes] is selected, then press the Enter key. The computer will restart.
My computer does not shut downIt is best to shut down your computer using the Shut Down command on theWindows® Start menu. Using other methods, including those listed here, may resultin loss of unsaved data. If the Shut Down command does not work properly, followthese steps:
lt + Delete and by choosing Shut Down
itch forward and hold it for at least four
er and remove the battery pack from your
ows® taskbar, click the Start button, click
preceding step, you can restart thence and then clicking Shut Down in the
the power switch toward the front ands off the power.a CD-ROM, stop the CD-ROM, and
lt+Delete as described above.
So
ny
No
teb
oo
� Restart the computer by pressing Ctrl + Ain the Security dialog box.
� If this does not work, slide the power swseconds, this turns off the power.
� Unplug the computer from the AC adaptcomputer.
My computer “locks up” � Try restarting the computer. On the Wind
Shut Down, and then select Restart.� If you cannot restart as described in the
computer by pressing Ctrl+Alt+Delete oSecurity dialog box.
� If the previous step does not work, slidehold it for at least four seconds. This turn
� If your computer locks up while playingrestart the computer by pressing Ctrl+A
So
ny
No
teb
oo
k C
om
pu
ter
Use
r G
uid
eGetting Help
Troubleshooting
64n N
My software program locks up or crashesContact the software publisher or designated provider for technical support. Pleaserefer to your Software guide for information on how to contact them.
My mouse doesn’t work� Check that the mouse is plugged into the USB connector.
� If you are using an optional Sony USB mouse, check that the appropriate driverand mouseware are properly installed.
e-clicknd change the button assignments in theons is assigned to the double-click action.
ate
evice using DVgate, my system displays the ck the power and cable connections to …computer. Frequent recording of imagessometimes causes this to occur. For moree help.
My touchpad interprets a single tap as a doublOpen the Mouse icon in the Control Panel aMouse Properties dialog box. One of the butt
About Digital Video Captures and DVg
While I'm recording images to a digital video dmessage Recording to DV device failed. Chethe DV device and try the operation againClose all open applications and restart yourto a digital video device while using DVgateinformation on DVgate, see the DVgate onlin

k C
om
pu
ter
Use
r G
uid
eGetting Help
Troubleshooting
65n N
About the display
My LCD does not display anything� Check that the computer is plugged into a power source and that it is turned on.� Check that the power indicator on the front panel of the computer is on.
� Check that the battery packs are inserted properly and that they are charged.� Adjust the brightness of the LCD.
� The computer may be in LCD (video) standby mode. Press any key to activate the
centered or sized properlyadjust the image. Please refer to theinformation.
Press Fn+F3 to turn on the speakers.e minimum. Press Fn+F4, and then press
heck that the battery is inserted properly
ts own volume control, check that the
.
So
ny
No
teb
oo display.
The screen image on my external display is notUse the controls on your external display tomanual supplied with your display for more
About sound
My speakers are not producing sound� The built-in speakers may be turned off.� The speaker volume may be turned to th
V or b to increase the volume.
� If your computer is powered by battery, cand that it is charged.
� If you are using an application that has ivolume is turned up.
� Check the volume controls in Windows®

k C
om
pu
ter
Use
r G
uid
eGetting Help
Troubleshooting
66n N
� If you use external speakers, check that the speakers are properly connected andthe volume is turned up. If the speakers have a mute button, make sure it is off. Ifbatteries power the speakers, check that the batteries are inserted properly andthat they are charged.
� If you have connected an audio cable to the Headphone connector, disconnect thecable.
My microphone does not workIf you are using an external microphone, check that the microphone is plugged into the
o your computer.u can check the line by plugging in anone.
m is dialing is correct.box (Control Panel / Phone and Modemd on the Modems tab, and that the
aling Rules tab.
ble with your telephone line.
ng the modem for use in your Software
So
ny
No
teb
oo
Microphone connector.
About the modem
My internal modem does not work� Check that the phone line is plugged int� Check that the phone line is working. Yo
ordinary phone and listening for a dial t
� Check that the phone number the progra� In the Phone and Modem Options dialog
Options), check that your modem is listelocation information is correct on the Di
My Modem Cannot Establish a ConnectionThe modem dialing mode may be incompati
To verify the modem settings, see ConfiguriGuide.

k C
om
pu
ter
Use
r G
uid
eGetting Help
Troubleshooting
67n N
My modem connection is slowMany factors influence modem connection speed, including telephone line noise orcompatibility with telephone equipment (such as fax machines or other modems). Ifyou think your modem is not connecting properly to other PC-based modems, faxmachines, or your Internet Service Provider, check the following:
� Have your phone company check that your phone line is free from any line noise.
� If your problem is fax-related, check that there are no problems with the faxmachine you are calling and that it is compatible with fax modems.
ith your Internet Service Provider, checkproblems.
e, try connecting the modem to that line.
So
ny
No
teb
oo � If you are having a problem connecting w
that the ISP is not experiencing technical
� If you have a second phone line availabl

k C
om
pu
ter
Use
r G
uid
eGetting Help
Troubleshooting
68n N
About CD-ROMs and diskettes
My CD-ROM drive tray does not open� Make sure the computer is turned on.� Press the Eject button on the CD-ROM drive.
� If the Eject button does not work, you can open the tray by inserting a sharp,pointed object into the hole to the right of the Eject button.
cing up.
ake sure the software is installed
d. Leave the computer for at least 1 hour
ge such as “You must insert the application oftware does not startcated on the application’s CD-ROM disc.
am again.
with the label side facing up.
he write-protect feature or use a diskette
ed into the floppy disk drive.
So
ny
No
teb
oo I cannot play a CD-ROM disk
� Make sure the label of the CD-ROM is fa
� If the CD-ROM disk requires software, maccording to the program’s instructions.
� Check the volume of your speakers.
� Clean the CD-ROM disk.� Moisture condensation may have occurre
while it is turned on.
When I double-click an application icon a messaCD into your CD-ROM drive” appears and the s� Some titles require specific files that are lo
Insert the disc and try starting the progr
� Make sure you place the disc in the tray
My floppy disk drive cannot write to a diskette� The diskette is write-protected. Disable t
that is not write-protected.
� Check that the diskette is properly insert

k C
om
pu
ter
Use
r G
uid
eGetting Help
Troubleshooting
69n N
When I remove the Memory Stick, an error message appears.� Insert the Memory Stick™ into the slot again and press the Enter key. Wait until
the active application finishes, then remove the Memory Stick™. If the messageconfirms eject of the Memory Stick™, click OK.
About peripherals
I cannot use DV devices. The message DV equipment seems to be disconnected or turned off appears.
that the cables are properly connected.
, the combination of the connectedhis case, turn off the power to allevices. Check the connection and then
your version of Windows®.
correctly connected.
red and that you have up to date
puter, is not recognized, or a message
nect it again.
So
ny
No
teb
oo � Check that the DV device is turned on and
� If you are using multiple i.LINK™ devicesdevices may cause unstable operation. In tconnected devices and disconnect unused dturn on the power again.
My PC card is not working� Make sure the PC card is compatible with
I cannot print.� Check that all the cables of the printer are
� Check that your printer is correctly configudrivers If needed, contact your dealer.
The i.LINK device, which is connected to the comappears.Disconnect the i.LINK™ device once, then con
Notes on Usek
Co
mp
ute
r U
ser
Gu
ide
70n N
Notes on UseThis section describes safety guidelines and precautions to help protect your computerfrom potential damage.
On Upgrading the SystemYour notebook computer and memory modules use high precision components and
he invalidation of your Guarantee by
memory module,
ot familiar with upgrading memory on
the memory panel.
.
So
ny
No
teb
oo electronic connectors' technology. To avoid t
mishandling, it is recommended that:
� You contact your dealer to install a new
� You do not install it yourself, if you are na notebook computer,
� You do not touch the connectors or open
Please call VAIO-Link if you need assistance

Notes on UseAdding Memory
k C
om
pu
ter
Use
r G
uid
e71n N
Adding MemoryIn the future you may want to install memory modules to expand the functionality ofyour computer. You can increase the memory by installing optional memory modules.
Precautions
On handlingBe careful when adding memory. Mistakes on installation or removal of the memorymodule may cause a malfunction.
omponents. Before touching a memory
n manual assume familiarity with thenal computers and with the safetyred for using and modifying electronic
rce and from any telecommunicationsen the system or do any of themory Module. Failure to do so mayage.
Memory Modules and otheribed in Installing the memory Module
on is not available, do not work in athat produce or hold static electricity
d yourself by maintaining contact withwhile performing the procedure.
until you are ready to install thefrom ESD.
So
ny
No
teb
oo Electrostatic discharge can damage electronic c
expansion board, ensure the following:
� Handle the Memory Module gently.� The procedures described in this instructio
general terminology associated with persopractices and regulatory compliance requiequipment.
� Disconnect the system from its power soulinks, networks, or modems before you opprocedures described in Installing the meresult in personal injury or equipment dam
� Electrostatic Discharge (ESD) can damagecomponents. Perform the procedures descronly at an ESD workstation. If such a staticarpeted area, and do not handle materials(cellophane wrappers, for example). Grounan unpainted metal portion of the chassis
� Do not open the memory module packagemodule. The package protects the module

Notes on UseAdding Memory
k C
om
pu
ter
Use
r G
uid
e72n N
On keepingUse the special bag delivered with the memory module or wrap the module inaluminium foil to protect it from electrostatic discharge.
Do not place the memory module in places subject to:
� Heat sources such as radiators or air ducts,
� Direct sunlight,� Excessive dust,
� Mechanical vibration or shock,agnetically shielded,
or less than +5°C,
So
ny
No
teb
oo
� Strong magnets or speakers that are not m
� Ambient temperature of more than +35°C� High humidity.

Notes on UseAdding Memory
k C
om
pu
ter
Use
r G
uid
e73n N
To install a memory module
1 Shut down your computer and disconnect all peripheral devices.
2 Unplug the computer and remove the battery packs.
3 Wait until the computer cools down. The interior of the notebook becomesextremely hot during operation. Wait at least one hour for the computer to cooldown before you remove the screws.
4 Use a precision Phillips screwdriver that matches the size of the screw heads tohe computer.
r, raise the palm rest toward you, turn itrd.
� When you turn the palm rest over, gently perform the action in order to avoid breaking the attached cable.
Cable
So
ny
No
teb
oo remove the 6 screws from the bottom of t
5 Slide the LCD lock lever and lift the coveover, and then set it gently on the keyboa
� To avoid damaging the computer, do not remove or loosen any other screws.
Palm rests

Notes on UseAdding Memory
k C
om
pu
ter
Use
r G
uid
e74n N
6 Before you remove the module from its package, touch a metal part of thecomputer to discharge any static electricity accumulated on your body. Removethe module from its protective package.
7 Install the memory module by holding the module edge connector pointing downand the notch on the right, and then insert it diagonally into an empty slot.
8 Lower the memory module until it clicks into place on both ends.
! Do not touch any part of the motherboard or the other components inside the computer.
tly seated.
So
ny
No
teb
oo
1 Slide the memory module into the slot.2 Snap the connectors into place when the board is correc
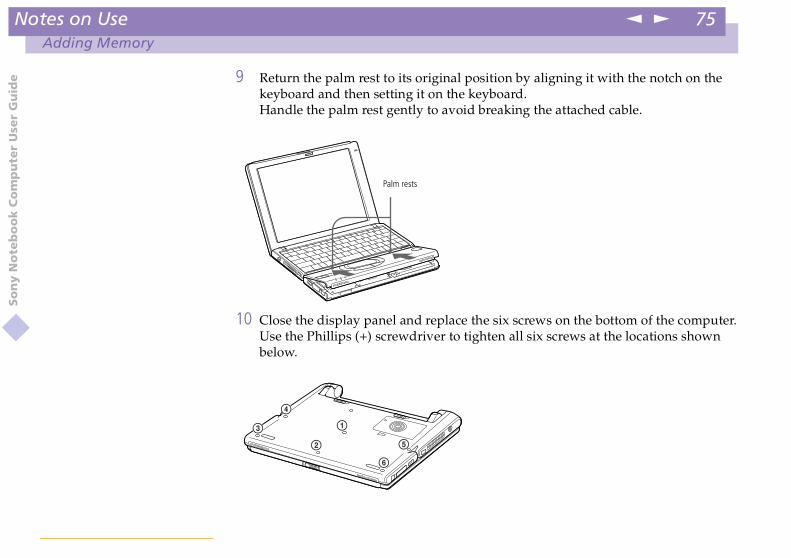
Notes on UseAdding Memory
k C
om
pu
ter
Use
r G
uid
e75n N
9 Return the palm rest to its original position by aligning it with the notch on thekeyboard and then setting it on the keyboard.Handle the palm rest gently to avoid breaking the attached cable.
ix screws on the bottom of the computer.n all six screws at the locations shown
Palm rests
So
ny
No
teb
oo
10 Close the display panel and replace the sUse the Phillips (+) screwdriver to tightebelow.

Notes on UseAdding Memory
k C
om
pu
ter
Use
r G
uid
e76n N
To remove a memory module
1 Turn off the computer and all peripheral devices. Disconnect the power cord andall cables from the computer, and then remove the battery packs.
2 Perform the steps 2 and 3 of "Installing a Memory Module".The computer interior becomes extremely hot during operation. Wait about onehour for the computer to cool down before you remove the screws.
3 Remove the memory module.Before you handle the memory module, touch a metal part of the computer to
ed on your body.
Memory Module".
down on the release tabs on either end dule at the same time.mory module in the direction of the
So
ny
No
teb
oo
discharge any static electricity accumulat
4 Perform the steps 6 and 7 of "Installing a
1Carefully press of the memory mo2 Pull out the mearrow.

Notes on UseAdding Memory
k C
om
pu
ter
Use
r G
uid
e77n N
To view the amount of memory
1 Turn on the computer.
2 Click the Start button, point to VAIO, and click "Sony Notebook Setup".
3 The Sony Notebook Setup screen appears.
4 Click the "About This Computer" tab to view the amount of system memory. If theadditional memory does not appear, repeat the steps 1-9.
So
ny
No
teb
oo

Notes on UseOther precautions
k C
om
pu
ter
Use
r G
uid
e78n N
Other precautions
On Handling the LCD Screen� Do not leave the LCD facing the sun as it can damage the LCD. Be careful when
using the computer near a window.� Do not scratch the LCD or exert pressure on it. This could cause malfunction.
� Using the computer in low temperature conditions may produce a residual imageon the screen. This is not a malfunction. When the computer returns to normal
l.en if the same image is displayed for ae disappears in a while. You can use a
ion. This is normal and does not indicate
cision technology. You may, however, seed, blue, or green) that continuously
lt of the manufacturing process and does
C 50/60 Hz.
wer-consuming equipment, such as a
rge protector. This device preventsen power surges such as those that may
So
ny
No
teb
oo temperature, the screen returns to norma
� A residual image may appear on the screlengthy period of time. The residual imagscreen saver to prevent residual images.
� The screen becomes warm during operata malfunction.
� The LCD is manufactured using high-pretiny black points and/or bright points (reappear on the LCD. This is a normal resunot indicate a malfunction.
On the Power Source� Your computer operates on 100V-240V A
� Do not share the AC outlet with other pocopying machine or shredder.
� You can purchase a power strip with a sudamage to your computer caused by suddoccur during an electrical storm.

Notes on UseOther precautions
k C
om
pu
ter
Use
r G
uid
e79n N
� Do not place heavy objects on the power cord.
� To disconnect the cord, pull it out by the plug. Never pull the cord itself.� Unplug your computer from the wall outlet if you will not be using the computer
for a long time.
� When the AC adapter is not used, unplug it from the AC outlet.� Use only the AC adapter supplied. Do not use any other AC adapter.
On Handlinga soft cloth lightly moistened with a mildf abrasive pad, scouring powder, orse may damage the finish of your
the computer, shut down your computere the computer checked by qualified.
objects on top of the computer.
subject to:
ducts,
ot magnetically shielded,
So
ny
No
teb
oo � Clean the cabinet with a soft, dry cloth or
detergent solution. Do not use any type osolvent such as alcohol or benzine, as thecomputer.
� Should any solid object or liquid fall intoand then unplug it. You may want to havpersonnel before operating it any further
� Do not drop the computer or place heavy
On Installation� Do not place your computer in a location
� Heat sources, such as radiators or air� Direct sunlight,
� Excessive dust,� Moisture or rain,
� Mechanical vibration or shock,� Strong magnets or speakers that are n

Notes on UseOther precautions
k C
om
pu
ter
Use
r G
uid
e80n N
� Ambient temperature of more than 35º C or less than 10º C,
� High humidity.� Do not place electronic equipment near your computer. The computer’s
electromagnetic field may cause a malfunction.
� Provide adequate air circulation to prevent internal heat build-up. Do not placeyour computer on porous surfaces such as rugs or blankets, or near material suchas curtains or draperies that may block its ventilation slots.
� The computer uses high-frequency radio signals and may cause interference torelocate the computer a suitable distance
and interface cables; otherwise,
bles.
coin-operated telephone, and may notX).
d location to a warm one, moisture mayallow at least an hour before turning ong your computer and contact VAIO-Link.
uch the surface of the diskette.
t and other heat sources.
So
ny
No
teb
oo radio or TV reception. Should this occur,
away from the set.
� Use only specified peripheral equipmentproblems may result.
� Do not use cut or damaged connection ca
� Your computer cannot be connected to awork with a private branch exchange (PB
On Moisture CondensationIf the computer is brought directly from a colcondense inside your computer. In this case,your computer. If any problem occurs, unplu
On Handling Diskettes� Do not open the shutter manually and to
� Keep diskettes away from magnets.� Keep diskettes away from direct sunligh

Notes on UseOther precautions
k C
om
pu
ter
Use
r G
uid
e81n N
On Handling CD-ROM Disks� Do not touch the surface of the disk.
� Do not drop or bend the disk.
On Cleaning CD-ROM Disks� Fingerprints and dust on the surface of a disk may cause read errors. Proper care
of the disk is essential to maintain its reliability. Do not use solvents such asbenzine, thinner, commercially available cleaners or anti-static spray, as they maycause damage to the disk.
edge and use a soft cloth to wipe the
cloth with water, wring it out well, andthe center out. Wipe off any remaining
ger or metallic objects.ory Stick as a label.
to the Memory Stick.ticks.
cation subject to:a car parked in the sun,
nces.
emory Stick.
So
ny
No
teb
oo
� For normal cleaning, hold the disk by itssurface from the center out.
� If the disk is badly soiled, moisten a softuse it to wipe the surface of the disk frommoisture with a dry soft cloth.
On Handling Memory Stick™ � Do not touch the connector with your fin� Use only the label supplied with the Mem
� Do not bend, drop, or apply strong shock� Do not disassemble or modify Memory S
� Do not let cards get wet.� Do not use or store Memory Sticks in a lo
- Extremely high temperatures, such as in- Direct sunlight,- High humidity or near corrosive substa
� Use the storage case supplied with the M
Notes on UseOther precautions
k C
om
pu
ter
Use
r G
uid
e82n N
On Using Batteries� Never leave the battery pack in temperatures above 60° C, such as in a car parked
in the sun or under direct sunlight.
� Battery life is shorter in a cold environment. This is due to decreased batteryefficiency at low temperatures.
� Charge the batteries at temperatures between 10° C to 30° C. Lower temperaturesrequire a longer charging time.
� While the battery is in use or being discharged, the battery pack heats up. This isnormal and is not cause for concern.
rces of heat.
ttery pack.
chanical shock.extended period of time, remove thent damage to the battery.
he battery power is still low, the batterynd should be replaced.before recharging.
a considerable amount of time, recharge
le driving, cycling, or operating anyazard and is illegal in some areas. It canr earphones at high volume while
So
ny
No
teb
oo
� Keep the battery pack away from all sou
� Keep the battery pack dry.� Do not open or try to disassemble the ba
� Do not expose the battery pack to any me� If you are not using the computer for an
battery pack from the computer to preve
� If, after fully charging the battery pack, tpack may be reaching the end of its life a
� You do not need to discharge the battery
� If you have not used the battery pack forthe battery.
On Using earphones� Road safety – Do not use earphones whi
motorized vehicle. It may create a traffic halso be potentially dangerous to play you

Notes on UseOther precautions
k C
om
pu
ter
Use
r G
uid
e83n N
walking, especially at pedestrian crossings. You should exercise extreme cautionor discontinue use in potentially hazardous situations.
� Preventing hearing damage – Avoid using earphones at high volume. Hearingexperts advise against continuous, loud and extended play. If you experience aringing in your ears, reduce the volume or discontinue use.
On Maintenance� Make sure to disconnect the power cord before cleaning the computer.
� Avoid rubbing the LCD screen, as this can damage the screen. Use a soft, dry cloth
tly moistened with a mild detergentpad, scouring powder or solvent such as
So
ny
No
teb
oo
to wipe the LCD screen.� Clean the computer with a soft cloth ligh
solution. Do not use any type of abrasivealcohol or benzine.

Specificationsk
Co
mp
ute
r U
ser
Gu
ide
84n N
Specifications
Model Number PCG-SR11K
Processor Mobile Intel® Pentium® III processor 600 MHz - Intel® SpeedStep™ technology
Hard Disk Drive xx 10 GB
Standard RAM xx MB SDRAM micro DIMM
xxx MB
XGA TFT poly-Si
KB (CPU integration)
l Video Supports full-screen playback
Savage/IX (8MB VRAM)
it CD-quality stereo sound
CD-ROM 16xaser Diode properties:
Wave Length : 795 nmLaser Output: 16.5 µW
Flex (56 kbps) data / fax modem
STN data connectivity
64
256
10.4”
256
So
ny
No
teb
oo
Maximum RAM
LCD Screen
L2 Cache Memory xxx
MPEG MPEG 1 Digita
Graphics S3
Sound Capabilities 16-b
CD-ROM DriveL
Internal modem V.90/ K56
Telecommunication Capabilities
P

Specificationsk
Co
mp
ute
r U
ser
Gu
ide
85n N
Expansion Capabilities
One PCMCIA type II Card and Cardbus support.
Built-In Capabilities Microphone, Stereo speakers, Touchpad, Jog Dial
Special Button Jog Dial
Connection Capabilities on
External speakers, Headphone, Mic, USB, Type II PC Cards,i.LINK™ (IEEE1394) S400
able battery, AC adapter, AC cord, phone cable,ne plug, display adapter.
r free VAIO-Link Service ‡
uarantee (parts and labour) ‡
aximum (16V DC/AC100-240V)
Energy Star compliantd Configuration & Power Interface).
6 cells Lithium ion
259 mm23.7 to 32.1 mm
209 mm
Model Number PCG-SR11K
So
ny
No
teb
oo Notebook
Supplied Accessories CD-ROM drive, rechargepho
Service 1 yea
Guarantee 1 year g
Power Requirement 65 watts m
Power ManagementACPI (Advance
Battery
Dimensions Width Height Depth

Specificationsk
Co
mp
ute
r U
ser
Gu
ide
86n N
Weightwithout AC adapter
with AC adapter
1.36 kg
1.62 kg
Operating Temperature
+5°C t +35°C (temperature gradient less than 10°C/hour)
Storage Temperature -20°C t+60°C (Temperature gradient less than 10°C/hour)
ndensed), provided that humidity is less(hygrometer reading of less than 29°C)
ndensed), provided that humidity is less(hygrometer reading of less than 35°C)
Model Number PCG-SR11K
So
ny
No
teb
oo
‡ See our special Guarantee extension conditions.
.Specifications are subject to change without notice.
Operating Humidity 20% t 80% (Not cothan 65% at +35°C
Storage Humidity 10% t 90% (Not cothan 20% at +60°C

Compatibility tablek
Co
mp
ute
r U
ser
Gu
ide
87n N
Compatibility tableThis table contains an overview of the devices that are compatible with your notebook.
Devices Compatible Not compatible
USB mouse Sony USB mouse PCGA-UMS Series
AC adapter PCGA-AC16V
White Memory Stick
So
ny
No
teb
oo
i.Link cables VMC-IL4415VMC-IL4408Series
Battery PCGA-BP2S
CD-ROM drive PCGA-CD51/A
CD-RW drive PCGA-CDRW51/A
Display adapter PCGA-DA1S
Memory Stick Blue Memory Stick
Indexk
Co
mp
ute
r U
ser
Gu
ide
88n N
IndexAAC adapter 17AC power 17adding
hardware 44peripherals 44printers 50
left 15right 15Start (Windows®) 23
Ccables
power cord 17cameras
digital video recorder 54canceling commands 26Caps Lock 15
indicator light 28CD drive tray
troubleshooting 68CD-ROM discs
cleaning 81handling 81troubleshooting 68
CD-ROM driveconnecting 40troubleshooting 68
charging battery pack 19charging battery packs 19choosing
power source 18cleaning computer 79computer
cleaning 79condensation 80lithium ion battery 6starting 22
So
ny
No
teb
oo
air circulation 80Alt key 26Applications key 27
Bbattery pack
charging 19connector 16inserting 18loading 18removing 21
battery packs 82charging 19indicator lights 15, 28inserting 18inserting into battery bay 18loading 18rechargeable 17
brightnessadjusting 22
buttons
Indexk
Co
mp
ute
r U
ser
Gu
ide
89n N
troubleshooting 61, 63, 64connecting
CD-ROM drive 40digital video recorder 54external speakers 57floppy disk drive 47microphone 58monitor 51network 40power source 17
diskettesejecting 48handling 80inserting into drive 48troubleshooting 68
drivesfloppy disk 47
DV In/Out 13, 54
Eearphone 52earphones
precautions 83Eject button 48ejecting
diskettes 48ergonomic considerations 11, 12Escape key 26external devices
display 12See also monitor 51
speakers 57
Ffloppy disk drive
connecting 47troubleshooting 68
Fn key 26combination commands 29
Function keys 26function keys 27
So
ny
No
teb
oo printer 50
USB device 46connectors
battery 16DC In 14, 17i.LINK 13keyboard 15microphone 13printer 50USB 14
Correction keys 26correction keys 26Ctrl key 26cursor-movement keys 26Customer Service Guide 59customer support 60
See also VAIO-Link 7
DDC In 14, 17digital video camera 54

Indexk
Co
mp
ute
r U
ser
Gu
ide
90n N
GGuarantee 24Guarantee card 24
Hhandling
audio CDs 81CD-ROM discs 81diskettes 80
hard drives
hardware 44memory 40peripherals 44
interference 80
Kkeyboard 26
connector 15
LLCD 78
lock lever 22troubleshooting 65
left button 15lever
LCD 22lithium ion battery
disposal 6safety precautions 6
loadingbattery pack 18
Mmaintenance 79, 83Memory Stick 14, 36, 69Memory Stick slot 36microphone 13
connecting 58troubleshooting 66
modemtroubleshooting 66
So
ny
No
teb
oo indicator light 15
HelpMouseware 35online 60
Ii.LINK 13, 54IEEE1394 13, 54Indicator lights 28indicator lights
battery 15, 28Caps Lock 15, 28hard drive 15Num Lock 15, 28power 15Scroll Lock 15, 28
Insert key 26inserting
battery pack 18diskettes into drive 48
installing

Indexk
Co
mp
ute
r U
ser
Gu
ide
91n N
moisture condensation 80monitor
connecting 51connector 52
mousetroubleshooting 64
Mouse Properties screen 35
NNavigation keys 26
switch 22power saving modes 42
System Hibernation 29, 43System Suspend 43Video Standby 30
power sources 18, 78connecting 17
precautions 80pre-installed software 59Print Screen key 26printer
connecting 50port 50
Rradio interference 80rechargeable battery packs 17recharging battery pack 19recharging battery packs 19registering
your computer 24Registering Your Computer 24, 25regulatory information 4removing
battery pack 21diskettes 48
right button 15
SScroll Lock 15
indicator light 28
So
ny
No
teb
oo navigation keys 26
networkconnecting 40
Num Lock 15indicator light 28
numeric keypad area 25
Oonline help 60operator keys 26output devices
adding 50
Ppacking list 59PC card 69
slots 13, 40troubleshooting 69
power 28cord 17indicator light 15
Indexk
Co
mp
ute
r U
ser
Gu
ide
92n N
selectingpower source 18
Shift key 27Shut Down Windows dialog box 23Smart Connect 55Software guide 59Sony e-mail support service 60Speakers
volume 29speakers
interference 80
UUSB
connecting 46connector 14, 46
VVAIO-Link 60
response center 60software 60
ventilation 80video camera 54Video Standby mode 30
WWindows
taskbar 63Windows®
key 26key combinations 27Start button 23taskbar 23
So
ny
No
teb
oo external 57
troubleshooting 65Start button 23starting
computer 22startup problems 23System Hibernation mode 29, 43System Suspend mode 29, 43
Ttechnical specifications 59technical support 59, 60Touchpad
accessing 35features 35
touchpad 15, 35, 64troubleshooting 61
startup 23, 61turning on
computer 22TV