user guide - corporate travel management solutions · user guide. travel itinerary email. after...
TRANSCRIPT

1
USER GUIDE
TRAVEL ITINERARY EMAIL
After your trip has been booked with ctms Travel, first time TripCase users will receive a confirmation email similar to the one to the right.
There are several methods to access your trip information which are described below.
VIEW ITINERARY
Simply click on the “View in TripCase” link in the email located at the top left. You will be redirected to the TripCase website where you will be prompted to create an account.
These steps can be easily completed on your PC’s web browser or on your mobile device.
TripCase is a tool for both business and leisure travelers to stay in control when traveling. Focusing on enhancing the traveler’s post-booking experience, this smart mobile toolkit delivers advice, alerts and tools relevant to when and where you are.

2
CREATE TRIPCASE ACCOUNT
If you do not have a TripCase account, one can be created by simply entering your first and last name, email address and a password. Alternatively, you can sign up using your Facebook login credentials.
If you already has a TripCase account, even if a different email address is assigned, you can login to your original account and link additional personal or business email addresses in your profile settings.
VERIFY TRIPCASE ACCOUNT
You will receive a verification email upon completion of the TripCase sign up process (new users only). This email will be sent to the email address used to create the account. You will be required to read and accept the terms and conditions, then click on the link to verify the email address used to create the TripCase account.

3
CONFIGURE TRIPCASE ACCOUNT
Add additional email addresses on the profile page. For example, if the TripCase account was created using a business email address, you can also add in several secondary email addresses such as a personal email address to combine both business and personal travel in one application.
VIEW TRIP RESERVATION WITHIN THE EMAIL
Once complete, future itinerary emails sent from ctms Travel will appear in the format to the right. Your itinerary details displayed directly within the email.
Log in to TripCase to sync to your calendar, connect trips, view weather receive trip related alerts.

4
TRIP MERGE CORRECTION
TripCase has merged multiple reservations into one single reservation. This is a new feature has been known to cause glitches and problems.
To avoid this:1. Log into TripCase2. Click your name in the upper right hand corner and then click on Profile3. Once the profile settings are displayed, scroll down to Account Settings and uncheck the box4. Save
Please note that this new setting will only correct NEW reservations that include the account email. For existing reservations that have not yet been travelled, user may experience an incorrect notification due to the merging process. In order to fix this, each trip will need to be reviewed and if the trip contains multiple reservations (PNRs) then they can be split out into an individual trip.

5
PRINT ITINERARY WITHIN THE EMAIL
In your travel itinerary email, you can print a copy of your current itinerary by clicking on the “Print Itinerary” link in the top of the email. You will then have the option of printing the document or saving it as a PDF.
VIEW TRIPS WITHIN TRIPCASE
Corporate ctms Travel customers who use TripCase for document delivery will enjoy the convenience of automatic trip imports into the traveler’s TripCase account. When you login into your TripCase account, you will see all of your upcoming trips.
Travelers may also manually add any trip related elements, such as ground transportation, ferry, hotel reservations, dining plans or activities by clicking My Trips and selecting Add Event to your Trips. All these elements can be pulled together into a single trip.
For reservations made outside of ctms Travel, trips can be imported by simply emailing the confirmation email to [email protected].

6
VIEW TRIPS
View or delete trips in the actions menu for each trip by selecting an item from the “Actions” drop down which is located beside each trip. COMBINE TRIPS
When trip elements booked through two or more sources appear as separate trips within TripCase, follow these simple instructions to combine them:
Click on the blue “Combine Trips” button on the My Trips page Check the boxes of the “trips” you wish to combine Go to the bottom of the window and click Continue. In the Confirm and Continue window, rename your new trip, click “Combine” and all of your trip elements are in one place under one trip.
VIEW DOCUMENTS
View and print etickets and itineraries for each trip by clicking the documents link. These items can be printed or saved as PDF documents. SHARE TRIPS
With TripCase, travel arrangers receive trips in their TripCase account when they are copied on the confirmation email. Travel arrangers can edit the name of the trip to easily find trips in the trip list made for other travelers
Share your itinerary with friends, family and colleagues. Travelers can select with whom they want to share your trip details with. It’s all configured right here.

7
IMPORTING TRIPS INTO CALENDARS
TripCase offers two different methods for importing your TripCase data into your calendar client (Outlook, Google and mobile devices).
1. Import Method The import method allows a one time ‘snapshot’ of your TripCase trip details. Carefully follow the steps outlined below to add your trip details to your existing calendar to avoid creating an additional TripCase calendar.
2. Subscription Method A new calendar labeled TripCase will be created in addition to your existing calendar. Future trips and updated trip items will be automatically added to this new calendar.
By using either method, you will be able to see all trip details in your calendar including: air, car, hotel and custom activities manually entered.
IMPORT METHOD USING OUTLOOK (2007 or higher)
To import trips into an existing Outlook Calendar, select the Calendar option from the drop down menu next to your name.
1. From the Calendar page, select “Download File”.
2. Select “Save” and close the dialogue box (caution: selecting “open” will create a separate calendar).

8
3. Go to your existing Outlook calendar and select File > Open > Import > Import an iCalendar.ics file > “Next”.
4. Browse your Downloads folder for the recent .ics file. Select “OK”.
5. When asked if you want to open as a new calendar or import items into your calendar, choose “Import”.
6. Your trip details should now be viewable in your existing Outlook calendar.
SUBSCRIPTION METHOD USING OUTLOOK
To import trips into an existing Outlook Calendar using the subscription method, select the Calendar option from the drop down menu next to your name.
1. Select “Turn On” in the section called Subscription Method.
2. Click on “Click Here” in the section called Subscription Method.
3. Click “Yes” to the question “Add this internet calendar to Outlook and subscribe to updates?”
9
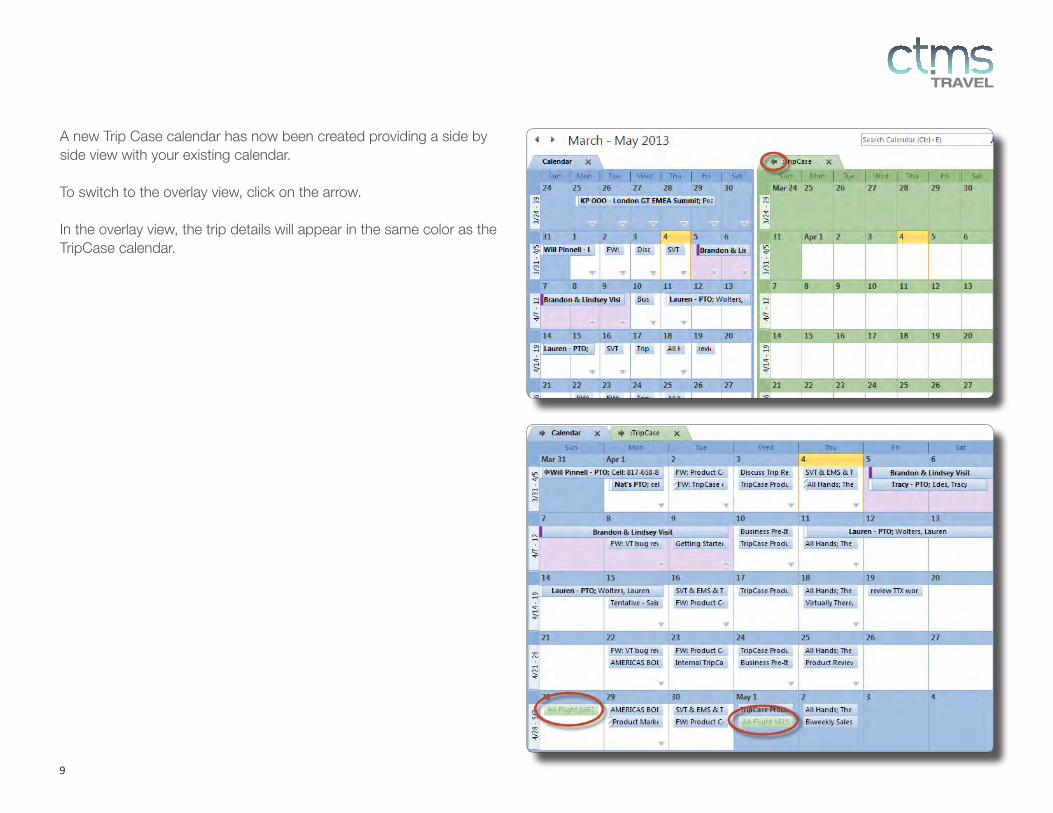
A new Trip Case calendar has now been created providing a side by side view with your existing calendar.
To switch to the overlay view, click on the arrow.
In the overlay view, the trip details will appear in the same color as the TripCase calendar.

10
SUBSCRIPTION METHOD USING GOOGLE
To import trips into a Google calendar using the subscription method, select the Calendar option from the drop down menu next to your name.
1. Select “Turn On” in the section called Subscription Method.
2. Copy the webcal URL in the Subscription Method.
3. In your Google calendar, paste the webcal URL by selecting ``Add by URL`` from the drop down menu under Other calendars.
4 Your TripCase calendar should now be viewable in your Google calendar and all trips will be denoted in a designated color.

11
ADD A TRIP INTO NATIVE CALENDAR ON MOBILE DEVICE
To import trips into the native calendar on a mobile device, select the Calendar option from the drop down menu next to your name.
1. Select “Turn On” in the section called Subscription Method.
2. Copy the webcal URL in the Subscription Method.
3. Send the URL to yourself via email or text.
4. Open the email or text from your mobile device and click on the URL.
5. Your trip data will be loaded into your phones calendar. Follow this same process for a tablet.
*The Blackberry does not work with the subscription method but will work with the import method. Always use Outlook - File > Open > Import method.

12
MOBILE DEVICES
Travel with confidence with ctms Travel and the TripCase app on your Apple or Android device or via mobile web browser for Blackberry users. Access all travel information on multiple devices (mobile web browser or PC, Apple or Android applications). Just make sure you login with the same user ID and password.
Display departure/arrival gate and baggage claim information, receive real-time flight change notifications, search alternate flights, check flight schedules and maps, check the weather, receive arrival updates, review the airline seat map with the graphical seat map functionality, and more, all from your mobile device.
Phone 305.936.5399 ▪ Toll Free 877.FLY.CTMS ▪ Fax 905.738.0867 ▪ www.ctmstravel.com
CORPORATE TRAVEL MADE SIMPLE.