user guide - edive · 2005 & 2006 aau national diving championships nys empire state games the...
TRANSCRIPT

USER GUIDE
Overly Nifty LLC (585) 317 – 9445 [email protected] [email protected] www.eDive.info
eDive Version 2.8 Last Updated May 20, 2010


TABLE OF CONTENTS
- i -
INTRODUCTION .................................................................................................................................... 1
SOFTWARE INSTALLATION INSTRUCTIONS ................................................................................... 2
INSTALLING ON WINDOWS VISTA OR WINDOWS 7 .................................................................................... 2
SYSTEM REQUIREMENTS ................................................................................................................... 3
DEMO VERSION FUNCTIONALITY...................................................................................................... 3
EDIVE LICENSE FILES ......................................................................................................................... 3
SUPPORT INFORMATION .................................................................................................................... 4
MENUS ................................................................................................................................................... 5
FILE ...................................................................................................................................................... 5 1. Save ................................................................................................................................................ 5 2. New ................................................................................................................................................. 5 3. Open ............................................................................................................................................... 5 4. Import .............................................................................................................................................. 8 5. Export ............................................................................................................................................ 12 6. Exit Application .............................................................................................................................. 17
EDIT ................................................................................................................................................... 18 1. Refresh Data ................................................................................................................................. 18 2. Divers ............................................................................................................................................ 18 3. Coaches ........................................................................................................................................ 19 4. Affiliations ...................................................................................................................................... 20 5. Dive Sheets ................................................................................................................................... 21 6. Scoring Templates ........................................................................................................................ 25
MEETS ................................................................................................................................................ 26 1. Add/Create a Meet ........................................................................................................................ 26 2. Edit a Meet .................................................................................................................................... 27 3. Register Divers .............................................................................................................................. 29 4. Delete Meet ................................................................................................................................... 31 5. Events ........................................................................................................................................... 31
EVENTS .............................................................................................................................................. 32 1. Add Event to Meet ......................................................................................................................... 32 2. Edit Event ...................................................................................................................................... 33 3. Combine Events ............................................................................................................................ 39 4. Merge 2 Events ............................................................................................................................. 40 5. Register Divers .............................................................................................................................. 41 6. Set Diver Order ............................................................................................................................. 41 7. Add/Modify Judges ........................................................................................................................ 45 8. Dive Sheets ................................................................................................................................... 45 9. Delete Event .................................................................................................................................. 45 10. Run Event ................................................................................................................................. 46 11. Modify Posted Results............................................................................................................... 58
VIEW .................................................................................................................................................. 59 1. Navigation ..................................................................................................................................... 59 2. Quick Bar ...................................................................................................................................... 60
TOOLS ................................................................................................................................................ 61 1. Lookup Dive DD ............................................................................................................................ 61 2. Transfer Dive Lists ........................................................................................................................ 63 3. Upload to Colorado ....................................................................................................................... 64 4. Upload to Daktronics ..................................................................................................................... 64 5. Judging Analysis ........................................................................................................................... 64
REPORTS ............................................................................................................................................ 67 1. Reports Browser ........................................................................................................................... 67 2. Registration Summary ................................................................................................................... 67
HELP .................................................................................................................................................. 68 1. eDive FAQ..................................................................................................................................... 68 2. Purchase/Renew Online ............................................................................................................... 68 3. About ............................................................................................................................................. 68
OTHER INFORMATION ....................................................................................................................... 69

TABLE OF CONTENTS
- ii -
REPORTS BROWSER............................................................................................................................ 69 Layout of the Reports Browser screen .......................................................................................... 69 Usage of the Reports Browser ...................................................................................................... 69 To view a report ............................................................................................................................. 71 Report Options .............................................................................................................................. 71 Available Reports .......................................................................................................................... 76 How do I … ? ................................................................................................................................. 79 Report Examples ........................................................................................................................... 82
Announcers Script ..................................................................................................................................... 82 Awards Labels .......................................................................................................................................... 83 Detailed Results ........................................................................................................................................ 84 Display Link ............................................................................................................................................... 85 Dive History ............................................................................................................................................... 86 Dive Sheet (NCAA format) ........................................................................................................................ 87 Dive Sheet (High School format with scores) ............................................................................................ 88 Dive Sheet (High School format without scores) ....................................................................................... 89 Blank Dive Sheet (High School 6 dives) .................................................................................................... 90 Blank Dive Sheet (AAU Age group) .......................................................................................................... 91 Blank Dive Sheet (USD Age group) .......................................................................................................... 92 Blank Dive Sheet (NCAA) ......................................................................................................................... 93 Diving Order .............................................................................................................................................. 94 Diving Order – with Dive Lists ................................................................................................................... 95 Quarter/Semi-Finals Summary .................................................................................................................. 96 Results - High School, 11 dive format ....................................................................................................... 97 Results – Official, for completed events .................................................................................................... 98 Results – Unofficial, for incomplete events ............................................................................................... 99 Table Score Sheet .................................................................................................................................. 100 Team Points ............................................................................................................................................ 101 Team Roster ........................................................................................................................................... 102 Teams Competing in this Meet ............................................................................................................... 103 Voluntary Totals ...................................................................................................................................... 104
CONNECTING TO YOUR DAKTRONICS OMNISPORT 2000 ...................................................................... 105 CONNECTING TO YOUR COLORADO SYSTEM ....................................................................................... 105 UPLOADING AN EVENT INTO THE COLORADO SYSTEM 5 ....................................................................... 106 UPLOADING AN EVENT INTO THE COLORADO SYSTEM 6 ....................................................................... 108 UPLOADING AN EVENT INTO THE DAKTRONICS OMNISPORT 2000 ......................................................... 109 UPLOADING AN EVENT INTO DAKTRONICS PRO DIVING SOFTWARE ....................................................... 110 DIVE SHEET STATUS ICON DEFINITIONS ............................................................................................. 112 USING THE SELECTION SCREEN ......................................................................................................... 112 USB TO SERIAL ADAPTERS ................................................................................................................ 113 TROUBLESHOOTING YOUR COM PORT CONNECTION ........................................................................... 114 WHAT DOES THE “… CLOSE ALL OPEN FORMS …” MESSAGE MEAN? ..................................................... 115 FORMAT FOR DELIMITED ENTRIES ...................................................................................................... 115 SALES RELATED QUESTIONS ............................................................................................................. 117 SUPPORT RELATED QUESTIONS ......................................................................................................... 119 GENERAL HOW TO QUESTIONS .......................................................................................................... 119

eDive™ User Guide Last Updated: May 20, 2010
© Copyright 2001-2010 Overly Nifty LLC. Printed in U.S.A. 1
Introduction
eDive is an MS Windows™ based application which allows you to efficiently setup and manage an
entire diving meet from the initial registrations through to printing the final results. It is the most widely used program in the country. It has been successfully used at thousands of national and international competitions for the past 10 years and has been used for club, high school, college and invitational meets throughout the country. eDive is the only program you will ever need to manage and run your diving meet! Take a look and see what you think.
Since 2000 eDive has been successfully used to manage ...
2005 & 2006 AAU National Diving Championships
NYS Empire State Games
The American Cup
World Cup Trials
USD Junior National Diving Championships
USD Senior National Diving Championships
USD Junior Regional and Zone Championships
FINA/USA Diving Grand Prix
NCAA Men's and Women's Championships
High School Federation Sectional and State Championships
... plus many more !! In fact, there are over 1,000 meets per month being run using our software! Features:
use it to run AAU, USD, FINA, NCAA and High School events or customized events
have your visiting team email you their entries and import them directy into eDive!
integration with Hy-Teks Meet Manager software!
built in support for Colorado or Daktronics Timing Systems ... create the entire meet in eDive and upload an entire event to the timer in a matter of seconds
select any number of judges
unlimited number of meets, entries and events
integrated Degree of Difficulty calculator
combine multiple events to be run simultaneously as one event, then report the results for each individual event
transfer dive sheets from one event to another with just a few clicks, no re-keying of dive sheets
transfer optionals &/or voluntaries to finals with just a few clicks, including carrying over the score for voluntaries
quickly add divers at the last minute to any event, even while it is in progress
create a new meet based on a meet you ran previously
view a divers list of dives at any time ... even while running the event
divers lists are validated as soon as you make any change ... even dives changed while on the board. Know immediately if there are any rules violations !
view a leader board while running any event, even combined events
cut a diver during an event ... and still be able to un-cut them later on
supports exhibition divers
dive statistics are available while running an event so you can see exactly how long each diver is taking and when the event will finish
numerous reports are available which can be run before, during or after an event completes
results can be printed immediately following the last diver ... no waiting !!

eDive™ User Guide Last Updated: May 20, 2010
© Copyright 2001-2010 Overly Nifty LLC. Printed in U.S.A. 2
Software Installation Instructions
To install the software just put in your installation CD and follow the prompts. If you just click “Next” through the installation the software will be installed in the default directory. If you did not order a CD then download the full installation package from our website at www.edive.info on the Downloads page, save the downloaded file to your desktop and double-click on it to run it. You can install eDive on as many computers as you need in order to run your events. For example, you can install on your home computer and your pool computer. You can then do all of your data entry at home, copy the database to your pool computer and then run your events.
Installing on Windows Vista or Windows 7 In order to install eDive on Windows Vista or Windows 7 you will need Administrator privileges. During the install process you will be prompted for the folder to install eDive into. Please use the default given by the installer. If you change the default installation folder for Vista or Windows 7 then you may encounter unpredictable results due to the security features in Vista and Windows 7. If you have any questions at all about the installation process please let us know and we will help.

eDive™ User Guide Last Updated: May 20, 2010
© Copyright 2001-2010 Overly Nifty LLC. Printed in U.S.A. 3
System Requirements
This program will run on any computer with an operating system of Windows XP sp2 or higher. It is assumed that you are running with the latest version of that operating system. Internet Explorer v6 (preferably higher) with the latest service pack is required to be installed. While it is possible to run eDive on Windows 95, 98 and ME we are unable to support it as Microsoft has officially ceased support of these operating systems. eDive can also be successfully installed on Windows Vista and Windows 7. Please see the special installation instructions for Windows 7 or Vista. Recommended system requirements
Win XP Pro
1 GB RAM
20 MB free hard disk space
Internet Explorer 7 with the latest service pack
32 bit True Color
1024x768 screen resolution
Demo version functionality
The demo version of eDive is a fully functional version. It is limited in that it contains only high school rules and will only allow you to run an event with 3 divers in it. The demo version can be converted into a licensed version by copying your retail license file into the eDive installation directory. The next time you run eDive it will load as a licensed version.
eDive License Files
When you purchase a license a file will be emailed to you. This is your license file and is an encrypted file which contains your licensing information. Do not lose this file as the software will not work without it. This license file needs to be saved to the directory where you installed the software. Do not attempt to open the file because just the act of opening it will most likely corrupt the file and make it unusable. If you can, save it directly from the email you receive into the installation directory. If you find the software comes up in demo mode even after you save your license file to the eDive directory then please try and save it again to that directory. It may be that you opened the file accidentally and it got corrupted during the save. If eDive still comes up in demo mode then look at the directory where eDive was installed to make sure the license file is in there. The file, as a default, is called “License.ini”. If you do not see this file in the eDive directory, then try saving it out of your email again. If you do not see the “.ini” file extension on the file then you either renamed it accidentally or you have file extensions turned off in Windows Explorer. Please turn on file extensions and look again. You may find that the file is actually named “license.ini.ini”. In which case please rename it to “license.ini” and then re-open eDive.

eDive™ User Guide Last Updated: May 20, 2010
© Copyright 2001-2010 Overly Nifty LLC. Printed in U.S.A. 4
Some customers have multiple licenses. For example, one for their high school team and one for their age group club. The recommended solution in that situation is to rename your license files so that you can tell them apart. You could, for example, rename one to licenseHS.ini and the other to licenseClub.ini. Then you can use the “Open eDive License File” menu option to open whichever one you need to run your meet. If you happen to lose your license file or it gets damaged somehow then please contact eDive support and a copy will be emailed to the contact person.
Support Information
Support is handled in a variety of ways.
This help file is a great resource for answering most questions.
You can email us at our support email address: [email protected]
You can call us directly: 585-317-9445
We have an email newsletter that you can sign up for on our main web page at www.eDive.info.
All of our contact information including email addresses and phone numbers are available online at www.edive.info/contact.htm. Support is available at any time, Sunday through Saturday. If you have a meet coming up that you think you might want some help with just let us know when that meet is. We will make sure someone is available to answer your questions whether it is through email or via telephone, before, during and after your meet. If you do call please leave a message stating your name, phone number, the team the software is licensed to, what the issue is and what the urgency is. We will call back as soon as we can. If you have an urgent problem please call our support phone number. We would suggest you also send an email to our support address if you can.

eDive™ User Guide Last Updated: May 20, 2010
© Copyright 2001-2010 Overly Nifty LLC. Printed in U.S.A. 5
Menus
File
1. Save
This option allows you to save any changes you’ve made on the current screen. If you are unsure whether the changes you made have been saved you can press this button to save the changes.
2. New
a. Add/Create a Meet
Select this option when you want to create a new meet in your current database. See “Meets > Add/Create a Meet” for more detailed information.
b. Add Event to Meet
Select this option when you want to add an event to an existing meet. See “Events > Add Event to Meet” for more detailed information.
c. Divers
Select this option when you want to add a new diver to your database. See “Edit > Divers” for more detailed information.
d. Coaches
Select this option when you want to add a new coach to your database. See “Edit > Coaches” for more detailed information.
e. Affiliations
Select this option when you want to add a new team or club affiliation to your database. See “Edit > Affiliations” for more detailed information.
3. Open
a. eDive Database
This option allows you to open an eDive database. Some users prefer to store different types of divers in separate database files or to have separate databases for different meets. For example you could have one database which contains your high school divers and another database which contains your club divers. Each database would have a different name and this menu option allows you to select the database. After selecting this option you will be prompted with the following screen.

eDive™ User Guide Last Updated: May 20, 2010
© Copyright 2001-2010 Overly Nifty LLC. Printed in U.S.A. 6
Select the database to use and press “Open”. Once eDive has loaded the database the status bar at the bottom of the screen will show the name of the database as in the screen shot below.
b. eDive License File
This option allows you to select the eDive license file to use. Some users have multiple licenses. For example they have one for their high school season and another for their club season. After selecting this option you will be prompted to locate the eDive license file to use. Just select the directory where your license file is stored, select the license file and press the Open button. The default location where your license file is stored is “C:\Program Files\eDive”. The current license you are using is displayed at the bottom of the main screen as well as the type of license and the ruleset you are allowed to use. For more information on license files please see “eDive License Files”.
c. Database Folder This option will open the folder which contains the database currently in use by eDive. The name of your current database will be shown at the bottom of the eDive screen right before the name of the team/site that the software is licensed to. If you want to backup your database then select this option,
eDive™ User Guide Last Updated: May 20, 2010
© Copyright 2001-2010 Overly Nifty LLC. Printed in U.S.A. 7
locate your database within the folder and copy it to a safe location on your computer. You may also want to rename the backup copy so that you know what it is.
d. License Folder This option will open the folder which contains the license file currently in use by eDive. The name of your license file will most likely be license.ini. You can use this option if you need to make a backup copy of your license file. Just locate the license file and copy it to a safe location on your computer.
e. Application Folder
This option will open the folder where you installed the eDive application. This folder will most likely contain your database and license files if you have not stored them somewhere else. It will also contain the ExportData folder which is the default folder where your exported data will be saved. The Help folder is also located here which contains the help file for eDive.

eDive™ User Guide Last Updated: May 20, 2010
© Copyright 2001-2010 Overly Nifty LLC. Printed in U.S.A. 8
4. Import
a. eDive Data
This option allows you to import data which was previously exported out of an eDive database. After selecting this option you will be presented with the following screen.
This screen allows you to specify the data that you want to import. There are 8 different types of data that you can import. Simply place a checkmark next to the data that you want to import. In most typical scenarios you will want to check off all options so that you don’t miss any data. During the import process data is read from files that were previously exported from another eDive database. The directory where the data files are read from is specified on this screen. You can either type in the full directory path or click the “Browse for Directory” button to browse to the directory where the data files are stored. Data files that eDive can read will have an EZX file extension. Once files have been imported, the file extension is changed from EZX to EZ_ and the files are left in the same directory. This renaming prevents the same file from being imported more than once and leaves the data files intact in case you want to keep the exported files as a backup. As a recommended practice make a backup of your database before importing any data. That way you can revert back to your existing database if you have any problems during the import process. Just copy the eDive database file you are currently using to a backup directory and rename it so that you can tell it is a backup before your import. The name of the database you are currently using is shown at the bottom of the eDive screen. There are 2 columns visible on this screen, the “Do Not Overwrite” column and the “Overwrite” column. The “Do Not Overwrite” column allows you to specify that if the data being imported already exists in your database then the existing data will not be overwritten by the data being imported. To select this option simply click the red stoplight icon and it will turn green signifying it has been selected. The “Overwrite” column allows you to specify that if the data being imported already exists in your database that it will be overwritten. To select this option simply click the red stoplight icon and it will turn green signifying it has been selected.

eDive™ User Guide Last Updated: May 20, 2010
© Copyright 2001-2010 Overly Nifty LLC. Printed in U.S.A. 9
Once you have selected the data to import and specified the directory where to find the data files simply press the “Import” button to begin the process. The box labeled “Status of last Import” will show the progress during the import of the data.
b. Hy-Tek Rosters (HY3)
This option allows you to transfer athletes from a Meet Manager database into your eDive database. It does not import event entries, just athletes and teams. When you select this option you will be prompted to select the Hy-Tek Meet Manager exported roster file. This will be a file with an HY3 extension. Please see your Meet Manager help manual to learn how to export diving entries and rosters. Once you have selected your HY3 file you will be presented with the following screen.
The file you selected to import is shown here. Press the “Begin Import” to start the import process. A status bar along the bottom will show your current progress. You are also shown a counter for the number of teams found and the number of athletes found in the data file. The numbers are shown for your reference as a double check that it imported all of the teams and athletes that you expected. Once the process is complete you can press the “Done” button to close the screen. If there were any problems during the import process the “Last Import Warnings” button will be enabled and you can click this button to view those warnings.
c. Hy-Tek Merge Entries (HY3)
This option allows you to import event entries that were previously exported from Hy-Teks Meet Manager. The basic process starts with Meet Manager by exporting the diving entries. This process can be found in the Meet Manager help files. Once you create the export file you will need to copy it to the computer running eDive. When you start the process you will need to select the meet to import the entries into. Each event being imported also needs to be paired up with an event in your existing database. These parings can be specified on the import dialog. Once you select this option you will be prompted for the location of the Meet Manager export file. This file will have an HY3 file extension. The following screen will be shown to allow you to select this HY3 file.

eDive™ User Guide Last Updated: May 20, 2010
© Copyright 2001-2010 Overly Nifty LLC. Printed in U.S.A. 10
Select the HY3 file and press the “Open” button. If the file you selected is a valid Meet Manager entries export file then the following screen will be shown. If the file selected is not a valid entries file you will get a message stating it is not valid.
The first field on this screen shows the path and file you selected to import. If you want to change this file then select the button next to the field with the ellipsis (“…”) on it. You will be prompted to select another file. The field below this shows the name of the meet that you are importing entries for. This meet name is read from the file you are importing. Also listed on this screen are the events that were found in the file being imported. The dropdown list (below the name of the meet being imported) shows the meet that you want to import these new entries into. If you want to import the entries into a different meet then select the meet from this dropdown.

eDive™ User Guide Last Updated: May 20, 2010
© Copyright 2001-2010 Overly Nifty LLC. Printed in U.S.A. 11
The events found in the file being imported are listed on this screen. For each event found in the import file the age, sex, board level and # of dives are shown. The last column in the list specifies the event in eDive that you want to import those entries into. If you click your mouse in the last column for any particular event, a dropdown button will appear. If you click this button you can select the eDive event to import the entries into. Select an eDive event for every event in the list. If you do not want to import the entries from one of the events listed then do not select an event in the last column. When you are done then click the “Begin Import” button to start the import process. The status bar at the bottom will show the progress of the import. There are also counters on the screen to show you how many teams, athletes and entries are being imported. If there were any warnings during the import process you can click the “Last Import Warnings” button to view them again. When the import process is complete select the “Done” button to close the screen.
d. Delimited Entries
Select this option to import entries for an event from a delimited text file. With this feature you can have coaches submit their diving entries electronically by creating a simple text file and emailing it to you. No special software is required to create this text file. You can use ™MS Windows Notepad to create the file. The entries in the text file can then be imported directly into an event without any data entry on your part. When you select this option you will be prompted to select the meet and event to import the entries into as in the screen below.
Once you select your meet and event press “Go” and you will be presented with the following screen.
This screen allows you to specify the file to be imported. Click the ellipsis button to browse to the folder where you stored your entries file. Select the file and press OK on that “browse for file” screen. When that screen closes the path and filename you selected will be shown on the screen above. Click on the “Import Entries” button to begin the process. The status of the import will be shown in the area on the right side of the screen. When the process is complete you can press the “Close” button to close the screen.
eDive™ User Guide Last Updated: May 20, 2010
© Copyright 2001-2010 Overly Nifty LLC. Printed in U.S.A. 12
The “Format of Entries” button will display a dialog that shows the format that the imported file must have in order to be imported into eDive. Please see the section “Format for Delimited Entries” for detailed information on the format of the delimited entries file.
5. Export
a. eDive Data
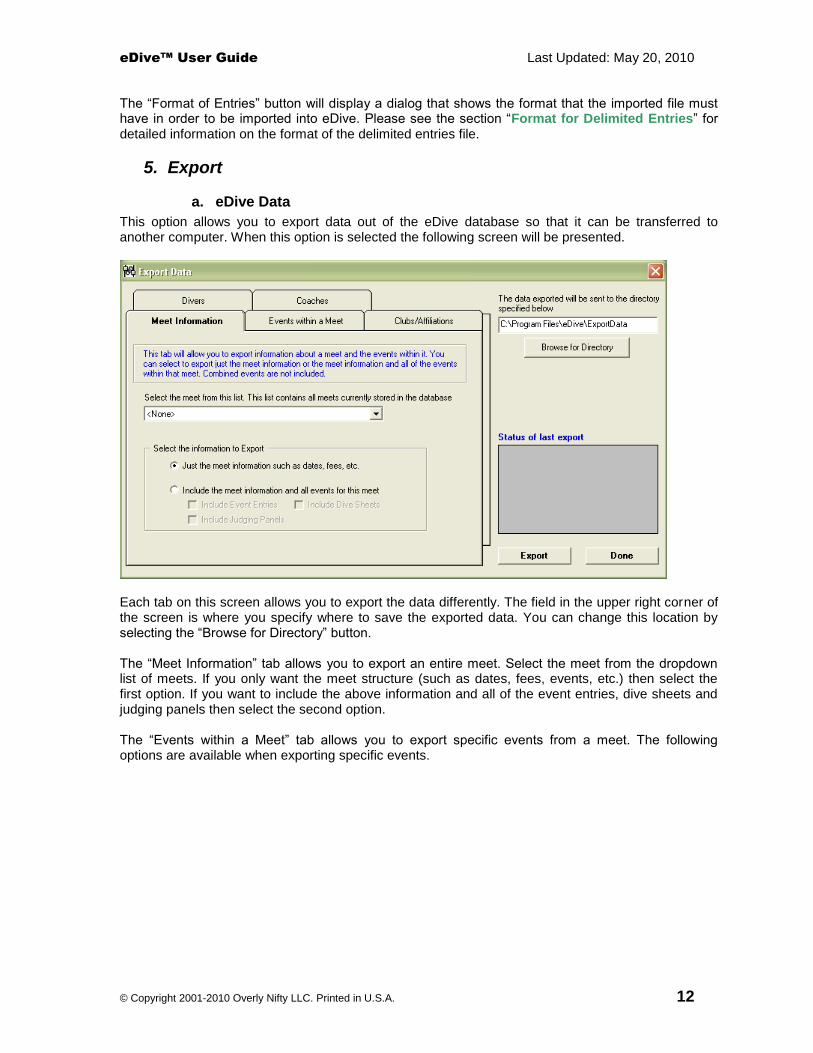
This option allows you to export data out of the eDive database so that it can be transferred to another computer. When this option is selected the following screen will be presented.
Each tab on this screen allows you to export the data differently. The field in the upper right corner of the screen is where you specify where to save the exported data. You can change this location by selecting the “Browse for Directory” button. The “Meet Information” tab allows you to export an entire meet. Select the meet from the dropdown list of meets. If you only want the meet structure (such as dates, fees, events, etc.) then select the first option. If you want to include the above information and all of the event entries, dive sheets and judging panels then select the second option. The “Events within a Meet” tab allows you to export specific events from a meet. The following options are available when exporting specific events.
eDive™ User Guide Last Updated: May 20, 2010
© Copyright 2001-2010 Overly Nifty LLC. Printed in U.S.A. 13
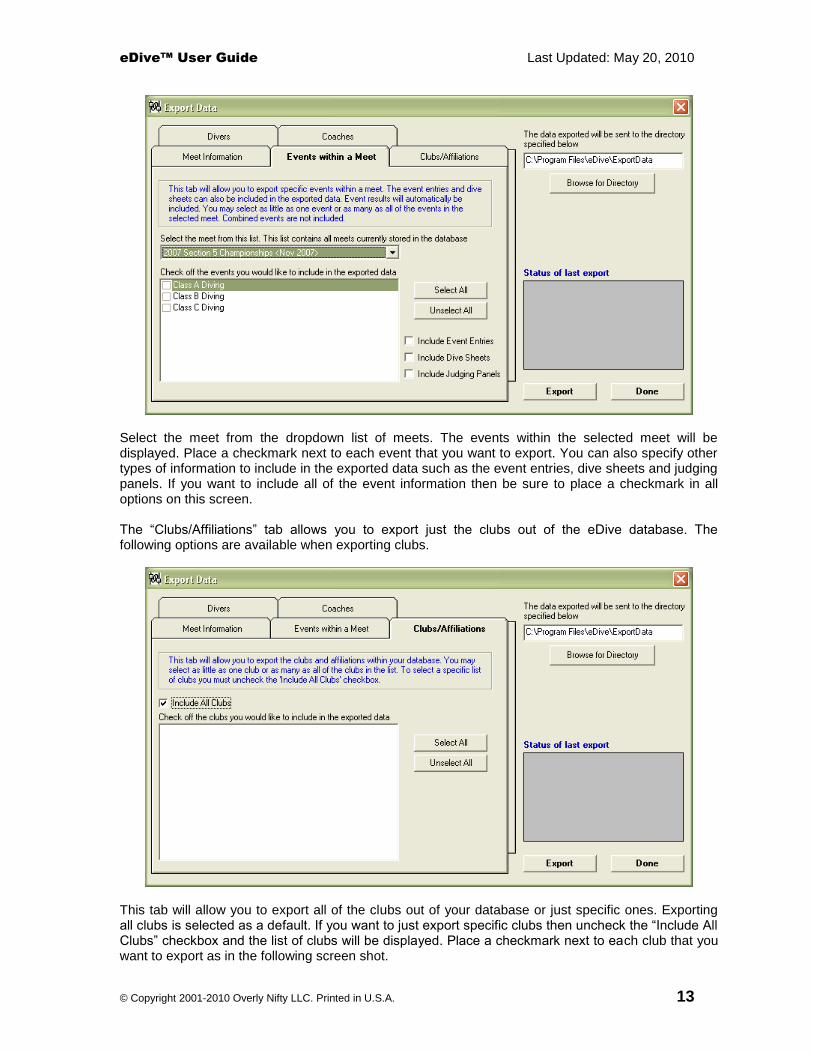
Select the meet from the dropdown list of meets. The events within the selected meet will be displayed. Place a checkmark next to each event that you want to export. You can also specify other types of information to include in the exported data such as the event entries, dive sheets and judging panels. If you want to include all of the event information then be sure to place a checkmark in all options on this screen. The “Clubs/Affiliations” tab allows you to export just the clubs out of the eDive database. The following options are available when exporting clubs.
This tab will allow you to export all of the clubs out of your database or just specific ones. Exporting all clubs is selected as a default. If you want to just export specific clubs then uncheck the “Include All Clubs” checkbox and the list of clubs will be displayed. Place a checkmark next to each club that you want to export as in the following screen shot.

eDive™ User Guide Last Updated: May 20, 2010
© Copyright 2001-2010 Overly Nifty LLC. Printed in U.S.A. 14
The “Divers” tab and the “Coaches” tab work exactly the same way as the “Clubs/Affiliations” tab. These 2 tabs allow you to export all divers/coaches or just specific ones. Whatever tab is the currently selected tab will be the data that is exported. If you want to export divers and clubs then you will need to export the divers, then select the clubs tab and export the clubs. Two sets of export files will be created in that situation. Once you have your options set please press the “Export” button to begin the export process. The status of the export will be displayed in the lower right corner of the screen. This status area will show “Export Completed” when it is complete as in the screenshot below.
The exported data will be saved to the directory you specified on this screen. Each time you export data it will be saved in a set of matching data files all ending with a file extension of EZX. You may have up to 6 data files created for one export depending on what data you exported. These data files will be similarly named so that you can tell they are part of the same set. When moving the data files to a different computer please make sure you keep all of the data files from the same set together. The type of data that is contained within the file is part of the name as well as the date/time the set of data files was created. So for example, during the export of event data, the following set of files was created.

eDive™ User Guide Last Updated: May 20, 2010
© Copyright 2001-2010 Overly Nifty LLC. Printed in U.S.A. 15
CLUBS20070324152431.ezx DIVER20070324152431.ezx ENTRIES20070324152431.ezx EVENT20070324152431.ezx MEET20070324152431.ezx SHEETS20070324152431.ezx The numbers at the end of the file name are the date and time the file set was created. In the above example this set of data files was created March 24
th, 2007 at 15:24.31 or 3:24.31 pm. The numbers
are in the format of YYYYddMMhhnnss where YYYY is the year, dd is the day prefixed by a zero, MM is the month prefixed by a zero, hh is the hour in 24 hour format, nn is the number of minutes past the hour, prefixed by a zero and ss is the number of seconds past the minute, prefixed by a zero. If you grab all of the files with this same number then you have grabbed the entire set of data files. With this format you can export data files one after the other without worrying about overwriting any of them. Please see the section “Import” for an explanation of what happens to these files once the data has been imported.
b. Hy-Tek Merge Results (HY3)
This option allows you to export eDive results to a file that can be imported directly into Hy-Tek’s Meet Manager software. The following screen will be presented when selecting this option.
Select a meet from the dropdown list. Once the meet has been selected you can select the finals event, the semi-finals event and the prelims event to export. What you select in the event lists depends on what you want to export. At a minimum you must select the finals event to export. If that event had a separate semi-finals event then select the semi-finals event in the semi-finals event dropdown. If that finals event had a separate prelims event then select that prelims event in the prelims event dropdown. Once you have specified the events to export you next need to specify the Meet Manager event number that these diving results will be imported into. You must also specify the name and location of the file where the exported results will be saved. You can either hand enter the full path and file name

eDive™ User Guide Last Updated: May 20, 2010
© Copyright 2001-2010 Overly Nifty LLC. Printed in U.S.A. 16
or you can click the browse button (“…”) and select the directory. You must specify an existing directory. Once all of the fields have been filled out you will press the “Export Results” button to create the file. This process can be repeated for every event you need to export. Just make sure you change the exported results filename each time. You can now take this file and import it into Meet Manager. Example 1) You just finished up your 1 meter prelims event and tomorrow you will be running your finals event. The finals event is set up in eDive as a separate event. The meet host wants the prelim results in Meet Manager so that they can print a heat sheet for finals the next day. You would set up your export results screen as shown in the screen shot above. A finals event and prelims event are selected but there is no semi-finals event selected. This will create one results file that contains the prelim results. In Meet Manager this event would be set up as a Prelims/Finals event. Example 2) You just finished up your prelims event and tomorrow you will run the finals. The event in eDive was set up as a 10 dive event where the first 5 dives are performed today, then cuts are made and the last 5 dives are performed tomorrow as the finals. On the export results screen you will only select this 10 dive event as your finals event. There will be no semi-final or prelim event selected. In Meet Manager your event would be set up as a timed finals event.
c. Daktronics Pro Diving Data file
Selecting this option allows you to export an entire event from eDive into Daktronics Pro Diving software. This is the process to use to get your event ready to run using your Daktronics hardware and software. The Pro Diving software is supplied by Daktronics and is used to control their Omnisport 2000 timer. With their software you can run an event that contains more than 25 divers. The software will also allow you to display diver names on the scoreboard. Without the software you will be limited to running events with up to 25 divers and you will not be able to display names on the scoreboard. When you select this option you will be prompted to select the meet to process as in the screen below.
Select your meet and press the “Go” button. This will bring you to the following screen.

eDive™ User Guide Last Updated: May 20, 2010
© Copyright 2001-2010 Overly Nifty LLC. Printed in U.S.A. 17
Select the event that you want to export. Enter the number of rounds that this event contains, the gender of the event and the board level. Next you need to specify where you would like the file exported to and what name to save the file under. If you are exporting multiple events then you should change the name of the file so it represents what event it contains. You can press the button with the ellipsis (“…”) on it to select another folder in the file system to store the file under. When you are done please press the “Export Data to File” button to create the export file. When the process is done you will get a message as in the screen shot below.
If you look in the directory you specified during the export process you will find your exported Pro Diving data file. This file needs to be taken to the computer running Pro Diving and imported. Just follow the instructions provided with your Pro Diving software to import the event. Once you have imported the file you are now ready to run your event. Please see the sections “Connecting to your Daktronics Omnisport 2000 timer” and “Events >Run Event” for more information about getting your event ready to run.
6. Exit Application This option will exit the application.

eDive™ User Guide Last Updated: May 20, 2010
© Copyright 2001-2010 Overly Nifty LLC. Printed in U.S.A. 18
Edit
1. Refresh Data
Selecting this option will refresh the data on the screen that you are currently viewing.
2. Divers Selecting this option will allow you to add, edit and delete divers in your database. The following screen is presented.
Along the left side are all of the divers you currently have in your database. Selecting a diver will fill the fields on the right of the screen with that divers information. Edit the information and select the Save button to save your changes. To delete a diver simply select the diver to delete and press the Delete button on the toolbar. This will delete the diver and all information related to that diver including event registrations, dive sheets, etc. You will be prompted to confirm the deletion. To create a new diver press the Create New button. The fields on the right will be cleared and you can enter your new divers’ information. The first name and last name fields are required. Select the Save button
( ) when you are done entering the new diver information or press the Cancel button ( ) to abort adding a new diver. If a date of birth is entered in the DOB field then you can press the “Calc” button to automatically calculate the divers’ age and have it automatically placed in the “Age” field. The Refresh button next to the Affiliation drop down will refresh the list of affiliations in that drop down list. The Grade field holds the divers grade in school. You can enter any value to represent the grade such as 11, Junior, Jr, etc. The Group field can contain whatever value you want to represent the group the diver belongs to. For example, In New York we are broken down into 11 sections. Section 5 is broken down into classes A, B and C. For our Sectional championships I would enter “Class A” in that field. For our State championships I would enter “Sec 5”. It can contain any value you want. Both the Grade field and the Group field can contain up to 10 characters each. You can search for a diver also. Enter a name in the field in the upper left corner of the screen labeled “Enter a Last Name to find” and press the “Find” button. If a last name is found then that diver will be highlighted. If the checkbox labeled “Refresh after update” is checked then any time you update any divers information and press the save button the list of divers will be refreshed and the first diver in the list will be highlighted. If the checkbox is left unchecked then whatever diver you are currently on will remain selected after pressing the save button.

eDive™ User Guide Last Updated: May 20, 2010
© Copyright 2001-2010 Overly Nifty LLC. Printed in U.S.A. 19
3. Coaches
Selecting this option will allow you to add, edit and delete coaches in your database. The following screen is presented.
Along the left side are all of the coaches you currently have in your database. Selecting a coach will fill the fields on the right of the screen with that coaches information. Edit the information and select the Save button to save your changes. To delete a coach simply select the coach to delete and press the Delete button on the toolbar. This will delete the coach and all information related to that coach. You will be prompted to confirm the deletion. To create a new coach press the Create New button. The fields on the right will be cleared and you can enter your new coaches information. The first
name and last name fields are required. Select the Save button ( ) when you are done entering the
new coach information or press the Cancel button ( ) to abort adding a new coach. If a date of birth is entered in the DOB field then you can press the “Calc” button to automatically calculate the coaches age and have it automatically placed in the “Age” field. The Refresh button next to the Affiliation drop down will refresh the list of affiliations in that drop down list. You can search for a coach also. Enter a name in the field in the upper left corner of the screen labeled “Enter a Last Name to find” and press the “Find” button. If a last name is found then that coach will be highlighted. If the checkbox labeled “Refresh after update” is checked then any time you update any coaches information and press the save button the list of coaches will be refreshed and the first coach in the list will be highlighted. If the checkbox is left unchecked then whatever coach you are currently on will remain selected after pressing the save button. There is a large button on the screen labeled “This is the main coach for this team. Update all event registrations appropriately.”. What this button will allow you to do is assign this coach to any diver who has registered for an event using this coaches team. It is a global update and will affect all event registrations for all meets. You will be prompted to confirm this global update.
eDive™ User Guide Last Updated: May 20, 2010
© Copyright 2001-2010 Overly Nifty LLC. Printed in U.S.A. 20
4. Affiliations
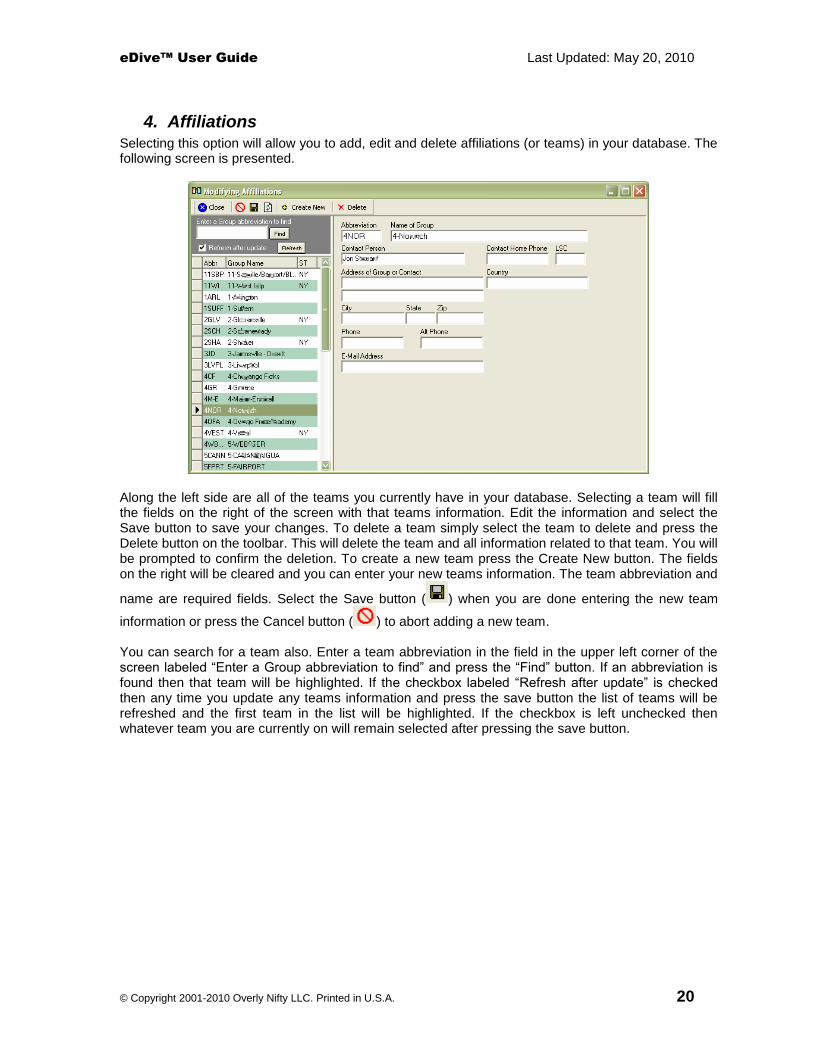
Selecting this option will allow you to add, edit and delete affiliations (or teams) in your database. The following screen is presented.
Along the left side are all of the teams you currently have in your database. Selecting a team will fill the fields on the right of the screen with that teams information. Edit the information and select the Save button to save your changes. To delete a team simply select the team to delete and press the Delete button on the toolbar. This will delete the team and all information related to that team. You will be prompted to confirm the deletion. To create a new team press the Create New button. The fields on the right will be cleared and you can enter your new teams information. The team abbreviation and
name are required fields. Select the Save button ( ) when you are done entering the new team
information or press the Cancel button ( ) to abort adding a new team. You can search for a team also. Enter a team abbreviation in the field in the upper left corner of the screen labeled “Enter a Group abbreviation to find” and press the “Find” button. If an abbreviation is found then that team will be highlighted. If the checkbox labeled “Refresh after update” is checked then any time you update any teams information and press the save button the list of teams will be refreshed and the first team in the list will be highlighted. If the checkbox is left unchecked then whatever team you are currently on will remain selected after pressing the save button.
eDive™ User Guide Last Updated: May 20, 2010
© Copyright 2001-2010 Overly Nifty LLC. Printed in U.S.A. 21
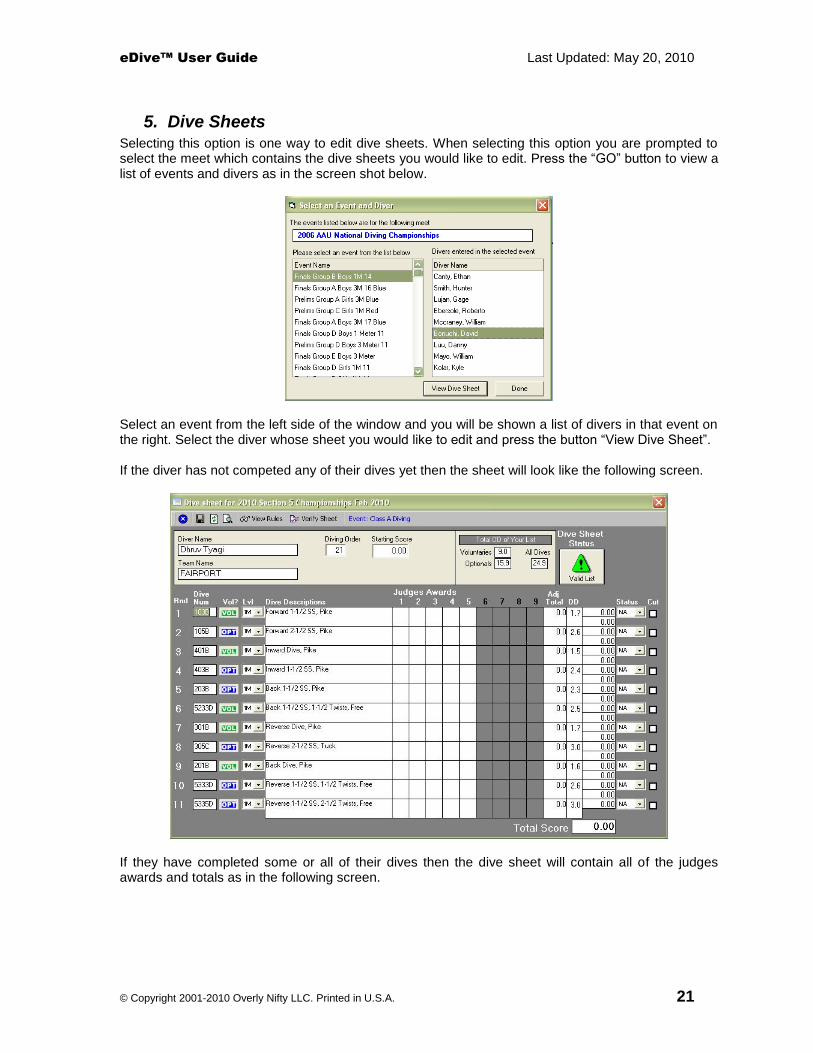
5. Dive Sheets
Selecting this option is one way to edit dive sheets. When selecting this option you are prompted to select the meet which contains the dive sheets you would like to edit. Press the “GO” button to view a list of events and divers as in the screen shot below.
Select an event from the left side of the window and you will be shown a list of divers in that event on the right. Select the diver whose sheet you would like to edit and press the button “View Dive Sheet”. If the diver has not competed any of their dives yet then the sheet will look like the following screen.
If they have completed some or all of their dives then the dive sheet will contain all of the judges awards and totals as in the following screen.
eDive™ User Guide Last Updated: May 20, 2010
© Copyright 2001-2010 Overly Nifty LLC. Printed in U.S.A. 22
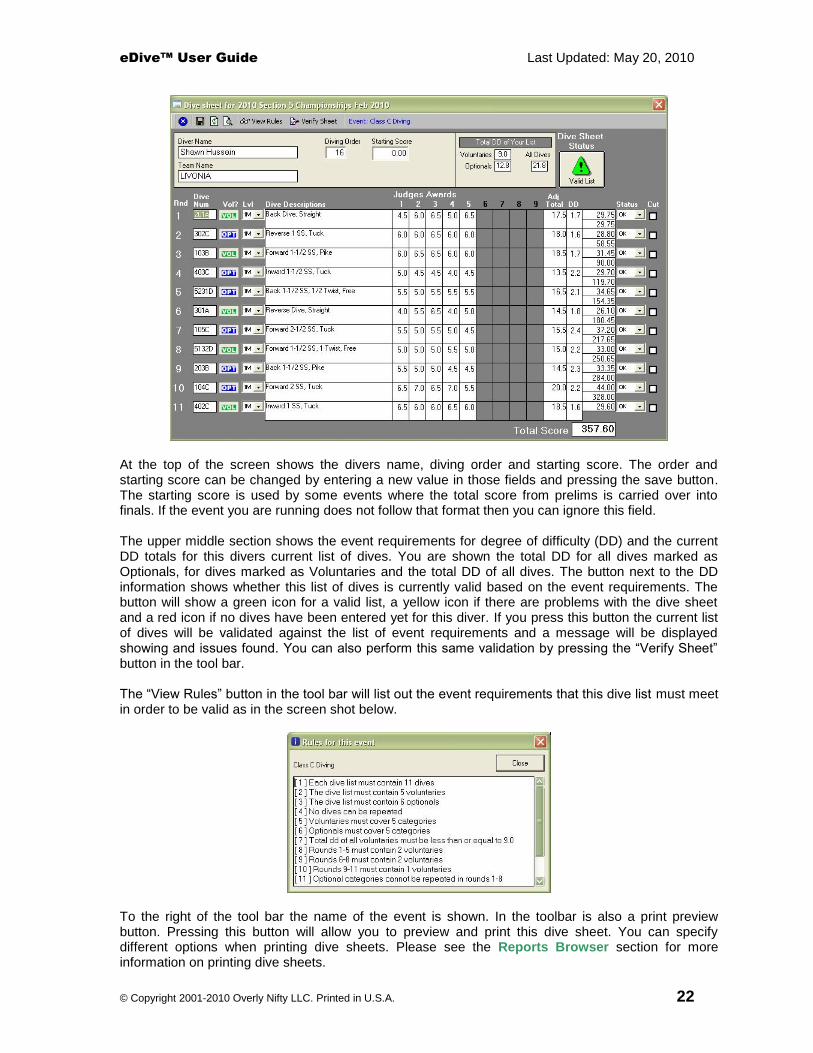
At the top of the screen shows the divers name, diving order and starting score. The order and starting score can be changed by entering a new value in those fields and pressing the save button. The starting score is used by some events where the total score from prelims is carried over into finals. If the event you are running does not follow that format then you can ignore this field. The upper middle section shows the event requirements for degree of difficulty (DD) and the current DD totals for this divers current list of dives. You are shown the total DD for all dives marked as Optionals, for dives marked as Voluntaries and the total DD of all dives. The button next to the DD information shows whether this list of dives is currently valid based on the event requirements. The button will show a green icon for a valid list, a yellow icon if there are problems with the dive sheet and a red icon if no dives have been entered yet for this diver. If you press this button the current list of dives will be validated against the list of event requirements and a message will be displayed showing and issues found. You can also perform this same validation by pressing the “Verify Sheet” button in the tool bar. The “View Rules” button in the tool bar will list out the event requirements that this dive list must meet in order to be valid as in the screen shot below.
To the right of the tool bar the name of the event is shown. In the toolbar is also a print preview button. Pressing this button will allow you to preview and print this dive sheet. You can specify different options when printing dive sheets. Please see the Reports Browser section for more information on printing dive sheets.
eDive™ User Guide Last Updated: May 20, 2010
© Copyright 2001-2010 Overly Nifty LLC. Printed in U.S.A. 23
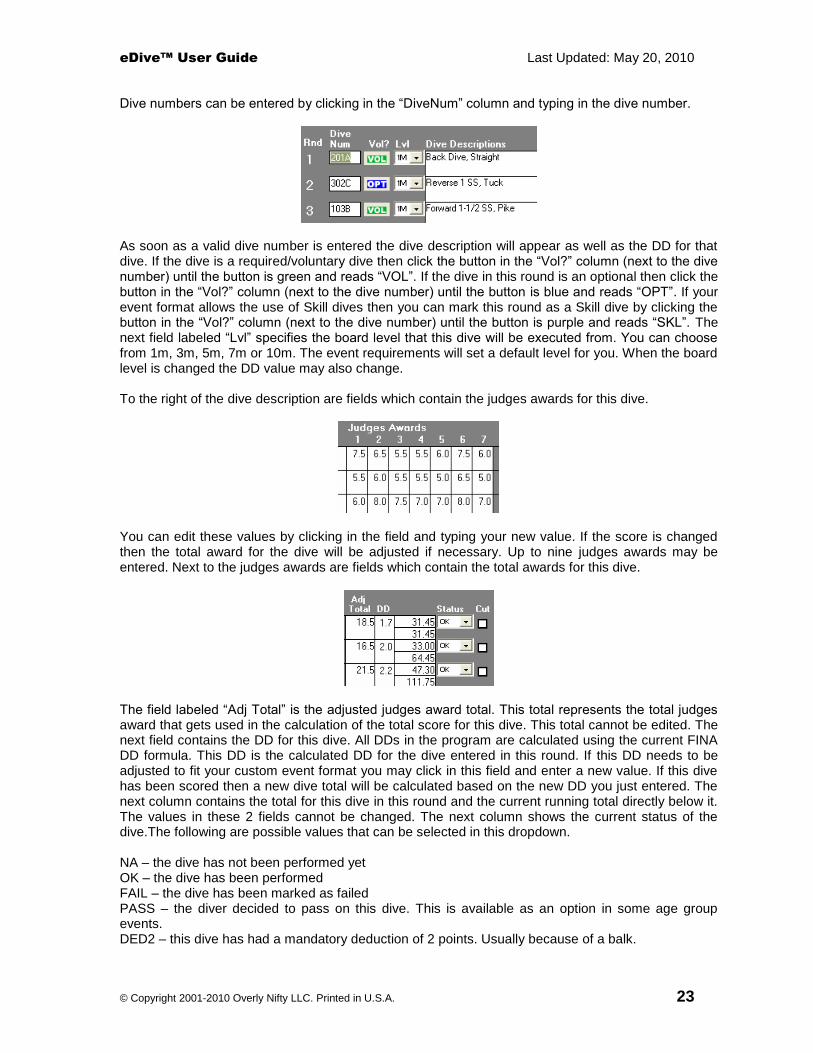
Dive numbers can be entered by clicking in the “DiveNum” column and typing in the dive number.
As soon as a valid dive number is entered the dive description will appear as well as the DD for that dive. If the dive is a required/voluntary dive then click the button in the “Vol?” column (next to the dive number) until the button is green and reads “VOL”. If the dive in this round is an optional then click the button in the “Vol?” column (next to the dive number) until the button is blue and reads “OPT”. If your event format allows the use of Skill dives then you can mark this round as a Skill dive by clicking the button in the “Vol?” column (next to the dive number) until the button is purple and reads “SKL”. The next field labeled “Lvl” specifies the board level that this dive will be executed from. You can choose from 1m, 3m, 5m, 7m or 10m. The event requirements will set a default level for you. When the board level is changed the DD value may also change. To the right of the dive description are fields which contain the judges awards for this dive.
You can edit these values by clicking in the field and typing your new value. If the score is changed then the total award for the dive will be adjusted if necessary. Up to nine judges awards may be entered. Next to the judges awards are fields which contain the total awards for this dive.
The field labeled “Adj Total” is the adjusted judges award total. This total represents the total judges award that gets used in the calculation of the total score for this dive. This total cannot be edited. The next field contains the DD for this dive. All DDs in the program are calculated using the current FINA DD formula. This DD is the calculated DD for the dive entered in this round. If this DD needs to be adjusted to fit your custom event format you may click in this field and enter a new value. If this dive has been scored then a new dive total will be calculated based on the new DD you just entered. The next column contains the total for this dive in this round and the current running total directly below it. The values in these 2 fields cannot be changed. The next column shows the current status of the dive.The following are possible values that can be selected in this dropdown. NA – the dive has not been performed yet OK – the dive has been performed FAIL – the dive has been marked as failed PASS – the diver decided to pass on this dive. This is available as an option in some age group events. DED2 – this dive has had a mandatory deduction of 2 points. Usually because of a balk.

eDive™ User Guide Last Updated: May 20, 2010
© Copyright 2001-2010 Overly Nifty LLC. Printed in U.S.A. 24
The dive is considered to have been performed if the value in this dropdown is anything other than “NA”. The last column is the CUT column. If the diver has been cut in this round then a checkmark will appear in the box. If the diver has been cut in round 8 of an 11 dive event, then rounds 8, 9, 10 and 11 will have a checkmark in this column. To uncut a diver simply remove the checkmark in this column in the appropriate round and all rounds following. The total score for this diver is shown in the bottom right corner of the screen and cannot be edited. If you make any changes on this screen please press the Save button in the toolbar to save your changes. Editing a dive sheet can be done through the Edit->Dive Sheets option but it can also be done on the run event screen, the diver registration screen, the event information screen and the meet information screen. Any where that you see a dive sheet status column you can edit the dive sheet directly from that screen.

eDive™ User Guide Last Updated: May 20, 2010
© Copyright 2001-2010 Overly Nifty LLC. Printed in U.S.A. 25
6. Scoring Templates Selecting this option allows you to set up a scoring template. Scoring templates are used to assign points to events based on the place of finish. The following screen is presented when selecting this option.
A default set of scoring templates are listed along the left. Selecting one of these default templates displays the currently assigned points per place of finish. Enter the number of places that will be scored in the field provided. Press the “Set” button to create that many places in the list below. In the list of places you can now click in the Points column and enter the number of points that will be assigned to that place when the event completes. The “Auto Decrement by 1” button allows you to automatically decrement the number of points per place starting from the place entered. In the screen shot above if you pressed the Auto Decrement button it would decrement the number of points from 2
nd place through 6
th by 1 point starting from 4
points. Second place would get 4 points and 6th place would get 0 points in this example.
A new template can be created by pressing the “Save As New” button. This will create a new template based on the currently selected template. You can then change the name, alter the points and save your new template. On the event information screen you can assign one of these scoring templates. When the event is complete and has been posted this scoring template will be used to score the event and assign points per finish place.

eDive™ User Guide Last Updated: May 20, 2010
© Copyright 2001-2010 Overly Nifty LLC. Printed in U.S.A. 26
Meets
1. Add/Create a Meet
Selecting this option allows you to create a new meet in your database. The following screen is displayed.
Enter the name of the meet and the dates of the meet in the fields provided. There is also a field which specifies which rules (or governing body) will be used at this meet. Select a governing body from the dropdown field provided. You can also specify the date to use to calculate a divers age if your events will be broken down by age groups. Some meets will allow divers to compete in an age group based on their age as of a certain date (i.e. December 31
st of the current year). If you do not
use age groups in your meet then you can ignore this field. There are options for selecting a default judging scheme when adding new events to your meet. Select a judging scheme from the list provided. Any new events you add to your meet will be assigned this judging scheme as a default. You can also specify the default event and late fees for each event if you so choose.
a. Let me choose which events to add to this meet
This option allows you to manually select the events to add to your meet. If you choose this option and you click the “Create” button on this screen, then two things will happen. First, you will get a confirmation message that your meet was created. Second, the event selection screen will automatically come up an allow you to choose which events to add to your meet. For instructions on how to add events to your meet please see the section Add Events to Meet.
b. Copy the events from the meet selected below
This option allows you to create a meet based on an existing meet in your database. From the dropdown provided select an existing meet. Once you click the “Create” button your new meet will be created and all of the events formats from the meet you selected will be added to your new meet. This includes the names, number of judges, fees, etc. The new meet will then have an exact copy of all of the events as they were defined in the existing meet. Once you have specified all of the information on how to create your new meet you can press the “Create” button. The new meet will be created using your selections.

eDive™ User Guide Last Updated: May 20, 2010
© Copyright 2001-2010 Overly Nifty LLC. Printed in U.S.A. 27
2. Edit a Meet
Selecting this option allows you to edit information about the meet such as name, address, contact information, fees, etc. You can have many meets in your database so when selecting this option you will be prompted to select the meet to edit. The following screen is presented when editing a meet.
a. Meet Information
Along the left side of the screen you will see the meet name and a list of all of the events that are currently in this meet. The top right section of the screen contains the meet information. The lower right section of the screen will show a list of divers currently registered for events in this meet. The list of divers shown will change depending on whether you have the meet selected or you have an event selected. When a meet is selected you will get a list of all divers registered for an event in the meet. If an event is selected then only those divers currently registered for that event will be shown in the list. Change any of the meet information shown in the fields in the upper right and press the Save button to save your changes. If your meet has fees associated with registration then those default fees can be entered on this screen. There are also 3 fields which hold additional fees if you need them. Just enter the fee amount in the “Add’tl Fee” fields. These fields can also be named. Just click on the text “Add’tl Fee”, type in a new short description of that fee and then click in any other field on the screen to save that change. In the screen shot above a “Meet Host” fee of $5.00 has been added. Pressing the button next to the Meet Director field or Meet Contact field will display a list of names defined in your database that you can select from. The list of names is pulled from all of the coaches you have defined in your database.
b. List of Registered Divers
The lower right section of the screen contains a list of divers that have been registered in the meet. Depending on what you have selected along the left side will determine what divers are displayed in this list. If you have the main meet name highlighted along the left side of the screen then all of the divers registered for the meet will be displayed. If you have an event name highlighted along the left side then the list of divers shown will be only the divers that have been registered for that event.

eDive™ User Guide Last Updated: May 20, 2010
© Copyright 2001-2010 Overly Nifty LLC. Printed in U.S.A. 28
Any column listed can be sorted simply by clicking on that columns header. The sort will be toggled between an ascending and descending sort each time you click that column header. You can also group by any column by dragging and dropping that columns header to the area right above it that says “Drag a column header here to group by that column”. The screen shot below shows an example of dragging the Club column to group by club.
Once the column has been grouped you get a summarized list by that column as in the screen shot below.
You will notice that if you expand one of the grouped clubs by pressing the “+” sign next to the club name, that it shows one or more totals in the group footer. In this example it is showing that there are 2 divers in that club and the total amount owed by that club. If you group by the event column you will get a total number of divers and amount due for each event. If you click your mouse in the column for Diver Name, Name of Event, Coach, Balance Due or Club a button will appear. If you click that button you will be taken to the Register Divers screen for the diver selected. From that screen you can manage the divers registration information such as coach, fees paid, etc..

eDive™ User Guide Last Updated: May 20, 2010
© Copyright 2001-2010 Overly Nifty LLC. Printed in U.S.A. 29
If you click your mouse in the “Dive Sheet Status” column a button will appear. If you click that button the divers dive sheet for that event will be brought up. From that screen you can modify the divers list of dives for that event. This column contains an icon which represents the status of that divers list of dives. Please refer to the Dive Sheet Status Icon Definitions section for information regarding what each icon represents. The last column in this list (“Ex”) is a column which indicates whether a diver is diving exhibition or not. If a check is placed in this column then the diver will be flagged as diving exhibition in that event. An exhibition diver gets scored like any other diver but they will not receive team points when the event is posted. They will also be ranked below all non-exhibition divers. To mark a diver as exhibition (or as non-exhibition) on this screen please check (or uncheck) the box in the “Ex” column and press the <Enter> key to save the change you made. Each time you come back to this screen the formatting/grouping for the list of divers will be cleared so that you can get a full view of the registered divers.
3. Register Divers
Selecting this option allows you to register divers for your meet. Registering a diver means selecting the events that diver will compete in. Once you select this option you will be prompted to select the meet to register the divers for. Select your meet and press the “Go” button. You will then be presented with the following screen.
Along the left side of this screen is a list of all of the divers in your database. The top right contains a list of all of the events defined for the meet you selected. The bottom section contains information regarding fees paid for the meet. It also shows the coach and team the selected diver is competing with at the meet for this event.

eDive™ User Guide Last Updated: May 20, 2010
© Copyright 2001-2010 Overly Nifty LLC. Printed in U.S.A. 30
The process of registering a diver is simple. Select the diver that you would like to register for an event in this meet. Now click in the first column in the list of events so that a checkmark appears in that first column. Once you do that a red exclamation will appear under the “Dive Sheet Status” column. This indicates that you have now registered the diver for that event but you have not entered a dive sheet for them yet. If you selected a team for the diver when you created the diver (see Edit->Divers) the team name will appear in the lower right corner in the dropdown list labeled “Affiliation”. If the team name is not displayed please select the appropriate name from the list. You can also specify the coach for this diver by pressing the ellipsis button (…) next to the coach field. Follow this same process to register the diver for all of the events they are competing in. The other fields on this screen show the standard meet and event fees that are due and any additional meet fees. It also has a field where you can enter the amount that this diver has paid. The balance due column shows you how much the diver owes which is the difference of the meet and event fees and the amount the diver has paid. The “Bal Due” column in the list of events will also show this balance due amount. If you would like to waive the registration fee for this diver then check the box labeled “Waive Reg Fee”. If the diver is registering late and there is a late fee assigned to this meet (which is set on the meet information screen), you can check the “Registration is Late” checkbox to indicate this. The late fee will be added to the total amount due. You also have the option of marking this diver as having the late registration fee waived by checking the checkbox labeled “Waive Late Fee”. If you waive the late fee then that fee will not be added to the total. Clicking on the question mark next to the field for additional meet fees will display a dialog that lists what the additional meet fees are. The additional Meet fees are specified on the meet information screen. If no additional meet fees were defined on the meet information screen then no dialog will be displayed.
a. List of Divers
The names listed on this screen are shown as last name, first name. The default sorting is by the name column. To change the sorting simply click on the column heading of the column that you want to sort by. This will change the sorting to ascending on that column. To sort the list in a descending order, click the same column heading again. If you scroll the list of divers to the right you will see additional columns for the divers age and date of birth. The list of divers can be made wider by hovering your mouse over the line which separates the list of divers and the list of events. The mouse cursor will change to indicate you can then click and drag to change the width of the list of divers. To search for a specific diver you will need to enter the divers last name in the field at the top of the list of divers. Then click the “Find” button. You can enter a partial name and the find will position you on the first diver it finds whose last name starts with the letters you specified. If you click the “New” button then the new diver dialog will be displayed allowing you to create a new diver. Creating a new diver is explained in the Edit->Divers menu item. Once you add a new diver you may need to click on the refresh button in the toolbar in order to see that new diver appear in the list.
b. List of Events
The events listed on the screen are all of the events that you have defined for this meet. If an event you just added does not appear in this list then please press the refresh icon in the toolbar to refresh the screen. If there is a checkmark in the first column then it means that the selected diver is registered for that event. To place a check in this column click your mouse in the checkbox until a check appears. If you remove that checkmark you will delete the divers registration for that event, including their dive sheet and any results. Please be careful and make sure you really want to delete the event registration. Once you un-register the diver from that event the data is gone. The event name column lists the name for each of the events in your meet. The dive sheet status column shows the current status of the dive sheet for that event. A red icon in this column indicates

eDive™ User Guide Last Updated: May 20, 2010
© Copyright 2001-2010 Overly Nifty LLC. Printed in U.S.A. 31
that there is no dive sheet for that diver. A yellow icon indicates that there is a dive sheet but that it does not meet the requirements for that event (i.e. there are errors). A green icon indicates that there is a dive sheet for that event and that it meets all of the event requirements. If you click your mouse in this column for any of the registered events, a small button will appear. If you click that button the dive sheet for that event will appear and can be edited. See the section Edit->Dive Sheet for information on how to edit your dive sheet. The Synchro Partner column is only used for Synchronized diving events. If you click in this column for a synchronized diving event, a small button will appear. If you click that button you will be taken to a screen where you can select the synchro partner (the secondary diver or diver “B”) for that event as shown in the screenshot below. How to use this screen to select a synchro partner is detailed in the section “Using the Selection Screen”.
The last column labeled “Ex” denotes whether this diver is diving exhibition in that event or not. If there is a check in this column then the diver is competing exhibition. To place a check in this column click your mouse in the checkbox until a check appears and then press the Enter key.
4. Delete Meet Selecting this option allows you to delete an entire meet from your database. When you click this option you will get prompted to select the meet to delete. Select the meet and press “Go”. You then be presented with a confirmation prompt to confirm that you really want to delete the meet you selected. When you delete a meet all of the registrations, dive sheets and results for all of the events in that meet will be deleted as well as all of the events in that meet and the meet itself. The divers and teams will be left in your database.
5. Events All of the options under this menu item are explained in the next section called “Events”.
eDive™ User Guide Last Updated: May 20, 2010
© Copyright 2001-2010 Overly Nifty LLC. Printed in U.S.A. 32
Events
1. Add Event to Meet
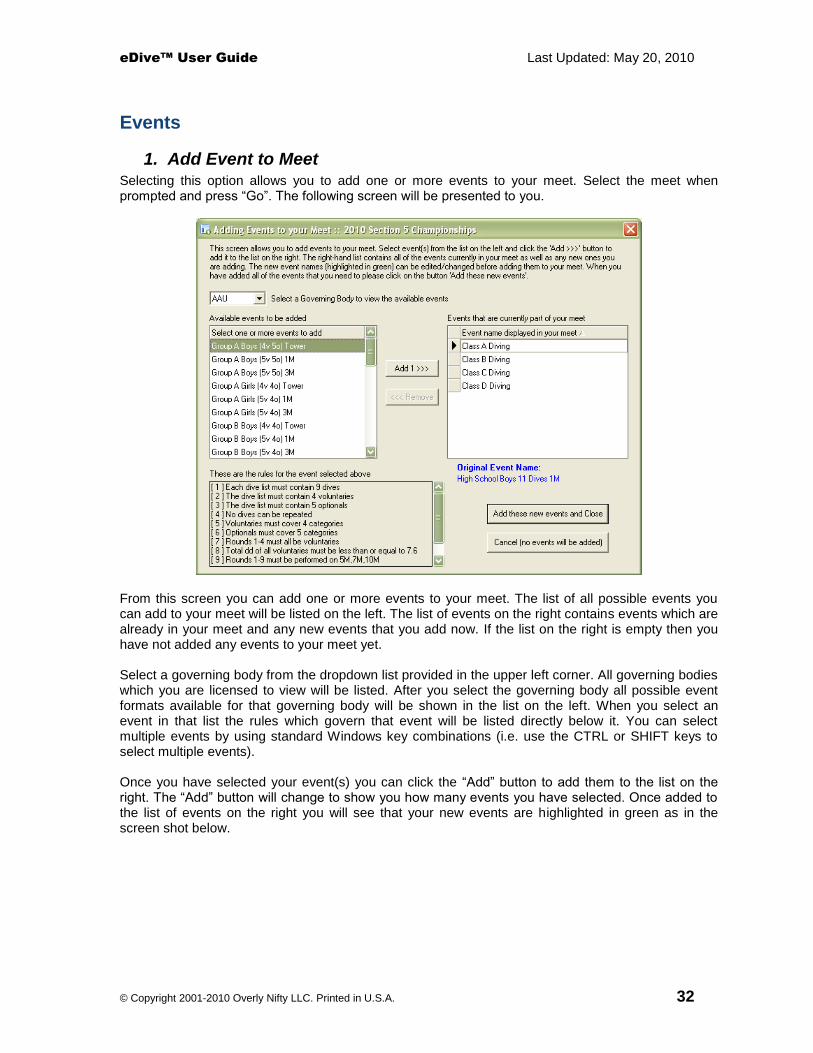
Selecting this option allows you to add one or more events to your meet. Select the meet when prompted and press “Go”. The following screen will be presented to you.
From this screen you can add one or more events to your meet. The list of all possible events you can add to your meet will be listed on the left. The list of events on the right contains events which are already in your meet and any new events that you add now. If the list on the right is empty then you have not added any events to your meet yet. Select a governing body from the dropdown list provided in the upper left corner. All governing bodies which you are licensed to view will be listed. After you select the governing body all possible event formats available for that governing body will be shown in the list on the left. When you select an event in that list the rules which govern that event will be listed directly below it. You can select multiple events by using standard Windows key combinations (i.e. use the CTRL or SHIFT keys to select multiple events). Once you have selected your event(s) you can click the “Add” button to add them to the list on the right. The “Add” button will change to show you how many events you have selected. Once added to the list of events on the right you will see that your new events are highlighted in green as in the screen shot below.

eDive™ User Guide Last Updated: May 20, 2010
© Copyright 2001-2010 Overly Nifty LLC. Printed in U.S.A. 33
All new events will be highlighted in green. You may add the exact same event format multiple times to the list on the right. You would want to do that in the situation where you are running a prelims and finals event separately but both have the same event format. In that scenario you would add the same event format twice and then change the name of one to Prelims and the other to Finals. As duplicate event formats are added the event name will be changed to make them unique as in “Copy (1) of Group A Boys 3M”. The event names on the left contain the board level and the number of voluntaries, optionals and skills (i.e. “5v 5o” stands for 5 voluntaries and 5 optionals) for that event format. You will also notice that the name of the event that appears in the list on the right is slightly different than the name of the event from the list on the left. That is because the event name has been changed to a more user-friendly version of the event name to hopefully reduce the amount of editing that you have to do. Any of the event names which are highlighted in green can be edited and changed. Just click on the event name and change it to whatever you would like. As an event is selected from the list on the right you can see the original event format name listed directly below it. In the above screenshot the event “Class B Diving” has been selected. Below it you can see that the original event format is “High School Boys 11 Dives 1M”. This allows you to freely rename your events and still be able to tell exactly what rules are being used. You can also remove newly added events by selecting the green highlighted event from the list on the right and clicking the “Remove” button. If the event was already in your meet and is not highlighted green, then you will not be allowed to remove it using this screen. To completely delete an existing event from your meet please use the option under the Events menu called Delete Event. Once you have added all of the events that you want in your meet you can click the button “Add these new events and Close”. This will add all of the new events to your meet and close the screen. If you select the other button “Cancel (no events will be added)” then the screen will close and no events will be added to your meet.
2. Edit Event Selecting this option allows you to edit an event. Just select the meet and event to edit when prompted and select “Go”. On this screen you can set the judging scheme, set the start date and time

eDive™ User Guide Last Updated: May 20, 2010
© Copyright 2001-2010 Overly Nifty LLC. Printed in U.S.A. 34
of the event, see divers registered for the event and set the scoring template for the event. The following screen is presented to you when selecting this option.
a. List of Events
Along the left side of the screen are all of the events you defined in this meet. If you click on an event in the list then all of the divers registered for just that event will be displayed in the list of divers. If you select the meet name at the top of the list then all divers in the meet will be listed. See the list of divers section below for information about the divers on this screen. If you added a new event to your meet and do not see it listed on this screen then please press the refresh icon on the toolbar to refresh the list of events. There are a couple of icons which may appear next to the event name. One is a white circle with a
red letter “J” in it ( ). If you see this icon then it means that you have not selected a judging scheme yet for this event. See the section below called “Setting the Judging Scheme” for more information about setting this option. Your event cannot be run without setting the judging scheme.
The other icon which may appear looks like a box with colored cubes coming out of it ( ). This icon means that the event it appears next to is part of a combined event. See the section “Combine Events” for more information about combining events. The original individual events which are included in the combined event will still work like a normal event. Meaning that if you click on one of those events you will see the divers registered for that individual event. If however, you click on the combined event name you will not see any divers listed. In the screen shot above if you click on the event “Finals 1 Meter, Men and Women” you will not see any divers listed. However if you click on the events with the icon next to them you will see the divers registered for that event. Once an event is combined you cannot change the judging scheme for that individual event. You must set the judging scheme for the combined event instead. If you do click the plus sign next to an event that has been combined and select the “Judges” under it, you will notice that the judging scheme box is disabled.
b. Setting the Judging Scheme
If there is a white circle with a red letter “J” ( ) next to the event name (as in the screen shot above) then the judging scheme for that event has not been set yet. Click on the “+” sign next to the event name so it opens up and you see the word “Judges” (as in the screen shot above). If you click on the word “Judges” the right side of the screen will change so it looks like the following.

eDive™ User Guide Last Updated: May 20, 2010
© Copyright 2001-2010 Overly Nifty LLC. Printed in U.S.A. 35
Under where it says “Judging Scheme” is a list of all possible judging scheme combinations that you can use for this event. Just place a check next to the judging scheme that you want to use for this event. This will define how many judges are used for this event and how the scores are calculated.
c. Judging Panels
You can use this screen to create one or more judging panels. Once you have selected a judging scheme for your event you can enter a name for your judging panel and press the “Create Panel” button. The following screen will be presented to you so that you can select the judges in your panel. See the section “Using the Selection Screen” for information on how to select the judges. Select the judges from the list provided or create new judges and add them to your list. Press the “Use Selections and Close” button to return to the judging panel screen.
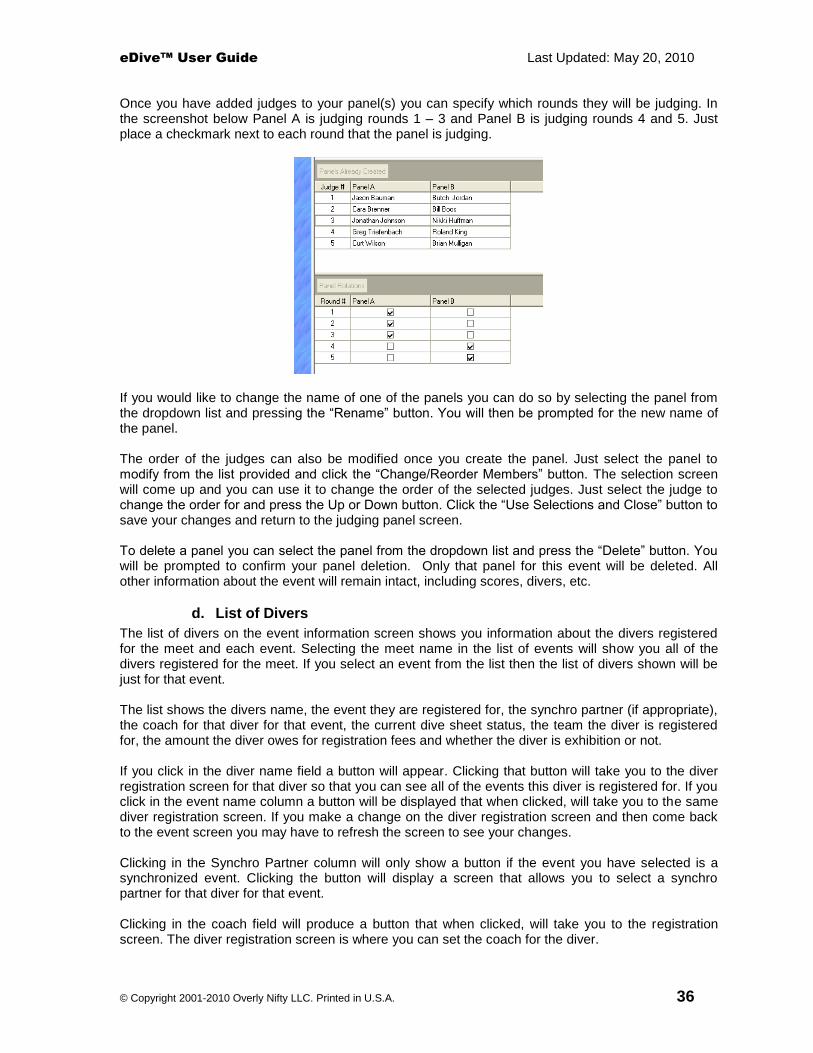
eDive™ User Guide Last Updated: May 20, 2010
© Copyright 2001-2010 Overly Nifty LLC. Printed in U.S.A. 36
Once you have added judges to your panel(s) you can specify which rounds they will be judging. In the screenshot below Panel A is judging rounds 1 – 3 and Panel B is judging rounds 4 and 5. Just place a checkmark next to each round that the panel is judging.
If you would like to change the name of one of the panels you can do so by selecting the panel from the dropdown list and pressing the “Rename” button. You will then be prompted for the new name of the panel. The order of the judges can also be modified once you create the panel. Just select the panel to modify from the list provided and click the “Change/Reorder Members” button. The selection screen will come up and you can use it to change the order of the selected judges. Just select the judge to change the order for and press the Up or Down button. Click the “Use Selections and Close” button to save your changes and return to the judging panel screen. To delete a panel you can select the panel from the dropdown list and press the “Delete” button. You will be prompted to confirm your panel deletion. Only that panel for this event will be deleted. All other information about the event will remain intact, including scores, divers, etc.
d. List of Divers
The list of divers on the event information screen shows you information about the divers registered for the meet and each event. Selecting the meet name in the list of events will show you all of the divers registered for the meet. If you select an event from the list then the list of divers shown will be just for that event. The list shows the divers name, the event they are registered for, the synchro partner (if appropriate), the coach for that diver for that event, the current dive sheet status, the team the diver is registered for, the amount the diver owes for registration fees and whether the diver is exhibition or not. If you click in the diver name field a button will appear. Clicking that button will take you to the diver registration screen for that diver so that you can see all of the events this diver is registered for. If you click in the event name column a button will be displayed that when clicked, will take you to the same diver registration screen. If you make a change on the diver registration screen and then come back to the event screen you may have to refresh the screen to see your changes. Clicking in the Synchro Partner column will only show a button if the event you have selected is a synchronized event. Clicking the button will display a screen that allows you to select a synchro partner for that diver for that event. Clicking in the coach field will produce a button that when clicked, will take you to the registration screen. The diver registration screen is where you can set the coach for the diver.

eDive™ User Guide Last Updated: May 20, 2010
© Copyright 2001-2010 Overly Nifty LLC. Printed in U.S.A. 37
The dive sheet status column shows the current status of the dive sheet for that event. A red icon in this column indicates that there is no dive sheet for that diver. A yellow icon indicates that there is a dive sheet but that it does not meet the requirements for that event (i.e. there are errors). A green icon indicates that there is a dive sheet for that event and that it meets all of the event requirements. If you click your mouse in this column, a small button will appear. If you click that button the dive sheet for that event will appear and can be edited. See the section Edit->Dive Sheet for information on how to edit your dive sheet. Clicking in the Club field will produce a button that when clicked, will take you to the registration screen. The diver registration screen is where you can set the club/ team for the diver. The balance due column shows how much the diver owes for each event they registered for. This field is read-only but you can view the details about the fees owed on the diver registration screen. If you click your mouse in this field and press the button you will be taken to the diver registration screen. The last column indicates whether the diver is diving exhibition or not. You can place a checkmark in this column if the diver is diving exhibition or remove it if they are not. Once you place a check in this column just press the enter key to save your change.
1. Sorting/Grouping the list of divers
The list of divers can be sorted by simply clicking on the column header of the column you want to sort by. Each click on the column header will toggle the sorting between ascending and descending on that column. Column order can also be manually changed by dragging a column header to before or after another column in the list. You can also group by columns. Grouping by a column will organize the list of information so that the data will be grouped by the column you chose. Click on a column heading and drag it up into the gray area labeled “Drag a column header here to group by that column” and then let go of the mouse. The list of information will now be grouped by that column. See the screen shot below for an example of dragging and grouping the Club column.
Once the column is grouped you will now see summary rows for that group. Each summary row is prefixed by a “+” plus sign that you can click to expand the group. A grouped row on the event information screen will show the total number of divers in that group. So in the screen shot below you can see that there are 2 divers in the group for the team “GENV”. A total for the amount owed for that group is also shown in the summary row.

eDive™ User Guide Last Updated: May 20, 2010
© Copyright 2001-2010 Overly Nifty LLC. Printed in U.S.A. 38
You can also group by multiple columns as in the screen shot below. The meet name has been selected so that all divers in the meet are listed. Then the data has been grouped first by event name and then, within the event name, by club. This was accomplished by dragging both columns up into the grouping area. First the event name column was dragged and then the club column. If the order of the group is incorrect you can switch the group order by clicking on the event name column in the grouping area and dragging it after the club column and letting go of the mouse. Then the data would be grouped first by club and then, within each club, by event name.
To remove a grouping just drag the column header from the grouping area and drop it back into position in the list of divers. It does not matter where in the list you position the column.
e. Event Information
This screen is also where you can change the information about this event. The following screen shot shows the information that can be changed.

eDive™ User Guide Last Updated: May 20, 2010
© Copyright 2001-2010 Overly Nifty LLC. Printed in U.S.A. 39
Any information you change about the event can be saved by clicking the save button on the toolbar. To see your changes reflected in the list of events on the left (i.e. if you changed the event name) you will have to hit the refresh button. To change the name of the event just click in the event name field and make your change. Click the save button to save your change. To see the name change in the list of events on the left side of the screen you will need to click the refresh button. The date and time this event starts can be set on this screen. Just click the dropdown arrow and a calendar will pop up to allow you to select the date. To change the time you will need to click in the part of the time that you want to change and type in the new time. The dropdown field for “Follows this event” is a way for you to track which event comes before this one in the schedule. It is only used as a reference and is not required nor does it affect any other information. The event fee is also set on this screen. Just enter the amount of the fee in the field provided. You can also set the late fee the same way. Any divers registering for this event from this point on will be charged the fee you entered. The scoring template used for this event is also set on this screen. Just select the appropriate template from the dropdown list. If the template you want to use is not on the list then please see the section called “Edit->Scoring Templates” for more information about creating scoring templates. Any scoring template you create will appear in this list. Once an event has been completed this scoring template will be used to assign team points to all of the divers that completed the event. Team points are assigned when posting the event results right after the last diver does their last dive.
3. Combine Events Selecting this option allows you to combine events. Combing events is a process where you combine 2 or more events together and run them as if they were one event judged by one judging panel. The events are run at the same time together but the results are tracked separately. You can think of a combined event as a virtual event. It is merely used to temporarily glue other events together. When you select this option please choose the meet to combine events for from the list provided and press “Go”. The following screen will then be presented when combining events.
In this screen one combined event has already been created called “Finals 1 Meter. Men and Women”. The events that have been combined are listed on the left. All of the other non-combined events that are in the meet are listed on the right. Only the events that have not yet been combined will be listed on the right.

eDive™ User Guide Last Updated: May 20, 2010
© Copyright 2001-2010 Overly Nifty LLC. Printed in U.S.A. 40
If you already have a combined event defined you can select it from the dropdown list provided. Events can then be added or removed from that list by using the left and right arrow buttons in the middle of the screen. Pressing the right facing red arrow will remove the currently selected event from the list on the left thus removing it from the combined event. Selecting the left facing green arrow will add the currently selected event in the list on the right to your combined event. The combined event will be left intact even if you remove all of the events within it. To remove the combined event itself you will have to select “Events->Delete Event” from the menu and select the combined event. You do not have to remove all of the individual events within a combined event before you delete the combined event. You can just delete the combined event by select “Events->Delete Event”. This will not delete the individual events that were combined. It will just delete the virtual combined event. You can click on the “Create New Combined Event” button to create a new combined event. This will display the following prompt.
Enter the name for your new combined event in the field provided at the top of the screen. You will also set the judging scheme to use for the combined event. Selecting a judging scheme will also set the judging scheme for each event you are combining to this scheme. Click OK when you are done. You will be taken back to the main combine events screen where your new combined event name will be automatically selected from the dropdown list. Now you can add events to your combined event. Just select an event from the list on the right and press the left facing green arrow. The event will be removed from the list on the right and added to the list on the left. Select the Done button when you are done creating your combined event.
4. Merge 2 Events Selecting this option allows you to merge two events together that had been previously split. This option is different than combining events. In combining events you are running 2 or more events together at the same time with one judging panel. But each event is kept separate by the program so that results can be printed for each of the individual events. When you merge 2 events you are actually merging them together so that you will be left with just one individual event. The following screen is presented when selecting this option.

eDive™ User Guide Last Updated: May 20, 2010
© Copyright 2001-2010 Overly Nifty LLC. Printed in U.S.A. 41
At the top of the screen you will start by selecting the meet from the list provided. This will then populate both lists of events. The selected event on the left will be the source event and the selected event on the right will be the destination event. Once the events are merged the source event will no longer exist. The destination event will be the only event left. As you select a source event and destination event the label underneath the lists will change to show you how many divers are registered for that event. The text of the options under the source event list will also change depending on how many divers are in each event. Under the source event you have some options as to where you want the divers from the source event inserted into the order of the destination event. You can choose to insert the source event divers into the even positions, into the odd positions, at the end of the order or at the beginning of the order. If we look at the screen shot above both events will have their diver orders set as 1,2,3,4,5,6. If the source divers are inserted into the even positions then, in the new merged event, the source divers will get positions 2,4,6,8,10,12 (i.e. diver 1 becomes 2
nd, diver 2 becomes 4
th, diver 3 becomes
6th, etc.) and the destination divers will be changed so that their new positions will be 1,3,5,7,9,11.
The relative order of the divers from each event will be maintained. Once you specify where the source event divers should be inserted you can then enter a new name for the merged event. A default name has been provided but you can delete that name and enter your own. Once you have set your options you can click the “Merge the Events” button. If the source or destination events have had their results posted already then when the merge is complete the results will be re-posted.
5. Register Divers Please see the section Meets->Register Divers or Events->Register Divers.
6. Set Diver Order Selecting this option allows you to set the diving order for an event. Please note that any changes you make to the order will not be saved until you press the Save button on the screen. The following screen is presented when you select this option.
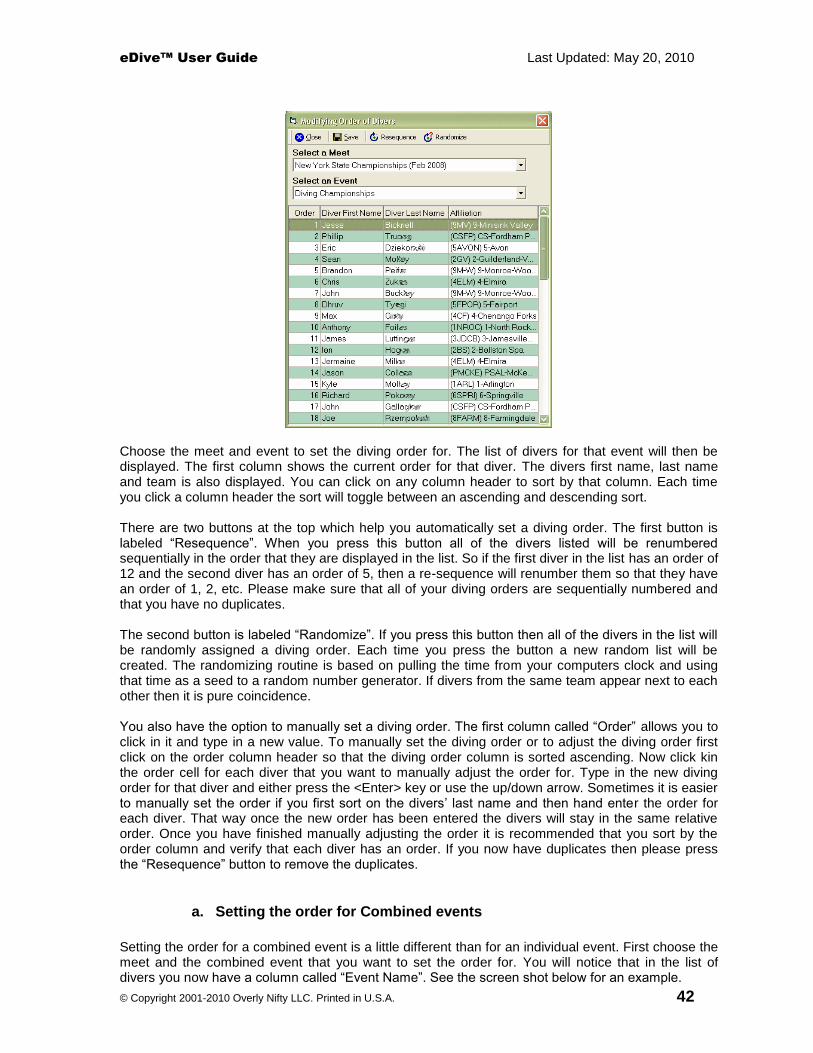
eDive™ User Guide Last Updated: May 20, 2010
© Copyright 2001-2010 Overly Nifty LLC. Printed in U.S.A. 42
Choose the meet and event to set the diving order for. The list of divers for that event will then be displayed. The first column shows the current order for that diver. The divers first name, last name and team is also displayed. You can click on any column header to sort by that column. Each time you click a column header the sort will toggle between an ascending and descending sort. There are two buttons at the top which help you automatically set a diving order. The first button is labeled “Resequence”. When you press this button all of the divers listed will be renumbered sequentially in the order that they are displayed in the list. So if the first diver in the list has an order of 12 and the second diver has an order of 5, then a re-sequence will renumber them so that they have an order of 1, 2, etc. Please make sure that all of your diving orders are sequentially numbered and that you have no duplicates. The second button is labeled “Randomize”. If you press this button then all of the divers in the list will be randomly assigned a diving order. Each time you press the button a new random list will be created. The randomizing routine is based on pulling the time from your computers clock and using that time as a seed to a random number generator. If divers from the same team appear next to each other then it is pure coincidence. You also have the option to manually set a diving order. The first column called “Order” allows you to click in it and type in a new value. To manually set the diving order or to adjust the diving order first click on the order column header so that the diving order column is sorted ascending. Now click kin the order cell for each diver that you want to manually adjust the order for. Type in the new diving order for that diver and either press the <Enter> key or use the up/down arrow. Sometimes it is easier to manually set the order if you first sort on the divers’ last name and then hand enter the order for each diver. That way once the new order has been entered the divers will stay in the same relative order. Once you have finished manually adjusting the order it is recommended that you sort by the order column and verify that each diver has an order. If you now have duplicates then please press the “Resequence” button to remove the duplicates.
a. Setting the order for Combined events
Setting the order for a combined event is a little different than for an individual event. First choose the meet and the combined event that you want to set the order for. You will notice that in the list of divers you now have a column called “Event Name”. See the screen shot below for an example.

eDive™ User Guide Last Updated: May 20, 2010
© Copyright 2001-2010 Overly Nifty LLC. Printed in U.S.A. 43
In the screenshot above there are 5 boys and 4 girls. The goal for this example is to have all of the girls dive their first dive followed by all of the boys. The first thing to do is to group the list by event name. Just drag the event name column up into the gray area labeled “Drag a column header here to group by that column” and drop the column there. The result will be the following screenshot.
Now click on the randomize button to randomize the diving order. You will end up with a screen similar to the following.
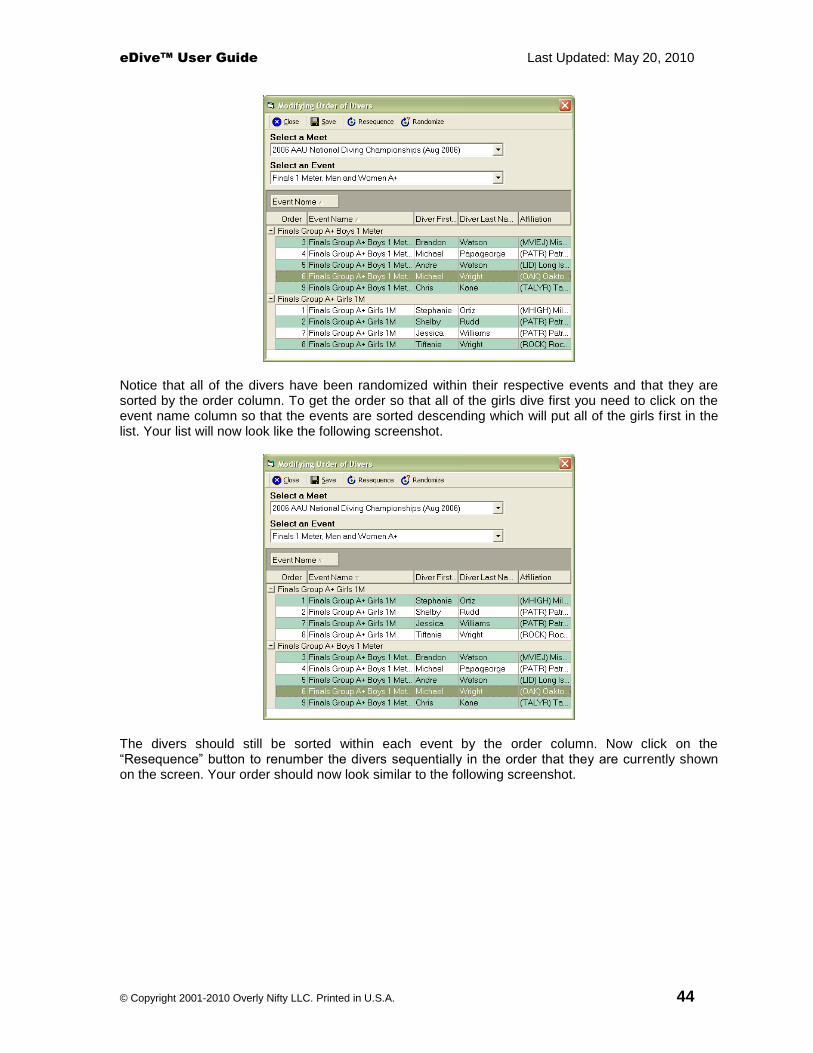
eDive™ User Guide Last Updated: May 20, 2010
© Copyright 2001-2010 Overly Nifty LLC. Printed in U.S.A. 44
Notice that all of the divers have been randomized within their respective events and that they are sorted by the order column. To get the order so that all of the girls dive first you need to click on the event name column so that the events are sorted descending which will put all of the girls first in the list. Your list will now look like the following screenshot.
The divers should still be sorted within each event by the order column. Now click on the “Resequence” button to renumber the divers sequentially in the order that they are currently shown on the screen. Your order should now look similar to the following screenshot.
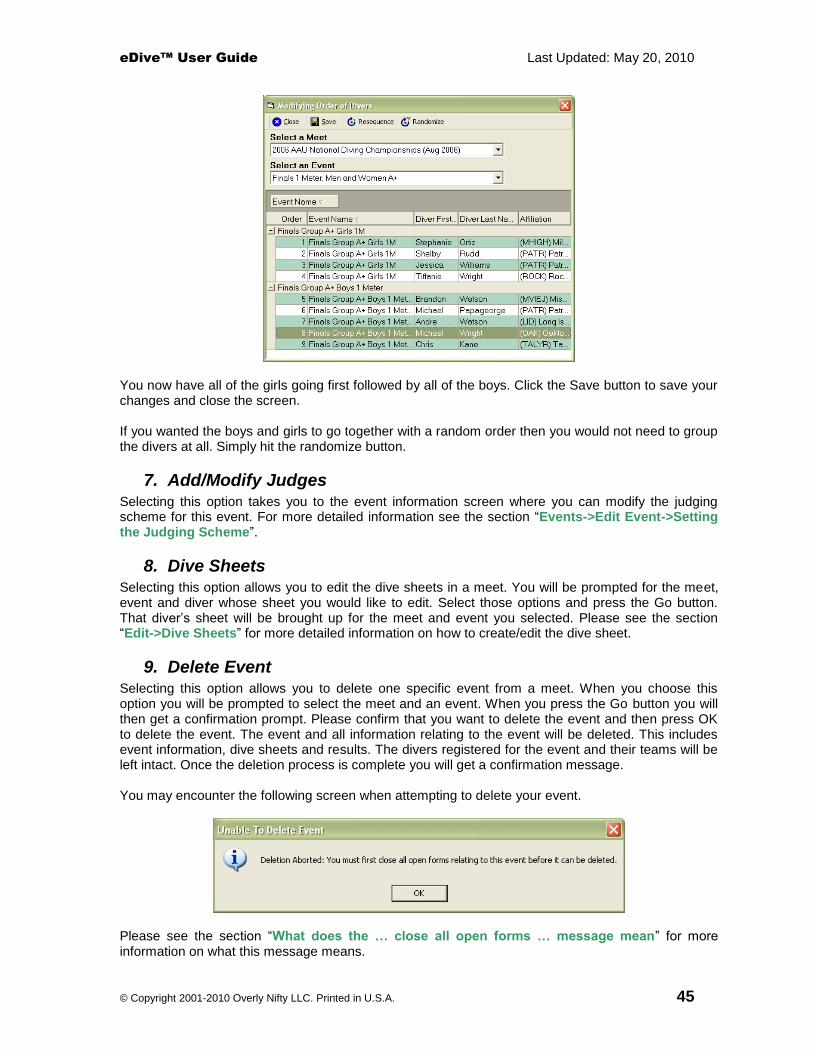
eDive™ User Guide Last Updated: May 20, 2010
© Copyright 2001-2010 Overly Nifty LLC. Printed in U.S.A. 45
You now have all of the girls going first followed by all of the boys. Click the Save button to save your changes and close the screen. If you wanted the boys and girls to go together with a random order then you would not need to group the divers at all. Simply hit the randomize button.
7. Add/Modify Judges Selecting this option takes you to the event information screen where you can modify the judging scheme for this event. For more detailed information see the section “Events->Edit Event->Setting the Judging Scheme”.
8. Dive Sheets Selecting this option allows you to edit the dive sheets in a meet. You will be prompted for the meet, event and diver whose sheet you would like to edit. Select those options and press the Go button. That diver’s sheet will be brought up for the meet and event you selected. Please see the section “Edit->Dive Sheets” for more detailed information on how to create/edit the dive sheet.
9. Delete Event Selecting this option allows you to delete one specific event from a meet. When you choose this option you will be prompted to select the meet and an event. When you press the Go button you will then get a confirmation prompt. Please confirm that you want to delete the event and then press OK to delete the event. The event and all information relating to the event will be deleted. This includes event information, dive sheets and results. The divers registered for the event and their teams will be left intact. Once the deletion process is complete you will get a confirmation message. You may encounter the following screen when attempting to delete your event.
Please see the section “What does the … close all open forms … message mean” for more information on what this message means.

eDive™ User Guide Last Updated: May 20, 2010
© Copyright 2001-2010 Overly Nifty LLC. Printed in U.S.A. 46
10. Run Event
Selecting this option allows you to run your event once it is all set up. Select the meet and event to run when prompted and click the Go button. The following screen will be presented to you.
Before an event can be run it is checked to make sure that it has been set up correctly. If any problems are found then a message will appear letting you know what the problem is. Please correct those issues and try and open the run event screen again. The screen shot above shows an event in progress. They have completed dives through round 2 and are currently on diver # 10 in round 3. The width and height of the main areas of this screen can be adjusted. If you position your mouse between the leader board and the list of dives your mouse icon will change as shown in the screen shot below.

eDive™ User Guide Last Updated: May 20, 2010
© Copyright 2001-2010 Overly Nifty LLC. Printed in U.S.A. 47
At that point you can click and drag to change the width of the leader board area. Some people have been known to do this to hide the leader board. The height of the area containing the list of dives can also be adjusted by hovering your mouse between that area and the current diver area as shown in the screen shot below.
a. List of divers and dives
The main area of the screen shows all of the divers in this event and the dives they are competing. When you first open the screen the list is in order by round and then diving order. You can scroll through this list and view all of the dives being performed in the event. The columns, as shown in the order in the screen shot are as follows; Rnd – the round Ord – the order for that diver in that round /!\ - the current dive sheet status. If there are any problems then a yellow icon will appear with an exclamation point in it. This indicates that the sheet for this diver violates one or more event rules. Diver Name –the name of the diver Dive – the dive that diver is doing in that round Level – the board level that the dive is being performed on DD – the degree of difficulty for that dive. If any of the dives have a zero for a degree of difficulty then the DD column for that dive will be highlighted red. J1 thru J9 – these columns hold the judges awards given for a dive. Up to 9 judges can be displayed in an event. Award – the total of the judges award for the dive Dive TTL – the judges award total multiplied by the DD for that dive CurTTL – the current running total (the total score) for that diver as of that round Cut – indicates whether the diver has been cut from the event The last column is a status column. It indicates whether the dive has been performed or not. The possible values are NA – the dive has not been performed yet, OK – the dive has been performed, BALK – the diver balked on that dive, DED2 – there was a 2 point deduction by the judges.
b. Current Diver and Next Diver
The current diver who should be on the board is listed under the Current Diver section. It shows the divers name, the board level for that dive, the dive they are competing, whether it is a voluntary dive, the degree of difficulty for the dive and the dive description. If the dive is a voluntary dive then the letters “Vol” will be shown right before the board level.
The next diver in the order is also listed under the Next Diver section. It shows the divers name who should be on deck getting ready to go.
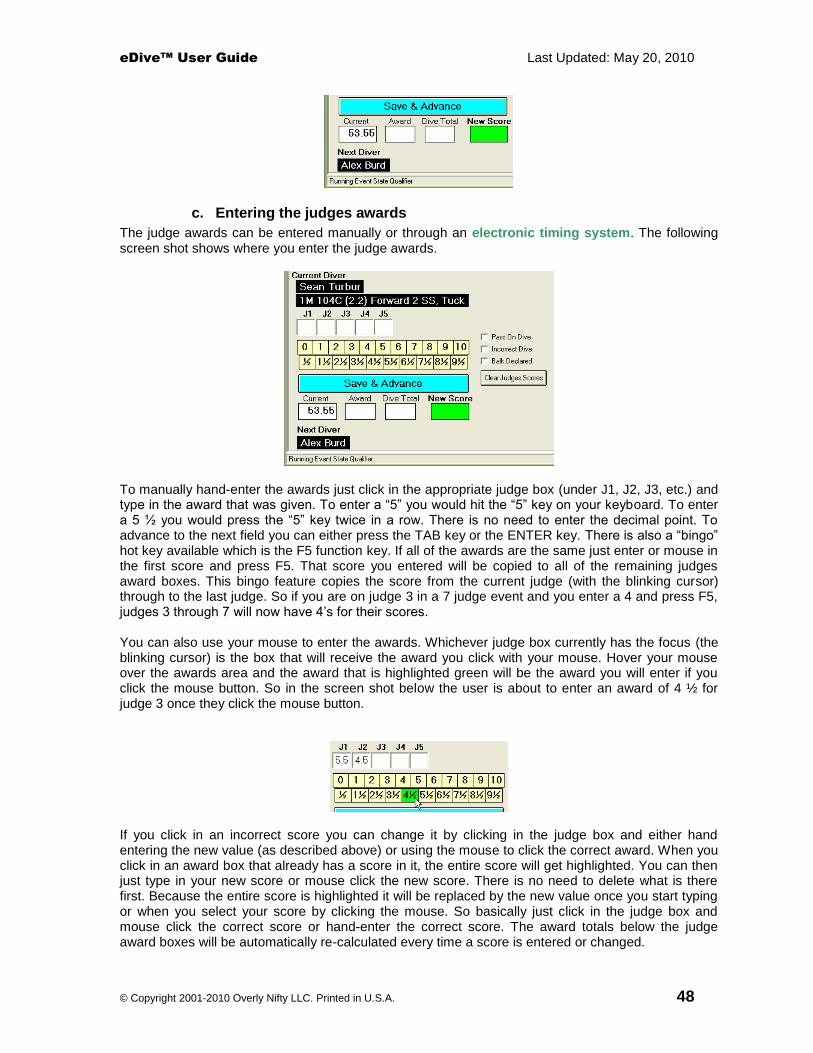
eDive™ User Guide Last Updated: May 20, 2010
© Copyright 2001-2010 Overly Nifty LLC. Printed in U.S.A. 48
c. Entering the judges awards
The judge awards can be entered manually or through an electronic timing system. The following screen shot shows where you enter the judge awards.
To manually hand-enter the awards just click in the appropriate judge box (under J1, J2, J3, etc.) and type in the award that was given. To enter a “5” you would hit the “5” key on your keyboard. To enter a 5 ½ you would press the “5” key twice in a row. There is no need to enter the decimal point. To advance to the next field you can either press the TAB key or the ENTER key. There is also a “bingo” hot key available which is the F5 function key. If all of the awards are the same just enter or mouse in the first score and press F5. That score you entered will be copied to all of the remaining judges award boxes. This bingo feature copies the score from the current judge (with the blinking cursor) through to the last judge. So if you are on judge 3 in a 7 judge event and you enter a 4 and press F5, judges 3 through 7 will now have 4’s for their scores. You can also use your mouse to enter the awards. Whichever judge box currently has the focus (the blinking cursor) is the box that will receive the award you click with your mouse. Hover your mouse over the awards area and the award that is highlighted green will be the award you will enter if you click the mouse button. So in the screen shot below the user is about to enter an award of 4 ½ for judge 3 once they click the mouse button.
If you click in an incorrect score you can change it by clicking in the judge box and either hand entering the new value (as described above) or using the mouse to click the correct award. When you click in an award box that already has a score in it, the entire score will get highlighted. You can then just type in your new score or mouse click the new score. There is no need to delete what is there first. Because the entire score is highlighted it will be replaced by the new value once you start typing or when you select your score by clicking the mouse. So basically just click in the judge box and mouse click the correct score or hand-enter the correct score. The award totals below the judge award boxes will be automatically re-calculated every time a score is entered or changed.

eDive™ User Guide Last Updated: May 20, 2010
© Copyright 2001-2010 Overly Nifty LLC. Printed in U.S.A. 49
d. Saving the awards and advancing to the next diver
Once all of the judge awards have been entered you will need to click the “Save and Advance” button in order to advance to the next diver in the order. This action will save the judge awards for that dive. The scores will then appear up above in the list of dives as a completed dive. Any judge box which does not have an award entered will be saved as a zero. You can clear all of the judge awards entered by clicking the “Clear Judges Scores” button. All it does is clear out the award in each judge box.
e. The calculated totals
Below the save and advance button are the calculated scores. Once all of the judges awards are in all of these fields will have a value. The judging scheme assigned to this event will determine how the system calculates the dive totals. The following values are stored in each field: Current – The current running total for this diver before this dive is complete. Award – The total of the judges awards for this dive. Dive Total – The calculated result of multiplying the DD and the judges award total. New Score – The new running total for this diver including the dive just performed.
f. Pass on Dive, Incorrect Dive (failed dive), Balk Declared
In some events the diver is allowed to declare that they are passing on a dive. If they chose to do this then you can check this box to mark the dive as having been passed. Having this box checked when you save and advance to the next diver will change the value in the last column on the screen from “OK” to “PASS”. It is merely a flag or visual indicator that something special happened on that dive. It is not required that you check this box. When you come back to this event later you will know what happened when you see all zeroes for the dive. If the diver fails a dive then place a check in the box for “Incorrect Dive”. Saying incorrect dive is a nicer way of saying the diver failed the dive. Having this box checked when you save and advance to the next diver will change the value in the last column on the screen from “OK” to “FAIL”. It is merely a flag or visual indicator that something special happened on that dive. It is not required that you check this box. When you come back to this event later you will know what happened when you see all zeroes for the dive. If the diver balks on a dive then you can place a check in this box. The Balk Declared box works a little differently than the other boxes. You will need to communicate with your head referee to determine how scores for balk dives will be announced. Some people prefer to announce the adjusted scores (including the 2 point deduction) and some people prefer to announce the actual scores and then take the 2 point deduction. If the referee wants to announce the awards with the 2 points taken off already then mouse click in the scores as they are read and then check the box for Balk Declared. If the referee wants to announce the actual awards and then take off the 2 point deduction then check the box first and mouse click in the scores that are announced. When done this way the system will automatically take off the 2 points for you. For example, if you have the Balk Declared box checked and then click on the 4 ½ award you will see a 2 ½ appear in the judges award box.
g. Leader board
The leader board is shown along the right side of the screen. It shows the current leaders in the event as of the last dive completed. There is a column for the current rank, the divers current total, a column to indicate if the diver has gone this round yet, the divers name and the team the diver is diving for. Before the event starts all of the divers listed in the leader board will be listed in diving order. As soon as the event starts the current running total for each diver will be displayed and the leader board will adjust its’ ranking accordingly. If the diver has not dove this round yet then there will be a little circle icon with a red dot in it next to their name. The icon will be removed once they complete their dive in the current round.
eDive™ User Guide Last Updated: May 20, 2010
© Copyright 2001-2010 Overly Nifty LLC. Printed in U.S.A. 50
The list can be sorted by clicking on the column heading. The sort will toggle between an ascending and descending sort each time you click the column heading. You can also refresh the contents of the leader board by clicking the “Update Leader Board” button in the toolbar.
h. Leader Board for Combined Events
When you are running a combined event the leader board displays a little differently. For a combined event the leader board will have a section for each event. That way you can see who is in the lead in each event even though you are running a combined event.
i. Editing the list of dives
If you need to edit information for a dive that is already completed you can do so up in the area that shows the dive lists. You can change the fields for dive number, board level, dive DD, the judge awards, the award total and the dive total. You may have, for example, already saved the scores for the current diver when the announcer discovers that they announced score incorrectly. The sections below explain how to change this information.
1. How to change a dive number or DD value
To change a dive number or DD simply click in the appropriate cell in the grid, type in the correct value and press the <Enter> key. As you type you will see the row header change from a little arrow
to what looks like a pencil ( ). This signifies that you are editing the row and have not yet saved your changes. Pressing the <Enter> key saves the changes to the row and commits them to the database. Once you have made your change, that divers dive sheet will be re-verified to make sure it still meets all of the rules for this event. A message will be displayed letting you know the results of that check.
2. How to change a judges award
A judge award can be changed the same way as a dive number. Just click in the appropriate cell, make your change and press the <Enter> key. The scores and totals for that dive will be recalculated and displayed in the grid.
j. Cutting a diver
You can cut a diver from an event in a few ways. In the list of all dives on this screen the second to last column is called “Cut”. It is a checkbox column. To cut a diver simply use you mouse to click on the box until a checkmark appears. Press the <Enter> key to save your change to that row. Once a diver is cut a line will be drawn through that divers name for that round and all subsequent rounds.
The leader board will also show a line through that divers name and display a “cut” icon ( ) next to their name. To un-cut a diver you follow the same process and remove the checkmark from the cut column. The diver will be uncut from that round through to the last round. If you cut a diver the leader board may not show the cut status right away. To refresh the leader board to show the cut status simply click the refresh leader board button in the toolbar. You can also cut a diver by right-clicking on their name in the list of dives to get the context menu to display. Then select the “Cut” option from that menu.
k. Cutting the Top N divers
Cutting the top N divers is done by changing the sort for the list of dives. If you click on the toolbar for Sorts you can select “Sort for Cuts”. This will sort the list of dives by round and then by score in a descending manner. So for each round you are looking at you will see the scores go from highest to lowest. Now take a look at your leader board and determine the highest score that will be cut. For example, if you are cutting to 16 divers and 16
th is 138.25 and 17
th is 132.55, then anyone with a
score of 132.55 or lower should be cut. Scroll down your list of dives (that have now been sorted by

eDive™ User Guide Last Updated: May 20, 2010
© Copyright 2001-2010 Overly Nifty LLC. Printed in U.S.A. 51
score) and cut each diver with a score of 132.55 or lower. When you are done with your cuts click on the Sorts toolbar button again and select “Sort for Running Event”. You are now ready to continue with your event. If the current diver is one that was cut you can have the computer determine who should be next on the diving board by selecting the toolbar button “Selected Diver” and select the option “Find and Assign Current”. This will search through your list of divers for this event and determine who should be the next diver to go and assign them as the current diver. Don’t forget that you may need to refresh the leader board if the cut status has not shown up yet.
l. Connecting to an electronic timing system
You can connect to an electronic timing system to receive your scores electronically. eDive supports the Colorado System 4000, 5 and 6. It also supports the Daktronics Omnisport 2000. Other systems can be incorporated as determined by the requests of our customers. If you have a system that you would like eDive to support please send us the information about your system and we will look into it. To connect to a Colorado electronic timing system click on the “Connect to Timing System” button and then select the option for “Colorado System 4000, 5 or 6”. Select the COM port you are using and press the “Connect” button. More detailed instructions can be found in the section “Connecting to your Colorado System”. When that dialog closes the text of the button will have changed to “Disconnect from Timing System”. To disconnect from the timing system simply click that button. To connect to a Daktronics Omnisport 2000 electronic timing system click on the “Connect to Timing System” button and then select the option for “Daktronics Omnisport 2000”. Select the COM port you are using and press the “Connect” button. You can also test your connection to the Omnisport by pressing the “Test Connection” button. A message will appear either saying that it could not connect to the timer or it will show that a connection was established and the current software version running on the timer. More detailed instructions can be found in the section “Connecting to your Daktronics Omnisport 2000”. When that dialog closes the text of the button will have changed to “Disconnect from Timing System”. To disconnect from the timing system simply click that button. Once you are connected to your system you are ready to accept scores. For a Colorado system as soon as all of the scores are received into the timer they will be sent to eDive and will appear in the judges award boxes. For the Daktronics system as soon as you accept the scores in the timer they will be sent to eDive and will appear in the judges award boxes.
m. Event Statistics
When an event is running there are some basic statistics shown on the screen as in the screen shot below.
The estimated time that the event will end if all of the remaining dives are completed is shown. It also displays the average time taken per dive. This average is a running 20 dive average. So if there is a very lengthy break during the meet it will be averaged out after 20 dives have passed. Each time the run event screen is opened this average will be reset to zero. So if you have a warm-up after cuts you can close and re-open the run event screen so that you get an accurate average dive time. There are also 3 dropdown controls which show the scores needed by the current diver to catch the place specified. In the example screen shot the controls are set to check against 3
rd place, 8
th place
and 12th place. To catch 3
rd place it shows 7.40. This means that the average judge award must be

eDive™ User Guide Last Updated: May 20, 2010
© Copyright 2001-2010 Overly Nifty LLC. Printed in U.S.A. 52
7.4 in order for the current diver to catch 3rd
place. Realistically this means that the current diver needs judge awards of 7.5, 7.5 and 7.5 to catch 3
rd place. The other two controls work the same way.
n. Backup Settings
Enabling the option to backup your data will create a log file of every score for every diver in the event.
A log file is written to the directory where you installed eDive. The file will be named starting with the letter “E” followed by a number as in “E20563.Log”. Each event will be saved in a separate log file. If you open this file in a normal text editor program the contents will look similar to the example below. ========================================= 2/9/2008 9:50:31 AM 2008 Section 5 Championships ========================================= 2/9/2008 9:50:31 AM Class B Championships Rnd:1 Diver:Aaron Latray Dive:201A(1.7) Scores:5.5, 5.0, 5.5, 6.0, 5.5 Status:OK Dive TTL:28.05 Current TTL:28.05 2/9/2008 9:51:16 AM Class B Championships Rnd:1 Diver:Dan Papazissimas Dive:103B(1.7) Scores:6.0, 5.5, 6.0, 7.0, 5.0 Status:OK Dive TTL:29.75 Current TTL:29.75 2/9/2008 9:52:13 AM Class B Championships Rnd:1 Diver:Edward Rosado Dive:101A(1.4) Scores:6.5, 6.0, 4.0, 5.0, 5.5 Status:OK Dive TTL:23.10 Current TTL:23.10 2/9/2008 9:52:56 AM Class B Championships Rnd:1 Diver:Tom Deiure Dive:103B(1.7) Scores:6.5, 5.0, 6.0, 5.5, 5.0 Status:OK Dive TTL:28.05 Current TTL:28.05 2/9/2008 9:53:47 AM Class B Championships Rnd:1 Diver:Tristan Esler Dive:401B(1.5) Scores:7.0, 7.0, 6.0, 7.0, 6.5 Status:OK Dive TTL:30.75 Current TTL:30.75 2/9/2008 9:54:33 AM Class B Championships Rnd:1 Diver:Dylan Petrie Dive:201A(1.7) Scores:5.0, 5.5, 4.5, 6.0, 4.5 Status:OK Dive TTL:25.50 Current TTL:25.50
o. Auto-Advance when all scores come in
Checking this option on the run event screen will make the software save and advance to the next diver automatically as soon as the last judge award is received or entered. If an invalid score was saved by mistake (i.e. the judge accidentally sent a zero) with this option active, you will need to go up into the list of dives area and manually edit the score to correct it.
p. Toolbar
The toolbar along the top of the run event screen allows you to manipulate the information on the screen.
The “Close” button closes the run event screen. All data will be saved so that when you re-open the screen you will end up right where you left off. The “All Options” button drops down a menu which contains all of the toolbar buttons/options but in a menu format. The section “All Options toolbar menu” explains these options in detail. The “Sorts” button drops down a menu which contains the options for sorting the list of dives displayed. The section “Sorts” explains these options in detail.
- This option allows you to refresh and update the leader board.
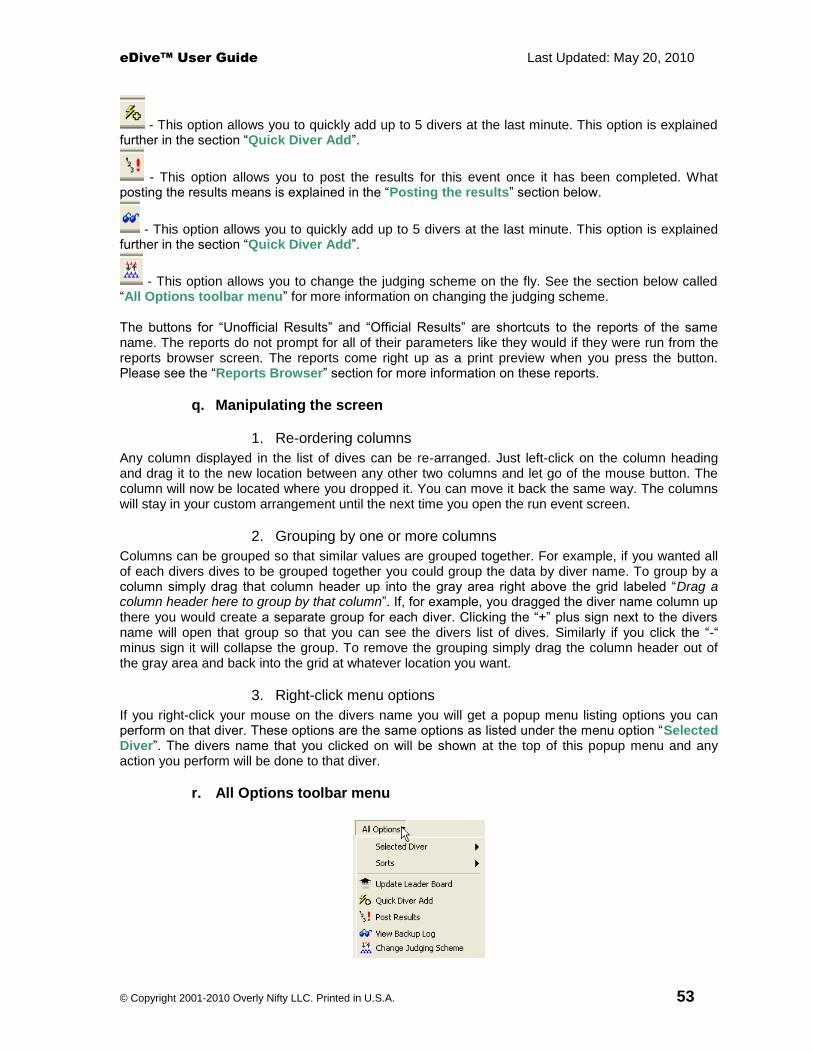
eDive™ User Guide Last Updated: May 20, 2010
© Copyright 2001-2010 Overly Nifty LLC. Printed in U.S.A. 53
- This option allows you to quickly add up to 5 divers at the last minute. This option is explained further in the section “Quick Diver Add”.
- This option allows you to post the results for this event once it has been completed. What posting the results means is explained in the “Posting the results” section below.
- This option allows you to quickly add up to 5 divers at the last minute. This option is explained further in the section “Quick Diver Add”.
- This option allows you to change the judging scheme on the fly. See the section below called “All Options toolbar menu” for more information on changing the judging scheme. The buttons for “Unofficial Results” and “Official Results” are shortcuts to the reports of the same name. The reports do not prompt for all of their parameters like they would if they were run from the reports browser screen. The reports come right up as a print preview when you press the button. Please see the “Reports Browser” section for more information on these reports.
q. Manipulating the screen
1. Re-ordering columns
Any column displayed in the list of dives can be re-arranged. Just left-click on the column heading and drag it to the new location between any other two columns and let go of the mouse button. The column will now be located where you dropped it. You can move it back the same way. The columns will stay in your custom arrangement until the next time you open the run event screen.
2. Grouping by one or more columns
Columns can be grouped so that similar values are grouped together. For example, if you wanted all of each divers dives to be grouped together you could group the data by diver name. To group by a column simply drag that column header up into the gray area right above the grid labeled “Drag a column header here to group by that column”. If, for example, you dragged the diver name column up there you would create a separate group for each diver. Clicking the “+” plus sign next to the divers name will open that group so that you can see the divers list of dives. Similarly if you click the “-“ minus sign it will collapse the group. To remove the grouping simply drag the column header out of the gray area and back into the grid at whatever location you want.
3. Right-click menu options
If you right-click your mouse on the divers name you will get a popup menu listing options you can perform on that diver. These options are the same options as listed under the menu option “Selected Diver”. The divers name that you clicked on will be shown at the top of this popup menu and any action you perform will be done to that diver.
r. All Options toolbar menu
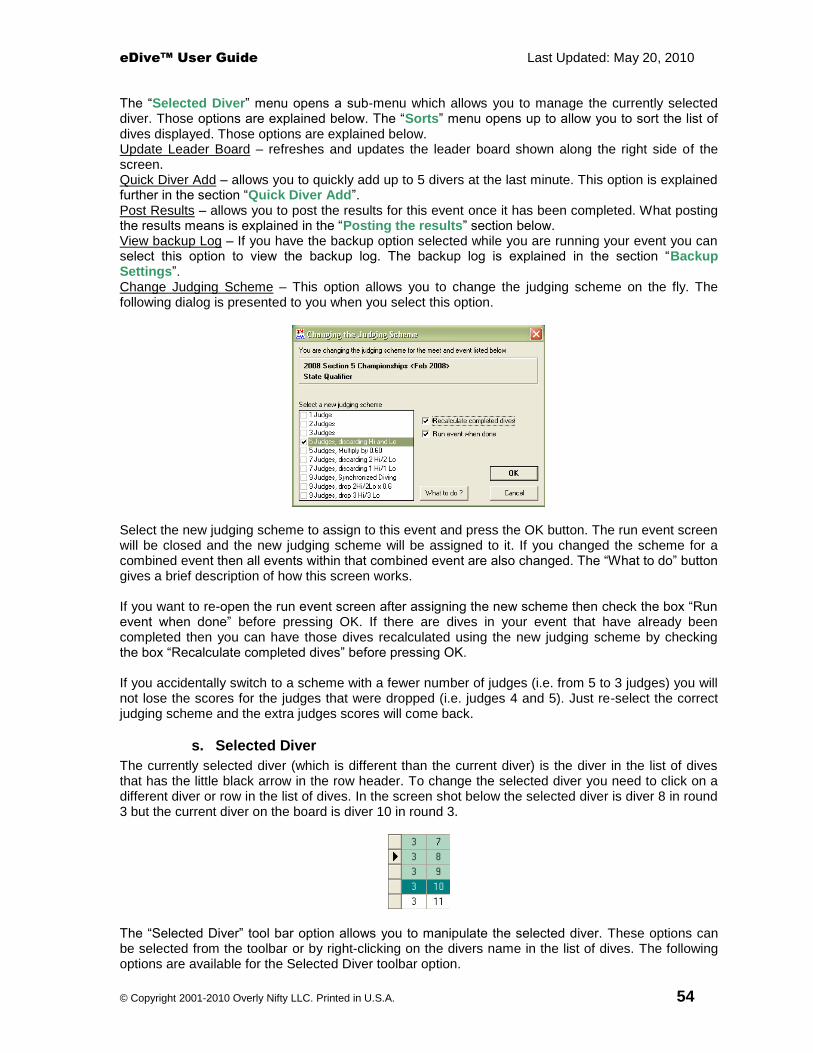
eDive™ User Guide Last Updated: May 20, 2010
© Copyright 2001-2010 Overly Nifty LLC. Printed in U.S.A. 54
The “Selected Diver” menu opens a sub-menu which allows you to manage the currently selected diver. Those options are explained below. The “Sorts” menu opens up to allow you to sort the list of dives displayed. Those options are explained below. Update Leader Board – refreshes and updates the leader board shown along the right side of the screen. Quick Diver Add – allows you to quickly add up to 5 divers at the last minute. This option is explained further in the section “Quick Diver Add”. Post Results – allows you to post the results for this event once it has been completed. What posting the results means is explained in the “Posting the results” section below. View backup Log – If you have the backup option selected while you are running your event you can select this option to view the backup log. The backup log is explained in the section “Backup Settings”. Change Judging Scheme – This option allows you to change the judging scheme on the fly. The following dialog is presented to you when you select this option.
Select the new judging scheme to assign to this event and press the OK button. The run event screen will be closed and the new judging scheme will be assigned to it. If you changed the scheme for a combined event then all events within that combined event are also changed. The “What to do” button gives a brief description of how this screen works. If you want to re-open the run event screen after assigning the new scheme then check the box “Run event when done” before pressing OK. If there are dives in your event that have already been completed then you can have those dives recalculated using the new judging scheme by checking the box “Recalculate completed dives” before pressing OK. If you accidentally switch to a scheme with a fewer number of judges (i.e. from 5 to 3 judges) you will not lose the scores for the judges that were dropped (i.e. judges 4 and 5). Just re-select the correct judging scheme and the extra judges scores will come back.
s. Selected Diver
The currently selected diver (which is different than the current diver) is the diver in the list of dives that has the little black arrow in the row header. To change the selected diver you need to click on a different diver or row in the list of dives. In the screen shot below the selected diver is diver 8 in round 3 but the current diver on the board is diver 10 in round 3.
The “Selected Diver” tool bar option allows you to manipulate the selected diver. These options can be selected from the toolbar or by right-clicking on the divers name in the list of dives. The following options are available for the Selected Diver toolbar option.

eDive™ User Guide Last Updated: May 20, 2010
© Copyright 2001-2010 Overly Nifty LLC. Printed in U.S.A. 55
Set as Current Diver – makes the selected diver the current diver on the board. The current diver is highlighted with a dark green background. Find and Assign Current – based on which dives are completed and which are left to do, the diver who should be on the board next is found and assigned as the current diver. View Dive Sheet – displays the selected divers dive sheet. Verify Divers List – verifies the divers current list of dives against the rules for the event they are entered in. Reset Dive – resets the dive as if it has not been completed yet. Cut Diver – cuts the selected diver from the selected round to the end of the event. Mark as Exhibition – marks the diver as diving exhibition. The prefix of “<Ex>” is added to the divers name in the main list of dives and in the leader board. Not Exhibition – if the diver is currently marked as exhibition this option removes that flag.
t. Sorts
1. Sorting on any column
Any column on the run event screen in the list of dives can be sorted. Each time you click on the column heading that column will be toggled between an ascending sort and a descending sort on that column. To get the list of dives back in order for running the event you will need to select “Sort for Running Event” from the sorts menu.
2. Sorting for Cuts
This option will sort the list of dives so that you can easily make cuts in your event. Each round is sorted by score descending. After selecting this option you can look at any round and see all of the divers scores sorted in a descending manner. To get the list of dives back in order for running the event you will need to select “Sort for Running Event” from the sorts menu.
3. Sorting for running the event
This option will set the sorted order of the list of dives so that they are in round and then diver order. This is the default order that is used when running your event. If you happen to change the sorted order you can reset it back by using this option.
u. Quick Diver Add
This option allows you to quickly add up to 5 divers at a time to your event while the event is running. If, for example, you missed a diver or a diver shows up at the last minute that you need to enter in the event, you can use this option to quickly add them. They are assigned a generic list of dives and a diving order when they are added. When it comes time for that diver to dive you will need to update the dive they are doing overwriting the default dive given when they were added. The new divers will be given an appropriate number of dives for the event they are added to. Each round will be set to a default of 101A. This will force their list to be invalid which should remind you that the dive needs to be changed each time they get up on the board. By the conclusion of the event you should have changed all of their dives so that they now have a valid list of dives according to the event they were entered in.

eDive™ User Guide Last Updated: May 20, 2010
© Copyright 2001-2010 Overly Nifty LLC. Printed in U.S.A. 56
The following is a screen shot of the quick diver add screen.
There will be a list of divers currently in your database listed along the left side of the screen. The right side contains diver specific information. The bottom section of the screen will contain the list of divers that you would like to add to your event. To create a new diver simply click the “Create New” button in the toolbar, enter the new divers information and press the “Save” button. This process is the same as defined in the section “Edit->Divers”. To select a diver (which will subsequently be added to your event) you must select that diver from the list on the left and press the “Add” button directly below the list. You will then see that divers name appear in the section at the bottom of the screen. You can add up to 5 divers this way. When you are finished you can press the toolbar button at the top of the screen called “Use Selections and Close”. To cancel this process you can press the toolbar button at the top called “Return/Do Not Use Selections”. To remove a divers name from the list at the bottom please select the diver to be removed and press the “Remove” button directly above the list at the bottom. To completely clear the list you can press the “Clear” button. Once you press the “Use Selections and Close” button you will then be prompted with the following screen.
This screen lists the divers you selected/created from the previous screen and allows you to set the diving order for these new divers. Traditionally any diver added at the last minute is assigned to go first in the event. That is the default order assigned for the new diver(s). To change the order for any

eDive™ User Guide Last Updated: May 20, 2010
© Copyright 2001-2010 Overly Nifty LLC. Printed in U.S.A. 57
diver listed simply click in the order column for that diver and type in the new order. If an existing diver has that order they will be pushed down one so that the new diver gets assigned the order that you gave them. So in the above example screen shot the 3 divers being added will be added in the order at 1st, 2nd and 3rd. Divers who were in those positions will be moved down in the order to 4
th, 5
th and
6th respectively. You can then press the “Add Divers” button to continue. You will be taken back to the
run event screen and those divers will now appear in the list of dives.
v. Posting the results
When an event has been completed you will be automatically prompted to post the event results. Posting the results will summarize the event results so that running reports on that event is faster. There are also some reports which will only run after an event has been posted. See the “Reports Browser” section for further information. When an event is complete you will see a screen appear like the following.
This screen shows the meet name and event name that are about to be posted at the top of the screen. A description of the posting process is included on the screen for you reference. When posting, the total score for each diver is calculated and saved. Individual dives are not recalculated at this time. The total dive score is used to determine the final total. Final rankings will be determined and saved and the team points will be calculated at this time. Click on the “Post Results” button to post the results for the event listed. If you are running a combined event then you will get a prompt like this for each event that is part of the combined event. Click on the “Post Results” button for each event in the combined event. You can post the results at a later time by either opening the run event screen for that event and clicking the post results toolbar button or selecting the menu item “Events->Modify Posted Results”.

eDive™ User Guide Last Updated: May 20, 2010
© Copyright 2001-2010 Overly Nifty LLC. Printed in U.S.A. 58
11. Modify Posted Results
Selecting this option allows you to modify the posted results for an event. Using this screen you can change the diver ranking, adjust team points or recalculate the team points based on the currently assigned scoring template. The following screen is presented.
Select the meet and event from the drop down lists provided. A list of all divers in that event will be shown along with their ranking and team points assigned. If the event has not had its’ results posted yet then you will be prompted with the following.
This prompt allows you to post the results before opening the modify screen or to view and edit the un-posted results. On the modify posted results screen you can change the divers rank, the final score and the team points assigned per place. Just click in the appropriate cell and type in the corrected value. Changes can be saved by clicking the save button on the toolbar. You can refresh the information shown by clicking the refresh button. The button with the blue “X” is the button which will close the screen. The “Exh” and “Cut” columns represent whether the diver was diving exhibition in this event and whether they were cut in this event, respectively. The columns are read-only and cannot be changed. You can also recalculate the team points for this event by clicking the “Recalculate Team Points” button. This will use the current scoring template assigned to this event and calculate team points. This is useful if you forgot to assign the scoring template before the event was finished. Just assign an appropriate scoring template on the event information screen, save it and then come back to this screen and click the button. Save your changes and then close the screen.

eDive™ User Guide Last Updated: May 20, 2010
© Copyright 2001-2010 Overly Nifty LLC. Printed in U.S.A. 59
View
1. Navigation
Selecting this option will display the main graphic navigation screen as shown in the following screen shot.
The navigation screen contains mouse-clickable areas that take you to the most commonly used functions of the program. The upper left corner graphic takes you to the event edit screen.
The upper right corner of the screen takes you to the register divers screen.
The lower right corner allows you to run an event.

eDive™ User Guide Last Updated: May 20, 2010
© Copyright 2001-2010 Overly Nifty LLC. Printed in U.S.A. 60
The lower left corner brings up the reports browser to view meet results and run any report in the system.
At the very upper right corner of the navigation screen there is a small button which toggles between showing the navigation screen and showing the “Quick Bar”. When the navigation screen is shown you can click this icon to hide the navigation screen and show the quick bar.
2. Quick Bar Selecting this option shows the toolbar called the Quick Bar. It is just a section of toolbar buttons that allow quick access to the major functionality in the program.
The following buttons are available in the quick bar.
- this button will show the navigation screen.
- this button will add a new meet to your database.
- this button will take you to the modify meet screen.
- this button will allow you to edit an event.
- this button will take you to the register divers screen.
- this button will allow you to modify the judges for an event.
- this button will run an event.
- this button takes you to the reports browser.

eDive™ User Guide Last Updated: May 20, 2010
© Copyright 2001-2010 Overly Nifty LLC. Printed in U.S.A. 61
Tools
1. Lookup Dive DD
Selecting this option allows you to enter a dive number and position and have the degree of difficulty calculated for you using the official FINA calculation rules. The following screen is presented for calculating the DD of a dive.
Enter a dive number in the field provided. As you enter the dive number it will be evaluated and the components of the degree of difficulty will be calculated. Entering a valid dive number will show component values as in the following screen shot.
In this example the dive 5335D has been entered and the calculated DD for all board levels is displayed as well as the calculated value for every component of the degree of difficulty. You can easily see that the DD for this dive on 3 meter is 2.9 and on 5 meter it is 3.0. If you enter an invalid dive number you will see error messages explaining what the problem is with the number you entered. In the example below it shows an invalid dive number because the user entered an invalid position.

eDive™ User Guide Last Updated: May 20, 2010
© Copyright 2001-2010 Overly Nifty LLC. Printed in U.S.A. 62
Any time you see the letters “NA” on this screen it means that the value cannot be calculated or is not allowed. If the “NA” appears for the total DD then the dive cannot be performed at that level. The example below shows the value of “NA” appearing for 1 meter and 5 meter.
To close the screen click the “X” in the upper right hand corner of the screen.

eDive™ User Guide Last Updated: May 20, 2010
© Copyright 2001-2010 Overly Nifty LLC. Printed in U.S.A. 63
2. Transfer Dive Lists
Selecting this option allows you to transfer a divers’ dives from one event into another event, even across meets within the same database. For example, your prelims event on the first day contains voluntaries and optionals. The finals event on the second day is for the top 12 divers from prelims and they will be repeating their optional list. They will also need to have the voluntary score carried over from prelims into finals as their starting score. The Transfer Dive Lists screen is what you would use to do this. For this example the transfer dive lists screen would be set up as in the following screen shot.
Starting at the top you need to choose which event you are transferring dives from. On the top right you next select which event you are transferring the dive lists to. Then, start on the left side of the screen just follow the options down to set up your transfer. In the screen shot the optionals for each diver will be transferred into the finals event and the dives will maintain the same round order. The diver order is set to reverse order of finish so that first place in prelims will go last in finals. The “Carry Over Score For” dropdown specifies that that total voluntary score will be carried over from prelims as the starting score in finals for each diver. The divers that will be transferred are selected next. In this example the top 12 divers will be transferred. To change the number of divers just click in the places field and type in the number you would like in finals. You also have the option to specifically select the divers to transfer. Just click the option for “Use Selected Divers” and place a checkmark next to each divers name that you want to transfer to finals. When you have selected all of your options you will then click on the “Transfer” button. When the transfer is complete you will be prompted on whether you would like to see the results of the transfer. As the divers and dives are transferred a log file is created which records the progress and if any errors occurred. To view that log file you can either select “Yes” to view the file when prompted (after the transfer is complete) or you can click on the “View Transfer Log” button. The following is an example of the contents of the log file. ============================================ Transfer results for: 10/23/2007 1:04:36 PM ============================================ Transferring data from Meet: 2007 Big XII Diving Championships Transferring data from Event: Womens 3 Meter - Finals Transferring data To Meet: 2007 Big XII Diving Championships Transferring data To Event: 07 NCAA 3M Women 06 dives (6opt) -->> Diving order kept the same for Jessica Livingston. -->> Added event registration for Jessica Livingston.

eDive™ User Guide Last Updated: May 20, 2010
© Copyright 2001-2010 Overly Nifty LLC. Printed in U.S.A. 64
-->> All Dives transferred for Jessica Livingston. -->> Diving order kept the same for Kendra Melnychuk. -->> Added event registration for Kendra Melnychuk. -->> All Dives transferred for Kendra Melnychuk. -->> Diving order kept the same for Shelby Noonan. -->> Added event registration for Shelby Noonan. -->> All Dives transferred for Shelby Noonan. -->> Diving order kept the same for Kara Jayne Salamone. -->> Added event registration for Kara Jayne Salamone. -->> All Dives transferred for Kara Jayne Salamone. -->> Diving order kept the same for Danielle Stansbury. -->> Added event registration for Danielle Stansbury. -->> All Dives transferred for Danielle Stansbury.
If there were any errors or problems during the transfer they will be noted and very obvious in the log file. New logs are appended to the end of the log file.
3. Upload to Colorado
Selecting this option allows you to upload your event directly into a Colorado System 5 or System 6 electronic timing system. If you own a System 5 then detailed instructions are found in the section “Uploading an event into the Colorado System 5”. If you own a System 6 then please see the instructions at “Uploading an event into the Colorado System 6”. To prepare your event to be uploaded into the Colorado timer you must set up each event as if it were to be run individually. So make sure the diving order is set, the judging scheme is selected and all divers that are registered for the event have a dive sheet. Once the event is ready to go you can then upload it into the timer. Combined events can also be uploaded into the timer in the same manner as an individual event. Just select the combined event to upload and follow the process. A connection to the Colorado timer needs to be made with a standard 9-pin serial cable. Detailed information on how to connect the timer to your computer can be found in the section “Connecting to your Colorado System”.
4. Upload to Daktronics
Selecting this option allows you to upload your event directly into a Daktronics Omnisport 2000 electronic timing system. If you own a Daktronics system then detailed instructions are found in the section “Uploading an event into the Daktronics Omnisport 2000”. If you also own the Daktronics Pro Diving software then you have the option of loading your event into it. Just follow the instructions in the section “Uploading an event into the Daktronics Pro Diving Software”. To prepare your event to be uploaded into the Daktronics timer or the Pro diving software you must set up each event as if it were to be run individually. So make sure the diving order is set, the judging scheme is selected and all divers that are registered for the event have a dive sheet. Once the event is ready to go you can then upload it into the timer. A connection to the Daktronics timer needs to be made with a standard 9-pin serial cable. Detailed information on how to connect the timer to your computer can be found in the section “Connecting to your Daktronics Omnisport 2000”.
5. Judging Analysis
Selecting this option allows you to run a judging analysis for an event. This analysis is the official FINA analysis used at all of the FINA international events. It allows you to see how a judge performs compared to other judges and to see if any judges are showing biased towards any divers. The following screen is presented when selecting this option.

eDive™ User Guide Last Updated: May 20, 2010
© Copyright 2001-2010 Overly Nifty LLC. Printed in U.S.A. 65
The screen allows you to enter the judges names, the rounds they judged (if rotating judging panels) and the head referee. Select the meet and event to analyze, enter the judge names and press the “Perform Analysis” button. Entering the judge names is optional. Once the analysis is complete you will be prompted to view the file that was created. This file is stored on your local drive in the eDive installation directory. The prompt will give you the exact path and file name that was created. Select yes to that prompt and you will see something similar to the following. (if the columns below are not aligned properly please change your font to Lucida Console or some other fixed width font) JUDGES ANALYSIS Meet: 2007 Big XII Diving Championships 2/15/2007 Event: Mens 1 Meter - Finals Evaluating Panel A which judged rounds 1,2,3,4,5,6 Place 1 Eric Sehn (TAMU) Session Score: 374.20 Starting Score: 0.00 Final Score: 374.20 Judge 1 Judge 2 Judge 3 Judge 4 Judge 5 TAW: 383.55 383.40 369.60 369.60 378.45 RNK: 1 1 1 1 1 DEV: 9.35 9.20 -4.60 -4.60 4.25 H/L: 0/0 0/0 0/1 0/0 0/0 Place 2 Mike Wong (UTX) Session Score: 328.90 Starting Score: 0.00 Final Score: 328.90 Judge 1 Judge 2 Judge 3 Judge 4 Judge 5 TAW: 335.40 308.10 329.70 321.30 331.80 RNK: 2 3 2 2 2 DEV: 6.50 -20.80 0.80 -7.60 2.90 H/L: 0/2 0/0 0/0 1/0 0/0 Place 3 Greg DeStephen (MIZ) Session Score: 312.65 Starting Score: 0.00 Final Score: 312.65 Judge 1 Judge 2 Judge 3 Judge 4 Judge 5 TAW: 308.40 319.35 306.90 311.40 323.55 RNK: 3 2 3 3 3 DEV: -4.25 6.70 -5.75 -1.25 10.90 H/L: 0/0 0/0 0/0 1/0 0/0

eDive™ User Guide Last Updated: May 20, 2010
© Copyright 2001-2010 Overly Nifty LLC. Printed in U.S.A. 66
Place 4 Brian Smith (UTX) Session Score: 289.15 Starting Score: 0.00 Final Score: 289.15 Judge 1 Judge 2 Judge 3 Judge 4 Judge 5 TAW: 297.15 273.30 287.85 288.75 295.05 RNK: 4 6 4 4 4 DEV: 8.00 -15.85 -1.30 -0.40 5.90 H/L: 0/2 0/0 0/0 1/0 0/1 … Etc. through to the last diver … JUDGES FOR PANEL A Referee: Not Specified Judge 1: John Paul Judge 2: Sue Ray Judge 3: Steven Holcomb Judge 4: Roger Hammer Judge 5: John Doe TRD PAP PBP CPD NPD H/L PAC Judge 1 2 37.10 -14.40 51.50 22.70 2/6 2.62 Judge 2 8 29.75 -63.15 92.90 -33.40 1/1 2.62 Judge 3 0 4.35 -27.25 31.60 -22.90 0/1 2.62 Judge 4 0 10.95 -17.80 28.75 -6.85 5/3 2.50 Judge 5 0 35.85 -12.85 48.70 23.00 0/3 2.25 ANALYSIS TERMS TAW - Total score if all judges agreed with Judge n. Award multiplied by 3, multiplied by Degree of Difficulty. RNK - Rank diver achieved using Judge n's scores only. DEV - Points deviation between Judge n's total and the panel's total. H/L - # of times Judge n was the lone high score or the lone low score. SUMMARY TERMS TRD - Total of rank deviations. PAP - Points above the panel. PBP - Points below the panel. CPD - Combined points deviation. Sum of the absolute values of PAP and PBP. NPD - Net points deviation. Arithmatic sum of PAP and PBP. H/L - Number of times Judge n was the lone high score or the lone low score during the event. PAC - Panel average correlation. Computed as follows: The difference between each judges award and the average of the non-deleted awards is calculated. If the difference is between 0 and 0.25 then 3 points are added. If the difference is between 0.26 and 0.50 then 2 points are added. If the difference is between 0.51 and 1.00 then 1 point is added. If the difference is greater than 1.00 then no points are added. The total points are then divided by the number of dives to determine an average. <-- Analysis performed on 5/1/2007 7:08:39 PM -->
The formulas used are specified at the end of the report. Looking at each diver you can see where each judge ranked them, which judges were high and which were low, etc. Basically you are looking for large variations in any formula. For example, judge 1 was the lone high judge twice and the lone low judge 6 times. If there were 50 divers in your event then that might now be significant but if there were only 10 or 12 then it might be very significant. All of the calculated numbers need to be looked at together. No one number is going to be useful by itself.

eDive™ User Guide Last Updated: May 20, 2010
© Copyright 2001-2010 Overly Nifty LLC. Printed in U.S.A. 67
Reports
1. Reports Browser Selecting this option allows you to run the reports for your events. Please see the section “Reports Browser” for more detailed information.
2. Registration Summary
Selecting this option gives you a summary sheet of all the event registrations for a meet. When prompted select the meet and press the “Go” button. A screen similar to the following will be presented to you.
The purpose of the screen is to give you something you can print out to track event registrations and payments. The columns displayed on the screen are customizable by selecting the “Show Columns” button. Just place a checkmark next to each column that you want displayed on the screen. This list includes a variety of information about each event registration. The information displayed is read-only so if you want to have a version that you can edit then highlight all of the rows, copy the rows to the clipboard and paste it into MS Excel. Fit Columns – this option will force the printed page to fit the entire width of the grid on the page so that no columns overlap to another page. Translate Colors – This option will force the grid to print in black and white. Repeat Headers – this option will print the column headers on each page. Print selected items only – if you have selected a specific set of rows then selecting this option will only print those selected rows. The “Print Preview” button will display a preview of the printed report. The “Print” button will print the grid directly to the printer. You will be prompted with the standard print options dialog before it is sent
to the printer. The button next to the “Print” button is the copy to clipboard button ( ). It allows you to copy the selected rows to the clipboard so that you can paste them into whatever application you choose. The columns of the grid can be grouped by simply dragging the column header up into the gray area labeled “Drag a column header here to group by that column” and dropping it. Multiple columns can be grouped in this manner. To ungroup a column just drag it out of the gray grouping area and drop it onto the grid. Any column can be sorted by clicking on its’ column header. Each time you click the column heading that column will be toggled between and ascending and a descending sort.
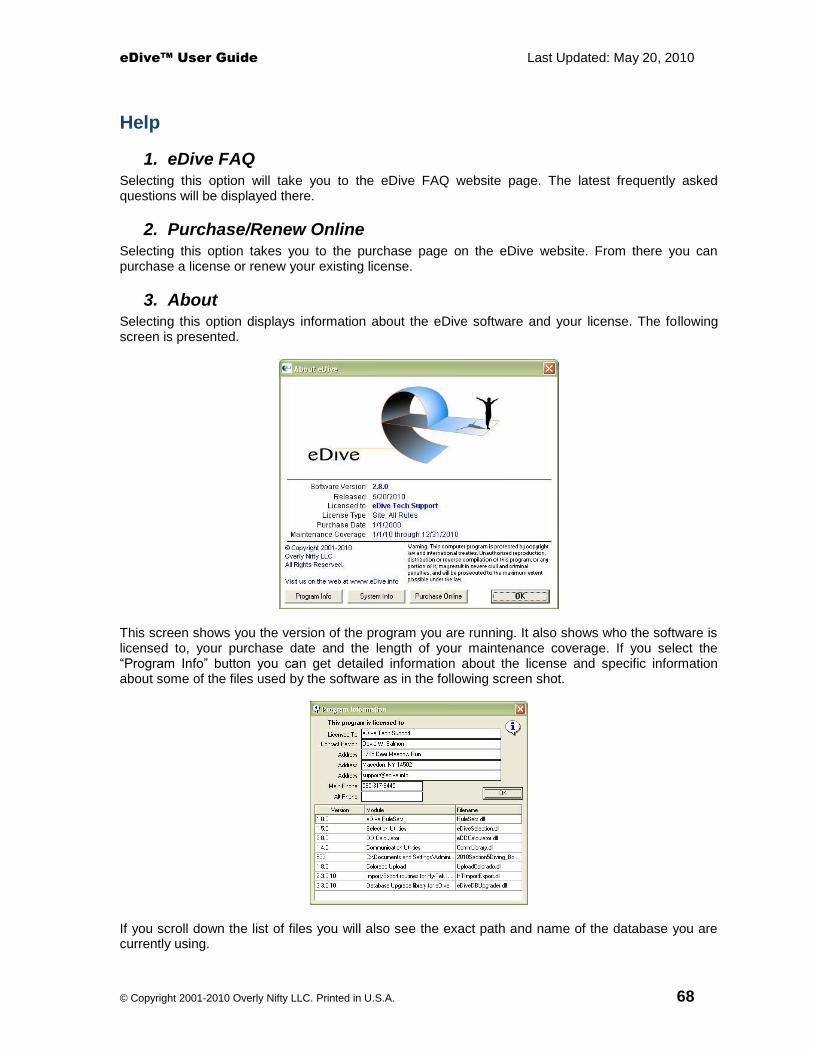
eDive™ User Guide Last Updated: May 20, 2010
© Copyright 2001-2010 Overly Nifty LLC. Printed in U.S.A. 68
Help
1. eDive FAQ
Selecting this option will take you to the eDive FAQ website page. The latest frequently asked questions will be displayed there.
2. Purchase/Renew Online
Selecting this option takes you to the purchase page on the eDive website. From there you can purchase a license or renew your existing license.
3. About Selecting this option displays information about the eDive software and your license. The following screen is presented.
This screen shows you the version of the program you are running. It also shows who the software is licensed to, your purchase date and the length of your maintenance coverage. If you select the “Program Info” button you can get detailed information about the license and specific information about some of the files used by the software as in the following screen shot.
If you scroll down the list of files you will also see the exact path and name of the database you are currently using.
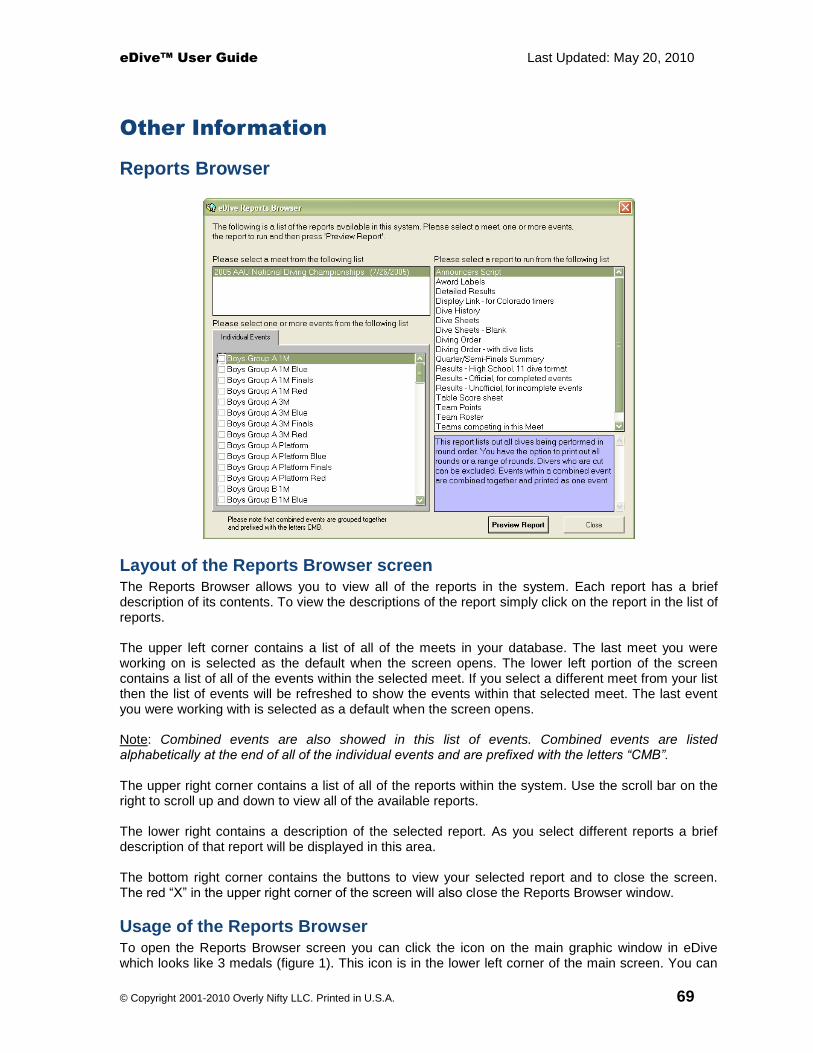
eDive™ User Guide Last Updated: May 20, 2010
© Copyright 2001-2010 Overly Nifty LLC. Printed in U.S.A. 69
Other Information
Reports Browser
Layout of the Reports Browser screen The Reports Browser allows you to view all of the reports in the system. Each report has a brief description of its contents. To view the descriptions of the report simply click on the report in the list of reports. The upper left corner contains a list of all of the meets in your database. The last meet you were working on is selected as the default when the screen opens. The lower left portion of the screen contains a list of all of the events within the selected meet. If you select a different meet from your list then the list of events will be refreshed to show the events within that selected meet. The last event you were working with is selected as a default when the screen opens. Note: Combined events are also showed in this list of events. Combined events are listed alphabetically at the end of all of the individual events and are prefixed with the letters “CMB”. The upper right corner contains a list of all of the reports within the system. Use the scroll bar on the right to scroll up and down to view all of the available reports.
The lower right contains a description of the selected report. As you select different reports a brief description of that report will be displayed in this area. The bottom right corner contains the buttons to view your selected report and to close the screen. The red “X” in the upper right corner of the screen will also close the Reports Browser window.
Usage of the Reports Browser To open the Reports Browser screen you can click the icon on the main graphic window in eDive which looks like 3 medals (figure 1). This icon is in the lower left corner of the main screen. You can

eDive™ User Guide Last Updated: May 20, 2010
© Copyright 2001-2010 Overly Nifty LLC. Printed in U.S.A. 70
also open the Reports Browser screen by clicking the icon in the toolbar (figure 2) or by selecting “Reports” from the main menu and then “Reports Browser” (figure 3).
Figure 1
Figure 2
Figure 3

eDive™ User Guide Last Updated: May 20, 2010
© Copyright 2001-2010 Overly Nifty LLC. Printed in U.S.A. 71
To view a report
1. Open the Reports Browser screen. 2. Select the meet which contains the events you want to report on. Once the meet is selected
the list of events will be refreshed to show the events in the meet you selected. 3. Next select the report to run. A brief description of that report will be displayed below the list
of reports. 4. Select one or more events from the list. To select an event you must place a checkmark in
the box to the left of the event name. Simply click on the little box to place a checkmark there. The report you run will include all of the events that have been checked. Some reports do not require that you select an event from the list. For reports that do not require an event to be selected the list of events is removed. Note: Combined events may be selected along with individual events. Some reports treat combined events differently than individual events. The description of each report will include an explanation of how combined events are treated by that report.
5. Press the “Preview Report” button to view the report.
Report Options Most of the reports in the system require additional information supplied by you in order to run. You will be prompted for these options, if applicable, after pressing the “Preview Report” button. Below is a list of each of the possible options that you may be prompted for when generating your report.
1. Print which rounds (figure 4) This option allows you to specify which rounds to include in the report. If you want all rounds for the event you selected to be printed then select “All Rounds” (the default). To specify which rounds to print please click on the “only print these rounds” option and enter the starting round and ending round to print.
Figure 4
2. Include Cut Divers (figure 5) This option allows you to include divers who have been cut in the report.. If you do not check this box then cut divers will not be included in the report.
Figure 5

eDive™ User Guide Last Updated: May 20, 2010
© Copyright 2001-2010 Overly Nifty LLC. Printed in U.S.A. 72
3. Visual Guidelines (figure 6) This option allows you to add a visual guideline to the report to make reading across the page easier. This option prints a dotted line every Nth diver. In the screen shot below a line will appear in the report after every other diver.
Figure 6
4. Selecting a diver (figure 7) This option allows you to specify a particular diver to include in the report.
Figure 7
5. Print/Hide all scores and totals (figure 8) For reports where judges awards and dive totals are shown this option will allow you to print or hide those scores. This is mainly used when printing dive sheets.
Figure 8
6. Sort the dive sheets by (figure 9) This option allows you to print the dive sheets in a sorted order. Just select the way you would like the dive sheets to be printed.
Figure 9

eDive™ User Guide Last Updated: May 20, 2010
© Copyright 2001-2010 Overly Nifty LLC. Printed in U.S.A. 73
7. Show the divers Grade in school (figure 10) This option allows you to include the divers grade in school on the report. This field is available on the diver information screen. Just check the box to include the divers grade on the report.
Figure 10
8. Show the group the diver belongs to (figure 11) This option allows you to include the Group field value from the diver information screen. The "Group" field can be used to group divers together. For example, if a state had 11 different sections then at our State championships you could enter Section 2, Section 5, etc. in the group field for each diver.
Figure 11
9. Show the divers age in the report (figure 12) This option allows you to include the divers age in the report. The divers’ age is calculated based on their date of birth. If no date of birth is supplied then their age cannot be calculated. You are also given the option of calculating and displaying their age as of December 31
st of the current year.
Figure 12
10. Sort the results by (figure 13) This option allows you to specify how to sort the results. You can choose to sort the results by final place or by diving order.
Figure 13
11. Quarter final rounds (figure 14) This option allows you to print the quarterfinal-semifinal report by specify which rounds comprise the quarterfinal rounds. Enter the last round number that makes up the quarterfinal rounds. Some events have a full list of dives but the first half of the dives make up the quarter finals and the remaining dives, after cuts, make up the semi-final rounds.
Figure 14
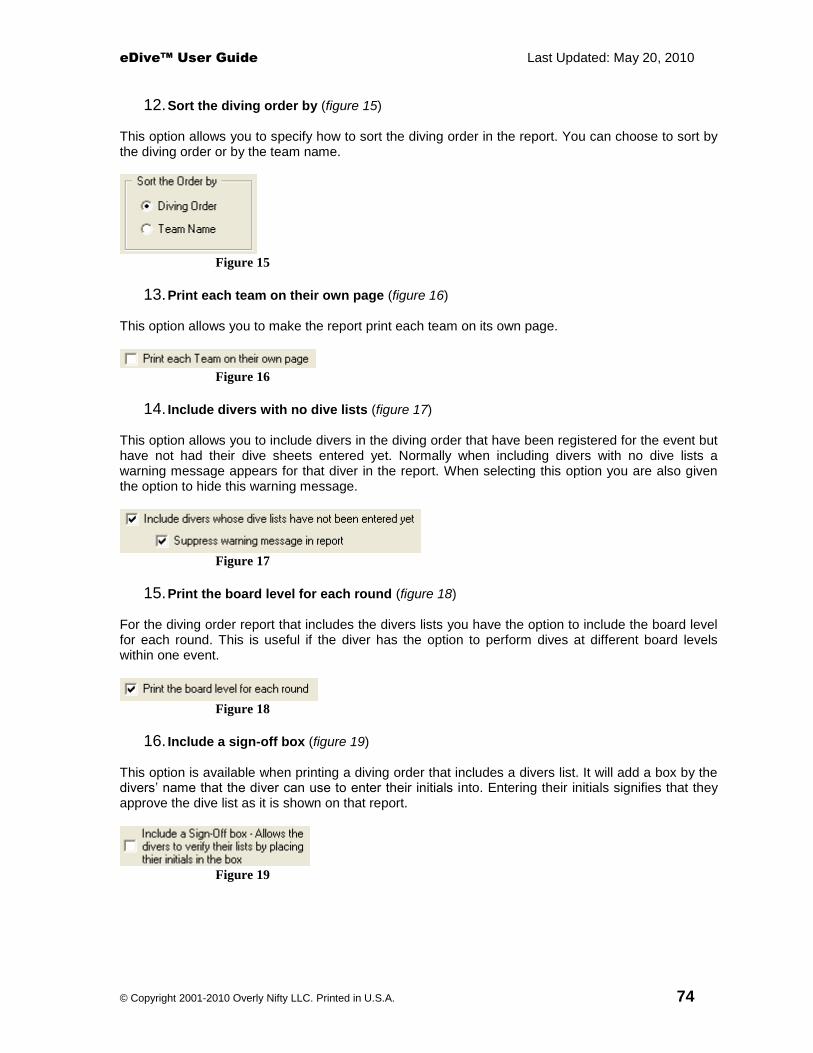
eDive™ User Guide Last Updated: May 20, 2010
© Copyright 2001-2010 Overly Nifty LLC. Printed in U.S.A. 74
12. Sort the diving order by (figure 15) This option allows you to specify how to sort the diving order in the report. You can choose to sort by the diving order or by the team name.
Figure 15
13. Print each team on their own page (figure 16) This option allows you to make the report print each team on its own page.
Figure 16
14. Include divers with no dive lists (figure 17) This option allows you to include divers in the diving order that have been registered for the event but have not had their dive sheets entered yet. Normally when including divers with no dive lists a warning message appears for that diver in the report. When selecting this option you are also given the option to hide this warning message.
Figure 17
15. Print the board level for each round (figure 18) For the diving order report that includes the divers lists you have the option to include the board level for each round. This is useful if the diver has the option to perform dives at different board levels within one event.
Figure 18
16. Include a sign-off box (figure 19) This option is available when printing a diving order that includes a divers list. It will add a box by the divers’ name that the diver can use to enter their initials into. Entering their initials signifies that they approve the dive list as it is shown on that report.
Figure 19
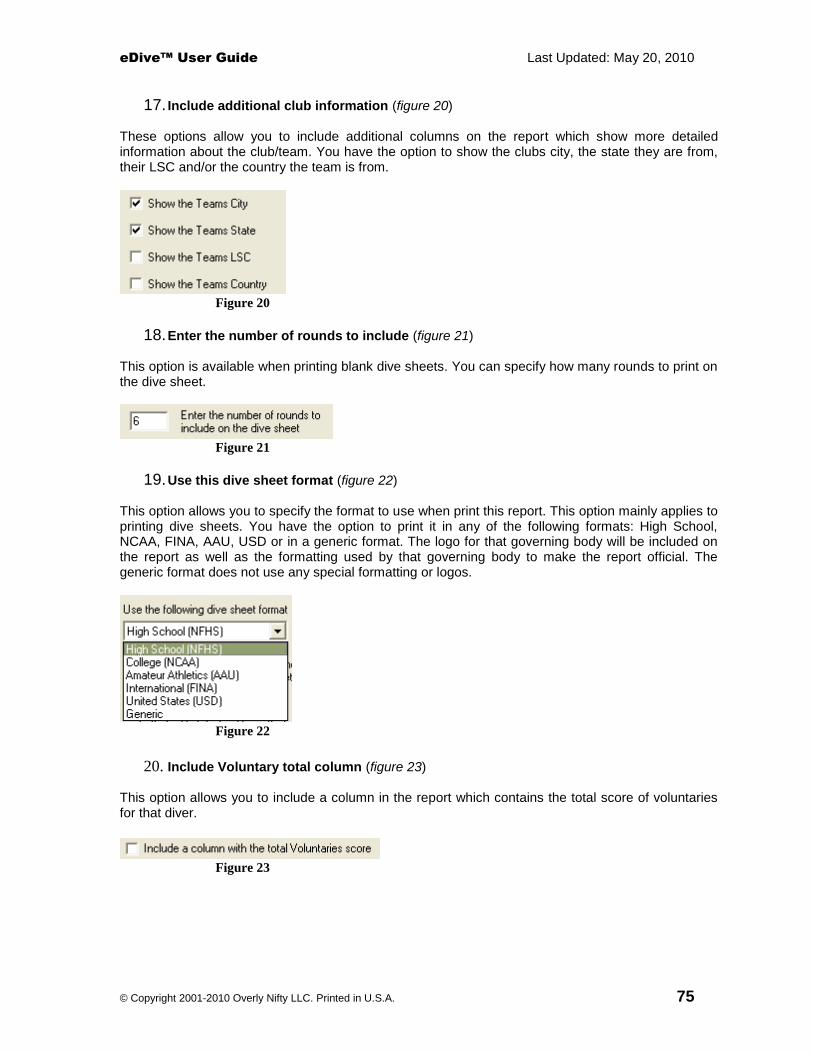
eDive™ User Guide Last Updated: May 20, 2010
© Copyright 2001-2010 Overly Nifty LLC. Printed in U.S.A. 75
17. Include additional club information (figure 20) These options allow you to include additional columns on the report which show more detailed information about the club/team. You have the option to show the clubs city, the state they are from, their LSC and/or the country the team is from.
Figure 20
18. Enter the number of rounds to include (figure 21) This option is available when printing blank dive sheets. You can specify how many rounds to print on the dive sheet.
Figure 21
19. Use this dive sheet format (figure 22) This option allows you to specify the format to use when print this report. This option mainly applies to printing dive sheets. You have the option to print it in any of the following formats: High School, NCAA, FINA, AAU, USD or in a generic format. The logo for that governing body will be included on the report as well as the formatting used by that governing body to make the report official. The generic format does not use any special formatting or logos.
Figure 22
20. Include Voluntary total column (figure 23) This option allows you to include a column in the report which contains the total score of voluntaries for that diver.
Figure 23

eDive™ User Guide Last Updated: May 20, 2010
© Copyright 2001-2010 Overly Nifty LLC. Printed in U.S.A. 76
Available Reports
The following reports are available in the system. The additional information needed to run each report is explained below as well as how each report treats combined events.
1. Announcers Script (Appendix A, report 1) The announcers script report allows you to print a list of all of the divers competing in the selected event by round, in the order the dives will be performed. It allows an announcer to go through each round of the event and read off the current diver and the diver on deck. Each round is printed on its’ own page. You can also specify which rounds to print. Combined events are treated as an entire event. So printing an announcers script for a combined event will include all divers in all events that are part of that combined event.
2. Awards Labels (Appendix A, report 2) The awards labels report allows you to print awards labels for any completed event. The labels print to an avery #5160 (3x10) sheet of labels. The labels are printed down then across. If multiple events are selected they will be printed one after the other. You can print labels for first place up through the place you specify. Combined events are not printed as an entire event. Each individual event is printed by itself.
3. Detailed Results (Appendix A, report 3) The detailed results report lists out all divers within an event. It includes every round for each diver including all judge awards, dive totals and rank each round. The report is sorted by final place. It can be run for completed or incomplete events. Combined events are not printed as an entire event. Each individual event is printed by itself.
4. Display Link (Appendix A, report 4) This report creates a text file that contains divers names that are in the selected event. This file is used for Colorado timing systems. The file created is opened in your default text file editor. Combined events are treated as an entire event.
5. Dive History (Appendix A, report 5) This report lists out the history of dives for a specific diver. For the diver selected the entire database is scanned looking for dives performed. For each dive performed a chart is displayed showing the dive total achieved for that dive. The lowest, highest and average dive total is displayed per dive.
6. Dive Sheets (Appendix A, report 6 to 8) This report will print dive sheets for the selected events. There are many options available for this report. You can sort by team, diver, order or final place. You can include scores and totals for completed events or hide the scores and totals so that you have a completed dive sheet with a divers list for every diver. Combined events are not printed as an entire event. Each individual event is printed separately.

eDive™ User Guide Last Updated: May 20, 2010
© Copyright 2001-2010 Overly Nifty LLC. Printed in U.S.A. 77
7. Dive Sheets Blank (Appendix A, report 9 to 12) This report allows you to print blank dive sheets with a user-specified number of rounds and using the formatting for any governing body. The selection of an event is not necessary in order to run this report.
8. Diving Order (Appendix A, report 13) This report lists the diving order for an event. Combined events are treated as an entire event.
9. Diving Order – with dive lists (Appendix A, report 14) This report lists the diving order for an event and includes each divers list of dives. You also have the option of including a box next to each diver’s name that the divers can use to place their initials in. This signifies that they have approved the list of dives as printed on the report. Combined events are treated as an entire event.
10. Quarter/Semi-Finals Summary (Appendix A, report 15) This report shows the quarter final and semi-final totals for completed events. If the dives for one event make up the quarter-finals and semi-finals then use this report to show those totals. You must specify which rounds make up the quarter-final rounds. The remaining rounds will be totaled as the semi-final rounds. Combined events are not printed as an entire event. Each individual event is printed separately.
11. Results - High School, 11 dive format (Appendix A, report 16) This report shows the results for a High School 11 dive event. It formats the scores in 3 columns showing prelim, semi and final totals. This report can only be run for High School 11 dive events. Combined events are not printed as an entire event. Each individual event is printed separately.
12. Results – Official, for completed events (Appendix A, report 17) This report will print the official results for events that have been completed. This report will only include events that have been completed. Final score, place and team points are included in this report. You have the option to sort the results by final place or by diving order. Combined events are not printed as an entire event. Each individual event is printed separately.
13. Results – Unofficial, for incomplete events (Appendix A, report 18) This report is primarily used to print the results for events that have not been completed yet. Team points are not included in this report. Cut and exhibition divers are placed in the order where their score would normally put them. Combined events are treated as an entire event.
14. Table Score Sheet (Appendix A, report 19) This report lists out all dives being performed in round order with boxes to manually enter scores into for the manual scorer at the table. You have the option to print out all rounds or a range of rounds. Divers who are cut can be excluded.

eDive™ User Guide Last Updated: May 20, 2010
© Copyright 2001-2010 Overly Nifty LLC. Printed in U.S.A. 78
Combined events are treated as an entire event.
15. Team Points (Appendix A, report 20) This report shows the points awarded per team. Each page contains a summary per event and the last page contains the total team points earned per team for the entire meet. Only the events you selected will be included in the report. All event results are used when calculating total team points for the meet. Combined events are not printed as an entire event. Each individual event is printed separately.
16. Team Roster (Appendix A, report 21) This report lists all teams in the database and all of the divers registered under those teams. The coaches for each team will be listed first followed by all of the divers for that team.
17. Teams competing in this Meet (Appendix A, report 22) This report lists all of the teams that are participating in the selected meet.
18. Voluntary Totals (Appendix A, report 23) This report shows the total score for only the voluntaries used in an event. Combined events are treated as an entire event.

eDive™ User Guide Last Updated: May 20, 2010
© Copyright 2001-2010 Overly Nifty LLC. Printed in U.S.A. 79
How do I … ?
This section gives common scenarios of reports that you may need and how to generate them..
1. I want to give a coach a summary of their divers’ lists for the upcoming event so that he can validate that what was entered into the computer is accurate.
Report: Select the “Diving order – with dive lists” report. Select sort by team and check the box “Print each team on their own page”. Also check the box “Include a sign-off box” so that the coach or diver can initial each divers list.
2. I want to print a diving order to post on the wall that includes each divers list of dives.
Report: Select the “Diving order – with dive lists” report.
3. I need to print a list for the announcer to read from during the event so that we don’t have to pass the actual dive sheets around the table. I also only want to print the rounds that are part of the next set of cuts.
Report: Select the “Announcers Script” report. On the options screen select “only print these rounds” and enter the range of rounds to print. For example, to only print rounds 6 through 8 you would enter 6 and 8 in the from and to round boxes respectively. To make it easier for the announcer to read across the page of text you can also include a visual guideline in the printout. Visual guidelines can be printed after every 2
nd diver or after every 3
rd, 4
th or 5
th
diver. A dotted line will appear underneath the divers name as a guideline.
4. I need to print labels for the awards ceremony. Report: Select the “Awards Labels” report. Labels are printed down then across on the page of Avery #5160 labels.
5. I just completed a combined event and I want to print the official results for all of the individual events that were part of that combined event. Do I have to open the reports browser and select each of the individual events and then run the official results report? Is there a faster way to do that? Report: Select the “Official Results” report. In the list of events select only the combined event. Now run the report. The combined event will be split back up into individual events when printing official results so that each individual event will be printed on its own page.
6. I created a combined event and now I want to print a diving order for the combined event. Report: Select the “Diving Order” report (either the normal diving order report or the one that includes the dive lists – which ever you prefer) and select the combined event from the list of events. Run the report.
7. I have added official FINA events to my meet but the meet is being run as an AAU meet. How do I get the dive sheets to print using the AAU format instead of the FINA format?
Report: Select the “Dive Sheets” report and the events you want to print the sheets for. On the options screen select the dropdown under “Use the following dive sheet format”. Select “Amateur Athletics (AAU)”. Now when you print the report the dive sheets will be formatted for the AAU instead of FINA.
8. I am using one of the FINA age group events for my meet because we have a non-standard
event format for our High School league. When I print dive sheets I want it to print using the NFHS formatting.

eDive™ User Guide Last Updated: May 20, 2010
© Copyright 2001-2010 Overly Nifty LLC. Printed in U.S.A. 80
Report: Select the “Dive Sheets” report and the events you want to print the sheets for. On the options screen select the dropdown under “Use the following dive sheet format”. Select “High School (NFHS)”. Now when you print the report the dive sheets will be formatted for NFHS instead of FINA.
9. I want to print blank dive sheets with 5 rounds for our High School formatted events but I don’t want any special formatting to be applied to the dive sheet. I also don’t want any logos printed on the sheet. Report: Select the “Dive Sheets - Blank” report. You do not need to select any events for this report. On the options screen select the dropdown under “Use the following dive sheet format”. Select “Generic” and enter 5 for the number of rounds to print.
10. I just finished our high school championships and I want to print results but I would like to include each divers total after each round of cuts. The official results report does not do that. Report: Select the “Results – High School, 11 dive format” report.
11. I need something for our backup scorer at the table to write down judges awards on. Do you
have a report that shows each divers dive, by round, that has spaces to write the judges awards into?
Report: Select the “Table Score Sheet” report.
12. We make cuts after round 5 and after round 8. I need a sheet that the table workers can write down judges awards onto but only for the rounds that we are competing in next. I don’t want to print the first 5 rounds again because we are done with them and only really need rounds 6 through 8. Report: Select the “Table Score Sheet” report. On the options screen select the option “only print these rounds” and enter the range of rounds to print. To only print rounds 6 through 8 you would enter 6 and 8 into the from and to fields respectively.
13. We just completed the days events and would like to print the current team standings up through our last event today. Report: Select the “Team Points” report. Select the events you competed in today and run the report. Each of the events that you selected will be printed on their own pages. The last page of the report will contain a summary by team, of all completed events for the entire meet.
14. I need a list of all of the teams competing in this meet and the states they are from. Report: Select the “Teams competing in this Meet” report. Make sure the “state” option is checked on the options screen and run the report.
15. We just completed our prelims event and I want to print the results. I would also like to know what the total voluntary score for each diver in that event. Report: Select the report “Results – Official, for completed events”. On the options screen make sure the box is checked for “Include a column with the total voluntaries score”.
16. Our state is broken up into different sections. How do I show what section each diver is from and include that information on the reports? Solution: On the diver information screen there is a field called “Group”. In that group field enter the section that diver is from. For example, “Sec 5”. Now when you run your reports

eDive™ User Guide Last Updated: May 20, 2010
© Copyright 2001-2010 Overly Nifty LLC. Printed in U.S.A. 81
there are some reports that give you the option of including the divers group when printing. Please make sure that box is checked.
17. We just finished a combined event and I want to run a report that shows how each diver ranked in the combined event as a whole. The official results report prints each event in the combined event as a separate event. For example, how do I print the results to show rankings 1 – 24 instead of rankings 1-10 for one event and 1-14 for the other event? Report: Select the report “Results – Unofficial, for incomplete events” and select your combined event from the list of events. The divers in the report will be listed and ranked as if that combined event was one complete individual event.

eDive™ User Guide Last Updated: May 20, 2010
© Copyright 2001-2010 Overly Nifty LLC. Printed in U.S.A. 82
Report Examples
Announcers Script
Report 1

eDive™ User Guide Last Updated: May 20, 2010
© Copyright 2001-2010 Overly Nifty LLC. Printed in U.S.A. 83
Awards Labels
Report 2
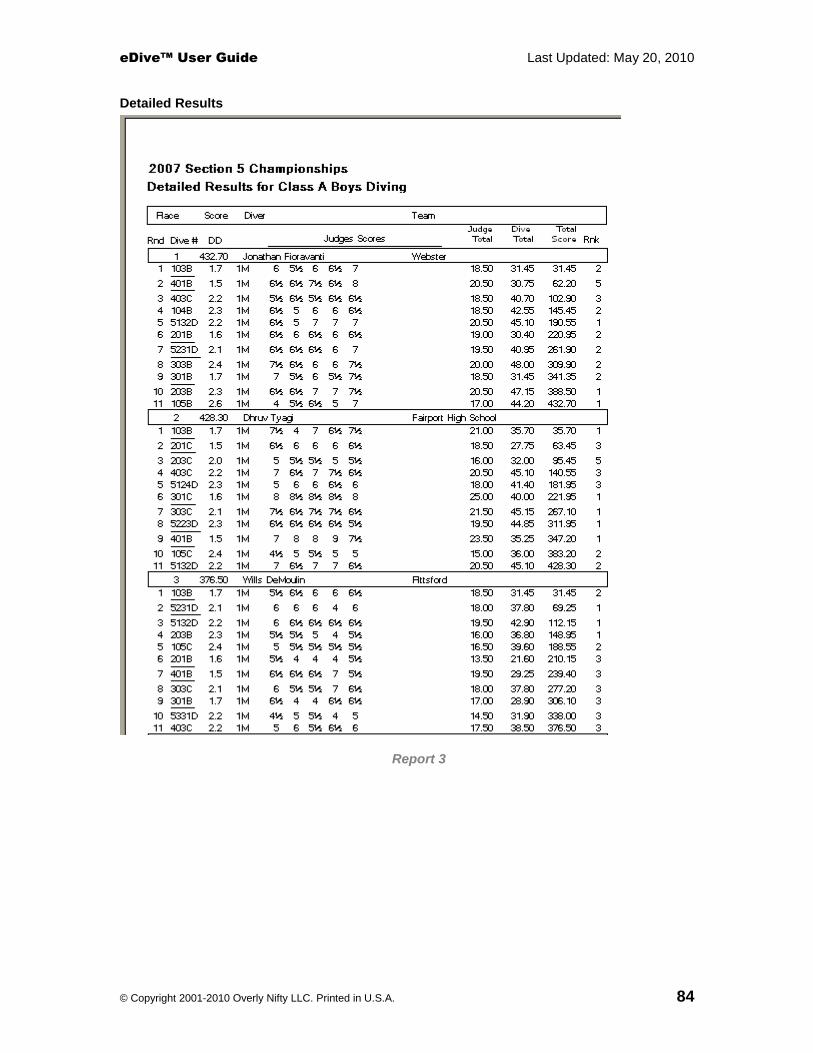
eDive™ User Guide Last Updated: May 20, 2010
© Copyright 2001-2010 Overly Nifty LLC. Printed in U.S.A. 84
Detailed Results
Report 3

eDive™ User Guide Last Updated: May 20, 2010
© Copyright 2001-2010 Overly Nifty LLC. Printed in U.S.A. 85
Display Link
Report 4

eDive™ User Guide Last Updated: May 20, 2010
© Copyright 2001-2010 Overly Nifty LLC. Printed in U.S.A. 86
Dive History
Report 5
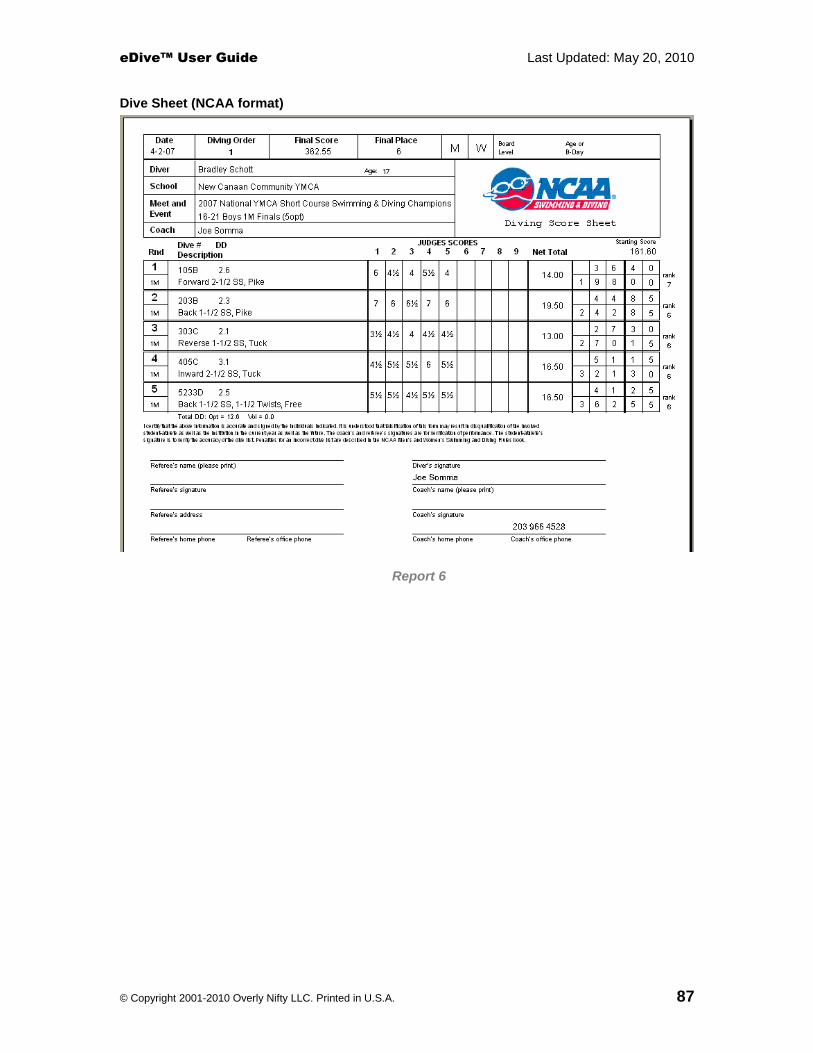
eDive™ User Guide Last Updated: May 20, 2010
© Copyright 2001-2010 Overly Nifty LLC. Printed in U.S.A. 87
Dive Sheet (NCAA format)
Report 6

eDive™ User Guide Last Updated: May 20, 2010
© Copyright 2001-2010 Overly Nifty LLC. Printed in U.S.A. 88
Dive Sheet (High School format with scores)
Report 7

eDive™ User Guide Last Updated: May 20, 2010
© Copyright 2001-2010 Overly Nifty LLC. Printed in U.S.A. 89
Dive Sheet (High School format without scores)
Report 8

eDive™ User Guide Last Updated: May 20, 2010
© Copyright 2001-2010 Overly Nifty LLC. Printed in U.S.A. 90
Blank Dive Sheet (High School 6 dives)
Report 9

eDive™ User Guide Last Updated: May 20, 2010
© Copyright 2001-2010 Overly Nifty LLC. Printed in U.S.A. 91
Blank Dive Sheet (AAU Age group)
Report 10

eDive™ User Guide Last Updated: May 20, 2010
© Copyright 2001-2010 Overly Nifty LLC. Printed in U.S.A. 92
Blank Dive Sheet (USD Age group)
Report 11

eDive™ User Guide Last Updated: May 20, 2010
© Copyright 2001-2010 Overly Nifty LLC. Printed in U.S.A. 93
Blank Dive Sheet (NCAA)
Report 12

eDive™ User Guide Last Updated: May 20, 2010
© Copyright 2001-2010 Overly Nifty LLC. Printed in U.S.A. 94
Diving Order
Report 13

eDive™ User Guide Last Updated: May 20, 2010
© Copyright 2001-2010 Overly Nifty LLC. Printed in U.S.A. 95
Diving Order – with Dive Lists
Report 14
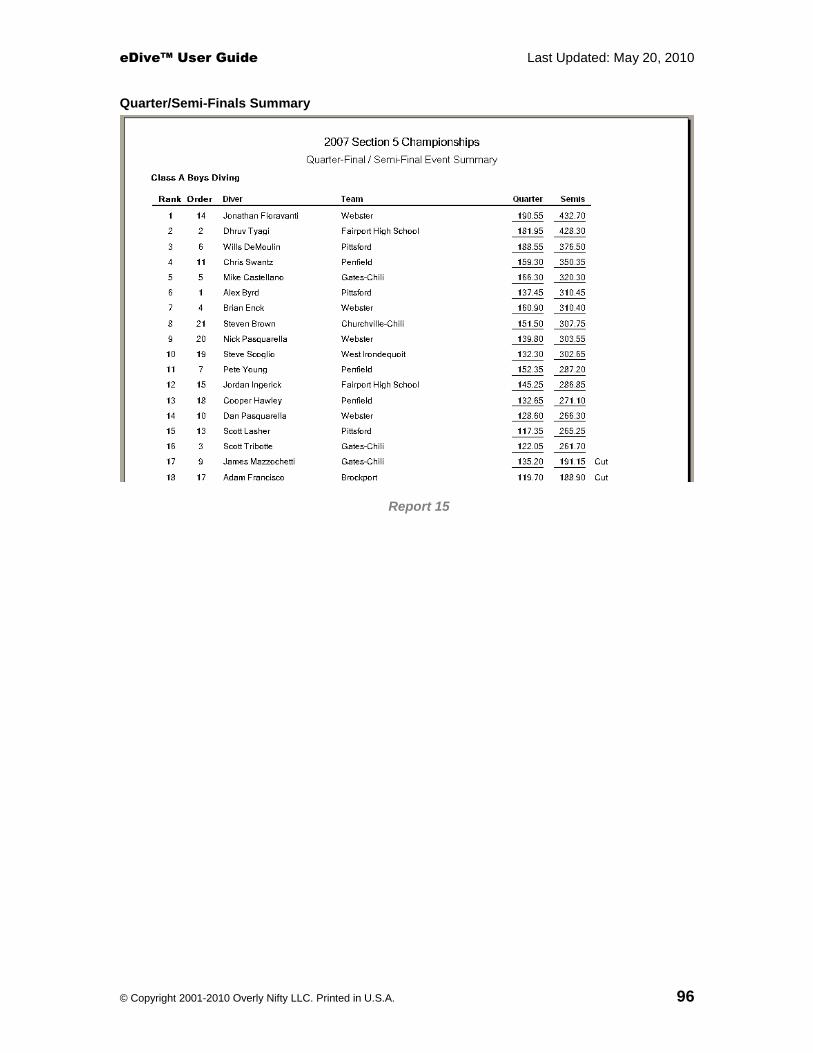
eDive™ User Guide Last Updated: May 20, 2010
© Copyright 2001-2010 Overly Nifty LLC. Printed in U.S.A. 96
Quarter/Semi-Finals Summary
Report 15

eDive™ User Guide Last Updated: May 20, 2010
© Copyright 2001-2010 Overly Nifty LLC. Printed in U.S.A. 97
Results - High School, 11 dive format
Report 16

eDive™ User Guide Last Updated: May 20, 2010
© Copyright 2001-2010 Overly Nifty LLC. Printed in U.S.A. 98
Results – Official, for completed events
Report 17
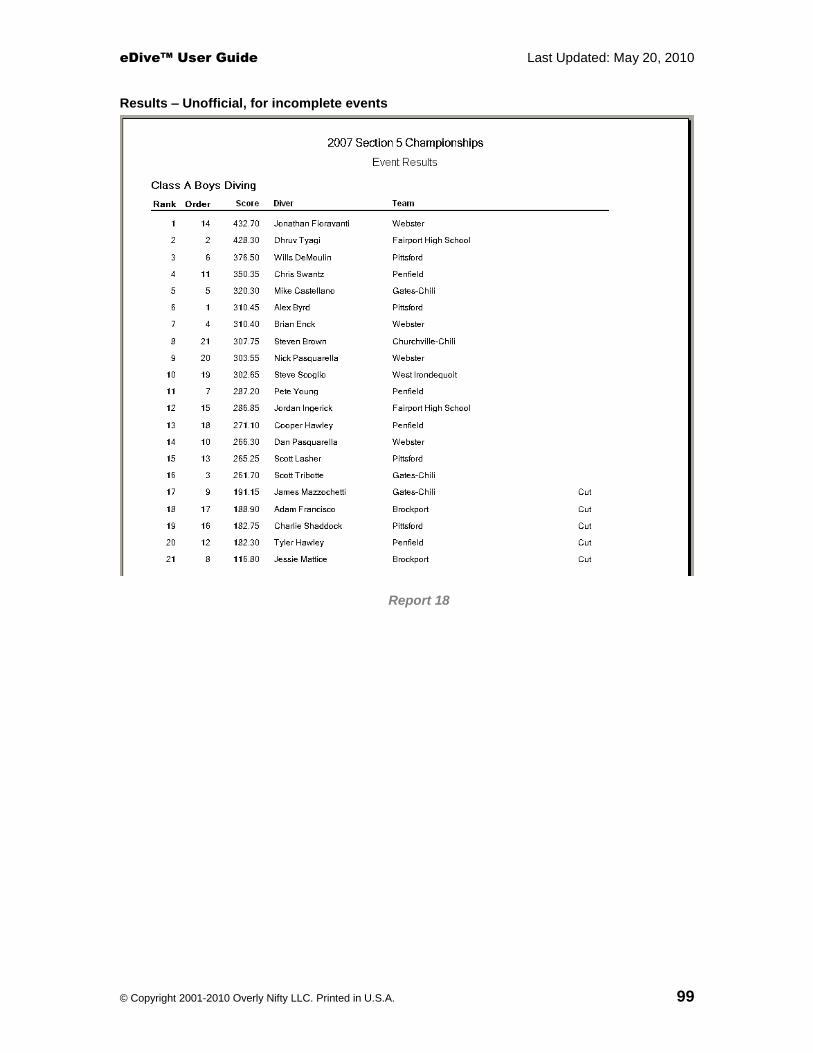
eDive™ User Guide Last Updated: May 20, 2010
© Copyright 2001-2010 Overly Nifty LLC. Printed in U.S.A. 99
Results – Unofficial, for incomplete events
Report 18

eDive™ User Guide Last Updated: May 20, 2010
© Copyright 2001-2010 Overly Nifty LLC. Printed in U.S.A. 100
Table Score Sheet
Report 19
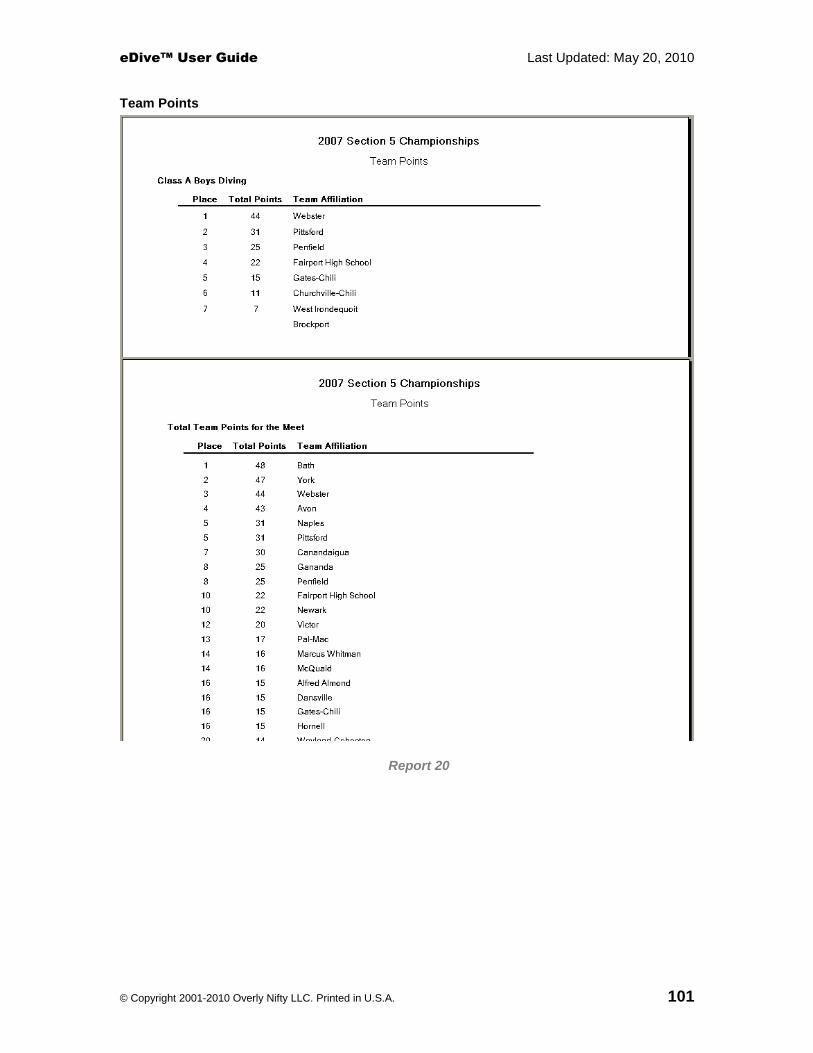
eDive™ User Guide Last Updated: May 20, 2010
© Copyright 2001-2010 Overly Nifty LLC. Printed in U.S.A. 101
Team Points
Report 20
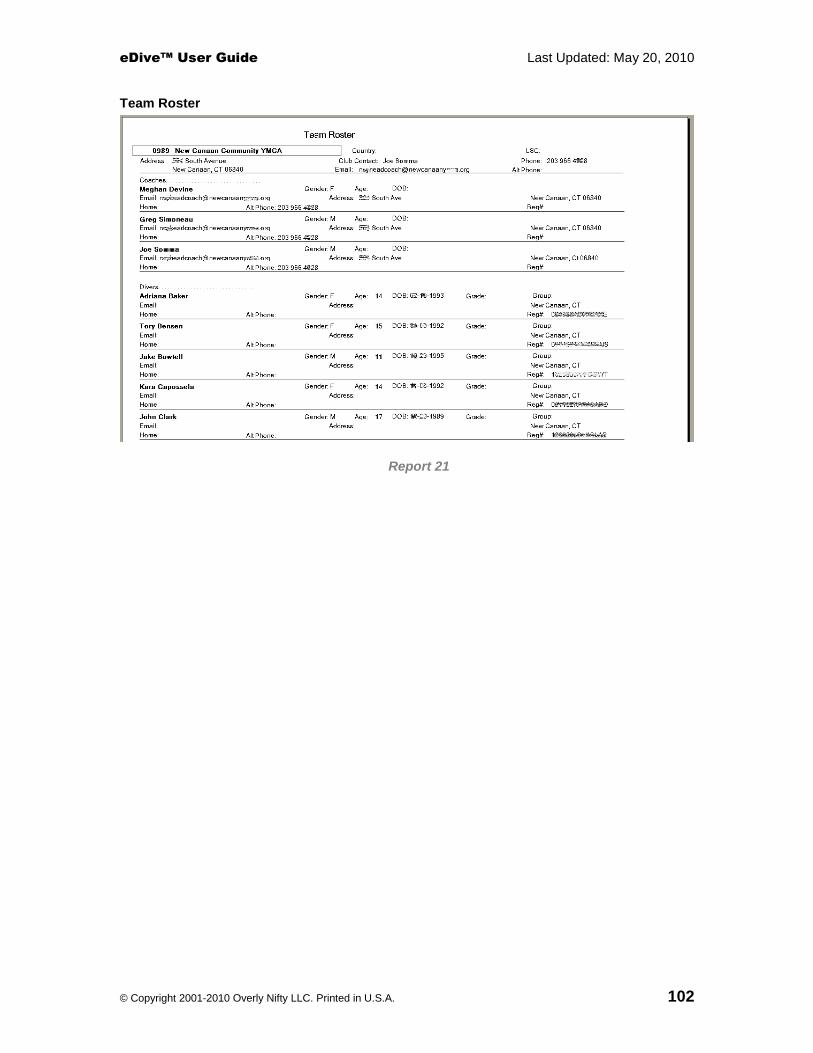
eDive™ User Guide Last Updated: May 20, 2010
© Copyright 2001-2010 Overly Nifty LLC. Printed in U.S.A. 102
Team Roster
Report 21

eDive™ User Guide Last Updated: May 20, 2010
© Copyright 2001-2010 Overly Nifty LLC. Printed in U.S.A. 103
Teams Competing in this Meet
Report 22

eDive™ User Guide Last Updated: May 20, 2010
© Copyright 2001-2010 Overly Nifty LLC. Printed in U.S.A. 104
Voluntary Totals
Report 23

eDive™ User Guide Last Updated: May 20, 2010
© Copyright 2001-2010 Overly Nifty LLC. Printed in U.S.A. 105
Connecting to your Daktronics Omnisport 2000 To connect your eDive computer to a Daktronics Omnisport 2000 timer you will need a standard 9-pin serial cable that you can get at any electronics store. Depending on what you want to do you will either plug one end of the cable into the RTD port on the timer or the RESULTS port on the timer. The other end of the cable gets plugged into your computers COM port. If you have a physical serial plug on your computer then plug the cable into that. If you only have USB ports then you will need a USB to Serial adapter cable. This is the only physical connection you need to make. If you want to upload an eDive event into the timer then you will need one end of your serial cable plugged into the RTD port on the timer. If you are ready to run your event and want to receive scores from the timer into eDive then one end of your cable must be plugged into the RESULTS port on the timer. When you are uploading an event to the timer or if you want to receive scores from the timer you will have to specify the COM port to use on your computer. This COM port is usually the first COM port listed in the dropdown provided on the screen where you are establishing your connection. To check which COM port to use please follow these steps.
Select Start->Control Panel. Double-click on the System icon. If you don't see it then click the "Switch to classic view" link in the upper left corner of the screen. Once the System applet is open click on the “Hardware” tab and press the “Device Manager” button. Scroll down to the COM ports line and click the plus sign next to it to open it up. You should see your serial port listed there with a COM port number next to it. That is the port you want to use. If you are using a USB to Serial adapter cable then this COM port number may change each time you plug the cable into your computer.
Connecting to your Colorado System To connect your eDive computer to a Colorado timer you will need a standard 9-pin serial cable that you can get at any electronics store. One end of the cable gets plugged into the back of the timer in the port labeled “COM 1”. The other end of the cable gets plugged into your computers COM port. If you have a physical serial plug on your computer then plug the cable into that. If you only have USB ports then you will need a USB to Serial adapter cable. This is the only physical connection you need to make. When you are uploading an event to the timer or if you want to receive scores from the timer you will have to specify the COM port to use on your computer. This COM port is usually the first COM port listed in the dropdown provided on the screen where you are establishing your connection. To check which COM port to use please follow these steps.
Select Start->Control Panel. Double-click on the System icon. If you don't see it then click the "Switch to classic view" link in the upper left corner of the screen. Once the System applet is open click on the “Hardware” tab and press the “Device Manager” button. Scroll down to the COM ports line and click the plus sign next to it to open it up. You should see your serial port listed there with a COM port number next to it. That is the port you want to use. If you are using a USB to Serial adapter cable then this COM port number may change each time you plug the cable into your computer.
Once connected to the Colorado you will automatically receive scores from the timer as soon as they are all received into the timer. If you do not receive the scores please see the section “Troubleshooting your COM port connection”.

eDive™ User Guide Last Updated: May 20, 2010
© Copyright 2001-2010 Overly Nifty LLC. Printed in U.S.A. 106
Uploading an event into the Colorado System 5 The process to upload an event from eDive to the Colorado System 5 timer is fairly simple. The basic steps are outlined below.
1. Connect a standard 9-pin serial cable between your computer and the timers “COM 1” port. The timers “COM 1” port is clearly labeled on the back of the timer.
2. Open eDive and select Tools->Upload to Colorado. The following screen will be presented to you.
3. Select the meet and event to upload from the dropdown lists provided. 4. Select the COM port to use. Please follow these steps to identify which COM port you should
use. Select Start->Control Panel. Double-click on the System icon. If you don't see it then click the "Switch to classic view" link in the upper left corner of the screen. Once the System applet is open click on the “Hardware” tab and press the “Device Manager” button. Scroll down to the COM ports line and click the plus sign next to it to open it up. You should see your serial port listed there with a COM port number next to it. That is the port you want to use. If you are using a USB to Serial adapter cable then this COM port number may change each time you plug the cable into your computer.
5. Press the “Validate” button to validate that your event is set up correctly and is ready to be uploaded. If there are any issues with your event (i.e. diving order is not set, etc.) a message will be displayed detailing the problems. Once validated the Transmit button will become enabled as in the screen shot below.

eDive™ User Guide Last Updated: May 20, 2010
© Copyright 2001-2010 Overly Nifty LLC. Printed in U.S.A. 107
6. On the system 5 timer go into Diving mode 7. Go to the “Stored Data” menu item in the timer. The Colorado help file explains how to
navigate to this menu option. 8. On the timer press the “Import Data” button and THEN press the “Transmit” button in eDive. It
is important that you press the Colorado’s Import button and THEN press the eDive Transmit button. From the time you press the Import button on the timer you have about 3-5 seconds to press the Transmit button in eDive. If you wait too long the timer will time out and display an error message.
The transmit process only takes 2-5 seconds too upload your event. When it is done you can press the Next Diver button on the timer and you should see your first diver. Save the event in the timer. If the timer had any problems receiving the data it will display a generic error message. Please check your settings and connection and try again. You can also check the section “Troubleshooting your COM port connection” for suggestions on fixing the issues. Please also note that some early versions of the System 5 timer required the use of a null modem serial cable. If you have tried everything you can to get the connection to work and it still does not work, then add a null modem adapter to your serial line (or use a null modem cable) and try again. These adapters can be found at any electronics store for about $10.

eDive™ User Guide Last Updated: May 20, 2010
© Copyright 2001-2010 Overly Nifty LLC. Printed in U.S.A. 108
Uploading an event into the Colorado System 6 These steps outline the process for uploading an event from eDive into a Colorado System 6 timer. This process works for a Colorado 6 timer with a firmware version of 1.32 and a software/sport loader version of 1.110. Steps: (These steps take you thru creating a new meet but you could just as well select an existing meet)
1. Power on the CTS 6 if it is not already on 2. Enter "Diving" from the main CTS menu. This should leave you on the "Choose Meet" screen. 3. Press the "Down" button to get to an empty slot 4. Enter the name of the meet as listed in eDive and press the "Enter" key to save the new
meet. You will be left on the "Choose Event" screen. 5. Press "Quit" 6. Press "Import/Export" on the main screen. You should now be on the screen where you see
the "Import Event" option. 7. Press the arrow on the CTS to select the meet that you want to import the event into. This is
important ... make sure the meet gets highlighted!! 8. Plug the serial cable into your computer. It is important that the cable be plugged in before
you upload into the timer. Before opening the "Upload To Colorado" screen in eDive or the run event screen in eDive, make sure your cables are plugged in.
9. Plug the end of the cable into the CTS 6 timers COM 1 port. It must be in the COM 1 port. 10. Start eDive 11. In eDive select “Tools/Upload to Colorado”. Select the meet and event you want to upload.
Verify the event by clicking the verify button. 12. The first COM port listed on this screen should be the correct COM port to use. If you know it
should be different then select the correct COM port. You can verify what COM port has been assigned in your computer by Windows by checking Device Manager.
13. Press the "Import Event" button on the CTS timer 14. Select the event type (1 Meter, 3 Meter, Platform, etc…). 15. Press the "Transmit" button in eDive. After it is done transmitting eDive should display a
message letting you know it is done. Click OK to close the message. The CTS timer will give you no feedback that anything happened.
16. In the timer select “Edit Event”. 17. Select “Edit Sessions”. 18. Change the # of judges scoring if needed. 19. Press “Quit”. 20. Press “Quit” again. 21. Press the “Connect To Timing System” button in the eDive software on the Run Event
screen. 22. Select “Run Event” in the timer.
*To display the diver’s name on the scoreboard, open the “Diving” menu in Display Link and enter the names in the dive order listed in eDive. There is an eDive report called DisplayLink which will list all of the names of the divers in an event.
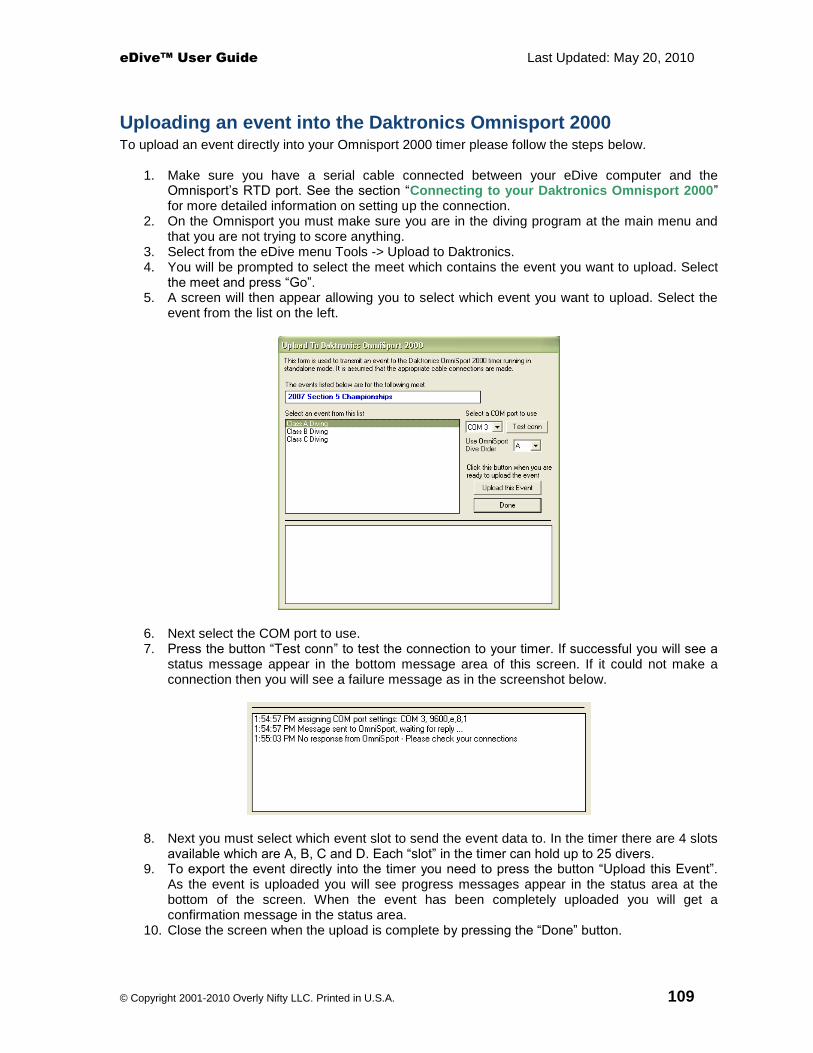
eDive™ User Guide Last Updated: May 20, 2010
© Copyright 2001-2010 Overly Nifty LLC. Printed in U.S.A. 109
Uploading an event into the Daktronics Omnisport 2000 To upload an event directly into your Omnisport 2000 timer please follow the steps below.
1. Make sure you have a serial cable connected between your eDive computer and the Omnisport’s RTD port. See the section “Connecting to your Daktronics Omnisport 2000” for more detailed information on setting up the connection.
2. On the Omnisport you must make sure you are in the diving program at the main menu and that you are not trying to score anything.
3. Select from the eDive menu Tools -> Upload to Daktronics. 4. You will be prompted to select the meet which contains the event you want to upload. Select
the meet and press “Go”. 5. A screen will then appear allowing you to select which event you want to upload. Select the
event from the list on the left.
6. Next select the COM port to use. 7. Press the button “Test conn” to test the connection to your timer. If successful you will see a
status message appear in the bottom message area of this screen. If it could not make a connection then you will see a failure message as in the screenshot below.
8. Next you must select which event slot to send the event data to. In the timer there are 4 slots available which are A, B, C and D. Each “slot” in the timer can hold up to 25 divers.
9. To export the event directly into the timer you need to press the button “Upload this Event”. As the event is uploaded you will see progress messages appear in the status area at the bottom of the screen. When the event has been completely uploaded you will get a confirmation message in the status area.
10. Close the screen when the upload is complete by pressing the “Done” button.

eDive™ User Guide Last Updated: May 20, 2010
© Copyright 2001-2010 Overly Nifty LLC. Printed in U.S.A. 110
Uploading an event into Daktronics Pro Diving software Selecting this option allows you to create a data file of your event that can be imported into the Daktronics Pro Diving software. The following steps outline this process.
1. Select “Daktronics Pro Diving Data file” from the File/Export menu
2. Select the meet that contains the event you want to export and click “GO”.
3. Select the event from the list of events.
4. You will also need to specify the number of rounds for this event, the sex and the board level
from the fields on the right side of the screen. If you are running a combined event where the number of rounds is different in each event, just enter the number of rounds for the event that has the most rounds. Ex) if you are combining a 6 dive and 8 dive event then you would enter an 8 for the number of rounds.

eDive™ User Guide Last Updated: May 20, 2010
© Copyright 2001-2010 Overly Nifty LLC. Printed in U.S.A. 111
5. In the field at the bottom please specify the name and location of the file to save the exported data to. To select a location click on the “…” button to the right of the field. The Pro software will expect a filename that ends with an extension of “xml”. The filename itself can be any name … like the name of the event for example … “c:\program files\mens1meter.xml”.
6. After filling in the appropriate information please select the “Export Data to File” button. When
the export is finished this screen will close. 7. You are done. The xml file you created needs to be taken to the computer running the Pro
software. Most people use an USB thumb drive to transfer the file. Please open the Pro software and import this file.

eDive™ User Guide Last Updated: May 20, 2010
© Copyright 2001-2010 Overly Nifty LLC. Printed in U.S.A. 112
Dive Sheet Status Icon Definitions The meanings of the dive sheet status icons are defined below. These icons appear anywhere that a dive sheet can be referenced.
- This dive sheet is valid.
- This dive sheet is invalid. It is either missing dives or it does not match the rules for that event.
- There is no dive sheet. The dive sheet is missing.
Using the Selection Screen The purpose of the selection screen is to allow you the ability to select individuals that already exist in your database for some operation (i.e. adding judges to a panel). The screen also allows you the ability to add a new individual if they are not currently in your database without interrupting the process you are trying to complete. The following screen is presented to you.
The caption at the top of the screen will change depending on what function you are trying to perform. In this example screen shot the user is adding judges to a judging panel. The screen functions the same regardless of why you are selecting individuals. Along the left side is a list of the current individuals in your database. The top right side contains the detailed information for the currently selected individual. The bottom section of the screen contains the individuals that you have selected and want to include in the judging panel. The top of the screen contains a menu bar with various options.
- Use the list of individuals you have selected and return to the screen where you started.
- Return to the screen where you started and do not use the individuals that you selected.
- Cancel changes. If you have made any changes to the currently selected individual this button will cancel the changes and refresh the record. If you are in the process of adding a new individual this button will also cancel the addition of the new individual.

eDive™ User Guide Last Updated: May 20, 2010
© Copyright 2001-2010 Overly Nifty LLC. Printed in U.S.A. 113
- Save Changes. If you have made any changes to the currently selected individual then this button will save those changes. If you are adding a new individual then this button will save that person into your database.
- Refresh Data. This button will refresh the data for the currently selected individual.
- This button will clear the fields on the screen and allow you to enter the information for a new individual that you want to add into your database. Once the new individual has been saved (by pressing the Save button) they will appear in the list on the left and will be available to be selected.
- Delete. This option will delete the currently selected individual from your database. When you press this button you will be asked to confirm the deletion before proceeding. If the person you want to select is not in the list then press the Create new button, add their information in the fields provided and press the Save button. They will then appear in the list and you will be able to select them. To add an individual to your list of selected individuals just select that person, from the list provided
on the left, and click the “Add” button ( ). That person will then appear in the list of selected individuals at the bottom of the screen. To remove a person from the list of selected individuals just
select them in the list at the bottom and press the “Remove” button ( ). The “Clear” button
( ) will remove all individuals from the list at the bottom of the screen. In some situations you will be allowed to change the order of the individuals you have selected. For example, when you are selecting judges for a judging panel. The following buttons will then be made available to you and will appear to the left of the selected individuals list at the bottom of the screen.
To change the order of the selected individuals just click on the person who needs to be re-ordered and press the “Up” button to move them up one place in the order or press the “Down” button to move them down one place in the order. Once you have selected all of the individuals you need then press the button “Use Selections and Close” and you will be taken back to the original screen where this one was called from.
USB to Serial adapters Using a USB to Serial adapter cable works great with eDive and is very convenient to use. Simply plug the cable into an available USB port and you have a COM port. We recommend the following adapter from Sewell Direct: www.sewelldirect.com/usbtoserial.asp. It works well with all Windows operating systems, including Vista, and provides a very reliable connection. Just make sure you install the drivers that come with the adapter. Using Windows default drivers have been known to cause issues. We have no affiliation with this company. We have just found their hardware to work very well.

eDive™ User Guide Last Updated: May 20, 2010
© Copyright 2001-2010 Overly Nifty LLC. Printed in U.S.A. 114
Troubleshooting your COM port connection Check your connections first. Make sure the cables are plugged into the correct port on both your meet computer and your timing system. If you have thumb screws on the plugs for your serial cable then make sure they are not screwed into too tightly. Over-tightening them has been known to cause problems for some users. They should be snug and not too tight. If you cannot seem to get your connection established then you may have the wrong COM port selected in eDive. To check to see which COM port you should be using please check Device manager in Control Panel. Follow these steps to check your COM port setting:
Select Start->Control Panel. Double-click on the System icon. If you don't see it then click the "Switch to classic view" link in the upper left corner of the screen. Once the System applet is open click on the “Hardware” tab and press the “Device Manager” button. Scroll down to the COM ports line and click the plus sign next to it to open it up. You should see your serial port listed there with a COM port number next to it. That is the port you want to use. If you are using a USB to Serial adapter cable then this COM port number may change each time you plug the cable into your computer.
Another known problem is if you are using a USB to Serial port adapter cable and you are not using the drivers that came with the adapter. Some native Windows drivers do not “talk” to the adapters correctly and may cause issues. If you just plugged in your adapter and started using it then you are probably using the native Windows drivers. Please install your adapter according to the directions that came with it and make sure you use the drivers that came with it. If you are not sure you have the latest drivers then please visit the adapter manufacturers’ website to download the latest drivers. Some USB to Serial adapter cables that work in Windows XP will not work in Windows Vista. If you have Windows Vista please be sure you download and install the Vista drivers for your adapter. If you have Meet manager open you may need to close it before you can try and connect using eDive. When Meet Manager is open it will lock up the COM port it is using so that no other application can use it. Close Meet Manager and then try to establish your connection. Plug in all of your hardware first. Then power on the timing system and let it go through its’ normal boot process. Then power on your computer next. Try your connection again. Some USB to Serial port adapter cables are not true serial port emulators. For example, the sync cables used for PDA’s cannot be used to communicate with a timing system. You must use a true USB to Serial port adapter cable. See the section “USB to Serial Adapters” for recommendations. Make sure you have the most up to date version of the timing system software. There have been many changes over the past year or so to most major brands. Visit their website to determine if you have the latest version of their software.
eDive™ User Guide Last Updated: May 20, 2010
© Copyright 2001-2010 Overly Nifty LLC. Printed in U.S.A. 115
What does the “… close all open forms …” message mean? In eDive you will sometimes get a message that says you cannot continue until you close all of the open forms first. For example, if you are merging two divers or importing Hy-Tek rosters. Many of the screens in eDive share information and when you perform an operation that may affect multiples screens or multiple pieces of data you are asked to close those screens so that the software can more easily update the information. When you have multiple screens open you can easily close them by either pressing the x in the upper right corner of the screen …
… or by pressing the Close button ( ) on that screen. You can try your operation again once all of the screens have been closed.
Format for Delimited Entries To create a file of your entries that can be imported directly into eDive please follow these guidelines. The file you are creating will contain all of the entries for your team for one event. If your team is competing in multiple events then you will need to create one file for each event. For example, if your divers are competing in the 12 & under 1 meter and 3 meter events then you will be creating 2 files, one for 1 meter and another for 3 meter. You can use Notepad or any text editor to create a file in the following format. Please make sure the file is saved as normal text (.txt) and not rich-text (.rtf).
The name of the file can be anything. In order for the meet host to differentiate between all of the files they will get it is recommended that you name the file using your team name. So if your team is from Johnson High School then name your text file "JohnsonHighSchool.txt". If you are submitting your entries for multiple events then also include an event abbreviation in the file name. For example "JohnsonHS_14-15_1m.txt".
The text file can only contain entries for one specific event.
There should be no empty lines at the beginning or end of the file.
Each diver should only be listed once in the file.
Each line will be a complete entry record for that diver. All of one divers information must be listed on the same line. It will contain the divers name, the team name and the divers list of dives separated by commas. The format for each line will be ...
"divername","teamname",round1,round2,round3,round4,round5,round6,round7,round8,round9,round10,etc
Where each round will be the dive the diver is doing in that round. The round must contain the dive number followed by the position. If the dive is a required/voluntary dive then please add the letter V after the dive position (as in 401BV). If there are only 4 rounds in the event you are creating the entries for, then only enter 4 dives.
The divers name must be enclosed in double quote marks. So John Smith should be listed as "John Smith". Please note that the quotes are not two single quotes ('') at the beginning and at the end but rather one double quote (") at the beginning and another double quote at the end.
The team name must be enclosed in quotation marks. So Johnson High School should be listed as "Johnson High School". Please note that the quotes are not two single quotes ('') at the beginning and at the end but rather one double quote (") at the beginning and another double quote at the end.
The dive numbers for each round are listed in round order and separated by a single comma.
Dive positions are listed directly after each dive number. So a 403 pike would be listed as 403B.
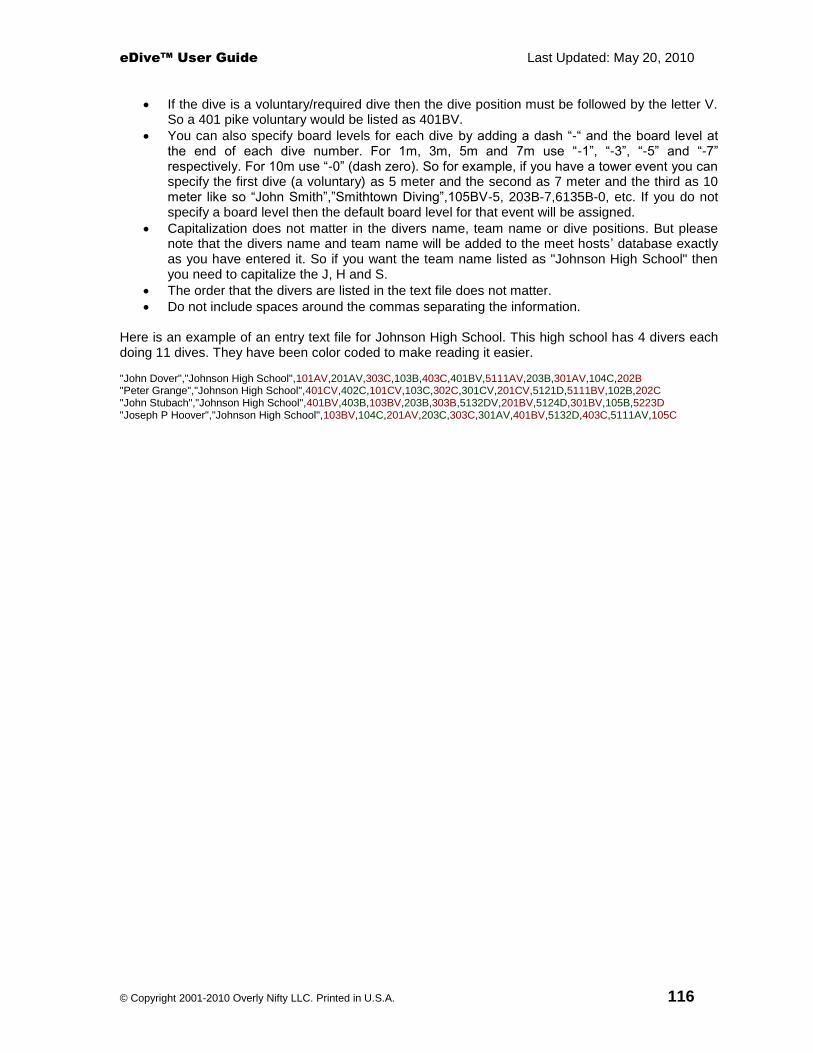
eDive™ User Guide Last Updated: May 20, 2010
© Copyright 2001-2010 Overly Nifty LLC. Printed in U.S.A. 116
If the dive is a voluntary/required dive then the dive position must be followed by the letter V. So a 401 pike voluntary would be listed as 401BV.
You can also specify board levels for each dive by adding a dash “-“ and the board level at the end of each dive number. For 1m, 3m, 5m and 7m use “-1”, “-3”, “-5” and “-7” respectively. For 10m use “-0” (dash zero). So for example, if you have a tower event you can specify the first dive (a voluntary) as 5 meter and the second as 7 meter and the third as 10 meter like so “John Smith”,”Smithtown Diving”,105BV-5, 203B-7,6135B-0, etc. If you do not specify a board level then the default board level for that event will be assigned.
Capitalization does not matter in the divers name, team name or dive positions. But please note that the divers name and team name will be added to the meet hosts’ database exactly as you have entered it. So if you want the team name listed as "Johnson High School" then you need to capitalize the J, H and S.
The order that the divers are listed in the text file does not matter.
Do not include spaces around the commas separating the information. Here is an example of an entry text file for Johnson High School. This high school has 4 divers each doing 11 dives. They have been color coded to make reading it easier. "John Dover","Johnson High School",101AV,201AV,303C,103B,403C,401BV,5111AV,203B,301AV,104C,202B "Peter Grange","Johnson High School",401CV,402C,101CV,103C,302C,301CV,201CV,5121D,5111BV,102B,202C "John Stubach","Johnson High School",401BV,403B,103BV,203B,303B,5132DV,201BV,5124D,301BV,105B,5223D "Joseph P Hoover","Johnson High School",103BV,104C,201AV,203C,303C,301AV,401BV,5132D,403C,5111AV,105C
eDive™ User Guide Last Updated: May 20, 2010
© Copyright 2001-2010 Overly Nifty LLC. Printed in U.S.A. 117
Sales Related Questions
1. What happens after I purchase the software license?
Once you make your purchase we will create a license file for you that contains your contact information. This license file will be emailed to you. The license file then needs to be saved to the eDive installation folder to activate the software. More information about license files can be found in the section “eDive License Files”.
2. How long does it take to get my license after I purchase?
We usually process licenses that same evening. So you should get your license the same day that you purchase. If we are processing a large number of licenses then your license may be delayed by up to 1-2 days. If you do not receive your license by the 3
rd day please call or email us and we will
make sure we get it to you right away. If you need your license right away please let us know and we will get it right out to you.
3. What forms of payment do you accept?
We accept Visa and Mastercard online. You can also send us a check, money order or purchase order. Checks can be made out to Overly Nifty LLC.
4. Where do I send payments to?
When sending any payment to us (or purchase order) you must also send a completed order form. Your order cannot be processed without a completed order form. Order forms can be found online at www.edive.info in the Downloads section. Payments can be mailed to 3795 Deer Meadow Run, Macedon, New York 14502. Purchase orders can be sent to the same mailing address or faxed to 585-226-1197.
5. I have not renewed lately. Can I still use the software?
Yes. You can use the software as long as you like without renewing. But without an active maintenance agreement you will not be able to download any updates for the software or use the current event rules from the AAU, USD, FINA, NCAA or NFHS.
6. My license is up for renewal. Do I have to re-purchase the entire program again?
There is a renewal fee of $20 for team and championship licenses and $40 for site licenses. You can renew at any time and your maintenance will be extended 12 months from your last renewal date. You have a total of 17 months from your last renewal date to renew your license and avoid the catch-up fee. If you wait longer than 17 months from your last renewal date then you will be subject to the additional catch-up fee.
7. What is the additional catch-up fee?
If it has been more than 17 months since you last renewed then you must also pay a $30 catch-up fee. This fee is to bring your very outdated software up to the latest and greatest version of eDive. Along with the normal maintenance renewal fee of $20 (or $40), you will also have to pay the catch-up fee of $30. For example, renewing a team license that was last renewed more than 17 months ago would cost you $50 (i.e. $20 maintenance + $30 catch-up).
8. I have a meet tomorrow and my school forgot to renew. What do I do?
How can I get the latest rules and use the software at my meet? That’s easy. Just give us a call and we will email you a temporary updated license so that you can run your meet. Your temporary license will be set to expire a few days after your meet. You should also contact the appropriate people at your school and get them going on renewing your license.

eDive™ User Guide Last Updated: May 20, 2010
© Copyright 2001-2010 Overly Nifty LLC. Printed in U.S.A. 118
9. Is there any kind of referral program?
Absolutely! If you refer a team or school that subsequently purchases a license, then you will get your next years’ maintenance renewal for free! If you refer 5 schools then you will get 5 years worth of maintenance added onto your current license. There is no limit to the number of referrals you can get. Just make sure that when the school/team you are referring purchases that they mention your name and team.
10. I just renewed my license for another 12 months. What happens next?
We will look up the contact information from your original purchase and email the contact person an updated license. You should receive your updated license the same day that you renew. If you do not receive it by the 3
rd day please contact us immediately.
11. How do we get our license updated with new contact information?
Email us the new contact information and the team name that the software is licensed to. We will update the license with the new information and email you the updated license. For site licenses please let us know the name of the facility also. The last contact person will also be emailed to let them know that they are being removed from the license.
12. Can I purchase a license and run meets for all of the schools in our district?
No. eDive is licensed to teams not individuals. If you have a group of teams in your area that you would like to run meets for then please contact us and we will explain how licensing works in that situation.
13. None of your licensing options seem to fit my situation. What do I buy?
Just give us a call and explain your situation. We are flexible enough that we can come up with a solution that will fit your needs and not cost you an arm and a leg.
14. I purchased the software and it doesn’t work the way I need it to. Can I get a refund?
Wow. We honestly have never ever heard that before. Even though all sales are final please let us know what you find difficult about the program. We get requests all the time for new features from our customers that we incorporate very regularly into upcoming releases. If something doesn’t work the way you need it to please let us know what your needs are. We will evaluate it and most likely incorporate it into the next release. In fact a lot of the features we currently have are based on customer suggestions. This is truly a customer built program that is designed to work the way you need it to work. It also may be as simple as explaining how to use a feature of the program that you did not know existed. Give us a call and let us make it right.
15. Is this license only good for one computer?
No. You can install eDive on as many computers as you need in order to run your meets.
eDive™ User Guide Last Updated: May 20, 2010
© Copyright 2001-2010 Overly Nifty LLC. Printed in U.S.A. 119
Support Related Questions
1. How do I contact support with a question?
You can contact support via email at [email protected]. We are also available via phone at 585-317-9445. The quickest way to get in touch with us is via email. If you have an urgent need please send an email and then give us call. When calling please let us know the nature of your issue and what the urgency is. If you call and leave a message we usually call right back within a couple minutes. It helps if you say your name and number twice during the message, once at the beginning and once at the end.
2. When is support available?
Support is available 7 days a week. We make ourselves available when you need us most which is usually at night and on the weekends when you run your meets. Any time you need help just give us a call. If you have a meet coming up and you think you might want help either before, during or after then please let us know ahead of time. We will make sure we are available for you.
3. What kind of support is available?
Support is pretty much whatever you need. We can email you with answers to your questions. We can work through your questions over the phone. If you’re sitting at your computer and need help we can also set up a remote connection and actually demo whatever you need help with right on your own computer. Need help setting up a meet? No problem. We’ll establish a remote connection to your computer and walk you through it until you’re comfortable. Do you have your meet all set up and ready to go and want us to look at it to see if you missed anything? Not a problem. Just email us your database and whatever questions you may have. We will check out your meet setup and let you know if we see any issues.
General How To Questions
1. How do I find out what version of the program I am running?
Select Help -> About from the menus. The program version is listed on that screen.
2. How do I find out when my maintenance is due to expire?
Select Help -> About from the menus. Your maintenance coverage dates are listed on that screen.
3. How do I find out what database file I am using and where it is located?
The name of the database file you are currently using is listed on the bottom of your eDive screen. You can view the folder that the database file is currently stored in by selecting File->Open->Database Folder. Other How To questions are available online at www.eDive.info. Just click the FAQ link along the left side of the web page. These questions are constantly being updated and are a good source of up to date information to the most commonly asked questions.