user guide for crm – ids & loc - home dodddodd.ohio.gov/training/documents/loc product guide...
TRANSCRIPT

User Guide for CRM – IDS & LOC
Individual Data System (IDS) and Level of Care (LOC) System
The Level of Care (LOC) system is designed to process and manage developmental disabilities level of care determinations for persons seeking enrollment in DODD’s home and community based services (HCBS) Waivers and admissions to an intermediate care facility for individuals with intellectual disabilities (ICF/IID).

1 User Guide for CRM – IDS & LOC
Ju
ly 1
, 2
01
5
OVERVIEW for LOC
The Level of Care (LOC) system is designed to process and manage developmental disabilities level of
care determinations for persons seeking enrollment in DODD’s home and community based services
(HCBS) Waivers and admissions to an intermediate care facility for individuals with intellectual
disabilities (ICF/IID).
OVERVIEW for IDS
The Department’s Individual Data System (IDS) is being rewritten to help accommodate increased
integration with various systems within the Ohio Department of Developmental Disabilities and the new
Ohio Department of Medicaid’s (ODM) eligibility system, Ohio Benefits. The first step of the IDS rewrite
is to have all of the demographic pieces of the each Individual record be created and edited in the new
CRM platform.
PURPOSE
The purpose of this User Guide is to provide a detailed list of functionality and guidance – based on
functional roles -- that can be performed by County Board of Development Disabilities(CBDD) Or Council
of Governments(COGS) users to create/edit individuals records, request county to county transfers of
individuals records and to identify an individual’s County Board Eligibility. The users upon certification as
an evaluator by DODD can submit and manage level of care assessments for individuals seeking
enrollment into DODD’s HCBS Waivers and admission to an ICF. The LOC Process allows County boards
to have the option for using the LOC assessment tool for determining County Board Eligibility for
individuals 10 and above.
PREREQUISITES
In order to access the LOC Process application, Users must have a registered account with DODD before
accessing the LOC application. Users can register their account here:
County Boards: Https://registerassociate.uatapps.dodd.ohio.gov
It is advised to use Internet Explorer (version 10 or higher) or Google Chrome.

2 User Guide for CRM – IDS & LOC
Ju
ly 1
, 2
01
5
Contents
County Boards Roles ..................................................................................................................................... 4
1. Customer Service Guide - CSG (IDS Create) .......................................................................................... 4
Login ...................................................................................................................................................... 4
Dashboard ............................................................................................................................................. 5
Access Individual ................................................................................................................................... 8
Search Individual ................................................................................................................................... 9
Start Individual Create Process ........................................................................................................... 11
Create Introduction ............................................................................................................................. 12
Create Individual ................................................................................................................................. 14
Search Individual ................................................................................................................................. 17
Edit Individual’s Information ............................................................................................................... 20
Add Address ........................................................................................................................................ 21
Edit Individual Address ........................................................................................................................ 24
Edit Service and Support ..................................................................................................................... 27
Individual Transfer Process (ITR) ......................................................................................................... 28
Decision Tree for County Board Eligibility .......................................................................................... 35
LOC for County Board Eligibility (Applies to only 10 & above individuals) ......................................... 55
LOC for Waiver Eligibility..................................................................................................................... 58
2. Eligibility Specialist (IDS Edit) .......................................................................................................... 66
Login .................................................................................................................................................... 66
Dashboard ........................................................................................................................................... 67
Access Individual ................................................................................................................................. 70
Search Individual ................................................................................................................................. 71
Edit Individual’s Information ............................................................................................................... 72
Add Address ........................................................................................................................................ 74
Edit Individual Address ........................................................................................................................ 78
Edit Service and Support ..................................................................................................................... 81
Decision Tree for County Board Eligibility .......................................................................................... 82
LOC for County Board Eligibility (Applies to only 10 & above individuals) ....................................... 102

3 User Guide for CRM – IDS & LOC
Ju
ly 1
, 2
01
5
LOC for Waiver Eligibility................................................................................................................... 105
3. Service Support Administrator – SSA (IDS Read) ............................................................................. 112
Login .................................................................................................................................................. 112
Dashboard ......................................................................................................................................... 113
Access Individual ............................................................................................................................... 115
Search Individual ............................................................................................................................... 117
4. County Board Evaluator ................................................................................................................... 119
Login .................................................................................................................................................. 119
Dashboard ......................................................................................................................................... 120
Access Individual ............................................................................................................................... 121
Search Individual ............................................................................................................................... 123
Decision Tree for County Board Eligibility ........................................................................................ 125
LOC for County Board Eligibility (Applies to only 10 & above individuals) ....................................... 145
LOC for Waiver Eligibility................................................................................................................... 165
Waiver NICS (Notification of Individual’s Change in Status) ............................................................. 186
Waiver County Transfer NICS ............................................................................................................ 186
Suspension/Restart of Waiver Program NICS ................................................................................... 192
Disenrollment/Withdrawal Waiver Program NICS ........................................................................... 195
Change of DODD Waiver NICS .......................................................................................................... 200
ICF to Waiver NICS ............................................................................................................................ 202
Waiver Redeterminations for LOC .................................................................................................... 204
Disclaimer - All data in this document is fictitious
and/or redacted

4 User Guide for CRM – IDS & LOC
Ju
ly 1
, 2
01
5
County Boards Roles
1. Customer Service Guide - CSG (IDS Create)
Login
1. Open Your Browser (internet explorer or chrome)
2. Click on login from DODD Home Page
3. Enter your User Name and Password
(Role: Customer Guide)

5 User Guide for CRM – IDS & LOC
Ju
ly 1
, 2
01
5
4. Select IDS/CRM from the dropdown of the applications
available
Dashboard
5. Once the user has logged in they will be taken to the
Customer Guide Dashboard

6 User Guide for CRM – IDS & LOC
Ju
ly 1
, 2
01
5
6. If you don’t see the SSA Caseload View:
a) Click on the dropdown arrow next to the currently
selected view.
b) Click on the view associated with the role you would like
to open (ex. SSA Caseload view).
c) Once selected from the view selector dropdown the SSA
Caseload View will be visible.
7 User Guide for CRM – IDS & LOC
Ju
ly 1
, 2
01
5
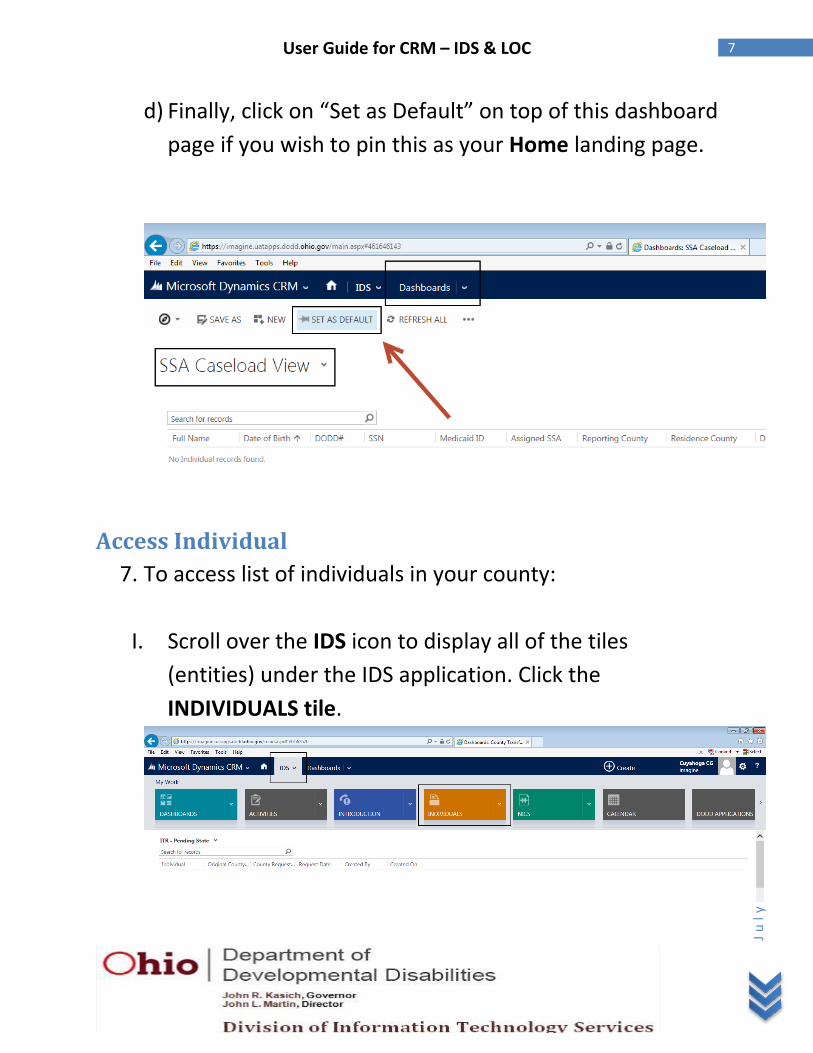
d) Finally, click on “Set as Default” on top of this dashboard
page if you wish to pin this as your Home landing page.
Access Individual
7. To access list of individuals in your county:
I. Scroll over the IDS icon to display all of the tiles
(entities) under the IDS application. Click the
INDIVIDUALS tile.

8 User Guide for CRM – IDS & LOC
Ju
ly 1
, 2
01
5
II. You will now be presented with Active Individuals view
that will list all active individuals in your county.
Search Individual
8. Follow these steps to Individual Search
I. Search for individual by entering search criteria in the
search box. Fields available to search on include: First
Name, Last Name, Full Name (Ex. Jonathan Dawkins),
Date of Birth, Medicaid #, SSN and DODD#.

9 User Guide for CRM – IDS & LOC
Ju
ly 1
, 2
01
5
Note: As a Customer Guide you have the ability to
search all individuals across 88 counties.
II. Hit Enter or click on the magnifying glass to search
III. Individual record(s) will be displayed if an individual exists
in any of the 88 counties.

10 User Guide for CRM – IDS & LOC
Ju
ly 1
, 2
01
5
Start Individual Create Process
9. Follow these steps to Create New Individual
a) Select the INTRODUCTION Tile from dropdown arrow
next to IDS.
b) The All Introductions View displays introductions from
the county of the Customer Guide only.

11 User Guide for CRM – IDS & LOC
Ju
ly 1
, 2
01
5

12 User Guide for CRM – IDS & LOC
Ju
ly 1
, 2
01
5
Create Introduction
10. Follow these steps to Create Introduction
a) Click on the + NEW button on the left top corner of
the Introduction page to create a new introduction
b) Enter the General introduction information like First
Name, Last Name, Date of Birth, Reporting County,
Resident County and SSN and/or Reason for No SSN.
Note: Required fields are denoted with a red (*).

13 User Guide for CRM – IDS & LOC
Ju
ly 1
, 2
01
5
Note: If you try to Save the record without entering a
SSN you will be prompted to provide a reason for not
entering one.

14 User Guide for CRM – IDS & LOC
Ju
ly 1
, 2
01
5
Create Individual
11. Follow these steps to Create Individual in IDS
a) Once the new Introduction record has been created, the
the CREATE INDIVIDUAL button will appear at the top of
the page:

15 User Guide for CRM – IDS & LOC
Ju
ly 1
, 2
01
5
b) Click the CREATE INDIVIDUAL button at the top of the
page to promote the introduction to an individual.
Once you click the CREATE INDIVIDUAL button a screen
will pop up alerting the user that the “Individual
creation triggered”. Close the pop up and wait for a
minute to allow the individual create process to run.

16 User Guide for CRM – IDS & LOC
Ju
ly 1
, 2
01
5
c) Alternatively, if potential duplicates are found – ex.
individuals having the same First name, Last name, Date
of Birth, Medicaid and SSN - you can still create the new
individual by attesting to the new individual create. The
same six duplicate rules that exist in IDS today have
been replicated in CRM.
Note: The system will not allow you to create the new
individual in the case where either a Medicaid or SSN
already exists.

17 User Guide for CRM – IDS & LOC
Ju
ly 1
, 2
01
5
d) To attest simply check the attestation checkbox, click on
the Create Individual button. The pop up will now read,
“Individual Creation triggered”. Close the pop up and
wait for a minute to allow the individual create process
to run. Go to the individual search page to locate your
newly created individual.
Search Individual
12. Follow these steps to Search for individual
I. Search for an individual by entering search criteria in the
search box. Fields available to search on include: First

18 User Guide for CRM – IDS & LOC
Ju
ly 1
, 2
01
5
Name, Last Name, Full Name (Ex. Jonathan Dawkins),
Date of Birth, Medicaid #, SSN and DODD#.
Note: As a Customer Guide you have the ability to
search individuals across all 88 counties.
II. The new individual created will have a unique DODD#
associated with it.

19 User Guide for CRM – IDS & LOC
Ju
ly 1
, 2
01
5
III. Double click on the individual record from the Individual
List in the Search page to navigate to the individual
details page.
Edit Individual’s Information
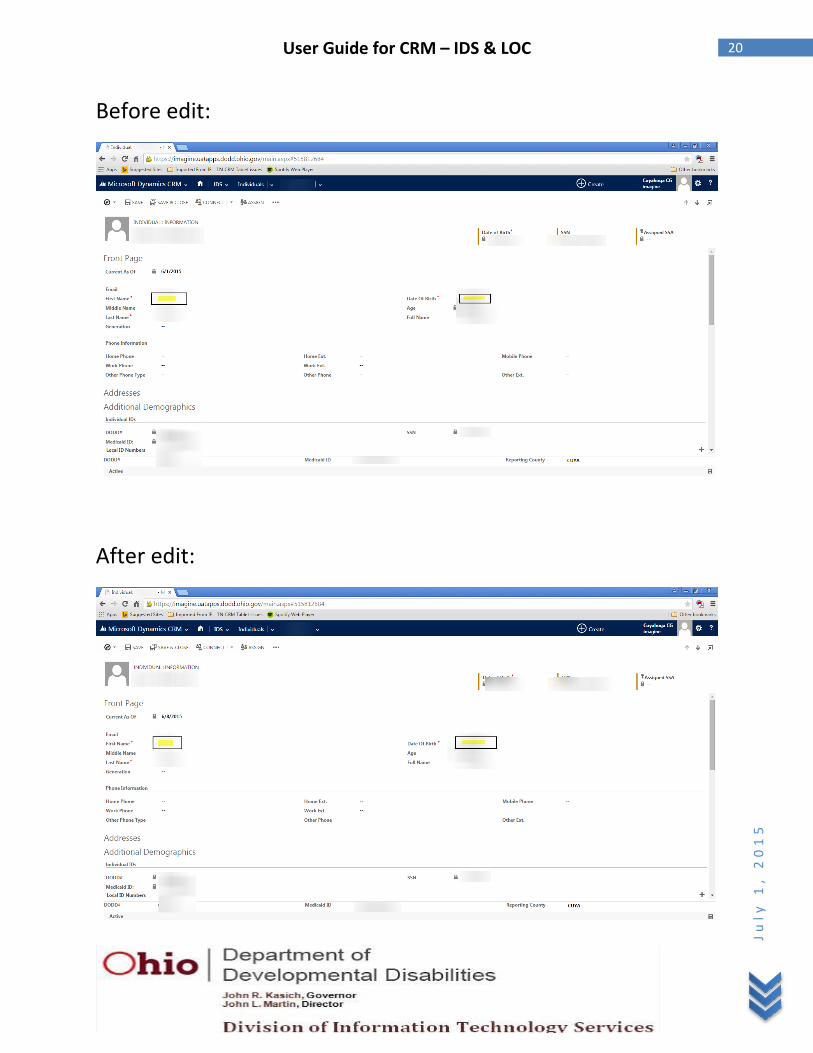
13. Edit an Individual’s Front Page information
I. Open Individual detail Page and edit an individual’s
general information such as First Name, Middle Name,
Last Name, Email, Date of Birth, Generation, Home
Phone, Work Phone, Mobile Phone etc.
20 User Guide for CRM – IDS & LOC
Ju
ly 1
, 2
01
5
Before edit:
After edit:

21 User Guide for CRM – IDS & LOC
Ju
ly 1
, 2
01
5
Add Address
14. Add an Individual’s Address information
I. Expand the Address section of the Individual
II. Click the Plus sign at the right top of this section to go to
III. Description, Address Type, Address and Address Effective
Begin date are all required fields denoted with a red
asterisk (*). Clicking the magnifying glass will allow you
to add a new address.
Note: If you select Residence as Address type, you need
to select Living Arrangement Category and Subcategory.
Also NOTE you cannot enter a residence address if the
individual lives in an ICF-IID setting and if they live in a

22 User Guide for CRM – IDS & LOC
Ju
ly 1
, 2
01
5
license setting, you will have to select the address from
the listing of the licensure database.
IV. Click the +New button

23 User Guide for CRM – IDS & LOC
Ju
ly 1
, 2
01
5
V. Street1, City, State and Zip are required fields denoted
with a red asterisk (*). SAVE & CLOSE when you are
done entering the new address detail.
VI. Now that you are back on the main New Individual
Address page, click the SAVE & CLOSE button.

24 User Guide for CRM – IDS & LOC
Ju
ly 1
, 2
01
5
VII. You will now see the new address listed under Current
Addresses.
Edit Individual Address
15. Edit an Individual Address

25 User Guide for CRM – IDS & LOC
Ju
ly 1
, 2
01
5
I. While on the Individual Information page scroll down to
the Address section. All existing addresses will be
displayed under Current Addresses.
II. Click the field (Hyperlink) called DODD Address to open
the Individual Address you would like to edit. This will
take you directly to the actual address information.
Note: Clicking the row instead of the DODD Address will
allow you to edit the Description and Address Effective
Begin Date but not the Address directly.
Note: Only residence addresses will be updated in the
legacy IDS for use by other DODD systems.

26 User Guide for CRM – IDS & LOC
Ju
ly 1
, 2
01
5
Before edit:
After edit:

27 User Guide for CRM – IDS & LOC
Ju
ly 1
, 2
01
5
Edit Service and Support
16. Edit (add or remove) Services and Support
I. Scroll down to open the Services and Support section of
an Individual. Check (or uncheck) the Services and Support
checkboxes that are applicable. Click Save.
Note: There are business rules that prevent certain
combinations of Services and Support from being
selected together. In the example below the individual
is 82 years old, already has Ohio Department of Aging
Day Support and therefore is prevented from having
Preschool added as a Services and Support
Ex.

28 User Guide for CRM – IDS & LOC
Ju
ly 1
, 2
01
5
Individual Transfer Process (ITR)
17. Follow these steps to complete Individual Transfer
Process
I. Select Individual by double clicking on the individual’s
record to go to the individual detail page and check the
reporting county

29 User Guide for CRM – IDS & LOC
Ju
ly 1
, 2
01
5
II. If individual is not in your county, then Start the ITR
process for the individual
III. Click on the dropdown arrow next to individual’s name
and select the Individual Transfer Request tile
IV. You will see Individual Transfer Request Associated view,
where you can view all the ITRs done for that individual.
You can also Add new ITR from here by clicking on the
+Add New Individual Transfer Request

30 User Guide for CRM – IDS & LOC
Ju
ly 1
, 2
01
5
V. ITR form will be created and will open in a new window.
Everything on the form will be prefilled and locked, you
just have to click on the Save and Close button
VI. ITR will appear under the Individual Associated View and
the Status reason will Pending once you do a Save and
Close

31 User Guide for CRM – IDS & LOC
Ju
ly 1
, 2
01
5
VII. Customer Guide from requesting county and reporting
county can change the dashboard view to County Transfer
VIII. Can view the ITRs on this County Transfer Dashboard

32 User Guide for CRM – IDS & LOC
Ju
ly 1
, 2
01
5
IX. Click on the record to open the ITR record
X. The original county can either Approve or Deny the ITR or
the requesting county can Cancel the submitted request
Requesting county customer guide can click on Cancel
Transfer button (Red Cross) at the top to cancel your
transfer anytime

33 User Guide for CRM – IDS & LOC
Ju
ly 1
, 2
01
5
Original county customer guide can click on the
Original County Response field to either Approve or
Deny to approve or deny the ITR respectively
XI. In case the reporting county doesn’t approve or deny the
ITR within 14 days, the Requesting County can claim the
Individual record on the 14th day by changing the Status
Reason to “Claimed” on the ITR form. In such case the
requesting county is converted to the reporting county, in
this case Greene County.

34 User Guide for CRM – IDS & LOC
Ju
ly 1
, 2
01
5
XII. If the reporting county neither approve/deny the ITR and
it is not claimed by the requesting county within another
30 days (total 44 days from the request date), then the
System will automatically drop the ITR and the Tracking
Status will be changed to Dropped

35 User Guide for CRM – IDS & LOC
Ju
ly 1
, 2
01
5
Decision Tree for County Board Eligibility
1. To start county board eligibility for an Individual, Search
for individual by typing name in search box.
2. Hit Enter or click on the magnifying glass next to search
box
3. Individual record will show up if individual exist in your
county
4. Double click on individual record to open individual’s
record

36 User Guide for CRM – IDS & LOC
Ju
ly 1
, 2
01
5
5. User will land on Individual front page.

37 User Guide for CRM – IDS & LOC
Ju
ly 1
, 2
01
5
6. Start Eligibility Process - Click on the Eligibility
Management Tile from the dropdown arrow next to
individual ‘s name
7. User will land on Eligibility Management View Page—you
can see all the eligibilities done for that individual.

38 User Guide for CRM – IDS & LOC
Ju
ly 1
, 2
01
5
8. Add New Eligibility Management
9. Enter required information on Initial stage to Save
Eligibility management
1. Assessment Reason = select County Board
Eligibility
2. Assessment Type = Initial
3. Assessment Date = can be todays or past date –
it’s when you are got this information from individual
4. Assign Eligibility Specialist = click on the
magnifying and select the eligibility specialist who will
work with the individual
5. Date of Visit = can be todays or past date – it’s
when you met with individual to capture this
information

39 User Guide for CRM – IDS & LOC
Ju
ly 1
, 2
01
5
Click on Save button.

40 User Guide for CRM – IDS & LOC
Ju
ly 1
, 2
01
5
10. Move to Decision Tree stage by clicking on
1. “Next Stage” and
2. Create+ on Next Stage
NOTE: The decision tree is available based on the individual’s
present age (Birth to 2, 3 to 5, 6 to 9 and 10 and above).

41 User Guide for CRM – IDS & LOC
Ju
ly 1
, 2
01
5
11. Enter the Date of Determination – can be todays or past
date. This is a required field
12. Answer all the questions on Decision Tree
13. Save or Save and Close at any time by clicking on the
save button or the save and close button from top of this
screen

42 User Guide for CRM – IDS & LOC
Ju
ly 1
, 2
01
5
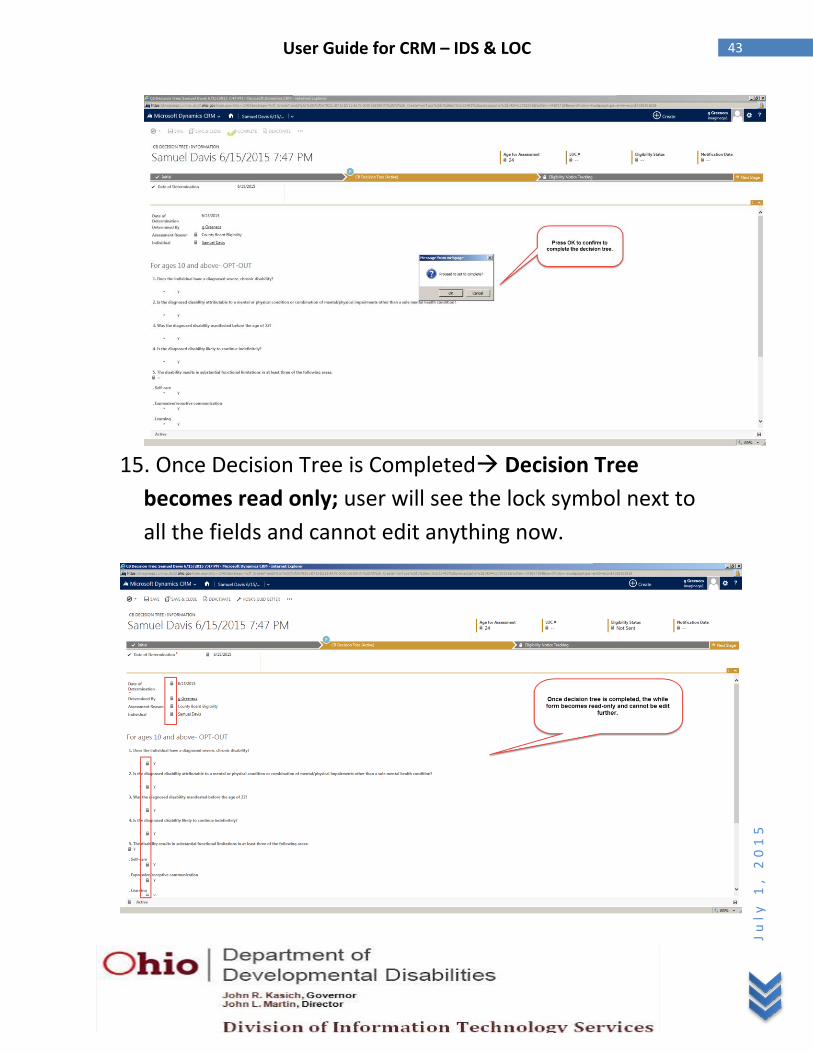
14. Click on the COMPLETE button (appears only after Save)
from top of this screen
43 User Guide for CRM – IDS & LOC
Ju
ly 1
, 2
01
5
15. Once Decision Tree is Completed Decision Tree
becomes read only; user will see the lock symbol next to
all the fields and cannot edit anything now.

44 User Guide for CRM – IDS & LOC
Ju
ly 1
, 2
01
5
16. User can view Y/N answer for question 5 after Decision
Tree is Completed
17. User will see the results (YES/NO) for county board
eligibility once the Decision Tree is completed.

45 User Guide for CRM – IDS & LOC
Ju
ly 1
, 2
01
5
18. You can upload document to SharePoint at any time –
before or after Completing the Decision Tree

46 User Guide for CRM – IDS & LOC
Ju
ly 1
, 2
01
5
19. Scroll down on Initial Stage – you are looking for the
Documents Tab to Upload document to SharePoint
1. Click on +new document
2. Click on chose file
3. Select the document you want to upload (has to be
a scanned PDF or image from your desktop)
either double click on the document or click on
“Open” once done selecting
4. You will be back on previous screen Click on OK

47 User Guide for CRM – IDS & LOC
Ju
ly 1
, 2
01
5
5. You will another pop up will appear Name will
be filled for you, you can enter Title and Comments
if you like (not required)
6. Add Section Select “LOC” from the option set
7. Add Category Select the reason for what you are
uploading the document in this case it should =
LOC –Waiver
8. Check Primary Verification if this is a Primary
Verification document
9. Click OK – User will be back on Initial Stage

48 User Guide for CRM – IDS & LOC
Ju
ly 1
, 2
01
5

49 User Guide for CRM – IDS & LOC
Ju
ly 1
, 2
01
5
20. Move to Eligibility Notice Tracking stage by clicking
1. on the “Next Stage” and
2. Select the Eligibility Notice that is available.
21. Type of Notification will auto populate per the result of
the tool (Eligible/Yes on LOC Tool or Ineligible/No on the
LOC Tool)

50 User Guide for CRM – IDS & LOC
Ju
ly 1
, 2
01
5
22. Enter Date notification Sent – date when you will send
this notification to the individual. Not a required field.
23. Fill in To Whom it was Sent
1. By selecting the Individual’s name or individual’s
parent or guardian’s name from the option set.

51 User Guide for CRM – IDS & LOC
Ju
ly 1
, 2
01
5
2. If the person to whom the mail has to be sent
does not have mailing address, system will
prompt you to enter mailing address. Press OK
to confirm.
3. Enter the mailing address for the individual.
Address will be prefilled if individual have a
mailing address on his profile
24. Select a Customer Guide or Eligibility Specialist by
clicking on the magnifying glass - this will show you list of
all customer guide and eligibility specialist in your county.

52 User Guide for CRM – IDS & LOC
Ju
ly 1
, 2
01
5
7. Enter Customer Guide’s contact information
8. Open the Eligible/Ineligible Notice by clicking on the
link under the Eligibility/Ineligibility Letter Tab

53 User Guide for CRM – IDS & LOC
Ju
ly 1
, 2
01
5
9. Eligible/Ineligible Notice will open in a new tab

54 User Guide for CRM – IDS & LOC
Ju
ly 1
, 2
01
5
10. Right click on your mouse and select print to Print the
Notice
You just completed the County Board eligibility for an individual

55 User Guide for CRM – IDS & LOC
Ju
ly 1
, 2
01
5
LOC for County Board Eligibility (Applies to only 10 & above individuals)
1. To start a LOC for county board eligibility for an Individual,
Search for individual by typing name in search box.
2. Hit Enter or click on the magnifying glass next to search
box.
3. Individual record will show up if individual exist in your
county
4. Double click on individual record to open individual’s
record
5. User will land on Individual front page
6. Start Eligibility Process - Click on the Eligibility
Management Tile from the dropdown arrow next to
individual ‘s name

56 User Guide for CRM – IDS & LOC
Ju
ly 1
, 2
01
5
7. User will land on Eligibility Management View Page—you
can see all the eligibilities done for that individual
8. Add New Eligibility Management
9. Enter required information on Initial stage to Save
Eligibility management

57 User Guide for CRM – IDS & LOC
Ju
ly 1
, 2
01
5
1. Assessment Reason = select County Board
Eligibility
2. Assessment Type = Initial
3. Assessment Date = can be todays or past date –
it’s when you are got this information from individual
4. Date of Visit = can be todays or past date – it’s
when you met with individual to capture this
information
5. Assign Eligibility Specialist = click on the
magnifying and select the eligibility specialist who will
work with the individual
6. Click on Save button
10. Cannot Move to LOC stage (has to be an evaluator)

58 User Guide for CRM – IDS & LOC
Ju
ly 1
, 2
01
5
LOC for Waiver Eligibility
1. To access list of individuals in your county Select
Individual Tile from dropdown arrow next to IDS/iMAGINE
2. You will see list of Active Individuals in your county
3. Search for individual by typing name in search box
4. Hit Enter or click on the magnifying glass next to search
box
5. Individual record will show up if individual exist in your
county

59 User Guide for CRM – IDS & LOC
Ju
ly 1
, 2
01
5
6. Double click on individual record to open individual’s
record
7. User will land on Individual front page
8. Start Eligibility Process - Click on the Eligibility
Management Tile from the dropdown arrow next to
individual ‘s name

60 User Guide for CRM – IDS & LOC
Ju
ly 1
, 2
01
5
9. User will land on Eligibility Management View Page—you
can see all the eligibilities done for that individual
10. Add New Eligibility Management
11. Enter required information on Initial stage to Save
Eligibility management
1. Assessment Reason = select Waiver
2. Assessment Type = Initial
3. Assign Evaluator = click on the magnifying and
select the evaluator who will complete the LOC for
this individual. You can assign yourself if you will do it
4. Assessment Date = can be todays or past date –
it’s the date when you got this information from
individual
5. Waiver Type – select the type of waiver you are
applying for
61 User Guide for CRM – IDS & LOC
Ju
ly 1
, 2
01
5

62 User Guide for CRM – IDS & LOC
Ju
ly 1
, 2
01
5
12. Scroll down on Initial Stage – you are looking for the
Documents Tab to Upload document to SharePoint
10. Click on +new document
11. Click on chose file
12. Select the document you want to upload (has to
be a scanned PDF or image from your desktop)
either double click on the document or click on
“Open” once done selecting
13. You will be back on previous screen Click on
OK

63 User Guide for CRM – IDS & LOC
Ju
ly 1
, 2
01
5
14. You will another pop up will appear Name
will be filled for you, you can enter Title and
Comments if you like (not required)
15. Add Section Select “LOC” from the option set
16. Add Category Select the reason for what you
are uploading the document in this case it should
= LOC –Waiver
17. Check Primary Verification if this is a Primary
Verification document
18. Click OK – User will be back on Initial Stage

64 User Guide for CRM – IDS & LOC
Ju
ly 1
, 2
01
5

65 User Guide for CRM – IDS & LOC
Ju
ly 1
, 2
01
5
13. On top of Initial Stage Check Primary Verification as
YES – This is a manual check for the user to confirm that
user has uploaded the primary verification document to
support this LOC
14. Cannot Move to LOC stage (has to be an evaluator)

66 User Guide for CRM – IDS & LOC
Ju
ly 1
, 2
01
5
2. Eligibility Specialist (IDS Edit)
Login
1. Open Your Browser (internet explorer or chrome)
2. Click on login from DODD Home Page
3. Enter your User Name and Password
(Role: Eligibility Specialist)

67 User Guide for CRM – IDS & LOC
Ju
ly 1
, 2
01
5
Dashboard
4. Once the user has logged in they will be taken to the
Eligibility Specialist Dashboard
5. If you don’t see the SSA Caseload View:
1. Click on the dropdown arrow next to the currently
selected view.
2. Click on the view associated with the role you would like
to open (ex. SSA Caseload view).
3. Once selected from the view selector dropdown the SSA
Caseload View will be visible.

68 User Guide for CRM – IDS & LOC
Ju
ly 1
, 2
01
5

69 User Guide for CRM – IDS & LOC
Ju
ly 1
, 2
01
5
4. Finally, click on “Set as Default” on top of this dashboard
page if you wish to pin this as your Home landing page.
Access Individual
6. To access list of individuals in your county:
I. Scroll over the IDS icon to display all of the tiles
(entities) under the IDS application. Click the
INDIVIDUALS tile.

70 User Guide for CRM – IDS & LOC
Ju
ly 1
, 2
01
5
II. You will now be presented with Active Individuals view
that will list all active individuals in your county.

71 User Guide for CRM – IDS & LOC
Ju
ly 1
, 2
01
5
Search Individual
7. Follow these steps to Individual Search
1. Search for individual by entering search criteria in the
search box. Fields available to search on include: First
Name, Last Name, Full Name (Ex. Jonathan Dawkins),
Date of Birth, Medicaid #, SSN and DODD#.
Note: As an Eligibility Specialist you have the ability to
search all individuals in your associated counties.
2. Hit Enter or click on the magnifying glass to search
3. Individual record(s) will be displayed if an individual
exists in your associated counties.

72 User Guide for CRM – IDS & LOC
Ju
ly 1
, 2
01
5
Edit Individual’s Information
8. Edit an Individual’s Front Page information
1. Open Individual detail Page and edit an individual’s
general information such as First Name, Middle Name,
Last Name, Email, Date of Birth, Generation, Home
Phone, Work Phone, Mobile Phone etc.

73 User Guide for CRM – IDS & LOC
Ju
ly 1
, 2
01
5
Before edit:
After edit:

74 User Guide for CRM – IDS & LOC
Ju
ly 1
, 2
01
5
Add Address
9. Add an Individual’s Address information
1. Expand the Address section of the Individual
2. Click the Plus sign at the right top of this section to go to
3. Description, Address Type, Address and Address
Effective Begin date are all required fields denoted with
a red asterisk (*). Clicking the magnifying glass will allow
you to add a new address.
Note: If you select Residence as Address type, you need
to select Living Arrangement Category and Subcategory.
Also NOTE you cannot enter a residence address if the
individual lives in an ICF-IID setting and if they live in a

75 User Guide for CRM – IDS & LOC
Ju
ly 1
, 2
01
5
license setting, you will have to select the address from
the listing of the licensure database.
4. Click the +New button

76 User Guide for CRM – IDS & LOC
Ju
ly 1
, 2
01
5
5. Street1, City, State and Zip are required fields denoted
with a red asterisk (*). SAVE & CLOSE when you are
done entering the new address detail.
6. Now that you are back on the main New Individual
Address page, click the SAVE & CLOSE button.

77 User Guide for CRM – IDS & LOC
Ju
ly 1
, 2
01
5
7. You will now see the new address listed under Current
Addresses.

78 User Guide for CRM – IDS & LOC
Ju
ly 1
, 2
01
5
Edit Individual Address
10. Edit an Individual Address
1. While on the Individual Information page scroll down to
the Address section. All existing addresses will be
displayed under Current Addresses.
2. Click the field (Hyperlink) called DODD Address to open
the Individual Address you would like to edit. This will
take you directly to the actual address information.
Note: Clicking the row instead of the DODD Address will
allow you to edit the Description and Address Effective
Begin Date but not the Address directly.
Note: Only residence addresses will be updated in the
legacy IDS for use by other DODD systems.

79 User Guide for CRM – IDS & LOC
Ju
ly 1
, 2
01
5
Before edit:
After edit:

80 User Guide for CRM – IDS & LOC
Ju
ly 1
, 2
01
5
Edit Service and Support
11. Edit (add or remove) Services and Support
1. Scroll down to open the Services and Support section of
an Individual. Check (or uncheck) the Services and
Support checkboxes that are applicable. Click Save.
Note: There are business rules that prevent certain
combinations of Services and Support from being
selected together. In the example below the individual
is 82 years old, already has Ohio Department of Aging
Day Support and therefore is prevented from having
Preschool added as a Services and Support
Ex.

81 User Guide for CRM – IDS & LOC
Ju
ly 1
, 2
01
5

82 User Guide for CRM – IDS & LOC
Ju
ly 1
, 2
01
5
Decision Tree for County Board Eligibility
1. To start county board eligibility for an Individual, Search
for individual by typing name in search box.
2. Hit Enter or click on the magnifying glass next to search
box
3. Individual record will show up if individual exist in your
county
4. Double click on individual record to open individual’s
record

83 User Guide for CRM – IDS & LOC
Ju
ly 1
, 2
01
5
5. User will land on Individual front page.

84 User Guide for CRM – IDS & LOC
Ju
ly 1
, 2
01
5
6. Start Eligibility Process - Click on the Eligibility
Management Tile from the dropdown arrow next to
individual ‘s name
7. User will land on Eligibility Management View Page—you
can see all the eligibilities done for that individual.

85 User Guide for CRM – IDS & LOC
Ju
ly 1
, 2
01
5
8. Add New Eligibility Management
9. Enter required information on Initial stage to Save
Eligibility management
1. Assessment Reason = select County Board Eligibility
2. Assessment Type = Initial
3. Assessment Date = can be todays or past date –
it’s when you are got this information from individual
4. Assign Eligibility Specialist = click on the
magnifying and select the eligibility specialist who will
work with the individual
5. Date of Visit = can be todays or past date – it’s
when you met with individual to capture this
information
Click on SAVE button.

86 User Guide for CRM – IDS & LOC
Ju
ly 1
, 2
01
5

87 User Guide for CRM – IDS & LOC
Ju
ly 1
, 2
01
5
10. Move to Decision Tree stage by clicking on the “Next
Stage” and Create+ on Next Stage
NOTE: The decision tree is available based on the individual’s
present age (Birth to 2, 3 to 5, 6 to 9 and 10 and above).

88 User Guide for CRM – IDS & LOC
Ju
ly 1
, 2
01
5
11. Enter the Date of Determination – can be todays or past
date. This is a required field

89 User Guide for CRM – IDS & LOC
Ju
ly 1
, 2
01
5
12. Answer all the questions on Decision Tree
13. Save or Save and Close at any time by clicking on the
save button or the save and close button from top of this
screen
14. Click on the COMPLETE button (appears only after Save)
from top of this screen

90 User Guide for CRM – IDS & LOC
Ju
ly 1
, 2
01
5
15. Once Decision Tree is Completed Decision Tree
becomes read only; user will see the lock symbol next to
all the fields and cannot edit anything now.

91 User Guide for CRM – IDS & LOC
Ju
ly 1
, 2
01
5
16. User can view Y/N answer for question 5 after Decision
Tree is Completed

92 User Guide for CRM – IDS & LOC
Ju
ly 1
, 2
01
5
17. User will see a YES/NO for if individual is county board
eligible once the Decision Tree is Completed.
18. You can upload document to SharePoint at any time –
before or after Completing the Decision Tree

93 User Guide for CRM – IDS & LOC
Ju
ly 1
, 2
01
5
19. Scroll down on Initial Stage – you are looking for the
Documents Tab to Upload document to SharePoint
1. Click on +new document
2. Click on chose file
3. Select the document you want to upload (has to be
a scanned PDF or image from your desktop)
either double click on the document or click on
“Open” once done selecting
4. You will be back on previous screen Click on OK

94 User Guide for CRM – IDS & LOC
Ju
ly 1
, 2
01
5
5. You will another pop up will appear Name will
be filled for you, you can enter Title and Comments
if you like (not required)
6. Add Section Select “LOC” from the option set
7. Add Category Select the reason for what you are
uploading the document in this case it should =
LOC –Waiver
8. Check Primary Verification if this is a Primary
Verification document
9. Click OK – User will be back on Initial Stage

95 User Guide for CRM – IDS & LOC
Ju
ly 1
, 2
01
5

96 User Guide for CRM – IDS & LOC
Ju
ly 1
, 2
01
5
20. Move to Eligibility Notice Tracking stage by clicking
1. on the “Next Stage” and
2. Select the Eligibility Notice that is available.
3. Type of Notification will auto populate per the result of
the tool (Eligible/Yes on LOC Tool or Ineligible/No on
the LOC Tool)

97 User Guide for CRM – IDS & LOC
Ju
ly 1
, 2
01
5
4. Enter Date notification Sent – date when you will send
this notification to the individual. Not a required field.
5. Fill in To Whom it was Sent
1. By selecting the Individual’s name or individual’s
parent or guardian’s name from the option set.

98 User Guide for CRM – IDS & LOC
Ju
ly 1
, 2
01
5
2. If the person to whom the mail has to be sent
does not have mailing address, system will
prompt you to enter mailing address. Press OK
to confirm.
3. Enter the mailing address for the individual.
Address will be prefilled if individual have a
mailing address on his profile
6. Select a Customer Guide or Eligibility Specialist by
clicking on the magnifying glass - this will show you list
of all customer guide and eligibility specialist in your
county.

99 User Guide for CRM – IDS & LOC
Ju
ly 1
, 2
01
5
11. Enter Customer Guide’s contact information

100 User Guide for CRM – IDS & LOC
Ju
ly 1
, 2
01
5
12. Open the Eligible/Ineligible Notice by clicking on the
link under the Eligibility/Ineligibility Letter Tab
13. Eligible/Ineligible Notice will open in a new tab

101 User Guide for CRM – IDS & LOC
Ju
ly 1
, 2
01
5
14. Right click on your mouse and select print to Print the
Notice
You just completed the County Board eligibility for an individual

102 User Guide for CRM – IDS & LOC
Ju
ly 1
, 2
01
5
LOC for County Board Eligibility (Applies to only 10 & above individuals)
1. To start county board eligibility for an Individual, Search
for individual by typing name in search box.
2. Hit Enter or click on the magnifying glass next to search
box
3. Individual record will show up if individual exist in your
county
4. Double click on individual record to open individual’s
record
5. User will land on Individual front page
6. Start Eligibility Process - Click on the Eligibility
Management Tile from the dropdown arrow next to
individual ‘s name

103 User Guide for CRM – IDS & LOC
Ju
ly 1
, 2
01
5
7. User will land on Eligibility Management View Page—you
can see all the eligibilities done for that individual
8. Add New Eligibility Management
9. Enter required information on Initial stage to Save
Eligibility management
1. Assessment Reason = select County Board Eligibility

104 User Guide for CRM – IDS & LOC
Ju
ly 1
, 2
01
5
2. Assessment Type = Initial
3. Assessment Date = can be todays or past date –
it’s when you are got this information from individual
4. Date of Visit = can be todays or past date – it’s
when you met with individual to capture this
information
5. Assign Eligibility Specialist = click on the
magnifying and select the eligibility specialist who will
work with the individual
6. Click on Save button
10. Cannot Move to LOC stage (has to be an evaluator)

105 User Guide for CRM – IDS & LOC
Ju
ly 1
, 2
01
5
LOC for Waiver Eligibility
25. To access list of individuals in your county Select
Individual Tile from dropdown arrow next to IDS/iMAGINE
26. You will see list of Active Individuals in your county
27. Search for individual by typing name in search box
28. Hit Enter or click on the magnifying glass next to search
box
29. Individual record will show up if individual exist in your
county

106 User Guide for CRM – IDS & LOC
Ju
ly 1
, 2
01
5
30. Double click on individual record to open individual’s
record
31. User will land on Individual front page
32. Start Eligibility Process - Click on the Eligibility
Management Tile from the dropdown arrow next to
individual ‘s name

107 User Guide for CRM – IDS & LOC
Ju
ly 1
, 2
01
5
33. User will land on Eligibility Management View Page—
you can see all the eligibilities done for that individual
34. Add New Eligibility Management
35. Enter required information on Initial stage to Save
Eligibility management
1. Assessment Reason = select Waiver
2. Request Type = Initial
3. Assigned Evaluator = click on the magnifying and
select the evaluator who will complete the LOC for
this individual. You can assign yourself if you will do it
4. Assessment Date = can be todays or past date –
it’s the date when you got this information from
individual
5. Waiver Type – select the type of waiver you are
applying for

108 User Guide for CRM – IDS & LOC
Ju
ly 1
, 2
01
5

109 User Guide for CRM – IDS & LOC
Ju
ly 1
, 2
01
5
36. Scroll down on Initial Stage – you are looking for the
Documents Tab to Upload document to SharePoint
10. Click on +new document
11. Click on chose file
12. Select the document you want to upload (has to
be a scanned PDF or image from your desktop)
either double click on the document or click on
“Open” once done selecting
13. You will be back on previous screen Click on
OK

110 User Guide for CRM – IDS & LOC
Ju
ly 1
, 2
01
5
14. You will another pop up will appear Name
will be filled for you, you can enter Title and
Comments if you like (not required)
15. Add Section Select “LOC” from the option set
16. Add Category Select the reason for what you
are uploading the document in this case it should
= LOC –Waiver
17. Check Primary Verification if this is a Primary
Verification document
18. Click OK – User will be back on Initial Stage

111 User Guide for CRM – IDS & LOC
Ju
ly 1
, 2
01
5
37. On top of Initial Stage Check Primary Verification as
YES – This is a manual check for the user to confirm that
user has uploaded the primary verification document to
support this LOC
38. Cannot Move to LOC stage (has to be an evaluator)

112 User Guide for CRM – IDS & LOC
Ju
ly 1
, 2
01
5
3. Service Support Administrator – SSA (IDS Read)
Login
1. Open Your Browser (internet explorer or chrome)
2. Click on login from DODD Home Page
3. Enter your User Name and Password
(Role: SSA)

113 User Guide for CRM – IDS & LOC
Ju
ly 1
, 2
01
5
Dashboard
4. Once the user has logged in they will be taken to the SSA
Dashboard
5. If you don’t see the SSA Caseload View:
1. Click on the dropdown arrow next to the currently
selected view.
2. Click on the view associated with the role you would like
to open (ex. SSA Caseload view).

114 User Guide for CRM – IDS & LOC
Ju
ly 1
, 2
01
5
3. Once selected from the view selector dropdown the SSA
Caseload View will be visible.

115 User Guide for CRM – IDS & LOC
Ju
ly 1
, 2
01
5
4. Finally, click on “Set as Default” on top of this dashboard
page if you wish to pin this as your Home landing page.
Access Individual
6. To access list of individuals in your county:
1. Scroll over the IDS icon to display all of the tiles
(entities) under the IDS application. Click the
INDIVIDUALS tile.

116 User Guide for CRM – IDS & LOC
Ju
ly 1
, 2
01
5
2. You will now be presented with Active Individuals view
that will list all active individuals in your county.

117 User Guide for CRM – IDS & LOC
Ju
ly 1
, 2
01
5
Search Individual
7. Follow these steps to Individual Search
1. Search for individual by entering search criteria in the
search box. Fields available to search on include: First
Name, Last Name, Full Name (Ex. Jonathan Dawkins),
Date of Birth, Medicaid #, SSN and DODD#.
Note: As an SSA you have the ability to search all
individuals in your associated counties.
2. Hit Enter or click on the magnifying glass to search
3. Individual record(s) will be displayed if an individual
exists in your associated counties.

118 User Guide for CRM – IDS & LOC
Ju
ly 1
, 2
01
5

119 User Guide for CRM – IDS & LOC
Ju
ly 1
, 2
01
5
4. County Board Evaluator
Login
1. Open Your Browser (internet explorer or chrome)
2. Click on login from DODD Home Page
3. Enter your User Name and Password
(Role: CB Evaluator)
Note: This role is assigned in addition to any CRM access roles,
once the LOC evaluator certification is achieved.

120 User Guide for CRM – IDS & LOC
Ju
ly 1
, 2
01
5
Dashboard
4. Once the user has logged in they will be taken to the
Evaluator Dashboard

121 User Guide for CRM – IDS & LOC
Ju
ly 1
, 2
01
5
5. If you don’t see Evaluator Dashboard, follow these steps:
1. Click on the dropdown arrow next to the currently
selected view.
2. Click on the view associated with the role you would like
to open (ex. Evaluator Dashboard).
3. Once selected from the view selector dropdown the
Evaluator Dashboard will be visible.
4. Finally, click on “Set as Default” on top of this
dashboard page if you wish to pin this as your Home
landing page.
Note: If you have multiple roles, you might see the
dashboard for any of those roles when you login (for eg: if
you are a SSA and also have an Evaluator role – you can
select either one of those dashboards as your default
dashboard by clicking on “Set as Default” button.
Access Individual
6. To access list of individuals in your county:

122 User Guide for CRM – IDS & LOC
Ju
ly 1
, 2
01
5
1. Scroll over the IDS icon to display all of the tiles
(entities) under the IDS application. Click the
INDIVIDUALS tile.
2. You will now be presented with Active Individuals view
that will list all active individuals in your county.

123 User Guide for CRM – IDS & LOC
Ju
ly 1
, 2
01
5
Search Individual
7. Follow these steps to Individual Search
1. Search for individual by entering search criteria in the
search box. Fields available to search on include: First
Name, Last Name, Full Name (Ex. Jonathan Dawkins),
Date of Birth, Medicaid #, SSN and DODD#.
Note: As an Evaluator you have the ability to search all
individuals in your associated counties.
2. Hit Enter or click on the magnifying glass to search
3. Individual record(s) will be displayed if an individual
exists in your associated counties.

124 User Guide for CRM – IDS & LOC
Ju
ly 1
, 2
01
5

125 User Guide for CRM – IDS & LOC
Ju
ly 1
, 2
01
5
Decision Tree for County Board Eligibility
1. To start county board eligibility for an Individual, Search
for individual by typing name in search box.
2. Hit Enter or click on the magnifying glass next to search
box.
3. Individual record will show up if individual exist in your
county

126 User Guide for CRM – IDS & LOC
Ju
ly 1
, 2
01
5
4. Double click on individual record to open individual’s
record
5. User will land on Individual front page.

127 User Guide for CRM – IDS & LOC
Ju
ly 1
, 2
01
5
6. Start Eligibility Process - Click on the Eligibility
Management Tile from the dropdown arrow next to
individual ‘s name
7. User will land on Eligibility Management View Page—you
can see all the eligibilities done for that individual.

128 User Guide for CRM – IDS & LOC
Ju
ly 1
, 2
01
5
8. Add New Eligibility Management
9. Enter required information on Initial stage to Save
Eligibility management

129 User Guide for CRM – IDS & LOC
Ju
ly 1
, 2
01
5
1. Assessment Reason = select County Board Eligibility
2. Assessment Type = Initial
3. Assessment Date = can be todays or past date –
it’s when you are got this information from individual
4. Assign Eligibility Specialist = click on the
magnifying and select the eligibility specialist who will
work with the individual
5. Date of Visit = can be todays or past date – it’s
when you met with individual to capture this
information
Click on Save button.

130 User Guide for CRM – IDS & LOC
Ju
ly 1
, 2
01
5
10. Move to Decision Tree stage by clicking on the “Next
Stage” and Create+ on Next Stage
NOTE: The decision tree is available based on the individual’s
present age (Birth to 2, 3 to 5, 6 to 9 and 10 and above).

131 User Guide for CRM – IDS & LOC
Ju
ly 1
, 2
01
5
11. Enter the Date of Determination – can be todays or past
date. This is a required field
12. Answer all the questions on Decision Tree
13. Save or Save and Close at any time by clicking on the
save button or the save and close button from top of this
screen

132 User Guide for CRM – IDS & LOC
Ju
ly 1
, 2
01
5

133 User Guide for CRM – IDS & LOC
Ju
ly 1
, 2
01
5
14. Click on the COMPLETE button (appears only after Save)
from top of this screen

134 User Guide for CRM – IDS & LOC
Ju
ly 1
, 2
01
5
15. Once Decision Tree is Completed Decision Tree
becomes read only; user will see the lock symbol next to
all the fields and cannot edit anything now.

135 User Guide for CRM – IDS & LOC
Ju
ly 1
, 2
01
5
16. User can view Y/N answer for question 5 after Decision
Tree is Completed
17. User will see a YES/NO for if individual is county board
eligible once the Decision Tree is Completed.

136 User Guide for CRM – IDS & LOC
Ju
ly 1
, 2
01
5
18. You can upload document to SharePoint at any time –
before or after Completing the Decision Tree
19. Scroll down on Initial Stage – you are looking for the
Documents Tab to Upload document to SharePoint
1. Click on +new document
2. Click on chose file
3. Select the document you want to upload (has to be
a scanned PDF or image from your desktop)
either double click on the document or click on
“Open” once done selecting
4. You will be back on previous screen Click on OK

137 User Guide for CRM – IDS & LOC
Ju
ly 1
, 2
01
5
5. You will another pop up will appear Name will
be filled for you, you can enter Title and Comments
if you like (not required)
6. Add Section Select “LOC” from the option set
7. Add Category Select the reason for what you are
uploading the document in this case it should =
LOC –Waiver
8. Check Primary Verification if this is a Primary
Verification document
9. Click OK – User will be back on Initial Stage

138 User Guide for CRM – IDS & LOC
Ju
ly 1
, 2
01
5

139 User Guide for CRM – IDS & LOC
Ju
ly 1
, 2
01
5
20. Move to Eligibility Notice Tracking stage by clicking
1. on the “Next Stage” and
2. Select the Eligibility Notice that is available.
3. Type of Notification will auto populate per the result of
the tool (Eligible/Yes on LOC Tool or Ineligible/No on
the LOC Tool)

140 User Guide for CRM – IDS & LOC
Ju
ly 1
, 2
01
5
4. Enter Date notification Sent – date when you will send
this notification to the individual. Not a required field.
5. Fill in To Whom it was Sent
1. By selecting the Individual’s name or individual’s
parent or guardian’s name from the option set.

141 User Guide for CRM – IDS & LOC
Ju
ly 1
, 2
01
5
2. If the person to whom the mail has to be sent
does not have mailing address, system will
prompt you to enter mailing address. Press OK
to confirm.
3. Enter the mailing address for the individual.
Address will be prefilled if individual have a
mailing address on his profile
6. Select a Customer Guide or Eligibility Specialist by
clicking on the magnifying glass - this will show you list
of all customer guide and eligibility specialist in your
county.

142 User Guide for CRM – IDS & LOC
Ju
ly 1
, 2
01
5
15. Enter Customer Guide’s contact information
16. Open the Eligible/Ineligible Notice by clicking on the
link under the Eligibility/Ineligibility Letter Tab

143 User Guide for CRM – IDS & LOC
Ju
ly 1
, 2
01
5
17. Eligible/Ineligible Notice will open in a new tab

144 User Guide for CRM – IDS & LOC
Ju
ly 1
, 2
01
5
18. Right click on your mouse and select print to Print the
Notice
You just completed the County Board eligibility for an individual

145 User Guide for CRM – IDS & LOC
Ju
ly 1
, 2
01
5
LOC for County Board Eligibility (Applies to only 10 & above individuals)
1. To start county board eligibility for an Individual, Search
for individual by typing name in search box.
2. Hit Enter or click on the magnifying glass next to search
box
3. Individual record will show up if individual exist in your
county
4. Double click on individual record to open individual’s
record
5. User will land on Individual front page

146 User Guide for CRM – IDS & LOC
Ju
ly 1
, 2
01
5
6. Start Eligibility Process - Click on the Eligibility
Management Tile from the dropdown arrow next to
individual ‘s name
7. User will land on Eligibility Management View Page—you
can see all the eligibilities done for that individual
8. Add New Eligibility Management

147 User Guide for CRM – IDS & LOC
Ju
ly 1
, 2
01
5
9. Enter required information on Initial stage to Save
Eligibility management
1. Assessment Reason = select County Board Eligibility
2. Assessment Type = Initial
3. Assessment Date = can be todays or past date –
it’s when you are got this information from individual
4. Date of Visit = can be todays or past date – it’s
when you met with individual to capture this
information
5. Assign Eligibility Specialist = click on the
magnifying and select the eligibility specialist who will
work with the individual
6. Click on Save button

148 User Guide for CRM – IDS & LOC
Ju
ly 1
, 2
01
5
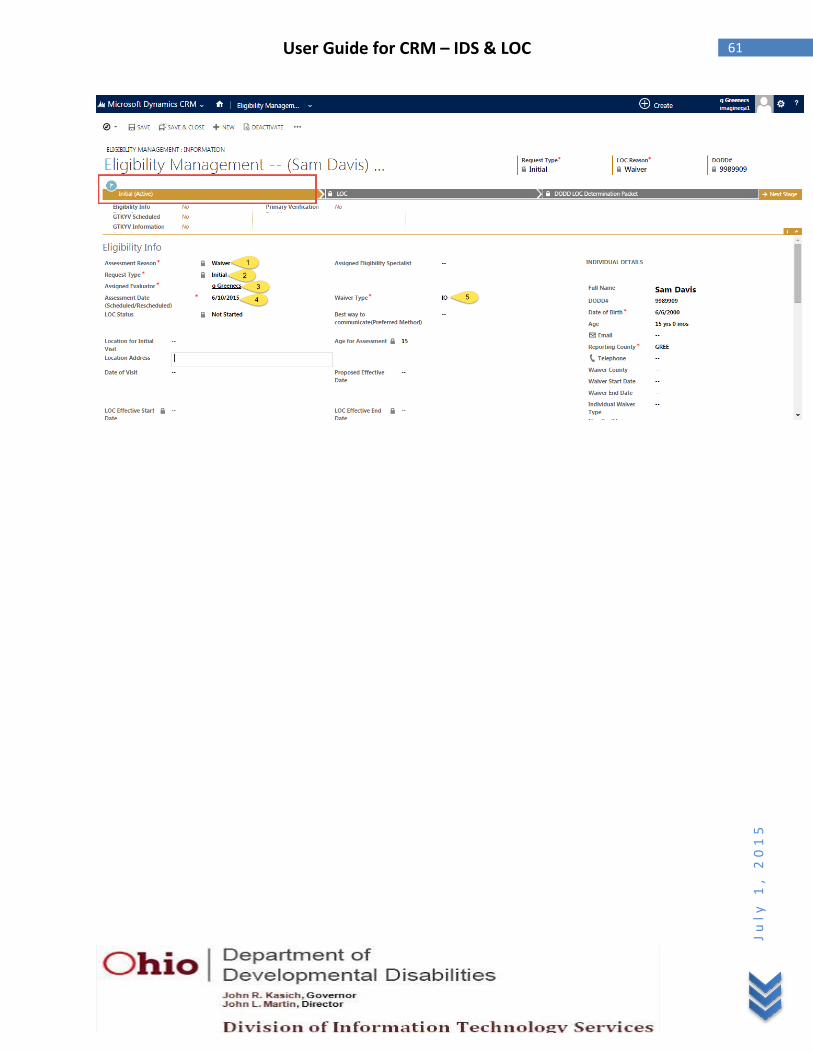
10. Move to LOC stage by clicking on
1. The “Next Stage” &
2. Create+ on Next Stage
11. User will be now be on the LOC tool

149 User Guide for CRM – IDS & LOC
Ju
ly 1
, 2
01
5
12. User will view some information that was already
entered before and will have a lock symbol next to it,
which means they are not editable
13. All fields on LOC are REQUIRED to complete LOC
14. Enter the General information on LOC and SAVE

150 User Guide for CRM – IDS & LOC
Ju
ly 1
, 2
01
5
15. Add informant by clicking on the + sign on your right
hand side enter informant’s name and relationship with
individual in the pop up that will appear
1. Add Informant Name
2. Add Informant relationship with individual.
3. And click on SAVE button.

151 User Guide for CRM – IDS & LOC
Ju
ly 1
, 2
01
5
16. Evaluator will see LOC questions as per Individual’s Age
(always 10 and above for county board eligibility)
17. Answer all the questions on LOC
18. Save LOC at any time.
19. Complete LOC by clicking on the “Complete” button;
once all information on LOC is entered

152 User Guide for CRM – IDS & LOC
Ju
ly 1
, 2
01
5
20. Click on OK when it confirms to complete LOC
21. Once LOC is Completed LOC becomes read only; user
will see the lock symbol next to all the fields and cannot
edit anything now.
153 User Guide for CRM – IDS & LOC
Ju
ly 1
, 2
01
5
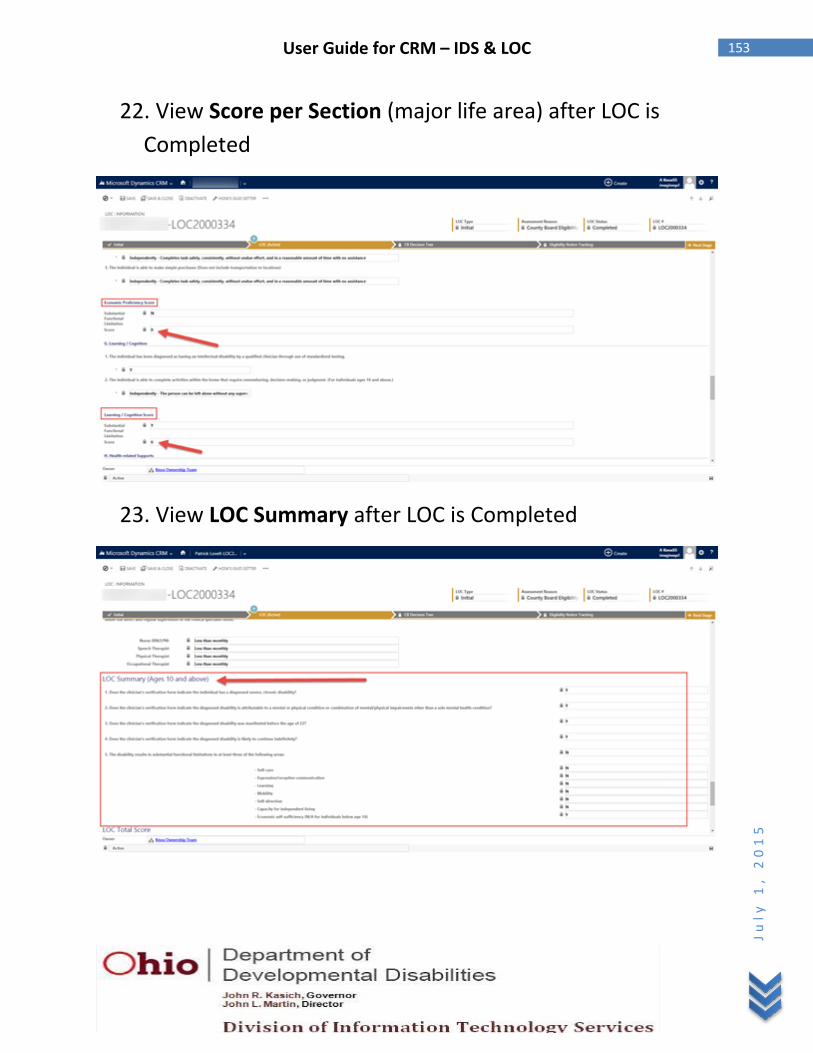
22. View Score per Section (major life area) after LOC is
Completed
23. View LOC Summary after LOC is Completed

154 User Guide for CRM – IDS & LOC
Ju
ly 1
, 2
01
5
24. View LOC Eligible = YES/NO after LOC is Completed
25. Move to Decision Tree stage by clicking on the
1. “Next Stage” &
2. Select the Determination Packet that is created

155 User Guide for CRM – IDS & LOC
Ju
ly 1
, 2
01
5
26. Enter the Date of Determination – can be todays or past
date
27. The Decision Tree will be pre filled from the LOC Tool. All
answers will be read only and cannot be edited

156 User Guide for CRM – IDS & LOC
Ju
ly 1
, 2
01
5
28. Scroll down on Initial Stage – you are looking for the
Documents Tab to Upload document to SharePoint
1. Click on +new document
2. Click on chose file
3. Select the document you want to upload (has to be
a scanned PDF or image from your desktop)
either double click on the document or click on
“Open” once done selecting
4. You will be back on previous screen Click on OK

157 User Guide for CRM – IDS & LOC
Ju
ly 1
, 2
01
5
5. You will another pop up will appear Name will
be filled for you, you can enter Title and Comments
if you like (not required)
6. Add Section Select “LOC” from the option set
7. Add Category Select the reason for what you are
uploading the document in this case it should =
LOC –Waiver
8. Check Primary Verification if this is a Primary
Verification document
9. Click OK – User will be back on Initial Stage

158 User Guide for CRM – IDS & LOC
Ju
ly 1
, 2
01
5
159 User Guide for CRM – IDS & LOC
Ju
ly 1
, 2
01
5
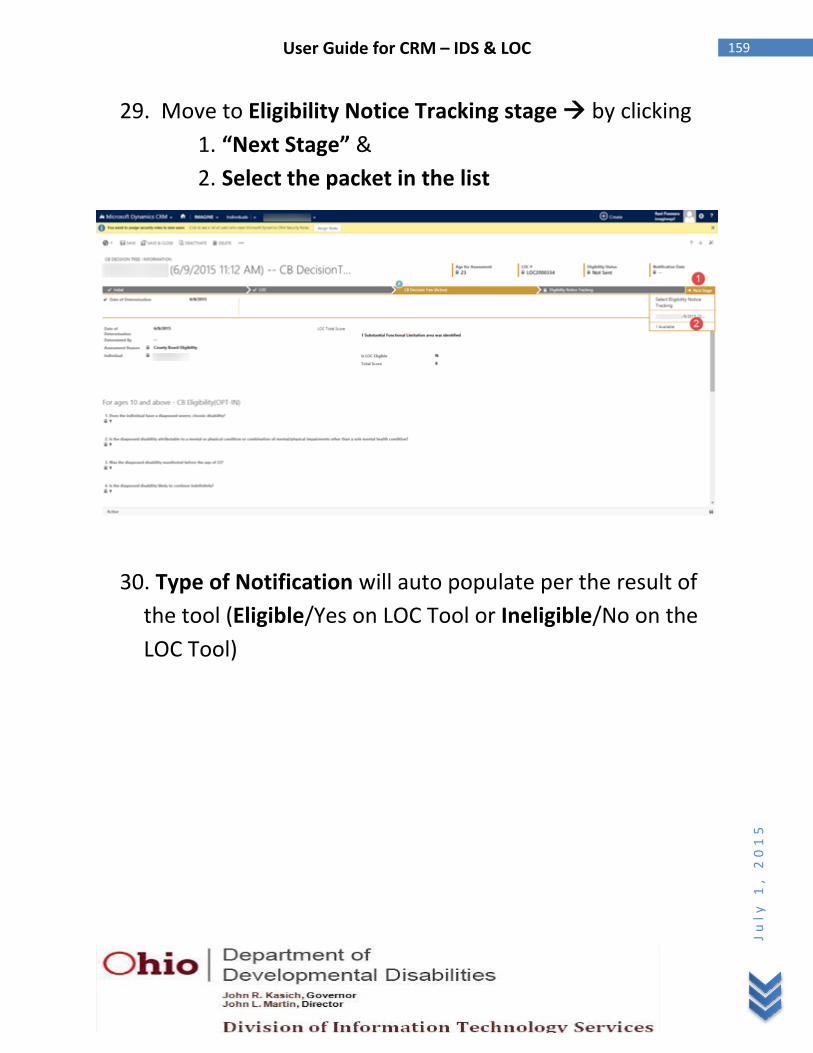
29. Move to Eligibility Notice Tracking stage by clicking
1. “Next Stage” &
2. Select the packet in the list
30. Type of Notification will auto populate per the result of
the tool (Eligible/Yes on LOC Tool or Ineligible/No on the
LOC Tool)

160 User Guide for CRM – IDS & LOC
Ju
ly 1
, 2
01
5
31. Enter Date notification Sent – date when you will send
this notification to the individual. Not a required field
32. Fill in To Whom it was sent by selecting the Individual’s
name or individual’s parent or guardian’s name from the
option set.

161 User Guide for CRM – IDS & LOC
Ju
ly 1
, 2
01
5
33. Enter the mailing address for the individual. Address will
be prefilled if individual have a mailing address on his
profile. If not, it will prompt you to add mailing address.
34. Select a Customer Guide by clicking on the magnifying
glass- this will show you list of all customer guide and
eligibility specialist in your county.

162 User Guide for CRM – IDS & LOC
Ju
ly 1
, 2
01
5

163 User Guide for CRM – IDS & LOC
Ju
ly 1
, 2
01
5
35. Enter Customer Guide’s contact information
36. Open the Eligible/Ineligible Notice by clicking on the link
under the Eligibility/Ineligibility Letter Tab

164 User Guide for CRM – IDS & LOC
Ju
ly 1
, 2
01
5
37. Eligible/Ineligible Notice will open in a new tab
38. Right click on your mouse and select print to Print the
Notice
Note: Counties are not required to use this letter for
notification.
You just completed the County Board eligibility for 10 and
above individual as an opt in county.

165 User Guide for CRM – IDS & LOC
Ju
ly 1
, 2
01
5
LOC for Waiver Eligibility
1. To access list of individuals in your county Select
Individual Tile from dropdown arrow next to IDS/IMAGINE
2. You will see list of Active Individuals in your county
3. Search for individual by typing name in search box
4. Hit Enter or click on the magnifying glass next to search
box
5. Individual record will show up if individual exist in your
county

166 User Guide for CRM – IDS & LOC
Ju
ly 1
, 2
01
5
6. Double click on individual record to open individual’s
record
7. User will land on Individual front page
8. Start Eligibility Process - Click on the Eligibility
Management Tile from the dropdown arrow next to
individual ‘s name

167 User Guide for CRM – IDS & LOC
Ju
ly 1
, 2
01
5
9. User will land on Eligibility Management View Page—you
can see all the eligibilities done for that individual
10. Add New Eligibility Management
11. Enter required information on Initial stage to Save
Eligibility management
1. Assessment Reason = select Waiver
2. Request Type = Initial
3. Assigned Evaluator = click on the magnifying and
select the evaluator who will complete the LOC for
this individual. You can assign yourself if you will do it
4. Assessment Date = can be todays or past date –
it’s the date when you got this information from
individual
5. Waiver Type – select the type of waiver you are
applying for

168 User Guide for CRM – IDS & LOC
Ju
ly 1
, 2
01
5

169 User Guide for CRM – IDS & LOC
Ju
ly 1
, 2
01
5
12. Scroll down on Initial Stage – you are looking for the
Documents Tab to Upload document to SharePoint
1. Click on +new document
2. Click on chose file
3. Select the document you want to upload (has to be
a scanned PDF or image from your desktop)
either double click on the document or click on
“Open” once done selecting
4. You will be back on previous screen Click on OK

170 User Guide for CRM – IDS & LOC
Ju
ly 1
, 2
01
5
5. You will another pop up will appear Name will
be filled for you, you can enter Title and Comments
if you like (not required)
6. Add Section Select “LOC” from the option set
7. Add Category Select the reason for what you are
uploading the document in this case it should =
LOC –Waiver
8. Check Primary Verification if this is a Primary
Verification document
9. Click OK – User will be back on Initial Stage

171 User Guide for CRM – IDS & LOC
Ju
ly 1
, 2
01
5

172 User Guide for CRM – IDS & LOC
Ju
ly 1
, 2
01
5
13. On top of Initial Stage Check Primary Verification as
YES – This is a manual check for the user to confirm that
user has uploaded the primary verification document to
support this LOC

173 User Guide for CRM – IDS & LOC
Ju
ly 1
, 2
01
5
14. Move to LOC stage by clicking on the “Next Stage” and
Create+ on Next Stage
15. User will now be on the LOC tool

174 User Guide for CRM – IDS & LOC
Ju
ly 1
, 2
01
5
16. User will view some information that was already
entered before and will have a lock symbol next to it,
which means they are not editable
17. All fields on LOC are REQUIRED to complete LOC
18. Enter the General information on LOC
175 User Guide for CRM – IDS & LOC
Ju
ly 1
, 2
01
5
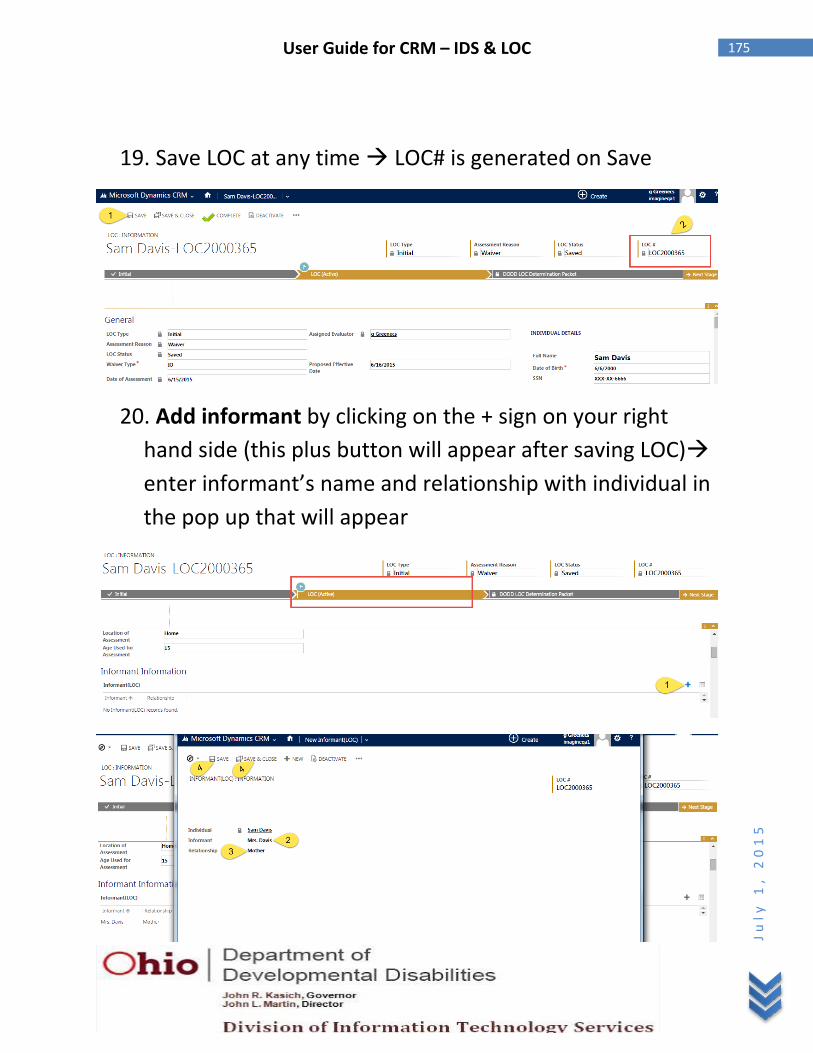
19. Save LOC at any time LOC# is generated on Save
20. Add informant by clicking on the + sign on your right
hand side (this plus button will appear after saving LOC)
enter informant’s name and relationship with individual in
the pop up that will appear

176 User Guide for CRM – IDS & LOC
Ju
ly 1
, 2
01
5
21. Evaluator will see LOC questions as per Individual’s Age
of Assessment (9 and below or 10 and above)

177 User Guide for CRM – IDS & LOC
Ju
ly 1
, 2
01
5
22. Answer all questions

178 User Guide for CRM – IDS & LOC
Ju
ly 1
, 2
01
5
23. Complete LOC by clicking on the “Complete” button;
once all information on LOC is entered

179 User Guide for CRM – IDS & LOC
Ju
ly 1
, 2
01
5
24. Once LOC is Completed LOC becomes read only; user
will see the lock symbol next to all the fields and cannot
edit anything now.

180 User Guide for CRM – IDS & LOC
Ju
ly 1
, 2
01
5
25. View Score per Section (major life area) after LOC is
Completed
26. View LOC Summary after LOC is Completed

181 User Guide for CRM – IDS & LOC
Ju
ly 1
, 2
01
5
27. View LOC LOC Eligible = YES/NO after LOC is Completed
28. Complete Attestation – 2399 and PICT by clicking on the
attestation record at the bottom of the LOC, under the
Attestation Tab on LOC

182 User Guide for CRM – IDS & LOC
Ju
ly 1
, 2
01
5
29. Attestation will open in a new window check mark
both PICT and 2399 Click on Save and Close (on the top
of this screen)

183 User Guide for CRM – IDS & LOC
Ju
ly 1
, 2
01
5
30. Assessor Recommendation will auto populate based on
the result of the LOC and cannot be edited by the
Evaluator. If LOC Eligible = YES, assessor recommendation
will = YES; if LOC Eligible = NO, assessor recommendation
will = NO. Evaluator can view this on the attestation
screen.
31. Add notes for LOC if needed – this is not required field.
Scroll down at the bottom of the page, you will see LOC
Notes tab below Attestation tab. Click on Notes to enter
“Notes”.

184 User Guide for CRM – IDS & LOC
Ju
ly 1
, 2
01
5
Enter notes and click on DONE
Can also attach a document with the notes

185 User Guide for CRM – IDS & LOC
Ju
ly 1
, 2
01
5
32. Submit LOC to DODD by clicking on the Submit button
available on top of the LOC stage.
Checklist before clicking on submit button:
1) Filled in required information on initial stage
2) Uploaded individual’s primary verification and other
supporting documents to SharePoint
3) Entered all required information on LOC Tool and
answered all questions
4) Added informant
5) View LOC summary from the LOC tool
6) Complete the required attestation for Waiver
7) Add notes for LOC if needed
8) Click on the SUBMIT button
You have successfully submitted the LOC to DODD; once DODD has
processed the LOC, you will receive an alert for status updates
and/or approval.

186 User Guide for CRM – IDS & LOC
Ju
ly 1
, 2
01
5
Waiver NICS (Notification of Individual’s Change in Status)
Waiver County Transfer NICS
1. To access list of individuals in your county Select
Individual Tile from dropdown arrow next to IDS/iMAGINE
2. You will see list of Active Individuals in your county
3. Search for individual by typing name in search box
4. Hit Enter or click on the magnifying glass next to search
box
5. Individual record will show up if individual exist in your
county

187 User Guide for CRM – IDS & LOC
Ju
ly 1
, 2
01
5
6. Double click on individual record to open individual’s
record
7. User will land on Individual front page
8. Look and Click on the NICS Tile from the dropdown arrow
next to individual ‘s name
9. User will land on NICS View Page—you can see all the
eligibilities done for that individual

188 User Guide for CRM – IDS & LOC
Ju
ly 1
, 2
01
5
10. Add New NICS
11. Add a Name for your NICS
12. Type of NICS = Waiver County Transfer NICS
13. Enter all Required Information
14. SAVE or SAVE and CLOSE at any time

189 User Guide for CRM – IDS & LOC
Ju
ly 1
, 2
01
5
15. After save – NICS Name will display on top of this NICS
form
Before SAVE
16. Once ready to Submit Check mark the checkbox next
to Submit and click on Save

190 User Guide for CRM – IDS & LOC
Ju
ly 1
, 2
01
5
17. NICS Submitted to DODD
18. All fields on NICS will be read only; user will see the lock
symbol next to all the fields and cannot edit anything now

191 User Guide for CRM – IDS & LOC
Ju
ly 1
, 2
01
5
You successfully submitted a Waiver NICS to DODD

192 User Guide for CRM – IDS & LOC
Ju
ly 1
, 2
01
5
Suspension/Restart of Waiver Program NICS
1. Add New NICS
2. Add a Name for your NICS
3. Select Type of NICS = Suspension/Restart of Waiver
Payment NICS

193 User Guide for CRM – IDS & LOC
Ju
ly 1
, 2
01
5
4. Enter all Required Information
5. SAVE or SAVE and CLOSE at any time
6. Once ready to Submit Check mark the checkbox next
to Submit and click on Save

194 User Guide for CRM – IDS & LOC
Ju
ly 1
, 2
01
5
7. NICS Submitted to DODD
8. All fields on NICS will be read only; user will see the lock
symbol next to all the fields and cannot edit anything now
You successfully submitted a Waiver NICS to DODD.

195 User Guide for CRM – IDS & LOC
Ju
ly 1
, 2
01
5
Disenrollment/Withdrawal Waiver Program NICS
1. Add New NICS
2. Add a Name for your NICS
3. Select Type of NICS = Disenrollment/Withdrawal from
Waiver Program
4. Enter all Required Information
5. Save at any time

196 User Guide for CRM – IDS & LOC
Ju
ly 1
, 2
01
5
6. Click on the “Print consent form for disenrollment
signature” to open the consent form
7. Print and fill the form

197 User Guide for CRM – IDS & LOC
Ju
ly 1
, 2
01
5
8. Upload a scanned copy of this consent form to Sharepoint
from the Supporting Document tab on this NICS form.
9. Once ready to Submit Check mark the checkbox next
to Submit and click on Save
10. NICS Submitted to DODD

198 User Guide for CRM – IDS & LOC
Ju
ly 1
, 2
01
5
11. All fields on NICS will be read only; user will see the lock
symbol next to all the fields and cannot edit anything now
You successfully submitted a Waiver NICS to DODD

199 User Guide for CRM – IDS & LOC
Ju
ly 1
, 2
01
5
Change of DODD Waiver NICS
1. Add New NICS
2. Add a Name for your NICS
3. Select Type of NICS = Change of DODD Waiver NICS
4. Enter all Required Information
5. Save at any time

200 User Guide for CRM – IDS & LOC
Ju
ly 1
, 2
01
5
Select new waiver type
Enter other information
6. Once ready to Submit Check mark the checkbox next
to Submit and click on Save
7. NICS Submitted to DODD

201 User Guide for CRM – IDS & LOC
Ju
ly 1
, 2
01
5
8. All fields on NICS will be read only; user will see the lock
symbol next to all the fields and cannot edit anything now
You successfully submitted a Waiver NICS to DODD

202 User Guide for CRM – IDS & LOC
Ju
ly 1
, 2
01
5
ICF to Waiver NICS
1. Add New NICS
2. Add a Name for your NICS
3. Select Type of NICS = ICF to Waiver
4. Enter all Required Information
5. Save at any time

203 User Guide for CRM – IDS & LOC
Ju
ly 1
, 2
01
5
6. Once ready to Submit Check mark the checkbox next
to Submit and click on Save
7. NICS Submitted to DODD
8. All fields on NICS will be read only; user will see the lock
symbol next to all the fields and cannot edit anything now
You successfully submitted a Waiver NICS to DODD.
Submitted NICS View

204 User Guide for CRM – IDS & LOC
Ju
ly 1
, 2
01
5
Waiver Redeterminations for LOC
1. Select the Waiver LOC Redet Tile from the dropdown arrow
next to Microsoft Dynamics CRM.
2. You will see WMS iframe in CRM Pull up all the redets due
for your county
3. List of individuals whose redets are due will show up

205 User Guide for CRM – IDS & LOC
Ju
ly 1
, 2
01
5
4. Check mark the box next to the Individual’s name (same as
current WMS Process) to select the redet you want to
submit.
Note: You are submitting redets in WMS by accessing WMS
from CRM. The functionality is same as current. You have to
be an evaluator to submit redets from new LOC system.
Note: If individual does not have a valid LOC in CRM, the LOC
status will be “None” and user will not be able to select that
individual to submit a redet. LOC status should be “LOC
Enrolled” to submit a redet.

206 User Guide for CRM – IDS & LOC
Ju
ly 1
, 2
01
5
5. Click on Submit to submit redets

207 User Guide for CRM – IDS & LOC
Ju
ly 1
, 2
01
5
6. Click OK
You have successfully submitted redets to DODD. Once DODD
approves the redets, LOC effective and LOC end dates will be
updated on individuals’ packets.