user guide - home - lynxspring · this user guide only covers the set-up of your onyxx-bacnet to...
TRANSCRIPT

Onyxx® BACnet® to Haystack Data Pump USER GUIDE
Onyxx-BH311 Version 1.2.0

lynxspring.com
shop.lynxspring.com
1210 NE Windsor Drive Lee’s Summit, MO 64086 [email protected] 1 (877) 649-5969
© 2019 Lynxspring, Inc. All Rights Reserved Revised 1/10/2019
Onyxx-BH311-V1 Page 1 of 38
Table of Contents
INTRODUCTION ....................................................................................................... 2
LOGGING INTO THE PUMP ...................................................................................... 2
HOME TAB ............................................................................................................... 2
SETTINGS TAB ......................................................................................................... 4
General Settings and Basic Information for the Data Pump ............................................... 5 BACnet Settings .............................................................................................................. 5
Local Device General Information ................................................................................. 5 Collection Rates ........................................................................................................... 6
Haystack Settings ........................................................................................................... 7 TCP/IP Settings ............................................................................................................... 8 Utilities ............................................................................................................................ 9
Upgrade Firmware ....................................................................................................... 9 Change Admin Password ........................................................................................... 10 Backup and/or Restore a Device ................................................................................ 10
CONFIGURATION TAB ............................................................................................. 12
Discovering Devices and Points ..................................................................................... 13 Discover Button- Discovering Devices ........................................................................ 13 Discover Button—Discovering Points ......................................................................... 15 The View Details Button ............................................................................................. 16 The View Audit Button ............................................................................................... 18 Using Filters When Discovering Devices and Points .................................................... 18 The Add Button ......................................................................................................... 20
Adding Devices and Points to Haystack ......................................................................... 20 Adding a Single Instance of a Device .......................................................................... 20 Adding Multiple Instances of a Device......................................................................... 21 Adding a Single Instance of a Point ............................................................................ 23 Adding Multiple Instances of a Point ........................................................................... 26 Other Database Pane Functions ................................................................................. 28
Managing Haystack Information ..................................................................................... 29 Creating Sites ............................................................................................................ 29 Modifying Existing Sites .............................................................................................. 31 Deleting an Existing Site ............................................................................................. 31 Creating Custom Tags ............................................................................................... 32 Removing Custom Tags ............................................................................................. 33 Moving Devices ......................................................................................................... 33 Moving Points ............................................................................................................ 35 Other Haystack Pane Functions ................................................................................. 36
lynxspring.com
shop.lynxspring.com
1210 NE Windsor Drive Lee’s Summit, MO 64086 [email protected] 1 (877) 649-5969
© 2019 Lynxspring, Inc. All Rights Reserved Revised 1/10/2019
Onyxx-BH311-V1 Page 2 of 38
INTRODUCTION The Onyxx® BACnet® to Haystack Data Pump allows for BACnet data to be converted into Haystack data following the Project-Haystack protocol. The Onyxx BACnet to Haystack Data Pump is built upon the Onyxx® platform and the user interface is accessible through a standard Web browser. A general understanding of the Onyxx platform is expected as this User Guide only covers the set-up of your Onyxx-BACnet to Haystack Data Pump.
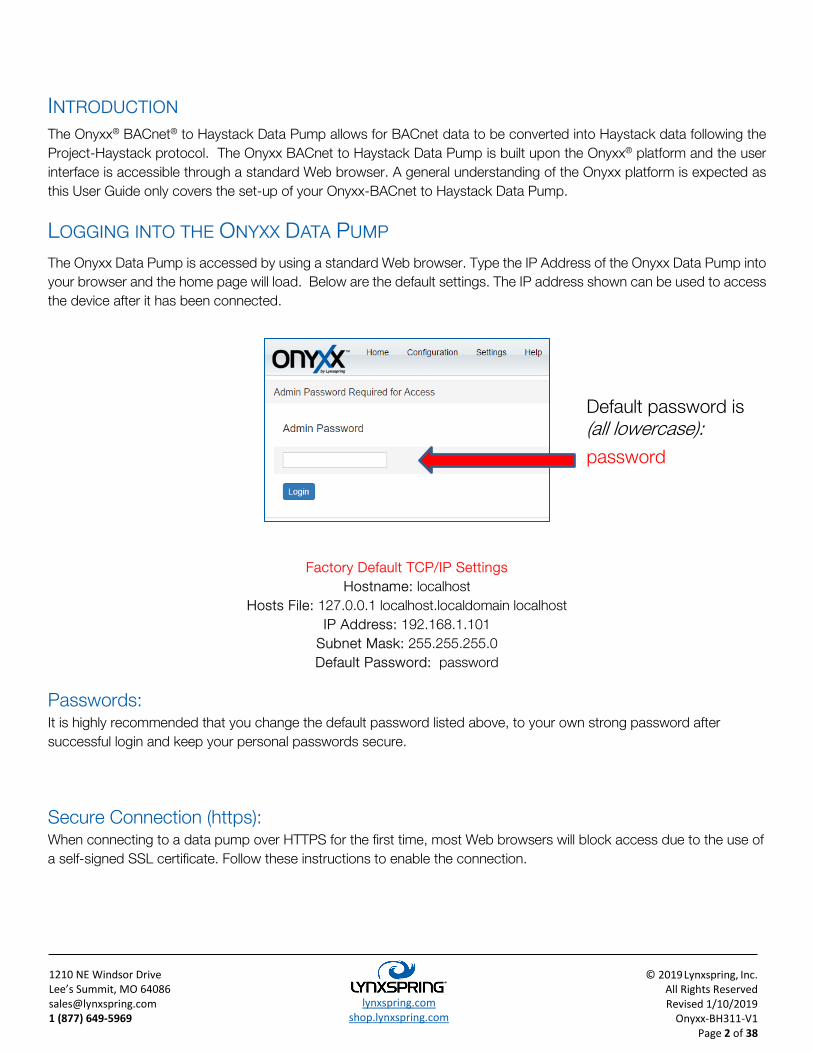
LOGGING INTO THE ONYXX DATA PUMP The Onyxx Data Pump is accessed by using a standard Web browser. Type the IP Address of the Onyxx Data Pump into your browser and the home page will load. Below are the default settings. The IP address shown can be used to access the device after it has been connected.
Factory Default TCP/IP Settings
Hostname: localhost Hosts File: 127.0.0.1 localhost.localdomain localhost
IP Address: 192.168.1.101 Subnet Mask: 255.255.255.0 Default Password: password
Passwords: It is highly recommended that you change the default password listed above, to your own strong password after successful login and keep your personal passwords secure.
Secure Connection (https): When connecting to a data pump over HTTPS for the first time, most Web browsers will block access due to the use of a self-signed SSL certificate. Follow these instructions to enable the connection.
Default password is (all lowercase):
password

lynxspring.com
shop.lynxspring.com
1210 NE Windsor Drive Lee’s Summit, MO 64086 [email protected] 1 (877) 649-5969
© 2019 Lynxspring, Inc. All Rights Reserved Revised 1/10/2019
Onyxx-BH311-V1 Page 3 of 38
1. Connect to your data pump via USB and navigate to https://192.168.7.2. You should receive a security warning:
2. Click “ADVANCED,” and then “Proceed to 192.168.7.2 (unsafe).”
3. Chrome will now allow you to access the data pump’s Web interface over HTTPS. The address bar will continue to show warnings, but all pages will function normally.

lynxspring.com
shop.lynxspring.com
1210 NE Windsor Drive Lee’s Summit, MO 64086 [email protected] 1 (877) 649-5969
© 2019 Lynxspring, Inc. All Rights Reserved Revised 1/10/2019
Onyxx-BH311-V1 Page 4 of 38
HOME TAB The Home Tab is the device landing area. It provides general information for the other pages that can be accessed. Below (Figure 1) is a screen shot of the landing page:
Figure 1
SETTINGS TAB This page is used to change/modify information or settings that the device will use. When the screen is first opened you will see the following:
Figure 2
Navigate to the sub-tab where modifications are needed and click on it to open that tab. If any changes have been made to any settings tab and you try to navigate away without saving those changes, you will be prompted for how the changes should be handled. Click the button that best describes your intentions to continue.
Figure 3

lynxspring.com
shop.lynxspring.com
1210 NE Windsor Drive Lee’s Summit, MO 64086 [email protected] 1 (877) 649-5969
© 2019 Lynxspring, Inc. All Rights Reserved Revised 1/10/2019
Onyxx-BH311-V1 Page 5 of 38
General Settings and Basic Information for the Data Pump
Figure 4
1. Time–Set the time, date, and time zone for this device. 2. Use Local Time–instead of manually entering the time, you can set the time to the connected PC’s local time with
one click of a button. Double check the TIME ZONE section to ensure it is correct. 3. Site Information–This is the DEFAULT site information. 4. Miscellaneous–Set the Debug level for this device to Error, Message, or Trace.
Once the changes have been made, click the SAVE button.
BACnet Settings
This section contains various BACnet settings that can be modified including: Local Device and Collection Rates.
Figure 5

lynxspring.com
shop.lynxspring.com
1210 NE Windsor Drive Lee’s Summit, MO 64086 [email protected] 1 (877) 649-5969
© 2019 Lynxspring, Inc. All Rights Reserved Revised 1/10/2019
Onyxx-BH311-V1 Page 6 of 38
Local Device
• Name–Provided so the user can give the device a specific descriptive name. (i.e. 3rd floor lighting) • Description–This area allows you to give a description for the device and its functions. • Object ID–To permit BACnet operations, you must reassign this to a valid, unique, device ID on the BACnet network.
(Range is from 0 to 4194302). • Apdu Segment Timeout–(default is 2000 ms) Defines the time to be delayed before retransmission of an APDU
segment (only relevant if devices are doing segmentation). • Apdu Timeout–(default is 2000 ms) Defines the time to be delayed before retransmission of an APDU segment (only
relevant if devices are doing segmentation). • Number of Apdu Retries–(default is 2000 ms) Defines the time to be delayed before retransmission of an APDU
segment (only relevant if devices are doing segmentation). • IP
o Enabled–Enables IP o UDP Port–Enables communication on an additional UDP port
• MS/TP o Enabled–Enables MS/TP o Baud Rate–The speed at which the BACnet devices communicates o Address–The BACnet link-layer protocol used by lower-cost devices, this uses master slave/token passing
over RS-485 multi-drop networks. QNX-based JACEs support direct MS/TP (network) trunks, one per RS-485 port (if licensed for MS/TP).
**Typically, you leave the MS/TP Address at 0 (the default), and verify that no other MS/TP device on the trunk is addressed the same. If there is ever a lost token, the device with the lowest MAC address regenerates the token (and in this case it will be the station).
o Max Master–Set Max Master to the highest known master device on the network, with possible room for expansion if needed.
o Max Info Frames–This property controls how many messages are sent before passing the token, and may be increased up to 50 to increase performance in some cases.
o Support Extended Frames–description of Support Extended Frames • Ethernet
o Enabled–select to enable Ethernet
Collection Rates This section will determine the rate that the BACnet devices are polled. You can specify the rate you prefer for each section (Fast, Normal and Slow).
It must be a minimum of 15 seconds and maximum of 24 hours.
Figure 6
Once this information has been modified (if needed), click SAVE.

lynxspring.com
shop.lynxspring.com
1210 NE Windsor Drive Lee’s Summit, MO 64086 [email protected] 1 (877) 649-5969
© 2019 Lynxspring, Inc. All Rights Reserved Revised 1/10/2019
Onyxx-BH311-V1 Page 7 of 38
Discovery Parameters In the discovery parameters section, you set the default discovery parameters for the BACnet discovery process. In this section, you set the default LowID, HighID, Network(s), and Timeout that will be used for each BACnet discovery. You can over-ride these values on the discover page using the DISCOVERY PARAMETERS button on that page.
Haystack Settings
This section allows you to change the advanced settings for the Onyxx BACnet to Haystack Data Pump.
Figure 7
PLEASE NOTE: Haystack Projects are Case Sensitive
Below is a description of the modifiable areas: • URI–Pushes history data. Connection can utilize SSL via HTTPS instead of HTTP
o Skyspark Structure http(s)://<url:port>/api/<projectName> Example: http://yourSiteHere:8080/api/MyProjectName/
o Connexxion Structure http(s)://cd.<url:port>/<projectName>/haystack/ Example: http://cd.yourSiteHere:8080/MyProjectName/haystack/
• Project–Project name on the Haystack site (for reference only). To successfully connect to your Haystack project, be sure to include it in the URI)
• User–User name on the Haystack site • Password–User password on the Haystack site • Test Haystack Connection Button: Once you have filled in all the connection information for your Haystack
server, and you have saved that information using the SAVE button, you can then TEST your connection to the Haystack server by clicking on the TEST HAYSTACK CONNECTION button. A message on-screen will tell you if the connection is successful or not successful.
• Data Push (Red Box) –Set the time or frequency for pushing the history data to the Haystack server. o Enabled–Allows data to be pushed to a server o Push Rate–Specifies the frequency of which data is pushed to the Haystack server
(pushed multiple times/day) o Push Time–Specifies the time of day for which data will be pushed to the Haystack server
(pushed only 1 time/day)

lynxspring.com
shop.lynxspring.com
1210 NE Windsor Drive Lee’s Summit, MO 64086 [email protected] 1 (877) 649-5969
© 2019 Lynxspring, Inc. All Rights Reserved Revised 1/10/2019
Onyxx-BH311-V1 Page 8 of 38
TCP/IP Settings This section allows you to change the TCP/IP settings for this Onyxx BACnet to Haystack Data Pump:
Figure 8
Below is a description of the modifiable areas: • TCP/IP Settings
o Hostname - A unique name for the Data Pump on the network. *Required o Hosts file - Stores the information about where to find a node on a computer network. This file maps
hostnames to IP addess.* Required o DNS Domain - Domain this Data Pump is associated with (if any). o DHCP Enabled - Disabled if this interface has a static IP address. o IP Address - The Internet Protocol Address for this device. o Subnet Mask - Determines which subnet(s) this interface can communicate with. o Gateway - Defines the gateway IP address to connect to an external LAN/WAN
(i.e. the World-Wide-Web).
• DNS Servers o DNS Server 1 - Server to use for domain name resolution. o DNS Server 2 - Backup server for domain name resolution.
Again, once all information is entered, ensure changes/modifications are saved by clicking SAVE.

lynxspring.com
shop.lynxspring.com
1210 NE Windsor Drive Lee’s Summit, MO 64086 [email protected] 1 (877) 649-5969
© 2019 Lynxspring, Inc. All Rights Reserved Revised 1/10/2019
Onyxx-BH311-V1 Page 9 of 38
Utilities This section allows you to upgrade your firmware, change the admin password, and backup or restore your device.
Upgrade Firmware To upgrade your firmware, you will first need an upgrade file. Once this file is stored on your computer, perform the following steps.
1. Click the CHOOSE FILE button.
Figure 9
2. From the choose file dialog, navigate to your stored upgrade file and click OPEN.
Figure 10
3. Once the file has been chosen, click the UPGRADE FIRMWARE buttons to upgrade your device.
Figure 11

lynxspring.com
shop.lynxspring.com
1210 NE Windsor Drive Lee’s Summit, MO 64086 [email protected] 1 (877) 649-5969
© 2019 Lynxspring, Inc. All Rights Reserved Revised 1/10/2019
Onyxx-BH311-V1 Page 10 of 38
Change Admin Password Changing the admin password is a simple process of entering the current password, and then typing the new password twice. Once this is done, you will click SUBMIT NEW PASSWORD. This will verify that the two new passwords match and will then upgrade the admin user to this new password.
Figure 12
Backup and/or Restore a Device
Backup
To back up a file, click BACKUP. This will produce a backup file and place it in your download folder. It is suggested that this file be moved from this folder into a folder of your choosing.
Figure 13
lynxspring.com
shop.lynxspring.com
1210 NE Windsor Drive Lee’s Summit, MO 64086 [email protected] 1 (877) 649-5969
© 2019 Lynxspring, Inc. All Rights Reserved Revised 1/10/2019
Onyxx-BH311-V1 Page 11 of 38
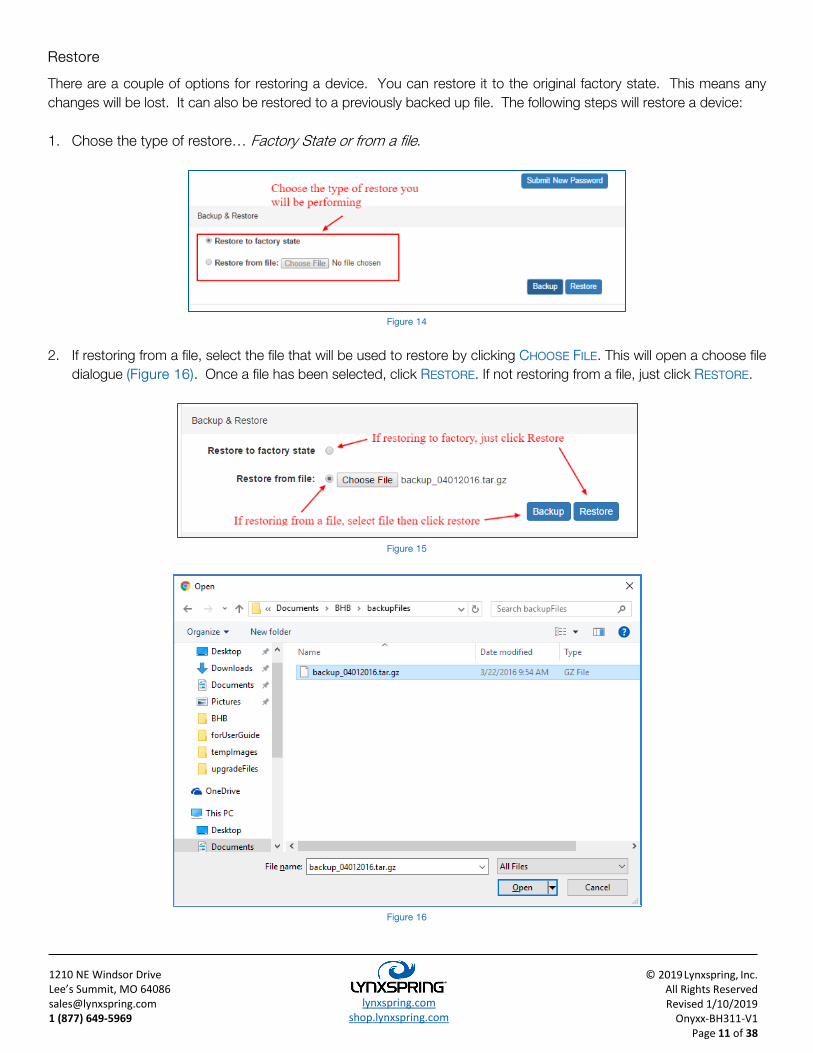
Restore
There are a couple of options for restoring a device. You can restore it to the original factory state. This means any changes will be lost. It can also be restored to a previously backed up file. The following steps will restore a device:
1. Chose the type of restore… Factory State or from a file.
Figure 14
2. If restoring from a file, select the file that will be used to restore by clicking CHOOSE FILE. This will open a choose file
dialogue (Figure 16). Once a file has been selected, click RESTORE. If not restoring from a file, just click RESTORE.
Figure 15
Figure 16

lynxspring.com
shop.lynxspring.com
1210 NE Windsor Drive Lee’s Summit, MO 64086 [email protected] 1 (877) 649-5969
© 2019 Lynxspring, Inc. All Rights Reserved Revised 1/10/2019
Onyxx-BH311-V1 Page 12 of 38
Settings Page Under Utilities
System Logs—allows the user to generate a report of the device usage and interactions with its environment.
1. Click DOWNLOAD LOG FILES. 2. This will allow you to open Finder and access the contents of this file.
Figure 17
System Status—shows a page displaying the system status.
Last time device booted Status of internet access Status of Haystack access Last time histories were pushed File system name Space used Space available Percentage of system used Push errors (if applicable)
HELP TAB
This page is a quick reference for definitions of terms used on the SETTINGS page.
CONFIGURATION TAB This page is used for the following:
1. Discovery of the BACnet devices and points 2. Selecting the devices and points needed, allowing them to be moved to the database 3. Adding devices and points from the database to the Haystack Data Pump
Figure 18 displays a screenshot of this page when it first loads:
Figure 18

lynxspring.com
shop.lynxspring.com
1210 NE Windsor Drive Lee’s Summit, MO 64086 [email protected] 1 (877) 649-5969
© 2019 Lynxspring, Inc. All Rights Reserved Revised 1/10/2019
Onyxx-BH311-V1 Page 13 of 38
Note: This page has slider bars that allow the different section to be enlarged or constricted. The red arrows (above) show the locations. All you need to do is click and then drag the direction needed. Increasing the area of one section decreases the area of another.
Discovering Devices and Points
In the Discovery section of the settings page you will find a button named DISCOVER. This button is used to load devices and points so they can be added to the database and tagged for Haystack.
Discover Button—Discovering Devices
To discover devices you need to click DISCOVER. Notice this will change the status to DISCOVERING DEVICES (see Figure 20). NOTE: Device discovery is dependent on return messages. The speed at which devices provide this message varies. By default, device discovery runs for 10 seconds and then displays the devices that have been identified. The run time for discovery can be altered using the discovery parameters option (see below). You can stop the device at any time by pressing the CANCEL button, and the devices that have been discovered so far, will be displayed in the Discovery panel.
Figure 19
Once the device discovery has finished you should see a page similar to Figure 20.
Figure 20

lynxspring.com
shop.lynxspring.com
1210 NE Windsor Drive Lee’s Summit, MO 64086 [email protected] 1 (877) 649-5969
© 2019 Lynxspring, Inc. All Rights Reserved Revised 1/10/2019
Onyxx-BH311-V1 Page 14 of 38
Notice the two red arrows pointing to the + signs (Figure 20). These are used to display discovered points under the
devices. To change the device discovery settings go to the SETTINGS page and open the BACnet tab. You can set the length of the device discovery by setting the timeout, specify which networks to run device discovery on, and specify a low and high range of device IDs.
Parameter Button
Figure 21
The Parameter button is used to establish your device settings. 1. Low – Allows you to set your lowest device instance number. 2. High – Allows you to set your highest device instance number. 3. Nets – Specifies which network you would like to run device discovery on. 4. Timeout – The default is set to 10 seconds, you can change this to either allow for more time to discover devices or you can decrease the time allowed.
Details the options associated with the parameter button.
Figure 22
Associating devices and network allows for you to either single out or include a device or a range of devices.
Figure 23

lynxspring.com
shop.lynxspring.com
1210 NE Windsor Drive Lee’s Summit, MO 64086 [email protected] 1 (877) 649-5969
© 2019 Lynxspring, Inc. All Rights Reserved Revised 1/10/2019
Onyxx-BH311-V1 Page 15 of 38
Discover Button—Discovering Points
To discover points, you will need to click the + (Figure 20) icon next to the device in which the points are located. After
a brief pause, your page will load points and look similar to the figure below. The red ellipse in Figure 24 shows points discovered under a device.
Note: It is possible for a device to be discovered that has no points.
Figure 24
At the very bottom of the Discovery section there are 2 buttons, ADD, and VIEW AUDIT. They are shown in the red ellipse in Figure 25.
Figure 25

lynxspring.com
shop.lynxspring.com
1210 NE Windsor Drive Lee’s Summit, MO 64086 [email protected] 1 (877) 649-5969
© 2019 Lynxspring, Inc. All Rights Reserved Revised 1/10/2019
Onyxx-BH311-V1 Page 16 of 38
The View Details Button
This button will produce a new window that will show information about the device, or the point that was selected.
Device Details:
1. Click the line of the device you want details (should be highlighted). 2. Click VIEW DETAILS.
Figure 26
Following the above steps will produce a window similar to Figure 27.
Click the X button in upper right to close this window.
Figure 27

lynxspring.com
shop.lynxspring.com
1210 NE Windsor Drive Lee’s Summit, MO 64086 [email protected] 1 (877) 649-5969
© 2019 Lynxspring, Inc. All Rights Reserved Revised 1/10/2019
Onyxx-BH311-V1 Page 17 of 38
Point Details: 1. Click the line of the point you want details about. (The device and point lines will be highlighted)
2. Click VIEW DETAILS.
Figure 28
Following the above steps will produce a window similar to Figure 29.
Click the X button in upper right to close this window.
Figure 29

lynxspring.com
shop.lynxspring.com
1210 NE Windsor Drive Lee’s Summit, MO 64086 [email protected] 1 (877) 649-5969
© 2019 Lynxspring, Inc. All Rights Reserved Revised 1/10/2019
Onyxx-BH311-V1 Page 18 of 38
The View Audit Button
This button will produce a window that will show a log file for recent executions. See Figure 30 for an example of this
window. Close this window by clicking the X in the upper right corner.
Figure 30
Sorting Devices and Points
Each of the column heads of the devices and points lists can be clicked to change the sort order for the items in the list.
Figure 30A
Using Filters When Discovering Devices and Points
Filters can be used on point names and units to have those that do not match any of the filtering criteria removed from the discovered points. Additionally, devices with points that meet the filtering criteria will float to the top of the list of devices. The points must be discovered under the device before this will work. This function is not case sensitive and will filter all occurrences of the string that is specified. Filters are applied first on the point’s name and then on the point’s
unit. Removing the filter is as simple as clicking the X on the filter’s icon in the filters list. Below is a screenshot before applying any filter:
Figure 31

lynxspring.com
shop.lynxspring.com
1210 NE Windsor Drive Lee’s Summit, MO 64086 [email protected] 1 (877) 649-5969
© 2019 Lynxspring, Inc. All Rights Reserved Revised 1/10/2019
Onyxx-BH311-V1 Page 19 of 38
Filters are created by typing the text to be filtered into the textbox and then clicking the + icon.
Figure 32
Screenshot with filter of ENUM applied… Notice how the points with ENUM in the name have floated to the top of the list.
Figure 33
Screen shot with filters of ENUM and A… Notice how the points with ENUM in its name AND A in its name or in its Units have floated to the top of the list.
Figure 34

lynxspring.com
shop.lynxspring.com
1210 NE Windsor Drive Lee’s Summit, MO 64086 [email protected] 1 (877) 649-5969
© 2019 Lynxspring, Inc. All Rights Reserved Revised 1/10/2019
Onyxx-BH311-V1 Page 20 of 38
The Add Button
This button is used to add devices and points to the Database/Haystack. Devices and points will be added to the default site and can be moved to other sites as needed. To create additional sites, please see the Managing Haystack Information section of this User Guide for instructions.
Adding Devices and Points to Haystack
When devices and points are added to the database and Haystack, they are added to the default site. But once they have been added, they can be moved to sites as needed. Multiple instances of a device can be added by tagging it and then saving the new instance.
Adding a Single Instance of a Device
Follow these steps to get device information added to the database and Haystack:
1. Highlight the device line you wish to add. 2. Click ADD to add information to the database.
After clicking ADD, your selected device will appear as a line in your database (Figure 35, Item 3).
Figure 35

lynxspring.com
shop.lynxspring.com
1210 NE Windsor Drive Lee’s Summit, MO 64086 [email protected] 1 (877) 649-5969
© 2019 Lynxspring, Inc. All Rights Reserved Revised 1/10/2019
Onyxx-BH311-V1 Page 21 of 38
This action will add an additional device item to the Haystack default site (Figure 36, Item 5). To see the device in the Haystack you will need to expand the site by clicking the up triangle next to the site (4).
Figure 36
Adding Multiple Instances of a Device
To add multiple instances of a device to the Haystack, the following steps will need to be completed:
1. Find the device listed in the database and highlight the line that is found. 2. Click TAG.
Figure 37
In the window that opens, you will be asked to either OPEN the existing device or create a NEW device. To create a second instance of the same device you will need to click NEW.
Figure 38

lynxspring.com
shop.lynxspring.com
1210 NE Windsor Drive Lee’s Summit, MO 64086 [email protected] 1 (877) 649-5969
© 2019 Lynxspring, Inc. All Rights Reserved Revised 1/10/2019
Onyxx-BH311-V1 Page 22 of 38
3. The process of tagging brings the device information from the database into the Haystack Pane. The device information being displayed is not the same as what was loaded previously in the Haystack. The attributes will match those previously added. Changing the device information is covered later. To create this new instance(s), you will need to click SAVE in the Haystack Pane to get multiple instance(s) of the same device.
Figure 39
Once the save completes, you will find another instance of the same device.
Figure 40

lynxspring.com
shop.lynxspring.com
1210 NE Windsor Drive Lee’s Summit, MO 64086 [email protected] 1 (877) 649-5969
© 2019 Lynxspring, Inc. All Rights Reserved Revised 1/10/2019
Onyxx-BH311-V1 Page 23 of 38
Adding a Single Instance of a Point
Points can be added in two different ways and it is dependent on whether the device has already been added to Haystack.
Device Currently in Haystack
If the device the point is located on is currently in Haystack, the following steps will need to be completed to add the point.
1. First, you will need to discover the points under the device. This is done by clicking the + next to the device in the
Discovery Panel. If the device doesn’t auto expand, click the + again.
Figure 41
2. With the device expanded to show its points, click the line of point you want to add to Haystack. This will highlight the point.
3. Click ADD.
Figure 42

lynxspring.com
shop.lynxspring.com
1210 NE Windsor Drive Lee’s Summit, MO 64086 [email protected] 1 (877) 649-5969
© 2019 Lynxspring, Inc. All Rights Reserved Revised 1/10/2019
Onyxx-BH311-V1 Page 24 of 38
After clicking ADD, the point can be found under the device in the database pane (Figure 43) as well as under the device in the Haystack Pane (Figure 40)
Figure 43
Figure 44
Device Not Currently in Haystack
If the device the point is located on is NOT currently in Haystack, the device AND the point can be added by the following steps. (In this example, a device and point that was not previously added has been used.)
1. First, you will need to discover the points under the device. This is done by clicking the + next to the device in the
Discovery Panel. If the device doesn’t auto expand, click the + again.
Figure 45

lynxspring.com
shop.lynxspring.com
1210 NE Windsor Drive Lee’s Summit, MO 64086 [email protected] 1 (877) 649-5969
© 2019 Lynxspring, Inc. All Rights Reserved Revised 1/10/2019
Onyxx-BH311-V1 Page 25 of 38
2. With the device expanded to show its points, click the line of the point you want to add to Haystack. This will highlight the point.
3. Click ADD.
Figure 46
After clicking ADD, the point AND the device will be added to the database pane (Figure 47) as well as the Haystack Pane (Figure 48)
Figure 47
Figure 48
lynxspring.com
shop.lynxspring.com
1210 NE Windsor Drive Lee’s Summit, MO 64086 [email protected] 1 (877) 649-5969
© 2019 Lynxspring, Inc. All Rights Reserved Revised 1/10/2019
Onyxx-BH311-V1 Page 26 of 38
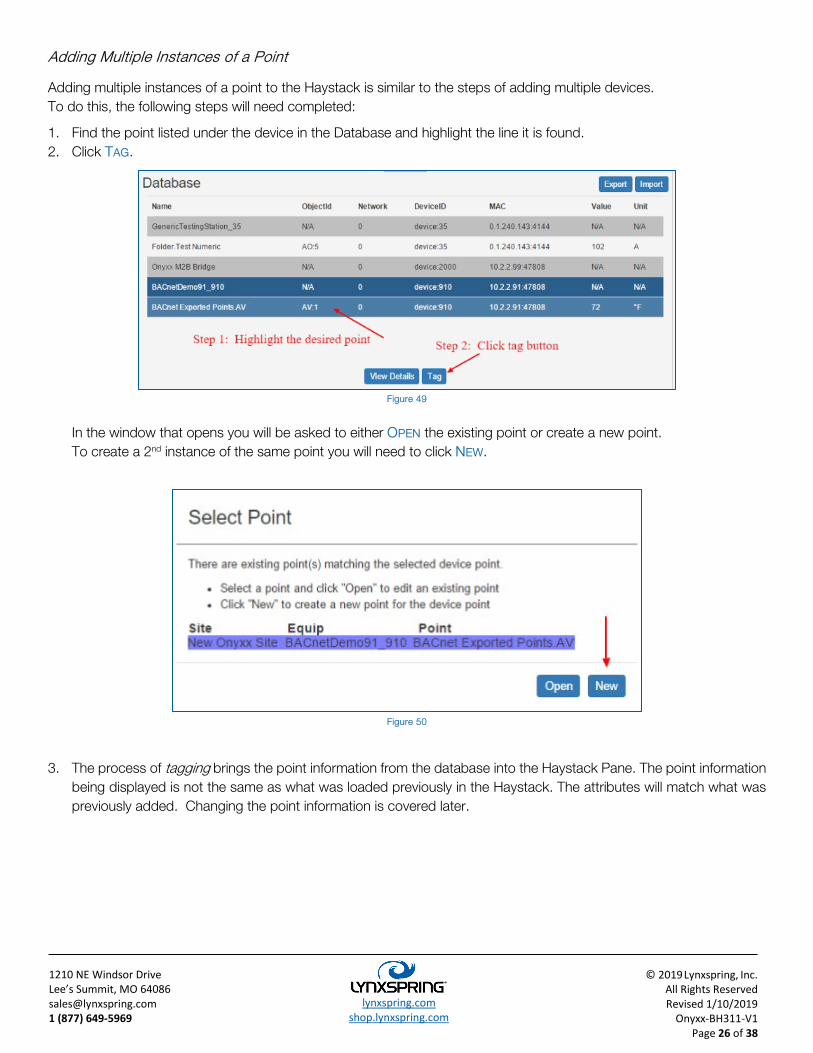
Adding Multiple Instances of a Point
Adding multiple instances of a point to the Haystack is similar to the steps of adding multiple devices. To do this, the following steps will need completed:
1. Find the point listed under the device in the Database and highlight the line it is found. 2. Click TAG.
Figure 49
In the window that opens you will be asked to either OPEN the existing point or create a new point. To create a 2nd instance of the same point you will need to click NEW.
Figure 50
3. The process of tagging brings the point information from the database into the Haystack Pane. The point information
being displayed is not the same as what was loaded previously in the Haystack. The attributes will match what was previously added. Changing the point information is covered later.

lynxspring.com
shop.lynxspring.com
1210 NE Windsor Drive Lee’s Summit, MO 64086 [email protected] 1 (877) 649-5969
© 2019 Lynxspring, Inc. All Rights Reserved Revised 1/10/2019
Onyxx-BH311-V1 Page 27 of 38
To create a new instance, you will still need to click SAVE in the Haystack Pane to get multiple instances of the same point.
Figure 51
Once the save completes, you will find another instance of the same point.
Figure 52

lynxspring.com
shop.lynxspring.com
1210 NE Windsor Drive Lee’s Summit, MO 64086 [email protected] 1 (877) 649-5969
© 2019 Lynxspring, Inc. All Rights Reserved Revised 1/10/2019
Onyxx-BH311-V1 Page 28 of 38
Other Database Pane Functions
Inside the database pane you have 2 options. You can view details of a device in the database or you can tag a device to have it added to the Haystack.
View Details
Similar to the discovery pane, clicking VIEW DETAILS will give you some basic information about the device or point that was highlighted.
Below is a screenshot of the information for a device:
Figure 53
Below is a screenshot of the information for a Point:
Figure 54
The Export Button
This will export all devices, points and the respective information from the database out to a comma separated value (.csv) file.
The Import Button
Functionality for this is expected in future releases. As such, this button currently does nothing.
lynxspring.com
shop.lynxspring.com
1210 NE Windsor Drive Lee’s Summit, MO 64086 [email protected] 1 (877) 649-5969
© 2019 Lynxspring, Inc. All Rights Reserved Revised 1/10/2019
Onyxx-BH311-V1 Page 29 of 38
Managing Haystack Information
The HAYSTACK section of the CONFIGURATION TAB is used to create and manage sites, to manage standard Project-Haystack tags, and to add additional Project-Haystack tags or custom tags.
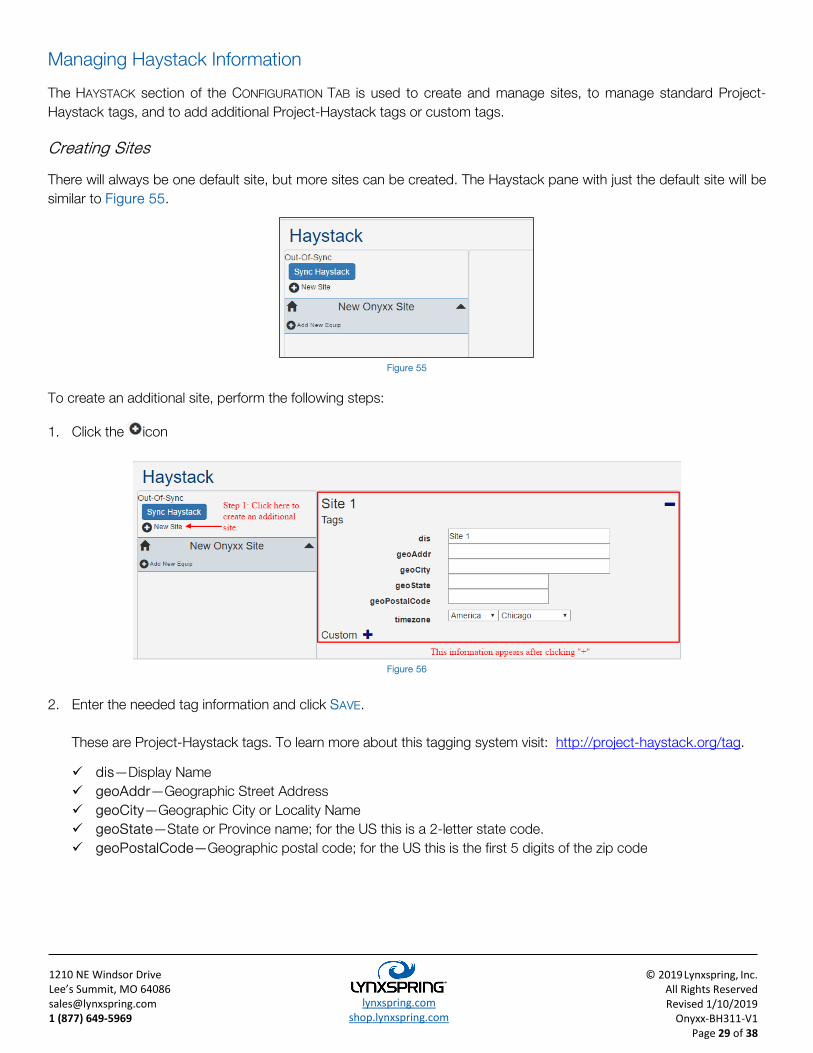
Creating Sites
There will always be one default site, but more sites can be created. The Haystack pane with just the default site will be similar to Figure 55.
Figure 55
To create an additional site, perform the following steps:
1. Click the icon
Figure 56
2. Enter the needed tag information and click SAVE. These are Project-Haystack tags. To learn more about this tagging system visit: http://project-haystack.org/tag.
dis—Display Name geoAddr—Geographic Street Address geoCity—Geographic City or Locality Name geoState—State or Province name; for the US this is a 2-letter state code. geoPostalCode—Geographic postal code; for the US this is the first 5 digits of the zip code

lynxspring.com
shop.lynxspring.com
1210 NE Windsor Drive Lee’s Summit, MO 64086 [email protected] 1 (877) 649-5969
© 2019 Lynxspring, Inc. All Rights Reserved Revised 1/10/2019
Onyxx-BH311-V1 Page 30 of 38
Figure 57
After the save has completed, you will find it added to the list of sites:
Figure 58

lynxspring.com
shop.lynxspring.com
1210 NE Windsor Drive Lee’s Summit, MO 64086 [email protected] 1 (877) 649-5969
© 2019 Lynxspring, Inc. All Rights Reserved Revised 1/10/2019
Onyxx-BH311-V1 Page 31 of 38
Modifying Existing Sites
Once a site has been created, modifications can be made to the values as needed. Just ensure you click SAVE after you have made the needed changes.
1. Click on the site where modifications are needed. This will bring up the sites Project-Haystack tag and time zone information.
2. Make any needed updates and ensure you click SAVE when done.
Figure 59
Deleting an Existing Site
A site can be easily removed. Click on the site that needs deleted and click the - icon in the upper right portion of this section. Confirmation of this action is needed because once it is done, it is permanent.
Figure 60

lynxspring.com
shop.lynxspring.com
1210 NE Windsor Drive Lee’s Summit, MO 64086 [email protected] 1 (877) 649-5969
© 2019 Lynxspring, Inc. All Rights Reserved Revised 1/10/2019
Onyxx-BH311-V1 Page 32 of 38
Creating Custom Tags
Other Custom Haystack tags can be created. Again, please refer to the http://project-haystack.org/tag website for more information on defined tags. To create custom tags, perform the following steps:
1. Click the + icon next to custom. This will bring up another dialog for you to enter information:
Figure 61
2. In this new dialog you can enter the name of the tag, the type of data the tag will hold, and the value of the tag.
Once finished, click the OK button.
The KIND section lets you choose from 11 different Project-Haystack kinds…. Marker, Boolean, Number, String, URI, Reference, Date, Time, DateTime, Binary Blob, and Coordinates.
Ensure values are entered following the format as is shown in light gray letters.
Figure 62
3. Once you finish entering all tags, click SAVE at the bottom on the Haystack panel.
Figure 63

lynxspring.com
shop.lynxspring.com
1210 NE Windsor Drive Lee’s Summit, MO 64086 [email protected] 1 (877) 649-5969
© 2019 Lynxspring, Inc. All Rights Reserved Revised 1/10/2019
Onyxx-BH311-V1 Page 33 of 38
Removing Custom Tags
When a custom tag is no longer needed, it can be removed by clicking the x to the right of the tag. Ensure you click
save after all changes have been made.
Figure 64
Moving Devices
To move a device that has been added to Haystack requires only changing the siteRef tag to that of the site that is desired. The site that the device is being moved to must have been created and shown in the Haystack pane. The following steps detail how to move a device to a new site:
1. In the Haystack pane, click the device that needs moved. In this example, we are moving “LYX-30P” from “New Onyxx Site” to “Brand New Site”:
Figure 65

lynxspring.com
shop.lynxspring.com
1210 NE Windsor Drive Lee’s Summit, MO 64086 [email protected] 1 (877) 649-5969
© 2019 Lynxspring, Inc. All Rights Reserved Revised 1/10/2019
Onyxx-BH311-V1 Page 34 of 38
2. Change the siteRef tag to the site the device should be listed under:
Figure 66
3. After the site has been selected, click SAVE.
Figure 67
After the save completes, the device and its points will be located under the updated site:
Figure 68

lynxspring.com
shop.lynxspring.com
1210 NE Windsor Drive Lee’s Summit, MO 64086 [email protected] 1 (877) 649-5969
© 2019 Lynxspring, Inc. All Rights Reserved Revised 1/10/2019
Onyxx-BH311-V1 Page 35 of 38
Moving Points
Points can be moved from one device (or instance of a device) to another device (or instance). The points being moved and the devices must have been added to Haystack.
The following steps detail how to move a point to a new device:
1. In the Haystack pane, click the point that needs moved. In this example we are moving “My New Object” from “New Virtual Device 1” to “bridge_2004”
Figure 69
Change the equipRef tag to the device the point needs listed under:
Figure 70

lynxspring.com
shop.lynxspring.com
1210 NE Windsor Drive Lee’s Summit, MO 64086 [email protected] 1 (877) 649-5969
© 2019 Lynxspring, Inc. All Rights Reserved Revised 1/10/2019
Onyxx-BH311-V1 Page 36 of 38
After the device has been selected, click SAVE.
Figure 71
2. After the save completes, the point will be located under the desired device:
Figure 72
Other Haystack Pane Functions Sync Haystack Button
The Sync Haystack button (Figure 73) is used to sync your Haystack device and point information to the haystack server specified in the Haystack section of the SETTINGS page.
Figure 73

lynxspring.com
shop.lynxspring.com
1210 NE Windsor Drive Lee’s Summit, MO 64086 [email protected] 1 (877) 649-5969
© 2019 Lynxspring, Inc. All Rights Reserved Revised 1/10/2019
Onyxx-BH311-V1 Page 37 of 38
Trademarks
Lynxspring®, JENEsys® and Onyxx® are registered trademarks of Lynxspring, Inc.
JENEsys Edge™ and Helixx® are trademarks of Lynxspring, Inc. Other brands and product names mentioned in this manual may be trademarks or registered trademarks of their respective companies and are hereby acknowledged.
Copyright Notice
Copyright © 2017, Lynxspring, Inc. All rights reserved. NOTICE: All information contained herein is, and remains the property of Lynxspring, Incorporated. The intellectual and technical concept contained herein are proprietary to Lynxspring, Incorporated and may be covered by U.S. and Foreign Patents, patents in process, and are protected by trade secret or copyright law. Dissemination of this information or reproduction of this material is strictly forbidden unless prior written permission is obtained from Lynxspring, Incorporated. This document contains proprietary information which is protected by copyright. No part of this document may be copied, photocopied, reproduced, translated, or converted to any electronic or machine-readable form in whole or in part without prior written approval of Lynxspring, Inc.
Disclaimer
NO WARRANTY. This technical documentation is being delivered to you AS-IS, and Lynxspring makes no warranty as to its accuracy or use. Any use of the technical documentation or the information contained therein is at the risk of the user. Documentation may include technical or other inaccuracies or typographical errors. Lynxspring reserves the right to make changes in this document without prior notice, and the reader should in all cases consult Lynxspring to determine whether any such changes have been made. The information in this publication does not represent a commitment on the part of Lynxspring. Lynxspring shall not be liable for incidental or consequential damages resulting from the furnishing, performance, or use of this material. This guide contains links and references to third-party websites that are not under the control of Lynxspring, and Lynxspring is not responsible for the content of any reference material or linked websites. If you access a third-party website mentioned in this guide, then you do so at your own risk. Lynxspring provides these links only as a convenience, and the inclusion of the link does not imply that Lynxspring endorses or accepts any responsibility for the content on those third-party sites.