user man
TRANSCRIPT
PyMOL User's Guide
written byWarren L. DeLano, Ph.D.
with assistance fromSarina Bromberg, Ph.D.
Copyright © 2004DeLano Scientific LLCAll Rights Reserved.

Table of ContentsCopyright Notice and Usage Terms..................................................................................................................1
Copyright Notice......................................................................................................................................1Terms of Usage for the PyMOL User's Manual......................................................................................1Trademarks..............................................................................................................................................1
Preface..................................................................................................................................................................2Why PyMOL?..........................................................................................................................................2Words of Caution.....................................................................................................................................2Strengths..................................................................................................................................................3Weaknesses..............................................................................................................................................3
Introduction.........................................................................................................................................................4Welcome to PyMOL!...............................................................................................................................4Is PyMOL Free Software?.......................................................................................................................4
Yes, but..............................................................................................................................................4The DeLano Scientific Mission...............................................................................................................4
Installation...........................................................................................................................................................6Windows..................................................................................................................................................6
Recommendations.............................................................................................................................6Minimal System Requirements.........................................................................................................6Python−Free Installation...................................................................................................................6Python−Dependent Installation.........................................................................................................6
MacOS X.................................................................................................................................................6Recommendations.............................................................................................................................7Minimial Requirements.....................................................................................................................7If you use Fink...................................................................................................................................7If you do not use Fink........................................................................................................................7
Linux and Unix........................................................................................................................................8System Requirements........................................................................................................................8Dependency−Free Approaches.........................................................................................................8Dependency−Based Approaches.......................................................................................................9
Getting Started with Mouse Controls.............................................................................................................10Launching..............................................................................................................................................10
Using the Mouse..............................................................................................................................10Using a Command Line...................................................................................................................10
PyMOL's Windows................................................................................................................................11The Viewer Window.......................................................................................................................11The External GUI Window.............................................................................................................12
Loading PDB Files.................................................................................................................................13Manipulating the View..........................................................................................................................13
Basic Mouse Control.......................................................................................................................13Virtual Trackball Rotation...............................................................................................................14Moving Clipping Planes..................................................................................................................16Changing the Origin of Rotation.....................................................................................................16Getting Comfortable........................................................................................................................17
i

Table of ContentsGetting Started with Commands.....................................................................................................................18
Recording Your Work (Optional)..........................................................................................................18Loading Data..........................................................................................................................................18Manipulating Objects.............................................................................................................................19
Atom Selections..............................................................................................................................19Coloring Objects and Selections.....................................................................................................21Turning Objects and Selections On and Off...................................................................................22
Changing Your Point of View..............................................................................................................23Saving Your Work.................................................................................................................................23
Scripts and Log Files.......................................................................................................................24png Files..........................................................................................................................................24Session Files....................................................................................................................................25
Command−Line Shortcuts.....................................................................................................................25Command Completion using TAB..................................................................................................26Filename Completion using TAB....................................................................................................26Automatic Inferences......................................................................................................................26
Other Typed Commands and Help.......................................................................................................27
Command Syntax and Atom Selections..........................................................................................................28Syntax....................................................................................................................................................28
Selection−expressions.....................................................................................................................28Named Atom Selections..................................................................................................................29Single−word Selectors.....................................................................................................................31Property Selectors............................................................................................................................31Selection Algebra............................................................................................................................34Atom Selection Macros...................................................................................................................35
Calling Python from within PyMOL.....................................................................................................37
Cartoon Representations..................................................................................................................................38Background............................................................................................................................................38
Accessibility....................................................................................................................................38Pretty and Correct............................................................................................................................38
Customization........................................................................................................................................41Cartoon Types.................................................................................................................................41Fancy Helices..................................................................................................................................44
Secondary Structure Assignment...........................................................................................................45
Ray−Tracing......................................................................................................................................................46Important Settings..................................................................................................................................46Saving Images........................................................................................................................................47
png...................................................................................................................................................47
Stereo..................................................................................................................................................................48Introduction............................................................................................................................................48Supported Stereo Modes........................................................................................................................48
Crosseye Stereo...............................................................................................................................48Walleye Stereo................................................................................................................................48Hardware Stereo..............................................................................................................................48
ii
Table of ContentsStereo
Generating Stereo Figures......................................................................................................................48
Movies................................................................................................................................................................49Concepts.................................................................................................................................................49
States and Frames............................................................................................................................49Important Commands To Know............................................................................................................49
load..................................................................................................................................................49mset.................................................................................................................................................49mdo..................................................................................................................................................50mmatrix...........................................................................................................................................50
Simple Examples...................................................................................................................................50Complex Examples................................................................................................................................51Previewing Ray−traced Movie Images..................................................................................................51
cache_frames...................................................................................................................................51mclear..............................................................................................................................................51
Saving movies........................................................................................................................................51mpng................................................................................................................................................52
Advanced Mouse Controls...............................................................................................................................53Picking Atoms and Bonds......................................................................................................................53Example Usage of the "pk" Atom Selections........................................................................................53The "lb" and "rb" Selections..................................................................................................................53Conformational Editing.........................................................................................................................54
Crystallography Applications..........................................................................................................................55Crystal Symmetry..................................................................................................................................55
load..................................................................................................................................................55symexp.............................................................................................................................................55
Electron Density Maps...........................................................................................................................56load..................................................................................................................................................56isomesh and isodot..........................................................................................................................56
Compiled Graphics Objects (CGOs) and Molscript Ribbons......................................................................57Introduction............................................................................................................................................57Molscript Ribbons..................................................................................................................................57
load..................................................................................................................................................57Using Molscript...............................................................................................................................57
Creating Compiled Graphics Objects....................................................................................................58CGO Reference......................................................................................................................................59
load_cgo..........................................................................................................................................59
Callback Objects and PyOpenGL...................................................................................................................61Introduction............................................................................................................................................61Example.................................................................................................................................................61
load_callback...................................................................................................................................62
iii

Copyright Notice and Usage Terms
Copyright Notice
The PyMOL User's Manual is Copyright © 1998−2004 DeLano Scientific LLC, San Carlos, California,U.S.A. All Rights Reserved.
Terms of Usage for the PyMOL User's Manual
This manual is NOT free. It is a PyMOL Incentive Product created to help you use the program while alsogenerating recurring sponsorship for the project. This manual is made available for evaluation via the "honor"system: You may evaluate this manual for a continuous period of up to one year without obligation. Ifyou wish to continue using this document beyond the end of the evaluation period, then you must become asponsor of the project by purchasing a PyMOL license and a subscription to maintenance and support fromDeLano Scientific LLC (http://www.delanoscientific.com).
Of course, if you are willing to sponsor the project today, then please don't wait a full year to start. The sooneryour sponsorship comes in, the sooner we can apply it to improve the software and documentation!
Existing PyMOL subscribers may use this manual for no additional cost. However, subscribers who do notrenew their subscription upon expiration must discountinue use of this and all other PyMOL IncentiveProducts. Though we have no direct means of enforcing this, we ask, in recognition of our declared scientificmission, that you honor the trust placed in you.
PyMOL users who are unable to sponsor the project by purchasing a PyMOL license and maintenancesubscription are welcome to use Open−Source versions of PyMOL and any free documentation that can befound on the internet.
Trademarks
PyMOL, DeLano Scientific, and the DeLano Scientific Logo are trademarks of DeLano Scientific LLC.Macintosh is a registered trademark of Apple Computer Inc., registered in the U.S. and other countries.Windows is a registered trademark of Microsoft Corporation in the U.S. and other countries. Linux is atrademark of Linus Torvalds. Unix is a trademark of The Open Group in the U.S. and other countries.MolScript is a trademark of Avatar Software AB. All other trademarks are the property of their respectiveowners.
This chapter last updated June 2004 by Warren L. DeLano, Ph.D.
Copyright © 2004 DeLano Scientific LLC. All rights reserved.
Copyright Notice and Usage Terms 1

Preface
Why PyMOL?
PyMOL is one lone scientist's answer to the frustration he encountered with existing visualization andmodeling software as a practicing computational scientist.
Anyone who has studied the remarkable complexity of a macromolecular structure will likely agree thatvisualization is essential to understanding structural biology. Nevertheless, most researchers who usevisualization packages ultimately run up against limitations inherent in them which make it difficult orimpossible to get exactly what you need. Such limitations in a closed−source commercial software packagecannot be easily surmounted, and the same is still true for free programs which aren't available in source form.
Only open−source software allows you to surmount problems by directly changing and enhancing the waysoftware operates, and it places virtually no restrictions on your power and opportunity to innovate. For thesereasons, we believe that open−source software is an intrinsically superior research product and willprovide greatest benefit to computer−assisted scientific research over the long term.
Launched over Christmas break in December 1999, PyMOL was originally designed to: (1) visualize multipleconformations of a single structure [trajectories or docked ligand ensembles] (2) interface with externalprograms, (3) provide professional strength graphics under both Windows and Unix, (4) prepare publicationquality images, and (5) fit into a tight budget. All of these goals have since been realized. Although PyMOL isfar from perfect and lacks such desirable features such as a general "undo" capacity, it now has many usefulcapabilities for the practicing research scientist. We hope that you will find PyMOL to be a valuable tool foryour work, and we encourage you to let us know what ideas you have for making it even better.
Words of Caution
About the Manual: This version of the manual has been updated for PyMOL version 0.86 (January 2003) butis still quite rough. Prepare yourself for omissions, errors, and potentially obsolete information. Make aninformed decision to use the PyMOL manual at your own risk. Understand that thiss same caution applies tothe program as a whole −− you shouldn't be using PyMOL if you aren't willing to troubleshoot problems andtake the initiative on the mailing list in order to discover solutions.
About the program: PyMOL was created in an efficient but highly pragmatic manner, with heavy emphasison delivering powerful features to end users. Expediency has almost always taken precedence over elegance,and adherence to established software development practices is inconsistent. PyMOL is about getting the jobdone now, as fast as possible, by whatever means were available. PyMOL succeeds in meeting importantneeds today, but we view it as merely an initial step in a promising direction.
In time, we hope that we and others will follow by creating PyMOL−like software platforms which meet theneeds of users but also provides the design rigor and code quality necessary to enable broad participation ofoutside developers. Though PyMOL will undoubtably continue to expand and improve over the next decade,we expectd that its long term impact will primarily be to inspire other development efforts having more timeand resources, and which will undoubtable achieve greater heights.
That isn't to say that you can't find good things about PyMOL's internal design. Indeed, we believe that thereare many successful and instructive aspects to the program. However, we just hope to appropriately calibrateyour expectations with respect to the code you will find if you with to "dive under to hood". Though the
Preface 2

program is Open−Source, it is best thought of as a dense, semi−opaque tool, best extended through Pythonrather than as a C coding environment in which to embed new technologies.
Strengths
Cross−Platform. A single code base supports both Unix, Macintosh, and Windows, using OpenGLand Python and a small set of Open−source external dependencies.
•
Command−Line and GUI Control Real world applications require both.• Atom Selections. Arbitrary logical expressions facilitate focused visualization and editing.• Molecular Splits/Joins. Structures can be sliced, diced, and reassembled on the fly and written out tostandard files (i.e. PDB).
•
Movies. Creating movies is as simple as loading multiple PDB files and hitting play.• Surfaces. As good if not better than Grasp, and mesh surfaces are supported too.• Cartoon Ribbons. PyMOL's cartoons are almost as nice as Molscript but are much easier to createand render.
•
Scripting. The best way to control PyMOL is through reusable scripts, which can be written in thecommand language or in Python.
•
Rendering. A built−in ray tracer gives you shadows and depth on any scene. You also renderexternally.
•
Output. PNG files output from PyMOL can be directly imported into PowerPoint.• Conformational Editing. Click and drag interface allows you to edit conformations naturally.Sculpting allows the molecule to adapt to your changes.
•
Expandability. The PyMOL Python API provides a solid way to extend and interface.•
Weaknesses
User Interface. Development has been focused on capabilities, not on easy−of−use for new users.• Documentation. Only recently has any documentation become available.• Object−Orientation. There is a single monolithic, functional API.• Electrostatics. PyMOL is not yet a replacement for Delphi/Grasp.• No Mechanics Engine Although PyMOL sports potent molecular editing features, you can't yetperform any "clean−up".
•
This chapter last updated January 2004 by Warren L. DeLano, Ph.D.
Strengths 3
Introduction
Welcome to PyMOL!
Over the years, PyMOL has become a capable molecular viewer with support for animations, high−qualityrendering, crystallography, and other common molecular graphics activities. It has been be adopted by manyhundreds (perhaps even thousands) of scientists spread over thirty countries. However, PyMOL is still verymuch a work in progress, with development expected to continue for years to come.
Is PyMOL Free Software?
Yes, but...
PyMOL is Copyrighted software that is Free for all parties to use, modify, and redistribute. Because ofPyMOL's unusual status, you can be confident that the time you invest today in learning the package willprovide you with long term utility no matter where your career happens to takes you. You will never berequired to pay software license fees in order to use Open−Source PyMOL or to share it with others whomight find it useful.
Nevertheless, PyMOL is not free to develop, document, maintain, and support. If you decide to adopt thepackage, then you are asked and expected to contribute to the project in some manner. Although suchcontributions may take a variety of forms, most PyMOL supporters choose to sponsor the project bypurchasing (usually through their school or employer) a license and a renewable subscription to maintenanceand support. All such contributions are entirely volutary since we have intentionally abandoned the usualmeans of compelling compliance. Instead, we depend on your free will to provide vital funding fordevelopment and to cover other necessary expenses. In return, we provide specific incentives (called IncentiveProducts) as a reward for helping to fund the project. Example incentive products include this manual, extrafeatures, enhanced platform−specific binary versions, and various other conveniences
Please take this request seriously. If you value PyMOL, then it is clearly in your interest to sponsor it. To findout how to donate or to purchase a license, visit the PyMOL web site at http://www.pymol.org
The DeLano Scientific Mission
DeLano Scientific LLC is a private vision−centered software company which owns, develops, and supportsthe PyMOL package. Our mission as a commercial entity is to create highly effective tools for scientificresearch and to distribute them as broadly as possible while still succeeding as a healthy business. As a"boot−strapped" company, DeLano Scientific is not beholden to any outside investors who would insist uponmaximum returns on investment. Thus, we have the rare privilege of being able to place Scientific andMedical Progress ahead of Profit in our hierarchy of values.
We have chosen a free and open−source approach for PyMOL because we believe this strategy will have thegreatest positive impact on humanity. Visualization is key part of understanding the nature of life at themolecular level, and powerful visualization tools need to be universally available to all students and scientistsif we are to make rapid progress in biomedical research. If PyMOL is successful, then we hope to expand thescope of our endeavors to meet other critical research needs in related areas.
Introduction 4

Growth of the DeLano Scientific will depend entirely on the willingness of PyMOL users to adopt, nuture,and advocate for our volitional approach to software funding. Eventually, we hope to evolve into a majorprovider of scientific software for biomedical research and be distinguished by the quality, openness, andaccessibility of our products, the trusting and nonexploitive relationships we form with our customers, and ourwillingness to work with all parties in advancing scientific software technologies.
This chapter last updated June 2004 by Warren L. DeLano, Ph.D.
Introduction 5

Installation
Windows
Recommendations
Windows 2000 or XP.• A late−model 3D OpenGL compatible graphics accelerator card from nVidia, ATI, 3Dlabs or similar.• 512 MB RAM (768 MB or 1 GB preferred).• 3 Ghz Pentium 4 processor or similar.•
Minimal System Requirements
Windows 98 and ME, or later. PyMOL will not run on Windows 95 and NT.• 3D OpenGL compatible graphics accelerator card.• 256 MB RAM.• 500 Mhz Pentium 3 processor.•
Unless you have prior experience with Python, we recommend installing a version of PyMOL which does notrequire an external Python interpreter. Avoid versions of which contain "−py21", "−py22", "−py23" or similarin the filename.
Python−Free Installation
Download the ".zip" format archive. For example,
pymol−0_90−bin−win32.zip
1.
Extract the .zip file using WinZip (Windows XP can open .zip files directly).2. Double click on the "Setup" or "Setup.exe" icon in the folder.3. Answer the questions which follow.4.
You can now launch PyMOL from the Start menu.
Python−Dependent Installation
If you already have Python installed and wish to use PyMOL with that interpreter, the process is virtuallyidentical. The only difference is that you need to download a version of PyMOL which matches your desiredPython version in the filename. For example:
pymol−0_90−bin−win32−py22.zip would work with
Python−2.2.2.exe available fromhttp://www.python.org.
MacOS X
Installation 6
Recommendations
Mac OS 10.2.x or 10.3.x.• Dual 2.0+ Ghz G5 system.• GeForce4 or Radeon 9x00 OpenGL accelerator.• 1 GB of RAM.•
Minimial Requirements
Mac OS X 10.2.x• Single 833 Mhz G4 system (will run on less, but performance is poor).• 3D OpenGL graphics acceleration.• 512 MB of RAM (1 GB recommended).•
If you use Fink
PyMOL is part of the Fink ports collection.
sudo −sapt−get pymol install
should be sufficient to get a functioning instance on your system. However, it may not be the most recentversion. We also highly recommend installation of Apple's X Server, which enables PyMOL to access youraccelerated graphics hardware.
If you do not use Fink
Option 1: MacPyMOL
At the request of various Macintosh users, as well as Apple itself, we have created MacPyMOL, a specialnative Aqua version of PyMOL for the Macintosh. The latest version of MacPyMOL can be downloaded fromhttp://delsci.com/macpymol.
However, note that this version is an Incentive Product only available to PyMOL sponsors (but students andteachers are exempt from this requirement). For more information on MacPyMOL, [email protected].
Option 2: PyMOL X11 Hybrid
This version of PyMOL includes a native Aqua−based OpenGL window and an X11−based Tcl/Tk externalGUI (graphical user interface). Before launching the PyMOL X11 Hybrid, you must have Apple's X11 serverinstalled and launched. The advantage of using this version is that it is fully compatible with Open−SourcePyMOL, and does not require Fink. However, unlike MacPyMOL, this version does not support direct exportof QuickTime movies. This binary build is free, but not Open−Source.
Download the "pymol−0_XX−bin−osx−x11−hybrid.dmg.gz" compressed disk image.1. Extract the archive and mount the disk image.2. Copy the "PyMOLX11Hybrid" folder to the main Applications folder on your hard disk.3.
You can then launch PyMOLX11Hybrid by double−clicking on the PyMOLX11Hybrid icon.
Recommendations 7

Linux and Unix
System Requirements
3D OpenGL graphics acceleration.•
There are a several different ways to install PyMOL on Linux. Please consult the PyMOL Web Site foradditional information.
Dependency−Free Approaches
These do not require installing any other packages in a privileged location on your system. All you need to dois download a "tar"−ball appropriate for your system, such as the following:
pymol−0_93−bin−linux−libc6−i386.tgz (for Linux)• pymol−0_93−bin−irix65−r10k.tgz (for SGI)• pymol−0_93−bin−solaris8−sun4u.tgz (for Solaris)•
issue the following commands
gunzip < pymol−...−bin−...−.tgz | tar −xvf −./setup.sh
which will install the program, and then
./pymol.com
will launch PyMOL. You may then want to make a symbol link for this file to ~/bin/pymol for easylaunching.
ln −s $PWD/pymol.com ~/bin/pymol
Install a minimal dependency binary build.
Compile PyMOL from source along with the "ext" dependencies distribution.
Because the installation process is often subject to change, please see the INSTALL file from the currentdistribution for detailed instructions. In summary,
Download, extract, configure, and compile the external dependencies.1. Download and extract the current PyMOL source distribution.2. Create a symbolic link from the external dependencies to "ext" in the PyMOL directory.3. Configure compilation by copying and modifying a "Rules.make" from the setup directory to reflectyour system.
4.
Run "make" to build pymol.5. Create a pymol.com specific to your installation location.6.
You should be able to launch PyMOL by running pymol.com. I usually symbolic link this file into my "bin"directory as "pymol".
Linux and Unix 8

Dependency−Based Approaches
You must install the following packages on your system
python (2.x), tcl (8.x), tk (8.x), libpng (1.x), zlib (1.x), glut (3.x), glut−devel (3.x), pmw*, and numeric* (numpy)
(* = not required for RPM packages.)
You then have several choices:
Using RedHat binary packages (RPMs).
rpm −i pymol−0.90−1.rh73.py22.i386.rpm
Using Python's distutils to compile and install PyMOL as a standard Python module.
python setup.py build (as a user)python setup.py install (as root)python setup2.py install (as root)
You can now run PyMOL with "./pymol.com".
Using Makefiles with preinstalled system dependencies.
Because the installation process is often subject to change, please see the INSTALL file from the currentdistribution for detailed instructions. In summary,
Download and extract the current PyMOL source distribution.1. Configure PyMOL by copying and modifying a "Rules.make" from the "setup" directory to reflectyour system.
2.
Run "make" to build pymol.3. Create a pymol.com specific to your installation location.4.
You should be able to launch PyMOL by running pymol.com, and it may be convenient to add a symboliclink from this file into your "bin" directory as "pymol".
This chapter last updated June 2004 by Warren L. DeLano, Ph.D.
Dependency−Based Approaches 9

Getting Started with Mouse Controls
Launching
Using the Mouse
On Windows:
Click on the Start menu, follow it to Programs (or All Programs on Windows XP), and then release themouse on PyMOL.
On Mac OSX (native version)
Double−click on the PyMOL icon in the Applications folder on your main hard drive
Using a Command Line
Various command line options can be included under both Windows and Unix to automatically open files andlaunch scripts. See "launching" in the reference manual for more information on these options.
On Windows:
At the command prompt, issue:
c:\program files\delano scientific\pymol\pymolwin.exe
If PyMOL in installed somewhere nonstandard, then use the correct drive letter and path.
On Unix, Linux, and MacOS X (Fink version)
If you installed using using a package such as an RPM, then there is a good chance that "pymol" is already inyour path. If not, then edit pymol.com in the PyMOL distribution and make sure PYMOL_PATH points tothe actual location of the distribution. Enter ./pymol.com to start pymol. You will probably want to create alink "pymol" from this file in to a "bin" directory in your path so that you can launch the program anywhereby simply entering "pymol".
Getting Started with Mouse Controls 10

PyMOL's Windows
PyMOL normally starts with two windows: The Viewer Window and the External (Tcl/Tk) GUI Window.
PyMOL's two windows.
GUI is an abbreviation for Graphical User Interface, which usually consists of menus, buttons, text boxes, andother familiar gadgets. By default, PyMOL actually has two GUI's: (1) an "Internal" GUI which appearsinside the Viewer Window, and (2) an "External" GUI which appears inside of its own window. The reasonsfor this are boring and technical, but know that both GUI's will eventually be unified into a single interface inthe future.
The Viewer Window
The PyMOL Viewer represents the heart of the PyMOL system. This is a single OpenGL window where all3D graphics are displayed and where all direct user interaction with 3D models takes place.
PyMOL Viewer window with Internal GUI enabled (Default).
PyMOL's Windows 11

The Internal GUI contained within this window (right) allows you to perform actions on specific objects andspecific atom selections. From top to bottom, it contains an object list, a mouse button configuration matrix, aframe indicator, and a set of "VCR"−like controls for working with movies.
The Viewer also contains a command line (bottom) which can be used to enter PyMOL commands. It is alsopossible to view PyMOL text output in the Viewer window. you can hit the ESC key anytime to togglebetween text and graphics mode inside the Viewer window.
The PyMOL Viewer can be run all by itself, and it provides the complete capability of the PyMOL coresystem. If desired, the Command line and Internal GUI can be disabled. Many tasks can be made easier andmore efficient through use of standard menus and controls. For the most part, such gadgets are currently foundin an External GUI window.
The External GUI Window
The default Tcl/Tk External GUI included with PyMOL.
By default, PyMOL comes with a single external GUI window which provides a standard menu bar, an outputregion, a command input field, and a series of buttons. One important advantage of the external GUI windowis that standard "cut and paste" functions for text will only work within the External GUI, and notwithin in the PyMOL Viewer. Furthermore, you must use Ctrl−X, Ctrl−C, and Ctrl−V to cut, copy, andpaste because a standard Edit menu has not yet been implemented.
Notes For Developers: External GUIs are the foundation for modularity and customizability in the PyMOLsystem. These windows constitute independent processes (or threads) which can control the behavior ofPyMOL, and potentially interact with other programs. They are completely customizable at the Pythonscripting level, and mutiple external GUIs can exist at once (within the restrictions of Tkinter and wxPython).
External GUIs communicate with PyMOL through the Python API (Application Programming Interface).Those of you who want to link up you own programs with PyMOL should generally use a separate externalGUI window to control the interaction, rather than changing internal PyMOL code. That way the programswill continue to work together even while development on each program proceeds independently. Theinternal GUI and all external GUI windows can be enabled and disabled using simple command line options(see reference for "launching").
The External GUI Window 12
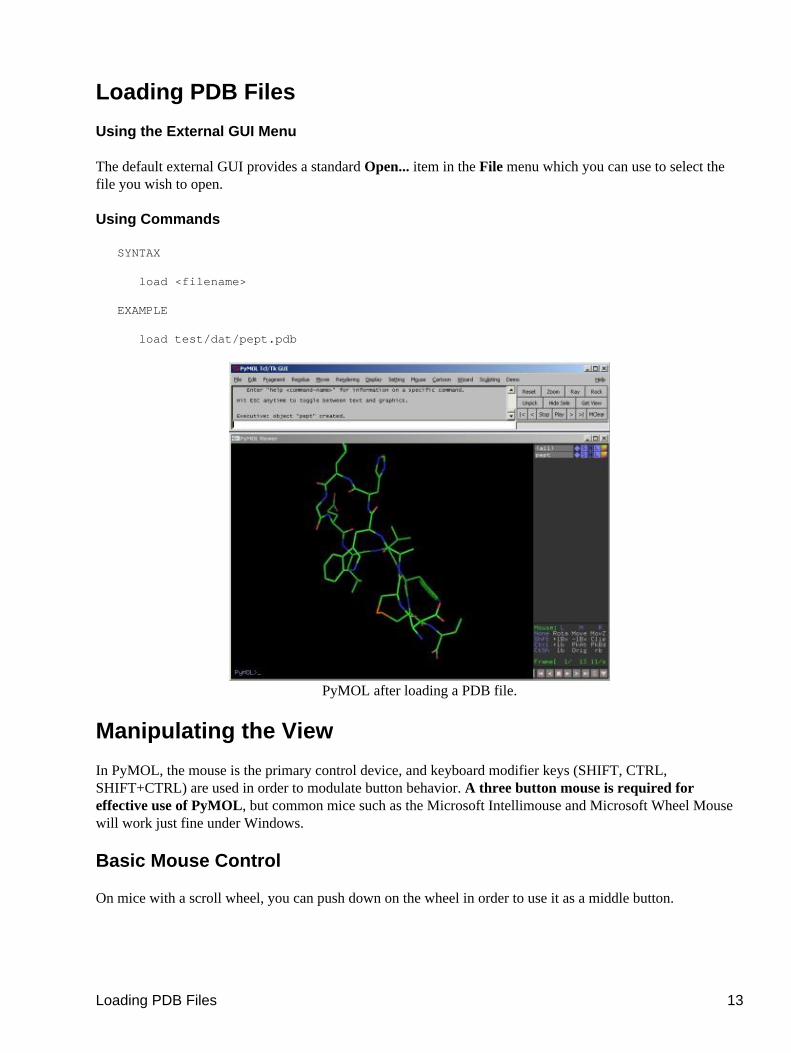
Loading PDB Files
Using the External GUI Menu
The default external GUI provides a standard Open... item in the File menu which you can use to select thefile you wish to open.
Using Commands
SYNTAX
load <filename>
EXAMPLE
load test/dat/pept.pdb
PyMOL after loading a PDB file.
Manipulating the View
In PyMOL, the mouse is the primary control device, and keyboard modifier keys (SHIFT, CTRL,SHIFT+CTRL) are used in order to modulate button behavior. A three button mouse is required foreffective use of PyMOL, but common mice such as the Microsoft Intellimouse and Microsoft Wheel Mousewill work just fine under Windows.
Basic Mouse Control
On mice with a scroll wheel, you can push down on the wheel in order to use it as a middle button.
Loading PDB Files 13

Here is a table of the basic mouse button/keyboard combinations for view manipulation:
Keyboard Modifier Left Button Middle Button Right Button
(none)Rotate Camera
(Virtual Trackball)Move Camera in XY(In Plane of Screen)
Move Camera in Z(Scale)
Shift Key Move Clipping Planes
Control Keys
Control and Shift Keys Set Origin of Rotation
An abbreviated version of this table, the Mouse Matrix, is always displayed in the Internal GUI, in order tohelp you remember which key and mouse button performs which action:
L M R
None RotaMove MovZ
Shft Clip
Ctrl
CtSh Orig
When using PyMOL on a laptop, it may be necessary to attach an external mouse or reassign the particularmouse controls you plan to use onto the reduced set of buttons that you have available internally (seereference on the "button" command).
Virtual Trackball Rotation
Virtual Trackball Rotation 14

PyMOL's Virtual Trackball.
Virtual trackball rotation works as if there is an invisible ball in the center of the scene. When you click anddrag on the screen, it is as if you put your finger on the sphere and rotated it in approximately the samemanner. If you click outside the sphere, then you get rotation about the Z−axis only. Generally, the view willbe easiest to control by either clicking in the center of the scene and moving outwards (mostly XY−rotation),or by clicking and draging around the edge of the screen and moving in a circular fashion (Z−rotation).
Virtual Trackball Rotation 15
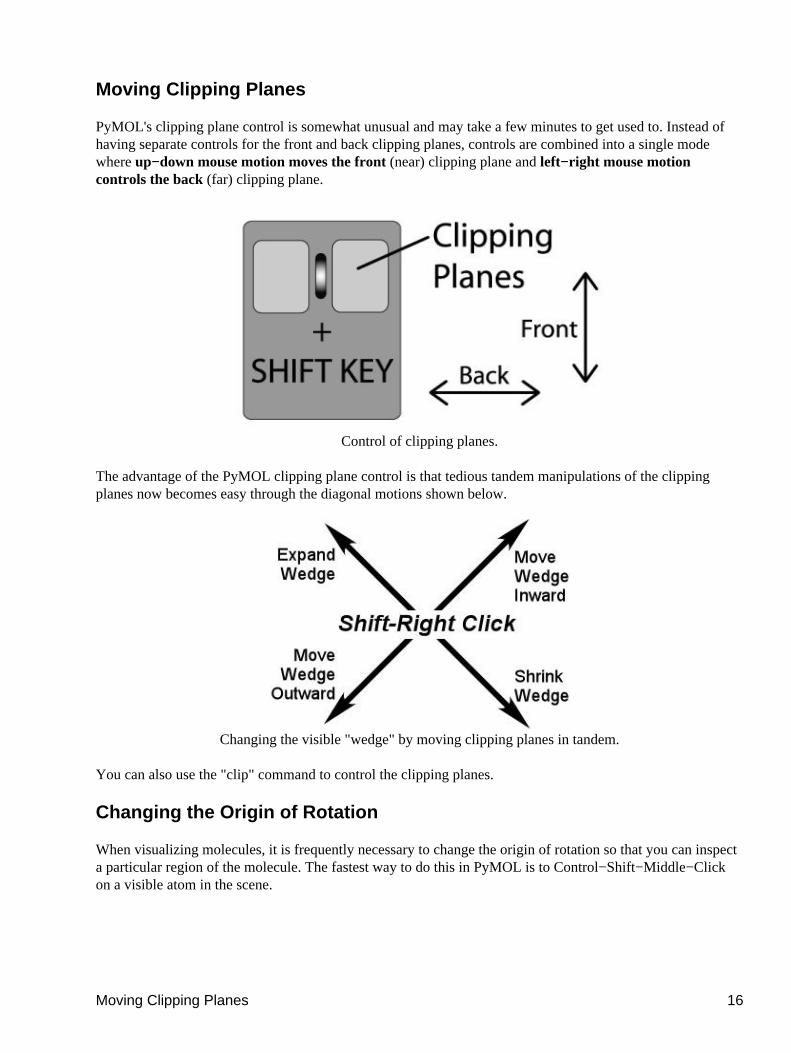
Moving Clipping Planes
PyMOL's clipping plane control is somewhat unusual and may take a few minutes to get used to. Instead ofhaving separate controls for the front and back clipping planes, controls are combined into a single modewhere up−down mouse motion moves the front (near) clipping plane and left−right mouse motioncontrols the back (far) clipping plane.
Control of clipping planes.
The advantage of the PyMOL clipping plane control is that tedious tandem manipulations of the clippingplanes now becomes easy through the diagonal motions shown below.
Changing the visible "wedge" by moving clipping planes in tandem.
You can also use the "clip" command to control the clipping planes.
Changing the Origin of Rotation
When visualizing molecules, it is frequently necessary to change the origin of rotation so that you can inspecta particular region of the molecule. The fastest way to do this in PyMOL is to Control−Shift−Middle−Clickon a visible atom in the scene.
Moving Clipping Planes 16

Getting Comfortable
At this point, we recommend that you spend five or ten minutes getting comfortable with the controlsdescribed in this chapter. Specifically, you should be able to accomplish the following tasks:
Load a PDB file into PyMOL.1. Rotate, translate, and zoom the camera.2. Adjust the front and back clipping planes to clearly view a slice of the molecule.3. Change the origin of rotation about any particular atom of interest.4.
Getting Comfortable 17

Getting Started with CommandsThis section steps through a typical PyMOL session, introducing typed commands and describing howPyMOL responds to them. The details of command syntax are in the section titled "PyMOL CommandLanguage."
The PyMOL language is case−sensitive, but upper case is not used in the current package. So just rememberto type all your commands in lower case.
Recording Your Work (Optional)
While you are learning PyMOL or doing complex projects, you may want to keep a record of all thecommands you give in a plain text log−file that you can read and edit. To open a log−file, type the commandlog_open followed by a file−name:
SYNTAX
log_open log−file−name
EXAMPLE
PyMOL> log_open log1.pml
All your commands, typed or clicked, will be recorded in the log−file. You should give your log−file−namethe extension ".pml" so you can load the file as a script, to repeat your commands in a new session (see thesubsection titled "Sessions and Scripts" below).
To stop recording your commands, type log_close. If you don't type log_close before you exit PyMOL, yourlog−file will still be saved to disk.
If you just want to save the current state of your PyMOL work without concern for the steps you took and thecommands you gave, you can create a session−file (see "Sessions and Scripts").
Loading Data
Next you need to input your data from a file, say atomic coordinates in PDB format:
SYNTAX
load data−file−name
EXAMPLE
PyMOL> load $PYMOL_PATH/test/dat/pept.pdb
Given this command, PyMOL will open and read the file "pept.pdb," create and name a corresponding object,display a representation of the object in the viewer, and add the object's name to the control panel.
By default, PyMOL names the object after the file it read. You can assign a different name to the object bytyping the name in the command line:
SYNTAX
Getting Started with Commands 18

load data−file−name, object−name
EXAMPLES
PyMOL> load $PYMOL_PATH/test/dat/pept.pdb # The object is named "pept". # PyMOL doesn't use # the file−name extension # ".pdb" in the object−name.
PyMOL> load $PYMOL_PATH/test/dat/pept.pdb, test # The object is named "test".
(Note that "#" is a comment character, so anything you type to the right of "#" in a command line is notinterpreted by PyMOL.)
The command for loading a file follows typical PyMOL syntax. load is a keyword; it calls PyMOL to performa certain function. data−file−name and object−name are arguments to load. These arguments tell PyMOLwhat file to load and what to name it, but in general, arguments to keywords just supply information thatPyMOL needs to carry out commands.
Manipulating Objects
After PyMOL creates an object, you can manipulate it in the view window and control panel with your mouse,and also by typing commands. For example, you can change from the default representation, called lines, tothe more hefty sticks. First get rid of the lines and then show the sticks:
SYNTAX
hide representation
show representation
EXAMPLES
PyMOL> hide lines # The object shown in lines disappears from view.
PyMOL> show sticks # The object is represented as sticks in the viewer.
Other representations are cartoons, ribbons, dots, spheres, surfaces, and meshes (See the Section titled"Representations").
Atom Selections
If you want to manipulate a subset of the atoms and bonds in a molecule, you can use atom selections.PyMOL is pretty sophisticated when it comes to selecting, grouping and naming groups of atoms. Forexample, you can select particular residues or atoms in a binding pocket, or a hydrophobic patch, or all thealanines in a helix, and so on. The Section titled "PyMOL Command Language" gives the details for selectinginteresting groups of atoms.
You can use a selection just once, or you can name it to make it easier to use again later. For example, you canzoom in on a selection "on the fly:"
SYNTAX
zoom selection−expression # Select the atoms just for zooming.
Manipulating Objects 19

EXAMPLE
PyMOL> zoom resi 1−10 # The selector resi # chooses amino acid residues # given by the PDB sequence number # identifier "1−10."
Selection−expressions range from single words to long complicated expressions. An object−name may be aselection−expression. The default selection−expression is all, which refers to all the atoms that are currentlyloaded. If a selection−expression is missing, PyMOL will apply the command to all. We'll keep ourselection−expressions short in this section.
If you name the selection, you will be able to manipulate it any number of times. Object and selection namesmay include the upper or lower case characters (A/a to Z/z), numerals (0 to 9), and the underscore character(_). Characters to avoid include:
! @ # $ % ^ &* ( ) ' " [ ] { } \ | ~ ` <> . ? /
First, name the selection:
SYNTAX
select selection−name, selection−expression
EXAMPLES
PyMOL> select akeeper, resi 1−10 # Select the residues and name them "akeeper."
Then use it:
SYNTAX
zoom selection−name
hide representation, selection−name
show representation, selection−name
EXAMPLES
PyMOL> zoom akeeper # Zoom in on them in the viewer.
PyMOL> hide everything, akeeper # Hide their representation in the viewer.
PyMOL> show spheres, akeeper # Show them in a different representation, # spheres, this time.
When you create a selection−name, PyMOL puts it in the control panel so you can apply control panelfunctions to the selection using your mouse (See the section titled "PyMOL Command Language").
Named−selections such as "akeeper" are manipulated like PyMOL objects, but objects and named−selectionsare fundamentally different. PyMOL creates an object−name to locate data when you load a data file. Makingselections is a way of pointing to a subset of that data. To distinguish selection−names from object−names,selection−names are shown inside parentheses in the control panel.
Manipulating Objects 20

When you delete a selection−name, the data are still found under the object−name, but the data are no longerorganized as the selection. In contrast, after you delete an object, you must reload the data to have access to itagain.
SYNTAX
delete selection−name
delete object−name
EXAMPLES
PyMOL> delete akeeper # "akeeper" is gone, but the object remains.
PyMOL> delete pept # The atoms and bonds in "pept" are gone.
Coloring Objects and Selections
You can apply various colors to selections and objects using typed commands. Predefined color−names arelisted under the settings/colors pull−down menu. Many of them can be chosen from the control panel. See thesection titled "Settings" to find out how to define more colors.
SYNTAX
color color−name # All the representations of # loaded objects are colored.
color color−name, selection−expression # The representation of # the selection is colored.
EXAMPLES
PyMOL> color white # Everything turns white. # This looks fine on the # default black background, # but causes disappearance # if you've changed the background to white.
PyMOL> color orange, pept # Remember that "pept" is our object−name, # so the entire object is colored orange.
PyMOL> color green, resi 50+54+58 # The representation of # residues numbered 50, 54 and 58 # is colored green.
PyMOL> color yellow, resi 60−90 # The representation of # residues numbered 60 through 90 # is colored yellow.
PyMOL> color blue, akeeper # Residues numbered 1−10, # which were collected in # the named selection "akeeper," # are colored blue.
PyMOL> color red, ss h # The representations of # helical residues # are colored red.
PyMOL> color yellow, ss s # The representations of
Coloring Objects and Selections 21
# beta sheet residues # are colored yellow.
PyMOL> color green, ss l+"" # The representations of # loop and unassigned residues # are colored green.
In the last three examples, the selector ss chooses secondary structures specified by h for helix, s for betasheet strand and l+"" for loops and unspecified structures.
Turning Objects and Selections On and Off
PyMOL can hold several objects in memory at the same time. The commands disable and enable allow youto eliminate representations of objects from the viewer while still controlling their properties with commands.
SYNTAX
enable object−name
EXAMPLE
PyMOL> load $PYMOL_PATH/test/dat/fc.pdb PyMOL> load $PYMOL_PATH/test/dat/pept.pdb
PyMOL> disable pept # All representations of "pept" # are removed from view.
PyMOL> color yellow, name c+o+n+ca # Backbone atoms in both "fc" # and "pept" are colored yellow, # but "pept" atoms # are still not visible.
PyMOL> enable pept # "pept" atoms are visible and # its backbone atoms are yellow.
You can also use the disable command to get rid of the pink dots that identify the last−named selection in theviewer:
SYNTAX
enable selection−name
EXAMPLE
PyMOL> select bb, name c+o+n+ca # Atoms included in the # named−selection are indicated # with pink dots in the viewer.
PyMOL> disable bb # The pink dots disappear, # but the named selection "bb" # is still visible.
PyMOL> color red, bb # You can still manipulate "bb."
You can still operate on the representations of objects that are disabled, even with the commands show andhide. The results will be apparent when you subsequently enable the object.
Turning Objects and Selections On and Off 22

Changing Your Point of View
Dragging on a molecule with the mouse is often the easiest way to manouver, but typed commands such aszoom and orient give you a different form of control, allowing computations to direct the view. zoom, as thename suggests, brings an object or selection close up in the center of the field of view. If the object orselection doesn't fit in the current view, the view opens out to include it. If it is just a small part of the currentview, the view closes in to fill more of the screen with it.
SYNTAX
zoom selection−expression # The "camera" moves close # to the selection so it fills the viewer, # or moves further away to include # all of the selection in the viewer
orient is a useful command when you want a fresh start in viewing the molecule. It aligns the object orselection so its largest dimension is shown horizontally, and its second largest dimension is shown vertically.
SYNTAX
orient selection−expression # The selection is aligned # for maximum visibility in the viewer.
You can store orientations and recall them later in your PyMOL session using the command view. Storing aview only saves the viewpoint on the objects in the viewer. It does not save their representation. To store aview for later in the session, you need to "key" it, that is, to give a name or number as an argument to thecommand view. A second argument tells PyMOL whether you want it to store the view or recall it.
SYNTAX
view key, action # The possible actions are store and recall.
EXAMPLES
PyMOL> view v1, store # The current view is named "v1" and stored.
PyMOL> view v1, recall # The view keyed "v1" is restored.
PyMOL> view v1 # recall is the default argument to view, # so this also recalls "v1."
The keyword view only stores an orientation for the duration of the current PyMOL session. The next sectiongives the recipe for saving and restoring views in different PyMOL sessions.
Saving Your Work
PyMOL saves your work in f kinds of processes: (1) Before you give a series of commands, you can initiatethe process of logging your commands into plain text log−files that can later be used as scripts. (2) At anypoint in a PyMOL session you can save the memory state of the program by creating a session file that canlater be loaded to restore that memory state. (3) You can write a graphics file to store the image you havecreated in the viewer for sharing or publication.
Changing Your Point of View 23
Scripts and Log Files
A PyMOL script is just a text file, such as a log−file, containing typed PyMOL commands separated bycarriage returns. When a script is loaded into PyMOL the commands it contains are executed. PyMOL expectsscripts to have ".pml" file−name extensions (this is not strictly required, but it is good practice).
You can use log−files as scripts, and you can create scripts in a text editor such as emacs, jot, or notepad. It'soften useful to keep a text editor open in a separate window while using PyMOL. Commands can then be cutand pasted between the two programs.
You can open a new log−file by typing log_open log−file−name, or by clicking on "log" under the "File"menu and naming the log−file in the dialog box. You can also append commands to an existing log−file bychoosing "append" or "resume" in the "File" menu. When you "resume" rather than "append," the existinglog−file is first loaded as a script, and then subsequent commands are written to it.
Once you have opened a log−file in any of these ways, PyMOL will write and save all your commands,whether they are typed or given by clicking on the buttons in the GUI.
However, to store the orientation of a molecule into a log−file, you need to give the command get_view (typeit or use the GUI button). You may find it convenient to get_view several times in a PyMOL session, and thenedit the log−file to select the most useful views.
Scripts can be executed in several ways. Under Windows, scripts can be run in a new PyMOL session bydouble clicking on the script's icon. Alternatively, you can run a script using the "File" menu's "Run" option.PyMOL also understands "@" as the typed command that loads a script:
SYNTAX
@script−file−name
EXAMPLE
PyMOL> @my_script.pml
You can also include the script−file−name when launching PyMOL from a command line:
SYNTAX
pymol script−file−name
EXAMPLE (Windows)
C:\> pymol.exe my_script.pml
EXAMPLE (Unix)
unix> ./pymol.com my_script.pml
png Files
Once you are satisfied with the representation and orientation of your molecule, you may want to save theimage in a graphics file. Before you do that, you can improve the quality of the graphics by switching fromPyMOL's fast default graphics engine, OpenGL, to its ray tracer. The ray tracer is slower, but produces higher
Scripts and Log Files 24
quality renderings for display and publication. Ray tracing shows how light is reflected and how shadows fallin a three−dimensional world. Ray tracing may take some minutes for a large complex object. The keywordray calls PyMOL's raytracer to redraw and display the image in the view window (See the section titled "RayTracing" for more details).
To save an image to a file, raytraced or not, use the "Save Image" option in the "File" menu or type the pngcommand:
SYNTAX
png file−name
EXAMPLE
PyMOL> png $PYMOL_PATH/pep # The file−name extension ".jpeg" is # added. The image file "pep.jpeg" is stored # in a path below the PyMOL installation.
The PNG file format is directly readable by PowerPoint. It can be converted into other formats using apackage like ImageMagick.
Session Files
If you want to be able to return to the current state of PyMOL, then you can create a session−file (Choose"Save Session" in the "File" menu and respond to the dialog box by naming the file with a ".pse" file−nameextension). This utility works like the "Save" utility in a word processing program. A PyMOL session−file is asymbolic record of the state of PyMOL's memory, including the the objects that have been loaded or created,the named−selections that have been created, and the display in the viewer.
When you open the saved session−file, PyMOL's memory returns to the state that was saved. Because asession−file represents a PyMOL memory state, opening one means that you are eliminating everything thatyou currently have in PyMOL's memory, and replacing it with the memory state from the session−file.
A session−file differs from a log−file or a script in a number of ways. You have to open a log−file before yougive the commands you want to save, but a session−file can be created at any point. A session−file is invokedby choosing "open" under the file menu, while a log−file is "run" as a script. Also, you can't write or editsession−files, as you can log−files and scripts.
It's a good idea to create session−files at strategic points in PyMOL sessions, for example, when you decide toexplore one of several options. In this way, session−files can be used to replace an "undo" utility, whichPyMOL lacks. You can store any number of PyMOL states in successive session−files, and revert to them,effectively "undo"−ing the work you did since creating the session−file.
Command−Line Shortcuts
Since almost nobody likes to type, PyMOL's command−line interface includes several "shortcut" featuresdesigned to reduce typing. If you are a unix user, you will recognize the similarity with features found in tcshor bash.
Session Files 25

Command Completion using TAB
If you type the first few characters of a command and then hit TAB, PyMOL will either complete thecommand or print out a list of which commands match the command.
EXAMPLE
PyMOL> sel
# hitting TAB will produce
PyMOL> select
If you hit the TAB key on a blank command line, PyMOL will output a list of its commands.
Filename Completion using TAB
Some of the files you need to load into PyMOL may have long paths and filenames. PyMOL makes it easierto load such files by automatically completing unambiguous paths and filenames when you hit the TAB key.For instance,
EXAMPLE
PyMOL> load cry
# If "crystal.pdb" exists in the current directory, hitting TAB will generate
PyMOL> load cystal.pdb
If there is some ambiguity in the filename, PyMOL will complete the name up to the point of ambiguity andthen print out the matching files in the directory.
Automatic Inferences
There are a small number of "fixed string" arguments to PyMOL commands. For example, in
PyMOL> show sticks
"sticks" is a fixed string argument to show. Because there is only a small set of such arguments to show,PyMOL will infer your meaning even if you only provide it with a few letters. For example
PyMOL> show st
works just as well.
Keywords are also inferred in this manner, so
PyMOL> sh st
works too, as long as show is the PyMOL only command starting with "sh".
Command Completion using TAB 26

NOTE: PyMOL's command language continues to grow and develop, so it is important to use full−lengthcommands and string arguments in scripts. Otherwise, you could not be sure that a later command orargument would not cause your abbreviation to become ambiguous. For example, "sh st" would no longerwork if a shutoff command were added to the PyMOL language.
Other Typed Commands and Help
This "Getting Started" section used the most frequent PyMOL commands in very brief examples. The sectiontitled "Simple Examples" shows other commands that combine representations, selections and propertychanges. More complicated examples appear in the section titled "Cookbook and Complex Examples," and acomprehensive listing of typed commands appears in the section titled "Command and API Reference."
To see a list of the keyword commands that are available in PyMOL on your computer screen, type help and"enter" (Typing TAB and "enter" will work too). Add the keyword if you want help on a particular command:
SYNTAX
help keyword
EXAMPLE
PyMOL> help load
PyMOL responds by displaying the manual page that discribes the command in the PyMOL viewer.Command line completion works inside of help, so if you don't remember the full keyword, type help, thefirst character or so of the keyword, and hit TAB. Python will display a list of possible help topics.
Click inside the viewer and hit escape to toggle back and forth between the display of the manual page or thelist of commands and the molecules you have loaded in PyMOL.
All the keywords that PyMOL understands are listed alphabetically and described in the "Reference" section.PyMOL commands run on top of the Python programming language and may contain Python statements.After you type in a command and hit return, PyMOL will check whether the first word is one of its keywords(or if it can be extended into a keyword). If not, PyMOL will pass the command on to the Python interpreter.PyMOL will return a Python error message if neither a PyMOL nor a Python keyword is recognized.
Other Typed Commands and Help 27

Command Syntax and Atom Selections
Syntax
A typed PyMOL command always starts with a keyword that calls PyMOL to execute an action. It ends with acarriage return ("enter" on your keyboard).
The simplest commands consist of a keyword alone. For example, typing quit will end your PyMOL session.The quit command never takes an argument.
Many commands have default arguments, so you can type the keyword alone and PyMOL will supply the rest.For example, the default argument to zoom is the selection−expression all:
EXAMPLE
PyMOL> zoom # All visible representations # are included in the view.
For some keywords, certain arguments are required and others are supplied by default. For example, thekeyword color requires one argument, the color−name. As for zoom, the default selection−expression is all:
SYNTAX
color color−name
color color−name, selection−expression
EXAMPLES
PyMOL> color red # All the representations # are colored red.
PyMOL> color red, name ca # Only the representations of # atoms named c−alpha are colored red.
When you type a command that has more than one argument, color color−name, selection−expression in thiscase, a comma must separate the arguments.
Selection−expressions are an essential type of keyword argument. They can be simple or complex, withseveral different kinds of syntax.
Selection−expressions
Selection−expressions stand for lists of atoms in arguments that are subject to PyMOL commands. You canname the selections to facilitate their re−use, or you can specify them anonymously (without names). Objectand selection names may include the upper or lower case characters A/a to Z/z, numerals 0 to 9, and theunderscore character (_). Characters to avoid include:
! @ # $ % ^ &* ( ) ' " [ ] { } \ | ~ ` <> . ? /
Selection−expressions describe the class of atoms you are referencing. Most of them require identifiers tocomplete the specification. For example, the selector resi references biopolymer residues by sequence
Command Syntax and Atom Selections 28
number, and the identifier gives the number. The selector name references atoms according to the namesdescribed in the PDB, and the identifier gives the name (ca for alpha carbons, cb for beta carbons, etc). Ahandful of selection−expressions don't require identifiers, but most do.
PyMOL uses several logical operators to increase the generality or specificity of selection−expressions.Logical combinations of selectors can get complex, so PyMOL accepts short forms and macros that expressthem with a minimum of keystrokes. This section describes named−selections, and then gives the syntax formaking selections in a progression from simple one−word selectors to complex combinations of selectors,using macros and short forms.
Named Atom Selections
Atom selections can be named for repeated use by using the select command:
SYNTAX
select selection−name, selection−expression # The selection−name and # the selection−expression # are both arguments to select # so they are separated by a comma.
EXAMPLE
PyMOL> select bb, name c+o+n+ca # Create an atom selection named "bb" # including all atoms named # "C","O","N", or "CA";
PyMOL> color red, bb # color the selection red,PyMOL> hide lines, bb # hide the line representation,PyMOL> show sticks, bb # show it using the stick representation,PyMOL> zoom bb # and zoom in on it.
In this case, the selection−expression is the property selector name, which takes the list of identifiersca+c+n+o to complete the specification. Property selectors and their identifiers are discussed below.
Named atom selections appear in the PyMOL names list in the control panel. They are distinguished fromobjects by a surrounding set of parentheses. The control panel options available under the diamond menudiffer between objects and atom−selections, because objects and named selections play slightly different rolesin PyMOL. Named selections are pointers to subsets of data that are found under an object name. After anobject is deleted, the data are no longer available, unless you reload the object. Any named selections thatrefer to atoms in that object will no longer work. But when named selections are deleted, the data are stillavailable under the object name. Disabling objects eliminates them from the viewer, but disablingnamed−selections just turns off the pink dots that highlight them in the viewer.
Atom−selections, named or not, can span multiple objects:
EXAMPLE
PyMOL> load $PYMOL_PATH/test/dat/fc.pdb PyMOL> load $PYMOL_PATH/test/dat/pept.pdb
PyMOL> select alpha_c, name ca # The named selection "alpha_c" # is created −− it includes atoms # in both "fc" and "pept" objects.
PyMOL> color red, name ca # "CA" atoms in both objects
Named Atom Selections 29

# are colored red.
Named selections will continue working after you have made changes to a molecular structure:
EXAMPLE
PyMOL> load $PYMOL_PATH/test/dat/pept.pdb PyMOL> select bb, name c+o+n+ca # The named selection "bb"
# is created.
PyMOL> count_atoms bb # PyMOL counts 52 atoms in "bb."
PyMOL> remove resi 5 # All atoms in residue 5 are removed # from the object "pept."
PyMOL> count_atoms bb # Now PyMOL counts # the remaining 48 atoms in "bb."
Named selections are static. Only atoms that exist at the time the selection is defined are included in theselection, even if atoms which are loaded subsequently fall within the selection criterion:
EXAMPLE
PyMOL> load $PYMOL_PATH/test/dat/pept.pdb
PyMOL> select static_demo, pept # The named selection "static_demo" # is created to reference all atoms.
PyMOL> count_atoms static_demo # PyMOL counts 107 atoms # in "static_demo."
PyMOL> h_add # PyMol adds hydrogens in # the appropriate places
PyMOL> count_atoms static_demo # PyMOL still counts 107 atoms # in "static_demo,"
PyMOL> count_atoms # even though it counts 200 atoms # in "pept."
Named selections can also be used in subsequent atom selections:
EXAMPLE
PyMOL> select bb, name c+o+n+ca # An atom selection named "bb" # is made, consisting of all # atoms named "C","O","N", or "CA."
PyMOL> select c_beta_bb, bb or name cb # An atom selection named "c_beta_bb" # is made, consisting of # all atoms named "C", "O", "N", "CA" or "CB."
Note that the word "or" is used to select all atoms in the two groups, "bb" and "cb." The word "and" wouldhave selected no atoms because it is interpreted in its boolean logical sense, not its natural language sense. Seethe subsection on "Selection Algebra" below.
Named Atom Selections 30

Single−word Selectors
The very simplest selection−expressions are single−word selectors. These selectors do not take identifiers;they are complete by themselves.
Single WordSelector
Short FormSelector
Description
all * All atoms currently loaded into PyMOL
none none No atoms (empty selection)
hydro h. All hydrogen atoms currently loaded into PyMOL
hetatm het All atoms loaded from Protein Data Bank HETATM records
visible v. All atoms in enabled objects with at least one visible representation
present pr.All atoms with defined coordinates in the current state(used in creating movies)
The selector none won't come up much when you are typing commands directly into PyMOL, but it is usefulin programming scripts.
As the table shows, many single−word selectors have short forms to save on typing. Some short forms mustbe followed by a period and a space, in order to delimit the word. Short forms and long forms have the sameeffect, so choose the form that suits you:
EXAMPLES
PyMOL> color blue, all # It all turns blue.PyMOL> color blue, *
PyMOL> hide hydro # Representations of all PyMOL> hide h. # hydrogen atoms are hidden.
PyMOL> show spheres, hetatom # All the atoms defined as HETATOMS PyMOL> show spheres, het # in the PDB input file
# are represented as spheres.
Property Selectors
PyMOL reads data files written in PDB, MOL/SDF, Macromodel, ChemPy Model, and Tinker XYZ formats.Some of the data fields in these formats allow PyMOL to assign properties to atoms. You can group and selectatoms according to these properties using property selectors and identifiers: the selectors correspond to thefields in the data files, and the identifiers correspond to the target words to match, or the target numbers tocompare.
The items in a list of identifiers are separated by plus signs (+) only. Do not add spaces within a list ofidentifiers. The selector resi takes (+)−separated lists of identifiers, as in
EXAMPLE
PyMOL> select nterm, resi 1+2+3
or, alternatively, it may take a range given with a dash:
EXAMPLE
Single−word Selectors 31

PyMOL> select nterm, resi 1−3
However, you will get an error message if you try to combine a list and a range in an identifier to a resi as in"select mistake, resi 1−3+6."
The identifier for a blank field in an input file is and empty pair of quotes:
EXAMPLE
PyMOL> select unstruct, ss "" # A named selection is created # to contain all atoms that are not assigned # a secondary structure.
Most property selectors select matches to their identifiers:
MatchingPropertySelector
Short FormSelector
Identifierand Example
symbol e.
chemical−symbol−listlist of 1− or 2−letter chemical symbols from theperiodic table
PyMOL> select polar, symbol o+n
name n.
atom−name−listlist of up to 4−letter codes for atoms in proteins ornucleic acids
PyMOL> select carbons, name ca+cb+cg+cd
resn r.
residue−name−listlist of 3−letter codes for amino acids
PyMOL> select aas, resn asp+glu+asn+gln
or list of up to 2−letter codes for nucleic acids
PyMOL> select bases, resn a+g
resi i.
residue−identifier−listlist of up to 4−digit residue numbers
PyMOL> select mults10, resi 1+10+100+1000
residue−identifier−range
PyMOL> select nterm, resi 1−10
alt alt
alternate−conformation−identifier−listlist of single letters
PyMOL> select altconf, alt a+""
chain c. chain−identifier−listlist of single letters or sometimes numbers
Single−word Selectors 32

PyMOL> select firstch, chain a
segi s.
segment−identifier−listlist of up to 4 letter identifiers
PyMOL> select ligand, segi lig
flag f.
flag−numbera single integer from 0 to 31
PyMOL> select f1, flag 0
numeric_type nt.
type−numbera single integer
PyMOL> select type1, nt. 5
text_type tt.
type−stringa list of up to 4 letter codes
PyMOL> select subset, text_type HA+HC
id id
external−index−numbera single integer
PyMOL> select idno, id 23
index idx.
internal−index−numbera single integer
PyMOL> select intid, index 11
ss ss
secondary−structure−typelist of single letters
PyMOL> select allstrs, ss h+s+l+""
Other property selectors select by comparison to numeric identifiers:
NumericSelector
Short FormArgument&Example
b b
comparison−operator b−factor−valuea real number
PyMOL> select fuzzy, b > 10
q q
comparison−operator occupancy−valuea real number
PyMOL> select lowcharges, q <0.50
formal_charge fc.
comparison−operator formal charge−valuean integer
PyMOL> select doubles, fc. = −1
partial_charge pc.
comparison−operator partial charge−valuea real number
PyMOL> select hicharges, pc. > 1
Single−word Selectors 33

Details of the atom and residue name formats can be found in the official guide to PDB file formats,http://www.rcsb.org/pdb/docs/format/pdbguide2.2/guide2.2_frame.html.
Selection Algebra
Selections can be made more precise or inclusive by combining them with logical operators, including theboolean and, or and not. The boolean and selects only those items that have both (or all) of the namedproperties, and the boolean or selects items that have either (or any) of them. Venn diagrams show that andselects the areas of overlap, while or selects both areas.
Operators:
Selection operators and modifiers are listed below. The dummy variables s1 and s2 stand forselection−expressions such as "chain a" or "hydro."
OperatorShortform
Effect
not s1 ! s1Selects atoms that are not included in s1
PyMOL> select sidechains, ! bb
s1 and s2 s1 & s2Selects atoms included in both s1 and s2
PyMOL> select far_bb, bb &farfrm_ten
s1 or s2 s1 | s2Selects atoms included in either s1 or s2
PyMOL> select all_prot, bb | sidechain
s1 in s2 s1 in s2
Selects atoms in s1 whose identifiersname, resi, resn, chain and segi all match atoms in s2
PyMOL> select same_atms, pept in prot
s1 like s2 s1 l. s2
Selects atoms in s1 whose identifiersname and resi match atoms in s2
PyMOL> select similar_atms, pept like prot
s1 gap X s1 gap X
Selects all atoms whose van der Waals radii are separated from the van derWaals radii of s1 by a minimum of X Angstroms.
PyMOL> select farfrm_ten, resi 10 gap 5
s1 around X s1 a. XSelects atoms with centers within X Angstroms of the center of any atom in s1
PyMOL> select near_ten, resi 10 around 5
s1 expand X s1 e. XExpands s1 by all atoms within X Angstroms of the center of any atom in s1
PyMOL> select near_ten_x, near10 expand 3
Selection Algebra 34

s1 within X ofs2
s1 w. Xof s2
Selects atoms in s1 that are within X Angstroms of the s2
PyMOL> select bbnearten, bb w. 4 of resi 10
byres s1 br. s1Expands selection to complete residues
PyMOL> select complete_res, br. bbnear10
byobject s1 bo. s1Expands selection to complete objects
PyMOL> select near_obj, bo. near_res
neighbor s1 nbr. s1Selects atoms directly bonded to s1
PyMOL> select vicinos, neighbor resi 10
Logical selections can be combined. For example, you might select atoms that are part of chain a, but notresidue number 125:
EXAMPLE
PyMOL> select chain a and (not resi 125) # selects atoms that are part of # chain a, but not # residue number 125.
PyMOL> select (name cb or name cg1 or name cg2) and chain A # These two # selections are
PyMOL> select name cb+cg1+cg2 and chain A # equivalent. # select c−beta's, # c−gamma−1's and # c−gamma−2's # that are # in chain A.
Like the results of groups of arithmetic operations, the results of groups of logical operations depend on whichoperation is performed first. They have an order of precedence. To ensure that the operations are performed inthe order you have in mind, use parentheses:
byres ((chain a or (chain b and (not resi 125))) around 5)
PyMOL will expand its logical selection out from the innermost parentheses.
Atom Selection Macros
Macros make it possible to represent a long atom selection phrase such as
PyMOL> select pept and segi lig and chain b and resi 142 and name ca
in a more compact form:
PyMOL> select /pept/lig/b/142/ca
An atom selection macro uses slashes to define fields corresponding to identifiers. The macro is used to selectatoms using the boolean "and," that is, the selected atoms must have all the matching identifiers:
/object−name/segi−identifier/chain−identifier/resi−identifier/name−identifier
Atom Selection Macros 35

These identifiers form a hierarchy from the object−name at the top, down to the name−identifier at thebottom. PyMOL has to be able to recognize the macro as one word, so no spaces are allowed within it.
Macros come in two flavors: those that begin with a slash and those that don't. The presence or absence of aslash at the beginning of the macro determines how it is interpreted. If the macro begins with a slash, PyMOLexpects to find the fields starting from the top of the hierarchy: the first field to the right of the slash isinterpreted as an object−name; the second field as an identifier to segi; the third as an identifier to chain, andso on. It may take any of the following forms:
/object−name/segi−identifier/chain−identifier/resi−identifier/name−identifier /object−name/segi−identifier/chain−identifier/resi−identifier /object−name/segi−identifier/chain−identifier /object−name/segi−identifier /object−name
EXAMPLES
PyMOL> zoom /peptPyMOL> show spheres, /pept/lig/PyMOL> show cartoon, /pept/lig/aPyMOL> color pink, /pept/lig/a/10PyMOL> color yellow, /pept/lig/a/10/ca
If the macro does not begin with a slash, it is interpreted differently. In this case, PyMOL expects to find thefields ending with the bottom of the hierarchy. Macros that don't start with a slash may take the followingforms:
resi−identifier/name−identifierchain−identifier/resi−identifier/name−identifier
segi−identifier/chain−identifier/resi−identifier/name−identifierobject−name/segi−identifier/chain−identifier/resi−identifier/name−identifier
EXAMPLES
PyMOL> zoom 10/cbPyMOL> show spheres, a/10−12/caPyMOL> show cartoon, lig/b/6+8/c+oPyMOL> color pink, pept/enz/c/3/n
You can also omit fields between slashes. Omitted fields will be interpreted as wildcards, as in the followingforms:
resi−identifier/resi−identifier/name−identifierchain−identifier//object−name//chain−identifier
EXAMPLES
PyMOL> zoom 142/ # Residue 142 fills the viewer.
PyMOL> show spheres, 156/ca # The alpha carbon of residue 156 # is shown as a sphere
PyMOL> show cartoon, a// # Chain "A" is shown as a cartoon.
PyMOL> color pink, pept//b # Chain "B" in object "pept" # is colored pink.
Atom Selection Macros 36

Selection macros must contain at least one forward slash in order to distinguish them from other words in theselection language. Being words, they must not contain any spaces. When using macros, it is also important tounderstand that they are converted into long form before being submitted to the selection engine. This canhelp in the interpretation of error messages.
Calling Python from within PyMOL
Single−line Python statements can be issued directly within PyMOL. For example:
PyMOL> print 1 + 23
Full access is available to standard Python library functions, and you can assign results to symbols.
PyMOL>import timePyMOL>now = time.time()PyMOL>print now1052982734.94
Multi−line blocks of Python can be included within PyMOL command scripts provided that a backslash ('\') isused for continuation on all but the final line.
PyMOL> for a in range(1,6): \PyMOL> b = 6 − a \PyMOL> print a, b 1 52 43 34 25 1
Calling Python from within PyMOL 37

Cartoon Representations
Background
Accessibility
Cartoon ribbons in PyMOL rival those of the popular Molscript/Raster3D packages, but PyMOL makescreating high quality images much easier. While PyMOL can read Molscript output directly (see the chapteron Molscript), this is no longer necessary or as convenient as utilizing PyMOL's built−in cartoon ribboncapability:
PyMOL built−in ribbons "molauto −nice ... | molscript −r > ..."
Molscript's cartoons are slightly more ideal, but PyMOL comes pretty darn close!
Note that all of the images in this section were colored using the rainbow feature (Color pop−up menu) andray−traced with antialising enabled.
Pretty and Correct
One of the advantages of PyMOL's cartoon ribbon facility is that it is easy to switch between "smoothed"versions of protein secondary structure, and "correct" renditions which portray actual main chain coordinates.Although cartoons are often used solely to represent protein structures in a schematic sense, sometimes it isdesirable to combine a schematic overall picture with atomic resolution in one particular location. However,unless the cartoon track properly with alpha−carbon positions, the resulting figures will look a little silly:
Cartoon Representations 38
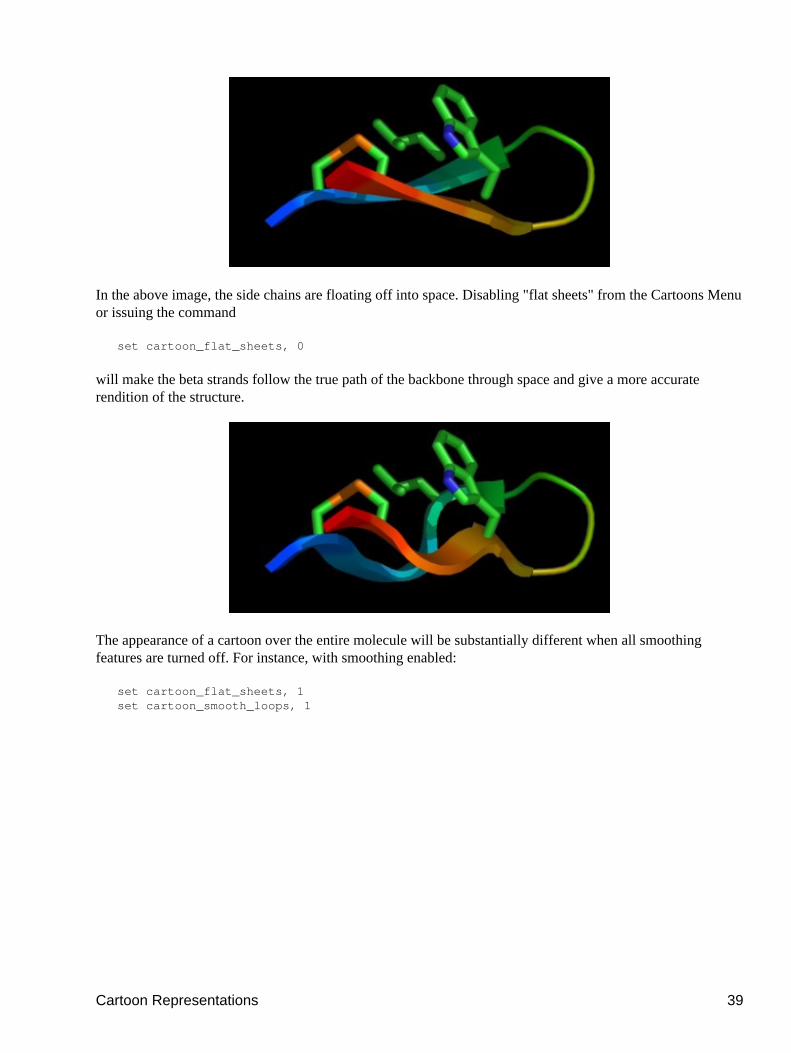
In the above image, the side chains are floating off into space. Disabling "flat sheets" from the Cartoons Menuor issuing the command
set cartoon_flat_sheets, 0
will make the beta strands follow the true path of the backbone through space and give a more accuraterendition of the structure.
The appearance of a cartoon over the entire molecule will be substantially different when all smoothingfeatures are turned off. For instance, with smoothing enabled:
set cartoon_flat_sheets, 1 set cartoon_smooth_loops, 1
Cartoon Representations 39

the image differs substantially from:
set cartoon_flat_sheets, 0 set cartoon_smooth_loops, 0
which more accurately reflects the true path of the peptide backbone:
Cartoon Representations 40
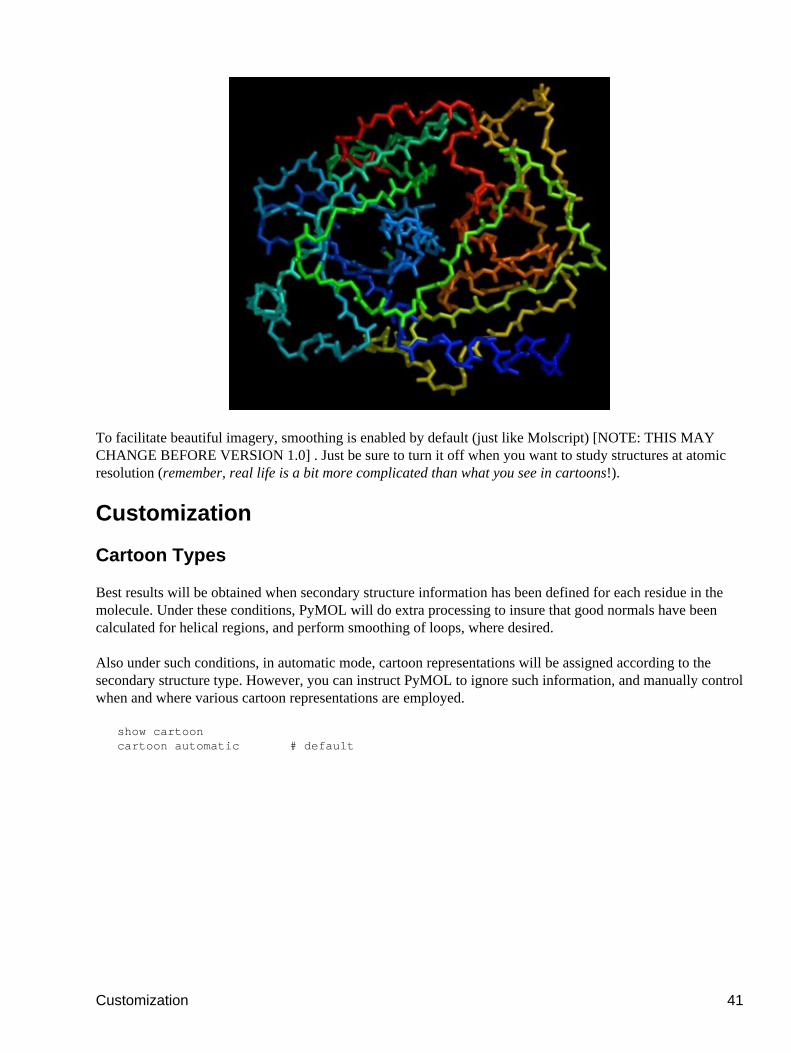
To facilitate beautiful imagery, smoothing is enabled by default (just like Molscript) [NOTE: THIS MAYCHANGE BEFORE VERSION 1.0] . Just be sure to turn it off when you want to study structures at atomicresolution (remember, real life is a bit more complicated than what you see in cartoons!).
Customization
Cartoon Types
Best results will be obtained when secondary structure information has been defined for each residue in themolecule. Under these conditions, PyMOL will do extra processing to insure that good normals have beencalculated for helical regions, and perform smoothing of loops, where desired.
Also under such conditions, in automatic mode, cartoon representations will be assigned according to thesecondary structure type. However, you can instruct PyMOL to ignore such information, and manually controlwhen and where various cartoon representations are employed.
show cartoon cartoon automatic # default
Customization 41

cartoon loop
cartoon rect
cartoon oval
Customization 42

cartoon tube
cartoon tube, 1:49/ cartoon arrow, 50:99/ cartoon loop, 100:149/ cartoon oval, 150:199/ cartoon rect, 200:250/
Customization 43

All cartoon ribbons have associated parameters accessible from the "set" command which allow you tochange their appearance. See the chapter on Settings for more information.
Fancy Helices
set cartoon_fancy_helices, 0
Molscript addicts who simply must have those ribbon helices with tubular edges will not be disappointed with"fancy helices":
set cartoon_fancy_helices, 1
Fancy Helices 44

Secondary Structure Assignment
It is recommended that you read in PDB files which already have correct secondary structure assignmentsfrom a program like DSSP. However, PyMOL does have a reasonably fast secondary structure alignmentalgorithm called "dss". Please be aware that due to the subjective nature of secondary structure assignment inborderline cases, dss results will differ somewhat from DSSP.
SYNTAX
dss selection
EXAMPLE
dss 1dfr
If you are visualizing an animation, you may wish derive secondary structure assignment from a specific stateof the animation. This can be done with:
SYNTAX
dss selection, state
EXAMPLE
dss mov, 1
To change assignments manually, the best way is to use the alter command as follows:
show cartoonalter 11−40/, ss='H' # assign residues 11−40 as helixalter 40−52/, ss='L' # assign residues 40−52 as loopalter 52−65/, ss='S' # assign residues 52−65 as sheetalter 65−72/, ss='H' # assign residues 65−72 as helixrebuild # regenerate the cartoon
Secondary Structure Assignment 45

Ray−TracingRay−tracing produces the highest quality molecular graphics images. PyMOL is the first full−featuredmolecular graphics program to include a high−speed ray−tracer which works with its native internalgeometries (except text).
OpenGL Rendering (real−time manipulation)Ray−traced Rendering (seconds or minutes per frame)You can ray−trace any Scene in PyMOL by clicking the "Ray Trace" button in the external GUI or using the"ray" command. The built−in raytracer also makes it possible to easily assemble very high−quality movies ina snap.
Important Settings
These can be changed using the "set" command. Unless otherwise specified, the settings apply only to theray−tracing engine and not the OpenGL renderer. Some reconciliation between the two renderers is muchneeded, so be warned that these settings may change in the future.
Normally, the only settings you will need to change are orthoscopic, antialias, and gamma. If you are downin an enzyme active site which is heavily shadowed, you may want to increase direct to 0.5−0.7 in order toimprove brightness and contrast.
orthoscopic (0 or 1) controls whether the OpenGL renderer uses the same orthoscopic transformationas the renderer. You'll want to set this to 1 when preparing figures so that OpenGL and raytracingmatch pixel−for−pixel.
•
ambient (0.0−1.0) controls the ambient light intensity for both OpenGL and the ray−tracer.• ambient_scale (float) controls the relative ambient intensity between OpenGL and the ray−tracer.• antialias (0 or 1) generate a "smooth" image (best quality, but takes 4X as long).• direct (0.0−1.0) the planer light intesity originating from the camera.•
Ray−Tracing 46

gamma (0.1−2.0) gamma transformation applied after rendering is complete.• light (vector) the position of the light.• reflect (0.0−1.0) the planer light intesity originating from the light source.• spec_reflect (0.0−1.0) intensity of the specular reflection from the light.• spec_power (1−100) how localized is the specular reflection (higher=smaller).•
Saving Images
png
All images (ray−traced or not) can be saved in PNG format using the "png" command. This format is directlyreadable by PowerPoint, and can be easily converted into other formats using a package like ImageMagick.You can also save images using the "Save Image" option in the "File" menu. Images are always saved at thesame resolution as the viewer window.
ray png my_image.png
Saving Images 47

Stereo
Introduction
PyMOL can supports several different stereo graphics options.
Supported Stereo Modes
Crosseye Stereo
Walleye Stereo
Hardware Stereo
Generating Stereo Figures
Stereo figures are often used in molecular graphics illustrations in order to provide the reader with athree−dimensional view using a two−dimensional sheet of paper. To achieve a satisfying 3D effect, care mustbe taken to insure that the stereo pairs are generated with the proper transformation and printed with thecorrect separation between images.
A key challenge in preparation of stereo figures is the fact that journals usually shrink images before they areprinted. In preparing your figure, it is essential that your drafts correspond to the final printed size. You mayneed to obtain this information from the journal ahead of time.
Stereo 48

Movies
Concepts
States and Frames
PyMOL has a powerful and unique molecular movie−making capability. In order to use it, you first need tounderstand a few key concepts:
States: States most directly correspond to particular arrangements of atoms at a point in time. Forexample, they could consist of steps in a molecular dynamics simulation or individual points of acoordinate interpolation. If you are making a movie of a static coordinate set (such as a single crystalstructure) then you have only one state. All objects in PyMOL can potentially consist of multiplestates.
•
Frames: Frames are like the individual images you'd find on a movie reel, except that in PyMOL,frames are composed of states instead of images, and frames can have additional actions associatedwith them (such as rotation of the camera).
•
The user can fully interact with models while movies are playing.
NOTE: State and frame indexes begin with 1, and not 0 as most C and Python programmers would expect. Ifyou load states into an object with a state index of 0, you are indicating that you want the state to be appendedafter the last existing state in the object.
Important Commands To Know
load
The "load" command is used to populate states of an object. By default, each new file loaded will be appendedonto the object's states. However, the optional third argument to the load command is the frame index intowhich the file should be loaded. See "help load" or consult the reference section for more information.
load foo1.pdb,mov # loads foo1.pdb into state 1 of "mov". load foo2.pdb,mov # loads foo2.pdb into state 2 of "mov". load foo3.pdb,mov,3 # loads foo3.pdb into state 3 of "mov". load foo4.pdb,mov,4 # loads foo4.pdb into state 4 of "mov".
mset
The "mset" command is used to specify which states get included as frames of a movie. If the mset commandis not used, PyMOL will by default play through all states in sequential order. However, if you wish to use theother movie commands (such as mdo), it is necessary to explicity use the mset command to create a moviedefinition inside of PyMOL.
The mset command is followed by an arbitrarily list of statements which defines the entire movie. Eachstatement takes on one of three forms:
# A number simply indicates a state is to be played next.1.
Movies 49

x# A lowercase "x" immediately followed by a number (no space) indicates that the previous stateshould be repeated that many times total.
2.
−# A hyphen immediately followed by a number (no space) indicates that a numeric sequence ofstates are to be appended onto the movie starting with the previously played state going to indicatedstate.
3.
Once a movie has been defined, the red "VCR" controls in the lower−right−hand corner of the viewer can beused to step or play through the movie.
Examples
mset 1 x30 # creates a 30 frame movie consisting of state 1 played 30 times. mset 1 −30 # creates a 30 frame movie: states 1, 2, ... up through 30. mset 1 −30 −2 # 58 frames: states 1, 2, ... , 29, 30, then 29, 28, ... , 4, 3, down to 2 mset 1 6 5 2 3 # 5 frames: states 1, 6, 5, 2, 3 in that order.
See "help mset" or the reference section for more information.
mdo
The "mdo" command allows you to bind a particular series of PyMOL commands to a frame in the movie. Forinstance, you can perform a rotation about the axis at each frame of the movie in order to sweep the cameraabout the object. See "help mdo" or the reference section for more information.
NOTE: The "util" module includes two python commands for generating mdo commands, "util.mrock" and"util.mdo". These functions have not been documented, but the source code can be found in the filemodules/pymol/util.py. Since they are actual python functions, explicit parenthesis are required to invokethem.
util.mrock(start, finish, angle, phase, loop−flag)util.mroll(start, finish, loop−flag)
mmatrix
The "mmatrix" command allows you to store and recall a particular viewing matrix to be used to set up frame1 of the movie. This can be particularly helpful when you're trying to preserve a movie's orientation whileperforming other actions within PyMOL during the same session. See "help mmatrix" or the reference sectionfor more information.
Simple Examples
Here a static structure is subject to a gentle rock. The following statements create a sixty frame movie whichsimply rocks the protein by 10 degrees.
load test/dat/pept.pdb # load a structure mset 1 x60 # define the movie util.mrock(1,60,10,1,1) # issues mdo commands to create +/− 10 deg. rock over 60 frames
In this next example, the protein is rotated through a full 360 sweep about the Y−axis over 120 frames
load test/dat/pept.pdb # load a structure mset 1 x120 # define the movie
mdo 50

util.mroll(1,120,1) # issues mdo commands to create full rotation over 120 frames
Complex Examples
The following is a Python program (with a .py or .pym extension) which uses a Python loop to load a largenumber of numbered PDB files, and then configures PyMOL to show them both forwards and backwards.
from glob import globfrom pymol import cmd
file_list = glob("mov*.pdb"):
for file in file_list cmd.load(file,"mov")
cmd.mset("1 −%d −2"%len(file_list))
Previewing Ray−traced Movie Images
PyMOL has the ability to cache a series of images in RAM and to play them back at a much higher rate thanthey could be rendered originally. This is most−useful for ray−traced images, but it can also be used withOpenGL images.
cache_frames
The cache_frames option controls whether or not PyMOL saves frames in memory. Its usage is demonstratedin the following script. NOTE: caching images takes a tremendous amount of memory, so you should use the"viewport" command to shrink the window before utilizing this option.
viewport 320,240 load test/dat/pept.pdb orient hide show sph mset 1 x30 util.mrock 1,30,3,1,1 set ray_trace_frames=1 set cache_frames=1 mplay
mclear
Once you have loaded a set of frames into RAM, the frames will remain there until you run the "mclear"command, even if you manipule that model. You can also press the mclear button on the external GUIwindow.
mclear # flushes the frame cache
Saving movies
Complex Examples 51
mpng
You can save movie images to numbered PNG format files with a common prefix. If you want each frame tobe ray−traced, you should turn on raytracing of frames, turn off caching, and clear the cache (see the MovieMenu or use the following commands).
set ray_trace_frames=1 set cache_frames=0 mclear
You can save the movie using the "mpng" command, or you can save it from the "File" menu. Either way, youmust provide a prefix which will be used to create numbered PNG files.
mpng mov # will create mov0001.png, mov0002.png, etc.
If you are compressing movies using Adobe Premiere (recommended for best quality), you will probably wantto convert the files using ImageMagick or a similar package into a format that Premiere is capable of reading(such as ".tga" − targa format).
mpng 52

Advanced Mouse Controls
Picking Atoms and Bonds
The current mouse confiruation is visible on the lower right−hand corner of the screen as a matrix. Under thedefault mouse configuration:
In Viewing Mode:
A single atom can be "picked" using the "Pk1" function which is CTRL/right−click.♦ Multiple atoms (up to 4) can be "picked" in series using the "PkAt" function which isCTRL/right−middle.
♦
•
In Editing Mode:
A single bond can be "picked" using the "PkTB" function which is CTRL/right−click.♦ Multiple atoms (up to 4) can be "picked" in series using the "PkAt" function which isCTRL/right−middle.
♦
•
Whenever an atom or bond has been picked, a number of atom selections are automatically defined asdescribed in the following table:
(pk1) The selected atom (or the first selected atom in a bond selection).• (pk2) The second selected atom in a bond selection.• (pkfrag#) A fragment of the molecule with its base adjacent to the selected bond or atom.• (pkchain) The contiguous chain of atoms which contains the selected atom or bond.• (pkresi) All atoms in the residue you picked.•
You can click on a selection name to see visually which atoms are included in the selection. All of theseselections can be used and manipulated as if they were created manually using the select command. Notehowever, that these selections are quite fragile, and will be automatically deleted in response to a number ofcommon occurences, such as loading a new object.
Example Usage of the "pk" Atom Selections
Assuming that you picked an atom or bond...
show sticks,(pkresi) # show sticks on the residue you picked
color read,(pkchain) # color the chain you picked
remove (byres pk1) # removes all atoms in the residue you picked
The "lb" and "rb" Selections
Most of the time, the "pk1" atom selection will suffice. However, there are times when you need to specifytwo or more sets of atom selections. This is where "lb" and "rb" come in.
In addition to the "pk" atom selection set, there are two more atom selections which can be manipulated withthe mouse. These are: (1) the left−button or "lb" selection and (2) the right−button or "rb" selection. Under the
Advanced Mouse Controls 53

default mouse configuration:
The "lb" selection can be redefined using the "lb" function which is CTRL−SHIFT/left−click.• The "lb" selection can be expanded using the "+lb" function which is CTRL/left−click.• The "rb" selection can be redefined using the "rb" function which is CTRL−SHIFT/right−click.•
Certain commands are designed to use "(lb)" and "(rb)" as default arguments. For instance, the "distance"command, if called without any arguments, will attempt to create a distance object between the (lb) and (rb)selections if they exist
# define (lb) by CTRL−SHIFT/left−clicking one atom # define (rb) by CTRL−SHIFT/right−clicking another
dist # will create a distance object between the two atoms.
Conformational Editing
Sorry, no documentation yet −− these features won't be too useful until PyMOL is coupled up with an energyminimiation engine.
Conformational Editing 54
Crystallography Applications
Crystal Symmetry
Ralf Grosse−Kunstleve has provided his SgLite module to enable PyMOL to deduce symmetry relationshipsfrom standard space group and unit cell information. Currently that information can only be provided toPyMOL as a CRYST1 record in the PDB file, which includes the correct space group identifier. However, itwould be only a minor development task to add a means of assigning unit−cell and symmetry to any moleculeobject directly from the API.
The format of the CRYST1 record is as follows.
1 − 6 Record name "CRYST1" 7 − 15 Real(9.3) a a (Angstroms).16 − 24 Real(9.3) b b (Angstroms).25 − 33 Real(9.3) c c (Angstroms).34 − 40 Real(7.2) alpha alpha (degrees).41 − 47 Real(7.2) beta beta (degrees).48 − 54 Real(7.2) gamma gamma (degrees).56 − 66 LString sGroup Space group.67 − 70 Integer z Z value. # ignored by PyMOL
load
When you use the "load" command to read in a PDB file with symmetry information, matrix informationshould be output. Verify that this information is produced before attempting to display symmetry relatedmolecules.
symexp
The "symexp" command is used to display symmetry related molecules in the crystal lattice about an atomselection. This commands creates a set of new objects with a common prefix. Each object in the seriescorresponds to one symmetry−related object, which can be treated independently. See "help symexp" or thereference section for usage information.
In order to visualize only symmetry−related atoms within a given distance, you need to break the processdown into two steps. First, you use the symexp command to create complete symmetry−related objects. Thenyou use "hide" commands to restrict what is visible to only those areas which you are interested.
load foo.pdb # load PDB file with CRYST record
symexp sym,foo,(foo),5.0 # Create symmetry related "foo" objects # which pass within 5 angstroms of foo # using the prefix "sym"
hide (not (foo expand 5)) # hide atoms greater than 5 A from foo
NOTE: The symexp command can potentially create large numbers of objects. You will want to use the"delete" command with a wildcard "*" to remove all objects that share a common prefix.
delete sym* # deletes objects starting with "sym"
Crystallography Applications 55

Electron Density Maps
The only map file format currently supported is the CNS and XPLOR ASCII format map file. PyMOL canread large maps of this format and then display arbitrary "bricks" of density within these maps about atomselections.
load
PyMOL expects XPLOR/CNS map files to have a ".xplor" extension. This requirement can be avoided bysupplying an explicit type of "xplor" to the "load" command.
load 2fofc.xplor,map1 # type inferred from the extension load 2fofc.map,map1,1,xplor # type explicitly provided
See "help load" or the reference section for additional information.
isomesh and isodot
Map objects are used to store the data and are represented by a wire−frame brick in space indicating the extentof the map. An arbitrary number of mesh or dots objects can be created from a given map using the "isomesh"and "isodot" commands.
isomesh msh1,map1,1.0 # display an isosurface−mesh at level 1.0 over # the entire map object "map1"
isomesh msh2,map1,1.0,(chain A),3.0 # display isosurface−mesh at 1.0 # in a brick about chain A with a # border of 3.0 Angstroms
See "help isomesh" or the reference section for additional information.
Electron Density Maps 56

Compiled Graphics Objects (CGOs) and MolscriptRibbons
Introduction
Although PyMOL uses OpenGL for all real−time rendering, the simple ray−tracing engine inside of PyMOLis incapable of understanding arbitrary OpenGL calls. Thus, any graphics scene must be translated into a setof primitives (spheres, cylinders, and triangles) that can be provided to the ray−tracer in order to generate highquality images with "ideal" geometries, lighting, and shadows.
Compiled graphics objects are a PyMOL−specific format which enables any Python programmer to createthree−dimensional geometries and animations which can be displayed at high−speed via OpenGL and alsorendered into maximum−quality images via the raytracer without any additional work.
Molscript Ribbons
NOTE: Molscript is a commercial software (free to academics) available at http://www.avatar.se/molscript/and must be obtained separately. It is our intention to eventually implement our own Molscript−qualityribbons directly from within PyMOL, but that day has not yet come.
PyMOL can automatically translate Raster3D format input files output by Molscript (with "−r" option) intoCompiled Graphics Objects for display and rendering inside of PyMOL. PyMOL expects these files to havethe file extension ".r3d". NOTE: the Raster3D−to−CGO interpreter is a bare−minimum Pythonimplementation, and doesn't include anything beyond what is required to read what is output by Molscript.
load
load test/dat/pept.r3d # loads one of the example raster3d files
Using Molscript
molauto
When using molauto to preparing input files for PyMOL, it is important to use the "−nocentre" option toprevent any transformation of the protein. That way the PDB file and the Molscript ribbons will be in thesame frame of reference.
Unix> molauto −nocentre 3al1.pdb | molscript −r > test1.r3dUnix> molauto −nocentre −nice 3al1.pdb | molscript −r > test2.r3d
You can load both PDB and ribbon files directly into PyMOL as separate objects.
load 3al1.pdb # loads the coordinates load test1.r3d # loads molscript ribbon
Molscript Input Files
Unfortunately, PyMOL does not have the ability to write molscript input files which reflect the current atom
Compiled Graphics Objects (CGOs) and Molscript Ribbons 57

colorings and visibilities. Therefore, you will need to get in the habit of manually editing Molscript input filesin order color and customize ribbons appropriately. Here are some tips:
1. Remove any line starting with "transform atom" from existing Molscript input files in order to preserve theframe of reference. For example:
transform atom * by centre position atom *;
2. For performance reasons, you may want to set the segments to a small number while working withMolscript ribbons in real−time. Later on you can increase this number, recreate, and reload the ".r3d" files.
set segments 2; # good for real−time graphics
set segments 8; # good for rendering
The easiest way to create new ribbons using PyMOL is to use the "save" command to write out a PDB filecontaining the atom selection of interest. You can then apply the "system" command to run molauto andmolscript, and then load the Raster3D file back into PyMOL.
save tmp.pdb,(chain C) system molauto −nocentre tmp.pdb | molscript −r > tmp.r3d load tmp.r3d
Creating Compiled Graphics Objects
Compiled graphics objects contain equivalents to the normal line and triangle primitives found in OpenGL butalso include primitives for spheres and cylinders.
At the Python level, compiled graphics objects are constructed as a simple linear list of Python floating pointnumbers, which is conceptually equivalent to an OpenGL stream.
from pymol.cgo import * # get constantsfrom pymol import cmd
obj = [ BEGIN, LINES, COLOR, 1.0, 1.0, 1.0,
VERTEX, 0.0, 0.0, 0.0, VERTEX, 1.0, 0.0, 0.0,
VERTEX, 0.0, 0.0, 0.0, VERTEX, 0.0, 2.0, 0.0,
VERTEX, 0.0, 0.0, 0.0, VERTEX, 00, 0.0, 3.0,
END ]
cmd.load_cgo(obj,'cgo01')
CGOs support the standard OpenGL BEGIN/END formalism as well as a few stand−alone primitives,SPHERE, CYLINDER, and TRIANGLE, which should NOT appear within a BEGIN/END block.
Creating Compiled Graphics Objects 58

CGO Reference
A CGO is simply a Python list of floating point numbers, which are compiled by PyMOL into a CGO objectand associated with a given state.
Lowercase names below are should be replaced with floating−point numbers. Generally, the TRIANGLEprimitive should only be used only as a last restore since it is much less effective to render than using a seriesof vertices with a BEGIN/END group.
BEGIN, { POINTS | LINES | LINE_LOOP | LINE_STRIP | TRIANGLES | TRIANGLE_STRIP | TRIANGLE_FAN },
VERTEX, x, y, z,
COLOR, red, green, blue,
NORMAL, normal−x, normal−y, normal−z,
END,
LINEWIDTH, line−width,
WIDTHSCALE, width−scale, # for ray−tracing
SPHERE, x, y, z, radius # uses the current color
CYLINDER, x1, y1, z1, x2, y2, z2, radius, red1, green1, blue1, red2, green2, blue2,
TRIANGLE, x1, y1, z1, x2, y2, z2, x3, y3, z3, normal−x1, normal−y1, normal−z1, normal−x2, normal−y2, normal−z2, normal−x3, normal−y3, normal−z3, red1, green1, blue1, red2, green2, blue2, red3, green3, blue3,
load_cgo
CGO lists are loaded into PyMOL using the "load_cgo" function.
cmd.load_cgo(list,name,state)
Arbitrary 3D animations can be created by loading CGOs into consecutive states of a given object. Theexample below is a static image from the "examples/devel/cgo03.py" cgo animation demonstration program.
CGO Reference 59
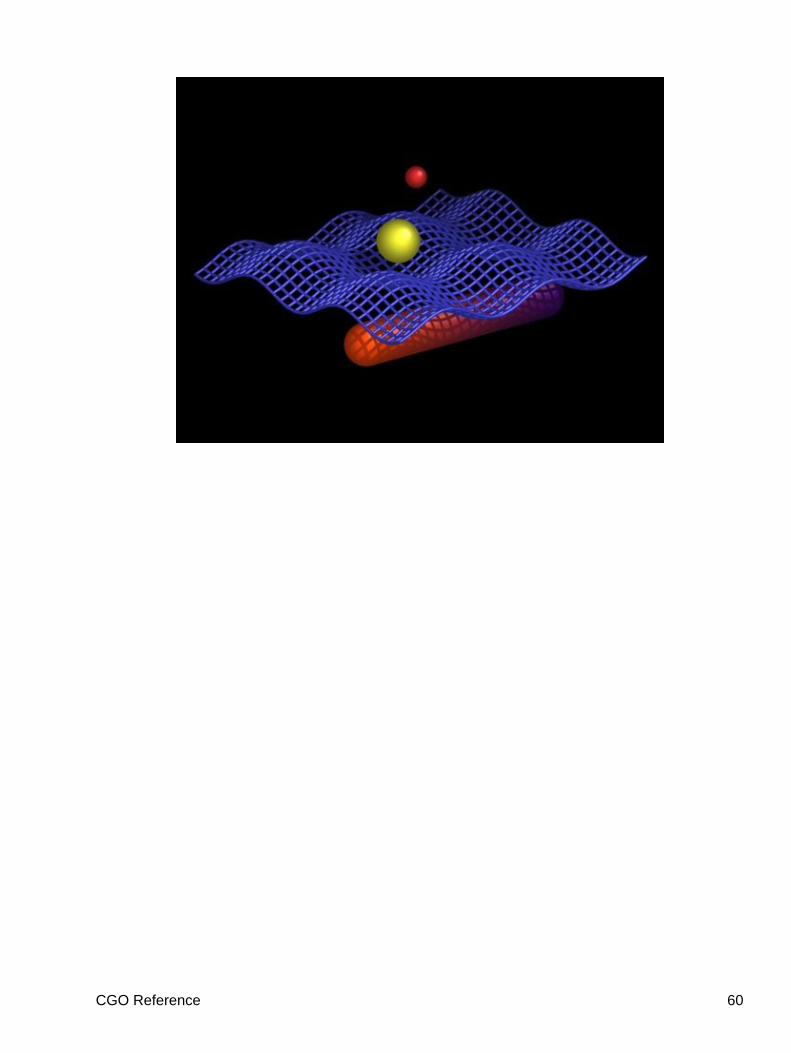
CGO Reference 60

Callback Objects and PyOpenGLThis is mainly a developer's function, so most users can skip this section. You will need some Pythonknowledge to understand the example.
Introduction
Athough all OpenGL rendering in PyMOL is perfomed at the C level, PyOpenGL provides an alternativebinding of the OpenGL API from Python. Unfortunately, it is impossible for PyMOL to produces ray−tracedimages of objects rendered using PyOpenGL. Nevertheless, PyOpenGL can be used within PyMOL viaCallback objects for pure OpenGL−based rendering pursposes. If you need your graphics to ray−tracable, thenyou should use Compiled Graphics Objects (see previous section).
Callback objects are trivial Python objects which have a "__call__" method for rendering and a "get_extent"method which tells PyMOL where in space the object is located. Once a callback object has been loaded intoPyMOL, Python will automatically call this object when needed to update the screen.
PyMOL includes a copy of PyOpenGL under the pymol module hierarchy (pymol.opengl), but usage of thiscopy is of course optional. You can instead bind to the latest version without problems, provided that youinstall it yourself into the Python library that PyMOL is using by default.
NOTE: The current Window's version of PyMOL does not include Numeric, which makes heavy usage ofPyOpenGL from within PyMOL impractical under Windows at present.
Example
The following Python program shows how you can use a Callback object within PyMOL to perform renderingusing OpenGL. For more examples, see the directory "$PYMOL_PATH/examples/devel".
from pymol.opengl.gl import *from pymol.callback import Callbackfrom pymol import cmd
class myCallback(Callback):
def __call__(self):
glBegin(GL_LINES)
glColor3f(1.0,1.0,1.0)
glVertex3f(0.0,0.0,0.0) glVertex3f(1.0,0.0,0.0)
glVertex3f(0.0,0.0,0.0) glVertex3f(0.0,2.0,0.0)
glVertex3f(0.0,0.0,0.0) glVertex3f(0.0,0.0,3.0)
glEnd()
def get_extent(self):
Callback Objects and PyOpenGL 61

return [[0.0,0.0,0.0],[1.0,2.0,3.0]]
cmd.load_callback(myCallback(),'gl01')
load_callback
Callback objects are loaded into PyMOL using the "load_callback" function.
cmd.load_callback(object,name,state)
load_callback 62