user manual for: digital 3d viewer for panel mount model
TRANSCRIPT

User manual for: Digital 3D viewer for panel mount
Model 18-04-D55-x
The contents are subject to changes without giving notice. January, 2019, version 1.1
de Wijs apparatenbouw Vleugelboot 68, 3991CL, Houten the Netherlands
Tel. +31 (0)30-6364928 Fax. +31 (0)30-6361723 e-mail: [email protected] Website: www.dewijs-3d.com
2
Table of contents. 1. Introduction ............................................................................................................. 3
1.1 Acknowledgements ........................................................................................... 3
2. Installation .............................................................................................................. 4
2.1 The viewer ........................................................................................................ 4
2.2 Caution required for the next points! ................................................................. 5
2.3 Content source .................................................................................................. 6
3 Technical data ......................................................................................................... 7
3.1 Physical dimensions (120 mm. lens version) .................................................... 7
3.2 Connectivity specifications ................................................................................ 9
3.3 Digital video input specifications (timing) ........................................................ 11
3.5 Buttons and indicator LED explanation. .......................................................... 15
3.6 Maintenance ................................................................................................... 16

3
1. Introduction With the release of this model of viewer, fall 2018, 3D viewing has grown to a wide range of experience systems like VR, AR, XR, autostereoscopic displays and holographic presentation systems. The purpose of this viewer is to present photographic and video content in 3D in high quality crisp and sharp. Besides the ability to present images on a full HD LCD, a higher standard of resolution became more relevant. To be able to easily switch of resolution or broken parts, the viewer is also improved to be modified and maintenance becomes easier. This viewer is a good balance between optics and the resolution of the screen to present a high quality, sharp and optically comfortable show of 3D content. The aim was to design a visitor tolerant viewing system and reach people of all ages to experience your well prepared and high quality 3D images or video’s. The viewer is actually a monitor only and can be connected to any source having the ability to customize the video output resolution. The intention of this viewer is to build it into walls, panels or other custom build constructions.
1.1 Acknowledgements
Ken Thompson for creating the open source presentation tool Pi-presents. http://pipresents.wordpress.com The Raspberry pi foundation for creating such a small and very useful source for the viewer: http://www.raspberrypi.org
- januari 2019, updated LCD timing settings.
4
2. Installation The 3D digital viewer can be used to present a slide show or video. For exhibit designers, the viewer could be used as a stand-alone object or as ‘support’ to explain a scene or object close to the viewer. Because of the small size of the viewer, in most situations only the lens barrels are visible, the visitor should not overlook viewer and miss the presentation! When looking through the viewer, you get the best experience when there is nothing that is irritating or inhibits a clear view. Things that might irritate are bright spot lights pointing on the viewer causing the light to be reflected in your eyes. Or flashing lights close to the lenses. A black (cinema like) surrounding gives the best impression.
2.1 The viewer
The viewer housing is constructed in such a way it gives the most freedom to integrate it in almost every situation. Integrating the viewer in your situation:
- Using the front panel plate is the easiest way to build the viewer in a wall or panel.
- For your custom application, you can replace the front plate for your own front cover. Steps in the side of the lens barrels allow to lock up your front plate between the barrels and the housing of the viewer.
Initially the viewer is supplied with the lens barrels locked up in their screw thread by hand. So you can remove the lens barrels with some force. This allows you to remove the front plate for whatever reason. Model number of the viewer only: 18-04-D55-xxx Year(18) of design – type panel viewer (04) – Digital 5.5” – Focal length xxx 80, 100 or 120 The LCD panels have their own identification: 18-04-D55X The X stands for A,B,C or D and explained in chapter 3.3 Digital Video input specifications (timing).
5
2.2 Caution required for the next points!
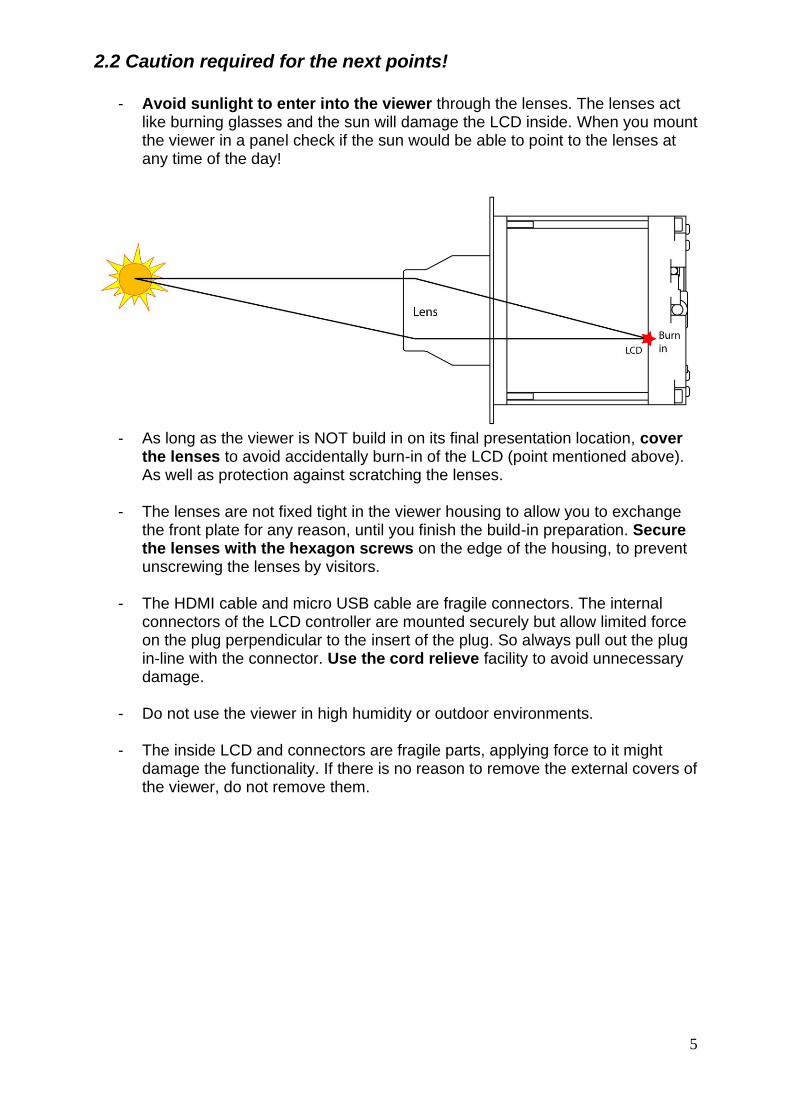
- Avoid sunlight to enter into the viewer through the lenses. The lenses act
like burning glasses and the sun will damage the LCD inside. When you mount the viewer in a panel check if the sun would be able to point to the lenses at any time of the day!
- As long as the viewer is NOT build in on its final presentation location, cover the lenses to avoid accidentally burn-in of the LCD (point mentioned above). As well as protection against scratching the lenses.
- The lenses are not fixed tight in the viewer housing to allow you to exchange the front plate for any reason, until you finish the build-in preparation. Secure the lenses with the hexagon screws on the edge of the housing, to prevent unscrewing the lenses by visitors.
- The HDMI cable and micro USB cable are fragile connectors. The internal connectors of the LCD controller are mounted securely but allow limited force on the plug perpendicular to the insert of the plug. So always pull out the plug in-line with the connector. Use the cord relieve facility to avoid unnecessary damage.
- Do not use the viewer in high humidity or outdoor environments.
- The inside LCD and connectors are fragile parts, applying force to it might damage the functionality. If there is no reason to remove the external covers of the viewer, do not remove them.

6
2.3 Content source
The viewer is built around a smart phone LCD display having the resolution that varies depending on the type of LCD panel you ordered. The choice of a content sources, cancels out devices which are unable to deliver this the native resolutions that the LCD requires! So check chapter 3.2 for video input requirements. Computer systems having a more advanced video processing output (separate video cards or graphic processors) are often automatically able to address portrait oriented LCD’s trough the EDID information. Simple small single board computers, depending on the operating system, require more knowledge to configure the vertical display. Be aware that there are a number of professional multimedia players having fixed output resolutions to select from, they do not match with portrait displays! Using a single board computer like the Raspberry pi De Wijs offers a simple solution as content source; the Raspberry pi. The choice for this device has several reasons:
- affordable and very good available. - The graphical output can be set to the required LCD configuration of the 3D
viewer up to QHD resolution. - The General Purpose IO header on this board allows push buttons to control a
slide show or start a video. - Open source software that can be adapted for your application.
We use Pi-presents that gives a good solution for an interactive slide show with acceptable performance.

7
3 Technical data
3.1 Physical dimensions (120 mm. lens version)

8
When you consider to make your own front plate. You need to make 2 holes side by side for the lenses. Heart to heart distance is 63 mm. and diameter of 56.5 mm. Fixing the lens barrels into the housing again, will lock up your panel in the rim of the lens barrels. Do NOT de-assemble the long M4 bolts that hold the whole viewer together. You might scratch the matt painted image splitter or LCD.
The viewer can carry 2 types of lenses. Both fit in the housing of the viewer. Only the length of the barrel is different:
- 100 mm. achromatic, 33 mm. diameter. This lens magnifies 2.5x and is a good choice for viewing video content, having a 4:3 aspect ratio. The most upper and lower part of the LCD is less good visible for glasses wearers when using the full height of the LCD.
- 120 mm. achromatic, 37 mm. diameter. This lens magnifies 2.1x and allows all visitors to see the full size of the LCD into the corners without image distortion. Pixels are hard to see. It is a good choice for viewing square or landscape still images.

9
3.2 Connectivity specifications
The viewer has 1 power connector; through micro USB Micro USB connector: 5 Volts dc. Power consumption; 500mA at 5 Volts dc. 2,5 Watts Digital video input through the HDMI connector type A, 1.4 Edid version 1.3. Maximum cable length 1.5 metres. It is recommended to secure the cables with the screws on the edge of the viewer as cable relieve facility. Native display orientation The display panels used in the 3D digital viewer are also used in known brands of smartphones and VR glasses. These displays are produced for that particular purpose and orientation (vertical or horizontal). The HDMI controller inside the 3D viewer is not able to rotate the presented content, so the connected media player should be able to rotate the content. The 5.5” smartphone display’s are natively produced in portrait orientation, see below as example.
In, for example, Windows, you can rotate the desktop environment, see below

10
Rotating a desktop inside any operating system requires enough graphical memory to do that. The Raspberry pi 2 and 3 are able to rotate only the Full HD resolution. However the dual LCD configuration is already horizontal oriented and does not require to rotate, see below. The HDMI controller in the viewer splits up the content in half for each display panel.

11
3.3 Digital video input specifications (timing)
The viewer’s rear frame is designed to be able to exchange an internal sub- LCD carrier. Such a carrier can hold a specific LCD panel measuring 5.5” diagonal or 120 mm. width. Bellow an example for the 1440x2560 LCD.
With the release of this viewer model, 4 variants are available and listed below. 18-04-D55A 1080x1920 pixels. HD 18-04-D55B 1440x2560 pixels. QHD 18-04-D55C 2880x1440 pixels. Double LCD 18-04-D55D 2160x3840 pixels. UHD Modern desktop PC’s are able to detect the right settings for these LCD’s, you do not need to set complicated parameters. Use the DVI digital output, not Display port or HDMI (or combinations with converters) However if you prefer to work with the Raspberry pi or other Linux based computers, you need the timing settings of each panel. They are listed below. For the full config.txt content for the Raspberry pi we refer to the configuration manual of the Raspberry pi for this viewer and LCD carriers.

12
1. Model 18-04-D55A Full HD Resolution: horizontal x vertical = 1080x1920 pixels at 60 Hz. 8 bits colour depth. Size: 5.5”, model LS055T1SX01
The timing parameters are as following:
Active Front Porch
Sync width
Back Porch
horizontal
Active field 1080x1920 pixels
60 10 35 Pixels (total 1185)
Front Porch 4 Hsync and vsync negative
Sync Width 4
Back Porch 2
veritical Lines (total 1930)
Xconfig timing: Modeline "1080x1920" 137.22 1080 1140 1150 1185 1920 1924 1928 1930 -hsync -vsync
String for Raspberry pi hdmi_timings=1080 0 60 10 35 1920 0 4 4 2 0 0 0 60 0 137220000 0 OS is able to rotate the desktop to landscape orientation.
2. Model 18-04-D55B QHD
Resolution: horizontal x vertical 1440x2560 pixels at 50Hz. 8 bit colour depth Size: 5.5”, model LS055R1SX04
The timing parameters are as following:
Active Front Porch
Sync width
Back Porch
horizontal
Active field 1440x2560 pixels
70 35 45 Pixels (total 1590)
Front Porch 12 Hsync and vsync negative
Sync Width 2
Back Porch 2
vertical Lines (total 2576)
Xconfig timing: Modeline "1440x2560" 204.792 1440 1510 1545 1590 2560 2572 2574 2576 -hsync -vsync
String for Raspberry pi hdmi_timings=1440 0 70 35 45 2560 0 12 2 2 0 0 0 50 0 204792000 0 OS is NOT able to rotate the desktop to landscape orientation.

13
3. Model 18-04-D55C Resolution: horizontal x vertical 2880x1440 pixels. 8 bit colour depth Size: 2x 2.9”, model LS029B3SX02 This Display set is able to change in resolution mode; clone mode and 3D mode (independent) using the ‘Restart Display / change resolution’ button.
The timing parameters are as following: 2880x1440 mode at 60Hz.
Active Front Porch
Sync width
Back Porch
horizontal
Active field 2880x1440 pixels
48 32 80 Pixels (total 3040)
Front Porch 8 Hsync and vsync negative
Sync Width 2
Back Porch 6
vertical Lines (total 1456)
Xconfig timing: Modeline "2880x1440" 265.57440 2880 2928 2960 3040 1440 1448 1450 1456 -hsync -vsync
String for Raspberry pi. hdmi_timings=2880 0 48 32 80 1440 0 8 2 6 0 0 0 60 0 265574400 0 No need to rotate the desktop orientation, already in landscape.
The timing parameters are as following: 1440x1440 clone mode at 60Hz.
Active Front Porch
Sync width
Back Porch
horizontal
Active field 1440x1440 pixels
48 32 80 Pixels (total 1600)
Front Porch 8 Hsync and vsync negative
Sync Width 2
Back Porch 6
vertical Lines (total 1456)
Xconfig timing: Modeline "1440x1440" 139.77600 1440 1488 1520 1600 1440 1448 1450 1456 -hsync -vsync
String for Raspberry pi. hdmi_timings=1440 0 48 32 80 1440 0 8 2 6 0 0 0 60 0 139776000 0 No need to rotate the desktop orientation, already in landscape.

14
4. Model 18-04-D55D UHD Resolution: horizontal x vertical 2160x3840 pixels at 50Hz. 8 bit colour depth Size: 5.5”, model H546UAN01.0 This UHD Display is able to change in resolution mode; HD, QHD and UHD, using the ‘Restart Display / change resolution’ button.
The timing parameters are as following: 1080x1920 mode, at 60 Hz.
Active Front Porch
Sync width
Back Porch
horizontal
Active field 1080x1920 pixels
105 32 100 Pixels (total 1317)
Front Porch 12 Hsync and vsync negative
Sync Width 2
Back Porch 10
vertical Lines (total 1944)
Xconfig timing: Modeline "1080x1920" 153.614880 1080 1185 1217 1317 1920 1932 1934 1944 -hsync -vsync
String for Raspberry pi hdmi_timings=1080 0 105 32 100 1920 0 12 2 10 0 0 0 60 0 153614880 0 OS is able to rotate the desktop to landscape orientation.
The timing parameters are as following: 1440x2560 mode. at 50 Hz.
Active Front Porch
Sync width
Back Porch
horizontal
Active field 1440x2560 pixels
105 32 100 Pixels (total 1677)
Front Porch 12 Hsync and vsync negative
Sync Width 2
Back Porch 11
vertical Lines (total 2585)
Xconfig timing: Modeline "1440x2560" 216,75225 1440 1545 1577 1677 2560 2572 2574 2585 -hsync -vsync
String for Raspberry pi. hdmi_timings=1440 0 105 32 100 2560 0 12 2 11 0 0 0 50 0 216752250 0 Portrait mode only
The timing parameters are as following: 2160x3820 mode at 24 Hz.
Active Front Porch
Sync width
Back Porch
horizontal
Active field 2160x3840 pixels
105 8 100 Pixels (total 2373)
Front Porch 12 Hsync and vsync negative
Sync Width 2
Back Porch 10
vertical Lines (total 3864)
Xconfig timing 30 Hz.: Modeline "2160x3840" 277.860240 2160 2265 2297 2397 3840 3852 3854 3864 -hsync -vsync Xconfig timing 24 Hz.: Modeline "2160x3840" 220.062520 2160 2265 2273 2373 3840 3852 3854 3864 -hsync -vsync
String for Raspberry pi., 24 Hz. hdmi_timings=2160 0 105 8 100 3864 0 12 2 10 0 0 0 24 0 220062520 0 Portait mode only

15
3.5 Buttons and indicator LED explanation.
Power up: When applying power to the viewer, the controller for the LCD starts up checks the input EDID data on the HDMI connector. When it is correct it will show video on the LCD. The bleu LED blinks fast and if the signal is correct, the green LED turns to stable green. If the HDMI signal does not match this inside display or the signal is temporally wrong, the bleu LED blinks slowly. Restart button: When pressing the restart button, the inside display controller restarts like power up. Pressing this button also switches the resolution on some display controllers. After each press, wait for 5 seconds to let the controller and the source (computer) to switch over (automatically). If one of them is not able to adapt to that resolution, the bleu LED blinks slowly. Brightness button: Pressing this button at the rear of the viewer changes the brightness of the backlight of the LCD in 5 steps. The brightness level is stored after setting. When power is turned on or connected again, the latest brightness level is restored. To preserve the lifecycle of the LCD screen, it is good not to set the brightness of the LCD to maximum. Keep it to about 75%

16
3.6 Maintenance
Cleaning The outside of the viewer can be cleaned with regular cleaning liquids, not too aggressive or polishing. The lenses are not water tight. Clean the lenses with a soft cloth. Dust visible on the LCD Turn on the viewer to see the dust particles. Take the lens barrels out of the front of the viewer. You can blow with compressed cleaned (oil free) air, not higher than 2 bars, inside the housing of the viewer towards the LCD. Not too deep and avoid touching the sides to prevent scratches on the inside walls. You can use a brush or soft cloth to wipe resistant particles away. There is no glass cover on the LCD! Do not apply too much pressure / force on it. When re- assembling the lens barrels in the front, it might happen new particles drop on the LCD. You can repeat the above steps until the result is satisfying. Miss alignment of the image splitter. Between the left and right image on the LCD runs a thin metal plate from the LCD to your nose / between the eyes. This avoids the left or right eye to see parts of the image of the other side. The position of this splitter is accurate but might be, for some reason be out of alignment, you might see a very small piece of image of the other side (left or right). To resolve do the following: For whatever source you have, we supply a test image that looks like this:
- Set your source to show the above image in the viewer. - Look through the lenses and see the direction and amount of miss alignment
of the splitter (metal plate). - Now unscrew both lenses out of the housing. Be sure the hexagon screws at
the side of the lenses are unlocked. - With your fingers you can push the splitter (through the lens holes) to the left
or right to get the splitter aligned. You actually bend the plate a little. - Check with the lenses if the alignment is right or repeat the previous step. - Clean the interior of the viewer with low pressure compressed air. - Re-assemble the lens barrels to the viewer and the alignment is finished.