user manual - · pdf fileuser manual electronic sphygmomanometer model contec08c to assure...
TRANSCRIPT

UserUserUserUserManualManualManualManual
Electronic Sphygmomanometer
Model CONTEC08C
■To assure the correct use of the product safety measures, please carefully read user manualbefore using.■ After reading, please validly keeping to refer and consult at any moment.

I
CONTENTSCONTENTSCONTENTSCONTENTSChapter1 Safety Precautions.........................................................................................................1Chapter2 Main Unit......................................................................................................................3Chapter3 Button Functions...........................................................................................................4Chapter4 External Interfaces........................................................................................................ 4Chapter5 Dry Battery/AC Adapter Installation............................................................................ 5
5.1 Dry Battery Installation.................................................................................................. 55.2 Using the ACAdapter.....................................................................................................5
Chapter6 Setting The Date And Time...........................................................................................6Chapter7 Unit............................................................................................................................... 7Chapter8 User Switch...................................................................................................................7Chapter9 Applying the Arm Cuff................................................................................................. 8Chapter10 BP Measurement.........................................................................................................9
10.1 Accurate Measurement Way......................................................................................... 910.2 Measurement BP.......................................................................................................... 9
Chapter11 Memory Function......................................................................................................1011.1 Review The Memory Value........................................................................................ 1111.2 Delete Memory Values................................................................................................11
Chapter12 SpO2 Measurement Function(Separate Sale)........................................................... 12Chapter13 Monitoring Procedure............................................................................................... 13Chapter14 Maintenance and Cleaning........................................................................................14Chapter15 Installation Of The Software.....................................................................................15
15.1 Demand Of Editor...................................................................................................... 1515.2 Installation Of Software..............................................................................................15
Chapter16 Error Message........................................................................................................... 16Chapter17 TROUBLESHOOTING............................................................................................17Chapter18 Care And Maintenance..............................................................................................17Chapter19 Specification............................................................................................................. 19

1
Chapter1Chapter1Chapter1Chapter1 SafetySafetySafetySafety PrecautionsPrecautionsPrecautionsPrecautions
� In order to use it correctly,please read the "Safety Precautions" carefully before using it.� To prevent users from sufferring hurt or damnification due to improper use, please refer tothese "Safety Precautions" and use this product properly.
For safety reasons, be sure to comply with safety precautions.
CautionCautionCautionCautionssss
If not to use correctly, it exists that a potentially hazardous situation which may result ininjury to the user or patient or damage to the equipment or other property.
CautionCautionCautionCautionssss
Self-diagnosis and treatment using measured results may be dangerous.Follow the instructions of your physician.
Contact your physician for specific information about your blood pressure.Please hand measurement results to the doctor who know your health to accept diagnosis.
For severe blood circulation disorder or arrhythmia patients, please use the device under theguidance of a doctor.
Otherwise it may lead to acute hemorrhage, or measurement error as a result of squeezed arm.This device is intended for using in measuring blood pressure and pulse rate.
Do not use for any other purpose.Otherwise it may cause accident or hold back..
Please use special cuff.Otherwise it is possible that measurement result is incorrect.
Do not disassemble or attempt to repair the unit or components.Otherwise it cannot gain accurate measurement.

2
OperationOperationOperationOperation forforforforACACACACAdapterAdapterAdapterAdapter ((((Separate Sale))))
CautionsCautionsCautionsCautions
Please use sold separately dedicated AC adapter.Otherwise it may cause trouble.
Sold separately dedicated AC adapter be sure to use the AC 220V. Be sure to use a separatesocket.
Otherwise it may cause electric shock or injury.When sold separately dedicated AC adapter plug or wire breakage,
please immediately pulled the plug from the socket.Otherwise it may cause electric shock or injury.
Do not plug or unplug the adapter power cord with wet hands.Otherwise it may cause electric shock or injury.
OperationOperationOperationOperation forforforfor batterybatterybatterybattery
CautionsCautionsCautionsCautions
Please use 4 "AA" size manganese or alkaline batteries, do not use batteries of other types.Otherwise it may cause fire.
New and old batteries, different kinds batteries can not be confusion.Otherwise it may cause battery leakage, heat, rupture, and damage to Electronic
Sphygmomanometer.+ and - polarities of the batteries must match the polarities of the battery compartment as
indicated.When the batteries power exhausts, replace with four new batteries at the same time.Please take out the batteries when you do not use the device for a long time(more than 3 months).
Otherwise it may cause battery leakage, heat, rupture, and damage to ElectronicSphygmomanometer.
If battery fluid get in your eyes, immediately rinse with plenty of clean water.Contact a physician immediately.
Otherwise it will cause blindness or other hazards.If electrolyte of the batteries immodestly glues on the skin or the clothes,
please immediately flush with a great deal of clear water.Otherwise it mar hurt the skin.
AdviceAdviceAdviceAdvice
Do not subject the device to strong shocks, such as dropping the unit on the floor.Do not add pressure before cuff wrapps around the armDo not force the cuff and the cuff air tube bending
The device applies measurement Blood Pressure (BP) and Pulse of adult .

3
Chapter2Chapter2Chapter2Chapter2 MainMainMainMain UnitUnitUnitUnit
The production is in the package .Open the package and confirm whether the production iswhole.
AccessoriesAccessoriesAccessoriesAccessories:
Adult Cuff Dry Battery
(Specification: limb circumference 22-32cm (middle part of upper arm ), please choice suitedcuff when measuring other).)
USB Data Line Software CD User Manual
Separate Sale:AC AdapterInput AC100-240V 50/60Hz AC 150mAOutput DC 6.0V±0.2V 1.0A
SpO2 Probe Y10UCH150SpO2 Measurement Range 35%~ 100 %Measurement Accuracy 70% ~ 100% ±2 %Pulse Measurement Range 30 ~ 250bpm
DisplayCuff PlugCuff Air Plug
UP/DOWN ButtonMEMORYButtonACAdapter JackSet Time ButtonUSB Plug Jack
USER SWITCH ButtonOPEN/CLOSE ButtonSTART/STOP Button
Adult Cuff

4
Chapter3Chapter3Chapter3Chapter3 ButtonButtonButtonButton FunctionsFunctionsFunctionsFunctions
All the operations to the Electronic Sphygmomanometer are through the buttons .The names ofthe buttons are above them. The buttons are listed. As follows:
【ON/OFFON/OFFON/OFFON/OFF】 Press the button and the system will start .Press the button for a long time
and the device will boot-strap or close.
【START/STOPSTART/STOPSTART/STOPSTART/STOP】 Press to inflate the cuff to start a blood pressure measurement.
When measuring, press it to cancel the measurement and deflate the cuff.
Left button 【USER】 uses to switch user.
Middle button 【SETUP】 uses to set year, month, date.Right button 【MEMORY】 uses to review user data.
Up and down buttons respectively carry on the functions that changing date and
switching state by up or down moving the cursor.
Chapter4Chapter4Chapter4Chapter4 ExternalExternalExternalExternal InterfacesInterfacesInterfacesInterfaces
NoteNoteNoteNote
When removing NIBP cuff, please take the front of the tracheal to pull the plug.
① Cuff Socket
left side
The right side of the instrument is USB socket and AC adapter socket.
①USB socket
②AC adapter socketright side
5
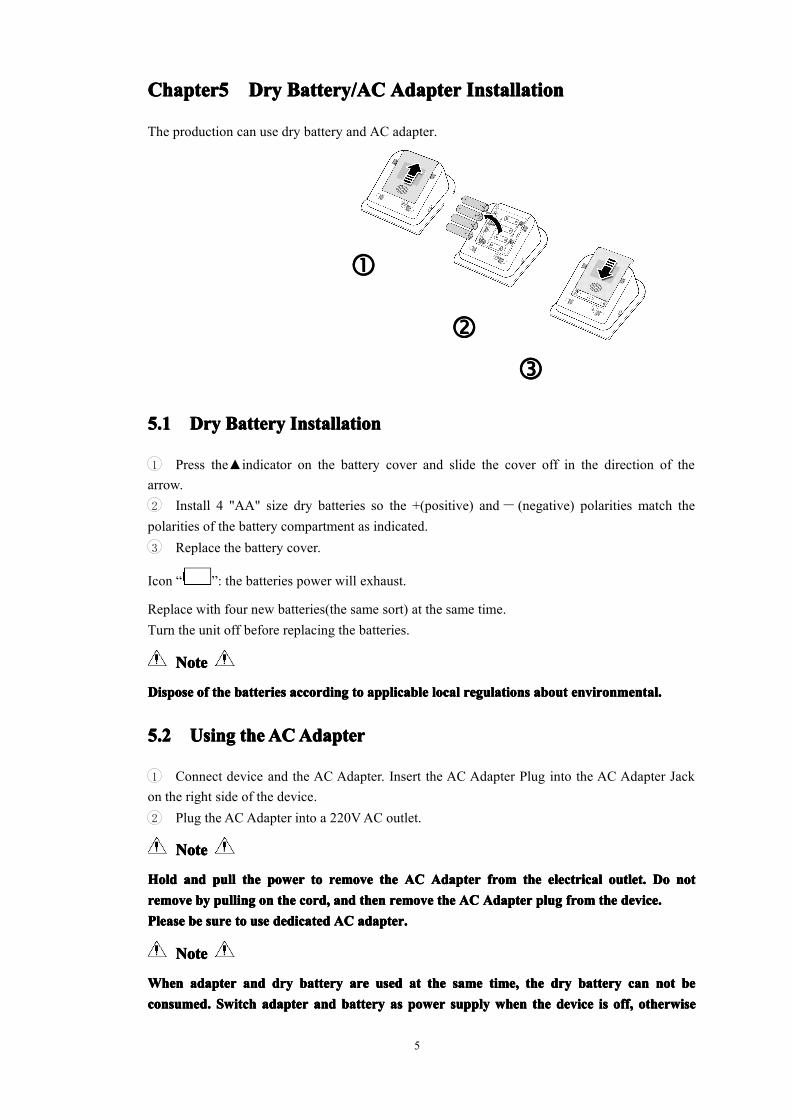
Chapter5Chapter5Chapter5Chapter5 DryDryDryDry Battery/ACBattery/ACBattery/ACBattery/AC AdapterAdapterAdapterAdapter InstallationInstallationInstallationInstallation
The production can use dry battery and AC adapter.
����
����
����
5.15.15.15.1 DryDryDryDry BatteryBatteryBatteryBattery InstallationInstallationInstallationInstallation
1 Press the▲indicator on the battery cover and slide the cover off in the direction of thearrow.2 Install 4 "AA" size dry batteries so the +(positive) and- (negative) polarities match thepolarities of the battery compartment as indicated.3 Replace the battery cover.
Icon “ ”: the batteries power will exhaust.
Replace with four new batteries(the same sort) at the same time.Turn the unit off before replacing the batteries.
NoteNoteNoteNote
DisposeDisposeDisposeDispose ofofofof thethethethe batteriesbatteriesbatteriesbatteries accordingaccordingaccordingaccording totototo applicableapplicableapplicableapplicable locallocallocallocal regulationsregulationsregulationsregulations aboutaboutaboutabout environmental.environmental.environmental.environmental.
5.25.25.25.2 UsingUsingUsingUsing thethethetheACACACACAdapterAdapterAdapterAdapter
1 Connect device and the AC Adapter. Insert the AC Adapter Plug into the AC Adapter Jackon the right side of the device.2 Plug the AC Adapter into a 220VAC outlet.
NoteNoteNoteNote
HoldHoldHoldHold andandandand pullpullpullpull thethethethe powerpowerpowerpower totototo removeremoveremoveremove thethethethe ACACACAC AdapterAdapterAdapterAdapter fromfromfromfrom thethethethe electricalelectricalelectricalelectrical outlet.outlet.outlet.outlet. DoDoDoDo notnotnotnotremoveremoveremoveremove bybybyby pullingpullingpullingpulling onononon thethethethe cord,cord,cord,cord, andandandand thenthenthenthen removeremoveremoveremove thethethethe ACACACAC AdapterAdapterAdapterAdapter plugplugplugplug fromfromfromfrom thethethethe devicedevicedevicedevice....PleasePleasePleasePlease bebebebe suresuresuresure totototo useuseuseuse dedicateddedicateddedicateddedicated ACACACAC adapteradapteradapteradapter....
NoteNoteNoteNote
WhenWhenWhenWhen adapteradapteradapteradapter andandandand drydrydrydry batterybatterybatterybattery areareareare usedusedusedused atatatat thethethethe samesamesamesame time,time,time,time, thethethethe drydrydrydry batterybatterybatterybattery cancancancan notnotnotnot bebebebeconsumedconsumedconsumedconsumed.... SwitchSwitchSwitchSwitch adapteradapteradapteradapter andandandand batterybatterybatterybattery asasasas powerpowerpowerpower supplysupplysupplysupply whenwhenwhenwhen thethethethe devicedevicedevicedevice isisisis off,off,off,off, otherwiseotherwiseotherwiseotherwise

6
thethethethe devicedevicedevicedevice maymaymaymay shutdownshutdownshutdownshutdown duedueduedue totototo powerpowerpowerpower failure.failure.failure.failure.
Chapter6Chapter6Chapter6Chapter6 SettingSettingSettingSetting TheTheTheThe DateDateDateDate AndAndAndAnd TimeTimeTimeTime
���� It is necessary to set date and time after turning on the device.���� The Electronic Sphygmomanometer automatically stores measurement results with date and
time.���� If dry battery power exhausts or removed ,then, after the device turned on, the date resumes
from the last setting value and the time from 00:00:00, set the date and time again
The Electronic Sphygmomanometer stores the measure results of three users automatically, andup to 99 items for every user.The results can be uploaded to PC via USB and processed with thePC software. If the date and time are set correctly, the measurement data and time will be storedcorrectly in the memory, otherwise it may not be correct.
NoteNoteNoteNote
IfIfIfIf correctlycorrectlycorrectlycorrectly useuseuseuse datadatadatadata uploaduploaduploadupload function:function:function:function:
1.Turn on the device to enter the main interface shown as the follow:
2.Press 【SETUP】 button to enter the setup date and time, LCD will display 2009.
3.Every press 【UP】 button to make the number increase 1, press 【DOWN】 buttons to makethe number reduce 1.
NoteNoteNoteNote
TheTheTheThe yearyearyearyear cancancancan bebebebe setsetsetset betweenbetweenbetweenbetween 2000200020002000 andandandand 2099.2099.2099.2099. WhenWhenWhenWhen thethethethe displaydisplaydisplaydisplay reachesreachesreachesreaches 2099,2099,2099,2099, itititit willwillwillwill returnreturnreturnreturn totototo2000.2000.2000.2000.4.When displaying year on the screen, press 【SETUP】 button to confirm the setup value, andenter the next step, if you want to end the setup, press 【MEMORY】 button.

7
5.Repeat the 3 and 4 steps to set month and day.6.Repeat the 3 and 4 steps to set hour and minute.7.After completing the above steps ,press 【SETUP】/【MEMORY】 button to end.Reset the date and timeReset the date and time according to 2~7 items of chapter 6.
Chapter7Chapter7Chapter7Chapter7 UnitUnitUnitUnit
There are two units: "mmHg" and "kPa".The default is: "mmHg".To switch "mmHg" and "kPa" units, press 【UP】 or 【DOWN】 button for more 5 seconds. Inthe same way, if you want to switch as "mmHg", press 【UP】 or 【DOWN】 button for more5 seconds.
Chapter8Chapter8Chapter8Chapter8 UserUserUserUser SwitchSwitchSwitchSwitch
The Electronic Sphygmomanometer stores the measure results of three users automatically, andup to 99 items for every user.Press 【USER】 button in time interface to switch users.You can also switch in the memory interface. (Refer to section 11.1)

8
ChapterChapterChapterChapter9999 AAAApplyingpplyingpplyingpplying thethethethe AAAArmrmrmrm CCCCuffuffuffuff
The measurement can be carried out by applying the cuff on left or right arm.Remove tight-fitting clothing from your upper arms.
Carry out the operation in a room with comfortable temperature.
When measuring, take the thick clothes off instead of rolling up the sleeves.In order to measure accurately, pay attention to applying the cuff properly (left arm).
1 Make sure that the air plug is securely inserted in the mainunit.
2 Stretch cuff into a barrel, as the arm can conformable enterinto the barrel.
3 Arm penetrate throught the cuff, the air tube of the cuff willpass the top of your palm
4 Apply the cuff to your upper arm. The color marker is on theinside center of your arm and make the air tube aligned with yourmiddle forger.
5 The bottom of the cuff should be approximately 2cm~3cmabove your elbow.
6 Be fixed with cloths, and wrapped tight cuff, the arm and thecuff should not have gaps.

9
Chapter10Chapter10Chapter10Chapter10 BPBPBPBPMeasurementMeasurementMeasurementMeasurement
10.110.110.110.1 AccurateAccurateAccurateAccurate MeasurementMeasurementMeasurementMeasurementWayWayWayWay
Measurement in quiet and relaxing state.1.Place your arm on a table.2.The cuff is level with your heart.3.The palm of the hand is up, and the body relax.
TryTryTryTry totototo measuremeasuremeasuremeasure youryouryouryour bloodbloodbloodblood pressupressupressupressurererere atatatat thethethethe samesamesamesame timetimetimetime everyeveryeveryevery daydaydayday withwithwithwith thethethethe samesamesamesame armarmarmarmandandandand thethethethe samesamesamesame poseposeposepose forforforfor consistency.consistency.consistency.consistency.
The high and low location of cuff will cause changes in measurement results.Do not touch unit, cuff and windpipe during measurement.
MeasurementsMeasurementsMeasurementsMeasurements shouldshouldshouldshould bebebebe takentakentakentaken inininin aaaa quietquietquietquiet placeplaceplaceplace andandandand thethethethe bodybodybodybody shouldshouldshouldshould relax.relax.relax.relax.Remain still 4~5 minutes before measurement.Relax the body, do not let the muscle activity.Do not talk and move during the measurement.Wait 4~5 minutes between measurements.Do not use a cellular phone near the device.
10.210.210.210.2 MeasurementMeasurementMeasurementMeasurement BPBPBPBP
�Press 【START/STOP】 button to take a measurement.
Start measurement Measuring
Start deflatingDuring measurement, please keep correct pose and quiet state, the body could not move.

10
StopStopStopStop MeasurementMeasurementMeasurementMeasurementPress 【START/STOP】 button, The device will stop inflating, start deflating and then will backtime interface.�End measurement after displaying measurement values.
�Confirm Measurement ValueMeasurement value can be automatically stored.([Use memory function] refer to chapter 11)
*Self-diagnosis and treatment using measured results may be dangerous. Follow the instructionsof your physician.
NoteNoteNoteNote
� WaitWaitWaitWait 4-54-54-54-5 minutesminutesminutesminutes betweenbetweenbetweenbetween measurements.measurements.measurements.measurements.Repeated measurements, because the arm appears congestion, it may not get correct bloodpressure measurement. After the blood flow, take a measurement again.
���� If the body move in measuring, icon will appear ,you should keep the body still, andrestart a measurement.
���� When the screen appear
ErrOxx , the measurement can not carry. (refer to chapter 16)
④Press any button to return the date and time interface.⑤Take down cuff, press 【ON/OFF】 button to turn the device off.
*The device will automatically turn off after five minutes in which there is no operation to thedevice, even if you forget to turn the power off.
ChapterChapterChapterChapter11111111 MemoryMemoryMemoryMemory FunctionFunctionFunctionFunction
The device is designed to store the blood pressure, the pulse rate and measurement data and time,which can display 99 measurement results.Press 【USER】 button to switch users, the switchfunction can be disabled in measuring and setting the date and time.� The device automatically stores up to 99 sets of measurement values. When 100 sets ofmeasurement values are stored, the pioneer record is deleted to save the latest datas.� The memory function can not be used in measuring.� If no measurement values, the memory values can be not numerated.

11
11.111.111.111.1 ReviewReviewReviewReview TheTheTheThe MemoryMemoryMemoryMemory ValueValueValueValue
1.Press 【MEMORY】 button can display the recent measurement results. When numerate the
memory values, display the memory values number from 1 to 99. [ ] M shows the memory
value, number shows the measurement time.
2.Every time press 【UP】/ 【DOWN】 button to circularly switch the former measurementvalues.
3.Press 【USER】 button to switch the users to view the memory result.
*The right figure show that there is not visible Measurement results.
4.End to display the measurement values.Press 【MEMORY】 to return the time interface or press 【ON/OFF】 button to turn the poweroff.* The device will automatically turn off after five minutes in which there is no operation to thedevice, even if you forget to turn the power off.
11.211.211.211.2 DeleteDeleteDeleteDelete MemoryMemoryMemoryMemory ValuesValuesValuesValues
User cannot partially delete values stored in the memory. All values of every user will be deleted.1.During numerate the measurement recordPress【SETUP】 button for more 5 seconds to delete all measurement results of the current user,as the following figure.

12
正 确
2、End OperationPress 【MEMORY】 to return the time interface, or press 【ON/OFF】 button to turn the poweroff.*The device will automatically turn off after five minutes in which there is no operation to thedevice, even if you forget to turn the power off.
ChapterChapterChapterChapter12121212 SpOSpOSpOSpO2222MeasurementMeasurementMeasurementMeasurement Function(SeparateFunction(SeparateFunction(SeparateFunction(Separate Sale)Sale)Sale)Sale)
PleasePleasePleasePlease paypaypaypay attentionattentionattentionattention to:to:to:to:
WarningWarningWarningWarning
◎PulsePulsePulsePulse oximeteroximeteroximeteroximeter cancancancan overestimateoverestimateoverestimateoverestimate thethethethe SSSSppppOOOO2222 valuevaluevaluevalue inininin thethethethe presencepresencepresencepresence ofofofof Hb-CO,Hb-CO,Hb-CO,Hb-CO, Met-HbMet-HbMet-HbMet-Hb orororordyedyedyedye dilutiondilutiondilutiondilution chemicals.chemicals.chemicals.chemicals.◎ES (Electrosurgery) equipment wire and SpO2 cable must not be tangled up.◎Do not put the sensor on extremities with arterial catheter or venous syringe.◎Do not perform SpO2 measuring and NIBP measuring on same arm at one time, becauseobstruction of blood flow during NIBP measuring may adversely affect the reading ofSPO2 value.
NoteNoteNoteNote
◎Make sure the nail covers the light window.◎the wire should be on the backside of the hand.◎SpO2 value always displays in the fixed place.
13
WarningWarningWarningWarning
◎CheckCheckCheckCheck ifififif thethethethe sensorsensorsensorsensor cablecablecablecable isisisis inininin normalnormalnormalnormal conditionconditionconditioncondition beforebeforebeforebefore monitoring.monitoring.monitoring.monitoring. AfterAfterAfterAfter unpluggingunpluggingunpluggingunplugging thethethetheSSSSpOpOpOpO2222 probeprobeprobeprobe cablecablecablecable fromfromfromfrom thethethethe socket,socket,socket,socket, thethethethe %S%S%S%SppppOOOO2222 andandandand bmpbmpbmpbmp willwillwillwill disappear.disappear.disappear.disappear.◎Do not use the SpO2 probe once the package or the sensor is found damaged. Instead, youshall return it to the vendor.◎Prolonged and continuous monitoring may increase jeopardy of unexpected change of dermalcondition such as abnormal sensitivity, erubescence, vesicle, repressive putrescence, Particularlyin newborns or in a Perfusion disorders and changes or immature skin form of the patient.According to skin quality change, correct optical path alignment and attachment methods toregularly check the place of SpO2 probe, and change the attachment position when the quality ofskin decline. More frequent examinations may be required for different patients.
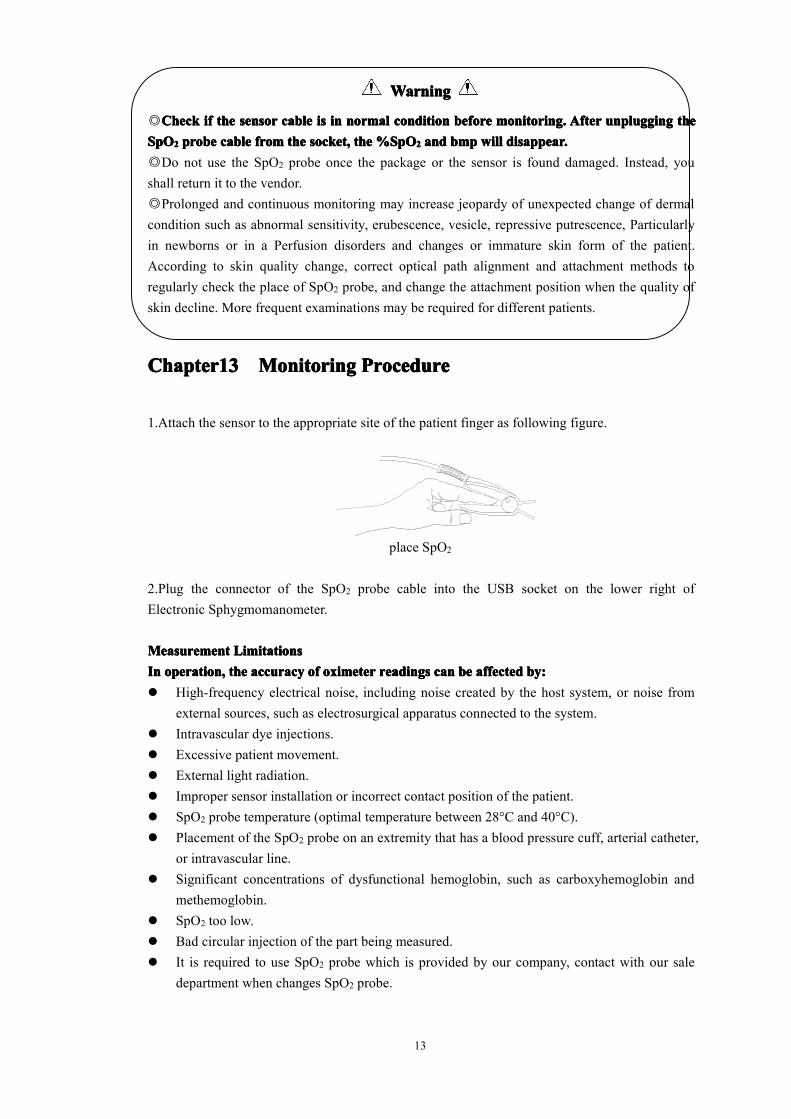
Chapter13Chapter13Chapter13Chapter13 MonitoringMonitoringMonitoringMonitoring ProcedureProcedureProcedureProcedure
1.Attach the sensor to the appropriate site of the patient finger as following figure.
place SpO2
2.Plug the connector of the SpO2 probe cable into the USB socket on the lower right ofElectronic Sphygmomanometer.
MeasurementMeasurementMeasurementMeasurement LimitationsLimitationsLimitationsLimitationsInInInIn operation,operation,operation,operation, thethethethe accuracyaccuracyaccuracyaccuracy ofofofof oximeteroximeteroximeteroximeter readingsreadingsreadingsreadings cancancancan bebebebe affectedaffectedaffectedaffected by:by:by:by:� High-frequency electrical noise, including noise created by the host system, or noise from
external sources, such as electrosurgical apparatus connected to the system.� Intravascular dye injections.� Excessive patient movement.� External light radiation.� Improper sensor installation or incorrect contact position of the patient.� SpO2 probe temperature (optimal temperature between 28°C and 40°C).� Placement of the SpO2 probe on an extremity that has a blood pressure cuff, arterial catheter,
or intravascular line.� Significant concentrations of dysfunctional hemoglobin, such as carboxyhemoglobin and
methemoglobin.� SpO2 too low.� Bad circular injection of the part being measured.� It is required to use SpO2 probe which is provided by our company, contact with our sale
department when changes SpO2 probe.

14
ChapterChapterChapterChapter14141414 MaintenanceMaintenanceMaintenanceMaintenance andandandand CleaningCleaningCleaningCleaning
WarningWarningWarningWarning
TurnTurnTurnTurn offoffoffoff thethethethe devicedevicedevicedevice beforebeforebeforebefore cleaningcleaningcleaningcleaning thethethethe devicedevicedevicedevice orororor thethethethe SSSSppppOOOO2222 probe.probe.probe.probe.
CautionCautionCautionCaution
� Do not subject the sensor to autoclaving.� Do not immerse the SpO2 probe into any liquid.� Do not use any SpO2 probe or cable that may be damaged or deteriorated.Cleaning:Cleaning:Cleaning:Cleaning:� Use a cotton ball or a soft mull moistened with hospital-grade ethanol to wipe the surface ofthe SpO2 probe, and then dry it with a cloth. This cleaning method can also be applied to theluminotron and receiving unit.� The cable can be cleaned with 3% hydrogen dioxide, 70% isopropanol, or other activereagent. However, connector of the SpO2 probe shall not be subjected to such solution.

15
ChapterChapterChapterChapter15151515 InstallationInstallationInstallationInstallation OfOfOfOf TheTheTheThe SoftwareSoftwareSoftwareSoftware
15.115.115.115.1 DemandDemandDemandDemand OfOfOfOf EditorEditorEditorEditor
Pentium IV 1.8G or moreOperation System:Windows XPEMS memory: 256M and moreHard Disk: 40G or moreDisplay: 17 inch or moreCD-ROMUSB: 2or moreResolution of printer: 600 DPI
15.215.215.215.2 InstallationInstallationInstallationInstallation OfOfOfOf SoftwareSoftwareSoftwareSoftware
1、Place the CD-ROM in the CD-ROM compartment located on your computer.2、If Auto Play for CDs is enabled, place CD in reader and follow instructions when they appearin the screen; otherwise follow install instructions below:Open Windows Explorer.Click on the root CD-ROM directory.Double click file Contec08C_Setup.EXE.Follow the instructions in the screen.
ReferReferReferRefer totototo "Software"Software"Software"Software Help"Help"Help"Help" forforforfor detailsdetailsdetailsdetails aboutaboutaboutabout thethethethe operationoperationoperationoperation methodmethodmethodmethod ofofofof thethethethe PCPCPCPC software.software.software.software.

16
ChapterChapterChapterChapter16161616 ErrorErrorErrorError MessageMessageMessageMessage
In the event that measurement is abnormal, the error message prompts will display. As thefollowing figure: when the high pressure position appears "Err" and the low pressure positionappears the error number, the measurement can not normally carry.(Error numbers are 02, 06~13,15, 19)
Error Mark Causes Solutions
Err02
Err15
The exceptional function cause
troublePlease contact our company
Err06 Cuff is not connected correctly.Correctly connect cuff
(refer to chapter 9)
Err07 Cuff plug fall off
Make sure the cuff plug is securely
inserted in the windpipe
(refer to chapter 9)
Err08 Atmospheric pressure error Keep arm, body still, again measure
Err09Object measuring the pulse is too
weak or the cuff is loose.
Correctly connect cuff
(refer to chapter 9)
Err10 Cuff is blocked or squeezedCorrectly connect cuff
(refer to chapter 9)
Err11
Err12
Err13
The signal range is too big owing to
the arm or body moving or other
reasons in measurement Keep arm, body still, again measure
Err19 It spends too much time

17
ChapterChapterChapterChapter17171717 TROUBLESHOOTINGTROUBLESHOOTINGTROUBLESHOOTINGTROUBLESHOOTING
ExceptionalPhenomenon
Causes Solutions
BP measurementvalues too high or
too low.
Cuff is not connected correctly.Correctly connect cuff(refer to chapter 9)
Talk or move arm in measurementKeep quiet and restart a
measurement
The turnup close oppress the arm
Shuck off the close whichoppress
the arm, and restart ameasurement
No pressureCuff leakage Buy a new cuff
The cuff windpipe is not correctlyconnected with cuff
Correctly connect
Cuff deflate in shorttime
Loose cuff Correctly tangle cuff
It can not carry on measurement ,even if press themeasurement button
Return on the power and restart ameasurement
Abruptly turn thepower off in adding
pressure
No use for a long time, the drybatteries can be exhausted owing to
the changed temperature
Replace all four batteries withnew ones.
After press theboot-strap
button ,no anydisplay
Batteries are wornReplace all four batteries with
new ones.
The battery polarities is reversedCheck the battery installation forproper placement of the battery
polarities.
Other phenomenon
Press power button and restart aoperation.
Replace the batteries, if no,pleasecontact our company.

18
Chapter18Chapter18Chapter18Chapter18 CareCareCareCare AndAndAndAndMaintenanceMaintenanceMaintenanceMaintenance
*Please follow the instructions in the the user manual. If you do not comply, the Company willnot assume responsibilities for quality.
� Frequently clean the Blood Pressure.� If the unit has dunghill, Clean the unit with a soft dry cloth.� If the unit is particularly dirty, you can clean it with a soft clothdampened with water or neutral detergent after the cloth can be fulltwisted.
WarningWarningWarningWarning
DoDoDoDo notnotnotnot submergesubmergesubmergesubmerge thethethethe devicedevicedevicedevice inininin water.water.water.water.
AdviceAdviceAdviceAdvice
� Do not use any naphtha, thinner or gas to clean.
� Do not attempt to clean or wash the cuff.
Keeping:
AdviceAdviceAdviceAdvice
DoDoDoDo notnotnotnot placeplaceplaceplace thethethethe machinemachinemachinemachine onononon thethethethe followingfollowingfollowingfollowing areas:areas:areas:areas:� Easy to splash water areas.
� Direct sunlight, extreme hot, humidity, dust, causticity gas areas.
� Lean or the area which can cause vibration, impact.
� Chemicals or corrosive gas storage areas.� Remove the batteries if the unit will not be used for long time (more three months).

19
ChapterChapterChapterChapter19191919 SpecificationSpecificationSpecificationSpecification
Name Electronic Sphygmomanometer
Model CONTEC08C
Harmful liquid proof
degreeOrdinary equipment (sealed equipment without liquid proof)
Display 2.8'' Code Segment LCD Display
NIBPNIBPNIBPNIBP SpecificationsSpecificationsSpecificationsSpecifications
Measurement Method Oscillometric method
Working modes Automatic
Measurement RangePressure: 0~290mmHg(0~36.0kPa)
Pulse: 40~240/min
ResolutionResolutionResolutionResolution
Pressure 1mmHg
Measurement Accuracy
Cuff Pressure Accuracy ±3mmHg
ErrorThe BP Value of the device is equivalence with the measurementvalue of Stethoscopy, which error accord with request ofYY0667-2008.
Operating Temperature/
Humidity
+5ºC~40 ºC . 15%RH~80%RH
Transport and Storage
Temperature/Humidity
-20ºC~+55ºC . ≤95%RH
Atmospheric pressure 80KPa~105KPa
BatteryBatteryBatteryBattery 4 "AA" alkaline batteries, ACAdapter (AC 220V) separately sold
Main Unit Dimensions 130*110*80mm
Main Unit Weight 300 gram
Anti-electroshock type II class BF digital device
20
AccessoriesAccessoriesAccessoriesAccessories Normal Configure:Adult Cuff: limb circumference 22-32cm (upper arm center)Soft CD, User Manual, USB data line, four "AA" alkalinebatteriesSeparate Sale:AC AdapterInput: AC 100-240V 50/60Hz AC 150mAOutput: DC 6.0V±0.2V 1.0ASpO2 Probe: Y10UCH150SpO2 Measurement Range: 35%~ 100 %
Measurement Accuracy: 70% ~ 100% ±2 %Pulse Measurement Range: 30 ~ 250bpm