user manual - dta0yqvfnusiq.cloudfront.net memory card slot external adaptor connection on/off...
TRANSCRIPT

User Manual
-202Ⅱ

Content
B. H/W Parts
C. System Settings
ⅰ. Both Sidesⅱ. Settings
ⅰ. Date & Timeⅱ. Wi-Fiⅲ. Screen Timeout ⅳ. Language
D. Applicationⅰ. Settingsⅱ.Full Diagnosis
CRMScalp DensityKeratinRednessPoreThicknessResultSend Result
F. Warranty
A. Components
ⅰ.Email ⅱ. Mirroring
E. Troubleshooting & FAQ
1
2
3
5789
1112141516171921
2223
25
27
10

Components
1A. Components
Main body with hair lens(ASNⅡ202)
Charger
Cleaning cloth Manual
Battery (2EA) USB cableCradle
Pen (2EA) Hand strap Leather case

H/W PartsBoth Sides
2 B. H/W Part - Both Sides
LED light&lens
Battery cover
SD memory card slot
External adaptor connection
On/off button
Capture button
Volume on MP3
Touch screen
Back buttonCapture buttonSet up button

B. H/W Part - Settings
H/W PartsSettings
Insert the battery
Open the battery cover by pushing it left to right way with thumbs.Insert the battery and gently press the battery into place.Close the cover.
1
2
3
3
1
1
2
1
To turn on & off the power
Press and hold “power” button.Then “Indicate LED” will be twinkled andturned on white.
1
2
3
2
H/W PartsSettings
4 B. H/W Parts - Settings
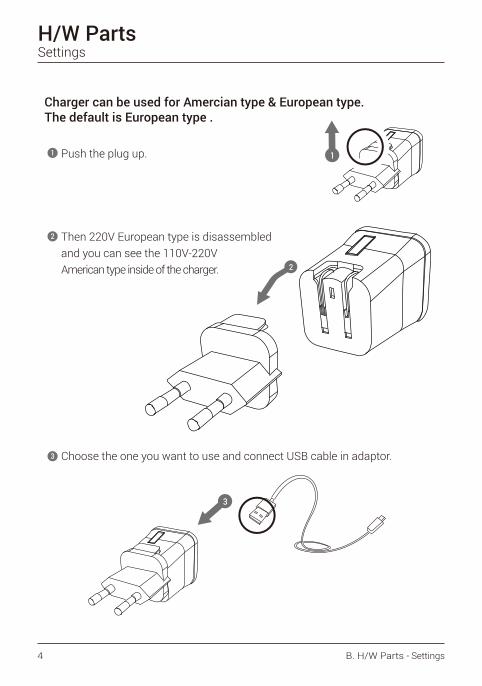
Then 220V European type is disassembledand you can see the 110V-220VAmerican type inside of the charger.
Charger can be used for Amercian type & European type. The default is European type .
Push the plug up.1
2
3 Choose the one you want to use and connect USB cable in adaptor.
1
2
3

System Settings
5C. System Settings - Date & Time
Date & Time
2
Touch “Date & time”.3
Touch “Set date”.4 Please check the setting is correctly applied.
6Change the date and touch “Set” button.
5
Touch button.2Press button. 1

System SettingsDate & Time
6 C. System Settings - Date & Time
Touch “Select time zone” button.
7 Please check the setting is correctly applied.
9
Touch “Set time”.10
Change into the current time zone.
8
Change into the current time and touch “Set” button.
11 Please check the setting is correctly applied.
12

7C. System Settings - Wi-Fi
System SettingsWi-Fi
Touch “Wireless & networks”.1 Check the square box.3
Wi-Fi list will be appeared.4
Touch “Wi-Fi settings”.2
Among the lists, select the Wi-Fi connection you could use.
5 Wait until the device is connected to with Wi-Fi.
6
System SettingsWi-Fi
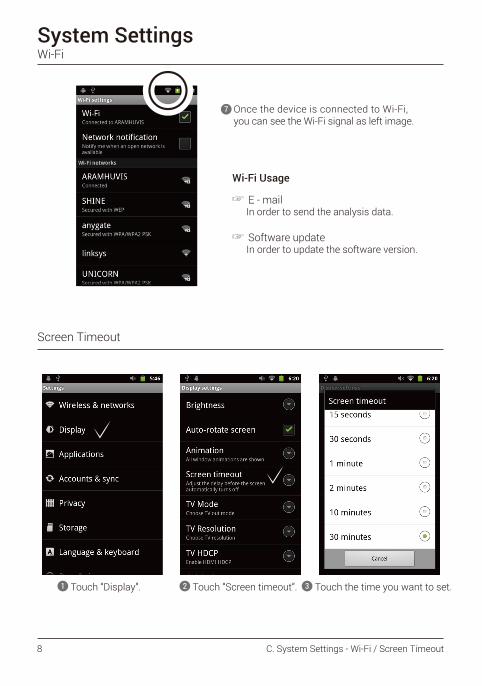
Once the device is connected to Wi-Fi, you can see the Wi-Fi signal as left image.
Wi-Fi Usage
☞ E - mailIn order to send the analysis data.
7
☞ Software updateIn order to update the software version.
Touch “Display”.1 Touch “Screen timeout”.2 Touch the time you want to set.3
8 C. System Settings - Wi-Fi / Screen Timeout
Screen Timeout

System SettingsLanguage
9C. System Settings - Language
Touch “Language & keyboard.1 Touch “Select language”.2
Among the lists, touch your language.3

Application
10 D. Application - Settings
Settings
2
Touch button.2
Touch “Setup” button.3
Language, version, email setting is available.4
Touch button.1

ApplicationCRM
11D. Application - CRM
Touch “Full” button.1 Touch “SKIP”.2
Input the information.3 Enter Age group and Gender of customer.4

Application
12 D. Application - Scalp
Scalp
4
Touch “Analysis”.3
Sample image
Customer’s image.
Touch to activate camera.1 Wait until the camera activates and take image.
2
Application
13D. Application - Scalp
Scalp
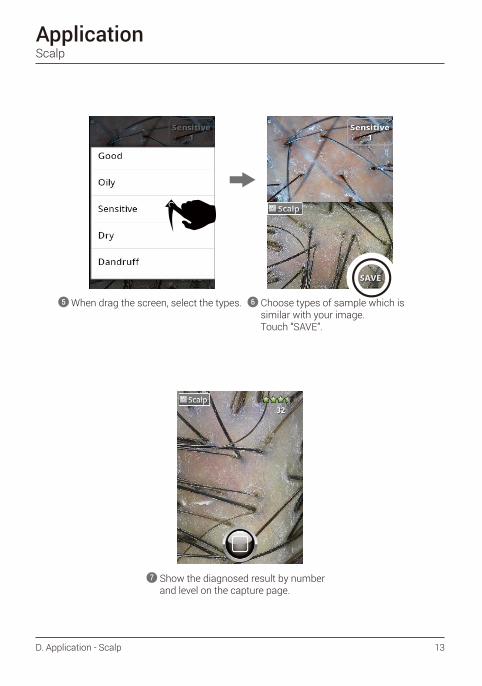
When drag the screen, select the types.5
Show the diagnosed result by number and level on the capture page.
7
Choose types of sample which is similar with your image.Touch “SAVE”.
6

Application
14 D. Application - Density
Touch to activate camera.1
Show the diagnosed result by number and level on the capture page.
6
Density
Touch “Analysis”.3
Calculate the number of hair by touching .
4
Wait until the camera activates and take image.
2
Touch “SAVE”.5

Application
15D. Application - Keratin
Keratin
Touch “Analysis”.3 Show the diagnosed result by number and level on the capture page.
4
Wait until the camera activates and take image.
21 Touch to activate camera.

16 D. Application - Redness
ApplicationRedness
Wait until the camera activates and take image.
2
Touch “Analysis”.3 Show the diagnosed result by number and level on the capture page.
4
1 Touch to activate camera.

17D. Application - Pore
ApplicationPore
1
Touch “Analysis”.5
There are three modes.NOR – For normal hair.BLK – For black hair.WHT – For blonde and white hair.Change the mode as your hair color.
2
Adjust the brightness by touching.3
4
Touch to activate camera.

Pore
18 D. Application - Pore
Application
6 Sample image
When drag the screen, select the types.
7
Show the diagnosed result by number and level on the capture page.
9
Customer’s image.
Choose types of sample which is similar with your image.Touch “SAVE”.
8

19D. Application - Thickness
Application
Touch ”Analysis”.3Wait until the camera activates and take image.
2Touch to activate camera.1
Thickness - Auto
Show the diagnosed result by number and level on the capture page.
6Touch 2 points of hair area, then be analyzed automatically.
4 Touch “SAVE”.5

20 D. Application - Thickness
ApplicationThickness - Auto
Show the diagnosed result by number and level on the capture page.
Measure the length of hair byusing touch pen.
6 7
Touch “Auto”.4 Choose the area by moving the white box.5
21D. Application - Result
ApplicationResult - Hair Type
Result - Analysis Result
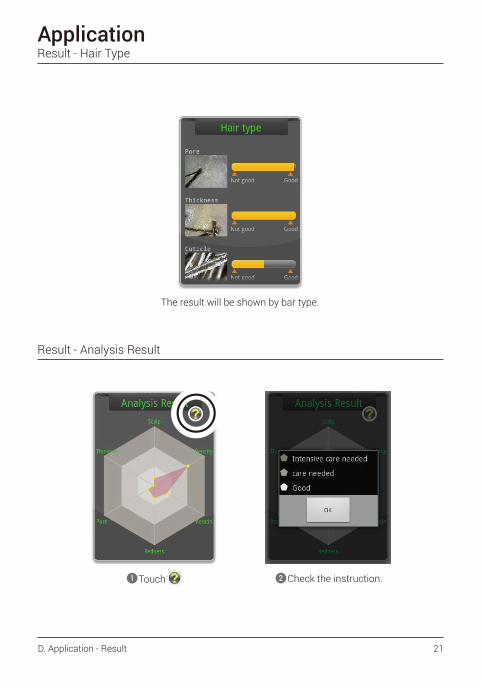
The result will be shown by bar type.
Touch1 Check the instruction.2

22 D. Application - Send Result
Only available when the device is connected to internet.
1
Enter the customer’s email address.2 Touch “OK” button.3
ApplicationSend Result - Email

23D. Application - Send Result
2
Touch button.1
Touch “Setup” button.3
4
Touch button.2
Touch “Option” button.
ApplicationSend Result - Mirroring

Application
D. Application - Send Result24
Send Result - Mirroring
Touch “Mirroring” button.5
Open the “ARAM VIEWER” app after installing.
8 Mirroring system is started.10In your mobile device go to Wi-Fi setting. Then find "ARAMHUVIS" code and connect it.
9
It is able to connect to “Android” & “iOS ” system when AP success is shown up on the screen.
6 7 With your mobile device, capture QR code. Then program will be installed.

Troubleshooting & FAQ
25E. Troubleshooting & FAQ
I cannot turn on the device.Connect and charge the device (or the battery) using the adaptor provided the supplier.(The battery charging indicator will be shown on the system main page.)
1
I cannot power on the device even the battery is still full.The battery might be dislocated on the device. Please separate the battery from the device and put it on, and then power on again.
2
The battery is not charging very well.Separate the battery from the device and put it on again.Check the connection among a device, a battery and a charger.A battery cannot be charged if there is an alien substance on the charging port. In this case, please use the device after cleaning the charging port of the device or check whether the sticker is attached on charging port.
3
The using time of the battery is different from the manual.The battery using time will be shorten if you put the charged battery in a low or high temperature.The battery using time varies in service type, using environment, using period of the battery.The battery is consumed without using the device, and the battery using time will be shorten if you use additional functions of the device.
4
The device turns on but the diagnosis doesn’t work.Check the smart card is correctly inserted (SD card slot on the button of the device.)
5
There are dust on the device.Clean the dust by using a smooth fabric. Do not use bemzene, alcohol, and a synthetic detergent.
6
The screen is frozen and the keys not working when using the device.Separate the battery from the device and put it on again.If the device is still not working please contact to the customer servise center.
7
A “force close” message appears on the screen.The repetition of commands can trigger a bug. Sometimes there may be a brief delay before the command is completed. Do not repeat/multiply the tasks as the device will no longer be able to follow them.
8
I cannot connect to Wi-Fi.Check the connection status on setting page.Try to connect to another Wi-Fi.Bluetooth : check the pairing status and try to re-pair the device with host device.
9

26 E. Troubleshooting & FAQ
Troubleshooting & FAQ
The touchscreen doesn’t react to my finger commands.Before using for the first time remove the protective plastic film.
10
I cannot connect to Blue-tooth.Make sure to use the Bluetooth hosting devices that have Bluetooth certified with the logo. You may need an external Bluetooth dongle for those devices that do not have Bluetooth feature. bring the device to closer with the Bluetooth hosting device.Try to re-pair the device with host device.The password of pairing is “0”(number).* Blue-tooth function is not allowed to use in IOS device without APPLE’S official permission.
11
The screen was turned off.Press the on/off button to turn on the screen.The device has a power save function that turn the screen off after 1minute.For the setting, please refer to Page 8.
12
I can see the black screen only during measurement.Check the LED light inside lens on the head part when you try to measurement.If you cannot see the light, please contact the customer service via email or phone call.
13
The image is not clear.Tap the screen while capturing focus.
14
I cannot update the diagnsis application.Check the network connection. The update process can be done after connecting to Wi-Fi.
15
Warranty
27F. Warranty
The product undergoes strict quality management and inspection process before production and introduction to market.
1
In case of functional or operational defect occurs under normal condition of use within 10 days after purchase, we will repair it for free or replace in new product.
2
When this product goes out under the normal use, we will repair it free of charge under warranty. 3
Please keep the warranty card when you ask for repair service.4
Customer needs to pay repair charge after warranty runs out.5
For this product, warranty period is 14 months from the Invoice date.6
Cost Within warranty : Sending delivery(Buyer), repair cost and returning delivery(Aram) - If the product is broken by user's fault, repair cost could be charged. After warranty : Sending delivery and repair cost(Buyer), returning delivery(Aram)
7
How to send :
- As sending a present from person to person by EMS or FEDEX. (Do not write the company name) - Total value should be under US 99$.(Write non-commercial value)
8

Warranty
28 F. Warranty
Service request form
Date of purchase
Contact Person
Address :
Tel :
Product name, serial No :
Problems :
Company / /
Shipping address:801-ho , 560 Dunchon-daero, Jungwon-gu Seongnam-si Gyeonggi-do 13230 KOREA.
E-mail : [email protected]
Tel : +82 70 4687 1712 / Fax : +82 31 732 6330

Memo

801-ho , 560 Dunchon-daero, Jungwon-guSeongnam-si Gyeonggi-do 13230 KOREA.E-mail : [email protected]