user manual - mopedbil norge · pdf filethis manual has been designed to ... fluid level in...
TRANSCRIPT
Usermanual

LigierwouldliketothankyouThank you for choosing one of our products. This manual has been designed to help you get the most out of your vehicle.We suggest that you read it in detail before driving it for the first time. In it you will find information, advice and instructions for use; as well as hints, tips and more about the distinctive characteristics of your vehicle, which will prove once again that you have made the right choice. Using this manual will make it easy to get to know your new vehicle and enjoy many miles of carefree motoring.
ThemanualCertain photographs, illustrations and descriptions in this maintenance manual may not always match the model of vehicle used. The instructions in this manual have been written essentially as a simple and straightforward guide to use. It also contains the basic maintenance procedures and the routine servicing which the vehicle should undergo at any professionnal workshop. The handbook also contains instructions for some simple repair tasks. The operations which are not explicitly described are those for which special equipment and/or technical expertise are necessary. In these circumstances you are advised to contact your local Distributor or authorized LIGIER's Dealer.Text in bold type or on a grey background contains important safety and vehicle usage instructions.
�
Tableofcontents
1.YOURVEHICLE
Driver's seat .................................................... 1.1
Dashboard ......................................................1.2
Controls ............................................................1.3
Central console ...........................................1.4
Opening the doors and adjustingrear view mirrors .........................................1.5
Identification and keys ......................... 1.6
Know your car ..............................................1.7
2.USAGE
Running in .......................................................2.1
Starting ............................................................ 2.2
Revolution specific engine functionning
492 DCI ........................................................... 2.3
Fuel .................................................................... 2.4
�

�.MAINTENANCE
In the event of a puncture ...................�.1
Lifting of the vehicle .............................. �.2
Bulb replacement .................................... �.3
Fuses ................................................................ �.4
Fluid level in the braking system . �.5
Gear Oil level ............................................... �.6
Engine Oil level .......................................... �.7
Transmission/Steering/windscreen
washer liquid ............................................... �.8
Coolant air filter ........................................ �.9
Servicing ...................................................... �.10
�.TECHNICALFEATURES
General features .........................................�.1
Bodywork and vehicle maintenance ............................................... �.2
5.ROADSIGNS
5


1.YOURVEHICLE
Driver's seat .................................................... 1.1
Dashboard ......................................................1.2
Controls ............................................................1.3
Central console ...........................................1.4
Opening the doors and adjustingrear view mirrors .........................................1.5
Identification and keys ......................... 1.6
Know your car ..............................................1.7
�
1.YO
UR
VE
HIC
LE
1.1 -
DR
IVE
R'S
SE
AT
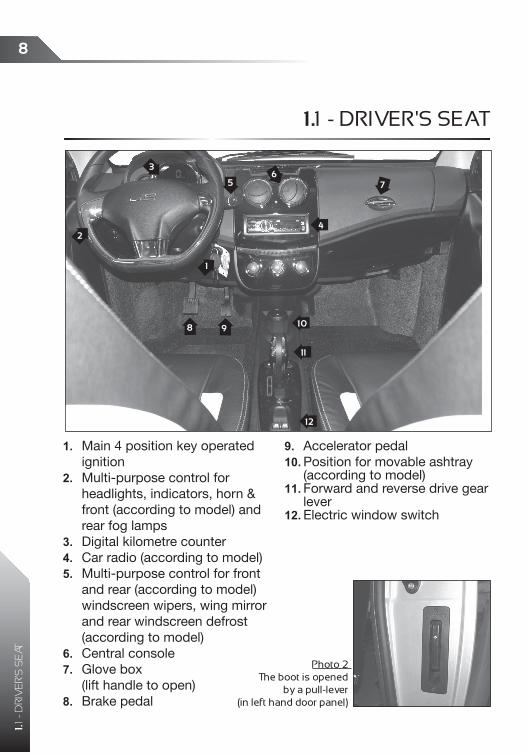
Main 4 position key operated ignitionMulti-purpose control for headlights, indicators, horn & front (according to model) and rear fog lampsDigital kilometre counterCar radio (according to model)Multi-purpose control for front and rear (according to model) windscreen wipers, wing mirror and rear windscreen defrost (according to model)Central consoleGlove box (lift handle to open)Brake pedal
1.
2.
3.4.5.
6.7.
8.
Accelerator pedalPosition for movable ashtray (according to model)Forward and reverse drive gear leverElectric window switch
9.10.
11.
12.
1.1 - DRIvER'S SEaT
�
1.1 -
DR
IVE
R'S
SE
AT
Photo 2 The boot is opened
by a pull-lever(in left hand door panel)
1
2
�
�
56
� 9
�
10
11
12
1.2 - S
EA
TS A
ND
STO
RA
GE
9
1.1 - DR
IVE
R'S
SE
AT
Photo 2
Photo 3
Photo 4
Photo 5 Photo 6
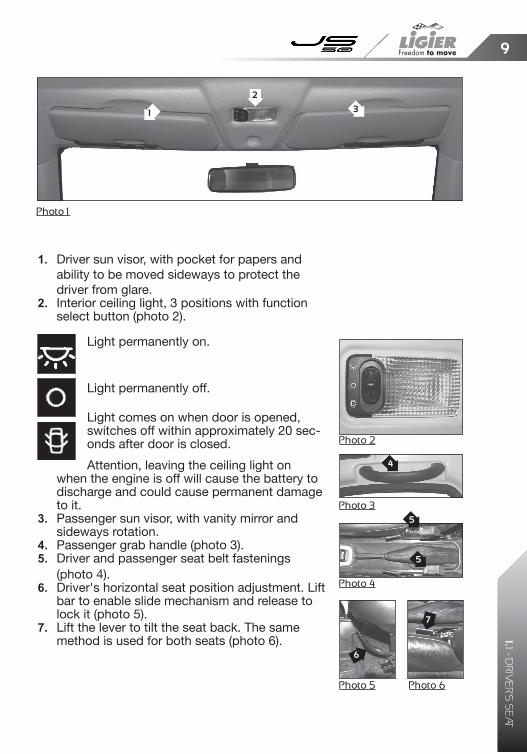
Driver sun visor, with pocket for papers and ability to be moved sideways to protect the driver from glare.Interior ceiling light, 3 positions with function select button (photo 2).
Light permanently on. Light permanently off. Light comes on when door is opened, switches off within approximately 20 sec-onds after door is closed. Attention, leaving the ceiling light on
when the engine is off will cause the battery to discharge and could cause permanent damage to it.Passenger sun visor, with vanity mirror and sideways rotation.Passenger grab handle (photo 3).Driver and passenger seat belt fastenings (photo 4).Driver's horizontal seat position adjustment. Lift bar to enable slide mechanism and release to lock it (photo 5).Lift the lever to tilt the seat back. The same method is used for both seats (photo 6).
1.
2.
3.
4.5.
6.
7.
�
5
6
�
5
Photo 1
1 �
2

1.2 - DIGITaL DaShBOaRD
Front fog lamp indicator (accord-ing to model) Headlamp indicatorDigital speedbarOil change indicatorClockSpeed indicatorTrip counterExternal temperature indicatorFuel level indicatorRear windscreen defrost indica-tor (according to model)Rear fog-lamp indicatorDipped beam indicatorForward gear indicator "D", neu-tral "N" and reverse gear "R"
Engine coolant temperature alert indicatorBrake pad wear and brake fluid level indicatorLeft indicatorOil pressure alert indicator
1.
2.3.4.5.6.7.8.9.10.
11.12.13.
14.
15.
16.17.
Right indicatorHand brake indicatorBattery charge indicatorEngine fault indicator (DCI only) Fuel level indicatorTrip counter resetPre-heat indicator Water in fuel filter indicator(DCI engine only)
ATTENTION!If one of the safety lamps (engine coolant temperature, oil pressure or engine fault) should illuminate whilst driving, you must stop the vehicle as soon as possible and contact your Ligier dealer.
18.19.20.21.22.23.24.
25.
10
1.2
- D
IGIT
AL
DA
SH
BO
AR
D
!
1
1�
2 � � 5 6 � � 9 10
11 1�12 15 16 1� 1� 19 20 22 2� 2� 2521

Settingtheclock Turn the ignition key to the ACC
position (Accessory). The number of kilometres to the next
oil change appears (photo 1). Hold down button "2�" on the
dashboard for 5 seconds: the clock is displayed and the numbers will flash (photo 2).
One short press (less than 1 second) on button "2�" increments the hour display.
One long press (more than 3 seconds) on button "2�" will switch to the flashing minutes display.
One short press on button "2�" will then increment the minutes display.
One long press will then confirm the changes made.
Totalkilometresandtripcounter
When the ignition key is in the APC position (vehicle in operation), the display shows the total kilometres of the vehicle.
One short press on button "2�" on the dashboard will display the trip counter. One long press on button "2�" will then reset the trip counter.
One short press returns to the total kilometre display.
11
1.2 - D
IGITA
L D
AS
HB
OA
RD
NeimankeypositionsS. Engine stopA. (ACC) AccessoryM. (APC) + after ignitionD. Start
D
MA
S
Photo 1
Photo 2
1.3 - ThE CONTROLS
12
1.3
- TH
E C
ON
TRO
LS
21
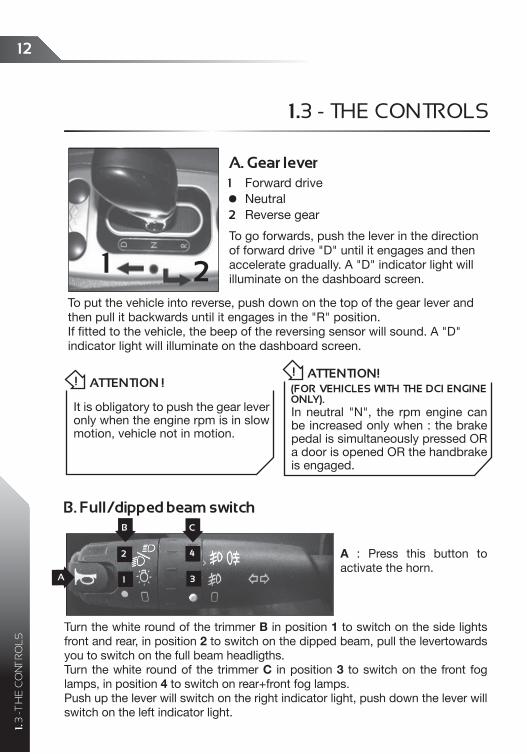
A.Gearlever1 Forward drive
• Neutral2 Reverse gear
To go forwards, push the lever in the direction of forward drive "D" until it engages and then accelerate gradually. A "D" indicator light will illuminate on the dashboard screen.
ATTENTION!(FOR VEHICLES wITH THE DCI ENGINEONLY).In neutral "N", the rpm engine can be increased only when : the brake pedal is simultaneously pressed OR a door is opened OR the handbrake is engaged.
!
Turn the white round of the trimmer B in position 1 to switch on the side lights front and rear, in position 2 to switch on the dipped beam, pull the levertowards you to switch on the full beam headligths.Turn the white round of the trimmer C in position 3 to switch on the front fog lamps, in position 4 to switch on rear+front fog lamps.Push up the lever will switch on the right indicator light, push down the lever will switch on the left indicator light.
ATTENTION!
It is obligatory to push the gear lever only when the engine rpm is in slow motion, vehicle not in motion.
!
A 1
2
�
�
B C
B.Full/dippedbeamswitch
A : Press this button to activate the horn.
To put the vehicle into reverse, push down on the top of the gear lever and then pull it backwards until it engages in the "R" position.If fitted to the vehicle, the beep of the reversing sensor will sound. A "D" indicator light will illuminate on the dashboard screen.
1�
1.3 - THE
CO
NTR
OL
S
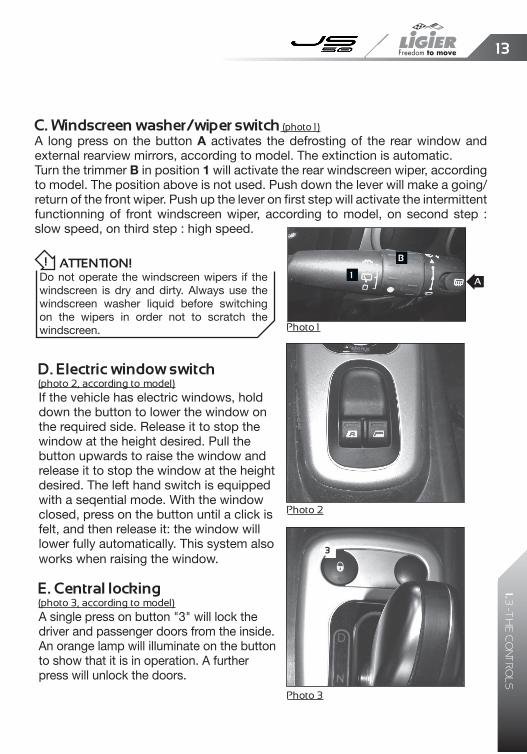
D.Electricwindowswitch(photo 2, according to model)If the vehicle has electric windows, hold down the button to lower the window on the required side. Release it to stop the window at the height desired. Pull the button upwards to raise the window and release it to stop the window at the height desired. The left hand switch is equipped with a seqential mode. With the window closed, press on the button until a click is felt, and then release it: the window will lower fully automatically. This system also works when raising the window.
E.Centrallocking(photo 3, according to model)A single press on button "3" will lock the driver and passenger doors from the inside.An orange lamp will illuminate on the button to show that it is in operation. A further press will unlock the doors.
Photo 1
Photo 2
Photo 3
�
ATTENTION!Do not operate the windscreen wipers if the windscreen is dry and dirty. Always use the windscreen washer liquid before switching on the wipers in order not to scratch the windscreen.
!
C.windscreenwasher/wiperswitch (photo 1)A long press on the button A activates the defrosting of the rear window and external rearview mirrors, according to model. The extinction is automatic.Turn the trimmer B in position 1 will activate the rear windscreen wiper, according to model. The position above is not used. Push down the lever will make a going/return of the front wiper. Push up the lever on first step will activate the intermittent functionning of front windscreen wiper, according to model, on second step : slow speed, on third step : high speed.
A1
B
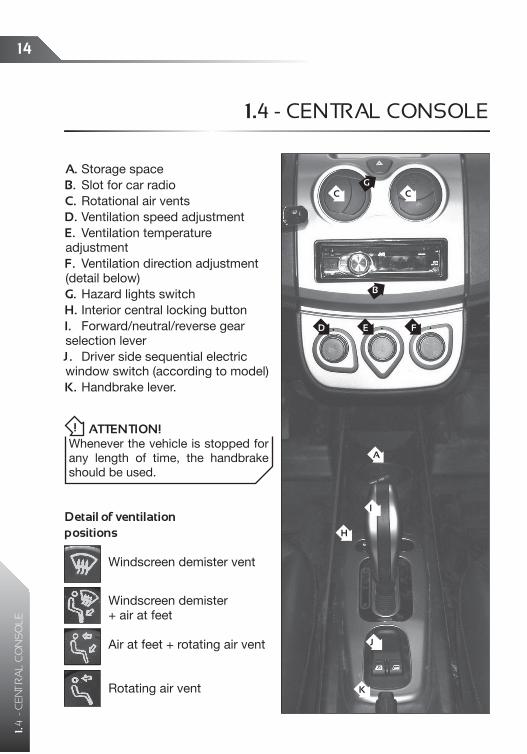
A.Storage spaceB. Slot for car radio C. Rotational air ventsD. Ventilation speed adjustmentE. Ventilation temperature adjustmentF. Ventilation direction adjustment (detail below)G. Hazard lights switch H. Interior central locking buttonI. Forward/neutral/reverse gear selection lever J. Driver side sequential electric window switch (according to model)K. Handbrake lever.
Detailofventilationpositions
Windscreen demister vent
Windscreen demister + air at feet
Air at feet + rotating air vent
Rotating air vent
1�
1.4
- C
EN
TRA
L C
ON
SO
LE
ATTENTION!Whenever the vehicle is stopped for any length of time, the handbrake should be used.
!
H
J
K
I
A
D E F
B
CCG
1.4 - CENTRaL CONSOLE

15
1.5 - DO
OR
/ BO
NN
ET O
PE
NIN
G
15
A.Exterior door handle (photo 1).
B. Interior door handle (photo 2).C. Wing mirror adjustment knob (photo 3).
Attention: the doors should not be used as support for getting in and out of the vehicle, as this could cause them to become misaligned and lead to leakage problems.
OpeningthefrontbonnetD. Front bonnet release, located under the dashboard on the left hand side. Pull to release the bonnet catch (photo 4) and then, push it back.
Lift the locking lever "1" in order to open the bonnet (photo 5).
Lift the bonnet, unclip the prop "2" from the holder "3" (photo 6).
Insert the bent end of the prop "4" into the slot "5" in the plastic casing of the bonnet (photo 7).
1.5 - DOOR/BONNET OPENING
Photo 1
Photo 2
Photo 3
Photo 7
Photo 4 Photo 5
B
Photo 6
�
2
DA
C
1
5
�
16
1.6
- ID
EN
TIF
ICA
TIO
N A
ND
KE
YS
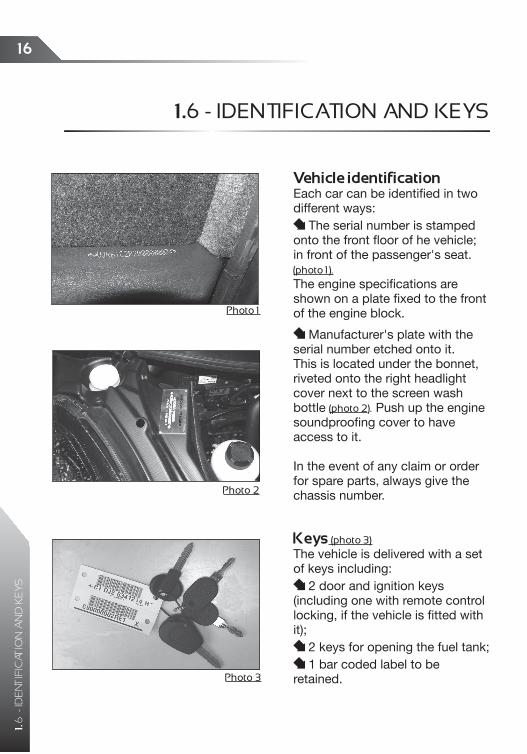
VehicleidentificationEach car can be identified in two different ways:
The serial number is stamped onto the front floor of he vehicle; in front of the passenger's seat. (photo 1).The engine specifications are shown on a plate fixed to the front of the engine block.
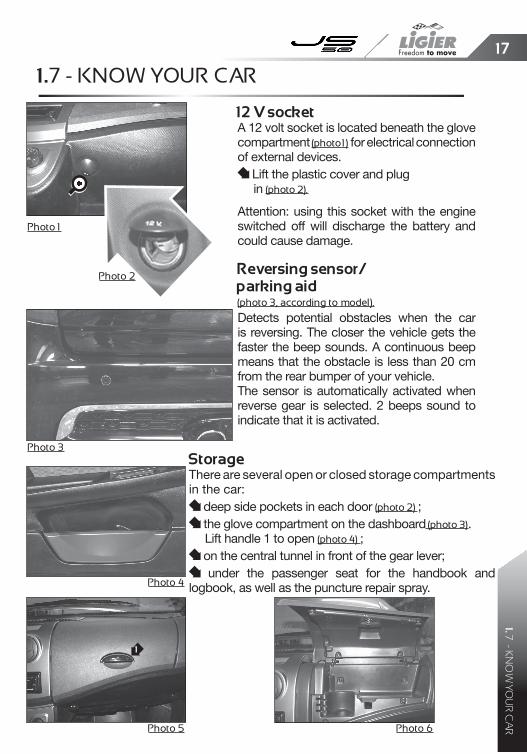
Manufacturer's plate with the serial number etched onto it. This is located under the bonnet, riveted onto the right headlight cover next to the screen wash bottle (photo 2). Push up the engine soundproofing cover to have access to it.
In the event of any claim or order for spare parts, always give the chassis number.
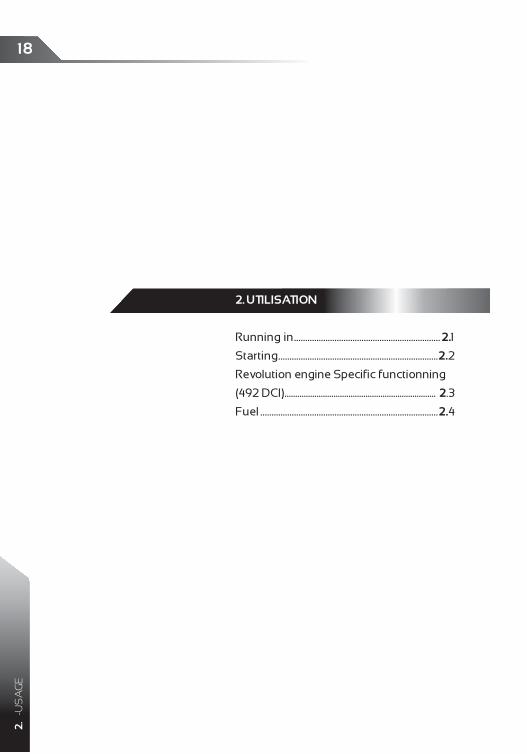
Keys (photo 3)The vehicle is delivered with a set of keys including:
2 door and ignition keys (including one with remote control locking, if the vehicle is fitted with it);
2 keys for opening the fuel tank; 1 bar coded label to be
retained.
1.6 - IDENTIFICaTION aND KEYS
Photo 1
Photo 3
Photo 2
1�
1.7 - KN
OW
YO
UR
CA
R
Reversingsensor/parkingaid(photo 3, according to model).
Detects potential obstacles when the car is reversing. The closer the vehicle gets the faster the beep sounds. A continuous beep means that the obstacle is less than 20 cm from the rear bumper of your vehicle.The sensor is automatically activated when reverse gear is selected. 2 beeps sound to indicate that it is activated.
12VsocketA 12 volt socket is located beneath the glove compartment (photo 1) for electrical connection of external devices.
Lift the plastic cover and plug in (photo 2).
Attention: using this socket with the engine switched off will discharge the battery and could cause damage.
1.7 - KNOW YOUR CaR
Photo 1
Photo 2
Photo 3
Photo 4
Photo 6Photo 5
1
StorageThere are several open or closed storage compartments in the car:
deep side pockets in each door (photo 2) ; the glove compartment on the dashboard (photo 3).
Lift handle 1 to open (photo 4) ; on the central tunnel in front of the gear lever; under the passenger seat for the handbook and
logbook, as well as the puncture repair spray.
1�
2.
-US
AG
E
2.UTILISATION
Running in ................................................................. 2.1
Starting .......................................................................2.2
Revolution engine Specific functionning
(492 DCI) ....................................................................... 2.3
Fuel ...............................................................................2.4
19
2.1 - R
UN
NIN
G IN
Forthefirstkilometres:
Avoid fast acceleration and sharp braking.
Check oil and coolant levels frequently.
Carry out the first service at 5,000 km (see servicing section)
2.1 - RUNNING IN

20
2.2
- S
TAR
TIN
G
Photo 1
Photo 2
Startingtheengine (photos 1 and 2)
Ensure that the gear lever is in neu-tral "N" on the lever and "N" dis-played on the dashboard "1".Put the handbrake on.Switch on the ignition. At the starting position ("M") (diagram page 5) a beep will sound.Wait for the preheating indicator to turn off.Activate the starter within 6 seconds after the preheating light has gone off. 2 beeps will sound if the engine has not been started within the time limit. In this event repeat the proce-dure.
If a beep sounds instead of the engine starting, then one of the gears is engaged. In this event, return the lever to neutral and activate the starter.If the engine does not start immediately, repeat the procedure.
IMPORTANT: once the engine has started, check that the oil pressure and engine fault lights have gone out.
Switchingofftheengine1. Put the vehicle into neutral ("N")2. Switch off the ignition�. Wait for the engine to stop�. Put on the handbrake
Startingthevehicle1. With the engine running in slow motion, put the gear lever into the drive position without pressing on the accelerator.2. Release the handbrake.�. Accelerate gradually
1.
2.3.
4.
5.
ATTENTION!
The engine will not start if a gear is engaged. (warning beep).
In neutral "N", a safety device prevents the engine from being accelerated using the pedal unless the brake pedal has been previously pressed. (ON VEHICLES wITH THE DCI ENGINEONLY).
Exhaust gases are toxic. Do not carry out these procedures in an enclosed area.
!
2.2 - STaRTING
1
21
2.3 - FON
CTIO
NN
EMEN
T SPEC
IFIQU
E DU
MO
TEUR REV
OLU
TION
492 DC
I
A vehicle assembled with the Revolution (492 DCI) engine has originally a particularity of use : the parking assitance calledEASYPARKING.
The system is like the driving of a vehicle with an automatic gearbox.
The EASYPARKINGsystem get activated each time the lever is handled in any sense.
2.3 - SPECIFIC FUNCTIONNING OF a vEhICLE aSSEMBLED WITh a REvOLUTION (492 DCI) ENGINE
Vehicle started, in slow motion, the driver presses on the brake pedal and then select a sense of motion with the lever : when releasing the brake pedal (without pressing on the accelerator pedal), the vehicle while slowly accelerate and will stay at a speed of 7km/h. This configuration will help the parking in any sense of motion.
Vehicle in use, the driver releases the accelerator pedal (the topology of the road has no incidence) without pressing on the brake pedal : the engine brake will decrease the engine rpm untill the speed is around 7 km/h.
ATTENTION : when the vehicle is in EASY PARKING way, moving at 7km/h at the starting or after deceleration, a long press on the brake pedal will immobilize the vehicle but will not desactivate the EASYPARKING : the releasing of the brake pedal will make going forward the way of motion handled with the lever inverter.
To desactivate the EASY PARKING mode, do one of the 3 operations mentionned hereafter: - pull out the handbrake lever - put the inverter lever at neutral - open a door
2.3.1. - EaSY PaRKING
2.3.2. - SECURITY
If the vehicle does a start stop with a door opened or if a door is opened during the use, the engine power will decrease voluntarily.
EngineFuel: use only commercial diesel, tank capacity: 17-l.
IMPORTANT: In freezing weather, add a special anti-freeze to the diesel in the proportion indicated on the bottle. ATTENTION : some supplier are delivering fuel already containing anti-freeze in a variable quantity.
!
2.4 - FUEL
ATTENTION!
Before filling with fuel, the engine must be switched off.
Fuel is highly inflammable. avoid spilling fuel onto a hot engine.
Do not go near the open fuel tank with a naked flame or a lighted cigarette: danger of fire.
Also avoid putting the face too close to the open fuel tank so that
harmful vapours are not inhaled.
Do not use a mobile phone when filling up with fuel.
The wrong type of fuel can cause irreversible damage to the engine, and is not covered by the warranty.
The engine will not tolerate the use of fuel of the type: • Bio diesel containing more than 20% methyl ester or greater than B20 • Vegetabel oil • Domestic fuel oil • Kerosene (for heating) • Diesel stored in jerrycans or galvanised containers
22
2.�
- F
UE
L
2�
�.MA
INTE
NA
NC
E
�.MAINTENANCE
In the event of a puncture .....................................................�.1
Lifting of the vehicle ............................................................... �.2
Bulb replacement ...................................................................... �.3
Fuses .................................................................................................. �.4
Fluid level in braking system ............................................ �.5
Gear oil level ..................................................................................�.6
Engine oil level ............................................................................. �.7
Transmission/Steering/windscreen washer liquid .......�.8
Cooling system air filter ........................................................�.9
Servicing ........................................................................................�.10
2�
�.1 -
IN T
HE
EV
EN
T O
F A
PU
NC
TUR
E /
�.2
- L
IFTI
NG
OF
TH
E V
EH
CIC
LE
�.1 - IN ThE EvENT OF a PUNCTURE
PUNCTUREREPAIRSEALANT
your vehicle is equipped with a punc-
ture repair sealant which is located in
a plastic case under the passenger's
seat.
To use, follow the instructions on the
sealant can.
TYRE PRESSURES - Front and rear: 1.2 bar
The condition of the tyres should befrequently checked. Abnormal wearmay be due to a misaligned axlesystem.ATTENTION,yourvehiclemustonlybedrivenforashorttimewithatyrethathasbeenrepairedusingthepuncturerepairsealant.
Thedamagedtyreshouldberepairedorreplacedassoonaspossible,asitmaydeflateorrupture.
�.2 - LIFTING OF ThE vEhICLE
vehicle have lifting points on the
left side and on the right side in
the area of the marker a.
A
25
�.3 - BU
LB
RE
PL
AC
EM
EN
T
Photo 1
Photo 3
Photo 4
Photo 5
Photo 2
Frontheadlight(photos 1, 2 and 3)For access to the bulbs, there is an opening with a plastic cover on the top of each front wheel arch.
Replacingthesidelight"1":- Unplug the connector from the bulb holder;- Turn the bulb holder 1/4 turn to the left and pull gently;- Turn the bulb 1/4 turn to the left.
Replacingtheindicator"2":- Unplug the connector from the bulb holder;- Turn the bulb holder 1/8 turn to the left and pull gently;- Turn the bulb 1/4 turn to the left.
Replacingtheheadlight"�":- Unplug the connector from the bulb holder;- Pull away the rubber covering;- Unhook the retaining spring;- Replace the bulb and reassemble the fitting.
Thumbwheel "A" adjusts the headlight from right to left.The height of the headlight can also be adjusted mechanically via the upper access opening.
Rearlightunit (photo 4)To replace the reversing, indicator, brake and fog lights:1.Unscrew the 2 screws then unclip the light unit "4".2.Turn the bulb holder in question to the left to unclip it, then change the bulb and replace the bulb holder.�.Fix the light unit back into position with the screws, then clip on the protective caps.
Registrationplatelamp (photo 5)1.Using a flat bladed screwdriver, remove the transparent cover "5" by placing the end of the screwdriver in one of the two slots on each side of the cover and lifting gently.2.Change the bulb and replace the cover.
�
�
�
1A
2
�.3 - BULB REPLaCEMENT

26
�.4
- C
HA
NG
ING
FU
SE
S
�.4 - ChaNGING FUSES
FUSESIf there is no electrical power, first check the fuses which are located under the dashboard on the passenger side
N° Function
1 Indicators supply
2 Central locking
3 Preheating supply
4 Fuel pump supply
5 Ventilation supply (DCI engine)
6 Headlight adjustment control and motor + APC central locking
7 Window opening control
8 12 V socket
9 Car radio
10 Speedometer unit accessory input
11APC speedometer unit, indicator control lever relay supply and APC supply to engine cluster
N° Function12 Dci ECU or Progress alternator control
13 Ventilation motor for vehicle interior
14 Brake lights, gear lever lamps and reversing lights
15 Defrost power supply, defrost relay and windscreen wiper control
16 Headlight control power supply
17 Speedometer unit power supply
18Power supply to front and rear windscreen wiper return
19 Ceiling light and car radio power supply
20Power supply to relay control and constant + to engine cluster
12��56��910
1�1�1211 15 16 1� 1� 19 20
2�
�.5 - FL
UID
LE
VE
L IN
BR
AK
E S
YS
TEM
�.5 - FLUID LEvEL IN BRaKE SYSTEM
BrakefluidbottleThe brake fluid bottle is situated under the bonnet on the driver side.
The level can be seen through the bottle and must not fall below the "MIN" mark on the bottle. Top up if necessary with a brake fluid suitable for the vehicle.
Changethebrakefluidevery50,000‑kmorevery�yearsusingaDOT�typefluid.
‑MIN‑
‑MAX‑
�.6 - GEaR OIL LEvEL
2�
�.6
- G
EA
R O
IL L
EV
EL
Gearbox (photo 1)
The gear box is situtated to the rear of the engine.It has a capacity of 0.8 litres(Oil type 80W/90)Check oil level frequently. Top up if necessary with gear oil suitable for the vehicle.
A.Drain plug "1".B.Filling "2".C.Checking the level "3".
Changethegearoilevery10,000kmorevery2years.Usingunsuitablelubricantsforthegearboxwillincreasewearonthemovingpartsandmaycauseseriousdamage.
Photo 1
2
�
1
! ATTENTION!Used oil contains substances hazardous to the environment. To change the gear oil, you are advised to contact a LIGIER dealer who is equipped to collect used oil in accordance with legal standards and with respect to the environment.
Attention.Usingtoomuchortoolittleoilmaycausethegearboxtofail.
�.7 - ENGINE OIL LEvEL
�.7.1. - LDW 492 REvOLUTION DCI ENGINE
Photo 2 Photo 3
Photo 4
Photo 5
Engine:greasing‑lubrication(photo 2-3-4)Engine oil capacity is 2.1 litres (5W/40 type oil).Check oil level frequently. Top up if necessary with an engine oil suitable for the vehicle.1.Dipstick "4" (photo 2).The level should be between the "min" and the "max" markings for normal vehicle operation (photo 4).2.Oil filler cap "5" (photo 2).�.Oil filter "6" (photo 3).The engine oil should be changed either by suction using an approved device, or by draining it from the drain plug 7 (photo 5).
Max. Min.
Check the oil level every 2500 km.Pleaserefertothemaintenanceperio‑dicity per engine type for the purgesandfilterreplacement.Attention. Using too much or too littleoilmaycausetheenginetofail.
6
5
�
�
29
�.7. - EN
GIN
E O
IL L
EV
EL
Engine,greasing,lubrication(photos 2 and 3)
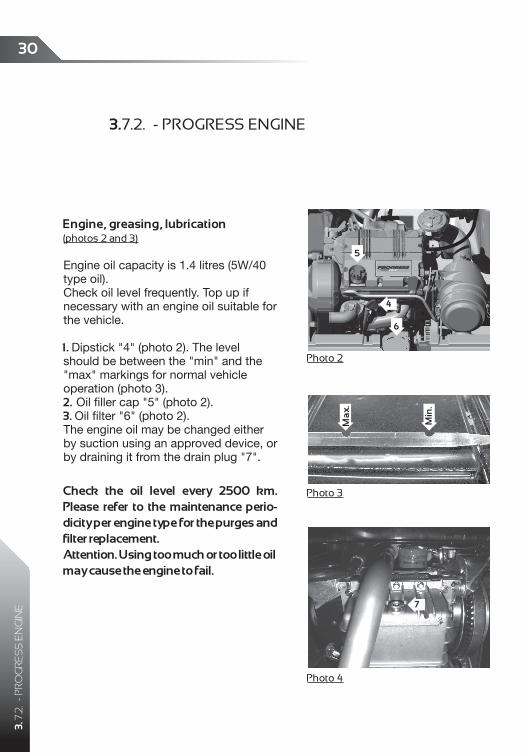
Engine oil capacity is 1.4 litres (5W/40 type oil).Check oil level frequently. Top up if necessary with an engine oil suitable for the vehicle.
1.Dipstick "4" (photo 2). The level should be between the "min" and the "max" markings for normal vehicle operation (photo 3).2. Oil filler cap "5" (photo 2).�.Oil filter "6" (photo 2).The engine oil may be changed either by suction using an approved device, or by draining it from the drain plug "7".
Check the oil level every 2500 km.Please refer to the maintenance perio‑dicityperenginetypeforthepurgesandfilterreplacement.Attention.Usingtoomuchortoolittleoilmaycausetheenginetofail.
Photo 2
6
5
�
Ma
x.
Min
.
Photo 3
Photo 4
�
�0
�.7
.2.
- PR
OG
RE
SS
EN
GIN
E
�.7.2. - PROGRESS ENGINE
�1
�.8 - TR
AN
SM
ISS
ION
/ STE
ER
ING
/ WIN
DS
CR
EE
N W
AS
HE
R L
IQU
ID
�.8 - TRaNSMISSION/STEERING/WINDSCREEN WaShER LIQUID
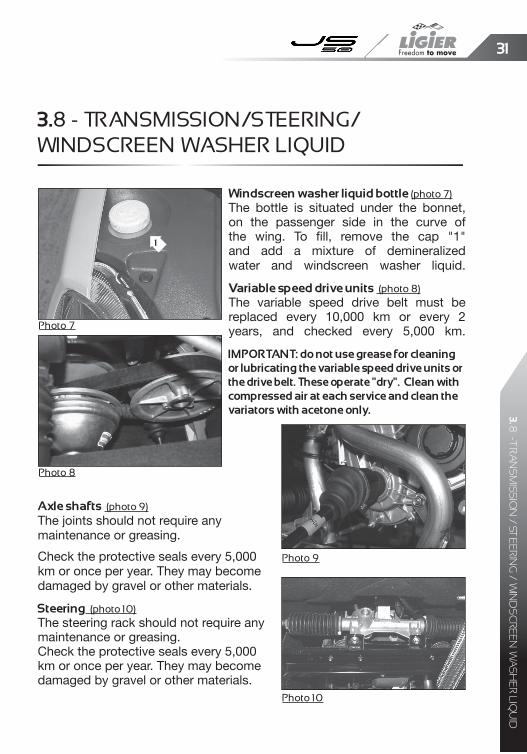
windscreenwasherliquidbottle(photo 7)The bottle is situated under the bonnet, on the passenger side in the curve of the wing. To fill, remove the cap "1" and add a mixture of demineralized water and windscreen washer liquid.
Variablespeeddriveunits (photo 8)The variable speed drive belt must be replaced every 10,000 km or every 2 years, and checked every 5,000 km.
IMPORTANT:donotusegreaseforcleaningorlubricatingthevariablespeeddriveunitsorthedrivebelt.Theseoperate"dry".Cleanwithcompressedairateachserviceandcleanthevariatorswithacetoneonly.
Photo 7
Photo 8
Photo 9
Photo 10
1
Axleshafts (photo 9)The joints should not require any maintenance or greasing.
Check the protective seals every 5,000 km or once per year. They may become damaged by gravel or other materials.
Steering (photo 10)The steering rack should not require any maintenance or greasing.Check the protective seals every 5,000 km or once per year. They may become damaged by gravel or other materials.
�2
�.9
- C
OO
LA
NT
/ A
IR F
ILTE
R
�.9 - COOLaNT / aIR FILTER
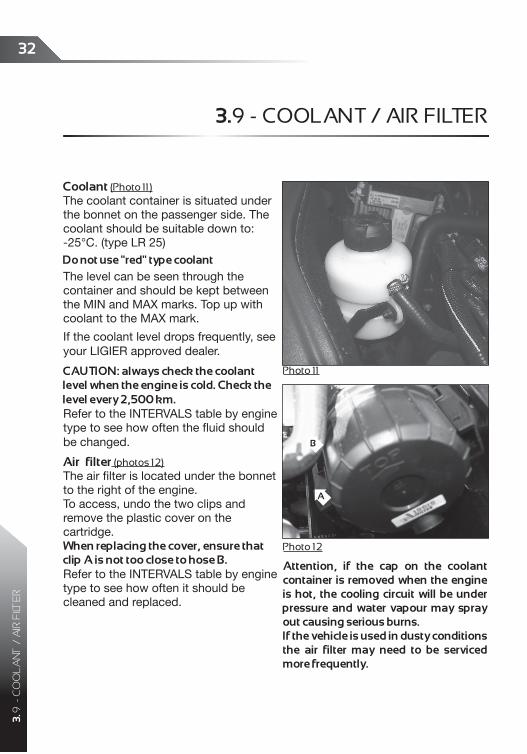
Coolant(Photo 11)The coolant container is situated under the bonnet on the passenger side. The coolant should be suitable down to: -25°C. (type LR 25)Donotuse"red"typecoolantThe level can be seen through the container and should be kept between the MIN and MAX marks. Top up with coolant to the MAX mark.
If the coolant level drops frequently, see your LIGIER approved dealer.
CAUTION:alwayscheckthecoolantlevelwhentheengineiscold.Checkthelevelevery2,500km.Refer to the INTERVALS table by engine type to see how often the fluid should be changed.
Airfilter (photos 12)The air filter is located under the bonnet to the right of the engine.To access, undo the two clips and remove the plastic cover on the cartridge.whenreplacingthecover,ensurethatclipAisnottooclosetohoseB.Refer to the INTERVALS table by engine type to see how often it should be cleaned and replaced.
Attention, if the cap on the coolantcontainer is removed when the engineis hot, the cooling circuit will be underpressure and water vapour may sprayoutcausingseriousburns.Ifthevehicleisusedindustyconditionsthe air filter may need to be servicedmorefrequently.
Photo 11
Photo 12
B
A
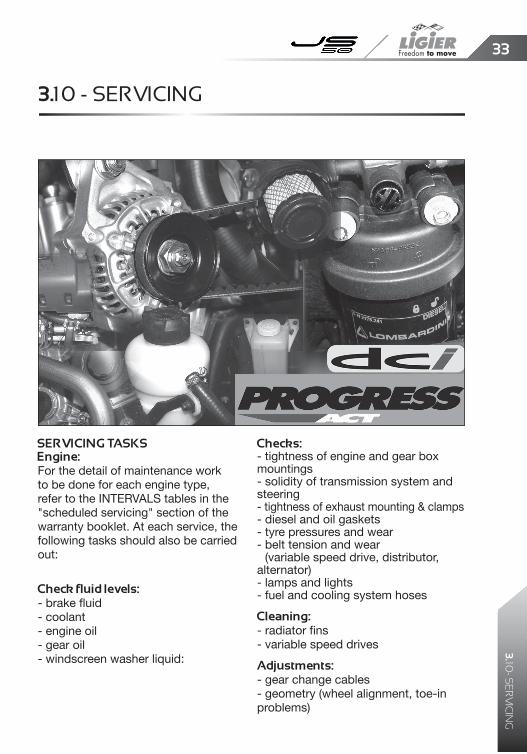
SERVICINGTASKSEngine:For the detail of maintenance work to be done for each engine type, refer to the INTERVALS tables in the "scheduled servicing" section of the warranty booklet. At each service, the following tasks should also be carried out:
Checkfluidlevels:- brake fluid- coolant- engine oil- gear oil- windscreen washer liquid:
Checks:- tightness of engine and gear box mountings- solidity of transmission system and steering- tightness of exhaust mounting & clamps- diesel and oil gaskets- tyre pressures and wear- belt tension and wear (variable speed drive, distributor, alternator)- lamps and lights- fuel and cooling system hoses
Cleaning:- radiator fins- variable speed drives
Adjustments:- gear change cables- geometry (wheel alignment, toe-in problems)
�.10 - SERvICING
��
�.10- S
ER
VIC
ING

�5
�.TEC
HN
ICA
L F
EA
TUR
ES
�.TECHNICALFEATURES
General features .......................................................................�.1
Maintenance of the bodywork and vehicle .........�.2
�6
�.1
- G
EN
ER
AL
FE
ATU
RE
S
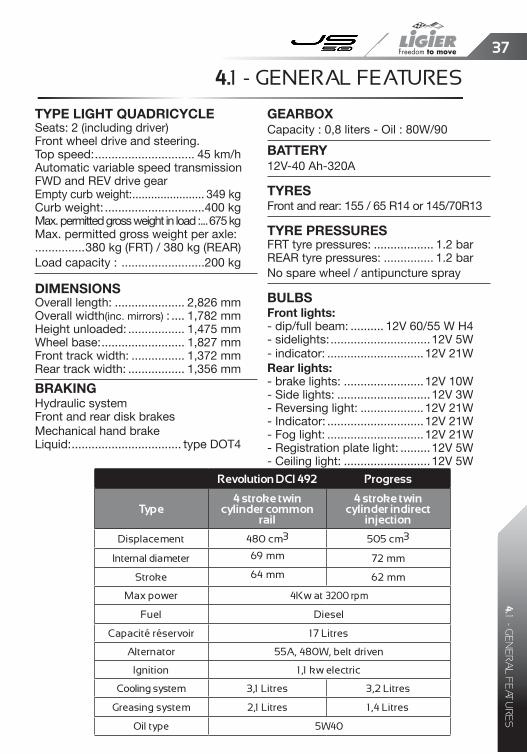
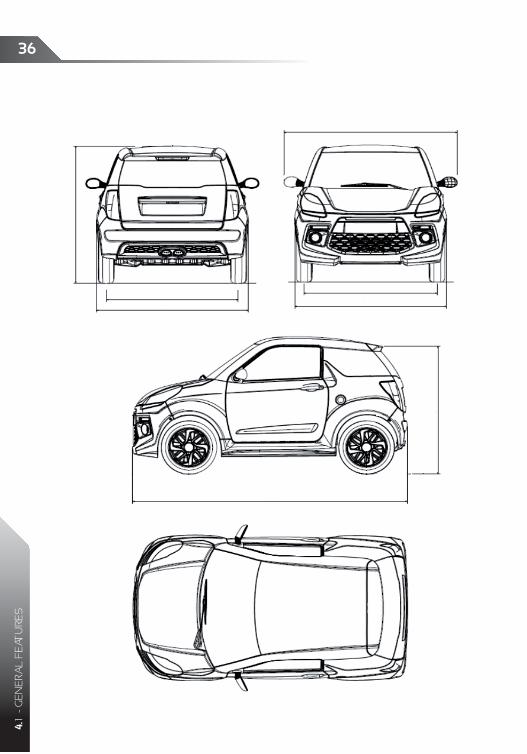
TYPE LIGHT QUADRICYCLESeats: 2 (including driver)Front wheel drive and steering.Top speed: .............................. 45 km/h Automatic variable speed transmissionFWD and REV drive gearEmpty curb weight: ....................... 349 kgCurb weight: ..............................400 kgMax. permitted gross weight in load : ...675 kgMax. permitted gross weight per axle: ...............380 kg (FRT) / 380 kg (REAR)Load capacity : .........................200 kg
DIMENSIONSOverall length: ..................... 2,826 mmOverall width(inc. mirrors) : .... 1,782 mmHeight unloaded: ................. 1,475 mmWheel base: ......................... 1,827 mmFront track width: ................ 1,372 mmRear track width: ................. 1,356 mm
BRAKINGHydraulic systemFront and rear disk brakesMechanical hand brakeLiquid: ................................. type DOT4
GEARBOxCapacity : 0,8 liters - Oil : 80W/90
BATTERY12V-40 Ah-320A
TYRESFront and rear: 155 / 65 R14 or 145/70R13
TYRE PRESSURESFRT tyre pressures: .................. 1.2 barREAR tyre pressures: ............... 1.2 barNo spare wheel / antipuncture spray
BULBSFront lights: - dip/full beam: .......... 12V 60/55 W H4- sidelights: ..............................12V 5W- indicator: .............................12V 21WRear lights:- brake lights: ........................12V 10W- Side lights: ............................12V 3W- Reversing light: ...................12V 21W- Indicator: .............................12V 21W- Fog light: .............................12V 21W- Registration plate light: .........12V 5W- Ceiling light: ..........................12V 5W
�.1 - GENERaL FEaTURES
��
�.1 - GE
NE
RA
L F
EA
TUR
ES
RevolutionDCI�92 Progress
Type�stroketwin
cylindercommonrail
�stroketwincylinderindirect
injection
Displacement 480 cm3 505 cm3
Internal diameter 69 mm 72 mm
Stroke 64 mm 62 mm
Max power 4Kw at 3200 rpm
Fuel Diesel
Capacité réservoir 17 Litres
alternator 55a, 480W, belt driven
Ignition 1,1 kw electric
Cooling system 3,1 Litres 3,2 Litres
Greasing system 2,1 Litres 1,4 Litres
Oil type 5W40
�.1
- G
EN
ER
AL
FE
ATU
RE
S
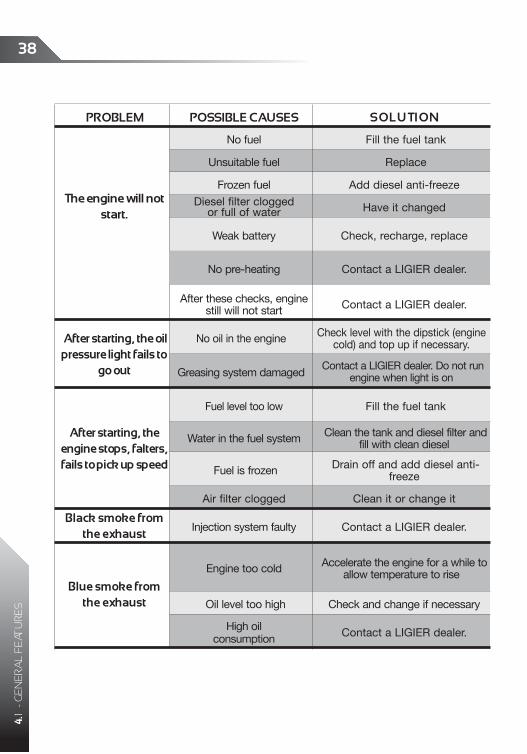
PROBLEM POSSIBLECAUSES SOLUTION
Theenginewillnotstart.
Afterstarting,theoilpressurelightfailsto
goout
Afterstarting,theenginestops,falters,failstopickupspeed
Blacksmokefromtheexhaust
Bluesmokefromtheexhaust
No fuel
Unsuitable fuel
Frozen fuel
Diesel filter cloggedor full of water
Weak battery
After these checks, engine still will not start
Fill the fuel tank
Fuel level too low Fill the fuel tank
Fuel is frozen Drain off and add diesel anti-freeze
Clean the tank and diesel filter and fill with clean dieselWater in the fuel system
No oil in the engine
Greasing system damaged Contact a LIGIER dealer. Do not run
engine when light is on
Accelerate the engine for a while to allow temperature to riseEngine too cold
Check level with the dipstick (engine cold) and top up if necessary.
Replace
Air filter clogged Clean it or change it
Add diesel anti-freeze
Have it changed
Check, recharge, replace
Contact a LIGIER dealer.
Injection system faulty Contact a LIGIER dealer.
Oil level too high
High oil consumption
Check and change if necessary
Contact a LIGIER dealer.
No pre-heating Contact a LIGIER dealer.
��
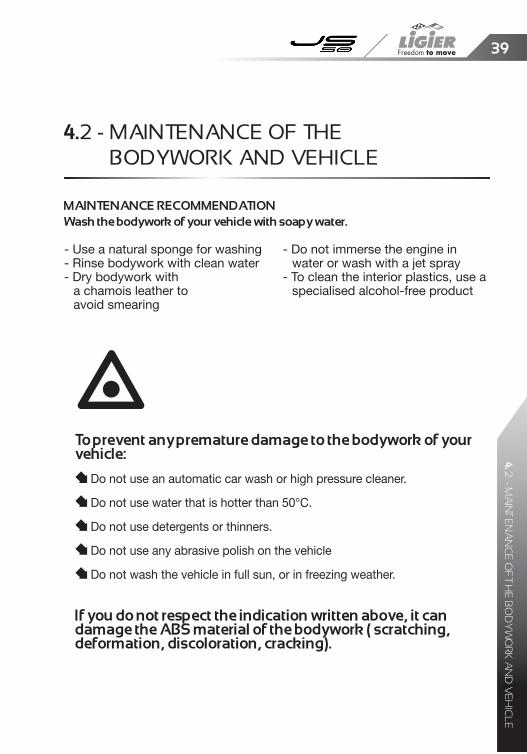
- Use a natural sponge for washing- Rinse bodywork with clean water- Dry bodywork with a chamois leather to avoid smearing
- Do not immerse the engine in water or wash with a jet spray- To clean the interior plastics, use a specialised alcohol-free product
MAINTENANCERECOMMENDATIONwashthebodyworkofyourvehiclewithsoapywater.
�.2 - MaINTENaNCE OF ThE BODYWORK aND vEhICLE
�9
�.2 - M
AIN
TEN
AN
CE
OF
THE
BO
DY
WO
RK
AN
D V
EH
ICL
E
Topreventanyprematuredamagetothebodyworkofyourvehicle:
Do not use an automatic car wash or high pressure cleaner.
Do not use water that is hotter than 50°C.
Do not use detergents or thinners.
Do not use any abrasive polish on the vehicle
Do not wash the vehicle in full sun, or in freezing weather.
Ifyoudonotrespecttheindicationwrittenabove,itcandamagetheABSmaterialofthebodywork(scratching,deformation,discoloration,cracking).

�0
�1
5. RO
AD
SIG
NS
5.ROADSIGNS

�2
1.1 -
DR
IVE
R'S
SE
AT
ROaD SIGN CaTEGORIES
Triangle = danger
Round = prohibition or obligation
Prohibition Obligation
End of obligation
Connection to a motorway
Routes selected for large towns
Temporary route
Direction
Blue
Green
Yellow
White
or = indication
DIRECTION
End of prohibition
�2
RO
AD
SIG
NS

��
PR
IOR
ITY S
IGN
S
PRORITY SIGNS
Give way to left and to right
Give way to left and to right
Give way to the right
Priority: you can go
But look out for dangers such as an emergency vehicle or a vehicle which ignores the road signs
The thickest line shows the priority road
Level crossing with gates
Level crossing without gates
��
1.1 -
DR
IVE
R'S
SE
AT
TRaFFIC LIGhTS
��
TRA
FF
IC L
IGH
TS
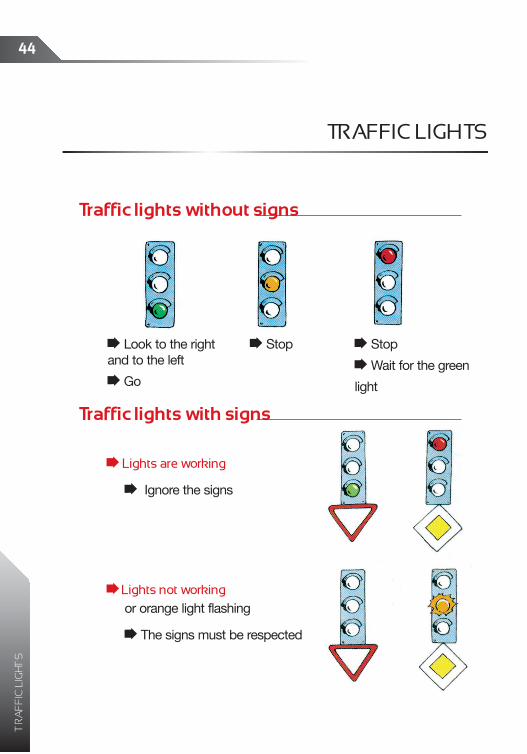
Trafficlightswithoutsigns
Trafficlightswithsigns
Look to the right and to the left
Go
Lights are working
Ignore the signs
Lights not working
or orange light flashing
The signs must be respected
Stop Stop
Wait for the green
light

ROaDS PROhIBITEDTO LIGhT QUaDRICYCLES aND MOTORCYCLES
Traffic prohibited to all vehicles in both directions
No entry to any vehicle
No entry to motorcycles and light quadricycles
No entry to any motor vehicle
Cycle route prohibited to quadricycles
Bus lane
Cars only, quadricycles prohibited
Motorway sliproad, quadricycles prohibited
Right turn prohibited for motorcycles and light quadricycles
Route prohibited to motorcycles and light quadricycles
ATTENTIONLightquadricyclesareconsideredbylawtobemotorcycles.Evenwhenregistered,theyareprohibitedonsomeroads.
�5
RO
AD
S P
RO
HIB
ITED