user manual - philips manual important! return your warranty registration card within 10 days. n see...
TRANSCRIPT

User manual
Important!Return your
WarrantyRegistration Cardwithin 10 days.See why inside.NEED HELP? CALL US!
PHILIPS REPRESENTATIVES ARE READY TO HELP YOU WITH ANY QUESTIONS ABOUT YOUR NEW
PRODUCT. WE CAN GUIDE YOU TROUGH CONNECTIONS, FIRST-TIME SETUP, AND ANY OF THE
FEATURES. WE WANT YOU TO START ENJOYING YOUR NEW PRODUCT RIGHT AWAY.
CALL US BEFORE YOU CONSIDERRETURNING THE PRODUCT
1-800-531-0039
OR VISIT US ON THE WEB AT WWW.PHILIPS.COM
DVD Recorder DVDR 615/17

Visit our World Wide Web Site at http://www.philips.com
Return your Warranty Registration card today to ensure youreceive all the benefits you're entitled to.
Once your PHILIPS purchase is registered, you're eligible to receive all the privileges of owning a PHILIPS So completeand return the Warranty Registration Card enclosed with your purchase at once. And take advantage of these importantbenefits.
WarrantyVerificationRegistering your product within 10 daysconfirms your right to maximumprotection under the terms andconditions of your PHILIPS warranty.
OwnerConfirmationYour completed Warranty RegistrationCard serves as verification of ownershipin the event of product theft or loss.
ModelRegistrationReturning your Warranty RegistrationCard right away guarantees you'll receiveall the information and special offerswhich you qualify for as the owner ofyour model.
Congratulations on your purchase,and welcome to the "family!"
Dear PHILIPS product owner:Thank you for your confidence in PHILIPS. You've selected oneof the best-built, best-backed products available today. We'lldo everything in our power to keep you happy with yourpurchase for many years to come.As a member of the PHILIPS "family," you're entitled toprotection by one of the most comprehensive warranties andoutstanding service networks in the industry. What's more,your purchase guarantees you'll receive all the information andspecial offers for which you qualify, plus easy access toaccessories from our convenient home shopping network.Most importantly, you can count on our uncompromisingcommitment to your total satisfaction. All of this is our way ofsaying welcome - and thanks for investing in a PHILIPSproduct.
Sincerely,
Lawrence J. BlanfordPresident and Chief Executive Officer
P.S.Remember, to get the most from your PHILIPSproduct, you must return your WarrantyRegistration Card within 10 days. So please mailit to us right now!
Know thesesafetysymbols
This "bolt of lightning" indicatesuninsulated material within yourunit may cause an electrical
shock. For the safety of everyone in yourhouse-hold, please do not remove productcovering.
The "exclamation point" callsattention to features for which youshould read the enclosed
literature closely to prevent operating andmaintenance problems.
WARNING: TO PREVENT FIRE ORSHOCK HAZARD, DO NOT EXPOSETHIS EQUIPMENT TO RAIN ORMOISTURE.
CAUTION: To prevent electric shock,match wide blade of plug to wide slot, fullyinsert.
ATTENTION: Pour éviter les chocélectriques, introduire la lame la plus largede la fiche dans la borne correspondante dela prise et pousser jusqu'au fond.
For Customer UseEnter below the Serial No. whichis located on the rear of thecabinet.Retain this informationfor future reference.
Model No.: DVDR615/17Serial No. _________________

Safety Information
Safety PrecautionsWarning: To prevent fire or shock hazard, do not expose this equipment to rain or moisture.Federal Communications Commission (FCC) Warning: Any unauthorized changes or modifications to this equipment void the user’sauthority to operate it.
Laser SafetyThis unit employs a laser. Only a qualified service person should remove the cover or attempt to service this device, due to possibleeye injury.CAUTION: Use of controls or adjustments or performance of procedures other than those specified herein may result in hazardousradiation exposure. The set complies with the FCC-Rules, Part 15 and with 21 CFR 1040.10.CAUTION: Visible and invisible laser radiation when open and interlock defeated. Do not stare into the beam. The beam is locatedinside, near the deck mechanism.
Special Information for Canadian UsersThis digital apparatus does not exceed the Class B limits for radio noise emissions from digital apparatus as set out in the RadioInterference Regulations of the Canadian Department of Communications.
Radio/TV InterferenceThis equipment has been tested and found to comply with the limits for a Class B digital device, pursuant to Part 15 of the FCCRules. These limits are designed to provide reasonable protection against harmful interference in a residential installation. Thisequipment generates, uses, and can radiate radio frequency energy and, if not installed and used in accordance with the instructions,may cause harmful interference to radio communications. However, there is no guarantee that interference will not occur in aparticular installation. If this equipment does cause harmful interference to radio or television reception, which can be determined byturning the equipment off and on, the user is encouraged to try to correct the interference by one or more of the followingmeasures:1) Reorient or relocate the receiving antenna.2) Increase the separation between the equipment and the receiver.3) Connect the equipment into an outlet on a circuit different from that to which the receiver is connected.4) Consult the dealer or an experienced radio/TV technician for help.
Note to Cable TV system installer:This reminder is provided to call the Cable TV(CATV) system installer 's attention to Article 820-40 of the NEC (National ElectricalCode) that provides guidelines for proper grounding and, in particular, specifies that the cableground shall be connected to thegrounding system of the building, as close to the point of cable entry as practical.
Copyright ProtectionUnauthorized copying, broadcasting, public performance and lending of Discs are prohibited. This product incorporates copyrightprotection technology that is protected by method claims of certain U.S. patents and other intellectual property rights owned byMacrovision Corporation and other rights owners. Use of this copyright protection technology must be authorized by MacrovisionCorporation and is intended for home and other limited viewing uses only unless otherwise authorized by Macrovision Corporation.Reverse engineering or disassembly is prohibited.
Declaration of ConformityModel Number: DVDR615/17Trade Name: PHILIPSResponsible Party: Philips Consumer Electronics N.A.
P.O. Box 14810, Knoxville, TN 37914-1810 1-800-531-0039

IMPORTANT SAFETY INSTRUCTIONS
1. Read these instructions.
2. Keep these instructions.
3. Heed all warnings.
4. Follow all instructions.
5. Do not use this apparatus near water.
6. Clean only with dry cloth.
7. Do not block any of the ventilation openings. Installin accordance with the manufacturer’s instructions.
8. Do not install near any heat sources such as radiators,heat registers, stoves, or other apparatus (includingamplifiers) that produce heat.
9. Do not defeat the safety purposeof the polarized or grounding-typeplug. A polarized plug has two bladeswith one wider than the other.A grounding type plug has two blades and a third groundingprong. The wide blade or the third prong are provided foryour safety. If the provided plug does not fit into youroutlet, consult an electrician for replacement of the obsoleteoutlet.
10.Protect the power cord from being walked on orpinched, particularly at plugs, convenience receptacles, andthe point where they exit from the apparatus.
11.Only use attachments/accessories specified by themanufacturer.
12. Use only with a cart, stand, tripod, bracket, ortable specified by the manufacturer or sold with theapparatus. When a cart is used, use caution whenmoving the cart/apparatus combination to avoidinjury from tip-over.
13.Unplug this apparatus during lightning storms or whenunused for long periods of time.
14.Refer all servicing to qualified service personnel.Servicing is required when the apparatus has been damagedin any way, such as power-supply cord or plug is damaged,liquid has been spilled or objects have fallen into theapparatus, the apparatus has been exposed to rain ormoisture, does not operate normally, or has been dropped.
15.Battery usage CAUTION - To prevent batteryleakage which may result in bodily injury, property damage,or damage to the unit:
• Install all batteries correctly, + and ? as marked on theunit.
• Do not mix batteries (old and new or carbon andalkaline, etc.).
• Remove batteries when the unit is not used for alongtime.
EL 6474?E004:02/8

The remote control
MONITOR Monitor: To switch between the internal tuner of the DVD Recorder(TV reception) and playback of the DVD Recorder
STANDBY m Switch on or off: To switch set on or off, interrupt menu function,interrupt a programmed recording (TIMER)
TV/DVD TV/DVD: To connect the antenna signal directly to the TV. This buttonlets you switch between the DVD Recorder and the antenna signal. Thisfunction operates when the DVD Recorder is connected to the TV withonly an antenna cable.
T/C Title/Chapter: To directly select a 'B'(title)/'C'(chapter) in the menubar using CH- B , CH+ A .If '����' appears in the display, the index menu of the loaded disc willappear or an introduction will play. In this case, this function will not beavailable.
PLAY MODE Playback mode: To select Repeat, Shuffle, and Intro Scan
REC MODE Recording mode (quality): To select the maximum possiblerecording duration
0..9 Number buttons: 0 - 9
DISC-MENU Disc Menu: To display the DVD menu or index screen
SYSTEM-MENU System Menu: To display/hide the main menu (menu bar at top ofscreen)
SELECT Select: To select a function
OK Store/Confirm: To store or confirm an entry
D C Cursor buttons : To move left, right
CH+ A Cursor buttons/Plus : Cursor up / Next channel
CH- B Cursor buttons/Minus : Cursor down / Previous channel
TIMER TIMER: To make a TIMER programming with VCR Plus+® system /without VCR Plus+® system or to alter or clear a programmed TIMER
FSS FSS: To display the edit menu for DVD+R(W) discs, to set chaptermarker
RETURN Back: To return to the previous menu step on a video CD (VCD). Thisalso functions with some DVDs.
CLEAR Delete: To delete last entry or clear programmed recording (TIMER)
PLAY G Playback: To play a recorded disc.
N Previous Chapter Track/Reverse search:Pressing this button twice during playback will return to the previouschapter track/ titleIf this button is held down during playback, it will search backward.If this button is held down during a still picture, it will search backwardin slow motion.
EN
GL
ISH

O Next title/Chapter/Track/Forward search:Pressing this button once during playback will jump to the nextchapter/track.If this button is held down during playback, it will search forward.If button is held down during a still picture function, it will searchforward in slow motion.
STOP h Stop: To stop playback/recording, except with programmed recordings(TIMER)Holding down the button will open and close the disc tray.
AUDIO Audio: To select the audio language. For SAP recording
REC/OTR n Record: Record the current TV channel
PAUSE 9 Pause(still picture): If this button is pressed during playback, theDVD Recorder switches to pause. You will see a still picture.If this button is pressed during recording, the DVD Recorder will alsoswitch to pause.
Additional TV functionsThis will only work with TVs with the same remote control code (RC5) (e.g. Philips TVs)
TV VOLUME q TV volume: Increase TV volume
TV VOLUME r TV volume: Reduce TV volume
For the following functions, you must hold down the side button DVD/TV while pressing theother button.
STANDBY m Switching the TV off:
0..9 Number buttons: 0 - 9
CH+ A TV Channel: To select the next highest TV channel.
CH- B TV Channel: To select the next lower TV channel.

Front of the Recorder
STANDBY-ON m Switch on or off: To switch the DVD Recorder off or on, interrupt afunction, or interrupt a programmed recording (TIMER)
OPEN/CLOSE J Open/close disc tray: Open/close disc tray
PLAY G Playback: To play a recorded disc.
REC n Record: Record the current TV channel
PREV/CH- N previous chapter track/reverse search/ previous channel
STOP h Stop: Pause playback/recording
NEXT/CH+ O next chapter track/forward search/next channel
Behind the door at the lower right frontcornerSwitching between jack S-VIDEO and VIDEO is done automatically.
S-VIDEO S?Video jack : Input for SVHS/Hi8 camcorders or SVHS/Hi8 videorecorders (channel number '����')
Yellow jackVIDEO
Video input jack: Input for camcorders or video recorders (channelnumber '����')
White/Red jackAUDIO left/right
Audio input jack left/right : Input for camcorders or video recorders(Channel number '����')
DV IN i.Link / DV jack (digital video input, IEEE 1394, Firewire): Inputfor digital Camcorders or other suitable devices using this connector(channel number '���').
EN
GL
ISH

Back of the Recorder
4MAINS Power plug: Connection to the power outlet (110V/60Hz)
ANTENNA IN Antenna input: Connect your antenna or Cable TV signal here
TV OUT Antenna output: Connection to the TV
Input jacks (IN?EXT2)
S-VIDEO (Y/C) S?Video input: Connection for an additional device (channel number'EXT2'). Switching between jack S-VIDEO (Y/C) and VIDEO(CVBS) is done automatically.
VIDEO (CVBS) Video input (yellow jack): Connection for an additional device(channel number 'EXT2')
L AUDIO R Analog audio input (red/white jack) underneath jack VIDEO(CVBS) . Audio for jack VIDEO (CVBS) : Connection for anadditional device (channel number 'EXT2')
Input jacks (IN?EXT1)
AUDIO Analog audio input (red/white jack) next to jack COMPONENTVIDEO Y PB PR : Connection for an additional device. Audio input forcomponent video (channel number 'EXT1')
COMPONENTVIDEO Y PB PR
Component video input (red/blue/green jack): Connection for anadditional device with component video output (channel number'EXT1')
Output jacks (OUT?2)
S-VIDEO (Y/C) OUT S?Video output: Connection for a S-video-compatible TV
VIDEO (CVBS)OUT
Video output (yellow jack): Connection to a TV with video input(CVBS, Composite Video)
L AUDIO R OUT Analog audio output (red/white jack) underneath jack VIDEO(CVBS) . Audio for jack VIDEO (CVBS) OUT : Connection for anadditional device

Output jacks (OUT?1 480p/480i)
AUDIO OUT Analog audio output (red/white jack): Connection for an additionaldevice. Audio output for component video/progressive scan
COMPONENTVIDEO Y PB PROUT
Component video output (red/blue/green jack): Connection foran additional device with component video/progressive scan output
Output jack (DIGITAL AUDIO OUT)
DIGITAL AUDIOOUT
Digital audio output: Connection for a digital audio device(amplifier/receiver)
The symbols on your DVD Recorderdisplay
The following symbols may appear on your DVD Recorder display:
Multifunction display/text line•) Clock•) Disc/Title play time•) OTR time•) Title name•) Display of the TV channel number / playing time / function.•) Display of information, warnings
IIIIIIIIIIIIIII Disc bar: Displays the current position on the disc (disc pointer).Play/Record: single flashing segment at the current position.Pause: flashing segment on both sides of the current position.Stop: flashing segment at the current position.
TIMER A recording (Timer) has been programmed
TV Modulator is switched off . The antenna signal (RF signal) is onlyconnected to the TV when the modulator is switched off.
PRO Component Video output set to 'Progressive Scan.' If this is notdisplayed, the Component Video output is set to 'Interlaced.'
o((( Remote control command has been sent
SAP Secondary audio program from the tuner is selected
EN
GL
ISH

Messages on your DVD Recorder display
����� The following messages may appear on your DVD Recorder display. If you name a disc, the discname will appear on the display panel as well.
�� �� ��� The DVD Recorder is currently in the initial installation mode. Switchon your TV and read section 'Initial installation' in chapter 'Installingyour DVD recorder.'
�� �� ��� No signal or poor signal strength
���� The on-screen menu display is on.
������ Disc tray is opening.
��� ���� Disc tray is open.
������ Disc tray is closing.
����� Disc is being read.
���� ���� After a successful recording, the list of disc contents is updated.
���� ���� After the first recording has been successfully completed on a new disc,the menu structure is created.
���� ��� The DVD/video cassette you are trying to copy is copy protected.
���� Please wait until this message disappears. The DVD Recorder is busyprocessing another operation.
�� ���� No disc has been inserted. If a disc has been inserted, then it is possiblethat the disc cannot be read.
���� Information on the inserted DVD is displayed on the screen.
���� The DVD Recorder is busy making changes DVD-compatible.
����� Entire disc is being erased.
��������� Inserted disc is new or has been completely erased (no recordingspresent).
�������� Disc cannot be recorded on.
��� ����� The maximum number of titles has been reached for the disc. Each disccan have a maximum of 48 titles.
��� ���� The maximum number of chapters per title/disc has been reached. Themaximum number of chapters per title is 99, and 124 per disc.
���� ���� Disc is full. There is no room for new recordings.
��� ���� A disc with PAL recordings has been inserted and an attempt was madeto record an NTSC signal. Insert a new disc or use a disc containingNTSC recordings.
���� ���� A disc with NTSC recordings has been inserted and an attempt wasmade to record a PAL signal. Insert a new disc or use a disc containingPAL recordings.

������ An unauthorized action was attempted during recording (e.g. pressingthe OPEN/CLOSE J button).
�������� An empty tile was selected.
���� ���� An attempt was made to record on a protected disc during playback.This message will also appear when an attempt is made to insert achapter marker( FSS button).
���� � An error occurred when writing the title. If this happens often, pleaseclean the disc or use a new one.Read section 'Cleaning discs' in the next chapter on how to clean thedisc.
���� ��� An error occurred when writing the title. The recording will continue,but the error will be skipped.
����� After the automatic channel search, the menu for setting the time/dateappears on the screen.
���� �� During automatic channel search, the detected TV channels arecounted.
������� It is not possible to close/open the disc tray.
���� �� The new recording will be added to the end of all recordings (SAFERECORD).
���������� After the creation of the menu structure the disc is prepared
������� The DVD-Recorder has been switched on
������� The DVD-Recorder has been switched off
EN
GL
ISH


Table of contents
AIntroduction 3....................................Dear Philips customer 3.....................................................................................Compatible discs 5..............................................................................................Region codes 6.....................................................................................................Technical data 6...................................................................................................Accessories 6........................................................................................................Important notes regarding operation 7..........................................................Cleaning discs 8....................................................................................................Special functions of your new DVD Recorder 9.........................................
BConnecting the DVD Recorder 11...Preparing the remote control for operation 11...........................................Connecting your DVD Recorder to the TV 11............................................Connecting with a Component Video (Y PB PR) cable 12........................Connecting with a S-Video (Y/C) cable 14....................................................Connecting with Video (CVBS) cable 15........................................................Connecting only with the antenna cable 16...................................................
CConnecting additional devices 18....Connecting an additional video recorder, DVD player 18.........................Connecting the satellite receiver using a cinch or an S-video cable 19...Connecting additional devices only via aerial cable 19................................Connecting a camcorder to the front jacks 20.............................................Connecting audio devices to analog audio jacks 20.....................................Connecting audio devices to the digital audio jack 21.................................
DInstalling your DVD recorder 22......Initial installation 22.............................................................................................Automatic TV channel search 24.....................................................................Adding and deleting TV channels manually 25...............................................Setting the language 26.......................................................................................Switching audio recording (Stereo, SAP) 27..................................................Assigning the VCR Plus+® Guide channel numbers 28................................Setting the time/date automatically 29............................................................Manually setting the time & date 30................................................................
EInformation on the TV screen 31....Menu bar icons 31...............................................................................................Menu bar 1 31.......................................................................................................Menu bar 2 31.......................................................................................................Field for temporary messages 32.....................................................................Status box 32........................................................................................................Disc type icons 32................................................................................................Disc status icons 33.............................................................................................Tuner info box 33................................................................................................Timer info box 33................................................................................................
FPlayback 34........................................General information regarding playback 34...................................................Inserting a disc 34................................................................................................Playing a DVD video disc 35..............................................................................Playing a DVD+RW or DVD+R 36.................................................................Playing audio CDs 36..........................................................................................Playing MP3 CDs 37............................................................................................Playback of a (Super) Video CD 38.................................................................
GOther playback functions 39.............Changing to a different chapter track/title 39...............................................Disc search 39......................................................................................................Still picture 40.......................................................................................................Slow motion 41....................................................................................................Search with time entry 41..................................................................................Repeating/Shuffle 42............................................................................................Repeat a specific segment A-B 42....................................................................Scan function 43...................................................................................................Camera angle 43...................................................................................................Zoom function 44................................................................................................Changing audio language 44...............................................................................Subtitles 45............................................................................................................
HRecording 46......................................General information 46......................................................................................Recording without automatic switch-off 47...................................................Pausing recording 49...........................................................................................Recording with automatic switch-off (OTR one-touch-recording) 49....Preventing accidental erasing of discs 50........................................................Lining up recordings within a title (assemble cut) 51..................................Selecting the recording mode (picture quality) 52.......................................
IManaging disc content 53.................General 53.............................................................................................................Favorite Scene Selection 54...............................................................................Inserting chapter marker 54..............................................................................Hiding chapters 54...............................................................................................Deleting chapter markers 56.............................................................................Changing the index picture 56..........................................................................Changing the menu background 57.................................................................Splitting titles 57...................................................................................................Editing recording titles (name) 58....................................................................Playing the entire title 58...................................................................................Deleting recordings/titles 59.............................................................................Disc settings 60....................................................................................................Changing disc name 60.......................................................................................Finalize editing 61.................................................................................................Finalizing DVD+R discs 61.................................................................................Erasing DVD+RWs 62........................................................................................
Table of contents

JProgramming a recording(TIMER) 63..............................................General 63.............................................................................................................Programming a recording with the 'VCR Plus+® system' 63......................Programming a recording without the VCR Plus+® system 66.................How to change or delete a programmed recording (TIMER) 67.............Problem solving for programmed recordings 68..........................................
KUser preferences 69..........................Picture settings 70................................................................................................Sound settings 71.................................................................................................Language settings 72............................................................................................Additional settings 72..........................................................................................Remote control settings 73...............................................................................Disc feature menu 74..........................................................................................
LAccess control (Child lock) 75.........Child lock (DVD and VCD) 75.........................................................................Activating/Deactivating the child lock 75........................................................Authorizing discs 76............................................................................................Locking authorized discs 76...............................................................................Parental control (DVD video only) 76............................................................Activating/Deactivating the parental control 77............................................Changing the country 78....................................................................................Changing the PIN 79...........................................................................................
MBefore you call technical support 80
Table of contents

3
AIntroduction
Dear Philips customer
Instruction manuals are usually very dry since they are technically-oriented and often poorlytranslated. I have been employed by Philips for this reason.
Allow me to introduce myself.My name is Phil. I will be guiding you through the instruction manual and try to be of help inoperating your new device. At appropriate points along the way, I will be providing you with thefollowing information:
(Question)?Here I will be explainingseemingly unimportant things.
TipHere I will be giving youinstructions on functions thathelp make it easier to use yourDVD Recorder.
ProblemHere I will help you find thecause of problems and theirsolutions.
I hope you have lots of fun with your new DVD Recorder.
PhilP.S.: If you have questions or if problems come up during operation, please see the helpfulinformation in the chapter 'Before you call technical support'. If this doesn't help you resolve theproblem, please call the customer support service for your country.The corresponding telephone numbers and e-mail addresses can be found on the last page ofthis instruction manual.You can also visit the website 'http://www.p4c.philips.com' .
EN
GL
ISH
Introduction

4
Welcome to the large family of PHILIPS DVD owners.Thank you for buying a DVDR615/17 .Please take the time to read this owner's manual before using your DVD Recorder. It containsimportant information and notes regarding operation.The DVD Recorder should not be turned on immediately after transportation from acold to a hot area or vice versa, or in conditions of extreme humidity.Wait at least three hours after transporting the device. The DVD Recorder needs this toacclimate to its new environment (temperature, air humidity, etc.).
Your Philips team hopes you will enjoyusing your new DVD Recorder.
What is a DVD?
DVDs (Digital Versatile Discs) are the new storage medium thatcombines the convenience of the Compact Disc with the latest advanceddigital video technology. DVD Video uses state-of-the-art MPEG2 datacompression technology that allows an entire film to be put on a single5-inch disc.
How high is the resolution compared to VHS?
The crystal-clear digital pictures have a resolution of over 500 lines, with720 pixels (picture elements) per line. This resolution is more thandouble that of VHS and is superior to Laser Discs. The quality can becompared to digital masters made in recording studios.
What is DVD+RW?
DVD+ReWritable (DVD+RW) uses phase-change media, the sametechnology that formed the basis for CD-ReWritable. A high-power laseris used to change the reflectivity of the recording layer. This processmeans the disc can be recorded on more than a thousand times.
What is DVD+R?
DVD+R (recordable DVD). In contrast to DVD+RW, this disc can onlybe recorded once. If a disc has not been finalized after recording, it cancontinue to be recorded upon in the DVD Recorder. Old recordings canbe later deleted, but they cannot be overwritten. The deleted titles aremarked as 'Deleted title.'For this disc to be played in a DVD player, it must be 'finalized' in theDVD Recorder. After this has been completed, no further recordingscan be added.
What can my DVD Recorder do?
Your Philips DVD Recorder is a Recorder and Player for digital videodiscs, with a two-way compatibility to the universal DVD Video standard.This means that:•)existing pre-recorded DVDs can be played.•)recordings made on your DVD Recorder can play on existing DVDVideo players and DVD-ROM drives. In some cases, the discs may haveto be finalized before they will play on other DVD players. ?
Introduction

5
Compatible discs
Using this DVD Recorder, you can play and record on the following discs:
Recording and Playback
DVD+RW (Digital Versatile Disc + Rewritable); can be recorded on over and over.
DVD+R (Digital Versatile Disc + recordable); can be recorded on once.
Playback only:
DVD Video (Digital Versatile Disc)
DVD-R (DVD-Recordable) Can only be played back when the recording was made in 'video mode'and the recording was finalized.
DVD-RW (DVD-Rewritable) Can only be played back when the recording was made in 'videomode' and the recording was finalized.
Audio CD (Compact Disc Digital Audio)
Super Audio CD (only plays the CD layer of a hybrid SACD disc)
Video CD (Formats 1.0, 1.1, 2.0)
Super Video CD
CD-R (CD-Recordable) Audio/MP3 contents
CD-RW (CD-Rewritable) Audio/MP3 contents
EN
GL
ISH
Introduction
6
Region codes
Because DVD films are usually not released at the same time in all regions of the world, all DVDplayers are keyed to a specific region code. Discs can be assigned an optional region code. If theregion codes of the player and disc do not coincide, playback is not possible.
This device will only play Region 1 DVDs or DVDs manufactured to be played in all regions ('ALL').DVDs from other regions cannot be played in this DVD Recorder.The number within the globe represents the region of the world.Region 1 represents:U.S, Canada, upper regions of North America, Bermuda, U.S. Virgin Islands and smaller regions nearAustralia.
Technical data
Voltage : 120V/60HzPower consumption : 27WPower consumption (Standby): Less than 3W (clock display off)Measurements in inches (W/H/D): 17.12/2.78/13.58 (disc tray closed), 18.90 (disc tray open)Weight without packaging approx.: 9.26 lbPower failure/no power supply: Channel and timer data will remain stored for approx. 1 year,
the clock data for approx. 12 hours.
Operating position: max. inclination of 10 degrees in any directionAmbient temperature: 59 °F - 95 °FHumidity: 25% - 75%
Accessories
Owner's manualWarranty bookletQuick install guideRemote control and batteriesAntenna cablePower cableAudio cable (with red/white plugs)Video cable (yellow plugs)
Introduction

7
Important notes regarding operation
Caution!Visible and invisible laser radiation. When open avoid exposure to beam.
Because of the danger of eye injury, only qualified service personnel should remove the cover orattempt to service this device.
LASERType: Semiconductor laser InGaAlP (DVD), AlGaAs (CD)Wavelength: 660nm (DVD), 780nm (CD)Output power (out of objective): 20mW (DVD+RW writing), 0.8mW (DVD reading), 0.3mW (CDreading).Beam divergence: 82 degrees (DVD), 54 degrees (CD)
Danger: High voltage! Do not open!There is a risk of an electrical shock!
The machine does not contain any components that can be repaired by the customer. Please leaveall maintenance work to qualified personnel.
As soon as the DVD Recorder is connected to the power supply, there are some componentsthat are in constant operation. To switch off the DVD Recorder completely you must disconnectit from the power supply.
If you disconnect the DVD Recorder from the power supply, pull out the power cord's plug fromthe wall outlet, not only the plug from the jack 4MAINS at the rear of the set. Children playingnear the device could suffer injuries at the free end of the cable.
These Owner's manual have been printed on non-polluting paper.
Deposit old batteries at the appropriate collection points.
Please make use of the facilities available in your country for disposing of the packaging in a waythat helps protect the environment.
This electronic device contains many materials that can be recycled. Please enquire about thepossibilities for recycling your old device.
EN
GL
ISH
Introduction

8
In a cabinet, allow about 2.5 cm (1 inch) of free space around the Recorder for adequateventilation.
Make sure that air can circulate freely through the ventilation slots on the machine. Do not placethe device on an unsteady base.
Make sure that no objects or liquids enter the Recorder. Do not place vases or similar objectson the DVD Recorder. If liquid spills into it, immediately disconnect the Recorder from thepower supply and call Philips for advice.
Keep the DVD Recorder away from domestic heating equipment and other sources of heat, as wellas direct sunlight.
Do not place any combustible objects on the device (candles, etc.).
Make sure children do not place any foreign objects into the openings or the disc tray.
Cleaning discs
Some problems occur because the disc inside the Recorder is dirty (frozen picture, sounddisruptions, picture distortions). To avoid these problems, discs should be cleaned on a regularbasis.
1 When a disc is dirty, clean it with a soft cloth. Wipe the discfrom the center to the edge in a straight line.
2 Do not use solvents such as benzine, thinner, commerciallyavailable cleaners, or anti-static sprays intended for analog discs.
Can I use a cleaning disc intended for DVD players?
Since the optical unit (laser) of the DVD Recorder operates at a higherpower than regular DVD or CD players, these kinds of cleaning CDsmay damage the optical unit (laser).Therefore, refrain from using a cleaning CD! ?
Introduction

9
Special functions of your new DVDRecorder
Your PHILIPSDVD Recorder has special functions that will make day-to-day use of your newDVD Recorder easier for you.
This connection is also known as 'FireWire' and 'IEEE 1394.' This connection is used for thetransfer of high bandwidth digital signals as used by digital video (DV) camcorders. Its cable isused to transmit audio and video signals. Along with DV and Hi8 camcorders, some personalcomputers with digital video outputs can also be connected to this digital input.
This screen provides an overview of the disc. Each index picture represents a recording. At theright-hand side of the screen, a disc pointer graphically displays the duration and position on thedisc of the selected recording.
This function can be used to delete commercial interruptions during a film as well as otherscenes. The corresponding scenes are marked, then skipped as desired. This is saved on theDVD so any DVD player will also skip these scenes. You must make edits compatible.
MP3 files are highly compressed pieces of music. The amount of data of the original audio materialis reduced by 1/10 of the original size using a special process. This enables you to fit up to 10 hoursof music on a single CD.These music CDs can be played using this Recorder.
As a rule, a recording is made at the current position. This is similar to a video tape, e.g. in themiddle of the tape. By holding down the REC/OTR n button, the recording will be made at theend of all other recordings. This helps avoid overwriting previous recordings.New recordings on a DVD+R disc will always be added after the end of all recordings.
The Philips DVD Recorder can play DVDs and CDs. DVDs made using this DVD Recorder can beplayed in most current (and future) DVD players.
EN
GL
ISH
Introduction

10
This is a standard from Dolby Laboratories for the transmission of 5.1 channel sound. Thisacoustical playback system is used to transmit five full channels. In addition, one channel is usedexclusively for low frequencies (effects). Speakers are positioned at front left, center, and frontright, as well as rear left and right. This is currently the most common system, also used inmovie theaters.This DVD Recorder records each sound in two-channel Dolby Digital on a DVD+RW.
Manufactured under license from Dolby Laboratories. Dolby and the double-D symbol aretrademarks of Dolby Laboratories.
This product incorporates copyright protection technology that is protected by US patent numbers4631603, 4577216, 4819098, and 4907093, as well as other intellectual property rights. Use of thiscopyright protection technology must be authorized by Macrovision Corporation, and is onlyintended for home use and other pay-per-view applications. Macrovision must provide writtenauthorization for any other use. Changes to the device, reverse engineering, or disassembly isprohibited.
Simple programming system for DVD recorders. Simply enter the number code associated withyour television program. This number is located in your television listings magazine.
VCR Plus+ and PlusCode are registered trademarks of Gemstar Development Corporation. TheVCR Plus+ system is manufactured under license from Gemstar Development Corporation. USpatent Nr.: 6,466,734; 6,430,359; 6,091,882; 6,049,652; 5,335,079; 5,307,173
In order to identify your machine for service questions or in the event of theft, enter the serialnumber here. The serial number (PROD. NO.) is printed on the type plate fixed at the rear ofthe recorder:
MODEL NO. DVDR615/17
PROD. NO. ..................
Introduction

11
BConnecting the DVD Recorder
Preparing the remote control foroperation
The remote control and its batteries are packed separately in the original DVD Recorderpackaging. You must install the batteries in the remote control - as described in the paragraphbelow - before use.
1 Take the remote control and the enclosed batteries (2 AAbatteries).
2 Remove the battery compartment lid, insert the batteries asshown, then replace the battery compartment lid. Always installthe +/- ends of the batteries as indicated inside the batterycompartment.
The remote control is now ready to use.Its range is approximately 16-32 feet (5 to 10 meters).
'Correct aiming' of the remote control
In the following sections, you require the remote control for the firsttime. When using the remote control, always aim the front part of it atthe DVD recorder, not the TV. Tip
Connecting your DVD Recorder to the TV
The necessary cable connections must be made before you can record or playback TV programsusing your DVD recorder.
Connect the DVD Recorder directly to the TV. Connecting a video cassette Recorder betweenthe DVD Recorder and the TV could result in poor picture quality.
When you install your DVD Recorder for the first time, select one of the following options:
'Connecting with Component Video (Y PB PR, YUV) / Progressive Scan (Y PB PR)If your TV is equipped with Component Video (Y PB PR, YUV) / Progressive Scan (Y PB PR)input
'Connecting with S?Video (Y/C)'If your TV is equipped with a S-Video (SVHS) jack.
'Connecting with a Video (CVBS) cable'If your TV is equipped with a Video (CVBS) jack.
'Connecting only with the antenna cable'If your TV has only an Antenna-In jack (no other audio and video in jacks) or you do not wish touse any other cable. The TV's Antenna In jack may be labeled ANT IN, RF IN, 75 ohm, etc. Checkyour TV instructions for details.
EN
GL
ISH
Connecting the DVD Recorder

12
Connecting with a Component Video(Y PB PR) cable
Component Video is the highest quality a system for transmitting video by splitting the videosignal into the Y (brightness), U and V (red minus brightness, blue minus brightness) components.The signals are sent over separate lines. The plus for these cables and the corresponding jacksare usually red, green, and blue.
In addition, the signal can be 'interlaced' or use 'progressive scan.'
InterlacedThe regular video/TV signal is interlaced, i.e. the even and odd lines are formed as half picturesin an alternate fashion.
Progressive scanWith progressive scan, each picture is structured (approx. 50/60 times per second depending onthe TV system) as a complete picture, i.e. the even and odd lines are formed together.Disruptive picture flickering is avoided as is the case with 100 Hz TV devices.
Have the following cables ready:an antenna cable (1, supplied), a power cable (2, supplied), a Component Video (Y PB PR) cable(3, red, green, blue jack) or a corresponding video-compatible cinch cable, an audio cable (4,red/white jack).
1 Remove the antenna cable plug from your TV. Insert it into theANTENNA IN jack at the back of the DVD recorder.
2 Insert one end of the supplied antenna cable into the TVOUT jack at the back of the DVD Recorder and the other endinto the antenna input jack at the back of the TV.
3 Use the Component Video (Y PB PR) cable and connect one endto the red, blue, green COMPONENT VIDEO Y PB PROUT jacks at the back of the DVD Recorder and the other endto the Component Video In jacks of the TV.
4 If your TV set is equipped with a 'progressive scan' jack, pleaseuse this jack. (Usually called 'Video In Y Cb Cr'. Please see yourTV's instruction manual).
Please note the color order
The colors of the jacks on the DVD Recorder must match those on theTV (red-red/blue-blue/green-green). If they are not matched properly,this could cause the color of the picture to be reversed or there couldbe no picture at all. Tip
Connecting the DVD Recorder

13
5 Use an audio cable and plug one end into the AUDIO OUT jackat the back of the DVD Recorder (next to COMPONENTVIDEO Y PB PR OUT ) and the other into the red/white AudioIn jacks of the TV (usually called Audio in', 'AV in'. Please seeyour TV's instruction manual).
6 Switch on the TV.If necessary, set the TV to the Component Video channel.If necessary, see the operating instructions for your TV. Or, goto channel zero on your TV, then keep changing channels downuntil you see the DVD Recorder screens (when the Recorder ison). This is not channel 3 or 4 as it would be if you used onlythe cable/antenna connection.
7 Connect the mains jack 4MAINS at the back of the DVDRecorder with the power supply using the supplied power cable.The most important features of the DVD Recorder will appearon the display.After the initial installation is completed, this function will beswitched off. How you switch on this function again, read in thechapter 'User preferences' in the section 'Standby'.
8 Press STANDBY-ON m on the recorder. '�� �� ���' willappear on the display.
Switching TV and DVD Recorder to 'Progressive scan'
The factory settings of the DVD Recorder are set to 'Interlaced'. If youselected the 'Progressive scan' connection during installation, you mustswitch the 'Component Video output' of the DVD Recorder and, ifnecessary, the 'Component Video input' of the TV to 'Progressive scan.'
Switching the TVPlease select 'Progressive scan' for the Component Video input on theTV. If necessary, see your TV instruction manual.If your TV is equipped with separate input jacks for Interlaced andProgressive, connect the DVD Recorder to the jack that supports'Progressive scan.'
Switching the DVD Recorder1 Disconnect the recorder's power cord.2 Hold down N on the DVD Recorder while reconnecting the
power cord. 'PRO' (progressive scan) will appear on the display.3 If you want to switch back, repeat steps 1 and 2 . 'PRO'
(progressive scan) will disappear from the display. The DVDRecorder is switched to 'Interlaced.' Tip
Then, read the paragraph 'Initial installation' in the chapter 'Installing your DVD recorder'.
EN
GL
ISH
Connecting the DVD Recorder

14
Connecting with a S?Video (Y/C) cable
This connecting cable, also known as the SVHS cable, is used to transmit the brightness signal (Ysignal) and color signal (C signal) separately. This mini DIN jack/plug is also called a Hosidenjack/plug.
Have the following cables ready:an antenna cable (1, supplied), a power cable (2, supplied), a S-video (SVHS) cable (3), an audiocable (4, with red/white ends).
1 Remove the antenna cable plug from your TV. Insert it into theANTENNA IN jack at the back of the DVD recorder.
2 Insert one end of the supplied antenna cable into the TVOUT jack at the back of the DVD Recorder and the other endinto the antenna input jack at the back of the TV.
3 Use a S-Video (SVHS) cable and plug one end into the S-VIDEO(Y/C) OUT jack at the back of the DVD Recorder and the otherend into the S-Video (SVHS) In jack of the TV (usually calledS-Video in or SVHS in. See your TV's instruction manual).
4 Use an audio (cinch) cable and plug one end into the red/whitecinch jack AUDIO L/R OUT at the back of the DVD Recorder(next to S-VIDEO (Y/C) OUT ) and the other into thecorresponding red/white audio input jack of the TV (usually calledAudio in', 'AV in'. See your TV's instruction manual).
5 Switch on the TV. Then switch the set to the SVHS input jack orselect the corresponding channel number. For the channelnumber, please see your TV's instruction manual.
6 Connect the mains jack 4MAINS at the back of the DVDRecorder with the power supply using the supplied power cable.The most important features of the DVD Recorder will appearon the display.After the initial installation is completed, this function will beswitched off. How you switch on this function again, read in thechapter 'User preferences' in the section 'Standby'.
7 Press STANDBY-ON m on the recorder. '�� �� ���' willappear on the display.
Then, read the paragraph 'Initial installation' in the chapter 'Installing your DVD recorder'.
Connecting the DVD Recorder

15
Connecting with Video (CVBS) cable
This cable, usually featuring yellow cinch plugs, is used for transmitting the Composite Videosignal (FBAS, CVBS). In this method of transmission the color signal and the brightness signal aretransmitted on the same cable. Under certain circumstances, this may lead to problems with thepicture, such as 'Moiré' patterns.
Have the following cables ready:an antenna cable (1, supplied), a power cable (2, supplied), a video (CVBS) cable (3, with yellowends), and an audio cable (4 with red/white ends).
1 Remove the antenna or cable TV signal from your TV. Connect itto the ANTENNA IN jack at the back of the DVD recorder.
2 Insert one end of the supplied antenna cable into the TVOUT jack at the back of the DVD Recorder and the other endinto the antenna input jack at the back of the TV.
3 Use a video (CVBS) cable and plug one end into the yellow jackVIDEO (CVBS) OUT at the back of the DVD Recorder and theother end into the Video In jack (usually yellow) of the TV(usually called Video in or AV in. See your TV's instructionmanual).
4 Use an audio (cinch) cable and plug one end into the red/whitecinch jack L AUDIO R OUT at the back of the DVD Recorder(under to VIDEO (CVBS) ) and the other into thecorresponding red/white audio input jack of the TV (usually calledAudio in', 'AV in'. See your TV's instruction manual).
5 Switch on the TV. Then switch the TV to the Video/Audio inputjack or select the corresponding channel number. For the channelnumber, please see your TV's instruction manual.
6 Connect the mains jack 4MAINS at the back of the DVDRecorder with the power supply using the supplied power cable.The most important features of the DVD Recorder will appearon the display.After the initial installation is completed, this function will beswitched off. How you switch on this function again, read in thechapter 'User preferences' in the section 'Standby'.
7 Press STANDBY-ON m on the recorder. '�� �� ���' willappear on the display.
Then, read the paragraph 'Initial installation' in the chapter 'Installing your DVD recorder'.
EN
GL
ISH
Connecting the DVD Recorder

16
Connecting only with the antenna cable
USE THIS CONNECTIONN IF YOUR TV ONLY HAS A SINGLE ANTENNA IN JACK ANDDOES NOT HAVE ANY AUDIO/VIDEO JACKS. Please observe that you must adjust the TV tothe DVD-Recorder (channel 3 or 4).
Have the following cables ready:an antenna cable (1, supplied), and a power cable (2, supplied).
1 Switch off your TV.
2 Remove the antenna or Cable TV signal from the antenna inputjack of the TV. Insert it into the ANTENNA IN jack at the backof the DVD recorder.
3 Insert one end of the supplied antenna cable into the TVOUT jack at the back of the DVD Recorder and the other endinto the antenna input jack at the back of the TV.
4 Connect the mains jack 4MAINS at the back of the DVDRecorder with the power supply using the supplied power cable.The most important features of the DVD Recorder will appearon the display.After the initial installation is completed, this function will beswitched off. How you switch on this function again, read in thechapter 'User preferences' in the section 'Standby'.
5 Press STANDBY-ON m on the recorder. '�� �� ���' willappear on the display.
6 Switch on your TV and select the channel used for DVD/VCRplayback on your TV. Choose between channel 3 or 4.
How do I switch the Recorder between channel 3 and 4?
The factory setting is for channel 3. However, if you would like toswitch to channel 4, proceed as follows:1 Hold 4 on the remote control while '�� �� ���' is displayed.2 '���' (channel 4) will appear on the display.3 If you want to switch back to channel 3, hold 3 . '���' (channel 3)
will appear on the display. ?
7 Switch your TV to the selected channel (channel 3 or 4). Usetherefor your TV remote control.The menu for language selection will appear on the screen.
Connecting the DVD Recorder

17
Initial Setup
Menu Language
EnglishEspañolFrançais
Press OK to continue
a I don't see a menu for language selection
b Check the cable connections.
b Is 'DVDR' (DVD Recorder operation) lit up in the display?If not, press the TV/DVD button until 'DVDR' is lit.
b Change between channel 3 and 4 on the TV. Problem
8 This TV channel number must be used in the future for DVDrecorder playback.
Then, read the paragraph 'Initial installation' in the chapter 'Installing your DVD recorder'.
EN
GL
ISH
Connecting the DVD Recorder

18
CConnecting additional devices
You can connect additional devices such as decoders, satellite receivers, camcorders, etc. to theS-VIDEO (Y/C) , VIDEO (CVBS) , COMPONENT VIDEO Y PB PR and the L AUDIO R ,AUDIO jacks on the recorder. Switching between jack S-VIDEO (Y/C) and VIDEO (CVBS) isdone automatically.
The DVD recorder must be connected directly to the TV set ( S-VIDEO (Y/C) OUT ,VIDEO (CVBS) OUT , or COMPONENT VIDEO Y PB PR OUT socket directly to the TVset). If there is a video recorder in between the picture quality may be poor because of the copyprotection system built into the DVD recorder.
Can I also connect other devices with 'Progressive scan'?
The COMPONENT VIDEO Y PB PR jacks are only used for'interlaced' signals. Signals using progressive scan cannot be processed bythe DVD recorder. ?
Connecting an additional video recorder,DVD playerYou can also connect a video recorder or a DVD player to the input jacks. Please use theS-VIDEO (Y/C) jack and the L AUDIO R jacks for SVHS video recorders.
Please be awareMost pre-recorded video cassettes and DVDs are copy protected. When you attempt to copythem, the '���� ���' message will appear in the DVD Recorder display.
aWhen copying video cassettes '�� �� ���' appears in theDVD Recorder display
b Check whether the cable plugs fit correctly.
b If the recording is made from a video recorder, adjust the "tracking"on the video recorder.
b In case of bad, non-standard video input signals, the DVD Recordermay not be able to detect the signal.
aWhen copying from DVDs or pre?copied video cassettes, thepicture is grainy and the brightness fluctuates.
b This occurs when you attempt to copy copy-protected DVDs orvideo cassettes. Although the picture on the TV is OK, the recordingis distorted on a DVD+R(W). Copy-protected DVDs and videocassettes cannot be copied without these disruptions. Problem
Connecting additional devices

19
Connecting the satellite receiver using acinch or an S?video cableYou can connect additional devices such as decoders, satellite receivers, camcorders, and the liketo the S-VIDEO (Y/C) or VIDEO (CVBS) input sockets and the L AUDIO R audio sockets.Switching between sockets S-VIDEO (Y/C) and VIDEO (CVBS) is done automatically.
The aerial cable must be connected to the satellite receiver and the DVD recorder.
Connect the DVD recorder directly to the TV set (cable from the S-VIDEO (Y/C) OUT ,VIDEO (CVBS) OUT output sockets is directly connected to the TV set). If there is a videorecorder or an additional device in between, the picture quality may be poor because of thecopy protection system built into the DVD recorder.
Connecting additional devices only viaaerial cableIf you want to connect additional devices (e.g. satellite receiver...) only via aerial cable, pleaseobserve the following:
The DVD-Recorder must be connected directly to the TV set. If there is a video recorder or anadditional device in between, the picture quality may be poor because of the copy protectionsystem built into the DVD-Recorder.
The additional device (satellite receiver) must be connected before the DVD recorder (additionaldevice - DVD recorder - TV set). Only the TV set must be connected to the TV OUT jack.
•) If there is interference in the picture when the satellite receiver is switched on, a TVbroadcaster may be transmitting on the same channel or a channel very close to that of thesatellite receiver. (e.g.: TV broadcaster on channel 3, satellite receiver also on channel 3). In thiscase, change the channel of the satellite receiver. Consult the instruction manual of the satellitereceiver.You must also store this channel on the DVD recorder to be able to record TV programmesfrom the satellite receiver.
•) Switch on the additional device during the installation of the DVD recorder. During theautomatic channel search, the channel on which the additional device is transmitting will bestored as a TV channel.
EN
GL
ISH
Connecting additional devices

20
Connecting a camcorder to the front jacks
The front video and audio jacks can be used to easily connect a camcorder to the DVDrecorder. These jacks are behind the door in the lower right corner of the front panel.
Best Picture QualityIf you are using a Digital Video or Digital 8 camcorder, connect the DV IN IN jack of the DVDRecorder to the corresponding DV OUT jack on the camcorder.When films are transferred, the original recording date and time are stored as DVD subtitles.During playback, you can display this data on the TV screen by using the 'E' function (Subtitle).
Choose '���' as a programme number for this input jack.
Very good Picture QualityIf you are using a Hi8 or S-VHS(C) camcorder, connect the S-VIDEO in jack of the DVDRecorder to the corresponding S-video out jack on the camcorder.You must also connect the AUDIO left/right in jacks of the DVD Recorder to the audio outjacks on the camcorder.
Choose '����' as a programme number for this input jack.
Good Picture QualityIf your camcorder only uses a video output (Composite Video or CVBS), connect theVIDEO input of the DVD Recorder to the corresponding output jack on the camcorder.You must also connect the AUDIO left/right in jacks of the DVD Recorder to the audio outjacks on the camcorder.
Choose '����' as a programme number for this input jack.
Connecting audio devices to analogaudio jacks
There two analog audio output jacks L AUDIO R OUT (audio signal output left/right) and twoaudio input jacks L AUDIO R (audio input left/right) on the back of the DVD Recorder.
These can be used to connect the following devices:•) A receiver with Dolby Surround Pro Logic•) A receiver with two?channel analog stereo
Can I use the 'Phono input' of my amplifier?
This amplifier jack (input) should only be used for record players withouta pre-amplifier. Do not use this input jack to connect the DVDrecorder.This could damage the DVD Recorder or the amplifier. ?
Connecting additional devices

21
Connecting audio devices to the digitalaudio jack
The rear of the DVD Recorder features a digital DIGITAL AUDIO OUT out jack for a coaxialcable.
It can be used to connect the following devices:•) an Audio/Video receiver or an Audio/Video amplifier with a digital multi?channelsound decoder•) a receiver with two?channel digital stereo (PCM)
Digital multi?channel sound
Digital multi-channel sound provides maximum sound quality.Consult the instruction manual of your receiver to find out which audioformats it supports. ?
aA loud distorted sound is coming from my speakers
b The receiver does not support the digital audio format of the DVDrecorder. The audio format of the inserted DVD is displayed in thedisplay panel when another language is switched on. Playback using6-channel digital surround sound is only possible when the receiverhas a digital multi-channel sound decoder.
Problem
EN
GL
ISH
Connecting additional devices

22
DInstalling your DVD recorder
Initial installation
After you have successfully connected the DVD Recorder and other devices to your TV (asdescribed in the previous chapter), this chapter will help you start the initial installation. TheDVD Recorder automatically seeks and stores all available TV channels.
Connecting additional devices
If you have connected additional devices (satellite receiver,...) via theantenna cable, switch them on now. The automatic channel search willrecognize them and save them.
No antenna connected
If you are only using the DVD Recorder as a playback device or youonly have a satellite receiver connected, you still need to perform theinitial installation. This is necessary so the basic settings can be savedcorrectly. After the initial installation is completed once, you can use theDVD Recorder normally. Tip
Initial Setup
Menu Language
EnglishEspañolFrançais
Press OK to continue
1 Select the desired language for the on-screen menu by pressingCH- B or CH+ A .
What is an on?screen menu?
The multi-language on-screen menu takes the mystery out of using yournew DVD recorder. All settings and/or functions are displayed on yourTV screen in one of the available languages (English, French, or Spanish). ?
2 Confirm with OK .
Initial Setup
Audio LanguageEnglishEspañolFrançaisPortuguêsItaliano
Press OK to continue
3 Select the desired audio language using CH- B or CH+ A .
What is the audio language?
The DVD audio will play in the selected language if it is available. If thislanguage is not available on the DVD, the audio will play in the firstlanguage on the DVD. The DVD disc menu will appear in the selectedlanguage if it is available on the disc. ?
4 Confirm with OK .
Initial Setup
Subtitle LanguageEnglishEspañolFrançaisPortuguêsItaliano
Press OK to continue
5 Select the desired language for the subtitles by pressingCH- B or CH+ A .
What is the language of the subtitles?
DVD subtitles will be in the selected language if it is available. If thislanguage is not available, subtitles will be in the first language on theDVD. ?
6 Confirm with OK .
Installing your DVD recorder
23
Initial Setup
TV Shape4:3 letterbox4:3 panscan16:9
Press OK to continue
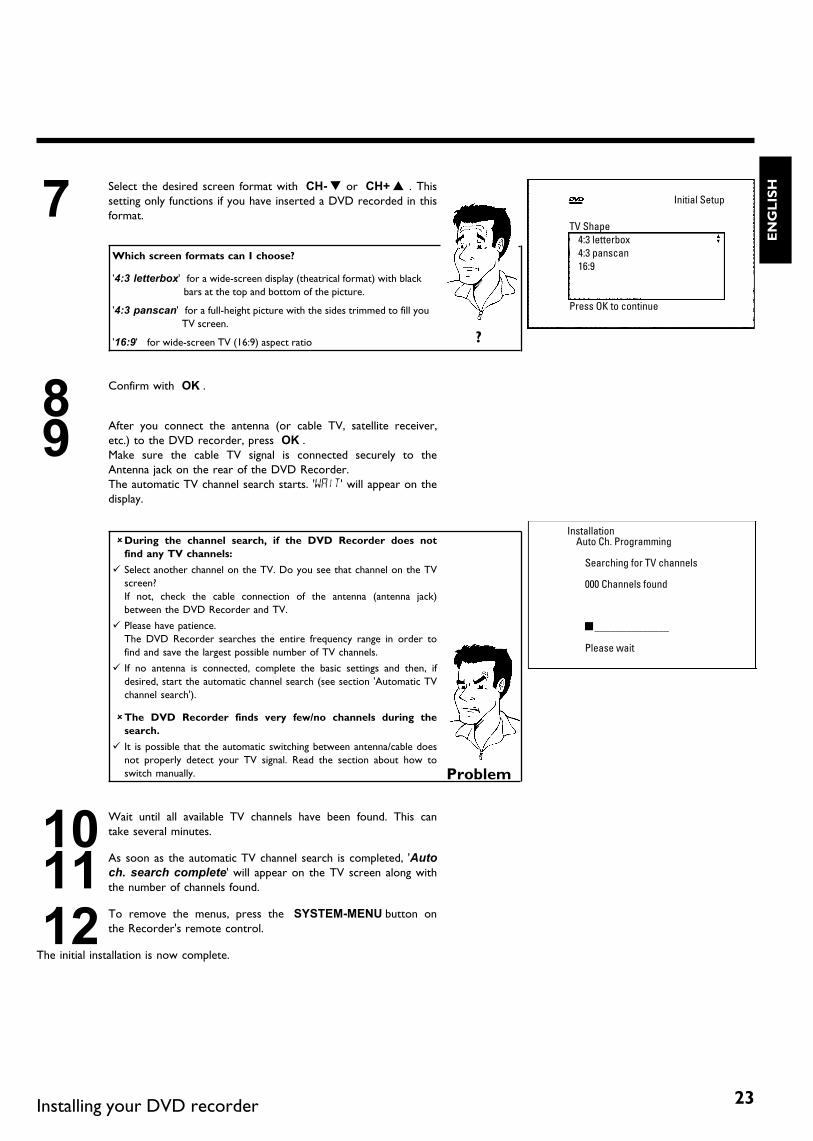
7 Select the desired screen format with CH- B or CH+ A . Thissetting only functions if you have inserted a DVD recorded in thisformat.
Which screen formats can I choose?
'4:3 letterbox' for a wide-screen display (theatrical format) with blackbars at the top and bottom of the picture.
'4:3 panscan' for a full-height picture with the sides trimmed to fill youTV screen.
'16:9' for wide-screen TV (16:9) aspect ratio ?
8 Confirm with OK .
9 After you connect the antenna (or cable TV, satellite receiver,etc.) to the DVD recorder, press OK .Make sure the cable TV signal is connected securely to theAntenna jack on the rear of the DVD Recorder.The automatic TV channel search starts. '����' will appear on thedisplay.
InstallationAuto Ch. Programming
Searching for TV channels
000 Channels found
h______________
Please wait
aDuring the channel search, if the DVD Recorder does notfind any TV channels:
b Select another channel on the TV. Do you see that channel on the TVscreen?If not, check the cable connection of the antenna (antenna jack)between the DVD Recorder and TV.
b Please have patience.The DVD Recorder searches the entire frequency range in order tofind and save the largest possible number of TV channels.
b If no antenna is connected, complete the basic settings and then, ifdesired, start the automatic channel search (see section 'Automatic TVchannel search').
aThe DVD Recorder finds very few/no channels during thesearch.
b It is possible that the automatic switching between antenna/cable doesnot properly detect your TV signal. Read the section about how toswitch manually. Problem
10 Wait until all available TV channels have been found. This cantake several minutes.
11 As soon as the automatic TV channel search is completed, 'Autoch. search complete' will appear on the TV screen along withthe number of channels found.
12 To remove the menus, press the SYSTEM-MENU button onthe Recorder's remote control.
The initial installation is now complete.
EN
GL
ISH
Installing your DVD recorder

24
Automatic TV channel search
During installation, all available TV channels are searched for and saved. If the channelassignments of your cable or satellite TV provider change or if you are reinstalling the DVDrecorder, e.g. after moving, you can start this procedure again. This will replace the TV channelsalready saved with the new ones.
1 Turn on your TV. Select the channel number for the DVDRecorder (channel 3 or 4 or the Audio/Video In channel).
2 Turn on the DVD Recorder by pressing STANDBY-ON m .
3 Press SYSTEM-MENU on the remote control. The menu barwill appear at the top of the TV screen.
4 Select 'A' using D or C .
5 Press CH- B continuously to select the line 'Installation'. (It ison the second screen of menus.) Confirm with C .
6 Select line 'Auto Ch. Programming' using CH- B orCH+ A .
7 Press C . The automatic TV channel search starts. This allowsthe DVD Recorder to save all available TV channels. Thisprocedure may take several minutes.
InstallationAuto Ch. Programming
Searching for TV channels
000 Channels found
h______________
Please wait
8 When the channel search is completed, 'Auto ch. searchcomplete' will appear on the TV screen.
9 Press SYSTEM-MENU repeatedly to remove all the menusfrom the screen.
aVery few TV channels were found
b During 'Automatic channel search' the DVD Recorder detectswhether an antenna or a cable TV signal is connected. If you haveconnected a cable TV signal but found very few TV channels, youmust search the channels manually.
1 To do so, select 'Cable/Antenna' instead of line 'Auto Ch.Programming' in step 6 and confirm with C .
2 If you select 'Cable', channels 1-125 will be available.If you select 'Anten.', channels 2-69 will be available.Select your type of connection by pressing C repeatedly:'Anten.', 'Cable' or 'Auto.' automatically detects which one youhave.
3 Confirm the setting with OK .4 Press SYSTEM-MENU to go to the next menu. Press OK to
start channel search as prompted by the on-screen message. Whenthe channel search is complete, press SYSTEM-MENU repeatedlyto remove all the menus. Problem
You can read about how to search for a TV channel manually in the following section 'Addingand clearing TV channels manually'.
Installing your DVD recorder

25
Adding and deleting TV channels manually
With this function you can delete/switch off TV channels on which reception is not possible.They will be skipped when the CH+ A and CH- B buttons are selected.
1 Turn on your TV. If required, select the TV's Audio/Video In (orchannel 3 or 4).
2 Press STANDBY m to turn on the DVD recorder. Press theSYSTEM-MENU button on the remote control. The menu barwill appear at the top of the screen.
3 Select 'A' using D or C .
4 Press CH- B repeatedly to select 'Installation' and then pressC .
5 Select line 'Add/Delete Channels' using CH- B orCH+ A the press C .
InstallationAdd/Delete Channels...
• Channel 001 AddChannel 002 AddChannel 003 DeleteChannel 004 DeleteChannel 005 DeleteChannel 006 Delete...
To exit pressSYSTEMMENU
6 Using CH- B or CH+ A select the TV channel that you wantto delete or add.
7 Press C or D to choose 'Add' or 'Delete'.
8 Repeat steps 6 to 7 until you have added/deleted all the TVchannels you want.
9 To save your channel selections, press OK .
10 To remove the menus, press SYSTEM-MENU repeatedly.E
NG
LIS
H
Installing your DVD recorder

26
Setting the language
You can select the language for subtitles and audio for DVD playback. Please observe that withsome DVDs, you can change the audio language and/or subtitle language only via the DVD discmenu.Moreover, when recording the sound of a TV channel, you can switch between stereo and anadditional language (SAP - Secondary Audio Program). See the following section on 'Switchingaudio recording (stereo, SAP)'.Plus, you have the option of setting one of the displayed languages for the recorder's on-screenmenu. However, the DVD Recorder will only display text in English, regardless of this setting.
1 Turn on your TV. If required, select the channel number for theDVD Recorder (channel 3 or 4).
2 Turn on the DVD Recorder by pressing STANDBY-ON m .
3 Press SYSTEM-MENU on the remote control. The menu barwill appear.
4 Select 'A' using D or C .
5 Select the line 'Language' using CH- B or CH+ A andconfirm with C .
LanguagePlayback audio EnglishRecording audio StereoSubtitle EnglishMenu English
6 Select the corresponding line and confirm with C .
Which settings can I choose?
'Playback audio' : The DVD will play back in the language you havechosen.
'Recording audio' : Type of audio recording 'Stereo' or 'SAP''Subtitle' : Subtitle language'Menu': Language of the OSD menu
Tip
7 Select the corresponding setting with CH- B or CH+ A andconfirm with OK .
8 To end, press SYSTEM-MENU .
Installing your DVD recorder

27
Switching audio recording (Stereo, SAP)Some TV programs broadcast additional audio (SAP - Secondary Audio Program). In most casesthis means an additional language is available. For example, if a program is available in English andSpanish, Spanish can be broadcast as the additional audio program (SAP).To record TV programs in stereo or SAP, you can select Stereo or SAP as the default setting.This setting does not become active until the sound of a TV program is transmitted in Stereo orSAP.When you playback the recording, you can playback the sound only in the setting you selectedfor recording (a recording in SAP can be played back only in SAP).
1 Switch on the TV. If required, select the channel number for theDVD Recorder (channel 3 or 4).
2 Turn on the DVD Recorder by pressing STANDBY-ON m .
3 Press SYSTEM-MENU on the remote control. The menu barwill appear.
4 Select 'A' using D or C .
LanguagePlayback audio EnglishRecording audio StereoSubtitle EnglishMenu English
5 Select the line 'Language' using CH- B or CH+ A andconfirm with C .
6 Select line 'Recording audio' and confirm with C .
7 Select 'Stereo' or 'SAP' using CH- B or CH+ A and confirmwith OK .
A TV program is only available in 'Stereo' but my setting is'SAP'?
If the setting for 'Recording audio' is 'SAP' but the TV channelbroadcasts only in stereo during recording, the recording will be done instereo. ?
8 To end, press SYSTEM-MENU .
EN
GL
ISH
Installing your DVD recorder

28
Assigning the VCR Plus+® Guide channelnumbers
If you intend to use the VCR Plus+® programming system, you must first assign Guide channelnumbers to the TV channels.
1 Press SYSTEM-MENU on the remote control. The menu barwill appear.
2 Select 'A' using D or C .
3 Select line 'Installation' using CH- B or CH+ A and confirmwith C .
4 Select the line 'VCR Plus+ Ch.' using CH- B or CH+ A andconfirm with C .
InstallationVCR Plus+ Ch.
VCR Plus+ Ch. Channel...
001 ---002 ---003 ---004 ---005 ---...
To exit pressSYSTEMMENU
5 Use CH- B or CH+ A to select the Guide channel numberyou want to assign to a TV channel.
6 Use D or C , or use the number buttons 0..9 to select the TVchannel corresponding to this Guide channel number. Anoverview of guide numbers/TV channels can be found in yourdaily newspaper or in your TV listings.
7 Confirm the allocation with OK .
8 To end, press SYSTEM-MENU .
Installing your DVD recorder

29
Setting the time/date automatically
This function uses the information sent via the local PBS channel to automatically set thetime/date. For this reason, you must enter the PBS channel that sends this additional information.When the DVD Recorder chooses a wrong PBS channel or the displayed time/date is wrong,you must manually set the date/time (see section 'Manually setting the time & date').
1 Press SYSTEM-MENU on the remote control. The menu barwill appear.
2 Select 'A' using D or C .
3 Select line 'Installation' using CH- B or CH+ A and confirmwith C .
4 Select line 'Time/Date' using CH- B or CH+ A and confirmwith C .
5 Select 'Automatic' with CH- B or CH+ A and confirm withC .
Time/DateAutomatic
PBS Channel Auto.Daylight Saving OffTime Zone Auto.
To exit pressSYSTEMMENU
6 Select the corresponding line with CH- B or CH+ A .
7 Select the channel which sends the time/date information in theline 'PBS Channel' and confirm with OK . The DVD Recorderwill check whether or not the information transfer is possible.
a 'Clock not set, check channel' will appear on the TV screen
b No time/date data can be received from this TV channel.Select a different channel or 'Auto.' in line 'PBS Channel'. Problem
8 Select one of the following settings in line 'Daylight Saving':'On': The time set corresponds to summer time (summer timeactivated)'Off': The time set corresponds to the winter time (summer timeis off)
9 In the line 'Time Zone', select your time zone if the PBS channelentered was for a different time zone. This is the only way to setthe time correctly, or, if necessary, to correct it.If you want to use the time zone of the PBS channel, select'Auto.'.
10 Confirm the changes with OK .
11 To end, press SYSTEM-MENU .
The time and date are automatically transferred from the selected 'PBS channel' after theRecorder is shut off.
EN
GL
ISH
Installing your DVD recorder

30
Manually setting the time & date
If the time is incorrect, this could be due to a weak or disrupted TV signal. If this is the case,switch off the automatic function.
1 Press SYSTEM-MENU on the remote control. The menu barwill appear.
2 Select 'A' using D or C .
3 Select line 'Installation' using CH- B or CH+ A and confirmwith C .
4 Select line 'Time/Date' using CH- B or CH+ A and confirmwith C .
5 Select 'Manual' with CH- B or CH+ A .
6 Confirm with OK .
Time/DateManual
Time 09:02AM/PM AMYear 2003Month 01Date 01Daylight Saving Off
To exit pressSYSTEMMENU
7 Change the time in line 'Time' using the number buttons 0..9 onyour remote control.
8 Check 'AM/PM', 'Year', 'Month', and 'Date' in the same way.To select between the fields, use CH- B or CH+ A .Change the information with D , C or the number buttons0..9 .
9 Select one of the following settings in line 'Daylight Saving':'On': The time set corresponds to the summer time (summertime is on)'Off': The time set corresponds to the winter time (summer timeis off)
10 When all settings are correct, confirm with OK .
11 To end, press SYSTEM-MENU .
If the setting has been confirmed with OK the automatic system is disabled.
Installing your DVD recorder

31
EInformation on the TV screen
You can check/change many functions and settings of your DVD Recorder via the system menubar. The menu bar cannot be displayed during recording.
Menu bar icons
The SYSTEM-MENU button is used to call up the menu bar (main menu) and to close it. TheD and C buttons are used to select the corresponding function. The CH- B button confirmsthe function and either leads you to an additional menu or executes the function.Depending on the disc inserted, some functions may not be available.
Menu bar 1
A User preferences
B Current Title/Track
C Current Chapter/Index
D Audio Language
E Subtitle Language
F Camera Angle
G Zoom
Menu bar 2While menu bar 1 is being displayed, you can press C repeatedly to display menu bar 2.
H Sound
I Picture by Picture
J Slow motion
K Fast motion
L Search with time entryE
NG
LIS
H
Information on the TV screen

32
Field for temporary messages
There is a field in the top left corner of the menu bar which displays temporary informationregarding different operating functions. This information appears briefly on the screen whencertain disc functions are activated.
Shuffle: Shuffle tracks
� Scan: Play introduction to each track
� Repeat entire disc
� Repeat current title
� Repeat current track
� Repeat current chapter
� Repeat A until end
� Repeat A to B
� Camera Angle
� Child lock on
� Resume
� Action prohibited
Status box
The status box displays the current status of the DVD Recorder and the type of disc inserted.This display can be turned off.
.
Disc type icons
M DVD+RW
W DVD+R
N DVD?Video
O Video?CD
P No disc
Q Disc error
Information on the TV screen

33
Disc status icons
R Recording
S Stop
T Playing
U Pause play
V Pause record
X Fast forward (x8)
Y Fast reverse (x8)
Z Slow motion
Tuner info box
This box appears in the bottom left corner of the TV screen. It displays the current antennasignal, the TV channel, and the channel name of the program you just selected.
a Current channel / selected device
b No SignalTV channel is not available or reception to too weak / Device is notconnected or is turned off
c Copy?protected signal
Timer info box
This box is located above the tuner info box. When a recording is programmed (timer), it showsthe time symbol and the start time or the date of the first programmed recording.When no timer is programmed, the current time will be displayed.This box is not displayed during disc playback or recording. However, you can access it duriongan OTR recording by pressing SYSTEM-MENU .
f Timer set for day shown or time shown (if set for today).
g OTR recording will run until displayed stop time
h Current timeNo recording (timer) programmed
EN
GL
ISH
Information on the TV screen

34
FPlayback
General information regarding playback
The DVD Recorder can be used with the following systems:•) DVD Video•) Video CD or Super Video CD•) DVD+RW•) DVD+R•) DVD-RW (video mode, finalized)•) DVD-R•) CD-R•) CD-RW•) Audio CD•) MP3-CDYou can operate the video Recorder using the remote control or the buttons on the front ofthe DVD recorder.
a '���' appears on the display.
b The child lock was activated for the inserted disc. Read 'Child lock'and 'Authorizing discs' in the 'Child lock' chapter.
a I see an 'X' in the menu bar on the screen.
b DVDs can be manufactured in such a way that certain operations arerequired or only specific functions are possible during playback. Whenthe 'X' symbol appears on the screen, the selected function is notavailable.
a I see region code information on the screen.
b Because DVD films are usually not released at the same time in allregions of the world, all DVD players are keyed to a specific regioncode. Discs can be assigned an optional region code. If the regioncodes of the player and disc do not coincide, playback is not possible.
b The region code for a DVD player can be found on a label at theback of the device.
b There are no region codes for DVD+Rs. Problem
Inserting a disc
������ ���1 Press the OPEN/CLOSE J button on the front of theRecorder. The disc tray will open. '������ ' will appear in thedisplay, then '��� ����' when the disc tray has already beenopened.
2 Carefully place the disc into the tray with the label facing up, thenpress PLAY G or OPEN/CLOSE J . '������ ' then'����� ' will appear on the display. This indicates that the discis being read.
How do I insert double?sided DVDs?
Double-sided DVDs do not have labels on either side. The label for eachside is placed in the middle (on the inner ring). To play a specific side,the label on the side you want to play must be on top. ?
Playback

35
Opening/Closing the tray using the remote control
You can also use the remote control to open and close the disc tray.To do this, hold down the STOP h button on the remote control until'������ ' (opens) or '������ ' (closes) appears in the display. Tip
3 Playback starts automatically.
A menu may appear during playback of a DVD. If the titles and chapters are numbered, press anumber button on the remote control. You can also select a menu item with D , C ,CH+ A , CH- B , or with the number buttons 0..9 and confirm with OK .You can also call up the menu any time by pressing DISC-MENU on the remote control.For more information, read section 'Playing a DVD video disc'.
When playing a DVD+RW, the Index Picture screen appears. Choose the title you want to playwith CH- B , CH+ A or N , O .Confirm with OK .For more information, read section 'Playing a DVD+RW or DVD+R'.
If playback does not start automatically, press PLAY G .For more information, read section 'Playing Audio CDs'.
If 'h' lights up in the display, begin replay with PLAY G .If a menu appears on the screen, select the corresponding menu item with the buttons of theremote control indicated on the screen (PREV= N , NEXT= O ) or with the remote controlbuttons 0..9 .For more information, read section 'Playback of a (Super) Video CD'.
Playing a DVD video disc
��� ���1 If playback does not start automatically, press PLAY G .The following will appear on the display:chapter, elapsed time.
2 To stop playback, press STOP h on the remote control orSTOP h on the DVD recorder.
3 To eject the disc, press OPEN/CLOSE J on the front of theDVD recorder.
EN
GL
ISH
Playback

36
Playing a DVD+RW or DVD+R
1 If the inserted disc has been write-protected or it is a finalizedDVD+R, playback starts automatically.
��� ���� ���2 If playback does not start automatically, select the title you wantto play from the index screen using CH- B or CH+ A .You can also use the N or O buttons on the front of therecorder.
3 Press the PLAY G button.The following will appear on the display:title/chapter number, elapsed time.
a I see the message '���������' on the display
b There are no recordings on this disc. Problem
4 To stop playback, press STOP h on the remote control orSTOP h on the DVD recorder.
5 To eject the disc, press OPEN/CLOSE J on the front of theDVD recorder.
What do I must pay attention to with regard to recordings thathave been recorded in different recording modes?
During playback, the device will automatically switch to the proper mode'M1, M2, M2x, M3, M4, M6, M8'.For more information, please read the section 'Selecting the recordingmode (picture quality)' in the chapter 'Manual recording'. ?
Playing audio CDs
You can also use the DVD Recorder to play audio CDs
1 Insert an audio CD. Playback starts automatically.
Audio CD display
If the TV is turned on, the Audio CD display will appear on the screen.
During playback, the number of the current track will be shown on thescreen and display. Tip
2 Stop playback with STOP h . Track number and total play timeare displayed.
Playback

37
Playing MP3 CDs
MP3 (MPEG1 Audio Layer-3) files are highly compressed pieces of music. Using this technologythe data volume can be compressed by a factor of 10. This enables you to fit up to 10 hours ofCD quality music on a single CD-ROM.
When creating MP3 CDs, keep the following in mind:Data system supported: ISO9660Directory structure: maximum of 8 levelsFormats: *.mp3File names: maximum of 12 characters (8+3)Maximum of 32 albums, 999 titlesSampling frequency supported: 32, 44.1, 48 (kHz). Music pieces with different frequencies will beskipped.Bit rate supported: 32, 64, 96, 128, 192, 256 (kbit/s)ID3 Tag: Version 1, 1.1. In the case of later versions, the directory name will appear as thealbum and the file name as the title.
Important information regarding playback:Only the first session of a multisession CD is played back.
1 Insert an MP3 CD. Playback starts automatically.
MP3 CD display
If the TV is turned on, the MP3 CD display will appear on the TVscreen.
During playback, the number of the current track will be shown on thescreen and display.During interrupted playback (using STOP h ), the album numbers willbe shown on the TV and on the display.
If available on the CD in a so-called ID tag, more information on album,track, and artist will appear on the display. Tip
2 Stop playback with STOP h . The number of albums appears onthe display.
Other playback functions
Select the previous or next track with N or O .
You can also use T/C to select tracks and albums.1 Press T/C and then select symbol 'T' for album or 'C' for track
with C or D .2 Select the number of the album/track with CH- B , CH+ A or
the number buttons 0..9 on the remote control.
You can also use repeat functions ( PLAY MODE ). Tip
EN
GL
ISH
Playback

38
Playback of a (Super) Video CD
(Super) Video CDs may feature 'PBC' (Play Back Control). This allows the direct selection ofspecial playback functions (menus). The Video CD must be PBC-compatible (see CD packaging).'PBC' is turned on by default.
1 Insert a (Super) Video CD.If the 'h' appears on the display, begin playback with PLAY G .
2 If a menu appears on the screen, select the corresponding menuitem with the buttons of the remote control indicated on thescreen (PREV= N , NEXT= O ) or with the remote controlbuttons 0..9 .If the PBC menu contains a title list, the desired title can bechosen directly.
3 The RETURN button will take you back to the previous menu.
4 Stop playback with STOP h .
Playback

39
GOther playback functions
Changing to a different chapter track/title
When a disc contains more than one track, title, or chapter, you can change to a different track,title or chapter as follows. However, if a title contains several chapters, these are selected. Titleselection is then possible via the menu bar only.
1 During playback, you can go to the next title/chapter/track usingthe O button. Using the N button, you can reach the startof the current title/chapter/track. By pressing the N buttontwice, you can return to the start or the previoustitle/chapter/track.
Using the T/C (title/chapter) button
1 Press the T/C (title/chapter) button and select the correspondingtitle with CH+ A or CH- B .Make sure that the 'T' (title) icon is selected in the menu bar.
2 You can also select a chapter within a title using the T/C button.Press T/C and select 'C' (chapter) using C .Then select the corresponding chapter with CH+ A or CH- B . Tip
Disc search
You can fast forward a disc at four or thirty two times normal playback speed. You can selectother speeds only via the menu bar (K).
1 During playback, hold down N (reverse) or O (forward) toswitch to the search function. You can switch between differentspeed modes using the N / O buttons.
2 To continue playback, press PLAY G twice at the desiredposition.
aNo sound
b During search the sound is turned off. This is not a defect of yourDVD recorder. Problem
EN
GL
ISH
Other playback functions

40
Search function via menu bar
1 During playback, press the SYSTEM-MENU button on the remotecontrol. The menu bar will appear at the top of the screen.
2 Select the 'K' symbol on the second menu bar using C orD and confirm with CH- B .
3 Now you can select different search speeds forwards or backwardsusing D or C .
4 If necessary, turn off the menu line with theSYSTEM-MENU button.
5 To continue playback, press PLAY G twice.Tip
Still picture
��� ���1 During playback, press PAUSE 9 to stop playback and display astill picture.
Still picture features via the menu bar
1 While playback is paused, press the SYSTEM-MENU button onthe remote control. The menu bar will appear at the top of thescreen.
2 Select 'I' in the second menu bar with C or D then pressCH- B .
3 You can now move the still picture forward or backward usingD or C .
4 If necessary, turn off the menu line with theSYSTEM-MENU button. Tip
2 To continue playback, press PLAY G .
Other playback functions

41
Slow motion
1 Press PAUSE 9 on the remote control during playback. Thenhold down N or O to switch to slow motion.
2 You can switch between the different speeds with N or O .
Slow motion via menu bar
1 During playback, press the PAUSE 9 button and then theSYSTEM-MENU button on the remote control. The menu barwill appear at the top of the screen.
2 Select 'J' with C or D and confirm with CH- B .3 You can now move forwards or backwards at different speeds using
D or C .4 If necessary, turn off the menu line with the
SYSTEM-MENU button. Tip
3 To continue playback, press PLAY G twice.
Search with time entry
Using this function, you can select where playback should start (elapsed time).
1 During playback, press the SYSTEM-MENU button on theremote control. The menu bar will appear at the top of thescreen.
2 Select 'L' with C or D and confirm with CH- B . Theplayback is stopped and the screen displays how much play timehas already elapsed.
3 Enter the desired start time for the playback using the numberbuttons 0..9 .
4 Confirm with OK .
aThe time that I entered is blinking on the screen
b The selected title is shorter than the time entered. Enter a new timeor cancel the function with SYSTEM-MENU . Problem
5 Playback will now start at the time you entered.
EN
GL
ISH
Other playback functions

42
Repeating/Shuffle
You can select an entire section or the entire disc for repeat playback. Depending on the disctype (DVD-Video, DVD+RW, Video-CDs), you can select chapters, titles or the entire disc.
1 Select the desired chapter, title or disc and start playback.
2 During playback, press PLAY MODE . By pressing PLAYMODE again, you can select from the following options:•) '�': Repeat chapter (DVD only)•) '�':Repeat track/title•) '�':Repeat entire disc (video CD, audio CD only)•) ' ':Shuffle•) No display:no repeat
3 To cancel the repeat, press STOP h .You can also keep pressing PLAY MODE until the displaysdisappear.
Repeat a specific segment A?BYou can repeat a specific segment within a title/chapter/track. To do this, you must mark thestart and end of the desired segment.
1 During playback, press the PAUSE 9 at the desired startingposition.You will see a still picture.
2 Keep pressing PLAY MODE until the '�' symbol appearson the TV screen. This will store the start point.Start playback with PLAY G .
3 At the desired stop point, press the OK button. '�' appearson the TV screen. Playback will now resume repeating theselected segment.
4 To cancel the repeat, press STOP h .You can also keep pressing PLAY MODE until the displaysdisappear.
Other playback functions

43
Scan function
Using this function, you can play the first 10 seconds of each chapter (DVD) or track (CD orVCD) on the disc.
1 During playback, press PLAY MODE repeatedly until '�'appears on the screen.
2 After 10 seconds, the DVD Recorder will switch to the nextchapter/track. To resume the playback at the correspondingchapter/track, press STOP h and then PLAY G .
Camera angle
If a disc contains video sequences that were recorded with different camera angles, you canselect different angles for playback.
1 During playback, press PAUSE 9 . You will see a still picture.
2 Press the SYSTEM-MENU button and select 'F' using C .
aThe 'F' icon cannot be selected.
b The selected scene was only recorded with one camera angle. Thisfunction is, therefore, not available. For more information, please readthe label of your DVD disc. Problem
3 Select the desired angle with CH- B or CH+ A . You can alsodirectly enter the number with the number buttons 0..9 .
4 After a short pause, playback will resume from the new angle.The 'F' icon will remain visible until a section starts that onlyhas one camera angle.
EN
GL
ISH
Other playback functions
44
Zoom function
Using this function, you can enlarge the video image and pan through the enlarged image.
1 During playback, press PAUSE 9 . The DVD Recorder switchesto 'PAUSE'. You will see a still picture.
2 Press the SYSTEM-MENU button and select 'G' using C .
3 Use CH- B or CH+ A to select the desired zoom factor.
4 As soon as 'press OK to pan' appears, the zoom process iscomplete.
5 Press OK . Use CH+ A , CH- B , C , and D to select anarea of the image that you want to look at more closely.
6 Confirm with OK .
7 To stop zooming, press PLAY G and then SYSTEM-MENU .
Changing audio language
Pre-recorded DVDs often come in different languages. The language used for playback is the onethat you selected during the initial installation of the Recorder or the default language of theDVD. However, you can change the audio language of a disc at any time.Please note that the audio language can be changed via the menu ( DISC-MENU button) of theinserted disc as well as with the AUDIO button. The audio languages for DVD playback in thetwo menus may be different. Some DVD's only allow you to change the language in the DVDmenu.
1 Press AUDIO during playback.
2 Use CH- B or CH+ A to select the desired audio language.You can also directly enter the number with the number buttons0..9 .
3 Playback will now resume with the new audio language.
Other playback functions

45
Subtitles
Pre-recorded DVDs sometimes come with different subtitle languages. The language used forplayback is the one that you selected during the initial installation or the default of the DVD.However, you can change the subtitle language of a disc at any time.Please note that the subtitle language can be changed via the menu ( DISC-MENU button) of theinserted disc as well as via the recorder's menu bar ( SYSTEM-MENU button). It is possible forthe subtitle languages of the two menus to be different.
1 Press the SYSTEM-MENU button during playback and select'E' using C .
2 Use CH- B or CH+ A to select the desired subtitle language.You can also directly enter the number with the number buttons0..9 .You can shut the subtitles off with number buttons 0 or byselecting 'off'.
3 Playback will now resume with the new subtitle language.
EN
GL
ISH
Other playback functions

46
HRecording
General information
What kind of discs can be used for recording?
You can used two different types of DVDs with this DVD recorder:DVD+RWThis disc can be recorded on and then erased.
DVD+RThis disc can only be recorded on once.For this DVD to be played in a DVD player, it must be finalized with'Finalize disc'. After this is done, no more recordings can be added tothis disc.If this disc is only to be played in the DVD recorder, then it does nothave to be finalized. Recordings can be added and then deleted.However, the location (playing time) of the deleted recording (title) willno longer be available.
?
With the 'Manual recording' function you can make a spontaneous recording (for example, aprogram currently being shown).To do this, select the title to be overwritten or choose an 'Empty title' in the 'index screen'with the CH- B , CH+ A buttons.If the recording is to be inserted between existing recordings, please note the length of the oldand new recording. If the new recording is too long, the recording (title/chapter) following it willbe overwritten.
Adding new recordings after the end of all recordings (SafeRecord)
To add a new recording after the last recording on a disc, press andhold the REC/OTR n button until '���� ��' appears in the display.
For DVD+R, each new recording is always placed after all previousrecordings since previous recordings cannot be overwritten.
End of disc is reached
If the end of a disc is reached during recording, recording will stop andthe Recorder will turn itself off automatically. Tip
If you want to start and stop a recording manually, read the section 'Recording withoutautomatic switch?off'.
Please refer to 'Recording with automatic switch?off', if you want to start a recording manuallyand conclude it within a specific amount of time. This permits accidentally recording to the end ofthe disc.
Recording

47
Recording without automatic switch?off
1 Switch on the TV and, if required, select the channel number forthe DVD Recorder (channel 3 or 4 or Audio In channel).
2 Insert a disc to be used for the recording. The system andcontent of the disc will be checked. '����� ' will appear on thedisplay.
a Index display
b A DVD+RW was inserted that already contains recordings. UseCH+ A and CH- B to select a location where the recording shouldbe started.
a '���������' appears in the display.
b The inserted DVD is empty.
aA dialog box appears asking if the contents should be erasedor the disc should be ejected.
b The inserted disc is a DVD+RW whose contents are not compatiblewith DVD Video (e.g. a data disc). This disc cannot be used forrecordings until the entire disc is erased using theREC/OTR n button.
a 'Title limit' appears on the screen when a recording isattempted.
b A disc can only contain a max. of 48 titles (including the empty titles).Erase the titles or change the disc. Problem
3 If necessary, switch to TV programming by pressing theMONITOR button on the remote.
4 Use CH+ A or CH- B to select the channel you want torecord. The following will appear on the display:
� �������� ���Channel number of the external inputs:
'���' SVHS jack (Y/C) S-VIDEO (Y/C) Video jack (CVBS) VIDEO(CVBS) , Audio jack L AUDIO R for SVHS-jack and Videojack.
Switching between jack S-VIDEO (Y/C) and VIDEO(CVBS) is done automatically.
'����' Component Video jacks on the back COMPONENT VIDEO YPB PR , Audio jacks AUDIO for Component Video
'����' SVHS-/Audio front jacks S-VIDEO / AUDIO left/right
'����' Video/Audio front jacks A/V VIDEO / AUDIO left/right
Switching between jack S-VIDEO and VIDEO is doneautomatically.
'���' Digital video (i.Link) front jack DV IN Tip
EN
GL
ISH
Recording

48
5 To start recording, press REC/OTR n on the remote controlor REC n on the DVD recorder.
To start the recording after all other recordings on the disc,press and hold the REC/OTR n button until '���� ��' appearsin the display.For DVD+Rs, each recording is always started after all previousrecordings since previous recordings cannot be overwritten.The display panel will appear similar to the example shownbelow.
��� ��� �!� ���Inserting chapter markers
During recording, scenes can be marked so they can be found or hiddenlater.During recording, press FSS at the start of the desired location.'Inserting marker' appears on the TV screen. In the display, thenumber of 'CHAPTERS' is increased by one.For more information about title/chapter, please read the section'Changing to a different chapter track/title' in the chapter 'Otherplayback functions'.
Tip
6 You can stop recording by pressing STOP h on the remote orSTOP h on the recorder. '���� ����' will appear on thedisplay. The DVD Recorder is preparing the list of contents. Waituntil this message disappears in the display, then the recording iscompleted.
a If display reads '���� �'
b The recording could not be completed correctly because of a discerror. Check and clean the inserted disc if necessary. Problem
Making recordings on DVD+R discs compatible
If you want to playback recordings on a DVD player, you must firstfinalize the disc in the DVD recorder. You can use the 'Finalizing'function on the DVD so that it can be read by the DVD player withoutproblem. Please read paragraph 'Finalizing DVD+R discs' in the chapter'Managing disc content'.
Tip
Recording

49
Pausing recording
1 During recording press PAUSE 9 , for example to avoidrecording the commercials.
2 To continue recording, press REC/OTR n .
Ending recording
To stop recording, press the STOP h button. Wait until '���� ����'disappears from the display before you try another feature. Tip
Recording with automatic switch?off(OTR one?touch?recording)
1 Insert a disc.
2 If necessary, switch to TV programming by pressing theMONITOR button on the remote.
3 Use CH+ A or CH- B to select the channel you want torecord.
4 Press REC/OTR n on the remote control.
5 Each time you press REC/OTR n you will add 30 minutes tothe recording time.
How can I delete the recording time I just entered?
To delete an entry, press CLEAR while the display shows the recordingtime.
How can I check the remaining recording time?
Press SYSTEM-MENU while an OTR is in progress. The time at whichthe recording will end will appear on the TV screen in the timer infobox. ?
EN
GL
ISH
Recording

50
Preventing accidental erasing of discs
You can lock the entire disc to prevent important recordings from being erased by accident. Youcan only lock the entire disc. It is not possible to lock individual recordings.
What happens with DVD+R discs?
As long as these discs have not been finalized, you can protect themagainst being overwritten just like DVD+RW. ?
1 Put the disc to be locked into the recorder.
2 While the Index Picture Screen is displayed, press STOP h onthe remote control. The first title is selected.
3 Press CH+ A . The disc information screen is displayed.
4 Press the C button.Select the 'Protection' line.Confirm with C .
5 Select 'Protected' using CH- B and confirm with OK .
6 Press D , then press DISC-MENU to play the disc.
The entire disc is now protected. If you attempt a recording,'���� ����' will appear on the display and 'Disc locked' willappear on the TV screen.
If you later decide to record on the disc, follow these steps but select'Unprotected' at step 5 . Tip
Recording

51
Lining up recordings within a title(assemble cut)
You can add further recordings to a title already contained on a DVD+RW. The new recordingwill be added to the title as a chapter. Previous information will be overwritten from thislocation onward. Depending on the length of the recording, this will also overwrite titles thatfollow the current title. The recording mode (quality) is automatically transferred from thecurrent title.To play back this recording, press SYSTEM-MENU and select 'C' (chapter) using C . You canalso use T/C .
For more information, read section 'Changing to a different chapter track/title' in chapter 'Otherplayback functions'.
What happens with DVD+Rs?
New recordings on DVD+R can only be made on existing space. Youcannot overwrite existing recordings on 'DVD+R' discs. ?
1 In the index display, find the title to which the new recording isto be added.
2 Look at the last minute of the old recording.
3 Press PAUSE 9 on the remote control at the location wherethe new recording is to start. '9' will appear on the screen.
4 If you want to monitor the recording, you can switch to theinternal tuner using the MONITOR button.
5 Now start recording as usual by pressing REC/OTR n on theremote control.The new recording is added.
6 Stop recording with STOP h .
EN
GL
ISH
Recording

52
Selecting the recording mode(picture quality)
By selecting a recording mode, you define the picture quality of recordings and the maximumrecording time for a disc.To check the quality of a recording mode you can make a 'test recording' with the desiredrecording mode. Check during playback the quality of this 'test recording'.For playback, the correct picture quality will automatically be selected.
1 Switch on the TV. If required, select the channel number for theDVD recorder (channel 3 or 4 or the Audio/Video In channel).
Select the record mode with the button REC MODE on theremote control.
Which recording modes can I choose?Please observe, that you can not switch the recording typeduring recording. You have to interrupt the recording with theSTOP h button.
'M1': High Quality offers the best picture quality with a total recordingtime of 1 hour.
'M2': Standard Play (pre-recorded DVD quality) offers excellent picturequality with a total recording time of 2 hours.
'M2x': Standard Play plus (better than S-VHS picture quality) offersexcellent picture quality with a total recording time of 2.5 hours.
'M3': Long Play (S-VHS picture quality). Total recording time of 3 hours.
'M4': Extended Play (better than VHS picture quality). Total recordingtime of 4 hours.
'M6': Super Long Play (VHS picture quality). Total recording time of 6hours.
'M8': Super Extended Play (VHS picture quality). Total recording time of8 hours.
Can I also change the recording mode via a menu?
1 Press the SYSTEM-MENU button.2 Select 'A' using D or C .3 Select line 'Record settings' using CH- B or CH+ A and
confirm with C .4 At 'Rec Mode,' select the recording mode using D or C .5 Confirm with OK and end with SYSTEM-MENU .6 If you select the 'M3', 'M4', 'M6' or 'M8' recording modes, you can
select the 'Stndrd' (standard) or 'Sport' (for quick movements)settings in the 'Filter mode' line. Tip
Recording

53
IManaging disc content
Charly 100:29:59 • M1Fr15/02/2003
Empty title01:30:01
General
When a recording is made on a disc, the following information is saved at the start of eachrecording:•) Name of the recordingIf no name is sent by the broadcaster, thenthe channel number (channel name) and time the recording started is saved as the name•) Length of recording•) Recording mode (quality)•) Date of the recording•) Recording index screen
If 'Auto chapters' is turned on in the 'Record settings' menu, a marking will be made every5-6 minutes. These markers are called chapter markers.These markers can be changed after the recording is complete.
Can markings also be made on DVD+Rs?
Markings can be made on these discs as long as they have not beenfinalized. ?
It is also possible to create additional chapter markings. This allows you to hide or skip thingsyou don't want to see (e.g. commercials). During playback you would then see your recordingwithout the hidden chapter as a complete sequence.
Select from the following chapters:
Read 'Favorite scene selection'to learn how to divide titles into chapters and how to managechapters.
Read 'Editing recording titles (name)'to learn how to change recording names.
Read 'Playing the entire title'to learn how to play the entire title, including hidden chapters.
Read 'Deleting recordings/titles'to learn how to erase the title.
Read 'Disc settings'to change general settings of the disc.
EN
GL
ISH
Managing disc content

54
Favorite Scene Selection
In this menu, you can adjust a title to your personal preferences.You can insert/delete chapter markers, hide chapters, select a new index screen, or split thetitle. Press FSS on the remote control during recording to open this menu.
Inserting chapter markerDuring playback, you can set and delete chapter markers within a title.Each disc can have a maximum of 124 chapters, and an individual Title can have up to 99chapters. When one of these values is reached, the following appears on the screen: 'Chapterlimit'. Some markers will need to be deleted in order to create new ones or to makerecordings.
1 During playback, press FSS on the remote control at theappropriate point. The 'Edit menu' menu will appear on thescreen.
Edit menu
Insert chapter marker Press OKDelete chapter markerDelete all markersCurrent chapter Visible
Press SELECT to togglePress FSS to exit
2 Press CH+ A or CH- B to select 'Insert chapter marker'then press OK . 'Inserting marker' appears on the TV screen.
'X' appears on the TV screen.
This DVD is protected or a finalized DVD-R was inserted. You cannotmake any changes to it. Tip
3 To remove the menu, press FSS .
Hiding chaptersInitially all chapters are visible. You can hide chapters for playback (e.g. commercial skipping) ormake them visible again. In editing mode, hidden chapters are displayed in dimmed mode. .A chapter always consists of a start marker and an end marker.To hide a certain scene, proceed as follows:
1 Search the beginning of the scene you want to hide. PressPAUSE 9 .
Edit menu
Insert chapter marker Press OKDelete chapter markerDelete all markersCurrent chapter Visible
Press SELECT to togglePress FSS to exit
2 Press FSS on the remote control to call the 'Edit menu'editing menu.
3 Set the start marker using OK .The number of chapters ('C') in the menu line will increase byone.
Managing disc content

55
4 Search for the end of the scene. You can also use O orN to search faster for the end of the scene.Make sure that you do not jump into the next title (title number'T' must not change). Only chapters within a title can be hidden.
5 Press PAUSE 9 at the corresponding position.
6 Set the end marker with OK . This will also be the start markerof the next chapter.The number of chapters ('C') in the menu line increases by one.
aThe number of chapters ('C') has increased by two or morenumbers
b This is the case when you want to hide a chapter that, due toautomatic chapter numbering (if switched on), stretches over two ormore chapters. In this case, you must delete the start of theautomatically generated chapter:
1 Press T/C twice while the editing menu is displayed to change thechapter number.
2 Select the chapter between the new markers using CH- B orCH+ A . Press PAUSE 9 .
3 Select 'Delete chapter marker' with CH- B to delete thecurrent chapter marker. Confirm with OK . The current chapternumber decreases by one. Problem
7 Press T/C twice to change the chapter number 'C'.
8 Select the previous chapter with CH- B , since you are alreadyin the next chapter (end of the chapter is also the beginning ofthe next chapter).
9 Wait until the chapter has been played and press PAUSE 9 tostop playback.
10 Select 'Current chapter' using CH- B or CH+ A .
11 Using C select 'hidden'. The picture is shown darker.
Switching quickly
You can switch between show chapters ('Visible') and hide chapters('hidden') quickly and easily using SELECT .This function is independent from the selected line. Tip
12 To end, press FSS .
During playback this chapter will be skipped.If the chapter is not visible, select 'Visible' in step 3 with C .
EN
GL
ISH
Managing disc content

56
Deleting chapter markersWithin a title, you can either delete individual chapter markers or all markers.
Edit menu
Insert chapter marker Press OKDelete chapter markerDelete all markersCurrent chapter Visible
Press SELECT to togglePress FSS to exit
1 During playback of the corresponding chapter, press FSS on theremote control. The 'Edit menu' menu will appear on thescreen.
How can I select other chapters?
1 Press T/C on the remote control. Titles and chapters will bedisplayed at the top of the screen.
2 Select the title (T) or chapter (C) with C or D .3 Select the title/chapter you want to edit with CH+ A or CH- B . Tip
2 Using CH- B , select either 'Delete chapter marker' for thischapter or 'Delete all markers' for all chapters of the selectedtitle.
3 Confirm with OK . (You will be prompted to press OK again tomake sure you really want to delete all markers. If you do notwant to, press the D button.)
4 To remove the menu, press FSS .
Changing the index pictureNormally, the first frame of a recording is shown as the title's index picture. You can, however,use any picture as an index picture.
1 During playback, find the location that you want to use as thenew index picture. Press the PAUSE 9 button to pause play.
Edit menu
New index picture Press OKNew backgroundDivide title
Press FSS to exit
2 Press the FSS button. The 'Edit menu' menu will appear onthe screen.
3 Select the line 'New index picture' and confirm with OK .
4 Start the action with OK . 'Updating menu' appears on the TVscreen.
When successfully completed, the DVD Recorder automatically brings you back to the indexpicture screen.
Managing disc content

57
Changing the menu backgroundYou can, however, use any picture as the menu background. This setting is stored on theinserted DVD. Please note that after the modification the 'original background' will be lost.If you erase the complete disc (close the disc tray with CLEAR and make a recording) the'original background' will be restored.
1 During playback, find the location that you want to use as thenew menu background. Press the PAUSE 9 button to pauseplay.
Edit menu
New index picture Press OKNew backgroundDivide title
Press FSS to exit
2 Press the FSS button. The 'Edit menu' menu will appear onthe screen.
3 Select the line 'New background' and confirm with OK .
4 Start the change with OK . 'Updating menu' appears on theTV screen.
When successfully completed, the DVD Recorder automatically brings you back to the indexpicture screen.
Splitting titlesA title can be split into several parts (titles) no matter how large. Each of these parts (titles) ischaracterized by its own index picture.Warning! Once a title is split, it cannot be reversed.
Can I also divide titles on DVD+Rs?
Because recordings on DVD+Rs cannot be overwritten, it is not possibleto divide titles. ?
Edit menu
New index picture Press OKNew backgroundDivide title
Press FSS to exit
1 Press FSS on the remote control during playback of thecorresponding title. The 'Edit menu' menu will appear on thescreen.
2 Select 'Divide title' and confirm with the OK button.
3 If you are certain, start the process with OK . 'Dividing title'will appear on the screen.
4 Wait until the new title is displayed with an index picture in theindex picture overview.
The process of splitting the title is now complete.
EN
GL
ISH
Managing disc content

58
Editing recording titles (name)
The channel number and time of the recording are stored as the name. The name of therecording can only be changed after the recording has been completed.
1 Press STOP h to stop playback if necessary.
Settings for title Charly 1
Name Charly 1Play full titleErase this title
2 Using CH+ A or CH- B , select the title you want to edit andconfirm with C . The menu for editing names will appear.
3 Select 'Name' using CH+ A or CH- B and confirm with C .
4 Using C or D , select the character position where theletter/number/symbol is to be changed or reentered.
5 Change the desired character using CH+ A or CH- B . Youcan switch between uppercase and lowercase letters with theSELECT button. You can re-delete a character with theCLEAR button.
6 Repeat steps 4 and 5 until you have made the desired changes.
7 Save the new name with OK . 'Storing name' appears on theTV screen for confirmation.
8 To end, press D .
Playing the entire title
If you have hidden certain chapters of a title, with this setting you can view the entire titleincluding the hidden chapters. Proceed as follows:
1 Press the STOP h button, or during playback pressDISC-MENU .
Settings for title Charly 1
Name Charly 1Play full title Press OKErase this title
2 Using CH+ A or CH- B select the title that you want to playback and confirm with C . The title editing menu will appear.
3 Select 'Play full title' using CH+ A or CH- B and confirmwith OK .
4 Playback starts automatically. The full title - including the hiddenchapters - is played.
Managing disc content

59
Deleting recordings/titles
You can delete specific recordings from a disc. Proceed as follows:
1 Press the STOP h button, or during playback pressDISC-MENU .
Settings for title Charly 1
Name Charly 1Play full titleErase this title Press OK
2 Use CH+ A or CH- B to select the title to be deleted andconfirm with C . The title editing menu will appear.
3 Select 'Erase this title' using CH+ A or CH- B and confirmwith OK . 'This will completely erase this title'. 'Press OKto confirm' will appear on the screen.
4 If you want to delete this title, confirm with OK . Otherwise,end by pressing D .
5 'Erasing title' will appear on the screen.
6 An 'Empty title' box will now appear at this location in theindex picture screen. New recordings can now be added at thislocation.If the deleted title was too short (less than one minute), no'Empty title' will appear at this point.
Can titles also be deleted on DVD+Rs?
Titles on DVD+R are only marked as deleted. 'Deleted title' appears onthe TV screen instead of 'Empty title.' During playback, the deleted titlewill be skipped. The location on the disc used for this title cannot bereused since the title has not been physically deleted. After a disc hasbeen finalized, no further changes can be made. ?
EN
GL
ISH
Managing disc content

60
Disc settings
Philips100:35:59 usedFr15/02/2003
Unlocked
NTSC
DVD playback
Edits
This display is located before the first title and contains general information about the inserteddisc.
You can:•) change the disc name•) protect or unprotect a disc•) finalize editing (make DVD compatible)•) finalizing DVD+Rs•) Erase DVD+RWs
To show this display, proceed as follows:
1 Press the STOP h button, or during playback pressDISC-MENU .
2 Select the first title with CH+ A or press STOP h .
3 Press the CH+ A button. The disc information screen willappear.
Changing disc name
1 Press C in the 'Disc info display'. The 'Settings for' menu willappear on the screen.
Settings for Philips1
Disc name Philips1Protection UnprotectedErase disc
2 Select the 'Disc name' line using CH+ A or CH- B andconfirm with C .
3 Using C or D select the position where theletter/number/symbol is to be changed/re-entered.
4 Change the desired character using CH+ A or CH- B . Youcan switch between uppercase and lowercase letters with theSELECT button. You can re-delete a character with theCLEAR button.
5 Repeat step 3 and step 4 until you have made the desiredchanges.
6 Save the new title with OK . 'Storing name' appears on the TVscreen for confirmation.
7 To end, press D .
Managing disc content

61
Finalize editingIf one or more titles have been edited, it is possible that another DVD Player will display theoriginal titles. You can prepare your disc so that a DVD player can play the edited version.
1 Press C in the 'Disc info display'. The 'Settings for' menu willappear on the screen.
2 Select the line 'Make edits compatible' using CH+ A orCH- B and confirm with OK .
aThe line 'Make edits compatible' does not appear
b Your disc is already compatible. It does not need to be converted.To end, press SYSTEM-MENU . Problem
3 'This will take...' will appear on the screen to show how longthis process will last.
4 To confirm, press OK . 'Working...' will appear on the screen. Abar moving from left to right will show the progress of theconversion.
Finalizing DVD+R discsThis function is necessary so that a DVD+R can be played in a DVD player. When this functionis completed, no further recordings or changes can be made to the disc.
1 Press C in the 'Disc info display'. The 'Settings for' menu willappear on the screen.
2 Select 'Finalize disc' using CH+ A or CH- B and confirmwith OK .
a 'Finalize disc' does not appear in the display.
b Either no DVD+R was inserted or the disc has already been finalized.To end, press SYSTEM-MENU .
aThe 'Settings for' menu does not appear
b If the disc was made on another DVD recorder, it is possible that thismenu cannot be opened. In this case, use the 'Finalize disc' functionin the 'A' menu, submenu 'Features'. Problem
3 'This will take...' will appear on the screen to show how longthis process will last.
4 To confirm, press OK . 'Working...' will appear on the screen. Abar moving from left to right will show the progress of theediting process.
EN
GL
ISH
Managing disc content

62
Erasing DVD+RWs
1 Press C in the 'Disc info display'. The 'Settings for' menu willappear on the screen.
Settings for Philips1
Disc name Philips1Protection UnprotectedErase disc Press OK
2 Select 'Erase disc' using CH+ A or CH- B and confirm withOK . 'This will erase all titles' Press OK to confirm'appears on the screen.
3 If you want to delete all titles, confirm with OK . Otherwise, endby pressing D .
4 'Erasing disc' will appear on the TV screen.
5 After the disc has been successfully erased, the index picturescreen will be empty.
If the disc is empty already, you cannot select 'Erase disc'. Tip
Managing disc content

63
JProgramming a recording (TIMER)
General
Use programmed recording (TIMER) to automatically start and stop a recording at a later date.The DVD Recorder will switch to the right channel and begin recording at the correct time.With this DVD recorder, you can pre-program up to 6 recordings within a period of one year.
To make a programmed recording, your DVD Recorder needs to know:* the date of the recording* the channel number of the TV channel* the start and stop time of the recording* the recording mode ('M1/M2/M2x/M3/M4/M6/M8')This information is saved in a TIMER block.Before you begin, make sure the clock is set. If the clock is not set, the 'Time/Date' menu willappear when you press the TIMER button.
Programming a recording with the 'VCRPlus+® system'
Thanks to this programming system, you no longer need to tediously enter the date, TV channel,start and end times. All the information needed for programming is contained in the PlusCodeprogramming number. This 8-digit PlusCode number is found in most TV listings for magazines.
1 Switch on the TV. Select the channel number for the DVDRecorder (channel 3 or 4 or the Audio/Video In channel).
2 With the Recorder on, press TIMER on the remote control.The programming method selected last is marked.
3 Select line 'VCR Plus+ system' using CH- B or CH+ A andconfirm with C .
4 Enter the entire PlusCode number. This number is up to 9 digitslong and can be found next to the start time of the TV programin your TV listings magazine.e.g.: 5-234-89 or 5 234 89Enter 523489 for the PlusCode number.If you make a mistake, you can clear the entry with CLEAR .
EN
GL
ISH
Programming a recording (TIMER)

64
TimerVCR Plus+ system
PlusCode number- - - - - - - - -
Mo-Fr/WeeklyPress SELECT
To storePress OK
Selecting daily/weekly recordings
Using SELECT , select from the following options:'Mo-Fr': Repeated daily recordings from Monday to Friday.'Weekly': Repeated weekly recordings (every week on the same day). Tip
5 Confirm with OK .
aThe following message appears on the screen: 'Please enterchannel number'
b The channel number of the TV channel has not yet been assigned tothe PlusCode number. Using C , D or the number buttons 0..9 onthe remote control, select the corresponding channel number (name)of the TV channel and confirm with OK .
aThe following message appears on the screen: 'PlusCodenumber wrong'
b The entered PlusCode number is incorrect. Repeat your entry orcancel using the SYSTEM-MENU button.
b Check the time/date (see 'Setting the time & date' in 'Installing yourDVD recorder').
aThe following message appears on the screen: 'Date does notmatch Mon-Fri'
b A daily recording was entered for the wrong day. Daily programmingcan only be used for recordings to be made from Monday to Friday. Problem
TimerVCR Plus+ system
Date01/22
Ch.001
Start08:30AM
End10:30AM
RecModeM1
To storePress OK
AM/PMPress SELECT
6 The decoded data appears after confirmation. You can go backand change the data. Select the appropriate input field with C orD . Change the information with CH+ A , CH- B or thenumber buttons 0..9 .
Change 'AM/PM'
Use the SELECT button to select 'AM' or 'PM' in the input fields'Start' and 'End'.
Changing the recording mode
Select 'RecMode' using C .Using CH- B , select the recording mode 'M1, M2, M2x, M3, M4, M6',M8'. Tip
7 If all information is correct, press the OK button. Theinformation is stored in a TIMER block.
Programming a recording (TIMER)

65
8 To end, press TIMER .
9 Insert a recordable disc in the Recorder.The disc is checked.
10 Locate on the disc the position where you want to start therecording.
11 Switch the Recorder off with STANDBY m .The programmed recording will only function properly when theDVD Recorder has been switched off using theSTANDBY m button.
If any of the TIMER blocks are in use, 'TIMER' will light up on the display.
EN
GL
ISH
Programming a recording (TIMER)

66
Programming a recording without theVCR Plus+® system
1 Switch on the TV. Select the channel number for the DVDRecorder (channel 3 or 4 or the Audio/Video In channel).
2 With the Recorder on, press TIMER on the remote control.The programming method selected last is marked.
TimerTimer Programming
Date01/22
Ch.01
Start08:30AM
End10:30AM
RecModeM1
Mo-Fr/WeeklyPress SELECT
To storePress OK
3 Select line 'Timer Programming' using CH- B or CH+ A andconfirm with C .The information will be displayed.
4 Select the entry field with D or C .
5 Enter information with CH- B , CH+ A or the number buttons0..9 .In the entry field 'Date', you first enter the month and then thedate.
Selecting daily/weekly recordings
In 'Date' use SELECT to select from the following options:'Mo-Fr': Repeated daily recordings from Monday to Friday'Mo': Repeated weekly recordings (every week on the same day, e.g.Monday).
Change 'AM/PM'
Use the SELECT button to select 'AM' or 'PM' in the input fields'Start' and 'End'.
Changing the recording quality
Select the 'RecMode' input field using C .Use CH- B , CH+ A to select the recording mode. Tip
6 If all information is correct, press the OK button. Theinformation is stored in a TIMER block.
7 To end, press TIMER .
The disk you have inserted will be checked.
8 Search the position on the disc where the recording should begin.
9 Switch off with STANDBY m .The programmed recording will only function properly when theDVD Recorder has been switched off using theSTANDBY m button.
If any of the TIMER blocks are in use, 'TIMER' will light up on the display.
Programming a recording (TIMER)

67
How to change or delete a programmedrecording (TIMER)
1 Switch on the TV. If required, select the channel number for theDVD Recorder (channel 3 or 4).
2 With the Recorder on, press TIMER on the remote control.The programming method selected last is marked.
3 Select 'Timer List' using CH- B or CH+ A and confirm withC .
TimerTimer List
Date01/22--/--
Ch.01-----
Start04:25PM--:--
End06:05PM--:--
RecModeM2---
Total record time: 01:40
To changePress ›
To exitPress TIMER
4 Select the programmed recording (TIMER) you want to check,change, or delete with CH- B or CH+ A .
Delete programmed recording
1 Press the CLEAR button.2 Confirm with OK . 'Timer Cleared' will briefly appear on the TV
screen.'--' appears rather than the displayed values
3 To end, press TIMER . Tip
5 Press C .Select the entry field with D or C .If required, change the information with CH+ A , CH- B orthe number buttons 0..9 .
6 In 'Date', you first enter the month and then the date.
7 Confirm with OK .
8 To end, press TIMER .
9 Switch off with STANDBY m .
EN
GL
ISH
Programming a recording (TIMER)

68
Problem solving for programmedrecordings
PROBLEM SOLUTION
DVD Recorder does notrespond
bWhile a programmed recording is being made, you cannot operate your DVD Recordermanually. If you want to cancel the programmed recording, press STANDBY m .
'Switch off, timer recording'flashes on the TV screen.
bThe DVD Recorder was switched on a few minutes before the start of a programmedrecording.Turn off the DVD Recorder by pressing STANDBY m . A programmed recording (timer)will only function if the DVD Recorder is switched off (button STANDBY m ).
Error message: 'Insertrecordable disc'
bEither no disc was inserted or a disc was inserted that cannot be used for recordings. Insert adisc that can be recorded upon.Locate on the disc the right position for the recording.Turn off the DVD Recorder by pressing STANDBY m .
The error message 'Disclocked' appears briefly onthe screen.
bA protected disc was inserted. Undo the erase protection (chapter 'Manual recording', section'Preventing accidental erasing of discs '), or insert a different disc.
Error message: 'Memoryfull'
bIf this error message appears after pressing TIMER , then all TIMER blocks are alreadyprogrammed. No more recordings can be programmed. Press the C button. Select theprogrammed recording (TIMER block) you want to check or clear using CH+ A or CH- B .
The 'Data error' messageappears on the screen.
bThe data for the recording could not be transferred. Please check date, start time, and endtime of the programmed recording.
The message 'Collision'appears on the screen.
bThe timer recording overlaps with another timer recording.bIf you ignore this warning, the programmed recording with the early start time will start first.
The second recording will then lack the beginning.bChange the information for one of the two recordings.bDelete one of the two recordings.
Programming a recording (TIMER)

69
KUser preferences
This section explains how to customize the DVD Recorder to your preferences. These iconsindicate the following:
- Picture settings
. Sound settings
/ Language settings
0 Additional settings
1 Remote control settingsControl the DVD Recorder using the remote control of your Philips TVset
2 Disc settings
3 Recording settings
4 Installation
1 Switch on the TV. If required, select the channel number for theDVD Recorder (channel 3 or 4 or Audio/Video In channel).
2 Press SYSTEM-MENU on the remote control. The menu barwill appear at the top of the TV screen.
3 Select 'A' with D or C and confirm with CH- B .
4 Select the corresponding function with CH- B or CH+ A andconfirm with C .
5 Select the corresponding line with CH- B or CH+ A andconfirm with the C button. Choose an item you want to adjust,using the instructions provided on the following pages.
6 Select the corresponding function with CH- B or CH+ A , orselect the setting with D or C . Choose an item you want toadjust, using the instructions provided on the following pages.
7 Confirm the new setting by pressing OK .
8 To close the menu item, press D .
EN
GL
ISH
User preferences

70
Picture settings
You can select the following functions in this menu:
PictureTV shape 16:9Black level shift OffVideo shift ïComponent video output Interlaced
'TV shape'The picture signal can be adjusted to fit your TV:
'4:3 letterbox': for a 'wide-screen' display with black bars on the top and bottom'4:3 panscan': for a full-height picture with the sides trimmed'16:9' : for wide-screen TV (frame ratio 16:9)
'Black level shift'Adapts the color dynamic for NTSC playback when set to 'On'.
'Video shift'This allows you to move the picture left or right using the D , C buttons in order to adjustthe picture to your TV screen.
'Component video output'This allows you to switch the Component Video signal between 'Interlaced' and 'ProgressiveScan.'Warning If your TV has separate connections for 'Interlaced' and 'Progressive Scan' or it doesnot switch automatically between the two, it is possible that no picture will appear on the TVafter it is switched from one to the other.
1 Select the setting you need with SELECT . Choose ProgressiveScan only if your TV has Progressive Scan.
2 Confirm with OK .
aNo picture appears on the TV after switching
Check the display of your DVD recorder.'PRO': 'Progressive Scan' is onNo display: 'Interlaced' is on. Switch your TV to the correspondinginput jack or select the corresponding connection. You can alsoswitch the Component video output signal as follows:
1 Disconnect the recorder's power cord.
2 Hold down N on the DVD Recorder while reconnecting thepower cord. 'PRO' (progressive scan) appears on the display.
3 If you want to switch back, repeat steps 1 and 2 . 'PRO' disappearsfrom the display. The DVD Recorder is switched to 'Interlaced.'
Problem
User preferences

71
Sound settings
Depending on the audio outputs being used, this menu provides you with a selection of settings.If you are only using the analog audio outputs (red and white L AUDIO R OUT , AUDIOOUT jacks), select 'Off' in the 'Digital output' menu.
SoundDigital output AllAnalog output StereoNight mode Off
'Digital output'You can select one of the following settings for devices that are connected to the DIGITALAUDIO OUT jack:
'All' : Dolby Digital and DTS signals are going out unchanged to the digital output. MPEG-2multi-channel signals are converted to PCM (Pulse Code Modulation).Use receivers/amplifiers with a digital multi?channel sound decoder.
'PCM only' : Dolby Digital and MPEG-2 multi-channel signals are converted to PCM (Pulse CodeModulation).For receivers/amplifiers without a digital multi?channel sound decoder.
'Off' : digital output is off.For devices with an analog audio input.
'Analog output'You can select from the following settings for devices connected to the analog outputs ( LAUDIO R OUT , AUDIO OUT ).
'Stereo' : For devices that use neither DolbySurround nor TruSurround. Only use this settingwhen the DVD Recorder is connected to a stereo TV.
'Surround' : Dolby Digital and MPEG-2 multi-channel are mixed to a Dolby Surround-compatibletwo-channel output signal.For devices with a Dolby Surround / Pro Logic decoder .
'Night mode'Night mode optimizes the sound dynamics at low volume. This causes less disturbance in quietenvironments. This setting only functions with Dolby Digital Audio on DVDs.
EN
GL
ISH
User preferences

72
Language settings
You can select the following settings in this menu:
LanguagePlayback audio EnglishRecording audio StereoSubtitle EnglishMenu English
'Playback audio'Audio language of DVDs
'Recording audio'Audio recording
'Subtitle'Subtitle language
'Menu'Screen menu language
Additional settings
You can select the following functions in this menu:
FeaturesStatus box OnStandby NormalDisplay Bright
'Status box'Along with the on screen menu, the OSD (On Screen Display) also displays the currentoperating status on the TV screen (counter, playback, recording, TV channel,...).You can switch off the information about the operating status so as to avoid recording thisinformation when making recordings.
'On': The OSD information appears with every selected mode for a few seconds, then disappearsagain.
'Off': The OSD information is switched off. It can no longer be displayed on the screen.
User preferences

73
'Standby'To save energy, you can switch off the clock display on the DVD recorder. Programmed(TIMER) recordings will still take place.Moreover, you can present the most important features of the DVD Recorder in scrolling textin the display (demo).
'Low power': If the DVD Recorder is switched off using STANDBY m , the clock display is notvisible.
'Normal': If the DVD Recorder is switched off using STANDBY m , the clock display is visible.
'Demo mode': If the DVD Recorder is switched off with the STANDBY m button, a list of themost important features is shown in the display.
'Display'You can change the brightness of the display on the DVD recorder. This setting only affects theDVD Recorder when it is switched on.
'Bright': The display appears with normal brightness.
'Dimmed': The display appears less bright.
'Off': The display is switched off.
Remote control settings
In this menu you can set the remote control type to which your DVD Recorder should respond:
'DVD player': The DVD Recorder also responds to a DVD player remote control (remotecontrol code RC-6).Choose this setting if your Philips TV remote supports DVD functions.
'DVD recorder': The DVD Recorder only responds to the supplied remote control.E
NG
LIS
H
User preferences

74
Disc feature menu
In this menu you can make changes that relate to the disc:
Access control Enter code…Auto resume On
'Access control'Please read the next chapter on 'Access control (child lock)'.
'Auto resume'If playback of a pre-recorded DVD or VCD is interrupted ( STOP h or OPEN/CLOSE J ),playback will be restarted at the exact location when the disc is reinserted. This function doesnot only apply to the current disc but also to the last 20 discs you played.
If desired, this function can be turned off.
'PBC'This line only appears when a VCD has been inserted.This function is used to activate or deactivate the PBC menu (playback control) of Video CDs.For more information, please see the chapter on 'Playback', 'Playback of a (Super) Video CD'.
'Finalize disc'This feature allows you to finalize DVD+R discs. If the disc has already been finalized this linewill appear darker.
'Adapt disc format'If a DVD+RW has been recorded in a computer drive or in another DVD recorder, the indexscreen may not be displayed correctly.This feature allows you to change the format of the disc.This function is therefore only visible if the disc format is different.
User preferences

75
LAccess control (Child lock)
Child lock (DVD and VCD)
This function can prevent children from viewing discs.When in use, a four-digit code (PIN) must be entered in order to play a disc.In addition, you can set a disc to be played 'always' or 'once' despite the child lock.
•)'Play always':This disc has been placed in a list that fits 50 such 'child safe discs'. When more than 50 discshave been added to the list, the oldest disc is removed to make room for the new one. 'Childsafe' will appear on the screen at the start of playback.
•)'Play once':This disc can be played only once. The PIN must be reentered the next time you try to play thedisc.
Activating/Deactivating the child lock
1 Switch on the TV. If required, select the channel number for theDVD Recorder (channel 3 or 4 or the Audio/Video In channel).
2 Turn on the DVD Recorder by pressing STANDBY-ON m .
3 Press SYSTEM-MENU . The menu bar will appear at the top ofthe screen.
4 Select 'A' using D or C .
5 Select line '2(Disc features)' using CH- B or CH+ A andconfirm with C .
Access control Enter code…Auto resume On
6 'Access control' will bne selected. Press C .
7 Press the number buttons to enter a four-digit code of yourchoice. If this is you first time entering your code, you mustenter this code a second time to confirm it.
8 Select 'Child lock' using CH+ A or CH- B and press C .
9 Select '5' using CH- B or CH+ A .
10 Confirm with OK .
11 To end, press D and SYSTEM-MENU .
If you activated Child Lock, you will need to enter the four-digit PIN in order to play lockeddiscs. To deactivate the child lock, select the '6' icon in 9 .
EN
GL
ISH
Access control (Child lock)

76
Authorizing discs
1 Insert the disc. After a short check, the access control menu willappear on the screen.
2 Using CH+ A or CH- B , select 'Play once' or 'Playalways.'
3 Use the number buttons 0..9 to enter your PIN.
Double-sided DVDs can have a unique ID number for each side. To completely authorize thesediscs, you must authorize each side separately. 'Multi-volume' VCDs can also have a unique IDnumber for each volume. To authorize the complete set, each volume must be authorizedseparately.
Locking authorized discsProceed as follows to lock an authorized disc.
1 Insert the disc. Playback starts automatically. If playback does notstart automatically, press PLAY G .
2 Press STOP h while the icon '7' is being displayed. Theicon will change to '�'. This disc is now locked for furtheruse.
Parental control (DVD video only)
Movies on DVDs may contain scenes which are not suitable for children. DVDs sometimes comewith rating information for the entire DVD or only for certain scenes.Affected scenes are rated from 1 to 8. If a scene with such a rating is recognized duringplayback, the DVD Recorder compares the Parental control rating with that of the DVD scene.If the scene rating exceeds the Parental control rating, an alternative scene will be played back (ifavailable).Most DVDs apply the rating to an entire DVD. Therefore, if certain scenes exceed the ratingyou select, the entire disc will be blocked from viewing.
Access control (Child lock)

77
Activating/Deactivating the parentalcontrol
1 Switch on the TV. If required, select the channel number for theDVD Recorder (channel 3 or 4 or the Audio/Video In channel).
2 Turn on the DVD Recorder by pressing STANDBY-ON m .
3 Press SYSTEM-MENU . The menu bar will appear on the topof the TV screen.
4 Select 'A' using D or C .
5 Select line '2(Disc features)' using CH- B or CH+ A andconfirm with C .
Access control Enter code…Auto resume On
6 Confirm the line 'Access control' by pressing C .
7 Enter a four-digit code of your choice. If you are entering thecode for the first time, you must enter it again to confirm.
8 Select 'Parental level' with CH+ A or CH- B and confirmwith C . A bar appears for selecting the parental control level.
9 Select the corresponding parental level using CH- B ,CH+ A or the number buttons 0..9 .
What do the parental levels mean?
Rating 0 (displayed as '--') parental control is not active.Rating 1 (childsafe)Rating 8 (for adults only)
What happens when a DVD scene with a higher rating thanauthorized is played?
If the Recorder cannot find a suitable alternative, playback is stoppeduntil the four-digit code is entered. Tip
10 Confirm with OK . To end, press repeatedly D and thenSYSTEM-MENU .
EN
GL
ISH
Access control (Child lock)

78
Changing the countryThe Parental control levels depend on the country in which the DVD was manufactured.Therefore, it is necessary that you enter the country for which these filter values apply.
1 Switch on the TV. If required, select the channel number for theDVD Recorder (channel 3 or 4 or the Audio/Video In channel).
2 Turn on the DVD Recorder by pressing STANDBY-ON m .
3 Press SYSTEM-MENU . The menu bar will appear.
4 Select 'A' using D or C .
5 Select line '2(Disc features)' using CH- B or CH+ A andconfirm with C .
Access control Enter code…Auto resume On
6 Confirm the line 'Access control' by pressing C .
7 Press the number buttons to enter a four-digit code of yourchoice. If this is you first time entering your code, you mustenter this code a second time to confirm it.
8 Select 'Change country' using CH+ A or CH- B and confirmwith C .
9 Select your country or that of the DVD using CH+ A orCH- B and confirm with OK .
10 To end, press D and then SYSTEM-MENU .
Access control (Child lock)

79
Changing the PIN
1 Switch on the TV. If required, select the channel number for theDVD Recorder (channel 3 or 4 or the Audio/Video In channel).
2 Turn on the DVD Recorder by pressing STANDBY-ON m .
3 Press SYSTEM-MENU . The menu bar will appear.
4 Select 'A' using D or C .
5 Select line '2(Disc features)' using CH- B or CH+ A andconfirm with C .
Access control Enter code…Auto resume On
6 Confirm the line 'Access control' by pressing C .
7 Press the number buttons to enter your four-digit code. If this isyou first time entering your code, you must enter this code asecond time to confirm it.
8 Select the line 'Change code' using CH+ A or CH- B andconfirm with C .
9 Enter the new code with the number buttons 0..9 . Re-enter thecode for confirmation.
10 To end, press D and SYSTEM-MENU .
I forgot my code.
When it asks for the code (step 7 ), press the STOP h button fourtimes and then press OK . The code entry is now deactivated. You cannow enter a new code as described above. Tip
EN
GL
ISH
Access control (Child lock)

80
MBefore you call technical support
If you have any problems using this DVD recorder, it may be caused by one of the followingreasons. You can also call the customer service center in your country.The telephone numbers can be found in the back of this instruction manual.You can also visit our web page 'http://www.p4c.philips.com' .Have the model number (MODEL NO) and the production number (PROD.NO) ready.The serial number (PROD. NO.) is printed on the type plate fixed at the rear of the set.
PROBLEM SOLUTION
Your DVD Recorder doesnot respond to any buttonbeing pressed, and '�� ��
���' appears in the display:
bDevice is in initial installation mode: Switch on the TV, switch over to the DVD Recorder jackor, if you have only connected the DVD Recorder to an antenna cable, select channel 3 or 4on the TV.Now the menu for language selection should appear. Read paragraph 'Initial Installation' in'Installing your DVD Recorder'.
The device does not reactto the touch of a button,the remote control isworking:
b'Dealer Mode' is on: All buttons at the front of the DVD Recorder are locked.To switch off this function:
1 Disconnect the DVD Recorder from the power outlet.
2 Press and hold down STOP h and OPEN/CLOSE J and re-connect theRecorder to the power supply.
3 As soon as the time or '--:--' appears in the display (6 - 10 seconds), releaseSTOP h and OPEN/CLOSE J .
Your DVD Recorder doesnot respond to any buttonbeing pressed.
bThere is no power. Check the power supply.bA programmed recording (TIMER) is currently being made: If desired, cancel the programmed
recording (Timer) with STANDBY m .bThere is a technical problem: Disconnect from the power outlet for 30 seconds, then connect
again.If this doesn't help, reset your DVD Recorder to the default factory settings.
Resetting the DVDRecorder to default factorysettings
bWarning:All the information stored in the memory (programs, time, TIMER) will be reset (deleted).
1 Disconnect the DVD Recorder from the power outlet.
2 Press and hold down the STANDBY-ON m button on the front of the Recorderwhile reconnecting to the power outlet.
3 Release STANDBY-ON m when '�� �� ���' appears in the display. All theinformation stored in the memory (programs, time, TIMER) will be reset (cleared).
Read paragraph 'Initial Installation' in 'Installing your DVD Recorder'.
Remote control does notwork:
bRemote control is not pointing at the device: Point the remote control at the DVD recorder.See if the 'o(((' appears on the display briefly each time you press a remote control button. Ifit does, the Recorder is receiving information from the remote correctly.
bThere is a technical problem: Take out the batteries, wait for 10 seconds, and then re-insertthem.
bBatteries are weak: Replace the batteries.
Before you call technical support

81
PROBLEM SOLUTION
No playback on DVDrecorder:
bThere is no recording on the disc: Change disc.bYou inserted the wrong disc type: Your Recorder can play the following disc types: DVD
Video, (Super)Video-CD, DVD+R(W), Audio-CD, , MP3-CDsbYou inserted the disc the wrong way: Insert the disc with the label facing up.bThe disc is dirty. Clean the disc.bWrong region code: The region code of the DVD and the DVD Recorder must match.bThe child lock is on. Read chapter 'Access Control (Child Lock)'bYou have selected or set the wrong channel number on the TV for the DVD recorder: Select
the correct channel number on the TV (channel 3 or 4).bThe cable connecting the TV and the DVD Recorder may be loose. Check the cable.
I cannot playback (Super)Video CDs
bIt is possible that this (Super) Video CD contains a menu and the 'PBC' is switched off. Youcan see this in status field 'PBC OFF'. To activate this function, proceed as follows:
1 Press SYSTEM-MENU while the (Super) Video-CD is inserted.
2 Select 'A' using D or C .
3 Select line 'Features' using CH- B or CH+ A and confirm with C .
4 Select 'On' in line 'PBC' using CH- B or CH+ A .
5 Confirm with OK and end with SYSTEM-MENU .
Poor playback on DVDRecorder (distortedpicture/distorted sound)
bYour TV is not properly adjusted.bThe disc is dirty: Clean the disc.bSometimes the picture may be temporarily distorted. This is not a defect of your DVD
recorder.
No recording possible. bThe TV channel you want to record is not stored or you selected the wrong programnumber: Check TV channels stored.
bDisc is write-protected (cannot be recorded on): Remove write-protection or change the disc.For more information, please see 'Preventing accidental erasing of discs' on the 'ManualRecording'.
bA finalized DVD+R has been inserted. Change disc.
Programmed recordingdoes not work:
bYou have set the wrong time or date: Check time/date.bYou have not set the TIMER properly: Check the programmed recordings (TIMER block).bA locked disc was inserted: Remove disc lock.bA finalized DVD+R has been inserted. Change disc.
The wrong TV channel wasdecoded (recorded) afteryou programmed arecording using the VCRPlus+ system.
1 Enter the PlusCode programming number of the desired TV channel.
2 Confirm with OK .
3 Check the channel number in the 'Ch.' input field
4 If this does not correspond to the desired TV channel, select this entry field andchange the channel number.
5 Confirm with OK .
There is picture or soundinterference with the TVreception.
bBefore recording, select the recording mode as described in chapter 'Manual Recording',section 'Selecting the recording mode (quality)'.
bChange the modulator channel. During standby hold on the remote the button 3 pressed toswitch to channel 3. With button 4 you switch to channel 4.
bHave your antenna or cable TV signal checked.
Distorted sound comingfrom a connected hi?fiamplifier
bThe DVD Recorder is connected to the 'Phono-input' of your amplifier: This input jack isprovided only for record players without a preamplifier. Connect to a different audio input.
EN
GL
ISH
Before you call technical support

82
PROBLEM SOLUTION
The picture is distorted orblack?and?white duringplayback.
bThe TV system of the disc does not match that of your TV (PAL/NTSC).bThe recording can be made in color only when the TV channels or the connected additional
device sends a color signal. Black-and-white signals without color information (colorsubcarriers) cannot be recorded in color.
No sound signal at thedigital output
bCheck whether the sound settings match the selected inputs and the connected additionaldevices.
A DVD+RW cannot beplayed on certain DVDplayers
bIf a recording is too short, it is possible that a DVD player cannot detect it: Please observethe following 'Minimum recording times':Recording mode 'M1': 5 minutes, 'M2': 10 minutes, 'M2x': 13 minutes, 'M3': 15 minutes, 'M4':20 minutes 'M6': 30 minutes 'M8': 30 minutes
bSome DVD players cannot playback DVD+RW recordings. You can solve this problem byusing a special function:
1 Open the disc tray with OPEN/CLOSE J . Insert the disc but do not close thetray.
2 Hold down the number button 2 on the remote control until the tray closes. Thedisc is modified.
3 If this fails to produce the desired result, repeat the procedure using the numberbutton 3 on the remote control.
4 You can restore the disc to its original condition by pressing and holding 1 .
Warning!There is a risk that you can no longer play the disc on other DVD players after thisprocedure. Therefore, apply this function with particular care.
Other disc errors bIf it is impossible to play a disc, you can try and repair it for new recordings using thefollowing function. The disc will only be prepared for deletion. It will be deleted only after thenext recording has taken place.
1 Clean the disc.
2 Open the disc tray with OPEN/CLOSE J . Insert the disc but do not close thetray.
3 Hold down CLEAR on the remote control until the tray closes. The disc isprepared for deletion.
4 Start recording as with an empty disc.
Other disc errors (DVD+R),'Disc contains unknowndata'
bThis message may appear if you insert a disc that was not finalised. DVD+R's that have notbeen finalised are very sensitive to fingerprints, dust, or dirt. This may cause problems duringrecording.To use the disc again, follow the next steps
1 Make sure that the surface of the disc is clean.
2 Open the disc tray with OPEN/CLOSE J . Insert the defect DVD+R but do notclose the tray.
3 Hold down 5 on the remote control until the tray closes. The disc will be read('����� ' appears on the display) and the DVD recorder will start the repairprocess. This may take up to four times as much time as the recording, in which theerror occurred.
4 If the disc is recovered, the index screen will appear.
Please observe the following:Error during recording: The title may be missing.Error while changing the title/index picture: The original title/index picture may be visible.Error while finalizing: The disc appears not to have been finalized.
Before you call technical support

83
PROBLEM SOLUTION
The index screen flickerswhen a DVD+R is inserted
bYou can finalise the disc using the following function:
1 Open the disc tray with OPEN/CLOSE J . Insert the defect DVD+R but do notclose the tray.
2 Hold down 4 on the remote control until the tray closes.'������"�' appears in the display. Finalising begins. This may take up to threeminutes.
3 If finalising has been successful, the index screen will appear.
EN
GL
ISH

This warranty gives you specific legal rights. You may have other rights which vary from state/province to state/province.Philips, P.O. Box 520890, Miami, FL 33152, (402) 536?4171
EL6506E003 / 09-02
Limited Warranty
DVD RecorderOne year Free Labor / One year Parts Exchange
This product must be carried in for repair.
WHO IS COVERED?You must have proof of purchase to receive warranty service.A sales receipt or other document showing that you purchasedthe product is considered proof of purchase.
WHAT IS COVERED?Warranty coverage begins the day you buy your product.For one year thereafter, all parts will be repaired or replaced, andlabor is free.After one year from the day of purchase, you pay for thereplacement or repair of all parts, and for all labor charges.All parts, including repaired and replaced parts, are coveredonly for the original warranty period. When the warranty onthe product expires, the warranty on all replaced and repairedparts also expires.
WHAT IS EXCLUDED?Your warranty does not cover:• labor charges for installation or setup of the product,adjustment of customer controls on the product, andinstallation or repair of antenna systems outside of theproduct.
• product repair and/or part replacement because of misuse,accident, unauthorized repair or other cause not within thecontrol of Philips.
• reception problems caused by signal conditions or cable orantenna systems outside the unit.
• a product that requires modification or adaptation to enable itto operate in any country other than the country for which itwas designed, manufactured, approved and/or authorized, orrepair of products damaged by these modifications.
• incidental or consequential damages resulting from theproduct. (Some states do not allow the exclusion of incidentalor consequential damages, so the above exclusion may notapply to you. This includes, but is not limited to, prerecordedmaterial, whether copyrighted or not copyrighted.)
• a product that is used for commercial or institutional purposes(including but not limited to rental purposes).
WHERE IS SERVICE AVAILABLE?Warranty service is available in all countries where the productis officially distributed by Philips. In countries where Philips doesnot distribute the product, the local Philips service organizationwill attempt to provide service (although there may be a delay ifthe appropriate spare parts and technical manual(s) are notreadily available).
MAKE SURE YOU KEEP...Please keep your sales receipt or other document showingproof of purchase. Attach it to the owner's manual and keepboth nearby. Also keep the original box and packing material incase you need to return your product.
BEFORE REQUESTING SERVICE...Please check your owner's manual before requesting service.Adjustments of the controls discussed there may save you aservice call.
TO GET WARRANTY SERVICE IN THEU.S.A., PUERTO RICO, OR U.S. VIRGINISLANDS...Take the product to a Philips factory service center (seeenclosed list) or authorized service center for repair. When theproduct has been repaired, you must pick up the unit at thecenter. Centers may keep defective parts.(In the U.S.A., Puerto Rico, and U.S. Virgin Islands, all impliedwarranties, including implied warranties of merchantability andfitness for a particular purpose, are limited in duration to theduration of this express warranty. Because some states do notallow limitations on how long an implied warranty may last, thislimitation may not apply to you.)
TO GET WARRANTY SERVICE INCANADA...Please contact Philips at:
1-800-531-0039 (English or Spanish Speaking)1-800-661-6162 (French Speaking)
(In Canada, this warranty is given in lieu of all other warranties.No other warranties are expressed or implied, including anyimplied warranties of merchantability or fitness for a particularpurpose. Philips is not liable under any circumstances for anydirect, indirect, special, incidental or consequential damages,howsoever incurred, even if notified of the possibility of suchdamages.)
REMEMBER...Please record below the model and serial numbers found on theproduct. Also, please fill out and mail your warranty registrationcard promptly. It will be easier for us to notify you if necessary.
Model Number: DVDR615/17
Serial Number:

Visite nuestro sitio web a http://www.philips.com
Devuelva hoy su tarjeta de Registro de garantía, para asegurarseque recibirá todos los beneficios a los que tiene derecho.
Una vez que haya registrado su compra PHILIPS, usted queda calificado para recibir todos los privilegios inherentes a laposesión de un producto PHILIPS. De modo que complete y devuelva de inmediato la Tarjeta de registro de garantíaincluida en su compra. Y aproveche estos importantes beneficios.
Verificaciónde garantíaEl registro de su producto dentro de unplazo de 10 días confirma su derecho auna máxima protección según lostérminos y condiciones de su garantíaPHILIPS.
Confirmacióndel propietarioSu Tarjeta de registrode garantíacompletada sirve como verificación depropiedad en caso de robo o pérdida delproducto.
Registrodel modeloLa inmediata devolución de su Tarjeta deregistro de garantía le garantiza querecibirá toda la información y ofertasespeciales a que tiene derecho comopropietario de su modelo.
¡Felicitaciones por su compray bienvenido a la "familia"!
Estimado propietario de un producto PHILIPS:Gracias por su confianza en PHILIPS. Usted ha escogido unode los productos mejor construidos y con mejor respaldodisponibles hoy en día. Y haremos todo lo que esté a nuestroalcance por mantenerle satisfecho con su compra durantemuchos años venideros.Como miembro de la "familia" PHILIPS, usted tiene derecho aestar protegido por una de las garantías más completas y redesde servicio más sobresalientes de la industria.Lo que es más, su compra le garantiza que recibirá toda lainformación y ofertas especiales a las que tiene derecho,además de un fácil acceso a los accesorios desde nuestracómoda red de compra desde el hogar. Y lo que es másimportante, usted puede confiar en nuestro irrestrictocompromiso con su satisfacción total. Todo esto es nuestramanera de decirle bienvenido y gracias por invertir en unproducto PHILIPS.
Sinceramente,
Lawrence J. BlanfordPresidente y Gerente General
P.S.Recuerde que para aprovechar al máximo suproducto PHILIPS, debe devolver su Tarjeta deregistro de la garantía dentro de 10 días.PEnvíela ahora mismo!
Conozca estossímbolos de seguridad
Este "relámpago" indica material noaislado dentro de su unidad quepuede causar una descarga
eléctrica. Para la seguridad de todos en suhogar, por favor no retire la cubierta delproducto.
El "signo de exclamación" llama laatención hacia funciones de las quedebería lee con atención
la literatura adjunta para evitar problemasoperativos y de mantenimiento.
ADVERTENCIA: PARA EVITARRIESGOS DE INCENDIO O DESCARGASELÉCTRICAS, NO EXPONGA ESTEEQUIPO A LA LLUVIA O A LAHUMEDAD.
PRECAUCIÓN: Para evitar descargaseléctricas, haga coincidir la paleta ancha delenchufe con la ranura ancha e introdúzcalahasta el fondo.
ATTENTION: Pour éviter les chocélectriques, introduire la lame la plus largede la fiche dans la borne correspondante dela prise et pousser jusqu'au fond.

Información de seguridad
Precauciones de seguridadAdvertencia: Para evitar cualquier riesgo de incendio o choque, no debe exponer este equipo a la lluvia ni a la humedad. Advertenciade la Comisión Federal de Comunicaciones (FCC): Todo cambio o modificación no autorizado en este equipo invalidará la autoridaddel usuario para operarlo.
Seguridad láserEsta unidad emplea un rayo láser. Únicamente el personal calificado de servicio puede retirar la cubierta o intentar dar servicio a estedispositivo, debido a la posibilidad de lesiones en los ojos.PRECAUCIÓN: Uso de controles o ajustes, o procedimientos distintos a los aquí especificados, pueden ocasionar una exposiciónpeligrosa a la radiación. Esta unidad cumple con los Reglamentos FCC, Parte 15 y 21 CFR 1040.10.PRECAUCIÓN: Cuando la unidad se abre y se anula el seguro, hay radiación láser visible e invisible. No mire el rayo. El rayo se ubicadentro, cerca del mecanismo de la unidad.
Información especial para usuarios CanadiensesEste aparato digital no excede los límites de Clase B para emisiones de ruidos de radiofrecuencia de aparatos digitales, tal como seestablece en los Reglamentos de interferencia de radio del Departamento Canadiense de Comunicaciones.
Interferencia para radio / televisiónSe ha probado este equipo y se encuentra que cumple con los límites para un dispositivo digital Clase B, de conformidad con la Parte15 de los Reglamentos FCC. Dichos límites están diseñados para proporcionar protección razonable contra interferencia dañina eninstalaciones residenciales. Este equipo genera, utiliza y puede radiar energía de radiofrecuencia y, si no se instala y utiliza de acuerdocon las instrucciones, puede ocasionar una interferencia dañina a las radiocomunicaciones. Sin embargo, no existe garantía que nohabrá interferencia en una instalación en particular. Si este equipo causa interferencia dañina a la recepción de radio o televisión, loque se puede determinar encendiendo y apagando el equipo, se alienta al usuario a intentar corregir la interferencia llevando a cabouna o más de las siguientes medidas:1) Reorientar o reubicar la antena receptora.2) Incrementar la separación entre el equipo y el receptor.3) Conectar el equipo a un enchufe que pertenezca a un circuito distinto al cual está conectado el receptor.4) Consultar al proveedor o a un técnico experimentado en radio / televisión para obtener ayuda.
Nota para el técnico de instalación del sistema de televisión por cable:Este recordatorio es para señalarle al técnico de instalación del sistema de televisión por cable (CATV) el Artículo 820-40 del CódigoNEC (Código Nacional Eléctrico) que proporciona los lineamientos para una conexión adecuada a tierra y, en particular, especificaque el cable aterrizado debe conectarse al sistema de tierra del edificio, tan cerca del punto de la entrada del cable como resultepráctico.
Protección de derechos de autorSe prohíbe la copia, transmisión, presentación pública y renta de discos no autorizados. Este producto incluye tecnología deprotección de los derechos de autor que está protegido con los derechos de los métodos de ciertas patentes en Estados Unidos yotros derechos de propiedad intelectual de Macrovision Corporation y otros propietarios de derechos de autor. El uso de estatecnología de protección de derechos de autor debe estar autorizado por Macrovision Corporation y está diseñado para usosdomésticos ilimitados, a menos que así lo autorice Macrovision Corporation. Se prohíbe la ingeniería inversa y el desensamble.
Declaración de conformidadNúmero de modelo: DVDR615/17Nombre comercial: PHILIPSParte responsable: Philips Consumer Electronics N.A.
P.O. Box 14810, Knoxville, TN 37914-1810 1-800-531-0039

INSTRUCCIONES IMPORTANTES DE SEGURIDAD
1. Lea estas instrucciones.
2. Conserve estas instrucciones.
3. Lea todos los avisos.
4. Siga todas las instrucciones.
5. No utilice este aparato cerca dei agua.
6. Para limpiar el aparato utilice sólo un trapo seco.
7. No tape las aperturas de ventilación. Proceda ainstalación de acuerdo con las instrucciones deifabricante.
8. No instale el equipo cerca de fuentes de calor? Comoradiadores, calentadorcs, estufas o cualquer otro aparato(incluyendo los amplificadores) generador de calor.
9. No anule la seguridad de la clavijade corriente (ya sea de tipopolarizado o con toma de tierra Lasclavijas polarizadas tienen dos patillas,una más ancha que la otra.Las que disponen de toma de tierra tienen dos patiltas y unatercera que es la de conexión a tierra. Tanto la patilla másancha como la toma de tierra han sido incorporadas a laclavija para su seguridad personal. Si la clavija suministradacon el equipo no es compatible con su toma de corriente,consulte a un electricista para sustituir la toma de corrienteobsoleta.
10.Proteja debidamente el cable impidiendo que puedapisarse o incluso perforarse, especialmente en la parte máspróxima a la clavija y en el punto de salida del equipo.
11.Utilice exclusivamente aquellosdispositivos/accesorios recomendados por el fabricante.
12. Coloque el equipo exclusivamente sobreaquellos carros, bases, tripodes, soportes o mesasespecificados por el comerciante o vendidos con elequipo. Cuando utilice un carro, tenga cuidado aldesplazar el conjunto carro/equipo para evitarposibles daños por vuelco.
13.Desenchufe el aparato durante tormentas eléctricas ocuando no vaya a ser utilizado durante largo tiempo.
14.Confie ei mantenimiento y las reparaciones apersonal técnico especializado. El equipo deberá repararsesiempre que haya resultado dañado de alguna manera, comopor ejemplo por daños en el cable o en la clavija, porderrame de liquido sobre el equipo, por objetos quehubieran podido introducirse en su interior, por exposicióndel equipo a la lluvia o a ambientes húmedos, cuando elequipo no funcione con normalidad o cuando hubierasufrido algún tipo de caida.
15.Uso de las pilas PRECAUCIÓN - Para prevenirescapes en las pilas, que pueden ocasionar lesiones fisicas odaños en la unidad:• lnstale todas las pilas correctamente, + y ? como está
marcado en la unidad.• No mezcle las pilas (viejas con nuevas o de carbono y
alcalinas , etc),• Extraiga las pilas cuando no vaya a usar la unidad durante
largo tiempo.
EL 6474?E004:02/8

El mando a distancia
MONITOR Monitor: Con esta tecla puede conmutar entre la reproducción de undisco o la imagen del sintonizador interno (canal de TV).
STANDBY m Apagar / encender: apagar/encender el aparato, interrumpir cualquierfunción, interrumpir una grabación programada (TIMER)
TV/DVD Conmutador TV / DVD: conmuta la señal de la antena directamenteal televisor. Con esta tecla se puede conmutar entre el grabador deDVD y la señal de la antena si el grabador de DVD se ha conectado altelevisor con un sólo cable de antena.
T/C Título / Capítulo: Selección directa de 'B' (título)/'C' (capítulo) en labarra de menús para seleccionar títulos o capítulos con CH- B ,CH+ A .Si en la pantalla aparece '����', se ve el menú de Índice de un discograbado o bien reproduce una secuencia introductoria. En ese caso, estafunción no está disponible.
PLAY MODE Modo de reproducción: seleccionar entre Repetir, Reproducciónaleatoria (Shuffle) e Intro-scan
REC MODE Tipo de grabación (calidad de la imagen): seleccionar la duraciónmáxima de grabación permitida
0..9 Teclas numéricas: 0 - 9
DISC-MENU Menú Disco: visualizar el menú del DVD o la imagen del Índice
SYSTEM-MENU Menú Sistema: acceder al menú principal / salir del menú principal(barra de menús en el borde superior de la pantalla)
SELECT Seleccionar: seleccionar funciones / valores
OK Memorizar y confirmar: memorizar / confirmar la entrada
D C Teclas de cursor : hacia la izquierda, la derecha
CH+ A Teclas de cursor / más : cursor hacia arriba / siguiente canal
CH- B Teclas de cursor / menos : cursor hacia abajo / canal anterior
TIMER TIMER: programar grabaciones con / sin sistema VCR Plus+® o bienmodificar/borrar una grabación programada
FSS FSS: Visualizar el menú de edición para discos de DVD+R(W),establecer las marcas de los capítulos
RETURN Atrás: regresar al paso anterior del menú dentro de un CD vídeo(VCD). Esto también funciona en determinados DVD.
CLEAR Borrar: borrar la última entrada / borrar una grabación programada(TIMER)
PLAY G Reproducción: Reproducir un disco grabado.
N Seleccionar título anterior / Búsqueda hacia atrás:Pulsar dos veces la tecla durante la reproducción: capítulo anterior /pieza o título anteriorMantener pulsada la tecla: búsqueda hacia atrásMantener pulsada la tecla durante la imagen fija: cámara lenta hacia atrás

O Seleccionar título siguiente / Búsqueda hacia delante:Pulsar una vez la tecla durante la reproducción: capítulo siguiente / piezao título siguienteMantener pulsada la tecla: búsqueda hacia delanteMantener pulsada la tecla durante la imagen fija: cámara lenta haciadelante
STOP h Stop: detener la reproducción o grabación, excepto durante unagrabación programada (TIMER)Mantener pulsada la tecla, abrir y cerrar la bandeja del disco.
AUDIO Audio: seleccionar el idioma de audio. Para la grabación SAP.
REC/OTR n Grabar: grabar el canal de televisión sintonizado en ese momento
PAUSE 9 Pausa (imagen fija): al pulsar esta tecla durante la reproducción, elgrabador de DVD conmuta a Pausa. En la pantalla verá una imagen fija.Al pulsar esta tecla durante la grabación, el grabador de DVD tambiénconmuta a Pausa.
Funciones de TV adicionalesFunciona sólo con televisores con los códigos iguales (RC5) (p. ej.: televisores Philips)
TV VOLUME q Volumen de TV: aumentar el volumen de TV
TV VOLUME r Volumen de TV: reducir el volumen de TV
Para utilizar las siguientes funciones debe mantener pulsada la tecla lateral DVD/TV (parteizquierda) y, a continuación, seleccionar la función con la tecla correspondiente.
STANDBY m Apagar el televisor
0..9 Teclas numéricas: 0 - 9
CH+ A Número de canal de TV: número de canal de TV hacia arriba
CH- B Número de canal de TV: número de canal de TV hacia abajo
ESP
AT
OL

La parte frontal del aparato
STANDBY-ON m Apagar / encender: apagar/encender el aparato, interrumpir cualquierfunción, interrumpir una grabación programada (TIMER)
OPEN/CLOSE J Abrir y cerrar la bandeja del discoAbrir / cerrar la bandeja deldisco
PLAY G Reproducir: reproducir un disco grabado
REC n Grabar: grabar el canal de televisión sintonizado en ese momento
PREV/CH- N seleccionar título anterior / búsqueda hacia atrás
STOP h Stop: detener la reproducción / grabación
NEXT/CH+ O seleccionar título siguiente / búsqueda hacia delante
Detrás de la tapa, en la parte frontal a laderechaEl cambio entre la clavija S-VIDEO y VIDEO se realiza automáticamente.
S-VIDEO Clavija de S?vídeo : conexión de videocámaras SVHS/Hi8 o vídeosSVHS/Hi8 (número de canal '����')
Clavija amarillaVIDEO
Clavija Entrada de vídeo: conexión de videocámaras o vídeos(número de canal '����')
clavija blanca / rojaAUDIO left/right
Clavija de entrada de audio izquierda/derecha: conexión devideocámaras o vídeos (número de canal '����')
DV IN Clavija i?Link / DV (entrada de vídeo digital IEEE 1394,FireWire): Conexión de videocámaras digitales u otros dispositivospreparados para ello (número de canal '���').

La parte posterior del aparato
4MAINS Toma de alimentación: conexión a la red (110V/60Hz)
ANTENNA IN Entrada de la antena: conexión a la antena
TV OUT Salida de la antena: conexión al televisor
Terminales de entrada (IN?EXT2)
S-VIDEO (Y/C) Entrada de S?vídeo: conexión a un aparato adicional (número decanal 'EXT2'). El cambio entre la clavija S-VIDEO (Y/C) y VIDEO(CVBS) se realiza automáticamente.
VIDEO (CVBS) Entrada de vídeo (clavija amarilla): conexión a un aparato adicional(número de canal 'EXT2').
L AUDIO R Entrada de audio analógica (clavija roja/blanca)debajo de la clavijaVIDEO (CVBS) . Audio para la clavija VIDEO (CVBS) : conexión aun aparato adicional (número de canal 'EXT2').
Clavijas de entrada (IN?EXT1)
AUDIO Entrada audio analógica (clavija roja/blanca) al lado de la clavijaCOMPONENT VIDEO Y PB PR : conexión a un aparato adicional.Entrada de audio para vídeo compuesto (número de canal 'EXT1')
COMPONENTVIDEO Y PB PR
Entrada de vídeo compuesto (clavija roja / azul / verde):conexión a un aparato adicional con salida de vídeo compuesto (númerode canal 'EXT1')
Terminales de salida (OUT?2)
S-VIDEO (Y/C) OUT Salida de S?vídeo: Conexión para un televisor preparado para S-vídeo.
VIDEO (CVBS)OUT
Salida de vídeo (clavija amarilla): conexión a un televisor conentrada de vídeo (CVBS, vídeo compuesto)
L AUDIO R OUT Salida de audio analógica (clavija roja/blanca)debajo de la clavijaVIDEO (CVBS) . Audio para la clavija VIDEO (CVBS) OUT :conexión a un aparato adicional.
ESP
AT
OL

Clavijas de salida (OUT?1 480p/480i)
AUDIO OUT Salida de audio analógica (clavija roja/blanca) : conexión a unaparato adicional. Salida de audio para vídeo compuesto / rastreoprogresivo
COMPONENTVIDEO Y PB PROUT
Salida de vídeo compuesto (clavija roja/azul/verde): conexión aun aparato adicional con entrada de vídeo compuesto / rastreoprogresivo
Clavija de salida (DIGITAL AUDIO OUT)
DIGITAL AUDIOOUT
Salida de audio digital : conexión de un aparato de audio digital(amplificador/receptor)
Indicaciones de la pantalla (display) delgrabador de DVD
En la pantalla indicadora del grabador de DVD pueden aparecer los símbolos siguientes:
Indicación multifuncional / líneas de texto•) Hora•) Duración del disco o del título•) Hora de finalización OTR•) Nombre del título•) Indicación del número de canal / del tiempo de reproducción / de lafunción.•) Indicación de información, avisos
IIIIIIIIIIIIIII Barras del disco: indicación de la posición actual del disco (puntero deldisco).Play/Record: un segmento parpadeando en la posición actual.Pause: segmento parpadeando a ambos lados de la posición actual.Stop: segmento encendido en la posición actual.
TIMER Grabación programada (Timer)
TV Modulador desconectado. La señal de la antena (señal RF) sólo seconecta al televisor con el modulador desconectado.
PRO Salida de vídeo compuesto en el modo 'Rastreo progresivo'. Si noaparece esta indicación, la salida de vídeo compuesto está en el modo'Entrelazado'.
o((( Recepción de una señal de televisión
SAP Se ha seleccionado un segundo canal de audio del sintonizador.

Mensajes de la pantalla del grabador deDVD (display)
����� En la pantalla del grabador de DVD pueden aparecer los siguientes mensajes: Si hubiera dado unnombre al disco, éste aparece igualmente en pantalla.
�� �� ��� El grabador de DVD se encuentra en el modo de instalación inicial.Encienda el televisor y consulte en el capítulo 'Puesta en marcha' elapartado 'Instalación inicial'.
�� �� ��� No hay ninguna señal de entrada adecuada (estable) disponible
���� El menú está seleccionado en la pantalla del televisor
������ Se abre la bandeja del disco
��� ���� La bandeja del disco está abierta
������ Se cierra la bandeja del disco
����� Se lee el disco
���� ���� Una vez finalizada la grabación se crea el índice.
���� ���� Tras finalizar la primera grabación en un disco nuevo, se crea laestructura del menú
���� ��� Se ha recibido una señal protegida contra copias. Ésta puede procederde un DVD/casete de vídeo protegido contra copias de un reproductorde DVD/vídeo o un canal de TV.
���� Espere a que desaparezca este mensaje. El grabador de DVD estáocupada realizando un proceso.
�� ���� No se ha insertado ningún disco para la grabación. En caso de que hayaun disco, es posible que no se pueda leer el disco insertado.
���� En la pantalla se muestra información acerca del DVD insertado
���� El grabador de DVD está ocupado realizando modificacionescompatibles con DVD
����� El disco completo se borra
��������� El disco insertado es nuevo o ha sido totalmente borrado (no contieneninguna grabación).
�������� Disco protegido contra grabaciones.
��� ����� Se ha alcanzado el número máximo de títulos por disco. El númeromáximo de títulos en un disco es de 48 títulos.
��� ���� Se ha alcanzado el número máximo de capítulos (Chapter) en un títuloo en el disco. El número máximo de capítulos (chapter) dentro de untítulo es de 99 y de 124 en un disco.
���� ���� Disco lleno. No queda espacio para más grabaciones
��� ���� Se ha insertado un disco con grabaciones en PAL y se está intentandograbar una señal de NTSC. Inserte un disco nuevo o utilice un disco quecontenga alguna grabación en NTSC.
ESP
AT
OL

���� ���� Se ha insertado un disco con grabaciones en NTSC y se está intentandograbar una señal de PAL. Inserte un disco nuevo o utilice un disco quecontenga alguna grabación en PAL.
������ Se ha realizado una acción no permitida durante la grabación (porejemplo, pulsar la tecla OPEN/CLOSE J ) .
�������� La reproducción ha comenzado por un título vacío o el siguiente títuloestá vacío.
���� ���� Se ha intentado grabar en un disco protegido durante la reproducción.Este mensaje también aparece si se intenta insertar una marca decapítulo (tecla FSS ).
���� � Se ha producido un error al escribir el título. Si surge este problema,limpie el disco o utilice uno nuevo.Para obtener información sobre cómo limpiar el disco, consulte en elsiguiente capítulo el apartado 'Limpieza del disco'.
���� ��� Se ha producido un error al escribir el título. Continúa la grabación y sesalta el error.
����� Una vez concluida la búsqueda automática de canales en la pantallaaparece el menú para configurar la fecha y hora.
���� �� Durante la búsqueda automática de canales se hace un recuento de loscanales de televisión encontrados
������� No se puede abrir ni cerrar la bandeja del disco.
���� �� La nueva grabación se insertará detrás de las demás grabaciones (SAFERECORD).
���������� Tras la creación de la estructura del menú se prepara el disco
������� El grabador de DVD se encendió
������� El grabador de DVD se apagó

Indice
AIntroducción 3....................................¡Distinguido cliente de Philips! 3......................................................................Discos compatibles 5..........................................................................................Código de país (código de región) 6...............................................................Datos técnicos 6..................................................................................................Accesorios suministrados 6...............................................................................Información importante acerca del manejo correcto del aparato 7........Limpieza del disco 8............................................................................................Funciones especiales de su grabador de DVD 9..........................................
BConexión del grabador de DVD 11.Preparación del mando a distancia para el funcionamiento 11..................Conexión del grabador de DVD al televisor 11...........................................Conexión con cable de vídeo compuesto (Y PB PR) 12.............................Conexión mediante cable de S-vídeo (Y/C) 14.............................................Conexión con cable de vídeo (CVBS) 16.......................................................Conexión únicamente con el cable de antena 17.........................................
CConexión de aparatos adicionales 19Conexión de vídeo, DVD 19.............................................................................Conexión del receptor de satélite con un cable cinch o S-Vídeo 20.......Conexión de aparatos adicionales sólo a través del cable de antena 20.Conexión de una videocámara a las clavijas frontales 21...........................Conexión de aparatos de audio a las clavijas de audio analógicas 22......Conexión de aparatos de audio a las clavijas de audio digitales 22..........
DPuesta en marcha 23.........................Instalación inicial 23.............................................................................................Búsqueda automática de canales 25.................................................................Asignación y borrado manual de canales de TV 26......................................Configuración del idioma 27..............................................................................Conmutar grabación de audio (estéreo, SAP) 28.........................................Asignación del número guía con VCR Plus+® 29..........................................Ajuste automática de la fecha y hora 29.........................................................Ajuste manual de la fecha y hora 31................................................................
EInformación en la pantalla deltelevisor 32..............................................Símbolos en la barra de menús 32...................................................................Barra de menús 1 32...........................................................................................Barra de menús 2 32...........................................................................................Campo de respuesta inmediata 33...................................................................Campo de estado 33...........................................................................................Símbolos de los tipos de discos 33..................................................................Símbolos de los modos de funcionamiento 34..............................................Campo de información del sintonizador 34...................................................Campo de información del temporizador 34................................................
FReproducción 35................................Indicaciones generales para la reproducción 35...........................................Insertar un disco 35.............................................................................................Reproducción de un disco de vídeo DVD 37................................................Reproducción de un disco DVD+RW/ +R 37...............................................Reproducción de un CD de audio 38.............................................................Reproducción de un CD de MP3 38...............................................................Reproducción de un CD de (súper) vídeo 39...............................................
GOtras funciones de reproducción 40Cómo cambiar a otro título o capítulo 40.....................................................Búsqueda en el disco 40.....................................................................................Imagen fija 41........................................................................................................Cámara lenta 41...................................................................................................Búsqueda por tiempos 42..................................................................................Repetición / reproducción aleatoria 43..........................................................Repetición de un pasaje (A-B) 43.....................................................................Función de rastreo 44.........................................................................................Perspectiva de la cámara 44...............................................................................Función zoom 45..................................................................................................Cambio del idioma de audio 45........................................................................Subtítulos 46..........................................................................................................
HGrabación manual 47........................General 47.............................................................................................................Grabación sin desconexión automática 48.....................................................Interrupción de la grabación (pausa) 50.........................................................Grabación con desconexión automática (OTROne-Touch-Recording) 50.................................................................................Proteger el disco contra grabaciones no deseadas 51.................................Alinear grabaciones dentro de un título (Assemble) 52.............................Selección del tipo de grabación (calidad de la imagen) 53..........................
ICómo administrar el contenidodel disco 54..............................................General 54.............................................................................................................Favorite Scene Selection (memoria de escenas) 55.....................................Inserción de marcas de capítulos 55................................................................Cómo ocultar capítulos 55................................................................................Eliminación de marcas de capítulos 57............................................................Cómo modificar la imagen del índice 57.........................................................Modificar el fondo del menú 58........................................................................División de títulos 58..........................................................................................Edición del título de la grabación (nombre) 59.............................................Reproducción total del título 59......................................................................Eliminación de grabaciones o títulos 60..........................................................Configuración del disco 61................................................................................Modificar el nombre del disco 61.....................................................................Finalizar ediciones 62..........................................................................................Terminar discos DVD+R (finalizar) 62............................................................Borrar discos DVD+RW 63..............................................................................
Indice

JProgramación de grabaciones(TIMER) 64..............................................General 64.............................................................................................................Programación de grabaciones con el sistema VCR Plus+® 64...................Programación de grabaciones sin el sistema VCR Plus+® 66.....................Cómo revisar o borrar una grabación programada (TIMER) 67...............Problemas con grabaciones programadas y soluciones 68.........................
KConfiguración preferidapersonalizada 69.....................................Ajuste de la imagen 70........................................................................................Ajuste del sonido 71............................................................................................Configuración de idioma 72...............................................................................Ajustes adicionales 72.........................................................................................Configuración del mando a distancia 73.........................................................Menú Disco 74......................................................................................................
LControl de acceso (bloqueo paraniUos) 75...................................................Bloqueo para niños (DVD y VCD) 75............................................................Activación y desactivación del bloqueo para niños 75................................Cómo desbloquear el disco 76.........................................................................Cómo proteger los discos desbloqueados 76...............................................Función de filtro (sólo vídeo DVD) 76...........................................................Activación y desactivación de la función de filtro 77...................................Modificación del país 78......................................................................................Cómo cambiar el código PIN 79......................................................................
MAntes de llamar al técnico 80...........
Indice

3
AIntroducción
PDistinguido cliente de Philips!
Los manuales de instrucciones son normalmente poco atractivos, ya que son muy técnicos yestán a menudo mal traducidos. Por eso mismo me ha contratado Philips.
Me presentaré:Me llamo Phil y voy a guiarle por el manual de instrucciones y a ayudarle en el uso de su nuevoaparato. Con este fin le daré en el momento oportuno la siguiente información:
Pregunta (?)Aquí explico cosasaparentemente pocoimportantes.
ConsejoAquí menciono funciones quesimplifican el manejo.
ProblemaAquí le ayudo a encontrar yeliminar las posibles causas delos problemas.
Espero que disfrute de su nuevo aparato.
PhilP.D.: Si tiene dudas o problemas acerca del manejo del aparato, en el capítulo 'Antes de llamar altécnico' encontrará información útil. Si, a pesar de todo, no obtiene el resultado deseado, puedeponerse en contacto con el Servicio de asistencia técnica de su país.Encontrará los números de teléfono y las direcciones de correo electrónico al final de estemanual de instrucciones.También puede visitar la página de Internet 'http://www.p4c.philips.com' .
ESP
AT
OL
Introducción

4
PBienvenido a la gran familia de propietarios de aparatos Philips!Muchas gracias por haberse decidido por la compra de una DVDR615/17 .Le recomendamos que lea el manual de instrucciones antes de poner el aparato enfuncionamiento por primera vez. El manual incluye importante información acerca delfuncionamiento.No ponga el aparato en funcionamiento inmediatamente después de haberlo trasladadodesde un lugar frío a uno caliente, o viceversa, o bien a lugares con elevada humedad del aire.Espere por lo menos tres horas después de trasladar el aparato. El grabador de DVD necesitaeste tiempo para adaptarse a las nuevas condiciones ambientales (temperatura, humedad, ...).
Le deseamos que disfrute de su nuevo grabador de DVD,El equipo Philips
VQué es un DVD?
El DVD (Digital Versatile Disc o disco versátil digital) es un soporte dealmacenamiento que combina la comodidad del CD con la técnica devídeo digital. El vídeo DVD utiliza la moderna tecnología de compresiónde datos MPEG2 con la que se puede almacenar una cinta completa enun solo disco de 5 pulgadas.
VHasta qué punto es elevada la resolución en comparación conel VHS?
Las imágenes digitales de extremada nitidez tienen una resolución de másde 500 líneas con 720 píxeles (elementos de la imagen) por línea. Estaresolución supera a la del VHS en más del doble y también es superior ala del Láser Disc. La calidad puede competir fácilmente con los mástersdigitales, tal como se produjeron en los estudios de grabación.
VQué hace el DVD+RW?
El DVD+ReWritable (DVD regrabable) utiliza la tecnología de medios decambio de fase, la misma que se emplea en los CD ReWritable (CDregrabables). El láser amplificador de potencia sirve para modificar elpoder reflexivo de la capa de grabación, de forma que el proceso sepuede repetir más de mil veces.
VQué hace el DVD+R?
DVD+R (DVD de un solo uso). A diferencia del DVD+RW, este discosólo se puede grabar una vez. Si una vez finalizada la grabación notermina (finaliza) el disco, puede volver a escribirlo en el grabador deDVD. Las grabaciones ya realizadas se pueden eliminar con posterioridad,pero no pueden volver a sobrescribirse. Las grabaciones (títulos)eliminadas se marcan como 'Título borrado'.Para reproducir el disco en un reproductor de DVD, el disco se debeterminar (finalizar) en el grabador de DVD. Una vez realizado el procesono se podrá volver a grabar el disco.
VDe qué funciones dispone el grabador de DVD?
Su grabador de DVD de Philips es un aparato que permite grabar yreproducir discos de vídeo digitales con una compatibilidad de doble víacon vídeo DVD estándar universal. Esto significa:•) Que con este grabador se pueden reproducir los discos de vídeoDVD existentes.•) Que las grabaciones realizadas en el grabador de DVD se puedenreproducir en otros aparatos de vídeo DVD y reproductores deDVD-ROM. ?
Introducción

5
Discos compatibles
Con este grabador de DVD se pueden reproducir y grabar los siguientes tipos de discos:
Grabación y reproducción
DVD+RW (Digital Versatile Disc + regrabable)
DVD+R (Digital Versatile Disc + de un sólo uso)
Sólo reproducción:
DVD Video (Digital Versatile Disk)
DVD-R (DVD-grabable)
DVD-RW (DVD-regrabable) Sólo se pueden reproducir si se graba en 'modo Vídeo' y si setermina (finaliza) la grabación.
Audio CD (Compact Disc Digital Audio)
Super Audio CD (reproduce únicamente el CD Layer de un disco SACD híbrido)
Video CD (formato 1.0, 1.1, 2.0)
Súper Video CD
CD-R (CD grabable) con contenido de sonido / MP3
CD-RW (CD regrabable) con contenido de sonido / MP3
ESP
AT
OL
Introducción

6
Código de país (código de región)
Las películas en DVD no suelen comercializarse al mismo tiempo en todas las regiones, por loque todos los reproductores de DVD disponen de un determinado código de región. Los discospueden estar provistos de un código de región opcional. En caso de que ambos códigos nocoincidan (reproductor/disco), el disco no se podrá reproducir.
Los DVD tienen que llevar el código 'ALL' para todas las regiones o '1' para la región 1 para que sepuedan reproducir en este aparato. En caso de que el DVD lleve impresa una región distinta, no sepodrá reproducir en este grabador de DVD.El número indicado en el globo terráqueo indica la región del mundo.La región 1 representa:Los Estados Unidos, Canadá, regiones superiores de Norteamérica, Bermudas, las Islas Vírgenes delos EE.UU. y pequeñas zonas de los alrededores de Australia.
Datos técnicos
Tensión de red: 120V/60HzConsumo de potencia : 27WConsumo de potencia (espera): menos de 3 vatios (indicación de hora desconectada).Dimensiones en pulgadas (ancho/alto/fondo) : 17,12 / 2,78 / 13,58 (bandeja de discocerrada), 18,90 (bandeja abierta)Peso aproximado sin embalaje: 9.26 lbFallo en la red eléctrica o falta de alimentación: Los datos de los canales y del TIMER se
guardan aproximadamente un año; la horase memoriza durante unas 12 horas.
Colocación para uso: máximo 10 grados de inclinación en todas las direccionesTemperatura ambiente: 15° C - 35° CHumedad del aire: 25% - 75%
Accesorios suministrados
Manual de instruccionesCertificado de garantíaGuía rápidaMando a distancia y pilasCable de antenaCable de alimentaciónCable de audio (con clavijas rojas/blancas)Cable de vídeo (con clavijas amarillas)
Introducción

7
Información importante acerca delmanejo correcto del aparato
PAtención!Rayo láser visible e invisible. Al abrir la tapa, no mire directamente al láser.
Debido al riesgo de sufrir una lesión ocular, sólo el técnico de mantenimiento cualificado debe abriry reparar el aparato.
LÁSERTipo: láser semiconductor InGaAlP (DVD), AlGaAs(CD)Longitud de onda: 660nm (DVD), 780nm (CD)Potencia de salida (fuera del objetivo): 20 mW (escritura DVD+RW), 0,8 mW (lectura de DVD),0,3 mW (lectura de CD).Divergencia del rayo: 82 grados (DVD), 54 grados (CD)
PPeligro, alta tensión en el aparato! PNo abrir!PPeligro de descarga eléctrica!
El aparato no contiene piezas que puedan ser reparadas por el cliente. Confíe todos los trabajos demantenimiento a personal especializado.
Cuando el grabador de DVD está conectado a la red algunas partes están en constantefuncionamiento. Para desconectar completamente el grabador de DVD, retire el enchufe de lared.
Si es necesario desconectar el grabador de DVD de la red, tenga cuidado de desenchufar el enchufede la pared y no sólo el enchufe de la clavija 4MAINS situada en la parte posterior del aparato.Si hay niños jugando alrededor del aparato, pueden dañarse con el extremo del cable que conducetensión.
Estas instrucciones de manejo están impresas en un papel que respeta el medio ambiente.
Entregue las pilas usadas en un punto de recogida adecuado.
Utilice los medios que existan en su país para eliminar el embalaje del aparato sin dañar al medioambiente.
Este aparato electrónico contiene muchos materiales que pueden ser reciclados. Infórmese tambiénsobre las posibilidades de reciclaje del aparato usado.
ESP
AT
OL
Introducción

8
Si instala el aparato en un armario, deje un espacio de unos 2,5 cm (1 pulgada) alrededor delgrabador para que circule el aire y no se condense el calor.
Asegúrese de que circule el aire por los orificios de ventilación del aparato. No coloque el aparatoen una superficie blanda.
Evite que cualquier objeto o líquido penetre en el aparato. No coloque jarrones ni objetossimilares sobre el grabador de DVD. Si entra algún líquido, desenchufe el aparato inmediatamentede la red y consulte al servicio de asistencia técnica.
Mantenga el grabador de DVD apartado de cuerpos calientes o fuentes de calor y proteja el aparatode la luz directa del sol.
No coloque objetos inflamables (velas, etc.) sobre el aparato.
Tenga cuidado de que los niños no coloquen objetos en las aberturas del aparato.
Limpieza del disco
Algunos problemas (imagen que se detiene, interrupción del sonido, problemas de imagen)pueden estar provocados por la suciedad del disco insertado. Para solucionar estos problemas,limpie los discos con regularidad.
1 Si un disco está sucio, límpielo con un paño suave. Límpielo desdeel centro hacia los bordes.
2 No utilice ningún producto detergente como líquidos limpiadores,diluyentes, ni los productos de limpieza disponibles en comercioso pulverizadores antiestáticos para discos convencionales.
VDebo utilizar un disco limpiador para el grabador de DVD?
Dado que la unidad óptica (láser) del grabador de DVD funciona con unapotencia superior a la de los reproductores de CD o DVD normales, losCD limpiadores pueden dañar la unidad óptica.Así pues, no utilice CD limpiadores. ?
Introducción

9
Funciones especiales de su grabador deDVD
Su PHILIPSgrabador de DVD posee una serie de funciones especiales que le facilitarán su manejodiario.
Esta conexión se denomina también 'FireWire' o 'IEEE 1394'. La conexión sirve para transmitirseñales digitales de mayor ancho de banda como al conectar una videocámara digital. La señal devídeo y audio se transmite a través de un cable. Además de videocámaras de vídeo digital y deHi8, en esta entrada digital se pueden conectar PCs con salida de vídeo digital.
En esta pantalla se ofrece un resumen del contenido del disco insertado. Cada imagen del índicecorresponde a una grabación. Asimismo, en el lado derecho de la pantalla aparece el denominadopuntero del disco, que muestra gráficamente cada grabación junto con la duración y posición de lamisma en el disco.
Gracias a esta función se pueden eliminar fácilmente los cortes publicitarios de una película uotras escenas. Así, las escenas correspondientes quedan marcadas y se pueden saltar si lo desea.La información se almacena en el DVD de forma que el reproductor DVD existente se saltatambién esas escenas. Para este fin tiene que terminar los cambios
Los archivos con formato MP3 son pistas de música comprimidas. La cantidad de datos del materialde audio original se reduce a la décima parte de la cantidad original a través ce un proceso especial.De esta forma se pueden incluir hasta 10 horas de música en un solo CD.Con este aparato se pueden reproducir este tipo de CDs de música.
Normalmente, la nueva grabación se realiza en la posición actual del disco. Como en un casetede vídeo, por ejemplo en el centro de la cinta. Si se mantiene pulsada unos segundos la teclaREC/OTR n , la nueva grabación se realiza entonces detrás de todas las demás grabaciones. Asíse evita sobrescribir las grabaciones existentes.Las nuevas grabaciones en discos de tipo DVD+R se introducen siempre detrás de las demásgrabaciones.
El grabador de DVD de Philips puede reproducir DVDs y CDs pregrabados; del mismo modo, losDVDs grabados con este aparato se pueden reproducir en reproductores de DVD ya disponibles (yen modelos futuros).
ESP
AT
OL
Introducción

10
Un estándar desarrollado por Dolby Laboratories para la transmisión de 1 a 5 canales completos,así como un canal (.1) para bajas frecuencias. De este modo se obtienen 5.1 canales separados.Los altavoces se colocan arriba a la izquierda, en el centro y a la derecha, además de abajo, a laizquierda y derecha. Este es el sistema más extendido en la actualidad y también se instala encines.Con este grabador de DVD cada sonido se registra en Dolby Digital de 2 canales en unDVD+RW.
Creado bajo licencia de Dolby Laboratories. Dolby y el símbolo de la doble D son marcas deDolby Laboratories.
Este producto cuenta con una tecnología de protección contra copias amparada por las patentesestadounidenses nº 4631603, 4577216 y 4819098 y otros derechos de propiedad intelectual. Paraemplear la tecnología de protección contra copias de Macrovision Corporation se debe disponerdel permiso de Macrovision; dicha tecnología está prevista exclusivamente para su uso doméstico yotras aplicaciones restringidas de pago por visión (PPV). Lo anterior se aplica a menos queMacrovision otorgue un permiso escrito para otro uso. Queda prohibido modificar el aparato,desmontar las distintas piezas y aplicar métodos de ingeniería inversa.
Fácil sistema de programación para el grabador de DVD. Asigne a cada programa su númerocorrespondiente. Encontrará dichos números en revistas de programación de televisión.
VCR Plus+ y PlusCode son marcas registradas de Gemstar Development Corporation. El sistemaVCR Plus+ ha sido creado bajo licencia de Gemstar Development Corporation. Patenteestadounidense nº: 6,466,734; 6,430,359; 6,091,882; 6,049,652; 5,335,079; 5,307,173
Para poder identificar su aparato en caso de consultas o de robo, anote aquí el número de seriedel aparato. Encontrará el número de serie (PROD. NO.) en la etiqueta en la parte posterior delaparato:
MODEL NO. DVDR615/17
PROD. NO. ..................
Introducción
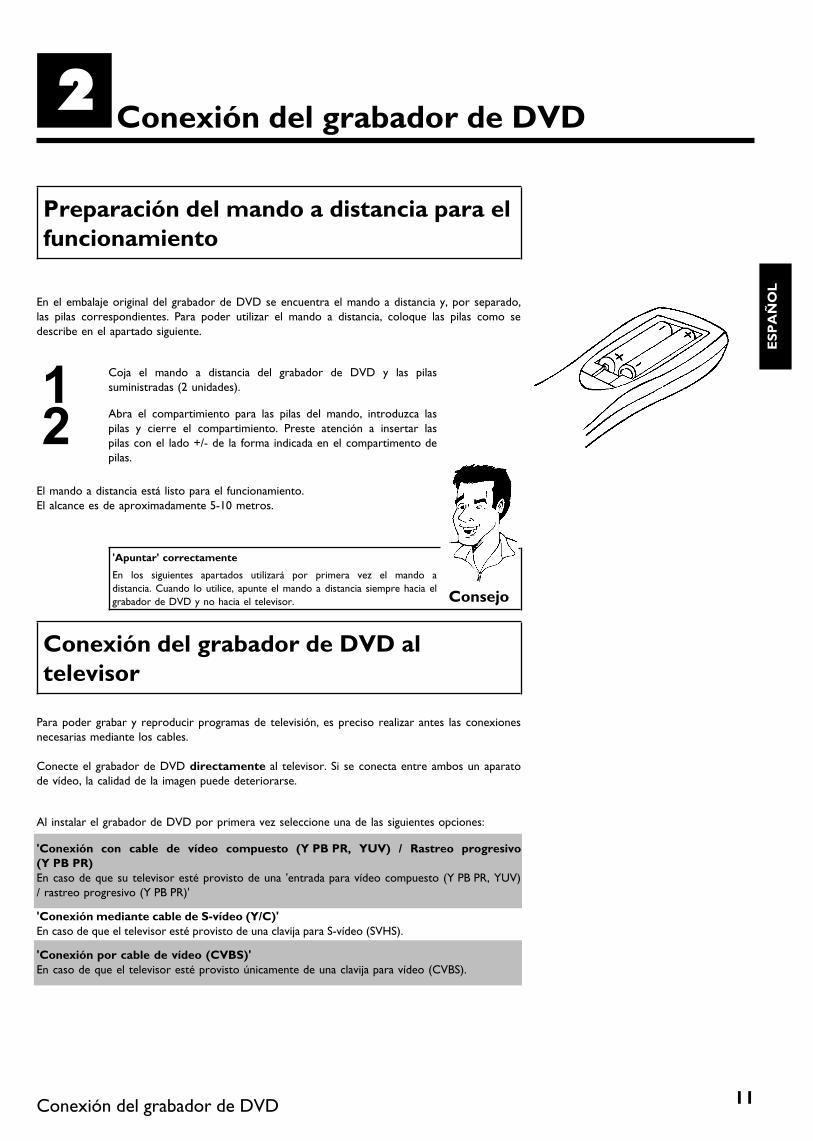
11
BConexión del grabador de DVD
Preparación del mando a distancia para elfuncionamiento
En el embalaje original del grabador de DVD se encuentra el mando a distancia y, por separado,las pilas correspondientes. Para poder utilizar el mando a distancia, coloque las pilas como sedescribe en el apartado siguiente.
1 Coja el mando a distancia del grabador de DVD y las pilassuministradas (2 unidades).
2 Abra el compartimiento para las pilas del mando, introduzca laspilas y cierre el compartimiento. Preste atención a insertar laspilas con el lado +/- de la forma indicada en el compartimento depilas.
El mando a distancia está listo para el funcionamiento.El alcance es de aproximadamente 5-10 metros.
'Apuntar' correctamente
En los siguientes apartados utilizará por primera vez el mando adistancia. Cuando lo utilice, apunte el mando a distancia siempre hacia elgrabador de DVD y no hacia el televisor. Consejo
Conexión del grabador de DVD altelevisor
Para poder grabar y reproducir programas de televisión, es preciso realizar antes las conexionesnecesarias mediante los cables.
Conecte el grabador de DVD directamente al televisor. Si se conecta entre ambos un aparatode vídeo, la calidad de la imagen puede deteriorarse.
Al instalar el grabador de DVD por primera vez seleccione una de las siguientes opciones:
'Conexión con cable de vídeo compuesto (Y PB PR, YUV) / Rastreo progresivo(Y PB PR)En caso de que su televisor esté provisto de una 'entrada para vídeo compuesto (Y PB PR, YUV)/ rastreo progresivo (Y PB PR)'
'Conexión mediante cable de S?vídeo (Y/C)'En caso de que el televisor esté provisto de una clavija para S-vídeo (SVHS).
'Conexión por cable de vídeo (CVBS)'En caso de que el televisor esté provisto únicamente de una clavija para vídeo (CVBS).
ESP
AT
OL
Conexión del grabador de DVD

12
'Conexión sólo con el cable de la antena'Si sólo dispone de una conexión para la antena en el televisor o bien no desea utilizar ningún cableadicional. La entrada de antena suele estar marcada con ANT IN, RF IN, 75 ohm, ... . Para másinformación, consulte el manual instrucciones de su televisor.
Conexión con cable de vídeo compuesto(Y PB PR)
El vídeo compuesto (Y PB PR) ofrece la posibilidad de obtener una mayor calidad de transmisiónde imagen al separar la señal de vídeo en los componentes Y (brillo), U y V (azul menos brillo,rojo menos brillo). Las señales se transmiten a través de líneas separadas. Normalmente lasclavijas de este cable, así como las tomas de que dispone, son de color rojo, verde, azul.
La señal se puede transmitir como 'Interlaced' o 'PRogressive scan'.
InterlacedLa señal de vídeo/TV convencional tiene la denominada estructura Interlaced; es decir, que seestablecen alternativamente las líneas impares y pares como semicuadros.
Progressive scanCon Progressive Scan, cada imagen se establece (alrededor de 50/60 veces por segundo, enfunción del sistema de TV) como imagen completa, es decir, líneas impares y pares juntas. Elmolesto centelleo de la imagen disminuye, de forma similar que en televisores de 100 Hz.
Tenga a mano los siguientes cables:un cable de antena (1, suministrado), un cable de red (2, suministrado), un cable de vídeocompuesto (Y PB PR) (3, conectores rojo, verde, azul) o un cable de Euroconector apto paravídeo, un cable de audio (4, conectores rojos/blancos).
1 Desenchufe el cable de antena del televisor. Introduzca la clavijaen la entrada ANTENNA IN en la parte posterior del grabadorde DVD.
2 Mediante el cable de antena suministrado conecte la clavija TVOUT a la parte posterior del grabador de DVD con la clavija deentrada de la antena del televisor.
3 Mediante un cable de vídeo compuesto (Y PB PR), conecte elEuroconector rojo, azul, verde COMPONENT VIDEO Y PBPR OUT en la parte posterior del grabador de DVD con lascorrespondientes clavijas de entrada de vídeo compuesto deltelevisor.
4 Si su televisor estuviera equipado con una clavija 'Progressivescan', utilice ésta. (Suele estar marcada con 'Video In Y PB Pr'.Consulte el manual de instrucciones del televisor.)
Conexión del grabador de DVD

13
Preste atención al orden de los colores
Los colores de las clavijas del grabador de DVD y los conectores tienenque coincidir con los colores de las clavijas en el televisor(rojo-rojo/azul-azul/verde-verde). Si éste no fuera el caso, los colores dela imagen pueden aparecer intercambiadas o la imagen puede quedarinvisible. Consejo
5 Mediante un cable de audio (cinch), conecte la clavija cinchroja/blanca AUDIO OUT junto a las clavijas COMPONENTVIDEO Y PB PR OUT ubicadas en la parte posterior delgrabador de DVD con la clavija de entrada de audio,generalmente roja/blanca, del televisor (normalmente con laindicación 'Audio in', 'AV in' . Consulte el manual de instruccionesdel televisor.)
6 Encienda el televisor.Si es necesario, cambie el televisor a la clavija de entrada devídeo compuesto.Consulte el manual de instrucciones del televisor en caso de quenecesite ayuda.
7 Mediante el cable de alimentación suministrado, conecte la clavija4MAINS situada en la parte posterior del grabador de DVD ala toma de alimentación de la pared.La pantalla indicadora presenta un resumen de las funciones másimportantes del grabador de DVD.Después de la primera instalación esta función se desactivará. Elcapítulo 'Configuración preferida personalizada', apartado 'Ahorrode energía' explica cómo reactivar la función de nuevo.
8 Encienda el grabador de DVD con la tecla STANDBY-ON m .En la pantalla indicadora aparece '�� �� ���'.
ESP
AT
OL
Conexión del grabador de DVD
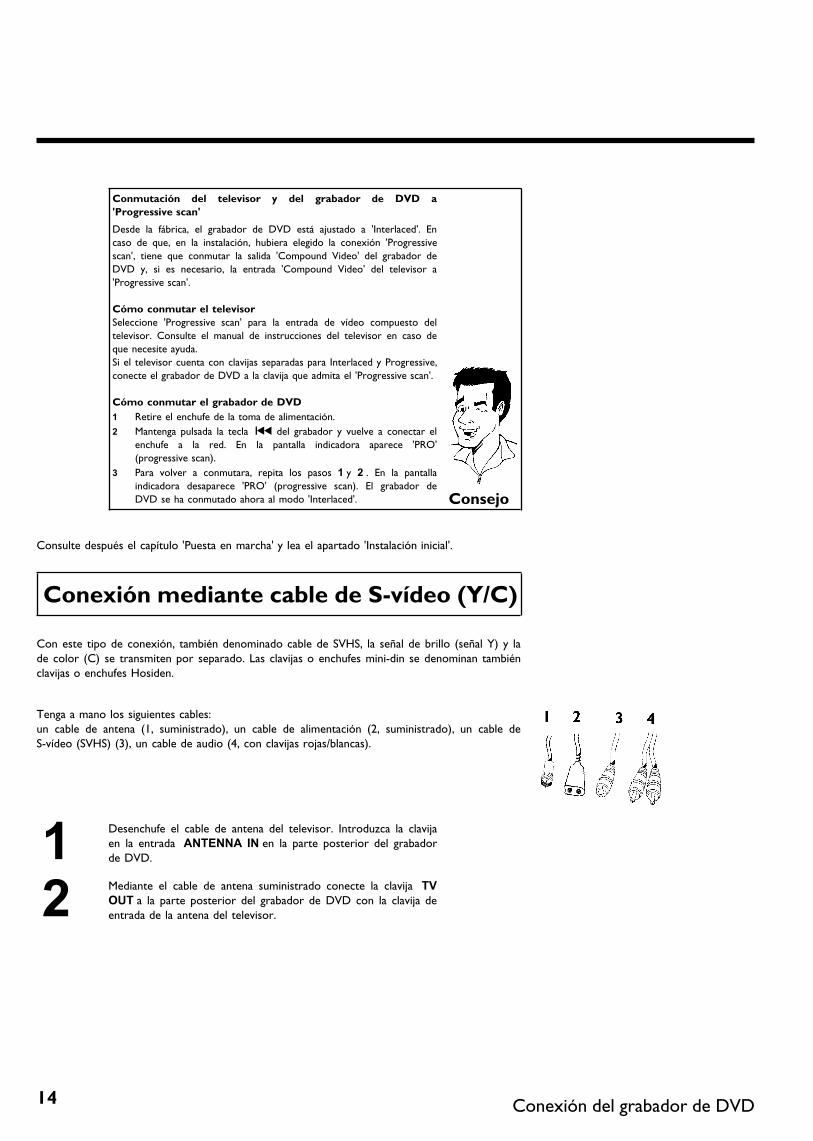
14
Conmutación del televisor y del grabador de DVD a'Progressive scan'
Desde la fábrica, el grabador de DVD está ajustado a 'Interlaced'. Encaso de que, en la instalación, hubiera elegido la conexión 'Progressivescan', tiene que conmutar la salida 'Compound Video' del grabador deDVD y, si es necesario, la entrada 'Compound Video' del televisor a'Progressive scan'.
Cómo conmutar el televisorSeleccione 'Progressive scan' para la entrada de vídeo compuesto deltelevisor. Consulte el manual de instrucciones del televisor en caso deque necesite ayuda.Si el televisor cuenta con clavijas separadas para Interlaced y Progressive,conecte el grabador de DVD a la clavija que admita el 'Progressive scan'.
Cómo conmutar el grabador de DVD1 Retire el enchufe de la toma de alimentación.2 Mantenga pulsada la tecla N del grabador y vuelve a conectar el
enchufe a la red. En la pantalla indicadora aparece 'PRO'(progressive scan).
3 Para volver a conmutara, repita los pasos 1 y 2 . En la pantallaindicadora desaparece 'PRO' (progressive scan). El grabador deDVD se ha conmutado ahora al modo 'Interlaced'. Consejo
Consulte después el capítulo 'Puesta en marcha' y lea el apartado 'Instalación inicial'.
Conexión mediante cable de S?vídeo (Y/C)
Con este tipo de conexión, también denominado cable de SVHS, la señal de brillo (señal Y) y lade color (C) se transmiten por separado. Las clavijas o enchufes mini-din se denominan tambiénclavijas o enchufes Hosiden.
Tenga a mano los siguientes cables:un cable de antena (1, suministrado), un cable de alimentación (2, suministrado), un cable deS-vídeo (SVHS) (3), un cable de audio (4, con clavijas rojas/blancas).
1 Desenchufe el cable de antena del televisor. Introduzca la clavijaen la entrada ANTENNA IN en la parte posterior del grabadorde DVD.
2 Mediante el cable de antena suministrado conecte la clavija TVOUT a la parte posterior del grabador de DVD con la clavija deentrada de la antena del televisor.
Conexión del grabador de DVD

15
3 Mediante el cable de S-Vídeo (SVHS), conecte la clavija S-VIDEO(Y/C) OUT situada en la parte posterior del grabador de DVDcon la clavija de entrada de S-vídeo (SVHS) correspondiente deltelevisor (normalmente con la indicación 'S-Video in', 'SVHS in'.Consulte el manual de instrucciones del televisor.)
4 Mediante un cable de audio (cinch), conecte la clavija cinchroja/blanca AUDIO L/R OUT junto a las clavijas S-VIDEO(Y/C) OUT ubicadas en la parte posterior del grabador de DVDcon la clavija de entrada de audio, generalmente roja/blanca, deltelevisor (normalmente con la indicación 'Audio in', 'AV in' .Consulte el manual de instrucciones del televisor.)
5 Encienda el televisor. A continuación, conmute el aparato a laclavija de entrada SVHS y seleccione el número de canalcorrespondiente. Encontrará más información acerca de losnúmeros de canales en el manual de instrucciones del televisor.
6 Mediante el cable de alimentación suministrado, conecte la clavija4MAINS situada en la parte posterior del grabador de DVD ala toma de alimentación de la pared.La pantalla indicadora presenta un resumen de las funciones másimportantes del grabador de DVD.Después de la primera instalación esta función se desactivará. Elcapítulo 'Configuración preferida personalizada', apartado 'Ahorrode energía' explica cómo reactivar la función de nuevo.
7 Encienda el grabador de DVD con la tecla STANDBY-ON m .En la pantalla indicadora aparece '�� �� ���'.
Consulte después el capítulo 'Puesta en marcha' y lea el apartado 'Instalación inicial'.
ESP
AT
OL
Conexión del grabador de DVD

16
Conexión con cable de vídeo (CVBS)
Este cable suele tener clavijas cinch amarillas y sirve para transmitir la señal de vídeo compuesto(FBAS, CVBS). Con esta forma de transmisión, la señal de color y brillo se envía a través de lamisma línea. Por ello en ocasiones aparecen interferencias en la imagen, es el llamado efecto'moiré'.
Tenga a mano los siguientes cables:un cable de antena (1, suministrado), un cable de alimentación (2, suministrado), un cable devídeo (CVBS) (3, clavijas amarillas). un cable de audio (4, con clavijas rojas/blancas).
1 Desenchufe el cable de antena del televisor. Introduzca la clavijaen la entrada ANTENNA IN en la parte posterior del grabadorde DVD.
2 Mediante el cable de antena suministrado conecte la clavija TVOUT a la parte posterior del grabador de DVD con la clavija deentrada de la antena del televisor.
3 Mediante un cable de vídeo (CVBS) conecte la clavija cinchamarilla VIDEO (CVBS) OUT situada en la parte posterior delgrabador de DVD con la clavija de entrada de vídeo del televisor(normalmente con la indicación 'Video in', 'AV in'. Consulte elmanual de instrucciones del televisor.)
4 Mediante un cable de audio (cinch), conecte la clavija cinchroja/blanca L AUDIO R OUT por debajo de la clavija VIDEO(CVBS) ubicada en la parte posterior del grabador de DVD conla clavija de entrada de audio, generalmente roja/blanca, deltelevisor (normalmente con la indicación 'Audio in', 'AV in' .Consulte el manual de instrucciones del televisor.)
5 Encienda el televisor. A continuación, conmute el aparato a laclavija de entrada audio/vídeo y seleccione el número de canalcorrespondiente. Encontrará más información acerca de losnúmeros de canales en el manual de instrucciones del televisor.
Conexión del grabador de DVD

17
6 Mediante el cable de alimentación suministrado, conecte la clavija4MAINS situada en la parte posterior del grabador de DVD ala toma de alimentación de la pared.La pantalla indicadora presenta un resumen de las funciones másimportantes del grabador de DVD.Después de la primera instalación esta función se desactivará. Elcapítulo 'Configuración preferida personalizada', apartado 'Ahorrode energía' explica cómo reactivar la función de nuevo.
7 Encienda el grabador de DVD con la tecla STANDBY-ON m .En la pantalla indicadora aparece '�� �� ���'.
Consulte después el capítulo 'Puesta en marcha' y lea el apartado 'Instalación inicial'.
Conexión únicamente con el cable deantena
Utilice esta conexión si, en su televisor, existe únicamente una conexión de antena y no sedispone de más clavijas de entrada de audio/vídeo. Tenga en cuenta que tiene que adaptar sutelevisor al grabador de DVD (canal 3 ó 4).
Tenga a mano los siguientes cables:Un cable de antena (1, suministrado), un cable de alimentación (2, suministrado).
1 Apague el televisor.
2 Desenchufe la clavija del cable del cable de antena de la clavija deentrada de la antena del televisor. Introduzca la clavija en laentrada ANTENNA IN en la parte posterior del grabador deDVD.
3 Mediante el cable de antena suministrado conecte la clavija TVOUT a la parte posterior del grabador de DVD con la clavija deentrada de la antena del televisor.
4 Mediante el cable de alimentación suministrado, conecte la clavija4MAINS situada en la parte posterior del grabador de DVD ala toma de alimentación de la pared.La pantalla indicadora presenta un resumen de las funciones másimportantes del grabador de DVD.Después de la primera instalación esta función se desactivará. Elcapítulo 'Configuración preferida personalizada', apartado 'Ahorrode energía' explica cómo reactivar la función de nuevo.
5 Encienda el grabador de DVD con la tecla STANDBY-ON m .En la pantalla indicadora aparece '�� �� ���'.
ESP
AT
OL
Conexión del grabador de DVD

18
6 Encienda el televisor y seleccione en el televisor el número decanal asignado al grabador de DVD o aparato de vídeo. Puedeelegir los canales 3 ó 4.
VCómo se puede cambiar entre los canales 3 y 4?
El canal 3 es el configurado en fábrica para esta función. Sin embargo,puede asignar el canal 4 realizando el siguiente procedimiento:1 Cuando aparezca '�� �� ���' en la pantalla, pulse la tecla 4 .2 En la pantalla indicadora aparece '���' (canal 4).3 Para restablecerlo, pulse la tecla 3 . En la pantalla indicadora
aparece '���' (canal 3). ?
7 Ponga el televisor en el canal seleccionado (3 ó 4). Utilice paraeste fin el mando a distancia de su televisor.En la pantalla del televisor aparece el menú de selección delidioma.
Inicialización
Idioma de menús
EnglishEspañolFrançais
OK para continuar
aNo aparece el menú de selección del idioma
b Verifique las conexiones de los cables.
b ¿Se enciende en la pantalla indicadora 'DVDR' (modo de grabador deDVD)?Si éste no es el caso, conmute con la tecla TV/DVD hasta que semuestra 'DVDR' en la pantalla indicadora.
b Conmute entre los canales 3 y 4 del televisor. Problema
8 Para la reproducción desde el grabador de DVD debe seleccionarel número del canal del televisor (canal de TV 'grabador deDVD').
Consulte después el capítulo 'Puesta en marcha' y lea el apartado 'Instalación inicial'.
Conexión del grabador de DVD

19
CConexión de aparatos adicionales
Puede conectar aparatos adicionales como, por ejemplo, un descodificador, un receptor desatélite, una videocámara, etc. en las clavijas S-VIDEO (Y/C) , VIDEO (CVBS) ,COMPONENT VIDEO Y PB PR y las clavijas de audio L AUDIO R , AUDIO .El cambio entre las clavijas S-VIDEO (Y/C) y VIDEO (CVBS) se realiza automáticamente.
El grabador de DVD debe estar conectado directamente al televisor (clavija de salidaS-VIDEO (Y/C) OUT , VIDEO (CVBS) OUT o COMPONENT VIDEO Y PB PROUT directamente al televisor). Si se conecta entre ambos un aparato de vídeo, la calidad de laimagen puede deteriorarse debido al sistema de protección anti copias que lleva incorporado elgrabador de DVD.
VSe pueden conectar aparatos adicionales con 'Progressivescan'?
Las clavijas de entrada COMPONENT VIDEO Y PB PR estánpreparadas únicamente para señales de tipo 'Interlaced'. El grabador deDVD no procesa las señales de entrada con 'Progressive scan'. ?
Conexión de vídeo, DVDPuede conectar a las clavijas de entrada también un vídeo o un grabador de DVD.Para aparatos de vídeo SVHS utilice la clavija S-VIDEO (Y/C) y las clavijas L AUDIO R
PAtención!:La mayoría de los casetes de vídeo y DVDs pregrabados están protegidos contra copias. Siintenta realizar una copia, en la pantalla indicadora del grabador de DVD aparece el mensaje'���� ���'.
aAl copiar de un casete de vídeo, en la pantalla indicadora delgrabador de DVD aparece '�� �� ���'
b Verifique que las clavijas del cable están bien insertadas.
b Si se realiza una grabación de un vídeo, modifique en el vídeo laconfiguración 'Tracking (posición de la cinta)'.
b Si la señal de entrada del vídeo es débil o no está bien, es posible queel grabador de DVD no reconozca la señal.
aAl copiar discos DVD o casetes pregrabados, la imagenpierde color y el brillo varía
b Esto sucede al intentar copiar un DVD o casete de vídeo protegidocontra copias. Aunque la imagen que se muestra en el televisor esbuena, la que se graba en el DVD+R/RW está deteriorada. Al grabareste tipo de DVD o casetes siempre aparecen estos problemas. Problema
ESP
AT
OL
Conexión de aparatos adicionales

20
Conexión del receptor de satélite con uncable cinch o S?VídeoPuede conectar aparatos adicionales, tales como descodificadores, receptores de satélite,videocámaras, etc. a las clavijas de entrada S-VIDEO (Y/C) , VIDEO (CVBS) y las clavijasaudio L AUDIO R .El cambio entre la clavija S-VIDEO (Y/C) y VIDEO (CVBS) se realiza automáticamente.
El cable de antena se tiene que conectar el receptor satélite y al grabador de DVD.
Conecte el grabador de DVD directamente al televisor (cable de los terminales de salidaS-VIDEO (Y/C) OUT , VIDEO (CVBS) OUT conectados directamente con el televisor). Si seconecta entre ambos un aparato de vídeo o un aparato adicional, la calidad de la imagen puededeteriorarse debido al sistema de protección anti copias que lleva incorporado el grabador deDVD.
Conexión de aparatos adicionales sólo através del cable de antenaSi conecta aparatos adicionales (p.ej. receptores de satélite,...) únicamente a través del cable deantena, tiene que observar lo siguiente:
El grabador de DVD se tiene que conectar directamente con el televisor. Si se conecta entreambos un aparato de vídeo, la calidad de la imagen puede deteriorarse debido al sistema deprotección anti copias que lleva incorporado el grabador de DVD.
El aparato adicional (receptor de satélite) se tiene que conectar antes del grabador de DVD(aparato adicional - grabador de DVD - televisor). A la clavija TV OUT sólo se debe conectar eltelevisor.
•) En caso de que, con el receptor de satélite conectado, se produjeran perturbaciones de laimagen de televisión, un canal de TV podría emitir en el mismo canal o en un canal en laproximidad inmediata del receptor de satélite. (por ejemplo: cadena de TV en el canal 3,receptor de satélite igualmente en el canal 3). Modifique en este caso el canal del receptor desatélite. Lea para este fin el Manual de instrucciones de éste.Este canal se tiene que conectar entonces también en el grabador de DVD para poder registrarlos programas de televisión del receptor de satélite.
•) Conecte durante la instalación del grabador de DVD el aparato adicional. Durante la búsquedaautomática de canales se memoriza entonces también el canal en el cual transmite el aparatoadicional como cadena de TV.
Conexión de aparatos adicionales

21
Conexión de una videocámara a lasclavijas frontales
Para facilitar la copia de grabaciones de videocámara se pueden utilizar las clavijas frontales.Dichas clavijas se encuentran debajo de la tapa del frontal, a la derecha.
Calidad de imagen superiorSi tiene una videocámara DV o una cámara Digital 8, utilice la entrada DV IN del grabador deDVD a la salida DV correspondiente de la videocámara.Al grabar la película se graban la fecha y hora de la grabación original como subtítulo del DVD.Durante la reproducción, puede visualizar esos datos en la pantalla del televisor con la función'E' (Subtítulos).
Seleccione como número de programa para esta entrada '���'.
Calidad de imagen muy buenaSi dispone de una videocámara Hi8 o S-VHS(C), conecte la entrada S-VIDEO del grabador deDVD a la salida de S-vídeo correspondiente de la videocámara.Asimismo, deberá conectar la entrada de audio AUDIO left/right del grabador de DVD a lasalida de audio de la videocámara.
Seleccione como número de programa para esta entrada '����'.
Calidad de imagen buenaSi su videocámara sólo dispone de una salida de vídeo (vídeo compuesto, CVBS), conecte laentrada VIDEO del grabador de DVD a la salida correspondiente de la videocámara.Asimismo, deberá conectar la entrada de audio AUDIO left/right del grabador de DVD a lasalida de audio de la videocámara.
Seleccione como número de programa para esta entrada '����'.
ESP
AT
OL
Conexión de aparatos adicionales
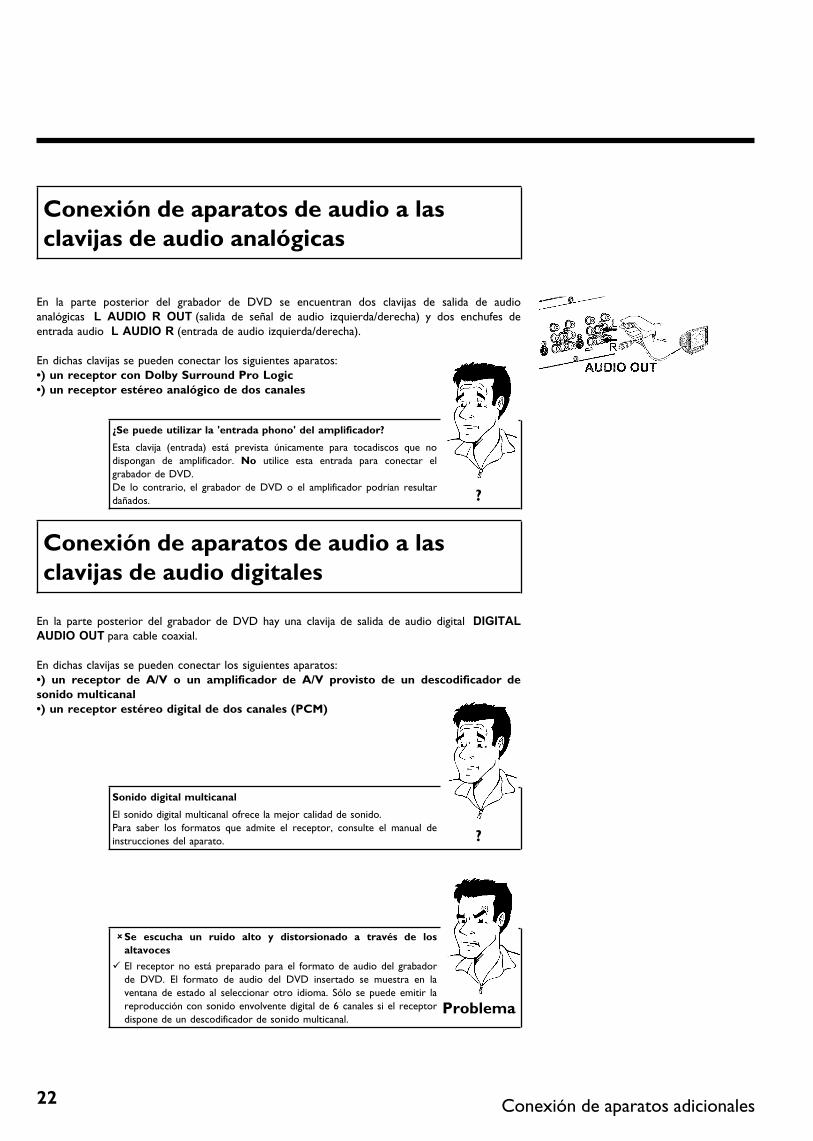
22
Conexión de aparatos de audio a lasclavijas de audio analógicas
En la parte posterior del grabador de DVD se encuentran dos clavijas de salida de audioanalógicas L AUDIO R OUT (salida de señal de audio izquierda/derecha) y dos enchufes deentrada audio L AUDIO R (entrada de audio izquierda/derecha).
En dichas clavijas se pueden conectar los siguientes aparatos:•) un receptor con Dolby Surround Pro Logic•) un receptor estéreo analógico de dos canales
VSe puede utilizar la 'entrada phono' del amplificador?
Esta clavija (entrada) está prevista únicamente para tocadiscos que nodispongan de amplificador. No utilice esta entrada para conectar elgrabador de DVD.De lo contrario, el grabador de DVD o el amplificador podrían resultardañados. ?
Conexión de aparatos de audio a lasclavijas de audio digitales
En la parte posterior del grabador de DVD hay una clavija de salida de audio digital DIGITALAUDIO OUT para cable coaxial.
En dichas clavijas se pueden conectar los siguientes aparatos:•) un receptor de A/V o un amplificador de A/V provisto de un descodificador desonido multicanal•) un receptor estéreo digital de dos canales (PCM)
Sonido digital multicanal
El sonido digital multicanal ofrece la mejor calidad de sonido.Para saber los formatos que admite el receptor, consulte el manual deinstrucciones del aparato. ?
aSe escucha un ruido alto y distorsionado a través de losaltavoces
b El receptor no está preparado para el formato de audio del grabadorde DVD. El formato de audio del DVD insertado se muestra en laventana de estado al seleccionar otro idioma. Sólo se puede emitir lareproducción con sonido envolvente digital de 6 canales si el receptordispone de un descodificador de sonido multicanal.
Problema
Conexión de aparatos adicionales

23
DPuesta en marcha
Instalación inicial
Una vez conectado el grabador de DVD al televisor y demás aparatos (tal como se describe enel capítulo anterior), en este capítulo se explica cómo realizar la instalación inicial. El grabador deDVD busca y memoriza automáticamente todos los canales de TV disponibles.
Encendido de los aparatos adicionales
Si ha conectado aparatos adicionales (receptor de satélite, etc.) a travésdel cable de la antena, enciéndalos. Durante la búsqueda automática sedetectan y memorizan también estos canales. Observe que, en algunosaparatos adicionales, tiene que conectar una 'señal de prueba'.
Antena no conectada
Incluso si sólo va a utilizar el grabador de DVD para reproducir o encaso de que haya conectado únicamente un receptor de satélite, tambiéndeberá realizar la instalación inicial. Este proceso es importante paramemorizar correctamente los ajustes básicos realizados. Tras realizar elproceso una vez, finaliza la instalación inicial y ya puede utilizar elgrabador de DVD con total normalidad. Consejo
Inicialización
Idioma de menús
EnglishEspañolFrançais
OK para continuar
1 Seleccione el idioma deseado para el menú de pantalla con latecla CH- B o CH+ A .
VQué es el menú de pantalla?
Gracias al menú de pantalla, disponible en varios idiomas, el nuevograbador de DVD no tendrá secretos para Ud. Todos los ajustes ofunciones se muestran en la pantalla del televisor en el idiomaseleccionado. ?
2 Confirme con la tecla OK .
Inicialización
Idioma de sonidoEnglishEspañolFrançaisPortuguêsItaliano
OK para continuar
3 Seleccione el idioma de sonido que desee con la tecla CH- B oCH+ A .
VQué es el idioma de sonido?
El sonido del DVD se reproduce en el idioma deseado, siempre que estédisponible en el disco. Si el idioma seleccionado no está disponible, elsonido se emite en la primera versión de idioma del DVD. También elmenú Disco de vídeo DVD se muestra en el idioma seleccionado siexiste en el disco. ?
4 Confirme con la tecla OK .
ESP
AT
OL
Puesta en marcha

24
Inicialización
Idioma de subtítulosEnglishEspañolFrançaisPortuguêsItaliano
OK para continuar
5 Seleccione el idioma que desea para los subtítulos con la teclaCH- B o CH+ A .
VQué es el idioma de los subtítulos?
Los subtítulos insertados se muestran en el idioma seleccionado, siempreque esté disponible. Si el idioma seleccionado no está disponible, lossubtítulos se muestran en la primera versión de idioma del DVD. ?
6 Confirme con la tecla OK .
Inicialización
Forma TV4:3 buzón4:3 panorámica16:9
OK para continuar
7 Seleccione el formato de imagen que desee con la teclaCH- B o CH+ A . Esta configuración sólo tiene efecto si elDVD insertado contiene esta información.
VQué formatos de imagen se pueden seleccionar?
'4:3 buzón' para ver la imagen apaisada con bandas negras (formato cine)en la parte superior e inferior de pantalla.
'4:3 panorámica' para ver la imagen completa en vertical; los lateralesaparecen cortados.
'16:9' para ver la imagen apaisada (relación de aspecto de imagen 16:9) ?
8 Confirme con la tecla OK .
9 Una vez conectada la antena (o la televisión por cable, receptorde satélite,...) al grabador de DVD, pulse la tecla OK .Comienza la búsqueda automática de canales. En la pantallaindicadora aparece '����'.
InstalaciónProgramación Canal. Auto.
Busca los canales de TV
000 Canales encontrados
h______________
Favor de esperar
aDurante la búsqueda el grabador de DVD no encuentraningún canal de televisión
b Seleccione otro canal de televisión en el televisor. ¿Se ve la imagen dedicho canal en el televisor?De no ser así, verifique la conexión del cable Antena (clavija de laantena) - grabador de DVD - televisor.
b Tenga paciencia durante la búsqueda.El grabador de DVD busca la gama de frecuencias completa parapoder memorizar el mayor número de canales de TV disponibles.
b Si no ha conectado ninguna antena, realice el ajuste básico hasta elfinal y, si lo desea, continúe con la búsqueda automática de canales(véase el apartado 'Búsqueda automática de canales').
aDurante la búsqueda el grabador de DVD encuentra pocos oningún canal de televisión
b Del mismo modo es posible que la conmutación automática entreantena/cable no reconozca bien la señal de televisión. Consulte en elsiguiente apartado cómo realizar el ajuste manual de la conmutación. Problema
10 Espere hasta que se hayan detectado todos los canalesdisponibles. Esto puede tardar varios minutos.
Puesta en marcha

25
11 Una vez terminada la búsqueda automática de canales, en lapantalla aparece el mensaje 'Búsqueda auto. completa'.
12 Finalice con la tecla SYSTEM-MENU .
La instalación inicial ha finalizado.
Búsqueda automática de canales
Durante la instalación inicial se buscan y memorizan automáticamente todos los canales de TVdisponibles. En caso de que el proveedor de televisión por cable o satélite modifique laasignación de canales o si desea poner en marcha el grabador de DVD después de un traslado,por ejemplo, puede iniciar de nuevo el proceso. De este modo, los canales de TV actualessustituirán a los ya memorizados.
1 Encienda el televisor. Seleccione el canal del grabador de DVD (3ó 4).
2 Encienda el grabador de DVD con la tecla STANDBY-ON m .
3 Pulse en el mando a distancia la tecla SYSTEM-MENU .Aparece la barra de menús.
4 Con la tecla D o C seleccione el símbolo 'A'.
5 Seleccione con la tecla CH- B o CH+ A la línea 'Instalación'y confirme con la tecla C .
6 Con la tecla CH- B o CH+ A , seleccione la línea'Programación Canal. Auto.'.
7 Pulse la tecla C . Comienza la búsqueda automática de canales.El grabador de DVD memoriza todos los canales de TVdisponibles. Este proceso puede tardar varios minutos.
InstalaciónProgramación Canal. Auto.
Busca los canales de TV
000 Canales encontrados
h______________
Favor de esperar
8 Una vez terminada la búsqueda de canales, en la pantalla aparece'Búsqueda auto. completa'.
9 Finalice con la tecla SYSTEM-MENU .
ESP
AT
OL
Puesta en marcha

26
aSe encuentran muy pocos canales de televisión
b El grabador de DVD reconoce para la 'Búsqueda automática decanales' si hay una señal de televisión por cable o por antenaconectada. Si ha conectado una señal de televisión por cable perorecibe muy pocos canales de televisión, debe realizar el ajuste deforma manual.
1 Para ello, en el paso 6 seleccione la línea 'Programación Canal.Auto.' o bien la línea 'Cable/Antena' y confirme con la tecla C .
2 Si usted selecciona ' Cable', los canales 1-125 estarán disponibles.Si usted selecciona 'Antena', los canales 2-69 estarán disponibles.Seleccione su tipo de conexión presionando C repetidas veces:'Antena', 'Cable' o 'Auto.' detecta automáticamente qué ustedtiene.
3 Confirme el ajuste nuevo con la tecla OK .4 Pulse la tecla SYSTEM-MENU para ir al menú siguiente. Pulse la
tecla OK para comenzar la búsqueda del canal según lo incitadopor el mensaje en la pantalla insertada. Cuando la búsqueda delcanal es completa, pulse la tecla SYSTEM-MENU repetidas vecespara quitar todos los menús. Problema
En el apartado siguiente 'Asignación y borrado manual de canales de TV' se describe cómoasignar manualmente un canal de TV.
Asignación y borrado manual de canalesde TV
Con esta función puede Borrar/apagar aquellos canales que no se reciban. Utilice las teclasCH+ A , CH- B para saltar.
1 Encienda el televisor. Seleccione, si es necesario, el canal delgrabador de DVD (canal 3 ó 4).
2 Encienda el grabador de DVD con la tecla STANDBY m . Pulseen el mando a distancia la tecla SYSTEM-MENU . Aparece labarra de menús.
3 Con la tecla D o C seleccione el símbolo 'A'.
4 Seleccione con la tecla CH- B o CH+ A la línea 'Instalación'y confirme con la tecla C .
5 Seleccione con la tecla CH- B o CH+ A la línea'Agregar/Eliminar Canales' y confirme con la tecla C .
InstalaciónAgregar/Eliminar Canales...
• Canal 001 Agr.Canal 002 Agr.Canal 003 Elim.Canal 004 Elim.Canal 005 Elim.Canal 006 Elim....
Pulsar SYSTEMMENU para salir
6 Seleccione con la tecla CH- B o CH+ A el canal que deseaasignar o borrar
7 Con la tecla C , D determine si desea asignar 'Agr.', o borrarun canal 'Elim.'.
Puesta en marcha

27
8 Repita los pasos 6 a 7 , hasta que haya asignado o borrado todoslos canales deseados.
9 Si desea memorizar los cambios, pulse la tecla OK .
10 Si desea terminar, pulse la tecla SYSTEM-MENU .
Configuración del idioma
Para el ajuste básico, puede seleccionar el idioma de los subtítulos o de sonido que desea utilizaren la reproducción de DVD. Recuerde que en algunos DVD se puede cambiar el idioma deaudio o de los subtítulos mediante el menú del disco DVD.Asimismo puede conmutar la grabación del sonido de un canal de televisión entre estéreo y unidioma adicional (Secondary Audio Program SAP). Lea al respecto el siguiente apartado.Asimismo, puede seleccionar uno de los idiomas mostrados para el menú de pantalla (OSD).Independientemente de esta selección, el texto de la pantalla indicadora del grabador de DVDestá en inglés.
1 Encienda el televisor. Seleccione, si es necesario, el canal delgrabador de DVD (canal 3 ó 4).
2 Encienda el grabador de DVD con la tecla STANDBY-ON m .
3 Pulse en el mando a distancia la tecla SYSTEM-MENU .Aparece la barra de menús.
4 Con la tecla D o C seleccione el símbolo 'A'.
5 Seleccione con la tecla CH- B o CH+ A la línea 'Idioma' yconfirme con la tecla C .
IdiomaAudio de Reproducción EnglishAudio de Grabado EstéreoSubtítulo EnglishMenú English
6 Seleccione la línea correspondiente y confirme con la tecla C .
VQué ajustes se pueden seleccionar?
Audio de Reproducción: La reproducción del DVD tiene lugar en elidioma seleccionado.
'Audio de Grabado' : Tipo de grabación de audio 'Estéreo' o 'SAP''Subtítulo' : Idioma de los subtítulos'Menú': Idioma de los OSD, menú en pantalla
Consejo
7 Seleccione el ajuste correspondiente con la tecla CH- B oCH+ A y confirme con la tecla OK .
8 Finalice con la tecla SYSTEM-MENU .
ESP
AT
OL
Puesta en marcha

28
Conmutar grabación de audio(estéreo, SAP)Algunos canales de televisión transmiten, además de la señal de audio en estéreo, una segundaseñal de audio (Secondary Audio Program SAP). Por lo general esto significa que se dispone deun idioma adicional. Por ejemplo, si un programa está disponible en inglés y en castellano, elcastellano puede que esté disponible como programa de audio adicional (SAP).Para grabar un canal de televisión en estéreo o SAP, puede seleccionar estéreo o SAP comoajuste básico. Dicho ajuste se activará cuando el sonido de un programa de televisión setransmita en estéreo o SAP.Al reproducir la grabación, el sonido sólo se reproducirá según el ajuste utilizado durante lagrabación (una grabación en SAP sólo se puede reproducir en SAP).
1 Encienda el televisor. Seleccione, si es necesario, el canal delgrabador de DVD (canal 3 ó 4).
2 Encienda el grabador de DVD con la tecla STANDBY-ON m .
3 Pulse en el mando a distancia la tecla SYSTEM-MENU .Aparece la barra de menús.
4 Con la tecla D o C seleccione el símbolo 'A'.
IdiomaAudio de Reproducción EnglishAudio de Grabado EstéreoSubtítulo EnglishMenú English
5 Seleccione con la tecla CH- B o CH+ A la línea 'Idioma' yconfirme con la tecla C .
6 Seleccione la línea 'Audio de Grabado' y confirme con la teclaC .
7 Seleccione con la tecla CH- B o CH+ A 'Estéreo' o 'SAP' yconfirme con la tecla OK .
Un programa de televisión sólo está disponible en 'Estéreo'pero mi configuración es 'SAP'.
Si la configuración para 'Audio de Grabado' es 'SAP' pero a la horade realizar la grabación el canal emite sólo en estéreo, la grabación serealizará en estéreo. ?
8 Finalice con la tecla SYSTEM-MENU .
Puesta en marcha

29
Asignación del número guía con VCRPlus+®
Si desea utilizar el sistema de programación VCR Plus+® , primero debe asignar al canal detelevisión el número guía correspondiente.
1 Pulse en el mando a distancia la tecla SYSTEM-MENU .Aparece la barra de menús.
2 Con la tecla D o C seleccione el símbolo 'A'.
3 Seleccione con la tecla CH- B o CH+ A la línea 'Instalación'y confirme con la tecla C .
4 Seleccione con la tecla CH- B o CH+ A la línea 'VCR Plus +Can.' y confirme con la tecla C .
InstalaciónVCR Plus + Can.
VCR Plus + Can. Canal...
001 ---002 ---003 ---004 ---005 ---...
Pulsar SYSTEMMENU para salir
5 Seleccione con la tecla CH- B o CH+ A el número guía al quedesee asignar un canal de televisión.
6 Seleccione con la tecla D o C o con las teclas numéricas0..9 el canal de televisión al que corresponde el número guía. Enlas guías de televisión y periódicos aparecen resúmenes con losnúmeros guía asignados a cada canal de televisión.
7 Confirme la asignación con la tecla OK .
8 Finalice con la tecla SYSTEM-MENU .
Ajuste automática de la fecha y hora
Con esta función se ajusta automáticamente la fecha y hora según la información enviada por elcanal PBS local. Para ello debe poner el canal PBS que envía esta información adicional. Si elgrabador de DVD elige un canal PSB equivocado o la fecha / hora es incorrecta, deberá ajustar lafecha y hora de forma manual (consulte el apartado 'Ajuste manual de la fecha y hora').
1 Pulse en el mando a distancia la tecla SYSTEM-MENU .Aparece la barra de menús.
2 Con la tecla D o C seleccione el símbolo 'A'.
3 Seleccione con la tecla CH- B o CH+ A la línea 'Instalación'y confirme con la tecla C .
ESP
AT
OL
Puesta en marcha

30
4 Seleccione con la tecla CH- B o CH+ A la línea 'Hora/fecha'y confirme con la tecla C .
5 Seleccione con la tecla CH- B o CH+ A 'Automático' yconfirme con la tecla C .
Hora/fechaAutomático
Canal PBS Auto.Horario Verano NoUso Horario Auto.
Pulsar SYSTEMMENU para salir
6 Seleccione la línea correspondiente con CH- B o CH+ A .
7 En la línea 'Canal PBS', seleccione el canal que envía lainformación de fecha y hora y confirme con la tecla OK . Elgrabador de DVD verifica si se puede obtener dicha información.
aEn la pantalla aparece 'Reloj no ajustado, ver.canal PBS'
b No se puede obtener información sobre la fecha y hora a partir deeste canal de televisión.Seleccione otro canal de televisión o bien seleccione la línea 'CanalPBS' 'Auto.'. Problema
8 En la línea 'Horario Verano' elija entre los siguientes ajustes:'Si': la hora ajustada corresponde al horario de verano (horariode verano activado)'No': la hora ajustada corresponde al horario de invierno (horariode verano desactivado)
9 En la línea 'Uso Horario', seleccione el huso horario en el quese encuentra, si se va a introducir otro huso horario. Sólo así sepuede ajustar correctamente el huso horario y, si es necesario,corregir.Para utilizar el huso horario del canal PBS, seleccione 'Auto.'.
10 Confirme cada línea con la tecla OK .
11 Finalice con la tecla SYSTEM-MENU .
Después de apagar el aparato, la fecha y hora se transmiten automáticamente desde el 'canal PBS'seleccionado.
Puesta en marcha
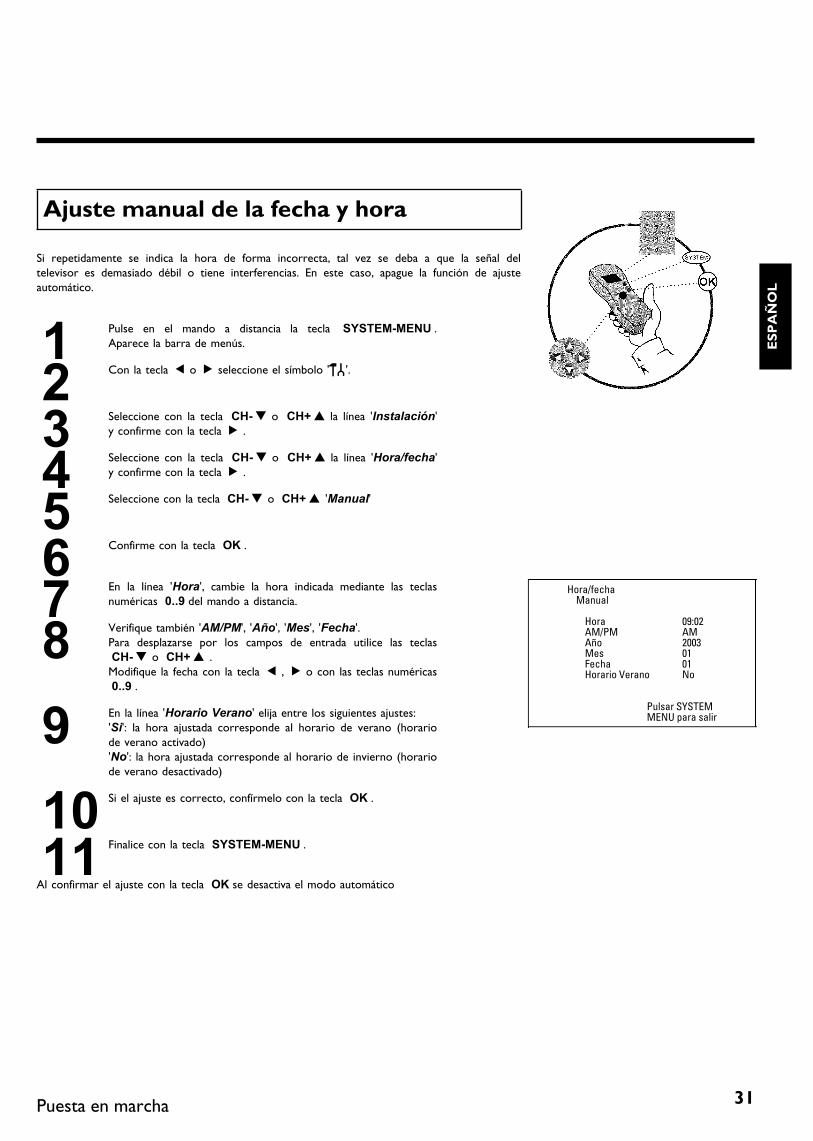
31
Ajuste manual de la fecha y hora
Si repetidamente se indica la hora de forma incorrecta, tal vez se deba a que la señal deltelevisor es demasiado débil o tiene interferencias. En este caso, apague la función de ajusteautomático.
1 Pulse en el mando a distancia la tecla SYSTEM-MENU .Aparece la barra de menús.
2 Con la tecla D o C seleccione el símbolo 'A'.
3 Seleccione con la tecla CH- B o CH+ A la línea 'Instalación'y confirme con la tecla C .
4 Seleccione con la tecla CH- B o CH+ A la línea 'Hora/fecha'y confirme con la tecla C .
5 Seleccione con la tecla CH- B o CH+ A 'Manual'
6 Confirme con la tecla OK .
Hora/fechaManual
Hora 09:02AM/PM AMAño 2003Mes 01Fecha 01Horario Verano No
Pulsar SYSTEMMENU para salir
7 En la línea 'Hora', cambie la hora indicada mediante las teclasnuméricas 0..9 del mando a distancia.
8 Verifique también 'AM/PM', 'Año', 'Mes', 'Fecha'.Para desplazarse por los campos de entrada utilice las teclasCH- B o CH+ A .Modifique la fecha con la tecla D , C o con las teclas numéricas0..9 .
9 En la línea 'Horario Verano' elija entre los siguientes ajustes:'Si': la hora ajustada corresponde al horario de verano (horariode verano activado)'No': la hora ajustada corresponde al horario de invierno (horariode verano desactivado)
10 Si el ajuste es correcto, confírmelo con la tecla OK .
11 Finalice con la tecla SYSTEM-MENU .
Al confirmar el ajuste con la tecla OK se desactiva el modo automático
ESP
AT
OL
Puesta en marcha

32
EInformación en la pantalla del televisor
A través de la barra de menús del sistema puede comprobar/modificar cómodamente numerosasfunciones y ajustes de su grabador de DVD. La barra de menús no se puede visualizar duranteuna grabación.
Símbolos en la barra de menús
Con la tecla SYSTEM-MENU se abre y se cierra la barra de menús (menú principal). Con lasteclas D , C se selecciona la correspondiente función. Con la tecla CH- B se confirma lafunción y se pasa a un siguiente menú o bien se activa la función.Según el disco insertado, algunas funciones no se pueden seleccionar.
Barra de menús 1
A Configuración preferida personalizada
B Título/pieza
C Capítulo/índice
D Idioma del sonido
E Idioma de los subtítulos
F Perspectiva de la cámara
G Zoom
Barra de menús 2Mientras se muestra en pantalla la barra de menús 1 puede acceder a la barra de menús 2pulsado repetidamente la tecla C .
H Sonido
I Cambio fotograma a fotograma
J Cámara lenta
K Avance a intervalos
L Búsqueda por tiempos
Información en la pantalla del televisor

33
Campo de respuesta inmediata
En la esquina superior izquierda de la barra de menús se encuentra el campo de respuestainmediata con información acerca de los distintos modos de funcionamiento. Esta información semuestra brevemente en pantalla al activar las distintas funciones del disco:
Shuffle: reproducción aleatoria
� Rastreo: cada título se inicia brevemente
� Repetición del disco completo
� Repetición del título
� Repetición de la pieza
� Repetición del capítulo
� Repetición de A hasta el final
� Repetición de A hasta B
� Perspectiva de la cámara
� Bloqueo para niUos activado
� Continuación de la reproducción
� Acción no permitida
Campo de estado
En el campo de estado se muestra el modo de funcionamiento actual (estado) del grabador deDVD y el tipo de disco insertado. Esta información se puede ocultar.
Símbolos de los tipos de discos
M DVD+RW
W DVD+R
N DVD?Video
O Video?CD
P Ningún disco insertado
Q Error
ESP
AT
OL
Información en la pantalla del televisor

34
Símbolos de los modos de funcionamiento
R Grabación
S Parada
T Reproducción
U Reproducción detenida
V Grabación detenida
X Búsqueda hacia delante (velocidad 8x)
Y Búsqueda hacia atrás (velocidad 8x)
Z Cámara lenta
Campo de información del sintonizador
Este campo se encuentra en la esquina inferior izquierda de pantalla. Muestra la señal de antena,el canal de televisión y el nombre del canal que se acaba de poner.
a Canal actual / clavija de entrada seleccionada
b Ninguna seUalEl canal de televisión no está disponible / el aparato adicional no estáconectado o está apagado
c SeUal de protección contra copias
Campo de información del temporizador
Este campo se encuentra por encima del campo de información del sintonizador. Si hay unagrabación programada (timer), se muestra el símbolo de Timer y la hora de inicio o la fecha dela primera grabación programada.Si no hay ningún temporizador programado, se muestra la hora actual.Durante la reproducción de un disco o durante una grabación no se muestra este campo. En unagrabación OTR puede visualizar este campo con la tecla SYSTEM-MENU .
f La grabación comienza el día indicado
g La grabación programada OTR continúa hasta la hora finalindicada
h Hora actualNinguna grabación (temporizador) programada
Información en la pantalla del televisor

35
FReproducción
Indicaciones generales para lareproducción
Con este grabador de DVD se pueden reproducir los siguientes sistemas:•) Vídeo DVD•) disco CD de (súper) vídeo•) disco DVD+RW•) disco DVD+R•) DVD-RW (modo vídeo, finalizado)•) DVD-R•) CD-R•) CD-RW•) CD de audio•) CD de MP3Para manejar el aparato puede utilizar el mando a distancia o las teclas situadas en la partefrontal del grabador de DVD.
aEn la pantalla indicadora aparece '���'
b En el disco insertado está encendido el bloqueo para niños. Consulteel capítulo 'Control de acceso (bloqueo para niños)', apartado'Bloqueo para niños' y 'Cómo desbloquear el disco'.
aEn la barra de menús de la pantalla aparece una 'X'
b Los discos de DVD pueden estar fabricados de tal forma que seanecesario realizar algunos pasos de funcionamiento o bien puede quehaya algunas funciones limitadas durante la reproducción. Si aparece elsímbolo 'X' en la pantalla, significa que la función seleccionada no estádisponible.
aEn la pantalla se muestra información sobre el códigoregional
b Las películas en DVD no suelen comercializarse al mismo tiempo entodas las regiones, por lo que todos los reproductores de DVDdisponen de un determinado código de región. Los discos puedenestar provistos de un código de región opcional. En caso de queambos códigos no coincidan (reproductor/disco), el disco no se podráreproducir.
b El código regional está indicado en una etiqueta en la parte posteriordel aparato.
b La codificación regional no se aplica a los discos DVD grabables. Problema
Insertar un disco
������ ���1 Pulse en el frontal la tecla OPEN/CLOSE J . Se abre labandeja del disco. Al abrirse la bandeja, aparece '������ ' en lapantalla indicadora y, a continuación, aparece '��� ����' una vezabierta del todo la bandeja.
2 Introduzca el disco con cuidado de forma que la etiqueta quedehacia arriba y pulse la tecla PLAY G o OPEN/CLOSE J . Enla pantalla indicadora aparece primero '������ ' y después'����� '. Se lee la información del disco.
ESP
AT
OL
Reproducción

36
VCómo se insertan los DVD de dos caras?
Los discos de doble cara no tienen nada impreso en la superficie. En elcentro aparece indicado el número de cada cara. Para reproducir el ladocorrespondiente, inserte el disco con el número de la cara hacia arriba. ?
Apertura y cierre de la bandeja con el mando a distancia
La bandeja del disco se puede abrir y cerrar con el mando a distancia.Para ello, mantenga pulsada la tecla STOP h del mando a distanciahasta que aparezca '������ ' (abriendo) en la pantalla indicadora o bien'������ ' (cerrando). Consejo
3 La reproducción se inicia automáticamente.
Al reproducirse un DVD puede que aparezca un menú. Si los títulos y capítulos estánnumerados, pulse una tecla numérica del mando a distancia. Asimismo, puede utilizar las teclasD , C , CH+ A , CH- B o las teclas numéricas 0..9 para seleccionar una opción del menú yconfirmarlo con la tecla OK .No obstante, puede activar el menú en cualquier momento con la tecla DISC-MENU del mandoa distancia.Obtendrá más información en el apartado 'Reproducción de un disco de vídeo DVD'.
Al reproducirse un DVD+RW aparece una vista general de la imagen de índice. Con las teclasseleccione CH- B , CH+ A , N , O el título que desea reproducir.Confirme con la tecla OK .Obtendrá más información en el apartado 'Reproducción de un disco DVD+RW/+R'.
En caso de que la reproducción no se inicie de forma automática, pulse la tecla PLAY G .Obtendrá más información en el apartado 'Reproducción de un CD de audio'.
Si aparece en la pantalla indicadora el símbolo 'h', inicie la reproducción con la tecla PLAY G .Si aparece un menú en pantalla, seleccione la opción de menú correspondiente con las teclas delmando a distancia (PREV= N , NEXT= O ) o bien con las teclas numéricas 0..9 .Obtendrá más información en el apartado 'Reproducción de un CD de (súper) vídeo'.
Reproducción

37
Reproducción de un disco de vídeo DVD
��� ���1 Si la reproducción no se inicia automáticamente, pulse la tecla dereproducción PLAY G .En la pantalla indicadora aparece:capítulo (chapter) y el tiempo transcurrido.
2 Para detener la reproducción, pulse la tecla STOP h del mandoa distancia o bien la tecla STOP h del grabador de DVD.
3 Para extraer el disco, pulse la tecla OPEN/CLOSE J en elfrontal del grabador de DVD.
Reproducción de un disco DVD+RW/ +R
1 Si el disco está protegido contra escritura o se ha insertado undisco DVD+R finalizado, la reproducción se iniciaautomáticamente.
��� ���� ���2 En caso de que la reproducción no se inicie de forma automática,seleccione en la pantalla del menú con la tecla CH- B oCH+ A el título que desea reproducir.También puede utilizar las teclas N o O del frontal.
3 Pulse la tecla de reproducción PLAY G .En la pantalla indicadora aparece:el título/número de capítulo y el tiempo transcurrido.
aEn la pantalla indicadora aparece el mensaje '���������'
b El disco no contiene ninguna grabación. Problema
4 Para detener la reproducción, pulse la tecla STOP h del mandoa distancia o bien la tecla STOP h del grabador de DVD.
5 Para extraer el disco, pulse la tecla OPEN/CLOSE J en elfrontal del grabador de DVD.
VQué se debe tener en cuenta al reproducir distintos tipos degrabaciones (calidades)?
Durante la reproducción el aparato cambia automáticamente entre losdistintos tipos de calidad 'M1, M2, M2x, M3, M4, M6, M8'.Obtendrá más información en el capítulo 'Grabación manual', en elapartado 'Selección del tipo de grabación (calidad de la imagen)'. ?
ESP
AT
OL
Reproducción

38
Reproducción de un CD de audio
El grabador de DVD se puede utilizar también para reproducir CD de audio
1 Introduzca un CD de audio. La reproducción se iniciaautomáticamente.
Indicaciones del CD de audio
Si el televisor está encendido, en la pantalla aparecen las indicaciones delCD de audio.
Durante la reproducción aparecen en el televisor y en la pantallaindicadora los números de las pistas actuales. Consejo
2 Pulse la tecla STOP h para detener la reproducción. Se muestrael número de pistas del CD y la duración total del mismo.
Reproducción de un CD de MP3
Los archivos de MP3 (MPEG1 Audio Layer-3) son pistas de música comprimida. Gracias a estatecnología se puede reducir 10 veces la cantidad de datos. De esta forma se pueden incluir hasta10 horas de música con calidad similar a la del CD en un solo CD ROM.
Al crear CD de MP3, tenga en cuenta lo siguiente:Sistema de archivos: ISO9660Estructura de directorios: máximo 8 nivelesFormato: *.mp3Nombres de archivo: máximo 12 caracteres (8+3)Máximo 32 álbumes, 999 títulosFrecuencia de muestreo empleada: 32; 44,1; 48 (kHz). Las pistas de música con una frecuenciadistinta se omitirán.Velocidad en bits empleada: 32, 64, 96, 128, 192, 256 (kbit/s)Etiqueta identificativa (ID3): versión 1, 1.1. En versiones posteriores, se mostrará como álbum elnombre del directorio y como título el nombre del archivo.
Indicaciones importantes para la reproducción:Sólo se reproduce la primera sesión de un CD multisesión.
1 Introduzca un CD de MP3. La reproducción se iniciaautomáticamente.
Indicaciones del CD de MP3
Si el televisor está encendido, en la pantalla aparecen las indicaciones delCD de MP3.
Durante la reproducción aparecen en el televisor y en la pantallaindicadora los números de las pistas actuales.Al detener la reproducción (tecla STOP h ) se indica en la pantalla deltelevisor y en la pantalla indicadora el número del álbum.
Asimismo, si está disponible en la etiqueta identificativa, se muestrainformación adicional acerca de: el álbum, la pista y el artista. Consejo
Reproducción

39
2 Pulse la tecla STOP h para detener la reproducción. En lapantalla indicadora se muestra el número de álbumes.
Otras funciones de reproducción
Seleccione con la tecla N o O el título anterior o el siguiente.
Puede utilizar también la tecla T/C para seleccionar títulos y álbumes.1 Pulse la tecla T/C y seleccione con la tecla C o D el símbolo 'T'
para álbum o 'C' para título.2 Seleccione con la tecla CH- B , CH+ A o bien con las teclas
numéricas 0..9 del mando a distancia el número del álbum o título.
Asimismo, puede utilizar funciones de repetición (tecla PLAY MODE ). Consejo
Reproducción de un CD de (súper) vídeo
Los CD de (súper) vídeo también pueden estar equipados de 'PBC' (control de la reproducción /Play Back Control). Ello permite seleccionar directamente funciones de reproducción (menús)especiales. El CD de vídeo debe ser compatible con PBC (consulte la carcasa del CD).La función 'PBC' está activada en la configuración estándar.
1 Inserte un CD de (súper) vídeo.Si aparece en la pantalla indicadora el símbolo 'h', inicie lareproducción con la tecla PLAY G .
2 Si aparece un menú en la pantalla, seleccione la opción de menúcorrespondiente con las teclas del mando a distancia(PREV= N , NEXT= O ) o bien con las teclas numéricas0..9 .Si el menú PBC dispone de una barra de títulos, se puede abrirdirectamente el título deseado.
3 Pulse la tecla RETURN para regresar al menú anterior.
4 Pulse la tecla STOP h para detener la reproducción.
ESP
AT
OL
Reproducción

40
GOtras funciones de reproducción
Cómo cambiar a otro título o capítulo
Si el disco contiene más de un título o capítulo, puede cambiar a otro título o capítulo tal comose indica a continuación. Si dentro de un capítulo hay varios capítulos, se cambia entre dichoscapítulos. Entonces, sólo se puede seleccionar el título a través de la barra de menús.
1 Durante la reproducción, pulse la tecla O para pasar alsiguiente título o capítulo. Con la tecla N se pasa al inicio deltítulo o capítulo actual. Al pulsar dos veces la tecla N se pasaal inicio del título o capítulo anterior.
Uso de la tecla T/C (título/capítulo)
1 Pulse la tecla T/C (título/capítulo) y, a continuación, seleccione eltítulo correspondiente con la tecla CH+ A o CH- B .Verifique que se haya seleccionado el símbolo 'T' (título) en la barrade menús.
2 Con la tecla T/C puede seleccionar capítulos dentro de un título.Pulse la tecla T/C y seleccione el símbolo 'C (capítulo) con la teclaC .A continuación, seleccione el capítulo correspondiente con la teclaCH+ A o CH- B . Consejo
Búsqueda en el disco
Dentro de la grabación se puede buscar a una velocidad 4 ó 32 veces superior a la velocidad degrabación. Las demás velocidades sólo se pueden seleccionar a través de la barra de menús(K).
1 Durante la reproducción, mantenga pulsada la teclaN (retroceso) o O (avance) para pasar a la función debúsqueda. Con las teclas N / O puede cambiar la velocidadde la búsqueda.
2 Para continuar con la reproducción, pulse dos veces la teclaPLAY G en la posición deseada.
aNo hay sonido
b Durante la búsqueda se desactiva el sonido. No se trata de ningúnfallo del aparato. Problema
Otras funciones de reproducción

41
Función de búsqueda a través de la barra de menús
1 Durante la reproducción, pulse la tecla SYSTEM-MENU delmando a distancia. Aparece una barra de menús en la partesuperior de la pantalla.
2 Seleccione el símbolo 'K' con la tecla C o D y confirme con latecla CH- B .
3 Con la tecla D o C puede seleccionar distintas velocidades debúsqueda hacia delante o hacia atrás.
4 Si es necesario, cierre la barra de menús con la teclaSYSTEM-MENU .
5 Para continuar con la reproducción, pulse la tecla PLAY G dosveces.
Consejo
Imagen fija
��� ���1 Durante la reproducción, pulse la tecla PAUSE 9 , para detenerla reproducción y ver una imagen fija.
Cambio fotograma a fotograma a través de la barra de menús
1 Con la imagen fija, pulse la tecla SYSTEM-MENU del mando adistancia. Aparece una barra de menús en la parte superior de lapantalla.
2 Seleccione el símbolo 'I' con la tecla C o D y confirme con latecla CH- B .
3 A continuación puede avanzar o retroceder fotograma a fotogramapulsando a tecla D o C .
4 Si es necesario, cierre la barra de menús con la teclaSYSTEM-MENU . Consejo
2 Para continuar con la reproducción, pulse la tecla PLAY G .
Cámara lenta
1 Durante la reproducción, pulse la tecla PAUSE 9 del mando adistancia. A continuación, mantenga pulsada la tecla N oO para cambiar al modo de reproducción a cámara lenta.
2 Con las teclas N o O puede cambiar entre las distintasvelocidades.
ESP
AT
OL
Otras funciones de reproducción

42
Cámara lenta mediante la barra de menús
1 Durante la reproducción, pulse la tecla PAUSE 9 del mando adistancia y, a continuación, pulse la tecla SYSTEM-MENU .Aparece una barra de menús en la parte superior de la pantalla.
2 Seleccione el símbolo 'J' con la tecla C o D y confirme con latecla CH- B .
3 Con las teclas D o C puede seleccionar distintas velocidades deavance o retroceso a cámara lenta.
4 Si es necesario, cierre la barra de menús con la teclaSYSTEM-MENU . Consejo
3 Para continuar con la reproducción, pulse la tecla PLAY G dosveces.
Búsqueda por tiempos
Con esta función se puede seleccionar el punto (momento) donde debe comenzar lareproducción.
1 Durante la reproducción, pulse la tecla SYSTEM-MENU delmando a distancia. Aparece una barra de menús en la partesuperior de la pantalla.
2 Seleccione el símbolo 'L' con la tecla C o D y confirme con latecla CH- B . Se interrumpe la reproducción y en la pantallaaparece un campo donde se muestra el tiempo transcurrido hastael momento (tiempo de reproducción).
3 Introduzca con las teclas numéricas 0..9 la hora de inicio a partirde la cual desea que se inicie a reproducción.
4 Confirme con la tecla OK .
aEn la pantalla parpadea la hora introducida
b La duración del título seleccionado es inferior al valor introducido.Introduzca una hora distinta o cancele la acción con la teclaSYSTEM-MENU . Problema
5 La reproducción comienza en el momento indicado.
Otras funciones de reproducción

43
Repetición / reproducción aleatoria
Puede marcar apartados completos o el disco entero para que se repita de forma continua.Según el tipo de disco (vídeo DVD, DVD+RW, CD de vídeo) puede seleccionar capítulos, títuloso el disco entero.
1 Seleccione el capítulo, título o disco deseado y comience lareproducción.
2 Pulse durante la reproducción la tecla PLAY MODE . Al pulsarrepetidamente la tecla PLAY MODE puede seleccionar entre lasdistintas opciones:•) '�•) '�': repetición del capítulo (sólo DVD)•) '�': repetición de la pista o título•) '�': repetición del disco entero (sólo CD de audio o vídeo)•) ' ': reproducción aleatoria (Shuffle)•) Desaparece la indicación: ninguna repetición
3 Si desea terminar la repetición, pulse la tecla STOP h .También puede pulsar la tecla PLAY MODE varias veces hastaque desaparezca la indicación.
Repetición de un pasaje (A?B)Se puede reproducir un pasaje concreto dentro de un título o capítulo. Para ello, debe marcar elprincipio y final del pasaje deseado.
1 Durante la reproducción, pulse la tecla PAUSE 9 en el puntode inicio deseado.En la pantalla verá una imagen fija.
2 Pulse la tecla PLAY MODE tantas veces como sea necesariohasta que en la pantalla aparezca el símbolo '�'. De estemodo se memoriza el punto de inicio.Inicie la reproducción con la tecla PLAY G .
3 Para marcar el final, pulse la tecla OK . En la pantalla aparece'�'. Se reproduce únicamente esa zona seleccionada.
4 Si desea terminar la repetición, pulse la tecla STOP h .También puede pulsar la tecla PLAY MODE varias veces hastaque desaparezca la indicación.
ESP
AT
OL
Otras funciones de reproducción

44
Función de rastreo
Con esta función se reproducen los 10 primeros segundos de cada capítulo (DCD) o de cadapista/apartado (CD).
1 Durante la reproducción pulse la tecla PLAY MODE tantasveces como sea necesario hasta que en la pantalla aparezca elsímbolo '�'.
2 Pasados 10 segundos, el grabador de DVD pasa al siguientecapítulo o índice. Para comenzar la reproducción en el capítulo oíndice deseado, pulse la tecla STOP h y, a continuación, la teclaPLAY G .
Perspectiva de la cámara
Si el DVD de vídeo contiene escenas que se pueden ver desde distintas perspectivas de lacámara, puede elegir reproducir el disco con la perspectiva que desee.
1 Pulse durante la reproducción la tecla PAUSE 9 . En la pantallaverá una imagen fija.
2 Pulse la tecla SYSTEM-MENU y, con la tecla C , seleccione elsímbolo 'F'.
aNo se ve el símbolo 'F'
b La escena elegida sólo está disponible con una perspectiva de cámara.Por consiguiente, no se puede seleccionar esta función. Para másinformación, lea el 'Cover-Text' adjunto a su disco DVD-Video. Problema
3 Con la tecla CH- B o CH+ A , seleccione la perspectivadeseada. También puede introducir directamente un número conlas teclas numéricas 0..9 .
4 Pasados unos instantes, se procede a reproducir la escena desdela nueva perspectiva. El símbolo 'F' aparece en pantalla hastaque llegue una escena que sólo se pueda ver desde unaperspectiva.
Otras funciones de reproducción

45
Función zoom
Con esta función puede aumentar la imagen de vídeo y puede desplazarse por la imagenampliada.
1 Pulse durante la reproducción la tecla PAUSE 9 . El grabadorde DVD pasa al modo 'PAUSE'. En la pantalla verá una imagenfija.
2 Pulse la tecla SYSTEM-MENU y, con la tecla C , seleccione elsímbolo 'G'.
3 Seleccione con la tecla CH- B o CH+ A el aumento que desee.
4 Tan pronto como aparezca 'OK para mover área' en pantallahabrá terminado el proceso de zoom.
5 Pulse la tecla OK . Con las teclas CH+ A , CH- B , C ,D seleccione la zona de la imagen que desea observar con másdetalle.
6 Confirme con la tecla OK .
7 Para finalizar la función pulse la tecla PLAY G y después la teclaSYSTEM-MENU .
Cambio del idioma de audio
Los DVD de vídeo pregrabados suelen estar doblados en varios idiomas. Al reproducir el discose selecciona el idioma elegido durante la instalación inicial, o bien el idioma principal del DVD.No obstante, puede modificar en todo momento el idioma de audio del disco insertado.Recuerde que también puede cambiar el idioma de audio a través del menú del disco insertado(tecla DISC-MENU ) con la tecla AUDIO . Es probable que los idiomas de sonido difieran.Recuerde que en algunos DVD se puede cambiar el idioma de audio o de los subtítulos medianteel menú del disco DVD.
1 Pulse durante la reproducción la tecla AUDIO .
2 Seleccione con la tecla CH- B o CH+ A el idioma de audioque desee. También puede introducir directamente un númerocon las teclas numéricas 0..9 .
3 La reproducción continúa con el nuevo idioma de audio.
ESP
AT
OL
Otras funciones de reproducción

46
Subtítulos
Los DVD de vídeo pregrabados suelen tener subtítulos en varios idiomas. Al reproducir el discose selecciona el idioma elegido durante la instalación inicial. No obstante, puede modificar entodo momento el idioma de los subtítulos del disco insertado.Recuerde que puede cambiar el idioma de los subtítulos desde el menú del disco insertado (teclaDISC-MENU ), así como a través de la barra de menús (tecla SYSTEM-MENU ). Es probableque los idiomas de los subtítulos difieran en cada menú.
1 Durante la reproducción, pulse la tecla SYSTEM-MENU yseleccione el símbolo 'E' con la tecla C .
2 Con la tecla CH- B o CH+ A , seleccione el idioma deseadopara los subtítulos. También puede introducir directamente unnúmero con las teclas numéricas 0..9 .Con la tecla 0 o seleccionando 'off' se vuelven a desactivar lossubtítulos.
3 La reproducción continúa con los subtítulos en el nuevo idioma.
Otras funciones de reproducción

47
HGrabación manual
General
VEn qué disco se puede grabar?
Con este grabador de DVD se pueden grabar dos tipos de discos DVDdistintos:DVD+RWEste tipo de discos se pueden grabar y borrar.
DVD+REste tipo de discos sólo se pueden grabar una vez.Para reproducir este DVD en un reproductor de DVD, se debe finalizarcon la función 'Finalizar disco' . Una vez finalizado el disco, no sepuede grabar más en él.Si el disco sólo se va a reproducir en el grabador de DVD, no hace faltafinalizarlo. Se pueden insertar más grabaciones, o bien borrarlas. Sinembargo, no se recupera el espacio (tiempo grabado) de la grabación(título) eliminada.
?
Utilice la función 'Grabación manual' para iniciar espontáneamente una grabación (p.ej.: unprograma de televisión en curso).Para ello, seleccione en la 'imagen del índice' el título que desea sobrescribir o 'Título libre' conlas teclas CH- B , CH+ A .Si desea introducir una grabación entre dos grabaciones existentes, tenga en cuenta la duraciónde las grabaciones antiguas y de la nueva. Si la nueva grabación ocupa demasiado, se sobrescribirála grabación siguiente (título o capítulo).
Inserción de nuevas grabaciones detrás de todas las demásgrabaciones (Safe Record)
Para incluir una nueva grabación después de la última grabación del disco,mantenga pulsada la tecla REC/OTR n hasta que en la pantallaindicadora aparezca '���� ��'.
En los discos DVD+R cada nueva grabación se añade siempre detrás delas anteriores, puesto que las grabaciones existentes no se puedensobrescribir.
Se alcanza el fin del disco
Si, durante una grabación, se alcanza el fin del disco, la grabación seinterrumpe y el grabador de DVD se desconecta automáticamente. Consejo
Lea el apartado 'Grabación sin desconexión automática', si desea empezar y terminar unagrabación Ud. mismo.
Lea el apartado 'Grabación con desconexión automática', si desea empezar una grabación Ud.mismo, pero terminarla automáticamente en un tiempo determinado. De este modo puede evitar lagrabación hasta el fin del disco.
ESP
AT
OL
Grabación manual

48
Grabación sin desconexión automática
1 Encienda el televisor y seleccione, si es necesario, el canal delgrabador de DVD (canal 3 ó 4).
2 Inserte el disco donde desea realizar la grabación. Se compruebael contenido y sistema del disco. En la pantalla indicadora aparece'����� '.
a Indicaciones del índice
b Se inserta un disco DVD+RW que ya contiene grabaciones. Con latecla CH+ A , CH- B seleccione el punto donde desea quecomience la grabación.
aEn la pantalla indicadora aparece el mensaje '���������'
b El disco DVD insertado está vacío.
aAparece un cuadro de diálogo donde se pregunta si deseaeliminar el contenido o bien expulsar el disco
b El disco insertado es un disco DVD+RW cuyo contenido no escompatible con vídeo DVD (por ejemplo, un disco de datos). Sólo sepueden realizar grabaciones en este disco si el contenido completo seborra previamente con la tecla REC/OTR n .
aSi se puede grabar, aparece el mensaje 'Límite de título' enpantalla
b Un disco puede contener sólo un máximo de 48 títulos (incluidostítulos vacíos). Elimine algunos títulos o cambie el disco. Problema
3 Si es necesario, utilice la tecla MONITOR del mando a distanciapara pasar al sintonizador interno del grabador de DVD.
4 Seleccione con la tecla CH+ A o CH- B el canal que deseagrabar. En la pantalla indicadora aparece:
� �������� ���Número de canal de las entradas externas:
'���' Clavija SVHS (Y/C) S-VIDEO (Y/C) , Clavija de vídeo (CVBS)VIDEO (CVBS) , Clavija de audio L AUDIO R para clavijaSVHS y de vídeo.
El cambio entre la clavija S-VIDEO (Y/C) y VIDEO(CVBS) se realiza automáticamente.
. '����' Clavijas de vídeo compuesto en la parte posteriorCOMPONENT VIDEO Y PB PR , clavijas de audioCOMPONENT VIDEO Y PB PR para vídeo compuesto
'����' Clavijas de SVHS / audio frontales S-VIDEO / AUDIOleft/right
'����' Clavijas de audio / vídeo frontales A/V VIDEO / AUDIOleft/right
El cambio entre la clavija S-VIDEO y VIDEO se realizaautomáticamente.
'���' Clavija de vídeo digital (i Link) frontal DV INConsejo
Grabación manual

49
5 Para grabar, pulse en el mando a distancia la teclaREC/OTR n o bien la tecla REC n del grabador de DVD.
Si desea iniciar la grabación después de las grabaciones existentes,mantenga pulsada la tecla REC/OTR n hasta que aparezca '������' en la pantalla indicadora.En los discos DVD+R cada grabación se añade siempre detrás delas anteriores, puesto que las grabaciones existentes no sepueden sobrescribir.En la pantalla indicadora aparece, por ejemplo:
��� ��� �!� ���Inserción de marcas de capítulos
Durante la grabación se pueden marcar las escenas para despuésbuscarlas u ocultarlas directamente.Durante la grabación, pulse la tecla FSS cuando comience la escena quedesee marcar. En la pantalla aparece 'Insertando marca'. En la pantallaindicadora aumenta en uno el número de 'CHAPTERS ' (capítulos).Encontrará más información acerca de los títulos y capítulos en elapartado 'Cómo cambiar a otro título o capítulo' dentro del capítulo'Reproducción'.
Consejo
6 Con la tecla STOP h del mando a distancia o la teclaSTOP h del aparato, detenga la grabación. En la pantallaindicadora aparece '���� ����'. El grabador de DVD reorganizael índice de contenidos. Espere hasta que en la pantalla indicadoraaparezca un mensaje; concluye entonces la grabación.
aEn la pantalla indicadora aparece '���� �'
b No se ha podido proceder a la finalización de la grabación debido aun error del disco. Compruebe el disco insertado y límpielo, siprocede. Problema
Cómo hacer compatibles las grabaciones en discos DVD+R
Si desea reproducir la grabación en un reproductor DVD, es necesariofinalizar el disco en el grabador de DVD. Gracias a la función'Finalizando', el DVD se prepara de forma que se pueda leer en unreproductor de DVD. Consulte el apartado 'Cómo terminar discosDVD+R (finalizar)' del capítulo 'Cómo administrar el contenido deldisco'.
Consejo
ESP
AT
OL
Grabación manual

50
Interrupción de la grabación (pausa)
1 Durante la grabación, pulse la tecla PAUSE 9 , para no incluiren la grabación las pausas publicitarias, por ejemplo.
2 Para continuar con la grabación, pulse la tecla REC/OTR n .
Finalización de la grabación
Para dar por terminada la grabación, pulse la tecla STOP h . Espere aque aparezca en la pantalla indicadora el mensaje '���� ����'. Consejo
Grabación con desconexión automática(OTR One?Touch?Recording)
1 Inserte un disco.
2 Si es necesario, utilice la tecla MONITOR del mando a distanciapara pasar al sintonizador interno del grabador de DVD.
3 Seleccione con la tecla CH+ A o CH- B el canal que deseagrabar.
4 Pulse en el mando a distancia repetidamente la teclaREC/OTR n .
5 Cada vez que pulsa la tecla REC/OTR n , el tiempo degrabación aumenta en 30 minutos.
VCómo se puede cancelar el tiempo de grabación establecido?
Para eliminar la entrada, mientras se muestra en pantalla el tiempo degrabación pulse la tecla CLEAR .
VCómo se comprueba el tiempo de grabación restante?
Pulse durante una grabación OTR la tecla SYSTEM-MENU . El tiempohasta el fin de la grabación aparece en pantalla en el cuadro deinformación del temporizador. ?
Grabación manual

51
Proteger el disco contra grabaciones nodeseadas
Para evitar borrar accidentalmente una grabación importante, puede proteger todo el disco. Laprotección se aplica siempre al disco completo. No se pueden proteger las grabacionesindividuales.
Qué sucede con los discos DVD+R
Siempre que no se finalicen o terminen, estos discos se pueden protegerde grabaciones accidentales igual que los discos DVD+RW. ?
1 Introduzca el disco que desea proteger.
2 Cuando aparezca el índice en pantalla, pulse en el mando adistancia la tecla STOP h . Se marca el primer título.
3 Pulse la tecla CH+ A . A continuación aparece la pantallainformativa del disco.
4 Pulse la tecla C .Seleccione la línea 'Protección'.Confirme con la tecla C .
5 Seleccione con la tecla CH- B 'Protegido' y confirme con latecla OK .
6 Finalice con la tecla D y, por último, con la tecla DISC-MENU .
Ya está protegido el disco completo.Si intenta realizar una grabación, en la pantalla indicadora aparece'���� ����' y en la pantalla aparece 'Disco cerrado'.
Si deseara realizar posteriormente grabaciones en este disco, repita lospasos, pero seleccione el paso 5 'Desprotegido'. Consejo
ESP
AT
OL
Grabación manual

52
Alinear grabaciones dentro de un título(Assemble)
En un DVD+RW grabado puede añadir una grabación adicional a un título existente. El títuloañadirá esta grabación en forma de 'Capítulo' ('Chapter'). La información existente que hay apartir de ese punto se sobrescribe. Asimismo, se sobrescriben los títulos que siguen al títuloactual, según la duración de la nueva grabación. Se utiliza el tipo de grabación (calidad) empleadoen el título actual.Para reproducir la grabación, pulse la tecla SYSTEM-MENU y seleccione con la tecla C elsímbolo 'C' (Chapter). También puede utilizar la tecla T/C .
Encontrará más información en el capítulo 'Reproducción', dentro del apartado 'Cómo cambiar aotro título o capítulo'.
VQué sucede con los discos 'DVD+R'?
En los discos 'DVD+R', las grabaciones nuevas sólo se pueden anexar alas ya existentes. Con los discos 'DVD+R' no se pueden sobrescribir lasgrabaciones anteriores. ?
1 En el índice, busque el título donde se va a insertar la nuevagrabación.
2 Consulte cuál es el último minuto de la grabación antigua(reproducción).
3 En el lugar donde se va a insertar la nueva grabación, pulse en elmando a distancia la tecla PAUSE 9 . En la pantalla aparece '9'.
4 Para controlar la grabación puede pasar al sintonizador internocon la tecla MONITOR .
5 Comience la grabación de la forma habitual con la teclaREC/OTR n del mando a distancia.Se anexa así la nueva grabación.
6 Con la tecla STOP h se termina la grabación.
Grabación manual

53
Selección del tipo de grabación (calidad dela imagen)
Con el tipo de grabación (calidad) se selecciona la calidad de imagen de la grabación y, por tanto,la duración máxima de grabación en un disco.Para comprobar la calidad de la grabación, efectúe una 'grabación de prueba' con el tipo degrabación deseado. A continuación, compruebe la calidad de la imagen durante la reproducciónde esta 'grabación de prueba'.Durante la reproducción se selecciona automáticamente la calidad de imagen correcta.
1 Encienda el televisor. Seleccione, si es necesario, el canal delgrabador de DVD (canal 3 ó 4 o el canal de la clavija de entradade audio/vídeo).
Seleccione con la tecla REC MODE del mando a distancia eltipo de grabación deseado.
VQué tipos de grabaciones se pueden seleccionar?Tenga en cuenta que el modo de grabación no se puedeconmutar durante la grabación. Primero se tiene queinterrumpir la grabación con la tecla STOP h .
'M1': High Quality (alta calidad) ofrece la mejor calidad de imagen enuna grabación con una duración de 1 hora.
'M2': Standard Play (calidad de DVD pregrabado) ofrece una calidad deimagen de primera clase habitual en una grabación con una duración de 2horas.
'M2x': Standard Play plus (superior a la calidad de imagen S-VHS) ofreceuna calidad de imagen de primera clase habitual en una grabación conuna duración de 2,5 horas.
'M3': Long Play (calidad de imagen S-VHS). Grabación de 3 horas.
'M4': Extended Play (superior a la calidad de imagen VHS). Grabación de4 horas.
'M6': Super Long Play (calidad de imagen VHS). Grabación de 6 horas.
'M8': Super Extended Play (calidad de imagen VHS). Grabación de 8horas.
VSe puede cambiar el tipo de grabación a través de un menú?
1 Pulse la tecla SYSTEM-MENU .2 Con la tecla D o C seleccione el símbolo 'A'.3 Seleccione con la tecla CH- B o CH+ A la línea 'Ajustes grab.'
y confirme con la tecla C .4 Con la tecla D o C , seleccione en la línea 'Modo Grabar' el
tipo de grabación correspondiente.5 Confirme con la tecla OK y finalice con la tecla
SYSTEM-MENU .6 Si ha seleccionado el modo de grabación 'M3', 'M4', 'M6' o 'M8',
puede seleccionar en la línea 'Modo de filtro' el ajuste 'Estndr'(estándar) o 'Deport' (para movimientos rápidos). Consejo
ESP
AT
OL
Grabación manual

54
ICómo administrar el contenido del disco
Charly 100:29:59 • M1Vi15/02/2003
Título libre01:30:01
General
Al grabar un disco, al principio de cada grabación se almacena la siguiente información adicional:•) Nombre de la grabaciónSi el canal de televisión no envía ningún nombre, se almacenanel canal y la hora como nombre del canal•) Duración de la grabación•) Tipo de grabación (calidad)•) Fecha de la grabación•) Imagen del índice de la grabación
Cada 5 o 6 minutos se realiza una marca, en el caso de que esté activada la función 'CapítuloAutom.' en el menú 'Ajustes grab.'. Dicha marca se denomina marca de capítulo.Una vez finalizada la grabación se pueden modificar las marcas.
VTambién se pueden insertar marcas en los discos DVD+R?
Sí, se pueden insertar marcas siempre que no se finalice el disco. ?
Además, se pueden insertar marcas de capítulo adicionales. De este modo se pueden ocultar osaltar determinados puntos de la grabación (por ejemplo, las pausas publicitarias). Durante lareproducción se ve la grabación sin los capítulos ocultos, sin interrupciones.
Seleccione en el siguiente capítulo:
'Favorite Scene Selection (memoria de escenas)',para dividir el título en capítulos y para administrar el capítulo.
'Edición del título de la grabación (nombre)',para modificar los nombres de las grabaciones.
'Reproducción total del título',para reproducir el título completo, incluidos los capítulos ocultos.
'Eliminación de grabaciones o títulos'para eliminar el título correspondiente y, por tanto, lagrabación.
'Configuración del disco', para modificar la configuración general del disco.
Cómo administrar el contenido del disco

55
Favorite Scene Selection (memoria deescenas)
En este menú puede adaptar un título de acuerdo con sus preferencias personales.Puede insertar o eliminar marcas de capítulo, ocultar capítulos, seleccionar una nueva imagen deíndice o dividir el título. Durante la reproducción, acceda a este menú con la tecla FSS delmando a distancia.
Inserción de marcas de capítulosDurante la reproducción puede insertar o eliminar marcas de capítulo dentro de un título.El número máximo de capítulos por disco es de 124, 99 por título. Si se alcanza esta cifra, en lapantalla aparece el mensaje: 'Límite de capítulo'. Llegado este punto, deberá eliminar variasmarcas para poder insertar otras nuevas o para añadir grabaciones.
1 Durante la reproducción, pulse en el momento adecuado a teclaFSS del mando a distancia. En la pantalla aparece el menú'Editar menú'.
Editar menú
Insertar marca de capítulo Presionar OKEliminar la marca del capítuloEliminar todas las marcasCapítulo actual Visible
SELECT para cambiarFSS para salir
2 Seleccione con la tecla CH- B o CH+ A la línea 'Insertarmarca de capítulo' y confirme con la tecla OK . En la pantallaaparece 'Insertando marca'.
En la pantalla aparece 'X'
El DVD está protegido contra escritura o bien se ha insertado un discoDVD+R finalizado. No se pueden introducir modificaciones. Consejo
3 Finalice la función con la tecla FSS .
Cómo ocultar capítulosEn principio todos los capítulos están visibles. No obstante, durante la reproducción puedeocultar o volver a mostrar algunos capítulos (por ejemplo, las pausas publicitarias). En el modode edición, los capítulos ocultos se muestran más oscuros.Un capítulo se compone siempre de una marca inicial y final.Para ocultar una determinada escena, proceda como sigue:
1 Busque el principio de la escena (del segmento) que quiereocultar. Pulse la tecla PAUSE 9 .
Editar menú
Insertar marca de capítulo Presionar OKEliminar la marca del capítuloEliminar todas las marcasCapítulo actual Visible
SELECT para cambiarFSS para salir
2 Pulse en el mando a distancia la tecla FSS para acceder al menúde edición 'Editar menú'.
3 Con la tecla OK se establece la marca inicial.En la línea de menú, el número de capítulos ('C') aumenta enuno.
ESP
AT
OL
Cómo administrar el contenido del disco

56
4 Busque el fin de la escena (del segmento). También puede utilizarlas teclas O o N para llegar más rápidamente al final.Cuide de no entrar en el siguiente título (el número de título 'T'no debe cambiar). Sólo se pueden ocultar capítulos dentro de untítulo.
5 Pulse en el correspondiente punto la tecla PAUSE 9 .
6 Con la tecla OK se establece la marca final. Ésta representa almismo tiempo la marca inicial del siguiente capítulo.En la línea de menú, el número de capítulos ('C') aumenta enuno.
aEl número de capítulos ('C') ha aumentado en dos o másnúmeros
b Éste es el caso si quiere ocultar un capítulo que, como consecuenciade la numeración automática de capítulos (si está activada), seextiende en dos o más capítulos. En este caso tiene que borrar elinicio del capítulo creado de forma automático:
1 Mientras se visualiza el menú de edición, pulse dos veces la teclaT/C para cambiar el número de capítulo
2 Seleccione con la tecla CH- B o CH+ A el capítulo situado entrelas marcas nuevas. Pulse la tecla PAUSE 9 .
3 Seleccione con la tecla CH- B la línea 'Eliminar la marca delcapítulo ' para borrar la marca de capítulo actual. Confirme con latecla OK . El número de capítulo actual se reduce en uno. Problema
7 Pulse la tecla T/C dos veces para cambiar el número de capítulo'C'.
8 Seleccione con la tecla CH- B el capítulo anterior, porque ya seencuentra en el siguiente capítulo (el fin del capítulo es, al mismotiempo, el inicio del siguiente).
9 Espere hasta que se reproduzca el capítulo, y pulse la teclaPAUSE 9 para interrumpir la reproducción.
10 Seleccione con la tecla CH- B o CH+ A la línea 'Capítuloactual'.
11 Seleccione con la tecla C 'Escondido'. La imagen se muestra enun tono más oscuro.
Conmutación rápida
Con la tecla SELECT se puede cambiar de forma fácil y rápida entremostrar capítulo ('Visible') y ocultar capítulo ('Escondido') en el menúde edición .Esta función es independiente de la línea seleccionada. Consejo
12 Finalice con la tecla FSS .
Este capítulo se saltará durante la reproducción.Para volver a mostrar el capítulo, seleccione en el paso 11 con la tecla C 'Visible'.
Cómo administrar el contenido del disco

57
Eliminación de marcas de capítulosDentro de un título, se pueden eliminar todas las marcas de capítulo o de una en una.
Editar menú
Insertar marca de capítulo Presionar OKEliminar la marca del capítuloEliminar todas las marcasCapítulo actual Visible
SELECT para cambiarFSS para salir
1 Durante la reproducción del capítulo en cuestión, pulse la teclaFSS del mando a distancia. En la pantalla aparece el menú'Editar menú'.
VCómo se seleccionan otros capítulos?
1 Pulse en el mando a distancia la tecla T/C . En la parte superior depantalla se muestra el título y capítulo (Chapter).
2 Con la tecla C o D seleccione título (T) o capítulo (C).3 Con la tecla CH+ A o CH- B seleccione el título o capítulo que
desea editar. Consejo
2 Con la tecla CH- B seleccione la línea 'Eliminar la marca delcapítulo ' para este capítulo, o bien la línea 'Eliminar todaslas marcas ' para todos los capítulos dentro del títuloseleccionado.
3 Confirme con la tecla OK . (Si quiere borrar realmente todas lasmarcas, confirme el mensaje visualizado con la tecla OK . Paracancelar, pulse la tecla D ).
4 Finalice con la tecla FSS .
Cómo modificar la imagen del índiceNormalmente, la imagen al inicio de una grabación se utiliza como imagen del índice. Sinembargo, puede insertar una imagen que desee de la grabación como imagen del índice.
1 Durante la reproducción, busque la imagen que desee insertarcomo nueva imagen del índice. Pulse la tecla PAUSE 9 .
Editar menú
Nuevo índice de imagen Presionar OKNuevo fondoDividir el título
FSS para salir
2 Pulse la tecla FSS . En la pantalla aparece el menú 'Editarmenú'.
3 Seleccione la línea 'Nuevo índice de imagen' y confirme con latecla OK .
4 Inicie la modificación con la tecla OK . E n la pantalla aparece'Actualizando menú'.
Una vez realizados los cambios, el grabador de DVD regresa al índice.
ESP
AT
OL
Cómo administrar el contenido del disco

58
Modificar el fondo del menúPuede insertar cualquier imagen que desee de la grabación como fondo de menú. Este ajuste seguarda en el DVD insertado. Tenga en cuenta que, después de una modificación, se pierde elfondo 'original'.Si el disco se borra por completo (cerrar la bandeja del disco con la tecla CLEAR y ejecutardespués una grabación) se restablece el fondo 'original'.
1 Durante la reproducción, busque la imagen que desee insertarcomo nuevo fondo del menú. Pulse la tecla PAUSE 9 .
Editar menú
Nuevo índice de imagen Presionar OKNuevo fondoDividir el título
FSS para salir
2 Pulse la tecla FSS . En la pantalla aparece el menú 'Editarmenú'.
3 Seleccione la línea 'Nuevo fondo' y confirme con la tecla OK .
4 Inicie la modificación con la tecla OK . En la pantalla aparece'Actualizando menú'.
Una vez realizados los cambios, el grabador de DVD regresa al índice.
División de títulosLos títulos se pueden dividir en varias partes del tamaño deseado (títulos). Cada parte (título) seidentifica con su propia imagen de índice.PAtención! ¡Estas divisiones son permanentes!
VSe pueden dividir también los títulos de los discos DVD+R?
Dado que las grabaciones en discos DVD+R no se pueden sobrescribir,los títulos en discos DCD+R no se pueden dividir. ?
Editar menú
Nuevo índice de imagen Presionar OKNuevo fondoDividir el título
FSS para salir
1 Durante la reproducción del título en cuestión, pulse la teclaFSS del mando a distancia. En la pantalla aparece el menú'Editar menú'.
2 Seleccione 'Dividir el título' y confirme con la tecla OK .
3 Para asegurarse, inicie el proceso con la tecla OK . En la pantallaaparece 'Dividiendo título'.
4 Espere hasta que se muestre en pantalla el nuevo título con unaimagen de índice en el resumen de índices.
De este modo finaliza la división del título.
Cómo administrar el contenido del disco

59
Edición del título de la grabación(nombre)
El número de canal y la fecha y hora se guardan como nombre de la grabación. El título de lagrabación sólo se puede modificar una vez finalizada la grabación.
1 Si es necesario, pulse la tecla STOP h para interrumpir lareproducción
Valores para el título Charly 1
Nombre Charly 1Reproducir toda la cintaBorrar este título
2 Seleccione con la tecla CH+ A o CH- B el título cuyo nombrequiere editar, y confirme con la tecla C . Aparece el menú deedición del nombre.
3 Seleccione con la tecla CH+ A o CH- B la línea 'Nombre' yconfirme con la tecla C .
4 Seleccione con la tecla C o D la posición en la que deseemodificar o introducir letras, cifras o caracteres especiales.
5 Modifique el carácter que desee con la tecla CH+ A o CH- B .Con la tecla SELECT puede cambiar entre mayúsculas yminúsculas. Utilice la tecla CLEAR para borrar caracteres.
6 Repita los pasos 4 y 5 hasta que el nombre quede como desee.
7 Memorice el nuevo nombre con la tecla OK . En la pantallaaparece 'Guardar menú' para que confirme la edición.
8 Finalice con la tecla D .
Reproducción total del título
Si desea ocultar un determinado apartado (capítulo) de un disco, con esta configuración puedever el título completo, incluidos las secciones ocultas. Para ello, proceda como se indica acontinuación:
1 Pulse la tecla STOP h o bien pulse la teclaDISC-MENU durante la reproducción.
Valores para el título Charly 1
Nombre Charly 1Reproducir toda la cinta Presionar OKBorrar este título
2 Seleccione con la tecla CH+ A o CH- B el título que deseareproducir por completo y confirme con la tecla C . Aparece elmenú de edición de títulos.
3 Seleccione con la tecla CH+ A o CH- B la línea 'Reproducirtoda la cinta' y confirme con la tecla OK .
4 La reproducción se inicia automáticamente. El título se reproducepor completo, incluidos los capítulos ocultos.
ESP
AT
OL
Cómo administrar el contenido del disco

60
Eliminación de grabaciones o títulos
Se puede eliminar del disco una grabación determinada. Para ello, proceda como se indica acontinuación:
1 Pulse la tecla STOP h o bien pulse la teclaDISC-MENU durante la reproducción.
Valores para el título Charly 1
Nombre Charly 1Reproducir toda la cintaBorrar este título Presionar OK
2 Seleccione con la tecla CH+ A o CH- B el título que deseaeliminar y confirme con la tecla C . Aparece el menú de ediciónde títulos.
3 Seleccione con la tecla CH+ A o CH- B la línea 'Borrar estetítulo' y confirme con la tecla OK . En la pantalla aparece 'Estoborrará el título por completo'. 'Presionar OK paraconfirmar'.
4 Si desea eliminar este título, confirme la acción con la tecla OK .De lo contrario, finalice con la tecla D .
5 En la pantalla aparece 'Borrando título'.
6 A continuación aparece 'Título libre' en este punto de las'indicaciones del índice' . Puede entonces realizar una nuevagrabación en dicho punto del disco.Si el título eliminado era demasiado corto (menos de 1 minuto),no aparece la indicación 'Título libre'.
VTambién se pueden eliminar los títulos en los discos DVD+R?
En los discos DVD+R los títulos sólo se marcan como eliminados. En lapantalla en lugar de 'Título libre' aparece 'Título borrado'. En laposterior reproducción, se salta el título 'eliminado'. El espacio queocupaba el título no se puede recuperar, puesto que el título no se haeliminado físicamente. Una vez finalizado el disco, no se puedenincorporar nuevas modificaciones. ?
Cómo administrar el contenido del disco

61
Configuración del disco
Philips100:35:59 usadoVi15/02/2003
Abierto
NTSC
Reproducir DVD
Ediciones
Esta pantalla aparece antes del primer título y contiene información general acerca del discoinsertado.
En ella puede:•) Modificar el nombre del disco•) Activar y desactivar la protección del disco•) Finalizar ediciones (hacer compatible con DVD)•) Finalizar un disco DVD+R (terminar)•) Borrar un disco DVD+RW
Para activar esta pantalla siga el procedimiento que se indica a continuación:
1 Pulse la tecla STOP h o bien pulse la teclaDISC-MENU durante la reproducción.
2 Seleccione con la tecla CH+ A el primer título o pulse la teclaSTOP h .
3 Pulse la tecla CH+ A . Aparece la pantalla de información deldisco.
Modificar el nombre del disco
1 En la pantalla de información del disco pulse la tecla C . En lapantalla aparece el menú 'Valores para'.
Valores para Philips1
Nombre del disco Philips1Protección DesprotegidoBorrar disco
2 Seleccione con la tecla CH+ A o CH- B la línea 'Nombre deldisco' y confirme con la tecla C .
3 Seleccione con la tecla C o D la posición en la que deseemodificar o introducir letras, cifras o caracteres especiales.
4 Modifique el carácter que desee con la tecla CH+ A o CH- B .Con la tecla SELECT puede cambiar entre mayúsculas yminúsculas. Utilice la tecla CLEAR para borrar caracteres.
5 Repita los pasos 3 y 4 hasta haber editado el título según suspreferencias.
6 Memorice el título nuevo con la tecla OK . En la pantalla aparece'Guardando nombre' para que confirme la edición.
7 Finalice con la tecla D .
ESP
AT
OL
Cómo administrar el contenido del disco

62
Finalizar edicionesSi se editan uno o varios títulos, es posible que un reproductor de DVD muestre los títulosoriginales. Puede editar el disco DVD+RW de forma que un reproductor de DVD puedamostrar la versión editada.
1 En la pantalla de información del disco pulse la tecla C . En lapantalla aparece el menú 'Valores para'.
2 Seleccione con la tecla CH+ A o CH- B la línea 'Hacer laedición compatible' y confirme con la tecla OK .
aNo aparece la línea 'Hacer la edición compatible'
b El disco ya es compatible. No es necesario convertirlo.Finalice con la tecla SYSTEM-MENU . Problema
3 En la pantalla aparece 'Esto tomará...' para indicar el tiempo quedurará el proceso.
4 Para confirmar pulse la tecla OK . En la pantalla aparece'Trabajando...' Aparece una barra que se desplaza de izquierda aderecha e indica el proceso de conversión.
Terminar discos DVD+R (finalizar)Esta función es necesaria si se va a reproducir un disco DVD+R en un reproductor de DVD.Una vez realizada la función Finalizar, no se pueden realizar más grabaciones ni modificaciones enel disco.
1 En la pantalla de información del disco pulse la tecla C . En lapantalla aparece el menú 'Valores para'.
2 Seleccione con la tecla CH+ A o CH- B la línea 'Finalizardisco' y confirme con la tecla OK .
aNo aparece la línea 'Finalizar disco'
b En este caso, o bien no se ha insertado ningún disco DVD+R o eldisco insertado ya está terminado.Finalice con la tecla SYSTEM-MENU .
aNo aparece el menú 'Valores para'
b Al reproducir el disco en un reproductor de DVD distinto, es posibleque no aparezca este menú. En este caso, utilice la función 'Finalizardisco' dentro del menú 'A', en el menú secundario'Características'. Problema
Cómo administrar el contenido del disco

63
3 En la pantalla aparece 'Esto tomará...' para indicar el tiempo quedurará el proceso.
4 Para confirmar pulse la tecla OK . En la pantalla aparece'Trabajando...' Aparece una barra que se desplaza de izquierda aderecha e indica el proceso de edición.
Borrar discos DVD+RW
1 En la pantalla de información del disco pulse la tecla C . En lapantalla aparece el menú 'Valores para'.
Valores para Philips1
Nombre del disco Philips1Protección DesprotegidoBorrar disco Presionar OK
2 Seleccione con la tecla CH+ A o CH- B la línea 'Borrardisco' y confirme con la tecla OK . En la pantalla aparece 'Estoborrará todos los títulos Presionar OK para confirmar'.
3 Si desea eliminar todos los títulos, confirme la acción con la teclaOK . De lo contrario, finalice con la tecla D .
4 En la pantalla aparece 'Borrando disco'.
5 Una vez eliminado el contenido, el índice muestra el espacio vacíodel disco.
Si el espacio del disco ya está vacío, no puede seleccionar 'Borrardisco'. Consejo
ESP
AT
OL
Cómo administrar el contenido del disco

64
JProgramación de grabaciones (TIMER)
General
Utilice la 'Programación de grabaciones (TIMER)', para que la grabación comience y termine enun momento concreto, más adelante.A la hora indicada, el grabador de DVD pasa al número de canal correcto e inicia la grabación.Con este grabador de DVD puede programar hasta seis grabaciones en un año.
Para programar la grabación, el grabador de DVD necesita la siguiente información:* la fecha de la grabación* el canal de TV* la hora de inicio y fin de la grabación* el modo de grabación (calidad de la imagen) ('M1/M2/M2x/M3/M4/M6/M8')Esta información se memoriza en el llamado bloque 'TIMER'.Antes de empezar tiene que estar ajustada la hora. Si la hora no está ajustada, aparece el menú'Hora/fecha' al pulsar la tecla TIMER .
Programación de grabaciones con elsistema VCR Plus+®
Gracias a este sistema de programación se suprime la laboriosa tarea de introducir la fecha, elnúmero de canal, la hora de inicio y la de finalización. Con sólo introducir el número deprogramación PlusCode, el grabador de DVD obtiene toda la información necesaria paraprogramar una grabación. El número de PlusCode (de hasta ocho dígitos) lo encontrará en lamayoría de las revistas de programación de TV.
1 Encienda el televisor. Seleccione el canal del grabador de DVD(canal 3 ó 4).
2 Con el grabador conectado, pulse TIMER en el mando adistancia.El cursor marca el último método de programación seleccionado.
3 Seleccione con la tecla CH- B o CH+ A la línea 'SistemaVCR Plus+' y confirme con la tecla C .
4 Introduzca el número PlusCode completo. Encontrará estenúmero de ocho dígitos como máximo en su revista deprogramación de TV junto a la hora de inicio del programacorrespondiente.Por ejemplo: 5-234-89 ó 5.234 89Introduzca 523489 como número PlusCode.Si se equivoca al escribir el número, borre la entrada pulsando latecla CLEAR .
TimerSistema VCR Plus+
Número PlusCode- - - - - - - - -
Lu-Vi/SemanalPresionar SELECT
Para memorizarPresionar OK
Selección de grabación diaria/semanal
Seleccione con la tecla SELECT una de las siguientes opciones:'Lu-Vi': grabaciones que se repiten diariamente (lunes a domingo).'Semanal': grabaciones que se repiten semanalmente (el mismo día cadasemana). Consejo
Programación de grabaciones (TIMER)

65
5 Confirme con la tecla OK .
aEn la pantalla aparece 'Favor ingresar número canal'
b Todavía se ha asignado un número de canal de TV al númeroPlusCode. Seleccione con las teclas C , D o con las teclas numéricas0..9 del mando a distancia el número de canal correspondiente a lacadena TV y confírmelo con la tecla OK .
aEn la pantalla aparece 'Núm. equivocado PlusCode'
b El número PlusCode introducido es erróneo. Repita la entrada ocancele con la tecla SYSTEM-MENU .
b Verifique la fecha y hora (véase el capítulo 'Puesta en marcha',apartado 'Ajuste de la hora y fecha).
aEn la pantalla aparece 'Imposible program. fin de semana'
b Se ha introducido una grabación diaria para el día erróneo. Lasgrabaciones diarias corresponden a grabaciones programadas para losdías de la semana de lunes a viernes. Problema
TimerSistema VCR Plus+
Fecha01/22
Can001
Inic.08:30AM
Fin10:30AM
RecModoM1
Para memorizarPresionar OK
AM/PMPresionar SELECT
6 Después de la confirmación aparecen los datos descodificados enla pantalla. Puede modificar los datos en cualquier momento. Paraello, seleccione el campo de entrada correspondiente con lasteclas C o D . Modifique los datos con la tecla CH+ A ,CH- B o bien con las teclas numéricas 0..9 .
'AM/PM' conmutar
En los campos de entrada 'Inic.' y 'Fin', seleccione con la teclaSELECT 'AM' o 'PM'.
Cómo cambiar la calidad de la grabación
Seleccione con la tecla C el campo de entrada 'RecModo'.Seleccione con la tecla CH- B , CH+ A el modo de grabación 'M1,M2, M2x, M3, M4, M6, M8'. Consejo
7 Si los datos son correctos, pulse la tecla OK . Los datos sememorizan en un bloque TIMER.
8 Finalice con la tecla TIMER .
9 Introduzca un DVD en el que se pueda grabar (sin proteger).Se procede a la comprobación del disco insertado.
10 Busque este lugar en el disco donde se debe iniciar la grabación.Pulse la tecla STOP h .
11 Apague el aparato pulsando la tecla STANDBY m .La grabación programada se activa únicamente si el grabador deDVD se ha apagado con la tecla STANDBY m .
Si se han programado una o más grabaciones, en la pantalla indicadora se enciende la indicación'TIMER'.
ESP
AT
OL
Programación de grabaciones (TIMER)

66
Programación de grabaciones sin elsistema VCR Plus+®
1 Encienda el televisor. Seleccione el canal del grabador de DVD(canal 3 ó 4).
2 Con el grabador conectado, pulse TIMER en el mando adistancia.El cursor marca el último método de programación seleccionado.
TimerProgramación timer
Fecha01/22
Can01
Inic.08:30AM
Fin10:30AM
RecModoM1
Lu-Vi/SemanalPresionar SELECT
Para memorizarPresionar OK
3 Seleccione con la tecla CH- B o CH+ A la línea'Programación timer' y confirme con la tecla C .Los datos actuales vienen indicados en la pantalla.
4 Seleccione el campo de entrada con la tecla D o C .
5 Introduzca los datos deseados con la tecla CH- B o CH+ A , ocon las teclas 0..9 .En el campo de entrada 'Fecha' introduzca primero el mes ydespués la fecha.
Selección de grabación diaria/semanal
Seleccione en el campo de entrada 'Fecha' con la tecla SELECT unade las siguientes opciones:'Lu-Vi': grabaciones que se repiten diariamente de lunes a viernes'Lu': grabaciones que se repiten semanalmente (el mismo día cadasemana, p.ej.: cada lunes).
'AM/PM' conmutar
En los campos de entrada 'Inic.' y 'Fin', seleccione con la teclaSELECT 'AM' o 'PM'.
Cómo cambiar la calidad de la grabación
Seleccione con la tecla C el campo de entrada 'RecModo'.Seleccione con la tecla CH- B , CH+ A el modo de grabación. Consejo
6 Si los datos son correctos, pulse la tecla OK . Los datos sememorizan en un bloque TIMER.
7 Finalice con la tecla TIMER .
Se procede a la comprobación del disco insertado.
8 Busque este lugar en el disco donde se debe iniciar la grabación.
9 Apague el aparato pulsando la tecla STANDBY m .La grabación programada se activa únicamente si el grabador deDVD se ha apagado con la tecla STANDBY m .
Si se han programado una o más grabaciones, en la pantalla indicadora se enciende la indicación'TIMER'.
Programación de grabaciones (TIMER)

67
Cómo revisar o borrar una grabaciónprogramada (TIMER)
1 Encienda el televisor. Seleccione, si es necesario, el canal delgrabador de DVD (canal 3 ó 4).
2 Pulse en el mando a distancia la tecla TIMER .El cursor marca el último modo de programación seleccionado.
3 Seleccione con la tecla CH- B o CH+ A la línea 'Lista timer'y confirme con la tecla C .
TimerLista timer
Fecha01/22--/--
Can01-----
Inic.04:25PM--:--
Fin06:05PM--:--
RecModoM2---
Duración tot. grab: 01:40
Para modificarPresionar ›
Para salirPresionar TIMER
4 Seleccione con la tecla CH- B o CH+ A la programación(TIMER Block) que desee revisar, modificar o borrar.
Cómo borrar una grabación programada
1 Pulse la tecla CLEAR .2 Confirme con la tecla OK . En la pantalla aparece brevemente
'Timer borrado'.En lugar de los datos indicados aparece '--'
3 Finalice con la tecla TIMER . Consejo
5 Pulse la tecla C .Seleccione el campo de entrada con la tecla D o C .Si es necesario, modifique los datos con la tecla CH+ A ,CH- B o con las teclas numéricas 0..9 .
6 En el campo de entrada 'Fecha' introduzca primero el mes ydespués la fecha.
7 Confirme con la tecla OK .
8 Finalice con la tecla TIMER .
9 Apague el aparato pulsando la tecla STANDBY m .
ESP
AT
OL
Programación de grabaciones (TIMER)
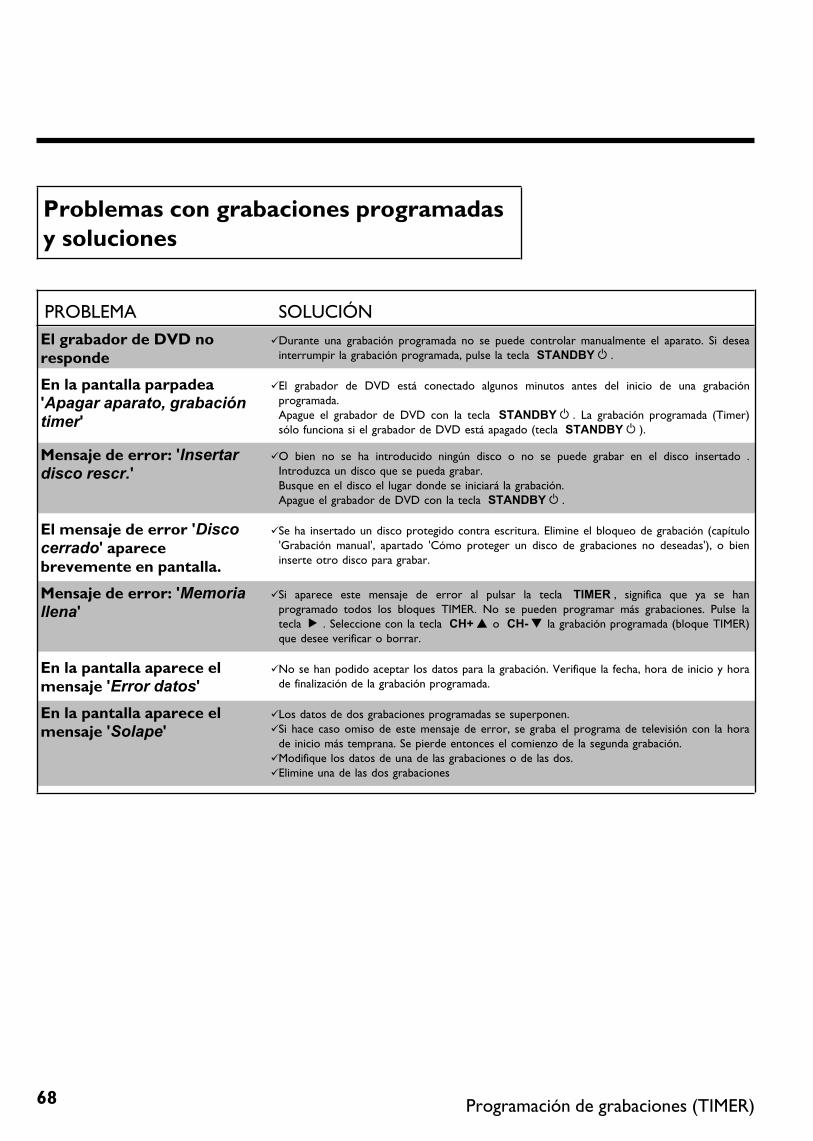
68
Problemas con grabaciones programadasy soluciones
PROBLEMA SOLUCIÓN
El grabador de DVD noresponde
bDurante una grabación programada no se puede controlar manualmente el aparato. Si deseainterrumpir la grabación programada, pulse la tecla STANDBY m .
En la pantalla parpadea'Apagar aparato, grabacióntimer'
bEl grabador de DVD está conectado algunos minutos antes del inicio de una grabaciónprogramada.Apague el grabador de DVD con la tecla STANDBY m . La grabación programada (Timer)sólo funciona si el grabador de DVD está apagado (tecla STANDBY m ).
Mensaje de error: 'Insertardisco rescr.'
bO bien no se ha introducido ningún disco o no se puede grabar en el disco insertado .Introduzca un disco que se pueda grabar.Busque en el disco el lugar donde se iniciará la grabación.Apague el grabador de DVD con la tecla STANDBY m .
El mensaje de error 'Discocerrado' aparecebrevemente en pantalla.
bSe ha insertado un disco protegido contra escritura. Elimine el bloqueo de grabación (capítulo'Grabación manual', apartado 'Cómo proteger un disco de grabaciones no deseadas'), o bieninserte otro disco para grabar.
Mensaje de error: 'Memoriallena'
bSi aparece este mensaje de error al pulsar la tecla TIMER , significa que ya se hanprogramado todos los bloques TIMER. No se pueden programar más grabaciones. Pulse latecla C . Seleccione con la tecla CH+ A o CH- B la grabación programada (bloque TIMER)que desee verificar o borrar.
En la pantalla aparece elmensaje 'Error datos'
bNo se han podido aceptar los datos para la grabación. Verifique la fecha, hora de inicio y horade finalización de la grabación programada.
En la pantalla aparece elmensaje 'Solape'
bLos datos de dos grabaciones programadas se superponen.bSi hace caso omiso de este mensaje de error, se graba el programa de televisión con la hora
de inicio más temprana. Se pierde entonces el comienzo de la segunda grabación.bModifique los datos de una de las grabaciones o de las dos.bElimine una de las dos grabaciones
Programación de grabaciones (TIMER)

69
KConfiguración preferida personalizada
En este apartado se indica cómo configurar el grabador de DVD para sus necesidades personales.Este es el significado de los símbolos:
- Ajuste de la imagen
. Ajuste del sonido
/ Configuración de idioma
0 Ajustes adicionales
1 Ajuste del mando a distanciaManejo con el mando a distancia de un televisor Philips
2 Configuración del disco
3 Ajustes de la grabación
4 Instalación
1 Encienda el televisor. Seleccione, si es necesario, el canal delgrabador de DVD (canal 3 ó 4 o el canal de la clavija de entradade audio/vídeo)
2 Pulse en el mando a distancia la tecla SYSTEM-MENU .Aparece la barra de menús.
3 Con la tecla D o C seleccione el símbolo 'A' y confirme conla tecla CH- B .
4 Seleccione con la tecla CH- B o CH+ A la funcióncorrespondiente y confirme con la tecla C .
5 Seleccione con las teclas CH- B o CH+ A la líneacorrespondiente y confirme con la tecla C . Información sobrelas distintas funciones se encuentra en las siguientes páginas.
6 Seleccione la función correspondiente con la tecla CH- B oCH+ A o bien el ajuste con la tecla D o C . Seleccione lasfunciones que quiere modificar de la forma descrita en lassiguientes páginas.
7 Confirme el nuevo ajuste con la tecla OK .
8 Finalice esta opción del menú con la tecla D .
ESP
AT
OL
Configuración preferida personalizada

70
Ajuste de la imagen
En este menú puede seleccionar las siguientes funciones:
ImagenForma TV 16:9Variación nivel negro DesactivadaVariación vídeo ïSalida vídeo Interlaced
'Forma TV'La señal de imagen que se emite se puede ajustar de forma que se adapte al televisor:
'4:3 buzón': para ver la imagen apaisada con bandas negras (formato cine) en la parte superior einferior de pantalla
'4:3 panorámica': para ver la imagen completa en vertical; los laterales aparecen cortados.'16:9' : para ver la imagen apaisada (relación de aspecto de imagen 16:9)
'Variación nivel negro'para la adaptación de la dinámica de color en la reproducción NTSC si se ha conmutado a'Activada'.
'Variación vídeo'Le ofrece la posibilidad de desplazar hacia la izquierda o la derecha la posición de la imagen conlas teclas D , C para adaptar la imagen a su televisor.
'Salida vídeo'Esta función le ofrece la posibilidad de cambiar la señal de la salida de vídeo compuesto entre'Interlaced' y 'Progressive Scan'.PAtención! Si su televisor dispone de una conexión independiente para las funciones 'Interlaced'y 'Progressive scan' o si el cambio entre ambos modos no se realiza de forma automática, esposible que al cambiar de un modo a otro no aparezca ninguna imagen en el televisor.
1 Seleccione con la tecla SELECT la opción correspondiente.Seleccione Progressive Scan únicamente si su televisor dispone deProgressive Scan.
2 Confirme con la tecla OK .
Configuración preferida personalizada

71
aAl cambiar no aparece ninguna imagen en el televisor
Verifique lo que se muestra en la pantalla indicadora del grabador deDVD:'PRO': 'Progressive Scan' activadoNinguna indicación: 'Interlaced' activado. Cambie el aparato detelevisión a la clavija adecuada o bien seleccione la conexióncorrespondiente. La señal de salida de vídeo compuesto se puedeconmutar como se indica a continuación:
1 Desconecte el grabador de DVD de la alimentación de la red.
2 Mantenga pulsada la tecla N del grabador y vuelva a conectar elenchufe a la red. En la pantalla indicadora aparece 'PRO'(progressive scan).
3 Para volver a conmutara, repita los pasos 1 y 2 . En la pantallaindicadora desaparece 'PRO' (progressive scan). El grabador deDVD se ha conmutado ahora al modo 'Interlaced'.
Problema
Ajuste del sonido
Según la salida de audio que vaya a utilizar, en este menú puede seleccionar la configuraciónadecuada.Si sólo se van a utilizar las salidas de audio analógicas (clavija roja y blanca L AUDIO R OUT ,AUDIO OUT ), seleccione en el menú 'Salida digital' el ajuste 'No'.
SonidoSalida digital TodasSalida analógica EstéreoModo nocturno Desactivado
'Salida digital'Para los aparatos conectados a la clavija DIGITAL AUDIO OUT puede seleccionar las siguientesconfiguraciones:
'Todas' : las señales de Dolby Digital y DTS se transmiten inalteradas a través de la salida digital.Las señales multicanal MPEG-2 se convierten a PCM (Pulse Code Modulation).Para receptores y amplificadores con descodificador de sonido digital multicanal.
'Sólo PCM' : las señales multicanal Dolby Digital y MPEG-2 se convierten a PCM (Pulse CodeModulation).Para receptores y amplificadores sin descodificar de sonido digital multicanal.
'Desactivada' : salida digital desconectada.Para aparatos con entrada de audio analógica.
'Salida analógica'Para los aparatos conectados a las salidas de audio analógica ( L AUDIO R OUT , AUDIOOUT ) se pueden seleccionar las siguientes configuraciones:
'Estéreo' : para aparatos que no disponen de DolbySurround ni de TruSurround. Utilice estaconfiguración si el grabador de DVD está conectada sólo a un televisor estéreo.
'Surround' : la señal multicanal Dolby Digital y MPEG-2 se mezcla para formar una señal de salidade doble canal compatible con Dolby Surround.Para dispositivos con descodificador Dolby Surround / Pro Logic .
ESP
AT
OL
Configuración preferida personalizada

72
'Modo nocturno'El modo noche optimiza la dinámica del sonido al bajar el volumen de los altavoces. De estaforma se contribuye a crear un entorno más tranquilo. Esta configuración sólo funciona conDVD Dolby Digital Audio en discos de vídeo.
Configuración de idioma
En este menú puede seleccionar las siguientes opciones:
IdiomaAudio de Reproducción EnglishAudio de Grabado EstéreoSubtítulo EnglishMenú English
'Audio de Reproducción'Idioma de audio de la reproducción.
'Audio de Grabado'Selección de la grabación de audio en programas bilingües
'Subtítulo'Idioma de los subtítulos
'Menú'Idioma del menú de pantalla
Ajustes adicionales
En este menú puede seleccionar las siguientes funciones:
CaracterísticasVentana de estado SiEn espera NormalDespliegue Iluminación
'Ventana de estado'Gracias a la información OSD (On Screen Display), además de los menús de pantalla, en eltelevisor se muestra información adicional acerca del estado actual de funcionamiento (contador,reproducción, grabación, canal de TV...).Puede desconectar la indicación de los estados de funcionamiento para no incluirla durante lagrabación en aparatos adicionales.
'Si': la información OSD aparece durante algunos segundos al seleccionar cualquier función yluego desaparece.
'No': la información OSD está apagada. No puede volver a mostrarse en pantalla.
Configuración preferida personalizada

73
'En espera'Puede apagar el reloj del grabador de DVD para ahorrar energía. Las grabaciones programadasse inician incluso con el reloj apagado.Adicionalmente pueden hacer indicar las funciones más importantes del grabador de DVD en lapantalla indicadora (textos pasando por la pantalla en modo Demo).
'Ahorro energía': al apagar el grabador de DVD con la tecla STANDBY m , en la pantallaindicadora se desconecta también la hora.
'Normal': al apagar el grabador de DVD con la tecla STANDBY m , la hora se muestra en lapantalla indicadora.
'Modo demo': Si el grabador de DVD ha sido apagado con la tecla STANDBY m la pantallaindicadora presenta un resumen de las funciones más importantes.
'Despliegue'Puede modificar el brillo de la pantalla indicadora del grabador de DVD. Esta configuración afectaúnicamente al grabador cuando está encendido.
'Iluminación': la pantalla indicadora tiene una luminosidad normal.
'Luz baja': la pantalla indicadora aparece más oscura.
'Apagado': la pantalla indicadora está apagada.
Configuración del mando a distancia
En este menú se puede configurar el mando a distancia para determinar cuál va a ser larespuesta del grabador de DVD.
'Reproductor DVD': El grabador de DVD responde también al mando a distancia adjunto y almando a distancia de un reproductor de DVD (código de mando adistancia RC-6).Seleccione esta configuración si el mando a distancia de su televisor admitefunciones de DVD.
'Grabadora DVD': El grabador de DVD sólo responde al mando a distancia suministrado.
ESP
AT
OL
Configuración preferida personalizada

74
Menú Disco
Con este menú puede aplicar las modificaciones introducidas en el disco:
Control de acceso Introducir código…Reinicio automático Si
'Control de acceso'Consulte el capítulo siguiente 'Control de acceso (bloqueo para niños)'.
Reinicio automáticoSi se interrumpe la reproducción de un DVD de vídeo pregrabado o un disco CD de vídeo(tecla STOP h o OPEN/CLOSE J ), la reproducción del disco continúa desde el punto enque se detuvo. Esto se aplica no sólo al disco insertado, sino también a los últimos veinte discosreproducidos.
Si no desea que esto suceda, puede desactivar esta función.
'PBC'Esta línea sólo aparece si hay un VCD insertado.Con esta función se puede activar o desactivar el menú PBC (Playback Control) de los CD devídeo. Obtendrá más información en el capítulo 'Reproducción', 'Reproducción de un CD de(súper) vídeo'.
'Finalizar disco'Con esta función puede terminar discos DVD+R (finalizar). Si el disco insertado ya estáfinalizado, esta línea aparece más oscura.
'Adaptar formato disco'Si el DVD+RW se va a reproducir en una unidad del PC o en otro grabador de DVD, esprobable que la pantalla del índice no se visualice correctamente.Con esta función puede adaptar el formato del disco insertado.Esta función sólo está disponible por tanto, si el formato del disco es distinto.
Configuración preferida personalizada

75
LControl de acceso (bloqueo para niUos)
Bloqueo para niUos (DVD y VCD)
Con esta función puede proteger los discos para que los niños no los vean.Al introducir el disco es necesario introducir un código de 4 dígitos (código PIN) parareproducir el disco.Asimismo puede seleccionar si el disco va a estar bloqueado para los niños 'siempre' o 'solo unavez'.
•)'Reproducir siempre':El disco se introduce en una memoria que tiene capacidad para 50 discos con bloqueo paraniños. Al memorizar más de 50 discos se elimina el más antiguo para liberar espacio para losnuevos discos. Al comienzo de la reproducción aparece 'Child safe' en pantalla.
•)'Reproducir una vez':El disco se desbloquea para esa única vez. Al apagar el grabador de DVD se debe volver aintroducir el código PIN.
Activación y desactivación del bloqueopara niUos
1 Encienda el televisor. Seleccione, si es necesario, el número decanal del grabador de DVD (canal 3 ó 4).
2 Encienda el grabador de DVD con la tecla STANDBY-ON m .
3 Pulse la tecla SYSTEM-MENU . Aparece la barra de menús.
4 Con la tecla D o C seleccione el símbolo 'A'.
5 Seleccione con la tecla CH- B o CH+ A la línea '2(Caract.Disco)' y confirme con la tecla C .
Control de acceso Introducir código…Reinicio automático Si
6 Confirme la línea 'Control de acceso' con la tecla C .
7 Introduzca con las teclas numéricas un código de cuatro dígitos.Una vez introducido el código, debe repetirlo para confirmarlo.
8 Seleccione con la tecla CH+ A o CH- B la línea 'Accesomenores' y confirme con la tecla C .
9 Con la tecla CH- B o CH+ A seleccione el símbolo '5'.
10 Confirme con la tecla OK .
11 Finalice con la tecla D y la tecla SYSTEM-MENU .
ESP
AT
OL
Control de acceso (bloqueo para niños)

76
A partir de ahora, los discos que no estén desbloqueados sólo se podrán reproducir trasintroducir el código de cuatro dígitos (PIN).Para desactivar el bloqueo para niños, seleccione en el paso 9 el símbolo '6'.
Cómo desbloquear el disco
1 Inserte un disco. Tras una breve comprobación, aparece enpantalla el menú de control de acceso.
2 Seleccione con la tecla CH+ A o CH- B 'Reproducir unavez' o 'Reproducir siempre'.
3 Introduzca el código PIN con las teclas numéricas 0..9 .
Los DVD de dos caras pueden tener un número de identificación (ID) distinto por cada cara.Para desbloquear completamente el disco, debe desbloquear cada una de las caras. En juegos deVCD, cada disco puede tener un número de identificación (ID) distinto. Para desbloquear eljuego completo, tiene que desbloquear cada disco por separado.
Cómo proteger los discos desbloqueadosPara proteger un disco desbloqueado realice el siguiente procedimiento:
1 Inserte el disco. La reproducción se inicia automáticamente. Encaso de que la reproducción no se inicie de forma automática,pulse la tecla PLAY G .
2 Cuando se muestre el símbolo '7', pulse la tecla STOP h .El símbolo cambia a '�'. El disco se protege para usosfuturos.
Función de filtro (sólo vídeo DVD)
Las películas de DVD pregrabados pueden incluir escenas que no sean adecuadas para niños. Adichos DVD se les puede asociar una información de filtro que oculte el DVD completo o sólounas escenas determinadas.Las escenas en cuestión están dotadas de valores de filtro de 1 a 8. Si, durante la reproducción,se detecta este tipo de escena, se compara el valor de filtro ajustado en el grabador de DVDcon el de la escena. Si el valor de filtro de la escena es mayor que el establecido, se reproduceuna escena alternativa (si hay alguna disponible).Si todo el DVD está dotado de la información de filtro, se bloquea la reproducción de todo eldisco.
Control de acceso (bloqueo para niños)

77
Activación y desactivación de la función defiltro
1 Encienda el televisor. Seleccione, si es necesario, el número decanal del grabador de DVD (canal 3 ó 4).
2 Encienda el grabador de DVD con la tecla STANDBY-ON m .
3 Pulse a tecla SYSTEM-MENU . Aparece la barra de menús
4 Con la tecla D o C seleccione el símbolo 'A'.
5 Seleccione con la tecla CH- B o CH+ A la línea '2(Caract.Disco)' y confirme con la tecla C .
Control de acceso Introducir código…Reinicio automático Si
6 Confirme la línea 'Control de acceso' con la tecla C .
7 Introduzca el código de cuatro dígitos que desee. Si es la primeravez que introduce el código, deberá introducirlo dos veces paraconfirmarlo.
8 Seleccione con la tecla CH+ A o CH- B la línea 'Nivelclasificación' y confirme con la tecla C . Aparece una barrapara elegir el nivel de protección.
9 Con la tecla CH- B , CH+ A o con las teclas numéricas0..9 seleccione el nivel de protección adecuado.
VQué se entiende por nivel de protección?
El valor de filtro 0 (indicado como '--') significa que la función de filtroestá desactivada.Valor de filtro 1 (apto para niños)Valor de filtro 8 (sólo para adultos)
VQué sucede si una escena del DVD tiene un elevado nivel deprotección predeterminado?
Si el grabador de DVD no encuentra ninguna alternativa adecuada,detiene la grabación y se debe introducir el código de cuatro dígitos. Consejo
10 Confirme con la tecla OK . Finalice con la tecla D ySYSTEM-MENU .
ESP
AT
OL
Control de acceso (bloqueo para niños)

78
Modificación del paísLos valores de filtro configurados dependen de cada país. Por ello, es necesario que introduzca elpaís adecuado para estos valores de filtro.
1 Encienda el televisor. Seleccione, si es necesario, el número decanal del grabador de DVD (canal 3 ó 4).
2 Encienda el grabador de DVD con la tecla STANDBY-ON m .
3 Pulse la tecla SYSTEM-MENU . Aparece la barra de menús
4 Con la tecla D o C seleccione el símbolo 'A'.
5 Seleccione con la tecla CH- B o CH+ A la línea '2(Caract.Disco)' y confirme con la tecla C .
Control de acceso Introducir código…Reinicio automático Si
6 Confirme la línea 'Control de acceso' con la tecla C .
7 Introduzca con las teclas numéricas un código de cuatro dígitos.Una vez introducido el código, debe repetirlo para confirmarlo.
8 Seleccione con la tecla CH+ A o CH- B la línea 'Cambiarpaís' y confirme con la tecla C .
9 Seleccione con la tecla CH+ A o CH- B el paíscorrespondiente y confirme con la tecla OK .
10 Finalice con la tecla D y, a continuación, con SYSTEM-MENU .
Control de acceso (bloqueo para niños)

79
Cómo cambiar el código PIN
1 Encienda el televisor. Seleccione, si es necesario, el número decanal del grabador de DVD (canal 3 ó 4).
2 Encienda el grabador de DVD con la tecla STANDBY-ON m .
3 Pulse la tecla SYSTEM-MENU . Aparece la barra de menús.
4 Con la tecla D o C seleccione el símbolo 'A'.
5 Seleccione con la tecla CH- B o CH+ A la línea '2(Caract.Disco)' y confirme con la tecla C .
Control de acceso Introducir código…Reinicio automático Si
6 Confirme la línea 'Control de acceso' con la tecla C .
7 Introduzca con las teclas numéricas el código de cuatro dígitos. Siintroduce el código por primera vez, tiene que volver aintroducirlo para la confirmación.
8 Seleccione con la tecla CH+ A o CH- B la línea 'Cambiarcódigo' y confirme con la tecla C .
9 Introduzca el nuevo código con las teclas numéricas 0..9 . Unavez introducido el código, debe repetirlo para confirmarlo.
10 Finalice con la tecla D y SYSTEM-MENU .
Si se olvida el código
Al introducir el código (en el paso 7 ), pulse cuatro veces la teclaSTOP h y finalice con la tecla OK . Se desactiva la introducción delcódigo. A continuación puede insertar el nuevo código tal como sedescribe en los pasos anteriores. Consejo
ESP
AT
OL
Control de acceso (bloqueo para niños)

80
MAntes de llamar al técnico
Si tiene problemas con el manejo de su grabador de DVD, las causas podrían ser las siguientes:Asimismo, puede ponerse en contacto con el Servicio de Asistencia Técnica .Los números de teléfono se encuentran al dorso del manual de instrucciones.También puede visitar la página de Internet 'http://www.p4c.philips.com' .Le recomendamos que tenga a mano el número de modelo (MODEL NO) y el número deproducción (PROD.NO.).Encontrará el número de producción (PROD. NO.) en la etiqueta en la parte posterior delaparato.
PROBLEMA SOLUCIÓN
El aparato no responde alpulsar una tecla y en lapantalla indicadora aparece'�� �� ���':
bAparato en el modo de instalación inicial: encienda el televisor y cambie a la clavija delgrabador de DVD o bien sólo ha conectado el grabador de DVD al cable de la antena,seleccione en el televisor el canal 3 ó 4.A continuación, aparece el menú para seleccionar el idioma. Consulte después el capítulo'Puesta en marcha' y lea el apartado 'Instalación inicial'.
El aparato no responde alpulsar una tecla, el mando adistancia funciona:
b'Dealer-Mode' activado: se bloquean todas las teclas del frontal del aparato.Desactivar la función:
1 Desconecte el grabador de DVD de la alimentación de la red.
2 Pulse y mantenga pulsadas las teclas STOP h y OPEN/CLOSE J y vuelva aconectar el enchufe a la red.
3 Tan pronto como aparezca la hora o '--:--' en la pantalla indicadora (tras unos 6 - 10segundos), suelte las teclas STOP h y OPEN/CLOSE J .
El aparato no responde alpulsar una tecla: bFalta de alimentación de la red: compruebe la alimentación de la red
bEstá en marcha una grabación programada (TIMER): si es necesario, cancele la grabación(TIMER) programada con la tecla STANDBY m .
bFallo técnico: desconecte durante 30 segundos el enchufe de la red y vuelva a enchufarlo.Si el problema no se soluciona de este modo, puede restablecer el estado de suministro delgrabador de DVD (ajustes de fábrica).
Restablecer los ajustes defábrica
bAtención:Todas las memorias de datos (canales, hora, TIMER) se borran.
1 Desconecte el grabador de DVD de la alimentación de la red.
2 Mantenga pulsada la tecla STANDBY-ON m del aparato y vuelva a conectar elenchufe a la red.
3 Cuando aparezca '�� �� ���' en la pantalla indicadora, suelte la teclaSTANDBY-ON m . Todas las memorias de datos (canales, hora, TIMER) se borran.
Consulte después el capítulo 'Puesta en marcha' y lea el apartado 'Instalación inicial'.
El mando a distancia nofunciona:
bEl mando a distancia no está dirigido hacia el aparato: ¿Se enciende en la pantalla indicadoracon cada pulsación de tecla 'o((('? Si se enciende esta indicación, significa que el grabador deDVD recibe la señal.
bFallo técnico: extraiga las pilas, espere unos 10 segundos y vuelva a ponerlas.bLas pilas están gastadas: cambie las pilas.
Antes de llamar al técnico

81
PROBLEMA SOLUCIÓN
El grabador de DVD noreproduce el disco:
bEl disco no está grabado: cambie el disco.bTipo de disco insertado incorrecto: sólo se pueden reproducir los siguientes tipos de discos:
DVD vídeo, CD de (súper) vídeo, DVD+R(W), CD de audio , MP3-CD'sbDisco insertado incorrectamente: insertar el disco con la etiqueta hacia arribabDisco sucio: limpiar el discobCódigo de región incorrecto: el código regional del DVD debe coincidir con el del grabador
de DVD.bBloqueo para niños activado: consulte el capítulo 'Control de acceso (bloqueo para niños)'bEl número de canal correspondiente al grabador de DVD está mal seleccionado o mal
ajustado: seleccione el número de canal correcto en el televisor (canal 3 ó 4).bEl cable de conexión entre el televisor y el grabador de DVD está suelto: compruebe el cable
de conexión.
No puedo reproducirningún CD de (súper) vídeo
bDel mismo modo, este CD de (súper) vídeo cuenta con un menú y la función 'PBC' estádesconectada. Esto se observa en el campo de estado 'PBC OFF'. Para activar la función,proceda como se indica a continuación:
1 Una vez introducido el CD de (súper) vídeo pulse la tecla SYSTEM-MENU .
2 Con la tecla D o C seleccione el símbolo 'A'.
3 Seleccione con la tecla CH- B o CH+ A la línea 'Características' y confirme conla tecla C .
4 Seleccione con la tecla CH- B o CH+ A en la línea 'PBC' 'Si'.
5 Confirme con la tecla OK y finalice con la tecla SYSTEM-MENU .
Reproducción deficiente delgrabador de DVD (imageno sonido distorsionados)
bAjuste incorrecto del televisor.bDisco sucio: Limpiar el discobEn ocasiones esto puede provocar una leve distorsión de la imagen. Esto no se debe a un fallo
del aparato.
No se puede grabar: bEl canal de televisión no ha sido memorizado o se ha seleccionado erróneamente: compruebelos canales memorizados.
bDisco protegido contra grabaciones (o contra escritura): Retire la protección contra escriturao cambie el disco. En el capítulo 'Grabación manual', consulte el apartado 'Cómo proteger undisco de grabaciones no deseadas'.
bEl disco DVD+R insertado ya está terminado (finalizado): cambie el disco.
La grabación programadano funciona:
bLa fecha y hora no están correctamente ajustadas: compruebe la fecha y hora.bProgramación errónea de la grabación (bloque TIMER): compruebe la grabación programada
(bloque TIMER).bEl disco insertado está protegido: retire la protección del disco.bEl disco DVD+R insertado ya está terminado (finalizado): cambie el disco.
Tras realizar una 'grabaciónprogramada con VCRPlus+' se descodifica (graba)un canal de televisiónerróneo.
1 Introduzca el número de programación PlusCode del canal de TV deseado.
2 Confirme con la tecla OK .
3 Compruebe en el campo de entrada 'Can' el número de canal mostrado.
4 Si no coincide con el canal de TV deseado, seleccione el campo de entrada y cambieel número de canal.
5 Confirme con la tecla OK .
ESP
AT
OL
Antes de llamar al técnico

82
PROBLEMA SOLUCIÓN
Distorsiones de imagen ysonido en la recepción deltelevisor
bAntes de proceder a la grabación, seleccione el tipo de grabación tal como se describe en elcapítulo 'Grabación manual', en el apartado 'Selección del tipo de grabación (calidad)'.
bModifique el canal del modulador: En estado apagado, mantenga pulsada la tecla 3 en elmando a distancia para conmutar al canal 3. Con la tecla 4 , conmute al canal 4.
bCompruebe la instalación de su antena.
Sonido distorsionadoprocedente de unamplificador de HiFiconectado
bEl grabador de DVD está conectado a la toma 'Phono' del amplificador: esta toma es sólo paratocadiscos que no dispongan de amplificador. Seleccione otra entrada de audio.
Durante la reproducción, laimagen aparecedistorsionada o está enblanco y negro
bEl sistema de televisión del disco no coincide con el sistema del televisor (PAL/NTSC).bLa grabación sólo se puede realizar en color únicamente si el canal de televisión o el aparato
adicional conectado emite información en color. Las señales en blanco y negro sin informaciónen color (subportadora de color) no se pueden grabar.
No hay sonido en la salidadigital
bCompruebe si el ajuste de sonido coincide o no con las conexiones seleccionadas y losaparatos conectados. Para más información, consulte el apartado 'Ajuste del sonido' en elcapítulo 'Configuración preferida personalizada'.
Algunos discos DVD+RWno se pueden reproducir endeterminadosreproductores de DVD
bSi la grabación tiene una duración demasiado breve, es posible que el reproductor de DVD nola reconozca: observe los siguientes 'Tiempos mínimos de grabación':Calidad de grabación 'M1': 5 minutos, 'M2': 10 minutos, 'M2x': 13 minutos, 'M3': 15 minutos,'M4': 20 minutos 'M6': 30 minutos 'M8': 30 minutos
bEn algunos reproductores de DVD no se pueden reproducir grabaciones de DVD+RW. Esteproblema se puede resolver gracias a una función especial:
1 Abra la bandeja del disco con la tecla OPEN/CLOSE J . Introduzca el disco, peromantenga abierta la bandeja.
2 Mantenga pulsada la tecla numérica 2 del mando a distancia hasta que se cierre labandeja. El disco queda modificado.
3 Si con ello no se logra el resultado deseado, puede repetir el proceso con la teclanumérica 3 del mando a distancia.
4 Con la tecla 1 se restablece el estado original del disco.
PAtención!Puede ocurrir que, con este proceso, ya no es posible la reproducción en otrosreproductores de DVD. Por lo tanto, esta función se tiene que utilizar con precaución.
Otros errores de disco(DVD+RW)
bSi no consigue volver a reproducir un disco, puede intentar repararlo para realizar nuevasgrabaciones con la siguiente función. De este modo el disco se prepara únicamente para elborrado. Sólo una vez realizada la grabación, el disco se borra realmente.
1 Limpie el disco
2 Abra la bandeja del disco con la tecla OPEN/CLOSE J . Introduzca el disco, peromantenga abierta la bandeja.
3 Mantenga pulsada la tecla CLEAR del mando a distancia hasta que se cierre labandeja. El disco se prepara para el borrado.
4 Inicie la grabación como si se tratará de un disco vacío.

83
PROBLEMA SOLUCIÓN
Otros errores de disco(DVD+R), 'Disco contienedatos desconocidos'
bEste mensaje puede aparecer si se ha insertado un DVD+R sin finalizar. Los DVD+R's sinfinalizar son muy sensibles a huellas dactilares, polvo y suciedad. Durante la grabación sepueden haber producido fallos por este motivo.Para volver a utilizar el disco, siga los siguientes pasos
1 Cerciórese de que no existen impurezas en el disco.
2 Abra la bandeja del disco con la tecla OPEN/CLOSE J . Introduzca el DVD+Rdefectuoso, pero mantenga abierta la bandeja.
3 Mantenga pulsada la tecla 5 del mando a distancia hasta que se cierre la bandeja. Selee el disco (pantalla indicadora '����� ') y el grabador de DVD inicia lareparación. Esta operación puede durar hasta cuatro veces el tiempo de la grabaciónen la cual se ha producido el error.
4 Si la recuperación ha finalizado con éxito, aparece la pantalla de índice.
Sin embargo, observe lo siguiente:Error durante la grabación: puede faltar el título.Error durante la modificación del título/de la pantalla de índice: puede ser visible el título/lapantalla de índice original.Error durante la finalización: el disco no aparece finalizado.
El índice centellea con unDVD+R
bCon la siguiente función se puede finalizar este disco:
1 Abra la bandeja del disco con la tecla OPEN/CLOSE J . Introduzca el DVD+Rdefectuoso, pero mantenga abierta la bandeja.
2 Mantenga pulsada la tecla 4 del mando a distancia hasta que se cierre la bandeja.En la pantalla indicadora aparece '������"�'. Se inicia la finalización. Ésta puededurar hasta tres minutos.
3 Cuando la finalización termina con éxito aparece el índice.
ESP
AT
OL

Esta garantía le otorga derechos legales específicos. Puede tener otros derechos que varían de estado / provincia a estado / provincia.Philips, P.O. Box 520890, Miami, FL 33152, (402) 536?4171
EL6506E003 / 09-02
Garantía limitada
Grabador de DVDGarantía de un año en mano de obra / Garantía de un año en cambio de partes
Es preciso que lleve este producto para su reparación.
VQUIÉN QUEDA CUBIERTO?Debe tener prueba de su compra para obtener servicio bajo garantía.Como prueba de compra se considera el recibo de venta o cualquierotro documento que indique que usted adquirió el producto.
VQUÉ QUEDA CUBIERTO?La cobertura de la garantía empieza el día que adquiere su producto.Un año a partir de entonces, todas las partes serán reparadas oreemplazadas y la mano de obra será gratuita.Después de un año a partir del día de la compra, debe pagar por elreemplazo o reparación de todas las partes y deberá pagar tambiéntodos los cargos de mano de obra. Todas las partes, incluyendo partesreparadas y reemplazadas quedan cubiertas únicamente durante elperiodo de la garantía original. Cuando expira la garantía del producto,expira también la garantía de partes reemplazadas y reparadas.
VQUÉ SE EXCLUYE?La garantía no cubre:• cargos de mano de obra de instalación o configuración del producto,ajuste de los controles realizada por el cliente en el producto einstalación o reparación de sistemas de antenas fuera del producto.
• reparación al producto y/o reemplazo de partes debido a un mal uso,accidentes, reparación no autorizada o cualquier otra causa que noesté bajo el control de Philips.
• problemas de recepción por condiciones de señal o cable o sistemasde antena fuera de la unidad.
• un producto que requiera modificación, adaptación para permitir queopere en un país distinto al país para el que fue diseñado, fabricado,aprobado y/o autorizado, o la reparación de productos dañados pordichas modificaciones.
• daños incidentales o consecuenciales que resulten del producto.(Algunos estados no permiten la exclusión de los daños incidentales oconsecuenciales, por lo que esta exclusión puede no aplicar a usted.Esto incluye, de manera enunciativa mas no limitativa, el materialpregrabado, ya sea que cuente o no con derechos de autor).
• un producto utilizado con propósitos comerciales e institucionales(incluyendo de manera enunciativa mas no limitativa propósitos derenta).
VDÓNDE HAY SERVICIO DISPONIBLE?El servicio de garantía está disponible en todos los países donde elproducto es oficialmente distribuido por Philips. En países en dondePhilips no distribuye el producto, la organización de servicio local dePhilips intentará proporcionar servicio (aunque puede haber retrasoscuando no se tengan disponibles las partes de repuesto o los manualestécnicos apropiados).
ASEGÚRESE DE GUARDAR...Por favor guarde su recibo de ventas y cualquier otro documento quesea prueba de compra. Anéxelo al manual del propietario y tengaambos a la mano. Guarde también la caja y el material de empaqueoriginal en caso que sea necesario devolver el producto.
ANTES DE SOLICITAR EL SERVICIO...Por favor verifique su manual del propietario antes de solicitar elservicio. Los ajustes de los controles que se analicen pueden ahorrarleuna llamada de servicio.
PARA OBTENER SERVICIO BAJOGARANTÍA EN ESTADOS UNIDOS,PUERTO RICO O LAS ISLAS VÍRGENES DEESTADOS UNIDOS...Lleve el producto a un Centro de servicio de fábrica Philips (ver listaanexa) o Centro autorizado de servicio para su reparación. Una vezreparado el producto, deberá recoger la unidad en el centro. Loscentros pueden guardar las partes defectuosas. (En los Estados Unidos,Puerto Rico y las Islas Vírgenes de Estados Unidos, toda garantíaimplícita, incluyendo garantías implícitas de comerciabilidad yadecuación para un propósito en particular, están limitadas en suduración al periodo de duración de esta garantía expresa. Debido a quealgunos estados no permiten limitaciones sobre la duración de unagarantía implícita, esta limitación puede no aplicar a usted).
PARA OBTENER SERVICIO BAJOGARANTÍA EN CANADÁ...Póngase en contacto con Philips al:
1-800-531-0039 (en inglés o en español)1-800-661-6162 (en francés)
(En Canadá, se otorga esta garantía en lugar de cualesquiera otrasgarantías. Ninguna otra garantía expresa o implícita, incluyendogarantías implícitas de comerciabilidad o adecuación para un propósitoen particular. Philips no será responsable bajo ninguna circunstancia decualesquier daños directos, indirectos, especiales, incidentales oconsecuenciales, sin importar cómo se haya incurrido en dicho daño,incluso si se notifica de la posibilidad de tales daños).
RECUERDE...Por favor anote a continuación los números de modelo y de serie quese encuentran en el producto. Por favor llene lo antes posible la tarjetade registro de garantía y envíela por correo. Será más fácil paranosotros notificarle en caso de que sea necesario.
Número de modelo: DVDR615/17
Número de serie:
EN
GL
ISH
ESP
AT
OL
3139
246
1342
141
03/0
00(WwnnNwWnNnnw
NnWNwwnNwwNnN
NwnnW)D
VD
R61
5/17

Rev. HH - 1/9/2003
FACTORY SERVICE LOCATIONS
NOTE: If you reside in one of our Philips Factory Service Branch areas (see directory on back), you can contact the nearest ServiceBranch to obtain efficient and expedient repair for your product. If your product is In-Warranty, you should have proof-of-purchaseto ensure No Charge Service. For Out-of-Warranty service, call the location nearest you.
NOTA: Si vous résidez dans une des régions desservies par une succursale de service après vente du fabricant Philips (voir listeci-dessous), vous pourrez contacter la branche de service après vente la plus près de chez vous pour obtenir un service après venterapide et efficace. Si le produit est sous garantie, il suffira de présenter une preuve d achat pour bénéficier d'un service sans frais.Pour les produits non couverts par la garantie, contactez le centre le plus près de chez vous.
NOTA: Si Ud. reside en una de nuestras zonas para sucursales Philips de servicio al de fábrica (ver directorio más abajo), Ud. puedecomunicarse con la sucursal de servicio más cercana para obtener una reparación oportuna y eficaz de su producto. Si su productoestá todavía bajo garantía, Ud. debe presentar comprobante de compra para no ocasionar ningunos cargos por servicio. Para serviciodespués del vencimiento de la garantía, llame al lugar más cercano de los abajo indicados.
In CanadaTo obtain efficient and expedient carry-in, mail-in, or in-home service for your product, please contact Philips at:
1-800-661-6162 (French speaking)1-800-531-0039 (English or Spanish speaking)
Au CanadaComment obtenir le service après-vente pour les produits apportés ou envoyés par la poste à notre centre de service ou le service àdomicile. Veuillez contacter philips á:
1-800-661-6162 (Francophone)1-800-531-0039 (Anglais ou Espagnol)
En el CanadáCómo recibir servicio efficiente para su producto, en persona, por correo o a domicillo Favor de comunicarse con Philips al:
1-800-661-6162 (francófono)1-800-531-0039 (Inglés o Español)

(WwnnNwWnNnnw
NnWNwwnNwwNnN
NwnnW)31
3924
613
421
4103
/000
DVDR615/17
Rev. HH ? 1/9/2003
FACTORY SERVICE LOCATIONS
QUALITY SERVICE IS AS CLOSE AS YOUR TELEPHONE! SIMPLY LOOK OVER THE LIST BELOW FOR THE NUMBER OF A FACTORY
SERVICE CENTER NEAR YOU. YOUR PRODUCT WILL RECEIVE EFFICIENT AND EXPEDIENT CARRY?IN, MAIL?IN, OR IN?HOME
SERVICE, AND YOU WILL RECEIVE PEACE OF MIND, KNOWING YOUR PRODUCT IS BEING GIVEN THE EXPERT ATTENTION OF
PHILIPS' FACTORY SERVICE.
COMMENT OBTENIR NOTRE SERVICE APR\S VENTE RAPIDE ET EFFICACE SOIT PAR COURRIER, ]DOMICILE, OU EN SE PRÉSENTANT ] UN CENTRE DE SERVICE PHILIPS.PLUS DE 600 CENTRES DE RÉCEPTION DE
PRODUITS ] RÉPARER ] TRAVERS LE PAYS: CONTACTER LE CENTRE DE SERVICE AUX CONSOMMATEURS LE PLUS PROCHE POUR
SAVOIR L'EMPLACEMENT DE CES DÉPÔTS DANS UN RAYON DE 50 ] 75 MILES (80 KM ] 120 KM) DU CENTRE DE SERVICE LOCAL.
CÓMO OBTENER UN SERVICIO OPORTUNO Y EFICIENTE POR CORREO, EN CASA O EN PERSONA PARASU PRODUCTO A TRAVÉS DE UN CENTRO PHILIPS DE SERVICIO. MAS DE 600 SITIOS POR TODO EL PAIS PARA LA
RECEPCION DE PRODUCTOS NECESITADOS DE REPARACIONES: COMUNICARSE CON EL CENTRO DE SERVICIO DE FABRICA MAS
CERCANO PARA ESTOS LUGARES DENTRO DE UN RADIO DE 80 A 120 KM (50 A 75 MILLAS) DEL CENTRO DE SERVICIO LOCAL.
ATLANTAPhilips Factory Service550 Franklin Road., Suite FMarietta, GA 30067800-273-1501
CLEVELANDPhilips Factory Service950 Keynote CircleBrooklyn Heights, OH 44131800-331-7037
CHICAGOPhilips Factory Service1279 W. Hamilton Pkwy.Itasca, IL 60143800-531-2922
TAMPAPhilips Factory Service1911 US Highway 301 North,Suite 100Tampa, FL 33619800-442-2027
DETROITPhilips Factory Service25173 DequindreMadison Heights, MI 48071800-438-1398
KNOXVILLEPhilips Factory ServiceOne Philips DriveBuilding 2Knoxville, TN 37914800-821-1767
SAN FRANCISCOPhilips Factory Service681 East Brokaw Rd.San Jose, CA 95112800-300-9013
DALLASPhilips Factory Service415 N. Main Street, #107Euless, TX 76040800-952-3254
PHILADELPHIAPhilips Factory Service354 Dunks Ferry Rd.Bensalem, PA 19020800-847-9320
HOUSTONPhilips Factory Service1110 N. Post Oak Rd.,Suite 100Houston, TX 77055800-952-3254
LOS ANGELESPhilips Factory Service20930 Bonita, Ste. VCarson, CA 90746800-300-9013