user manual precision and analytical balances me-t analytical balances...safety notes caution damage...
TRANSCRIPT
Precision and Analytical BalancesME-T
User
Man
ual

1 Safety Information
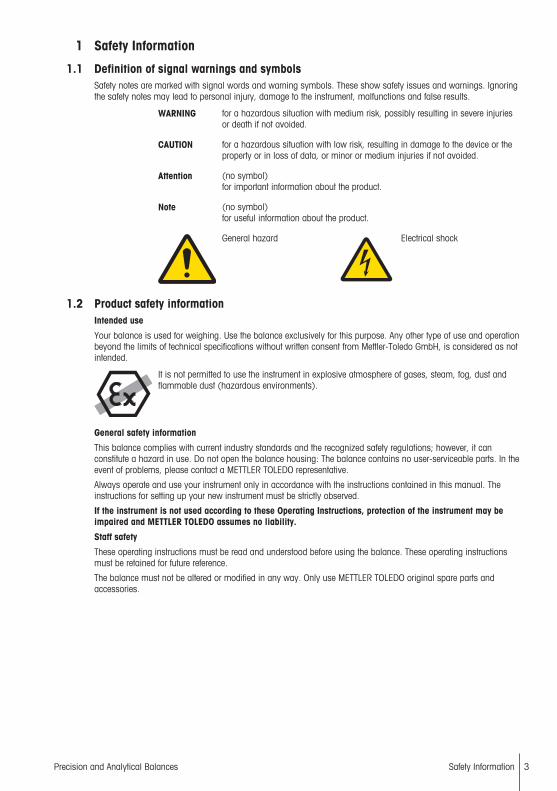
1.1 Definition of signal warnings and symbolsSafety notes are marked with signal words and warning symbols. These show safety issues and warnings. Ignoringthe safety notes may lead to personal injury, damage to the instrument, malfunctions and false results.
WARNING for a hazardous situation with medium risk, possibly resulting in severe injuriesor death if not avoided.
CAUTION for a hazardous situation with low risk, resulting in damage to the device or theproperty or in loss of data, or minor or medium injuries if not avoided.
Attention (no symbol) for important information about the product.
Note (no symbol) for useful information about the product.
General hazard Electrical shock
1.2 Product safety informationIntended use
Your balance is used for weighing. Use the balance exclusively for this purpose. Any other type of use and operationbeyond the limits of technical specifications without written consent from Mettler-Toledo GmbH, is considered as notintended.
It is not permitted to use the instrument in explosive atmosphere of gases, steam, fog, dust andflammable dust (hazardous environments).
General safety information
This balance complies with current industry standards and the recognized safety regulations; however, it canconstitute a hazard in use. Do not open the balance housing: The balance contains no user-serviceable parts. In theevent of problems, please contact a METTLER TOLEDO representative.
Always operate and use your instrument only in accordance with the instructions contained in this manual. Theinstructions for setting up your new instrument must be strictly observed.
If the instrument is not used according to these Operating Instructions, protection of the instrument may beimpaired and METTLER TOLEDO assumes no liability.
Staff safety
These operating instructions must be read and understood before using the balance. These operating instructionsmust be retained for future reference.
The balance must not be altered or modified in any way. Only use METTLER TOLEDO original spare parts andaccessories.
Safety Information 3Precision and Analytical Balances
Safety notes
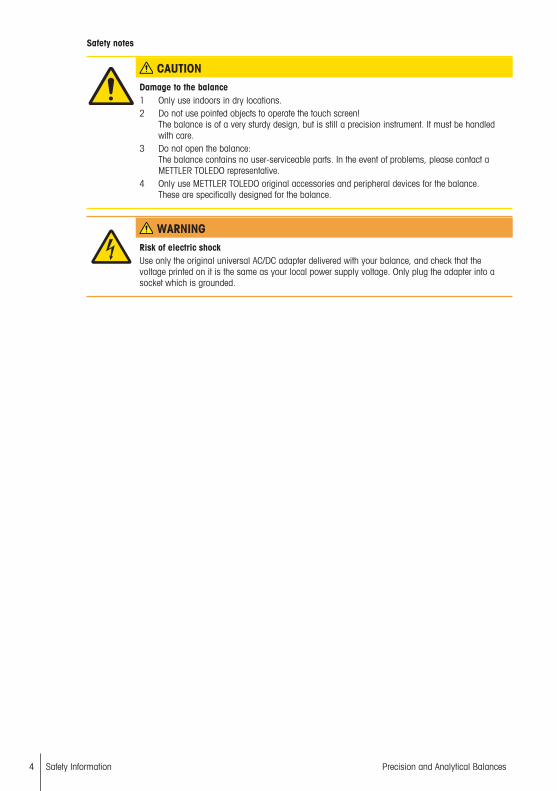
CAUTIONDamage to the balance1 Only use indoors in dry locations.2 Do not use pointed objects to operate the touch screen!
The balance is of a very sturdy design, but is still a precision instrument. It must be handledwith care.
3 Do not open the balance: The balance contains no user-serviceable parts. In the event of problems, please contact aMETTLER TOLEDO representative.
4 Only use METTLER TOLEDO original accessories and peripheral devices for the balance. These are specifically designed for the balance.
WARNINGRisk of electric shockUse only the original universal AC/DC adapter delivered with your balance, and check that thevoltage printed on it is the same as your local power supply voltage. Only plug the adapter into asocket which is grounded.
Safety Information4 Precision and Analytical Balances

2 Design and Function
2.1 Overview
8
101
23
3
3
1
2 1
2
7
77
9
9
5
6
54
4
5
6
11
1314
12
0.1 mg 1 mg
10 mg~0.1 g
1 Display 2 Operation keys
3 Leveling foot 4 Handle for operation of the draft shield door
5 Weighing pan 6 Draft shield element
7 Level indicator 8 Kensington slot for anti-theft purposes
9 Glass draft shield 10 RS232 serial interface
11 Socket for AC adapter 12 Legal for trade (LFT) sealing
13 USB device 14 USB host
Design and Function 5Precision and Analytical Balances

2.2 Operation keys
53 41 2
No. Key Name Explanation
1 ON/OFF To switch the instrument on or off.
2 Capacitive color TFT touch screen General navigation
3 Tare To tare the balance.
4 Zero To zero the balance.
5 Home To return from any menu level, or other window tothe application home screen.
2.3 User InterfaceThe screen is a capacitive color TFT touch screen. The screen not only displays information, it also allows the userto enter commands by tapping on certain areas on its surface. You can choose the information displayed on thescreen, change balance settings or perform certain operations on the instrument.
Only those elements which are available for the current dialog appear on the display.
CAUTIONDo not touch the touch screen with pointed or sharp objects!This may damage the touch screen.
Design and Function6 Precision and Analytical Balances

2.3.1 Application home screenThe application home screen appears after the startup of the instrument. It always shows the last application thatwas being used before the balance was switched off. The application home screen is the main screen of thebalance, from where every function can be accessed. You can always return to the application home screen bypressing on the home button [ ] in the lower right corner of the screen.
Prepare weight and start
Information and work bars
Name Explanation
1 Weighing information bar Shows the weighing-in aid and general balance information.
2 Work title bar Shows information about the current activity.
3 Value bar Shows information about the current weighing process.
4 Main navigation Work-related functions.
Information fields
Name Explanation
5 Weighing-in aid A dynamic graphic indicator shows the used amount of the totalweighing range.
6 Short balance information Readability and capacity of the balance.*
7 Weighing value field Shows the value of the current weighing process.
8 Coach text field Shows instructions for the current weighing process.
* For approved balances: Min (minimum capacity) and e (Verification scale interval) are shown in the left uppercorner.
Action buttons
Name Explanation
9 Main activity configuration To configure the current application (e.g. Weighing).
10 Detailed balance Information Shows detailed technical data about the balance.
11 Weighing unit Shows the unit of the current weighing process.
12 Activities To open the activities selection.
13 Print To print out results and/or settings (printer required).
14 Settings/Preferences To configure settings/preferences.
15 Status information field Shows information about the system status.
Design and Function 7Precision and Analytical Balances

2.3.2 Input Dialogs
2.3.2.1 Entering Characters and Numbers
The keyboard dialog allows the user to enter characters including letters, numbers and a variety of specialcharacters.
ID 1 - Label
Name Explanation
1 Input field Shows the characters that have been entered.
2 Delete all To delete all entered characters.
3 Discard To discard the entered data and to exit the dialog.
4 Confirm To confirm the data entered.
5 Delete To delete the last entered character.
6 Shift To switch between lower and upper case letters.
7 Specialized tabs To switch the keyboard mode for entering letters, numbers or special characters.
8 Explanation field Extra information about the value to enter (e.g. the maximum number of charactersavailable).
Design and Function8 Precision and Analytical Balances

2.3.2.2 Changing the date and time
The dialog (Picker view) allows the user to set the date and time.
Time
Name Explanation
1 Change date/time format Various date/time formats can be chosen.
2 Pick button Increment
3 Picker field Shows the defined time/date.
4 Pick button Decrement
5 Selection tabs Tabs of the selectable sub-categories
Design and Function 9Precision and Analytical Balances

2.3.3 Lists and tablesBasic elements of a simple list include a content title and a list of sub-elements. Tapping on an element opens a listof sub-elements or an input dialog.
General configuration
Weighing options
Publishing
Devices/connectivity
System settings
Name Explanation
1 List title Title of the current list
2 Contextual help Additional information about the current process
3 Back button To go one step back.
4 List element title Title of the list element
5 Scroll position The list can be scrolled.
6 Selection tabs Tabs of the selectable sub-categories.
Design and Function10 Precision and Analytical Balances

3 Installation and Putting into OperationThis section describes how to put the new instrument into operation.
Finding more information
u www.mt.com/balances
3.1 Scope of deliveryComponents Model
0.1 mg 1 mg 0.1 g / 10 mg
Draft shield high, 235 mm – –
low, 170 mm – –
Weighing pan with pan support Ø 90 mm – –
Ø 120 mm – –
180 x 180 mm – –
Draft shield element –
Pan support – –
Protective cover
Universal AC/DC adapter -
AC/DC adapter with country-specific power cable - -
Declaration of conformity
User Manual
Operating instructions: printed or on CD-ROM depending on thecountry.
Installation and Putting into Operation 11Precision and Analytical Balances

3.2 Installing the componentsBalances with readability of 0.1 mg
1
2
Place the following components on the balance in thespecified order:
1 Push the side glass doors back as far as will go.
2 Place draft shield element (1).
3 Place weighing pan (2).NoteCleaning the draft shield see Cleaning and Service.
Balances with readability of 1 mg
1
Place the following components on the balance in thespecified order:
1 Push the side glass doors back as far as will go.
2 Place weighing pan (1).NoteCleaning the draft shield see Cleaning and Service.
Installation and Putting into Operation12 Precision and Analytical Balances

Balances with readability of 10 mg / 0.1 g
1
2
3
Place the following components on the balance in thespecified order:
1 Place draft shield element (1): carefully pull apart thedraft shield element to fix it under the retaining plate.
2 Insert pan support (2).
3 Place weighing pan (3).
Installation and Putting into Operation 13Precision and Analytical Balances

3.3 Installing Protective CoverNoteMake sure using the correct protective cover, see Accessories and Spare Parts
Balances with readability of 0.1 mg / 1 mg Balances with readability of 0.01 g / 0.1 g
Install the protective cover according to the illustrationsbelow, using a screwdriver Philips No. 2.
Install the protective cover according to the illustrationsbelow, using a flat-head screwdriver.
Installation and Putting into Operation14 Precision and Analytical Balances

3.4 Selecting the locationYour balance is a sensitive precision instrument; the location where it is placed will have a profound effect on therepeatability and accuracy of weighing results. Chose a stable surface that is as horizontal as possible. The surfacemust be able to safety carry the weight of a fully loaded balance.
Observe ambient conditions (see Technical Data).
Avoid the following:
• Direct sunlight• Air drafts (e.g. from fans or air conditioners)• Temperature fluctuations• Vibrations
3.5 Connecting the instrumentThe balance is supplied with a universal AC/DC adapter or with an AC/DC adapter with a country-specific powercable. The power supply is suitable for all line voltages in the range: 100 - 240 VAC, 50/60 Hz. For detailedspecifications, see [Technical Data } 26].
Note Allow the balance to warm up for 30 minutes (0.1 mg models need 60 minutes) to adapt itself to the ambientconditions.
Connect the AC/DC adapter to the connection socket on the back of your balance andto the power line.
Attention
• Check if the local power supply falls within this range. If this is not the case, under no circumstances connectthe AC/DC adapter to the power supply, but contact a METTLER TOLEDO representative.
• The power plug must be accessible at all times.• Prior to use, check the power cable for damage.• Route the cable in such a way that it cannot be damaged or cause a hindrance when working.• Ensure that no liquid ever comes into contact with the AC/DC adapter.
3.6 Leveling the balanceExact horizontal positioning and stable installation are prerequisites for repeatable and accurate weighing results.
Note To compensate for small irregularities or inclinations (±2 %), the instrument must be leveled and adjusted eachtime it is moved to a new location. There are two adjustable leveling feet to compensate for slight irregularities in thesurface of the weighing bench.
Leveling the balance
− Adjust the two front leveling feet until the air bubble comes to restexactly in the middle of the glass:
Air bubble at "12 o'clock" turn both feet clockwise
Air bubble at "3 o'clock" turn left foot clockwise, rightfoot counterclockwise
Air bubble at "6 o'clock" turn both feet counterclockwise
Air bubble at "9 o'clock" turn left foot counterclockwise,right foot clockwise
Installation and Putting into Operation 15Precision and Analytical Balances
3.7 Switching on the balanceSwitching on the balance for the first time
1 Remove any load from the weighing pan.
2 Connect the balance using the AC/DC adapter to the mains.ð After the start screen has disappeared, the balance starts with the application home screen.
After the balance has switched on for the first time, it can be switched on by pressing long on [ ].
Note When the balance is switched on for the first time, the home screen of the application Weighing opens. If thebalance is switched on again, it always starts with the home screen of the application that was last used beforeswitching off.
3.8 Switching off the balance1 Press on [ ] and hold until the dialog Switch-off appears.
2 Tap on [ ].ð the balance switches off and goes into standby mode.
Note
• After switching on from standby mode, the balance needs no warm-up time and is immediately ready forweighing.
• If the balance has been switched off manually, the display is off.To completely switch off the balance, it must be disconnected from the power supply.
3.9 Zeroing1 Unload the balance.
2 Press [ ] to set the balance to zero.All weight values are measured in relation to the zero point.
Note Press [ ] before starting the weighing process.
3.10 Taring1 Tap on [ ] to set the balance to zero.
2 Place the empty container on the balance.ð The weight is displayed.
3 Press [ ] to tare the balance.ð The status information field on the left side of the screen shows Net and the weighing value field shows
0.000 g.
Installation and Putting into Operation16 Precision and Analytical Balances

3.11 Transporting the balanceSwitch off the balance and remove the power cable and any interface cable from the balance. Refer to the notes insection [Selecting the location } 15] regarding the choice of an optimal location.
Transporting over short distances
CAUTIONFor balances with a draft shield:Never lift the balance by its glass draft shield. The draft shield is not sufficiently fastened to thebalance.
Transporting over long distances
CAUTIONIf you would like to transport or ship your balance over long distances, use the complete originalpackaging.
Note For transporting the balance over a long distance, we recommend to use the transport case, see Accessories andSpare parts.
3.12 General requirements
3.12.1 Warming up the balanceBefore working with the balance, it must be warmed up in order to obtain accurate weighing results. To reachoperating temperature, the balance must be connected to the power supply for at least:
• 30 minutes for balances with a readability of 1 mg to 0.1 g.• 60 minutes for balances with a readability of 0.1 mg and higher.
3.12.2 Adjusting the balanceTo obtain accurate weighing results, the balance must be adjusted to match the gravitational acceleration at itslocation and depending on the ambient conditions. After reaching the operation temperature, an adjustment isnecessary in the following cases:
• Before the balance is used for the first time.• After reaching the operating temperature (only for balances with FACT).• When the balance was disconnected from the power or in case of power failure.• After significant environmental changes (e. g. temperature, humidity, air draft or vibrations)• At regular intervals during weighing service.
Installation and Putting into Operation 17Precision and Analytical Balances
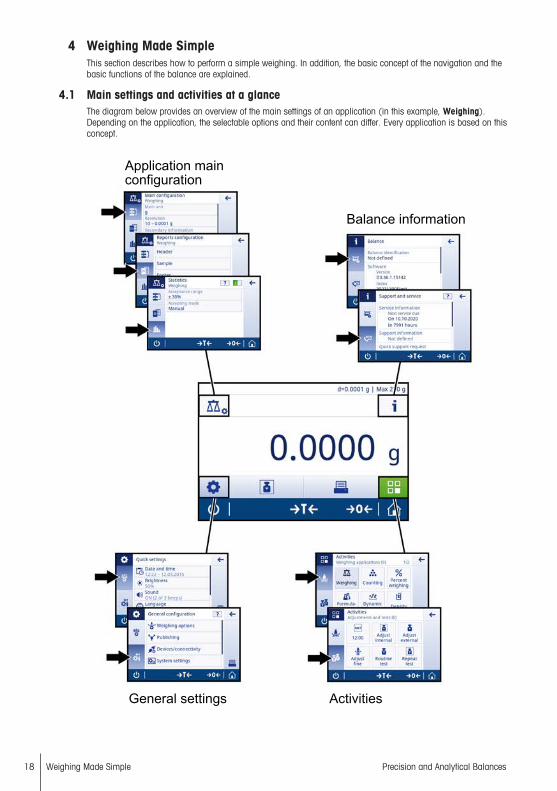
4 Weighing Made SimpleThis section describes how to perform a simple weighing. In addition, the basic concept of the navigation and thebasic functions of the balance are explained.
4.1 Main settings and activities at a glanceThe diagram below provides an overview of the main settings of an application (in this example, Weighing).Depending on the application, the selectable options and their content can differ. Every application is based on thisconcept.
Application mainconfiguration
Balance information
General settings Activities
Weighing Made Simple18 Precision and Analytical Balances

4.2 Navigation on the touch screenTo interact with the balance, use the screen and the operating keys at the bottom of the screen. The navigation onthe screen is similar to the navigation on a smart phone or tablet PC.
4.2.1 Opening an applicationTo open settings or applications, tap with your finger on the symbol of the application (e.g. [ ] Weighing).
ActivitiesWeighing applications
Counting Percent weighing
Percentweighing
4.2.2 ScrollingWhen the options are too numerous to be shown on one screen, a blue bar on the right side appears. This meansthat the user can scroll up and down. For scrolling, simply place your finger somewhere in the list and drag it up ordown.
Quick settings
Date and Time
Brightness
SoundON (3 of 3 beeps)Language
Weighing Made Simple 19Precision and Analytical Balances
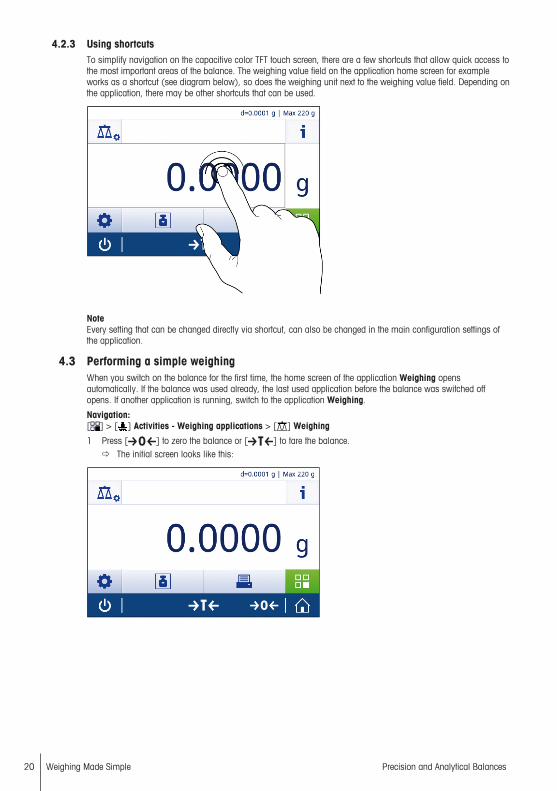
4.2.3 Using shortcutsTo simplify navigation on the capacitive color TFT touch screen, there are a few shortcuts that allow quick access tothe most important areas of the balance. The weighing value field on the application home screen for exampleworks as a shortcut (see diagram below), so does the weighing unit next to the weighing value field. Depending onthe application, there may be other shortcuts that can be used.
Note Every setting that can be changed directly via shortcut, can also be changed in the main configuration settings ofthe application.
4.3 Performing a simple weighingWhen you switch on the balance for the first time, the home screen of the application Weighing opensautomatically. If the balance was used already, the last used application before the balance was switched offopens. If another application is running, switch to the application Weighing.
Navigation:[ ] > [ ] Activities - Weighing applications > [ ] Weighing
1 Press [ ] to zero the balance or [ ] to tare the balance.ð The initial screen looks like this:
Weighing Made Simple20 Precision and Analytical Balances

2 Place a sample on the weighing pan.ð The unstability symbol appears at the left side of the screen and the value in the weighing value field
becomes light blue.
ð After a short period of time, the weighing pan is stable. The unstability symbol disappears and the valuein the weighing value field becomes dark blue again.
ð The weighing process is finished. The result appears on the screen.
4.4 Switching the weighing unitThere are several weighing units available. The default value is country-specific.
The weighing unit can be chosen via the main configuration of the current application or via shortcut. This exampledescribes how to change the weighing unit via shortcut.
1 Tap on the weighing process unit (shortcut) gram (g).
ð the screen Main unit opens.
Weighing Made Simple 21Precision and Analytical Balances

2 Put your finger somewhere in the list and drag up to scroll down.
Main unit
g (Default)
3 Choose another weighing unit (e.g. ounce (oz)) by tapping on it.
4 Tap on [ ] to confirm the chosen weighing unit.
ð The weighing unit gram (g) has been changed to ounce (oz).
Note With approved balances, this menu topic has a fixed setting and cannot be changed.
4.5 Changing the resolutionThere are several resolutions available. The default resolution is instrument-specific.
The resolution can be changed as follows:
1 Tap on the weighing value field.
Weighing Made Simple22 Precision and Analytical Balances

2 Tap on 10d - 0.001 g.
Resolution
3 Confirm the chosen resolution by tapping on [ ].
ð The resolution has been changed.
Weighing Made Simple 23Precision and Analytical Balances
5 Maintenance
WARNINGRisk of electric shock– The instrument must be disconnected from the power supply, before cleaning or other maintenancework to be performed.– Use only the power cord from METTLER TOLEDO, if it needs replacing.
Please observe the following notes:
Note
On no account use cleaning agents which contain solvents or abrasive ingredients, as this can result in damage tothe touch screen.
5.1 Cleaning and ServiceEvery now and then, clean the weighing pan, draft shield element, bottom plate, draft shield (depending on themodel) and housing of your balance. Your balance is made from high-quality, durable materials and can thereforebe cleaned using a damp cloth or with a standard, mild cleaning agent.
Please observe the following notes:
• The balance must be disconnected from the power supply• Ensure that no liquid comes into contact with the balance or the AC adapter.• Never open the balance or AC adapter – they contain no components, which can be cleaned,
repaired or replaced by the user.
• On no account use cleaning agents which contain solvents or abrasive ingredients, as thiscan result in damage to the operation panel overlay.
• Do not use wet, but only damp cloth for cleaning.
Please contact your METTLER TOLEDO dealer for details of the available service options. Regularservicing by an authorized service engineer ensures constant accuracy for years to come andprolongs the service life of your balance.
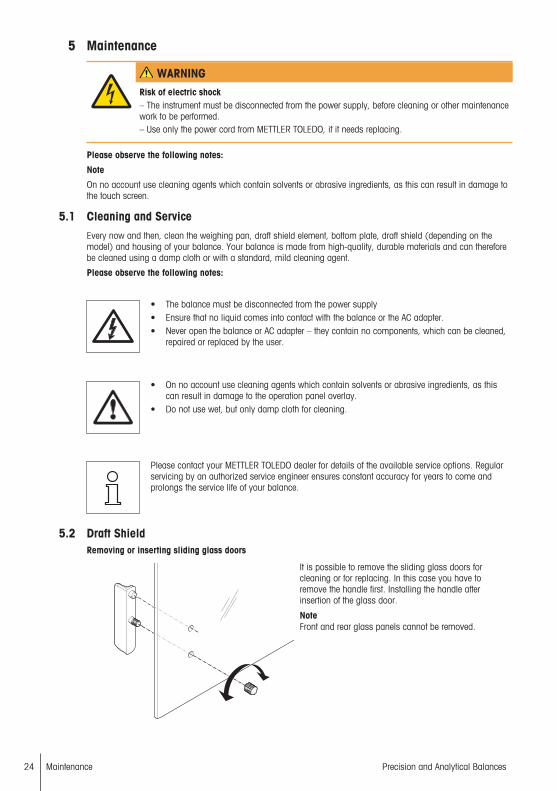
5.2 Draft ShieldRemoving or inserting sliding glass doors
It is possible to remove the sliding glass doors forcleaning or for replacing. In this case you have toremove the handle first. Installing the handle afterinsertion of the glass door.
NoteFront and rear glass panels cannot be removed.
Maintenance24 Precision and Analytical Balances
5.3 DisposalIn conformance with the European Directive 2002/96/EC on Waste Electrical and ElectronicEquipment (WEEE) this device may not be disposed of in domestic waste. This also applies tocountries outside the EU, per their specific requirements.
Please dispose of this product in accordance with local regulations at the collecting pointspecified for electrical and electronic equipment. If you have any questions, please contact theresponsible authority or the distributor from which you purchased this device. Should this devicebe passed on to other parties (for private or professional use), the content of this regulation mustalso be related.
Thank you for your contribution to environmental protection.
Maintenance 25Precision and Analytical Balances
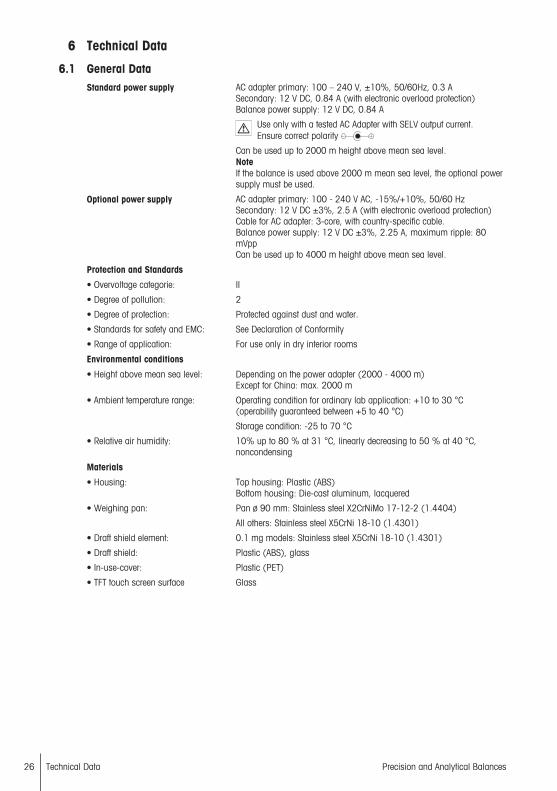
6 Technical Data
6.1 General DataStandard power supply AC adapter primary: 100 – 240 V, ±10%, 50/60Hz, 0.3 A
Secondary: 12 V DC, 0.84 A (with electronic overload protection)Balance power supply: 12 V DC, 0.84 A
Use only with a tested AC Adapter with SELV output current.Ensure correct polarity
Can be used up to 2000 m height above mean sea level.Note If the balance is used above 2000 m mean sea level, the optional powersupply must be used.
Optional power supply AC adapter primary: 100 - 240 V AC, -15%/+10%, 50/60 HzSecondary: 12 V DC ±3%, 2.5 A (with electronic overload protection)Cable for AC adapter: 3-core, with country-specific cable.Balance power supply: 12 V DC ±3%, 2.25 A, maximum ripple: 80mVppCan be used up to 4000 m height above mean sea level.
Protection and Standards
• Overvoltage categorie: II
• Degree of pollution: 2
• Degree of protection: Protected against dust and water.
• Standards for safety and EMC: See Declaration of Conformity
• Range of application: For use only in dry interior rooms
Environmental conditions
• Height above mean sea level: Depending on the power adapter (2000 - 4000 m)Except for China: max. 2000 m
• Ambient temperature range: Operating condition for ordinary lab application: +10 to 30 °C(operability guaranteed between +5 to 40 °C)
Storage condition: -25 to 70 °C
• Relative air humidity: 10% up to 80 % at 31 °C, linearly decreasing to 50 % at 40 °C,noncondensing
Materials
• Housing: Top housing: Plastic (ABS)Bottom housing: Die-cast aluminum, lacquered
• Weighing pan: Pan ø 90 mm: Stainless steel X2CrNiMo 17-12-2 (1.4404)
All others: Stainless steel X5CrNi 18-10 (1.4301)
• Draft shield element: 0.1 mg models: Stainless steel X5CrNi 18-10 (1.4301)
• Draft shield: Plastic (ABS), glass
• In-use-cover: Plastic (PET)
• TFT touch screen surface Glass
Technical Data26 Precision and Analytical Balances


Mettler-Toledo GmbHIm Langacher 448606 Greifensee, Switzerlandwww.mt.com/contact
Subject to technical changes.© Mettler-Toledo GmbH 02/201630203401B en
For more informationwww.mt.com/balances
*30203401*