user manual solo 4k 25 11 2016 - dune hd · user manual. 2 dune hd solo 4k introduction dune hd...
TRANSCRIPT
UHD 4K and HEVC Enabled IPTV/VOD/OTT Media Player
User Manual

2
Dune HD solo 4k
Introduction
Dune HD Solo 4K is the universal solution for playback of 4K and Full HD video, high-quality audio, IPTV and VOD content, digital TV channels.
This media player sets an entirely new standard for home entertainment. It supports the majority of digital audio and video formats, including the most modern HEVC video codec with one billion colors (10-bit color encoding), all modern 3D video standards such as MVC, Side-by-Side and Top-and-Bottom, audiophile HD audio with high resolution up to 24-bit / 192 KHz, etc.
Dune HD Solo 4K is equipped with two USB ports, an internal 2.5” SATA HDD bay, 1Gbit Ethernet, 802.11ac Dual Band 2T2R Wi-Fi.

3
USER MANUAL
Key Features
· The newest media processor: The latest Sigma Designs SMP8758 chip from the famous vendor of high-end media processors, with the new Dual Core ARM CPU (4x more power than before); the first and the only chip from Sigma Designs with real 4K support
· 4K video playback: Decode 4K video content in all popular formats (including H.265 10-bit)· 4K video output: Output 4K content with pixel-to-pixel precision to 4K TV· SD/HD to 4K conversion: Automatically increase resolution of SD/HD content to 4K· VXP: Professional-grade video processing engine for the best possible picture quality of any
content· HEVC: Play video encoded using the latest H.265 codec (2x picture quality increase over H.264)· 10-bit color encoding: Enjoy one billion colors (64x more than before) with the newest H.265
Hi10P video encoding standard· Blu-ray menu: Enjoy full Blu-ray menu navigation or use simple BD Lite menu at your discretion· True 24p output: Ensure perfectly smooth playback of Hollywood movies due to full support for
24p (23.976) framerate· Advanced media player: Play video in MKV and other modern video file formats, including top
quality 4K and HD with very high bitrates (100 Mbit/s+)· 3D video: Play all popular 3D video formats, including MVC, SBS, Top/Bottom· HD audio: Output studio-quality high definition audio tracks (Dolby TrueHD, DTS HD MA) to your
A/V receiver· Dolby Atmos 3D audio: Enjoy the newest 3D audio format from Dolby using Dolby Atmos pass-
through capability· Hi-End music: Play very high-quality (up to 192 KHz / 24-bit) music files in various formats (FLAC,
Monkey's Audio APE, WAV/PCM, etc)· Network player: Connect to local network and play content directly from PC or NAS via UPnP,
SMB, or NFS· HDD player: Play content from any HDD (internal, USB, NAS) of any size (including the newest
6TB+ HDD models)· HDD rack: Insert and exchange internal 2.5'' SATA HDDs (5-7 mm) for nearly unlimited storage
capacity expansion· Built-in storage: 4GB flash memory for applications and system needs· USB ports: Conveniently connect USB HDDs, USB flash drives, USB card readers, USB hubs and
other USB devices· Full range of A/V connectors: HDMI, S/PDIF coaxial audio output, analog stereo audio output,
composite video output

4
Dune HD solo 4k
· 1Gbit Ether net port: Ensure the best performance when connecting to your local network via cable
· 802.11ac Wi-Fi with both 2.4 and 5.0 GHz support and 2T2R (two antennas): Ensure the best performance when connecting to your local network via air
· DVB-T/T2 tuner (option): Watch and record digital terrestrial TV channels (free-to-air broadcasts)
· IR extender: Easily organize hidden installation of the media player when needed via included external IR eye
· Control4: Integrate seamlessly into Smart Home installations based on Control4 technology via ready-to-use Control4 driver
· Z-Wave (option): Use built-in Z-Wave controller to build your Smart Home based on Z-Wave technology
· Dual boot Linux + Android: Enjoy both Linux OS with full classic Dune HD media player functionality and the newest Android OS and Android applications
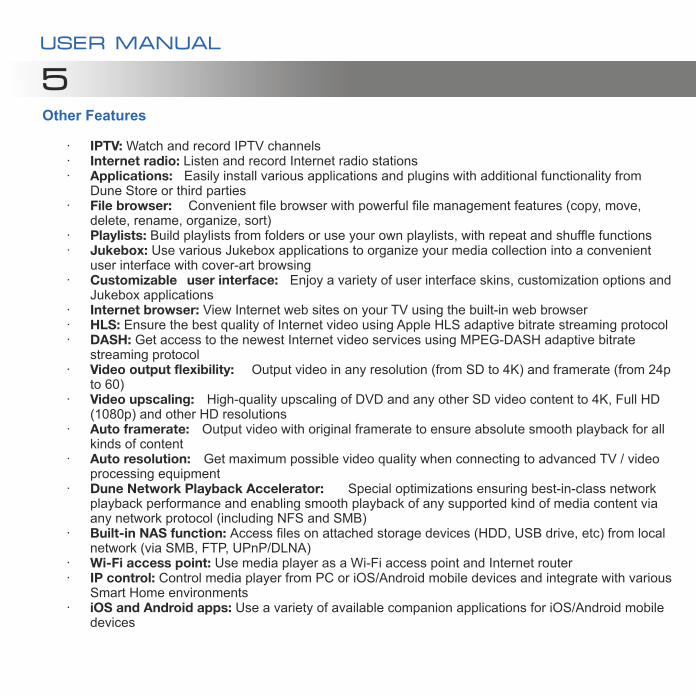
5Other Features
· IPTV: Watch and record IPTV channels· Internet radio: Listen and record Internet radio stations· Applications: Easily install various applications and plugins with additional functionality from
Dune Store or third parties· File browser: Convenient file browser with powerful file management features (copy, move,
delete, rename, organize, sort)· Playlists: Build playlists from folders or use your own playlists, with repeat and shuffle functions· Jukebox: Use various Jukebox applications to organize your media collection into a convenient
user interface with cover-art browsing· Customizable user interface: Enjoy a variety of user interface skins, customization options and
Jukebox applications· Internet browser: View Internet web sites on your TV using the built-in web browser· HLS: Ensure the best quality of Internet video using Apple HLS adaptive bitrate streaming protocol· DASH: Get access to the newest Internet video services using MPEG-DASH adaptive bitrate
streaming protocol· Video output flexibility: Output video in any resolution (from SD to 4K) and framerate (from 24p
to 60)· Video upscaling: High-quality upscaling of DVD and any other SD video content to 4K, Full HD
(1080p) and other HD resolutions· Auto framerate: Output video with original framerate to ensure absolute smooth playback for all
kinds of content· Auto resolution: Get maximum possible video quality when connecting to advanced TV / video
processing equipment· Dune Network Playback Accelerator: Special optimizations ensuring best-in-class network
playback performance and enabling smooth playback of any supported kind of media content via any network protocol (including NFS and SMB)
· Built-in NAS function: Access files on attached storage devices (HDD, USB drive, etc) from local network (via SMB, FTP, UPnP/DLNA)
· Wi-Fi access point: Use media player as a Wi-Fi access point and Internet router· IP control: Control media player from PC or iOS/Android mobile devices and integrate with various
Smart Home environments· iOS and Android apps: Use a variety of available companion applications for iOS/Android mobile
devices
USER MANUAL

9
6
Package Contents
1 2 3 4 5
6 7 8 10
1. Dune HD Solo 4K media player2. Remote control (batteries may not be included)3. HDMI cable (optional)4. LAN cable (optional)5. AV cable (3.5mm minijack to 3 x RCA)
NOTE: Additional items (optional) may be included into the package, depending on player configuration, region, and distributor.
Dune HD solo 4k
6. IR extender (optional)7. External power supply (12V)8. 2 x Wi-Fi antenna9. Wall-mounting clips10. Quick start guide and user manual
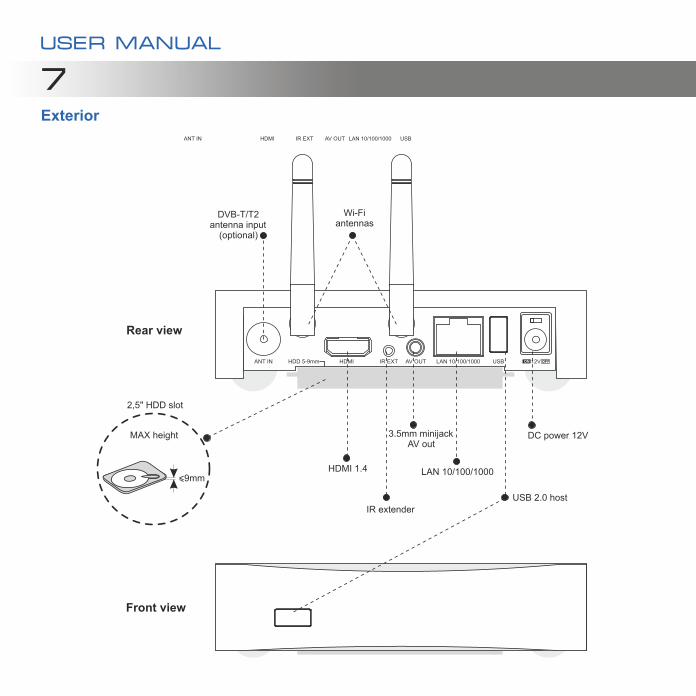
Exterior
Rear view
USB 2.0 host
DC power 12V
LAN 10/100/1000
3.5mm minijackAV out
IR extender
HDMI 1.4
2,5" HDD slot
DVB-T/T2 antenna input
(optional)
Front view
Wi-Fiantennas
MAX height
<9mm
7
USER MANUAL
HDD 5-9mm
Remote control
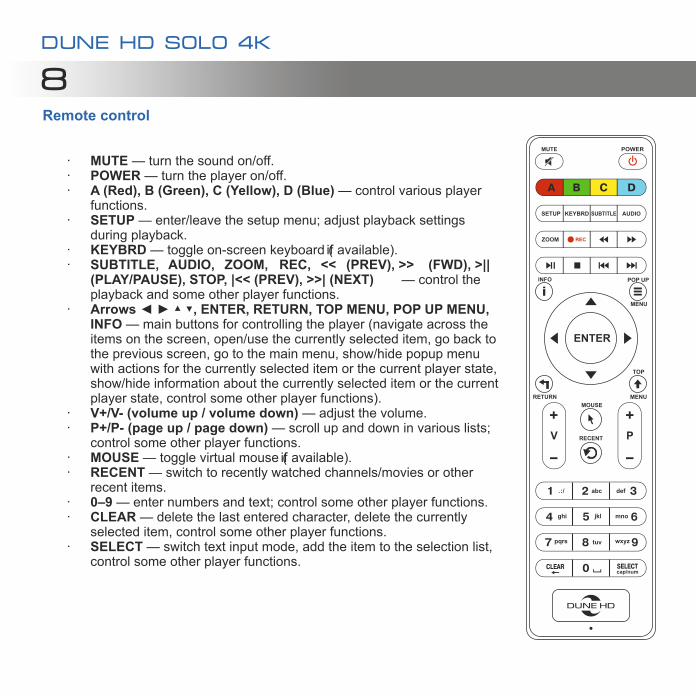
· MUTE — turn the sound on/off.· POWER — turn the player on/off.· A (Red), B (Green), C (Yellow), D (Blue) — control various player
functions.· SETUP — enter/leave the setup menu; adjust playback settings
during playback.· KEYBRD — toggle on-screen keyboard ( available).· SUBTITLE, AUDIO, ZOOM, REC, << (PREV), >> (FWD), >||
(PLAY/PAUSE), STOP, |<< (PREV), >>| (NEXT) — control the playback and some other player functions.
· Arrows ◄ ► ▲ ▼, ENTER, RETURN, TOP MENU, POP UP MENU, INFO — main buttons for controlling the player (navigate across the items on the screen, open/use the currently selected item, go back to the previous screen, go to the main menu, show/hide popup menu with actions for the currently selected item or the current player state, show/hide information about the currently selected item or the current player state, control some other player functions).
· V+/V- (volume up / volume down) — adjust the volume.· P+/P- (page up / page down) — scroll up and down in various lists;
control some other player functions.· MOUSE — toggle virtual mouse ( available).· RECENT — switch to recently watched channels/movies or other
recent items.· 0–9 — enter numbers and text; control some other player functions.· CLEAR — delete the last entered character, delete the currently
selected item, control some other player functions.· SELECT — switch text input mode, add the item to the selection list,
control some other player functions.
if
if
8
Dune HD solo 4k

9Installation
You can install the player on a horizontal surface or mount it on a wall. Wall-mounting is typically used for installing the player on a wall behind a TV set. For wall-mounting, attach the wall-mounting clips to the bottom of the player using the screws which fix the bottom HDD cover.
When installing the player in a hidden location, such as enclosed cabinet or behind a TV set, you can use the IR extender cable to allow the infrared signal from the remote control to reach the player.Ensure there is enough space around the player for proper cooling. The space at each side should be not less than 10 cm. When installing the player in an enclosed cabinet, please ensure proper airflow and cooling inside the cabinet.
96 mm
450
900
USER MANUAL

10Getting Started
Quick Setting of Video Output Mode
Ensure the RC has batteries installed. Connect the player to your TV and to other A/V equipment in an appropriate way. Use HDMI connection to get the best possible quality of video and audio. Make sure to switch off the player and all relevant A/V equipment before connecting them. Ensure your TV and other A/V equipment are configured to use proper inputs. Connect the power cable to the player and switch the player on using the power switch on the back panel of the player.
The player will perform its initial loading procedure, which may take up to about 1 minute. During the loading procedure, "DUNE HD" logo is shown on the TV screen.
· If you do not see "DUNE HD" logo on the TV screen when you switch on the player, it may mean some problem with the connection between the player and the TV or that a wrong video input is chosen in the TV or A/V receiver/switch. In this case, recheck the cables and the settings of the TV or A/V receiver/switch, or try to use different cables or a different way of connecting the player to the TV.
· If you see "DUNE HD" logo on the TV screen when you switch on the player, but then the picture disappears and the other picture does not appear during at least 10 seconds, it may mean that a wrong video output mode is configured in the player. In this case, press the "REC" RC button, and then press one of the RC buttons "1", "2", "3", "4" or "5" to switch to a different video output mode (see "Quick Setting of Video Output Mode" for more information).
Finally, you should see the initial setup wizard, which will allow you to perform the initial player configuration. After that you should see the main screen of the player menu. The main screen shows menu items which allow the use of different player functions and access to all storage devices and network drives connected to the player.
The “REC” RC button allows quick setting of video output mode without entering the player setup menu. This way of video output configuration may be required if you see no picture on the screen after connecting your player to a TV.Press the “REC” RC button and then one of the RC buttons “1”, “2”, “3”, “4”, or “5” to switch to one of the following video output modes respectively:1. Composite PAL2. Composite NTSC3. HDMI, 480i, 60 Hz4. HDMI, 720p, 60 Hz5. HDMI, 1080i, 60 Hz
Adjust the player settings as needed using "Setup" menu.
Dune HD solo 4k

11After you see a picture on the TV screen, press the “ENTER” RC button, and then go to the player setup menu to perform a more precise configuration of the video output mode if needed.
NOTE: The procedure of quick setting of video output mode cannot be used during playback and in some other cases. To ensure this procedure can be used, switch the player off, then switch the player on, and then wait about 1 minute to ensure the player loading is finished. After that press "STOP" RC button to ensure playback is stopped. Then use "REC" RC button.
To connect a USB drive, go to “Sources” section of the player menu and connect the USB drive to an USB port of the player. The player will recognize the USB drive, and will show an item corresponding to the USB drive on the main screen.
When connecting a USB drive requiring significant power (such as USB HDD), use an external power supply for the USB drive. Power provided by the USB ports of the player may not be enough for correct functioning of the USB drive.
Do not disconnect or switch off the USB drive when some write operation is in progress.
You can insert an internal 2.5” SATA HDD into the player.
NOTE: The HDD thickness must be between 5 mm and 9 mm. 9.5 mm and 12 mm models are not supported.
To insert an HDD into the player, perform the following steps:1. Unscrew the two screws which fix the bottom HDD cover.2. Detach the bottom HDD cover.3. Insert the HDD into the player. The HDD will connect to the internal SATA connectors.4. Attach the bottom HDD cover.5. Screw the two screws to fix the bottom HDD cover.To remove the internal HDD, perform the same steps in the opposite order.
NOTE: Do not remove the HDD when some write operation is in progress.
The player shows an item corresponding to the HDD in “Sources” section of the player menu.
Connecting USB Drives
Using Internal HDD
USER MANUAL
12It is recommended to use “green” HDD models with small RPM value, small heat emission, and small power consumption; for more information, please see here:http://dune-hd.com/support/hw_compat/
To format the HDD attached to the player, select the HDD item in “Sources” section of the player menu, press the “INFO” RC button and choose “Format Disk” (to format the entire disk) or “Format Partition” (to format an already existing disk partition only). Then choose the type of file system: if you want to use the HDD only with the player, “EXT3” is typically a good choice; if you want to connect the HDD to a Windows PC, “NTFS” is typically a good choice. The player will format the disk. To format an unformatted HDD, just press the “ENTER” RC button on the HDD item.
NOTE: To use disks formatted by the player into “EXT2” or “EXT3” file system on a Windows PC, you may need to install additional software on the PC, such as “EXT2FSD” (http://www.ext2fsd.com/).
To connect a network drive using SMB or NFS protocol, go to “Sources” section of the player menu, press the “POP UP MENU” RC button, and choose “Create Network Folder”, then fill the parameters of the network drive as needed. The player will show an item corresponding to the configured network drive on the main screen. To browse the list of network resources accessible via SMB or UPnP protocols, use “Network Browser” item in “Sources” section of the player menu.
NOTE: If some network resources are not shown by the player, you may need to wait some minutes and then retry (or press the “POP UP MENU” RC button and choose “Refresh” command).
To switch the player on and to switch it off completely, use the power switch on the rear panel of the player.
To put the player into the standby mode, press the "POWER" RC button. To exit the standby mode, press this button again. Depending on the player settings (see the player setup menu), the "hardware standby" or "software standby" mode may be used.In the "hardware standby" mode, almost complete power-off takes place and the player consumes almost no power.
Formatting HDD
Accessing Network Drives
Switching the Player On and Off
Dune HD solo 4k
13In the "software standby" mode, the player produces no signal on the video output, but is still functioning. For example, if you have some storage devices connected to the player, you may still access them from network ("NAS" function of the player). Exiting the "software standby" mode takes just a few seconds. When the player is in the "software standby" mode, it still consumes significant power. It is not recommended to keep the player in the "software standby" mode for a while if you do not need it.
NOTE: After switching off the player completely or putting the player into the "hardware standby" mode, it is recommended to wait about 1 minute before switching it on again.
The player can work as a file server, i.e. you can access storage devices connected to the player (internal HDD, USB drives) from the local network using FTP and SMB protocols. For example, you can copy files to the player directly from a PC or other device in the local network. On a Windows PC, just type "ftp://ip_address" or "\\ip_address" in the Windows explorer, where "ip_address" is the IP address of the player. The IP address of the player can be found in “Setup / Information” menu.
The player can work as a Wi-Fi access point or Wi-Fi router. I.e. the player can connect to Internet via Ethernet and create its own Wi-Fi network which can be used by various devices (such as mobile phones, tablets, notebooks, etc) to communicate with the player and with each other and to access Internet. In order to use this, enable “Wi-Fi access point” function in “Setup / Network” menu.
Built-in NAS (Network Attached Storage) function
Built-in Wi-Fi Access Point function
USER MANUAL

14Limitations
Updating Your Player and Getting More Information
Compatibility of the player with a particular hardware (A/V equipment, network equipment, disk drives, etc) may depend on various factors (particular hardware model, specifics of hardware installation and usage, configuration of the player and the hardware, etc). If the player does not work correctly with a particular hardware, try to adjust the configuration of the player or hardware, try to use the hardware in a different way, or try to use some other hardware.
Compatibility of the player with a particular media content (files, discs, etc) may depend on various factors (specifics of media content encoding, specifics of the configuration of the player, etc). If the player does not play correctly a particular media content, try to adjust the configuration of the player, or try to use media content encoded in a different way.
Please check here for updated versions of player firmware (which may improve player functioning and extend player possibilities): http://dune-hd.com/firmwar e/
You can also connect the player to Internet and use the online firmware upgrade function, see “Setup / Misc / Firmware Upgrade” menu.
Please check here for more detailed and up-to-date documentation and information on player usage:http://dune-hd.com/manuals/
http://dune-hd.com/support/
Dune HD solo 4k

15
NOTES
