user manual v3.1 - az849230.vo.msecnd.net · user manual v3.1.0 icompel deployment manager (idm)...
TRANSCRIPT

User Manual v3.1.0
iCOMPEL Deployment Manager (IDM) v3.1.0
IDM-AP-100 IDM-VM-100 IDM-AP-500 IDM-VM-500 IDM-AP-1000 IDM-VM-1000 IDM-AP-1500 IDM-VM-1500
Order toll-free in the U.S.: Call 877-877-BBOX (outside U.S. call 724-746-5500)FREE technical support 24 hours a day, 7 days a week: Call 724-746-5500 or fax 724-746-0746www.blackbox.com • [email protected]
Customer Support
Information

877-877-2269 | blackbox.com
iCOMPEL Deployment Manager (IDM) User Manual
We‘re here to help! If you have any questions about your application or our products, contact Black Box Tech Support at 877-877-2269
or go to blackbox.com and click on “Talk to Black Box.”You’ll be live with one of our technical experts in less than 60 seconds.
Trademarks Used in this Manual
Black Box and the Double Diamond logo are registered trademarks of BB Technologies, Inc.
Any other trademarks mentioned in this manual are acknowledged to be the property of the trademark owners.

877-877-2269 | blackbox.com
iCOMPEL Deployment Manager (IDM) User Manual
Federal Communications Commission and Industry Canada Radio Frequency Interference Statements
This equipment generates, uses, and can radiate radio-frequency energy, and if not installed and used properly, that is, in strict accordance with the manufacturer’s instructions, may cause inter ference to radio communication. It has been tested and found to comply with the limits for a Class A computing device in accordance with the specifications in Subpart B of Part 15 of FCC rules, which are designed to provide reasonable protection against such interference when the equipment is operated in a commercial environment. Operation of this equipment in a residential area is likely to cause interference, in which case the user at his own expense will be required to take whatever measures may be necessary to correct the interference.
Changes or modifications not expressly approved by the party responsible for compliance could void the user’s authority to operate the equipment.
This digital apparatus does not exceed the Class A limits for radio noise emis sion from digital apparatus set out in the Radio Interference Regulation of Industry Canada.
Le présent appareil numérique n’émet pas de bruits radioélectriques dépassant les limites applicables aux appareils numériques de la classe A prescrites dans le Règlement sur le brouillage radioélectrique publié par Industrie Canada.
Disclaimer:Black Box Network Services shall not be liable for damages of any kind, including, but not limited to, punitive, consequential or cost of cover damages, resulting from any errors in the product information or specifications set forth in this document and Black Box Network Services may revise this document at any time without notice.

877-877-2269 | blackbox.com
iCOMPEL Deployment Manager (IDM) User Manual
Instrucciones de Seguridad(Normas Oficiales Mexicanas Electrical Safety Statement)1. Todas las instrucciones de seguridad y operación deberán ser leídas antes de que el aparato eléctrico sea operado.
2. Las instrucciones de seguridad y operación deberán ser guardadas para referencia futura.
3. Todas las advertencias en el aparato eléctrico y en sus instrucciones de operación deben ser respetadas.
4. Todas las instrucciones de operación y uso deben ser seguidas.
5. El aparato eléctrico no deberá ser usado cerca del agua—por ejemplo, cerca de la tina de baño, lavabo, sótano mojado o cercade una alberca, etc.
6. El aparato eléctrico debe ser usado únicamente con carritos o pedestales que sean recomendados por el fabricante.
7. El aparato eléctrico debe ser montado a la pared o al techo sólo como sea recomendado por el fabricante.
8. Servicio—El usuario no debe intentar dar servicio al equipo eléctrico más allá a lo descrito en las instrucciones de operación.Todo otro servicio deberá ser referido a personal de servicio calificado.
9. El aparato eléctrico debe ser situado de tal manera que su posición no interfiera su uso. La colocación del aparato eléctricosobre una cama, sofá, alfombra o superficie similar puede bloquea la ventilación, no se debe colocar en libreros o gabinetesque impidan el flujo de aire por los orificios de ventilación.
10. El equipo eléctrico deber ser situado fuera del alcance de fuentes de calor como radiadores, registros de calor, estufas u otrosaparatos (incluyendo amplificadores) que producen calor.
11. El aparato eléctrico deberá ser connectado a una fuente de poder sólo del tipo descrito en el instructivo de operación, o comose indique en el aparato.
12. Precaución debe ser tomada de tal manera que la tierra fisica y la polarización del equipo no sea eliminada.
13. Los cables de la fuente de poder deben ser guiados de tal manera que no sean pisados ni pellizcados por objetos colocadossobre o contra ellos, poniendo particular atención a los contactos y receptáculos donde salen del aparato.
14. El equipo eléctrico debe ser limpiado únicamente de acuerdo a las recomendaciones del fabricante.
15. En caso de existir, una antena externa deberá ser localizada lejos de las lineas de energia.
16. El cable de corriente deberá ser desconectado del cuando el equipo no sea usado por un largo periodo de tiempo.
17. Cuidado debe ser tomado de tal manera que objectos liquidos no sean derramados sobre la cubierta u orificios de ventilación.
18. Servicio por personal calificado deberá ser provisto cuando:A: El cable de poder o el contacto ha sido dañado; u B: Objectos han caído o líquido ha sido derramado dentro del aparato; o C: El aparato ha sido expuesto a la lluvia; o D: El aparato parece no operar normalmente o muestra un cambio en su desempeño; o E: El aparato ha sido tirado o su cubierta ha sido dañada.

iCOMPEL Deployment Manager (IDM) User GuideV3.1.0Copyright © 2016. Black Box Corporation. All Rights Reserved.
The iCOMPEL Deployment Manager (IDM) is a Web appliance designed to monitor and remotely manage multiple Black Box digital signage appliances. It allows remote configuration, provides monitoring, maintenance, and media playout audit reports on groups of iCOMPEL appliances over user-defined periods.
Copyright © 2016. Black Box Corporation. All Rights Reserved.
All rights reserved. No parts of this work may be reproduced in any form or by any means - graphic, electronic, or mechanical, including photocopying, recording, taping, or information storage and retrieval systems - without the written permission of the publisher.
Products that are referred to in this document may be either trademarks and/or registered trademarks of the respective owners. The publisher and the author make no claim to these trademarks.
While every precaution has been taken in the preparation of this document, the publisher and the author assume no responsibility for errors or omissions, or for damages resulting from the use of information contained in this document or from the use of programs and source code that may accompany it. In no event shall the publisher and the author be liable for any loss of profit or any other commercial damage caused or alleged to have been caused directly or indirectly by this document.

iCOMPEL Deployment Manager (IDM) User Guide (V3.1.0) Contents
3
Table of ContentsPart I Getting Started with Your Digital Signage Network 6
............................................................................................................................ .... 61.1 The Parts of a DSM Network
....................................................................................................................................................................................... 71.1.1 Standalone Display
....................................................................................................................................................................................... 81.1.2 Multiple Displays
....................................................................................................................................................................................... 91.1.3 Enterprise Signage Netw ork
................................................................................................................................... 101.2 Managing and Monitoring
....................................................................................................................................................................................... 111.2.1 Example Netw ork Structure
....................................................................................................................................................................................... 121.2.2 Example Netw ork Monitoring
................................................................................................................................... 141.3 What to Do First
................................................................................................................................... 161.4 Use Cases and Common Tasks
....................................................................................................................................................................................... 161.4.1 Configuring Player Reporting
1.4.2 A .d..d.i.n..g.. ..P.l.a..y..e..r.s.. .t.o.. ..Y..o..u..r. ..O..r.g..a..n..i.z.a.ti..o..n. ............................................................................................................................... 17
1.4.3 St.r..u..c.t..u.r.i..n..g. ..Y..o..u..r. ..O..r..g..a..n.i.z.a..t.i.o..n.. .U..s..i.n..g.. .F..o.l..d..e.r..s.. .................................................................................................................. 18
....................................................................................................................................................................................... 191.4.4 Donating Player Set Up to a Folder
1.4.5 Cu..s..t.o...m.i..z.i.n..g.. .t.h..e.. ..P.l.a..y..e..r. ..V.i..e..w... ........................................................................................................................................... 20
....................................................................................................................................................................................... 211.4.6 Responding to Alarms
Part II Managing and Monitoring the Network 25
................................................................................................................................... 252.1 Home – Managing and Monitoring the Network
....................................................................................................................................................................................... 262.1.1 Players – Understanding the Display
....................................................................................................................................................................................... 282.1.2 Players – Accessing Detailed Status
....................................................................................................................................................................................... 282.1.3 Players – Using Remote Setup
....................................................................................................................................................................................... 312.1.4 Summary
....................................................................................................................................................................................... 312.1.5 Thumbnails
....................................................................................................................................................................................... 322.1.6 Map View
....................................................................................................................................................................................... 332.1.7 Manage
....................................................................................................................................................................................... 342.1.8 Media Audit Reports
2.2 Organizatio..n.. .–.. .C..o..n..f.i.g..u..r.i..n..g. ..A.l..a.r..m...s. ............................................................................................. 35
....................................................................................................................................................................................... 352.2.1 Configuring Alarms
....................................................................................................................................................................................... 362.2.2 Configuring Email Notif ications
....................................................................................................................................................................................... 372.2.3 Configuring Operating Hours
................................................................................................................................... 382.3 System – Configuring Users, Players, and Alarms
....................................................................................................................................................................................... 392.3.1 Adding and Modifying Users
2.3.2 Or..g..a..n.i..z..a.t.i.o..n.. ..P.e..r..m..i.s..s.i..o..n..s. ................................................................................................................................................. 40
....................................................................................................................................................................................... 412.3.3 Adding and Deleting Players
....................................................................................................................................................................................... 422.3.4 Setting Up Alarms
Part III Configuring and Maintaining the IDM 45
................................................................................................................................... 453.1 Status – Monitoring the DSM
................................................................................................................................... 463.2 Setup – Setting Up the DSM
....................................................................................................................................................................................... 473.2.1 Date and Time

iCOMPEL Deployment Manager (IDM) User Guide (V3.1.0) Contents
Copyright © 2010-2012 ONELAN Ld. All Rights Reserved. 4
....................................................................................................................................................................................... 483.2.2 Email Settings
....................................................................................................................................................................................... 493.2.3 Netw ork
....................................................................................................................................................................................... 493.2.4 Security
....................................................................................................................................................................................... 523.2.5 Scheduled Jobs
3.2.6 Feature Keys. .......................................................................................................................................................................... 52
3.3 Setup – Ma.i..n.t..a.i..n.i..n..g. .t..h..e. ..IDM ..................................................................................................... 52
....................................................................................................................................................................................... 523.3.1 Backup/Restore Database
....................................................................................................................................................................................... 533.3.2 Softw are Update
....................................................................................................................................................................................... 543.3.3 Reboot
....................................................................................................................................................................................... 553.3.4 Support Snap Shot
................................................................................................................................... 553.4 Help – Configuring User Interface Preferences
Part IV Reference 58
................................................................................................................................... 584.1 Players Summary Columns
................................................................................................................................... 594.2 Alarms
................................................................................................................................... 634.3 User Permissions
4.4 User IDIDM Programming Interfaces ..................................................................................................... 64
Part V Glossary66
Index 67

Part
IGetting Started with Your Digital Signage Network

6Co
iCOMPEL Deployment Manager (IDM) User Guide (V3.1.0) Getting Started with Your Digital Signage Network
1 Getting Started with Your Digital Signage Network
Here is the information you need to get started with creating and managing a digital signage network using the iCOMPEL Deployment Manager (IDM).
A Digital signage network is simply a set of systems connected together to provide integrated management of numerous display screens. The purpose of the IDM is to provide you with the means to set up, monitor, and control such a network.
Before you begin using the IDM, you should familiarize yourself with its key concepts and understand how to perform some common tasks. To help with this, you will find the following orientation material useful:
Use Cases and Common Tasks – Provides step-by-step examples of some tasks you are likely to performregularly.
Managing and Monitoring the Network
Configuring and Maintaining the IDM
Reference
1.1 The Parts of an IDM Network
To assist your understanding of the parts that make up a IDM network, it is useful to start by describing a very simple arrangement with a standalone display. Building on that, further illustrations add the extra features that become increasingly relevant as the network grows more distributed and more sophisticated.
Work through the description of these examples in turn:
Standalone Display
Multiple Displays
Enterprise Signage Network
The Parts of an IDM Network 6 – Explains the concepts of the IDM network and illustrates its constituent
parts. Managing and Monitoring 10 – Describes how you use IDM to structure your network and ensure its
smooth operation.
What to Do First – Takes you step-by-step through the tasks you need to take to set up your network.14
16
Note: Refer to the Glossary 66 for definitions of IDM concepts and terminology.
If you are already familiar with the IDM product, you might want to refer to detailed information about it immediately. That detail is provided in these subject areas:
25
45
58
7
8
9

7
iCOMPEL Deployment Manager (IDM) User Guide (V3.1.0) Getting Started with Your Digital Signage Network
1.1.1 Standalone Display
The following diagram illustrates the simplest situation with a single display controlled by an individual. You mightconceive of this as a screen displaying information in the foyer of a school:
Note the significance of the highlighted features in that scenario:
User – The person controlling the screen content and its operation (that is, you).
Browser – You exercise control through a web browser (such as Mozilla Firefox or Microsoft Internet Explorer). This remains the case for even the largest digital signage network.
Local area network, Intranet, or Internet – In principle, you do not need to be physically close to the screen's location. This becomes more significant as the size of the network increases.
Player – Player is the generic term for the appliance that runs the screen. Specifically, the player is the iCOMPEL appliance. The appliance has to be physically attached to the screen.
Display Screen – The equipment that displays the content you have defined. You configure the player to display various media on selected areas of the screen at chosen times.
As you might expect, additional features are needed to support a network that includes Multiple Displays .8

8
iCOMPEL Deployment Manager (IDM) User Guide (V3.1.0) Getting Started with Your Digital Signage Network
1.1.2 Multiple Displays
The following diagram illustrates a more fully-featured situation where a user controls several players and their screens.You might conceive of this as a set of screens displaying sales information on the floors of a shop. In practice, thenumber of players would be much higher, which is why it is desirable – and soon necessary – to add further componentsto the network:
You can see that certain features are the same: the user, the browser, and the network. Note now the significance of theadditional features, discussed clockwise as they appear:
Publisher – A Publisher is a player that you configure to provide content to other players. This enables you to displayconsistent content on several screens and means you only need update it in one place.
Channel – A Channel refers to both the content it contains and its originating publisher. The Channel Name (in thiscase 'Channel 1') identifies the channel and is often just the name of the publisher player.
Reports – The status messages sent by the players in the network are known as Reports. As the user, you rely onreports to keep up-to-date with the status of individual players and of the network as a whole.
Subscriber – A Subscriber is a player that you configure to accept content from a publisher. In the diagram, Channel 1provides the content for all the subscribers players and their screens. All players still send separate reports. Subscriberand Publisher are referred to as Roles (the only other role is Standalone, which is the role of the player in the firstdiagram).
Manager – Manager is the generic term for the appliance that manages the digital signage network. Specifically, the manager is the iCOMPEL Deployment Manager (IDM). Players send reports to the IDM over the network for processing. As with the players, you access the Manager through your browser. So long as you can make a network connection to the Manager, it can be located anywhere.
One final, but highly significant, feature is not illustrated but only implied: security. The IDM may be on one site and the players on another, each protected by a firewall. The IDM and the player can communicate using a number of protocols but for the highest security you might use the VPN option. The secure VPN pipe allows the player to send reports through its local firewall to the IDM behind its firewall. In turn, the IDM also uses VPN to communicate with the player.

9
iCOMPEL Deployment Manager (IDM) User Guide (V3.1.0) Getting Started with Your Digital Signage Network
IDM continues to support you as your signage network grows to encompass multiple players, relying on multiple channels, and distributed over several sites. The parts described already come together so that you can build a true Enterprise Signage Network .
1.1.3 Enterprise Signage Network
IDM becomes vital when your signage network grows to several hundred or more players and their screens. The quantity and variety of content you need to manage and distribute grows accordingly. That scenario is of a truly enterprise-wide signage network with a priority on efficient and effective management and monitoring.
Once again, it is useful to envision the key components in a condensed and summarized form. The following diagram shows how the individual network features we have discussed so far combine to provide an enterprise signage network infrastructure. You might conceive of this as a country-wide business with sites in different cities, maintaining a resilient network of players displaying various streams of content, and all under centralized control:
Notice how the by-now familiar IDM network components operate in combination:
At the center, you monitor the whole network through your web browser interface to the IDM.
Multiple publisher players provide content over multiple channels. You configure as many as you need to serve the needs of the business.
Multiple subscriber players display content from whichever channel you designate appropriate to their function. For example, the content could be subject-based if the display is for a particular department or could be locale-based if the display is for a particular city.
9

10
iCOMPEL Deployment Manager (IDM) User Guide (V3.1.0) Getting Started with Your Digital Signage Network
How you group the subscriber players is up to you: there may be several hundred you manage for a common purpose.
All players send reports for processing by the IDM. Thereby, you can keep track of your network's operations at whatever level of detail you wish.
All – This folder lists all of the player in your network (including those in the Unassigned folder).
Unassigned – This folder lists any players you have not assigned to one of the folders you create.
Having understood the background terms and concepts, the next step is to consider what IDM provides for Managing and Monitoring 10 your network.
1.2 Managing and Monitoring
As your digital signage network grows in size and complexity, a range of IDM features support your ability to easily manage and monitor operations. In particular, IDM provides a structural view of the network that you can customize to match business needs and to arrange players into manageable groups.
When you first access the IDM, it immediately guides you to set up an Organization. IDM regards the Organization as the root of, and identifier for, the whole network. You choose the name you want to give your Organization (it is likely you will want to use the name of your company or institution). IDM uses the Organization as the starting point for your network's structure.
The other key structural component in the IDM view of the network is the folder. The concept is parallel to that of folders on a disk drive: they allow you to collect items together in an identifiable group. In the case of IDM, those items are the players that run your digital signage screens. IDM lets you create as many folders as you need to structure your network.
To facilitate later operations, IDM automatically creates two folders when you first set up your organization:
To understand how these components help you structure and so more easily manage your network, see Example Network Structure 11 .

11
iCOMPEL Deployment Manager (IDM) User Guide (V3.1.0) Getting Started with Your Digital Signage Network
1.2.1 Example Network Structure
The following diagram contains a schematic image of how the IDM displays a view of an Organization (called HQ) structured with folders. Individual players are shown by numbered circles (there are four). You might conceive of this as a very-much simplified view of the signage network you are managing for a chain store:
You can see that the Organization, HQ, contains the ever-present All and Unassigned folders. The IDM lists all of the players in the All folder but lists none in the Unassigned folder. No players are listed in Unassigned because you have assigned them to your newly-created folders:
Channels – This folder contains two subfolders, Clothes and Books. You have assigned players 1 and 2 to Clothesand player 3 to Books.
Locations – This folder contains two subfolders, Reading and Henley. You have assigned players 1 and 3 toReading and players 2 and 4 to Henley.
This structure allows you to view your players through two perspectives:
Through Channels to view players according to the content they display (in this example, in the Clothes and Bookdepartments).
Through Locations to view players according to where the store is sited (in this example, in Reading or Henley).
This shows how IDM allows you to customize folders according to specific characteristics. You use folders to group your players for easier management and monitoring. So, grouping players under Channels helps in checking that particular content is consistent and is being delivered smoothly. Grouping them under Locations helps in checking that all of the players in a particular store are operating correctly. Even more powerfully, the IDM Remote Setup feature allows you to reconfigure a player by moving it from one folder to another (for example, you can change player 2 so that it has a 'Books' set up by dragging it from the Clothes folder and dropping it into the Books folder).

12
iCOMPEL Deployment Manager (IDM) User Guide (V3.1.0) Getting Started with Your Digital Signage Network
The reports that individual players send to the IDM are instrumental for effective network monitoring. Reports contain a wide range of diagnostic data about the player and indicators of its operational status. The IDM processes that information and compares the values with the boundary parameters you have specified. If any value falls outside of those boundaries, the IDM warns you by raising an Alarm specific to that condition.
The IDM supports an extensive suite of alarms covering very many aspects of player performance and behavior. You can select which alarms IDM observes or ignores and you can configure individual alarms to match your exact requirements. This allows you to establish a monitoring regime to your desired degree of detail. On that basis, IDM continuously updates its display of player, folder, and Organization status.
To display the current status, IDM uses a system of icons to represent alarm states. The icons are:
– No alarms
– Alarm is raised
– You have acknowledged the alarm
The sequence of actual alarm states is very simple:
1. IDM raises an alarm when a player reports out-of-parameter data.
2. IDM only lowers the alarm when the player reports that the data is within parameters again.
IDM offers the intermediate 'acknowledged' state as an assistance to your system-monitoring workflow. The Acknowledge Alarm procedure simply provides you with a means to record and track alarms: it does not alter how orwhen IDM raises or lowers alarms. (Responding to Alarms describes how to use the Acknowledge Alarmprocedure.)
Having grouped your players into a meaningful structure, you will want to monitor them in a precise and timely fashion. Example Network Monitoring 1 2 expands the HQ Organization example to illustrate how IDM helps you do that.
1.2.2 Example Network Monitoring
21

13
iCOMPEL Deployment Manager (IDM) User Guide (V3.1.0) Getting Started with Your Digital Signage Network
The following diagram contains the schematic image of the example HQ Organization, but now showing how alarm states ripple up through the Organization to show detailed and overall status:
Notice how you can monitor the status of your network at various levels of detail:
Player level – Players 1 and 3 have no problems. You have acknowledged a Player 2 alarm, but the problem is not yet resolved. Player 4 has an unacknowledged alarm.
Folder level – The folder icon shows the worst-case status within it (for example, both the Henley and Locations
status is ).
Organization level – The Organization icon shows the worst-case status within it. (This is matched by that for the All folder.)
In addition, the icon indicates that a folder has no players within it. Here, this indicates that there are no Unassignedplayers.
You will find the the alarms statuses are vital for rapid problem solving and troubleshooting. In the scenarios above, youmight arrive at some basic conclusions:
1. Players 1 and 3 are running without issues, suggesting all is well at the Reading location.
2. Henley is creating alarms on all players (a current alarm on Player 4 and a recent one on Player 2). This implies astore-wide issue, perhaps related to network connectivity.
3. However, you would need to check the specific alarms raised to eliminate a coincidence of player-specific issues. Forexample, Player 4 may have been accidentally switched off or has suffered from overheating.
Having understood the key IDM concepts, refer now to What to Do First to understand the steps you take to createa real network.
14

14Copyright
iCOMPEL Deployment Manager (IDM) User Guide (V3.1.0) Getting Started with Your Digital Signage Network
1.3 What to Do First
When you access your IDM for the first time, you must complete certain essential set-up steps. Those steps configure the IDM with the two fundamental features it needs to begin building a signage network:
The Organization.
The basic IDM user accounts.
After your IDM is up on your network, take the steps described below to set it up.
Security: It is strongly recommended that you change the remote account password from the factory default as soon as possible. Also change the IDM master password and check that the security services configurationmatches your requirements (see Security for details).
Step 1: Connect to the IDM through a browser
The IDM prompts you for your login details. Use these factory settings:
Username: remote
Password: 9999
IDM displays this screen:
Step 2: Complete the basic Organization set up
Click the Organizations link and IDM displays the Add Organization screen.
You must complete ALL of the fields listed on the Add Organization screen:
Organization – Enter a name for your organization (you can change this later if you wish).
Organization Admin, organization Viewer, Reporter – Complete the usernames and passwords for all three accounts. You need separate accounts to restrict the permissions to just those needed for each function: Organization Admin for administering the players in the organization, Organization Viewer for monitoring player status, and Reporter for players to report in to the organization.
You must compose the username from any of these components:
Lower case letters (a-z).
Numbers (0-9) (not permitted as the first character of the username).
Underscore (_) (two underscores not permitted as the beginning of the username).
49

15
iCOMPEL Deployment Manager (IDM) User Guide (V3.1.0) Getting Started with Your Digital Signage Network
When you are certain you have completed all of the information, click the button. IDM displays thisscreen:
In this example, the Organization name is HQ. The Members column reflects that the Organization has no players but has the three user accounts you configured in this step.
Step 3: Check user permissions
Click the Users tab to examine the default user permissions. IDM displays this screen:
That screen lists details of the basic user accounts you set up in step 2, In particular, note the following:
User – This column lists the usernames you provided for each of the accounts (in this example, orgadmin, orgview, and reporter). The remote user is the default IDM system account.
Permissions – This column lists the permissions specifying what each account can and cannot do. Notice that the organization Admin account (in this example, username orgadmin) allows you to administer your organization and the remote account allows you to administer your IDM system.
Default organization – By default, this applies only to the Reporter account (username reporter). Notice that this account has only the Accept Report and Establish VPN permissions. Those features allow the account to operate as the destination for player reports sent to the IDM. The Default organization configuration allows you to automatically add players to your network (rather than manually).
This default configuration is enough to allow you to start building your network. However, if you want to change what each
user can do, click its button and change the settings. You can also add further users by clicking the Add Usertab.

16
iCOMPEL Deployment Manager (IDM) User Guide (V3.1.0) Getting Started with Your Digital Signage Network
Step 4: Connect to the IDM on the Organization Admin account
To enable you to manage and monitor your network, you need to access the IDM on an account with Organization permissions. To do so, close down your browser to clear your current session on the IDM. Start your browser again and connect to the IDM on the Organization Admin account. Alternatively, configure another user account with the required Organization permissions and use that account instead.
Now that you have set up the IDM fundamentals, you might want to understand the steps involved in some commonsignage network tasks. Uses Cases and Common Tasks explains how to perform many of the tasks you need tofurther develop and manage your network.
Alternatively, you may wish to refer to detailed information about the whole IDM user interface. That detail is provided in these subject areas:
Managing and Monitoring the Network
Configuring and Maintaining the IDM
Reference
1.4 Use Cases and Common Tasks
You will find that you need to perform some IDM management and monitoring tasks on a regular basis. To assist you perform such tasks, here is a selection provided with step-by-step instructions:
Configuring Player Reporting
Donating Player Set Up to a Folder
customizing the Player View
Responding to Alarms
1.4.1 Configuring Player Reporting
Configuring players to report to your IDM fulfils two purposes:
It provides the regular status updates necessary for you to monitor the
network. It is the simplest way to add players to your Organization.
You configure a player to send reports using its Setup> System> Reporting and Remote Setup options (refer to the NTB documentation for details). The player needs to know the following about your IDM:
Its name or IP address.
Its Reporter user account username and password.
Note: It is crucial that the user account you log in on has the right permissions. IDM displays certain menu options only if you have the correct permissions. In general, you need the System Administration permission to perform tasks related to the IDM system and the organization Administration permission to perform tasks related to your organization. (User Permissions 63 provides more details.)
16
25
45
58
16
Adding Players to Your organization 17
Structuring Your organization Using Folders 18
19
20
21

17
iCOMPEL Deployment Manager (IDM) User Guide (V3.1.0) Getting Started with Your Digital Signage Network
first report.
1.4.2 Adding Players to Your Organization
1. Connect to the IDM using an account that has the System Administration permission.
2. Select System and click Users.
3. Click the Add User tab.
4. Configure the user with these options:
Default Player organization: select the Unknown players will be added to organization radio button (and your Organisation's name).
Organisations: check the box next to your Organisation's name.
Permissions: check only the Accept Reports and Establish VPN boxes.
5. Click the button.
6. On the player's Reporting and Remote Setup page, configure it to report using the username and password of that
manage the players in your organization.
When you configure the player, you must also specify whether to use HTTP, HTTPS, or VPN to send reports. The choice depends on the level of security required for communications between the player and your IDM. Using HTTPS or VPN also enables other interactions between the player and the IDM (for example, remote management). For best security and highest degree of interaction use VPN.
Adding Players to Your organization 17 describes how to automatically add players to your organization when they
As noted in Configuring Player Reporting 16 , the IDM can automatically add players to your organization when they first send a report.
Configuring the IDM to do so was part of the start up process described in What to Do First 14 . However, if needed, you can configure the IDM to automatically add players by following these steps:
IDM user.
Now, when the player sends a report, the IDM adds it to your organization. In the first instance, IDM places the player
in your Organisation's All and Unassigned folders.
You can also add players manually and this is explained in Adding and Deleting Players 41 .
Structuring Your organization Using Folders 18 explains how to add further folders to group and so more easily
18
iCOMPEL Deployment Manager (IDM) User Guide (V3.1.0) Getting Started with Your Digital Signage Network
1.4.3 Structuring Your Organization Using Folders
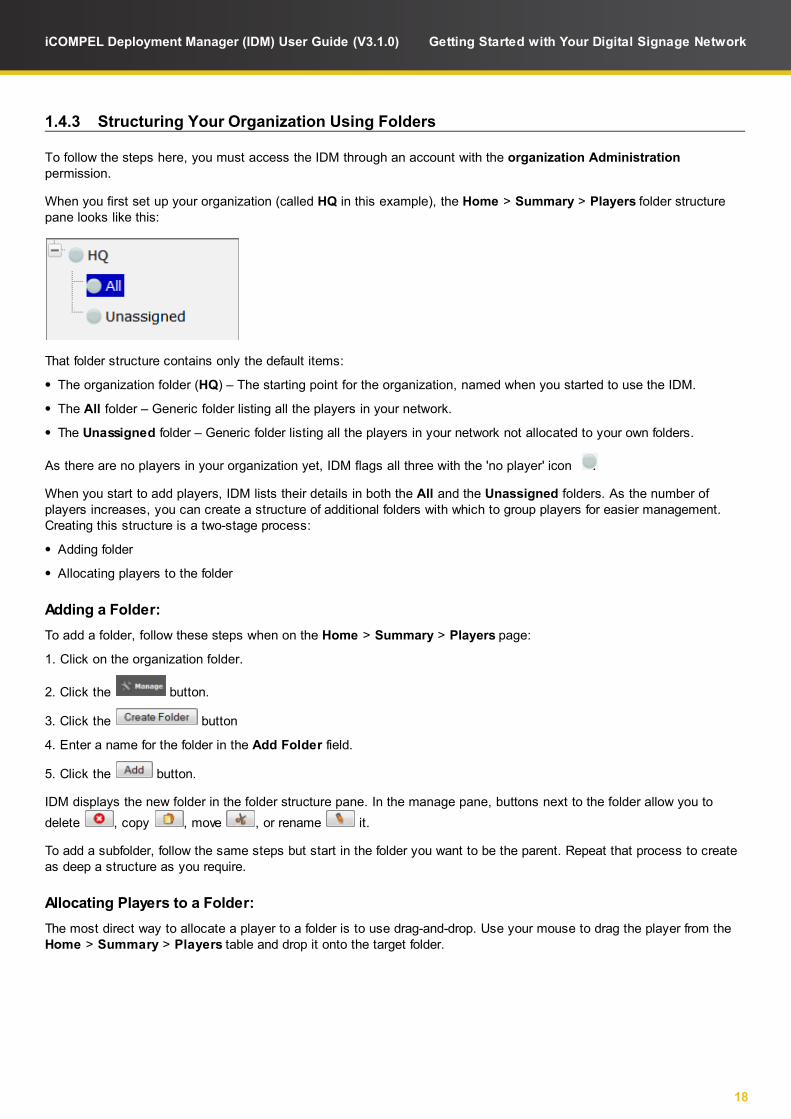
To follow the steps here, you must access the IDM through an account with the organization Administration permission.
When you first set up your organization (called HQ in this example), the Home > Summary > Players folder structure pane looks like this:
That folder structure contains only the default items:
The organization folder (HQ) – The starting point for the organization, named when you started to use the IDM.
The All folder – Generic folder listing all the players in your network.
The Unassigned folder – Generic folder listing all the players in your network not allocated to your own folders.
As there are no players in your organization yet, IDM flags all three with the 'no player' icon .
When you start to add players, IDM lists their details in both the All and the Unassigned folders. As the number of players increases, you can create a structure of additional folders with which to group players for easier management. Creating this structure is a two-stage process:
Adding folder
Allocating players to the folder
Adding a Folder:
To add a folder, follow these steps when on the Home > Summary > Players page:
1. Click on the organization folder.
2. Click the button.
3. Click the button
4. Enter a name for the folder in the Add Folder field.
5. Click the button.
IDM displays the new folder in the folder structure pane. In the manage pane, buttons next to the folder allow you to delete , copy , move , or rename it.
To add a subfolder, follow the same steps but start in the folder you want to be the parent. Repeat that process to createas deep a structure as you require.
Allocating Players to a Folder:
The most direct way to allocate a player to a folder is to use drag-and-drop. Use your mouse to drag the player from the Home > Summary > Players table and drop it onto the target folder.

19
iCOMPEL Deployment Manager (IDM) User Guide (V3.1.0) Getting Started with Your Digital Signage Network
IDM offers two ways to allocate players to folders using drag-and-drop:
Move the player from the All folder to one of your folders – This allows you to allocate the player to more than onefolder. You do this to monitor the same players in different folder views (for example, one folder to view playerssubscribing to a channel and another to view players according to their location).
Move the player from one to another of your folders – This removes the player from the first folder and places it in thesecond. You do this to allocate players to an exclusive view.
A related feature of IDM allows you to configure a folder (and, if desired, all the player's within it) with one player'scharacteristics (the player is said to Donate its characteristics). Donating Player Configuration to a Folderdescribes how to do that.
If you want to allocate a number of players to, or delete a number of players from, a folder at one time, use the folder
management features of the option (see Manage ).
1.4.4 Donating Player Set Up to a Folder
To follow the steps here, you must access the IDM through an account with the organization Administration permission.
Grouping players in folders allows you to more easily manage them. IDM enhances this facility by allowing you to see the same players in different folder views. You can configure each folder with the view you want by donating the relevant characteristics from a suitable player.
For example, you might select a subscriber player to donate its channel set up. When you allocate other players to that folder, IDM automatically configures them to subscribe to the same channel. Then, viewing that folder provides you with a focus on the performance of that channel and the players subscribed to it.
To donate a player set up to a folder, you need to perform steps both on the player and on the IDM.
Take these steps on the player (refer to the NTB documentation for details):
1. Open its Setup > System> Reporting and Remote Setup page.
2. In Reporting Settings, configure the player to report status to the IDM using VPN.
3. Click the Remote Setup tab
4. Check the Enable Remote Setup for this Player box.
5. Check the boxes next to the Categories you want the player to donate.
6. Click the button.
Take these steps on the IDM:
3. Click on the folder and click the button.
4. Click the Ready link in the player's Remote Setup column to select the categories to donate.
19
33
1. Create the folder you want to configure (see Structuring Your organization Using Folders 18 ).
2. Allocate the player to that folder.

20
iCOMPEL Deployment Manager (IDM) User Guide (V3.1.0) Getting Started with Your Digital Signage Network
IDM displays the Donate Remote Setup screen (the categories listed are those you selected in step 5 on the player). In this example, the only category selected was Channel (so this will donate the player's channel set up):
To donate the categories you require, check the relevant boxes on the Donate Remote Setup screen and click the
button.
To follow the steps here, you must access the IDM through an account with the organization Administration permission.
The IDM Home > Summary > Players page displays information about each player in your organization. IDM arranges the information in a multi-column table, which you can customise to include only the specific details you want.
Here is an example of a simple table displaying information for a player with the serial number 31421:
You can give the player a more meaningful name (or modify an existing one) by following these steps:
1. Click the link in the Name or Serial column. IDM displays the Detailed Status page.
2. Enter the name in the Name field.
3. Click the button.
4. Select Home > Summary to return to the Players page.
IDM now displays the remote setup icon ( ) next to the folder's name. That indicates that if you add players to the folder, IDM will reconfigure them accordingly. This provides you with a rapid method for configuring numerous players to a standard set up.
Players – Using Remote Setup 28 provides more information about remote setup.
1.4.5 Customizing the Player View

21
iCOMPEL Deployment Manager (IDM) User Guide (V3.1.0) Getting Started with Your Digital Signage Network
To change the columns displayed, click the button and check or uncheck the relevant boxes:
Note: Although IDM changes the columns displayed as you click the boxes, the information may only be updated when the player next reports. Not all players can provide all of the information listed.
Players Summary Columns list all of the column names and describes the information they contain.
1.4.6 Responding to Alarms
As described in Example Network Monitoring , IDM displays alarms if the data reported by players falls outside of the parameters you have specified. (For details on configuring alarms, see organization – Configuring Alarms .)
In outline, the alarm process follows this sequence:
1. IDM raises an alarm. You decide what action, if any, is needed.
2. Optionally, you acknowledge the alarm with a reason (usually the action in response to the alarm). Note that youcannot lower an alarm manually.
3. IDM lowers the alarm when the alarm condition no longer applies.
To clarify the procedure you follow, including the steps you take to acknowledge an alarm, here is a worked example (thealarm is Report Overdue):
1. IDM reports the alarm in the player's Alarms column (and displays the icon next to the relevant folders plus here in the optional State column):
58
12
35

22
iCOMPEL Deployment Manager (IDM) User Guide (V3.1.0) Getting Started with Your Digital Signage Network
2. You decide the player needs to be manually inspected. You click on the Report Overdue link and IDM displays theplayer's Alarms tab:
3. Click on the Report Overdue link and IDM displays the Acknowledge Alarm screen:
4. button.You enter a description of your response to the alarm in the Reason field and click theIDM displays the Alarm Acknowledged screen (note the bar color has changed to 'acknowledged'):
You can Update your acknowledgement reason or Delete it and enter a new one.

23
iCOMPEL Deployment Manager (IDM) User Guide (V3.1.0) Getting Started with Your Digital Signage Network
5. Return to the player Alarms tab to see that IDM has updated the entry with your acknowledgement reason:
6. IDM also updates the player's Alarms column (and displays the icon):
7. IDM lowers the alarm when the alarm condition is corrected (in this case, the player sends a report again):
8. IDM retains a record of the alarm on the player's Alarms tab:

Part
IIManaging and Monitoring the Network

25
iCOMPEL Deployment Manager (IDM) User Guide (V3.1.0) Managing and Monitoring the Network
2 Managing and Monitoring the Network
Getting Started with Your Digital Signage Network 6 explains the key IDM concepts and describes how to accomplish the basic tasks needed to construct a simple digital signage network. However, as your network becomes larger you will need to make more use of and rely on the in-depth management and monitoring features that IDM offers.
At the highest level, those features are grouped around the performance of two activities:
Managing and monitoring the network.
Configuring and maintaining the IDM.
The guidance here directs you to the detailed information on the first of those. You can find guidance on the second in Configuring and Maintaining the IDM .
To support your management and monitoring of the network, IDM features enable you to:
Structure the view of your organization around folders.
Move players into, out of, and around your organization.
Reconfigure players remotely from the IDM.
Be made aware of potential problem areas by configurable alarms.
IDM offers the following menu options for you to perform those tasks:
Click the menu item for the option you require:
Additionally, you can click to access online help for each option you are using (see Help – Configuring UserInterface Preferences for details).
2.1 Home – Managing and Monitoring the Network
Use the Home > Summary options to display various views of your digital signage network and to access individualplayer details. In particular, the Home > Summary options provide features that enable you to use it as your centralmanagement and monitoring console.
There is also a Home > Media Audit Reports page, where you can generate reports on when and how often playersdisplay specific content items (see Media Audit Reports for details).
Note: You will only see the Home> Media Audit Reports option if you have the organization Media Audit View permission.
45
Home 25 – Structuring and monitoring your digital signage network and the players within it. If you are responsible for ensuring the network runs smoothly, Home is where you will spend most of your time.
Organization 35 – Configuring how your organization observes or ignores alarms (only available for an account that has the organization Administration permission).
System 3 8 – Manually adding players, configuring IDM user accounts, and setting up alarm defaults (only available for an account that has the System Administration permission).
55
34

26
iCOMPEL Deployment Manager (IDM) User Guide (V3.1.0) Managing and Monitoring the Network
To support you when managing and monitoring the network, the Home > Summary page offers its own set of buttons:
Those buttons provide you with access to these options:
– Viewing a single image of the overall network state.
– Displaying the folder structure of your organization and a tabular view of player performance
and
environmental metrics. This is likely to be the display you refer to most often. See the guidance below for where to findmore information.
– Viewing images of what is on each player's screen.
– Viewing players arranged on an image (especially, on a map).
– Creating and managing folders (and selecting alternative settings for the other Home > Summary menuoptions).
For day-to-day management of your network, the view is the most significant. To support you when performing
management tasks, it provides a wide range of features. Consequently, it is important to understand the optionsin some detail. To find out more, refer to these topics:
Players – Understanding the Display
Players – Accessing Detailed Status
Players – Using Remote Setup
For a description of the other Home > Summary options, refer to these topics:
Summary
Thumbnails
Map View
Manage
2.1.1 Players – Understanding the Display
Use the options to manage and monitor the players in your network. The page displays your Organization's folder structure and provides a tabular view of player performance and environmental metrics. Most significantly for monitoring purposes, IDM flags alarm conditions on this page.
Note: By default, IDM refreshes player information every 30 seconds. You can change the refresh interval on the Help > UI Options page but take care as too short an interval may impact IDM performance.
26
28
28
31
31
32
33

27
iCOMPEL Deployment Manager (IDM) User Guide (V3.1.0) Managing and Monitoring the Network
To help you understand the display, this illustration exhibits the key elements and these are described below:
IDM divides the display into panes that show:
Your Organization and the folders that make up its structure.
The players in your Organization or in a folder listed in a table.
Organization and Folders:
The Organization and folders pane looks like
this:
This visual summary immediately informs you of your Organization's structure and status:
The root contains your Organization's name.
The arrangement indicates the structural hierarchy of folders and
subfolders. IDM displays the relevant alarm icon at each level of the
hierarchy.Related tasks you might want to perform:
Player Listing Table:
A simple example of the table listing the players looks like this:
Although a simple example, that table illustrates the key features that assist you manage your players:
IDM displays the information you want to see for each player on a separate line.
Click the link in the Name or Serial column to access the player's detailed status page (see Players – AccessingPlayer Status ).
Adding or modifying a folder or subfolder (see Structuring Your Organization Using Folders 18 ).
Adding, moving, or deleting players to or from folders (see Structuring Your Organization Using Folders 18 ).
Dealing with alarms (see Responding to Alarms 21 ).
28

28
iCOMPEL Deployment Manager (IDM) User Guide (V3.1.0) Managing and Monitoring the Network
If there is a link in the VPN column, click it to manage the player remotely.
If there is a link in the Alarms column, click it to respond to the alarm (see Responding to Alarms ).
If there is a Ready link in the Remote Setup column, click it to configure donating the player's settings to a folder(see Players – Using Remote Setup ).
Related tasks you might want to perform:
Changing the details displayed in the table (click the button and see customizing thePlayer View ).
Restricting the display to just players with raised or acknowledged alarms (check the Only Alarms box).
2.1.2 Players – Accessing Detailed Status
Clicking the link in the Name or Serial column of the player's table opens the detailed status page for the individualplayer.
IDM groups the information into five categories. Click the tab appropriate to the details you want to see for the player:
General – Hardware and software versions, current display, up-time, last report received, IP address, environmentalmetrics (fan speeds and temperatures), and disk-space usage. This page also contains the Name field for entering ameaningful name for the player (or modifying an existing one).
Alarms – Current alarm settings and details of recently raised, acknowledged, and lowered alarms.
Channel – Current channel data (player role, channel name, channel ID, connection times, file numbers and size, andpending channel and poll details).
Remote Setup – Current remote setup settings per category (controlling folder, status, and dates of last donation,application, and first report).
Other – Details of any configured local information and RS-232 output item status.
2.1.3 Players – Using Remote Setup
Donating Player Set Up to a Player describes the basic steps needed to donate a player's set up to a folder usingRemote Setup. That simple case demonstrates how Remote Setup can be a powerful tool to assist you with managingyour network. To see how Remote Setup can help you further, you will need to consider more details about itsoperation.
The aspects of Remote Setup described in more detail are:
Choosing Player Set Up Categories .
Donating Player Set Up – Steps on the Player .
Donating Player Set Up – Steps on the IDM .
Using the Folder to Set Up Other Players .
Viewing and Modifying Folder Configuration .
Choosing Player Set Up Categories:
You can choose to donate player set ups from these categories:
Channel – The currently subscribed channel (not available if the player is a publisher).
21
28
20
19
28
29
29
30
30

29
iCOMPEL Deployment Manager (IDM) User Guide (V3.1.0) Managing and Monitoring the Network
Date and Time – Donates only the time method (see Date and Time for a description of the time methods). If thatis Local System Clock, the actual time on the player is not donated.
HTTP Proxy – Setup of the current HTTP proxy.
LDAP – LDAP configuration.
Player – Player settings.
Screen – Screen settings.
Security – Security settings.
Software Update – Software update settings.
Users – All users defined on the player.
You might take the time and trouble to configure one player with a 'standard' set up. Donating the categories concernedto a folder lets you rapidly disseminate all or part of that set up to a number of other players.
More subtly, with careful configuration within those categories, you can create fine distinctions between folders and thegroups of player they contain. For example, you might create a user account on a player specific to a physical location:donating that player's Users to a folder allows you to configure all the players at that location site with the same account.
Donating Player Set Up – Steps on the Player:
To donate a player set up to a folder, perform these steps on the player (refer to the NTB documentation for details):
1. Open its Setup > System> Reporting and Remote Setup page.
2. In Reporting Settings, configure the player to report status to the IDM using VPN.
3. Click the Remote Setup tab
4. Check the Enable Remote Setup for this Player box.
5. Check the boxes next to the Categories you want the player to donate:
6. Click the button.
Donating Player Set Up – Steps on the IDM: To
donate a player set up, take these steps on the IDM:
1. Create the folder you want to configure.
2. Allocate the player to that folder.
3. Click on the folder and click the button.
4. Click the Ready link in the player's Remote Setup column to select the categories to donate.
47

30
iCOMPEL Deployment Manager (IDM) User Guide (V3.1.0) Managing and Monitoring the Network
IDM displays the Donate Remote Setup screen (the categories listed are those you selected in step 5 on the player):
To donate the categories you require, check the relevant boxes and click the button.
Using the Folder to Set Up Other Players:
Now that you have donated the categories to the folder, you can set up other players with the same categories. You must configure those players to report to the IDM by HTTPS or VPN and enable remote setup for the categories required.
Note: You can see the categories a player will accept by clicking its Ready link in the Remote Setup column.
Use the folder to set up other players by one of these methods:
Dragging an individual player from the Home > Summary> Players view and dropping it on the folder.
Clicking the folder and using the page to select and add as many players as required.
When the player receives the set up, it overwrites any existing set up in the same categories. You will need to reboot theplayer if the new set up includes any of these categories:
Date and Time
HTTP Proxy
LDAP
Player
Screen
Security
Viewing and Modifying Folder Configuration:
You can see if a folder is configured with a donation because IDM displays the remote setup icon ( ) next to its name. IDM also adds this banner to the top of the folder player's list:

31
iCOMPEL Deployment Manager (IDM) User Guide (V3.1.0) Managing and Monitoring the Network
If you click the Details link, IDM reports the categories configured (in this case, Channel):
You can remove a category from the folder configuration by clicking its button.
To add other categories to the configuration, take the same steps you did in Donating Player Set Up: Steps on the IDM. Bolded category names indicate one of two things:
You have not donated them to the folder before.
Their set up on the donor player is different from the previously donated set up.
2.1.4 Summary
Use the options to view a high-level picture of the state of the whole network.
When you are on the page, click to choose the view you want:
Barchart – Viewing the state as a bar, split into colours to indicate the number of players in each alarm state (greenfor no alarms, orange for acknowledged alarms, red for unacknowledged alarms).
Warboard – Viewing the state as a lozenge, coloured to indicate the overall state and listing the proportion of playersin each alarm state .
Check the relevant radio button and click the button.
2.1.5 Thumbnails
Use the option to display small images of what is on each player's screen.
By default, players do not include a thumbnail in their reports. If you want the thumbnail to be sent, you need to configureit in the player's Reporting and Remote Setup page.
Here is an example display:
Note: The IDM labels each thumbnail with the player's serial number or name. Click the label to display the player's detailed status (see Players – Accessing Detailed Status 28 ).

32
iCOMPEL Deployment Manager (IDM) User Guide (V3.1.0) Managing and Monitoring the Network
2.1.6 Map View
Use the option to display the players in a folder or in the whole organization as symbols on an image (forexample, to show location on a map).
Whether the view is of a folder or of the organization matches what you have selected on the page.
Customise the display when on the page by clicking . You can then:
Relocate a player symbol by dragging and dropping.
Resize the size of the display area by dragging its edges.
Access further customizing features by clicking the button.
Configure the following customisations through the button and click the button to enable them:
Background Select the radio button for the option you want:
Use an image – Navigate to the location of the image and select it. Select the appropriateformatting radio button.
Use Solid color – Click the button to specify a different color.
Item Display Select the radio button for the option you want:
Display the Folder Name or Player name / serial number
Display a Pin icon
In both cases, the color changes according to the player's current alarm state.
When you have completed any changes, click Map View again to finish your editing session.
Here is a map view with players displayed as pin icons on a map background (a green pin means IDM has no alarms raised for that player):

33
iCOMPEL Deployment Manager (IDM) User Guide (V3.1.0) Managing and Monitoring the Network
2.1.7 Manage
Use the button to access the configuration options for other of the Home > Summary pages. The configurationoptions vary depending on which of the Home > Summary pages you are on:
– Selecting Barchart or Warboard view (see Summary ).
and – Configuring folders and adding or deleting players (see below).
– Setting up and modifying the view's background image and player symbols (see Map View ).
When you click in either the or views, it offers the same options, as shown in thisexample:
That example shows:
An existing folder (Channels).
A player that is already allocated to that folder (31421).
A player that is also in the organization but is not allocated to this folder (15393).
allows you to perform these actions:
Copy, move, or rename the Channels folder.
Create a new folder by clicking the button.
Delete players from the Channels folder by either checking the individual player's box or by clicking Select All and
clicking the button.
Add players to the Channels folder by either checking the individual player's box or by clicking Select All and clicking
the button.
31
32

34
iCOMPEL Deployment Manager (IDM) User Guide (V3.1.0) Managing and Monitoring the Network
2.1.8 Media Audit Reports
Use the Home > Media Audit Reports options to generate reports on when and how often players display specific content items.
Note: To see the Media Audit Reports option, you must have the organization Media Audit View permission
On the player, you have to:
Enable media reporting for each item in each zone you want reported.
Configure the player to include media auditing in the reports it sends the IDM.
Refer to the NTB documentation for details.
On the IDM, generate the report by selecting from the following options and clicking the button:
Type Choose how verbose you want the report to be:
Summary – Brief report.
Listing – Detailed report.
For Choose the focus of the report:
Player – Reports on the items enabled on a player. Select the player from the drop-down.
Channel – Reports on the items enabled on a channel. Select the channel from the drop-down.
Period Use the From and Until settings to specify the duration you want reported.
Output Check the as a csv file box if you want the report in a spreadsheet format. Your browser will prompt you to either
open the file or save it.
Note: If you do not check the box, IDM offers the CSV file option again in the on-screen display.
Here is an example of a summary media audit report containing a month's worth of statistics for selected zones in aplaylist called Hotel:

35
iCOMPEL Deployment Manager (IDM) User Guide (V3.1.0) Managing and Monitoring the Network
2.2 organization – Configuring Alarms
Use the organization options to configure alarms for monitoring the players in your organization and to specify times when the IDM does not raise alarms.
By default, IDM observes all alarms (except Software Version). However, a user with the System Administration permission can change those defaults at the system level. Before configuring your organization alarms, check the system-level alarm defaults with your system administrator or by going to System > Alarm Configuration. You can then configure each organization alarm in relationship to the system-level default.
Note: If you are satisfied with all of the system-level defaults you need do nothing more to set up your Organisation'salarms.
Select the menu item for the option you require:
2.2.1 Configuring Alarms
Note: You can only configure alarms for your organization if you have the Alarm Configuration permission enabled (see the System > Organisations > Edit page).
IDM groups alarms into categories according to their applicability. Click the tab appropriate to the alarms you want to set up:
Software
Hardware
Publisher
Subscriber
For each alarm, choose the radio button that describes the behaviour you want to set:
Inherit Alarm Use
Ignore Alarm
Observe Alarm
Default. IDM treats the alarm as set up by the system default.
IDM ignores the alarm for your organization (this overrides the system default).
IDM raises the alarm for your organization (this overrides the system default)
In addition, many alarms offer an Override Default Alarm Settings option. Check this box if you want to furthercustomise your alarm settings.
To enable any changes, you must click the button.
35Alarm Configuration – Configuring specific behaviour for each alarm in your organization.
Email Configuration 36 – Configuring the optional reporting of alarms by email.
Operating Hours Configuration 3 7 – Specifying the times during which the IDM does not raise alarms.
59Refer to Alarms for background and reference information on all of the alarms.
Use the Alarm Configuration options to configure alarms for your organization. You only need to do this if you want IDM to treat alarms differently than the system defaults (Setting Up Alarms 42 describes how to set up the system defaults).
36
iCOMPEL Deployment Manager (IDM) User Guide (V3.1.0) Managing and Monitoring the Network
2.2.2 Configuring Email Notifications
Use the Email Configuration options to set up and test the reporting of alarms by email.
Note: You can only configure alarm email notifications if you have the Alarm Email permission enabled (see theSystem > Organisations > Edit page).
Before configuring email reporting, you must first set up the IDM global email profile. Do this using the IDM Setup >System Setup > Email Configuration options (as described in Email Settings ) (requires the SystemAdministration permission).
Click the tab for the option you require:
Configure – Configuring the email delivery and format parameters
Test – Sending a test email
Alarms – Selecting which alarms trigger an email
Configure:
To configure email notifications, enter the following details and click the button:
Send EmailNotifications
Select No to disable and Yes to enable notifications by email.
Recipient Address to send the email.
From Address to indicate sender of the email.
Subject Prefix String used to begin the subject line.
Message Header Material to include prior to the alarm report.
Message Footer Material to include after the alarm report..
Language Language used in the subject line and in alarm names
Custom SMTP Headers Enter any additional headers needed in the SMTP header format.
Time Style Select the time display format you want:
Hour Minute
Hour Minute Second
Locale Specific
Time Separator Enter a character to separate the time-display values.
Date Style Select the date display format you want:
Year Month Day
Day Month Year
Month Day Year
Locale Specific
48

37
iCOMPEL Deployment Manager (IDM) User Guide (V3.1.0) Managing and Monitoring the Network
Check the box if you want the last five days displayed by name not number.
Date Separator Enter a character to separate the date-display values.
Month Style Select the month display format you want:
Numeric
Full Name
Abbreviated Name
Test:
To test the email configuration, click the button. The SMTP server will report if the test succeeds orreturn an error message if it fails.
Note: A successfully sent email does not necessarily mean successful receipt by the recipient. For example, emailscan be lost in transit or quarantined by a recipient's spam filter.
Alarms:
Check or uncheck the boxes to select which alarms trigger an email and whether it is when the alarm is raised, lowered,
or both. To enable a change, you must click the button.
2.2.3 Configuring Operating Hours
Use the Operating Hours Configuration options to create rules defining your Organisation's operating and non-operating hours.
IDM does not raise alarms during your Organisation's non-operating hours. You may want to do this for when alarm reporting is irrelevant (for example, if your signage is in a store and it is closed).
Note: IDM does not lower already raised alarms when non-operating hours begin.
Click the tab for the option you require:
Operating Hours Rules – Displaying and editing the current operating hours rules.
Add Rule – Setting up new operating hours rules.
Operating Hours Rules:
Here is an example operating hours rules display:

38
iCOMPEL Deployment Manager (IDM) User Guide (V3.1.0) Managing and Monitoring the Network
Those rules indicate that:
Operating hours are always between 9:00 and 17:00 on Monday to Friday (the IDM reports alarms).
Non-operating hours are always between 17:00 and 9:00 on Monday to Friday and all day Saturday and Sunday
(the IDM does not report alarms).
Click the button to open a dialogue to modify a rule. Click the button to delete a rule.
Add Rule:
To add a new rule, complete the following options and click the button:
Applicability Select the radio button to indicate when the rule applies:
This rule applies indefinitely – The rule applies always.
This rules during the time period – The rule applies only during the dates and times you definewith the From and To drop-down menus.
Effect Select the radio button to define whether the rule creates operating hours or non-operating hours:
The organization is within operating hours while this rule is in effect.
The organization is outside operating hours while this rule is in
effect. Days Check the boxes against the days to which the rule applies.
Time Select the radio button to define during which part of the day the rule applies:
All day – Applies for the whole day.
Between – Applies during the time you define with the drop-down menus.
2.3 System – Configuring Users, Players, and Alarms
Use the System options to manage the IDM user accounts, manage the players in your organization, and configure the system alarm defaults.
Select the menu item for the option you require:
Users – Viewing, modifying, and adding user accounts.
Organisations – Viewing and modifying organization permissions.
39
40

39
iCOMPEL Deployment Manager (IDM) User Guide (V3.1.0) Managing and Monitoring the Network
Players – Listing, adding, and deleting players.
Alarm Configuration – Configuring the system alarm defaults.
Note: If you select Users or Organisations, IDM displays a page containing the tabs for both sets of options (the relevant tab first in each case). This is because between them those options control all of the IDM system permissions.
2.3.1 Adding and Modifying Users
Users – Viewing, modifying, and deleting user accounts.
Add User – Adding new users and selecting their permissions.
Users:
Each user is listed on a row with these features:
Actions Click the button that matches the action you want to take:
– Delete the user (note that you cannot delete the current user account).
– Edit the user details.
Besides displaying the user's name and organization, the dialogue allows you to modify:
Default User organization – Whether the user can add a reporting but unknown player to the organization (also needs Accept Report permission).
Permissions – Adding or removing the user's permissions (see User Permissions for details).
Password – Resetting the user's password.
To enable any changes, you must click the button.
User The user's username.
Organisations The user's organization.
Permissions Lists the user's permissions.
Default organization A name in this column means the user can add reporting but unknown players to the organization. A blank column means the user cannot do so.
Add User:
To add a user, enter the following details and click the button:
Username Unique name for the user. You can compose the username from any of these components:
41
42
Use the Users options to view, modify, and add IDM user accounts and their permissions.
Note: The Organisations tabs also appear on this page. Refer to organization Permissions 40 for details.
Click the tab for the option you require:
63

40
iCOMPEL Deployment Manager (IDM) User Guide (V3.1.0) Managing and Monitoring the Network
Lower case letters (a-z)
Numbers (0-9) (not permitted as the first character of the username).
Underscore (_) (two underscores not permitted as the beginning of the username).
Password
Password Confirm
Password for this user account, repeated in the Password Confirm field.
Default Playerorganization
Select the appropriate radio button:
Unknown players will be ignored – If a player that has not been added to the organization sends a report to the user it is ignored.
Unknown players will be added to organization – If a player that has not been added to the organization sends a report to the user, it is automatically added to the organization. The user also needs the Accept Report permission.
Organisations Name of the user's organization.
Permissions Check the boxes for the permissions you want to assign the user (see User Permissions fordetails).
2.3.2 organization Permissions
Organisations – Viewing and modifying the organization name, minimum reporting interval, permissions, and default data retention periods.
Add Organisations – Establishing a new organization and its initial user accounts (only if permitted by license).
Organisations:
The organization details are listed on a row with these features:
Actions – Click the button to modify the organization permissions and other parameters (see below fordetails).
organization – The name of the organization.
Members – The number of players and users in the organization.
The dialogue allows you to modify the following (to enable any changes, you must click the button):
organization Name The organization name (two underscores are not permitted as the beginning of the username).
Minimum ReportingInterval
Select the appropriate radio button:
A 60 second reporting interval will be applied to the players belonging to this organization –Default. Prevents players reporting to the IDM more often than 60 seconds.
63
Use the Organisations options to view and modify the organization permissions and other operational parameters.
Note: The Users tabs also appear on this page. Refer to Adding and Modifying Users 39 for details.
Click the tab for the option you require:

41
iCOMPEL Deployment Manager (IDM) User Guide (V3.1.0) Managing and Monitoring the Network
A minimum interval of time between reports will be applied to players reporting to this organization – Enter a different minimum interval between player reports. Take care with the interval you choose. Long intervals may be insufficiently informative. Short intervals may impact player and IDM performance because of processing overhead.
AlarmAcknowledgement
Default: enabled. If disabled, users cannot acknowledge alarm reports.
Alarm Configuration Default: enabled. If disabled, users cannot set up organization alarms differently from the system defaults.
Alarm Email Default: enabled. If disabled, users cannot set up email notification of alarms.
RS232 Reporting Default: enabled. If disabled, players cannot report their RS-232 information.
Thumbnail Reporting Default: enabled. If disabled, players cannot return their screen thumbnails in reports.
Maximum Players Select the appropriate radio button:
Unlimited – Default. Other than defined by license, no limit on the number of players that can report to the organization.
Limited – Within the maximum defined by license, specify the number of players that can report to the organization.
Reports Data RetentionPeriod
Default: 90 days. You can specify a different period to retain data. Only relevant if you enableautomatic database pruning (see Scheduled Jobs ).
Media Audit EventsRetention Period
Default: 90 days. You can specify a different period to retain events. Only relevant if you enableautomatic database pruning (see Scheduled Jobs )
2.3.3 Adding and Deleting Players
Use the Players options to list and modify the players in, and manually add players to, your organization.
Click the tab for the option you require:
Players – Listing and modifying players
Add Players – Adding players
Players:
Each player is listed on a row with these features:
Actions Click the button that matches the action you want to take:
– Delete the player.
– Edit the player details.
The dialogue:
52
52
Note: You can add players automatically by using the Default Player organization setting on the Accept Report account (see Adding Players to Your organization 17 ).

42
iCOMPEL Deployment Manager (IDM) User Guide (V3.1.0) Managing and Monitoring the Network
Lists the player's serial number and the organization to which it belongs.
Allows you to add, modify, or clear the player's name.
Configure whether or not the IDM accepts the player's reports.
organization
Name
Serial
Properties
To enable any changes, you must click the button.
Displays the name of the organization to which the player belongs.
Displays the player's name (if configured). If you did not configure it with a name, IDM displays the
player's serial number.
Displays the player's serial number.
Indicates that the IDM accepts reports from the player. If not, this field is left blank.
Add Players:
To add a player, enter the following details and click the button:
Serial Number
organization
Enter the player's serial number.
IDM adds the player to the named organization.
Name
Accept Reports Check the Accept Reports from this Player box for IDM to accept the player's reports.
2.3.4 Setting Up Alarms
Software
Hardware
Publisher
Subscriber
For each alarm, choose the radio button that describes the behaviour you want:
Ignore Alarm – IDM ignores this alarm.
Observe Alarm – IDM monitors the condition and raises an alarm according to the defined parameter.
If you wish to refer to the player by a meaningful name, enter it here. You can also name a player on its Detailed Status page (see customizing the Player View 20 for details).
59Refer to Alarms for background and reference information on all of the alarms.
Use the Alarm Configuration options to set up the default alarms for the IDM system, which will be used unless you override them elsewhere. If required, you can override those defaults by using the organization > Alarm Configuration options (as described in organization – Configuring Alarms 35 ).
IDM groups alarms into categories according to their applicability. Click the tab appropriate to the alarms you want to set up:

43
iCOMPEL Deployment Manager (IDM) User Guide (V3.1.0) Managing and Monitoring the Network
You can set up parameters for most alarms. The IDM offers defaults but you can modify those to best suit the needs of your network.
Note: By default, IDM observes all alarms (except Software Version).
To enable any changes, you must click the button.

Part
IIIConfiguring and Maintaining the IDM

45
iCOMPEL Deployment Manager (IDM) User Guide (V3.1.0) Configuring and Maintaining the IDM
3 Configuring and Maintaining the IDM
Typically, the majority of your day-to-day activities will be focussed on managing and monitoring the players in your digital signage network. However, for your network to operate smoothly, efficiently, and securely the IDM needs to provide the necessary infrastructure. You also need to configure and maintain the IDM so that it provides its high-level of service.
As far as possible, the IDM is ready-configured with default settings that should allow it to operate successfully immediately. However, you will need to review and if necessary modify those settings to match the needs of your signage network.
IDM offers the following menu options to support those tasks:
Click the menu or submenu item for the option you require:
Status – Viewing IDM environmental performance (temperature, uptime, network and other metrics).
Setup > System Setup – Setting up the IDM time, email, network, and security configurations and managing thesoftware licensing.
Setup > Maintenance and Troubleshooting – Performing backup, update, reboot, and support activities.
Help – Choosing your preferred time format display and accessing the online help.
3.1 Status – Monitoring the IDM
Use the Status options to monitor the environmental performance of your IDM.
Select the tab for the option you require:
°C 24 Hours – Viewing disk and CPU temperatures from the last 24 hours.
°C 30 Days – Viewing disk and CPU temperatures from the last 30 days.
Status – Viewing uptime, temperature, Ethernet, and memory metrics.
Hardware – Viewing IDM processor specification and memory capacity.
°C 24 Hours:
Illustrates disk and CPU temperatures from the previous 24 hours on separate graphs. Green lines indicate the safetemperature range and red where the temperature is too high.
Beneath each graph, notes indicate the maximum temperature during the period and the shut down temperature. IDM shuts itself down if the disk temperature exceeds 50°C for more than 5 minutes.
°C 30 Days:
As above except covering the previous 30 days.
45
46
52
55

46
iCOMPEL Deployment Manager (IDM) User Guide (V3.1.0) Configuring and Maintaining the IDM
Status:
The display contains the following information:
IDM Uptime Disk
Temperature CPU
Temperature MB
Temperature Case
Fan Speed
Ethernet Receive
Ethernet Transmit
System Disk
Data Disk
How long the IDM has been running since its last restart
Current disk temperature
Current CPU temperature
Current motherboard temperature
Speed of system cooling fan (in RPM)
Total inbound network traffic (in bytes and packets) and number of errors
Total outbound network traffic (in bytes and packets) and number of errors
How much system disk space used of how much available
How much data disk space used of how much available
Hardware:
The display contains the following information:
CPU
Available Memory
CMOS Signature
Make, model, and speed of IDM processor
Amount of IDM main memory
Signifier value (support may request this value)
3.2 Setup – Setting Up the IDM
Use the Setup > System Setup options to configure and check the operational features of your IDM.
Select the menu item for the option you require:
Date and Time – Specifying time source and time zone.
Email Settings – Setting up and testing the global email profile.
Network – Setting up and testing the network connection.
Security – Configuring firewall and secure access services.
Scheduled Jobs – Enabling automatic deletion of old audit events and reports from the database.
Licensing – Checking and adding license features.
47
48
49
49
52
52

47
iCOMPEL Deployment Manager (IDM) User Guide (V3.1.0) Configuring and Maintaining the IDM
3.2.1 Date and Time
Use the Date and Time options to configure the time source and time zone for your IDM.
Click the tab for the option you require:
Settings – Configuring the time source and time zone.
Status – Checking current Network Time Protocol (NTP) characteristics.
Settings:
To configure the time settings, complete the following options then click the button and reboot the IDM:
Date and Time Settings Choose the time method to use:
Network Time Protocol (NTP) – Best for accuracy but requires the IDM to have a network connection to an external NTP server.
Windows Compatible Network Time Protocol – Use if the NTP server is a local Windowsserver.
Local System Clock – The IDM internal clock. Only use if the IDM cannot access an NTP server. Without an external reference, the local system clock may drift.
Time Zone Setting Select the time zone for the IDM to use.
Local System Clock Settings If you chose the Local System Clock method, IDM activates this display. The values shown are
those current when you opened the Date and Time page. Adjust the date and time to thoserequired.
Network Time Protocol (NTP)Settings
If you chose one of the NTP methods, you must enter the URL of at least one NTP server (threeare recommended).
Note: The IDM will only synchronise to NTP server time if the NTP time and the local system time are within a few minutes of each other. If the difference is greater, reboot the IDM to synchronise times again.
Status:
Not displayed if you have chosen Local System Clock. Shows the latest characteristics of the designated NTP servers,as in this example:

48
iCOMPEL Deployment Manager (IDM) User Guide (V3.1.0) Configuring and Maintaining the IDM
3.2.2 Email Settings
Use the Email Settings options to configure and test the IDM global email profile.
If you want to enable email notifications of alarms for your organization, you must configure these settings first. You can then configure specific alarm emails on the organization > Email Configuration page.
Click the tab for the option you require:
Configure – Detailing the email profile parameters.
Test – Sending a test email to ensure the profile works.
Status – Checking email status and errors.
Configure:
To configure the email settings, complete the following options and click the button:
Send EmailNotifications
Select No to disable and Yes to enable IDM email.
SMTP Server Specify the SMTP server address and port number to use.
Authentication If the SMTP server requires authentication, enter the Username and Password required
TLS Specify if you need to use Transport Layer Security:
No – Send email without TLS
If Available – Send email and use TLS if it is available
Yes – Only send email with TLS
Test:
To test the email settings, complete the Recipient and From fields with the relevant email addresses and click the
button. The SMTP server will report if the test succeeds or return an error message if it fails.
Note: A successfully sent email does not necessarily mean successful receipt by the recipient. For example, emailscan be lost in transit or quarantined by a recipient's spam filter.
Status:
Displays information about the latest email state including any error messages.
49
iCOMPEL Deployment Manager (IDM) User Guide (V3.1.0) Configuring and Maintaining the IDM
3.2.3 Network
Use the Network options to configure, check, and test the IDM network connection.
Click the tab for the options you require:
Ethernet – Configuring IP address and DNS settings.
Network Status – Checking current IP address and DNS values.
Tests – Running ping, trace, or DNS lookup tests against a host (for example, an email server).
Ethernet:
To configure the network, complete the following information then click the button and reboot the IDM:
Ethernet Settings Type:
DHCP – Select if the IDM will obtain its IP address from a DHCP server on your network. If the IDM cannot find a DHCP server, it defaults to an IP address of 169.254.1.1.
Static – Select if you are specifying an IP address for the IDM. Enter it in the IP Address field. Host Name – Optional. For ease of reference, enter a name for the IDM. Only available if your DHCP server supports this feature.
IP Address – If you selected Static IP addressing, enter the IP address for the IDM.
Netmask – If you selected Static IP addressing, specify the address range for the IDM subnet.
Default Gateway – Enter the gateway IP address if the IDM uses one.
DNS Settings DNS Search Path – If required, enter the path needed to reach the Domain Name Server (DNS).
DNS Nameserver – Enter the IP addresses of up to three DNS nameservers.
Network Status:
Displays the current network address values.
Tests:
In each case, start the test by entering the host's name or IP address and clicking the button.
Ping Host Ping the host.
Trace Route Trace the route to the host. This can take a few minutes to complete.
DNS Lookup See the host's details held on the DNS.
3.2.4 Security
Use the Security options to configure the IDM firewall and other security services and to monitor firewall activity.
Caution: The IDM comes ready-prepared with default firewall and other security service settings to protect against unauthorised access. Do not change the security settings unless you have a good working knowledge of IP networking and network security. Incorrect configuration can block all access to the IDM.

50
iCOMPEL Deployment Manager (IDM) User Guide (V3.1.0) Configuring and Maintaining the IDM
The IDM firewall protects it against unwanted and potentially malicious traffic. However, the IDM also needs to accept your management login and communications from players in the digital signage network. To allow and protect such access, the IDM supports a variety of secure services:
VPN – Virtual Private Network. Allows the IDM and the players to communicate over an encrypted path through their respective firewalls.
HTTP/HTTPS – Hypertext Transfer Protocol and Hypertext Transfer Protocol Secure. HTTP encrypts passwords butHTTPS is more secure because it also encrypts content.
FTP – File Transfer Protocol. FTP access is controlled by password. Passwords are not encrypted. Use FTP forcopying over backups and software updates.
SSH – Secure Shell. Only used to access the deepest levels of the IDM for occasional support and maintenance purposes. Access is by the Master Password.
You can configure each of those to match the specific security needs of your network or to conform to corporate policyon port numbering.
Click the tab for the option you require:
Firewall – Examining and configuring the firewall and other security services settings.
Master Password – Changing the IDM master password.
Firewall Status – Monitoring the detailed firewall activity report.
Firewall:
The Firewall tab allows you to examine and configure the firewall and other security service settings.
Caution: The IDM comes ready-prepared with default firewall and other security service settings to protect against unauthorised access. Do not change the security settings unless you have a good working knowledge of IP networking and network security. Incorrect configuration can block all access to the IDM.
button and rebootTo change your security settings, complete the relevant options then click the the IDM:
Firewall ServiceSettings
IP Address Filtering – Default: Disabled. Check this box to prevent any access to the IDM except from the Allowed IP Addresses.
Allowed IP Addresses – Enter the IP addresses that can access the IDM, not forgetting to include your own. To allow more than eight IP addresses, specify a range using the standard syntax (for example, entering 192.168.1.0/24 allows access for all IP addresses between 192.168.1.0 and 192.168.1.255).
VPN ServiceSettings
Service State – Default: Enabled. Uncheck this box to disable VPN access.
VPN Port Range – Default: 1194. Modify if you want your IDM to accept VPN connections through a different port.
HTTP ServiceSettings
Supported Protocols – Default: HTTP and HTTPS. Select either HTTP or HTTPS to restrict access to that protocol. You cannot manage the IDM without either HTTP or HTTPS enabled.
HTTP Ports – Default: 80. Modify or add if you want your IDM to accept HTTP connections through different ports.
HTTPS Ports – Default: 443. Modify or add if you want your IDM to accept HTTP connections through different ports.
50
51
51

51
iCOMPEL Deployment Manager (IDM) User Guide (V3.1.0) Configuring and Maintaining the IDM
FTP ServiceSettings
Service State – Default: Enabled. Uncheck this box to disable FTP access.
Supported Protocols – Fixed default: FTP.
FTP Ports – Default: 21. Modify or add if you want your IDM to accept FTP connections through a different port.
Passive Port Range – Default: 59000-59009. Modify the Low Port and High Port values to specify a differentrange.
Transfer Rate – Default: Limit to 2500 KiB/Second. Modify the Limit to value to specify a different transferrate.
SSH ServiceSettings
SSH Ports – Default: 22. Modify or add if you want your IDM to accept FTP connections through a different port.
Master Password:
The Master Password tab allows you to change the master password. You need the master password to access the deeper levels of the IDM through SSH.
Note: This is not the same password you use to login to the IDM through a browser.
It may be desirable to change the master password, but you must know the existing one to do so. Please contact yourreseller or supplier for the master password.
To enable the new password, you must click the button and reboot the IDM.
Firewall Status:
The Firewall Status tab displays the detailed IDM firewall activity report.
Understanding the information in that report requires a good working knowledge of IP networking and network security. Inparticular, note these points:
The Chain MANAGER-INPUT section details the rules governing connections made to the IDM on various Prot (protocols).
The IDM checks the IP address of incoming connections against the Chain MANAGER-INPUT-ADDRESSES rule set. IDM drops connections from IP addresses disallowed by security settings.
The IDM checks allowed connections against the Chain MANAGER-INPUT-PORTS rule set. IDM drops connections to a port disallowed by the security settings.
The Pkts (packets) and Bytes columns show the volume of traffic accepted or rejected by each rule. An unusually high number of packets on a DROP line might indicate an attack on the IDM.

52
iCOMPEL Deployment Manager (IDM) User Guide (V3.1.0) Configuring and Maintaining the IDM
3.2.5 Scheduled Jobs
Use the Scheduled Jobs option to automatically remove old audit events and reports from the database. By default, thisis not enabled.
Check the Prune Database box to enable Scheduled Jobs. When it is enabled, the IDM daily checks for and deletes old events and reports. The default retention period for both events and reports is 90 days (you can alter these periods
bygoing to System > Organisations and clicking the button).
To confirm and initiate the daily clean-up of the database, you must click the button.
3.2.6 Licensing
Use the Licensing options to check on and add to the features licensed on your IDM.
Click the tab for the option you require:
Licensing – Examining a summary of installed licenses.
Status – Seeing all currently licensed features.
Add License – Adding new licenses for additional features.
Note: You must reboot the IDM to activate new license features.
3.3 Setup – Maintaining the IDM
Use the Setup > Maintenance and Troubleshooting options to perform housekeeping, update, and support tasks on your IDM.
Select the menu item for the option you require:
Backup/Restore Database – Creating backups and restoring the IDM database with them.
Software Update – Checking for and performing software updates automatically or manually.
Reboot – Rebooting the IDM.
Support Snap Shot – Collecting and examining IDM advanced support information.
3.3.1 Backup/Restore Database
Use the Backup/Restore Database options to create a backup of the IDM database that you can use to restore the database in case of problems.
Note: In case of system failure, it is recommended that you save a copy of your backup off of the IDM (as described below).
Click the tab for the option you require:
Backups – Restoring the IDM database from a backup and deleting unwanted backups.
Create Backup – Creating a new database backup.
52
53
54
55

53
iCOMPEL Deployment Manager (IDM) User Guide (V3.1.0) Configuring and Maintaining the IDM
Backups:
This tab provides access to your existing backups on the IDM.
IDM identifies its currently stored backups under the Filename column. The filename includes the IDM serial number
and a timestamp to uniquely identify the backup. To restore the database, click the button next to the relevantfile.
Caution: Only restore the database if you are certain this is what you want to do as it removes all existing data inthe database.
If the backup you require is not on the IDM but is one you saved to disk, take these steps to make it available:
1. Click the button and navigate to the location of the saved file.
2. Select the file.
3. Click the button.
4. After the file uploads it is listed in the Filename column: you can now use it to restore the database.
Delete a backup by clicking the button next to the relevant file.
Create Backup:
This tab displays the button. Click the button to create a new backup. After IDM completes thebackup, it displays the Backups tab again with the new file listed.
To save a copy of the backup off of the IDM, as recommended, the steps to take depend on the browser you are using. Commonly, one or other of these methods will work:
Left-click the filename: select the Save or Save As option.
Right-click the filename: select the Save Link As or Save Target As option.
3.3.2 Software Update
Use the Software Update options to check the latest update status and to configure whether the IDM performs updates automatically or not. Please contact your reseller or supplier for more information on available updates.
Click the tab for the option you require:
Update Status – Checking details of the last update, how the IDM checks for updates, and if any new updates are available.
Settings – Configuring or disabling automatic updating.
Manual Update – Performing a manual update from a downloaded file.
Update Status:
The display contains the following information:
Last Update Messages Describes the most recent update.
Status Indicates whether or not the IDM automatically checks for updates.

54
iCOMPEL Deployment Manager (IDM) User Guide (V3.1.0) Configuring and Maintaining the IDM
Last Checked forUpdates
Indicates when the IDM last checked for updates.
Update File Indicates if a new update is available (when you have chosen Check for new updates but do notdownload or install them).
Settings:
To configure software updating, complete the following options and click the button:
Update Mode Choose how you want automatic updating to work:
Automatically download and install updates
Check for new updates but do not download or install them
Turn off automatic update
Reboot Allowed Only activated if you have chosen Automatically download and install updates. Specify the day and time when the IDM can reboot to install an update.
Download Allowed Not activated if you have chosen Turn off automatic update. Specify the day and a time slot when the IDM can download an update.
Update Server URL Not activated if you have chosen Turn off automatic update. If different from the default, specify the URL where the IDM checks for updates.
Check Interval Not activated if you have chosen Turn off automatic update. Specify how often the IDM checks for updates (in hours and minutes).
Authentication Not activated if you have chosen Turn off automatic update. If the update server requiresauthentication, enter the details here.
Manual Update:
Confirms the version of the software currently installed on the IDM.
If you have manually downloaded an update and wish to install it:
1. Click the button and navigate to the update file location.
2. Click the button.
3. Follow the on-screen instructions.
3.3.3 Reboot
Use the Reboot option to manually reboot the IDM.
To confirm you want to reboot, select Yes from the drop-down and click the button.

55
iCOMPEL Deployment Manager (IDM) User Guide (V3.1.0) Configuring and Maintaining the IDM
3.3.4 Support Snap Shot
Use the Support Snap Shot options to collect and examine details of IDM operations at the deepest levels of the system. You may want to do this if you are experiencing a problem and need to provide support with a snap shot of system internals for diagnosis.
Note: This information is in the form of extensive and verbatim logs, process listings, and kernel messages and isspecifically for advanced users, such as systems experts and support staff.
Click the tab for the option you require:
Support Snap Shot – Creating a package of diagnostic system data to send to support.
Extras – Viewing the individual log files, process listings, and the kernel messages list.
Support Snap Shot:
Click the button for IDM to gather and package the snap shot data. Follow the on-screeninstructions to pass this on to support.
Extras:
Support may want you to look at individual pieces of data. Take the action required to access the data of interest:
Click the relevant button to generate and view the data described.
Click the button to access the logs covering the area described. To open an individual log, click its button.
3.4 Help – Configuring User Interface Preferences
Use the Help options to configure the IDM user interface, access the online help, and display product information.
Select the menu item for the option you require:
UI Options – Configuring the menu, player status, and date and time display features.
Help for this Page – Accessing help for the IDM option you are using.
About – Displaying information about the IDM hardware and software.
UI Options:
Changes only apply to the current user account. To change the UI display features, select from the following options and
click the button:
Menu DisplayMode
Select the menu display mechanism you want:
Menu is shown when hovered over – Positioning cursor on the menu name displays its options
Player StatusUpdate Interval
Menu will show when clicked – Clicking the menu name displays its options
Enter in seconds how often the IDM refreshes the player status display.
Time Style Select the time display format you want:

56
iCOMPEL Deployment Manager (IDM) User Guide (V3.1.0) Configuring and Maintaining the IDM
Hour Minute
Hour Minute Second
Locale Specific
Time Separator Enter a character to separate the time-display values.
Date Style Select the date display format you want:
Year Month Day
Day Month Year
Month Day Year
Locale Specific
Check the box if you want the last five days displayed by name not number.
Date Separator Enter a character to separate the date-display values.
Month Style Select the month display format you want:
Numeric
Full Name
Abbreviated Name
Help for this Page:
Displays help specific to the IDM options on the current page.
About:
Displays outline IDM product, support, and license information.

Part
IVReference

58
iCOMPEL Deployment Manager (IDM) User Guide (V3.1.0) Reference
4 Reference
This reference section contains definitions of key IDM user interface components and provides background guidance in other areas. Consult this information to enhance and complement your understanding of the managing and monitoring tasks described elsewhere.
Choose from the following resources:
Players Summary Columns – Lists and describes all of the data columns you can select for the Home >Summary > Players display.
Alarms – Lists and describes all of the alarm names and the states that trigger them.
User Permissions – Lists and describes all of the user account permissions.
IDM Programming Interfaces – Outlines the IDM application programming interfaces.
4.1 Players Summary Columns
You can customise which data the IDM displays in the tabular Players view on the Home > Summary page. Every time a player reports, the IDM updates the data it displays about that player.
To customise the display, click the button and check the box against each column you require.You can re-order the columns by dragging and dropping them.
This table lists and describes the columns available (whether a player can report particular items is dependent on modeland configuration):
Column Name Player Information Displayed
Alarms Raised and acknowledged alarms.
CPU Fan Speed CPU fan speed in RPM.
CPU °C CPU temperature in degrees centigrade.
Chan ID Identifier of the channel to which the player subscribes
Chan Last Connect The last time the player connected to the channel.
Chan Name Name of the channel to which the player subscribes.
Chan Next Connect The next time the player will connect to the channel.
Chan Size Size of the channel content.
Chan Transferred Amount of the channel transferred.
Chan Transferred % Percentage of the channel content transferred.
Data Disk % Used Percentage of the data disk filled.
Data Disk Free Amount of free space on the data disk.
Data Disk Size Size of the data disk.
58
59
63
64

59
iCOMPEL Deployment Manager (IDM) User Guide (V3.1.0) Reference
Column Name Player Information Displayed
Data Disk Used Amount of the data disk used.
Disk °C Disk drive temperature in degrees centigrade.
Model NTB model description.
Name Player name (you can set this).
Remote Setup Whether the player is configured to allow remote setup.
Report Date Date of last report received.
Role Player role (standalone, subscriber, or publisher).
Serial Player serial number.
State Player status icon (as described in Example Network Monitoring ).
System Disk % Used Percentage of the system disk used.
System Disk Free Amount of free space on the system disk.
System Disk Used Amount of the system disk used.
System Fan Speed System fan speed in RPM.
System °C System temperature in degrees centigrade.
Up Since Date and time when the player last came up.
VPN Whether the player is connected by VPN and when that was established.
Version Version of the software running on the player.
4.2 Alarms
As described in organization – Configuring Alarms , you can monitor the operation of your digital signage network and the players in it by configuring the IDM alarms.
IDM provides a wide range of alarms, the majority of them controlled by parameters that you can specify. This allows you to establish a monitoring regime to the level of detail you require. You can check the alarm settings on your IDM through these menu options:
IDM groups alarms into categories according to their applicability, as described in the following tables:
Software
Hardware
12
35
System > Alarm Configuration – Default settings (see Setting Up Alarms 42 )
organization > Alarm Configuration – Your Organisation's settings (see Configuring Alarms 35 ).
60
61

60
iCOMPEL Deployment Manager (IDM) User Guide (V3.1.0) Reference
Publishers
Subscribers
These tables describe the circumstances under which each alarm is raised or lowered. Where appropriate, guidancenotes provide further explanation and advice.
Software:
Alarm Name Description
Schedule Not Normal Raised when the player is playing something other than its regular schedule after the period youspecify.
Lowered when the player begins playing its regular schedule
Guidance notes: The circumstances under which this alarm might be raised include:
The player has been told to audition or preview
The player has been told to use a Schedule Override
You can change the waiting period by using the Override Default Alarm Settings option on the organization > Alarm Configuration > Software page.
Report Overdue Raised if it has been longer than the period you specify since the player last reported (if withinoperating hours).
Lowered when the player reports.
Guidance notes: To prevent this firing too often, specify a period that allows for momentary issues (forexample, make the period at least twice as long as the reporting period itself).
Software Version Raised when the player reports a software version that does not match the one you specify.
Lowered when the player reports a software version that matches the one you specify.
Remote Setup UpdateLate
Raised when the player has not applied remote setup changes within the period you specify.
Lowered when the player has applied the remote setup changes.
Data Disk Free Space Raised when the free space on the player data disk is less than the limit you specify.
Lowered when the free space on the player data disk is greater than the limit you specify.
Guidance notes: Possible causes for large amounts of data disk space being taken include:
Large log files
Large media files (for example, when downloading new media both the old and the new files mayneed to be stored simultaneously)
System Disk FreeSpace
Raised when the free space on the player system disk is less than the limit you specify.
Lowered when the free space on the player system disk is greater than the limit you specify.
Guidance notes: A possible cause for large amounts of system disk space being taken are large logfiles.
61
62

61
iCOMPEL Deployment Manager (IDM) User Guide (V3.1.0) Reference
Hardware:
Alarm Name Description
Disk Overheat Raised when the player disk temperature safety margin is less than the value you specify.
Lowered when the player disk temperature safety margin is greater than than the value you specify.
Guidance notes: Only applies to models with a hard disk drive. Possible causes of overheating are:
Insufficient ventilation around the player .
Problems with player cooling fans.
CPU Overheat Raised when the player CPU temperature safety margin is less than the value you specify.
Lowered when the player CPU temperature safety margin is greater than than the value you specify.
Guidance notes: Only applies to systems that can report CPU temperature. Possible causes ofoverheating are:
Insufficient ventilation around the player.
Problems with player cooling fans.
System Overheat Raised when the player system temperature goes above the value you specify.
Lowered when the player system temperature drops below the value you specify.
Guidance notes: Only applies to systems that can report system temperature. Possible causes ofoverheating are:
Insufficient ventilation around the player.
Problems with player cooling fans.
Slow CPU Fan Raised when the player CPU fan speed drops below the RPM you specify.
Lowered when the player CPU fan speed goes above the RPM you specify.
Guidance notes: Only applies to systems with a CPU fan and that can report fan speed. A possiblecause is that the fan itself is failing.
Slow System Fan Raised when the player system fan speed drops below the RPM you specify.
Lowered when the player system fan speed goes above the RPM you specify.
Guidance notes: Only applies to systems with a system fan and that can report fan speed. A possiblecause is that the fan itself is failing.
Publishers:
Alarm Name Description
Channel ManagerInitialising
Raised when the channel manager responsible for either publishing or subscribing is initialising atthe time of the report.
Lowered when the channel manager reports initialisation complete.

62
iCOMPEL Deployment Manager (IDM) User Guide (V3.1.0) Reference
Alarm Name Description
Publisher Transfer Late Raised when the publisher has not completed a channel data transfer within the period you specify.
Lowered when the publisher reports transfer complete.
Guidance notes: To prevent this firing too often, specify a length of time that takes into account thelikely amount of data transferring and network performance (including bandwidth and throughput).
Publisher InactiveChannel Is Incomplete
Raised when a multi-channel publisher reports that an inactive channel has not completedpublishing.
Lowered when the inactive channel reports completion.
Guidance notes: It is possible that the administrator on the publisher activated another channelbefore the inactive channel completed publishing.
Publisher DuplicateChannel
Raised when multiple publishers report publishing a channel of the same name.
Lowered when all channel names within an organization are unique.
Guidance notes: One cause might be if a publisher is restored from backup and begins to publish an
old channel. Identify the responsible publisher and correct its configuration.
Publisher Error Raised when the publisher experienced an error while trying to publish a channel (details on thepublisher).
Lowered when the publisher reports publishing the channel without error.
Guidance notes: One cause might be a problem with the network connection (for example, that anintermediate FTP server is down).
Subscribers:
Alarm Name Description
Subscriber TransferLate
Raised when the subscriber has not completed a channel data transfer within the period you specify.
Lowered when the subscriber reports the data transfer complete.
Guidance notes: To prevent this firing too often, specify a length of time that takes into account thelikely amount of data transferring and network performance (including bandwidth and throughput).
Subscriber Not UsingNew Channel
Raised when the subscriber has not switched to a new channel within the period you specify.
Lowered when the subscriber reports it has switched to the new channel.
Subscriber ActivateLate
Raised when the subscriber is late to activate the channel when the publisher has specified an'Activate After' time.
Lowered when the subscriber reports activating the channel.
Guidance notes: This might appear as a 'deadline' problem (for example, the 'Activate After' time is9:00 am and the channel has not activated by 9:10 am). However, it may be caused by a 'slowness'problem (such as flagged by a Subscriber Transfer Late alarm).

63
iCOMPEL Deployment Manager (IDM) User Guide (V3.1.0) Reference
Alarm Name Description
Subscriber Error Raised when the subscriber experiences an error when trying to subscribe to the channel (details onthe subscriber).
Lowered when the subscriber reports subscribing to the channel without error.
Subscriber Has NoPublisher
Raised when the subscriber's publisher is not reporting to this IDM.
Lowered if the subscriber's publisher begins reporting to the IDM.
Guidance notes: Typically, this alarm is raised for one of these reasons:
The subscriber is configured to use the wrong channel
The publisher has not been configured to report to the IDMIt is not a requirement that both the subscriber and its publisher report to the same IDM. If this is
a factor in your configuration, consider setting this alarm to Ignore on the organization > Alarm Configuration > Subscriber page.
Subscriber ChannelHas Multiple Publishers
Raised when more than one publisher is publishing a channel with the same name as that beingsubscribed to by a player.
Lowered when all publisher channels possess unique names.
Guidance notes: One cause might be if a publisher is restored from backup and begins to publish anold channel. Identify the responsible publisher and correct its configuration.
4.3 User Permissions
You can precisely control what users can and cannot do on the IDM by selecting the mix of permissions they areallowed. See Adding and Modifying Users for how to configure user permissions.
This table lists and describes all of the user permissions:
This Permission... Allows the User to...
organization Status View
View the status of the players within the organization
Organization Alarm Update
Acknowledge alarms
organization Administration
Perform administration task on the organization (for example, add or remove players from folders)
organization Browse to Player via VPN
Browse to and manage a player that reports to IDM through a VPN
organization SSH to Player via VPN
Connect by SSH to a player that reports to IDM through a VPN
organization Media Audit View
View the media audit reports players make to the organization
39

64
iCOMPEL Deployment Manager (IDM) User Guide (V3.1.0) Reference
This Permission...
Accept Report
Establish VPN
External DatabaseReports
Allows the User to...
Be an account through which players can report to the iCOMPEL Deployment
Manager (IDM). Be an account through which players can report to the IDM
through a VPN Connect externally to the IDM database and create reports from it
FTP Access Login to the iCOMPEL Deployment Manager (IDM) with their username and password through FTP (for example, to fetch logs from or upload system updates to the IDM)
System Administration Perform system administration tasks on the IDM
Database Backup
API SystemAdministration
Backup and restore the IDM database
Permit API operations in the areas allowed by the System Administration permission
API organization Administration
Permit API operations in the areas allowed by the organization Administration permission
API organization Alarm Update
Permit API operations in the areas allowed by the organization Alarm Update permission
API organization Status View
Permit API operations in the areas allowed by the organization Status View permission
4.4 IDM Programming Interfaces
For advanced users, the IDM provides application programming interfaces (APIs). For example, system integrators may find the APIs useful for implementing bespoke features (such as billing) desirable in a tightly-knit enterprise
environment.The three APIs are:
XML API – Read and write access to the IDM (example uses: configure and manage Organisations, users, players, and alarms).
JSON and JSONP API – Read-only access to the IDM (example uses: obtain information on Organisations and players).
Database views – Read-only access to the IDM databases.
The iCOMPEL Deployment Manager (IDM) Technical Reference manual details the APIs.
For more information, please contact your reseller or supplier.

Part
VGlossary

66
iCOMPEL Deployment Manager (IDM) User Guide (V3.1.0) Glossary
5 Glossary
Term Definition
Alarms Notifications that an operating condition is outside of specified parameters. Alarm states are raised,acknowledged, and lowered.
Channel A source of display content used by subscribers. Also refers to the content it contains.
Channel Name Identifies the channel.
Digital SignageNetwork
A set of systems connected together to provide integrated management of numerous display screens.
Donate The process of applying a player's configuration to a folder that then configures other players.
Folder A component used to structure the management of a digital signage network. Folders can contain playersand other folders.
Manager A component of the ONELAN Digital Signage Platform. Manager is the generic term for the appliance thatmanages the digital signage network. Specifically, the manager is the ONELAN iCOMPEL Deployment Manager (IDM) (IDM).
organization The root of the digital signage network and the name that refers to it as a whole.
Player A component of the ONELAN Digital Signage Platform. Player is the generic term for the appliance that runsthe screen. Specifically, the player is the ONELAN Net-Top-Box (NTB).
Publisher A player that provides content to other players on channels.
Remote Setup A feature allowing a player's configuration to be applied to other players through a folder.
Reports Status messages sent to the manager by the players in the network.
Role Describes the function of a player: one of standalone, subscriber, or publisher.
Snap Shot A collection of detailed logging information used for support and problem solving purposes.
Standalone A player that is neither a subscriber or publisher.
Subscriber A player that accepts a channel from a publisher.

67
iCOMPEL Deployment Manager (IDM) User Guide (V3.1.0) Glossary
Index
- A -Accept Report permission 14, 16 Administration permissions 63
Alarm Configuration (organization) options 35 Alarm Configuration (System) options 42 Alarm Configuration permission 35
Alarm Email permission 36
Alarms
acknowledging 21
and operating hours 35, 37 basic troubleshooting with 59 categories 35, 42
clearing 21
configuring 35, 59 configuring
for organization 35 configuring
for system 42 customizing
35, 42
defaults 21, 35, 42
defined 12
displaying only players with 26 email notification 40
guidance 59
hardware 35, 42, 59
icons 12
ignoring 35, 42
inheriting 35
levels of applicability 21
observing 35, 42
overriding 35
publisher 35, 42, 59
reference 59
reporting by email 35, 36
responding to 21
setting parameters 42
setting up for system 42
software 35, 42, 59
states 12
subscriber 35, 42, 59
system defaults 35, 42
All folder 10
APIs
database views 64
JSON/JSONP 64
XML 64
- B -Backup/Restore Database options 52
Barchart view
changing to 31
Browser 7
- C -Channel
defined 8
multiple 9
Common tasks
listed 16
Concepts
defined 66
Configuring
alarm notifications by email 36 alarms 59
DNS nameserver 49
DNS search path 49
IDM 25, 45, 46
IDM network 49
Ethernet 49
firewall 49
folders using players 28
FTP 49
HTTP 49
HTTPS 49
Media Audit Report 34
menu display 55
minimum reporting interval 40 organization 40
player reports 16
Remote Setup categories 28 security 49
SSH 49
time and date display 55 user interface 55
VPN 49
CPU temperature 45
- D -Database
backing up and restoring 52 IDM events and reports 52

68
iCOMPEL Deployment Manager (IDM) User Guide (V3.1.0) Glossary
Database
housekeeping 52
retention period for reports 40 Date and Time options 46, 47 Default organization
for adding players 14 Defaults
organization alarms 59
system alarms 59
Digital signage network 6
enterprise-wide 9
monitoring example 12
parts of 6
structure example 11
Disk temperature 45
Display screen 7
DNS lookup test 49
DNS settings
nameserver 49
search path 49
Donate 19
defined 18
Dragging and dropping players
18 IDM
accessing help 55
accounts 63
administration 63
alarm definitions 59
APIs 64
backing up and restoring database 52
changing menu display mode 55
configuring 25, 45, 46
configuring and testing network 49
configuring user interface 55
CPU temperature 45
database views API 64
date and time 47
disk temperature 45
displaying time and date 55
email profile 36, 48
events and reports database 52
gathering support information 52, 55
IP address 49
JSON/JSONP API 64
logs 55
maintaining 25, 45
permissions 63
player table display 58
programming interfaces 64
rebooting 52, 54
reference information 58
security settings 49
setting up 46
status 45
support snap shot 55
test email 36
updating software 52, 53
user accounts on 39
users 63
XML API 64
- E -Email
test 36
to notify alarms 36, 40
Email Configuration options 36
Email Settings options 46, 48
Enterprise signage network
pictured 9
Establish VPN permission 14, 16
Ethernet settings 49
- F -Firewall
activity report 49
and VPN 8
communicating through 8
settings 49
status 49
Folder
adding 18
adding players to 18, 33
All 10
configuring players with 28
copying 18, 33
creating 18, 33
creating subfolder 18 customizing 11
defined 10
deleting 18
deleting players from 33 donating characteristics 18, 19 grouping players with 11
in organization 26
moving 18, 33
moving players between 18

69
iCOMPEL Deployment Manager (IDM) User Guide (V3.1.0) Glossary
Folder
renaming 18, 33
structuring organization 18, 26 Unassigned 10
viewing and modifying configuration
28FTP
guidance 49
settings 49
- G -Getting started 6
what to do first 14
Glossary 66
- H -Hardware
alarms defined 59
configuring alarms for organization 35 setting up alarms 42
Help menu 45, 55
Home menu 25
Media Audit Reports 25, 34
Summary page 25
HTTP
and reporting 16
guidance 49
settings 49
HTTPS
and Remote Setup 28
guidance 49
settings 49
- I -Ignoring alarms 35, 42
Inheriting alarms 35
Internet 7
Intranet 7
- J -JSON/JSONP API 64
- L -Licensing options 46, 52
Local Area Network 7
Logs 55
- M -Maintaining
IDM 25, 45
Maintenance and Troubleshooting menu 52 Manage options 25
and Map View 32, 33
and Players 33
and Summary 31, 33
and Thumbnails 33
Manager
defined 8
Managing
network 10, 25
Map View option 32
Map View options 25
Master password 49
Media Audit Reports 25
configuring 34
example content 34
retention period 40
Menu options
Alarm Configuration (organization) 35 Alarm Configuration (System) 42 Backup/Restore Database 52
Date and Time 46, 47
Email Configuration 36
Email Settings 46, 48
Help 45, 55
Home 25
Licensing 46, 52
Maintenance and Troubleshooting 52 Manage 25, 31, 33
Map View 25, 32
Network 46, 49
Operating Hours Configuration 37 organization 25
Organisations 35, 40
Players 25, 41
Reboot 54
Scheduled Jobs 46, 52
Security 46, 49
Setup 45, 52
Software Update 53
Status 45
70
iCOMPEL Deployment Manager (IDM) User Guide (V3.1.0) Glossary
Menu options
Summary 25, 31
Support Snap Shot 55
System 25, 38
System Setup 46
Thumbnails 25, 31
Users 39
Monitoring
network 10, 12, 25
Multiple displays diagram 8
- N -Network
managing 10, 25
monitoring 10, 12, 25
structuring 11
Network options 46, 49
Network status 49
- O -Observing alarms 35, 42
Online help 55
Only Alarms
listing players by 26
Operating hours
adding rules 37
and alarms 35
configuring 37
displaying rules 37
editing rules 37
Operating Hours Configuration options
37 organization
accounts 39
adding players automatically 17
alarms 59
configuring 40
configuring alarms 35
Default organization 14
defined 10
folders 26
name 10, 40
name format 14
non-operating hours 37
operating hours 35, 37
organization Admin account 14 organization Administration permission 14
organization Viewer account 14 permissions 40
Remote account 14
Reporter account 14
setup steps described 14 structuring 18, 26
user accounts 14
users 39
organization Admin account 14 organization menu 25 organization Viewer account 14 Organisations options 35, 40 Overriding alarms 35
- P -Password
changing system default 14 IDM system 14
for user account 39 master password 49 Remote account 14
Permissions
Accept Report 14, 16
Alarm Configuration 35 Alarm Email 36
defaults 14
Establish VPN 14, 16
listed and described 63 organization 40, 63 organization Administration 14 reference 63
required 14, 63
system 63
System Administration 14 users 39, 63
Ping test 49
Player
adding 41
adding to folder 18, 33
adding to organization 14
adding to organization automatically 17 configuring reporting 16
configuring using folders 28 controlling several 8
customizing player view 20
defined 7
deleting 41
deleting from folder 33

71
iCOMPEL Deployment Manager (IDM) User Guide (V3.1.0) Glossary
Player
detailed status 28
donating characteristics 18, 19, 28 dragging and dropping 18
grouping using folders 11 information about 20, 58
listed 41
listed in table 20, 26
listing by Only Alarms 26 maximum
number in organization 40 minimum
reporting interval 40 modifying 41
moving between folders 18
name 41
Only Alarms 26
players view page 20
Remote Setup 19, 28
report 41
roles 8
selecting columns for table 20 table
options listed 20
table summary columns 58
tabular view of 26
Players option 25, 41
what is displayed 26 Players view page
customizing 20 Problem solving
with alarms 59 Programming interfaces 64 Publisher
alarms defined 59
configuring alarms for organization 35 defined 8
setting up alarms 42
- R -Reboot option 54 Rebooting the IDM 54 Remote account 14 Remote Setup
and HTTPS 28
and VPN 28
configuration categories 28
icon 19, 28
Report
and HTTP 16
and VPN 16
configuring 16
media audit 25, 34
minimum reporting interval 40
Reporter account 14, 16
Reporting interval
configuring minimum for organization 40 Reports
accepting from player 41
defined 8
enabling 41
Required permissions 14, 63
Retention period
database reports 40
media audit events 40
Roles
defined 8
Publisher 8
Standalone 8
Subscriber 8
RS-232 reporting 40
- S -Scheduled Jobs options 52
Screen 7
Security
and firewall 8
and VPN 8
firewall 49
master password 49
services and settings 49
Security options 46, 49
Selecting player view columns 20
Setup menu 45, 52
Snap shot
of support information 52
Software
alarms defined 59
configuring alarms for organization 35 setting up alarms 42
updating 52, 53
Software Update menu 53
SSH
guidance 49
settings 49
Standalone display
pictured 7
Status

72
iCOMPEL Deployment Manager (IDM) User Guide (V3.1.0) Glossary
Status
IDM 45
firewall 49 network 49 players detailed 28
Status menu 45
Subscriber
alarms defined 59
configuring alarms for organization 35 defined 8
setting up alarms 42
Summary option 25
and Manage 31
Barchart 31
Warboard 31
Support 55
gathering support information 52
snap shot 52
Support Snap Shot options 55
System
alarms defined 59
permissions 63
System menu 25, 38
System Setup menu 46
- T -Temperature
alarms related to 59
CPU 45
disk 45
Terms
defined 66
Tests
DNS lookup 49
email set up 36
ping 49
trace 49
Thumbnails option 25
display illustrated 31
Trace test 49
Troubleshooting
with alarms 59
- U -Unassigned folder 10
Use cases
listed 16
User accounts
default permissions 14
name format defined 14
organization Admin 14
organization Viewer 14
Remote 14
Reporter 14
setting up 14
User guide
how to access 55
Username
for user accounts 39
format defined 39
Users
adding 39 configuring 39 deleting 39
in organization 39 modifying 39
on IDM 39 password 39 permissions 39 username 39
Users option 39
- V -VPN
and firewall 8
and Remote Setup 28
and reporting 16
guidance 49
settings 49
- W -Warboard view
changing to 31
What to do first 14
- X -XML API 64

724-746-5500 | blackbox.com
About Black BoxBlack Box provides an extensive range of networking and infrastructure products. You’ll find everything from cabinets and racks and power and surge protection products to media converters and Ethernet switches all supported by free, live 24/7 Tech support available in 60 seconds or less.
© Copyright 2016. Black Box Corporation. All rights reserved. Black Box® and the Double Diamond logo are registered trademarks of BB Technologies, Inc. Any third-party trademarks appearing in this manual are acknowledged to be the property of their respective owners.
Black Box Tech Support: FREE! Live. 24/7.
Tech support the way it should be.
Great tech support is just 60 seconds away at 724-746-5500 or blackbox.com.
ICOMPEL Deployment Manager (IDM) User Manual, version 3.1.0