userguide motorola gp340 atex - english - murphy...
TRANSCRIPT

MOTOROLA and the Stylized M Logo are registered in the U.S. Patent & Trademark Office.All other product or service names are the property of their respective owners.© Motorola, Inc. 2005-2007. BASIC USER GUIDE
GP340 Ex Portable Radio6866546D11-P
NL
SV TU
DA
DE
EN
ES
FR
RO
RU
IT
CZ
PR
HU
PL
@6866546D11@
MTM800 User Cover 06/Jan/05
SF
2
9
3
4
8
5
6
1
7
11
10
6866546D11-P.book Page 1 Thursday, September 27, 2007 12:14 PM
1 English
BA
SIC
US
ER
GU
IDE
anual may include copyrighted Motorola ctor memories or other mediums. Laws in serve for Motorola certain exclusive
s, including the exclusive right to copy or mputer program. Accordingly, any
s contained in the Motorola products
ied or reproduced in any manner without la. Furthermore, the purchase of Motorola ther directly or by implication, estoppel, or
hts, patents, or patent applications of usive royalty-free licence to use that of a product.
6866546D11-P.book Page 1 Thursday, September 27, 2007 12:14 PM
BASIC USER GUIDE
CONTENTS
General Information . . . . . . . . . . . . . . . . . 2
Operation and Control Functions. . . . . . 3
Radio Controls . . . . . . . . . . . . . . . . . . . . . . 3
Audio Signal Tones . . . . . . . . . . . . . . . . . . 4
Getting Started . . . . . . . . . . . . . . . . . . . . . 5
Radio On-Off/Volume Control . . . . . . . . . . 5
Adjusting the Radio’s Volume . . . . . . . . . . 5
Selecting a Channel . . . . . . . . . . . . . . . . . . 5
Sending a Call . . . . . . . . . . . . . . . . . . . . . . 5
Receiving a Call . . . . . . . . . . . . . . . . . . . . . 5
Battery Information . . . . . . . . . . . . . . . . . 6
Battery Care and Tips . . . . . . . . . . . . . . . . 6
Recycling or Disposal of Batteries . . . . . . . 7
Charging the Battery . . . . . . . . . . . . . . . . . 7
Accessory Information . . . . . . . . . . . . . . 8
Attaching/Removing the Battery. . . . . . . . . 8
Copyright Information
The Motorola products described in this mcomputer programs stored in semiconduthe United States and other countries pre
rights for copyrighted computer programreproduce in any form the copyrighted cocopyrighted Motorola computer program
described in this manual may not be copthe express written permission of Motoroproducts shall not be deemed to grant ei
otherwise, any licence under the copyrigMotorola, except for the normal non-exclarises by operation of the law in the sale

BA
SIC
US
ER
GU
IDE
TION!ccupational use only to
exposure requirements. read the RF energy d operating instructions in Exposure booklet
number 6864117B25) to F energy exposure limits.
this product, read the ructions for safe usage he Product Safety and booklet 6864117B25 your radio.
6866546D11-P.book Page 2 Thursday, September 27, 2007 12:14 PM
2English
GENERAL INFORMATION
This user guide covers the basic operation of the GP340 ATEX Portable Radio. Please consult your dealer for further, more detailed information which is contained in a full feature user guide 6864110B23.
ATTENThis radio is restricted to osatisfy ICNIRP RF energyBefore using this product, awareness information anthe Product Safety and RF(Motorola Publication partensure compliance with R
Before using operating instcontained in tRF Exposureenclosed with
!C a u t i o n

3 English
BA
SIC
US
ER
GU
IDE
wer up. o scanning. ng. el busy - when receiving.
io call reminder alert. attery warning - when
micorphone when
emote speaker/er accessories. Replace en not in use.
6866546D11-P.book Page 3 Thursday, September 27, 2007 12:14 PM
OPERATION AND CONTROL FUNCTIONS
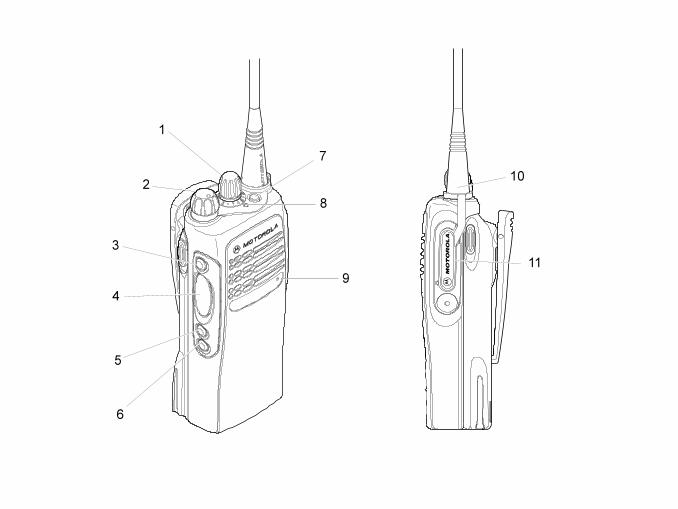
Radio Controls
The numbers below refer to the illustrations on the inside front cover.
1. Channel Selector Knob (16 Position) Switches the radio to different channels.
2. On-Off / Volume Knob
Used to turn the radio on or off, and to adjust the radio’s volume.
3. Side Button 1 (programmable) Recommended for Monitor/Cancel Button.
4. Push to Talk Button (PTT) Press and hold down this button to talk, release it to listen.
5. Side Button 2 (programmable)
6. Side Button 3 (programmable)
7. Top Button (programmable) Recommended for Emergency Button.
8. LED Indicator Green: Successful poGreen Flashing: RadiRed: Radio transmittiRed Flashing: ChannYellow: Radio called. Yellow Flashing: RadRed Flashing: Low btransmitting.
9. Microphone
Speak clearly into thesending a message.
10. Antenna
11. Accessory ConnectorConnects headsets, rmicrophones and othattached dust cap wh

BA
SIC
US
ER
GU
IDE itched
neLow Pitched
Tone
an
n
Stop Scan
operation
nsmits
ower
Radio transmits
at low power
erates in
1or 2
Radio forced to
monitor prior to
transmitting
sfers
s to
radio if
absent
Off - Disables
call forward when
you return
Lone
unction
Disables Lone
Worker function
es not repeater
Radio does use
the repeater
ws you
ietly into
one
Off - allows you
to talk normally
into microphone
6866546D11-P.book Page 4 Thursday, September 27, 2007 12:14 PM
4English
Audio Signal Tones
High pitched tone
Low pitched tone
High pitched tones generally are positive indicators used for example to inform you of incoming calls, starting a feature and good status (e.g. radio power up OK).
Low pitched tones generally are negative indicators used for example to inform you of time restrictions, stopping a feature and bad status (e.g. error conditions).
Audio Indicators for Programmable Buttons
Some programmable buttons function as toggles, alternating between two different choices. These buttons use audio tones to indicate the change.
Programmable Buttons
High PTo
ScanStart Sc
operatio
Tx PowerRadio tra
at high p
Monitor/Cancel Radio op
Monitor
Call Forward
On - tran
your call
another
you are
Lone WorkerEnablesWorker f
Repeater/
Talkaround
Radio douse the
Whisper mode
On - allo
to talk qu
microph

5 English
BA
SIC
US
ER
GU
IDE
ector knob to change to
and speak clearly into the
about 2.5 to 5 cm away
on when you finish
d adjust the volume level.
channel.
s received, you will hear level you have set.
6866546D11-P.book Page 5 Thursday, September 27, 2007 12:14 PM
GETTING STARTED
Radio On-Off/Volume Control
To turn the radio on, turn the On-Off/Volume Control knob clockwise.
To turn the radio off, turn the On-Off/Volume Control knob counterclockwise until you hear a click.
Adjusting the Radio’s Volume
Turn the On-Off/Volume Control knob to adjust the volume level.
Selecting a Radio Channel
Turn the Channel Selector knob clockwise or counterclockwise until you reach the desired channel indicated on the Channel Selector knob graduation.
Sending a Call
1. Use the Channel Selthe required channel.
2. Press the PTT buttonmicrophone. Your mouth should befrom the microphone.
3. Release the PTT buttspeaking.
Receiving a Call
1. Turn your radio on an
2. Switch to the desired
3. If, at any time, a call ithe call at the volume

BA
SIC
US
ER
GU
IDE
(above 35°C/95°F) harge capacity, affecting radio. Motorola rapid-rate in a temperature-sensing e battery is charged re limits.
tored up to two years e loss. Store new/unused ea.
een in storage should be
ged batteries to the oost”. This action will attery life.
and battery in the ing. Continuous charging (Do not use your charger
e and operation use only rs. They were designed to d energy system.
6866546D11-P.book Page 6 Thursday, September 27, 2007 12:14 PM
6English
BATTERY INFORMATION
Battery Care and Tips
This product is powered by lithium-ion rechargeable battery.
The following battery tips will help you obtain the highest performance and longest cycle life from your Motorola rechargeable battery.
• Charge your new battery overnight (14-16 hrs) before using it to obtain maximum battery capacity and performance.
• Charging in non-Motorola equipment may lead to battery damage and void the battery warranty.
• When charging a battery that is attached to the radio, turn the radio off to ensure a full charge.
• The battery should be at about 25°C/77°F (room temperature) whenever possible. Charging a cold battery (below 10°C/50° F) may result in leakage of electrolyte and ultimately, in failure of the battery.
• Charging a hot batteryresults in reduced discthe performance of thebattery chargers contacircuit to ensure that thwithin these temperatu
• New batteries can be swithout significant cyclbatteries in cool dry ar
• Batteries which have bcharged overnight.
• Do not return fully charcharger for an “extra bsignificantly reduce b
• Do not leave your radiocharger when not chargwill shorten battery life.as a radio stand.)
• For optimum battery lifMotorola brand chargeoperate as an integrate

7 English
BA
SIC
US
ER
GU
IDE
e battery attached, or the harger.
dicates the charging
only the Motorola elow; other batteries will
Status
is charging
is fully charged
is unchargeable
r is getting ready to charge
is 90% charged
contact your dealer.
Description
ATEX Lithium-Ion Battery
6866546D11-P.book Page 7 Thursday, September 27, 2007 12:14 PM
Recycling or Disposal of Batteries
Motorola endorses and encourages the recycling of all re-chargeable batteries. Contact your dealer for further information.
Charging the Battery
If a battery is new, or its charge level is very low, you will need to charge the battery before you can use it in your radio.
Note: Batteries are shipped uncharged from the factory. New batteries could prematurely indicate full charge, charge a new battery for 14-16 hrs before initial use.
1. Place the radio with thbattery alone, in the c
2. The charger’s LED inprogress.
Battery chargers will chargeauthorized batteries listed bnot charge.
NiCd
Charger LED
Red Battery
Green Battery
Flashing Red * Battery
Flashing Yellow Charge
Flashing Green Battery
* Battery is damaged. Please
Part No.
NNTN5510_R GP Series
BA
SIC
US
ER
GU
IDE
section on attaching/cludes the ATEX radios datory carry case)
e
ck
oving the Belt Clip=
e a key to press the belt tab away from the battery.
e the belt clip upwards to ove it.
6866546D11-P.book Page 8 Thursday, September 27, 2007 12:14 PM
8English
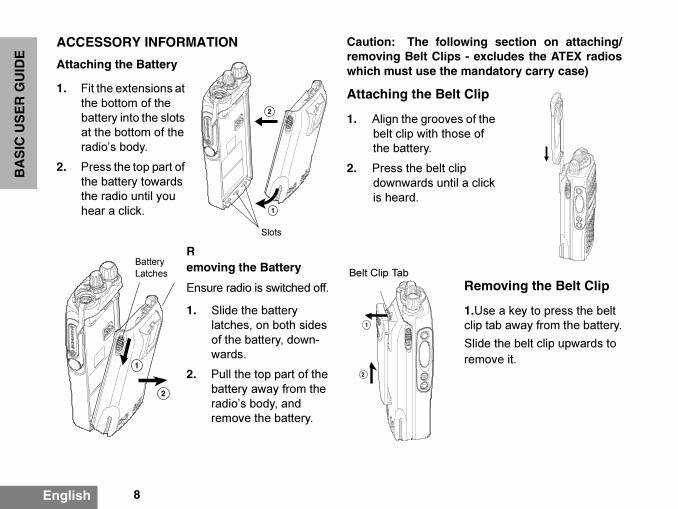
ACCESSORY INFORMATION
Attaching the Battery
1. Fit the extensions at the bottom of the battery into the slots at the bottom of the radio’s body.
2. Press the top part of the battery towards the radio until you hear a click.
Removing the Battery
Ensure radio is switched off.
1. Slide the battery latches, on both sides of the battery, down-wards.
2. Pull the top part of the battery away from the radio’s body, and remove the battery.
Caution: The followingremoving Belt Clips - exwhich must use the man
Attaching the Belt Clip
1. Align the grooves of thbelt clip with those ofthe battery.
2. Press the belt clip downwards until a cliis heard.
Rem
1.Usclip
Slidrem
1
2
Slots
2
1
Battery
Latches
2
1
Belt Clip Tab