user's guide · 2018-03-27 · user's guide
TRANSCRIPT

User's Guide
NPD5471-03 EN
CopyrightNo part of this publication may be reproduced, stored in a retrieval system, or transmitted in any form or by anymeans, electronic, mechanical, photocopying, recording, or otherwise, without the prior written permission ofSeiko Epson Corporation. No patent liability is assumed with respect to the use of the information containedherein. Neither is any liability assumed for damages resulting from the use of the information herein. Theinformation contained herein is designed only for use with this Epson product. Epson is not responsible for anyuse of this information as applied to other products.
Neither Seiko Epson Corporation nor its affiliates shall be liable to the purchaser of this product or third parties fordamages, losses, costs, or expenses incurred by the purchaser or third parties as a result of accident, misuse, orabuse of this product or unauthorized modifications, repairs, or alterations to this product, or (excluding the U.S.)failure to strictly comply with Seiko Epson Corporation's operating and maintenance instructions.
Seiko Epson Corporation and its affiliates shall not be liable for any damages or problems arising from the use ofany options or any consumable products other than those designated as Original Epson Products or EpsonApproved Products by Seiko Epson Corporation.
Seiko Epson Corporation shall not be held liable for any damage resulting from electromagnetic interference thatoccurs from the use of any interface cables other than those designated as Epson Approved Products by SeikoEpson Corporation.
© 2017 Seiko Epson Corporation
The contents of this manual and the specifications of this product are subject to change without notice.
User's Guide
Copyright
2
Trademarks❏ EPSON® is a registered trademark, and EPSON EXCEED YOUR VISION or EXCEED YOUR VISION is a
trademark of Seiko Epson Corporation.
❏ Epson Scan 2 software is based in part on the work of the Independent JPEG Group.
❏ libtiffCopyright © 1988-1997 Sam LefflerCopyright © 1991-1997 Silicon Graphics, Inc.Permission to use, copy, modify, distribute, and sell this software and its documentation for any purpose ishereby granted without fee, provided that (i) the above copyright notices and this permission notice appear inall copies of the software and related documentation, and (ii) the names of Sam Leffler and Silicon Graphicsmay not be used in any advertising or publicity relating to the software without the specific, prior writtenpermission of Sam Leffler and Silicon Graphics.THE SOFTWARE IS PROVIDED "AS-IS" AND WITHOUT WARRANTY OF ANY KIND, EXPRESS,IMPLIED OR OTHERWISE, INCLUDING WITHOUT LIMITATION, ANY WARRANTY OFMERCHANTABILITY OR FITNESS FOR A PARTICULAR PURPOSE.IN NO EVENT SHALL SAM LEFFLER OR SILICON GRAPHICS BE LIABLE FOR ANY SPECIAL,INCIDENTAL, INDIRECT OR CONSEQUENTIAL DAMAGES OF ANY KIND, OR ANY DAMAGESWHATSOEVER RESULTING FROM LOSS OF USE, DATA OR PROFITS, WHETHER OR NOT ADVISEDOF THE POSSIBILITY OF DAMAGE, AND ON ANY THEORY OF LIABILITY, ARISING OUT OF OR INCONNECTION WITH THE USE OR PERFORMANCE OF THIS SOFTWARE.
❏ SDXC Logo is a trademark of SD-3C, LLC.
❏ Memory Stick Duo, Memory Stick PRO Duo, Memory Stick PRO-HG Duo, Memory Stick Micro, andMagicGate Memory Stick Duo are trademarks of Sony Corporation.
❏ Microsoft®, Windows®, and Windows Vista® are registered trademarks of Microsoft Corporation.
❏ Apple, Macintosh, macOS, OS X, Bonjour, Safari, iPad, iPhone, iPod touch, and iTunes are trademarks of AppleInc., registered in the U.S. and other countries.
❏ Google Cloud Print, Chrome, Chrome OS, and Android are trademarks of Google Inc.
❏ Adobe and Adobe Reader are either registered trademarks or trademarks of Adobe Systems Incorporated in theUnited States and/or other countries.
❏ Intel® is a registered trademark of Intel Corporation.
❏ General Notice: Other product names used herein are for identification purposes only and may be trademarksof their respective owners. Epson disclaims any and all rights in those marks.
User's Guide
Trademarks
3
Contents
Copyright
Trademarks
About This ManualIntroduction to the Manuals. . . . . . . . . . . . . . . . . . .9Marks and Symbols. . . . . . . . . . . . . . . . . . . . . . . . . 9Descriptions Used in this Manual. . . . . . . . . . . . . . 10Operating System References. . . . . . . . . . . . . . . . . 10
Important InstructionsSafety Instructions. . . . . . . . . . . . . . . . . . . . . . . . . 11Safety Instructions for Ink. . . . . . . . . . . . . . . . . . . 12Printer Advisories and Warnings. . . . . . . . . . . . . . 12
Advisories and Warnings for Setting Up thePrinter. . . . . . . . . . . . . . . . . . . . . . . . . . . . . . . .12Advisories and Warnings for Using the Printer. . 13Advisories and Warnings for Transporting orStoring the Printer. . . . . . . . . . . . . . . . . . . . . . . 13Advisories and Warnings for Using thePrinter with a Wireless Connection. . . . . . . . . . . 14Advisories and Warnings for Using MemoryCards. . . . . . . . . . . . . . . . . . . . . . . . . . . . . . . . 14Advisories and Warnings for Using theTouchscreen. . . . . . . . . . . . . . . . . . . . . . . . . . . 14
Protecting Your Personal Information. . . . . . . . . . . 14
Printer BasicsPart Names and Functions. . . . . . . . . . . . . . . . . . . 15Control Panel. . . . . . . . . . . . . . . . . . . . . . . . . . . . 18
Buttons and Lights. . . . . . . . . . . . . . . . . . . . . . . 18Icons Displayed on the LCD Screen. . . . . . . . . . .19Icons Displayed on the Software Keyboard ofthe LCD Screen. . . . . . . . . . . . . . . . . . . . . . . . . 20Presets Mode. . . . . . . . . . . . . . . . . . . . . . . . . . . 21
Network SettingsNetwork Connection Types. . . . . . . . . . . . . . . . . . 22
Ethernet Connection. . . . . . . . . . . . . . . . . . . . . 22Wi-Fi Connection. . . . . . . . . . . . . . . . . . . . . . . 22Wi-Fi Direct Connection. . . . . . . . . . . . . . . . . . 23
Connecting to a Computer. . . . . . . . . . . . . . . . . . . 24Connecting to a Smart Device. . . . . . . . . . . . . . . . 25
Making Wi-Fi Settings from the Control Panel. . . . .25Making Wi-Fi Settings Manually. . . . . . . . . . . . . 26Making Wi-Fi Settings by Push Button Setup(WPS). . . . . . . . . . . . . . . . . . . . . . . . . . . . . . . . 27Making Wi-Fi Settings by PIN Code Setup(WPS). . . . . . . . . . . . . . . . . . . . . . . . . . . . . . . . 28Making Wi-Fi Direct Settings. . . . . . . . . . . . . . . 28Making Advanced Network Settings from theControl Panel. . . . . . . . . . . . . . . . . . . . . . . . . . 30
Checking the Network Connection Status. . . . . . . . 32Checking the Network Status Using NetworkIcon. . . . . . . . . . . . . . . . . . . . . . . . . . . . . . . . . 32Checking the Network Status from theControl Panel. . . . . . . . . . . . . . . . . . . . . . . . . . 32Printing a Network Connection Report. . . . . . . . 33Printing a Network Status Sheet. . . . . . . . . . . . . 39
Replacing or Adding New Access Points. . . . . . . . . 39Changing the Connection Method to a Computer. . 39Disabling Wi-Fi from the Control Panel. . . . . . . . . .41Disconnecting Wi-Fi Direct from the ControlPanel. . . . . . . . . . . . . . . . . . . . . . . . . . . . . . . . . . . 41Restoring the Network Settings from theControl Panel. . . . . . . . . . . . . . . . . . . . . . . . . . . . 41
Administrator SettingsLocking the Printer Settings Using anAdministrator's Password. . . . . . . . . . . . . . . . . . . . 43Unlocking the Printer Settings. . . . . . . . . . . . . . . . 43
Loading PaperPaper Handling Precautions. . . . . . . . . . . . . . . . . . 44Available Paper and Capacities. . . . . . . . . . . . . . . . 45
List of Paper Types. . . . . . . . . . . . . . . . . . . . . . . 46Loading Paper in the Paper Cassette. . . . . . . . . . . . 47Loading Paper in the Rear Paper Feed Slot. . . . . . . .50
Placing OriginalsAvailable Originals on the ADF. . . . . . . . . . . . . . . 54Placing Originals on the ADF. . . . . . . . . . . . . . . . . 54
Placing Originals on the ADF for 2-up Copying. .56Placing Originals on the Scanner Glass. . . . . . . . . . 56
Inserting a Memory CardSupported Memory Cards. . . . . . . . . . . . . . . . . . . 58
User's Guide
Contents
4
Inserting and Removing a Memory Card. . . . . . . . .58
Managing ContactsRegistering Contacts. . . . . . . . . . . . . . . . . . . . . . . 60Registering Grouped Contacts. . . . . . . . . . . . . . . . 61Register Contacts on a Computer. . . . . . . . . . . . . . 61Backing up Contacts using a Computer. . . . . . . . . . 61
PrintingPrinting from the Control Panel. . . . . . . . . . . . . . . 63
Printing a JPEG file. . . . . . . . . . . . . . . . . . . . . . 63Printing a TIFF file. . . . . . . . . . . . . . . . . . . . . . .64Menu Options for Memory Device. . . . . . . . . . . 65
Printing from a Computer. . . . . . . . . . . . . . . . . . . 66Printing Basics - Windows. . . . . . . . . . . . . . . . . 66Printing Basics - Mac OS. . . . . . . . . . . . . . . . . . 68Printing on 2-Sides. . . . . . . . . . . . . . . . . . . . . . .70Printing Several Pages on One Sheet. . . . . . . . . . 72Printing to Fit the Paper Size. . . . . . . . . . . . . . . .73Printing Multiple Files Together (forWindows Only). . . . . . . . . . . . . . . . . . . . . . . . . 75Printing One Image on Multiple Sheets toCreate a Poster (for Windows Only). . . . . . . . . . 76Printing Using Advanced Features. . . . . . . . . . . 82Printing Photos Using Epson Easy Photo Print. . 85
Printing from Smart Devices. . . . . . . . . . . . . . . . . 85Using Epson iPrint. . . . . . . . . . . . . . . . . . . . . . . 85
Canceling Printing. . . . . . . . . . . . . . . . . . . . . . . . . 86Canceling Printing - Printer Button. . . . . . . . . . .87Canceling Printing - Status Menu. . . . . . . . . . . . 87Canceling Printing - Windows. . . . . . . . . . . . . . 87Canceling Printing - Mac OS. . . . . . . . . . . . . . . 87
CopyingMenu Options for Copy Mode. . . . . . . . . . . . . . . . 88
ScanningScanning Using the Control Panel. . . . . . . . . . . . . .91
Scanning to an Email. . . . . . . . . . . . . . . . . . . . . 91Scanning to a Network Folder or FTP Server. . . . 92Scanning to a Memory Device. . . . . . . . . . . . . . 94Scanning to the Cloud. . . . . . . . . . . . . . . . . . . . 95Scanning to a Computer. . . . . . . . . . . . . . . . . . . 96Scanning to a Computer (WSD). . . . . . . . . . . . . 97Common Menu Options for Scanning. . . . . . . . .99
Scanning from a Computer. . . . . . . . . . . . . . . . . .100Scanning Using Epson Scan 2. . . . . . . . . . . . . . 100
Scanning from Smart Devices. . . . . . . . . . . . . . . . 103Installing Epson iPrint. . . . . . . . . . . . . . . . . . . 103Scanning Using Epson iPrint. . . . . . . . . . . . . . .103
FaxingSetting Up a Fax. . . . . . . . . . . . . . . . . . . . . . . . . . 105
Connecting to a Phone Line. . . . . . . . . . . . . . . 105Making Basic Fax Settings. . . . . . . . . . . . . . . . .108
Sending Faxes. . . . . . . . . . . . . . . . . . . . . . . . . . . 110Basic Fax Sending Operations. . . . . . . . . . . . . . 110Various Ways of Sending Faxes. . . . . . . . . . . . . 113
Receiving Faxes. . . . . . . . . . . . . . . . . . . . . . . . . . 116Setting Receiving Mode. . . . . . . . . . . . . . . . . . 116Various Ways of Receiving Faxes. . . . . . . . . . . . 117Saving and Forwarding Received Faxes. . . . . . . 119
Using Other Faxing Features. . . . . . . . . . . . . . . . .124Printing Fax Report and List. . . . . . . . . . . . . . . 124Setting Security for Faxing. . . . . . . . . . . . . . . . 125Checking Fax Jobs. . . . . . . . . . . . . . . . . . . . . . 125
Menu Options for Fax Mode. . . . . . . . . . . . . . . . . 127Fax Settings Options. . . . . . . . . . . . . . . . . . . . . . .129
User Default Settings. . . . . . . . . . . . . . . . . . . . 129Send Settings. . . . . . . . . . . . . . . . . . . . . . . . . . 129Receive Settings. . . . . . . . . . . . . . . . . . . . . . . . 130Output Settings. . . . . . . . . . . . . . . . . . . . . . . . 130Basic Settings. . . . . . . . . . . . . . . . . . . . . . . . . . 131Security Settings. . . . . . . . . . . . . . . . . . . . . . . .132Check Fax Connection. . . . . . . . . . . . . . . . . . . 133Fax Setting Wizard. . . . . . . . . . . . . . . . . . . . . . 133
Refilling Ink and Replacing Maintenance BoxesChecking the Status of the Remaining Ink andthe Maintenance Box. . . . . . . . . . . . . . . . . . . . . . 134
Checking the Status of the MaintenanceBox - Control Panel. . . . . . . . . . . . . . . . . . . . .134Checking the Status of the Remaining Inkand the Maintenance Box - Windows. . . . . . . . .134Checking the Status of the Remaining Inkand the Maintenance Box - Mac OS. . . . . . . . . .134
Ink Bottle Codes. . . . . . . . . . . . . . . . . . . . . . . . . 135Ink Bottle Handling Precautions. . . . . . . . . . . . . . 135Refilling the Ink Tanks. . . . . . . . . . . . . . . . . . . . . 136Maintenance Box Code. . . . . . . . . . . . . . . . . . . . .139Maintenance Box Handling Precautions. . . . . . . . 140Replacing a Maintenance Box. . . . . . . . . . . . . . . . 140
User's Guide
Contents
5
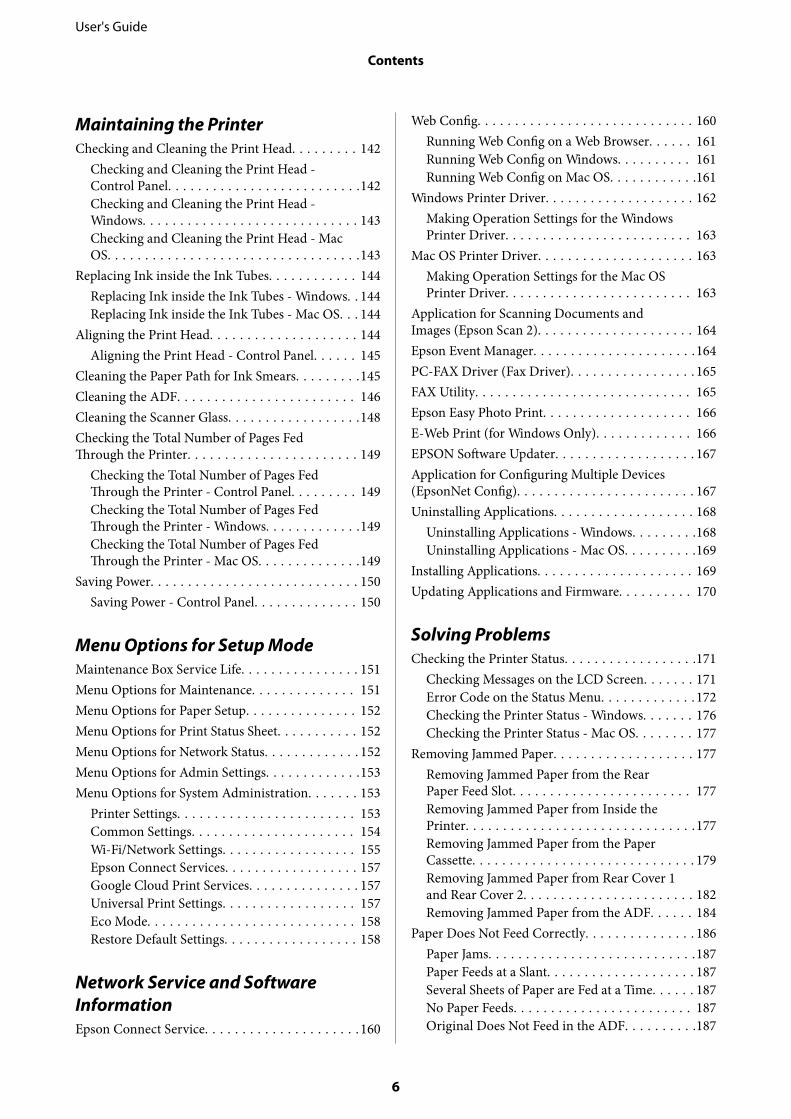
Maintaining the PrinterChecking and Cleaning the Print Head. . . . . . . . . 142
Checking and Cleaning the Print Head -Control Panel. . . . . . . . . . . . . . . . . . . . . . . . . .142Checking and Cleaning the Print Head -Windows. . . . . . . . . . . . . . . . . . . . . . . . . . . . . 143Checking and Cleaning the Print Head - MacOS. . . . . . . . . . . . . . . . . . . . . . . . . . . . . . . . . .143
Replacing Ink inside the Ink Tubes. . . . . . . . . . . . 144Replacing Ink inside the Ink Tubes - Windows. . 144Replacing Ink inside the Ink Tubes - Mac OS. . . 144
Aligning the Print Head. . . . . . . . . . . . . . . . . . . . 144Aligning the Print Head - Control Panel. . . . . . 145
Cleaning the Paper Path for Ink Smears. . . . . . . . .145Cleaning the ADF. . . . . . . . . . . . . . . . . . . . . . . . 146Cleaning the Scanner Glass. . . . . . . . . . . . . . . . . .148Checking the Total Number of Pages FedThrough the Printer. . . . . . . . . . . . . . . . . . . . . . . 149
Checking the Total Number of Pages FedThrough the Printer - Control Panel. . . . . . . . . 149Checking the Total Number of Pages FedThrough the Printer - Windows. . . . . . . . . . . . .149Checking the Total Number of Pages FedThrough the Printer - Mac OS. . . . . . . . . . . . . .149
Saving Power. . . . . . . . . . . . . . . . . . . . . . . . . . . . 150Saving Power - Control Panel. . . . . . . . . . . . . . 150
Menu Options for Setup ModeMaintenance Box Service Life. . . . . . . . . . . . . . . . 151Menu Options for Maintenance. . . . . . . . . . . . . . 151Menu Options for Paper Setup. . . . . . . . . . . . . . . 152Menu Options for Print Status Sheet. . . . . . . . . . . 152Menu Options for Network Status. . . . . . . . . . . . . 152Menu Options for Admin Settings. . . . . . . . . . . . .153Menu Options for System Administration. . . . . . . 153
Printer Settings. . . . . . . . . . . . . . . . . . . . . . . . 153Common Settings. . . . . . . . . . . . . . . . . . . . . . 154Wi-Fi/Network Settings. . . . . . . . . . . . . . . . . . 155Epson Connect Services. . . . . . . . . . . . . . . . . . 157Google Cloud Print Services. . . . . . . . . . . . . . . 157Universal Print Settings. . . . . . . . . . . . . . . . . . 157Eco Mode. . . . . . . . . . . . . . . . . . . . . . . . . . . . 158Restore Default Settings. . . . . . . . . . . . . . . . . . 158
Network Service and Software InformationEpson Connect Service. . . . . . . . . . . . . . . . . . . . . 160
Web Config. . . . . . . . . . . . . . . . . . . . . . . . . . . . . 160Running Web Config on a Web Browser. . . . . . 161Running Web Config on Windows. . . . . . . . . . 161Running Web Config on Mac OS. . . . . . . . . . . .161
Windows Printer Driver. . . . . . . . . . . . . . . . . . . . 162Making Operation Settings for the WindowsPrinter Driver. . . . . . . . . . . . . . . . . . . . . . . . . 163
Mac OS Printer Driver. . . . . . . . . . . . . . . . . . . . . 163Making Operation Settings for the Mac OSPrinter Driver. . . . . . . . . . . . . . . . . . . . . . . . . 163
Application for Scanning Documents andImages (Epson Scan 2). . . . . . . . . . . . . . . . . . . . . 164Epson Event Manager. . . . . . . . . . . . . . . . . . . . . .164PC-FAX Driver (Fax Driver). . . . . . . . . . . . . . . . . 165FAX Utility. . . . . . . . . . . . . . . . . . . . . . . . . . . . . 165Epson Easy Photo Print. . . . . . . . . . . . . . . . . . . . 166E-Web Print (for Windows Only). . . . . . . . . . . . . 166EPSON Software Updater. . . . . . . . . . . . . . . . . . . 167Application for Configuring Multiple Devices(EpsonNet Config). . . . . . . . . . . . . . . . . . . . . . . . 167Uninstalling Applications. . . . . . . . . . . . . . . . . . . 168
Uninstalling Applications - Windows. . . . . . . . .168Uninstalling Applications - Mac OS. . . . . . . . . .169
Installing Applications. . . . . . . . . . . . . . . . . . . . . 169Updating Applications and Firmware. . . . . . . . . . 170
Solving ProblemsChecking the Printer Status. . . . . . . . . . . . . . . . . .171
Checking Messages on the LCD Screen. . . . . . . 171Error Code on the Status Menu. . . . . . . . . . . . . 172Checking the Printer Status - Windows. . . . . . . 176Checking the Printer Status - Mac OS. . . . . . . . 177
Removing Jammed Paper. . . . . . . . . . . . . . . . . . . 177Removing Jammed Paper from the RearPaper Feed Slot. . . . . . . . . . . . . . . . . . . . . . . . 177Removing Jammed Paper from Inside thePrinter. . . . . . . . . . . . . . . . . . . . . . . . . . . . . . .177Removing Jammed Paper from the PaperCassette. . . . . . . . . . . . . . . . . . . . . . . . . . . . . . 179Removing Jammed Paper from Rear Cover 1and Rear Cover 2. . . . . . . . . . . . . . . . . . . . . . . 182Removing Jammed Paper from the ADF. . . . . . 184
Paper Does Not Feed Correctly. . . . . . . . . . . . . . . 186Paper Jams. . . . . . . . . . . . . . . . . . . . . . . . . . . .187Paper Feeds at a Slant. . . . . . . . . . . . . . . . . . . . 187Several Sheets of Paper are Fed at a Time. . . . . . 187No Paper Feeds. . . . . . . . . . . . . . . . . . . . . . . . 187Original Does Not Feed in the ADF. . . . . . . . . .187
User's Guide
Contents
6

Power and Control Panel Problems. . . . . . . . . . . . 188Power Does Not Turn On. . . . . . . . . . . . . . . . . 188Power Does Not Turn Off. . . . . . . . . . . . . . . . . 188Power Turns Off Automatically. . . . . . . . . . . . . 188LCD Screen Gets Dark. . . . . . . . . . . . . . . . . . . 189
Cannot Print from a Computer. . . . . . . . . . . . . . . 189When You Cannot Make Network Settings. . . . . . 190
Cannot Connect from Devices Even ThoughNetwork Settings are No Problem. . . . . . . . . . . 190Checking the SSID Connected to the Printer. . . 192Checking the SSID for the Computer. . . . . . . . .192
Suddenly the Printer Cannot Print over aNetwork Connection. . . . . . . . . . . . . . . . . . . . . . 193Suddenly the Printer Cannot Print Using a USBConnection. . . . . . . . . . . . . . . . . . . . . . . . . . . . . 194Printout Problems. . . . . . . . . . . . . . . . . . . . . . . . 194
Printout is Scuffed or Color is Missing. . . . . . . .194Banding or Unexpected Colors Appear. . . . . . . 194Colored Banding Appears at Intervals ofApproximately 2.5 cm. . . . . . . . . . . . . . . . . . . .195Blurry Prints, Vertical Banding, orMisalignment. . . . . . . . . . . . . . . . . . . . . . . . . .195Print Quality is Poor. . . . . . . . . . . . . . . . . . . . .196Printed Photos are Sticky. . . . . . . . . . . . . . . . . 197Images or Photos are Printed in UnexpectedColors. . . . . . . . . . . . . . . . . . . . . . . . . . . . . . . 197The Position, Size, or Margins of the PrintoutAre Incorrect. . . . . . . . . . . . . . . . . . . . . . . . . . 197Paper Is Smeared or Scuffed. . . . . . . . . . . . . . . 198Paper is Smeared During Automatic 2-SidedPrinting. . . . . . . . . . . . . . . . . . . . . . . . . . . . . . 199Printed Characters Are Incorrect or Garbled. . . 199The Printed Image Is Inverted. . . . . . . . . . . . . . 199Mosaic-Like Patterns in the Prints. . . . . . . . . . .199Uneven Colors, Smears, Dots, or StraightLines Appear in the Copied Image. . . . . . . . . . .199Moiré (Cross-Hatch) Patterns Appear in theCopied Image. . . . . . . . . . . . . . . . . . . . . . . . . 200An Image of the Reverse Side of the OriginalAppears in the Copied Image. . . . . . . . . . . . . . 200The Printout Problem Could Not be Cleared. . . 200
Other Printing Problems. . . . . . . . . . . . . . . . . . . 200Printing Is Too Slow. . . . . . . . . . . . . . . . . . . . . 200Printing Slows Down Dramatically DuringContinuous Printing. . . . . . . . . . . . . . . . . . . . .201
Cannot Start Scanning. . . . . . . . . . . . . . . . . . . . . 201Cannot Start Scanning when Using theControl Panel. . . . . . . . . . . . . . . . . . . . . . . . . .202
Scanned Image Problems. . . . . . . . . . . . . . . . . . . 202
Uneven Colors, Dirt, Spots, and so on Appearwhen Scanning from the Scanner Glass. . . . . . . 202Straight Lines Appear when Scanning fromADF. . . . . . . . . . . . . . . . . . . . . . . . . . . . . . . . 203The Image Quality Is Rough. . . . . . . . . . . . . . . 203Offset Appears in the Background of Images. . . 203Text is Blurred. . . . . . . . . . . . . . . . . . . . . . . . . 203Moiré Patterns (Web-Like Shadows) Appear. . . 204Cannot Scan the Correct Area on theScanner Glass. . . . . . . . . . . . . . . . . . . . . . . . . .204Text is Not Recognized Correctly whenSaving as a Searchable PDF. . . . . . . . . . . . . . . . 204Cannot Solve Problems in the Scanned Image. . 205
Other Scanning Problems. . . . . . . . . . . . . . . . . . . 206Scanning Speed Is Slow. . . . . . . . . . . . . . . . . . .206Cannot Send the Scanned Image by Email. . . . . 206Scanning Stops when Scanning to PDF/Multi-TIFF. . . . . . . . . . . . . . . . . . . . . . . . . . . 206
Problems when Sending and Receiving Faxes. . . . .206Cannot Send or Receive Faxes. . . . . . . . . . . . . .206Cannot Send Faxes. . . . . . . . . . . . . . . . . . . . . . 208Cannot Send Faxes to a Specific Recipient. . . . . 208Cannot Send Faxes at a Specified Time. . . . . . . 209Cannot Receive Faxes. . . . . . . . . . . . . . . . . . . . 209Memory Full Error Occurs. . . . . . . . . . . . . . . . 209Sent Fax Quality Is Poor. . . . . . . . . . . . . . . . . . 210Faxes are Sent at the Wrong Size. . . . . . . . . . . . 210Received Fax Quality Is Poor. . . . . . . . . . . . . . .210Cannot Receive A3 Size Faxes. . . . . . . . . . . . . . 211Received Faxes Are Not Printed. . . . . . . . . . . . 211
Other Faxing Problems. . . . . . . . . . . . . . . . . . . . .211Cannot Make Calls on the ConnectedTelephone. . . . . . . . . . . . . . . . . . . . . . . . . . . . 211Answering Machine Cannot Answer VoiceCalls. . . . . . . . . . . . . . . . . . . . . . . . . . . . . . . . 211Sender's Fax Number Not Displayed onReceived Faxes or the Number Is Wrong. . . . . . 212
Other Problems. . . . . . . . . . . . . . . . . . . . . . . . . . 212Slight Electric Shock when Touching thePrinter. . . . . . . . . . . . . . . . . . . . . . . . . . . . . . .212Operation Sounds Are Loud. . . . . . . . . . . . . . . 212Rear Paper Feed Slot is Removed. . . . . . . . . . . .213The Date and Time Are Incorrect. . . . . . . . . . . 213Memory Device Is not Recognized. . . . . . . . . . 213Cannot Save Data to a Memory Device. . . . . . . 213Forgot Your Password. . . . . . . . . . . . . . . . . . . .214Application Is Blocked by a Firewall (forWindows Only). . . . . . . . . . . . . . . . . . . . . . . . 214"?" Is Displayed on the Photo Selection Screen. . 214A Message Prompting You to Reset the InkLevels is Displayed. . . . . . . . . . . . . . . . . . . . . . 214
User's Guide
Contents
7
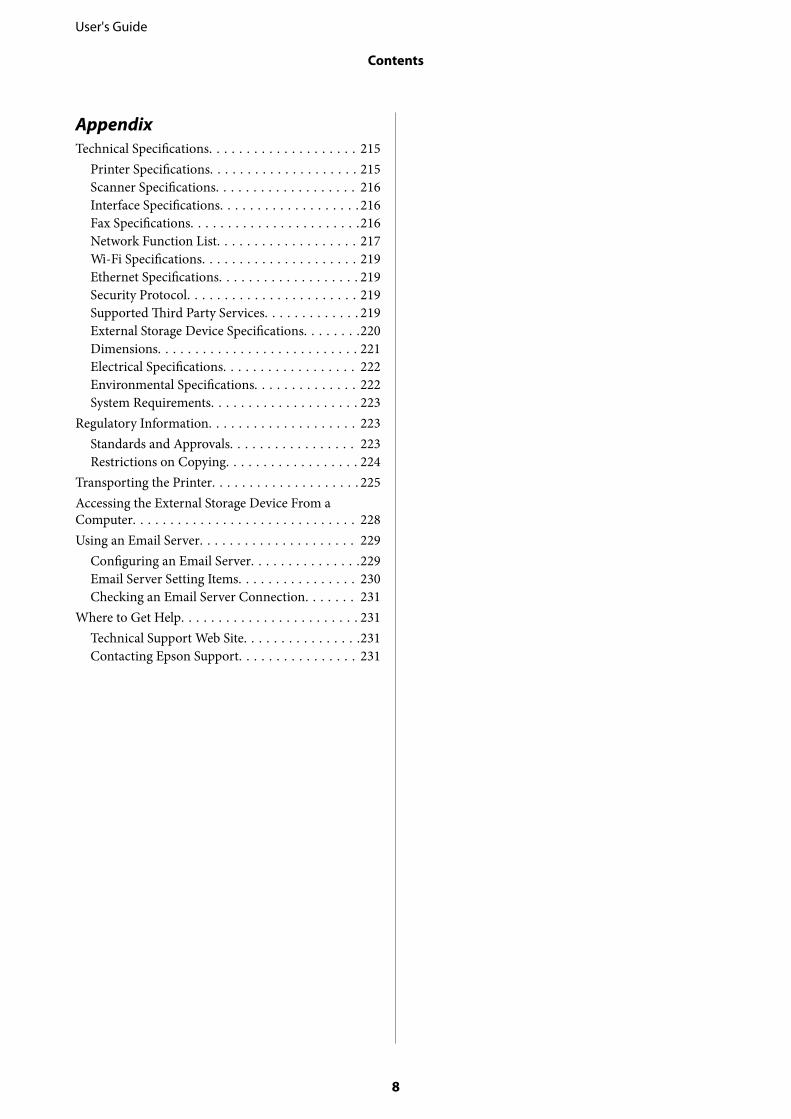
AppendixTechnical Specifications. . . . . . . . . . . . . . . . . . . . 215
Printer Specifications. . . . . . . . . . . . . . . . . . . . 215Scanner Specifications. . . . . . . . . . . . . . . . . . . 216Interface Specifications. . . . . . . . . . . . . . . . . . . 216Fax Specifications. . . . . . . . . . . . . . . . . . . . . . .216Network Function List. . . . . . . . . . . . . . . . . . . 217Wi-Fi Specifications. . . . . . . . . . . . . . . . . . . . . 219Ethernet Specifications. . . . . . . . . . . . . . . . . . . 219Security Protocol. . . . . . . . . . . . . . . . . . . . . . . 219Supported Third Party Services. . . . . . . . . . . . . 219External Storage Device Specifications. . . . . . . .220Dimensions. . . . . . . . . . . . . . . . . . . . . . . . . . . 221Electrical Specifications. . . . . . . . . . . . . . . . . . 222Environmental Specifications. . . . . . . . . . . . . . 222System Requirements. . . . . . . . . . . . . . . . . . . . 223
Regulatory Information. . . . . . . . . . . . . . . . . . . . 223Standards and Approvals. . . . . . . . . . . . . . . . . 223Restrictions on Copying. . . . . . . . . . . . . . . . . . 224
Transporting the Printer. . . . . . . . . . . . . . . . . . . . 225Accessing the External Storage Device From aComputer. . . . . . . . . . . . . . . . . . . . . . . . . . . . . . 228Using an Email Server. . . . . . . . . . . . . . . . . . . . . 229
Configuring an Email Server. . . . . . . . . . . . . . .229Email Server Setting Items. . . . . . . . . . . . . . . . 230Checking an Email Server Connection. . . . . . . 231
Where to Get Help. . . . . . . . . . . . . . . . . . . . . . . . 231Technical Support Web Site. . . . . . . . . . . . . . . .231Contacting Epson Support. . . . . . . . . . . . . . . . 231
User's Guide
Contents
8
About This Manual
Introduction to the ManualsThe following manuals are supplied with your Epson printer. As well as the manuals, check the various types ofhelp information available from the printer itself or from the Epson software applications.
❏ Important Safety Instructions (paper manual)Provides you with instructions to ensure the safe use of this printer.
❏ Start Here (paper manual)Provides you with information on setting up the printer and installing the software.
❏ User's Guide (digital manual)This manual. Provides overall information and instructions on using the printer, on network settings whenusing the printer on a network, and on solving problems.
❏ Administrator's Guide (digital manual)Provides network administrators with information on management and printer settings.
You can obtain the latest versions of the above manuals with the following methods.
❏ Paper manualVisit the Epson Europe support website at http://www.epson.eu/Support, or the Epson worldwide supportwebsite at http://support.epson.net/.
❏ Digital manualStart EPSON Software Updater on your computer. EPSON Software Updater checks for available updates ofEpson software applications and the digital manuals, and allows you to download the latest ones.
Related Information
& “EPSON Software Updater” on page 167
Marks and Symbols
!Caution:
Instructions that must be followed carefully to avoid bodily injury.
cImportant:
Instructions that must be observed to avoid damage to your equipment.
Note:Provides complementary and reference information.
& Related Information
Links to related sections.
User's Guide
About This Manual
9
Descriptions Used in this Manual❏ Screenshots of the printer driver and the Epson Scan 2 (scanner driver) screens are from Windows 10 or OS X
El Capitan. The content displayed on the screens varies depending on the model and situation.
❏ Illustrations of the printer used in this manual are examples only. Although there may be slight differencesdepending on the model, the method of operation is the same.
❏ Some of the menu items on the LCD screen vary depending on the model and settings.
Operating System References
Windows
In this manual, terms such as "Windows 10", "Windows 8.1", "Windows 8", "Windows 7", "Windows Vista","Windows XP", "Windows Server 2016", "Windows Server 2012 R2", "Windows Server 2012", "Windows Server 2008R2", "Windows Server 2008", "Windows Server 2003 R2", and "Windows Server 2003" refer to the followingoperating systems. Additionally, "Windows" is used to refer to all versions.
❏ Microsoft® Windows® 10 operating system
❏ Microsoft® Windows® 8.1 operating system
❏ Microsoft® Windows® 8 operating system
❏ Microsoft® Windows® 7 operating system
❏ Microsoft® Windows Vista® operating system
❏ Microsoft® Windows® XP operating system
❏ Microsoft® Windows® XP Professional x64 Edition operating system
❏ Microsoft® Windows Server® 2016 operating system
❏ Microsoft® Windows Server® 2012 R2 operating system
❏ Microsoft® Windows Server® 2012 operating system
❏ Microsoft® Windows Server® 2008 R2 operating system
❏ Microsoft® Windows Server® 2008 operating system
❏ Microsoft® Windows Server® 2003 R2 operating system
❏ Microsoft® Windows Server® 2003 operating system
Mac OS
In this manual, "Mac OS" is used to refer to macOS Sierra, OS X El Capitan, OS X Yosemite, OS X Mavericks, OS XMountain Lion, Mac OS X v10.7.x, and Mac OS X v10.6.8.
User's Guide
About This Manual
10
Important Instructions
Safety InstructionsRead and follow these instructions to ensure safe use of this printer. Make sure you keep this manual for futurereference. Also, be sure to follow all warnings and instructions marked on the printer.
❏ Some of the symbols used on your printer are to ensure safety and proper use of the printer. Visit the followingWeb site to learn the meaning of the symbols.http://support.epson.net/symbols
❏ Use only the power cord supplied with the printer and do not use the cord with any other equipment. Use ofother cords with this printer or the use of the supplied power cord with other equipment may result in fire orelectric shock.
❏ Be sure your AC power cord meets the relevant local safety standard.
❏ Never disassemble, modify, or attempt to repair the power cord, plug, printer unit, scanner unit, or options byyourself, except as specifically explained in the printer's manuals.
❏ Unplug the printer and refer servicing to qualified service personnel under the following conditions:The power cord or plug is damaged; liquid has entered the printer; the printer has been dropped or the casingdamaged; the printer does not operate normally or exhibits a distinct change in performance. Do not adjustcontrols that are not covered by the operating instructions.
❏ Place the printer near a wall outlet where the plug can be easily unplugged.
❏ Do not place or store the printer outdoors, near excessive dirt or dust, water, heat sources, or in locationssubject to shocks, vibrations, high temperature or humidity.
❏ Take care not to spill liquid on the printer and not to handle the printer with wet hands.
❏ Keep the printer at least 22 cm away from cardiac pacemakers. Radio waves from this printer may adverselyaffect the operation of cardiac pacemakers.
❏ If the LCD screen is damaged, contact your dealer. If the liquid crystal solution gets on your hands, wash themthoroughly with soap and water. If the liquid crystal solution gets into your eyes, flush them immediately withwater. If discomfort or vision problems remain after a thorough flushing, see a doctor immediately.
❏ Avoid using a telephone during an electrical storm. There may be a remote risk of electric shock from lightning.
❏ Do not use a telephone to report a gas leak in the vicinity of the leak.
User's Guide
Important Instructions
11
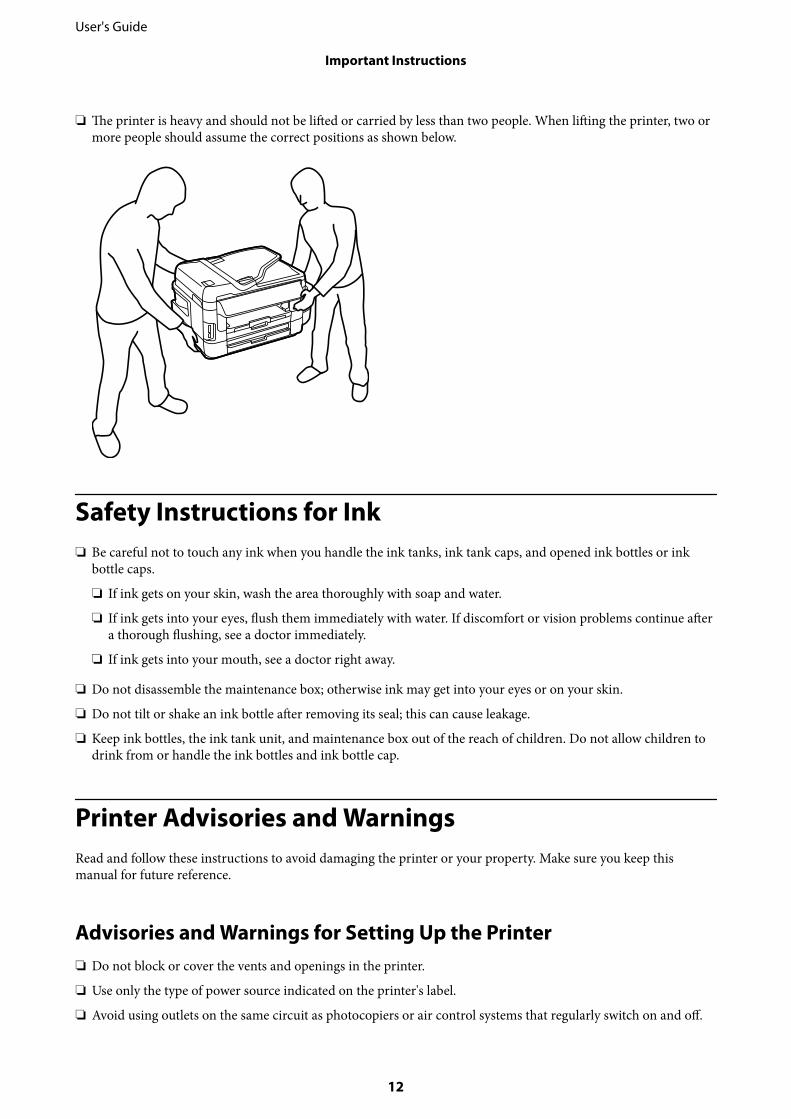
❏ The printer is heavy and should not be lifted or carried by less than two people. When lifting the printer, two ormore people should assume the correct positions as shown below.
Safety Instructions for Ink❏ Be careful not to touch any ink when you handle the ink tanks, ink tank caps, and opened ink bottles or ink
bottle caps.
❏ If ink gets on your skin, wash the area thoroughly with soap and water.
❏ If ink gets into your eyes, flush them immediately with water. If discomfort or vision problems continue aftera thorough flushing, see a doctor immediately.
❏ If ink gets into your mouth, see a doctor right away.
❏ Do not disassemble the maintenance box; otherwise ink may get into your eyes or on your skin.
❏ Do not tilt or shake an ink bottle after removing its seal; this can cause leakage.
❏ Keep ink bottles, the ink tank unit, and maintenance box out of the reach of children. Do not allow children todrink from or handle the ink bottles and ink bottle cap.
Printer Advisories and WarningsRead and follow these instructions to avoid damaging the printer or your property. Make sure you keep thismanual for future reference.
Advisories and Warnings for Setting Up the Printer❏ Do not block or cover the vents and openings in the printer.
❏ Use only the type of power source indicated on the printer's label.
❏ Avoid using outlets on the same circuit as photocopiers or air control systems that regularly switch on and off.
User's Guide
Important Instructions
12
❏ Avoid electrical outlets controlled by wall switches or automatic timers.
❏ Keep the entire computer system away from potential sources of electromagnetic interference, such asloudspeakers or the base units of cordless telephones.
❏ The power-supply cords should be placed to avoid abrasions, cuts, fraying, crimping, and kinking. Do not placeobjects on top of the power-supply cords and do not allow the power-supply cords to be stepped on or run over.Be particularly careful to keep all the power-supply cords straight at the ends and the points where they enterand leave the transformer.
❏ If you use an extension cord with the printer, make sure that the total ampere rating of the devices plugged intothe extension cord does not exceed the cord's ampere rating. Also, make sure that the total ampere rating of alldevices plugged into the wall outlet does not exceed the wall outlet's ampere rating.
❏ If you plan to use the printer in Germany, the building installation must be protected by a 10 or 16 amp circuitbreaker to provide adequate short-circuit protection and over-current protection for the printer.
❏ When connecting the printer to a computer or other device with a cable, ensure the correct orientation of theconnectors. Each connector has only one correct orientation. Inserting a connector in the wrong orientationmay damage both devices connected by the cable.
❏ Place the printer on a flat, stable surface that extends beyond the base of the printer in all directions. The printerwill not operate properly if it is tilted at an angle.
❏ Allow space above the printer so that you can fully raise the document cover.
❏ Leave enough space in front of the printer for the paper to be fully ejected.
❏ Avoid places subject to rapid changes in temperature and humidity. Also, keep the printer away from directsunlight, strong light, or heat sources.
Advisories and Warnings for Using the Printer❏ Do not insert objects through the slots in the printer.
❏ Do not put your hand inside the printer during printing.
❏ Do not touch the white flat cable and ink tubes inside the printer.
❏ Do not use aerosol products that contain flammable gases inside or around the printer. Doing so may cause fire.
❏ Do not move the print head by hand; otherwise, you may damage the printer.
❏ Be careful not to trap your fingers when closing the scanner unit.
❏ Do not press too hard on the scanner glass when placing the originals.
❏ Visually check ink levels in the actual ink tanks. Continued use of the printer when the ink is expended coulddamage the printer. Epson recommends filling the ink tank to the upper line when the printer is not operatingto reset the ink level.
❏ Always turn the printer off using the P button. Do not unplug the printer or turn off the power at the outletuntil the P light stops flashing.
❏ If you are not going to use the printer for a long period, be sure to unplug the power cord from the electricaloutlet.
Advisories and Warnings for Transporting or Storing the Printer❏ When storing or transporting the printer, avoid tilting it, placing it vertically, or turning it upside down;
otherwise ink may leak.
User's Guide
Important Instructions
13
❏ Before transporting the printer, make sure that the print head is in the home (far right) position.
Advisories and Warnings for Using the Printer with a WirelessConnection❏ Radio waves from this printer may negatively affect the operation of medical electronic equipment, causing
them to malfunction. When using this printer inside medical facilities or near medical equipment, followdirections from the authorized personnel representing the medical facilities, and follow all posted warnings anddirections on the medical equipment.
❏ Radio waves from this printer may negatively affect the operation of automatically controlled devices such asautomatic doors or fire alarms, and could lead to accidents due to malfunction. When using this printer nearautomatically controlled devices, follow all posted warnings and directions on these devices.
Advisories and Warnings for Using Memory Cards❏ Do not remove a memory card or turn off the printer while the memory card light is flashing.
❏ The methods for using memory cards vary according to card type. Be sure to refer to the manual packaged withyour memory card for details.
❏ Use only memory cards compatible with the printer.
Related Information
& “Supported Memory Card Specifications” on page 220
Advisories and Warnings for Using the Touchscreen❏ The LCD screen may contain a few small bright or dark spots, and because of its features it may have an uneven
brightness. These are normal and do not indicate that it is damaged in any way.
❏ Only use a dry, soft cloth for cleaning. Do not use liquid or chemical cleaners.
❏ The exterior cover of the touchscreen could break if it receives a heavy impact. Contact your dealer if the panelsurface chips or cracks, and do not touch or attempt to remove the broken pieces.
❏ Press the touchscreen gently with your finger. Do not press force or operate with your nails.
❏ Do not use sharp objects such as ball point pens or sharp pencils to perform operations.
❏ Condensation inside the touchscreen due to abrupt changes in temperature or humidity may causeperformance to deteriorate.
Protecting Your Personal InformationWhen you give the printer to someone else or dispose of it, erase all the personal information stored in the printer'smemory by selecting Setup > System Administration > Restore Default Settings > Clear All Data and Settingson the control panel.
User's Guide
Important Instructions
14
Printer Basics
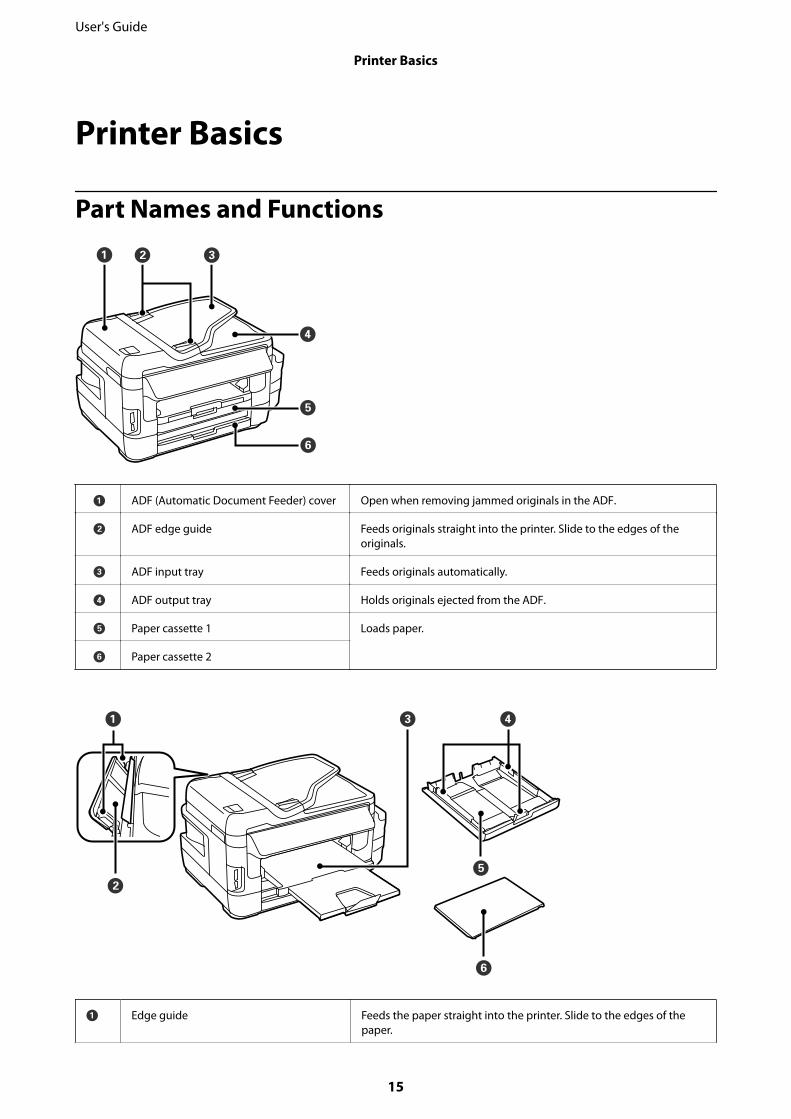
Part Names and Functions
A ADF (Automatic Document Feeder) cover Open when removing jammed originals in the ADF.
B ADF edge guide Feeds originals straight into the printer. Slide to the edges of theoriginals.
C ADF input tray Feeds originals automatically.
D ADF output tray Holds originals ejected from the ADF.
E Paper cassette 1 Loads paper.
F Paper cassette 2
A Edge guide Feeds the paper straight into the printer. Slide to the edges of thepaper.
User's Guide
Printer Basics
15
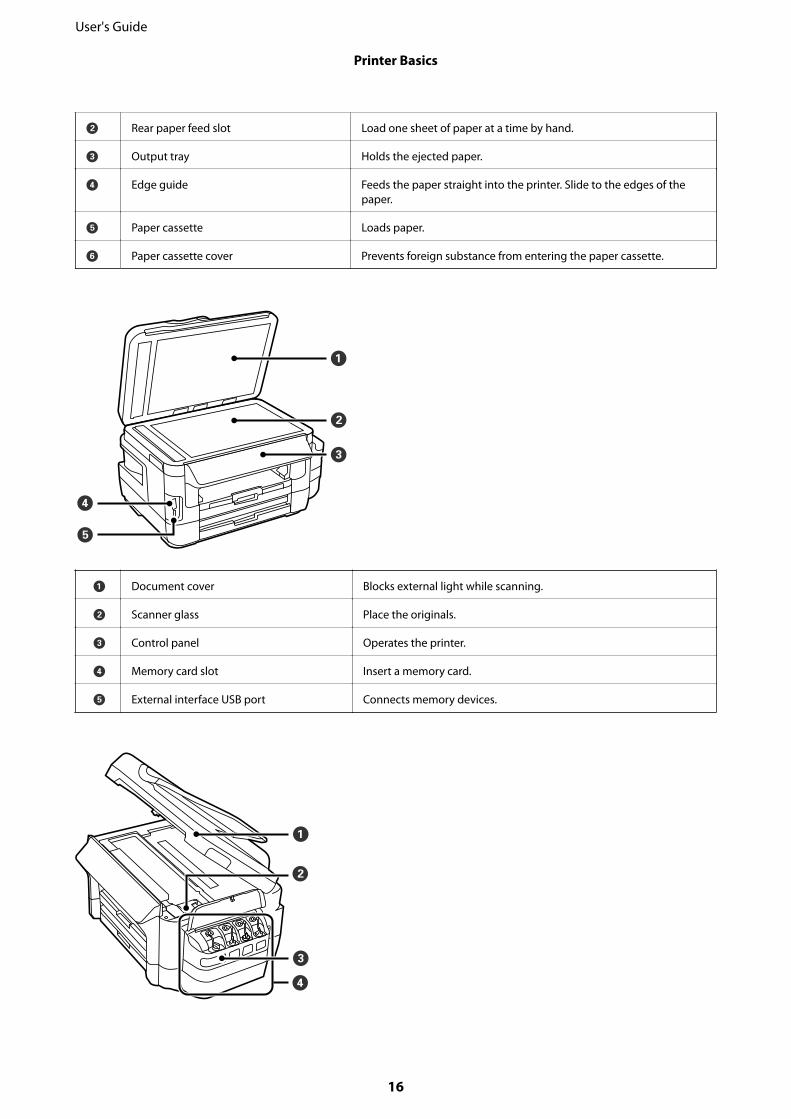
B Rear paper feed slot Load one sheet of paper at a time by hand.
C Output tray Holds the ejected paper.
D Edge guide Feeds the paper straight into the printer. Slide to the edges of thepaper.
E Paper cassette Loads paper.
F Paper cassette cover Prevents foreign substance from entering the paper cassette.
A Document cover Blocks external light while scanning.
B Scanner glass Place the originals.
C Control panel Operates the printer.
D Memory card slot Insert a memory card.
E External interface USB port Connects memory devices.
User's Guide
Printer Basics
16
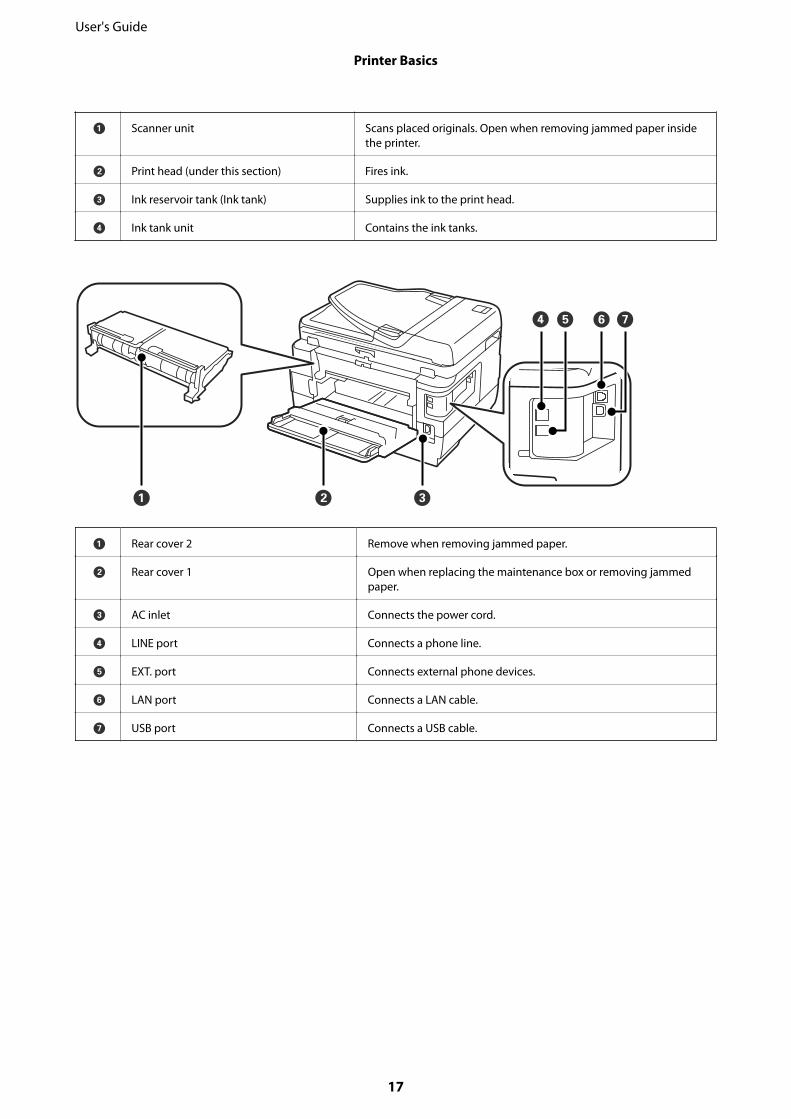
A Scanner unit Scans placed originals. Open when removing jammed paper insidethe printer.
B Print head (under this section) Fires ink.
C Ink reservoir tank (Ink tank) Supplies ink to the print head.
D Ink tank unit Contains the ink tanks.
A Rear cover 2 Remove when removing jammed paper.
B Rear cover 1 Open when replacing the maintenance box or removing jammedpaper.
C AC inlet Connects the power cord.
D LINE port Connects a phone line.
E EXT. port Connects external phone devices.
F LAN port Connects a LAN cable.
G USB port Connects a USB cable.
User's Guide
Printer Basics
17
Control Panel
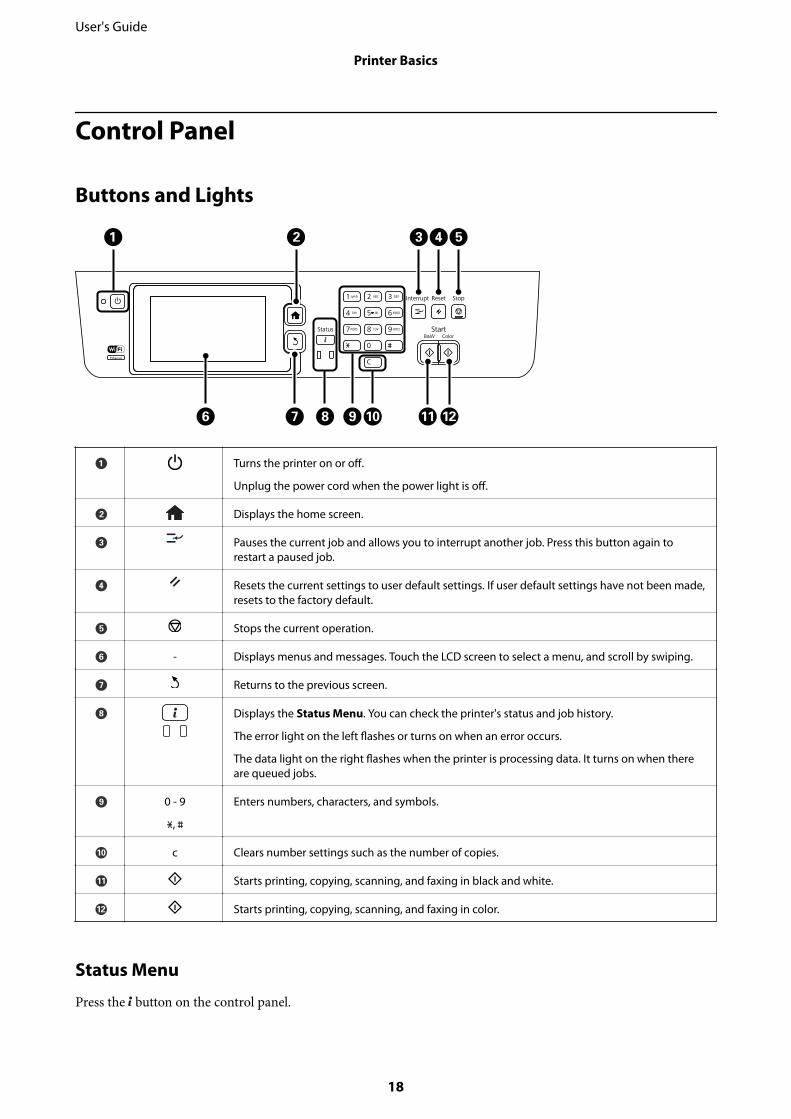
Buttons and Lights
A Turns the printer on or off.
Unplug the power cord when the power light is off.
B Displays the home screen.
C Pauses the current job and allows you to interrupt another job. Press this button again torestart a paused job.
D Resets the current settings to user default settings. If user default settings have not been made,resets to the factory default.
E Stops the current operation.
F - Displays menus and messages. Touch the LCD screen to select a menu, and scroll by swiping.
G Returns to the previous screen.
H Displays the Status Menu. You can check the printer's status and job history.
The error light on the left flashes or turns on when an error occurs.
The data light on the right flashes when the printer is processing data. It turns on when thereare queued jobs.
I 0 - 9
,
Enters numbers, characters, and symbols.
J c Clears number settings such as the number of copies.
K Starts printing, copying, scanning, and faxing in black and white.
L Starts printing, copying, scanning, and faxing in color.
Status Menu
Press the button on the control panel.
User's Guide
Printer Basics
18

Printer Information
Displays the status of the consumables and any errors that have occurred in the printer. Select the errorfrom the list to display the error massage.
Job Monitor
Displays a list of ongoing jobs and jobs waiting to be processed. You can also cancel jobs.
Job History
Displays the job history. If a job has failed, an error code is displayed in the history.
Job Storage
Select Inbox to display the received faxes stored in the printer's memory.
Related Information
& “Error Code on the Status Menu” on page 172
Icons Displayed on the LCD ScreenThe following icons are displayed on the LCD screen depending on the printer's status. Press the network icon tocheck the current network settings and make Wi-Fi settings.
Press this icon to view operating instructions such as how to load paper, and how to placeoriginals.
Turns on when originals are placed in the ADF.
Turns on when the maintenance box is nearly full. Press the button, and then selectPrinter Information to check the status.
Turns on when the maintenance box is full. Press the button, and then select PrinterInformation to check the status.
Turns on when received documents that have not yet been read, printed, or saved, arestored in the printer's memory.
Turns on while the printer is receiving or sending faxes.
Indicates fax memory usage.
Indicates that the fax memory is full.
User's Guide
Printer Basics
19
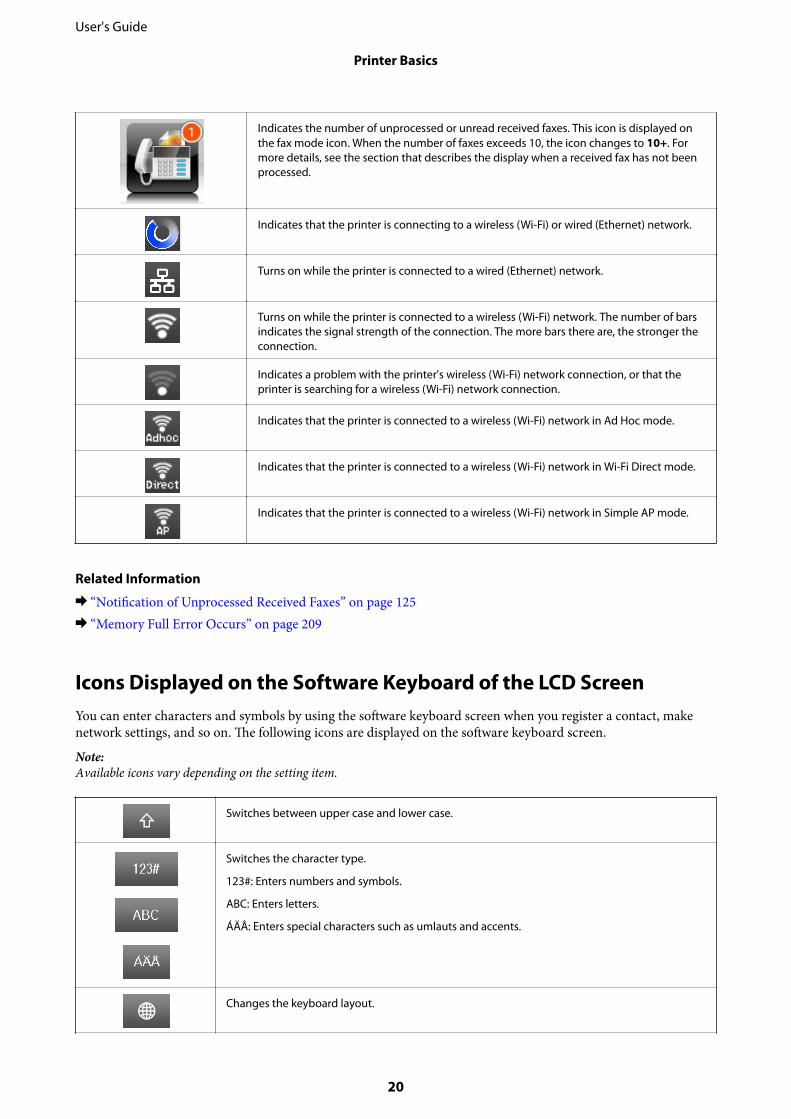
Indicates the number of unprocessed or unread received faxes. This icon is displayed onthe fax mode icon. When the number of faxes exceeds 10, the icon changes to 10+. Formore details, see the section that describes the display when a received fax has not beenprocessed.
Indicates that the printer is connecting to a wireless (Wi-Fi) or wired (Ethernet) network.
Turns on while the printer is connected to a wired (Ethernet) network.
Turns on while the printer is connected to a wireless (Wi-Fi) network. The number of barsindicates the signal strength of the connection. The more bars there are, the stronger theconnection.
Indicates a problem with the printer's wireless (Wi-Fi) network connection, or that theprinter is searching for a wireless (Wi-Fi) network connection.
Indicates that the printer is connected to a wireless (Wi-Fi) network in Ad Hoc mode.
Indicates that the printer is connected to a wireless (Wi-Fi) network in Wi-Fi Direct mode.
Indicates that the printer is connected to a wireless (Wi-Fi) network in Simple AP mode.
Related Information
& “Notification of Unprocessed Received Faxes” on page 125& “Memory Full Error Occurs” on page 209
Icons Displayed on the Software Keyboard of the LCD ScreenYou can enter characters and symbols by using the software keyboard screen when you register a contact, makenetwork settings, and so on. The following icons are displayed on the software keyboard screen.
Note:Available icons vary depending on the setting item.
Switches between upper case and lower case.
Switches the character type.
123#: Enters numbers and symbols.
ABC: Enters letters.
ÁÄÂ: Enters special characters such as umlauts and accents.
Changes the keyboard layout.
User's Guide
Printer Basics
20

Enters a space.
Deletes a character to the left.
Enters a character.
Enters a pause (pauses for three seconds) while dialing. A hyphen (-) is entered as the pausemark.
Presets ModeYou can register frequently used copy, fax, and scan settings as presets. To register a preset, select Presets from thehome screen, select Add New, and then select the feature for which you want to register a contact. Make thenecessary settings, press Save, and then enter a name for the preset.
To load a registered preset, select the preset from the list.
Press Preset on the screen of each feature. You can register the current address (except for address that have beenentered directly and the contacts in the LDAP address list) and settings.
Menu
Displays the details of registered presets, and allows you to change their names, edit, and delete.
User's Guide
Printer Basics
21
Network Settings
Network Connection TypesYou can use the following connection methods.
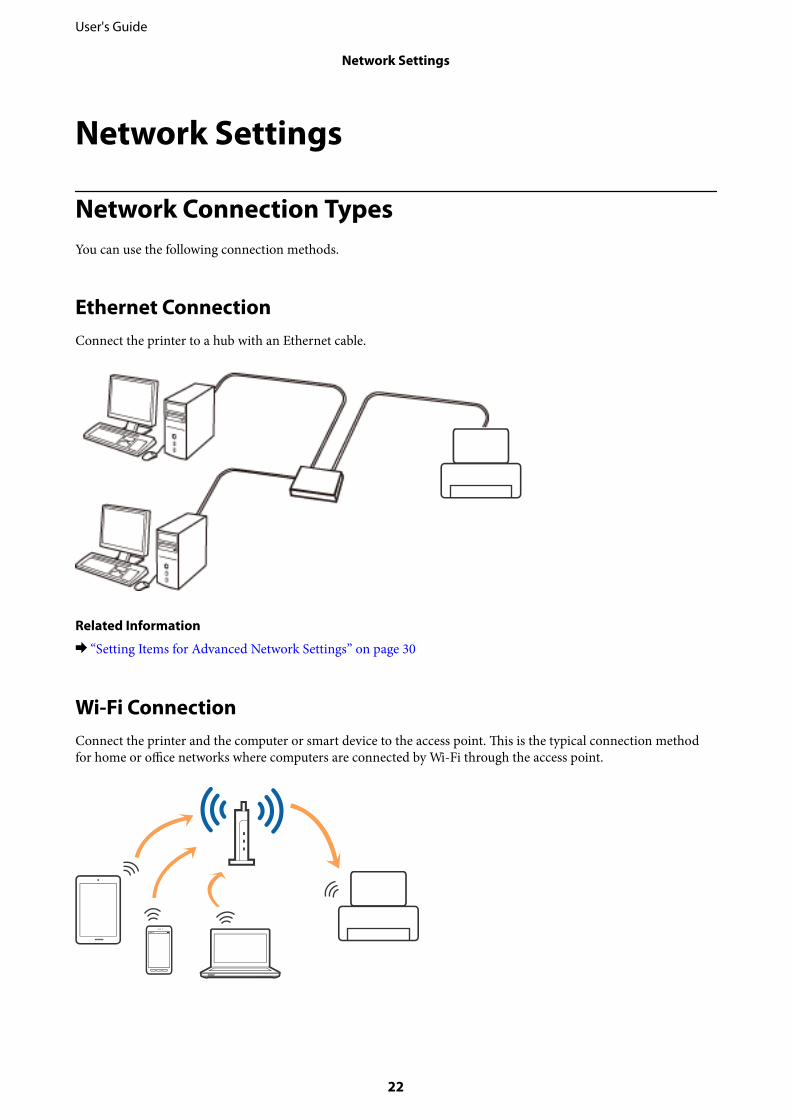
Ethernet ConnectionConnect the printer to a hub with an Ethernet cable.
Related Information
& “Setting Items for Advanced Network Settings” on page 30
Wi-Fi ConnectionConnect the printer and the computer or smart device to the access point. This is the typical connection methodfor home or office networks where computers are connected by Wi-Fi through the access point.
User's Guide
Network Settings
22
Related Information
& “Making Wi-Fi Settings Manually” on page 26& “Making Wi-Fi Settings by Push Button Setup (WPS)” on page 27& “Making Wi-Fi Settings by PIN Code Setup (WPS)” on page 28
Wi-Fi Direct ConnectionUse this connection method when you are not using Wi-Fi at home or at the office, or when you want to connectthe printer and the computer or smart device directly.
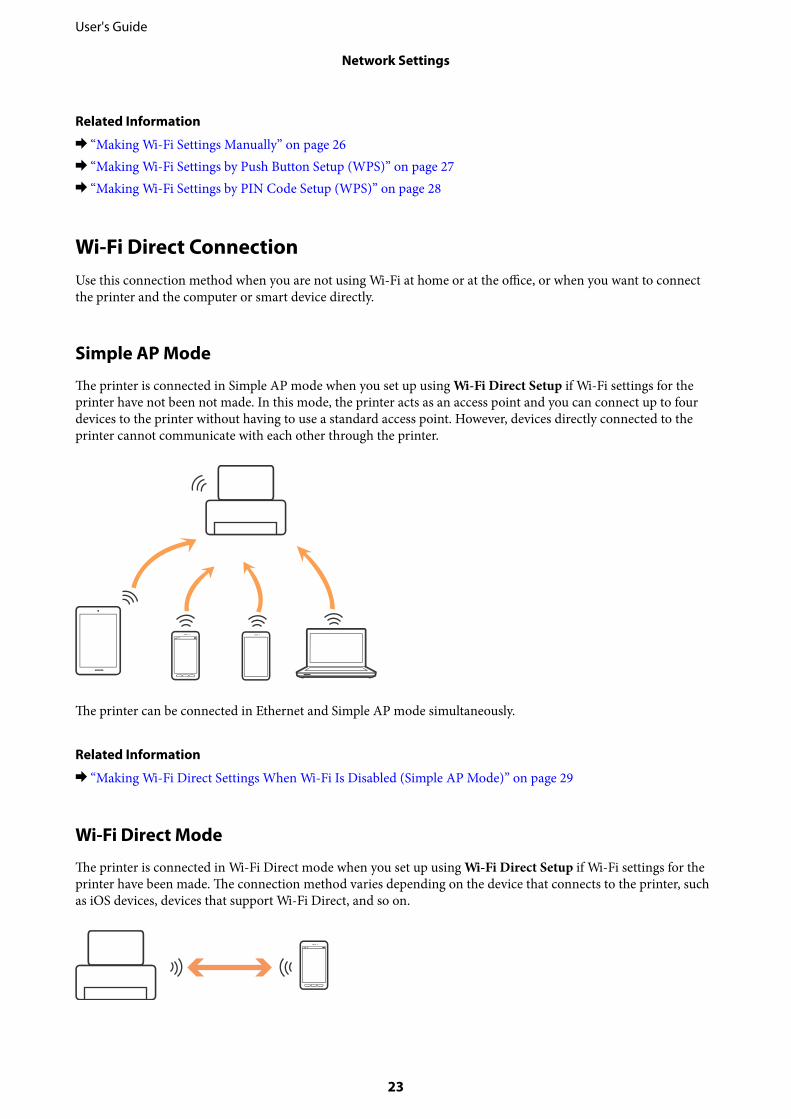
Simple AP Mode
The printer is connected in Simple AP mode when you set up using Wi-Fi Direct Setup if Wi-Fi settings for theprinter have not been not made. In this mode, the printer acts as an access point and you can connect up to fourdevices to the printer without having to use a standard access point. However, devices directly connected to theprinter cannot communicate with each other through the printer.
The printer can be connected in Ethernet and Simple AP mode simultaneously.
Related Information
& “Making Wi-Fi Direct Settings When Wi-Fi Is Disabled (Simple AP Mode)” on page 29
Wi-Fi Direct Mode
The printer is connected in Wi-Fi Direct mode when you set up using Wi-Fi Direct Setup if Wi-Fi settings for theprinter have been made. The connection method varies depending on the device that connects to the printer, suchas iOS devices, devices that support Wi-Fi Direct, and so on.
User's Guide
Network Settings
23
Note:❏ Only one device can connect to the printer in Wi-Fi Direct mode.
❏ Since Wi-Fi Direct mode is a temporary connection method, we recommend connecting by Wi-Fi if you want to use thedevice continuously.
Related Information
& “Making Wi-Fi Direct Settings When Wi-Fi Is Enabled (Wi-Fi Direct Mode)” on page 30
Connecting to a ComputerWe recommend using the installer to connect the printer to a computer. You can run the installer using one of thefollowing methods.
❏ Setting up from the websiteAccess the following website, and then enter the product name.http://epson.snGo to Setup, and then click Download in the download and connect part. Click or double-click thedownloaded file to run the installer. Follow the on-screen instructions.
❏ Setting up using the software disc (only for the models that come with a software disc and users with computerswith disc drives.)Insert the software disc into the computer, and then follow the on-screen instructions.
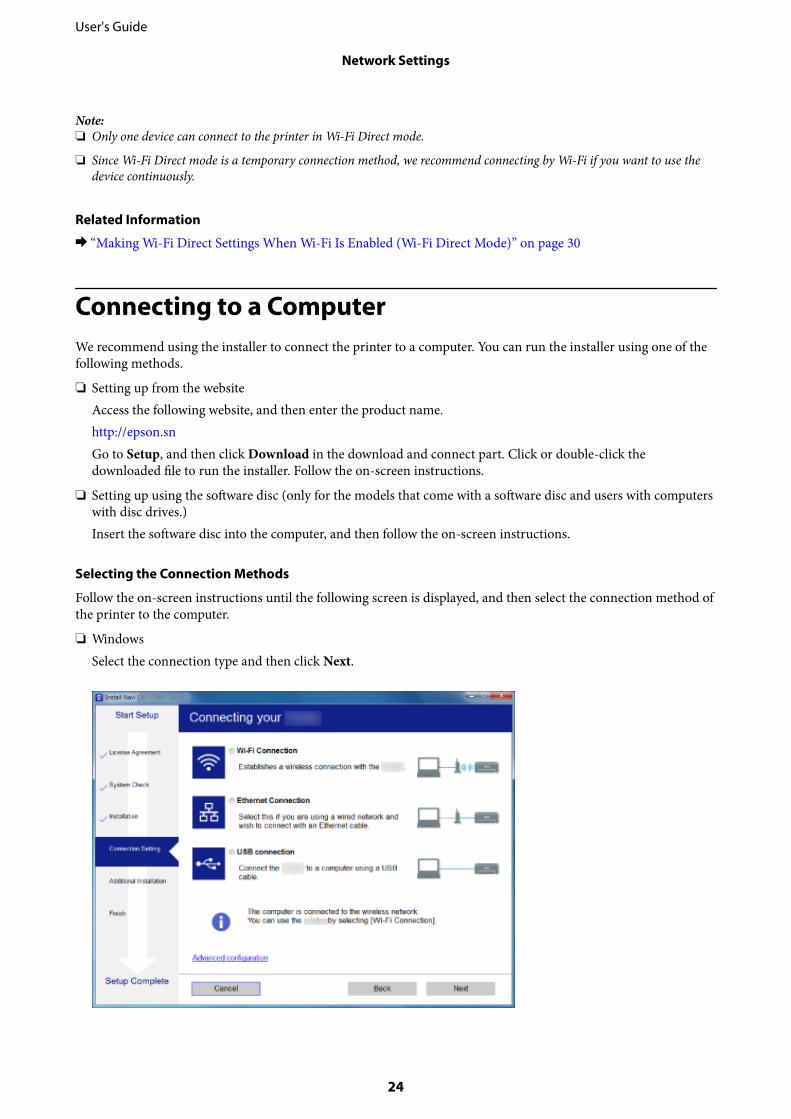
Selecting the Connection Methods
Follow the on-screen instructions until the following screen is displayed, and then select the connection method ofthe printer to the computer.
❏ WindowsSelect the connection type and then click Next.
User's Guide
Network Settings
24
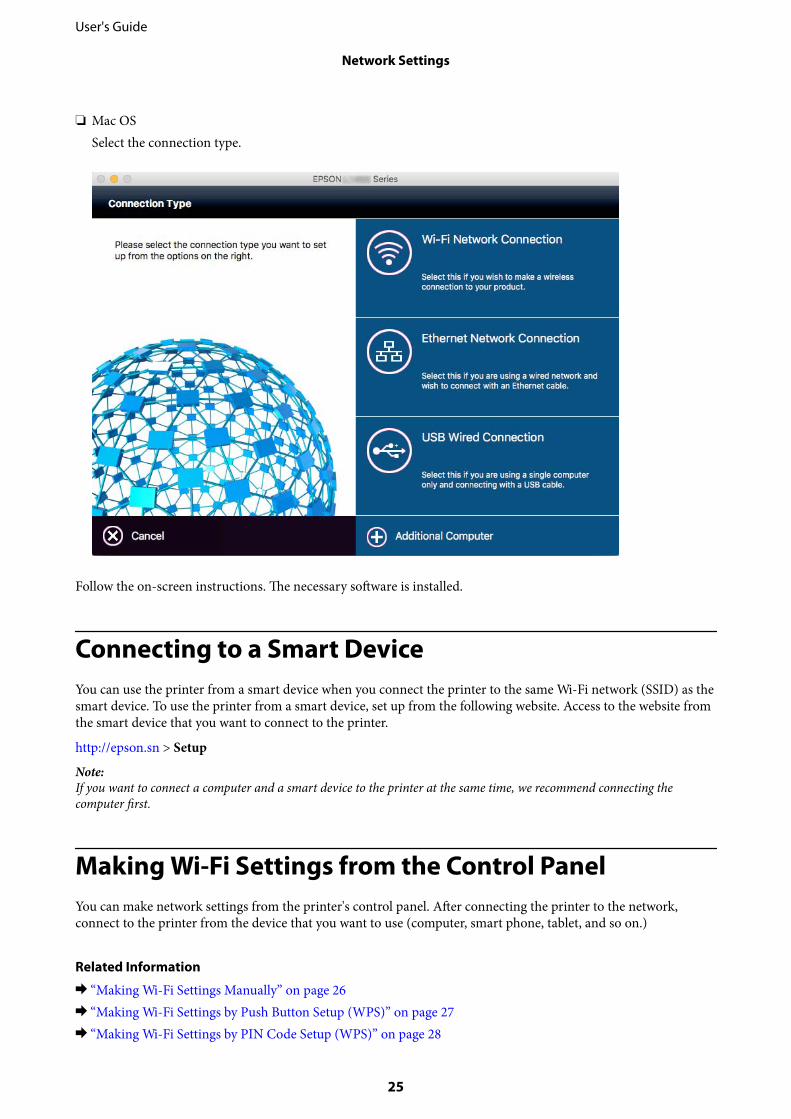
❏ Mac OSSelect the connection type.
Follow the on-screen instructions. The necessary software is installed.
Connecting to a Smart DeviceYou can use the printer from a smart device when you connect the printer to the same Wi-Fi network (SSID) as thesmart device. To use the printer from a smart device, set up from the following website. Access to the website fromthe smart device that you want to connect to the printer.
http://epson.sn > Setup
Note:If you want to connect a computer and a smart device to the printer at the same time, we recommend connecting thecomputer first.
Making Wi-Fi Settings from the Control PanelYou can make network settings from the printer's control panel. After connecting the printer to the network,connect to the printer from the device that you want to use (computer, smart phone, tablet, and so on.)
Related Information
& “Making Wi-Fi Settings Manually” on page 26& “Making Wi-Fi Settings by Push Button Setup (WPS)” on page 27& “Making Wi-Fi Settings by PIN Code Setup (WPS)” on page 28
User's Guide
Network Settings
25
& “Making Wi-Fi Direct Settings” on page 28
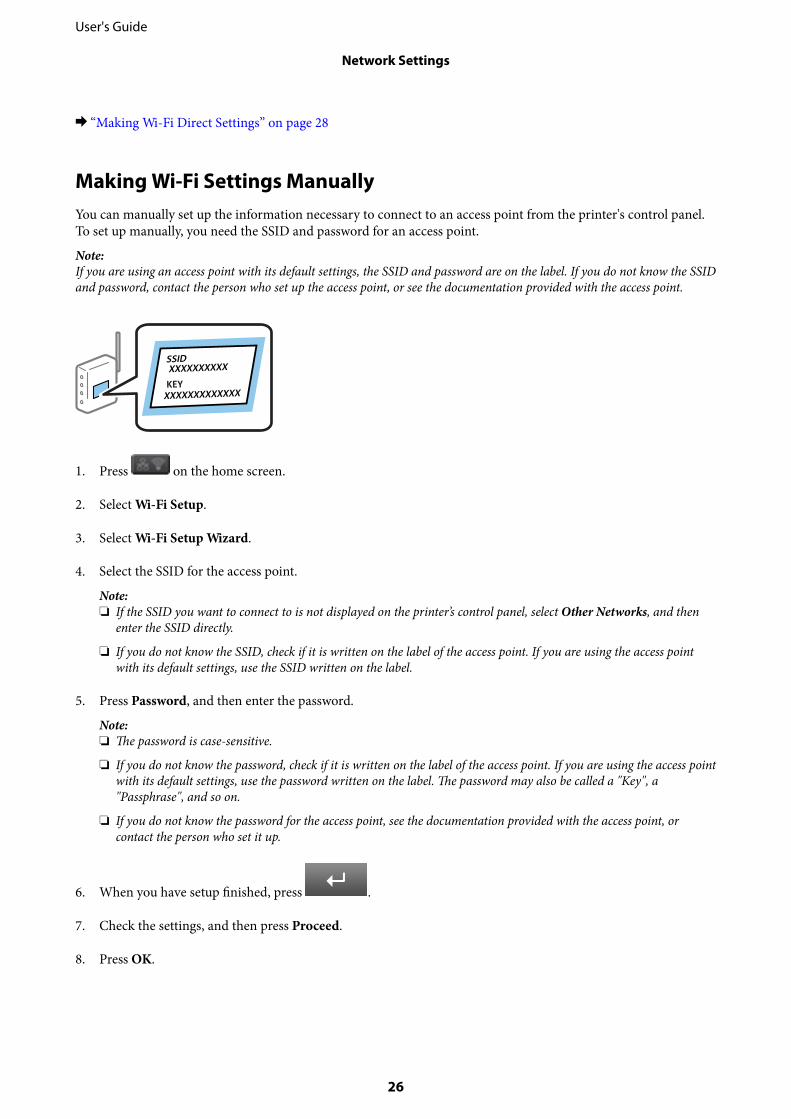
Making Wi-Fi Settings ManuallyYou can manually set up the information necessary to connect to an access point from the printer's control panel.To set up manually, you need the SSID and password for an access point.
Note:If you are using an access point with its default settings, the SSID and password are on the label. If you do not know the SSIDand password, contact the person who set up the access point, or see the documentation provided with the access point.
1. Press on the home screen.
2. Select Wi-Fi Setup.
3. Select Wi-Fi Setup Wizard.
4. Select the SSID for the access point.
Note:❏ If the SSID you want to connect to is not displayed on the printer’s control panel, select Other Networks, and then
enter the SSID directly.
❏ If you do not know the SSID, check if it is written on the label of the access point. If you are using the access pointwith its default settings, use the SSID written on the label.
5. Press Password, and then enter the password.
Note:❏ The password is case-sensitive.
❏ If you do not know the password, check if it is written on the label of the access point. If you are using the access pointwith its default settings, use the password written on the label. The password may also be called a "Key", a"Passphrase", and so on.
❏ If you do not know the password for the access point, see the documentation provided with the access point, orcontact the person who set it up.
6. When you have setup finished, press .
7. Check the settings, and then press Proceed.
8. Press OK.
User's Guide
Network Settings
26
9. Press Done to finish.
Note:If you fail to connect, load A4 size plain paper, and then press the button to print a connection report.
Related Information
& “Checking the Network Connection Status” on page 32& “When You Cannot Make Network Settings” on page 190
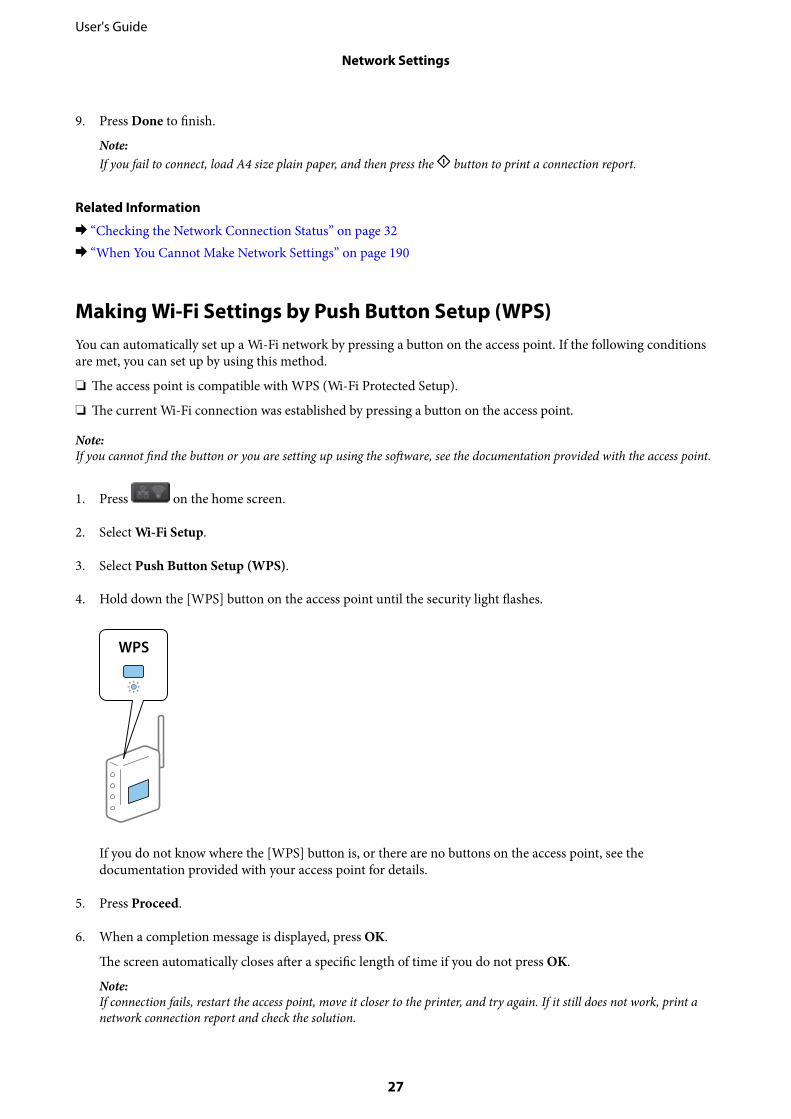
Making Wi-Fi Settings by Push Button Setup (WPS)You can automatically set up a Wi-Fi network by pressing a button on the access point. If the following conditionsare met, you can set up by using this method.
❏ The access point is compatible with WPS (Wi-Fi Protected Setup).
❏ The current Wi-Fi connection was established by pressing a button on the access point.
Note:If you cannot find the button or you are setting up using the software, see the documentation provided with the access point.
1. Press on the home screen.
2. Select Wi-Fi Setup.
3. Select Push Button Setup (WPS).
4. Hold down the [WPS] button on the access point until the security light flashes.
If you do not know where the [WPS] button is, or there are no buttons on the access point, see thedocumentation provided with your access point for details.
5. Press Proceed.
6. When a completion message is displayed, press OK.
The screen automatically closes after a specific length of time if you do not press OK.
Note:If connection fails, restart the access point, move it closer to the printer, and try again. If it still does not work, print anetwork connection report and check the solution.
User's Guide
Network Settings
27
7. Press OK.
Related Information
& “Checking the Network Connection Status” on page 32& “When You Cannot Make Network Settings” on page 190
Making Wi-Fi Settings by PIN Code Setup (WPS)You can automatically connect to an access point by using a PIN code. You can use this method to set up if anaccess point is capable of WPS (Wi-Fi Protected Setup). Use a computer to enter a PIN code into the access point.
1. Press on the home screen.
2. Select Wi-Fi Setup.
3. Select PIN Code Setup (WPS).
4. Use your computer to enter the PIN code (an eight digit number) displayed on the printer's control panel intothe access point within two minutes.
Note:See the documentation provided with your access point for details on entering a PIN code.
5. Press Proceed.
6. When a completion message is displayed, press OK.
The screen automatically closes after a specific length of time if you do not press OK.
Note:If connection fails, restart the access point, move it closer to the printer, and try again. If it still does not work, print aconnection report and check the solution.
7. Press OK.
Related Information
& “Checking the Network Connection Status” on page 32& “When You Cannot Make Network Settings” on page 190
Making Wi-Fi Direct SettingsThis method allows you to connect the printer directly to devices without an access point. The printer acts as anaccess point. The connection mode varies depending on whether or not Wi-Fi settings have been made.
User's Guide
Network Settings
28
cImportant:
When you connect from the computer or smart device to the printer using the Wi-Fi Direct connection, the printer isconnected to the same Wi-Fi network (SSID) as the computer or smart device and the communication is establishedbetween them. Since the computer or smart device is automatically connected to the other connectable Wi-Finetwork if the printer is turned off, it is not connected to the previous Wi-Fi network again if the printer is turnedon. Connect to the printer's SSID for Wi-Fi Direct connection from the computer or smart device again. If you donot want to connect every time you turn the printer on or off, we recommend to use Wi-Fi network by connectingthe printer to an access point.
Related Information
& “Making Wi-Fi Direct Settings When Wi-Fi Is Disabled (Simple AP Mode)” on page 29& “Making Wi-Fi Direct Settings When Wi-Fi Is Enabled (Wi-Fi Direct Mode)” on page 30
Making Wi-Fi Direct Settings When Wi-Fi Is Disabled (Simple AP Mode)
Note:In this mode, the printer can be connected by Ethernet at the same time. Also, you can connect up to four devices to theprinter.
1. Press on the home screen.
2. Select Wi-Fi Setup.
3. Select Wi-Fi Direct Setup.
4. Select Connection Setup.
5. Select Proceed.
If you want to change the password, select Change Password and follow the on-screen instruction.
6. Scroll the screen and check the SSID and password. On the computer's network connection screen or thesmart device's Wi-Fi screen, select the SSID shown on the printer's control panel to connect.
7. Enter the password displayed on the printer's control panel.
8. After the connection is established, press Done on the printer's control panel.
Related Information
& “Checking the Network Connection Status” on page 32& “When You Cannot Make Network Settings” on page 190
User's Guide
Network Settings
29
Making Wi-Fi Direct Settings When Wi-Fi Is Enabled (Wi-Fi Direct Mode)
cImportant:
Since the printer is disconnected from the Wi-Fi network when it is connected in Wi-Fi Direct mode, you cannot usethe printer over the Wi-Fi network. If you disconnect the connection in Wi-Fi Direct mode, the printer is re-connected to the previous Wi-Fi network.
The connection method for Wi-Fi Direct mode is much the same as Simple AP mode. Select > Wi-Fi Setup> Wi-Fi Direct Setup > Connection Setup on the pritner's control panel, press Proceed, and then start connectingfrom the device. The message is displayed on the printer's control panel and the network icon on the home screenchanges to the Wi-Fi Direct mode icon when the printer is connected.
Note:You can connect in Wi-Fi Direct mode from Android devices only. Before connecting, start Web Config, and then select BasicSettings > Wi-Fi Direct Setup > Connect to the Wi-Fi Direct devices only to set up the prnter. The method for startingconnection from the printer is the same as for Wi-Fi Direct mode.
If you connect in Wi-Fi Direct mode from specific smart devices, you can only connect using Wi-Fi Direct mode whenconnecting to the printer from the smart device, and you do not need to enter the SSID and password because the printerand the devices communicate each other directly to connect.
Related Information
& “Checking the Network Connection Status” on page 32& “When You Cannot Make Network Settings” on page 190
Making Advanced Network Settings from the Control PanelYou can change the network printer name, TCP/IP setup, DNS server and so on. Check your network environmentbefore making changes.
1. Press on the home screen.
2. Select Menu.
3. Select Wi-Fi/Network Settings.
4. Select Advanced Setup.
5. Select the menu item for settings, and then select or specify the setting values.
Setting Items for Advanced Network Settings
Select the menu item for settings, and then select or specify the setting values.
User's Guide
Network Settings
30
❏ Printer NameEnter the printer name. You can enter the following characters.
❏ Character limits: 2 to 15 (you must enter at least 2 characters)
❏ Usable characters: A to Z, a to z, 0 to 9, -.
❏ Characters you cannot use at the top: 0 to 9.
❏ Characters you cannot use at the bottom: -
Note:
If you press button without entering the printer name, the default printer name (EPSON and the last six digitsof the printer's MAC address) are set.
❏ TCP/IP Address
❏ AutoSelect when you are using an access point at home or you are allowing the IP address to be acquiredautomatically by DHCP.
❏ ManualSelect when you do not want the printer's IP address to be changed. Enter the IP Address, Subnet Mask, andDefault Gateway, according to your network environment.
❏ DNS Server
❏ AutoSelect when you want to acquire the IP address automatically.
❏ ManualSelect when you want to set a unique DNS server address to the printer. Enter the addresses for the PrimaryDNS Server and the Secondary DNS Server.
❏ Proxy Server
❏ UseSelect when you are using a proxy server in your network environment and you want to set it to the printer.Enter the proxy server address and port number.
❏ Do Not UseSelect when you are using the printer in a home network environment.
❏ Email Server
❏ Server SettingsSpecify the authentication method for the printer to access the mail server from Off, POP before SMTP, orSMTP-AUTH.
❏ Connection CheckYou can check the connection for e-mail server. See Administrator's Guide if an error occurs whenperforming Connection Check.
User's Guide
Network Settings
31
❏ IPv6 Address
❏ EnableSelect this when using an IPv6 address.
❏ DisableSelect this when using an IPv4 address.
❏ Wi-Fi Direct
❏ EnableAllow computers or smart devices to connect using Wi-Fi Direct.
❏ DisableReject computers or smart devices that are trying to connect using Wi-Fi Direct. If Disable is selected, nocomputers or smart devices can connect to the printer directly.
❏ MS Network Sharing
❏ EnableUse MS Network service.
❏ DisableProhibit file sharing using the MS Network service. You cannot share files by network scanning.
Checking the Network Connection StatusYou can check the network connection status in the following way.
Checking the Network Status Using Network IconYou can check the network connection status using the network icon on the printer's home screen. The iconchanges depending on the connection type and strength of the radio wave.
Related Information
& “Icons Displayed on the LCD Screen” on page 19
Checking the Network Status from the Control PanelWhen your printer is connected to the network, you can also view other network-related information by pressingthe network menus you want to check.
1. Enter Setup from the home screen.
2. Select Network Status.
3. To check the information, select the menus that you want to check.
❏ Wi-Fi/Network StatusDisplays the network information (Printer Name, Obtain IP Address, Default Gateway, DNS Server SetupMode and so on) for Ethernet or Wi-Fi connections.
User's Guide
Network Settings
32
❏ Wi-Fi Direct StatusDisplays the network information (Printer Name, Connection, Obtain IP Address, Default Gateway and soon) for Wi-Fi Direct connections.
❏ Email Server Status
❏ Epson Connect StatusDisplays the registered information for Epson Connect services.
❏ Google Cloud Print StatusDisplays the registered information for services and the connection status.
4. Press OK to return to the menu screen or Print to print a network status sheet.
When you press Print, make sure that A4 plain paper is loaded in the printer, and then press the x button toprint.
Printing a Network Connection ReportYou can print a network connection report to check the status between the printer and the access point.
1. Load A4-size plain paper in the printer.
2. Press on the home screen.
3. Select Menu.
4. Select Wi-Fi/Network Settings > Connection Check.
5. Press x button to print the network connection report.
If an error has occurred, check the network connection report and then follow the printed solutions.
Related Information
& “Messages and Solutions on the Network Connection Report” on page 34
User's Guide
Network Settings
33
Messages and Solutions on the Network Connection Report
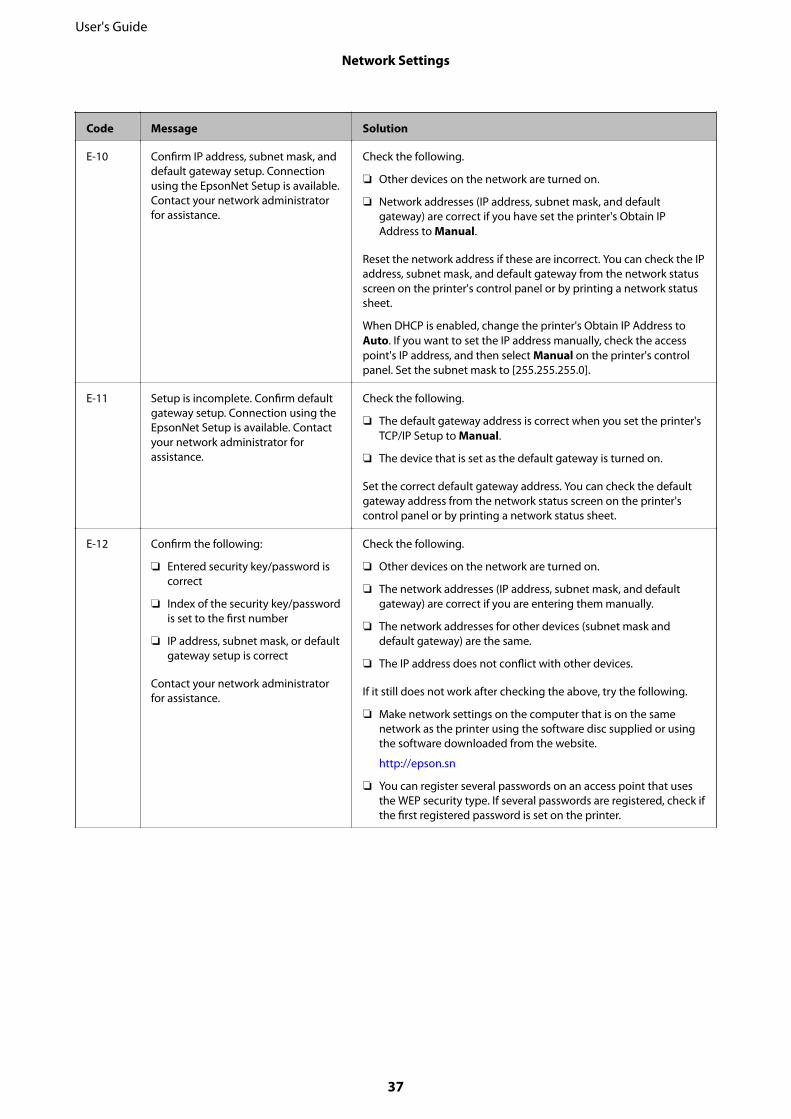
Check the messages and error codes on the network connection report, and then follow the solutions.
a. Error code
b. Messages on the Network Environment
a. Error code
Code Message Solution
E-1 Confirm that the network cable isconnected and network devices suchas hub, router, or access point areturned on.
❏ Make sure that the Ethernet cable is connected to the printer, ahub, or other network devices.
❏ Make sure that the hub or other network devices are turned on.
User's Guide
Network Settings
34
Code Message Solution
E-2 No wireless network names (SSID)found. Confirm that the router/accesspoint is turned on and the wirelessnetwork (SSID) is set up correctly.Contact your network administratorfor assistance.
❏ Make sure that the access point is turned on.
❏ Check that the computer or other devices are connected correctlyto the access point.
❏ Place the printer close to the access point. Remove any obstaclesbetween them.
❏ If you have entered the SSID manually, check if it is correct. Youcan check the SSID from Network Status on the networkconnection report.
❏ To establish a network using Push Button Setup (WPS), check thatthe access point supports WPS. If it does not support WPS, youcannot establish a network using Push Button Setup (WPS).
❏ If you want to connect the printer and a computer in Ad Hocmode, set up your computer in Ad Hoc mode and start aconnection, and then make the printer's network settings.
❏ Check that only ASCII characters (alphanumeric characters andsymbols) are used for the SSID. The printer cannot display an SSIDwhich contains any characters other than ASCII characters.
E-3 No wireless network names (SSID)found. Confirm that the wirelessnetwork name (SSID) of the PC youwish to connect is set up correctly.Contact your network administratorfor assistance.
❏ To establish a connection in Ad Hoc mode, make sure thecomputer is turned on. If it is turned off, turn it on and then makethe printer's network settings.
❏ Place the computer close to the printer.
E-4 Wi-Fi communication mode(IEEE802.11b/g/n) does not match thecurrent setting of the printer. Set thesame communication mode to theprinter, router/access point, and PC.Contact your network administratorfor assistance.
Make sure the Wi-Fi standard set on the access point matches theprinter's Wi-Fi standard. If the standard does not match, adjust theWi-Fi standard on the access point. See the documentation providedwith the access point for details.
E-5 Security mode (e.g. WEP, WPA) doesnot match the current setting of theprinter. Confirm security mode.Contact your network administratorfor assistance.
Make sure the access point's security type is set to one of thefollowing. If it is not, change the security type on the access point,and then reset the printer's network settings.
❏ WEP-64 bit (40 bit)
❏ WEP-128 bit (104 bit)
❏ WPA PSK (TKIP/AES)*
❏ WPA2 PSK (TKIP/AES)*
❏ WPA (TKIP/AES)
❏ WPA2 (TKIP/AES)
* : WPA PSK is also known as WPA Personal. WPA2 PSK is alsoknown as WPA2 Personal.
User's Guide
Network Settings
35
Code Message Solution
E-6 MAC address of your printer may befiltered. Check whether your router/access point has restrictions such asMAC address filtering. See thedocumentation of the router/accesspoint or contact your networkadministrator for assistance.
❏ Check if the MAC address is disabled. If it is enabled, register theprinter's MAC address so that it is not filtered. See thedocumentation provided with the access point for details. You cancheck the printer's MAC address from the network status screenon the printer's control panel or by printing a network statussheet.
❏ If the access point's shared authentication is enabled on the WEPsecurity method, make sure the authentication key and index arecorrect.
E-7 Entered security key/password doesnot match the one set for your router/access point. Confirm security key/password. Contact your networkadministrator for assistance.
❏ The password set on the access point and the entered passworddo not match. The password is case sensitive. Enter the correctpassword.
❏ If the Wi-Fi connection is suddenly disconnected, check thefollowing. If any of these are applicable, reset the network settingsusing the software disc supplied or using the softwaredownloaded from the website.
http://epson.sn
❏ Another smart device was added to the network usingPush Button Setup (WPS).
❏ The Wi-Fi network was set up using any method otherthan Push Button Setup (WPS) from the software discsupplied.
E-8 Incorrect IP address is assigned to theprinter. Confirm IP address setup ofthe network device (hub, router, oraccess point). Contact your networkadministrator for assistance.
❏ Enable DHCP on the access point when the printer's Obtain IPAddress is set to Auto.
❏ If the printer's Obtain IP Address is set to Manual, the IP addressyou manually set is out of range (for example: 0.0.0.0) and it isdisabled. Set a valid IP address.
E-9 Confirm the connection and networksetup of the PC or other device.Connection using the EpsonNet Setupis available. Contact your networkadministrator for assistance.
Check the following.
❏ Devices are turned on.
❏ You can access the Internet and other computers or networkdevices on the same network from the devices you want toconnect to the printer.
If it still does not work after checking the above, reset the networksettings using the software disc supplied or using the softwaredownloaded from the website.
http://epson.sn
User's Guide
Network Settings
36
Code Message Solution
E-10 Confirm IP address, subnet mask, anddefault gateway setup. Connectionusing the EpsonNet Setup is available.Contact your network administratorfor assistance.
Check the following.
❏ Other devices on the network are turned on.
❏ Network addresses (IP address, subnet mask, and defaultgateway) are correct if you have set the printer's Obtain IPAddress to Manual.
Reset the network address if these are incorrect. You can check the IPaddress, subnet mask, and default gateway from the network statusscreen on the printer's control panel or by printing a network statussheet.
When DHCP is enabled, change the printer's Obtain IP Address toAuto. If you want to set the IP address manually, check the accesspoint's IP address, and then select Manual on the printer's controlpanel. Set the subnet mask to [255.255.255.0].
E-11 Setup is incomplete. Confirm defaultgateway setup. Connection using theEpsonNet Setup is available. Contactyour network administrator forassistance.
Check the following.
❏ The default gateway address is correct when you set the printer'sTCP/IP Setup to Manual.
❏ The device that is set as the default gateway is turned on.
Set the correct default gateway address. You can check the defaultgateway address from the network status screen on the printer'scontrol panel or by printing a network status sheet.
E-12 Confirm the following:
❏ Entered security key/password iscorrect
❏ Index of the security key/passwordis set to the first number
❏ IP address, subnet mask, or defaultgateway setup is correct
Contact your network administratorfor assistance.
Check the following.
❏ Other devices on the network are turned on.
❏ The network addresses (IP address, subnet mask, and defaultgateway) are correct if you are entering them manually.
❏ The network addresses for other devices (subnet mask anddefault gateway) are the same.
❏ The IP address does not conflict with other devices.
If it still does not work after checking the above, try the following.
❏ Make network settings on the computer that is on the samenetwork as the printer using the software disc supplied or usingthe software downloaded from the website.
http://epson.sn
❏ You can register several passwords on an access point that usesthe WEP security type. If several passwords are registered, check ifthe first registered password is set on the printer.
User's Guide
Network Settings
37
Code Message Solution
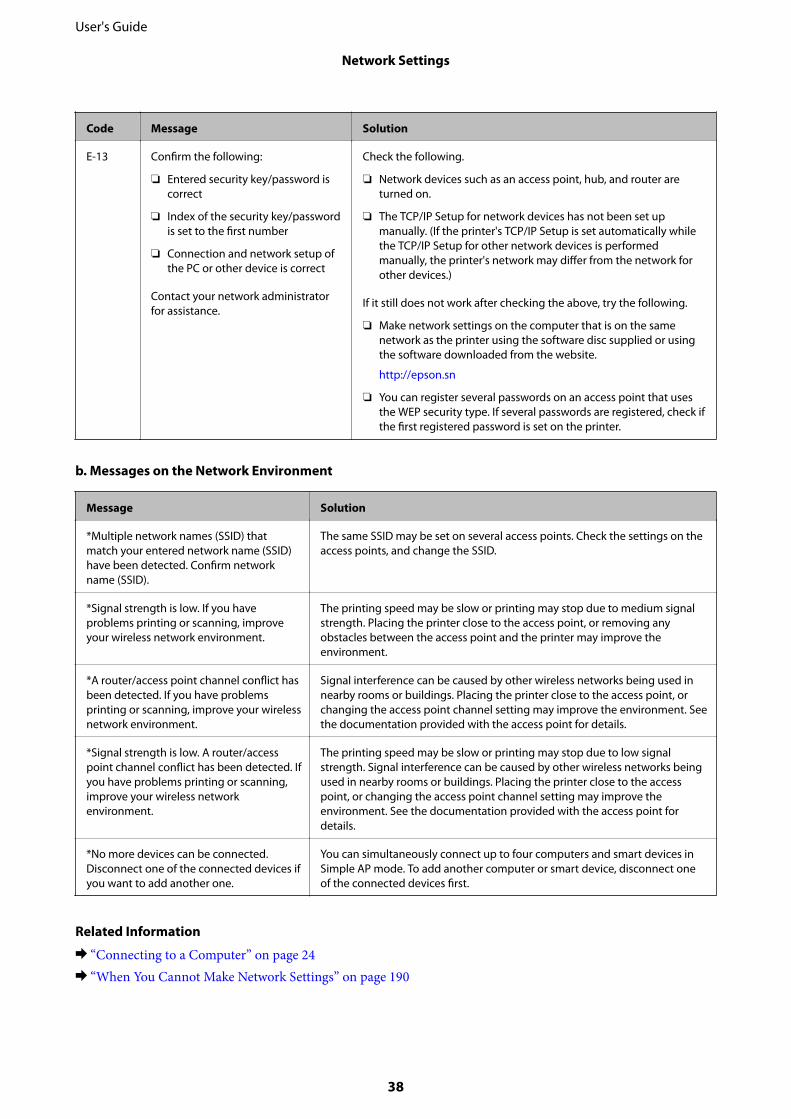
E-13 Confirm the following:
❏ Entered security key/password iscorrect
❏ Index of the security key/passwordis set to the first number
❏ Connection and network setup ofthe PC or other device is correct
Contact your network administratorfor assistance.
Check the following.
❏ Network devices such as an access point, hub, and router areturned on.
❏ The TCP/IP Setup for network devices has not been set upmanually. (If the printer's TCP/IP Setup is set automatically whilethe TCP/IP Setup for other network devices is performedmanually, the printer's network may differ from the network forother devices.)
If it still does not work after checking the above, try the following.
❏ Make network settings on the computer that is on the samenetwork as the printer using the software disc supplied or usingthe software downloaded from the website.
http://epson.sn
❏ You can register several passwords on an access point that usesthe WEP security type. If several passwords are registered, check ifthe first registered password is set on the printer.
b. Messages on the Network Environment
Message Solution
*Multiple network names (SSID) thatmatch your entered network name (SSID)have been detected. Confirm networkname (SSID).
The same SSID may be set on several access points. Check the settings on theaccess points, and change the SSID.
*Signal strength is low. If you haveproblems printing or scanning, improveyour wireless network environment.
The printing speed may be slow or printing may stop due to medium signalstrength. Placing the printer close to the access point, or removing anyobstacles between the access point and the printer may improve theenvironment.
*A router/access point channel conflict hasbeen detected. If you have problemsprinting or scanning, improve your wirelessnetwork environment.
Signal interference can be caused by other wireless networks being used innearby rooms or buildings. Placing the printer close to the access point, orchanging the access point channel setting may improve the environment. Seethe documentation provided with the access point for details.
*Signal strength is low. A router/accesspoint channel conflict has been detected. Ifyou have problems printing or scanning,improve your wireless networkenvironment.
The printing speed may be slow or printing may stop due to low signalstrength. Signal interference can be caused by other wireless networks beingused in nearby rooms or buildings. Placing the printer close to the accesspoint, or changing the access point channel setting may improve theenvironment. See the documentation provided with the access point fordetails.
*No more devices can be connected.Disconnect one of the connected devices ifyou want to add another one.
You can simultaneously connect up to four computers and smart devices inSimple AP mode. To add another computer or smart device, disconnect oneof the connected devices first.
Related Information
& “Connecting to a Computer” on page 24& “When You Cannot Make Network Settings” on page 190
User's Guide
Network Settings
38
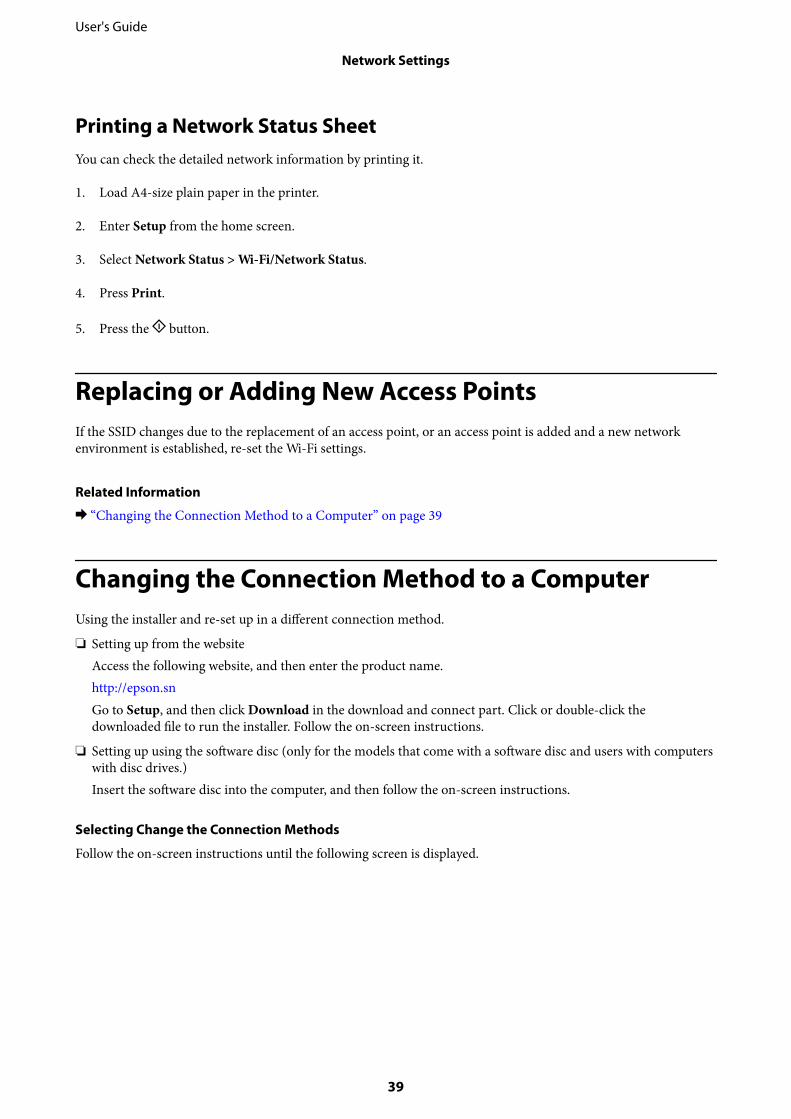
Printing a Network Status SheetYou can check the detailed network information by printing it.
1. Load A4-size plain paper in the printer.
2. Enter Setup from the home screen.
3. Select Network Status > Wi-Fi/Network Status.
4. Press Print.
5. Press the button.
Replacing or Adding New Access PointsIf the SSID changes due to the replacement of an access point, or an access point is added and a new networkenvironment is established, re-set the Wi-Fi settings.
Related Information
& “Changing the Connection Method to a Computer” on page 39
Changing the Connection Method to a ComputerUsing the installer and re-set up in a different connection method.
❏ Setting up from the websiteAccess the following website, and then enter the product name.http://epson.snGo to Setup, and then click Download in the download and connect part. Click or double-click thedownloaded file to run the installer. Follow the on-screen instructions.
❏ Setting up using the software disc (only for the models that come with a software disc and users with computerswith disc drives.)Insert the software disc into the computer, and then follow the on-screen instructions.
Selecting Change the Connection Methods
Follow the on-screen instructions until the following screen is displayed.
User's Guide
Network Settings
39
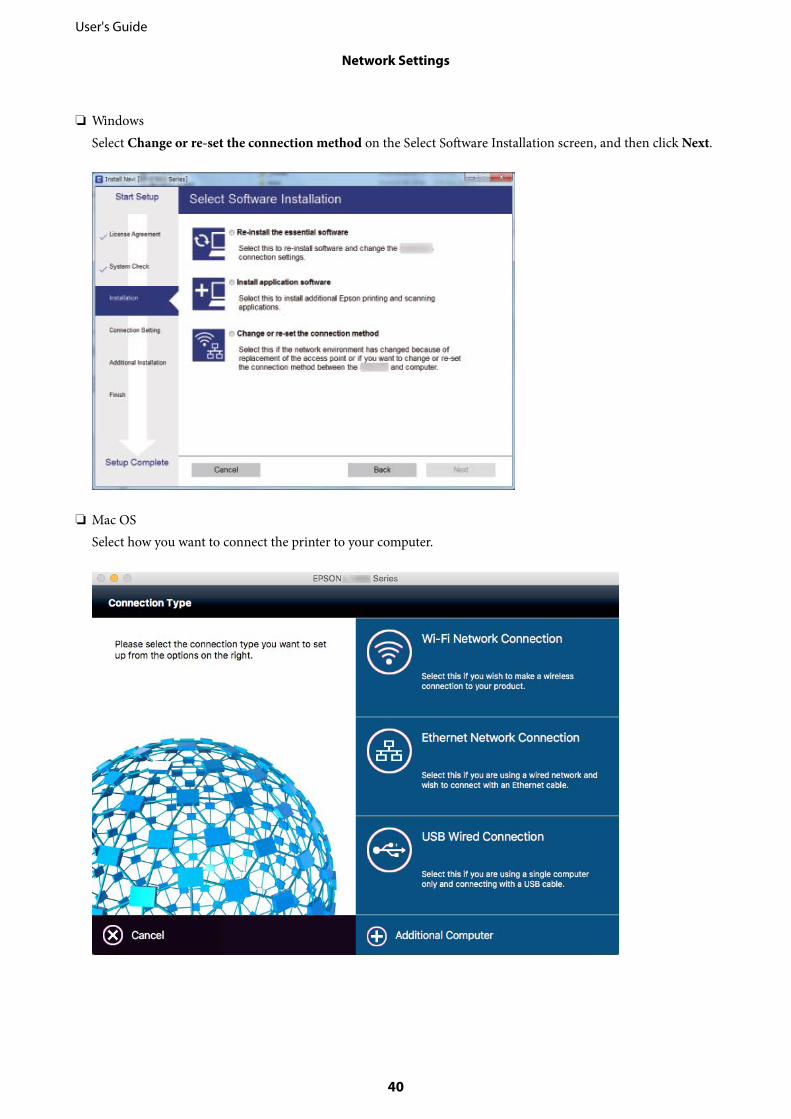
❏ WindowsSelect Change or re-set the connection method on the Select Software Installation screen, and then click Next.
❏ Mac OSSelect how you want to connect the printer to your computer.
User's Guide
Network Settings
40
Disabling Wi-Fi from the Control PanelWhen Wi-Fi is disabled, the Wi-Fi connection is disconnected.
1. Press on the home screen.
2. Select Wi-Fi Setup.
3. Select Disable Wi-Fi.
4. Check the message, and then select Yes.
5. Press Done.
Disconnecting Wi-Fi Direct from the Control PanelNote:❏ When Simple AP mode is disabled, all devices connected to the printer in Simple AP mode are disconnected. If you want
to disconnect a specific device, disconnect from the device instead of the printer.
❏ If you disconnect Wi-Fi Direct mode from the printer or from a device, the network is returned to its original setup.
1. Press on the home screen.
2. Select Wi-Fi Setup.
3. Select Wi-Fi Direct Setup.
4. Select Disconnect.
5. Check the message, and then select Yes.
6. Press Done.
Restoring the Network Settings from the ControlPanelYou can restore all network settings to their defaults.
1. Enter Setup from the home screen.
2. Select System Administration.
3. Select Restore Default Settings.
4. Select Wi-Fi/Network Settings.
5. Check the message, and then select Yes.
User's Guide
Network Settings
41

6. Press OK.
User's Guide
Network Settings
42
Administrator Settings
Locking the Printer Settings Using an Administrator'sPasswordYou can set an administrator's password to lock the printer settings so that they cannot be changed by other users.You can lock the following settings.
❏ System Administration
❏ Eco Mode
❏ Presets
❏ Contacts
You cannot change settings without entering the password. This password is also required when you make settingsusing Web Config or EpsonNet Config.
cImportant:
Do not forget the password. If you forget the password, contact Epson support.
1. Enter Setup from the home screen.
2. Select Admin Settings > Admin Password.
3. Select Register, and then enter a password.
4. Enter the password again.
5. Select Lock Setting, and then enable it.
Unlocking the Printer Settings1. Enter Setup from the home screen.
2. Select Admin Settings.
3. Enter the administrator's password.
4. Select Lock Setting, and then disable it.
User's Guide
Administrator Settings
43
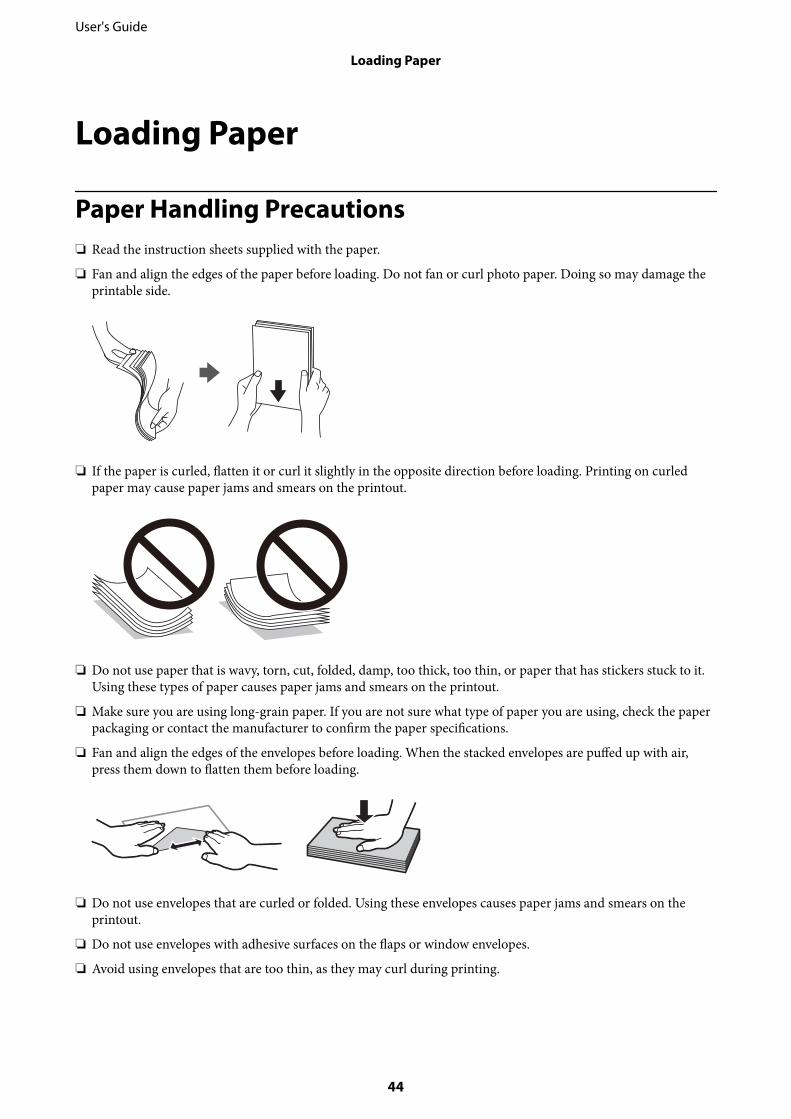
Loading Paper
Paper Handling Precautions❏ Read the instruction sheets supplied with the paper.
❏ Fan and align the edges of the paper before loading. Do not fan or curl photo paper. Doing so may damage theprintable side.
❏ If the paper is curled, flatten it or curl it slightly in the opposite direction before loading. Printing on curledpaper may cause paper jams and smears on the printout.
❏ Do not use paper that is wavy, torn, cut, folded, damp, too thick, too thin, or paper that has stickers stuck to it.Using these types of paper causes paper jams and smears on the printout.
❏ Make sure you are using long-grain paper. If you are not sure what type of paper you are using, check the paperpackaging or contact the manufacturer to confirm the paper specifications.
❏ Fan and align the edges of the envelopes before loading. When the stacked envelopes are puffed up with air,press them down to flatten them before loading.
❏ Do not use envelopes that are curled or folded. Using these envelopes causes paper jams and smears on theprintout.
❏ Do not use envelopes with adhesive surfaces on the flaps or window envelopes.
❏ Avoid using envelopes that are too thin, as they may curl during printing.
User's Guide
Loading Paper
44
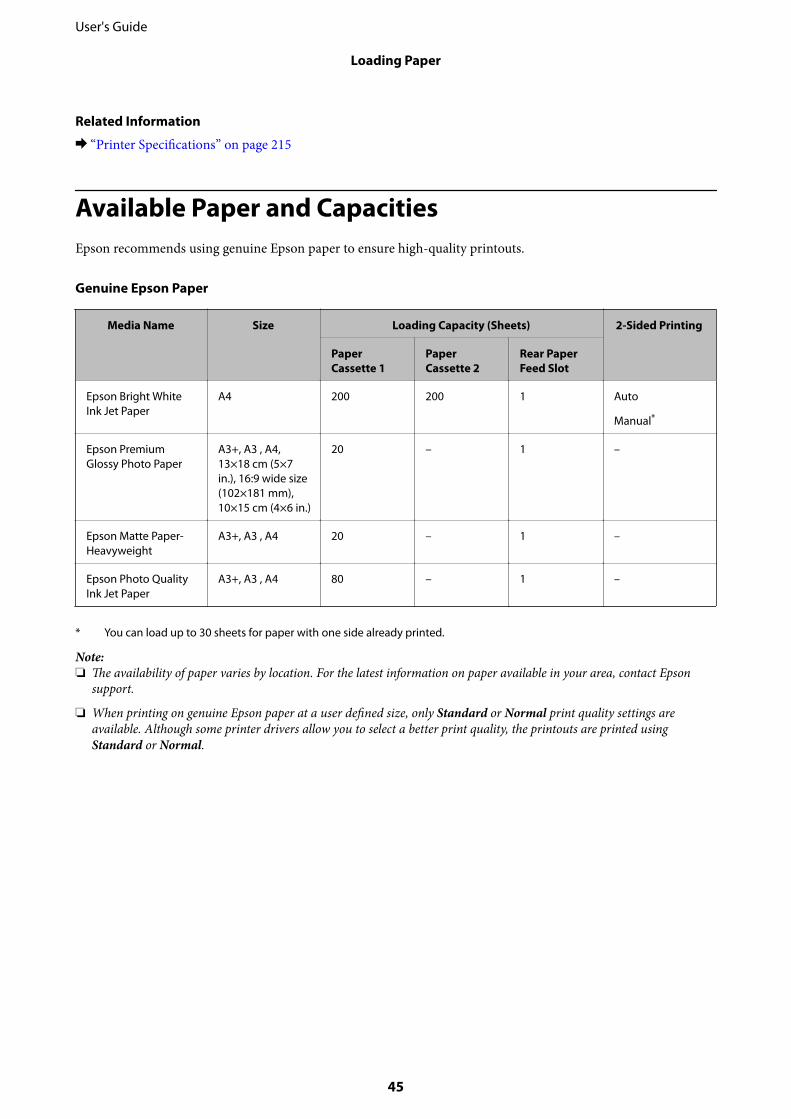
Related Information
& “Printer Specifications” on page 215
Available Paper and CapacitiesEpson recommends using genuine Epson paper to ensure high-quality printouts.
Genuine Epson Paper
Media Name Size Loading Capacity (Sheets) 2-Sided Printing
PaperCassette 1
PaperCassette 2
Rear PaperFeed Slot
Epson Bright WhiteInk Jet Paper
A4 200 200 1 Auto
Manual*
Epson PremiumGlossy Photo Paper
A3+, A3 , A4,13×18 cm (5×7in.), 16:9 wide size(102×181 mm),10×15 cm (4×6 in.)
20 – 1 –
Epson Matte Paper-Heavyweight
A3+, A3 , A4 20 – 1 –
Epson Photo QualityInk Jet Paper
A3+, A3 , A4 80 – 1 –
* You can load up to 30 sheets for paper with one side already printed.
Note:❏ The availability of paper varies by location. For the latest information on paper available in your area, contact Epson
support.
❏ When printing on genuine Epson paper at a user defined size, only Standard or Normal print quality settings areavailable. Although some printer drivers allow you to select a better print quality, the printouts are printed usingStandard or Normal.
User's Guide
Loading Paper
45
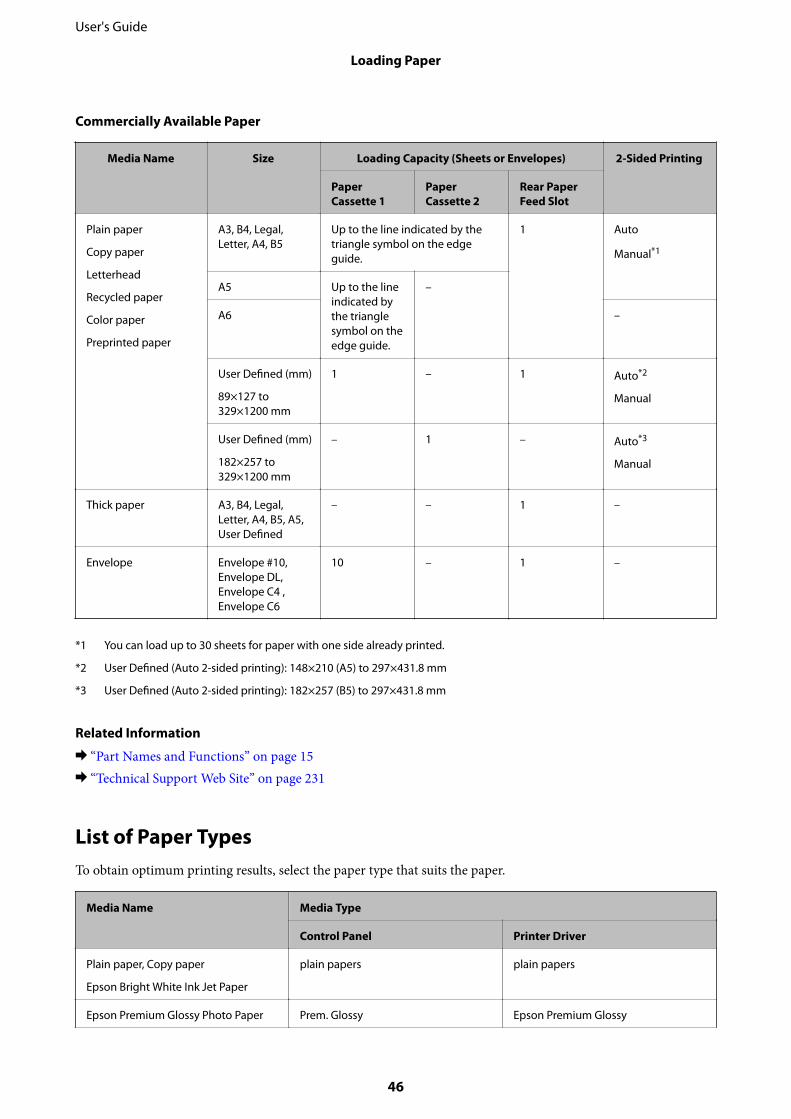
Commercially Available Paper
Media Name Size Loading Capacity (Sheets or Envelopes) 2-Sided Printing
PaperCassette 1
PaperCassette 2
Rear PaperFeed Slot
Plain paper
Copy paper
Letterhead
Recycled paper
Color paper
Preprinted paper
A3, B4, Legal,Letter, A4, B5
Up to the line indicated by thetriangle symbol on the edgeguide.
1 Auto
Manual*1
A5 Up to the lineindicated bythe trianglesymbol on theedge guide.
–
A6 –
User Defined (mm)
89×127 to329×1200 mm
1 – 1 Auto*2
Manual
User Defined (mm)
182×257 to329×1200 mm
– 1 – Auto*3
Manual
Thick paper A3, B4, Legal,Letter, A4, B5, A5,User Defined
– – 1 –
Envelope Envelope #10,Envelope DL,Envelope C4 ,Envelope C6
10 – 1 –
*1 You can load up to 30 sheets for paper with one side already printed.
*2 User Defined (Auto 2-sided printing): 148×210 (A5) to 297×431.8 mm
*3 User Defined (Auto 2-sided printing): 182×257 (B5) to 297×431.8 mm
Related Information
& “Part Names and Functions” on page 15& “Technical Support Web Site” on page 231
List of Paper TypesTo obtain optimum printing results, select the paper type that suits the paper.
Media Name Media Type
Control Panel Printer Driver
Plain paper, Copy paper
Epson Bright White Ink Jet Paper
plain papers plain papers
Epson Premium Glossy Photo Paper Prem. Glossy Epson Premium Glossy
User's Guide
Loading Paper
46
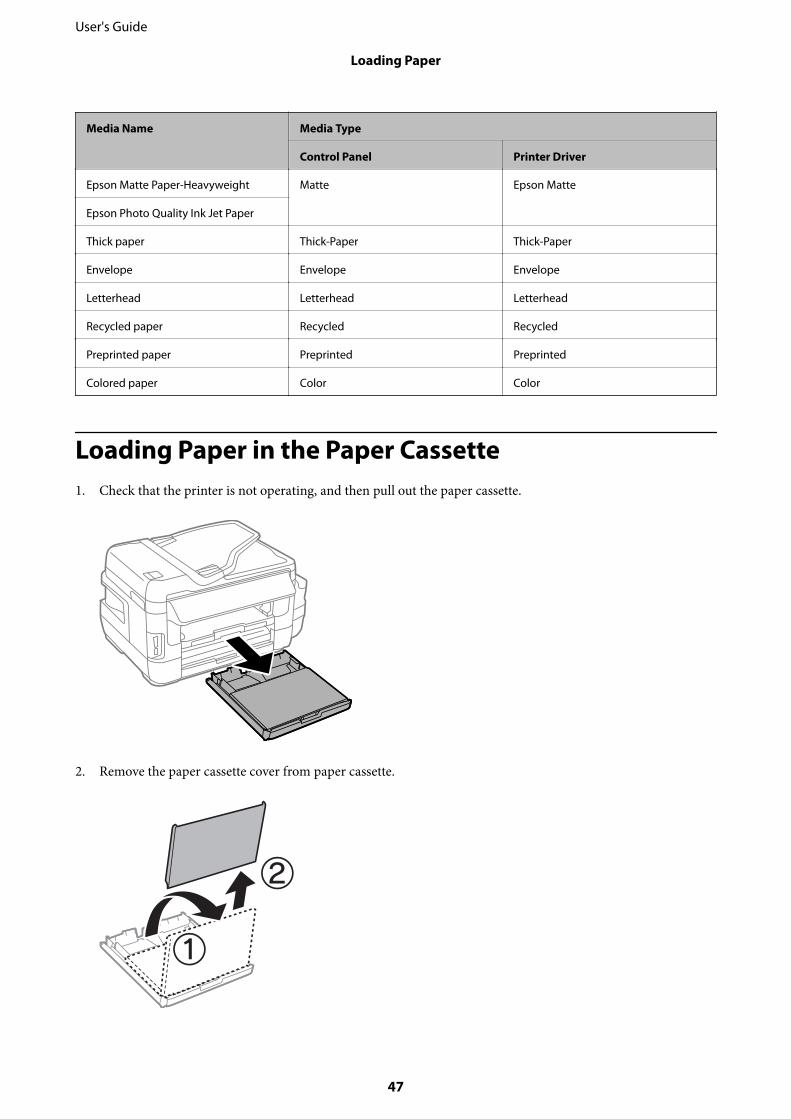
Media Name Media Type
Control Panel Printer Driver
Epson Matte Paper-Heavyweight Matte Epson Matte
Epson Photo Quality Ink Jet Paper
Thick paper Thick-Paper Thick-Paper
Envelope Envelope Envelope
Letterhead Letterhead Letterhead
Recycled paper Recycled Recycled
Preprinted paper Preprinted Preprinted
Colored paper Color Color
Loading Paper in the Paper Cassette1. Check that the printer is not operating, and then pull out the paper cassette.
2. Remove the paper cassette cover from paper cassette.
User's Guide
Loading Paper
47
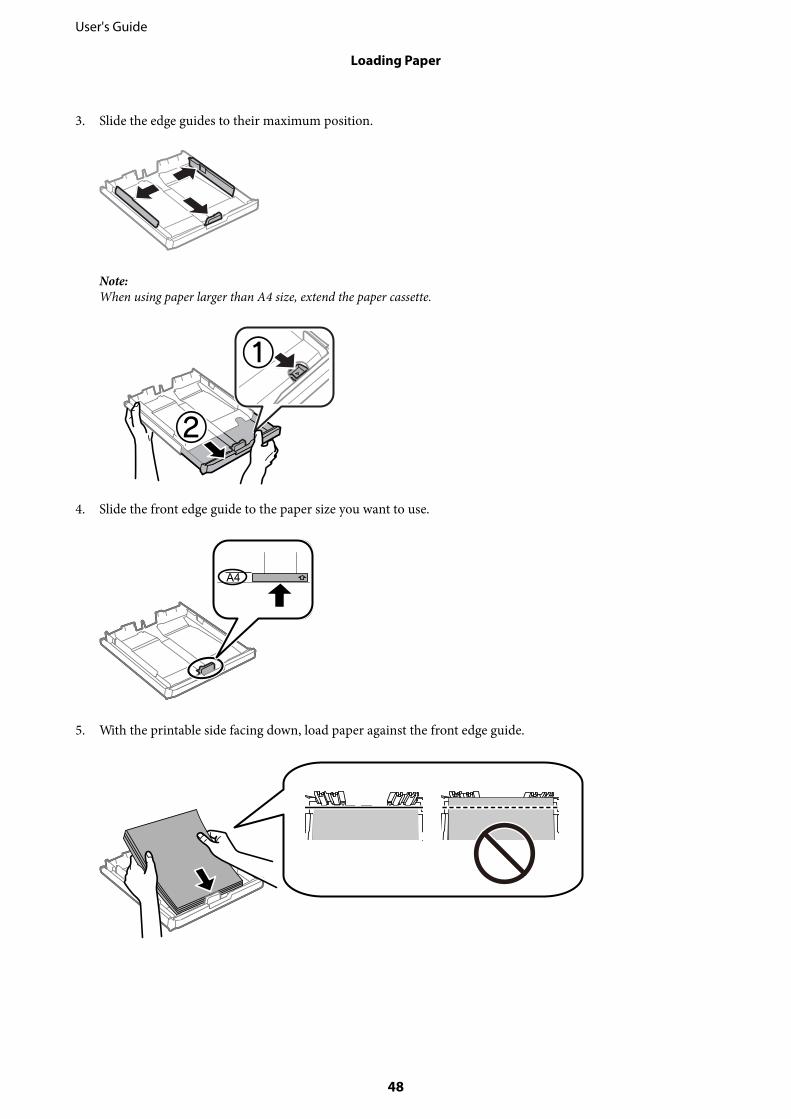
3. Slide the edge guides to their maximum position.
Note:When using paper larger than A4 size, extend the paper cassette.
4. Slide the front edge guide to the paper size you want to use.
5. With the printable side facing down, load paper against the front edge guide.
User's Guide
Loading Paper
48

For envelopes:
cImportant:
Do not load more than the maximum number of sheets specified for the paper. For plain paper, do not loadabove the line just under the triangle symbol inside the edge guide.
6. Slide the side edge guides to the edges of the paper.
7. Put the paper cassette cover back on.
8. Insert the paper cassette all the way.
9. On the control panel, set the size and type of the paper you loaded in the paper cassette.
Note:You can also display the paper size and paper type settings screen by selecting Setup > Paper Setup.
User's Guide
Loading Paper
49
10. Slide out the output tray.
Related Information
& “Paper Handling Precautions” on page 44& “Available Paper and Capacities” on page 45
Loading Paper in the Rear Paper Feed SlotYou can load a single sheet of all types of supported paper in the rear paper feed slot. You can also load thick paper(up to 0.3 mm thick) and pre-punched paper, which cannot be loaded in the paper cassette. However, even if thethickness is within this range, some paper may not be fed correctly depending on the hardness.
cImportant:
Do not load paper in the rear paper feed slot until the printer prompts you to do so. Doing so will result in the blankpaper being ejected.
1. Do one of the following.
❏ When printing from the control panel: Select rear paper feed slot as the Paper Source setting, make otherprint settings, and then press the x button.
❏ When printing from a computer: Select rear paper feed slot as the Paper Source setting, make other printsettings, and then click Print.
2. A message is displayed on the control panel telling you to load paper. Follow the instructions below to load thepaper.
User's Guide
Loading Paper
50
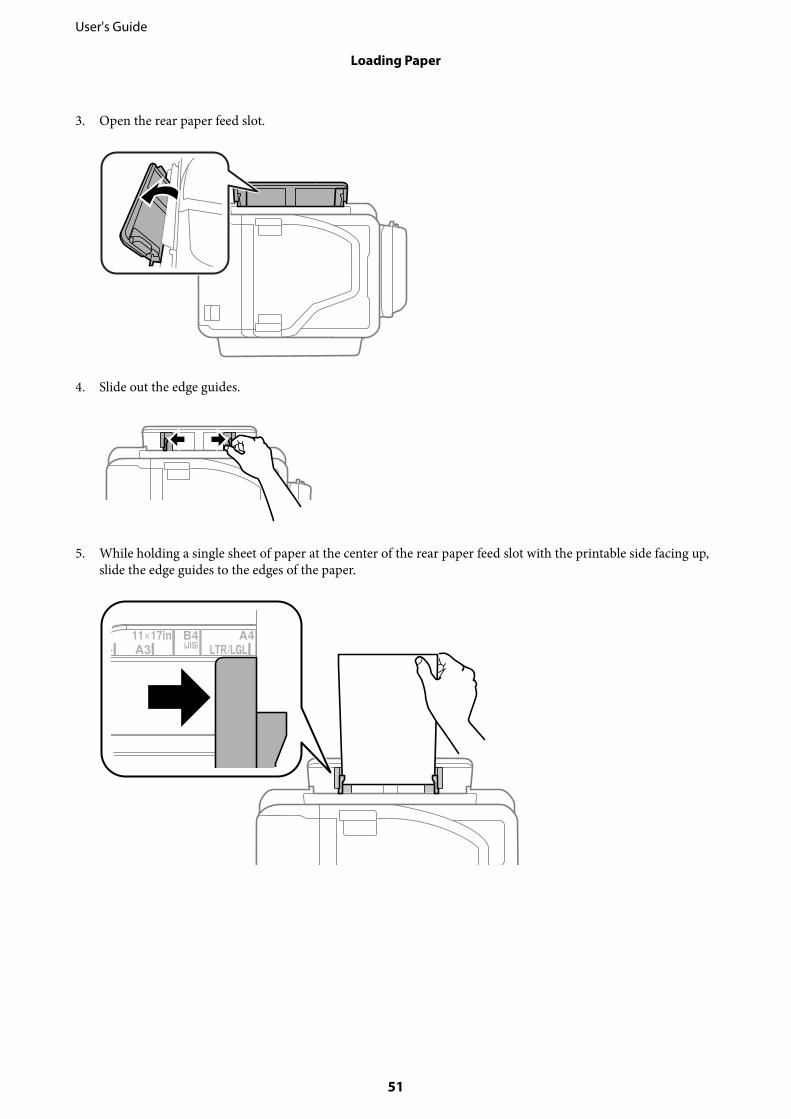
3. Open the rear paper feed slot.
4. Slide out the edge guides.
5. While holding a single sheet of paper at the center of the rear paper feed slot with the printable side facing up,slide the edge guides to the edges of the paper.
User's Guide
Loading Paper
51
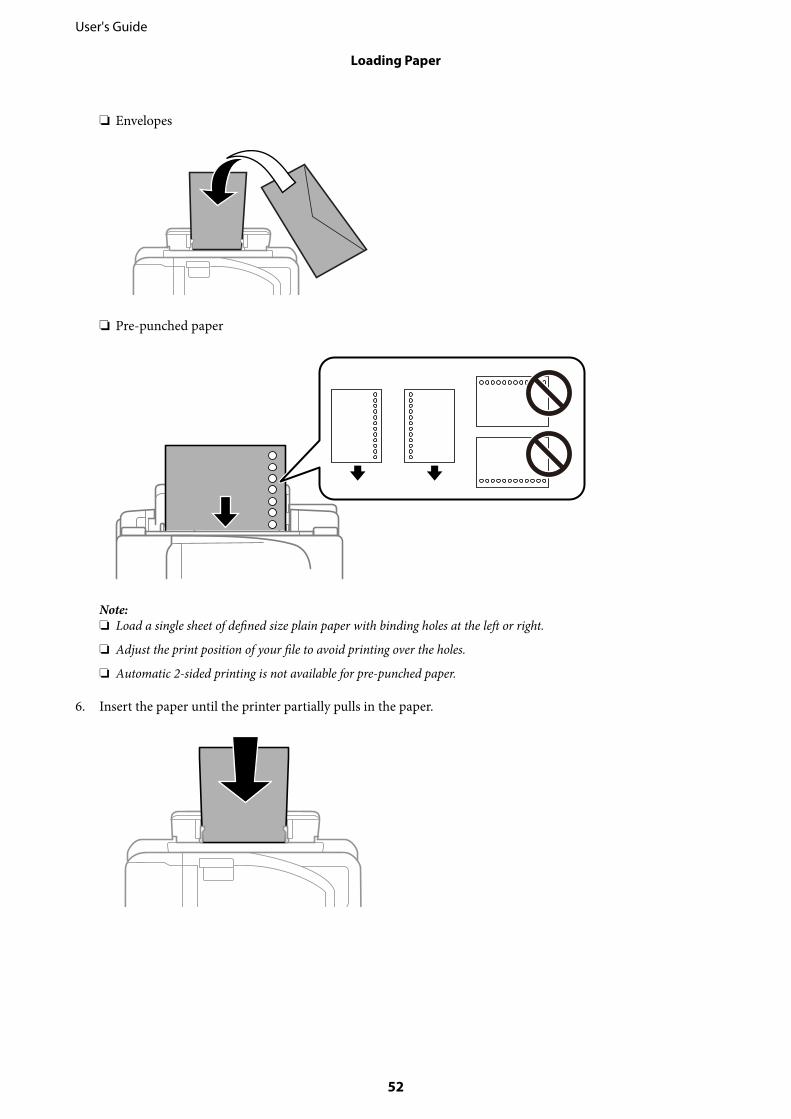
❏ Envelopes
❏ Pre-punched paper
Note:❏ Load a single sheet of defined size plain paper with binding holes at the left or right.
❏ Adjust the print position of your file to avoid printing over the holes.
❏ Automatic 2-sided printing is not available for pre-punched paper.
6. Insert the paper until the printer partially pulls in the paper.
User's Guide
Loading Paper
52
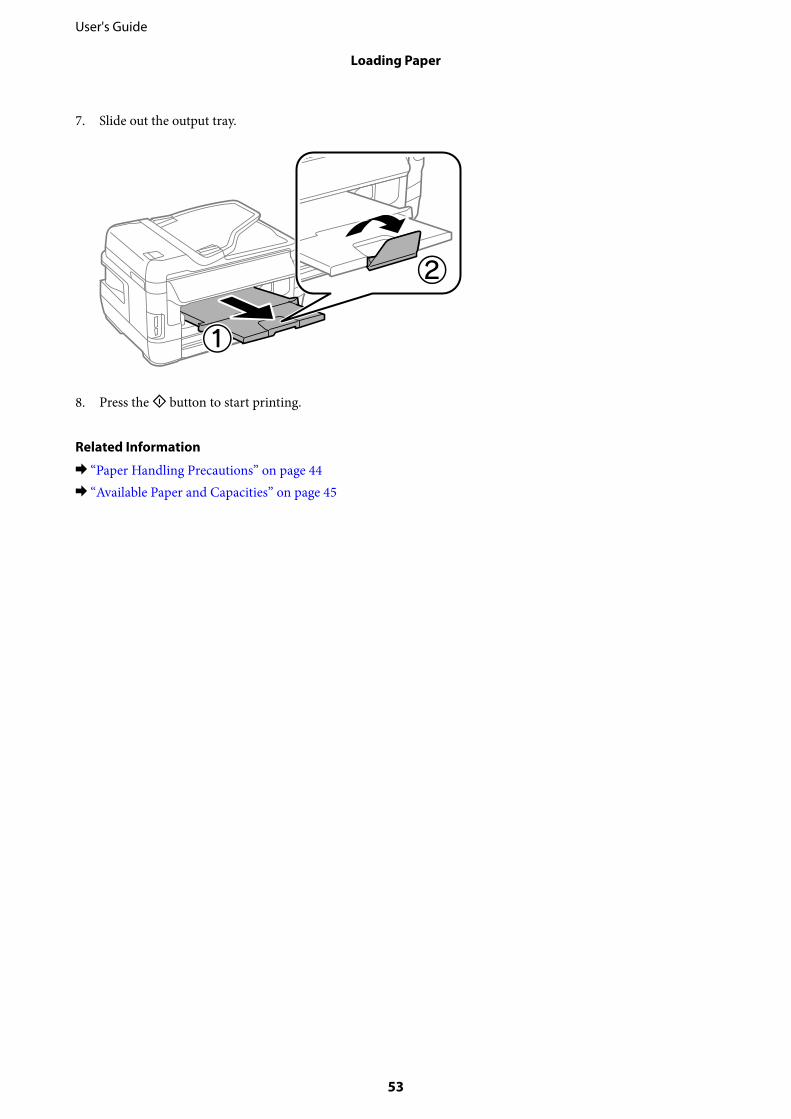
7. Slide out the output tray.
8. Press the x button to start printing.
Related Information
& “Paper Handling Precautions” on page 44& “Available Paper and Capacities” on page 45
User's Guide
Loading Paper
53

Placing OriginalsPlace originals on the scanner glass or the ADF. Use the scanner glass for originals that the ADF does not support.
You can scan multiple originals and both sides of the originals at the same time with the ADF.
Available Originals on the ADF
Available Paper Sizes A5 to A3, Ledger
Paper Type Plain paper
Paper Thickness (Weight of Paper) 64 to 95 g/m2
Loading Capacity 35 sheets or 3.5 mm
Even when the original meets the specifications for media that can be placed in the ADF, it may not feed from theADF or the scan quality may decline depending on the paper properties or quality.
cImportant:
Do not feed photographs or valuable original artwork into the ADF. Misfeeding may wrinkle or damage theoriginal. Scan these documents on the scanner glass instead.
To prevent paper jams, avoid placing the following originals in the ADF. For these types, use the scanner glass.
❏ Originals that are torn, folded, wrinkled, deteriorated, or curled
❏ Originals with binder holes
❏ Originals held together with tape, staples, paper clips etc.
❏ Originals that have stickers or labels stuck to them
❏ Originals that are cut irregularly or not right angled
❏ Originals that are bound
❏ OHPs, thermal transfer paper, or carbon backs
Placing Originals on the ADF1. Align the edges of the originals.
User's Guide
Placing Originals
54
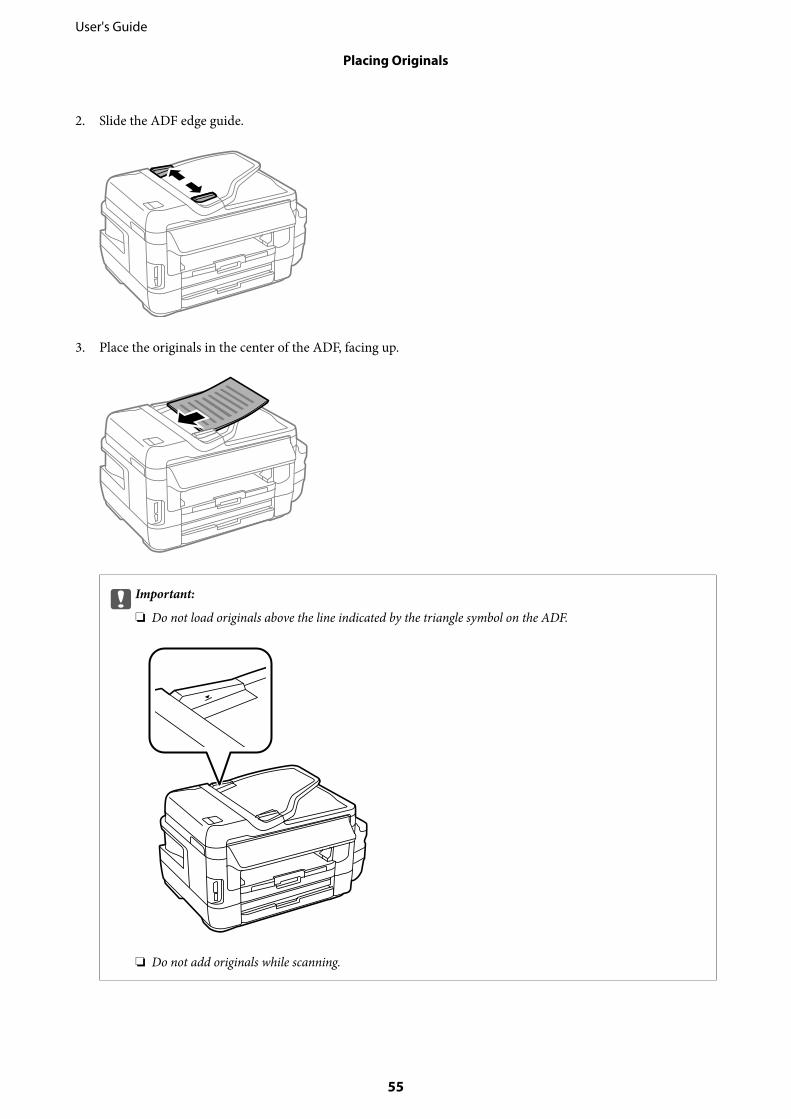
2. Slide the ADF edge guide.
3. Place the originals in the center of the ADF, facing up.
cImportant:
❏ Do not load originals above the line indicated by the triangle symbol on the ADF.
❏ Do not add originals while scanning.
User's Guide
Placing Originals
55
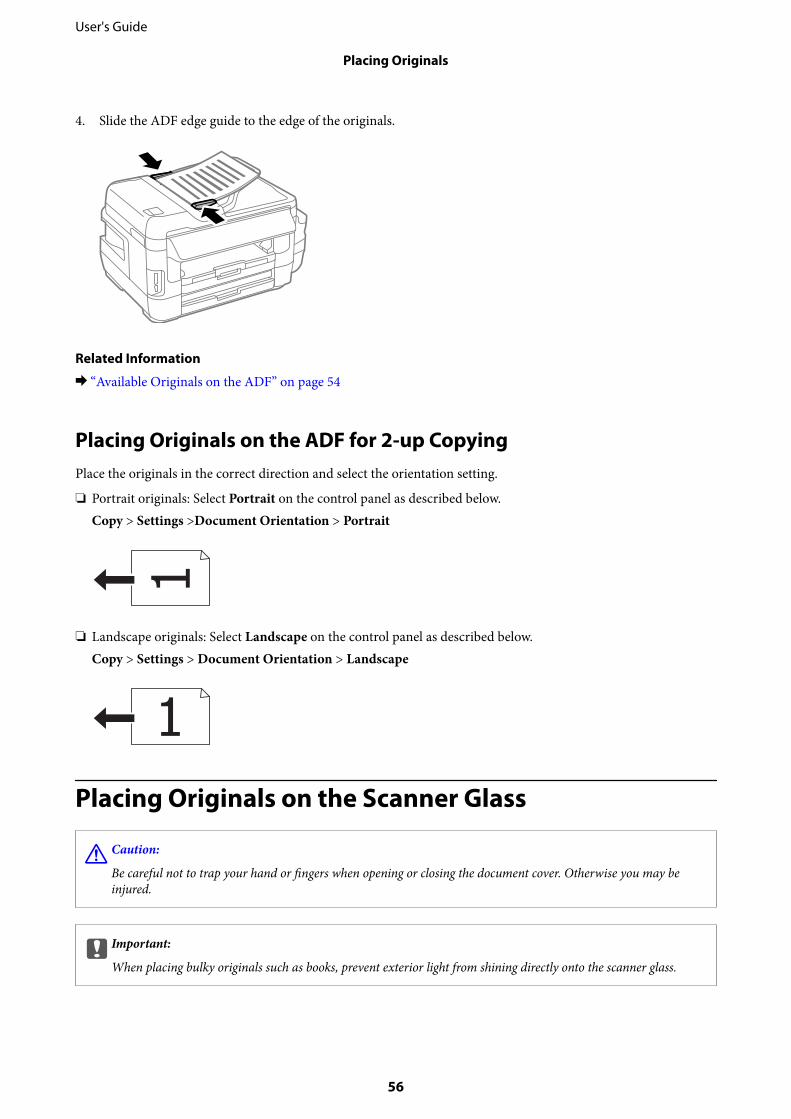
4. Slide the ADF edge guide to the edge of the originals.
Related Information
& “Available Originals on the ADF” on page 54
Placing Originals on the ADF for 2-up CopyingPlace the originals in the correct direction and select the orientation setting.
❏ Portrait originals: Select Portrait on the control panel as described below.Copy > Settings >Document Orientation > Portrait
❏ Landscape originals: Select Landscape on the control panel as described below.Copy > Settings > Document Orientation > Landscape
Placing Originals on the Scanner Glass
!Caution:
Be careful not to trap your hand or fingers when opening or closing the document cover. Otherwise you may beinjured.
cImportant:
When placing bulky originals such as books, prevent exterior light from shining directly onto the scanner glass.
User's Guide
Placing Originals
56
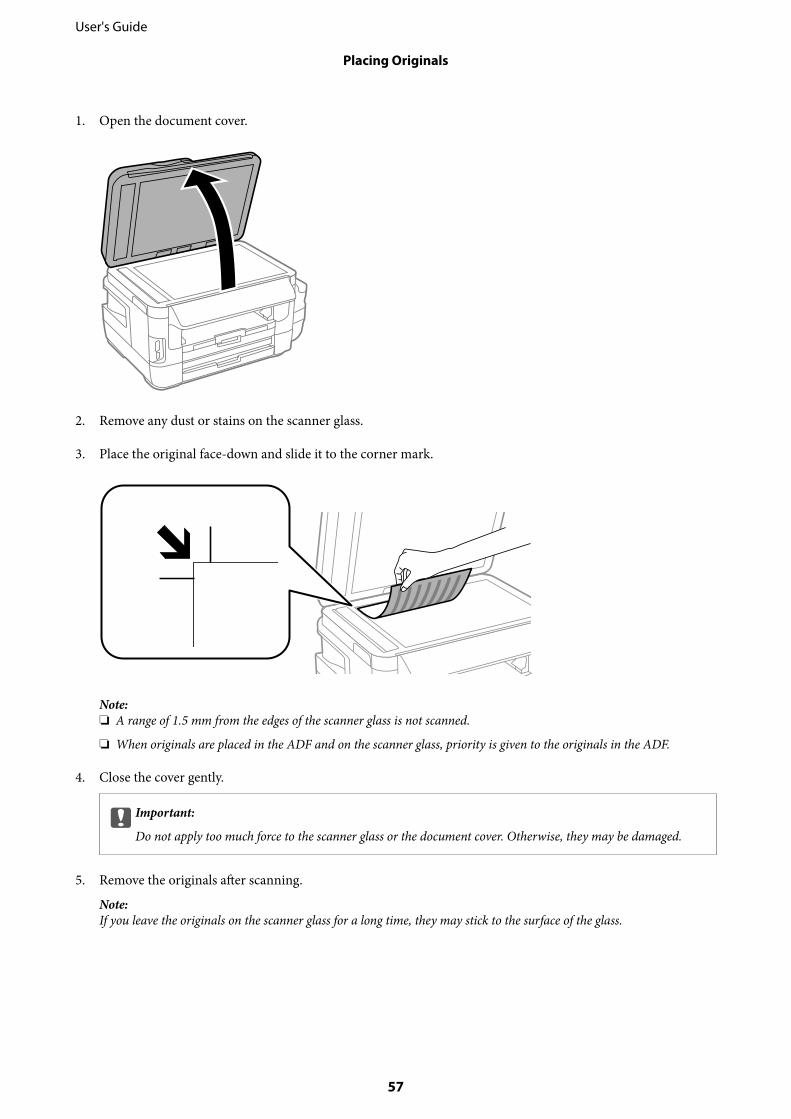
1. Open the document cover.
2. Remove any dust or stains on the scanner glass.
3. Place the original face-down and slide it to the corner mark.
Note:❏ A range of 1.5 mm from the edges of the scanner glass is not scanned.
❏ When originals are placed in the ADF and on the scanner glass, priority is given to the originals in the ADF.
4. Close the cover gently.
cImportant:
Do not apply too much force to the scanner glass or the document cover. Otherwise, they may be damaged.
5. Remove the originals after scanning.
Note:If you leave the originals on the scanner glass for a long time, they may stick to the surface of the glass.
User's Guide
Placing Originals
57
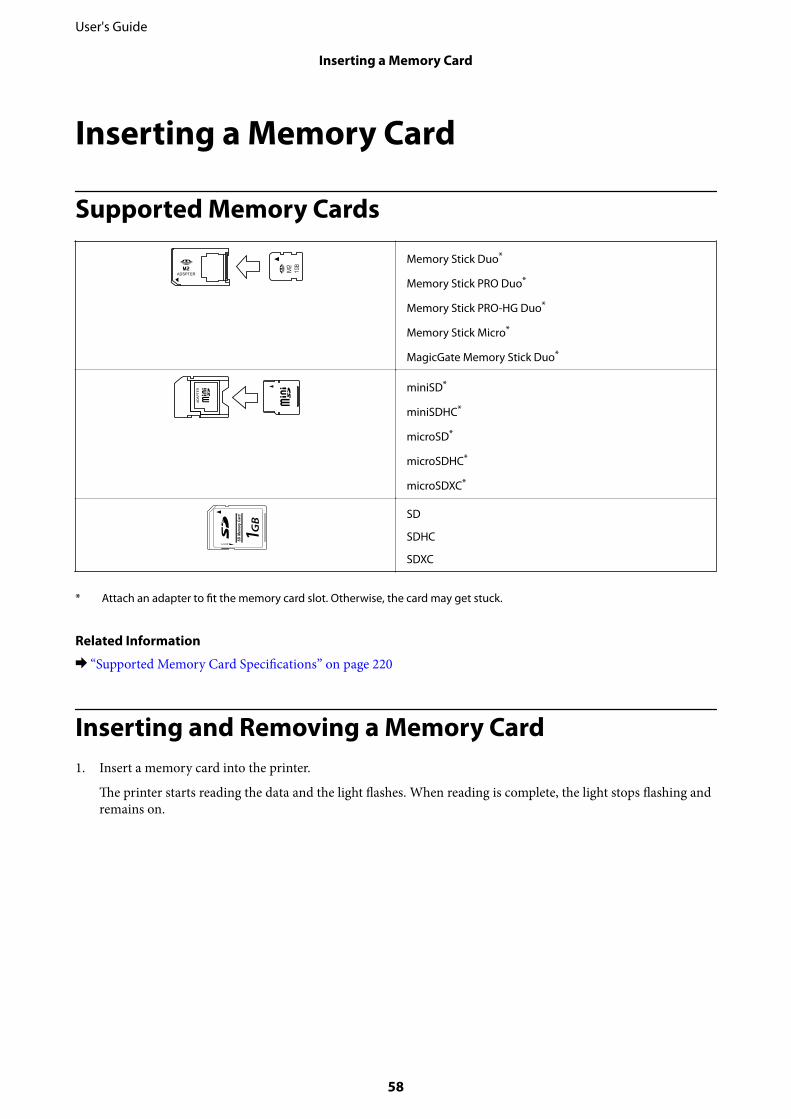
Inserting a Memory Card
Supported Memory Cards
Memory Stick Duo*
Memory Stick PRO Duo*
Memory Stick PRO-HG Duo*
Memory Stick Micro*
MagicGate Memory Stick Duo*
miniSD*
miniSDHC*
microSD*
microSDHC*
microSDXC*
SD
SDHC
SDXC
* Attach an adapter to fit the memory card slot. Otherwise, the card may get stuck.
Related Information
& “Supported Memory Card Specifications” on page 220
Inserting and Removing a Memory Card1. Insert a memory card into the printer.
The printer starts reading the data and the light flashes. When reading is complete, the light stops flashing andremains on.
User's Guide
Inserting a Memory Card
58
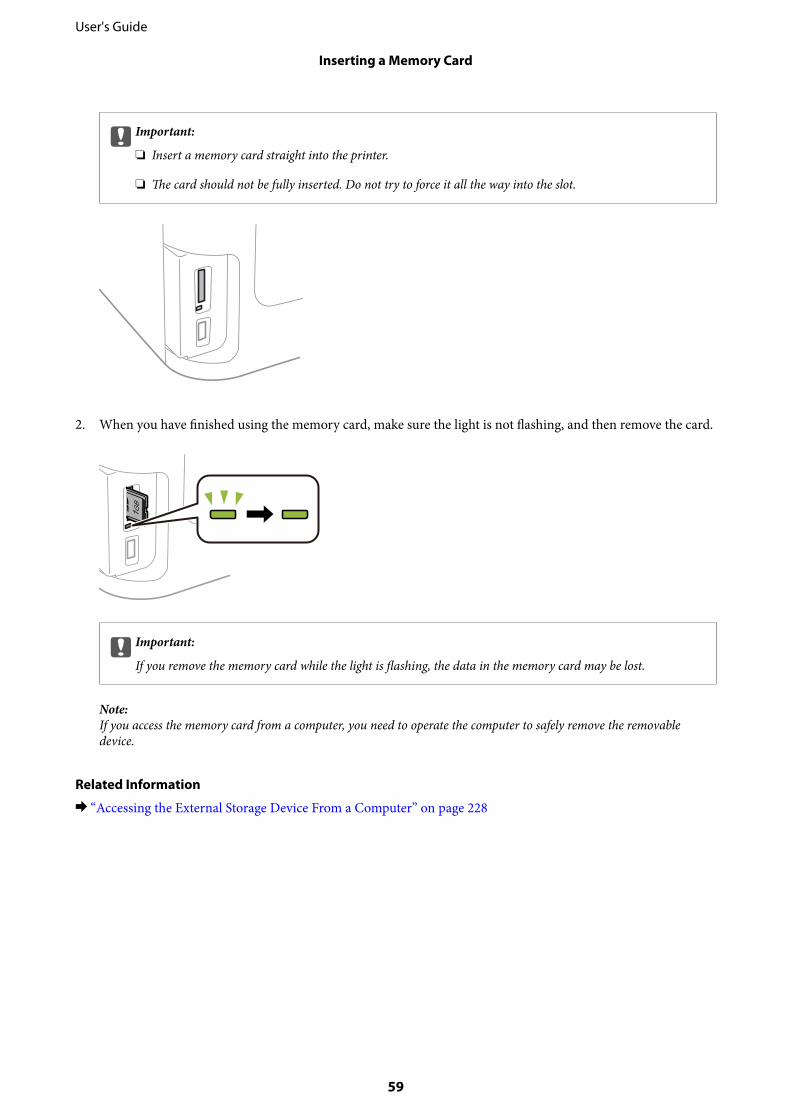
cImportant:
❏ Insert a memory card straight into the printer.
❏ The card should not be fully inserted. Do not try to force it all the way into the slot.
2. When you have finished using the memory card, make sure the light is not flashing, and then remove the card.
cImportant:
If you remove the memory card while the light is flashing, the data in the memory card may be lost.
Note:If you access the memory card from a computer, you need to operate the computer to safely remove the removabledevice.
Related Information
& “Accessing the External Storage Device From a Computer” on page 228
User's Guide
Inserting a Memory Card
59
Managing ContactsRegistering a contacts list allows you to easily enter destinations. You can register up to 200 entries, and you canuse the contacts list when you enter a fax number, enter a destination for attaching a scanned image to an email,and saving a scanned image to a network folder.
You can also register contacts in the LDAP server. See the Administrator's Guide to register contacts in the LDAPserver.
Registering ContactsNote:Before registering contacts, make sure you have also configured the email server settings to use the email address.
1. Select Contacts from the home screen, the Scan mode, or the Fax mode.
2. Press Menu, and then select Add Entry.
3. Select the type of contact you want to register.
❏ Fax: Register a contact (fax number) to send a fax.
❏ Email: Register an email address to send a scanned image or forward a received fax.
❏ Network Folder/FTP: Register a network folder to save a scanned image or received fax.
Note:This screen is displayed when you open the contacts list from the home screen.
4. Select the entry number that you want to register.
5. Make the necessary settings for each mode.
Note:When entering a fax number, enter an external access code at the beginning of the fax number if your phone system isPBX and you need the access code to get an outside line. If the access code has been set in the Line Type setting, enter ahash (#) instead of the actual access code. To add a pause (pause for three seconds) during dialing, enter a hyphen bypressing .
6. Press Save.
Note:❏ To edit or delete an entry, press the information icon on the right of the target entry, and then press Edit or Delete.
❏ You can register an address that is registered in the LDAP server in the local contacts list of the printer. Display anentry, and then press Save.
Related Information
& “Using an Email Server” on page 229
User's Guide
Managing Contacts
60
Registering Grouped ContactsAdding contacts to a group allows you to send a fax or send a scanned image by an email to multiple destinationsat the same time.
1. Select Contacts from the home screen, the Scan mode, or the Fax mode.
2. Press Menu, and then select Add Group.
3. Select the type of group address you want to register.
❏ Fax: Register a contact (fax number) to send a fax.
❏ Email: Register an email address to send a scanned image or forward a received fax.
Note:This screen is displayed when you open the contacts list from the home screen.
4. Select the entry number that you want to register.
5. Enter Name and Index Word, and then press Proceed.
6. Press the check box of the contacts that you want to register in the group.
Note:❏ You can register up to 199 contacts.
❏ To deselect, press the check box of the contact again.
7. Press Save.
Note:To edit or delete a grouped contact, press the information icon on the right of the target grouped contact, and then pressEdit or Delete.
Register Contacts on a ComputerUsing EpsonNet Config, you can create a contact list on your computer and import it to the printer. See the manualof EpsonNet Config for details.
Related Information
& “Application for Configuring Multiple Devices (EpsonNet Config)” on page 167
Backing up Contacts using a ComputerUsing EpsonNet Config, you can back up the contact data stored in the printer to the computer. See the manual ofEpsonNet Config for details.
Contacts data may be lost due to a printer malfunction. We recommend that you make a backup of the datawhenever you update the data. Epson shall not be responsible for the loss of any data, for backing up or recoveringdata and/or settings even during a warranty period.
User's Guide
Managing Contacts
61

Related Information
& “Application for Configuring Multiple Devices (EpsonNet Config)” on page 167
User's Guide
Managing Contacts
62
Printing
Printing from the Control PanelYou can print data from a memory card or an external USB device.
Printing a JPEG file
1. Load paper in the printer.
cImportant:
❏ When loading in the paper cassette, make the paper settings on the control panel.
❏ When loading in the rear paper feed slot, do not load paper until the printer prompts you to do so.
2. Insert a memory device.
cImportant:
Do not remove the memory device until you have finished printing.
3. Enter Memory Device from the Home menu.
4. Select JPEG.
Note:❏ If you have more than 999 images on your memory device, images are automatically divided into groups and the
group selection screen is displayed. Select the group that contains the image you want to print. Images are sorted bythe date they were taken.
❏ To select another group, select the menu as shown below.Memory Device > JPEG > Options > Select Group.
5. Select the image you want to print.
6. Enter the number of prints by using the numeric keypad on the control panel.
7. Press Adjustments to make color adjustment settings
Note:For more information on detailed settings, see the menus for the memory device.
8. Press y button.
Note:To select more images, press the y button and then repeat step 5 or swipe horizontally to change the image. Then repeatsteps 6 to 7.
User's Guide
Printing
63
9. Press Settings to make print settings.
Note:For more information on detailed settings, see the menus for the memory device.
10. Press Proceed to confirm the print settings.
11. Press one of the x buttons to set the color mode, and then start printing.
Related Information
& “Loading Paper in the Paper Cassette” on page 47& “Loading Paper in the Rear Paper Feed Slot” on page 50& “Inserting a Memory Card” on page 58& “Menu Options for Memory Device” on page 65
Printing a TIFF file
1. Load paper in the printer.
cImportant:
❏ When loading in the paper cassette, make the paper settings on the control panel.
❏ When loading in the rear paper feed slot, do not load paper until the printer prompts you to do so.
2. Insert a memory device.
cImportant:
Do not remove the memory device until you have finished printing.
3. Select Memory Device from the Home menu.
4. Select TIFF.
5. Select the file you want to print.
6. Check the file information, and then press Proceed.
7. Enter the number of prints by using the numeric keypad on the control panel.
8. Press Settings to make print settings.
Note:For more information on detailed settings, see the menus for the memory device.
9. Press the y button, and the press Proceed to confirm the print settings.
10. Press one of the x buttons to set the color mode, and then start printing.
User's Guide
Printing
64
Related Information
& “Loading Paper in the Paper Cassette” on page 47& “Loading Paper in the Rear Paper Feed Slot” on page 50& “Inserting a Memory Card” on page 58& “Menu Options for Memory Device” on page 65
Menu Options for Memory DeviceNote:Available menus vary depending on the format of the file that you are printing.
Format of file
Select JPEG or TIFF to print the file in the memory device.
Number of copies
Enter the number of printouts.
Settings
❏ Paper SourceSelect the paper source that you want to use. When you select Rear Paper Feed Slot, select the papersize and paper type you want to load in the rear paper feed slot.
❏ QualitySelect the print quality. Selecting Best provides higher quality printing, but the printing speed maybe slower.
❏ DateSelect the format used to print the date on photos for photos that include the date the photos weretaken or the date they were saved. The date is not printed for some layouts.
❏ Fit FrameIf the aspect ratio of the image data and the paper size is different, the image is automaticallyenlarged or reduced so that the short sides match the short sides of the paper. The long side of theimage is cropped if it extends beyond the long side of the paper. This feature may not work forpanorama photos.
❏ BidirectionalPrints while the print head moves to the left and to the right. If vertical or horizontal ruled lines onyour printout look blurred or misaligned, disabling this feature may solve the problem; however,doing so may reduce print speed.
❏ Print OrderSelect Last Page on Top to print from the first page of a file. Select First Page on Top to print fromthe last page of a file.
Adjustments
❏ Fix PhotoSelect the image fixing method.
User's Guide
Printing
65
❏ Fix Red-EyeFixes red-eye in photos. Corrections are not applied to the original file, only to the printouts.Depending on the type of photo, parts of the image other than the eyes may be corrected.
Options
❏ Select ImagesSelect All Images selects all of the images on the memory device.
❏ Select GroupSelect this menu to select another group.
Printing from a ComputerIf you cannot change some of the printer driver settings, they may have been restricted by the administrator.Contact your printer administrator for assistance.
Printing Basics - WindowsNote:❏ See the online help for explanations of the setting items. Right-click an item, and then click Help.
❏ Operations may differ depending on the application. See the application's help for details.
1. Load paper in the printer.
cImportant:
❏ When loading in the paper cassette, make the paper settings on the control panel.
❏ When loading in the rear paper feed slot, start printing from the printer driver before loading paper. SelectRear Paper Feed Slot as the Paper Source setting on the printer driver. When printing starts, the printerdriver tells you that printing is in progress. Follow the printer's on-screen instructions to load paper.
2. Open the file you want to print.
3. Select Print or Print Setup from the File menu.
4. Select your printer.
User's Guide
Printing
66
5. Select Preferences or Properties to access the printer driver window.
6. Make the following settings.
❏ Paper Source: Select the paper source in which you loaded the paper.
❏ Document Size: Select the paper size you loaded in the printer.
❏ Orientation: Select the orientation you set in the application.
❏ Paper Type: Select the type of paper you loaded.
❏ Quality: Select the print quality. Selecting High provides higher quality printing, but the printing speed maybe slower.
❏ Color: Select Grayscale when you want to print in black or shades of gray.
Note:❏ If you are printing high-density data on plain paper, letterhead, or preprinted paper, select Standard-Vivid as the
Quality setting to make your printout vivid.
❏ When printing on envelopes, select Landscape as the Orientation setting.
7. Click OK to close the printer driver window.
8. Click Print.
Related Information
& “Available Paper and Capacities” on page 45& “Loading Paper in the Paper Cassette” on page 47& “Loading Paper in the Rear Paper Feed Slot” on page 50& “List of Paper Types” on page 46
User's Guide
Printing
67
Printing Basics - Mac OSNote:❏ Explanations in the section use TextEdit as an example. Operations and screens differ depending on the application. See
the application's help for details.
❏ When printing envelopes, use the application to rotate the data 180 degrees. See the application's help for details.
1. Load paper in the printer.
cImportant:
❏ When loading in the paper cassette, make the paper settings on the control panel.
❏ When loading in the rear paper feed slot, start printing from the printer driver before loading paper. SelectRear Paper Feed Slot as the Paper Source setting on the printer driver. When printing starts, the printerdriver tells you that printing is in progress. Follow the printer's on-screen instructions to load paper.
2. Open the file you want to print.
3. Select Print from the File menu or another command to access the print dialog.
If necessary, click Show Details or d to expand the print window.
4. Make the following settings.
❏ Printer: Select your printer.
❏ Presets: Select when you want to use the registered settings.
❏ Paper Size: Select the paper size you loaded in the printer.
❏ Orientation: Select the orientation you set in the application.
User's Guide
Printing
68
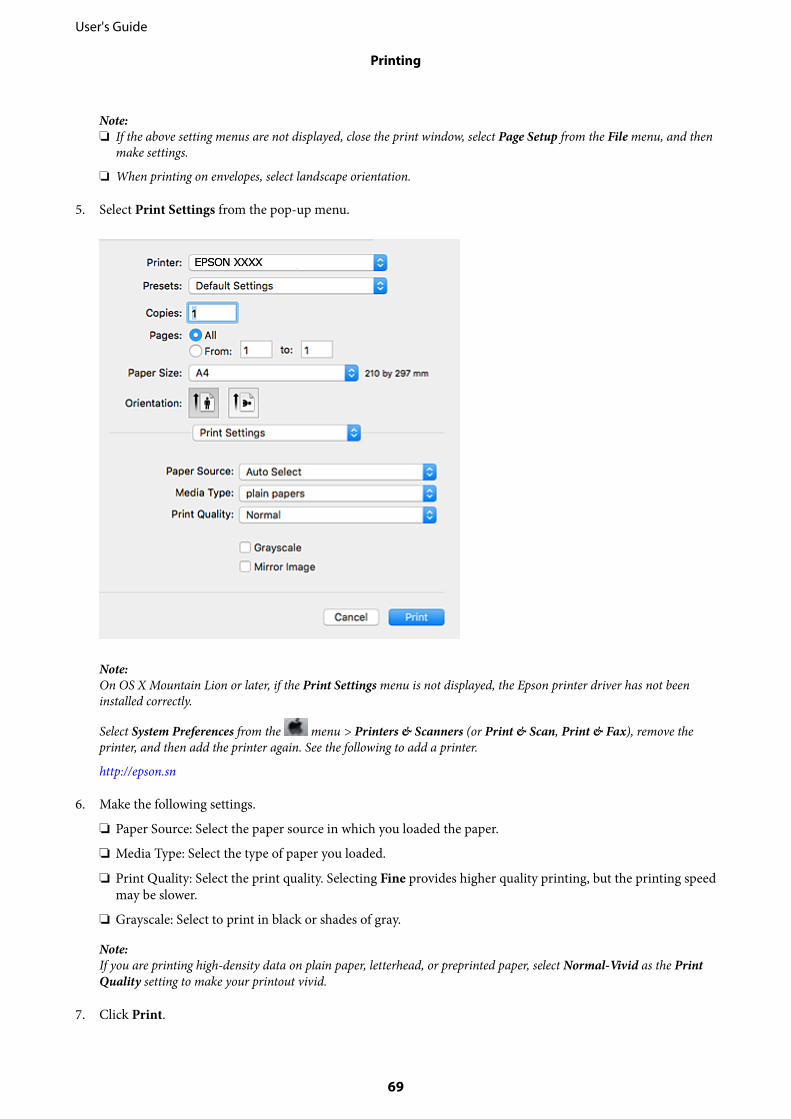
Note:❏ If the above setting menus are not displayed, close the print window, select Page Setup from the File menu, and then
make settings.
❏ When printing on envelopes, select landscape orientation.
5. Select Print Settings from the pop-up menu.
Note:On OS X Mountain Lion or later, if the Print Settings menu is not displayed, the Epson printer driver has not beeninstalled correctly.
Select System Preferences from the menu > Printers & Scanners (or Print & Scan, Print & Fax), remove theprinter, and then add the printer again. See the following to add a printer.
http://epson.sn
6. Make the following settings.
❏ Paper Source: Select the paper source in which you loaded the paper.
❏ Media Type: Select the type of paper you loaded.
❏ Print Quality: Select the print quality. Selecting Fine provides higher quality printing, but the printing speedmay be slower.
❏ Grayscale: Select to print in black or shades of gray.
Note:If you are printing high-density data on plain paper, letterhead, or preprinted paper, select Normal-Vivid as the PrintQuality setting to make your printout vivid.
7. Click Print.
User's Guide
Printing
69
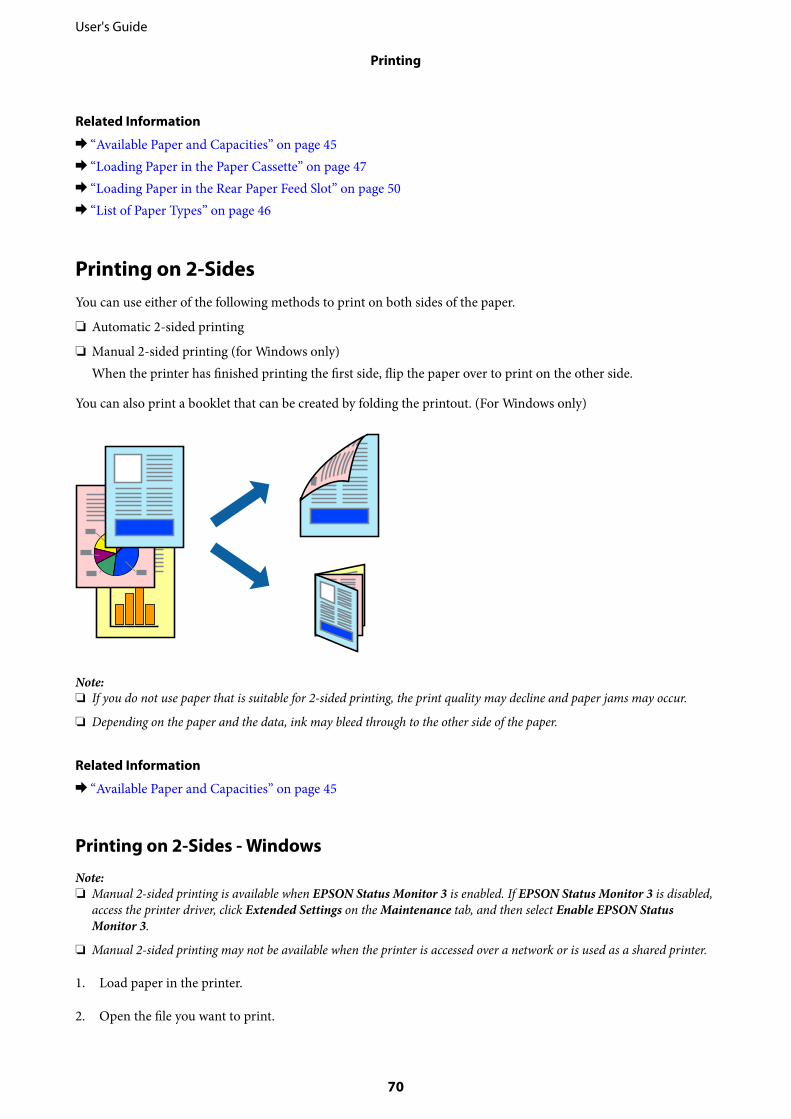
Related Information
& “Available Paper and Capacities” on page 45& “Loading Paper in the Paper Cassette” on page 47& “Loading Paper in the Rear Paper Feed Slot” on page 50& “List of Paper Types” on page 46
Printing on 2-SidesYou can use either of the following methods to print on both sides of the paper.
❏ Automatic 2-sided printing
❏ Manual 2-sided printing (for Windows only)When the printer has finished printing the first side, flip the paper over to print on the other side.
You can also print a booklet that can be created by folding the printout. (For Windows only)
Note:❏ If you do not use paper that is suitable for 2-sided printing, the print quality may decline and paper jams may occur.
❏ Depending on the paper and the data, ink may bleed through to the other side of the paper.
Related Information
& “Available Paper and Capacities” on page 45
Printing on 2-Sides - Windows
Note:❏ Manual 2-sided printing is available when EPSON Status Monitor 3 is enabled. If EPSON Status Monitor 3 is disabled,
access the printer driver, click Extended Settings on the Maintenance tab, and then select Enable EPSON StatusMonitor 3.
❏ Manual 2-sided printing may not be available when the printer is accessed over a network or is used as a shared printer.
1. Load paper in the printer.
2. Open the file you want to print.
User's Guide
Printing
70
3. Access the printer driver window.
4. Select Auto (Long-edge binding), Auto (Short-edge binding), Manual (Long-edge binding), or Manual(Short-edge binding) from 2-Sided Printing on the Main tab.
5. Click Settings, make the appropriate settings, and then click OK.
Note:To print a folded booklet, select Booklet.
6. Click Print Density, select the document type from Select Document Type, and then click OK.
The printer driver automatically sets the Adjustments options for that document type.
Note:❏ Printing may be slow depending on the combination of options selected for Select Document Type in the Print
Density Adjustment window and for Quality on the Main tab.
❏ For manual 2-sided printing, the Print Density Adjustment setting is not available.
7. Set the other items on the Main and More Options tabs as necessary, and then click OK.
8. Click Print.
For manual 2-sided printing, when the first side has finished printing, a pop-up window is displayed on thecomputer. Follow the on-screen instructions.
Related Information
& “Loading Paper in the Paper Cassette” on page 47& “Loading Paper in the Rear Paper Feed Slot” on page 50& “Printing Basics - Windows” on page 66
Printing on 2-Sides - Mac OS
1. Load paper in the printer.
2. Open the file you want to print.
3. Access the print dialog.
4. Select Two-sided Printing Settings from the pop-up menu.
5. Select the bindings and Document Type.
Note:❏ Printing may be slow depending on the Document Type setting.
❏ If you are printing high-density data such as photos or graphs, select Text & Graphics or Text & Photos as theDocument Type setting. If scuffing occurs or the image bleeds through to the reverse side, adjust the print densityand ink drying time by clicking the arrow mark next to Adjustments.
6. Set the other items as necessary.
7. Click Print.
User's Guide
Printing
71
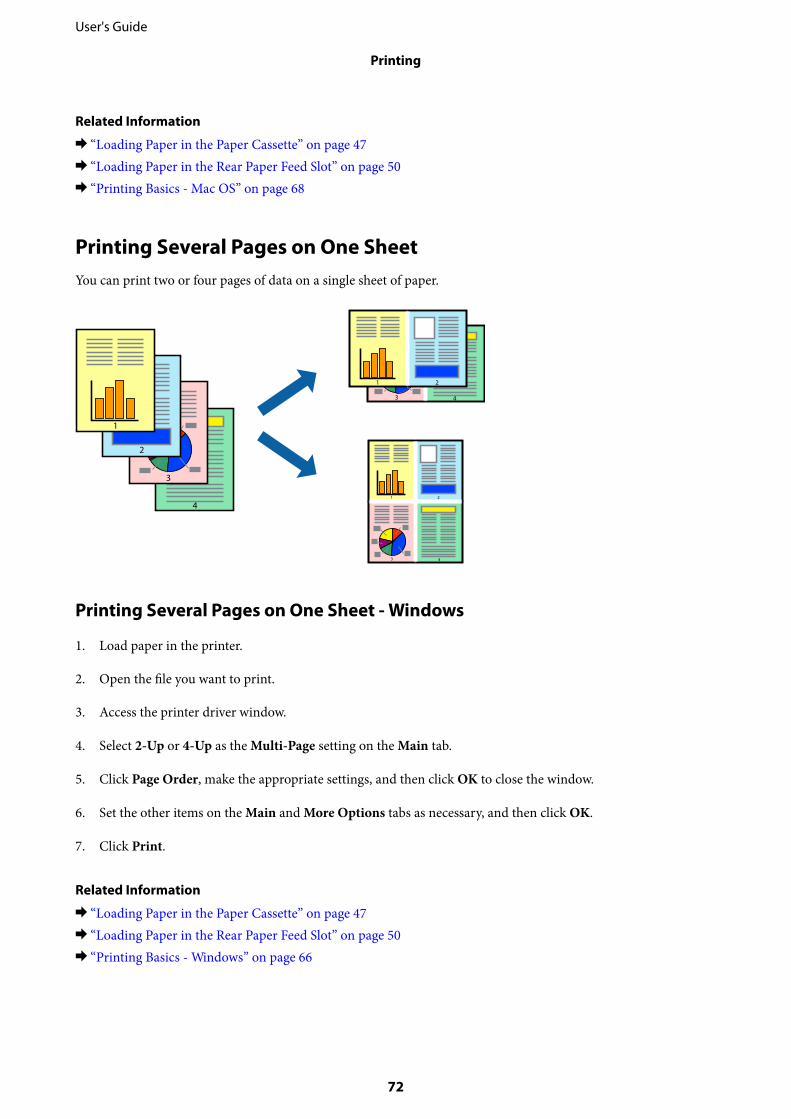
Related Information
& “Loading Paper in the Paper Cassette” on page 47& “Loading Paper in the Rear Paper Feed Slot” on page 50& “Printing Basics - Mac OS” on page 68
Printing Several Pages on One SheetYou can print two or four pages of data on a single sheet of paper.
Printing Several Pages on One Sheet - Windows
1. Load paper in the printer.
2. Open the file you want to print.
3. Access the printer driver window.
4. Select 2-Up or 4-Up as the Multi-Page setting on the Main tab.
5. Click Page Order, make the appropriate settings, and then click OK to close the window.
6. Set the other items on the Main and More Options tabs as necessary, and then click OK.
7. Click Print.
Related Information
& “Loading Paper in the Paper Cassette” on page 47& “Loading Paper in the Rear Paper Feed Slot” on page 50& “Printing Basics - Windows” on page 66
User's Guide
Printing
72
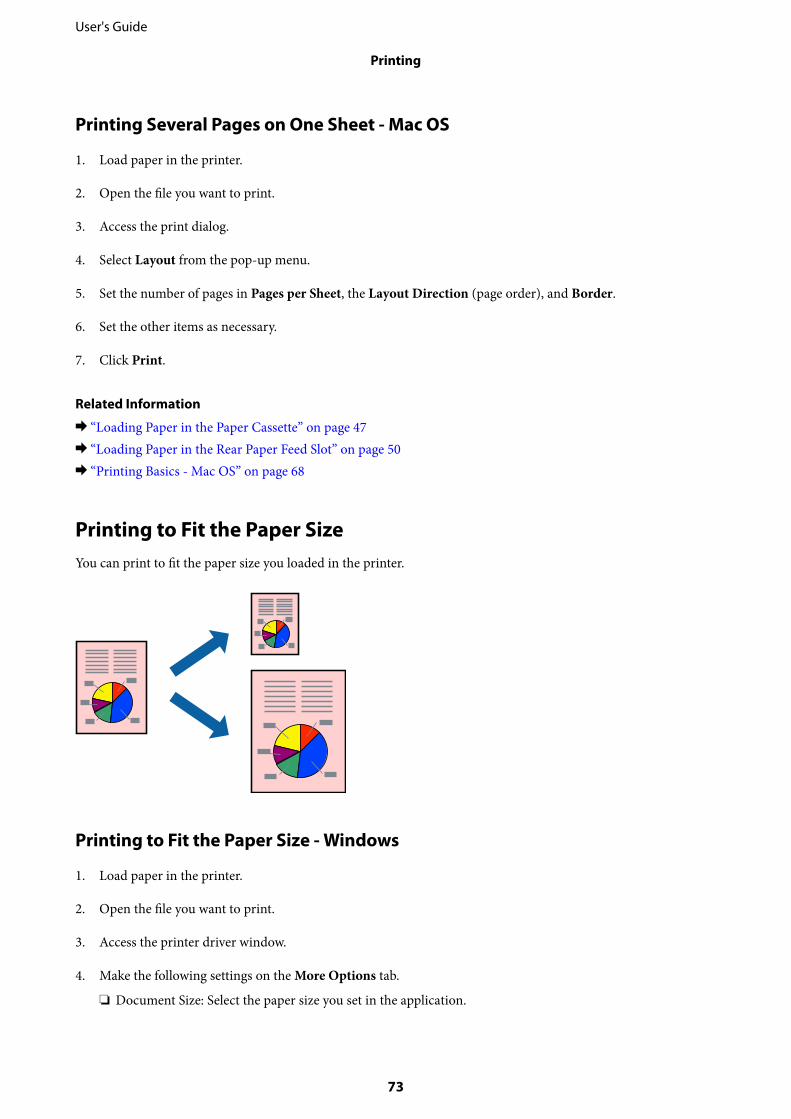
Printing Several Pages on One Sheet - Mac OS
1. Load paper in the printer.
2. Open the file you want to print.
3. Access the print dialog.
4. Select Layout from the pop-up menu.
5. Set the number of pages in Pages per Sheet, the Layout Direction (page order), and Border.
6. Set the other items as necessary.
7. Click Print.
Related Information
& “Loading Paper in the Paper Cassette” on page 47& “Loading Paper in the Rear Paper Feed Slot” on page 50& “Printing Basics - Mac OS” on page 68
Printing to Fit the Paper SizeYou can print to fit the paper size you loaded in the printer.
Printing to Fit the Paper Size - Windows
1. Load paper in the printer.
2. Open the file you want to print.
3. Access the printer driver window.
4. Make the following settings on the More Options tab.
❏ Document Size: Select the paper size you set in the application.
User's Guide
Printing
73

❏ Output Paper: Select the paper size you loaded in the printer.Fit to Page is selected automatically.
Note:If you want to print a reduced image at the center of the page, select Center.
5. Set the other items on the Main and More Options tabs as necessary, and then click OK.
6. Click Print.
Related Information
& “Loading Paper in the Paper Cassette” on page 47& “Loading Paper in the Rear Paper Feed Slot” on page 50& “Printing Basics - Windows” on page 66
Printing to Fit the Paper Size - Mac OS
1. Load paper in the printer.
2. Open the file you want to print.
3. Access the print dialog.
4. Select the size of the paper you set in the application as the Paper Size setting.
5. Select Paper Handling from the pop-up menu.
6. Select Scale to fit paper size.
7. Select the paper size you loaded in the printer as the Destination Paper Size setting.
8. Set the other items as necessary.
9. Click Print.
Related Information
& “Loading Paper in the Paper Cassette” on page 47& “Loading Paper in the Rear Paper Feed Slot” on page 50& “Printing Basics - Mac OS” on page 68
User's Guide
Printing
74
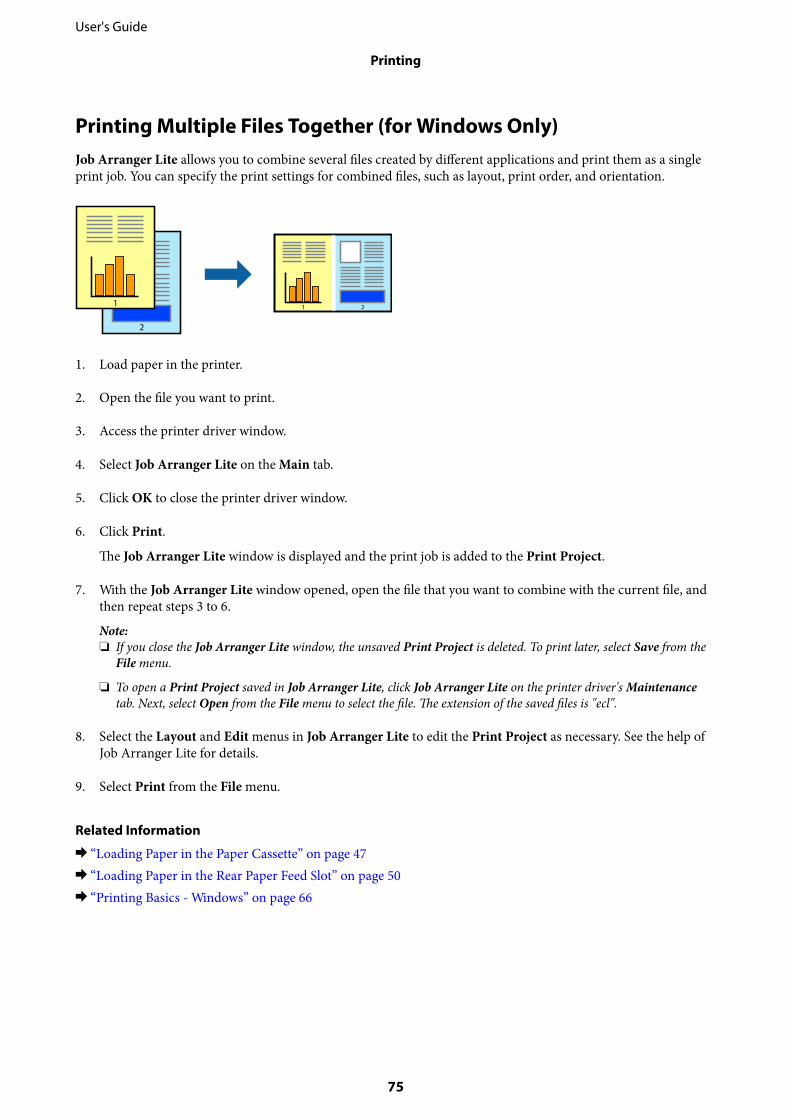
Printing Multiple Files Together (for Windows Only)Job Arranger Lite allows you to combine several files created by different applications and print them as a singleprint job. You can specify the print settings for combined files, such as layout, print order, and orientation.
1. Load paper in the printer.
2. Open the file you want to print.
3. Access the printer driver window.
4. Select Job Arranger Lite on the Main tab.
5. Click OK to close the printer driver window.
6. Click Print.
The Job Arranger Lite window is displayed and the print job is added to the Print Project.
7. With the Job Arranger Lite window opened, open the file that you want to combine with the current file, andthen repeat steps 3 to 6.
Note:❏ If you close the Job Arranger Lite window, the unsaved Print Project is deleted. To print later, select Save from the
File menu.
❏ To open a Print Project saved in Job Arranger Lite, click Job Arranger Lite on the printer driver's Maintenancetab. Next, select Open from the File menu to select the file. The extension of the saved files is "ecl".
8. Select the Layout and Edit menus in Job Arranger Lite to edit the Print Project as necessary. See the help ofJob Arranger Lite for details.
9. Select Print from the File menu.
Related Information
& “Loading Paper in the Paper Cassette” on page 47& “Loading Paper in the Rear Paper Feed Slot” on page 50& “Printing Basics - Windows” on page 66
User's Guide
Printing
75
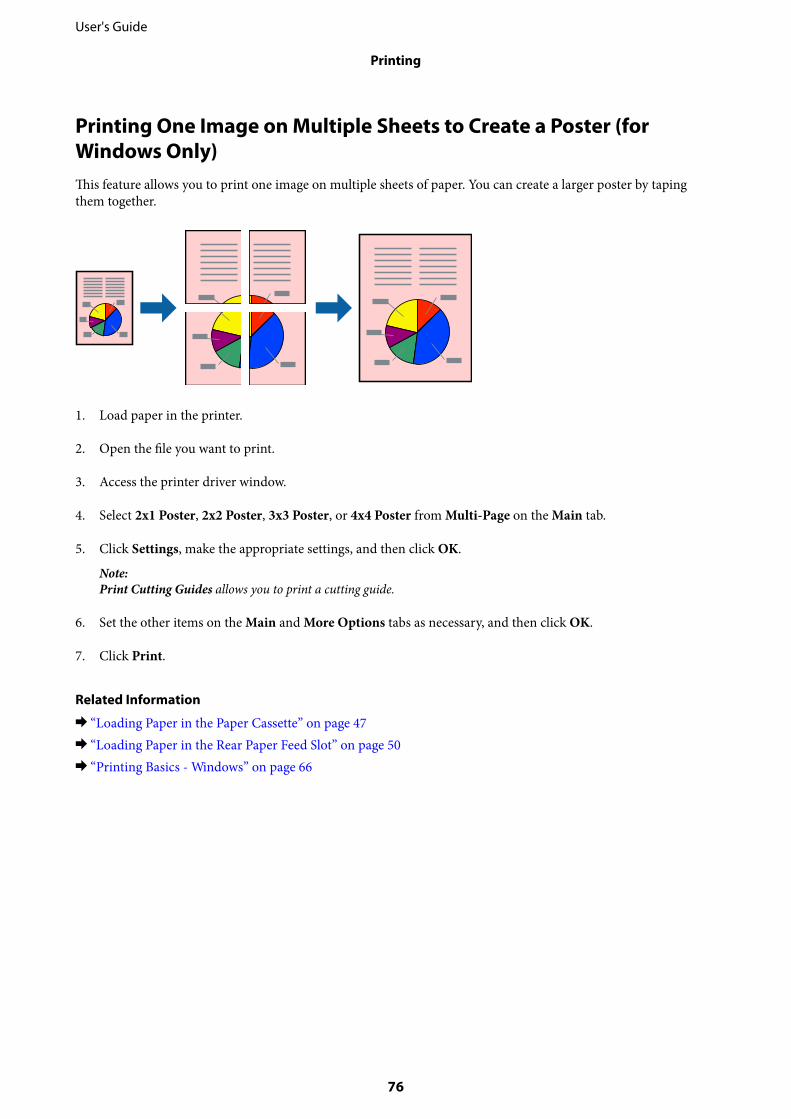
Printing One Image on Multiple Sheets to Create a Poster (forWindows Only)This feature allows you to print one image on multiple sheets of paper. You can create a larger poster by tapingthem together.
1. Load paper in the printer.
2. Open the file you want to print.
3. Access the printer driver window.
4. Select 2x1 Poster, 2x2 Poster, 3x3 Poster, or 4x4 Poster from Multi-Page on the Main tab.
5. Click Settings, make the appropriate settings, and then click OK.
Note:Print Cutting Guides allows you to print a cutting guide.
6. Set the other items on the Main and More Options tabs as necessary, and then click OK.
7. Click Print.
Related Information
& “Loading Paper in the Paper Cassette” on page 47& “Loading Paper in the Rear Paper Feed Slot” on page 50& “Printing Basics - Windows” on page 66
User's Guide
Printing
76
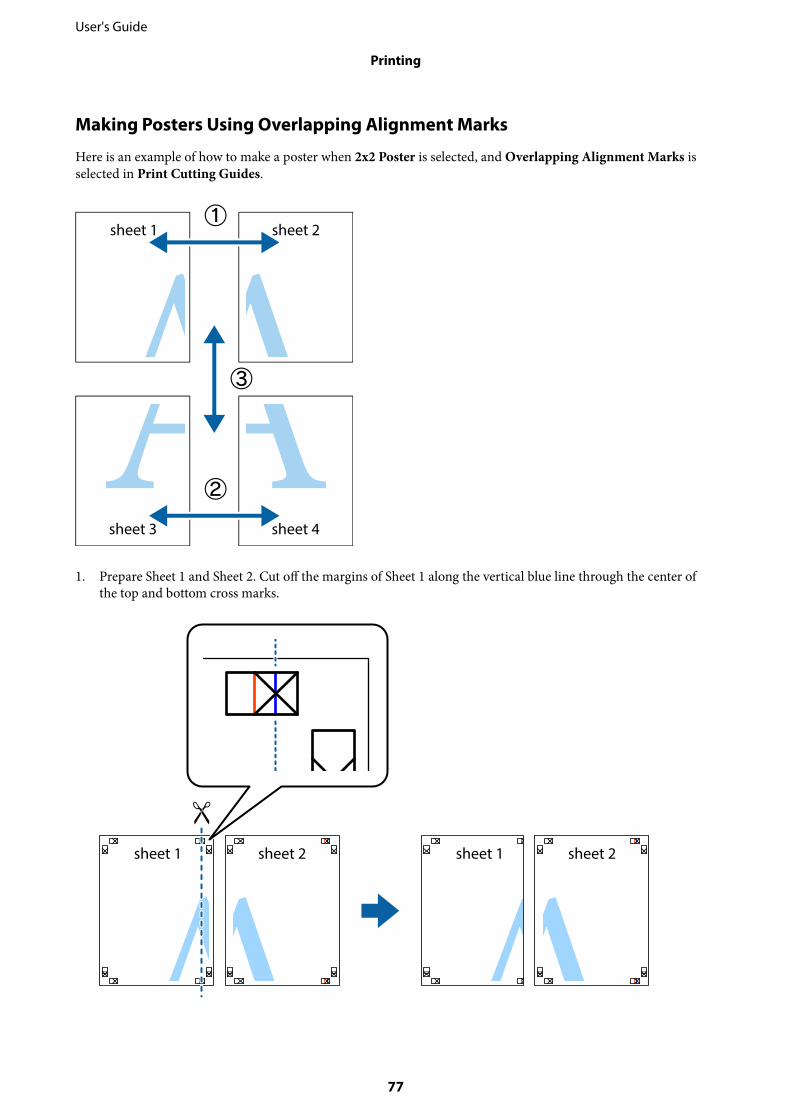
Making Posters Using Overlapping Alignment Marks
Here is an example of how to make a poster when 2x2 Poster is selected, and Overlapping Alignment Marks isselected in Print Cutting Guides.
1. Prepare Sheet 1 and Sheet 2. Cut off the margins of Sheet 1 along the vertical blue line through the center ofthe top and bottom cross marks.
User's Guide
Printing
77
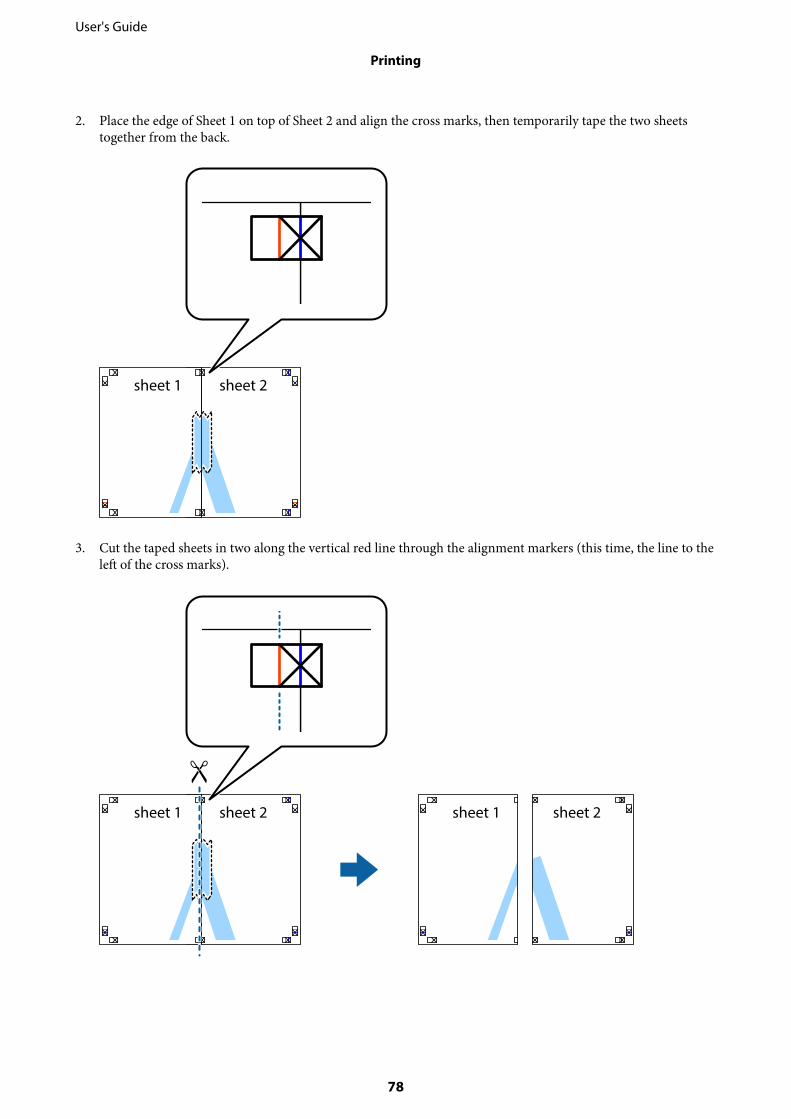
2. Place the edge of Sheet 1 on top of Sheet 2 and align the cross marks, then temporarily tape the two sheetstogether from the back.
3. Cut the taped sheets in two along the vertical red line through the alignment markers (this time, the line to theleft of the cross marks).
User's Guide
Printing
78
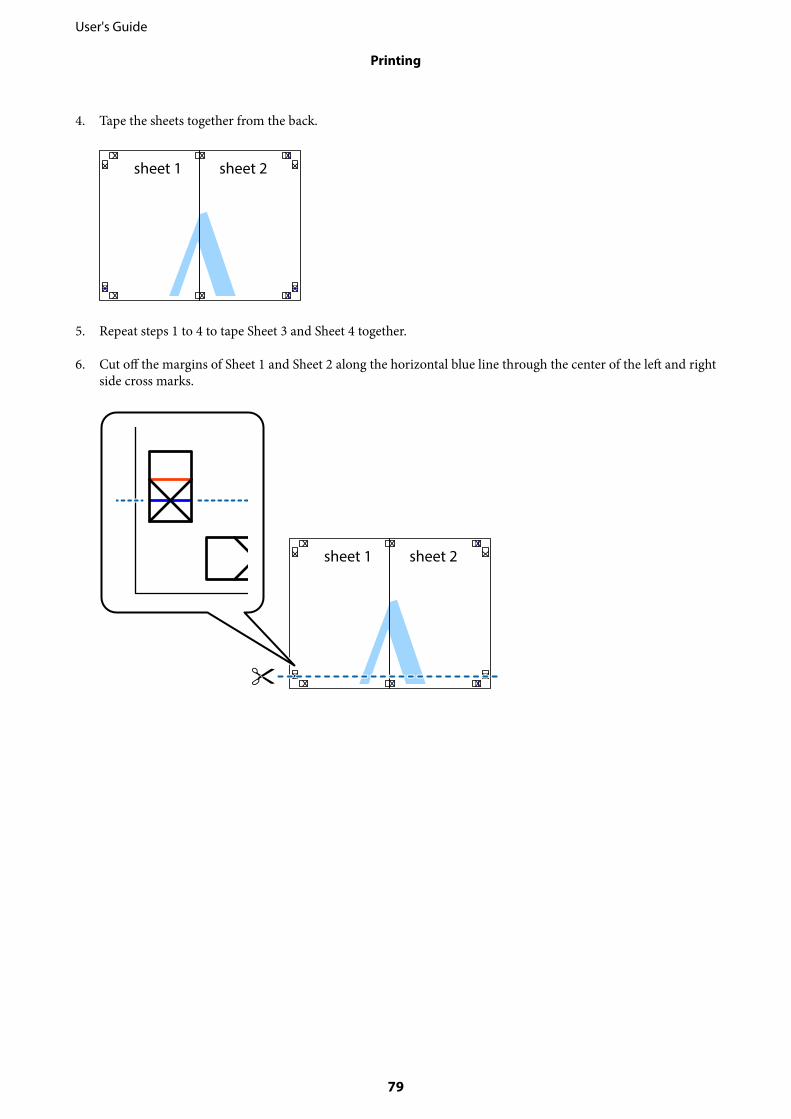
4. Tape the sheets together from the back.
5. Repeat steps 1 to 4 to tape Sheet 3 and Sheet 4 together.
6. Cut off the margins of Sheet 1 and Sheet 2 along the horizontal blue line through the center of the left and rightside cross marks.
User's Guide
Printing
79
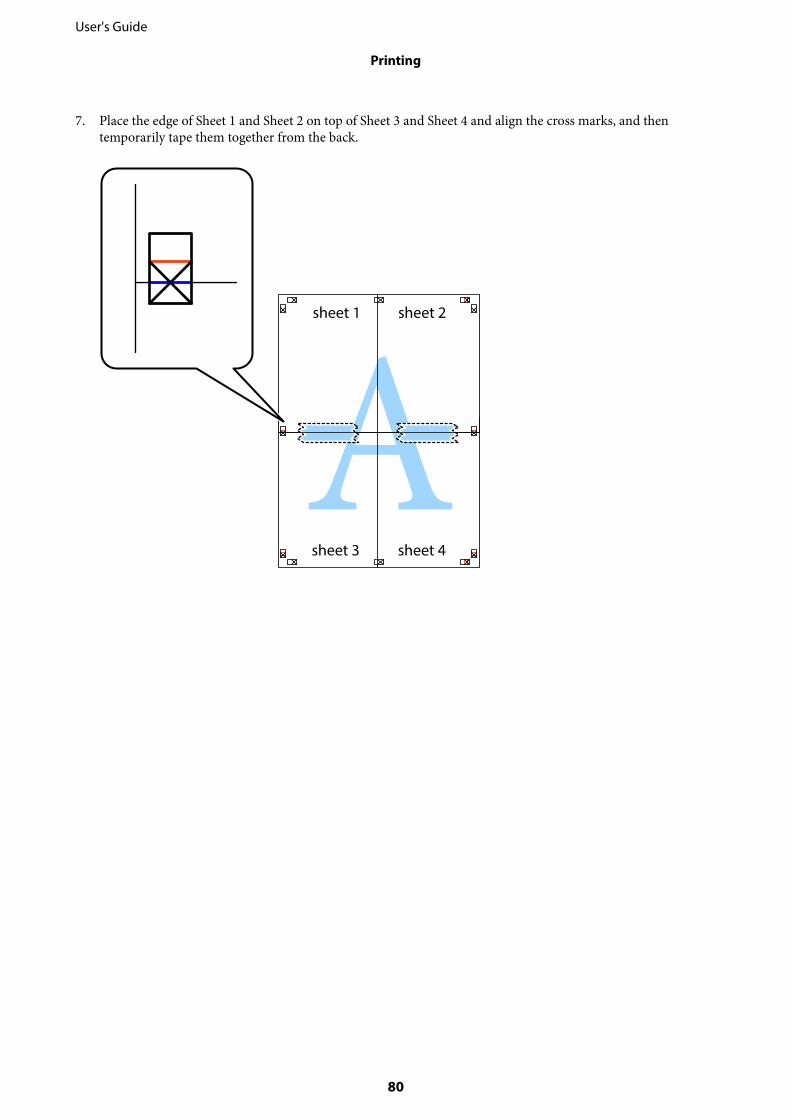
7. Place the edge of Sheet 1 and Sheet 2 on top of Sheet 3 and Sheet 4 and align the cross marks, and thentemporarily tape them together from the back.
User's Guide
Printing
80
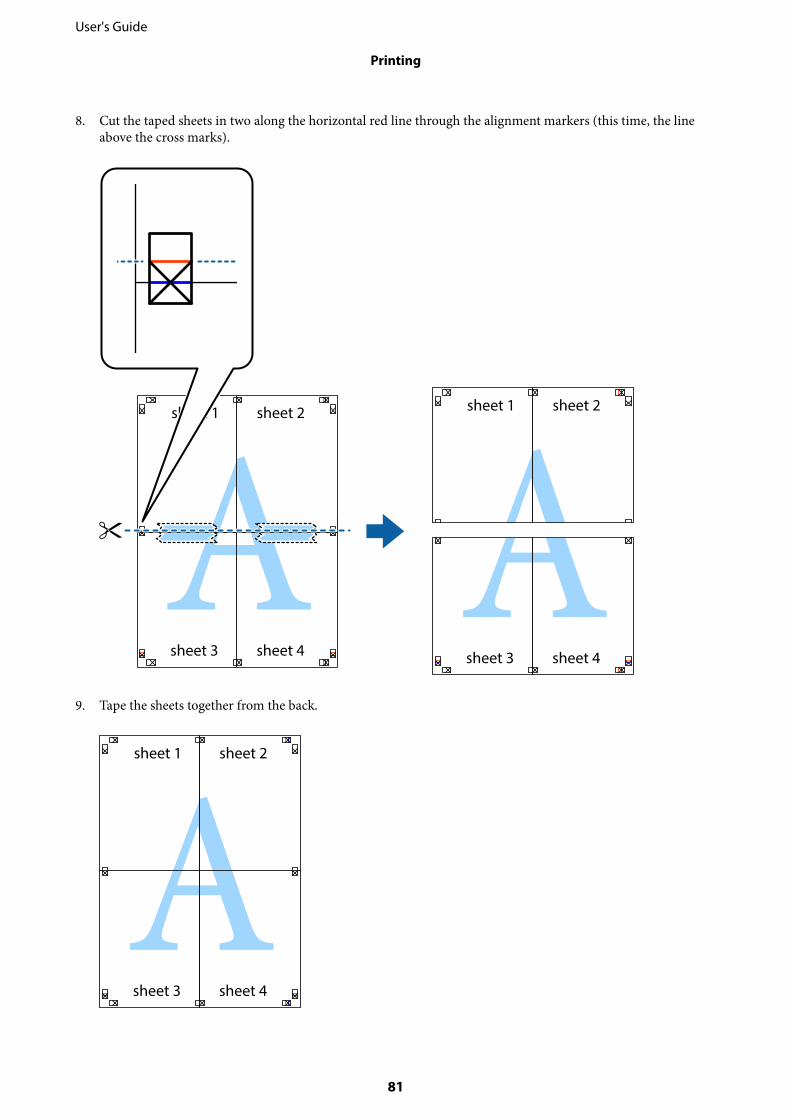
8. Cut the taped sheets in two along the horizontal red line through the alignment markers (this time, the lineabove the cross marks).
9. Tape the sheets together from the back.
User's Guide
Printing
81
10. Cut off the remaining margins along the outer guide.
Printing Using Advanced FeaturesThis section introduces a variety of additional layout and printing features available on the printer driver.
Related Information
& “Windows Printer Driver” on page 162& “Mac OS Printer Driver” on page 163
Adding a Printing Preset to Print Easily
If you create your own preset of frequently used print settings on the printer driver, you can print easily byselecting the preset from the list.
User's Guide
Printing
82
Windows
To add your own preset, set items such as the Document Size and Paper Type on the Main or More Options tab,and then click Add/Remove Presets in Printing Presets.
Note:To delete an added preset, click Add/Remove Presets, select the preset name you want to delete from the list, and then deleteit.
Mac OS
Access the print dialog. To add your own preset, set items such as the Paper Size and Media Type, and then savethe current settings as the preset in the Presets setting.
Note:To delete an added preset, click Presets > Show Presets, select the preset name you want to delete from the list, and thendelete it.
Printing a Reduced or Enlarged Document
You can reduce or enlarge the size of a document by a specific percentage.
Windows
Set the Document Size on the More Options tab. Select Reduce/Enlarge Document, Zoom to, and then enter apercentage.
Mac OS
Note:Operations differ depending on the application. See the application's help for details.
Select Page Setup (or Print) from the File menu. Select the printer from Format For, select the paper size, andthen enter a percentage in Scale. Close the window, and then print following the basic printing instructions.
Related Information
& “Printing Basics - Mac OS” on page 68
Adjusting the Print Color
You can adjust the colors used in the print job.
PhotoEnhance produces sharper images and more vivid colors by automatically adjusting the contrast, saturation,and brightness of the original image data.
Note:❏ These adjustments are not applied to the original data.
❏ PhotoEnhance adjusts the color by analyzing the location of the subject. Therefore, if you have changed the location ofthe subject by reducing, enlarging, cropping, or rotating the image, the color may change unexpectedly. If the image is outof focus, the tone may be unnatural. If the color is changed or becomes unnatural, print in a mode other thanPhotoEnhance.
Windows
Select the method of color correction from Color Correction on the More Options tab.
User's Guide
Printing
83
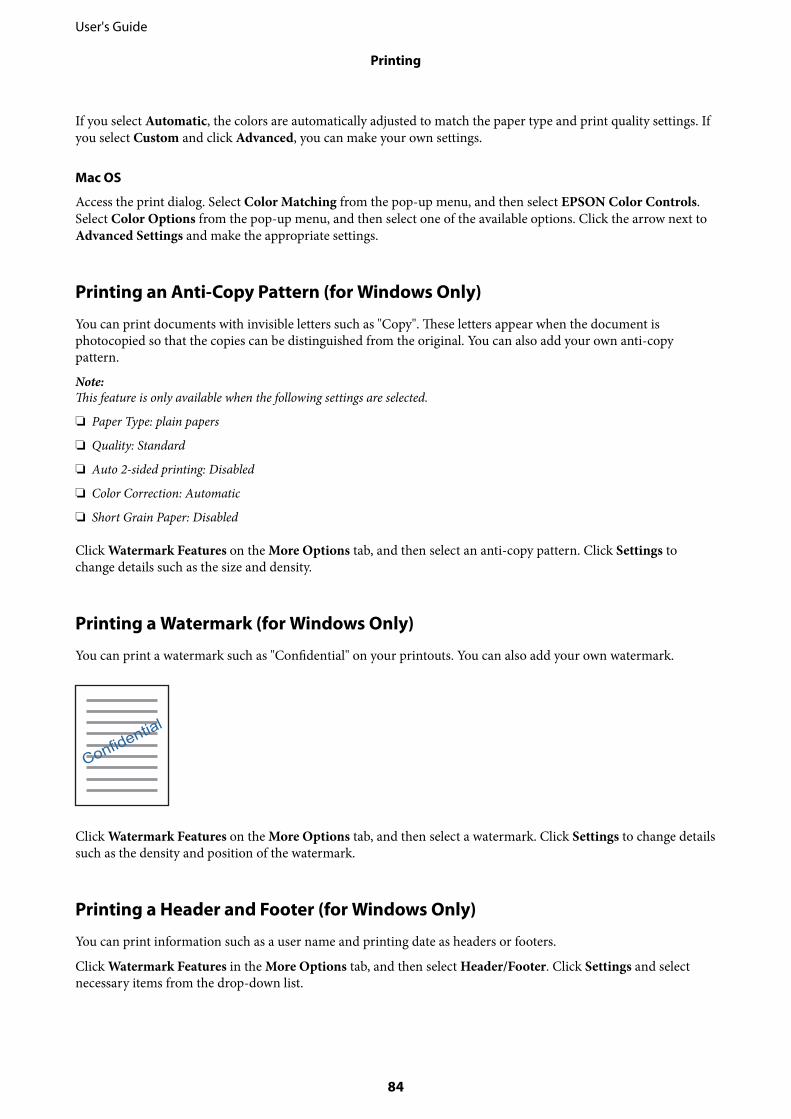
If you select Automatic, the colors are automatically adjusted to match the paper type and print quality settings. Ifyou select Custom and click Advanced, you can make your own settings.
Mac OS
Access the print dialog. Select Color Matching from the pop-up menu, and then select EPSON Color Controls.Select Color Options from the pop-up menu, and then select one of the available options. Click the arrow next toAdvanced Settings and make the appropriate settings.
Printing an Anti-Copy Pattern (for Windows Only)
You can print documents with invisible letters such as "Copy". These letters appear when the document isphotocopied so that the copies can be distinguished from the original. You can also add your own anti-copypattern.
Note:This feature is only available when the following settings are selected.
❏ Paper Type: plain papers
❏ Quality: Standard
❏ Auto 2-sided printing: Disabled
❏ Color Correction: Automatic
❏ Short Grain Paper: Disabled
Click Watermark Features on the More Options tab, and then select an anti-copy pattern. Click Settings tochange details such as the size and density.
Printing a Watermark (for Windows Only)
You can print a watermark such as "Confidential" on your printouts. You can also add your own watermark.
Click Watermark Features on the More Options tab, and then select a watermark. Click Settings to change detailssuch as the density and position of the watermark.
Printing a Header and Footer (for Windows Only)
You can print information such as a user name and printing date as headers or footers.
Click Watermark Features in the More Options tab, and then select Header/Footer. Click Settings and selectnecessary items from the drop-down list.
User's Guide
Printing
84
Printing Photos Using Epson Easy Photo PrintEpson Easy Photo Print lets you lay out and print photos easily on various types of paper. See the application's helpfor details.
Note:By printing on genuine Epson photo paper, the ink quality is maximized and the printouts are vivid and clear.
Related Information
& “Epson Easy Photo Print” on page 166
Printing from Smart Devices
Using Epson iPrintEpson iPrint is an application that allows you to print photos, documents, and web pages from a smart device suchas a smartphone or tablet. You can use local print, printing from a smart device that is connected to the samewireless network as your printer, or remote print, printing from a remote location over the Internet. To use remoteprint, register your printer in the Epson Connect service.
Related Information
& “Epson Connect Service” on page 160
Installing Epson iPrint
You can install Epson iPrint on your smart device from the following URL or QR code.
http://ipr.to/c
Printing Using Epson iPrint
Start Epson iPrint from your smart device and select the item you want to use from the home screen.
User's Guide
Printing
85
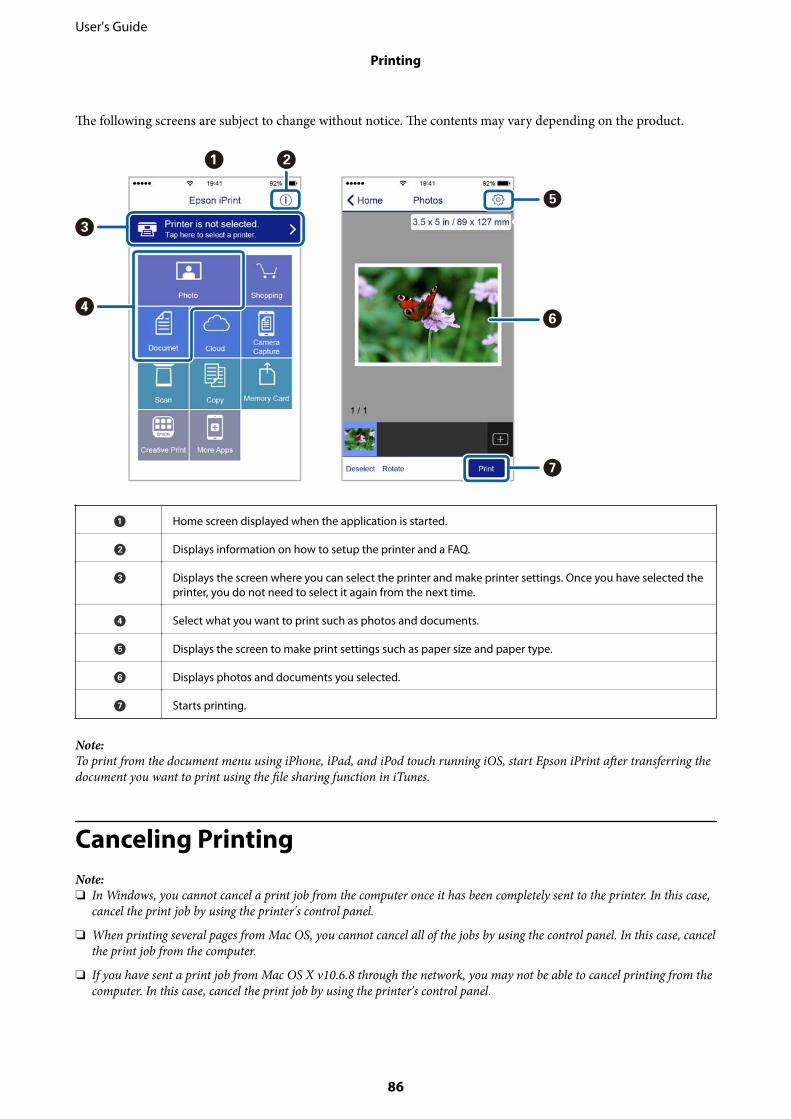
The following screens are subject to change without notice. The contents may vary depending on the product.
A Home screen displayed when the application is started.
B Displays information on how to setup the printer and a FAQ.
C Displays the screen where you can select the printer and make printer settings. Once you have selected theprinter, you do not need to select it again from the next time.
D Select what you want to print such as photos and documents.
E Displays the screen to make print settings such as paper size and paper type.
F Displays photos and documents you selected.
G Starts printing.
Note:To print from the document menu using iPhone, iPad, and iPod touch running iOS, start Epson iPrint after transferring thedocument you want to print using the file sharing function in iTunes.
Canceling PrintingNote:❏ In Windows, you cannot cancel a print job from the computer once it has been completely sent to the printer. In this case,
cancel the print job by using the printer's control panel.
❏ When printing several pages from Mac OS, you cannot cancel all of the jobs by using the control panel. In this case, cancelthe print job from the computer.
❏ If you have sent a print job from Mac OS X v10.6.8 through the network, you may not be able to cancel printing from thecomputer. In this case, cancel the print job by using the printer's control panel.
User's Guide
Printing
86

Canceling Printing - Printer Button
Press the y button to cancel the print job in progress.
Canceling Printing - Status Menu
1. Press the button to display Status Menu.
2. Select Job Monitor > Print Job.
Ongoing jobs and jobs that are standing by are shown in the list.
3. Select the job that you want to cancel.
4. Press Cancel.
Canceling Printing - Windows
1. Access the printer driver window.
2. Select the Maintenance tab.
3. Click Print Queue.
4. Right-click on the job you want to cancel and then select Cancel.
Related Information
& “Windows Printer Driver” on page 162
Canceling Printing - Mac OS
1. Click the printer icon in the Dock.
2. Select the job you want to cancel.
3. Cancel the job.
❏ OS X Mountain Lion or later
Click next to the progress meter.
❏ Mac OS X v10.6.8 to v10.7.xClick Delete.
User's Guide
Printing
87
Copying1. Load paper in the printer.
When loading in the rear paper feed slot, do not load paper until the printer prompts you to do so.
cImportant:
Make the paper settings on the control panel.
2. Place the originals.
If you want to copy multiple originals or make 2-sided copies, place all of the originals on the ADF.
3. Enter Copy from the home screen.
4. Enter the number of copies by using the numeric keypad.
5. Press Layout, and then select the appropriate layout.
6. Make other settings as necessary. You can make detailed settings by pressing Settings.
Note:❏ Press Preset to save your settings as a preset.
❏ Press Preview to preview the copy results. However, you cannot preview when you have placed the originals on theADF.
7. Press the x button.
Related Information
& “Loading Paper in the Paper Cassette” on page 47& “Loading Paper in the Rear Paper Feed Slot” on page 50& “Placing Originals” on page 54& “Menu Options for Copy Mode” on page 88
Menu Options for Copy ModeNote:Available menus vary depending on the layout you selected.
Number of copies
Enter the number of copies.
Layout
❏ With BorderCopies with margins around the edges.
User's Guide
Copying
88
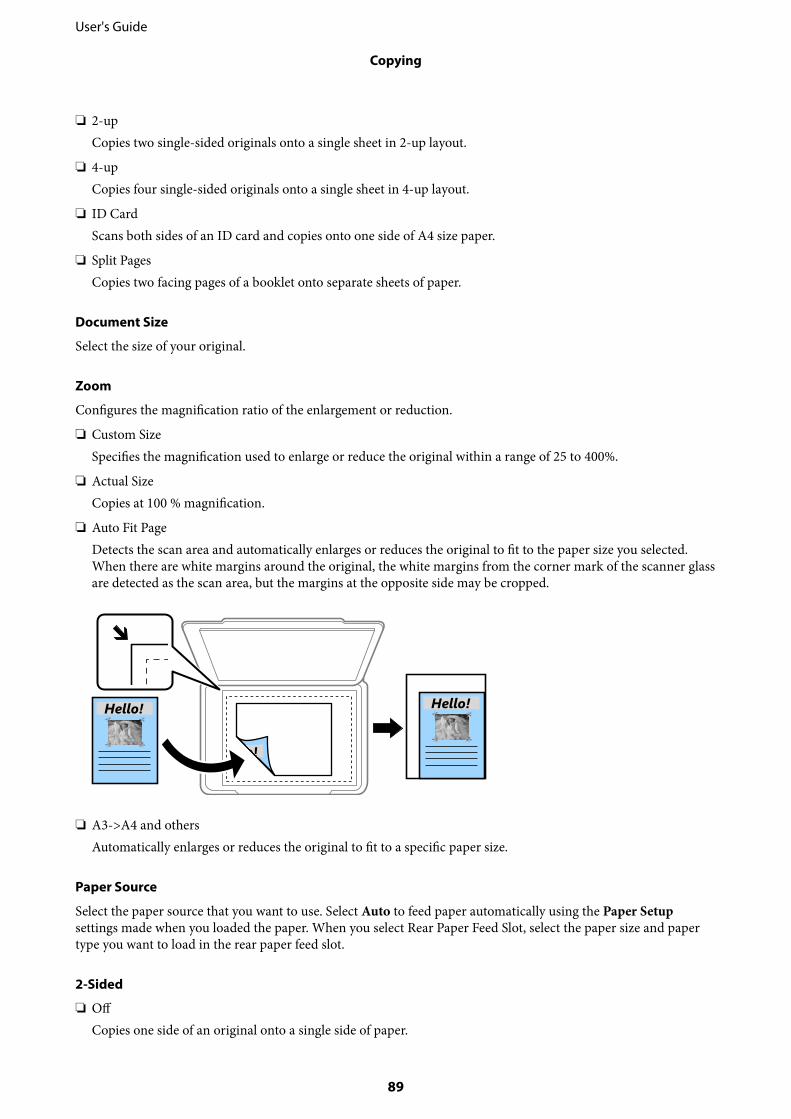
❏ 2-upCopies two single-sided originals onto a single sheet in 2-up layout.
❏ 4-upCopies four single-sided originals onto a single sheet in 4-up layout.
❏ ID CardScans both sides of an ID card and copies onto one side of A4 size paper.
❏ Split PagesCopies two facing pages of a booklet onto separate sheets of paper.
Document Size
Select the size of your original.
Zoom
Configures the magnification ratio of the enlargement or reduction.
❏ Custom SizeSpecifies the magnification used to enlarge or reduce the original within a range of 25 to 400%.
❏ Actual SizeCopies at 100 % magnification.
❏ Auto Fit PageDetects the scan area and automatically enlarges or reduces the original to fit to the paper size you selected.When there are white margins around the original, the white margins from the corner mark of the scanner glassare detected as the scan area, but the margins at the opposite side may be cropped.
❏ A3->A4 and othersAutomatically enlarges or reduces the original to fit to a specific paper size.
Paper Source
Select the paper source that you want to use. Select Auto to feed paper automatically using the Paper Setupsettings made when you loaded the paper. When you select Rear Paper Feed Slot, select the paper size and papertype you want to load in the rear paper feed slot.
2-Sided
❏ OffCopies one side of an original onto a single side of paper.
User's Guide
Copying
89
❏ 2>2-SidedCopies both sides of a double-sided original onto both sides of a single sheet of paper.
❏ 1>2-SidedCopies two single-sided originals onto both sides of a single sheet of paper. Press Advanced to configure thebinding position of the paper.
❏ 2>1-SidedCopies both sides of a double-sided original onto one side of two sheets of paper. Press Advanced to configurethe binding position of your original.
Document Orientation
Select the orientation of your original.
Quality
Copies in optimal quality to match the type of original.
Density
Increase the level of density when the copying results are faint. Decrease the level of density when ink smears.
Layout Order
Select the copy layout for multiple pages when you have selected 2-up or 4-up as the Layout setting.
Scan Order
Select which page of a booklet to scan when you have selected Split Pages as the Layout setting.
Remove Shadow
Removes shadows that appear in the center of copies when copying a booklet or that appear around copies whencopying thick paper.
Remove Punch Holes
Removes the binding holes when copying.
Collate Copy
Prints multiple copies of multiple originals collated in order and sorts them into sets.
Dry Time
Select the drying time for 2-sided copying. Increase the level of drying time when ink smears.
User's Guide
Copying
90
Scanning
Scanning Using the Control Panel
Scanning to an EmailYou can send scanned image files by email directly from the printer through a pre-configured email server. Beforeusing this feature, you need to configure the email server.
You can specify the email address by entering directly, but it may be easier if you register the email address in thecontacts list first.
Note:❏ Before you use this feature, make sure the printer's Date/Time and Time Difference settings are correct. Access the menus
from Setup > System Administration > Common Settings > Date/Time Settings.
❏ Instead of this feature, you can select Email as a format when scanning to computer from the control panel. You can sendan email by entering the address on a computer connected to this printer. When scanning to computer, make sure thecomputer is turned on.
1. Place the originals.
Note:If you want to scan multiple originals or make 2-sided scans, place all of the originals in the ADF.
2. Enter Scan from the home screen.
3. Select Email.
4. Enter the email addresses.
❏ To select from the contacts list: Press Contacts, select a contact, and then press Proceed.
❏ To enter the email address manually: Select Enter Email Address > Enter Email Address, enter the emailaddress, and then press the enter key at the bottom-right of the screen.
Note:You can send emails to up to 10 individual email addresses and groups.
5. Press Format, and then select the file format.
6. Press Menu, and then make settings for Email Settings and Basic Settings.
Note:❏ You can specify the maximum size for files that can be attached to an email in Attached File Max Size.
❏ When you select PDF as the file format, you can set a password to protect the file. Select PDF Settings, and thenmake settings.
❏ Press Preset to save your settings as a preset.
7. Press the x button.
User's Guide
Scanning
91
Related Information
& “Configuring an Email Server” on page 229& “Managing Contacts” on page 60& “Scanning to a Computer” on page 96& “Placing Originals” on page 54& “Presets Mode” on page 21& “Common Menu Options for Scanning” on page 99
Menu Options for Scanning to an Email
Contacts
Select email addresses to send the scanned image from the contacts list.
Format
Select the format in which to save the scanned image. When you select TIFF (Single Page) or TIFF(Multi Page), only monochrome scanning is available.
Menu
❏ Email SettingsSubject:Enter a subject for the email in alphanumeric characters and symbols.Filename Prefix:Enter a prefix for the name of the images in alphanumeric characters and symbols.
❏ Basic SettingsSet the scan settings for the originals. See the common setting menus in scanning for more details.
❏ Scan ReportPrints a history that shows when and to which email address scanned images have been sent.
Related Information
& “Common Menu Options for Scanning” on page 99
Scanning to a Network Folder or FTP ServerYou can save the scanned image to a specified folder on a network. You can specify the folder by entering a folderpath directly, but it may be easier if you register the folder information in the contacts list first.
Note:Before you use this feature, make sure the printer's Date/Time and Time Difference settings are correct. Access the menusfrom Setup > System Administration > Common Settings > Date/Time Settings.
1. Place the originals.
Note:If you want to scan multiple originals or make a 2-sided scan, place all of the originals on the ADF.
2. Enter Scan from the home screen.
User's Guide
Scanning
92
3. Select Network Folder/FTP.
4. Specify the folder.
❏ To select from the contacts list: Press Contacts, select a contact, and then press Proceed.
❏ To enter the folder path directly: Press Enter Location. Select Communication Mode, enter the folder pathas Location, and then make other folder settings.
Note:Enter the folder path in the following format.
When using SMB as the communication mode:
\\host name\folder name
When using FTP as the communication mode:
ftp://host name/folder name
5. Press Format, and then select the file format.
6. Press Menu, and then make settings for File Settings and Basic Settings.
Note:❏ When you select PDF as the file format, you can set a password to protect the file. Select Basic Settings > PDF
Settings, and then make settings.
❏ Press Preset to save your settings as a preset.
7. Press the x button.
Related Information
& “Managing Contacts” on page 60& “Placing Originals” on page 54& “Presets Mode” on page 21& “Common Menu Options for Scanning” on page 99
Menu Options for Network Folder or FTP Server
Contacts
Select a folder in which to save the scanned image from the contacts list. You do not need to makelocation settings when you have selected a folder from the contacts list.
Location
❏ Communication ModeSelect the communication mode.
❏ LocationEnter a folder path in which to save the scanned image.
❏ User NameEnter a user name for the specified folder.
❏ PasswordEnter a password for the specified folder.
User's Guide
Scanning
93
❏ Connection ModeSelect the connection mode.
❏ Port NumberEnter a port number.
Format
Select the format in which to save the scanned image. When you select TIFF (Multi Page), onlymonochrome scanning is available.
Menu
❏ File SettingsEnter a prefix for the name of the images in Filename Prefix in alphanumeric characters andsymbols.
❏ Basic SettingsSet the scan settings for the originals. See the common setting menus in scanning for more details.
❏ Scan ReportPrints a history that shows when and to which folder the scanned images have been sent.
Related Information
& “Common Menu Options for Scanning” on page 99
Scanning to a Memory DeviceYou can save the scanned image to a memory device.
1. Insert a memory device into the printer's memory card slot or external interface USB port.
2. Place the originals.
Note:If you want to scan multiple originals or make a 2-sided scan, place all of the originals on the ADF.
3. Enter Scan from the home screen.
4. Select Memory Device.
5. Press Format, and then select the file save format.
6. Press Settings, and then make scan settings.
Note:❏ When you select PDF as the file format, you can set a password to protect the file. Select PDF Settings, and then
make settings.
❏ Press Preset to save your settings as a preset.
7. Press the x button.
User's Guide
Scanning
94
Related Information
& “Part Names and Functions” on page 15& “Placing Originals” on page 54& “Presets Mode” on page 21& “Common Menu Options for Scanning” on page 99
Menu Options for Scanning to a Memory Device
Format
Select the format in which to save the scanned image. When you select TIFF (Multi Page) onlymonochrome scanning is available.
Settings
Set the scan settings for the originals. See the common setting menus in scanning for more details.
Related Information
& “Common Menu Options for Scanning” on page 99
Scanning to the CloudYou can send scanned images to could services. Before using this feature, make settings using Epson Connect. Seethe following Epson Connect portal website for details.
https://www.epsonconnect.com/
http://www.epsonconnect.eu (Europe only)
1. Make sure that you have made settings using Epson Connect.
2. Place the originals.
Note:If you want to scan multiple originals or make a 2-sided scan, place all of the originals on the ADF.
3. Enter Scan from the home screen.
4. Select Cloud.
5. Select a destination.
6. Press Format, and then select the file save format.
7. Press Settings, and then make scan settings.
Note:Press Preset to save your settings as a preset.
8. Press the x button.
User's Guide
Scanning
95
Related Information
& “Placing Originals” on page 54& “Common Menu Options for Scanning” on page 99
Menu Options for Scanning to the Cloud
Format
Select the format in which to save the scanned image.
Settings
Set the scan settings for the originals. See the common setting menus in scanning for more details.
Related Information
& “Common Menu Options for Scanning” on page 99
Scanning to a ComputerYou can save the scanned image to a computer.
cImportant:
Make sure you have installed Epson Scan 2 and Epson Event Manager on your computer before using this feature.
1. Place the originals.
Note:If you want to scan multiple originals or make a 2-sided scan, place all of the originals on the ADF.
2. Enter Scan from the home screen.
3. Select Computer.
4. Select a computer on which to save the scanned images.
Note:❏ You can change the scan settings such as the scanning size, folder to save, or save format, by using Epson Event
Manager.
❏ When the printer is connected to a network, you can select the computer to which you want to save the scannedimage. Up to 20 computers can be displayed on the printer's control panel.
❏ When the computer to which you want to save the scanned images is detected on the network, the initial 15characters of the computer name are displayed on the control panel. If you set Network Scan Name(Alphanumeric) in Epson Event Manager, it is displayed on the control panel.
5. Press Format, and then select the file format.
Note:When Email is selected, you can attach the scanned image to an email.
User's Guide
Scanning
96
6. Set the Scan Area and the 2-Sided settings if necessary.
Note:Press Preset to save your settings as a preset.
7. Press the x button.
Related Information
& “Placing Originals” on page 54& “Common Menu Options for Scanning” on page 99
Menu Options for Scanning to a Computer
2-Sided
Scans both sides of the original.
Scan Area
Select the scan area. To use the settings in Epson Event Manager, select Defined by Event Manager.
Format
Select the format in which to save the scanned image.
Scanning to a Computer (WSD)Note:❏ This feature is only available for computers running Windows 10/Windows 8.1/Windows 8/Windows 7/Windows Vista.
❏ If you are using Windows 7/Windows Vista, you need to setup your computer in advance using this feature.
1. Place the originals.
Note:If you want to scan multiple originals, place all of the originals on the ADF.
2. Enter Scan from the home screen.
3. Select Computer (WSD).
4. Select a computer.
5. Press the x button.
Related Information
& “Placing Originals” on page 54
Setting Up a WSD Port
This section explains how to set up a WSD port for Windows 7/Windows Vista.
User's Guide
Scanning
97
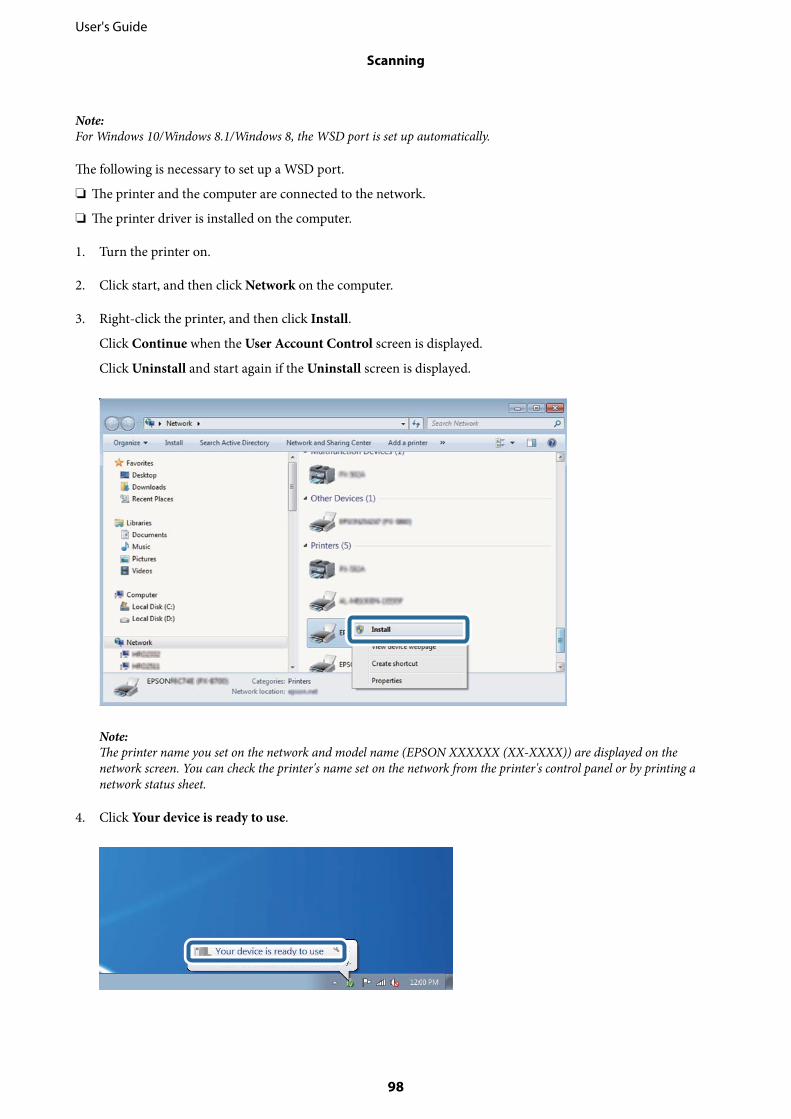
Note:For Windows 10/Windows 8.1/Windows 8, the WSD port is set up automatically.
The following is necessary to set up a WSD port.
❏ The printer and the computer are connected to the network.
❏ The printer driver is installed on the computer.
1. Turn the printer on.
2. Click start, and then click Network on the computer.
3. Right-click the printer, and then click Install.
Click Continue when the User Account Control screen is displayed.
Click Uninstall and start again if the Uninstall screen is displayed.
Note:The printer name you set on the network and model name (EPSON XXXXXX (XX-XXXX)) are displayed on thenetwork screen. You can check the printer's name set on the network from the printer's control panel or by printing anetwork status sheet.
4. Click Your device is ready to use.
User's Guide
Scanning
98
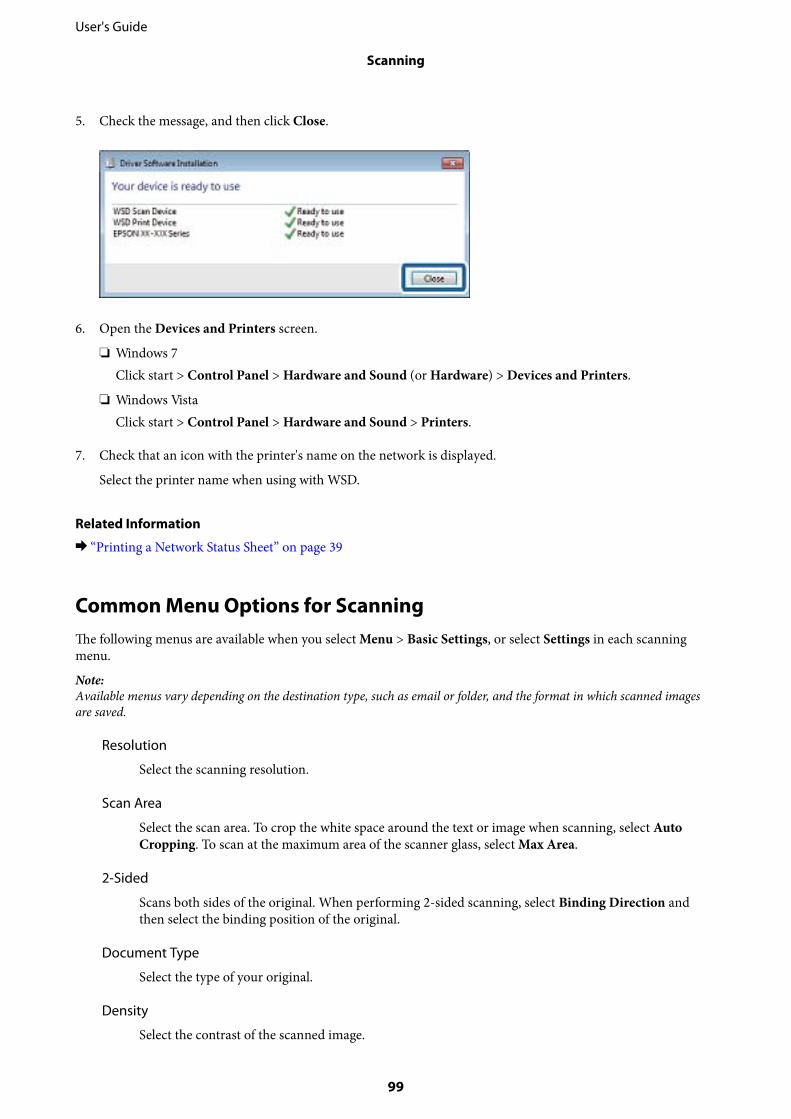
5. Check the message, and then click Close.
6. Open the Devices and Printers screen.
❏ Windows 7Click start > Control Panel > Hardware and Sound (or Hardware) > Devices and Printers.
❏ Windows VistaClick start > Control Panel > Hardware and Sound > Printers.
7. Check that an icon with the printer's name on the network is displayed.
Select the printer name when using with WSD.
Related Information
& “Printing a Network Status Sheet” on page 39
Common Menu Options for ScanningThe following menus are available when you select Menu > Basic Settings, or select Settings in each scanningmenu.
Note:Available menus vary depending on the destination type, such as email or folder, and the format in which scanned imagesare saved.
Resolution
Select the scanning resolution.
Scan Area
Select the scan area. To crop the white space around the text or image when scanning, select AutoCropping. To scan at the maximum area of the scanner glass, select Max Area.
2-Sided
Scans both sides of the original. When performing 2-sided scanning, select Binding Direction andthen select the binding position of the original.
Document Type
Select the type of your original.
Density
Select the contrast of the scanned image.
User's Guide
Scanning
99
Document Orientation
Select the orientation of your original.
Compression Ratio
Select how much to compress the scanned image.
PDF Settings
When you have selected PDF as the save format setting, use these settings to protect PDF files.
❏ Document Open PasswordCreates a PDF file that requires a password when opening.
❏ Permissions PasswordCreates a PDF file that requires a password when printing or editing.
Attached File Max Size
Select the maximum file size that can be attached to the email.
Scanning from a Computer
Scanning Using Epson Scan 2You can scan using the scanner driver "Epson Scan 2". You can scan originals using detailed settings that aresuitable for text documents.
See the Epson Scan 2 help for an explanation of each setting item.
1. Place the original.
Note:If you want to scan multiple originals, place them in the ADF.
2. Start Epson Scan 2.
User's Guide
Scanning
100

3. Make the following settings on the Main Settings tab.
❏ Document Source: Select the source where the original is placed.
❏ Scanning Side: Select the side of the original you want to scan when scanning from ADF.
❏ Document Size: Select the size of the original you placed.
❏ Image Type: Select the color for saving the scanned image.
❏ Resolution: Select the resolution.
4. Make other scan settings if necessary.
❏ You can preview the scanned image by clicking the Preview button. The preview window opens, and thepreviewed image is displayed.When you preview using the ADF, the original is ejected from the ADF. Place the ejected original again.
User's Guide
Scanning
101
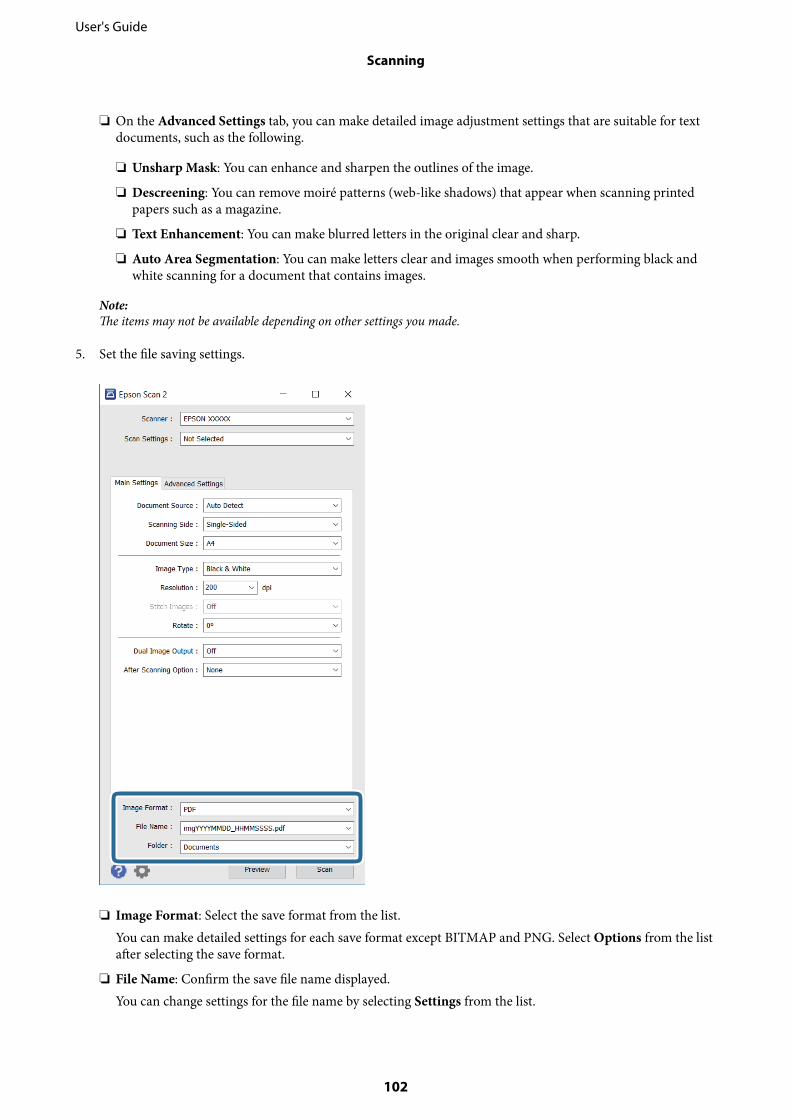
❏ On the Advanced Settings tab, you can make detailed image adjustment settings that are suitable for textdocuments, such as the following.
❏ Unsharp Mask: You can enhance and sharpen the outlines of the image.
❏ Descreening: You can remove moiré patterns (web-like shadows) that appear when scanning printedpapers such as a magazine.
❏ Text Enhancement: You can make blurred letters in the original clear and sharp.
❏ Auto Area Segmentation: You can make letters clear and images smooth when performing black andwhite scanning for a document that contains images.
Note:The items may not be available depending on other settings you made.
5. Set the file saving settings.
❏ Image Format: Select the save format from the list.You can make detailed settings for each save format except BITMAP and PNG. Select Options from the listafter selecting the save format.
❏ File Name: Confirm the save file name displayed.You can change settings for the file name by selecting Settings from the list.
User's Guide
Scanning
102
❏ Folder: Select the save folder for the scanned image from the list.You can select another folder or create a new folder by selecting Select from the list.
6. Click Scan.
Related Information
& “Placing Originals” on page 54& “Application for Scanning Documents and Images (Epson Scan 2)” on page 164
Scanning from Smart DevicesEpson iPrint is an application that allows you to scan photos and documents from a smart device, such as asmartphone or tablet, that is connected to the same wireless network as your printer. You can save the scanneddata on a smart device or to Cloud services, send it by email, or print it.
Installing Epson iPrintYou can install Epson iPrint on your smart device from the following URL or QR code.
http://ipr.to/c
Scanning Using Epson iPrintStart Epson iPrint from your smart device and select the item you want to use from the home screen.
User's Guide
Scanning
103
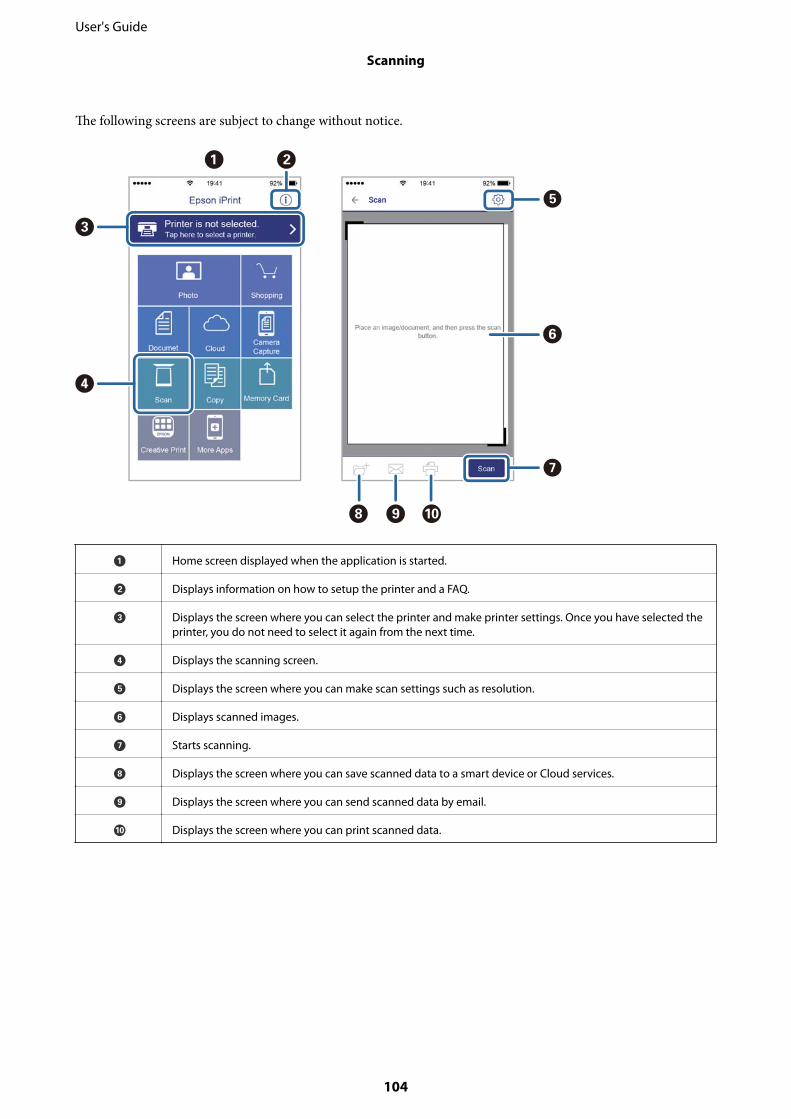
The following screens are subject to change without notice.
A Home screen displayed when the application is started.
B Displays information on how to setup the printer and a FAQ.
C Displays the screen where you can select the printer and make printer settings. Once you have selected theprinter, you do not need to select it again from the next time.
D Displays the scanning screen.
E Displays the screen where you can make scan settings such as resolution.
F Displays scanned images.
G Starts scanning.
H Displays the screen where you can save scanned data to a smart device or Cloud services.
I Displays the screen where you can send scanned data by email.
J Displays the screen where you can print scanned data.
User's Guide
Scanning
104
Faxing
Setting Up a Fax
Connecting to a Phone Line
Compatible Telephone Lines
You can use the printer over standard analogue telephone lines (PSTN = Public Switched Telephone Network) andPBX (Private Branch Exchange) telephone systems.
You may not be able to use the printer with the following phone lines or systems.
❏ VoIP phone line such as DSL or fiber-optic digital service
❏ Digital phone line (ISDN)
❏ Some PBX telephone systems
❏ When adapters such as terminal adapters, VoIP adapters, splitters, or DSL router are connected between thetelephone wall jack and the printer
Connecting the Printer to a Phone Line
Connect the printer to a telephone wall jack using an RJ-11 (6P2C) phone cable. When connecting a telephone tothe printer, use a second RJ-11 (6P2C) phone cable.
Depending on the area, a phone cable may be included with the printer. If it is included, use that cable.
You may need to connect the phone cable to an adapter provided for your country or region.
cImportant:
Remove the cap from the EXT. port of the printer only when connecting your telephone to the printer. Do notremove the cap if you are not connecting your telephone.
In areas where lightning strikes occur frequently, we recommend that you use a surge protector.
User's Guide
Faxing
105
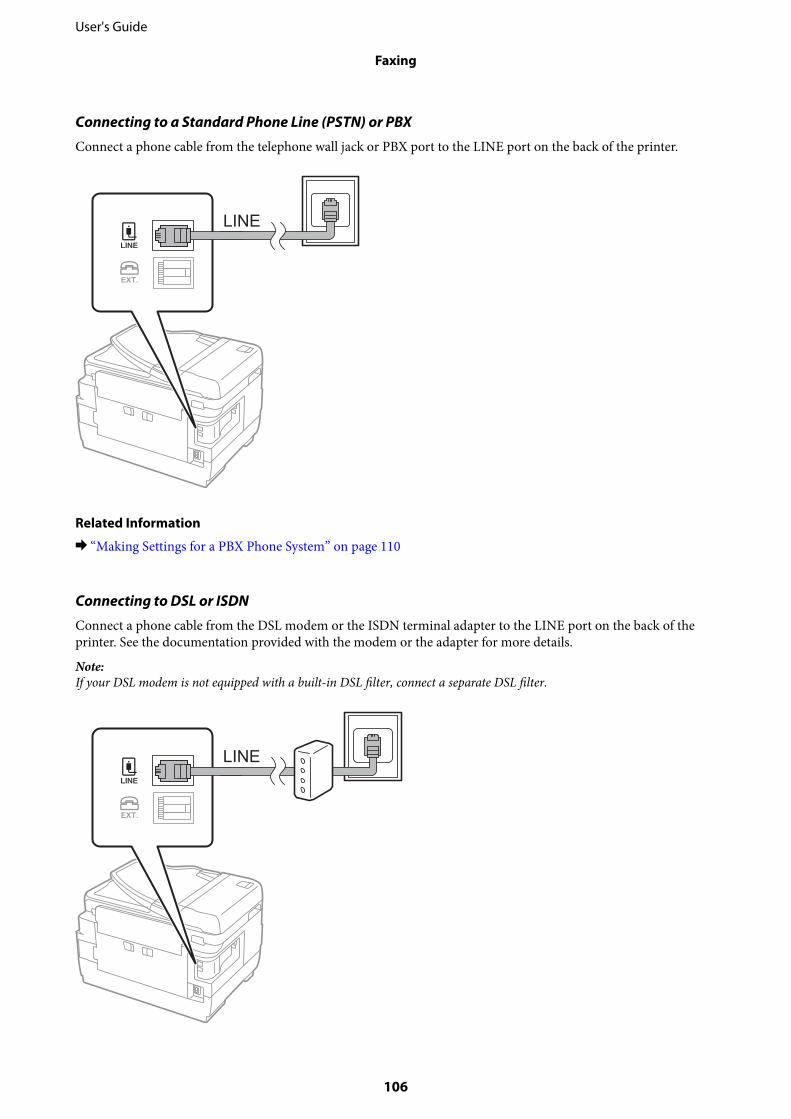
Connecting to a Standard Phone Line (PSTN) or PBX
Connect a phone cable from the telephone wall jack or PBX port to the LINE port on the back of the printer.
Related Information
& “Making Settings for a PBX Phone System” on page 110
Connecting to DSL or ISDN
Connect a phone cable from the DSL modem or the ISDN terminal adapter to the LINE port on the back of theprinter. See the documentation provided with the modem or the adapter for more details.
Note:If your DSL modem is not equipped with a built-in DSL filter, connect a separate DSL filter.
User's Guide
Faxing
106
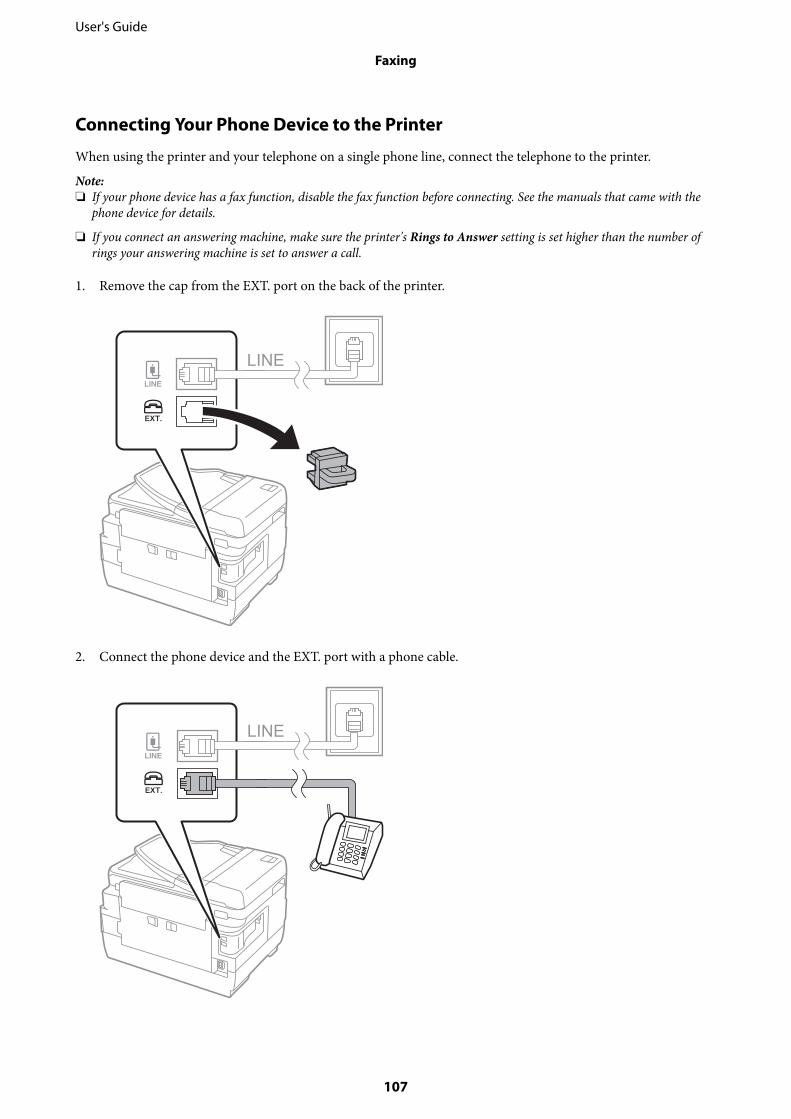
Connecting Your Phone Device to the Printer
When using the printer and your telephone on a single phone line, connect the telephone to the printer.
Note:❏ If your phone device has a fax function, disable the fax function before connecting. See the manuals that came with the
phone device for details.
❏ If you connect an answering machine, make sure the printer's Rings to Answer setting is set higher than the number ofrings your answering machine is set to answer a call.
1. Remove the cap from the EXT. port on the back of the printer.
2. Connect the phone device and the EXT. port with a phone cable.
User's Guide
Faxing
107
cImportant:
When sharing a single phone line, make sure you connect the phone device to the EXT. port of the printer. Ifyou split the line to connect the phone device and the printer separately, the phone and the printer do not workcorrectly.
3. Pick up the handset of the connected phone device and confirm that the [The phone line is in use.] message isdisplayed on the LCD screen.
If the message is not displayed, check that the phone cable is securely connected to the EXT. port.
Related Information
& “Settings for the Answering Machine” on page 117
Making Basic Fax SettingsFirst make basic fax settings such as Receive Mode using the Fax Setting Wizard, and then configure the othersettings as necessary.
The Fax Setting Wizard is automatically displayed when the printer is turned on for the first time. Once you havemade the settings, you do not need to make them again unless the connection environment is changed.
If an administrator has locked the settings, only the administrator can make the settings.
Making Basic Fax Settings Using the Fax Setting Wizard
Make basic settings by following the on-screen instructions.
1. Connect the printer to the phone line.
cImportant:
Because an automatic fax connection check runs at the end of the wizard, make sure you connect the printer tothe phone line before starting the wizard.
2. Enter Setup from the home screen.
3. Select System Administration > Fax Settings > Fax Setting Wizard, and then press Start.
The wizard begins.
4. On the fax header entry screen, enter your sender name such as your company name.
Note:Your sender name and your fax number appear as the header for outgoing faxes.
5. On the phone number entry screen, enter your fax number.
6. On the DRD Setting screen, make the following settings.
❏ If you have subscribed to a distinctive ring service from your telephone company: Press Proceed, select thering pattern to be used for incoming faxes, and then go to step 9. Receive Mode is automatically set toAuto.
User's Guide
Faxing
108
❏ If you do not need to set this option: Press Skip, and then go to the next step.
Note:❏ Distinctive ring services, offered by many telephone companies (the service name differs by company), allows you to
have several phone numbers on one phone line. Each number is assigned a different ring pattern. You can use onenumber for voice calls and another for fax calls. Select the ring pattern assigned to fax calls in DRD.
❏ Depending on the region, On and Off are displayed as the DRD options. Select On to use the distinctive ring feature.
7. On the Receive Mode Setting screen, select whether you are using your phone device connected to the printer.
❏ When connected: Press Yes, and go to the next step.
❏ When not connected: Press No and go to step 9. Receive Mode is set to Auto.
8. On the Receive Mode Setting screen, select whether you want to receive faxes automatically.
❏ To receive automatically: Press Yes. Receive Mode is set to Auto.
❏ To receive manually: Press No. Receive Mode is set to Manual.
9. On the Confirm Settings screen, check the settings you made, and then press Proceed.
To correct or change settings, press the y button.
10. Press Start to run the fax connection check, and when the screen prompts you to print the check result, pressthe x button.
A report of the check result that shows the connection status is printed.
Note:❏ If there are any errors reported, follow the instructions on the report to solve them.
❏ If the Select Line Type screen is displayed, select the line type. When you are connecting the printer to a PBX phonesystem or terminal adapter, select PBX.
❏ If the Select Dial Tone Detection screen is displayed, select Disable.However, setting this to Disable may cause the printer to skip the first digit of a fax number when dialing and sendthe fax to the wrong number.
Related Information
& “Connecting the Printer to a Phone Line” on page 105& “Setting Receiving Mode” on page 116& “Making Settings for a PBX Phone System” on page 110& “Fax Settings Options” on page 129
Making Basic Fax Settings Individually
You can make fax settings without using the fax setting wizard by selecting each setting menu individually. Thesettings configured using the wizard can also be changed. For more details, see the list of menus in fax settings.
Related Information
& “Fax Settings Options” on page 129
User's Guide
Faxing
109
Making Settings for a PBX Phone System
Make the following settings when using the printer in offices that use extensions and require external access codes,such as 0 and 9, to get an outside line.
1. Enter Setup from the home screen.
2. Select System Administration > Fax Settings > Basic Settings > Line Type.
3. Select PBX.
4. On the Access Code screen, select Use.
5. Press the Access Code field, enter the external access code used for your phone system, and then press theenter key at the bottom-right of the screen.
The access code is stored in the printer. When sending a fax to an outside fax number, enter # (hash) instead ofthe actual access code.
Note:When # (hash) is entered at the beginning of the fax number, the printer replaces the # with the stored access code whendialing. Using # helps avoid connection problems when connecting to an outside line.
Making Paper Source Settings to Receive Faxes
You can set the printer so that specific paper sources are not used for printing received documents and fax reports.By default, all of the paper sources are enabled for fax printing. Use this feature if you do not want to use paper in aspecific paper source for fax printing.
1. Enter Setup from the home screen.
2. Select System Administration > Printer Settings > Paper Source Settings > Auto Select Settings > Fax.
3. Select the paper source that you do not want to use for printing faxes, and then disable it.
Sending Faxes
Basic Fax Sending OperationsSend faxes in color or monochrome (B&W). When sending a fax in monochrome, you can preview the scannedimage on the LCD screen before sending.
Note:❏ If the fax number is busy or there is some problem, the printer automatically redials after one minute.
❏ You can reserve up to 50 monochrome fax jobs even while the phone line is in use for a voice call, sending another fax, orreceiving a fax. You can check or cancel reserved fax jobs from Job Monitor in Status Menu.
❏ If you have enabled the Save Failure Data feature, failed faxes are saved, and you can resend them from Job Monitor inStatus Menu.
User's Guide
Faxing
110
Sending Faxes Using the Control Panel
1. Place the originals.
Note:You can send up to 100 pages in one transmission; however depending on the remaining amount of memory, you maynot be able to send faxes even with less than 100 pages.
2. Enter Fax from the home screen.
3. Specify the recipient.
❏ To enter manually: Enter numbers using the numerical keypad on the control panel or the LCD screen, andthen press the enter key at the bottom-right of the screen.
❏ To select from the contacts list: Press Contacts, press the check box to add a check mark to a contact, andthen press Proceed.
❏ To select from the sent fax history: Press History, select a recipient, and then press Menu > Send to thisnumber.
Note:❏ You can send the same monochrome fax to up to 200 recipients. A color fax can only be sent to one recipient at a
time.
❏ To add a pause (pause for three seconds) during dialing, enter a hyphen by pressing .
❏ When Direct Dialing Restrictions in Security Settings is enabled, you can only select fax recipients from thecontacts list or the sent fax history. You cannot manually enter a fax number.
❏ If you set an external access code in Line Type, enter "#" (hash) instead of the actual external access code at thebeginning of the fax number.
❏ To delete recipients you entered, display the list of recipients by pressing the field on the screen that shows a faxnumber or the number of recipients, select the recipient from the list, and then select Delete from the List.
4. Press Menu, select Fax Send Settings, and then make settings such as the resolution and the sending methodas necessary.
Note:❏ To send 2-sided originals, enable ADF 2-Sided. However, you cannot send in color with this setting.
❏ Press Preset on the fax top screen to save the current settings and the recipients in Preset. Recipients may not besaved depending on how you specified the recipients, such as entering a fax number manually.
5. When sending a monochrome fax, press Preview on the fax top screen to check the scanned document.
❏ : Moves the screen in the direction of the arrows.
❏ : Reduces or enlarges.
❏ : Moves to the previous or the next page.
❏ Retry: Cancels the preview.
❏ View: Displays or hides the operation icons.
User's Guide
Faxing
111
Note:❏ You cannot send the fax in color after previewing.
❏ When Direct Send is enabled, you cannot preview.
❏ When the preview screen is left untouched for 20 seconds, the fax is sent automatically.
❏ The image quality of a sent fax may be different from what you previewed depending on the capability of therecipient machine.
6. Press the x button.
Note:❏ To cancel sending, press the y button.
❏ It takes longer to send a fax in color because the printer performs scanning and sending simultaneously. While theprinter is sending a color fax, you cannot use the other features.
Related Information
& “Placing Originals” on page 54& “Menu Options for Fax Mode” on page 127& “Checking Fax Jobs” on page 125& “Managing Contacts” on page 60& “Presets Mode” on page 21
Sending Faxes Dialing from the External Phone Device
You can send a fax by dialing using the connected telephone when you want to talk over the phone before sendinga fax, or when the recipient's fax machine does not switch to the fax automatically.
1. Place the originals.
Note:You can send up to 100 pages in one transmission.
2. Pick up the handset of the connected telephone, and then dial the recipient's fax number using the phone.
3. Press Start Fax on the printer's control panel, and then press Send.
4. Press Menu, select Fax Send Settings, and then make settings such as the resolution and the sending methodas necessary.
5. When you hear a fax tone, press the x button, and then hang up the handset.
Note:When a number is dialed using the connected telephone, it takes longer to send a fax because the printer performsscanning and sending simultaneously. While sending the fax, you cannot use the other features.
Related Information
& “Placing Originals” on page 54& “Menu Options for Fax Mode” on page 127
User's Guide
Faxing
112
Various Ways of Sending Faxes
Sending Faxes After Confirming the Recipient's Status
You can send a fax while listening to sounds or voices through the printer's speaker while dialing, communicating,and transmitting. You can also use this feature when you want to receive a fax from a fax polling service byfollowing audio guidance.
1. Place the originals.
2. Enter Fax from the home screen.
3. Press On Hook.
Note:You can adjust the sound volume of the speaker.
4. Specify the recipient.
5. When you hear a fax tone, press Send/Receive, and then press Send.
Note:When receiving a fax from a fax polling service, and you hear the audio guidance, follow the guidance to make theprinter operations.
6. Press the x button.
Related Information
& “Sending Faxes Using the Control Panel” on page 111& “Receiving Faxes by Polling (Polling Receive)” on page 118& “Placing Originals” on page 54& “Menu Options for Fax Mode” on page 127
Sending Faxes at a Specified Time (Send Fax Later)
You can set to send a fax at a specified time. Only monochrome faxes can be sent when the time to send isspecified.
1. Place the originals.
2. Enter Fax from the home screen.
3. Specify the recipient.
4. Press Menu, and then select Send Fax Later.
5. Press On, enter the time to send the fax, and then press OK.
6. Press Menu, select Fax Send Settings, and then make settings such as the resolution and the sending methodas necessary.
User's Guide
Faxing
113
7. Press the x (B&W) button.
Note:To cancel the fax, cancel it from Job Monitor in Status Menu.
Related Information
& “Sending Faxes Using the Control Panel” on page 111& “Placing Originals” on page 54& “Menu Options for Fax Mode” on page 127& “Checking Fax Jobs” on page 125
Storing a Fax Without Specifying a Recipient (Store Fax Data)
You can store up to 100 pages of a single document in monochrome. This allows you to save the time spentscanning the document when you need to send the same document frequently.
1. Place the originals.
2. Enter Fax from the home screen.
3. Press Menu, select Store Fax Data, and then enable the function.
4. Press Menu, select Fax Send Settings, and then make settings such as the resolution and the sending methodas necessary.
5. Press the x (B&W) button.
To send or delete the stored document, press the button to display Status Menu, select Job Monitor >Communication Job, select the document, and then follow the on-screen instructions.
Related Information
& “Sending Faxes Using the Control Panel” on page 111& “Placing Originals” on page 54& “Menu Options for Fax Mode” on page 127& “Checking Fax Jobs” on page 125
Sending Faxes on Demand (Polling Send)
You can store up to 100 pages of a single document in monochrome for polling fax. The stored document is sentupon request from another fax machine that has a polling receive feature.
1. Place the originals.
2. Enter Fax from the home screen.
3. Press Menu, select Polling Send, and then enable the function.
4. Press Menu, select Fax Send Settings, and then make settings such as the resolution and the sending methodas necessary.
User's Guide
Faxing
114
5. Press the x (B&W) button.
To delete the stored document, press the button to display Status Menu, select Job Monitor >Communication Job, select the document to delete, and then select Delete.
Related Information
& “Sending Faxes Using the Control Panel” on page 111& “Placing Originals” on page 54& “Menu Options for Fax Mode” on page 127& “Checking Fax Jobs” on page 125
Sending Many Pages of a Monochrome Document (Direct Send)
When sending a fax in monochrome, the scanned document is temporarily stored in the printer's memory.Therefore, sending a lot of pages may cause the printer to run out of memory and stop sending the fax. You canavoid this by enabling the Direct Send feature, however, it takes longer to send the fax because the printerperforms scanning and sending simultaneously. You can use this feature when there is only one recipient.
From the home screen, select Fax > Menu > Fax Send Settings > Direct Send > On.
Sending a Fax Preferentially (Priority Send)
You can send an urgent document ahead of the other faxes waiting to be sent.
From the home screen, select Fax > Menu > Fax Send Settings > Priority Send > On.
Note:You cannot send your document preferentially while one of the following is in progress because the printer cannot acceptanother fax.
❏ Sending a monochrome fax with Direct Send enabled
❏ Sending a color fax
❏ Sending a fax using a connected telephone
❏ Sending a fax sent from the computer
Sending Different Size Documents Using ADF (Continuous Scan from ADF)
If you place different sized originals in the ADF, all of the originals are sent at the largest size among them. You cansend them in their original sizes by sorting and placing them by size, or placing them one by one.
Before placing originals, select Fax > Menu > Fax Send Settings > Continuous Scan from ADF > On from thehome screen. Follow the on-screen instructions to place originals.
The printer stores the scanned documents, and sends as one document.
Note:If you leave the printer untouched for 20 seconds after prompted to set the next originals, the printer stops storing and startssending the document.
User's Guide
Faxing
115
Sending Multiple Faxes to the Same Recipient at Once (Batch Send)
If there are multiple faxes waiting to be sent to the same recipient, you can set the printer to group them together tosend them at once. Up to 5 documents (up to 100 pages in total) can be sent at one time. This helps you save onconnection fees by reducing the number of transmission times.
From the home screen, select Setup > System Administration > Fax Settings > Send Settings > Batch Send > On.
Note:❏ Scheduled faxes are also grouped together when the recipient and the time to send the fax match.
❏ Batch Send is not applied to the following fax jobs.
❏ Monochrome fax with Priority Send enabled
❏ Monochrome fax with Direct Send enabled
❏ Color faxes
❏ Faxes sent from the computer
Sending a Fax from a Computer
You can send faxes from the computer by using the FAX Utility and PC-FAX driver. See the help of FAX Utility andPC-FAX driver for the operating instructions.
Related Information
& “PC-FAX Driver (Fax Driver)” on page 165& “FAX Utility” on page 165
Receiving Faxes
Setting Receiving ModeYou can set Receive Mode using the Fax Setting Wizard. When you set up the fax feature for the first time, werecommend using the Fax Setting Wizard. If you want to change the Receive Mode settings individually, followthe steps below.
1. Enter Setup from the home screen.
2. Select System Administration > Fax Settings > Receive Settings > Receive Mode.
3. Select how to receive.
❏ Auto: Recommended for heavy fax users. The printer automatically receives a fax after the number of ringsyou specified.
cImportant:
When you do not connect a telephone to the printer, select the Auto mode.
User's Guide
Faxing
116
❏ Manual: Recommended for users who do not fax often, or who want to receive a fax after answering callswith the connected telephone. When receiving a fax, pick up the handset, and then operate the printer.
Note:If you enable the Remote Receive feature, you can start receiving a fax just by using the connected telephone.
Related Information
& “Making Basic Fax Settings Using the Fax Setting Wizard” on page 108& “Receiving Faxes Manually” on page 117& “Receiving Faxes Using a Connected Telephone (Remote Receive)” on page 118
Settings for the Answering Machine
You need settings to use an answering machine.
❏ Set the Receive Mode of the printer to Auto.
❏ Set the Rings to Answer setting of the printer to a higher number than the number of rings for the answeringmachine. Otherwise, the answering machine cannot receive voice calls to record voice messages. See themanuals that came with the answering machine for its settings.The Rings to Answer setting may not be displayed depending on the region.
Related Information
& “Receive Settings” on page 130
Various Ways of Receiving Faxes
Receiving Faxes Manually
When you connect a telephone and set the Receive Mode setting of the printer to Manual, follow the steps belowto receive faxes.
1. When the telephone rings, pick up the handset.
2. When you hear a fax tone, press Start Fax on the LCD screen of the printer.
Note:If you enable the Remote Receive feature, you can start receiving a fax just by using the connected telephone.
3. Press Receive.
4. Press the x button, and then hang up the handset.
Related Information
& “Receiving Faxes Using a Connected Telephone (Remote Receive)” on page 118& “Saving Received Faxes in the Inbox” on page 119& “Making Paper Source Settings to Receive Faxes” on page 110
User's Guide
Faxing
117
Receiving Faxes Using a Connected Telephone (Remote Receive)
To receive a fax manually, you need to operate the printer after you pick up the handset of the telephone. By usingthe Remote Receive feature, you can start receiving a fax just by operating the phone.
The Remote Receive feature is available for telephones that support tone dialing.
Related Information
& “Receiving Faxes Manually” on page 117
Setting Up Remote Receive
1. Enter Setup from the home screen.
2. Select System Administration > Fax Settings > Receive Settings > Remote Receive.
3. After enabling Remote Receive, enter a two digit code (0 to 9, *, and # can be entered) in the Start Code field.
4. Press OK.
Using Remote Receive
1. When the telephone rings, pick up the handset.
2. When you hear a fax tone, enter the start code using the telephone.
3. After confirming that the printer has started receiving the fax, hang up the handset.
Receiving Faxes by Polling (Polling Receive)
You can receive a fax stored on another fax machine by dialing the fax number. Use this feature to receive adocument from a fax information service. However, if the fax information service has an audio guidance featurethat you need to follow to receive a document, you cannot use this feature.
Note:To receive a document from a fax information service that uses audio guidance, just dial the fax number using the On Hookfeature or the connected telephone, and operate the phone and the printer following the audio guidance.
1. Enter Fax from the home screen.
2. Select Menu > Polling Receive, and then enable the function.
3. Enter the fax number.
Note:When Direct Dialing Restrictions in Security Settings is enabled, you can only select fax recipients from the contactlist or the sent fax history. You cannot manually enter a fax number.
4. Press the x button.
User's Guide
Faxing
118
Related Information
& “Sending Faxes After Confirming the Recipient's Status” on page 113& “Sending Faxes Dialing from the External Phone Device” on page 112
Saving and Forwarding Received FaxesThe printer provides the following features to save and forward received faxes.
❏ Saving in the printer's inbox
❏ Saving in an external memory device
❏ Saving on a computer
❏ Forwarding to another fax machine, an email address, or to a shared folder on a network
Note:❏ The above features can be used at the same time. If you do use them all at the same time, received documents are saved to
the inbox, to an external memory device, on a computer, and forwarded to the specified destination.
❏ When there are received documents that have not been read, saved or forwarded yet, the number of the unprocessed jobsis displayed on the fax mode icon.
Related Information
& “Saving Received Faxes in the Inbox” on page 119& “Saving Received Faxes in an External Memory Device” on page 120& “Saving Received Faxes on a Computer” on page 121& “Forwarding Received Faxes” on page 122& “Notification of Unprocessed Received Faxes” on page 125
Saving Received Faxes in the Inbox
You can set to save received faxes in the printer's inbox. Up to 100 documents can be saved. If you use this feature,received documents are not automatically printed. You can view them on the printer's LCD screen and print onlywhen needed.
Note:Saving 100 documents may not be possible depending on the usage conditions such as the file size of saved documents, andusing of multiple fax saving features at a time.
Setting to Save Received Faxes in the Inbox
1. Enter Setup from the home screen.
2. Select System Administration > Fax Settings > Output Settings > Fax Output.
3. Check the current settings displayed on the screen, and press Settings.
4. Select Save to Inbox > Yes.
User's Guide
Faxing
119
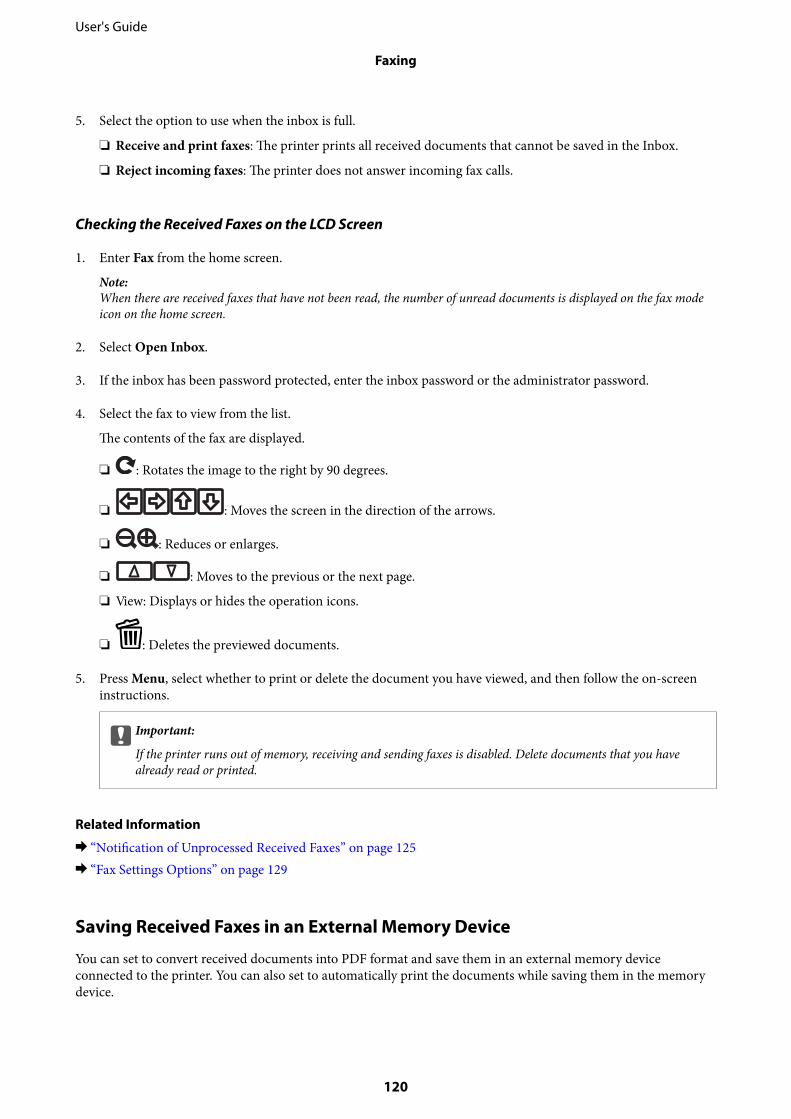
5. Select the option to use when the inbox is full.
❏ Receive and print faxes: The printer prints all received documents that cannot be saved in the Inbox.
❏ Reject incoming faxes: The printer does not answer incoming fax calls.
Checking the Received Faxes on the LCD Screen
1. Enter Fax from the home screen.
Note:When there are received faxes that have not been read, the number of unread documents is displayed on the fax modeicon on the home screen.
2. Select Open Inbox.
3. If the inbox has been password protected, enter the inbox password or the administrator password.
4. Select the fax to view from the list.
The contents of the fax are displayed.
❏ : Rotates the image to the right by 90 degrees.
❏ : Moves the screen in the direction of the arrows.
❏ : Reduces or enlarges.
❏ : Moves to the previous or the next page.
❏ View: Displays or hides the operation icons.
❏ : Deletes the previewed documents.
5. Press Menu, select whether to print or delete the document you have viewed, and then follow the on-screeninstructions.
cImportant:
If the printer runs out of memory, receiving and sending faxes is disabled. Delete documents that you havealready read or printed.
Related Information
& “Notification of Unprocessed Received Faxes” on page 125& “Fax Settings Options” on page 129
Saving Received Faxes in an External Memory Device
You can set to convert received documents into PDF format and save them in an external memory deviceconnected to the printer. You can also set to automatically print the documents while saving them in the memorydevice.
User's Guide
Faxing
120
cImportant:
Received documents are saved in the printer's memory temporarily before the documents are saved in the memorydevice connected to the printer. Because a memory full error disables sending and receiving faxes, keep the memorydevice connected to the printer. The number of documents that have saved in the printer's memory temporarily isdisplayed on the fax mode icon on the home screen.
1. Connect an external memory device to the printer.
2. Enter Setup from the home screen.
3. Select System Administration > Fax Settings > Output Settings > Fax Output.
4. Check the current settings displayed on the screen, and press Settings.
5. Select Other Settings > Create Folder to Save.
6. Check the message on the screen and then press Create.
A folder to save received documents is created in the memory device.
7. Press the y button to return to the Fax Output screen.
8. Select Save to Memory Device > Yes. To print the documents automatically while saving them in the memorydevice, select Yes and Print.
Related Information
& “Notification of Unprocessed Received Faxes” on page 125
Saving Received Faxes on a Computer
You can set to convert received documents into PDF format and save them on a computer connected to the printer.You can also set to automatically print the documents while saving them on the computer.
You need to use FAX Utility to make the setting. Install FAX Utility on the computer.
The Windows FAX Utility instructions differ depending on the version being used. This document provides theinstructions for Version 1.XX. For Windows FAX Utility Version 2.XX, see Basic Operations in the FAX UtilityOnline Help. To check which version you are using, right-click the FAX Utility title bar, and then click VersionInformation.
cImportant:
❏ Set the printer's receive mode to Auto.
❏ Received documents are saved in the printer's memory temporarily before the documents are saved on thecomputer that is set to save the faxes. Because a memory full error disables sending and receiving faxes, keep thecomputer turned on. The number of documents that have saved in the printer's memory temporarily is displayedon the fax mode icon on the home screen.
1. Start FAX Utility on the computer connected to the printer.
User's Guide
Faxing
121
2. Open the setting screen of FAX Utility.
Note:If a password entry screen is displayed, enter the password. If you do not know the password, contact your printeradministrator.
❏ WindowsClick Fax Settings for Printer, select the printer, and then click Received Fax Output Settings.
❏ Mac OS XClick Fax Receive Monitor, select the printer, and then click Receive Settings.
3. Click Save faxes on this computer and click Browse to specify the folder to save received documents.
4. Make the other settings as necessary.
Note:For details on the setting items and instructions, see the FAX Utility help settings screen.
5. Send the settings information to your printer.
❏ WindowsClick OK.
❏ Mac OS XClick Send.
If you want to save and print at the same time, go to the next step.
6. On the printer's control panel, select Setup > System Administration > Fax Settings > Output Settings.
7. On the Fax Output screen, select Settings, Save to Computer, and then select Yes and Print.
Note:To stop saving received document on the computer, set Save to Computer to No. You can also use FAX Utility to changethe setting, however, changing from FAX Utility is not allowed while there are received faxes that have not been savedon the computer.
Related Information
& “Setting Receiving Mode” on page 116& “FAX Utility” on page 165& “Notification of Unprocessed Received Faxes” on page 125
Forwarding Received Faxes
You can set to forward received documents to another fax machine, or convert the documents into PDF formatand forward them to a shared folder on a network or to an email address. Forwarded documents are deleted fromthe printer. First register the forwarding destinations to the contacts list. To forward to an email address, you alsoneed to configure the email server settings.
Note:❏ Color documents cannot be forwarded to another fax machine. They are processed as documents that failed to be
forwarded.
❏ Before you use this feature, make sure the printer's Date/Time and Time Difference settings are correct. Access the menusfrom System Administration > Common Settings.
User's Guide
Faxing
122
1. Enter Setup from the home screen.
2. Select System Administration > Fax Settings > Output Settings > Fax Output.
3. Check the current settings displayed on the screen, and press Settings.
4. Select Forward > Yes.
Note:To print the documents automatically while forwarding them, select Yes and Print.
5. Select Other Settings > Where to Forward.
6. Select forwarding destinations from the contacts list.
Note:❏ Press View to sort the contacts by printer's feature.
❏ You can specify up to five forwarding destinations. Press the check box to select the destination. Press the box again tocancel the selection.
7. When finished selecting forwarding destinations, press Proceed.
8. Check that the forwarding destinations you selected are correct, then press Close.
9. Select Options When Forwarding Failed.
10. Select whether to print received documents or save them in the printer's inbox when forwarding them is failed.
cImportant:
When the inbox is full, sending and receiving faxes is disabled. You should delete the documents from the inboxonce they have been checked. The number of documents that have failed to be forwarded is displayed on the faxmode icon on the home screen, in addition to other unprocessed jobs.
11. When forwarding to an email address, you can specify a subject for the email. Select Email Subject toForward, and enter the subject.
Note:❏ If you have selected a shared folder on a network or an email address as the forwarding destination, we recommend
that you test if you can send a scanned image to the destination in the scan mode. Select Scan > Email, or Scan >Network Folder/FTP from the home screen, select the destination, and then start scanning.
❏ You can set to receive a new fax notification on a Windows computer when received documents are saved to a sharedfolder on a network. Use FAX Utility to make the settings. For details, see the help of FAX Utility.
Related Information
& “Output Settings” on page 130& “Managing Contacts” on page 60& “Using an Email Server” on page 229& “Checking the Received Faxes on the LCD Screen” on page 120& “Notification of Unprocessed Received Faxes” on page 125& “Scanning to an Email” on page 91& “Scanning to a Network Folder or FTP Server” on page 92& “FAX Utility” on page 165
User's Guide
Faxing
123
Using Other Faxing Features
Printing Fax Report and List
Printing Fax Report Manually
1. Enter Fax from the home screen.
2. Select Menu > Fax Report.
3. Select the report to print, and then follow the on-screen instruction.
Note:You can change the report format. From the home screen, select Setup > System Administration > Fax Settings >Output Settings, and then change the Attach Image to Report or Report Format settings.
Related Information
& “Menu Options for Fax Mode” on page 127& “Output Settings” on page 130
Setting Up to Print Fax Reports Automatically
You can make settings to print the following fax reports automatically.
Transmission Report
From the home screen, select Setup > System Administration > Fax Settings > User Default Settings >Transmission Report, and then select Print or Print on Error.
Note:To change the setting when sending a fax, press Menu on the fax top screen, and then select Fax Send Settings >Transmission Report.
Forwarding Report
From the home screen, select Setup > System Administration > Fax Settings > Output Settings > ForwardingReport, and then select Print or Print on Error.
Fax Log
From the home screen, select Setup > System Administration > Fax Settings > Output Settings > Fax Log AutoPrint, and then select On(Every 30) or On(Time).
Related Information
& “Menu Options for Fax Mode” on page 127& “Output Settings” on page 130
User's Guide
Faxing
124
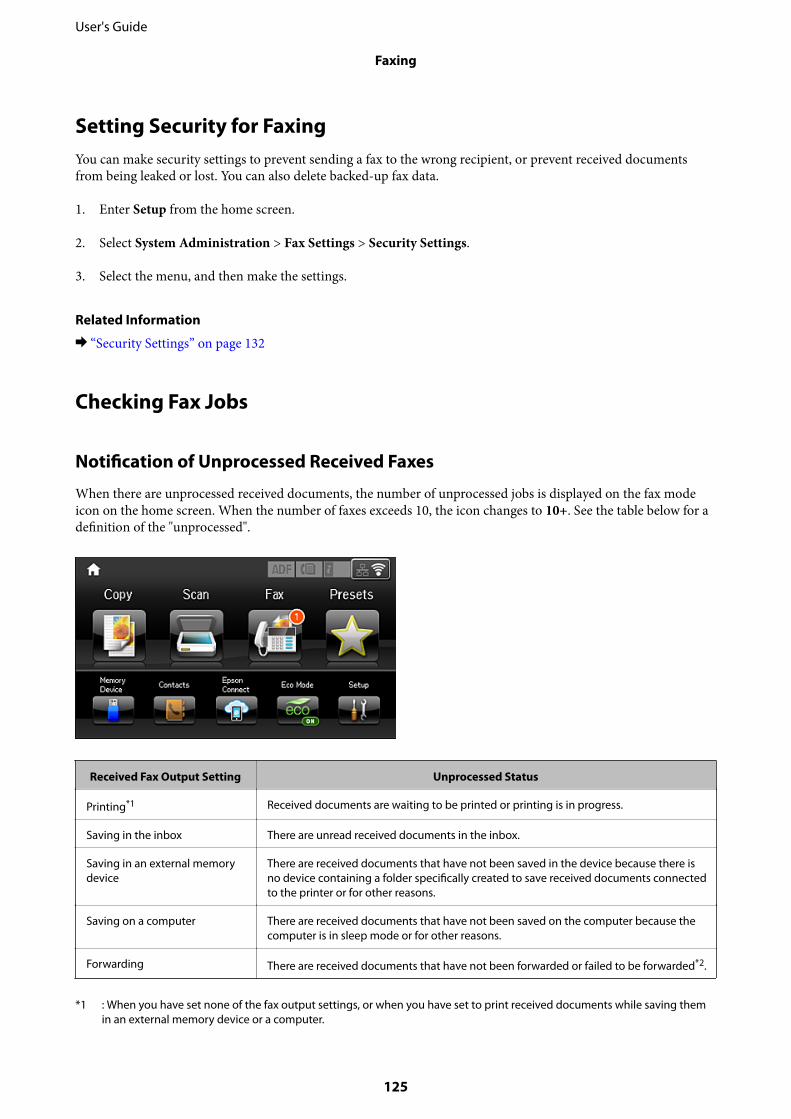
Setting Security for FaxingYou can make security settings to prevent sending a fax to the wrong recipient, or prevent received documentsfrom being leaked or lost. You can also delete backed-up fax data.
1. Enter Setup from the home screen.
2. Select System Administration > Fax Settings > Security Settings.
3. Select the menu, and then make the settings.
Related Information
& “Security Settings” on page 132
Checking Fax Jobs
Notification of Unprocessed Received Faxes
When there are unprocessed received documents, the number of unprocessed jobs is displayed on the fax modeicon on the home screen. When the number of faxes exceeds 10, the icon changes to 10+. See the table below for adefinition of the "unprocessed".
Received Fax Output Setting Unprocessed Status
Printing*1 Received documents are waiting to be printed or printing is in progress.
Saving in the inbox There are unread received documents in the inbox.
Saving in an external memorydevice
There are received documents that have not been saved in the device because there isno device containing a folder specifically created to save received documents connectedto the printer or for other reasons.
Saving on a computer There are received documents that have not been saved on the computer because thecomputer is in sleep mode or for other reasons.
Forwarding There are received documents that have not been forwarded or failed to be forwarded*2.
*1 : When you have set none of the fax output settings, or when you have set to print received documents while saving themin an external memory device or a computer.
User's Guide
Faxing
125
*2 : When you have set to save documents that could not be forwarded in the inbox, there are unread documents that failed tobe forwarded in the inbox. When you have set to print documents that failed to be forwarded, printing is not complete.
Note:If you are using more than one of the fax output settings, the number of unprocessed jobs may be displayed as "2" or "3" evenif only one fax has been received. For example, if you have set to save faxes in the inbox and on a computer and one fax isreceived, the number of unprocessed jobs is displayed as "2" if the fax has not been saved to the inbox and on a computer.
Related Information
& “Saving Received Faxes in the Inbox” on page 119& “Saving Received Faxes in an External Memory Device” on page 120& “Saving Received Faxes on a Computer” on page 121& “Forwarding Received Faxes” on page 122& “Checking the Received Faxes on the LCD Screen” on page 120& “Checking Fax Jobs in Progress” on page 126
Checking Fax Jobs in Progress
You can check, cancel, print, resend, or delete the following fax documents.
❏ Received documents that have not been printed yet.
❏ Documents that have not be sent yet
❏ Documents stored using Polling Send or Store Fax Data.
❏ Documents that have failed to be sent (if you have enabled Save Failure Data)
❏ Received documents that have not been saved on a computer or in an external memory device
1. Press the button.
2. Select Job Monitor, and then select Communication Job or Print Job.
3. Select a job to check.
Checking the Fax Job History
You can check the history of sent or received fax jobs. The received fax logs include the received documents so thatyou can reprint them. You cannot print or resend sent documents from the sent log.
1. Press the button.
2. Select Job History, and then select Receive Job or Send Job.
3. Select a job to check.
Note:All the received documents are stored in Job History so that you can reprint them, but they are deleted in chronologicalorder when the printer runs out of memory.
User's Guide
Faxing
126
Checking the Received Documents in the Inbox
You can check received documents stored in the printer's inbox.
1. Press the button.
2. Select Job Storage and then select Inbox.
Note:Press Menu to display menus for printing or deleting all the documents in the inbox.
3. Select a fax to check.
The content of the document is displayed.
Note:❏ Press Menu, and then select Details to see detailed information such as the date and time, and the sender.
❏ The printer cannot receive and send faxes when the memory is full. We recommend deleting the viewed or printeddocuments.
Menu Options for Fax Mode❏ Enter a Fax Number
Manually enter a fax number.
❏ ResolutionSelect the resolution of the outgoing fax. Select Photo for originals that contain both text and photo images.
❏ DensitySets the density of the outgoing fax.
❏ Document Size (Glass)Select the size and orientation of the original you placed on the scanner glass.
❏ ADF 2-SidedScans both sides of originals placed in the ADF and sends a monochrome fax.
❏ ContactsSelect a recipient from the contacts list. You can also add or edit a contact.
❏ HistorySelect a recipient from the sent fax history. You can also add the recipient to the contacts list.
❏ On HookYou can send a fax while listening to sounds or voices through the printer's speaker while dialing,communicating, and transmitting.
Fax Send Settings
Select the menus on the control panel as described below.
Fax > Menu > Fax Send Settings
❏ ResolutionSelect the resolution of the outgoing fax. Select Photo for originals that contain both text and photoimages.
User's Guide
Faxing
127
❏ DensitySets the density of the outgoing fax.
❏ Document Size (Glass)Select the size and orientation of the original you placed on the scanner glass.
❏ ADF 2-SidedScans both sides of originals placed in the ADF and sends a monochrome fax.
❏ Direct SendSends monochrome faxes to a single recipient as soon as the connection is made, without saving thescanned image to memory. If you do not enable this option, the printer starts the transmission aftersaving the scanned image to memory and may cause a memory full error when sending many pages.By using this option, you can avoid the error, but it takes longer to send the fax. You cannot use thisoption when using the ADF 2-Sided option and when sending a fax to multiple recipients.
❏ Priority SendSends the current fax before other faxes waiting to be sent.
❏ Continuous Scan from ADFWhen sending a fax from the ADF, you cannot add originals in the ADF after starting scanning. Ifyou place different sized originals in the ADF, all of the originals are sent at the largest size amongthem. Enable this option so that the printer asks if you want to scan another page after an original inthe ADF has finished scanning. Then you can sort and scan your originals by size and send them asa single fax.
❏ Transmission ReportPrints a transmission report automatically after you send a fax. Select Print on Error to print areport only when an error occurs.
Send Fax Later
Select the menus on the control panel as described below.
Fax > Menu > Send Fax Later
Sends a fax at a time you specified. Only a monochrome fax is available when using this option.
Polling Receive
Select the menus on the control panel as described below.
Fax > Menu > Polling Receive
Connects to the fax number you entered and receives a fax stored on the fax machine. You can use thisoption for receiving a fax from a fax information service.
Polling Send
Select the menus on the control panel as described below.
Fax > Menu > Polling Send
Stores one scanned document (up to 100 monochrome pages) for polling and sends it automaticallywhen another fax machine requests it using the device's polling receive function.
Store Fax Data
Select the menus on the control panel as described below.
User's Guide
Faxing
128
Fax > Menu > Store Fax Data
Stores one scanned document (up to 100 monochrome pages) and allows you to send it whenevernecessary.
Fax Report
Select the menus on the control panel as described below.
Fax > Menu > Fax Report
❏ Fax Settings ListPrints the current fax settings.
❏ Fax LogPrints a transmission report automatically after you send a fax. You can set to print this reportautomatically using the following menu.Setup > System Administration > Fax Settings > Output Settings > Fax Log Auto Print
❏ Last TransmissionPrints a report for the previous fax that was sent or received through polling.
❏ Stored Fax DocumentsPrints a list of fax documents stored in the printer’s memory, such as unfinished jobs.
❏ Protocol TracePrints a detailed report for the previous fax that was sent or received.
Fax Settings OptionsSelect the menus on the control panel as described below.
Setup > System Administration > Fax Settings
User Default SettingsSelect the menus on the control panel as described below.
Setup > System Administration > Fax Settings > User Default Settings
The settings made in this menu become your default settings for sending faxes. For explanations on the settingitems, see the Fax Send Settings in Fax mode.
Related Information
& “Menu Options for Fax Mode” on page 127
Send SettingsSelect the menus on the control panel as described below.
Setup > System Administration > Fax Settings > Send Settings
User's Guide
Faxing
129
Auto Rotation
An A4 size original placed in the ADF or on the scanner glass with its long edge facing to the left is sentas an A3 size fax. Enable this to rotate the scanned image to send it at A4 size.
Batch Send
When there are multiple faxes waiting to be sent to the same recipient, this groups them together tosend them at once. Up to five documents (up to 100 pages in total) can be sent at one time. This helpsyou save on connection fees by reducing the number of transmission times.
Save Failure Data
Saves documents that failed to be sent in the printer's memory. You can resend the documents from theStatus Menu.
Receive SettingsSelect the menus on the control panel as described below.
Setup > System Administration > Fax Settings > Receive Settings
Receive Mode
Select the receive mode.
DRD
If you have subscribed to a distinctive ring service from your telephone company, select the ringpattern to be used for incoming faxes. The distinctive ring service, offered by many telephonecompanies (the service name differs by company), allows you to have several phone numbers on onephone line. Each number is assigned different ring pattern. You can use one number for voice calls andanother for fax calls. Depending on the region, this option may be On or Off.
Rings to Answer
Select the number of rings that must occur before the printer automatically receives a fax.
Remote Receive
When you answer an incoming fax call on a phone connected to the printer, you can start receiving thefax by entering the code using the phone.
Output SettingsSelect the menus on the control panel as described below.
Setup > System Administration > Fax Settings > Output Settings
Fax Output
You can set to save received documents in the inbox, on a memory device, or on a computer, or forwardthe documents.
User's Guide
Faxing
130
Auto Reduction
Reduces large received documents to fit on the paper in the paper source. Reducing may not always bepossible depending on the received data. If this is turned off, large documents are printed at theiroriginal size on multiple sheets, or a blank second page may be ejected.
Auto Rotation
Rotates a landscape-oriented A5, B5, A4, or Letter size received document so that it is printed on thecorrect paper size. This setting is applied when two or more paper sources are set for fax printing inPaper Source Settings > Auto Select Settings, and the paper size settings of the paper sources are A3and A4, B4 and B5, or A4 and A5.
Collation Stack
Prints received documents from the last page (print in descending order) so that the printeddocuments are stacked in the correct page order. When the printer is running low on memory, thisfeature may not be available.
Print Suspend Time
Saves documents received during the specified time period in the printer's memory without printingthem. At the time specified to restart printing, the documents are automatically printed. This featurecan be used for noise prevention at night or to prevent confidential documents from being disclosedwhile you are away. Before using this feature, make sure there is enough free memory. Even before therestarting time, you can check and print the received documents individually from Status Menu.
Forwarding Report
Prints a report after forwarding a received document.
Attach Image to Report
Prints a Transmission Report with an image of the first page of the sent document. Select On(LargeImage) to print the upper part of the page without reducing. Select On(Small Image) to print theentire page reducing it to fit onto the report.
Fax Log Auto Print
Prints the fax log automatically. Select On(Every 30) to print a log every time 30 fax jobs arecompleted. Select On(Time) to print the log at a specified time. However, if the number of fax jobsexceeds 30, the log is printed before the specified time.
Report Format
Select a format for fax reports other than Protocol Trace. Select Detail to print with error codes.
Basic SettingsSelect the menus on the control panel as described below.
Setup > System Administration > Fax Settings > Basic Settings
Fax Speed
Select the fax transmission speed. We recommend selecting Slow(9,600bps) when a communicationerror occurs frequently, when sending/receiving a fax to/from abroad, or when you are using an IP(VoIP) phone service.
User's Guide
Faxing
131

ECM
Automatically corrects errors in the fax transmission (Error Correction Mode), mostly caused bytelephone line noise. If this is disabled, you cannot send or receive documents in color.
Dial Tone Detection
Detects a dial tone before starting to dial. If the printer is connected to a PBX (Private BranchExchange) or digital phone line, the printer may fail to start dialing. In this situation, change the LineType setting to PBX. If this does not work, disable this feature. However, disabling this feature maydrop the first digit of a fax number and send the fax to the wrong number.
Dial Mode
Select the type of phone system to which you have connected the printer. When set to Pulse, you cantemporarily switch the dialing mode from pulse to tone by pressing ("T" is entered) while enteringnumbers on the fax top screen. Depending on the region, this setting may not be displayed.
Line Type
Select the line type to which you have connected the printer. When using the printer in an environmentthat uses extensions and requires an external access code, such as 0 and 9, to get an outside line, selectPBX and register the access code. Once you have registered the access code, enter # (hash) instead ofthe access code when sending a fax to an outside fax number. For an environment that uses a DSLmodem or terminal adapter, setting to PBX is also recommended.
Header
Enter your sender name and fax number. These appear as a header on outgoing faxes. You can enter upto 40 characters for your name, and up to 20 digits for your fax number.
Security SettingsSelect the menus on the control panel as described below.
Setup > System Administration > Fax Settings > Security Settings
Direct Dialing Restrictions
Enable this to disable the manual entry of recipient's fax numbers allowing the operator to selectrecipients only from the contacts list or sent history. Select Enter Twice to require the operator to enterthe fax number again when the number was manually entered.
Confirm Address List
Displays a recipient confirmation screen before starting the transmission.
Inbox Password Settings
Password protects the inbox to restrict users from viewing received faxes. Select Change to change thepassword, and select Reset to cancel password protection. When changing or resetting the password,you need the current password.
Backup Data Auto Clear
To prepare for an unexpected power off due to an electricity failure or an incorrect operation, theprinter temporarily stores backup copies of sent and received documents in its memory. Enable this
User's Guide
Faxing
132
option to automatically erase the backups when sending or receiving a document completessuccessfully and the backups become unnecessary.
Clear Backup Data
Erases all backup copies temporarily stored in the printer's memory. Run this before you give theprinter to someone else or dispose of it.
Check Fax ConnectionSelect the menus on the control panel as described below.
Setup > System Administration > Fax Settings > Check Fax Connection
Checks if the printer is connected to the phone line and ready for fax transmission, and prints the check result onA4 size plain paper.
Fax Setting WizardSelect the menus on the control panel as described below.
Setup > System Administration > Fax Settings > Fax Setting Wizard
Select to make basic fax settings by following the on-screen instructions. For details, see the page that describesbasic fax settings.
User's Guide
Faxing
133
Refilling Ink and Replacing MaintenanceBoxes
Checking the Status of the Remaining Ink and theMaintenance BoxYou can check the approximate ink levels from the computer.
To confirm the actual ink remaining, visually check the ink levels in all of the printer's tanks.
You can check the approximate service life of the maintenance box from the control panel or the computer.
Checking the Status of the Maintenance Box - Control Panel
1. Press the button on the control panel.
2. Select Printer Information.
Note:The indicator on the far right indicates the available space in the maintenance box.
Checking the Status of the Remaining Ink and the Maintenance Box- Windows
1. Access the printer driver window.
2. Click EPSON Status Monitor 3 on the Maintenance tab.
Note:If EPSON Status Monitor 3 is disabled, click Extended Settings on the Maintenance tab, and then select EnableEPSON Status Monitor 3.
Related Information
& “Windows Printer Driver” on page 162
Checking the Status of the Remaining Ink and the Maintenance Box- Mac OS
1. Select System Preferences from the menu > Printers & Scanners (or Print & Scan, Print & Fax), andthen select the printer.
2. Click Options & Supplies > Utility > Open Printer Utility.
3. Click EPSON Status Monitor.
User's Guide
Refilling Ink and Replacing Maintenance Boxes
134
Ink Bottle CodesEpson recommends the use of genuine Epson ink bottles. Epson warranty does not cover damage caused by inksother than those specified, including any genuine Epson ink not designed for this printer or any third party ink.
Other products not manufactured by Epson may cause damage that is not covered by Epson's warranties, andunder certain circumstances, may cause erratic printer behavior.
The following are the codes for genuine Epson ink bottles.
BK: Black C: Cyan M: Magenta Y: Yellow
774 664 664 664
cImportant:
Use of genuine Epson ink other than the specified ink could cause damage that is not covered by Epson's warranties.
Note:❏ Ink bottle codes may vary by location. For the correct codes in your area, contact Epson support.
❏ For users in Europe, visit the following website for information on Epson's ink bottle yields.http://www.epson.eu/pageyield
Related Information
& “Technical Support Web Site” on page 231
Ink Bottle Handling PrecautionsRead the following instructions before refilling ink.
Handling precautions
❏ Use ink bottles with the correct part code for this printer.
❏ This printer requires careful handling of ink. Ink may splatter when the ink tanks are filled or refilled with ink.If ink gets on your clothes or belongings, it may not come off.
❏ Store ink bottles at normal room temperature and keep them away from direct sunlight.
❏ Epson recommends using the ink bottle before the date printed on the package.
❏ Store the ink bottles in the same environment as the printer.
❏ When storing or transporting an ink bottle after removing its seal, do not tilt the bottle and do not subject it toimpacts or temperature changes. Otherwise, ink may leak even if the cap on the ink bottle is tightened securely.Be sure to keep the ink bottle upright when tightening the cap, and take measures to prevent ink from leakingwhen you transport the bottle.
❏ After bringing an ink bottle inside from a cold storage site, allow it to warm up at room temperature for at leastthree hours before using it.
❏ Do not open the ink bottle package until you are ready to fill the ink tank. The ink bottle is vacuum packed tomaintain its reliability. If you leave an ink bottle unpacked for a long time before using it, normal printing maynot be possible.
User's Guide
Refilling Ink and Replacing Maintenance Boxes
135
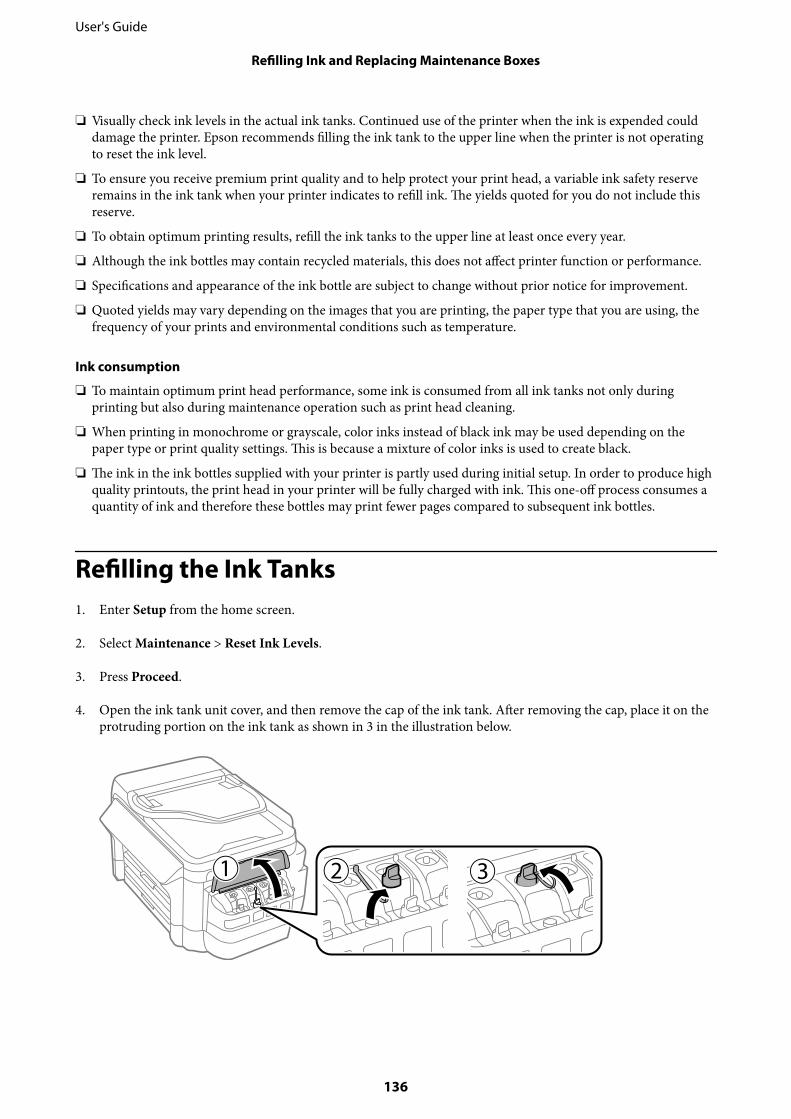
❏ Visually check ink levels in the actual ink tanks. Continued use of the printer when the ink is expended coulddamage the printer. Epson recommends filling the ink tank to the upper line when the printer is not operatingto reset the ink level.
❏ To ensure you receive premium print quality and to help protect your print head, a variable ink safety reserveremains in the ink tank when your printer indicates to refill ink. The yields quoted for you do not include thisreserve.
❏ To obtain optimum printing results, refill the ink tanks to the upper line at least once every year.
❏ Although the ink bottles may contain recycled materials, this does not affect printer function or performance.
❏ Specifications and appearance of the ink bottle are subject to change without prior notice for improvement.
❏ Quoted yields may vary depending on the images that you are printing, the paper type that you are using, thefrequency of your prints and environmental conditions such as temperature.
Ink consumption
❏ To maintain optimum print head performance, some ink is consumed from all ink tanks not only duringprinting but also during maintenance operation such as print head cleaning.
❏ When printing in monochrome or grayscale, color inks instead of black ink may be used depending on thepaper type or print quality settings. This is because a mixture of color inks is used to create black.
❏ The ink in the ink bottles supplied with your printer is partly used during initial setup. In order to produce highquality printouts, the print head in your printer will be fully charged with ink. This one-off process consumes aquantity of ink and therefore these bottles may print fewer pages compared to subsequent ink bottles.
Refilling the Ink Tanks1. Enter Setup from the home screen.
2. Select Maintenance > Reset Ink Levels.
3. Press Proceed.
4. Open the ink tank unit cover, and then remove the cap of the ink tank. After removing the cap, place it on theprotruding portion on the ink tank as shown in 3 in the illustration below.
User's Guide
Refilling Ink and Replacing Maintenance Boxes
136
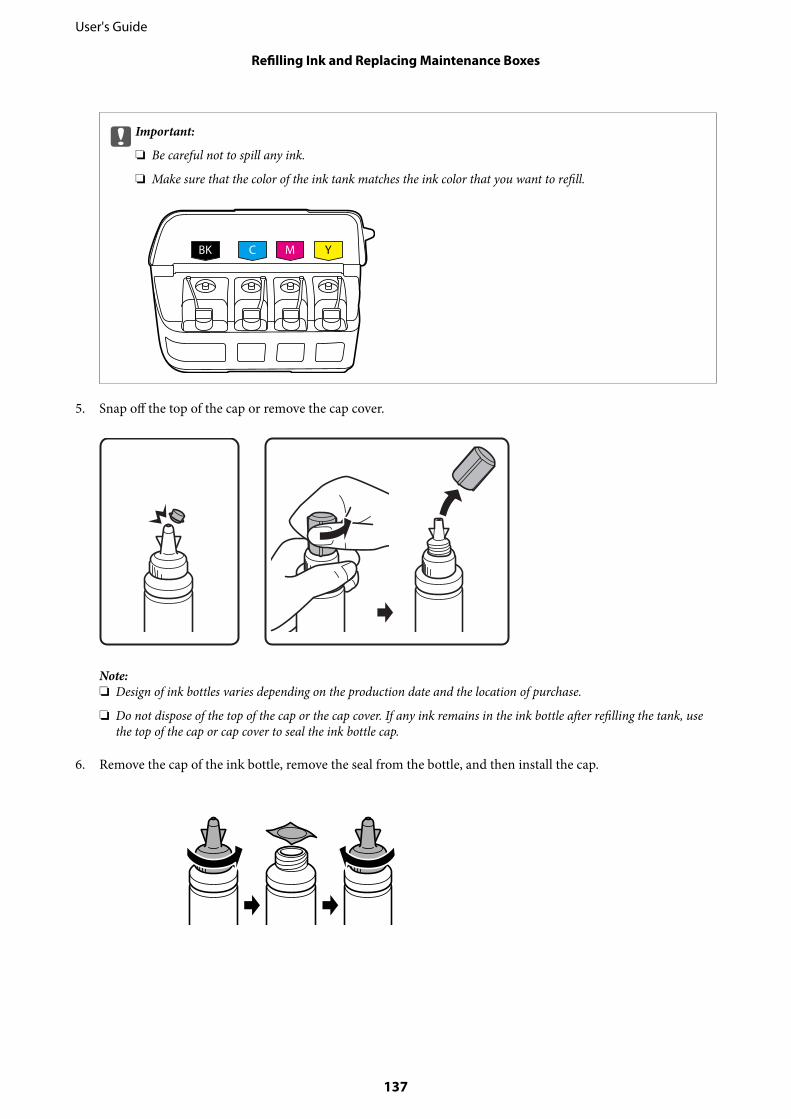
cImportant:
❏ Be careful not to spill any ink.
❏ Make sure that the color of the ink tank matches the ink color that you want to refill.
5. Snap off the top of the cap or remove the cap cover.
Note:❏ Design of ink bottles varies depending on the production date and the location of purchase.
❏ Do not dispose of the top of the cap or the cap cover. If any ink remains in the ink bottle after refilling the tank, usethe top of the cap or cap cover to seal the ink bottle cap.
6. Remove the cap of the ink bottle, remove the seal from the bottle, and then install the cap.
User's Guide
Refilling Ink and Replacing Maintenance Boxes
137
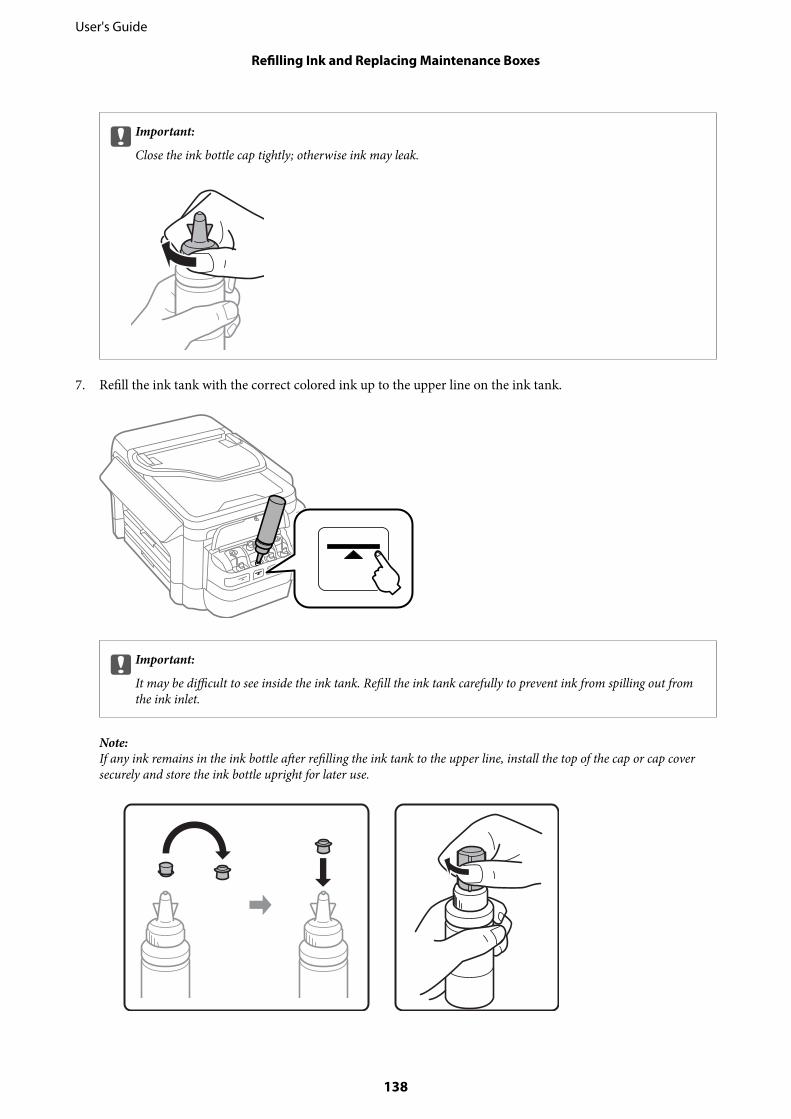
cImportant:
Close the ink bottle cap tightly; otherwise ink may leak.
7. Refill the ink tank with the correct colored ink up to the upper line on the ink tank.
cImportant:
It may be difficult to see inside the ink tank. Refill the ink tank carefully to prevent ink from spilling out fromthe ink inlet.
Note:If any ink remains in the ink bottle after refilling the ink tank to the upper line, install the top of the cap or cap coversecurely and store the ink bottle upright for later use.
User's Guide
Refilling Ink and Replacing Maintenance Boxes
138
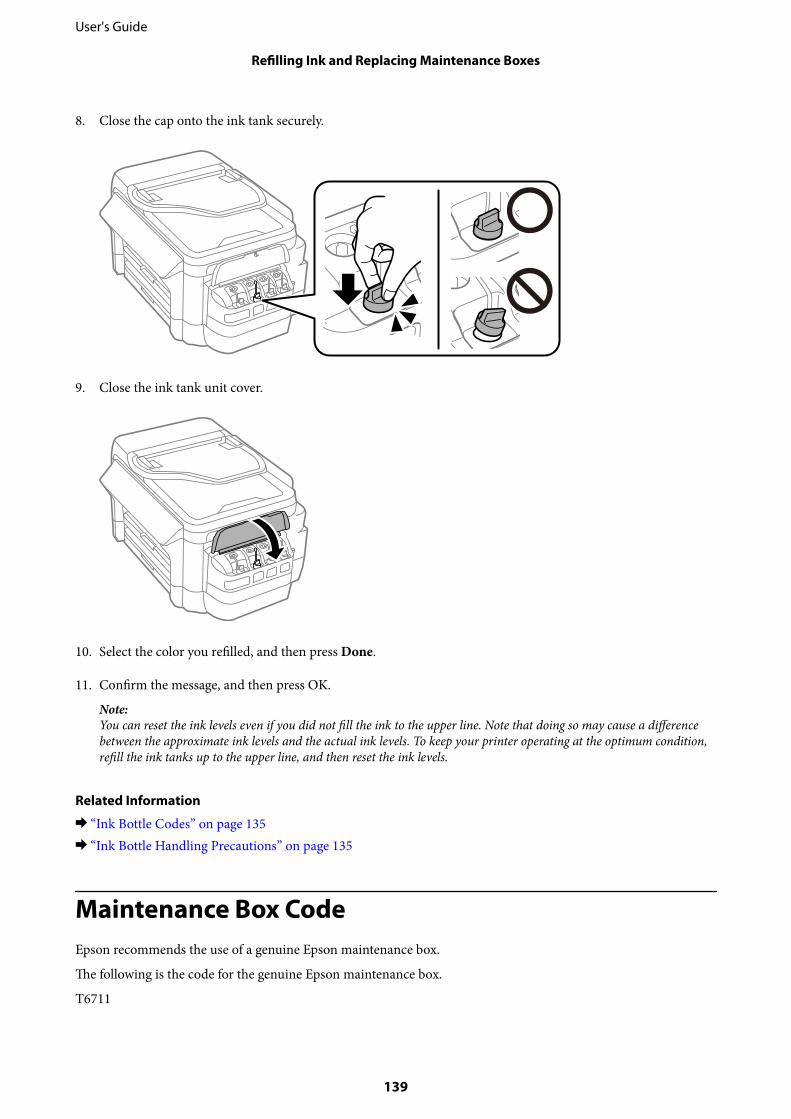
8. Close the cap onto the ink tank securely.
9. Close the ink tank unit cover.
10. Select the color you refilled, and then press Done.
11. Confirm the message, and then press OK.
Note:You can reset the ink levels even if you did not fill the ink to the upper line. Note that doing so may cause a differencebetween the approximate ink levels and the actual ink levels. To keep your printer operating at the optimum condition,refill the ink tanks up to the upper line, and then reset the ink levels.
Related Information
& “Ink Bottle Codes” on page 135& “Ink Bottle Handling Precautions” on page 135
Maintenance Box CodeEpson recommends the use of a genuine Epson maintenance box.
The following is the code for the genuine Epson maintenance box.
T6711
User's Guide
Refilling Ink and Replacing Maintenance Boxes
139
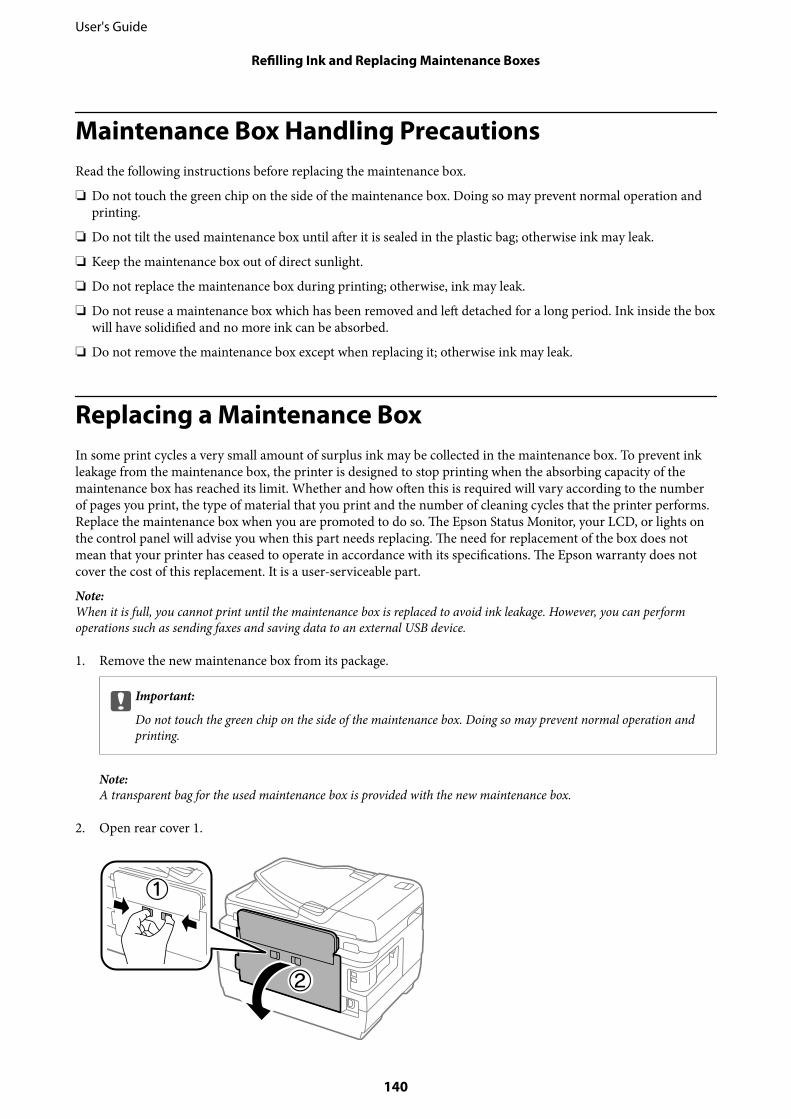
Maintenance Box Handling PrecautionsRead the following instructions before replacing the maintenance box.
❏ Do not touch the green chip on the side of the maintenance box. Doing so may prevent normal operation andprinting.
❏ Do not tilt the used maintenance box until after it is sealed in the plastic bag; otherwise ink may leak.
❏ Keep the maintenance box out of direct sunlight.
❏ Do not replace the maintenance box during printing; otherwise, ink may leak.
❏ Do not reuse a maintenance box which has been removed and left detached for a long period. Ink inside the boxwill have solidified and no more ink can be absorbed.
❏ Do not remove the maintenance box except when replacing it; otherwise ink may leak.
Replacing a Maintenance BoxIn some print cycles a very small amount of surplus ink may be collected in the maintenance box. To prevent inkleakage from the maintenance box, the printer is designed to stop printing when the absorbing capacity of themaintenance box has reached its limit. Whether and how often this is required will vary according to the numberof pages you print, the type of material that you print and the number of cleaning cycles that the printer performs.Replace the maintenance box when you are promoted to do so. The Epson Status Monitor, your LCD, or lights onthe control panel will advise you when this part needs replacing. The need for replacement of the box does notmean that your printer has ceased to operate in accordance with its specifications. The Epson warranty does notcover the cost of this replacement. It is a user-serviceable part.
Note:When it is full, you cannot print until the maintenance box is replaced to avoid ink leakage. However, you can performoperations such as sending faxes and saving data to an external USB device.
1. Remove the new maintenance box from its package.
cImportant:
Do not touch the green chip on the side of the maintenance box. Doing so may prevent normal operation andprinting.
Note:A transparent bag for the used maintenance box is provided with the new maintenance box.
2. Open rear cover 1.
User's Guide
Refilling Ink and Replacing Maintenance Boxes
140
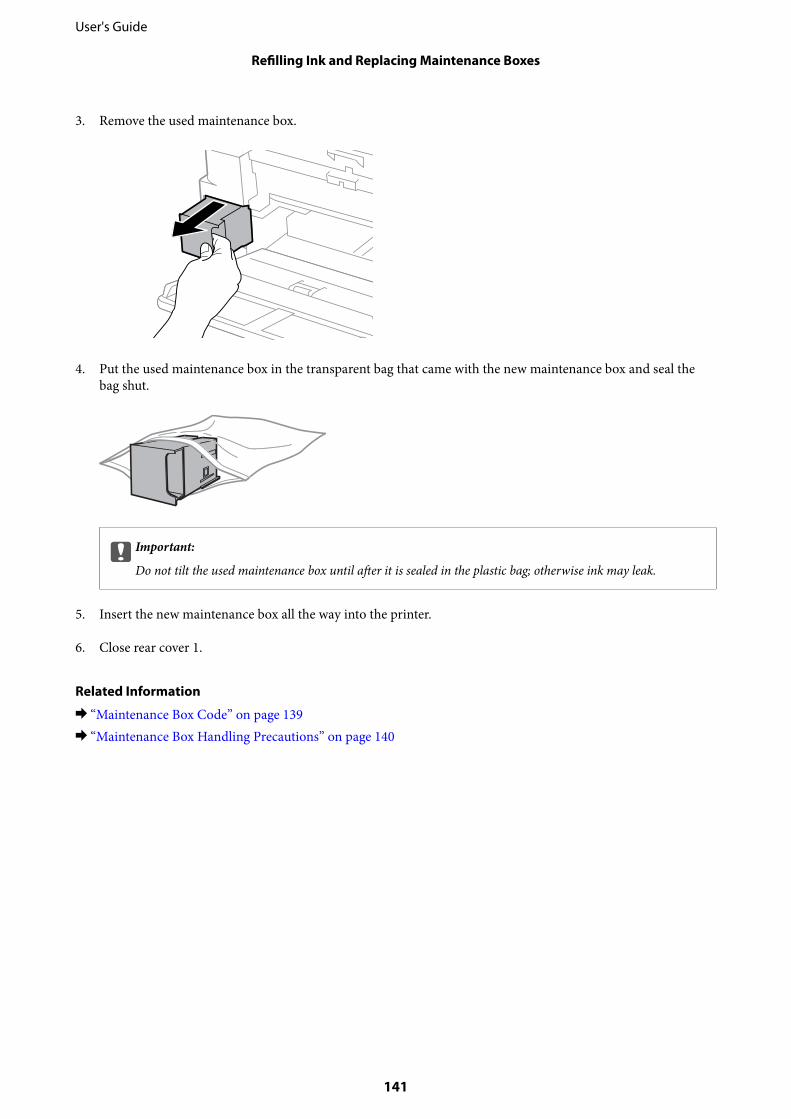
3. Remove the used maintenance box.
4. Put the used maintenance box in the transparent bag that came with the new maintenance box and seal thebag shut.
cImportant:
Do not tilt the used maintenance box until after it is sealed in the plastic bag; otherwise ink may leak.
5. Insert the new maintenance box all the way into the printer.
6. Close rear cover 1.
Related Information
& “Maintenance Box Code” on page 139& “Maintenance Box Handling Precautions” on page 140
User's Guide
Refilling Ink and Replacing Maintenance Boxes
141
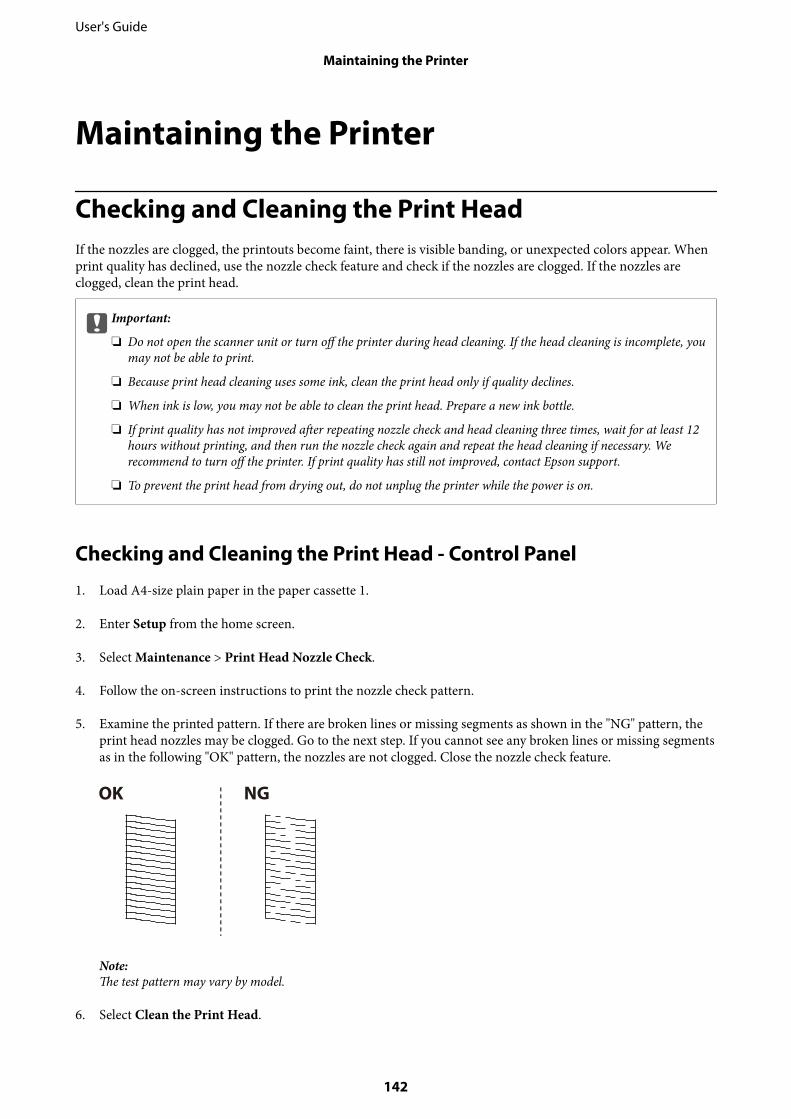
Maintaining the Printer
Checking and Cleaning the Print HeadIf the nozzles are clogged, the printouts become faint, there is visible banding, or unexpected colors appear. Whenprint quality has declined, use the nozzle check feature and check if the nozzles are clogged. If the nozzles areclogged, clean the print head.
cImportant:
❏ Do not open the scanner unit or turn off the printer during head cleaning. If the head cleaning is incomplete, youmay not be able to print.
❏ Because print head cleaning uses some ink, clean the print head only if quality declines.
❏ When ink is low, you may not be able to clean the print head. Prepare a new ink bottle.
❏ If print quality has not improved after repeating nozzle check and head cleaning three times, wait for at least 12hours without printing, and then run the nozzle check again and repeat the head cleaning if necessary. Werecommend to turn off the printer. If print quality has still not improved, contact Epson support.
❏ To prevent the print head from drying out, do not unplug the printer while the power is on.
Checking and Cleaning the Print Head - Control Panel
1. Load A4-size plain paper in the paper cassette 1.
2. Enter Setup from the home screen.
3. Select Maintenance > Print Head Nozzle Check.
4. Follow the on-screen instructions to print the nozzle check pattern.
5. Examine the printed pattern. If there are broken lines or missing segments as shown in the "NG" pattern, theprint head nozzles may be clogged. Go to the next step. If you cannot see any broken lines or missing segmentsas in the following "OK" pattern, the nozzles are not clogged. Close the nozzle check feature.
Note:The test pattern may vary by model.
6. Select Clean the Print Head.
User's Guide
Maintaining the Printer
142
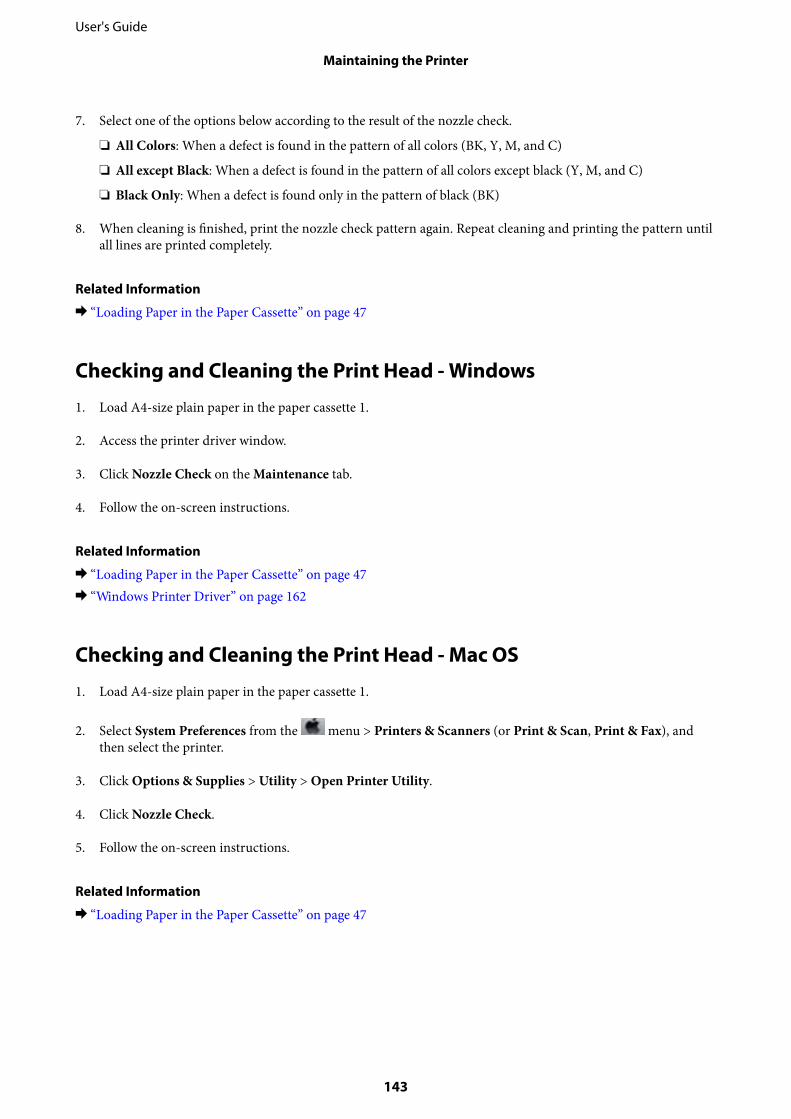
7. Select one of the options below according to the result of the nozzle check.
❏ All Colors: When a defect is found in the pattern of all colors (BK, Y, M, and C)
❏ All except Black: When a defect is found in the pattern of all colors except black (Y, M, and C)
❏ Black Only: When a defect is found only in the pattern of black (BK)
8. When cleaning is finished, print the nozzle check pattern again. Repeat cleaning and printing the pattern untilall lines are printed completely.
Related Information
& “Loading Paper in the Paper Cassette” on page 47
Checking and Cleaning the Print Head - Windows
1. Load A4-size plain paper in the paper cassette 1.
2. Access the printer driver window.
3. Click Nozzle Check on the Maintenance tab.
4. Follow the on-screen instructions.
Related Information
& “Loading Paper in the Paper Cassette” on page 47& “Windows Printer Driver” on page 162
Checking and Cleaning the Print Head - Mac OS
1. Load A4-size plain paper in the paper cassette 1.
2. Select System Preferences from the menu > Printers & Scanners (or Print & Scan, Print & Fax), andthen select the printer.
3. Click Options & Supplies > Utility > Open Printer Utility.
4. Click Nozzle Check.
5. Follow the on-screen instructions.
Related Information
& “Loading Paper in the Paper Cassette” on page 47
User's Guide
Maintaining the Printer
143
Replacing Ink inside the Ink TubesIf you have not used the printer for one or two months and notice banding or missing colors in the printouts, youmay need to replace the ink inside the ink tubes to solve the problem. The Power Ink Flushing utility allows you toreplace all of the ink inside the ink tubes.
cImportant:
❏ This feature consumes a lot of ink. Before using this feature, make sure there is enough ink in the printer’s inktanks. If there is not enough ink, refill the ink tanks.
❏ The maintenance box reaches its capacity earlier by running this feature. Replace the maintenance box when theabsorbing capacity of the maintenance box has reached its limit.
❏ After using the Power Ink Flushing utility, turn the printer off and wait for at least 12 hours. Using this featureimproves the print quality after 12 hours, however it cannot be used again within 12 hours of the last use. If youstill cannot solve the problem after trying all of the methods above, contact Epson support.
Related Information
& “Replacing a Maintenance Box” on page 140
Replacing Ink inside the Ink Tubes - Windows
1. Access the printer driver window.
2. Click Power Ink Flushing on the Maintenance tab.
3. Follow the on-screen instructions.
Related Information
& “Windows Printer Driver” on page 162
Replacing Ink inside the Ink Tubes - Mac OS
1. Select System Preferences from the menu > Printers & Scanners (or Print & Scan, Print & Fax), andthen select the printer.
2. Click Options & Supplies > Utility > Open Printer Utility.
3. Click Power Ink Flushing.
4. Follow the on-screen instructions.
Aligning the Print HeadIf you notice a misalignment of vertical lines or blurred images, align the print head.
User's Guide
Maintaining the Printer
144
Aligning the Print Head - Control Panel
1. Load A4-size plain paper in the paper cassette 1.
2. Enter Setup from the home screen.
3. Select Maintenance > Print Head Alignment.
4. Select Vertical Alignment or Horizontal Alignment, and then follow the on-screen instructions to print analignment pattern.
❏ Vertical Alignment: Select this if your printouts look blurry or vertical ruled lines appear misaligned.
❏ Horizontal Alignment: Select this if you see horizontal banding at regular intervals.
5. Follow the on-screen instructions to align the print head.
❏ Vertical Alignment: Find and enter the number for the most solid pattern in each group.
❏ Horizontal Alignment: Find and enter the number for the least separated and overlapping pattern.
Note:The test pattern may vary by model.
Related Information
& “Loading Paper in the Paper Cassette” on page 47
Cleaning the Paper Path for Ink SmearsWhen the printouts are smeared or scuffed, clean the roller inside.
User's Guide
Maintaining the Printer
145
cImportant:
Do not use tissue paper to clean the inside of the printer. The print head nozzles may be clogged with lint.
1. Load A3-size plain paper in the paper source that you want to clean.
2. Enter Setup from the home screen.
3. Select Maintenance > Paper Guide Cleaning.
4. Select the paper source, and then follow the on-screen instructions to clean the paper path.
Note:Repeat this procedure until the paper is not smeared with ink. If the printouts are still smeared or scuffed, clean theother paper sources.
Related Information
& “Loading Paper in the Paper Cassette” on page 47
Cleaning the ADFWhen the copied or scanned images from the ADF are smeared or the originals do not feed in the ADF correctly,clean the ADF.
cImportant:
Never use alcohol or thinner to clean the printer. These chemicals can damage the printer.
1. Open the ADF cover.
User's Guide
Maintaining the Printer
146
2. Use a soft, dry, clean cloth to clean the roller and the interior of the ADF.
3. Open the document cover.
4. Clean the part that is shown in the illustration.
User's Guide
Maintaining the Printer
147
Note:❏ If the glass surface is stained with grease or some other hard-to-remove material, use a small amount of glass cleaner
and a soft cloth to remove it. Wipe off all remaining liquid.
❏ Do not press the glass surface too hard.
❏ Be careful not to scratch or damage the surface of the glass. A damaged glass surface can decrease the scan quality.
Cleaning the Scanner GlassWhen the copies or scanned images are smeared or scuffed, clean the scanner glass.
!Caution:
Be careful not to trap your hand or fingers when opening or closing the document cover. Otherwise you may beinjured.
cImportant:
Never use alcohol or thinner to clean the printer. These chemicals can damage the printer.
1. Open the document cover.
2. Use a soft, dry, clean cloth to clean the surface of the scanner glass.
Note:❏ If the glass surface is stained with grease or some other hard-to-remove material, use a small amount of glass cleaner
and a soft cloth to remove it. Wipe off all remaining liquid.
❏ Do not press the glass surface too hard.
❏ Be careful not to scratch or damage the surface of the glass. A damaged glass surface can decrease the scan quality.
User's Guide
Maintaining the Printer
148

Checking the Total Number of Pages Fed Through thePrinterYou can check the total number of pages fed through the printer.
Checking the Total Number of Pages Fed Through the Printer -Control PanelThe information is printed together with the nozzle check pattern.
1. Load A4-size plain paper in the paper cassette 1.
2. Enter Setup from the home screen.
3. Select Maintenance > Print Head Nozzle Check.
4. Follow the on-screen instructions to print the nozzle check pattern.
Related Information
& “Loading Paper in the Paper Cassette” on page 47
Checking the Total Number of Pages Fed Through the Printer -Windows
1. Access the printer driver window.
2. Click Printer and Option Information on the Maintenance tab.
Related Information
& “Windows Printer Driver” on page 162
Checking the Total Number of Pages Fed Through the Printer - MacOS
1. Select System Preferences from the menu > Printers & Scanners (or Print & Scan, Print & Fax), andthen select the printer.
2. Click Options & Supplies > Utility > Open Printer Utility.
3. Click Printer and Option Information.
User's Guide
Maintaining the Printer
149
Saving PowerThe printer enters sleep mode or turns off automatically if no operations are performed for a set period. You canadjust the time before power management is applied. Any increase will affect the product's energy efficiency. Pleaseconsider the environment before making any change.
Depending on the location of purchase, the printer may have a feature that turns it off automatically if it is notconnected to the network for 30 minutes.
Saving Power - Control Panel
1. Enter Setup from the home screen, and then select System Administration.
2. Select Common Settings.
3. Do one of the following.
❏ Select Sleep Timer or Power Off Settings > Power Off If Inactive or Power Off If Disconnected, and thenmake settings.
❏ Select Sleep Timer or Power Off Timer, and then make settings.
Note:Your product may have the Power Off Settings or Power Off Timer feature depending on the location of purchase.
User's Guide
Maintaining the Printer
150

Menu Options for Setup ModeBy selecting Setup on the home screen from the control panel, you can make printer settings or perform printermaintenance.
Maintenance Box Service LifeSelect the menus on the control panel as described below.
Setup > Maintenance Box Service Life
Displays the approximate service life of the maintenance box. When an exclamation mark is displayed, themaintenance box is nearly full. When a x icon is displayed, the maintenance box is full.
Related Information
& “Replacing a Maintenance Box” on page 140
Menu Options for MaintenanceSelect the menus on the control panel as described below.
Setup > Maintenance
Print Head Nozzle Check
Prints a pattern to check if the print head nozzles are clogged.
Print Head Cleaning
Cleans clogged nozzles in the print head.
Reset Ink Levels
Resets the ink levels to 100% when refilling the ink tank.
Print Head Alignment
Adjusts the print head to improve print quality.
Run Vertical Alignment if your printouts look blurry or text and lines are misaligned.
Run Horizontal Alignment if your printouts contain horizontal banding at regular intervals.
Thick Paper
Reduces ink smearing when printing. Enable this feature only when you see ink smearing on yourprintouts because it may lower the printing speed.
Paper Guide Cleaning
Use this feature to feed a plain paper for cleaning when there are ink stains on the internal rollers or apaper feed problem has occurred.
User's Guide
Menu Options for Setup Mode
151
Remove Paper
Use this feature if there are still some torn pieces of paper inside the printer even after removingjammed paper.
Related Information
& “Checking and Cleaning the Print Head” on page 142& “Aligning the Print Head” on page 144& “Refilling the Ink Tanks” on page 136& “Cleaning the Paper Path for Ink Smears” on page 145& “Removing Jammed Paper from Inside the Printer” on page 177
Menu Options for Paper SetupSelect the menus on the control panel as described below.
Setup > Paper Setup
Select the paper size and paper type you loaded in the paper source.
Related Information
& “Loading Paper” on page 44
Menu Options for Print Status SheetSelect the menus on the control panel as described below.
Setup > Print Status Sheet
Configuration Status Sheet
Prints an information sheet showing the current printer status and settings.
Supply Status Sheet
Prints an information sheet showing the status of consumables.
Usage History Sheet
Prints an information sheet showing the usage history of the printer.
Menu Options for Network StatusSelect the menus on the control panel as described below.
Setup > Network Status
User's Guide
Menu Options for Setup Mode
152
Wi-Fi/Network Status
Displays or prints the current network settings.
Wi-Fi Direct Status
Displays or prints the current Wi-Fi Direct settings.
Email Server Status
Displays the current email server settings.
Epson Connect Status
Displays whether the printer is registered and connected to Epson Connect.
Google Cloud Print Status
Displays whether the printer is registered and connected to Google Cloud Print.
Related Information
& “Making Wi-Fi Settings from the Control Panel” on page 25& “Checking the Network Connection Status” on page 32
Menu Options for Admin SettingsSelect the menus on the control panel as described below.
Setup > Admin Settings
These menus allow an administrator to register an administrator password to protect the printer settings frombeing changed by other users.
Admin Password
Set, change, or reset the administrator password. If you forget the password, contact Epson support.
Lock Setting
Select whether or not to lock the control panel using the password registered in Admin Password.
Related Information
& “Locking the Printer Settings Using an Administrator's Password” on page 43
Menu Options for System Administration
Printer SettingsSelect the menus on the control panel as described below.
Setup > System Administration > Printer Settings
User's Guide
Menu Options for Setup Mode
153
Paper Source Settings
❏ A4/Letter Auto SwitchingFeeds paper from the paper source set as A4 size when there is no paper source set as Letter, or feedsfrom the paper source set as Letter size when there is no paper source set as A4.
❏ Auto Select SettingsSpecify which paper source to feed from. When more than one paper source is enabled, paper is fedfrom one of the paper sources whose paper settings match with the print job.
❏ Error NoticeSelect whether or not the printer displays an error message when the paper size or type settings inPaper Setup from Setup mode and the print settings do not match.
Auto Error Solver
Select an action to perform when a 2-sided printing error occurs.
❏ OnIf a 2-sided job is sent when there is no paper available that supports 2-sided printing, the printerdisplays an error message, and then automatically prints on only one side of the paper.
❏ OffThe printer displays an error message and cancels printing.
Memory Device Interface
❏ Memory DeviceSelect whether or not the printer can access an inserted memory device. Disable this function tostop data from being saved to the memory device. This prevents confidential documents from beingremoved illegally.
❏ File SharingSelect whether to give write access to the memory device from a USB-connected computer or from anetwork-connected computer.
PC Connection via USB
Select whether or not the printer allows access from a USB-connected computer. Disable this functionto restrict printing and scanning that is not sent over a network connection.
Common SettingsSelect the menus on the control panel as described below.
Setup > System Administration > Common Settings
LCD Brightness
Adjust the brightness of the LCD screen.
Sound
Adjust the volume and select the type of audio.
User's Guide
Menu Options for Setup Mode
154
Sleep Timer
Select the time period before the printer enters sleep mode (energy saving mode) when no operationsare performed. The LCD screen turns black when the set time passes.
Power Off Settings
Your product may have this feature or the Power Off Timer feature depending on the location ofpurchase .
❏ Power Off If InactiveAutomatically turns the printer off if no operations are performed for a set time period. You canadjust the time before power management is applied. Any increase will affect the product's energyefficiency. Please consider the environment before making any change.
❏ Power Off If DisconnectedTurns the printer off after 30 minutes when all network ports including the LINE port aredisconnected.
Power Off Timer
Your product may have this feature or the Power Off Settings feature depending on the location ofpurchase .
Automatically turns the printer off if no operations are performed for a set time period. You can adjustthe time before power management is applied. Any increase will affect the product’s energy efficiency.Please consider the environment before making any change.
Date/Time Settings
❏ Date/TimeEnter the current date and time.
❏ Daylight Saving TimeSelect the summer time setting that applies to your area.
❏ Time DifferenceEnter the time difference between your local time and UTC (Coordinated Universal Time).
Country/Region
Select the display country or region.
Language
Select the display language.
Operation Time Out
If this feature is enabled, the LCD screen returns to the home screen when no operations have beenperformed for about three minutes.
Wi-Fi/Network SettingsSelect the menus on the control panel as described below.
Setup > System Administration > Wi-Fi/Network Settings
User's Guide
Menu Options for Setup Mode
155

Wi-Fi/Network Status
Displays or prints the network settings and connection status.
Wi-Fi Setup
❏ Wi-Fi Setup WizardSelect an SSID, enter a password, and then connect the printer to a wireless (Wi-Fi) network.
❏ Push Button Setup (WPS)Connect the printer to a wireless network by pressing the WPS button on your wireless router.
❏ PIN Code Setup (WPS)In the wireless router utility, enter the PIN code displayed on the printer's screen to connect theprinter to a wireless (Wi-Fi) network.
❏ Wi-Fi Auto ConnectConnects the printer to a wireless (Wi-Fi) network using a computer that is connected to the accesspoint. Insert the software disc supplied with the printer into the computer, and then follow the on-screen instructions. When you are prompted to operate the printer, run this menu.
❏ Disable Wi-FiDisables the connection by turning off the wireless signal without deleting the network information.To enable the connection, set up the wireless (Wi-Fi) network again.
❏ Wi-Fi Direct SetupConnects the printer to a wireless (Wi-Fi) network without a wireless router.
Connection Check
Checks the status of the network connection and prints the network connection report. If there are anyproblems with the connection, see the report to solve the problem.
Advanced Setup
Make the following detailed settings.
❏ Printer Name
❏ TCP/IP Address
❏ DNS Server
❏ Proxy Server
❏ Email Server
❏ IPv6 Address
❏ Wi-Fi Direct
❏ MS Network Sharing
Related Information
& “Making Wi-Fi Settings by Push Button Setup (WPS)” on page 27& “Making Wi-Fi Settings by PIN Code Setup (WPS)” on page 28& “Disabling Wi-Fi from the Control Panel” on page 41& “Making Wi-Fi Direct Settings” on page 28& “Messages and Solutions on the Network Connection Report” on page 34& “Making Advanced Network Settings from the Control Panel” on page 30
User's Guide
Menu Options for Setup Mode
156

Epson Connect ServicesSelect the menus on the control panel as described below.
Setup > System Administration > Epson Connect Services
How to
Provides a short description of the Epson Connect services.
Settings
❏ Suspend/ResumeSelect whether to suspend or resume the Epson Connect services.
❏ Restore Default SettingsResets the settings to their defaults.
For registration and usage guides, see the following portal website.
https://www.epsonconnect.com/
http://www.epsonconnect.eu (Europe only)
Related Information
& “Epson Connect Service” on page 160
Google Cloud Print ServicesSelect the menus on the control panel as described below.
Setup > System Administration > Google Cloud Print Services
How to
Provides a short description of the Google Cloud Print Services.
Settings
❏ Suspend/ResumeSelect whether to suspend or resume the Google Cloud Print Services.
❏ Restore Default SettingsResets the settings to their defaults.
For registration and usage guides, see the following portal website.
https://www.epsonconnect.com/
http://www.epsonconnect.eu (Europe only)
Universal Print SettingsSelect the menus on the control panel as described below.
Setup > System Administration > Universal Print Settings
User's Guide
Menu Options for Setup Mode
157
These print settings are applied when you print using an external device without using the printer driver.
Top Offset
Adjust the top margin of the paper.
Left Offset
Adjust the left margin of the paper.
Top Offset in Back
Adjust the top margin for the back of the page when performing 2-sided printing.
Left Offset in Back
Adjust the left margin for the back of the page when performing 2-sided printing.
Check Paper Width
Checks the paper width before the printer starts printing. This prevents printing beyond the edges ofthe paper when the paper size setting is not correct. However, the printing time may be little longer.
Dry Time
Select the drying time when performing 2-sided printing.
Skip Blank Page
Skips blank pages in the print data automatically.
Eco ModeSelect the menus on the control panel as described below.
Setup > System Administration > Eco Mode
Applies the settings for energy and resource saving. Enabling this feature allows you to make the following settings.When Eco Mode is disabled, the settings made in Common Settings are applied.
Configure
❏ Sleep TimerSelect the time period before the printer enters sleep mode (energy saving mode) when nooperations are performed. The LCD screen turns black when the set time passes.
❏ LCD BrightnessAdjust the brightness of the LCD screen.
❏ 2-Sided (Copy)Sets 2-sided copying as the default setting.
Restore Default SettingsSelect the menus on the control panel as described below.
Setup > System Administration > Restore Default Settings
User's Guide
Menu Options for Setup Mode
158
Wi-Fi/Network Settings
Resets the network settings to the default.
Copy Settings
Resets the settings in the following menus to the default.
Setup > System Administration > Copy Settings
Scan Settings
Resets the settings in the following menus to the default.
Setup > System Administration > Scan Settings
Fax Settings
Resets the send, receive, connection settings in the following menus to the default.
Setup > System Administration > Fax Settings
Clear All Data and Settings
Resets all settings to the default.
User's Guide
Menu Options for Setup Mode
159
Network Service and SoftwareInformationThis section introduces the network services and software products available for your printer from the Epsonwebsite or the supplied software disc.
Epson Connect ServiceBy using Epson Connect service available on the Internet, you can print from your smartphone, tablet PC, orlaptop, anytime and practically anywhere.
The features available on the Internet are as follows.
Email Print Epson iPrint remote print Scan to Cloud Remote Print Driver
✓ ✓ ✓ ✓
See the Epson Connect portal website for details.
https://www.epsonconnect.com/
http://www.epsonconnect.eu (Europe only)
Web ConfigWeb Config is an application that runs in a web browser, such as Internet Explorer and Safari, on a computer orsmart device. You can confirm the printer status or change the network service and printer settings. To use theWeb Config, connect the printer and the computer or device to the same network.
Note:The following browsers are supported.
OS Browser
Windows XP or later Internet Explorer 8 or later, Firefox*, Chrome*
Mac OS X v10.6.8 or later Safari*, Firefox*, Chrome*
iOS* Safari*
Android 2.3 or later Default browser
Chrome OS* Default browser
* Use the latest version.
User's Guide
Network Service and Software Information
160
Running Web Config on a Web Browser
1. Check the printer's IP address.
Select Setup > Network Status > Wi-Fi/Network Status from the home screen, and then check the printer's IPaddress.
2. Launch a Web browser from a computer or smart device, and then enter the printer's IP address.
Format:
IPv4: http://the printer's IP address/
IPv6: http://[the printer's IP address]/
Examples:
IPv4: http://192.168.100.201/
IPv6: http://[2001:db8::1000:1]/
Note:Using the smart device, you can also run Web Config from the maintenance screen of Epson iPrint.
Related Information
& “Printing Using Epson iPrint” on page 85
Running Web Config on WindowsWhen connecting a computer to the printer using WSD, follow the steps below to run Web Config.
1. Access the devices and printers screen in Windows.
❏ Windows 10/Windows Server 2016Right-click the start button or press and hold it, and then select Control Panel > View devices and printersin Hardware and Sound.
❏ Windows 8.1/Windows 8/Windows Server 2012 R2/Windows Server 2012Select Desktop > Settings > Control Panel > View devices and printers in Hardware and Sound (orHardware).
❏ Windows 7/Windows Server 2008 R2Click the start button, and select Control Panel > View devices and printers in Hardware and Sound.
❏ Windows Vista/Windows Server 2008Click the start button, and select Control Panel > Printers in Hardware and Sound.
2. Right-click on your printer and select Properties.
3. Select the Web Service tab and click the URL.
Running Web Config on Mac OS
1. Select System Preferences from the menu > Printers & Scanners (or Print & Scan, Print & Fax), andthen select the printer.
User's Guide
Network Service and Software Information
161
2. Click Options & Supplies> Show Printer Webpage.
Windows Printer DriverThe printer driver controls the printer according to the commands from an application. Making settings on theprinter driver provides the best printing results. You can also check the status of the printer or keep it in topoperating condition using the printer driver utility.
Note:You can change the language of the printer driver. Select the language you want to use from the Language setting on theMaintenance tab.
Accessing the printer driver from applications
To make settings that apply only to the application you are using, access from that application.
Select Print or Print Setup from the File menu. Select your printer, and then click Preferences or Properties.
Note:Operations differ depending on the application. See the application's help for details.
Accessing the printer driver from the control panel
To make settings that apply to all of the applications, access from the control panel.
❏ Windows 10/Windows Server 2016Right-click the start button or press and hold it, and then select Control Panel > View devices and printers inHardware and Sound. Right-click on your printer, or press and hold it and then select Printing preferences.
❏ Windows 8.1/Windows 8/Windows Server 2012 R2/Windows Server 2012Select Desktop > Settings > Control Panel > View devices and printers in Hardware and Sound. Right-clickon your printer, or press and hold it and then select Printing preferences.
❏ Windows 7/Windows Server 2008 R2Click the start button, and select Control Panel > View devices and printers in Hardware and Sound. Right-click on your printer and select Printing preferences.
❏ Windows Vista/Windows Server 2008Click the start button, and select Control Panel > Printers in Hardware and Sound. Right-click on your printerand select Select printing preferences.
❏ Windows XP/Windows Server 2003 R2/Windows Server 2003Click the start button, and select Control Panel > Printers and Other Hardware > Printers and Faxes. Right-click on your printer and select Printing preferences.
Accessing the printer driver from the printer icon on the task bar
The printer icon on the desktop task bar is a shortcut icon allowing you to quickly access the printer driver.
If you click the printer icon and select Printer Settings, you can access the same printer settings window as the onedisplayed from the control panel. If you double-click this icon, you can check the status of the printer.
Note:If the printer icon is not displayed on the task bar, access the printer driver window, click Monitoring Preferences on theMaintenance tab, and then select Register the shortcut icon to the taskbar.
User's Guide
Network Service and Software Information
162
Starting the utility
Access the printer driver window. Click the Maintenance tab.
Making Operation Settings for the Windows Printer DriverYou can make settings such as enabling EPSON Status Monitor 3.
1. Access the printer driver window.
2. Click Extended Settings on the Maintenance tab.
3. Make the appropriate settings, and then click OK.
See the online help for explanations of the setting items.
Related Information
& “Windows Printer Driver” on page 162
Mac OS Printer DriverThe printer driver controls the printer according to the commands from an application. Making settings on theprinter driver provides the best printing results. You can also check the status of the printer or keep it in topoperating condition using the printer driver utility.
Accessing the printer driver from applications
Click Page Setup or Print on the File menu of your application. If necessary, click Show Details (or d) to expandthe print window.
Note:Depending on the application being used, Page Setup may not be displayed in the File menu, and the operations fordisplaying the print screen may differ. See the application's help for details.
Starting the utility
Select System Preferences from the menu > Printers & Scanners (or Print & Scan, Print & Fax), and thenselect the printer. Click Options & Supplies > Utility > Open Printer Utility.
Making Operation Settings for the Mac OS Printer Driver
Accessing the Operation Settings Window of the Mac OS Printer Driver
Select System Preferences from the menu > Printers & Scanners (or Print & Scan, Print & Fax), and thenselect the printer. Click Options & Supplies > Options (or Driver).
User's Guide
Network Service and Software Information
163
Operation Settings for Mac OS Printer Driver
❏ Thick paper and envelopes: Prevents the ink from smearing when printing on thick paper. However, this mayreduce print speed.
❏ Skip Blank Page: Avoids printing blank pages.
❏ Quiet Mode: Reduces the noise the printer makes, however, may reduce print speed.
❏ High Speed Printing: Prints when the print head moves in both directions. The print speed is faster, but thequality may decline.
❏ Warning Notifications: Allows the printer driver to display warning notifications.
❏ Establish bidirectional communication: Usually, this should be set to On. Select Off when acquiring the printerinformation is impossible because the printer is shared with Windows computers on a network or for any otherreason.
Application for Scanning Documents and Images(Epson Scan 2)Epson Scan 2 is an application for controlling scanning. You can adjust the size, resolution, brightness, contrast,and quality of the scanned image. You can also start Epson Scan 2 from a TWAIN-compliant scanning application.See the application's help for details.
Starting on Windows
Note:For Windows Server operating systems, make sure the Desktop Experience feature is installed.
❏ Windows 10/Windows Server 2016Click the start button, and then select EPSON > Epson Scan 2.
❏ Windows 8.1/Windows 8/Windows Server 2012 R2/Windows Server 2012Enter the application name in the search charm, and then select the displayed icon.
❏ Windows 7/Windows Vista/Windows XP/Windows Server 2008 R2/Windows Server 2008/Windows Server 2003R2/Windows Server 2003Click the start button, and then select All Programs or Programs > EPSON > Epson Scan 2> Epson Scan 2.
Starting on Mac OS
Note:Epson Scan 2 does not support the Mac OS fast user switching feature. Turn off fast user switching.
Select Go > Applications > Epson Software > Epson Scan 2.
Epson Event ManagerEpson Event Manager is an application that allows you to manage scanning from the control panel and save imagesto a computer. You can add your own settings as presets, such as the document type, the save folder location, andthe image format. See the application's help for details.
User's Guide
Network Service and Software Information
164
Note:Windows Server operating systems are not supported.
Starting on Windows
❏ Windows 10Click the start button, and then select Epson Software > Event Manager.
❏ Windows 8.1/Windows 8Enter the application name in the search charm, and then select the displayed icon.
❏ Windows 7/Windows Vista/Windows XPClick the start button, and then select All Programs or Programs > Epson Software > Event Manager.
Starting on Mac OS
Select Go > Applications > Epson Software > Event Manager.
Related Information
& “Scanning to a Computer” on page 96
PC-FAX Driver (Fax Driver)PC-FAX driver is an application that allows you to send a document created on a separate application as a faxdirectly from the computer. PC-FAX driver is installed when you install FAX Utility. See the application's help fordetails.
Note:❏ Windows Server operating systems are not supported.
❏ The operation differs depending on the application you used to create the document. See the application's help for details.
Accessing from Windows
In the application, select Print or Print Setup from the File menu. Select your printer (FAX), and then clickPreferences or Properties.
Accessing from Mac OS
In the application, select Print from the File menu. Select your printer (FAX) as the Printer setting, and then selectFax Settings or Recipient Settings from the pop-up menu.
FAX UtilityFAX Utility is an application that allows you to configure various settings for sending faxes from a computer. Youcan create or edit the contacts list to be used when sending a fax, configure to save received faxes in PDF format onthe computer, and so on. See the application's help for details.
Note:❏ Windows Server operating systems are not supported.
❏ Make sure you have installed the printer driver before installing FAX Utility.
User's Guide
Network Service and Software Information
165
Starting on Windows
❏ Windows 10Click the start button, and select Epson Software > FAX Utility.
❏ Windows 8.1/Windows 8Enter the application name in the search charm, and then select the displayed icon.
❏ Windows 7/Windows Vista/Windows XPClick the start button, and select All Programs (or Programs) > Epson Software > FAX Utility.
Starting on Mac OS
Select System Preferences from the menu > Printers & Scanners (or Print & Scan, Print & Fax), and thenselect the printer (FAX). Click Options & Supplies > Utility > Open Printer Utility.
Epson Easy Photo PrintEpson Easy Photo Print is an application that allows you to easily print photos with various layouts. You canpreview the photo image and adjust the images or position. You can also print photos with a frame. See theapplication's help for details.
Note:❏ Windows Server operating systems are not supported.
❏ To use this application, the printer driver needs to be installed.
Starting on Windows
❏ Windows 10Click the start button, and then select Epson Software > Epson Easy Photo Print.
❏ Windows 8.1/Windows 8Enter the application name in the search charm, and then select the displayed icon.
❏ Windows 7/Windows Vista/Windows XPClick the start button, and then select All Programs or Programs > Epson Software > Epson Easy PhotoPrint.
Starting on Mac OS
Select Go > Applications > Epson Software > Epson Easy Photo Print.
E-Web Print (for Windows Only)E-Web Print is an application that allows you to easily print web pages with various layouts. See the application'shelp for details. You can access the help from the E-Web Print menu on the E-Web Print tool bar.
Note:❏ Windows Server operating systems are not supported.
❏ Check for supported browsers and the latest version from the download site.
User's Guide
Network Service and Software Information
166
Starting
When you install E-Web Print, it is displayed in your browser. Click Print or Clip.
EPSON Software UpdaterEPSON Software Updater is an application that checks for new or updated software on the internet and installs it.You can also update the printer's firmware and manual.
Note:Windows Server operating systems are not supported.
Starting on Windows
❏ Windows 10Click the start button, and then select Epson Software > EPSON Software Updater.
❏ Windows 8.1/Windows 8Enter the application name in the search charm, and then select the displayed icon.
❏ Windows 7/Windows Vista/Windows XPClick the start button, and then select All Programs (or Programs) > Epson Software > EPSON SoftwareUpdater.
Note:You can also start EPSON Software Updater by clicking the printer icon on the task bar on the desktop, and then selectingSoftware Update.
Starting on Mac OS
Select Go > Applications > Epson Software > EPSON Software Updater.
Application for Configuring Multiple Devices(EpsonNet Config)EpsonNet Config is an application that allows you to set the network interface addresses and protocols. See theoperations guide for EpsonNet Config or the application's help for more details.
Starting on Windows
❏ Windows 10/Windows Server 2016Click the start button, and then select EpsonNet > EpsonNet Config.
❏ Windows 8.1/Windows 8/Windows Server 2012 R2/Windows Server 2012Enter the application name in the search charm, and then select the displayed icon.
❏ Windows 7/Windows Vista/Windows XP/Windows Server 2008 R2/Windows Server 2008/Windows Server 2003R2/Windows Server 2003Click the start button, and select All Programs or Programs > EpsonNet > EpsonNet Config SE > EpsonNetConfig.
User's Guide
Network Service and Software Information
167
Starting on Mac OS
Go > Applications > Epson Software > EpsonNet > EpsonNet Config SE > EpsonNet Config.
Uninstalling ApplicationsLog in to your computer as an administrator. Enter the administrator password if the computer prompts you.
Uninstalling Applications - Windows
1. Press the P button to turn off the printer.
2. Quit all running applications.
3. Open Control Panel:
❏ Windows 10/Windows Server 2016Right-click the start button or press and hold it, and then select Control Panel.
❏ Windows 8.1/Windows 8/Windows Server 2012 R2/Windows Server 2012Select Desktop > Settings > Control Panel.
❏ Windows 7/Windows Vista/Windows XP/Windows Server 2008 R2/Windows Server 2008/Windows Server2003 R2/Windows Server 2003Click the start button and select Control Panel.
4. Open Uninstall a program (or Add or Remove Programs):
❏ Windows 10/Windows 8.1/Windows 8/Windows 7/Windows Vista/Windows Server 2016/Windows Server2012 R2/Windows Server 2012/Windows Server 2008 R2/Windows Server 2008Select Uninstall a program in Programs.
❏ Windows XP/Windows Server 2003 R2/Windows Server 2003Click Add or Remove Programs.
5. Select the application you want to uninstall.
You cannot uninstall the printer driver if there is any print jobs. Delete or wait to be printed the jobs beforeuninstalling.
6. Uninstall the applications:
❏ Windows 10/Windows 8.1/Windows 8/Windows 7/Windows Vista/Windows Server 2016/Windows Server2012 R2/Windows Server 2012/Windows Server 2008 R2/Windows Server 2008Click Uninstall/Change or Uninstall.
❏ Windows XP/Windows Server 2003 R2/Windows Server 2003Click Change/Remove or Remove.
Note:If the User Account Control window is displayed, click Continue.
7. Follow the on-screen instructions.
User's Guide
Network Service and Software Information
168
Uninstalling Applications - Mac OS
1. Download the Uninstaller using EPSON Software Updater.
Once you have downloaded the Uninstaller, you do not need to download it again each time you uninstall theapplication.
2. Press the P button to turn off the printer.
3. To uninstall the printer driver or PC-FAX driver, select System Preferences from the menu > Printers &Scanners (or Print & Scan, Print & Fax), and then remove the printer from the enabled printers list.
4. Quit all running applications.
5. Select Go > Applications > Epson Software > Uninstaller.
6. Select the application you want to uninstall, and then click Uninstall.
cImportant:
The Uninstaller removes all drivers for Epson inkjet printers on the computer. If you use multiple Epson inkjetprinters and you only want to delete some drivers, delete all of them first, and then install the necessary printerdriver again.
Note:If you cannot find the application you want to uninstall in the application list, you cannot uninstall using theUninstaller. In this situation, select Go > Applications > Epson Software, select the application you want to uninstall,and then drag it to the trash icon.
Related Information
& “EPSON Software Updater” on page 167
Installing ApplicationsConnect your computer to the network and install the latest version of applications from the website.
Note:❏ Log on to your computer as an administrator. Enter the administrator password if the computer prompts you.
❏ When reinstalling an application, you need to uninstall it first.
1. Quit all running applications.
2. When installing the printer driver or Epson Scan 2, disconnect the printer and the computer temporarily.
Note:Do not connect the printer and the computer until you are instructed to do so.
3. Install the applications by following the instructions on the website below.
http://epson.sn
User's Guide
Network Service and Software Information
169
Note:If you are using a Windows computer and you cannot download applications from the website, install them from thesoftware disc that came with the printer.
Related Information
& “Uninstalling Applications” on page 168
Updating Applications and FirmwareYou may be able to clear certain problems and improve or add functions by updating the applications and thefirmware. Make sure you use the latest version of the applications and firmware.
1. Make sure that the printer and the computer are connected, and the computer is connected to the internet.
2. Start EPSON Software Updater, and update the applications or the firmware.
cImportant:
Do not turn off the computer or the printer while updating.
Note:If you cannot find the application you want to update in the list, you cannot update using the EPSON SoftwareUpdater. Check for the latest versions of the applications from your local Epson website.
http://www.epson.com
Related Information
& “EPSON Software Updater” on page 167
User's Guide
Network Service and Software Information
170
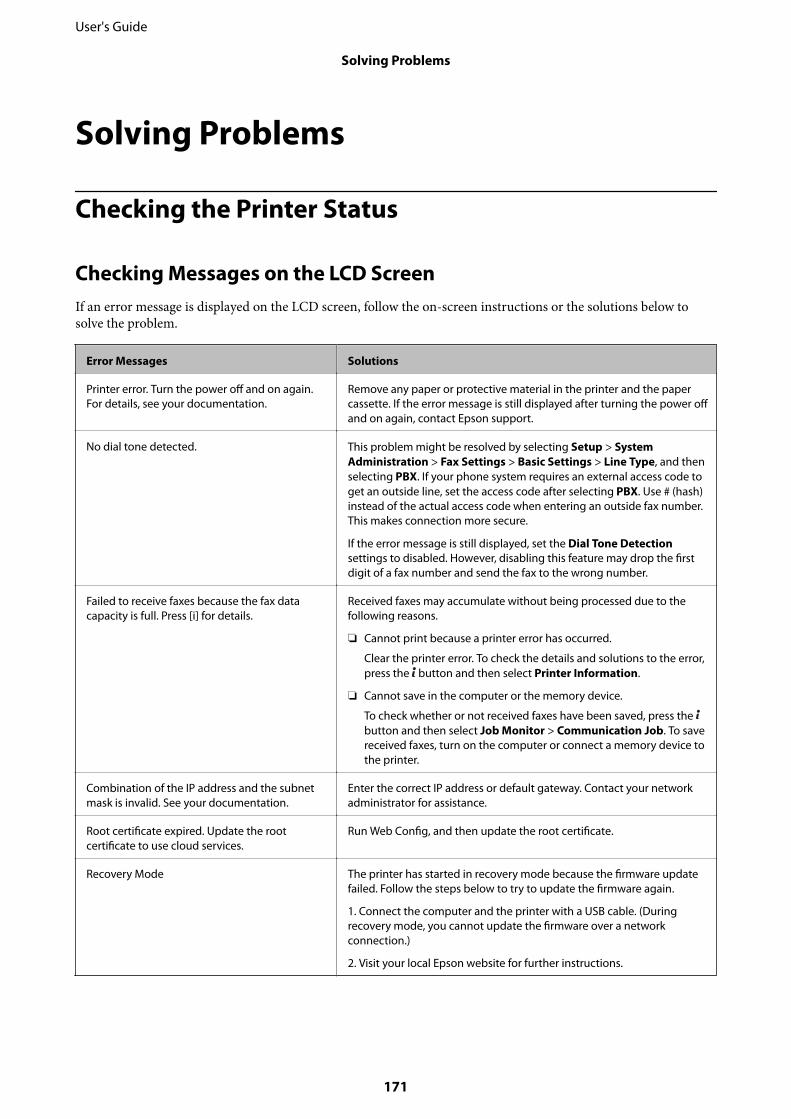
Solving Problems
Checking the Printer Status
Checking Messages on the LCD ScreenIf an error message is displayed on the LCD screen, follow the on-screen instructions or the solutions below tosolve the problem.
Error Messages Solutions
Printer error. Turn the power off and on again.For details, see your documentation.
Remove any paper or protective material in the printer and the papercassette. If the error message is still displayed after turning the power offand on again, contact Epson support.
No dial tone detected. This problem might be resolved by selecting Setup > SystemAdministration > Fax Settings > Basic Settings > Line Type, and thenselecting PBX. If your phone system requires an external access code toget an outside line, set the access code after selecting PBX. Use # (hash)instead of the actual access code when entering an outside fax number.This makes connection more secure.
If the error message is still displayed, set the Dial Tone Detectionsettings to disabled. However, disabling this feature may drop the firstdigit of a fax number and send the fax to the wrong number.
Failed to receive faxes because the fax datacapacity is full. Press [i] for details.
Received faxes may accumulate without being processed due to thefollowing reasons.
❏ Cannot print because a printer error has occurred.
Clear the printer error. To check the details and solutions to the error,press the button and then select Printer Information.
❏ Cannot save in the computer or the memory device.
To check whether or not received faxes have been saved, press the button and then select Job Monitor > Communication Job. To savereceived faxes, turn on the computer or connect a memory device tothe printer.
Combination of the IP address and the subnetmask is invalid. See your documentation.
Enter the correct IP address or default gateway. Contact your networkadministrator for assistance.
Root certificate expired. Update the rootcertificate to use cloud services.
Run Web Config, and then update the root certificate.
Recovery Mode The printer has started in recovery mode because the firmware updatefailed. Follow the steps below to try to update the firmware again.
1. Connect the computer and the printer with a USB cable. (Duringrecovery mode, you cannot update the firmware over a networkconnection.)
2. Visit your local Epson website for further instructions.
User's Guide
Solving Problems
171
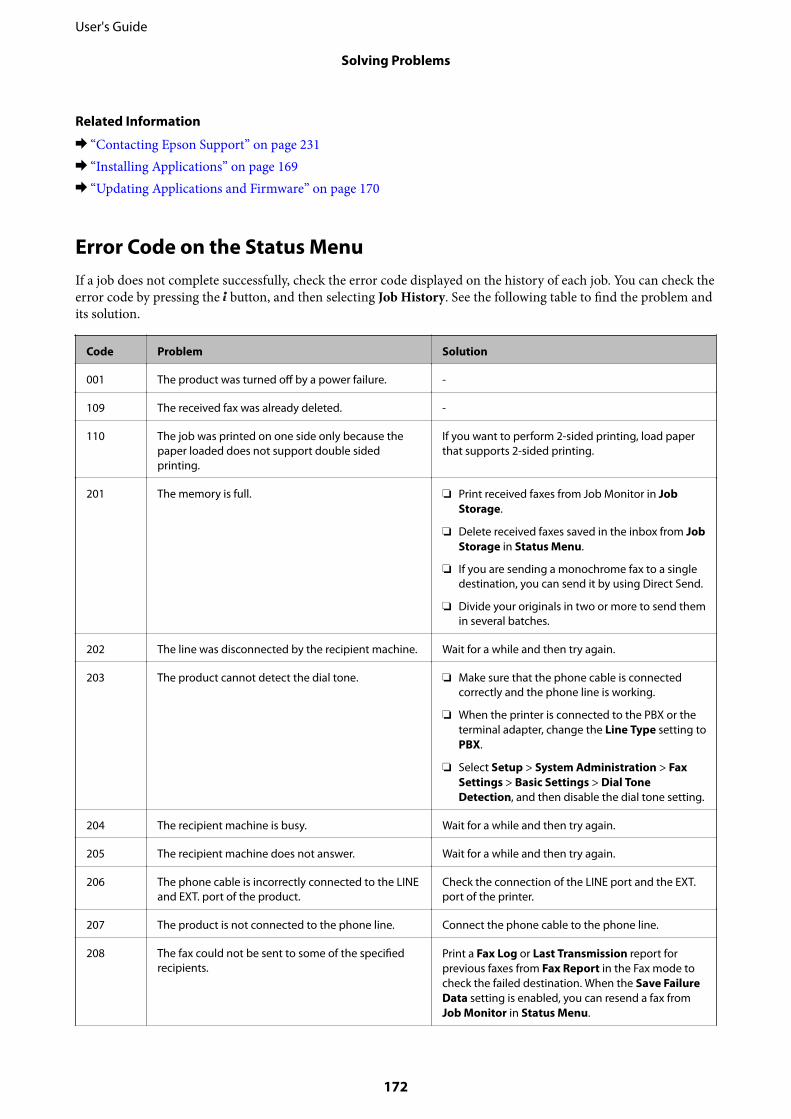
Related Information
& “Contacting Epson Support” on page 231& “Installing Applications” on page 169& “Updating Applications and Firmware” on page 170
Error Code on the Status MenuIf a job does not complete successfully, check the error code displayed on the history of each job. You can check theerror code by pressing the button, and then selecting Job History. See the following table to find the problem andits solution.
Code Problem Solution
001 The product was turned off by a power failure. -
109 The received fax was already deleted. -
110 The job was printed on one side only because thepaper loaded does not support double sidedprinting.
If you want to perform 2-sided printing, load paperthat supports 2-sided printing.
201 The memory is full. ❏ Print received faxes from Job Monitor in JobStorage.
❏ Delete received faxes saved in the inbox from JobStorage in Status Menu.
❏ If you are sending a monochrome fax to a singledestination, you can send it by using Direct Send.
❏ Divide your originals in two or more to send themin several batches.
202 The line was disconnected by the recipient machine. Wait for a while and then try again.
203 The product cannot detect the dial tone. ❏ Make sure that the phone cable is connectedcorrectly and the phone line is working.
❏ When the printer is connected to the PBX or theterminal adapter, change the Line Type setting toPBX.
❏ Select Setup > System Administration > FaxSettings > Basic Settings > Dial ToneDetection, and then disable the dial tone setting.
204 The recipient machine is busy. Wait for a while and then try again.
205 The recipient machine does not answer. Wait for a while and then try again.
206 The phone cable is incorrectly connected to the LINEand EXT. port of the product.
Check the connection of the LINE port and the EXT.port of the printer.
207 The product is not connected to the phone line. Connect the phone cable to the phone line.
208 The fax could not be sent to some of the specifiedrecipients.
Print a Fax Log or Last Transmission report forprevious faxes from Fax Report in the Fax mode tocheck the failed destination. When the Save FailureData setting is enabled, you can resend a fax fromJob Monitor in Status Menu.
User's Guide
Solving Problems
172
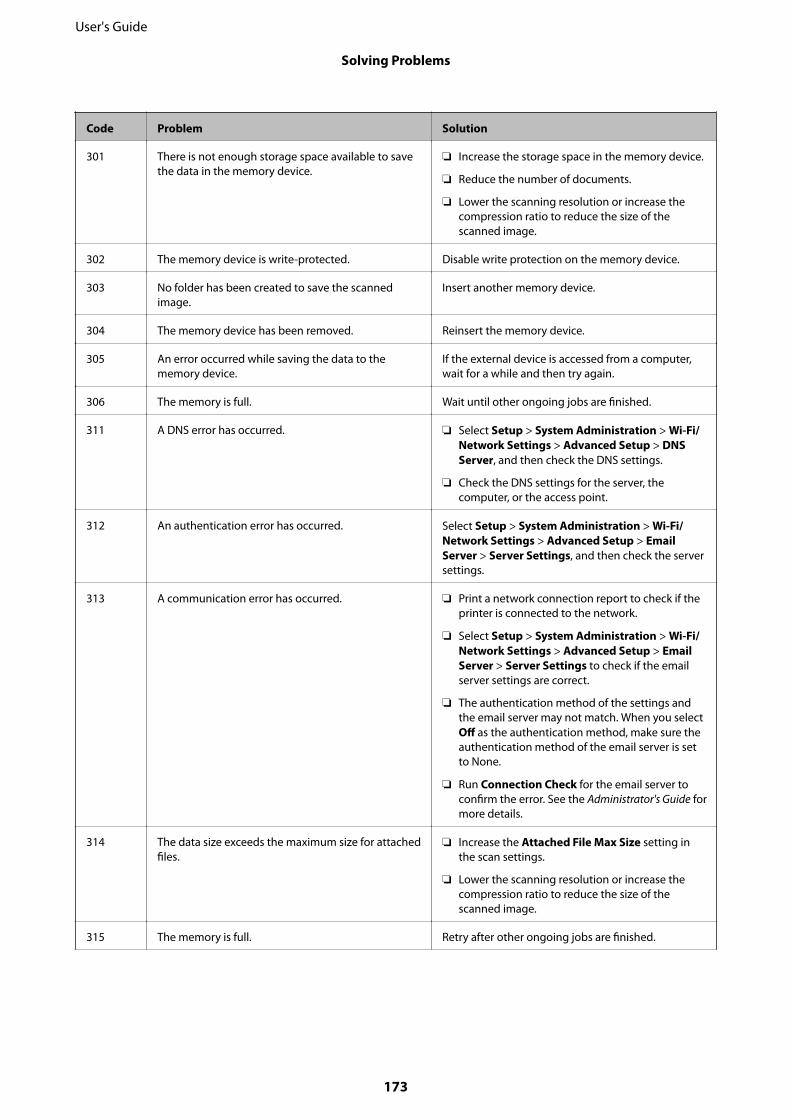
Code Problem Solution
301 There is not enough storage space available to savethe data in the memory device.
❏ Increase the storage space in the memory device.
❏ Reduce the number of documents.
❏ Lower the scanning resolution or increase thecompression ratio to reduce the size of thescanned image.
302 The memory device is write-protected. Disable write protection on the memory device.
303 No folder has been created to save the scannedimage.
Insert another memory device.
304 The memory device has been removed. Reinsert the memory device.
305 An error occurred while saving the data to thememory device.
If the external device is accessed from a computer,wait for a while and then try again.
306 The memory is full. Wait until other ongoing jobs are finished.
311 A DNS error has occurred. ❏ Select Setup > System Administration > Wi-Fi/Network Settings > Advanced Setup > DNSServer, and then check the DNS settings.
❏ Check the DNS settings for the server, thecomputer, or the access point.
312 An authentication error has occurred. Select Setup > System Administration > Wi-Fi/Network Settings > Advanced Setup > EmailServer > Server Settings, and then check the serversettings.
313 A communication error has occurred. ❏ Print a network connection report to check if theprinter is connected to the network.
❏ Select Setup > System Administration > Wi-Fi/Network Settings > Advanced Setup > EmailServer > Server Settings to check if the emailserver settings are correct.
❏ The authentication method of the settings andthe email server may not match. When you selectOff as the authentication method, make sure theauthentication method of the email server is setto None.
❏ Run Connection Check for the email server toconfirm the error. See the Administrator's Guide formore details.
314 The data size exceeds the maximum size for attachedfiles.
❏ Increase the Attached File Max Size setting inthe scan settings.
❏ Lower the scanning resolution or increase thecompression ratio to reduce the size of thescanned image.
315 The memory is full. Retry after other ongoing jobs are finished.
User's Guide
Solving Problems
173
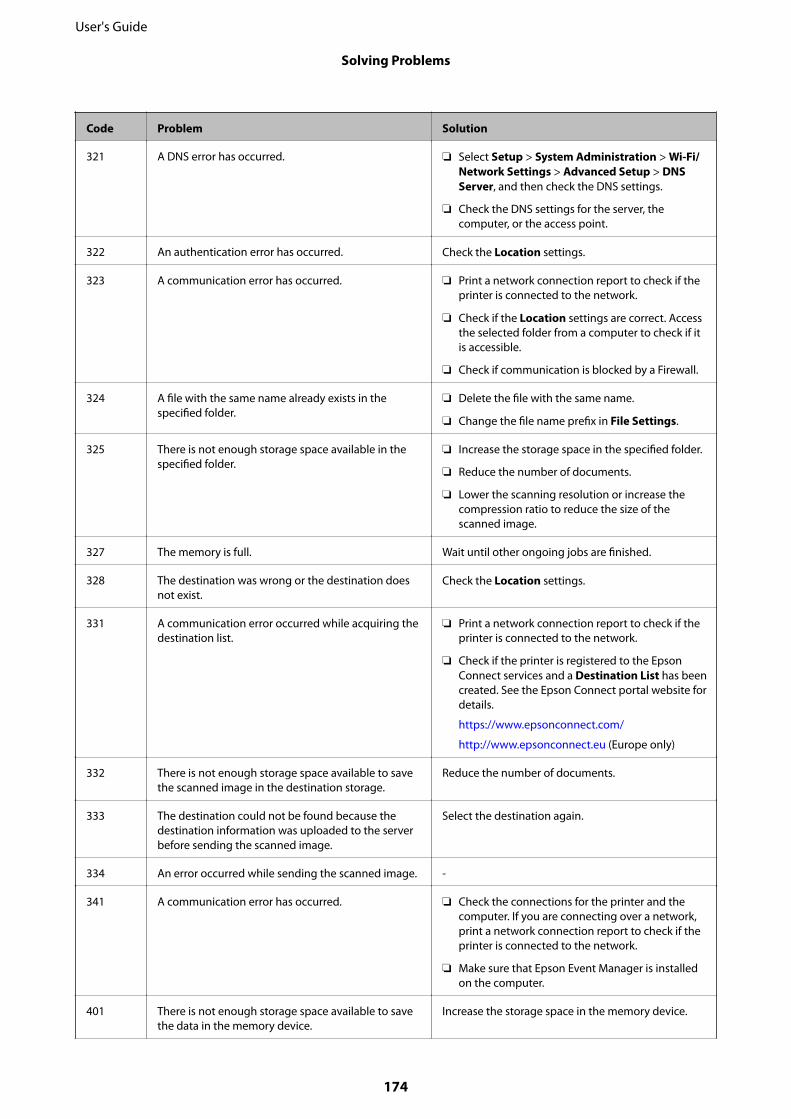
Code Problem Solution
321 A DNS error has occurred. ❏ Select Setup > System Administration > Wi-Fi/Network Settings > Advanced Setup > DNSServer, and then check the DNS settings.
❏ Check the DNS settings for the server, thecomputer, or the access point.
322 An authentication error has occurred. Check the Location settings.
323 A communication error has occurred. ❏ Print a network connection report to check if theprinter is connected to the network.
❏ Check if the Location settings are correct. Accessthe selected folder from a computer to check if itis accessible.
❏ Check if communication is blocked by a Firewall.
324 A file with the same name already exists in thespecified folder.
❏ Delete the file with the same name.
❏ Change the file name prefix in File Settings.
325 There is not enough storage space available in thespecified folder.
❏ Increase the storage space in the specified folder.
❏ Reduce the number of documents.
❏ Lower the scanning resolution or increase thecompression ratio to reduce the size of thescanned image.
327 The memory is full. Wait until other ongoing jobs are finished.
328 The destination was wrong or the destination doesnot exist.
Check the Location settings.
331 A communication error occurred while acquiring thedestination list.
❏ Print a network connection report to check if theprinter is connected to the network.
❏ Check if the printer is registered to the EpsonConnect services and a Destination List has beencreated. See the Epson Connect portal website fordetails.
https://www.epsonconnect.com/
http://www.epsonconnect.eu (Europe only)
332 There is not enough storage space available to savethe scanned image in the destination storage.
Reduce the number of documents.
333 The destination could not be found because thedestination information was uploaded to the serverbefore sending the scanned image.
Select the destination again.
334 An error occurred while sending the scanned image. -
341 A communication error has occurred. ❏ Check the connections for the printer and thecomputer. If you are connecting over a network,print a network connection report to check if theprinter is connected to the network.
❏ Make sure that Epson Event Manager is installedon the computer.
401 There is not enough storage space available to savethe data in the memory device.
Increase the storage space in the memory device.
User's Guide
Solving Problems
174
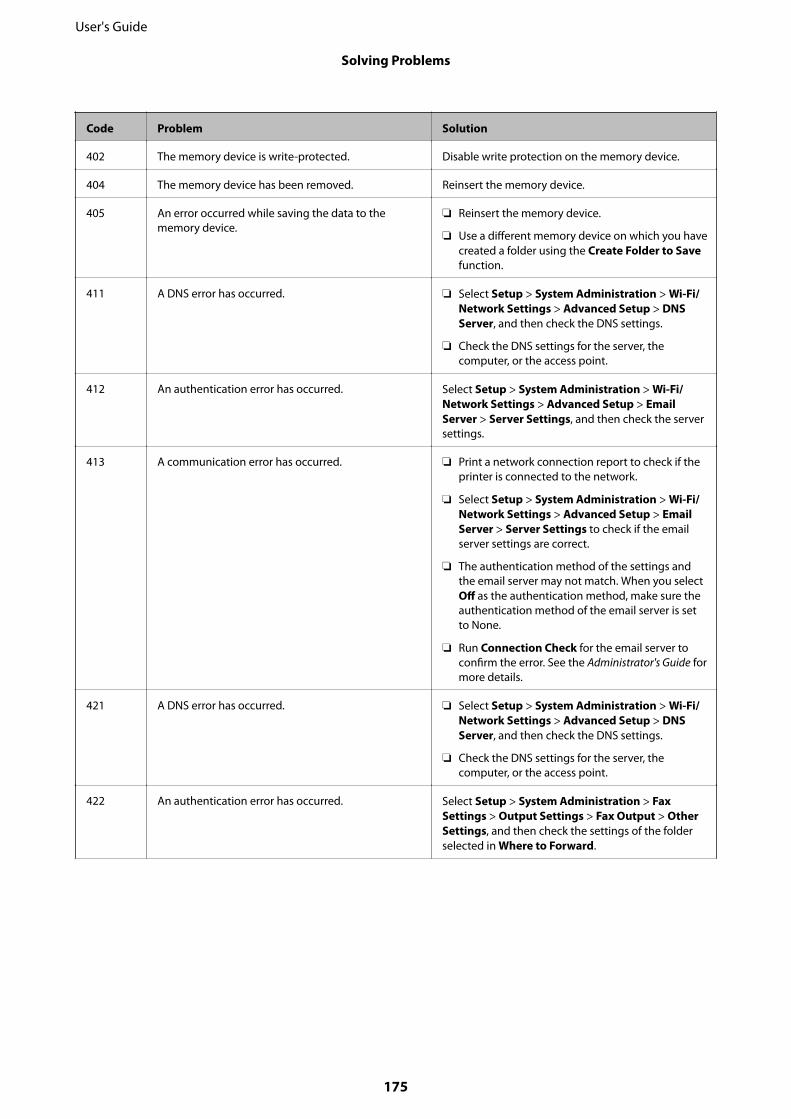
Code Problem Solution
402 The memory device is write-protected. Disable write protection on the memory device.
404 The memory device has been removed. Reinsert the memory device.
405 An error occurred while saving the data to thememory device.
❏ Reinsert the memory device.
❏ Use a different memory device on which you havecreated a folder using the Create Folder to Savefunction.
411 A DNS error has occurred. ❏ Select Setup > System Administration > Wi-Fi/Network Settings > Advanced Setup > DNSServer, and then check the DNS settings.
❏ Check the DNS settings for the server, thecomputer, or the access point.
412 An authentication error has occurred. Select Setup > System Administration > Wi-Fi/Network Settings > Advanced Setup > EmailServer > Server Settings, and then check the serversettings.
413 A communication error has occurred. ❏ Print a network connection report to check if theprinter is connected to the network.
❏ Select Setup > System Administration > Wi-Fi/Network Settings > Advanced Setup > EmailServer > Server Settings to check if the emailserver settings are correct.
❏ The authentication method of the settings andthe email server may not match. When you selectOff as the authentication method, make sure theauthentication method of the email server is setto None.
❏ Run Connection Check for the email server toconfirm the error. See the Administrator's Guide formore details.
421 A DNS error has occurred. ❏ Select Setup > System Administration > Wi-Fi/Network Settings > Advanced Setup > DNSServer, and then check the DNS settings.
❏ Check the DNS settings for the server, thecomputer, or the access point.
422 An authentication error has occurred. Select Setup > System Administration > FaxSettings > Output Settings > Fax Output > OtherSettings, and then check the settings of the folderselected in Where to Forward.
User's Guide
Solving Problems
175
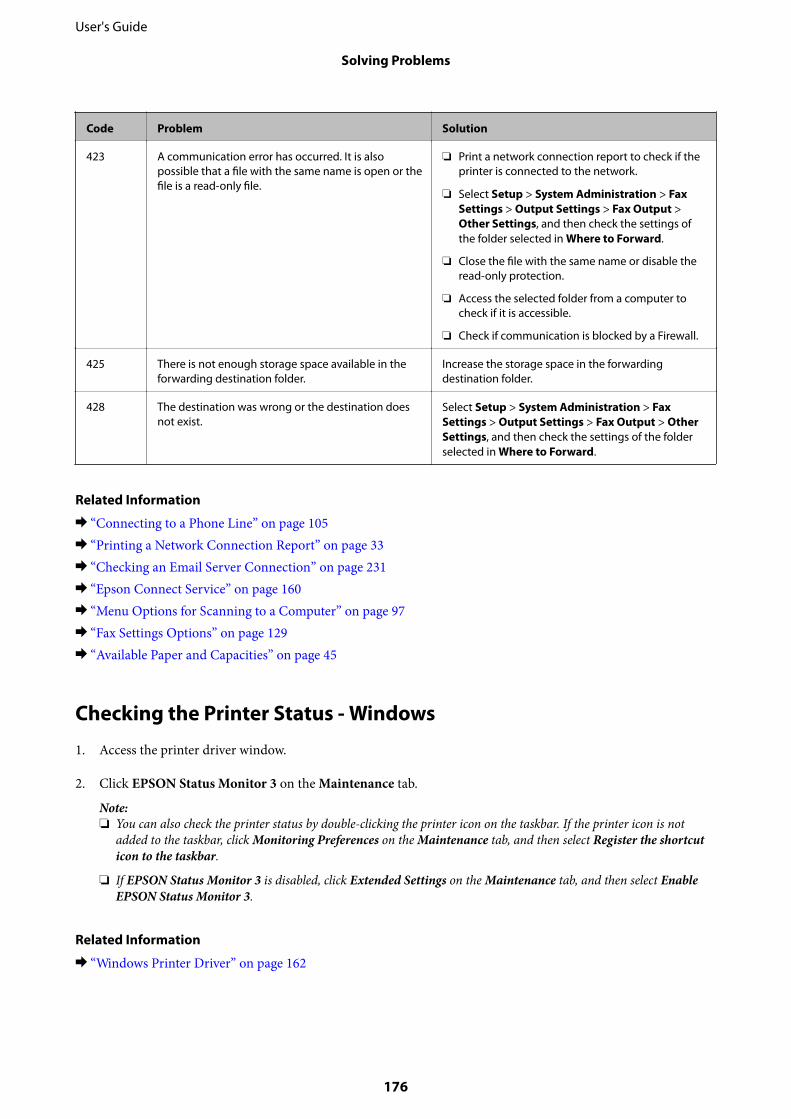
Code Problem Solution
423 A communication error has occurred. It is alsopossible that a file with the same name is open or thefile is a read-only file.
❏ Print a network connection report to check if theprinter is connected to the network.
❏ Select Setup > System Administration > FaxSettings > Output Settings > Fax Output >Other Settings, and then check the settings ofthe folder selected in Where to Forward.
❏ Close the file with the same name or disable theread-only protection.
❏ Access the selected folder from a computer tocheck if it is accessible.
❏ Check if communication is blocked by a Firewall.
425 There is not enough storage space available in theforwarding destination folder.
Increase the storage space in the forwardingdestination folder.
428 The destination was wrong or the destination doesnot exist.
Select Setup > System Administration > FaxSettings > Output Settings > Fax Output > OtherSettings, and then check the settings of the folderselected in Where to Forward.
Related Information
& “Connecting to a Phone Line” on page 105& “Printing a Network Connection Report” on page 33& “Checking an Email Server Connection” on page 231& “Epson Connect Service” on page 160& “Menu Options for Scanning to a Computer” on page 97& “Fax Settings Options” on page 129& “Available Paper and Capacities” on page 45
Checking the Printer Status - Windows
1. Access the printer driver window.
2. Click EPSON Status Monitor 3 on the Maintenance tab.
Note:❏ You can also check the printer status by double-clicking the printer icon on the taskbar. If the printer icon is not
added to the taskbar, click Monitoring Preferences on the Maintenance tab, and then select Register the shortcuticon to the taskbar.
❏ If EPSON Status Monitor 3 is disabled, click Extended Settings on the Maintenance tab, and then select EnableEPSON Status Monitor 3.
Related Information
& “Windows Printer Driver” on page 162
User's Guide
Solving Problems
176
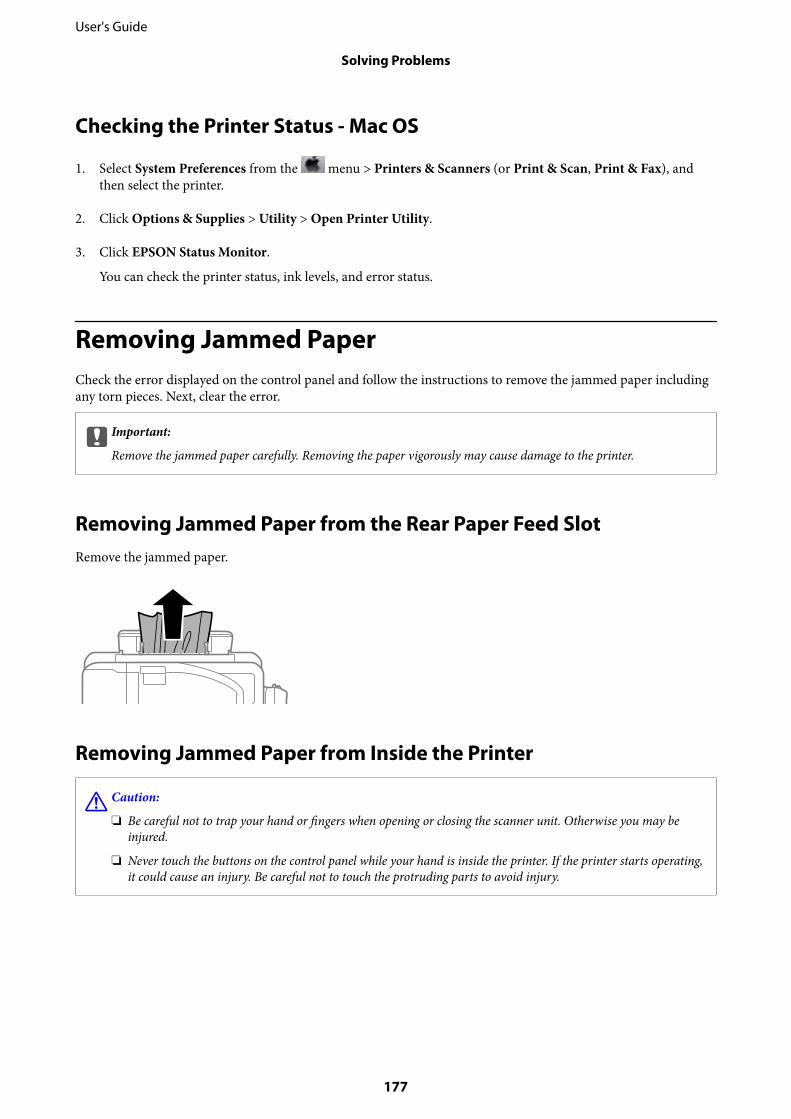
Checking the Printer Status - Mac OS
1. Select System Preferences from the menu > Printers & Scanners (or Print & Scan, Print & Fax), andthen select the printer.
2. Click Options & Supplies > Utility > Open Printer Utility.
3. Click EPSON Status Monitor.
You can check the printer status, ink levels, and error status.
Removing Jammed PaperCheck the error displayed on the control panel and follow the instructions to remove the jammed paper includingany torn pieces. Next, clear the error.
cImportant:
Remove the jammed paper carefully. Removing the paper vigorously may cause damage to the printer.
Removing Jammed Paper from the Rear Paper Feed SlotRemove the jammed paper.
Removing Jammed Paper from Inside the Printer
!Caution:
❏ Be careful not to trap your hand or fingers when opening or closing the scanner unit. Otherwise you may beinjured.
❏ Never touch the buttons on the control panel while your hand is inside the printer. If the printer starts operating,it could cause an injury. Be careful not to touch the protruding parts to avoid injury.
User's Guide
Solving Problems
177
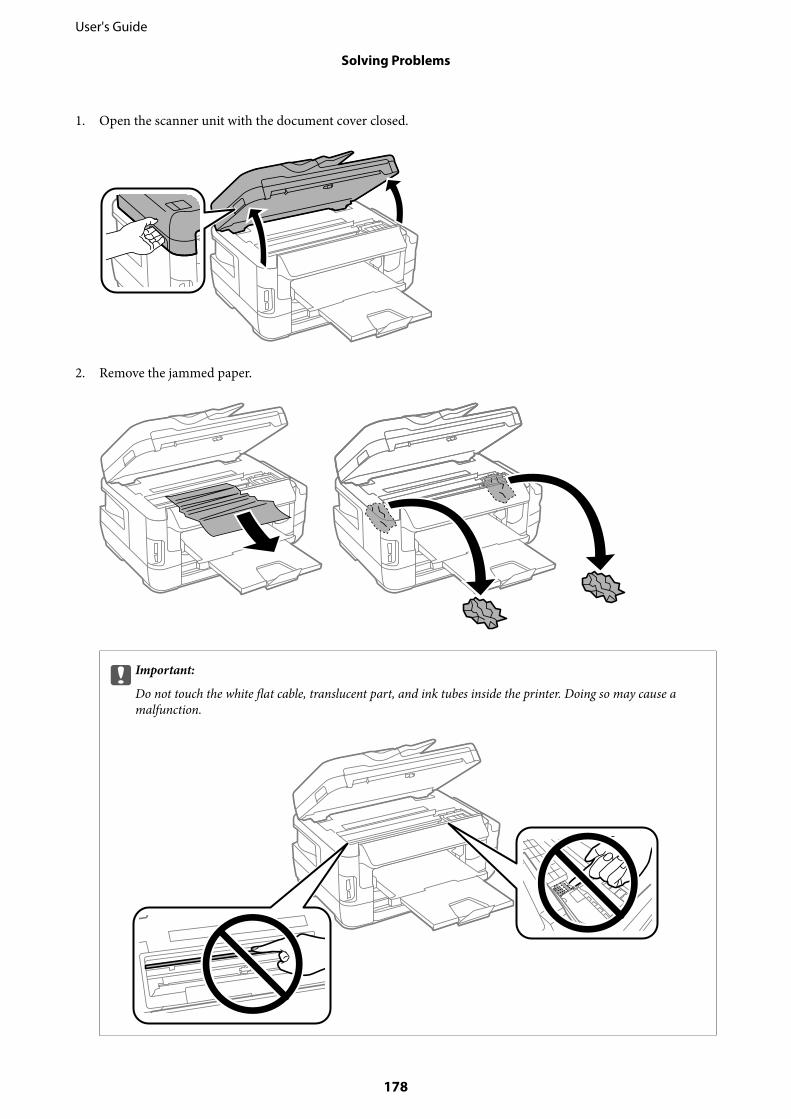
1. Open the scanner unit with the document cover closed.
2. Remove the jammed paper.
cImportant:
Do not touch the white flat cable, translucent part, and ink tubes inside the printer. Doing so may cause amalfunction.
User's Guide
Solving Problems
178
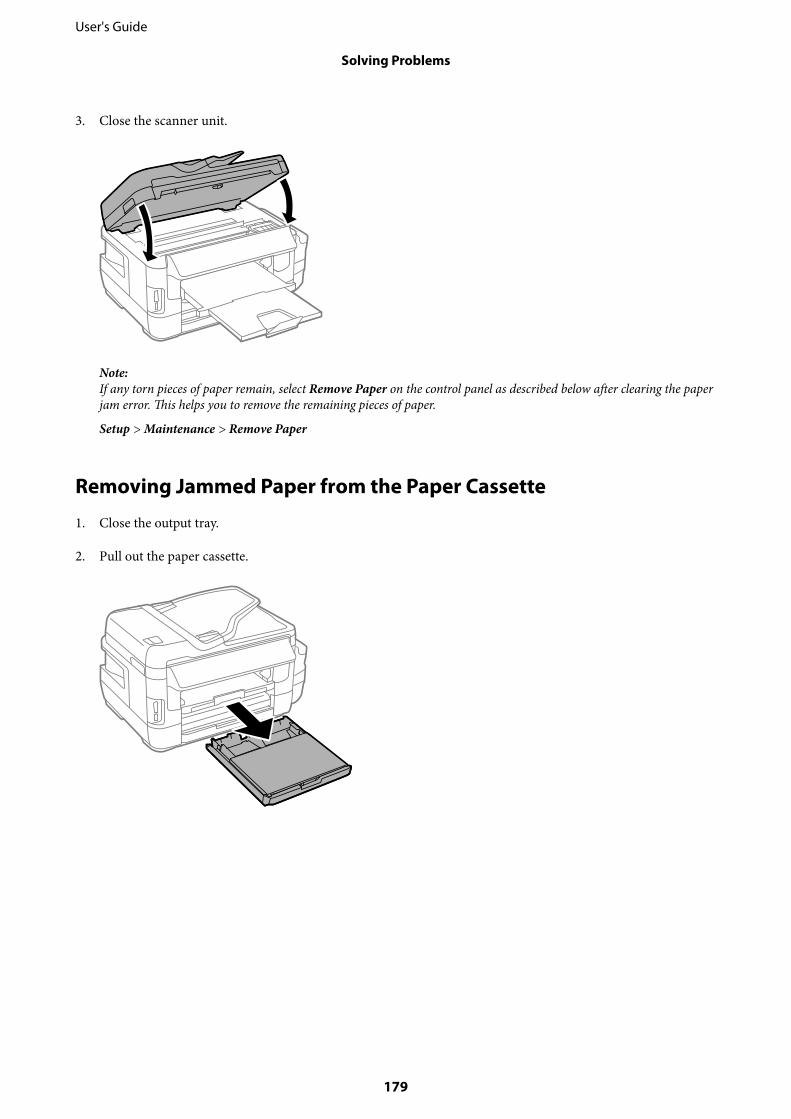
3. Close the scanner unit.
Note:If any torn pieces of paper remain, select Remove Paper on the control panel as described below after clearing the paperjam error. This helps you to remove the remaining pieces of paper.
Setup > Maintenance > Remove Paper
Removing Jammed Paper from the Paper Cassette
1. Close the output tray.
2. Pull out the paper cassette.
User's Guide
Solving Problems
179
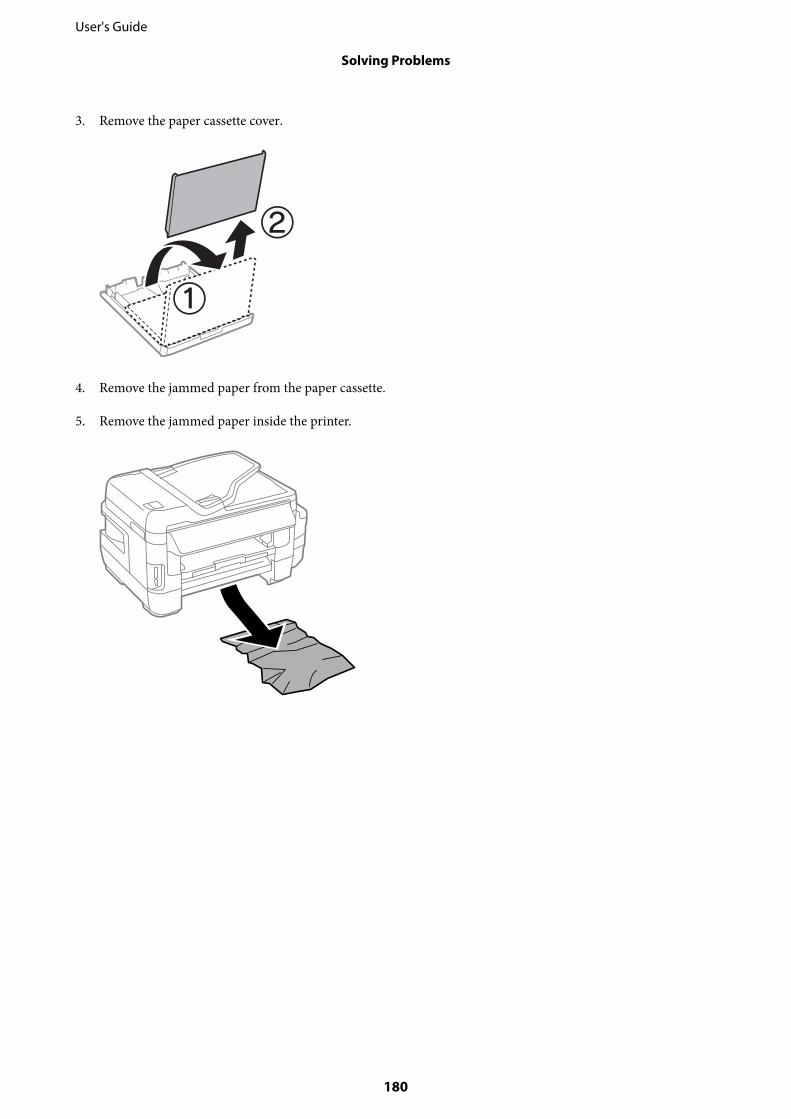
3. Remove the paper cassette cover.
4. Remove the jammed paper from the paper cassette.
5. Remove the jammed paper inside the printer.
User's Guide
Solving Problems
180
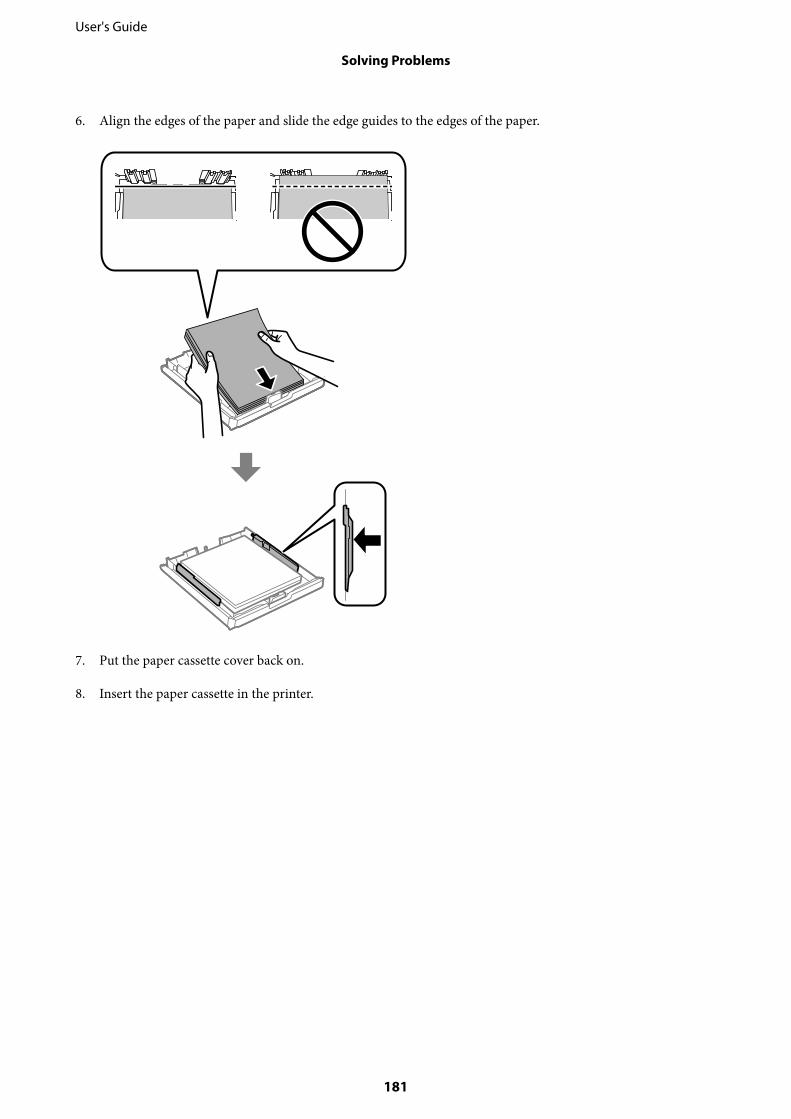
6. Align the edges of the paper and slide the edge guides to the edges of the paper.
7. Put the paper cassette cover back on.
8. Insert the paper cassette in the printer.
User's Guide
Solving Problems
181
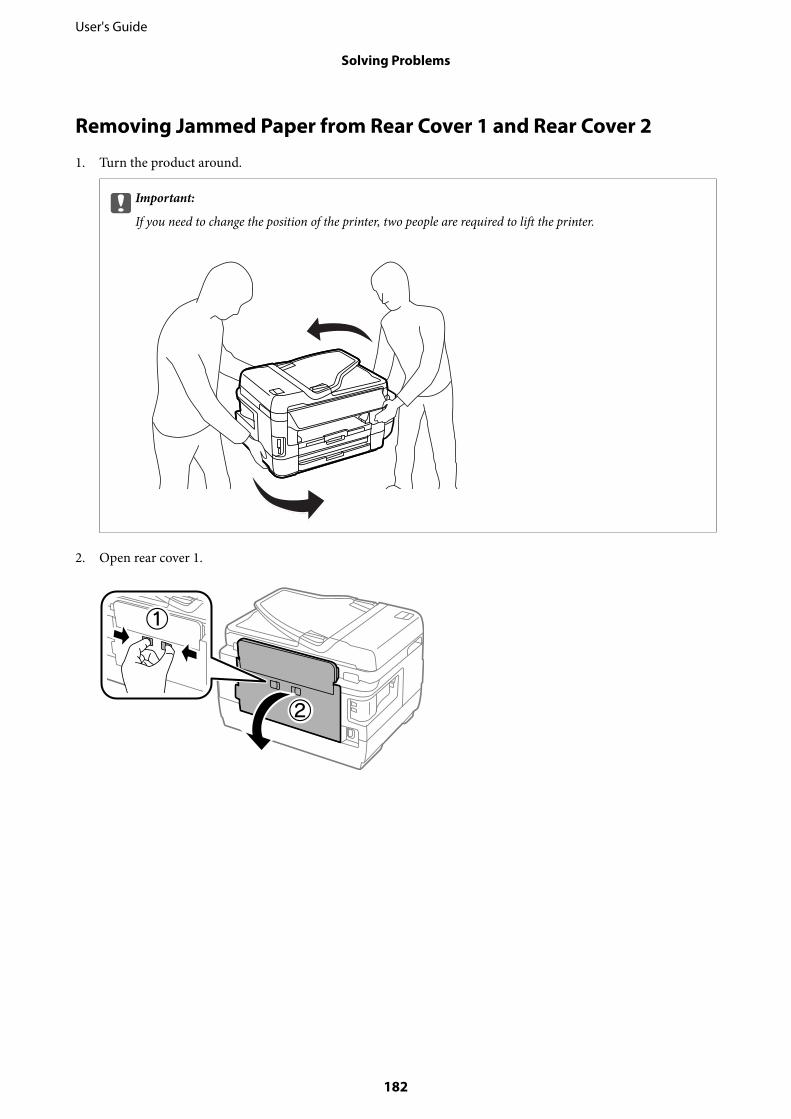
Removing Jammed Paper from Rear Cover 1 and Rear Cover 2
1. Turn the product around.
cImportant:
If you need to change the position of the printer, two people are required to lift the printer.
2. Open rear cover 1.
User's Guide
Solving Problems
182
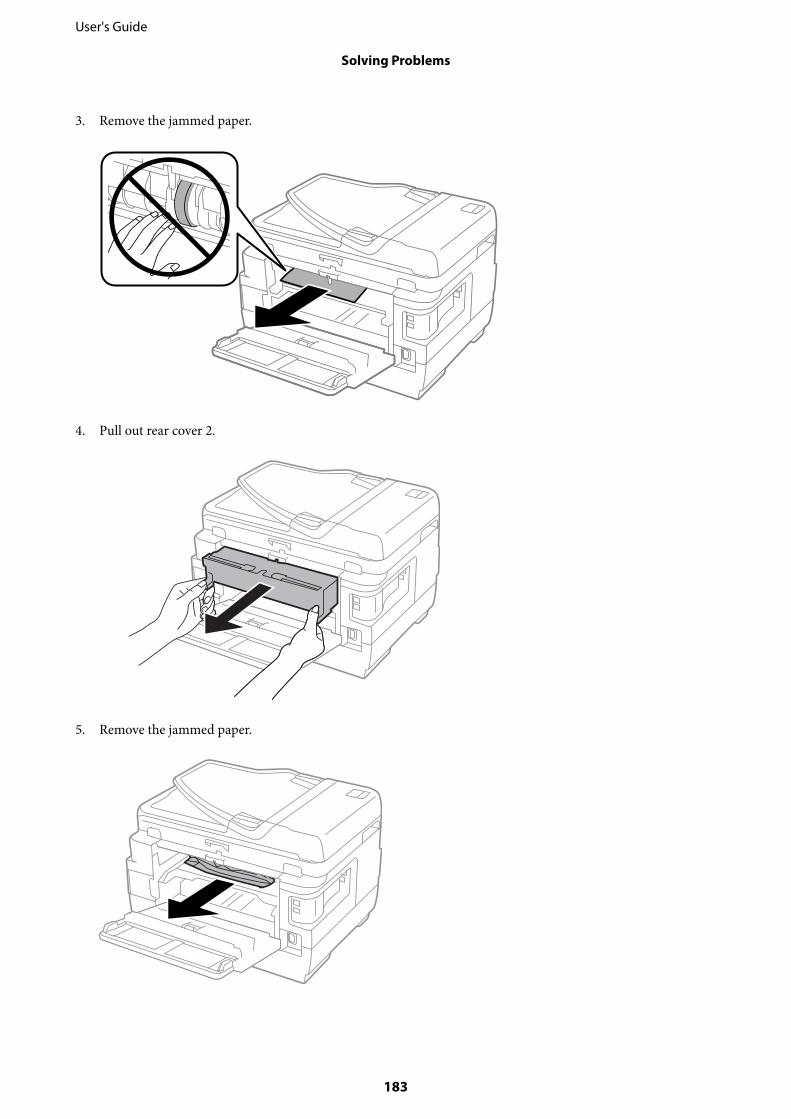
3. Remove the jammed paper.
4. Pull out rear cover 2.
5. Remove the jammed paper.
User's Guide
Solving Problems
183
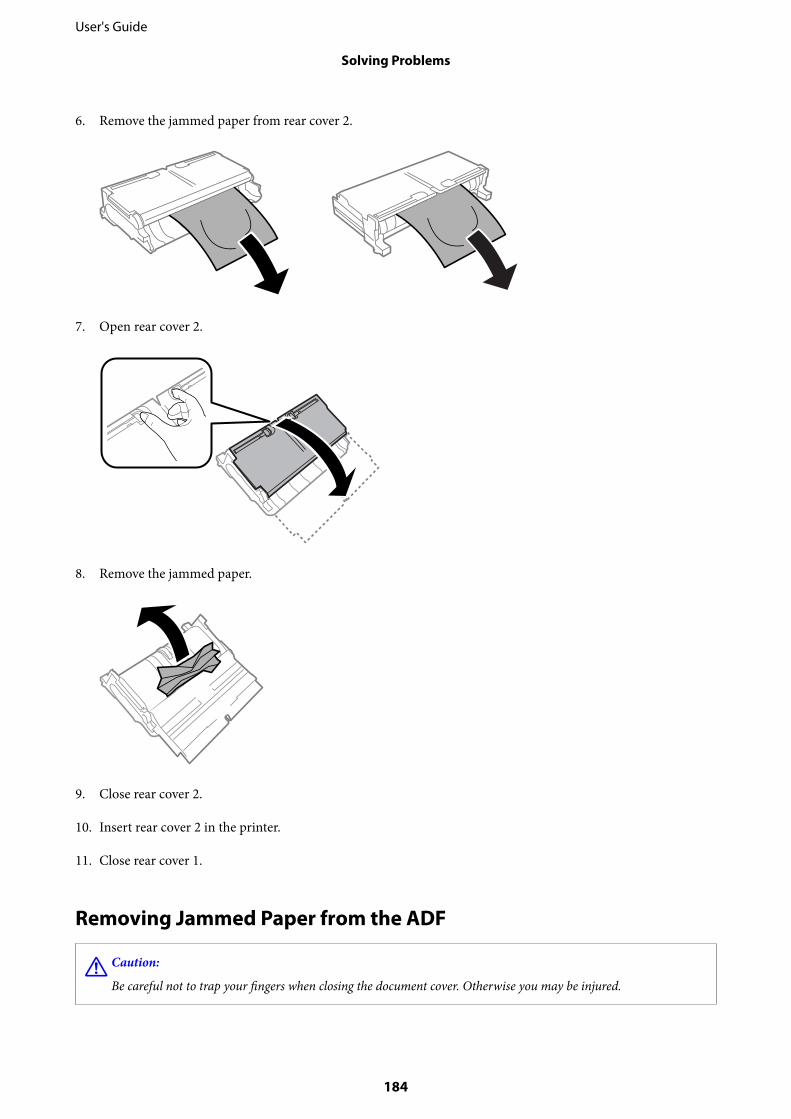
6. Remove the jammed paper from rear cover 2.
7. Open rear cover 2.
8. Remove the jammed paper.
9. Close rear cover 2.
10. Insert rear cover 2 in the printer.
11. Close rear cover 1.
Removing Jammed Paper from the ADF
!Caution:
Be careful not to trap your fingers when closing the document cover. Otherwise you may be injured.
User's Guide
Solving Problems
184
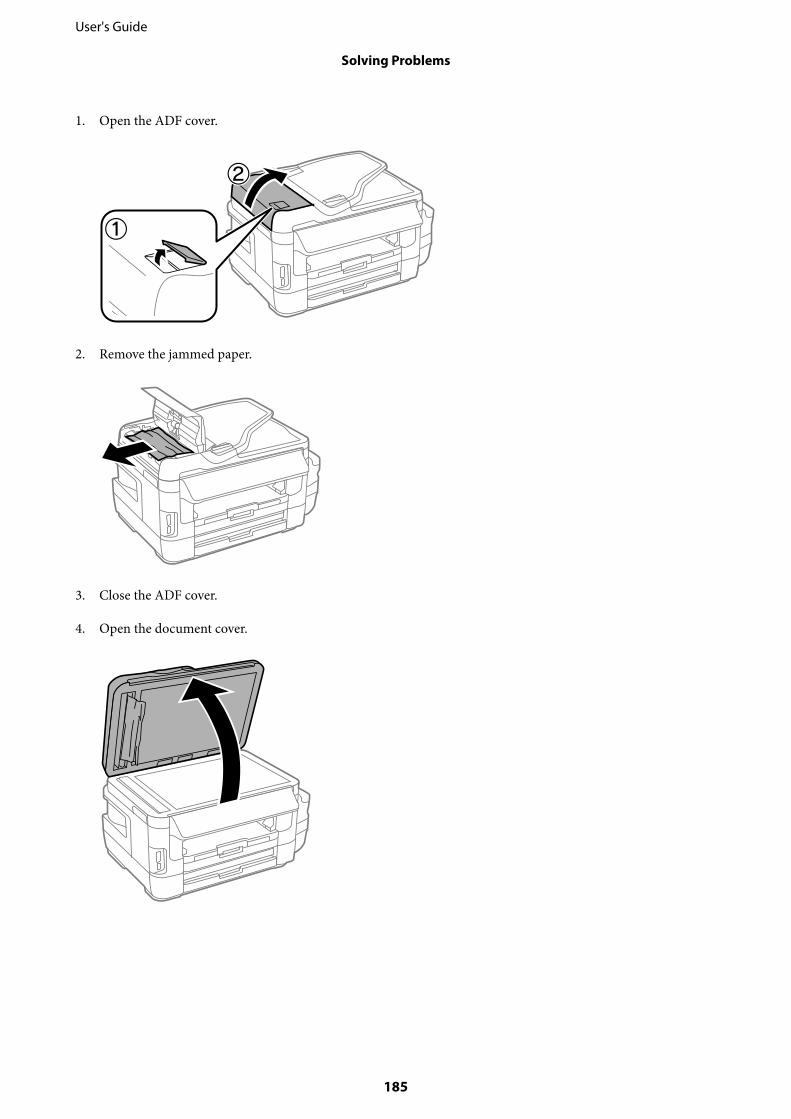
1. Open the ADF cover.
2. Remove the jammed paper.
3. Close the ADF cover.
4. Open the document cover.
User's Guide
Solving Problems
185
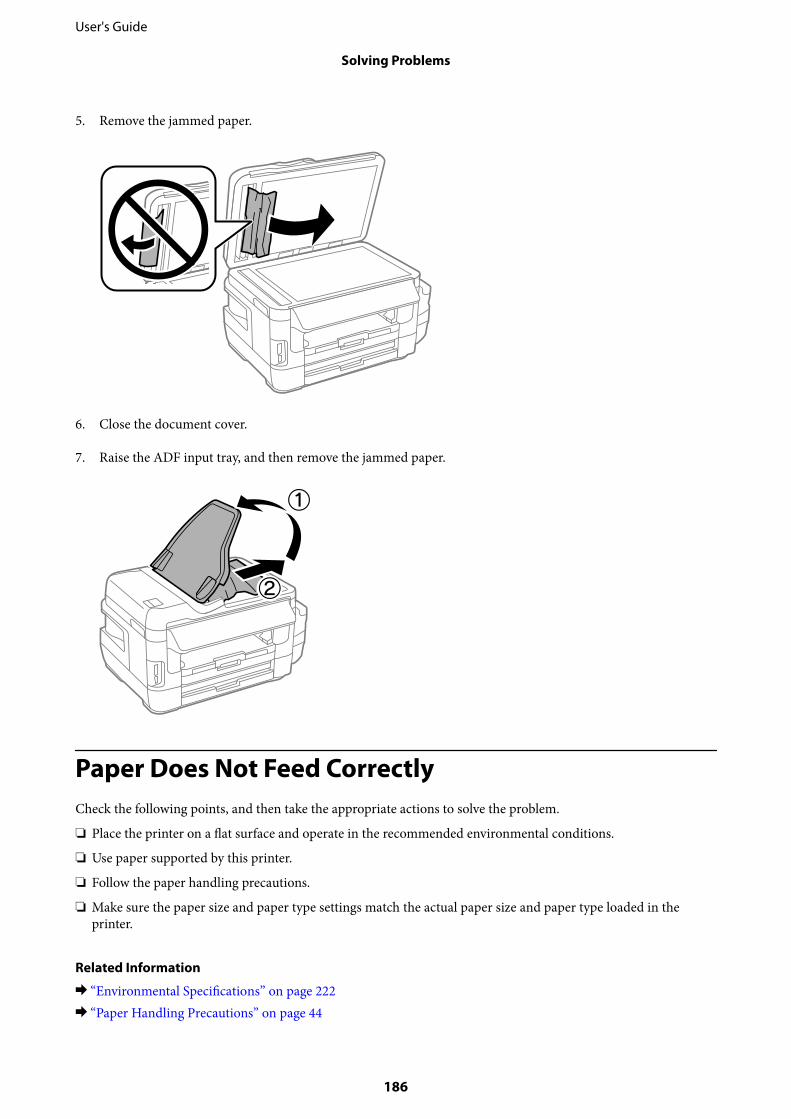
5. Remove the jammed paper.
6. Close the document cover.
7. Raise the ADF input tray, and then remove the jammed paper.
Paper Does Not Feed CorrectlyCheck the following points, and then take the appropriate actions to solve the problem.
❏ Place the printer on a flat surface and operate in the recommended environmental conditions.
❏ Use paper supported by this printer.
❏ Follow the paper handling precautions.
❏ Make sure the paper size and paper type settings match the actual paper size and paper type loaded in theprinter.
Related Information
& “Environmental Specifications” on page 222& “Paper Handling Precautions” on page 44
User's Guide
Solving Problems
186
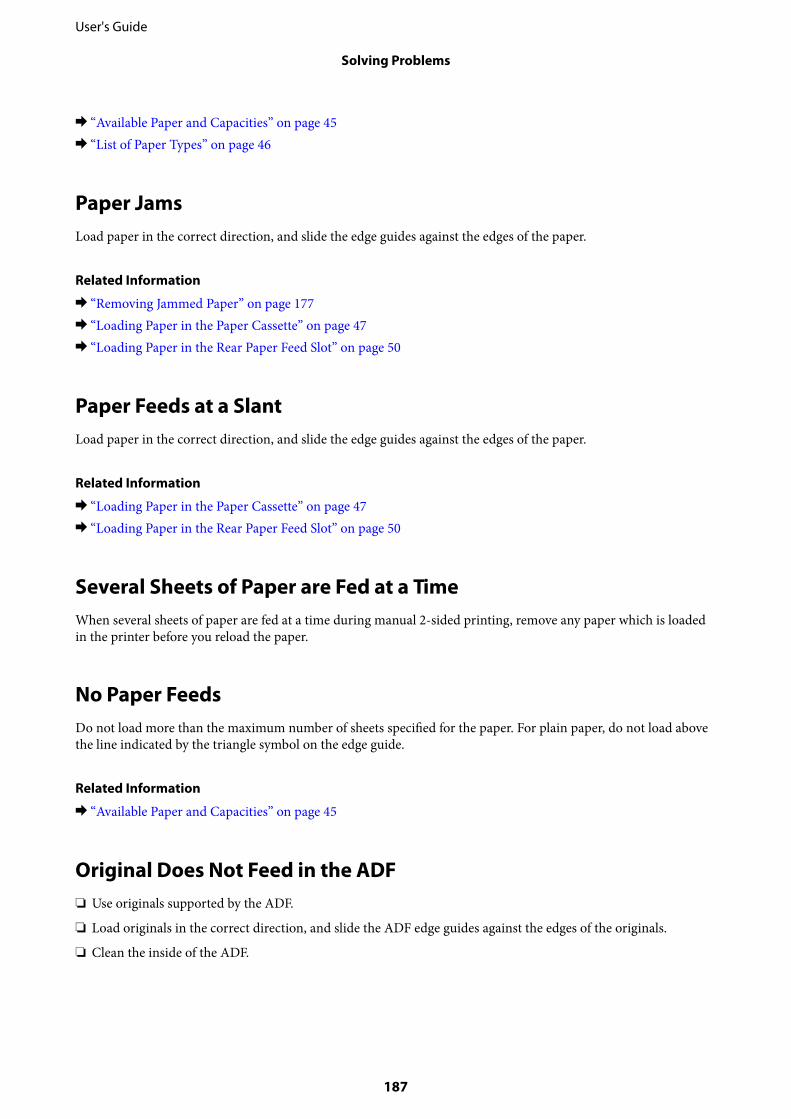
& “Available Paper and Capacities” on page 45& “List of Paper Types” on page 46
Paper JamsLoad paper in the correct direction, and slide the edge guides against the edges of the paper.
Related Information
& “Removing Jammed Paper” on page 177& “Loading Paper in the Paper Cassette” on page 47& “Loading Paper in the Rear Paper Feed Slot” on page 50
Paper Feeds at a SlantLoad paper in the correct direction, and slide the edge guides against the edges of the paper.
Related Information
& “Loading Paper in the Paper Cassette” on page 47& “Loading Paper in the Rear Paper Feed Slot” on page 50
Several Sheets of Paper are Fed at a TimeWhen several sheets of paper are fed at a time during manual 2-sided printing, remove any paper which is loadedin the printer before you reload the paper.
No Paper FeedsDo not load more than the maximum number of sheets specified for the paper. For plain paper, do not load abovethe line indicated by the triangle symbol on the edge guide.
Related Information
& “Available Paper and Capacities” on page 45
Original Does Not Feed in the ADF❏ Use originals supported by the ADF.
❏ Load originals in the correct direction, and slide the ADF edge guides against the edges of the originals.
❏ Clean the inside of the ADF.
User's Guide
Solving Problems
187
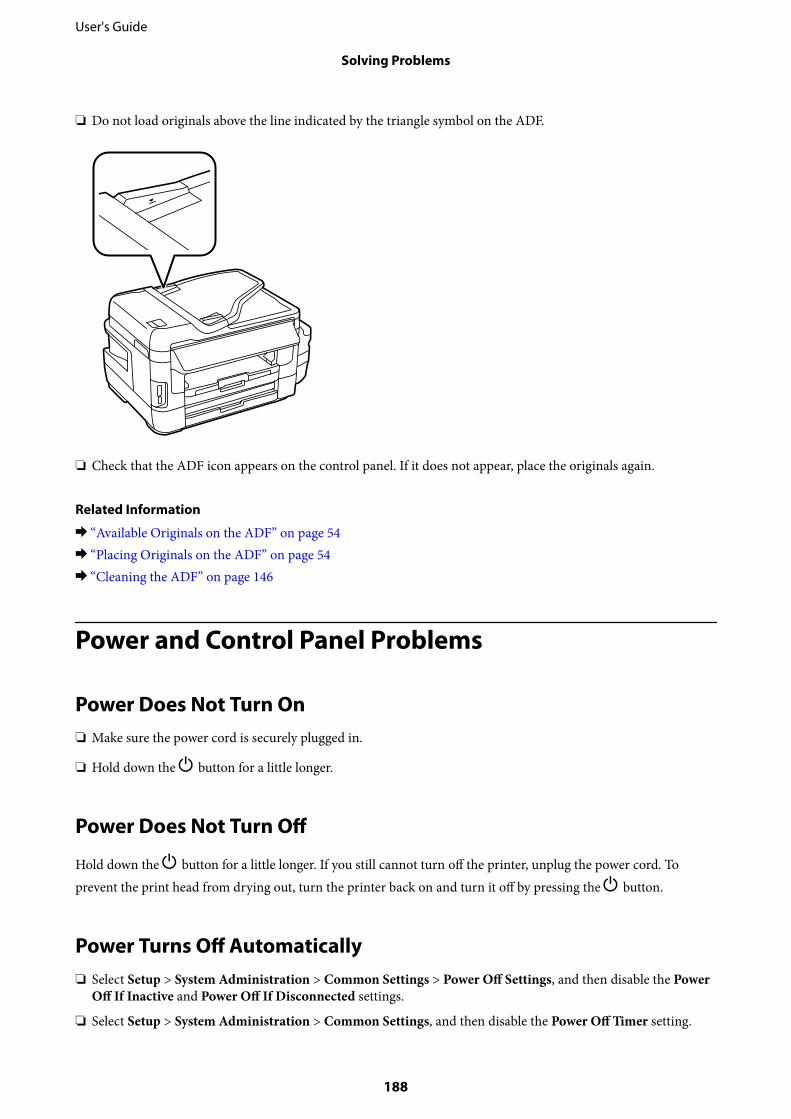
❏ Do not load originals above the line indicated by the triangle symbol on the ADF.
❏ Check that the ADF icon appears on the control panel. If it does not appear, place the originals again.
Related Information
& “Available Originals on the ADF” on page 54& “Placing Originals on the ADF” on page 54& “Cleaning the ADF” on page 146
Power and Control Panel Problems
Power Does Not Turn On❏ Make sure the power cord is securely plugged in.
❏ Hold down the P button for a little longer.
Power Does Not Turn Off
Hold down the P button for a little longer. If you still cannot turn off the printer, unplug the power cord. Toprevent the print head from drying out, turn the printer back on and turn it off by pressing the P button.
Power Turns Off Automatically❏ Select Setup > System Administration > Common Settings > Power Off Settings, and then disable the Power
Off If Inactive and Power Off If Disconnected settings.
❏ Select Setup > System Administration > Common Settings, and then disable the Power Off Timer setting.
User's Guide
Solving Problems
188
Note:Your product may have the Power Off Settings or Power Off Timer feature depending on the location of purchase.
LCD Screen Gets DarkThe printer is in sleep mode. Press anywhere on the LCD screen to return it to its former state.
Cannot Print from a Computer
Checking the connection
❏ Connect the USB cable securely to the printer and the computer.
❏ If you are using a USB hub, try to connect the printer directly to the computer.
❏ If you cannot print over a network, see the page that describes the network connection method from thecomputer.
Checking the software and data
❏ Make sure that a genuine Epson printer driver is installed. If a genuine Epson printer driver is not installed, theavailable functions are limited. We recommend using a genuine Epson printer driver. See the relatedinformation link below for details.
❏ If you are printing a large data size image, the computer may run out of memory. Print the image at a lowerresolution or a smaller size.
Checking the printer status from the computer (Windows)
Click Print Queue on the printer driver's Maintenance tab, and then check the following.
❏ Check if there are any paused print jobs.Cancel printing if necessary.
❏ Make sure the printer is not offline or pending.If the printer is offline or pending, clear the offline or pending setting from the Printer menu.
❏ Make sure the printer is selected as the default printer from the Printer menu (there should be a check mark onthe menu item).If the printer is not selected as the default printer, set it as the default printer.
❏ Make sure the printer port is selected correctly in Property > Port from the Printer menu as follows.Select "USBXXX" for a USB connection, or "EpsonNet Print Port" for a network connection.
Checking the printer status from the computer (Mac OS)
Make sure the printer status is not Pause.
Select System Preferences from the menu > Printers & Scanners (or Print & Scan, Print & Fax), and thendouble-click the printer. If the printer is paused, click Resume (or Resume Printer).
Related Information
& “Connecting to a Computer” on page 24& “Installing Applications” on page 169
User's Guide
Solving Problems
189
& “Canceling Printing” on page 86
When You Cannot Make Network Settings❏ Turn off the devices you want to connect to the network. Wait for about 10 seconds, and then turn on the
devices in the following order; access point, computer or smart device, and then printer. Move the printer andcomputer or smart device closer to the access point to help with radio wave communication, and then try tomake network settings again.
❏ Press on the home screen. Select Menu > Wi-Fi/Network Settings > Connection Check, and then printthe network connection report. If an error has occurred, check the network connection report and then followthe printed solutions.
Related Information
& “Cannot Connect from Devices Even Though Network Settings are No Problem” on page 190& “Messages and Solutions on the Network Connection Report” on page 34
Cannot Connect from Devices Even Though Network Settings areNo ProblemIf you cannot connect from the computer or smart device to the printer even though the network connectionreport does not show any problems, see the following.
❏ When you are using multiple access points at the same time, you may not be able to use the printer from thecomputer or smart device depending on the settings of the access points. Connect the computer or smart deviceto the same access point as the printer.
User's Guide
Solving Problems
190
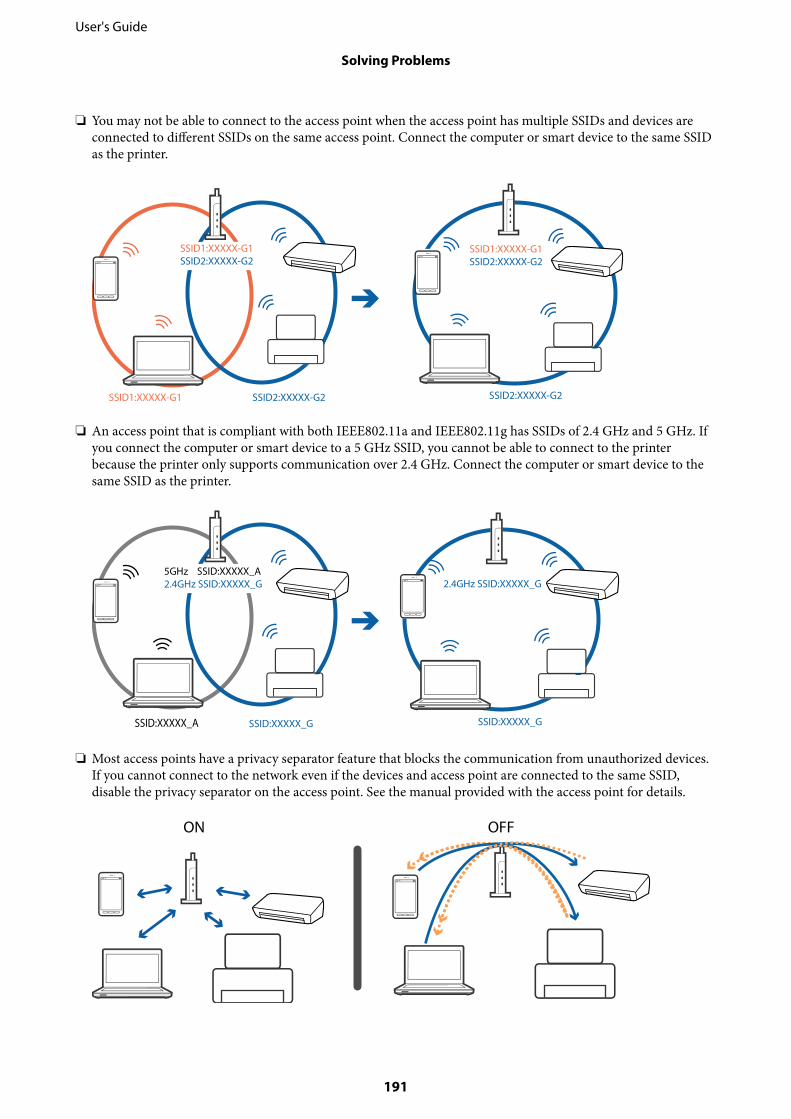
❏ You may not be able to connect to the access point when the access point has multiple SSIDs and devices areconnected to different SSIDs on the same access point. Connect the computer or smart device to the same SSIDas the printer.
❏ An access point that is compliant with both IEEE802.11a and IEEE802.11g has SSIDs of 2.4 GHz and 5 GHz. Ifyou connect the computer or smart device to a 5 GHz SSID, you cannot be able to connect to the printerbecause the printer only supports communication over 2.4 GHz. Connect the computer or smart device to thesame SSID as the printer.
❏ Most access points have a privacy separator feature that blocks the communication from unauthorized devices.If you cannot connect to the network even if the devices and access point are connected to the same SSID,disable the privacy separator on the access point. See the manual provided with the access point for details.
User's Guide
Solving Problems
191
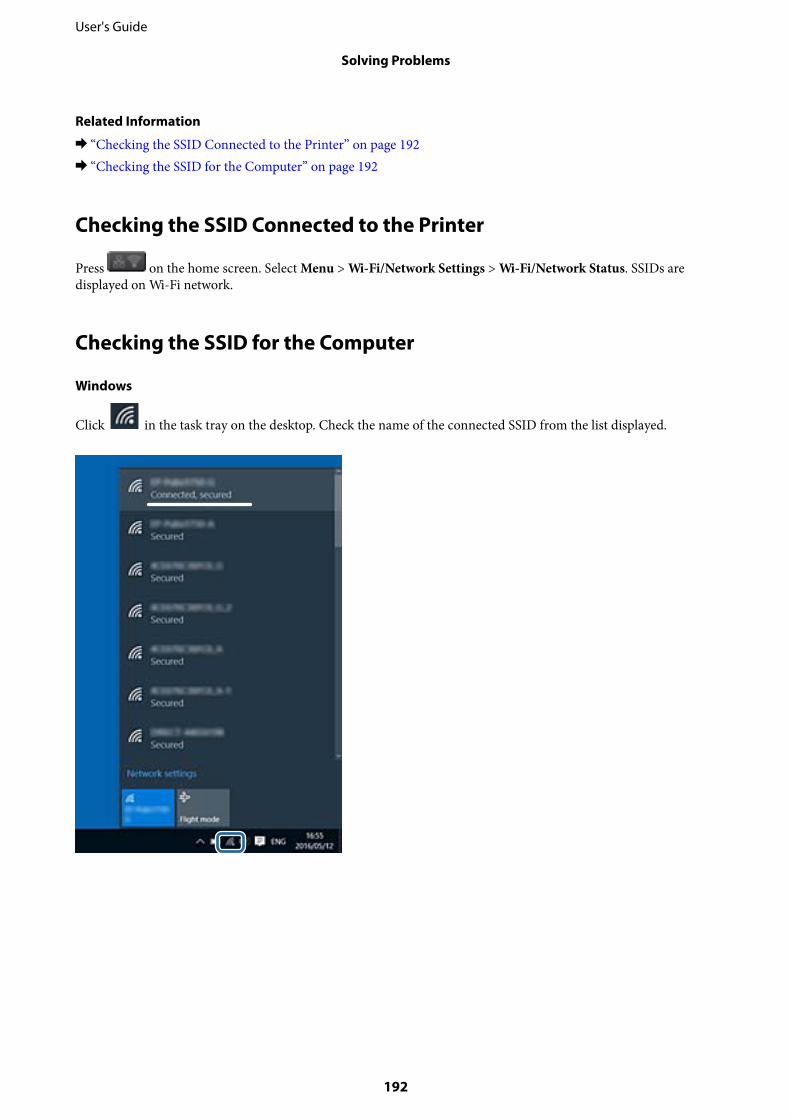
Related Information
& “Checking the SSID Connected to the Printer” on page 192& “Checking the SSID for the Computer” on page 192
Checking the SSID Connected to the Printer
Press on the home screen. Select Menu > Wi-Fi/Network Settings > Wi-Fi/Network Status. SSIDs aredisplayed on Wi-Fi network.
Checking the SSID for the Computer
Windows
Click in the task tray on the desktop. Check the name of the connected SSID from the list displayed.
User's Guide
Solving Problems
192

Mac OS
Click the Wi-Fi icon at the top of the computer screen. A list of SSIDs is displayed and the connected SSID isindicated with a check mark.
Suddenly the Printer Cannot Print over a NetworkConnection❏ When you have changed your access point or provider, try making network settings for the printer again.
Connect the computer or smart device to the same SSID as the printer.
❏ Turn off the devices you want to connect to the network. Wait for about 10 seconds, and then turn on thedevices in the following order; access point, computer or smart device, and then printer. Move the printer andcomputer or smart device closer to the access point to help with radio wave communication, and then try tomake network settings again.
❏ In Windows, click Print Queue on the printer driver's Maintenance tab, and then check the following.
❏ Check if there are any paused print jobs. Cancel printing if necessary.
❏ Make sure the printer is not offline or pending. If the printer is offline or pending, clear the offline orpending setting from the Printer menu.
❏ Make sure the printer is selected as the default printer from the Printer menu (there should be a check markon the menu item).If the printer is not selected as the default printer, set it as the default printer.
❏ Check if the selected port is correct in Printer Properties > Port
❏ Press on the home screen. Select Menu > Wi-Fi/Network Settings > Connection Check, and then printthe network connection report. If the report shows that the network connection failed, check the networkconnection report and then follow the printed solutions.
❏ Try accessing any website from your computer to make sure that your computer's network settings are correct.If you cannot access any websites, there is a problem on the computer. See the manual provided with yourcomputer for more details.
Related Information
& “Checking the SSID Connected to the Printer” on page 192& “Checking the SSID for the Computer” on page 192
User's Guide
Solving Problems
193

& “Messages and Solutions on the Network Connection Report” on page 34& “Cannot Connect from Devices Even Though Network Settings are No Problem” on page 190
Suddenly the Printer Cannot Print Using a USBConnection❏ Disconnect the USB cable from the computer. Right-click on the printer icon displayed on the computer, and
then select Remove Device. Next, connect the USB cable to the computer and try a test print. If printing ispossible, the setup is complete.
❏ Follow the steps in the paper manual bundled with the printer to setup the printer again.
Printout Problems
Printout is Scuffed or Color is MissingIf you have not used the printer for a long time, the print head nozzles may be clogged and ink drops may not bedischarged. Perform a nozzle check, and then clean the print head if any of the print head nozzles are clogged.
Related Information
& “Checking and Cleaning the Print Head” on page 142
Banding or Unexpected Colors Appear
The print head nozzles may be clogged. Perform a nozzle check to check if the print head nozzles are clogged.Clean the print head if any of the print head nozzles are clogged.
Related Information
& “Checking and Cleaning the Print Head” on page 142
User's Guide
Solving Problems
194
Colored Banding Appears at Intervals of Approximately 2.5 cm
❏ Select the appropriate paper type setting for the type of paper loaded in the printer.
❏ Align the print head using the Horizontal Alignment feature.
❏ When printing on plain paper, print using a higher quality setting.
Related Information
& “List of Paper Types” on page 46& “Aligning the Print Head” on page 144
Blurry Prints, Vertical Banding, or Misalignment
Align the print head using the Vertical Alignment feature.
Related Information
& “Aligning the Print Head” on page 144
Print Quality Does Not Improve Even After Aligning the Print Head
During bidirectional (or high speed) printing, the print head prints while moving in both directions, and verticallines may be misaligned. If print quality does not improve, disable the bidirectional (or high speed) setting.Disabling this setting may slow down printing speed.
❏ Control panelDisable Bidirectional in the print settings.
❏ WindowsClear High Speed on the printer driver’s More Options tab.
User's Guide
Solving Problems
195
❏ Mac OS
Select System Preferences from the menu > Printers & Scanners (or Print & Scan, Print & Fax), and thenselect the printer. Click Options & Supplies > Options (or Driver). Select Off as the High Speed Printingsetting.
Related Information
& “Menu Options for Memory Device” on page 65
Print Quality is PoorCheck the following if the print quality is poor due to blurry prints, banding, missing colors, faded colors, andmisalignment in the prints.
❏ Make sure the initial ink charging is complete.
❏ Perform a nozzle check, and then clean the print head if any of the print head nozzles are clogged.
❏ If you have not used the printer for one or two months, replace the ink inside the ink tubes.
❏ Align the print head.
❏ Use paper supported by this printer.
❏ Select the appropriate paper type setting for the type of paper loaded in the printer.
❏ Do not print on paper that is damp, damaged, or too old.
❏ If the paper is curled or the envelope is puffed up, flatten it.
❏ Print using a higher quality setting.
❏ If you have selected Standard-Vivid as the quality setting on the Windows printer driver, change to Standard. Ifyou have selected Normal-Vivid as the quality setting on the Mac OS printer driver, change to Normal.
❏ Do not stack the paper immediately after printing.
❏ Dry the printouts completely before filing or displaying them. When drying the printouts, avoid direct sun light,do not use a dryer, and do not touch the printed side of paper.
❏ When printing images or photos, Epson recommends using genuine Epson paper rather than plain paper. Printon the printable side of the genuine Epson paper.
❏ Try to use genuine Epson ink bottles. This product is designed to adjust colors based on the use of genuineEpson ink bottles. The use of non-genuine ink bottles may cause print quality to decline.
❏ Use ink bottles with the correct part code for this printer.
❏ Epson recommends using the ink bottle before the date printed on the package.
Related Information
& “Refilling the Ink Tanks” on page 136& “Checking and Cleaning the Print Head” on page 142& “Aligning the Print Head” on page 144& “Available Paper and Capacities” on page 45& “List of Paper Types” on page 46& “Paper Handling Precautions” on page 44& “Ink Bottle Codes” on page 135
User's Guide
Solving Problems
196
Printed Photos are StickyYou may be printing on the wrong side of the photo paper. Make sure you are printing on the printable side.
When printing on the wrong side of the photo paper, you need to clean the paper path.
Related Information
& “Cleaning the Paper Path for Ink Smears” on page 145
Images or Photos are Printed in Unexpected ColorsWhen printing from the control panel or from the Windows printer driver, the Epson auto photo adjustmentsetting is applied by default depending on the paper type. Try change the setting.
❏ Control panelChange the Scene Detection setting from Automatic to any other option. If changing the setting does not work,select any other option other than On as the Fix Photo setting.
❏ Windows printer driverOn the More Options tab, select Custom in Color Correction, and then click Advanced. Change the SceneCorrection setting from Auto Correct to any other option. If changing the setting does not work, use any colorcorrection method other than PhotoEnhance in Color Management.
Related Information
& “Menu Options for Memory Device” on page 65& “Adjusting the Print Color” on page 83
The Position, Size, or Margins of the Printout Are Incorrect❏ Load paper in the correct direction, and slide the edge guides against the edges of the paper.
❏ When placing the originals on the scanner glass, align the corner of the original with the corner indicated by asymbol on the frame of the scanner glass. If the edges of the copy are cropped off, move the original slightlyaway from the corner.
❏ When placing the originals on the scanner glass, clean the scanner glass and the document cover. If there is dustor stains on the glass, the copy area may extend to include the dust or stains, resulting in the wrong copyingposition or small images.
❏ Select the appropriate Document Size in the copy settings. If you have placed the printer in direct sunlight ornear a light source, the scanner glass may not detect the document correctly.
❏ Select the appropriate paper size setting.
❏ Adjust the margin setting in the application so that it falls within the printable area.
Related Information
& “Loading Paper in the Paper Cassette” on page 47& “Loading Paper in the Rear Paper Feed Slot” on page 50& “Placing Originals on the Scanner Glass” on page 56& “Cleaning the Scanner Glass” on page 148
User's Guide
Solving Problems
197
& “Printable Area” on page 215
Paper Is Smeared or Scuffed❏ When horizontal banding appears or the top or bottom of the paper is smeared, load paper in the correct
direction and slide the edge guides to the edges of the paper.
❏ When vertical banding appears or the paper is smeared, clean the paper path.
❏ Place the paper on a flat surface to check if it is curled. If it is, flatten it.
❏ When the thick paper is scuffed, enable the reduce scuff setting. If you enable this setting, print quality maydecline or printing may slow down.
❏ Control panelSelect Setup > Maintenance from the home screen, and then enable Thick Paper.
❏ WindowsClick Extended Settings on the printer driver's Maintenance tab, and then select Thick Paper andEnvelopes.If the paper is still scuffed after selecting the Thick Paper and Envelopes setting, select Short Grain Paper inthe Extended Settings window of the printer driver.
❏ Mac OS
Select System Preferences from the menu > Printers & Scanners (or Print & Scan, Print & Fax), andthen select the printer. Click Options & Supplies > Options (or Driver). Select On as theThick paper andenvelopes setting.
❏ When performing manual 2-sided printing, make sure that the ink is completely dry before reloading the paper.
Related Information
& “Loading Paper in the Paper Cassette” on page 47& “Loading Paper in the Rear Paper Feed Slot” on page 50& “Cleaning the Paper Path for Ink Smears” on page 145
User's Guide
Solving Problems
198
Paper is Smeared During Automatic 2-Sided PrintingWhen using the automatic 2-sided printing feature and printing high density data such as images and graphs, setthe print density to lower and the drying time to longer.
Related Information
& “Printing on 2-Sides” on page 70& “Menu Options for Copy Mode” on page 88
Printed Characters Are Incorrect or Garbled❏ Connect the USB cable securely to the printer and the computer.
❏ Cancel any paused print jobs.
❏ Do not put the computer manually into the Hibernate mode or the Sleep mode while printing. Pages of garbledtext may be printed next time you start the computer.
Related Information
& “Canceling Printing” on page 86
The Printed Image Is InvertedClear any mirror image settings in the printer driver or the application.
❏ WindowsClear Mirror Image on the printer driver's More Options tab.
❏ Mac OSClear Mirror Image from the print dialog's Print Settings menu.
Mosaic-Like Patterns in the PrintsWhen printing images or photos, print using high-resolution data. Images on websites are often low resolutionalthough they look good enough on the display, and so print quality may decline.
Uneven Colors, Smears, Dots, or Straight Lines Appear in the CopiedImage❏ Clean the paper path.
❏ Clean the scanner glass.
❏ Clean the ADF.
❏ Do not press too hard on the original or the document cover when you are placing the originals on the scannerglass.
❏ When the paper is smeared, lower the copy density setting.
User's Guide
Solving Problems
199
Related Information
& “Cleaning the Paper Path for Ink Smears” on page 145& “Cleaning the Scanner Glass” on page 148& “Cleaning the ADF” on page 146& “Menu Options for Copy Mode” on page 88
Moiré (Cross-Hatch) Patterns Appear in the Copied ImageChange the reduce and enlarge setting or place the original at a slightly different angle.
Related Information
& “Menu Options for Copy Mode” on page 88
An Image of the Reverse Side of the Original Appears in the CopiedImage❏ For a thin original, place the original on the scanner glass and then place a piece of black paper over it.
❏ Lower the copy density setting on the control panel.
Related Information
& “Menu Options for Copy Mode” on page 88
The Printout Problem Could Not be ClearedIf you have tried all of the solutions and have not solved the problem, try uninstalling and then reinstalling theprinter driver.
Related Information
& “Uninstalling Applications” on page 168& “Installing Applications” on page 169
Other Printing Problems
Printing Is Too Slow❏ Close any unnecessary applications.
❏ Lower the quality setting. High quality printing slows down the printing speed.
User's Guide
Solving Problems
200
❏ Enable the bidirectional (or high speed) setting. When this setting is enabled, the print head prints whilemoving in both directions, and the printing speed increases.
❏ Control PanelWhen printing JPEGs or TIFFs, press Settings, and then enable Bidirectional.
❏ WindowsSelect High Speed on the printer driver's More Options tab.
❏ Mac OS
Select System Preferences from the menu > Printers & Scanners (or Print & Scan, Print & Fax), andthen select the printer. Click Options & Supplies > Options (or Driver). Select On as the High SpeedPrinting setting.
❏ Disable Quiet Mode.
❏ WindowsSelect Off as the Quiet Mode setting on the printer driver's Main tab.
❏ Mac OS
Select System Preferences from the menu > Printers & Scanners (or Print & Scan, Print & Fax), andthen select the printer. Click Options & Supplies > Options (or Driver). Select Off as the Quiet Modesetting.
Related Information
& “Menu Options for Memory Device” on page 65
Printing Slows Down Dramatically During Continuous PrintingPrinting slows down to prevent the printer mechanism from overheating and being damaged. However, you cancontinue printing. To return to normal printing speed, leave the printer idle for at least 30 minutes. Printing speeddoes not return to normal if the power is off.
Cannot Start Scanning❏ When the access control function is enabled for a printer, you need to enter a user ID and password when
scanning. If you do not know the password, contact your system administrator.
❏ When the access control function is enabled, Mac OS might not be able to scan. Contact your systemadministrator.
❏ If you are scanning with the ADF, check that the document cover and ADF cover are closed.
❏ Connect the USB cable securely to the printer and the computer. If you are using a USB hub, try to connect theprinter directly to the computer.
❏ If you scan at a high resolution over a network, a communication error may occur. Lower the resolution.
❏ Make sure that the correct printer (scanner) is selected on Epson Scan 2.
User's Guide
Solving Problems
201
Check whether or not the printer is recognized when using Windows
In Windows, make sure the printer (scanner) is displayed in Scanner and Camera. The printer (scanner) should bedisplayed as "EPSON XXXXX (printer name)". If the printer (scanner) is not displayed, uninstall and then re-install Epson Scan 2. See the following to access Scanner and Camera.
❏ Windows 10Right-click the start button or press and hold it, select Control Panel, enter "Scanner and Camera" in the searchcharm, click View scanners and cameras, and then check if the printer is displayed.
❏ Windows 8.1/Windows 8/Windows Server 2012 R2/Windows Server 2012Select Desktop > Settings > Control Panel, enter "Scanner and Camera" in the search charm, click ShowScanner and Camera, and then check if the printer is displayed.
❏ Windows 7/Windows Server 2008 R2Click the start button and select Control Panel, enter "Scanner and Camera" in the search charm, click Viewscanners and cameras, and then check if the printer is displayed.
❏ Windows Vista/Windows Server 2008Click the start button, select Control Panel > Hardware and Sound > Scanners and Cameras, and then checkif the printer is displayed.
❏ Windows XP/Windows Server 2003 R2/Windows Server 2003Click the start button, select Control Panel > Printers and Other Hardware > Scanner and Cameras, and thencheck if the printer is displayed.
Related Information
& “Uninstalling Applications” on page 168& “Installing Applications” on page 169
Cannot Start Scanning when Using the Control Panel❏ Make sure Epson Scan 2 and Epson Event Manager are installed correctly.
❏ Check the scanning setting assigned in Epson Event Manager.
Related Information
& “Application for Scanning Documents and Images (Epson Scan 2)” on page 164& “Epson Event Manager” on page 164
Scanned Image Problems
Uneven Colors, Dirt, Spots, and so on Appear when Scanning fromthe Scanner Glass❏ Clean the scanner glass.
❏ Remove any trash or dirt that adheres to the original.
User's Guide
Solving Problems
202
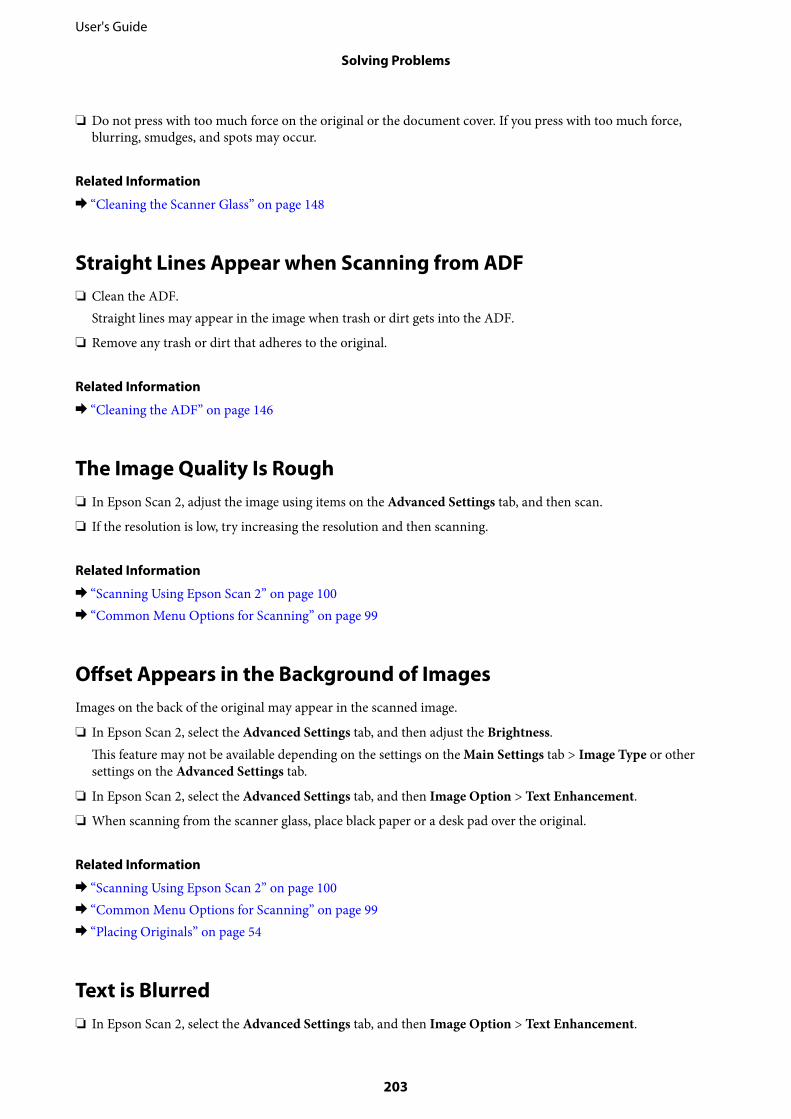
❏ Do not press with too much force on the original or the document cover. If you press with too much force,blurring, smudges, and spots may occur.
Related Information
& “Cleaning the Scanner Glass” on page 148
Straight Lines Appear when Scanning from ADF❏ Clean the ADF.
Straight lines may appear in the image when trash or dirt gets into the ADF.
❏ Remove any trash or dirt that adheres to the original.
Related Information
& “Cleaning the ADF” on page 146
The Image Quality Is Rough❏ In Epson Scan 2, adjust the image using items on the Advanced Settings tab, and then scan.
❏ If the resolution is low, try increasing the resolution and then scanning.
Related Information
& “Scanning Using Epson Scan 2” on page 100& “Common Menu Options for Scanning” on page 99
Offset Appears in the Background of ImagesImages on the back of the original may appear in the scanned image.
❏ In Epson Scan 2, select the Advanced Settings tab, and then adjust the Brightness.This feature may not be available depending on the settings on the Main Settings tab > Image Type or othersettings on the Advanced Settings tab.
❏ In Epson Scan 2, select the Advanced Settings tab, and then Image Option > Text Enhancement.
❏ When scanning from the scanner glass, place black paper or a desk pad over the original.
Related Information
& “Scanning Using Epson Scan 2” on page 100& “Common Menu Options for Scanning” on page 99& “Placing Originals” on page 54
Text is Blurred❏ In Epson Scan 2, select the Advanced Settings tab, and then Image Option > Text Enhancement.
User's Guide
Solving Problems
203
❏ In Epson Scan 2, when Image Type on the Main Settings tab is set to Black & White, adjust the Threshold onthe Advanced Settings tab. When you increase the Threshold, black becomes stronger.
❏ If the resolution is low, try increasing the resolution and then scanning.
Related Information
& “Scanning Using Epson Scan 2” on page 100& “Common Menu Options for Scanning” on page 99
Moiré Patterns (Web-Like Shadows) AppearIf the original is a printed document, moiré patterns (web-like shadows) may appear in the scanned image.
❏ On the Advanced Settings tab in Epson Scan 2, set Descreening.
❏ Change the resolution, and then scan again.
Related Information
& “Scanning Using Epson Scan 2” on page 100& “Common Menu Options for Scanning” on page 99
Cannot Scan the Correct Area on the Scanner Glass❏ Make sure the original is placed correctly against the alignment marks.
❏ If the edge of the scanned image is missing, move the original slightly away from the edge of the scanner glass.
❏ When scanning from the control panel and selecting auto scan area cropping function, remove any trash or dirtfrom the scanner glass and document cover. If there is any trash or dirt around the original, the scanning rangeexpands to include it.
❏ Select the appropriate document size in the scan settings. If you have placed the printer in direct sunlight ornear a light source, the scanner glass may not detect the document size correctly.
Related Information
& “Placing Originals” on page 54& “Cleaning the Scanner Glass” on page 148
Text is Not Recognized Correctly when Saving as a Searchable PDF❏ On the Image Format Options window in Epson Scan 2, check that Text Language is set correctly on the Text
tab.
User's Guide
Solving Problems
204
❏ Check that the original is placed straight.
❏ Use an original with clear text. Text recognition may decline for the following types of originals.
❏ Originals that have been copied a number of times
❏ Originals received by fax (at low resolutions)
❏ Originals on which the letter spacing or line spacing is too small
❏ Originals with ruled lines or underlining over the text
❏ Originals with hand-written text
❏ Originals with creases or wrinkles
❏ In Epson Scan 2, when Image Type on the Main Settings tab is set to Black & White, adjust the Threshold onthe Advanced Settings tab. When you increase the Threshold, the black color area becomes larger.
❏ In Epson Scan 2, select the Advanced Settings tab, and then Image Option > Text Enhancement.
Related Information
& “Scanning Using Epson Scan 2” on page 100
Cannot Solve Problems in the Scanned ImageIf you have tried all of the solutions and have not solved the problem, initialize the Epson Scan 2 settings usingEpson Scan 2 Utility.
Note:Epson Scan 2 Utility is an application that comes with Epson Scan 2.
1. Start Epson Scan 2 Utility.
❏ Windows 10/Windows Server 2016Click the start button, and then select EPSON > Epson Scan 2 Utility.
❏ Windows 8.1/Windows 8/Windows Server 2012 R2/Windows Server 2012Enter the application name in the search charm, and then select the displayed icon.
❏ Windows 7/Windows Vista/Windows XP/Windows Server 2008 R2/Windows Server 2008/Windows Server2003 R2/Windows Server 2003Click the start button, and then select All Programs or Programs > EPSON > Epson Scan 2 > Epson Scan2 Utility.
❏ Mac OSSelect Go > Applications > Epson Software > Epson Scan 2 Utility.
2. Select the Other tab.
3. Click Reset.
Note:If initialization does not solve the problem, uninstall and re-install Epson Scan 2.
Related Information
& “Uninstalling Applications” on page 168& “Installing Applications” on page 169
User's Guide
Solving Problems
205
Other Scanning Problems
Scanning Speed Is Slow❏ Lower the resolution, and then scan again. When the resolution is high, scanning may take some time.
❏ The scanning speed may be reduced depending on the image adjustment features in Epson Scan 2.
❏ On the Configuration screen which is displayed by clicking the button in Epson Scan 2, if you set QuietMode on the Scan tab, the scanning speed may be reduced.
Related Information
& “Scanning Using Epson Scan 2” on page 100& “Common Menu Options for Scanning” on page 99
Cannot Send the Scanned Image by EmailMake sure you have configured the email server settings.
Related Information
& “Configuring an Email Server” on page 229
Scanning Stops when Scanning to PDF/Multi-TIFF❏ When scanning using Epson Scan 2, you can continuously scan up to 999 pages in PDF format and up to 200
pages in Multi-TIFF format. When scanning using the control panel, you can continuously scan up to 50 pagesin single-sided scanning using the ADF, and up to 100 pages in 2-sided scanning using the ADF and whenscanning using the scanner glass.
❏ When scanning large volumes, we recommend scanning in grayscale.
❏ Increase the free space on the computer's hard disk. Scanning may stop if there is not enough free space.
❏ Try scanning at a lower resolution. Scanning stops if the total data size reaches the limit.
Related Information
& “Scanning Using Epson Scan 2” on page 100& “Common Menu Options for Scanning” on page 99
Problems when Sending and Receiving Faxes
Cannot Send or Receive Faxes❏ Use Check Fax Connection on the control panel to run the automatic fax connection check. Try the solutions
printed on the report.
User's Guide
Solving Problems
206
❏ Check the error code displayed for the failed fax job, and try the solutions described in the error code list.
❏ Check the Line Type setting. Setting to PBX may solve the problem. If your phone system requires an externalaccess code to get an outside line, register the access code to the printer, and enter # (hash) at the beginning of afax number when sending.
❏ If a communication error occurs, change the Fax Speed setting to Slow(9,600bps) on the control panel.
❏ Check that the telephone wall jack works by connecting a phone to it and testing it. If you cannot make orreceive calls, contact your telecommunication company.
❏ To connect to a DSL phone line, you need to use a DSL modem equipped with a built-in DSL filter, or install aseparate DSL filter to the line. Contact your DSL provider.
❏ If you are connecting to a DSL phone line, connect the printer directly to a telephone wall jack to see if theprinter can send a fax. If it works, the problem may be caused by the DSL filter. Contact your DSL provider.
❏ Enable the ECM setting on the control panel. Color faxes cannot be sent or received when ECM is off.
❏ To send or receive faxes using the computer, make sure that the printer is connected using a USB cable or anetwork, and that the PC-FAX Driver have been installed on the computer. The PC-FAX Driver is installedtogether with FAX Utility.
❏ In Windows, make sure the printer (fax) is displayed in Devices and Printers, Printer, or Printers and OtherHardware. The printer (fax) is displayed as "EPSON XXXXX (FAX)". If the printer (fax) is not displayed,uninstall and then re-install the FAX Utility. See the following to access Devices and Printers, Printer, orPrinters and Other Hardware.
❏ Windows 10Right-click on the start button, or press and hold it and then select Control Panel > View devices andprinters in Hardware and Sound.
❏ Windows 8.1/Windows 8Select Desktop > Settings > Control Panel > View devices and printers in Hardware and Sound orHardware.
❏ Windows 7Click the start button, and select Control Panel > View devices and printers in Hardware and Sound orHardware.
❏ Windows VistaClick the start button, and select Control Panel > Printers in Hardware and Sound.
❏ Windows XPClick the start button, and select Settings > Control Panel > Printers and Other Hardware > Printers andFaxes.
❏ In Mac OS, check the following.
❏ Select System Preferences from the menu > Printers & Scanners (or Print & Scan, Print & Fax), andthen make sure the printer (fax) is displayed. The printer (fax) is displayed as "FAX XXXX (USB)" or "FAXXXXX (IP)". If the printer (fax) is not displayed, click [+] and then register the printer (fax).
❏ Select System Preferences from the menu > Printers & Scanners (or Print & Scan, Print & Fax), andthen double-click the printer (fax). If the printer is paused, click Resume (or Resume Printer).
Related Information
& “Check Fax Connection” on page 133& “Basic Settings” on page 131
User's Guide
Solving Problems
207
& “Error Code on the Status Menu” on page 172& “Making Settings for a PBX Phone System” on page 110& “Connecting the Printer to a Phone Line” on page 105& “Uninstalling Applications” on page 168& “Installing Applications” on page 169
Cannot Send Faxes❏ If the user restriction feature has been enabled, a user name and password are required to operate the printer.
Contact your administrator if you do not know the password.
❏ If the user restriction feature has been enabled, and you send a fax from a computer, user authentication isperformed using the user name and password set in the printer driver. When you cannot send a fax due to anauthentication error, contact your administrator.
❏ Set up the header information for outgoing faxes on the control panel. Some fax machines automatically rejectincoming faxes that do not include header information.
❏ If you have blocked your caller ID, unblock it. Some phones or fax machines automatically reject anonymouscalls.
❏ Ask the recipient if the fax number is correct and the recipient's fax machine is ready to receive a fax.
Related Information
& “Basic Settings” on page 131& “Cannot Send or Receive Faxes” on page 206
Cannot Send Faxes to a Specific RecipientCheck the following if you cannot send faxes to a specific recipient due to an error.
❏ If the recipient machine does not pick up your call within 50 seconds after the printer has finished dialing, thecall ends with an error. Dial using the On Hook feature or using a connected telephone to check how long ittakes before you hear a fax tone. If it takes more than 50 seconds, add pauses after the fax number to send thefax. Press to enter the pause. A hyphen is entered as the pause mark. One pause is about three seconds. Addmultiple pauses as needed.
❏ If you have selected the recipient from the contacts list, verify that the registered information is correct. If theinformation is correct, select the recipient from the contacts list, press Edit and change Fax Speed toSlow(9,600bps).
Related Information
& “Sending Faxes After Confirming the Recipient's Status” on page 113& “Sending Faxes Dialing from the External Phone Device” on page 112& “Managing Contacts” on page 60& “Cannot Send or Receive Faxes” on page 206
User's Guide
Solving Problems
208
Cannot Send Faxes at a Specified TimeSet the date and the time correctly on the control panel.
Related Information
& “Sending Faxes at a Specified Time (Send Fax Later)” on page 113& “Common Settings” on page 154
Cannot Receive Faxes❏ If you have subscribed to a call forwarding service, the printer may not be able to receive faxes. Contact the
service provider.
❏ If you have not connected a telephone to the printer, set the Receive Mode setting to Auto on the control panel.
❏ Under the following conditions, the printer runs out of memory and cannot receive faxes. See thetroubleshooting for information on handling a memory full error.
❏ 100 received documents have been saved in the inbox.
❏ The printer's memory is full (100%).
Related Information
& “Receive Settings” on page 130& “Cannot Send or Receive Faxes” on page 206& “Memory Full Error Occurs” on page 209
Memory Full Error Occurs❏ If the printer has been set to save received faxes in the inbox, delete faxes you have already read from the inbox.
❏ If the printer has been set to save received faxes on a computer, turn on the computer that is set to save thefaxes. Once the faxes are saved in the computer, they are deleted from the printer's memory.
❏ If the printer has been set to save received faxes on a memory device, connect the device, in which you havecreated a folder to save faxes, to the printer. Once the faxes are saved in the device, they are deleted from theprinter's memory. Make sure that the device has enough available memory and is not write protected.
❏ Even though the memory is full, you can send a monochrome fax by using the Direct Send feature. Or you canalso send a fax by dialing from the external phone device, or by using the On Hook feature. You can also divideyour originals into two or more to send them in several batches.
❏ If the printer cannot print a received fax due to a printer error, such as a paper jam, the memory full error mayoccur. Clear the printer problem, and then contact the sender and ask them to send the fax again.
Related Information
& “Saving Received Faxes in the Inbox” on page 119& “Saving Received Faxes on a Computer” on page 121& “Saving Received Faxes in an External Memory Device” on page 120& “Sending Many Pages of a Monochrome Document (Direct Send)” on page 115& “Sending Faxes Dialing from the External Phone Device” on page 112
User's Guide
Solving Problems
209
& “Sending Faxes After Confirming the Recipient's Status” on page 113& “Removing Jammed Paper” on page 177
Sent Fax Quality Is Poor❏ Clean the scanner glass.
❏ Clean the ADF.
❏ Change the Resolution setting on the control panel. If your originals contain both text and photos, selectPhoto.
❏ Change the Density setting on the control panel.
❏ If you are not sure about the capabilities of the recipient fax machine, enable the Direct Send feature or selectFine as the Resolution setting.If you select Super Fine or Ultra Fine for a monochrome fax, and send the fax without using the Direct Sendfeature, the printer may automatically lower the resolution.
❏ Enable the ECM setting on the control panel.
Related Information
& “Menu Options for Fax Mode” on page 127& “Basic Settings” on page 131& “Cleaning the Scanner Glass” on page 148& “Cleaning the ADF” on page 146
Faxes are Sent at the Wrong Size❏ Before you send an A3 size document, ask the recipient if the recipient's machine supports A3 size. If you see
OK (Reduced Size) in the fax transmission report, the recipient's fax machine does not support A3 size.
❏ When sending a fax using the scanner glass, place the original correctly aligning its corner with the origin mark.Select your original size on the control panel.
❏ If you have placed the printer in direct sunlight or near a light source, the scanner glass may not detect thedocument correctly. Select your original size on the control panel.
❏ Clean the scanner glass and the document cover. If there is dust or stains on the glass, the scanning area mayextend to include the dust or stains, resulting in the wrong scanning position or small images.
Related Information
& “Menu Options for Fax Mode” on page 127& “Placing Originals” on page 54& “Cleaning the Scanner Glass” on page 148
Received Fax Quality Is Poor❏ Enable the ECM setting on the control panel.
❏ Contact the sender and ask them to send using a higher quality mode.
User's Guide
Solving Problems
210
❏ Reprint the received fax. Select Job History from Status Menu to reprint the fax.
Related Information
& “Basic Settings” on page 131& “Checking the Fax Job History” on page 126
Cannot Receive A3 Size FaxesCheck that the paper size setting of the paper source that contains A3 paper has been set to A3, and that the papersource is set for use with the fax feature. Select Setup > System Administration > Printer Settings > Paper SourceSettings > Auto Select Settings > Fax, and then check the enabled paper source(s).
Related Information
& “Printer Settings” on page 153
Received Faxes Are Not Printed❏ If an error has occurred on the printer, such as a paper jam, the printer cannot print received faxes. Check the
printer.
❏ If the printer has been set to save received faxes in the inbox, the received faxes are not automatically printed.Check the Fax Output setting.
Related Information
& “Checking the Printer Status” on page 171& “Removing Jammed Paper” on page 177& “Saving Received Faxes in the Inbox” on page 119
Other Faxing Problems
Cannot Make Calls on the Connected TelephoneConnect the telephone to the EXT. port on the printer, and pick up the receiver. If you cannot hear a dial tonethrough the receiver, connect the phone cable correctly.
Related Information
& “Connecting Your Phone Device to the Printer” on page 107
Answering Machine Cannot Answer Voice CallsOn the control panel, set the printer's Rings to Answer setting to a number higher than the number of rings foryour answering machine.
User's Guide
Solving Problems
211
Related Information
& “Receive Settings” on page 130& “Settings for the Answering Machine” on page 117
Sender's Fax Number Not Displayed on Received Faxes or theNumber Is WrongThe sender may not have set the fax header information or may have set it incorrectly. Contact the sender.
Other Problems
Slight Electric Shock when Touching the PrinterIf many peripherals are connected to the computer, you may feel a slight electric shock when touching the printer.Install a ground wire to the computer that is connected to the printer.
Operation Sounds Are LoudIf operations sounds are too loud, enable Quiet Mode. Enabling this feature may reduce printing speed.
❏ Windows printer driverEnable Quiet Mode on the Main tab.
❏ Mac OS printer driver
Select System Preferences from the menu > Printers & Scanners (or Print & Scan, Print & Fax), and thenselect the printer. Click Options & Supplies > Options (or Driver). Select On as the Quiet Mode setting.
❏ Epson Scan 2
Click the button to open the Configuration window. Next, set the Quiet Mode on the Scan tab.
User's Guide
Solving Problems
212
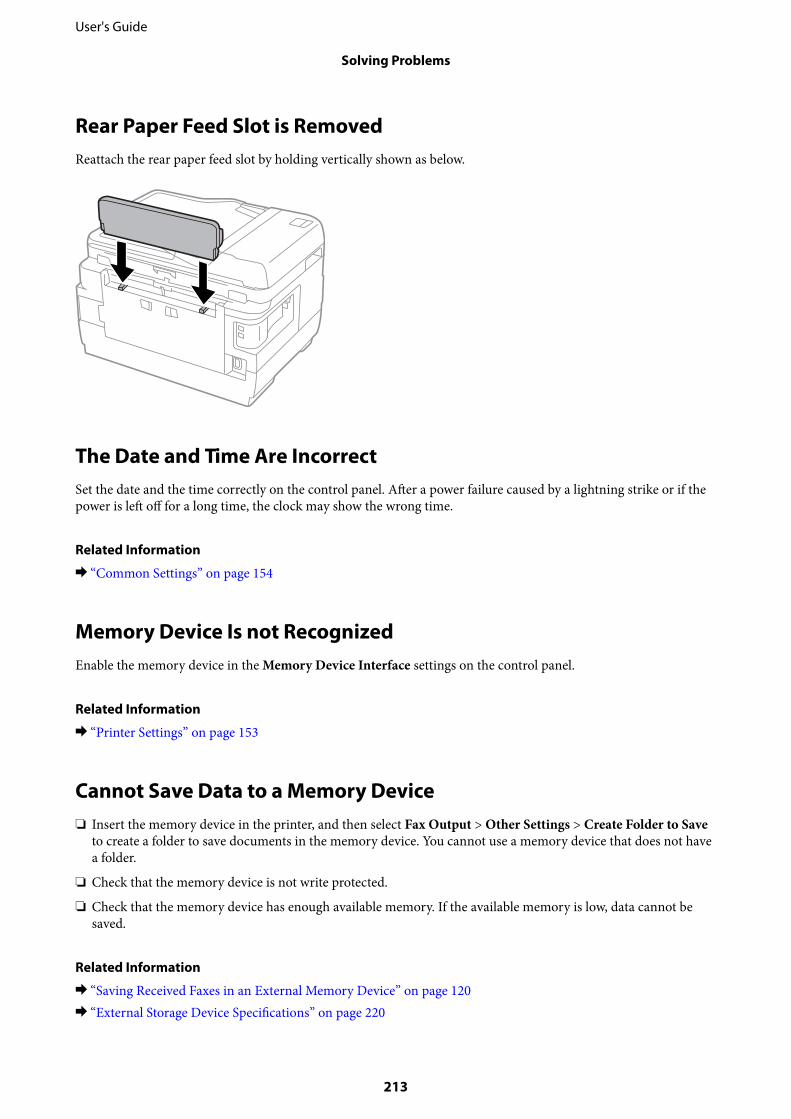
Rear Paper Feed Slot is RemovedReattach the rear paper feed slot by holding vertically shown as below.
The Date and Time Are IncorrectSet the date and the time correctly on the control panel. After a power failure caused by a lightning strike or if thepower is left off for a long time, the clock may show the wrong time.
Related Information
& “Common Settings” on page 154
Memory Device Is not RecognizedEnable the memory device in the Memory Device Interface settings on the control panel.
Related Information
& “Printer Settings” on page 153
Cannot Save Data to a Memory Device❏ Insert the memory device in the printer, and then select Fax Output > Other Settings > Create Folder to Save
to create a folder to save documents in the memory device. You cannot use a memory device that does not havea folder.
❏ Check that the memory device is not write protected.
❏ Check that the memory device has enough available memory. If the available memory is low, data cannot besaved.
Related Information
& “Saving Received Faxes in an External Memory Device” on page 120& “External Storage Device Specifications” on page 220
User's Guide
Solving Problems
213
Forgot Your PasswordIf you forget the administrator's password, contact Epson support.
Related Information
& “Contacting Epson Support” on page 231
Application Is Blocked by a Firewall (for Windows Only)Add the application to the Windows Firewall allowed program in security settings on the Control Panel.
"?" Is Displayed on the Photo Selection Screen"?" is displayed on the LCD screen when the image file is not supported by the product.
Related Information
& “Supported Data Specifications” on page 221
A Message Prompting You to Reset the Ink Levels is DisplayedRefill all or the specified ink tanks, select the color that you refilled on the LCD screen, and then press Done toreset the ink levels.
Depending on the usage conditions, the message may be displayed when there is still ink in the tank.
If the message is displayed even when more than half of the ink remains in the ink tanks, the printer may bemalfunctioning. Contact Epson support.
Related Information
& “Refilling the Ink Tanks” on page 136
User's Guide
Solving Problems
214
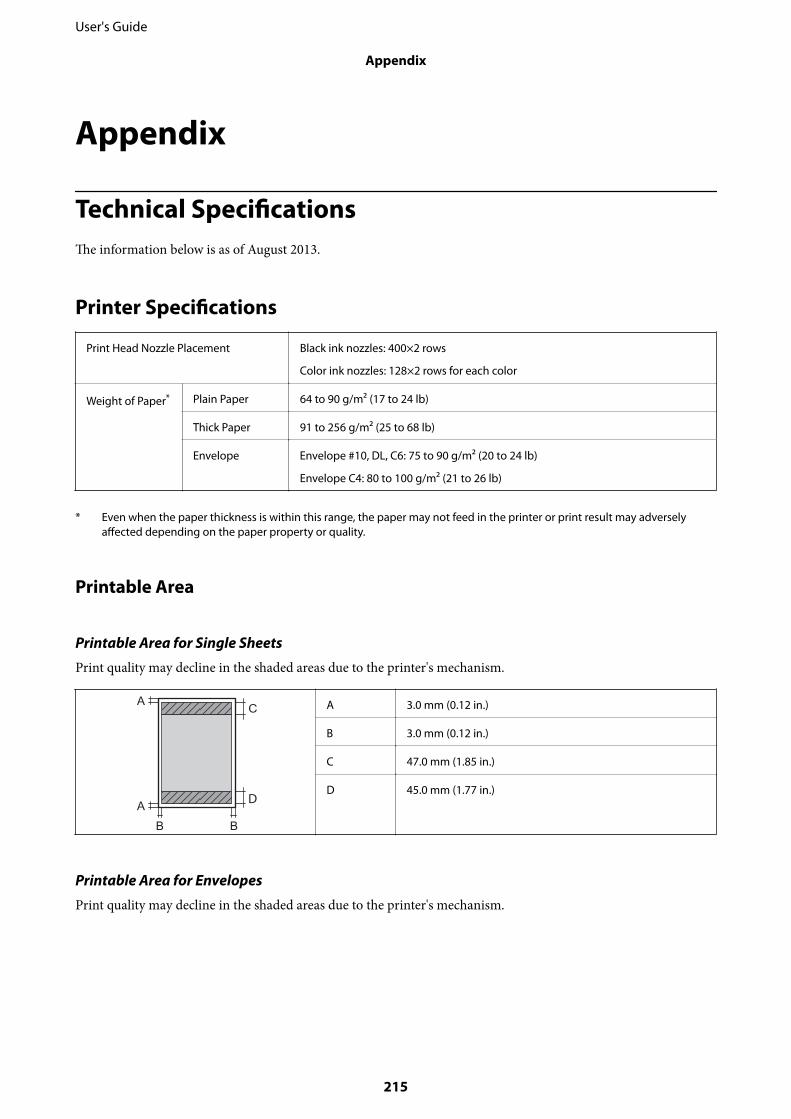
Appendix
Technical SpecificationsThe information below is as of August 2013.
Printer Specifications
Print Head Nozzle Placement Black ink nozzles: 400×2 rows
Color ink nozzles: 128×2 rows for each color
Weight of Paper* Plain Paper 64 to 90 g/m2 (17 to 24 lb)
Thick Paper 91 to 256 g/m2 (25 to 68 lb)
Envelope Envelope #10, DL, C6: 75 to 90 g/m2 (20 to 24 lb)
Envelope C4: 80 to 100 g/m2 (21 to 26 lb)
* Even when the paper thickness is within this range, the paper may not feed in the printer or print result may adverselyaffected depending on the paper property or quality.
Printable Area
Printable Area for Single Sheets
Print quality may decline in the shaded areas due to the printer's mechanism.
A 3.0 mm (0.12 in.)
B 3.0 mm (0.12 in.)
C 47.0 mm (1.85 in.)
D 45.0 mm (1.77 in.)
Printable Area for Envelopes
Print quality may decline in the shaded areas due to the printer's mechanism.
User's Guide
Appendix
215
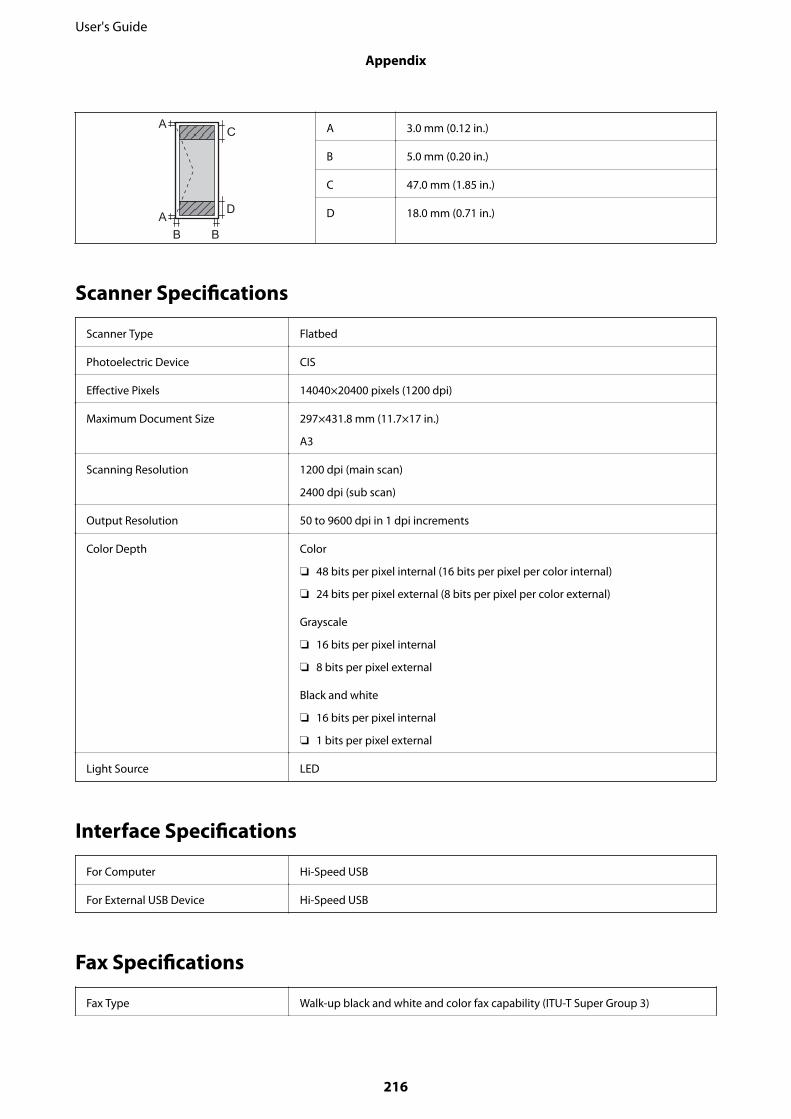
A 3.0 mm (0.12 in.)
B 5.0 mm (0.20 in.)
C 47.0 mm (1.85 in.)
D 18.0 mm (0.71 in.)
Scanner Specifications
Scanner Type Flatbed
Photoelectric Device CIS
Effective Pixels 14040×20400 pixels (1200 dpi)
Maximum Document Size 297×431.8 mm (11.7×17 in.)
A3
Scanning Resolution 1200 dpi (main scan)
2400 dpi (sub scan)
Output Resolution 50 to 9600 dpi in 1 dpi increments
Color Depth Color
❏ 48 bits per pixel internal (16 bits per pixel per color internal)
❏ 24 bits per pixel external (8 bits per pixel per color external)
Grayscale
❏ 16 bits per pixel internal
❏ 8 bits per pixel external
Black and white
❏ 16 bits per pixel internal
❏ 1 bits per pixel external
Light Source LED
Interface Specifications
For Computer Hi-Speed USB
For External USB Device Hi-Speed USB
Fax Specifications
Fax Type Walk-up black and white and color fax capability (ITU-T Super Group 3)
User's Guide
Appendix
216

Supported Lines Standard analogue telephone lines, PBX (Private Branch Exchange) telephonesystems
Speed Up to 33.6 kbps
Resolution Monochrome
❏ Standard: 8 pel/mm×3.85 line/mm (203 pel/in.×98 line/in.)
❏ Fine: 8 pel/mm×7.7 line/mm (203 pel/in.×196 line/in.)
❏ Super Fine: 8 pel/mm×15.4 line/mm (203 pel/in.×392 line/in.)
❏ Ultra Fine: 16 pel/mm×15.4 line/mm (406 pel/in.×392 line/in.)
❏ Photo: 8 pel/mm×7.7 line/mm (203 pel/in.×196 line/in.)
Color
❏ Fine: 200×200 dpi
❏ Photo: 200×200 dpi
Page Memory Up to 550 pages (when received ITU-T No.1 chart in monochrome draft mode)
Redial* 2 times (with 1 minute intervals)
Interface RJ-11 Phone Line, RJ-11 Telephone set connection
* The specifications may differ by country or region.
Network Function List
Functions Supported Remarks
NetworkInterfaces
Ethernet ✓ -
Wi-Fi Infrastructure ✓ -
Ad hoc ✓ -
Wi-FiDirect
Simple APMode
✓ -
Wi-Fi DirectMode
✓ -
ConcurrentConnection
Ethernet Simple AP Mode ✓ -
Wi-Fi(Infrastructure)
Simple AP Mode - -
Ad hoc Simple AP Mode - -
User's Guide
Appendix
217
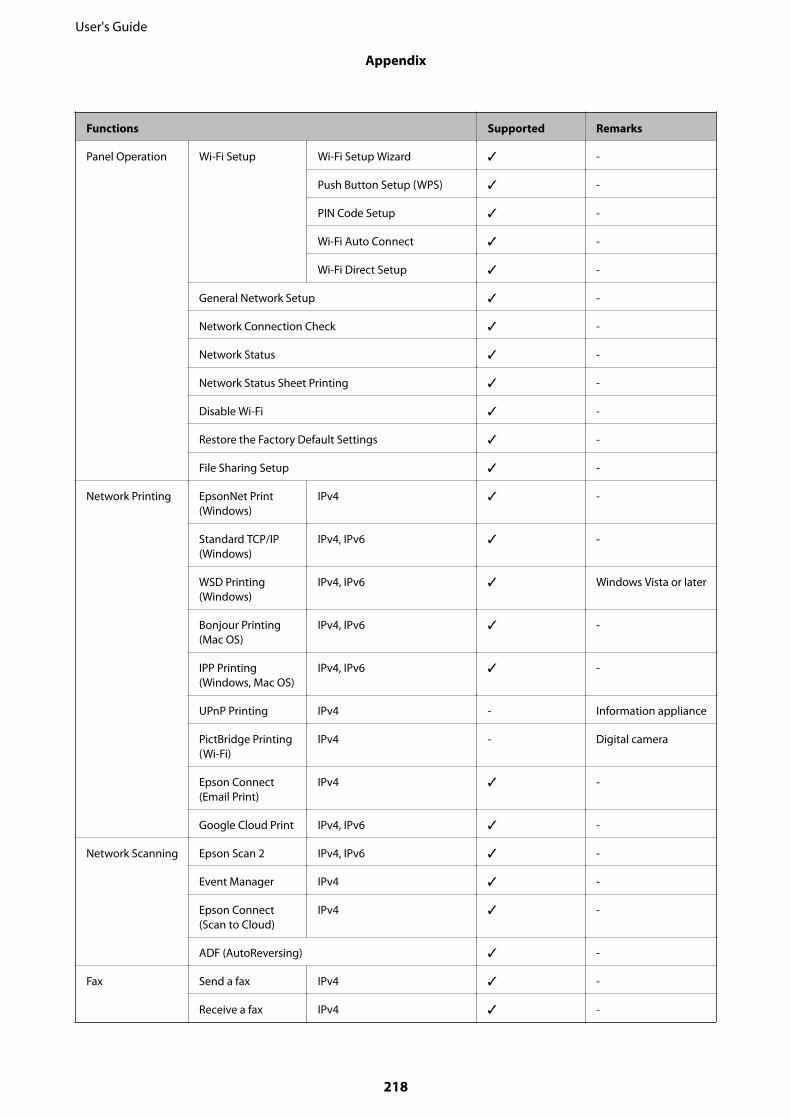
Functions Supported Remarks
Panel Operation Wi-Fi Setup Wi-Fi Setup Wizard ✓ -
Push Button Setup (WPS) ✓ -
PIN Code Setup ✓ -
Wi-Fi Auto Connect ✓ -
Wi-Fi Direct Setup ✓ -
General Network Setup ✓ -
Network Connection Check ✓ -
Network Status ✓ -
Network Status Sheet Printing ✓ -
Disable Wi-Fi ✓ -
Restore the Factory Default Settings ✓ -
File Sharing Setup ✓ -
Network Printing EpsonNet Print(Windows)
IPv4 ✓ -
Standard TCP/IP(Windows)
IPv4, IPv6 ✓ -
WSD Printing(Windows)
IPv4, IPv6 ✓ Windows Vista or later
Bonjour Printing(Mac OS)
IPv4, IPv6 ✓ -
IPP Printing(Windows, Mac OS)
IPv4, IPv6 ✓ -
UPnP Printing IPv4 - Information appliance
PictBridge Printing(Wi-Fi)
IPv4 - Digital camera
Epson Connect(Email Print)
IPv4 ✓ -
Google Cloud Print IPv4, IPv6 ✓ -
Network Scanning Epson Scan 2 IPv4, IPv6 ✓ -
Event Manager IPv4 ✓ -
Epson Connect(Scan to Cloud)
IPv4 ✓ -
ADF (AutoReversing) ✓ -
Fax Send a fax IPv4 ✓ -
Receive a fax IPv4 ✓ -
User's Guide
Appendix
218
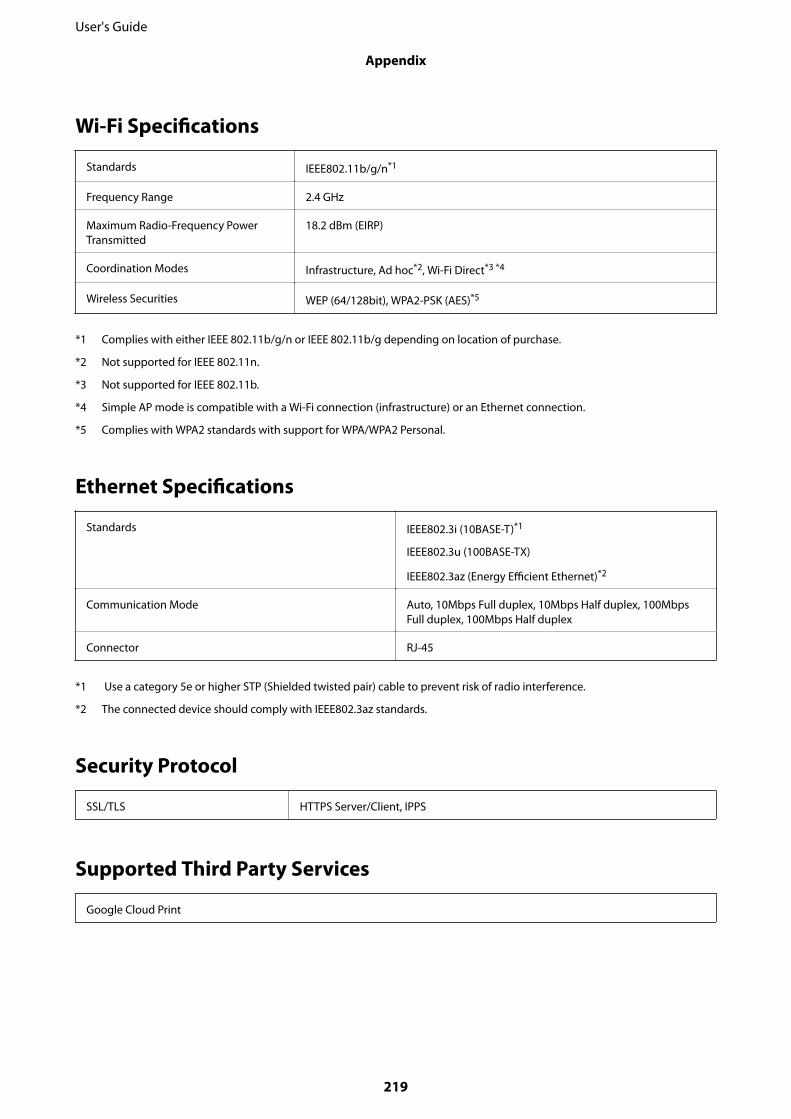
Wi-Fi Specifications
Standards IEEE802.11b/g/n*1
Frequency Range 2.4 GHz
Maximum Radio-Frequency PowerTransmitted
18.2 dBm (EIRP)
Coordination Modes Infrastructure, Ad hoc*2, Wi-Fi Direct*3 *4
Wireless Securities WEP (64/128bit), WPA2-PSK (AES)*5
*1 Complies with either IEEE 802.11b/g/n or IEEE 802.11b/g depending on location of purchase.
*2 Not supported for IEEE 802.11n.
*3 Not supported for IEEE 802.11b.
*4 Simple AP mode is compatible with a Wi-Fi connection (infrastructure) or an Ethernet connection.
*5 Complies with WPA2 standards with support for WPA/WPA2 Personal.
Ethernet Specifications
Standards IEEE802.3i (10BASE-T)*1
IEEE802.3u (100BASE-TX)
IEEE802.3az (Energy Efficient Ethernet)*2
Communication Mode Auto, 10Mbps Full duplex, 10Mbps Half duplex, 100MbpsFull duplex, 100Mbps Half duplex
Connector RJ-45
*1 Use a category 5e or higher STP (Shielded twisted pair) cable to prevent risk of radio interference.
*2 The connected device should comply with IEEE802.3az standards.
Security Protocol
SSL/TLS HTTPS Server/Client, IPPS
Supported Third Party Services
Google Cloud Print
User's Guide
Appendix
219
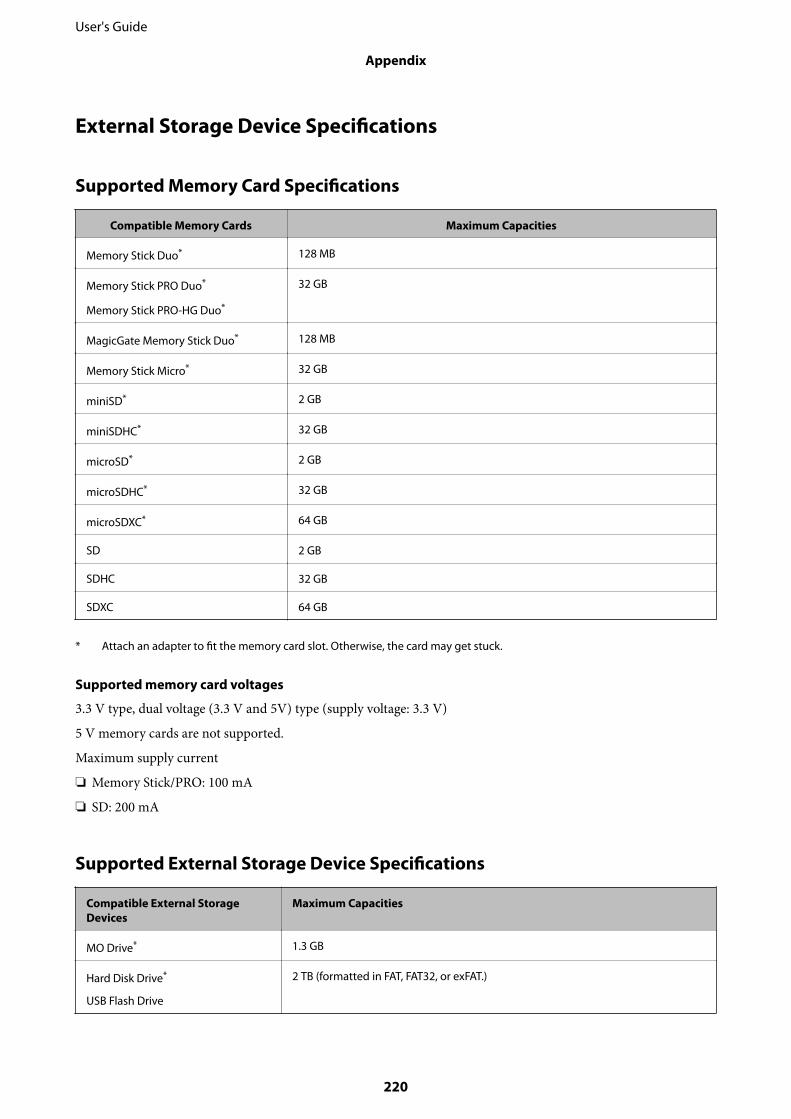
External Storage Device Specifications
Supported Memory Card Specifications
Compatible Memory Cards Maximum Capacities
Memory Stick Duo* 128 MB
Memory Stick PRO Duo*
Memory Stick PRO-HG Duo*
32 GB
MagicGate Memory Stick Duo* 128 MB
Memory Stick Micro* 32 GB
miniSD* 2 GB
miniSDHC* 32 GB
microSD* 2 GB
microSDHC* 32 GB
microSDXC* 64 GB
SD 2 GB
SDHC 32 GB
SDXC 64 GB
* Attach an adapter to fit the memory card slot. Otherwise, the card may get stuck.
Supported memory card voltages
3.3 V type, dual voltage (3.3 V and 5V) type (supply voltage: 3.3 V)
5 V memory cards are not supported.
Maximum supply current
❏ Memory Stick/PRO: 100 mA
❏ SD: 200 mA
Supported External Storage Device Specifications
Compatible External StorageDevices
Maximum Capacities
MO Drive* 1.3 GB
Hard Disk Drive*
USB Flash Drive
2 TB (formatted in FAT, FAT32, or exFAT.)
User's Guide
Appendix
220
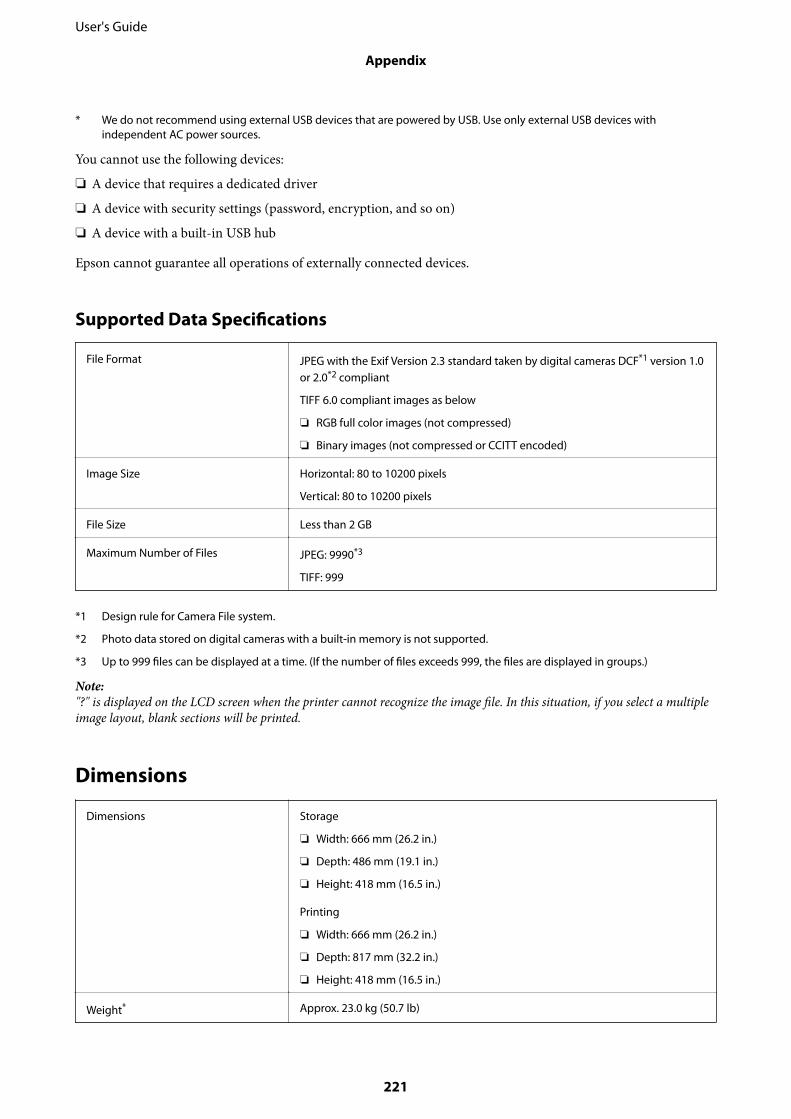
* We do not recommend using external USB devices that are powered by USB. Use only external USB devices withindependent AC power sources.
You cannot use the following devices:
❏ A device that requires a dedicated driver
❏ A device with security settings (password, encryption, and so on)
❏ A device with a built-in USB hub
Epson cannot guarantee all operations of externally connected devices.
Supported Data Specifications
File Format JPEG with the Exif Version 2.3 standard taken by digital cameras DCF*1 version 1.0or 2.0*2 compliant
TIFF 6.0 compliant images as below
❏ RGB full color images (not compressed)
❏ Binary images (not compressed or CCITT encoded)
Image Size Horizontal: 80 to 10200 pixels
Vertical: 80 to 10200 pixels
File Size Less than 2 GB
Maximum Number of Files JPEG: 9990*3
TIFF: 999
*1 Design rule for Camera File system.
*2 Photo data stored on digital cameras with a built-in memory is not supported.
*3 Up to 999 files can be displayed at a time. (If the number of files exceeds 999, the files are displayed in groups.)
Note:"?" is displayed on the LCD screen when the printer cannot recognize the image file. In this situation, if you select a multipleimage layout, blank sections will be printed.
Dimensions
Dimensions Storage
❏ Width: 666 mm (26.2 in.)
❏ Depth: 486 mm (19.1 in.)
❏ Height: 418 mm (16.5 in.)
Printing
❏ Width: 666 mm (26.2 in.)
❏ Depth: 817 mm (32.2 in.)
❏ Height: 418 mm (16.5 in.)
Weight* Approx. 23.0 kg (50.7 lb)
User's Guide
Appendix
221
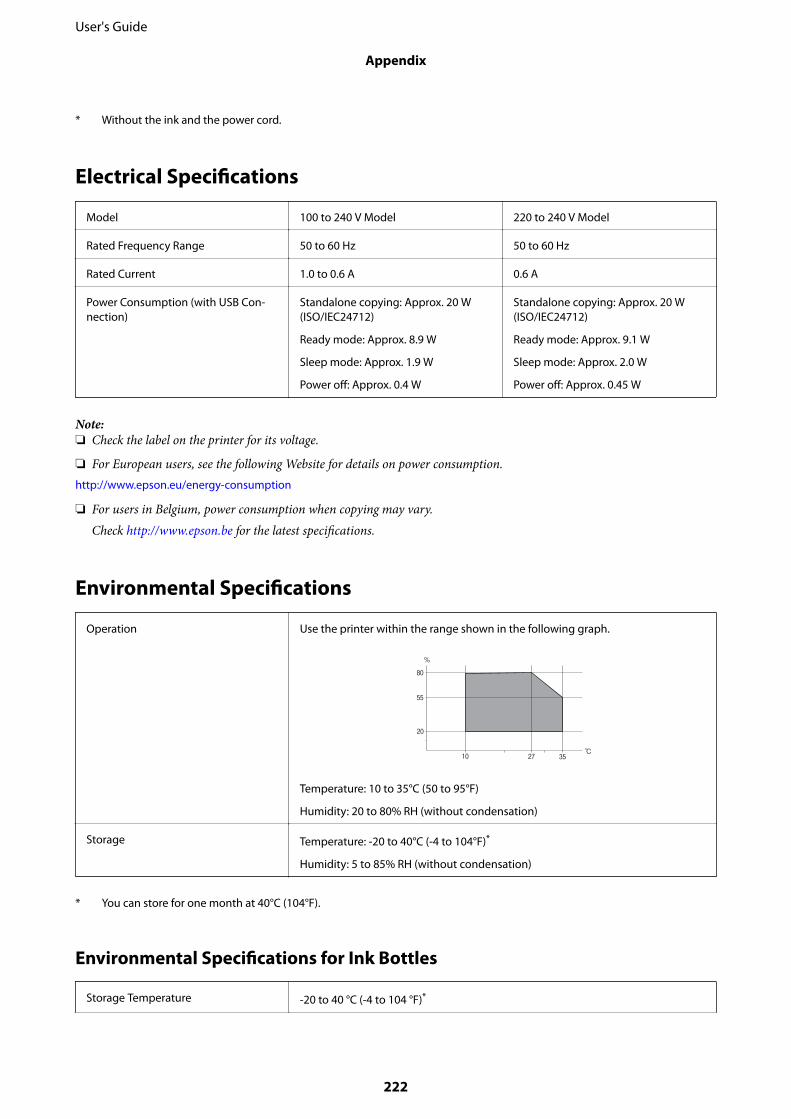
* Without the ink and the power cord.
Electrical Specifications
Model 100 to 240 V Model 220 to 240 V Model
Rated Frequency Range 50 to 60 Hz 50 to 60 Hz
Rated Current 1.0 to 0.6 A 0.6 A
Power Consumption (with USB Con-nection)
Standalone copying: Approx. 20 W(ISO/IEC24712)
Ready mode: Approx. 8.9 W
Sleep mode: Approx. 1.9 W
Power off: Approx. 0.4 W
Standalone copying: Approx. 20 W(ISO/IEC24712)
Ready mode: Approx. 9.1 W
Sleep mode: Approx. 2.0 W
Power off: Approx. 0.45 W
Note:❏ Check the label on the printer for its voltage.
❏ For European users, see the following Website for details on power consumption.http://www.epson.eu/energy-consumption
❏ For users in Belgium, power consumption when copying may vary.Check http://www.epson.be for the latest specifications.
Environmental Specifications
Operation Use the printer within the range shown in the following graph.
Temperature: 10 to 35°C (50 to 95°F)
Humidity: 20 to 80% RH (without condensation)
Storage Temperature: -20 to 40°C (-4 to 104°F)*
Humidity: 5 to 85% RH (without condensation)
* You can store for one month at 40°C (104°F).
Environmental Specifications for Ink Bottles
Storage Temperature -20 to 40 °C (-4 to 104 °F)*
User's Guide
Appendix
222
Freezing Temperature -15 °C (5 °F)
Ink thaws and is usable after approximately 2 hours at 25 °C (77 °F).
* You can store for one month at 40 °C (104 °F).
System Requirements❏ Windows 10 (32-bit, 64-bit)/Windows 8.1 (32-bit, 64-bit)/Windows 8 (32-bit, 64-bit)/Windows 7 (32-bit, 64-
bit)/Windows Vista (32-bit, 64-bit)/Windows XP SP3 or later (32-bit)/Windows XP Professional x64 Edition/Windows Server 2016/Windows Server 2012 R2/Windows Server 2012/Windows Server 2008 R2/WindowsServer 2008/Windows Server 2003 R2/Windows Server 2003 SP2 or later
❏ macOS Sierra/OS X El Capitan/OS X Yosemite/OS X Mavericks/OS X Mountain Lion/Mac OS X v10.7.x/MacOS X v10.6.8
Note:❏ Mac OS may not support some applications and features.
❏ The UNIX File System (UFS) for Mac OS is not supported.
Regulatory Information
Standards and Approvals
Standards and Approvals for U.S. Model
Safety UL60950-1
CAN/CSA-C22.2 No.60950-1
EMC FCC Part 15 Subpart B Class B
CAN/CSA-CEI/IEC CISPR 22 Class B
This equipment contains the following wireless module.
Manufacturer: Askey Computer Corporation
Type: WLU6117-D69 (RoHS)
This product conforms to Part 15 of the FCC Rules and RSS-210 of the IC Rules. Epson cannot acceptresponsibility for any failure to satisfy the protection requirements resulting from a non-recommendedmodification of the product. Operation is subject to the following two conditions: (1) this device may not causeharmful interference, and (2) this device must accept any interference received, including interference that maycause undesired operation of the device.
To prevent radio interference to the licensed service, this device is intended to be operated indoors and away fromwindows to provide maximum shielding. Equipment (or its transmit antenna) that is installed outdoors is subjectto licensing.
This equipment complies with FCC/IC radiation exposure limits set forth for an uncontrolled environment andmeets the FCC radio frequency (RF) Exposure Guidelines in Supplement C to OET65 and RSS-102 of the IC radio
User's Guide
Appendix
223
frequency (RF) Exposure rules. This equipment should be installed and operated so that the radiator is kept at least7.9 inches (20 cm) or more away from a person's body (excluding extremities: hands, wrists, feet and ankles).
Standards and Approvals for European Model
For European users
Hereby, Seiko Epson Corporation declares that the following radio equipment model is in compliance withDirective 2014/53/EU. The full text of the EU declaration of conformity is available at the following website.
http://www.epson.eu/conformity
C441D
For use only in Ireland, UK, Austria, Germany, Liechtenstein, Switzerland, France, Belgium, Luxemburg,Netherlands, Italy, Portugal, Spain, Denmark, Finland, Norway, Sweden, Iceland, Croatia, Cyprus, Greece,Slovenia, Malta, Bulgaria, Czech, Estonia, Hungary, Latvia, Lithuania, Poland, Romania, and Slovakia.
Epson cannot accept responsibility for any failure to satisfy the protection requirements resulting from a non-recommended modification of the products.
Standards and Approvals for Australian Model
EMC AS/NZS CISPR32 Class B
Epson hereby declares that the following equipment Models are in compliance with the essential requirements andother relevant provisions of AS/NZS4268:
C441D
Epson cannot accept responsibility for any failure to satisfy the protection requirements resulting from a non-recommended modification of the products.
Restrictions on CopyingObserve the following restrictions to ensure the responsible and legal use of the printer.
Copying of the following items is prohibited by law:
❏ Bank bills, coins, government-issued marketable securities, government bond securities, and municipalsecurities
❏ Unused postage stamps, pre-stamped postcards, and other official postal items bearing valid postage
❏ Government-issued revenue stamps, and securities issued according to legal procedure
Exercise caution when copying the following items:
❏ Private marketable securities (stock certificates, negotiable notes, checks, etc.), monthly passes, concessiontickets, etc.
❏ Passports, driver’s licenses, warrants of fitness, road passes, food stamps, tickets, etc.
Note:Copying these items may also be prohibited by law.
User's Guide
Appendix
224
Responsible use of copyrighted materials:
Printers can be misused by improperly copying copyrighted materials. Unless acting on the advice of aknowledgeable attorney, be responsible and respectful by obtaining the permission of the copyright holder beforecopying published material.
Transporting the PrinterWhen you need to transport the printer to move or for repairs, follow the steps below to pack the printer.
!Caution:
❏ Be careful not to trap your hand or fingers when opening or closing the scanner unit. Otherwise you may beinjured.
❏ When carrying the printer, lift it using a stable position. Lifting the printer using an unstable position may resultin injury.
❏ Because this printer is heavy, it should always be carried by two or more people when unpacking andtransporting.
❏ When lifting the printer, place your hands in the positions shown below. If you lift the printer holding otherpositions, the printer may fall or you may trap your fingers when placing the printer.
❏ When carrying the printer, do not tilt it more than 10 degrees; otherwise the printer may fall.
User's Guide
Appendix
225
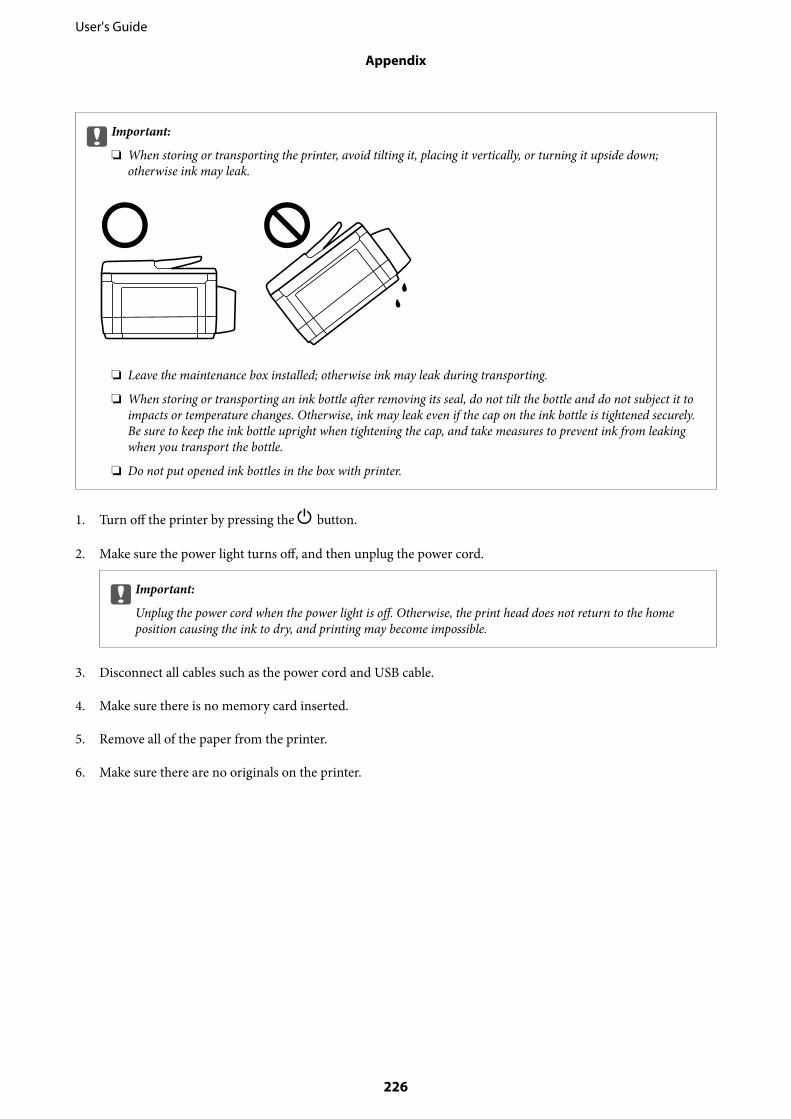
cImportant:
❏ When storing or transporting the printer, avoid tilting it, placing it vertically, or turning it upside down;otherwise ink may leak.
❏ Leave the maintenance box installed; otherwise ink may leak during transporting.
❏ When storing or transporting an ink bottle after removing its seal, do not tilt the bottle and do not subject it toimpacts or temperature changes. Otherwise, ink may leak even if the cap on the ink bottle is tightened securely.Be sure to keep the ink bottle upright when tightening the cap, and take measures to prevent ink from leakingwhen you transport the bottle.
❏ Do not put opened ink bottles in the box with printer.
1. Turn off the printer by pressing the P button.
2. Make sure the power light turns off, and then unplug the power cord.
cImportant:
Unplug the power cord when the power light is off. Otherwise, the print head does not return to the homeposition causing the ink to dry, and printing may become impossible.
3. Disconnect all cables such as the power cord and USB cable.
4. Make sure there is no memory card inserted.
5. Remove all of the paper from the printer.
6. Make sure there are no originals on the printer.
User's Guide
Appendix
226
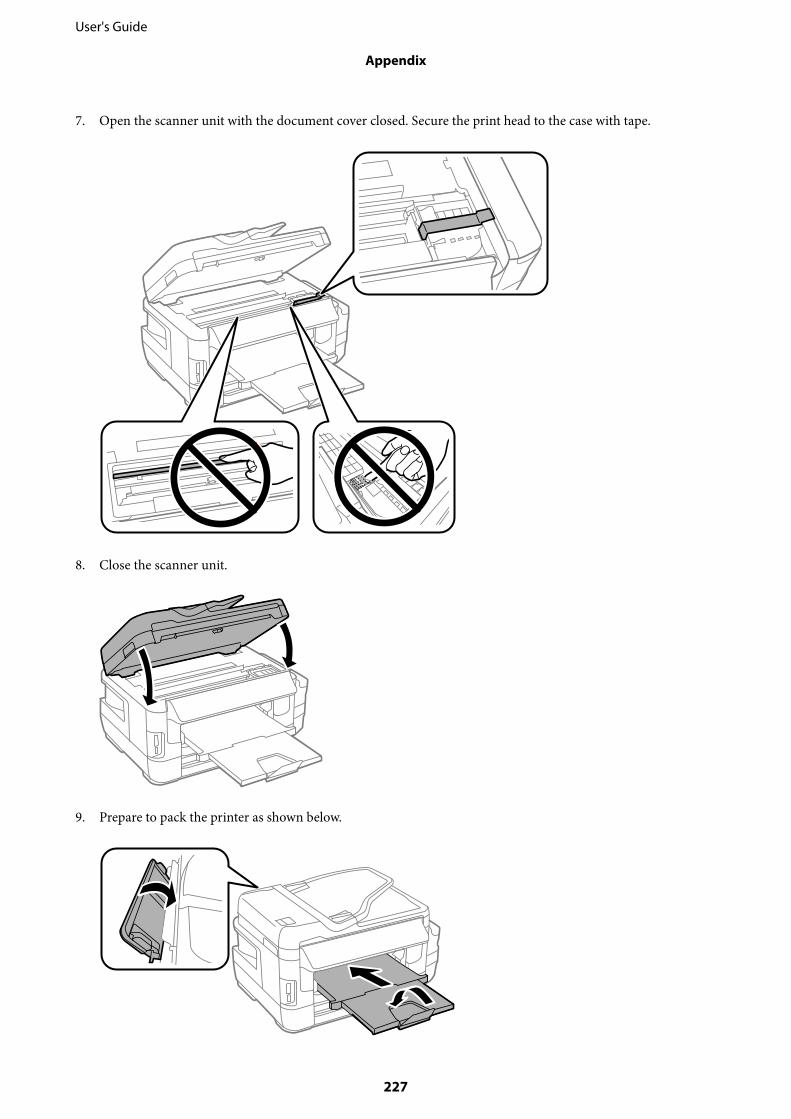
7. Open the scanner unit with the document cover closed. Secure the print head to the case with tape.
8. Close the scanner unit.
9. Prepare to pack the printer as shown below.
User's Guide
Appendix
227
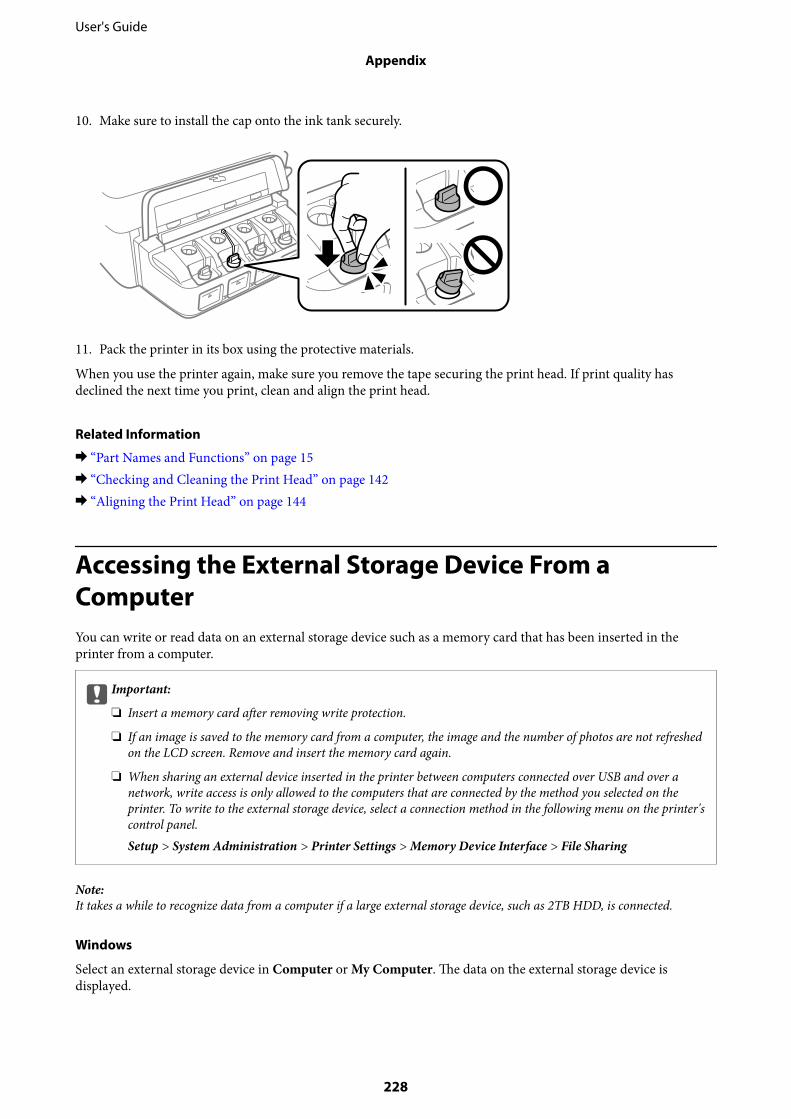
10. Make sure to install the cap onto the ink tank securely.
11. Pack the printer in its box using the protective materials.
When you use the printer again, make sure you remove the tape securing the print head. If print quality hasdeclined the next time you print, clean and align the print head.
Related Information
& “Part Names and Functions” on page 15& “Checking and Cleaning the Print Head” on page 142& “Aligning the Print Head” on page 144
Accessing the External Storage Device From aComputerYou can write or read data on an external storage device such as a memory card that has been inserted in theprinter from a computer.
cImportant:
❏ Insert a memory card after removing write protection.
❏ If an image is saved to the memory card from a computer, the image and the number of photos are not refreshedon the LCD screen. Remove and insert the memory card again.
❏ When sharing an external device inserted in the printer between computers connected over USB and over anetwork, write access is only allowed to the computers that are connected by the method you selected on theprinter. To write to the external storage device, select a connection method in the following menu on the printer'scontrol panel.Setup > System Administration > Printer Settings > Memory Device Interface > File Sharing
Note:It takes a while to recognize data from a computer if a large external storage device, such as 2TB HDD, is connected.
Windows
Select an external storage device in Computer or My Computer. The data on the external storage device isdisplayed.
User's Guide
Appendix
228
Note:If you connected the printer to the network without the software disc or Web Installer, map a memory card slot or USB portas a network drive. Open Run and enter a printer name \\XXXXX or a printer's IP address \\XXX.XXX.XXX.XXX toOpen:. Right-click a device icon displayed to assign the network. The network drive appears in Computer or My Computer.
Mac OS
Select a corresponding device icon. The data on the external storage device is displayed.
Note:❏ To remove an external storage device, drag and drop the device icon to the trash icon. Otherwise, data in the shared drive
may not be displayed correctly when another external storage device is inserted.
❏ To access an external storage device through the network, select Go > Connect to Server from the menu on the desktop.Enter a printer name cifs://XXXXX or smb://XXXXX (Where "xxxxx" is the printer name) in the Server Address, andthen click Connect.
Related Information
& “Advisories and Warnings for Using Memory Cards” on page 14& “Inserting a Memory Card” on page 58& “External Storage Device Specifications” on page 220
Using an Email ServerTo use email features, such as scan or fax forwarding features, you need to configure the email server.
Configuring an Email ServerCheck the following before configuring the email server.
❏ The printer is connected to the network.
❏ The email server information, such as the documents from your service provider that you used to setup theemail on your computer.
Note:If you use a free email service, such as Internet email, search the Internet to get the email server information you need.
1. Enter Setup from the home screen.
2. Select System Administration > Wi-Fi/Network Settings > Advanced Setup.
3. Select Email Server > Server Settings.
User's Guide
Appendix
229
4. Select the authentication method of the email server you are using.
cImportant:
The following authentication methods are available. SSL and STARTTLS are not supported.
❏ None
❏ SMTP (SMTP AUTH)
❏ POP Before SMTP
Contact your internet service provider to confirm the authentication method of the email server.
The printer may not be able to communicate with an email server even if the authentication method isavailable since security may be enhanced (for example SSL communication is necessary). Visit the Epsonsupport website for the latest information.
http://www.epson.eu/Support (Europe)
http://support.epson.net/ (outside Europe)
5. Make the appropriate settings.
The necessary settings vary depending on the authentication method. Enter the information for the emailserver you are using.
6. Press OK.
Note:❏ If an error message is displayed, check if the email server settings are correct.
❏ When you cannot send an email even if you have completed the settings, check the authentication method for theemail server you are using.
Related Information
& “Email Server Setting Items” on page 230
Email Server Setting Items
Items Explanations
Authentication Method Displays the selected authentication method.
Authenticated Account If you select SMTP-AUTH or POP before SMTP as the Au-thentication Method, enter the user name (email address)registered to the email server within 30 characters or less.
Authenticated Password If you select SMTP-AUTH or POP before SMTP as the Au-thentication Method, enter the password of the authenti-cated account within 20 characters or less.
Sender's Email Address Specify the email address that the printer uses to sendemails. You can specify the existing email address. To make itclear that the email is being sent from the printer, you canacquire an address specifically for the printer and enter ithere.
SMTP Server Address Enter the server address of the server that sends the email(SMTP server).
User's Guide
Appendix
230
Items Explanations
SMTP Server Port Number Enter the port number of the server that sends the email(SMTP server).
POP3 Server Address If you select POP before SMTP as the AuthenticationMethod, enter the server address of the server that receivesthe email (POP3 server).
POP3 Server Port Number If you select POP before SMTP as the AuthenticationMethod, enter the port number of the email server that re-ceives the email (POP3 server).
Checking an Email Server Connection
1. Enter Setup from the home screen.
2. Select System Administration > Wi-Fi/Network Settings > Advanced Setup.
3. Select Email Server > Connection Check to check that the printer is connected to the email server.
Note:❏ If an error message is displayed, check if the email server settings are correct.
❏ When you cannot send an email even if the connection check succeeds, check the authentication method for theemail server you are using.
Where to Get Help
Technical Support Web SiteIf you need further help, visit the Epson support website shown below. Select your country or region and go to thesupport section of your local Epson website. The latest drivers, FAQs, manuals, or other downloadables are alsoavailable from the site.
http://support.epson.net/
http://www.epson.eu/Support (Europe)
If your Epson product is not operating properly and you cannot solve the problem, contact Epson support servicesfor assistance.
Contacting Epson Support
Before Contacting Epson
If your Epson product is not operating properly and you cannot solve the problem using the troubleshootinginformation in your product manuals, contact Epson support services for assistance. If Epson support for your areais not listed below, contact the dealer where you purchased your product.
Epson support will be able to help you much more quickly if you give them the following information:
User's Guide
Appendix
231
❏ Product serial number(The serial number label is usually on the back of the product.)
❏ Product model
❏ Product software version(Click About, Version Info, or a similar button in the product software.)
❏ Brand and model of your computer
❏ Your computer operating system name and version
❏ Names and versions of the software applications you normally use with your product
Note:Depending on the product, the dial list data for fax and/or network settings may be stored in the product’s memory. Due tobreakdown or repair of a product, data and/or settings may be lost. Epson shall not be responsible for the loss of any data, forbacking up or recovering data and/or settings even during a warranty period. We recommend that you make your ownbackup data or take notes.
Help for Users in Europe
Check your Pan-European Warranty Document for information on how to contact Epson support.
Help for Users in Taiwan
Contacts for information, support, and services are:
World Wide Web
http://www.epson.com.tw
Information on product specifications, drivers for download, and products enquiry are available.
Epson HelpDesk
Phone: +886-2-80242008
Our HelpDesk team can help you with the following over the phone:
❏ Sales enquiries and product information
❏ Product usage questions or problems
❏ Enquiries on repair service and warranty
Repair service center:
http://www.tekcare.com.tw/branchMap.page
TekCare corporation is an authorized service center for Epson Taiwan Technology & Trading Ltd.
Help for Users in Australia
Epson Australia wishes to provide you with a high level of customer service. In addition to your product manuals,we provide the following sources for obtaining information:
User's Guide
Appendix
232
Internet URL
http://www.epson.com.au
Access the Epson Australia World Wide Web pages. Worth taking your modem here for the occasional surf! Thesite provides a download area for drivers, Epson contact points, new product information and technical support (e-mail).
Epson Helpdesk
Phone: 1300-361-054
Epson Helpdesk is provided as a final backup to make sure our clients have access to advice. Operators on theHelpdesk can aid you in installing, configuring and operating your Epson product. Our Pre-sales Helpdesk staffcan provide literature on new Epson products and advise where the nearest dealer or service agent is located. Manytypes of queries are answered here.
We encourage you to have all the relevant information on hand when you ring. The more information you prepare,the faster we can help solve the problem. This information includes your Epson product manuals, type ofcomputer, operating system, application programs, and any information you feel is required.
Transportation of Product
Epson recommends retaining product packaging for future transportation. Securing the ink tank with tape andkeeping the product upright is also recommended.
Help for Users in New Zealand
Epson New Zealand wishes to provide you with a high level of customer service. In addition to your productdocumentation, we provide the following sources for obtaining information:
Internet URL
http://www.epson.co.nz
Access the Epson New Zealand World Wide Web pages. Worth taking your modem here for the occasional surf!The site provides a download area for drivers, Epson contact points, new product information and technicalsupport (e-mail).
Epson Helpdesk
Phone: 0800 237 766
Epson Helpdesk is provided as a final backup to make sure our clients have access to advice. Operators on theHelpdesk can aid you in installing, configuring and operating your Epson product. Our Pre-sales Helpdesk staffcan provide literature on new Epson products and advise where the nearest dealer or service agent is located. Manytypes of queries are answered here.
We encourage you to have all the relevant information on hand when you ring. The more information you prepare,the faster we can help solve the problem. This information includes your Epson product documentation, type ofcomputer, operating system, application programs, and any information you feel is required.
Transportation of Product
Epson recommends retaining product packaging for future transportation. Securing the ink tank with tape andkeeping the product upright is also recommended.
User's Guide
Appendix
233
Help for Users in Singapore
Sources of information, support, and services available from Epson Singapore are:
World Wide Web
http://www.epson.com.sg
Information on product specifications, drivers for download, Frequently Asked Questions (FAQ), Sales Enquiries,and Technical Support via e-mail are available.
Epson HelpDesk
Toll Free: 800-120-5564
Our HelpDesk team can help you with the following over the phone:
❏ Sales enquiries and product information
❏ Product usage questions or problem troubleshooting
❏ Enquiries on repair service and warranty
Help for Users in Thailand
Contacts for information, support, and services are:
World Wide Web
http://www.epson.co.th
Information on product specifications, drivers for download, Frequently Asked Questions (FAQ), and e-mail areavailable.
Epson Hotline
Phone: 66-2685-9899
Email: [email protected]
Our Hotline team can help you with the following over the phone:
❏ Sales enquiries and product information
❏ Product usage questions or problems
❏ Enquiries on repair service and warranty
Help for Users in Vietnam
Contacts for information, support, and services are:
Epson Hotline
Phone(Ho Chi Minh City): 84-8-823-9239
Phone(Hanoi City): 84-4-3978-4785, 84-4-3978-4775
User's Guide
Appendix
234
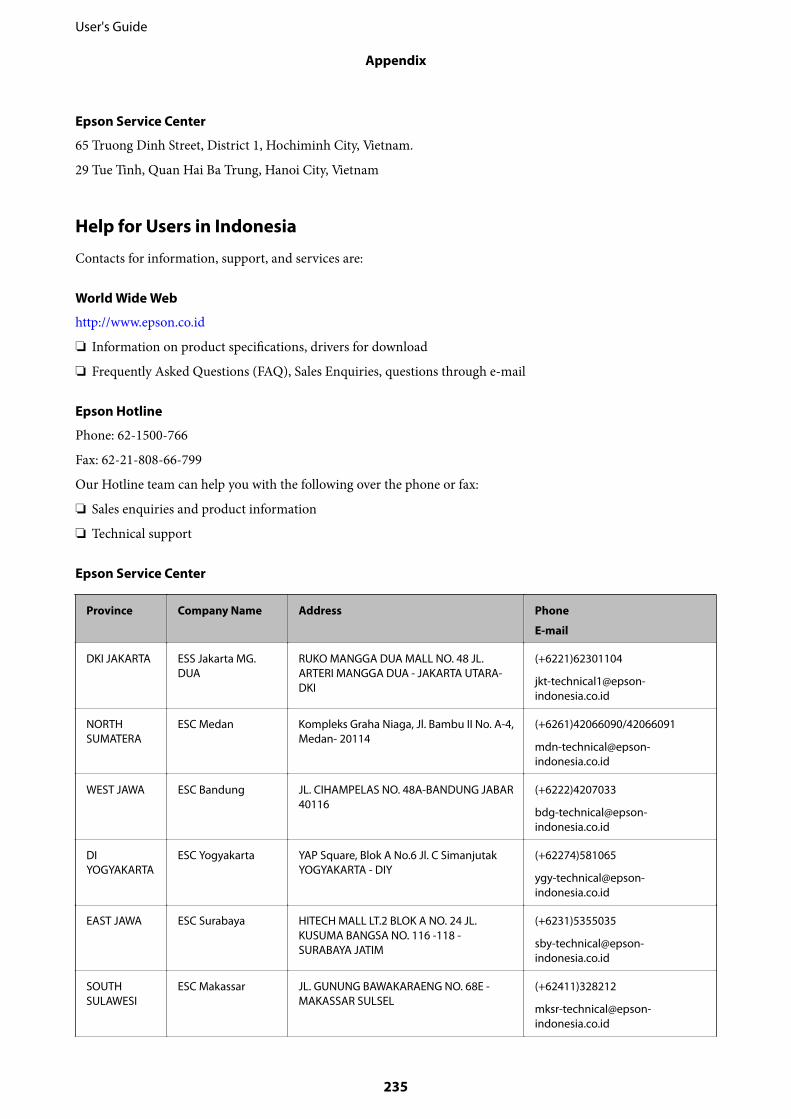
Epson Service Center
65 Truong Dinh Street, District 1, Hochiminh City, Vietnam.
29 Tue Tinh, Quan Hai Ba Trung, Hanoi City, Vietnam
Help for Users in Indonesia
Contacts for information, support, and services are:
World Wide Web
http://www.epson.co.id
❏ Information on product specifications, drivers for download
❏ Frequently Asked Questions (FAQ), Sales Enquiries, questions through e-mail
Epson Hotline
Phone: 62-1500-766
Fax: 62-21-808-66-799
Our Hotline team can help you with the following over the phone or fax:
❏ Sales enquiries and product information
❏ Technical support
Epson Service Center
Province Company Name Address Phone
DKI JAKARTA ESS Jakarta MG.DUA
RUKO MANGGA DUA MALL NO. 48 JL.ARTERI MANGGA DUA - JAKARTA UTARA-DKI
(+6221)62301104
NORTHSUMATERA
ESC Medan Kompleks Graha Niaga, Jl. Bambu II No. A-4,Medan- 20114
(+6261)42066090/42066091
WEST JAWA ESC Bandung JL. CIHAMPELAS NO. 48A-BANDUNG JABAR40116
(+6222)4207033
DIYOGYAKARTA
ESC Yogyakarta YAP Square, Blok A No.6 Jl. C SimanjutakYOGYAKARTA - DIY
(+62274)581065
EAST JAWA ESC Surabaya HITECH MALL LT.2 BLOK A NO. 24 JL.KUSUMA BANGSA NO. 116 -118 -SURABAYA JATIM
(+6231)5355035
SOUTHSULAWESI
ESC Makassar JL. GUNUNG BAWAKARAENG NO. 68E -MAKASSAR SULSEL
(+62411)328212
User's Guide
Appendix
235
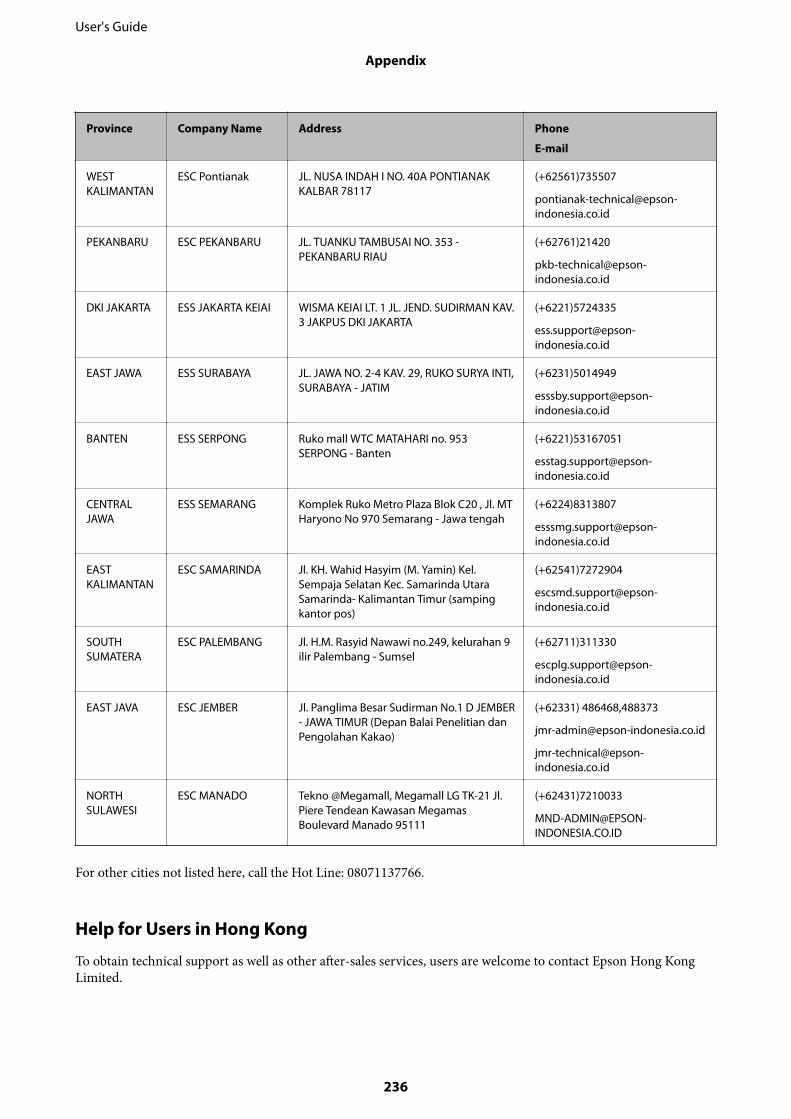
Province Company Name Address Phone
WESTKALIMANTAN
ESC Pontianak JL. NUSA INDAH I NO. 40A PONTIANAKKALBAR 78117
(+62561)735507
PEKANBARU ESC PEKANBARU JL. TUANKU TAMBUSAI NO. 353 -PEKANBARU RIAU
(+62761)21420
DKI JAKARTA ESS JAKARTA KEIAI WISMA KEIAI LT. 1 JL. JEND. SUDIRMAN KAV.3 JAKPUS DKI JAKARTA
(+6221)5724335
EAST JAWA ESS SURABAYA JL. JAWA NO. 2-4 KAV. 29, RUKO SURYA INTI,SURABAYA - JATIM
(+6231)5014949
BANTEN ESS SERPONG Ruko mall WTC MATAHARI no. 953SERPONG - Banten
(+6221)53167051
CENTRALJAWA
ESS SEMARANG Komplek Ruko Metro Plaza Blok C20 , Jl. MTHaryono No 970 Semarang - Jawa tengah
(+6224)8313807
EASTKALIMANTAN
ESC SAMARINDA Jl. KH. Wahid Hasyim (M. Yamin) Kel.Sempaja Selatan Kec. Samarinda UtaraSamarinda- Kalimantan Timur (sampingkantor pos)
(+62541)7272904
SOUTHSUMATERA
ESC PALEMBANG Jl. H.M. Rasyid Nawawi no.249, kelurahan 9ilir Palembang - Sumsel
(+62711)311330
EAST JAVA ESC JEMBER Jl. Panglima Besar Sudirman No.1 D JEMBER- JAWA TIMUR (Depan Balai Penelitian danPengolahan Kakao)
(+62331) 486468,488373
NORTHSULAWESI
ESC MANADO Tekno @Megamall, Megamall LG TK-21 Jl.Piere Tendean Kawasan MegamasBoulevard Manado 95111
(+62431)7210033
For other cities not listed here, call the Hot Line: 08071137766.
Help for Users in Hong Kong
To obtain technical support as well as other after-sales services, users are welcome to contact Epson Hong KongLimited.
User's Guide
Appendix
236
Internet Home Page
http://www.epson.com.hk
Epson Hong Kong has established a local home page in both Chinese and English on the Internet to provide userswith the following information:
❏ Product information
❏ Answers to Frequently Asked Questions (FAQs)
❏ Latest versions of Epson product drivers
Technical Support Hotline
You can also contact our technical staff at the following telephone and fax numbers:
Phone: 852-2827-8911
Fax: 852-2827-4383
Help for Users in Malaysia
Contacts for information, support, and services are:
World Wide Web
http://www.epson.com.my
❏ Information on product specifications, drivers for download
❏ Frequently Asked Questions (FAQ), Sales Enquiries, questions through e-mail
Epson Call Centre
Phone: +60 1800-8-17349
❏ Sales enquiries and product information
❏ Product usage questions or problems
❏ Enquiries on repair services and warranty
Head Office
Phone: 603-56288288
Fax: 603-5628 8388/603-5621 2088
Help for Users in India
Contacts for information, support, and services are:
World Wide Web
http://www.epson.co.in
Information on product specifications, drivers for download, and products enquiry are available.
User's Guide
Appendix
237
Helpline
❏ Service, product information, and ordering consumables (BSNL Lines)Toll-free number: 18004250011Accessible 9am to 6pm, Monday through Saturday (Except public holidays)
❏ Service (CDMA & Mobile Users)Toll-free number: 186030001600Accessible 9am to 6pm, Monday through Saturday (Except public holidays)
Help for Users in the Philippines
To obtain technical support as well as other after sales services, users are welcome to contact the Epson PhilippinesCorporation at the telephone, fax numbers and e-mail address below:
World Wide Web
http://www.epson.com.ph
Information on product specifications, drivers for download, Frequently Asked Questions (FAQ), and E-mailEnquiries are available.
Epson Philippines Customer Care
Toll Free: (PLDT) 1-800-1069-37766
Toll Free: (Digital) 1-800-3-0037766
Metro Manila: (+632)441-9030
Web Site: https://www.epson.com.ph/contact
E-mail: [email protected]
Accessible 9am to 6pm, Monday through Saturday (Except public holidays)
Our Customer Care team can help you with the following over the phone:
❏ Sales enquiries and product information
❏ Product usage questions or problems
❏ Enquiries on repair service and warranty
Epson Philippines Corporation
Trunk Line: +632-706-2609
Fax: +632-706-2663
User's Guide
Appendix
238