user’s guide - cnet contentcdn.cnetcontent.com/0b/be/0bbe8437-a4f0-4ef3-bb93-c6344c20d5c5.pdf ·...
TRANSCRIPT
Dell™ PowerEdge™ Diagnostics
Version 2.7
User’s Guide
w w w . d e l l . c o m | s u p p o r t . d e l l . c o m
Notes and Notices NOTE: A NOTE indicates important information that helps you make better use of your computer.
NOTICE: A NOTICE indicates either potential damage to hardware or loss of data and tells you how to avoid the problem.
____________________
Information in this document is subject to change without notice.© 2006 Dell Inc. All rights reserved.
Reproduction in any manner whatsoever without the written permission of Dell Inc. is strictly forbidden.
Trademarks used in this text: Dell, the DELL logo, PowerEdge, PowerVault, and Dell OpenManage are trademarks of Dell Inc.; Microsoft and Windows are registered trademarks and Windows Server is a trademark of Microsoft Corporation; Intel is a registered trademark of Intel Corporation; Red Hat is a registered trademark of Red Hat, Inc. SUSE is a registered trademark of Novell, Inc.
Other trademarks and trade names may be used in this document to refer to either the entities claiming the marks and names or their products. Dell Inc. disclaims any proprietary interest in trademarks and trade names other than its own.
May 2006

Contents
1 Introduction . . . . . . . . . . . . . . . . . . . . . . . . . . . . . . . . . 5
Supported Operating Systems . . . . . . . . . . . . . . . . . . . . . . . . . . . 5
Devices Supported by PowerEdge Diagnostics . . . . . . . . . . . . . . . . . . 5
Diagnostics Features. . . . . . . . . . . . . . . . . . . . . . . . . . . . . . . . 6
2 Setting up Dell PowerEdge Diagnostics . . . . . . . . . . . . . . 9
Before You Begin. . . . . . . . . . . . . . . . . . . . . . . . . . . . . . . . . . 9
Things to Remember . . . . . . . . . . . . . . . . . . . . . . . . . . . . . . . . 9
Setup and Diagnostic Requirements . . . . . . . . . . . . . . . . . . . . . . 10
Managed System Requirements . . . . . . . . . . . . . . . . . . . . . . 10
Diagnostic Requirements . . . . . . . . . . . . . . . . . . . . . . . . . . 10
Setting Up Diagnostics. . . . . . . . . . . . . . . . . . . . . . . . . . . . . . 12
Installing PowerEdge Diagnostics on Microsoft Windows . . . . . . . . 12
Installing PowerEdge Diagnostics on Linux . . . . . . . . . . . . . . . . 13
3 Using Dell PowerEdge Diagnostics . . . . . . . . . . . . . . . . . 15
The GUI . . . . . . . . . . . . . . . . . . . . . . . . . . . . . . . . . . . . . . 15
Menu Options . . . . . . . . . . . . . . . . . . . . . . . . . . . . . . . . 15
Diagnostics Interface . . . . . . . . . . . . . . . . . . . . . . . . . . . . 16
Diagnostic Selection . . . . . . . . . . . . . . . . . . . . . . . . . . . . 16
Diagnostic Information . . . . . . . . . . . . . . . . . . . . . . . . . . . 18
The Command Line Interface . . . . . . . . . . . . . . . . . . . . . . . . . . 21
Primary CLI Commands . . . . . . . . . . . . . . . . . . . . . . . . . . . 21
Aborting PowerEdge Diagnostics in CLI Mode Using <Ctrl><c> . . . . . . 22
Scripting With the CLI. . . . . . . . . . . . . . . . . . . . . . . . . . . . 22
4 Running Dell PowerEdge Diagnostics in GUI Mode . . . . . . 25
Running Diagnostic Tests . . . . . . . . . . . . . . . . . . . . . . . . . . . . 25
Contents 3

Configuring the Test Execution Settings . . . . . . . . . . . . . . . . . . 26
5 Supported Devices . . . . . . . . . . . . . . . . . . . . . . . . . . . . 29
Diagnostics for Tape Drives, Autoloaders, and Libraries . . . . . . . . . . . . 29
Diagnostics for RAID Controllers, SAS Controllers, SCSI Controllers,
and Attached Hard Drives . . . . . . . . . . . . . . . . . . . . . . . . . . . . 30
6 Diagnostic Dependencies for Supported RAID Controllers. 33
Overview . . . . . . . . . . . . . . . . . . . . . . . . . . . . . . . . . . . . . 33
PERC 320/DC . . . . . . . . . . . . . . . . . . . . . . . . . . . . . . . . . . . 33
PERC 3/SC, 3/DC and 3/QC . . . . . . . . . . . . . . . . . . . . . . . . . . . . 34
PERC 3/Di . . . . . . . . . . . . . . . . . . . . . . . . . . . . . . . . . . . . . 34
PERC 4/SC . . . . . . . . . . . . . . . . . . . . . . . . . . . . . . . . . . . . 34
PERC 4/DC . . . . . . . . . . . . . . . . . . . . . . . . . . . . . . . . . . . . 35
PERC 4e/Di . . . . . . . . . . . . . . . . . . . . . . . . . . . . . . . . . . . . 35
PERC 4e/DC . . . . . . . . . . . . . . . . . . . . . . . . . . . . . . . . . . . . 35
PERC 4e/Si . . . . . . . . . . . . . . . . . . . . . . . . . . . . . . . . . . . . 36
PERC 4/IM . . . . . . . . . . . . . . . . . . . . . . . . . . . . . . . . . . . . 36
PERC 4/Di . . . . . . . . . . . . . . . . . . . . . . . . . . . . . . . . . . . . . 36
PERC 5/E, PERC 5/i Integrated, and PERC 5/i Adapter . . . . . . . . . . . . . . 37
CERC SATA 1.5/6 Channel . . . . . . . . . . . . . . . . . . . . . . . . . . . . 37
CERC ATA 100 4/CH . . . . . . . . . . . . . . . . . . . . . . . . . . . . . . . . 37
CERC SATA 1.5/2S . . . . . . . . . . . . . . . . . . . . . . . . . . . . . . . . 38
SAS 5/iR (Adapter and Integrated), SAS 5i Integrated . . . . . . . . . . . . . 38
SAS 5/E Adapter . . . . . . . . . . . . . . . . . . . . . . . . . . . . . . . . . 38
A Appendix A . . . . . . . . . . . . . . . . . . . . . . . . . . . . . . . . . . 39
4 Contents
IntroductionDell™ PowerEdge™ Diagnostics is a suite of diagnostic programs, or test modules, that run on your system. These include diagnostic tests on chassis and storage components such as hard drives, physical memory, communications and printer ports, NICs, CMOS, and more. You can use the graphical user interface (GUI) or the command line interface (CLI) to run diagnostic tests on the hardware that PowerEdge Diagnostics discovers on your system.
Supported Operating Systems• Microsoft® Windows Server™ 2003 x64 R2 and SP1, Standard and Enterprise editions
• Windows Server 2003 SP1 Web Edition
• Windows Storage Server 2003 R2 for Intel® Extended Memory 64 Technology (Intel EM64T) Express, Standard, Workgroup, and Enterprise editions
• Windows Server 2003 SBS R2 and SP1
• Windows 2000 Server and Advanced Server with SP 4
• Red Hat® Enterprise Linux AS ES, WS (version 3) update 6, for Intel x86 and Intel EM64T
• Red Hat Enterprise Linux AS, ES, WS (version 4) Gold, for Intel x86 and Intel EM64T
• SUSE® Linux Enterprise Server 9 (SP3) for Intel EM64T
• SUSE Linux Enterprise Server 10 Gold for Intel EM64T
Devices Supported by PowerEdge DiagnosticsPowerEdge Diagnostics provides diagnostics for the following Dell-supplied hardware devices:
• CD drives
• DVD drives
• CD-RW/DVD combination drives
• Diskette drives
• NICs
• Modems
• SCSI controllers
• RAID controllers (See "Diagnostics for RAID Controllers, SAS Controllers, SCSI Controllers, and Attached Hard Drives")
Introduction 5
• Hard drives
• CMOS
• Parallel ports
• Serial ports
• PCI buses
• Dell Remote Access Cards (DRAC 4 and DRAC 5)
• USB controllers
• Tape drives (See "Diagnostics for Tape Drives, Autoloaders, and Libraries")
• Tape autoloaders and libraries (See "Diagnostics for Tape Drives, Autoloaders, and Libraries")
• Memory DIMMs
• SAS controllers
NOTE: Broadcom NIC tests are not supported in this release of PowerEdge Diagnostics.
Diagnostics FeaturesIn addition to the testable devices listed in the section, "Devices Supported by PowerEdge Diagnostics," PowerEdge Diagnostics offers the following features:
• Discovering Devices
This feature enables you to enumerate/discover all testable devices on your system. Enumeration occurs when the application is launched. If your system hardware has changed, restart the application to re-enumerate the devices on the system.
• Device and Test Selection
This feature enables you to select the devices on which you want to run diagnostic tests and the tests you want to run. See "Running Diagnostic Tests".
• Diagnostic Test Review
This feature enables you to review the selected diagnostic tests that you want to run. See "Running Diagnostic Tests."
• Diagnostic Test Status
This feature enables you to view the status of the diagnostic tests that are running. See "Running Diagnostic Tests."
6 Introduction

• Diagnostic Test Results
This feature enables you to view the results of the diagnostic tests performed. See "Running Diagnostic Tests."
• Help
This feature allows you to view the help information of the various diagnostic tests and devices. To view a description of a diagnostic and/or a diagnostic test, select the device/test and click the Help button in the GUI or run the pediags --help command in the CLI.
• Quick Test
This feature enables you to use a faster algorithm to conduct the test, if one is available for the specified test. See "Configuring the Test Execution Settings."
• Saving Configuration and Results
This feature enables you to save the system configuration and test results when seeking technical assistance. See "Using Dell PowerEdge Diagnostics."
• Number of Passes
This feature enables you to run the selected tests for a specified number of iterations. The minimum value is 1 and the maximum is 20.
NOTE: In the CLI mode, PowerEdge Diagnostics allows for a maximum number of 999 passes.
Introduction 7

8 Introduction
Setting up Dell PowerEdge DiagnosticsThis section describes the process for setting up Dell™ PowerEdge™ Diagnostics.
Before You Begin• Read the setup requirements and ensure that your system meets or exceeds the minimum
requirements.
• Read the PowerEdge Diagnostics readme file provided with this application. The readme contains the latest information about PowerEdge Diagnostics in addition to information about known issues.
Things to Remember• PowerEdge Diagnostics is engineered to diagnose hardware problems on individual systems.
PowerEdge Diagnostics does not address problems that arise at the network level, unless the problem resides with a NIC on a single system.
• The hard drive diagnostics are designed to run as low-priority background tasks to limit their effect on other hard drive I/O activity. Because of their low priority, it is recommended that you limit drive activity while running the hard drive diagnostics. The diagnostics may run slowly or even stop while other hard drive I/O activity is running simultaneously. The diagnostics resume when the hard drive I/O activity has decreased.
• PowerEdge Diagnostics runs concurrently with all other applications running on the system under test. When you run these diagnostics, the additional system load is significant and will impact the performance of your system and all running applications. If you are running critical applications that require rapid response or that consume significant system resources, take appropriate precautions before running these diagnostics. Close all nonessential applications and only run the diagnostics during nonpeak hours of system use.
• Running PowerEdge Diagnostics simultaneously with the Dell OpenManage™ Server Administrator Diagnostic Service is not supported.
Setting Up Diagnostics 9

Setup and Diagnostic RequirementsThe PowerEdge Diagnostics must be set up on each managed system to run diagnostics locally.
Managed System Requirements
• Your system must have a supported operating system installed. See "Supported Operating Systems."
• You must install Dell-qualified device drivers and firmware to run diagnostics on RAID controllers, RAID-attached hard drives, tape drives, tape autoloaders, and tape libraries. See the documentation that accompanied your device for more information, or access the latest drivers and firmware from the Dell Support website at support.dell.com. A list of the latest drivers and firmware versions for RAID Controllers can be found in the section "Diagnostic Dependencies for Supported RAID Controllers."
Diagnostic Requirements
• You must be logged in with Administrator privileges to run PowerEdge Diagnostics.
• Table 2-1 lists the devices and the dependencies that are required for each operating system to run the Diagnostic Service. If these device dependencies are not installed, the Diagnostic Service exhibits the default behavior described in the table.
Table 2-1. Device Dependencies
Device Operating System Dependency Default Behavior
Intel® NIC Microsoft® Windows® Intel PROSet Utility for Microsoft Device Manager or Intel PROSet management agent. You can access the Intel PROSet Utility for Microsoft Device Manager from either the Dell PowerEdge Service and Diagnostic Utilities CD or from the Dell Support website at support.dell.com.
Intel vendor network tests are not available.
Broadcom NIC Red Hat® EnterpriseLinux and SUSE® Linux Enterprise Server
Broadcom vendor network tests are not available.
NOTE: For systems that have a PCIe Intel Network Interface Controller (NIC), Intel PROSet Utility for Microsoft
Device Manager is required for the Intel network adapter diagnostics in Microsoft Windows. If you have a PCI-X Intel
NIC, you may install either the Intel PROSet for Microsoft Device Manager or the Intel PROSet management agent to
enable Intel network adapter diagnostics. If you have any other Dell-supported Intel NIC, you should install the Intel
PROSet management agent. If these requirements are not met, the Intel vendor tests will not be available (only the
default network diagnostics are available).
10 Setting Up Diagnostics

NOTE: Memory diagnostics are not supported on the following PowerEdge systems as they do not support IPMI:
SC420, SC430, SC440, SC1420, and SC1430.
NOTE: If Dell OpenManage Server Administrator is not installed, Memory diagnostics are not supported and the
status of the Memory device will not be displayed on the following PowerEdge models: PE600, PE650, PE1600,
PE1650, PE1655MC, PE2600, PE2650,PE4600, PE6600, PE6650, PE700, PE750, and PE1750.
Adaptec RAID Controllers on PowerEdge SC systems
Microsoft Windows RAID Storage Manager (RSM) version 1.0 or later
The diagnostic tests for the PERC320/DC RAID controller, hard drives attached to the PERC320/DC RAID controller, and hard drives attached to the SCSI39320 may not function properly or may not be available.
Adaptec RAID Controllers on all other PowerEdge systems
Microsoft Windows Dell OpenManage Array Manager version 3.6 or later or the Storage Management Service version 1.0 or later.
The diagnostic tests for hard drives attached to the Adaptec RAID controller may not function properly or may not be available.
DRAC 4 Microsoft Windows, SUSE Linux Enterprise Server, and Red Hat Enterprise Linux
Remote Access Controller component on Windows, Remote Access Core component on Linux
All tests will fail with an internal warning indicating that the drivers and services are not installed.
Dual In-line Memory Modules (DIMMs)
Red Hat Enterprise Linux and SUSE Linux Enterprise Server
Either Dell OpenManage systems management software or the Open Intelligent Platform Management Interface (OpenIPMI) driver. You can download the OpenIPMI driver component from the Dell Support website at support.dell.com.
If both the Dell OpenManage systems management software and the OpenIPMI driver are not available, the Memory Pattern Test will fail with a warning message stating that the Hardware Application Programming Interface is either not installed or has not started.
DRAC 5 Red Hat Enterprise Linux and SUSE Linux Enterprise Server
Open Intelligent Platform Management Interface (OpenIPMI) driver. You can download the OpenIPMI driver component from the Dell Support website at support.dell.com.
The DRAC 5 hardware will not be detected and the diagnostic tests will not be available.
Table 2-1. Device Dependencies (continued)
Device Operating System Dependency Default Behavior
Setting Up Diagnostics 11

Setting Up DiagnosticsThe files required to run PowerEdge Diagnostics for Microsoft Windows and Linux operating systems are available at the Dell Support website at support.dell.com and on the Dell PowerEdge Service and Diagnostic Utilities CD.
NOTE: Ensure that you accept the End-User License Agreement (EULA) while installing PowerEdge Diagnostics.
NOTE: Installation of Dell PowerEdge Diagnostics requires a minimum free space of 40 MB on your system drive
(C: on Windows or /opt on Linux).
Installing PowerEdge Diagnostics on Microsoft Windows
The following steps show how to install PowerEdge Diagnostics on systems running supported Microsoft Windows operating systems.
1 Double-click the .exe file to start the installer.
2 The Welcome to the Dell PowerEdge Diagnostics 2.7 Wizard screen opens.
3 Click Next.
4 The Software License Agreement is displayed.
5 Click I Agree to accept the terms of the agreement.
6 To accept the default directory path to install PowerEdge Diagnostics, click Install.
Otherwise, click Browse and navigate to the directory where you want to install PowerEdge Diagnostics, and then click Install.
7 Click Finish to exit the PowerEdge Diagnostics installation.
8 To launch PowerEdge Diagnostics, click the Start button. Point to Programs→PowerEdge Diagnostics 2.7 and select PowerEdge Diagnostics GUI to run in GUI mode or select PowerEdge Diagnostics CLI to run in CLI mode.
NOTE: The option to run PowerEdge Diagnostics from the Start-up menu will only be available to the Administrator
who installed the application. All other Administrators will need to use the StartDiags shortcut inside the
installation folder to run the application.
NOTE: To uninstall PowerEdge Diagnostics 2.7, select Start→Programs→PowerEdge Diagnostics 2.7→ Uninstall.
NOTE: Uninstallation of Dell PowerEdge Diagnostics requires a minimum free space of 40 KB on your system drive.
To run the application in CLI mode while using either Microsoft Windows and Linux, run the pediags program from <ExtractDir>/oldiags/bin, which should be the current working directory. Always run the pediags program from <ExtractDir>/oldiags/bin. Do not install and run the pediags program from a network-mapped drive. Some network-diagnostic tests disconnect the network and this can cause the pediags program to perform inconsistently.
12 Setting Up Diagnostics

Installing PowerEdge Diagnostics on Linux
The following steps show how to install PowerEdge Diagnostics on systems running supported Linux operating systems.
1 Extract the tar.gz file to a specified location. The extracted files contain an install script (install.sh) and the required installation packages.
2 Run install.sh to install these packages.
3 The Software License Agreement is displayed.
4 Enter Y to accept the terms of the agreement.
5 All of the files needed to run the application are extracted to the default install directory, /opt/dell/pediags.
6 In the pediags directory, run startDiags.sh to launch the application.
NOTE: This application should not be extracted and then copied to another directory to run. Running the
application on a read-only file system is also not supported.
PowerEdge Diagnostics requires that the compat-libstdc++ package be present in order to function. If your Linux operating system does not have this package, the PowerEdge Diagnostics installation will fail. If you are running a supported Red Hat Enterprise Linux operating system, you can find the compat-libstdc++ RPM package on one of the Red Hat Enterprise Linux operating system CDs.
NOTE: To uninstall the application, run uninstall.sh. This file is located in the install directory.
The PowerEdge Diagnostics GUI, which is a 32-bit application, does not function on Red Hat Enterprise Linux for Intel EM64T (RHEL EM64T) systems if Compatibility Arch Support packages are missing.
Your RHEL EM64T system may display the following message when you try launching PowerEdge Diagnostics:
Compatibility Arch Support package(s) [gtk, pango, and redhat-artwork] is not installed on this system. For details on installing the package(s) please refer to the README file.
To resolve the issue, perform the following actions:
1 Run the Red Hat Package Management Utility (redhat-config-packages).
2 Select the Compatibility Arch support check box in the Package Management window and click Details. A new window, Compatibility Arch Support Details, is displayed.
3 Select gtk, pango, and redhat-artwork packages for installation and click Close.
4 Click the Update button in the Package Management window.
NOTE: For Red Hat Enterprise Linux (version 3), ensure that update 4 is running before you install the Compatibility
Arch Support packages. You cannot upgrade to update 4 from update 2 with Compatibility Arch Support package(s)
[gtk, pango, and redhat-artwork] already installed.
NOTE: Running multiple instances of PowerEdge Diagnostics is not supported.
Setting Up Diagnostics 13

14 Setting Up Diagnostics

Using Dell PowerEdge DiagnosticsDell™ PowerEdge™ Diagnostics can be accessed in two ways: from an integrated graphical user interface (GUI) and from a CLI through the operating system. This section describes both interfaces.
The GUIWhen you launch PowerEdge Diagnostics in GUI mode, the Discovering Devices window indicates the progress of device-discovery, until enumeration is complete. Discovery or enumeration of the devices occurs only when the application is launched. If your system hardware has changed, restart the application to re-enumerate the devices on your system.
NOTE: Connecting or removing a USB or a CD/DVD device from a Red Hat® Enterprise Linux system or
SUSE® Linux Enterprise Server while the enumeration is in progress may cause the system to hang.
NOTE: If the system fails to discover USB controllers, ensure that the USB Controllers are enabled in the
BIOS and USB Controller support is set to "ON with BIOS support" in the BIOS Setup menu.
Menu Options
The File menu provides the following menu options:
• Exit: Use this option to exit the application. If you are running diagnostic tests, you are asked if you want to continue or exit the application.
• Save Configuration: Use this option to save the configuration details of the devices detected by PowerEdge Diagnostics. The configuration details are saved to an HTML file (config.html), which is contained in an archive file. You can specify any name for this archive file, for example, config.zip. This option is available only when PowerEdge Diagnostics are not running any tests. If you have any system or device problem, you can save the configuration details in the config.zip file and provide the file when contacting technical support.
To save the configuration details:
1 Click File→ Save Configuration or press <Ctrl><s>.
The Save Configuration HTML File to Archive dialog box is displayed.
2 Choose the location where you want to save the config.zip file and click Save.
3 A message box displays a message indicating success or failure to save the HTML file (config.html) to the archive file (config.zip). Click OK.
4 Extract the contents of config.zip to a selected directory and then open config.html.
Using Diagnostics 15

• Save Results: Use this option to save the test result details. The test result details are saved to an HTML file (results.html), which is contained in an archive file. You can specify any name for this archive file, for example, results.zip. This option can be used only when all the running tests have completed. When contacting technical support for any system or device problem, you can save the result details and send the result.zip file to technical support. To save the test results:
1 Click File→Save Results. Alternatively, press <Ctrl><r>.
The Save Result HTML File to Archive dialog box is displayed.
2 Choose the location where you want to save the archive file (results.zip), and click Save.
3 A message box displays a message that indicates success or failure to save the HTML file (results.html) to the archive file (results.zip). Click OK.
4 Extract the contents of results.zip to a selected directory and then open results.html.
• Auto Logging: PowerEdge Diagnostics saves the diagnostic test results, in XML format, in an auto-generated file (result.xml). The file is available in the <your-system-drive>\dell\diagnostics\log\ directory for Windows operating systems and in /var/log/dell/diagnostics/log for Linux operating systems. The default maximum log file size is 512 KB. PowerEdge Diagnostics removes the log entries in a First-In-First-Out (FIFO) fashion once the log file-size reaches the upper limit.
The Help menu provides the following menu options:
• User Guide: This options provides access to the Dell PowerEdge Diagnostics User Guide, which is available in the HTML format.
• About: This option provides the version information of Dell PowerEdge Diagnostics running on your system.
Diagnostics Interface
The PowerEdge Diagnostics GUI is divided into two sections:
• Diagnostic Selection
• Diagnostic Information
Diagnostic Selection
Use this section to select and organize how devices and tests are displayed.
16 Using Diagnostics

Selection Options
Use this list box to organize how tests and detected devices are displayed. You can select any of the three options from this list box.
The following table describes the icons in the Select Test(s) to Run window.
Select All: Click this button to select all the devices and tests displayed in the Select Test(s) to Run box.
Remove All: Click this button to remove all the selected devices and tests in the Select Test(s) to Run box.
Select Test(s) to Run
Use this section to select the devices and tests to be executed. The section is organized according to the option you selected in the Selection Options list box.
If the display is grouped by devices, you can do one of the following:
• Select the check box next to the device to select all the tests listed for the device.
• Expand the device node and select the tests to be executed.
If the display is grouped by tests, you can do one of the following:
• Select the check box next to the test to select all the devices listed for the test.
• Expand the test node and select the devices on which to run the tests.
NOTE: You can select a device in the Diagnostic Information section, and view its corresponding configuration
details highlighted in the Configuration tab.
Group by connection Use this option to organize the Select Test(s) to Run box display as a tree structure with the connection as the nodes and with the applicable devices and the tests listed under them.
Group by device Use this option to organize the Select Test(s) to Run box display as a tree structure with the devices as the nodes and the tests applicable to each device listed under them. If the device is grayed out, it implies that there are no tests available for the device. However, you can still view the configuration details of the device.
Group by tests Use this option to organize the Select Test(s) to Run box display as a tree structure with the tests as the nodes and the applicable devices listed under them.
Indicates a device.
Indicates a device with a noncritical error or warning associated.
Indicates a test.
Indicates a test with a noncritical error or warning associated. A test warning message is displayed on mouseover.
Using Diagnostics 17

Diagnostic Information
Use this section to view the system configuration and operational status information. In addition, you can run selected tests and view the results of these tests.
Configuration
Use this tab to view the operational status of the detected devices and their configuration details. To view the configuration details for a device, select the device from the Select Test(s) to Run section. The configuration details of the selected device are highlighted in this page.
The configuration details of the devices are listed under the following headings.
Device Name: The name of the device.
Device Attribute: Lists the device attributes. The following are the device attributes.
Value: Specifies a value against each attribute of a device.
Additional Hardware Information: Provides additional hardware information of a device, if available, under the Configuration tab. When additional hardware is available, the information icon appears next to the device name in the Configuration tab. Double-click the row to view additional hardware information for the device. See "Appendix A" for more information.
Tests Selected
Use this tab to run the tests you selected in the Select Test(s) to Run section. This tab contains the following sections.
Diagnostic Tests Selected: This list box displays all the tests selected in the Select Test(s) to Run box.
Status Specifies the operational status of the device.
Description Specifies a brief description.
Class Specifies the class to which the device belongs. For example, the device LPT1 belongs to the class Parallel Port.
Location Specifies the location of the device in the system. For example, system board.
Additional Information Specifies any additional information. For example, if the device is embedded on the system board, the value Embedded is displayed against this field.
18 Using Diagnostics

Diagnostic Options: Use this section of the Tests Selected tab to run the selected tests. This section contains the following controls.
NOTE: Double-click a test associated with a Noncritical icon to view the warning or informational message.
Status
Use this tab to view the status of the tests that are executing. Elapsed Time and Overall Progress appear as part of Status. Elapsed Time is shown in the format of hh:mm:ss and is the amount of time that elapsed, since the job group of tests started to run. Overall Progress is the cumulative progress of all the tests in the current job group.
The status of each test is displayed under the following column headings:
• Device: The device on which the test is running.
• Test: The test that is executing.
• Progress: Test progress indicated in percentage.
• Cur. Pass: Indicates the current pass that is running if you selected the Number of Passes option for the test.
• Total Pass: Indicates the total number of passes that you specified to run if you selected the Number of Passes option for the test.
• Status: Indicates the current status of a test. The following text indicators specify the test status.
Run Tests Starts the selected tests. You can run multiple tests at the same time.
Quick Test Uses a faster algorithm to conduct a specific test if one is available. If no errors are reported after running in Quick Test mode and you still believe the tested hardware has problems, it is recommended that you clear (deselect) Quick Test mode and run the same test again.
Number of Passes Specifies the number of iterations for the selected test. The minimum value is 1 and the maximum is 20.
Using Diagnostics 19

Result: Specifies the result of a test in the form of symbols. For example, the Status column of a test might show as Completed, but the Result column specifies whether the test completed successfully or failed.
The following table describes the various symbols and the test result indicators they represent.
Result
Use this tab to view the results of the tests executed along with a brief description about the outcome of each test.
The Result column in this tab briefly describes the test outcome. In addition, you can double-click anywhere in the row to view the corresponding result message. For example, if a test failed, the Result column will display the problem encountered and any actions you must take.
Right-click to bring up the Delete/Delete All Completed menu. Select Delete to remove the test results of an individual test and Delete All Completed to remove all test results of all completed tests from the Status tab and the Results tab.
Completed Specifies that the test has been completed.
Suspended Specifies that the test has been suspended. You can only suspend a test manually. In addition, the application does not suspend a test on its own. You can suspend a test in the Executing state only if the test supports the Suspend feature. Not all diagnostic tests support the Suspend feature.
Aborted Specifies that the test has been aborted. You can only abort a test manually. In addition, the application does not abort a test on its own. You can abort any test in the Ready state or you can abort a test in the Executing state only if the test supports the Abort feature. Not all diagnostic tests support the Abort feature.
Executing Specifies that the test is running. You can suspend a test only when the test status is Executing. You can abort a test in the Executing state only if the test supports the Abort feature.
Ready Specifies that the test has not started but has been queued up for execution. You can abort any test when it is in the Ready state.
The test completed successfully.
The test is being executed.
The test was aborted.
Noncritical errors were encountered during the execution of the test.
The test failed.
The test has been suspended.
20 Using Diagnostics
The Command Line InterfaceTo run the application in CLI mode, run pediags from <ExtractDir>/oldiags/bin, which should be the current working directory. In Windows operating systems you can also select Start→Programs→PowerEdge Diagnostics 2.7 → PowerEdge Diagnostics CLI to run the application in CLI mode.
NOTE: Connecting or removing a USB or a CD/DVD device from a Red Hat Enterprise Linux system or SUSE Linux
Enterprise Server while the enumeration is in progress may cause the system to hang.
Primary CLI Commands
The following commands carry out the functions of PowerEdge Diagnostics:
• pediags --help
This command displays short text help for CLI commands.
• pediags --show all
This command lists all device classes and tests available.
• pediags <DEVICECLASS> --help
This command displays text help for the <DEVICECLASS> you specify. For example, if you type the following command, pediags modem --help, this command displays a short text help for the devices listed as modems and the different tests associated with modems. <DEVICECLASS> is the package name of the device, for example, CMOS, network, and cddvd.
• pediags <DEVICECLASS> --show [device|test|all] [<Index Options>] [<Details Option>] [fmt=lst|tbl|xml]
This command displays the list of device classes, tests, or both device classes and tests. The default option is all that displays both device classes and tests. You can specify index options and choose the format in which you want the output to be displayed. The parameters should follow the particular order in which they are listed above, format options must always be the last parameter.
For example, the command, pediags pci --show test test-index=1,2,3 fmt=tbl, displays the tests whose index numbers are 1, 2, and 3 in a table format.
If you type the following command, pediags pci --show device device-index=1,2,3 fmt=tbl, this command displays the device classes whose index numbers are 1, 2, and 3 in a table format.
Use pediags <DEVICECLASS> --show device details=true to view additional device information, if available.
The details=true option works only with "--show device". For example, to see additional hardware information for the SCSI devices, enter pediags Scsidevdiag --show device details=true.
Using Diagnostics 21
• pediags <DEVICECLASS> --run [<Index Options>] [<Test Settings>] [fmt=lst|tbl|xml]
This command runs tests on the device class you select. You can specify index options, test settings, and choose the format in which you want the results to be displayed. The parameters should follow the particular order in which they are listed above, format options must always be the last parameter.
In the <Test Settings> parameter, you can specify quicktest as true or false and you can specify the number of iterations or passes for the selected test. Passes specifies the number of passes to execute.
For example, the command, pediags network --run test-index=1,2,3 quicktest=true passes=6 fmt=tbl, runs six iterations of the tests whose index numbers are 1, 2, and 3 on the network device class. The results are then displayed in a tabular format.
Runtime is limited to 3 days (72 hours). The minimum value is 1 and the maximum is 999.
NOTE: Running the pediags command on the device class from two different consoles simultaneously may
display the message: System resources may have already been used by another diagnostics instance.
Aborting PowerEdge Diagnostics in CLI Mode Using <Ctrl><c>
Using <Ctrl><c> to abort with the --show command does not cause the action to abort. When running tests, you may use <Ctrl><c> at any point of time during the execution sequence to stop the test. No output may be available and the test may exit with a blank message. This may occur if the execution of the pediags command has been interrupted even before the diagnostic test has started. If you abort a test that has already started, the test may come out with a Test was aborted by the user result event if the Abort feature is supported by the particular test. For multiple passes, even if the test supports Abort, it is not guaranteed that the test will always come out with Test was aborted by the user result event. This might occur because the multiple pass test may have been aborted during the transition from one pass to another.
Tests that do not support the Abort feature will always run to completion. See Table 4-1 for a complete list of tests that support any or all of the Abort, Suspend, and Quick Test features.
Scripting With the CLI
The PowerEdge Diagnostics CLI allows administrators to write batch programs or scripts to be executed by the operating system. For an enterprise with many systems, an administrator could write a script that runs diagnostic tests on system components to determine their health.
In many cases, the CLI allows a user with a very well-defined task in mind to retrieve information about the system rapidly. You can redirect the diagnostic output to a file using the operating system’s redirection feature.
22 Using Diagnostics
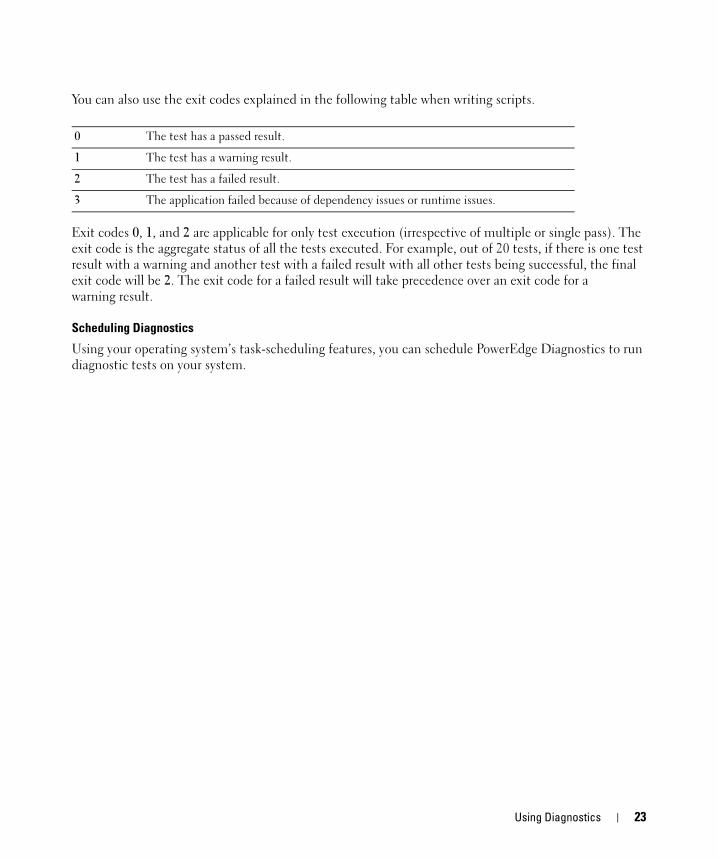
You can also use the exit codes explained in the following table when writing scripts.
Exit codes 0, 1, and 2 are applicable for only test execution (irrespective of multiple or single pass). The exit code is the aggregate status of all the tests executed. For example, out of 20 tests, if there is one test result with a warning and another test with a failed result with all other tests being successful, the final exit code will be 2. The exit code for a failed result will take precedence over an exit code for a warning result.
Scheduling Diagnostics
Using your operating system’s task-scheduling features, you can schedule PowerEdge Diagnostics to run diagnostic tests on your system.
0 The test has a passed result.
1 The test has a warning result.
2 The test has a failed result.
3 The application failed because of dependency issues or runtime issues.
Using Diagnostics 23

24 Using Diagnostics

Running Dell PowerEdge Diagnostics in GUI ModeThis section provides step-by-step instructions on running Dell™ PowerEdge™ Diagnostics in GUI mode.
Running Diagnostic TestsTo run diagnostic tests, perform the following steps:
1 Launch the application.
2 In the Diagnostic Selection section on the left, select the appropriate option from the Selection Options drop-down menu.
• Select the Group by connection option to view the connections as nodes with the corresponding devices and tests displayed under each connection.
• Select the Group by device option to list the system devices. All of the tests available for each device are displayed under the device.
NOTE: If a device is grayed out, the device does not have any tests available. Configuration information
for this device is displayed in the Configuration tab.
• Select the Group by test option to list all the available tests with the corresponding devices displayed under each test.
3 Select the check boxes corresponding to the tests that you want to run.
In the Diagnostic Information section on the right, the Tests Selected tab lists the currently selected diagnostics tests. Click Run Tests to execute the selected tests.
NOTE: The Warning row displays the Noncritical icon to indicate that tests with possible noncritical
errors have been selected. Double-click the icon to view the test warning.
NOTE: The tests are queued for execution in the order in which they were selected. To stop tests from
queuing, click the Stop button on the Queuing Diagnostic Tests window.
Running Diagnostics 25
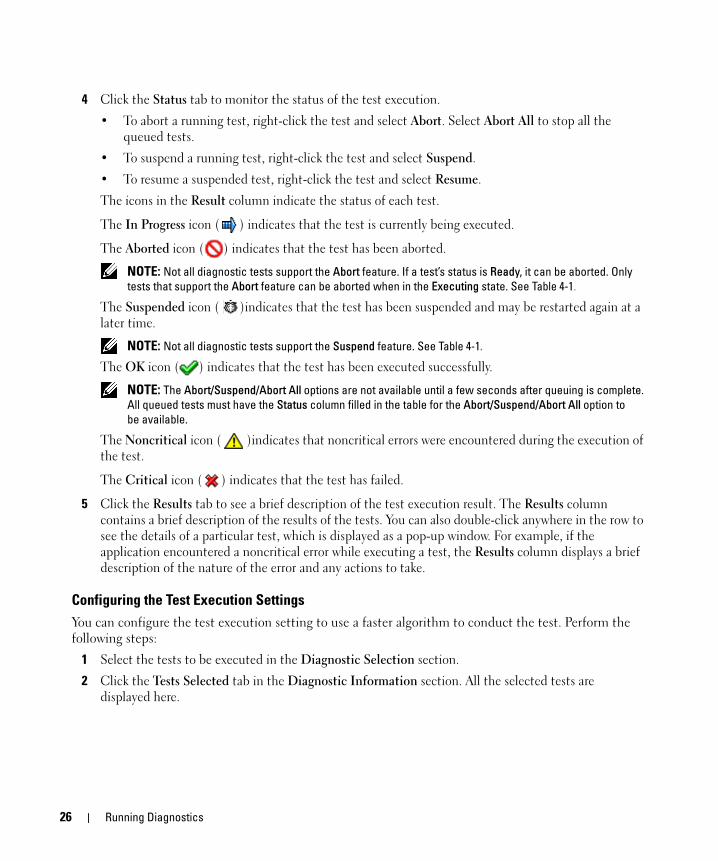
4 Click the Status tab to monitor the status of the test execution.
• To abort a running test, right-click the test and select Abort. Select Abort All to stop all the queued tests.
• To suspend a running test, right-click the test and select Suspend.
• To resume a suspended test, right-click the test and select Resume.
The icons in the Result column indicate the status of each test.
The In Progress icon ( ) indicates that the test is currently being executed.
The Aborted icon ( ) indicates that the test has been aborted.
NOTE: Not all diagnostic tests support the Abort feature. If a test’s status is Ready, it can be aborted. Only
tests that support the Abort feature can be aborted when in the Executing state. See Table 4-1.
The Suspended icon ( )indicates that the test has been suspended and may be restarted again at a later time.
NOTE: Not all diagnostic tests support the Suspend feature. See Table 4-1.
The OK icon ( ) indicates that the test has been executed successfully.
NOTE: The Abort/Suspend/Abort All options are not available until a few seconds after queuing is complete.
All queued tests must have the Status column filled in the table for the Abort/Suspend/Abort All option to
be available.
The Noncritical icon ( )indicates that noncritical errors were encountered during the execution of the test.
The Critical icon ( ) indicates that the test has failed.
5 Click the Results tab to see a brief description of the test execution result. The Results column contains a brief description of the results of the tests. You can also double-click anywhere in the row to see the details of a particular test, which is displayed as a pop-up window. For example, if the application encountered a noncritical error while executing a test, the Results column displays a brief description of the nature of the error and any actions to take.
Configuring the Test Execution Settings
You can configure the test execution setting to use a faster algorithm to conduct the test. Perform the following steps:
1 Select the tests to be executed in the Diagnostic Selection section.
2 Click the Tests Selected tab in the Diagnostic Information section. All the selected tests are displayed here.
26 Running Diagnostics

3 Select the Quick Test check box in the Diagnostic Options section at the bottom. If this option is available for one of the selected tests, the test is run in this mode.
NOTE: The Quick Test feature is not a supported test mode for all tests. Only a few tests support this feature.
See Table 4-1 for supported test modes.
NOTE: If no errors are reported after running in Quick Test mode and you suspect that the hardware still has
problems, it is recommended that you deselect Quick Test and run the test again.
4 Use the Number of Passes option to specify the number of times you want the tests to run. The minimum value is 1 and the maximum is 20.
Table 4-1 lists the tests that support any or all of the Abort, Suspend, and Quick Test test features.
Table 4-1. Supported Tests for Abort, Suspend, and Quick Test
Test Device Abort Suspend Quick Test
Hayes Basic Command Test Modem X
Hayes Extended Command Test Modem X
S-Registers Test Modem X
Read Exerciser Test CD/DVD drive X X X
Linear Seek Test Diskette drive X X X
Funnel Seek Test Diskette drive X X X
Read-Write Test Diskette drive X X
PCI Device Configuration Test PCI Bus X
Adaptec Array Disk Test Hard drive X X
LSI Array Disk Test Hard drive X X
IDE Hard Disk Test Hard drive X X
SCSI Disk Test Hard drive X X
Adaptec RAID Controller Hardware Test
RAID controller X
LSI RAID Controller Hardware Test RAID controller X
Post Result Test DRAC X X
Tape Media Test Tape drive, autoloader, and library
X X X
Tape Self Test Tape drive, autoloader, and library
X
Memory Pattern Test Memory DIMMs X X
Tape Changer Slot to Slot test Autoloader and library X X
Tape Changer Slot to Drive test Autoloader and library X X
Running Diagnostics 27
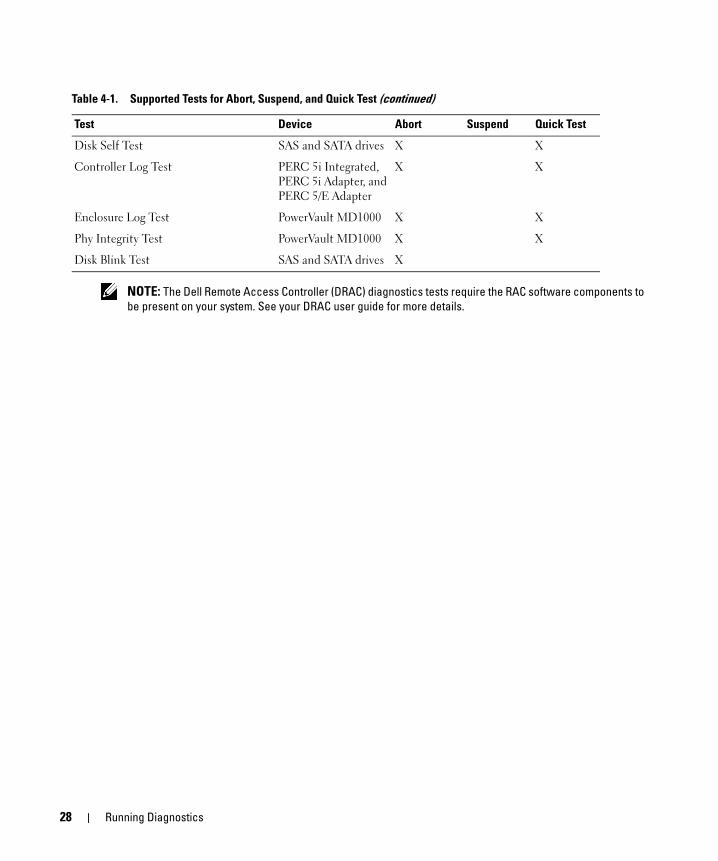
NOTE: The Dell Remote Access Controller (DRAC) diagnostics tests require the RAC software components to
be present on your system. See your DRAC user guide for more details.
Disk Self Test SAS and SATA drives X X
Controller Log Test PERC 5i Integrated, PERC 5i Adapter, and PERC 5/E Adapter
X X
Enclosure Log Test PowerVault MD1000 X X
Phy Integrity Test PowerVault MD1000 X X
Disk Blink Test SAS and SATA drives X
Table 4-1. Supported Tests for Abort, Suspend, and Quick Test (continued)
Test Device Abort Suspend Quick Test
28 Running Diagnostics

Supported DevicesThis section lists the devices that can be tested using Dell™ PowerEdge™ Diagnostics.
Diagnostics for Tape Drives, Autoloaders, and Libraries NOTE: You must install Dell-qualified device drivers in order to run diagnostics on tape drives, tape
autoloaders, and tape libraries. See the documentation that came with your device, or access the latest
drivers from the Dell Support website at support.dell.com.
NOTE: On Linux operating systems, diagnostic tests for SATA hard-disks and controllers are not available.
PowerEdge Diagnostics does not enumerate SATA hard-disks and channels on Linux operating systems.
PowerEdge Diagnostics supports the following Dell-supplied hardware devices.
Tape Drives
PowerEdge Diagnostics supports diagnostics for the following tape drives:
• Dell PowerVault™ 100T DDS4
• PowerVault 100T DAT72 (not supported on Red Hat® Enterprise Linux version 3)
• PowerVault 110T DLT1
• PowerVault 110T VS80
• PowerVault 110T DLT VS160
• PowerVault 110T SDLT 220
• PowerVault 110T SDLT 320
• PowerVault 110T LTO-2
• PowerVault 110T LTO-2-L
• PowerVault 110T LTO-3
For more information on all drives in supported arrays, autoloaders, and libraries, see "Tape Arrays, Autoloaders, and Libraries."
Tape Arrays, Autoloaders, and Libraries
PowerEdge Diagnostics supports diagnostics for the following tape arrays, tape autoloaders, and tape libraries:
• PowerVault 122T Autoloader VS80
• PowerVault 122T Autoloader SDLT 320
Supported Devices 29

• PowerVault 122T Autoloader LTO-2
• PowerVault 132T Autoloader SDLT 320
• PowerVault 132T Autoloader LTO-2
• PowerVault 136T Autoloader SDLT 220 (supports diagnostics for tape drives only)
• PowerVault 136T Autoloader SDLT 320 (supports diagnostics for tape drives only)
• PowerVault 136T Autoloader LTO-2 (supports diagnostics for tape drives only)
• PowerVault 124T-DLT VS160
• PowerVault 124T-LTO2-LC
• PowerVault 124T-LTO-3
• PowerVault 132T-LTO-3
• PowerVault 136T- LTO-3
• PowerVault ML6000-LTO-2
• PowerVault ML6000-LTO-3
Enclosures
You can test Powervault MD1000 using Dell PowerEdge Diagnostics.
Diagnostics for RAID Controllers, SAS Controllers, SCSI Controllers, and Attached Hard Drives
NOTE: For a list of firmware requirements that are required for each controller, see "Diagnostic Dependencies for
Supported RAID Controllers."
This section lists the diagnostics supported on systems running Microsoft® Windows® or Red Hat Enterprise Linux or SUSE Linux Enterprise Server. PowerEdge Diagnostics supports diagnostics for the following RAID and SCSI controllers as well as for the hard drives that are attached to RAID, SCSI, and IDE controllers, depending on the installed operating system.
NOTE: PowerEdge Diagnostics does not run diagnostic tests on IDE controllers.
NOTE: PowerEdge Diagnostics enumerates and displays the diagnostic tests for the hard drives that are
connected to SAS 5/iR (Adapter and Integrated) and SAS 5i integrated controllers. However, diagnostic tests for
these controllers themselves are unavailable.
Diagnostics Supported on Systems Running Microsoft Windows, Red Hat Enterprise Linux, and SUSE Linux Enterprise Server
On systems running Windows, Red Hat Enterprise Linux and SUSE Linux Enterprise Server, PowerEdge Diagnostics supports diagnostics for the following controllers and the hard drives that are attached to these controllers:
• PERC 3/DC
30 Supported Devices

• PERC 3/QC
• PERC 3/SC
• PERC 3/Di
• PERC 320/DC
• PERC 4/SC
• PERC 4/DC
• PERC 4e/DC
• PERC 4/Di
• PERC 4e/Di
• PERC 4e/Si
• PERC 4/IM
• PERC 5/E
• PERC 5/i Integrated
• PERC 5/i Adapter
• SAS 5/iR (Integrated / Adapter)
• SAS5/I integrated
• ICH 7R
• ESB2 SATA
• CERC SATA 1.5/6 Channel
• CERC ATA 100 4/CH.
NOTE: The CERC ATA 100 4/CH is not supported on Linux operating systems. It is supported only on Windows
operating systems.
Supported Devices 31

32 Supported Devices

Diagnostic Dependencies for Supported RAID Controllers
OverviewDell™ PowerEdge™ Diagnostics require Dell-qualified device drivers and firmware to run diagnostics on RAID controllers, SCSI controllers, and attached hard drives.
Systems administrators who are responsible for diagnosing their storage devices with the latest installed operating system need a complete matrix showing the elements that are compatible with a particular storage controller. Each version of the storage controller in turn supports a specific array of elements, including:
• Version of the Array Manager, Storage Management Service, or RAID Storage Manager
• Dell PowerEdge system
• Firmware version number required for a particular controller
• Supported operating systems, where each operating system requires a specific driver
PERC 320/DCTable 6-1 shows the elements supported by the PERC 320/DC controller.
Table 6-1. PERC 320/DC Supported Elements
PERC Firmware
Version
Windows 2000
Driver
Windows Server
2003 Driver
Linux Driver (Red Hat
Enterprise Linux 3)
4.0.0.5812 N/A 4.0.0.5810 1.1.4-2302
Diagnostic Dependencies for Supported RAID Controllers 33

PERC 3/SC, 3/DC and 3/QCTable 6-2 shows the elements supported by the PERC 3/DC and 3/QC controllers.
PERC 3/DiTable 6-3 shows the elements supported by the PERC 3/Di controller.
PERC 4/SCTable 6-4 shows the elements supported by the PERC 4/SC controller.
Table 6-2. PERC 3/DC and 3/QC Supported Elements
PERC
Firmware
Version
Windows
2000
Driver
Windows
Server 2003
Driver
Linux Driver
(Red Hat
Enterprise Linux 3)
Linux Driver
(Red Hat
Enterprise Linux 4)
198X 5.48 6.46.2.32 (32-bit)6.46.3.64 (64-bit)
2.10.10.1 2.20.4.4
Table 6-3. PERC 3/Di Supported Elements
PERC
Firmware
Version
Windows
2000
Driver
Windows
Server 2003
Driver
Linux Driver
(Red Hat
Enterprise Linux 3)
Linux Driver
(Red Hat
Enterprise Linux 4)
2.8.0.6098 2.8.0.6085 2.8.0.6085 1.1.4 1.1.5.2392
Table 6-4. PERC 4/SC Supported Elements
PERC
Firmware
Version
Microsoft®
Windows® 2000
Driver
Windows Server™
2003 Driver
Linux Driver
(Red Hat®
Enterprise Linux 3)
Linux Driver
(Red Hat®
Enterprise Linux 4)
351X 5.48 6.46.2.32 (32-bit)
6.46.3.64 (64-bit)
2.10.10.1 2.20.4.4
34 Diagnostic Dependencies for Supported RAID Controllers

PERC 4/DC Table 6-5 shows the elements supported by the PERC 4/DC controller.
PERC 4e/DiTable 6-6 shows the elements supported by the PERC 4e/Di controller.
PERC 4e/DCTable 6-7 shows the elements supported by the PERC 4e/DC controller.
Table 6-5. PERC 4/DC Supported Elements
PERC
Firmware
Version
Windows 2000
Driver
Windows Server 2003
Driver
Linux Driver
(Red Hat
Enterprise Linux 3)
Linux Driver
(Red Hat®
Enterprise
Linux 4)
SUSE® Linux
Enterprise Server
(version 9 and 10)
351X (32-bit)
351S (64-bit)
5.48 6.46.2.32 (32-bit)
6.46.3.64 (64-bit)
2.10.10.1 2.20.4.4 2.20.4.7
Table 6-6. PERC 4e/Di Supported Elements
PERC
Firmware
Version
Windows 2000
Driver
Windows Server 2003
Driver
Linux Driver
(Red Hat
Enterprise Linux 3)
Linux Driver
(Red Hat
Enterprise Linux 4)
SUSE® Linux
Enterprise Server
(version 9 and 10)
521X 5.48 6.46.2.32 (32-bit)6.46.3.64 (64-bit)
2.10.10.1 2.20.4.4 2.20.4.7
Table 6-7. PERC 4e/DC Supported Elements
PERC
Firmware
Version
Windows 2000
Driver
Windows Server 2003
Driver
Linux Driver
(Red Hat
Enterprise
Linux 3)
Linux Driver
(Red Hat
Enterprise
Linux 4)
SUSE® Linux
Enterprise Server
(version 9 and 10)
512X 5.48 6.46.2.32 (32-bit)6.46.3.64 (64-bit)
2.10.10.1 2.20.4.4 2.20.4.7
Diagnostic Dependencies for Supported RAID Controllers 35

PERC 4e/SiTable 6-8 shows the elements supported by the PERC 4e/Si controller.
PERC 4/IMTable 6-9 shows the elements supported by the PERC 4/IM controller.
NOTE: The following requirements are necessary to diagnose this controller in SCSI mode.
PERC 4/DiTable 6-10 shows the elements supported by the PERC 4/Di controller.
Table 6-8. PERC 4e/Si Supported Elements
PERC
Firmware
Version
Windows 2000
Driver
Windows
Server 2003
Driver
Linux Driver
(Red Hat
Enterprise Linux 3)
Linux Driver
(Red Hat
Enterprise Linux 4)
521X 5.48 6.46.2.32 (32-bit)6.46.3.64 (64-bit)
2.10.10.1 2.20.4.4
Table 6-9. PERC 4/IM Supported Elements
PERC Firmware
Version
Windows 2000
Driver
Windows Server
2003 Driver
Linux Driver (Red Hat
Enterprise Linux 3)
Linux Driver
(Red Hat
Enterprise Linux 4)
1.03.23.90 1.09.11 1.09.11 Native Native
Table 6-10. PERC 4/Di Supported Elements
PERC
Firmware
Version
Windows
2000
Driver
Windows Server 2003
Driver
Linux Driver
(Red Hat
Enterprise Linux 3)
Linux Driver
(Red Hat
Enterprise Linux 4)
251X (on PE2600)
421W (on PE1750)
5.48 6.46.2.32 (32-bit)6.46.3.64 (64-bit)
2.10.10.1 2.20.4.4
36 Diagnostic Dependencies for Supported RAID Controllers

PERC 5/E, PERC 5/i Integrated, and PERC 5/i AdapterTable 6-11 shows the elements supported by the PERC 5/E, PERC 5/i Integrated, and PERC 5/i Adapter controllers.
CERC SATA 1.5/6 ChannelTable 6-12 shows the elements supported by the CERC SATA 1.5/6 Channel controller.
CERC ATA 100 4/CHTable 6-13 shows the elements supported by the CERC ATA 100 4/CH Channel controller.
Table 6-11. PERC 5/E, PERC 5/i Integrated, and PERC 5/i Adapter Supported Elements
PERC
Firmware
Version
Windows
2000 Driver
Windows Server
2003 Driver
Linux Driver (Red
Hat Enterprise
Linux 3)
Linux Driver (Red
Hat Enterprise
Linux 4)
SUSE Linux
Enterprise
Server (version
9 and 10)
5.0.1-0026 1.18.0.32 1.18.0.32(32-bit)
1.18.0.64 (64-bit)
00.00.02.03 00.00.02.03 00.00.02.05
Table 6-12. CERC SATA 1.5/6 Channel Supported Elements
PERC Firmware
Version
Windows 2000
Driver
Windows Server
2003 Driver
Linux Driver (Red
Hat Enterprise
Linux 3)
Linux Driver
(Red Hat
Enterprise Linux 4)
4.1.0.7417 4.1.0.7010 4.1.0.7010 (32-bit)
4.1.1.7038 (64-bit)
1.1.4 1.1.5-2372
Table 6-13. CERC ATA 100 4/CH Channel Supported Elements
PERC Firmware
Version
Windows 2000
Driver
Windows Server
2003 Driver
Linux Driver (Red
Hat Enterprise
Linux 3)
Linux Driver
(Red Hat
Enterprise Linux 4)
6.62 5.46 6.41.2.32 2.10.1 2.10.1
Diagnostic Dependencies for Supported RAID Controllers 37
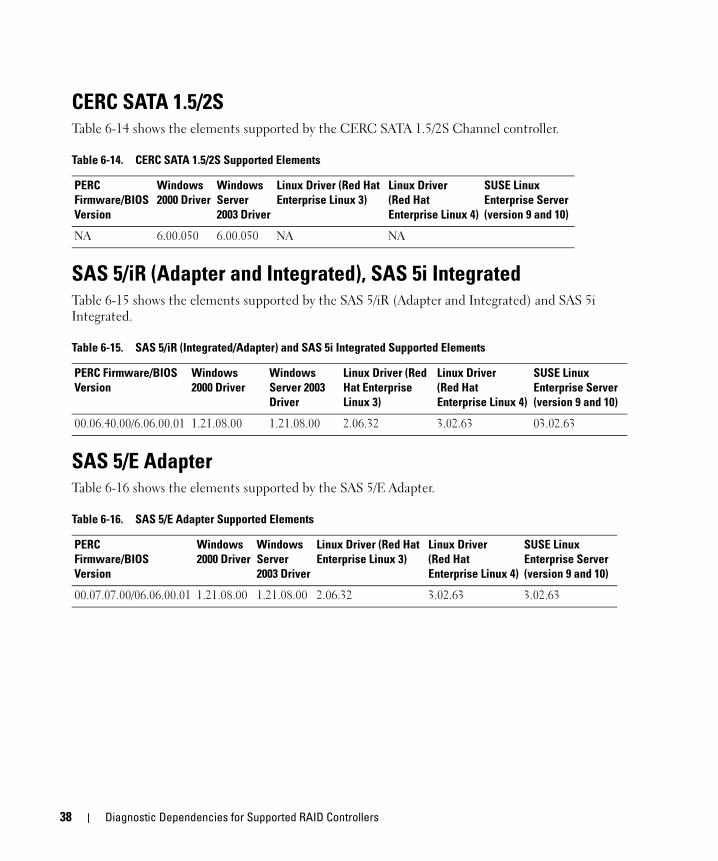
CERC SATA 1.5/2STable 6-14 shows the elements supported by the CERC SATA 1.5/2S Channel controller.
SAS 5/iR (Adapter and Integrated), SAS 5i IntegratedTable 6-15 shows the elements supported by the SAS 5/iR (Adapter and Integrated) and SAS 5i Integrated.
SAS 5/E AdapterTable 6-16 shows the elements supported by the SAS 5/E Adapter.
Table 6-14. CERC SATA 1.5/2S Supported Elements
PERC
Firmware/BIOS
Version
Windows
2000 Driver
Windows
Server
2003 Driver
Linux Driver (Red Hat
Enterprise Linux 3)
Linux Driver
(Red Hat
Enterprise Linux 4)
SUSE Linux
Enterprise Server
(version 9 and 10)
NA 6.00.050 6.00.050 NA NA
Table 6-15. SAS 5/iR (Integrated/Adapter) and SAS 5i Integrated Supported Elements
PERC Firmware/BIOS
Version
Windows
2000 Driver
Windows
Server 2003
Driver
Linux Driver (Red
Hat Enterprise
Linux 3)
Linux Driver
(Red Hat
Enterprise Linux 4)
SUSE Linux
Enterprise Server
(version 9 and 10)
00.06.40.00/6.06.00.01 1.21.08.00 1.21.08.00 2.06.32 3.02.63 03.02.63
Table 6-16. SAS 5/E Adapter Supported Elements
PERC
Firmware/BIOS
Version
Windows
2000 Driver
Windows
Server
2003 Driver
Linux Driver (Red Hat
Enterprise Linux 3)
Linux Driver
(Red Hat
Enterprise Linux 4)
SUSE Linux
Enterprise Server
(version 9 and 10)
00.07.07.00/06.06.00.01 1.21.08.00 1.21.08.00 2.06.32 3.02.63 3.02.63
38 Diagnostic Dependencies for Supported RAID Controllers

Appendix ATable A-1. Additional Hardware Information for Storage Diagnostics
Parameter Description
Total Moves Total number of AutoLoader moves.
Drive Loads Number loads to the drive from magazines and mail slot.
Mailslot Exports Number of times a cartridge was exported from the system.
Mailslot Imports Number times a cartridge was importing into the system.
Magazine Moves Number of moves between storage slots.
Magazine Loads Number of times a cartridge was moved from a storage slot to the drive.
Servo Hard Error The number of unrecoverable errors.
Drive Soft Error Each field is a count of the number of times high-level recoverable error was reported for that component.
Rotation Recovery Action Each field is a count of the number of times recovery actions were required in that axis to perform an operation.
System Moves Total system moves would include every point to point movement that was made regardless of slot.
System Pick Retries Total Pick-retries regardless of slot.
System Put Retries Total put-retries regardless of slot.
Element Total Puts The Total Puts field indicates the total number of cartridge-puts to the element location.
Element Total Picks The Total Picks field indicates the total number of cartridge-picks from the element location.
Element Total Put Retries The Total Put Retries field indicates the total number of retry-puts to the element indicated by the element address.
Element Total Pick Retries The Total Pick Retries field indicates the number of retry-pick Operations from the element address.
Firmware Firmware version on the tape device.
Last Clean Indicates the number of hours since the Last-clean done.
Clean Required Set to ‘Yes’ if cleaning-required condition exists.
Replace Cleaning Tape ‘YES’ if cleaning tape needs replacement.
Number of Drive Cleans Drive cleaning cycle count.
Number of Tape Cleans Specifies the number of cleaning sessions per cartridge.
Power On Hours (POH) Amount of time a Tape Drive has been turned on.
Diagnostic Dependencies for Supported RAID Controllers 39

Tape Motion Hours/Cylinder on Hours (COH)
This represents the amount of time the tape drive has been used for backups and restores.
Load Count It is a counter which indicates how many times a tape cartridge was loaded. Some drives increment this value when a tape cartridge is inserted and some increment this value when a tape drive is unloaded.
Number of Cleans Specifies the number of cleaning sessions per cartridge.
Time in COH when Incompatible media was last loaded.
Time stamp in COH
Time in POH when the Over temperature condition occurred – returns zeros
Time stamp in POH
Time in POH when the Power issue condition occurred
Time stamp in POH
Total Number of Cleaning Total number of Cleanings that are done using a cleaning tape.
Time since last cleaning Time stamp in hours.
Time in COH of last emergency eject
Time stamp in COH.
Media Type:
total time in COH
Total COH for specified media type.
Sense codes
(List of latest four Sense Codes)
Various codes and parameter are listed. Example: Sense Key, Additional Sense Code, and Additional Sense Code Qualifier.
Table A-1. Additional Hardware Information for Storage Diagnostics (continued)
Parameter Description
40 Appendix A