user’s guide - heartland community college · parasoft or request a multi-user license from...
TRANSCRIPT

User’s GuideVersion 4.5
Parasoft Corporation2031 S. Myrtle Ave.Monrovia, CA 91016Phone: (888) 305-0041Fax: (626) 305-9048E-mail: [email protected]: www.parasoft.com
PARASOFT END USER LICENSE AGREEMENTREDISTRIBUTION NOT PERMITTEDThis Agreement has 3 parts. Part I applies if you have not purchased a license to the accompanying software (the "SOFTWARE"). Part II applies if you have pur-chased a license to the SOFTWARE. Part III applies to all license grants. If you initially acquired a copy of the SOFTWARE without purchasing a license and you wish to purchase a license, contact Parasoft Corporation ("PARASOFT"):
(626) 305-0041
(888) 305-0041 (Toll-Free)
(626) 305-9048 (Fax)
http://www.parasoft.com
PART I -- TERMS APPLICABLE WHEN LICENSE FEES NOT (YET) PAID GRANT.
DISCLAIMER OF WARRANTY. Free of charge SOFTWARE is provided on an "AS IS" basis, without warranty of any kind, including without limitation the warranties of merchantability, fitness for a particular purpose and non-infringement. The entire risk as to the quality and per-formance of the SOFTWARE is borne by you. Should the SOFTWARE prove defective, you and not PARASOFT assume the entire cost of any service and repair. This disclaimer of warranty constitutes an essential part of the agreement. SOME JURISDICTIONS DO NOT ALLOW EXCLUSIONS OF AN IMPLIED WAR-RANTY, SO THIS DISCLAIMER MAY NOT APPLY TO YOU AND YOU MAY HAVE OTHER LEGAL RIGHTS THAT VARY BY JURISDICTION.
PART II -- TERMS APPLICABLE WHEN LICENSE FEES PAID
GRANT OF LICENSE. PARASOFT hereby grants you, and you accept, a limited license to use the enclosed electronic media, user manuals, and any related materials (collectively called the SOFTWARE in this AGREEMENT). You may install the SOFTWARE in only one location on a single disk or in one location on the temporary or perma-nent replacement of this disk. If you wish to install the SOFTWARE in multiple locations, you must either license an additional copy of the SOFTWARE from

PARASOFT or request a multi-user license from PARASOFT. You may not trans-fer or sub-license, either temporarily or permanently, your right to use the SOFT-WARE under this AGREEMENT without the prior written consent of PARASOFT.
LIMITED WARRANTY. PARASOFT warrants for a period of thirty (30) days from the date of purchase, that under normal use, the material of the electronic media will not prove defec-tive. If, during the thirty (30) day period, the software media shall prove defective, you may return them to PARASOFT for a replacement without charge.
THIS IS A LIMITED WARRANTY AND IT IS THE ONLY WARRANTYMADE BY PARASOFT. PARASOFT MAKES NO OTHER EXPRESS WARRANTY AND NO WARRANTY OF NONINFRINGEMENT OF THIRD PARTIES' RIGHTS. THE DURATION OF IMPLIED WARRANTIES, INCLUDING WITHOUT LIMITATION, WARRANTIES OF MERCHANTABILITY AND OF FITNESS FOR A PARTICU-LAR PURPOSE, IS LIMITED TO THE ABOVE LIMITED WARRANTY PERIOD; SOME JURISDICTIONS DO NOT ALLOW LIMITATIONS ON HOW LONG AN IMPLIED WARRANTY LASTS, SO LIMITATIONS MAY NOT APPLY TO YOU. NO PARASOFT DEALER, AGENT, OR EMPLOYEE IS AUTHORIZED TO MAKE ANY MODIFICATIONS, EXTENSIONS, OR ADDITIONS TO THIS WARRANTY.
If any modifications are made to the SOFTWARE by you during the warranty period; if the media is subjected to accident, abuse, or improper use; or if you vio-late the terms of this Agreement, then this warranty shall immediately be termi-nated. This warranty shall not apply if the SOFTWARE is used on or in conjunction with hardware or software other than the unmodified version of hard-ware and software with which the SOFTWARE was designed to be used as described in the Documentation. THIS WARRANTY GIVES YOU SPECIFIC LEGAL RIGHTS, AND YOU MAY HAVE OTHER LEGAL RIGHTS THAT VARY BY JURISDICTION.
YOUR ORIGINAL ELECTRONIC MEDIA/ARCHIVAL COPIES. The electronic media enclosed contain an original PARASOFT label. Use the orig-inal electronic media to make "back-up" or "archival" copies for the purpose of running the SOFTWARE program. You should not use the original electronic media in your terminal except to create the archival copy. After recording the archival copies, place the original electronic media in a safe place. Other than these archival copies, you agree that no other copies of the SOFTWARE will be made.
TERM. This AGREEMENT is effective from the day you install the SOFTWARE and con-tinues until you return the original SOFTWARE to PARASOFT, in which case you
must also certify in writing that you have destroyed any archival copies you may have recorded on any memory system or magnetic, electronic, or optical media and likewise any copies of the written materials.
CUSTOMER REGISTRATION. PARASOFT may from time to time revise or update the SOFTWARE. These revi-sions will be made generally available at PARASOFT's discretion. Revisions or notification of revisions can only be provided to you if you have registered with a PARASOFT representative or on the PARASOFT Web site. PARASOFT's cus-tomer services are available only to registered users.
PART III -- TERMS APPLICABLE TO ALL LICENSE GRANTS
SCOPE OF GRANT.
DERIVED PRODUCTS. Products developed from the use of the SOFTWARE remain your property. No royalty fees or runtime licenses are required on said products.
PARASOFT'S RIGHTS. You acknowledge that the SOFTWARE is the sole and exclusive property of PARASOFT. By accepting this agreement you do not become the owner of the SOFTWARE, but you do have the right to use the SOFTWARE in accordance with this AGREEMENT. You agree to use your best efforts and all reasonable steps to protect the SOFTWARE from use, reproduction, or distribution, except as autho-rized by this AGREEMENT. You agree not to disassemble, de-compile or other-wise reverse engineer the SOFTWARE.
SUITABILITY. PARASOFT has worked hard to make this a quality product, however PARASOFT makes no warranties as to the suitability, accuracy, or operational characteristics of this SOFTWARE. The SOFTWARE is sold on an "as-is" basis.
EXCLUSIONS. PARASOFT shall have no obligation to support SOFTWARE that is not the then current release.
TERMINATION OF AGREEMENT. If any of the terms and conditions of this AGREEMENT are broken, this AGREE-MENT will terminate automatically. Upon termination, you must return the soft-ware to PARASOFT or destroy all copies of the SOFTWARE and Documentation.

At that time you must also certify, in writing, that you have not retained any copies of the SOFTWARE.
LIMITATION OF LIABILITY. You agree that PARASOFT's liability for any damages to you or to any other party shall not exceed the license fee paid for the SOFTWARE.
PARASOFT WILL NOT BE RESPONSIBLE FOR ANY DIRECT, INDIRECT, INCI-DENTAL, OR CONSEQUENTIAL DAMAGES RESULTING FROM THE USE OF THE SOFTWARE ARISING OUT OF ANY BREACH OF THE WARRANTY, EVEN IF PARASOFT HAS BEEN ADVISED OF SUCH DAMAGES. THIS PRODUCT IS SOLD "AS-IS".
SOME STATES DO NOT ALLOW THE LIMITATION OR EXCLUSION OF LIABIL-ITY FOR INCIDENTAL OR CONSEQUENTIAL DAMAGES, SO THE ABOVE LIM-ITATION OR EXCLUSION MAY NOT APPLY TO YOU. YOU MAY ALSO HAVE OTHER RIGHTS WHICH VARY FROM STATE TO STATE.
ENTIRE AGREEMENT.This Agreement represents the complete agreement concerning this license and may be amended only by a writing executed by both parties. THE ACCEPTANCE OF ANY PURCHASE ORDER PLACED BY YOU IS EXPRESSLY MADE CONDI-TIONAL ON YOUR ASSENT TO THE TERMS SET FORTH HEREIN, AND NOT THOSE IN YOUR PURCHASE ORDER. If any provision of this Agreement is held to be unenforceable, such provision shall be reformed only to the extent neces-sary to make it enforceable. This Agreement shall be governed by California law (except for conflict of law provisions).
All brand and product names are trademarks or registered trademarks of their respective holders.
Copyright 1993-2002
Parasoft Corporation
2031 South Myrtle Avenue
Monrovia, CA 91016
Printed in the U.S.A, October 9, 2002


Jtest User’s GuideTable of Contents
IntroductionIntroduction ........................................................................................1Windows Installation and Setup .........................................................2UNIX Installation and Setup ...............................................................5Contacting Parasoft............................................................................11
Testing With JtestQuick Start Guide...............................................................................14Testing a Single Class or JSP............................................................21Testing a Class - Two Simple Examples............................................24Exploring Class Test Results .............................................................35Testing a Set of Classes ....................................................................47Testing a Set of Classes - Example ...................................................52Exploring Project Test Results ...........................................................54Loading One of a Project's Classes in the Class Testing UI ..............72Editing Class Test Parameters from the Project Testing UI ...............75Running Jtest in Command Line and Batch Mode.............................78Saving and Restoring Tests Parameters............................................92Using Jtest in a Group Environment ..................................................94Using Jtest with JUnit .........................................................................104Using Jtest with Ant............................................................................108Viewing and Validating Test Cases....................................................110Viewing Coverage Information ...........................................................121Viewing, Editing, or Compiling a Source ............................................124Viewing a Report of Results ...............................................................127Viewing Test History ..........................................................................132Customizing Test Parameters ............................................................134Customizing System Settings ............................................................136Customizing Error Reporting..............................................................137Testing a Large Project ......................................................................138Viewing Context-Sensitive Help .........................................................139

Static AnalysisAbout Static Analysis ......................................................................... 140Performing Static Analysis ................................................................. 143Viewing Class and Project Metrics..................................................... 145Tracking Metrics Over Time............................................................... 150Customizing Static Analysis ............................................................... 153Creating Customized Static Analysis Rules....................................... 166Static Analysis Suppressions.............................................................167
Dynamic AnalysisAbout Dynamic Analysis .................................................................... 168Performing Dynamic Analysis ............................................................ 169Customizing Dynamic Analysis .......................................................... 171Dynamic Analysis Suppressions........................................................ 173Testing Classes That Reference External Resources ....................... 178Using Custom Stubs .......................................................................... 184Setting an Object to a Certain State ..................................................192
White-Box TestingAbout White-Box Testing ................................................................... 195Performing White-Box Testing ........................................................... 197Customizing White-Box Testing......................................................... 200
Black-Box TestingAbout Black-Box Testing.................................................................... 204Performing Black-Box Testing ........................................................... 207Adding Test Cases with Method Inputs ............................................. 210Adding Test Cases with Test Classes ............................................... 218Specifying Imports ............................................................................. 234
Design by ContractUsing Design by Contract With Jtest ................................................. 235About Design by Contract ..................................................................239The Design by Contract Specification Language............................... 243
Regression Testing

About Regression Testing..................................................................256Performing Regression Testing..........................................................257
IDE Integration (Windows Only)Integrating VisualAge and Jtest .........................................................259Integrating JBuilder and Jtest.............................................................264Integrating Sun One Studio/Forte/NetBeans and Jtest ......................267Integrating WebSphere Studio Application Developer/Eclipse and Jtest
272Integrating Together and Jtest ...........................................................277
Jtest UI HelpJtest UI Overview ...............................................................................280Trees ..................................................................................................281Cursors...............................................................................................282Built-In Editor......................................................................................283
Class Testing UIClass Testing UI .................................................................................284Class Testing UI Menu Bar ................................................................285Class Testing UI Tool Bar ..................................................................291Class Testing UI Class Name Panel ..................................................297Class Testing UI Test Progress Panel ...............................................298Class Testing UI Errors Found Panel.................................................299
Project Testing UIProject Testing UI...............................................................................300Project Testing UI Menu Bar ..............................................................301Project Testing UI Tool Bar ................................................................307Project Testing UI Controls Panel ......................................................313Project Testing UI Results Panel .......................................................316

Test Parameters WindowsGlobal Test Parameters ..................................................................... 317Global Test Parameters - Static Analysis........................................... 318Global Test Parameters - Dynamic Analysis......................................323Global Test Parameters - Common and Search Parameters ............ 333Class Test Parameters ...................................................................... 343Class Test Parameters - Static Analysis ............................................344Class Test Parameters - Dynamic Analysis ....................................... 345Class Test Parameters - Common Parameters .................................354Project Test Parameters .................................................................... 356Project Test Parameters - Static Analysis.......................................... 357Project Test Parameters - Dynamic Analysis..................................... 358Project Test Parameters - Common Parameters, Search Parameters,
Classes in Project ........................................................................... 363
ToolsFind Classes UI.................................................................................. 368
ReferenceJtest Tutorials..................................................................................... 372Jtest FAQs .........................................................................................373Accessing the Jtest API ..................................................................... 374Fixing Errors Found ........................................................................... 375Understanding Exceptions ................................................................. 382xjavadoc Reference ........................................................................... 387Properties File Customization Options............................................... 394Confidence Level Reference.............................................................. 403Recommended Reference Books ...................................................... 406Built-in Static Analysis Rules .............................................................407
CreditsCredits for Open Source Software Included in Jtest .......................... 946
Introduction
1
Intr
od
uct
ion
IntroductionIntroductionWelcome to Jtest, an automated error prevention tool that tests any Java class or JSP without requiring you to write a single test case, harness, or stub.
With the click of a button, Jtest automatically creates and executes test cases that verify class/JSP construction. If you use Design by Contract (DbC) to add specification information to your code, Jtest also automati-cally creates and executes test cases that verify whether classes function as specified. Jtest helps you create additional user-defined test cases, and performs automated regression testing with both automatically-gen-erated and user-defined test cases. In addition, Jtest prevents errors with a customizable static analysis feature that automatically checks over 300 industry-respected coding standards and any number of custom coding standards you design with its RuleWizard feature.
Jtest complements and extends JUnit. Jtest not only runs JUnit test cases, but also automatically designs and executes additional test cases that verify the code and increase test coverage. Moreover, Jtest automat-ically creates JUnit test class templates into which you can easily enter test cases, and exports all Jtest test cases as JUnit-compatible test classes. It even enforces best practices for JUnit test classes during static analysis.
Jtest’s unique test case generation and static analysis technology helps you prevent problems, catch existing problems as early as possible, achieve the fullest possible coverage of the methods, and uncover prob-lems that other types of testing are unable to detect. When you use Jtest to test each class as soon as you compile it, you will improve software reliability while you reduce development time, effort, and cost.
Windows Installation and Setup
Intro
du
ction
Windows Installation and SetupThis topic explains how to install, configure, and run Jtest on a Windows system. Subtopics include:
• Prerequisites
• Installing Jtest
• Starting Jtest
• Installing a License
Prerequisites• Windows NT/2000/XP
• JDK 1.3 or higher
Installing JtestTo install Jtest:
1. Run the setup executable that you downloaded from the ParaSoft Web site or that is on your CD.
2. Follow the installation program’s onscreen directions. The instal-lation program will automatically install Jtest on your system.
Starting JtestTo launch Jtest, double-click the Jtest desktop icon.
A Jtest license must be installed before you can begin using Jtest.
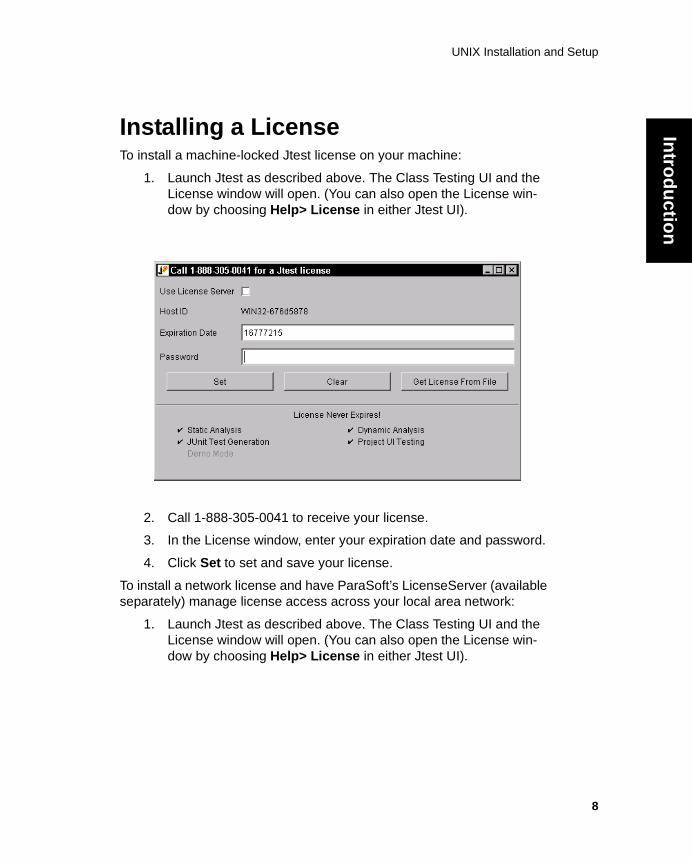
Installing a LicenseTo install a machine-locked Jtest license on your machine:
2

Windows Installation and Setup
3
Intr
od
uct
ion
1. Launch Jtest as described above. The Class Testing UI and the License window will open. (You can also open the License win-dow by choosing Help> License in either Jtest UI).
2. Call 1-888-305-0041 to receive your license.
3. In the License window, enter your expiration date and password.
4. Click Set to set and save your license.
To install a network license and have ParaSoft’s LicenseServer (available separately) manage license access across your local area network:
1. Launch Jtest as described above. The Class Testing UI and the License window will open. (You can also open the License win-dow by choosing Help> License in either Jtest UI).
2. Select the Use License Server option in the License window. The License window will then change to the window shown

Windows Installation and Setup
Intro
du
ction
below.
3. Enter the name of your LicenseServer host in the License Server Host field.
4. Enter your LicenseServer port in the License Server Port field (the default port is 2002).
5. Click Set to set and save your LicenseServer information.
6. Call 1-888-305-0041 to receive your license.
7. Add your license to LicenseServer as described in the LicenseServer documentation.
4

UNIX Installation and Setup
5
Intr
od
uct
ion
UNIX Installation and SetupThis topic explains how to install, configure, and run Jtest on a UNIX sys-tem. Subtopics include:
• Glossary of Terms Used in this Topic
• Prerequisites
• Installing Jtest
• Setting the Environment
• Starting Jtest
• Installing a License
• Indicating the Location of Your JDK
Glossary of Terms Used in this Topic<jtest-home>: The Jtest installation directory (the directory where Jtest is installed).
<arch>: The platform on which Jtest will be run. For example, solaris, linux, and so on.
<compression-scheme>: The compression scheme used to create the Jtest installation archive. ".Z (compressed)" is standard. ".gz (gzipped)" is faster and smaller, but not as common.
Prerequisites• JDK 1.3.1
• One of the following platforms:
• Solaris 7 or 8. All relevant patches from Sun that will allow the machine to run the interpreter from JDK 1.3.1 must be installed.
• RedHat Linux 6.1, 7.1, or 7.2
• SuSE Linux 7.2

UNIX Installation and Setup
Intro
du
ction
• Mandrake Linux 8.1
Installing Jtest1. Copy the jtest.<arch>.tar.<compression-scheme> file to the
directory where you would like to install Jtest.
2. Extract the archive using one of the commands listed below.
• For .gz files, enter:gzip -dc jtest.<arch>.tar.gz | tar xvf -
• For .Z files, enter:uncompress -c jtest.<arch>.tar.Z | tar xvf -
• Remember to substitute your specific architecture name (for example, solaris, linux, etc.) for <arch>. For exam-ple, to extract a Linux .gz file, you would enter the follow-ing command:gzip -dc jtest.linux.tar.gz | tar xvf -
During extraction, a directory named jtest will be created; this directory will contain the program files needed to run Jtest.
Setting the EnvironmentAfter you install Jtest, you must set your environment before you can run Jtest. To set the environment:
1. Use the provided shell script to set up your environment or set the environment by hand.
• To use the script:
• For bash or sh shells: Run the jtvars.sh script in <jtest-home>. For example:$ cd <jtest-home>$ . jtvars.sh
• For csh, tcsh, or ksh shells: Source the jtvars script in <jtest-home>. For example:$ cd <jtest-home>$ source jtvars
6

UNIX Installation and Setup
7
Intr
od
uct
ion
• To determine which shell you are using, enter:$ echo $SHELL
• To set the environment by hand, add the <jtest-home>/bin directory to the PATH environment vari-able and add the <jtest-home>/lib directory to the LD_LIBRARY_PATH environment variable.
2. Add the Sun Microsystems javac compiler to your path (if it is not already there).Jtest requires the javac compiler for Design by Contract and black-box testing. If you do not have javac on your shell's path, set the PARASOFT_JDK_HOME environment variable to the location of the Sun Microsystems JDK on your machine.
• bash or sh shell example:$ PARASOFT_JDK_HOME=/usr/java/jdk1.3.1$ export PARASOFT_JDK_HOME
• tcsh, csh or ksh shell example:$ setenv PARASOFT_JDK_HOME /usr/java/jdk1.3.1
• Note: If you add to your environment the bin directory of the Sun JDK, you do not need to set PARASOFT_JDK_HOME.
3. Make your changes to LD_LIBRARY_PATH, PATH and PARASOFT_JDK_HOME permanent.To make the changes environment variables, edit your shell's login script. Add the definition of the PARASOFT_JDK_HOME environment variable to your login script only if you don't have javac on your PATH.You might want to ask sysadmin for help with this task. Until sysadmin responds, use the scripts provided in the <jtest-home> directory.
Starting JtestAfter you have set the environment, you can start Jtest by running the jtestgui command.
A Jtest license must be installed before you can begin using Jtest.
UNIX Installation and Setup
Intro
du
ction
Installing a LicenseTo install a machine-locked Jtest license on your machine:
1. Launch Jtest as described above. The Class Testing UI and the License window will open. (You can also open the License win-dow by choosing Help> License in either Jtest UI).
2. Call 1-888-305-0041 to receive your license.
3. In the License window, enter your expiration date and password.
4. Click Set to set and save your license.
To install a network license and have ParaSoft’s LicenseServer (available separately) manage license access across your local area network:
1. Launch Jtest as described above. The Class Testing UI and the License window will open. (You can also open the License win-dow by choosing Help> License in either Jtest UI).
8

UNIX Installation and Setup
9
Intr
od
uct
ion
2. In the License window, check the Use License Server option. The License window will then change to the window shown below
3. Enter your LicenseServer host in the License Server Host field.
4. Enter your LicenseServer port in the License Server Port field (the default port is 2002).
5. Click Set to set and save your LicenseServer information.
6. Call 1-888-305-0041 to receive your license.
7. Add your license to LicenseServer as described in the LicenseServer documentation.
Indicating the Location of Your JDKIf Jtest opens a dialog box that asks you to set PARASOFT_JDK_HOME, it is indicating that it could not find the javac compiler required for black-box testing and Design by Contract.
There are two ways to resolve this issue:
• Set the variable to the installation directory of the JDK.

UNIX Installation and Setup
Intro
du
ction
• sh and bash shell example: $ export PARASOFT_JDK_HOME=/usr/java/jdk1.3.1
• tcsh, csh, and ksh shell example:$ setenv PARASOFT_JDK_HOME /usr/java/jdk1.3.1
• Add the JDK’s bin directory to the PATH.
• sh and bash shell example:$ export PATH=$PATH\:/usr/java/jdk1.3.1/bin
• tcsh, csh, and ksh shell example:$ set path=($path /usr/java/jdk1.3.1/bin)$ rehash
10

Contacting Parasoft
11
Intr
od
uct
ion
Contacting ParasoftParasoft is committed to providing you with the best possible product sup-port for Jtest. If you have any trouble installing or using Jtest, please fol-low the procedure below in contacting our Quality Consulting department.
• Be prepared to recreate your problem.
• Know your Jtest version. (You can find it in Help> About.)
Obtaining Live Online SupportJtest experts are available online Monday through Friday from 8:00 AM to 5:00 PM Pacific Standard Time to answer your questions. This live sup-port allows you to chat in real-time with the Jtest team and perform desk-top sharing if needed. To receive live online support, choose Help> Support> Live Help in either Jtest UI.
Contacting Us Via Phone, E-Mail, or Fax
• USA Headquarters
Tel: (888) 305-0041
Fax: (626) 305-9048
Email: [email protected]
Web Site: http://www.parasoft.com
• Parasoft France
Tel: +33 (0) 1 64 89 26 00
Fax: +33 (0) 1 64 89 26 10
Email: [email protected]
• Parasoft Germany

Contacting Parasoft
Intro
du
ction
Tel: +49 (0) 78 05 95 69 60
Fax: +49 (0) 78 05 95 69 19
Email: [email protected]
• Parasoft UK
Tel: +44 (020) 8263 2827
Fax: +44 (020) 8263 2701
Email: [email protected]
12

Contacting Parasoft
13
Intr
od
uct
ion

Quick Start Guide
Testin
g
Testing With Jtest
Quick Start GuideThis topic provides an overview of how to perform white-box (construc-tion) testing, black-box (functionality) testing, regression testing, and static analysis with Jtest. It also describes the prerequisites for performing these tests. Subtopics include:
• Prerequisites
• General Testing Procedure
• CLASSPATH Configuration
Prerequisites
General PrerequisitesYou must satisfy all of the following requirements in order to use the basic Jtest functionality:
• The '.class' or .’jsp’ files for the classes you want to test must be available. A '.class' file is a compiled Java source. Without a '.class' or ‘.jsp’ file, Jtest will not be able to perform any tests.
• The '.class' files must be in a directory hierarchy that reflects the structure of the package, regardless of whether they are in jar files, zip files, or in the file system.
• The classes or JSPs referenced by the tested '.class' and ‘jsp’ files must be available to Jtest. To make the files available, add their location to the CLASSPATH as described in “CLASSPATH Configuration” on page 19.
• If the '.class' or ‘.jsp’ files are in directories, '.zip' files, or '.jar' files, the '.class' or ‘.jsp’ files must be accessible by Jtest.
To use full Jtest functionality (static analysis, source browsing, Design by Contract, etc.) the '.java' source or ‘.jsp’ files must be available to Jtest during testing.
Black-Box Testing/Design by Contract
14

Quick Start Guide
15
Tes
tin
g
Prerequisites
JDK PrerequisitesIn order for Jtest to perform black-box (functionality) testing and use Design by Contract information, a valid path to your Java compiler must be specified in Jtest’s global test parameters.
Jtest automatically determines the path to your JDK by looking at the fol-lowing variables in the order listed:
1. The PARASOFT_JDK_HOME variable.
2. The javac PATH environment variable.
3. JAVA_HOME, JDK_HOME, JAVAHOME, ...
The first valid variable found is used.
To see which JDK Jtest has detected on your system, click the Global button in the current Jtest UI, then read the value listed in the Common Parameters> Path to JDK directory branch of the Global Test Parame-ters window that opens.
You can configure Jtest to use a different JDK permanently or temporarily.
To permanently change the JDK used:
• Change the PARASOFT_JDK_HOME environment variable in the method appropriate for your operating system.
To temporarily change the JDK used:
1. Temporarily reset the PARASOFT_JDK_HOME variable at the command line in the method appropriate for your operating sys-tem.
2. Start Jtest from the command line as described in “Running Jtest in Command Line and Batch Mode” on page 78.
Contract PrerequisitesIf you want Jtest to automatically create black-box (functionality) test cases, your code must use Design by Contract. For information on Design by Contract, see “Using Design by Contract With Jtest” on page 235 and “The Design by Contract Specification Language” on page 243.

Quick Start Guide
Testin
g
JSP Testing PrerequisitesIf you want Jtest to access TLD files or “include files” referenced in a JSP, you must specify these parameters in the global, project, or class test parameters.
When you are testing JSPs, you might also need to specify the URI base or URI root directories.
For information on all JSP-related parameters, see “Common Parame-ters> JSP Parameters” on page 337.
General Testing ProcedureTo automatically test your class(es) or JSPs with Jtest, perform the follow-ing steps:
1. Open the appropriate UI for your test. The Class Testing UI is used to test a single class or JSP; the Project Testing UI is used to test a set of classes or JSPs.
• The Class Testing UI opens by default when Jtest is launched.
• The Project Testing UI can be opened by clicking the Class Testing UI’s Project button.
2. If a class or set of classes is already loaded into the UI you are using, click the New button to clear the previous test.
3. Click the Browse button, then use the file chooser to indicate what class or set of classes you want to test.
4. Choose Tools> Check Class/Project Dependencies to deter-mine whether Jtest can locate all required files.
5. Test the class/JSP or project for the first time by clicking the Start button. Jtest will open a dialog box asking you to save test parameters, then it will execute the test.
The first time you test a class or JSP, Jtest will:
• Perform static analysis (if the class’s .java source file is available or if you are testing a JSP).
16
Quick Start Guide
17
Tes
tin
g
• Create and execute white-box test cases that check your code’s construction.
• Create and execute black-box test cases that verify your code’s functionality (if your code uses Design by Con-tract).
6. Review the class test results or project test results, then evaluate outcomes of automatically-generated test cases, correct errors found, modify the contracts, or suppress reporting of errors you do not want reported in future test runs. For tips on fixing errors, see “Fixing Errors Found” on page 375.
7. Rerun the test after you have modified one or more classes that you previously tested (i.e., perform regression testing). To do this:
a. If the class or project is not still loaded into Jtest, choose File> Open in the UI that you used for the original test, then choose the appropriate .ctp or .ptp file from the file chooser.
b. Click Start.
When the test is run this time (and all additional times) Jtest will:
• Repeat static analysis.
• Repeat the previously-created test cases that are still applicable to the modified classes.
• Create new test cases as needed for the modi-fied code.
• Perform regression testing by comparing the lat-est test case outcomes with those obtained dur-ing the initial test run (or the outcomes that you specified while evaluating test cases).
Adding User-Defined Stubs and Test Cases (Including JUnit Test Classes)Jtest also allows you to enter your own stubs and test cases.

Quick Start Guide
Testin
g
Stubs can be added as Stubs Classes; for information on adding stubs, see “Using Custom Stubs” on page 184 and “Testing Classes That Refer-ence External Resources” on page 178.
Test cases can be added using new or existing JUnit Test Classes and Jtest Test Classes, or by specifying method inputs. To add and execute user-defined test cases, perform these additional steps in either Jtest UI:
1. If the class or project is not still loaded into Jtest, choose File> Open in the UI that you used for the original test, then choose the appropriate .ctp or .ptp file from the file chooser.
2. Open the View Test Cases window to view the automatic inputs that Jtest created during previous test runs.
• In the Class Testing UI, open the View Test Cases win-dow by clicking View.
• In the Project Testing UI, right-click the [Class Name] node in the Results panel, then choose View Test Cases from the shortcut menu.
• Tip: If the View button is not selected, click the Results button.
3. Design additional test cases as needed.
4. Add the user-defined test cases using JUnit or Jtest Test Classes or method inputs.
• For information on using JUnit or Jtest Test Classes, see “Adding Test Cases with Test Classes” on page 218.
• For information on using method inputs, see “Adding Test Cases with Method Inputs” on page 210.
5. Rerun the test by clicking the Start button.
When the test is run, Jtest will perform all the tests it performed in previous test runs, plus it will execute the user-defined test cases and determine the outcome for these test cases.
6. Specify the correct outcomes for the user-defined method inputs, as well as for automatically-generated test cases, by performing the following tasks for each class and test case:
18

Quick Start Guide
19
Tes
tin
g
a. View the test case input and outcomes in the View Test Cases window.
b. Validate correct outcomes or set the correct value for incorrect outcomes by right-clicking the appropriate out-come node, then selecting the appropriate command from the shortcut menu.
7. Rerun the test by restoring test parameters (if the class/project is not already loaded into Jtest) and clicking the Start button.
When you rerun the test, Jtest will check for specification and regression testing errors; it does this by comparing validated out-comes with their specified values, and comparing nonvalidated outcomes with their previous values. Jtest will also continue to test for uncaught runtime exceptions and static analysis viola-tions.
Using Jtest with JUnitFor an overview of how you can use Jtest with JUnit, see “Using Jtest with JUnit” on page 104.
Using Jtest with AntFor tips on using Jtest with Apache's Jakarta Ant build tool, see “Using Jtest with Ant” on page 108.
CLASSPATH ConfigurationIf during testing, Jtest finds ClassNotFoundExceptions or NoClassDef-FoundErrors, or if it reports that it could not find the package from "imports", the CLASSPATH is not set properly. If this occurs, you need to set the system CLASSPATH variable to include every class referenced (recursively) by the tested class prior to testing. Check that the CLASS-PATH includes the parent directory of the directory hierarchy. For exam-ple, if you are testing com.company.MyClass and Jtest reports that it could not find a package referenced by MyClass, it is probably because the com directory is not on the CLASSPATH.

Quick Start Guide
Testin
g
A CLASSPATH is typically set in in the IDE, with bash or batch files, or with Makefiles.
If your CLASSPATH is set from your IDE, you can set your CLASSPATH for Jtest by starting Jtest from your IDE.
If your CLASSPATH is set with bash or batch files, you can set your CLASSPATH for Jtest by launching Jtest from a bash script or batch file.
If your CLASSPATH is set with Makefiles, you can set your CLASSPATH for Jtest by launching Jtest from a command line after running your make-file in the same environment.
You can also set one of the CLASSPATH parameters (-cp or –classpath) within the Common Parameters> java/javac like parameters area of the Jtest class, project, or global test parameters (described in “Customiz-ing Test Parameters” on page 134). This option is best if you want to over-ride the CLASSPATH set in your system environment or if you only have a few paths to set.
To indicate your source file location, set the Common Parameters> Source Path option in the Jtest class, project, or global test parameters (described in “Customizing Test Parameters” on page 134).
20
Testing a Single Class or JSP
21
Tes
tin
g
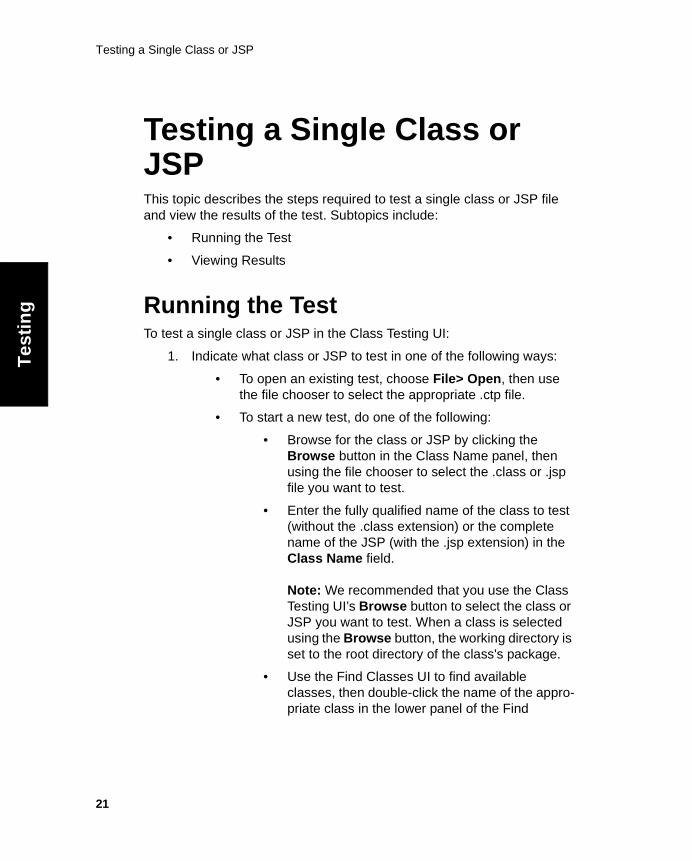
Testing a Single Class or JSPThis topic describes the steps required to test a single class or JSP file and view the results of the test. Subtopics include:
• Running the Test
• Viewing Results
Running the TestTo test a single class or JSP in the Class Testing UI:
1. Indicate what class or JSP to test in one of the following ways:
• To open an existing test, choose File> Open, then use the file chooser to select the appropriate .ctp file.
• To start a new test, do one of the following:
• Browse for the class or JSP by clicking the Browse button in the Class Name panel, then using the file chooser to select the .class or .jsp file you want to test.
• Enter the fully qualified name of the class to test (without the .class extension) or the complete name of the JSP (with the .jsp extension) in the Class Name field.
Note: We recommended that you use the Class Testing UI’s Browse button to select the class or JSP you want to test. When a class is selected using the Browse button, the working directory is set to the root directory of the class's package.
• Use the Find Classes UI to find available classes, then double-click the name of the appro-priate class in the lower panel of the Find

Testing a Single Class or JSP
Testin
g
Classes UI. This will set up a test for the selected class in the Class Testing UI.
2. (Optional) Add user-defined test cases using Test Classes or method inputs.
• For information on adding Test Classes, see “Adding Test Cases with Test Classes” on page 218.
• For information on adding method inputs, see “Adding Test Cases with Method Inputs” on page 210.
3. Verify whether Jtest can locate all necessary files by choosing Tools> Check Class Dependencies. If Jtest cannot locate a necessary file, it will open a dialog box that allows you to modify your classpath to point to the necessary file.
4. Start the test by clicking the Start tool bar button, then save your class test parameters when prompted to do so.
• If you only want to perform static analysis or a specific type of static analysis, right-click the Start button and choose the menu item that describes the type of static analysis that you want to perform.
• If you only want to perform dynamic analysis or a specific type of dynamic analysis, right-click the Start button and choose the menu item that describes the type of dynamic analysis that you want to perform.
Unless you tell it to do otherwise, Jtest automatically performs all steps required for:
• Static analysis
• White-box testing
• Black-box testing (if Design by Contract-format contract informa-tion is included in the class under test, test case outcomes have been validated, or user-defined test cases have been added)
• Regression testing (on all test runs after the first)
If you want to configure Jtest to perform only static analysis or only dynamic analysis, modify your test parameters as described in “Customiz-ing Test Parameters” on page 134.
22

Testing a Single Class or JSP
23
Tes
tin
g
For details on specific types of tests performed, see the following topics:
• “About Static Analysis” on page 140
• “About Dynamic Analysis” on page 168
• “About White-Box Testing” on page 195
• “About Black-Box Testing” on page 204
• “About Regression Testing” on page 256
Viewing ResultsResults are displayed in the Errors Found Panel. To learn more about this panel's branches and available options, see “Exploring Class Test Results” on page 35.
For tips on fixing the errors found, see “Fixing Errors Found” on page 375.
For information on producing HTML, ASCII, XML, and custom reports, see “Viewing a Report of Results” on page 127.

Testing a Class - Two Simple Examples
Testin
g
Testing a Class - Two Simple ExamplesThe following topic demonstrates how to perform fully automatic testing on two simple classes: one that does not use Design by Contract and one that does. Subtopics include:
• Example 1: Testing a Class Without Design by Contract Com-ments
• Example 2: Testing a Class With Design by Contract Comments
Example 1: Testing a Class Without Design by Contract CommentsThis example demonstrates how Jtest tests a single class file that does not use Design by Contract.
To test the sample class:
1. Go to Jtest’s Class Testing UI. (This UI opens by default when you launch Jtest).
2. If a class is already loaded into the Class Testing UI (i.e., if you see a class name in the Class Name field), click the New button to clear the previous test.
3. Browse to Simple.class (in <jtest_install_dir>/examples/eval) using the Browse button in the Class Name panel.
4. Click the Start button in the tool bar, then save your class test parameters when prompted to do so.
Jtest will perform static analysis, then automatically create and execute white-box test cases designed to test the class’s construction. A dialog box will open to notify you when testing is complete. Information on test progress will be displayed in the Test Progress panel. Errors found will be reported in the Errors Found panel.
Examining Static Analysis Violations
24

Testing a Class - Two Simple Examples
25
Tes
tin
g
The following static analysis violations will be reported in the Static Anal-ysis Violations branch of the Errors Found panel.
To see more information about a violation, expand the violation’s branch. For example, expand the violation of the PB.TLS rule.
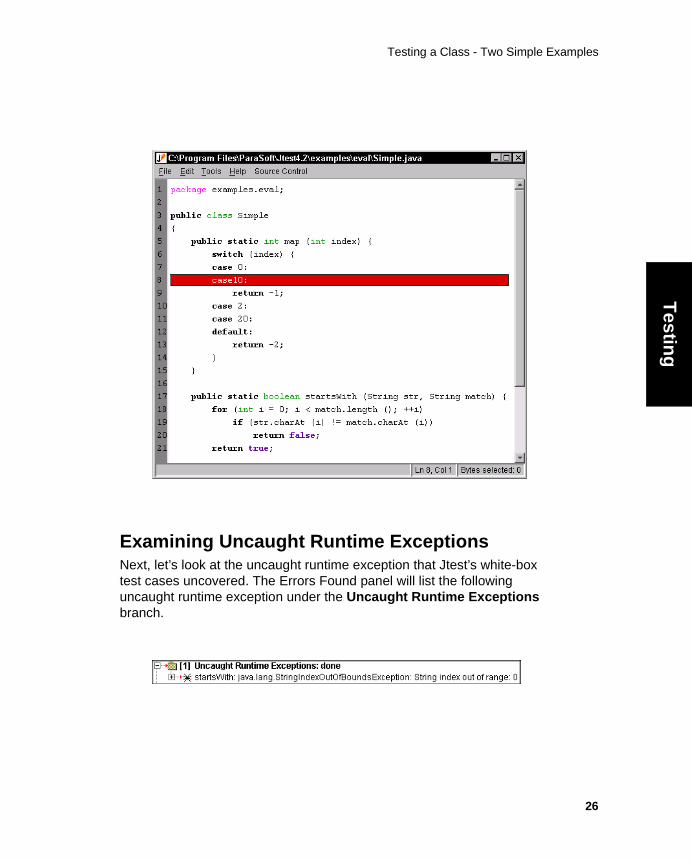
This message reveals that the developer of this class inadvertently wrote case10 instead of case 10. If the class is not fixed, it will give incorrect results when it is passed the value 10. To view the source code of the class (with the line containing the violation highlighted), double-click the node containing the violation’s file/line information. Jtest will then open Simple.java in its default editor, the editor of the IDE you have integrated into Jtest, or any other editor you have configured Jtest to use.
Testing a Class - Two Simple Examples
Testin
g
Examining Uncaught Runtime ExceptionsNext, let’s look at the uncaught runtime exception that Jtest’s white-box test cases uncovered. The Errors Found panel will list the following uncaught runtime exception under the Uncaught Runtime Exceptions branch.
26

Testing a Class - Two Simple Examples
27
Tes
tin
g
This error message reveals that there is some input for which the class will throw an uncaught runtime exception at runtime. This could cause the application running this class to crash.
To see a stack trace like the one the Java virtual machine would give if this uncaught runtime exception were thrown, expand this branch.
To see an example usage of this class that would lead to the reported uncaught runtime exception, expand the Test Case Input branch.
This error message reveals that the startsWith method is implemented incorrectly. The method should return false for the argument "" and "0" instead of throwing a runtime exception. If the error is not fixed, any appli-cation using this class will eventually crash or give incorrect results.
To view the source code of the class (with the problematic line of the stack trace highlighted), double-click the node containing the exception's file/line information.

Testing a Class - Two Simple Examples
Testin
g
To see a sample of the test cases that Jtest automatically created, click the View button to open the View Test Cases window. In the View Test Cases window, Control-right-click the Automatic Test Cases node, then choose Expand Children from the shortcut menu.
Performing Regression TestingJtest doesn't display any regression errors on the first run through a class because it is impossible to detect a regression error the first time a class is tested. Regression testing checks that class outcomes don't change, so it always needs a first run for reference.
To see how regression testing works, introduce an error into Simple.java and test it again:
28
Testing a Class - Two Simple Examples
29
Tes
tin
g
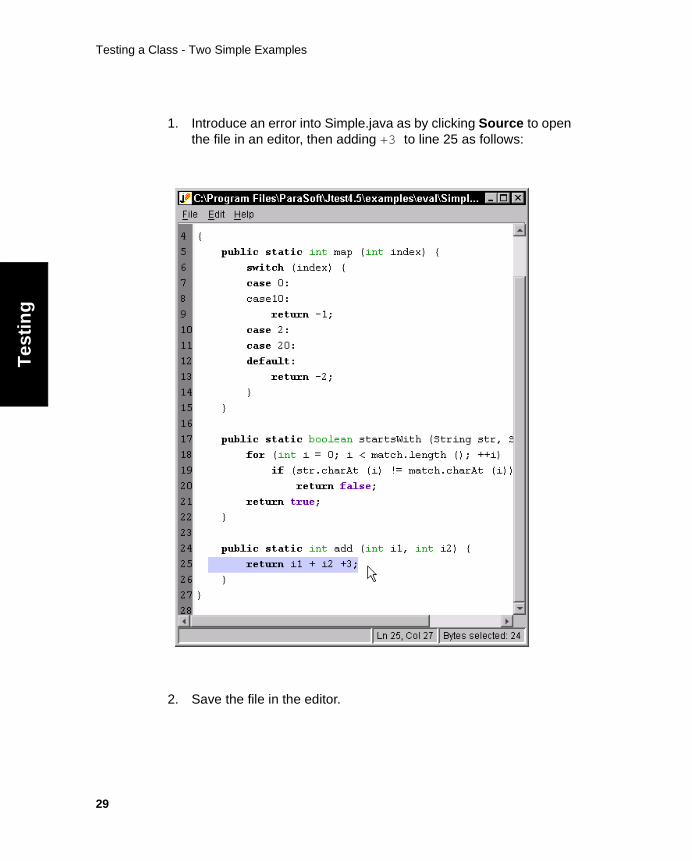
1. Introduce an error into Simple.java as by clicking Source to open the file in an editor, then adding +3 to line 25 as follows:
2. Save the file in the editor.

Testing a Class - Two Simple Examples
Testin
g
3. Recompile Simple.java by right-clicking the Source button, then choosing Compile Source from the shortcut menu.
4. Click Start to retest Simple.class. Jtest then replays the existing test cases and compares the current outcomes with the previous outcomes.
The modified code changes the test outcomes, so Jtest reports the follow-ing regression errors in the Errors Found panel:
Expand the error messages to see the inputs for which these regression errors occur. The first error tells us that the method "add" is now returning 3 instead of 0 for the input 0, 0. The second error reveals that the method "add" is now returning 17 instead of 14 for the input 7,7.
Example 2: Testing a Class With Design by Contract CommentsThis example demonstrates how Jtest tests a single class file that con-tains Design by Contract-format specification information.
30

Testing a Class - Two Simple Examples
31
Tes
tin
g
To test a sample class which uses DbC:
1. Go to Jtest’s Class Testing UI. (This UI opens by default when you launch Jtest).
2. If a class is already loaded into the Class Testing UI (i.e., if you see a class name in the Class Name field), click the New button to clear the previous test.
3. Browse to Example.class (in <jtest_install_dir>/examples/eval) using the Browse button in the Class Name panel.
4. Click the Start button in the tool bar, then save your class test parameters when prompted to do so.
Jtest will perform both static and dynamic analysis on the class. Because specification information is incorporated into the code using Design by Contract comment tags, Jtest can fully automate black-box (functionality) testing as well as white-box (construction) testing. Jtest will automatically create and execute black-box test cases that verify the functionality described in the class’s contracts. It will also create and execute test cases that check how the class handles a wide range of inputs.
A dialog box will open to notify you when testing is complete. Information on test progress will be displayed in the Test Progress panel. This test uncovers one Design by Contract violation, one uncaught runtime excep-tion, and eight static analysis violations.
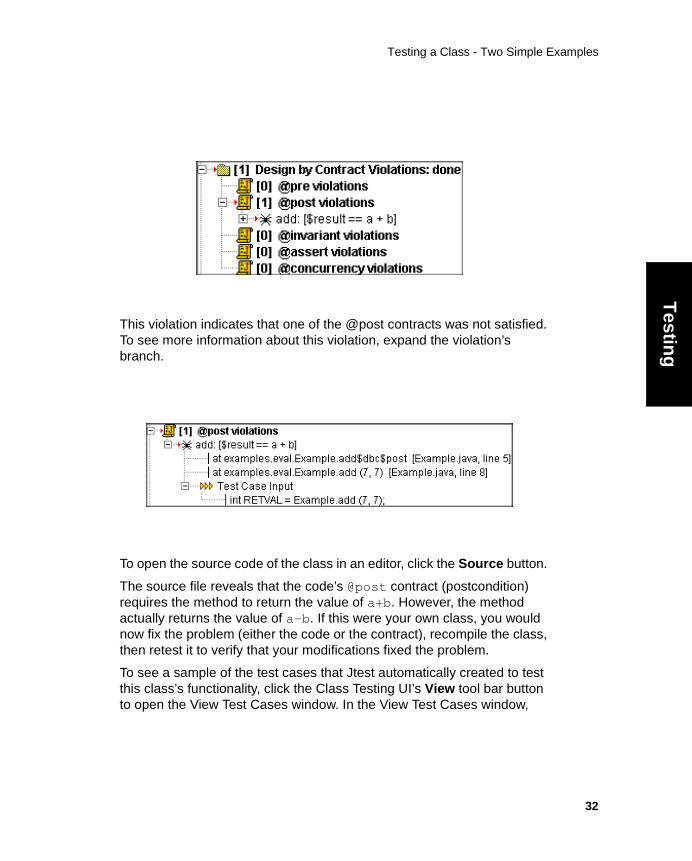
Examining Design by Contract ViolationsThe following Design by Contact violation will be reported in the Design by Contract Violations branch of the Errors Found panel.
Testing a Class - Two Simple Examples
Testin
g
This violation indicates that one of the @post contracts was not satisfied. To see more information about this violation, expand the violation’s branch.
To open the source code of the class in an editor, click the Source button.
The source file reveals that the code’s @post contract (postcondition) requires the method to return the value of a+b. However, the method actually returns the value of a-b. If this were your own class, you would now fix the problem (either the code or the contract), recompile the class, then retest it to verify that your modifications fixed the problem.
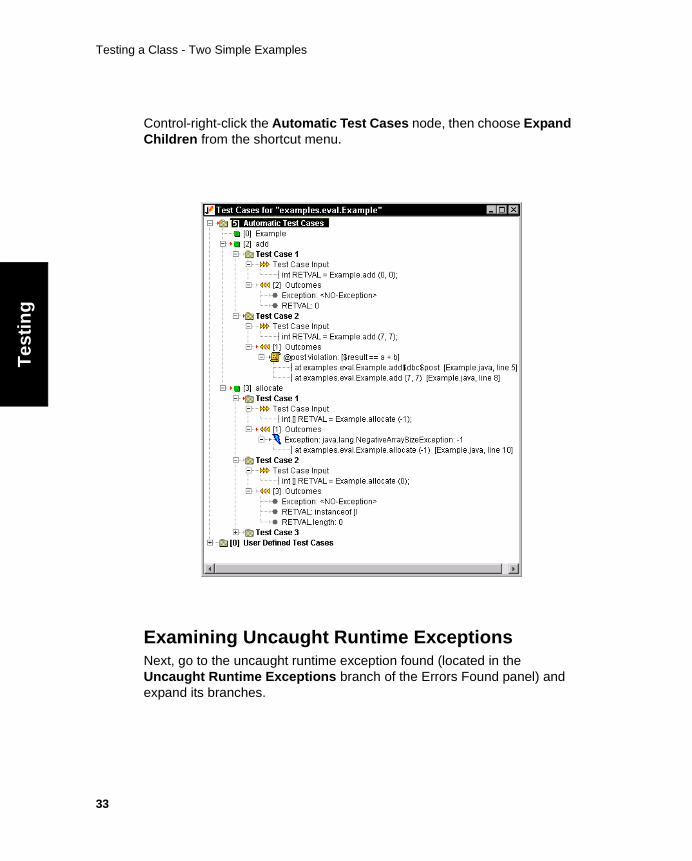
To see a sample of the test cases that Jtest automatically created to test this class’s functionality, click the Class Testing UI’s View tool bar button to open the View Test Cases window. In the View Test Cases window,
32
Testing a Class - Two Simple Examples
33
Tes
tin
g
Control-right-click the Automatic Test Cases node, then choose Expand Children from the shortcut menu.
Examining Uncaught Runtime ExceptionsNext, go to the uncaught runtime exception found (located in the Uncaught Runtime Exceptions branch of the Errors Found panel) and expand its branches.

Testing a Class - Two Simple Examples
Testin
g
This error message shows that a NegativeArraySizeException occurs when a negative index is used as an index to an array. This is an expected exception. If this were your code, you would want to document this exception in your source file by adding the following Design by Con-tract Javadoc comment above the method:
/** @exception java.lang.NegativeArraySizeException */
By adding this comment, you make the code easier to maintain. Someone looking at the code later on will immediately know that the method is throwing an exception because the code is supposed to throw an excep-tion, not because the code has a bug. In addition, you configure Jtest to suppress future occurrences of this exception.
34

Exploring Class Test Results
35
Tes
tin
g
Exploring Class Test ResultsThis topic describes how you can view class test results in the Class Test-ing UI’s Errors Found Panel, get more detail about results, and change how results are reported in subsequent tests. Subtopics include:
• Overview
• Viewing Test Progress Details
• Viewing Error/Violation Details
• Exploring and Modifying Results
For information about Jtest’s reports, see “Viewing a Report of Results” on page 127.
OverviewAll errors and violations exposed during a class test are displayed in the Class Testing UI’s Errors Found panel. The contents of this panel are described below, and in context-sensitive help.
Test progress information, including coverage information, is displayed in the Class Testing UI’s Test Progress panel. The contents of this panel are described below, and in context-sensitive help.
The Class Testing UI also provides you with a variety of ways to gain additional information about the test results and to customize what results are reported the next time that a test is run. Most options are accessible via shortcut menus associated with Errors Found node, or with Jtest tool bar buttons. For more information on these options, see “Exploring and Modifying Results” on page 41.
Viewing Test Progress DetailsThe Test Progress panel’s tree contains the following information about test progress and coverage:
Exploring Class Test Results
Testin
g
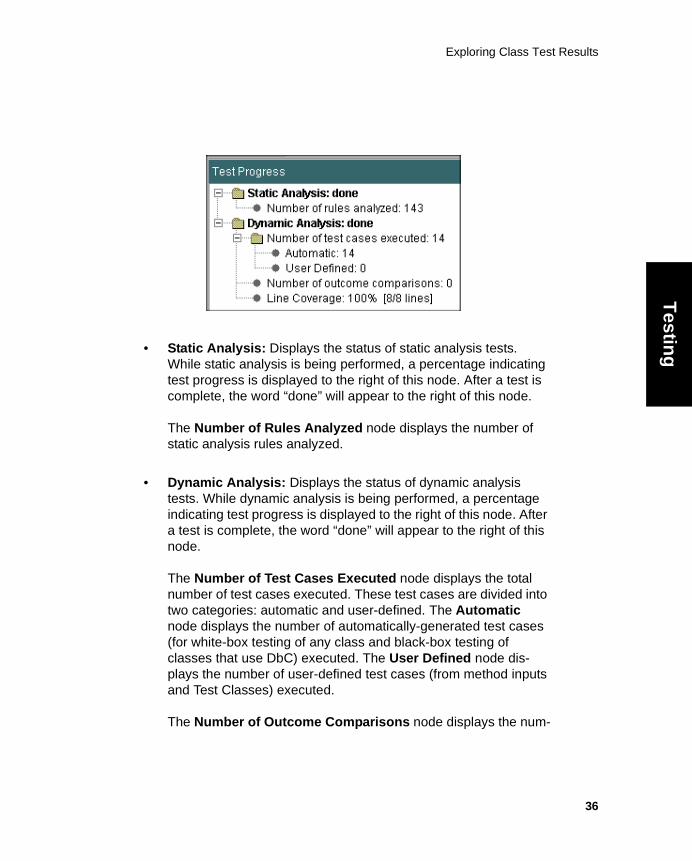
• Static Analysis: Displays the status of static analysis tests. While static analysis is being performed, a percentage indicating test progress is displayed to the right of this node. After a test is complete, the word “done” will appear to the right of this node.The Number of Rules Analyzed node displays the number of static analysis rules analyzed.
• Dynamic Analysis: Displays the status of dynamic analysis tests. While dynamic analysis is being performed, a percentage indicating test progress is displayed to the right of this node. After a test is complete, the word “done” will appear to the right of this node.
The Number of Test Cases Executed node displays the total number of test cases executed. These test cases are divided into two categories: automatic and user-defined. The Automatic node displays the number of automatically-generated test cases (for white-box testing of any class and black-box testing of classes that use DbC) executed. The User Defined node dis-plays the number of user-defined test cases (from method inputs and Test Classes) executed.
The Number of Outcome Comparisons node displays the num-
36

Exploring Class Test Results
37
Tes
tin
g
ber of outcomes compared during black-box and regression test-ing.
The Line Coverage node displays the cumulative coverage achieved by all the test cases used in a test. If some part of the class is not covered, it means that Jtest has not yet found a path leading to those statements or no path leads to those statements. On average, Jtest is able to automatically create test cases that cover about 75% of the code. Sometimes Jtest will be able to test 100% of the class, and sometimes it will test less than 75% of the class. For more information about viewing and customizing cov-erage results, see “Viewing Coverage Information” on page 121.
Note that the Test Progress panel is minimized by default. To view the information that it contains, you need to maximize it by clicking the Maxi-mize button.
Viewing Error/Violation DetailsThe Errors Found panel’s tree contains the following information about the errors and violations detected:
Static Analysis Violations
Uncaught Runtime Exceptions
Specification & Regression Errors
Design by Contract Violations

Exploring Class Test Results
Testin
g
• Static Analysis Violations: Displays the number of violations that Jtest found while performing static analysis. This branch con-tains the following information:
• Rule: Name of rule violated. (Rule ID and severity level is displayed in parentheses. Violations of Level 1 rules are most critical; violations of level 5 rules are least critical). Marked with a wizard hat icon.
• Violation: Jtest rule violation message. To view the asso-ciated rule description, right-click this node then choose View Rule Description from the shortcut menu. Marked with a bug icon.
• File/line info: File name and line number where violation occurred. To view or edit the source code, double-click this node.
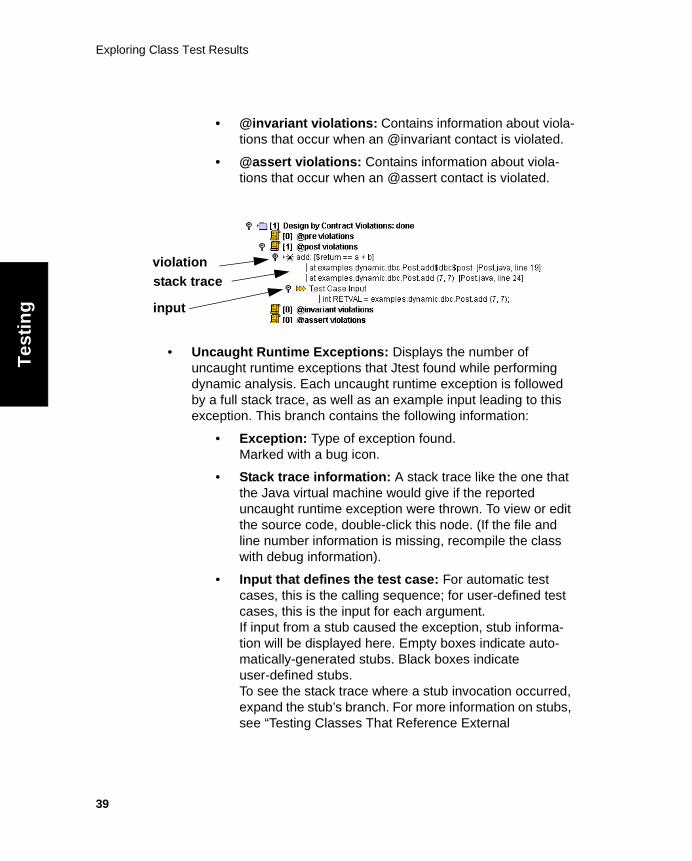
• Design by Contract Violations: Displays the number of Design by Contract violations that Jtest found while performing dynamic analysis. Each violation message includes file/line information as well as stack trace and calling sequence information. Design by Contract violations are organized according to the type of con-tract that was violated. Design by Contract Violations. This branch contains the following violation categories:
• @pre violations: Contains information about violations that occur when a method is called incorrectly and a @pre contract is violated.
• @post violations: Contains information about violations that occur when a method does not return the expected value and a @post contract is violated.
file/line info
violation
rule
38
Exploring Class Test Results
39
Tes
tin
g
• @invariant violations: Contains information about viola-tions that occur when an @invariant contact is violated.
• @assert violations: Contains information about viola-tions that occur when an @assert contact is violated.
• Uncaught Runtime Exceptions: Displays the number of uncaught runtime exceptions that Jtest found while performing dynamic analysis. Each uncaught runtime exception is followed by a full stack trace, as well as an example input leading to this exception. This branch contains the following information:
• Exception: Type of exception found. Marked with a bug icon.
• Stack trace information: A stack trace like the one that the Java virtual machine would give if the reported uncaught runtime exception were thrown. To view or edit the source code, double-click this node. (If the file and line number information is missing, recompile the class with debug information).
• Input that defines the test case: For automatic test cases, this is the calling sequence; for user-defined test cases, this is the input for each argument.If input from a stub caused the exception, stub informa-tion will be displayed here. Empty boxes indicate auto-matically-generated stubs. Black boxes indicate user-defined stubs. To see the stack trace where a stub invocation occurred, expand the stub’s branch. For more information on stubs, see “Testing Classes That Reference External
violation
input
stack trace

Exploring Class Test Results
Testin
g
Resources” on page 178 and “Using Custom Stubs” on page 184. Marked with an arrow icon.
• Specification and Regression Errors: Displays the specifica-tion and regression errors that Jtest found while performing dynamic analysis. Jtest finds these errors by comparing the test case outcomes of the current test run with the outcomes of previ-ous runs (or outcomes that you specified). This branch contains the following information:
• Error: Specification and regression error found. Marked with a bug icon.
• Input that defines the test case: For automatic test cases, this is the calling sequence; for user-defined test cases, this is the input for each argument. If input from a stub caused the error, stub information will be displayed here. Empty boxes indicate automati-cally-generated stubs. Black boxes indicate user-defined stubs. To see the stack trace where a stub invocation occurred, expand the stub’s branch. For more information on stubs, see “Testing Classes That Reference External Resources” on page 178 and “Using Custom Stubs” on page 184. Marked with an arrow icon.
calling sequence
stack trace
exception
stub
40

Exploring Class Test Results
41
Tes
tin
g
Exploring and Modifying ResultsThe Class Testing UI provides you with a variety of ways to explore test results and to customize what results are reported the next time the test is run. Actions that you might want to perform when viewing results can be divided into the following categories.
• General Actions
• Actions for Static Analysis Violations
• Actions for Uncaught Runtime Exceptions
• Actions for Specification and Regression Testing Errors
• Actions for Design by Contract Violations
General Actions• Produce an HTML, ASCII, XML, or customized report: To pro-
duce the default HTML class report file, click the Report button in the Class Testing UI tool bar. For more information about reports, see “Viewing a Report of Results” on page 127.
• View results in the Jtest UI at a later time: To display results of a previous test in the Errors Found Panel at a later time, open the appropriate .ctp file using File> Open or File> Open Recent, then click the Results button.
• View or edit the source: To view or edit the source of an error/violation, with the problematic line highlighted, double-click the file/line information for the error in the Errors Found panel. Or, if you do not want the violation or error highlighted (or if the class does not contain any errors or violations), you can open the source file by clicking the Source button. For more information
input
error

Exploring Class Test Results
Testin
g
about viewing/editing source files, see “Viewing, Editing, or Com-piling a Source” on page 124.
• Determine how to repair the error/violation: To access tips on repairing problems found, see “Fixing Errors Found” on page 375.
• View/evaluate test cases: To view and/or evaluate the automati-cally-generated and user-defined test cases used to test this class, click the View tool bar button. For more information about viewing test case details and evaluating test case outcomes, see “Viewing and Validating Test Cases” on page 110.
• Gauge coverage: There are two ways to gauge test coverage:
• Review the coverage data displayed in the Test Progress panel.
• Display and review the report file.
• For more information about viewing and customizing cov-erage results, see “Viewing Coverage Information” on page 121.
Actions for Static Analysis Violations• View a description of a violated rule: To view a description of a
violated static analysis rule, along with an example of that rule and a suggested repair, right-click the appropriate static analysis violation message with a wizard hat or bug icon, then choose View Rule Description from the shortcut menu. To access all rule descriptions, see “Built-in Static Analysis Rules” on page 407.
• Modify a violated rule: To modify a violated static analysis rule, right-click the appropriate static analysis violation message with a wizard hat or bug icon, then choose View RuleWizard Rule from the shortcut menu. You can then use RuleWizard to modify the rule. To access the RuleWizard User’s Guide, choose Help> View in the RuleWizard UI.
• Suppress a specific static analysis messages: To suppress the reporting of a single, specific static analysis violation, right-click the message (with the bug icon) related to the violation
42

Exploring Class Test Results
43
Tes
tin
g
that you do not want reported in subsequent test runs, then choose Suppress This Message from the shortcut menu. This automatically adds the suppression to the Suppressions List. For more detail on static analysis suppressions, see “Static Analysis Suppressions” on page 167.
• Disable a violated rule: To disable a violated rule for all subse-quent tests, right-click the appropriate static analysis violation message with a hat icon, then choose Disable This Rule from the shortcut menu.
• Access the control for a violated rule: To open the Global Test Parameters control for the violated rule, right-click the appropriate static analysis violation message, then choose Go to Rule> [desired parameters level] from the shortcut menu.
• View metrics: To view class metrics, click Metrics. For more details about metrics, see “Viewing Class and Project Metrics” on page 145.
Actions for Uncaught Runtime Exceptions• View the stack trace of an uncaught runtime exception: To
view a stack trace like the one that the Java virtual machine would give if a reported uncaught runtime exception were thrown, expand the appropriate Uncaught Runtime Exceptions branch.
• View the calling sequence: To view the calling sequence, expand the Test Case Input branch of the related uncaught runt-ime exception.
• View an example test case: To view an example Java program that executes the input for a test case, right-click the Test Case Input node, then choose View Example Test Case from the shortcut menu. The exception will be thrown when you run this program.
• Note: Sometimes (for example, while testing an abstract class) the input that Jtest finds doesn’t correspond to a compilable Java program. If the input includes stubs, the generated program will include only the stub text.
Exploring Class Test Results
Testin
g
• Modify test case evaluation: To change how Jtest evaluates test case outcomes, validate test case outcomes as described in “Viewing and Validating Test Cases” on page 110 or by right-click-ing error messages and choosing commands in the shortcut menu.
• You should modify test case outcomes if you want Jtest to ignore the outcome of an input while checking for specification and regression errors, or if the reported error is actually the correct outcome.
• If you want to evaluate an individual test outcome, right-click the error that represents the outcome you want to evaluate, then choose one of the following options from the shortcut menu:
• Not an Error: Choose this option if the reported outcome is actually the correct outcome.
• Ignore this Outcome: Choose this option if you want Jtest to ignore the outcome of an input while checking for specification and regression errors.
• If you want to apply the same evaluation to all test out-comes listed in the Uncaught Runtime Exceptions branch, right-click the Uncaught Runtime Exceptions node, then choose Set All to: Not an Error or Set All to: Ignore this Outcome.
• Suppress a specific uncaught runtime exception: To sup-press the reporting of a single, specific exception, right-click the message (with the bug icon) related to the error that you do not want reported in future test runs, then choose Suppress This Message from the shortcut menu. This automatically adds the suppression to the Suppressions Table. For more detail on dynamic analysis suppressions, see “Dynamic Analysis Suppres-sions” on page 173.
• Learn how to document an expected exception or the expected input range using Design by Contract: To learn how to document an expected exception or the expected input range using Design by Contract, right-click the related error node, then
44

Exploring Class Test Results
45
Tes
tin
g
choose How to fix Using Design by Contract from the shortcut menu. After you add the appropriate contract, Jtest will verify whether the code follows the contract.
Actions for Specification and Regression Testing Errors
• View the error-causing input: To view the error-causing input, expand the Test Case Input branch of the appropriate specifica-tion or regression testing error.
• View an example test case: To view an example Java program that executes the input for a test case, right-click the related Test Case Input node, then choose View Example Test Case from the shortcut menu. The exception will be thrown when you run this program.
• Note: Sometimes (for example, while testing an abstract class) the input that Jtest finds doesn’t correspond to a compilable Java program. If the input includes stubs, the generated program will include only the stub text.
• Modify test case evaluation: To change how Jtest evaluates test case outcomes, validate test case outcomes as described in “Viewing and Validating Test Cases” on page 110 or by right-click-ing error messages and choosing commands in the shortcut menu. You should modify test case outcomes if you want Jtest to ignore the outcome of an input while checking for specification and regression errors, or if the reported error is actually the cor-rect outcome.
• If you want to evaluate an individual test outcome, right-click the error that represents the outcome you want to evaluate, then choose one of the following options from the shortcut menu:
• Not an Error: Choose this option if the reported outcome is actually the correct outcome.
• Ignore this Outcome: Choose this option if you want Jtest to ignore the outcome of an input

Exploring Class Test Results
Testin
g
while checking for specification and regression errors.
• If you want to apply the same evaluation to all test out-comes listed in the Specification and Regression Errors branch, right-click the Specification and Regression Errors node, then choose Set All to: Not an Error or Set All to: Ignore this Outcome.
• Access an explanation of the error: To access a brief explana-tion of a specification/regression error, right-click the related error node, then choose Why an Error? from the shortcut menu.
Actions for Design by Contract Violations• View an example test case: To view an example Java program
that executes the input for a test case, right-click the Test Case Input node, then choose View Example Test Case from the shortcut menu. If an exception was reported for the related input, the exception will be thrown when you run this program.Note: Sometimes (for example, while testing an abstract class) the input that Jtest finds doesn’t correspond to a compilable Java program. If the input includes stubs, the generated program will include only the stub text.
46

Testing a Set of Classes
47
Tes
tin
g
Testing a Set of ClassesThis topic describes the steps required to test a set of class or JSP files and view the results of the test. Subtopics include:
• Overview
• Running the Test
• Viewing Results
OverviewIn Jtest's Project Testing UI, you can automatically test all (or a selected set) of the classes and JSPs contained in any directory, jar file, or zip file. Jtest automatically searches the specified directory, jar file, or zip file, and tests all of the classes and JSPs that it finds.
It is possible to perform all testing-related activities from the Project UI. The Project Testing UI contains all results for all classes tested, and allows you to access the same features that are available in the Class Testing UI. If you want to test an entire project, then focus on results on a class-by-class basis, you can test the project in the Project Testing UI, then open the class(es) that you want to focus on in the Class Testing UI.
By default, the Project Testing UI:
• Performs dynamic analysis only on public classes. This setting can be changed with the Search Parameters> Dynamic Analy-sis> Test Public Classes Only node of the Project Test Parame-ters tree.
• Does not execute Test Classes. This setting can be changed with the Search Parameters> Skip Test Classes node of the Project Test Parameters tree.
• Does not test a class that it has previously tested unless that class has been modified since the previous test. Jtest determines whether or not a class has changed by checking that both the .class file and the .java file contents have not changed. Times-tamps are not considered. To force Jtest to test all classes on

Testing a Set of Classes
Testin
g
every test, disable the Skip Classes Already Tested node in the Search Parameters branch of the Project Test Parameters tree.
• Tests all files that were not previously tested. If you want Jtest to test only files created or modified after a certain date (i.e., if you want Jtest to ignore legacy code), use the Skip classes not modified since feature (described in step 3 below) to specify the threshold date that you want Jtest to use. If you want Jtest to test only selected files, use the Filter-In or Skip List feature (described in step 3 below) to specify which files you want to test.
Running the TestTo test a set of classes in the Project Testing UI:
1. Open the Project Testing UI by clicking the Project button in the Class Testing UI tool bar, or by choosing Window> Project Test-ing UI in the Class Testing UI menu bar.
2. Indicate which files you want to test by doing one of the following:
• To open an existing test, choose File> Open, then use the file chooser to select the appropriate .ptp file.
• To start a new test, go to the Search In field of the Project Testing UI and specify what directory, zip file, .jar file, .class file, .jsp file, or set of files you want Jtest to test. To browse for a directory, jar file, class file, .jsp file, or zip file, click the Browse button. To select several files at once in the file chooser, CTRL-click or SHIFT-click to select the files that you want to test. If the parameter is a directory, Jtest will recursively traverse the path's subdirectories, zip files, and jar files, searching for and testing any classes it finds.If the parameter is a jar or zip file, Jtest will open the file and search it for classes.
3. (Optional) If you want to restrict the classes that Jtest tests, do one of the following:
• Use the Skip classes not modified since feature to tell Jtest to find and test only classes whose .java source
48

Testing a Set of Classes
49
Tes
tin
g
files were created or modified after a specific date. You enter the threshold date by double-clicking the Project Test Parameters panel’s Search Parameters> Skip classes not modified since branch, then entering date parameters in the dialog box that opens. If you are using source control, Jtest will try to determine when each file was last modified by looking at the source control files. If it cannot find the last modified date from a source control file, it will use the date on the local copy of the file.
• Use the Filter-in field to tell Jtest to find and test only classes that match the given expression. Use regular expressions to indicate what types of files to include.
For example, if you want Jtest to look only for classes in the util package, enter the following parameter in this field:util.*To test only classes in the packages com.util or com.lib, enter the following parameter in this field:{com.util.*,com.lib.*}
Important: Do not use a space before or after the "," or it will be a different expression.
When the Filter-In field is left empty, all classes found will be tested.For more information about entering regular expressions in this field, see “Project Testing UI Controls Panel” on page 313.
• Use the Skip List to indicate project classes that you want Jtest to skip. The Skip List is accessible by double-click-ing the Skip List node in the Search Parameters branch of the Project Test Parameters panel.
• Use the Test Only List to indicate the specific project classes that you want Jtest to test. The Test Only List is accessible by double-clicking the Test Only List node in

Testing a Set of Classes
Testin
g
the Search Parameters branch of the Project Test Parameters panel.
4. (Optional) Add user-defined test cases using Test Classes or method inputs.
• For information on adding Test Classes, see “Adding Test Cases with Test Classes” on page 218.
• For information on adding method inputs, see “Adding Test Cases with Method Inputs” on page 210.
5. Verify whether Jtest can locate all necessary files by choosing Tools> Check Project Dependencies. If Jtest cannot locate a necessary file, it will open a dialog box that allows you to modify your classpath to point to the necessary file.
6. Start the test by clicking the Start tool bar button.
• If you only want to perform static analysis or a specific type of static analysis, right-click the Start button and choose the menu item that describes the type of test that you want to perform.
• If you only want to perform dynamic analysis or a specific type of dynamic analysis, right-click the Start button and choose the menu item that describes the type of test that you want to perform.
Unless you tell it to do otherwise, Jtest automatically performs all steps required for:
• Static analysis
• White-box testing
• Black-box testing (if Design by Contract-format contract informa-tion is included in the class under test, test case outcomes have been validated, or user-defined test cases have been added)
• Regression testing (on all test runs after the first)
If you want to configure Jtest to perform only static analysis or only dynamic analysis, modify your testing parameters as described in “Cus-tomizing Test Parameters” on page 134.
50
Testing a Set of Classes
51
Tes
tin
g
To have Jtest stop finding and testing classes while the test is in progress, click the Stop button.
To have Jtest temporarily pause (or resume) finding and testing classes while the test is in progress, click the Pause button. If you pause testing, Jtest will finish testing the current class before pausing.
For details on specific types of tests performed, see the following topics:
• “About Static Analysis” on page 140
• “About Dynamic Analysis” on page 168
• “About White-Box Testing” on page 195
• “About Black-Box Testing” on page 204
• “About Regression Testing” on page 256
Viewing ResultsResults are displayed in the Project Testing UI's Results panel. To learn more about this panel's branches and available options, see “Exploring Project Test Results” on page 54. For tips on fixing the errors found, see “Fixing Errors Found” on page 375.

Testing a Set of Classes - Example
Testin
g
Testing a Set of Classes - ExampleThe following topic demonstrates how to perform basic automatic testing on a sample project.
Example Project TestThis example demonstrates how Jtest automatically performs white-box testing on a set of sample classes in one of the Jtest example directories.
To test all files in a sample directory::
1. Open Jtest.
2. Click the Project button in the Class Testing UI tool bar. The Project Testing UI will open.
3. Click the Browse button in the Project Controls panel, select the sample Jtest project directory (<jtest_install_dir>/exam-ples/eval/project) in the file chooser that opens, then click Open.
4. Click the Start button in the Project UI tool bar.
Jtest will prompt you to save your test parameters, then it will start finding and testing classes.
52
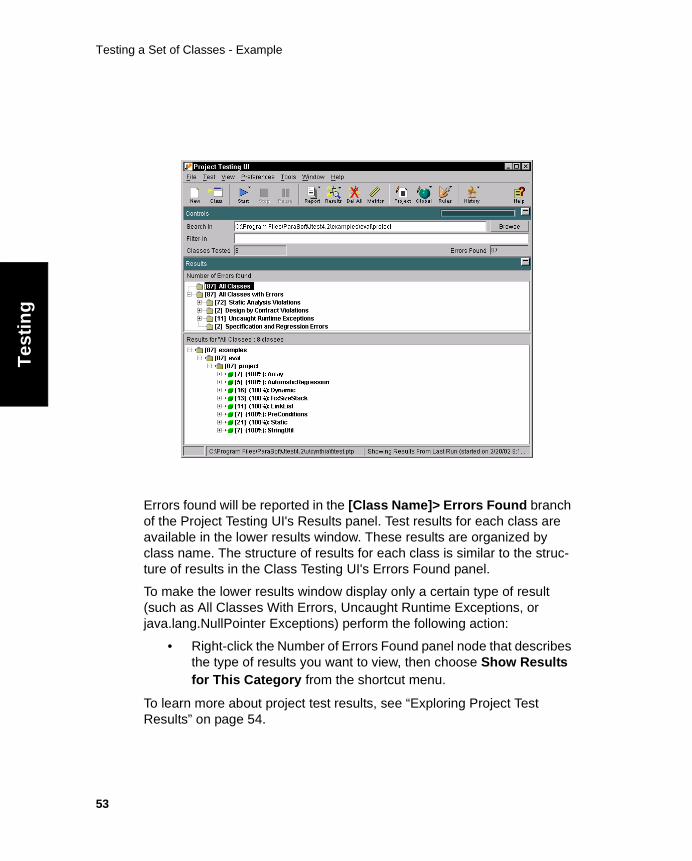
Testing a Set of Classes - Example
53
Tes
tin
g
Errors found will be reported in the [Class Name]> Errors Found branch of the Project Testing UI's Results panel. Test results for each class are available in the lower results window. These results are organized by class name. The structure of results for each class is similar to the struc-ture of results in the Class Testing UI's Errors Found panel.
To make the lower results window display only a certain type of result (such as All Classes With Errors, Uncaught Runtime Exceptions, or java.lang.NullPointer Exceptions) perform the following action:
• Right-click the Number of Errors Found panel node that describes the type of results you want to view, then choose Show Results for This Category from the shortcut menu.
To learn more about project test results, see “Exploring Project Test Results” on page 54.

Exploring Project Test Results
Testin
g
Exploring Project Test ResultsThis topic describes how you can view project test results in the Project Testing UI’s Results panel, get more detail about results, and change how results are reported in subsequent tests. Subtopics include:
• Overview
• Understanding and Tracking the Summary Run Results
• Viewing Result Summaries and Determining the Types of Results Displayed
• Viewing Specific Error, Violation, and Coverage Information
• Exploring and Modifying Results
For information about Jtest’s reports, see “Viewing a Report of Results” on page 127.
OverviewAfter a project test, Jtest reports a summary of result parameters in the Summary Run Results dialog box, and displays all test results in the Project Testing UI’s Results panel after the test is completed.
The Results panel has two main panels: the Number of Errors Found pan-els (displays result summaries and lets you control which errors are reported in detail) and the Results for All Classes panel (displays detailed result information). The contents of these panels are described below, and in context-sensitive help.
The Project Testing UI also provides you with a variety of ways to gain additional information about the tests performed and to customize what results are reported the next time that a test is run. For more information about these options, see “Exploring and Modifying Results” on page 65.
Understanding and Tracking the
54

Exploring Project Test Results
55
Tes
tin
g
Summary Run ResultsThe Summary Run Results dialog box which opens at the end of a project test reports the following test details for the current project test (listed in the For This Run tab) and the summary of results found in all current and previous tests of this project (listed in the For All Results tab).
• Classes Tested: Total number of classes tested.
• Classes Skipped: Number of project classes that were not tested.
• Number of Errors: Total number of static analysis violations and dynamic analysis violations.
• Static Analysis Errors: Total number of static analysis viola-tions.
• Number of Rules Analyzed: Number of static analysis rules that were applied.
• Dynamic Analysis Errors: Total number of dynamic analysis errors (includes uncaught runtime exceptions, Design by Con-tract violations, and specification and regression testing errors).
• Project Coverage: Line coverage attained by all the test cases used in the test.
• Test Cases Executed: Total number of test cases (both automat-ically-generated and user-defined) used in the test.
• Outcomes Compared: Total number of outcome comparisons made after the test.
• Errors per Class: Average number of errors per class.
• Dynamic Errors per Class: Average number of dynamic analy-sis errors per class.
• Extrapolated Errors per Class: Extrapolated number of errors per class for 100% coverage. This is determined using the follow-ing formula:number_of_dynamic_errors * (100 / coverage)
• Static Errors per Class: Average number of static analysis viola-tions per class.

Exploring Project Test Results
Testin
g
• Confidence Level %: The number that estimates the degree to which the code is correct, robust, and well-tested. A 100% confi-dence level means that Jtest’s dynamic analysis tests achieved 100% coverage of the code and Jtest did not find any errors in the code. Errors found and uncovered code will lower the confi-dence level. Confidence level measurements are most useful for tracking the evolution of a project and to compare the state of dif-ferent projects. For more detail on how the confidence level is cal-culated and how you can customize the confidence level formula, see “Confidence Level Reference” on page 403.
To see the Summary Run Results after you have closed the initial results dialog box:
1. Open the Test History window or Global History window by right-clicking the History tool bar button, then choosing the appropriate shortcut menu item.
2. Do one of the following:
• To see the summary results for a particular test run: Expand the tree branches, right-click the node that repre-sents the test whose results summary you want to view, then choose View Summary Results> For Run Results from the shortcut menu. Jtest will then display the selected results summary.
56
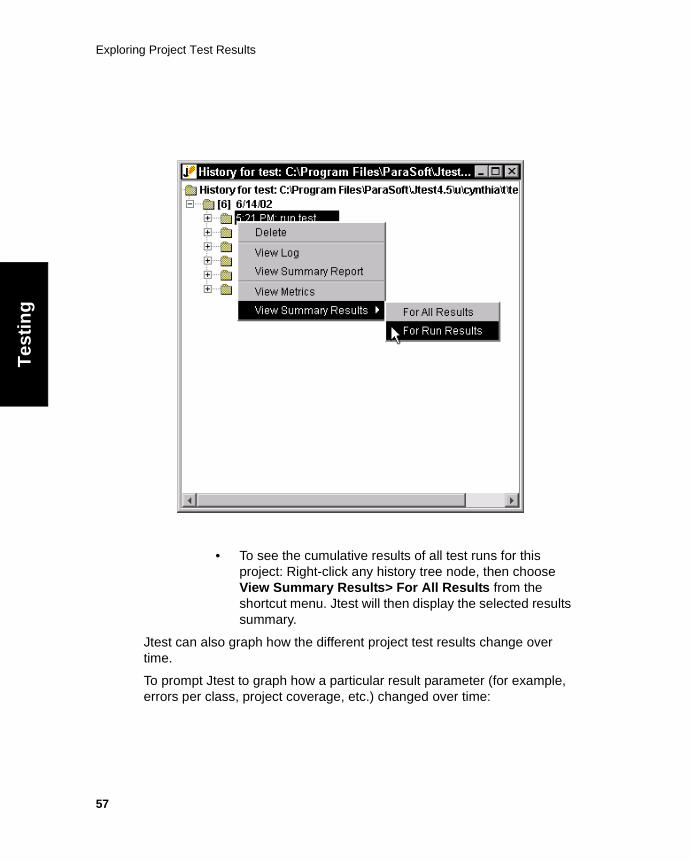
Exploring Project Test Results
57
Tes
tin
g
• To see the cumulative results of all test runs for this project: Right-click any history tree node, then choose View Summary Results> For All Results from the shortcut menu. Jtest will then display the selected results summary.
Jtest can also graph how the different project test results change over time.
To prompt Jtest to graph how a particular result parameter (for example, errors per class, project coverage, etc.) changed over time:

Exploring Project Test Results
Testin
g
1. Open the Test History window by clicking the History button in the Project Testing UI (with the project’s results loaded in the Project Testing UI).
2. Right-click the History for Test node, then choose Draw Sum-mary Graph> For All Results/For Run Results > [Desired Type of Graph] from the shortcut menu.
• If you want to chart the cumulative project results, choose For All Results.
• If you want to chart the results of the most recent test run, choose For Run Results.
Jtest will then create a graph that displays the evolution of the specified result parameter.
58

Exploring Project Test Results
59
Tes
tin
g
Viewing Result Summaries and Determining the Types of Results Displayed The Results for All Classes panel displays the distribution of the errors found. The tree in this panel contains a node for every type of error that Jtest detects, along with the number of that type of error found in the project test.
This panel also lets you determine what results are displayed in the Results For All Classes panel. To make the lower results panel display only a certain type of result (such as All Classes With Errors, Uncaught Runtime Exceptions, or java.lang.NullPointer Exceptions) perform the fol-lowing action:
• Right-click the Number of Errors Found panel node that describes the type of results you want to view, then choose Show Results for This Category from the shortcut menu.
Note: If you do not see a node representing the type of result that you want to view, expand the All Classes With Errors branch.
The node that describes the types of results displayed in the lower Results panel will be highlighted.
Viewing Specific Error, Violation, and Coverage InformationThe Results for All Classes panel lists detailed results for the project test. The results are organized into a tree. Each tree branch corresponds to
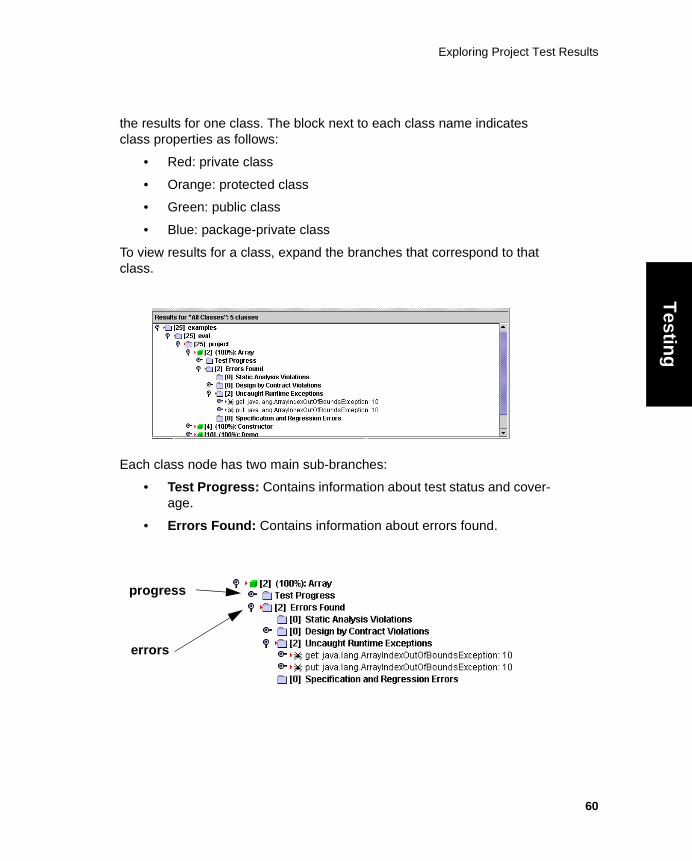
Exploring Project Test Results
Testin
g
the results for one class. The block next to each class name indicates class properties as follows:
• Red: private class
• Orange: protected class
• Green: public class
• Blue: package-private class
To view results for a class, expand the branches that correspond to that class.
Each class node has two main sub-branches:
• Test Progress: Contains information about test status and cover-age.
• Errors Found: Contains information about errors found.
progress
errors
60

Exploring Project Test Results
61
Tes
tin
g
Test ProgressThe Test Progress branch contains the following information:
• Static Analysis: Displays the status of static analysis tests. While static analysis is being performed, a percentage indicating test progress is displayed to the right of this node. After a test is complete, the word “done” will appear to the right of this node.
The Number of Rules Analyzed node displays the number of static analysis rules analyzed.
• Dynamic Analysis: Displays the status of dynamic analysis tests. While dynamic analysis is being performed, a percentage indicating test progress is displayed to the right of this node. After a test is complete, the word “done” will appear to the right of this node.
Dynamic coverage is shown only for classes on which Jtest has performed dynamic analysis. By default, dynamic analysis is only performed on the public classes; static analysis is performed on all classes found (public and non-public).
The Number of Test Cases Executed node displays the total number of test cases executed. These test cases are divided into two categories: automatic and user-defined. The Automatic node displays the number of automatically-generated test cases (for white-box testing of any class and black-box testing of classes that use DbC) executed. The User Defined node dis-plays the number of user-defined test cases (from method inputs and Test Classes) executed.
The Number of Outcome Comparisons node displays the num-ber of outcomes compared during black-box and regression test-ing.
The Line Coverage node displays the cumulative coverage achieved by all the test cases used in a test. If some part of the class is not covered, it means that Jtest has not yet found a path leading to those statements or no path leads to those statements.

Exploring Project Test Results
Testin
g
On average, Jtest is able to automatically create test cases that cover about 75% of the code. Sometimes Jtest will be able to test 100% of the class, and sometimes it will test less than 75% of the class. For more information about viewing and customizing cov-erage results, see “Viewing Coverage Information” on page 121.
Errors FoundThe Errors Found branch is organized like the Errors Found tree in the Class Testing UI Errors Found panel. It contains the following information:
Note: All error/violation messages are marked with a bug icon.
• Static Analysis Violations: Displays the number of violations that Jtest found while performing static analysis. This branch con-tains the following information:
• Rule: Name of rule violated. (Rule ID and severity level is displayed in parentheses. Violations of Level 1 rules are most critical; violations of level 5 rules are least critical). Marked with a wizard hat icon.
• Violation: Jtest rule violation message. To view the asso-ciated rule description, right-click this node then choose View Rule Description from the shortcut menu. Marked with a bug icon.
• File/line info: File name and line number where violation occurred. To view or edit the source code, double-click this node.
• Design by Contract Violations: Displays the number of Design by Contract violations that Jtest found while performing dynamic analysis. Each violation message includes file/line information as well as stack trace and calling sequence information. Design by
file/line info
violation
rule
62

Exploring Project Test Results
63
Tes
tin
g
Contract violations are organized according to the type of con-tract that was violated. This branch contains the following viola-tion categories:
• @pre violations: Contains information about violations that occur when a method is called incorrectly and a @pre contract is violated.
• @post violations: Contains information about violations that occur when a method does not return the expected value and a @post contract is violated.
• @invariant violations: Contains information about viola-tions that occur when an @invariant contact is violated.
• @assert violations: Contains information about viola-tions that occur when an @assert contact is violated.
• Uncaught Runtime Exceptions: Displays the number of uncaught runtime exceptions that Jtest found while performing dynamic analysis. Each uncaught runtime exception is followed by a full stack trace, as well as an example input leading to this exception. This branch contains the following information:
• Exception: Type of exception found. Marked with a bug icon.
• Stack trace information: A stack trace like the one that the Java virtual machine would give if a reported uncaught runtime exception were thrown. To view or edit the source code, double-click this node. (If the file and line number information is missing, recompile the class with debug information).
violation
input
stack trace
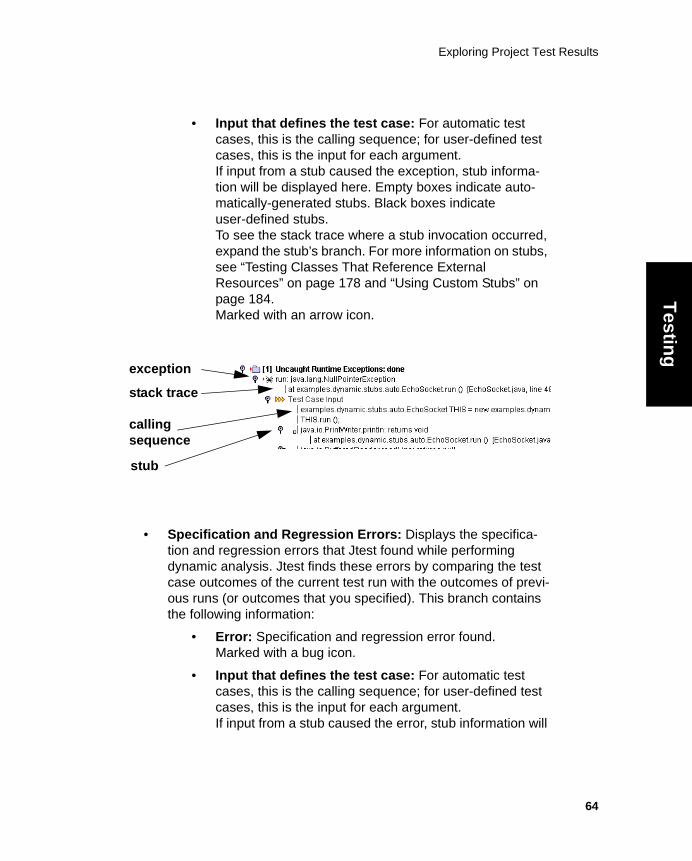
Exploring Project Test Results
Testin
g
• Input that defines the test case: For automatic test cases, this is the calling sequence; for user-defined test cases, this is the input for each argument.If input from a stub caused the exception, stub informa-tion will be displayed here. Empty boxes indicate auto-matically-generated stubs. Black boxes indicate user-defined stubs. To see the stack trace where a stub invocation occurred, expand the stub’s branch. For more information on stubs, see “Testing Classes That Reference External Resources” on page 178 and “Using Custom Stubs” on page 184. Marked with an arrow icon.
• Specification and Regression Errors: Displays the specifica-tion and regression errors that Jtest found while performing dynamic analysis. Jtest finds these errors by comparing the test case outcomes of the current test run with the outcomes of previ-ous runs (or outcomes that you specified). This branch contains the following information:
• Error: Specification and regression error found. Marked with a bug icon.
• Input that defines the test case: For automatic test cases, this is the calling sequence; for user-defined test cases, this is the input for each argument. If input from a stub caused the error, stub information will
calling sequence
stack trace
exception
stub
64

Exploring Project Test Results
65
Tes
tin
g
be displayed here. Empty boxes indicate automati-cally-generated stubs. Black boxes indicate user-defined stubs. To see the stack trace where a stub invocation occurred, expand the stub’s branch. For more information on stubs, see “Testing Classes That Reference External Resources” on page 178 and “Using Custom Stubs” on page 184. Marked with an arrow icon.
Exploring and Modifying ResultsThe Project Testing UI provides you with a variety of ways to explore test results, as well as to customize what results are reported the next time this test is run. Most options are accessed via shortcut menus in the lower Results panel. Actions that you might want to perform when viewing results can be divided into the following categories.
• General Actions
• Actions for Static Analysis Violations
• Actions for Uncaught Runtime Exceptions
• Actions for Specification and Regression Testing Errors
• Actions for Design by Contract Violations
General Actions• Produce an HTML, ASCII, XML, or customized report: To pro-
duce the default HTML project report file, click the Report button in the Project Testing UI tool bar. For information about reports, see “Viewing a Report of Results” on page 127.
input
error

Exploring Project Test Results
Testin
g
• View results in the Jtest UI at a later time: To display results of a previous test in the Results panel at a later time, open the appropriate .ptp file using File> Open or File> Open Recent, then click the Results button.
• Load results in the Class Testing UI: To focus on the errors for a single class, view the class in the Class Testing UI by right-clicking the [Class Name] node, then choosing Load in Class Testing UI from the shortcut menu.
• Remove a class's results from the Results panel and Results folder: To remove the results of a class from both the Results panel and the Results Folder (which stores project test results), right-click the [Class Name] node, then choose Delete from the shortcut menu.
• View or edit a source file: To view or edit the source of an error/violation, with the problematic line highlighted, double-click the file/line information for any error/violation contained within the Errors Found branch. Or, if you do not want a violation or error highlighted (or if the class does not contain any errors or viola-tions), you can open a class’s source file by right-clicking the [Class Name] node, then choosing Edit Source from the short-cut menu. For more information about viewing/editing source files, see “Viewing, Editing, or Compiling a Source” on page 124.
• Determine how to repair the error/violation: To access tips on repairing problems found, see “Fixing Errors Found” on page 375.
• View/evaluate test cases: To view and/or evaluate the automati-cally-generated and user-defined test cases used to test a class, right-click either the [Class Name] node, or the [Class Name]> Test Progress> Dynamic Analysis> Number of Test Cases Executed node, then choose View Test Cases from the shortcut menu. For more information about viewing test case details and evaluating test case outcomes, see “Viewing and Validating Test Cases” on page 110.
• Gauge coverage: To review coverage, open the [Class Name]> Test Progress> Dynamic Analysis> Line Coverage node. For
66

Exploring Project Test Results
67
Tes
tin
g
more information about viewing and customizing coverage results, see “Viewing Coverage Information” on page 121.
• Edit Test Parameters: You can modify test parameters at the class, project, or global level.
• To access a specific class’s Class Test Parameters, right-click the [Class Name] node, then choose Edit Class Test Parameters from the shortcut menu (other methods for opening Class Test Parameters are described in “Editing Class Test Parameters from the Project Testing UI” on page 75).
• To access project parameters, click the Project tool bar button.
• To access global parameters, click the Global tool bar button.
• For descriptions of available Test Parameters, see “Class Test Parameters” on page 343, “Project Test Parameters” on page 356, and “Global Test Parameters” on page 317.
Actions for Static Analysis Violations• View a description of a violated rule: To view a description of a
violated static analysis rule, along with an example of that rule and a suggested repair, right-click the appropriate static analysis error message with a wizard or bug icon, then choose View Rule Description from the shortcut menu. To access all rule descrip-tions, see “Built-in Static Analysis Rules” on page 407.
• Modify a violated rule: To modify a violated static analysis rule, right-click the appropriate static analysis error message with a wizard hat or bug icon, then choose View RuleWizard Rule from the shortcut menu. You can then use RuleWizard to modify the rule. To access the RuleWizard User’s Guide, choose Help> View in the RuleWizard UI.
• Suppress a specific static analysis messages: To suppress the reporting of a single, specific static analysis violation, right-click the message (with the bug icon) related to the violation that you do not want reported in future test runs, then choose

Exploring Project Test Results
Testin
g
Suppress This Message from the shortcut menu. This automati-cally adds the suppression to the Suppressions List. For more detail on static analysis suppressions, see “Static Analysis Sup-pressions” on page 167.
• Disable a violated rule: To disable a violated rule, right-click the appropriate static analysis violation message with a hat icon, then choose Disable This Rule from the shortcut menu.
• Access the control for a violated rule: To open the Global Test Parameters or Project Test Parameters control for the violated rule, right-click the appropriate static analysis violation message, then choose Go to Rule> [desired parameters level] from the shortcut menu.
• View metrics: Jtest reports class and project metrics.
• To view project and average class metrics, click Metrics.
• To view a specific class’s metrics, right-click that class’s node in the Results panel, then choose View Class Met-rics.
• To view how project metrics have changed over time, click the History tool bar button, right-click the History for Test node, then choose Draw Metrics Graph> <Desired Type of Graph>.
• For details about metrics, see “Viewing Class and Project Metrics” on page 145 and “Tracking Metrics Over Time” on page 150.
Actions for Uncaught Runtime Exceptions• View the stack trace of an uncaught runtime exception: To
view a stack trace like the one that the Java Virtual Machine would give if a reported uncaught runtime exception were thrown, open the appropriate Uncaught Runtime Exceptions branch.
• View the calling sequence: To view the calling sequence, expand the Test Case Input branch of the related uncaught runt-ime exception.
68

Exploring Project Test Results
69
Tes
tin
g
• View an example test case: To view an example Java program that executes the input for a test case, right-click the Test Case Input node, then choose View Example Test Case from the shortcut menu. The exception will be thrown when you run this program.
• Note: Sometimes (for example, while testing an abstract class) the input that Jtest finds doesn’t correspond to a compilable Java program. If the input includes stubs, the generated program will include only the stub text.
• Modify test case evaluation: To change how Jtest eval-uates test case outcomes, validate test case outcomes as described in “Viewing and Validating Test Cases” on page 110 or by right-clicking error/violation messages and choosing commands in the shortcut menu. You should modify test case outcomes if you want Jtest to ignore the outcome of an input while checking for specifi-cation and regression errors, or if the reported error is actually the correct outcome.
• If you want to evaluate an individual test outcome, right-click the error that represents the outcome you want to evaluate, then choose one of the following options from the shortcut menu:
• Not an Error: Choose this option if the reported outcome is actually the correct outcome.
• Ignore this Outcome: Choose this option if you want Jtest to ignore the outcome of an input while checking for specification and regression errors.
• If you want to apply the same evaluation to all test out-comes listed in the Uncaught Runtime Exceptions branch, right-click the Uncaught Runtime Exceptions node, then choose Set All to: Not an Error or Set All to: Ignore this Outcome.
• Suppress a specific uncaught runtime exception: To sup-press the reporting of a single, specific exception, right-click the message (with the bug icon) related to the error that you do not

Exploring Project Test Results
Testin
g
want reported in future test runs, then choose Suppress This Message from the shortcut menu. This automatically adds the suppression to the Suppressions Table. For more detail on dynamic analysis suppressions, see “Dynamic Analysis Suppres-sions” on page 173.
• Learn how to document an expected exception or the expected input range using Design by Contract: To learn how to document an expected exception or the expected input range using Design by Contract, right-click the related error node, then choose How to fix Using Design by Contract from the shortcut menu. After you add the appropriate contract, Jtest will verify whether the code follows the contract.
Actions for Specification and Regression Testing Errors
• View the error-causing input: To view the error-causing input, expand the Test Case Input branch of the appropriate specifica-tion or regression testing error.
• View an example test case: To view an example Java program that executes the input for a test case, right-click the related Test Case Input node, then choose View Example Test Case from the shortcut menu. The exception will be thrown when you run this program.
• Note: Sometimes (for example, while testing an abstract class) the input that Jtest finds doesn’t correspond to a compilable Java program. If the input includes stubs, the generated program will include only the stub text.
• Modify test case evaluation: To change how Jtest evaluates test case outcomes, validate test case outcomes as described in “Viewing and Validating Test Cases” on page 110 or by right-click-ing error messages and choosing commands in the shortcut menu.
• You should modify test case outcomes if you want Jtest to ignore the outcome of an input while checking for specification and regression errors, or if the reported error is actually the correct outcome.
70

Exploring Project Test Results
71
Tes
tin
g
• If you want to evaluate an individual test outcome, right-click the error that represents the outcome you want to evaluate, then choose one of the following options from the shortcut menu:
• Not an Error: Choose this option if the reported outcome is actually the correct outcome.
• Ignore this Outcome: Choose this option if you want Jtest to ignore the outcome of an input while checking for specification and regression errors.
• If you want to apply the same evaluation to all test out-comes listed in the Specification and Regression Errors branch, right-click the Specification and Regression Errors node, then choose Set All to: Not an Error or Set All to: Ignore this Outcome.
• Access an explanation of the error: To access a brief explana-tion of a specification/regression error, right-click the related error node, then choose Why an Error? from the shortcut menu.
Actions for Design by Contract Violations• View an example test case: To view an example Java program
that executes the input for a test case, right-click the Test Case Input node, then choose View Example Test Case from the shortcut menu. If an exception was reported for the related input, the exception will be thrown when you run this program.Note: Sometimes (for example, while testing an abstract class) the input that Jtest finds doesn’t correspond to a compilable Java program. If the input includes stubs, the generated program will include only the stub text.

Loading One of a Project's Classes in the Class Testing UI
Testin
g
Loading One of a Project's Classes in the Class Testing UIThis topic explains several ways to load a class from a project test into the Class Testing UI (so you can focus on the results for that class). Subtop-ics include:
• Method 1: From the Project Testing UI (With or Without Results)
• Method 2: From the Project Testing UI (With Results)
• Method 3: From the Class Testing UI
Method 1: From the Project Testing UI (With or Without Results)To load a class from the Project Testing UI (whether or not it displays results for the class you want to load):
1. When the appropriate project is loaded in the Project Testing UI, click Project to open the Project Test Parameters. The Project Test Parameters window will open.
2. In the Project Test Parameters window, open the Classes in Project branch.
3. Right-click the node that corresponds to the class that you want to open in the Class Testing UI, then choose Load in Class Test-ing UI from the shortcut menu.
72

Loading One of a Project's Classes in the Class Testing UI
73
Tes
tin
g
The class and its test parameters will then be loaded in the Class Testing UI.
Method 2: From the Project Testing UI (With Results)To load a class from the Project Testing UI’s Results panel:
1. If the Project Testing UI's Results panel does not contain test results for the appropriate project, open the results.
2. In the lower Results panel, right-click the node whose name cor-responds to the class that you want to open in the Class Testing UI, then choose Load in Class Testing UI from the shortcut menu.
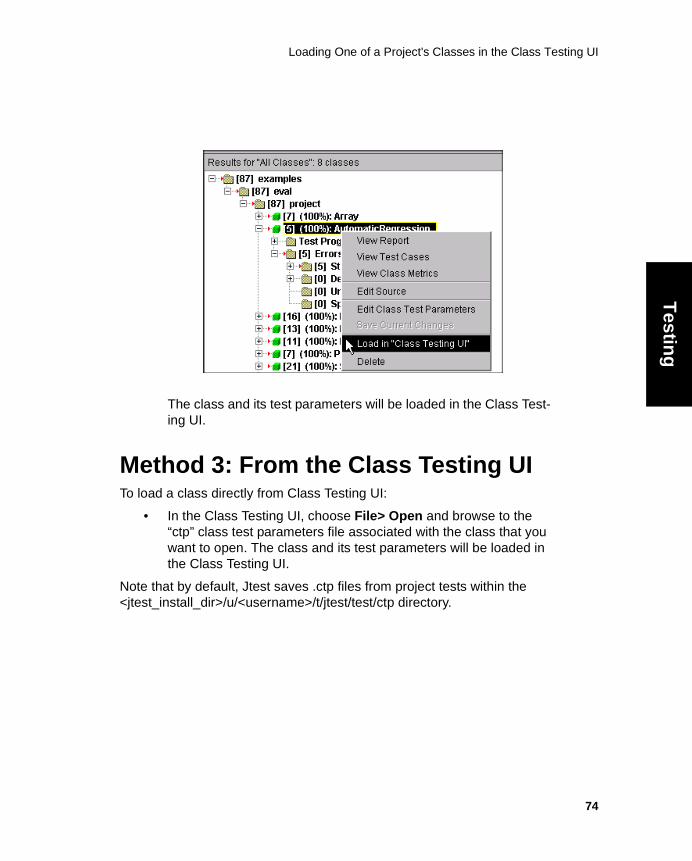
Loading One of a Project's Classes in the Class Testing UI
Testin
g
The class and its test parameters will be loaded in the Class Test-ing UI.
Method 3: From the Class Testing UITo load a class directly from Class Testing UI:
• In the Class Testing UI, choose File> Open and browse to the “ctp” class test parameters file associated with the class that you want to open. The class and its test parameters will be loaded in the Class Testing UI.
Note that by default, Jtest saves .ctp files from project tests within the <jtest_install_dir>/u/<username>/t/jtest/test/ctp directory.
74

Editing Class Test Parameters from the Project Testing UI
75
Tes
tin
g
Editing Class Test Parameters from the Project Testing UIIf you are testing a project and want to add user-defined test cases or change class-specific test parameters, you must edit the appropriate class’s class test parameters. This topic explains two ways to edit the class test parameters for classes tested during a project test. Subtopics include:
• Method 1: From the Project Testing UI (With or Without Results)
• Method 2: From the Project Testing UI (With Results)
• Saving Your Changes
Method 1: From the Project Testing UI (With or Without Results)To edit class test parameters from the Project Testing UI (whether or not it displays results for the class whose parameters you want to edit):
1. When the appropriate project is loaded in the Project Testing UI, click Project to open the Project Test Parameters. The Project Test Parameters window will open.
2. In the Project Test Parameters window, open the Classes in Project branch.
3. Right-click the node that corresponds to the class whose parame-ters you want to modify, then choose Edit Class Test Parame-ters from the shortcut menu.

Editing Class Test Parameters from the Project Testing UI
Testin
g
The Class Test Parameters window will open.
4. Modify parameters in the Class Test Parameters window.
Method 2: From the Project Testing UI (With Results)To edit class test parameters from the Project Testing UI’s Results panel:
1. If the Project Testing UI's Results panel does not contain test results for the appropriate project, open the results.
2. In the lower Results panel, right-click the node whose name cor-responds to the class whose parameters you want to modify, then choose Edit Class Test Parameters from the shortcut menu.
76
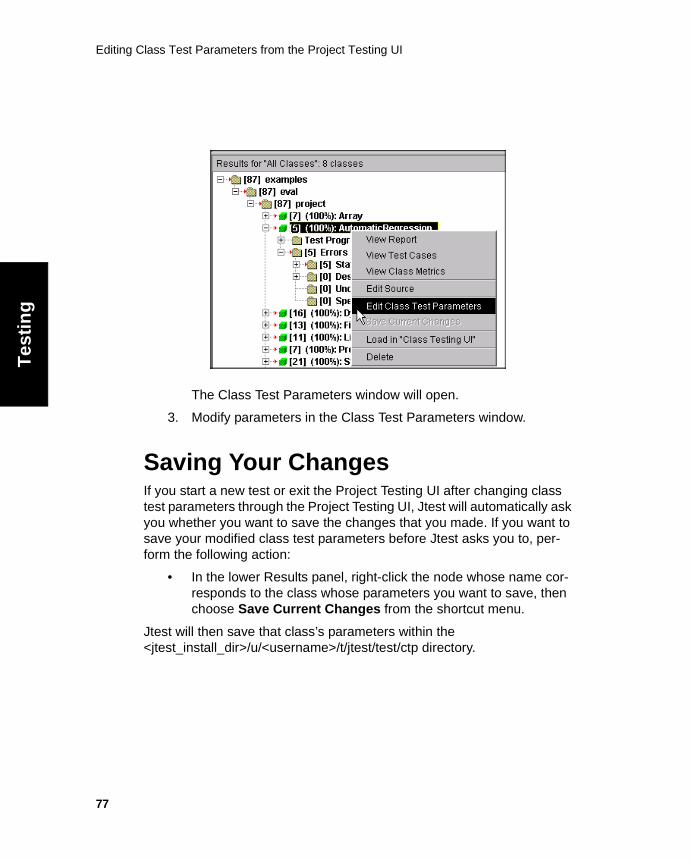
Editing Class Test Parameters from the Project Testing UI
77
Tes
tin
g
The Class Test Parameters window will open.
3. Modify parameters in the Class Test Parameters window.
Saving Your ChangesIf you start a new test or exit the Project Testing UI after changing class test parameters through the Project Testing UI, Jtest will automatically ask you whether you want to save the changes that you made. If you want to save your modified class test parameters before Jtest asks you to, per-form the following action:
• In the lower Results panel, right-click the node whose name cor-responds to the class whose parameters you want to save, then choose Save Current Changes from the shortcut menu.
Jtest will then save that class’s parameters within the <jtest_install_dir>/u/<username>/t/jtest/test/ctp directory.
Running Jtest in Command Line and Batch Mode
Testin
g
Running Jtest in Command Line and Batch ModeThis topic explains how to run a new or existing test from the command line. Subtopics include:
• Windows Instructions
• UNIX Instructions
• Available Command Line Options
• Example Commands
• Creating a Batch or Script File
Windows InstructionsTo run Jtest in command line/batch mode on a Windows system:
1. Set up command line Jtest as follows:
a. Change directories to the Jtest installation directory.
b. Run the jtvars.bat program by entering the following command at the prompt:
jtvars.bat
2. Run the test from the command line by entering jtestgui (fol-lowed by the commands for options you want to use) at the prompt. For a list of options and tips on creating commands, see Available Command Line Options and Example Commands below.
When you enter a valid test command at a command prompt, Jtest will start the test as soon as you press Enter.
After the test is complete, you can view the report that was generated, or you can view the results within the Jtest UI. To view results within the UI, launch Jtest, open the .ctp or .ptp file for the class or project that you tested in batch mode, then click the Results button. After the results are
78

Running Jtest in Command Line and Batch Mode
79
Tes
tin
g
loaded, you can also generate additional types of reports by right-clicking the Report button and selecting the type of report that you want to see.
UNIX InstructionsTo run Jtest in command line/batch mode on a UNIX system:
1. Set up command line Jtest in one of the following ways:
• If you are using a bash or sh shell, run the jtvars.sh script in the Jtest installation directory. For example,$ cd <jtest-home>$ . jtvars.sh
• If you are using a csh, tcsh, or ksh shell, source the jtvars script in the Jtest installation directory. For example, $ cd <jtest-home>$ source jtvars
• To determine which shell you are using, enter $echo $SHELL
2. Run the test from the command line by entering jtestgui (fol-lowed by the commands for options you want to use) at the prompt. For a list of options and tips on creating commands, see Available Command Line Options and Example Commands below.
When you enter a valid test command at a command prompt, Jtest will start the test as soon as you press Enter.
After the test is complete, you can view the report that was generated, or you can view the results within the Jtest UI. To view results within the UI, launch Jtest, open the .ctp or .ptp file for the class or project that you tested in batch mode, then click the Results button. After the results are loaded, you can also generate additional types of reports by right-clicking the Report button and selecting the type of report that you want to see.

Running Jtest in Command Line and Batch Mode
Testin
g
Available Command Line OptionsAvailable command line options for jtestgui are listed in the following table.
Note: If your command includes a path that contains a space character (for example, c:\program files\parasoft\jtest4.5), you need to place quota-tion marks around that path (for example, -cp “c:\program files\para-soft\jtest4.5”).
:
Command Meaning
-help Print out list of available options.
-nogui Run jtestgui without the UI. If used with -ctp, -ptp, -ctp_new, or -ptp_new, the associated test will be run. Example: jtestgui -nogui Sim-ple.ctp
-nolog Do not generate log messages to stdout.
-nologo Do not show logo message.
-retest Force retesting of all classes-- even classes tested in a previous test run.Note: This option is similar to the Skip classes already tested option in the Project Test Parameters window. It applies to .ptp files and is used for all tests runs during that jtestgui invo-cation.Example: jtestgui -retest
-silent Only generate output if errors are found. Project reports only contain classes with errors.
80

Running Jtest in Command Line and Batch Mode
81
Tes
tin
g
-run_only <what> Run specific types of tests only. Options for <what> include:
• static: Runs static all enabled static analysis rules.
• static_builtin: Runs all enabled built-in static analysis rules.
• static_user: Runs all enabled user-defined rules.
• static_<XXX>: Runs all enabled rules in the XXX cate-gory; for example, use static_UC to run all enabled “Unused Code” rules.
• dynamic: Runs dynamic anal-ysis.
• dynamic_auto: Runs auto-matic test cases.
• dynamic_user: Runs user-defined test cases.
Use -run_only help to see a list of all options for <what>.

Running Jtest in Command Line and Batch Mode
Testin
g
-ptp_new <file>.ptp Create and load project test parame-ters in the file <file>.ptp. If the file <file>.ptp already exists, it will be overwritten by this new file. You can use the following options when creating a new .ptp file from the command line:
• -search_in <dir|jar|zip>: Sets the project test parame-ters’ “Search In” parameter (indicates which set of classes you want to test).
• -filter_in <regexp>: Sets the project test parameters’ “Filter In” parameter (indi-cates which particular classes you want to test).
• -cp <path_list>: Sets the project test parameters’ -cp parameter. Should specify the fully-qualified name of the path.
• -classpath <path_list>: Sets the project test parame-ters’ -classpath parameter.
• -sourcepath <path_list>: Sets the project test parame-ters’ -sourcepath parame-ter. You only need to set this parameter if your .java files and .class files are not stored in the same directory.
82

Running Jtest in Command Line and Batch Mode
83
Tes
tin
g
-ptp <file>.ptp Load project test parameters file <file>.ptp.
-ctp <file>.ctp Load class test parameters file <file>.ctp.
-ctp_new <file>.ctp Create and load class test parameters in the file <file>.ctp. If the file <file>.ctp already exists, it will be overwritten by this new file. You can use the following options when creating a new .ctp file from the command line:
• -class_name <name>: Sets the class test parameters’ “Class Name” parameter. Indicates which class you want to test.
• -jsp <path>: Sets the path to a JSP file.
• -cp <path_list>: Sets the class test parameters’ -cp parameter. Should specify the fully-qualified name of the path.
• -classpath <path_list>: Sets the class test parame-ters’ -classpath parameter.
• -sourcepath <path_list>: Sets the class test parame-ters’ -sourcepath parame-ter. You only need to set this parameter if your .java file and .class file are not stored in the same directory.

Running Jtest in Command Line and Batch Mode
Testin
g
-gtp <filename> Use Global Test Parameters in <filename>.If the specified file doesn’t exist, Jtest creates one with default values.Example: jtestgui -gtp new-Projects.gtp
-report[_ascii|_html|_xml] <filename|std-out|stderr>
Generate report in <filename>.Needs to be used with -nogui.Example: jtestgui -nogui -ctp Simple.ctp -report_xml file-name.xml Note: If you don’t specify ascii, xml, or html, Jtest uses the format speci-fied in your Global Test Parameters.
-summary_report[_ascii|_html] <filename|std-out|stderr>
Generate summary report in <file-name>.Needs to be used with -noguiExample: jtestgui -nogui -ctp Simple.ctp -summary_report_html filename.html
-detail_report[_ascii|_html|_xml] <file-name|stdout|stderr>
Generate detail report in <filename>needs to be used with -nogui.Example: jtestgui -nogui -ctp Simple.ctp -detail_report_ascii filename.txt
-load_results Loads the results from a previous test. If used with one of the available -report flags, a report is created. Jtest does not start a test when this option is used.
Examples: jtestgui -nogui -ptp project.ptp -load_results -report_html report.html
jtestgui -ctp class.ctp -load_results
84

Running Jtest in Command Line and Batch Mode
85
Tes
tin
g
To see all available command-line options, enter
jtestgui -help
at the prompt.
If you are on a Windows system, you must set the environment for com-mand line Jtest before you enter this command.
Example Commands• To test a class that has not yet been tested in Jtest, you need to
prompt Jtest to create a new .ctp file before it runs the test. In addition, your command needs to use the -class_name option to indicate the full package name of the class under test, and it needs configure the -cp classpath. For example, to create a new .ctp file for examples.eval.Simple (which resides in C:\pro-gram files\parasoft\jtest4.5), you could enter the following command:C:\Program Files\ParaSoft\Jtest4.5\examples\eval> jtestgui -nogui -nologo -ctp_new Simple.ctp -class_name examples.eval.Simple -cp "C:\program files\parasoft\jtest4.5"
• jtestgui starts Jtest.
• -nogui specifies that you want to run this test without opening the UI.
-rulesdir <rulesdir> Use <rulesdir> as the RuleWizard rules directory. Example: jtestgui -nogui -rulesdir /usr/group/rules
-rulemapping mapping.txt
Use the specified rule mapping file to use to change rule categories and severities. For more information on rule mapping, see “Changing Rule Categories with Jtest Properties” on page 160.
Running Jtest in Command Line and Batch Mode
Testin
g
• -nologo specifies that you do not want Jtest to display its logo message.
• -ctp_new Simple.ctp prompts Jtest to create and load class test parameters for this test, then save those parameters in the file Simple.ctp.
• -class_name examples.eval.Simple indicates that you want Jtest to perform standard testing (static and dynamic analysis) on examples.eval.Simple.
• -cp "C:\program files\parasoft\jtest4.5" indi-cates that examples.eval.Simple is saved in C:\pro-gram files\parasoft\jtest4.5\examples\eval.The quotation marks are used because the path contains a space character. Quotes are not required when the path name does not contain space characters.
• You do not use the -sourcepath command because the .java and .class files are located in the same directory.
• To create a new .ctp file for examples.eval.Simple (which resides in C:\program files\parasoft\jtest4.5) and perform only dynamic analysis (white-box, black-box, and regression test-ing), you could enter the following command:C:\Program Files\ParaSoft\Jtest4.5\examples\eval> jtestgui -nogui -nologo -ctp_new Simple.ctp -class_name examples.eval.Simple -run_only dynamic -cp "C:\program files\parasoft\jtest4.5"
• -run_only dynamic indicates that you want to perform only dynamic analysis.
• To create a new .ctp file for examples.eval.Simple (which resides in C:\program files\parasoft\jtest4.5) and perform only static analysis, you could enter the following command:C:\Program Files\ParaSoft\Jtest4.5\examples\eval> jtestgui -nogui -nologo -ctp_new Example.ctp -class_name examples.eval.Example -run_only static -cp "C:\program files\parasoft\jtest4.5"
• -run_only static indicates that you want to perform only static analysis.
86

Running Jtest in Command Line and Batch Mode
87
Tes
tin
g
• To create a new .ctp file for exam-ples.dynamic.testclasses.Counter (which resides in C:\program files\parasoft\jtest4.5) and perform static and dynamic analysis, you could enter the following command:C:\Program Files\ParaSoft\Jtest4.5\exam-ples\dynamic\testclasses> jtestgui -nogui -nologo -ctp_new Counter.ctp -class_name exam-ples.dynamic.testclasses.Counter -cp "C:\program files\parasoft\jtest4.5"
• To create a new .ctp file for exam-ples.dynamic.testclasses.Counter (which resides in C:\program files\parasoft\jtest4.5) and run only user-defined test cases, you could enter the following command:C:\Program Files\ParaSoft\Jtest4.5\exam-ples\dynamic\testclasses> jtestgui -nogui -nologo -ctp_new Counter.ctp -class_name exam-ples.dynamic.testclasses.Counter -run_only dynamic_user -cp "C:\program files\parasoft\jtest4.5"
• -run_only dynamic_user indicates that you want to run only user-defined test cases.
• To create a new .ptp file for the files in C:\Program Files\Para-Soft\Jtest4.5\examples\eval\project and perform static and dynamic analysis on the classes in that directory, you could enter the following command:C:\Program Files\ParaSoft\Jtest4.5\examples\eval> jtestgui -nogui -nologo -ptp_new ProjectTest.ptp -search_in project -cp "C:\program files\para-soft\jtest4.5"
• -ptp_new ProjectTest.ptp prompts Jtest to create and load class test parameters for this test, then save those parameters in the file ProjectTest.ptp.
• -search_in project (combined with -cp "C:\program files\parasoft\jtest4.5") indicates that you want the project to include files in the C:\Program Files\ParaSoft\Jtest4.5\examples\eval\project directory.

Running Jtest in Command Line and Batch Mode
Testin
g
• To create a new .ptp file for the Array class in C:\Program Files\ParaSoft\Jtest4.5\examples\eval\project and per-form dynamic and static analysis on that class, you could enter the following command:
C:\Program Files\ParaSoft\Jtest4.5\examples\eval> jtestgui -nogui -nologo -ptp_new ProjectTest.ptp -search_in project -filter_in Array -cp "C:\program files\parasoft\jtest4.5"
• -filter_in Array indicates that you only want to test classes that match the specified regular expression (in this case, the string “Array”).
• To have Jtest automatically load the global test parameters saved in C:\Program Files\ParaSoft\Jtest4.5\exam-ples\eval\SelectedGroup.gtp, then use these parameters to perform static analysis on the previously-untested file exam-ples.dynamic.Stack (which resides in C:\program files\parasoft\jtest4.5), you could enter the following com-mand:C:\Program Files\ParaSoft\Jtest4.5\examples\dynamic> jtestgui -nogui -nologo -ctp_new Stack.ctp -class_name examples.dynamic.Stack -gtp "C:\program files\parasoft\jtest4.5\examples\eval\Select-edGroup.gtp" -run_only static -cp "c:\program files\parasoft\jtest4.5"
• -gtp examples.eval.SelectedGroup indicates that you want Jtest to load the global test parameters saved in C:\Program Files\ParaSoft\Jtest4.5\exam-ples\eval\SelectedGroup.gtp and use these parame-ters to test examples.dynamic.Stack. The class test parameters created from this test will be saved in Stack.ctp
• For instructions on creating shareable .gtp files, see “Pre-paring Global Test Parameters for Sharing” on page 99.
• For an alternative way of ensuring that a specified .gtp file is used for all tests, see “Sharing Global Test Parame-ters” on page 100.
88

Running Jtest in Command Line and Batch Mode
89
Tes
tin
g
• If you wanted Jtest to produce an HTML-format report of these test results and save that report as StackRe-port.html in the current directory, you could add the fol-lowing option at the end of the above command:-report_html StackReport.html
• To create a new .ctp file for examples.eval.project.Automati-cRegression (which resides in C:\program files\para-soft\jtest4.5) perform static and dynamic analysis, then and save that report as AutoReg.txt in the current directory, enter the following command:C:\Program Files\ParaSoft\Jtest4.5\exam-ples\eval\project> jtestgui -nogui -nologo -ctp_new AutomaticRegression.ctp -class_name exam-ples.eval.project.AutomaticRegression -report_ascii AutoReg.txt -run_only static -cp "c:\program files\parasoft\jtest4.5"
• To perform an initial test on the Sample class in c:\source without using the UI, then generate an HTML summary report (sum-mary.html) in the current working directory, enter the following command at the prompt:jtestgui -nogui -ctp_new Sample.ctp -class_name com.foo.Sample -cp c:\source -summary_report_html summary.html
• To run the previously-tested MyTest test whose test parameters are saved in c:\progra~1\para-soft\jtest\tests\MyTest.ptp, then generate an HTML sum-mary report (summary.html) in the current working directory, enter the following command at the prompt:jtestgui -nogui -ptp c:\progra~1\para-soft\jtest\tests\MyTest.ptp -summary_report_html sum-mary.html
• To run the previously-tested MyTest class whose test parameters are saved in /usr/users/carson/jtest/tests/MyClass.ctp, then generate an XML report (report.xml) in the current working directory, enter the following command at the prompt:jtestgui -nogui -ctp /usr/users/car-son/jtest/tests/MyClass.ctp -report_xml report.xml

Running Jtest in Command Line and Batch Mode
Testin
g
• To test a class that has not yet been tested and that has class dependencies, use the -ctp_new, -class_name, -cp, -class-path, and -sourcepath tags. For example, to create a .ctp file for a class named com.package.Foo that lives in C:\com\pack-age, enter the following command at the prompt: jtestgui -nogui -ctp_new <name of ctp file> -class_name com.package.Foo -cp C:\Jtest -sourcepath < path to source code if not in same dir as Foo.class>
• To test only selected classes within the previously-untested Foo.jar, enter the following command at the prompt: jtestgui -ptp_new <name of ptp file> -search_in <path the Foo.jar> -filter_in <regular expression specify-ing the files to be tested> -cp <full path to depen-dencies> -sourcepath <path to source code>
Note: Jtest is unable to find source code that is located within a jar file. For this example, the -sourcepath option should point to the source code of the project that has been unjarred.
• To create an HTML-format report (named report.html) that con-tains the project test results saved in project.ptp, enter the fol-lowing command at the prompt:jtestgui -nogui -ptp project.ptp -load_results -report_html report.html
• To open the Jtest UI and display the class test results saved in class.ctp, enter the following command at the prompt:jtestgui -ctp class.ctp -load_results
Creating a Batch or Script FileIf you have a classpath that is extensive (i.e., it has over 30 paths), we suggest that you create and use a batch file (for Windows) or a script (for UNIX).
Creating a Windows Batch FileTo create a Windows batch file:
1. Change directories to your Jtest installation directory.
90

Running Jtest in Command Line and Batch Mode
91
Tes
tin
g
2. Enter <filename>.bat to create a new batch file.
3. Add to the batch file the test commands you want to execute. A sample batch file might look like this:CALL jtvars (to setup the environment to use jtest) jtestgui -nogui -nologo -ctp_new Simple.ctp -class_name examples.eval.Simple -cp <1st classpath>;<2nd classpath>;<etc>
4. Save and close the batch file.
5. Run the test by entering <filename> at the command prompt.
Creating a UNIX ScriptTo create a UNIX script:
1. Open a console (or xterm window).
2. Enter vi <filename>.sh to create a new script.
3. Add to the script the test commands you want to execute. A sam-ple script might look like this:#!/bin/sh # jteststatic.sh # Purpose: This shell script runs Jtest # # Set Jtest env vars. cd <Jtest_home> (to go to jtest installation direc-tory) . jtvars.sh (to setup the environment to use jtest) # Run Jtest cmd line cmd to create a new .ctp and run static analysis. echo "Creating new ctp..." jtestgui -nogui -nologo -ctp_new Simple.ctp -class_name examples.eval.Simple -run_only static -report Simple.rpt -cp <set 1st classpath>: <2nd classpath>: <etc>
4. Save and close the script.
5. Run the test by entering <filename> at the command prompt.

Saving and Restoring Tests Parameters
Testin
g
Saving and Restoring Tests ParametersThis topic explains how to save test parameters and restore previ-ously-saved test parameters. Subtopics include:
• Saving Parameters
• Restoring Test Parameters
Saving ParametersIf you save test parameters, you will be able to instantly restore the pre-cise testing circumstances that you used for a specific test. This lets you accurately repeat a test to see if modifications caused class behavior to change and/or introduced errors (i.e., it lets you perform regression test-ing).
Whenever Jtest tests a class, it saves the class test parameters in the file you indicate at the beginning of the test. Whenever Jtest tests a set of classes, it saves the project test parameters in the file you indicate at the beginning of the test; it also automatically saves the class test parameters for each class contained in the project.
You can also save parameters under a different name by choosing Save As from the File menu in the appropriate UI. (Use the Project Testing UI to save project test parameters, and the Class Testing UI to save class test parameters).
Restoring Test ParametersTo restore parameters from a previous test (for example, to perform regression testing), simply choose File> Open from the appropriate UI (Use the Class Testing UI to restore class test parameters; use the Project Testing UI to restore project test parameters). In the file chooser that opens, select the .ctp (for class test parameters) or .ptp (for project test parameters) file that you want to restore, then Jtest will open the specified test parameters.
92

Saving and Restoring Tests Parameters
93
Tes
tin
g
Tip: You can also open recent parameters by choosing File> Open Recent> [File Name].

Using Jtest in a Group Environment
Testin
g
Using Jtest in a Group EnvironmentThis topic explains how to share Jtest settings throughout your group, as well as how to use Jtest and CVS to manage your group’s access to the source code repository. Subtopics include:
• Overview
• Sharing a Jtest Properties File
• Preparing Test Parameter Files for Sharing
• Sharing Global Test Parameters
• Integrating CVS Source Control at the Local and Group Level
OverviewYou can have all team members share the same Jtest and test settings by sharing the appropriate parameters. For example, you can share your basic static analysis rule settings (which rules and rule categories are enabled and disabled) by sharing global test parameters. You can share advanced settings (such as source control settings or rule severity/cate-gory settings) by sharing a properties file like the one discussed in “Prop-erties File Customization Options” on page 394. You can share project-specific parameters and test cases by sharing project and class test parameters. Jtest provides a means to share as many or as few set-tings as you need.
If you are using Jtest throughout your group, we strongly recommend that the entire group share the following:
• A global test parameters (.gtp) file.
• A Jtest Properties file.
• A single user-defined rules directory.
• Project test parameter (.ptp) files and associated class test parameter (.ctp) files for the classes in those projects.
94

Using Jtest in a Group Environment
95
Tes
tin
g
Note: Jtest’s global, project, and class test parameter files are generally user-independent. Jtest automatically tries to replace the user HOME variable in the paths in the .ctp, .ptp, and .gtp files. For example if a .ptp has a "Search In" parameter of the form "c:\users\john\dv\com\para-soft\u", Jtest will save it as: "$HOME/dv/com/parasoft/u" (assuming HOME is set). Thus that .ptp file can be used by another user as long as that user has the HOME variable set and uses the same directory struc-ture.
Sharing a Jtest Properties FileThe Jtest properties file allows you to change advanced settings such as rule category/severity levels, the user-defined rule directory, the location of your global test parameters file, source control settings, and so on.
The default local Jtest properties file is located in <jtest_install_dir>/u/<username>/jtest.properties (Windows) or <your_home_directory\.jtest\jtest.properties (UNIX).
If you are using Jtest across a group, we strongly recommend that you create a group properties file, then use that file throughout your group. Settings specified in a group properties file will take precedence over those in any local jtest.properties file.
To establish a group properties file:
1. Close Jtest if it is open.
2. Copy the default local jtest.properties file to a network drive shared by your group.
3. Rename that file jtest_group.properties.
4. (Optional) Add the jtest_group.properties file to source control.
5. On all systems that you want to share this file, set the PARASOFT_GROUP_PROPERTIES environment variable so that it points to this jtest_group.properties file. Set this variable permanently, not temporarily.
After you complete these steps, the properties set in this file will automat-ically be applied to all group members using Jtest. Whenever you modify settings in this file (such as rule mapping settings, rules directory settings,

Using Jtest in a Group Environment
Testin
g
source control settings, and so on), the changes will be applied to all group members who share this file.
Preparing Test Parameter Files for SharingThis section provides general instructions for preparing your test parame-ter files for sharing.
Preparing Class Test Parameters for SharingWhen you test one class at a time in the Class Testing UI, you can save all the class test settings for that test in a class test parameters (.ctp) file (Jtest prompts you to create a .ctp file whenever you start a new class test). The .ctp file keeps track of information such as the class name under test, the test results, and the automatic and user-defined test cases used.
To share a single class’s test settings, you need to prepare the appropri-ate class test parameters (.ctp) file for multi-user use as follows:
1. Load into the Jtest Class Testing UI the class whose test settings you want to share.
2. Click Class to open the Class Test Parameters window.
3. Modify the settings in the Class Test Parameters tree’s Common Parameters branch as needed to ensure that the following parameters will work on systems other than your own:
• Directories> Working Path
• Directories> Results
• java/javac-like Parameters> classpath or java/javac-like Parameters> -cp (depending on which one you typically use)
• java/javac-like Parameters> System Properties
• Tip: For sharing purposes, you can use environment variables such as $HOME or $JAVA_HOME, $RESULTS_HOME, etc. or Jtest variables.For informa-
96

Using Jtest in a Group Environment
97
Tes
tin
g
tion on the Jtest variables that can be used for the nodes in the Common Parameters branch, see the Context Sensitive Help for that area.
4. Save this class’s class test parameters (.ctp) file by choosing File> Save or File> Save As.
You can then add this file and the related .java files to the source code repository. Jtest will automatically add .ctp files to source control if you integrate CVS into Jtest and add the jtest.sourcecontrol.addct-pifjava=true option to your properties file as described in “Properties File Customization Options” on page 394.
To open a saved class test parameters file in Jtest, choose File> Open in the Class Testing UI, then select the appropriate .ctp file from the file chooser. Or, if you are running Jtest from the command line, enter the command jtestgui -ctp your_file_name.ctp to launch Jtest with the specific .ctp file.
Note: It is important to use the most current version of the .ctp file when you perform regression testing.
Preparing Project Test Parameters for SharingWhen you test a set of classes or JSPs in the Project Testing UI, you can save all the project test settings for that test in a project test parameters (.ptp) file (Jtest prompts you to create a .ptp file whenever you start a new project test). The .ptp file keeps track of project-wide settings.
To share a project’s test settings, you need to prepare the appropriate project test parameters (.ptp) file for multi-user use. Then, you can check this file and all related .ctp (Class Test Parameter) files in and out of source control and share them as you would share your other files.
To prepare a .ptp file for multi-user use:
1. Load into the Jtest Project Testing UI the project whose settings you want to share.
2. Click Project to open the Project Test Parameters window.
3. Modify the settings in the Project Test Parameters tree’s Com-mon Parameters branch as needed to ensure that the following parameters will work on systems other than your own:

Using Jtest in a Group Environment
Testin
g
• Source Path
• Directories> Working Path
• Directories> Results
• Directories> Class Test Parameters root
• java/javac-like Parameters> classpath or java/javac-like Parameters> -cp (depending on which one you typically use)
• java/javac-like Parameters> System Properties
• Tip: For sharing purposes, you can use environment variables such as $HOME or $JAVA_HOME, $RESULTS_HOME, etc. or Jtest variables. For example, if the $PARMS_DIR value is used for the Class Test Parameters Root option, all the .ctp files will be placed in the same directory as the .ptp file. For information on the Jtest variables that can be used for the nodes in the Common Parameters branch, see the Context Sensitive Help for that area.
4. Save the project test parameters file for the test by choosing File> Save As, then saving the .ptp file in the same directory as the files that are included in the project.
You can then add the related .ptp, .ctp, and .java files to the source code repository. Jtest will automatically add .ctp files to source control if you integrate CVS into Jtest and add the jtest.sourcecontrol.addct-pifjava=true option to your properties file as described in “Properties File Customization Options” on page 394.
To open a saved project test parameters file in Jtest, choose File> Open in the Project Testing UI, then select the appropriate .ptp file from the file chooser.
Note: It is important to use the most current version of the .ctp and .ptp files when you perform regression testing. It also important to check out all .ctp files related to your project before you modify any test settings; if all necessary .ctp files are not checked out, test result will not be saved properly.
98

Using Jtest in a Group Environment
99
Tes
tin
g
Preparing Global Test Parameters for SharingWhen you test a class in the Class Testing UI or a test set of classes in the Project Testing UI, you can save global test parameters for that test, in a .gtp file (Global Test Parameters file). The .gtp file contains information such as the rules (built-in and user-defined) that are enforced, the Search Parameter settings for a project test, and the path to the test results for all tests.
Whenever you launch Jtest, it will use the default .gtp file saved in <jtest_install_dir>\u\username\persist (Windows) or <users home>/.jtest/persist (UNIX)-- directories that are not typically shareable-- unless you specify a different location from the command line.
To create a global test parameters file in a shareable directory:
1. Open a command prompt and set your environment for Jtest as described in “Running Jtest in Command Line and Batch Mode” on page 78.You will see the message, ‘Environment for using Jtest set’.
2. To launch Jtest and create a new .gtp file, enterjtestgui -gtp <path_to_file>/<filename>.gtpFor example, if you want to create a .gtp file at C:\Program Files\ParaSoft\Jtest4.5\u\share\shared.gtp, you could enterjtestgui -gtp c:\program files\jtest4.5\share\shared.gtp.
3. When the Jtest UI opens, modify the following settings in the Glo-bal Test Parameters tree’s Common Parameters branch as needed to ensure that the following parameters will work on sys-tems other than your own:
• Source Path
• Directories> Working Path
• Directories> Results
• Directories> Class Test Parameters root
• java/javac-like Parameters> classpath or java/javac-like Parameters> -cp (depending on which one you typically use)
• java/javac-like Parameters> System Properties

Using Jtest in a Group Environment
Testin
g
• Tip: For sharing purposes, you can use environment variables such as $HOME or $JAVA_HOME, $RESULTS_HOME, etc. or Jtest variables. For informa-tion on the Jtest variables that can be used for the nodes in the Common Parameters branch, see the Context Sensitive Help for that area.
• Tip: The parameters set here will be applied to project and class test parameters unless you specify values other than $PARENT or inherit at the project or class level.
4. Make any additional customizations to the global test parameters so that they reflect the settings you want your group to share. For example, you might want to modify static analysis rule or class-path settings.
5. Save the global test parameters file for the test by right-clicking the Global button, then choosing Save Global Parameters. When Jtest asks you to confirm whether you want to save this .gtp file, click Yes.
You can then add the .gtp file to the source code repository.
To apply these settings to all group members, follow the procedure described in the next section.
Sharing Global Test ParametersJtest’s global test parameters control all general Jtest test settings (static analysis, dynamic analysis, directories, classpath settings, and so on).
To share global test parameters throughout your group:
1. Close Jtest if it is currently open.
2. Establish a group properties file in a shareable directory if you have not already done so. Instructions for creating a group prop-erties file are available in Sharing a Jtest Properties File above.
3. In the group properties file, specify the location of your shared global test parameters file by modifying the jtest.gtp.path setting.
100

Using Jtest in a Group Environment
101
Tes
tin
g
4. Save and close the group properties file.
The next time any group member using the shared properties file launches Jtest, the shared global test parameters will automatically be loaded into the UI. If the .gtp file is modified (for example, if someone changes the rule settings), the changes will be applied to all team mem-bers.
Integrating CVS Source Control at the Local and Group LevelYou can integrate CVS source control into the Jtest environment and con-trol various source control parameters via the settings in a local or shared Jtest properties file. After the integration, Jtest can automatically update, check in, and check out the files involved in each test (.class, .java, .rule, .gtp, .ptp, .ctp, and properties files). You can configure how and when Jtest accesses the source control system, define access privileges, and prompt Jtest to create log files that track source control transactions.
To integrate CVS into Jtest, you need the following:
• Access to a CVS repository.
• Access to a CVS client. By default, Jtest will use the CVS execut-able (jtestcvs for UNIX, jtestcvs.exe for Windows) shipped with Jtest. It is located in the <jtest_install_dir>/bin direc-tory.
• A CVSROOT environment variable that points to the root of the repository.
Integrating Source Control Into JtestTo integrate CVS source control into Jtest:
1. Close Jtest if it is open.
2. Perform a CVS login if you are using the CVS executable shipped with Jtest. You must perform a login before using CVS within Jtest.
Using Jtest in a Group Environment
Testin
g
3. Modify the sourcecontrol setting in the Jtest properties file as follows:sourcecontrol=CVS
4. If a different environment variable is used instead of CVSROOT, add the following entry to the Jtest properties file:sourcecontrol.cvs.cvsroot
5. Save and close the property file.
6. Launch Jtest.
When you are using the default source control settings, Jtest will automat-ically check whether each file you load into Jtest is currently under source control. If a file is under source control, Jtest will automatically check it out.
You can also configure Jtest to automatically check in files when they are no longer in use, retrieve the most recent version of every file you access from Jtest, or automatically add .ctp files to source control. For instruc-tions on configuring these and other source control options, see “Proper-ties File Customization Options” on page 394.
Integrating Group-Wide Source ControlTo integrate CVS source control at the group level:
1. Close Jtest if it is open.
2. Establish a group properties file in a shareable directory if you have not already done so. Instructions for creating a group prop-erties file are available in the Sharing a Jtest Properties File sec-tion of this topic.
3. In the group properties file, modify the sourcecontrol setting as follows:sourcecontrol=CVS
4. If a different environment variable is used instead of CVSROOT, add the following entry to the group properties file:sourcecontrol.cvs.cvsroot
5. Save and close the group properties file.
6. Launch Jtest.
102

Using Jtest in a Group Environment
103
Tes
tin
g
Parameters defined in the group.properties file will now override the parameters defined in the jtest.properties file (<jtest_install_dir>\u\user-name\jtest.properties).
When you are using the default source control settings, Jtest will automat-ically check whether each file you load into Jtest is currently under source control. If a file is under source control, Jtest will automatically check it out.
You can also configure Jtest to automatically check in files when they are no longer in use, retrieve the most recent version of every file you access from Jtest, or automatically add .ctp files to source control. For instruc-tions on configuring these and other source control options, see “Proper-ties File Customization Options” on page 394.
Customizing Source Control OptionsAdditional source control options (log file options, automatic check out options, and so on) can be set in the local or shared properties file. For a complete list of available options, see “Properties File Customization Options” on page 394.

Using Jtest with JUnit
Testin
g
Using Jtest with JUnitThis topic explains how you can use Jtest with JUnit. Subtopics include:
• Overview
• Using JUnit Test Classes in Jtest
• Creating JUnit Test Class Templates
• Automatically Generating Test Cases and Exporting Jtest Test Cases into JUnit
• Enforcing Best Practices for JUnit Test Classes
• Obtaining a “Using Jtest and JUnit” White Paper
OverviewJtest complements and extends JUnit. Jtest not only runs JUnit test cases, but also automatically designs and executes additional test cases that verify the code and increase test coverage. Moreover, Jtest automat-ically creates JUnit test class templates into which you can easily enter test cases, and exports Jtest test cases in JUnit-compatible format. It even enforces best practices for JUnit test classes.
Using JUnit Test Classes in JtestJtest can run JUnit test cases while it automatically generates test cases and/or runs other user-defined test cases. For instructions on using JUnit test cases within Jtest, see “Using Existing JUnit Test Classes” on page 230.
Creating JUnit Test Class TemplatesJtest can automatically create Test Class templates which you can later modify for use in Jtest and/or JUnit. Automatically-generated templates contain a test for each of the methods in the class under test. By default, each test will fail until you add your own test code. The Test Class also includes comments that describe the purpose of each method, which
104

Using Jtest with JUnit
105
Tes
tin
g
method the test method is testing, and where you need to modify or extend the code.
For instructions on creating a JUnit-compatible Test Class template, see “Automatically Creating and Modifying a JUnit-Compatible Test Class Template” on page 223.
Automatically Generating Test Cases and Exporting Jtest Test Cases into JUnitJtest automatically generates test cases that test class construction and (if the class uses Design by Contract) class functionality. These test cases are generated during the standard testing procedure introduced in “Quick Start Guide” on page 14.
Jtest can create JUnit-compatible test classes that represent automati-cally-generated test cases or user-defined test cases. You can modify these test classes as much or as little as you like, then run them within JUnit or Jtest.
For instructions on exporting Jtest Test Cases as JUnit-compatible Test Classes, see the following sections:
• “Automatically Creating a JUnit-Compatible Test Class that Rep-resents Automatically-Generated Test Cases” on page 224
• “Automatically Creating a JUnit-Compatible Test Class that Rep-resents Existing Method Inputs” on page 225
• “Automatically Creating a JUnit-Compatible Test Class that Rep-resents Existing User Defined Test Cases” on page 226
• “Modifying Automatically-Generated Test Classes” on page 227
Enforcing Best Practices for JUnit Test Classes

Using Jtest with JUnit
Testin
g
Jtest contains a set of static analysis rules that check whether JUnit Test Classes follow JUnit best practices. For details about these best prac-tices, see the following topics:
• “JUNIT.OSIC-2 Avoid using the constructor to set up test cases” on page 679
• “JUNIT.OSUM-3 Always override the 'setUp ()' method” on page 681
• “JUNIT.OTDM-3 Always override the 'tearDown ()' method” on page 683
To check whether a Test Class follows these guidelines:
1. Load the Test Class into the Class Testing UI.
2. Enable level 3 rules (so that all JUnit best practices are checked) as follows:
a. Click Global to open the Global Test Parameters window.
b. Enable the Static Analysis> Rules> Severity Levels Enabled> Level 3 option.
c. Close the Global Test Parameters window.
3. Start the test by clicking the Start tool bar button, then save your class test parameters when prompted to do so.
• If you only want to perform static analysis or a specific type of static analysis (for example, you only want to enforce JUnit rules), right-click the Start button, then choose the menu item that describes the type of static analysis that you want to perform.
106

Using Jtest with JUnit
107
Tes
tin
g
Obtaining a “Using Jtest and JUnit” White PaperTo obtain a white paper that explains and demonstrates how to use Jtest with JUnit, visit http://www.parasoft.com/jsp/prod-ucts/tech_papers.jsp?product=Jtest

Using Jtest with Ant
Testin
g
Using Jtest with AntThis topic provides tips on using Jtest with Apache's Jakarta Ant build tool. Subtopics include:
• Configuring Your System
• Running Ant
• Exploring Sample Files
• Obtaining a “Using Jtest and Ant” White Paper
Configuring Your SystemBefore you run any of the Ant targets in build.xml, ensure that <ant_install_dir>/bin is on the path, <jdk_install_dir>/bin is on the path, and '.' is on the CLASSPATH.
Before you compile JtestTask.java, ensure that <ant_install_dir>/lib/ant.jar is on the CLASSPATH.
Before you run any of Jtest's testing targets that use Ant's exec built-in task, ensure that <jtest_install_dir>/bin is on the PATH.
Running AntTo run Ant, use the command ant <testing target name>
Valid testing targets include:
• simple_test
• project_test
• project_test_project
• project_test_whitebox
• project_test_blackbox
• simple_jtest_task
108

Using Jtest with Ant
109
Tes
tin
g
Exploring Sample FilesA sample build file (build.xml)and sample task file (Jtest-Task.java) are available in the <jtest_install/dir>/exam-ples/tools/ant directory.
Obtaining a “Using Jtest and Ant” White PaperA white paper that explains and demonstrates how to use Jtest with Ant is available to Jtest customers. If you would like a copy of this paper, please contact your Parasoft Quality Consultant.

Viewing and Validating Test Cases
Testin
g
Viewing and Validating Test CasesThis topic explains how to view dynamic analysis test cases and validate test case outcomes in the View Test Cases window. Subtopics include:
• Viewing Test Cases
• Validating Outcomes
Viewing Test CasesTo open the View Test Cases window from the Class Testing UI, click the View Test Cases button.
To open this window from the Project Testing UI’s Results panel, right-click the [Class Name] node, then choose View Test Cases from the shortcut menu.
The color of the arrow to the left of a leaf has the following meaning:
• green: The outcome is correct, or has been validated as correct by the user.
• red: The outcome is incorrect (or has been validated as incorrect by the user), or an uncaught runtime exception was detected.
• gray: The outcome status is unknown, and no uncaught runtime exceptions were detected.
• no arrow: The user has specified to ignore this outcome.
If the Perform Automatic Regression Testing flag was selected, Jtest will assume that gray outcomes are correct and will report an error if the outcome changes.
In this window, the outcome is marked as incorrect if it is different than the one in the Specification and Regression Test Cases branch of the Errors Found panel (in the Class Testing UI) or Results panel (in the Project Testing UI). When more than one test case outcome differs, only one of them is marked as an error and only that one is reported as an error in the Errors Found panel or Results panel.
110

Viewing and Validating Test Cases
111
Tes
tin
g
Viewing Test Case DetailsThe View Test Cases window contains the following nodes:
Automatic Test Cases
Contains the test cases that Jtest generated automatically. Only the test cases that do something new (e.g., increase coverage, throw a new exception, etc.) are shown.
Automatic Test Cases> [method name]
Viewing and Validating Test Cases
Testin
g
Contains test cases for this method.
Automatic Test Cases> [method name]> Test Case
Contains all of the information for a test case. You can choose to delete a test case, ignore it in future tests, or not ignore it in future tests by right-clicking its Test Case node, then choosing the appropri-ate menu option
Automatic Test Cases> [method name]> Test Case> Test Case Input
Contains input that defines the test case.
The input for automatic test cases is the calling sequence.
The input for user defined test cases is the input for each argument.
If stubs were used, they will be listed here. Empty boxes indicate automatically generated stubs. Black boxes indicate user-defined stubs. For more information on stubs, see “Testing Classes That Ref-erence External Resources” on page 178 and “Using Custom Stubs” on page 184.
To view an example Java program that executes the input for a test case, right-click the Test Case Input node, then choose View Exam-ple Test Case from the shortcut menu. If an exception has been reported for this input, the exception will be thrown when you run this program. Sometimes (for example, while testing an abstract class) the input that Jtest finds doesn’t correspond to a compilable Java pro-gram. If the input includes stubs, the generated .java program will include only the stub text.
Automatic Test Cases> [method name]> Test Case> Outcomes
Contains outcomes for this test case. Verify if the outcomes are cor-rect or incorrect according to the class specification and set their state using the shortcut menus. To set all outcomes for a Test Case to the same status (correct, incorrect, unknown, or ignore), right-click the Outcomes node, then choose the appropriate shortcut menu item. To set the status of a particular outcome, right-click the Outcomes subn-ode for that outcome, then choose the appropriate shortcut menu
112

Viewing and Validating Test Cases
113
Tes
tin
g
item.
When the outcome is an object, Jtest automatically chooses the toString method to show its state. If a method named jtestInspector is defined for the object’s class, Jtest will only use the return value of this method to show the object state. If no toString or jtestInspector methods are defined, Jtest will heuristically choose some public instance methods for that object to show its state. If the method under test is a static method, Jtest will heuristically choose public static methods to show the class state. If the methods Jtest chose are not enough, declare a static method called sjtestInspector for the class. Jtest will use the return value of this method to show the object class.
[n]= number of outcomes for this test case.
Automatic Test Cases> [method name]> Test Case> Outcomes> Exception
Indicates that an exception occurred.
If an exception was suppressed, you can see the reason for the sup-pression by right-clicking the exception message node and choosing Why Suppressed? from the shortcut menu.
To change the status of an exception outcome to correct, incorrect, unknown, or ignore, right-click this node, then choose the appropriate shortcut menu item.
To see an explanation of why the outcomes resulted in an error, right-click the Exception node, then choose Why an Error? from the shortcut menu.
User Defined Test Cases
Contains test cases generated from user-defined input.
User Defined Test Cases> Method Inputs
Contains test cases generated from method inputs.
User Defined Test Cases> Method Inputs > [method name]

Viewing and Validating Test Cases
Testin
g
Contains test cases for this method.
User Defined Test Cases> Method Inputs > [method name]> Test Case
Contains all of the information for a test case.
User Defined Test Cases> Method Inputs > [method name]> Test Case> Test Case Input
Contains input that defines the test case.
The input for automatic test cases is the calling sequence.
The input for user defined test cases is the input for each argument.
If stubs were used, they will be listed here. Empty boxes indicate automatically generated stubs. Black boxes indicate user-defined stubs. To see the stack trace where a stub invocation occurred, expand the stub’s branch. For more information on stubs, see “Test-ing Classes That Reference External Resources” on page 178 and “Using Custom Stubs” on page 184.
User Defined Test Cases> Method Inputs > [method name]> Test Case> Outcomes
Contains outcomes for this test case. Verify if the outcomes are cor-rect or incorrect according to the class specification and set their state using the shortcut menus. To set all outcomes for a Test Case to the same status (correct, incorrect, unknown, or ignore), right-click the Outcomes node, then choose the appropriate shortcut menu item. To set the status of a particular outcome, right-click the Outcomes subn-ode for that outcome, then choose the appropriate shortcut menu item.
When the outcome is an object, Jtest automatically chooses the toString method to show its state. If a method named jtestInspector is defined for the object’s class, Jtest will only use the return value of this method to show the object state. If no toString or jtestInspector methods are defined, Jtest will heuristically choose some public instance methods for that object to show its state. If the method under
114

Viewing and Validating Test Cases
115
Tes
tin
g
test is a static method, Jtest will heuristically choose public static methods to show the class state. If the methods Jtest chose are not enough, declare a static method called sjtestInspector for the class. Jtest will use the return value of this method to show the object class.
[n]= number of outcomes for this test case.
User Defined Test Cases> Method Inputs > [method name]> Test Case> Outcomes > Exception
Indicates whether an exception occurred, and, if so, what type of exception occurred. When an exception occurs, stack trace informa-tion can be displayed by opening this node.
To change the status of an exception outcome to correct, incorrect, unknown, or ignore, right-click this node, then choose the appropriate shortcut menu item.
To see an explanation of why the outcomes resulted in an error, right-click the Exception node, then choose Why an Error? from the shortcut menu.
If an exception was suppressed, you can see the reason for the sup-pression by right-clicking the exception message node and choosing Why Suppressed? from the shortcut menu.
User Defined Test Cases> Test Classes
Contains the test cases added from Test Classes.
User Defined Test Cases> Test Classes> Test Case
Contains all of the information for a Test Class’s test case.
User Defined Test Cases> Test Classes> Test Case> Test Case Input
Contains input that defines the test case.
If stubs were used, they will be listed here. Empty boxes indicate automatically generated stubs. Black boxes indicate user-defined stubs. To see the stack trace where a stub invocation occurred,

Viewing and Validating Test Cases
Testin
g
expand the stub’s branch. For more information on stubs, see “Test-ing Classes That Reference External Resources” on page 178 and “Using Custom Stubs” on page 184.
User Defined Test Cases> Test Classes> Test Case> Outcomes
Contains outcomes for this test case. Verify if the outcomes are cor-rect or incorrect according to the class specification and set their state using the shortcut menus. To set all outcomes for a Test Case to the same status (correct, incorrect, unknown, or ignore), right-click the Outcomes node, then choose the appropriate shortcut menu item. To set the status of a particular outcome, right-click the Outcomes subn-ode for that outcome, then choose the appropriate shortcut menu item.
When the outcome is an object, Jtest automatically chooses the toString method to show its state. If a method named jtestInspector is defined for the object’s class, Jtest will only use the return value of this method to show the object state. If no toString or jtestInspector methods are defined, Jtest will heuristically choose some public instance methods for that object to show its state. If the method under test is a static method, Jtest will heuristically choose public static methods to show the class state. If the methods Jtest chose are not enough, declare a static method called sjtestInspector for the class. Jtest will use the return value of this method to show the object class.
[n]= number of outcomes for this test case.
User Defined Test Cases> Test Classes> Test Case> Outcomes > Exception
Indicates whether an exception occurred, and, if so, what type of exception occurred. When an exception occurs, stack trace informa-tion can be displayed by opening this node.
To change the status of an exception outcome to correct, incorrect, unknown, or ignore, right-click this node, then choose the appropriate shortcut menu item.
To see an explanation of why the outcomes resulted in an error,
116

Viewing and Validating Test Cases
117
Tes
tin
g
right-click the Exception node, then choose Why an Error? from the shortcut menu.
If an exception was suppressed, you can see the reason for the sup-pression by right-clicking the exception message node and choosing Why Suppressed? from the shortcut menu.
Note: If you change test cases, but want to restore the test cases used during the actual tests, right-click the Class Test Parameter window’s Dynamic Analysis> Test Case Evaluation> Specification and Regres-sion Test Cases node, then choose the Reload option from the shortcut menu. Jtest will then reload the original test cases.
Validating OutcomesIf you validate the automatically-generated white-box test case outcomes, those test cases will be used to test functionality as well as construction. If you have entered user-defined test cases by adding method inputs, you need to validate test case outcomes to ensure that future test runs are using the correct comparison value.
To evaluate test case outcomes for a class:
1. Review the class’s test case outcomes in the View Test Cases window by performing one of the following actions:
• To open this window from the Class Testing UI, click the View Test Cases button.
• To open this window from the Project Testing UI's Results panel, right-click the [Class Name] node, then choose View Test Cases from the shortcut menu.
2. In the View Test Cases window, expand the test case tree so that the inputs and outcomes for the test cases you are evaluating are visible.
3. Indicate whether or not the outcome for each test case is correct by right-clicking the appropriate outcome, then doing one of the following:

Viewing and Validating Test Cases
Testin
g
• Choose Mark as Correct if the listed outcome is the expected outcome.
• Choose Mark as Incorrect if the listed outcome is not the expected outcome.
• Choose Mark as Unknown if you don't know how the listed outcome compares to the expected outcome.
• Choose Mark as Ignore if you want Jtest to ignore the listed outcome.
• To choose the same option for all of a test case’s out-comes, right-click the test case’s Outcomes leaf, then choose the appropriate Set All to... command from the shortcut menu.
4. If any outcome was incorrect, enter the correct value as follows:
a. Open the Class Test Parameters window.
b. Open that test case’s branch in Dynamic Analysis> Test Case Evaluation> Specification and Regression Testing.
c. Right-click the outcome, choose Edit from the shortcut menu, then enter the correct value in the text field that opens.
5. If you want to remove any test cases, do one of the following:
• To remove an entire test case, right-click the appropriate Test Case node, then choose Delete from the shortcut menu.
• To remove the entire set of test cases, right-click the Specification and Regression Test Cases node, then choose Delete All from the shortcut menu.
Now every time Jtest is run on that class, it will execute the remaining test cases and check whether or not the correct outcomes are produced.
Any problems found using these test cases will be reported in the Speci-fication and Regression Errors branch of the Errors Found Panel (if you tested a single class) or the Results Panel (if you tested a project).
118

Viewing and Validating Test Cases
119
Tes
tin
g
Note: If you change test cases, but want to restore the test cases used during the actual tests, right-click the Class Test Parameter window’s Dynamic Analysis> Test Case Evaluation> Specification and Regres-sion Test Cases node, then choose the Reload option from the shortcut menu. Jtest will then reload the original test cases.

Viewing and Validating Test Cases
Testin
g
120

Viewing Coverage Information
121
Tes
tin
g
Viewing Coverage InformationThis topic explains different ways to view coverage information and cus-tomize what type of coverage details are reported. Subtopics include:
• Overview
• Customizing Coverage Reports
• Pinpointing Untested Code
OverviewYou can view coverage information in three places:
• The Class Testing UI’s Test Progress panel (see “Class Testing UI Test Progress Panel” on page 298).
• The Project Testing UI Results panel’s [Class Name]> Test Progress> Dynamic Analysis> Line Coverage branch. (see “Test Progress” on page 61).
• A single class report (see “Single Class Report” on page 127).
A method is designated “covered” if Jtest automatically tests any part of the constructor.
Jtest performs data coverage for the generated input categories; this means that the parts of the class that have been covered are thoroughly tested with respect to those inputs.
Jtest records and displays the cumulative coverage achieved by all the test cases used in a test. If some part of the class is not covered, it means that Jtest has not yet found a path leading to those statements or no path leads to those statements. On average, Jtest is able to automatically cre-ate test cases that cover about 75% of the code. Sometimes Jtest will be able to test 100% of the class, and sometimes it will test less than 75% of the class.

Viewing Coverage Information
Testin
g
Customizing Coverage ReportsAll classes accessed that are not part of the JDK will be included in the coverage report if you do not specify any filtering options. If you want to see coverage for more or fewer classes, modify the Coverage Filter parameters. This filter can be set at the global, project, or class level in the appropriate parameters window. To modify coverage parameters:
1. Open the appropriate parameters window.
2. Double-click the Dynamic Analysis> Test Case Evaluation> Coverage node.
3. Enter the desired filter parameters (see below for a list of avail-able parameters and syntax).
4. Click OK.
Available ParametersThe format for parameters is comma separated filtering options.
Parameter options are as follows:
• To have Jtest report coverage only for the tested class, use the special token $DEFAULT.
• To filter out a package or class, use-F=<package or class>
• To include a package or class, use +F=<package or class> Note: +F overwrites -F.
• If no filter matches a class, coverage for the class is included in the coverage report unless the class is from the JDK
For example, if you want Jtest to report coverage only for the class pkg.Test, use the following filter parameters:
-F=*,+F=pkg.Test
If you want Jtest to report coverage only for classes in the package pkg, use the following filter parameters:
-F=*,+F=pkg.*
122

Viewing Coverage Information
123
Tes
tin
g
If you want Jtest to report coverage for classes in java.util and classes outside the JDK, use the following filter parameters:
+F=java.util.*
If you want Jtest to report coverage for all loaded test classes-- but not JDK classes-- leave the coverage filter empty.
If you want Jtest to report coverage for all loaded classes, JDK classes, and test classes, use the following filter parameters:
+F=*
Pinpointing Untested CodeTo determine what lines were not covered, view the single class report (if you performed a project test, you can access this report from the standard project report). If you configured Jtest to create an HTML report, lines highlighted in pink were not tested by Jtest. If you configured Jtest to cre-ate an ASCII text report, the lines that have a ">" in front of them were not tested by Jtest.

Viewing, Editing, or Compiling a Source
Testin
g
Viewing, Editing, or Compiling a SourceThis topic explains how to integrate and use your preferred editor with Jtest. Subtopics include:
• Choosing an Editor
• Viewing, Editing, and Compiling Any Source
• Viewing/Editing the Source of a Violation or Error
Choosing an EditorBy default, Jtest uses its built-in editor for source code display and edit-ing. This editor is a language-sensitive editor with basic editor functional-ity, as well as the capability to compile your code and check files in and out of the source code repository (if you have integrated CVS into Jtest).
If you prefer to use a different editor, choose Preferences> Configura-tion Options> Editor, clear the Use built-in editor option, then enter your preferred editor in the dialog box that opens. You may also specify any parameters for that executable. If you choose to specify parameters, make sure to remove the quotations in the Parameters text field if needed. The default third-party editor is WordPad (Windows) or vi (UNIX).
Example Editor ParametersTo integrate Visual Slick Edit, specify the location of the executable and use the following parameters:"$FILE" -#$LINE
124
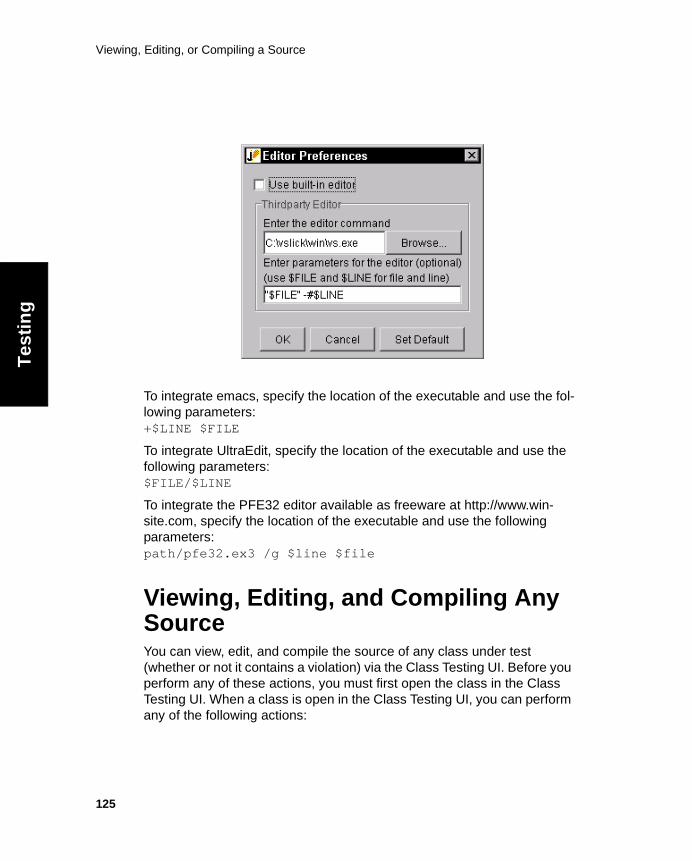
Viewing, Editing, or Compiling a Source
125
Tes
tin
g
To integrate emacs, specify the location of the executable and use the fol-lowing parameters:+$LINE $FILE
To integrate UltraEdit, specify the location of the executable and use the following parameters:$FILE/$LINE
To integrate the PFE32 editor available as freeware at http://www.win-site.com, specify the location of the executable and use the following parameters:path/pfe32.ex3 /g $line $file
Viewing, Editing, and Compiling Any SourceYou can view, edit, and compile the source of any class under test (whether or not it contains a violation) via the Class Testing UI. Before you perform any of these actions, you must first open the class in the Class Testing UI. When a class is open in the Class Testing UI, you can perform any of the following actions:

Viewing, Editing, or Compiling a Source
Testin
g
• Open the class source in Jtest's built-in editor or the selected third-party editor: Click Source.
• Compile the current class: Right-click the Source button, then choose Compile Class.
• Locate the source file: Right-click the Source button, then choose Locate Source File.
• Locate the .class file: Right-click the Source button, then choose Locate .class File.
Viewing/Editing the Source of a Violation or ErrorYou can open the source of a violation/error in an editor, with the problem-atic line highlighted, by double-clicking the file/line information for the error in the Errors Found panel (in the Class Testing UI) or in the Errors Found branch of the lower Results panel (in the Project Testing UI). Another way to open the source is to right-click that same error message and choose View Source from the shortcut menu.
126

Viewing a Report of Results
127
Tes
tin
g
Viewing a Report of ResultsThis topic describes the reports that Jtest creates and explains how to access each type of report. Subtopics include:
• Overview
• Single Class Report
• Summary Project Report
• Project Report
• Detailed Project Report
• Customized Reports
OverviewJtest generates the following types of reports:
• Single Class Report
• Project Report
• Detailed Project Report
• Summary Project Report
These reports all use the standard JNI 1.1 specification to identify meth-ods.
By default, the reports are formatted in HTML format, If you want Jtest to generate text (ASCII) format reports, choose Preferences> Configura-tion Options> Report Format> ASCII.
Jtest can also create XML format report which can be transformed using supplied or custom XSL files. For details on producing and transforming XML reports, see “Customized Reports” on page 130.
Single Class ReportAfter performing a test on a single class, Jtest will generate a Single Class Report of the testing session.

Viewing a Report of Results
Testin
g
This report contains information about all errors found, class metrics, test progress, class test parameters, test cases, and coverage. If you config-ured Jtest to create an HTML report, lines highlighted in pink were not tested by Jtest. If you configured Jtest to create an ASCII text report, the lines that have a ">" in front of them were not tested by Jtest.
By default, Jtest shows the test cases used for the test. Use the Prefer-ences> Configuration Options> Report File> Show Test Cases option to tell Jtest to omit test case information in this report.
To access the Single Class Report from the Class Testing UI, click the Report button in the Class Testing UI tool bar.
To print an ASCII (text) version of the report, right-click the Report button, then choose Print ASCII Report from the shortcut menu.
Tip: If you would like a Single Class Report for a class included in a project test, perform one of the following actions:
• Open the class in the Class Testing UI, then click the Report but-ton.
• Open the HTML Project Report or ASCII Detailed Project Report, then view the Single Class Report accessible from that report.
Summary Project ReportThis is the least detailed of the available project reports. This report con-tains the test name, a results summary, and an entry for each error avail-able in the Results panel; if there are no errors, this report contains only the test name and results summary.
To access the Summary Project Report, right-click the Report button in the Project Testing UI tool bar, then choose View Summary Report from the shortcut menu; you can also obtain this report by using -summary_report in the command line.
All project reports contain only information on the classes and errors that were available in the Results panel when the Report button was clicked. To limit the classes and errors contained in your report, remove results for classes and errors you are not interested in before you click the Report button.
128

Viewing a Report of Results
129
Tes
tin
g
Note: You can also access summary project reports for previous tests as follows:
1. Open the Test History window by clicking the History button in the Project Testing UI (with the project’s results loaded in the Project Testing UI).
2. Right-click the node that represents the test whose results sum-mary you want to view, then choose View Summary Report from the shortcut menu.
Project ReportThis report is more detailed than the Summary Project Report, but less detailed than the Detailed Project Report. This report contains project test parameters as well as all essential details about each error available in the Results panel.
This report is only available in ASCII format. If you configured Jtest to cre-ate ASCII-format reports, you can access an ASCII-format Project Report by clicking the Report button in the Project Testing UI tool bar, or using -report_ascii at the command line.
All project reports contain only information on the classes and errors that were available in the Results panel when the Report button was clicked. To limit the classes and errors contained in your report, remove results for classes and errors you are not interested in before you click the Report button.
Detailed Project ReportThis is the most detailed of the available project reports. This report con-tains one project report and one standard class report for each class involved in the test. From the detailed project report, you can access such information as:
• a results summary
• a list of all errors found (by class and by error type)
• project metrics

Viewing a Report of Results
Testin
g
• project test parameters.
• class test parameters
• class metrics
• coverage information
• test case information
• all results information available in the Results panel.
If you configured Jtest to create HTML-format reports, you can access an HTML-format Detailed Project Report by clicking the Report button in the Project Testing UI tool bar; you can also obtain this report by using -report_html in the command line.
If you configured Jtest to create ASCII-format reports, you can access an ASCII-format Detailed Project Report by right-clicking the Report button in the Project Testing UI tool bar, then choosing View Detail Report from the shortcut menu; you can also obtain this report by using -detail_report_ascii in the command line.
All project reports contain only information on the classes and errors that were available in the Results panel when the Report button was clicked. To limit the classes and errors contained in your report, remove results for classes and errors you are not interested in before you click the Report button.
Customized ReportsJtest saves results in XML format so you can apply a supplied or custom XSL file to transform this information in whatever way suits your needs.
You can have Jtest apply an XSL file, or you can have Jtest save XML-format results to a file so you can customize them at a later time or in a different environment. Jtest includes default XSL files (located in <jtest_install_dir>/classes/xsl). You can modify these XSL files so that they produce the precise type of report you need, or you can use these files as models while developing your own XSL files.
Applying an XSL File Within Jtest
130
Viewing a Report of Results
131
Tes
tin
g
To prompt Jtest to transform its XML results for the current test with an XSL file:
1. Right-click the Report button in either UI’s tool bar, then choose Generate Customized Report from the tool bar. A dialog box will open.
2. Specify the location of the XSL file you want to apply to customize the report, then click OK.
Jtest will then apply the XSL file and open the resulting report in your default browser.
Creating an XML File that can be Transformed LaterTo prompt Jtest to produce the XML report file for the current test:
• Right-click the Report button in either UI’s tool bar, then choose Create XML File from the shortcut menu. After the file is created, Jtest opens a message window indicating the file’s location.
You can also create XML files from the command line. For details, see “Running Jtest in Command Line and Batch Mode” on page 78.
Once you have an XML result file, you can transform it using one of the XSL files shipped with Jtest or any other XSL file you want to use.
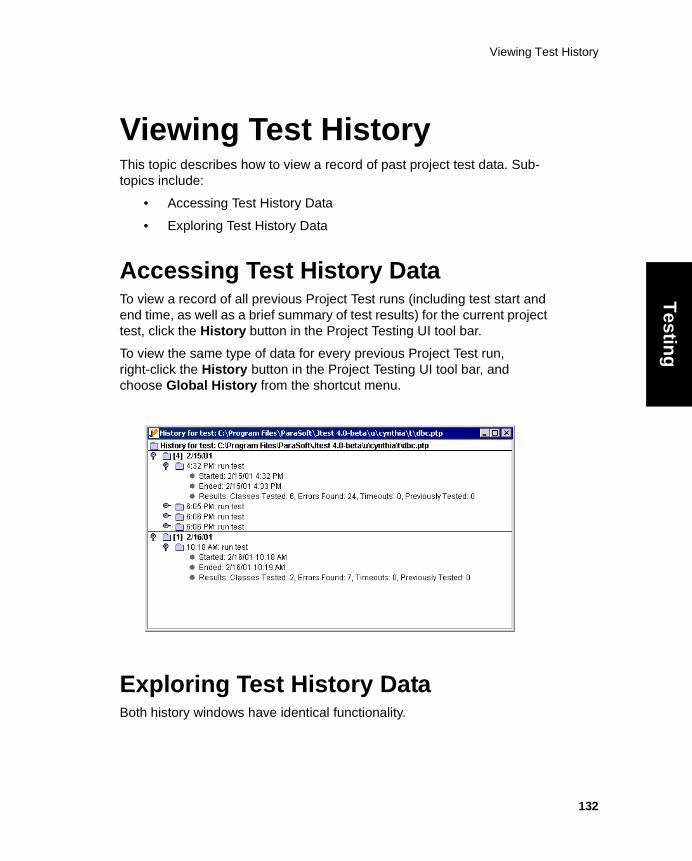
Viewing Test History
Testin
g
Viewing Test HistoryThis topic describes how to view a record of past project test data. Sub-topics include:
• Accessing Test History Data
• Exploring Test History Data
Accessing Test History DataTo view a record of all previous Project Test runs (including test start and end time, as well as a brief summary of test results) for the current project test, click the History button in the Project Testing UI tool bar.
To view the same type of data for every previous Project Test run, right-click the History button in the Project Testing UI tool bar, and choose Global History from the shortcut menu.
Exploring Test History DataBoth history windows have identical functionality.
132

Viewing Test History
133
Tes
tin
g
• To remove a record from the test history, right-click the appropri-ate record, then choose Delete from the shortcut menu.
• To delete all history entries, right-click the History (or Global His-tory) node, then choose Delete All Entries from the shortcut menu.
• To view a log of a test run, right-click the node that identifies that test run, then choose View Log from the shortcut menu.
• To view a summary report of a test run, right-click the node that identifies that test run, then choose View Summary Report from the shortcut menu.
• To view metrics for a test run, right-click the node that identifies that test run, then choose View Project Metrics from the shortcut menu. For information on creating graphs that track how metrics vary as the project progresses, see “Tracking Metrics Over Time” on page 150.
• To view the Summary Run Results for a test run, right-click the node that identifies that test run, then choose View Summary Run Results from the shortcut menu. For information on creating graphs that track how these project results vary as the project progresses, see “Understanding and Tracking the Summary Run Results” on page 54.

Customizing Test Parameters
Testin
g
Customizing Test ParametersThis topic provides an overview of how to customize Jtest test parameters at the global, project, and class level. Subtopics include:
• Overview
• Parameters that Appear at Multiple Levels
OverviewThe testing done by Jtest is highly customizable. Test parameters can be customized at three levels:
• Global Test Parameters (apply to all tests)
• Project Test Parameters (apply to a specific project, or set of classes)
• Class Test Parameters (apply to a specific class)
For details on each of these types of parameters, see the related topics.
If you want parameters (such as static analysis rule settings) to apply to all class or project tests, you should set them at the global level; each new class or project test will automatically inherit the applicable global param-eters.
In general, you modify parameter values in one of the following ways:
• Right-clicking and choosing available options from the shortcut menus that open.
• Double-clicking a node and entering values in a dialog box that appears.
• Selecting/clearing the radio button to the left of a node.
Note: Jtest’s global, project, and class test parameter files are generally user-independent. Jtest automatically tries to replace the user HOME variable in the paths in the .ctp, .ptp, and .gtp files. For example if a .ptp has a "Search In" parameter of the form "c:\users\john\dv\com\para-
134

Customizing Test Parameters
135
Tes
tin
g
soft\u", Jtest will save it as: "$HOME/dv/com/parasoft/u" (assuming HOME is set). Thus that .ptp file can be used by another user as long as that user has the HOME variable set and uses the same directory struc-ture. For details on sharing parameters, see “Using Jtest in a Group Envi-ronment” on page 94.
Parameters that Appear at Multiple LevelsWhen setting parameters, be aware that many parameters appear at more than one level. For example the parameter Static Analysis> Rules> Severity Levels appears in all parameters (global, project and class).
If a class or project parameter has an option for 'inherit' or the variable '$PARENT', this means that it can be set globally. The actual value that will be used is shown in the icon or in parentheses.
When you create a new test, the value in the parent parameter is used. In the Class Testing UI, applicable class test parameters are inherited from global test parameters. In the Project Testing UI, applicable project test parameters are inherited from global test parameters, and applicable class test parameters are inherited from project test parameters.

Customizing System Settings
136
Testin
g
Customizing System SettingsThis topic explains how to customize Jtest system settings using parame-ter and property files.
Many options for setting Jtest system preferences (for example, editor preferences, UI options, report options, and so on) are available in the Preferences menu of the Class Testing UI or Project Testing UI menu bar. For more information about available menu items, see “Class Testing UI Menu Bar” on page 285 and “Project Testing UI Menu Bar” on page 301.
Additional options can (for instance, rule category/severity changes. source control settings, flags you want passed to javac, etc.) can be mod-ified in the Jtest properties file discussed in “Properties File Customization Options” on page 394.

Customizing Error Reporting
137
Tes
tin
g
Customizing Error ReportingThis topic links you to topics that explain suppression and customization options.
To customize Jtest so that it only reports the errors relevant to your project, you can suppress the reporting of any static analysis warning messages and uncaught runtime exception messages that you do not want displayed. You can also change which errors are reported by modi-fying test parameter settings or adding Design by Contract tags to your files.
Related Topics“Static Analysis Suppressions” on page 167
“Dynamic Analysis Suppressions” on page 173
“Customizing Static Analysis” on page 153
“Customizing White-Box Testing” on page 200

Testing a Large Project
138
Testin
g
Testing a Large ProjectThis topic contains tips for testing a large project efficiently. Subtopics include:
• General Tips
• Dividing the Project
• Running the Test
General TipsIf you are testing a large project (over 1000 classes), we recommend that you test in batch mode, and that you perform several smaller subtests rather than one large one. Each test should test a package or a tree of packages.
Dividing the ProjectTo break the test run into subtests, use the Project Testing UI’s Filter-in field to define your subtests. For example, you could define three tests using com.tech.util.*, com.tech.tool1.*, and com.tech.tool2.*, then save these tests as util.ptp, tool1.ptp, and tool2.ptp.
Running the TestTo run these tests, you would invoke jtestgui one time for each small test that you want to run. For example, assuming that you want to run the tests referenced in the previous section, you could use the following three commands:
jtestgui -nogui -ptp util.ptp -summary_report util.repjtestgui -nogui -ptp tool1.ptp -summary_report tool1.repjtestgui -nogui -ptp tool2.ptp -summary_report tool2.rep
Viewing Context-Sensitive Help
139
Tes
tin
g
Viewing Context-Sensitive HelpThis topic explains how to use Jtest’s context-sensitive help.
Jtest has context-sensitive help topics associated with almost every option, command, and UI component.
To view context-sensitive help topics:
1. Enable context-sensitive help by clicking the Context Help but-ton in either UI's tool bar, or by choosing Help> Activate Context Help.
2. Move your cursor over the item that you want to learn more about. If a context-sensitive help topic is available for this ele-ment, that topic will then open.

About Static Analysis
Testin
g
Static AnalysisAbout Static AnalysisThis topic introduces the concept of static analysis and describes how Jtest applies it. Subtopics include:
• Overview
• Coding Standards Enforced
• How Jtest Performs Static Analysis
OverviewJtest’s static analysis feature prevents errors by automatically checking whether your code follows over 300 industry-respected coding guidelines. It statically analyzes each class by parsing its Java source code and com-paring it to a set of coding rules. Available rules include EJB rules, servlet rules, metric rules, formatting rules, optimization rules, and rules that help you add DbC contracts to your code. You can tailor rules to your projects as well as create and enforce custom coding rules with the RuleWizard feature.
Coding Standards EnforcedJtest enforces the following types of coding standards:
• Traditional coding standards: Traditional coding standards are rules which apply to constructs within the class under test. A tra-ditional coding standard might test whether or not a file’s source code contains a construct that has a high probability of resulting in an error. For example, one traditional coding standard checks that you use “equals” instead of “==” when comparing strings (writing “==” when you should have used “equals” causes the pro-gram to check whether two strings are identical, rather than check whether two strings have the same value).
• Global coding standards: Global coding standards are rules which ensure that projects use fields, methods, and classes wisely. A global coding standard might check that a project does not contain logical flaws and unclear code (such as unused or
140

About Static Analysis
141
Tes
tin
g
overly-accessible fields, methods, and classes). These problems increase the probability of an error being introduced into the code, and might also make the code less object-oriented.
• Metrics: Metrics are measures of the size and complexity of code. When Jtest performs static analysis, it also measures your class’s and (if applicable) project’s metrics; it reports all metrics in the Metrics window, and reports a static analysis violation for any class metric does not fall within the preset “acceptable” range for that metric.
• Custom coding standards: Custom coding standards are rules specially tailored to your own or your group’s unique coding style. For information on creating custom coding standards, refer to “Creating Customized Static Analysis Rules” on page 166.
For a complete list of available built-in rules, see “Built-in Static Analysis Rules” on page 407.
How Jtest Performs Static AnalysisJtest automatically performs static analysis when you test a class or project.
When enforcing all static analysis rules except for Global Static Analysis rules, Jtest statically analyzes each class by parsing the .java source and applying a set of rules to it, then alerting you to any rule violations found.
When enforcing global static analysis rules, Jtest scans all of the project’s .class files to collect global usage information, uses this information to check whether any class violates the rules in Jtest’s Global Static Analysis category, then reports violations in the classes under test. Because Jtest uses .class files (rather than .java files) to check this particular category of rules, you can perform global static analysis even when .java files are not available. However, global static analysis can only be performed while testing a project.
Related Topics“Performing Static Analysis” on page 143
“Viewing Class and Project Metrics” on page 145

About Static Analysis
Testin
g
“Tracking Metrics Over Time” on page 150
“Customizing Static Analysis” on page 153
“Creating Customized Static Analysis Rules” on page 166
“Built-in Static Analysis Rules” on page 407
142

Performing Static Analysis
143
Tes
tin
g
Performing Static AnalysisThis topic provides general instructions for performing static analysis. Subtopics include:
• Running the Test
• Viewing Results
• Disabling/Enabling Static Analysis
Running the TestJtest performs static analysis, along with all other appropriate types of testing, each time that you test a class or set of classes. Traditional static analysis (checking static analysis rules that are not in the Global Static Analysis category) can only be performed on classes whose .java source files are available. Global static analysis can be performed as long as .class files are available.
Jtest performs dynamic analysis and static analysis each time that you test a class or set of classes. To perform static analysis, follow the basic test procedure described in the following topics:
• “Quick Start Guide” on page 14
• “Testing a Single Class or JSP” on page 21
• “Testing a Set of Classes” on page 47
Tip: If you want Jtest to perform only static analysis, right-click the Start button, then choose Static Analysis from the shortcut menu (instead of simply clicking the Start button).
If you only want to enforce a particular set of rules, right-click the Start button, then choose Static Analysis> <type of rules you want enforced> from the shortcut menu.

Performing Static Analysis
Testin
g
Viewing ResultsRule violations found will be reported in the Static Analysis Violations branch of the Errors Found Panel (if you tested a single class) or the Results Panel (if you tested a project).
A description of each rule, as well as an example violation and suggested repair, appears in the Rules section of this User’s Guide. An index of these rules is available at “Built-in Static Analysis Rules” on page 407.
You can also see a description of a rule by right-clicking the rule’s viola-tion message (the line with the bug icon), then choosing View Rule Description from the shortcut menu.
Disabling/Enabling Static AnalysisStatic analysis is enabled by default.
To disable or re-enable static analysis:
1. Open the class, project, or global test parameters window (depending on how widely you want your changes applied).
2. Go to the Static Analysis branch and disable/enable the Per-form Static Analysis option.
Note: If you want Jtest to skip static analysis any time it cannot locate the .java file for a class from a Project test, enable the Global or Project parameters’ Search Parameters> Static Analysis> Skip if .java file not found option.
Related Topics“About Static Analysis” on page 140
“Viewing Class and Project Metrics” on page 145
“Tracking Metrics Over Time” on page 150
“Customizing Static Analysis” on page 153
“Creating Customized Static Analysis Rules” on page 166
“Jtest Tutorials” on page 372
“Built-in Static Analysis Rules” on page 407
144

Viewing Class and Project Metrics
145
Tes
tin
g
Viewing Class and Project MetricsThis topic describes how to access the class and metric information that Jtest produces while performing static analysis. Subtopics include:
• Overview
• Accessing Metrics Information
• Exploring Metrics Results
OverviewJtest automatically measures class metrics when it performs static analy-sis; for project tests, it also reports average class and project metrics. In addition, if any metrics measured are outside of the suggested or custom-ized “legal” bounds, Jtest will report a static analysis violation for each out-of-bound metric. For details on modifying the upper or lower threshold for a particular class metric, see “Customizing Static Analysis” on page 153.
Accessing Metrics InformationAfter you have performed static analysis on a class or project, you can view metrics information by clicking the Metrics tool bar button in the appropriate Jtest UI. The Class Testing UI’s metrics window will contain metrics for the class; the Project Testing UI’s metrics window will contain both project metrics (metrics about aspects of the project) and class met-rics averages (the average class metrics of all of the tested classes).
If you are testing a project and have not performed static analysis, you can prompt Jtest to gather project metrics information by right-clicking the Project Testing UI’s Start button, then choosing Static Analysis> Built-In> Project Metrics from the shortcut menu. After the analysis is complete, you can view the metrics by clicking the Metrics tool bar button in the Project Testing UI.

Viewing Class and Project Metrics
Testin
g
Metrics for a Class Test
146

Viewing Class and Project Metrics
147
Tes
tin
g
To view class metrics for a class tested as part of a project, right-click that class’s node in the Project Testing UI’s Results panel, then choose View Class Metrics from the shortcut menu.
Metrics for a Project Test

Viewing Class and Project Metrics
Testin
g
Exploring Metrics ResultsTo view a full description of a project or class metric, right-click the metric that you want to learn more about, then choose View Rule Description from the shortcut menu that opens.
Jtest can also graph how your project metrics change over time. For infor-mation on graphing metrics, see “Tracking Metrics Over Time” on page 150.
To print your metrics, Control-right-click the unused area of the Metrics window, then choose Print from the shortcut menu.
Related Topics“About Static Analysis” on page 140
“Performing Static Analysis” on page 143
“Creating Customized Static Analysis Rules” on page 166
148

Viewing Class and Project Metrics
149
Tes
tin
g
“Tracking Metrics Over Time” on page 150
“Customizing Static Analysis” on page 153
“Built-in Static Analysis Rules” on page 407

Tracking Metrics Over Time
Testin
g
Tracking Metrics Over TimeThis topic describes how to access graphs which display how project met-rics information changes over time. Subtopics include:
• Overview
• Viewing Metrics Graphs
OverviewJtest saves the project metrics for each test and can graph how each met-ric changes over time. You can prompt Jtest to graph the following met-rics:
• Number of bytes: Total number of bytes of all class files in the project.
• Number of classes: Total number of classes in the project.
• Number of Java source files: Total number of Java source files in the project.
• Number of lines: Total number of lines in the project’s classes.
• Number of packages: Total number of packages in the project.
• Number of package-private classes: Total number of pack-age-private classes in the project.
• Number of private classes: Total number of private classes in the project.
• Number of protected classes: Total number of “protected” classes in the project.
• Number of public classes: Total number of “public” classes in the project.
Viewing Metrics Graphs To track metric information for a specific project:
150

Tracking Metrics Over Time
151
Tes
tin
g
1. Open the Test History window by clicking the History button in the Project Testing UI (with the project’s results loaded in the Project Testing UI).
2. Right-click the History for Test node, then choose Draw Metrics Graph> <Desired Type of Graph> from the shortcut menu.
Jtest will then create a graph that displays the specified metrics. The graph’s X axis contains date information and its Y axis contain count infor-mation. For example, the Number of Lines Graph contains test dates on the X axis and the number of lines on the Y axis.

Tracking Metrics Over Time
Testin
g
Related Topics“About Static Analysis” on page 140
“Creating Customized Static Analysis Rules” on page 166
“Viewing Class and Project Metrics” on page 145
“Tracking Metrics Over Time” on page 150
“Customizing Static Analysis” on page 153
“Built-in Static Analysis Rules” on page 407
152

Customizing Static Analysis
153
Tes
tin
g
Customizing Static AnalysisThis topic describes the various ways in which you can customize Jtest’s static analysis feature. Subtopics include:
• Enabling/Disabling Rule Categories
• Enabling/Disabling Specific Rules
• Generating a List of Enabled Rules
• Customizing Rules
• Suppressing a Rule’s Violation Messages
• Changing Rule Categories with Jtest Properties
• Modifying the User-Defined Rule Directory with Jtest Properties
• Exporting/Importing Rule Customizations
Note: You can also use the RuleWizard feature to create custom coding standards; for more information on this feature, see “Creating Customized Static Analysis Rules” on page 166.
Important: If you want a particular setting to apply to all class or project tests, you should set it in the global test parameters; each new class or project test will automatically inherit the applicable global parameters.
Enabling/Disabling Rule CategoriesEach Jtest static analysis rule has two categories:
• The descriptive category that describes the type of rule (for example, Servlets, Design by Contract, Initialization, User Defined Rules, etc.)
• The severity category that describes the severity of a violation of the rule. Violations of coding standards that are most likely to cause an error are in the level 1 category; violations of coding standards that are least likely to cause an error are in the level 5 category). By default, Jtest reports violations of all coding stan-dards with a severity level of 1 or 2. A rule’s severity is indicated by the final character in each rule code, as shown in the Global Test Parameters window’s Static Analysis> Rules> Built-in

Customizing Static Analysis
Testin
g
Rules/User Defined Rules branch. For example, PB.SBC has a severity level of 1, and OOP.IIN has a severity level of 5.
To enable/disable all rules in a certain descriptive category:
1. Open the Global Test Parameters window by clicking the Global button in either UI or open the Project Test Parameters window by clicking the Project button in the Project Testing UI.
• To change rule settings for all tests, open the Global Test Parameters window. To change rule settings only for a specific project, open the Project Test Parameters.
2. Right-click the Static Analysis> Rules> <name_of_rule_category> node, then choose Enable All or Disable All from the shortcut menu.Note: You can view descriptions of all rules in a category by right-clicking the category’s node, then choosing View Rule Descriptions from the shortcut menu.
To enable/disable all rules in a certain severity category:
1. Open the appropriate Test Parameters window.
• You can enable/disable severity categories at the class, project, or global level. You might want to configure these settings at the class or project level if, for example, you generally want to enforce only the most severe rules, but you want to enforce a more comprehensive set of rules for a specific class.
2. Open the Severity Levels Enabled node (beneath Static Analy-sis> Rules).
3. Enable/disable categories by right-clicking a category whose sta-tus you want to change and choosing Enable or Disable from the shortcut menu.
Enabling/Disabling Specific Rules
154

Customizing Static Analysis
155
Tes
tin
g
One way to control what rules are enforced is to enable/disable individual rules. If you do this, be aware that Jtest looks for violations of a rule only if the rule is enabled and its severity level is enabled.
For descriptions of all available built-in rules, see “Built-in Static Analysis Rules” on page 407.
To enable/disable specific rules:
1. Open the Global Test Parameters window by clicking the Global button in either UI or open the Project Test Parameters window by clicking the Project button in the Project Testing UI.
• To change rule settings for all tests, open the Global Test Parameters window. To change rule settings only for a specific project, open the Project Test Parameters.
2. In the Test Parameters window, open the Static Analysis> Rules> Built-in Rules or Static Analysis> Rules> User Defined Rules branch.
3. Enable/disable rules by setting or clearing the button to the left of the rule name. Note: You can view a rule description by right-clicking a rule node, then choosing View Rule Description from the shortcut menu.
If you want Jtest to enforce a rule whose severity level is not currently enabled, you must also enable the corresponding severity level category as described below.
Generating a List of Enabled RulesTo generate a text format list of all rules enabled at the global, project, or class level:
1. Open the class, project, or global test parameters window (depending on which rule set you want listed).
2. Right-click the Static Analysis> Rules node, then choose Enabled Rules List from the shortcut menu. Jtest will then cre-ate a text-format list of rules and save it in $Home/Enable-dRulesList.txt.

Customizing Static Analysis
Testin
g
Customizing RulesYou can customize three types of rules:
• Rules saved in <jtest_install_dir>/brules
• Naming conventions
• Class metrics rules
Customizing Rules with RuleWizardYou can customize any rule available in <jtest_install_dir/brules> with RuleWizard.
To access RuleWizard, right-click the Rules button in either Jtest UI, then choose Launch RuleWizard from the shortcut menu.
The RuleWizard UI will then open. The RuleWizard User’s Guide (acces-sible by choosing Help> View in the RuleWizard UI) contains information on how to create, enforce, and enable/disable custom rules.
Note: You can also modify Naming Convention rules and Metrics rules from the Jtest Global Test Parameters window (without using the RuleWizard UI) as described below.
Customizing Naming ConventionsTo edit what naming convention is enforced by a naming convention rule:
1. Locate the rule that you want to modify in the Global Test Param-eters window.
2. Right-click the rule, then choose Edit Regular Expression from the shortcut menu.
3. Modify the regular expression in the dialog box that opens.
4. Click OK to save your changes.
If you want the naming convention to apply only to certain modifiers (e.g., public, protected, package, private):
1. Locate the rule that you want to modify in the Global Test Param-eters window.
156

Customizing Static Analysis
157
Tes
tin
g
2. Right-click the rule, then choose Edit Optional Modifier from the shortcut menu.
3. Enter the appropriate modifiers in the dialog box that opens. If you are entering multiple modifiers, use a space character to sep-arate the modifiers’ names.
4. Click OK to save your changes.
Customizing Class MetricsTo edit the upper and lower thresholds for a class metric:
1. Locate the metric rule that you want to modify in the Global Test Parameters window.
2. Right-click the rule, then choose Modify Upper Threshold or Modify Lower Threshold from the shortcut menu.
3. Modify the threshold in the dialog box that opens.
4. Click OK to save your changes.
Suppressing a Rule’s Violation MessagesYou can suppress the reporting of rule violation messages by adding a suppression from the Errors Found or Results panel. However, because the specific rule violation messages will change from class to class, the best way to “suppress” the reporting of warning messages from particular rules or sets of rules is by turning rules (or rule categories) on and off as described in “Enabling/Disabling Specific Rules” on page 154.
To suppress a particular warning message, right-click the related mes-sage in the Errors Found panel or Results panel, then choose Suppress This Message from the shortcut menu. This action will add that specific warning message to the Static Analysis suppressions list (in the Class Test Parameters’ Static Analysis> Suppressed Messages branch).
Note: To unsuppress the message, open the Class Test Parameters win-dow’s Static Analysis> Suppressed Messages branch, right-click the
Customizing Static Analysis
Testin
g
message you want to unsuppress, then choose Delete. This message will be reported on the next test run (unless you fixed the violating code).
Documenting the Reason for a SuppressionJtest lets you record an explanation of why you suppressed a particular static analysis violation. If you want to record an explanation for every suppression, configure Jtest to prompt you for this explanation by adding a property to the default local Jtest properties file (located in <jtest_install_dir>\u\username\jtest.properties) or a group properties file (discussed in “Sharing a Jtest Properties File” on page 95).
If you want Jtest to automatically open a dialog box in which you can record the reason for a suppression every time you enter a suppression, do the following:
1. Close Jtest, then open a Jtest properties file (the default jtest.properties file or a group properties file) and add the property jtest.static.asksuppressreason=true
2. Save and close the properties file.
After you have performed this configuration, every time you suppress a static analysis violation, the dialog box titled “Enter reason for suppres-sion” will open. In the text field, enter a phrase or sentence that describes why you chose to suppress the selected message.
158

Customizing Static Analysis
159
Tes
tin
g
When you have finished entering the reason, click OK. Jtest will then add that specific warning message, along with the explanation given, to the Static Analysis suppressions list (in the Class Test Parameters’ Static Analysis> Suppressed Messages branch).
Note: To stop Jtest from displaying the “Enter reason for suppression” dialog box when you suppress a static analysis violation, set the jtest.static.asksuppressreason property to false in the properties file.
Even if you do not enable the jtest.static.asksuppressreason=true option, you can document available suppressions as follows:
1. Open the Class Test Parameters window.
2. Right-click the Static Analysis> Suppressed Messages> [suppressed_message_name] branch, then choose View/Edit Reason from the shortcut menu.
3. Enter the reason for your suppression in the dialog box that opens.

Customizing Static Analysis
Testin
g
To view or edit an explanation for a suppression, open the Class Test Parameters window, right-click the Static Analysis> Suppressed Mes-sages> <suppressed_message_name> branch, then choose View/Edit Reason from the shortcut menu. Jtest will then display the specified explanation. Make any desired modifications, then click OK to close the dialog box.
Changing Rule Categories with Jtest PropertiesYou can modify rule severity and category settings by creating a rule mapping file, then telling Jtest where to find that rule file.
160

Customizing Static Analysis
161
Tes
tin
g
You can create as many rule mapping files as you like, but you can only use one rule mapping file at a time.
Creating a Rule Mapping FileA sample rule mapping file is available at <jtest_install_dir>/exam-ples/custom/rulemapping/mapping.txt.
A rule mapping file is a simple text file. The first line should always be the title; this title will be displayed in the global test parameters next to the Static Analysis > Rules> Built-in Rules node. A sample title line is:
title "Rule Severity Changes"
We recommend that you follow the title entry with a blank line to improve file readability.
The remainder of the rule mapping file contains the entries that describe each rule category/severity change that you want to make. You need to create one entry for each rule that you want to change. One entry can handle multiple changes for a rule (for example, a single entry can be used to change one rule’s category and severity level). Every map entry should be entered on a new line (without any line breaks), and should have a comment that describes the map entry.
Important: Jtest will not use your rule mapping file unless you specify its location as described in “Indicating the Rule Mapping File’s Location” on page 162.
Available Map CommandsAvailable map commands are:
• category: Creates a new Built-in Rule category. You can specify a category ID and a category name. Syntax: category CATEGORY_ABBREVIATION Full_Category_Name
• map: Defines a rule map which can change the specified built-in rule’s category ID or severity level.Syntax: map CURRENT_CATEGORY_ABBREVIATION.IDENTI-FIER NEW__CATEGORY_ABBREVIATION or new_severity_level.

Customizing Static Analysis
Testin
g
ExamplesThe following entry changes the PB.SBC rule’s severity level from 1 to 4:
map PB.SBC PB 4// rule PB.SBC, will only change severity level
The following entry changes moves the GC.DUD rule from the Garbage Collection category to the Miscellaneous category:
map GC.DUD MISC // rule GC.DUD, will move to the MISC category
The following entry creates a new category with the name Demonstration and abbreviation DEMO:
category DEMO demonstration // defines a new category
The following entry moves the GC.NCF rule to the Demonstration cate-gory and changes its severity to level 2:
map GC.NCF DEMO 2 // rule GC.NCF, will move to the DEMO category and change severity level
Indicating the Rule Mapping File’s LocationTo prompt Jtest to recognize your rule mapping file and make the speci-fied changes:
1. Close Jtest, then open the default local Jtest properties file (located in <jtest_install_dir>\u\username\jtest.properties) or a group properties file (discussed in “Sharing a Jtest Properties File” on page 95).
2. Specify the path to your rule mapping file by adding a jtest.static.rulemapping entry to the properties file. For example, the following entry points to the rule mapping file located in C:\temp\example_map.txt:jtest.static.rulemapping=C\:\\temp\\example_map.txt
3. Save and close the properties file.
Note: When adding paths to a Jtest properties file, the paths must follow Java convention. For example, c:\temp would be written as c:\\temp.
Note: The rulemapping flag can also be used to specify a rule mapping file when you invoke jtestgui (example: $ jtestgui -rulemapping mapping.txt). See “Running Jtest in Command Line
162

Customizing Static Analysis
163
Tes
tin
g
and Batch Mode” on page 78 for information on running Jtest from the command line.
Modifying the User-Defined Rule Directory with Jtest PropertiesBy default, Jtest searches for user-defined rules in the <jtest_install_dir>/jrules directory. You can change the directory in which Jtest searches for user-defined rules by adding a Jtest property definition.
To specify the rules directory through a local or shared properties file:
1. Close Jtest, then open the local Jtest properties file (located in <jtest_install_dir>\u\username\jtest.properties) or a group proper-ties file (discussed in “Sharing a Jtest Properties File” on page 95).
2. Point Jtest to the user-defined rules directory by changing the jtest.static.userdefined.rulesdir property. If your rules are saved in c:\temp\rules, you would change it to:jtest.static.userdefined.rulesdir=c:\\temp\\rules
3. Save and close the properties file.
4. Verify that the correct User Defined Rules directory is being used by launching Jtest, right-clicking the Rules button, then selecting Show Rules Directory from the shortcut menu. The new rule directory specified in the properties file should be displayed in the dialog box that opens.
Exporting/Importing Rule CustomizationsOne way to share rule customizations with group members is to export and import the related settings. (Another way is to share test parameter and properties files as described in “Using Jtest in a Group Environment” on page 94).
The import/export rule customizations feature helps you share the follow-ing rule settings:

Customizing Static Analysis
Testin
g
• Severity level settings (enabled, disabled, or inherit)
• Rule settings (enabled, disabled, or inherit)
• Rule parameters (naming convention expressions and metrics thresholds)
You can export rule customizations from any parameter level, then import them into any parameter level. For example, you could export class-level rule settings, then import them as global-level rule settings.
To export rule customizations:
1. Open the parameters panel that contains the rule customizations you want to export. You can export settings from class, project, or global parameters.
2. Right-click the Static Analysis> Rules node, then choose Export Rule Customizations. An Export Rule Customization dialog box will open.
3. In the dialog box, enter or browse to the name and location for the exported rule customization file.
4. Click OK to close the dialog box and save the settings.
To import rule customizations:
1. Open the parameters panel into which you want to import rule customizations. You can import settings into class, project, or glo-bal parameters.
2. Right-click the Static Analysis> Rules node, then choose Import Rule Customizations. An Import Rule Customization dialog box will open.
3. In the dialog box, browse to the file that contains the rule custom-izations you want to import (or enter the path to that file in the dia-log box’s text field).
4. Click OK to close the dialog box and import the settings.
Related Topics“About Static Analysis” on page 140
“Performing Static Analysis” on page 143
164

Customizing Static Analysis
165
Tes
tin
g
“Viewing Class and Project Metrics” on page 145
“Creating Customized Static Analysis Rules” on page 166
“Built-in Static Analysis Rules” on page 407

Creating Customized Static Analysis Rules
166
Testin
g
Creating Customized Static Analysis RulesThis topic introduces the ways in which you can create customized coding rules or modify existing rules.
Creating Customized RulesYou can easily create your own static analysis rules (or modify built-in rules) using Jtest’s RuleWizard feature.
With RuleWizard, you create custom rules by graphically expressing the pattern that you want Jtest to look for when it parses code during static analysis. Rules are created by selecting a main "node," then adding addi-tional elements in a flow-chart-like representation until it fully expresses the pattern that constitutes a violation of the rule. Rules are built by point-ing and clicking to add graphical representations of rule elements, then using dialog boxes to make any necessary modifications.
To access RuleWizard, right-click the Rules tool bar button, then choose Launch RuleWizard from the shortcut menu that opens.
The RuleWizard UI will then open. The RuleWizard User’s Guide (acces-sible by choosing Help> View in the RuleWizard UI) contains information on how to create, enforce, and enable/disable custom rules.
Related Topics“About Static Analysis” on page 140
“Performing Static Analysis” on page 143
“Viewing Class and Project Metrics” on page 145
“Customizing Static Analysis” on page 153

Static Analysis Suppressions
167
Tes
tin
g
Static Analysis SuppressionsThis topic describes how to suppress static analysis messages and intro-duces alternative ways to customize static analysis results. Subtopics include:
• Suppressing Messages
• Suppression Alternatives
Suppressing MessagesYou can suppress the reporting of rule violation messages by adding a suppression from the Errors Found panel or Results panel. To suppress a particular warning message that appears in the Errors Found panel or Results panel, right-click the message that you want suppress, then choose Suppress This Message from the shortcut menu. This action will add that specific warning message to the Static Analysis Suppressions list (in the Class Test Parameters’ Static Analysis> Suppressed Messages branch.
Tip: You can record the reason for each suppression; for instructions on recording suppression explanations, see “Documenting the Reason for a Suppression” on page 158.
Suppression AlternativesSuppressions are too precise for some situations because they prompt Jtest to suppress an exact violation, rather than all violations of a general rule. Because the exact rule violation messages will change from class to class, the best way to “suppress” the reporting of warning messages from particular rules or sets of rules is to enable/disable rules or rule categories in the manner described in “Customizing Static Analysis” on page 153.
Related Topics“Customizing Static Analysis” on page 153
About Dynamic Analysis
168
Testin
g
Dynamic AnalysisAbout Dynamic AnalysisThis topic introduces the concept of dynamic analysis and describes how Jtest applies it.
OverviewDynamic analysis involves executing a class with actual inputs. To per-form dynamic analysis, Jtest automatically creates and executes test cases, and-- where applicable-- executes user-defined test cases.
Jtest uses dynamic analysis to perform white-box testing, black-box test-ing, and regression testing. If your code contains Design by Contract comments, Jtest will use this contract information during dynamic analy-sis.
Jtest refers to the white-box construction test cases and the functionality test cases created to verify the functionality described in Design by Con-tract (DbC) contracts as “automatically-generated test cases.” Test cases that you enter to perform black-box testing are referred to as “user-defined test cases.”
Related Topics“Performing Dynamic Analysis” on page 169
“Customizing Dynamic Analysis” on page 171
“Testing Classes That Reference External Resources” on page 178
“Using Custom Stubs” on page 184
“Setting an Object to a Certain State” on page 192

Performing Dynamic Analysis
169
Tes
tin
g
Performing Dynamic AnalysisThis topic provides general instructions for performing dynamic analysis. Subtopics include:
• Running the Test
• Disabling/Enabling Dynamic Analysis
Running the TestJtest performs dynamic analysis and static analysis each time that you test a class or set of classes. To perform dynamic analysis, follow the basic test procedure described in the following topics:
• “Quick Start Guide” on page 14
• “Testing a Single Class or JSP” on page 21
• “Testing a Set of Classes” on page 47
Tip: If you want Jtest to perform only dynamic analysis, right-click the Start button and choose Dynamic Analysis from the shortcut menu (instead of simply clicking the Start button).
Note: Because Jtest’s dynamic analysis tests at the class level, Jtest will only perform dynamic analysis on classes whose .class or .jsp files are available.
Disabling/Enabling Dynamic AnalysisDynamic analysis is enabled by default.
To disable or re-enable dynamic analysis:
1. Open the class, project, or global test parameters window (depending on how widely you want your changes applied).
2. Go to the Dynamic Analysis branch and disable/enable the Dynamic Analysis option.

Performing Dynamic Analysis
Testin
g
Related Topics“About Dynamic Analysis” on page 168
“Customizing Dynamic Analysis” on page 171
“Testing Classes That Reference External Resources” on page 178
“Using Custom Stubs” on page 184
“Setting an Object to a Certain State” on page 192
“Jtest Tutorials” on page 372
170

Customizing Dynamic Analysis
171
Tes
tin
g
Customizing Dynamic AnalysisThis topic introduces methods for customizing test parameters related to dynamic analysis.
Important: If you want a particular setting to apply to all class or project tests, you should set it in the global test parameters; each new class or project test will automatically inherit the applicable global parameters.
Customizing Dynamic Analysis ParametersDynamic analysis can be customized by suppressing dynamic analysis error messages, and by modifying Class, Project, and Global Test Param-eters.
• The parameters under Test Case Generation control the genera-tion of both the automatic test cases (the ones that Jtest gener-ates automatically for white-box testing or for checking DbC contracts) and the user-defined test cases.
• The parameters under Test Case Execution control the execu-tion of all the test cases.
• The parameters under Test Case Evaluation control the evalua-tion of all the test cases. Note that the evaluation is performed on both the automatic and user-defined test cases. For example, if Perform Automatic Regression Testing is selected, automatic regression testing is performed for both the automatic and the user-defined test cases.
Related Topics“About Dynamic Analysis” on page 168
“Performing Dynamic Analysis” on page 169
“Testing Classes That Reference External Resources” on page 178

Customizing Dynamic Analysis
Testin
g
“Using Custom Stubs” on page 184
“Setting an Object to a Certain State” on page 192
172
Dynamic Analysis Suppressions
173
Tes
tin
g
Dynamic Analysis SuppressionsThis topic explains several ways to prevent Jtest from reporting selected types of dynamic analysis errors. Subtopics include:
• Using Design by Contract
• Using the “Not an Error” or “Ignore” Commands
• Using Suppressions
Using Design by ContractIn general, the best way to prevent Jtest from reporting exceptions that are not relevant to the class under test is to document the class’s permis-sible inputs and/or expected exceptions using Design by Contract tags. This way, the class’s implicit contracts are documented in the code itself. For information about using these tags to suppress exceptions, see “Cus-tomizing White-Box Testing” on page 200.
Using the “Not an Error” or “Ignore” CommandsAnother preferred way to stop Jtest from displaying certain uncaught runt-ime exceptions, specification errors, and regression errors is to right-click the appropriate message in the Errors Found panel of the Class Testing UI or in the Results panel of the Project Testing UI, then choose one of the following commands from the shortcut menu:
• Not an Error: Choose this command to indicate that a reported problem is not an error, but rather is the class’s correct behavior (for that input).
• Ignore: Choose this command to tell Jtest to ignore the problem reported for this input. If this command is selected, the outcome will not be used for comparisons when searching for specification

Dynamic Analysis Suppressions
Testin
g
or regression errors. Also, no uncaught runtime exceptions will be reported for this input.
Using SuppressionsYou can suppress the reporting of uncaught runtime exceptions in two ways:
• Adding a suppression from the Errors Found panel or Results panel.
• Adding a suppression directly to the Dynamic Analysis Suppres-sions table.
To suppress a particular exception that appears in the Errors Found panel or Results panel, right-click the exception that you want suppress, and choose Suppress from the shortcut menu. This action will add that spe-cific exception to the Dynamic Analysis Suppressions table.
The Dynamic Analysis Suppressions table lets you create new suppres-sion categories for uncaught runtime exceptions. You can use this option to suppress the reporting of exceptions by class, method, and exception type.
Note: You can also enable or disable checking for certain types of excep-tions in the Pre-filtering Suppressions Categories node (located under Dynamic Analysis> Test Case Execution) of the Global, Project, or Class Test Parameters.
Opening the Suppressions TableTo reach the Suppressions table, double-click the Suppressions Table node in the Dynamic Analysis branch of the Global Test Parameters tree.
Adding a Suppression to the Dynamic Analysis Suppressions TableTo add a suppression:
1. Right-click any area of the Suppressions table, then choose Add New Suppression. An empty table entry will open.
174

Dynamic Analysis Suppressions
175
Tes
tin
g
2. In the empty table entry, enter the exception, the method that throws it, or the class that declares the method that you want to suppress.
Important: Make sure that you type all values exactly as they appear in the Jtest UI.
Suppressing Specific Exceptions by Class, Method, and Exception TypeTo suppress specific exceptions by class, method, and exception type, enter the information in the appropriate fields. For example, to suppress the ArrayIndexOutOfBoundsException from the 'setSize' method of java.util.Vector, use:
Suppressing Exceptions by ClassTo suppress exceptions by class, enter the classname in the Class field by double clicking that field and then entering the fully qualified class-name.

Dynamic Analysis Suppressions
Testin
g
Use the '*' (asterisk) symbol to match any letter. For example, to suppress all exceptions from the class java.util.Vector, use:
java.util.Vector | * | *
Suppressing Exceptions by MethodTo suppress exceptions by method, enter the method name in the Method field by double-clicking that field then entering the method name. To suppress exceptions from a single method belonging to a set of over-loaded methods, specify the method by including its signature enclosed in parentheses. Method signatures should follow the JNI specification from the JDK (minus the return type). For example, to suppress exceptions from the following method
(int n, String s, int []ia)
use the following as the method signature:
(ILJava/lang/String;[I)
Suppressing Exceptions by Exception TypeTo suppress exceptions by exception type, enter the exception type in the Exception field by double clicking that field and then entering the excep-tion type.
Use the '*' (asterisk) symbol to match any letter. For example, to suppress all NullPointerExceptions use:
Removing a SuppressionTo remove any suppression you entered using the suppression table or the Suppress shortcut menu command:
176

Dynamic Analysis Suppressions
177
Tes
tin
g
1. Right-click the table entry. A shortcut menu will open.
2. Choose Delete from the shortcut menu.
Note: To delete a list of suppressions, right-click drag from the first sup-pression to the final one, then release the mouse button. A shortcut menu will open. Choose Delete from the shortcut menu.
Related Topics“Customizing White-Box Testing” on page 200
“Customizing Dynamic Analysis” on page 171

Testing Classes That Reference External Resources
Testin
g
Testing Classes That Reference External ResourcesThis topic provides an overview of how Jtest tests classes that reference external resources (such as databases, EJB, CORBA, and so on). It describes how Jtest handles such classes by default, and explains how you can customize this behavior by creating your own stubs and modify-ing which classes Jtest considers “external.” Subtopics include:
• Overview
• Defining Which Classes are “External”
• Using Automatically-Generated Stubs
• Using Your Own Stubs
OverviewJtest’s stub options let you automatically and precisely test classes that reference external resources.
Stubs are basically replacements for references to external methods. For example, you could use stubs to specify that when the method “stream.readInt()” is invoked, Jtest should use the value 3 instead of actu-ally invoking the readInt method.
Stubs are mainly used for one of the following purposes:
• To isolate a class and test it independently of other classes.
• To test a class before the external classes it uses are available.
If you are using automatically-generated test cases to test classes that reference external resources, you can choose one of the following options:
• Have Jtest automatically generate stubs.
• Enter your own stubs.
178

Testing Classes That Reference External Resources
179
Tes
tin
g
• Have Jtest call the actual external method.
Jtest does not automatically generate stubs for user-defined test cases. If you are using user-defined test cases to test classes that reference exter-nal resources, you can choose one of the following options:
• Enter your own stubs.
• Have Jtest call the actual external method.
When you perform regression testing on classes that reference external resources, Jtest will automatically use the stub types (if any) that were used during the previous test run(s).
Defining Which Classes are “External” You can indicate which classes are considered to be “external” by defin-ing the “Tested Set.”
The Tested Set is the set of classes and methods included in the current test. Any class outside of the Tested Set is considered external. When a class or method in the Tested Set references a class or method that is inside that Tested Set, the actual class or method is accessed. When a class or method in the Tested Set references a class or method that is outside that Tested Set, stubs are called.
The class under test and its inner classes are always included in the Tested Set. When Jtest creates a new project, its default Tested Set con-tains all of the classes in the package and subpackages of each class under test.
The Tested Set will also include additional classes that match the prefixes specified in the Tested Set list.
To open the dialog box that lets you specify what other classes are included in the Tested Set, open the Global, Project, or Class Test Param-eters window, then:
1. Open Dynamic Analysis> Test Case Execution> Stubs.
2. Double-click the Tested Set Includes node.
3. Modify the tested set by adding prefixes and/or tokens.
Testing Classes That Reference External Resources
Testin
g
• To add a class name prefix, enter or browse to it, then click Add.
• To remove a class name prefix, select it, then click Delete.
• To represent general values, use the following tokens in addition to (or instead of) specific class name prefixes:
• $PACKAGE: This token is replaced by the name of the package under test.
• $PARENT: This token is replaced by the parent parameter value.
• <unnamed>: This token refers to the unnamed package.
4. Click OK to close the Tested Set dialog box.
Using Automatically-Generated StubsWhen performing white-box testing on classes that reference external resources (such as external files, databases, Enterprise Java Beans [EJB] and CORBA), Jtest automatically generates stubs for the resources and executes the stubs to get input for the call to the external resources; like Jtest’s other automatically-generated inputs, these inputs are designed to provide maximum coverage of the class. When designing these inputs, Jtest assumes that a call to an external resource can return any input compatible with its return type.
These inputs are created as white-box stubs, and these stubs are used for both white-box testing and regression testing. When these stubs are used for white-box testing, Jtest executes the stubs and reports errors if any uncaught runtime exceptions occur from the stubs’ input. When these stubs are used for regression testing, Jtest executes the stubs and reports errors if class modifications cause a previously-tested input to pro-duce output other than the known or previous value.
You can view the stubs that Jtest automatically generated and executed in the Automatic Test Cases> Method Name> Test Case> Test Case Input branch of the View Test Cases tree. Automatically-generated stubs will be marked with a small, empty box. Each stub branch displays the
180

Testing Classes That Reference External Resources
181
Tes
tin
g
method invoked as well as the value or exceptions returned by the stub. Expand the stub’s branch to see the stack trace where the invocation occurred.
If the stub’s values resulted in an error, the above information will also be displayed in the Errors Found Panel (if you are testing a class) or the Results panel (if you are testing a project).
Currently, Jtest can generate inputs for the following external resources:
• java.io
• java.net
• java.sql
In addition, Jtest offers preliminary support for CORBA and Enterprise Java Beans (see below for details).
Note: This support for classes that reference external resources is prelim-inary and we welcome any suggestions you have on improving it.
CORBAWhen you perform white-box testing on classes that call CORBA objects, Jtest automatically generates and executes white-box stubs for the Object Request Broker and for other CORBA objects referenced by the class under test. For example, if a client or CORBA class references another CORBA object, Jtest will assume that method calls to the other CORBA object can return any value compatible with its return type, gen-erate and execute white-box stubs that contain appropriate input, and report any uncaught runtime exceptions that result from this input.
When you test a set of classes using the Project UI, Jtest skips automati-cally-generated classes such as helper classes, client stub classes, server skeletons, etc..
Testing Classes That Reference External Resources
Testin
g
Enterprise Java Beans When you perform white-box testing on EJB classes, Jtest assumes that the beans referenced by the bean under test can return any value that is compatible with the return type for that method. This tests that the EJB bean class will behave correctly regardless of other beans’ behavior or return values.
Before you test any business method in the EJB class, Jtest will invoke the bean initialization routines and provide a dummy container context. Previous Jtest versions called the class’s constructor and invoked the business methods. If you prefer to have Jtest test business methods using this older technique, set the following environment value:
For Windows: set JTEST_OPT_SKIP_CREATE=ON
For UNIX: setenv JTEST_OPT_SKIP_CREATE ON
Jtest skips the classes that the EJB vendor generated automatically.
Using Your Own StubsWhen you configure Jtest to use stubs that you have created, you have complete control over what values or exceptions an external method returns to the class under test-- without having to have the actual external method completed and/or available. You can enter your own stubs for both automatically-generated and user-defined test cases.
If a stub is not defined for an external method or if no options in the appro-priate test parameter’s Dynamic Analysis> Test Case Execution> Stubs> Options for Automatic Test Cases/ Options for User Defined Test Cases options are enabled, Jtest will call the actual external method.
For more information about entering your own stubs, see “Using Custom Stubs” on page 184.
Related Topics“About Dynamic Analysis” on page 168
“Performing Dynamic Analysis” on page 169
“Customizing Dynamic Analysis” on page 171
182

Testing Classes That Reference External Resources
183
Tes
tin
g
“Using Custom Stubs” on page 184
“Setting an Object to a Certain State” on page 192

Using Custom Stubs
Testin
g
Using Custom StubsThis topic provides detailed instructions on how to create and use cus-tomized stubs for classes that reference external resources. Subtopics include:
• Overview
• Creating a Custom Stub
• Enabling User-Defined Stubs
• Indicating the Stub’s Location
• Running the Test
• Viewing the Stubs
• Summary
OverviewStubs are basically replacements for references to external methods. For example, you could use stubs to specify that when the method "stream.readInt()" is invoked, Jtest should use the value “3” instead of actually invoking the readInt method.
Stubs are mainly used for two purposes:
• To isolate a class and test it independently of other classes.
• To test a class before the external classes it uses are available.
You can enter your own stubs for both automatic and user-defined test cases. When you configure Jtest to use customized stubs, you have com-plete control over what values or exceptions an external method returns to the class under test-- without having to have the actual external method completed and/or available.
There are 5 basic steps involved in creating and using user-defined stubs:
1. Create the custom stub.
2. Enable the custom stub.
3. Indicate the stub’s location.
184

Using Custom Stubs
185
Tes
tin
g
4. Test the class in the normal manner.
5. View the stubs.
Creating a Custom StubThe first step in using user-defined stubs is creating a Stubs Class. If you create a Stubs Class named <name_of_class_under_test>Stubs.class (for example, fooStubs.class) and save it in the same directory as the class under test, you will not have to indicate the stub’s location. You can use a class with a different name or location as long as you indicate the stub’s location (as described in Indicating the Stub’s Location below).
The main way to specify stubs is to create a Stubs Class: a class that con-tains one or more “stubs()” methods which define what (if any) return val-ues or exceptions should be used for a certain input. Stubs Classes extend jtest.Stubs. For information about jtest.Stubs, see the Jtest API javadoc (you can access this documentation by choosing Help> Jtest API).
Each Stubs Class should implement a method of the form:
public static Object stubs ( Method method // external method being invoked , Object _this // "this" if instance method , Object[] args // arguments to the method
// invocation , Method caller_method // method calling "method" , boolean executing_automatic // true if executing
//automatic Test Case);
Important: Only the first parameter is required; all others are optional. For example, you could define a “stubs()” method of the form “Object stubs (Method method)”.
Whenever the class under test invokes a method “method” external to the class, Jtest will call the “stubs()” method. The "stubs()" method should declare what (if any) return values or exceptions should be returned for certain inputs. Use the following table to determine what type of return values or exceptions should be used for each possible stub type:

Using Custom Stubs
Testin
g
Important: The “stubs()” method can only return an Object. To specify a return value of a primitive type, you need to wrap that type in an Object. For example, to specify that the method
int userMethod()
returns 3, have the "stubs ()" method return
return new Integer (3)
To define stubs for constructor invocations, define a “stubs()” method whose first parameter is a constructor (instead of a method).
If some “stubs()” method is not defined, no stubs will be used for those members (method or constructor).
Using Stub ObjectsStub objects are useful when writing user-defined stubs. A stub object is similar to any other object, with the following differences:
If you want the external method to return this . . .
Have the “stubs()” method return this . . .
No stub NO_STUBS_GENERATED
Void VOID
A value The value. If the value is a primitive type, it shouldbe wrapped in an Object. For example, if a given external call should return the integer 3, “stubs()” should return “new Integer (3)”.
An exception The exception that you want the stub to throw. Forexample, you could use something like:
throw new IllegalArgumentException (“time is:” + time);
186

Using Custom Stubs
187
Tes
tin
g
• The stub object can be an instance of an interface. For example, the following code creates an instance of "Enumeration":Enumeration enum = makeStubObject (Enumera-tion.class);
• Any method invocation or field reference is a stub-- even if no stub has been defined for it. If no stub has been defined, Jtest will use a default stub returning the default initialization value for the method return type or field type (for example, "null" for Object, "0.0d" for double, etc.).
You need to use stub objects if you want to test classes that use inter-faces for which an implementation has not yet been written. They can be used whenever an object of the interface class needs to be created.
Stub objects can also be used whenever you want to create an object of a given type without having to call a specific constructor. For example, instead of using "new java.io.FileInputStream ("what to put here?”)", you could use "(FileInputStream) JT.makeStubObject (java.io.FileInput-Stream.class)"; this creates a FileInputStream object.
Defining Stubs in Test ClassesIf you are using a Test Class, you can define specific stubs for each test method by defining a "stubs()" methods within the Test Class. For exam-ple, to specify the stubs for a test case defined by a "testXYZ" method, define a method of the form
Object stubsXYZ (Method method, ...);
in that Test Class.
If a Test Class does not define a "stubs ()" method, or if it does not return any stubs, Jtest will apply the Class and Project Test Parameters "stubs()" methods.
For more information on Test Classes, see “Adding Test Cases with Test Classes” on page 218.
Defining Stubs at the Project LevelIf more than one of the classes in your project uses the same "stubs ()" method, you should create a project-level Stubs Class that contains the

Using Custom Stubs
Testin
g
return values for that method. You create project-level stubs in the same way that you create class-level stubs. The only differences between project-level stubs and class-level stubs are:
• Class-level stubs contain stubs specific to a class, whereas project-level stubs contain stubs that can be shared by multiple classes.
• You indicate the location of class-level stubs in the Class Test Parameters Dynamic Analysis> Test Case Execution> Stubs> Stubs Class branch, but you indicate the location of project-level stubs in the Project Test Parameters Dynamic Analysis> Test Case Execution> Stubs> Stubs Class branch.
When Jtest tests a class in the project, it will first apply the Stubs Class indicated in the Class Test parameters. If no stub is generated at the class level, Jtest will apply the Stubs Class indicated at the project level.
Enabling User-Defined StubsJtest will not use your user-defined stubs unless it is configured to do so. By default, user-defined stubs are enabled for user-defined test cases, but disabled for automatically-generated test cases.
You can enable user-defined stubs at the global, project, or class level. To do so, open the appropriate parameters window, then:
1. Open Dynamic Analysis> Test Case Execution> Stubs.
2. Open Options for Automatic Test Cases or Options for User Defined Test Cases (depending on the type of test case you are working with).
3. Enable the Use User Defined Stubs option.
Indicating the Stub’s LocationBy default, when Jtest detects that the class under test references an external method, it searches for and uses Stubs Classes that are:
• In the same directory as the class under test, and
188

Using Custom Stubs
189
Tes
tin
g
• Named <name_of_class_under_test>Stubs (for example, fooSt-ubs.class).
If you do not change the default setting (Class Test Parameters’ Dynamic Analysis> Test Case Execution> Stubs> Stubs Class value set to “$DEFAULT”), your Stubs Classes are named correctly, and your Stubs Classes are located in the same directory as the class under test, you do not need to indicate the stub’s location.
If you specified your stub via a Test Class, you do not need to indicate the location of a Stubs Class.
To indicate the Stubs Class location for a specific class:
1. Right-click the Class Test Parameters’ Dynamic Analysis> Test Case Execution> Stubs> Stubs Class node, then choose Edit.
2. Enter the location of the Stubs Class in the text field that opens.
To indicate the Stubs Class’s location at the project level:
1. Right-click the Project Test Parameters’ Dynamic Analysis> Test Case Execution> Stubs> Stubs Class node, then choose Edit.
2. Enter the location of the Stubs Class in the text field that opens.
Important: If you specify a Stubs Class at the project level, Jtest will first apply the Stubs Class indicated in the Class Test parameters. If no stub is generated at the class level, Jtest will apply the Stubs Class indicated at the project level. Jtest will not automatically search for Stubs Classes at the project level.
Running the TestIf you have performed the above steps, Jtest will automatically use your stubs when you test the class or project in the normal manner.
Viewing the StubsAfter you test a class using a user-defined stub, you can view the stubs in the User Defined Test Cases> Method Name> Test Case> Test Case Input or User Defined Test Cases> Test Classes> Test Case> Test

Using Custom Stubs
Testin
g
Case Input branch of the View Test Cases tree. User-defined stubs will be marked with a small black box. Each stub branch displays the method invoked as well as the value or exceptions returned by the stub. Expand the stub’s branch to see the stack trace where the invocation occurred.
If the stub’s values resulted in an error, the above information will also be displayed in the Errors Found Panel (if you are testing a class) or the Results panel (if you are testing a project).
SummaryIf you want Jtest to use user-defined stubs:
1. Create a Stubs Class whose "stubs ()" methods indicate what (if any) values or exceptions you want the stub to return.
2. Enable user-defined stubs in the appropriate test parameters win-dow.
3. If your Stubs Class is not named <name_of_class_under_test>Stubs and is not in the same direc-tory as the class under test (or, if your Stubs Class should be applied at the project level), indicate the stub’s location.
4. Test the class as normal.
190

Using Custom Stubs
191
Tes
tin
g
Related Topics “About Dynamic Analysis” on page 168
“Performing Dynamic Analysis” on page 169
“Customizing Dynamic Analysis” on page 171
“Testing Classes That Reference External Resources” on page 178
“Setting an Object to a Certain State” on page 192

Setting an Object to a Certain State
Testin
g
Setting an Object to a Certain StateThis topic explains how to set an object to an initial state prior to testing a class. Subtopics include:
• Overview
• About Static Initialization Code
• Adding Static Initialization Code
OverviewIn some cases, you might want to set up an initial state prior to testing a class in order to avoid exceptions. For example, suppose that a class is used as a global object containing static member variables accessible by any other project within the application. When Jtest tests an object that uses this static member variable, a NullPointer Exception will result because the variable has not been set. This problem can be solved by giving Jtest static initialization code.
About Static Initialization CodeAll initialization code will be executed before any test case is executed, and can be used to setup and initialize the class if needed.
You can add static initialization code at the global, project, or class level. Initialization code set in the Global Test Parameters will be executed for all classes that Jtest tests. Initialization code set in the Project Test Parameters will be executed for all classes in the project. Initialization code set in the Class Test Parameters will be executed only for the class whose parameters you are editing.
Initialization code is executed in the following order:
1. Static Global Initialization code
2. Static Project Initialization code
192

Setting an Object to a Certain State
193
Tes
tin
g
3. Static Class Initialization code
For an example that uses initialization code, see <jtest_install_dir>/exam-ples/dynamic/common/ClassInit.
Note: Initialization code can only be used to invoke static methods.
Adding Static Initialization CodeTo add static initialization code:
1. Open the Test Parameters window for the level at which you want to add initialization code.
• To add Global Initialization code, click Global (in either UI).
• To add Project Initialization code, click Project (in the Project Testing UI).
• To add Class Initialization code, click Class (in the Class Testing UI).
2. In the Test Parameters window, open Dynamic Analysis> Test Case Generation> Common.
3. Double-click the Static Global Initialization, Static Project Ini-tialization, or Static Class Initialization node. A Static Initializa-tion window will open.
4. Enter the initialization code in the Static Initialization window, or import the code by choosing Options> Import File.
5. Choose Options> Save to save the modification.
6. Choose Options> Quit to close this window.
Related Topics“About Dynamic Analysis” on page 168
“Performing Dynamic Analysis” on page 169
“Customizing Dynamic Analysis” on page 171
“Testing Classes That Reference External Resources” on page 178

Setting an Object to a Certain State
Testin
g
“Using Custom Stubs” on page 184
194

About White-Box Testing
195
Tes
tin
g
White-Box TestingAbout White-Box TestingThis topic introduces the concept of white-box testing and describes how Jtest applies it. Subtopics include:
• Overview
• Testing Classes that Reference External Resources
• Suppressing Expected or Less Critical Exceptions
OverviewWhite-box testing checks that the class is structurally sound. It doesn't test that the class behaves according to the specification, but instead ensures that the class doesn't crash and that it behaves correctly when passed unexpected input. White-box testing involves looking at the class code and trying to find out if there are any possible class usages that will make the class crash (in Java this is equivalent to throwing an uncaught runtime exception).
Jtest uses unique technology to completely automate the white-box test-ing process. Jtest examines the internal structure of each class under test, automatically designs and executes test cases designed to thor-oughly test the class’s construction, then determines whether each test case’s inputs would produce an uncaught runtime exception. For each uncaught runtime exception that is detected, Jtest reports an error and provides the stack trace as well as the calling sequence that led to the problem.
White-box test cases are classified as automatic test cases. Any test case that Jtest automatically creates to verify the functionality described in DbC contracts is also classified as an automatic test case.
Testing Classes that Reference External ResourcesJtest can perform white-box testing on any Java class, JSP, or compo-nent, including classes that reference external resources (such as exter-

About White-Box Testing
Testin
g
nal files, databases, Enterprise JavaBeansTM [EJB] and CORBA). If you are performing white-box testing on classes that reference external resources, Jtest will automatically generate the necessary stubs, or give you the option of calling the actual external method or entering your own stubs. For classes using CORBA, Jtest provides stubs for the Object Request Broker and other objects referenced by the class. For classes using EJB, Jtest invokes bean initialization routines and provides a simu-lated container context, then performs white-box testing to make sure that the bean class will always behave correctly.
Suppressing Expected or Less Critical ExceptionsIf you find that certain exceptions reported are not relevant to the project at hand, you can easily tailor Jtest’s error reports to your needs. If you document valid exceptions in the code using a special @exception com-ment tag, Jtest will suppress any occurrence of that particular exception. If you use the @pre comment tag to document the permissible range for valid method inputs, Jtest will suppress errors found for inputs that fall outside of that range. You can also suppress exceptions using shortcut menus or the suppression panel.
Related Topics“Performing White-Box Testing” on page 197
“Customizing White-Box Testing” on page 200
196

Performing White-Box Testing
197
Tes
tin
g
Performing White-Box TestingThis topic provides general instructions for performing white-box testing. Subtopics include:
• Running the Test
• Recognizing and Understanding Suppressed Exceptions
• Disabling/Enabling White-Box Testing
Running the TestJtest performs white-box testing, along with all other appropriate types of testing, each time that you test a class or set of classes.
To perform white-box testing, follow the basic test procedure described in the following topics:
• “Quick Start Guide” on page 14
• “Testing a Single Class or JSP” on page 21
• “Testing a Set of Classes” on page 47
Tip: If you want Jtest to perform only dynamic analysis, right-click the Start button and choose Dynamic Analysis from the shortcut menu (instead of simply clicking the Start button).
If you want Jtest to execute only automatically-generated test cases, right-click the Start button and choose Dynamic Analysis> Automatic from the shortcut menu.
For details on understanding and fixing reported uncaught runtime excep-tions found, see “Understanding Exceptions” on page 382.
Recognizing and Understanding Suppressed ExceptionsThe following types of exceptions are suppressed by default:

Performing White-Box Testing
Testin
g
• Exceptions in Throws Clause
• DirectIllegalArgumentExceptions
• Explicitly Thrown Exceptions
• Exceptions Caught By Empty Catch
• Direct NullPointerExceptions
You can enable the reporting of any of these exception types by modifying settings in any parameter tree’s Dynamic Analysis> Test Case Execu-tion> Pre-Filtering Categories branch.
All exceptions found-- including suppressed exceptions-- are displayed in the View Test Cases window. To see the reason why one of the excep-tions listed here was suppressed, right-click that exception’s node (the node with the lightning bolt icon) in the View Test Cases window, then choose Why Suppressed? from the shortcut menu.
For information about suppressing exceptions, see “Customizing White-Box Testing” on page 200 and “Dynamic Analysis Suppressions” on page 173.
Disabling/Enabling White-Box TestingJtest performs white-box testing by default.
To disable or re-enable automatic creation and execution of automatic white-box and DbC test cases:
1. Open the class, project, or global test parameters window (depending on how widely you want your changes applied).
2. Go to the Dynamic Analysis> Tests Case Execution branch and disable/enable the Execute Automatic option.
To disable or re-enable reporting of uncaught runtime exceptions found:
1. Open the class, project, or global test parameters window (depending on how widely you want your changes applied).
2. Go to the Dynamic Analysis> Tests Case Evaluation branch and disable/enable the Report Uncaught Runtime Exceptions option.
198

Performing White-Box Testing
199
Tes
tin
g
Related Topics“About White-Box Testing” on page 195
“Customizing White-Box Testing” on page 200
“Testing a Class - Two Simple Examples” on page 24
“Jtest Tutorials” on page 372
Customizing White-Box Testing
Testin
g
Customizing White-Box TestingJtest provides a variety of ways to customize white-box testing. Most options related to white-box testing can be configured from within the glo-bal, class, or project test parameters’ Dynamic Analysis> Test Case Generation and Dynamic Analysis> Test Case Execution branches. This topic discusses the most common customization options. Subtopics include:
• Enabling Suppressed Categories of Exceptions
• Determining Which Types of Methods are Tested
• Suppressing Known Exceptions and Tailoring Input Generation
Enabling Suppressed Categories of ExceptionsThe following exceptions are suppressed because developers normally expect them to occur (given the circumstances of the input) and account for them, either with throws clauses, or try-catch clauses:
• Exceptions in Throws Clause
• DirectIllegalArgumentExceptions
• Explicitly Thrown Exceptions
• Exceptions Caught By Empty Catch
• Direct NullPointerExceptions
However, sometimes you might want to have Jtest report these exception types to make sure your code is robust and that you have accounted for all possible types, ranges, and values of method input which will cause exceptions in the code.
You configure Jtest to report violations of the above exception types as follows:
200

Customizing White-Box Testing
201
Tes
tin
g
1. Open the desired level of test parameters (class, project, or glo-bal) by clicking the related tool bar button.
2. In the parameter tree's Dynamic Analysis> Test Case Execu-tion> Pre-Filtering Suppression Categories branch, clear the radio buttons to the left of each suppression type you want reported. For descriptions of each type of exception, see “Dynamic Analysis> Test Case Execution> Pre-filtering Suppres-sion Categories” on page 330.
Determining Which Types of Methods are TestedBy default, Jtest only directly calls public and protected methods. You configure which methods Jtest calls as follows:
1. Open the desired level of test parameters (class, project, or glo-bal) by clicking the related tool bar button.
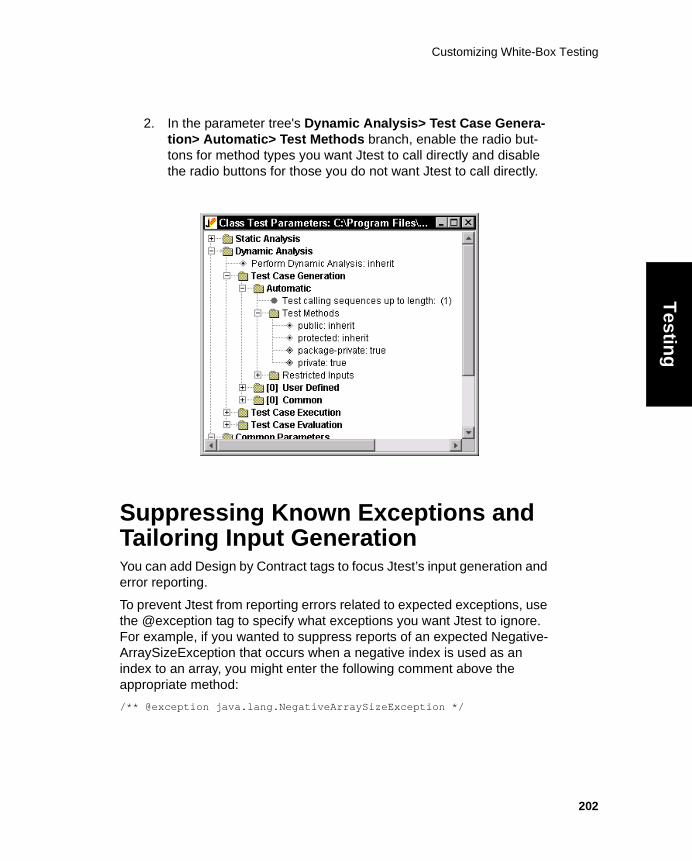
Customizing White-Box Testing
Testin
g
2. In the parameter tree's Dynamic Analysis> Test Case Genera-tion> Automatic> Test Methods branch, enable the radio but-tons for method types you want Jtest to call directly and disable the radio buttons for those you do not want Jtest to call directly.
Suppressing Known Exceptions and Tailoring Input GenerationYou can add Design by Contract tags to focus Jtest’s input generation and error reporting.
To prevent Jtest from reporting errors related to expected exceptions, use the @exception tag to specify what exceptions you want Jtest to ignore. For example, if you wanted to suppress reports of an expected Negative-ArraySizeException that occurs when a negative index is used as an index to an array, you might enter the following comment above the appropriate method:
/** @exception java.lang.NegativeArraySizeException */
202
Customizing White-Box Testing
203
Tes
tin
g
This not only tells Jtest to ignore the exception, but it also makes the code easier to understand and maintain.
To prevent Jtest from generating test case inputs that you do not expect to occur, use the @pre tag to specify what range of inputs is permissible. For example, if negative inputs are not allowed, you would enter the fol-lowing comment above the appropriate method:
/** @pre arg >=0 */
If you use the @pre tag to indicate valid method inputs, and then use Parasoft’s Jcontract to check Design by Contract contracts at runtime, you will automatically be alerted to instances where the system passes this method any unexpected inputs.
For details on using these two tags, see “About Design by Contract” on page 239 and “The Design by Contract Specification Language” on page 243.
Note: An alternative way to suppress exceptions is to right-click the related violation message in the Errors Found panel or Results panel, then choose Suppress from the shortcut menu. For more details on add-ing these suppressions, see “Dynamic Analysis Suppressions” on page 173.
Related Topics“About White-Box Testing” on page 195
“Performing White-Box Testing” on page 197
“Dynamic Analysis Suppressions” on page 173
“Using Design by Contract With Jtest” on page 235
“The Design by Contract Specification Language” on page 243
“Testing a Class - Two Simple Examples” on page 24

About Black-Box Testing
Testin
g
Black-Box TestingAbout Black-Box TestingThis topic introduces the concept of black-box testing and describes how Jtest applies it. Subtopics include:
• Overview
• Black-Box Testing with Design by Contract
• Traditional Black-Box Testing
OverviewBlack-box (functionality) testing checks a class’s functionality by deter-mining whether or not the class’s public interface performs according to specification. This type of testing is performed without paying attention to implementation details.
Black-Box Testing with Design by ContractIf your class contains Design by Contract-format specification information, Jtest completely automates the black-box testing process. Jtest reads specification information built into the class with the DbC language, then automatically develops test cases based on this specification. Jtest designs its black-box test cases as follows:
• If the code has @post contracts, Jtest creates test cases that ver-ify whether the code satisfies those conditions.
• If the code has @assert contracts, Jtest creates test cases that try to make the assertions fail.
• If the code has @invariant contracts (conditions that apply to all of a class’s methods), Jtest creates test cases that try to make the invariant conditions fail.
• If the code has @pre contracts, Jtest tries to find inputs that force all of the paths in the preconditions.
204

About Black-Box Testing
205
Tes
tin
g
• If the method under test calls other methods that have specified @pre contracts, Jtest determines whether the method under test can pass non-permissible values to the other methods.
• If any class under test (with or without contracts) calls a class that contains contracts, Jtest determines whether the class under test can interact with the second class in a way that violates the con-tract.
Test cases that Jtest creates to verify the functionality described in DbC contracts are referred to as automatic test cases.
Traditional Black-Box TestingJtest also helps you create black-box test cases if you do not use Design by Contract. You can validate the outcomes of Jtest’s automatically-gen-erated set of test cases, make those test cases the foundation for your black-box test suite, then extend it by adding your own test cases. Test cases that you add are referred to as user-defined test cases.
User-defined test cases can be added in a variety of ways; for example, test cases can be introduced by adding:
• Method inputs directly to a tree node representing each method argument.
• Constants and methods to global or local repositories, then add-ing them to any method argument.
• JUnit or Jtest Test Classes for test cases that are too complex or difficult to be added as method inputs.
If a class references external resources, you can enter your own stubs or have Jtest call the actual external method.
When the test is run, Jtest uses any available stubs, automatically exe-cutes the inputs, and displays the outcomes for those inputs in a simple tree representation. You can then view the outcomes and verify them with the click of a button.
Related Topics“Performing Black-Box Testing” on page 207
About Black-Box Testing
Testin
g
“Adding Test Cases with Test Classes” on page 218
“Adding Test Cases with Method Inputs” on page 210
“Viewing and Validating Test Cases” on page 110
“Specifying Imports” on page 234
206

Performing Black-Box Testing
207
Tes
tin
g
Performing Black-Box Testing This topic provides general instructions for performing black-box testing. Subtopics include:
• Prerequisites
• Running the Test
• Disabling/Enabling Black-Box Testing
PrerequisitesBefore Jtest can perform black-box testing, you must have done at least one of the following things for the class under test:
• Add DbC contracts to your code (as described in “Using Design by Contract With Jtest” on page 235 and “The Design by Contract Specification Language” on page 243).
• Add user-defined method inputs or Test Classes (as described in “Adding Test Cases with Test Classes” on page 218 and “Adding Test Cases with Method Inputs” on page 210).
• Validate the outcomes of automatically-generated test cases (as described in “Viewing and Validating Test Cases” on page 110).
In addition, Jtest needs to know the location of your JDK. Jtest deter-mines this location automatically. For information on changing the JDK used, see “JDK Prerequisites” on page 15.
Running the TestAs long as you have satisfied the prerequisites mentioned above, Jtest performs black-box testing, along with all other appropriate types of test-ing, each time that you test a class or set of classes.
To perform black-box testing, follow the basic test procedure described in the following topics:

Performing Black-Box Testing
Testin
g
• “Quick Start Guide” on page 14
• “Testing a Single Class or JSP” on page 21
• “Testing a Set of Classes” on page 47
Tip: If you want Jtest to perform only dynamic analysis, right-click the Start button and choose Dynamic Analysis from the shortcut menu (instead of simply clicking the Start button).
If you want Jtest to execute only automatically-generated test cases, right-click the Start button and choose Dynamic Analysis> Automatic from the shortcut menu.
If you want Jtest to execute only user-defined test cases, right-click the Start button, then choose Dynamic Analysis> User Defined from the shortcut menu.
Disabling/Enabling Black-Box TestingJtest performs black-box testing by default.
To disable or re-enable automatic creation and execution of DbC test cases:
1. Open the class, project, or global test parameters window (depending on how widely you want your changes applied).
2. Go to the Dynamic Analysis> Tests Case Execution branch and disable/enable the Automatically Instrument Design by Contract Comments option.
To disable or re-enable automatic creation and execution of automatic white-box and DbC test cases:
1. Open the class, project, or global test parameters window (depending on how widely you want your changes applied).
2. Go to the Dynamic Analysis> Tests Case Execution branch and disable/enable the Execute Automatic option.
To disable or re-enable the execution of user-defined test cases (from method inputs or Test Classes):
1. Open the class, project, or global test parameters window (depending on how widely you want your changes applied).
208

Performing Black-Box Testing
209
Tes
tin
g
2. Go to the Dynamic Analysis> Tests Case Execution branch and disable/enable the Execute User Defined option.
Related Topics“About Black-Box Testing” on page 204
“Adding Test Cases with Test Classes” on page 218
“Adding Test Cases with Method Inputs” on page 210
“Viewing and Validating Test Cases” on page 110
“Specifying Imports” on page 234
“Using Design by Contract With Jtest” on page 235
“The Design by Contract Specification Language” on page 243
“Testing a Class - Two Simple Examples” on page 24
“Jtest Tutorials” on page 372

Adding Test Cases with Method Inputs
Testin
g
Adding Test Cases with Method InputsThis topic describes how to add test cases by specifying primitive or com-plex (object-type) method inputs. Subtopics include:
• Adding Primitive Inputs
• Adding Complex Inputs
Important: After you add primitive or complex inputs and run the test, you need to verify whether the correct outcomes were reached. For instruc-tions on validating the outcomes, see “Viewing and Validating Test Cases” on page 110.
Adding Primitive Inputs There are two ways to define primitive inputs for methods under test:
• Using the Method’s Class Test Parameters Tree Node
• Using the Repository
Using the Method’s Class Test Parameters Tree NodeTo add primitive inputs directly to the method’s Class Test Parameters tree node:
1. Open the Class Test Parameters window.
2. In the Class Test Parameters window, go to Dynamic Analysis> Test Case Generation> User Defined> Method Inputs to view a list of all methods in the class.
3. Open the node associated with the method whose inputs you want to define.
4. Right-click the argument that you want to define an input for, then choose Add Input Value from the shortcut menu.
210

Adding Test Cases with Method Inputs
211
Tes
tin
g
5. In the text field of the box that opens, type the input that you want to use, then press Enter to save this value.
The specified input will be executed the next time you run the test.
Using the RepositoryTo add a primitive inputs using the repository, you must complete two main tasks:
1. Add constants to the inputs repository.
2. Add the appropriate repository inputs to the appropriate method argument.
Adding Constants to an Inputs Repository

Adding Test Cases with Method Inputs
Testin
g
To add a constant to an Inputs Repository:
1. Open the Class Test Parameters or Global Test Parameters win-dow.
2. In the Test Parameters window, go to Dynamic Analysis> Test Case Generation> Common> Inputs Repository.
3. Right-click Inputs Repository, then choose Add Constant from the shortcut menu.
The Add Constant window will open.
4. In the Add Constant window, enter the type of the constant (e.g. int) in the Type field, the name of the constant (e.g. FIVE) in the Name field, and the value of the constant (any valid Java expres-sion-- e.g., 5) in the Value field.
212

Adding Test Cases with Method Inputs
213
Tes
tin
g
5. Choose Options> Save.6. Choose Options> Quit.
Using Repository InputsTo add repository inputs to an argument:
1. In the Class Test Parameters window, right-click the node associ-ated with the argument that you want to add an input value to (this node is at Dynamic Analysis> Test Case Generation> User Defined> Method Inputs> <Method Name>). A shortcut menu will open.
2. From the shortcut menu, choose either Add From: Local Repos-itory (if the input is in the local repository) or Add From: Global Repository (if the input is in the global repository), then choose the desired input.

Adding Test Cases with Method Inputs
Testin
g
Adding Complex InputsThere are two ways to add non-primitive (object-type) inputs to a method:
• Using a .java Class File
• Using the Repository
Using a .java Class FileThe objects to be used for the user-defined test cases can be defined in any .java file. Jtest can use those inputs as long as:
214

Adding Test Cases with Method Inputs
215
Tes
tin
g
• The class that is defining the input object is in the classpath.
• You import each input class using the Dynamic Analysis> Test Case Generation> Common> Imports node of the Class Test Parameters tree.
For an example of how to add inputs using .java class files, see <jtest_install_dir>/examples/dynamic/blackbox/inputs/README.
Using the RepositoryTo add a non-primitive input using the repository, you must complete two main tasks:
1. Define a method that will instantiate and set up the desired object input, then add it to an Inputs Repository.
2. Add the appropriate repository input to the appropriate method argument.
Adding Methods to an Inputs RepositoryTo add a method to an Inputs Repository:
1. Open the Class Test Parameters or Global Test Parameters win-dow.
2. In the Test Parameters window, go to Dynamic Analysis> Test Case Generation> Common> Inputs Repository.
3. Right-click Inputs Repository, then choose Add Method from the shortcut menu. The Add Method window will open.

Adding Test Cases with Method Inputs
Testin
g
In that window, define a method that creates and returns the desired input values.
4. Enter the method declaration (e.g. int sum() ) in the Decl field.
5. (Optional) If you want to check the method, choose Save & Check from the Options menu.
6. Choose Options> Save.
7. Choose Options> Quit.
Using Repository InputsTo add repository inputs to an argument:
1. In the Class Test Parameters window, right-click the node associ-ated with the argument that you want to add an input value to (this node is at Dynamic Analysis> Test Case Generation> User Defined> Method Inputs> <Method Name>). A shortcut menu will open.
2. From the shortcut menu, choose either Add From Local Repos-itory (if the input is in the local repository) or Add From Global
216

Adding Test Cases with Method Inputs
217
Tes
tin
g
Repository (if the input is in the global repository), then choose the desired input.
Related Topics“About Black-Box Testing” on page 204
“Performing Black-Box Testing” on page 207
“Adding Test Cases with Test Classes” on page 218
“Specifying Imports” on page 234
“Viewing and Validating Test Cases” on page 110
“Jtest Tutorials” on page 372
Adding Test Cases with Test Classes
Testin
g
Adding Test Cases with Test ClassesThis topic describes how you can use Jtest or JUnit Test Classes to add complex user-defined test cases and how you can export Jtest test cases into JUnit-compatible Test Classes. Subtopics include
• Overview
• Setting Your Environment to Use Test Classes
• Creating Test Classes for Classes
• Creating Test Classes for JSPs
• Using Existing JUnit Test Classes
• Loading Test Classes
• Checking Test Classes
• Running Test Classes
• Testing Test Classes
OverviewTest Classes let you add test cases that are too complex to be added as method inputs. For example, you might want to use Test Classes if you want to:
• Use objects as inputs for static and instance methods.
• Test a calling sequence and check the state of the object using assertTrue statements.
• Create complex test cases that depend upon a specific calling sequence.
• Validate the state of an object.
You can add test cases via Test Classes in any of the following ways:
218

Adding Test Cases with Test Classes
219
Tes
tin
g
• Have Jtest create a JUnit-compatible Test Class template, then add test cases by modifying the template.
• Have Jtest export user-defined or automatically-generated inputs as JUnit-compatible Test Classes, then add more test cases by modifying the Test Classes.
• Write your own Test Classes using any Java development envi-ronment.
• Integrate JUnit classes into your Jtest tests.
To use Test Classes, you need to:
1. Set you environment to use Test Classes.
2. Create a Test Class (or locate an existing JUnit Test Class).
3. Load the Test Class (this is not necessary if you have named and saved the Test Class in the conventional manner).
These steps are described in the following sections.
Note: You can create and use either JUnit Test Classes or Jtest Test Classes.
• A JUnit Test Class is a test class that extends junit.frame-work.TestCase or if it has a suite() method that returns a junit.framework.Test object. is compatible with the JUnit framework.
• A Jtest Test Class is a class that extends jtest.TestClass to specify test cases that Jtest should use to test the class. For information about jtest.TestClass, see the Jtest API Java-doc (you can access this documentation by choosing Help> Jtest API). The jtest.TestClass file is in the jtest.zip file located in <jtest_install_dir>/classes.
Setting Your Environment to Use Test Classes

Adding Test Cases with Test Classes
Testin
g
In order to use the Test Classes feature, you need to add the jtest.zip file that contains jtest.TestClass to your CLASSPATH. This zip file is located in <jtest_install_dir>/classes/jtest.zip
You can have Jtest automatically set your CLASSPATH by opening a command prompt, changing directories to the Jtest installation directory, then entering the appropriate command(s):
• If you are using Windows, enter:$ jtvars.bat
• If you are using a bash or sh shell, run the jtvars.sh script in the Jtest installation directory. For example,$ cd <jtest-home>$ . jtvars.sh
• If you are using a csh, tcsh, or ksh shell. source the jtvars script in the Jtest installation directory. For example, $ cd <jtest-home>$ source jtvars
• To determine which shell you are using, enter $echo $SHELL
In addition, if you want to execute Test Classes during a project test, you must disable the project test parameters’ Search Parameters> Skip Test Classes option. This option determines whether Jtest recognizes Test Classes during project tests. When this option is enabled and the global test parameters’ Common Parameters> When Testing a Test Class> Run the Tests Defined in the Test Class option is enabled, Jtest will execute the test cases defined in a project’s Test Classes.
Creating Test Classes for ClassesYou can create Test Classes for non-JSP classes from scratch, modify JUnit-compatible Test Class templates automatically created by Jtest, or have Jtest create JUnit-compatible Test Classes based on the method inputs you have added or on the test cases that Jtest created automati-cally.
This section contains the following topics:
220

Adding Test Cases with Test Classes
221
Tes
tin
g
• Understanding General Test Class Guidelines
• Automatically Creating and Modifying a JUnit-Compatible Test Class Template
• Automatically Creating a JUnit-Compatible Test Class that Repre-sents Automatically-Generated Test Cases
• Automatically Creating a JUnit-Compatible Test Class that Repre-sents Existing Method Inputs
• Automatically Creating a JUnit-Compatible Test Class that Repre-sents Existing User Defined Test Cases
• Modifying Automatically-Generated Test Classes
Understanding General Test Class GuidelinesFor examples of Test Classes that follow the suggested guidelines, see <jtest_install_dir>/examples/dynamic/testclasses.
Class GuidelinesA Test Classes must be a public class that does one of the following:
• Extends junit.framework.TestCase or has a suite() method that returns a junit.framework.Test object (for JUnit Test Classes).
• Extends jtest.TestClass (for Jtest Test Classes).
Test Method GuidelinesEach Test Class can contain any number of test cases. You add test cases to a Test Class by adding one test method for every test case you want to add. Each test method should be public static void method that starts with the string "test".
Test methods should specify the correct behavior of the class in “assertTrue (String message, boolean condition)” state-ments. For example, consider the following Jtest Test Class:
public class TestVector extends jtest.TestClass{ public static void testSize ()

Adding Test Cases with Test Classes
Testin
g
{ Vector vector = new Vector (); vector.addElement(“name”); assertTrue("should be 1", vector.size () == 1); }}
Jtest will invoke all the test methods in the class consecutively. The class can have other methods (for example, for common procedures used by all test methods). Jtest will consider non-static public methods within the class to be helper methods. These methods can be called to perform ini-tialization for the test case.
Stubs GuidelinesYou can define stubs for each test method by defining a stubs() meth-ods within the Test Class. For example, to specify the stubs for a test case defined by a testXYZ method, define a method of the form
Object stubsXYZ (Method method, ...);
in that Test Class.
If a Test Class does not define a stubs method, or if it does not return any stubs, Jtest will apply the Class and Project Test Parameters "stubs()" methods.
For more information on User-Defined Stubs, see “Using Custom Stubs” on page 184
Test Class Name and Location GuidelinesThe Test Class can follow any naming convention you wish and be saved in any package.
If you already have group guidelines for naming and saving Test Classes, you can follow those guidelines. Jtest will automatically load a class’s Test Classes as long as you tell it how you name and save your Test Classes (this procedure is described in “Loading Test Classes” on page 230).
If you do not have guidelines for naming and saving Test Classes, it is convenient (but not necessary) to name traditional Test Classes (Test Classes that were not automatically-generated) so that the word Test appends the class name and save them in the same package as the class
222

Adding Test Cases with Test Classes
223
Tes
tin
g
under test. If you follow these conventions, Jtest will automatically load each class’s Test Classes. For example, if you test the java.util.Vec-tor class, Jtest will automatically search on the CLASSPATH for a java.util.VectorTest class. If it finds this class, it will use it as the Test Class for the java.util.Vector class.
If you decide not to follow the default conventions, Jtest will automatically load a class’s Test Classes as long as you tell it how you name and save your Test Classes (this procedure is described in “Loading Test Classes” on page 230).
Automatically Creating and Modifying a JUnit-Compatible Test Class TemplateIf you want to add completely new test cases, we recommend that you add them to an automatically-generated JUnit Test Class template. If you would rather add test cases by modifying a Test Class that contains exist-ing automatically-defined or user-defined Jtest test cases, we recommend that you export the test cases as a JUnit Test Class and then modify that Test Class as described in “Modifying Automatically-Generated Test Classes” on page 227.
To create a basic JUnit-format Test Class template (which you can later modify):
1. Open the Class Test Parameters window in one of the following ways:
• In the Class Testing UI, click the Class tool bar button.
• In the Project Testing UI, right-click the [Class Name] Results panel node that represents the class for which you want to create a Test Class, then choose Edit Class Test Parameters from the shortcut menu.
2. Right-click the Class Test Parameters tree’s Dynamic Analysis> Test Case Generation> User Defined> Test Classes node, then choose Add JUnit Test Class Template from the shortcut menu. A file chooser will open so you can enter a name and path. Save the Test Class using either the default file name and loca-tion suggested in the file chooser or the file name and location that your team typically uses for Test Classes.

Adding Test Cases with Test Classes
Testin
g
After you select a name and location for the Test Class, it will open in your preferred editor so you can modify it. The Test Class created contains a test for each of the methods in the class under test. By default, each test will fail until you add your own test code (the failures remind you to modify the test class template). The Test Class also includes comments that describe the purpose of each method, which method the test method is testing, and where you need to modify or add to the code.
You can run this Test Class in Jtest or JUnit. Before you attempt to use this Test Class, make sure that junit.jar is in your classpath so you will be able to compile the Test Class.
Automatically Creating a JUnit-Compatible Test Class that Represents Automatically-Generated Test CasesTo create a JUnit-format Test Class based on the test cases that Jtest cre-ated automatically:
1. After a test has completed, open the View Test Cases window in one of the following ways:
• In the Class Testing UI, click the View tool bar button.
• In the Project Testing UI, right-click the [Class Name] Results panel node that represents the class for which you want to create a Test Class, then choose View Test Cases from the shortcut menu.
2. Right-click the View Test Cases tree’s Automatic Test Cases node, then choose Export to a JUnit Test Class from the short-cut menu. A file chooser will open so you can enter a name and path to the Test Class. Save the Test Class using either the default file name and location suggested in the file chooser or the file name and location that your team typically uses for Test Classes.
After you select a name and location for the Test Class, it will open in your preferred editor so you can modify it if desired. The Test Class created tests each method with the arguments created in dynamic analysis. The return value is then compared to the results from dynamic analysis (using
224
Adding Test Cases with Test Classes
225
Tes
tin
g
assertTrue methods). Each test case created in Jtest will be placed in a separate test method.
You can run this Test Class in JUnit or Jtest. You can run it as is, or you can modify it to extend or change the existing test cases.
Before you attempt to use this Test Class, make sure that junit.jar is in your classpath so you will be able to compile the Test Class.
Automatically Creating a JUnit-Compatible Test Class that Represents Existing Method InputsTo create a JUnit-compatible Test Class based on the method inputs you have entered in the Class Test Parameter tree’s Dynamic Analysis> Test Case Generation> User Defined> Method Inputs branch:
1. Open the Class Test Parameters window in one of the following ways:
• In the Class Testing UI, click the Class tool bar button.
• In the Project Testing UI, right-click the [Class Name] Results panel node that represents the class for which you want to create a Test Class, then choose Edit Class Test Parameters from the shortcut menu.
2. Right-click the Class Test Parameter tree’s Dynamic Analysis> Test Case Generation> User Defined> Method Inputs node, then choose Export to JUnit Test Class from the shortcut menu. A file chooser will open so you can enter a name and path to the Test Class. Save the Test Class using either the default file name and location suggested in the file chooser or the file name and location that your team typically uses for Test Classes.
After you select a name and location for the Test Class, it will open in your preferred editor so you can modify it if desired. The Test Class created contains calls to the methods for which you have entered inputs. The Test Class also includes comments that describe the purpose of each method, which method the test method is testing, and where you need to modify or add to the code.
You can run this Test Class in JUnit or Jtest. You can run it as is, or you can modify it to extend or change the existing test cases.

Adding Test Cases with Test Classes
Testin
g
Before you attempt to use this Test Class, make sure that junit.jar is in your classpath so you will be able to compile the Test Class.
Automatically Creating a JUnit-Compatible Test Class that Represents Existing User Defined Test CasesIf you have already run dynamic analysis on the class for which you want to create a Test Class, you can create a Test Class that tests each method with the arguments you entered in the Method Inputs node, then uses assertTrue methods to compare each test return value to the cor-responding value in the dynamic analysis results. To do this:
1. After a test has completed, open the View Test Cases window in one of the following ways:
• In the Class Testing UI, click the View tool bar button.
• In the Project Testing UI, right-click the [Class Name] Results panel node that represents the class for which you want to create a Test Class, then choose View Test Cases from the shortcut menu.
2. Right-click the View Test Cases tree’s User Defined Test Cases> Test Case Generation> Method Inputs node, then choose Export to a JUnit Test Class from the shortcut menu. A file chooser will open so you can enter a name and path to the Test Class. Save the Test Class using either the default file name and location suggested in the file chooser or the file name and location that your team typically uses for Test Classes.
After you select a name and location for the Test Class, it will open in your preferred editor so you can modify it if desired. The Test Class created contains calls to the methods for which you have entered inputs and assertTrue methods to compare future test results with the results achieved in the previous test. The Test Class also includes comments that describe the purpose of each method, which method the test method is testing, and where you need to modify or add to the code.
You can run this Test Class in JUnit or Jtest. You can run it as is, or you can modify it to extend or change the existing test cases.
226

Adding Test Cases with Test Classes
227
Tes
tin
g
Before you attempt to use this Test Class, make sure that junit.jar is in your classpath so you will be able to compile the Test Class.
Note: Jtest will not generate test cases which use stubs.
Modifying Automatically-Generated Test ClassesThe test methods, the setUp method, and tearDown method can be modified to your specifications.
Creating Test Classes for JSPsYou create Test Classes for JSPs by writing public classes that extend JspTestClass (described in the Jtest API; you can access the API doc-umentation by choosing Help> Jtest API). Like traditional Test Classes, JSP Test Classes can follow any naming convention and be saved in any location. Jtest’s default settings prompt it to automatically identify and load any Test Class that is named <name_of_JSP_under_test>Test and is saved in the same directory as the JSP under test, but you can configure it to load files with different names or locations.
You add tests to the Test Class by creating test methods (public static void methods whose names begin with the string test). You can create two types of test methods:
• Test methods that test the _jspService method.
• Test methods that test the methods from the original JSP source file.
Test methods that test the _jspService method need to calltestJspService (described in the Jtest API).
Test methods that test other JSP methods need to calltestJspMethod(“your method name”). For example, the test method for the getResult method would calltestJspMethod("getResult")
The correct behavior of the method should be specified using “assert-True (String message, boolean condition)” statements.
Before the code responsible for the actual test (for either type of test method), you must add code that sets the name of the JSP under test.

Adding Test Cases with Test Classes
Testin
g
You do this by calling setJspName(“your jsp name”). setJspName is described in the Jtest API.
If you want to send the JSP any parameters prior to test execution, you call addParameter("param name", "param value") from the HttpServletRequestAdapter class. addParameter and HttpS-ervletRequestAdapter are described in the Jtest API.
If you want to send the method under test any parameters prior to test execution, you call addMethodArg() to set the argument value.
Here is one example of a simple JSP Test Class (calcu-lateTest.java) that tests the calculate.jsp file located in the <jtest_install_dir>/examples/jsp directory:public class calculateTest extends JspTestClass {
public static void testService1() throws Exception {
setJspName("calculate.jsp"); addParameter("cal", "true"); addParameter("first", "120"); addParameter("second", "30"); addParameter("op", "plus"); testJspService(); assertTrue("response is null", _response != null); assertTrue("content is null", _response.getContent()
!= null); assertTrue("content type is null",
_response.getContentType() != null); assertTrue("content type is not text/html",
_response.getContentType().indexOf("text/html") >= 0); assertTrue("result is not 150",
_response.getContent().indexOf("150") > 0); }
public static void testService2() throws Exception {
setJspName("calculate.jsp"); addParameter("cal", "true"); addParameter("first", null); addParameter("second", "letter"); addParameter("op", "plus");
228

Adding Test Cases with Test Classes
229
Tes
tin
g
testJspService(); assertTrue("response is null", _response != null); assertTrue("content is null",
_response.getContent() != null); assertTrue("content type is null",
_response.getContentType() != null); assertTrue("content type is not text/html",
_response.getContentType().indexOf("text/html") >= 0); assertTrue("result is not 0",
_response.getContent().indexOf("0") > 0); }
public static void testGetResultMethod1() throws Exception {
setJspName("calculate.jsp"); addMethodArg(Class.forName("java.lang.String"), "120");
// ARG 1 addMethodArg(Class.forName("java.lang.String"), "30");
// ARG 2 addMethodArg(Class.forName("java.lang.String"), "plus");
// ARG 3 Object ret = testJspMethod("getResult"); assertTrue("return is null", ret != null); assertTrue("result is not 150",
((String)ret).equals("150")); } public static void testGetResultMethod2() throws Exception {
setJspName("calculate.jsp"); addMethodArg(Class.forName("java.lang.String"), "100");
// ARG 1 addMethodArg(Class.forName("java.lang.String"), "20");
// ARG 2 addMethodArg(Class.forName("java.lang.String"), "other");
// ARG 3 Object ret = testJspMethod("getResult"); assertTrue("return is null", ret != null); assertTrue("result is not 0", ((String)ret).equals("0")); } }

Adding Test Cases with Test Classes
Testin
g
To view other sample JSP Test Classes, look at the <name_of_JSP>Test files in the <jtest_install_dir>/exam-ples/jsp directory.
Using Existing JUnit Test ClassesIf you want to use a JUnit Test Class with Jtest, you need to:
• Include the junit.jar file on your CLASSPATH.
• Make sure Jtest knows how to locate the Test Class (as described in Loading Test Classes below).
After you perform these steps, Jtest will use the JUnit Test Class when you run your test in the normal manner.
Note: The Jtest Tutorial contains a lesson on using JUnit Test Classes with Jtest. To reach the Jtest Tutorial, choose Help> Tutorial in either Jtest UI. In addition, you can access a paper that describes and demon-strates how to use JUnit test classes with Jtest at http://www.para-soft.com/jsp/products/tech_papers.jsp?product=Jtest.
Loading Test ClassesJtest’s default settings prompt it to automatically identify and load any Test Class that is named <name_of_class/JSP_under_test>Test and is saved in the same directory as the class or JSP under test. You can also configure Jtest to automatically load files with different names or locations, or you can individually specify the location of specific Test Classes.
Automatically Loading Test Classes that do not Follow the Default Name/Location ConventionsIf you do not follow the default Test Class name or location conventions, Jtest can automatically load your Test Classes if you use name mapping expressions to tell Jtest how to find your Test Classes.
To specify a name mapping expression:
230

Adding Test Cases with Test Classes
231
Tes
tin
g
1. Open the global, project, or class test parameters (depending on whether the same Test Class conventions apply globally, to a specific project, or to a specific class).
2. Double-click the Dynamic Analysis> Test Case Generation> User Defined> Name Mapping Expression node. The Name Mapping Expression dialog box will open.
3. Enter one or more name mapping expressions in the dialog box.
When you design an expression, use the # sign to represent the class or JSP name. For example:
• The default expression #Test tells Jtest to look in the same package as the class under test (or the same directory as the JSP under test) and load any class named [name_of_class_or_JSP_under_test]Test (such as SimpleTest, ExampleTest, etc.).
• The expression tests.T# tells Jtest to look in the tests pack-age and load any class whose name begins with a capital T (such as TSimple, TExample, etc.).
If you want to specify multiple expressions, separate the expressions with a pipe ( | ) character. For example, if you want Jtest to use both of the example expressions listed above, you would enter:#Test | tests.T#
Manually Indicating the Location of a Specific Test ClassIf you name your Test Class <classname>Test (or follow one of the other naming conventions referenced earlier), save it in the same pack-age or directory as the class or JSP under test, and set your CLASSPATH (if applicable), Jtest will automatically find and load it.
To manually indicate which Test Class(es) Jtest should use for the class or JSP currently under test:
1. Right-click the Class Test Parameter tree’s Dynamic Analysis> Test Case Generation> User Defined> Test Classes node, then choose Add Test Class from the shortcut menu.
2. Enter the name of your Test Class in the text field.
Adding Test Cases with Test Classes
Testin
g
Checking Test ClassesIf you want to check your Test Class:
• Control-click the Class Test Parameter tree’s Dynamic Analy-sis> Test Case Generation> User Defined> Test Classes node, then choose Check from the shortcut menu.
Running Test Classes
Running Test Classes Within JtestWhen Jtest performs dynamic analysis, it will execute all Test Classes that it finds automatically and/or you load manually.
If any assertion fails, Jtest will report an error in the Specification and Regression Errors branch of the Results panel or Errors Found panel.
If any test case throws an uncaught runtime exception, Jtest will report an error in the Uncaught Runtime Exceptions of the Results panel or Errors Found panel.
Note: When Jtest executes a test case within the Test Class, all of the Test Class’s static variables will be initialized with default values.
Running Test Classes Outside of JtestYou can run a Test Class outside of the Jtest environment by entering the following command at the command line:
java jtest.TestClass <your TestClass>
For example, if your Test Class was named fooTest, you would enter the following command:
java jtest.TestClass fooTest
Important: In order to execute this command, you must have the jtest.zip file in your CLASSPATH.
Testing Test Classes
232
Adding Test Cases with Test Classes
233
Tes
tin
g
By default, Jtest does not perform static or dynamic analysis on any class that it recognizes as a Test Class.
If you want Jtest to test a specific Test Class, open its Class Test Parame-ters window, then enable the Common Parameters> When Testing a Test Class> Test the Test Class itself option. The Run the tests defined in the class parameter will automatically be disabled.
If you want Jtest to test all Test Classes in a project (and ignore other classes in the project), open the Project Test Parameters window, then enable the Common Parameters> When Testing a Test Class> Test Test Classes Only option. The Skip Test Classes parameter will auto-matically be disabled.
If you want Jtest to always test all Test Classes it encounters, open the Global Test Parameters window, then enable the Common Parameters> When Testing a Test Class> Test the Test Class Itself option. The Run the tests defined in the class parameter will automatically be disabled.
Related Topics“About Black-Box Testing” on page 204
“Performing Black-Box Testing” on page 207
“Adding Test Cases with Method Inputs” on page 210
“Viewing and Validating Test Cases” on page 110
“Specifying Imports” on page 234
“Jtest Tutorials” on page 372

Specifying Imports
234
Testin
g
Specifying ImportsThis topic describes how to add and use import statements shared by all code in the test specification.
Adding Import StatementsTo specify import statements shared by all of the code used in the test specification:
1. In the Class Test Parameters window, open Dynamic Analysis> Test Case Generation> Common.
2. Double-click the Imports node. The Imports window will open.
3. Enter the import statement in the Imports window.
Example:import java.util.Vector;
import java.awt*;
4. (Optional) If you want to check the method, choose Options> Save & Check.
5. Choose Options> Save.
6. Choose Options> Quit.
Related Topics“About Black-Box Testing” on page 204
“Performing Black-Box Testing” on page 207
“Adding Test Cases with Test Classes” on page 218
“Adding Test Cases with Method Inputs” on page 210
“Viewing and Validating Test Cases” on page 110
“Specifying Imports” on page 234

Using Design by Contract With Jtest
235
Tes
tin
g
Design by ContractUsing Design by Contract With JtestThis topic explains the advantages and general logistics of including Design by Contract in classes that you will test with Jtest. Subtopics include:
• Benefits of Using DbC With Jtest
• Understanding the Difference Between Jtest and Jcontract
• Creating DbC Comments
• Using DbC Information in Tests
• Generating DbC Documentation
• Modifying DbC Instrumentation Preferences
• Accessing Example DbC Files
Benefits of Using DbC With JtestYou do not need to use Design by Contract (DbC) in order to use Jtest. You can, however, increase Jtest’s functionality if you use DbC; there are several main advantages to using DbC with Jtest:
• Jtest will automatically create black-box test cases that verify the functionality described in your DbC contracts and report contract violations.
• Jtest will not generate test cases with inputs that violate the @pre contracts of the methods under test.
• Jtest will automatically suppress expected uncaught runtime exceptions that are documented using the @exception Javadoc tag.
Understanding the Difference Between Jtest and Jcontract

Using Design by Contract With Jtest
Testin
g
Jtest contains all necessary elements to understand DbC comments and create test cases that verify whether the specifications detailed in those comments are indeed implemented. It uses the DbC information to check that the unit under test is implemented correctly. It also contains a set of static analysis rules that verify whether you are adding appropriate con-tracts.
Jcontract is a new Java development tool that checks DbC contracts at runtime; it is run independently of Jtest, but the two tools are complemen-tary. After you have used Jtest to thoroughly test a class or component at the unit level, instrument it with Jcontract, integrate it into your sys-tem/application, then Jcontract will automatically check whether its con-tracts are violated at runtime and perform the specified action if a contract violation occurs. Jcontract is particularly useful for determining whether an application misuses specific classes or components.
Creating DbC CommentsSee for a general description of DbC, see “About Design by Contract” on page 239.
See “The Design by Contract Specification Language” on page 243 for information about how to add DbC comments to your code.
Jtest’s Design by Contract static analysis rules help you determine where contracts need to be placed and create well-formed DbC contracts. These rules are applied during static analysis.
Using DbC Information in TestsJtest will use DbC information in its tests as long as the class under test’s DbC contracts have been instrumented (by default, they are instrumented as the class is loaded). Just run the test in the normal manner, then Jtest reads specification information built into the class with the DbC language, and automatically develops test cases based on this specification. Jtest designs these test cases as follows:
• If the code has @post contracts, Jtest creates test cases that ver-ify whether the code satisfies those conditions.
236

Using Design by Contract With Jtest
237
Tes
tin
g
• If the code has @assert contracts, Jtest creates test cases that try to make the assertions fail.
• If the code has @invariant contracts (conditions that apply to all of a class’s methods), Jtest creates test cases that try to make the invariant conditions fail.
• If the code has @pre contracts, Jtest tries to find inputs that force all of the paths in the preconditions.
• If the method under test calls other methods that have specified @pre contracts, Jtest determines whether the method under test can pass non-permissible values to the other methods.
• If any class under test (with or without contracts) calls a class that contains contracts, Jtest determines whether the class under test can interact with the second class in a way that violates the con-tract.
If Jtest finds inputs that violate contracts, it will report them in the Design by Contract Violations branch of the Errors Found Panel (if you tested a single class) or the Results Panel (if you tested a project).
Jtest also uses the DbC information to focus its tests and results. If you document valid exceptions in the code using the @exception comment tag, Jtest will suppress any occurrence of that particular exception. If you use the @pre comment tag to document the permissible range for valid method inputs, Jtest not generate tests cases with inputs that violate the @pre contracts.
Generating DbC DocumentationYou can use the xjavadoc tool to generate DbC documentation. xjavadoc parses the documentation comments in a particular source file and pro-duces a set of pages (in HTML or XML) describing the classes, inner classes, interfaces, constructors, methods, and fields. This tool adds sup-port for DbC tags. For more information on xjavadoc, see “xjavadoc Reference” on page 387.
Modifying DbC Instrumentation

Using Design by Contract With Jtest
Testin
g
PreferencesIf you use DbC comments, Jtest will by default instrument the comments when it loads the class or project under test. You can control whether or not Jtest instruments DbC comments with the Automatically Instrument Design by Contract Comments option in all test parameters’ Dynamic Analysis> Test Case Execution branch.
By default, Jtest creates code to instrument all legal DbC contracts. If you would prefer that Jtest instrument only a certain subset of contracts, you can do so by modifying the instrumentation preferences. To reach the panel where you can modify instrumentation settings, open any test parameter window, right-click the Dynamic Analysis> Test Case Execu-tion> Automatically Instrument Design by Contract Comments branch, then choose Edit Instrumentation Preferences.
Accessing Example DbC FilesExample class files that use DbC are contained in the <jtest_installation_dir>/examples/dynamic/dbc directory.
Related Topics“About Design by Contract” on page 239
“The Design by Contract Specification Language” on page 243
“Performing Black-Box Testing” on page 207
“Customizing White-Box Testing” on page 200
“Testing a Class - Two Simple Examples” on page 24
“Using Design by Contract With Jtest” on page 235
238

About Design by Contract
239
Tes
tin
g
About Design by ContractThis topic provides a general introduction to Design by Contract purpose, semantics, and benefits. Subtopics include:
• Overview
• Example Class with Design by Contract
• Benefits of Using Design by Contract
• Additional DbC Resources
OverviewDesign by Contract is a structured way of writing comments to define what code should do. The contract requires components of the code (such as classes or methods) to follow certain specifications as they inter-act with each other. The interactions between these components must ful-fill a set of predetermined mutual obligations.
The main idea behind DbC is that any piece of code in any language car-ries implicit contracts. The simplest example of an implicit contract in Java is a method to which you are not supposed to pass null. If this contract is not met, a NullPointerException occurs. In this case, the built-in checking of Java creates a warning that something is wrong. However, there’s no indication of whether the error is in the caller or the callee. An explicit DbC clause would clarify that callers are not supposed to pass null.
Another example of code with an implicit contract is a component whose specification states that it returns only positive values. If it occasionally returns negative values and the consumer of this component is expecting the functionality described in the specification (only positive values returned), the consumer can end up with a critical problem.
DbC originated in the Eiffel programming language, where classes are components that cooperate through the use of a contract that defines the obligations and benefits for each class. Formal DbC is not yet “officially” a part of most programming languages, including Java. However, tools such as Jtest and Jcontract bring Design by Contract to Java by helping you specify the contracts in comments and check whether or not the con-tract has been fulfilled.
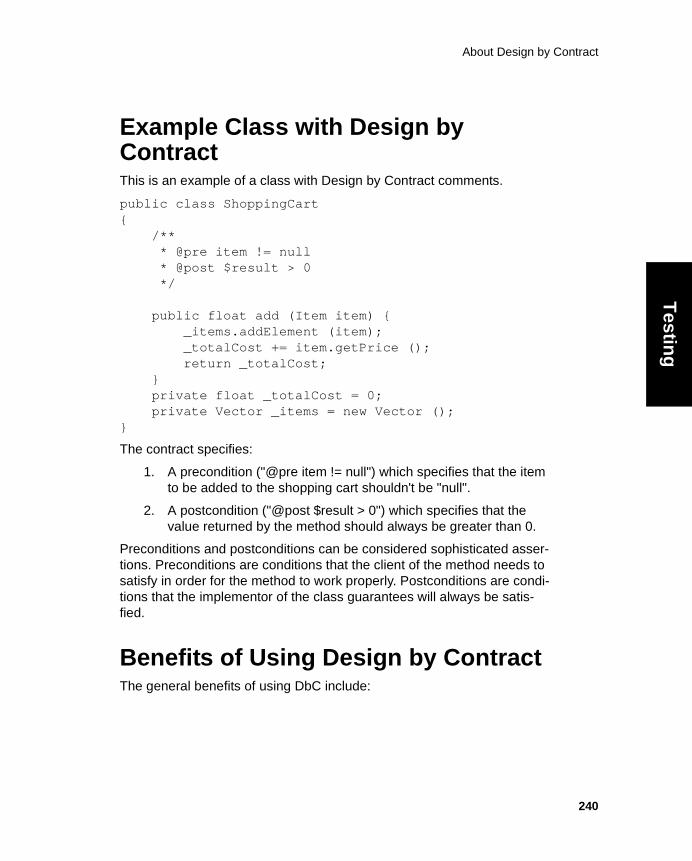
About Design by Contract
Testin
g
Example Class with Design by ContractThis is an example of a class with Design by Contract comments.
public class ShoppingCart{ /** * @pre item != null * @post $result > 0 */
public float add (Item item) { _items.addElement (item); _totalCost += item.getPrice (); return _totalCost; } private float _totalCost = 0; private Vector _items = new Vector ();}
The contract specifies:
1. A precondition ("@pre item != null") which specifies that the item to be added to the shopping cart shouldn't be "null".
2. A postcondition ("@post $result > 0") which specifies that the value returned by the method should always be greater than 0.
Preconditions and postconditions can be considered sophisticated asser-tions. Preconditions are conditions that the client of the method needs to satisfy in order for the method to work properly. Postconditions are condi-tions that the implementor of the class guarantees will always be satis-fied.
Benefits of Using Design by ContractThe general benefits of using DbC include:
240

About Design by Contract
241
Tes
tin
g
• The code’s assumptions are clearly documented (for example, you assume that item should not be null). Design concepts are placed directly in the code itself.
• The code’s contracts can be checked for consistency because they are explicit.
• The code is much easier to reuse.
• The specification will never be lost.
• When you see the specification while writing the code, you are more likely to implement the specification correctly.
• When you see the specification while modifying code, you are much less likely to introduce errors.
Once you start using Jtest and Jcontract, the benefits of using DbC also include:
• Black-box test cases are created automatically. If you currently create your black-box test cases manually, this means fewer resources spent creating test cases and more resources you can dedicate to more complex tasks, such as design and coding. If you do not currently perform black-box testing, this will translate to more reliable software/components.
• Black-box test cases are automatically updated when you modify the contracts.
• Class/component misuse is automatically detected.
• The class implementation can assume that input arguments sat-isfy the preconditions, so the implementation can be simpler and more efficient.
• The class client is guaranteed that the results will satisfy the post-conditions.
Additional DbC ResourcesFor more information about DbC see:

About Design by Contract
Testin
g
• Interactive Software Engineering, "Building Bug-Free O-O Soft-ware: An Introduction to Design by ContractTM." http://www.eiffel.com/doc/manuals/technology/contract/page.html
• Eldridge, G. "Java and `Design by Contract.'” http://www.elj.com/eiffel/feature/dbc/java/ge/
• Kolawa, A., "Automating the Development Process." Software Development, July 2000. http://www.sdmagazine.com
• Meyer, B. Object-Oriented Software Construction. Prentice Hall, 2000.
Note: “Design by Contract” is a trademark of Interactive Software Engi-neering.
Related Topics“Using Design by Contract With Jtest” on page 235
“The Design by Contract Specification Language” on page 243
“Performing Black-Box Testing” on page 207
“Customizing White-Box Testing” on page 200
“Testing a Class - Two Simple Examples” on page 24
242

The Design by Contract Specification Language
243
Tes
tin
g
The Design by Contract Specification LanguageThis topic provides a detailed description of Design by Contract tags, syn-tax, and semantics supported by Jtest and Jcontract.
• Contract Tags
• Contract Syntax
• Contract Semantics
• Contract Inheritance
• Special Keywords and Functions
• Coding Conventions
Contract TagsDbC contracts are expressed with Java code embedded within Javadoc comments in a .java source file.
The reserved Javadoc tags for DbC are:
• @invariant: Specifies class invariant condition.
• @pre: Specifies method precondition.
• @post: Specifies method postcondition.
• @concurrency: Specifies the method concurrency.
Other tags supported by Jtest and Jcontract include:
• @throws/@exception: Used to document exceptions.
• @assert: Used to add assertions in the method bodies.
• @verbose: Used to add verbose statements to the method bod-ies. (Not currently used by Jtest)
The following subsections describe each DbC tag in detail.

The Design by Contract Specification Language
Testin
g
@pre
DescriptionPreconditions check that the client calls the method correctly.
Point of executionImmediately before calling the method.
ScopeCan access anything accessible from the method scope except local vari-ables. For example, it can access method arguments, and methods/fields of the class.
@post
DescriptionPostconditions check whether the method works correctly.
Sometimes when a post-condition fails it means that the method was not actually supposed to accept the arguments that were passed to it. The fix in this case is to strengthen the precondition.
Point of executionImmediately after the method returns successfully. Note that if the method throws an exception, the @post contract is not executed.
ScopeSame as @pre, plus it can access "$result" and "$pre (type, expression)".
AccessibilitySame as @pre.
@invariant
Description
244

The Design by Contract Specification Language
245
Tes
tin
g
Class invariants are contracts that the objects of the class should always satisfy.
Point of executionSame as @pre/@post: @invariant is checked before checking the pre-condition and after checking the postcondition.
Executed for every non-static, non-private method entry and exit and for every non-private constructor exit.
If a constructor throws an exception, its @invariant contract is not exe-cuted.
Not executed for "finalize ()".
When inner class methods are executed, the invariants of the outer classes are not checked.
ScopeClass scope: it can access anything a method in the class can access, except local variables.
AccessibilitySame as @pre/@post.
@concurrency
DescriptionThe @concurrency tag specifies how the method can be called by multi-ple threads. Its possible values are:
• Concurrent: The method can be called simultaneously by differ-ent threads (i.e., the method is multi-thread safe). Note that this is the default mode for Java methods.
• Guarded: The method can be called simultaneously by different threads, but only one will execute it in turn, while the other threads will wait for the executing one to finish. In other words, it specifies that the method is synchronized. Jcontract will only
The Design by Contract Specification Language
Testin
g
report a compile-time error if a method is declared as “guarded” but is not declared as “synchronized”.
• Sequential: The method can only by executed by one thread at once and it is not declared synchronized. It is thus the responsi-bility of the callers to ensure that no simultaneous calls to that method occur. For methods with this concurrency contract, Jcon-tract will generate code to check if they are being executed by more than one thread at once. An error will be reported at runtime if the contract is violated.
Point of executionImmediately before calling the method.
@throws/@exceptionThese are the standard @throws and @exception tags found in Javadoc; they are used to document that the method throws a given exception. @throws and @exception are synonymous. In this entry, we use @throws to represent both tags.
The syntax for the @throws tag is:
ThrowsContract : @throws ExceptionName Text
Example:
/** @throws NegativeArraySizeException if size is negative */
Note: Methods that throw multiple exceptions need a separate @throws tag for each exception.
When a method throws an exception, the Jcontract Runtime Handler will call 'documentedExceptionThrown (Throwable t)' if that exception is docu-mented with a @throws tag.
Note that the Runtime Monitors provided with Jcontract don't take any action when 'documentedExceptionThrown' is called. You can neverthe-less take a specific action by defining a custom Runtime Handler.
246
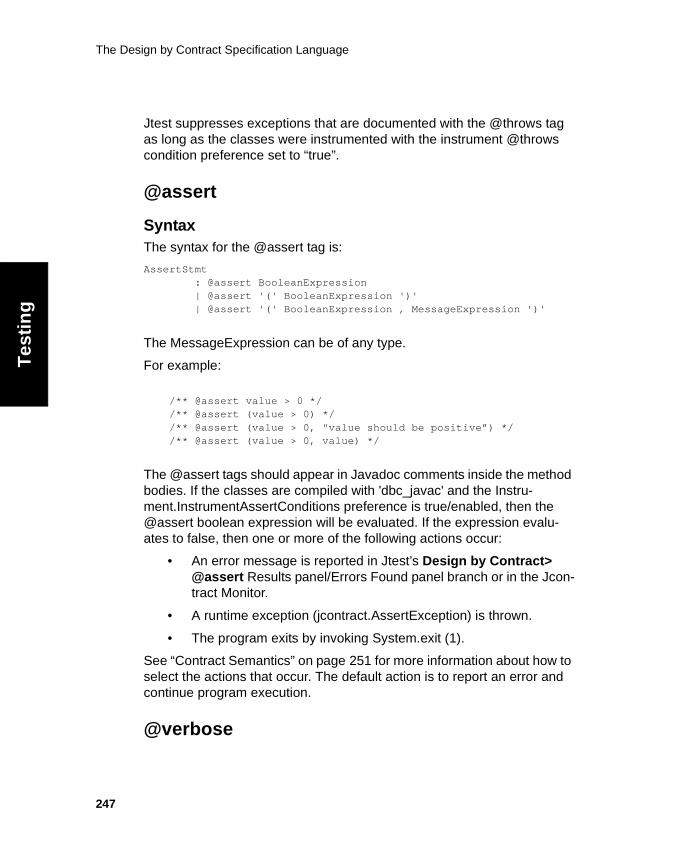
The Design by Contract Specification Language
247
Tes
tin
g
Jtest suppresses exceptions that are documented with the @throws tag as long as the classes were instrumented with the instrument @throws condition preference set to “true”.
@assert
SyntaxThe syntax for the @assert tag is:
AssertStmt : @assert BooleanExpression | @assert '(' BooleanExpression ')' | @assert '(' BooleanExpression , MessageExpression ')'
The MessageExpression can be of any type.
For example:
/** @assert value > 0 */ /** @assert (value > 0) */ /** @assert (value > 0, "value should be positive”) */ /** @assert (value > 0, value) */
The @assert tags should appear in Javadoc comments inside the method bodies. If the classes are compiled with 'dbc_javac' and the Instru-ment.InstrumentAssertConditions preference is true/enabled, then the @assert boolean expression will be evaluated. If the expression evalu-ates to false, then one or more of the following actions occur:
• An error message is reported in Jtest’s Design by Contract> @assert Results panel/Errors Found panel branch or in the Jcon-tract Monitor.
• A runtime exception (jcontract.AssertException) is thrown.
• The program exits by invoking System.exit (1).
See “Contract Semantics” on page 251 for more information about how to select the actions that occur. The default action is to report an error and continue program execution.
@verbose

The Design by Contract Specification Language
Testin
g
The syntax for the @verbose tag is:
VerboseStmt : @verbose MessageExpression | @verbose '(' MessageExpression ')'
For example:
/** @verbose "process starts" */ /** @verbose ("process ends") */ /** @verbose 26.7 */
The @verbose tags should appear in Javadoc comments inside the method bodies. If the classes are compiled with 'dbc_javac' and the Instrument.InstrumentVerboseConditions preferences is true/enabled, then the classes are instrumented with the verbose expression.
By default, all verbose statements are inactive; once they are activated, they print the MessageExpression to System.out.
The @verbose statements can be activated separately for each class. The @verbose statements for a class are active if the system property jcontract.verbose.CLASSNAME is set to the value ON (where CLASS-NAME is the name of the class without the package part). For example, to activate the verbose statements in class pkg.DataDictionary on Windows, use:
$ java -Djcontract.verbose.DataDictionary=ON ...
Note that the MessageExpression in a verbose statement is not evaluated if the verbose statement is inactive.
Contract SyntaxThe general syntax for a contract is:
DbcContract: DbcTag DbcCode | @concurrency { concurrent | guarded | sequential }
where
248

The Design by Contract Specification Language
249
Tes
tin
g
DbcTag: @invariant | @pre | @post
DbcCode: BooleanExpression | '(' BooleanExpression ')' | '(' BooleanExpression ',' MessageExpression ')' | CodeBlock | $none
MessageExpression: Expression
Any Java code can be used in the DbcCode with the following restriction: the code should not have side effects (i.e., it should not have assignments or invocation of methods with side effects).
The following extensions to Java (DbC keywords) are allowed in the con-tract code:
• $result: Used in a @post contract, evaluates to the return value of the method.
• $pre: Used in a @post contract to refer to the value of an expres-sion at @pre-time. The syntax to use it is:$pre (ExpressionType, Expression).Note: The full "$pre (...)" expression should not extend over mul-tiple lines.
• $assert: Can be used in DbcCode CodeBlocks to specify the con-tract conditions.The syntax to use it is:$assert (BooleanExpression)or$assert (BooleanExpression , MessageExpression)
• $none: Used to specify that there is no contract because the specified tag is not applicable in the given situation. For example, if the @throws tag is not applicable to a method, you could docu-ment this by adding the contract@throws $none

The Design by Contract Specification Language
Testin
g
Notes• The @pre, @post and @concurrent tags apply to the method that
follows in the source file.
• The MessageExpression is optional and will be used to identify the contract in the error messages or contract violation excep-tions thrown. The MessageExpression can be of any type. If it is a reference type, it will be converted to a String using the "toString ()" method. If it is of primitive type, it will first be wrapped into an object.
• There can be multiple conditions of the same kind for a given method. If there are multiple conditions, all conditions are checked. The conditions are ANDed together into one virtual con-dition. For example, it is equivalent (and encouraged for clarity) to have multiple @pre conditions instead of a single large @pre condition.
Examples
/** * @pre { * for (int i = 0; i < array.length; i++) * $assert (array [i] != null, "array elements
are non-null"); * } */
public void set (int[] array) {...}
/** @post $result == ($pre (int, arg) + 1) */
public int inc (arg) {...}
/** @invariant size () >= 0 */
class Stack {...}
/** * @concurrency sequential * @pre (value > 0, "value positive:" + value) */
250

The Design by Contract Specification Language
251
Tes
tin
g
void update (int value) {...}
Contract SemanticsThe contracts are specified in comments and will not have any effect if you are compiling or executing in a non DbC enhanced environment.
In a DbC enhanced environment, the contracts are executed/checked when methods of a class with DbC contracts are invoked. Contracts placed inside a method are treated like normal statements and can thus alter the flow of poorly structured conditional statements. See “Coding Conventions” on page 254 for details.
A contract fails if any of these conditions occur:
• The "BooleanExpression" evaluates to "false."
• An "$assert (BooleanExpression)" is called in a "CodeBlock" with an argument that evaluates to "false."
• The method is called in a way that violates its @concurrency con-tract.
If a contract fails, the Runtime Handler for the class is notified of the con-tract violation. Jcontract provides several Runtime Handlers; the default one uses a GUI Monitor that shows program progress and contract viola-tions. You can also write your own Runtime Handlers.
With the Monitor Runtime Handler provided by Jcontract, program execu-tion continues as if nothing has happened when a contract is violated. For example, if a @pre contract is violated, the method will still be executed.
This option makes the DbC-enabled and non DbC-enabled versions of the program work in exactly the same way. The only difference is that in the DbC-enabled version, the contract violations are reported to the cur-rent Jcontract Monitor.
Note: Contract evaluation is not nested; when a contract calls another method, the contracts in the other method are not executed.
Contract Inheritance

The Design by Contract Specification Language
Testin
g
Contracts are inherited. If the derived class or overriding method doesn't define a contract, it inherits that of the super class or interface. Note that a contract of $none implies that the super contract is applied.
If an overriding method does define a contract then it can only:
• Weaken the precondition: Because it should at least accept the same input as the parent, but it can also accept more.
• Strengthen the postcondition: Because it should at least do as much as the parent one, but it can also do more.
To enforce this:
• When checking the @pre condition, the precondition contract is assumed to succeed if any of the @pre conditions of the chain of overridden methods succeeds (i.e., the preconditions are ORed).
• When checking the @post condition, the postcondition contract is assumed to succeed if all the @post conditions of the chain of overridden methods succeed (i.e., the postconditions are ANDed).
Note: If there are multiple @pre conditions for a given method, the pre-conditions are ANDed together into one virtual @pre condition and then ORed with the virtual @pre conditions for the other methods in the chain of overridden methods.
For @invariant conditions, the same logic as for @post applies.
@concurrency contracts are also inherited. If the overriding method doesn't have an @concurrency contract, it inherits that of the parent. If it has an inheritance contract, it can only weaken it (as it does for @pre conditions). For example, if the parent has a “sequential” @concurrency, the overriding method can have a “guarded” or “concurrent” @concur-rency.
Special Keywords and Functions
Keywords
$implies
252

The Design by Contract Specification Language
253
Tes
tin
g
You can use the $implies keyword to compare two boolean expressions. This ensures that when the first expression is true, the second one also is true.
For example, a $implies b is equivalent to !a || b
Collection FunctionsClass and method contracts can contain a several special functions that are internally mapped to equivalent Java code. Permissible functions include:
• <public boolean Collection.$forall(Type t; <boolean expression>)
• <public boolean Collection.$exists(Type t; <boolean expression>)
<boolean expression> is an expression that will be evaluated for all ele-ments in the collection, with each element of type "Type" using an ele-ment named "t".
public boolean Collection.$forall(Type t; <boolean expression>)The value of $forall is true when the expression evaluates to true for all elements.
You can think of this as a modified 'for' statement.
Example:
/** @pre names.$forall (String s; s.length() != 0) */void method (List names) { }
Because $forall generates a boolean value, you can use it with $assert in a block precondition:
/** @pre { $assert (names != null); $assert (names.$forall (String e; e.length() > 1)); }*/

The Design by Contract Specification Language
Testin
g
public boolean Collection.$exists(Type t; <boolean expression>)This is almost identical in structure to $forall, but it succeeds if any of the elements in the collection cause the expression to evaluate to true.
Example:
/** @pre names.$exists (String s; s != null && "seth".equals (s)) */void method (List names) { }
Coding ConventionsWhen using Design by Contract in Java, the following coding conventions are recommended:
• Place all the @invariant conditions in the class Javadoc comment with the Javadoc comment appearing immediately before the class definition.
• Javadoc comments with the @invariant tag should appear before the class definition.
• All public and protected methods should have a contract. All package-private and private methods should also have a con-tract.
• If a method has a DbC tag, it should have a complete contract. This means that if you have both a precondition and a postcondi-tion, you should use "DbcTag $none" to specify that a method doesn't have any condition for that tag.
• No public class field should participate in an @invariant clause. Because any client can modify such a field arbitrarily, there is no way for the class to ensure any invariant on it.
• The code contracts should only access members visible from the interface. For example, the code in a method’s @pre condition should only access members that are accessible from any client that could use the method. In other words, the contract of a public method should only use public members from the method's class.
• Contracts that appear in the body of a method should be consid-ered normal statements. Thus, the following example would have
254

The Design by Contract Specification Language
255
Tes
tin
g
undesireable behavior:if (a) /** @assert (a) */ System.out.println("poor use of contract code");
Because the assert is a normal statement when your code is compiled by dbc_javac, this example is equivalent to the follow-ing pseudocode which makes it clear that the assertion is the body of the "if": if (a) assert (a);System.out.println("poor use of contract code");
Note: Jcontract does not currently enforce these conventions.
Related Topics“Using Design by Contract With Jtest” on page 235
“About Design by Contract” on page 239
“Performing Black-Box Testing” on page 207
“Customizing White-Box Testing” on page 200
“Testing a Class - Two Simple Examples” on page 24

About Regression Testing
256
Testin
g
Regression TestingAbout Regression TestingThis topic introduces the concept of regression testing and describes how Jtest applies it.
OverviewRegression testing-- testing modified code under the exact same set of inputs and test parameters used in previous test runs-- is the only way to ensure that modifications did not introduce new errors into the class, or to check if modifications successfully eliminated existing errors. Every time a class is modified or used in a new environment, regression testing should be used to verify the class's integrity.
Jtest's regression testing feature lets you perform regression testing at the class level; this means that you can run test suites that monitor your code's integrity early in the development process. Jtest completely auto-mates all steps involved in and related to regression testing. Even if you do not specify the correct outcomes, Jtest remembers the outcomes from previous runs, compares them every time the class is tested, then reports an error for any outcome that changes. If you do specify the correct out-comes, Jtest uses those values as a reference when running regression tests. Both automatic test cases and user-defined test cases are used for regression testing.
Whenever Jtest tests a class or set of classes, it automatically saves all test inputs and settings, then adds the test to Jtest's menu options. As a result, you can perform regression testing by simply selecting the appro-priate test, then clicking the Start button. You can also integrate batch-mode Jtest into your nightly builds to ensure that regression errors are always found and fixed as soon as possible.
Related Topics“Performing Regression Testing” on page 257

Performing Regression Testing
257
Tes
tin
g
Performing Regression TestingThis topic provides step-by-step instructions for performing regression testing. Subtopics include:
• Running the Test
• Disabling/Enabling Regression Testing
• Performing Regression Testing on Objects Whose Instances Always Differ
Running the TestJtest performs regression testing, along with all other appropriate types of testing, each time that you test a class or set of classes that has already been tested at least once.
To perform regression testing:
1. Open the appropriate UI for your test. The Class Testing UI is used to test a single class; the Project Testing UI is used to test a set of files.
• The Class Testing UI opens by default when Jtest is launched.
• The Project Testing UI can be opened by clicking the Class Testing UI’s Project Button.
2. Restore previously saved test parameters by doing one of the fol-lowing:
• Choosing File> Open, then selecting the appropriate .ctp (for class test parameters) or .ptp (for project test param-eters) file in the file chooser.
• (For recently accessed tests) Choosing File> Open Recent> [File Name].
3. Run the test by clicking the Start button.

Performing Regression Testing
Testin
g
Regression errors found will be reported in the Specification and Regression Errors branch of the Errors Found Panel (if you tested a sin-gle class) or the Results Panel (if you tested a project).
Disabling/Enabling Regression TestingJtest performs regression testing by default.
To disable or re-enable regression testing:
1. Open the Class, Project, or Global Test parameters window (depending on how widely you want your changes applied).
2. Go to the Dynamic Analysis> Tests Case Evaluation branch and disable/enable the Perform Automatic Regression Testing option.
Performing Regression Testing on Objects Whose Instances Always DifferIf you want to perform regression testing on objects whose instances always differ, you can use the object comparator to tell Jtest how to han-dle the differences. For example, you can use the object comparator to have Jtest ignore certain fields and types or to specify a tolerance for comparing floating fields.
You interact with the object comparator through the Jtest API. To access the documentation for the Jtest API (which includes a detailed description of how to use the object comparator), choose Help> Jtest API in either Jtest UI.
Related Topics“About Regression Testing” on page 256
“Jtest Tutorials” on page 372
258

Integrating VisualAge and Jtest
259
Tes
tin
g
IDE Integration (Windows Only)
Integrating VisualAge and JtestThis topic describes how to integrate Jtest and IBM’s VisualAge 3.5, 3.5.3, and 4.0 on Windows, as well as how to use the integrated set of tools. Subtopics include:
• Integrating the Programs
• Using Jtest with VisualAge
• Additional Notes on Jtest/VisualAge Integration
Integrating the ProgramsAfter you integrate Jtest and VisualAge, you will be able to test your files with Jtest from within the VisualAge IDE.
To integrate Jtest and VisualAge:
1. If you have not already done so, install both Jtest and VisualAge.
2. If you have not already done so, close VisualAge and start Jtest.
3. Choose Tools> IDE Integration> IBM VisualAge> <visualage version_number> in either of Jtest’s UIs.
Jtest will then open a dialog box that displays the VisualAge installation directory it detected. If this is not the correct directory, change the direc-tory by entering the correct directory or by browsing to it.
Next, Jtest will place the correct files in the VisualAge IDE’s Tools direc-tory, and you will be ready to use Jtest with VisualAge.
Using Jtest with VisualAgeAfter you have integrated Jtest with VisualAge, you can access Jtest within the VisualAge IDE to perform any of the following actions:
• Test a single class within a project.
• Test a package.
Integrating VisualAge and Jtest
Testin
g
• Test a project.
• Test a class that uses a class in another project.
• Edit your source code.
• Import Test Classes or Stub Classes.
• Remove exported files.
Important: You must compile the appropriate source files in this IDE before you prompt Jtest to test a project, package, or class from this IDE.
If you have already established shared global test parameters, you can apply them to the tests you perform from VAJ. For details, see the instruc-tions on sharing global test parameters in “Using Jtest in a Group Envi-ronment” on page 94.
When you use Jtest within VAJ, results are saved in the <jtest_install_dir>/u/<username>/t/VA directory.
Testing a Single Class Within a ProjectTo test a single class from the VisualAge IDE:
1. In the VisualAge IDE, right-click the class that you want to test, then choose Tools> Jtest> Test Class from the shortcut menu. This will export the project that contains the class and load the class in Jtest’s Class Testing UI. The VAJ log window will indicate that it is exporting into Jtest. After the export is complete, the log window will indicate that you must export the class under test’s dependencies before you start testing in Jtest.
2. Click Start in Jtest’s Class Testing UI to start testing.
Testing a PackageTo test a package from the VisualAge IDE:
1. In the VisualAge IDE, right-click the package that you want to test, then choose Tools> Jtest> Test Package from the shortcut menu. This will export the project the class is contained within and load the package path in Jtest’s Project Testing UI. The VAJ log window will indicate that it is exporting into Jtest. After the export is complete, the log window will indicate that you must
260

Integrating VisualAge and Jtest
261
Tes
tin
g
export the package under test’s dependencies before you start testing in Jtest.
2. Click Start in Jtest’s Project Testing UI to start testing.
Testing a ProjectTo test a project from the VisualAge IDE:
1. In the VisualAge IDE, right-click the project that you want to test, then choose Tools> Jtest> Test Project from the shortcut menu. This will export the project and load the project path in Jtest’s Project Testing UI. After the export is complete, the log window will indicate that you must export the project under test’s depen-dencies before you start testing in Jtest.
2. Click Start in Jtest’s Project Testing UI to start testing.
Testing a Class that Uses a Class in Another ProjectTo test a class that uses a class in another project, you need to export the dependencies into Jtest. You can export a single class, a package, or a project.
To export a single class needed for testing:
• Right-click the class in the VisualAge IDE, then choose Tools> Jtest> Export Class from the shortcut menu.
To export a package needed for testing:
• Right-click the package in the VisualAge IDE, then choose Tools> Jtest> Export Package from the shortcut menu.
To export a project needed for testing:
• Right-click the project in the VisualAge IDE, then choose Tools> Jtest> Export Project from the shortcut menu.
When you export a class, package, or project into Jtest, it will automati-cally be added to the Jtest classpath. All classes, packages, and projects that you have tested or exported into Jtest will be placed in the following path:

Integrating VisualAge and Jtest
Testin
g
<jtest_installation_directory>/u/<your_user_name>/tmp/va/export/<path to class >
Editing Your Source CodeWhenever you choose to edit your source code from Jtest, Jtest will auto-matically open the appropriate file in the VisualAge IDE.
Important: After you modify the file in VisualAge, be sure to save it within VisualAge. When you start a test in Jtest, the package or project being tested is re-exported to capture any changes made when you edited your code within VisualAge. However, if you did not save the changes in Visu-alAge, the modified code will not be sent to Jtest.
Importing Test Classes and Stub ClassesTo access Test Classes and Stub Classes within VisualAge, you must first import them into your workspace. To do this, choose Workspace> Tools> Jtest> Import Jtest classes from the VisualAge menu bar. This will cre-ate a project titled “Jtest classes” and import Jtest classes (Jtest API) in VisualAge’s workspace.
Removing Exported FilesAfter you are done testing, if you want to remove the files that Jtest exported to your file system, choose Workspace> Tools> Jtest> Clean Export Directory from the VisualAge menu bar
Additional Notes on Jtest/VisualAge Integration
• Only files currently in the workspace can be exported.
• When Jtest is started, the project that is being tested (or the project that contains the class or package being tested) is auto-matically exported to the File System. All the classes must be in the workspace. Classes that are in the repository but not in the workspace will not be exported.
262

Integrating VisualAge and Jtest
263
Tes
tin
g
• If a class that you want to test depends on a class or package in another project, you need to perform one of the following steps to export that class, package, or project into Jtest:
• Right-click the class, then choose Tools> Jtest> Export Class.
• Right-click the package, then choose Tools> Jtest> Export Package.
• Right-click the project, then choose Tools> Jtest> Export Project.
• If you change a tested class, package, or project while Jtest is open, you don’t need to restart Jtest. When you click Jtest’s Start button, the entire project is re-exported and all of the changes in that current project will be captured.
• Jtest behaves as follows to improve testing speed:
• When you right-click a package or project then choose Tools> Jtest> Test Project/Package, Jtest asks whether you would like to re-export the project/package. If you modified your code since you chose Test Project/Package (and want to test the modified code), choose Yes. Otherwise, choose No.
• Jtest will not collect global static analysis information before you test in the Class Testing UI. This information will still be collected when you test a set of files in the Project Testing UI.

Integrating JBuilder and Jtest
Testin
g
Integrating JBuilder and JtestThis topic describes how to integrate Jtest and Borland’s JBuilder 4.0, 5.0, and 6.0, and 7.0 on Windows, as well as how to use the integrated set of tools. Subtopics include:
• Integrating the Programs
• Using Jtest with JBuilder
Integrating the ProgramsAfter you integrate Jtest and JBuilder, you will be able to test your files with Jtest from within the JBuilder IDE.
To integrate Jtest and JBuilder:
1. If you have not already done so, install both Jtest and JBuilder.
2. If you have not already done so, close JBuilder and start Jtest.
3. Choose Tools> IDE Integration> Borland JBuilder> <jbuilder_version_number> in either of Jtest’s UIs.
Jtest will then open a dialog box that displays the JBuilder installation directory it detected. If this is not the correct directory, change the direc-tory by entering the correct directory or by browsing to it.
Next, Jtest will place the correct files in the JBuilder IDE’s Tools directory, and you will be ready to use Jtest within JBuilder.
Using Jtest with JBuilderAfter you have integrated Jtest with JBuilder, you can access Jtest within the JBuilder IDE to test a class, JSP, or project.
Important: You must compile the appropriate source files in this IDE before you prompt Jtest to test a project or class from this IDE.
If you have already established shared global test parameters, you can apply them to the tests you perform from JBuilder. For details, see the
264

Integrating JBuilder and Jtest
265
Tes
tin
g
instructions on sharing global test parameters in “Using Jtest in a Group Environment” on page 94.
When you use Jtest within JBuilder, Jtest parameters and results are saved as follows by default:
• Jtest results are saved in the <jtest_install_dir>/u/<your user-name>/results directory.
• ptp files are saved as <Path_to_Project_Being_Tested>/<Name_of_Project>.ptp.
• ctp files are saved as <Path_to_Project_Being_Tested>/ctp/<path_to_package_of_class>/<name_of_class>.ctp.
• If you don't have a license for the Project Testing UI fea-ture, ctp files are saved in the same directory as the Java files.
Testing a Single Class Within a ProjectTo test a single class from the JBuilder IDE:
1. In the JBuilder IDE, ensure that the class that you want to test is active.
2. Choose Tools> Jtest> Test Active Class. This will load the active JBuilder class in Jtest’s Class Testing UI.
3. Click Start in Jtest’s Class Testing UI to start testing.
Testing a JSP Within a ProjectTo test a JSP from the JBuilder IDE:
1. In the JBuilder IDE, ensure that the JSP that you want to test is active.
2. Choose Tools> Jtest> Test Active JSP. This will load the active JBuilder JSP in Jtest’s Class Testing UI.
3. Click Start in Jtest’s Class Testing UI to start testing.
Testing a Project

Integrating JBuilder and Jtest
Testin
g
To test a project from the JBuilder IDE:
1. In the JBuilder IDE, ensure that the project that you want to test is active.
2. Choose Tools> Jtest> Test Active Project. This will load the active JBuilder project in Jtest’s Project Testing UI.
3. Click Start in Jtest’s Project Testing UI to start testing.
Editing Source Code in JBuilderIf you have integrated JBuilder into Jtest and you choose to edit your source code from Jtest, Jtest will open the source code in JBuilder. If you choose to edit the source code related to a specific error message (for example, by right-clicking a static analysis violation message with a spe-cific line reference, then choosing Edit Source), the referenced line of source code will be highlighted in JBuilder.
266

Integrating Sun One Studio/Forte/NetBeans and Jtest
267
Tes
tin
g
Integrating Sun One Studio/Forte/NetBeans and JtestThis topic describes how to integrate Jtest and Sun Microsystems Sun One Studio/Forte 3.0, 4.0, and NetBeans build on Windows, as well as how to use the integrated set of tools. Subtopics include:
• Integrating the Programs
• Using Jtest with Sun ONE Studio/Forte/NetBeans
Integrating the ProgramsAfter you integrate Jtest and Sun One Studio/Forte/NetBeans, you will be able to test your files with Jtest from within the Forte/Sun One Stu-dio/Forte/NetBeans IDE.
To integrate Jtest and Sun One Studio/Forte/NetBeans:
1. If you have not already done so, install both Jtest and Sun One Studio/Forte/NetBeans.
2. If you have not already done so, close Sun One Studio/Forte/Net-Beans and start Jtest.
3. Choose Tools> IDE Integration> Sun One Studio/Forte/Net-Beans> <your_version_number> in either of Jtest’s UIs.
Jtest will then open a dialog box that displays the Sun One Stu-dio/Forte/NetBeans installation directory it detected. If this is not the cor-rect directory, change the directory by entering the correct directory or by browsing to it.
Next, Jtest will place the correct files in the Sun One Studio/Forte/Net-Beans IDE’s Modules directory, and you will be ready to use Jtest within Sun One Studio/Forte/NetBeans.
Using Jtest with Sun ONE
Integrating Sun One Studio/Forte/NetBeans and Jtest
Testin
g
Studio/Forte/NetBeansAfter you have integrated Jtest and Sun One Studio/Forte/NetBeans, you can use Jtest within the Sun One Studio/Forte/NetBeans IDE to test a sin-gle class or project.
Important: You must compile the appropriate source files in this IDE before you prompt Jtest to test a project or class from this IDE.
If you have already established shared global test parameters, you can apply them to the tests you perform from Sun One Studio/Forte/Net-Beans. For details, see the instructions on sharing global test parameters in “Using Jtest in a Group Environment” on page 94.
When you use Jtest within Sun One Studio/Forte/NetBeans, Jtest param-eters and results are saved as follows by default:
• Jtest results are saved in the <jtest_install_dir>/u/<your user-name>/results directory.
• ptp files are saved as <Path_to_Project_Being_Tested>/<Name_of_Project>.ptp.
• ctp files are saved as <Path_to_Project_Being_Tested>/ctp/<path_to_package_of_class>/<name_of_class>.ctp.
• If you don't have a license for the Project Testing UI fea-ture, ctp files are saved in the same directory as the Java files.
Testing a Single ClassTo test a single class from the Sun One Studio/Forte/NetBeans IDE:
1. Select the class that you want to test in the Sun One Stu-dio/Forte/NetBeans IDE’s Explorer window.
2. Perform one of the following actions to load the selected class into Jtest’s Class Testing UI:
• Right-click the project in the Explorer, then select Tools> Jtest> Test Class from the shortcut menu.
268

Integrating Sun One Studio/Forte/NetBeans and Jtest
269
Tes
tin
g
• Choose Jtest> Test Class from the Tools menu.
3. Click Start in Jtest’s Class Testing UI to start testing.
Testing a ProjectTo test a project from the Sun One Studio/Forte/NetBeans IDE:
1. Select the project that you want to test in the Sun One Stu-dio/Forte/NetBeans IDE’s Explorer window.
2. Perform one of the following actions to load the selected project into Jtest’s Project Testing UI:
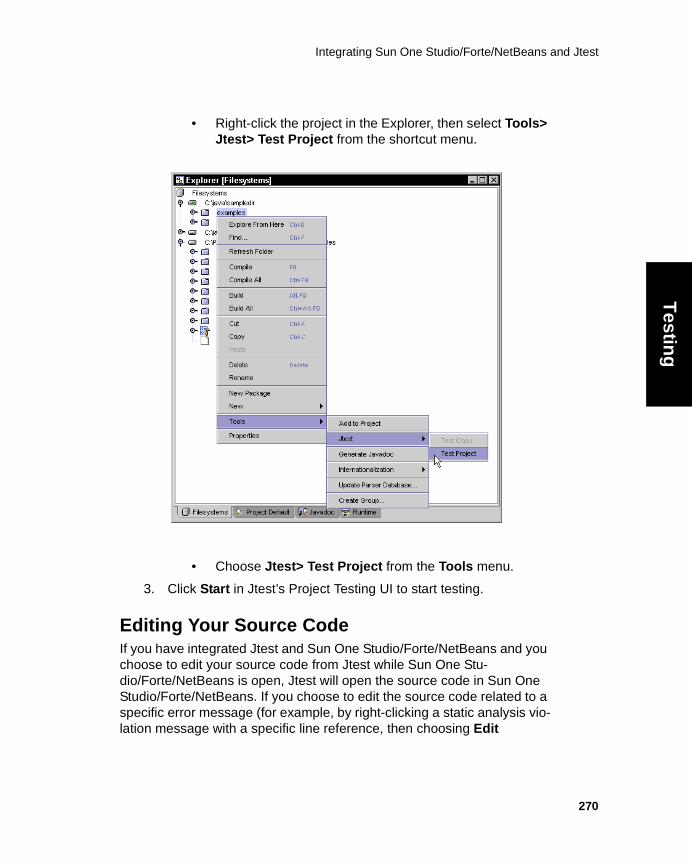
Integrating Sun One Studio/Forte/NetBeans and Jtest
Testin
g
• Right-click the project in the Explorer, then select Tools> Jtest> Test Project from the shortcut menu.
• Choose Jtest> Test Project from the Tools menu.
3. Click Start in Jtest’s Project Testing UI to start testing.
Editing Your Source CodeIf you have integrated Jtest and Sun One Studio/Forte/NetBeans and you choose to edit your source code from Jtest while Sun One Stu-dio/Forte/NetBeans is open, Jtest will open the source code in Sun One Studio/Forte/NetBeans. If you choose to edit the source code related to a specific error message (for example, by right-clicking a static analysis vio-lation message with a specific line reference, then choosing Edit
270

Integrating Sun One Studio/Forte/NetBeans and Jtest
271
Tes
tin
g
Source), the referenced line of source code will be highlighted in Sun One Studio/Forte/NetBeans.

Integrating WebSphere Studio Application Developer/Eclipse and Jtest
Testin
g
Integrating WebSphere Studio Application Developer/Eclipse and JtestThis topic describes how to integrate Jtest and IBM WebSphere Studio Application Developer (WSAD) Eclipse build, Version 4.02, 4.03, 5.0, and IE Version 4.1 on Windows, as well as how to use the integrated set of tools. Subtopics include:
• Integrating the Programs
• Using Jtest with WSAD
• Obtaining a “Using Jtest and WSAD/Eclipse” White Paper
Integrating the ProgramsAfter you integrate Jtest and WSAD, you will be able to test your files with Jtest from within the WSAD IDE.
To integrate Jtest and WSAD:
1. If you have not already done so, install both Jtest and WSAD.
2. If you have not already done so, close WSAD and start Jtest.
3. Choose Tools> IDE Integration> IBM WebSphere Studio Application Developer/Eclipse> <wsad/eclipse_ version_number> in either of Jtest’s UIs.
Jtest will then open a dialog box that displays the WSAD installation direc-tory it detected. If this is not the correct directory, change the directory by entering the correct directory or by browsing to it.
Next, Jtest will place the correct files in the WSAD IDE’s plugin directory, and you will be ready to use Jtest with WSAD.
Using Jtest with WSAD
272

Integrating WebSphere Studio Application Developer/Eclipse and Jtest
273
Tes
tin
g
After you have integrated Jtest and WSAD, you can access Jtest within the WSAD IDE to test a single class or project from the Java perspective.
Jtest installs the features of Test Class, Test Package and Test Project into the WSAD IDE. They are displayed in the Java perspective under a Jtest menu, Jtest tool bar, and shortcut menus. The Jtest menu and Jtest tool bar are Action Sets that you can enable or disable. By default, they are displayed. To enable or disable one of these items, go to the Per-spective menu in the Java perspective, choose Customize> Other, then check or clear the appropriate options.
Important: Before you use the Jtest-WSAD integration for the first time, you must open a new Java Perspective; this will enable the Jtest menu and Jtest tool bar Action Sets in the perspective. In addition, any time you want to use Jtest from WSAD, you must:
• Be in WSAD’s Java perspective.
• Have already compiled the source files in this IDE.
If you have already established shared global test parameters, you can apply them to the tests you perform from WSAD. For details, see the instructions on sharing global test parameters in “Using Jtest in a Group Environment” on page 94.
When you use Jtest within WSAD, Jtest parameters and results are saved as follows by default:
• Jtest results are saved in the <jtest_install_dir>/u/<your user-name>/results directory.
• ptp files are saved as <Path_to_Project_Being_Tested>/<Name_of_Project>.ptp.
• ctp files are saved as <Path_to_Project_Being_Tested>/ctp/<path_to_package_of_class>/<name_of_class>.ctp.
• If you don't have a license for the Project Testing UI fea-ture, ctp files are saved in the same directory as the Java files.
Testing a Single ClassTo test a single class from the WSAD IDE:

Integrating WebSphere Studio Application Developer/Eclipse and Jtest
Testin
g
1. If you have not already done so, compile the source file that you want to test with Jtest.
2. Select the class that you want to test in the WSAD IDE’s Java Perspective’s Packages View.
3. Perform one of the following actions to load the selected package into Jtest’s Class Testing UI:
• Right-click the package in the WSAD IDE’s Java Per-spective’s Packages View, then choose Test Class from the shortcut menu.
• Choose Jtest> Test Class from the Jtest menu or tool bar.
4. Click Start in Jtest’s Class Testing UI to start testing.
Testing a PackageTo test a package from the WSAD IDE:
1. If you have not already done so, compile the source files that you want to test with Jtest.
2. Select the package that you want to test in the WSAD IDE’s Java Perspective’s Packages View.
3. Perform one of the following actions to load the selected package into Jtest’s Project Testing UI:
• Right-click the package in the WSAD IDE’s Java Per-spective’s Packages View, then choose Test Package from the shortcut menu.
• Choose Jtest> Test Package from the Jtest menu or tool bar.
4. Click Start in Jtest’s Project Testing UI to start testing.
Testing a ProjectTo test a project from the WSAD IDE:
1. If you have not already done so, compile the source files that you want to test with Jtest.
274

Integrating WebSphere Studio Application Developer/Eclipse and Jtest
275
Tes
tin
g
2. Select the project that you want to test in the WSAD IDE’s Java Perspective’s Packages View.
3. Perform one of the following actions to load the selected project into Jtest’s Project Testing UI:
• Right-click the project in the WSAD IDE’s Java Perspec-tive’s Packages View, then choose Test Project from the shortcut menu.
• Choose Jtest> Test Project from the Jtest menu or tool bar.
4. Click Start in Jtest’s Project Testing UI to start testing.
Editing Your Source CodeIf you have integrated Jtest and WSAD and you choose to edit your source code from Jtest while WSAD is open, Jtest will open the source code in WSAD. If you choose to edit the source code related to a specific error message (for example, by right-clicking a static analysis violation message with a specific line reference, then choosing Edit Source), the referenced line of source code will be highlighted in WSAD.
Obtaining a “Using Jtest and WSAD/Eclipse” White PaperTo obtain a white paper that explains and demonstrates how to use Jtest with WSAD/Eclipse, visit http://www.parasoft.com/jsp/prod-ucts/tech_papers.jsp?product=Jtest

Integrating WebSphere Studio Application Developer/Eclipse and Jtest
Testin
g
276

Integrating Together and Jtest
277
Tes
tin
g
Integrating Together and JtestThis topic describes how to integrate Jtest and TogetherSoft Together Control Center 5.5 on Windows, as well as how to use the integrated set of tools. Subtopics include:
• Integrating the Programs
• Using Jtest with Together
Integrating the ProgramsAfter you integrate Jtest and Together, you will be able to test your files with Jtest from within the Together IDE.
To integrate Jtest and Together:
1. If you have not already done so, install both Jtest and Together.
2. If you have not already done so, close Together and start Jtest.
3. Choose Tools> IDE Integration> Together Control Center> Version 5.5 in either of Jtest’s UIs.
Jtest will then open a dialog box that displays the Together installation directory it detected. If this is not the correct directory, change the direc-tory by entering the correct directory or by browsing to it.
Next, Jtest will place the correct files in the Together IDE’s Modules direc-tory, and you will be ready to use Jtest with Together.
Using Jtest with TogetherAfter you have integrated Jtest with Together, you can access Jtest within the Together IDE to test a single class, a package, or a project.
Important: You must compile the appropriate source files in this IDE before you prompt Jtest to test a project, package, or class from this IDE.
If you have already established shared global test parameters, you can apply them to the tests you perform from Together. For details, see the

Integrating Together and Jtest
Testin
g
instructions on sharing global test parameters in “Using Jtest in a Group Environment” on page 94.
When you use Jtest within Together, Jtest parameters and results are saved as follows by default:
• Jtest results are saved in the <jtest_install_dir>/u/<your user-name>/results directory.
• ptp files are saved as <Path_to_Project_Being_Tested>/<Name_of_Project>.ptp.
• ctp files are saved as <Path_to_Project_Being_Tested>/ctp/<path_to_package_of_class>/<name_of_class>.ctp.
• If you don't have a license for the Project Testing UI fea-ture, ctp files are saved in the same directory as the Java files.
Testing a Single ClassTo test a single class from the Together IDE:
1. Select the Class Element under the Model View of the Project.
2. Right click on the Class Name in that view, then choose Tools> Jtest> Test Class from the shortcut menu. The class will be loaded into Jtest's Class Testing UI.
3. Click Start in Jtest’s Class Testing UI to start testing.
Testing a PackageTo test a package from the Together IDE:
1. Select the Package Element under the Model View of the Project.
2. Right click on the Package Name in that view, then choose Tools> Jtest> Test Package from the shortcut menu. The pack-age will be loaded into Jtest's Project Testing UI.
3. Click Start in Jtest’s Project Testing UI to start testing.
278

Integrating Together and Jtest
279
Tes
tin
g
Testing a ProjectTo test a project from the Together IDE:
1. Select any element in the Project, under the Model View of the Project.
2. Right click the Element's name in that view, then choose Tools> Jtest> Test Project from the shortcut menu. The project will be loaded into Jtest's Project Testing UI.
3. Click Start in Jtest’s Project Testing UI to start testing.
Editing Your Source CodeIf you have integrated Jtest and Together and you choose to edit your source code from Jtest while Together is open, Jtest will open the source code in Together. If you choose to edit the source code related to a spe-cific error message (for example, by right-clicking a static analysis viola-tion message with a specific line reference, then choosing Edit Source), the referenced line of source code will be highlighted in Together.

Jtest UI Overview
280
Jtest UI
Jtest UI HelpJtest UI OverviewJtest has two available UIs:
• Class Testing UI: Area to test a single class/JSP or view results of a single class tested as part of a project test.
• Project Testing UI: Area to test a set of classes/JSPs (from a directory, zip file, or jar file). When this UI is open, it takes control of the Class Testing UI.
By default, Jtest opens the Class Testing UI the first time that you start Jtest. On subsequent launches, Jtest opens the last UI that you were working with the last time that you used Jtest.
To determine which UI appears when Jtest is started, choose Prefer-ences> UI Preferences> Starting UI <Desired UI>. To configure Jtest to automatically open whichever UI you were working with the last time that you closed Jtest, choose Last UI Visible instead of <Desired UI>.
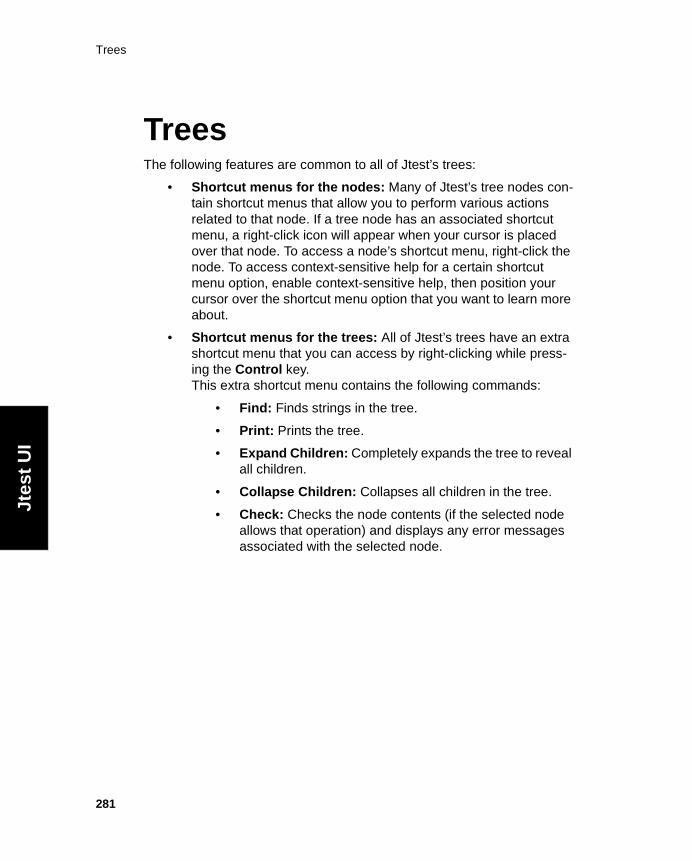
Trees
281
Jtes
t U
I
TreesThe following features are common to all of Jtest’s trees:
• Shortcut menus for the nodes: Many of Jtest’s tree nodes con-tain shortcut menus that allow you to perform various actions related to that node. If a tree node has an associated shortcut menu, a right-click icon will appear when your cursor is placed over that node. To access a node’s shortcut menu, right-click the node. To access context-sensitive help for a certain shortcut menu option, enable context-sensitive help, then position your cursor over the shortcut menu option that you want to learn more about.
• Shortcut menus for the trees: All of Jtest’s trees have an extra shortcut menu that you can access by right-clicking while press-ing the Control key.This extra shortcut menu contains the following commands:
• Find: Finds strings in the tree.
• Print: Prints the tree.
• Expand Children: Completely expands the tree to reveal all children.
• Collapse Children: Collapses all children in the tree.
• Check: Checks the node contents (if the selected node allows that operation) and displays any error messages associated with the selected node.

Cursors
282
Jtest UI
CursorsJtest uses two special cursors to alert you to “hidden” options and/or infor-mation:
• The help cursor:
After context-sensitive help has been enabled, this cursor indi-cates that there is a context-sensitive help topic available for the item that the cursor is positioned over.
• The right-click cursor:
This cursor indicates that a shortcut menu is associated with the item that the cursor is positioned over. The shortcut menu can be accessed by right-clicking the item.

Built-In Editor
283
Jtes
t U
I
Built-In EditorJtest built-in editor is a language-sensitive editor with basic editor func-tionality, as well as the capability to compile your code and check files in and out of the source code repository (if you have integrated CVS into Jtest as described in “Integrating CVS Source Control at the Local and Group Level” on page 101).
When a class is open in the Class Testing UI, you can open it in the editor by clicking the Source button.
When Jtest reports an error/violation message for a class, you can open the related source file in the editor by right-clicking the file/line information for the violation message in the Errors Found panel (in Class Testing UI) or in the Errors Found branch of the lower Results panel (in Project Test-ing UI), then choosing Edit Source from the shortcut menu.
For more information on using this or another preferred editor within Jtest, see “Viewing, Editing, or Compiling a Source” on page 124.

Class Testing UI
284
Jtest UI
Class Testing UIClass Testing UIThe Class Testing UI allows you to perform and configure tests of single classes or JSPs, as well as focus on the results of a class tested as part of a project test. This UI consists of the following components:
• Class Testing UI Menu Bar
• Class Testing UI Tool Bar
• Class Testing UI Class Name Panel
• Class Testing UI Test Progress Panel
• Class Testing UI Errors Found Panel
For information on testing a class in the Class Testing UI, see “Testing a Single Class or JSP” on page 21.

Class Testing UI Menu Bar
285
Jtes
t U
I
Class Testing UI Menu Bar
File Commands in this menu control basic test functionality.
• New: Starts a new session by clearing any existing setup values or settings.
• Open: Opens an existing test specification saved as a .ctp file.
• Open Recent: Opens parameters of a recent test. Contains a list of the most recently opened classes; choose a file name from this list to open the associated parameters file. The Clear List com-mand clears all items from this list.
• Save: Saves the current class test parameters in the test param-eters file shown in the status bar.
• Save As: Saves the current class test parameters in the test parameters file that you specify.
• Close UI: Closes the Class Testing UI. If the Project Testing UI is not open, choosing this command will also close Jtest.
• Exit: Closes Jtest.
TestCommands in this menu start and stop tests.
• Start: Starts testing the class whose name appears in the Class Name field.
• Stop: Stops the current test.
ViewCommands in this menu display information related to the current test.
• Report: Contains the following report-related commands:

Class Testing UI Menu Bar
Jtest UI
• View Report: Displays the Single Class Report of the current test.
• Print ASCII Report: Sends the Single Class Report directly to the printer.
• Test Cases: Opens the View Test Cases window (displays test cases that Jtest used for Dynamic Analysis).
• Metrics: Displays class metrics.
• Class Test Parameters: Lets you view and edit the Class Test Parameters (parameters used for the current class test).
• Global Test Parameters: Lets you view and edit the Global Test Parameters (parameters used for all Jtest tests).
• Source: Contains the following commands that let you view, find, and compile source files:
• Edit Class Source: Opens the current class’s source file in the integrated editor.
• Locate .java file: Displays the path to the .java file cur-rently under test.
• Locate .class file: Displays the path to the .class file cur-rently under test.
• Compile Class: Compiles the source of the current class.
Preferences Commands in the menu let you customize Jtest system settings.
• Configuration Options: Contains the following non-UI-related configuration options:
• Editor: Opens a dialog box that lets you determine what editor is invoked when you view report files and edit your source. If the editor command includes white space, enclose the command in quotation marks. To represent the file parameter and the line number parameter, use
286
Class Testing UI Menu Bar
287
Jtes
t U
I
the special tokens $FILE and $LINE in the lower text field.
• Report Format: Contains options that determine whether Jtest’s reports are in HTML or ASCII (text) for-mat.
• Report File: Contains the following options that custom-ize report file characteristics:
• Show All Classes Accessed: This former option used to determine whether or not Jtest’s single class reports annotate all sources for each class accessed during testing. It has been replaced by the Coverage Filter functionality dis-cussed in “Customizing Coverage Reports” on page 122.
• Show Test Cases: Determines whether or not Jtest includes test case information in single class reports.
• UI Preferences: Contains the following UI-related configuration options:
• Starting UI: Determines whether the Class Testing UI or the Project Testing UI opens by default when Jtest is started. Choose Last UI Visible to have Jtest open the UI that was active the last time that you closed Jtest.
• Look and Feel: Changes the look and feel of Jtest's UIs.
• Title Bar Background Color: Determines the title bar's background color.
• Notion of Working: Determines how the notion of work-ing is represented.
• Context Help Font: Determines the size and type of the font used to display context-sensitive help text.
Tools Commands in this menu access Jtest's tools.

Class Testing UI Menu Bar
Jtest UI
• Find Classes: Starts the Find Classes UI that finds classes which can be tested by Jtest.
• IDE Integration: (Windows Only) Enables you to integrate Jtest into third-party IDEs. Contains the following options:
• IBM VisualAge: Integrates Jtest with IBM VisualAge. For more information on how Jtest works with VisualAge, see “Integrating VisualAge and Jtest” on page 259.
• Borland JBuilder: Integrates Jtest with JBuilder. For more information on how Jtest works with JBuilder, see “Integrating JBuilder and Jtest” on page 264.
• Sun ONE Studio/Forte/NetBeans: Integrates Jtest with Sun ONE Studio/Forte/NetBeans. For more information on how Jtest works with Sun One Studio/Forte/NetBeans, see “Integrating Sun One Studio/Forte/NetBeans and Jtest” on page 267.
• IBM WebSphere Studio Application Devel-oper/Eclipse: Integrates Jtest with IBM WebSphere Stu-dio Application Developer/Eclipse. For more information on how Jtest works with WSAD/Eclipse, see “Integrating WebSphere Studio Application Developer/Eclipse and Jtest” on page 272.
• Together: Integrates Jtest with TogetherSoft Together Control Center. For more information on how Jtest works with Together, see “Integrating Together and Jtest” on page 277.
• Check Class Dependencies: Checks whether Jtest can locate all necessary files. If Jtest cannot locate a necessary file, it opens a dialog box that allows you to modify your classpath to point to the necessary file.
WindowThe command in this menu allows you to open the Project Testing UI.
• Project Testing UI: Opens the Project Testing UI (used to test a set of classes or JSPs).
288

Class Testing UI Menu Bar
289
Jtes
t U
I
Help Commands in this menu help you access additional information about Jtest.
• Contents: Opens the Jtest User's Guide.
• Activate ContextHelp: Activates context-sensitive help. After activating the help, move your cursor over the area on the UI that you would like to learn more about. A help window will open if that area has context-sensitive help. When you want to deactivate this help, choose Help> Activate ContextHelp.
• Jtest API: Opens the Jtest API documentation.
• License: Lets you enter or view your Jtest license.
• Support: Allows you to choose from the following support options:
• Support Website: Opens the Jtest support Web site.
• Live Help: Opens a Web page from which you can receive live online help.
• Pack Support Files: Automatically creates a zip file which can be sent to Jtest’s Quality Consultants to help them answer your questions.
• Environment: Contains the following commands that provide more information about the environment in which Jtest is running:
• Show CLASSPATH: Displays the CLASSPATH that Jtest uses when it tests a class.
• Show User: Display the name of the current Jtest user.
• Show OS: Displays the operating sys-tem that Jtest is currently running on.
• Show JTEST_USER_DIR: Displays the users directory that Jtest is using. (For

Class Testing UI Menu Bar
Jtest UI
example, C:\users\username\users or /users/username/users).
• Show Installation: Displays the Jtest installation directory.
• FAQ: Opens the Jtest FAQ page.
• Tutorial: Opens the Jtest tutorial page.
• Jcontract: Displays information about the Jcontract Design by Contract tool.
• About: Displays the Jtest version number and logo.
290

Class Testing UI Tool Bar
291
Jtes
t U
I
ny
d to
Class Testing UI Tool BarThe following commands are available in the Jtest Class Testing UI tool bar.
Note: Buttons with a small downward arrow in their top right-corner have additional commands available in a shortcut menu. To access the shortcut menu containing additional commands, right-click the button.
Button Name Action
New Session Starts a new session by clearing aexisting setup values or settings.
Project Testing UI Opens the Project Testing UI (usetest a set of classes).

Class Testing UI Tool Bar
Jtest UI
e
the
e
n-
run-
Start All Tests Starts testing the class/JSP whosname appears in the Class Namefield.
Right-clicking this button displaysfollowing commands in a shortcutmenu:
• All Tests: Starts testing thclass/JSP.
• Static Analysis: Starts runing the selected type of Static Analysis tests.
• Dynamic Testing: Starts ning the selected type of Dynamic Analysis tests.
Stop Stops testing the class/JSP whosename appears in the Class Namefield.
292

Class Testing UI Tool Bar
293
Jtes
t U
I
for
the
e
-e
L
s
w for
View Report Displays the Single Class Report the current test.
Right-clicking this button displaysfollowing commands in a shortcutmenu:
• View Report: Displays thSingle Class Report of thecurrent test.
• Generate Customized Report: Creates a customized report by applying thXSL file you specify to anXML report file.
• Create XML File: Saves class test results as an XMfile.
• Print ASCII Report: Sendthe report directly to the printer.
View Results Displays results from the last test saved for the current .ctp file.
View Test Cases Opens the View Test Cases windo(displays test cases that Jtest usedDynamic Analysis).

Class Testing UI Tool Bar
Jtest UI
est the
Test all
View Class Metrics Displays class metrics.
Class Test Parameters
Lets you view and edit the Class TParameters (parameters used forcurrent class test).
Global Test Parameters
Lets you view and edit the Global Parameters (parameters used for Jtest tests).
294

Class Testing UI Tool Bar
295
Jtes
t U
I
the
- sis
s: ing
is-h
ets mat s ilt-in
les: e h its
ens ture wn ing
Rules Displays global test parameters nodes representing Jtest’s built-instatic analysis rules.
Right-clicking this button displaysfollowing commands in a shortcutmenu:
• Show Built-in Rules: Displays nodes representingJtest’s built-in static analyrules.
• Show User-Defined RuleDisplays nodes representthe rules you created withRuleWizard.
• Show Rules Directory: Dplays the directory in whicJtest expects user-definedrules to be saved.
• View Rule Descriptions:Displays an index which lyou access the HTML-fordescription of all availablerules. You can also accesrule descriptions from “BuStatic Analysis Rules” on page 407.
• Reload User-Defined RuPrompts Jtest to check thRules directory and refreslist of user-defined rules.
• Launch RuleWizard: OpRuleWizard, the Jtest feathat lets you create your orules and customize existrules.
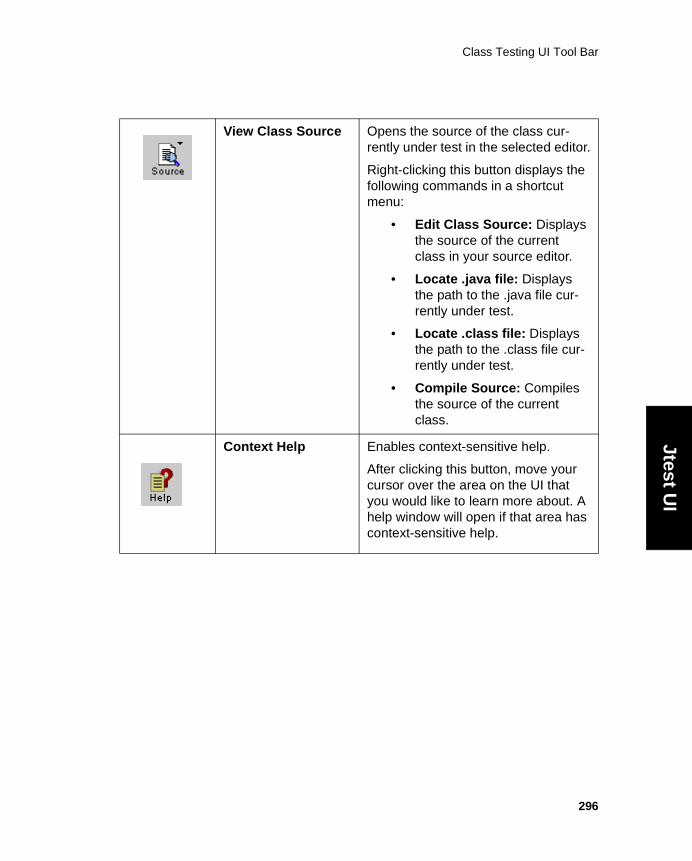
Class Testing UI Tool Bar
Jtest UI
-itor.
the
lays
r.
s ur-
ys ur-
es
ur t t. A has
View Class Source Opens the source of the class currently under test in the selected ed
Right-clicking this button displaysfollowing commands in a shortcutmenu:
• Edit Class Source: Dispthe source of the current class in your source edito
• Locate .java file: Displaythe path to the .java file crently under test.
• Locate .class file: Displathe path to the .class file crently under test.
• Compile Source: Compilthe source of the current class.
Context Help Enables context-sensitive help.
After clicking this button, move yocursor over the area on the UI thayou would like to learn more abouhelp window will open if that area context-sensitive help.
296
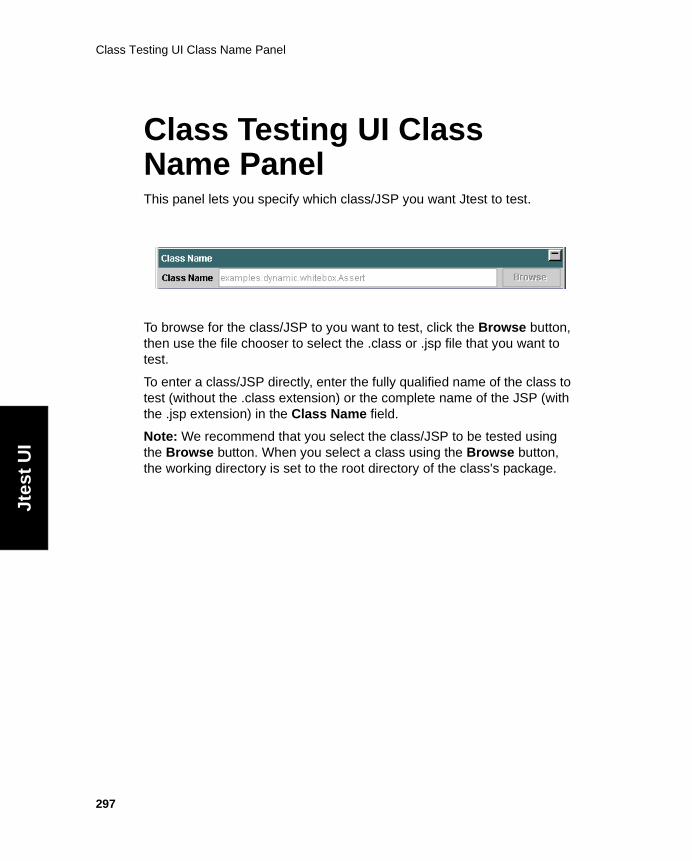
Class Testing UI Class Name Panel
297
Jtes
t U
I
Class Testing UI Class Name PanelThis panel lets you specify which class/JSP you want Jtest to test.
To browse for the class/JSP to you want to test, click the Browse button, then use the file chooser to select the .class or .jsp file that you want to test.
To enter a class/JSP directly, enter the fully qualified name of the class to test (without the .class extension) or the complete name of the JSP (with the .jsp extension) in the Class Name field.
Note: We recommend that you select the class/JSP to be tested using the Browse button. When you select a class using the Browse button, the working directory is set to the root directory of the class's package.

Class Testing UI Test Progress Panel
298
Jtest UI
Class Testing UI Test Progress PanelThis panel displays test progress and coverage information.
For details about this panel’s branches and available options, see “Explor-ing Class Test Results” on page 35.
Note: The Test Progress panel is minimized by default. To view the infor-mation that it contains, you need to maximize it by clicking the Maximize button.

Class Testing UI Errors Found Panel
299
Jtes
t U
I
Class Testing UI Errors Found PanelThis panel displays information about the errors that Jtest found and lets you perform numerous actions that help you understand and customize test results.
To learn more about this panel's branches and available options, see “Exploring Class Test Results” on page 35.
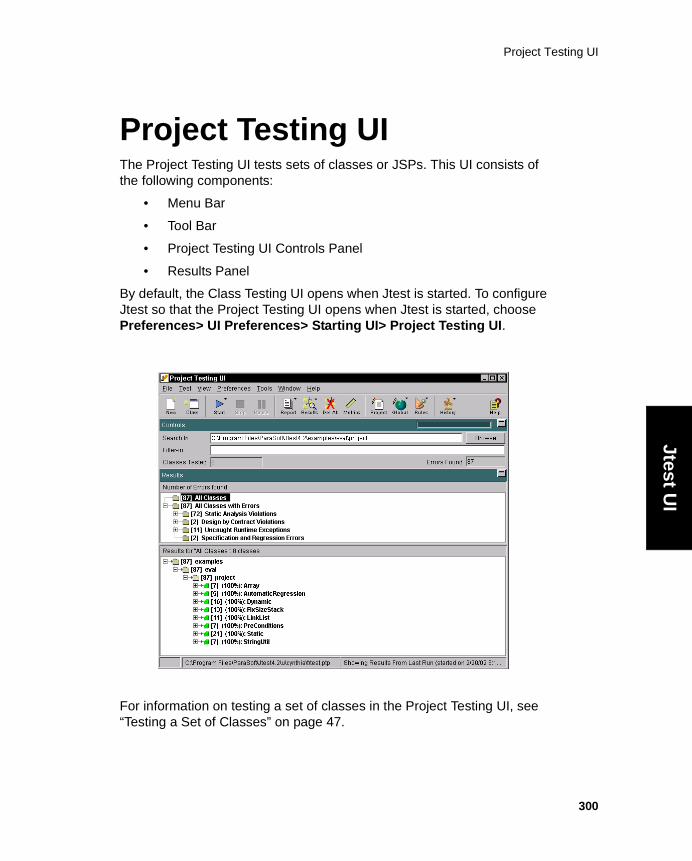
Project Testing UI
300
Jtest UI
Project Testing UIProject Testing UIThe Project Testing UI tests sets of classes or JSPs. This UI consists of the following components:
• Menu Bar
• Tool Bar
• Project Testing UI Controls Panel
• Results Panel
By default, the Class Testing UI opens when Jtest is started. To configure Jtest so that the Project Testing UI opens when Jtest is started, choose Preferences> UI Preferences> Starting UI> Project Testing UI.
For information on testing a set of classes in the Project Testing UI, see “Testing a Set of Classes” on page 47.
Project Testing UI Menu Bar
301
Jtes
t U
I
Project Testing UI Menu Bar
File Commands in this menu control basic test functionality.
• New: Starts a new session by clearing any existing setup values or settings.
• Open: Opens an existing test specification saved as a .ptp file.
• Open Recent: Opens parameters of a recent test. Contains a list of the most recently opened projects; choose a file name from the list to open the associated parameters file. The Clear List com-mand clears all items from this list.
• Save: Saves the current project test parameters in the test parameters file shown in the status bar.
• Save As: Saves the current project test parameters in the test parameters file that you specify.
• Close UI: Closes the Project Testing UI. If the Class Testing UI is not open, choosing this command will also close Jtest.
• Exit: Closes Jtest.
TestCommands in this menu start, stop, and pause tests.
• Start: Starts testing the project specified in the Search In field.
• Stop: Stops the current test.
• Pause: Temporarily stops the current test. Click this button again to resume testing. Note: Jtest will finish testing the current class before pausing.

Project Testing UI Menu Bar
Jtest UI
ViewCommands in this menu display information related to the current test.
• Report: Contains the following report-related commands:
• View Report: Displays the Project Report (contains project test parameters and details on all errors available in the Results panel).
• View Detail Report: Displays the Detailed Project Report (contains project test parameters, class test parameters, and all information available in the Results panel).
• View Summary Report: Displays the Summary Project Report (contains one line for each error available in the Results panel).
• Results: Contains the following results commands:
• Load All Results: Displays all results for the current project test file.
• Load Results From Last Run: Displays only the test results from the most recent test run.
• Delete All: Removes all the results in the lower Results window.
• Metrics: Displays project and average class metrics.
• Project Test Parameters: Lets you view and edit the current Project Test Parameters (parameters used for the current project test).
• Global Test Parameters: Lets you view and edit the Global Test Parameters (parameters used for all Jtest tests).
• History: Displays a record of all the runs for this Project test.
Preferences Commands in the menu let you customize Jtest system settings.
• Configuration Options: Contains the following non-UI-related configuration options:
302

Project Testing UI Menu Bar
303
Jtes
t U
I
• Editor: Opens a dialog box that lets you determine what editor is invoked when you view report files and edit your source. If the editor command includes white space, enclose the command in quotation marks. To represent the file parameter and the line number parameter, use the special tokens $FILE and $LINE in the lower text field. See “Viewing, Editing, or Compiling a Source” on page 124 for more details.
• Report Format: Contains options which let you deter-mine whether Jtest’s reports are in HTML or ASCII (text) format.
• Report File: Contains the following options that custom-ize report file characteristics:
• Show All Classes Accessed: This former option used to determine whether or not Jtest’s single class reports annotate all sources for each class accessed during testing. It has been replaced by the Coverage Filter functionality dis-cussed in “Customizing Coverage Reports” on page 122.
• Show Test Cases: Determines whether or not Jtest includes test case information in single class reports.
• Default Results Loading: Determines what results are loaded when a .ptp file is opened. Contains the following options:
• Last: Only results from the most recent test will be loaded when a .ptp file is opened.
• All: All previous results (including results from the most recent test run) will be loaded when a .ptp file is opened.
• None: Prevents any results from being loaded when a .ptp file is opened.
• UI Preferences: Contains the following UI-related configuration options:

Project Testing UI Menu Bar
Jtest UI
• Starting UI: Determines whether the Class Testing UI or the Project Testing UI opens by default when Jtest is started. Choose Last UI Visible to have Jtest open the UI that was active the last time that you closed Jtest.
• Look and Feel: Changes the look and feel of Jtest's UIs.
• Title Bar Background Color: Determines the title bar's background color.
• Notion of Working: Determines how the notion of work-ing is represented.
• Context Help Font: Determines the size and type of the font used to display context-sensitive help text.
ToolsCommands in this menu access Jtest's tools.
• IDE Integration: (Windows Only) Enables you to integrate Jtest into third-party IDEs. Contains the following options:
• IBM VisualAge: Integrates Jtest with IBM VisualAge. For more information on how Jtest works with VisualAge, see “Integrating VisualAge and Jtest” on page 259.
• Borland JBuilder: Integrates Jtest with JBuilder. For more information on how Jtest works with JBuilder, see “Integrating JBuilder and Jtest” on page 264.
• Sun ONE Studio/Forte/NetBeans: Integrates Jtest with Sun ONE Studio/Forte/NetBeans. For more information on how Jtest works with Sun One Studio/Forte/NetBeans, see “Integrating Sun One Studio/Forte/NetBeans and Jtest” on page 267.
• IBM WebSphere Studio Application Devel-oper/Eclipse: Integrates Jtest with IBM WebSphere Stu-dio Application Developer/Eclipse. For more information on how Jtest works with WSAD/Eclipse, see “Integrating WebSphere Studio Application Developer/Eclipse and Jtest” on page 272.
304

Project Testing UI Menu Bar
305
Jtes
t U
I
• Together: Integrates Jtest with TogetherSoft Together Control Center. For more information on how Jtest works with Together, see “Integrating Together and Jtest” on page 277.
• Check Project Dependencies: Checks whether Jtest can locate all necessary files. If Jtest cannot locate a necessary file, it opens a dialog box that allows you to modify your classpath to point to the necessary file.
WindowThe command in this menu allows you to open the Class Testing UI.
• Class Testing UI: Opens the Class Testing UI (used to test a sin-gle class or view results for a single class).
HelpCommands in this menu help you access additional information about Jtest.
• Contents: Opens the Jtest User's Guide.
• Activate Context Help: Activates context-sensitive help. After activating the help, move your cursor over the area on the UI that you would like to learn more about. A help window will open if that area has context-sensitive help. When you want to deactivate this help, choose Help> Activate ContextHelp.
• Jtest API: Opens the Jtest API documentation.
• License: Lets you enter or view your Jtest license.
• Support: Allows you to choose from the following support options:
• Support Website: Opens the Jtest support Web site.
• Live Help: Opens a Web page from which you can receive live online help.

Project Testing UI Menu Bar
Jtest UI
• Pack Support Files: Automatically creates a zip file which can be sent to Jtest’s Quality Consultants to help them answer your questions.
• Environment: Contains the following commands that provide more information about the environment in which Jtest is running:
• Show CLASSPATH: Displays the CLASSPATH that Jtest uses when it tests a class.
• Show User: Display the name of the current Jtest user.
• Show OS: Displays the operating sys-tem that Jtest is currently running on.
• Show JTEST_USER_DIR: Displays the users directory that Jtest is using. (For example, C:\users\username\users or /users/username/users).
• Show Installation: Displays the Jtest installation directory.
• FAQ: Opens the Jtest FAQ page.
• Tutorial: Opens the Jtest tutorial page.
• Jcontract: Displays information about the Jcontract Design by Contract tool.
• About: Displays the Jtest version number and logo.
306

Project Testing UI Tool Bar
307
Jtes
t U
I
ny
to ults
Project Testing UI Tool BarThe following commands are available in the Project UI tool bar.
Note: Buttons with a small downward arrow in their top right-corner have additional commands available in a shortcut menu. To access the shortcut menu containing additional commands, right-click the button.
Button Name Action
New Session Starts a new session by clearing aexisting setup values or settings.
Class Testing UI Opens the Class Testing UI (usedtest a single class/JSP or view resfor a single class/JSP).

Project Testing UI Tool Bar
Jtest UI
in
the
ing .
d-ns
n
ly
ing
ur-
Start Starts finding and testing classes/JSPs in the area specifiedthe Search In parameter.
Right-clicking this button displaysfollowing commands in a shortcutmenu:
• Start All Tests: Starts findand testing classes/JSPs
• Static Analysis: Starts fining classes/JSPs, then ruthe selected type of StaticAnalysis tests.
• Dynamic Testing: Starts finding classes/JSPs, theruns the selected type of Dynamic Analysis tests.
Note: Jtest will not test a previoustested class unless that class wasmodified since the last test.
Stop Stops finding and testing classes.
Pause Temporarily stops finding and testclasses. Click this button again toresume testing.
Note: Jtest will finish testing the crent class before pausing.
308

Project Testing UI Tool Bar
309
Jtes
t U
I
ject
yed is
-lts u
ee
the
iled ct
e his for
Dis-ct
-e
ML
View Report Displays a report of the current protest. The report contains only the classes and errors that are displain the Results panel at the time thbutton is clicked.
To limit the classes and errors contained in your report, remove resuyou are not interested in before yoclick the Report button.
For more information on reports s“Viewing a Report of Results” on page 127.
Right-clicking this button displaysfollowing commands in a shortcutmenu:
• View Report: For HTML reports, displays the DetaProject Report. For ASCIIreports, displays the ProjeReport.
• View Detail Report: For ASCII reports, displays thDetailed Project Report. Tcommand is not availableHTML-format reports.
• View Summary Report: plays the Summary ProjeReport.
• Generate Customized Report: Creates a customized report by applying thXSL file you specify to anXML report file.
• Create XML File: Saves project test results as an Xfile.

Project Testing UI Tool Bar
Jtest UI
this
s
s
wer
s
ers
View All Results Displays all results. Right-clickingbutton displays the following com-mands in a shortcut menu:
• View All Results: Displayall results.
• View Results From LastRun: Displays only resultfrom the last run.
Delete All Removes all of the results in the loResults window.
Metrics Displays project and average clasmetrics.
Project Test Parameters
Lets you view and edit the currentProject Test Parameters (parametused for the current project test).
310
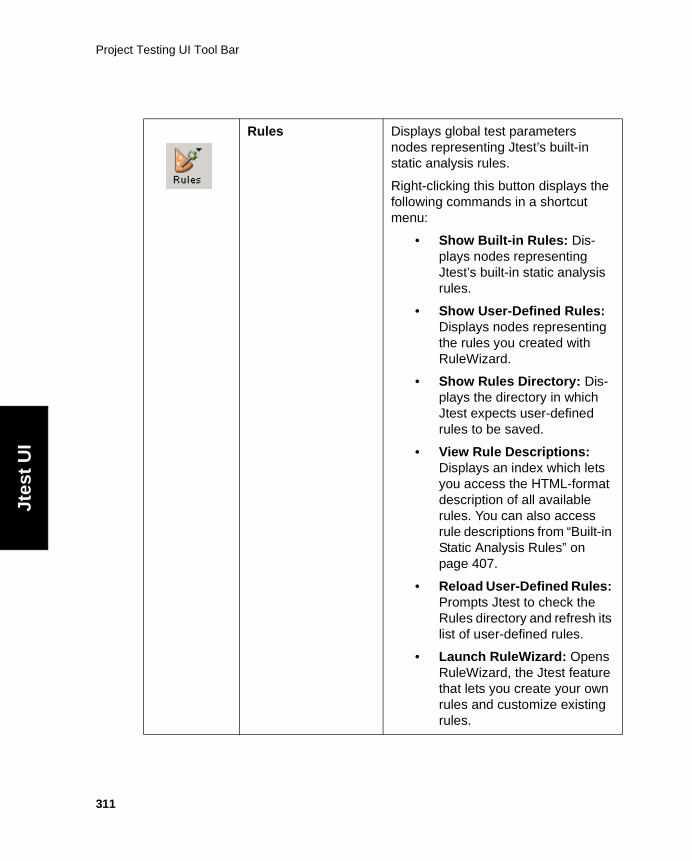
Project Testing UI Tool Bar
311
Jtes
t U
I
the
- sis
s: ing
is-h
ets mat s ilt-in
les: e h its
ens ture wn ing
Rules Displays global test parameters nodes representing Jtest’s built-instatic analysis rules.
Right-clicking this button displaysfollowing commands in a shortcutmenu:
• Show Built-in Rules: Displays nodes representingJtest’s built-in static analyrules.
• Show User-Defined RuleDisplays nodes representthe rules you created withRuleWizard.
• Show Rules Directory: Dplays the directory in whicJtest expects user-definedrules to be saved.
• View Rule Descriptions:Displays an index which lyou access the HTML-fordescription of all availablerules. You can also accesrule descriptions from “BuStatic Analysis Rules” on page 407.
• Reload User-Defined RuPrompts Jtest to check thRules directory and refreslist of user-defined rules.
• Launch RuleWizard: OpRuleWizard, the Jtest feathat lets you create your orules and customize existrules.

Project Testing UI Tool Bar
Jtest UI
Test all
r .
the
r-
a
ur t t. A has
Global Test Parameters
Lets you view and edit the Global Parameters (parameters used for Jtest tests).
Test History Displays a record of all the runs fothis project test, or all project tests
Right-clicking this button displaysfollowing commands in a shortcutmenu:
• Test History: Displays a record of all runs of the curent test.
• Global History: Displaysrecord of all project tests.
Context Help Enables context-sensitive help.
After clicking this button, move yocursor over the area on the UI thayou would like to learn more abouhelp window will open if that area context-sensitive help.
312

Project Testing UI Controls Panel
313
Jtes
t U
I
Project Testing UI Controls PanelThis panel lets you specify the fundamental parameters used during a project test and reports basic data about a project test.
You can enter two parameters in this panel:
• Search In: Specifies where Jtest should start searching for classes to test. The parameter can be a directory, a jar file, a zip file, a .class file, or a .jsp file.
If the parameter is a directory, Jtest will recursively traverse the path's subdirectories, zip files, and jar files, searching for and testing any classes/JSPs it finds.
If the parameter is a jar or zip file, Jtest will open the file and search it for classes in which to find errors.
To browse for the directory, jar file, or zip file that you want Jtest to start searching and testing, click the Browse button, locate and select the desired directory, jar file, or zip file in the file chooser, then click Open.
• Filter-in: Tells Jtest to find and test only classes that match the given regular expression. This regular expression works like the

Project Testing UI Controls Panel
Jtest UI
file-matching utility of a Unix shell.
To test only classes with the string XYZ in the class name use:*XYZ*
To test only classes with names that end with XYZ, use: *XYZ
To test only classes in the packages com.util or com.lib use:{com.util.*,com.lib.*}
For example, if you want Jtest to look only for classes in the DB package, use: DB.*
When this field is left empty, all classes found will be tested.
The following table describes the difference between perl's regu-lar expressions and file matching:
FileRegex Regex
* .*
. \.
{ (?:
{?! (?!
{?= (?=
} )
? .
{,} (|)
314

Project Testing UI Controls Panel
315
Jtes
t U
I
For a reference on Regular Expressions, see
http://www.perldoc.com/perl5.6/pod/perlre.html
If you want to use regular expressions instead of File regexpres-sions, change the jtest.properties file’s COM.para-soft.util.Regexp.Type value to 2 instead of 1. This file is located at:Windows: <jtest install dir>/u/<user name>/jtest.propertiesUnix: $HOME/.jtest/jtest.properties
Two test result parameters are displayed in this panel:
• Classes Tested: Displays the number of classes tested by Jtest.
• Errors Found: Displays the number of errors found by Jtest.
*.java .*\.java$
*.{java,html} .*\.(java|html)$

Project Testing UI Results Panel
316
Jtest UI
Project Testing UI Results PanelThis panel displays information about the errors that Jtest found during a project test. It also lets you perform numerous actions that help you understand and customize results.
To learn more about this panel's branches and available options, see “Exploring Project Test Results” on page 54.

Global Test Parameters
317
Jtes
t U
I
Test Parameters WindowsGlobal Test ParametersThe Global Test Parameters window lets you view and edit the global test parameters used throughout Jtest. If you want parameters to apply to all class or project tests, you should set them at this level; each new class or project test will automatically inherit the applicable global parameters.
To open this window, click the Global button in either the Class Testing UI or Project Testing UI.
By default, global test parameters are automatically saved in <jtest_install_dir>\u\username\persist\jtest.gtp (Windows) or <users home>/.jtest/persist/jtest.gtp (UNIX).
Descriptions of global test parameters tree branches are divided into three categories:
• Global Test Parameters - Static Analysis
• Global Test Parameters - Dynamic Analysis
• Global Test Parameters - Common and Search Parameters
Global Test Parameters - Static Analysis
Jtest UI
Global Test Parameters - Static AnalysisThe Global Test Parameters Static Analysis branch contains the follow-ing branches and nodes:
Static Analysis
Contains parameters that control static analysis (testing that checks whether code follows selected coding rules).
Static Analysis> Perform Static Analysis
Flag that controls whether or not static analysis is performed when a class is tested.
Note: This flag appears in all parameter levels.
Static Analysis> Rules
Contains rules that can be applied when Jtest performs static analy-sis.
Static Analysis> Rules> Severity Levels Enabled
Contains severity level flags. Each rule has a severity level associ-ated with it. Violations of coding standards that are most likely to cause an error are in the level 1 category; violations of coding stan-dards that are least likely to cause an error are in the level 5 cate-gory). By default, Jtest reports violations of all coding standards with a severity level of 1 or 2. A rule’s severity is indicated by the final character in each rule code, as shown in the Global Test Parameters window’s Static Analysis> Rules> Built-in Rules node.
A rule is enforced only if both the rule and its severity level are enabled. This branch controls which severity levels are enabled.
To enable all severity level, right-click this node, then choose Enable All from the shortcut menu.
318
Global Test Parameters - Static Analysis
319
Jtes
t U
I
To view the number of active rules, right-click this node, then choose Show Number Active Rules from the shortcut menu.
Static Analysis> Rules> Severity Levels Enabled> Level 1-5
Flags that control whether or not the rules of a particular severity level are applied. By default, levels 1-2 are enabled.
Static Analysis> Rules> Built-in Rules
Contains a options for built-in rules shipped with Jtest. A specific rule can be enabled or disabled using the flag associated with that rule. A rule is enforced only if both the rule and its severity level are enabled.
To enable or disable all rules within one of the built-in rule categories, right-click the node that represents the category you want to enable or disable, then choose Enable All or Disable All from the shortcut menu.
To view the descriptions of all rules within a category, right-click the node that represents the category whose rules you want view, then choose View Rule Descriptions from the shortcut menu.
To view the description of a specific rule, right-click the node that rep-resents the rule you want view, then choose View Rule Description from the shortcut menu.
You can also access rule descriptions from “Built-in Static Analysis Rules” on page 407
Static Analysis> Rules> Built-in Rules> Possible Bugs
Contains rules that check for possible bugs in the code (i.e., the code compiles, but the programmer made some typos while entering the code).
Static Analysis> Rules> Built-in Rules> Object-Oriented Program-ming
Contains rules that enforce Object-Oriented Programming best prac-tices.

Global Test Parameters - Static Analysis
Jtest UI
Static Analysis> Rules> Built-in Rules> Unused Code
Contains rules that check for unused code.
Static Analysis> Rules> Built-in Rules> Initialization
Contains rules that enforce the explicit initialization of the variables.
Static Analysis> Rules> Built-in Rules> Coding Guidelines
Contains rules that enforce good coding practices.
Static Analysis> Rules> Built-in Rules> Naming Conventions
Contains rules that enforce common naming conventions.
Static Analysis> Rules> Built-in Rules> Javadoc Comments
Contains rules related to Javadoc comments.
Static Analysis> Rules> Built-in Rules> Portability
Contains rules related to portability.
Static Analysis> Rules> Built-in Rules> Optimization
Contains rules that check for non-optimal constructs.
Static Analysis> Rules> Built-in Rules> Garbage Collection
Contains rules related to garbage collection.
Static Analysis> Rules> Built-in Rules> Threads and Synchroniza-tion
Contains rules related to threads and synchronization.
Static Analysis> Rules> Built-in Rules> Enterprise JavaBeans
Contains rules related to Enterprise JavaBeans (EJB).
Static Analysis> Rules> Built-in Rules> Class Metrics
Contains rules that measure class and method metrics. Lets you modify upper and lower thresholds for each metric (for information on
320

Global Test Parameters - Static Analysis
321
Jtes
t U
I
modifying thresholds, see “Customizing Class Metrics” on page 157).
Static Analysis> Rules> Built-in Rules> Project Metrics
Contains rules that measure project and average class metrics.
Static Analysis> Rules> Built-in Rules> Miscellaneous
Contains miscellaneous rules.
Static Analysis> Rules> Built-in Rules> Design by Contract
Contains rules that enforce proper Design by Contract contract for-mation.
Static Analysis> Rules> Built-in Rules> Internationalization
Contains rules that facilitate code internationalization.
Static Analysis> Rules> Built-in Rules> Security
Contains rules related to security.
Static Analysis> Rules> Built-in Rules> Servlets
Contains rules related to servlets.
Static Analysis> Rules> Built-in Rules> Global Static Analysis
Contains rules that perform global static analysis.
Note: These rules are only checked when you test a project in the Project Testing UI.
Static Analysis> Rules> User Defined Rules
Contains user defined rules that were created in RuleWizard. Specific rules can be enabled or disabled using the flag associated with each particular rule (listed by category). A rule is enforced only if both the rule and its severity level are enabled.
To open RuleWizard, the feature that lets you create and modify rules, right-click the User Defined Rules node, then choose

Global Test Parameters - Static Analysis
Jtest UI
Add/Edit Rules from the shortcut menu.
To prompt Jtest to refresh its list of User Defined rules, right-click the User Defined Rules node, then choose Reload Rules from the shortcut menu.
To prompt Jtest to display your current rules directory and information on how to modify it, right-click the User Defined Rules node, then choose Show Rules Directory from the shortcut menu.
To view the descriptions of all user-defined rules, right-click the User Defined Rules node, then choose View Rule Descriptions from the shortcut menu.
To view the description of a specific rule, right-click the node that rep-resents the rule you want view, then choose View Rule Description from the shortcut menu.
322

Global Test Parameters - Dynamic Analysis
323
Jtes
t U
I
Global Test Parameters - Dynamic AnalysisThe Global Test Parameters Dynamic Analysis branch contains the fol-lowing branches and nodes:
Dynamic Analysis
Contains parameters that control dynamic analysis. Dynamic analysis includes white-box (construction) testing and black-box (functionality) testing.
Dynamic Analysis> Perform Dynamic Analysis
Flag that controls whether or not dynamic analysis is performed every time a class is tested.
Note: This flag appears in all parameter levels.
Dynamic Analysis> Test Case Generation
Contains parameters that control test case generation.
Dynamic Analysis> Test Case Generation> Automatic
Contains parameters that control the generation of automatic test cases used for white-box testing and for verification of DbC contracts.
Dynamic Analysis> Test Case Generation> Automatic> Test calling sequences up to length
By default, Jtest tests each method by calling it independently and generating arguments to it. In other words, Jtest basically tries calling sequences of length 1.
This option can be used to tell Jtest to try calling sequences longer than 1. If a calling sequence of length N is specified, Jtest will first try all calling sequences of length 1, then all calling sequences of length 2, and so on.

Global Test Parameters - Dynamic Analysis
Jtest UI
Note: Jtest will attempt to show errors with the shortest calling sequences that can cause the errors. Most errors should have a call-ing sequences of length 1 or 2.
Dynamic Analysis> Test Case Generation> Automatic> Test Methods
Contains flags that control which methods can be called directly in the calling sequence generated by Jtest
Jtest will only directly call the methods whose accessibility is selected here.
Note that the methods which are not called directly are still tested indirectly, through calls to the methods that are called directly.
Dynamic Analysis> Test Case Generation> Automatic> Test Meth-ods> public
Flag that controls if Jtest tests all of the class’s public methods. Public methods are tested by default.
Dynamic Analysis> Test Case Generation> Automatic> Test Meth-ods> protected
Flag that controls if Jtest tests all of the class’s protected methods. Protected methods are tested by default.
Dynamic Analysis> Test Case Generation> Automatic> Test Meth-ods> package-private of package-private classes
Flag that controls if Jtest tests all package-private methods in pack-age-private classes.
A package-private method is a method without any accessibility qual-ifier (e.g., public, protected, or private). package-private methods are only accessible by classes within the same package as the method.
A package-private class is a class without the “public” accessibility qualifier. package-private classes are only accessible by other classes within the same package as the method.
324

Global Test Parameters - Dynamic Analysis
325
Jtes
t U
I
Package-private methods in package-private classes are tested by default.
Dynamic Analysis> Test Case Generation> Automatic> Test Meth-ods> package-private of public classes
Flag that controls if Jtest tests all package-private methods in public classes.
A package-private method is a method without any accessibility qual-ifier (e.g., public, protected, or private). package-private classes are only accessible by classes within the same package as the method.
Package-private methods in public classes are not tested by default.
Dynamic Analysis> Test Case Generation> Automatic> Test Meth-ods> private
Flag that controls if private methods are called directly. Private meth-ods are not tested by default.
Dynamic Analysis> Test Case Generation> User Defined
Contains parameters that control how Jtest locates user-defined Jtest or JUnit Test Class files.
Dynamic Analysis> Test Case Generation> User Defined> Name Mapping Expression
Determines how Jtest locates user-defined Jtest or JUnit Test Class files. By default, Jtest automatically identifies and loads any Test Class that is named <name_of_class_or_jsp_under_test>Test and is saved in the same package/directory as the class or JSP under test. If you do not follow both of these conventions but you want Jtest to automati-cally locate your Test Classes, use a name mapping expression to tell Jtest how to find your Test Classes.
To specify a name matching expression, double-click the Name Map-ping Expression node, then enter one or more name mapping expressions in the dialog box that opens.

Global Test Parameters - Dynamic Analysis
Jtest UI
When you design an expression, use the # sign to represent the class or JSP name. For example:
• The default expression #Test tells Jtest to look in the same package as the class under test (or the same directory as the JSP under test) and load any class named [name_of_class_or_JSP_under_test]Test (such as SimpleTest, ExampleTest, etc.).
• The expression tests.T# tells Jtest to look in the tests pack-age and load any class whose name begins with a capital T (such as TSimple, TExample, etc.).
You can enter any number of name mapping expressions. If you add multiple expressions, separate the expressions with a pipe ( | ) char-acter. For example, if you want Jtest to use both of the example expressions listed above, you would enter:#Test | tests.T#
The following tokens are treated specially:
• $PARENT: This token is replaced by the parent parame-ter value.
• $NAME: This token is replaced by the value of the envi-ronment variable NAME.
Note: This flag appears in all parameter levels.
Dynamic Analysis> Test Case Generation> Common
Contains parameters shared by both automatic and user-defined test case generation.
Dynamic Analysis> Test Case Generation> Common> Static Global Initialization
The code associated with this node (as well as the code associated with the Static Project Initialization and Static Class Initialization nodes) is executed before any test case is executed, and can be used to setup and initialize the class if needed. You can invoke only static methods from these initialization nodes. See “Setting an Object
326

Global Test Parameters - Dynamic Analysis
327
Jtes
t U
I
to a Certain State” on page 192 for more information.
Dynamic Analysis> Test Case Generation> Common> Inputs Repos-itory
Stores input values that can later be added to a method argument node. For more information about defining inputs for test cases, see “Adding Test Cases with Method Inputs” on page 210.
Note: This feature is deprecated.
Dynamic Analysis> Test Case Execution
Contains parameters that control test case execution.
Note: This flag appears in all parameter levels.
Dynamic Analysis> Test Case Execution> Execute Automatic
Flag that controls whether automatic test cases (for white-box testing and verification of DbC contracts) are executed every time a class is tested.
Note: This flag appears in all parameter levels.
Dynamic Analysis> Test Case Execution> Execute User Defined
Flag that controls whether user-defined test cases are executed every time a class is tested.
Note: This flag appears in all parameter levels.
Dynamic Analysis> Test Case Execution> Automatically Instrument “Design by Contract” Comments
Determines whether Jtest automatically instruments Design by Con-tract comments when classes are loaded into Jtest.
If you want Jtest to use the information in a class’s “Design by Con-tract” javadoc comments (e.g., to automatically create test cases that verify functionality, or to use these comments to suppress certain

Global Test Parameters - Dynamic Analysis
Jtest UI
exceptions), it is necessary to instrument these comments.
If you never use Design by Contract comments, you can prevent Jtest from instrumenting classes by disabling this option.
If you want to customize which contracts are instrumented or change other instrumentation options, right-click this node, then choose Edit Instrumentation Preferences. You can then modify instrumentation options in the panel that opens.
Note: This flag appears in all parameter levels.
Dynamic Analysis> Test Case Execution> Stubs
Contains stub-related options.
For more information on stubs, see “Testing Classes That Reference External Resources” on page 178 and “Using Custom Stubs” on page 184.
Dynamic Analysis> Test Case Execution> Stubs> Options for Auto-matic Test Cases
Contains options that control what type of stubs are used while run-ning the automatically-generated test cases (for white-box testing and verification of DbC contracts). You can choose Use Automatic Stubs, Use User Defined Stubs, or neither. Jtest will call the actual external method if neither of these stub types are selected, or if Use User Defined Stubs is selected, but no stubs are defined for a partic-ular method reference.
Dynamic Analysis> Test Case Execution> Stubs> Options for Auto-matic Test Cases> Use Automatic Stubs (white-box stubs)
If selected, Jtest will automatically generate stubs for external resources while running the automatically-generated test cases (for white-box testing and verification of DbC contracts). For more infor-mation on Automatic Stubs, see “Testing Classes That Reference External Resources” on page 178.
328

Global Test Parameters - Dynamic Analysis
329
Jtes
t U
I
Dynamic Analysis> Test Case Execution> Stubs> Options for Auto-matic Test Cases> Use User Defined Stubs
If selected, Jtest will use user-defined stubs when the class under test references external resources. For more information on User Defined Stubs, see “Testing Classes That Reference External Resources” on page 178 and “Using Custom Stubs” on page 184.
Dynamic Analysis> Test Case Execution> Stubs> Options for User Defined Test Cases
Contains options that control what type of stubs are used while run-ning the user defined test cases. You can choose Use User Defined Stubs, or you can leave this option unselected. Jtest will call the actual method if this option is not selected, or if this option is selected, but no user defined stubs are defined for a particular method refer-ence.
Dynamic Analysis> Test Case Execution> Stubs> Options for User Defined Test Cases> Use User Defined Stubs
If selected, Jtest will use user-defined stubs when the class under test references external resources. For more information on User Defined Stubs, see “Testing Classes That Reference External Resources” on page 178 and “Using Custom Stubs” on page 184.
Note: This flag appears in all parameter levels.
Dynamic Analysis> Test Case Execution> Stubs> “Tested Set” Includes
Defines the “Tested Set”: the set of classes and methods included in the current test. When a class or method in the Tested Set references a class or method that is inside that Tested Set, the actual class or method is accessed. When a class or method in the Tested Set refer-ences a class or method that is outside that Tested Set, stubs are called.
For more information about Tested Sets, see “Defining Which Classes are “External”” on page 179.

Global Test Parameters - Dynamic Analysis
Jtest UI
Dynamic Analysis> Test Case Execution> Pre-filtering Suppression Categories
Contains suppression categories that can be applied when the test cases are executed.
These exceptions are suppressed because developers normally expect them to occur (given the circumstances of the input) and account for them, either with throws clauses, or try-catch clauses. However, sometimes you might want to have Jtest report these exception types to make sure your code is robust and that you have accounted for all possible types/ranges/values of method input which will cause exceptions in the code.
For an example of each suppressed exception type, see the Default-SuppressionsExample.java file in <jtest_install_dir>/exam-ples/eval/whitebox.
Dynamic Analysis> Test Case Execution> Pre-filtering Suppression Categories> Exceptions in Throws Clause
If selected, Jtest will not report exceptions that occur in methods which are declared with the exception's type in the throws clause of the method.
If you use the throws clause, you are aware of the possibility of exceptions thrown by the called code. The throws clause indicates that this method's exceptions are handled by the caller.
Note: This flag appears in all parameter levels.
Dynamic Analysis> Test Case Execution> Pre-filtering Suppression Categories> Direct IllegalArgumentExceptions
If selected, Jtest will not report IllegalArgumentExceptions that are thrown directly by a throw statement.
In these cases, input is accounted for. Jtest suppresses these excep-tions by default because developers generally don’t want to see exceptions they know should be thrown under certain circumstances.
330

Global Test Parameters - Dynamic Analysis
331
Jtes
t U
I
Note: This flag appears in all parameter levels.
Dynamic Analysis> Test Case Execution> Pre-filtering Suppression Categories> Explicitly Thrown Exceptions
If selected, Jtest will not report exceptions that are explicitly thrown by user code with a throw statement.
Jtest suppresses these exceptions by default because when an exception of any type is explicitly thrown by the code, the code is behaving properly.
Note: This flag appears in all parameter levels.
Dynamic Analysis> Test Case Execution> Pre-filtering Suppression Categories> Exceptions Caught By Empty Catch
If selected, Jtest will not report exceptions caught by an empty catch block.
Empty catch clauses provide a way for you to handle exceptions when you don't want to or don't need to write error handling code to make the code fault-tolerant.
Note: This flag appears in all parameter levels.
Dynamic Analysis> Test Case Execution> Pre-filtering Suppression Categories> Direct NullPointerExceptions
If selected, Jtest will not report exceptions that can occur because a null object is passed to a method which subsequently dereferences the object, thus causing the NullPointerException.
This exception is suppressed by default because most developers know that if a null argument is sent to a method which doesn't check the argument before a dereferencing operation, the code will throw an exception.
Note: This flag appears in all parameter levels.

Global Test Parameters - Dynamic Analysis
Jtest UI
Dynamic Analysis> Test Case Evaluation
Contains parameters that control test case evaluation.
Dynamic Analysis> Test Case Evaluation> Report Uncaught Runt-ime Exceptions
Flag that controls whether Jtest reports uncaught runtime exceptions that occur in the tested class.
Note: This flag appears in all parameter levels.
Dynamic Analysis> Test Case Evaluation> Perform Automatic Regression Testing
Flag that controls whether Jtest performs Automatic Regression Test-ing for the tested class.
Note: This flag appears in all parameter levels.
Dynamic Analysis> Test Case Evaluation> Coverage Filter
Allows you to customize what coverage information Jtest records and reports. See “Customizing Coverage Reports” on page 122 for more information.
Note: This flag appears in all parameter levels.
Dynamic Analysis> Suppressions Table
Double-clicking this leaf invokes the dynamic analysis Suppression Table which lets you suppress dynamic analysis violations.
332
Global Test Parameters - Common and Search Parameters
333
Jtes
t U
I
Global Test Parameters - Common and Search ParametersThe Global Test Parameters Common Parameters branch contains the following branches and nodes:
Common Parameters
Contains parameters shared by both static and dynamic analysis.
Common Parameters> Directories
Contains parameters related to directories.
Common Parameters> Directories> Working Directory
Determines the directory that is used as the current working directory when testing a class.
This directory will be used as "." on the CLASSPATH.
This parameter appears in most parameter levels (Global, Project, and Class). When testing a class, Jtest uses the value in the Class Test Parameters. If this parameter is not set, the value of the current parent parameter is used.
The following tokens are treated specially:
• $PARENT: This token is replaced by the parent parame-ter value.
• $PARAMS_DIR: This token is replaced by the directory that includes the parameters directory.
• $INSTALL_DIR: This token is replaced by the Jtest instal-lation directory.
• $NAME: This token is replaced by the value of the envi-ronment variable NAME.

Global Test Parameters - Common and Search Parameters
Jtest UI
The actual value that will be used is shown in parentheses.
To see the current working directory, right-click this node, then choose Show Current Working Directory.
Common Parameters> Directories> Results
Determines where the test results will be stored.
The following tokens are treated specially:
• $DEFAULT: In project tests, this token is replaced by a path relative to the location of the project test parameters (.ptp) file. This token only applies to project tests.
• $PARENT: This token is replaced by the parent parame-ter value.
• $PARAMS_DIR: This token is replaced by the directory that includes the parameters directory.
• $INSTALL_DIR: This token is replaced by the Jtest instal-lation directory.
• $NAME: This token is replaced by the value of the envi-ronment variable NAME.
The actual value that will be used is shown in parentheses.
Common Parameters> Directories> Class Test Parameters Root
When you test a project, the Project Testing UI automatically creates the class test parameters for the individual classes found. This parameter determines what directory the class test parameter (.ctp) files are stored in.
The string $DEFAULT receives special treatment; it is replaced by a path relative to the location of the project test parameters (.ptp) file.
This parameter appears in most parameter levels.
Common Parameters> java/javac-like Parameters
334

Global Test Parameters - Common and Search Parameters
335
Jtes
t U
I
Contains parameters equivalent to parameters used in java or javac.
Common Parameters> java/javac-like Parameters> -classpath
Overrides the CLASSPATH environment variable with the list of entries specified here (an entry is a directory, zip file, or jar file).
This option is equivalent to the Java interpreter's -classpath flag.
This parameter appears in most parameter levels (Global, Project, and Class). When testing a class, Jtest uses the value in the Class Test Parameters. If this parameter is not set, the value of the current parent parameter is used.
The following tokens are treated specially:
• $PARENT: This token is replaced by the parent parame-ter value.
• $PARAMS_DIR: This token is replaced by the directory that includes the parameters directory.
• $INSTALL_DIR: This token is replaced by the Jtest instal-lation directory.
• $NAME: This token is replaced by the value of the envi-ronment variable NAME.
The actual value that will be used is shown in parentheses.
To see how this setting affects the classpath, right-click this node, then choose Show Resulting Classpath.
Common Parameters> java/javac-like Parameters> -cp
Prepends the CLASSPATH environment variable with the list of entries specified here (an entry is a directory, zip file, or jar file).
This option is equivalent to the JRE’s -cp flag.
The token $PARENT receives special treatment and is replaced by the parent parameter value.

Global Test Parameters - Common and Search Parameters
Jtest UI
This parameter appears in most parameter levels (Global, Project, and Class). When testing a class, Jtest uses the value in the Class Test Parameters. If this parameter is not set, the value of the current parent parameter is used.
The following tokens are treated specially:
• $PARENT: This token is replaced by the parent parame-ter value.
• $PARAMS_DIR: This token is replaced by the directory that includes the parameters directory.
• $INSTALL_DIR: This token is replaced by the Jtest instal-lation directory.
• $NAME: This token is replaced by the value of the envi-ronment variable NAME.
The actual value that will be used is shown in parentheses.
To see how this setting affects the classpath, right-click this node, then choose Show Resulting Classpath.
Common Parameters> java/javac-like Parameters> System Proper-ties
Defines system properties. This parameter is equivalent to the -D flag of the Java interpreter and is used to define properties for the class being tested.
System properties are defined by naming the property and assigning a value to the property. Use a space to separate properties if multiple properties are defined.
Example: property.one=On PROPERTY_TWO=d:/temp
This parameter appears in most parameter levels (Global, Project, and Class). When testing a class, Jtest uses the value in the Class Test Parameters. If this parameter is not set, the value of the current parent parameter is used.
336

Global Test Parameters - Common and Search Parameters
337
Jtes
t U
I
The following tokens are treated specially:
• $PARENT: This token is replaced by the parent parame-ter value.
• $PARAMS_DIR: This token is replaced by the directory that includes the parameters directory.
• $INSTALL_DIR: This token is replaced by the Jtest instal-lation directory.
• $NAME: This token is replaced by the value of the envi-ronment variable NAME.
The actual value that will be used is shown in parentheses.
Common Parameters> java/javac-like Parameters> -Xbootclasspath
Overrides location of bootstrap class files. To see how this setting affects the classpath, right-click this node, then choose Show Result-ing Classpath.
Common Parameters> JSP Parameters
Contains JSP-related parameters.
Common Parameters> JSP Parameters> uribase
Specifies the URI directory to which compilations are relative. If the uribase cannot be determined, the default is “/”. If you specify the uriroot, the uribase will be set to that input.
For example, in the tag<%@ taglib uri="tlds/html.tld" prefix="jtest" %>the actual path to the referenced object should be"<uriroot>+<uribase>/tlds/jtest.tld"
The following token is treated specially:
• $PARENT: Replaced by the parent directory of the .jsp file that is being tested.
The actual value that will be used is shown in parentheses.

Global Test Parameters - Common and Search Parameters
Jtest UI
Common Parameters> JSP Parameters> uriroot
Specifies the root of the Web application. This is the root directory to which absolute URI paths are relative.
If the uriroot parameter is empty, Jtest searches for a WEB-INF direc-tory in the parent directory of the JSP. The directory with a WEB-INF that is closest to the JSP will be used as the uriroot. If such a directory is not found, the uriroot will be set to the parent directory of the JSP under test.
If you set the uriroot, the uriroot will be based on the that value.
For example, in the tag<%@ taglib uri="tlds/jtest.tld" prefix="jtest" %>the actual path to the referenced object should be"<uriroot>/tlds/jtest.tld"
The following tokens are treated specially:
• $DEFAULT: Prompts Jtest to search for the WEB-INF directory that appears on the parent path of the file under test. If it is found, the token is replaced by the parent directory where the WEB-INF directory is located. If it is not found, the token is replaced by the parent directory of the JSP under test.
• $PARENT: Replaced by the parent parameter value.
The actual value that will be used is shown in parentheses.
Common Parameters> JSP Parameters> TLD List
Specifies the tag library descriptors (TLDs) that Jtest uses during JSP testing.
To specify a tag library descriptor, double-click this node, complete the URI and Location fields (described below) in the dialog box that opens, then choose Options> Save.
338

Global Test Parameters - Common and Search Parameters
339
Jtes
t U
I
• URI: Enter the complete URI attribute value from the taglib directive. For example, if your JSP’s URI field is<%@ taglib uri="/parasoft" prefix="ps" %> you would enter/parasoft
• Location: Enter (or browse to) the full path to the .tld file (for example, C:\dv\tlds\ps.tld)
Common Parameters> JSP Parameters> File List
Specifies the path to include files Jtest needs to access during JSP testing. By include files, we mean other HTML or JSP files that the JSP under test references using the <%@ include file=”file name” %> tag.
To specify an include file, double-click this node, complete the File and Location fields (described below) in the dialog box that opens, then choose Options> Save.
• File: Enter the name of the include file you want Jtest to access during testing. For example, if your JSP uses the include tag<%@ include file=”test.jsp” %>and that file is not yet on the correct path, you would entertest.jsp
• Location: Enter (or browse to) the full path to the included file. For example, if your JSP uses the include tag<%@ include file=”test.jsp” %>and that file is not yet on the correct path, you would enterC:\tmp\test.jsp)
Common Parameters> When Testing a Test Class
Determines how Jtest behaves when the class under test is a Test Class.
Common Parameters> When Testing a Test Class> Run the tests

Global Test Parameters - Common and Search Parameters
Jtest UI
defined in the Class
If selected, Jtest runs the tests defined in the Test Class and Jtest will not test the Test Class itself (Jtest will not perform static analysis on the class or create test cases for it). If you select this option, you can-not select the Test the Test Class itself option.
Common Parameters> When Testing a Test Class> Test the Test Class itself
If selected, Jtest tests the Test Class as it would test any other class. Jtest will test perform static analysis on the class and create test cases for it). If you select this option, you cannot select the Run the tests defined in the Class option.
Common Parameters> Source Path
Determines where Jtest looks for the source of a class.
Common Parameters> Path to JDK Directory
Specifies the path to the JDK installation directory. Jtest only uses this JDK installation to compile classes; it runs classes with the JRE that is shipped with Jtest.
Jtest automatically determines the path to your JDK by looking at the following variables in the order listed:
1. The PARASOFT_JDK_HOME variable.
2. The javac PATH environment variable.
3. JAVA_HOME, JDK_HOME, JAVAHOME, ...
The first valid variable found is used.
You can configure Jtest to use a different JDK permanently or tempo-rarily.
To change the JDK permanently, change the PARASOFT_JDK_HOME environment variable in the method appro-priate for your operating system.
340

Global Test Parameters - Common and Search Parameters
341
Jtes
t U
I
To change the JDK temporarily, temporarily reset the PARASOFT_JDK_HOME variable at the command line in the method appropriate for your operating system, then start Jtest from the com-mand line as described in “Running Jtest in Command Line and Batch Mode” on page 78.
The Global Test Parameters window’s Search Parameters branch con-tains the following branches and nodes:
Search Parameters
Contains parameters that control how Jtest searches for classes.
Search Parameters> Skip classes already tested
If this option is selected, Jtest will not retest a class if results for that class already exist and the class didn't change since the previous results were calculated. Jtest determines whether or not a class has changed by checking that both the .class file and the .java file con-tents have not changed. Timestamps are not considered.
Search Parameters> Skip Test Classes
If this option is selected, Jtest will not test Jtest and JUnit Test Classes.
If this option is not selected, Jtest will use the options set in Common Parameters> When Testing a Test Class to determine how to treat Test Classes.
Search Parameters> Test Test Classes Only
If this option is selected, Jtest will only test Test Classes during a project test (it will skip all other classes). Jtest will test Test Classes according to the parameters set in the Common Parameters> When Testing a Test Class branch. When this option is enabled, the Skip Test Classes option is automatically disabled.
Search Parameters> Recursively search subdirs, .jar, and .zip files
Global Test Parameters - Common and Search Parameters
Jtest UI
If this option is selected, Jtest will recursively search through subdi-rectories, .jar files, and .zip files when searching for files to test.
Search Parameters> Test .jsp files
If this option is selected, Jtest will test files with the .jsp extension.
Search Parameters> Static Analysis
Contains parameters that control how Jtest searches for classes for static analysis.
Search Parameters> Static Analysis> Skip if .java file not found
If selected, Jtest will only perform static analysis on classes for which it finds a .java file.
Search Parameters> Dynamic Analysis
Contains parameters that control how Jtest searches for classes for dynamic analysis.
Search Parameters> Dynamic Analysis> Test public classes only
If selected, Jtest will perform dynamic analysis only on public classes.
Note that the non-public classes will be tested indirectly when called from the public classes.
342

Class Test Parameters
343
Jtes
t U
I
Class Test ParametersThe Class Test Parameters window lets you view and edit parameters that are specific to a certain class.
In the Class Testing UI, you can open this window by clicking the Class button.
You can also open this window from the Project Testing UI Right-click the Result panel node whose name corresponds to the class whose parame-ters you want to modify, then choose Edit Class Test Parameters from the shortcut menu.
Jtest prompts you to save class test parameters as a .ctp file whenever you start a new class test.
Descriptions of class test parameters tree branches are divided into three categories:
• Class Test Parameters - Static Analysis
• Class Test Parameters - Dynamic Analysis
• Class Test Parameters - Common Parameters

Class Test Parameters - Static Analysis
344
Jtest UI
Class Test Parameters - Static AnalysisThe Class Test Parameters Static Analysis branch contains the following branches and nodes:
Static Analysis
See description in Global Test Parameters.
Static Analysis>Perform Static Analysis
See description in Global Test Parameters.
Static Analysis> Rules
See description in Global Test Parameters.
Static Analysis> Severity Levels
See description in Global Test Parameters.
Static Analysis> Level 1-5
See description in Global Test Parameters.
Static Analysis> Suppressed Messages
Lists the list of specific static analysis messages that have been sup-pressed for this class.

Class Test Parameters - Dynamic Analysis
345
Jtes
t U
I
Class Test Parameters - Dynamic AnalysisThe Class Test Parameters Dynamic Analysis branch contains the fol-lowing branches and nodes:
Dynamic Analysis
See description in Global Test Parameters.
Dynamic Analysis> Perform Dynamic Analysis
See description in Global Test Parameters.
Dynamic Analysis> Test Case Generation
See description in Global Test Parameters.
Dynamic Analysis> Test Case Generation> Automatic
See description in Global Test Parameters.
Dynamic Analysis> Test Case Generation> Automatic> Test calling sequences up to length
See description in Global Test Parameters.
Dynamic Analysis> Test Case Generation> Automatic> Test Methods
See description in Global Test Parameters.
Dynamic Analysis> Test Case Generation> Automatic> Test Meth-ods> public
See description in Global Test Parameters.
Dynamic Analysis> Test Case Generation> Automatic> Test Meth-ods> protected
See description in Global Test Parameters.

Class Test Parameters - Dynamic Analysis
Jtest UI
Dynamic Analysis> Test Case Generation> Automatic> Test Meth-ods> package-private
See description in Global Test Parameters.
Dynamic Analysis> Test Case Generation> Automatic> Test Meth-ods> private
See description in Global Test Parameters.
Dynamic Analysis> Test Case Generation> Automatic> Restricted Inputs
By default, Jtest will try to generate any input for the methods of the class. Use these nodes to restrict the inputs that Jtest will generate.
Dynamic Analysis> Test Case Generation> Automatic> Restricted Inputs> "THIS" object
Specifies what value Jtest will use by default when testing instance methods of the given class. Right-clicking this node displays a short-cut menu that allows you to set restricted inputs, add inputs from the local repository, or add inputs from the global repository. This shortcut menu contains the following options:
• Set Restricted Input: Lets you add a valid Java expres-sion as a simple input value. If you reference classes that are not in the same package as the tested class, make sure to add import statements for these classes. For information about adding imports, see “Specifying Imports” on page 234.
• Add From Local Repository: Contains menu items associated with the values available in the local reposito-ries.Choose an input's menu item to add that input to the node. You can add inputs to the local repository in Class Test Parameters> Dynamic Analysis> Test Case Genera-tion> Common> Inputs Repository.
346
Class Test Parameters - Dynamic Analysis
347
Jtes
t U
I
• Add From Global Repository: Contains menu items associated with the values available in the global reposi-tory.Choose a menu item to add the input to the node. You can add inputs to the global repository in Global Test Parameters> Dynamic Analysis> Test Case Gen-eration> Common> Inputs Repository.
Dynamic Analysis> Test Case Generation> User Defined
Contains parameters that control the generation of the user defined test cases. [n]= number of test cases defined.
Dynamic Analysis> Test Case Generation> User Defined> Method Inputs
Contains nodes that can be used to specify the set of inputs with which you want Jtest to test the class. [n]= number of test cases.
Dynamic Analysis> Test Case Generation> User Defined> Method Inputs> [Method name]
Use these nodes to specify the inputs to be used for the named method. [n]= number of test cases for this method.
Dynamic Analysis> Test Case Generation> User Defined> Method Inputs> [Method name]> [Argument name]
Use the associated shortcut menu to add valid Java expressions as input values to this argument. [n]= number of inputs for this argument.
Shortcut menu commands available include:
• Add Input Value: Lets you add a simple input value.
• Add From Local Repository: Contains menu items associated with the values available in the local reposito-ries.
Choose an input's menu item to add that input to the node.

Class Test Parameters - Dynamic Analysis
Jtest UI
You can add inputs to the local repository in Class Test Parameters> Dynamic Analysis> Test Case Genera-tion> Common> Inputs Repository.
• Add From Global Repository: Contains menu items associated with the values available in the global reposi-tory.
Choose an input menu item to add the input to the node.
You can add inputs to the global repository in Global Test Parameters> Dynamic Analysis> Test Case Gen-eration> Common> Inputs Repository.
• Delete All Inputs: Removes all existing inputs.
Dynamic Analysis> Test Case Generation> User Defined> Test Classes
Test classes let you add test cases that are too complex or difficult to be added as method inputs. A test class is a class that extends jtest.TestClass and is used to specify test cases that Jtest should use to test the class. You can write your own test class, or use your JUnit classes. For information on adding Test Classes, see “Adding Test Cases with Test Classes” on page 218.
[n]= Total number of test cases defined by all of the test classes.
Dynamic Analysis> Test Case Generation> User Defined> Name Mapping Expression
See description in Global Test Parameters.
Dynamic Analysis> Test Case Generation> Common
Contains parameters shared by both automatic and user-defined test case generation.
Dynamic Analysis> Test Case Generation> Imports
Contains imports shared by all the code used in the specification. See “Specifying Imports” on page 234 for more information.
Dynamic Analysis> Test Case Generation> Static Class Initialization
348

Class Test Parameters - Dynamic Analysis
349
Jtes
t U
I
See description in Global Test Parameters.
Dynamic Analysis> Test Case Generation> Inputs Repository
See description in Global Test Parameters
Dynamic Analysis> Test Case Execution
See description in Global Test Parameters.
Dynamic Analysis> Test Case Execution> Execute Automatic
See description in Global Test Parameters.
Dynamic Analysis> Test Case Execution> Execute User Defined
See description in Global Test Parameters.
Dynamic Analysis> Test Case Execution> Automatically Instrument “Design by Contract” Comments
See description in Global Test Parameters.
Dynamic Analysis> Test Case Execution> Stubs
See description in Global Test Parameters.
Dynamic Analysis> Test Case Execution> Stubs> Options for Auto-matic Test Cases
See description in Global Test Parameters.
Dynamic Analysis> Test Case Execution> Stubs> Options for Auto-matic Test Cases> Use Automatic Stubs (white-box stubs)
See description in Global Test Parameters.
Dynamic Analysis> Test Case Execution> Stubs> Options for Auto-matic Test Cases> Use User Defined Stubs
See description in Global Test Parameters.
Dynamic Analysis> Test Case Execution> Stubs> Options for User Defined Test Cases

Class Test Parameters - Dynamic Analysis
Jtest UI
See description in Global Test Parameters.
Dynamic Analysis> Test Case Execution> Stubs> Options for User Defined Test Cases> Use User Defined Stubs
See description in Global Test Parameters.
Dynamic Analysis> Test Case Execution> Stubs> “Tested Set” Includes
See description in Global Test Parameters.
Dynamic Analysis> Test Case Execution> Stubs> Stubs Class
Indicates what stub class to use while testing this class. If you use the token $DEFAULT, Jtest will automatically search for and use a class named (class_under_test_name)Stubs that extends jtest.Stubs. To enter the specific location of the appropriate stubs class, right-click this option, choose Edit from the shortcut menu, then enter the path to the stubs class.
For more information on stubs, see “Testing Classes That Reference External Resources” on page 178 and “Using Custom Stubs” on page 184.
Dynamic Analysis> Test Case Execution> Pre-filtering Suppression Categories
See description in Global Test Parameters.
Dynamic Analysis> Test Case Execution> Pre-filtering Suppression Categories> Exceptions in Throws Clause
See description in Global Test Parameters.
Dynamic Analysis> Test Case Execution> Pre-filtering Suppression Categories> DirectIllegalArgumentExceptions
See description in Global Test Parameters.
Dynamic Analysis> Test Case Execution> Pre-filtering Suppression Categories> Explicitly Thrown Exceptions
350
Class Test Parameters - Dynamic Analysis
351
Jtes
t U
I
See description in Global Test Parameters.
Dynamic Analysis> Test Case Execution> Pre-filtering Suppression Categories> Exceptions Caught By Empty Catch
See description in Global Test Parameters.
Dynamic Analysis> Test Case Execution> Pre-filtering Suppression Categories> DirectNullPointerExceptions
See description in Global Test Parameters.
Dynamic Analysis> Test Case Evaluation
Contains parameters that control test case evaluation. For informa-tion about test case evaluation, see “Viewing and Validating Test Cases” on page 110.
Dynamic Analysis> Test Case Evaluation> Report Uncaught Runt-ime Exceptions
See description in Global Test Parameters.
Dynamic Analysis> Test Case Evaluation> Perform Automatic Regression Testing
See description in Global Test Parameters.
Dynamic Analysis> Test Case Evaluation> Coverage Filter
See description in Global Test Parameters.
Dynamic Analysis> Test Case Evaluation> Specification and Regres-sion Test Cases
These test cases are used as reference test cases when Jtest per-forms regression and black-box testing. When tests are run, the out-comes for the run are compared with these outcomes. If a discrepancy exists, an error is reported.
Jtest automatically adds the automatic test cases that increase cover-age to this list. All user-defined test cases are added.

Class Test Parameters - Dynamic Analysis
Jtest UI
Shortcut menus let you validate outcomes in the same way that you validate outcomes in the View Test Cases window.
If you change specification and regression test cases and want to restore the set used during the actual tests, right-click the Specifica-tion and Regression Test Cases node, then choose the Reload option from the shortcut menu. Jtest will then reload the original test cases.
Dynamic Analysis> Test Case Evaluation> Specification and Regres-sion Test Cases> [method name]
Contains test cases for this method.
Dynamic Analysis> Test Case Evaluation> Specification and Regres-sion Test Cases> [method name]> Test Case
Contains all the information for a test case.
Dynamic Analysis> Test Case Evaluation> Specification and Regres-sion Test Cases> [method name]> Test Case> Test Case Input
Input that defines the test case.
The input for automatic test cases is the calling sequence.
Dynamic Analysis> Test Case Evaluation> Specification and Regres-sion Test Cases> [method name]> Test Case> Outcomes
Outcomes for this test case. Verify if the outcomes are correct or incorrect according to the class specification and set their state using the shortcut menus.
When the outcome is an object, Jtest automatically chooses the toString method to show its state.
If a method named jtestInspector is defined for the object’s class, Jtest will only use the return value of this method to show the object state.
If no toString or jtestInspector methods are defined, Jtest will heuristi-
352

Class Test Parameters - Dynamic Analysis
353
Jtes
t U
I
cally choose some public instance methods for that object to show its state.
If the method under test is a static method, Jtest will heuristically choose public static methods to show the class state. If the methods Jtest chose are not enough, declare a static method called sjtestIn-spector for the class. Jtest will use the return value of this method to show the object class.
[n]= number of outcomes for this test case.

Class Test Parameters - Common Parameters
Jtest UI
Class Test Parameters - Common ParametersThe Class Test Parameters Common Parameters branch contains the following branches and nodes:
Common Parameters
See description in Global Test Parameters.
Common Parameters> Directories
See description in Global Test Parameters.
Common Parameters> Directories> Working Directory
See description in Global Test Parameters.
Common Parameters> Directories> Results
See description in Global Test Parameters.
Common Parameters> java/javac-like Parameters
See description in Global Test Parameters.
Common Parameters> java/javac-like Parameters> -classpath
See description in Global Test Parameters.
Common Parameters> java/javac-like Parameters>-cp
See description in Global Test Parameters.
Common Parameters> java/javac-like Parameters> System Proper-ties
See description in Global Test Parameters.
Common Parameters> java/javac-like Parameters> -Xbootclasspath
See description in Global Test Parameters.
354

Class Test Parameters - Common Parameters
355
Jtes
t U
I
Common Parameters> JSP Parameters
See description in Global Test Parameters.
Common Parameters> JSP Parameters> uriroot
See description in Global Test Parameters. This option is available at the class level only when the file under test is a JSP.
Common Parameters> JSP Parameters> uribase
See description in Global Test Parameters. This option is available at the class level only when the file under test is a JSP.
Common Parameters> JSP Parameters> TLD List
See description in Global Test Parameters. This option is available at the class level only when the file under test is a JSP.
Common Parameters> JSP Parameters> File List
See description in Global Test Parameters. This option is available at the class level only when the file under test is a JSP.
Common Parameters> When Testing a Test Class
See description in Global Test Parameters.
Common Parameters> When Testing a Test Class> Run the tests defined in the Class
See description in Global Test Parameters.
Common Parameters> When Testing a Test Class> Test the Test Class itself
See description in Global Test Parameters.
Common Parameters> Source Path
See description in Global Test Parameters

Project Test Parameters
356
Jtest UI
Project Test ParametersThe Project Test Parameters window lets you view and edit parameters that apply to the current project test. To open this window, click the Project button in the Project Testing UI tool bar.
Jtest prompts you to save project test parameters as a .ptp file whenever you start a new project test.
Descriptions of Project Test Parameters tree branches are divided into three categories:
• Project Test Parameters - Static Analysis
• Project Test Parameters - Dynamic Analysis
• Project Test Parameters - Common Parameters, Search Parame-ters, Classes in Project

Project Test Parameters - Static Analysis
357
Jtes
t U
I
Project Test Parameters - Static AnalysisThe Project Test Parameters Static Analysis branch contains the follow-ing branches and nodes:
Static Analysis
See description in Global Test Parameters.
Static Analysis> Perform Static Analysis
See description in Global Test Parameters.
Static Analysis> Rules
See description in Global Test Parameters.
Static Analysis> Rules> Severity Levels Enabled
See description in Global Test Parameters.
Static Analysis> Rules> Built-in Rules
See description in Global Test Parameters.
Static Analysis> Rules> Built-in Rules> User Defined Rules
See description in Global Test Parameters.

Project Test Parameters - Dynamic Analysis
Jtest UI
Project Test Parameters - Dynamic Analysis The Project Test Parameters Dynamic Analysis branch contains the fol-lowing branches and nodes:
Dynamic Analysis
See description in Global Test Parameters.
Dynamic Analysis> Perform Dynamic Analysis
See description in Global Test Parameters.
Dynamic Analysis> Test Case Generation
See description in Global Test Parameters.
Dynamic Analysis> Test Case Generation> Automatic
See description in Global Test Parameters.
Dynamic Analysis> Test Case Generation> Automatic> Test calling sequences up to length
See description in Global Test Parameters.
Dynamic Analysis> Test Case Generation> Automatic> Test Methods
See description in Global Test Parameters.
Dynamic Analysis> Test Case Generation> Automatic> Test Meth-ods> public
See description in Global Test Parameters.
Dynamic Analysis> Test Case Generation> Automatic> Test Meth-ods> protected
See description in Global Test Parameters.
Dynamic Analysis> Test Case Generation> Automatic> Test Meth-
358

Project Test Parameters - Dynamic Analysis
359
Jtes
t U
I
ods> package-private of package-private classes
See description in Global Test Parameters.
Dynamic Analysis> Test Case Generation> Automatic> Test Meth-ods> package-private of public classes
See description in Global Test Parameters.
Dynamic Analysis> Test Case Generation> Automatic> Test Meth-ods> private
See description in Global Test Parameters.
Dynamic Analysis> Test Case Generation> User Defined> Name Mapping Expression
See description in Global Test Parameters.
Dynamic Analysis> Test Case Generation> Common
See description in Global Test Parameters.
Dynamic Analysis> Test Case Generation> Common> Static Project Initialization
See description in Global Test Parameters.
Dynamic Analysis> Test Case Execution
See description in Global Test Parameters.
Dynamic Analysis> Test Case Execution> Execute Automatic
See description in Global Test Parameters.
Execute User-Defined
See description in Global Test Parameters.
Dynamic Analysis> Test Case Execution> Automatically Instrument “Design by Contract” Comments
See description in Global Test Parameters.

Project Test Parameters - Dynamic Analysis
Jtest UI
Dynamic Analysis> Test Case Execution> Stubs
See description in Global Test Parameters.
Dynamic Analysis> Test Case Execution> Stubs> Options for Auto-matic Test Cases
See description in Global Test Parameters.
Dynamic Analysis> Test Case Execution> Stubs> Options for Auto-matic Test Cases> Use Automatic Stubs (white-box stubs)
See description in Global Test Parameters.
Dynamic Analysis> Test Case Execution> Stubs> Options for Auto-matic Test Cases> Use User Defined Stubs
See description in Global Test Parameters.
Dynamic Analysis> Test Case Execution> Stubs> Options for User Defined Test Cases
See description in Global Test Parameters.
Dynamic Analysis> Test Case Execution> Stubs> Options for User Defined Test Cases> Use User Defined Stubs
See description in Global Test Parameters.
Dynamic Analysis> Test Case Execution> Stubs> “Tested Set” Includes
See description in Global Test Parameters.
Dynamic Analysis> Test Case Execution> Stubs> Stubs Class
Indicates what stubs class to use while testing classes in this project. To enter the specific location of the appropriate stubs class, right-click this option, choose Edit from the shortcut menu, then enter the path to the stubs class.
For more information on stubs, see “Testing Classes That Reference External Resources” on page 178 and “Using Custom Stubs” on
360

Project Test Parameters - Dynamic Analysis
361
Jtes
t U
I
page 184.
Dynamic Analysis> Test Case Execution> Pre-filtering Suppression Categories
See description in Global Test Parameters.
Dynamic Analysis> Test Case Execution> Pre-filtering Suppression Categories> Exceptions in Throws Clause
See description in Global Test Parameters.
Dynamic Analysis> Test Case Execution> Pre-filtering Suppression Categories> DirectIllegalArgumentExceptions
See description in Global Test Parameters.
Dynamic Analysis> Test Case Execution> Pre-filtering Suppression Categories> Explicitly Thrown Exceptions
See description in Global Test Parameters.
Dynamic Analysis> Test Case Execution> Pre-filtering Suppression Categories> Exceptions Caught By Empty Catch
See description in Global Test Parameters.
Dynamic Analysis> Test Case Execution> Pre-filtering Suppression Categories> DirectNullPointerExceptions
See description in Global Test Parameters.
Dynamic Analysis> Test Case Evaluation
See description in Global Test Parameters.
Dynamic Analysis> Test Case Evaluation> Report Uncaught Runt-ime Exceptions
See description in Global Test Parameters.
Dynamic Analysis> Test Case Evaluation> Perform Automatic Regression Testing

Project Test Parameters - Dynamic Analysis
Jtest UI
See description in Global Test Parameters.
Dynamic Analysis> Test Case Evaluation> Coverage Filter
See description in Global Test Parameters.
Dynamic Analysis> Test Case Evaluation> Specification and Regres-sion Test Cases
The test cases for each class should be accessed through the Classes in Project branch of the Project Test Parameters tree.
362

Project Test Parameters - Common Parameters, Search Parameters, Classes in Project
363
Jtes
t U
I
Project Test Parameters - Common Parameters, Search Parameters, Classes in ProjectThe Project Test Parameters Common Parameters branch contains the following branches and nodes:
Common Parameters
See description in Global Test Parameters.
Common Parameters> Directories
See description in Global Test Parameters.
Common Parameters> Directories> Working directory
See description in Global Test Parameters.
Common Parameters> Directories> Results
See description in Global Test Parameters.
Common Parameters> Directories> Class Test Parameters Root
See description in Global Test Parameters.
Common Parameters> java/javac-like Parameters
See description in Global Test Parameters.
Common Parameters> java/javac-like Parameters> -classpath
See description in Global Test Parameters.
Common Parameters> java/javac-like Parameters> -cp
See description in Global Test Parameters.

Project Test Parameters - Common Parameters, Search Parameters, Classes in Project
Jtest UI
Common Parameters> java/javac-like Parameters> System Proper-ties
See description in Global Test Parameters.
Common Parameters> java/javac-like Parameters> -Xbootclasspath
See description in Global Test Parameters.
Common Parameters> JSP Parameters
See description in Global Test Parameters.
Common Parameters> JSP Parameters> uriroot
See description in Global Test Parameters.
Common Parameters> JSP Parameters> uribase
See description in Global Test Parameters.
Common Parameters> JSP Parameters> TLD List
See description in Global Test Parameters.
Common Parameters> JSP Parameters> File List
See description in Global Test Parameters.
Common Parameters> When Testing a Test Class
See description in Global Test Parameters.
Common Parameters> When Testing a Test Class> Run the tests defined in the Class
See description in Global Test Parameters.
Common Parameters> When Testing a Test Class> Test the Test Class itself
See description in Global Test Parameters.
364

Project Test Parameters - Common Parameters, Search Parameters, Classes in Project
365
Jtes
t U
I
The Global Test Parameters window’s Search Parameters branch con-tains the following branches and nodes:
Search Parameters
Contains parameters that control how Jtest searches for classes.
Search Parameters> Skip classes already tested
See description in Global Test Parameters.
Search Parameters> Recursively search subdirs, .jar, and .zip files
See description in Global Test Parameters.
Search Parameters> Test .jsp files
See description in Global Test Parameters.
Search Parameters> Skip List
Opens a dialog box which lets you enter the names of specific project classes that you do not want tested.
Search Parameters> Test Only List
Opens a dialog box which lets you enter the names of specific project classes that you want tested.
Search Parameters> Skip classes not modified since
Opens a dialog box which lets you configure Jtest to find and test only classes whose .java source files were created or modified after a spe-cific date. This allows you to test current code while ignoring legacy code. It is particularly useful when you want to check that all code produced after a certain date follows specific requirements.
If you are using source control, Jtest will try to determine when each file was last modified by looking at the source control files. If it cannot find the last modified date from a source control file, it will use the date on the local copy of the file.
Search Parameters> Static Analysis

Project Test Parameters - Common Parameters, Search Parameters, Classes in Project
Jtest UI
Contains parameters that control how Jtest searches for classes for static analysis.
Search Parameters> Static Analysis> Skip if .java file not found
See description in Global Test Parameters.
Search Parameters> Dynamic Analysis
Contains parameters that control how Jtest searches for classes for dynamic analysis.
Search Parameters> Dynamic Analysis> Test public classes only
See description in Global Test Parameters.
Search Parameters> Dynamic Analysis> Timeout
Specifies the maximum amount of time that Jtest will spend testing any one class in the project.
The Project Test Parameters window’s Classes in Project branch con-tains the following branches and nodes:
Classes in Project
Contains a list of all classes in the project. Also allows you to suspend and resume the finder's search for classes, and delete all individual class test parameters.
• To suspend the finder from searching for all classes in the project, right-click this node and choose Suspend Finder from the shortcut menu.
• To prompt the finder to resume finding classes in this project, right-click this node and choose Resume Finder from the shortcut menu.
• To delete all individual Class Test Parameters (.ctp files), right-click this node and choose Delete All Individual Class Test Parameters from the shortcut menu.
Classes in Project > [Class Name]
366

Project Test Parameters - Common Parameters, Search Parameters, Classes in Project
367
Jtes
t U
I
Allows you to edit and reset the named class's Class Test Parame-ters, and open the named class in the Class Testing UI.
• To edit class test parameters, right-click this node and choose Edit Class Test Parameters from the shortcut menu.
• To reset all class test parameters to their default value, right-click this node and choose Reset Class Test Parameters from the shortcut menu.
• To load this class in the Class Testing UI (where you can focus on results for this class), right-click this node and choose Load Test in Class Testing UI from the shortcut menu.
• To view the location of the selected class’s .class file, right-click this node and choose Locate .class file from the shortcut menu.
• To view the location of the selected class’s .java file, right-click this node and choose Locate .java file from the shortcut menu.

Find Classes UI
Jtest UI
ToolsFind Classes UIThe Find Classes UI searches for classes that can be tested by Jtest, then allows you to easily set up a test for any found class. This UI can be opened in the Class Testing UI by choosing Tools> Find Classes UI. This UI cannot be accessed from the Project Testing UI.
To find classes, tell Jtest where to start looking for classes (using the Browse button, or by entering the path in the Search In field), then click the Start button.
The Find Classes UI has three main components:
• The tool bar
• The Find Classes panel
• The status bar
Find Classes Tool BarThe following commands are available in the Find Class UI tool bar:
368

Find Classes UI
369
Jtes
t U
I
the rch
en
Find Classes Panel• Only find public classes: If checked, Jtest will only search for
public classes.
• Search In: Specifies where Jtest should start searching for classes to test. The parameter can be a directory, a .class file, a jar file, or a zip file.
If the parameter is a directory, Jtest will recursively traverse the path's subdirectories, zip files, and jar files when it searches for file to test.
Button Name Action
Find Starts finding classes. The search starts indirectory, jar, or zip file specified in the SeaIn parameter.
Stop Stops finding classes.
Pause Temporarily stops finding classes. Also resumes searching after searching has bepaused.
Find Classes UI
Jtest UI
If the parameter is a jar or zip file, Jtest will open the file and search it for classes in which to find errors.
To browse to the directory, jar file, or zip file that you want Jtest to start searching, click the Browse button, locate and select the desired directory, jar file, or zip file in the file chooser, then click Open.
• Filter: Tells Jtest to find only classes that match the given expres-sion. Use the * (asterisk) character to match zero or more charac-ters.
For example, if you want Jtest to look only for classes in the DB package, enter the following parameter in this field:
DB.*
When this field is left empty, Jtest will look for all classes.
• Classes Found: The number of classes found.
• Reset: Clears the lower panel.
The lower panel lists the classes that Jtest located.
370
Find Classes UI
371
Jtes
t U
I
To load a class found into the Class Testing UI (for testing), double-click the name of the class. The class will then be loaded in the Class Testing UI, and can be tested by clicking the Start button in the Class Testing UI.
Status BarThe status bar displays the current search path.

Jtest Tutorials
372
Referen
ce
ReferenceJtest TutorialsJtest’s tutorials offer step-by-step guides on such topics as:
• Performing static analysis
• Performing white-box testing
• Performing black-box testing (includes automatic black-box test-ing and adding user-defined test cases with Test Classes and method inputs)
• Performing regression testing
• Using Jtest with JUnit
These tutorials are available on the Parasoft Web site and can be reached by choosing Help> Tutorial from either Jtest UI.
You can also access a RuleWizard tutorial in the RuleWizard User’s Guide.

Jtest FAQs
373
Ref
eren
ce
Jtest FAQsJtest FAQs are available online at http://www.parasoft.com/jsp/prod-ucts/faq.jsp?product=Jtest.

Accessing the Jtest API
374
Referen
ce
Accessing the Jtest APIThis topic explains how to access the Jtest API.
The Jtest API describes how you can interact with exposed Jtest classes at the program level. The API contains details on tasks such as:
• Developing user-defined Test Classes for classes and JSPs (described in “Adding Test Cases with Test Classes” on page 218).
• Developing user-defined stubs (described in “Using Custom Stubs” on page 184)
• Using the sophisticated object comparator to compare two com-plex objects or to perform regression testing.
To access the Jtest API, choose Help> Jtest API in either Jtest UI.

Fixing Errors Found
375
Ref
eren
ce
Fixing Errors FoundThis topic explains how and why to repair the various types of errors that Jtest finds in your code. Subtopics include:
• Learning More About Errors Found
• Static Analysis Violations
• Design by Contract Violations
• Uncaught Runtime Exceptions
• Specification/Regression Errors
• Fixing Errors Found
• Static Analysis Violations
• Design by Contract Violations
• Uncaught Runtime Exceptions
• Specification/Regression Errors
Learning More About Errors FoundBefore you begin to fix the errors found, you should explore them to deter-mine what caused each error. For example, if Jtest reports an uncaught runtime exception, you should examine the exception details to determine whether it is the result of an incorrectly-behaving method, an unexpected argument, a correctly-behaving method, or a developer-use only method. If Jtest reports a coding standard violation, you should determine whether this violation makes sense in the context of your project.
If you performed your test in the Project Testing UI, errors found are dis-played in the Project Testing UI's Results panel. To learn more about this panel's branches and available options, see “Exploring Project Test Results” on page 54.
If you performed your test in the Class Testing UI, errors found are dis-played in the Class Testing UI’s Errors Found panel. To learn more about this panel's branches and available options, see “Exploring Class Test Results” on page 35.

Fixing Errors Found
Referen
ce
Both panels classify errors found into four categories:
• Static Analysis Violations
• Design by Contract Violations
• Uncaught Runtime Exceptions
• Specification/Regression Errors
Static Analysis ViolationsDuring static analysis, Jtest checks for possible coding standard viola-tions. Coding standard violations are reported under the Static Analysis branch. Jtest reports the following information for each violation found:
1. Rule: Jtest presents each rule violation by listing the rule, a rule ID, and a number that indicates the severity level of the rule (vio-lations of Level 1 rules are most critical; violations of level 5 rules are least critical). The rule might be a built-in rule, or a user-defined rule that you created with RuleWizard. For a com-plete explanation of a particular coding standard, right-click the violation node, then choose View Rule Description.
2. Violation Detail: To see more details about the violation, expand the top-level rule branch.
3. Line Reference: To view a line reference of where the coding standard violation occurred, expand the violation detail branch. If you double click the line reference, the editor will open with the line of code that produced the violation highlighted.
Design by Contract ViolationsDuring dynamic analysis, Jtest creates test cases that verify the specifica-tions included in each class’s DbC-format contact. Violations found are reported under the Design by Contract Violations heading. Design by Contract violations are organized according to the nature of the violation. This heading contains the following violation categories:
• @pre violations: Contains information about violations that occur when a method is called incorrectly and a @pre contract is violated.
376

Fixing Errors Found
377
Ref
eren
ce
• @post violations: Contains information about violations that occur when a method does not return the expected value and a @post contract is violated.
• @invariant violations: Contains information about violations that occur when an @invariant contact is violated.
• @assert violations: Contains information about violations that occur when an @assert contact is violated.
Each error message includes file/line information as well as stack trace and calling sequence information.
Uncaught Runtime ExceptionsDuring dynamic analysis, Jtest automatically creates and executes test cases for each class; it also executes any user-defined test cases that you have added. Exceptions found from automatic and user-defined test cases are reported under the Uncaught Runtime Exceptions heading. Jtest reports the following information for each exception found:
1. Exception Description: Jtest presents each uncaught runtime exception by listing the method that produced the exception, fol-lowed by a description of the exception that was thrown. Jtest lists the exception in the following format:name_of_method_tested: name_of_exception
2. Stack Trace: To see the stack trace, as well as a line reference, expand the branch that displays the exception description. Start reading the stack trace at the bottom of the trace list, then move backwards towards the top. If you double click the line reference, the editor will open with the line of code that produced the excep-tion highlighted.
3. Calling Sequence: To see the calling sequence that produced the exception, expand the Test Case Input branch.
4. Test Case: To view a sample test case finds this uncaught runt-ime exception, right click Test Case Input and choose View Example Test Case from the shortcut menu.
For a more detailed discussion about exploring the reported uncaught runtime exceptions, see “Understanding Exceptions” on page 382.

Fixing Errors Found
Referen
ce
Specification/Regression ErrorsJtest performs automatic regression testing on a class after the class has been tested at least once. Jtest will compare results from old tests with the current test to ensure that new errors are not introduced into the code after modification. Inconsistencies between old test runs and the current test are reported under Specification and Regression Errors in the Errors Found panel of the Class Testing UI. Jtest reports the following informa-tion for each specification/regression error found:
1. Error Description: Jtest presents each specification/regression error by listing the method that produced the error, followed by a description of the error that occurred. Jtest lists the error in the following format:name_of_method_tested: name_of_test_class (if applicable): error message
2. Test Case Input: To see the input for the test case that revealed the error, as well as a line reference, expand the branch that dis-plays the error description. Jtest lists the input for user-defined test cases in the following format:RETVAL=[THIS|Class].method (ARG1, ARG2, ...)
3. Test Case: To view a sample test case finds this error, right click Test Case Input and choose View Example Test Case from the shortcut menu.
Fixing Errors FoundThis section offers suggestions on how to fix the errors that Jtest found.
Static Analysis Violations
Violation Needs to Be Fixed• Description: The rule violation indicates a violation that needs to
be fixed.
• Repair: Repair the code to follow the coding standard. For a complete explanation of a particular coding standard, right-click the violation node, then choose View Rule Description, or see
378

Fixing Errors Found
379
Ref
eren
ce
“Built-in Static Analysis Rules” on page 407 or the documentation generated for user-defined rules.
• Benefit of Repair: Reduced opportunity for errors to enter into the code.
Violation Does Not Apply• Description: The coding standard does not apply to your current
project, or your development team has decided not to enforce the coding standard.
• Repair: Right click the node that lists the violation, then select Disable This Rule from the shortcut menu. The rule can be re-enabled in the Global Test Parameters window.
• Benefit of Repair: Violations of this rule will not be reported in future tests.
Design by Contract Violations• Description: Design by Contract violations indicate either an
error in the code or an error in the contract.
• Repair: Determine if the problem is in the code or in the contract, then make the appropriate modifications.
• Benefit of Repair: The code or contract has been fixed.
Uncaught Runtime Exceptions
Incorrectly Behaving Method• Description: The method is behaving incorrectly; the method
shouldn't throw an exception for those arguments.
• Repair: Repair the method's code so that it behaves correctly.
• Benefit of Repair The code has been fixed.
Unexpected Arguments

Fixing Errors Found
Referen
ce
• Description: The method is not supposed to handle those argu-ments; an exception is thrown because the method is not expect-ing those arguments.
• Repair: If the arguments are illegal, either add an @pre condition to the method (this is the recommended repair), or throw an Ille-galArgumentException.
• Benefit of Repair: The code is documented, easier to maintain, and easier to change. The code explicitly says what arguments the method handles and which ones it doesn't. The error mes-sages when using illegal arguments are clarified. Encapsulation is enforced. When the method is passed arguments that it is not supposed to handle, it should throw an IllegalArgumentExcep-tion. If this is not done, one of the following things will occur:
• The method throws an exception exposing internal imple-mentation details of the method, hence, violating encap-sulation.
• The method doesn't throw an exception when passed illegal arguments. Instead, it returns a value without any meaning or leaves the program in an inconsistent state.
Correctly Behaving Methods• Description: The method is behaving correctly; the output of the
method is to throw an Exception.
• Repair: Either add an @exception tag to document that this method should throw that exception (this is the recommended repair), or specify the type of exception in the method's throws clause.
• Benefit of Repair: The code is documented (the code explicitly says that the method can throw that kind of exception) and easier to maintain. Someone looking at the code later on will know whether the method is throwing an exception because the code has a bug or because the code is supposed to throw an excep-tion.
Developer Use Only Methods
380

Fixing Errors Found
381
Ref
eren
ce
• Description: The method is never sent those arguments.
• Repair: Do one of the following:
• Add an @pre condition to that method (this is the recom-mended repair). See “Suppressing Known Exceptions and Tailoring Input Generation” on page 202 and “The Design by Contract Specification Language” on page 243 for more information. (recommended action)
• Fix the code so that it throws an IllegalArgumentExcep-tion. (recommended action)
• Decrease the accessibility of the method (e.g., set it to private).
• Benefit of Repair: Someone looking at the code later on will know whether the program is throwing an exception because the code is incorrect or because the code is not supposed to handle those arguments.
Specification/Regression Errors
Code is Incorrect• Description: A specification/regression error reveals a function-
ality problem.
• Repair: Modify the code to correct the functionality problem.
• Benefit of Repair: Functionality errors are removed.
Test Case Reference Value is Incorrect• Description: The code is functioning correctly, but an error is
reported because Jtest is using the incorrect reference value.
• Repair: Specify the correct reference value by modifying the value in the View Test Cases window (as described in “Viewing and Validating Test Cases” on page 110) or by modifying the Test Class (if applicable).
• Benefit of Repair: Jtest checks the test case against the correct reference value in future test runs.

Understanding Exceptions
Referen
ce
Understanding ExceptionsThis topic explains the steps you can take in Jtest to understand and repair the uncaught runtime exceptions that Jtest reports. Subtopics include:
• Overview
• Reading and Repairing UREs
• Learning More
OverviewDuring dynamic analysis testing in Jtest, uncaught runtime exceptions (UREs) found during a class test will be reported in the Errors Found panel (in the Class Testing UI), the Results panel (in the Project Testing UI) and the View Test Cases window.
Note: Exceptions that have been suppressed (based on default Jtest set-tings or suppressions you have entered) will not be reported in the Errors Found panel or the Results panel; they will, however, be listed in the View Test Cases window. For default suppressions, see the global, project, or class test parameters’ Dynamic Analysis> Test Case Execution> Pre-Filtered Suppressions options. For a list of suppressions that you (or another user) have added, double-click the global test parameters’ Dynamic Analysis> Suppressions Table node, then view the entries in the Suppression Table that opens.
Reading and Repairing UREsTo read and repair the UREs in Jtest, perform the following steps:
1. Read the reported exception in the Uncaught Runtime Excep-tions branch of the Errors Found panel or the Results panel.Jtest lists the exception in the following format:name_of_method_tested: name_of_exception
The following exception was thrown from a dynamic analysis test on the class examples.eval.Example (located in
382

Understanding Exceptions
383
Ref
eren
ce
<jtest_install_dir>/examples/eval).
The message reveals that a NegativeArraySizeException was thrown when Jtest was testing the "allocate" method.
2. Expand the exception branch.
The stack trace from the exception will appear (in one or more lines) above the Test Case Input branch.
The following example has a one-line stack trace.
3. Start reading the stack trace at the bottom of the trace list, then move backwards towards the top.
In the sample exception shown above, the exception was thrown when the integer "-1" was passed as a parameter to the "allocate" method.To see where in the code the exception was throw, double click a line with a line number.

Understanding Exceptions
Referen
ce
4. Expand the Test Case Input branch. Jtest will display the calling sequence that lead to the exception being thrown.
5. Prompt Jtest to generate a sample test case by right-clicking the Test Case Input node and choosing View Example Test Case from the shortcut menu.
384

Understanding Exceptions
385
Ref
eren
ce
The sample test case should further clarify what Jtest executed that lead to the exception.
6. Fix the code to prevent this exception as described in “Fixing Errors Found” on page 375.
Learning MoreFor more information on Java exceptions see:
• The Java Tutorial. Lesson: Handling Errors with Exceptionshttp://java.sun.com/docs/books/tutorial/essential/excep-tions/index.html

Understanding Exceptions
Referen
ce
• The Java Language Specification: Exceptions http://java.sun.com/docs/books/jls/second_edition/html/excep-tions.doc.html
386

xjavadoc Reference
387
Ref
eren
ce
xjavadoc ReferenceExtended javadoc (xjavadoc) is a tool that wraps Sun's javadoc tool and sets it up to use Parasoft's Doclet instead of Sun's Standard Doclet. xjavadoc adds support for Design by Contract (DbC) tags and gener-ates API documentation in either HTML or XML format. This topic describes the classes, inner classes, interfaces, constructors, methods, and fields in your product. Subtopics include:
• Required Setup
• xjavadoc Options
• Standard Doclet Options Support
• Javadoc Tag Support
• DbC Tag Support
• xjavadoc Examples
Note: xjavadoc uses the Xerces XML processor developed by the Apache XML Project and the Saxon XSLT processor developed by Michael Kay.
Required SetupBefore you use xjavadoc, you need to set your environment as follows:
1. Open a command prompt.
2. Change directories to the Jtest installation directory.
3. Entering the appropriate command(s) at the prompt:
• If you are using Windows, enter:$ jtvars.bat
• If you are using a bash or sh shell, run the jtvars.sh script in the Jtest installation directory. For example,$ cd <jtest-home>$ . jtvars.sh

xjavadoc Reference
Referen
ce
• If you are using a csh, tcsh, or ksh shell. source the jtvars script in the Jtest installation directory. For example, $ cd <jtest-home>$ source jtvars
• To determine which shell you are using, enter $echo $SHELL
xjavadoc Options • -xml: Generate only XML files.
Standard Doclet Options Support xjavadoc supports the following options provided by the Standard Doclet:
• -author: Includes @author paragraphs.
• -bottom <text>: Specifies the bottom text for each page. The text may contain HTML tags, text and whitespace(s).
• -d <directory>: Specifies the destination directory for output files.
• -doctitle <text>: Specifies the title for the package index (first) page. The text may contain HTML tags, text and whitespace(s).
• -footer <text>: Specifies the footer text for each page. The text may contain HTML tags, text and whitespace(s).
• -header <text>: Specifies the header text for each page. The text may contain HTML tags, text and whitespace(s).
• -helpfile <file>: Specifies the file that the help item in the naviga-tion bar links to.
• -link <url>: Creates links to javadoc output at url.
• -linkoffline <url1> <url2>: Creates a link to the docs at url1 using the package list at url2.
388
xjavadoc Reference
389
Ref
eren
ce
• -nodeprecated: Performs the standard actions for -nodepre-catedlist. In addition it omits mention of any deprecated meth-ods throughout the documentation.
• -nodeprecatedlist: Prevents the generation of the file containing the list of deprecated APIs (deprecated-list.html) and the link in the navigation bar to that page.
• -nohelp: Omits the HELP link in the navigation bars at the top and bottom of each page of output.
• -noindex: Omits the index from the generated docs.
• -nonavbar: Omits the navigation bar.
• -nosince: Omits @since information.
• -notree: Omits the class/interface hierarchy from the generated docs.
• -splitindex: Splits the index file into multiple files, alphabetically, one file per letter, plus a file for any index entries that start with non-alphabetical characters.
• -stylesheetfile <path>: Specifies the stylesheet file that will change the style of the generated documentation.
• -version: Includes @version paragraphs.
• -windowtitle <text>: Specifies the title of the browser window that will display the documentation. The text may contain HTML tags, text and whitespace(s).
Javadoc Tag Support xjavadoc supports the following Javadoc tags:
• @author <name-text>: Adds an "Author" entry with the specified name-text to the generated docs when the -author option is used.
• @deprecated <deprecated-text>: Adds a comment indicating that this API should no longer be used (even though it may con-tinue to work).
• {@link <package.class#member> <label> }: Inserts an in-line link with visible text label that points to the documentation for the

xjavadoc Reference
Referen
ce
specified name in the Java Language that is referenced in a sig-nature of the source files being documented.
• @param <parameter-name> <description>: Adds a parameter to the "Parameters" section. The description may be continued on the next line.
• @return <description>: Adds a "Returns" section with the description text. This text should describe the return type and per-missible range of values.
• @since <since-text>: Adds a "Since" heading with the specified since-text to the generated documentation.
• @see <reference>: Adds a "See Also" heading with a link or text entry that points to reference.
• @serial <field-description>: Used in the doc comment for a default serializable field.
• @serialData <data-description>: The data-description docu-ments the types and order of data in the serialized form. Specifi-cally, this data includes the optional data written by the writeObject method and all data (including base classes) writ-ten by the Externalizable.writeExternal method.
• @serialField <field-name> <field-type> <field-description>: Documents an ObjectStreamField component of a Serial-izable class' serialPersistentFields member. One @serialField tag should be used for each ObjectStream-Field component.
• @throws / @exception <class-name> <description>: Adds a "Throws" subheading to the generated documentation, with the class name and description text.
• @version <version-text>: Adds a "Version" subheading with the specified version-text to the generated docs when the -ver-sion option is used.
DbC Tag Supportxjavadoc supports following DbC tags:
390

xjavadoc Reference
391
Ref
eren
ce
• @pre: Specifies a method precondition. Preconditions check that the client calls the method correctly.
• @post: Specifies a method postcondition. Postconditions check whether the method works correctly.
• @invariant: Specifies a class invariant condition. Class invari-ants are conditions that the objects of the class should always satisfy.
• @concurrency: Specifies the method concurrency. The @con-current tag specifies how the method can be called by multiple threads.
• @throws / @exception: Used to document exceptions. xjava-doc handles these tags the same way that javadoc does.
xjavadoc ExamplesThe following examples show how you can run xjavadoc on entire pack-ages or individual classes (just as you can with javadoc). Each package name has a corresponding directory name.
In these examples, we assume that the Jtest installation directory is C:\Program Files\ParaSoft\Jtest4.5, the source files are C:\Program Files\ParaSoft\Jtest4.5\examples\eval\*.java, and the destination direc-tory is C:\temp\docs. We also assume that the environment has already been set (as described in “Required Setup” on page 387).
Documenting a PackageThe source files (*.java) for the package you want to document must be located in a directory with the same name as the package. You can run xjavadoc by changing directories (with cd) or by using the -source-path option.
In both of the following examples, xjavadoc generates HTML-format documentation for the public and protected classes and interfaces in the package examples.eval, then saves the HTML files in the specified desti-nation directory (C:\temp\docs).

xjavadoc Reference
Referen
ce
When you want to document a package, you can run xjavadoc from the package directory or by fully specifying the path to the .java files.
Example 1: Running xjavadoc from the Package DirectoryTo invoke xjavadoc from the directory containing the package(s) you want to document:
1. Use the cd command to change to the parent directory of the fully-qualified package. For example:C:> cd C:\Program Files\ParaSoft\Jtest4.5
2. Run xjavadoc and specify the name of one or more packages you want to document. For example:C:> xjavadoc -d C:\temp\docs exam-ples.dynamic.dbc
Example 2: Running xjavadoc from any DirectoryTo invoke xjavadoc from any directory:
• Run xjavadoc and specify the -sourcepath with the parent directory of the fully-qualified package, as well as the name of one or more packages you want to document. For example:C:> xjavadoc -d C:\temp\docs -sourcepath "C:\Program Files\ParaSoft\Jtest4.5" examples.dynamic.dbc
Documenting One or More ClassesWhen you want to document one or more classes, you can run xjava-doc from the classes’ source directory or from the package root directory.
Example 1: Running xjavadoc from the Source DirectoryTo invoke xjavadoc from the classes’ source directory:
1. Change directories to the directory holding the .java files. For example:C:> cd C:\Program Files\ParaSoft\Jtest4.5\exam-ples\eval
392

xjavadoc Reference
393
Ref
eren
ce
2. Run xjavadoc and specify the name of one or more source files you want to document. For example:C:> xjavadoc -d C:\temp\docs Example.java Simple.java
Example 2: Running xjavadoc from the Package Root DirectoryIf you want to document individual source files from different subpack-ages off the same root, it is useful to run xjavadoc from the package root directory.
To invoke xjavadoc from the package root directory:
1. Change to the package root directory. For example:C:> cd C:\Program Files\ParaSoft\Jtest4.5
2. Run xjavadoc and specify the path to the source files (from the root). For example:C:> xjavadoc -d C:\temp\docs examples\eval\Exam-ple.java examples\eval\project\FixSizeStack.java

Properties File Customization Options
Referen
ce
Properties File Customization OptionsThis topic explains how Jtest properties files are used and lists properties that can be included in such a file. Subtopics include:
• Overview
• Available Properties
OverviewThe Jtest properties file allows you to change settings such as rule cate-gory/severity levels, the user-defined rule directory, the location of your global test parameters file, source control settings and so on.
By default, Jtest uses the local properties file stored at <jtest_install_dir>/u/<username>/jtest.properties (Windows) or <your_home_directory\.jtest\jtest.properties (UNIX).
If you are using Jtest across a group, we strongly recommend that you create a group properties file, then use that file throughout your group. Instructions for establishing and using a group properties file are available in “Sharing a Jtest Properties File” on page 95. If you establish a group properties file, settings specified in a group properties file will take prece-dence over those in any local jtest.properties file.
Note: When adding paths to a Jtest properties file, the paths must follow Java convention. For example, c:\temp would be written as c:\\temp in a .properties file.
394

Properties File Customization Options
395
Ref
eren
ce
Available Properties
Property Description Example
Editor.command Determines the editor used to edit .java source files.
Editor.com-mand=write.exe
jtest.class.browser.dir
Determines the start-ing directory when browsing for classes.
The default value is <jtest_install_dir>\\examples\\eval
jtest.class.browser.dir=c\:\\program files\\para-soft\\Jtest4.5
jtest.javac.flags Determines what flags Jtest passes to javac when it invokes javac.
jtest.javac.flags=-source 1.4
jtest.gtp.path Determines the default path to the jtest.gtp file.
The default value is <jtest_install_dir>\\u\\<username>\\per-sist\jtest.gtp
jtest.gtp.path=C\:\\shared\\jtest.gtp
jtest.last.ctp Configures Jtest to always list the speci-fied .ctp file in the Class Testing UI's File> Open Recent menu. (Normally, only the four most recent classes are listed in this menu).
jtest.last.ctp=C\:\\shared\\Foo.ctp

Properties File Customization Options
Referen
ce
jtest.last.ptp Configures Jtest to always list the speci-fied .ptp file in the Project Testing UI's File> Open Recent menu. (Normally, only the four most recent projects are listed in this menu).
jtest.last.ptp=c\:\\shared\\Foo.ptp
jtest.report.htmldir
Determines the direc-tory in which Jtest saves HTML reports.
jtest.report.htmldir=$HOME\\report
jtest.rules.desc.dir Determines the direc-tory in which Jtest saves rule descrip-tions when a project is generated. By default, rule descrip-tions are saved in the same directory as the report files. If you move your HTML report file from the default directory, change the rules directory setting as needed to prevent broken links in the report file.
jtest.rules.desc.dir=c\:\\shared\\rules
Property Description Example
396

Properties File Customization Options
397
Ref
eren
ce
jtest.sourcecon-trol.addctpifjava
Determines whether Jtest will automati-cally add a new .ctp files to source con-trol if the correspond-ing .java file is in source control.
The default value is false
jtest.sourcecon-trol.addctpif-java=true
jtest.sourcecon-trol.privilegedusers
Specifies which users are able to autocheckout and autocheckin .gtp, .ptp, and .rule files. The names of privi-leged users should be listed separated by a ';'. If the property doesn't exist or is empty, then it defaults to everyone.
jtest.sourcecon-trol.privilegedus-ers=tina
jtest.static.asksup-pressreason
Configures Jtest to open a "reason for suppression" dialog box after you sup-press a static analy-sis error message.
The default value is false.
jtest.static.asksuppressrea-son=true
Property Description Example

Properties File Customization Options
Referen
ce
jtest.static.rulemapping
Specifies the path to a rule mapping file. A rule map is used to change the catego-ries or severity of built-in rules. The <jtest_install_dir>/examples/cus-tom/rulemapping /README directory contains more infor-mation about rule mapping.
jtest.static.rulemapping=c\:\\shared\\map-ping.txt
jtest.static.userde-fined.rulesdir=
Determines the path to the user defined rules directory Note: If the directory is in source control, Jtest will make any neces-sary updates (addi-tions, modifications, deletions, etc.) to the user defined rules each time that Jtest is launched.
The default value is <jtest_install_dir>\\jrules
jtest.static.userde-fined.rulesdir=c:\:\\program-files\\parasoft\\jtest4.5\\jrules
sourcecontrol Specifies the source control system in use (either CVS or none).
The default value is none.
sourcecontrol=CVS
Property Description Example
398

Properties File Customization Options
399
Ref
eren
ce
sourcecon-trol.autocheckin
Determines whether Jtest automatically checks in files that it previously checked out. This property should not be true unless the source-con-trol.autocheckout setting is also true. The default value is false.
sourcecontrol.autocheckin=true
sourcecon-trol.autocheckout
Determines whether Jtest automatically checks out a file cur-rently in source con-trol before that file is loaded into Jtest. A file is only checked out when a privi-leged user attempts to modify it.
The default value is true.
sourcecontrol.autocheckout=true
Property Description Example

Properties File Customization Options
Referen
ce
sourcecontrol.con-currentcheckouts
Determines whether more than one user can have a file from source control checked out at the same time. This is mainly used for source files and is automatically false for Jtest files (.gtp, .ptp, .ctp, and .rule). It can be set to true, false, or ask.
sourcecontrol.concurrentcheck-outs=ask
sourcecon-trol.cvs.commitmsg
Specifies the log message to use when committing a file. The default mes-sage is "Edited by Jtest".
sourcecontrol.cvs.commitmsg="file altered"
sourcecon-trol.cvs.cvsroot
Specifies the CVS-ROOT to use when executing CVS com-mands. The default value is the user's $CVSROOT environ-ment variable (if it is set).
sourcecontrol.cvs.cvsroot= $CVSROOT
Property Description Example
400

Properties File Customization Options
401
Ref
eren
ce
sourcecon-trol.cvs.execut-able.path
Specifies which CVS executable to use. The default value is the jtestcvs (UNIX) or jtestcvs.exe (Win-dows) executable in the Jtest bin direc-tory.
sourcecontrol.cvs.executable.path= jtestcvs.exe
sourcecontrol.log-file= (std-out*|stderr|NONE|path)
Determines where to send the log informa-tion from source con-trol. The default value is stdout.
sourcecontrol.logfile=stdout
sourcecontrol.upda-teoncheckout
Determines whether the most recent ver-sion of a .class, .java or other relevant file is retrieved from the source control reposi-tory and checked out when a user opens it in Jtest. Jtest files (.gtp, .rule, .ptp, etc.) are always updated automatically. The default is ask. Possi-ble values are true, false, or ask,
sourcecontrol.updateoncheckout=ask
sourceeditor.right-margin
Sets the right hand margin according to the number of char-acters specified. The default value is 80.
sourceeditor.rightmargin=80
Property Description Example

Properties File Customization Options
Referen
ce
sourceeditor.inden-tsize
Sets the tab spacing. The default value is 4.
sourceeditor.intentsize=4
sourceedi-tor.inserthardtabs
Allows tabs to be rep-resented by spaces or actual tab charac-ters. Setting this option to false will convert tabs to spaces.
sourceeditor.inserthardtabs=false
Property Description Example
402

Confidence Level Reference
403
Ref
eren
ce
Confidence Level ReferenceThe confidence level is the number that estimates the degree to which the code is correct, robust, and well-tested. A 100% confidence level means that Jtest’s dynamic analysis tests achieved 100% coverage of the code and Jtest did not find any errors in the code. Errors found and uncovered code will lower the confidence level. Confidence level measurements are most useful for tracking the evolution of a project and to compare the state of different projects.
This topic describes how the confidence level is calculated and you can customize the formula used to calculate the confidence level. Subtopics include:
• Understanding How the Confidence Level is Calculated
• Customizing the Confidence Level Calculations
Understanding How the Confidence Level is CalculatedThe confidence level is calculated using the following formulas:
confidence_level = (sa_cl * sa_w + da_cl * da_w) / (sa_w + da_w)
sa_cl = MAX (100 - num_sa_errors * sa_errors_w, 0)
da_cl = (num_da_failures / num_tc) * coverage
num_da_failures = dbc_errors * dbc_w + ure_errors * ure_w + sre_errors * sre_w
• sa_cl: static analysis confidence level.
• sa_w: a customizable weight parameter.
• da_cl: dynamic analysis confidence level.
• da_w: a customizable weight parameter.
• num_sa_errors: number of static analysis errors.
• num_sa_errors_w: a customizable weight parameter.
Confidence Level Reference
Referen
ce
• num_da_failures: estimation of the real number of dynamic analysis failures.
• num_tc: number of test cases executed.
• coverage: project coverage.
• dbc_errors: number of Design by Contract violations.
• dbc_w: a customizable weight parameter.
• ure_errors: number of uncaught runtime exceptions found.
• ure_w: a customizable weight parameter.
• sre_errors: number of specification and regression errors found.
• sre_w: a customizable weight parameter.
Customizing the Confidence Level CalculationsYou can customize how the confidence level is calculated by modifying the customizable weight parameters used in the calculation described above.
The following weight variables can be customized in the jtest.properties file (discussed in “Properties File Customization Options” on page 394):
• jtest.confidence.weight.static: sa_w, default value: 0.5
• jtest.confidence.weight.dynamic: da_w, default value: 0.5
• jtest.confidence.weight.static.percent: sa_errors_w, default value: 2f (Rationale: The more errors per class, the less likely it is to be correct).
• jtest.confidence.weight.dynamic.dbc: dbc_w, default value: 1f.
• jtest.confidence.weight.dynamic.dbc: ure_w, default value: 0.2f. (Rationale: All uncaught runtime exceptions might not
404

Confidence Level Reference
405
Ref
eren
ce
correspond to real errors. It may just be that the method contract is not properly documented).
• jtest.confidence.weight.dynamic.dbc: sre_w, default value: 1f.

Recommended Reference Books
406
Referen
ce
Recommended Reference BooksIf you want to learn more about producing reliable Java code, the Jtest team recommends the following reference books:
Bloch, Joshua. Effective Java Programming Language Guide. Addison Wesley, 2001.
Mitchell. Richard, McKin, Jim. Design by Contract by Example. Addison Wesley, 2001.
Mitchell, Will David. Debugging Java: Troubleshooting for Programmers. Mc Graw-Hill, 2000.

Built-in Static Analysis Rules
407
Ref
eren
ce
Built-in Static Analysis RulesJtest includes the following built-in rules. A detailed description of each rule is provided in the pages that follow. Rules are listed in alphabetical order here and in the detailed rule descriptions that follow.
The severity of each rule is listed after the rule abbreviation. Violations of rules with a severity level of 1 are the most critical; violations of rules with a severity level of 5 are the least critical. Only rules in level 1 and 2 are enabled by default.
Note: You can also view the descriptions for a particular rule or category of rules by right-clicking the related node in the Global Test Parameters tree, then choosing View Rule Descriptions from the shortcut menu.
Coding Guidelines• CODSTA.ACDO-1
Avoid using "new" keyword when creating String objects to hold string literals
• CODSTA.ASI-3Make methods "static" if they do not use any non-static class fields
• CODSTA.AUVT-3Declare 'List' and 'Set' variables with the type of their interface
• CODSTA.CLONE-2Declare 'clone () throws CloneNotSupportedException' for Cloneable class
• CODSTA.CLS-4Place constants on the left side of comparisons
• CODSTA.CRS-4Place constants on the right side of comparisons
• CODSTA.DCI-5Define constants in an “interface”
Built-in Static Analysis Rules
Referen
ce
• CODSTA.DCTOR-3Define a default constructor whenever possible
• CODSTA.DUN-5Avoid using the negation operator '!' more than 3 times in a single method
• CODSTA.IMPT-4Disallows the use of wild cards ('*') in "import" statements
• CODSTA.IMPT2-4Use wild card symbols when importing classes
• CODSTA.ISACF-5Avoid using an "interface" to define constants
• CODSTA.LONG-2Use ‘L’ instead of ‘l’ to express “long” integer constants
• CODSTA.MVOS-3Avoid declaring multiple variables in one statement
• CODSTA.NCAC-2Avoid calling an "abstract" method from a constructor in an "abstract" class
• CODSTA.NCE-4Avoid using ‘Exception’, RuntimeException’, or ‘Throwable’ in “catch” statement
• CODSTA.NEA-1Avoid nested assignments
• CODSTA.NTX-3Avoid using "throws" Exception; Always use a subclass of 'Exception'
• CODSTA.OGM-3Organize methods by name
• CODSTA.OTOSM-3Always override 'toString ()'
• CODSTA.OVERLOAD-4Avoid multiple overloaded methods with the same number of parameters
408

Built-in Static Analysis Rules
409
Ref
eren
ce
• CODSTA.OVERRIDE-4Always override 'Object.hashCode ()' when you override 'Object.equals ()'
• CODSTA.PML-4Place the ‘main ()’ method last
• CODSTA.SMC-3Avoid “switch” statements with many "case" statements
• CODSTA.UCC-2Declare only "private" constructors in utility classes
• CODSTA.UCDC-2Provide a "private" default constructor for utility classes
• CODSTA.USN-2Avoid using literal constants
• CODSTA.VDT-1Avoid declaring multiple variables of different types in one statement
Design by Contract Rules• DBC.PKGC-4
Provide '@invariant' contract for all package-private classes
• DBC.PKGMPOST-4Provide '@post' contract for all package-private methods
• DBC.PKGMPRE-4Provide '@pre' contract for all package-private methods
• DBC.PRIC-5Provide '@invariant' contract for all "private" classes
• DBC.PRIMPOST-5Provide '@post' contract for all "private" methods
• DBC.PRIMPRE-5Provide '@pre' contract for all "private" methods
• DBC.PROC-3Provide '@invariant' contract for all "protected" classes
Built-in Static Analysis Rules
Referen
ce
• DBC.PROMPOST-3Provide '@post' contract for all "protected" methods
• DBC.PROMPRE-3Provide '@pre' contract for all "protected" methods
• DBC.PUBC-2Provide '@invariant' contract for all "public" classes
• DBC.PUBMPOST-2Provide '@post' contract for all "public" methods
• DBC.PUBMPRE-2Provide '@pre' contract for all "public" methods
• DBC.SYNTAX-1Use correct syntax in the contracts
EJB Rules• EJB.AMSC-2
Avoid accessing or modifying security configuration objects
• EJB.CDP-1Declare bean classes "public"
• EJB.CNDA-1Do not declare bean classes as "abstract"
• EJB.CNDF-1Do not declare bean classes as "final"
• EJB.CRTE-1Declare 'ejbCreate ()' methods "public", but neither "static" nor "final"
• EJB.FNDM-1Declare finder methods "public" and neither "final" nor "static"
• EJB.IECM-1Implement one or more 'ejbCreate ()' methods in bean classes
• EJB.IEPM-1Implement one or more 'ejbPostCreate ()' methods in EntityBean classes
410

Built-in Static Analysis Rules
411
Ref
eren
ce
• EJB.LNL-2Avoid loading native libraries in a Bean class
• EJB.MDBC-1Implement the 'ejbCreate()' method for all message-driven bean classes
• EJB.MEC-1Define a matching 'ejbPostCreate' method for each 'ejbCreate' method in entity bean classes
• EJB.MNDF-1Do not define 'finalize ()' method in bean classes
• EJB.MRE-1Throw 'java.rmi.RemoteException' in the methods of the session beans’ remote interface and remote home interface
• EJB.NAC-1Do not have arguments in MessageDrivenBeans' 'ejbCreate()' method
• EJB.NFDC-1Declare a "public" constructor that takes no parameters
• EJB.NFS-2Declare all "static" fields in the EJB component "final"
• EJB.PCRTE-1Declare 'ejbPostCreate ()' "public" and neither "static" nor "final"
• EJB.RILH-1Do not throw 'java.rmi.RemoteException' in a bean's local interface and local home interface
• EJB.RT-1Make finder methods' return type the primary key or a collection of primary keys
• EJB.RTC-1Make the return type "void" for SessionBeans' 'ejbCreate ()' methods
• EJB.RTP-1Make the return type "void" for the 'ejbPostCreate ()' method
Built-in Static Analysis Rules
Referen
ce
• EJB.RUH-2Reuse EJB homes
• EJB.TCE-1Throw 'javax.ejb.CreateException' in create methods of remote home or local home interfaces
• EJB.TFE-1Throw 'javax.ejb.FinderException' in finder methods of remote home or local home interfaces
• EJB.THISARG-1Avoid passing the "this" reference as an argument
• EJB.THISRET-1Avoid returning "this"
• EJB.THREAD-2Avoid starting, stopping, or managing threads in any way
Formatting Rules• FORMAT.CBRACE-3
Place closing "}" braces on their own line
• FORMAT.CMS-3Have at least one space after type casting
• FORMAT.DUT-3Use spaces instead of 'Tabs'
• FORMAT.FCB-4Avoid placing '{' braces on their own line
• FORMAT.IAD-3Declare arrays with the '[ ]' brackets after the array type and before the variable name(s)
• FORMAT.IND-2Use a multiple of four spaces for indentation
• FORMAT.JSPH-2Provide a header comment for each JSP file
• FORMAT.LL-2Break lines at 80 characters
412

Built-in Static Analysis Rules
413
Ref
eren
ce
• FORMAT.MCH-2Provide a file header comment for each source file
• FORMAT.MSP-3Place a single space between a method name and the opening '(' parenthesis
• FORMAT.NSAB-3Avoid placing statements after '{' opening braces on the same line
• FORMAT.OSPL-1Write one statement per line
• FORMAT.SAC-3Place a single space character after every comma
• FORMAT.SAOP-3Place a single space on each side of an assignment operator
• FORMAT.SAS-3Place a single space character after every semicolon
• FORMAT.SAUOP-3Avoid placing space between a prefixed unary operator and its operand
• FORMAT.SBOP-3Place a single space on each side of a bitwise operator
• FORMAT.SBUOP-3Avoid placing space between a unary operator and its operand
• FORMAT.SC-3Place a single space between a conditional statement and the opening "(" parenthesis
• FORMAT.SCOP-3Place a single space before and after the "?" conditional operator
• FORMAT.SLOP-3Place a single space on each side of a logical operator
• FORMAT.SROP-3Place a single space on each side of a relational operator
• FORMAT.UP-3Avoid using unnecessary parentheses in "return" statements

Built-in Static Analysis Rules
Referen
ce
Garbage Collection Rules• GC.AUTP-2
Avoid unnecessary temporaries when converting primitive types to String
• GC.DUD-3Avoid using ‘Date[]’; use ‘long[]’ instead
• GC.FCF-1Always call 'super.finalize ()' from 'finalize ()'
• GC.FM-1Avoid using 'finalize ()' methods to unregister listeners
• GC.GCB-5Reuse calls to 'getClipBounds ()'
• GC.IFF-2Call 'super.finalize ()' in the "finally" block of 'finalize ()' methods
• GC.NCF-1Avoid calling 'finalize ()' explicitly
• GC.OSTM-2Avoid potential memory leaks in ObjectStreams by calling 'reset ()'
• GC.STV-3Avoid “static” collections; they can grow without bounds
Global Static Analysis Rules• GLOBAL.DPAC-1
Declare package-private classes as inaccessible as possible
• GLOBAL.DPAF-1Declare package-private fields as inaccessible as possible
• GLOBAL.DPAM-1Declare package-private methods as inaccessible as possible
• GLOBAL.DPPC-4Declare “public”/”protected” classes as inaccessible as possible
414

Built-in Static Analysis Rules
415
Ref
eren
ce
• GLOBAL.DPPF-4Declare “public”/”protected” fields as inaccessible as possible
• GLOBAL.DPPM-4Declare public/protected methods as inaccessible as possible
• GLOBAL.SPAC-2Declare a package-private class "final" if a class has not been subclassed
• GLOBAL.SPAM-2Declare a package-private method "final" if a method has not been overridden
• GLOBAL.SPPC-5Declare a "public/protected" class "final" if a class has not been subclassed
• GLOBAL.SPPM-5Declare a "public/protected" method "final" if a method has not been overridden
• GLOBAL.UPAC-1Avoid globally unused package-private classes
• GLOBAL.UPAF-1Avoid globally unused package-private fields
• GLOBAL.UPAM-1Avoid globally unused package-private methods
• GLOBAL.UPPC-4Avoid globally unused “public”/”protected” classes
• GLOBAL.UPPF-4Avoid globally unused “public/protected” fields
• GLOBAL.UPPM-4Avoid globally unused “public”/”protected” methods
Initialization Rules• INIT.CSI-2
Explicitly initialize all fields in a constructor

Built-in Static Analysis Rules
Referen
ce
• INIT.LV-3Initialize all local variables explicitly at the declaration statement
• INIT.NFS-2Avoid using non-final "static" fields during the initialization
• INIT.SF-2Explicitly initialize all “static” fields
Internationalization Rules• INTER.CLO-4
Avoid using single characters with logic operators in an internationalized environment
• INTER.COS-4Avoid String concatenation in an Internationalized environment
• INTER.DTS-4Avoid calling 'toString ()' on Date variables in an Internationalized environment
• INTER.ITT-2Isolate translatable text in resource bundles
• INTER.NCL-4Put single character literals in constants
• INTER.NTS-4Avoid calling 'toString ()' on numeric variables in an Internationalized environment
• INTER.SCT-4Avoid calling 'String.compareTo ()' in an Internationalized environment
• INTER.SE-4Avoid calling 'String.equals ()' in an Internationalized environment
• INTER.ST-4Avoid using 'StringTokenizer' in an Internationalized environment
• INTER.TTS-4Avoid calling 'Time.toString ()' in an Internationalized environment
416

Built-in Static Analysis Rules
417
Ref
eren
ce
Javadoc Comment Rules• JAVADOC.BT-4
Avoid using nonexistent '@' tags in Javadoc comments
• JAVADOC.MAJDT-3Use the '@author' Javadoc tag in "class" and "interface" Javadoc comments
• JAVADOC.MRDC-1Use the '@return' Javadoc tag in "public" method Javadoc comments
• JAVADOC.MRDC2-2Use the '@return' Javadoc tag in "protected" method Javadoc comments.
• JAVADOC.MRDC3-3Use the '@return' Javadoc tag in "private" methods
• JAVADOC.MRDC4-5Use the '@return' Javadoc tag in "private" methods
• JAVADOC.MVJDT-3Use the '@version' tag in "class" Javadoc comments
• JAVADOC.PARAM-1Use the '@param' Javadoc tag for each parameter of "public" methods
• JAVADOC.PARAM2-2Use the '@param' Javadoc tag for each parameter of "protected" methods
• JAVADOC.PARAM3-3Use the '@param' Javadoc tag for each parameter of package-private methods
• JAVADOC.PARAM4-5Use the '@param' Javadoc tag for each parameter of "private" methods
• JAVADOC.PJDCC-1Provide Javadoc comments for "public" classes

Built-in Static Analysis Rules
Referen
ce
• JAVADOC.PJDCC2-2Provide Javadoc comments for "protected" classes
• JAVADOC.PJDCC3-3Provide Javadoc comments for package-private classes and interfaces
• JAVADOC.PJDCC4-5Provide Javadoc comments for "private" classes and interfaces
• JAVADOC.PJDCF-1Provide Javadoc comments for "public" fields
• JAVADOC.PJDCF2-2Provide Javadoc comments for "protected" fields
• JAVADOC.PJDCF3-3Provide Javadoc comments for package-private fields
• JAVADOC.PJDCF4-5Provide Javadoc comments for "private" fields
• JAVADOC.PJDCM-1Provide Javadoc comments for "public" methods
• JAVADOC.PJDCM2-2Provide Javadoc comments for "protected" methods
• JAVADOC.PJDCM3-3Provide Javadoc comments for package-private methods
• JAVADOC.PJDCM4-5Provide Javadoc comments for "private" methods
• JAVADOC.SMJT-1Use the '@concurrency' Javadoc tag on "synchronized" "public" methods and blocks
• JAVADOC.SMJT2-2Use the '@concurrency' Javadoc tag on "synchronized" "protected" methods and blocks
• JAVADOC.SMJT3-4Use the '@concurrency' Javadoc tag for "synchronized" package-private methods and '{ }' blocks
418

Built-in Static Analysis Rules
419
Ref
eren
ce
• JAVADOC.THROW-1Use the '@throws' or ‘@exception’ Javadoc tag in "public" methods
• JAVADOC.THROW2-2Use the '@throws' or ‘@exception’ Javadoc tag in "protected" methods
• JAVADOC.THROW3-3Use the '@throws' or ‘@exception’ Javadoc tag in package-private methods
• JAVADOC.THROW4-5Use the '@throws' or ‘@exception’ Javadoc tag in Use the '@throws' Javadoc tag in "private" methods
• JAVADOC.TSMJT-3Provide Javadoc comment for 'toString ()' method
• JAVADOC.VMCR-3Avoid using the '@return' Javadoc tag on "void" methods
JUnit Rules• JUNIT.OSIC-2
Avoid using the constructor to set up test cases
• JUNIT.OSUM-3Always override the 'setUp ()' method
• JUNIT.OTDM-3Always override the 'tearDown ()' method
Class Metrics• METRICS.CCNL-2
Number of comment lines in a "class" or "interface"
• METRICS.CIHL-2"class" or "interface" inheritance level
• METRICS.CNLM-2Number of comment lines in a method

Built-in Static Analysis Rules
Referen
ce
• METRICS.CSNL-2Number of statement lines in a "class" or "interface"
• METRICS.CTNL-2Number of lines in "class" or "interface"
• METRICS.NOF-2Number of fields
• METRICS.NOM-2Number of methods
• METRICS.NPKGF-2Number of package-private fields
• METRICS.NPKGM-2Number of package-private methods
• METRICS.NPRIF-2Number of "private" fields
• METRICS.NPRIM-2Number of "private" methods
• METRICS.NPROF-2Number of "protected" fields
• METRICS.NPROM-2Number of "protected" methods
• METRICS.NPUBF-2Number of "public" fields
• METRICS.NPUBM-2Number of "public" methods
• METRICS.PJDC-2Percentage of Javadoc comments(%)
• METRICS.SNLM-2Number of statement lines in a method
• METRICS.STMT-2Number of statements in a method
• METRICS.TCC-2Cyclomatic Complexity
420

Built-in Static Analysis Rules
421
Ref
eren
ce
• METRICS.TNLM-2Number of lines in a method
• METRICS.TNMC-2Number of method calls
• METRICS.TNOP-2Number of parameters
• METRICS.TRET-2Number of "return" statements
Miscellaneous Rules• MISC.AFP-5
Avoid making assignments to method parameters
• MISC.ARN-3Return zero-length arrays instead of "null"
• MISC.ASFI-2Redeclare a class with only "abstract" methods and "static final" fields as an "interface"
• MISC.AUO-1Avoid using an object to access "static" fields or methods
• MISC.AURM-4Avoid using java.lang.reflect package
• MISC.BLKELSE-3Provide a '{}' block for "else" statements
• MISC.BLKFOR-3Provide a '{}' block for "for" statements
• MISC.BLKIF-3Provide a '{}' block for "if" statements
• MISC.BLKWHL-3Provide a '{}' block for "while" statements
• MISC.CLNC-1Avoid using constructors in the 'clone ()' method
• MISC.CLONE-1Call 'super.clone ()' in all 'clone ()' methods

Built-in Static Analysis Rules
Referen
ce
• MISC.CTOR-4Avoid calling non-"final", non-"static" and non-"private" methods from constructors
• MISC.DPRAPI-1Avoid using deprecated APIs
• MISC.FF-1Declare "private" constant fields "final"
• MISC.FLV-4Declare constant local variables "final"
• MISC.HMF-1Avoid giving method local variables the same name as class fields
• MISC.MSF-4Avoid too many "static" fields
• MISC.PCIF-1Declare "for" loops with a condition and an increment statement
• MISC.PCTOR-2Avoid non-public classes with "public" constructors
• MISC.PFL-5Use "for" loops instead of "while" loops
• MISC.PSFA-2Avoid using "public static final" array fields
• MISC.UBD-3Avoid "float" and "double" if exact answers are required
• MISC.UST-2Use 'StringTokenizer' instead of 'indexOf ()' or 'substring ()' for String parsing
Naming Convention Rules• NAMING.CVN-5
Use conventional variable names
• NAMING.GETA-1Prepend 'get' to the names of getter methods
422

Built-in Static Analysis Rules
423
Ref
eren
ce
• NAMING.GETB-3Prepend 'is, can, has, have' to the names of "boolean" getter methods
• NAMING.IFV-2Use all uppercase letters for the names of fields in an "interface"
• NAMING.IRB-1Use 'is...' only for naming methods that return a "boolean"
• NAMING.NCL-2Enforce name format of classes
• NAMING.NE-2Enforce name format of exceptions
• NAMING.NIF-2Enforce name format of non-”static” fields
• NAMING.NITF-2Enforce name format of interfaces
• NAMING.NLV-2Enforce name format of local variables
• NAMING.NM-2Enforce name format of non-”static” methods
• NAMING.NMP-2Enforce name format of method parameters
• NAMING.NSF-2Enforce name format of non-“final” “static” fields
• NAMING.NSM-2Enforce name format of "static" methods
• NAMING.PKG-3Use lowercase letters for “package" names
• NAMING.SETA-2Prepend 'set' to the names of setter methods
• NAMING.USF-2Avoid lowercase letters in "final" "static" field names
Object Oriented Programming Rules
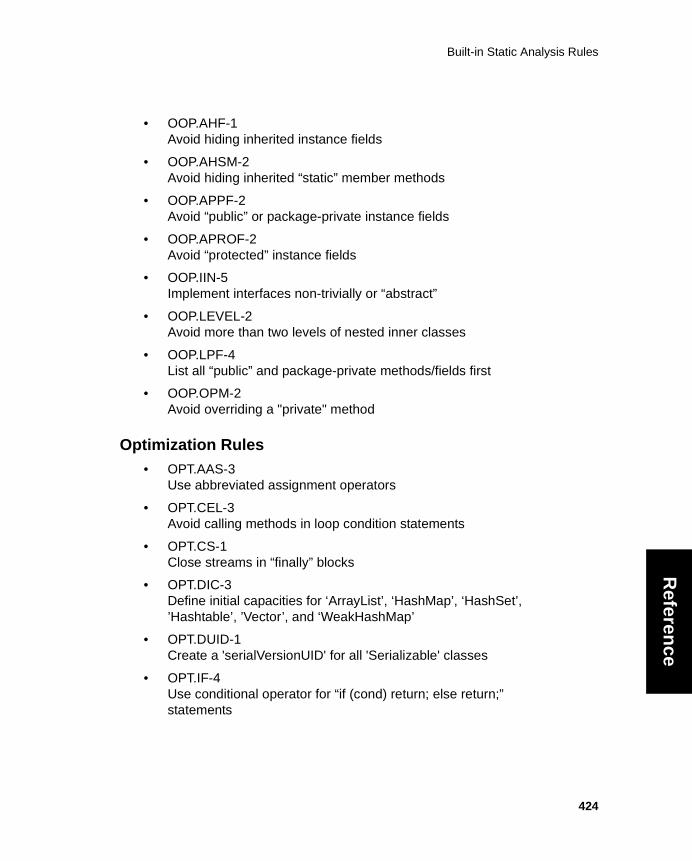
Built-in Static Analysis Rules
Referen
ce
• OOP.AHF-1Avoid hiding inherited instance fields
• OOP.AHSM-2Avoid hiding inherited “static” member methods
• OOP.APPF-2Avoid “public” or package-private instance fields
• OOP.APROF-2Avoid “protected” instance fields
• OOP.IIN-5Implement interfaces non-trivially or “abstract”
• OOP.LEVEL-2Avoid more than two levels of nested inner classes
• OOP.LPF-4List all “public” and package-private methods/fields first
• OOP.OPM-2Avoid overriding a "private" method
Optimization Rules• OPT.AAS-3
Use abbreviated assignment operators
• OPT.CEL-3Avoid calling methods in loop condition statements
• OPT.CS-1Close streams in “finally” blocks
• OPT.DIC-3Define initial capacities for ‘ArrayList’, ‘HashMap’, ‘HashSet’, ’Hashtable’, ’Vector’, and ‘WeakHashMap’
• OPT.DUID-1Create a 'serialVersionUID' for all 'Serializable' classes
• OPT.IF-4Use conditional operator for “if (cond) return; else return;” statements
424
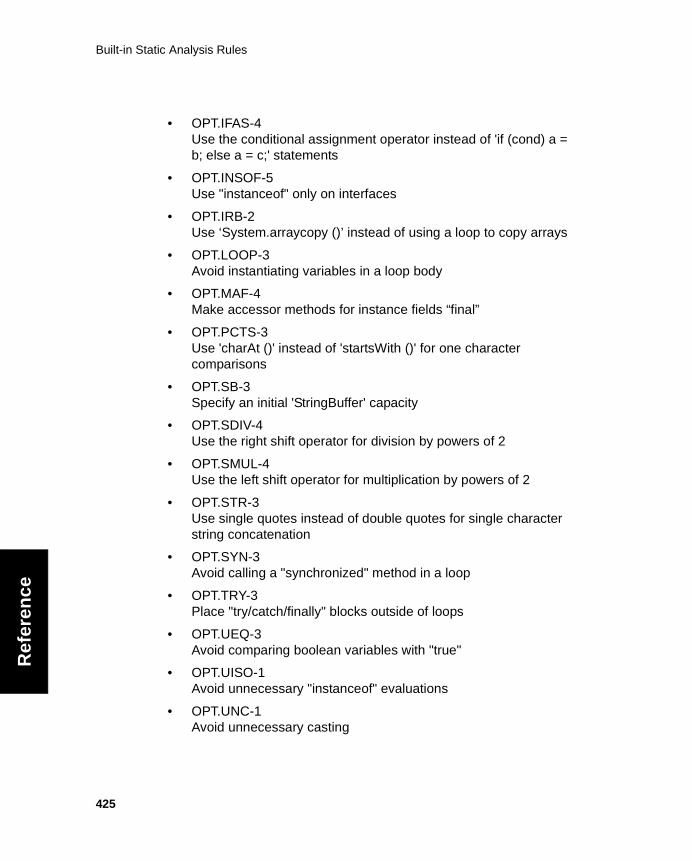
Built-in Static Analysis Rules
425
Ref
eren
ce
• OPT.IFAS-4Use the conditional assignment operator instead of 'if (cond) a = b; else a = c;' statements
• OPT.INSOF-5Use "instanceof" only on interfaces
• OPT.IRB-2Use ‘System.arraycopy ()’ instead of using a loop to copy arrays
• OPT.LOOP-3Avoid instantiating variables in a loop body
• OPT.MAF-4Make accessor methods for instance fields “final”
• OPT.PCTS-3Use 'charAt ()' instead of 'startsWith ()' for one character comparisons
• OPT.SB-3Specify an initial 'StringBuffer' capacity
• OPT.SDIV-4Use the right shift operator for division by powers of 2
• OPT.SMUL-4Use the left shift operator for multiplication by powers of 2
• OPT.STR-3Use single quotes instead of double quotes for single character string concatenation
• OPT.SYN-3Avoid calling a "synchronized" method in a loop
• OPT.TRY-3Place "try/catch/finally" blocks outside of loops
• OPT.UEQ-3Avoid comparing boolean variables with "true"
• OPT.UISO-1Avoid unnecessary "instanceof" evaluations
• OPT.UNC-1Avoid unnecessary casting

Built-in Static Analysis Rules
Referen
ce
• OPT.USB-2Use ‘StringBuffer’ instead of ‘String’ for non-constant strings
• OPT.USC-2Use ’String’ instead of ’StringBuffer’ for constant strings
• OPT.USV-3Use ‘stack’ variables whenever possible
Possible Bugs Rules• PB.ADE-1
Avoid dangling “else” statements
• PB.AECB-1Avoid “catch” blocks with empty bodies
• PB.ASI-2Avoid assignment within an “if” condition
• PB.CLP-2Avoid casting primitive data types to lower precision
• PB.DCF-2Avoid comparing floating point types
• PB.DCP-3Avoid using "+" on Strings to concatenate instead of add numbers
• PB.DNCSS-1Do not call 'setSize ()' in 'ComponentListener.componentResized ()'
• PB.EQL-3Use 'getClass ()' in the 'equals ()' method implementation
• PB.EQL2-3Use 'instanceof' within an 'equals ()' method implementation
• PB.FEB-1Avoid “for” statements with empty bodies
• PB.FLVA-2Do not assign loop control variables in the body of a "for" loop
• PB.IEB-1Avoid “if” statements with empty bodies
426

Built-in Static Analysis Rules
427
Ref
eren
ce
• PB.IESM-3Avoid calling 'String.equals ("literal")' or 'String.equalsIgnoreCase("literal")','
• PB.IMO-2Make sure the intended method is overridden
• PB.MAIN-1Use the method name 'main ()' only for the entry point method
• PB.MASP-2Assign "protected" accessibility to 'readResolve ()' and 'writeReplace ()' methods in serializable classes
• PB.MPC-2Avoid using method parameter names that conflict with class member names
• PB.NAMING-1Avoid giving non-constructor methods the same name as the class
• PB.NDC-1Avoid defining direct or indirect subclasses of 'Error' and 'Throwable'
• PB.NXRE-3Avoid defining direct or indirect subclasses of 'RuntimeException'
• PB.OROM-2Implement the 'readObject ()' for all 'Serializable' classes
• PB.PDS-2Provide "default:" for each "switch" statement
• PB.SBC-1Avoid a “switch” statement with a bad “case”
• PB.TLS-1Avoid using text labels in "switch" statements
• PB.UEI-3Use ‘equals ()’ when comparing Objects
• PB.UEI2-3Use ‘equals ()’ when comparing Strings

Built-in Static Analysis Rules
Referen
ce
Project Metrics• PMETRICS.NB-2
Number of bytes
• PMETRICS.NC-2Number of classes
• PMETRICS.NJF-2Number of Java source files
• PMETRICS.NL-2Number of lines
• PMETRICS.NOF-2Number of fields
• PMETRICS.NOM-2Number of methods
• PMETRICS.NPAC-2Number of packages
• PMETRICS.NPKGC-2Number of package-private classes
• PMETRICS.NPRIC-2Number of "private" classes
• PMETRICS.NPROC-2Number of "protected" classes
• PMETRICS.NPUBC-2Number of "public" classes
Portability Rules• PORT.ENV-1
Avoid using 'System.getenv ()'
• PORT.EXEC-3Avoid using 'Runtime.exec ()'
• PORT.LNSP-1Avoid hard coding '\n', or '\r' as a line separator
428

Built-in Static Analysis Rules
429
Ref
eren
ce
• PORT.NATV-3Avoid using user-defined "native" methods
• PORT.PEER-1Avoid using "java.awt.peer.*" interfaces directly
Security Rules• SECURITY.CLONE-3
Make your 'clone ()' method "final" for security
• SECURITY.CMP-2Avoid comparing Class objects by name
• SECURITY.INNER-1Make all inner classes "private"
• SECURITY.PKG-5Do not depend on "package" scope
• SECURITY.SER-3Make your classes Unserializable
• SECURITY.SER2-3Avoid making your interfaces Serializable
Servlet Rules• SERVLET.BINS-3
Avoid using java.beans.Beans.instantiate ()
• SERVLET.CDBC-1Close JDBC connection in finally block
• SERVLET.DSLV-2Reuse data sources for JDBC connections
• SERVLET.HVR-2Release HttpSession variables when done
• SERVLET.MDC-1Declare a “public” constructor that takes no parameters
• SERVLET.RRWD-2Close JDBC resources when done

Built-in Static Analysis Rules
Referen
ce
• SERVLET.SOP-2Minimize use of System.out.println or System.err.println
• SERVLET.STM-2Avoid using 'SingleThreadModel' in Servlet classes
• SERVLET.SYN-2Minimize synchronization in Servlets
Threads and Synchronization Rules• TRS.ANF-3
Do not use 'notify ()'; use 'notifyAll ()' instead
• TRS.AUTG-3Avoid using variables of type 'java.lang.ThreadGroup'
• TRS.AUTY-3Avoid using 'Thread.yield'
• TRS.CSFS-3Avoid causing deadlock by calling a "synchronized" method from a "synchronized" method
• TRS.MRUN-2Give subclasses of Thread a 'run ()' method
• TRS.NSM-5Avoid using the "synchronized" modifier in the method declaration
• TRS.NSYN-1Unsynchronized methods should not call 'wait ()', or 'notify ()'
• TRS.RUN-5Use the "synchronized" modifier on methods that implement 'Runnable.run ()'
• TRS.THRD-1Avoid calling 'Thread.resume ()', 'Thread.stop ()', 'Thread.suspend ()', or 'Runtime.runFinalizersOnExit ()''
• TRS.UWIL-2Call 'wait ()' only inside a "while" loop
• TRS.UWNA-2Use ’wait ()’ and ’notifyAll ()’ instead of polling loops
430

Built-in Static Analysis Rules
431
Ref
eren
ce
Unused Code Rules• UC.AAI-2
Avoid unnecessary modifiers in an “interface”
• UC.AUV-2Avoid unused local variables
• UC.DIL-3Do not explicitly "import" the java.lang.* "package"
• UC.PF-2Avoid unused “private” fields
• UC.PM-2Avoid unused “private” methods
• UC.UP-2Avoid unused parameters

CODSTA.ACDO-1 Avoid using "new" keyword when creating String objects to hold string
Referen
ce
Coding Standard RulesCODSTA.ACDO-1Avoid using "new" keyword when creating String objects to hold string literals
DescriptionDisallows the use of 'new String ("string literal")', i.e. the instantiation of a new String variable using a string literal.
BenefitsCopying a string constant into a String object wastes time and is redun-dant.
Examplepackage examples.rules.codsta;
class ACDO { void method () { System.out.println (_s); } private String _s = new String ("ACDO"); // VIOLATION}
RepairPut the string constant in a "static final" field instead of creating a 'new' object.
package examples.rules.codsta;
class ACDOFixed { void method () { System.out.println (_s);
432

CODSTA.ACDO-1 Avoid using "new" keyword when creating String objects to hold string
433
Ref
eren
ce
} private String _s = "ACDO"; // FIXED}
ReferenceBloch, Joshua. Effective Java Programming Language Guide. Addison Wesley, 2001, p. 12.

CODSTA.ASI-3 Make methods "static" if they do not use any non-static class fields
434
Referen
ce
CODSTA.ASI-3Make methods "static" if they do not use any non-static class fields
DescriptionRequires that methods be declared "static" if they do not use any non-static class fields.
BenefitsA method that does not make use of any non-static data can carry out its intended behavior without creating an instance of the class, so it should be declared "static".
Examplepackage examples.rules.codsta;
public class ASI { public int add (int i, int j) { // VIOLATION return i + j; }}
RepairDeclare the method "static".
package examples.rules.codsta;
public class ASIFixed { public static int method (int i, int j) { // FIXED return i + j; }}
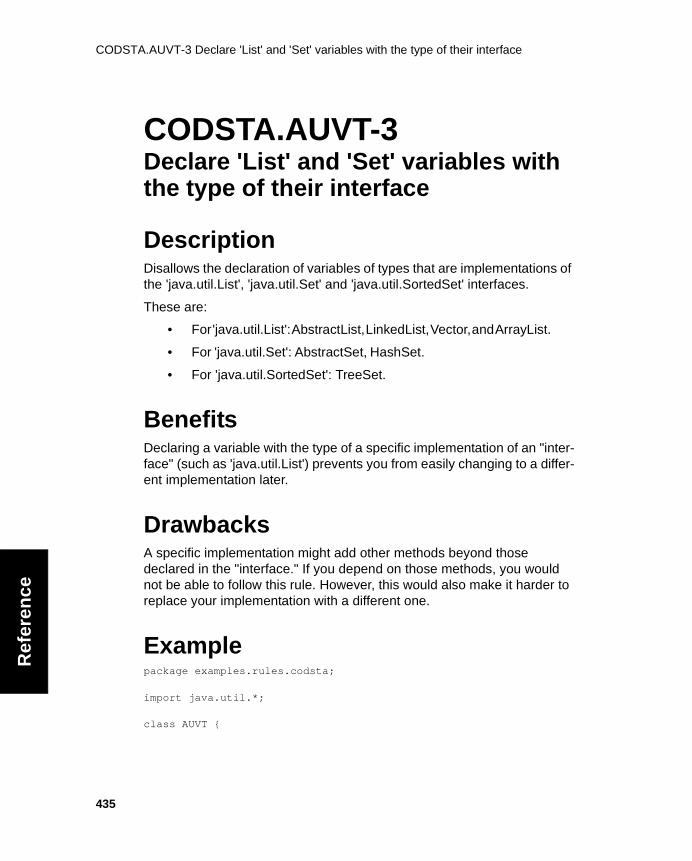
CODSTA.AUVT-3 Declare 'List' and 'Set' variables with the type of their interface
435
Ref
eren
ce
CODSTA.AUVT-3Declare 'List' and 'Set' variables with the type of their interface
DescriptionDisallows the declaration of variables of types that are implementations of the 'java.util.List', 'java.util.Set' and 'java.util.SortedSet' interfaces.
These are:
• For 'java.util.List': AbstractList, LinkedList, Vector, and ArrayList.
• For 'java.util.Set': AbstractSet, HashSet.
• For 'java.util.SortedSet': TreeSet.
BenefitsDeclaring a variable with the type of a specific implementation of an "inter-face" (such as 'java.util.List') prevents you from easily changing to a differ-ent implementation later.
DrawbacksA specific implementation might add other methods beyond those declared in the "interface." If you depend on those methods, you would not be able to follow this rule. However, this would also make it harder to replace your implementation with a different one.
Examplepackage examples.rules.codsta;
import java.util.*;
class AUVT {

CODSTA.AUVT-3 Declare 'List' and 'Set' variables with the type of their interface
Referen
ce
Vector v = new Vector (); // VIOLATION}
RepairDeclare the variable to be of the type of its "interface".
package examples.rules.codsta;
import java.util.*;
class AUVTFixed { List l = new Vector (); // FIXED}
ReferenceBloch, Joshua. Effective Java Programming Language Guide. Addison Wesley, 2001, p. 156.
436

CODSTA.CLONE-2 Declare 'clone () throws CloneNotSupportedException' for Cloneable
437
Ref
eren
ce
CODSTA.CLONE-2Declare 'clone () throws CloneNotSupportedException' for Cloneable class
DescriptionReports an error if the class implements Cloneable but does not have the method 'clone' in the class, or the class implements Cloneable but the method 'clone' does not throw 'CloneNotSupportedException'.
BenefitsIf a class implements the Cloneable interface, it should have a "public" 'clone ()' method. It should be declared to throw 'CloneNotSupportedEx-ception', but subclasses do not need the "throws" declaration unless their 'clone ()' method will throw the exception. Thus, subclasses can decide to not support 'Cloneable' by implementing the 'clone ()' method to throw 'CloneNotSupportedException'.
If this rule were ignored and the parent did not have the "throws" declara-tion, then subclasses that should not be cloned would be forced to imple-ment a trivial 'clone ()' to satisfy inheritance.
Note that "final" classes implementing 'Cloneable' should not be declared to throw 'CloneNotSupportedException" because their implementation of 'clone ()' should be a fully functional method that will not throw the excep-tion.
Examplepackage examples.rules.codsta;
import java.util.*;
class CLONE implements Cloneable {

CODSTA.CLONE-2 Declare 'clone () throws CloneNotSupportedException' for Cloneable
Referen
ce
private Entry[] buckets = null; private static class Entry { Object key; Object value; Entry next;
Entry (Object key, Object value, Entry next) { this.key = key; this.value = value; this.next = next; } }
// VIOLATION : missing clone method}
RepairIn classes that implement 'java.lang.Cloneable', you should write a 'clone ()' method and declare the method as "throws CloneNotSupportedExcep-tion".
package examples.rules.codsta;
class CLONEFixed implements Cloneable { private Entry[] buckets = null; private static class Entry { Object key; Object value; Entry next;
Entry (Object key, Object value, Entry next) { this.key = key; this.value = value; this.next = next; } Entry deepCopy () {
Entry n = next == null ? null : next.deepCopy ();return new Entry (key, value, n);
}
}
438

CODSTA.CLONE-2 Declare 'clone () throws CloneNotSupportedException' for Cloneable
439
Ref
eren
ce
public Object clone () throws CloneNotSupportedException { // FIXED CLONEFixed result = (CLONEFixed)super.clone (); result.buckets = new Entry[buckets.length]; for (int i = 0; i < buckets.length; i++) { if (buckets[i] != null) { result.buckets[i] = (Entry)buckets[i].deepCopy (); } } return result; }}
ReferenceBloch, Joshua. Effective Java Programming Language Guide. Addison Wesley, 2001, pp. 45-52.
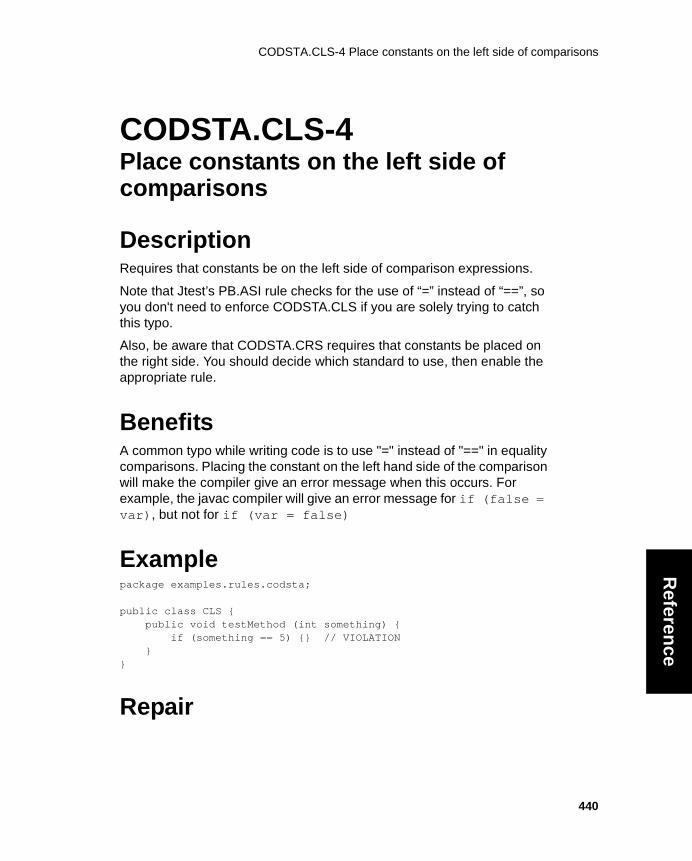
CODSTA.CLS-4 Place constants on the left side of comparisons
Referen
ce
CODSTA.CLS-4Place constants on the left side of comparisons
DescriptionRequires that constants be on the left side of comparison expressions.
Note that Jtest’s PB.ASI rule checks for the use of “=” instead of “==”, so you don't need to enforce CODSTA.CLS if you are solely trying to catch this typo.
Also, be aware that CODSTA.CRS requires that constants be placed on the right side. You should decide which standard to use, then enable the appropriate rule.
BenefitsA common typo while writing code is to use "=" instead of "==" in equality comparisons. Placing the constant on the left hand side of the comparison will make the compiler give an error message when this occurs. For example, the javac compiler will give an error message for if (false = var), but not for if (var = false)
Examplepackage examples.rules.codsta;
public class CLS { public void testMethod (int something) { if (something == 5) {} // VIOLATION }}
Repair
440

CODSTA.CLS-4 Place constants on the left side of comparisons
441
Ref
eren
ce
Place constants on the left side of comparisons.
package examples.rules.codsta;
public class CLSFixed { public void testMethod (int something) { if (5 == something) {} // FIXED }}
ReferenceSection 2.5.2 of http://www.AmbySoft.com/javaCodingStandards.pdf

CODSTA.CRS-4 Place constants on the right side of comparisons
Referen
ce
CODSTA.CRS-4Place constants on the right side of comparisons
DescriptionRequires that constants be on the right side of comparison expressions.
Note that Jtest’s PB.ASI rule checks for the use of “=” instead of “==”.
Also, be aware that CODSTA.CLS requires that constants be placed on the left side. You should decide which standard to use, then enable the appropriate rule.
BenefitsIt is good practice to always place constants on the same side of compar-ison expressions. This rule and the complementary CODSTA.CLS rule help you enforce whichever convention you decide to follow.
DrawbacksIf you disable PB.ASI, then placing constants on the right side of compar-isons can lead to bugs if you accidentally write '=' instead of '==', turning the expression into an assignment.
Examplepackage examples.rules.codsta;
public class CRS { public void testMethod (int something) { if (5 == something) {} // VIOLATION }}
442

CODSTA.CRS-4 Place constants on the right side of comparisons
443
Ref
eren
ce
RepairPlace the constant on the right side of the comparison.
package examples.rules.codsta;
public class CRSFixed { public void testMethod (int something) { if (something == 5) {} // FIXED }}

CODSTA.DCI-5 Define constants in an “interface”
444
Referen
ce
CODSTA.DCI-5Define constants in an “interface”
DescriptionRequires that non-private named constants be defined in an "interface."
Note that Jtest has another rule, CODSTA.ISACF, which conflicts with this rule. Since we have two references containing conflicting opinions, we have added both rules and will allow you to decide which to follow.
Examplepackage examples.rules.codsta;
class DCI { int getMax () { return MAX; } static final int MAX = 1000; // VIOLATION}
RepairDeclare the constant in an "interface":
package examples.rules.codsta;
class DCI { int getMax () { return Constants.MAX; }}
package examples.rules.codsta;
interface Constants { int MAX = 1000;}

CODSTA.DCTOR-3 Define a default constructor whenever possible
445
Ref
eren
ce
CODSTA.DCTOR-3Define a default constructor whenever possible
DescriptionRequires that classes have a constructor that takes no arguments (a 'default constructor').
BenefitsDefault constructors allow classes of unknown types to be dynamically loaded and instantiated at runtime (for example, when loading unknown applets from HTML pages). In Java 1.1 and later, reflection alleviates the need for no-argument constructors somewhat, but many classes which dynamically instantiate other classes at runtime still depend on their pres-ence.
Examplepackage examples.rules.codsta;
public class DCTOR { // VIOLATION: no default constructor defined public DCTOR (int size) { _size = size; } private int _size;}
RepairDefine a default constructor whenever a class might be dynamically loaded by code that does not know the type of the class.
package examples.rules.codsta;

CODSTA.DCTOR-3 Define a default constructor whenever possible
Referen
ce
public class DCTORFixed { // FIXED public DCTORFixed () { _size = 0; } public DCTORFixed (int size) { _size = size; } private int _size;}
Referencehttp://www.infospheres.caltech.edu/resources/code_standards/recom-mendations.html
446

CODSTA.DUN-5 Avoid using the negation operator '!' more than 3 times in a single method
447
Ref
eren
ce
CODSTA.DUN-5Avoid using the negation operator '!' more than 3 times in a single method
DescriptionDisallows use of the negation operator, '!', more than 3 times in a single method.
BenefitsThe negation operator diminishes the readability of code.
Examplepackage examples.rules.codsta;public class DUN { boolean method (boolean a, boolean b) { // VIOLATION if (!a) return (!a && !b); else return !b; }}
RepairDo not use the negation operator if possible.
package examples.rules.codsta;public class DUNFixed { boolean method (boolean a, boolean b) { if (a) return !b; else return (! (a || b) ); }}

CODSTA.IMPT-4 Disallows the use of wild cards ('*') in "import" statements
Referen
ce
CODSTA.IMPT-4Disallows the use of wild cards ('*') in "import" statements
DescriptionDisallows the use of wild cards ('*') in "import" statements
BenefitsBe precise about what you are importing. Otherwise, readers will have a hard time understanding your classes' context and dependencies. Some people even prefer not using "import" at all (thus requiring that every class reference is fully qualified), which avoids all possible ambiguity and reduces source code changes if package names change.
DrawbacksYou need to modify your import statements whenever you start or stop using an imported class.
Note that Jtest has another rule, CODSTA.IMPT2, that advises the use of wild card symbols in import statements. Since we have two references which contain conflicting opinions, ParaSoft added both rules and will allow you to decide which to follow.
Examplepackage examples.rules.codsta;
import java.io.*; // VIOLATION
public class IMPT { void method (InputStream in) { if (in == null) return; }
448
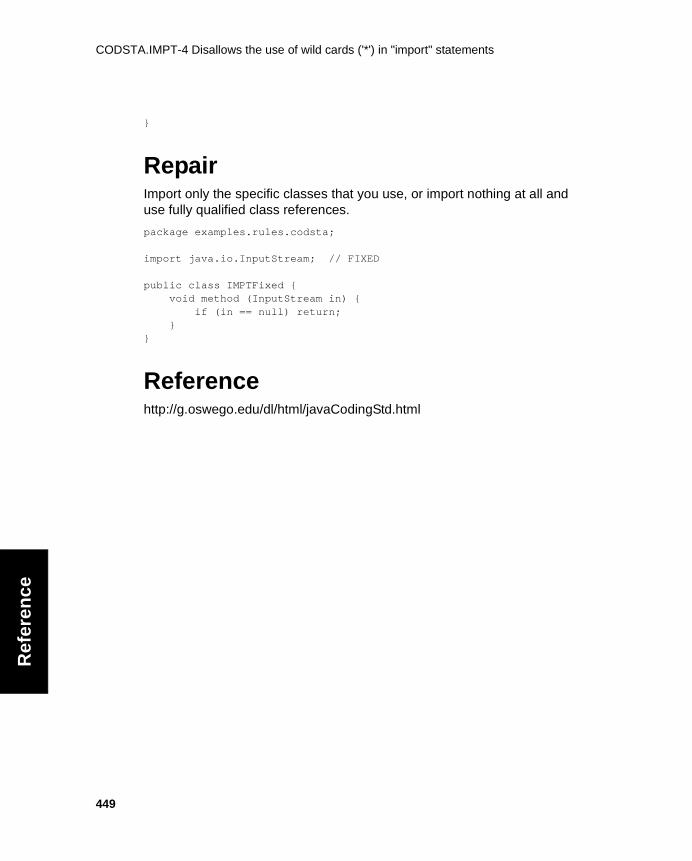
CODSTA.IMPT-4 Disallows the use of wild cards ('*') in "import" statements
449
Ref
eren
ce
}
RepairImport only the specific classes that you use, or import nothing at all and use fully qualified class references.
package examples.rules.codsta;
import java.io.InputStream; // FIXED
public class IMPTFixed { void method (InputStream in) { if (in == null) return; }}
Referencehttp://g.oswego.edu/dl/html/javaCodingStd.html

CODSTA.IMPT2-4 Use wild card symbols when importing classes
Referen
ce
CODSTA.IMPT2-4Use wild card symbols when importing classes
DescriptionRequires that "import" statements use '*'.
BenefitsThe import statement allows the use of the wild cards when indicating the names of classes. For example, if you use the statement import java.awt.*; all of the classes that you use in the package java.awt will be brought into your code when it is compiled.
Note that Jtest has another rule, CODSTA.IMPT, that discourages the use of wild card symbols in import statements. Since we have two references which contain conflicting opinions, ParaSoft added both rules and will allow you to decide which to follow.
Examplepackage examples.rules.codsta;
import java.io.InputStream; // VIOLATION
public class IMPT2 { void method (InputStream in) { if (in == null) return; }
RepairUse '*' to import the whole package instead of just one class.
package examples.rules.codsta;
450

CODSTA.IMPT2-4 Use wild card symbols when importing classes
451
Ref
eren
ce
import java.io.*; // FIXED
public class IMPT2Fixed { void method (InputStream in) { if (in == null) return; }}
ReferenceSection 7.2 of http://www.AmbySoft.com/javaCodingStandards.pdf

CODSTA.ISACF-5 Avoid using an "interface" to define constants
Referen
ce
CODSTA.ISACF-5Avoid using an "interface" to define constants
DescriptionDisallows the presence of constants in an "interface".
BenefitsWhile it is common practice to use a constant interface, an interface that only contains static final fields and no methods should be avoided. The use of constants is an implementation detail. Implementing a constant interface causes this implementation detail to leak into the class's exported API.
Note that Jtest has another rule, CODSTA.DCI, which conflicts with this rule. Since we have two references containing conflicting opinions, Para-Soft has added both rules and will allow you to decide which to follow.
Examplepackage examples.rules.codsta;
public interface ISACF { int NUM = 1234; // VIOLATION}
RepairPlace constants in a utility class instead of an "interface"
package examples.rules.codsta; public class ISACF_CLASS { private ISACF_CLASS() {} // prevents instantiation static final int NUM = 1234;
452

CODSTA.ISACF-5 Avoid using an "interface" to define constants
453
Ref
eren
ce
}
ReferenceBloch, Joshua. Effective Java Programming Language Guide. Addison Wesley, 2001, pp. 89 - 90.

CODSTA.LONG-2 Use ‘L’ instead of ‘l’ to express “long” integer constants
Referen
ce
CODSTA.LONG-2Use ‘L’ instead of ‘l’ to express “long” integer constants
DescriptionRequires that "long" constants end in an uppercase 'L' instead of a lower-case 'l'.
BenefitsInteger constants are "long" if they end in 'L' or 'l'. 'L' is preferred over 'l' because 'l' (lowercase 'L') can easily be confused with '1' (the number one).
Examplepackage examples.rules.codsta;
class LONG { long getLongNumber () { long temp = 23434l; // VIOLATION return temp; }}
RepairMake the 'l' uppercase.
package examples.rules.codsta;
class LONGFixed { long getLongNumber () { long temp = 23434L; // FIXED return temp; }
454

CODSTA.LONG-2 Use ‘L’ instead of ‘l’ to express “long” integer constants
455
Ref
eren
ce
}
ReferenceArnold, Ken, and Gosling, James The Java Programming Language. 2d ed. Addison Wesley, 1997, p.108

CODSTA.MVOS-3 Avoid declaring multiple variables in one statement
Referen
ce
CODSTA.MVOS-3Avoid declaring multiple variables in one statement
DescriptionRequires that only a single variable is declared per declaration statement.
BenefitsDeclaring multiple variables in a single declaration statement is confusing.
Examplepackage examples.rules.codsta;
class MVOS { String s, s1; // VIOLATION;
public MVOS() { s1 = "hello"; s2 = "world"; }
public boolean method() { int i = 0, j = 0; // VIOLATION return (i == j); }
public String toString() { return s + " " + s1; }}
RepairGive each variable its own declaration statement.
456

CODSTA.MVOS-3 Avoid declaring multiple variables in one statement
457
Ref
eren
ce
package examples.rules.codsta;
class MVOSFixed { String s1; // FIXED String s2;
public MVOSFixed() { s1 = "hello"; s2 = "world"; }
public boolean method() { int i = 0; // FIXED int j = 0; return (i == j); }
public String toString() { return s + " " + s1; }}

CODSTA.NCAC-2 Avoid calling an "abstract" method from a constructor in an "abstract"
Referen
ce
CODSTA.NCAC-2Avoid calling an "abstract" method from a constructor in an "abstract" class
DescriptionDisallows calling of "abstract" methods from an "abstract" class's con-structor.
BenefitsCalling "abstract" methods from an "abstract" class's constructor causes the object's methods to be used before the object has finished its con-structors.
Examplepackage examples.rules.codsta;
abstract class NCAC { public NCAC () { System.out.println("Constructor: "); test ();// VIOLATION: calls an abstract method from the
constructor. } abstract public void test (); }
class MyClass extends NCAC { public MyClass (int size) { super (); System.out.println("setting size to : " + size); _size = size; } public void test () { _size++;
458

CODSTA.NCAC-2 Avoid calling an "abstract" method from a constructor in an "abstract" class
459
Ref
eren
ce
System.out.println("Increment : " + _size); } private int _size = 0;}
The output from "MyClass mc = new MyClass (50);" is:
Constructor: Increment : 1 // super class's constructor called test(); setting size to : 50 // finish executing MyClass' constructor.
RepairRemove any calls to "abstract" methods from the "abstract" class's con-structor.
package examples.rules.codsta;
abstract class NCACFixed { public NCACFixed () { System.out.println("Constructor: "); // FIXED } abstract public void test (); }
ReferenceWarren, Nigel, and Bishop, Philip. Java in Practice. Addison-Wesley, 1999, pp.103-104.

CODSTA.NCE-4 Avoid using ‘Exception’, RuntimeException’, or ‘Throwable’ in “catch”
Referen
ce
CODSTA.NCE-4Avoid using ‘Exception’, RuntimeException’, or ‘Throwable’ in “catch” statement
DescriptionDisallows the use of "catch" on 'Exception', 'RuntimeException' or 'Throw-able'.
BenefitsIf you "catch" one of these general error types, then your code might acci-dentally "catch" errors that were supposed to be caught (or left uncaught) by the caller of the current method. You should always try to catch the specific subclasses of 'Exception' that your code is meant to handle.
ExampleThe example below tries to read from an input stream, so it should try to "catch" 'IOException' and deal with it accordingly.
package examples.rules.codsta;
public class NCE { void method () { try { System.in.read(); } catch (Exception e1) { // VIOLATION } }}
Repair
460

CODSTA.NCE-4 Avoid using ‘Exception’, RuntimeException’, or ‘Throwable’ in “catch” statement
461
Ref
eren
ce
Deal with subclasses of 'Exception', 'RuntimeException', and 'Throwable' when handling exceptions.
package examples.rules.codsta;
public class NCEFixed { void method () { try { System.in.read(); } catch (java.io.IOException e1) { // FIXED } }}
ReferenceWarren, Nigel, and Bishop, Philip. Java in Practice. Addison-Wesley, 1999, p. 68.

CODSTA.NEA-1 Avoid nested assignments
462
Referen
ce
CODSTA.NEA-1Avoid nested assignments
DescriptionDisallows the use of nested assignments.
BenefitsNested assignments can be difficult to read, so this rule will improve the readability of your code.
Examplepackage examples.rules.codsta;
public class NEA { int method (int i, int j) { int k = (i = i + j) + j; // VIOLATION return k; }}
RepairSeparate the nested assignments into multiple statements.
package examples.rules.codsta;
public class NEAFixed { int method (int i, int j) { i = i + j; // FIXED int k = i + j; // FIXED return k; }}

CODSTA.NTX-3 Avoid using "throws" Exception; Always use a subclass of 'Exception'
463
Ref
eren
ce
CODSTA.NTX-3Avoid using "throws" Exception; Always use a subclass of 'Exception'
DescriptionReports an error if a method is declared to throw 'Exception'.
BenefitsSince 'Exception' is the superclass of all exceptions, a method declared to throw 'Exception' obscures the kinds of exceptions that users of the method will have to deal with.
Examplepackage examples.rules.codsta;
public class NTX { void lostDetailsTest () throws Exception { // VIOLATION try { throw new java.io.IOException ("IO exception"); }}
RepairDo not declare a method with "throws" Exception. Also, always catch exceptions that might occur in the "finally" block.
package examples.rules.codsta;
public class NTXFixed { void lostDetailsTest () throws java.io.IOException { // FIXED try { throw new java.io.IOException ("IO exception"); }

CODSTA.NTX-3 Avoid using "throws" Exception; Always use a subclass of 'Exception'
Referen
ce
}
ReferenceWarren, Nigel, and Bishop, Philip. Java in Practice. Addison-Wesley, 1999, p. 76.
464

CODSTA.OGM-3 Organize methods by name
465
Ref
eren
ce
CODSTA.OGM-3Organize methods by name
DescriptionRequires that methods of the same name be grouped together.
BenefitsFollowing this rule should improve the legibility of the code.
Examplepackage examples.rules.codsta;
public class OGM { void foo () {} void bar () {} void foo (int a) { // VIOLATION: this should be with the previ-ous 'foo ()' } }
RepairMove the 'foo' methods together.
package examples.rules.codsta;
public class OGMFixed { void foo () {} void foo (int a) { // FIXED } void bar () {}}

CODSTA.OTOSM-3 Always override 'toString ()'
Referen
ce
CODSTA.OTOSM-3Always override 'toString ()'
DescriptionRequires that classes have a 'toString ()' method.
BenefitsThe default 'toString ()' method in java.lang.Object returns a string repre-sentation of the object that has nothing to do with the actual contents of the object.
Examplepackage examples.rules.codsta;
class OTOSM { // VIOLATION OTOSM () { company = "ParaSoft"; product = "Jtest"; } void display () { System.out.println (toString ()); } private String company; private String product;}
RepairImplement your own 'toString ()' method that returns a meaningful string representation of the object.
package examples.rules.codsta;
class OTOSMFixed { OTOSMFixed () {
466

CODSTA.OTOSM-3 Always override 'toString ()'
467
Ref
eren
ce
company = "ParaSoft"; product = "Jtest"; } public String toString () { // FIXED return company + ' ' + product; } void display () { System.out.println (toString ()); } private String company; private String product;}
ReferenceBloch, Joshua. Effective Java Programming Language Guide. Addison Wesley, 2001, pp. 42-44.

CODSTA.OVERLOAD-4 Avoid multiple overloaded methods with the same number of pa-
Referen
ce
CODSTA.OVERLOAD-4Avoid multiple overloaded methods with the same number of parameters
DescriptionDisallows having an overloaded method with the same number of param-eters as another version of the same method.
BenefitsThis rule is intended to catch the especially confusing problems that result from having overloaded methods with parameters that are of compatible types. For example, if we have the following code where class B "extends" class A, callers may easily confuse which method will be called. :
class test { public void foo (A param) { /* ... */ } public void foo (B param) { /* ... */ } // ... }
For example, in the following variable declaration the 'A' form of the method will be called if we call 'foo (x)' because even though 'x' is an instance of the 'B' class, it is in a 'A' variable.
A x = new B ();
DrawbacksOne strategy for allowing an algorithm to accept different types of input is to write overloaded methods that accept parameters of different types. You only need to learn the signature of the general method and do not have to remember any variations in signature from method to method. Java's String class provides such a method for conversion of numeric
468

CODSTA.OVERLOAD-4 Avoid multiple overloaded methods with the same number of pa-
469
Ref
eren
ce
types to Strings, 'valueOf ()', which takes any basic numeric type as a parameter.
Examplepackage examples.rules.codsta;
import java.util.*;
class OVERLOAD { public void method (ArrayList al) {} // VIOLATION public void method (Vector v) {} // VIOLATION}
RepairDifferentiate the methods by either renaming them or changing the num-ber of parameters.
package examples.rules.codsta;
class OVERLOADFixed { public void arrayListMethod (ArrayList al) {} // FIXED public void vectorMethod (Vector v) {} // FIXED}
ReferenceBloch, Joshua. Effective Java Programming Language Guide. Addison Wesley, 2001, pp. 128-133.
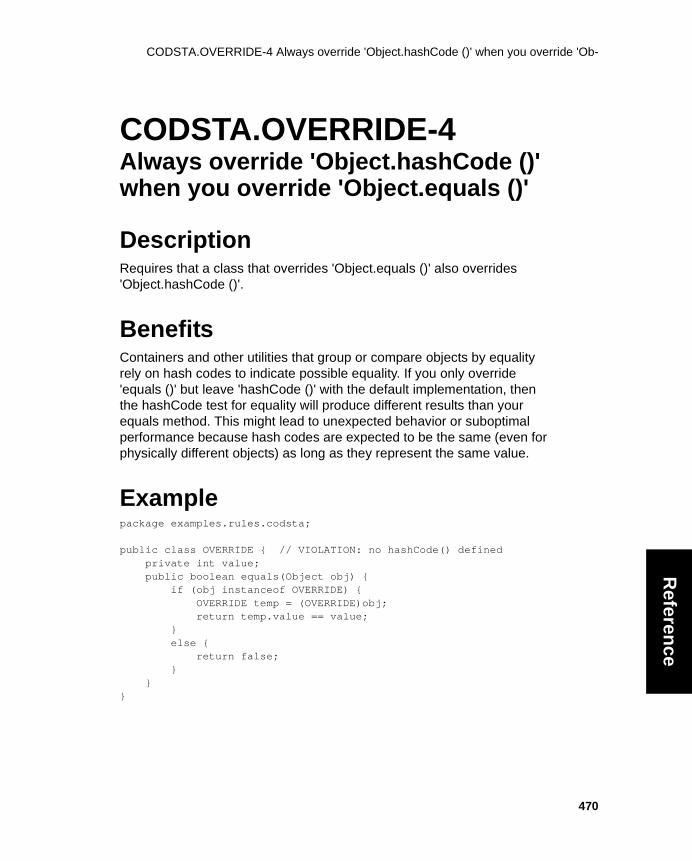
CODSTA.OVERRIDE-4 Always override 'Object.hashCode ()' when you override 'Ob-
Referen
ce
CODSTA.OVERRIDE-4Always override 'Object.hashCode ()' when you override 'Object.equals ()'
DescriptionRequires that a class that overrides 'Object.equals ()' also overrides 'Object.hashCode ()'.
BenefitsContainers and other utilities that group or compare objects by equality rely on hash codes to indicate possible equality. If you only override 'equals ()' but leave 'hashCode ()' with the default implementation, then the hashCode test for equality will produce different results than your equals method. This might lead to unexpected behavior or suboptimal performance because hash codes are expected to be the same (even for physically different objects) as long as they represent the same value.
Examplepackage examples.rules.codsta;
public class OVERRIDE { // VIOLATION: no hashCode() defined private int value; public boolean equals(Object obj) { if (obj instanceof OVERRIDE) { OVERRIDE temp = (OVERRIDE)obj; return temp.value == value; } else { return false; } }}
470

CODSTA.OVERRIDE-4 Always override 'Object.hashCode ()' when you override 'Ob-
471
Ref
eren
ce
RepairDefine a 'hashCode()' method in the class. This method should return a number based on the same fields that the 'equals()' method uses to test for equality. Ideally, 'hashCode()' should produce the same value for two objects only when 'equals()' return true when called on them.
package examples.rules.codsta;
public class OVERRIDEFixed { // FIXED: now overrides 'hashCode()' private int value; public boolean equals(Object obj) { if (obj instanceof OVERRIDEFixed) { OVERRIDEFixed temp = (OVERRIDEFixed)obj; return temp.value == value; } else { return false; } } public int hashCode() { return value; }}
Referencehttp://www.infospheres.caltech.edu/resources/code_standards/recom-mendations.html
Bloch, Joshua. Effective Java Programming Language Guide. Addison Wesley, 2001, pp. 36-41.

CODSTA.PML-4 Place the ‘main ()’ method last
472
Referen
ce
CODSTA.PML-4Place the ‘main ()’ method last
DescriptionRequires that the 'main ()' method be the last method in a class.
BenefitsThis helps enforce stylistic conventions across a project.
Examplepackage examples.rules.codsta;
class PML { public static void main (String args[]) { // VIOLATION System.out.println("Hello, world."); } void foo () { }}
RepairList the 'main ()' method last within the "class" definition.
package examples.rules.codsta;
class PMLFixed { void foo () { } public static void main (String args[]) { // FIXED System.out.println("Hello, world."); }}

CODSTA.SMC-3 Avoid “switch” statements with many "case" statements
473
Ref
eren
ce
CODSTA.SMC-3Avoid “switch” statements with many "case" statements
DescriptionDisallows "switch" statements with more than 10 cases.
Benefits"switch" statements with many "case" statements make code difficult to follow. More importantly, switches with many cases often indicate places where polymorphic behavior could better be used to provide different behavior for different types. Note that although the general principle is to avoid many cases in a switch, the actual cutoff point is arbitrary.
RepairLook for cleaner ways to invoke the alternative behaviors.

CODSTA.UCC-2 Declare only "private" constructors in utility classes
Referen
ce
CODSTA.UCC-2Declare only "private" constructors in utility classes
DescriptionRequires that a class whose members are all "static" only contains "pri-vate" constructors.
BenefitsA utility class only contains "static" methods and "static" fields. Since the utility class is not designed to be instantiated, all of the constructors should be "private".
Examplepackage examples.rules.codsta; public class UCC { public UCC() {} // VIOLATION public static String getS() { return s; } public static String s = "foo";}
RepairMake all the constructors "private".
package examples.rules.codsta;
public class UCCFixed { private UCCFixed() {} // FIXED public static String getS() { return s;
474

CODSTA.UCC-2 Declare only "private" constructors in utility classes
475
Ref
eren
ce
} public static String s = "foo";}
ReferenceBloch, Joshua. Effective Java Programming Language Guide. Addison Wesley, 2001, p. 12.

CODSTA.UCDC-2 Provide a "private" default constructor for utility classes
Referen
ce
CODSTA.UCDC-2Provide a "private" default constructor for utility classes
DescriptionRequires that a utility class explicitly declares a "private" default construc-tor (a constructor that has no arguments).
BenefitsA utility class only contains static methods and static variables. Since an implicit default constructor is "public" and a utility class is not designed to be instantiated, the "public" default constructor of a utility class should be declared "private".
Examplepackage examples.rules.codsta; public class UCDC { // VIOLATION: implicit default constructor is "public" public static String s = "foo"; public static String getS() { return s; }}
RepairDeclare an explicit "private" default constructor.
package examples.rules.codsta; public class UCDCFixed { private UCDCFixed () {} // FIXED public static String s = "foo";
476

CODSTA.UCDC-2 Provide a "private" default constructor for utility classes
477
Ref
eren
ce
public static String getS() { return s; }}
ReferenceBloch, Joshua. Effective Java Programming Language Guide. Addison Wesley, 2001, p. 12.

CODSTA.USN-2 Avoid using literal constants
478
Referen
ce
CODSTA.USN-2Avoid using literal constants
DescriptionDisallows use of literal constants.
To avoid reporting too many spurious errors, Jtest will not report an error for the following literal constants:
-1, 0, 1, 2, 3, 4, 5, 6, 7, 8, 9, 10, 0L, and 0.0
BenefitsNamed constants ("final static" fields) make the code much easier to understand and maintain.
Examplepackage examples.rules.codsta;
class USN { int[] getArray () { return new int [1000]; // VIOLATION }}
RepairPut the literal constant into a "static final" field.
package examples.rules.codsta;class USNFixed { int[] getArray () { return new int [ARRAY_SIZE]; // FIXED } private static final int ARRAY_SIZE = 1000;}

CODSTA.VDT-1 Avoid declaring multiple variables of different types in one statement
479
Ref
eren
ce
CODSTA.VDT-1Avoid declaring multiple variables of different types in one statement
DescriptionRequires that each variable declaration statement declares variables of a single type.
BenefitsDeclaring multiple variables of different types in a single declaration state-ment is confusing.
Examplepackage examples.rules.codsta;
class VDT {
private int index, index1[]; // VIOLATION
public void method () { int aaa, bbb[]; // VIOLATION int ccc; int ddd; }}
RepairUse separate declaration statements for variables of different types.
package examples.rules.codsta;
class VDTFixed {

CODSTA.VDT-1 Avoid declaring multiple variables of different types in one statement
Referen
ce
private int index; // FIXED private int index1[]; // FIXED
public void method () { int aaa; // FIXED int bbb[]; // FIXED int ccc; int ddd; }}
480

DBC.PKGC-4 Provide '@invariant' contract for all package-private classes
481
Ref
eren
ce
Design by Contract RulesDBC.PKGC-4Provide '@invariant' contract for all package-private classes
DescriptionRequires that all package-private classes have an '@invariant' contract.
Note: If the class does not contain any Javadoc comments, Jtest will not report this error.
BenefitsClass invariants are contracts that the objects of the class should always satisfy. A class invariant is often implicit in the design of a class, so by making it explicit, you help prevent bugs that violate the class's intended behavior.
Examplepackage examples.rules.dbc;
public class PKGC{ class Stack // VIOLATION { public int getSize () { return _size; } int _size; }}
Repair

DBC.PKGC-4 Provide '@invariant' contract for all package-private classes
Referen
ce
Provide an '@invariant' contract or document the lack of a contract using '/** @invariant $none */'.
package examples.rules.dbc;
public class PKGCFixed{ /** @invariant getSize () >= 0 */ // FIXED class Stack { public int getSize () { return _size; } int _size; }}
482

DBC.PKGMPOST-4 Provide '@post' contract for all package-private methods
483
Ref
eren
ce
DBC.PKGMPOST-4Provide '@post' contract for all package-private methods
DescriptionAll package-private methods should have a '@post' contract.
Note: If the class does not contain any Javadoc comments, Jtest will not report this error.
BenefitsPostconditions check whether the method works correctly.
Examplepackage examples.rules.dbc;public class PKGMPOST{ int add (int a, int b) { // VIOLATION return a + b; }}
RepairProvide a '@post' contract or explicitly document the lack of one using '/** @post $none */'.
package examples.rules.dbc;public class PKGMPOSTFixed{ /** @post $result == a + b */ // FIXED int add (int a, int b) { return a + b; }

DBC.PKGMPOST-4 Provide '@post' contract for all package-private methods
Referen
ce
}
484

DBC.PKGMPRE-4 Provide '@pre' contract for all package-private methods
485
Ref
eren
ce
DBC.PKGMPRE-4Provide '@pre' contract for all package-private methods
DescriptionAll package-private methods should have a '@pre' contract.
Note: If the class does not contain any Javadoc comments, Jtest will not report this error.
BenefitsPreconditions check that the client calls the method correctly.
Examplepackage examples.rules.dbc;
public class PKGMPRE{ int setMonth (int month) { // VIOLATION _month = month; } private int _month;}
RepairProvide a '@pre' contract or document the lack of one using '/** @pre none */'.
package examples.rules.dbc;
public class PKGMPREFixed{

DBC.PKGMPRE-4 Provide '@pre' contract for all package-private methods
Referen
ce
/** @pre month >= 1 && month <= 12 */ // FIXED int setMonth (int month) { _month = month; } private int _month;}
486

DBC.PRIC-5 Provide '@invariant' contract for all "private" classes
487
Ref
eren
ce
DBC.PRIC-5Provide '@invariant' contract for all "private" classes
DescriptionAll "private" classes should have an '@invariant' contract.
Note: If the class does not contain any Javadoc comments, Jtest will not report this error.
BenefitsClass invariants are contracts that the objects of the class should always satisfy. A class invariant is often implicit in the design of a class, so by making it explicit, you help prevent bugs that violate the class' intended behavior.
Examplepackage examples.rules.dbc;
public class PRIC{ private class Stack // VIOLATION { public int getSize () { return _size; } private int _size; }}
RepairProvide an '@invariant' contract or document the lack of one using '/** @invariant $none */'.

DBC.PRIC-5 Provide '@invariant' contract for all "private" classes
Referen
ce
package examples.rules.dbc;
public class PRICFixed{ /** @invariant getSize () >= 0 */ //FIXED private class Stack { public int getSize () { return _size; } private int _size; }}
488
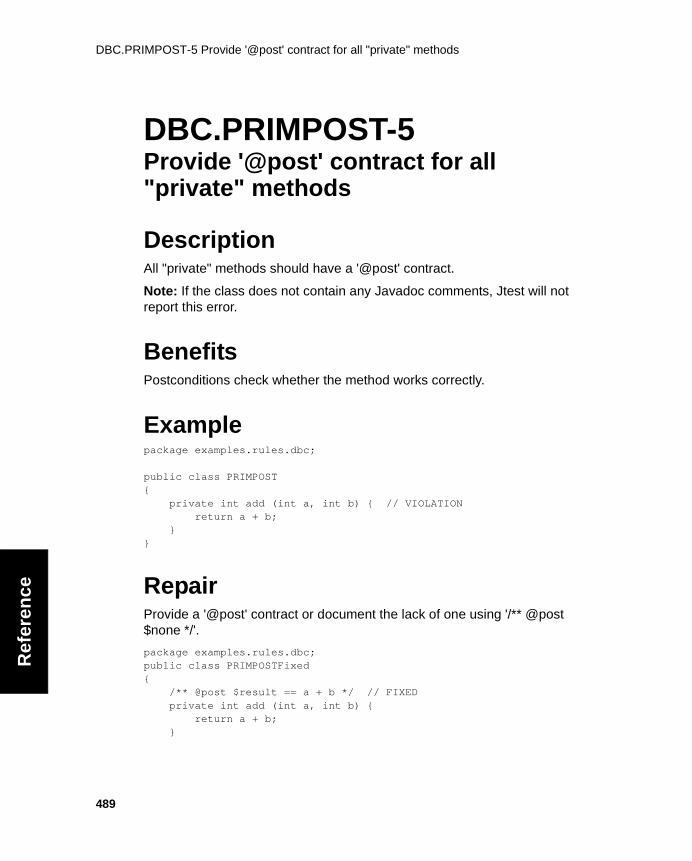
DBC.PRIMPOST-5 Provide '@post' contract for all "private" methods
489
Ref
eren
ce
DBC.PRIMPOST-5Provide '@post' contract for all "private" methods
DescriptionAll "private" methods should have a '@post' contract.
Note: If the class does not contain any Javadoc comments, Jtest will not report this error.
BenefitsPostconditions check whether the method works correctly.
Examplepackage examples.rules.dbc;
public class PRIMPOST{ private int add (int a, int b) { // VIOLATION return a + b; }}
RepairProvide a '@post' contract or document the lack of one using '/** @post $none */'.
package examples.rules.dbc;public class PRIMPOSTFixed{ /** @post $result == a + b */ // FIXED private int add (int a, int b) { return a + b; }

DBC.PRIMPOST-5 Provide '@post' contract for all "private" methods
Referen
ce
}
490

DBC.PRIMPRE-5 Provide '@pre' contract for all "private" methods
491
Ref
eren
ce
DBC.PRIMPRE-5Provide '@pre' contract for all "private" methods
DescriptionAll "private" methods should have a '@pre' contract.
Note: If the class does not contain any Javadoc comments, Jtest will not report this error.
BenefitsPreconditions check that the client calls the method correctly.
Examplepackage examples.rules.dbc;
public class PRIMPRE{ private int setMonth (int month) { // VIOLATION _month = month; } private int _month;}
RepairProvide a '@pre' contract or document the lack of one using '/** @pre $none */'.
package examples.rules.dbc;
public class PRIMPREFixed{ /** @pre month >= 1 && month <= 12 */ // FIXED

DBC.PRIMPRE-5 Provide '@pre' contract for all "private" methods
Referen
ce
private int setMonth (int month) { _month = month; } private int _month;}
492

DBC.PROC-3 Provide '@invariant' contract for all "protected" classes
493
Ref
eren
ce
DBC.PROC-3Provide '@invariant' contract for all "protected" classes
DescriptionAll "protected" classes should have an '@invariant' contract.
Note: If the class does not contain any Javadoc comments, Jtest will not report this error.
BenefitsClass invariants are contracts that the objects of the class should always satisfy. A class invariant is often implicit in the design of a class, so by making it explicit, you help prevent bugs that violate the class' intended behavior.
Examplepackage examples.rules.dbc;
public class PROC { protected class Stack // VIOLATION { public int getSize () { return _size; } private int _size; }}
RepairProvide an '@invariant' contract or document the lack of one using '/** @invariant $none */'.

DBC.PROC-3 Provide '@invariant' contract for all "protected" classes
Referen
ce
package examples.rules.dbc;
public class PROC{ /** @invariant getSize () >= 0 */ // FIXED protected class Stack { public int getSize () { return _size; } private int _size; }}
494

DBC.PROMPOST-3 Provide '@post' contract for all "protected" methods
495
Ref
eren
ce
DBC.PROMPOST-3Provide '@post' contract for all "protected" methods
DescriptionAll "protected" methods should have a '@post' contract.
Note: If the class does not contain any Javadoc comments, Jtest will not report this error.
BenefitsPostconditions check whether the method works correctly.
Examplepackage examples.rules.dbc;public class PROMPOST{ protected int add (int a, int b) { // VIOLATION return a + b; }}
RepairProvide a '@post' contract or document the lack of one using '/** @post $none */'.
package examples.rules.dbc;
public class PROMPOSTFixed{ /** @post $result == a + b */ // FIXED protected int add (int a, int b) { return a + b; }

DBC.PROMPOST-3 Provide '@post' contract for all "protected" methods
Referen
ce
}
496

DBC.PROMPRE-3 Provide '@pre' contract for all "protected" methods
497
Ref
eren
ce
DBC.PROMPRE-3Provide '@pre' contract for all "protected" methods
DescriptionAll "protected" methods should have a '@pre' contract.
Note: If the class does not contain any Javadoc comments, Jtest will not report this error.
BenefitsPreconditions check that the client calls the method correctly.
Examplepackage examples.rules.dbc;public class PROMPRE{ protected int setMonth (int month) { // VIOLATION _month = month; } private int _month;}
RepairProvide a '@pre' contract or document the lack of one using '/** @pre $none */'.

DBC.PROMPRE-3 Provide '@pre' contract for all "protected" methods
Referen
ce
package examples.rules.dbc;public class PROMPREFixed{ /** @pre month >= 1 && month <= 12 */ // FIXED protected int setMonth (int month) { _month = month; } private int _month;}
498

DBC.PUBC-2 Provide '@invariant' contract for all "public" classes
499
Ref
eren
ce
DBC.PUBC-2Provide '@invariant' contract for all "public" classes
DescriptionAll "public" classes should have an '@invariant' contract.
Note: If the class does not contain any Javadoc comments, Jtest will not report this error.
BenefitsClass invariants are contracts that the objects of the class should always satisfy. A class invariant is often implicit in the design of a class, so by making it explicit, you help prevent bugs that violate the class' intended behavior.
Examplepackage examples.rules.dbc;
public class PUBC{ public int getSize () { // VIOLATION return _size; } private int _size;}
RepairProvide an '@invariant' contract or document the lack of one using '/** @invariant $none */'.
package examples.rules.dbc;

DBC.PUBC-2 Provide '@invariant' contract for all "public" classes
Referen
ce
/** @invariant getSize () >= 0 */ // FIXEDpublic class PUBCFixed{ public int getSize () { return _size; } private int _size;}
500

DBC.PUBMPOST-2 Provide '@post' contract for all "public" methods
501
Ref
eren
ce
DBC.PUBMPOST-2Provide '@post' contract for all "public" methods
DescriptionAll "public" methods should have a '@post' contract.
Note: If the class does not contain any Javadoc comments, Jtest will not report this error.
BenefitsPostconditions check whether the method works correctly.
Examplepackage examples.rules.dbc;public class PUBMPOST{ public int add (int a, int b) { // VIOLATION return a + b; }}
RepairProvide a '@post' contract or document the lack of one using '/** @post $none */'.
package examples.rules.dbc;public class PUBMPOSTFixed{ /** @post $result == a + b */ // FIXED public int add (int a, int b) { return a + b; }}

DBC.PUBMPRE-2 Provide '@pre' contract for all "public" methods
Referen
ce
DBC.PUBMPRE-2Provide '@pre' contract for all "public" methods
DescriptionAll "public" methods should have a '@pre' contract.
Note: If the class does not contain any Javadoc comments, Jtest will not report this error.
BenefitsPreconditions check that the client calls the method correctly.
Examplepackage examples.rules.dbc;
public class PUBMPRE{ public int setMonth (int month) { // VIOLATION _month = month; } private int _month;}
RepairProvide a '@pre' contract or document the lack of one using '/** @pre $none */'.
package examples.rules.dbc;public class PUBMPREFixed{ /** @pre month >= 1 && month <= 12 */ // FIXED public int setMonth (int month) { _month = month;
502

DBC.PUBMPRE-2 Provide '@pre' contract for all "public" methods
503
Ref
eren
ce
} private int _month;}

DBC.SYNTAX-1 Use correct syntax in the contracts
Referen
ce
DBC.SYNTAX-1Use correct syntax in the contracts
DescriptionChecks contracts for syntactical errors.
See “About Design by Contract” on page 239 and “The Design by Con-tract Specification Language” on page 243 for details on Design by Con-tract.
For a more complete check of your contracts, consider compiling your classes with the 'dbc_javac' compiler in the companion Jcontract tool (available at http://www.parasoft.com).
Examplepackage examples.rules.dbc;
import java.io.*;
public class SYNTAX{ /** @throws an io exception */ // VIOLATION
FileInputStream openFile (String path) throws java.io.IOException { // ... }
/** @throws no exceptions */ // VIOLATION
static void method () { }}
RepairUse the correct syntax for the @throws tag:
504

DBC.SYNTAX-1 Use correct syntax in the contracts
505
Ref
eren
ce
/** @throws exception_class_name text */
The repaired class follows:
package examples.rules.dbc;
import java.io.*;
public class SYNTAXFixed{ /** @throws IOException */ // FIXED
FileInputStream openFile (String path) throws IOException { System.in.read (); }
/** @throws $none */ // FIXED
static void method () { }}

EJB.AMSC-2 Avoid accessing or modifying security configuration objects
506
Referen
ce
EJB RulesEJB.AMSC-2Avoid accessing or modifying security configuration objects
DescriptionBean classes should not access or modify security configuration objects for security reasons.
ReferenceMahapatra, Sanjay. Programming Restrictions on EJB. JavaWorld, (August 2000).
http://www.javaworld.com/javaworld/jw-08-2000/jw-0825-ejbrestrict.html
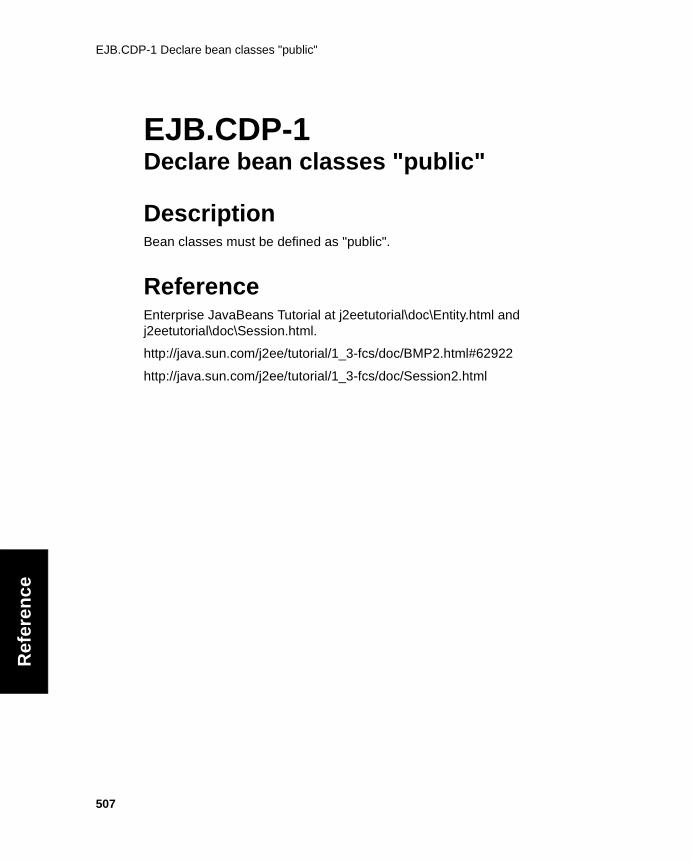
EJB.CDP-1 Declare bean classes "public"
507
Ref
eren
ce
EJB.CDP-1Declare bean classes "public"
DescriptionBean classes must be defined as "public".
ReferenceEnterprise JavaBeans Tutorial at j2eetutorial\doc\Entity.html and j2eetutorial\doc\Session.html.
http://java.sun.com/j2ee/tutorial/1_3-fcs/doc/BMP2.html#62922
http://java.sun.com/j2ee/tutorial/1_3-fcs/doc/Session2.html

EJB.CNDA-1 Do not declare bean classes as "abstract"
508
Referen
ce
EJB.CNDA-1Do not declare bean classes as "abstract"
DescriptionBean classes cannot be defined as "abstract".
ReferenceEnterprise JavaBeans Tutorial at j2eetutorial\doc\Entity.html and j2eetutorial\doc\Session.html.
http://java.sun.com/j2ee/tutorial/1_3-fcs/doc/BMP2.html#62922
http://java.sun.com/j2ee/tutorial/1_3-fcs/doc/Session2.html

EJB.CNDF-1 Do not declare bean classes as "final"
509
Ref
eren
ce
EJB.CNDF-1Do not declare bean classes as "final"
DescriptionBean classes cannot be defined as "final".
ReferenceEnterprise JavaBeans Tutorial at j2eetutorial\doc\Entity.html and j2eetutorial\doc\Session.html.
http://java.sun.com/j2ee/tutorial/1_3-fcs/doc/BMP2.html#62922
http://java.sun.com/j2ee/tutorial/1_3-fcs/doc/Session2.html
EJB.CRTE-1 Declare 'ejbCreate ()' methods "public", but neither "static" nor "final"
510
Referen
ce
EJB.CRTE-1Declare 'ejbCreate ()' methods "public", but neither "static" nor "final"
DescriptionAn enterprise bean must have one or more ejbCreate methods.
The methods must be "public" and can be neither "static" nor "final".
ReferenceEnterprise JavaBeans Tutorial at j2eetutorial\doc\Entity.html and j2eetutorial\doc\Session.html.
http://java.sun.com/j2ee/tutorial/1_3-fcs/doc/BMP2.html#62922
http://java.sun.com/j2ee/tutorial/1_3-fcs/doc/Session2.html
EJB.FNDM-1 Declare finder methods "public" and neither "final" nor "static"
511
Ref
eren
ce
EJB.FNDM-1Declare finder methods "public" and neither "final" nor "static"
DescriptionFinder methods must be neither "final" nor "static" and they must be "pub-lic".
ReferenceEnterprise JavaBeans Tutorial at j2eetutorial\doc\Entity.html and j2eetutorial\doc\Session.html.
http://java.sun.com/j2ee/tutorial/1_3-fcs/doc/BMP2.html#62922
http://java.sun.com/j2ee/tutorial/1_3-fcs/doc/Session2.html

EJB.IECM-1 Implement one or more 'ejbCreate ()' methods in bean classes
512
Referen
ce
EJB.IECM-1Implement one or more 'ejbCreate ()' methods in bean classes
DescriptionBean classes must implement one or more 'ejbCreate ()' methods.
ReferenceEnterprise JavaBeans Tutorial at j2eetutorial\doc\Entity.html and j2eetutorial\doc\Session.html.
http://java.sun.com/j2ee/tutorial/1_3-fcs/doc/BMP2.html#62922
http://java.sun.com/j2ee/tutorial/1_3-fcs/doc/Session2.html
EJB.IEPM-1 Implement one or more 'ejbPostCreate ()' methods in EntityBean classes
513
Ref
eren
ce
EJB.IEPM-1Implement one or more 'ejbPostCreate ()' methods in EntityBean classes
DescriptionEntityBean classes must implement one or more 'ejbPostCreate ()' meth-ods.
ReferenceEnterprise JavaBeans Tutorial at j2eetutorial\doc\Entity.html and j2eetutorial\doc\Session.html.
http://java.sun.com/j2ee/tutorial/1_3-fcs/doc/BMP2.html#62922
http://java.sun.com/j2ee/tutorial/1_3-fcs/doc/Session2.html

EJB.LNL-2 Avoid loading native libraries in a Bean class
514
Referen
ce
EJB.LNL-2Avoid loading native libraries in a Bean class
DescriptionLoading native libraries in a Bean class should be avoided.
ReferenceMahapatra, Sanjay. Programming Restrictions on EJB. JavaWorld, (August 2000).
http://www.javaworld.com/javaworld/jw-08-2000/jw-0825-ejbrestrict.html

EJB.MDBC-1 Implement the 'ejbCreate()' method for all message-driven bean classes
515
Ref
eren
ce
EJB.MDBC-1Implement the 'ejbCreate()' method for all message-driven bean classes
DescriptionEach message-driven bean class must have one ‘ejbCreate()’ method with no arguments.
Referenceftp://ftp.java.sun.com/pub/ejb/947q9tbb/ejb-2_0-fr2-spec.pdf
pg.316 section 15.4.4

EJB.MEC-1 Define a matching 'ejbPostCreate' method for each 'ejbCreate' method in entity
516
Referen
ce
EJB.MEC-1Define a matching 'ejbPostCreate' method for each 'ejbCreate' method in entity bean classes
DescriptionFor each ejbCreate<METHOD> () method, the entity bean class must define a matching ejbPostCreate<METHOD> () method in Enterprise Jav-aBeans specification version 2.0.
Referenceftp://ftp.java.sun.com/pub/ejb/947q9tbb/ejb-2_0-fr2-spec.pdf
pg. 192 section 10.6.5
EJB.MNDF-1 Do not define 'finalize ()' method in bean classes
517
Ref
eren
ce
EJB.MNDF-1Do not define 'finalize ()' method in bean classes
DescriptionBean classes must not define the 'finalize ()' method.
ReferenceEnterprise JavaBeans Tutorial at j2eetutorial\doc\Entity.html and j2eetutorial\doc\Session.html.
http://java.sun.com/j2ee/tutorial/1_3-fcs/doc/BMP2.html#62922
http://java.sun.com/j2ee/tutorial/1_3-fcs/doc/Session2.html

EJB.MRE-1 Throw 'java.rmi.RemoteException' in the methods of the session beans’ remote
518
Referen
ce
EJB.MRE-1Throw 'java.rmi.RemoteException' in the methods of the session beans’ remote interface and remote home interface
DescriptionSession and entity bean methods must follow the rules for RMI/IIOP. This means that their argument and return values must be of valid types for RMI/IIOP and their throws clauses must include the java.rmi.RemoteEx-ception.
Referenceftp://ftp.java.sun.com/pub/ejb/947q9tbb/ejb-2_0-fr2-spec.pdf
pg.97 sections 7.10.5 and 7.10.6.

EJB.NAC-1 Do not have arguments in MessageDrivenBeans' 'ejbCreate()' method
519
Ref
eren
ce
EJB.NAC-1Do not have arguments in MessageDrivenBeans' 'ejbCreate()' method
DescriptionEach message-driven bean class must have one ‘ejbCreate()’ method with no arguments.
Referenceftp://ftp.java.sun.com/pub/ejb/947q9tbb/ejb-2_0-fr2-spec.pdf
pg.316 section 15.4.4.

EJB.NFDC-1 Declare a "public" constructor that takes no parameters
520
Referen
ce
EJB.NFDC-1Declare a "public" constructor that takes no parameters
DescriptionThe bean class must have a "public" constructor that takes no parame-ters. The container uses this constructor to create an instance of the bean class.
Referenceftp://ftp.java.sun.com/pub/ejb/947q9tbb/ejb-2_0-fr2-spec.pdf
pg. 95 section 7.10.2
pg. 170 section 10.5.2
pg. 323 section 15.7.2

EJB.NFS-2 Declare all "static" fields in the EJB component "final"
521
Ref
eren
ce
EJB.NFS-2Declare all "static" fields in the EJB component "final"
DescriptionRequires that all "static" fields in the EJB component be declared "final".
BenefitsThis ensures consistent runtime semantics so that EJB containers have the flexibility to distribute instances across multiple JVMs.
ReferenceMahapatra, Sanjay. Programming Restrictions on EJB. JavaWorld, (August 2000).
http://www.javaworld.com/javaworld/jw-08-2000/jw-0825-ejbrestrict.html

EJB.PCRTE-1 Declare 'ejbPostCreate ()' "public" and neither "static" nor "final"
522
Referen
ce
EJB.PCRTE-1Declare 'ejbPostCreate ()' "public" and neither "static" nor "final"
Description'ejbPostCreate ()' must be "public", and it cannot be "static" or "final".
ReferenceEnterprise JavaBeans Tutorial at j2eetutorial\doc\Entity.html and j2eetutorial\doc\Session.html.
http://java.sun.com/j2ee/tutorial/1_3-fcs/doc/BMP2.html#62922
http://java.sun.com/j2ee/tutorial/1_3-fcs/doc/Session2.html

EJB.RILH-1 Do not throw 'java.rmi.RemoteException' in a bean's local interface and local
523
Ref
eren
ce
EJB.RILH-1Do not throw 'java.rmi.RemoteException' in a bean's local interface and local home interface
DescriptionThe methods of the session bean's and entity bean's local interface and local home interface must not throw the java.rmi.RemoteException.
Referenceftp://ftp.java.sun.com/pub/ejb/947q9tbb/ejb-2_0-fr2-spec.pdf
pg. 98 sections 7.10.7 and 7.10.8
pg. 122 section 9.10

EJB.RT-1 Make finder methods' return type the primary key or a collection of primary keys
524
Referen
ce
EJB.RT-1Make finder methods' return type the primary key or a collection of primary keys
DescriptionThe return type of finder methods must be the primary key or a collection of primary keys.
ReferenceEnterprise JavaBeans Tutorial at j2eetutorial\doc\Entity.html and j2eetutorial\doc\Session.html.
http://java.sun.com/j2ee/tutorial/1_3-fcs/doc/BMP2.html#62922
http://java.sun.com/j2ee/tutorial/1_3-fcs/doc/Session2.html

EJB.RTC-1 Make the return type "void" for SessionBeans' 'ejbCreate ()' methods
525
Ref
eren
ce
EJB.RTC-1Make the return type "void" for SessionBeans' 'ejbCreate ()' methods
DescriptionRequires that SessionBeans' 'ejbCreate ()' methods' have a "void" return type.
ReferenceEnterprise JavaBeans Tutorial at j2eetutorial\doc\Entity.html and j2eetutorial\doc\Session.html.
http://java.sun.com/j2ee/tutorial/1_3-fcs/doc/BMP2.html#62922
http://java.sun.com/j2ee/tutorial/1_3-fcs/doc/Session2.html

EJB.RTP-1 Make the return type "void" for the 'ejbPostCreate ()' method
526
Referen
ce
EJB.RTP-1Make the return type "void" for the 'ejbPostCreate ()' method
DescriptionRequires that the 'ejbPostCreate ()' method's return type be "void".
ReferenceEnterprise JavaBeans Tutorial at j2eetutorial\doc\Entity.html and j2eetutorial\doc\Session.html.
http://java.sun.com/j2ee/tutorial/1_3-fcs/doc/BMP2.html#62922
http://java.sun.com/j2ee/tutorial/1_3-fcs/doc/Session2.html

EJB.RUH-2 Reuse EJB homes
527
Ref
eren
ce
EJB.RUH-2Reuse EJB homes
DescriptionEJB homes are obtained from the WebSphere Application Server through a JNDI naming lookup. This is an expensive operation that can be mini-mized by caching and reusing EJB Home objects.
Note that this rule only applies to a simple application like that shown in the Repair section.
Examplepackage examples.rules.ejb;
import javax.servlet.*;import javax.servlet.http.*;import javax.rmi.*;import javax.naming.*;
public class RUH extends HttpServlet { public void transaction () throws ServletException { Context ctx = null; try { ctx = new InitialContext (new java.util.Hashtable ()); Object homeObject = ctx.lookup ("EJB JNDI NAME"); //violation, Home interface should not be a local vari-able. AccountHome aHome = (AccountHome)PortableRemoteOb-ject.narrow ( homeObject, AccountHome.class); } catch (Exception e) { throw new ServletException ("INIT ERROR" +e.getMessage (), e); } finally { try { if (ctx != null) ctx.close (); } catch (Exception e) {} } }

EJB.RUH-2 Reuse EJB homes
Referen
ce
}
RepairCaching EJB Home in Servlet init method.
package examples.rules.ejb;
import javax.servlet.*;import javax.servlet.http.*;import javax.naming.*;
public class rw137_correct extends HttpServlet { private AccountHome aHome = null; // cache Home interface. public void init (ServletConfig config) throws ServletException { super.init (config); Context ctx = null; try { ctx = new InitialContext (new java.util.Hashtable ()); Object homeObject = ctx.lookup ("EJB JNDI NAME"); aHome = (AccountHome)javax.rmi.PortableRemoteObject.nar-row ( homeObject, AccountHome.class); } catch (Exception e) { throw new ServletException ("INIT ERROR" +e.getMessage (), e); } finally { try { if (ctx != null) ctx.close (); } catch (Exception e) {} } }}
For simple applications, it might be enough to acquire the EJB home in the servlet init() method.
More complicated applications might require cached EJB homes in many servlet and EJBs. In these cases, you might want to create an EJB Home Locator and Caching class.
Reference
528
EJB.RUH-2 Reuse EJB homes
529
Ref
eren
ce
Gunther. Harvey W. IBM WebSphere Application Server Standard and Advanced Editions.
http://www-4.ibm.com/software/webservers/apps-erv/ws_bestpractices.pdf
EJB.TCE-1 Throw 'javax.ejb.CreateException' in create methods of remote home or local
530
Referen
ce
EJB.TCE-1Throw 'javax.ejb.CreateException' in create methods of remote home or local home interfaces
DescriptionA create<Method> method in a remote home or local home interface must have a throws clause that includes javax.ejb.CreateException.
Referenceftp://ftp.java.sun.com/pub/ejb/947q9tbb/ejb-2_0-fr2-spec.pdf
pg. 97 section 7.10.6
pg. 98 section 7.10.8
pg. 112 section 9.5.1
pg. 115 section 9.6.1

EJB.TFE-1 Throw 'javax.ejb.FinderException' in finder methods of remote home or local
531
Ref
eren
ce
EJB.TFE-1Throw 'javax.ejb.FinderException' in finder methods of remote home or local home interfaces
DescriptionA find<Method> method in a remote home or local home interface must have a throws clause that includes javax.ejb.FinderException.
Referenceftp://ftp.java.sun.com/pub/ejb/947q9tbb/ejb-2_0-fr2-spec.pdf
pg. 113 section 9.5.2
pg. 116 section 9.6.2

EJB.THISARG-1 Avoid passing the "this" reference as an argument
532
Referen
ce
EJB.THISARG-1Avoid passing the "this" reference as an argument
DescriptionDisallows passing "this" as an argument.
RepairUse ‘getEJBObject ()’ available in SessionContext or EntityContext.
ReferenceMahapatra, Sanjay. Programming Restrictions on EJB. JavaWorld, (August 2000).
http://www.javaworld.com/javaworld/jw-08-2000/jw-0825-ejbrestrict.html

EJB.THISRET-1 Avoid returning "this"
533
Ref
eren
ce
EJB.THISRET-1Avoid returning "this"
DescriptionDisallows returning "this".
RepairUse ‘getEJBObject ()’ available in SessionContext or EntityContext.
ReferenceMahapatra, Sanjay. Programming Restrictions on EJB. JavaWorld, (August 2000).
http://www.javaworld.com/javaworld/jw-08-2000/jw-0825-ejbrestrict.html

EJB.THREAD-2 Avoid starting, stopping, or managing threads in any way
534
Referen
ce
EJB.THREAD-2Avoid starting, stopping, or managing threads in any way
DescriptionDisallows manually starting, stopping, and managing threads.
BenefitsNot starting, stopping, or managing thread usage eliminates the possibil-ity of conflicts with the EJB container's responsibility to manage locking, threading, and concurrency issues.
ReferenceMahapatra, Sanjay. Programming Restrictions on EJB. JavaWorld, (August 2000).
http://www.javaworld.com/javaworld/jw-08-2000/jw-0825-ejbrestrict.html

FORMAT.CBRACE-3 Place closing "}" braces on their own line
535
Ref
eren
ce
Formatting RulesFORMAT.CBRACE-3Place closing "}" braces on their own line
DescriptionRequires that a closing "}" brace be alone on a line.
BenefitsIf all team members follow the same formatting style, it will be easier for each team member to read and understand the code.
Examplepackage examples.rules.format;
public class CBRACE { private int index; } // VIOLATION
RepairPut the closing "}" brace on its own line.
package examples.rules.format;
public class CBRACEFixed { private int index;} // FIXED

FORMAT.CMS-3 Have at least one space after type casting
Referen
ce
FORMAT.CMS-3Have at least one space after type casting
DescriptionRequires that code contains at least one space after type casting.
BenefitsIf all team members follow the same formatting style, it will be easier for each team member to read and understand the code.
Examplepackage examples.rules.format;
import java.util.*;
public class CMS {
private Vector table;
public CMS () {
table = new Vector();
}
public void add (String s) {
table.addElement(s);
}
public String get () {
String s = (String)table.remove(0); // VIOLATION
return s;
536

FORMAT.CMS-3 Have at least one space after type casting
537
Ref
eren
ce
}
}
Repairpackage examples.rules.format;
import java.util.*;
public class CMSFixed {
private Vector table;
public CMS () {
table = new Vector();
}
public void add (String s) {
table.addElement(s);
}
public String get () {
String s = (String) table.remove(0); // FIXED
return s;
}
}

FORMAT.DUT-3 Use spaces instead of 'Tabs'
538
Referen
ce
FORMAT.DUT-3Use spaces instead of 'Tabs'
DescriptionDisallows the use of tab characters.
BenefitsReduces the chance of the code appearing differently in different editors.
Examplepackage examples.rules.format;
class DUT { public void spaced_method () {}
public void tabbed_method () {} // VIOLATION}
RepairReplace tabs with an agreed-upon number of spaces. Traditionally, a tab represents 8 spaces. The alignment issue in the preceding example could occur when a user has set his or her editor to use 4 space tabs, causing confusion for people who view the file in a different editor.
package examples.rules.format;
class DUTFixed { public void spaced_method () {} public void nolonger_tabbed_method () {} // FIXED}

FORMAT.FCB-4 Avoid placing '{' braces on their own line
539
Ref
eren
ce
FORMAT.FCB-4Avoid placing '{' braces on their own line
DescriptionDisallows the placement of '{' braces on their own line.
BenefitsIf all team members follow the same formatting style, it will be easier for each team member to read and understand the code.
Examplepackage examples.rules.format;
public class FCB { // VIOLATION}
RepairPut the '{' opening brace on the previous line.
package examples.rules.format;
public class FCBFixed { // FIXED}

FORMAT.IAD-3 Declare arrays with the '[ ]' brackets after the array type and before the vari-
540
Referen
ce
FORMAT.IAD-3Declare arrays with the '[ ]' brackets after the array type and before the variable name(s)
DescriptionRequires that array declarations place the '[]' brackets after the array type name and before the array variable name.
BenefitsIf all team members follow the same formatting style, it will be easier for each team member to read and understand the code.
Examplepackage examples.rule.format;
public class IAD { private int attr []; // VIOLATION private String str1 [], str2 [], str3 []; // VIOLATION}
RepairMove the brackets to the proper position.
package examples.rule.format;
public class IADFixed { private int [] attr; // FIXED private String [] str1, str2, str3; // FIXED}

FORMAT.IND-2 Use a multiple of four spaces for indentation
541
Ref
eren
ce
FORMAT.IND-2Use a multiple of four spaces for indentation
DescriptionRequires that lines are indented by a multiple of four spaces.
BenefitsIf all team members follow the same formatting style, it will be easier for each team member to read and understand the code.
Examplepackage examples.rules.format;
public class IND {
private int index; // VIOLATION
}
RepairIndent lines by a multiples of 4 spaces.
package examples.rules.format;
public class INDFixed {
private int index; // FIXED
}

FORMAT.JSPH-2 Provide a header comment for each JSP file
542
Referen
ce
FORMAT.JSPH-2Provide a header comment for each JSP file
DescriptionRequires that the first line of a JSP file be a 'JSP header' comment.
BenefitsYou can help others understand your JSP by documenting its intended behavior with a comment at the beginning of the file.

FORMAT.LL-2 Break lines at 80 characters
543
Ref
eren
ce
FORMAT.LL-2Break lines at 80 characters
DescriptionRequires that lines be no longer than 80 characters.
BenefitsLonger lines are not only more difficult to read on a standard screen, but they are also more difficult to print and email.
Examplepackage examples.rules.format;
public class LL { // VIOLATION public void method (int i, int j, int k, int l, int m, int n, int o, int p, int q) { }}
RepairBreak the single line into multiple well-formatted lines. As our example shows, this might expose other problems (such as overuse of method parameters).
package examples.rules.format;
public class LLFixed { public void method ( // FIXED int i , int j , int k , int l , int m

FORMAT.LL-2 Break lines at 80 characters
Referen
ce
, int n , int o , int p , int q ) { }}
544

FORMAT.MCH-2 Provide a file header comment for each source file
545
Ref
eren
ce
FORMAT.MCH-2Provide a file header comment for each source file
DescriptionRequires that the first line of a class be a 'file header' comment.
BenefitsDocumenting the intended behavior of a class with a comment at the beginning of the file helps users understand your code.
Example// VIOLATION: first line is not a header comment. package examples.rules.format;class MCH {
}
RepairAdd a file header comment on the first line of the source file.
/* * Class header text. // FIXED */package examples.rules.format;class MCHFixed { }

FORMAT.MSP-3 Place a single space between a method name and the opening '(' paren-
Referen
ce
FORMAT.MSP-3Place a single space between a method name and the opening '(' parenthesis
DescriptionRequires that method names have a single space before their opening '(' parenthesis.
This rule only applies to method declarations, not method calls.
BenefitsIf all team members follow the same formatting style, it will be easier for each team member to read and understand the code.
Examplepackage examples.rules.format;
class MSP { public void method() { // VIOLATION } public void method1 () { // VIOLATION }}
RepairPut exactly one space between the method and its opening '(' parenthe-sis.
package examples.rules.format;
class MSPFixed { public void method () { // FIXED
546

FORMAT.MSP-3 Place a single space between a method name and the opening '(' paren-
547
Ref
eren
ce
} public void method1 () { // FIXED }}

FORMAT.NSAB-3 Avoid placing statements after '{' opening braces on the same line
548
Referen
ce
FORMAT.NSAB-3Avoid placing statements after '{' opening braces on the same line
DescriptionRequires that no statements follow '{' opening braces on the same line.
BenefitsIf all team members follow the same formatting style, it will be easier for each team member to read and understand the code.
Examplepackage examples.rules.format;
public class NSAB { void foo () { int i = 0; // VIOLATION }}
RepairPut the statement on the next line..
package examples.rules.format;
public class NSABFixed { void foo () {
int i = 0; // FIXED }}

FORMAT.OSPL-1 Write one statement per line
549
Ref
eren
ce
FORMAT.OSPL-1Write one statement per line
DescriptionRequires that each line have no more than one statement.
Note that this rule cannot detect multiple statements on the same line as a "for" statement. For example, for (int i = 0; i < 10; i++) x--; would not be caught.
BenefitsIf all team members follow the same formatting style, it will be easier for each team member to read and understand the code.
Examplepackage examples.rules.format;
public class OSPL { int method (int a, int b) { int i = a + b; return i; // VIOLATION }}
Repairpackage examples.rules.format;
public class OSPLFixed { int method (int a, int b) { int i = a + b; // FIXED return i; // FIXED }}

FORMAT.SAC-3 Place a single space character after every comma
550
Referen
ce
FORMAT.SAC-3Place a single space character after every comma
DescriptionRequires that every comma be followed by a single ' ' space character.
BenefitsIf all team members follow the same formatting style, it will be easier for each team member to read and understand the code.
Examplepackage examples.rules.format;
public class SAC { public void method (int i,int j) { } // VIOLATION}
RepairPlace a single space after each comma.
package examples.rules.format;
public class SACFixed { public void method (int i, int j) { } // FIXED}

FORMAT.SAOP-3 Place a single space on each side of an assignment operator
551
Ref
eren
ce
FORMAT.SAOP-3Place a single space on each side of an assignment operator
DescriptionRequires that a single ' ' space precedes and follows all assignment oper-ators.
This applies to: =, *=, &=, +=, %=, -=, /=, <<=, >>=, ^=, |=.
BenefitsIf all team members follow the same formatting style, it will be easier for each team member to read and understand the code.
Examplepackage examples.rules.format;
public class SAOP { void method (int x) { private int y= 1; // VIOLATION y *=x; // VIOLATION }}
RepairPlace a single space before and after each assignment operator.
package examples.rules.format;
public class SAOPFixed { void method (int x) { private int y = 1; // FIXED y *= x; // FIXED }

FORMAT.SAOP-3 Place a single space on each side of an assignment operator
Referen
ce
}
552

FORMAT.SAS-3 Place a single space character after every semicolon
553
Ref
eren
ce
FORMAT.SAS-3Place a single space character after every semicolon
DescriptionRequires that every semicolon be followed by a single ' ' space character.
BenefitsIf all team members follow the same formatting style, it will be easier for each team member to read and understand the code.
Examplepackage examples.rules.format;
public class SAS { public void method () { for (int i = 0;i < 10;i++) { // VIOLATION System.out.println ("i: " + i); } }}
RepairPlace a single space after each semicolon.
package examples.rules.format;
public class SASFixed { public void method () { for (int i = 0; i < 10; i++) { // FIXED System.out.println ("i: " + i); } }}

FORMAT.SAUOP-3 Avoid placing space between a prefixed unary operator and its operand
554
Referen
ce
FORMAT.SAUOP-3Avoid placing space between a prefixed unary operator and its operand
DescriptionDisallows white space between a unary operator and its operand.
This applies to prefixed "++" and "--" operators.
BenefitsSpace between a unary operator can be confusing.
Examplepackage examples.rules.format;
public class SAUOP { public void method (int x) { System.out.println("x: " + ++ x); // VIOLATION }}
RepairRemove the space.
package examples.rules.format;
public class SAUOPFixed { public void method (int x) { System.out.println("x: " + ++x); // FIXED }}

FORMAT.SBOP-3 Place a single space on each side of a bitwise operator
555
Ref
eren
ce
FORMAT.SBOP-3Place a single space on each side of a bitwise operator
DescriptionRequires that a single ' ' space precedes and follows all bitwise operators.
This applies to: |, &, ^, <<,<<, >>.
BenefitsIf all team members follow the same formatting style, it will be easier for each team member to read and understand the code.
Examplepackage examples.rules.format;
public class SBOP { public void method (int x, int y) { int z = x >>y; // VIOLATION z = z& 0xff; // VIOLATION }}
RepairPlace a single space before and after each bitwise operator.
package examples.rules.format;
public class SBOPFixed { public void method (int x, int y) { int z = x | y; // FIXED z = z & 0xff; // FIXED }}

FORMAT.SBUOP-3 Avoid placing space between a unary operator and its operand
556
Referen
ce
FORMAT.SBUOP-3Avoid placing space between a unary operator and its operand
DescriptionDisallows white space between a unary operator and its operand.
This applies to postfix "++" and "--" operators.
BenefitsSpace between a unary operator can be confusing.
Examplepackage examples.rules.format;
public class SBUOP { public void method (int x) { System.out.println("x: " + x ++); // VIOLATION } }
RepairRemove the space.
package examples.rules.format;
public class SBUOPFixed { public void method (int x) { System.out.println("x: " + x++); // FIXED } }

FORMAT.SC-3 Place a single space between a conditional statement and the opening "("
557
Ref
eren
ce
FORMAT.SC-3Place a single space between a conditional statement and the opening "(" parenthesis
DescriptionRequires that conditional statements have a single space before their opening "(" parenthesis. There must also be no more than one space after the parenthesis.
BenefitsIf all team members follow the same formatting style, it will be easier for each team member to read and understand the code.
Examplepackage examples.rules.format;
public class SC { public void method (int x) { if( i < 0) { // VIOLATION System.out.println("Less than zero"); } }}
RepairPut a single space before the "(" and place no more than one space after the parenthesis.
package examples.rules.format;
public class SCFixed {

FORMAT.SC-3 Place a single space between a conditional statement and the opening "("
Referen
ce
public void method (int x) { if (i < 0) { // FIXED //if ( i < 0) { // Would also be acceptable System.out.println("Less than zero"); } }}
558

FORMAT.SCOP-3 Place a single space before and after the "?" conditional operator
559
Ref
eren
ce
FORMAT.SCOP-3Place a single space before and after the "?" conditional operator
DescriptionRequires that every "?" conditional operator be preceded and followed by a single ' ' space character.
BenefitsIf all team members follow the same formatting style, it will be easier for each team member to read and understand the code.
Examplepackage examples.rules.format;
public class SCOP { public int method (int i) { int j = (i < 0)? 0 : i; // VIOLATION return j; }
RepairPlace a single space before and after the "?" operator.
package examples.rules.format;
public class SCOPFixed { public int method (int i) { int j = (i < 0) ? 0 : i; // FIXED return j; }}

FORMAT.SLOP-3 Place a single space on each side of a logical operator
560
Referen
ce
FORMAT.SLOP-3Place a single space on each side of a logical operator
DescriptionRequires that a single ' ' space precedes and follows all logical operators.
This rule applies to: "&&", "||".
BenefitsIf all team members follow the same formatting style, it will be easier for each team member to read and understand the code.
Examplepackage examples.rules.format;
public class SLOP { public void method (boolean x, boolean y) { if (x|| y) { } // VIOLATION if (x &&y) { } // VIOLATION }}
RepairPlace a single space before and after the operator.
package examples.rules.format;
public class SLOPFixed { public void method (boolean x, boolean y) { if (x || y) { } // FIXED if (x && y) { } // FIXED }}

FORMAT.SROP-3 Place a single space on each side of a relational operator
561
Ref
eren
ce
FORMAT.SROP-3Place a single space on each side of a relational operator
DescriptionRequires that a single ' ' space precedes and follows all relational opera-tors.
BenefitsIf all team members follow the same formatting style, it will be easier for each team member to read and understand the code.
Examplepackage examples.rules.format;
public class SROP { public void method (boolean x, boolean y) { if (x<= y) { } // VIOLATION if (x ==y) { } // VIOLATION }}
RepairPlace a single space before and after the operator.
package examples.rules.format;
public class SROPFixed { public void method (boolean x, boolean y) { if (x <= y) { } // FIXED if (x == y) { } // FIXED }}

FORMAT.UP-3 Avoid using unnecessary parentheses in "return" statements
Referen
ce
FORMAT.UP-3Avoid using unnecessary parentheses in "return" statements
DescriptionDisallows the use of unnecessary parentheses in "return" statements.
BenefitsIf all team members follow the same formatting style, it will be easier for each team member to read and understand the code.
Examplepackage examples.rules.format;
public class UP { public int toInt () { return (int)(_d); // VIOLATION } public double add (double d2) { return (_d + d2); // VIOLATION } private double _d;}
RepairRemove the unnecessary parentheses.
package examples.rules.format;
public class UPFixed { public int toInt () { return (int)_d; // FIXED } public double add (double d2) {
562

FORMAT.UP-3 Avoid using unnecessary parentheses in "return" statements
563
Ref
eren
ce
return _d + d2; // FIXED } private double _d;}

GC.AUTP-2 Avoid unnecessary temporaries when converting primitive types to String
Referen
ce
Garbage Collection RulesGC.AUTP-2Avoid unnecessary temporaries when converting primitive types to String
DescriptionDisallows creating an unnamed temporary primitive type wrapper solely to call its 'toString ()' method.
Note that the rule will not detect a violation if you create a temporary wrapper object and then, in a separate statement, call its 'toString ()' method.
BenefitsJava provides wrapping classes for primitive types. Those classes pro-vide a static method 'toString (...)' to convert primitive types into their String equivalent. Calling the static method avoids creating a wasted object.
Examplepackage examples.rules.gc;
public class AUTP { String foobar (int x) { return new Integer (x).toString (); // VIOLATION }}
RepairUse the static 'toString ()' method of the wrapper class instead of creating an object of the wrapper class and then using the instance 'toString ()' method.
564

GC.AUTP-2 Avoid unnecessary temporaries when converting primitive types to String
565
Ref
eren
ce
Alternatively you can use 'String.toString (primitive)', a static method that will call the appropriate 'toString ()' from the class that wraps the primitive argument.
package examples.rules.gc;
class AUTPFixed { String foobar (int x) { return Integer.toString (x); // FIXED }}

GC.DUD-3 Avoid using ‘Date[]’; use ‘long[]’ instead
Referen
ce
GC.DUD-3Avoid using ‘Date[]’; use ‘long[]’ instead
DescriptionDisallows the use of Date arrays (for example, 'Date[] d;').
BenefitsThe 'Date' object contains a lot of fields, and will use a lot of space.
DrawbacksUsing an array of type "long" obscures the intended use of the values and loses the extra information that the 'Date' object carries.
Examplepackage examples.rules.gc;
import java.util.Date;
public class DUD { Date d[]; // VIOLATION}
RepairIt is more efficient to use an array of type "long" instead of an array of 'Date' objects.
package examples.rules.gc;
import java.util.Date;
566

GC.DUD-3 Avoid using ‘Date[]’; use ‘long[]’ instead
567
Ref
eren
ce
public class DUD { long d[]; // FIXED}
GC.FCF-1 Always call 'super.finalize ()' from 'finalize ()'
Referen
ce
GC.FCF-1Always call 'super.finalize ()' from 'finalize ()'
DescriptionRequires that all 'finalize()' methods call 'super.finalize()'.
BenefitsIf the call to 'super.finalize()' is not made, the finalize methods of the superclasses will not be invoked. There are two reasons to do this even if the parent class doesn't define 'finalize ()'. First, this allows a parent class that uses 'finalize ()' to be added to your class without modifying your code. Second, following this rule habituates you to always calling 'super.finalize ()' so that you don't accidentally forget to call it when your class has a parent that does have a 'finalize ()' method.
Examplepackage examples.rules.gc;
class FCF { protected void finalize () throws Throwable { // VIOLATION }}
RepairAdd a call to 'super.finalize()'.
package examples.rules.gc;
class FCFFixed { protected void finalize () throws Throwable { super.finalize(); // FIXED }
568

GC.FCF-1 Always call 'super.finalize ()' from 'finalize ()'
569
Ref
eren
ce
}
ReferenceArnold, Ken, and Gosling, James The Java Programming Language. 2d ed. Addison Wesley, 1997, pp.49.

GC.FM-1 Avoid using 'finalize ()' methods to unregister listeners
Referen
ce
GC.FM-1Avoid using 'finalize ()' methods to unregister listeners
DescriptionDisallows removing event listeners from a 'finalize ()' method.
BenefitsThe 'finalize ()' method is only called when there are no more references to the object. If the listeners are removed in the 'finalize ()' method, the object being finalized will not be removed during garbage collection.
Examplepackage examples.rules.gc;
import java.applet.*;import java.awt.*;import java.awt.event.*;
public class FM extends Applet {
public void finalize () throws Throwable { beepButton.removeActionListener (act); // VIOLATION } public void init () { beepButton = new Button ("Beep"); act = new FMAction (); this.add (beepButton); beepButton.addActionListener (act); }
class FMAction implements ActionListener { public void actionPerformed (ActionEvent ae) { Toolkit tk = Toolkit.getDefaultToolkit ();
570

GC.FM-1 Avoid using 'finalize ()' methods to unregister listeners
571
Ref
eren
ce
tk.beep (); } }
private Button beepButton; private FMAction act;}
RepairDo not call methods that remove listeners in the 'finalize ()' method.

GC.GCB-5 Reuse calls to 'getClipBounds ()'
Referen
ce
GC.GCB-5Reuse calls to 'getClipBounds ()'
DescriptionDisallows calling 'getClipBounds ()' more than once in a method.
BenefitsThe 'getClipBounds ()' method always returns a new rectangle, thereby allocating more memory every time it is called. This causes the garbage collector to be very busy.
Note that only methods with more than one 'getClipBounds ()' call will be reported.
Examplepackage examples.rules.gc;
import java.awt.Graphics;
public class GCB { public void paint(Graphics g) { int firstColLine = g.getClipBounds().x; // VIOLATION int lastColLine = g.getClipBounds().x + g.getClip-Bounds().width; }}
RepairReuse the 'Rectangle' object that the first 'getClipBounds ()' call returns.
package examples.rules.gc;
import java.awt.Graphics;import java.awt.Rectangle;
572

GC.GCB-5 Reuse calls to 'getClipBounds ()'
573
Ref
eren
ce
public class GCB { public void paint(Graphics g) { Rectangle rec = g.getClipBounds(); int firstColLine = rec.x; int lastColLine = rec.x + rec.width; // FIXED }}

GC.IFF-2 Call 'super.finalize ()' in the "finally" block of 'finalize ()' methods
Referen
ce
GC.IFF-2Call 'super.finalize ()' in the "finally" block of 'finalize ()' methods
DescriptionRequires that the "finally" block of a 'finalize ()' method call 'super.final-ize()'.
BenefitsIf the call to 'super.finalize()' is not made, the finalize methods of the superclasses will not be invoked. There are two reasons to do this even if the parent class doesn't define 'finalize ()'. First, this allows a parent class that uses 'finalize ()' to be added to your class without modifying your code. Second, following this rule habituates you to always calling 'super.finalize ()' so that you don't accidentally forget to call it when your class has a parent that does have a 'finalize ()' method.
Examplepackage examples.rules.gc;
class IFF { public void finalize () throws Throwable { try { } catch (Exception e) { } finally { // VIOLATION return; } }}
Repair
574

GC.IFF-2 Call 'super.finalize ()' in the "finally" block of 'finalize ()' methods
575
Ref
eren
ce
Call 'super.finalize ()' in the "finally" block of the 'finalize ()' method.
package examples.rules.gc;
class IFFFixed { public void finalize () throws Throwable { try { } catch (Exception e) { } finally { super.finalize (); // FIXED } }}
ReferenceArnold, Ken, and Gosling, James The Java Programming Language. 2d ed. Addison Wesley, 1997, p. 49.

GC.NCF-1 Avoid calling 'finalize ()' explicitly
Referen
ce
GC.NCF-1Avoid calling 'finalize ()' explicitly
DescriptionDisallows directly calling 'finalize ()'.
BenefitsCalling the ‘finalize ()’ method explicitly insures that ‘finalize ()’ is called, but the Garbage Collector will call ‘finalize ()’ again when the object is col-lected.
Examplepackage examples.rules.gc;
class NCF { public void finalize () throws Throwable { close_resources (); super.finalize (); } public void close_resources () {}}
class Test { void cleanup () throws Throwable { _ncf.finalize (); // VIOLATION _ncf = null; } private NCF _ncf = new NCF ();}
RepairCreate a helper method (in the example, this is 'release ()') that does what the original 'finalize ()' method did. Place a call to this method in 'finalize ()' and wherever you explicitly called 'finalize ()', call the helper instead. By
576

GC.NCF-1 Avoid calling 'finalize ()' explicitly
577
Ref
eren
ce
using a "boolean" field to ensure that the helper only cleans up once, you render later calls harmless.
package examples.rules.gc;
class NCFFixed { public synchronized void release () throws Throwable{ if (!_released) { close_resources (); // do what the old 'finalize ()' did _released = true; } } public void finalize () throws Throwable { release (); super.finalize (); } public void close_resources () {} private boolean _released = false;}
class TestFixed { void closeTest () throws Throwable { _ncf.release (); // FIXED _ncf = null; } private NCFFixed _ncf = new NCFFixed ();}
ReferenceWarren, Nigel, and Bishop, Philip. Java in Practice. Addison-Wesley, 1999, pp. 110-111.

GC.OSTM-2 Avoid potential memory leaks in ObjectStreams by calling 'reset ()'
Referen
ce
GC.OSTM-2Avoid potential memory leaks in ObjectStreams by calling 'reset ()'
DescriptionRequires that methods that use 'ObjectInputStream' or 'ObjectOutput-Stream' call 'reset ()' before returning.
Benefits'ObjectInputStream' and 'ObjectOutputStream' might cause memory leaks. ObjectStreams are designed to handle the case of sending the same Object multiple times across a connection. For this reason, Object-Stream classes keep a reference to all objects written or read until the 'reset()' method is called. Those objects will not be garbage collected until 'reset()' is called.
DrawbacksIf a method will be used to repeatedly stream the same objects, you should not 'reset ()' the stream because the object being sent might be cached by the stream for faster access.
Examplepackage examples.rules.gc;
import java.io.*;
public class OSTM { public void writeToStream(ObjectOutputStream os, String s) // VIOLATION throws IOException { os.writeObject (s); }
578

GC.OSTM-2 Avoid potential memory leaks in ObjectStreams by calling 'reset ()'
579
Ref
eren
ce
}
RepairUse the 'reset ()' method to clear the list of Objects written to the Stream. Alternatively, use DataStreams instead of ObjectStreams for optimal per-formance. For example, DataOutputStream has 'writeBytes (String s)' for Strings and 'write (byte[] data, int offset, int length)' for byte arrays.
package examples.rules.gc;
import java.io.*;
public class OSTMFixed { public void writeToStream(ObjectOutputStream os, String s) throws IOException { os.writeObject (s); os.reset(); // FIXED }}

GC.STV-3 Avoid “static” collections; they can grow without bounds
Referen
ce
GC.STV-3Avoid “static” collections; they can grow without bounds
DescriptionDisallows the use of static collection fields.
BenefitsStatic collection objects (i.e. Vector, Hashtable, etc.) are able to hold large numbers of objects, making them candidates for memory leaks. How can Java have memory leaks? If you put a short-lived object into a "static" col-lection, that object will be referenced by the collection for the life of the program if you forget to remove the object from the collection when you are done with the object. If you have already removed all other references to the object, it can be difficult to see that it is still referenced by the collec-tion.
DrawbacksAn application might need to use an unknown and possibly unbounded number of objects. However, this can and should be avoided because memory exhaustion can drastically reduce the speed of the program.
Examplepackage examples.rules.gc;
import java.util.Vector;
public class STV { public static Vector vector = new Vector (); // VIOLATION void addToVector () { Object o = new Object (); vector.add (o); // this temporary object will never be freed
580

GC.STV-3 Avoid “static” collections; they can grow without bounds
581
Ref
eren
ce
}}
RepairIf the static variable is necessary, set a maximum size and make sure that it is not exceeded.
package examples.rules.gc;
import java.util.Vector;
public class STVFixed { public static void addToVector () { // checks size of the Vector before calling 'add()'. if (vector.size() < MAX_SIZE) { // FIXED Object o = new Object (); vector.add(o); } else { System.err.println("vector MAX_SIZE exceeded."); } }
public static Vector vector = new Vector (5); // FIXED public static final int MAX_SIZE = 100;}

GLOBAL.DPAC-1 Declare package-private classes as inaccessible as possible
582
Referen
ce
Global Static Analysis RulesGLOBAL.DPAC-1Declare package-private classes as inaccessible as possible
DescriptionRequires that package-private classes be as inaccessible as possible.
BenefitsThis makes the code more object-oriented and clarifies its dependencies.
ExampleSee the examples in <Jtest install dir>/examples/static/GLO-BAL/too-accessible.
RepairChange the class's accessibility or document the reason for the excessive accessibility

GLOBAL.DPAF-1 Declare package-private fields as inaccessible as possible
583
Ref
eren
ce
GLOBAL.DPAF-1Declare package-private fields as inaccessible as possible
DescriptionRequires that package-private fields be as inaccessible as possible.
BenefitsThis makes the code more object-oriented and clarifies its dependencies.
ExampleSee the examples in <Jtest install dir>/examples/static/GLO-BAL/too-accessible.
RepairChange the field's accessibility or document the reason for the excessive accessibility.
GLOBAL.DPAM-1 Declare package-private methods as inaccessible as possible
584
Referen
ce
GLOBAL.DPAM-1Declare package-private methods as inaccessible as possible
DescriptionRequires that package-private methods be as inaccessible as possible.
BenefitsThis makes the code more object-oriented and clarifies its dependencies.
ExampleSee the examples in <Jtest install dir>/examples/static/GLO-BAL/too-accessible.
RepairChange the method's accessibility or document the reason for the exces-sive accessibility.

GLOBAL.DPPC-4 Declare “public”/”protected” classes as inaccessible as possible
585
Ref
eren
ce
GLOBAL.DPPC-4Declare “public”/”protected” classes as inaccessible as possible
DescriptionRequires that "public" and "protected" classes be as inaccessible as pos-sible.
BenefitsThis makes the code more object-oriented and clarifies its dependencies.
ExampleSee the examples in <Jtest install dir>/examples/static/GLO-BAL/too-accessible.
RepairChange the class’s accessibility or document the reason for the excessive accessibility.

GLOBAL.DPPF-4 Declare “public”/”protected” fields as inaccessible as possible
586
Referen
ce
GLOBAL.DPPF-4Declare “public”/”protected” fields as inaccessible as possible
DescriptionRequires that "public" and "protected" fields be as inaccessible as possi-ble.
BenefitsThis makes the code more object-oriented and clarifies its dependencies.
ExampleSee the examples in <Jtest install dir>/examples/static/GLO-BAL/too-accessible.
RepairChange the field's accessibility or document the reason for the excessive accessibility.

GLOBAL.DPPM-4 Declare public/protected methods as inaccessible as possible
587
Ref
eren
ce
GLOBAL.DPPM-4Declare public/protected methods as inaccessible as possible
DescriptionRequires that "public" and "protected" methods be as inaccessible as possible.
BenefitsThis makes the code more object-oriented and clarifies its dependencies.
ExampleSee the examples in <Jtest install dir>/examples/static/GLO-BAL/too-accessible.
RepairChange the method’s accessibility or document the reason for the exces-sive accessibility.

GLOBAL.SPAC-2 Declare a package-private class "final" if a class has not been subclassed
588
Referen
ce
GLOBAL.SPAC-2Declare a package-private class "final" if a class has not been subclassed
DescriptionRequires that a package-private class that has no subclasses be declared "final".
Benefits1. It optimizes the code: the compiler knows that nobody can extend
the class or override its methods, so it can generate optimized code.
2. It makes the code self documented: somebody looking at the class will know that no other class "extends" this class.
RepairMake the class "final" or document the reason for the class not being final.

GLOBAL.SPAM-2 Declare a package-private method "final" if a method has not been over-
589
Ref
eren
ce
GLOBAL.SPAM-2Declare a package-private method "final" if a method has not been overridden
DescriptionRequires that a package-private method that is not overridden be declared "final".
Benefits1. It optimizes the code: the compiler knows that nobody is overrid-
ing the method, so it can generate optimized code.
2. It makes the code self documented: somebody looking at the method knows that no other method overrides it.
RepairMake the method "final" or document the reason for the method not being final.

GLOBAL.SPPC-5 Declare a "public/protected" class "final" if a class has not been sub-
590
Referen
ce
GLOBAL.SPPC-5Declare a "public/protected" class "final" if a class has not been subclassed
DescriptionRequires that a "public" or "protected" class that has no subclasses be declared "final".
Benefits1. It optimizes the code: the compiler knows that nobody can extend
the class or override its methods, so it can generate optimized code.
2. It makes the code self documented: somebody looking at the class will know that no other class extends this class.
RepairMake the class "final" or document the reason for the class not being final.

GLOBAL.SPPM-5 Declare a "public/protected" method "final" if a method has not been over-
591
Ref
eren
ce
GLOBAL.SPPM-5Declare a "public/protected" method "final" if a method has not been overridden
DescriptionRequires that a "public" or "protected" method that is not overridden be declared "final".
Benefits1. It optimizes the code: the compiler knows that nobody can extend
the class or override its methods, so it can generate optimized code.
2. It makes the code self documented: somebody looking at the class will know that no other class extends this class.
RepairMake the method "final" or document the reason for the method not being final.

GLOBAL.UPAC-1 Avoid globally unused package-private classes
592
Referen
ce
GLOBAL.UPAC-1Avoid globally unused package-private classes
DescriptionDisallows the existence of unused package-private classes.
BenefitsThese unused entities usually point to either:
1. Old code that is no longer needed and which makes the class more difficult to understand.
2. A logical flaw (if the entity needs to be used, but other classes incorrectly avoid using it).
ExampleSee the examples in <Jtest install dir>/examples/static/GLOBAL/unused.
RepairRemove the unused class or document the reason for its existence.

GLOBAL.UPAF-1 Avoid globally unused package-private fields
593
Ref
eren
ce
GLOBAL.UPAF-1Avoid globally unused package-private fields
DescriptionDisallows the existence of unused package-private fields.
BenefitsThese unused entities usually point to either:
1. Old code that is no longer needed and which makes the class more difficult to understand.
2. A logical flaw (if the entity needs to be used, but other classes incorrectly avoid using it).
ExampleSee the examples in <Jtest install dir>/examples/static/GLOBAL/unused.
RepairRemove the unused field or document the reason for its existence.

GLOBAL.UPAM-1 Avoid globally unused package-private methods
594
Referen
ce
GLOBAL.UPAM-1Avoid globally unused package-private methods
DescriptionDisallows the existence of unused package-private methods.
BenefitsThese unused entities usually point to either:
1. Old code that is no longer needed and which makes the class more difficult to understand.
2. A logical flaw (if the entity needs to be used, but other classes incorrectly avoid using it).
ExampleSee the examples in <Jtest install dir>/examples/static/GLOBAL/unused.
RepairRemove the unused method or document the reason for its existence.

GLOBAL.UPPC-4 Avoid globally unused “public”/”protected” classes
595
Ref
eren
ce
GLOBAL.UPPC-4Avoid globally unused “public”/”protected” classes
DescriptionDisallows the existence of unused "public" and "protected" classes.
BenefitsThese unused entities usually point to either:
1. Old code that is no longer needed and which makes the class more difficult to understand.
2. A logical flaw (if the entity needs to be used, but other classes incorrectly avoid using it).
ExampleSee the examples in <Jtest install dir>/examples/static/GLOBAL/unused.
RepairRemove the unused class or document the reason for its existence.

GLOBAL.UPPF-4 Avoid globally unused “public/protected” fields
596
Referen
ce
GLOBAL.UPPF-4Avoid globally unused “public/protected” fields
DescriptionDisallows the existence of unused "public" and "protected" fields.
BenefitsThese unused entities usually point to either:
1. Old code that is no longer needed and which makes the class more difficult to understand.
2. A logical flaw (if the entity needs to be used, but other classes incorrectly avoid using it).
ExampleSee the examples in <Jtest install dir>/examples/static/GLOBAL/unused.
RepairRemove the unused field or document the reason for its existence.

GLOBAL.UPPM-4 Avoid globally unused “public”/”protected” methods
597
Ref
eren
ce
GLOBAL.UPPM-4Avoid globally unused “public”/”protected” methods
DescriptionDisallows the existence of unused "public" and "protected" methods.
BenefitsThese unused entities usually point to either:
1. Old code that is no longer needed and which makes the class more difficult to understand.
2. A logical flaw (if the entity needs to be used, but other classes incorrectly avoid using it).
ExampleSee the examples in <Jtest install dir>/examples/static/GLOBAL/unused.
RepairRemove the unused method or document the reason for its existence.

INIT.CSI-2 Explicitly initialize all fields in a constructor
Referen
ce
Initialization RulesINIT.CSI-2Explicitly initialize all fields in a constructor
DescriptionRequires that constructors initialize all of a class's fields.
BenefitsUninitialized fields are a potential source of bugs.
Examplepackage examples.rules.init;
class CSI { CSI () { this (12); k = 0; }
CSI (int val) { // VIOLATION: 'k' will not be initialized j = val; }
private int i = 5; private int j; private int k;}
598

INIT.CSI-2 Explicitly initialize all fields in a constructor
599
Ref
eren
ce
RepairIn some cases, these errors can be corrected by initializing the appropri-ate fields. In other cases, these fields will have been assigned values from other uninitialized fields that must be initialized to eliminate the prob-lem.
package examples.rules.init;
class CSIFixed { CSIFixed () { this (12); }
CSIFixed (int val) { j = val; k = 0; // FIXED }
private int i = 5; private int j; private int k;}

INIT.LV-3 Initialize all local variables explicitly at the declaration statement
Referen
ce
INIT.LV-3Initialize all local variables explicitly at the declaration statement
DescriptionRequires that all local variables be initialized in their declaration.
BenefitsUninitialized variables are a potential source of bugs.
Examplepackage examples.rules.init;
public class LV { public boolean method (int size) { int max; // VIOLATION return size > 0; }}
600

INIT.LV-3 Initialize all local variables explicitly at the declaration statement
601
Ref
eren
ce
RepairInitialize all local variables in their declaration.
package examples.rules.init;
public class LVFixed { public boolean method (int size) { int max = 0; // FIXED return size > 0; }}

INIT.NFS-2 Avoid using non-final "static" fields during the initialization
602
Referen
ce
INIT.NFS-2Avoid using non-final "static" fields during the initialization
DescriptionDisallows use of non-final "static" fields in a field's initialization.
Benefits"Static" values can be modified by other users of a class. Therefore, the "static" field might contain a different value than what users expect.
Examplepackage examples.rules.init;
public class NFS { static int max = 10; int size = max; // VIOLATION}
RepairUse a "static final" field instead.
package examples.rules.init;
public class NFSFixed { static final int MAX = 10; // FIXED static int max = 10; int size = NFS.MAX; // FIXED}

INIT.SF-2 Explicitly initialize all “static” fields
603
Ref
eren
ce
INIT.SF-2Explicitly initialize all “static” fields
DescriptionRequires that all "static" fields be initialized.
BenefitsUninitialized fields are a potential source of bugs.
Examplepackage examples.rules.init;
class SF { SF () {}
static private int K; static private int L; // VIOLATION: not initialized
static { K = 10; }}
RepairThese errors can be corrected by initializing the appropriate static field.
package examples.rules.init;
class SFFixed { SFFixed () {}
static private int K; static private int L;
static {

INIT.SF-2 Explicitly initialize all “static” fields
Referen
ce
K = 10; L = 0; // FIXED }}
604

INTER.CLO-4 Avoid using single characters with logic operators in an internationalized en-
605
Ref
eren
ce
Internationalization RulesINTER.CLO-4Avoid using single characters with logic operators in an internationalized environment
DescriptionFor code to be able to run in an internationalized environment, a single character must not be prefixed or followed by a logic operator.
Examplepackage examples.rules.inter;
public class CLO { public boolean isLetter (char ch) { boolean _isLetter = ( ch >= 'a' && ch <= 'z') // VIOLATION || (ch >= 'A' && ch <= 'Z'); return _isLetter; }}

INTER.CLO-4 Avoid using single characters with logic operators in an internationalized en-
Referen
ce
RepairUse the character comparison methods which use the Unicode standard to identify character properties. In this case, you would replace the "if" statement from the preceding example with the following code:
package examples.rules.inter;
public class CLOFixed { public boolean isLetter (char ch) { boolean _isLetter = Character.isLetter(ch); // FIXED return _isLetter; }}
Referencehttp://java.sun.com/docs/books/tutorial/i18n/intro/checklist.html
For more information on the Character comparison methods, see the sec-tion 'Checking Character Properties' at http://java.sun.com/docs/books/tutorial/i18n/text/charintro.html
606

INTER.COS-4 Avoid String concatenation in an Internationalized environment
607
Ref
eren
ce
INTER.COS-4Avoid String concatenation in an Internationalized environment
DescriptionDisallows string concatenation using 'String.concat ()', '+', or '+=' opera-tions in an internationalized environment.
BenefitsIf you want code to be able to run in an internationalized environment, do not use concatenated strings. This includes using the 'String.concat ()' method or using '+' or '+=' operators with strings. The reason for this is that compound messages contain variable data and are difficult to trans-late. For example, the message "At 12:30 P.M on Jul 3, 2053, something happened" would be translated from a few distinct strings representing a time stamp and the text that follows the time stamp.
Examplepackage examples.rules.inter;
import java.util.Date;
public class COS { public void addstrings () { Date current_date = new Date (System.currentTimeMillis ()); String message = "At " + current_date; // VIOLATION message = message.concat (" something happened.");// VIOLA
TION System.out.println (message); }}

INTER.COS-4 Avoid String concatenation in an Internationalized environment
Referen
ce
RepairThe example's approach will work fine in English, but it won't work for lan-guages in which the sentences are structured differently. Because the word order of this message is hard coded, your localizers won't be able to create grammatically correct translations for all languages.
The "MessageFormat" class should be used to deal with compound mes-sages as follows:
package examples.rules.inter;
import java.util.Date;import java.text.MessageFormat;
public class COSFixed { public void addstrings () { Object [] arguments = { new Date (System.currentTimeMillis ()), "something happened" }; MessageFormat f = new MessageFormat ("At (0, time) on (0, date), {1}."); System.out.print (f.format (arguments)); // FIXED }}
Referencehttp://java.sun.com/docs/books/tutorial/i18n/intro/checklist.html
http://java.sun.com/products/jdk/1.2/docs/api/java/text/MessageFor-mat.html
608

INTER.DTS-4 Avoid calling 'toString ()' on Date variables in an Internationalized environ-
609
Ref
eren
ce
INTER.DTS-4Avoid calling 'toString ()' on Date variables in an Internationalized environment
DescriptionDisallows calling 'Date.toString ()' in an internationalized environment.
BenefitsDate formats differ with region and language, so 'Date.toString ()' must not be used in an internationalized environment.
Examplepackage examples.rules.inter;
import java.util.Date;
public class DTS { public void printToday () { Date today = new Date (); String todayStr = today.toString (); // VIOLATION System.out.println (todayStr); }}

INTER.DTS-4 Avoid calling 'toString ()' on Date variables in an Internationalized environ-
Referen
ce
RepairThe 'DateFormat' class provides predefined formatting styles that are locale-specific and easy to use.
package examples.rules.inter;
import java.util.Date;import java.util.Locale;import java.text.DateFormat;
public class DTSFixed { public void printToday () { Locale currentLocale = Locale.getDefault (); DateFormat dateFormatter = DateFormat.getDateInstance ( DateFormat.DEFAULT, currentLocale); Date today = new Date (); String todayStr = dateFormatter.format (today) // FIXED + currentLocale.toString (); System.out.println (todayStr); }}
Referencehttp://java.sun.com/docs/books/tutorial/i18n/intro/checklist.html
http://java.sun.com/docs/books/tutorial/i18n/format/dateFormat.html
610

INTER.ITT-2 Isolate translatable text in resource bundles
611
Ref
eren
ce
INTER.ITT-2Isolate translatable text in resource bundles
DescriptionReports an error if a constant String is used in the program, unless the String is used as the single argument of a method returning either a String type or char type, the value is an empty string, or the value only contains spaces.
Note that these exceptions have been added after ParaSoft's testing determined that these were often sources of erroneous warnings.
BenefitsInternationalization is much easier if you put all of your user-visible text into resource files that your program reads.
Examplepackage examples.rules.inter;
public class ITT { public void printHello () { System.out.println ("hello, how are you today?");//VIOLATION }}

INTER.ITT-2 Isolate translatable text in resource bundles
Referen
ce
RepairUse the 'ResourceBundle' and associated classes to put text into Proper-ties files or classes that can be easily localized.
package examples.rules.inter;
import java.util.*;
public class ITTFixed { public void printHello () { Locale currentLocale = Locale.getDefault (); ResourceBundle labels = ResourceBundle.getBundle ("LabelsBundle", currentLo-cale); String value = labels.getString ("hello_text"); System.out.println (value); // FIXED }}
Referencehttp://java.sun.com/docs/books/tutorial/i18n/intro/checklist.html
http://java.sun.com/docs/books/tutorial/i18n/format/dateFormat.html
612

INTER.NCL-4 Put single character literals in constants
613
Ref
eren
ce
INTER.NCL-4Put single character literals in constants
DescriptionRequires that single character literals be placed in constants in an inter-nationalized environment. This means single character literals can only be used when declared "static" and "final".
Examplepackage examples.rules.inter;
public class NCL { public void method () { System.out.println ('c'); // VIOLATION }}
RepairPut the literal into a constant.
package examples.rules.inter;
public class NCLFixed { public void method () { System.out.println (mychar); // FIXED } private static final char mychar = 'c';}

INTER.NCL-4 Put single character literals in constants
Referen
ce
Referencehttp://java.sun.com/docs/books/tutorial/i18n/
614

INTER.NTS-4 Avoid calling 'toString ()' on numeric variables in an Internationalized environ-
615
Ref
eren
ce
INTER.NTS-4Avoid calling 'toString ()' on numeric variables in an Internationalized environment
DescriptionDisallows calling 'toString ()' on a numeric variable in an internationalized environment. Specifically, this means any subclass of java.lang.Number, including BigDecimal, BigInteger, Byte, Double, Float, Integer, Long, and Short.
BenefitsNumbers and currencies that are displayed must be formatted in a locale-independent manner.
Examplepackage examples.rules.inter;
public class NTS { public void method (Double amount) { String amountStr = amount.toString (); // VIOLATION System.out.println (amountStr); }}

INTER.NTS-4 Avoid calling 'toString ()' on numeric variables in an Internationalized environ-
Referen
ce
RepairReplace the code with a routine that formats the number correctly. The Java programming language provides several classes that format num-bers. One way to do this is by using predefined formats with the "Number-Format" class. This allows you to format numbers, currencies, and percentages according to Locale.
package examples.rules.inter;
import java.text.NumberFormat;import java.util.Locale;
public class NTSFixed { public void method (Double amount) { Locale currentLocale = Locale.getDefault (); NumberFormat numberFormatter = NumberFormat.getNumberInstance (currentLocale); String amountStr = numberFormatter.format (amount); // FIXED System.out.println (amountStr + ' ' + currentLocale.toString ()); }}
Referencehttp://java.sun.com/docs/books/tutorial/i18n/intro/checklist.html
http://java.sun.com/docs/books/tutorial/i18n/format/numberFormat.html
616

INTER.SCT-4 Avoid calling 'String.compareTo ()' in an Internationalized environment
617
Ref
eren
ce
INTER.SCT-4Avoid calling 'String.compareTo ()' in an Internationalized environment
DescriptionDisallows the use of 'String.compareTo ()' in an internationalized environ-ment.
Benefits'compareTo ()' cannot be relied on to sort strings because the Unicode values of the characters in the strings do not correspond to the relative order of the characters for most languages.
Examplepackage examples.rules.inter;
public class SCT { public boolean compstr (String s1, String s2) { boolean b = (s1.compareTo (s2) < 0); // VIOLATION return b; }}

INTER.SCT-4 Avoid calling 'String.compareTo ()' in an Internationalized environment
Referen
ce
RepairThe predefined collation rules provided by the "Collator" class should be used to sort strings in a locale-independent manner. To instantiate the Collator class, call the ‘getInstance()’ method. Usually, you create a Colla-tor for the default locale, as in the following example:
Collator myCollator = Collator.getInstance();
You can also specify a particular locale when you create a Collator as fol-lows:
Collator myFrenchCollator = Collator.getInstance(Locale.FRENCH);
Next you invoke ‘Collator.compare()’ to perform a locale-independent string comparison as follows:
myCollator.compare(s1,s2);
For more information on the 'Collator' class, see http://java.sun.com/docs/books/tutorial/i18n/text/collationintro.html
The repaired version of the original example follows:
package examples.rules.inter;
import java.text.Collator;
public class SCTFixed { public boolean compstr (String s1, String s2) { Collator myCollator = Collator.getInstance (); boolean b = (myCollator.compare(s1,s2) < 0); // FIXED return b; }}
Referencehttp://java.sun.com/docs/books/tutorial/i18n/intro/checklist.html
http://java.sun.com/docs/books/tutorial/i18n/text/locale.html
618

INTER.SE-4 Avoid calling 'String.equals ()' in an Internationalized environment
619
Ref
eren
ce
INTER.SE-4Avoid calling 'String.equals ()' in an Internationalized environment
DescriptionDisallows the use of 'String.equals ()' in an internationalized environment.
Benefits'equals ()' cannot be relied on to sort strings because the Unicode values of the characters in the strings do not correspond to the relative order of the characters for most languages.
Examplepackage examples.rules.inter;
public class SE { public boolean compstr (String s1, String s2) { boolean b = (s1.equals (s2)); // VIOLATION return b; }}

INTER.SE-4 Avoid calling 'String.equals ()' in an Internationalized environment
Referen
ce
RepairThe predefined collation rules provided by the 'Collator' class should be used to sort strings in a locale-independent manner. To instantiate the Collator class, call the 'getInstance ()' method. Usually, you create a Col-lator for the default locale, as in the following example:
Collator myCollator = Collator.getInstance ();
You can also specify a particular locale when you create a Collator as fol-lows:
Collator myFrenchCollator = Collator.getInstance (Locale.FRENCH);
Then, you invoke 'Collator.compare ()' to perform a locale-independent string comparison as follows:
myCollator.compare (s1,s2);
For more information on the 'Collator' class, see
http://java.sun.com/docs/books/tutorial/i18n/text/collationintro.html
The repaired version of our original example follows:
package examples.rules.inter;
import java.text.Collator;
public class SEFixed { public boolean compstr (String s1, String s2) { Collator myCollator = Collator.getInstance (); boolean b = (myCollator.compare(s1,s2) == 0); // FIXED return b; }}
Referencehttp://java.sun.com/docs/books/tutorial/i18n/intro/checklist.html
http://java.sun.com/docs/books/tutorial/i18n/text/locale.html
620

INTER.ST-4 Avoid using 'StringTokenizer' in an Internationalized environment
621
Ref
eren
ce
INTER.ST-4Avoid using 'StringTokenizer' in an Internationalized environment
Description'StringTokenizer()' must not be used in an internationalized environment.
Examplepackage examples.rules.inter;
public class ST{ public int method (String str) { StringTokenizer st = new StringTokenizer(str); // VIOLATION return st.countTokens (); }}
Referencehttp://java.sun.com/docs/books/tutorial/i18n/intro/checklist.html

INTER.TTS-4 Avoid calling 'Time.toString ()' in an Internationalized environment
Referen
ce
INTER.TTS-4Avoid calling 'Time.toString ()' in an Internationalized environment
DescriptionDisallows calling 'Time.toString ()' in an internationalized environment.
BenefitsTime formats differ with region and language.
Examplepackage examples.rules.inter;
import java.sql.Time;
public class TTS { public void printTime (Time t1) { String timeStr = t1.toString (); // VIOLATION System.out.println (timeStr); }}
RepairIf you use the date-formatting classes, your application can display dates and times correctly around the world. First, create a formatter with the 'getTimeInstance ()' method as follows:
DateFormat timeFormatter = DateFormat.getTimeInstance(DateFor-mat.DEFAULT , Locale.getDefault ());
Second, call 'format ()', which returns a String containing the formatted date/time:
622
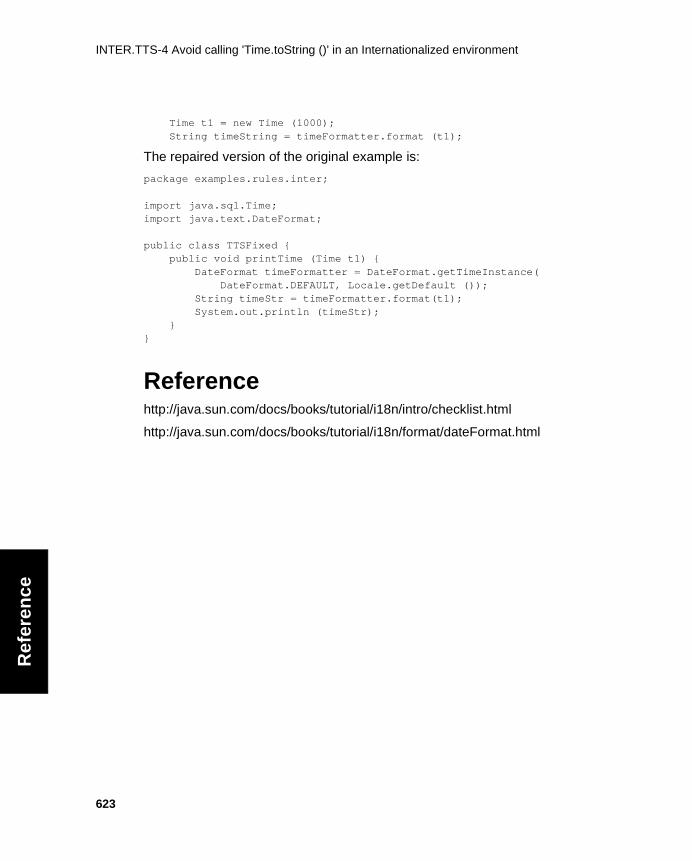
INTER.TTS-4 Avoid calling 'Time.toString ()' in an Internationalized environment
623
Ref
eren
ce
Time t1 = new Time (1000); String timeString = timeFormatter.format (t1);
The repaired version of the original example is:
package examples.rules.inter;
import java.sql.Time;import java.text.DateFormat;
public class TTSFixed { public void printTime (Time t1) { DateFormat timeFormatter = DateFormat.getTimeInstance( DateFormat.DEFAULT, Locale.getDefault ()); String timeStr = timeFormatter.format(t1); System.out.println (timeStr); }}
Referencehttp://java.sun.com/docs/books/tutorial/i18n/intro/checklist.html
http://java.sun.com/docs/books/tutorial/i18n/format/dateFormat.html

JAVADOC.BT-4 Avoid using nonexistent '@' tags in Javadoc comments
624
Referen
ce
Javadoc Comment RulesJAVADOC.BT-4Avoid using nonexistent '@' tags in Javadoc comments
DescriptionRequires that only valid Javadoc tags be used.
BenefitsA Javadoc comment may use special tags which all begin with the '@' character to allow Javadoc to provide additional formatting for the docu-mentation.
Examplepackage examples.rules.javadoc;/** * Javadoc comment * @unsupported tag */public class BT {}
RepairEither change the tag to a valid one or remove it.
package examples.rules.javadoc;/** * Javadoc comment * replaced tag with comment text. // FIXED */public class BT {}
Tip: If your Javadoc comments contain HTML tags, you should also check for errors in these tags.
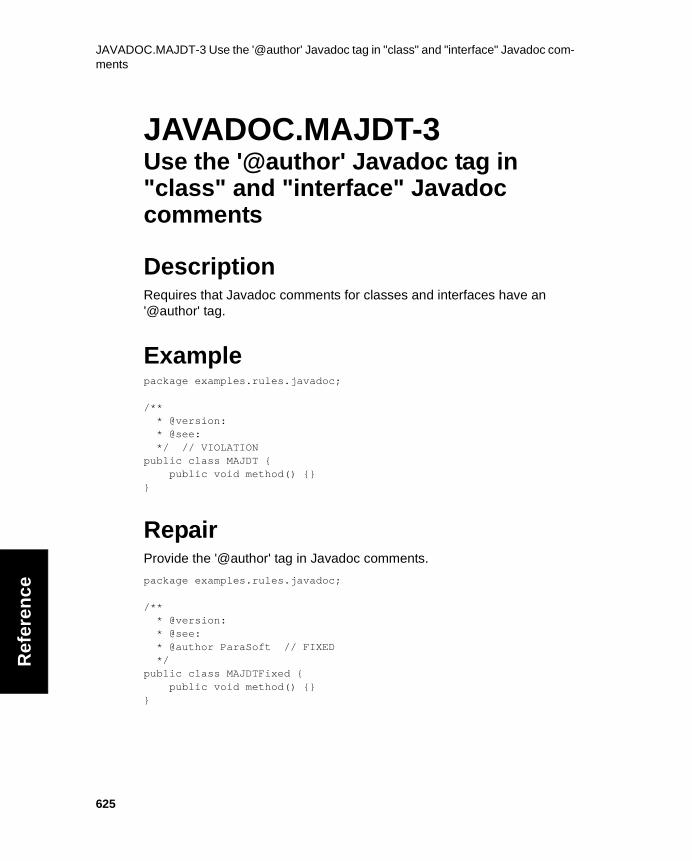
JAVADOC.MAJDT-3 Use the '@author' Javadoc tag in "class" and "interface" Javadoc com-ments
625
Ref
eren
ce
JAVADOC.MAJDT-3Use the '@author' Javadoc tag in "class" and "interface" Javadoc comments
DescriptionRequires that Javadoc comments for classes and interfaces have an '@author' tag.
Examplepackage examples.rules.javadoc;
/** * @version: * @see: */ // VIOLATIONpublic class MAJDT { public void method() {}}
RepairProvide the '@author' tag in Javadoc comments.
package examples.rules.javadoc;
/** * @version: * @see: * @author ParaSoft // FIXED */public class MAJDTFixed { public void method() {}}

JAVADOC.MRDC-1 Use the '@return' Javadoc tag in "public" method Javadoc comments
626
Referen
ce
JAVADOC.MRDC-1Use the '@return' Javadoc tag in "public" method Javadoc comments
DescriptionRequires the use of the '@return' tag in the Javadoc comments of non-"void" "public" methods.
BenefitsCommenting your code is a good way to document its behavior.
Examplepackage examples.rules.javadoc;class MRDC { public String getStr () { // VIOLATION return _str; } private String _str;}
RepairProvide the '@return' tag in the Javadoc comments.
package examples.rules.javadoc;class MRDCFixed { /** * @return string // FIXED */ public String getStr () { return _str; } private String _str;}

JAVADOC.MRDC2-2 Use the '@return' Javadoc tag in "protected" method Javadoc com-
627
Ref
eren
ce
JAVADOC.MRDC2-2Use the '@return' Javadoc tag in "protected" method Javadoc comments.
DescriptionRequires the use of the '@return' tag in the Javadoc comments of non-"void" "protected" methods.
BenefitsCommenting your code is a good way to document its behavior.
Examplepackage examples.rules.javadoc;class MRDC2 { protected String getStr () { // VIOLATION return _str; } private String _str;}
RepairProvide the '@return' tag in the Javadoc comments.
package examples.rules.javadoc;class MRDC2Fixed { /** * @return string // FIXED */ protected String getStr () { return _str; } private String _str;}

JAVADOC.MRDC3-3 Use the '@return' Javadoc tag in "private" methods
628
Referen
ce
JAVADOC.MRDC3-3Use the '@return' Javadoc tag in "private" methods
DescriptionRequires the use of the '@return' tag in the Javadoc comments of non-"void" package-private methods.
BenefitsCommenting your code is a good way to document its behavior.
Examplepackage examples.rules.javadoc;class MRDC3 { String getStr () { // VIOLATION return _str; } private String _str;}
RepairProvide the '@return' tag in package-private method Javadoc comments.
package examples.rules.javadoc;class MRDC3Fixed { /** * @return string // FIXED */ String getStr () { return _str; } private String _str;}

JAVADOC.MRDC4-5 Use the '@return' Javadoc tag in "private" methods
629
Ref
eren
ce
JAVADOC.MRDC4-5Use the '@return' Javadoc tag in "private" methods
DescriptionRequires the use of the '@return' tag in the Javadoc comments of non-"void" "private" methods.
BenefitsCommenting your code is a good way to document its behavior.
Examplepackage examples.rules.javadoc;class MRDC4 { private String getStr () { // VIOLATION return _str; } private String _str;}
RepairProvide the '@return' tag in "private" method Javadoc comments.
package examples.rules.javadoc;class MRDC4Fixed { /** * @return string // FIXED */ private String getStr () { return _str; } private String _str;}

JAVADOC.MVJDT-3 Use the '@version' tag in "class" Javadoc comments
630
Referen
ce
JAVADOC.MVJDT-3Use the '@version' tag in "class" Javadoc comments
DescriptionRequires that the Javadoc comments for classes and interfaces have the '@version' Javadoc tag
Examplepackage examples.rules.javadoc;
public class MVJDT { // VIOLATION void method() {}}
RepairProvide the '@version' tag.
package examples.rules.javadoc;
/** @version 1.0 */public class MVJDTFixed { // FIXED void method() {}}

JAVADOC.PARAM-1 Use the '@param' Javadoc tag for each parameter of "public" meth-
631
Ref
eren
ce
JAVADOC.PARAM-1Use the '@param' Javadoc tag for each parameter of "public" methods
DescriptionRequires that if a "public" method has a Javadoc comment, the comment should have an '@param' tag for each parameter.
Note that Jtest will not flag this error if a method does not have a Javadoc comment. Another rule (JAVADOC.MJDC) will report an error if there is no Javadoc comment.
BenefitsHelps users of your methods understand what data you expect in each parameter.
DrawbacksSome parameters are obvious enough to not benefit from comments. The '@param' text might not have anything more to say than is already obvi-ous from the names of the parameter and the method. The 'fixed' exam-ple below is an example of this problem.
Examplepackage examples.rules.javadoc;
public class Param{ /** */ // VIOLATION public void setId (String id) { _id = id; } private String _id;

JAVADOC.PARAM-1 Use the '@param' Javadoc tag for each parameter of "public" meth-
Referen
ce
}
RepairProvide a '@param' tag for each "public" method's parameters.
package examples.rules.javadoc;
public class ParamFixed { /** @param id is set as the new id. */ // FIXED public void setId (String id) { _id = id; } private String _id;}
632

JAVADOC.PARAM2-2 Use the '@param' Javadoc tag for each parameter of "protected"
633
Ref
eren
ce
JAVADOC.PARAM2-2Use the '@param' Javadoc tag for each parameter of "protected" methods
DescriptionRequires that if a "protected" method has a Javadoc comment, the com-ment should have an '@param' tag for each parameter.
Note that Jtest will not flag this error if a method does not have a Javadoc comment. Another rule (JAVADOC.MJDC) will report an error if there is no Javadoc comment.
BenefitsHelps users of your methods understand what data you expect in each parameter.
DrawbacksSome parameters are obvious enough to not benefit from comments. The '@param' text might not have anything more to say than is already obvi-ous from the names of the parameter and the method. The 'fixed' exam-ple below is an example of this problem.
Examplepackage examples.rules.javadoc;
public class Param2{ /** */ // VIOLATION protected void setId (String id) { _id = id;

JAVADOC.PARAM2-2 Use the '@param' Javadoc tag for each parameter of "protected"
Referen
ce
} private String _id;}
RepairProvide a '@param' tag for each "protected" method's parameters.
package examples.rules.javadoc;
public class Param2Fixed { /** @param id is set as the new id. */ // FIXED protected void setId (String id) { _id = id; } private String _id;}
634

JAVADOC.PARAM3-3 Use the '@param' Javadoc tag for each parameter of package-pri-
635
Ref
eren
ce
JAVADOC.PARAM3-3Use the '@param' Javadoc tag for each parameter of package-private methods
DescriptionRequires that if a package-private method has a Javadoc comment, the comment should have an '@param' tag for each parameter.
Note that Jtest will not flag this error if a method does not have a Javadoc comment. Another rule (JAVADOC.MJDC) will report an error if there is no Javadoc comment.
BenefitsHelps users of your methods understand what data you expect in each parameter.
DrawbacksSome parameters are obvious enough to not benefit from comments. The '@param' text might not have anything more to say than is already obvi-ous from the names of the parameter and the method. The 'fixed' exam-ple below is an example of this problem.
Examplepackage examples.rules.javadoc;
public class Param3{ /** */ // VIOLATION void setId (String id) { _id = id;

JAVADOC.PARAM3-3 Use the '@param' Javadoc tag for each parameter of package-pri-
Referen
ce
} private String _id;}
RepairProvide a '@param' tag for each package-private method's parameters.
package examples.rules.javadoc;
public class Param3Fixed { /** @param id is set as the new id. */ // FIXED void setId (String id) { _id = id; } private String _id;}
636
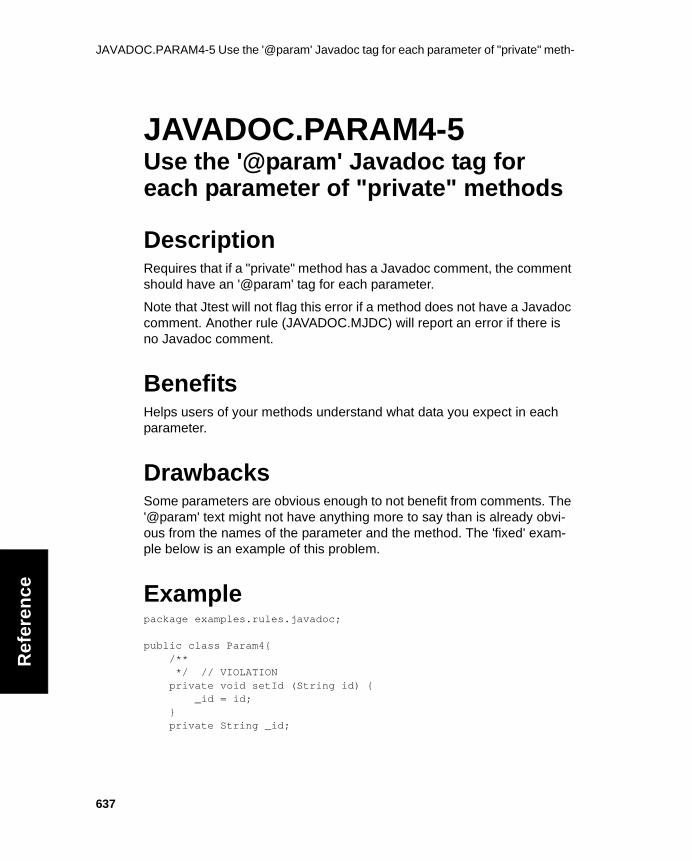
JAVADOC.PARAM4-5 Use the '@param' Javadoc tag for each parameter of "private" meth-
637
Ref
eren
ce
JAVADOC.PARAM4-5Use the '@param' Javadoc tag for each parameter of "private" methods
DescriptionRequires that if a "private" method has a Javadoc comment, the comment should have an '@param' tag for each parameter.
Note that Jtest will not flag this error if a method does not have a Javadoc comment. Another rule (JAVADOC.MJDC) will report an error if there is no Javadoc comment.
BenefitsHelps users of your methods understand what data you expect in each parameter.
DrawbacksSome parameters are obvious enough to not benefit from comments. The '@param' text might not have anything more to say than is already obvi-ous from the names of the parameter and the method. The 'fixed' exam-ple below is an example of this problem.
Examplepackage examples.rules.javadoc;
public class Param4{ /** */ // VIOLATION private void setId (String id) { _id = id; } private String _id;

JAVADOC.PARAM4-5 Use the '@param' Javadoc tag for each parameter of "private" meth-
Referen
ce
}
RepairProvide a '@param' tag for each "private" method's parameters.
package examples.rules.javadoc;
public class Param4Fixed { /** @param id is set as the new id. */ // FIXED private void setId (String id) { _id = id; } private String _id;}
638
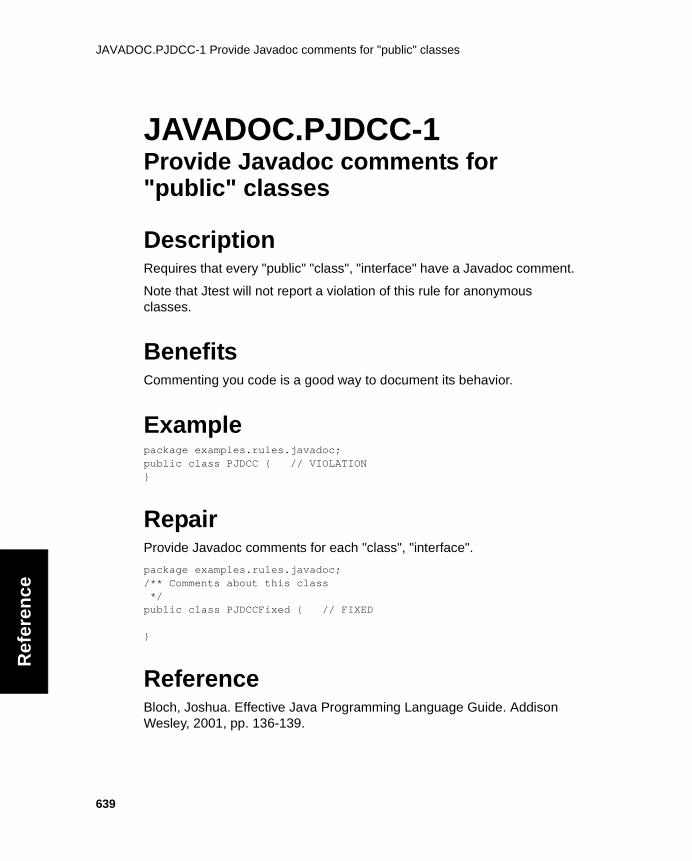
JAVADOC.PJDCC-1 Provide Javadoc comments for "public" classes
639
Ref
eren
ce
JAVADOC.PJDCC-1Provide Javadoc comments for "public" classes
DescriptionRequires that every "public" "class", "interface" have a Javadoc comment.
Note that Jtest will not report a violation of this rule for anonymous classes.
BenefitsCommenting you code is a good way to document its behavior.
Examplepackage examples.rules.javadoc; public class PJDCC { // VIOLATION}
RepairProvide Javadoc comments for each "class", "interface".
package examples.rules.javadoc; /** Comments about this class */public class PJDCCFixed { // FIXED
}
ReferenceBloch, Joshua. Effective Java Programming Language Guide. Addison Wesley, 2001, pp. 136-139.

JAVADOC.PJDCC2-2 Provide Javadoc comments for "protected" classes
640
Referen
ce
JAVADOC.PJDCC2-2Provide Javadoc comments for "protected" classes
DescriptionRequires that every "protected" "class", "interface" have a Javadoc com-ment.
Note that Jtest will not report a violation of this rule for anonymous classes.
BenefitsCommenting you code is a good way to document its behavior.
Examplepackage examples.rules.javadoc; protected class PJDCC2 { // VIOLATION}
RepairProvide Javadoc comments for each "class", "interface".
package examples.rules.javadoc; /** Comments about this class */protected class PJDCC2Fixed { // FIXED}
ReferenceBloch, Joshua. Effective Java Programming Language Guide. Addison Wesley, 2001, pp. 136-139.

JAVADOC.PJDCC3-3 Provide Javadoc comments for package-private classes and inter-
641
Ref
eren
ce
JAVADOC.PJDCC3-3Provide Javadoc comments for package-private classes and interfaces
DescriptionRequires that every package-private "class", "interface" have a Javadoc comment.
Note that Jtest will not report a violation of this rule for anonymous classes.
BenefitsCommenting you code is a good way to document its behavior.
Examplepackage examples.rules.javadoc;
class PJDCC3 { // VIOLATION
}
RepairProvide Javadoc comments for each "class", "interface".
package examples.rules.javadoc;
/** Comments about this class */class PJDCC3Fixed { // FIXED
}

JAVADOC.PJDCC3-3 Provide Javadoc comments for package-private classes and inter-
Referen
ce
ReferenceBloch, Joshua. Effective Java Programming Language Guide. Addison Wesley, 2001, pp. 136-139.
642

JAVADOC.PJDCC4-5 Provide Javadoc comments for "private" classes and interfaces
643
Ref
eren
ce
JAVADOC.PJDCC4-5Provide Javadoc comments for "private" classes and interfaces
DescriptionRequires that every "private" "class", "interface" have a Javadoc com-ment.
Note that Jtest will not report a violation of this rule for anonymous classes.
BenefitsCommenting you code is a good way to document its behavior.
Examplepackage examples.rules.javadoc;
private class PJDCC4 { // VIOLATION
}
RepairProvide Javadoc comments for each "class", "interface".
package examples.rules.javadoc;
/** Comments about this class */private class PJDCC4Fixed { // FIXED
}

JAVADOC.PJDCC4-5 Provide Javadoc comments for "private" classes and interfaces
Referen
ce
ReferenceBloch, Joshua. Effective Java Programming Language Guide. Addison Wesley, 2001, pp. 136-139.
644
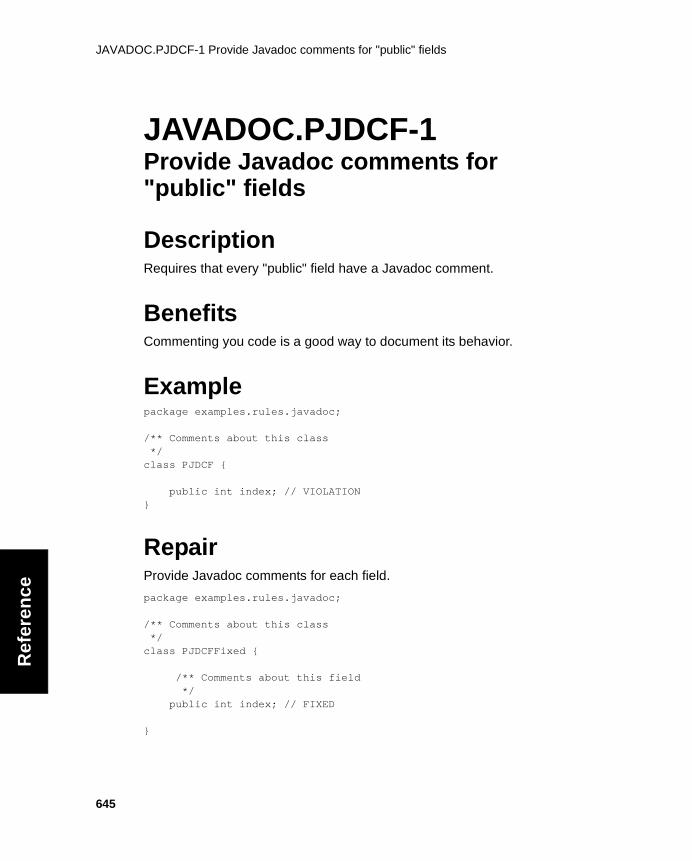
JAVADOC.PJDCF-1 Provide Javadoc comments for "public" fields
645
Ref
eren
ce
JAVADOC.PJDCF-1Provide Javadoc comments for "public" fields
DescriptionRequires that every "public" field have a Javadoc comment.
BenefitsCommenting you code is a good way to document its behavior.
Examplepackage examples.rules.javadoc;
/** Comments about this class */class PJDCF {
public int index; // VIOLATION}
RepairProvide Javadoc comments for each field.
package examples.rules.javadoc;
/** Comments about this class */class PJDCFFixed { /** Comments about this field */ public int index; // FIXED
}

JAVADOC.PJDCF-1 Provide Javadoc comments for "public" fields
Referen
ce
ReferenceBloch, Joshua. Effective Java Programming Language Guide. Addison Wesley, 2001, pp. 136-139.
646

JAVADOC.PJDCF2-2 Provide Javadoc comments for "protected" fields
647
Ref
eren
ce
JAVADOC.PJDCF2-2Provide Javadoc comments for "protected" fields
DescriptionRequires that every "protected" field have a Javadoc comment.
BenefitsCommenting you code is a good way to document its behavior.
Examplepackage examples.rules.javadoc;
/** Comments about this class */class PJDCF2 {
protected int index; // VIOLATION}
RepairProvide Javadoc comments for each field.
package examples.rules.javadoc;
/** Comments about this class */class PJDCF2Fixed { /** Comments about this field */ protected int index; // FIXED
}

JAVADOC.PJDCF2-2 Provide Javadoc comments for "protected" fields
Referen
ce
ReferenceBloch, Joshua. Effective Java Programming Language Guide. Addison Wesley, 2001, pp. 136-139.
648

JAVADOC.PJDCF3-3 Provide Javadoc comments for package-private fields
649
Ref
eren
ce
JAVADOC.PJDCF3-3Provide Javadoc comments for package-private fields
DescriptionRequires that every package-private field have a Javadoc comment.
BenefitsCommenting you code is a good way to document its behavior.
Examplepackage examples.rules.javadoc;
/** Comments about this class */class PJDCF3 {
int index; // VIOLATION}
RepairProvide Javadoc comments for each field.
package examples.rules.javadoc;
/** Comments about this class */class PJDCF3Fixed { /** Comments about this field */ int index; // FIXED
}

JAVADOC.PJDCF3-3 Provide Javadoc comments for package-private fields
Referen
ce
ReferenceBloch, Joshua. Effective Java Programming Language Guide. Addison Wesley, 2001, pp. 136-139.
650

JAVADOC.PJDCF4-5 Provide Javadoc comments for "private" fields
651
Ref
eren
ce
JAVADOC.PJDCF4-5Provide Javadoc comments for "private" fields
DescriptionRequires that every "private" field have a Javadoc comment.
BenefitsCommenting you code is a good way to document its behavior.
Examplepackage examples.rules.javadoc;
/** Comments about this class */class PJDCF4 {
private int index; // VIOLATION}
RepairProvide Javadoc comments for each field.
package examples.rules.javadoc;
/** Comments about this class */class PJDCF4Fixed { /** Comments about this field */ private int index; // FIXED
}

JAVADOC.PJDCF4-5 Provide Javadoc comments for "private" fields
Referen
ce
ReferenceBloch, Joshua. Effective Java Programming Language Guide. Addison Wesley, 2001, pp. 136-139.
652

JAVADOC.PJDCM-1 Provide Javadoc comments for "public" methods
653
Ref
eren
ce
JAVADOC.PJDCM-1Provide Javadoc comments for "public" methods
DescriptionRequires that every "public" method have a Javadoc comment.
Note that Jtest will not report a violation of this rule for anonymous classes.
BenefitsCommenting you code is a good way to document its behavior.
Examplepackage examples.rules.javadoc;
/** Comments about this class */public class PJDCM {
public void method () {} // VIOLATION}
RepairProvide Javadoc comments for each method.
package examples.rules.javadoc;
/** Comments about this class */public class PJDCMFixed { /** Comments about this method */

JAVADOC.PJDCM-1 Provide Javadoc comments for "public" methods
Referen
ce
public void method () {} // FIXED
}
ReferenceBloch, Joshua. Effective Java Programming Language Guide. Addison Wesley, 2001, pp. 136-139.
654

JAVADOC.PJDCM2-2 Provide Javadoc comments for "protected" methods
655
Ref
eren
ce
JAVADOC.PJDCM2-2Provide Javadoc comments for "protected" methods
DescriptionRequires that every "protected" method have a Javadoc comment.
Note that Jtest will not report a violation of this rule for anonymous classes.
BenefitsCommenting you code is a good way to document its behavior.
Examplepackage examples.rules.javadoc;
/** Comments about this class */public class PJDCM2 {
protected void method () {} // VIOLATION}
RepairProvide Javadoc comments for each method.
package examples.rules.javadoc;
/** Comments about this class */public class PJDCM2Fixed { /** Comments about this method */

JAVADOC.PJDCM2-2 Provide Javadoc comments for "protected" methods
Referen
ce
protected void method () {} // FIXED
}
ReferenceBloch, Joshua. Effective Java Programming Language Guide. Addison Wesley, 2001, pp. 136-139.
656
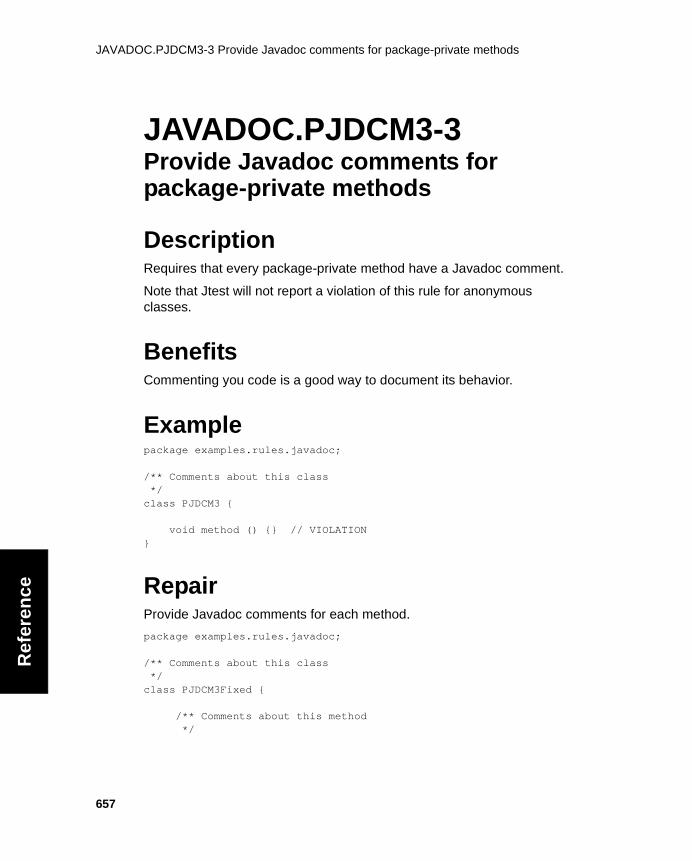
JAVADOC.PJDCM3-3 Provide Javadoc comments for package-private methods
657
Ref
eren
ce
JAVADOC.PJDCM3-3Provide Javadoc comments for package-private methods
DescriptionRequires that every package-private method have a Javadoc comment.
Note that Jtest will not report a violation of this rule for anonymous classes.
BenefitsCommenting you code is a good way to document its behavior.
Examplepackage examples.rules.javadoc;
/** Comments about this class */class PJDCM3 {
void method () {} // VIOLATION}
RepairProvide Javadoc comments for each method.
package examples.rules.javadoc;
/** Comments about this class */class PJDCM3Fixed { /** Comments about this method */

JAVADOC.PJDCM3-3 Provide Javadoc comments for package-private methods
Referen
ce
void method () {} // FIXED
}
ReferenceBloch, Joshua. Effective Java Programming Language Guide. Addison Wesley, 2001, pp. 136-139.
658

JAVADOC.PJDCM4-5 Provide Javadoc comments for "private" methods
659
Ref
eren
ce
JAVADOC.PJDCM4-5Provide Javadoc comments for "private" methods
DescriptionRequires that every "private" method have a Javadoc comment.
Note that Jtest will not report a violation of this rule for anonymous classes.
BenefitsCommenting you code is a good way to document its behavior.
Examplepackage examples.rules.javadoc;
/** Comments about this class */class PJDCM4 {
private void method () {} // VIOLATION}
RepairProvide Javadoc comments for each method.
package examples.rules.javadoc;
/** Comments about this class */class PJDCM4Fixed { /** Comments about this method */

JAVADOC.PJDCM4-5 Provide Javadoc comments for "private" methods
Referen
ce
private void method () {} // FIXED
}
ReferenceBloch, Joshua. Effective Java Programming Language Guide. Addison Wesley, 2001, pp. 136-139.
660

JAVADOC.SMJT-1 Use the '@concurrency' Javadoc tag on "synchronized" "public" meth-
661
Ref
eren
ce
JAVADOC.SMJT-1Use the '@concurrency' Javadoc tag on "synchronized" "public" methods and blocks
DescriptionRequires that "synchronized" "public" code (i.e. methods and "{ }" blocks) have a Javadoc comment with a header (i.e. a sentence describing the code) and a '@concurrency' tag.
BenefitsIdeally, your header will explain how the code maintains thread-safety and how the users of the code should avoid threading problems.
Examplepackage examples.rules.javadoc;
class SMJT { public synchronized void method () { // VIOLATION }}
RepairProvide the '@concurrency' tag along with a header for the "synchro-nized" code.
package examples.rules.javadoc;
class SMJTFixed { /** * Thread safety is maintained because this method doesn't do anything

JAVADOC.SMJT-1 Use the '@concurrency' Javadoc tag on "synchronized" "public" meth-
Referen
ce
* @concurrency ... */ public synchronized void method () { // FIXED }}
ReferenceBloch, Joshua. Effective Java Programming Language Guide. Addison Wesley, 2001, pp. 208-210.
662

JAVADOC.SMJT2-2 Use the '@concurrency' Javadoc tag on "synchronized" "protected"
663
Ref
eren
ce
JAVADOC.SMJT2-2Use the '@concurrency' Javadoc tag on "synchronized" "protected" methods and blocks
DescriptionRequires that "synchronized" "protected" code (i.e. methods and "{ }" blocks) have a Javadoc comment with a header (a sentence describing the code) and an '@concurrency' tag.
BenefitsIdeally, your header will explain how the code maintains thread-safety and how the users of the code should avoid threading problems.
Examplepackage examples.rules.javadoc;
class SMJT2 { protected synchronized void method () { // VIOLATION }}
RepairProvide the '@concurrency' tag along with a header for the "synchro-nized" code.
package examples.rules.javadoc;
class SMJT2Fixed { /** * Thread safety is maintained because this method doesn't do anything

JAVADOC.SMJT2-2 Use the '@concurrency' Javadoc tag on "synchronized" "protected"
Referen
ce
* @concurrency ... */ protected synchronized void method () { // FIXED }}
ReferenceBloch, Joshua. Effective Java Programming Language Guide. Addison Wesley, 2001, pp. 208-210.
664

JAVADOC.SMJT3-4 Use the '@concurrency' Javadoc tag for "synchronized" package-pri-
665
Ref
eren
ce
JAVADOC.SMJT3-4Use the '@concurrency' Javadoc tag for "synchronized" package-private methods and '{ }' blocks
DescriptionRequires that "synchronized" package-private code (i.e. methods and "{ }" blocks) have a Javadoc comment with a header (a sentence describing the code) and an '@concurrency' tag.
BenefitsIdeally, your header will explain how the code maintains thread-safety and how the users of the code should avoid threading problems.
Examplepackage examples.rules.javadoc;
class SMJT3 { synchronized void method () { // VIOLATION }}
RepairProvide the '@concurrency' tag along with a header for the "synchro-nized" code.
package examples.rules.javadoc;
class SMJT3Fixed { /** * Thread safety is maintained because this method doesn't do anything

JAVADOC.SMJT3-4 Use the '@concurrency' Javadoc tag for "synchronized" package-pri-
Referen
ce
* @concurrency ... */ synchronized void method () { // FIXED }}
ReferenceBloch, Joshua. Effective Java Programming Language Guide. Addison Wesley, 2001, pp. 208-210.
666

JAVADOC.THROW-1 Use the '@throws' or ‘@exception’ Javadoc tag in "public" methods
667
Ref
eren
ce
JAVADOC.THROW-1Use the '@throws' or ‘@exception’ Javadoc tag in "public" methods
DescriptionRequires that the number of '@throws' or ‘@exception’ tags in "public" method Javadoc comments is the same as the number of exceptions in the "throws" list.
BenefitsCommenting your code is a good way to document its behavior.
Examplepackage examples.rules.javadoc;
public class THROW { public void method () throws IOException { // VIOLATION System.in.read (); }}
RepairUse the '@throws' or ‘@exception’ Javadoc tag for each exception in the "throws" list.
package examples.rules.javadoc;
public class THROWFixed { /** * @throws IOException */ public void method () throws IOException { // FIXED System.in.read ();
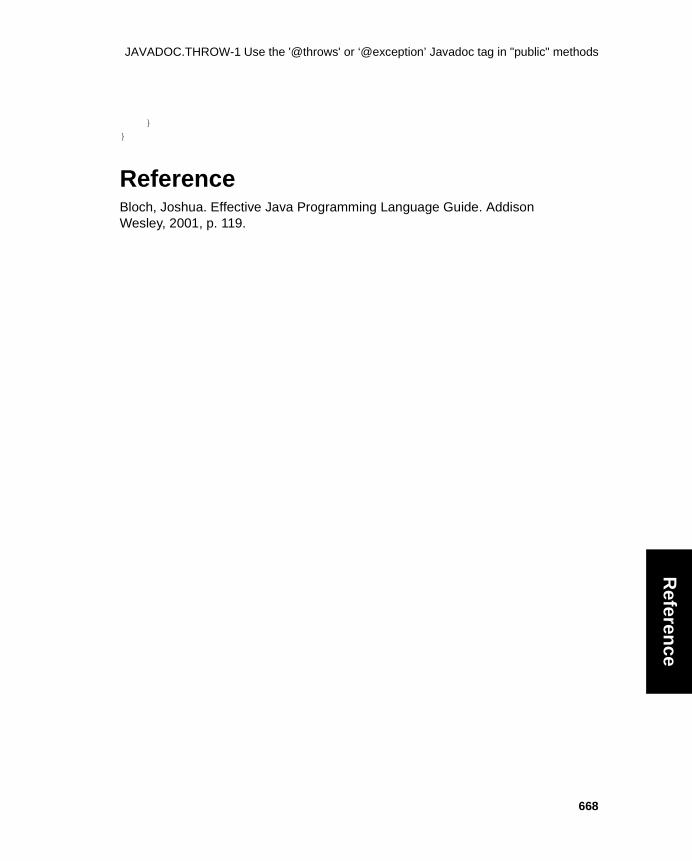
JAVADOC.THROW-1 Use the '@throws' or ‘@exception’ Javadoc tag in "public" methods
Referen
ce
}}
ReferenceBloch, Joshua. Effective Java Programming Language Guide. Addison Wesley, 2001, p. 119.
668

JAVADOC.THROW2-2 Use the '@throws' or ‘@exception’ Javadoc tag in "protected" meth-
669
Ref
eren
ce
JAVADOC.THROW2-2Use the '@throws' or ‘@exception’ Javadoc tag in "protected" methods
DescriptionRequires that the number of '@throws' or ‘@exception’ tags in “protected” method Javadoc comments is the same as the number of exceptions in the "throws" list.
BenefitsCommenting your code is a good way to document its behavior.
Examplepackage examples.rules.javadoc;
public class THROW2 { protected void method () throws IOException { // VIOLATION System.in.read (); }}
RepairUse the '@throws' or ‘@exception’ Javadoc tag for each exception in the "throws" list.
package examples.rules.javadoc;
public class THROW2Fixed { /** * @throws IOException */ protected void method () throws IOException { // FIXED System.in.read ();

JAVADOC.THROW2-2 Use the '@throws' or ‘@exception’ Javadoc tag in "protected" meth-
Referen
ce
}}
ReferenceBloch, Joshua. Effective Java Programming Language Guide. Addison Wesley, 2001, p. 119.
670

JAVADOC.THROW3-3 Use the '@throws' or ‘@exception’ Javadoc tag in package-private
671
Ref
eren
ce
JAVADOC.THROW3-3Use the '@throws' or ‘@exception’ Javadoc tag in package-private methods
DescriptionRequires that the number of '@throws' or ‘@exception’ tags in pack-age-private method Javadoc comments is the same as the number of exceptions in the "throws" list.
BenefitsCommenting your code is a good way to document its behavior.
Examplepackage examples.rules.javadoc;
class THROW3 { void method () throws IOException { // VIOLATION System.in.read (); }}
RepairUse the '@throws' or ‘@exception’ Javadoc tag for each exception in the "throws" list.
package examples.rules.javadoc;
class THROW3Fixed { /** * @throws IOException */

JAVADOC.THROW3-3 Use the '@throws' or ‘@exception’ Javadoc tag in package-private
Referen
ce
void method () throws IOException { // FIXED System.in.read (); }}
ReferenceBloch, Joshua. Effective Java Programming Language Guide. Addison Wesley, 2001, p. 119.
672

JAVADOC.THROW4-5 Use the '@throws' or ‘@exception’ Javadoc tag in "private" methods
673
Ref
eren
ce
JAVADOC.THROW4-5Use the '@throws' or ‘@exception’ Javadoc tag in "private" methods
DescriptionRequires that the number of '@throws' or ‘@exception’ tags in “private” method Javadoc comments is the same as the number of exceptions in the "throws" list.
BenefitsCommenting your code is a good way to document its behavior.
Examplepackage examples.rules.javadoc;
class THROW4 { private void method () throws IOException { // VIOLATION System.in.read (); }}
RepairUse the '@throws' or ‘@exception’ Javadoc tag for each exception in the "throws" list.
package examples.rules.javadoc;
class THROW4Fixed { /** * @throws IOException */ private void method () throws IOException { // FIXED System.in.read ();

JAVADOC.THROW4-5 Use the '@throws' or ‘@exception’ Javadoc tag in "private" methods
Referen
ce
}}
ReferenceBloch, Joshua. Effective Java Programming Language Guide. Addison Wesley, 2001, p. 119.
674

JAVADOC.TSMJT-3 Provide Javadoc comment for 'toString ()' method
675
Ref
eren
ce
JAVADOC.TSMJT-3Provide Javadoc comment for 'toString ()' method
DescriptionRequires that the 'toString ()' method have a Javadoc comment.
BenefitsThe documentation of a 'toString ()' method should tell the user how the data will be formatted.
Examplepackage examples.rules.javadoc;
class TSMJT { public TSMJT () { _name = "ParaSoft"; _product = "Jtest"; } public String toString () { // VIOLATION return "name=" + _name + ", product=" + _product; } private String _name; private String _product;}
RepairGive the 'toString ()' method a Javadoc comment.
package examples.rules.javadoc;
class TSMJTFixed { public TSMJTFixed () { _name = "ParaSoft";

JAVADOC.TSMJT-3 Provide Javadoc comment for 'toString ()' method
Referen
ce
_product = "Jtest"; } // FIXED /** * The string representation is "name=NAME, product=PRODUCT" * Where NAME is the company name and PRODUCT is the product name. */ public String toString () { return "name=" + _name + ", product=" + _product; } private String _name; private String _product;}
ReferenceBloch, Joshua. Effective Java Programming Language Guide. Addison Wesley, 2001, pp. 42-44.
676

JAVADOC.VMCR-3 Avoid using the '@return' Javadoc tag on "void" methods
677
Ref
eren
ce
JAVADOC.VMCR-3Avoid using the '@return' Javadoc tag on "void" methods
DescriptionDisallows the use of the '@return' Javadoc tag on "void" methods (i.e. methods that do not return a value).
BenefitsLeaving '@return' tags on methods that do not actually return anything can lead to confusion. In general, documentation that disagrees with the actual behavior of the code may cause confusion and bugs.
Examplepackage examples.rules.javadoc;
public class VMCR { /** * Displays text to the screen * @return ... */ public void display () { // VIOLATION System.out.println ("hello"); }}
RepairRemove the '@return' Javadoc tag.
package examples.rules.javadoc;
public class VMCRFixed { /**

JAVADOC.VMCR-3 Avoid using the '@return' Javadoc tag on "void" methods
Referen
ce
* Displays text to the screen */ public void display () { // FIXED System.out.println ("hello"); }}
678

JUNIT.OSIC-2 Avoid using the constructor to set up test cases
679
Ref
eren
ce
JUnit RulesJUNIT.OSIC-2Avoid using the constructor to set up test cases
DescriptionRequires that a JUnit test case constructor contain nothing more than a call to the super class's constructor.
BenefitsIf the constructor throws an IllegalStateException, JUnit will throw an AssertionFailedError to indicate that the test case could not be instanti-ated. The resulting stack trace would show only the location of the Asser-tionFailedError, not the location of the original error. This makes debugging difficult.
Examplepackage examples.rules.junit;
import junit.framework.*;
class OSIC extends TestCase { private String _name; public OSIC () { super (); _name = "Test string"; // VIOLATION }}
RepairInstead of setting up the data in the constructor, perform test setup by overriding the 'setUp ()' method. Any exception thrown within 'setUp ()' is reported correctly by JUnit.

JUNIT.OSIC-2 Avoid using the constructor to set up test cases
Referen
ce
package examples.rules.junit;
import junit.framework.*;
class OSICFixed extends TestCase { public OSICFixed () { super (); } public void setUp () { _name = "Test string"; // FIXED }}
ReferenceSchneider, Andy, JUnit Best Practices. JavaWorld. (December 2000).
http://www.javaworld.com/javaworld/jw-12-2000/jw-1221-junit.html
680

JUNIT.OSUM-3 Always override the 'setUp ()' method
681
Ref
eren
ce
JUNIT.OSUM-3Always override the 'setUp ()' method
DescriptionRequires that JUnit tests override the 'setUp ()' method.
BenefitsYou should use the 'setUp ()' method to do your initialization because exceptions thrown in the constructor will be obscured by JUnit, while exceptions thrown from 'setUp ()' will have more precise information.
Examplepackage examples.rules.junit;
import junit.framework.*;
class OSUM extends TestCase { // VIOLATION: missing 'setUp ()' method public OSUM (String n) {
super (n); // ... extra initialization code } public void tearDown () { }}
RepairMove any initialization code to a 'setUp ()' method.
package examples.rules.junit;
import junit.framework.*;
class OSUMFixed extends TestCase { public OSUMFixed(String n) {

JUNIT.OSUM-3 Always override the 'setUp ()' method
Referen
ce
super(n); } public void setUp () { // FIXED // ... extra initialization code } public void tearDown() { }}
ReferenceSchneider, Andy, JUnit Best Practices. JavaWorld. (December 2000).
http://www.javaworld.com/javaworld/jw-12-2000/jw-1221-junit.html
682

JUNIT.OTDM-3 Always override the 'tearDown ()' method
683
Ref
eren
ce
JUNIT.OTDM-3Always override the 'tearDown ()' method
DescriptionRequires that JUnit tests override the 'tearDown ()' method.
BenefitsIt is a good idea to use the 'tearDown ()' method to clean up all open resources (e.g. networking connections and files) after all the tests defined in the class have been executed.
Examplepackage examples.rules.junit;
import junit.framework.*;
class OTDM extends TestCase { // VIOLATION: missing 'tearDown ()' method public OTDM (String n) {
super(n); } public void setUp () { }}
RepairAdd the 'tearDown ()' method.
package examples.rules.junit;
import junit.framework.*;
class OTDMFixed extends TestCase {

JUNIT.OTDM-3 Always override the 'tearDown ()' method
Referen
ce
public OTDMFixed (String n) {super (n);
} public void setUp () { }
public void tearDown () { // FIXED // cleanup code goes here }}
ReferenceSchneider, Andy, JUnit Best Practices. JavaWorld. (December 2000).
http://www.javaworld.com/javaworld/jw-12-2000/jw-1221-junit.html
684

METRICS.CCNL-2 Number of comment lines in a "class" or "interface"
685
Ref
eren
ce
Class MetricsMETRICS.CCNL-2Number of comment lines in a "class" or "interface"
DescriptionMeasures the number of comments in a class. This indicates whether the code is documented. This rule includes //, /* */, and /** */ format comments that are not part of other statements.
Note that Jtest will report an error if the value is beyond the lower or upper threshold set in the Global Test Parameters tree’s Rules> Built-in Rules> Class Metrics branch. To change the upper or lower threshold, right-click the Global Test Parameters tree node representing the metric you want to modify, choose Modify Upper Threshold or Modify Lower Threshold from the shortcut menu, then modify the threshold in the dia-log box that opens.
BenefitsEvery class, interface, method and field should have a Javadoc comment associated with it. Documentation helps users of your code better under-stand it.
Examplepackage examples.rules.metrics;
class CCNL { /** javadoc for example method */ void example (boolean isDone) { if (isDone) { /* this is a comment */ System.out.println ("this is a statement"); someMethod (); } // end of if } // end of example.

METRICS.CCNL-2 Number of comment lines in a "class" or "interface"
Referen
ce
void someMethod () { }}
This class' comments: 5
This class' statements: 7
This class' total lines: 13
686

METRICS.CIHL-2 "class" or "interface" inheritance level
687
Ref
eren
ce
METRICS.CIHL-2"class" or "interface" inheritance level
DescriptionMeasures the inheritance level of a "class".
Note that Jtest will report an error if the value is beyond the lower or upper threshold set in the Global Test Parameters tree’s Rules> Built-in Rules> Class Metrics branch. To change the upper or lower threshold, right-click the Global Test Parameters tree node representing the metric you want to modify, choose Modify Upper Threshold or Modify Lower Threshold from the shortcut menu, then modify the threshold in the dia-log box that opens.
BenefitsAn unnecessarily deep "class" hierarchy adds to complexity and can rep-resent a poor use of the inheritance mechanism.
ReferenceSchroeder, Mark. A Practical Guide to Object-Oriented Metrics. IT Pro, (November/December, 1999).

METRICS.CNLM-2 Number of comment lines in a method
688
Referen
ce
METRICS.CNLM-2Number of comment lines in a method
DescriptionMeasures the number of comments in a method. This indicates how well the code is documented.
Note that Jtest will report an error if the value is beyond the lower or upper threshold set in the Global Test Parameters tree’s Rules> Built-in Rules> Class Metrics branch. To change the upper or lower threshold, right-click the Global Test Parameters tree node representing the metric you want to modify, choose Modify Upper Threshold or Modify Lower Threshold from the shortcut menu, then modify the threshold in the dia-log box that opens.
BenefitsEvery class, interface, method and field should have a Javadoc comment associated with it. Documentation helps users of your code to better understand it.
Examplepackage examples.rules.metrics;class CNLM { void example (boolean isDone) { if (isDone) { /* comment 1*/ System.out.println ("this is a statement"); someMethod (); } // end of if : comment 2 } // end of example: comment 3}
example method's comments: 3
example method's statements: 3
example method's total lines: 6

METRICS.CSNL-2 Number of statement lines in a "class" or "interface"
689
Ref
eren
ce
METRICS.CSNL-2Number of statement lines in a "class" or "interface"
DescriptionMeasures the number the number of statements in a class. An opening or closing brace by itself does not get counted as a statement.
Note that Jtest will report an error if the value is beyond the lower or upper threshold set in the Global Test Parameters tree’s Rules> Built-in Rules> Class Metrics branch. To change the upper or lower threshold, right-click the Global Test Parameters tree node representing the metric you want to modify, choose Modify Upper Threshold or Modify Lower Threshold from the shortcut menu, then modify the threshold in the dia-log box that opens.
BenefitsLarge classes are difficult to understand and maintain. Consider breaking down large classes into smaller ones that perform related tasks.
Examplepackage examples.rules.metrics;
class CSNL { /** javadoc for example method */ void example (boolean isDone) { if (isDone) { /* this is a comment */ System.out.println ("this is a statement"); someMethod (); } // end of if } // end of example.
void someMethod () { }

METRICS.CSNL-2 Number of statement lines in a "class" or "interface"
Referen
ce
}
This class's comments: 5
This class's statements: 7
This class's total lines: 13
690
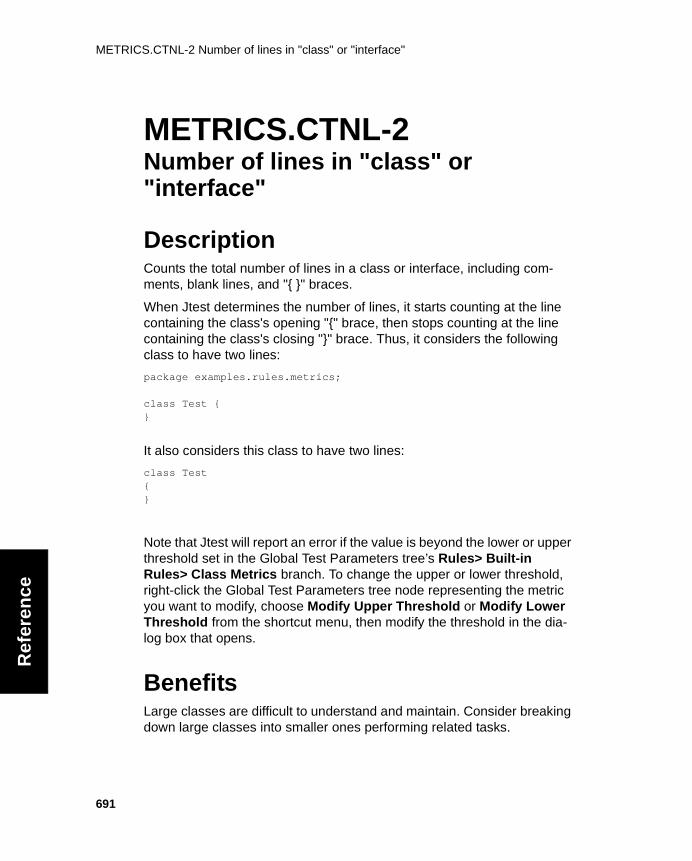
METRICS.CTNL-2 Number of lines in "class" or "interface"
691
Ref
eren
ce
METRICS.CTNL-2Number of lines in "class" or "interface"
DescriptionCounts the total number of lines in a class or interface, including com-ments, blank lines, and "{ }" braces.
When Jtest determines the number of lines, it starts counting at the line containing the class's opening "{" brace, then stops counting at the line containing the class's closing "}" brace. Thus, it considers the following class to have two lines:
package examples.rules.metrics;
class Test {}
It also considers this class to have two lines:
class Test{}
Note that Jtest will report an error if the value is beyond the lower or upper threshold set in the Global Test Parameters tree’s Rules> Built-in Rules> Class Metrics branch. To change the upper or lower threshold, right-click the Global Test Parameters tree node representing the metric you want to modify, choose Modify Upper Threshold or Modify Lower Threshold from the shortcut menu, then modify the threshold in the dia-log box that opens.
BenefitsLarge classes are difficult to understand and maintain. Consider breaking down large classes into smaller ones performing related tasks.

METRICS.CTNL-2 Number of lines in "class" or "interface"
Referen
ce
ReferenceSchroeder, Mark. A Practical Guide to Object-Oriented Metrics. IT Pro, (November/December, 1999).
692

METRICS.NOF-2 Number of fields
693
Ref
eren
ce
METRICS.NOF-2Number of fields
DescriptionThe number of fields in a class indicates the amount of data the class must maintain in order to carry out its responsibilities.
Note that Jtest will report an error if the value is beyond the lower or upper threshold set in the Global Test Parameters tree’s Rules> Built-in Rules> Class Metrics branch. To change the upper or lower threshold, right-click the Global Test Parameters tree node representing the metric you want to modify, choose Modify Upper Threshold or Modify Lower Threshold from the shortcut menu, then modify the threshold in the dia-log box that opens.
ReferenceSchroeder, Mark. A Practical Guide to Object-Oriented Metrics. IT Pro, (November/December, 1999).

METRICS.NOM-2 Number of methods
694
Referen
ce
METRICS.NOM-2Number of methods
DescriptionThe number of methods in a class indicates the amount of functionality implemented by a class.
This rule does not count implicitly or explicitly declared default construc-tors.
Note that Jtest will report an error if the value is beyond the lower or upper threshold set in the Global Test Parameters tree’s Rules> Built-in Rules> Class Metrics branch. To change the upper or lower threshold, right-click the Global Test Parameters tree node representing the metric you want to modify, choose Modify Upper Threshold or Modify Lower Threshold from the shortcut menu, then modify the threshold in the dia-log box that opens.
ReferenceSchroeder, Mark. A Practical Guide to Object-Oriented Metrics. IT Pro, (November/December, 1999).

METRICS.NPKGF-2 Number of package-private fields
695
Ref
eren
ce
METRICS.NPKGF-2Number of package-private fields
DescriptionThe number of fields in a class indicates the amount of data the class must maintain in order to carry out its responsibilities.
Note that Jtest will report an error if the value is beyond the lower or upper threshold set in the Global Test Parameters tree’s Rules> Built-in Rules> Class Metrics branch. To change the upper or lower threshold, right-click the Global Test Parameters tree node representing the metric you want to modify, choose Modify Upper Threshold or Modify Lower Threshold from the shortcut menu, then modify the threshold in the dia-log box that opens.
ReferenceSchroeder, Mark. A Practical Guide to Object-Oriented Metrics. IT Pro, (November/December, 1999).
METRICS.NPKGM-2 Number of package-private methods
696
Referen
ce
METRICS.NPKGM-2Number of package-private methods
DescriptionThe number of methods in a class indicates the amount of functionality implemented by a class.
Note that Jtest will report an error if the value is beyond the lower or upper threshold set in the Global Test Parameters tree’s Rules> Built-in Rules> Class Metrics branch. To change the upper or lower threshold, right-click the Global Test Parameters tree node representing the metric you want to modify, choose Modify Upper Threshold or Modify Lower Threshold from the shortcut menu, then modify the threshold in the dia-log box that opens.
ReferenceSchroeder, Mark. A Practical Guide to Object-Oriented Metrics. IT Pro, (November/December, 1999).

METRICS.NPRIF-2 Number of "private" fields
697
Ref
eren
ce
METRICS.NPRIF-2Number of "private" fields
DescriptionThe number of fields in a class indicates the amount of data the class must maintain in order to carry out its responsibilities.
Note that Jtest will report an error if the value is beyond the lower or upper threshold set in the Global Test Parameters tree’s Rules> Built-in Rules> Class Metrics branch. To change the upper or lower threshold, right-click the Global Test Parameters tree node representing the metric you want to modify, choose Modify Upper Threshold or Modify Lower Threshold from the shortcut menu, then modify the threshold in the dia-log box that opens.
ReferenceSchroeder, Mark. A Practical Guide to Object-Oriented Metrics. IT Pro, (November/December, 1999).

METRICS.NPRIM-2 Number of "private" methods
698
Referen
ce
METRICS.NPRIM-2Number of "private" methods
DescriptionThe number of methods in a class indicates the amount of functionality implemented by a class.
Note that Jtest will report an error if the value is beyond the lower or upper threshold set in the Global Test Parameters tree’s Rules> Built-in Rules> Class Metrics branch. To change the upper or lower threshold, right-click the Global Test Parameters tree node representing the metric you want to modify, choose Modify Upper Threshold or Modify Lower Threshold from the shortcut menu, then modify the threshold in the dia-log box that opens.
ReferenceSchroeder, Mark. A Practical Guide to Object-Oriented Metrics. IT Pro, (November/December, 1999).

METRICS.NPROF-2 Number of "protected" fields
699
Ref
eren
ce
METRICS.NPROF-2Number of "protected" fields
DescriptionThe number of fields in a class indicates the amount of data the class must maintain in order to carry out its responsibilities.
Note that Jtest will report an error if the value is beyond the lower or upper threshold set in the Global Test Parameters tree’s Rules> Built-in Rules> Class Metrics branch. To change the upper or lower threshold, right-click the Global Test Parameters tree node representing the metric you want to modify, choose Modify Upper Threshold or Modify Lower Threshold from the shortcut menu, then modify the threshold in the dia-log box that opens.
ReferenceSchroeder, Mark. A Practical Guide to Object-Oriented Metrics. IT Pro, (November/December, 1999).

METRICS.NPROM-2 Number of "protected" methods
700
Referen
ce
METRICS.NPROM-2Number of "protected" methods
DescriptionThe number of methods in a class indicates the amount of functionality implemented by a class.
Note that Jtest will report an error if the value is beyond the lower or upper threshold set in the Global Test Parameters tree’s Rules> Built-in Rules> Class Metrics branch. To change the upper or lower threshold, right-click the Global Test Parameters tree node representing the metric you want to modify, choose Modify Upper Threshold or Modify Lower Threshold from the shortcut menu, then modify the threshold in the dia-log box that opens.
ReferenceSchroeder, Mark. A Practical Guide to Object-Oriented Metrics. IT Pro, (November/December, 1999).

METRICS.NPUBF-2 Number of "public" fields
701
Ref
eren
ce
METRICS.NPUBF-2Number of "public" fields
DescriptionThe number of fields in a class indicates the amount of data the class must maintain in order to carry out its responsibilities.
Note that Jtest will report an error if the value is beyond the lower or upper threshold set in the Global Test Parameters tree’s Rules> Built-in Rules> Class Metrics branch. To change the upper or lower threshold, right-click the Global Test Parameters tree node representing the metric you want to modify, choose Modify Upper Threshold or Modify Lower Threshold from the shortcut menu, then modify the threshold in the dia-log box that opens.
ReferenceSchroeder, Mark. A Practical Guide to Object-Oriented Metrics. IT Pro, (November/December, 1999).

METRICS.NPUBM-2 Number of "public" methods
702
Referen
ce
METRICS.NPUBM-2Number of "public" methods
DescriptionThe number of methods in a class indicates the amount of functionality implemented by a class.
Note that Jtest will report an error if the value is beyond the lower or upper threshold set in the Global Test Parameters tree’s Rules> Built-in Rules> Class Metrics branch. To change the upper or lower threshold, right-click the Global Test Parameters tree node representing the metric you want to modify, choose Modify Upper Threshold or Modify Lower Threshold from the shortcut menu, then modify the threshold in the dia-log box that opens.
ReferenceSchroeder, Mark. A Practical Guide to Object-Oriented Metrics. IT Pro, (November/December, 1999).

METRICS.PJDC-2 Percentage of Javadoc comments(%)
703
Ref
eren
ce
METRICS.PJDC-2Percentage of Javadoc comments(%)
DescriptionCalculates, for classes and interfaces, the percentage of fields and meth-ods that have Javadoc comments.
This value is derived from the following formula:
% comments = #comments in a file / (#fields + #methods + 1) * 100
(‘+ 1’ is for the class or interface’s Javadoc comment).
Note that Jtest will report an error if the value is beyond the lower or upper threshold set in the Global Test Parameters tree’s Rules> Built-in Rules> Class Metrics branch. To change the upper or lower threshold, right-click the Global Test Parameters tree node representing the metric you want to modify, choose Modify Upper Threshold or Modify Lower Threshold from the shortcut menu, then modify the threshold in the dia-log box that opens.
BenefitsEvery class, interface, method and field should have a Javadoc comment associated with it. Documentation helps users of your code understand it better.
ReferenceSchroeder, Mark. A Practical Guide to Object-Oriented Metrics. IT Pro, (November/December, 1999).

METRICS.SNLM-2 Number of statement lines in a method
Referen
ce
METRICS.SNLM-2Number of statement lines in a method
DescriptionMeasures the number of statements per method.
An opening or closing brace by itself does not get counted as a statement.
Note that Jtest will report an error if the value is beyond the lower or upper threshold set in the Global Test Parameters tree’s Rules> Built-in Rules> Class Metrics branch. To change the upper or lower threshold, right-click the Global Test Parameters tree node representing the metric you want to modify, choose Modify Upper Threshold or Modify Lower Threshold from the shortcut menu, then modify the threshold in the dia-log box that opens.
BenefitsLarge methods are difficult to understand and maintain. Consider break-ing down large methods into smaller ones performing related tasks.
Examplepackage examples.rules.metrics;
class SNLM { /** javadoc for example method */ void example (boolean isDone) { if (isDone) { /* this is a comment */ System.out.println ("this is a statement"); someMethod (); } // end of if } // end of example.
void someMethod () {
704

METRICS.SNLM-2 Number of statement lines in a method
705
Ref
eren
ce
}}
example method's comments: 3
example method's statements: 4
example method's total lines: 6

METRICS.STMT-2 Number of statements in a method
706
Referen
ce
METRICS.STMT-2Number of statements in a method
DescriptionCounts the number of statements per method.
Note that Jtest will report an error if the value is beyond the lower or upper threshold set in the Global Test Parameters tree’s Rules> Built-in Rules> Class Metrics branch. The default lower threshold is 0; the default upper threshold is 20. To change the upper or lower threshold, right-click the Global Test Parameters tree node representing the metric you want to modify, choose Modify Upper Threshold or Modify Lower Threshold from the shortcut menu, then modify the threshold in the dia-log box that opens.
BenefitsExtremely long methods can be difficult to comprehend and often contain several conceptually unrelated functions.
RepairBreak the method into several methods that each accomplish a single dis-tinct function.

METRICS.TCC-2 Cyclomatic Complexity
707
Ref
eren
ce
METRICS.TCC-2Cyclomatic Complexity
DescriptionMeasures the 'cyclomatic complexity' of a method. Cyclomatic complexity represents the number of "while", "for", "if" and "switch" statements in a method.
This rule does not test "abstract", "native", and any methods that are declared in the interface.
Note that Jtest will report an error if the value is beyond the lower or upper threshold set in the Global Test Parameters tree’s Rules> Built-in Rules> Class Metrics branch. To change the upper or lower threshold, right-click the Global Test Parameters tree node representing the metric you want to modify, choose Modify Upper Threshold or Modify Lower Threshold from the shortcut menu, then modify the threshold in the dia-log box that opens.
BenefitsStudies have found that methods with cyclomatic complexity higher than 10 are error-prone.
ReferenceGrady, Robert B. Practical Software Metrics For Project Management and Process Improvement. Prentice Hall P T R, 1992, pp.16-18.
METRICS.TNLM-2 Number of lines in a method
Referen
ce
METRICS.TNLM-2Number of lines in a method
DescriptionCounts the number of lines in a method. This rule does not test "abstract" methods, "native" methods, or any methods that are declared in the inter-face.
When Jtest determines the number of lines, it starts counting at the line containing the class's opening "{" brace, then stops counting at the line containing the class's closing "}" brace. Thus, it considers the following class to have two lines:
package examples.rules.metrics;
class Test {}
It also considers this class to have two lines:
class Test{}
Note that Jtest will report an error if the value is beyond the lower or upper threshold set in the Global Test Parameters tree’s Rules> Built-in Rules> Class Metrics branch. To change the upper or lower threshold, right-click the Global Test Parameters tree node representing the metric you want to modify, choose Modify Upper Threshold or Modify Lower Threshold from the shortcut menu, then modify the threshold in the dia-log box that opens.
BenefitsExtremely long methods can be difficult to comprehend and often contain several conceptually unrelated functions.
708

METRICS.TNLM-2 Number of lines in a method
709
Ref
eren
ce
RepairBreak the method into several methods that each accomplish a single dis-tinct function.
ReferenceSchroeder, Mark. A Practical Guide to Object-Oriented Metrics. IT Pro, (November/December, 1999).

METRICS.TNMC-2 Number of method calls
710
Referen
ce
METRICS.TNMC-2Number of method calls
DescriptionCounts calls to methods and system functions within a system, class, or method.
This rule does not count "abstract", "native", or any methods that are declared in the interface.
Note that Jtest will report an error if the value is beyond the lower or upper threshold set in the Global Test Parameters tree’s Rules> Built-in Rules> Class Metrics branch. To change the upper or lower threshold, right-click the Global Test Parameters tree node representing the metric you want to modify, choose Modify Upper Threshold or Modify Lower Threshold from the shortcut menu, then modify the threshold in the dia-log box that opens.
BenefitsMany method calls can indicate that a method is doing a lot of work and should be separated into several smaller methods.
ReferenceSchroeder, Mark. A Practical Guide to Object-Oriented Metrics. IT Pro, (November/December, 1999).

METRICS.TNOP-2 Number of parameters
711
Ref
eren
ce
METRICS.TNOP-2Number of parameters
DescriptionCounts the number of method parameters.
Note that Jtest will report an error if the value is beyond the lower or upper threshold set in the Global Test Parameters tree’s Rules> Built-in Rules> Class Metrics branch. To change the upper or lower threshold, right-click the Global Test Parameters tree node representing the metric you want to modify, choose Modify Upper Threshold or Modify Lower Threshold from the shortcut menu, then modify the threshold in the dia-log box that opens.
BenefitsA high number of parameters indicate a complex interface to calling objects and should be avoided.
ReferenceSchroeder, Mark. A Practical Guide to Object-Oriented Metrics. IT Pro, (November/December, 1999).

METRICS.TRET-2 Number of "return" statements
712
Referen
ce
METRICS.TRET-2Number of "return" statements
DescriptionCounts the number of "return" statements in a method.
This rule only checks explicit "return" statements (the implicit return at the end of a "void" method is not counted). This rule does not test "abstract", "native", or any methods that are declared in the interface.
Note that Jtest will report an error if the value is beyond the lower or upper threshold set in the Global Test Parameters tree’s Rules> Built-in Rules> Class Metrics branch. To change the upper or lower threshold, right-click the Global Test Parameters tree node representing the metric you want to modify, choose Modify Upper Threshold or Modify Lower Threshold from the shortcut menu, then modify the threshold in the dia-log box that opens.
BenefitsMethods with multiple return points are easy to program, but they are more difficult to debug and maintain.

MISC.AFP-5 Avoid making assignments to method parameters
713
Ref
eren
ce
Miscellaneous RulesMISC.AFP-5Avoid making assignments to method parameters
DescriptionAssignment operations on method parameters can have potential prob-lems when the value of the parameter is used more than once in a block.
Examplepackage examples.rules.misc;
class AFP { int method (int low, int high) { int count = 0; while (low++ < high) { // VIOLATION count += low; } return count; }}
RepairCreate a local variable.
package examples.rules.misc;
class AFPFixed { int avg (int x) { int count = 0; int i = x; while (i++ < 10) { count += i; } return count % i; }}

MISC.ARN-3 Return zero-length arrays instead of "null"
Referen
ce
MISC.ARN-3Return zero-length arrays instead of "null"
DescriptionRequires that methods that "return" arrays never return "null".
BenefitsClients have to write extra code when using array methods that might return "null" instead of an empty array. This clutters the program and pro-vides an insignificant performance improvement.
Examplepackage examples.rules.misc;
import java.util.*; String[] getStringList () {
if (slist.size() == 0){ return null; // VIOLATION
} return (String[])slist.toArray (new String[slist.size ()]); } void find () { ARN a = new ARN (); String[] list = a.getStringList (); if (list != null) { // client had to write extra error checking code if (Arrays.asList (list).contains ("Hello")) { System.out.println ("find"); } } } private List slist;}
714

MISC.ARN-3 Return zero-length arrays instead of "null"
715
Ref
eren
ce
RepairReturn an empty array instead of "null".
package examples.rules.misc;
import java.util.*;
class ARNFixed { String[] getStringList () { return (String[])slist.toArray (new String[slist.size()]); // FIXED } void find () { ARNFixed a = new ARNFixed (); String[] list = a.getStringList (); if (Arrays.asList (list).contains ("Hello")) {
System.out.println ("find"); } } private List slist;
ReferenceBloch, Joshua. Effective Java Programming Language Guide. Addison Wesley, 2001, p. 134.

MISC.ASFI-2 Redeclare a class with only "abstract" methods and "static final" fields as an
Referen
ce
MISC.ASFI-2Redeclare a class with only "abstract" methods and "static final" fields as an "interface"
DescriptionDisallows the use of "abstract" classes that only contain method signa-tures and "static" "final" fields.
BenefitsSuch a class should be declared as an "interface" because the only thing that differs from it and an "interface" is that other classes can "extend" a single class, but they can "implement" multiple interfaces.
DrawbacksThe use of "abstract" classes in the place of interfaces could be part of a policy to avoid multiple inheritance. However, programming to an inter-face is usually recommended.
Examplepackage examples.rules.misc;
abstract class ASFI { // VIOLATION abstract void method(); final static String ID = "final static string";}
RepairReplace "abstract" class with an "interface".
716

MISC.ASFI-2 Redeclare a class with only "abstract" methods and "static final" fields as an
717
Ref
eren
ce
package examples.rules.misc;
interface ASFIFixed { // FIXED void method(); String ID = "MISC_ASFI"; // No need for "final static", it is implied}
ReferenceWarren, Nigel, and Bishop, Philip. Java in Practice. Addison-Wesley, 1999, pp.26-29.

MISC.AUO-1 Avoid using an object to access "static" fields or methods
Referen
ce
MISC.AUO-1Avoid using an object to access "static" fields or methods
DescriptionRequires that you reference "static" members of a class through the class name.
BenefitsImproves the code's clarity.
Examplepackage examples.rules.misc;
class AUO { static void staticMethod () {} void method () {}
public static void main (String[] args) { AUO object = new AUO (); object.staticMethod (); // VIOLATION object.method (); }}
RepairAccess “static” methods and fields through the “class”.
package examples.rules.misc;
class AUOFixed { static void staticMethod () {} void method () {}
718

MISC.AUO-1 Avoid using an object to access "static" fields or methods
719
Ref
eren
ce
public static void main (String[] args) { AUO object = new AUO (); AUO.staticMethod (); // FIXED object.method (); }}

MISC.AURM-4 Avoid using java.lang.reflect package
Referen
ce
MISC.AURM-4Avoid using java.lang.reflect package
DescriptionDisallows the use of classes in the java.lang.reflect package.
BenefitsUsing Java's reflection capabilities is quite slow. It is also unsafe because you lose compile-time type and exception checking.
RepairAvoid using classes in the java.lang.reflect package. One way to avoid reflection when you know a superclass or interface of the class is to use the 'Class.newInstance ()' method to call the default constructor. You can then cast the new object to a known interface or superclass.
For example, you can call:
package examples.rules.misc;
class AURM { void example () { try { Class class = Class.forName("java.util.Vector"); } catch (ClassNotFoundException e) { /* cannot happen in this example */ } }}
This will give you a class object. Next, call the default constructor and cast the result to an interface that you know the class implements:
package examples.rules.misc;
class AURM { void example () { java.util.List list = null;
720

MISC.AURM-4 Avoid using java.lang.reflect package
721
Ref
eren
ce
try { list = (List) class.newInstance (); } catch (IllegalAccessException e) { /* cannot happen in this example */ }}
ReferenceBloch, Joshua. Effective Java Programming Language Guide. Addison Wesley, 2001, pp. 158-160.

MISC.BLKELSE-3 Provide a '{}' block for "else" statements
722
Referen
ce
MISC.BLKELSE-3Provide a '{}' block for "else" statements
DescriptionRequires that "else" statements have a "{ }" block.
BenefitsUsing a block is less error prone.
Examplepackage examples.rules.misc;public class BLKELSE { public void method (boolean b) { if (b) { System.out.println ("inside of if"); } else // VIOLATION System.out.println ("inside of else"); }}
RepairProvide a block for each "else" statement.
package examples.rules.misc;public class BLKELSEFixed { public void method (boolean b) { if (b) { System.out.println ("inside of if"); } else { // FIXED System.out.println ("inside of else"); } }}

MISC.BLKFOR-3 Provide a '{}' block for "for" statements
723
Ref
eren
ce
MISC.BLKFOR-3Provide a '{}' block for "for" statements
DescriptionRequires that "for" statements have a "{ }" block.
BenefitsUsing a block is less error prone.
Examplepackage examples.rules.misc;
public class BLKFOR{ public void method () { for (int i = 0; i < 10; i++) // VIOLATION System.out.println (i * i); // inside the loop System.out.println (i); // outside the loop }}
RepairProvide a block for each "for" statement.
package examples.rules.misc;
public class BLKFORFixed { public void method () { for (int i = 0; i < 10; i++) { // FIXED System.out.println (i * i); // inside the loop System.out.println (i); // now inside the loop } }}

MISC.BLKIF-3 Provide a '{}' block for "if" statements
724
Referen
ce
MISC.BLKIF-3Provide a '{}' block for "if" statements
DescriptionRequires that "if" statements have a "{ }" block.
BenefitsUsing a block is less error prone.
Examplepackage examples.rulse.misc;
public class BLKIF { public void method (boolean b) { if (b) // VIOLATION System.out.println ("inside of if"); System.out.println ("OUTSIDE of if"); }}
RepairProvide a block for each "if" statement.
package examples.rules.misc;
public class BLKIFFixed { public void method (boolean b) { if (b) { // FIXED System.out.println ("inside of if"); System.out.println ("inside of if"); } }}

MISC.BLKWHL-3 Provide a '{}' block for "while" statements
725
Ref
eren
ce
MISC.BLKWHL-3Provide a '{}' block for "while" statements
DescriptionRequires that "while" statements have a "{ }" block.
BenefitsUsing a block is less error prone.
Examplepackage examples.rules.misc;
public class BLKWHL { public void method (int count) { while (count++ < 10) // VIOLATION System.out.println ("inside of while"); System.out.println ("OUTSIDE of while"); }}
RepairAdd a "{ }" block.
package examples.rules.misc;
public class BLKWHLFixed { public void method (int count) { while (count++ < 10) { // FIXED System.out.println ("inside of while"); System.out.println ("now inside of while"); } }}

MISC.CLNC-1 Avoid using constructors in the 'clone ()' method
Referen
ce
MISC.CLNC-1Avoid using constructors in the 'clone ()' method
DescriptionAvoid using a constructor when implementing the 'clone()' method.
BenefitsUsing a constructor restricts subclasses from reusing the 'clone ()' method of the superclass.
Examplepackage examples.rules.misc;
public class CLNC implements Cloneable { public Object clone() { CLNC cl = new CLNC(); // VIOLATION cl._field = _field; return cl; } private int _field = 0;}
RepairUse 'super.clone()' instead of calling a constructor to implement 'clone()'.
package examples.rules.misc;
public class CLNCFixed implements Cloneable { public Object clone() { CLNCFixed cl = (CLNCFixed) super.clone(); // FIXED cl._field = _field;
726

MISC.CLNC-1 Avoid using constructors in the 'clone ()' method
727
Ref
eren
ce
return cl; } private int _field = 0;}
ReferenceDaconta, M, Monk, E, Keller, J, and Bohnenberger, K. Java Pitfalls. John Wiley & Sons, 2000, pp.70-74.

MISC.CLONE-1 Call 'super.clone ()' in all 'clone ()' methods
Referen
ce
MISC.CLONE-1Call 'super.clone ()' in all 'clone ()' methods
DescriptionRequires that the implementation of 'clone ()' calls 'super.clone ()'.
Benefits'super.clone ()' invokes the method 'Object.clone ()', which creates an object of the correct type. 'Object.clone ()' initializes each field in the new clone object by assigning it the value from the same field of the object being cloned. Therefore, if 'super.clone()' is not called, the object might not be initialized correctly.
Examplepackage examples.rules.misc;
public class CLONE { public Object clone() { // VIOLATION: no call to 'super.clone ()' CLONE cl = new CLONE(); cl._field = _field; return cl; } private int _field = 0;}
RepairUse 'super.clone()' to implement 'clone()'.
package examples.rules.misc;
public class CLONEFixed {
728

MISC.CLONE-1 Call 'super.clone ()' in all 'clone ()' methods
729
Ref
eren
ce
public Object clone() { CLONEFixed cl = (CLONEFixed) super.clone(); // FIXED cl._field = _field; return cl; } private int _field = 0;}
ReferenceArnold, Ken, and Gosling, James The Java Programming Language. 2d ed. Addison Wesley, 1997, pp. 77 - 82.

MISC.CTOR-4 Avoid calling non-"final", non-"static" and non-"private" methods from con-
Referen
ce
MISC.CTOR-4Avoid calling non-"final", non-"static" and non-"private" methods from constructors
DescriptionDisallows calling non-"final" non-"private" methods from a constructor.
BenefitsThe purpose of a constructor is to initialize an object. If it calls a non-"final" method that is accessible to subclasses, a subclass can over-ride the method. This can lead to unexpected results.
Examplepackage examples.rules.misc;
public class CTOR { public CTOR () { _size = readSize(); // VIOLATION } public int readSize () { return fis.read (); } private FileInputStream fis = new FileInputStream ("data.out"); private int _size;}
RepairIf a constructor needs to call a method for initialization, make this method "final" or "private". Or, create a "private void" method to do all of the initial-ization.
730

MISC.CTOR-4 Avoid calling non-"final", non-"static" and non-"private" methods from con-
731
Ref
eren
ce
package examples.rules.misc;
public class CTORFixed { public CTORFixed () { _size = readSize (); } private int readSize () { // FIXED return fis.read (); } private FileInputStream fis = new FileInputStream ("data.out"); private int _size;}
ReferenceHaggar, Peter. Practical Java - Programming Language Guide. Addison Wesley, 2000, pp.238 - 240.

MISC.DPRAPI-1 Avoid using deprecated APIs
Referen
ce
MISC.DPRAPI-1Avoid using deprecated APIs
DescriptionDisallows the use of APIs that are deprecated in JDK version 1.3.
BenefitsThe classes, methods, and various other Java components that have been deprecated should not be used; Sun uses the "deprecated" tag to indicate that an API is obsolete and a better alternative is available.
Examplepackage examples.rules.misc;
import java.awt.*;
class DPRAPI { private List _list = new List ();
void addToList (String str) { _list.addItem (str); // VIOLATION }}
RepairThe Javadoc document on the deprecated 'addItem ()' method indicates that 'add ()' should be used instead.
package examples.rules.misc;
import java.awt.*;
class DPRAPIFixed { private List _list = new List ();
732

MISC.DPRAPI-1 Avoid using deprecated APIs
733
Ref
eren
ce
void addToList (String str) { _list.add (str); // FIXED }}
Referencehttp://java.sun.com/j2se/1.3/docs/api/index.html

MISC.FF-1 Declare "private" constant fields "final"
734
Referen
ce
MISC.FF-1Declare "private" constant fields "final"
DescriptionRequires that fields which are initialized during their declaration and val-ues which do not change throughout the class be "final" fields.
BenefitsThese values are constants, so adding "final" makes it explicit that these values will not change.
Examplepackage examples.rules.misc;public class FF { private int size = 5; // violation private int method (int x) { return x + size; }}
RepairDeclare the constant field to be "final".
package examples.rules.misc;public class FFFixed { private final int size = 5; // FIXED private int method (int x) { return x + size; }}

MISC.FLV-4 Declare constant local variables "final"
735
Ref
eren
ce
MISC.FLV-4Declare constant local variables "final"
DescriptionRequires that local variables which are not modified after their declaration be declared "final".
This rule checks only the primitive type local variables.
BenefitsThese values are constants, so adding "final" makes it explicit that these values will not change.
Examplepackage examples.rules.misc;public class FLV { private int method (int x) {
int size = 5; // VIOLATION return size + x; }}
RepairDeclare the variable "final".
package examples.rules.misc;public class FLVFixed { private int method (int x) {
final int size = 5; // FIXED return size + x; }}

MISC.HMF-1 Avoid giving method local variables the same name as class fields
Referen
ce
MISC.HMF-1Avoid giving method local variables the same name as class fields
DescriptionDisallows method local variables with the same name as class fields.
BenefitsHiding class fields with method local variables of the same name can con-fuse readers. It is good practice to make a variable's name as unique as possible.
Examplepackage examples.rules.misc;
public class HMF { public void method () { final int i = 5; // VIOLATION System.out.println (i); }
private int i = 0;}
RepairGive the local variable a unique name.
package examples.rules.misc;
public class HMFFixed { public void method () { final int x = 5; // FIXED System.out.println (x);
736

MISC.HMF-1 Avoid giving method local variables the same name as class fields
737
Ref
eren
ce
}
private int i = 0;}
ReferenceDaconta, M, Monk, E, Keller, J, and Bohnenberger, K. Java Pitfalls. John Wiley & Sons, 2000, pp.17-25.

MISC.MSF-4 Avoid too many "static" fields
Referen
ce
MISC.MSF-4Avoid too many "static" fields
DescriptionRequires that a class contains fewer than three "static" fields.
This rule reports an error if a class has more than two "static" fields.
BenefitsStatic fields are the equivalent of global variables in non-OO languages. They make methods more context-dependent, hide possible side-effects, sometimes present synchronized access problems, and are the source of fragile, non-extensible constructions. Also, neither static variables nor methods can be overridden in any useful sense in subclasses.
Examplepackage examples.rules.misc;
public class MSF { private static int s_size; static String s_title; // VIOLATION
static void setFields (int size, String title) { s_size = size; s_title = title; } }
RepairTry to minimize "static" fields if possible.
738

MISC.MSF-4 Avoid too many "static" fields
739
Ref
eren
ce
Referencehttp://g.oswego.edu/dl/html/javaCodingStd.html

MISC.PCIF-1 Declare "for" loops with a condition and an increment statement
Referen
ce
MISC.PCIF-1Declare "for" loops with a condition and an increment statement
DescriptionRequires that a "for" statement makes use of its increment/decrement and condition arguments.
The increment/decrement expression is the third argument in the "for" parameter list, e.g. 'for (...; ...; i++)'.
The condition argument is the second expression, e.g. 'for (...; i < 10; ...)'.
BenefitsA properly written for loop has an ending condition and an increment expression stated in the "for" statement. If the increment or the condition check are missing, a for loop should not be used. It is poor style to have the condition and the increment in the body of the loop.
Examplepackage examples.rules.misc;
public class PCIF { void method (int i) { for (; i < 1000; ) { // VIOLATION: increment is done in the loop i++; } }}
740

MISC.PCIF-1 Declare "for" loops with a condition and an increment statement
741
Ref
eren
ce
RepairCheck whether the condition or the increment expressions are missing or are simply embedded in the loop body. If the expression is missing, either replace it or replace the "for" statement with a "while" statement.
package examples.rules.misc;
public class PCIFFixed { void method (int i) { while (i < 1000) { // FIXED i++; } }}

MISC.PCTOR-2 Avoid non-public classes with "public" constructors
742
Referen
ce
MISC.PCTOR-2Avoid non-public classes with "public" constructors
DescriptionRequires that non-"public" classes' constructors do not have the "public" modifier.
BenefitsConstructors for non-"public" classes are not publicly accessible. To avoid confusion, make sure that these constructors do not have the "public" modifier.
Examplepackage examples.rules.misc;
class PCTOR { // package accessible class public PCTOR () { // VIOLATION }}
RepairRemove the "public" modifier on any constructors or add it to the class.
package examples.rules.misc;
class PCTORFixed { // package accessible class PCTOR () { // FIXED }}

MISC.PFL-5 Use "for" loops instead of "while" loops
743
Ref
eren
ce
MISC.PFL-5Use "for" loops instead of "while" loops
DescriptionDisallows the use of "while" loops.
Benefits"for" loops allow you to declare loop-scoped variables in the setup of the loop, minimizing the scope of loop-control variables to just the body of the loop. Since these control variables' scope ends after the loop, they cannot accidentally be referenced later. This might help to catch errors that result from copying and pasting.
Examplepackage examples.rules.misc;
import java.util.*;
class PFL { public void display (Vector strings) {
int i = 0; while (strings != null && i < strings.size ()) { // VIOLATION System.out.println (i + " : " + (String)s.elementAt (i)); } }}

MISC.PFL-5 Use "for" loops instead of "while" loops
Referen
ce
RepairUse a "for" loop instead.
package examples.rules.misc;
class PFLFixed { public void display (Vector strings) {
for (int i = 0; strings != null && i < strings.size (); i++) { // FIXED System.out.println(i + " : " + (String)s.elementAt (i)); } }}
Note that this repaired method has a problem carried over from the origi-nal example. Every iteration through the loop calls 'strings.size ()'. If we are certain that 'strings' will not be modified during the course of the loop (even by another thread), then an efficient fix is the following small change:
for (int i = 0, int n = strings.size (); strings != null && i < n; i++) {
By using a second loop-scoped variable 'n' that caches the size value, we avoid this unnecessary calculation.
ReferenceBloch, Joshua. Effective Java Programming Language Guide. Addison Wesley, 2001, pp. 142-143.
744

MISC.PSFA-2 Avoid using "public static final" array fields
745
Ref
eren
ce
MISC.PSFA-2Avoid using "public static final" array fields
DescriptionDisallows the use of "public static final" array fields.
BenefitsThe contents of all non-empty array fields are mutable, so attackers can modify your 'constants' if you ignore this rule.
Examplepackage examples.rules.misc;
class PSFA { public static final int[] MUTABLE = { 0 }; // VIOLATION
public static void main (String[] args) { MUTABLE[0] = 1; System.out.println ("MUTABLE[0]=" + MUTABLE[0]); }}
RepairIn the preceding example, the output is "MUTABLE[0]=1" because the value can be changed. To avoid this, ensure that users cannot directly access your 'constant' arrays.
package examples.rules.misc;
class PSFAFixed { private static final int[] MUTABLE = { 0 }; // FIXED public static final List unmutable =

MISC.PSFA-2 Avoid using "public static final" array fields
Referen
ce
Collections.unmodifiableList (Arrays.asList(MUTABLE));}
ReferenceBloch, Joshua. Effective Java Programming Language Guide. Addison Wesley, 2001, p. 62.
746

MISC.UBD-3 Avoid "float" and "double" if exact answers are required
747
Ref
eren
ce
MISC.UBD-3Avoid "float" and "double" if exact answers are required
DescriptionReports an error if the variable is either "float" or "double" type when cal-culations requiring exact results are performed.
BenefitsThe "float" and "double" types are designed primarily for scientific and engineering calculations. They perform binary floating-point arithmetic, which was carefully designed to furnish accurate approximations quickly over a broad range of magnitudes. They do not, however, provide exact results and should not be use where exact results are required.
Examplepackage examples.rules.misc;
import java.math.*;
class UBD { public static void main(String[] args) { double funds = 1.0; // VIOLATION int itemsBought = 0; for (double price = .10; funds >= price; price += .10) {
// VIOLATION funds -= price; itemsBought++; } System.out.println(itemsBought + " items bought."); System.out.println("Change : $" + funds); }}

MISC.UBD-3 Avoid "float" and "double" if exact answers are required
Referen
ce
RepairChange "float" and "double" types to the 'java.math.BigDecimal' type.
package examples.rules.misc;
class UBDFixed { public static void main(String[] args) { final BigDecimal TEN_CENTS = new BigDecimal(".10"); // FIXED int itemsBought = 0; BigDecimal funds = new BigDecimal("1.00"); // FIXED for (BigDecimal price = TEN_CENTS; funds.compareTo(price) >= 0; price = price.add(TEN_CENTS)) { itemsBought++; funds = funds.subtract(price); } System.out.println(itemsBought + " items bought."); System.out.println("Money left over: $" + funds); }}
ReferenceBloch, Joshua. Effective Java Programming Language Guide. Addison Wesley, 2001, pp. 149-151.
748

MISC.UST-2 Use 'StringTokenizer' instead of 'indexOf ()' or 'substring ()' for String parsing
749
Ref
eren
ce
MISC.UST-2Use 'StringTokenizer' instead of 'indexOf ()' or 'substring ()' for String parsing
DescriptionDisallows using 'String.indexOf ()' with 'String.substring ()'.
Note that if the algorithm implemented by the method is not String pars-ing, StringTokenizer cannot be used and this rule's error message should be ignored.
BenefitsString parsing is commonly performed in many applications. Using 'indexOf ()' and 'substring ()' to parse a String makes the code error prone, difficult to understand and can cause StringIndexOutOfBoundsExcep-tions. 'StringTokenizer' is clearer and safer.
Examplepackage examples.rules.misc;
import java.util.*;
class UST { static void parseString (String string) { int index = 0; int next_index = 0; while ((next_index = string.indexOf ('.', index)) != -1) { System.out.println (string.substring (index, next_index)); index = next_index + 1; } } // NOTE: the above method parses the String incorrectly: it

MISC.UST-2 Use 'StringTokenizer' instead of 'indexOf ()' or 'substring ()' for String parsing
Referen
ce
doesn't // print the last token in the String}
RepairUse StringTokenizer to parse strings:
package examples.rules.misc;
class USTFixed { static void parseString (String string) { StringTokenizer tokenizer = new StringTokenizer (string, "."); while (tokenizer.hasMoreTokens ()) System.out.println (tokenizer.nextToken ()); }}
ReferenceLarman, C., Guthrie, R. Java 2 Performance and Idiom Guide. Prentice Hall PTR, 1999, pp. 282-283.
750

NAMING.CVN-5 Use conventional variable names
751
Ref
eren
ce
Naming Convention RulesNAMING.CVN-5Use conventional variable names
DescriptionRequires that one-character variables names are only used for their con-ventional purpose:
• b for a byte
• c for a char
• d for a double
• f for a float
• i, j, and k for integers
• l for a long
• o for an Object
• s for a String
• v for an arbitrary value of some type
BenefitsMisusing these variable names can lead to confusion.
Examplepackage examples.rules.naming;
public class CVN { void method () { int b = 1; // VIOLATION }}

NAMING.CVN-5 Use conventional variable names
Referen
ce
RepairUse conventional variable names.
package examples.rules.naming;
public class CVNFixed { void method () { int i = 1; // FIXED }}
752

NAMING.GETA-1 Prepend 'get' to the names of getter methods
753
Ref
eren
ce
NAMING.GETA-1Prepend 'get' to the names of getter methods
DescriptionRequires that getter methods that do not return a "boolean" start with the prefix 'get'.
BenefitsClarifies that the method is an accessor that returns the value of the field.
DrawbacksThe extra 'get' requires extra typing and makes calling the accessor take extra screen space.
Examplepackage examples.rules.naming;
public class GETA { public int method () { // VIOLATION return _count; } private int _count = 100;}
RepairChange the getter method's name to 'get<Field name>'.
package examples.rules.naming;

NAMING.GETA-1 Prepend 'get' to the names of getter methods
Referen
ce
public class GETAFixed { public int getCount () { return _count; } private int _count = 2;}
ReferenceSection 2.1.1 of http://www.AmbySoft.com/javaCodingStandards.pdf
Referencehttp://www.AmbySoft.com/javaCodingStandards.pdf
754

NAMING.GETB-3 Prepend 'is, can, has, have' to the names of "boolean" getter methods
755
Ref
eren
ce
NAMING.GETB-3Prepend 'is, can, has, have' to the names of "boolean" getter methods
DescriptionRequires that the names of getter methods which return "boolean" values start with 'is', 'can', 'has', or 'have'.
BenefitsThis helps enforce a naming convention.
Examplepackage examples.rules.naming;
public class GETB { public boolean method () { // VIOLATION return _ready; } private boolean _ready = false;}
RepairChange getter method's name.
package examples.rules.naming;
public class GETBFixed { public boolean isReady () { // FIXED return _ready; }

NAMING.GETB-3 Prepend 'is, can, has, have' to the names of "boolean" getter methods
Referen
ce
private boolean _ready = false;}
ReferenceSection 2.1.1 of
http://www.AmbySoft.com/javaCodingStandards.pdf
756

NAMING.IFV-2 Use all uppercase letters for the names of fields in an "interface"
757
Ref
eren
ce
NAMING.IFV-2Use all uppercase letters for the names of fields in an "interface"
DescriptionRequires that fields in an "interface" have all uppercase names.
BenefitsFields in an "interface" are always "static" and "final". Therefore, they should follow the same naming convention as named constants.
Examplepackage examples.rules.naming;
interface IFV { int max = 1000; // VIOLATION}
RepairMake the field name all uppercase.
package examples.rules.naming;
interface IFVFixed { int MAX = 1000; // FIXED}
ReferenceArnold, Ken, and Gosling, James The Java Programming Language. 2d ed. Addison Wesley, 1997, pp. 91-93.

NAMING.IRB-1 Use 'is...' only for naming methods that return a "boolean"
758
Referen
ce
NAMING.IRB-1Use 'is...' only for naming methods that return a "boolean"
DescriptionRequires that only methods that return "boolean" values have names beginning with 'is'.
BenefitsThis helps enforce a naming convention.
Examplepackage examples.rules.naming;
public class IRB { public int isOK () { // VIOLATION return _value; } private int _value;}
RepairUse standard naming conventions for legibility.
package examples.rules.naming;
public class IRBFixed { public int getValue () { // FIXED return _value; } private int _value;}

NAMING.NCL-2 Enforce name format of classes
759
Ref
eren
ce
NAMING.NCL-2Enforce name format of classes
DescriptionEnforces the user-specified naming convention for classes. This rule is enforced using a regular expression. The default requires a capital first letter.
BenefitsThis helps enforce a naming convention.
Examplepackage examples.rules.naming;
public class ncl { // VIOLATION}
RepairChange the identifier to follow the convention.
package examples.rules.naming;
public class NCLFixed { // FIXED}
ReferenceSection 6.1.2 of
http://www.AmbySoft.com/javaCodingStandards.pdf

NAMING.NE-2 Enforce name format of exceptions
760
Referen
ce
NAMING.NE-2Enforce name format of exceptions
DescriptionEnforces the user-specified naming convention for exceptions. This rule is enforced using a regular expression. The default requires that the name end with 'Exception'.
BenefitsThis helps enforce a naming convention.
Examplepackage examples.rules.naming;
public class NE extends Exception { // VIOLATION}
RepairChange the identifier to follow the convention.
package examples.rules.naming;
public class NException extends Exception { // FIXED}

NAMING.NIF-2 Enforce name format of non-”static” fields
761
Ref
eren
ce
NAMING.NIF-2Enforce name format of non-”static” fields
DescriptionEnforces the user-specified naming convention for non-"static" fields. This rule is enforced using a regular expression.
Note that the default settings do not enforce any naming convention.
BenefitsThis helps enforce a naming convention.
Referencehttp://www.AmbySoft.com/javaCodingStandards.pdf

NAMING.NITF-2 Enforce name format of interfaces
762
Referen
ce
NAMING.NITF-2Enforce name format of interfaces
DescriptionEnforces the user-specified naming convention for interfaces. This rule is enforced using a regular expression. The default requires a capital first letter.
BenefitsThis helps enforce a naming convention.
Examplepackage examples.rules.naming;
public interface nitf { // VIOLATION}
RepairChange the identifier to follow the convention.
package examples.rules.naming;
public interface NITFFixed { // FIXED}
Referencehttp://www.AmbySoft.com/javaCodingStandards.pdf

NAMING.NLV-2 Enforce name format of local variables
763
Ref
eren
ce
NAMING.NLV-2Enforce name format of local variables
DescriptionEnforces the user-specified naming convention for local variables. This rule is enforced using a regular expression.
Note that the default settings do not enforce any naming convention.
BenefitsThis helps enforce a naming convention.
Referencehttp://www.AmbySoft.com/javaCodingStandards.pdf
NAMING.NM-2 Enforce name format of non-”static” methods
Referen
ce
NAMING.NM-2Enforce name format of non-”static” methods
DescriptionEnforces the user-specified naming convention for non-"static" methods. This rule is enforced using a regular expression. The default requires that the name start with a lowercase character.
BenefitsThis helps enforce a naming convention.
Examplepackage examples.rules.naming;
public class NM { void Method () { // VIOLATION }}
RepairChange the identifier to follow the convention.
package examples.rules.naming;
public class NMFixed { void method () { // FIXED }}
764

NAMING.NM-2 Enforce name format of non-”static” methods
765
Ref
eren
ce
Referencehttp://www.AmbySoft.com/javaCodingStandards.pdf

NAMING.NMP-2 Enforce name format of method parameters
766
Referen
ce
NAMING.NMP-2Enforce name format of method parameters
DescriptionEnforces the user-specified naming convention for method parameters. This rule is enforced using a regular expression.
Note that the default settings do not enforce any naming convention.
BenefitsThis helps enforce a naming convention.
Referencehttp://www.AmbySoft.com/javaCodingStandards.pdf

NAMING.NSF-2 Enforce name format of non-“final” “static” fields
767
Ref
eren
ce
NAMING.NSF-2Enforce name format of non-“final” “static” fields
DescriptionEnforces the user-specified naming convention for non-"final" "static" fields. This rule is enforced using a regular expression.
Note that the default settings do not enforce any naming convention.
BenefitsThis helps enforce a naming convention.
Referencehttp://www.AmbySoft.com/javaCodingStandards.pdf

NAMING.NSM-2 Enforce name format of "static" methods
768
Referen
ce
NAMING.NSM-2Enforce name format of "static" methods
DescriptionEnforces the user-specified naming convention for "static" methods. This rule is enforced using a regular expression.
Note that the default settings do not enforce any naming convention.
BenefitsThis helps enforce a naming convention.
Referencehttp://www.AmbySoft.com/javaCodingStandards.pdf

NAMING.PKG-3 Use lowercase letters for “package" names
769
Ref
eren
ce
NAMING.PKG-3Use lowercase letters for “package" names
DescriptionRequires that "package" names should not contain uppercase letters.
BenefitsThis prevents readers from mistaking a package name for a class name. Package names should usually consist solely of lowercase letters.
Examplepackage examples.rules.NAMING; // VIOLATION
public class PKG {}
RepairChange uppercase letters to lowercase letters.
package examples.rules.naming; // FIXED
public class PKGFixed {}
ReferenceLarman, C, Guthrie, R Java 2 Performance and Idiom Guide. Prentice Hall, 1999, pp. 248 - 249.

NAMING.SETA-2 Prepend 'set' to the names of setter methods
Referen
ce
NAMING.SETA-2Prepend 'set' to the names of setter methods
DescriptionRequires that setter method names start with 'set'.
BenefitsThis follows the JavaBeans naming conventions.
Examplepackage examples.rules.naming;
public class SETA { public void method(int count) { // VIOLATION _count = count; } private int _count = 0;}
RepairChange the setter method name to 'set<Field name>'.
package examples.rules.naming;
public class SETAFixed { public void setCount(int count) { // FIXED _count = count; } private int _count = 0;}
770

NAMING.SETA-2 Prepend 'set' to the names of setter methods
771
Ref
eren
ce
Referencehttp://www.AmbySoft.com/javaCodingStandards.pdf

NAMING.USF-2 Avoid lowercase letters in "final" "static" field names
772
Referen
ce
NAMING.USF-2Avoid lowercase letters in "final" "static" field names
DescriptionRequires that "final" "static" field names (i.e. named constants) consist solely of uppercase letters, underscores and numbers.
BenefitsConforms to the Java API Language Specification's naming conventions.
Examplepackage examples.rules.naming;
class USF { public static final int size = 10; // VIOLATION}
RepairMake sure that the name consists solely of uppercase letters, under-scores and numbers.
package examples.rules.naming;
class USFFixed { public static final int SIZE = 10; // FIXED}
ReferenceJava API Language Specification, section 6.8.5.

OOP.AHF-1 Avoid hiding inherited instance fields
773
Ref
eren
ce
Object Oriented Programming RulesOOP.AHF-1Avoid hiding inherited instance fields
DescriptionRequires that no inherited fields are overridden by a child class.
BenefitsOverriding a parent field obscures the inheritance relationship between the parent and the child class. It is also likely to be an unintended mis-take.
Examplepackage examples.rules.oop;
public class AHV { protected long a = 4;}
public class AHV_ extends AHV { protected int a = 5; // VIOLATION}
RepairThe solution will depend on the design of the program, but might be as simple as using the inherited member and removing the member declared in the child class.

OOP.AHSM-2 Avoid hiding inherited “static” member methods
774
Referen
ce
OOP.AHSM-2Avoid hiding inherited “static” member methods
DescriptionRequires that no inherited methods are overridden by a child class.
Examplepackage examples.rules.oop;
public class AHSM { static void method1 () {}}
class AHSM_ extends AHSM { static void method1 () {} // VIOLATION}
RepairThe solution will depend upon the design of the program, but might be as simple as using the inherited method and removing the method declared in the child class.

OOP.APPF-2 Avoid “public” or package-private instance fields
775
Ref
eren
ce
OOP.APPF-2Avoid “public” or package-private instance fields
DescriptionRequires that fields are not "public" or package-private.
BenefitsInstance fields are an implementation detail of a class. It is good practice to hide such implementation details from the users of the class. This is accomplished by making the field "private" or "protected" and providing access methods to read and/or write its value.
Examplepackage examples.rules.oop;
class APPF { int _a = 10; // VIOLATION private int _c = 14;}
RepairDeclare the field "private" or "protected" and provide access methods to the field if needed.
package examples.rules.oop;
class APPFFixed { public void setA (int a) { // FIXED _a = a; } public int getA () { // FIXED

OOP.APPF-2 Avoid “public” or package-private instance fields
Referen
ce
return _a; } private int _a = 10; // FIXED private int _c = 14;}
ReferenceHaggar, Peter. Practical Java - Programming Language Guide. Addison Wesley, 2000, pp.170 - 173.
776

OOP.APROF-2 Avoid “protected” instance fields
777
Ref
eren
ce
OOP.APROF-2Avoid “protected” instance fields
DescriptionRequires that fields are not "protected".
BenefitsInstance fields are an implementation detail of a class. It is good practice to hide such implementation details from the users of the class. Instead, provide the user with methods to access and/or change such fields.
Drawbacks"Protected" fields allow you to share implementation details with sub-classes.
Examplepackage examples.rules.oop;
class APROF { protected int _a = 10; // VIOLATION}
RepairDeclare the field "private" and provide access methods to the field if needed.
package examples.rules.oop;
class APROFFixed { protected void setA (int a) { // FIXED _a = a; }

OOP.APROF-2 Avoid “protected” instance fields
Referen
ce
protected int getA () { // FIXED return _a; } private int _a = 10; // FIXED }
ReferenceHaggar, Peter. Practical Java - Programming Language Guide. Addison Wesley, 2000, pp.170 - 173.
778

OOP.IIN-5 Implement interfaces non-trivially or “abstract”
779
Ref
eren
ce
OOP.IIN-5Implement interfaces non-trivially or “abstract”
DescriptionDisallows a class from implementing an "interface" by declaring empty 'no-op' methods.
BenefitsIf you create empty versions of an interface's methods, authors of sub-classes can inherit your empty implementation without any errors or warn-ings from the compiler. If you declare the methods "abstract" instead, subclasses will not compile unless they have an implementation of their base class's "abstract" methods.
package examples.rules.oop;
abstract public class IIN implements B { public void f () { int i = 9; i = 10; }
public void g () {} // VIOLATION abstract public void h ();}
interface B { public void f (); public void g (); public void h ();}

OOP.IIN-5 Implement interfaces non-trivially or “abstract”
Referen
ce
RepairThe proper body for the offending method might not have been added, or this method might have been declared unintentionally. In either case, the method should be declared to be “abstract”.
package examples.rules.oop;
abstract public class IINFixed implements B { public void f () { int i = 9; i = 10; }
abstract public void g () {} // FIXED abstract public void h ();}
interface B { public void f (); public void g (); public void h ();}
Referencehttp://g.oswego.edu/dl/html/javaCodingStd.html
780
OOP.LEVEL-2 Avoid more than two levels of nested inner classes
781
Ref
eren
ce
OOP.LEVEL-2Avoid more than two levels of nested inner classes
DescriptionRequires that no more than two levels of nested inner classes be used.
BenefitsNesting more than two levels deep can be hard to follow.
Examplepackage examples.rules.oop;
public class LEVEL { class Level1 { class Level2 { class Level3 { // VIOLATION private boolean _isClosed = false; } private int _count = 0; } private int _size = 0; } private int _length = 0;}
RepairMove the code from the nested classes into separate classes in their own files.
First file ('LEVELFixed.java'):
package examples.rules.oop;

OOP.LEVEL-2 Avoid more than two levels of nested inner classes
Referen
ce
public class LEVELFixed { class Level1 { class Level2 { private int _count = 0; } private int _size = 0; } private int _length = 0;}
Second file ('Level3Fixed.java'):
package examples.rules.oop;
class Level3Fixed { private boolean _isClosed = false;}
ReferenceArnold, Ken, and Gosling, James The Java Programming Language. 2d ed. Addison Wesley, 1997, p .53.
782

OOP.LPF-4 List all “public” and package-private methods/fields first
783
Ref
eren
ce
OOP.LPF-4List all “public” and package-private methods/fields first
DescriptionRequires that the "public" and package-private methods and fields of a class appear before the "protected" and "private" ones.
BenefitsIf you follow this convention, the user of your class will find the accessible methods directly underneath the "class" declaration, and will not be both-ered with implementation details described by "private" and "protected" fields/methods.
Examplepackage examples.rules.oop;
class LPF { private int method () { // VIOLATION } int method2 () { }}
RepairReorder the list of methods/fields in your class.
package examples.rules.oop;

OOP.LPF-4 List all “public” and package-private methods/fields first
Referen
ce
class LPFFixed { int method2 () { } private int method () { // FIXED }}
ReferenceHaggar, Peter. Practical Java - Programming Language Guide. Addison Wesley, 2000, pp.170 - 173.
784

OOP.OPM-2 Avoid overriding a "private" method
785
Ref
eren
ce
OOP.OPM-2Avoid overriding a "private" method
DescriptionRequires that a class not contain any methods with the same name as a "private" method in a parent class.
BenefitsA "private" method in a superclass is not overridden by a method with the same name in the current class. This can lead to confusion. Also, if the method access in the superclass is changed to non-private, then the pro-gram semantics will change because the method will now be overridden.
Examplepackage examples.rules.oop;
class OPM extends Super { private void method () {} // VIOLATION}
class Super { private void method () {}
public static void main (String[] args) { OPM x = new OPM (); test (x); }
private static void test (Super x) { x.method (); // invokes 'Super.method ()', not 'OPM.method ()' } }

OOP.OPM-2 Avoid overriding a "private" method
Referen
ce
RepairUse different names for the methods to clarify that they are unrelated and to avoid possible problems if the access modifier is changed.
package examples.rules.oop;
class OPMFixed extends Super { private void renamedMethod () {} // FIXED}
786

OPT.AAS-3 Use abbreviated assignment operators
787
Ref
eren
ce
Optimization RulesOPT.AAS-3Use abbreviated assignment operators
DescriptionRequires that assignment statements use the abbreviated assignment operators (e.g. "+=" instead of "+", "*=" instead of "*", etc.).
BenefitsSome compilers may run faster this way. It also is more concise.
Examplepackage examples.rules.opt;
public class AAS { void method () { int i = 0; i = i - 1; // VIOLATION: should use "-=" }}
RepairUse abbreviated assignment operators.
package examples.rules.opt;
public class AAS { void method () { int i = 0; i -= 1; }}
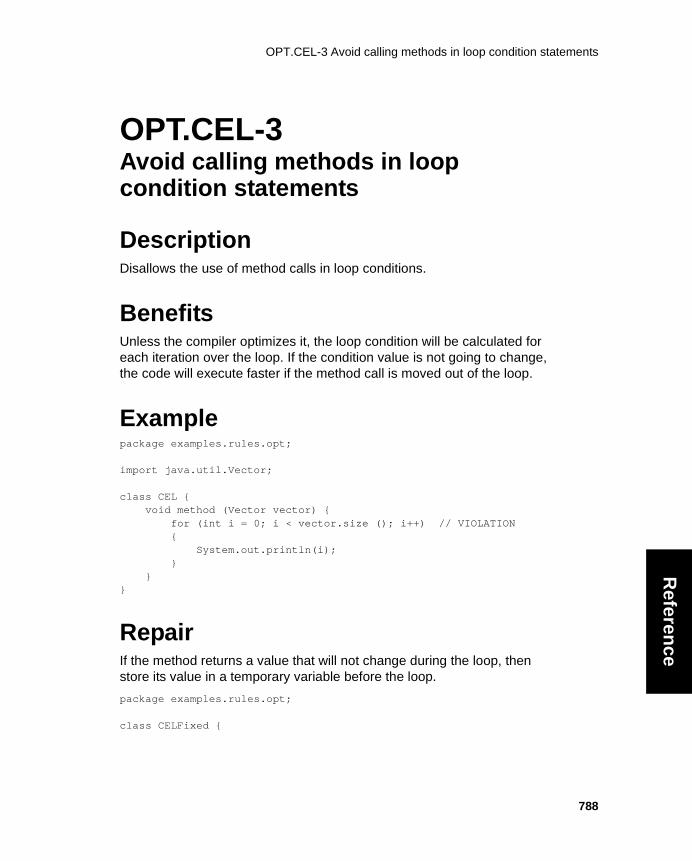
OPT.CEL-3 Avoid calling methods in loop condition statements
Referen
ce
OPT.CEL-3Avoid calling methods in loop condition statements
DescriptionDisallows the use of method calls in loop conditions.
BenefitsUnless the compiler optimizes it, the loop condition will be calculated for each iteration over the loop. If the condition value is not going to change, the code will execute faster if the method call is moved out of the loop.
Examplepackage examples.rules.opt;
import java.util.Vector;
class CEL { void method (Vector vector) { for (int i = 0; i < vector.size (); i++) // VIOLATION { System.out.println(i); } }}
RepairIf the method returns a value that will not change during the loop, then store its value in a temporary variable before the loop.
package examples.rules.opt;
class CELFixed {
788

OPT.CEL-3 Avoid calling methods in loop condition statements
789
Ref
eren
ce
void method (Vector vector) { int size = vector.size (); for (int i = 0; i < size; i++) // FIXED { System.out.println(i); } }}
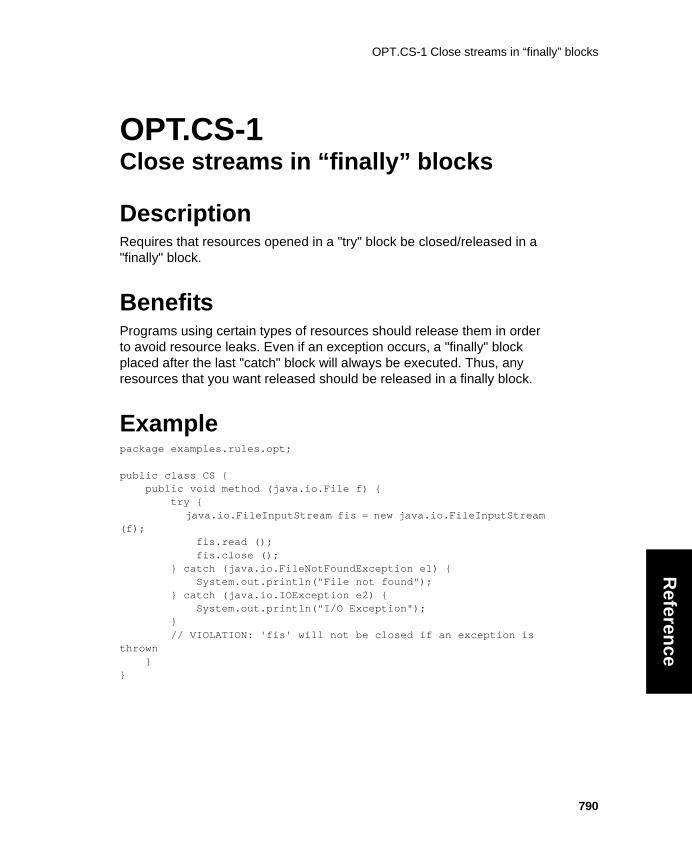
OPT.CS-1 Close streams in “finally” blocks
Referen
ce
OPT.CS-1Close streams in “finally” blocks
DescriptionRequires that resources opened in a "try" block be closed/released in a "finally" block.
BenefitsPrograms using certain types of resources should release them in order to avoid resource leaks. Even if an exception occurs, a "finally" block placed after the last "catch" block will always be executed. Thus, any resources that you want released should be released in a finally block.
Examplepackage examples.rules.opt;
public class CS { public void method (java.io.File f) { try { java.io.FileInputStream fis = new java.io.FileInputStream (f); fis.read (); fis.close (); } catch (java.io.FileNotFoundException e1) { System.out.println("File not found"); } catch (java.io.IOException e2) { System.out.println("I/O Exception"); } // VIOLATION: 'fis' will not be closed if an exception is thrown }}
790

OPT.CS-1 Close streams in “finally” blocks
791
Ref
eren
ce
RepairAdd a “finally” block after the last “catch”.
package examples.rules.opt;
public class CSFixed { public void method (java.io.File f) { try { java.io.FileInputStream fis = new java.io.FileInputStream (f); fis.read (); } catch (java.io.FileNotFoundException e1) { System.out.println("File not found"); } catch (java.io.IOException e2) { System.out.println("I/O Exception"); } finally { fis.close (); // FIXED } }}
ReferenceHaggar, Peter. Practical Java - Programming Language Guide. Addison Wesley, 2000, pp. 77 -79.
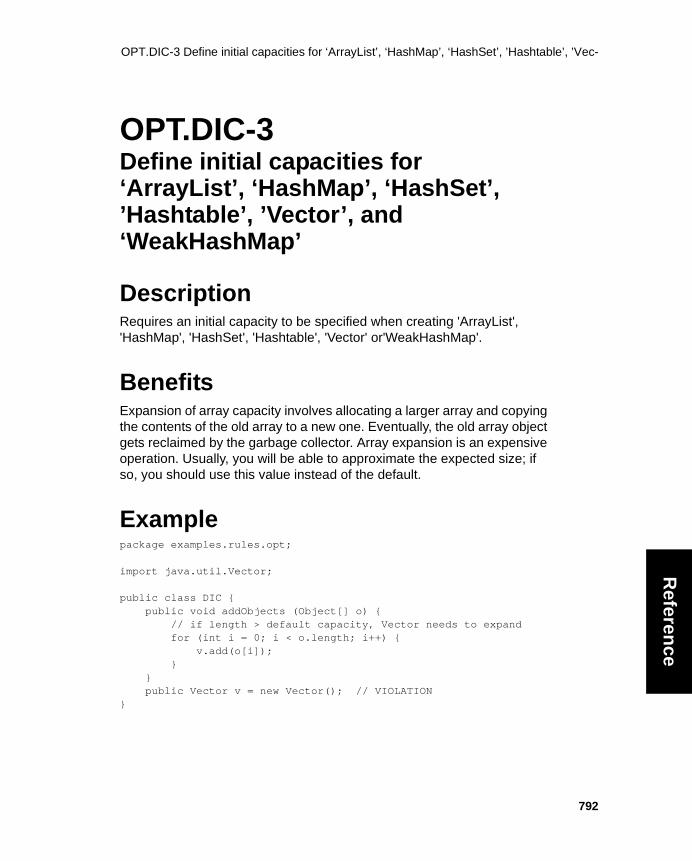
OPT.DIC-3 Define initial capacities for ‘ArrayList’, ‘HashMap’, ‘HashSet’, ’Hashtable’, ’Vec-
Referen
ce
OPT.DIC-3Define initial capacities for ‘ArrayList’, ‘HashMap’, ‘HashSet’, ’Hashtable’, ’Vector’, and ‘WeakHashMap’
DescriptionRequires an initial capacity to be specified when creating 'ArrayList', 'HashMap', 'HashSet', 'Hashtable', 'Vector' or'WeakHashMap'.
BenefitsExpansion of array capacity involves allocating a larger array and copying the contents of the old array to a new one. Eventually, the old array object gets reclaimed by the garbage collector. Array expansion is an expensive operation. Usually, you will be able to approximate the expected size; if so, you should use this value instead of the default.
Examplepackage examples.rules.opt;
import java.util.Vector;
public class DIC { public void addObjects (Object[] o) { // if length > default capacity, Vector needs to expand for (int i = 0; i < o.length; i++) { v.add(o[i]); } } public Vector v = new Vector(); // VIOLATION}
792

OPT.DIC-3 Define initial capacities for ‘ArrayList’, ‘HashMap’, ‘HashSet’, ’Hashtable’, ’Vec-
793
Ref
eren
ce
RepairDefine an initial capacity when you can make an educated guess.
package examples.rules.opt;
import java.util.Vector;
public class DICFixed { public void addObjects (Object[] o) { for (int i = 0; i < o.length; i++) { v.add(o[i]); } } public Vector v = new Vector(20); // FIXED}
ReferencesBulka, Dov. Java Performance and Scalability Volume 1: Server-Side Pro-gramming Techniques. Addison Wesley, 2000. pp.55 - 57.
Ford, Neal. Performance Tuning With Java Technology, JavaOne 2001 Conference.

OPT.DUID-1 Create a 'serialVersionUID' for all 'Serializable' classes
Referen
ce
OPT.DUID-1Create a 'serialVersionUID' for all 'Serializable' classes
DescriptionRequires that 'Serializable' classes declare a serial version UID.
BenefitsThis prevents you from breaking serialization compatibility across differ-ent versions of your class. If you do not specify a serial version UID, one will be automatically generated based on the contents of the class. If the UID changes in a new version of your class, you will be unable to deseri-alize copies of the old version, even if the serialized form has not changed.
Examplepackage examples.rules.opt;
class DUID implements java.io.Serializable { // VIOLATION public void method () {}}
RepairAdd a serial version UID in each class which implements 'java.io.Serializ-able'. Only change the UID when the serialized form of the class has also changed and you wish to ensure that old versions cannot be read.
package examples.rules.opt;
class DUIDFixed implements java.io.Serializable { public void method () {} private static final long serialVersionUID = 1; // FIXED
794

OPT.DUID-1 Create a 'serialVersionUID' for all 'Serializable' classes
795
Ref
eren
ce
}
ReferencesBloch, Joshua. Effective Java Programming Language Guide. Addison Wesley, 2001, p. 223.

OPT.IF-4 Use conditional operator for “if (cond) return; else return;” statements
Referen
ce
OPT.IF-4Use conditional operator for “if (cond) return; else return;” statements
DescriptionDisallows statements of the form:
if (condition) return foo; else return bar;
BenefitsThe conditional operator provides a single expression that yields one of two sub-expressions based on a boolean expression.This results in a more compact expression.
DrawbacksSome people might find the conditional operator confusing.
Examplepackage examples.rule.opt;
public class IF { public int method (boolean isDone) { if (isDone) // VIOLATION return 0; else return 10; }}
796

OPT.IF-4 Use conditional operator for “if (cond) return; else return;” statements
797
Ref
eren
ce
RepairReplace the 'if-else' block with a statement using the conditional operator.
package examples.rules.opt;
public class IFFixed { public int method (boolean isDone) { return isDone ? 0 : 10; }}
Note: Use 'return (condition)' instead in the special case of statements that return a boolean constant:
if (condition) return true; else return false;

OPT.IFAS-4 Use the conditional assignment operator instead of 'if (cond) a = b; else a = c;'
Referen
ce
OPT.IFAS-4Use the conditional assignment operator instead of 'if (cond) a = b; else a = c;' statements
DescriptionDisallows statements of the form:
if (condition) a = b; else a = c;
BenefitsThe conditional operator provides a single expression that yields one of two values based on a boolean expression. The conditional operator results in a more compact expression.
DrawbacksSome people might find the conditional operator confusing.
Examplepackage examples.rules.opt;
public class IFAS { void method(boolean isTrue) { if (isTrue) // VIOLATION _value = 0; else _value = 1; } private int _value = 0;
798

OPT.IFAS-4 Use the conditional assignment operator instead of 'if (cond) a = b; else a = c;'
799
Ref
eren
ce
}
RepairUse the conditional assignment operator instead of an if-else statement.
package examples.rules.opt;
public class IFASFixed { void method(boolean isTrue) { _value = (isTrue ? 0 : 1); // FIXED } private int _value = 0;}
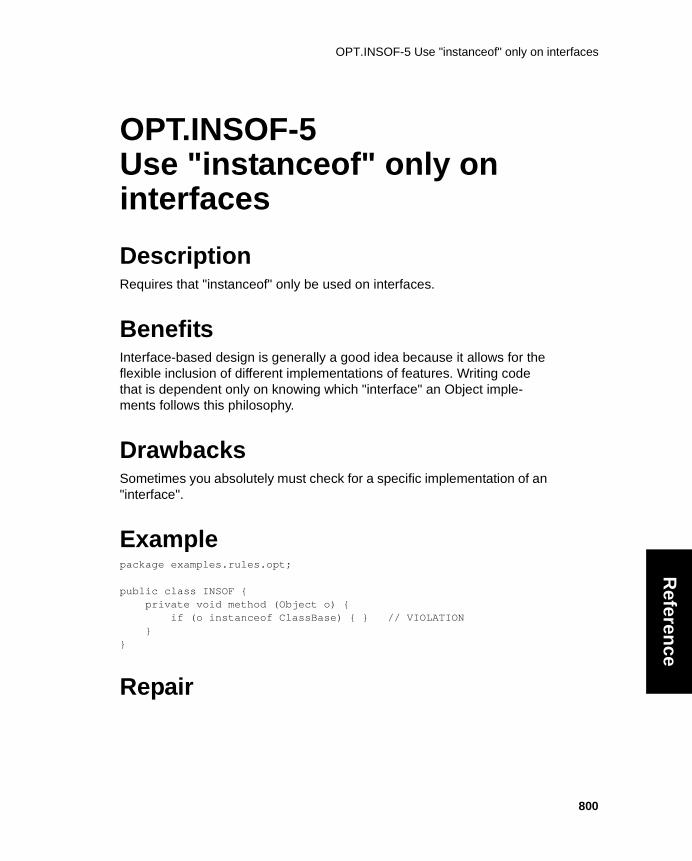
OPT.INSOF-5 Use "instanceof" only on interfaces
Referen
ce
OPT.INSOF-5Use "instanceof" only on interfaces
DescriptionRequires that "instanceof" only be used on interfaces.
BenefitsInterface-based design is generally a good idea because it allows for the flexible inclusion of different implementations of features. Writing code that is dependent only on knowing which "interface" an Object imple-ments follows this philosophy.
DrawbacksSometimes you absolutely must check for a specific implementation of an "interface".
Examplepackage examples.rules.opt;
public class INSOF { private void method (Object o) { if (o instanceof ClassBase) { } // VIOLATION }}
Repair
800

OPT.INSOF-5 Use "instanceof" only on interfaces
801
Ref
eren
ce
Use "instanceof" on an "interface" that the "class" "implements". If the class does not implement any interfaces, then modify it to implement an "interface" that encompasses the "public" methods of the class.
package examples.rules.opt;
public class INSOFFixed { private void method (Object o) { if (o instanceof InterfaceBase) { } // FIXED }}
class ClassBase implements InterfaceBase {} // FIXEDinterface InterfaceBase {}
ReferenceLarman, C., Guthrie, R. Java 2 Performance and Idiom Guide. Prentice Hall, 2000, p.20.

OPT.IRB-2 Use ‘System.arraycopy ()’ instead of using a loop to copy arrays
Referen
ce
OPT.IRB-2Use ‘System.arraycopy ()’ instead of using a loop to copy arrays
DescriptionDisallows the copying of arrays inside a loop.
Benefits'System.arraycopy ()' is much faster than using a loop to copy an array.
Examplepackage examples.rules.opt;
public class IRB { int[] copyArray (int[] array) { int length = array.length; int[] copy = new int [length]; for (int i = 0; i < length; i++) copy[i] = array[i]; // VIOLATION return copy; }}
RepairUse 'System.arraycopy ()' instead of a loop.
package examples.rules.opt;
public class IRB { int[] copyArray (int[] array) { int length = array.length; int[] copy = new int [length]; System.arraycopy(array, 0, copy, 0, length); // FIXED
802

OPT.IRB-2 Use ‘System.arraycopy ()’ instead of using a loop to copy arrays
803
Ref
eren
ce
return copy; }}
Referencehttp://www.cs.cmu.edu/~jch/java/speed.html

OPT.LOOP-3 Avoid instantiating variables in a loop body
Referen
ce
OPT.LOOP-3Avoid instantiating variables in a loop body
DescriptionDisallows instantiating temporary Objects in a loop body.
BenefitsTemporary object creation inside a loop can increase memory manage-ment overhead.
Examplepackage examples.rules.opt;
public class LOOP { public void method(int max) { for (int i = 0; i < max; i++) { StringBuffer sb = new StringBuffer(); // VIOLATION sb.append("loop: "); sb.append(i); System.out.println(sb.toString()); } }}
RepairDeclare the variable outside of the loop and reuse it.
package examples.rules.opt;
public class LOOPFixed { public void method(int max) { StringBuffer sb = new StringBuffer(); // FIXED for (int i = 0; i < max; i++) {
804

OPT.LOOP-3 Avoid instantiating variables in a loop body
805
Ref
eren
ce
sb.append("loop: "); sb.append(i); System.out.println(sb.toString()); sb.setLength(0); // FIXED } }}
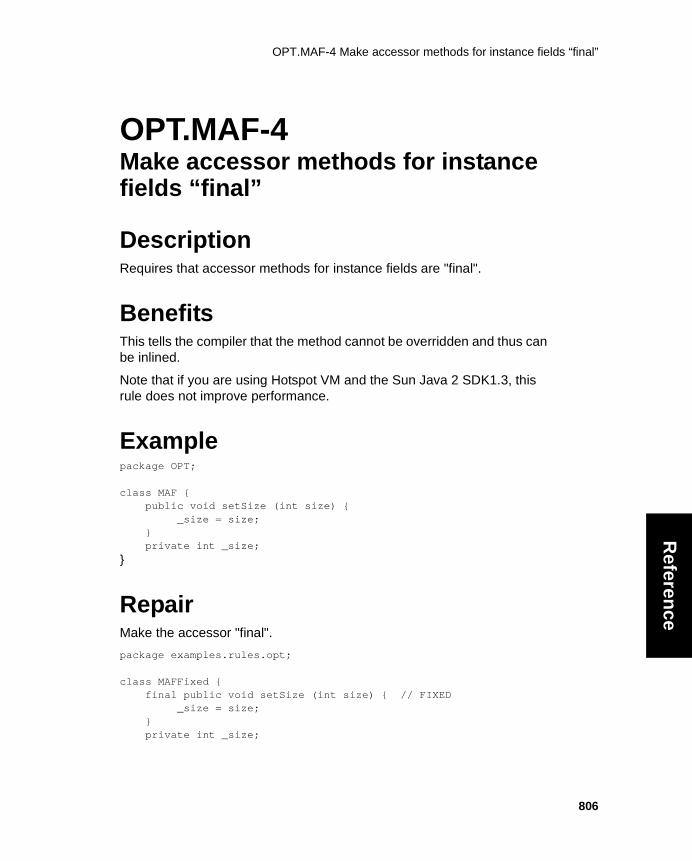
OPT.MAF-4 Make accessor methods for instance fields “final”
Referen
ce
OPT.MAF-4Make accessor methods for instance fields “final”
DescriptionRequires that accessor methods for instance fields are "final".
BenefitsThis tells the compiler that the method cannot be overridden and thus can be inlined.
Note that if you are using Hotspot VM and the Sun Java 2 SDK1.3, this rule does not improve performance.
Examplepackage OPT;
class MAF { public void setSize (int size) { _size = size; } private int _size;
}
RepairMake the accessor "final".
package examples.rules.opt;
class MAFFixed { final public void setSize (int size) { // FIXED _size = size; } private int _size;
806
OPT.MAF-4 Make accessor methods for instance fields “final”
807
Ref
eren
ce
}
ReferenceWarren, Nigel. and Bishop, Philip. Java in Practice. Addison-Wesley, 1999, pp. 4-5.
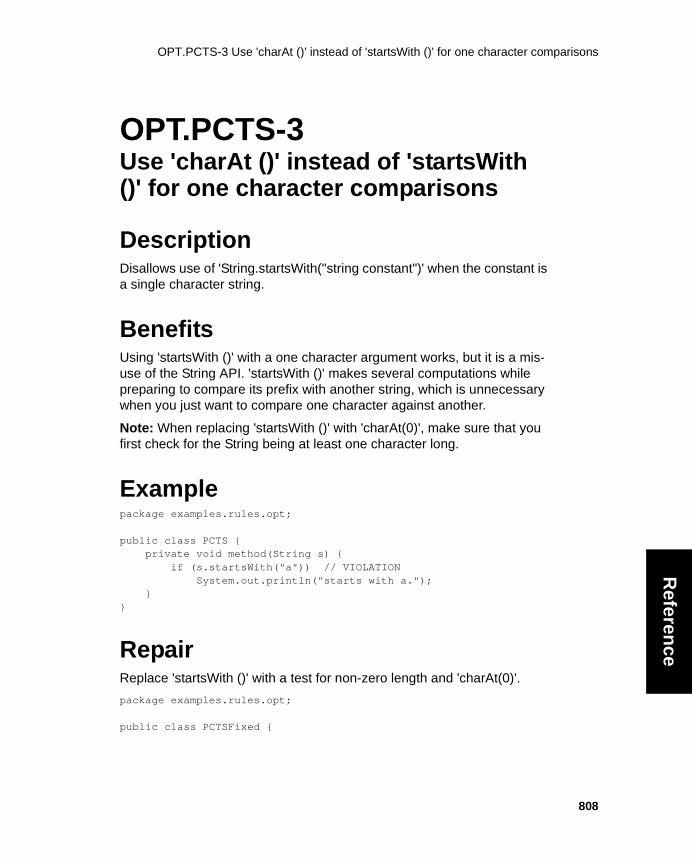
OPT.PCTS-3 Use 'charAt ()' instead of 'startsWith ()' for one character comparisons
Referen
ce
OPT.PCTS-3Use 'charAt ()' instead of 'startsWith ()' for one character comparisons
DescriptionDisallows use of 'String.startsWith("string constant")' when the constant is a single character string.
BenefitsUsing 'startsWith ()' with a one character argument works, but it is a mis-use of the String API. 'startsWith ()' makes several computations while preparing to compare its prefix with another string, which is unnecessary when you just want to compare one character against another.
Note: When replacing 'startsWith ()' with 'charAt(0)', make sure that you first check for the String being at least one character long.
Examplepackage examples.rules.opt;
public class PCTS { private void method(String s) { if (s.startsWith("a")) // VIOLATION System.out.println("starts with a."); }}
RepairReplace 'startsWith ()' with a test for non-zero length and 'charAt(0)'.
package examples.rules.opt;
public class PCTSFixed {
808

OPT.PCTS-3 Use 'charAt ()' instead of 'startsWith ()' for one character comparisons
809
Ref
eren
ce
private void method(String s) { if (s.length () > 0 && s.charAt(0) == 'a') // FIXED System.out.println("starts with a."); }}
ReferenceBulka, D. Java Performance and Scalability Volume 1: Server-Side Pro-gramming Techniques.
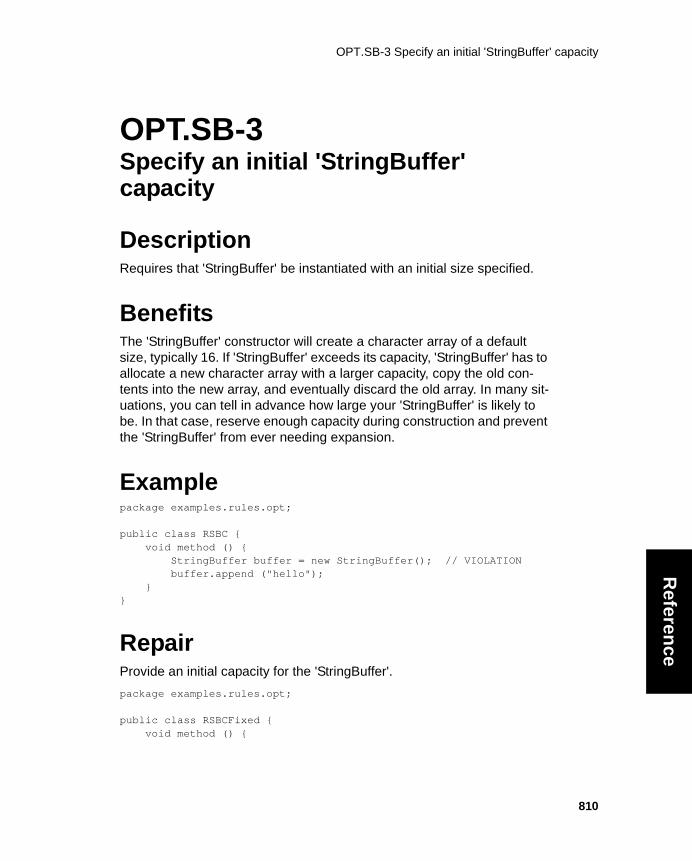
OPT.SB-3 Specify an initial 'StringBuffer' capacity
Referen
ce
OPT.SB-3Specify an initial 'StringBuffer' capacity
DescriptionRequires that 'StringBuffer' be instantiated with an initial size specified.
BenefitsThe 'StringBuffer' constructor will create a character array of a default size, typically 16. If 'StringBuffer' exceeds its capacity, 'StringBuffer' has to allocate a new character array with a larger capacity, copy the old con-tents into the new array, and eventually discard the old array. In many sit-uations, you can tell in advance how large your 'StringBuffer' is likely to be. In that case, reserve enough capacity during construction and prevent the 'StringBuffer' from ever needing expansion.
Examplepackage examples.rules.opt;
public class RSBC { void method () { StringBuffer buffer = new StringBuffer(); // VIOLATION buffer.append ("hello"); }}
RepairProvide an initial capacity for the 'StringBuffer'.
package examples.rules.opt;
public class RSBCFixed { void method () {
810

OPT.SB-3 Specify an initial 'StringBuffer' capacity
811
Ref
eren
ce
StringBuffer buffer = new StringBuffer(SBSIZE); // FIXED buffer.append ("hello"); } private final int SBSIZE = 100;}
ReferenceBulka, D. Java Performance and Scalability Volume 1: Server-Side Pro-gramming Techniques. Addison Wesley, pp. 30-31.

OPT.SDIV-4 Use the right shift operator for division by powers of 2
812
Referen
ce
OPT.SDIV-4Use the right shift operator for division by powers of 2
DescriptionDisallows using "/" with a multiple of '2' as the denominator.
Note that this rule only checks for 2, 4, 8, 16, 32, 64, and 128.
Benefits"/" is an expensive operation. Using the shift operator is faster and more efficient.
Examplepackage examples.rules.opt;
public class SDIV { public int calculate (int a) { return a / 4; // VIOLATION }}
RepairReplace the division with an equivalent '>> power', where 'power' is the power of two such that 2 ^ power = divisor.
package examples.rules.opt;
public class SDIVFixed { public int calculate (int a) { return a >> 2; // FIXED }}

OPT.SMUL-4 Use the left shift operator for multiplication by powers of 2
813
Ref
eren
ce
OPT.SMUL-4Use the left shift operator for multiplication by powers of 2
DescriptionDisallows using "*" with a multiple of '2'.
Note: This rule only checks for 2, 4, 8, 16, 32, 64, and 128.
Benefits"*" is an expensive operation. Using the shift operator is faster and more efficient.
Examplepackage examples.rules.opt;public class SMUL { public int calculate(int a) { return a * 4; // VIOLATION }}
RepairReplace the multiplication with an equivalent '<< power', where 'power' is the power of two such that 2 ^ power = multiplier.
package examples.rules.opt;public class SMULFixed { public int calculate(int a) { return a << 2; // FIXED }}

OPT.STR-3 Use single quotes instead of double quotes for single character string concate-
814
Referen
ce
OPT.STR-3Use single quotes instead of double quotes for single character string concatenation
DescriptionDisallows String concatenation with the "+" operator when one of the arguments is a single character String.
BenefitsOptimization.
Examplepackage examples.rules.opt;public class STR { public String method(String s) { String string = s + "d" // VIOLATION return string; }}
RepairInstead of concatenating one-character String constants, replace them with character constants.
package examples.rules.opt;public class STRFixed { public void method(String s) { String string = s + 'd' // FIXED return string; }}

OPT.SYN-3 Avoid calling a "synchronized" method in a loop
815
Ref
eren
ce
OPT.SYN-3Avoid calling a "synchronized" method in a loop
DescriptionDisallows use of "synchronized" methods inside loop bodies.
Benefits"synchronized" methods are expensive. Invoking them inside a loop is not recommended.
DrawbacksMultithreaded programs might require the use of "synchronized" methods in loop bodies.
Examplepackage examples.rules.opt;
public class SYN { public synchronized void method () { } private void test () { for (int i = 0; i < 100; i++) { method (); // VIOLATION } }}
RepairDo not invoke the "synchronized" method in the loop body.

OPT.SYN-3 Avoid calling a "synchronized" method in a loop
Referen
ce
Note: Many of the "synchronized" java.util containers like 'Vector' have unsynchronized versions that you can use if your program is sin-gle-threaded. If the java.util class you are using does not have an unsy-chronized version, you may want to consider writing a slightly modified version that removes the "synchronized" modifiers from the class.
816

OPT.TRY-3 Place "try/catch/finally" blocks outside of loops
817
Ref
eren
ce
OPT.TRY-3Place "try/catch/finally" blocks outside of loops
DescriptionDisallows "try" statements inside loops.
BenefitsPlacing "try/catch/finally" blocks outside of loops can speed code execu-tion.
Examplepackage examples.rules.opt;
import java.io.FileInputStream;
public class TRY { void method (FileInputStream fis) { for (int i = 0; i < size; i++) { try { // VIOLATION _sum += fis.read (); } catch (Exception e) {} } } private int _sum;}
RepairPlace the “try/catch/finally” block outside of the loop.
package examples.rules.opt;

OPT.TRY-3 Place "try/catch/finally" blocks outside of loops
Referen
ce
import java.io.FileInputStream;
public class TRY { void method (FileInputStream fis) { try { // FIXED for (int i = 0; i < size; i++) { _sum += fis.read (); } } catch (Exception e) {} }}
ReferenceHaggar, Peter. Practical Java - Programming Language Guide. Addison Wesley, 2000, pp.81 - 83.
818

OPT.UEQ-3 Avoid comparing boolean variables with "true"
819
Ref
eren
ce
OPT.UEQ-3Avoid comparing boolean variables with "true"
DescriptionDisallows comparing a boolean value with "true".
BenefitsComparing a boolean value with "true" is an identity operation (returns the same boolean value). The advantages of removing this unnecessary comparison with "true" are:
1. The code will perform faster (the code generated has about 5 bytecodes less).
2. The code becomes clearer.
Examplepackage examples.rules.opt;
public class UEQ{ boolean method (String string) { return string.endsWith ("foo") == true; // VIOLATION }}

OPT.UEQ-3 Avoid comparing boolean variables with "true"
Referen
ce
RepairRemove the unnecessary comparison.
package examples.rules.opt;
class UEQFixed{ boolean method (String string) { return string.endsWith ("foo"); // FIXED }}
820

OPT.UISO-1 Avoid unnecessary "instanceof" evaluations
821
Ref
eren
ce
OPT.UISO-1Avoid unnecessary "instanceof" evaluations
DescriptionDisallows using "instanceof" on variables whose static type is the type for which you are checking.
BenefitsThe result of the "instanceof" expression is always true in this case.
Examplepackage examples.rules.opt;
public class UISO { public UISO () {}}
class Dog extends UISO { void method (Dog dog, UISO u) { Dog d = dog; if (d instanceof UISO) // VIOLATION System.out.println("Dog is a UISO"); UISO uiso = u; if (uiso instanceof Object) // VIOLATION System.out.println("uiso is an Object"); }}
RepairRemove the unnecessary "instanceof" evaluations:
package examples.rules.opt;

OPT.UISO-1 Avoid unnecessary "instanceof" evaluations
Referen
ce
public class UISO { public UISO () {}}
class DogFixed extends UISO { void method () { DogFixed d; System.out.println ("DogFixed is a UISO"); // FIXED System.out.println ("UISO is a UISO"); // FIXED }}
822
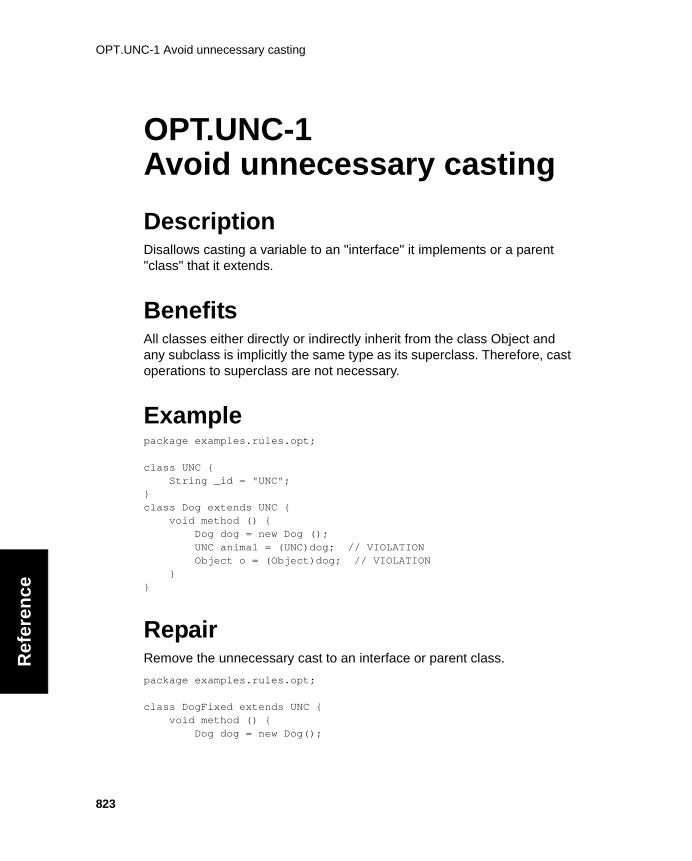
OPT.UNC-1 Avoid unnecessary casting
823
Ref
eren
ce
OPT.UNC-1Avoid unnecessary casting
DescriptionDisallows casting a variable to an "interface" it implements or a parent "class" that it extends.
BenefitsAll classes either directly or indirectly inherit from the class Object and any subclass is implicitly the same type as its superclass. Therefore, cast operations to superclass are not necessary.
Examplepackage examples.rules.opt;
class UNC { String _id = "UNC";}class Dog extends UNC { void method () { Dog dog = new Dog (); UNC animal = (UNC)dog; // VIOLATION Object o = (Object)dog; // VIOLATION }}
RepairRemove the unnecessary cast to an interface or parent class.
package examples.rules.opt;
class DogFixed extends UNC { void method () { Dog dog = new Dog();

OPT.UNC-1 Avoid unnecessary casting
Referen
ce
UNC animal = dog; // FIXED Object o = dog; // FIXED }}
ReferenceWarren, Nigel, and Bishop, Philip. Java in Practice. Addison-Wesley, 1999, pp.22-23.
824

OPT.USB-2 Use ‘StringBuffer’ instead of ‘String’ for non-constant strings
825
Ref
eren
ce
OPT.USB-2Use ‘StringBuffer’ instead of ‘String’ for non-constant strings
DescriptionDisallows the use of the "+=" string concatenation operator.
BenefitsAlthough the "+=" operator is provided by the String class, it is much less efficient than the 'StringBuffer.append()' method. Use StringBuffers rather than "+=" on String objects to improve performance.
Examplepackage examples.rules.opt;
class USB { public String foobar () { String fruit = "apples"; fruit += ", bananas"; // VIOLATION return fruit; }}
RepairCreate a StringBuffer, append both strings, and then call 'String-Buffer.toString ()'.
Note: If you already know the new string’s length, give the StringBuffer an appropriate initial size to hold both strings.
package examples.rules.opt;
class USBFixed {

OPT.USB-2 Use ‘StringBuffer’ instead of ‘String’ for non-constant strings
Referen
ce
public String betterFoobar () { StringBuffer fruit = new StringBuffer (15); fruit.append ("apples"); // FIXED fruit.append (", bananas"); // FIXED return fruit.toString (); }}
ReferenceHaggar, Peter. Practical Java - Programming Language Guide. Addison Wesley, 2000, pp.107 - 109.
Bloch, Joshua. Effective Java Programming Language Guide. Addison Wesley, 2001, pp. 155-156.
826

OPT.USC-2 Use ’String’ instead of ’StringBuffer’ for constant strings
827
Ref
eren
ce
OPT.USC-2Use ’String’ instead of ’StringBuffer’ for constant strings
DescriptionDisallows use of StringBuffer to hold a String that is never modified.
BenefitsDynamically resizable strings are not necessary for constant strings.
Examplepackage examples.rules.opt;
public class USC { String method () { StringBuffer s = new StringBuffer ("Hello"); // VIOLATION String t = s + " World!"; return t; }}
RepairReplace StringBuffer with String if it is certain that the object will not change. This will reduce the overhead and improve performance.
package examples.rules.opt;
public class USCFixed { String method () { String s = "Hello"; // FIXED String t = s + " World!"; return t; }}
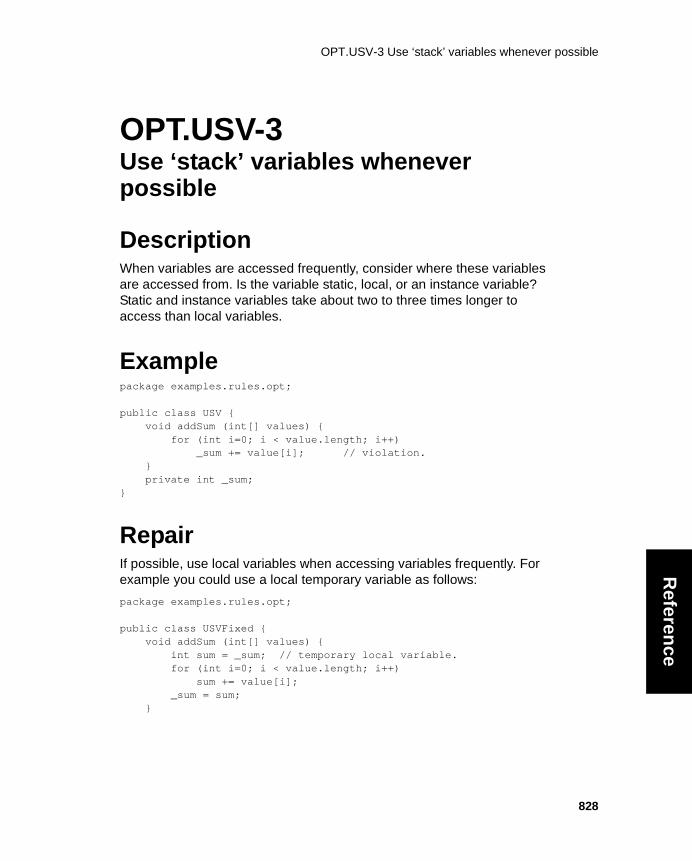
OPT.USV-3 Use ‘stack’ variables whenever possible
Referen
ce
OPT.USV-3Use ‘stack’ variables whenever possible
DescriptionWhen variables are accessed frequently, consider where these variables are accessed from. Is the variable static, local, or an instance variable? Static and instance variables take about two to three times longer to access than local variables.
Examplepackage examples.rules.opt;
public class USV { void addSum (int[] values) { for (int i=0; i < value.length; i++) _sum += value[i]; // violation. } private int _sum;}
RepairIf possible, use local variables when accessing variables frequently. For example you could use a local temporary variable as follows:
package examples.rules.opt;
public class USVFixed { void addSum (int[] values) { int sum = _sum; // temporary local variable. for (int i=0; i < value.length; i++) sum += value[i]; _sum = sum; }
828

OPT.USV-3 Use ‘stack’ variables whenever possible
829
Ref
eren
ce
ReferenceHaggar, Peter. Practical Java - Programming Language Guide. Addison Wesley, 2000, pp.122 - 125.

PB.ADE-1 Avoid dangling “else” statements
Referen
ce
Possible Bugs RulesPB.ADE-1Avoid dangling “else” statements
DescriptionRequires that an "if" statement have a "{ }" block if it is followed by an "else" statement.
BenefitsThe compiler always associates an "else" with the previous "if" unless instructed by braces to do otherwise. If your "if" block is not protected by braces, the "else" can easily be misdirected to another "if" statement.
ExampleThe indentation of the following code suggests that the programmer's intent is to decrement i if i >= 5. In our example, the "else" is associated with the second "if", therefore the decrement takes place 'if (i >= 2)'.
package examples.rules.pb;
public class ADE { void method () { int i = 5; if (i < 5) // VIOLATION: should have "{ }" braces if (i < 2) i++; else i--; }}
RepairTo force the structure to execute as originally planned, use braces to indi-cate to the compiler that the "else" matches the first "if". Or, if the "else"
830

PB.ADE-1 Avoid dangling “else” statements
831
Ref
eren
ce
really is meant to be attached to the last "if" statement, then change the indentation and add braces to the last "if" statement to remove any ambi-guity.
package examples.rules.pb;
public class ADE { void method () { int i = 5; if (i < 5) { // FIXED if (i < 2) i++; } else { i--; } }}

PB.AECB-1 Avoid “catch” blocks with empty bodies
Referen
ce
PB.AECB-1Avoid “catch” blocks with empty bodies
DescriptionRequires that "catch" blocks are not empty.
Note: If a "catch" block has a Javadoc comment, this rule will not flag an error.
BenefitsIt is always a good idea to insert error handling code inside of each “catch” block.
Examplepackage examples.rules.pb;
public class AECB { public void method () { try { System.in.read (); } catch (java.io.IOException e) { // VIOLATION } }}
RepairAdd exception handling code inside the "catch" block.
package examples.rules.pb;
public class AECBFixed { public void method () {
832
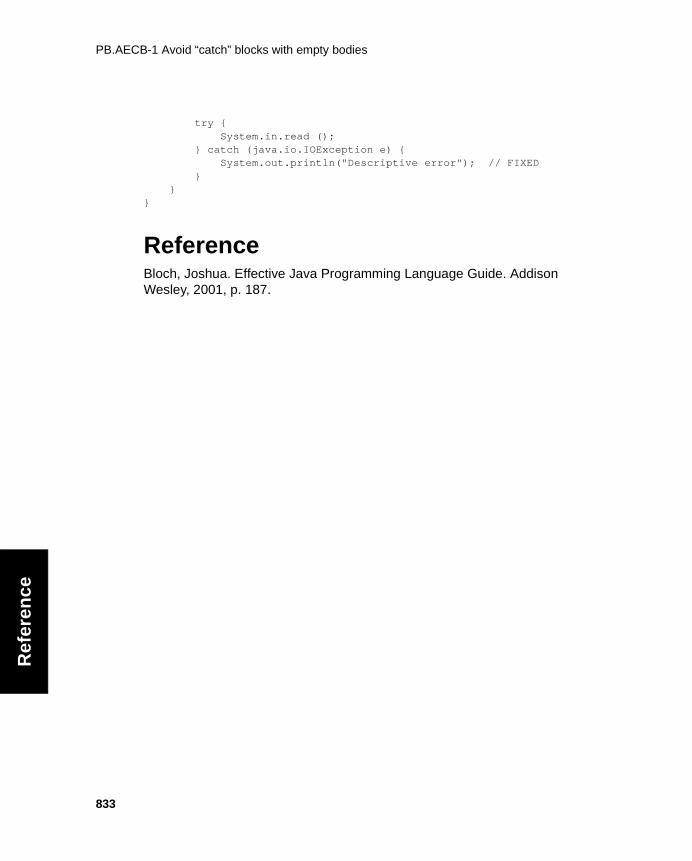
PB.AECB-1 Avoid “catch” blocks with empty bodies
833
Ref
eren
ce
try { System.in.read (); } catch (java.io.IOException e) { System.out.println("Descriptive error"); // FIXED } }}
ReferenceBloch, Joshua. Effective Java Programming Language Guide. Addison Wesley, 2001, p. 187.

PB.ASI-2 Avoid assignment within an “if” condition
Referen
ce
PB.ASI-2Avoid assignment within an “if” condition
DescriptionReports an error when assignments are used in "if" conditional state-ments.
BenefitsAssignments in many types of conditional statements in Java are illegal because they are easy to accidentally type. Following this rule helps maintain that conformity and prevents difficult-to-detect bugs.
Examplepackage examples.rules.pb;
public class ASI { public int foo (boolean b) { int ret = 0; if (b = true) { // VIOLATION ret = 3; } return ret; }}
RepairMove the variable assignment to a separate statement or, if it was a mis-take, replace it with a "==" comparison operator.
package examples.rules.pb;
public class ASIFixed {
834

PB.ASI-2 Avoid assignment within an “if” condition
835
Ref
eren
ce
public int foo (boolean b) { int ret = 0; if (b == true) { // FIXED ret = 3; } return ret; }}
Referencehttp://g.oswego.edu/dl/html/javaCodingStd.html

PB.CLP-2 Avoid casting primitive data types to lower precision
836
Referen
ce
PB.CLP-2Avoid casting primitive data types to lower precision
DescriptionDisallows the casting of primitive data types to lower precision types.
BenefitsCasting this way truncates the value. If the original value cannot be repre-sented by the new type, then the new value will be different.
Examplepackage examples.rules.pb;
public class CLP { void method () { double d = 4.25; int i;
i = this.square ((int) d); // VIOLATION }
int square (int i) { return (i * i); }}
RepairEither explicitly test the value before performing a cast or avoid casting.

PB.DCF-2 Avoid comparing floating point types
837
Ref
eren
ce
PB.DCF-2Avoid comparing floating point types
DescriptionRequires that floating point numbers are not compared for equality.
BenefitsThis prevents logic errors when a floating point comparison's outcome is changed by the imprecision of the numbers' representation.
Examplepackage examples.rules.pb;public class DCF { int method (double d) { if (d == 1) { // VIOLATION return 1; } else return 0; }}
RepairChange the types of the numbers being compared or change the compar-ison to allow for some imprecision.

PB.DCF-2 Avoid comparing floating point types
Referen
ce
package examples.rules.pb;public class DCFFixed { int method (int d) { // FIXED if (d == 1) { return 1; } else { return 0; } }}
838

PB.DCP-3 Avoid using "+" on Strings to concatenate instead of add numbers
839
Ref
eren
ce
PB.DCP-3Avoid using "+" on Strings to concatenate instead of add numbers
DescriptionDisallows the use of the "+" string concatenation operator when the value being appended is a basic numeric type (e.g. int).
BenefitsThe "+" operator with a left operand of type "String" will call "toString ()" on the right operand unless it is already a String. This can cause unintended effects when the right side is a number, as in the following example. The example will print "2+9 = 29" instead of the "2+9 = 11" that might have been intended.
Examplepackage examples.rules.pb;public class DCP { public static void main (String args []) { System.err.println ("2+9 = " + 2 + 9); // VIOLATION }}
RepairCalculate the number before concatenating it to a string or enclose the calculation in parentheses (i.e: "2+9 = " + (2+9)).

PB.DCP-3 Avoid using "+" on Strings to concatenate instead of add numbers
Referen
ce
package examples.rules.pb;public class DCPFixed { public static void main (String args []) { System.err.println ("2+9 = " + (2 + 9)); // VIOLATION }}
840

PB.DNCSS-1 Do not call 'setSize ()' in 'ComponentListener.componentResized ()'
841
Ref
eren
ce
PB.DNCSS-1Do not call 'setSize ()' in 'ComponentListener.componentResized ()'
DescriptionDisallows calling 'setSize ()' in 'ComponentListener.componentResized ()'.
BenefitsThe ‘componentResized ()’ method gets called when the component’s size changes. Invoking the ‘setSize ()’ method from within the ‘componen-tResized ()” method can cause an unending sequence of resizing events:
1. User resizes component.
2. ‘componentResized ()’ gets invoked.
3. ‘componentResized ()’ invokes ‘setSize ()’.
4. ‘setSize ()’ posts a component resized event.
5. ‘componentResized ()’ gets invoked.
6. ...
Examplepackage examples.rules.pb;
import java.awt.*;import java.awt.event.ComponentEvent;
public class DNCSS extends Component { public void componentResized (ComponentEvent e) { Dimension d = getSize (); setSize(d.width - 10, d.height - 10); // VIOLATION

PB.DNCSS-1 Do not call 'setSize ()' in 'ComponentListener.componentResized ()'
Referen
ce
}}
RepairDo not call 'setSize ()' method inside of 'componentResized ()' method's body.
package examples.rules.pb;
import java.awt.*;import java.awt.event.ComponentEvent;
public class DNCSSFixed extends Component { public void componentResized (ComponentEvent e) { Dimension d = getSize (); // FIXED }}
842

PB.EQL-3 Use 'getClass ()' in the 'equals ()' method implementation
843
Ref
eren
ce
PB.EQL-3Use 'getClass ()' in the 'equals ()' method implementation
DescriptionRequires that the 'equals ()' method uses 'getClass ()' in its implementa-tion.
BenefitsAllowing only objects of the same class to be considered equal is a clean and simple solution to implementing the 'equals ()' method correctly. The 'getClass ()' method returns the runtime class of an object.Therefore, 'get-Class ()' can be used to implement the 'equals ()' method for the object.
Note that Jtest has another rule, PB.EQL2, which uses another way to implement the 'equals ()' method. Since we have two references which contain conflicting opinions, ParaSoft added both rules and will allow you to decide which one you want to enforce.
Examplepackage examples.rules.pb;
public class EQL { public int value; public boolean equals (Object o) { EQL temp = (EQL)o; return temp.value == value; // VIOLATION }}
RepairUse the 'getClass ()' method before comparing two objects for equality.

PB.EQL-3 Use 'getClass ()' in the 'equals ()' method implementation
Referen
ce
package examples.rules.pb;
public class EQLFixed { public int value; public boolean equals (Object o) { if (getClass () != o.getClass ()) { // FIXED return false; } else { EQLFixed temp = (EQLFixed)o; return temp.value == value; } }}
ReferenceHaggar, Peter. Practical Java - Programming Language Guide. Addison Wesley, 2000, pp. 44 -47.
844

PB.EQL2-3 Use 'instanceof' within an 'equals ()' method implementation
845
Ref
eren
ce
PB.EQL2-3Use 'instanceof' within an 'equals ()' method implementation
DescriptionRequires that the 'equals ()' method uses "instanceof" in its implementa-tion.
BenefitsAllowing only objects of the same class to be considered equal is a clean and simple solution to implementing the 'equals ()' method correctly. The "instanceof" operator checks whether the argument is of a specific type. Therefore, "instanceof" can be used to implement the 'equals ()' method for an object.
Note that Jtest has another rule, PB.EQL, which uses another way to implement the 'equals ()' method. Since we have two references which contain conflicting opinions, ParaSoft added both rules and will allow you to decide which one you want to enforce.
Examplepackage examples.rules.pb;
public class EQL2 { public int value; public boolean equals (Object o) { EQL2 temp = (EQL2)o; return temp.value == value; // VIOLATION }}
Repair

PB.EQL2-3 Use 'instanceof' within an 'equals ()' method implementation
Referen
ce
Use the "instanceof" operator before comparing two objects for equality.
package examples.rules.pb;
public class EQL2Fixed { public int value; public boolean equals (Object o) { if (o instanceof EQL2Fixed) { // FIXED EQL2Fixed temp = (EQL2Fixed)o; return temp.value == value;
}else {
return false; } }}
ReferenceBloch, Joshua. Effective Java Programming Language Guide. Addison Wesley, 2001, pp 25- 34.
846
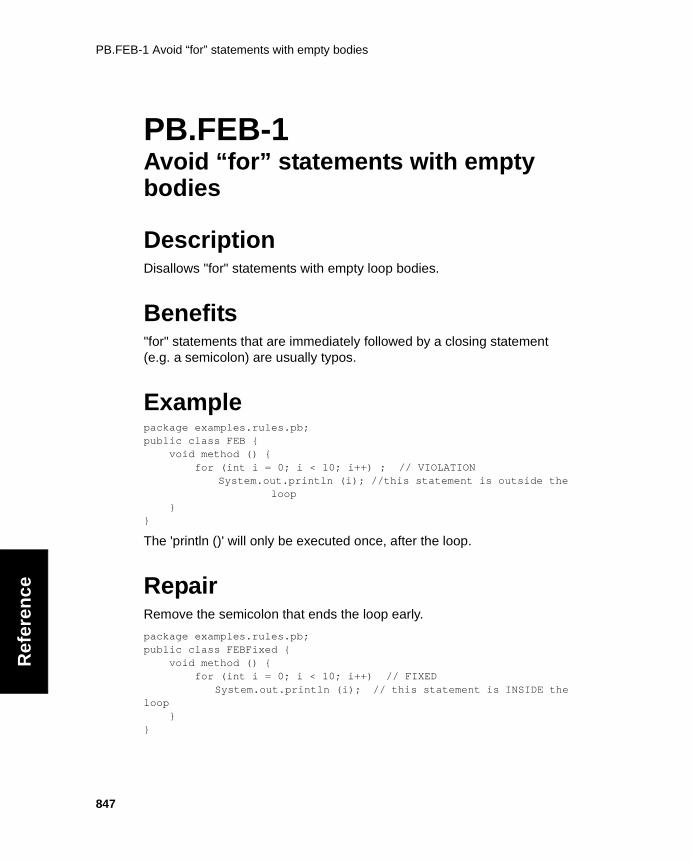
PB.FEB-1 Avoid “for” statements with empty bodies
847
Ref
eren
ce
PB.FEB-1Avoid “for” statements with empty bodies
DescriptionDisallows "for" statements with empty loop bodies.
Benefits"for" statements that are immediately followed by a closing statement (e.g. a semicolon) are usually typos.
Examplepackage examples.rules.pb;public class FEB { void method () { for (int i = 0; i < 10; i++) ; // VIOLATION System.out.println (i); //this statement is outside the
loop }}
The 'println ()' will only be executed once, after the loop.
RepairRemove the semicolon that ends the loop early.
package examples.rules.pb;public class FEBFixed { void method () { for (int i = 0; i < 10; i++) // FIXED System.out.println (i); // this statement is INSIDE the loop }}

PB.FLVA-2 Do not assign loop control variables in the body of a "for" loop
Referen
ce
PB.FLVA-2Do not assign loop control variables in the body of a "for" loop
DescriptionDisallows modification of "for" loop control variables in the body of a "for" loop.
BenefitsA "for" loop control variable should only be modified in the initialization and condition expressions of the "for" loop statement. Modifying it in the loop body makes the code difficult to understand and can lead to subtle bugs.
Examplepackage examples.rules.pb;public class FLVA { int method () { int sum = 0; for (int i = 0; i < 100; i++) { i += 3; // VIOLATION sum += i; } }}
RepairRewrite code so that the "for" loop control variable doesn't need to be assigned within the loop body.
package examples.rules.pb;public class FLVA { int method () {
848

PB.FLVA-2 Do not assign loop control variables in the body of a "for" loop
849
Ref
eren
ce
int sum = 0; for (int i = 0; i < 100; i += 4) { // FIXED sum += i; } return sum; }}
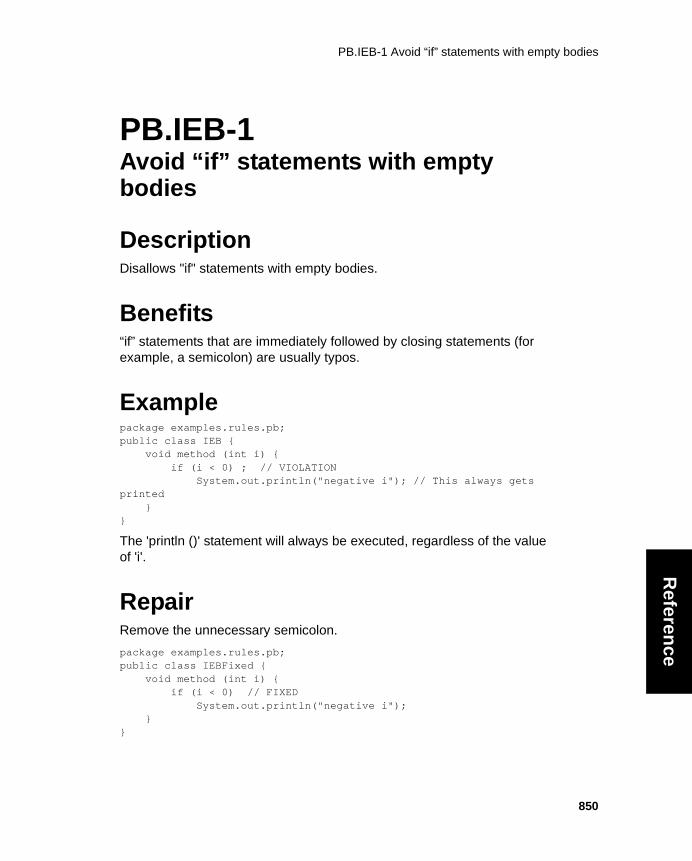
PB.IEB-1 Avoid “if” statements with empty bodies
850
Referen
ce
PB.IEB-1Avoid “if” statements with empty bodies
DescriptionDisallows "if" statements with empty bodies.
Benefits“if” statements that are immediately followed by closing statements (for example, a semicolon) are usually typos.
Examplepackage examples.rules.pb;public class IEB { void method (int i) { if (i < 0) ; // VIOLATION System.out.println("negative i"); // This always gets printed }}
The 'println ()' statement will always be executed, regardless of the value of 'i'.
RepairRemove the unnecessary semicolon.
package examples.rules.pb;public class IEBFixed { void method (int i) { if (i < 0) // FIXED System.out.println("negative i"); }}

PB.IESM-3 Avoid calling 'String.equals ("literal")' or 'String.equalsIgnoreCase ("literal")'
851
Ref
eren
ce
PB.IESM-3Avoid calling 'String.equals ("literal")' or 'String.equalsIgnoreCase ("literal")'
DescriptionDisallows calling 'String.equals ()' when the caller is a variable and the parameter is a string literal.
BenefitsSuppose you have a String variable 'str'. If you call 'str.equals ("literal")', you have to first check to ensure that 'str' is not null. If you reverse the call to '"literal".equals (str)' instead, you can avoid checking for null. This makes your code more concise.
Examplepackage examples.rules.pb;public class ISEM { public boolean isHello (String str) { return (s != null && s.equals("Hello")); // VIOLATION }}
Repairpackage examples.rules.pb;public class ISEMFixed {
public boolean isHello (String str) { return "Hello".equals (str); // FIXED }}
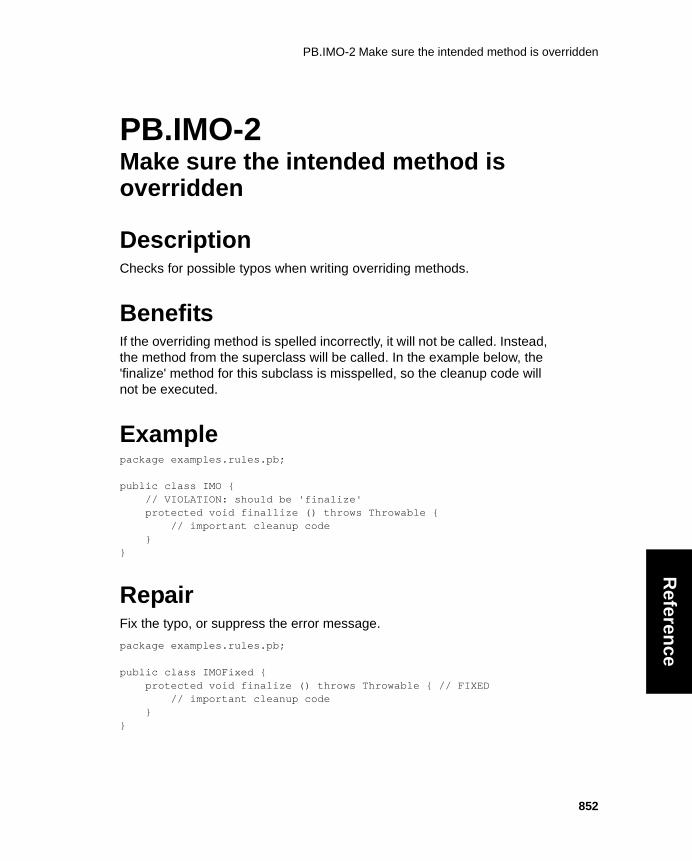
PB.IMO-2 Make sure the intended method is overridden
852
Referen
ce
PB.IMO-2Make sure the intended method is overridden
DescriptionChecks for possible typos when writing overriding methods.
BenefitsIf the overriding method is spelled incorrectly, it will not be called. Instead, the method from the superclass will be called. In the example below, the 'finalize' method for this subclass is misspelled, so the cleanup code will not be executed.
Examplepackage examples.rules.pb;
public class IMO { // VIOLATION: should be 'finalize' protected void finallize () throws Throwable { // important cleanup code }}
RepairFix the typo, or suppress the error message.
package examples.rules.pb;
public class IMOFixed { protected void finalize () throws Throwable { // FIXED // important cleanup code }}

PB.MAIN-1 Use the method name 'main ()' only for the entry point method
853
Ref
eren
ce
PB.MAIN-1Use the method name 'main ()' only for the entry point method
DescriptionRequires that methods named 'main ()' have the signature 'public static void main (java.lang.String[])'.
BenefitsBecause the method name 'main ()' has a special meaning in Java, you can avoid confusion by not using 'main ()' for purposes other than defining 'public static void main (java.lang.String[])'.
Examplepackage examples.rules.pb;
public class MAIN {
public static void main (String[] args) { System.out.println ("This is the main method."); }
public static void main () { // VIOLATION System.out.println ("This is another method named main."); }}
RepairRename the method to something other than 'main ()'.

PB.MAIN-1 Use the method name 'main ()' only for the entry point method
Referen
ce
package examples.rules.pb;
public class MAINFixed {
public static void main (String[] args) { System.out.println ("This is the main method."); }
public static void other_main () { // FIXED System.out.println ("This is another method, now named other_main."); }}
854

PB.MASP-2 Assign "protected" accessibility to 'readResolve ()' and 'writeReplace ()' meth-
855
Ref
eren
ce
PB.MASP-2Assign "protected" accessibility to 'readResolve ()' and 'writeReplace ()' methods in serializable classes
DescriptionRequires that serializable classes have "protected" 'readResolve ()' and 'writeReplace ()' methods.
BenefitsMaking these methods available to subclasses simplifies the task of extending classes that implement 'java.io.Serializable'.
Examplepackage examples.rules.pb;
import java.io.*;
class MASP implements Serializable { private Object readResolve () throws ObjectStreamException {} // VIOLATION private Object writeReplace () throws ObjectStreamException {} // VIOLATION}
RepairMake your 'readResolve ()' and 'writeReplace ()' methods "protected".
package examples.rules.pb;
import java.io.*;

PB.MASP-2 Assign "protected" accessibility to 'readResolve ()' and 'writeReplace ()' meth-
Referen
ce
class MASPfixed implements Serializable { protected Object readResolve () throws ObjectStreamException {} // FIXED protected Object writeReplace () throws ObjectStreamException {} // FIXED}
ReferenceBloch, Joshua. Effective Java Programming Language Guide. Addison Wesley, 2001, pp. 78-83.
856

PB.MPC-2 Avoid using method parameter names that conflict with class member names
857
Ref
eren
ce
PB.MPC-2Avoid using method parameter names that conflict with class member names
DescriptionDisallows method parameters that have the same name as a class's members (methods and fields).
BenefitsThis prevents confusion and could help to prevent logic errors.
Examplepackage examples.rules.pb;
public class MPC { void method (int i, int j) {} // VIOLATION void j() {} private int i = 0;}
RepairUse different names for method parameters and "class" members (meth-ods and fields) to avoid confusion.
package examples.rules.pb;
public class MPCFixed { void method (int first, int second) {} // FIXED void j() {} private int i = 0;}

PB.NAMING-1 Avoid giving non-constructor methods the same name as the class
Referen
ce
PB.NAMING-1Avoid giving non-constructor methods the same name as the class
DescriptionRequires that only constructors have the same name as the class.
BenefitsIf a non-constructor method has the same name as the class, it probably indicates a typo.
Examplepackage examples.rules.pb;
public class NAMING { public NAMING () {} // constructor public void NAMING (int size) {} // VIOLATION}
RepairIf the name is just misspelled, verify the correct spelling. If the method is supposed to be a constructor, change the method's signature to that of a constructor.
package examples.rules.pb;
public class NAMINGFixed { public NAMINGFixed () {} // constructor public NAMINGFixed (int size) {} // FIXED}
858

PB.NAMING-1 Avoid giving non-constructor methods the same name as the class
859
Ref
eren
ce
ReferenceDaconta, M, Monk, E, Keller, J, and Bohnenberger, K. Java Pitfalls. John Wiley & Sons, 2000, pp.12 - 14.

PB.NDC-1 Avoid defining direct or indirect subclasses of 'Error' and 'Throwable'
Referen
ce
PB.NDC-1Avoid defining direct or indirect subclasses of 'Error' and 'Throwable'
DescriptionDisallows direct and indirect subclassing of 'Error' and 'Throwable'.
BenefitsThe class 'java.lang.Error' is meant for covering abnormal Java Virtual Machine conditions only. If you define a direct or indirect subclass of class 'Error', it is implied that the error is also an abnormal Java Virtual Machine condition, which is not the case. Exception handling of 'Error' is not checked by the Java compiler, so erroneous exception handling might not be noticed.
The class 'java.lang.Throwable' is the super class of 'java.lang.Exception' and 'java.lang.Error'. User-defined exceptions should always be defined as subclasses of 'java.lang.Exception'.
Examplepackage examples.rules.pb; public class NDC_Exception extends Error { // VIOLATION public NDC_Exception (String s) { super(s); }}
RepairChange the class to extend Exception.
860

PB.NDC-1 Avoid defining direct or indirect subclasses of 'Error' and 'Throwable'
861
Ref
eren
ce
package examples.rules.pb; public class NDC_ExceptionFixed extends Exception { // FIXED public NDC_ExceptionFixed (String s) { super(s); }}

PB.NXRE-3 Avoid defining direct or indirect subclasses of 'RuntimeException'
862
Referen
ce
PB.NXRE-3Avoid defining direct or indirect subclasses of 'RuntimeException'
DescriptionDisallows direct and indirect subclassing of RuntimeException.
BenefitsExceptions in java.lang.RuntimeException and its subclasses are used for avoidable exceptions. The Java compiler does not check the correct handling of these exceptions, so erroneous exception handling might not be noticed.
Examplepackage examples.rules.nxre; public class NXRE extends RunTimeException { // VIOLATION public NXRE (String s) { super(s); }}
RepairChange the class to extend Exception.
package examples.pb.nxre; public class NXREFixed extends Exception { // FIXED public NXREFixed (String s) { super(s); }}

PB.OROM-2 Implement the 'readObject ()' for all 'Serializable' classes
863
Ref
eren
ce
PB.OROM-2Implement the 'readObject ()' for all 'Serializable' classes
DescriptionRequires that 'Serializable' classes implement the 'readObject ()' method.
BenefitsEven if your class uses the default serialized form, you should still use 'readObject ()' to guarantee security and class invariants.
Examplepackage examples.rules.pb;
import java.io.*;
class OROM implements Serializable { // VIOLATION /** * Max should always be positive. (for the sake of the example) */ public void setMax (int max) { _max = max; } public int getMax () { return _max; } private int _max; private static final long serialVersionUID = 1;}
RepairImplement the 'readObject ()' method and use it to verify the values being read.

PB.OROM-2 Implement the 'readObject ()' for all 'Serializable' classes
Referen
ce
package examples.rules.pb;
import java.io.*;
class OROMFixed implements Serializable { private void readObject (ObjectInputStream in) // FIXED throws IOException, ClassNotFoundException { in.defaultReadObject (); if ( _max < 0 ) throw new IOException ("Illegal max value read: " + _max); } /** * Max should always be positive. (for the sake of the example) */ public void setMax (int max) { _max = max; } public int getMax () { return _max; } private int _max; private static final long serialVersionUID = 1;}
ReferenceBloch, Joshua. Effective Java Programming Language Guide. Addison Wesley, 2001, pp. 218-219.
864

PB.PDS-2 Provide "default:" for each "switch" statement
865
Ref
eren
ce
PB.PDS-2Provide "default:" for each "switch" statement
DescriptionRequires that all "switch" statements have a "default" statement.
BenefitsOften, the "case" statements in a switch are the only logical options, so a "default" statement should be added to catch any options that are outside the accepted range of inputs.
Examplepackage examples.rules.pb;
public class PDS { void method (int i) { switch (i) { // VIOLATION: missing default label case 0: System.out.println ("Zero"); break; } }}
RepairAdd a “default” statement.
package examples.rules.pb;
public class PDSFixed { void method (int i) { switch (i) {

PB.PDS-2 Provide "default:" for each "switch" statement
Referen
ce
case 0: System.out.println ("Zero"); break; default: // FIXED } }}
866

PB.SBC-1 Avoid a “switch” statement with a bad “case”
867
Ref
eren
ce
PB.SBC-1Avoid a “switch” statement with a bad “case”
DescriptionRequires that every "case" statement in a "switch" have a "return" or "break" to stop the control flow from going into the next "case".
BenefitsIf a "case" statement does not have a "break" or "return" statement at the end of its code block, control will continue into the next case. This might seem fine if the case is the last one, but this safety is lost if more cases are added later.
DrawbacksSome "switch" statements use the same code block to treat several cases. Having several cases fall through to the same code block would trigger this rule even though this is an acceptable way of writing switches.
Examplepackage examples.rules.pb;
public class SBC { int method (int i) { int x = 0; switch (i) { case 1: x = 10; break; case 2: // VIOLATION x = 20; default:

PB.SBC-1 Avoid a “switch” statement with a bad “case”
Referen
ce
a = 40; break; } }}
RepairAdd the missing “break” or “return”.
package examples.rules.pb;
public class SBCFixed { void method (int i) { int x = 0; switch (i) { case 1: x = 10; break; case 2: // VIOLATION x = 20; break; default: x = 40; break; } }}
868

PB.TLS-1 Avoid using text labels in "switch" statements
869
Ref
eren
ce
PB.TLS-1Avoid using text labels in "switch" statements
DescriptionDisallows the use of text labels in "switch" statements.
BenefitsLabels are lines of code marked by a label such as 'mark:' that can be jumped to by a "break" statement. A "case" statement such as 'case 5:' is one typo away from being a label: "case5:", which will change the behav-ior of the "switch" statement.
Labels that are not typos should not appear in "switch" statements because they will not be used.
Examplepackage examples.rules.pb;
public class TLS { static int method (int i) { switch (i) { case 4: case3: // VIOLATION: label typo i++; break; case 25: unusedlabel: // VIOLATION: unused label. break; } return i; }}

PB.TLS-1 Avoid using text labels in "switch" statements
Referen
ce
RepairChange "case3" to "case 3" and remove the unused label.
package examples.rules.pb;
public class TLSFixed { static int method (int i) { switch (i) { case 4: case 3: // FIXED i++; break; case 25: // FIXED break; } return i; }}
870

PB.UEI-3 Use ‘equals ()’ when comparing Objects
871
Ref
eren
ce
PB.UEI-3Use ‘equals ()’ when comparing Objects
DescriptionThe '==' and '!=' operators used on two Objects check whether they are the same instance of an object. However, if you want to check whether two objects have the same value, you should use the 'equals ()' method.
Note that this rule does not check Strings because that is done by the 'PB.UEI2' rule.
Examplepackage examples.rules.pb; import java.awt.*; public class UEI { public boolean notEqual (Choice other) { boolean monthly = co.getSelectedItem () != other; // VIOLATION return monthly; } private Choice co = null;}
RepairUse 'equals ()' instead of "==" or "!=".
package examples.rules.pb; import java.awt.*; public class UEIFixed { public boolean notEqual (Choice other) { boolean monthly = !(co.getSelectedItem ().equals (other));

PB.UEI-3 Use ‘equals ()’ when comparing Objects
Referen
ce
// FIXED return monthly; } private Choice co = null;}
ReferenceBloch, Joshua. Effective Java Programming Language Guide. Addison Wesley, 2001, pp.25 - 36.
872

PB.UEI2-3 Use ‘equals ()’ when comparing Strings
873
Ref
eren
ce
PB.UEI2-3Use ‘equals ()’ when comparing Strings
DescriptionDisallows the use of the '==' or '!=' operators to compare String objects.
BenefitsThese operators determine whether the strings are references to the same object, not whether they are the same characters. Comparing strings for object equality is unlikely to be the desired effect and is proba-bly a bug.
Examplepackage examples.rules.pb;class UEI2 { public boolean compare (String s1, String s2) { boolean same = s1 == s2; // VIOLATION return same; }}
RepairUse 'equals ()' when comparing String objects.
package examples.rules.pb;class UEI2Fixed { public boolean compare (String s1, String s2) { boolean same = s1.equals (s2); // FIXED return same; }}

PMETRICS.NB-2 Number of bytes
874
Referen
ce
Project MetricsPMETRICS.NB-2Number of bytes
DescriptionThis metric measures project size by adding the total number of bytes of all .class files in a project.

PMETRICS.NC-2 Number of classes
875
Ref
eren
ce
PMETRICS.NC-2Number of classes
DescriptionThis metric measures the total number of classes in a project.

PMETRICS.NJF-2 Number of Java source files
876
Referen
ce
PMETRICS.NJF-2Number of Java source files
DescriptionThis metric measures the total number of Java source files in a project.

PMETRICS.NL-2 Number of lines
877
Ref
eren
ce
PMETRICS.NL-2Number of lines
DescriptionThis metric measures the total number of lines in a project’s source files.
Note: This metric includes comments, blank lines, and everything else in the .java file.

PMETRICS.NOF-2 Number of fields
878
Referen
ce
PMETRICS.NOF-2Number of fields
DescriptionThis metric measures the total number of fields in a project.

PMETRICS.NOM-2 Number of methods
879
Ref
eren
ce
PMETRICS.NOM-2Number of methods
DescriptionThis metric measures the total number of methods in a project.
Note: This rule will not count default constructors.

PMETRICS.NPAC-2 Number of packages
880
Referen
ce
PMETRICS.NPAC-2Number of packages
DescriptionThis metric measures the total number of packages in a project.

PMETRICS.NPKGC-2 Number of package-private classes
881
Ref
eren
ce
PMETRICS.NPKGC-2Number of package-private classes
DescriptionThis metric measures the total number of package-private classes in a project.

PMETRICS.NPRIC-2 Number of "private" classes
882
Referen
ce
PMETRICS.NPRIC-2Number of "private" classes
DescriptionThis metric measures the total number of “private” classes in a project.

PMETRICS.NPROC-2 Number of "protected" classes
883
Ref
eren
ce
PMETRICS.NPROC-2Number of "protected" classes
DescriptionThis metric measures the total number of “protected” classes in a project.

PMETRICS.NPUBC-2 Number of "public" classes
884
Referen
ce
PMETRICS.NPUBC-2Number of "public" classes
DescriptionThis metric measures the total number of “public” classes in a project.

PORT.ENV-1 Avoid using 'System.getenv ()'
885
Ref
eren
ce
Portability RulesPORT.ENV-1Avoid using 'System.getenv ()'
DescriptionDisallows the use of 'System.getenv ()'.
Benefits'System.getenv ()' has been "deprecated” because it is not portable. This is because not all platforms have environment variables.
DrawbacksYour users might be unfamiliar with how to change Java properties.
Examplepackage examples.rules.port;
public class ENV { void method (String name) { System.getenv (name); // VIOLATION }}
RepairUse 'System.getProperty ()' and the corresponding 'getTypeName ()' methods of the "boolean", "integer", and "long" primitive types. This will retrieve Java system properties instead of environment variables.
package examples.rules.port;
public class ENV { void method (String name) { System.getProperty (name); // FIXED

PORT.ENV-1 Avoid using 'System.getenv ()'
Referen
ce
}}
ReferenceFlanagan, David. Java in a Nutshell. O’Reilly, 1999, pp.190-192.
886

PORT.EXEC-3 Avoid using 'Runtime.exec ()'
887
Ref
eren
ce
PORT.EXEC-3Avoid using 'Runtime.exec ()'
DescriptionCalling the 'Runtime.exec ()' method to spawn a process and execute an external command might not be portable because there is no guarantee that the native OS command will behave consistently on different plat-forms.
Examplepackage examples.rules.port;
import java.io.IOException;
public class EXEC { public void method(String command) { try { Runtime.getRuntime().exec(command); // violation, not portable } catch (IOException io) { } }}
ReferenceFlanagan, David. Java in a Nutshell. O’Reilly, 1999, pp.190-192.

PORT.LNSP-1 Avoid hard coding '\n', or '\r' as a line separator
Referen
ce
PORT.LNSP-1Avoid hard coding '\n', or '\r' as a line separator
DescriptionDisallows strings that contain hard coded '\n' or '\r' line separator charac-ters.
BenefitsDifferent systems use different characters or sequences of characters as line separators. Therefore, hard coding '\n', '\r', or "\r\n" violates the porta-bility of Java code.
Examplepackage examples.rules.port;
public class LNSP { public void sayHello (String name) { System.out.println("Hello\n" + name); // VIOLATION }}
RepairUse the println() method of PrintStream or PrintWriter; this automatically terminates a line with the line separator appropriate for the platform. Or, use the value of System.getProperty("line.separator")
package examples.rules.port;
public class LNSPFixed { public void sayHello (String name) { System.out.println("Hello"); // FIXED System.out.println(name); // FIXED
888

PORT.LNSP-1 Avoid hard coding '\n', or '\r' as a line separator
889
Ref
eren
ce
}}
ReferenceFlanagan, David. Java in a Nutshell. O’Reilly, 1999, pp. 191-192.

PORT.NATV-3 Avoid using user-defined "native" methods
890
Referen
ce
PORT.NATV-3Avoid using user-defined "native" methods
DescriptionDisallows user-defined native methods.
BenefitsUser-defined native methods are not portable because all native methods must be ported to each platform to be usable.
DrawbacksSome features must be implemented at the native level to use native libraries or implement a performance optimization.
Examplepackage examples.rules.port;
public class NATV { native void method (String s); // VIOLATION}
ReferenceFlanagan, David. Java in a Nutshell. O’Reilly, 1999, pp.190-192.

PORT.PEER-1 Avoid using "java.awt.peer.*" interfaces directly
891
Ref
eren
ce
PORT.PEER-1Avoid using "java.awt.peer.*" interfaces directly
DescriptionDisallows directly using the interfaces defined in the "java.awt.peer" pack-age.
BenefitsThese interfaces are meant for use only by implementors of the AWT package. Applications that use these interfaces directly are not portable.
Examplepackage examples.rules.port;
import java.awt.peer.ComponentPeer;
interface PEER extends ComponentPeer { // VIOLATION void setName(String name);}
RepairDo not use the ‘java.awt.peer’ package directly.
ReferenceFlanagan, David. Java in a Nutshell. O’Reilly, 1999, pp.190-192.

SECURITY.CLONE-3 Make your 'clone ()' method "final" for security
Referen
ce
Security RulesSECURITY.CLONE-3Make your 'clone ()' method "final" for security
DescriptionRequires that classes implementing the Cloneable "interface" have a "final" 'clone ()' method.
BenefitsIf a class does not implement the 'Cloneable' interface, or if it implements the interface with a non-final 'clone ()' method, then attackers can create their own subclass that implements 'Cloneable' with a 'clone ()' method that does not call a constructor, possibly changing the behavior of the cloned object.
Examplepackage examples.rules.security;
public class CLONE implements Cloneable { public Object clone () { // VIOLATION CLONE cl = (CLONE) super.clone(); cl._field = _field; return cl; } private int _field = 0;}
RepairDeclare as "final" either the entire class or just the 'clone ()' method.
package examples.rules.security;
public class CLONEFixed implements Cloneable {
892

SECURITY.CLONE-3 Make your 'clone ()' method "final" for security
893
Ref
eren
ce
public final Object clone () { // FIXED CLONEFixed cl = (CLONEFixed) super.clone(); cl._field = _field; return cl; } private int _field = 0;}
ReferenceViaga, J., McGraw,G., Mutsdoch,T, Felten, E.. Statically Scanning Java Code: Finding Security Vulnerabilities. IEEE Software, (September/Octo-ber 2000).
Bloch, Joshua. Effective Java Programming Language Guide. Addison Wesley, 2001, pp. 45-52.

SECURITY.CMP-2 Avoid comparing Class objects by name
Referen
ce
SECURITY.CMP-2Avoid comparing Class objects by name
DescriptionDisallows comparing class objects with the 'getName ()' method.
BenefitsBecause more than one class in a running JVM can have the same name, comparing objects by name is not a safe or reliable way to check for class equality.
Examplepackage examples.rules.security;
public class CMP { public boolean sameClass (Object o) { Class thisClass = this.getClass(); Class otherClass = o.getClass(); return (thisClass.getName() == otherClass.getName()); // VIOLATION }}
RepairCompare Class objects for equality directly.
package examples.rules.security;
public class CMPFixed { public boolean sameClass (Object o) { Class thisClass = this.getClass(); Class otherClass = o.getClass();
894

SECURITY.CMP-2 Avoid comparing Class objects by name
895
Ref
eren
ce
return (thisClass == otherClass); // FIXED }}
ReferenceViaga, J., McGraw, G., Mutsdoch, T, Felten, E.. Statically Scanning Java Code: Finding Security Vulnerabilities. IEEE Software, (September/Octo-ber 2000).

SECURITY.INNER-1 Make all inner classes "private"
Referen
ce
SECURITY.INNER-1Make all inner classes "private"
DescriptionRequires that inner classes be "private".
BenefitsJava allows classes to contain other classes. Because Java byte code does not have this concept, the compiler translates inner classes into package-private classes. Any "private" method or field in the container class that the inner class accesses can be seen by other classes in the same "package" (with the exception that other classes in the package cannot write to a private field of the container class unless the inner class also writes to that field).
Examplepackage examples.rules.security;
public class INNER { class INNER_Class { // VIOLATION public void setValue(int i) { _value = i; // now the "package" can write to this "pri-vate" field. } } private int _value;}
RepairMake inner classes "private".
package examples.rules.security;
public class INNERFixed {
896

SECURITY.INNER-1 Make all inner classes "private"
897
Ref
eren
ce
private class INNER_Class { // FIXED public void setValue(int i) { _value = i; } } private int _value;}
ReferenceViaga, J., McGraw,G., Mutsdoch,T, Felten, E.. Statically Scanning Java Code: Finding Security Vulnerabilities. IEEE Software, (September/Octo-ber 2000).

SECURITY.PKG-5 Do not depend on "package" scope
898
Referen
ce
SECURITY.PKG-5Do not depend on "package" scope
DescriptionDisallows classes with "public" or package-private (neither "public" nor "private") access.
BenefitsAn attacker can simply add another class to your "package" and then access package-private fields that were supposed to be hidden.
RepairDo not rely on package-level access. Give your classes, methods, and fields the most restricted access possible.
ReferenceViaga, J., McGraw,G., Mutsdoch,T, Felten, E.. Statically Scanning Java Code: Finding Security Vulnerabilities. IEEE Software, (September/Octo-ber 2000).

SECURITY.SER-3 Make your classes Unserializable
899
Ref
eren
ce
SECURITY.SER-3Make your classes Unserializable
DescriptionDisallows classes that implement the 'java.io.Serializable' "interface".
BenefitsBy examining a byte-array containing a serialized object, an attacker can read the object's internal state, including "private" fields and the internal state of any referenced objects.
Examplepackage examples.rules.security;
public class SER implements java.io.Serializable { // VIOLATION public void setValue(int value) { _value = value; } private int _value;}
RepairDo not make your classes Serializable if possible. If you make your classes Serializable, make sure that any sensitive fields are "transient" ("transient" fields will not be serialized).
package examples.rules.security;
public class SER implements java.io.Serializable { // VIOLATION public void setValue(int value) { _value = value; } private transient int _value;//though the rule is still violated // _value will not be serialized.

SECURITY.SER-3 Make your classes Unserializable
Referen
ce
}
ReferenceViaga, J., McGraw,G., Mutsdoch,T, Felten, E.. “Statically Scanning Java Code: Finding Security Vulnerabilities.” IEEE Software, September/Octo-ber 2000.
Bloch, Joshua. Effective Java Programming Language Guide. Addison Wesley, 2001, pp. 213-217.
900

SECURITY.SER2-3 Avoid making your interfaces Serializable
901
Ref
eren
ce
SECURITY.SER2-3Avoid making your interfaces Serializable
DescriptionDisallows interfaces that extend the 'java.io.Serializable' "interface".
BenefitsBy examining a byte-array containing a serialized object, an attacker can read the object's internal state, including "private" fields and the internal state of any referenced objects.
Examplepackage examples.rules.security;
public interface SER2 extends java.io.Serializable { // VIOLATION public void method(); static final int MAX = 10;}
RepairDo not make your interfaces Serializable if possible. If you make your interfaces Serializable, make sure that any sensitive fields are "transient" ("transient" fields will not be serialized).
package examples.rules.security;
public interface SER2Fixed { // FIXED public void method(); static final int MAX = 10;}

SECURITY.SER2-3 Avoid making your interfaces Serializable
Referen
ce
ReferenceViaga, J., McGraw,G., Mutsdoch,T, Felten, E.. Statically Scanning Java Code: Finding Security Vulnerabilities. IEEE Software, (September/Octo-ber 2000).
902

SERVLET.BINS-3 Avoid using java.beans.Beans.instantiate ()
903
Ref
eren
ce
Servlet RulesSERVLET.BINS-3Avoid using java.beans.Beans.instantiate ()
DescriptionDisallows calling 'java.beans.Beans.instantiate ()'.
BenefitsThe method will create a new bean instance either by retrieving a serial-ized version of the bean from disk or creating a new bean if the serialized form does not exist. From a performance perspective, the problem is that each time 'java.beans.Beans.instantiate ()' is called, the file system is checked for a serialized version of the bean. As usual, such disk activity in the critical path of your Web request can be costly.
Examplepackage examples.rules.servlet;
import javax.servlet.http.*;import java.beans.*;
public class BINS extends HttpServlet { public void doGet (HttpServletRequest request) throws ClassNot-FoundException , java.io.IOException { // VIOLATION Beans b = (Beans)Beans.instantiate (this.getClass ().get-ClassLoader () , "web_prmtv.Bean"); }}

SERVLET.BINS-3 Avoid using java.beans.Beans.instantiate ()
Referen
ce
RepairTo avoid the disk overhead, simply use "new" to create the instance.
package examples.rules.servlet;
import javax.servlet.http.*;import java.beans.*;
public class BINSFixed extends HttpServlet { public void doGet (HttpServletRequest request) throws ClassNot-FoundException , java.io.IOException { Beans b = new Beans (); // FIXED }}
ReferenceIBM WebSphere Application Server Standard and Advanced Editions, Harvey W. Gunther.
http://www-4.ibm.com/software/webservers/appserv/ws_bestpractices.pdf
904

SERVLET.CDBC-1 Close JDBC connections in the finally block
905
Ref
eren
ce
SERVLET.CDBC-1Close JDBC connections in the finally block
DescriptionRequires that a local JDBC object created in the try block must be closed in the finally block.
BenefitsIf you fail to close and release database connections, users might experi-ence long waits for connections. When connections are left unclosed, users might have to wait for the connections to be returned by the data-base. It is best to ensure that your code is structured to close and release JDBC resources in all cases-- even in exception and error conditions. If you include the close statement in a finally block, the close will always occur.
Examplepackage examples.rules.servlet;
import java.sql.*;
class SERVLET_CDBC {
void execute() {
Connection con = null;
try {
// assume the connection is created here

SERVLET.CDBC-1 Close JDBC connections in the finally block
Referen
ce
Statement stmt = con.createStatement();
// ....
} catch(SQLException e) {
e.printStackTrace();
}
// VIOLATION : missing 'con.close()' in finally block
}
}
RepairAdd the finally block and close all the connection.
package examples.rules.servlet;
class SERVLET_CDBCFixed {
void execute() throws java.sql.SQLException {
Connection con = null;
try {
// assume the connection is created here
Statement stmt = con.createStatement();
// ....
} finally {
if (con != null && !con.isClosed()) {
con.close(); // FIXED
}
}
}
}
906

SERVLET.DSLV-2 Reuse data sources for JDBC connections
907
Ref
eren
ce
SERVLET.DSLV-2Reuse data sources for JDBC connections
DescriptionDisallows the creation of method-local DataSource variables.
BenefitsA javax.sql.DataSource is obtained from WebSphere Application Server through a JNDI naming lookup. Avoid the overhead of acquiring a javax.sql.DataSource for each SQL access. This is an expensive opera-tion that will severely impact the performance and scalability of the appli-cation.
Examplepackage examples.rules.servlet;
import javax.servlet.*;import javax.servlet.http.*;import javax.sql.*;import javax.naming.Context;import javax.naming.InitialContext;
public class DSLV extends HttpServlet { public void doGet () throws ServletException { DataSource ds = null; // VIOLATION try { java.util.Hashtable env = new java.util.Hashtable (); env.put (Context.INITIAL_CONTEXT_FACTORY, "jndi.CNIni-tialContext"); Context ctx = new InitialContext (env); ds = (DataSource)ctx.lookup ("jdbc/SAMPLE"); ctx.close (); } catch (Exception e) { e.printStackTrace ();

SERVLET.DSLV-2 Reuse data sources for JDBC connections
Referen
ce
} }}
RepairServlets should acquire the javax.sql.DataSource in the Servlet.init () method (or some other thread-safe method) and maintain it in a common location for reuse.
package examples.rules.servlet;
class DSLVFixed extends HttpServlet { // caching the DataSource private DataSource ds = null;
public void init (ServletConfig config) throws ServletException { super.init (config); Context ctx = null; try { java.util.Hashtable env = new java.util.Hashtable (); env.put (Context.INITIAL_CONTEXT_FACTORY, "jndi.CNIni-tialContext"); ctx = new InitialContext (env); ds = (DataSource)ctx.lookup ("jdbc/SAMPLE"); ctx.close (); } catch (Exception e) { e.printStackTrace (); } }}
ReferenceIBM WebSphere Application Server Standard and Advanced Editions, Harvey W. Gunther.
http://www-4.ibm.com/software/webservers/appserv/ws_bestpractices.pdf
908

SERVLET.HVR-2 Release HttpSession variables when done
909
Ref
eren
ce
SERVLET.HVR-2Release HttpSession variables when done
DescriptionRequires that methods call 'javax.servlet.http.HttpSession.invalidate ()' on local HttpSession objects.
BenefitsHttpSession objects live inside the WebSphere servlet engine until either:
• The application explicitly and programmatically releases it using the API, javax.servlet.http.HttpSession.invalidate ()
• WebSphere Application Server destroys the allocated HttpSes-sion when it expires (by default, after 1800 seconds or 30 min-utes). WebSphere Application can only maintain a certain number of HttpSessions in memory. When this limit is reached, it serial-izes and swaps the allocated HttpSession to disk. In a high vol-ume system, the cost of serializing many abandoned HttpSessions can be quite high.
Examplepackage examples.rules.servlet;
import javax.servlet.*;import javax.servlet.http.*;
public class HVR { // VIOLATION: no call to 'javax.servlet.http.HttpSession.invali-date ()'. public void session (HttpServletRequest request) { HttpSession mySession = request.getSession (false); String id = mySession.getId ();

SERVLET.HVR-2 Release HttpSession variables when done
Referen
ce
System.out.println ("HttpSession id = " + id); }}
RepairCall 'javax.servlet.http.HttpSession.invalidate ()' when finished.
package examples.rules.servlet;
import javax.servlet.*;import javax.servlet.http.*;
public class HVRFixed { public void sessionFixed (HttpServletRequest request) { HttpSession mySession = request.getSession (false); if (mySession != null) { String id = mySession.getId (); System.out.println ("HttpSession id = " + id); mySession.invalidate (); // FIXED } }
ReferenceIBM WebSphere Application Server Standard and Advanced Editions, Harvey W. Gunther.
http://www-4.ibm.com/software/webservers/appserv/ws_bestpractices.pdf
910

SERVLET.MDC-1 Declare a “public” constructor that takes no parameters
911
Ref
eren
ce
SERVLET.MDC-1Declare a “public” constructor that takes no parameters
DescriptionRequires that the servlet class have a "public" constructor that takes no parameters.
BenefitsThe container uses this constructor to create an instance of the servlet class.
Examplepackage examples.rules.servlet;
import javax.servlet.*;
import javax.servlet.http.*;
public class MDC extends HttpServlet {
// VIOLATION : missing default constructor
public MDC(String name) {
// do something
}
}

SERVLET.MDC-1 Declare a “public” constructor that takes no parameters
Referen
ce
Repairpackage examples.rules.servlet;
import javax.servlet.*;
import javax.servlet.http.*;
public class Fixed_MDC extends HttpServlet {
public MDC(String name) {
// do something
}
public MDC() { // FIXED
// do something
}
}
912

SERVLET.RRWD-2 Close JDBC resources when done
913
Ref
eren
ce
SERVLET.RRWD-2Close JDBC resources when done
DescriptionRequires that method-local JDBC variables be closed by the method.
BenefitsFailure to close and release JDBC connections can cause other users to experience long waits for connections. Although a JDBC connection that is left unclosed will be reaped and returned by WebSphere Application Server after a timeout period, others might have to wait for this to occur.
Examplepackage examples.rules.servlet;
import java.sql.*;
public class RRWD { void test0 () { // VIOLATION: 'close ()' never called for JDBC variables Connection conn = null; Statement stmt = null; ResultSet rs = null; try { conn = DriverManager.getConnection ("some url"); stmt = conn.createStatement(); rs = stmt.executeQuery ("some query"); } catch (Exception e) {} finally { try { // FIX: rs.close (); // FIX: stmt.close (); } catch (Exception e) {}
SERVLET.RRWD-2 Close JDBC resources when done
Referen
ce
} }}
RepairEnsure that your code is structured to close and release JDBC resources in all cases, even in exception and error conditions. JDBC ResultSets can be explicitly closed as well. If not explicitly closed, ResultSets are released when their associated statements are closed.
ReferenceIBM WebSphere Application Server Standard and Advanced Editions, Harvey W. Gunther.
http://www-4.ibm.com/software/webservers/appserv/ws_bestpractices.pdf
914

SERVLET.SOP-2 Minimize use of System.out.println or System.err.println
915
Ref
eren
ce
SERVLET.SOP-2Minimize use of System.out.println or System.err.println
DescriptionDisallows the use of System.out and System.err output methods.
BenefitsSystem.out.println statements and similar constructs synchronize pro-cessing for the duration of disk I/O and can significantly slow throughput.
Examplepackage examples.rules.servlet;
import javax.servlet.*;import javax.servlet.http.*;
public class SOP extends HttpServlet { public void service () { System.out.println ("starting service"); // VIOLATION }}
RepairTry to minimize System.out and System.err output.
package examples.rules.servlet;
import javax.servlet.*;import javax.servlet.http.*;
public class SOPFixed extends HttpServlet { private final static boolean DEBUG_ON = false; public void service () {

SERVLET.SOP-2 Minimize use of System.out.println or System.err.println
Referen
ce
if (DEBUG_ON) { System.out.println ("starting service"); // VIOLATION } }}
ReferenceIBM WebSphere Application Server Standard and Advanced Editions, Harvey W. Gunther.
http://www-4.ibm.com/software/webservers/appserv/ws_bestpractices.pdf
916
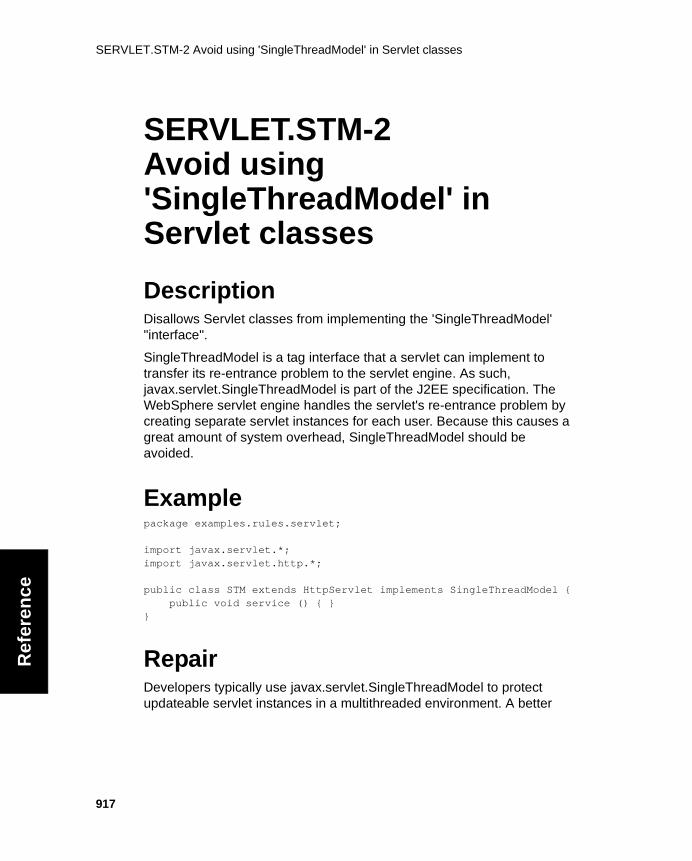
SERVLET.STM-2 Avoid using 'SingleThreadModel' in Servlet classes
917
Ref
eren
ce
SERVLET.STM-2Avoid using 'SingleThreadModel' in Servlet classes
DescriptionDisallows Servlet classes from implementing the 'SingleThreadModel' "interface".
SingleThreadModel is a tag interface that a servlet can implement to transfer its re-entrance problem to the servlet engine. As such, javax.servlet.SingleThreadModel is part of the J2EE specification. The WebSphere servlet engine handles the servlet's re-entrance problem by creating separate servlet instances for each user. Because this causes a great amount of system overhead, SingleThreadModel should be avoided.
Examplepackage examples.rules.servlet;
import javax.servlet.*;import javax.servlet.http.*;
public class STM extends HttpServlet implements SingleThreadModel { public void service () { }}
RepairDevelopers typically use javax.servlet.SingleThreadModel to protect updateable servlet instances in a multithreaded environment. A better

SERVLET.STM-2 Avoid using 'SingleThreadModel' in Servlet classes
Referen
ce
approach is to avoid using servlet instance variables that are updated from the servlet's service method.
ReferenceIBM WebSphere Application Server Standard and Advanced Editions, Harvey W. Gunther.
http://www-4.ibm.com/software/webservers/appserv/ws_bestpractices.pdf
918

SERVLET.SYN-2 Minimize synchronization in Servlets
919
Ref
eren
ce
SERVLET.SYN-2Minimize synchronization in Servlets
DescriptionDisallows "synchronized" blocks with more than 6 statements.
BenefitsServlets are multi-threaded. Servlet-based applications have to recognize and handle this. However, if large sections of code are synchronized, an application effectively becomes single threaded, and throughput decreases.
Examplepackage examples.rules.servlet;
import javax.servlet.*;import javax.servlet.http.*;import java.sql.*;
public class SYN extends HttpServlet { private int numberOfRows = 0; private javax.sql.DataSource ds = null;
public void method (HttpServletRequest request) { ResultSet rs = null; try { synchronized (this) { // VIOLATION PreparedStatement stmt = null; Connection conn = null; String info = null; int startingRows = numberOfRows; conn = ds.getConnection ("db2admin", "db2admin"); stmt = conn.prepareStatement ("select * from

SERVLET.SYN-2 Minimize synchronization in Servlets
Referen
ce
db2admin.employy"); rs = stmt.executeQuery (); info = rs.getString ("Name"); } } catch (Exception e) { } finally { try { rs.close (); } catch (Exception e) {} } }}
RepairMinimize the number of "synchronized" statements.
package examples.rules.servlet;
import javax.servlet.*;import javax.servlet.http.*;import java.sql.*;
public class SYNFixed extends HttpServlet { private int numberOfRows = 0; private javax.sql.DataSource ds = null;
public void method (HttpServletRequest request) { Connection conn = null; ResultSet rs = null; PreparedStatement stmt = null; int startingRows;
synchronized (this) { // FIXED startingRows = numberOfRows; }
try { String info = null; conn = ds.getConnection ("db2admin", "db2admin"); stmt = conn.prepareStatement ("select * from db2admin.employy"); rs = stmt.executeQuery (); info = rs.getString ("Name"); } catch (Exception e) { } finally { try { rs.close (); }
920

SERVLET.SYN-2 Minimize synchronization in Servlets
921
Ref
eren
ce
catch (Exception e) {} } }
ReferenceIBM WebSphere Application Server Standard and Advanced Editions, Harvey W. Gunther.
http://www-4.ibm.com/software/webservers/appserv/ws_bestpractices.pdf

TRS.ANF-3 Do not use 'notify ()'; use 'notifyAll ()' instead
Referen
ce
Threads and Synchronization RulesTRS.ANF-3Do not use 'notify ()'; use 'notifyAll ()' instead
DescriptionDisallows calls to 'notify ()'.
BenefitsMultiple threads may be waiting on the same object. 'notify ()' picks one of the waiting threads and wakes it up. There is no way to predict which thread will be awakened. A poor scheduling algorithm could leave some waiting threads stalled much longer than others. Therefore, you should use 'notifyAll ()' to wake up all waiting threads.
DrawbacksSome resource allocation algorithms depend on single notification. If all the threads are waiting to lock a single resource, only one of the threads should be notified as long as you do not care about scheduling.
Examplepackage examples.rules.trs;
public class ANF { public synchronized void notifyThread () { notify (); // VIOLATION }}
Repair
922

TRS.ANF-3 Do not use 'notify ()'; use 'notifyAll ()' instead
923
Ref
eren
ce
Replace ’notify ()’ with ’notifyAll ()’
package examples.rules.trs;
public class ANFFixed { public synchronized void notifyThread () { notifyAll (); // FIXED }}
ReferenceArnold, Ken, and Gosling, James The Java Programming Language. 2d ed. Addison Wesley, 1997, pp.188-190.

TRS.AUTG-3 Avoid using variables of type 'java.lang.ThreadGroup'
924
Referen
ce
TRS.AUTG-3Avoid using variables of type 'java.lang.ThreadGroup'
DescriptionDisallows the use of 'java.lang.ThreadGroup' variables.
BenefitsThreadGroup has safety flaws and should be avoided because it is unnecessary. The 'activeCount ()' method, for example, is not thread safe, yet by definition it will be used in a threaded environment.
RepairStore 'Thread' references in an array or collection.
ReferenceBloch, Joshua. Effective Java Programming Language Guide. Addison Wesley, 2001, p. 211.

TRS.AUTY-3 Avoid using 'Thread.yield'
925
Ref
eren
ce
TRS.AUTY-3Avoid using 'Thread.yield'
DescriptionDisallows the use of 'Thread.yield ()'.
Benefits'Thread.yield ()' has no predictable impact on the behavior of an applica-tion when run under different virtual machines. If you are depending on yielding as a source of liveness or safety, then you have no guarantee that your program will always work.
DrawbacksThis method changes the scheduling of your program, so it might be use-ful during testing to insert calls to 'Thread.yield ()' to try to break your pro-gram by exercising more possible execution orders.
RepairAvoid using Thread.yield when you are programming. Try to minimize the number of concurrently running threads.
ReferenceBloch, Joshua. Effective Java Programming Language Guide. Addison Wesley, 2001, pp. 204-207.

TRS.CSFS-3 Avoid causing deadlock by calling a "synchronized" method from a "synchro-
Referen
ce
TRS.CSFS-3Avoid causing deadlock by calling a "synchronized" method from a "synchronized" method
DescriptionDisallows calling one "synchronized" method from another.
BenefitsIf a "synchronized" method calls another "synchronized" method, it means that the threads executing this code will try to get a lock on a monitor while already holding a lock on a different monitor. This kind of situation can easily lead to circular dependencies and deadlocks and should thus be avoided if possible. Having a thread holding only one monitor at a time greatly reduces the chances of getting into deadlocks.
Note: If both methods synchronize on the same object or class, then no deadlock will occur.
DrawbacksSome algorithms depend on locking objects in a specific order. Extra cau-tion should be used when doing this to ensure that the ordering is main-tained by all methods trying to lock multiple objects.
Examplepackage examples.rules.trs;
public class CSFS extends Thread{ public static void main (String[] args) {
926

TRS.CSFS-3 Avoid causing deadlock by calling a "synchronized" method from a "synchro-
927
Ref
eren
ce
CSFS thread1 = new CSFS (); CSFS thread2 = new CSFS (); thread1.setMonitor (thread2); thread2.setMonitor (thread1);
thread1.start (); thread2.start ();
// program will not exit: thread1 and thread2 are deadlocked. }
public synchronized void run () { // give the other thread time to start try { Thread.sleep (1000); } catch (InterruptedException e) {} _monitor.synchronizedMethod (); // VIOLATION } synchronized void synchronizedMethod () {} void setMonitor (CSFS monitor) {_monitor = monitor;}
private CSFS _monitor;}
RepairTry to write the code so that a thread doesn't try to get a lock on a monitor while already holding a lock. One possibility is to use a "synchronized" statement to only synchronize the part of the method that really needs to be synchronized. Alternatively, before locking a second object, make sure that it is not already locked.
ReferenceDaconta, M., Monk, E., Keller, J., Bohnenberger, K. Java Pitfalls. John Wiley & Sons, pp. 50 - 60.

TRS.MRUN-2 Give subclasses of Thread a 'run ()' method
928
Referen
ce
TRS.MRUN-2Give subclasses of Thread a 'run ()' method
DescriptionRequires classes that extend 'Thread' to have a 'run()' method.
BenefitsClasses that extend 'Thread' should always have a 'run()' method. If a 'run()' method is not implemented, the class will not run as a separate thread.
Examplepackage examples.rules.trs;
public class MRUN extends Thread{ public MRUN () {} // VIOLATION, no run method}
RepairProvide a 'run()' method for this class.
package examples.rules.trs;
public class MRUNFixed extends Thread { public MRUNFixed extends Thread () {} public void run () {} // FIXED}

TRS.NSM-5 Avoid using the "synchronized" modifier in the method declaration
929
Ref
eren
ce
TRS.NSM-5Avoid using the "synchronized" modifier in the method declaration
DescriptionDisallows the use of the "synchronized" method modifier.
BenefitsIn Java there are two ways of declaring "synchronized" code:
1. Using the "synchronized" method modifier.
2. Using the "synchronized" statement.
Each way has its advantages and disadvantages. If you decide that the "synchronized" modifier shouldn't be used, you can use this rule to enforce that guidelines.
Some of the advantages of using the "synchronized" statement over the "synchronized" modifier are:
• It allows more precise selection of the code to synchronize. Instead of synchronizing an entire method, you can synchronize only the part of the method that really needs synchronization.
• It allows you to choose the monitor object. The "synchronized" modifier will use the "this" object or the class of the method (for instance, all the "synchronized" "static" methods of a class will use the same object to synchronize). If we instead use a "syn-chronized" statement, we can choose different monitors for differ-ent groups of methods, thus decreasing the probability of deadlocks.
• It is easier to debug programs that use the "synchronized" state-ment.

TRS.NSM-5 Avoid using the "synchronized" modifier in the method declaration
Referen
ce
DrawbacksOne of the advantages of using the "synchronized" modifier over the "syn-chronized" statement is that if the whole method needs to be "synchro-nized", the "synchronized" modifier will produce smaller and slightly faster code.
Examplepackage examples.rules.trs;
class NSM { synchronized void method (int i) { // VIOLATION return i - 1; }}
RepairRemove the "synchronized" modifier from the method and add a "syn-chronized" "{ }" block around the part of the method that needs synchroni-zation.
package examples.rules.trs;
class NSM { void method () { synchronized (this) { // FIXED return i - 1; } }}
ReferenceHaggar, Peter. Practical Java - Programming Language Guide. Addison Wesley, 2000, pp.116-122, 173-176.
930

TRS.NSYN-1 Unsynchronized methods should not call 'wait ()', or 'notify ()'
931
Ref
eren
ce
TRS.NSYN-1Unsynchronized methods should not call 'wait ()', or 'notify ()'
DescriptionDisallows calling 'wait ()' or 'notify ()' from an unsynchronized method.
BenefitsThese methods should not be called from an unsynchronized context, as is usually the case with methods that are not declared "synchronized".
DrawbacksA monitor can be locked from another method, which directly or indirectly invokes an unsynchronized method. The unsynchronized method might need to call 'wait ()' or 'notify ()'. The rule would conflict with this program-ming style.
Examplepackage examples.rules.trs;
public class NSYN { public void method () { try { wait (); // VIOLATION } catch (InterruptedException e) { /* ignoring exception */ } }}

TRS.NSYN-1 Unsynchronized methods should not call 'wait ()', or 'notify ()'
Referen
ce
RepairRemove the 'wait ()' or 'notify ()' method call.
package examples.rules.trs;
public class NSYNFixed { public void method () { // FIXED }}
932

TRS.RUN-5 Use the "synchronized" modifier on methods that implement 'Runnable.run ()'
933
Ref
eren
ce
TRS.RUN-5Use the "synchronized" modifier on methods that implement 'Runnable.run ()'
DescriptionRequires that the "synchronized" modifier be applied to the 'run ()' method of a class which implements the 'Runnable' "interface".
BenefitsThe 'run ()' method should be "synchronized" if it cannot be safely exe-cuted concurrently. Multiple threads can be started for the same object implementing the Runnable interface and the method 'run ()' can be exe-cuted concurrently.
DrawbacksIf the body of the 'run ()' method can be safely executed concurrently, the method should NOT be "synchronized". Declaring the method as "syn-chronized" will slow down the program.
Examplepackage examples.rules.trs;
public class RUN implements Runnable { public void run () { // VIOLATION }}

TRS.RUN-5 Use the "synchronized" modifier on methods that implement 'Runnable.run ()'
Referen
ce
RepairDeclare the 'run ()' method "synchronized".
package examples.rules.trs;
public class RUNFixed implements Runnable { public synchronized void run () { }}
Referencehttp://www.ispras.ru/~knizhnik/jlint/ReadMe.htm
934

TRS.THRD-1 Avoid calling 'Thread.resume ()', 'Thread.stop ()', 'Thread.suspend ()', or
935
Ref
eren
ce
TRS.THRD-1Avoid calling 'Thread.resume ()', 'Thread.stop ()', 'Thread.suspend ()', or 'Runtime.runFinalizersOnExit ()''
DescriptionDisallows using 'Thread.resume ()', 'Thread.stop ()', 'Thread.suspend ()' and 'Runtime.runFinalizersOnExit ()'.
Benefits'Thread.resume ()', 'Thread.stop ()', 'Thread.suspend ()' and 'Runt-ime.runFinalizersOnExit ()' have been deprecated because they are deadlock-prone.
RepairSee http://java.sun.com/j2se/1.3/docs/guide/misc/threadPrimitiveDepre-cation.html. It is devoted to a more in depth discussion of this rule.
Reference“java.lang.Thread" of API documentation.
http://java.sun.com/j2se/1.3/docs/guide/misc/threadPrimitiveDepreca-tion.html
Hyde, Paul. Java Thread Programming. Sams, 1999, p. 270.
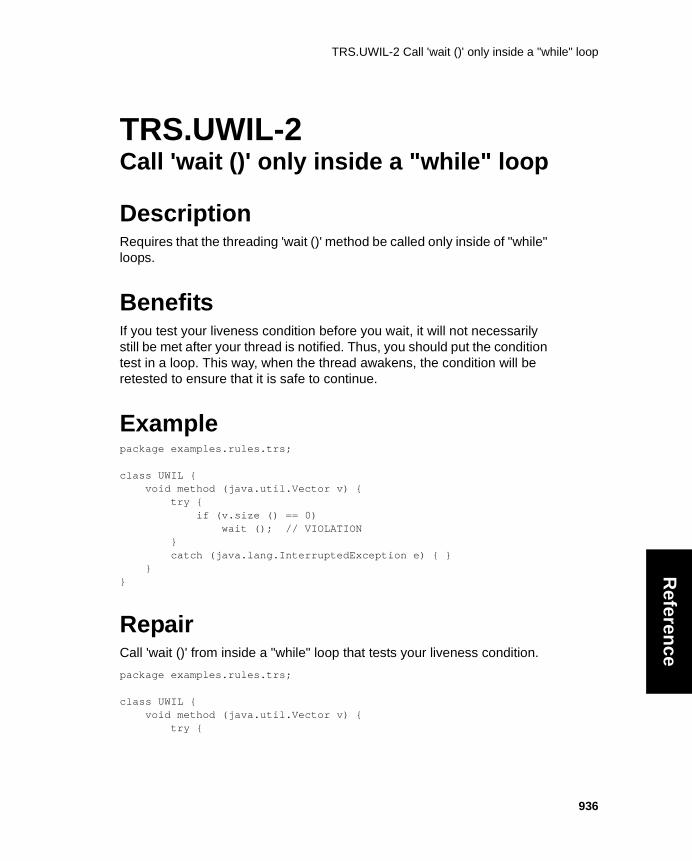
TRS.UWIL-2 Call 'wait ()' only inside a "while" loop
Referen
ce
TRS.UWIL-2Call 'wait ()' only inside a "while" loop
DescriptionRequires that the threading 'wait ()' method be called only inside of "while" loops.
BenefitsIf you test your liveness condition before you wait, it will not necessarily still be met after your thread is notified. Thus, you should put the condition test in a loop. This way, when the thread awakens, the condition will be retested to ensure that it is safe to continue.
Examplepackage examples.rules.trs;
class UWIL { void method (java.util.Vector v) { try { if (v.size () == 0) wait (); // VIOLATION } catch (java.lang.InterruptedException e) { } }}
RepairCall 'wait ()' from inside a "while" loop that tests your liveness condition.
package examples.rules.trs;
class UWIL { void method (java.util.Vector v) { try {
936

TRS.UWIL-2 Call 'wait ()' only inside a "while" loop
937
Ref
eren
ce
while (v.size () == 0) // FIXED wait (); } catch (java.lang.InterruptedException e) { } }}
ReferenceBloch, Joshua. Effective Java Programming Language Guide. Addison Wesley, 2001, pp. 201-203.

TRS.UWNA-2 Use ’wait ()’ and ’notifyAll ()’ instead of polling loops
Referen
ce
TRS.UWNA-2Use ’wait ()’ and ’notifyAll ()’ instead of polling loops
DescriptionDisallows the use of 'sleep ()' in a while loop, also known as "busy wait-ing" or a "polling loop".
Benefits Using 'sleep ()' as a polling loop is not efficient because polling loops take up processor cycles to execute the multiple 'sleep ()' calls, but 'wait ()' and 'notify ()' or 'notifyAll ()' do not.
Examplepackage examples.rules.trs;
public class UWNA { void method (Object o) { while (true) { while (!_ready) { try { sleep (300); // VIOLATION } catch (Exception e) {} } synchronized (o) { // process data. } } } public void ready () { _ready = true; } private boolean _ready;}
938

TRS.UWNA-2 Use ’wait ()’ and ’notifyAll ()’ instead of polling loops
939
Ref
eren
ce
RepairReplace "while", and ’sleep ()’ with ’wait ()’ and ’notifyAll ()’.
package examples.rules.trs;
public class UWNAFixed { void method () { while (true) { synchronized (lock) { while (!_ready) { try { lock.wait (); } catch (Exception e) {} } // process data. } } } public void ready () { _ready = true; lock.notifyAll (); } private boolean _ready; private Object lock;}
ReferenceHaggar, Peter. Practical Java - Programming Language Guide. Addison Wesley, 2000, pp.191 - 194.

UC.AAI-2 Avoid unnecessary modifiers in an “interface”
940
Referen
ce
Unused Code RulesUC.AAI-2Avoid unnecessary modifiers in an “interface”
DescriptionDisallows the use of unnecessary modifiers in "interface" members.
Interface methods are always "public" and "abstract".
Interface fields are always "public", "static" and "final".
BenefitsThese modifiers are applied automatically, so there is no need to write them.
Examplepackage examples.rules.uc;
interface AAI { public void method (); // VIOLATION: useless "public" abstract int getSize (); // VIOLATION: useless "abstract" static int SIZE = 100; // VIOLATION: useless "static"}
RepairRemove the unnecessary modifiers.
package examples.rules.uc;
interface AAIFixed { void method (); // FIXED int getSize (); // FIXED int SIZE = 100; // FIXED}

UC.AUV-2 Avoid unused local variables
941
Ref
eren
ce
UC.AUV-2Avoid unused local variables
DescriptionRequires that all variables be used.
BenefitsAn unused variable might indicate a logical flaw in the corresponding method; in this case, the method should be rewritten to take the unused variable into account. The variable could also have accidentally been left over when its use was deleted; in this case, it is safe to remove it.
Examplepackage examples.rules.uc;
public class AUV { void method () { int i = 4; // VIOLATION }}
RepairEither add the missing usage of the variable or remove the variable.
package examples.rules.uc;
public class AUVFixed { void method () { // FIXED }}

UC.DIL-3 Do not explicitly "import" the java.lang.* "package"
942
Referen
ce
UC.DIL-3Do not explicitly "import" the java.lang.* "package"
DescriptionDisallows explicitly imported 'java.lang' "package"s.
BenefitsIt is not necessary to "import" this "package" because it is implicitly imported.
Examplepackage examples.rules.uc;
import java.lang.*; // VIOLATION
public class DIL {}
RepairRemove the statement that imports 'java.lang'.
package examples.rules.uc;
// FIXED
public class DILFixed {}

UC.PF-2 Avoid unused “private” fields
943
Ref
eren
ce
UC.PF-2Avoid unused “private” fields
DescriptionDisallows unused private fields.
BenefitsAn unused field could indicate a logical flaw in the corresponding class, or it could be left over from a previously deleted section of code.
Examplepackage examples.rules.uc;
class PF { private int _unusedField; // VIOLATION}
RepairEither correct the logic to use the field or remove the field.
package examples.rules.uc;
class PFFixed { // FIXED}

UC.PM-2 Avoid unused “private” methods
944
Referen
ce
UC.PM-2Avoid unused “private” methods
DescriptionDisallows unused private methods.
BenefitsAn unused method could indicate a logical flaw in the corresponding class, or it could be left over from a previously deleted section of the class.
Examplepackage examples.rules.uc;
class PM { private int unusedMethod () {} // VIOLATION}
RepairRemove the logical flaw or the left over method.
package examples.rules.uc;
class PMFixed { // FIXED}

UC.UP-2 Avoid unused parameters
945
Ref
eren
ce
UC.UP-2Avoid unused parameters
DescriptionDisallows unused method parameters.
BenefitsUnused parameters result in a waste of stack space and cause confusion.
Examplepackage examples.rules.uc;
class UP { int findProduct (int x, int y) { // VIOLATION: "y" is unused return = x * x; }}
RepairRemove the unused parameter or check whether a logic flaw or typo is causing the parameter to be unused.
package examples.rules.uc;
class UPFixed { int findProduct (int x, int y) { return = x * y; // FIXED: "x * x" was supposed to be "x * y" }}

Credits for Open Source Software Included in Jtest
Referen
ce
Credits
Credits for Open Source Software Included in JtestJtest includes the following open-source software:
• Antlr Translator generator, by Terence Parr (http://www.antlr.org).
• Tomcat jspc compiler, by The Jakarta Project (http://jakarta.apache.org/tomcat/). Released under the terms of the Apache Software License (available in <jtest_install_dir>/help/apache.txt).
• Xerces Java XML Parser, by the Apache XML Project (http://xml.apache.org/xerces-j/). Released under the terms of the Apache Software License (available in <jtest_install_dir>/help/apache.txt).
• CVS, by the GNU Project (http://www.cvshome.org) CVS is released under the terms of the GNU General Public License. (available in <jtest_install_dir>/help/gpl.html).
• Junit, by Erich Gamma and Kent Beck (http://www.junit.org). Junit is released under the terms of the IBM Public License (available in <jtest_install_dir>/help/ibm.html) and is Copyright © 2001, International Business Machines Corporation and others. All Rights Reserved
• The GNU Java Regular Expressions Package, by Wesley Walden Biggs (http://www.cacas.org/java/gnu/regexp) The GNU Java Regular Expressions Package is released under the terms of the GNU Lesser General Public License (available in <jtest_install_dir>/help/lgpl.html).
• The Saxon XSLT processor, by Michael Kay (http://saxon.source-forge.net/). Saxon is released under the terms of the Mozilla Pub-lic License (available in <jtest_install_dir>/help/mpl.html).
• The Java Diff Library, part of the JRCS project, by Juancarlo Añez (http://www.suigeneris.org/jrcs/). JRCS is released under the terms of the GNU General Public License (available in <jtest_install_dir>/help/lgpl.html).
946

Credits for Open Source Software Included in Jtest
947
Ref
eren
ce

Index
Ind
ex
Index
Index
Aant, using with Jtest 108Antlr credits 946API 185, 219, 374arrow colors 110assert DbC tag 247assert, DbC keyword 249assertions
in Test Classes 221, 227with DbC 247
Bbatch mode 78black-box testing
about 204adding constants and methods
214adding method inputs 210adding primitive inputs 210adding test cases 210, 218adding Test Classes 218disabling/enabling 208performing 207
bootstrap class files 337buttons
Class Testing UI 291Find Class UI 368Project Testing UI 307
Ccalling sequence
length tested 323testing with Test Classes 218viewing in Project Testing UI 43,
68class
dependencies 22opening in Class Testing UI (from
project test) 72Class Name panel 297class test
class dependencies 22example 24JSP testing 21performing 21results 35saving/restoring test parameters
92class test parameters
common 354dynamic analysis 345editing (from project test) 75introduction 343location of file 334saving (from project test) 77static analysis 344
Class Testing UIClass Name panel 297Errors Found panel 299introduction 284menus 285Test Progress panel 298tool bar 291
ClassNotFoundException 19CLASSPATH 19, 335, 354, 363coding standards
creating 166enforced 407enforcing 143
command-line mode 78comparing objects 258, 374compiling a source 125concurrency DbC tag 245confidence level 56, 403constants, adding 211construction testing, about 195contacting ParaSoft 11CORBA 180coverage
viewing 121viewing in Class Testing UI 42,
298
948

Index
Ind
ex
viewing in Project Testing UI 61,66
viewing in single class report 128-cp 335credits for open-source software 946cursors 282CVS
credits 946integration 101options 398
Ddatabases 180dependencies
class 22project 50
Design by Contractand Jcontract 236and Jtest 235coding conventions 254contract inheritance 252contract semantics 251contract syntax 248customizing instrumentation 238disabling 327enabling 327example files 238example using 30for suppressing exceptions 202generating documentation for
237, 387introduction 239keywords 249OCL support 252special keywords and functions
252detailed project report 129Diff credits 946Direct IllegalArgumentExceptions 200,
330Direct NullPointerExceptions 200, 331directory, testing. See project testdynamic analysis
about 168
customizing 171disabling/enabling 169performing 169
EEclipse integration 272editing source code 124editor configuration 124emacs 125Enterprise Java Beans 180, 182errors
understanding and fixing 375viewing in Class Testing UI 35viewing in Project Testing UI 54
Errors Found Panel 35Errors Found panel 299example test case
viewing in Class Testing UI 45, 46viewing in Project Testing UI 70,
71exception DbC tag 246exceptions
Direct IllegalArgumentExceptions200, 330
Direct NullPointerExceptions 200,331
Exceptions Caught By EmptyCatch 200, 331
Exceptions in Throws Clause 330Exceptions in throws clause 200Explicitly Thrown Exceptions 200,
331suppressed by default 197, 200suppressing uncaught runtime ex-
ceptions 198, 202uncaught runtime exceptions,
finding. See white-boxtesting
understanding and fixing un-caught runtime excep-tions 374, 382
Exceptions Caught By Empty Catch200, 331
Exceptions in Throws Clause 330
949
Index
Ind
ex
exists, DbC keyword 254Explicitly Thrown Exceptions 200, 331exporting test cases to JUnit 224, 225,
226external resources 180, 184
FFAQs 373Filter-in 49Find Classes UI 368fixing errors 375forall, DbC keyword 253Forte integration 268functionality testing, about 204
Gglobal history 132global static analysis 140global test parameters
common 333dynamic analysis 323, 358introduction 317static analysis 318
GNU credits 946group use tips 94GUI. See UI
Hhelp, context sensitive 139history for test 132
IIllegalArgumentExceptions 200, 330implies, DbC keyword 253imports 234inheritance
DbC contracts 252test parameters 134
initial state, setting 192initialization code 192input that caused error
viewing in Class Testing UI 45viewing in Project Testing UI 68,
70inputs
adding 210, 218adding constants and methods
214adding primitive inputs 210restricted 346
installationUNIX 5Windows 2
invariant DbC tag 244, 245
JJakarta credits 946jar file, testing. See project testJava Regular Expressions Package
credits 946java.io, java.net, java.sql 180javac, invoking with flags 395javadoc, extended 237, 387JBuilder integration 264Jcontract 203, 236JDK 9, 340JRCS credits 946JSP
adding user-defined test cases227
include file support 339parameters 337, 342tag library support 338test prerequisites 16testing 21, 47, 227uribase 337uriroot 338
jtest.properties 95, 394jtest_group.properties 95, 394jtestInspector 113, 114, 116, 352JUnit
credits 946
950

Index
Ind
ex
enforcing best practices for 106exporting automatic test cases to
224exporting test cases to 225, 226generating test class templates for
223Test Classes 230using JUnit test cases 230using with Jtest 104
Llegacy code, ignoring 48LicenseServer
UNIX 8Windows 3
licensingUNIX 8Windows 2
Mmenus
Class Testing UI 285Project Testing UI 301
method inputs, adding 215method types tested 201, 324metrics
customizing 157graphs 150tracking over time 150viewing 145
Mozilla credits 946
Nname mapping expressions 230naming conventions, customizing 156NetBeans integration 268NoClassDefFoundError 19none, DbC keyword 249NullPointer Exceptions, resolving 192
Oobject comparator 258, 374OCL support with DbC 252outcomes, validating 117
Pparameters
class 343global 317inheritance 135project 356sharing 94test 134
ParaSoft, contacting 11PARASOFT_GROUP_PROPERTIES
environment variable 95PARASOFT_JDK_HOME 9PFE32 editor 125post DbC tag 244postcondition 244pre DbC tag 244pre, DbC keyword 249precondition 244printing 281progress
viewing in Class Testing UI 298viewing in Project Testing UI 61
Project Controls panel 313project dependencies 50project report 129project test
example 52history 132JSP testing 47performing 47project dependencies 50restricting files included in 48results 65saving/restoring test parameters
92testing large projects 138
project test parameterscommon, search, classes in
951

Index
Ind
ex
project 363dynamic analysis 358introduction 356static analysis 357
Project Testing UImenus 301Project Controls panel 313Results panel 316tool bar 307
properties file 394
QQuality Consulting 11
Rregression testing
about 256disabling 258performing 257
regular expressions 313reloading original test cases 117, 119,
352report
ASCII format 127customized 130detailed project 129HTML format 127overview 127project 129single class 127summary project 128XML format 130
requirements 14restoring test parameters 92restricted inputs 346restricting files tested 48result, DbC keyword 249results
class test 35customizing 130directory 334project test 65
removing from Project Testing UI66
XML 130Results panel 316rule mapping 160rules
changing categories 160changing severity 160changing the default rules directo-
ry 163creating your own 166customizing metrics 157customizing naming conventions
156customizing with RuleWizard 156enabling/disabling severity cate-
gories 153enabling/disabling specific rules
154exporting customizations 163generating a list of enabled 155importing customizations 163list of built-in rules 407suppressing specific violations
157viewing rule descriptions in Class
Testing UI 42viewing rule descriptions in
Project Testing UI 67RuleWizard 166
Ssample test case
viewing in Class Testing UI 43viewing in Project Testing UI 69
saving test parameters 92Saxon XSLT processor credits 946sharing Jtest settings 94single class report 127Skip classes not modified since 49,
365Skip List 49, 365sophisticated object comparator 258,
374
952

Index
Ind
ex
sourcecompiling 125editing 125location, indicating 340source path 340
source controlintegration 101options 398
specification testing, about 204stack trace
reading 383viewing in Class Testing UI 43viewing in Project Testing UI 68
starting JtestUNIX 5Windows 2
state, setting objects’ 192static analysis
about 140creating custom rules 166customizing 153disabling/enabling 144global 140list of built-in rules 407performing 143suppressions 167
static initialization code 192stubs
automatically-generated 180options 328user defined 184
summary project report 128Summary Run Result 54Sun ONE Studio integration 268support 11suppressions
documenting 157dynamic analysis 173exceptions 202from Class Testing UI 42, 44, 67from Project Testing UI 69static analysis 157, 167viewing reason for suppression
113, 198system properties. 336
Ttag library support 338technical support 11test case
adding 210, 218assertions in 221, 227automatic generation 195evaluation 110
modifying from Class TestingUI 44, 45
modifying from Project Test-ing UI 69, 70
exporting automatic test cases toJUnit 224
exporting user-defined test casesto JUnit 226
exporting user-defined to JUnit225
reference test cases 351restoring 117, 119, 352validation 110viewing test cases 110
Test Classes 218test history 132Test Only List 49, 365test parameters 134
class 343global 317project 356saving and restoring 92
Test Progress panel 298Tested Set 179THIS object 346throws clause, exceptions in 200, 330throws DbC tag 246timeout 366timestamp, testing only files modified
after 49, 365Together Control Center integration
277Tomcat credits 946tool bar
Class Testing UI 291Project Testing UI 307
trees 281
953

Index
Ind
ex
tutorials 372
UUI
Class Testing UI 280, 284configuring startup UI 280Find Classes UI 368Project Testing UI 280
UltraEdit 125uribase 337uriroot 338
Vvalidating outcomes 110, 117verbose DbC tag 247Visual Slick Edit 124VisualAge integration 259
WWebSphere Studio Application Devel-
oper integration 272white-box testing
about 195disabling/enabling 198performing 197stubs 180
working directory 333
X-Xbootclasspath 337Xerces credits 946xjavadoc 237, 387XML reports 130
Zzip file, testing. See project test.
954