user's guide (version 4 - free video ... -...
TRANSCRIPT

Page 1 of 27
User's Guide (version 5.2)
VideoCleaner can natively open a wide range of image and video files, including some that normally require a proprietary player. For all other situations, VideoCleaner includes an optional free screen capture utility (CamStudio) that can dub videos as they playback within their proprietary player. VideoCleaner works best on videos that:
Are extremely dark (e.g. shot at night) or overly bright where the target details are located
Require a moderate increase in details or focus to see the target event
Have specks or artifacts that are randomly located on each video frame
Need to be resized, cropped, trimmed, slowed down, or changed to a more common format
Have artifacts from a prior VHS-digital conversion
Depict very faint motion or subtle (e.g. due to distance) color changes
Have compressed (washed out) or incorrect colors, or have incorrect lighting levels
Are suspected of having undergone post-production scene manipulations VideoCleaner does little to help with videos that:
Are visually perfectly clear, but include noisy audio
Show image smearing where video details blend into adjacent video details
Require a television crime show's fantasy level of clarity improvement ABOUT: VideoCleaner is the world's most relied upon forensic video enhancement software because it: Meets the highest evidentiary scientific standards validated by courts and experts worldwide. Automatically maintains an audit trail of all filters and settings, and generates a metadata log. Preserves evidence by applying industry accepted filters without altering the original recording. Opens its source code for peer review scrutiny and is supported by hundreds of programmers. Provides free unlimited updates and support, and is licensed for any legal purpose. Is cost-free, ad-free, allows unlimited usage, and never collects any personal information.
With VideoCleaner, you can recover license plates and facial details, illuminate poorly lit scenes, increase detail clarity, correct the viewing perspective, reverse lens distortion, repair VHS recordings, improve color contrast, isolate channels, and so much more. VideoCleaner is cost and advertising free, and created under the belief that clear evidence should be available to all those who need it.
Page 2 of 27
TABLE OF CONTENTS Topic Page Cover page ........................................................................................................................................... 1
Table of Contents .................................................................................................................................. 2
Quick Start Guide .................................................................................................................................. 3
Usage Hints .......................................................................................................................................... 4
Version history ...................................................................................................................................... 5
Main Interface ....................................................................................................................................... 6
Saving Your Work ................................................................................................................................. 7
CamStudio ............................................................................................................................................ 8
MediaInfo .............................................................................................................................................. 9
Main Section ....................................................................................................................................... 10
Properties Section ............................................................................................................................... 13
Specialty Features Section ................................................................................................................. 16
Finalizing Features .............................................................................................................................. 17
Final ColorSpace/transparency ........................................................................................................... 18
Forensic Authentication and Tamper Testing (explained) ................................................................... 19
Tutorial - Enhancing Sample Files ...................................................................................................... 20
References .......................................................................................................................................... 24
Science ............................................................................................................................................... 25
Notes and Acknowledgement ............................................................................................................. 26
Glossary (definition of terms) .............................................................................................................. 27
Frequently check http://VideoCleaner.com for the latest version update. This guide is Copyright, Forensic Protection, Inc. 2018
Page 3 of 27
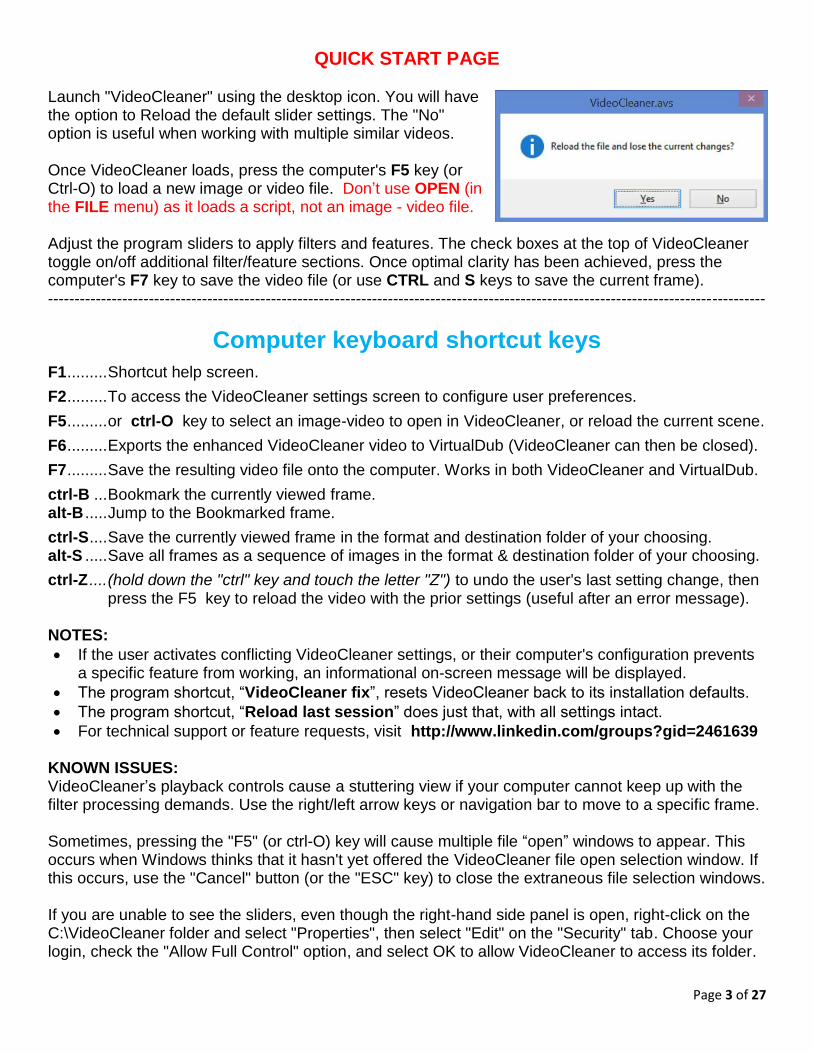
QUICK START PAGE Launch "VideoCleaner" using the desktop icon. You will have the option to Reload the default slider settings. The "No" option is useful when working with multiple similar videos. Once VideoCleaner loads, press the computer's F5 key (or Ctrl-O) to load a new image or video file. Don’t use OPEN (in the FILE menu) as it loads a script, not an image - video file. Adjust the program sliders to apply filters and features. The check boxes at the top of VideoCleaner toggle on/off additional filter/feature sections. Once optimal clarity has been achieved, press the computer's F7 key to save the video file (or use CTRL and S keys to save the current frame). ---------------------------------------------------------------------------------------------------------------------------------------
Computer keyboard shortcut keys
F1 ......... Shortcut help screen.
F2 ......... To access the VideoCleaner settings screen to configure user preferences.
F5 ......... or ctrl-O key to select an image-video to open in VideoCleaner, or reload the current scene.
F6 ......... Exports the enhanced VideoCleaner video to VirtualDub (VideoCleaner can then be closed).
F7 ......... Save the resulting video file onto the computer. Works in both VideoCleaner and VirtualDub.
ctrl-B ... Bookmark the currently viewed frame. alt-B ..... Jump to the Bookmarked frame.
ctrl-S .... Save the currently viewed frame in the format and destination folder of your choosing. alt-S ..... Save all frames as a sequence of images in the format & destination folder of your choosing.
ctrl-Z .... (hold down the "ctrl" key and touch the letter "Z") to undo the user's last setting change, then press the F5 key to reload the video with the prior settings (useful after an error message).
NOTES:
If the user activates conflicting VideoCleaner settings, or their computer's configuration prevents a specific feature from working, an informational on-screen message will be displayed.
The program shortcut, “VideoCleaner fix”, resets VideoCleaner back to its installation defaults.
The program shortcut, “Reload last session” does just that, with all settings intact.
For technical support or feature requests, visit http://www.linkedin.com/groups?gid=2461639 KNOWN ISSUES: VideoCleaner’s playback controls cause a stuttering view if your computer cannot keep up with the filter processing demands. Use the right/left arrow keys or navigation bar to move to a specific frame. Sometimes, pressing the "F5" (or ctrl-O) key will cause multiple file “open” windows to appear. This occurs when Windows thinks that it hasn't yet offered the VideoCleaner file open selection window. If this occurs, use the "Cancel" button (or the "ESC" key) to close the extraneous file selection windows. If you are unable to see the sliders, even though the right-hand side panel is open, right-click on the C:\VideoCleaner folder and select "Properties", then select "Edit" on the "Security" tab. Choose your login, check the "Allow Full Control" option, and select OK to allow VideoCleaner to access its folder.

Page 4 of 27
USAGE HINTS
Looking for a fast image/video enhancement or authentication solution? Here are a few examples,
along with their corresponding VideoCleaner solution (denoted as feature group - specific feature).
PROBLEM .................................................................. SOLUTION
See active settings or their inverse affect ................... MAIN - Use / List / Override / Subtract Features
Blend the original to the enhanced .............................. MAIN - Enhancement Transparency
Place original next to enhanced result ........................ MAIN - Compare Original to Enhanced
Video details appear fuzzy .......................................... MAIN - TOOLS - Unsharpen , Sharpen Strength
Video details/colors are compressed or expanded ..... MAIN - TOOLS - Video/Color Contrast Strength
Video colors are too subtle or intense ......................... MAIN - TOOLS - Color Saturation Strength
Remove glare or flashing lights ................................... MAIN - TOOLS - Suppress HotSpot Strength
Scene is too dark or too bright (automatic) ................. MAIN - TOOLS - Backlight / Histogram
Scene is too dark or too bright (manual) ..................... MAIN - TOOLS - Equalizer & MAIN - CURVE
Handheld camera motion is erratic ............................. MAIN - TOOLS - Stabilize Iterations
Video has random specks or blurring .......................... MAIN - TOOLS - Denoise
Video or image is slightly out of focus ......................... MAIN - TOOLS - Focus
Scene looks like a mosaic of tiny squares .................. MAIN - TOOLS - Deblocking
License plate, text or logo is hard to read ................... MAIN - FORENSIC - Canny, Sobel & Edge
Movement or color changes are too faint .................... MAIN - FORENSIC - RGBamplifier Strength
Hard to detect moving objects/people ......................... MAIN - FORENSIC - Isolate Motion / iFrames
Can't read stationary signage or license plate ............ MAIN - FORENSIC - Frame Averaging
Video's authenticity is suspect .................................... MAIN - ANALYSIS - Extract & Test & MinMax
Identify file's characteristics ........................................ MAIN - ANALYSIS - File Information
Video contains repeated frames ................................. PROPERTIES - DUPLICATE removal
Audio is too quiet or shouldn't exist ............................. PROPERTIES - CORE - Volume
Video plays at the incorrect speed .............................. PROPERTIES - CORE - FPS speed
Only need a range of video frames ............................. PROPERTIES - CORE - Starting & Keep frame
Video plays in reverse order ....................................... PROPERTIES - CORE - Reverse Video
Fast moving objects look jagged ................................. PROPERTIES - FIELDS - Sep/Swap
Video jerks up/down or left/right (after Sep/Swap) ...... PROPERTIES - FIELDS - Nudge & Shift
Interlaced fields are out of horizontal alignment .......... PROPERTIES - FIELDS - Horizontal alignment
Only a small portion of the video matters .................... PROPERTIES - CROP
Adjust video resolution or orientation .......................... PROPERTIES - RESIZE
Video needs to be flipped or rotated ........................... PROPERTIES - ANGLE
Certain color channels contain greater detail .............. PROPERTIES - CHANNELS
Remove frames inconsistent with reference frame ..... SPECIALTY - DESEQUENCE
Digitized video tape shows VHS aging defects ........... SPECIALTY - VHS
Perspective is distorted, or is pincushion or barrel ...... SPECIALTY - VIEW
Overall image/video color is incorrect ......................... SPECIALTY - COLORIZE
Add a header to contain annotations .......................... FINALIZING - MARGIN - Header
Add the audio waveform for visual impact .................. FINALIZING - MARGIN - Waveform
Need to highlight or pixilate a specific area ................. FINALIZING - ACCENT
Need to add on-screen text annotation ....................... FINALIZING - TEXT
Need to add frame number annotation ....................... FINALIZING - NUMBER
Need to add a progressive time stamp annotation ...... FINALIZING - TIMEstamp
Page 5 of 27
VERSION HISTORY (beginning with version 5.0)
5.0 FINALIZINE section defaults to active. SuperResolution can be applied to any resizing. ACCENT
feature group defaults to a rectangular or oval highlight. DEBLOCKING and EQUALIZER feature
groups have been simplified, defaulted to their optimal mode, and relocated into TOOLS group.
The DESEQUENCER feature group was relocated into the SPECIALTY section. Added “Nearest
neighbor” to the RESIZE group, and Looping to the CORE group. Sub-second accuracy added to
time stamp annotation. Untouched video and its cropped version can now be placed beside the
fully enhanced version. Sliders streamlined to improve speed. Improved wording & error handling.
5.1 Combined TOOLS slider pairs (Backlight & Histogram) and (Denoise & Deblur), plus FORENSIC
slider pair (Motion & iFrames). Added 8th Forensic edging mode that discards colored pixels. New
“Reload last session” program shortcut (also useful if installation step #1 was ignored).
5.2 F7 key also saves videos from within VideoCleaner. New top slider OVERRIDE option overrides
protective user limits. Increased TIMESTAMP annotation size range. FRAME number annotation
auto-resizes based upon aspect ratio. TRANSPARENCY slider moved to top (rightmost position
“7” replaces the now removed Bypass option). COMPARE’s “Original” text overlay is less opaque.
Removed “mid-frame” option (was redundant to the frame range options within the CORE group).

Page 6 of 27
THE VIDEOCLEANER INTERFACE:
Do not use the menu at the very top of this program. It relates to the AvsPmod interface and
not the VideoCleaner features. Instead, use the controls located on the right-hand side.
Script code: No need to examine this area unless you want to modify or understand the VideoCleaner source code.
Preview window: Shows the video in its current state. Apply filters to make changes. Auto-resizes to fit the entire video.
Section toggles: Check a toggle box to activate and display the features of that section. The program automatically reloads.
Current frame # Total number of video frames
Playing time of current frame
Video resolution and aspect
Color space
Playback frames per second
If the VideoCleaner sliders are not visible, click on these 3 mini arrows to restore their visibility. You can adjust the size of the control windows by
moving the boundaries guides (see the blue arrows in the image above).
NOTE: Do not use the Playback controls because very few computers have the power to play an enhancing video in real time. Use the computer's arrow keys or navigation bar to select a frame.
Ratio of displayed size to true size
Slider and its setting (min, max, current)
Playback controls. Feature description
Frame number. Frame navigation bar

Page 7 of 27
SAVING YOUR WORK - VIRTUALDUB VideoCleaner settings are automatically saved for the next time you start the program, and logged in a file ending in "VideoCleaner_settings.txt" located in the video's file folder (and in c:\VideoCleaner). When VideoCleaner starts, you have the option to reset all settings and sliders back to their defaults. Prior to exiting VideoCleaner, you can hold down the computer’s CTRL key and touch the letter “S” to save the current frame, ALT and “S” to save all frames as images, or the “F7” key to save your enhanced results as a video. Alternatively, you can press the "F6" key (or choose "External player" under the "Video" menu) to export the video into VirtualDub for more options when saving your finished work, including the inclusion of any audio track.
Once inside of VirtualDub, press the "F7" key (or select "Save as AVI" under the "Video" menu) to save a copy of the enhanced video in the uncompressed format (a huge file format that retains 100% of the video details). If a smaller compressed file size is needed, press CTRL-P (hold down the "ctrl" key and touch the letter "P") or select "Compression" under the "Video" menu to choose a compression Codec, and then press "F7" to save the video. VirtualDub will ask for the file's name and where the user wants to save their finished video. Once the video has been exported into VirtualDub, the VideoCleaner program can be closed. Once the video has been saved, the user can close VirtualDub too. The user can relaunch VideoCleaner to work on another video while Virtualdub is saving the last video because the two programs work independently of each other. To save only a portion of the video, the user only needs
to select the first and last frames by moving to the beginning or ending frame in the range and then selecting the relevant icon (see the red arrows above). Only the selected frame range will be saved (see above for saving instructions). Likewise, pressing the computer's Delete key will remove only the designated range of frames. Pressing the Delete key without selecting a frame range, will remove just the currently viewed frame. If frames are accidentally deleted, pressing CTRL-Z (holding down the "ctrl" key and touching the letter "Z") will undo the last change, and repetitively pressing CTL-Z will undo successively prior changes. Alternatively, the user can close VirtualDub, and then use the F6 key while in VideoCleaner to once again export the enhanced video into a new VirtualDub session. There are additional free VirtualDub features and filters available through the internet. Unless the user activates additional filters inside of VirtualDub (located under the "Video" menu), the side-by-side before-after views of the video will be exact duplicates of the finished VideoCleaner results. To review the enhanced video from within VirtualDub, use the keyboard right and left arrow keys to move forward and backward through that video, just as can be done from within VideoCleaner.
Page 8 of 27
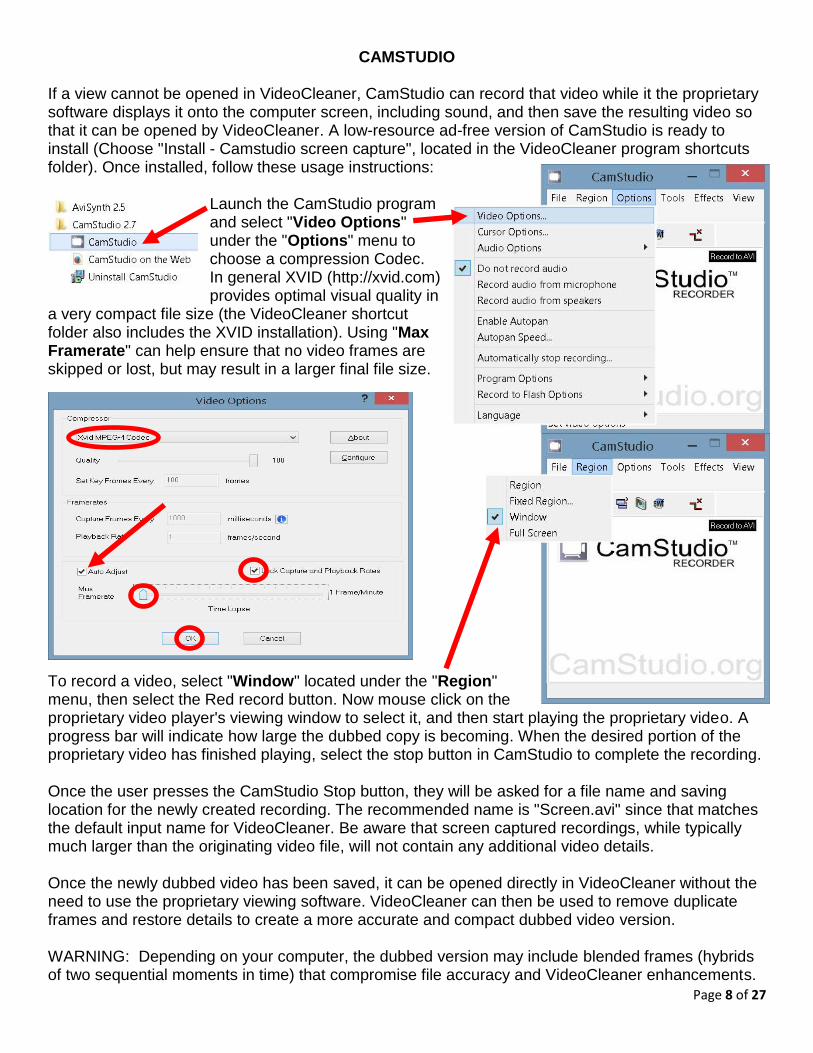
CAMSTUDIO If a view cannot be opened in VideoCleaner, CamStudio can record that video while it the proprietary software displays it onto the computer screen, including sound, and then save the resulting video so that it can be opened by VideoCleaner. A low-resource ad-free version of CamStudio is ready to install (Choose "Install - Camstudio screen capture", located in the VideoCleaner program shortcuts folder). Once installed, follow these usage instructions:
Launch the CamStudio program and select "Video Options" under the "Options" menu to choose a compression Codec. In general XVID (http://xvid.com) provides optimal visual quality in
a very compact file size (the VideoCleaner shortcut folder also includes the XVID installation). Using "Max Framerate" can help ensure that no video frames are skipped or lost, but may result in a larger final file size.
To record a video, select "Window" located under the "Region" menu, then select the Red record button. Now mouse click on the proprietary video player's viewing window to select it, and then start playing the proprietary video. A progress bar will indicate how large the dubbed copy is becoming. When the desired portion of the proprietary video has finished playing, select the stop button in CamStudio to complete the recording. Once the user presses the CamStudio Stop button, they will be asked for a file name and saving location for the newly created recording. The recommended name is "Screen.avi" since that matches the default input name for VideoCleaner. Be aware that screen captured recordings, while typically much larger than the originating video file, will not contain any additional video details. Once the newly dubbed video has been saved, it can be opened directly in VideoCleaner without the need to use the proprietary viewing software. VideoCleaner can then be used to remove duplicate frames and restore details to create a more accurate and compact dubbed video version. WARNING: Depending on your computer, the dubbed version may include blended frames (hybrids of two sequential moments in time) that compromise file accuracy and VideoCleaner enhancements.
Page 9 of 27
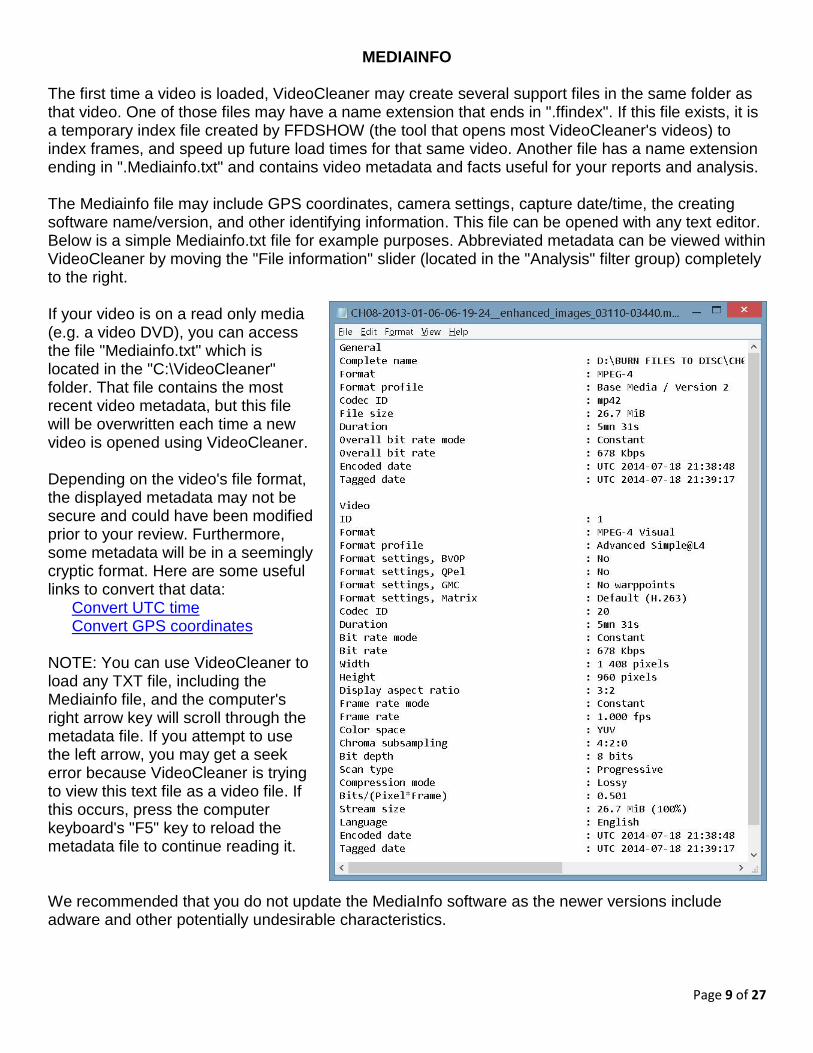
MEDIAINFO The first time a video is loaded, VideoCleaner may create several support files in the same folder as that video. One of those files may have a name extension that ends in ".ffindex". If this file exists, it is a temporary index file created by FFDSHOW (the tool that opens most VideoCleaner's videos) to index frames, and speed up future load times for that same video. Another file has a name extension ending in ".Mediainfo.txt" and contains video metadata and facts useful for your reports and analysis. The Mediainfo file may include GPS coordinates, camera settings, capture date/time, the creating software name/version, and other identifying information. This file can be opened with any text editor. Below is a simple Mediainfo.txt file for example purposes. Abbreviated metadata can be viewed within VideoCleaner by moving the "File information" slider (located in the "Analysis" filter group) completely to the right. If your video is on a read only media (e.g. a video DVD), you can access the file "Mediainfo.txt" which is located in the "C:\VideoCleaner" folder. That file contains the most recent video metadata, but this file will be overwritten each time a new video is opened using VideoCleaner. Depending on the video's file format, the displayed metadata may not be secure and could have been modified prior to your review. Furthermore, some metadata will be in a seemingly cryptic format. Here are some useful links to convert that data: Convert UTC time Convert GPS coordinates NOTE: You can use VideoCleaner to load any TXT file, including the Mediainfo file, and the computer's right arrow key will scroll through the metadata file. If you attempt to use the left arrow, you may get a seek error because VideoCleaner is trying to view this text file as a video file. If this occurs, press the computer keyboard's "F5" key to reload the metadata file to continue reading it. We recommended that you do not update the MediaInfo software as the newer versions include adware and other potentially undesirable characteristics.
Page 10 of 27
VIDEOCLEANER - SLIDERS AND SETTINGS Within each VideoCleaner section, are groups of features. Each feature is controlled by sliders. To the left of the slider is its description plus the default (inactive) value shown in brackets. To the right of the slider's name is the actual slider control. The number on the left edge of the slider control is the lowest allowed value. The highest allowed value is listed to the right side of the slider. The farthest right number (in blue) is the current value of that slider. Mouse clicking on the blue current value will reset the slider to its setting from when the current video was last loaded or reloaded.
MAIN SECTION This section is always visible, regardless of the other feature section check boxes. Most video clarification work will occur within this section. These first few sliders act as master controls. Use / List / Override / Bypass / Subtract Features (0) Set this slider to “0” for normal functionality. Set to "1" and on-screen text will list active features. Use position "2" to override built-in protective restrictions. Position “3” subtracts the enhanced version from the original to display what has changed. Enhancement transparency (0=none) Any value above zero allows the original video blend into the final result. Position seven effectively bypasses all VideoCleaner features. Changes made in the Properties section are not affected by this slider’s position. Compare Original to Enhanced "OFF / Side / Atop / Sweep (0=off)" Set this slider to “0” for normal viewing. Set to “1” to place the original and enhanced views side-by-side, or to “2” to have them stacked vertically. If set to “3”, the original & enhanced views will interchange by sweeping over time. “MODE: Normal / Full / Both” Set this slider to “0” for normal viewing. Set to “1” for the original view to be uncropped or “2” to show both cropped and uncropped originals. This only has an effect if you have applied the CROP or ROTATE features.
TOOLS Apply TOOLS settings (0=no) A value of zero (0) disables all features in this filter group. A value of one (1) allows them. Unsharpen Strength (0=off) Subtracts a local contrast Gaussian blur to retain the high-frequency details. If set to high, object edging can appear overly exaggerated. Sharpening Strength (0=off) Any value above zero (0) applies a sharpening filter. Be mindful to not over-sharpen. Video Contrast Strength (0=off) A value of zero (0) turns this feature off. Any other value applies an ever increasing or decreasing amounts of luminosity contrast. Color Contrast Strength (0=off) A value of zero (0) turns this feature off. Any other value applies an ever increasing or decreasing amounts of color contrast. Color Saturation Strength (0=off) A value of zero (0) turns this feature off. Any other value applies ever increasing or decreasing color saturation of the scene. Suppress HotSpot Strength (0=off) Positive values apply an ever increasing amount of hotspot suppression (reduction of bright or flashing lights while preserving details and lighting levels). Negative values substitute pure black to aid in histogram skewing.
The "subtract" setting displays how your filter settings have affected your video and is useful in confirming that critical details were not accidentally removed.
Although the filter's name is misleading, unsharpening not only sharpens the video, but can provide pseudo-focus correction.
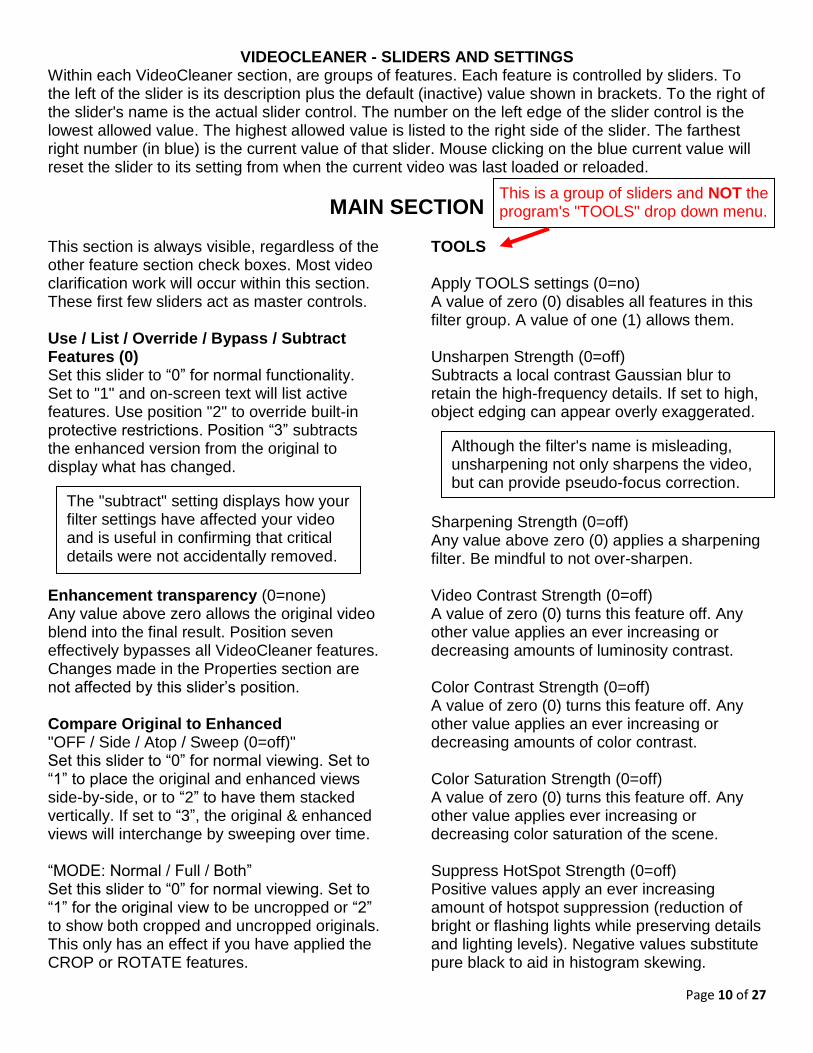
This is a group of sliders and NOT the program's "TOOLS" drop down menu.

Page 11 of 27
Equalizer Strength (0=off) A positive value applies an increasingly intense illumination correction without the risk of blowout, with negative values using a video negative. Strong anti-banding (interpolation of luminosity transitions between adjacent pixels) and the full luminosity range are always used. Backlight / Off / Histogram (0) A value of zero (0) turns this feature off. A negative value applies automatic back-lighting correction while a positive value applies an automatic color histogram equalization. Stabilize Strength (0=off) A value of zero (0) turns this feature off. Any other value applies ever increasing stabilization Denoise: off / Large / Fine / Deblur (0) A value of zero (0) turns this feature off. A value of one (1) cleans larger sized noise while a value of two (2) is for fine details, and a value of three (3) applies automatic lens blur corrections. Check results since denoising can over-compensate and cause scene distortions. Focus Correction (0=off) Any value above zero (0) optically refocuses every pixel of every frame. The available range is up to twenty tenths of one pixel radius, using a finite impulse response (FIR) Wiener filtering. Deblock Model (0=off) Set above “0” to find a model to repair or soften the square tiling artifacts typically found in over-compressed videos. If they exist, iFrames and Color data is automatically referenced. Deblock Strength (0=lowest) Higher values strengthen the attack on any blocking artifacts. Increase until just prior to causing any detectable losses in scene details.
CURVE (lighting balance) Apply CURVE settings (0=no) A value of zero (0) disables all features in this filter group. A value of one (1) allows them. Lowest Lumin in (0) A value of zero (0) represents pure black and a value of 255 represents pure white. This slider sets the darkest lighting level to be retained as being unique. If set to high, any details darker than the chosen value will be clipped. Gamma Multiplier (1) A value of one (1) leaves the video untouched. Values above one skew brightness upward, while lower values do the opposite. By shifting the relative brightness distribution through gamma control, details can become more visible without the risk of luminosity blowout. Highest Lumin in (255) A value of zero (0) represents pure black and a value of 255 represents pure white. This slider sets the brightest lighting level to be retained as being unique. If set to low, any details brighter than the chosen value will be clipped. NOTE: Backlight, Denoise and Focus features are math intensive and can take a long time to process and reprocess, especially when used in combination (some combinations are not permitted). Try using one or two, save the resulting file and then close VideoCleaner. Reopen that saved video file in a new VideoCleaner session to continue where you left off to use all three.
NOTE: In the TOOLS filter group, if the Denoise filter responds with "Feature not available", just go to the VideoCleaner shortcut folder and RIGHT click on the option for "VideoCleaner fix". Choose "Run as administrator" to allow the solution. Since this process is only copying two files into the Windows file directory, it will occur instantaneously to solve this issue.

Page 12 of 27
FORENSIC (iFrame can be slow) Apply FORENSIC settings (0=no) A value of zero (0) disables all features in this filter group. A value of one (1) allows them. Canny Edge Strength (0=off) Any value above zero (0) applies Canny edge filtering in an ever increasing hysteresis range for the relevant gradient threshold magnitudes. Canny Noise Sensitivity (0=min) Higher values reduce the applied Gaussian blur ("9" disables blurring), which increases the resulting sensitivity to noise and artifacts. Sobel Edge (off/Luma/Chroma/both) Uses a dual axis quadratic mean where each pixel is masked and dominantly weighted. Use a value of one (1) for the Luma channel, two (2) for Chroma, and three (3) for all channels. Sobel Saturation (0=max) Each value above zero (0) reduces the edge mask saturation limit by an additional 10%. Edge Filtering Mode (0=off) Any value above zero (0) emphasizes edges using these algorithms: 1=Inverse spatial differentials 2=Spatial differentials 3=Differentials 4='Y' channel of spatial differentials 5='Y' channel intensities 6='U' channel intensities 7='V' channel intensities 8=Suppress colored pixels RGBamplifier Strength (0=off) Any value above zero (0) sets the strength to emphasizes each pixel's deviation from that same pixel's average RGB values from among the preceding and following 25 frames. Isolate Scene Changes (0=no) A value of one (1) suppresses all pixels which remain unchanged in the preceding and following 25 frames. Subtle actions become obvious and, when something starts or stops moving, it will fade into or from the scene. This filter is designed for fixed position cameras.
Frame Averaging Radius (0=off) Any value above zero (0) blends that number of preceding and following frames together into a low noise version for every video frame. iFrame isolation (0=no) A value of (1) removes any detectable non-iFrames. This process is slow, so save the resulting file, to then re-open that file in a new VideoCleaner session to apply other filters. ANALYSIS and Information Apply ANALYSIS settings (0=no) A value of zero (0) disables all features in this filter group. A value of one (1) allows them. Extract (off/Noise/DCT/Motion) A value of zero (0) leaves the video alone. A value of one (1) subtracts a Gaussian blur (leaves an amplified noise profile), two (2) isolates the DCT (Discrete Cosine Transform) AC component (Curves or Equalizer improves results view-ability), and three (3) generates motion vectors (this can be a slow process). Test (off/PseudoColors/VELA) A value of zero (0) leaves the video alone. A value of one (1) assigns a random color palette to highlight subtle color differentials to detect clipping or masked content (add the Channels-Grayscale slider to test temperature). A value of two (2) performs VELA (to detect cropping or content addition, removal or relocation. Read page #22 of this guide for more instructions). MinMax Range (0=off) Any value above zero (0) displays the luminosity clipping at this setting's distance from 8-bit limit values of 0 and 255, seen as blue and red respectively. Clipping should not occur in an authentic surveillance recording. File information (0=off) A value of zero (0) leaves the video alone. One (1) displays the luminance waveform, two (2) displays a color allocation Vectorscope, and three (3) displays the file's summary Metadata. (see "Mediainfo.txt' in the video's file folder for a more comprehensive list of file Metadata).

Page 13 of 27
PROPERTIES SECTION CORE Settings Apply CORE settings (0=no) A value of zero (0) disables all features in this filter group. A value of one (1) allows them. Volume (0=ignore 1=mute) A value of zero (0) leaves the audio alone, one (1) mutes the audio, and higher values amplify audio. Be aware that VideoCleaner does not play audio. The user will need to press F6 to export and hear the audio using VirtualDub. FPS Speed seconds (0=same) FPS Millisec (add to above) A value of zero (0) for both sliders leaves the playback speed as-is. Otherwise, the value of both sliders are added together to set a new playback frame rate. For example, 29 seconds and 973 milliseconds results in a 29.973 frames-per-second frame rate. Starting Frame thousands (0) Starting Frame (add to above) The first slider set the number of frames (in thousands) and the other slider value is added. For example, if the thousands is set to 2 and the second slider is set to 100, then the first 2100 frames of the input video will be ignored. Keep Frames thousands (0=all) Keep Frames (add to above) The first slider set the number of frames (in thousands) and the other slider value is added. For example, if the thousands is set to 2 and the second slider is set to 100, then only 2100 frames of the input video will be retained. Off / Reverse / Loop (0=off) A value of one "1" reverses the direction of playback, so the last frame becomes the first. A value of two (2) will loop the video ten times.
DUPlicate frame removal Apply DUPLICATE Removal (0=no) A value of zero (0) disables this filter group. A value of one (1) lets the user remove frames that are replicate in their successive frame. Removal Threshold Strength (0.1) This setting is the percentage of difference (threshold) between successive frames for each frame to be considered unique. For forensic purposes, the default value of 0.1 is the suggested initial testing value. Auto-adjust Framerate (0=no) A value of zero (0) retains the current frame rate so that, if duplicate frames were removed, the resulting video will play in less time and may appear to be sped up. A value of one (1) adjusts the playback frame rate so that the resulting video retains its original duration, albeit with fewer video frames to display.
NOTE: Duplicate frame removal can be very time consuming and is re-invoked with each subsequent VideoCleaner settings are changed. For this reason, it is recommended that you perform duplicate frame removal by itself, save the resulting video, close VideoCleaner, and then reopen that resulting video in a new VideoCleaner session to apply any additional filters that may be required.
NOTE: Some computer configurations have issues playing videos with non-standard frame rates, especially those below one frame-per-second.
Page 14 of 27
FIELDS FIELDS: Off / Overlay / Apply (0=off) A value of zero (0) disables all features in this filter group. A value of one (1) Displays an overlay to assist the user with the "Horizontal alignment" slider {vertical lines will become thinner as the alignment improves}. A value of two (2) applies normal Fields functionality. Fields: off / Separate / Swap (0) Each frame of an interlaced video is composed of two interlaced fields, thus representing two independent moments in time in one image. A value of zero (0) leaves the video alone. A value of one (1) separates ("deinterlaces") the fields, thus creating a half height video with twice as many frames. A value of two (2) works the same way, but swaps the field pair order. Nudge Fields (off / Up / Down) A value of zero (0) leaves the video untouched. A value of one (1) nudges the even numbered fields, of the now deinterlaced frames (requires the prior slider), upward a half-pixel. A value of two (2) will nudge them half a pixel downward. Nudge Fields (off / Left / Right) A value of zero (0) leaves the video untouched. A value of one (1) will shift the even numbered fields, of the now de-interlaced frames, leftward one-half pixel. A value of two (2) will shift the even numbered fields rightward half a pixel.
Horizontal alignment (0=off) A value of zero (0) leaves the video untouched. A positive value shifts the fields from the center, with even fields moving rightward. A negative value shifts in the other direction. Higher values will invoke a greater shift. Retain Which Fields (All / Even / Odd) A value of zero (0) leaves the video untouched. When a set of fields is blurrier than the other, one (1) retains only the even numbered fields, while two (2) retains the odd numbered fields. Restore Original Size (0=no) A value of zero (0) leaves the video untouched. A value of one (1) will use bicubic resizing to restore the deinterlaced video's height back to its original size prior to the field filter changes. ANGLE Apply ANGLE settings (0=no) A value of zero (0) disables all features in this filter group. A value of one (1) allows the user to modify the viewing angle. Turn: Off / Right / Left (0) A value of zero (0) leaves the video alone. A value of one (1) turns the video 90-degrees clockwise and a value of two (2) turns the video 90-degrees counter-clockwise. Flip This Video (0=no) A value of zero (0) leaves the video alone. A value of one (1) flips the video horizontally. This can be required when a video Codec incorrectly determines the video's left edge. Rotate Video Angle (0) Any value above zero (0) rotates the video clockwise by that value's number of degrees. The video is cropped to retain the video's dimensions. A value of "180" degrees can be used with the "Flip" filter to create a vertical flip. Add Rotation Borders (0=no) A value of zero (0) leaves the video alone. A value of one (1) adds borders so the rotated video remains fully visible without rescaling.
Hint: Use the keyboard's right-left arrow keys to advance through the video and, if the movement seems to oddly jerk forward-backward, try setting this slider to two "2".
Use this slider if the video slightly alternates up/down as you use the computer right-left arrow keys to advance through the video.
NOTE: Sub-pixel nudging, when required, improves final enhancement results, but its interpolation can impact Photogrammetry and Videogrammetry measurement accuracies.
Page 15 of 27
CROP Apply CROP settings (0=no) A value of zero (0) disables all features in this filter group. A value of one (1) allows the user to zoom in by cropping the viewable scene, rounded to the nearest multiple of four pixels for maximum playback compatibility. Crop by Percentage (0) A value of zero (0) means that cropping is by the following values number of pixels. A value of (1) changes each value to behave as a percentage of the video's original dimensions. From Left (0) A value of zero (0) leaves the video alone. Any other value trims away the designated portion of the left edge of the video. The next three sliders behave the same as the above slider, but from their respective edges: From Right (0) From Top (0) From Bottom (0)
RESIZE Off / Neighbor / Cubic / SR (0=off) A value of zero (0) disables this filter group, while any other value resizes (in multiples of four pixels for optimal playback compatibility). A value of one (1) magnifies using nearest neighbor {best for forensic measurements), A value of two (2) applies bicubic interpolation resizing, and a value of three (3) applies SuperResolution {best for upsizing}, Preserve General Aspect Ratio (0=no) A value of one (1) automatically changes the video's height based upon the selected width, to best preserve the video's aspect ratio. Snap to a Common Size (0=no) A value of one (1) lets VideoCleaner select the closest common video size relative to the user's selected New width and New height. New Width (0=same) A value of zero (0) leaves the video alone. Any other value resizes to the closest valid value. New Height (0=same) A value of zero (0) leaves the video alone. Any other value resizes to the closest valid value. CHANNELS selector Apply CHANNELS settings (0=no) A value of zero (0) disables all features in this filter group. A value of one (1) allows them. Due to the way videos are saved, defects can prominently exist in one color channel, which can be disabled by the next three sliders: Turn Red OFF (0=no) Turn Green OFF (0=no) Turn Blue OFF (0=no) Off / Gray / Negative/ Both (0) A value of zero (0) leaves the video alone. A value of one (1) converts the video to monochrome. Use two (2) to negative all active color channels. Use three (3) to apply both.
HINT: Cropping has an immediate exponential improvement on VideoCleaner's filter processing time. A popular trick is to activate cropping to show just the critical scene, test and apply all of the required VideoCleaner filters, and then deactivate cropping as the last step before saving the video results. This will significantly improve your overall workflow efficiency.
NOTE: The included SuperResolution mode is fully functional, but applies a demo mode watermarked as thin diagonal lines. You are under no obligation to use SuperResolution or purchase a license from Infognition. This enhancement feature is offered solely because it produces extremely clear results. Visit HERE to read more or to purchase a license. Click HERE after purchasing a license to remove the demo watermark.
Page 16 of 27
SPECIALTY FEATURES SECTION DESEQUENCE Apply DESEQUENCE settings (0=no) A value of zero (0) disables all features in this filter group. A value of one (1) allows the user to remove broken or inconsistent frames, including those from a sequenced video. NOT INTENDED FOR PANNING VIDEOS. Frame to use as the reference Set this to the first frame that shows the scene that you wish to retain. The range is 0 to 99. Retention strength (15=default) If set too low, desired frames may be missed. If set too high, bad frames may be retained. "15" is a good starting point for surveillance videos. VHS Toolbox Apply VHS settings (0=no) A value of zero (0) disables in this filter group while one (1) applies the active features. These filters are effective with digitized VHS tapes, without any benefit to other types of videos. Repair Chroma Lines (0=no) A value of zero (0) leaves the video alone. A value of (1) applies automatic Chroma repair and applies line strength. Lines Strength (0=off) Any value above zero (0) sets the strength of line repair. Requires “Repair Chrima” Jitter Size (0=off) Any value above zero (0) sets the strength of scene jitter correction. Threshold (0=off) Any value above zero (0) sets the sensitivity threshold required to incur scene correction. Synch Signal Width (0=off) A value of zero (0) leaves the video alone. Any value above zero (0) proportionally shifts the video synch horizontally.
VIEW Perspective changer Apply VIEW settings (0=no) A value of one (1) changes the video's viewing perspective, maintaining bicubic frame sizing. Lens Curve (0=off) A positive value corrects fish-eye distortion. A negative value corrects barrel lens distortion. Top Left (X) 0=default A non-zero value selects a different top left corner along the horizontal (X) axis by the value's percentage of total pixels. Top Left (Y) 0=default Same functionality as above, but referencing the top left corner's vertical (Y) coordinate. These next six sliders work in a similar manner on their respective corner’s coordinates. Top Right (X) 100 Top Right (Y) 0 Bottom Right (X) 100 Bottom Right (Y) 100 Bottom Left (X) 0 Bottom Left (Y) 100 COLORize section Apply Colorize settings (0=no) A value of one (1) will apply color corrections as defined by the other sliders in this group. Filter Strength (10) Sets the colorizing strength. Low Tones Strength (10) Determines the strength of also applying colorization upon the low energy pixel values. For the next sliders, a positive value applies that color while a negative value reduces it. Add/Subtract Red (0) Add/Subtract Green (0) Add/Subtract Blue (0)

Page 17 of 27
FINALIZING FEATURES MARGIN Apply MARGIN settings (0=no) A value of zero (0) disables all features in this filter group. A value of one (1) activates them. Annotations Header Size (0=none) A value of two (2) creates a video header, equal to 25% of the file height, and then forces all annotations (Text, numbered frames, and Timestamp) proportionally into that header. Use a setting of one (1) to half it’s height. NOTE: Added timestamps are preceded by a tilde to denote that this time is approximate. Waveform Footer - Intensity (0=off) Any value above zero creates a video footer, equal to 25% of the file height, a nd then displays an audio volume waveform in that footer. The waveform display height is adjusted by this slider’s value. Stereo audio is visually averaged into a mono representation. If the Annotation Header Size slider is set to one (1), then the footer will also be half height. ACCENT an area Apply ACCENT settings (0=no) This feature highlights an area by brightening or darkening a user defined region and/or the residual region. A value of zero (0) disables all features in this filter group. A value of one (1) will apply all active features in this filter group. Use an Oval (0=rectangle) A value of zero (0) defines the highlighting accent shape as a rectangle while a value of (1) changes the shape to an oval. Highlight Inner (0=neutral) The default value of zero (0) leaves the video alone. A positive value lightens the highlighted area while a negative value darkens the highlighted area. Pixilation Strength (0=off)
Values above zero (0) applies ever increasing pixelation of the inner highlighted area. Highlight Outer (0=neutral) The default value is zero (0). A positive value lightens the non-highlighted outer area while a negative value darkens that area. Percent from_Top (0) Any value above zero (0) defines the percentage from the top of the video that is to be ignored by this filter. Thus allowing the user to target what region is to be affected. Percent from_Bottom (0) Percent from_Left (0) Percent from_Right (0) These sliders function similarly to the TOP slider, and only affect their respective boundary when defining which area is to be accented. TEXT Annotate Apply TEXT settings (0=no) A value of zero (0) disables annotation while a value of one (1) activates this filter group. Relative Size (0=smallest) The larger the value, the larger the relative size of the text annotation. Depending on the size of the target video, the default value of zero (0) may make the text too small to be seen. Percent From Top (50) This value defines the percentage from the top edge of the video that the annotation is to be placed. The default is fifty (50), which is midway.
This feature annotates the video with the exact text saved in the VideoCleaner options, defined by pressing the "F2" key. The default annotation wording is "Target".
A red border will appear until highlighting or pixilation is non-zero. This helps placement and serves as its own type of accenting style.

Page 18 of 27
Percent From Left (0) The value defines the percentage from the left edge of the video that the annotation is to be placed. The default is zero (0), which is the left edge of the video. Text Color (0-white) The available options range from zero (0) to nine (9), which each value representing a different font color and transparency. The default is zero (0) which shows white text. Angle (0=horizontal) A value of zero (0) leaves the text horizontal. A positive value rotates the annotation text clockwise, while negative values rotate counter-clockwise. NUMBER Frame Numbers Apply NUMBER settings (0=no) A value of one (1) places an incrementally increasing frame number along the left edge. The number size is relative to the video’s size. Percent From Top_(0) This value defines the percentage from the top edge to place the frame numbers. The default is zero (0), the top left corner of the video. Starting Number (0) The value is the starting frame number to be used (useful if the current video is a brief continuous portion from a much longer video). Add a TIMEstamp Apply TIMEstamp settings (0=no) A value of zero (0) disables this filter group. A value of one (1) displays an incrementally increasing timestamp on each video frame. Percent from_Top (0) The value defines the percentage from the top edge to place the timestamp. The default is zero (0) the top edge of the video.
Percent_from_Left (50) This slider sets the timestamp’s percentage distance from the left edge. The default is fifty (50), which approximates midway. As the value approaches 99, you will effectively hide the fractional seconds portion of the timestamp. Relative_Size (4=medium) The larger the value, the larger the relative size of the text timestamp, relative to the size of the target video. The default value is four (4). Starting Hours (0) Starting Minutes (0) Starting Seconds (0) These slider values determine what timestamp is to displayed upon the first video frame (in 24-hour format). The timestamp increments upon subsequent frames at the video’s frame rate (adjustable in the PROPERTIES filter group within the CORE section). Apply Frame Offset (0=none) VideoCleaner’s timestamp counts in milliseconds and sometimes a video clip does not begin exactly on the second. Any value above zero will increment the starting timestamp by that many frames worth of timing. For example, at a setting of nine, the first frame of a video set to play at ten frames-per-second will have a timestamp of 00:00:00.900 and the next frame timestamp will be 00:00:01.000 and so on. --------------------------------------------------------------- FINAL ColorSpace Convert to YUV (0=no) VideoCleaner works in RGB colorspace. If this slider is set to one (1), the final colorspace is changed to YUV, which significantly reduces saved file size. It is common practice that, if the originating video was in YUV colorspace, so should the resulting enhanced video.
Page 19 of 27
FORENSIC AUTHENTICATION AND TAMPER TESTING (explained)
Performing and understanding Noise, Motion, DCT, PseudoColors, VELA and Min/Max analysis
Surveillance video is saved with destructive (lossy) compression, which results in compression error
artifacts, and is perceived as high-energy moving noise. The continual absence or inconsistency of
"noise", "motion vectors”, and "DCT" (Discrete Cosine Transform) high-energy at any portion of a
video is a strong indicator of post-production editing or subjective blurring at that portion of the scene.
PseudoColor, converts subtle pixel intensity differentials into extreme color shifts, making it easier to
detect content cloning and intensity clipping, which will appear as identical colors. VELA (Video Error
Level Analysis) depicts content cropping or alterations tampered content as inconsistent brightness
and/or color, when compared to other scene details of similar contrast. Contrast or luminosity skewing
(e.g. excessive darkness/brightness) is depicted as blue/red respectively by the Min/Max test.
WHAT YOU MUST DO FOR VELA IN VIDEOCLEANER
VELA testing requires that a re-compressed version of the test video already exist. First, be sure that
the XVID codec is installed (there is an "Install - XVID Codec" shortcut in the VideoCleaner shortcut
folder). This installation only needs to be done once, but there is no harm in repeating this step if you
are unsure. The XVID Codec installation is fast with only a momentary on-screen message.
Open your video using VideoCleaner and, without applying any sliders, press F6 to transfer the video
to VirtualDub, but don’t close VideoCleaner. In VirtualDub, press CTRL-P and select the XVID Codec,
and now to the right you will see a "Configure" button (select that and in the third box down labeled
"Target quantizer" enter the number "8", select OK to save your settings), and click OK to commit the
XVID Codec. Now press F7 to save the video. Use the default name of "VideoCleaner.avi" and save
the video in the C:\VideoCleaner folder. Using any other file name or folder will prevent the VELA
slider setting from working as expected. Close VirtualDub once the file saving process is complete.
In VideoCleaner, move the "Apply ANALYSIS settings" slider to the right to activate this feature group
and then move the "Test" slider to its rightmost position to activate VELA testing. Be aware that any
saved VideoCelaner.avi file will be automatically deleted the next time the VideoCleaner program is
re-started. As such, be sure to save or review your VELA results before closing VideoCleaner.
NOTES: Lossy compression or a skilled manipulator can affect testing results. Test results should be treated as compelling evidence and not as a definitive conclusion. Prior training to understanding test results is expected. VideoCleaner analysis tests are based upon prior peer reviewed and public domain research: NOISE (Niabot, Djembayz, and Waithamai), MOTION (Laurent de Soras and pavelsx2), DCT (N. Ahmed, T. Natarajan, and K.R. Rao), Pseudo Colors (Dschwen, and Aimcotest), VELA (kaʁstn, George Chernilevsky, Dr. Neal Krawetz, and Doug Carner), and MinMax (Anil. K. Jain, Fundamentals of Digital Image Processing, Prentice Hall, 1989 pp.240).
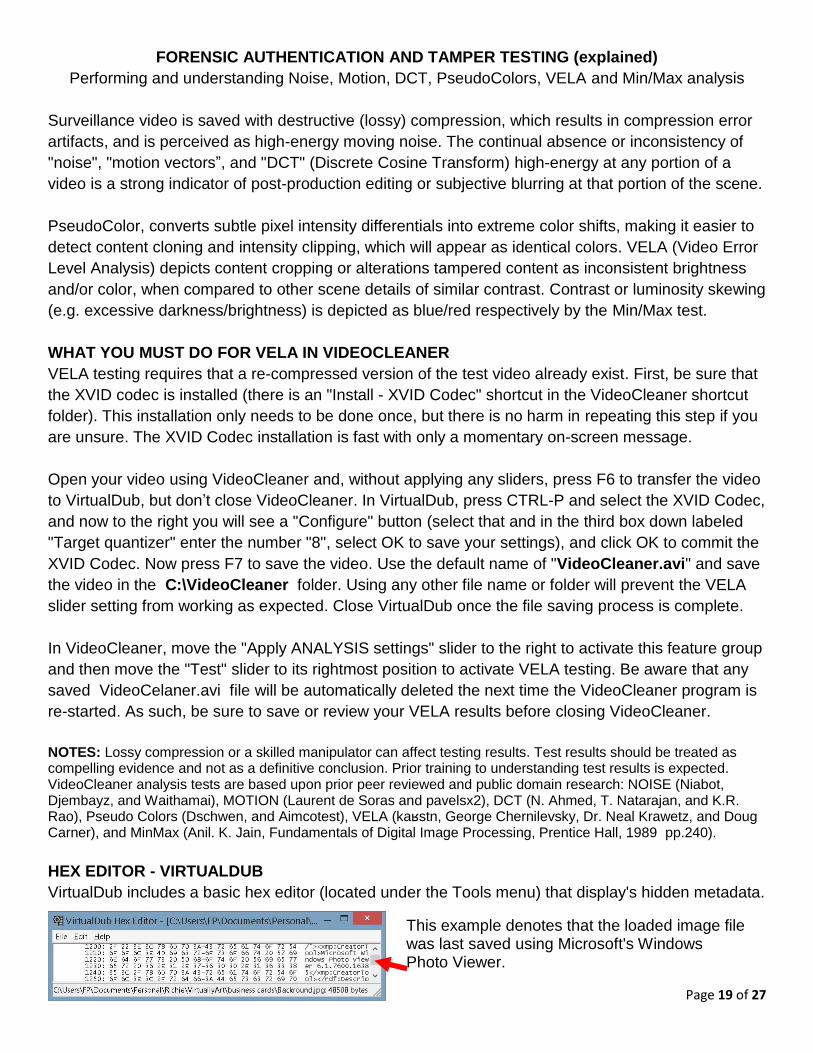
HEX EDITOR - VIRTUALDUB
VirtualDub includes a basic hex editor (located under the Tools menu) that display's hidden metadata.
This example denotes that the loaded image file was last saved using Microsoft's Windows Photo Viewer.

Page 20 of 27
TUTORIAL (Enhancing sample files)
The "VideoCleaner" folder on the user's computer includes a sub-folder named "Samples" which has
three practice files. Each file is listed below along with the recommended enhancement steps to
apply. Remember that, enhancement is somewhat subjective. The quality of your vision and
computer monitor will affect your perceived results. You are encouraged to experiment with different
VideoCleaner features and settings. As with all skills, practice improves performance.
For these tutorials, it is recommended that the user install the Xvid Codec and Lagareth Codec, both
of which are listed as links in the VideoCleaner program shortcut menu on their computer.
First, use the desktop icon to launch the VideoCleaner program. When VideoCleaner loads, the user
presses their computer's "F5" key (or CTRL-O) to load the desired file to work with.
Dark.jpg
Open the image file named "Dark" (or "Dark.jpg" depending on the computer’s configuration). It is so
dark that it is almost impossible to see anything, so first activate the TOOLS filter group by moving
the slider named "Apply TOOLS settings" rightward.
This is a very dark scene, so move the “Backlight / Off / Histogram” slider rightward to position 1
(histogram) to expand the lighting and color levels. Since the text appears faint, move the Video
contrast Strength slider rightward to about "14" to emphasize the luminosity differentials between
adjacent pixels (dots of resolution). Now you can add additional improvements by moving the
UnSharpen or Deblur sliders all the way rightward to improve image clarity.
NOTE: The Deblur filter can take minutes or even hours to process a video (which is why you should
always test it without applying any other filters when working with high-resolution videos. Since
"Dark.jpg" is just an image (a one frame video), the Deblur results will apply nearly instantaneously.
Turn ON the FORENSIC filter group (by moving Apply Forensic settings slider to the right) and set
Sobel to position "2". This filter will automatically locate and emphasize edges. Since position 2 is for
Chroma, and the image is nearly black/white, the resulting image takes on a greenish hue. To remove
the color, you need only turn ON the CHANNELS filter group and move the Off/ Gray / Negative /
Both slider Rightward to position “1”. Although, the green version may appear clearer due to the way
that our eyes work.
Now let's save the finished image by holding the computer keyboard’s CTRL key down while then
pressing the letter "S". Alternatively, the user can press their computer keyboard's "F6" key to send
this image into VirtualDub, where it can be saved in a wider range of image (FILE --> EXPORT -->
IMAGE SEQUENCE) or video file formats.

Page 21 of 27
XVID.avi
The "XVID.avi" video demonstrates an extremely dark video from a stationary camera. For this video,
you will need to have previously installed the XVID Codec. If this was never done, there is an
installation shortcut in the VideoCleaner program shortcut folder to take care of that now.
Load the "XVID.avi" video, which is located in the “Samples” folder of “VideoCleaner” on your
computer's C drive. As you play or scroll (right arrow key of your computer keyboard) through this
video you will likely see nothing except darkness. We can fix this by turning ON the TOOLS filter
group (by moving the slider named "Apply TOOLS settings" rightward), and then move the
“Backlight / Off / Histogram” rightward to position 1 (histogram). Now scrolling through the video we
can see a license plate, but each frame is not very readable due to the extreme pixilation noise.
Since this noise is random, we can average the video frames to improve the signal-to-noise ratio. To
do this, turn ON the FORENSIC filter group (by moving the slider named "Apply FORENSIC
settings" rightward), and then move the "Frame Averaging Radius" slider to its rightmost position,
"50". Immediately the random noise is suppressed. Since this setting averages the prior and
successive 50 frames, viewing frame number 50 (midway into the video) will maximize the effect.
Applying additional VideoCleaner settings will further improve the end results. For example, just
turning setting the Deblock Model to “1” (located in the TOOLS filter group) will apply a subtle effect
that leads to a slightly clearer image.
You can also move the "Video Contrast Strength" slider, located in the TOOLS filter group, to a
position of "10" to further gain additional subtle improvements, and move "Color Contrast Strength"
to a position of "5" to give the image a more visually pleasing appearance. That is the power of
having access to such an extensive enhancement toolbox within in VideoCleaner.
Now let's save the finished result by holding down the CTRL key and then pressing the letter "S",
which lets you save the current image in the location and format of your choosing. Alternatively, press
the F6 key to send the video to VirtualDub. Within VirtualDub, press the "F7" key to save your
enhanced video. If you hold the CTRL and press the P key (or "Compression" option under "Video"
menu) before pressing F7 Save, you can select a compression codec that will reduce the file size.
There is a slider named Deactivate all enhancements located above the Tools filter group. Move
that slider to the right to see what the image looked like prior to the applied enhancements.
Alternatively, you can use the transparency slider (the second to last VideoCleaner slider) to blend
the before and after versions. You can also use the OFF / Side / Atop / Sweep slider located near
the top to compare the before and after results.

Page 22 of 27
Noise.avi
Open the "Noise" video file. We can see that there is a lot of distracting noise in the Red and Green
color channels. Before we turn off color channels, we will need to ensure that the luminosity levels will
remain balanced. Turn ON the TOOLS section (by moving the slider named "Apply TOOLS
settings" rightward) and “Backlight / Off / Histogram” rightward to position 1 (histogram).
Move down several filter groups to locate and turn ON the Channels filter group (Apply CHANNELS
settings) and within that group turn OFF (move the slider rightward) both the Red and Green
channels, leaving a blue channel image. In this same filter group, move the Off/ Gray / Negative /
Both slider Rightward to position “1”. The image should appear much clearer but you can clearly see
that it is upside down.
In the Properties section is the ANGLE filter group. Turn this group on (Move the Apply ANGLE
settings slider rightward) and then change the Rotate video angle to a setting of "180". The image
is right side up, but we can see that it includes a noise pattern from having been a scanned image.
Change the rotation value to "181" and notice how the resulting interpolation reduces that pattern
effect.
We can further improve the the signal-to-noise ratio by adjusting the image's resolution using the
RESIZE filter group. Turn ON that group (also in the Properties section) and activate Preserve
General Aspect Ratio and adjust the New Width to "800". Like the angle change, here too we are
using interpolation to suppress the distracting noise from the image details.
At the top of all the sliders, mouse click a check mark to activate the Toggle "Specialty" Section and
be patient while the new feature group loads. Turn ON the COLORize feature group and set Filter
strength to "12", Low tones strength to "9", Add/Subtract red to "4", Add/Subtract green to "-2",
Add/Subtract blue to "4". These settings help restore a more natural color to the resulting image.
We can use the ACCENT filter group to define an area for highlighting (set the Use an oval to "1",
Highlight inner to "9", Highlight outer remains at "0", percent from_top to "60", percent
from_bottom to "24", percent from_left to "33, and percent from_right to "37"). Use the TEXT filter
group to place the word "Target" on the image (set the Relative size to "6", Percent from top to "55",
Percent from left to "27", Text color to "4", and Angle to "-18"). The actual text word (defaults to
"Target") and is changed using your computer keyboard’s F2 key.
Optionally, go to the LENS Fish Eye Barrel Correction section and use the top slider to turn this
filter group ON. Now play with the settings to see their effect. You can also try the VIEW section to
change the perspective (set the Top left (x) to "2" and Top right (y) to "4", with all other settings
remaining at their default).
You may wish to experiment with additional effects to see if the final results can be further improved.

Page 23 of 27
DCT.jpg
In nearly all circumstances, videos and images are compressed in a lossy manner, meaning that
details are discarded and error artifacts are introduced, while the perceived visual accuracy is
generally preserved. Each successive resave introduces additional compression errors. As such,
post-production manipulations will show different error artifacts from the remaining untouched scene.
Open the "DCT" image file (located in the C:\VideoCleaner\Samples folder) to see one of our forensic
lab stations. The picture appears normal, but it has been manipulated. Turn ON the ANALYSIS filter
section (by moving the slider named "Apply ANALYSIS settings" rightward) and then move the
"Extract (off/Noise/DCT/Motion)" slider to position number 2 to use the DCT (Discrete Cosine
Transform) filter feature. DCT reduces the variable differential from the scene's energy level, and this
is how most image and video files are compressed. In VideoCleaner, the DCT filter only displays the
variable component, which is where most compression errors reside. As such, once the DCT filter is
applied, the resulting scene may appear strange and quite dark.
Turn ON the TOOLS section (by moving the slider named "Apply TOOLS settings" rightward) and
then move the "Equalizer Strength" slider to its rightmost position to enhance the brightness
differentials. Notice that the area above the three chairs is devoid of noise, as are the three desktop
monitors. These are the altered portions of the scene. If you would like a more pleasant view, set the
"Enhancement Transparency" (the second to last slider in VideoCleaner) to about “4” to blend the
before and after results. In practice, DCT is highly effective at detecting in-painting, which is the most
common type of video manipulation.
DCT.jpg (the suspicious scene you are given) The original unaltered image
The VideoCleaner DCT test results depicting the manipulations (wall picture and desktop monitors).
VideoCleaner's DCT and VELA are powerful
tests for common types of visual manipulations.
However, extreme post-production compression
and sophisticated tamper methods can prevent
manipulation detection. As such, a lack of
tamper detection is not proof of file authenticity.

Page 24 of 27
REFERENCES
Legend
A. Anil. K. Jain, Fundamentals of Digital Image Processing, Prentice Hall, 1989
(isbn:0133325784)
B. Marcus Weise & Diana Weynand, How Video Works, 2nd edition, Focal Press, 2007
(isbn:0240809335)
C. Vlado Damjanovski, CCTV Networking and Digital Technology, 2nd edition, Elsevier
Butterworth-Heinemann, 2005 (isbn:0750678003)
D. Bernard Grob & Charles E. Herndon, Basic Television and Video Systems, 6th edition,
McGraw-Hill, 1999 (isbn:0071163093)
E. Nosratinia, Enhancement of JPEG-Compressed images by re-application of JPEG, Journal of
VLSI Signal Processing, vol. 27, 2007 (issn:0922-5773)
F. J. Canny, A Computational Approach to Edge Detection, in IEEE Transactions on Pattern
Analysis and Machine Intelligence, vol. 8, no. 6, 1986 (issn: 0162-8828)
G. S.Murali, Govindraj B. Chittapur, Prabhakara H.S, & Basavaraj S. Anami, IJCSA vol. 2, no.6,
2012 "Comparison And Analysis of Photo Image Forgery Detection Techniques"
H. Advances in Visual Computing: 7th International Symposium ISVC 2011 Las Vegas, NV "A
Non-intrusive Method for Copy-Move Forgery Detection"
I. Hitesh C Patel and Mohit M Patel, IJCA (0975-8887) Volume 111, No. 15, 2015
"An Improvement of Forgery Video Detection Technique using Error Level Analysis"
J. W. Wang, J. Dong, and T. Tan, Digital Watermarking: 9th International Workshop, IWDW 2010
Seoul, Korea Section 3: "Tampered Region Localization of Digital Color Images"
Feature References (in order of their appearance within VideoCleaner)
Subtract......................... A. pp. 240 ...................... B. pp. 57 ............ C. pp. 47 .................D. pp. 241
Unsharpen/Sharpen ...... A. pp. 249
Video Contrast .............. A. pp. 49, 51, 120, 235 ... ........................... ................................D. pp. 51
Color Contrast/Saturate A. pp. 235, 262............... ........................... ................................D. pp. 51
Suppress Hotspot ......... A. pp. 240 ...................... ........................... C. pp. 202 ...............D. pp. 82
Equalizer/Histogram ...... A. pp 241-244, 344, 396 B. pp. 268
Backlight Compensation A. pp. 234-241 ............... ........................... ................................D. pp. 86
Stabilize ........................ A. pp. 81 ........................ B. pp. 268
Denoise ......................... A. pp. 273
Deblur Lens ................... A. pp. 322 ...................... ........................... C. pp. 58
Focus Correction ........... A. pp. 276-284
Deblock ......................... ....................................... ........................... ................................E. pp. 69-79
Curve ............................ A. pp. 240 ...................... ........................... C. pp. 202 ...............D. pp. 82
Canny Edge Filtering .... ....................................... ........................... ................................F. all
Sobel Edge Filtering ...... A. pp. 347-357
Edge Filtering ................ A. pp. 71 & 234-241 ...... B. pp. 57 ............ C. pp. 47 .................D. pp. 241
RGBamplifier ................. A. pp. 234-241 ............... ........................... C. pp. 197
Isolate Motion ................ A. pp. 522 ...................... B. pp. 167
Isolate iFrames ............. A. pp. 485 ...................... B. pp.166
Frame Averaging .......... A. pp. 234-241 ............... ........................... C. pp. 197
Page 25 of 27
Analysis......................... (see the bottom of page #20 of this guide)
DCT ............................ ....................................... ........................... G. pp. 45-46 ............J. 125-127
PseudoColors ............. ....................................... ........................... H. pp. 522-523
VELA ........................... ....................................... ........................... I. pp. 26-28 .............J. 123-125
Metadata ....................... ....................................... B. pp. 147
Framerate ..................... A. pp. 521 ...................... B. pp. 127 .......... ................................D. pp. 41
Trim ............................... ....................................... B. pp. 218
Duplicate Removal ........ A. pp. 521
Fields ............................ A. pp. 81 ........................ B. pp. 19, 126 .... C. pp. 112, 265 .......D. pp. 45
Angle ............................. A. pp. 255, 320
Crop .............................. A. pp. 253
Resize ........................... A. pp. 255 ...................... B. pp. 123, 145 .. C. pp. 205, 479 .......D. pp. 51
Channels ....................... A. pp. 234-241
Grayscale ...................... A. pp. 71
Negative ........................ A. pp. 238
Desequence .................. A. pp. 521
Chroma ......................... A. pp. 65 ........................ B. pp. 257 .......... C. pp. 241
Jitter .............................. A. pp. 81, 93 .................. B. pp. 268
Synch ............................ A. pp. 81 ........................ B. pp. 26 ............ ................................D. pp. 44
Lens Fish Eye / Barrel ... A. pp. 320
Perspective ................... A. pp. 320
Colorize ......................... A. pp. 234-241 ............... B. pp. 57 ............ C. pp. 48 .................D. pp. 52
Annotate........................ ....................................... B. pp. 223 .......... ................................D. pp. 479
Frame Number .............. A. pp. 521 ...................... ........................... ................................D. pp. 479
Color space ................... A. pp. 60, 73 .................. B. pp. 109 .......... C. pp. 172 ...............D. pp. 329
Transparency (Dubbing) ....................................... ........................... ................................D. pp. 368
SCIENCE, MATH and CODE (continued reading)
Additional and optional components (AviSynth, CamStudio, Codecs, Lagarith, VirtualDub, xvid)
Color and luminosity (AutoGain, Histogram Adjust, Histogram Equalize, RgbAmplifier)
Edge detection and analysis (Canny, Sobel, VELA, DCT)
Opening a file (DGDecode, Direct Show Source, ffms2, MPEG2Dec3, Rawsource)
Perspective filters (DeBarrel, Rotate)
Sharpening filters (LSFmod, Unsharp, Sharpen)
Spatial noise filters (Chroma Shift, Remove Grain, SmoothD2, Vague Denoiser)
Specialty tools (3dFourier, Debanding, Dejitter, Deshaker, Subtitler, VideoCleaner)
Support tools (ExpLabo, GScript, MaskTools, Mvtools, Mvtools2, Nnedi2, RT_Stats)
Temporal noise filters (3d, Degrain, Denoise, Smoother, Wavlet)
Demo license filters (SuperResolution) {purchase a license here and activate here}*
*The development team of VideoCleaner is not compensated in any manner for the inclusion of filters
with a demo license. These filters do not include any advertising or tracking, are fully functional in
their demo mode, and are included solely because they deliver superior peer-reviewed results.

Page 26 of 27
VIDEOCLEANER FILTERS ARE ALWAYS APPLIED IN THIS ORDER
(regardless of the order in which the user activates the program sliders)
DUPLICATE, CORE, FIELDS, ANGLE, CROP, RESIZE, CHANNELS (except negative), TOOLS +
FORENSIC + ANALYSIS, CURVE, negative, DESEQuencer, VHS, VIEW, COLORIZE, MARGIN,
ACCENT, TEXT, NUMBER, TIMEstamp, FINAL, subtract, COMPARE
NOTE: There is no such thing as a perfect order of filters that will always work for all videos. The order of the
VideoCleaner filters are based upon the optimal results spanning thousands of real world forensic videos.
NOTES
VideoCleaner can be redistributed and/or modified under the terms of each component's relevant
GNU General Public License, available in the VideoCleaner Support folder. VideoCleaner is
provided "as is" without any warranties or guarantees. VideoCleaner installation-usage constitutes
a unilateral unlimited release of any and all related risks, damages and liability, actual or implied.
ACKNOWLEDGEMENT
VideoCleaner would not be possible without the peer review, user feedback and programming
efforts of others. If you appreciate the features, consider donating to the respective programmers
(see the SCIENCE, MATH and CODE section above). Special thanks and appreciation are given
to the invaluable development contributions by Allen Combs and Marc Robinson. Doug Carner
donates his time as the lead VideoCleaner programmer and support, and Forensic Protection gifts
funds to keep it advertising free. Both are not financially compensated, and do not accept
donations or pay, for any aspect of VideoCleaner, but gladly accept accolades.
Page 27 of 27
GLOSSARY (definition of terms)
Codec - An abbreviation of the words Compression Decompression, and it defines (in computer
code) how a given video is to be saved and later reconstituted. Nearly all Codecs are lossy;
meaning that details are irreversibly discarded to reduce file size. These losses can appear as
muted brightness, an out-of-focus appearance, strange artifacts, and tiling (when the video looks
like a mosaic of tiny rectangles). VideoCleaner provides the option to save files uncompressed,
which preserves the available file details, thus creating very large file sizes. The noted defects can
be suppressed using VideoCleaner's Tools and Deblocking sliders.
Color space - There are different standards to record visual luminosity and color values. The
color wheel is based upon RGB (Red, Green, Blue) where each value is that color's contribution to
a given pixel. If all the RGB values are zero, the pixel appears black. If all the RGB values are at
their maximum, then the pixel appears white. Television, and thus nearly all security cameras, use
a planar color space, where pixel brightness is one value, and the color values are often shared
with their neighboring pixels. YV12 is the most common planar color space used with surveillance
video. The 2nd to last VideoCleaner slider transforms the enhanced video into YV12 color space.
Contrast - Linearly expand or contract the value difference between adjacent pixel. If the critical
details blend together, then VideoCleaner's video contrast (luminosity) and color contrast
adjustments can expand the subtle differences to make the visual details easier to recognize.
Adjust contrast with caution because, as contrast is increased, details located in the darkest or
brightest areas of the video can become clipped as they try to exceed the allowed values. Videos
that lack both very bright and very dark areas will benefit the most from contrast adjustments.
Histogram equalization - Non-destructively increases the global contrast of the entire video by
more evenly distributing the intensity differences between adjacent and overall pixel values.
Videos that are extremely bright (e.g. details are washed out) or extremely dark (e.g. a nighttime
video with insufficient lighting) will benefit the most from this process.
iFrames - Frames that contain the entire scene and thus are the truest to what the camera saw.
All other types of video frames are composites made by adding or subtracting pixels from the
closest iFrames. Depending on the video Codec, non-iFrames can introduce additional visual
defects. VideoCleaner's Forensic tools include an option to isolate just the iFrames.
Interlaced - When video broadcasting was invented (over 70 years ago), images from two
consecutive but independent moments in time (called fields) where simultaneously displayed as
one frame by interlacing these fields in a vertical weaving pattern. While newer systems use
progressive systems that avoid this (e.g. 1080i for interlaced and 1080p for progressive), most
security systems still record interlaced video. When those systems use their proprietary playing
software, that software will often deinterlace (undo the interlacing) by blending both moments in
time, which creates distortion and a false set of facts. VideoCleaner's Field filters (located in the
Properties section) can non-destructively isolate, and correctly align, those interlaced fields.
Pixel - A video or image is actually displayed as a grid of dots called pixels. Each pixel is denoted
by values that, depending on its format, may include details about luminosity (brightness), color
and transparency. VideoCleaner uses 32-bit RGBa color space to retain maximum pixel details,
and the status bar seen below the video displays the relevant values for the current image pixel
located under the computer's mouse pointer position.
Document version: May, 2018