user's guide - xp-430/xp-434 - epson · 5 multi-page printing options - windows..... 71...
TRANSCRIPT
XP-430/XP-434 User's Guide


3
ContentsXP-430/XP-434 User's Guide..................................................................................................................... 13Product Basics .......................................................................................................................................... 14
Using the Control Panel ..................................................................................................................... 14Control Panel Buttons and Lights .................................................................................................. 14Adjusting Control Panel Position ................................................................................................... 15Changing LCD Screen Language.................................................................................................. 16Turning Off Control Panel Sounds................................................................................................. 17
Product Parts Locations ..................................................................................................................... 17Product Parts - Top........................................................................................................................ 18Product Parts - Inside .................................................................................................................... 20Product Parts - Back...................................................................................................................... 21
The Power Off and Sleep Timers ....................................................................................................... 21Changing the Power Off and Sleep Timer Settings From the Control Panel.................................. 21Changing the Power and Sleep Timer Settings - Windows............................................................ 23Changing the Power and Sleep Timer Settings - OS X.................................................................. 24
Epson Connect Solutions for Smartphones, Tablets, and More ......................................................... 25Setting Up Epson Connect Services.............................................................................................. 26Using Epson Email Print ............................................................................................................... 27Using the Epson iPrint Mobile App ................................................................................................ 28Using the Epson Creative Print Mobile App................................................................................... 28Using Epson Remote Print ........................................................................................................... 29Using Epson Scan to Cloud........................................................................................................... 30
Using Google Cloud Print ................................................................................................................... 30Setting Up Google Cloud Print on a Chromebook ......................................................................... 31
Using AirPrint .................................................................................................................................... 32Using the Mopria Print Service .......................................................................................................... 33Android Printing Using the Epson Print Enabler ................................................................................ 33Using Fire OS Printing ....................................................................................................................... 34Using Windows 10 Mobile Printing .................................................................................................... 34Using Epson Print and Scan App with Windows Tablets ................................................................... 35

4
Wi-Fi Networking ....................................................................................................................................... 36Wi-Fi Infrastructure Mode Setup......................................................................................................... 36
Selecting Wireless Network Settings From the Control Panel ....................................................... 37Wi-Fi Direct Mode Setup .................................................................................................................... 39
Enabling Wi-Fi Direct Mode........................................................................................................... 40Wi-Fi Protected Setup (WPS)............................................................................................................. 42
Using WPS to Connect to a Network ............................................................................................. 43Printing a Network Status Sheet......................................................................................................... 43Changing or Updating Network Connections ..................................................................................... 45
Accessing the Web Config Utility ................................................................................................... 45Changing a USB Connection to a Wi-Fi Connection...................................................................... 46Connecting to a New Wi-Fi Router ................................................................................................ 46Disabling Wi-Fi Features ............................................................................................................... 47
Loading Paper ........................................................................................................................................... 48Loading Paper for Documents and Photos......................................................................................... 48Loading Envelopes ............................................................................................................................ 51Paper Loading Capacity ..................................................................................................................... 54Available Epson Papers ..................................................................................................................... 55Borderless Paper Type Compatibility ................................................................................................. 56Paper or Media Type Settings - Control Panel ................................................................................... 57Paper or Media Type Settings - Product Software.............................................................................. 58
Placing Originals on the Product ............................................................................................................. 59Placing Originals on the Scanner Glass ............................................................................................. 59
Copying...................................................................................................................................................... 62Copying Documents or Photos........................................................................................................... 62
Paper Size Settings - Copying....................................................................................................... 64Copying Options............................................................................................................................ 64
Copying and Restoring Photos........................................................................................................... 65Printing from a Computer ......................................................................................................................... 68
Printing with Windows ........................................................................................................................ 68Selecting Basic Print Settings - Windows ...................................................................................... 68
Print Quality Options - Windows ............................................................................................... 71

5
Multi-Page Printing Options - Windows..................................................................................... 71Selecting Double-sided Printing Settings - Windows ..................................................................... 71
Double-sided Printing Options - Windows................................................................................. 73Selecting Additional Layout and Print Options - Windows ............................................................. 73
Custom Color Correction Options - Windows............................................................................ 75Image Options and Additional Settings - Windows.................................................................... 76Header/Footer Settings - Windows ........................................................................................... 77
Selecting a Printing Preset - Windows........................................................................................... 78Selecting Extended Settings - Windows ........................................................................................ 79
Extended Settings - Windows ................................................................................................... 80Printing Your Document or Photo - Windows................................................................................. 81
Checking Print Status - Windows.............................................................................................. 83Selecting Default Print Settings - Windows.................................................................................... 83
Changing the Language of the Printer Software Screens ......................................................... 84Changing Automatic Update Options ............................................................................................ 85
Printing with OS X .............................................................................................................................. 86Selecting Basic Print Settings - OS X ............................................................................................ 87
Print Quality Settings - OS X..................................................................................................... 90Print Options - OS X.................................................................................................................. 91
Selecting Page Setup Settings - OS X........................................................................................... 91Selecting Print Layout Options - OS X........................................................................................... 92Managing Color - OS X.................................................................................................................. 93
Color Matching and Color Options - OS X................................................................................. 94Selecting Printing Preferences - OS X........................................................................................... 95
Printing Preferences - OS X...................................................................................................... 96Printing Your Document or Photo - OS X....................................................................................... 96
Checking Print Status - OS X.................................................................................................... 97Cancelling Printing Using a Product Button........................................................................................ 98
Scanning .................................................................................................................................................... 99Starting a Scan................................................................................................................................... 99
Starting a Scan Using the Product Control Panel .......................................................................... 99Changing Default Scan Button Settings.................................................................................. 101
Starting a Scan Using the Epson Scan Icon ................................................................................ 102

6
Starting a Scan from a Scanning Program................................................................................... 104Selecting Epson Scan Settings ........................................................................................................ 106
Scan Modes................................................................................................................................. 106Selecting the Scan Mode............................................................................................................. 107Scanning in Full Auto Mode......................................................................................................... 107
Available Image Adjustments - Full Auto Mode....................................................................... 110Scanning in Home Mode ............................................................................................................. 110
Selecting a Scan Area - Home Mode ...................................................................................... 113Available Image Adjustments - Home Mode ........................................................................... 116Selecting a Scan Size - Home Mode....................................................................................... 117
Scanning in Office Mode.............................................................................................................. 120Selecting a Scan Area - Office Mode ...................................................................................... 121Available Image Adjustments - Office Mode ........................................................................... 123
Scanning in Professional Mode ................................................................................................... 124Available Image Types - Professional Mode ........................................................................... 127Selecting a Scan Area - Professional Mode............................................................................ 127Available Image Adjustments - Professional Mode ................................................................. 130Selecting a Scan Size - Professional Mode............................................................................. 132
Image Preview Guidelines........................................................................................................... 135Scan Resolution Guidelines ........................................................................................................ 135Selecting Scan File Settings ........................................................................................................ 137
Available Scanned File Types and Optional Settings.............................................................. 138Scanning with OS X Using Image Capture....................................................................................... 139
Available Scan Settings - OS X Image Capture........................................................................... 141Scanning from Smart Devices.......................................................................................................... 141Scanning Special Projects................................................................................................................ 141
Scanning to Online Destinations Using Easy Photo Scan ........................................................... 142Scanning Using Easy Photo Scan .......................................................................................... 142Uploading Scanned Images to Facebook ............................................................................... 144Uploading Scanned Images to Picasa .................................................................................... 146Uploading Scanned Images to Evernote................................................................................. 148Uploading Scanned Images to SugarSync ............................................................................. 150Uploading Scanned Images to a Web Folder.......................................................................... 152
7
Uploading Scanned Images to Email ...................................................................................... 154Saving Scanned Images to a Folder ....................................................................................... 155Epson JPEG File Settings....................................................................................................... 156Epson TIFF and Multi-TIFF File Settings ................................................................................ 157
Scanning to a PDF File................................................................................................................ 158Restoring Photo Colors as You Scan .......................................................................................... 161
Using Memory Cards With Your Product .............................................................................................. 163Inserting a Memory Card.................................................................................................................. 163
Memory Card Types .................................................................................................................... 164Memory Card File Specifications ................................................................................................. 164Removing a Memory Card........................................................................................................... 165
Printing from a Memory Card ........................................................................................................... 165Viewing and Printing Photos........................................................................................................ 166
Viewing and Printing Individual Photos ................................................................................... 166Viewing and Printing Individual Photos Using the Slide Show ................................................ 168Cropping Photos Displayed on the LCD Screen ..................................................................... 171Print Setting Options - Photo Mode......................................................................................... 171Printing Photo Layouts From a Memory Card ......................................................................... 171Photo Layout Options ............................................................................................................. 174
Scanning to a Memory Card............................................................................................................. 174Transferring Photos on a Memory Card ........................................................................................... 175
Setting Up File Sharing for Photo Transfers From Your Computer .............................................. 175Transferring Photos from a Memory Card to Your Computer ...................................................... 176
Printing Personalized Projects............................................................................................................... 178Printing Lined Paper and Graph Paper............................................................................................. 178Printing Personalized Note Paper .................................................................................................... 180Printing Calendar Pages .................................................................................................................. 182
Replacing Ink Cartridges ........................................................................................................................ 185Check Cartridge Status .................................................................................................................... 185
Checking Cartridge Status on the LCD Screen............................................................................ 185Checking Cartridge Status with Windows.................................................................................... 187Checking Cartridge Status with OS X .......................................................................................... 190
Purchase Epson Ink Cartridges........................................................................................................ 191
8
Ink Cartridge Part Numbers ......................................................................................................... 191Removing and Installing Ink Cartridges............................................................................................ 192Replacing Ink Cartridges Using a Computer Utility........................................................................... 197Printing with Black Ink and Expended Color Cartridges ................................................................... 198
Printing with Expended Color Cartridges - Windows ................................................................... 198Printing with Expended Color Cartridges - OS X ......................................................................... 199
Conserving Low Black Ink with Windows ......................................................................................... 200Adjusting Print Quality............................................................................................................................ 202
Print Head Maintenance................................................................................................................... 202Print Head Nozzle Check............................................................................................................. 202
Checking the Nozzles Using the Product Control Panel ......................................................... 202Checking the Nozzles Using a Computer Utility ...................................................................... 205
Print Head Cleaning .................................................................................................................... 206Cleaning the Print Head Using the Product Control Panel ...................................................... 207Cleaning the Print Head Using a Computer Utility................................................................... 209
Print Head Alignment ....................................................................................................................... 212Aligning the Print Head Using the Product Control Panel ............................................................ 212Aligning the Print Head Using a Computer Utility......................................................................... 214
Cleaning the Paper Path .................................................................................................................. 216Cleaning and Transporting Your Product ............................................................................................. 217
Cleaning Your Product ..................................................................................................................... 217Transporting Your Product ............................................................................................................... 217
Solving Problems .................................................................................................................................... 220Checking for Software Updates........................................................................................................ 220Product Status Messages ................................................................................................................ 221Running a Product Check ................................................................................................................ 222Resetting Control Panel Defaults ..................................................................................................... 224Solving Setup Problems................................................................................................................... 225
Noise After Ink Installation ........................................................................................................... 226Software Installation Problems .................................................................................................... 226Control Panel Setup Problems .................................................................................................... 226USB Connection Problems.......................................................................................................... 227
Solving Network Problems ............................................................................................................... 227

9
Product Cannot Connect to a Wireless Router or Access Point .................................................. 227Network Software Cannot Find Product on a Network................................................................. 228Product Does Not Appear in OS X Printer Window...................................................................... 229Cannot Print Over a Network....................................................................................................... 230Cannot Scan Over a Network ...................................................................................................... 231
Solving Copying Problems ............................................................................................................... 232Product Makes Noise, But Nothing Copies.................................................................................. 232Product Makes Noise When It Sits for a While............................................................................. 233
Solving Paper Problems................................................................................................................... 233Paper Feeding Problems............................................................................................................. 233Paper Jam Problems ................................................................................................................... 234Paper Ejection Problems ............................................................................................................. 235
Solving Problems Printing from a Computer..................................................................................... 235Nothing Prints .............................................................................................................................. 236Product Icon Does Not Appear in Windows Taskbar ................................................................... 236Error After Cartridge Replacement .............................................................................................. 237Printing is Slow ............................................................................................................................ 238
Solving Page Layout and Content Problems.................................................................................... 239Inverted Image............................................................................................................................. 239Too Many Copies Print ................................................................................................................ 239Blank Pages Print ........................................................................................................................ 240Incorrect Margins on Printout....................................................................................................... 240Border Appears on Borderless Prints .......................................................................................... 241Incorrect Characters Print............................................................................................................ 241Incorrect Image Size or Position.................................................................................................. 242Slanted Printout ........................................................................................................................... 242
Solving Print Quality Problems......................................................................................................... 243White or Dark Lines in Printout .................................................................................................... 243Blurry or Smeared Printout .......................................................................................................... 244Faint Printout or Printout Has Gaps ............................................................................................. 245Grainy Printout............................................................................................................................. 246Incorrect Colors ........................................................................................................................... 247
Solving Scanning Problems ............................................................................................................. 247

10
Scanning Software Does Not Operate Correctly ......................................................................... 248Cannot Start Epson Scan ............................................................................................................ 248
Solving Scanned Image Quality Problems ....................................................................................... 249Image Consists of a Few Dots Only............................................................................................. 250Line of Dots Appears in All Scanned Images............................................................................... 250Straight Lines in an Image Appear Crooked ................................................................................ 250Image is Distorted or Blurry ......................................................................................................... 251Image Colors are Patchy at the Edges ........................................................................................ 251Image is Too Dark ....................................................................................................................... 251Back of Original Image Appears in Scanned Image .................................................................... 252Ripple Patterns Appear in an Image ............................................................................................ 252Image is Scanned Upside-Down ................................................................................................. 252Scanned Image Colors Do Not Match Original Colors................................................................. 253Scan Area is Not Adjustable in Thumbnail Preview ..................................................................... 253Scanned Image Edges are Cropped ........................................................................................... 253
Solving Memory Card Problems....................................................................................................... 254Memory Card Does Not Fit Into a Slot ......................................................................................... 254Cannot View or Print Photos from a Memory Card ...................................................................... 254Cannot Transfer Photos To or From a Memory Card................................................................... 255
Uninstall Your Product Software....................................................................................................... 255Uninstalling Product Software - Windows.................................................................................... 256Uninstalling Product Software - OS X .......................................................................................... 257
Where to Get Help............................................................................................................................ 258Technical Specifications ........................................................................................................................ 259
Windows System Requirements ...................................................................................................... 259OS X System Requirements............................................................................................................. 260Printing Specifications...................................................................................................................... 260Scanning Specifications ................................................................................................................... 260Paper Specifications ........................................................................................................................ 261Printable Area Specifications ........................................................................................................... 262Ink Cartridge Specifications.............................................................................................................. 264Memory Card Specifications ............................................................................................................ 265Dimension Specifications ................................................................................................................. 266

11
Electrical Specifications ................................................................................................................... 266Environmental Specifications ........................................................................................................... 267Interface Specifications .................................................................................................................... 267Network Interface Specifications ...................................................................................................... 267Safety and Approvals Specifications ................................................................................................ 268
Notices ..................................................................................................................................................... 269General Product Safety Instructions................................................................................................. 269Ink Cartridge Safety Instructions ...................................................................................................... 271LCD Screen Safety Instructions ....................................................................................................... 272Wireless Connection Safety Instructions.......................................................................................... 272FCC Compliance Statement............................................................................................................. 272Trademarks...................................................................................................................................... 273Copyright Notice............................................................................................................................... 273
libTIFF Software Acknowledgment.............................................................................................. 274A Note Concerning Responsible Use of Copyrighted Materials................................................... 275Default Delay Times for Power Management for Epson Products ............................................... 275Copyright Attribution.................................................................................................................... 275


13
XP-430/XP-434 User's GuideWelcome to the XP-430/XP-434 User's Guide. For a printable PDF copy of this guide, click here.

14
Product BasicsSee these sections to learn about the basic features of your product.Using the Control PanelProduct Parts LocationsThe Power Off and Sleep TimersEpson Connect Solutions for Smartphones, Tablets, and MoreUsing Google Cloud PrintUsing AirPrintUsing the Mopria Print ServiceAndroid Printing Using the Epson Print EnablerUsing Fire OS PrintingUsing Windows 10 Mobile PrintingUsing Epson Print and Scan App with Windows Tablets
Using the Control PanelSee these sections to learn about the control panel and select control panel settings.Control Panel Buttons and LightsAdjusting Control Panel PositionChanging LCD Screen LanguageTurning Off Control Panel SoundsParent topic: Product Basics
Control Panel Buttons and Lights

15
1 The power button and the power light2 The home button3 The LCD screen4 The back button5 The arrow buttons and the OK button6 The + and – buttons (increase or decrease the number of copies)7 The start button8 The stop button
Parent topic: Using the Control Panel
Adjusting Control Panel PositionYou can adjust the position of the control panel to make it easier to use.• To raise the control panel, lift it up from the bottom.• To lower the control panel, squeeze the release bar and gently push the panel down.
Caution: Do not lower the control panel without first squeezing the release bar or you may damageyour product.
Parent topic: Using the Control Panel

16
Changing LCD Screen LanguageYou can change the language used on the LCD screen.
1. Press the home button, if necessary.2. Press the left or right arrow button to select Setup and press the OK button.
You see this screen:
3. Press the up or down arrow button to select Printer Setup and press the OK button.You see this screen:

17
4. Press the up or down arrow button to select Language and press the OK button.5. Press the up or down arrow button to select a language and press the OK button.
6. Press the home button to exit.Parent topic: Using the Control Panel
Turning Off Control Panel SoundsYou can turn off the sound heard when you press buttons on the control panel.
1. Press the home button, if necessary.2. Press the left or right arrow button to select Quiet Mode and press the OK button.
You see this screen:
3. Select the Off setting and press the OK button.
4. Press the home button to exit.Parent topic: Using the Control Panel
Product Parts LocationsSee these sections to identify the parts on your product.Product Parts - TopProduct Parts - InsideProduct Parts - Back
18
Parent topic: Product Basics
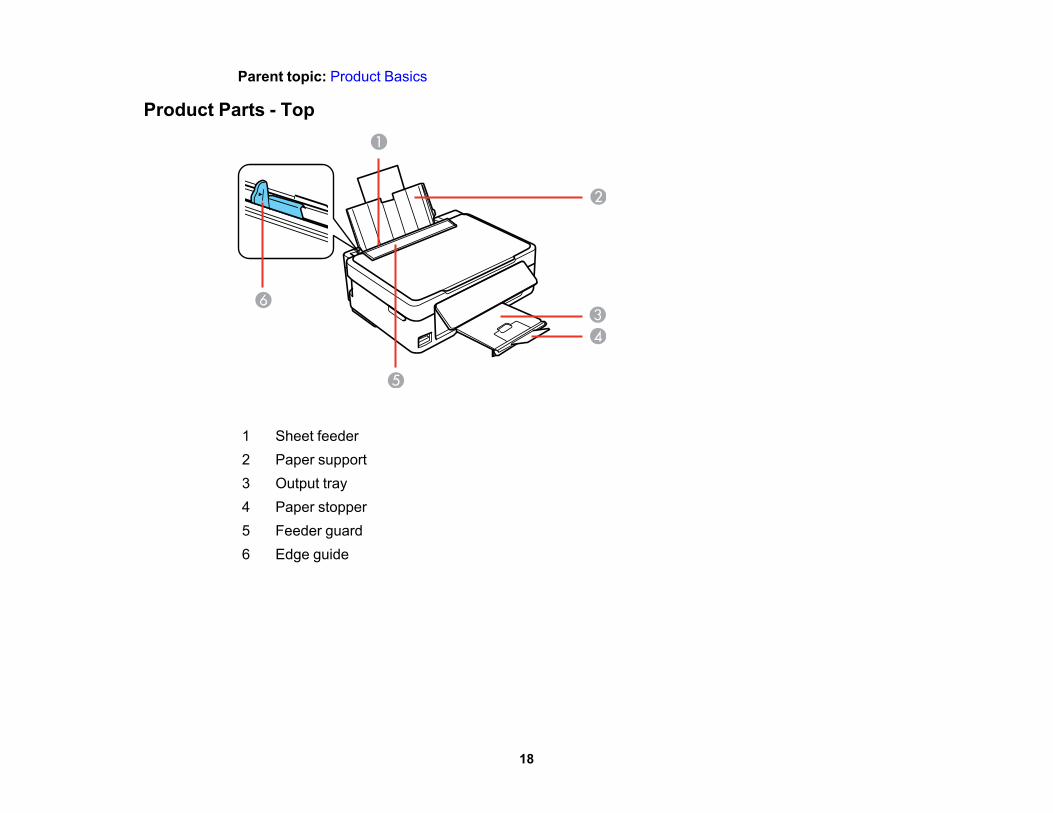
Product Parts - Top
1 Sheet feeder2 Paper support3 Output tray4 Paper stopper5 Feeder guard6 Edge guide

19
1 Document cover2 Scanner glass3 Control panel4 Control panel release bar (beneath)5 Memory card slot6 Memory card access light
Parent topic: Product Parts Locations

20
Product Parts - Inside
1 Scanner unit2 Ink cartridge holder in home position
Parent topic: Product Parts Locations
21
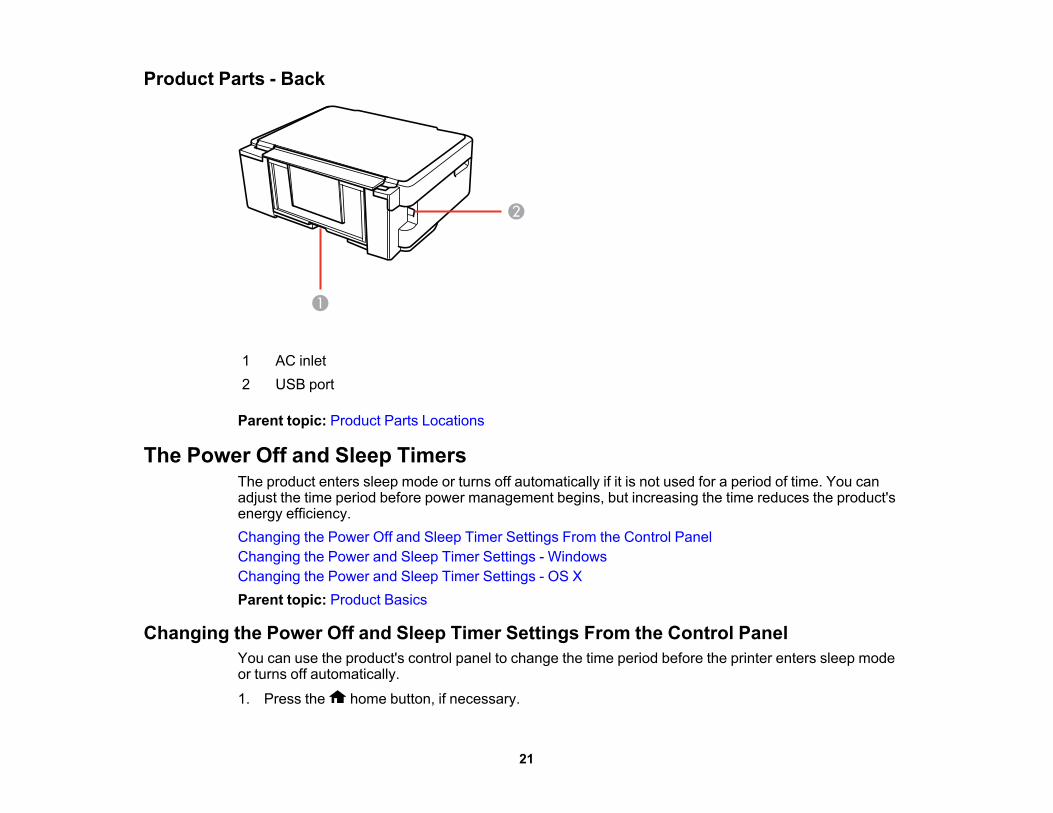
Product Parts - Back
1 AC inlet2 USB port
Parent topic: Product Parts Locations
The Power Off and Sleep TimersThe product enters sleep mode or turns off automatically if it is not used for a period of time. You canadjust the time period before power management begins, but increasing the time reduces the product'senergy efficiency.Changing the Power Off and Sleep Timer Settings From the Control PanelChanging the Power and Sleep Timer Settings - WindowsChanging the Power and Sleep Timer Settings - OS XParent topic: Product Basics
Changing the Power Off and Sleep Timer Settings From the Control PanelYou can use the product's control panel to change the time period before the printer enters sleep modeor turns off automatically.
1. Press the home button, if necessary.

22
2. Press the left or right arrow button to select Setup and press the OK button.3. Press the up or down arrow button to select Printer Setup and press the OK button.
You see this screen:
4. To change the Power Off Timer setting, press the up or down arrow button to select Power OffTimer and press the OK button.You see this screen:
5. Press the up or down arrow button to select the time period you want, then press the OK button.

23
6. To change the Sleep Timer setting, press the up or down arrow button to select Sleep Timer andpress the OK button.You see this screen:
7. Press the up or down arrow button to select the time period you want, then press the OK button.
8. Press the home to exit.Parent topic: The Power Off and Sleep Timers
Changing the Power and Sleep Timer Settings - WindowsYou can use the printer software to change the time period before the product enters sleep mode orturns off automatically.1. Make sure your product is turned on.2. Access the Windows Desktop and right-click the product icon in the Windows taskbar.3. Select Printer Settings.4. Click the Maintenance tab.5. Click the Printer and Option Information button.

24
You see this screen:
6. Select the length of time after which you want the product to automatically turn off when it is not inuse as the Power Off Timer setting.
7. Click Send.8. Select the time period you want before the product goes to sleep as the Sleep Timer setting.9. Click Send.10. Click OK to close the open program windows.Parent topic: The Power Off and Sleep Timers
Changing the Power and Sleep Timer Settings - OS XYou can use the printer software to change the time period before the product enters sleep mode orturns off automatically.1. Make sure your product is turned on.2. In the Apple menu or the Dock, select System Preferences. Select Print & Fax, Print & Scan, or
Printers & Scanners, select your product, and select Options & Supplies. Select Utility and selectOpen Printer Utility.
3. Select Printer Settings.

25
You see this window:
4. Select the length of time after which you want the product to automatically turn off when it is not inuse as the Power Off Timer setting.
5. Select the time period you want before the product goes to sleep as the Sleep Timer setting.6. Click Apply.7. Close the Printer Settings window.Parent topic: The Power Off and Sleep Timers
Epson Connect Solutions for Smartphones, Tablets, and MoreUse your smartphone, tablet, or computer to print and scan documents, photos, emails, and web pagesfrom your home, office, or even across the globe.Print from anywhere with these Epson Connect solutions:• Epson Email Print• Epson iPrint Mobile App• Epson Remote Print

26
Scan and send a file as an email or upload it to an online service directly from your Epson product withEpson Scan to Cloud or the Epson iPrint Mobile App.Setting Up Epson Connect ServicesUsing Epson Email PrintUsing the Epson iPrint Mobile AppUsing the Epson Creative Print Mobile AppUsing Epson Remote PrintUsing Epson Scan to CloudParent topic: Product BasicsRelated tasksUsing AirPrintUsing Epson Email PrintUsing Google Cloud PrintUsing Epson Remote PrintUsing the Epson iPrint Mobile App
Setting Up Epson Connect ServicesIf you did not activate your product's email address for use with Epson Connect when you set up yourproduct, you can activate it using the product control panel.
1. Press the home button, if necessary.2. Press the left or right arrow button to select Setup and press the OK button.3. Press the up or down arrow button to select Epson Connect Services and press the OK button.

27
You see this screen:
4. Press the up or down arrow button to select Register/Delete and press the OK button.5. Press the up or down arrow button to select Yes and press the OK button.6. Follow the instructions on your screen to activate your product's email address.Parent topic: Epson Connect Solutions for Smartphones, Tablets, and MoreRelated tasksUsing Epson Email Print
Using Epson Email PrintWith Epson Email Print, you can print from any device that can send email, such as your smartphone,tablet, or laptop. Just activate your product's unique email address. When you want to print, attach aPDF, Microsoft Office document, or photo to an email and send it to your product. Both the email and theattachments will print automatically.1. Connect your product to your network. See the link below.2. If you did not already set up Email Print when you installed your product software, see the link below
to use your product control panel to activate your unique email address. Or visit epsonconnect.comto learn more about Email Print, create your Epson Connect account, and register your product tothe Epson Connect service.
3. Now you are ready to send and print emails to your product's Email Print address.

28
Note: Go to epsonconnect.com and log into your Epson connect account to personalize your product'semail, adjust print settings, and set up other Epson Connect services.
Parent topic: Epson Connect Solutions for Smartphones, Tablets, and MoreRelated tasksSetting Up Epson Connect ServicesRelated topicsWi-Fi Networking
Using the Epson iPrint Mobile AppUse this free Apple and Android app to print and scan with networked Epson products. Epson iPrint letsyou print PDFs, Microsoft Office documents, photos, and web pages over a wireless network. You canscan and save a file on your device, send it as an email, or upload it to an online service such as Box,Dropbox, Evernote, or Google Drive.1. Connect your product to your wireless network. See the link below.2. Visit epson.com/connect to learn more about Epson iPrint and check the compatibility of your mobile
device.3. Download Epson iPrint from the Apple App Store or Google Play.4. Connect your mobile device to the same wireless network as your product.5. Open Epson iPrint and select your Epson product.Now you are ready to print or scan with your mobile device and your Epson product.Parent topic: Epson Connect Solutions for Smartphones, Tablets, and MoreRelated topicsWi-Fi Networking
Using the Epson Creative Print Mobile AppUse this free Apple and Android app to do the following:• Access and print your Facebook photos• Create custom greeting cards and stationery• Print onto CD/DVDs• Turn photos into coloring book templates1. Connect your product to your wireless network. See the link below.

29
2. Visit epson.com/connect to learn more about Epson Creative Print and check the compatibility ofyour mobile device and your Epson product.
3. Download Epson Creative Print from the Apple App Store or Google Play.4. Connect your mobile device to the same wireless network that your product is using.5. Open Epson Creative Print.Now you are ready to get creative with your mobile device and your Epson product.Parent topic: Epson Connect Solutions for Smartphones, Tablets, and MoreRelated topicsWi-Fi Networking
Using Epson Remote PrintWith Epson Remote Print software, you can print from your laptop or desktop computer to an EpsonEmail-enabled product anywhere in the world.1. Connect your Epson product to your wireless network. See the link below.2. If you did not already set up an Epson Connect account when you installed your product software,
visit epsonconnect.com to create your account and register your product to the Epson Connectservice.
Note: Make a note of your product's email address.
3. Visit epsonconnect.com to learn more about Remote Print and how to download the Remote PrintDriver software.
4. Download and install the Remote Print software.5. Enter the email address and optional access key of your Epson product during Remote Print setup.6. Now you are ready to print remotely. Select the print command in your laptop or desktop computer
application and choose the Remote Print option for your Epson product.Parent topic: Epson Connect Solutions for Smartphones, Tablets, and MoreRelated topicsWi-Fi Networking

30
Using Epson Scan to CloudThe Epson Scan to Cloud service allows you to scan and send a file as an email or upload it to an onlineservice directly from your Epson product. Register an email address or online services such as Box,DropBox, Evernote, or Google Drive with your Epson Connect account.1. Connect your Epson product to your network. See the link below.2. If you did not already set up an Epson Connect account when you installed your product software,
visit epsonconnect.com to create your account and register your product to the Epson Connectservice.
Note: Make a note of your product's email address and password.
3. Visit epsonconnect.com to sign into your account with the email address and password youselected.
4. Select your product, select Scan to Cloud, and select Destination List.5. Click Add, then follow the instructions on the screen to create your destination list.6. Now you are ready to use Scan to Cloud. Select the setting for scanning to Scan to Cloud on your
Epson product control panel.Parent topic: Epson Connect Solutions for Smartphones, Tablets, and MoreRelated tasksStarting a Scan Using the Product Control PanelRelated topicsWi-Fi NetworkingUsing the Control Panel
Using Google Cloud PrintWith a Google Account, you can print from your Apple or Android device to your Epson product. You canalso print from Chromebooks and the Google Chrome browser without drivers or cables.1. Connect your Epson product to your wireless network. See the link below.2. Note your product's IP address by checking your network status. See the link below.3. Connect your computer or your Apple or Android device to the same wireless network as your Epson
product.4. Enter your product's IP address into the address bar of a web browser.

31
5. Select the Google Cloud Print Services option.
Note: If you don't see the Google Cloud Print Services option, turn your product off and back on. Ifthe option still doesn't appear, select the Firmware Update option and follow the on-screeninstructions to update your product.
6. Click Register.7. Select the checkbox to agree to the Usage Advisory and click Next.8. Click OK to launch the sign-in page.
A separate browser window opens.9. Enter your Google Account username and password and click Sign in, or, if you don't have an
account, click Sign up for a new Google Account and follow the on-screen instructions.10. Click Finish printer registration to complete setup and print a test page.Your product is now linked to your Google Account and can be accessed from any Chromebook,computer, Apple or Android device with Internet access. Visit Epson Support for more information onusing Google Cloud Print, or the Google Cloud Print website for a list of supported apps.Setting Up Google Cloud Print on a ChromebookParent topic: Product BasicsRelated tasksPrinting a Network Status SheetRelated topicsWi-Fi Networking
Setting Up Google Cloud Print on a ChromebookWith a Google Account, you can print from a Chromebook without drivers or cables.1. Connect your Epson product to your wireless network. See the link below.2. Turn on your Chromebook and connect it to the same wireless network as your product.
Note: See your Chromebook's documentation for details on connecting to a network.
3. Do one of the following:• Click Add to Cloud Print in the notification that appears in the corner of your Chromebook
screen.

32
Note: If you do not see a notification, check to see if a number appears in the status area at thelower-right corner of the screen. Click this number to open the notifications menu, then click Addto Cloud Print.
• Open a web browser and enter chrome://devices in the address bar. Skip to step 4.• If you see a registration confirmation screen instead, click Register.
4. Click Add Device.5. Click the Register button that appears next to your product.6. Click Register on the confirmation screen. Your product's LCD screen displays a confirmation
message.7. Select OK or press the OK button on your product to confirm the Google Cloud Print connection and
print a test page.Your product is now linked to your Google Account and can be accessed from any Chromebook, iPhone,or Android phone with Internet access. Visit Epson Support for more information on using Google CloudPrint, or the Google Cloud Print website for a list of supported appsParent topic: Using Google Cloud PrintRelated topicsWi-Fi Networking
Using AirPrintAirPrint enables instant wireless printing from iPhone, iPad, and iPod touch with the latest version ofiOS, and Mac with the latest version of OS X.
1. Load paper in your product.2. Set up your product for wireless printing. See the link below.3. Connect your Apple device to the same wireless network that your product is using.4. Print from your device to your product.
Note: For details, see the AirPrint page on the Apple website.
33
Parent topic: Product Basics
Using the Mopria Print ServiceYou can use the Mopria Print Service to print from your Android phone or tablet (Android v4.4 or later) toyour Epson product or any Mopria-certified product from other manufacturers. You can download theMopria Print Service from Google Play.
Note: For details on the Mopria Print Service, click here.
1. Connect your Epson product to your wireless network. See the link below.2. On your Android device, download the Mopria Print Service from Google Play.3. Go to Settings on your Android device, select Printing, and enable the Mopria Print Service.4. Connect your Android device to the same wireless network as your product.5. Now you are ready to print. From an Android application such as Chrome or Gmail, tap the menu
icon and select Print. Then select All printers, select your Epson product, adjust your print settings,and print.
Parent topic: Product Basics
Android Printing Using the Epson Print EnablerYou can wirelessly print your documents, emails, photos, and web pages right from your Android phoneor tablet (Android v4.4 or later). With a few taps, your Android device will discover your nearby Epsonproduct and print.1. Connect your Epson product to your wireless network. See the link below.2. On your Android device, download the Epson Print Enabler plug-in from Google Play.3. Go to settings on your Android device, select printers, and enable the Epson plug-in.4. Connect your Android device to the same wireless network as your product.5. Now you are ready to print. From an Android application such as Chrome or Gmail, tap the menu
icon and print whatever is on the screen.
Note: If you do not see your product, tap All Printers and select your product.
Parent topic: Product Basics

34
Related topicsWi-Fi Networking
Using Fire OS PrintingYou can wirelessly print from Amazon Fire tablets and phones to your nearby networked Epson product.There is no software to download, no drivers to install, and no cables to connect. With just a few taps inEmail, Calendar, Contacts, and WPS Office, you can send whatever is on the screen to an Epsonproduct.1. Connect your Epson product to your wireless network. See the link below.2. Connect your Amazon device to the same wireless network as your product.3. Now you are ready to print. From your Amazon application, tap the print option and select your
product to print whatever is on the screen.
Note: If you see a message telling you that a plug-in is required, tap OK and tap Download.
Visit epson.com/connect to learn more about Fire OS Printing (one of many Epson Connect PartnerSolutions) and check the compatibility of your mobile device.Parent topic: Product BasicsRelated topicsWi-Fi Networking
Using Windows 10 Mobile PrintingYou can wirelessly print from Windows 10 Mobile tablets and phones to your nearby networked Epsonproduct. There is no software to download, no drivers to install, and no cables to connect. Look for theprint option in your Windows 10 application to send whatever is on the screen to an Epson product.1. Connect your Epson product to your wireless network. See the link below.2. Connect your Windows 10 Mobile device to the same wireless network as your product.3. Now you are ready to print. From your Windows 10 application, tap the print option and select your
product to print whatever is on the screen.Visit epson.com/connect to learn more about Windows 10 Mobile Printing (one of many Epson ConnectPartner Solutions) and check the compatibility of your mobile device.Parent topic: Product Basics

35
Related topicsWi-Fi Networking
Using Epson Print and Scan App with Windows TabletsYou can use this free app to print photos and scan from your Windows (Windows 8 or higher) SurfaceRT or Pro tablet with networked Epson products. Epson Print and Scan App allows you to scan andcapture images right to your tablet or to Microsoft OneDrive.
Note: The Epson Print and Scan App does not support Windows 10 Mobile printing.
1. Connect your Epson product to your wireless network. See the link below.2. Download Epson Print and Scan App from the Microsoft Windows Store.3. Connect your Windows tablet to the same wireless network as your product.4. Open Epson Print and Scan App and select your Epson product.
Now you are ready to print photos or scan.Visit epson.com/connect to learn more about Epson Print and Scan App.Parent topic: Product BasicsRelated topicsWi-Fi Networking

36
Wi-Fi NetworkingSee these sections to use your product on a Wi-Fi network.Wi-Fi Infrastructure Mode SetupWi-Fi Direct Mode SetupWi-Fi Protected Setup (WPS)Printing a Network Status SheetChanging or Updating Network Connections
Wi-Fi Infrastructure Mode SetupYou can set up your product to communicate with your computer using a wireless router or access point.The wireless router or access point can be connected to your computer over a wireless or wired network.
1 Epson product2 Wireless router or access point

37
3 Computer with a wireless interface4 Computer5 Internet6 Ethernet cable (used only for wired connection to the wireless router or access point)
Selecting Wireless Network Settings From the Control PanelParent topic: Wi-Fi Networking
Selecting Wireless Network Settings From the Control PanelYou can select or change wireless network settings using your product control panel.To install your product on a wireless network, follow the instructions on the Start Here sheet and installthe necessary software from the product CD. The installer program guides you through network setup.
Note: Breakdown or repair of this product may cause loss of network data and settings. Epson is notresponsible for backing up or recovering data and settings during or after the warranty period. Werecommend that you make your own backup or print out your network data and settings.
1. Press the home button, if necessary.2. Press the left or right arrow button to select Wi-Fi Setup and press the OK button.
You see this screen:
38
3. Press the OK button to select Wi-Fi Setup Wizard.4. Press the up or down arrow button to select the name of your wireless network and press the OK
button. If you do not see your wireless network's name, you can enter it manually.
Note: To enter the wireless network name manually, select Other SSIDs and press the OK button.Enter your network name as described in the next step.
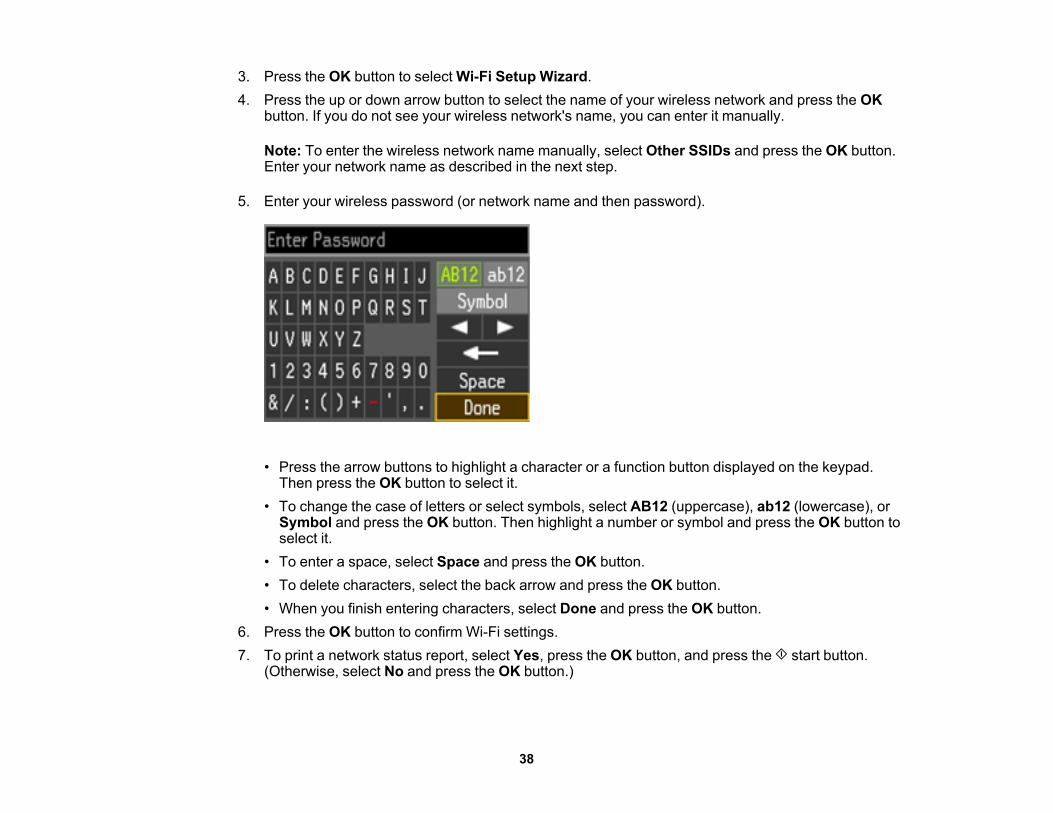
5. Enter your wireless password (or network name and then password).
• Press the arrow buttons to highlight a character or a function button displayed on the keypad.Then press the OK button to select it.
• To change the case of letters or select symbols, select AB12 (uppercase), ab12 (lowercase), orSymbol and press the OK button. Then highlight a number or symbol and press the OK button toselect it.
• To enter a space, select Space and press the OK button.• To delete characters, select the back arrow and press the OK button.• When you finish entering characters, select Done and press the OK button.
6. Press the OK button to confirm Wi-Fi settings.7. To print a network status report, select Yes, press the OK button, and press the start button.
(Otherwise, select No and press the OK button.)
39
Your product should now display a Wi-Fi icon with connection bars in the upper right corner ofthe LCD screen.
Note: If the Wi-Fi icon is not displayed on the LCD screen, you may have selected the wrongnetwork name or entered the password incorrectly. Repeat these steps to try again.
Parent topic: Wi-Fi Infrastructure Mode Setup
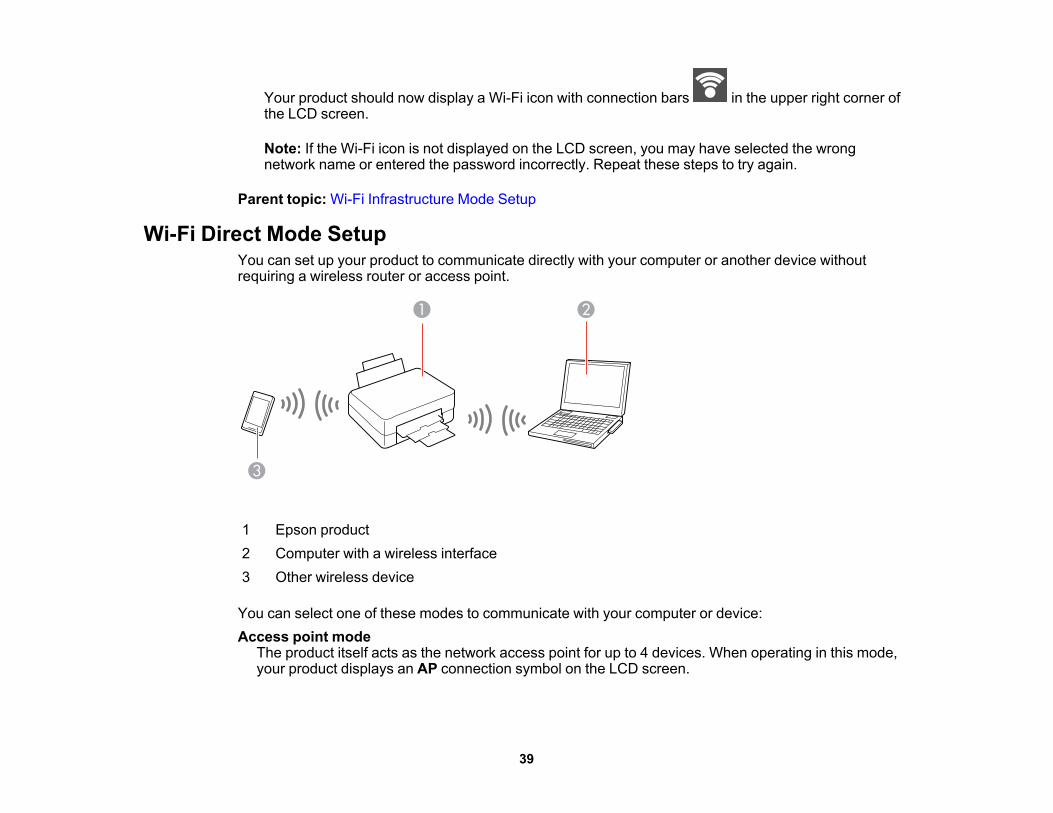
Wi-Fi Direct Mode SetupYou can set up your product to communicate directly with your computer or another device withoutrequiring a wireless router or access point.
1 Epson product2 Computer with a wireless interface3 Other wireless device
You can select one of these modes to communicate with your computer or device:Access point mode
The product itself acts as the network access point for up to 4 devices. When operating in this mode,your product displays an AP connection symbol on the LCD screen.

40
Peer-to-peer modeThe product communicates one-to-one with another Wi-Fi Direct capable device. When operating inthis mode, your product displays a Direct or D connection symbol on the LCD screen.To disconnect a peer-to-peer mode connection, release the connection to your product from yourcomputer or other device.To enable peer-to-peer mode, you must select it from the Web Config Utility, under WiFi/NetworkSettings > Services > Wi-Fi Direct.
Enabling Wi-Fi Direct ModeParent topic: Wi-Fi Networking
Enabling Wi-Fi Direct ModeYou can enable Wi-Fi Direct mode to allow direct communication between your product and computer orother devices without a wireless router or access point.
1. Press the home button, if necessary.2. Press the left or right arrow button to select Wi-Fi Setup and press the OK button.
You see this screen:
3. Press the up or down arrow button to select Wi-Fi Direct Setup and press the OK button.4. Make sure Connection Setup is highlighted, then press the OK button.

41
5. Press the down arrow button, then press the OK button to change the Wi-Fi Direct password.
Note: If you have already connected devices or computers to your product via Wi-Fi Direct, they willbe disconnected when you change the password.
6. Enter your Wi-Fi Direct password.
Note: Your password must be at least 8 and no more than 22 characters long.
• Press the arrow buttons to highlight a character or a function button displayed on the keypad.Then press the OK button to select it.
• To change the case of letters or select symbols, select AB12 (uppercase), ab12 (lowercase), orSymbol and press the OK button. Then highlight a number or symbol and press the OK button toselect it.
• To enter a space, select Space and press the OK button.• To delete characters, select the back arrow and press the OK button.• When you finish entering characters, select Done and press the OK button.
7. Press the OK button.

42
You see this screen:
8. Use your computer or wireless device to select the Wi-Fi network name (SSID) displayed on theLCD screen, then enter the password shown.
9. Press the OK button to exit.You see either an AP or Direct connection symbol on the LCD screen and should be able to printdirectly to your product from your computer or device.
Note: If the AP or Direct connection symbol is not displayed on the LCD screen, Wi-Fi Direct modeis not enabled. Repeat these steps to try again.
Parent topic: Wi-Fi Direct Mode Setup
Wi-Fi Protected Setup (WPS)If your network uses a WPS-enabled wireless router or access point, you can quickly connect yourproduct to the network using Wi-Fi Protected Setup (WPS).
Note: To check if your router is WPS-enabled, look for a button labeled WPS on your router or accesspoint. If there is no hardware button, there may be a virtual WPS button in the software for the device.Check your network product documentation for details.
Using WPS to Connect to a NetworkParent topic: Wi-Fi Networking

43
Using WPS to Connect to a NetworkIf you have a WPS-enabled wireless router or access point, you can use Wi-Fi Protected Setup (WPS) toconnect your product to the network.1. Press the WPS button on your router.
2. On the product, press the home button, if necessary.3. Press the left or right arrow button to select Wi-Fi Setup and press the OK button.
You see this screen:
4. Press the up or down arrow button to select Push Button Setup (WPS) and press the OK button.5. Follow the instructions on the LCD screen to complete WPS setup.
If the network connection is successful, a Wi-Fi icon with connection bars is displayed in theupper right corner of the LCD screen.
Parent topic: Wi-Fi Protected Setup (WPS)
Printing a Network Status SheetYou can print a network status sheet to help you determine the causes of any problems you may haveusing your product on a network.
1. Press the home button, if necessary.2. Press the left or right arrow button to select Setup and press the OK button.

44
3. Press the up or down arrow button to select Network Settings and press the OK button.You see this screen:
4. Press the up or down arrow button to select Network Status and press the OK button.You see this screen:
Note: If you are connected to a network, the signal strength is also displayed.
5. Press the left or right arrow button to display the Network Status screen.6. Press the up or down arrow button to select Print Status Sheet and press the OK button.
45
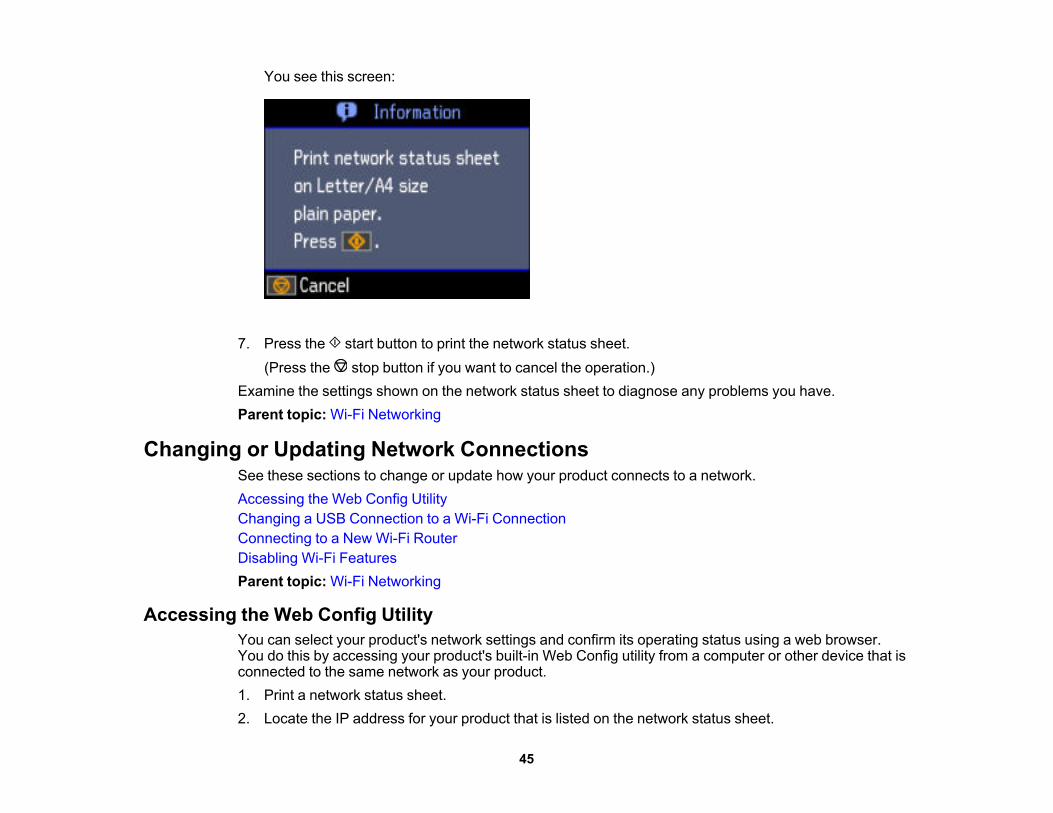
You see this screen:
7. Press the start button to print the network status sheet.(Press the stop button if you want to cancel the operation.)
Examine the settings shown on the network status sheet to diagnose any problems you have.Parent topic: Wi-Fi Networking
Changing or Updating Network ConnectionsSee these sections to change or update how your product connects to a network.Accessing the Web Config UtilityChanging a USB Connection to a Wi-Fi ConnectionConnecting to a New Wi-Fi RouterDisabling Wi-Fi FeaturesParent topic: Wi-Fi Networking
Accessing the Web Config UtilityYou can select your product's network settings and confirm its operating status using a web browser.You do this by accessing your product's built-in Web Config utility from a computer or other device that isconnected to the same network as your product.1. Print a network status sheet.2. Locate the IP address for your product that is listed on the network status sheet.

46
3. On a computer or other device connected to the same network as your product, open a webbrowser.
4. Enter your product's IP address into the address bar.You see the available Web Config utility options.
Parent topic: Changing or Updating Network ConnectionsRelated tasksPrinting a Network Status Sheet
Changing a USB Connection to a Wi-Fi ConnectionIf you have already connected your product to your computer using a USB connection, you can changeto a Wi-Fi connection.1. Disconnect the USB cable from your product.2. Uninstall your product software.3. Download and install your product software from the Epson website using the instructions on the
Start Here sheet.Parent topic: Changing or Updating Network ConnectionsRelated conceptsUninstall Your Product Software
Connecting to a New Wi-Fi RouterIf you change the wireless router you have been using on your network, you need to update yourproduct's Wi-Fi connection to the new router.
Note: If you switch to a 5 GHz wireless router, set the router to operate in dual band (2.4 GHz and5 GHz) mode. See your router documentation for instructions.
1. Do one of the following:• Windows: Uninstall your product software.• OS X: Go to the next step.
2. Download and install your product software from the Epson website using the instructions on theStart Here sheet.
Parent topic: Changing or Updating Network Connections

47
Related conceptsUninstall Your Product Software
Disabling Wi-Fi FeaturesYou may need to disable your product's Wi-Fi features if you change your network connection type orneed to solve a problem with your network connection.
Note: Before disabling Wi-Fi features, make a note of your product's SSID (network name) andpassword, and any network settings selected for the Epson Connect services you may use.
1. Press the home button, if necessary.2. Press the left or right arrow button to select Wi-Fi Setup and press the OK button.
You see this screen:
3. Press the up or down arrow button to select Disable Wi-Fi and press the OK button.4. Press the up or down arrow button to select Yes and press the OK button to disable Wi-Fi.Parent topic: Changing or Updating Network Connections

48
Loading PaperBefore you print, load paper for the type of printing you will do.Loading Paper for Documents and PhotosLoading EnvelopesPaper Loading CapacityAvailable Epson PapersBorderless Paper Type CompatibilityPaper or Media Type Settings - Control PanelPaper or Media Type Settings - Product Software
Loading Paper for Documents and PhotosYou can print documents and photos on a variety of paper types and sizes.1. Flip the feeder guard forward.
2. Pull up the paper support and its extension.

49
3. Pull out the output tray and open the paper stopper on the end.
Note: If you print on legal-size or longer paper, leave the paper stopper closed.
4. Slide the edge guide left.
5. If you are inserting a stack of paper, fan the sheets first and tap the stack on a flat surface to eventhe edges.
Note: Do not fan or curl photo paper.
50
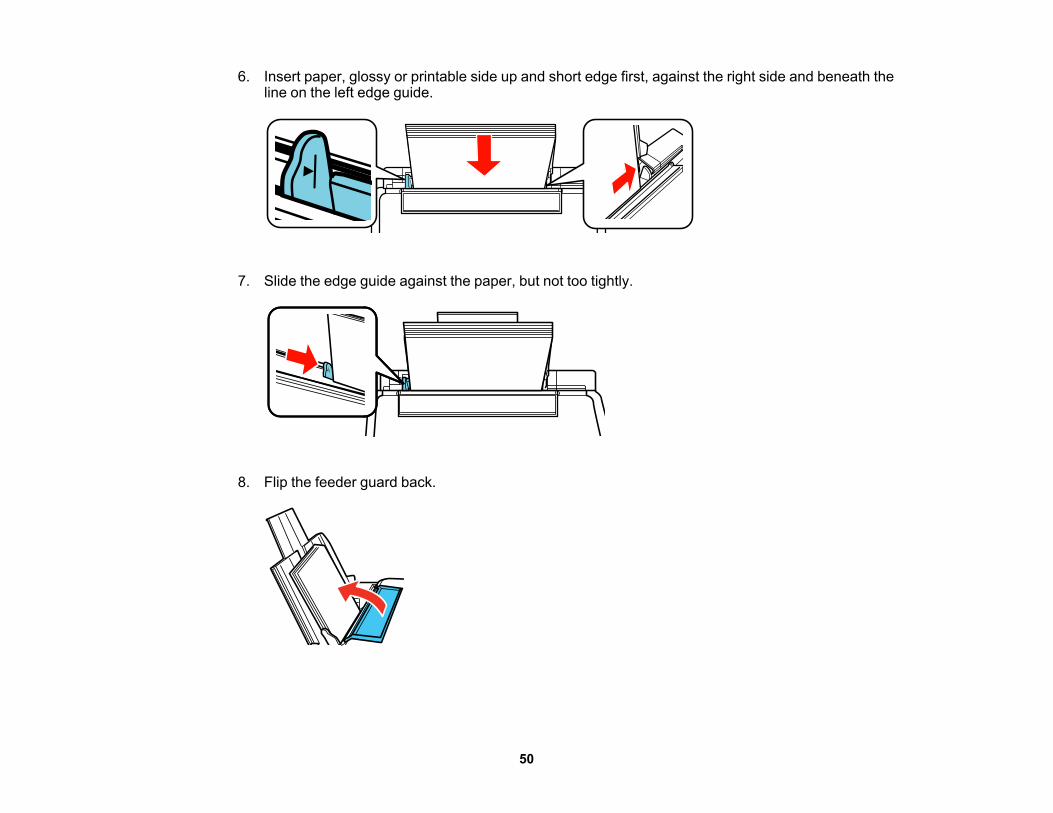
6. Insert paper, glossy or printable side up and short edge first, against the right side and beneath theline on the left edge guide.
7. Slide the edge guide against the paper, but not too tightly.
8. Flip the feeder guard back.

51
9. Do one of the following to select the size and type of paper you just loaded on the product LCDscreen:• To use the existing settings, press the OK button.• To change the settings, press the up or down arrow button to select Change and press the OK
button. Select the paper size and press the OK button, then select the paper type, press the OKbutton, and press the OK button again to confirm the settings.
Note: To prevent the paper setup screen from appearing automatically when you load paper, selectthe Setup > Printer Setup > Paper Source Settings > Paper Configuration setting and set it toOff. (This will also disable AirPrint.)
Always follow these paper loading guidelines:• Load only the recommended number of sheets.• Load paper short edge first, no matter which way your document faces.
• Load letterhead or pre-printed paper top edge first.• Do not load paper above the arrow mark inside the edge guide.• Check the paper package for any additional loading instructions.Parent topic: Loading PaperRelated referencesPaper Loading Capacity
Loading EnvelopesYou can print on plain paper envelopes in this size: No. 10 (4.1 × 9.5 inches [105 × 241 mm]).

52
1. Flip the feeder guard forward.
2. Pull up the paper support and its extension.3. Pull out the output tray and open the paper stopper.

53
4. Slide the edge guide left.
5. Load up to 10 envelopes printable side up and flap edge left, against the right side as shown.6. Slide the edge guide against the envelopes, but not too tightly.
7. Flip the feeder guard back.Always follow these envelope loading guidelines:• If you have trouble loading a stack of envelopes, press each envelope flat before loading it or load one
envelope at a time.• Do not load envelopes above the arrow mark inside the edge guide.

54
• Do not load envelopes that are curled, folded, or too thin, or that have plastic windows or exposedadhesive flaps.
Parent topic: Loading Paper
Paper Loading CapacityPaper type Load up to this many sheetsPlain paper - Letter (8.5 × 11 inches[216 × 279 mm]) or A4 (8.3 × 11.7 inches[210 × 297 mm])**
Approximately 100 sheets*
Epson Bright White PaperEpson Presentation Paper Matte
80 sheets
Epson Premium Presentation Paper MatteEpson Photo Paper GlossyEpson Premium Photo Paper GlossyEpson Ultra Premium Photo Paper GlossyEpson Premium Photo Paper Semi-gloss
20 sheets
Plain paper - Legal (8.5 × 14 inches[216 × 356 mm])Epson Ultra Premium Presentation Paper MatteEpson Premium Presentation Paper Matte Double-sidedEpson Brochure & Flyer Paper Matte Double-sidedEpson Photo Quality Self-adhesive SheetsEpson Iron-on Cool Peel Transfer paper
1 sheet
* Based on 20-lb (75-g/m²) paper weight. Do not load paper above the arrow mark inside the left edgeguide.** For two-sided printing, load up to 30 sheets.Parent topic: Loading Paper
55
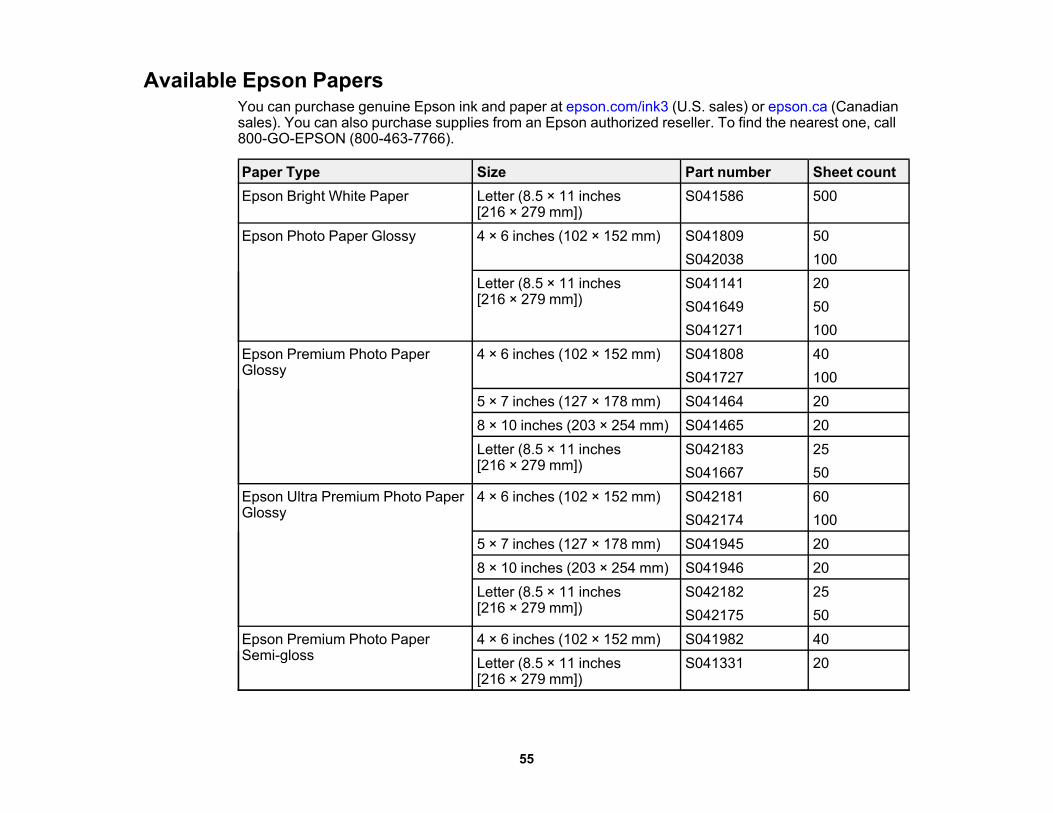
Available Epson PapersYou can purchase genuine Epson ink and paper at epson.com/ink3 (U.S. sales) or epson.ca (Canadiansales). You can also purchase supplies from an Epson authorized reseller. To find the nearest one, call800-GO-EPSON (800-463-7766).
Paper Type Size Part number Sheet countEpson Bright White Paper Letter (8.5 × 11 inches
[216 × 279 mm])S041586 500
Epson Photo Paper Glossy 4 × 6 inches (102 × 152 mm) S041809S042038
50100
Letter (8.5 × 11 inches[216 × 279 mm])
S041141S041649S041271
2050100
Epson Premium Photo PaperGlossy
4 × 6 inches (102 × 152 mm) S041808S041727
40100
5 × 7 inches (127 × 178 mm) S041464 208 × 10 inches (203 × 254 mm) S041465 20Letter (8.5 × 11 inches[216 × 279 mm])
S042183S041667
2550
Epson Ultra Premium Photo PaperGlossy
4 × 6 inches (102 × 152 mm) S042181S042174
60100
5 × 7 inches (127 × 178 mm) S041945 208 × 10 inches (203 × 254 mm) S041946 20Letter (8.5 × 11 inches[216 × 279 mm])
S042182S042175
2550
Epson Premium Photo PaperSemi-gloss
4 × 6 inches (102 × 152 mm) S041982 40Letter (8.5 × 11 inches[216 × 279 mm])
S041331 20

56
Paper Type Size Part number Sheet countEpson Presentation Paper Matte Letter (8.5 × 11 inches
[216 × 279 mm])S041062 100
Legal (8.5 × 14 inches[216 × 356 mm])
S041067 100
Epson Premium PresentationPaper Matte
8 × 10 inches (203 × 254 mm) S041467 50Letter (8.5 × 11 inches[216 × 279 mm])
S041257S042180
50100
Epson Premium PresentationPaper Matte Double-sided
Letter (8.5 × 11 inches[216 × 279 mm])
S041568 10
Epson Ultra Premium PresentationPaper Matte
Letter (8.5 × 11 inches[216 × 279 mm])
S041341 50
Epson Brochure & Flyer PaperMatte Double-sided
Letter (8.5 × 11 inches[216 × 279 mm])
S042384 150
Epson Photo Quality Self-adhesiveSheets
Letter (8.5 × 11 inches[216 × 279 mm])
S041106 10
Epson Iron-on Cool Peel Transferpaper
Letter (8.5 × 11 inches[216 × 279 mm])
S041153 10
Parent topic: Loading Paper
Borderless Paper Type CompatibilityYou can print borderless photos on compatible paper types in compatible sizes:
Borderless Paper Types• Epson Premium Photo Paper Glossy• Epson Ultra Premium Photo Paper Glossy• Epson Photo Paper Glossy• Epson Premium Photo Paper Semi-gloss• Epson Premium Presentation Paper Matte

57
Borderless Paper Sizes• 4 × 6 inches (102 × 152 mm)• 5 × 7 inches (127 × 178 mm)• A4 (8.3 × 11.7 inches [210 × 297 mm])• Letter (8.5 × 11 inches [216 × 279 mm])Parent topic: Loading Paper
Paper or Media Type Settings - Control PanelFor this paper Select this Paper Type settingPlain paperEpson Bright White PaperEpson Photo Quality Self-adhesive SheetsEpson Iron-on Cool Peel Transfer paper
plain papers
Epson Premium Photo Paper Glossy Prem. GlossyEpson Ultra Premium Photo Paper Glossy Ultra GlossyEpson Photo Paper Glossy GlossyEpson Premium Photo Paper Semi-gloss Prem. Semi-GlossEpson Presentation Paper MatteEpson Premium Presentation Paper MatteEpson Premium Presentation Paper Matte Double-sidedEpson Ultra Premium Presentation Paper MatteEpson Brochure & Flyer Paper Matte Double-sided
Prem. Matte
Envelope Envelope
Parent topic: Loading Paper

58
Paper or Media Type Settings - Product SoftwareFor this paper Select this Paper Type or Media Type settingPlain paperEpson Bright White PaperEpson Presentation Paper MatteEpson Photo Quality Self-adhesive SheetsEpson Iron-on Cool Peel Transfer paper
Plain Paper/Bright White Paper
Epson Ultra Premium Photo Paper Glossy Ultra Premium Photo Paper GlossyEpson Premium Photo Paper Glossy Premium Photo Paper GlossyEpson Premium Presentation Paper MatteEpson Premium Presentation Paper Matte Double-sidedEpson Ultra Premium Presentation Paper MatteEpson Brochure & Flyer Paper Matte Double-sided
Premium Presentation Paper Matte
Epson Premium Photo Paper Semi-gloss Premium Photo Paper Semi-glossEpson Photo Paper Glossy Photo Paper GlossyEnvelopes Envelope
Parent topic: Loading Paper

59
Placing Originals on the ProductFollow the instructions here to place your original documents or photos on the product.
Caution: Do not place anything on top of your product or use its cover as a writing surface to avoiddamaging it.
Placing Originals on the Scanner Glass
Placing Originals on the Scanner GlassYou can place originals up to this size on the scanner glass: Letter (8.5 × 11 inches [216 × 279 mm]) orA4 (8.3 × 11.7 inches [210 × 297 mm]).1. Open the document cover.

60
2. Place your original facedown on the scanner glass with the top facing into the corner. Slide theoriginal to the edges of the indicated corner.
Note: You can place multiple originals on the scanner glass. Just make sure they are at least0.8 inch (20 mm) away from each other.
Note: The edges of your original may be cropped by 0.06 inch (1.5 mm) from the edge of thescanner glass. If you are scanning in Full Auto mode or using thumbnail preview in another mode inEpson Scan, the edges of your original may be cropped by about 0.2 inch (4.5 mm) from the top andside edges. Manually position your original away from the edges to prevent cropping.

61
3. Close the document cover gently to keep your original in place.
Parent topic: Placing Originals on the ProductRelated topicsCopyingScanning

62
CopyingSee the information here to copy documents or photos using your product.
Note: Copies may not be exactly the same size as your originals.
Copying Documents or PhotosCopying and Restoring Photos
Copying Documents or PhotosYou can copy color or black-and-white documents or photos onto various sizes and types of paper,including Epson special papers.1. Place your original document or photo on the product.2. Load the paper you want to print on in the product.
3. Press the home button, if necessary.4. Press the left or right arrow button, select Copy, and press the OK button.
You see this screen:
5. To print more than one copy, press the + or – button to select the number (up to 99).

63
6. Press the left or right arrow button to select one of the following:• Color: for color copies• B&W: for black-and-white copies
7. Press the down arrow button and then press the OK button to view the print settings for the copies.You see this screen:
8. Press the up or down arrow button to view additional settings. To change the print settings, press theleft or right arrow button and select the necessary settings.
9. When you are ready to copy, press the start button.
Note: To cancel copying, press the stop button.
Paper Size Settings - CopyingCopying OptionsParent topic: CopyingRelated tasksPlacing Originals on the Scanner GlassRelated topicsLoading Paper
64
Paper Size Settings - CopyingSelect the Paper Size setting that matches the paper you loaded.You can copy on these paper sizes.• 4 × 6 inches (102 × 152 mm)• 5 × 7 inches (127 × 178 mm)• Letter (8.5 × 11 inches [216 × 279 mm])• A4 (8.3 × 11.7 inches [210 × 297 mm])Parent topic: Copying Documents or Photos
Copying OptionsSelect the copying options you want to use for your copies.
Note: Not all options or settings may be available, depending on other copying settings.
Copying option Available settings DescriptionDensity Various levels Adjusts the lightness or darkness of copiesLayout Borderless Expands the image to the edge of the paper
(slight cropping may occur)With Border Leaves a small margin around the imageA4, 2-up Copy Copies 2 originals onto a single A4-size sheetLetter, 2-up Copy Copies 2 originals onto a single letter-size sheetA4, Book/2-up Copies 2 pages of a book or magazine onto a
single A4-size sheetLetter, Book/2-up Copies 2 pages of a book or magazine onto a
single letter-size sheetReduce/Enlarge Actual Size Copies at 100% size, unless you select a
different percentage as the Custom Size settingAuto Fit Page Automatically sizes the image to fit the selected
paper size settingCustom Size Automatically sizes the image by the percentage
you select (25 to 400%)

65
Copying option Available settings DescriptionPaper Size Various sizes Selects the paper size for the copy printoutPaper Type Various types Adjusts printer settings for the selected paper
typeQuality Best Provides best quality for photo copies
Standard Provides good quality for most copiesDraft Provides lower quality for draft copies
Parent topic: Copying Documents or Photos
Copying and Restoring PhotosYou can restore the colors in faded photos as you copy them.1. Place your original document or photo on the product.2. Load photo paper in the product.
3. Press the home button, if necessary.4. Press the left or right arrow button, select More Functions, and press the OK button.5. Select Copy/Restore Photos and press the OK button.
You see this screen:
6. Press the down arrow button to select On and press the OK button.

66
7. Place up to two original photos on the product.
Note: Press the up or down arrow button for instructions on placing your photos on the product.
8. Press the start button.You see this screen:
9. Press the left or right arrow button to scroll through your photos and display one that you want tocopy.
10. Press the + or – button to select one or more copies of the photo (up to 99).11. If you placed two originals on the scanner, press the left or right arrow button to view the second
original, then press the + or – button to select one or more copies of the photo (up to 99).12. To select settings for the photos, press the down arrow button.

67
You see this screen:
13. Do one of the following:• To change the display setting for the LCD screen, select Display Options, press the OK button,
and select the setting you want.• To change the print settings, select Print Settings, press the OK button, and select the necessary
settings.• To crop or zoom into your photo, select Crop/Zoom, press the OK button, and press the arrow
buttons and the + or – button to adjust the selection area and location.14. When you are ready to print, press the start button.
Note: To cancel printing, press the stop button.
Parent topic: CopyingRelated referencesPaper Size Settings - CopyingCopying OptionsRelated tasksPlacing Originals on the Scanner GlassRelated topicsLoading Paper

68
Printing from a ComputerBefore printing from your computer, make sure you have set up your product and installed its softwareas described on the Start Here sheet.
Note: If you have an Internet connection, it is a good idea to check for updates to your product softwareon Epson's support website. If you see a Software Update screen, select Enable automatic checkingand click OK. The update scans your system to see if you have the latest product software. Follow theon-screen instructions.
Printing with WindowsPrinting with OS XCancelling Printing Using a Product Button
Printing with WindowsYou can print with your product using any Windows application, as described in these sections.Selecting Basic Print Settings - WindowsSelecting Double-sided Printing Settings - WindowsSelecting Additional Layout and Print Options - WindowsSelecting a Printing Preset - WindowsSelecting Extended Settings - WindowsPrinting Your Document or Photo - WindowsSelecting Default Print Settings - WindowsChanging Automatic Update OptionsParent topic: Printing from a Computer
Selecting Basic Print Settings - WindowsSelect the basic settings for the document or photo you want to print.1. Open a photo or document for printing.2. Select the print command in your application.
Note: You may need to select a print icon on your screen, the Print option in the File menu, oranother command. See your application's help utility for details.
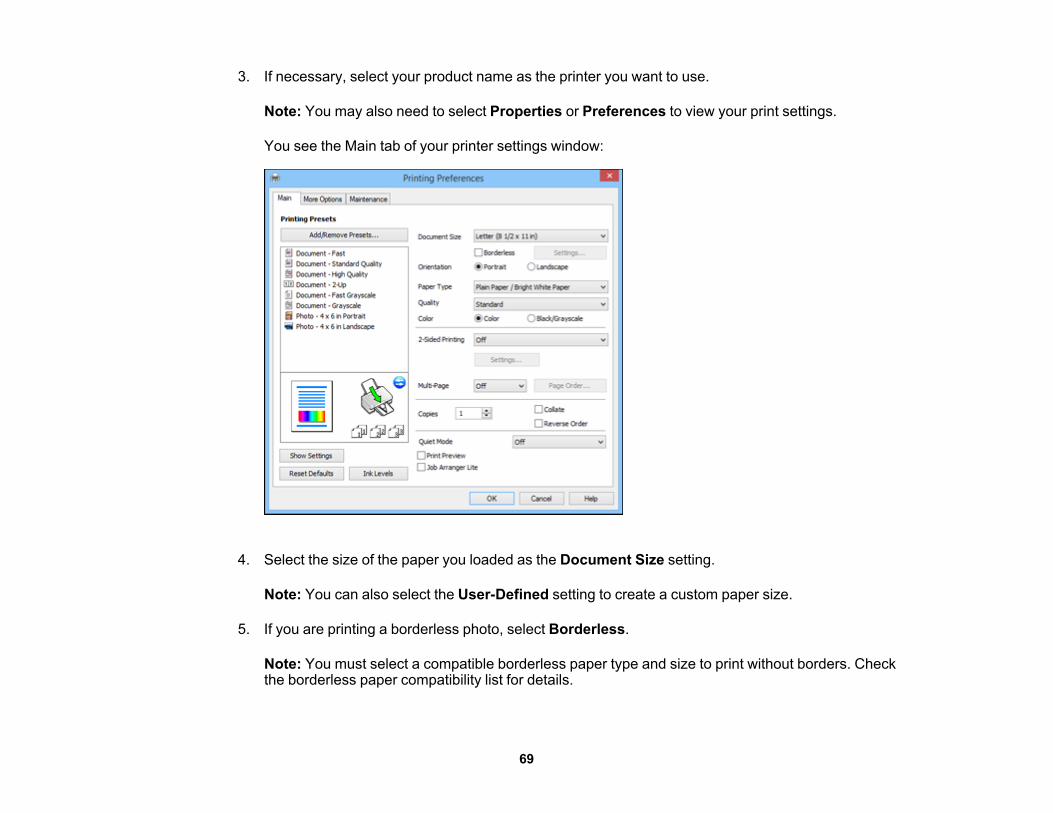
69
3. If necessary, select your product name as the printer you want to use.
Note: You may also need to select Properties or Preferences to view your print settings.
You see the Main tab of your printer settings window:
4. Select the size of the paper you loaded as the Document Size setting.
Note: You can also select the User-Defined setting to create a custom paper size.
5. If you are printing a borderless photo, select Borderless.
Note: You must select a compatible borderless paper type and size to print without borders. Checkthe borderless paper compatibility list for details.
70
6. Select the orientation of your document.
Note: If you are printing an envelope, select Landscape.
7. Select the type of paper you loaded as the Paper Type setting.
Note: The setting may not exactly match the name of your paper. Check the paper type settings listfor details.
8. Select the Quality setting that matches the print quality you want to use.9. Select a Color option:
• To print a color document or photo, select the Color setting.• To print text and graphics in black or shades of gray, select the Black/Grayscale setting.
10. To print on both sides of the paper, select a 2-Sided Printing option and select the settings youwant.
11. To print multiple pages on one sheet of paper, or print one image on multiple sheets of paper, selectone of the settings in the Multi-Page menu and select the printing options you want.
12. To print multiple copies and arrange their print order, select the Copies options.13. To preview your job before printing, select Print Preview.14. To save your print job as a project that can be modified and combined with other print jobs, select
Job Arranger Lite.15. To reduce noise during printing when you select Plain Paper/Bright White Paper and the Standard
Quality setting, select Quiet Mode (printing will be slower).Print Quality Options - WindowsMulti-Page Printing Options - WindowsParent topic: Printing with WindowsRelated referencesBorderless Paper Type CompatibilityPaper or Media Type Settings - Product SoftwareRelated tasksPrinting Your Document or Photo - Windows

71
Print Quality Options - WindowsYou can select any of the available Quality options to fine-tune the quality of your print. Some settingsmay be unavailable, depending on the paper type and border setting you have chosen.Draft
For draft printing on plain paper.Standard
For everyday text and image printing.High
For photos and graphics with high print quality.More Settings
Opens a window that lets you choose among levels of speed and quality.Parent topic: Selecting Basic Print Settings - Windows
Multi-Page Printing Options - WindowsYou can select any of the available options in the Multi-Page menu to set up your multi-page print job.2-Up and 4-Up
Prints 2 or 4 pages on one sheet of paper. Click the Page Order button to select page layout andborder options.
2×1 Poster, 2×2 Poster, 3×3 Poster, 4×4 PosterPrints one image on multiple sheets of paper to create a larger poster. Click the Settings button toselect image layout and guideline options.
Parent topic: Selecting Basic Print Settings - Windows
Selecting Double-sided Printing Settings - WindowsYou can print on both sides of the paper by selecting one of the 2-Sided Printing options on the Maintab.

72
1. Select one of the following options for 2-Sided Printing:• Manual (Long-edge binding) to print your double-sided print job by printing one side and
prompting you to flip the paper over on the long edge to print the other side.• Manual (Short-edge binding) to print your double-sided print job by printing one side and
prompting you to flip the paper over on the short edge to print the other side.2. Click the Settings button.
You see this window:
3. Select the double-sided printing options you want to use.4. Click OK to return to the Main tab.5. Print a test copy of your double-sided document to test the selected settings.6. Follow any instructions displayed on the screen during printing.Double-sided Printing Options - Windows

73
Parent topic: Printing with WindowsDouble-sided Printing Options - Windows
You can select any of the double-sided options to set up your double-sided print job.Binding Edge Options
Select a setting that orients double-sided print binding in the desired direction.Binding Margin Options
Select options that define a wider margin to allow for binding.Booklet Option
Select a binding option to use when creating a folded booklet.Parent topic: Selecting Double-sided Printing Settings - Windows
Selecting Additional Layout and Print Options - WindowsYou can select a variety of additional layout and printing options for your document or photo on the MoreOptions tab.

74
1. To change the size of your printed document or photo, select the Reduce/Enlarge Documentcheckbox and select one of these sizing options:• Select the Fit to Page option to size your image to fit the paper you loaded. Select the size of your
document or photo as the Document Size setting, and the size of your paper as the OutputPaper setting. If you want to center your image on the paper, select the Center option.
• Select the Zoom to option to reduce or enlarge your document or photo by a specific percentage.Select the percentage in the % menu.
2. Select one of the following Color Correction options:• Select Automatic to automatically adjust the sharpness, brightness, contrast, and color saturation
for your image.• Select Custom and click the Advanced button to manually adjust the color correction settings or
turn off color management in your printer software.• Select Image Options to access additional settings for improving printed images.
3. To add the following features, click the Watermark Features button:• Watermark: adds a visible watermark to your printout
Note: Click the Add/Delete button to create your own watermark, and click the Settings button tocustomize the watermark.
• Header/Footer: adds information such as the date and time to the top or bottom of your printout
Note: Click the Settings button to customize the text and location of the header or footer.
4. Select any of the Additional Settings options to customize your print.Custom Color Correction Options - WindowsImage Options and Additional Settings - WindowsHeader/Footer Settings - WindowsParent topic: Printing with Windows

75
Custom Color Correction Options - WindowsYou can select any of the available options in the Color Correction window to customize the image colorsfor your print job.
Color ControlsLets you select a Color Mode setting, individual settings for Brightness, Contrast, Saturation, andDensity, and individual color tones. Depending on the selected color mode, you can also adjust themidtone density using the Gamma setting.
Fix PhotoImproves the color, contrast, and sharpness of flawed photos.
Note: Fix Photo uses a sophisticated face recognition technology to optimize photos that includefaces. For this to work, both eyes and the nose must be visible in the subject's face. If your photoincludes a face with an intentional color cast, such as a statue, you may want to turn off Fix Photo toretain the special color effects.

76
ICMLets you manage color using installed color printing profiles.
No Color AdjustmentTurns off color management in your printer software so you can manage color using only yourapplication software.
Parent topic: Selecting Additional Layout and Print Options - WindowsImage Options and Additional Settings - Windows
You can select any of the Image Options and Additional Settings to customize your print. Some optionsmay be pre-selected or unavailable, depending on other settings you have chosen.
Image OptionsEmphasize Text
Adjusts the weight of printed text to increase readability.Emphasize Thin Lines
Adjusts the weight of printed lines to increase visibility.Edge Smoothing
Smooths jagged edges in low-resolution images such as screen captures or images from the Web.Fix Red-Eye
Reduces or removes red-eye in photos.Print Text in Black
Prints colored text in black.For Color Text
Prints colored text on a background pattern or underlined.For Color Graphs and Images
Prints colored graphics and images with overlay patterns.For Color Text, Graphs, and Images
Prints colored text, graphics, and images with overlay patterns.
Additional Settings OptionsRotate 180º
Prints the image rotated 180º from its original orientation.High Speed
Speeds up printing but may reduce print quality.
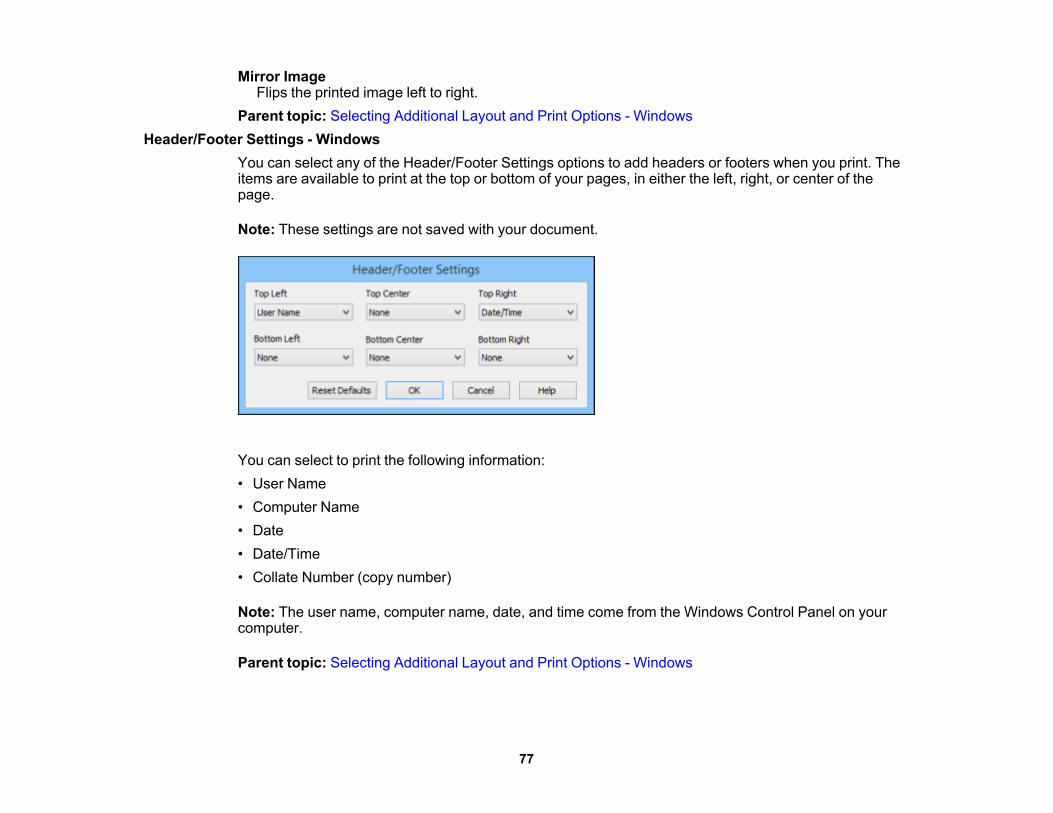
77
Mirror ImageFlips the printed image left to right.
Parent topic: Selecting Additional Layout and Print Options - WindowsHeader/Footer Settings - Windows
You can select any of the Header/Footer Settings options to add headers or footers when you print. Theitems are available to print at the top or bottom of your pages, in either the left, right, or center of thepage.
Note: These settings are not saved with your document.
You can select to print the following information:• User Name• Computer Name• Date• Date/Time• Collate Number (copy number)
Note: The user name, computer name, date, and time come from the Windows Control Panel on yourcomputer.
Parent topic: Selecting Additional Layout and Print Options - Windows
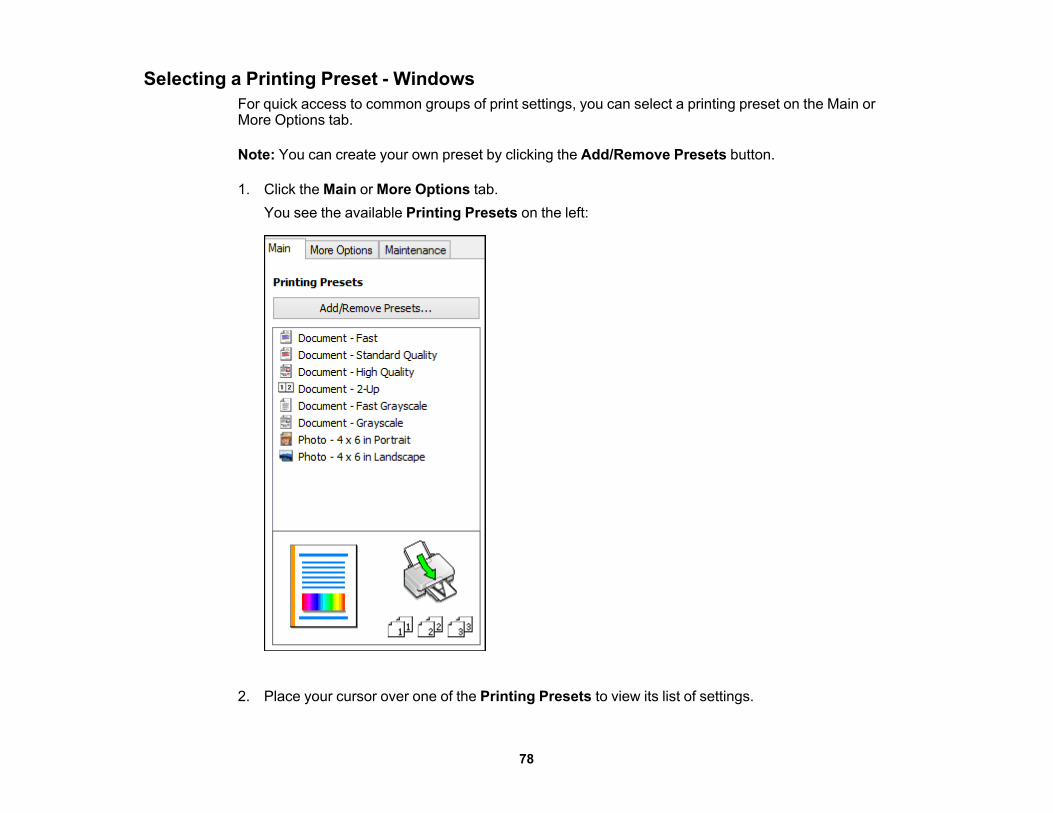
78
Selecting a Printing Preset - WindowsFor quick access to common groups of print settings, you can select a printing preset on the Main orMore Options tab.
Note: You can create your own preset by clicking the Add/Remove Presets button.
1. Click the Main or More Options tab.You see the available Printing Presets on the left:
2. Place your cursor over one of the Printing Presets to view its list of settings.
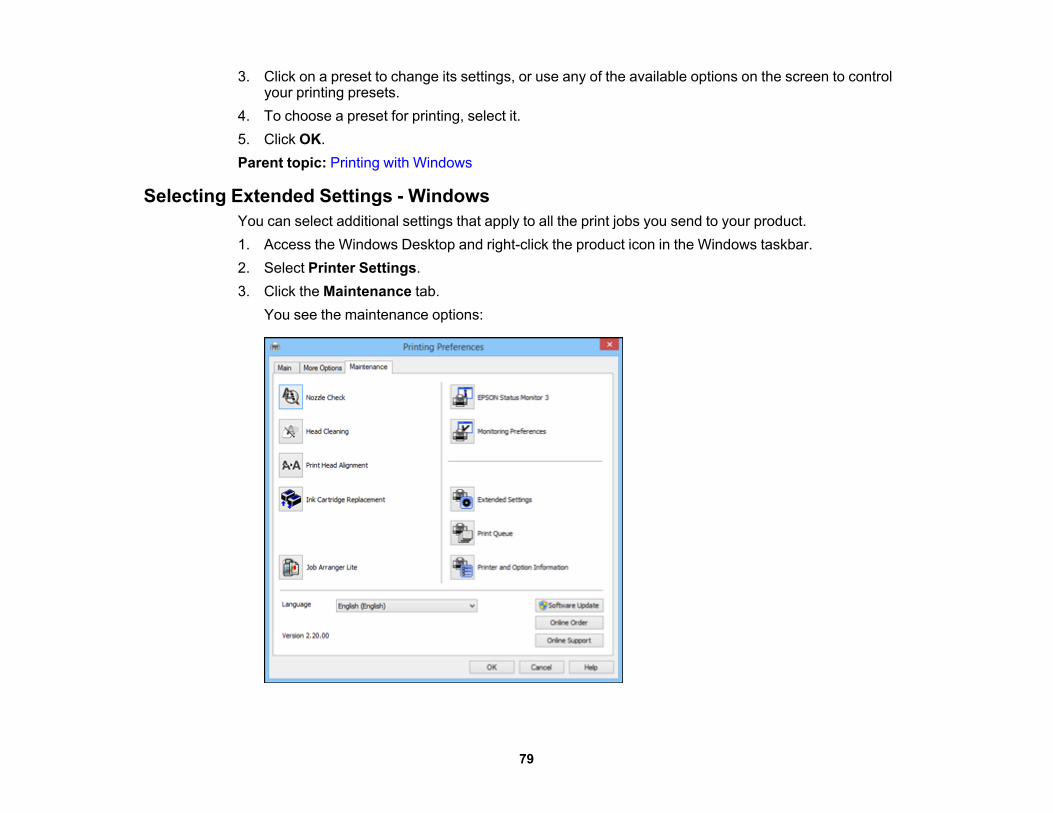
79
3. Click on a preset to change its settings, or use any of the available options on the screen to controlyour printing presets.
4. To choose a preset for printing, select it.5. Click OK.Parent topic: Printing with Windows
Selecting Extended Settings - WindowsYou can select additional settings that apply to all the print jobs you send to your product.1. Access the Windows Desktop and right-click the product icon in the Windows taskbar.2. Select Printer Settings.3. Click the Maintenance tab.
You see the maintenance options:

80
4. Click the Extended Settings button.You see this window:
5. Select any of the extended settings to customize your print.6. Click OK to close the Extended Settings window.7. Click OK to close the printer software window.Extended Settings - WindowsParent topic: Printing with Windows
Extended Settings - WindowsYou can select from these settings on the Extended Settings window.Show Progress Meter
Displays the progress of print jobs as they are being printed.Enable EPSON Status Monitor 3
Enables product monitoring for ink and paper supplies and other issues.Separator Page
Before each document, prints a separator page containing the title, user, date, and time.Always Spool RAW Datatype
Increases print speed and may solve other printing problems.
81
Page Rendering ModeIncreases print speed when printing is extremely slow or the print head stops during printing.
Print as BitmapIncreases print speed when printing is extremely slow or the print head stops during printing, andother settings do not help.
Skip Blank PageEnsures that your product does not print pages that contain no text or images.
Change Standard ResolutionReduces the resolution of print data to correct printing problems.
Refine screening patternPrints graphics with a finer screening pattern.
Allow Applications to Perform ICM Color MatchingAllows applications to perform ICM color matching.
Always Use the Driver's Paper Source SettingPrints using the paper source setting in the printer driver, rather than the setting in your application.
Parent topic: Selecting Extended Settings - Windows
Printing Your Document or Photo - WindowsOnce you have selected your print settings, you are ready to save your settings and print.1. Click OK to save your settings.

82
You see your application's Print window, such as this one:
2. Click OK or Print to start printing.Checking Print Status - WindowsParent topic: Printing with Windows

83
Checking Print Status - WindowsDuring printing, you see this window showing the progress of your print job. It allows you to controlprinting and check ink cartridge status.
• To cancel printing, click Cancel.• To see print jobs waiting to print, click Print Queue.• To check ink status, click Consumables Status.Parent topic: Printing Your Document or Photo - Windows
Selecting Default Print Settings - WindowsWhen you change your print settings in a program, the changes apply only while you are printing in thatprogram session. If you want to change the print settings you use in all your Windows programs, you canselect new default print settings.1. Access the Windows Desktop and right-click the product icon in the Windows taskbar.2. Select Printer Settings.

84
You see the printer settings window:
3. Select the print settings you want to use as defaults in all your Windows programs.4. Click OK.These settings are now the defaults selected for printing. You can still change them as needed forprinting in any program session.Changing the Language of the Printer Software ScreensParent topic: Printing with Windows
Changing the Language of the Printer Software ScreensYou can change the language used on the Windows printer software screens.1. Access the Windows Desktop and right-click the product icon in the Windows taskbar.2. Select Printer Settings.
You see the printer settings window.

85
3. Click the Maintenance tab.You see the maintenance options:
4. Select the language you want to use as the Language setting.5. Click OK to close the printer software window.The printer software screens appear in the language you selected the next time you access them.Parent topic: Selecting Default Print Settings - Windows
Changing Automatic Update OptionsYour printer software for Windows automatically checks for updates to the product software. You canchange how often the software checks for updates or disable this feature.1. Access the Windows Desktop and right-click the product icon in the Windows taskbar.2. Select Software Update Settings.

86
You see this window:
3. Do one of the following:• To change how often the software checks for updates, select a setting in the Check every menu.• To disable the automatic update feature, select the Never option.
4. Click OK to exit.
Note: If you choose to disable the automatic update feature, you can check for updates manually.
Parent topic: Printing with WindowsRelated tasksChecking for Software Updates
Printing with OS XYou can print with your product using any OS X printing program, as described in these sections.
Note: If you have an Internet connection, it is a good idea to check for updates to your product softwareon Epson's support website.
Selecting Basic Print Settings - OS XSelecting Page Setup Settings - OS XSelecting Print Layout Options - OS X

87
Managing Color - OS XSelecting Printing Preferences - OS XPrinting Your Document or Photo - OS XParent topic: Printing from a Computer
Selecting Basic Print Settings - OS XSelect the basic settings for the document or photo you want to print.1. Open a photo or document for printing.2. Select the print command in your application.
Note: You may need to select a print icon on your screen, the Print option in the File menu, oranother command. See your application's help utility for details.
3. Select your product as the Printer setting.
4. If necessary, click the arrow next to the Printer setting or the Show Details button to expand theprint window.

88
You see the expanded printer settings window for your product:
Note: The print window may look different, depending on the version of OS X and the applicationyou are using.
5. Select the Copies and Pages settings as necessary.
Note: If you do not see these settings in the print window, check for them in your application beforeprinting.

89
6. Select the page setup options: Paper Size and Orientation.
Note: If you do not see these settings in the print window, check for them in your application beforeprinting. They may be accessible by selecting Page Setup from the File menu.
7. Select any application-specific settings that appear on the screen, such as those shown in the imageabove for the Preview application.
8. Select Print Settings from the pop-up menu.
You see these settings:

90
9. Select the type of paper you loaded as the Media Type setting.
Note: The setting may not exactly match the name of your paper. Check the paper type settings listfor details.
10. Select the Print Quality setting you want to use.11. Select any of the available print options.Print Quality Settings - OS XPrint Options - OS XParent topic: Printing with OS XRelated referencesPaper or Media Type Settings - Product SoftwareRelated tasksSelecting Page Setup Settings - OS XSelecting Print Layout Options - OS XPrinting Your Document or Photo - OS X
Print Quality Settings - OS XYou can select any of the print quality settings to fine-tune the quality of your print. Some settings maybe unavailable, depending on the paper type and border setting you have chosen.Draft
For draft printing on photo paper.Fast Economy
For the fastest printing with draft quality.Economy
For fast printing with reduced quality.Normal
For everyday text and image printing.Fine
For text and graphics with good quality and print speed.Quality
For photos and graphics with good quality and print speed.High Quality
For photos and graphics with high print quality.

91
Best QualityFor the best print quality, but the slowest print speed.
Parent topic: Selecting Basic Print Settings - OS XPrint Options - OS X
You can select any of the print options to customize your print. Some options may be unavailable,depending on other settings you have chosen.Expansion
If you selected a borderless paper size setting, this option adjusts the image expansion settings tocontrol printing at the edges of borderless prints.
GrayscalePrints text and graphics in black or shades of gray.
Mirror ImageLets you flip the printed image horizontally.
Note: If you select the Min option for the Expansion setting, you may see white borders on your printedphoto.
Parent topic: Selecting Basic Print Settings - OS X
Selecting Page Setup Settings - OS XDepending on your application, you may be able to select the paper size and orientation settings fromthe print window.
Note: If you do not see these settings in the print window, check for them in your application beforeprinting. They may be accessible by selecting Page Setup from the File menu.
1. Select the size of the paper you loaded as the Paper Size setting. If you are printing a borderlessphoto, select the Borderless checkbox or a paper size with a Borderless option. You can also

92
select a custom setting to create a custom paper size, but the Quality setting will be limited toNormal.
Note: You must select a compatible borderless paper type and size to print without borders. Checkthe borderless paper compatibility list for details.
2. Select the orientation of your document or photo as shown in the print window.
Note: If you are printing an envelope, select the icon.
Note: You can reduce or enlarge the size of the printed image by selecting Paper Handling from thepop-up menu and selecting a scaling option.
Parent topic: Printing with OS XRelated referencesBorderless Paper Type Compatibility
Selecting Print Layout Options - OS XYou can select a variety of layout options for your document or photo by selecting Layout from the pop-up menu on the print window.

93
• To print multiple pages on one sheet of paper, select the number of pages in the Pages per Sheetpop-up menu. To arrange the print order of the pages, select a Layout Direction setting.
• To print borders around each page on the sheet, select a line setting from the Border pop-up menu.• To invert or flip the printed image, select the Reverse page orientation or Flip horizontally settings.Parent topic: Printing with OS X
Managing Color - OS XYou can adjust the Color Matching and Color Options settings to fine-tune the colors in your printout, orturn off color management in your printer software.1. Select Color Matching from the pop-up menu in the print window.
2. Select one of the available options.3. Select Color Options from the pop-up menu in the print window.

94
Note: The available settings on the Color Options menu depend on the option you selected on theColor Matching menu.
4. Select one of the available options.Color Matching and Color Options - OS XParent topic: Printing with OS X
Color Matching and Color Options - OS XYou can select from these settings on the Color Matching and Color Options menus.
Color Matching SettingsEPSON Color Controls
Lets you manage color using controls in your printer software or turn off color management.ColorSync
Prints using standard color profiles for your product and paper to help match image colors. You cancustomize the conversion method and filter settings on the ColorSync pop-up menu in the printwindow.
Color Options SettingsManual Settings
Lets you select manual color adjustments. Click the arrow next to Advanced Settings and selectsettings for Brightness, Contrast, Saturation, and individual color tones. You can also select a colorMode setting for printing photos and graphics and the Fix Red-Eye setting to reduce or remove red-eye in photos. Depending on the selected color mode, you can also adjust the midtone density usingthe Gamma setting.
Fix PhotoImproves the color, contrast, and sharpness of flawed photos. Click the arrow next to AdvancedSettings and select the Fix Red-Eye setting to reduce or remove red-eye in photos.
Note: Fix Photo uses a sophisticated face recognition technology to optimize photos that includefaces. For this to work, both eyes and the nose must be visible in the subject's face. If your photoincludes a face with an intentional color cast, such as a statue, you may want to turn off Fix Photo toretain the special color effects.
Off (No Color Adjustment)Turns off color management in your printer software so you can manage color using only yourapplication software.

95
Note: An ICC profile is required if color management is turned off.
Parent topic: Managing Color - OS X
Selecting Printing Preferences - OS XYou can select printing preferences that apply to all the print jobs you send to your product.1. In the Apple menu or the Dock, select System Preferences.2. Select Print & Fax, Print & Scan, or Printers & Scanners, select your product, and select Options
& Supplies.3. Select Driver or Options.
You see a screen like this:
4. Select any of the available printing preferences.5. Click OK.Printing Preferences - OS XParent topic: Printing with OS X

96
Printing Preferences - OS XYou can select from these settings on the Options or Driver tab.Skip Blank Page
Ensures that your product does not print pages that contain no text or images.Quiet Mode
Lessens noise during printing when you select Plain Paper/Bright White Paper as the paper Type orMedia Type setting.
Permit temporary black printingAllows you to print using black ink when color ink is expended.
High Speed PrintingSpeeds up printing but may reduce print quality.
Warning NotificationsLets you choose whether or not to receive warning notifications from the printer software for variousoperating conditions.
Establish bidirectional communicationAllows the product to communicate with the computer. Do not change the default setting unless youexperience issues when using a shared printing pool.
Parent topic: Selecting Printing Preferences - OS X
Printing Your Document or Photo - OS XOnce you have selected your print settings, you are ready to print.

97
Click Print at the bottom of the print window.
Checking Print Status - OS XParent topic: Printing with OS X
Checking Print Status - OS XDuring printing, you can view the progress of your print job, control printing, and check ink status.1. Click the printer icon when it appears in the Dock.
You see the print status window:

98
2. Select the following options as necessary for your version of OS X:
• To cancel printing, click the print job and click or Delete.
• To pause a print job, click the print job and click or Hold. To resume a print job, click thepaused print job and click or Resume.
• To pause printing for all queued print jobs, click Pause or Pause Printer.• To display other printer information, click Settings or Supply Levels.
Parent topic: Printing Your Document or Photo - OS X
Cancelling Printing Using a Product ButtonIf you need to cancel printing, press the stop button on your product.Parent topic: Printing from a Computer

99
ScanningYou can scan original documents or photos and save them as digital files.Starting a ScanSelecting Epson Scan SettingsScanning with OS X Using Image CaptureScanning from Smart DevicesScanning Special Projects
Starting a ScanAfter placing your original documents or photos on your product for scanning, start scanning using one ofthese methods.Starting a Scan Using the Product Control PanelStarting a Scan Using the Epson Scan IconStarting a Scan from a Scanning ProgramParent topic: Scanning
Starting a Scan Using the Product Control PanelYou can scan an image to your computer using your product's control panel buttons.Your product automatically selects suitable default scan settings, but you can view or change them asnecessary.1. Make sure you installed the product software and connected the product to your computer or
network.
Note: Restart your computer after installing the product software to enable scanning from the controlpanel. Also make sure the Event Manager program is not being blocked by your firewall or securitysoftware.
2. Press the home button, if necessary.3. Press the left or right arrow button to select Scan and press the OK button.

100
The scan options are displayed:
4. Press the left or right arrow button to select a scan option and press the OK button.• Scan to Memory Card saves your scan file on a memory card and lets you select the file format,
quality, and other settings.• Scan to Cloud saves your scan to a designated cloud account.
Note: To use this feature, you must have registered a cloud account with Epson Connect.
• Scan to Computer (JPEG) saves your scan file directly to your computer.• Scan to Computer (PDF) saves your scan as a PDF file to your computer.• Scan to Computer (Email) scans your original and attaches it to a message in your e-mail
program. You can select the e-mail program you want to use and resize your image, if necessary,from an option screen on your computer.
Note: This works with MAPI-type email such as Microsoft Outlook, Windows Live Mail, Mac Mail,and Entourage, but not web-based email such as Gmail.
• Scan to Computer (WSD) lets you manage wireless scanning in Windows 8.x, Windows 7, orWindows Vista (English only).
Note: To use this feature, you must first set up WSD (Web Services for Devices) on the computeryou want to scan to.

101
5. To scan to your computer, select how you connected your product to your computer:• If your product is connected directly to your computer with a USB cable, select USB Connection.• If your product is connected to your computer over a network, select the computer name from the
list.6. Press the start button to start scanning.Changing Default Scan Button SettingsParent topic: Starting a ScanRelated tasksUsing Epson Scan to CloudInserting a Memory Card
Changing Default Scan Button SettingsYou can view or change the default scan settings your product uses when you scan to your computerusing the product buttons. You do this using the Event Manager program.1. Do one of the following to open Event Manager:
• Windows 10: Click , select All apps, and select Event Manager.• Windows 8.x: Navigate to the Apps screen and select Event Manager.
• Windows (other versions): Click or Start > All Programs or Programs > EPSON Software> Event Manager.
• OS X: Open the Applications folder, click Epson Software, and click Event Manager.2. Open the Scanner (Windows) or Select Scanner (OS X) drop-down list and select your product, if
necessary.3. Click Make Job Settings.4. Open the Edit Job Settings drop-down list and select the scan button settings you want to view or
change.5. Change the settings as necessary.6. Click OK.7. Click Close to close the Event Manager window.Parent topic: Starting a Scan Using the Product Control Panel
102
Starting a Scan Using the Epson Scan IconYou can start the Epson Scan program to select scan settings, scan, and save the scanned image to afile.
• Windows 10: Click and select All apps. Select EPSON Software, then select EPSON Scan.• Windows 8.x: Navigate to the Apps screen and select EPSON Scan under EPSON or EPSON
Software.
• Windows (other versions): Click or Start, and select All Programs or Programs. Select EPSONor EPSON Software and click EPSON Scan.
• OS X: Open the Applications folder, open the Epson Software folder, and double-click the EPSONScan icon.
Note: With OS X, in addition to scanning with Image Capture, you can download and install EpsonScan scanning software. Epson Scan provides additional image adjustment and photo correctionfeatures for enhancing scanned images, and provides an interface for TWAIN-compliant OCRscanning software. To download Epson Scan, visit Epson's driver download site (U.S. downloads orCanadian downloads).
Note: In OS X 10.11, if you see a message asking if you want to use TWAIN to scan with yourproduct, select Yes to scan using Epson Scan.

103
You see an Epson Scan window like this:
Parent topic: Starting a ScanRelated tasksScanning with OS X Using Image CaptureRelated topicsSelecting Epson Scan Settings

104
Starting a Scan from a Scanning ProgramYou can start Epson Scan from a scanning program to select scan settings, scan, and open the scannedimage in the program.
Note: With OS X, in addition to scanning with Image Capture, you can download and install Epson Scanscanning software. Epson Scan provides additional image adjustment and photo correction features forenhancing scanned images, and provides an interface for TWAIN-compliant OCR scanning software. Todownload Epson Scan, visit Epson's driver download site (U.S. downloads or Canadian downloads).
1. Open your scanning program and select its scanning option. (See your scanning program help forinstructions.)
2. Select your product.
Note: In certain programs, you may need to select your product as the "source" first. If you see aSelect Source option, choose it and select your product. With Windows, do not select a WIA optionfor your product; it will not work correctly.

105
You see an Epson Scan window like this:
Note: Epson Scan may start in a different mode when you first access it.
Parent topic: Starting a Scan

106
Related tasksScanning with OS X Using Image CaptureRelated topicsSelecting Epson Scan Settings
Selecting Epson Scan SettingsAfter starting Epson Scan, you can select settings in various modes to customize your scan.Scan ModesSelecting the Scan ModeScanning in Full Auto ModeScanning in Home ModeScanning in Office ModeScanning in Professional ModeImage Preview GuidelinesScan Resolution GuidelinesSelecting Scan File SettingsParent topic: Scanning
Scan ModesEpson Scan provides a choice of scan modes with different levels of control over your settings.Full Auto Mode
This mode automatically detects the type of content you are scanning, selects settings for it, andsaves your scanned image. You can also select various image adjustment options.
Home ModeYou can select setting groups based on the type of content you are scanning. You can also selectvarious image adjustment options, and preview and size your scanned image.
Office ModeYou can quickly scan text documents and adjust them on a preview screen. You can also selectvarious image adjustment options and preview your scanned image.
Professional ModeYou can manually customize all available settings, and preview and size your scanned image.
Parent topic: Selecting Epson Scan Settings

107
Related tasksSelecting the Scan Mode
Selecting the Scan ModeSelect the Epson Scan mode you want to use from the Mode box in the upper right corner of the EpsonScan window:
Parent topic: Selecting Epson Scan SettingsRelated tasksScanning in Full Auto ModeScanning in Home ModeScanning in Office ModeScanning in Professional Mode
Scanning in Full Auto ModeWhen you scan in Full Auto Mode, Epson Scan automatically saves your scanned file in JPEG format inyour operating system's Pictures or My Pictures folder, or opens it in your scanning program. You canchange the scanned file settings and select various image adjustment options before you scan, ifnecessary.1. Start Epson Scan and select Full Auto Mode as the Mode setting.

108
You see this window:
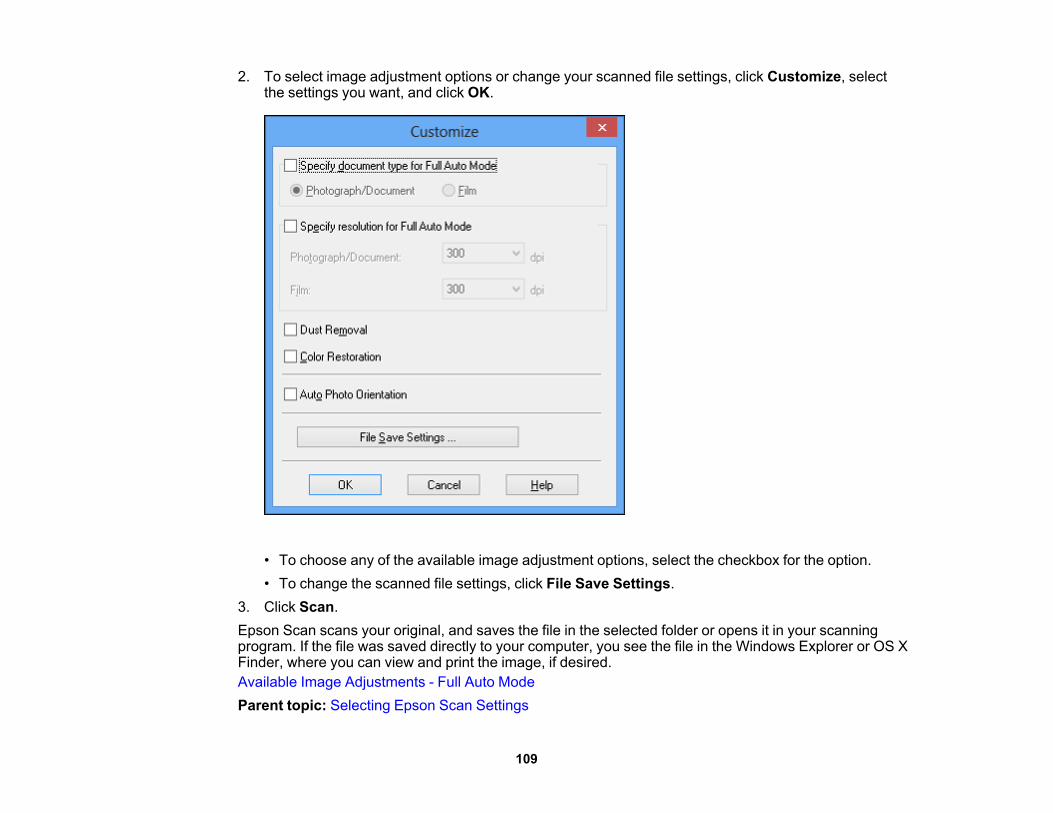
109
2. To select image adjustment options or change your scanned file settings, click Customize, selectthe settings you want, and click OK.
• To choose any of the available image adjustment options, select the checkbox for the option.• To change the scanned file settings, click File Save Settings.
3. Click Scan.Epson Scan scans your original, and saves the file in the selected folder or opens it in your scanningprogram. If the file was saved directly to your computer, you see the file in the Windows Explorer or OS XFinder, where you can view and print the image, if desired.Available Image Adjustments - Full Auto ModeParent topic: Selecting Epson Scan Settings
110
Available Image Adjustments - Full Auto ModeYou can select these image adjustment options in Epson Scan Full Auto Mode.Dust Removal
Removes dust marks from your originals automatically.Color Restoration
Restores the colors in faded photos automatically.Auto Photo Orientation
Checks the preview image for faces, the sky, and other features, and then correctly rotates the photowhen it is scanned, if necessary. (If your photo is not oriented correctly using this option, deselect thisoption and scan again.)
Parent topic: Scanning in Full Auto Mode
Scanning in Home ModeWhen you scan in Home Mode, Epson Scan automatically saves your scanned file in JPEG format inyour operating system's Pictures or My Pictures folder, or opens it in your scanning program. You canselect settings, preview, and change the scanned file settings as necessary.1. Start Epson Scan and select Home Mode as the Mode setting.

111
You see this window:
2. Select the Document Type setting that matches your original, such as Photograph or Text/LineArt.
3. Select the Image Type setting that matches your original.

112
4. Select the way you plan to use your scanned image as the Destination setting. (The Resolutionsetting is selected automatically based on the Destination setting you choose.)• Screen/Web: Select this option for images you will email, view on a computer screen, or post on
the web.• Printer: Select this option for images you will print or documents you will convert to editable text
using OCR (Optical Character Recognition) software.• Other: Select this option if you want to select a custom resolution for your image.
5. If you selected Other in the last step, select the Resolution setting you want to use for your scan.6. Click the Preview button.
Epson Scan previews your original and displays the result in a separate Preview window.7. If desired, select the area in your preview image that you want to scan (scan area).8. Select any of the image adjustment settings you want to use. Before making adjustments, click the
image or scan area in the Preview window.9. If you want to reduce or enlarge your image as you scan, select the Target Size setting you want to
use.10. Click Scan.
You see the File Save Settings window.11. Change any of the necessary file save settings and click OK.Epson Scan scans your original, and saves the file in the selected folder or opens it in your scanningprogram. If the file was saved directly to your computer, you see the file in the Windows Explorer or OS XFinder, where you can view and print the image, if desired.Selecting a Scan Area - Home ModeAvailable Image Adjustments - Home ModeSelecting a Scan Size - Home ModeParent topic: Selecting Epson Scan SettingsRelated conceptsImage Preview GuidelinesScan Resolution GuidelinesRelated tasksSelecting Scan File Settings

113
Selecting a Scan Area - Home ModeYou can select a specific area in your preview image to include in your scanned image. You can selectthe entire image area or a portion of it. You can even select multiple scan areas to create multiplescanned images of different areas (Normal Preview mode only).You can also use the scan area to select specific Image Adjustments settings for a scanned image. Justbe sure to click inside the scan area before selecting the settings.

114
1. Do one of the following to select your scan area in the Preview image:• Thumbnail preview: Your scan area is selected automatically, but you can change it. Place your
cursor in one corner of the desired scan area, then click and drag the cursor to the opposite cornerto create a marquee (dotted line) on the preview image.

115
• Normal preview: Click the Auto Locate icon to create a marquee (dotted line) on the previewimage.
2. Do the following, as necessary, to work with the selected scan area:• If the marquee is correct, continue with the next step.• To move the marquee, click inside the scan area and drag the marquee where you want it.

116
• To resize the scan area, place your cursor over the edge or corner of the marquee, then click anddrag the edges where you want them. (Hold down the Shift key as you resize the marquee toretain the same width/height proportions.)
• Normal preview: To create additional marquees (up to 50), click the Copy Marquee icon tocopy the existing marquee and paste it on the preview image.
Note: If you draw multiple marquees, make sure you select the All button in the Preview windowbefore you scan. Otherwise, only the area inside the currently selected marquee will be scanned.
• To delete a marquee, click the marquee, then click the Delete Marquee icon.3. Click inside the scan area and make any necessary settings in the Epson Scan window.Parent topic: Scanning in Home Mode
Available Image Adjustments - Home ModeYou can select these Image Adjustments options in Epson Scan Home Mode.
Note: Select the Image Option checkbox if you need to set any of the grayed-out image adjustments.Not all adjustment settings may be available, depending on the Document Type and Image Type setting.Click the Brightness button to access additional settings.
DescreeningRemoves the ripple pattern that might appear in subtly shaded image areas, such as skin tones. Thisoption improves results when scanning magazines or newspapers. (The results of descreening do notappear in the preview image, only in your scanned image.)
Color RestorationRestores the colors in faded photos automatically.

117
Backlight CorrectionRemoves shadows from photos that have too much background light.
Dust RemovalRemoves dust marks from your originals automatically.
Text EnhancementSharpens the appearance of letters in text documents.
Auto Area SegmentationMakes grayscale images clearer and text recognition more accurate by separating the text from thegraphics.
BrightnessAdjusts the overall lightness and darkness of the scanned image.
ContrastAdjusts the difference between the light and dark areas of the overall scanned image.
ThresholdAdjusts the level at which black areas in text and line art are delineated, improving text recognition inOCR (Optical Character Recognition) programs.
Parent topic: Scanning in Home ModeSelecting a Scan Size - Home Mode
You can reduce or enlarge the size of your image as you scan. You can also select a specific scan size,such as a common photo size like 4 × 6 inches (102 × 152 mm). This places a scan area of that size onthe preview image so you can use it to help crop the image in the correct proportions.1. Click the Preview button to preview your image.2. In the Epson Scan window, select the size you want your scanned image to be from the Target Size
list.
Note: If you need to rotate the orientation of the target size for your image, click the Orientationicon.

118
A marquee (dotted line) appears on your preview image proportioned for the size you selected.
3. Do the following, as necessary, to work with the selected scan area:• To move the marquee, click inside the scan area and drag the marquee where you want it.
119
• To resize the scan area, place your cursor over the edge or corner of the marquee, then click anddrag the edge where you want it.
Note: Manually adjusting the marquee will not change the target size of the scanned file. Themarquee only indicates the area of the image that will be scanned.
4. To create a scanned image size that is not available in the Target Size list, click the Customizeoption.You see this window:
5. Name the custom size, enter the size, click Save, and click OK. Then adjust the marquee on thepreview image.The marquee is automatically proportioned for your custom scan size.
Parent topic: Scanning in Home Mode

120
Scanning in Office ModeWhen you scan in Office Mode, Epson Scan automatically saves your scanned file in JPEG format inyour operating system's Pictures or My Pictures folder, or opens it in your scanning program. You canselect settings, preview, and change the scanned file settings as necessary.1. Start Epson Scan and select Office Mode as the Mode setting.
You see this window:

121
2. Select the Image Type setting that matches your original.3. Select the Document Source setting indicating where you placed your original.4. Select the Size and Orientation settings that match your original.5. Select the Resolution setting you want to use for your scan.6. Click the Preview button.
Epson Scan previews your original and displays the result in a separate Preview window.7. If desired, select the area in your preview image that you want to scan (scan area).8. Select any of the image adjustment settings you want to use. Before making adjustments, click the
image or scan area in the Preview window.9. Click Scan.
You see the File Save Settings window.10. Change any of the necessary file save settings and click OK.Epson Scan scans your original, and saves the file in the selected folder or opens it in your scanningprogram. If the file was saved directly to your computer, you see the file in the Windows Explorer or OS XFinder, where you can view and print the image, if desired.Selecting a Scan Area - Office ModeAvailable Image Adjustments - Office ModeParent topic: Selecting Epson Scan SettingsRelated conceptsImage Preview GuidelinesScan Resolution GuidelinesRelated tasksSelecting Scan File Settings
Selecting a Scan Area - Office ModeYou can select a specific area in your preview image to include in your scanned image. You can selectthe entire image area or a portion of it. You can even select multiple scan areas to create multiplescanned images of different areas.You can also use the scan area to select specific Image Adjustments settings for a scanned image. Justbe sure to click inside the scan area before selecting the settings.

122
1. In the Preview window, click the Auto Locate icon to create a marquee (dotted line) on thepreview image.
2. Do the following, as necessary, to work with the selected scan area:• If the marquee is correct, continue with the next step.• To move the marquee, click inside the scan area and drag the marquee where you want it.

123
• To resize the scan area, place your cursor over the edge or corner of the marquee, then click anddrag the edges where you want them. (Hold down the Shift key as you resize the marquee toretain the same width/height proportions.)
• To create additional marquees (up to 50, if available), click the Copy Marquee icon to copy theexisting marquee and paste it on the preview image.
Note: If you draw multiple marquees, make sure you select the All button in the Preview windowbefore you scan. Otherwise, only the area inside the currently selected marquee will be scanned.
• To delete a marquee, click the marquee, then click the Delete Marquee icon.3. Click inside each scan area and make any necessary settings in the Epson Scan window.Parent topic: Scanning in Office Mode
Available Image Adjustments - Office ModeYou can select these Image Adjustments options in Epson Scan Office Mode. Not all adjustment settingsmay be available, depending on other settings you have chosen.
Note: Select the Image Option checkbox if you need to set any of the grayed-out image adjustmentsbeneath the checkbox. Not all adjustment settings may be available, depending on the Image Typesetting.
Unsharp MaskMakes the edges of certain image areas clearer. Turn off this option to leave softer edges.

124
DescreeningRemoves the ripple pattern that might appear in subtly shaded image areas, such as skin tones. Thisoption improves results when scanning magazines or newspapers. (The results of descreening do notappear in the preview image, only in your scanned image.)
Text EnhancementSharpens the appearance of letters in text documents.
Auto Area SegmentationMakes grayscale images clearer and text recognition more accurate by separating the text from thegraphics.
Color EnhanceEnhances the red, green, or blue shades in the scanned image.
BrightnessAdjusts the overall lightness and darkness of the scanned image.
ContrastAdjusts the difference between the light and dark areas of the overall scanned image.
ThresholdAdjusts the level at which black areas in text and line art are delineated, improving text recognition inOCR (Optical Character Recognition) programs.
Parent topic: Scanning in Office Mode
Scanning in Professional ModeWhen you scan in Professional Mode, Epson Scan automatically saves your scanned file in JPEGformat in your operating system's Pictures or My Pictures folder, or opens it in your scanning program.You can select settings, preview, and change the scanned file settings as necessary.1. Start Epson Scan and select Professional Mode as the Mode setting.

125
You see this window:

126
2. Select the Document Type setting that matches your original, such as Reflective for documents orphotos.
3. Select the Document Source setting indicating where you placed your original.4. Select the specific type of original you are scanning as the Auto Exposure Type setting: Document
or Photo.5. Select the details of your original and how you want it scanned as the Image Type setting.6. Select the Resolution setting you want to use for your scan.7. Click the Preview button.
Epson Scan previews your original and displays the result in a separate Preview window.8. If desired, select the area in your preview image that you want to scan (scan area).9. Select any of the image adjustment settings you want to use. Before making adjustments, click the
image or scan area in the Preview window.10. If you want to reduce or enlarge your image as you scan, select the Target Size setting you want to
use.11. Click Scan.
You see the File Save Settings window.12. Change any of the necessary file save settings and click OK.Epson Scan scans your original, and saves the file in the selected folder or opens it in your scanningprogram. If the file was saved directly to your computer, you see the file in the Windows Explorer or OS XFinder, where you can view and print the image, if desired.Available Image Types - Professional ModeSelecting a Scan Area - Professional ModeAvailable Image Adjustments - Professional ModeSelecting a Scan Size - Professional ModeParent topic: Selecting Epson Scan SettingsRelated conceptsImage Preview GuidelinesScan Resolution GuidelinesRelated tasksSelecting Scan File Settings

127
Available Image Types - Professional ModeYou can select these Image Type options in Epson Scan Professional Mode.24-bit Color
Select this setting for color photos.Color Smoothing
Select this setting for color graphic images, such as charts or graphs.8-bit Grayscale
Select this setting for black-and-white photos.Black & White
Select this setting for black text documents or line art.Parent topic: Scanning in Professional Mode
Selecting a Scan Area - Professional ModeYou can select a specific area in your preview image to include in your scanned image. You can selectthe entire image area or a portion of it. You can even select multiple scan areas to create multiplescanned images of different areas (Normal Preview mode only).You can also use the scan area to select specific image Adjustments settings for a scanned image. Justbe sure to click inside the scan area before selecting the settings.
Note: In Professional Mode, the default Preview mode is Normal Preview mode. To use ThumbnailPreview mode instead, select the Thumbnail checkbox beneath the Preview button (if available), thenclick the Preview button to preview your image again.

128
1. Do one of the following to select your scan area in the Preview image:
• Normal preview: Click the Auto Locate icon to create a marquee (dotted line) on the previewimage.

129
• Thumbnail preview: Your scan area is selected automatically, but you can change it. Place yourcursor in one corner of the desired scan area, then click and drag the cursor to the opposite cornerto create a marquee (dotted line) on the preview image.
2. Do the following, as necessary, to work with the selected scan area:• If the marquee is correct, continue with the next step.• To move the marquee, click inside the scan area and drag the marquee where you want it.

130
• To resize the scan area, place your cursor over the edge or corner of the marquee, then click anddrag the edges where you want them. (Hold down the Shift key as you resize the marquee toretain the same width/height proportions.)
• Normal preview: To create additional marquees (up to 50, if available), click the CopyMarquee icon to copy the existing marquee and paste it on the preview image.
• To delete a marquee, click the marquee, then click the Delete Marquee icon.
Note: If you draw multiple marquees, make sure you select the All button in the Preview windowbefore you scan. Otherwise, only the area inside the currently selected marquee will be scanned.
3. Click inside the scan area and make any necessary settings in the Epson Scan window.Parent topic: Scanning in Professional Mode
Available Image Adjustments - Professional ModeYou can select these Adjustments options in Epson Scan Professional Mode. Not all adjustment settingsmay be available, depending on other settings you have chosen.
Click the image adjustment icon to access additional settings.Click the + (Windows) or (OS X) icon next to a setting to change the level of adjustment.Unsharp Mask
Makes the edges of certain image areas clearer. Turn off this option to leave softer edges.
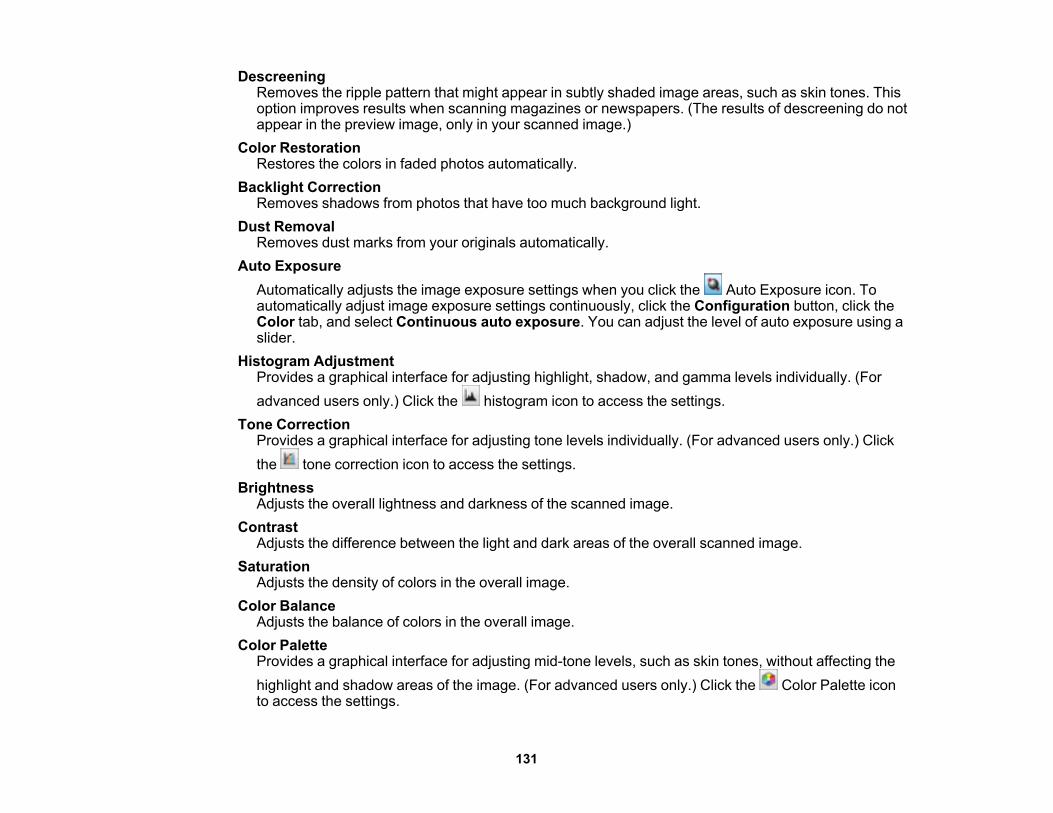
131
DescreeningRemoves the ripple pattern that might appear in subtly shaded image areas, such as skin tones. Thisoption improves results when scanning magazines or newspapers. (The results of descreening do notappear in the preview image, only in your scanned image.)
Color RestorationRestores the colors in faded photos automatically.
Backlight CorrectionRemoves shadows from photos that have too much background light.
Dust RemovalRemoves dust marks from your originals automatically.
Auto ExposureAutomatically adjusts the image exposure settings when you click the Auto Exposure icon. Toautomatically adjust image exposure settings continuously, click the Configuration button, click theColor tab, and select Continuous auto exposure. You can adjust the level of auto exposure using aslider.
Histogram AdjustmentProvides a graphical interface for adjusting highlight, shadow, and gamma levels individually. (Foradvanced users only.) Click the histogram icon to access the settings.
Tone CorrectionProvides a graphical interface for adjusting tone levels individually. (For advanced users only.) Clickthe tone correction icon to access the settings.
BrightnessAdjusts the overall lightness and darkness of the scanned image.
ContrastAdjusts the difference between the light and dark areas of the overall scanned image.
SaturationAdjusts the density of colors in the overall image.
Color BalanceAdjusts the balance of colors in the overall image.
Color PaletteProvides a graphical interface for adjusting mid-tone levels, such as skin tones, without affecting thehighlight and shadow areas of the image. (For advanced users only.) Click the Color Palette iconto access the settings.

132
ThresholdAdjusts the level at which black areas in text and line art are delineated, improving text recognition inOCR (Optical Character Recognition) programs.
Parent topic: Scanning in Professional ModeSelecting a Scan Size - Professional Mode
You can reduce or enlarge the size of your image as you scan. You can also select a specific scan size,such as a common photo size like 4 × 6 inches (102 × 152 mm). This places a scan area of that size onthe preview image so you can use it to help crop the image in the correct proportions.1. Click the Preview button to preview your image.2. In the Epson Scan window, select the size you want your scanned image to be from the Target Size
list.
Note: If you need to rotate the orientation of the target size for your image, click the orientationicon.
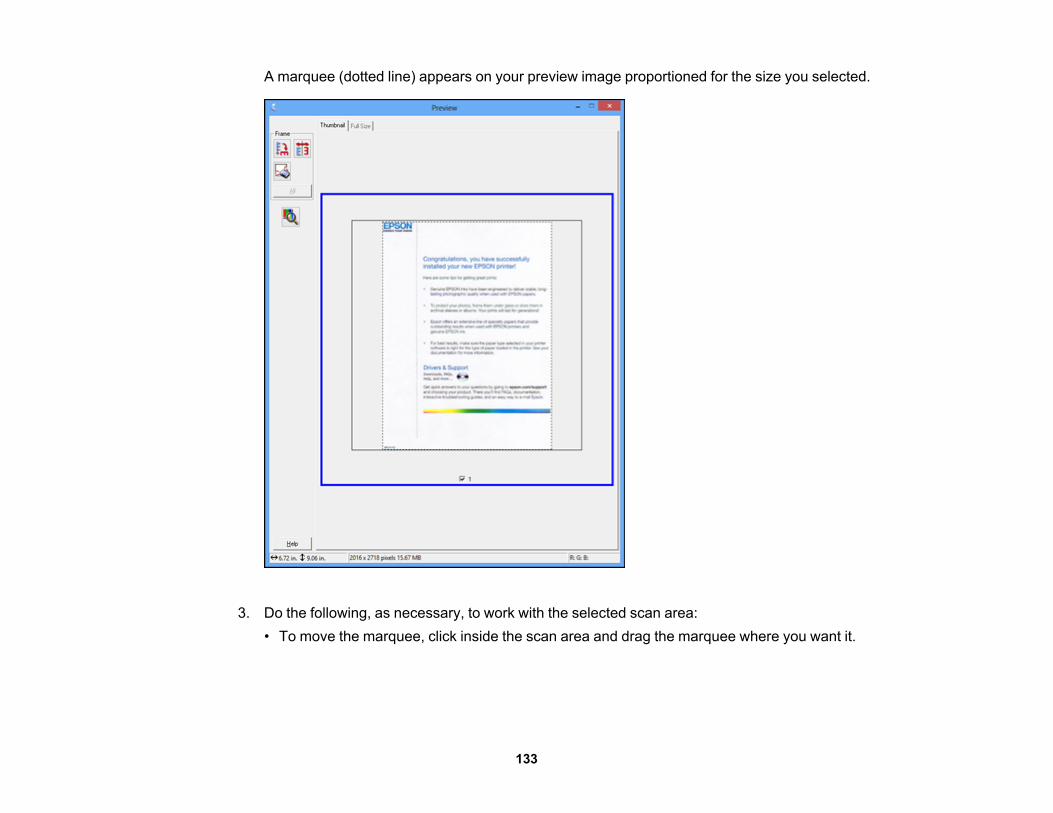
133
A marquee (dotted line) appears on your preview image proportioned for the size you selected.
3. Do the following, as necessary, to work with the selected scan area:• To move the marquee, click inside the scan area and drag the marquee where you want it.
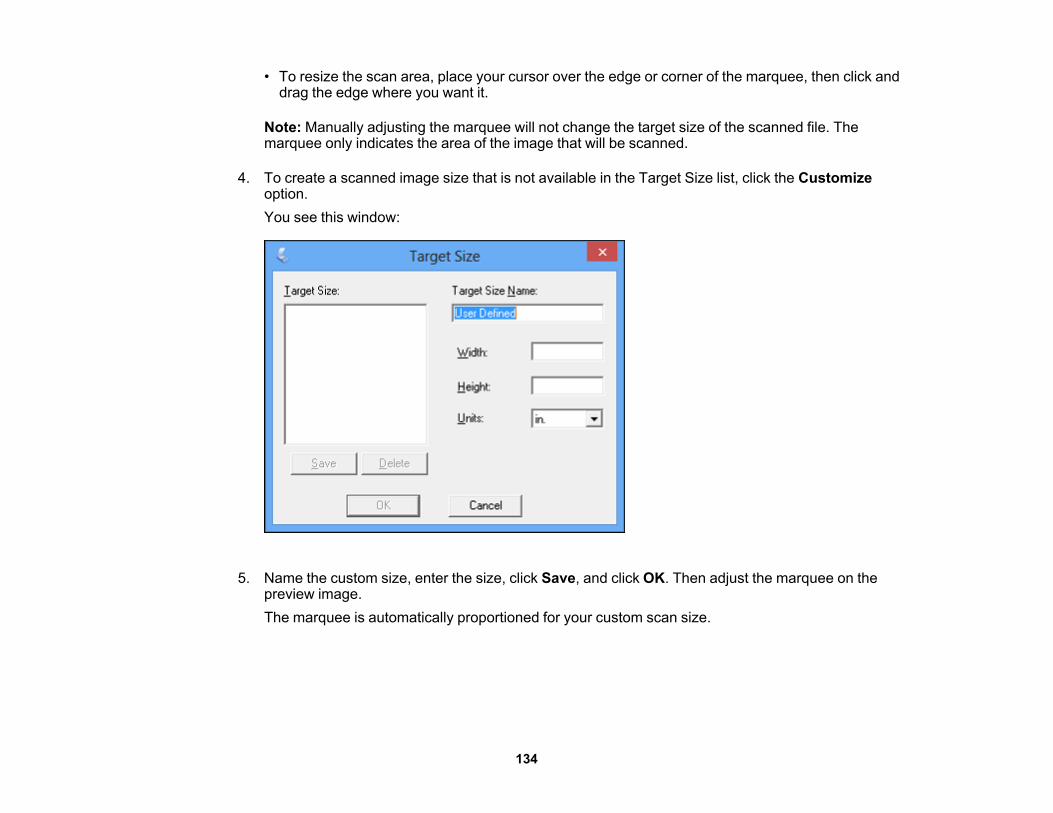
134
• To resize the scan area, place your cursor over the edge or corner of the marquee, then click anddrag the edge where you want it.
Note: Manually adjusting the marquee will not change the target size of the scanned file. Themarquee only indicates the area of the image that will be scanned.
4. To create a scanned image size that is not available in the Target Size list, click the Customizeoption.You see this window:
5. Name the custom size, enter the size, click Save, and click OK. Then adjust the marquee on thepreview image.The marquee is automatically proportioned for your custom scan size.

135
6. To use additional sizing tools, click the + (Windows) or (OS X) icon next to the Target Size settingand select options as desired.
• Scale: Reduces or enlarges your image by the percentage you enter.• Trimming: Turns automatic image cropping on or off.
• Unlock icon: Unlocks the width/height proportions of the scanned image size so you can adjustit without constraint.
Parent topic: Scanning in Professional Mode
Image Preview GuidelinesYou can preview your scanned image so you can adjust the scan settings using the preview as a guide.There are two types of preview available, depending on the scan mode and selected settings:Thumbnail preview
A thumbnail preview displays your previewed images as thumbnails with the scanned image area andexposure automatically selected. If the Thumbnail checkbox is selected, clicking the Preview buttonopens a thumbnail preview.
Normal previewA normal preview displays your previewed images in their entirety so you can select the scannedimage area and other settings manually. If the Thumbnail checkbox is deselected, clicking thePreview button opens a normal preview.
Parent topic: Selecting Epson Scan Settings
Scan Resolution GuidelinesIf you plan to enlarge a scanned image so you can print it at a larger size, you may need to increase theresolution from the default resolution set by Epson Scan. Follow these guidelines to determine theresolution setting you need:• You will enlarge the image as you scan it.

136
If you will enlarge the image using Epson Scan's Target Size setting, you do not need to increase theResolution setting.
• You will scan the image at its original size but enlarge it later in an image-editing program.Increase Epson Scan's Resolution setting in your scan. Increase the resolution by the same amountyou will increase the image size to retain a high image quality. For example, if the resolution is 300 dpi(dots per inch) and you will double the image size later, change the Resolution setting to 600 dpi.
• You will scan the image at 100% or smaller size.Select Epson Scan's Resolution setting based on how you will use the scanned image:• Email/view on a computer screen/post on the web: 96 to 150 dpi• Print/convert to editable text (OCR): 300 dpi• Fax: 200 dpi
Parent topic: Selecting Epson Scan Settings

137
Selecting Scan File SettingsYou can select the location, name, and format of your scan file on the File Save Settings window. Youcan also select various optional settings that control how Epson Scan behaves when you scan and savefiles.
The File Save Settings window may appear after you click Scan on the Epson Scan window. You mayalso be able to access the window by clicking the icon on the Epson Scan window.1. Do one of the following to select the folder in which you want to save your scanned image:
• Click the button for one of the displayed folders.

138
• Click the Other button, click the Browse or Choose button, and select a folder.2. Type in a file name in the Prefix field. This name is used along with numbers to automatically name
your scanned files.3. Select a different number as the Start Number setting, if you like.4. Select the file format you want to use in the Image Format Type menu.5. If your file format provides optional settings, click the Options button to select them.6. Choose any of the optional settings you want to use by selecting their checkboxes.7. Click OK.Available Scanned File Types and Optional SettingsParent topic: Selecting Epson Scan Settings
Available Scanned File Types and Optional SettingsYou can select from a variety of scanned file types and optional settings on the File Save Settingswindow in Epson Scan.
File FormatsBitmap (*.bmp)
A standard image file format for most Windows programs.JPEG (*.jpg)
An image format that lets you highly compress image data. However, the higher the compression, thelower the image quality. (The TIFF format is recommended when you need to modify or retouch yourscanned image.)
Multi-TIFF (*.tif)A TIFF file format when multiple pages are saved to the same file, allowing you to edit the imagesusing a compatible program.
PDF (*.pdf)A document format that is readable by Windows and OS X systems using Adobe Reader, Acrobat, orother programs. You can save multi-page documents in one PDF file.
PICT (*.pct)A standard image file format for most OS X programs.
PRINT Image Matching II (*.jpg or *.tif)File formats that include Epson PRINT Image Matching II data for enhanced quality and a wider colorrange (does not affect the way the image displays on the screen).

139
TIFF (*.tif)A file format created for exchanging data between many programs, such as graphic and DTPsoftware.
Optional SettingsOverwrite any files with the same name
Select to overwrite previous files with the same names.Show this dialog box before next scan
Select to have the File Save Settings window appear automatically before you scan (in certain EpsonScan modes).
Open image folder after scanningSelect to have Windows Explorer or OS X Finder automatically open to the folder where your scannedimage is saved after scanning.
Show Add Page dialog after scanningIf you are scanning a multi-page document using the PDF or Multi-TIFF format, select to display aprompt for scanning additional pages after the first page is scanned.
Parent topic: Selecting Scan File Settings
Scanning with OS X Using Image CaptureWith OS X, you can scan with your product using an image-editing application such as Image Capture.
Note: With OS X, in addition to scanning with Image Capture, you can download and install Epson Scanscanning software. Epson Scan provides additional image adjustment and photo correction features forenhancing scanned images, and provides an interface for TWAIN-compliant OCR scanning software. Todownload Epson Scan, visit Epson's driver download site (U.S. downloads or Canadian downloads).
1. Open an image editing application, such as Image Capture.2. Select your Epson product from the DEVICES or SHARED list in the Finder, if necessary. (You may
need to hover over the DEVICES or SHARED list, click Show, and select your product.)3. If you see the Show Details button, click it.
If you are scanning an item on the scanner glass, your product begins a preview scan.

140
4. Select the Scan Mode setting indicating where you placed your original (if available). Select anyother available scan settings as necessary.
5. Select the folder in which you want to save your scanned file in the Scan To pop-up menu.6. Click Scan.

141
Your scanned file is saved in the folder you selected.Available Scan Settings - OS X Image CaptureParent topic: Scanning
Available Scan Settings - OS X Image CaptureYou can select these scan settings in your imaging editing application for OS X, if available.Image Correction
Provides a graphical interface for adjusting brightness, tint, temperature, and saturation.Unsharp Mask
Makes the edges of certain image areas clearer. Turn off this option to leave softer edges.Descreening
Removes the ripple pattern that might appear in subtly shaded image areas, such as skin tones. Thisoption improves results when scanning magazines or newspapers. (The results of descreening do notappear in the preview image, only in your scanned image.)
Backlight CorrectionRemoves shadows from photos that have too much background light.
Dust RemovalRemoves dust marks from your originals automatically.
Color RestorationRestores the colors in faded photos automatically.
Parent topic: Scanning with OS X Using Image Capture
Scanning from Smart DevicesUsing the Epson iPrint application, you can use your iOS or Android smartphone or tablet to scanoriginal documents or photos on your networked product and save them as digital files on your device.Follow the link here for more information on Epson iPrint.Parent topic: ScanningRelated tasksUsing the Epson iPrint Mobile App
Scanning Special ProjectsYour product's scanning software offers various options to help you quickly complete special scanprojects.
142
Scanning to Online Destinations Using Easy Photo ScanScanning to a PDF FileRestoring Photo Colors as You ScanParent topic: Scanning
Scanning to Online Destinations Using Easy Photo ScanYou can scan documents or photos and upload them to Facebook and other online destinations, such asphoto-sharing sites, web servers, or network folders using Easy Photo Scan.Scanning Using Easy Photo ScanUploading Scanned Images to FacebookUploading Scanned Images to PicasaUploading Scanned Images to EvernoteUploading Scanned Images to SugarSyncUploading Scanned Images to a Web FolderUploading Scanned Images to EmailSaving Scanned Images to a FolderEpson JPEG File SettingsEpson TIFF and Multi-TIFF File SettingsParent topic: Scanning Special Projects
Scanning Using Easy Photo ScanYou can use Easy Photo Scan to easily scan your originals, edit the scanned images, and upload themto Facebook or other online destinations.
Note: With OS X, in addition to scanning with Image Capture, you can download and install Epson Scanscanning software. Epson Scan provides additional image adjustment and photo correction features forenhancing scanned images, and provides an interface for TWAIN-compliant OCR scanning software. Todownload Epson Scan, visit Epson's driver download site (U.S. downloads or Canadian downloads).
1. Place your original on your product for scanning.2. Do one of the following to open Easy Photo Scan:
• Windows 10: Click and select All apps. Select Epson Software and click Easy Photo Scan.Select your product and click OK, if necessary.
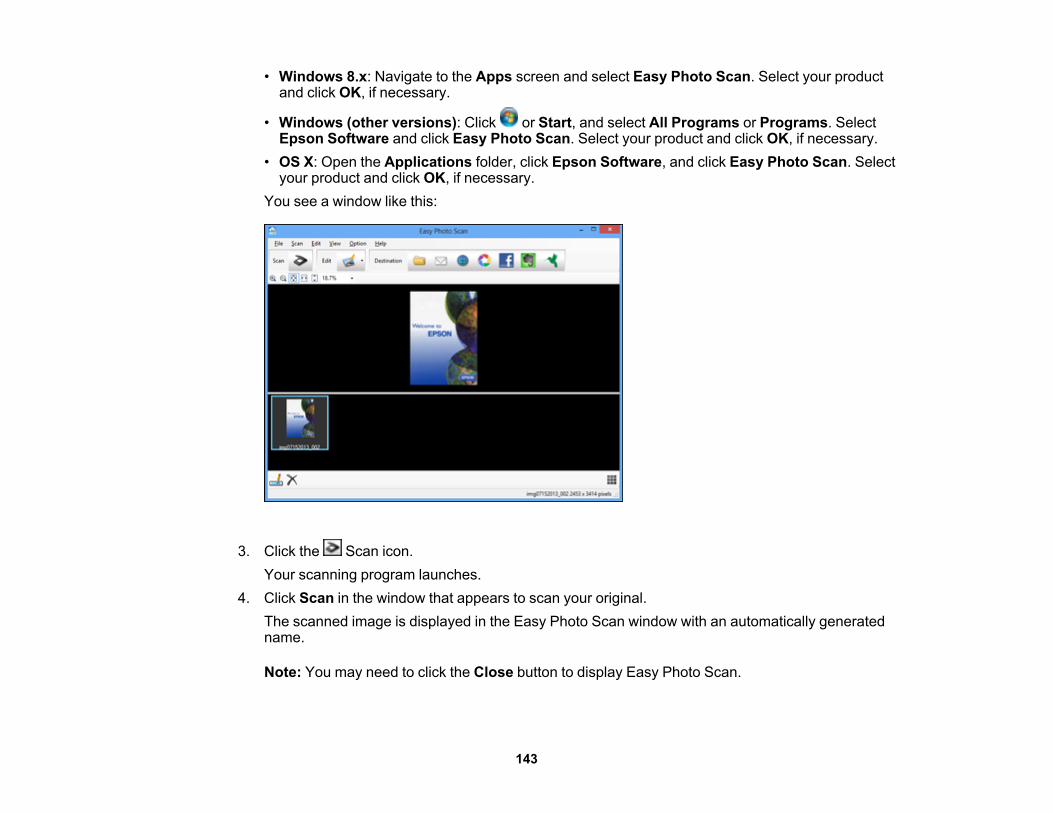
143
• Windows 8.x: Navigate to the Apps screen and select Easy Photo Scan. Select your productand click OK, if necessary.
• Windows (other versions): Click or Start, and select All Programs or Programs. SelectEpson Software and click Easy Photo Scan. Select your product and click OK, if necessary.
• OS X: Open the Applications folder, click Epson Software, and click Easy Photo Scan. Selectyour product and click OK, if necessary.
You see a window like this:
3. Click the Scan icon.Your scanning program launches.
4. Click Scan in the window that appears to scan your original.The scanned image is displayed in the Easy Photo Scan window with an automatically generatedname.
Note: You may need to click the Close button to display Easy Photo Scan.

144
5. To edit the name of the file, select the image thumbnail at the bottom of the screen, click theicon, and enter the new filename.
6. To edit the scanned image, click the Edit icon and select one of the displayed options.
Note: See the Easy Photo Scan help for additional information on image editing options.
7. Repeat these steps for each image you want to upload.8. When you finish scanning, click one of the destination icons to upload the images.
Note: You may need to click the arrow next to the icons in order to see all of them. The availableicons may vary, depending on the software version you are using.
Parent topic: Scanning to Online Destinations Using Easy Photo ScanRelated tasksUploading Scanned Images to FacebookUploading Scanned Images to PicasaUploading Scanned Images to EvernoteUploading Scanned Images to SugarSyncUploading Scanned Images to a Web FolderUploading Scanned Images to EmailSaving Scanned Images to a Folder
Uploading Scanned Images to FacebookYou can configure a Facebook account for use with Easy Photo Scan and upload your scanned imagesto it.1. Scan your original using Easy Photo Scan.
2. Click the icon.

145
You see a window like this:
Note: If you have already configured a Facebook account in Easy Photo Scan, you can select theSetting Name or Destination Name for the account, click Login if necessary, and click Send toupload your images.
3. Click Login.4. On the Application Authentication screen, log in to your Facebook account.
Note: To enable automatic image uploading, select the option for staying logged in.

146
5. Select an album from the Album list.
Note: If you cannot select an album, make sure the Setting Name is set to (No Selection), clickLogin to log in to your Facebook account, and try again. If you want to create a new album, youmust create it directly in Facebook.
6. Select the image format for the uploaded files from the File or File Type list.7. If there are options for the selected file format, click Options or Option and select the options you
want.8. If you also want to save the images to a local folder, select the Copy the image(s) to a local folder
checkbox and select a folder.9. If you want to save the current settings, click Edit, or the Setting Name or Destination Name field,
and select Save As. Enter a name for the setting and click OK.10. Click Send to upload the images to your Facebook account, or click Cancel to cancel the operation.Parent topic: Scanning to Online Destinations Using Easy Photo ScanRelated referencesEpson JPEG File SettingsRelated tasksScanning Using Easy Photo Scan
Uploading Scanned Images to PicasaYou can configure a Picasa account for use with Easy Photo Scan and upload your scanned images.1. Scan your original using Easy Photo Scan.
2. Click the icon.
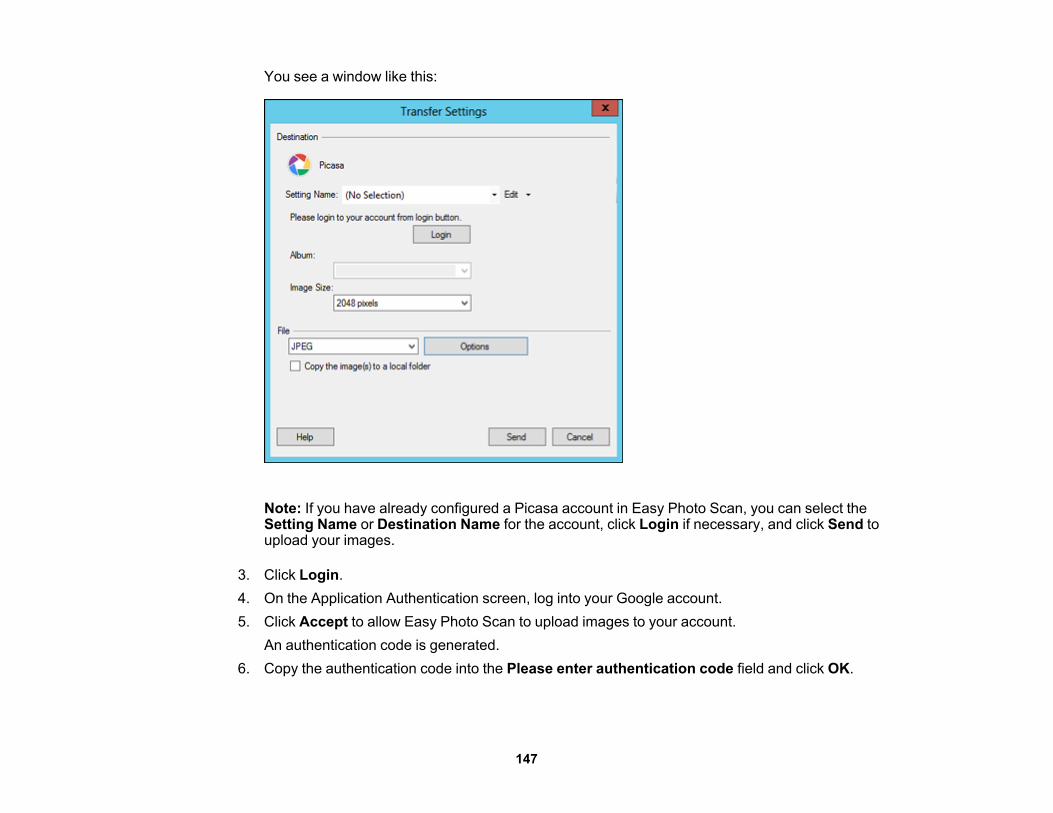
147
You see a window like this:
Note: If you have already configured a Picasa account in Easy Photo Scan, you can select theSetting Name or Destination Name for the account, click Login if necessary, and click Send toupload your images.
3. Click Login.4. On the Application Authentication screen, log into your Google account.5. Click Accept to allow Easy Photo Scan to upload images to your account.
An authentication code is generated.6. Copy the authentication code into the Please enter authentication code field and click OK.
148
7. Select an album from the Album list.
Note: If you cannot select an album, make sure the Setting Name is set to (No Selection), click theLogin button to log into your Picasa account, and try again. If you want to create a new album, youmust create it directly in Picasa.
8. Select an Image Size option for the uploaded images.9. Select the image format for the uploaded files from the File or File Type list.10. If there are options for the selected file format, click Options or Option and select the options you
want.11. If you also want to save the images to a local folder, select the Copy the image(s) to a local folder
checkbox and select a folder.12. If you want to save the current settings, click Edit, or the Setting Name or Destination Name field,
and select Save As. Enter a name for the setting and click OK.13. Click Send to upload the images to your Picasa account, or click Cancel to cancel the operation.Parent topic: Scanning to Online Destinations Using Easy Photo ScanRelated referencesEpson JPEG File SettingsRelated tasksScanning Using Easy Photo Scan
Uploading Scanned Images to EvernoteYou can configure an Evernote account for use with Easy Photo Scan and upload your scanned imagesto it (Windows only).
Note: You must install Evernote before you can use it with Easy Photo Scan.
1. Scan your original using Easy Photo Scan.
2. Click the icon.

149
You see a window like this:
Note: If you have already configured an Evernote account in Easy Photo Scan, you can select theSetting Name or Destination Name for the account and click Send to upload your images.
3. Select a notebook from the Notebook list.
Note: If you want to create a new notebook, you must create it directly in Evernote.
4. Select the image format for the uploaded files from the File or File Type list.5. If there are options for the selected file format, click Options or Option and select the options you
want.6. If you also want to save the images to a local folder, select the Copy the image(s) to a local folder
checkbox and select a folder.
150
7. If you want to save the current settings, click Edit, or the Setting Name or Destination Name field,and select Save As. Enter a name for the setting and click OK.
8. Click Send to upload the images to your Evernote account, or click Cancel to cancel the operation.Parent topic: Scanning to Online Destinations Using Easy Photo ScanRelated referencesEpson JPEG File SettingsRelated tasksScanning Using Easy Photo Scan
Uploading Scanned Images to SugarSyncYou can configure a SugarSync account for use with Easy Photo Scan and upload your scannedimages.1. Scan your original using Easy Photo Scan.
2. Click the icon.

151
You see a window like this:
Note: If you have already configured a SugarSync account in Easy Photo Scan, you can select theSetting Name or Destination Name for the account and click Send to upload your images.
3. Enter the account information in the E-Mail Address and Password fields.4. Select a Place option for the uploaded images.
Note: In SugarSync, the Magic Briefcase is now called "My SugarSync". Uploads to the MagicBriefcase appear in the My SugarSync folder.
5. Enter a folder name in the Folder field.If you enter the name of an existing folder, the images are uploaded to that folder. If the folder doesnot exist, a new folder with that name is created.

152
6. If you want to replace existing files with the same name with the uploaded images, click theOverwrite file(s) with the same name checkbox.
7. Click Check Connection to test whether the SugarSync account information is correct.8. Select the image format for the uploaded files from the File or File Type list.9. If there are options for the selected file format, click Options or Option and select the options you
want.10. If you also want to save the images to a local folder, select the Copy the image(s) to a local folder
checkbox and select a folder.11. If you want to save the current settings, click Edit, or the Setting Name or Destination Name field,
and select Save As. Enter a name for the setting and click OK.12. Click Send to upload the images to your SugarSync account, or click Cancel to cancel the
operation.Parent topic: Scanning to Online Destinations Using Easy Photo ScanRelated referencesEpson JPEG File SettingsEpson TIFF and Multi-TIFF File SettingsRelated tasksScanning Using Easy Photo Scan
Uploading Scanned Images to a Web FolderYou can upload your scanned images to a Web Folder (WebDAV) using Easy Photo Scan.1. Scan your original using Easy Photo Scan.
2. Click the icon.

153
You see a window like this:
Note: If you have already configured a Web Folder account in Easy Photo Scan, you can select theSetting Name or Destination Name for the account and click Send to upload your pictures.
3. Enter the Web Folder URL in the Address field.4. Enter the login information in the User Name and Password fields.5. If you want to replace existing files with the same name with the uploaded images, click the
Overwrite file(s) with the same name checkbox.6. Click Check Connection to test whether the account information is correct.7. Select the image format for the uploaded files from the File or File Type list.8. If there are options for the selected file format, click Options or Option and select the options you
want.
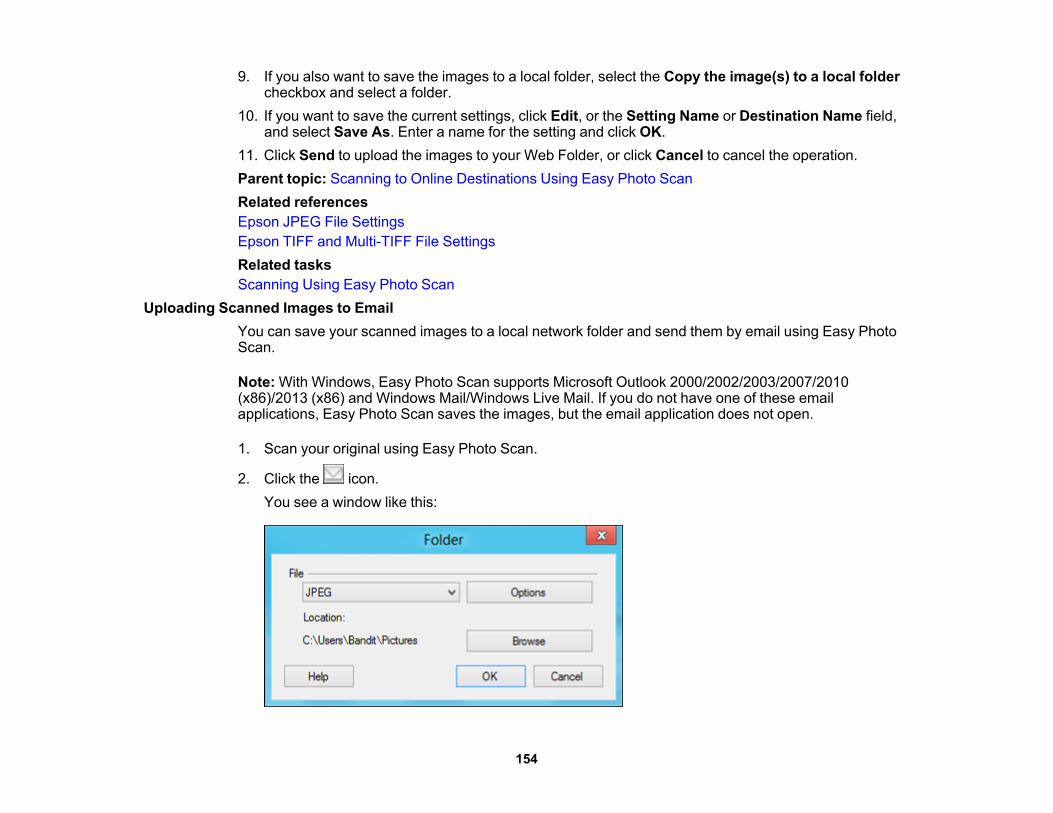
154
9. If you also want to save the images to a local folder, select the Copy the image(s) to a local foldercheckbox and select a folder.
10. If you want to save the current settings, click Edit, or the Setting Name or Destination Name field,and select Save As. Enter a name for the setting and click OK.
11. Click Send to upload the images to your Web Folder, or click Cancel to cancel the operation.Parent topic: Scanning to Online Destinations Using Easy Photo ScanRelated referencesEpson JPEG File SettingsEpson TIFF and Multi-TIFF File SettingsRelated tasksScanning Using Easy Photo Scan
Uploading Scanned Images to EmailYou can save your scanned images to a local network folder and send them by email using Easy PhotoScan.
Note: With Windows, Easy Photo Scan supports Microsoft Outlook 2000/2002/2003/2007/2010(x86)/2013 (x86) and Windows Mail/Windows Live Mail. If you do not have one of these emailapplications, Easy Photo Scan saves the images, but the email application does not open.
1. Scan your original using Easy Photo Scan.
2. Click the icon.You see a window like this:

155
Note: With OS X, you also enter an email address and email text in the window. If you have alreadyconfigured email settings in Easy Photo Scan, you can select them using the Destination Namefield.
3. Select the image format for the saved files from the File or File Type list.4. If there are options for the selected file format, click Options or Option and select the options you
want.5. Do one of the following:
• Windows: Click Browse to choose the folder where you want to save the images. Then click OKto save the images to the folder and launch your email program, or click Cancel to cancel theoperation.
• OS X: If you also want to save the images to a local folder, select the Copy the image(s) to alocal folder checkbox and select a folder. Then click Send, or click Cancel to cancel theoperation.
Parent topic: Scanning to Online Destinations Using Easy Photo ScanRelated referencesEpson JPEG File SettingsEpson TIFF and Multi-TIFF File SettingsRelated tasksScanning Using Easy Photo Scan
Saving Scanned Images to a FolderYou can save your scanned images to a local network folder using Easy Photo Scan.1. Scan your original using Easy Photo Scan.
2. Click the icon.
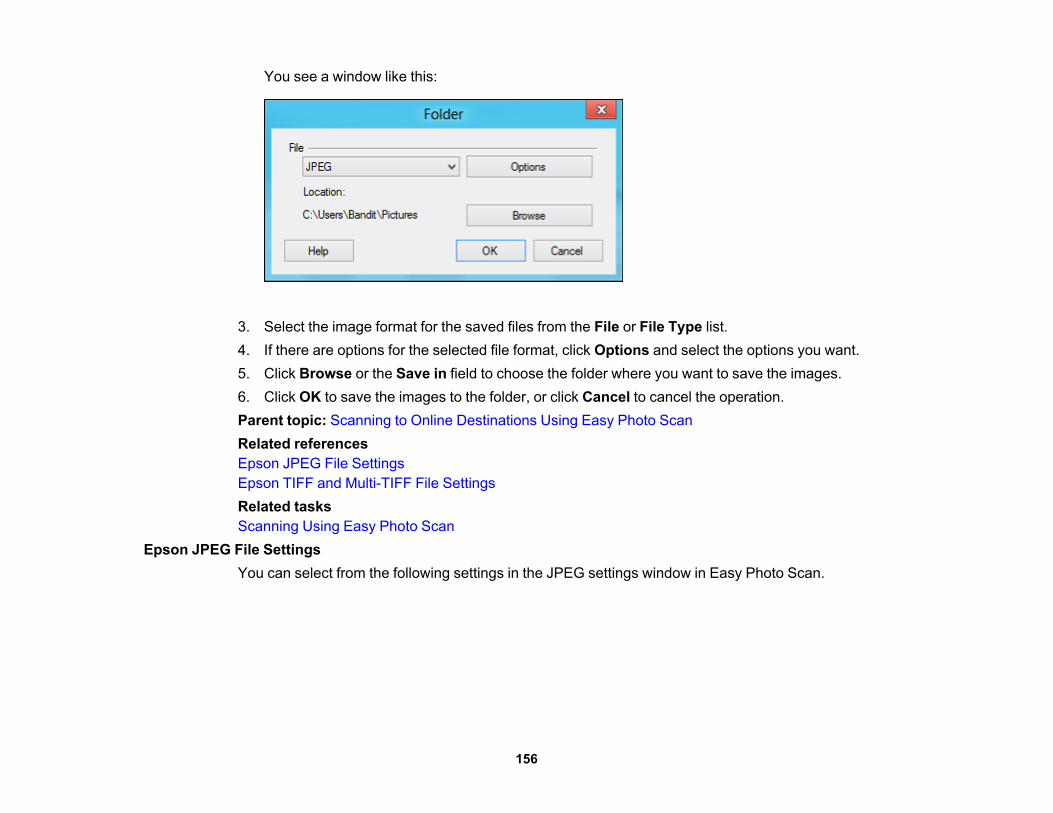
156
You see a window like this:
3. Select the image format for the saved files from the File or File Type list.4. If there are options for the selected file format, click Options and select the options you want.5. Click Browse or the Save in field to choose the folder where you want to save the images.6. Click OK to save the images to the folder, or click Cancel to cancel the operation.Parent topic: Scanning to Online Destinations Using Easy Photo ScanRelated referencesEpson JPEG File SettingsEpson TIFF and Multi-TIFF File SettingsRelated tasksScanning Using Easy Photo Scan
Epson JPEG File SettingsYou can select from the following settings in the JPEG settings window in Easy Photo Scan.
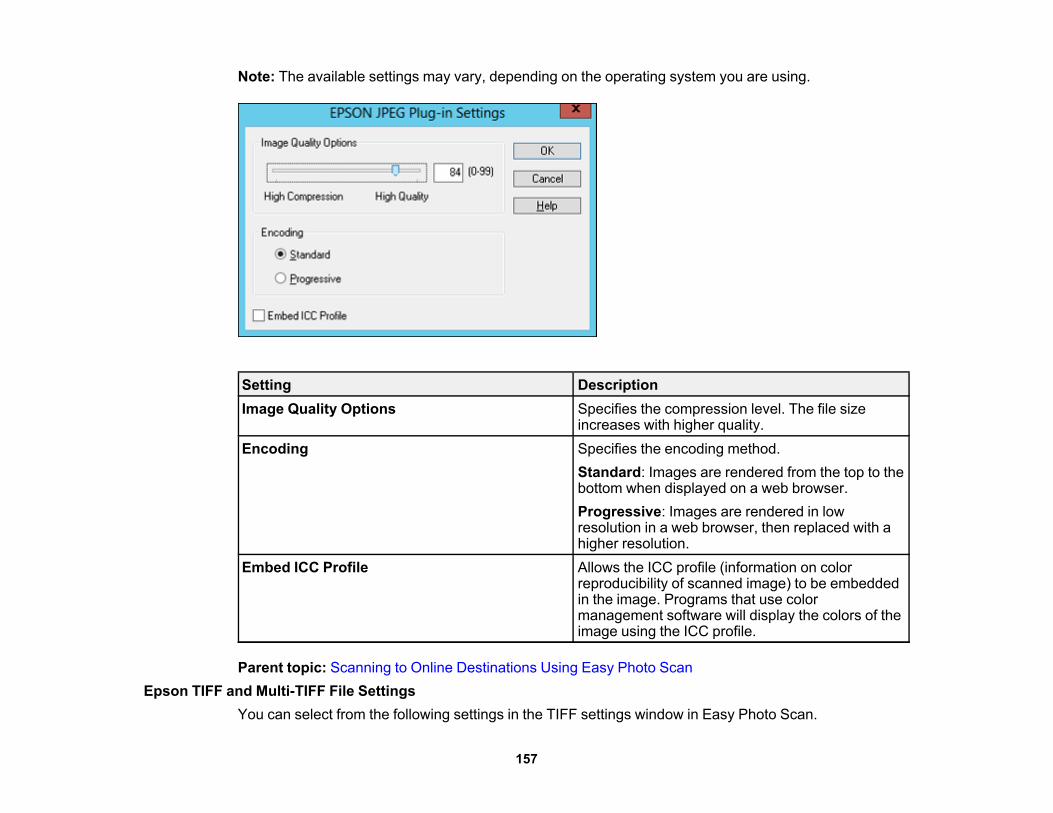
157
Note: The available settings may vary, depending on the operating system you are using.
Setting DescriptionImage Quality Options Specifies the compression level. The file size
increases with higher quality.Encoding Specifies the encoding method.
Standard: Images are rendered from the top to thebottom when displayed on a web browser.Progressive: Images are rendered in lowresolution in a web browser, then replaced with ahigher resolution.
Embed ICC Profile Allows the ICC profile (information on colorreproducibility of scanned image) to be embeddedin the image. Programs that use colormanagement software will display the colors of theimage using the ICC profile.
Parent topic: Scanning to Online Destinations Using Easy Photo ScanEpson TIFF and Multi-TIFF File Settings
You can select from the following settings in the TIFF settings window in Easy Photo Scan.

158
Note: The available settings may vary, depending on the operating system you are using.
Setting DescriptionByte Order Specifies the operating system where the scanned
image will be used.Compression Specifies the compression format and level for
Color/Grayscale and B&W images. The file sizeincreases with higher quality.
Embed ICC Profile Allows the ICC profile (information on colorreproducibility of scanned image) to be embeddedin the image. Programs that use colormanagement software will display the colors of theimage using the ICC profile.
Parent topic: Scanning to Online Destinations Using Easy Photo Scan
Scanning to a PDF FileUsing Epson Scan in Office, Home, or Professional Mode, you can scan a multi-page document andsave it in one PDF (Portable Document Format) file on your computer.

159
1. Place your original on your product for scanning.2. Start Epson Scan.3. Select the scan mode you want to use.4. Select the scan settings for your scan.5. Preview your image.6. When you finish selecting all your settings, click Scan.
You see the File Save Settings window.
7. Select PDF as the Type setting.

160
8. Select any other settings you want to use on the File Save Settings window. Click the Optionsbutton to access additional settings.
9. Click OK.Epson Scan scans your document and you see this window:
10. Choose one of the following options:• If you are scanning only one page, click Save File.• If you need to scan additional pages in a document, click Add page. Place additional pages on
the product for scanning, click Scan, and repeat until you have scanned all the pages. When youare finished, click Save File.
• If you need to delete or reorder the scanned pages, click Edit page. Delete or reorder the pagesusing the icons that appear on the bottom of the editing window. When you are finished, click OK.
Note: If you installed an OCR (Optical Character Recognition) program, you may see a screenindicating the program is converting your page to text. Wait until the program re-scans the page andclose the program, if necessary.
11. Click Close to exit the Epson Scan window, if necessary.Epson Scan scans your original, and saves the PDF file in the selected folder or opens it in yourscanning program. If the file was saved directly to your computer, you see the file in the WindowsExplorer or OS X Finder, where you can view and print the document, if desired.

161
Parent topic: Scanning Special ProjectsRelated tasksSelecting the Scan ModeSelecting Scan File SettingsRelated topicsStarting a ScanSelecting Epson Scan Settings
Restoring Photo Colors as You ScanYou can restore the colors in faded photos as you scan them using Epson Scan's Color Restorationsetting. You can select this setting in any of the available scan modes.
Note: Color restoration is not available in Office Mode, if Epson Scan offers that mode.
1. Place your original on your product for scanning.2. Start Epson Scan.3. Select the scan mode you want to use.4. Select the scan settings for your scan.5. Preview your image.6. Locate or access the image adjustment settings.7. Select the Color Restoration checkbox.
8. When you finish selecting all your settings, click Scan.9. Click Close to exit the Epson Scan window, if necessary.Epson Scan scans your original, and saves the color-restored file in the selected folder or opens it inyour scanning program. If the file was saved directly to your computer, you see the file in the WindowsExplorer or OS X Finder, where you can view and print the image, if desired.Parent topic: Scanning Special Projects

162
Related tasksSelecting the Scan ModeRelated topicsStarting a ScanSelecting Epson Scan Settings
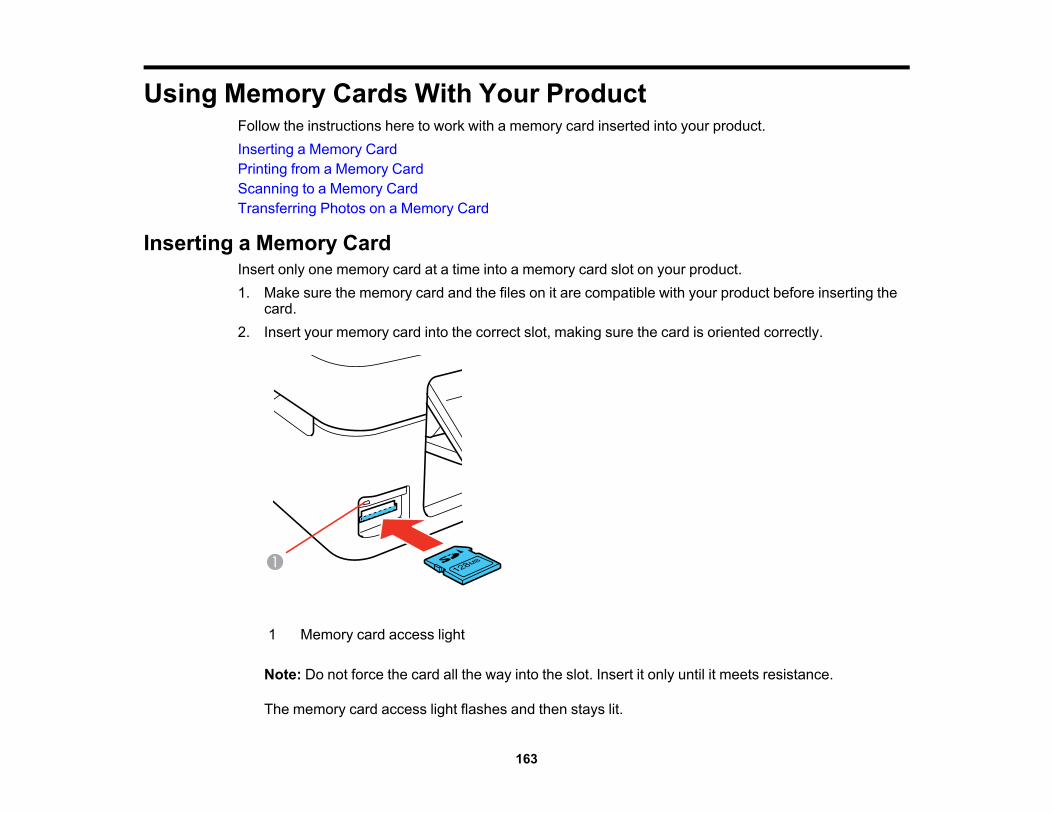
163
Using Memory Cards With Your ProductFollow the instructions here to work with a memory card inserted into your product.Inserting a Memory CardPrinting from a Memory CardScanning to a Memory CardTransferring Photos on a Memory Card
Inserting a Memory CardInsert only one memory card at a time into a memory card slot on your product.1. Make sure the memory card and the files on it are compatible with your product before inserting the
card.2. Insert your memory card into the correct slot, making sure the card is oriented correctly.
1 Memory card access light
Note: Do not force the card all the way into the slot. Insert it only until it meets resistance.
The memory card access light flashes and then stays lit.

164
Caution: Do not remove a memory card or turn off your product while the memory card access light isflashing or you may lose data from the memory card.
Memory Card TypesMemory Card File SpecificationsRemoving a Memory CardParent topic: Using Memory Cards With Your Product
Memory Card TypesYou can insert these types of memory cards in your product.
Note: Cards marked with an asterisk (*) require an adapter; consult your adapter documentation fordetails on using it.
• SDXC• SDHC• SD• miniSDHC*• miniSD*• microSDHC*• microSDXC*• microSD*Parent topic: Inserting a Memory Card
Memory Card File SpecificationsYou can insert memory cards in your product containing files that meet these specifications.
File format JPEG with the Exif version 2.3 standardImage size 80 × 80 pixels to 10200 × 10200 pixelsNumber of files Up to 9990
Parent topic: Inserting a Memory Card

165
Removing a Memory CardAfter you finish working with a memory card, check to make sure it is safe to remove it from your product.
Caution: Do not remove a memory card or turn off your product while the memory card access light isflashing or you may lose data from the memory card.
1. Make sure the memory card access light is not flashing.
1 Memory card access light
2. If your product is connected to your computer using a USB cable, do one of the following:• Windows: Open the My Computer, Computer, Windows Explorer, or File Explorer utility.
Then right-click the name of your memory card (listed as a removable disk) and select Eject.• OS X: Drag the removable disk icon for your memory card from the desktop or computer window
into the trash.3. Pull the memory card straight out of its slot.Parent topic: Inserting a Memory Card
Printing from a Memory CardSee these sections to print photos from a memory card inserted into your product:

166
Viewing and Printing PhotosParent topic: Using Memory Cards With Your Product
Viewing and Printing PhotosSee these sections to view and print photos displayed on your product's LCD screen.Viewing and Printing Individual PhotosViewing and Printing Individual Photos Using the Slide ShowCropping Photos Displayed on the LCD ScreenPrint Setting Options - Photo ModePrinting Photo Layouts From a Memory CardPhoto Layout OptionsParent topic: Printing from a Memory Card
Viewing and Printing Individual PhotosYou can select individual photos for printing as you view them on the LCD screen.
1. Press the home button, if necessary.2. Press the left or right arrow button to select Print Photos and press the OK button.
The first photo on your memory card is displayed:
3. Press the left or right arrow button to scroll through your photos and display one that you want toview or print.

167
4. Press the + or – button to select one or more copies of the photo (up to 99).5. To view additional photos and select others for printing, press the left or right arrow button and
repeat the selections above.6. To select settings for the photos, press the down arrow button.
You see this screen:
7. Do one of the following:• To change the selected photos and number of copies to print, select Select Photos, press the OK
button, and select the necessary settings.• To change the display setting for the LCD screen, select Display Options, press the OK button,
and select the setting you want.• To change the print settings, select Print Settings, press the OK button, and select the necessary
settings.• To crop or zoom into your photo, select Crop/Zoom, press the OK button, and press the + or –
button to adjust the image area or the home button to rotate the crop area.8. When you are ready to print, press the start button.
Note: To cancel printing, press the stop button.
Parent topic: Viewing and Printing Photos

168
Related referencesPrint Setting Options - Photo ModeRelated tasksCropping Photos Displayed on the LCD Screen
Viewing and Printing Individual Photos Using the Slide ShowYou can view a slide show of the photos on your memory card and select individual photos for printing.
1. Press the home button, if necessary.2. Press the left or right arrow button to select More Functions and press the OK button.
3. Press the up or down arrow button to select Slide Show and press the OK button.

169
The first photo on your memory card is displayed:
4. The LCD screen scrolls through your photos and displays each photo on the memory card. Press thedown arrow to pause the slide show. Press the down arrow again to resume the slide show.
5. Press OK to select a photo to print.6. Press the + or – button to select one or more copies of the photo (up to 99).7. To view additional photos and select others for printing, press the left or right arrow button and
repeat the selections above.
Note: Once you select a photo for printing, you cannot restart the slide show. You must manuallybrowse the photos if you wish to select more than one photo for printing.
8. To select print settings for the photos, press the down arrow button.

170
You see this screen:
9. Do one of the following:• To change the selected photos and number of copies to print, select Select Photos, press the OK
button, and select the necessary settings.• To change the display setting for the LCD screen, select Display Options, press the OK button,
and select the setting you want.• To change the print settings, select Print Settings, press the OK button, and select the necessary
settings.• To crop or zoom into your photo, select Crop/Zoom, press the OK button, and press the + or –
button to adjust the image area or the home button to rotate the crop area.10. When you are ready to print, press the start button.
Note: To cancel printing, press the stop button.
Parent topic: Viewing and Printing PhotosRelated referencesPrint Setting Options - Photo ModeRelated tasksCropping Photos Displayed on the LCD Screen

171
Cropping Photos Displayed on the LCD ScreenIf you want to crop or rotate photos displayed on the LCD screen, press the down arrow button, selectCrop/Zoom, and press the OK button. Then select the necessary options.• To crop the photo, press the + button to move the yellow crop area inward or the – button to move the
crop area outward.• To move the crop area, press the arrow buttons.
• To rotate the crop area, press the home button.• To check the cropped image, press the OK button.Parent topic: Viewing and Printing PhotosRelated tasksViewing and Printing Individual PhotosViewing and Printing Individual Photos Using the Slide Show
Print Setting Options - Photo ModeSelect these Print Settings options when printing photos displayed on the LCD screen.
Print settings Available options DescriptionPaper Size Various paper sizes Indicates the size of paper you have loadedPaper Type Various paper types Indicates the type of paper you have loadedBorderless Borderless Expands the image to the edge of the paper (slight
cropping may occur)With Border Leaves a small margin around the image
Quality Standard Provides good quality for most printsBest Provides the highest quality for important prints
Fix Red-Eye Off-Current Turns off red-eye correction for the current print jobOn-Current Turns on red-eye correction for the current print job
Parent topic: Viewing and Printing PhotosPrinting Photo Layouts From a Memory Card
You can print one or more photos from a memory card in special layouts on various sizes of photo paper.1. Load photo paper in your product.

172
2. Press the home button, if necessary.3. Press the left or right arrow button to select More Functions and press the OK button.4. Press the up or down arrow button to select Photo Layout Sheet and press the OK button.
You see this screen:
5. Press the left or right arrow button to select one of the layout options and press the OK button.You see this screen:

173
6. Press the up or down arrow button to select the Paper Size setting that matches the paper youloaded and press the OK button.
7. Press the up or down arrow button to select the Paper Type setting that matches the paper youloaded and press the OK button.Depending on the layout you selected, you may see this screen:
8. If you see the screen above, do one of the following:• To allow your product to place photos in the layout automatically, select Automatic layout and
press the OK button. Press the + button to select a photo to print. If you need to deselect a photo,press the – button. Press the OK button when you are finished.
• To place photos in the layout manually, select Place photos manually and press the OK button.Press the arrow buttons displayed to change layout options, pressing the OK button to confirmeach photo placement.
Note: If the printer does not automatically advance to the next screen when you have finishedplacing your photos, press the arrow buttons displayed to select Finished, and press the OKbutton.
9. If you want to change the print settings for the photo layout sheet, press the up or down arrow buttonto select Menu, and press the OK button.
10. Press the + or – button to select one or more copies of each photo layout sheet (up to 99).11. Press the OK button.
174
12. To print more than one copy of the photo layout sheet, press the + or – button to select the number(up to 99).
13. When you are ready to print, press the start button.
Note: To cancel printing, press the stop button.
Parent topic: Viewing and Printing PhotosRelated referencesPhoto Layout Options
Photo Layout OptionsSelect the layout you want to use when printing your photos in a layout.2-up, 4-up, 8-up, or 20-up
Print 2, 4, 8, or 20 photos on one sheet.Upper ½ or Lower ½
Print one photo in the upper or lower half of the sheet.Photo ID
Prints 4 ID-sized photos on one sheet.Picture Package
Prints one photo in multiple sizes on one sheet.Parent topic: Viewing and Printing Photos
Scanning to a Memory CardYou can scan an image to a memory card inserted into a memory card slot on your product.1. Insert a memory card into a memory card slot on your product.2. Place your original document or photo on the product.
3. Press the home button, if necessary.4. Press the left or right arrow button to select Scan and press the OK button.5. Select Scan to Memory Card and press the OK button.

175
You see this screen:
6. Select the memory card scanning settings you want to use.7. Press the start button to start the scan.Parent topic: Using Memory Cards With Your ProductRelated tasksInserting a Memory CardPlacing Originals on the Scanner Glass
Transferring Photos on a Memory CardYou can transfer photos to and from a memory card inserted into a memory card slot on your product.Setting Up File Sharing for Photo Transfers From Your ComputerTransferring Photos from a Memory Card to Your ComputerParent topic: Using Memory Cards With Your Product
Setting Up File Sharing for Photo Transfers From Your ComputerBefore you transfer photos from a computer to a memory card inserted into a memory card slot on yourproduct, you may need to set up your product's file sharing settings.

176
Caution: Remove the memory card before you change this setting or you may lose data from thememory card. Do not remove a memory card or turn off your product while the memory card access lightis flashing or you may lose data from the memory card.
1. Press the left or right arrow button to select Setup and press the OK button.2. Press the up or down arrow button to select File Sharing Setup and press the OK button.3. Press the up or down arrow button to select your connection type and press the OK button.Parent topic: Transferring Photos on a Memory CardRelated tasksRemoving a Memory Card
Transferring Photos from a Memory Card to Your ComputerYou can transfer photos to and from a memory card inserted into a memory card slot on your productand a computer connected to your product.
Note: Do not transfer photos to and from a memory card while you are printing from the memory card.
1. Make sure your product is connected to a computer.2. Insert a memory card into a memory card slot on your product.3. Do one of the following to access your memory card files from your computer:
• Windows: Open the Computer, My Computer, Windows Explorer, or File Explorer utility, thenselect the removable disk icon.
• OS X with a USB connection: Look for the removable disk icon on your desktop or computerwindow, then select it.
• OS X with a network connection: Select the hard drive icon on your desktop or computerwindow, select your product in the SHARED section of the sidebar (you may need to widen thesidebar to see the name), then select the MEMORYCARD icon.
4. Select the folder that contains your photos.5. Drag the photos you want to transfer to the desired folder on your computer or on your memory card.
Note: Your product's LCD screen does not update to display new photos transferred to the memorycard. Wait until the memory card access light stops flashing, then remove and insert the memory card toupdate the photos displayed.

177
Parent topic: Transferring Photos on a Memory CardRelated tasksInserting a Memory CardRemoving a Memory Card
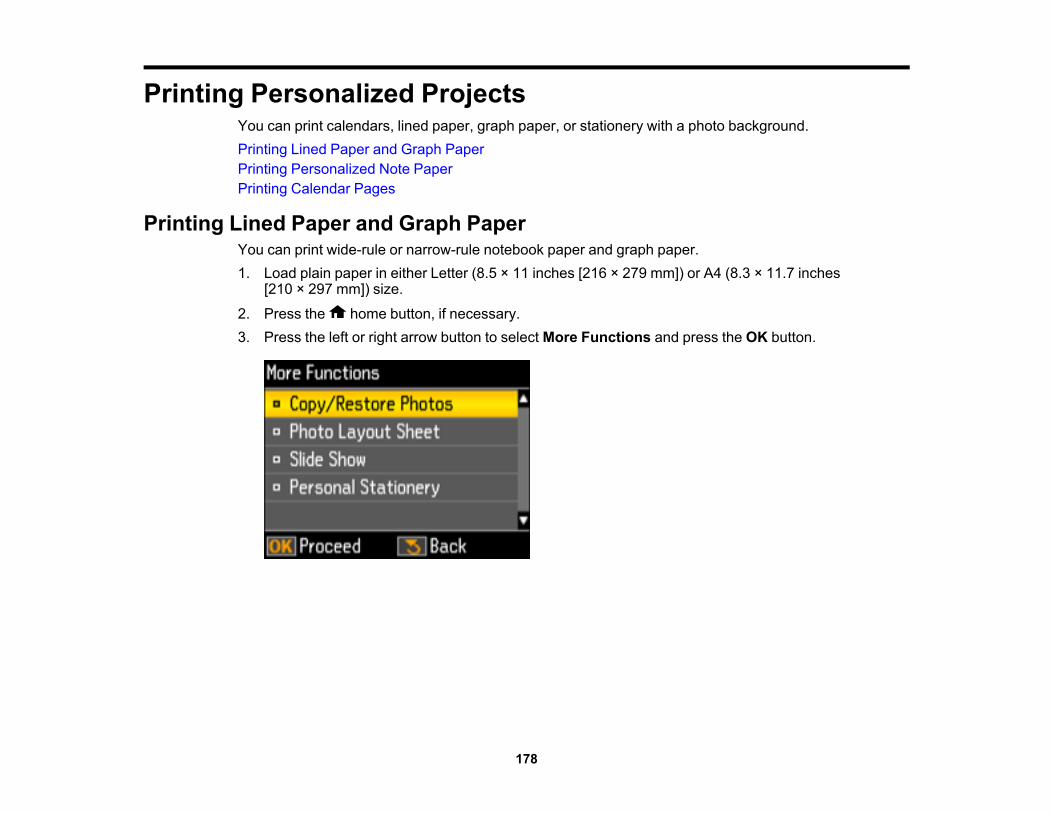
178
Printing Personalized ProjectsYou can print calendars, lined paper, graph paper, or stationery with a photo background.Printing Lined Paper and Graph PaperPrinting Personalized Note PaperPrinting Calendar Pages
Printing Lined Paper and Graph PaperYou can print wide-rule or narrow-rule notebook paper and graph paper.1. Load plain paper in either Letter (8.5 × 11 inches [216 × 279 mm]) or A4 (8.3 × 11.7 inches
[210 × 297 mm]) size.
2. Press the home button, if necessary.3. Press the left or right arrow button to select More Functions and press the OK button.

179
4. Press the up or down arrow button to select Personal Stationery and press the OK button.
5. Press the up or down arrow button to select Lined Papers and press the OK button.
6. Press the left or right arrow button, then press the OK button to select one of the following settings:• Wide Rule• Thin Rule• Graph Paper
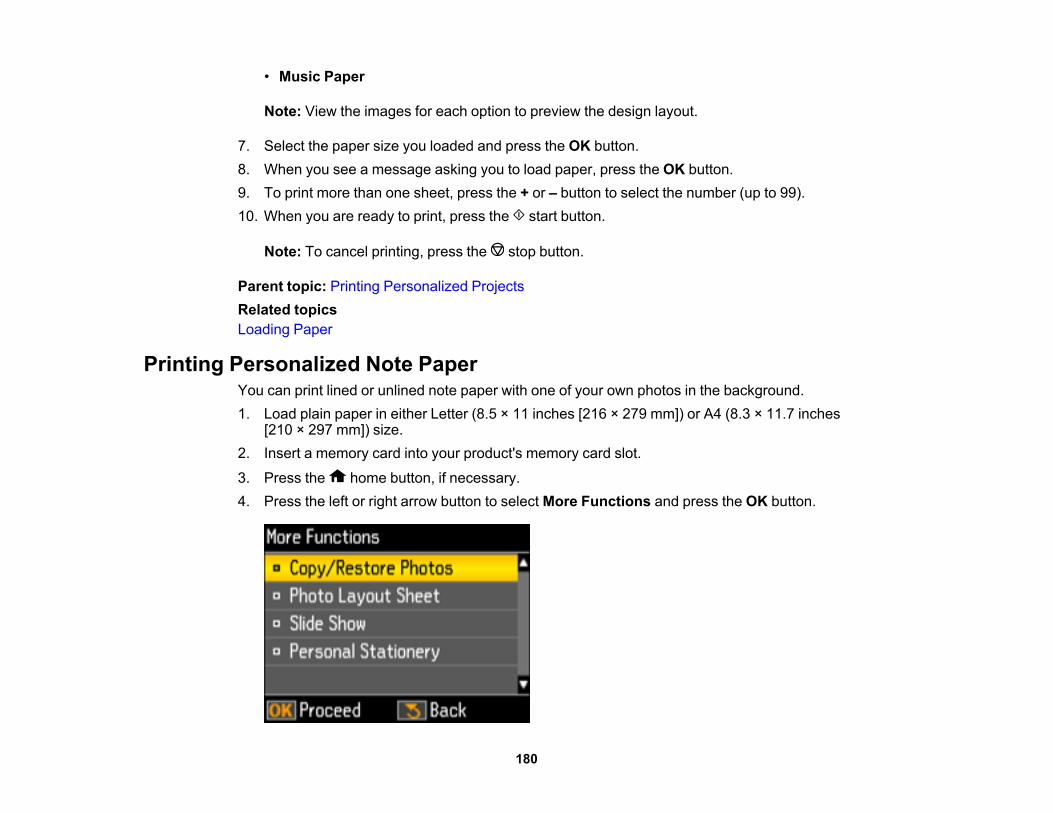
180
• Music Paper
Note: View the images for each option to preview the design layout.
7. Select the paper size you loaded and press the OK button.8. When you see a message asking you to load paper, press the OK button.9. To print more than one sheet, press the + or – button to select the number (up to 99).10. When you are ready to print, press the start button.
Note: To cancel printing, press the stop button.
Parent topic: Printing Personalized ProjectsRelated topicsLoading Paper
Printing Personalized Note PaperYou can print lined or unlined note paper with one of your own photos in the background.1. Load plain paper in either Letter (8.5 × 11 inches [216 × 279 mm]) or A4 (8.3 × 11.7 inches
[210 × 297 mm]) size.2. Insert a memory card into your product's memory card slot.
3. Press the home button, if necessary.4. Press the left or right arrow button to select More Functions and press the OK button.

181
5. Press the up or down arrow button to select Personal Stationery and press the OK button.
6. Press the up or down arrow button to select Writing Papers and press the OK button.
7. Press the left or right arrow button, then press the OK button to select one of the following settings:• Without Rule• Horizontal Rule• Vertical Rule
Note: View the images for each option to preview the design layout.

182
8. Select the size of paper you loaded and press the OK button.9. Select the photo you want to use for your note paper and press the OK button.
Note: To rotate the layout for your note paper, press the down arrow.
10. When you see a message asking you to load paper, press the OK button.11. To print more than one sheet, press the + or – button to select the number (up to 99).12. When you are ready to print, press the start button.
Note: To cancel printing, press the stop button.
Parent topic: Printing Personalized ProjectsRelated tasksInserting a Memory CardRelated topicsLoading Paper
Printing Calendar PagesYou can create and print a weekly or monthly calendar page from your product.1. Load one of these types of paper in either Letter (8.5 × 11 inches [216 × 279 mm]) or A4 (8.3 × 11.7
inches [210 × 297 mm]) size:• Plain paper• Epson Bright White Paper• Epson Presentation Paper Matte• Epson Premium Presentation Paper Matte
2. Press the home button, if necessary.

183
3. Press the left or right arrow button to select More Functions and press the OK button.
4. Press the up or down arrow button to select Personal Stationery and press the OK button.

184
5. Press the up or down arrow button to select Calendar and press the OK button.
6. Press the left or right arrow button, then press the OK button to select one of the following settings:• Weekly: prints a Sunday to Saturday week-long calendar with hourly divisions.• Monthly: prints a monthly calendar for a chosen month and year.
Note: View the images for each option to preview the design layout.
7. If you chose Monthly, select the year and month, and press the OK button.8. Select the type of paper to print on and press the OK button.9. When you see a message asking you to load paper, press the OK button.10. To print more than one sheet, press the + or – button to select the number (up to 99).11. When you are ready to print, press the start button.
Note: To cancel printing, press the stop button.
Parent topic: Printing Personalized ProjectsRelated topicsLoading Paper

185
Replacing Ink CartridgesWhen an ink cartridge is expended, you need to replace it.You may also need to replace a cartridge that is more than six months old, or if your printouts do not looktheir best, even after cleaning and aligning the print head.
Note: Please dispose of your used Epson branded ink cartridges responsibly and in accordance withlocal requirements. If you would like to return your used ink cartridges to Epson for proper disposal,please go to epson.com/recycle for more information.
Check Cartridge StatusPurchase Epson Ink CartridgesRemoving and Installing Ink CartridgesReplacing Ink Cartridges Using a Computer UtilityPrinting with Black Ink and Expended Color CartridgesConserving Low Black Ink with Windows
Check Cartridge StatusYour product and its printing software will let you know when an ink cartridge is low or expended.Checking Cartridge Status on the LCD ScreenChecking Cartridge Status with WindowsChecking Cartridge Status with OS XParent topic: Replacing Ink Cartridges
Checking Cartridge Status on the LCD ScreenYou can check the status of your ink cartridges using your product's LCD screen.
1. Press the home button, if necessary.2. Press the left or right arrow button to select Setup and press the OK button.

186
You see this screen:
3. Press the OK button.You see this screen:
Note: The display is different depending on which ink cartridges are low or expended, if any.Displayed ink levels are approximate.
4. Do one of the following:• If you are finished, press the OK button.

187
• If you want to replace an ink cartridge now, select Cartridge Replacement and press the OKbutton. When you finish replacing cartridges, press the start button. Once ink charging iscomplete, press the OK button.
Note: Depending on the color of the expended cartridge and how you are printing, you may be ableto continue printing temporarily.
Parent topic: Check Cartridge StatusRelated tasksRemoving and Installing Ink CartridgesRelated topicsPrinting with Black Ink and Expended Color Cartridges
Checking Cartridge Status with WindowsA low ink reminder appears if you try to print when ink is low, and you can check your cartridge status atany time using a utility on your Windows computer.1. To check your cartridge status, access the Windows Desktop and double-click the product icon in
the Windows taskbar.

188
You see this window:
2. Replace or reinstall any ink cartridge indicated on the screen.
Note: Depending on the color of the expended cartridge and how you are printing, you may be ableto continue printing temporarily.
Note: If any of the cartridges installed in the product are broken, incompatible with the productmodel, or improperly installed, Epson Status Monitor will not display an accurate cartridge status.
3. To disable the low ink reminder, right-click the product icon in the Windows taskbar and selectMonitoring Preferences.

189
You see this window:
4. Deselect the See Low Ink Reminder alerts checkbox at the bottom of the screen.5. To disable promotional offers, deselect the Display Epson Offers checkbox.Parent topic: Check Cartridge StatusRelated tasksRemoving and Installing Ink Cartridges

190
Related topicsPrinting with Black Ink and Expended Color Cartridges
Checking Cartridge Status with OS XYou can check your cartridge status using a utility on your Mac.1. In the Apple menu or the Dock, select System Preferences. Select Print & Fax, Print & Scan, or
Printers & Scanners, select your product, and select Options & Supplies. Select Utility and selectOpen Printer Utility.
2. Select EPSON Status Monitor.You see a window like this:

191
3. Do the following as necessary:• To update the ink cartridge status, click Update.• Replace or reinstall any ink cartridge indicated on the screen.
Note: Depending on the color of the expended cartridge and how you are printing, you may be ableto continue printing temporarily.
Note: If any of the cartridges installed in the product is broken, incompatible with the product model,or improperly installed, Epson Status Monitor will not display an accurate cartridge status.
Parent topic: Check Cartridge StatusRelated tasksRemoving and Installing Ink CartridgesRelated topicsPrinting with Black Ink and Expended Color Cartridges
Purchase Epson Ink CartridgesYou can purchase genuine Epson ink and paper at epson.com/ink3 (U.S. sales) or epson.ca (Canadiansales). You can also purchase supplies from an Epson authorized reseller. To find the nearest one, call800-GO-EPSON (800-463-7766).
Note: This product uses only genuine Epson-brand cartridges. Other brands of ink cartridges and inksupplies are not compatible and, even if described as compatible, may not function properly.The cartridge included with the printer is designed for printer setup and not for resale. After some ink isused for charging, the rest is available for printing. Yields vary considerably based on images printed,print settings, paper type, frequency of use, and temperature. For print quality, a variable amount of inkremains in the cartridge after the "replace cartridge" indicator comes on.
Ink Cartridge Part NumbersParent topic: Replacing Ink Cartridges
Ink Cartridge Part NumbersUse these part numbers when you order or purchase new ink cartridges, and use the cartridges withinsix months of installing them.

192
Ink color Part numberStandard-capacity High-capacity
Black 288 288XLCyan 288 288XLMagenta 288 288XLYellow 288 288XL
Parent topic: Purchase Epson Ink Cartridges
Removing and Installing Ink CartridgesMake sure you have your replacement cartridges handy before you begin. You must install newcartridges immediately after removing the old ones.
Caution: Leave your old cartridges in the printer until you are ready to replace them to prevent the printhead nozzles from drying out. Do not open ink cartridge packages until you are ready to install the ink.Cartridges are vacuum packed to maintain reliability.
1. Turn on your product.• If an ink cartridge is expended, you see a message on the LCD screen. Note which cartridges
need to be replaced and press the OK button, then choose Replace now.
• If you are replacing a cartridge before you see a message on the LCD screen, press the homebutton if necessary, and select Setup. Select Maintenance, then select Ink CartridgeReplacement and press the OK button.

193
2. Lift up the scanner unit.
Caution: Do not move the print head by hand; otherwise, you may damage your product. Do nottouch the flat white cable inside the printer.
3. Squeeze the tab on the cartridge and lift the cartridge straight up to remove it.
Note: Dispose of used cartridges carefully. Do not take the used cartridge apart or try to refill it.

194
Warning: If ink gets on your skin, wash it thoroughly with soap and water. If ink gets into your eyes,flush them immediately with water. If ink gets into your mouth, spit it out and see a doctor right away.Keep ink cartridges out of the reach of children.
4. Before opening the new cartridge package, shake it gently four or five times.
Caution: Do not shake the cartridges after opening the packages, or ink may leak.
5. Remove the cartridge from the package.
Caution: Do not touch the green chip on the cartridge. Install the new cartridge immediately afterremoving the old one; if you do not, the print head may dry out and be unable to print.
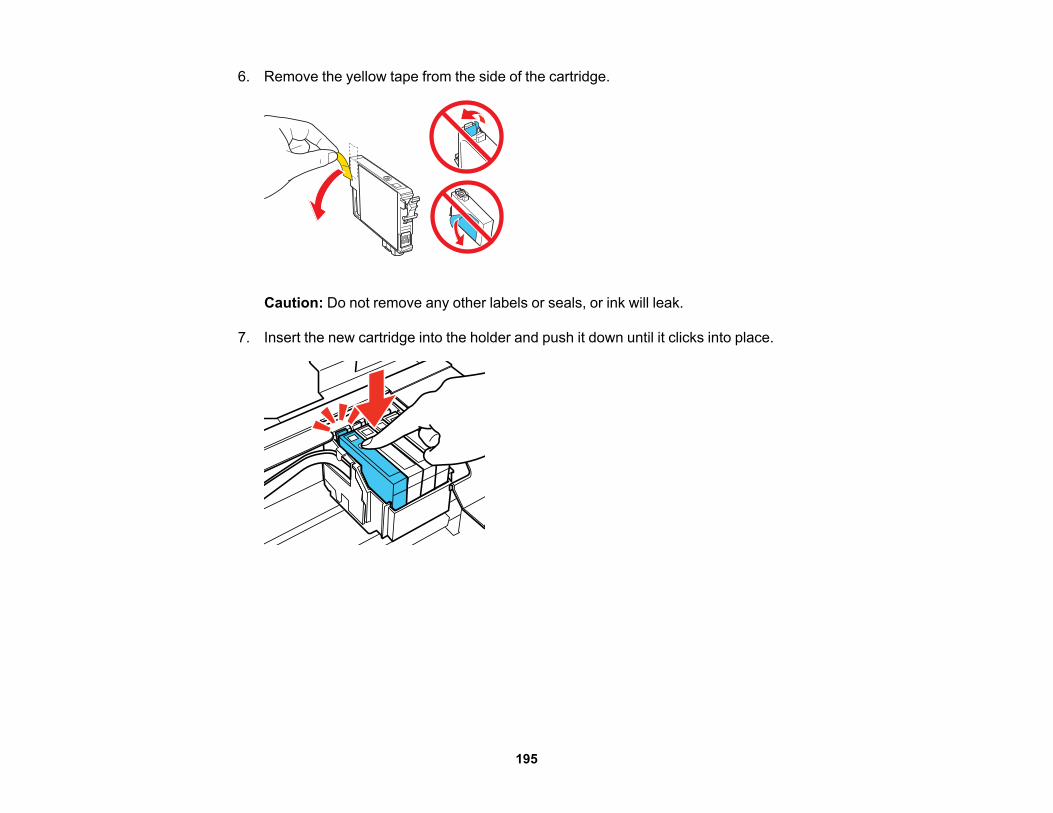
195
6. Remove the yellow tape from the side of the cartridge.
Caution: Do not remove any other labels or seals, or ink will leak.
7. Insert the new cartridge into the holder and push it down until it clicks into place.
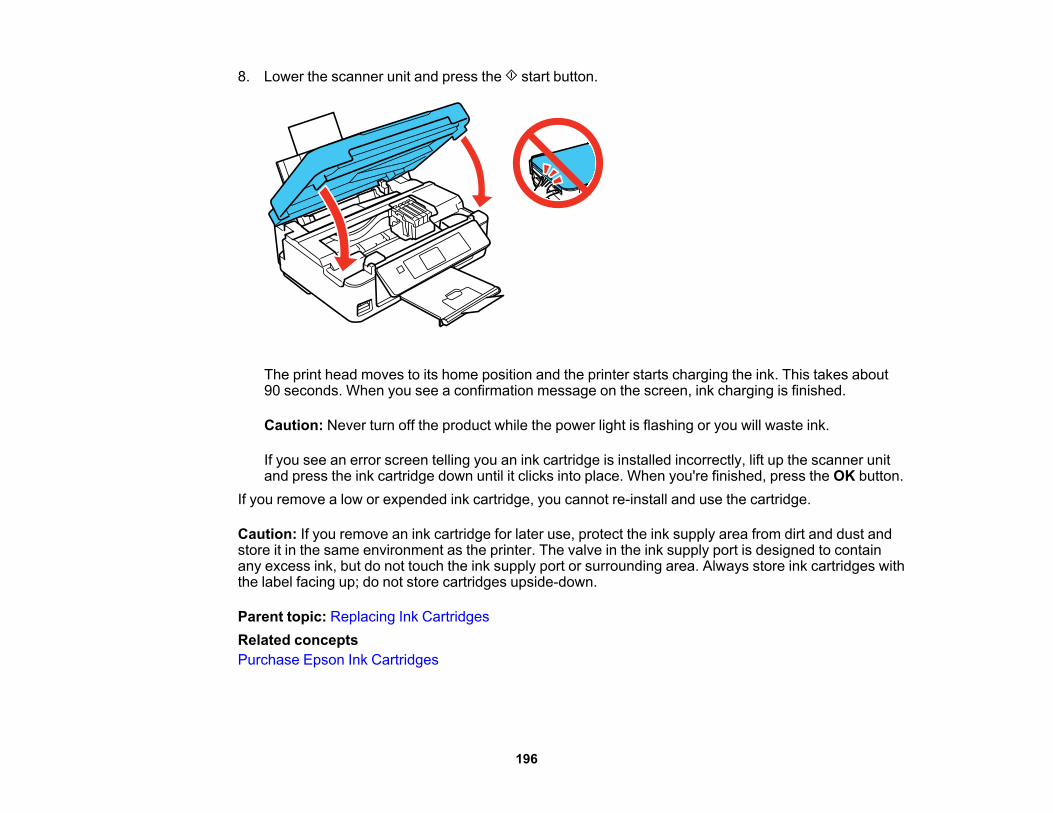
196
8. Lower the scanner unit and press the start button.
The print head moves to its home position and the printer starts charging the ink. This takes about90 seconds. When you see a confirmation message on the screen, ink charging is finished.
Caution: Never turn off the product while the power light is flashing or you will waste ink.
If you see an error screen telling you an ink cartridge is installed incorrectly, lift up the scanner unitand press the ink cartridge down until it clicks into place. When you're finished, press the OK button.
If you remove a low or expended ink cartridge, you cannot re-install and use the cartridge.
Caution: If you remove an ink cartridge for later use, protect the ink supply area from dirt and dust andstore it in the same environment as the printer. The valve in the ink supply port is designed to containany excess ink, but do not touch the ink supply port or surrounding area. Always store ink cartridges withthe label facing up; do not store cartridges upside-down.
Parent topic: Replacing Ink CartridgesRelated conceptsPurchase Epson Ink Cartridges

197
Replacing Ink Cartridges Using a Computer UtilityYou can use the Ink Cartridge Replacement utility to view on-screen instructions for replacing an inkcartridge. This method allows you to replace a cartridge before it is low or expended (if it is too old, forexample).1. Do one of the following:
• Windows: Access the Windows Desktop, right-click the product icon in the Windows taskbar, andselect Printer Settings. Then click the Maintenance tab.
• OS X: In the Apple menu or the Dock, select System Preferences. Select Print & Fax, Print &Scan, or Printers & Scanners, select your product, and select Options & Supplies. SelectUtility and select Open Printer Utility.
You see a window like this:
2. Click the Ink Cartridge Replacement icon and follow the on-screen instructions to replace your inkcartridges as necessary.

198
Parent topic: Replacing Ink CartridgesRelated conceptsPurchase Epson Ink Cartridges
Printing with Black Ink and Expended Color CartridgesWhen a color ink cartridge is expended, you can temporarily continue printing from your computer usingblack ink. Replace the expended color cartridge as soon as possible for future printing.
Note: You cannot print with expended color ink cartridges using your product's control panel.
Printing with Expended Color Cartridges - WindowsPrinting with Expended Color Cartridges - OS XParent topic: Replacing Ink Cartridges
Printing with Expended Color Cartridges - WindowsIf you see a message during printing telling you that you can temporarily print in black ink with anexpended color cartridge, you can cancel your print job and select settings to print on plain paper or onan envelope.
Note: To use this feature, Epson Status Monitor must be enabled.
1. Click Stop or Cancel Print to cancel your print job.2. Load plain paper or an envelope in your product.3. Access the print settings in your print application.4. Click the Main tab.5. Select Plain Paper/Bright White Paper or Envelope as the paper type setting.6. Select the Black/Grayscale checkbox.7. Click OK.8. Print your document.
Epson Status Monitor 3 displays a print message.9. Click Print in Black to print your document.Parent topic: Printing with Black Ink and Expended Color Cartridges

199
Related tasksSelecting Basic Print Settings - WindowsCancelling Printing Using a Product ButtonRelated topicsLoading Paper
Printing with Expended Color Cartridges - OS XIf printing stops, you can cancel your print job and select settings to temporarily print with only black inkon plain paper or on an envelope.1. Click the printer icon in the Dock.2. If you see a message telling you that you can temporarily print with only black ink, click the Delete or
button to cancel your print job. If you see an error message, click OK.3. In the Apple menu or the Dock, select System Preferences.4. Select Print & Fax, Print & Scan, or Printers & Scanners, select your product, and select Options
& Supplies.5. Select Driver or Options.
You see a screen like this:

200
6. Select On as the Permit temporary black printing setting.7. Click OK.8. Close the utility window.9. Load plain paper or an envelope in your product.10. Access the print settings in your print application.11. Select Print Settings from the pop-up menu.12. Select Plain Paper/Bright White Paper or Envelope as the paper type setting.13. Select the Grayscale option.14. Click Print to print your document.Parent topic: Printing with Black Ink and Expended Color CartridgesRelated tasksSelecting Basic Print Settings - OS XCancelling Printing Using a Product ButtonRelated topicsLoading Paper
Conserving Low Black Ink with WindowsThe following window appears when black ink runs low and there is more color ink.

201
Note: The window appears only when you have selected Plain Paper/Bright White Paper as the papertype setting, and depends on other selected print settings. To use this feature, Epson Status Monitormust be enabled.
• Click Yes to use a mixture of color inks to create black, or No to continue using the remaining black inkfor the document you are printing.
• Click Disable this feature to continue using the remaining black ink.
Note: If you disable this feature, it remains disabled until you install a new black ink cartridge.
Parent topic: Replacing Ink Cartridges
202
Adjusting Print QualityIf your print quality declines, you may need to run a utility to clean or align the print head.If running these utilities does not solve the problem, you may need to replace the ink cartridges.Print Head MaintenancePrint Head AlignmentCleaning the Paper PathRelated topicsReplacing Ink Cartridges
Print Head MaintenanceIf your printouts become too light, or you see dark or light bands across them, you may need to clean theprint head nozzles. Cleaning uses ink, so clean the nozzles only if print quality declines.You can check for clogged nozzles before you clean them so you don’t clean them unnecessarily.
Note: You cannot clean the print head if an ink cartridge is expended, and may not be able to clean itwhen a cartridge is low. You must replace the cartridge first.
Print Head Nozzle CheckPrint Head CleaningParent topic: Adjusting Print QualityRelated topicsReplacing Ink Cartridges
Print Head Nozzle CheckYou can print a nozzle check pattern to check for clogged nozzles.Checking the Nozzles Using the Product Control PanelChecking the Nozzles Using a Computer UtilityParent topic: Print Head Maintenance
Checking the Nozzles Using the Product Control PanelYou can check the print head nozzles using the control panel on your product.

203
1. Load a few sheets of plain paper in the product.
2. Press the home button, if necessary.3. Press the left or right arrow button to select Setup and press the OK button.4. Press the up or down arrow button to select Maintenance and press the OK button.
You see this screen:
5. Press the OK button.6. Press the start button.
After the nozzle pattern prints, you see this screen:

204
7. Check the printed pattern to see if there are gaps in the lines.Print head is clean
Print head needs cleaning
8. Do one of the following:• If there are no gaps, select Finish Nozzle Check and press the OK button.• If there are gaps or the pattern is faint, select Head Cleaning and press the OK button to
continue.9. Follow the instructions on the screen to clean the print head, check the nozzles, and repeat the
process as necessary.If you don’t see any improvement after cleaning the print head up to 4 times, turn off the product and waitat least 6 hours. Then try cleaning the print head again. If quality still does not improve, one of the inkcartridges may be old or damaged and needs to be replaced.Parent topic: Print Head Nozzle CheckRelated conceptsPrint Head Cleaning

205
Related topicsLoading Paper
Checking the Nozzles Using a Computer UtilityYou can check the print head nozzles using a utility on your Windows or Mac computer.1. Load a few sheets of plain paper in the product.2. Do one of the following:
• Windows: Access the Windows Desktop and right-click the product icon in the Windows taskbar.• OS X: In the Apple menu or the Dock, select System Preferences. Select Print & Fax, Print &
Scan, or Printers & Scanners, select your product, and select Options & Supplies. SelectUtility and select Open Printer Utility.
3. Select Nozzle Check.You see a window like this:

206
4. Click Print.5. Check the printed pattern to see if there are gaps in the lines.
Print head is clean
Print head needs cleaning
6. If there are no gaps, click Finish.If there are gaps or the pattern is faint, clean the print head.
Parent topic: Print Head Nozzle CheckRelated conceptsPrint Head CleaningRelated topicsLoading Paper
Print Head CleaningIf print quality has declined and the nozzle check pattern indicates clogged nozzles, you can clean theprint head.
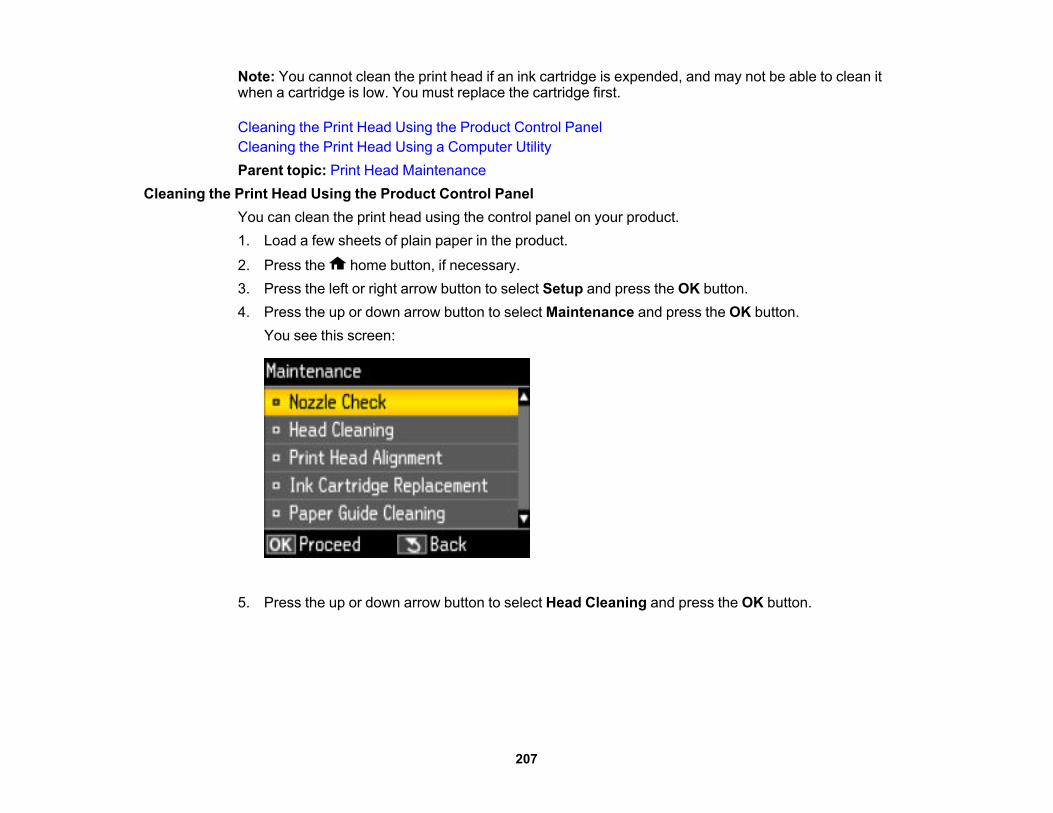
207
Note: You cannot clean the print head if an ink cartridge is expended, and may not be able to clean itwhen a cartridge is low. You must replace the cartridge first.
Cleaning the Print Head Using the Product Control PanelCleaning the Print Head Using a Computer UtilityParent topic: Print Head Maintenance
Cleaning the Print Head Using the Product Control PanelYou can clean the print head using the control panel on your product.1. Load a few sheets of plain paper in the product.
2. Press the home button, if necessary.3. Press the left or right arrow button to select Setup and press the OK button.4. Press the up or down arrow button to select Maintenance and press the OK button.
You see this screen:
5. Press the up or down arrow button to select Head Cleaning and press the OK button.

208
You see this screen:
6. Press the start button to begin the cleaning cycle.
Caution: Never turn off the product during a cleaning cycle or you may damage it.
The power light flashes throughout the cleaning cycle and stays on green when the cleaning cycleis finished. You see this screen:
7. Select Nozzle Check and press the OK button to run a nozzle check to confirm that the print head isclean.

209
If you don’t see any improvement after cleaning the print head up to 4 times, turn off the product and waitat least 6 hours. Then try cleaning the print head again. If quality still does not improve, one of the inkcartridges may be old or damaged and needs to be replaced.Parent topic: Print Head CleaningRelated conceptsPrint Head Nozzle CheckRelated topicsLoading PaperReplacing Ink Cartridges
Cleaning the Print Head Using a Computer UtilityYou can clean the print head using a utility on your Windows or Mac computer.1. Load a few sheets of plain paper in the product.2. Do one of the following:
• Windows: Access the Windows Desktop and right-click the product icon in the Windows taskbar.• OS X: In the Apple menu or the Dock, select System Preferences. Select Print & Fax, Print &
Scan, or Printers & Scanners, select your product, and select Options & Supplies. SelectUtility and select Open Printer Utility.
3. Select Head Cleaning.
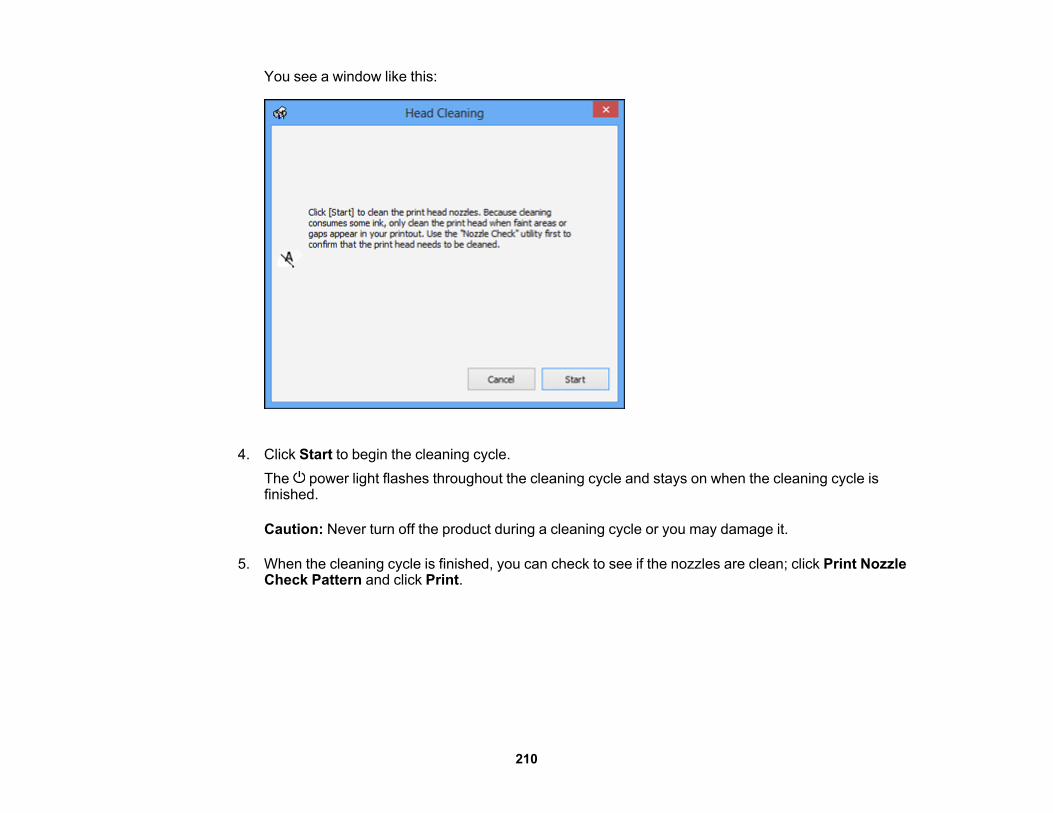
210
You see a window like this:
4. Click Start to begin the cleaning cycle.The power light flashes throughout the cleaning cycle and stays on when the cleaning cycle isfinished.
Caution: Never turn off the product during a cleaning cycle or you may damage it.
5. When the cleaning cycle is finished, you can check to see if the nozzles are clean; click Print NozzleCheck Pattern and click Print.

211
6. Check the printed pattern to see if there are gaps in the lines.Print head is clean
Print head needs cleaning
• If there are no gaps, click Finish.• If there are gaps or the pattern is faint, click Clean to clean the print head again.
If you don’t see any improvement after cleaning the print head up to 4 times, turn off the product and waitat least 6 hours. Then try cleaning the print head again. If quality still does not improve, one of the inkcartridges may be old or damaged and needs to be replaced.Parent topic: Print Head CleaningRelated conceptsPrint Head Nozzle CheckRelated topicsLoading PaperReplacing Ink Cartridges
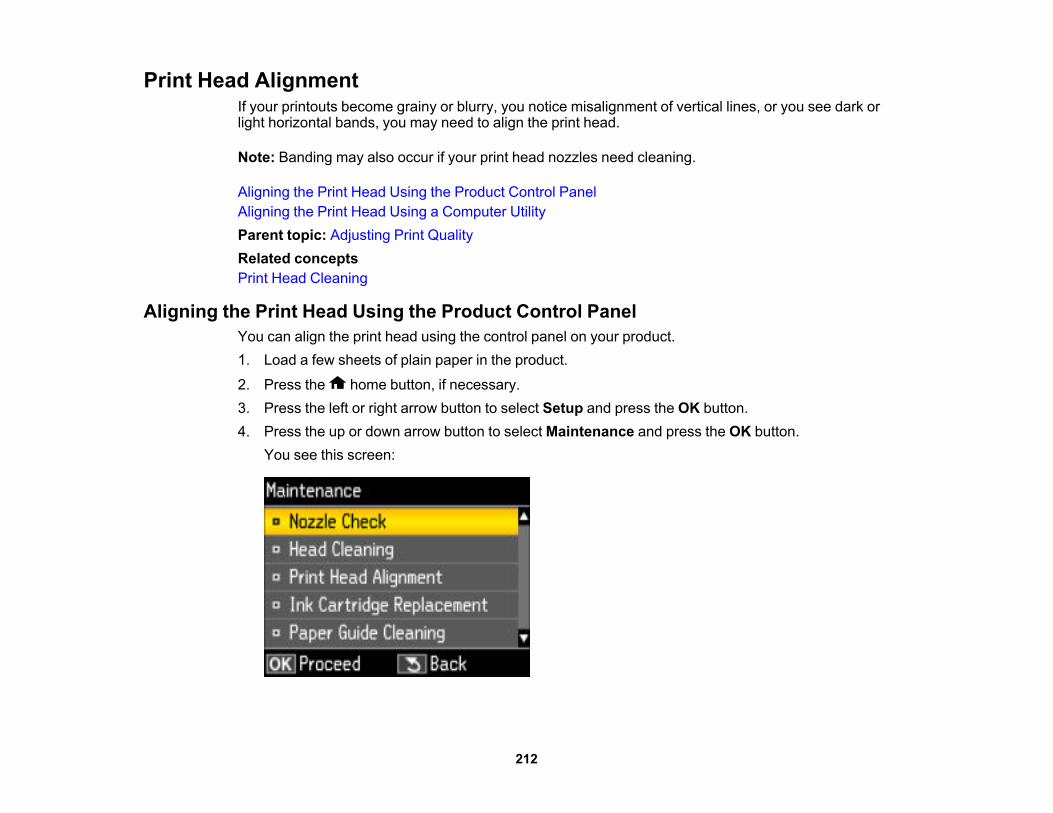
212
Print Head AlignmentIf your printouts become grainy or blurry, you notice misalignment of vertical lines, or you see dark orlight horizontal bands, you may need to align the print head.
Note: Banding may also occur if your print head nozzles need cleaning.
Aligning the Print Head Using the Product Control PanelAligning the Print Head Using a Computer UtilityParent topic: Adjusting Print QualityRelated conceptsPrint Head Cleaning
Aligning the Print Head Using the Product Control PanelYou can align the print head using the control panel on your product.1. Load a few sheets of plain paper in the product.
2. Press the home button, if necessary.3. Press the left or right arrow button to select Setup and press the OK button.4. Press the up or down arrow button to select Maintenance and press the OK button.
You see this screen:
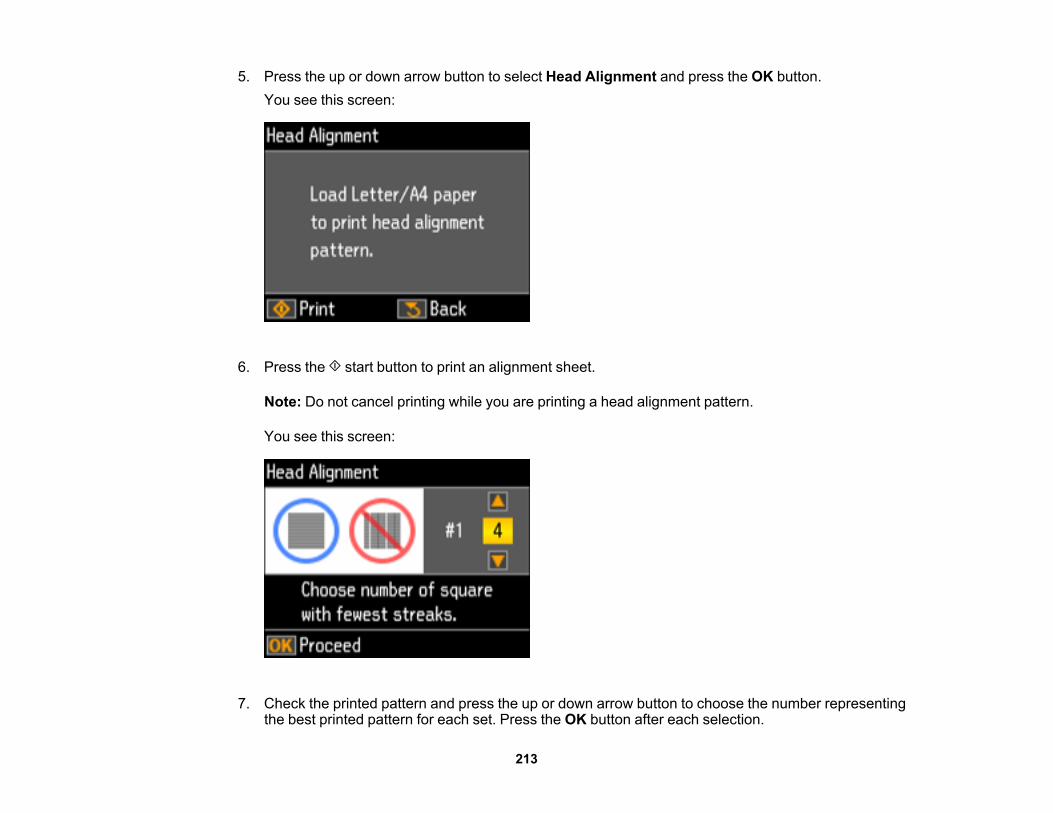
213
5. Press the up or down arrow button to select Head Alignment and press the OK button.You see this screen:
6. Press the start button to print an alignment sheet.
Note: Do not cancel printing while you are printing a head alignment pattern.
You see this screen:
7. Check the printed pattern and press the up or down arrow button to choose the number representingthe best printed pattern for each set. Press the OK button after each selection.

214
Parent topic: Print Head AlignmentRelated topicsLoading Paper
Aligning the Print Head Using a Computer UtilityYou can align the print head using a utility on your Windows or Mac computer.1. Load a few sheets of plain paper in the product.2. Do one of the following:
• Windows: Access the Windows Desktop and right-click the product icon in the Windows taskbar.• OS X: In the Apple menu or the Dock, select System Preferences. Select Print & Fax, Print &
Scan, or Printers & Scanners, select your product, and select Options & Supplies. SelectUtility and select Open Printer Utility.
3. Select Print Head Alignment.4. Click Next, then click Print to print an alignment sheet.
Note: Do not cancel printing while you are printing a head alignment pattern.

215
You see a window like this:
5. Check the printed pattern and follow the instructions on the screen to choose the number of the bestprinted pattern for each set.• After choosing a pattern number, click Next.• If no patterns are aligned in one or more of the sets, choose the closest one in each set and click
Realignment. Then print another alignment sheet and check it.
Note: Click Skip (where available) if you want to skip a particular alignment sheet.
6. When you are done, click Finish.Parent topic: Print Head AlignmentRelated topicsLoading Paper

216
Cleaning the Paper PathIf you see ink on the back of a printout, you can clean the paper path to remove any excess ink.1. Load a few sheets of plain paper in the product.
2. Press the home button, if necessary.3. Press the left or right arrow button to select Setup and press the OK button.4. Press the up or down arrow button to select Maintenance and press the OK button.
You see this screen:
5. Press the up or down arrow to select Paper Guide Cleaning and press the OK button.6. Check the back of the ejected paper to see if it is clean.7. Repeat as necessary until the paper comes out clean.Parent topic: Adjusting Print QualityRelated topicsLoading Paper

217
Cleaning and Transporting Your ProductSee these sections if you need to clean or transport your product.Cleaning Your ProductTransporting Your Product
Cleaning Your ProductTo keep your product working at its best, you should clean it several times a year.Close the output tray and paper support when you are not using the product to protect it from dust.
Caution: Do not use a hard brush, alcohol, or paint thinner to clean the product or you may damage it.Do not use oil or other lubricants inside the product or let water get inside it.
1. Turn off the product.2. Unplug the power cable.3. Disconnect any connected cables.4. Remove all the paper.5. Clean the scanner glass with a soft, lint-free cloth (microfiber is recommended), moistened with a
little glass cleaner.
Caution: Do not spray glass cleaner directly on the glass and do not press the glass surface withany force.
6. Clean the outer case and control panel with a soft, dry cloth. Do not use liquid or chemical cleansers.Parent topic: Cleaning and Transporting Your Product
Transporting Your ProductIf you need to store your product or transport it a long distance, prepare it for transportation as describedhere.
Caution: During transportation and storage, follow these guidelines:• Avoid tilting the product, placing it vertically, or turning it upside down; otherwise ink may leak.

218
• Leave the ink cartridges installed. Removing the cartridges can dry out the print head and may preventthe product from printing.
• Do not carry the product by its control panel; this may damage the product.
Note: Before storing your product for a long period, replace low, expended, or expired ink to helpprevent the print head from drying out. Store your product in a cool, dry place.
1. Turn off the product.2. Wait for the power light to go out, then unplug the power cable.3. Disconnect any connected cables.4. Remove all the paper from the product.5. Close the output tray and paper support.6. Remove any memory card inserted in the product.7. Lift up the scanner unit and check to see if the print head is in the far right position (the home
position). If not, turn on the product, wait for the print head to move, then turn the product off again.8. Secure the ink cartridge holder to the case with tape.
Caution: Do not place tape on the white flat cable inside the product; otherwise, you may damageyour product.
9. Lower the scanner unit.
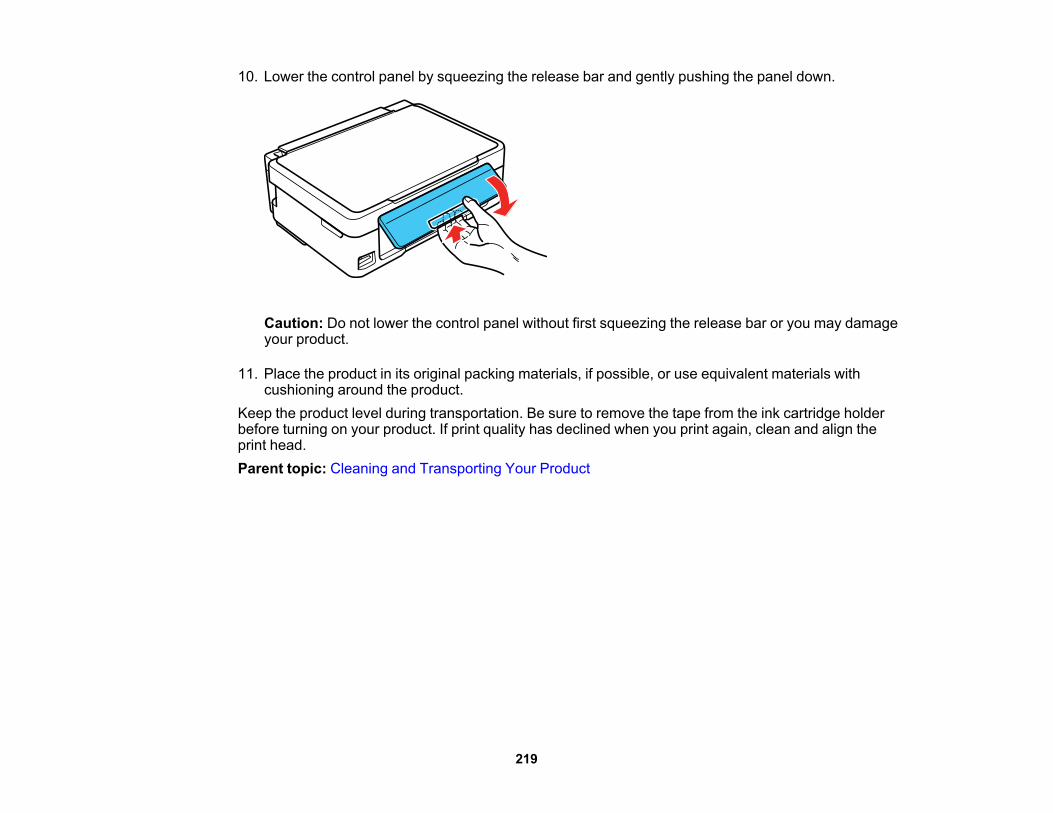
219
10. Lower the control panel by squeezing the release bar and gently pushing the panel down.
Caution: Do not lower the control panel without first squeezing the release bar or you may damageyour product.
11. Place the product in its original packing materials, if possible, or use equivalent materials withcushioning around the product.
Keep the product level during transportation. Be sure to remove the tape from the ink cartridge holderbefore turning on your product. If print quality has declined when you print again, clean and align theprint head.Parent topic: Cleaning and Transporting Your Product

220
Solving ProblemsCheck these sections for solutions to problems you may have using your product.Checking for Software UpdatesProduct Status MessagesRunning a Product CheckResetting Control Panel DefaultsSolving Setup ProblemsSolving Network ProblemsSolving Copying ProblemsSolving Paper ProblemsSolving Problems Printing from a ComputerSolving Page Layout and Content ProblemsSolving Print Quality ProblemsSolving Scanning ProblemsSolving Scanned Image Quality ProblemsSolving Memory Card ProblemsUninstall Your Product SoftwareWhere to Get Help
Checking for Software UpdatesPeriodically, it's a good idea to check Epson's support website for free updates to your product software.Visit the driver download site at (U.S. downloads or Canadian downloads).• Windows: Your printer software automatically checks for updates. You can also manually update the
software by selecting Software Update here:• Accessing the Windows Desktop and right-clicking the product icon in the Windows taskbar• On the Maintenance tab in the printer settings windowYou can also update the software by selecting EPSON Software Updater in the EPSON or EPSONSoftware program group, accessible by the Start button, or on the Start or Apps screens, dependingon your version of Windows.
• OS X: You can manually update the software by opening the Applications > Epson Software folderand selecting EPSON Software Updater.

221
Parent topic: Solving ProblemsRelated tasksChanging Automatic Update Options
Product Status MessagesYou can often diagnose problems with your product by checking the messages on its LCD screen.
LCD screenmessage/code
Condition/solution
Paper out. Load paper. No paper is loaded. Load paper in the productPaper feed error or jam. Paper is jammed in the product. Remove the jammed paper, then press the
start button to clear the error.Combination of IPaddress and subnetmask is invalid.
There is a problem with the network connection to your product.
The printer's ink pad isat the end of its servicelife.
The ink pad is at the end of its service life. Turn off the product and contactEpson for support.
The printer's ink pad isnearing the end of itsservice life.
The ink pad is near the end of its service life. Contact Epson for support. (Tocontinue printing, press the start button.)
Communication error.Connect computer.
Make sure the computer is connected to your product and your software isinstalled correctly.
Paper Configuration isdisabled. Some featuresmay not be available.
The Paper Configuration setting must be turned on to use AirPrint.
You need to replace thefollowing inkcartridge(s).
Replace the ink cartridge indicated on the LCD screen.
Operation canceled.Error while saving.
Make sure the memory card is inserted correctly and meets thespecifications for your product.
Recovery mode An error has occurred during firmware updating. Connect your product usinga USB cable and try updating the firmware again. If you still receive this errormessage, contact Epson for support.

222
LCD screenmessage/code
Condition/solution
Printer error. Turn poweroff and on again.
A fatal error has occurred. Turn the product off and then back on again. If theerror continues, check for a paper jam. If there is no paper jam, contactEpson for support.
Note: The ink pads in the printer collect, distribute, and contain the ink that is not used on printed pages.During the life of your product it may reach a condition where either satisfactory print quality cannot bemaintained or the ink pads have reached the end of their usable life. The Epson Status Monitor, yourLCD screen, or lights on the control panel will advise you when these parts need replacing. If thishappens during the standard warranty of the product, the exchange of the product or replacement of thepads is covered under the standard warranty. If the product is out of warranty, the pads can be replacedby any Epson authorized service provider. The waste ink pads are not a user-replaceable part.
Parent topic: Solving ProblemsRelated conceptsCheck Cartridge StatusRelated referencesPaper Jam ProblemsWhere to Get HelpRelated topicsLoading PaperReplacing Ink Cartridges
Running a Product CheckRunning a product check helps you determine if your product is operating properly.1. Disconnect any interface cables connected to your product.2. Load plain paper in the product.
3. Press the home button, if necessary.4. Press the left or right arrow button to select Setup and press the OK button.5. Press the up or down arrow button to select Maintenance and press the OK button.

223
You see this screen:
6. Press the OK button.7. Press the start button.
After the nozzle pattern prints, you see this screen:
8. Do the following, depending on the results of the product check:• If the page prints and the nozzle check pattern is complete, the product is operating properly. Any
operation problem you may have could be caused by your computer, cable, software, or selected
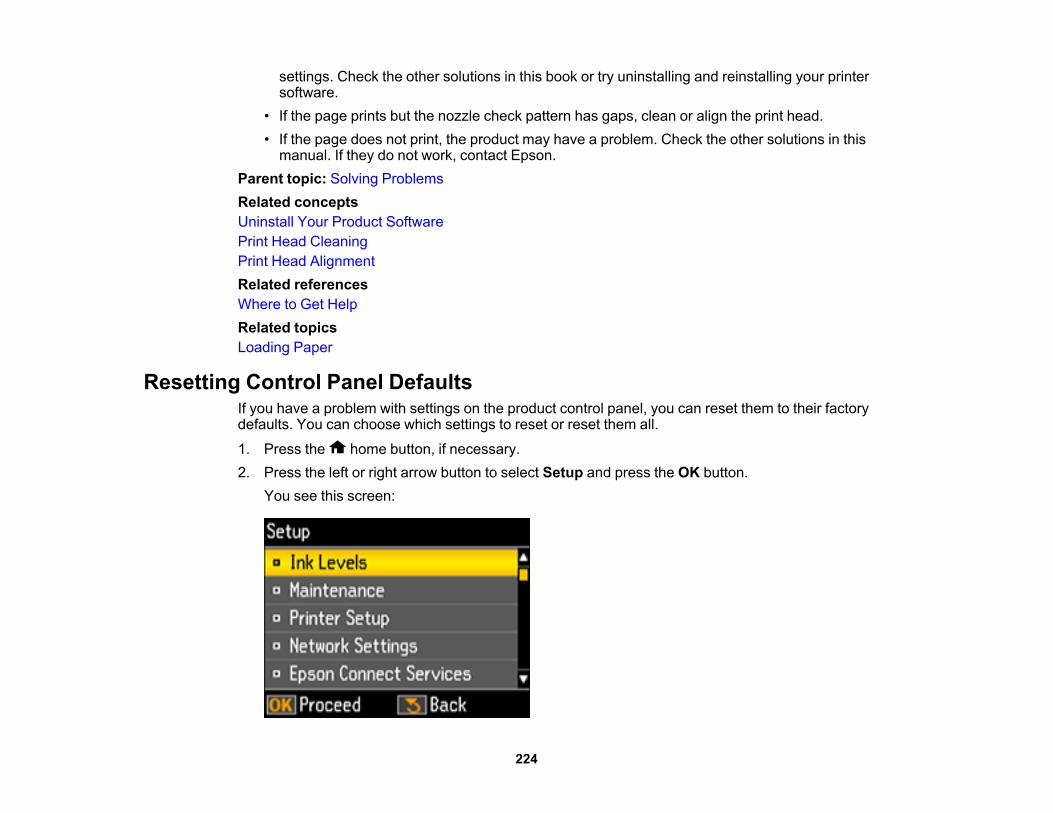
224
settings. Check the other solutions in this book or try uninstalling and reinstalling your printersoftware.
• If the page prints but the nozzle check pattern has gaps, clean or align the print head.• If the page does not print, the product may have a problem. Check the other solutions in this
manual. If they do not work, contact Epson.Parent topic: Solving ProblemsRelated conceptsUninstall Your Product SoftwarePrint Head CleaningPrint Head AlignmentRelated referencesWhere to Get HelpRelated topicsLoading Paper
Resetting Control Panel DefaultsIf you have a problem with settings on the product control panel, you can reset them to their factorydefaults. You can choose which settings to reset or reset them all.
1. Press the home button, if necessary.2. Press the left or right arrow button to select Setup and press the OK button.
You see this screen:

225
3. Press the up or down arrow button to select Restore Default Settings and press the OK button.You see this screen:
4. Press the up or down arrow button to select one of these options and press the OK button:• Network Settings: Resets all network settings.• All except Network Settings: Resets all control panel settings, except for network settings.• All Settings: Resets all control panel settings.You see a confirmation screen.
5. Press the OK button to reset the selected settings.Parent topic: Solving Problems
Solving Setup ProblemsCheck these sections if you have problems while setting up your product.Noise After Ink InstallationSoftware Installation ProblemsControl Panel Setup ProblemsUSB Connection ProblemsParent topic: Solving Problems

226
Noise After Ink InstallationIf you hear noises from your product after installing ink, check the following:• The first time you install ink cartridges, the product must charge its print head. Wait until charging
finishes before you turn off the product, or it may charge improperly and use excess ink the next timeyou turn it on. Your product is finished charging the print head when the power light stops flashing.
• If the product's print head stops moving or making noise, and the charging process has not finishedafter approximately 5 minutes, turn off your product. Turn it back on and check to see if charging is stillin progress. If it is still in progress, contact Epson for help.
Parent topic: Solving Setup ProblemsRelated topicsReplacing Ink Cartridges
Software Installation ProblemsIf you have problems while installing your product software, try these solutions:• Make sure your product is turned on and any necessary cables are securely connected at both ends. If
you still have problems installing software, disconnect the cable and carefully follow the instructions onthe Start Here sheet. Also make sure your system meets the requirements for your operating system.
• Close any other programs, including screen savers and virus protection software, and install yourproduct software again.
• In Windows, make sure your product is selected as the default printer and the correct port is shown inthe printer properties.
• If you see any error message or your software does not install correctly in Windows, you may not havesoftware installation privileges. Contact your System Administrator.
Parent topic: Solving Setup ProblemsRelated referencesWindows System RequirementsOS X System Requirements
Control Panel Setup ProblemsIf you have problems setting up the control panel, try these solutions:• To view LCD screen text in a different language, select a different language setting for the panel.• To adjust the position of the control panel, carefully raise or lower it using the release bar.
227
Parent topic: Solving Setup ProblemsRelated topicsUsing the Control Panel
USB Connection ProblemsIf you used a USB cable to connect to a computer that has multiple peripherals, make sure the computeris grounded. Otherwise, you may feel a slight electric shock when touching your product.Parent topic: Solving Setup Problems
Solving Network ProblemsCheck these solutions if you have problems setting up or using your product on a network.
Note: Breakdown or repair of this product may cause loss of network data and settings. Epson is notresponsible for backing up or recovering data and settings during or after the warranty period. Werecommend that you make your own backup or print out your network data and settings.
Product Cannot Connect to a Wireless Router or Access PointNetwork Software Cannot Find Product on a NetworkProduct Does Not Appear in OS X Printer WindowCannot Print Over a NetworkCannot Scan Over a NetworkParent topic: Solving Problems
Product Cannot Connect to a Wireless Router or Access PointIf your product has trouble finding or connecting to a wireless router or access point, try these solutions:• Make sure to place your product within contact range of your 2.4 GHz router or access point. Avoid
placing your product near a microwave oven, 2.4 GHz cordless phone, or large metal object, such as afiling cabinet.
Note: If you are using a 5 GHz wireless router, set the router to operate in dual band (2.4 GHz and5 GHz) mode. If your router uses a single network name (SSID) for both the 2.4 GHz and 5 GHz band,give each band its own network name (SSID) instead, such as Home Network 2.4 GHz and HomeNetwork 5 GHz. See your router documentation or contact your internet service provider forinstructions.

228
• Verify that your router or access point is operating correctly by connecting to it from your computer oranother device.
• You may need to disable the firewall and any anti-virus software on your wireless router or accesspoint.
• Check to see if access restrictions, such as MAC address filtering, are set on the router or accesspoint. If access restrictions are set, add your product's MAC address to your router's address list. Toobtain your product's MAC address, print a network status sheet. Then follow the instructions in yourrouter or access point documentation to add the address to the list.
• If your router or access point does not broadcast its network name (SSID), follow the instructions thatcame with your product to enter your wireless network name manually.
• If your router or access point has security enabled, determine the kind of security it is using and anyrequired password or passphrase for connection. Then make sure to enter the exact WEP key or WPApassphrase correctly.
• Check if your computer is restricting the available wireless channels. If so, verify that your wirelessaccess point is using one of the usable channels and change to a usable channel, if necessary.
• If you are using a Wi-Fi Direct connection that suddenly disconnects, the Wi-Fi direct password onyour device may have been changed. If necessary, delete the existing DIRECT-xxxxxxxx connectionsettings from your device and enter a new password. See your device documentation for instructions.
• If you connected your product to a Windows computer using Wi-Fi Direct and it automatically selectedAccess Point Mode, you may have trouble accessing a low-priority Internet connection. Check thenetwork connection or adapter settings in the Windows Control Panel and set the Internet metricsetting to 100 for your version of the Internet Protocol.
Parent topic: Solving Network ProblemsRelated topicsWi-Fi Networking
Network Software Cannot Find Product on a NetworkIf EpsonNet Setup cannot find your product on a network, try these solutions:• Make sure your product is turned on and connected to your network. Verify connection using your
product control panel.• Check if your network name (SSID) contains non-ASCII characters. Your product cannot display non-
ASCII characters.• Make sure your product is not connected to a guest network.

229
• If necessary, reinstall your product software and try running EpsonNet Setup again:1. Reset your product's network settings to their factory defaults.2. Windows only: uninstall your product software.3. Initialize your router following the instructions in your router documentation.
Note: If you are reading these instructions online, you will lose your Internet connection when youinitialize your router, so note the next step before initializing it.
4. Download your product software from the Epson website using the instructions on the Start Heresheet.
• If you have replaced your router, reinstall your product software to connect to the new router.
Note: If you are using a 5 GHz wireless router, set the router to operate in dual band (2.4 GHz and5 GHz) mode. If your router uses a single network name (SSID) for both the 2.4 GHz and 5 GHz band,give each band its own network name (SSID) instead, such as Home Network 2.4 GHz and HomeNetwork 5 GHz. See your router documentation or contact your internet service provider forinstructions.
Parent topic: Solving Network ProblemsRelated conceptsUninstall Your Product SoftwareRelated tasksConnecting to a New Wi-Fi RouterRelated topicsWi-Fi Networking
Product Does Not Appear in OS X Printer WindowIf your product does not appear in the OS X printer window, try these solutions:• Turn your product off, wait 30 seconds, then turn it back on again.• If you are connecting the product wirelessly via EpsonNet Setup and a WiFi symbol is not displayed on
the product's LCD screen, make sure your product software was installed correctly. If necessary,reinstall your software.
• Make sure you installed your product software correctly for your network. See the Start Here sheet forinstructions.

230
• If your Mac includes both wired and wireless network services, make sure the network to which youconnected your product is at the top of the Set Service Order list. Check your Mac documentation forinstructions.
Note: If you are using a 5 GHz wireless router, set the router to operate in dual band (2.4 GHz and5 GHz) mode. If your router uses a single network name (SSID) for both the 2.4 GHz and 5 GHz band,give each band its own network name (SSID) instead, such as Home Network 2.4 GHz and HomeNetwork 5 GHz. See your router documentation or contact your internet service provider forinstructions.
Parent topic: Solving Network ProblemsRelated topicsWi-Fi Networking
Cannot Print Over a NetworkIf you cannot print over a network, try these solutions:• Make sure that your product is turned on.• Make sure you install your product's network software as described in your product documentation.• Print a network status sheet and verify that the network settings are correct. If the network status is
Disconnected, check any cable connections and turn your product off and then on again.• If you are using TCP/IP, make sure the product's IP address is set correctly for your network. If your
network does not assign IP addresses using DHCP, set the IP address manually.• Make sure your computer and product are both using the same wireless network.• If network printing is slow, print a network status sheet and check the signal strength. If it is poor, place
your product closer to your router or access point. Avoid placing your product near a microwave oven,2.4 GHz cordless phone, or large metal object, such as a filing cabinet.
Note: If you are using a 5 GHz wireless router, set the router to operate in dual band (2.4 GHz and5 GHz) mode. If your router uses a single network name (SSID) for both the 2.4 GHz and 5 GHz band,give each band its own network name (SSID) instead, such as Home Network 2.4 GHz and HomeNetwork 5 GHz. See your router documentation or contact your internet service provider forinstructions.
• Check to see if your wireless router or access point has an enabled Privacy Separator function that ispreventing printing from a device over the network. See your router or access point documentation forinstructions on disabling the Privacy Separator function.

231
• If you are connecting the product wirelessly via EpsonNet Setup and the Wi-Fi connection icon is notlit or does not appear on the product's LCD screen, make sure your product software was installedcorrectly. If necessary, reinstall your software.
Parent topic: Solving Network ProblemsRelated topicsWi-Fi Networking
Cannot Scan Over a NetworkIf you cannot start Epson Scan for scanning over a network, try these solutions:• If you cannot scan from your product control panel, make sure you restarted your computer after
installing the product software. Make sure the Event Manager program is not being blocked by yourfirewall or security software.
Note: If you are using a 5 GHz wireless router, set the router to operate in dual band (2.4 GHz and5 GHz) mode. If your router uses a single network name (SSID) for both the 2.4 GHz and 5 GHz band,give each band its own network name (SSID) instead, such as Home Network 2.4 GHz and HomeNetwork 5 GHz. See your router documentation or contact your internet service provider forinstructions.
• If you are scanning a large original at a high resolution, a network communication error may occur. Tryscanning again at a lower resolution.
• If network communication was interrupted while starting Epson Scan, exit Epson Scan, wait a fewseconds, and restart it. If Epson Scan cannot restart, turn off your product, turn it back on, and tryrestarting Epson Scan again.
• Check the connection setting and test the connection using Epson Scan Settings:
Windows 10: Click , select All apps, and select EPSON Scan Settings. Make sure theConnection setting is set to Network, then click the Test button.Windows 8.x: Navigate to the Apps screen and select EPSON Scan Settings. Make sure theConnection setting is set to Network, then click the Test button.
Windows (other versions): Click or Start > All Programs or Programs > EPSON > EPSONScan > EPSON Scan Settings. Make sure the Connection setting is set to Network, then click theTest button.OS X: Open the Applications folder, click Epson Software, and click EPSON Scan Settings. Makesure the Connection setting is set to Network, then click the Test button.

232
• Make sure the option selected as the Timeout Setting in the Epson Scan Settings program is longenough to complete scanning over a network.
• You may need to disable the firewall and any anti-virus software on your wireless router or accesspoint.
Note: With OS X, in addition to scanning with Image Capture, you can download and install Epson Scanscanning software. Epson Scan provides additional image adjustment and photo correction features forenhancing scanned images, and provides an interface for TWAIN-compliant OCR scanning software. Todownload Epson Scan, visit Epson's driver download site (U.S. downloads or Canadian downloads).
Parent topic: Solving Network ProblemsRelated topicsWi-Fi NetworkingStarting a Scan
Solving Copying ProblemsCheck these solutions if you have problems copying with your product.Product Makes Noise, But Nothing CopiesProduct Makes Noise When It Sits for a WhileParent topic: Solving Problems
Product Makes Noise, But Nothing CopiesIf your product makes a noise, but nothing copies, try these solutions:• Run a nozzle check to see if any of the print head nozzles are clogged. Then clean the print head, if
necessary.• If the nozzle check page does not print, but the product's power is on, make sure your product
software is installed correctly.• Make sure your product is level (not tilted).Parent topic: Solving Copying ProblemsRelated conceptsPrint Head Nozzle CheckPrint Head Cleaning
233
Product Makes Noise When It Sits for a WhileYour product is performing routine maintenance. This is normal.Parent topic: Solving Copying Problems
Solving Paper ProblemsCheck these sections if you have problems using paper with your product.Paper Feeding ProblemsPaper Jam ProblemsPaper Ejection ProblemsParent topic: Solving Problems
Paper Feeding ProblemsIf you have problems feeding paper, try these solutions:• If paper does not feed for printing, remove it. Then reload it in the sheet feeder against the right side
and beneath the tab. Slide the edge guide against the edge of the paper, making sure that the paperstack is not above the arrow mark on the edge guide.
• If multiple pages feed at once, remove the paper, fan the edges to separate the sheets, and reload it.• If paper jams when you load only one or two sheets, try loading more sheets at a time. Do not load
more than the recommended number of sheets.• If paper jams when you print on both sides of the paper, try loading fewer sheets.• For best results, follow these guidelines:
• Use new, smooth, high-quality paper that is not curled, creased, old, too thin, or too thick.• Load paper in the sheet feeder printable side up.• Follow any special loading instructions that came with the paper.
Parent topic: Solving Paper ProblemsRelated referencesPaper Loading CapacityPaper Jam ProblemsRelated topicsLoading Paper

234
Paper Jam ProblemsIf you have problems with paper jams, try these solutions:1. Cancel the print job from your computer, if necessary.2. Gently pull out any jammed paper from the output tray and sheet feeder.3. Press the start button to resume printing. If the product messages still show an error, continue with
the next step.4. Press the power button to turn the product off.5. Lift up the scanner unit, and remove the jammed paper and any torn pieces.
6. Lower the scanner unit and press the power button to turn the product back on.7. Carefully follow all paper loading instructions when you load new paper.Parent topic: Solving Paper ProblemsRelated tasksCancelling Printing Using a Product Button

235
Related topicsLoading Paper
Paper Ejection ProblemsIf you have problems with paper ejecting properly, try these solutions:• If paper does not eject fully, you may have set the wrong paper size. Cancel printing to eject the paper.
Select the correct paper size when you reprint.• If paper is wrinkled when it ejects, it may be damp or too thin. Load new paper and be sure to select
the correct paper type setting when you reprint.Parent topic: Solving Paper ProblemsRelated referencesPaper Jam ProblemsPaper or Media Type Settings - Control PanelPaper or Media Type Settings - Product SoftwareRelated tasksCancelling Printing Using a Product ButtonRelated topicsLoading Paper
Solving Problems Printing from a ComputerCheck these sections if you have problems while printing from your computer.
Note: When printing using AirPrint, the available print settings are different from those covered in thismanual. See the Apple website for details.
Nothing PrintsProduct Icon Does Not Appear in Windows TaskbarError After Cartridge ReplacementPrinting is SlowParent topic: Solving Problems

236
Nothing PrintsIf you have sent a print job and nothing prints, try these solutions:• Make sure your product is turned on.• Make sure any interface cables are connected securely at both ends.• If you connected your product to a USB hub, make sure it is a first-tier hub. If it still does not print,
connect your product directly to your computer instead of the hub.• Run a product check to see if a test page prints. If the test page prints, check to see if your product
software is installed correctly.• If you are printing a large image, the computer may not have enough memory. Print the image at a
lower resolution or a smaller file size.• In Windows, click Print Queue on the Maintenance tab in the printer settings window and check for
the following:• Check for any stalled or paused print jobs. Cancel or unpause any jobs as necessary.• Open the Printer menu and make sure the product is not offline.• Open the Printer menu and set the product as the default printer, if necessary.
• In OS X, select System Preferences from the Apple menu or Dock, select Print & Scan or Printers& Scanners, then double-click your printer icon. Check to see if any jobs are paused. Cancel orresume any jobs as necessary.
Parent topic: Solving Problems Printing from a ComputerRelated tasksRunning a Product CheckCancelling Printing Using a Product Button
Product Icon Does Not Appear in Windows TaskbarIf you do not see your product icon in the Windows taskbar, first try restarting your computer. If that doesnot work, try this solution:1. Do one of the following:
• Windows 10: Right-click and select Control Panel > Hardware and Sound > Devices andPrinters.
• Windows 8.x: Navigate to the Apps screen and select Control Panel > Hardware and Sound >Devices and Printers.
237
• Windows 7: Click and select Devices and Printers.
• Windows Vista: Click , select Control Panel, and click Printer under Hardware and Sound.• Windows XP: Click Start and select Printers and Faxes. (Or open the Control Panel, select
Printers and Other Hardware, if necessary, and Printers and Faxes.)2. Right-click your product name, select Printing Preferences, and select your product name again if
necessary.3. Click the Maintenance tab.4. Click the Extended Settings button.5. Select Enable EPSON Status Monitor 3, then click OK.6. Click the Monitoring Preferences button.7. Click the checkbox for the option that adds the shortcut icon to the taskbar.8. Click OK to close the open program windows.Parent topic: Solving Problems Printing from a Computer
Error After Cartridge ReplacementIf you see an error light or error message after you replace an ink cartridge, follow these steps:1. Make sure the print head is in the ink cartridge replacement position. (The ink cartridge holder should
be beneath the cutout in the product case.)
Note: If the print head is not in the ink cartridge replacement position, follow the instructions onreplacing an ink cartridge in this manual to move it.
2. Remove and reinsert the replaced ink cartridge, making sure to push it all the way into its slot.3. Complete the ink cartridge installation steps.Parent topic: Solving Problems Printing from a ComputerRelated topicsReplacing Ink Cartridges

238
Printing is SlowIf printing becomes slow, try these solutions:• Make sure your system meets the requirements for your operating system. If you are printing a high-
resolution image, you may need more than the minimum requirements. If necessary, increase yoursystem's memory.
• If you are using Windows 7, close the Devices and Printers window before you print.• If you are using OS X, make sure you download and install the Epson printer driver.• Clear space on your hard drive or run a defragmentation utility to free up existing space.• Close any programs you are not using when you print.• If your product is connected to a USB hub, connect it directly to your computer instead.• If printing becomes slower after printing continuously for a long time, the product may have
automatically slowed down to protect the print mechanism from overheating or becoming damaged.Let the product rest with the power on for 30 minutes, then try printing again.
For the fastest printing, select the following settings in your product software:• Make sure the paper type setting matches the type of paper you loaded.• Turn on any high speed settings in your product software.• Select a lower print quality setting.• Windows: Click the Maintenance or Utility tab, select Extended Settings or Speed and Progress,
and select the following settings:• Always Spool RAW Datatype• Page Rendering Mode• Print as Bitmap
Parent topic: Solving Problems Printing from a ComputerRelated referencesWindows System RequirementsOS X System RequirementsPaper or Media Type Settings - Product SoftwareRelated tasksSelecting Basic Print Settings - WindowsSelecting Basic Print Settings - OS X
239
Solving Page Layout and Content ProblemsCheck these sections if you have problems with the layout or content of your printed pages.
Note: When printing using AirPrint, the available print settings are different from those covered in thismanual. See the Apple website for details.
Inverted ImageToo Many Copies PrintBlank Pages PrintIncorrect Margins on PrintoutBorder Appears on Borderless PrintsIncorrect Characters PrintIncorrect Image Size or PositionSlanted PrintoutParent topic: Solving Problems
Inverted ImageIf your printed image is inverted unexpectedly, try these solutions:• Turn off any mirror or inversion settings in your printing application.• Turn off the Mirror Image, Flip horizontally, or Reverse page orientation settings in your printer
software. (This option has different names, depending on your operating system version.)
Note: Leave these options turned on when you print on Epson Iron-on Cool Peel Transfer paper, ifavailable for your product.
Parent topic: Solving Page Layout and Content ProblemsRelated tasksSelecting Additional Layout and Print Options - WindowsSelecting Basic Print Settings - OS X
Too Many Copies PrintMake sure that the Copies setting in your printing program or printer software is not set for multiplecopies.Parent topic: Solving Page Layout and Content Problems

240
Related tasksSelecting Basic Print Settings - WindowsSelecting Basic Print Settings - OS X
Blank Pages PrintIf blank pages print unexpectedly, try these solutions:• Make sure you selected the correct paper size settings in your printing program and printer software.• If a blank page exists in a document you are printing and you want to skip printing it, select the Skip
Blank Page setting in your printer software.• Run a print head nozzle check to see if any of the nozzles are clogged. Then clean the print head, if
necessary.• Make sure your product is selected as the printer in your printing program.Parent topic: Solving Page Layout and Content ProblemsRelated conceptsPrint Head Nozzle CheckPrint Head CleaningRelated tasksSelecting Basic Print Settings - WindowsSelecting Basic Print Settings - OS XSelecting Page Setup Settings - OS X
Incorrect Margins on PrintoutIf your printed page has incorrect margins, try these solutions:• Make sure you selected the correct paper size settings in your printing program and printer software.• Make sure you selected the correct margins for your paper size in your printing program.• Make sure your paper is positioned correctly for feeding into the printer.You can use the preview option in your printer software to check your margins before you print.Parent topic: Solving Page Layout and Content ProblemsRelated tasksSelecting Basic Print Settings - WindowsSelecting Basic Print Settings - OS X

241
Related topicsLoading Paper
Border Appears on Borderless PrintsIf you see a border on borderless prints, try these solutions:• Make sure you are printing on a compatible borderless paper type and size.
Note: For custom paper sizes, make sure you select a supported borderless page width.
• Windows: Make sure you selected the Borderless setting in your printer software.• OS X: Make sure you selected the Borderless checkbox or a paper size with a Borderless option in
your printer software.• Adjust the Expansion setting to adjust the amount of image expansion on the edges of borderless
prints.• Make sure the image size and the paper size are set correctly; if the image is small, the enlargement
may not be enough to cover the paper.Parent topic: Solving Page Layout and Content ProblemsRelated referencesBorderless Paper Type CompatibilityRelated tasksSelecting Basic Print Settings - WindowsSelecting Basic Print Settings - OS XSelecting Page Setup Settings - OS XSelecting Print Layout Options - OS X
Incorrect Characters PrintIf incorrect characters appear in your prints, try these solutions before reprinting:• Make sure any cables are securely connected at both ends.• In Windows, delete all jobs from the Windows Spooler. Click Print Queue on the Maintenance tab in
the printer settings window, and cancel any stalled print jobs.• If your product is connected to a USB hub, connect it directly to your computer instead.• If incorrect characters still appear in your prints, try connecting your product using a different cable.

242
Parent topic: Solving Page Layout and Content ProblemsRelated tasksSelecting Extended Settings - Windows
Incorrect Image Size or PositionIf your printed image is the wrong size or in the wrong position, try these solutions:• Make sure you selected the correct paper size and layout settings in your printing program and printer
software.• Make sure your paper is positioned correctly for feeding into the printer.You can use the preview option in your printer software to check your margins before you print.Parent topic: Solving Page Layout and Content ProblemsRelated tasksSelecting Basic Print Settings - WindowsSelecting Additional Layout and Print Options - WindowsSelecting Basic Print Settings - OS XSelecting Page Setup Settings - OS X
Slanted PrintoutIf your printouts are slanted, try these solutions:• Slide the edge guide against the edge of the paper.• Select a higher print quality setting in your printer software.• Turn off any high speed settings in your product software.• Align the print head.• Make sure the product is not printing while tilted or at an angle.Parent topic: Solving Page Layout and Content ProblemsRelated tasksSelecting Basic Print Settings - WindowsSelecting Additional Layout and Print Options - WindowsSelecting Basic Print Settings - OS XRelated topicsLoading Paper

243
Solving Print Quality ProblemsCheck these sections if your printouts have problems with print quality, but your image looks fine on yourcomputer screen.
Note: When printing using AirPrint, the available print settings are different from those covered in thismanual. See the Apple website for details.
White or Dark Lines in PrintoutBlurry or Smeared PrintoutFaint Printout or Printout Has GapsGrainy PrintoutIncorrect ColorsParent topic: Solving ProblemsRelated topicsSolving Scanned Image Quality Problems
White or Dark Lines in PrintoutIf you notice white or dark lines in your prints (also called banding), try these solutions before you reprint:• Run a nozzle check to see if any of the print head nozzles are clogged. Then clean the print head, if
necessary.• Make sure the paper type setting matches the type of paper you loaded.• Make sure you loaded the printable side of the paper correctly for your product.• Turn off any high speed settings in your product software.• Align the print head.• You may need to replace the ink cartridges.Parent topic: Solving Print Quality ProblemsRelated conceptsPrint Head Nozzle CheckPrint Head CleaningPrint Head AlignmentRelated referencesPaper or Media Type Settings - Control Panel

244
Paper or Media Type Settings - Product SoftwareRelated tasksSelecting Additional Layout and Print Options - WindowsSelecting Printing Preferences - OS XRelated topicsReplacing Ink Cartridges
Blurry or Smeared PrintoutIf your printouts are blurry or smeared, try these solutions:• Make sure your paper is not damp, curled, old, or loaded incorrectly in your product.• Use a support sheet with special paper, or load special paper one sheet at a time.• Make sure your paper meets the specifications for your product.• Use Epson papers to ensure proper saturation and absorption of genuine Epson inks.• Make sure the paper type setting in your product software matches the type of paper you loaded.• Make sure you loaded the printable side of the paper correctly for your product.• Remove each sheet from the output tray as it is printed.• Avoid handling printouts on glossy paper right after printing to allow the ink to set.• Turn off any high speed settings in your product software.• If you print on both sides of a sheet of paper, smudges may appear on the reverse side of heavily
saturated or dark images. If one side of a sheet will contain a lighter image or text, print that side first.• Run a nozzle check to see if any of the print head nozzles are clogged. Then clean the print head, if
necessary.• Align the print head.• Clean the paper path.
Note: Your product will not operate properly while tilted at an angle. Place it on a flat, stable surface thatextends beyond the base of the product in all directions.
Parent topic: Solving Print Quality ProblemsRelated conceptsPrint Head Nozzle Check
245
Print Head CleaningPrint Head AlignmentRelated referencesAvailable Epson PapersPaper SpecificationsRelated tasksSelecting Additional Layout and Print Options - WindowsSelecting Printing Preferences - OS XSelecting Basic Print Settings - WindowsSelecting Basic Print Settings - OS XCleaning the Paper Path
Faint Printout or Printout Has GapsIf your printouts are faint or have gaps, try these solutions:• Run a nozzle check to see if any of the print head nozzles are clogged. Then clean the print head, if
necessary.• The ink cartridges may be old or low on ink, and you may need to replace them.• Make sure the paper type setting matches the type of paper you loaded.• Make sure your paper is not damp, curled, old, or loaded incorrectly in your product.• Align the print head.• Clean the paper path.Parent topic: Solving Print Quality ProblemsRelated conceptsPrint Head Nozzle CheckPrint Head CleaningPrint Head AlignmentRelated tasksSelecting Basic Print Settings - WindowsSelecting Basic Print Settings - OS XCleaning the Paper Path

246
Related topicsReplacing Ink CartridgesLoading Paper
Grainy PrintoutIf your printouts are grainy, try these solutions:• Make sure you loaded the printable side of the paper correctly for your product.• Select a higher print quality setting and turn off any high speed settings in your product software.• Run a nozzle check to see if any of the print head nozzles are clogged. Then clean the print head, if
necessary.• Align the print head.• You may need to increase the image resolution or print a smaller size; see your software
documentation.
Note: Images from the Internet may be low resolution and not result in a high quality printout.
• If you enlarged the image in an image-editing program, you need to increase the resolution setting toretain a high image quality. Increase the resolution by the same amount you increased the image size.For example, if the resolution is 300 dpi (dots per inch) and you will double the image size later,change the resolution setting to 600 dpi.
Note: Higher resolution settings result in larger file sizes, which take longer to process and print.Consider the limitations of your computer system when selecting a resolution, and select the lowestpossible resolution that produces acceptable quality to keep file sizes manageable.
Parent topic: Solving Print Quality ProblemsRelated conceptsPrint Head Nozzle CheckPrint Head CleaningPrint Head AlignmentRelated tasksSelecting Basic Print Settings - WindowsSelecting Basic Print Settings - OS XSelecting Additional Layout and Print Options - Windows

247
Selecting Printing Preferences - OS XRelated topicsLoading Paper
Incorrect ColorsIf your printouts have incorrect colors, try these solutions:• Make sure the paper type setting matches the paper you loaded.• Make sure the Black/Grayscale or Grayscale setting is not selected in your printer software.• Run a nozzle check to see if any of the print head nozzles are clogged. Then clean the print head, if
necessary.• The ink cartridges may be old or low on ink, and you may need to replace them.• After you print, the colors in your printout need time to set as the ink dries. During this time, the colors
may look different than you expect. To speed up drying time, do not stack your printouts on top of eachother.
• Your printed colors can never exactly match your on-screen colors. However, you can use a colormanagement system to get as close as possible. Try using the color management options in yourprinter software.
• For best results, use genuine Epson ink and paper.Parent topic: Solving Print Quality ProblemsRelated conceptsPrint Head Nozzle CheckPrint Head CleaningRelated referencesAvailable Epson PapersRelated tasksSelecting Additional Layout and Print Options - WindowsManaging Color - OS XRelated topicsReplacing Ink Cartridges
Solving Scanning ProblemsCheck these solutions if you have problems scanning with your product.

248
Scanning Software Does Not Operate CorrectlyCannot Start Epson ScanParent topic: Solving Problems
Scanning Software Does Not Operate CorrectlyIf your scanning software does not operate correctly, try these solutions:• Make sure your computer has adequate memory and meets the system requirements for your
operating system.• Make sure your computer is not running in a power-saving mode, such as sleep or standby. If so,
wake your system and restart your scanning software.• If you upgraded your operating system but did not reinstall your scanning software, try reinstalling it.
Note: With OS X, in addition to scanning with Image Capture, you can download and install EpsonScan scanning software. Epson Scan provides additional image adjustment and photo correctionfeatures for enhancing scanned images, and provides an interface for TWAIN-compliant OCRscanning software. To download Epson Scan, visit Epson's driver download site (U.S. downloads orCanadian downloads).
Parent topic: Solving Scanning ProblemsRelated referencesWindows System RequirementsOS X System Requirements
Cannot Start Epson ScanIf you cannot start Epson Scan, try these solutions:• Make sure your product is turned on and any interface cables are securely connected at both ends.• Make sure Epson Scan is selected in your scanning program.• Make sure your computer is not running in a power-saving mode, such as sleep or standby. If so,
wake your system and restart Epson Scan.• Check the connection setting and test the connection using Epson Scan Settings:
Windows 10: Click and select All apps. Select EPSON, then select EPSON Scan Settings. Makesure the correct Connection setting is selected, then click the Test button.

249
Windows 8.x: Navigate to the Apps screen and select EPSON Scan Settings. Make sure the correctConnection setting is selected, then click the Test button.
Windows (other versions): Click or Start > All Programs or Programs > EPSON > EPSONScan > EPSON Scan Settings. Make sure the correct Connection setting is selected, then click theTest button.OS X: Open the Applications folder, click Epson Software, and click EPSON Scan Settings. Makesure the correct Connection setting is selected, then click the Test button.
• Make sure you do not have multiple versions of Epson Scan installed. If you do, uninstall both versionsand install one version.
• If you upgraded your operating system but did not reinstall Epson Scan, try reinstalling it.
Note: With OS X, in addition to scanning with Image Capture, you can download and install Epson Scanscanning software. Epson Scan provides additional image adjustment and photo correction features forenhancing scanned images, and provides an interface for TWAIN-compliant OCR scanning software. Todownload Epson Scan, visit Epson's driver download site (U.S. downloads or Canadian downloads).
Parent topic: Solving Scanning ProblemsRelated tasksScanning with OS X Using Image CaptureRelated topicsStarting a Scan
Solving Scanned Image Quality ProblemsCheck these sections if a scanned image on your computer screen has a quality problem.Image Consists of a Few Dots OnlyLine of Dots Appears in All Scanned ImagesStraight Lines in an Image Appear CrookedImage is Distorted or BlurryImage Colors are Patchy at the EdgesImage is Too DarkBack of Original Image Appears in Scanned ImageRipple Patterns Appear in an ImageImage is Scanned Upside-Down
250
Scanned Image Colors Do Not Match Original ColorsScan Area is Not Adjustable in Thumbnail PreviewScanned Image Edges are CroppedParent topic: Solving ProblemsRelated topicsSolving Print Quality Problems
Image Consists of a Few Dots OnlyIf your scanned image consists only of a few dots, try these solutions:• Make sure you placed your original for scanning facing the correct way.• If you are scanning using the Epson Scan Black & White setting, adjust the Threshold setting and
scan again.Parent topic: Solving Scanned Image Quality ProblemsRelated referencesAvailable Image Adjustments - Full Auto ModeAvailable Image Adjustments - Home ModeAvailable Image Adjustments - Office ModeAvailable Image Adjustments - Professional Mode
Line of Dots Appears in All Scanned ImagesIf a line of dots appears in all your scanned images, clean the scanner glass with a soft, dry, lint-freecloth or use a small amount of glass cleaner on the cloth, if necessary. Paper towels are notrecommended.
Caution: Do not spray glass cleaner directly on the scanner glass.
Parent topic: Solving Scanned Image Quality ProblemsRelated tasksCleaning Your Product
Straight Lines in an Image Appear CrookedIf straight lines in an original appear crooked in a scanned image, make sure to place your originalstraight when you scan it.
251
Parent topic: Solving Scanned Image Quality ProblemsRelated tasksPlacing Originals on the Scanner Glass
Image is Distorted or BlurryIf a scanned image appears distorted or blurry, try these solutions:• Make sure your original is not wrinkled or warped. This may prevent the original from laying flat on the
scanner glass.• Do not move your original or your product during scanning.• Your product will not operate properly while tilted at an angle. Place your product on a flat, stable
surface that extends beyond its base in all directions.• Adjust these Epson Scan settings (if available) and try scanning again:
• Select the Unsharp Mask setting.• Adjust the Auto Exposure setting.• Increase the Resolution setting.
Parent topic: Solving Scanned Image Quality ProblemsRelated topicsSelecting Epson Scan Settings
Image Colors are Patchy at the EdgesIf you are scanning a thick or warped original, cover its edges with paper to block external light as youscan it.Parent topic: Solving Scanned Image Quality Problems
Image is Too DarkIf your scanned image is too dark, try these solutions:• Adjust these Epson Scan settings (if available) and try scanning again:
• Auto Exposure• Brightness• Histogram Adjustment
• Check the brightness and contrast settings of your computer monitor.

252
Parent topic: Solving Scanned Image Quality ProblemsRelated topicsSelecting Epson Scan Settings
Back of Original Image Appears in Scanned ImageIf an image from the back of a thin original appears in your scanned image, place a piece of black paperon the back of the original and scan it again.Parent topic: Solving Scanned Image Quality Problems
Ripple Patterns Appear in an ImageYou may see a ripple pattern (called a moiré) in scanned images of printed documents. This is causedby interference from differing pitches in the scanner's screen and your original's halftone screen. Toreduce this effect, adjust these Epson Scan settings (if available) and try scanning again:• Select the Descreening setting.• Select a lower Resolution setting.Parent topic: Solving Scanned Image Quality ProblemsRelated topicsSelecting Epson Scan Settings
Image is Scanned Upside-DownYour product scans using the Auto Photo Orientation setting. This setting checks the preview imagefor faces, the sky, and other features, and then correctly rotates the photo when it is scanned, ifnecessary. If your photo is not oriented correctly using this option, deselect the Auto Photo Orientationsetting and scan again.
Note: Auto Photo Orientation will not work when you scan newspapers, magazines, documents,illustrations, or line art, or images smaller than 2 inches (5.1 cm) on any side.
Parent topic: Solving Scanned Image Quality ProblemsRelated tasksScanning in Full Auto Mode

253
Scanned Image Colors Do Not Match Original ColorsPrinted colors can never exactly match the colors on your computer monitor because printers andmonitors use different color systems: monitors use RGB (red, green, and blue) and printers typically useCMYK (cyan, magenta, yellow, and black).Check the color matching and color management capabilities of your computer, display adapter, and thesoftware you are using to see if they are affecting the palette of colors you see on your screen.To adjust the colors in your scanned image, adjust these Epson Scan settings (if available) and tryscanning again:• Change the Image Type setting and experiment with different combinations of the next settings.• Adjust the Tone Correction setting.• Adjust the Auto Exposure setting.Parent topic: Solving Scanned Image Quality ProblemsRelated topicsSelecting Epson Scan Settings
Scan Area is Not Adjustable in Thumbnail PreviewIf you cannot adjust the scan area while viewing a Thumbnail preview in Epson Scan, try these solutions:• Create a scan area by drawing a marquee on your preview image and adjusting it as necessary.• Switch to Normal preview mode, if available, and preview your image again.Parent topic: Solving Scanned Image Quality ProblemsRelated tasksSelecting a Scan Area - Home ModeSelecting a Scan Area - Office ModeSelecting a Scan Area - Professional Mode
Scanned Image Edges are CroppedIf the edges of a scanned image are cropped, make sure your original is placed correctly for scanning. Ifnecessary, move your original away from the edges of the scanner glass slightly.Parent topic: Solving Scanned Image Quality ProblemsRelated tasksPlacing Originals on the Scanner Glass

254
Solving Memory Card ProblemsCheck these solutions if you have problems using memory cards with your product.Memory Card Does Not Fit Into a SlotCannot View or Print Photos from a Memory CardCannot Transfer Photos To or From a Memory CardParent topic: Solving Problems
Memory Card Does Not Fit Into a SlotIf a memory card does not fit properly in a slot, do not force it in. You may need to use an adapter withyour memory card.Parent topic: Solving Memory Card ProblemsRelated referencesMemory Card TypesRelated tasksInserting a Memory Card
Cannot View or Print Photos from a Memory CardIf you cannot view or print photos from a memory card inserted in your product, try these solutions:• Make sure you have inserted only one memory card at a time.• Make sure your memory card is compatible with the product.• Make sure the files on your memory card are in the correct format.• If you have too many photos on your memory card, you may not see all the photos you expect or may
be prompted to select a group of photos by date. Reduce the number of photos on your card or selectone group of photos at a time. Check the memory card specifications for the maximum number ofphotos.
Parent topic: Solving Memory Card ProblemsRelated referencesMemory Card TypesMemory Card File SpecificationsMemory Card Specifications

255
Related tasksInserting a Memory CardRelated topicsViewing and Printing Photos
Cannot Transfer Photos To or From a Memory CardIf you have problems transferring photos to or from a memory card inserted in your product, try thesesolutions:• Make sure you have inserted only one memory card at a time.• Make sure your memory card is compatible with the product.• Make sure your product is securely connected to your computer.• If you are transferring photos to the memory card, check the memory card's write-protect tab to make
sure it is set to allow writing to the card. Also make sure the card has enough memory available.• Make sure that the file sharing setting for your product is set correctly.Parent topic: Solving Memory Card ProblemsRelated referencesMemory Card TypesMemory Card File SpecificationsMemory Card SpecificationsRelated tasksInserting a Memory CardSetting Up File Sharing for Photo Transfers From Your ComputerTransferring Photos from a Memory Card to Your Computer
Uninstall Your Product SoftwareIf you have a problem that requires you to uninstall and re-install your software, follow the instructions foryour operating system.Uninstalling Product Software - WindowsUninstalling Product Software - OS XParent topic: Solving Problems

256
Uninstalling Product Software - WindowsYou can uninstall and then re-install your product software to solve certain problems.1. Turn off the product.2. Disconnect any interface cables.3. Do one of the following:
• Windows 10: Right click and select Control Panel > Programs > Programs and Features.Select the uninstall option for your Epson product, then select Uninstall/Change.
Note: If you see a User Account Control window, click Yes or Continue.
Select your product again, if necessary, then select OK, and click Yes to confirm theuninstallation.
• Windows 8.x: Navigate to the Apps screen and select Control Panel > Programs > Programsand Features. Select the uninstall option for your Epson product, then select Uninstall/Change.
Note: If you see a User Account Control window, click Yes or Continue.
Select your product again, if necessary, then select OK, and click Yes to confirm theuninstallation.
• Windows (other versions): Click or Start, and select All Programs or Programs. SelectEPSON, select your product, then click EPSON Printer Software Uninstall.
Note: If you see a User Account Control window, click Yes or Continue.
In the next window, select your product and click OK. Then follow any on-screen instructions.4. Do one of the following to uninstall Epson Event Manager, then follow any on-screen instructions:
• Windows 10: Select Epson Event Manager and click Uninstall.• Windows 8.x: Select Epson Event Manager and click Uninstall.• Windows 7/Windows Vista: Open the Windows Control Panel utility. Select Programs and
Features. (In Classic view, select Programs and click Uninstall a program.) Select EpsonEvent Manager and click Uninstall/Change.
• Windows XP: Open the Windows Control Panel utility. Double-click Add or Remove Programs.Select Epson Event Manager and click Change/Remove.

257
5. Do one of the following to uninstall Epson Scan, then follow any on-screen instructions:• Windows 10: Select EPSON Scan and click Uninstall.• Windows 8.x/Windows 7/Windows Vista: Select EPSON Scan and click Uninstall/Change.• Windows XP: Select EPSON Scan and click Change/Remove.
6. Restart your computer, then see the Start Here sheet to re-install your software.
Note: If you find that re-installing your product software does not solve a problem, contact Epson.
Parent topic: Uninstall Your Product Software
Uninstalling Product Software - OS XIn most cases, you do not need to uninstall your product software before re-installing it. However, youcan download the Uninstaller utility from the Epson support website to uninstall your product software asdescribed here.
Note: If you find that re-installing your product software does not solve a problem, contact Epson.
1. To download the Uninstaller utility, visit the Epson download site (U.S. downloads or Canadiandownloads).
2. Follow the instructions on the screen to install the Uninstaller utility.3. Quit all applications currently running on your Mac.4. Double-click the Uninstaller icon.5. Select the checkbox for each software program you want to uninstall.6. Click Uninstall.7. Follow the on-screen instructions to uninstall the software.8. Reinstall your product software.
Note: If you uninstall the printer driver and your product name remains in the Print & Fax, Print & Scan,or Printers & Scanners window, select your product name and click the – (remove) icon to remove it.
Parent topic: Uninstall Your Product Software

258
Where to Get HelpIf you need to contact Epson for technical support services, use the following support options.
Internet SupportVisit Epson's support website at epson.com/support (U.S.) or epson.ca/support (Canada) for solutions tocommon problems. You can download drivers and documentation, get FAQs and troubleshootingadvice, or e-mail Epson with your questions.
Speak to a Support RepresentativeBefore you call Epson for support, please have the following information ready:• Product name• Product serial number (located on a label on the product)• Proof of purchase (such as a store receipt) and date of purchase• Computer configuration• Description of the problemThen call:• U.S.: (562) 276-4382, 6 AM to 8 PM, Pacific Time, Monday through Friday, and 7 AM to 4 PM, Pacific
Time, Saturday• Canada: (905) 709-3839, 6 AM to 8 PM, Pacific Time, Monday through Friday, and 7 AM to 4 PM,
Pacific Time, SaturdayDays and hours of support are subject to change without notice. Toll or long distance charges mayapply.
Purchase Supplies and AccessoriesYou can purchase genuine Epson ink and paper at epson.com/ink3 (U.S. sales) or epson.ca (Canadiansales). You can also purchase supplies from an Epson authorized reseller. To find the nearest one, call800-GO-EPSON (800-463-7766).Parent topic: Solving Problems

259
Technical SpecificationsThese sections list the technical specifications for your product.
Note: Epson offers a recycling program for end of life Epson products. Please go to this site forinformation on how to return your Epson products for proper disposal.
Windows System RequirementsOS X System RequirementsPrinting SpecificationsScanning SpecificationsPaper SpecificationsPrintable Area SpecificationsInk Cartridge SpecificationsMemory Card SpecificationsDimension SpecificationsElectrical SpecificationsEnvironmental SpecificationsInterface SpecificationsNetwork Interface SpecificationsSafety and Approvals Specifications
Windows System RequirementsTo use your product and its software, your computer should use one of these Microsoft operatingsystems:• Windows 10• Windows 8.x• Windows 7• Windows Vista• Windows XP Professional x64 Edition• Windows XP SP3

260
Note: Visit Epson's support website at epson.com/support (U.S.) or epson.ca/support (Canada) for thelatest in compatibility and drivers for your product.
Parent topic: Technical Specifications
OS X System RequirementsTo use your product and its software, your Mac should use one of these operating systems:• OS X 10.11.x• OS X 10.10.x• OS X 10.9.x• OS X 10.8.x• OS X 10.7.x• OS X 10.6.8
Note: Visit Epson's support website at epson.com/support (U.S.) or epson.ca/support (Canada) for thelatest in compatibility and drivers for your product.
Parent topic: Technical Specifications
Printing SpecificationsPaper path Sheet feeder, top entrySheet feeder capacity Approximately 100 sheets at 17 lb (64 g/m2) to 24 lb (90 g/m2); load
legal-size or user-defined paper sizes one sheet at a time
Parent topic: Technical Specifications
Scanning SpecificationsScanner type Flatbed, colorPhotoelectric device CISDocument size Maximum: 8.5 × 11.7 inches (216 × 297 mm)
Scanner glass: US letter or A4

261
Scanning resolution 1200 dpi (main scan)2400 dpi (sub scan)
Image data Color:16 bits per pixel per color internal (48 bits per pixel)8 bits per pixel per color external (24 bits per pixel)Grayscale:16 bits per pixel internal8 bits per pixel externalBlack and white:16 bits per pixel internal1 bit per pixel external
Light source LED
Parent topic: Technical Specifications
Paper SpecificationsNote: Since the quality of any particular brand or type of paper may be changed by the manufacturer atany time, Epson cannot guarantee the quality of any non-Epson brand or type of paper. Always test asample of paper stock before purchasing large quantities or printing large jobs.

262
Single-sheets
Size A4 (8.3 × 11.7 inches [210 × 297 mm])A6 (4.1 × 5.8 inches [105 × 148 mm])Letter (8.5 × 11 inches [216 × 279 mm])Legal (8.5 × 14 inches [216 × 356 mm])4 × 6 inches (102 × 152 mm)5 × 7 inches (127 × 178 mm)8 × 10 inches (203 × 254 mm)3.5 × 5 inches (89 × 127 mm)16:9 wide (4 × 7.1 inches [102 × 181 mm])Half Letter (5.5 × 8.5 inches [140 × 216 mm])
Paper types Plain paper and paper distributed by EpsonWeight 17 lb (64 g/m2) to 24 lb (90 g/m2)
Envelopes
Size No. 10 (4.1 × 9.5 inches [105 × 241 mm])Paper types Plain bond paperWeight 20 lb (75 g/m2) to 24 lb (90 g/m2)
Parent topic: Technical Specifications
Printable Area SpecificationsNote: Print quality may decline in the border area.

263
Single sheets
1 Top and sides: 0.12 inch (3 mm) minimum2 Reduced print quality area/top: 1.57 inch (40 mm) minimum3 Reduced print quality area/bottom: 1.26 inch (32 mm) minimum
Borderless
1 Reduced print quality area/top: 1.69 inch (43 mm) minimum2 Reduced print quality area/bottom: 1.38 inch (35 mm) minimum
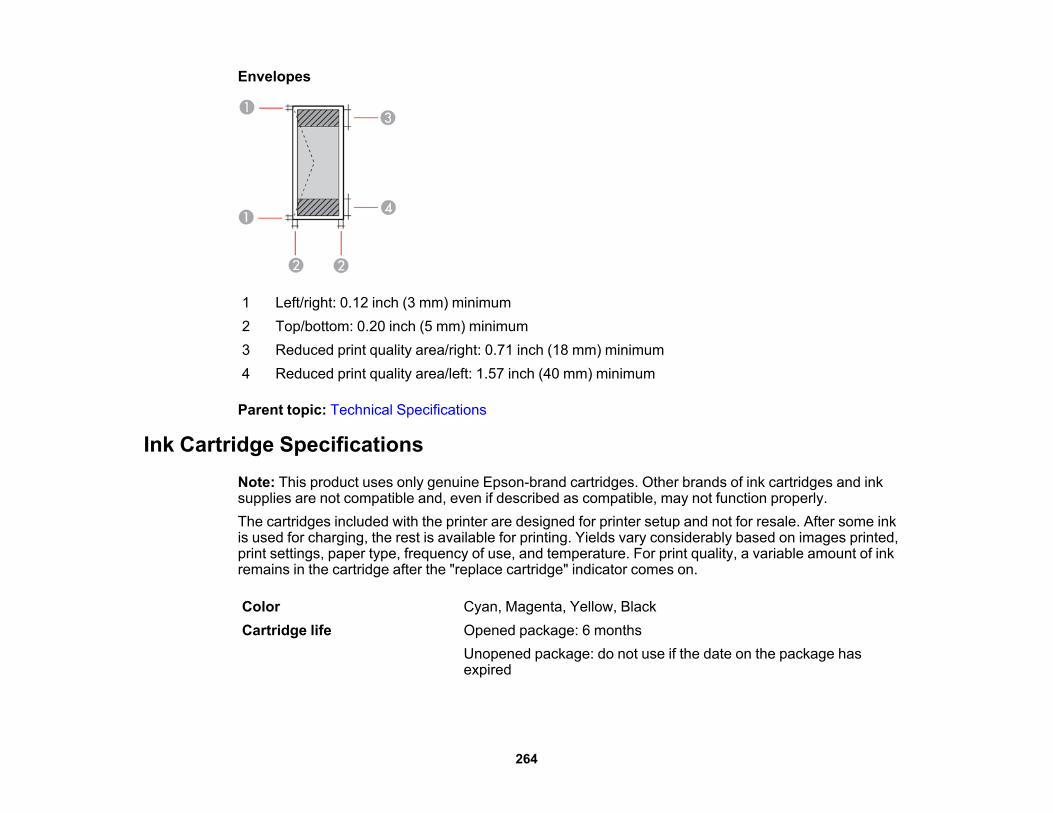
264
Envelopes
1 Left/right: 0.12 inch (3 mm) minimum2 Top/bottom: 0.20 inch (5 mm) minimum3 Reduced print quality area/right: 0.71 inch (18 mm) minimum4 Reduced print quality area/left: 1.57 inch (40 mm) minimum
Parent topic: Technical Specifications
Ink Cartridge SpecificationsNote: This product uses only genuine Epson-brand cartridges. Other brands of ink cartridges and inksupplies are not compatible and, even if described as compatible, may not function properly.The cartridges included with the printer are designed for printer setup and not for resale. After some inkis used for charging, the rest is available for printing. Yields vary considerably based on images printed,print settings, paper type, frequency of use, and temperature. For print quality, a variable amount of inkremains in the cartridge after the "replace cartridge" indicator comes on.
Color Cyan, Magenta, Yellow, BlackCartridge life Opened package: 6 months
Unopened package: do not use if the date on the package hasexpired
265
Temperature Storage: –4 to 104 °F (–20 to 40 °C)1 month at 104 °F (40 °C)Ink freezes at 3.2 °F (–16 °C)Ink thaws and is usable after 3 hours at 77 °F (25 °C)
Note: For best printing results, use up a cartridge within 6 months of opening the package.
Parent topic: Technical SpecificationsRelated referencesInk Cartridge Part Numbers
Memory Card SpecificationsNote: Cards marked with an asterisk (*) require an adapter; consult your adapter documentation fordetails on using it.
Compatible types/maximumcapacities
SD/2GBSDHC/32GBSDXC/64GBminiSD/2GB*miniSDHC/32GB*microSD/2GB*microSDHC/32GB*microSDXC/64GB*
Voltage requirements 3.3 V type, dual voltage 3.3 V/5 V type with supply voltage of 3.3 V;5 V memory cards are not supportedMaximum current: 200 mA
Parent topic: Technical Specifications

266
Dimension SpecificationsHeight Stored: 5.7 inches (145 mm)
Printing: 11 inches (279 mm)Width Stored: 15.4 inches (390 mm)
Printing: 15.4 inches (390 mm)Depth Stored: 11.8 inches (300 mm)
Printing: 20.8 inches (528 mm)Weight(without ink cartridges and powercord)
9.5 lb (4.3 kg)
Parent topic: Technical Specifications
Electrical SpecificationsNote: Check the label on the product for its voltage.
Power supply rating 100 to 240 V (UPS)Rated frequency range 50/60 HzRated current 0.5 to 0.3 APower consumption Standalone copying: Approximately 12 W (ISO/IEC24712)
Ready mode: Approximately 4.6 WSleep mode: Approximately 1.6 WPower off mode: Approximately 0.3 W
Parent topic: Technical Specifications

267
Environmental SpecificationsTemperature Operating: 50 to 95 °F (10 to 35 °C)
Storage: –4 to 104 °F (–20 to 40 °C)1 month at 104 °F (40 °C)
Humidity(without condensation)
Operating: 20 to 80% RHStorage: 5 to 85% RH
Parent topic: Technical Specifications
Interface SpecificationsInterface type Hi-Speed USB
Parent topic: Technical Specifications
Network Interface SpecificationsWireless LAN standard IEEE 802.11 b/g/nWireless security WPA-PSK (AES); WPA2 compliant with support for WPA/WPA2
PersonalWEP (64/128 bit)
Security protocol SSL/TLS: HTTPS Server/Client, IPPSFrequency range 2.4 GHzCoordination modes Infrastructure mode
Ad hoc mode; not supported for IEEE 802.11nWi-Fi Direct mode; not supported for IEEE 802.11b; Simple APmode compatible with Wi-Fi connection (infrastructure)
Parent topic: Technical Specifications

268
Safety and Approvals SpecificationsUnited States Safety: UL60950-1
EMC: FCC part 15 Subpart B class BCanada Safety: CAN/CSA C22.2 No. 60950-1
EMC: CAN/CSA-CEI/IEC CISPR 22 Class B
This equipment contains the following wireless module:• Manufacturer: Askey Computer Corporation.• Type: WLU6320-D69 (RoHS)This product conforms to Part 15 of FCC Rules and RSS-210 of the IC Rules. Epson cannot acceptresponsibility for any failure to satisfy the protection requirements resulting from a non-recommendedmodification of the product. Operation is subject to the following two conditions: (1) this device may notcause harmful interference, and (2) this device must accept any interference received, includinginterference that may cause undesired operation of the device.To prevent radio interference to the licensed service, this device is intended to be operated indoors andaway from windows to provide maximum shielding. Equipment (or its transmit antenna) that is installedoutdoors is subject to licensing.Parent topic: Technical Specifications

269
NoticesCheck these sections for important notices about your product.
Note: Epson offers a recycling program for end of life Epson products. Please go to this site forinformation on how to return your Epson products for proper disposal.
General Product Safety InstructionsInk Cartridge Safety InstructionsLCD Screen Safety InstructionsWireless Connection Safety InstructionsFCC Compliance StatementTrademarksCopyright Notice
General Product Safety Instructions• Be sure to follow all warnings and instructions marked on the product.• Use only the type of power source indicated on the product's label.• Use only the power cord that comes with the product. Use of another cord may cause fires or shock.
Do not use the cord with any other equipment.• Place the product near a wall outlet where the plug can be easily unplugged.• Avoid plugging the product into an outlet on the same circuit as a photo copier or air control system
that regularly switches on and off, or on an outlet controlled by a wall switch or timer.• Do not let the power cord become damaged or frayed. Place it to avoid abrasions, cuts, fraying,
crimping, and kinking. Do not place objects on top of it and do not allow it to be stepped on or run over.Be careful to keep the cord straight at each end.
• If you use an extension cord with the product, make sure the total ampere rating of the devicesplugged into the extension cord does not exceed the cord's ampere rating. Also, make sure the totalampere rating of all devices plugged into the wall outlet does not exceed the wall outlet's ampererating.
• Always turn off the product using the power button, and wait until the power light stops flashing beforeunplugging the product or cutting off power to the electrical outlet.
• If you will not be using the product for a long period, unplug the power cord from the electrical outlet.
270
• Place the product on a flat, stable surface that extends beyond its base in all directions. It will notoperate properly if it is tilted or at an angle.
• Make sure the back of the product is at least 4 inches (10 cm) away from the wall.• Allow space behind the product for the cables, and space above the product so that you can fully raise
the document cover.• Leave enough space in front of the product for the paper to be fully ejected.• Avoid locations that are subject to rapid changes in heat or humidity, shocks or vibrations, or dust.• Do not place or store the product outdoors.• Do not place the product near excessive heat sources or in direct sunlight.• Leave enough room around the product for sufficient ventilation. Do not block or cover openings in the
case or insert objects through the slots.• Keep the product away from potential sources of electromagnetic interference, such as loudspeakers
or the base units of cordless telephones.• When connecting the product to a computer or other device with a cable, ensure the correct
orientation of the connectors. Each connector has only one correct orientation. Inserting a connectorin the wrong orientation may damage both devices connected by the cable.
• Do not touch the flat white cable inside the product.• Do not move the print head by hand; this may damage the product.• Do not spill liquid on the product or use the product with wet hands.• Do not use aerosol products that contain flammable gases inside or around the product. Doing so may
cause fire.• Do not press too hard on the document table when placing originals.• Do not open the scanner section while the product is copying, printing, scanning, or performing any
other functions.• Be careful not to trap your fingers when closing the document cover or scanner.• Except as specifically explained in your documentation, do not attempt to service the product yourself.• Unplug the product and refer servicing to qualified service personnel under the following conditions: if
the power cord or plug is damaged; if liquid has entered the product; if the product has been droppedor the case damaged; if the product does not operate normally or exhibits a distinct change inperformance. Adjust only those controls that are covered by the operating instructions.
• Leave the ink cartridges installed. Removing the cartridges can dehydrate the print head and mayprevent the product from printing.

271
• Before transporting the product, make sure that the print head is in the home (far right) position andthe ink cartridges are in place.
• When storing or transporting the product, do not tilt it, stand it on its side, or turn it upside down;otherwise ink may leak.
Parent topic: Notices
Ink Cartridge Safety Instructions• Keep ink cartridges out of the reach of children and do not drink the ink.• Be careful when you handle used ink cartridges; there may be ink remaining around the ink supply
port. If ink gets on your skin, wash it off with soap and water. If it gets in your eyes, flush themimmediately with water.
• Do not put your hand inside the product or touch any cartridges during printing.• Install a new ink cartridge immediately after removing an expended one. Leaving cartridges
uninstalled can dry out the print head and may prevent the product from printing.• Do not remove or tear the label on the cartridge; this can cause leakage.• Do not remove the transparent seal from the bottom of the cartridge. This may cause the cartridge to
become unusable.• Do not break the hooks on the side of the cartridge when removing it from the packaging.• Do not touch the green IC chip on the side of the cartridge. This may prevent normal operation.• Do not shake cartridges after opening their packages; this can cause them to leak.• If you remove an ink cartridge for later use, protect the ink supply area from dirt and dust and store it in
the same environment as the product. Note that there is a valve in the ink supply port, making coversor plugs unnecessary, but care is needed to prevent the ink from staining items that the cartridgetouches. Do not touch the ink cartridge ink supply port or surrounding area.
• Use an ink cartridge before the date printed on its package.• Do not dismantle an ink cartridge. This could damage the print head.• Store ink cartridges in a cool, dark place.• After bringing an ink cartridge inside from a cold storage site, allow it to warm up at room temperature
for at least three hours before using it.• Store ink cartridges with their labels facing upward. Do not store cartridges upside down.Parent topic: Notices

272
LCD Screen Safety Instructions• Use only a dry, soft cloth to clean the LCD screen. Do not use liquid or chemical cleansers.• If the LCD screen is damaged, contact Epson. If the liquid crystal solution gets on your hands, wash
them thoroughly with soap and water. If the liquid crystal solution gets into your eyes, flush themimmediately with water. If discomfort or vision problems remain after a thorough flushing, see a doctorimmediately.
• Do not press too hard on the LCD screen.• Do not use a pointy or sharp object, such as a pen or your fingernail, to operate the LCD screen.Parent topic: Notices
Wireless Connection Safety InstructionsRadio waves from this product may adversely affect the operation of medical equipment or automaticallycontrolled devices, such as pacemakers, automatic doors or fire alarms. When using this product nearsuch devices or inside a medical facility, follow the directions from authorized staff members at thefacility, and follow all posted warnings and directions on the device to avoid causing an accident.Parent topic: Notices
FCC Compliance StatementFor United States UsersThis equipment has been tested and found to comply with the limits for a Class B digital device, pursuantto Part 15 of the FCC Rules. These limits are designed to provide reasonable protection against harmfulinterference in a residential installation. This equipment generates, uses, and can radiate radiofrequency energy and, if not installed and used in accordance with the instructions, may cause harmfulinterference to radio or television reception. However, there is no guarantee that interference will notoccur in a particular installation. If this equipment does cause interference to radio and televisionreception, which can be determined by turning the equipment off and on, the user is encouraged to try tocorrect the interference by one or more of the following measures:• Reorient or relocate the receiving antenna.• Increase the separation between the equipment and receiver.• Connect the equipment into an outlet on a circuit different from that to which the receiver is connected.• Consult the dealer or an experienced radio/TV technician for help.

273
WARNINGThe connection of a non-shielded equipment interface cable to this equipment will invalidate the FCCCertification or Declaration of this device and may cause interference levels which exceed the limitsestablished by the FCC for this equipment. It is the responsibility of the user to obtain and use a shieldedequipment interface cable with this device. If this equipment has more than one interface connector, donot leave cables connected to unused interfaces. Changes or modifications not expressly approved bythe manufacturer could void the user’s authority to operate the equipment.
For Canadian UsersCAN ICES-3(B)/NMB-3(B)Parent topic: Notices
TrademarksEPSON® is a registered trademark, EPSON Exceed Your Vision is a registered logomark, and EpsonConnectTM is a trademark of Seiko Epson Corporation.Epson StoreSM is a service mark of Epson America, Inc.Epson iPrintTM and Remote PrintTM are trademarks of Seiko Epson Corporation.Apple, App Store, AirPrint, AirPrint logo, Mac, and OS X are trademarks of Apple Inc., registered in theU.S. and other countries.Google® is a registered trademark and AndroidTM, ChromebookTM, GmailTM, Google ChromeTM, GoogleCloud PrintTM, Google DriveTM, Google PlayTM, PicasaTM, and YouTubeTM are trademarks of Google Inc.Wi-Fi Direct® is a registered trademark of Wi-Fi Alliance®.General Notice: Other product names used herein are for identification purposes only and may betrademarks of their respective owners. Epson disclaims any and all rights in those marks.
Parent topic: Notices
Copyright NoticeAll rights reserved. No part of this publication may be reproduced, stored in a retrieval system, ortransmitted in any form or by any means, electronic, mechanical, photocopying, recording, or otherwise,

274
without the prior written permission of Seiko Epson Corporation. The information contained herein isdesigned only for use with this Epson product. Epson is not responsible for any use of this information asapplied to other products.Neither Seiko Epson Corporation nor its affiliates shall be liable to the purchaser of this product or thirdparties for damages, losses, costs, or expenses incurred by purchaser or third parties as a result of:accident, misuse, or abuse of this product or unauthorized modifications, repairs, or alterations to thisproduct, or (excluding the U.S.) failure to strictly comply with Seiko Epson Corporation's operating andmaintenance instructions.Seiko Epson Corporation shall not be liable for any damages or problems arising from the use of anyoptions or any consumable products other than those designated as Original Epson Products or EpsonApproved Products by Seiko Epson Corporation.Seiko Epson Corporation shall not be held liable for any damage resulting from electromagneticinterference that occurs from the use of any interface cables other than those designated as Epsonapproved Products by Seiko Epson Corporation.This information is subject to change without notice.libTIFF Software AcknowledgmentA Note Concerning Responsible Use of Copyrighted MaterialsDefault Delay Times for Power Management for Epson ProductsCopyright AttributionParent topic: Notices
libTIFF Software AcknowledgmentCopyright © 1988-1997 Sam LefflerCopyright © 1991-1997 Silicon Graphics, Inc.Permission to use, copy, modify, distribute, and sell this software and its documentation for any purposeis hereby granted without fee, provided that (I) the above copyright notices and this permission noticeappear in all copies of the software and related documentation, and (ii) the names of Sam Leffler andSilicon Graphics may not be used in any advertising or publicity relating to the software without thespecific, prior written permission of Sam Leffler and Silicon Graphics.THE SOFTWARE IS PROVIDED "AS-IS" AND WITHOUT WARRANTY OF ANY KIND, EXPRESS,IMPLIED OR OTHERWISE, INCLUDING WITHOUT LIMITATION, ANY WARRANTY OFMERCHANTABILITY OR FITNESS FOR A PARTICULAR PURPOSE.IN NO EVENT SHALL SAM LEFFLER OR SILICON GRAPHICS BE LIABLE FOR ANY SPECIAL,INCIDENTAL, INDIRECT OR CONSEQUENTIAL DAMAGES OF ANY KIND, OR ANY DAMAGESWHATSOEVER RESULTING FROM LOSS OF USE, DATA OR PROFITS, WHETHER OR NOT

275
ADVISED OF THE POSSIBILITY OF DAMAGE, AND ON ANY THEORY OF LIABILITY, ARISING OUTOF OR IN CONNECTION WITH THE USE OR PERFORMANCE OF THIS SOFTWARE.Parent topic: Copyright Notice
A Note Concerning Responsible Use of Copyrighted MaterialsEpson encourages each user to be responsible and respectful of the copyright laws when using anyEpson product. While some countries' laws permit limited copying or reuse of copyrighted material incertain circumstances, those circumstances may not be as broad as some people assume. Contact yourlegal advisor for any questions regarding copyright law.Parent topic: Copyright Notice
Default Delay Times for Power Management for Epson ProductsThis product will enter sleep mode after a period of nonuse. This is to ensure that the product meetsEnergy Star standards of energy efficiency. More energy savings can be achieved by setting the time tosleep to a shorter interval.Parent topic: Copyright Notice
Copyright Attribution© 2016 Epson America, Inc.4/16CPD-43290Parent topic: Copyright Notice