user’s guide zt - erweka gmbh · 1.1 about the user’s guide ... 3.2 setting up the hardware...
TRANSCRIPT

ERWEKA GmbH * Ottostr. 20 – 22 * 63150 Heusenstamm * Germany * Tel: +49 (0) 6104 6903-0 Fax: +49 (0) 6104 6903-40 * E-mail: [email protected] * www.erweka.com
Directors: Werner G. Müller, Claudia Müller, Manfred Koller * District court Offenbach HRB 2382
User’s Guide Zt.Net

Copyright The material in this document is the intellectual property of ERWEKA. Any copy or reproduction of this document or its parts without the written permission of and reference to ERWEKA is prohibited and will be prosecuted according to the law. All trademarks are the property of their respective owners. Copyright© 2015 by ERWEKA
Document version Zt.Net
Version table Date Software
version Document version*
Change
08.08.2014 2.6.0 1.0 19.08.2015 2.6.1 1.1 Update 2.6.1; management;
corporate identity; system requirements * When the document version X.Y was changed, X means a technical change and Y – a document change only.
Date: 2015-08-19 Software version: 2.6.1
Document No.: 597-309-0003 Document version: 1.1
Language: English

Zt.Net User’s Guide
Zt.Net 2.6.1 User’s Guide / 2015-08 SZ / V1.1 Page 3 of 113
Table of Contents
1 INTRODUCTION ............................................................................................................................................. 5 1.1 ABOUT THE USER’S GUIDE ............................................................................................................................... 5 1.2 SYMBOLS USED IN THE USER’S GUIDE .............................................................................................................. 5 1.3 WHEN YOU NEED HELP .................................................................................................................................... 5
2 SYSTEM REQUIREMENTS ........................................................................................................................... 6
3 HARDWARE SETUP ....................................................................................................................................... 7 3.1 SETTING UP THE HARDWARE ........................................................................................................................... 7 3.2 SETTING UP THE HARDWARE WITH THE CONBOX CONNECTION ....................................................................... 8
4 USER INTERFACE .......................................................................................................................................... 9 4.1 MAIN OPERATIONS WITH ENTITIES ................................................................................................................. 10 4.2 DATA PRESENTATION .................................................................................................................................... 15 4.3 LOCALIZATION .............................................................................................................................................. 15
5 NOTIFICATION SYSTEM ............................................................................................................................ 17 6 GETTING STARTED ..................................................................................................................................... 20
6.1 FIRST ACCESS TO ZT.NET .............................................................................................................................. 20 6.2 SERVER CONNECTION SETTINGS .................................................................................................................... 23 6.3 OPTIONS ........................................................................................................................................................ 26 6.4 SURFACE LOCK .............................................................................................................................................. 29
7 USER AND GROUP MANAGEMENT ........................................................................................................ 31 7.1 CREATING THE USER ACCOUNTS .................................................................................................................... 31 7.2 PASSWORD POLICY ........................................................................................................................................ 36 7.3 MODIFYING THE USER ACCOUNTS ................................................................................................................. 38 7.4 DELETING THE USER ACCOUNTS .................................................................................................................... 39 7.5 ARCHIVING THE USER ACCOUNTS .................................................................................................................. 40 7.6 SETTING THE PERMISSIONS ............................................................................................................................ 41 7.7 CREATING THE USER GROUPS ........................................................................................................................ 43 7.8 MODIFYING THE USER GROUPS ...................................................................................................................... 46 7.9 DELETING THE USER GROUPS ......................................................................................................................... 46 7.10 ARCHIVING THE USER GROUPS .................................................................................................................. 47 7.11 AUDIT TRAIL ............................................................................................................................................ 47
7.11.1 Applying the filters ......................................................................................................................... 48
8 TEST PREPARATION ................................................................................................................................... 51 8.1 INSTRUMENT MANAGEMENT .......................................................................................................................... 51
8.1.1 Creating the instruments ..................................................................................................................... 52 8.1.2 Modifying the instruments ................................................................................................................... 55 8.1.3 Deleting the instruments ...................................................................................................................... 55 8.1.4 Archiving the instruments .................................................................................................................... 56
8.2 BASKET MANAGEMENT ................................................................................................................................. 56 8.2.1 Creating the baskets ............................................................................................................................ 57 8.2.2 Modifying the baskets .......................................................................................................................... 58 8.2.3 Deleting the baskets ............................................................................................................................ 58 8.2.4 Archiving the baskets .......................................................................................................................... 58
8.3 PRESS MANAGEMENT ..................................................................................................................................... 58 8.3.1 Creating the presses ............................................................................................................................ 59 8.3.2 Modifying the presses .......................................................................................................................... 61 8.3.3 Deleting the presses ............................................................................................................................ 61 8.3.4 Archiving the presses .......................................................................................................................... 61
8.4 MEDIUM MANAGEMENT ................................................................................................................................ 62 8.4.1 Creating the media .............................................................................................................................. 63 8.4.2 Modifying the media ............................................................................................................................ 65 8.4.3 Deleting the media .............................................................................................................................. 65 8.4.4 Archiving the media ............................................................................................................................ 65

Zt.Net User’s Guide
Zt.Net 2.6.1 User’s Guide / 2015-08 SZ / V1.1 Page 4 of 113
8.5 PRODUCT MANAGEMENT ............................................................................................................................... 66 8.5.1 Creating the products .......................................................................................................................... 67 8.5.2 Modifying the products........................................................................................................................ 69 8.5.3 Deleting the products .......................................................................................................................... 69 8.5.4 Archiving the products ........................................................................................................................ 69
8.6 METHOD MANAGEMENT ................................................................................................................................ 70 8.6.1 Creating the methods .......................................................................................................................... 70
8.6.1.1 Method defaults ............................................................................................................................................... 75 8.6.2 Modifying the methods ........................................................................................................................ 76 8.6.3 Deleting the methods ........................................................................................................................... 76 8.6.4 Archiving the methods ......................................................................................................................... 76
9 PERFORMING THE TESTS ......................................................................................................................... 77 9.1 VIEWING AND CHANGING THE TEST OPTIONS ................................................................................................. 78 9.2 CALIBRATING THE MEASURING SENSORS (ZT7X INSTRUMENTS) ................................................................... 80 9.3 PERFORMING THE DISINTEGRATION TESTS ..................................................................................................... 83
9.3.1 Performing the standard disintegration tests ...................................................................................... 83 9.3.2 Performing the supplementary tests .................................................................................................... 94 9.3.3 Performing the quick tests ................................................................................................................... 96
10 RESULT MANAGEMENT ............................................................................................................................ 99 10.1 APPROVING THE TEST RESULTS ............................................................................................................... 102 10.2 CANCELLING THE TEST APPROVAL .......................................................................................................... 103
11 REPORTS ...................................................................................................................................................... 104 11.1 REPORT SETTINGS ................................................................................................................................... 104
12 DATABASE BACKUP AND RESTORE .................................................................................................... 105 12.1 BACKING UP THE DATABASES ................................................................................................................. 105 12.2 RESTORING THE DATABASES................................................................................................................... 109
13 FAVORITES .................................................................................................................................................. 111
14 HELP .............................................................................................................................................................. 113

Zt.Net User’s Guide Introduction
Zt.Net 2.6.1 User’s Guide / 2015-08 SZ / V1.1 Page 5 of 113
1 Introduction Thank you for purchasing the ERWEKA Disintegration Software!
1.1 About the user’s guide
This user’s guide is intended to assist you in working with the ERWEKA Disintegration Software (shortly referred to as Zt.Net). It covers all the functionality of the product and presents the information in an easy-to-read and understandable way. The user’s guide is designed to be both an introduction to the program and a tool to enhance existing skills. It abounds with screenshots to facilitate the comprehension of the processes. You do not have to read this user’s guide front-to-back. It is designed around common activities that you will perform, with headings and subheadings that allow you scan the pages easily and zoom in on the information you are interested in. Take some time to browse through these activities. You may discover things that will make your work with Zt.Net more efficient and effective.
1.2 Symbols used in the user’s guide
1.3 When you need help
At ERWEKA, we treat you as our valued customer and thus are ready to help you every time you require our advice or assistance. Our web site (www.erweka.com) is being constantly updated so that you could find the recent changes of our products, proposals and events. In case you need a personal reply, contact us at [email protected].
The editorial team of ERWEKA appreciates your feedback regarding the present manual. Just send an e-mail to [email protected] with your topic and “technical documentation” as a subject. Your reply contributes to our high quality level.
This symbol emphasizes the information to ensure smooth work process.
NOTE Notice sign indicates a possible hazardous situation which, if not avoided, can lead to the damage.
This symbol provides you with additional useful information.

Zt.Net User’s Guide System Requirements
Zt.Net 2.6.1 User’s Guide / 2015-08 SZ / V1.1 Page 6 of 113
2 System Requirements This chapter describes what hardware and software is recommended to use with Zt.Net to ensure its continuous and smooth operation. Recommended PC configuration: • Processor: Intel® Core™ i3-3240 CPU @ 3.40 GHz • Memory: 4 GB • HDD free space: 250 GB • Video card: Intel HD Graphics • Display resolution: 1280 x 1080 (minimal) Supported operating systems: • Microsoft Windows 7 SP1
NOTE
Zt.Net software is delivered with the database in which the following objects are given for the usage example:
• placeholder method
• placeholder product
• $placeholder instrument Do not change them without a need!

Zt.Net User’s Guide User Interface
Zt.Net 2.6.1 User’s Guide / 2015-08 SZ / V1.1 Page 7 of 113
3 Hardware Setup Before you start working with Zt.Net, make sure that you have connected the instruments properly. This chapter will help you to correctly set up the hardware you will be using. Follow the instructions carefully to avoid malfunction afterwards. In the majority of cases the instruments are connected to the computer through the serial port (RS232). Usually computers are equipped with two or more serial ports. You are able to connect your instrument directly to the computer (you may also use the USB adapter cable and connect the instrument to the USB port on your computer).
3.1 Setting up the hardware
To set up the hardware: 1. Connect the instrument to the computer using the serial cable (DB9, female to
male). Connect the male connector’s end to the COM port (RS232C) on the back panel of the instrument and the female connector’s end to one of the COM ports of your computer. See the picture below:
2. Connect all the necessary appliances to the instrument, as it is described in the instrument support documentation.
3. Connect the instrument to the power supply following the instructions described in the instrument support documentation.
A special driver delivered on the separate disk should be installed for the USB adapter cable.

Zt.Net User’s Guide User Interface
Zt.Net 2.6.1 User’s Guide / 2015-08 SZ / V1.1 Page 8 of 113
3.2 Setting up the hardware with the ConBox connection
The ConBox multiplexer is a device used for connection between the ZT32x instruments, computer and mBaskets (baskets with magnetic sensors). This device collects the data from the baskets and transfers it to the computer for processing and storing in the database. As it can be seen from the picture below, the ConBox multiplexer allows connection to the computer through the USB port and to the instrument through the serial port.
To set up the hardware with the ConBox connection: 1. Connect the ConBox to the computer through USB cable and to the ZT32x
through COM cable. 2. Plug in the wires of mBaskets to the corresponding slots of the ConBox multiplexer
(connect the basket from the first support arm to the first slot (from the left) and the basket from the second support arm – to the second slot of the multiplexer). Small red lamps blink on the baskets when they are properly connected.
3. Connect all the necessary appliances to the instrument, as it is described in the
instrument support documentation. 4. Connect the instrument to the power supply following the instructions described in
the instrument support documentation.
NOTE The slots intended for mBaskets are bigger than the slots for standard baskets. To avoid collision, connect the baskets to the corresponding slots!
Zt.Net User’s Guide User Interface
Zt.Net 2.6.1 User’s Guide / 2015-08 SZ / V1.1 Page 9 of 113
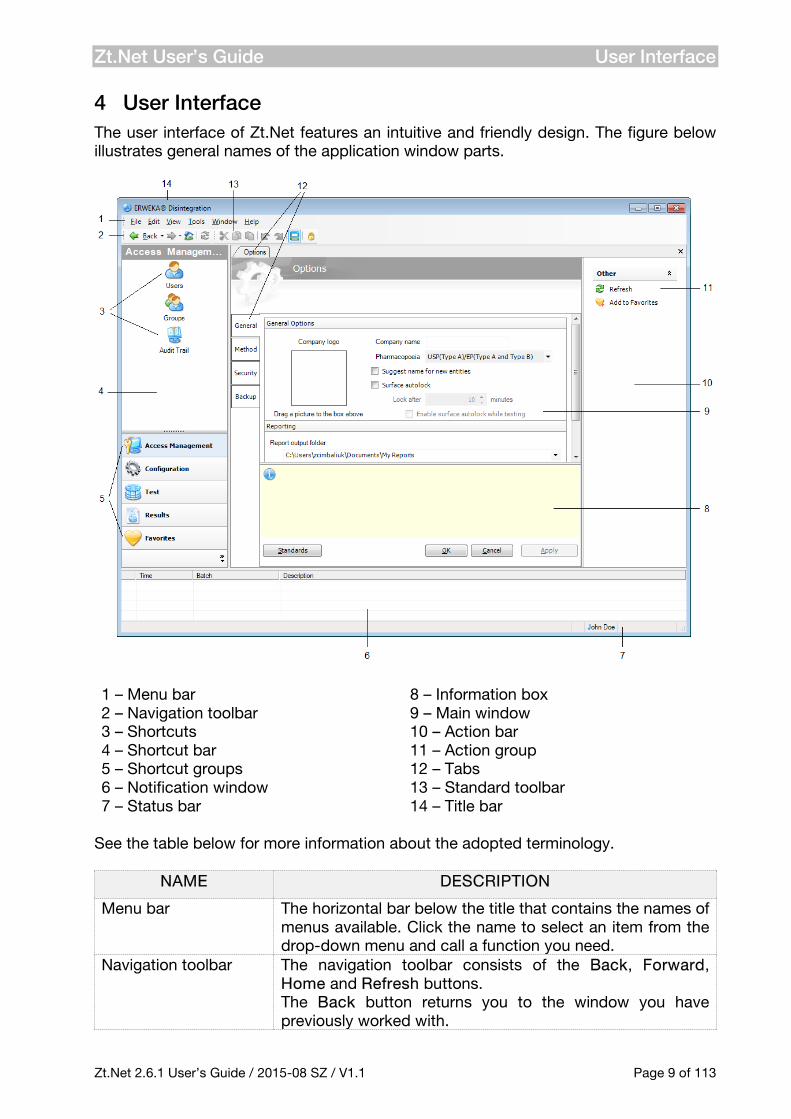
4 User Interface The user interface of Zt.Net features an intuitive and friendly design. The figure below illustrates general names of the application window parts.
1 – Menu bar 2 – Navigation toolbar 3 – Shortcuts 4 – Shortcut bar 5 – Shortcut groups 6 – Notification window 7 – Status bar
8 – Information box 9 – Main window 10 – Action bar 11 – Action group 12 – Tabs 13 – Standard toolbar 14 – Title bar
See the table below for more information about the adopted terminology.
NAME DESCRIPTION
Menu bar The horizontal bar below the title that contains the names of menus available. Click the name to select an item from the drop-down menu and call a function you need.
Navigation toolbar The navigation toolbar consists of the Back, Forward, Home and Refresh buttons. The Back button returns you to the window you have previously worked with.
Zt.Net User’s Guide User Interface
Zt.Net 2.6.1 User’s Guide / 2015-08 SZ / V1.1 Page 10 of 113
NAME DESCRIPTION
The Forward button takes you to the next window in case you have used the Back button before. The Home button brings you to the individual home page. The Refresh button updates the content of the main window.
Shortcut An image with a name of the program element. You can quickly associate the element with the image and promptly access it when you click the image.
Shortcut bar The column on the left of the window that includes groups and shortcuts within each group. Clicking the needed group shortcut, you immediately access the group elements list. Click the necessary item to quickly open it in the main window.
Shortcut group A group of shortcuts to application elements that is displayed on the shortcut bar. Clicking one of the group names of the shortcut bar changes the group of shortcuts that is displayed.
Notification window The part of the window that contains all messages generated by the program during its operation: errors, information and warnings.
Status bar The bar that shows the status of operations conducted in the main window.
Information box An additional marked space in the main window where contextual notifications are displayed.
Main window The central part of the window where the current operations are shown.
Action bar The action bar contains links to actions that can be performed on the elements in the main window. Available actions are united into action groups. The list of available actions is shown below the action group title. Click the necessary list item to call the function you need.
Action group A group of actions that are shown on the action bar. Tab A bookmark with the name of the window used when you
need to systematically arrange several windows (more than two) and show them all together.
Standard toolbar The standard toolbar consists of a number of icons that give you quick access to functions.
Title bar The horizontal bar on the top of the window where the name of the software is displayed.
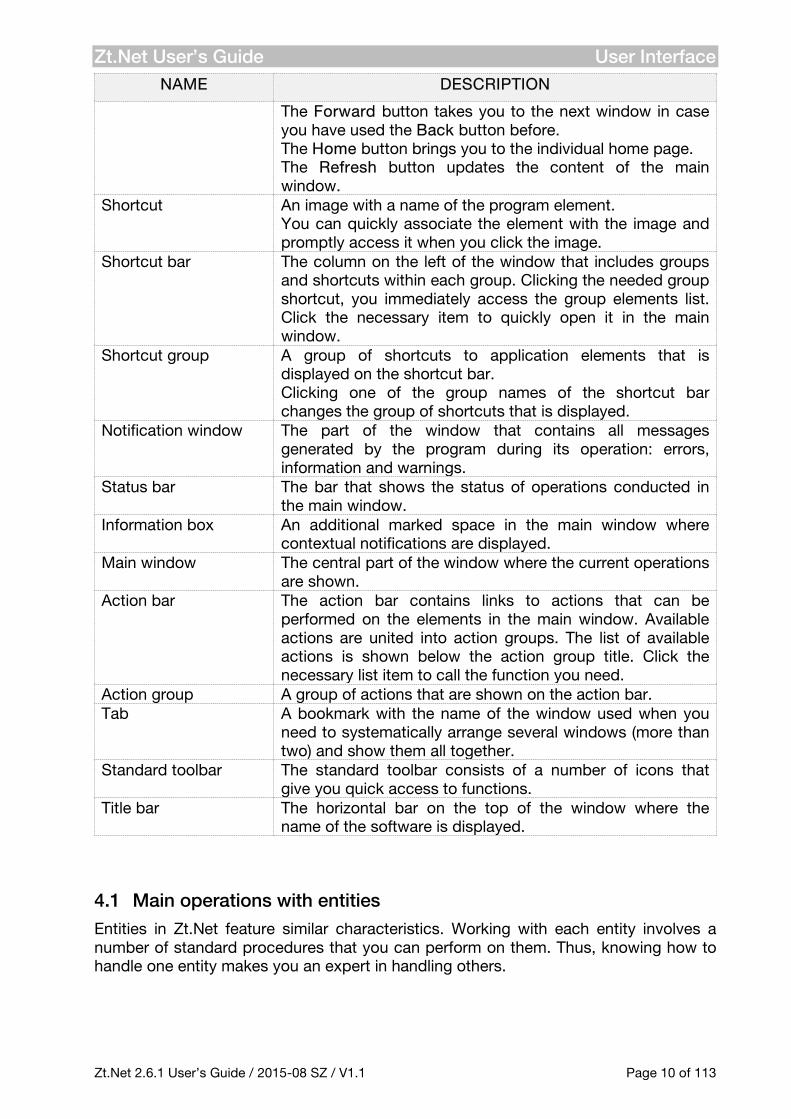
4.1 Main operations with entities
Entities in Zt.Net feature similar characteristics. Working with each entity involves a number of standard procedures that you can perform on them. Thus, knowing how to handle one entity makes you an expert in handling others.

Zt.Net User’s Guide User Interface
Zt.Net 2.6.1 User’s Guide / 2015-08 SZ / V1.1 Page 11 of 113
Main operations with entities in Zt.Net include creating, modifying, deleting and archiving entities as well as refreshing, customizing and adding them to Favorites. The system entities are arranged in groups on the shortcut bar. Main operations that you can perform on entities are displayed on the action bar. The action bar contains three standard collapsible action groups: Edit, Other and Columns. In the Edit action group for the list pages (lists of users, instruments), you can find actions you can perform on entities: add, modify, delete and archive. Moreover, you can use the context menu to perform actions on entities. To do so, right-click the necessary entity and select the action to perform from the list of available actions in the pop-up menu that appears:
A detailed description of the main operations with entities displayed in the Edit action group is provided in chapter 7 User and Group Management. All similar procedures will also be referred to this chapter, which implies that they are performed by analogy. In the Other action group, you can do the following: • add the current page to Favorites (see chapter 13 Favorites) by clicking Add to
Favorites • refresh the page and see recent changes by clicking Refresh • export the list of the current entity to PDF by clicking Print

Zt.Net User’s Guide User Interface
Zt.Net 2.6.1 User’s Guide / 2015-08 SZ / V1.1 Page 12 of 113
In the Columns action group, see the list of columns that make the table in the main window.
The pages for editing in Zt.Net also contain the Object Audit group on the action bar. In the Object Audit action group, you can view details about the creation and last modification of the current entity. This group includes the following fields:
• Created by − contains the name of the user who created the entity • Created on − contains the date and time when the entity was created • Modified by − contains the name of the user who performed the last
modification of the entity • Modified on − contains the date and time when the entity was last modified • Revisions − contains the number of entity changes (the version number)
In Zt.Net, you can open pages on the new tabs. You may need this functionality in various situations, for example, to compare parameters of two or more methods, or to run several tests simultaneously.
You can select which columns to show in the table. Clear the check boxes next to the columns you want to hide. You can restore these columns at any time by selecting the check boxes next to the column names.

Zt.Net User’s Guide User Interface
Zt.Net 2.6.1 User’s Guide / 2015-08 SZ / V1.1 Page 13 of 113
To open a page on a new tab, hold down the Shift key and click the corresponding page link. You can also open a page on a new tab by clicking New Window on the Window menu. As a result, the same page appears on a new tab. If there is no active page, the home page of the currently logged on user will be displayed.
Moreover, Zt.Net allows arranging the open tabs according to your own preferences. If two or more tabs are open at the same time, you can arrange them vertically or horizontally. To do so, right-click the tab name to see the context menu.
Click the corresponding item on the menu: • New Horizontal Tab Group: to arrange tabs horizontally; so that they may look
follows:

Zt.Net User’s Guide User Interface
Zt.Net 2.6.1 User’s Guide / 2015-08 SZ / V1.1 Page 14 of 113
• New Vertical Tab Group: to arrange tabs vertically; so that they may look as follows:
You can also choose to close all windows. To do so, click Close All Windows on the Window menu. You can always return to your home page by clicking on the toolbar or, alternatively, by clicking Go to, Home on the View menu.
Using the Move to Next Tab Group and Move to Previous Tab Group options that appear when you right-click the name of one of the arranged tabs you can return to the default tab view.

Zt.Net User’s Guide User Interface
Zt.Net 2.6.1 User’s Guide / 2015-08 SZ / V1.1 Page 15 of 113
4.2 Data presentation
In the main window, information pertaining to the same category is usually grouped under a single heading. For example, the Company, Department, Job title and E-mail fields are placed under the Company Information heading on the User page:
Usually, information in the main window is presented in the form of tables (lists of users, instruments, methods, results). You can sort the records by any of the columns simply by clicking the column name. The column by which the records are sorted is marked as follows:
- When the records are sorted in the ascending order
- When the records are sorted in the descending order
4.3 Localization
Zt.Net is the all-in-your-language software. It is possible to have all user interface elements, as well as reports, displayed in different languages depending on the language packs available. You can apply the language you need either right at the start or at any moment of work with the software.

Zt.Net User’s Guide User Interface
Zt.Net 2.6.1 User’s Guide / 2015-08 SZ / V1.1 Page 16 of 113
To apply the language at the start-up, select the one you need from the list on the My Language action bar:
Alternatively, you can click View on the menu bar and then Language. Select the language you need from the list of languages available.

Zt.Net User’s Guide Notification System
Zt.Net 2.6.1 User’s Guide / 2015-08 SZ / V1.1 Page 17 of 113
5 Notification System Zt.Net keeps track of all the procedures that are taking place and signals about the occurred events. This is accomplished through generating runtime errors and information messages that can influence the test results or even prevent the system from finishing the test. To give you a possibility to actively supervise and monitor the process, the notification system has been designed in Zt.Net. The notification system is the functionality that reports each occurrence of an event in Zt.Net. You can find the reported notification messages displayed directly in the main window, on the action bar, or in the notification area:
The table mainly displays the test notifications and has the following columns: Column Description Time Time when the message was generated by the system Batch Code of the tested batch Description Detailed description of the event that caused the message to appear,
for example, user has aborted the test You can receive notifications of the following three types: SYMBOL NAME DESCRIPTION EXAMPLE
Error This message informs you about a value or condition that is not consistent with the true, specified or expected value or condition. It also indicates a situation that requires immediate intervention or correction. The error prevents the further work of the instrument or the software. You should read the error message carefully and investigate its cause and possible solutions. You cannot proceed to work without taking actions on the error.
A product must be specified.
Warning This message alerts you that a dangerous or wrong event has happened or may happen, and, thus, cause malfunction or damage to the instrument and gives you advice how to prevent or avoid it. The warning message does not block the work of the instrument and the software; you can ignore the warning.
The instrument’s status is unknown. The selected instrument cannot be used in tests.
Information This message provides you with additional The medium

Zt.Net User’s Guide Notification System
Zt.Net 2.6.1 User’s Guide / 2015-08 SZ / V1.1 Page 18 of 113
SYMBOL NAME DESCRIPTION EXAMPLE information about the current state or operation of the instrument or the software.
is changed. The test continues.
The notification area with messages may look as follows:
You can hide or display the Notifications area by clicking on the toolbar or, alternatively, by clicking Other Windows, Notifications on the View menu.
Moreover, contextual notifications are employed in Zt.Net. This means that there are guidelines for creating entities or for starting a test which are displayed as information, error or warning messages on the main working page. Read through the contextual notifications carefully. They can provide you with the necessary assistance and support and make your interaction with the system more efficient and effective.

Zt.Net User’s Guide Notification System
Zt.Net 2.6.1 User’s Guide / 2015-08 SZ / V1.1 Page 19 of 113
Below you can see the New Method page. On this page, you can find contextual notifications of the informational type that provide useful guidelines for creating a new method:

Zt.Net User’s Guide Getting Started
Zt.Net 2.6.1 User’s Guide / 2015-08 SZ / V1.1 Page 20 of 113
6 Getting Started
6.1 First access to Zt.Net
After you have properly installed and set up both the software and the instrument, you can launch Zt.Net. To start Zt.Net: 1. In the Start menu find All Programs, ERWEKA.
2. Click Disintegration. The program shortcut appears.
3. Click ERWEKA Disintegration to start the program.
The following screen appears indicating that the system is loaded:
You may also use on the desktop to quickly start the program.
Zt.Net User’s Guide Getting Started
Zt.Net 2.6.1 User’s Guide / 2015-08 SZ / V1.1 Page 21 of 113
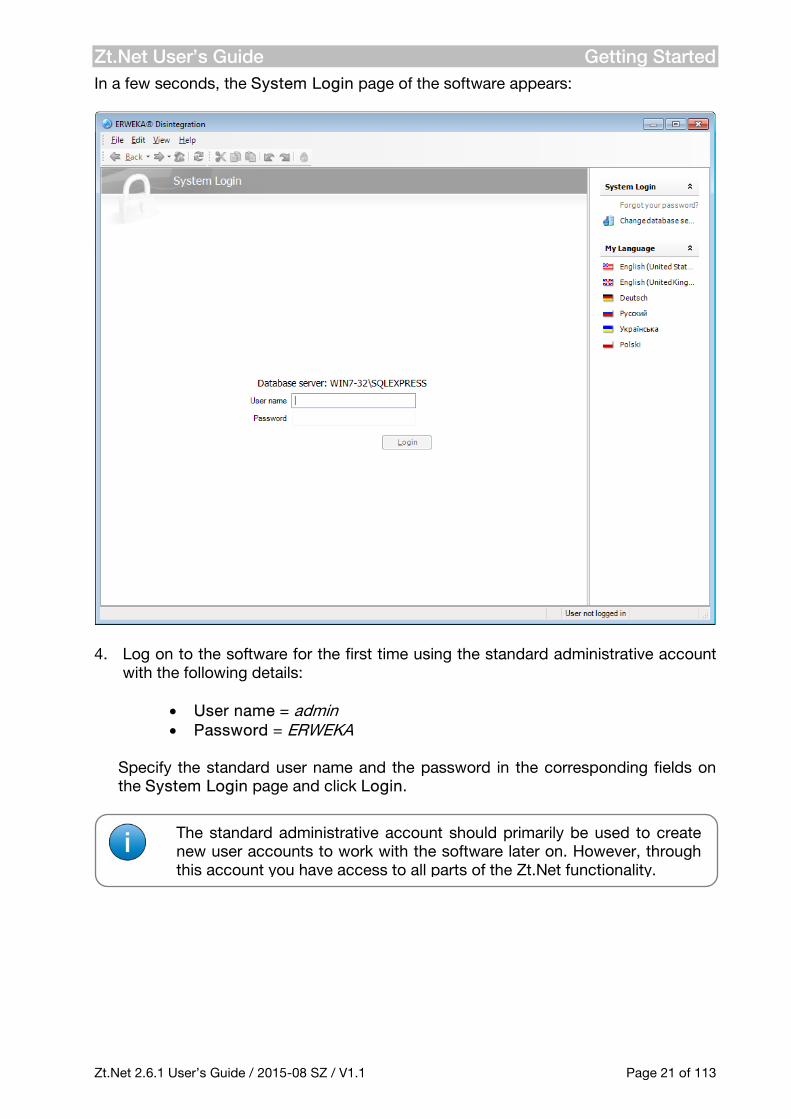
In a few seconds, the System Login page of the software appears:
4. Log on to the software for the first time using the standard administrative account
with the following details:
• User name = admin • Password = ERWEKA
Specify the standard user name and the password in the corresponding fields on the System Login page and click Login.
The standard administrative account should primarily be used to create new user accounts to work with the software later on. However, through this account you have access to all parts of the Zt.Net functionality.

Zt.Net User’s Guide Getting Started
Zt.Net 2.6.1 User’s Guide / 2015-08 SZ / V1.1 Page 22 of 113
The home page for the built-in administrator user appears:
The home page is displayed individually for each registered user. The amount of information this page contains depends on the activities she/he was engaged in during the previous logons.
The home page may contain the following information: • name of the logged on user in the page title • links to available languages that can be applied to the software in the My Language
action group • the Recent Tests panel where the most recently performed tests are displayed (up
to five). By clicking each of the tests, you can access the results page and view the results of the selected test. In this panel, you may also click to generate a report or (if enabled) to run a supplementary test for the selected test. In the lower part of the Recent Tests panel, there is the Run Test shortcut which gives you the possibility to start a regular test directly from the home page (for more information on how to perform tests, see chapter 9 Performing the Tests).
• the Recent Methods panel where up to 5 recently used methods are displayed. Click any of the methods to view the detailed information about the selected item.
During the first access before you continue working with the program we recommend that you navigate to the Options page to customize the program to your needs (for more details, see section 6.3 Options).

Zt.Net User’s Guide Getting Started
Zt.Net 2.6.1 User’s Guide / 2015-08 SZ / V1.1 Page 23 of 113
You may also click near any of the displayed methods to start a test on the selected method. (For more information on creating new methods, see section 8.6.1 Creating the methods).
You may choose either to display or hide the task panels by selecting or clearing the corresponding check boxes in the Task Panels action group.
6.2 Server connection settings
The database server connection settings are initially specified during the installation and verified during the first access procedures (see the section above). You may, however, change the server connection settings later on.
Do not change the database server connection settings while performing procedures with the software. We recommend that you change the settings (if necessary) before logging on. If you apply the server connection settings while working with the program, the change will not take effect until the next logon.
Only an administrator must be able to apply the database server connection settings. It is highly recommended that you restrict access to these settings for regular users in order to prevent and avoid possible malfunction and errors.

Zt.Net User’s Guide Getting Started
Zt.Net 2.6.1 User’s Guide / 2015-08 SZ / V1.1 Page 24 of 113
To view/apply the server connection settings: 1. Start ERWEKA Disintegration software (see the section above). The System Login
page appears:
2. Click Change database server… in the System Login action group. Alternatively,
you can click File, Database Server on the menu bar. The following page appears:

Zt.Net User’s Guide Getting Started
Zt.Net 2.6.1 User’s Guide / 2015-08 SZ / V1.1 Page 25 of 113
The page has the following information in the fields: • Database server: here you can select the name of your database server that will be
used by Zt.Net software.
• Use Windows authentication: an option button that allows you get connected to
the database server using current Windows credentials. Thus, when you are using Windows authentication, you do not need to specify the server user and password.
• Use SQL Server authentication: an option button that allows you get connected to the database server by specifying the name of the server user and password.
• Server user: the name of the user (normally the administrator) who is registered at the server and has permissions to work with the server.
• Server password: the password of the server user to access the server.
3. Check the server to be used with Zt.Net software and change it if necessary by selecting from the Database server drop-down list.
4. Select the Use Windows authentication option button if the database server you have chosen is installed on your computer and you are logged on to the operating system as administrator or select the Use SQL Server authentication option
The server name may consist of the name of the computer where the server is installed and the name of the instance (for example, Main\SQLServer) or just the name of the server (for example, local).

Zt.Net User’s Guide Getting Started
Zt.Net 2.6.1 User’s Guide / 2015-08 SZ / V1.1 Page 26 of 113
button if you are using a remote database server. In the latter case, to access the server you will be required to specify the Server user name and Server password in the corresponding fields.
5. Click OK to apply the settings you have made. To reject, click Cancel. For the convenience, you can also specify the necessary database server to work with Zt.Net and be shown by default on the System Login page. To set the default database server: 1. Find ERWEKA Disintegration in the Start menu or on the desktop and right-click
the corresponding icon. 2. Select Run as administrator from the pop-up menu that appears. 3. The splash screen and, in a few seconds, the System Login page are displayed.
Click Change database server… in the System Login action group. The page for SQL Server selection appears.
4. Select the necessary database server from the corresponding drop-down list and click OK. From this time on the selected server will be displayed by default when starting the ERWEKA Disintegration software.
6.3 Options
In Zt.Net, there is a special Options page where you can specify default settings to configure the program according to your own preferences.
Users can only access the Options page provided they have appropriate permissions. The user logged on as administrator is assigned with these permissions by default. For more information about user permissions, refer to section 7.6 Setting the permissions of this user’s guide.
If you have installed the SQL Server from Zt.Net installation disk, use the following credentials: User name: sa Password: sa.0123456

Zt.Net User’s Guide Getting Started
Zt.Net 2.6.1 User’s Guide / 2015-08 SZ / V1.1 Page 27 of 113
To open the Options page, click Tools, Options… on the menu bar. The following page appears:
All options in Zt.Net are arranged on four tabs according to their function:
• General – general program settings • Method – method and test settings • Security – security settings (password policy) • Backup – data protection settings
In this section, we will mainly focus on general options. All other options (for security, methods, testing conditions and backup) will be described in the corresponding chapters on database backup, tests, user and method management. To view/change the general options: 1. On the Tools menu, click Options… The Options… page appears with the
General tab displayed by default. 2. Go through the fields and change the settings if necessary:
• In the Company name field, specify the name of your company. • Add a logo of your company to the Company logo box by dragging it.

Zt.Net User’s Guide Getting Started
Zt.Net 2.6.1 User’s Guide / 2015-08 SZ / V1.1 Page 28 of 113
• In the Pharmacopoeia field only the USP (Type A)/EP (Type A and B) pharmacopoeia is available.
• Select Suggest name for new entities if you want the program to set default names for the entities that are created; otherwise, leave the check box cleared.
• Select Surface autolock to enable automatic surface lock after a certain non-working period or leave the check box cleared if you do not want the program to lock automatically (see section 6.4 Surface lock).
• Under the Reporting heading, specify the settings for your test reports; in the Report output folder field, select the necessary location from the folders list where all generated test reports will be saved; the default location is initially suggested in the field.
• In the Report name field, select one of the patterns to name test reports.
• In the File format field, select the format for test reports. • Select Print report immediately after test is finished if you want a report to be
printed after the test is finished.
In Zt.Net, names for test reports are generated according to the available patterns. The name patterns for test reports contain substitution elements that begin with the #-symbol. Each of these elements will be replaced in the name of the report by the corresponding values. The report name pattern can be edited by typing in the Report name field, but you should make sure that at least one of the substitution elements (#CODE (batch code), #DATE (batch date) or #REF (referral)) is left in the pattern that you have created.
The default name for a new entity is generated in the format “New + Entity”, where by an entity one of the following items is implied: user, group, product, method, instrument, press or medium. Thus, the default name for each of the new entities looks as follows: “New User”, “New Product”, “New Method” etc.
The test results will be analyzed according to the type of pharmacopoeia on the Options page.
The company information you provide under General Options will be used while generating reports for the tests performed and when creating new users.

Zt.Net User’s Guide Getting Started
Zt.Net 2.6.1 User’s Guide / 2015-08 SZ / V1.1 Page 29 of 113
By clicking any of the fields on the Options page you can view its description displayed in the information box below. The information box may look as follows:
3. Click OK to save the changes you have made, close the current page and return to
the previous page. To close the page without saving changes, click Cancel.
6.4 Surface lock
You may lock the software surface for the time you are not using it without exiting the program. To do so, click on the toolbar or, alternatively, click Surface Lock on the File menu. The following page appears:
To unlock the program, enter your password in the Password field and click Login. You can also enable automatic surface lock which will take effect after a certain non-operating period.
If needed, you can restore the default settings by clicking Standards.

Zt.Net User’s Guide Getting Started
Zt.Net 2.6.1 User’s Guide / 2015-08 SZ / V1.1 Page 30 of 113
To enable the automatic surface lock: 1. On the Tools menu, click Options… The Options… page appears with the
General tab displayed by default:
2. Under the General Options heading, select the Surface autolock check box. 3. In the Lock after spin box, enter the period of time after which the software will be
automatically locked either by using the spin arrows or by typing the valid value directly in the text box.
4. Leave the Enable surface autolock while testing check box cleared to prevent
the software from locking when tests are performed or select it if you want the software to lock anyway.
5. Click OK to save the changes you have made, close the current page and return to the previous page.
By default, the locking interval is set to 10 minutes, which is also the highest value that can be entered.

Zt.Net User’s Guide User and Group Management
Zt.Net 2.6.1 User’s Guide / 2015-08 SZ / V1.1 Page 31 of 113
7 User and Group Management Using the user management functionality of Zt.Net you can create new user accounts, modify, delete and archive the existing ones.
7.1 Creating the user accounts
To be able to work with Zt.Net, you should have an active user account. A user account is an established mean for an individual to gain access to the system and its resources; it contains information about the user, such as user name, personal and company data and permissions. To create a new user account: 1. Log on under the user account that has permissions to create new accounts. 2. On the shortcut bar, click Access Management, Users. The Users page appears:
The main window contains a list of registered users. If no user account has been created yet, the table will contain only the built-in administrative account which cannot be removed.
Only a user with administrative permissions can create new accounts, edit and delete the existing ones. If you do not have administrative permissions, you can only edit your own account.

Zt.Net User’s Guide User and Group Management
Zt.Net 2.6.1 User’s Guide / 2015-08 SZ / V1.1 Page 32 of 113
The table on the page contains the following columns by default: Column Description User Name Login name for instrument operator First Name First name of the operator Last Name Last name of the operator Company Company where the operator works Department Department where the operator works Job Title Job title of the operator
3. On the action bar, click Add User. The New User page appears as follows:
You can make the required columns visible by selecting them from the Columns action group.
Zt.Net User’s Guide User and Group Management
Zt.Net 2.6.1 User’s Guide / 2015-08 SZ / V1.1 Page 33 of 113
The New User window contains the following information: • General: a user name, first and last names, description. • Company Information: the user’s company information. • Group Membership: the user groups (with the set of permissions of each group). • Permissions: specific permissions for the user.
4. Fill in the fields with the relevant information:
• In the User name field, type the name the person will use to enter the system.
• Enter the first and last names of the user in the First name and Last name fields. • Enter any relevant description for the user in the Description field.
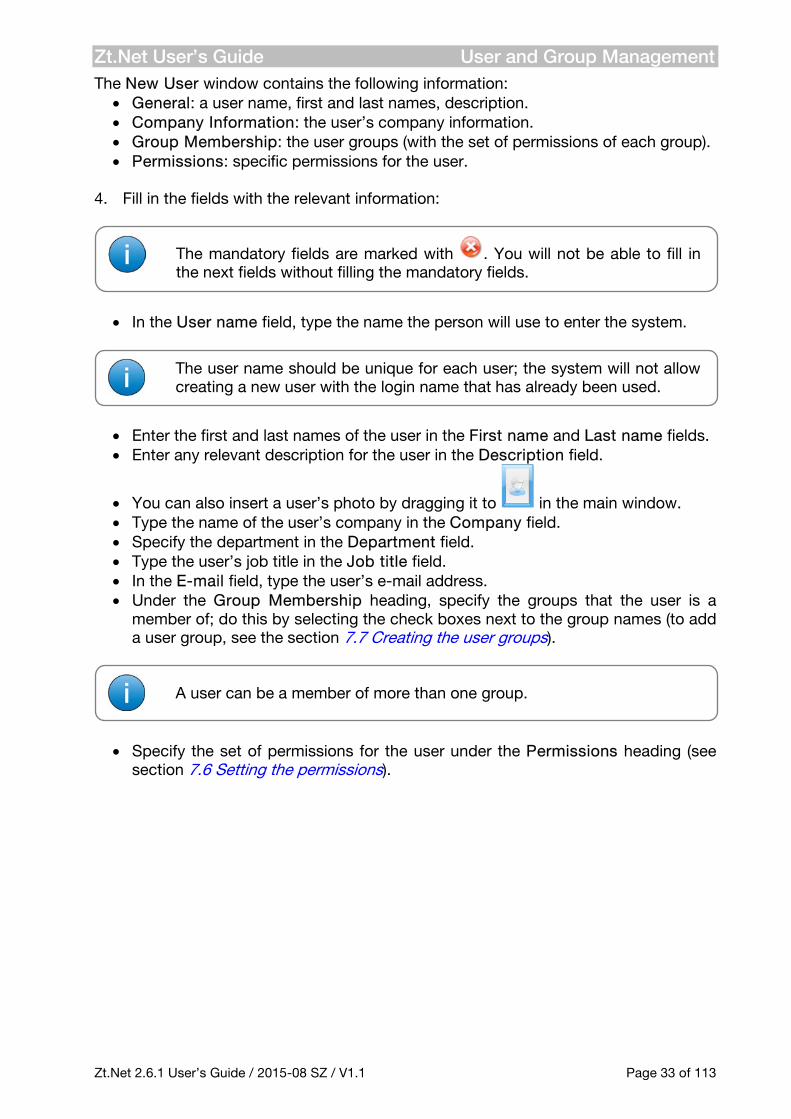
• You can also insert a user’s photo by dragging it to in the main window. • Type the name of the user’s company in the Company field. • Specify the department in the Department field. • Type the user’s job title in the Job title field. • In the E-mail field, type the user’s e-mail address. • Under the Group Membership heading, specify the groups that the user is a
member of; do this by selecting the check boxes next to the group names (to add a user group, see the section 7.7 Creating the user groups).
• Specify the set of permissions for the user under the Permissions heading (see section 7.6 Setting the permissions).
The user name should be unique for each user; the system will not allow creating a new user with the login name that has already been used.
The mandatory fields are marked with . You will not be able to fill in the next fields without filling the mandatory fields.
A user can be a member of more than one group.
Zt.Net User’s Guide User and Group Management
Zt.Net 2.6.1 User’s Guide / 2015-08 SZ / V1.1 Page 34 of 113
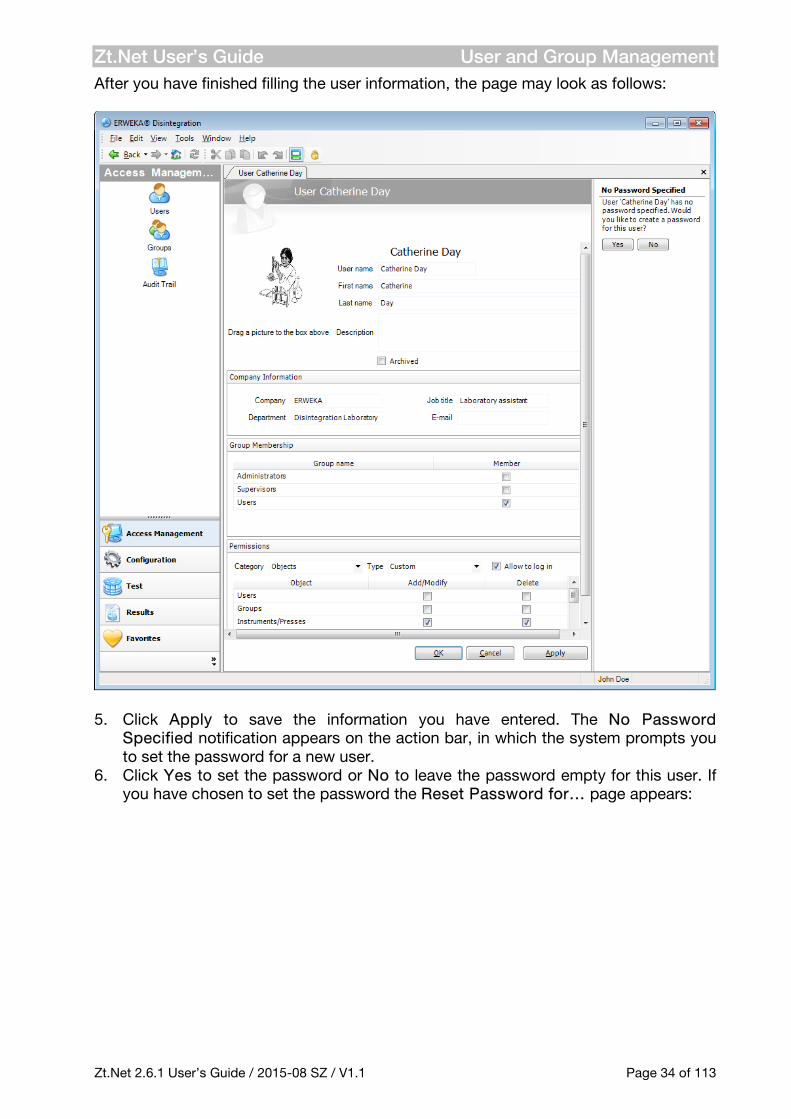
After you have finished filling the user information, the page may look as follows:
5. Click Apply to save the information you have entered. The No Password Specified notification appears on the action bar, in which the system prompts you to set the password for a new user.
6. Click Yes to set the password or No to leave the password empty for this user. If you have chosen to set the password the Reset Password for… page appears:

Zt.Net User’s Guide User and Group Management
Zt.Net 2.6.1 User’s Guide / 2015-08 SZ / V1.1 Page 35 of 113
7. In the New password field, enter the password the user will use too log on to the
system and repeat the password in the Retype new password field. Click Reset to save the password.
8. Click OK to save the information you have entered. The current page is closed and
you return to the Users page. Make sure that the user account you have just created is added to the list.
A user with no password specified will not be able to log on.
The Reset Password option is available only for the user with administrative permissions. It is primarily used to set passwords for newly created users. To keep the password secure, it is recommended that you change your password after the first logon to the system.
In Zt.Net, a special password policy is employed. If the entered password does not meet the policy criteria, the Password Reset Error will appear on the action bar. For more information, see section 7.2 Password policy.

Zt.Net User’s Guide User and Group Management
Zt.Net 2.6.1 User’s Guide / 2015-08 SZ / V1.1 Page 36 of 113
7.2 Password policy
In Zt.Net, a special password policy is employed. The purpose of this policy is to establish standards for creating strong passwords, protecting them and setting the frequency of change. To view/change the password policy settings: 1. Click Tools, Options…, Security. The Password policy page appears:
In the main window, you can see the list of available options with default values.

Zt.Net User’s Guide User and Group Management
Zt.Net 2.6.1 User’s Guide / 2015-08 SZ / V1.1 Page 37 of 113
Click any of the spin boxes to view information about it displayed in the information box in the lower part of the main window. The information box may look as follows:
2. Select the Strong passwords check box to allow only strong passwords. To view definition of strong passwords, select the Strong passwords check box and the related information will appear in the information box.
3. Click OK to save the changes you have made, close the current page and return to
the previous page. To close the page without saving any changes, click Cancel.
If needed, you can restore the default settings by clicking Standards.
The default password policy values are as follows: - The password minimum length is 6 characters. - A new password may not repeat any of the 3 previous ones; this is the number of remembered passwords for each user, and you will not be able to reuse a password until you have used three different new passwords. - The password expires after 30 days and should be changed; this is the maximum password age. - The minimum password age is 7 days; it prevents users from immediately changing their newly set password back to the old one, effectively eliminating the requirement to change passwords. - The system starts prompting the necessity of password change 7 days before the password expiry date. - The account locks after 3 failed login attempts; this reduces the number of tries that a brute-force password-guessing attack can make over a given period of time. - The lockout duration is 5 minutes; in the meantime only the administrator will be able to unlock the account. - The system allows using weak (not strong) passwords.

Zt.Net User’s Guide User and Group Management
Zt.Net 2.6.1 User’s Guide / 2015-08 SZ / V1.1 Page 38 of 113
7.3 Modifying the user accounts
You can modify all user accounts, if you have the corresponding permissions, or only your own account. To modify the user account: 1. Log on under the user account that has permissions to modify accounts. 2. On the shortcut bar, click Access Management, Users. The Users page appears:
3. Select the user account you want to modify from the list and click Modify User on
the Edit action bar. Alternatively, you can double-click the needed line in the table. The corresponding User page appears.
4. Change any information you need in the fields of the main window and click Apply to save changes.
5. If you want to change the password, click Change Password on the Edit action bar. The Change password for… page appears. Make necessary changes and click Change to save them.
6. Click OK to save the changes you have made, close the current page and return to
the Users page.
The Change password for… page is available for the currently logged on user only. For the users with administrative permissions, the Reset Password option is available instead, which enables them to reset passwords for any user registered in the system. To reset a password for a user, the administrator does not need to specify the old password.

Zt.Net User’s Guide User and Group Management
Zt.Net 2.6.1 User’s Guide / 2015-08 SZ / V1.1 Page 39 of 113
7.4 Deleting the user accounts
User accounts are deleted using a standard deletion procedure. However, you can delete user accounts only if you have the administrative permissions.
To delete the user account: 1. Log on under the user account that has permissions to delete users. 2. On the shortcut bar, click Access Management, Users. The Users page opens. 3. Select the user whose account you want to delete from the list and click Delete
User on the Edit action bar. The Confirm Deletion dialog window appears on the action bar:
4. Confirm deletion of the selected user account by clicking Yes.
NOTE Once deleted the user account cannot be restored. However, a record will be made in the Audit Trail that will contain details about the event.
Another user (non-creator) can delete objects (products, media, instruments) if they are not used in the methods.
The user cannot be deleted in case she/he is the creator of one or more objects (products, instruments or media). For deletion of the user account all the objects belonging to this user should be removed.
Zt.Net User’s Guide User and Group Management
Zt.Net 2.6.1 User’s Guide / 2015-08 SZ / V1.1 Page 40 of 113
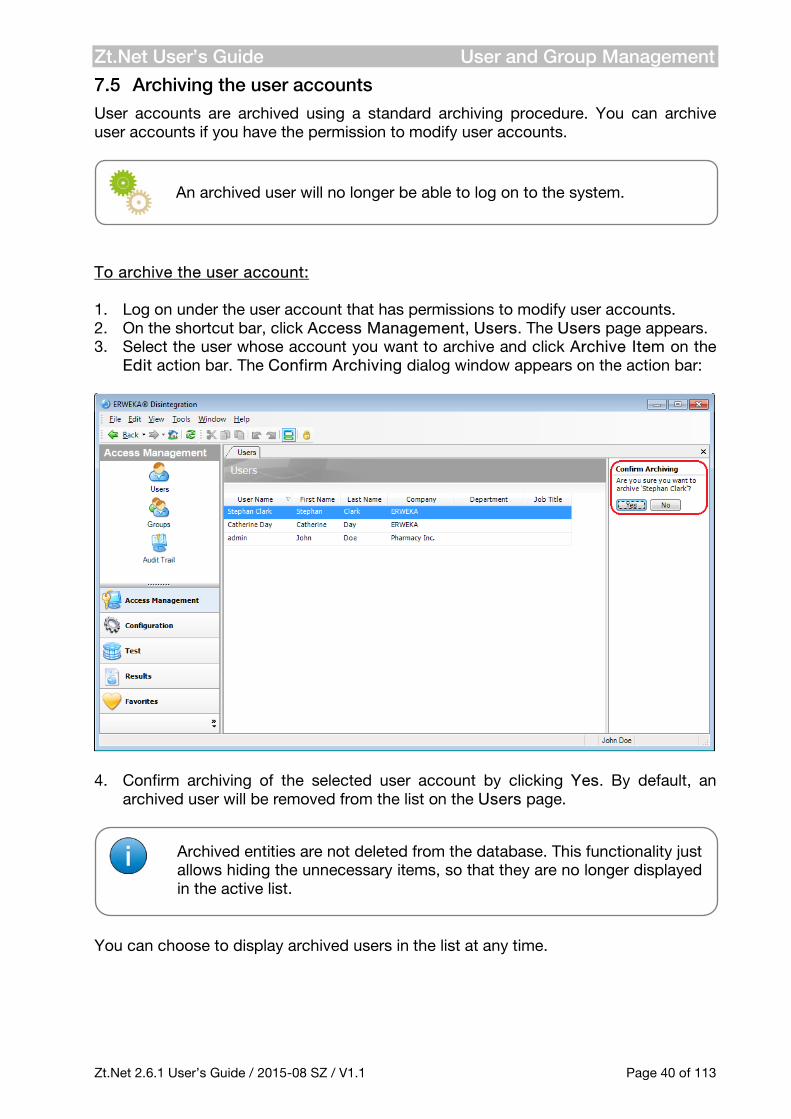
7.5 Archiving the user accounts
User accounts are archived using a standard archiving procedure. You can archive user accounts if you have the permission to modify user accounts.
To archive the user account: 1. Log on under the user account that has permissions to modify user accounts. 2. On the shortcut bar, click Access Management, Users. The Users page appears. 3. Select the user whose account you want to archive and click Archive Item on the
Edit action bar. The Confirm Archiving dialog window appears on the action bar:
4. Confirm archiving of the selected user account by clicking Yes. By default, an
archived user will be removed from the list on the Users page.
You can choose to display archived users in the list at any time.
Archived entities are not deleted from the database. This functionality just allows hiding the unnecessary items, so that they are no longer displayed in the active list.
An archived user will no longer be able to log on to the system.

Zt.Net User’s Guide User and Group Management
Zt.Net 2.6.1 User’s Guide / 2015-08 SZ / V1.1 Page 41 of 113
To display the archived users: 1. On the shortcut bar click Access Management, Users. The Users page opens. 2. Right-click the list of users on the Users page. The following pop-up menu
appears:
3. On the pop-up menu, select Show Archived Items. All archived users will be displayed in the list (use the same procedure to hide the archived users).
7.6 Setting the permissions
All users registered in the system can access either all functionality or its parts according to the set of permissions they have been granted. Permission is the ability of a particular user to access a particular resource in the system. Permissions in Zt.Net are granted in the following ways:
• Specifying a set of permissions for a user individually by selecting the corresponding check boxes under the Permissions heading on the New User page when creating (or editing) a user account (see section 7.1 Creating the user accounts).
• Adding a user to a group when creating (or editing) a user account, whereby the user will be automatically granted the set of permissions assigned to this user group (see section 7.7 Creating the user groups).
Permissions can be granted by the user who is a member of the Administrators group or has individual permissions to create, modify and delete users and user groups. You can set permissions when creating a new user account or at any time later. Open the account you need following the procedures for creating or modifying user accounts.
Sets of permissions granted to the user (both individually and as a member of a group) are not mutually exclusive but complement each other.
Archived user accounts will have the Archived check box selected in the list of users. You can restore a user account from the archive by clearing the Archived check box on the User edit page.

Zt.Net User’s Guide User and Group Management
Zt.Net 2.6.1 User’s Guide / 2015-08 SZ / V1.1 Page 42 of 113
To set the permissions: 1. Under the Permissions heading, select the category in which you want to set
permissions by clicking the drop-down arrow in the Category field. In Zt.Net, there are three categories of entities for which permissions can be granted: objects, instruments and actions.
2. The Permissions area with the Objects category selected looks as follows:
Here you can set permissions for creating/modifying and deleting of various objects, such as users, groups, instruments/presses, products, methods and media. To assign permissions in the Objects category for the user, select the corresponding option from the Type field:
• Full – to assign the user the full set of permissions • Custom – to assign the user an individual set of permissions manually (by
selecting or clearing the corresponding check boxes) • None – to deny the user the permissions in this category
5. The Permissions area with the Instruments category selected looks as follows:
Here you can set permissions for working with particular instruments, including their usage in tests and maintenance. To assign permissions in the Instruments category for the user, select the corresponding option from the Type field:
• Full – to assign the user the full set of permissions
Select the Allow to log in check box to permit the user to log on to the system (by default, this check box is selected). If you clear the check box, the user will not be able to use the program. For example, you can clear this check box when you register a person who is responsible for instrument maintenance. Such a user is created in the system for further reference, but she/he is not supposed to work with the program.

Zt.Net User’s Guide User and Group Management
Zt.Net 2.6.1 User’s Guide / 2015-08 SZ / V1.1 Page 43 of 113
• Full instrument access – to allow the user access all instruments registered in the system and perform tests on them
• Full maintenance – to allow the user perform maintenance for all instruments registered in the system
• Custom – to assign the user an individual set of permissions manually (by selecting or clearing the corresponding check boxes)
• None – to deny the user the permissions in this category 7. The Permissions area with the Actions category selected looks as follows:
Here you can set permissions for accessing special types of Zt.Net functionality, such as approving tests (as well as cancelling approvals), modifying software options (accessing the Options page from the Tools menu, changing settings specified on it) and backing up/restoring databases. To assign permissions in the Actions category for the user, select the corresponding option from the Type field:
• Full – to assign the user the full set of permissions in this category • Custom – to assign the user an individual set of permissions manually (by
selecting or clearing the corresponding check boxes) • None – to deny the user the permissions in this category
8. Click OK to save the permissions you have just set and return to the Users page.
7.7 Creating the user groups
Every user who has an account in the system will have a set of defined permissions to work with the system functionality (see section 7.6 Setting the permissions). For convenience purposes, you can create user groups – sets of user accounts that feature similar access permissions. The following groups are predefined in Zt.Net: • Administrators: users who have access management permissions, for example,
they are allowed to create/modify and delete user accounts and groups; in addition, the members of the Administrators group are allowed to approve tests; create/modify and delete instruments and presses as well as access and maintain registered instruments; administrators are also allowed to run tests (provided that they are permitted to access the corresponding instruments).
Zt.Net User’s Guide User and Group Management
Zt.Net 2.6.1 User’s Guide / 2015-08 SZ / V1.1 Page 44 of 113
• Supervisors: users who are allowed to manage disintegration entities (for example,
products, methods and media, except instruments and presses) and approve tests; supervisors are also allowed to run tests (provided that they are allowed to access the corresponding instruments).
• Users: laboratory assistants who are allowed to run tests (provided that they are permitted to access instruments).
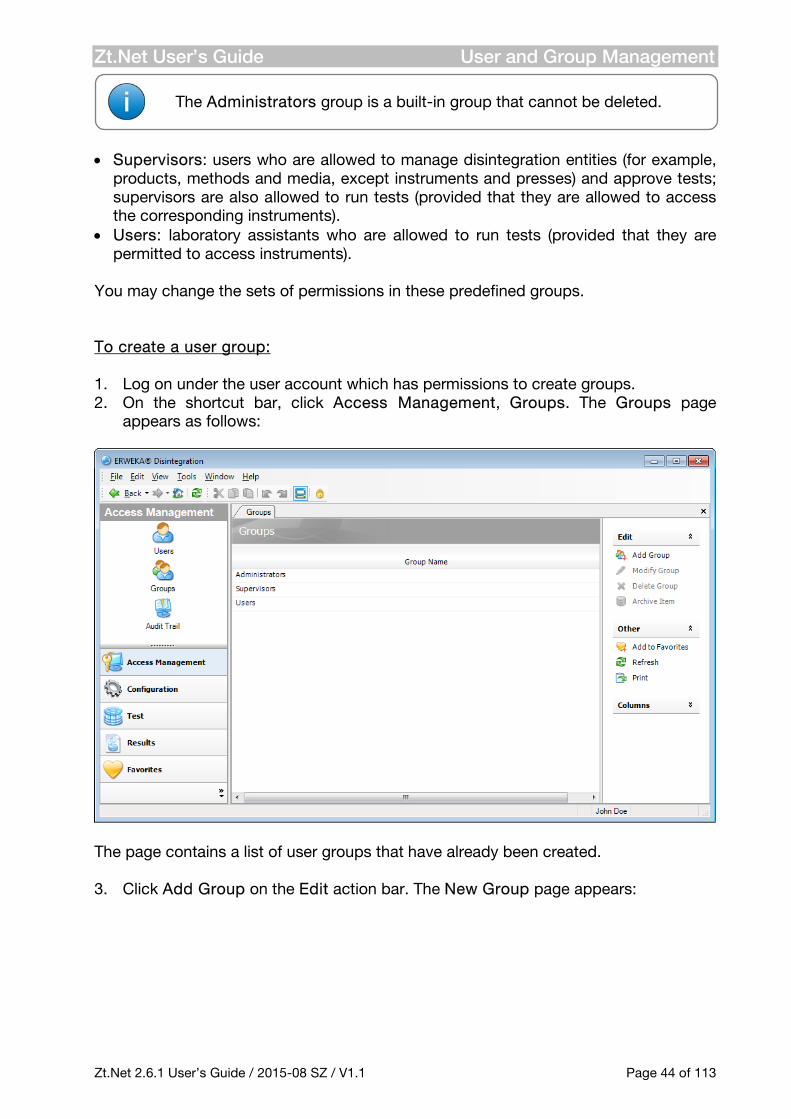
You may change the sets of permissions in these predefined groups. To create a user group: 1. Log on under the user account which has permissions to create groups. 2. On the shortcut bar, click Access Management, Groups. The Groups page
appears as follows:
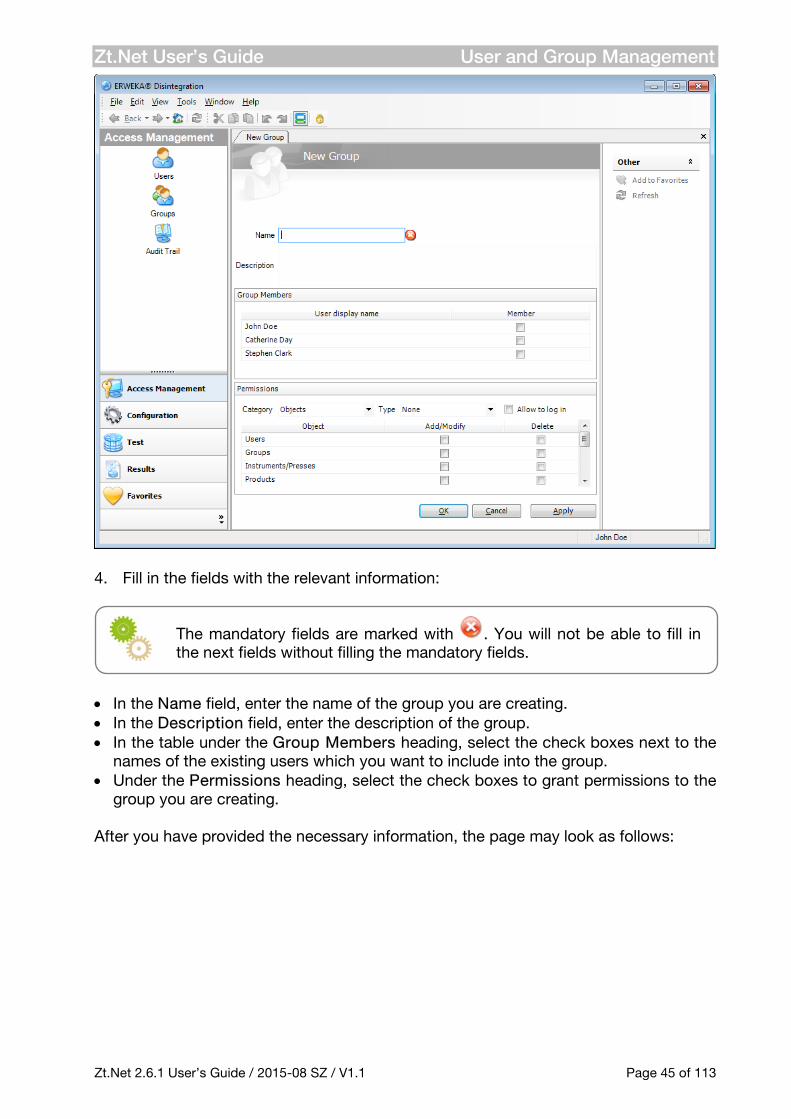
The page contains a list of user groups that have already been created. 3. Click Add Group on the Edit action bar. The New Group page appears:
The Administrators group is a built-in group that cannot be deleted.
Zt.Net User’s Guide User and Group Management
Zt.Net 2.6.1 User’s Guide / 2015-08 SZ / V1.1 Page 45 of 113
4. Fill in the fields with the relevant information:
• In the Name field, enter the name of the group you are creating. • In the Description field, enter the description of the group. • In the table under the Group Members heading, select the check boxes next to the
names of the existing users which you want to include into the group. • Under the Permissions heading, select the check boxes to grant permissions to the
group you are creating. After you have provided the necessary information, the page may look as follows:
The mandatory fields are marked with . You will not be able to fill in the next fields without filling the mandatory fields.

Zt.Net User’s Guide User and Group Management
Zt.Net 2.6.1 User’s Guide / 2015-08 SZ / V1.1 Page 46 of 113
5. Click OK to save the information you have entered and close the current page. The
Groups page appears again. The group you have just created is added to the list.
7.8 Modifying the user groups User groups are modified using a standard editing procedure. You can modify user groups only if you have the corresponding permissions. To modify a user group, refer to the standard procedure of modifying entities described in section 7.3 Modifying the user accounts and follow the corresponding steps on the Groups page.
7.9 Deleting the user groups
User groups are deleted using a standard deletion procedure. You can delete user groups only if you have the corresponding permissions.

Zt.Net User’s Guide User and Group Management
Zt.Net 2.6.1 User’s Guide / 2015-08 SZ / V1.1 Page 47 of 113
To delete a user group, refer to the standard procedure of deleting entities described in section 7.4 Deleting the user accounts and follow the corresponding steps on the Groups page.
7.10 Archiving the user groups
User groups are archived using a standard archiving procedure. You can archive user groups only if you have the permission to modify them.
To archive, display and restore a user group from the archive, refer to the standard procedure of archiving entities described in section 7.5 Archiving the user accounts and follow the corresponding steps on the Groups page.
7.11 Audit Trail
You can track all user activities and instrument operations in the Audit Trail. This functionality in Zt.Net is in full compliance with the FDA requirements, namely CFR 21 Part 11. The Audit Trail is a part of the software where all events that have occurred in the system are registered and saved. For example, you can view what a certain user has accessed or modified for the stated period of time. Furthermore, records about external modifications of the system entities are stored in the Audit Trail. If any of the entities has been externally accessed and modified, for example, through Microsoft SQL Server Query Analyzer, a corresponding record will be made in the Audit Trail and may look as follows: “Database entity has been externally modified”. In such cases you should go to the page of the modified entity and check the data carefully.
NOTE Once deleted the user group cannot be restored. However, a record will be made in the Audit Trail that will contain details about the event.
You cannot delete any records in the Audit Trail.
Users from an archived group will not be able to log on to the system.

Zt.Net User’s Guide User and Group Management
Zt.Net 2.6.1 User’s Guide / 2015-08 SZ / V1.1 Page 48 of 113
To view the Audit Trail records: 1. On the shortcut bar, click Access Management, Audit Trail. The Audit Trail page
appears:
The main window contains the following information: • Under the Audit Filter heading, the fields are displayed in which you can specify the
search criteria if you wish to view specific Audit Trail information. • The main table contains the Audit Trail records (either all of them by default or
filtered).
7.11.1 Applying the filters
If you need to view information about specific events that have occurred in the system, you can sort the Audit Trail records by applying filters. To view and apply audit filters, click on the toolbar (by default, this icon is already selected) or, alternatively, click Audit Filter on the View menu. Otherwise, only the main table containing all audit records will be displayed on the page. To view the required information, make sure you have applied filters correctly. Note the criteria you specify under the Audit Filter heading on the Audit Trail page. Specify the filtering criteria in a chain, when the previous element defines available options of the subsequent one. For example, if you have selected Object in the Category field, the list of all existing objects appears as options in the Option field; and after you select the necessary option, the list of available values for this option appears in the Value field.

Zt.Net User’s Guide User and Group Management
Zt.Net 2.6.1 User’s Guide / 2015-08 SZ / V1.1 Page 49 of 113
To add a filter: 1. On the shortcut bar, click Access Management, Audit Trail. The Audit Trail page
appears. 2. Under the Audit Filter heading, specify the filtering criteria using the following tips: • Click the drop-down arrow in the Category field to select the category by which the
Audit Trail records will be filtered. This is the first part of the filter criterion; depending on your choice, the options will appear to the right of the Category field. For example, if you have selected Time in the Category field, the drop-down list in the Option field will appear containing possible dates by which all performed operations can be filtered.
• Narrow your filter by selecting the necessary options in the fields that appear according to your choice in the Category field.
3. After you have set the filtering criteria, the Audit Filter table may look as follows:
Applying this filter, you will see all actions performed within the period of July 1-28, 2014. 4. Click Add to List to add the filter you have created to the filter list. By adding
different filters to the list you can considerably narrow the record search and, thus, simplify your work with the Audit Trail records.
5. Click the Apply button to view the filtered records in the table. The table may look
as follows:
The table has the following columns: Column Description Date/Time Information about the date and time when the event happened Entity Name of the item that was the object of the performed action User Name of the user who performed the action Host Name of the computer IP Address Definition of the IP address
To remove one of the added filters, right-click it in the list and select Remove Selected that becomes available. If you want to delete all filters created, select Clear All. You can also apply the respective buttons under the list to perform these actions.

Zt.Net User’s Guide User and Group Management
Zt.Net 2.6.1 User’s Guide / 2015-08 SZ / V1.1 Page 50 of 113
Column Description Operation Description of the action that was performed Comment Comment on the performed action
The expand button ( ) next to the row in the table shows that a group of associated actions is united under one line; this is applicable to all types of changes (creating, modifying). Click the expand button ( ) to open the sub-table. It may look as follows:
The sub-tables have the following columns: Column Description Field Name Name of the entity parameter that was accessed Old Value In case the entity was modified, this column will show the old value of
the changed item New Value New value of the changed item

Zt.Net User’s Guide Test Preparation
Zt.Net 2.6.1 User’s Guide / 2015-08 SZ / V1.1 Page 51 of 113
8 Test Preparation
8.1 Instrument management
You need instruments to perform tests. You can create new instruments, modify, delete and archive existing ones if you have the corresponding permissions. To view the list of registered instruments, click Configuration, Instruments on the shortcut bar. The list may look as follows:
The table on the page is filled with the data obtained when creating instruments and by default contains the following columns: Column Description Name Name of the instrument Serial Number Serial number of the instrument Responsible Person Name of the person responsible for maintenance operations
Zt.Net User’s Guide Test Preparation
Zt.Net 2.6.1 User’s Guide / 2015-08 SZ / V1.1 Page 52 of 113
8.1.1 Creating the instruments
You can add new instruments to perform tests on them. To do so, you should have the corresponding permissions.
To create a new instrument: 1. In the Configuration shortcut group, click Instruments. The Instruments page
appears. 2. Click Add Instrument on the Edit action bar. The New Instrument page appears
as follows:
When you register an instrument, make sure you have the supporting documentation close at hand; you will need to refer to it when entering the information.
You can make the required columns visible by selecting them from the Columns action group.

Zt.Net User’s Guide Test Preparation
Zt.Net 2.6.1 User’s Guide / 2015-08 SZ / V1.1 Page 53 of 113
3. Fill the fields with appropriate instrument information as follows:
• In the Name field, enter a name of the instrument you are creating. • In the Description field, enter a short description of the instrument you are creating. • In the Responsible person field, click the drop-down arrow to select the user who is
responsible for the instrument maintenance (calibration, IQ/OQ/PQ). • In the Location field, specify the location of the new instrument. • Under the Instrument Information heading, type the serial number of the instrument
in the Serial number field as it is specified at the back panel of the instrument or in the instrument support documentation.
• In the ID number field, type the identification number of the instrument which is also the printed circuit board identification number (PCB ID) as it is specified on the
The mandatory fields are marked with yellow. You will not be able to create an entity without filling the mandatory fields.

Zt.Net User’s Guide Test Preparation
Zt.Net 2.6.1 User’s Guide / 2015-08 SZ / V1.1 Page 54 of 113
instrument display after the instrument has been switched on or in the support documentation.
• In the Number of baskets field, enter the number of baskets your instrument model is equipped with.
• In the Firmware version field, type the firmware version number of the instrument as it is specified on the instrument display after the instrument has been switched on or in the support documentation.
• In the Model field, specify the model of the instrument which predetermines the number of available test stations, for example, ZT7x, ZT32x.
• In the Temperature offset field, specify the offset of temperatures in the bath and in the vessels.
• Under the Driver Information heading, select the driver for your instrument from the
Driver drop-down list: ZT32m driver for the ZT32x disintegration testers equipped with mBaskets ZT32x driver for the ZT32x disintegration testers with standard baskets ZT7x driver for the ZT7x series disintegration testers
• In the COM port drop-down list, select the port your instrument is connected to.
You can look up the port number of an USB to serial port in Control Panel/ System /Hardware /Device Manager/ Ports (COM and LPT).
• In the Baud rate drop-down list, select the baud rate value defined in the instrument connection settings (in bits per second).
• In the Flow control drop-down list, select how the data flow between the instrument and the computer will be controlled: by the software method (the Xon/Xoff option) or by the hardware methods (the CTS/RTS or DSR/DTR options).
4. Under the Suitability heading, specify whether the instrument you are creating is
validated and its proper operation is ensured by IQ (Installation Qualification), OQ (Operation Qualification) and PQ (Performance Qualification):
• Select the check boxes next to the performed qualifications in the Qualification type column.
Make sure the connection settings of the computer and the instrument are the same. Otherwise, they will not run properly.
The specified offset value must be within the range from 0 to 9°C.

Zt.Net User’s Guide Test Preparation
Zt.Net 2.6.1 User’s Guide / 2015-08 SZ / V1.1 Page 55 of 113
• In the Performed column next to the selected qualification type, click the drop-down arrow and, in the calendar that appears, select the date on which each specific qualification is performed.
• In the Validity (months) column, specify the validity period for the performed
qualifications using the spin arrows. You can also type a value directly in the box. 5. Click OK to save the information you have entered, close the current page and
return to the Instruments page. The instrument you have just created is added to the list.
8.1.2 Modifying the instruments
Instruments are modified using a standard editing procedure. You can modify information about registered instruments at any time, provided that you have the corresponding permissions. To modify an instrument, refer to the standard procedure of modifying entities described in section 7.3 Modifying the user accounts and follow the steps on the Instruments page.
8.1.3 Deleting the instruments
Instruments are deleted using a standard deletion procedure. You can delete instruments only if you have the corresponding permissions.
To delete an instrument, refer to the standard procedure of deleting entities described in section 7.4 Deleting the user accounts and follow the steps on the Instruments page.
NOTE Once deleted the instrument cannot be restored. However, a record will be made in the Audit Trail that will contain details about the event.
You will not be able to delete an instrument if it is used in methods. You will need to delete the method first.

Zt.Net User’s Guide Test Preparation
Zt.Net 2.6.1 User’s Guide / 2015-08 SZ / V1.1 Page 56 of 113
8.1.4 Archiving the instruments
Instruments are archived using a standard archiving procedure. You can archive instruments provided you have the permission to modify them.
To archive, display and restore an instrument from the archive, refer to the standard procedure of archiving entities described in section 7.5 Archiving the user accounts and follow the corresponding steps on the Instruments page.
8.2 Basket management
Before testing products, you should specify the baskets required for the test. This means that you should enter the apparatus type and the serial number of the corresponding basket. You can add new baskets, modify, delete and archive the existing baskets. To see the list of registered baskets, click Configuration, Baskets on the shortcut bar. The list may look as follows:
An archived instrument cannot be used in tests.

Zt.Net User’s Guide Test Preparation
Zt.Net 2.6.1 User’s Guide / 2015-08 SZ / V1.1 Page 57 of 113
The table on the page contains the following columns by default: Column Description Serial Number Serial number of the basket Apparatus Type Apparatus (A or B) used in the basket
8.2.1 Creating the baskets
You can add new baskets to use them during tests. When registering a basket, make sure its serial number is available. To create a new basket: 1. In the Configuration shortcut group, click Baskets. The Basket page appears. 2. Click Add Basket on the Edit action bar. The New Basket page appears as
follows:
3. Enter the serial number and select the apparatus of the basket in the
corresponding fields.
You can make the required columns visible by selecting them from the Columns action group.

Zt.Net User’s Guide Test Preparation
Zt.Net 2.6.1 User’s Guide / 2015-08 SZ / V1.1 Page 58 of 113
4. Click OK to save the information you have specified, close the current page and return to the Basket page. The basket you have just created is added to the list.
8.2.2 Modifying the baskets
Baskets are modified using a standard editing procedure. To modify a basket, refer to the standard procedure of modifying entities described in section 7.3 Modifying the user accounts and follow the corresponding steps on the Basket page.
8.2.3 Deleting the baskets
Baskets are deleted using a standard deletion procedure.
To delete a basket, refer to the standard procedure of deleting entities described in section 7.4 Deleting the user accounts and follow the corresponding steps on the Basket page.
8.2.4 Archiving the baskets
Baskets are archived using a standard archiving procedure.
To archive, display and restore a basket from the archive, refer to the standard procedure of archiving entities described in section 7.5 Archiving the user accounts and follow the corresponding steps on the Basket page.
8.3 Press management
Before you start performing tests on products, you may provide information about the conditions of product manufacturing. This means that you may provide information about the press on which a specific dosage form was produced. You can add new presses, modify, delete and archive the existing ones.
NOTE Once deleted the basket cannot be restored. However, a record will be made in the Audit Trail that will contain details about the event.
An archived basket cannot be used in tests.
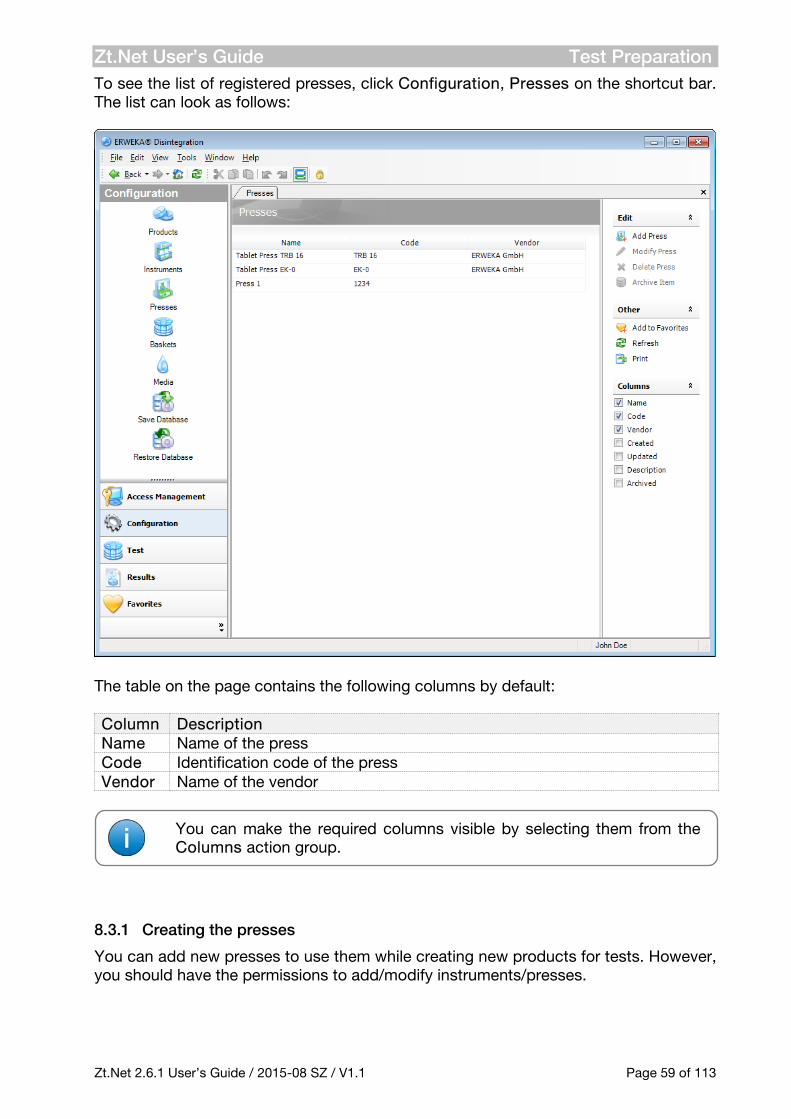
Zt.Net User’s Guide Test Preparation
Zt.Net 2.6.1 User’s Guide / 2015-08 SZ / V1.1 Page 59 of 113
To see the list of registered presses, click Configuration, Presses on the shortcut bar. The list can look as follows:
The table on the page contains the following columns by default: Column Description Name Name of the press Code Identification code of the press Vendor Name of the vendor
8.3.1 Creating the presses
You can add new presses to use them while creating new products for tests. However, you should have the permissions to add/modify instruments/presses.
You can make the required columns visible by selecting them from the Columns action group.

Zt.Net User’s Guide Test Preparation
Zt.Net 2.6.1 User’s Guide / 2015-08 SZ / V1.1 Page 60 of 113
To create a new press: 1. In the Configuration shortcut group, click Presses. The Presses page appears. 2. Click Add Press on the Edit action bar. The New Press page appears as follows:
3. Fill the fields with the appropriate information:
• In the Name field, type a name of the press you are creating. • In the Description field, type a short description of the press you are creating.
When registering a press, make sure you have the supporting documentation close at hand; since you may need to refer to it when entering the information.
The mandatory fields are marked with yellow. You will not be able to create an entity without filling the mandatory fields.

Zt.Net User’s Guide Test Preparation
Zt.Net 2.6.1 User’s Guide / 2015-08 SZ / V1.1 Page 61 of 113
• Under the Press Information heading, type the identification code of the press in the Code field as it is specified in the supporting documentation or at the back panel of the press.
• In the Vendor field, type the name of the vendor. 4. Click OK to save the information you have specified, close the current page and
return to the Presses page. The press you have just created is added to the list.
8.3.2 Modifying the presses
Presses are modified using a standard editing procedure. You can modify information about registered presses at any time provided that you have the permission to add/modify instruments/presses. To modify a press, refer to the standard procedure of modifying entities described in section 7.3 Modifying the user accounts and follow the corresponding steps on the Presses page.
8.3.3 Deleting the presses
Presses are deleted using a standard deletion procedure. You can delete presses only if you have the permission to delete instruments/presses.
To delete a press, refer to the standard procedure of deleting entities described in section 7.4 Deleting the user accounts and follow the corresponding steps on the Presses page.
8.3.4 Archiving the presses
Presses are archived using a standard archiving procedure. You can archive presses provided that you have the permission to add/modify instruments/presses.
NOTE Once deleted the press cannot be restored. However, a record will be made in the Audit Trail that will contain details about the event.
An archived press cannot be used in tests.

Zt.Net User’s Guide Test Preparation
Zt.Net 2.6.1 User’s Guide / 2015-08 SZ / V1.1 Page 62 of 113
To archive, display and restore a press from the archive, refer to the standard procedure of archiving entities described in section 7.5 Archiving the user accounts and follow the corresponding steps on the Presses page.
8.4 Medium management A medium is an immersion fluid in the vessel that is used to test disintegration of a product. To be able to run tests, you should create a medium first. The medium in which the product should be tested is specified individually for each method. You can modify information about existing media at any time. If you are not using the medium, you can delete or archive it. To see the list of registered media, click Configuration, Media on the shortcut bar. The list may look as follows:
Zt.Net User’s Guide Test Preparation
Zt.Net 2.6.1 User’s Guide / 2015-08 SZ / V1.1 Page 63 of 113
The table on the page contains the following columns by default: Column Description Name Name of the medium pH Factor pH value of the medium
8.4.1 Creating the media
Before you start performing tests, you need to create a medium. You can do this only if you have the permissions to add/modify media. To create a medium: 1. In the Configuration shortcut group, click Media. The Media page appears. 2. Click Add Medium on the Edit action bar. The New Medium page appears as
follows:
You can make the required columns visible by selecting them from the Columns action group.

Zt.Net User’s Guide Test Preparation
Zt.Net 2.6.1 User’s Guide / 2015-08 SZ / V1.1 Page 64 of 113
3. Fill the fields with appropriate information:
• In the Name field, type a name of the medium you are creating. • In the Description field, type a short description of the medium you are creating. • In the pH Factor spin box, specify the pH of the medium you are creating.
4. Click OK to save the information you have just entered, close the current page and return to the Media page. The medium you have just created is added to the list.
The mandatory fields are marked with yellow. You will not be able to create an entity without filling the mandatory fields.

Zt.Net User’s Guide Test Preparation
Zt.Net 2.6.1 User’s Guide / 2015-08 SZ / V1.1 Page 65 of 113
8.4.2 Modifying the media
Media are modified using a standard editing procedure. You can modify information about registered media at any time provided that you have permissions to add/modify media. To modify a medium, refer to the standard procedure of modifying entities described in section 7.3 Modifying the user accounts and follow the corresponding steps on the Media page.
8.4.3 Deleting the media
Media are deleted using a standard deletion procedure. You can delete media only if you have the corresponding permission.
To delete a medium, refer to the standard procedure of deleting entities described in section 7.4 Deleting the user accounts and follow the corresponding steps on the Media page.
8.4.4 Archiving the media
Media are archived using a standard archiving procedure. You can archive media if you have the permissions to add/modify media.
To archive, display and restore a medium from the archive, refer to the standard procedure of archiving entities described in section 7.5 Archiving the user accounts and follow the corresponding steps on the Media page.
NOTE Once deleted the medium cannot be restored. However, a record will be made in the Audit Trail that will contain details about the event.
An archived medium cannot be used in tests.
You will not be able to delete a medium if it is used in methods. You will need to delete the method first.
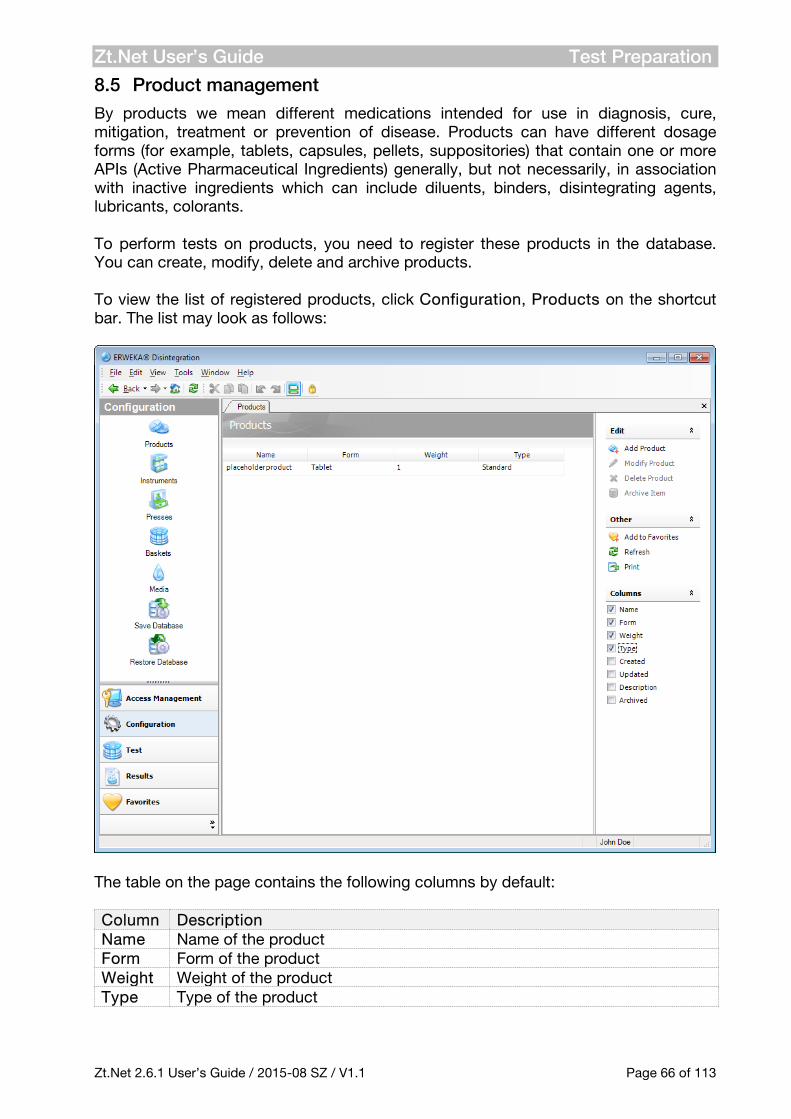
Zt.Net User’s Guide Test Preparation
Zt.Net 2.6.1 User’s Guide / 2015-08 SZ / V1.1 Page 66 of 113
8.5 Product management
By products we mean different medications intended for use in diagnosis, cure, mitigation, treatment or prevention of disease. Products can have different dosage forms (for example, tablets, capsules, pellets, suppositories) that contain one or more APIs (Active Pharmaceutical Ingredients) generally, but not necessarily, in association with inactive ingredients which can include diluents, binders, disintegrating agents, lubricants, colorants. To perform tests on products, you need to register these products in the database. You can create, modify, delete and archive products. To view the list of registered products, click Configuration, Products on the shortcut bar. The list may look as follows:
The table on the page contains the following columns by default: Column Description Name Name of the product Form Form of the product Weight Weight of the product Type Type of the product

Zt.Net User’s Guide Test Preparation
Zt.Net 2.6.1 User’s Guide / 2015-08 SZ / V1.1 Page 67 of 113
8.5.1 Creating the products
Before you start testing products, you need to create them in the system; however, you can do this only provided that you have the permissions to add/modify products. To create a product: 1. In the Configuration shortcut group, click Products. The Products page appears. 2. Click Add Product on the Edit action bar. The New Product page appears as
follows:
3. Fill the fields with the appropriate information:
You can make the required columns visible by selecting them from the Columns action group.

Zt.Net User’s Guide Test Preparation
Zt.Net 2.6.1 User’s Guide / 2015-08 SZ / V1.1 Page 68 of 113
• In the Name field, type a name of the product you are creating. • In the Description field, type a short description of the product you are creating. • In the Form drop-down list, select the dosage form of the product you are creating.
In Zt.Net, products of the following dosage forms are supported: Tablet – a solid dosage form containing medicinal substances with or without
suitable diluents Dragee – a sugar-coated pill Capsule – a solid dosage form in which the drug is enclosed within a hard or
soft soluble container (“shell”) Core – an extended-release tablet consisting of the core containing the active
material and a semi-permeable membrane that coats the core, having a micro drill produced orifice in order to release the active material
Patch – an adhesive patch that is placed on the skin to deliver a specific dose of medicinal substance(s) through the skin and into the blood stream.
Plaster – an adhesive strip of material usually medicated with a therapeutic substance for dressing a cut or wound
Other – any other form of the product not included into the predefined list Oblong – elongated tablet Caplet – capsule-shaped tablet Coated Tablet – tablet coated with one of the traditional coating types (other
than film and sugar coatings) Film Tablet – tablet with film coating
• In the Weight spin box, specify the weight of the product you are creating
4. Click OK to save the information you have just entered, close the current page and return to the Products page. The product you have just created is added to the list.
The specified value must be within the range from 10 ng to 200 g.
You can specify the product weight using the measurement units that are convenient for you (nanograms, milligrams (mg) or grams (g)). Type the required measurement unit in the spin box.
In Zt.Net, the list of available product forms is predefined. Therefore, it remains unchanged in different language packages.
The mandatory fields are marked with yellow. You will not be able to create an entity without filling the mandatory fields.

Zt.Net User’s Guide Test Preparation
Zt.Net 2.6.1 User’s Guide / 2015-08 SZ / V1.1 Page 69 of 113
8.5.2 Modifying the products
Products are modified using a standard editing procedure. You can modify information about registered products at any time provided that you have the permissions to add/modify products. To modify a product, refer to the standard procedure of modifying entities described in section 7.3 Modifying the user accounts and follow the corresponding steps on the Products page.
8.5.3 Deleting the products
Products are deleted using a standard deletion procedure. You can delete products only if you have the corresponding permissions.
To delete a product, refer to the standard procedure of deleting entities described in section 7.4 Deleting the user accounts and follow the corresponding steps on the Products page.
8.5.4 Archiving the products
Products are archived using a standard archiving procedure. You can archive products if you have permissions to add/modify products.
To archive, display and restore a product from the archive, refer to the standard procedure of archiving entities described in section 7.5 Archiving the user accounts and follow the corresponding steps on the Products page.
NOTE Once deleted the product cannot be restored. However, a record will be made in the Audit Trail which will contain details about the event.
An archived product cannot be used in tests.
You will not be able to delete a product if it is used in methods. If you need to delete a product, you should delete the method first.

Zt.Net User’s Guide Test Preparation
Zt.Net 2.6.1 User’s Guide / 2015-08 SZ / V1.1 Page 70 of 113
8.6 Method management
A method is a set of defined conditions, procedures and techniques for testing a product. Thus, a method is closely connected and associated with the test. A disintegration method is applied to determine disintegration of solid preparations for oral use in test fluids.
8.6.1 Creating the methods
Before creating a method, make sure you have the corresponding permissions and know the following: • the name of the product that will be tested • the names of the media that should be prepared for the test • the name of the instrument that will be used • the apparatus that will be involved in testing • the height of the product rest remaining after disintegration (mBaskets only) • the mesh size of the sieves that will be used • whether the testing will involve a retard phase • the temperature for the test • minimum, maximum and expected time for the samples to disintegrate To create a new method: 1. In the Test shortcut group, click Methods. The Methods page appears:

Zt.Net User’s Guide Test Preparation
Zt.Net 2.6.1 User’s Guide / 2015-08 SZ / V1.1 Page 71 of 113
The table on the page contains the following columns by default: Column Description Name Name of the method Product Product with which the test is performed Apparatus Type Apparatus (A or B) used in the basket Instrument Disintegration tester on which the test is performed Medium Medium used in the test Temperature Temperature of the water bath during the test Min. Disintegration Time Minimum disintegration time; the samples disintegrated
during this time are regarded as failed. Exp. Disintegration Time Expected disintegration time; the samples disintegrated
during this time are regarded as passed. Max. Disintegration Time Maximum disintegration time; the samples disintegrated
during this time are regarded as failed to disintegrate. Mesh Width Mesh width of the basket sieves Mesh Height Mesh height of the basket sieves Distance Acceptable distance between the sieve and cover disk Continue after Tmax To continue the test after maximum disintegration time
2. Click Add Method on the Edit action bar. The New Method page appears:
You can make the required columns visible by selecting them from the Columns action group.

Zt.Net User’s Guide Test Preparation
Zt.Net 2.6.1 User’s Guide / 2015-08 SZ / V1.1 Page 72 of 113
3. Fill the fields with the appropriate information:
• In the Name field, type a name of the method you are creating. • In the Description field, type a short description of the method you are creating. • In the Product drop-down list, select a product that will be tested using this
method. • Under the Instrument Information heading in the Instrument drop-down list, select
the instrument you are going to use.
You can also open this page by clicking the Add Method shortcut in the Recent Methods task panel on your home page.
The mandatory fields are marked with yellow. You will not be able to create an entity without filling the mandatory fields.
Zt.Net User’s Guide Test Preparation
Zt.Net 2.6.1 User’s Guide / 2015-08 SZ / V1.1 Page 73 of 113
• In the Distance spin box, specify the acceptable distance between the sieve at the bottom of the tube and the cover disk at which the product is regarded as disintegrated (for mBaskets only).
• In the Apparatus drop-down list, select the valid apparatus. • In the Mesh width spin box, enter the mesh width of the basket sieves. • In the Mesh height spin box, enter the mesh height of the basket sieves.
• Select I want to calibrate baskets before the test to enable calibration of the test
stations at the beginning of each test performed on the basis of this method; otherwise, leave the check box cleared.
• Under the Product Disintegration heading, select Has retard phase if the product you are going to test will have a retard phase; otherwise, leave the check box cleared.
• If you have selected Has retard phase, set the time of the retard phase in the Retard time field and specify the retard medium in the Retard medium field. In case your test does not include a retard phase (and Has retard phase is not selected), these fields will be disabled.
• Select Restart time after retard phase is complete if you want the test time to restart on completion of the retard phase; otherwise, leave the check box cleared.
• In the Expected time (T) spin box, specify the expected time of product disintegration.
• Select Continue testing until all samples disintegrate to carry out the test until all samples are disintegrated or leave the check box cleared if you want the test to stop upon reaching the specified time limits.
• In the Medium drop-down list, select the medium that will be used in testing. • In the Temperature spin box, specify the temperature value that should be
maintained during the test.
• Under the Optional Constraints heading, select Enable optional constraints if you
want to indicate additional criteria for the disintegration test, such as minimum and maximum product disintegration time.
• If you have enabled optional constraints, specify the minimum and maximum time at which the product is expected to disintegrate in the Min. disintegration time (Tmin) and Max. disintegration time (Tmax) spin boxes correspondingly.
The specified value must be within the range from 10.5 to 50.0°C.
The value in the Mesh width and Mesh height fields can be selected within the range from 0.01 to 5 mm.
The specified value must be in the range from 0 to 2 mm.

Zt.Net User’s Guide Test Preparation
Zt.Net 2.6.1 User’s Guide / 2015-08 SZ / V1.1 Page 74 of 113
4. Click OK to save the information you have just entered, close the current page and
return to the list of methods.
To start a test on the created method, select it from the list of methods and click Start Test on the action bar (for more information, refer to chapter 9 Performing the Tests.)
When using spin arrows, pay attention to the measurement unit that appears in the spin box. By default, the spinning starts from the smallest units or from the previously entered ones. To change the measurement unit, you should type its common abbreviation directly in the box. Abbreviation of the measurement unit changes automatically if the working language of the program is changed.
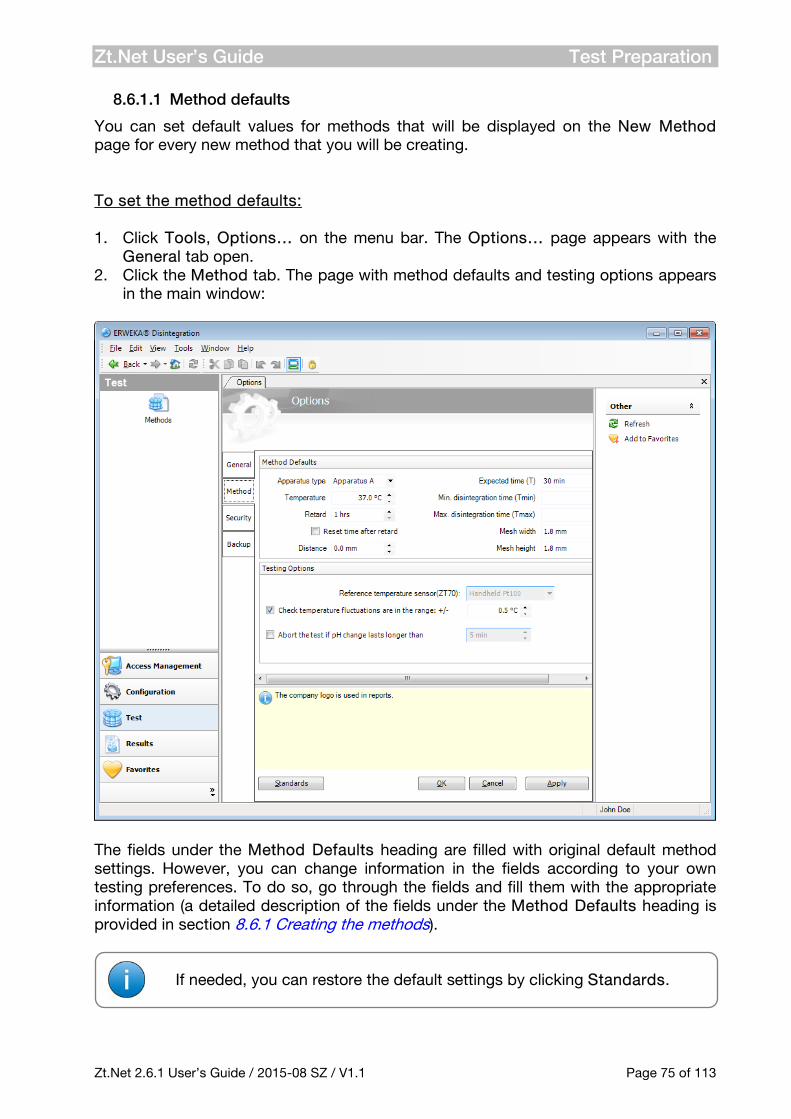
Zt.Net User’s Guide Test Preparation
Zt.Net 2.6.1 User’s Guide / 2015-08 SZ / V1.1 Page 75 of 113
8.6.1.1 Method defaults
You can set default values for methods that will be displayed on the New Method page for every new method that you will be creating. To set the method defaults: 1. Click Tools, Options… on the menu bar. The Options… page appears with the
General tab open. 2. Click the Method tab. The page with method defaults and testing options appears
in the main window:
The fields under the Method Defaults heading are filled with original default method settings. However, you can change information in the fields according to your own testing preferences. To do so, go through the fields and fill them with the appropriate information (a detailed description of the fields under the Method Defaults heading is provided in section 8.6.1 Creating the methods).
If needed, you can restore the default settings by clicking Standards.

Zt.Net User’s Guide Test Preparation
Zt.Net 2.6.1 User’s Guide / 2015-08 SZ / V1.1 Page 76 of 113
3. Click OK to save the changes you have made, close the current page and return to the previous page.
8.6.2 Modifying the methods
Methods are modified using a standard editing procedure. You can modify information about registered methods at any time, provided you have the permission to add/modify methods. To modify a method, refer to the standard procedure of modifying entities described in section 7.3 Modifying the user accounts and follow the corresponding steps on the Methods page.
8.6.3 Deleting the methods
Methods are deleted using a standard deletion procedure. You can delete methods only if you have the corresponding permissions.
To delete a method, refer to the standard procedure of deleting entities described in section 7.4 Deleting the user accounts and follow the corresponding steps on the Methods page.
8.6.4 Archiving the methods
Methods are archived using a standard archiving procedure. You can archive methods only if you have permissions to add/modify methods.
To archive, display and restore a method from the archive, refer to the standard procedure of archiving entities described in section 7.5 Archiving the user accounts and follow the corresponding steps on the Methods page.
NOTE Once deleted the method cannot be restored. However, a record will be made in the Audit Trail which will contain details about the event.
You will not be able to perform tests on archived methods.
You can delete any method, even if it was used in tests. In this case, the method details will remain in the test record; this information will also be available when generating test reports.

Zt.Net User’s Guide Performing the Tests
Zt.Net 2.6.1 User’s Guide / 2015-08 SZ / V1.1 Page 77 of 113
9 Performing the Tests A disintegration test is intended for determining compliance of a product with the disintegration limits stated in the individual class monographs for different product types. Disintegration of a product does not imply its complete dissolution or even dissolution of its active constituent. Complete disintegration is defined as the state in which any residue of the unit, except fragments of insoluble coating or capsule shell, remaining on the screen of the test apparatus is a soft mass having no palpably firm core. Testing procedure starts from determining the type of the product that will be tested, labelling and observing it, and applying the appropriate method to six or more dosage units.
You can view the list of performed tests under the Results shortcut. To perform a disintegration test, you should know the following: • the batch details (code, press, date of samples’ manufacturing, referral) • the method to use in the test
Before you start performing a test: • ensure you have sufficient permissions to perform tests on a particular instrument • create a method for the test • prepare the medium that will be used in the test • check the enabled testing options (see the procedure below) • connect and switch on the instrument • log on to the ZT instrument and stay in the main menu Disintegration test is designed in the form of a wizard. The wizard will guide you through the whole testing procedure.
It is recommended to set the ZT7x instruments in the remote mode manually and leave the ZT32x instruments in the main menu each time when preparing for a series of tests. Otherwise, the instruments may improperly react to some software commands.
Tests in Zt.Net are based on methods. You can only perform tests if you have created methods before (see section 8.6 Method management).
Some data for the test is taken from the method you will be using. However, we recommend that you check all the data properly before you start a test.

Zt.Net User’s Guide Performing the Tests
Zt.Net 2.6.1 User’s Guide / 2015-08 SZ / V1.1 Page 78 of 113
9.1 Viewing and changing the test options
To view/change the test options: 1. Click Tools, Options… on the menu bar. The Options… page appears with the
General tab open. 2. Click the Method tab. The page with method defaults and testing options appears
in the main window:
Under the Testing Options heading, the default settings for the test are displayed. 3. Select Check temperature fluctuations are in the range: +/- for the system to
verify that the temperature during the test does not exceed the specified deviation norm and take into account the temperature data obtained during the test while generating test results.
4. If you have selected Check temperature fluctuations are in the range: +/-, set
the allowed temperature deviation in the spin box near this check box.
With this check box selected, the test will be regarded as failed whenever temperature fluctuations during the test exceed the specified limit.
Zt.Net User’s Guide Performing the Tests
Zt.Net 2.6.1 User’s Guide / 2015-08 SZ / V1.1 Page 79 of 113
5. Select Abort the test if pH change lasts longer than if you want the retard test to
be aborted whenever medium changing lasts longer than it is specified in the spin box nearby or leave the check box empty if you would like to continue testing irrespective of medium change duration.
6. If you have selected Abort the test if pH change lasts longer than, set the allowed time in the spin box near this check box.
7. Click OK to save the changes you have made, close the current page and return to
the previous page. To close the page without saving changes, click Cancel.
If needed, you can restore the default settings by clicking Standards.
By default, +/- 0.5°C is inserted in the field as the standard permissible rate of temperature deviation. The value you specify must be within the range from 0.0 to 0.9°C.

Zt.Net User’s Guide Performing the Tests
Zt.Net 2.6.1 User’s Guide / 2015-08 SZ / V1.1 Page 80 of 113
9.2 Calibrating the measuring sensors (ZT7x instruments)
Calibrate the measuring sensors located under the basket bottom to ensure the most accurate determination of the disintegration time for your products. To calibrate the measuring sensor: 8. On the Instruments page, select a disintegration tester, the sensors of which you
want to calibrate, and open the Other action bar:
9. Click Measuring Sensor on the action bar. The following page appears:

Zt.Net User’s Guide Performing the Tests
Zt.Net 2.6.1 User’s Guide / 2015-08 SZ / V1.1 Page 81 of 113
10. Note the status of your instrument displayed in the Status: field and make sure
that the selected instrument is connected to the computer and switched on. You may only proceed with the calibration for the selected instrument if it has the status “Ready”.

Zt.Net User’s Guide Performing the Tests
Zt.Net 2.6.1 User’s Guide / 2015-08 SZ / V1.1 Page 82 of 113
11. Under the Select basket(s) for test heading, select a basket, the measuring
sensors of which you want to calibrate. In the Actual value of measuring sensor 1-6 fields, the actual values obtained from the basket measuring sensors are displayed.
12. Click Run to calibrate the basket measuring sensors.
13. After you have calibrated the basket measuring sensors, you can print a calibration
report by clicking Print.
14. To quit this page, click Exit. The Instruments page appears.
To obtain a calibration report, make sure that the printer is connected to the computer and switched on.
If you have changed the basket at the selected test station, click Reboot to refresh the communication of the software with the instrument and obtain the latest basket data.
The values displayed in the Actual value of measuring sensor 1-6 field should be within the range of +/- 2.
In Zt.Net, the status of the instrument is marked with the help of special symbols. The status symbols can be the following:
– “Unknown” means that the software is currently checking the status of the selected instrument; during this process the instrument cannot be used for testing.
– “Offline” means that the software has failed to establish connection with your instrument; the instrument is either disconnected or switched off.
– “Ready” means that the instrument is ready to perform tests. – “Running” means that the instrument is working and some
baskets are busy; but you can still involve this instrument in testing by selecting those baskets that are marked as free.
– “Error returned” means that, while trying to establish connection with the instrument, an error has occurred; check if you have sufficient permissions, or whether the instrument is connected, and try again.
– “Port busy” means that the instrument is being accessed by third-party software; such an instrument cannot be used for testing; restart the instrument and try again.

Zt.Net User’s Guide Performing the Tests
Zt.Net 2.6.1 User’s Guide / 2015-08 SZ / V1.1 Page 83 of 113
9.3 Performing the disintegration tests
9.3.1 Performing the standard disintegration tests
To start a disintegration test: 1. Find Test, Methods. 2. Select the method on which you want to perform a test and click Start Test on the
action bar.
The Test Start page appears. This is the first page of the wizard:
3. Go through the fields and fill them with the appropriate information:
The mandatory fields are marked with yellow. You will not be able to start a test without filling them.
You can also start a test from your home page. To do so, click Run Test in the Recent Tests task panel. To run a test on a recent method, click
next to the selected method in the Recent Methods task panel.

Zt.Net User’s Guide Performing the Tests
Zt.Net 2.6.1 User’s Guide / 2015-08 SZ / V1.1 Page 84 of 113
• Under the Batch Data heading, type the batch name in the Batch field.
• In the Batch date field, specify the date of sample manufacturing by typing or selecting it from the drop-down calendar.
• In the Press field, select the press on which the batch you are going to test was
produced. • In the Referral field, type the internal number of the batch you are going to test or
the internal number of the test you are going to perform according to the common practice of your company.
• Under the Testing Method heading, select the method which you are going to use in testing from the Method drop-down list.
• Under the Instrument Data heading, select a disintegration tester from the
Instrument drop-down list.
• In the Select baskets for the test: field, select the baskets you are going to involve
in the test by clicking the necessary baskets.
You can select for testing only those baskets which are marked as free.
The baskets marked as busy cannot be selected.
The selected baskets will then look in this way.
Note the status of your instrument displayed in the Status: field and make sure that the selected instrument is connected to the computer and switched on. You may only proceed with testing on the selected instrument if it has the status “Ready”. For more information on the instrument statuses, refer to section 9.2 Calibrating the measuring sensors (ZT7x instruments).
If you have started the test from the Methods page or from the Recent Methods panel (home page), the testing method in this field will be filled automatically. You can change the selected method or override the method settings if needed.

Zt.Net User’s Guide Performing the Tests
Zt.Net 2.6.1 User’s Guide / 2015-08 SZ / V1.1 Page 85 of 113
• From the Basket SN drop-down list, select the serial number for selected basket. • Under the Comments heading, you can add a comment to the test you are going to
perform. 4. Check the specified testing parameters before you start testing. You can view the
details of the selected product, method and instrument by clicking More… under the corresponding data group on the action bar. A separate page with the corresponding product, method or instrument details will be opened.
5. Click Next to start the test. The Testing of Batch ‘…’ page appears (‘…’ stands for the batch code).
In case the reported status or type of baskets does not correspond to its actual status or if you have reconnected some of the baskets, click Reboot to update the basket data obtained from the instrument. Note that there is no Reboot button for the ZT32x instruments because this process is carried out automatically in these instruments. It is not recommended to click Reboot if the instrument is currently involved in some tests.
You will not be able to select the basket with the apparatus type that is different from the one specified in method. Such baskets are blocked by the system and marked as busy. The apparatus type is indicated by the letters A and B near the basket icon.

Zt.Net User’s Guide Performing the Tests
Zt.Net 2.6.1 User’s Guide / 2015-08 SZ / V1.1 Page 86 of 113
When you pass on to the Testing of Batch ‘…’ page, the instrument is automatically initialized and the corresponding notification of the process appears at the top of the main window.
On this page, the testing process is schematically displayed. In the following picture, a simple test on one basket with apparatus A without retard phase is shown:
A simple test on one basket with apparatus B will be displayed as follows:

Zt.Net User’s Guide Performing the Tests
Zt.Net 2.6.1 User’s Guide / 2015-08 SZ / V1.1 Page 87 of 113
The Testing of Batch ‘…’ page for a test that includes a retard phase and is conducted on more than one basket on the ZT32x instrument may look as follows:
The timeline already shows the retard phase (in this example, it is 10 minutes).
The Testing of Batch ‘…’ page for a test that includes a retard phase and is conducted on more than one basket on the ZT7x instrument may look as follows:
In ZT32x instruments, each basket is displayed on the separate tab. On the timeline the testing progress is displayed pertaining to the basket that is currently selected. You can switch between the baskets in Zt.Net by selecting the corresponding tab.

Zt.Net User’s Guide Performing the Tests
Zt.Net 2.6.1 User’s Guide / 2015-08 SZ / V1.1 Page 88 of 113
After the instrument has been initialized, the notification for basket calibration appears. Calibrate the baskets before you proceed.
To calibrate the baskets:
• Insert the disks into each of the basket tubes.
• Click Calibrate 1 to calibrate the first basket.
• Remove the disks and adjust the basket to the shaft. • Repeat the procedure for all involved baskets and click Done to finish the
calibration; the test continues.
All the disks are numbered. So are the tubes. Make sure that you drop the disks into the corresponding tubes.
Not calibrated (empty) basket positions are displayed as red. Calibrated basket positions (with disks inserted) are displayed as green. Positions displayed as yellow are also regarded as calibrated. The yellow color indicates that the contact between the disk and the magnetic sensor under the sieve is loose, which can occur as a result of possible disk displacements.
By clicking Calibrate only the currently shown basket is being calibrated. If you operate several baskets, the calibration should be started individually by clicking the corresponding button for each basket which should be calibrated.
The software prompts you to calibrate the baskets before the test only if you have selected I want to calibrate baskets before the test on the Method page. If the calibration option was not selected, this procedure is skipped.
In ZT7x instruments, when you are working with one basket, it is usually displayed in the left part of the main window. When you are working with two or more baskets, the one is displayed on the left and the others are shown on the right. On the timeline the testing progress is displayed pertaining to the basket that is currently enlarged. In Zt.Net, you can switch between involved baskets. To switch to another basket, just click it and the basket will be enlarged in the left part of the main window.

Zt.Net User’s Guide Performing the Tests
Zt.Net 2.6.1 User’s Guide / 2015-08 SZ / V1.1 Page 89 of 113
To proceed with the disintegration test:
After the instrument initialization and basket calibration, the software starts the previous warming of the bath to the specified temperature.
1. The temperature measured in the water bath is displayed under the
water bath icon. Wait for the bath temperature to stabilize, or click Continue to proceed immediately.
2. When the bath is ready, the system prompts you to insert the samples. Place the samples in the tubes, add the corresponding disks and click Done to start the test.
NOTE Lay the samples that disintegrate more than 5 seconds!
If you proceed with testing before the temperature reaches the required value, your test may fail if the corresponding option is selected on the Options page (see section 9.1 Viewing and changing the test options).
If you have a basket with apparatus A, you must calibrate this basket before using a basket with apparatus B.
Performing disintegration tests on an improperly calibrated basket may lead to incorrect test results. Therefore, it is recommended to perform a calibration each time you carry out a standard test. The standard test calibration file is saved in the database and the software uses this calibration file as long as you make a new calibration.
You will see the calibration value when you right-click the basket tube and select View statistics. For correct calibration this value should be under 200.
If you do not want to calibrate the selected basket, you may skip the calibration by clicking Done.

Zt.Net User’s Guide Performing the Tests
Zt.Net 2.6.1 User’s Guide / 2015-08 SZ / V1.1 Page 90 of 113
The test is started. The time of samples disintegration is displayed in the basket chart or table in the main window. For all basket positions the currently measured values are displayed in the square brackets. The measured values are expressed in conventional units and may vary depending on the latest basket calibration.
Time counting starts. The total elapsed time is displayed in the test time field marked with the clock symbol.
The testing progress is displayed in the timeline form. In case you have enabled optional constraints (see section 8.6.1 Creating the methods), the minimum and maximum disintegration time will be displayed.
On the timeline, the testing progress is displayed in different colors. The red color signals that the time has not reached the minimum disintegration limit and the samples that disintegrate within this period (also marked with red) are regarded as failed. The time period within the specified limits is marked with green and the samples that disintegrate within these limits (also marked with green) are regarded as passed.
The end of the timeline can be marked with the symbol, which means that the test is stopped upon reaching the specified maximum time. If the end of the timeline is marked with the symbol, it means that the testing time is unlimited and the test will continue until all samples disintegrate.
The time for tests that include a retard phase is displayed in the Time to retard: field with the countdown to the pH change.
The retard phase is marked in the timeline with the orange color. The end of the retard phase in the timeline can be marked with the clock, which means that the test time is reset after the medium change.
On completion of the retard phase, Zt.Net prompts you to change the medium.
In the pH change time: field the time of the medium replacement is counted. Replace the medium and click Done to continue the test.
If 2 or more samples disintegrate during the retard phase, the test will be stopped and considered as failed.

Zt.Net User’s Guide Performing the Tests
Zt.Net 2.6.1 User’s Guide / 2015-08 SZ / V1.1 Page 91 of 113
If the samples do not disintegrate within the expected limit (T), the elapsed time after the expected limit is counted.
As soon as the samples disintegrate or the test time elapses, the test is finished.
When performing tests, you can abort them by clicking the corresponding button on the toolbar. The Start button is inactive during test performance. Click the Abort button to stop the test and the testing toolbar will disappear after your confirmation.
The temperature maintained during the test is also displayed in the graphical and tabular form. To see such information, right-click the Temperature Data heading or click the drop-down list in the upper right corner of this area. Here belong the following:
• Data chart – a chart in which bath temperature changes during the test run are
graphically displayed:
In the chart, the temperature maintained during the test is displayed in the range from the lowest to the highest values at a given period of time. The lowest and the highest temperature values maintained during the test are presented in the chart by two horizontal dotted lines. The specified testing temperature is presented by a firm line. By default, the temperature progress for the whole test is displayed starting from instrument initiation to the current time point. The time period at which you are viewing the chart is displayed in the time scale at the bottom of the chart. Using this time scale you can narrow the time period and get a more precise curve of temperature changes. To narrow the displayed time period, click one of the scale divisions. The sliding symbol will move indicating the time for which the temperature curve is displayed.
If the pH change lasts longer than it is specified under the Testing Options on the Options page, further execution of the test may not be allowed and the test will be aborted (for more information, see section 9.1 Viewing and changing the test options).
The chart will not be displayed if the temperature sensor is absent.

Zt.Net User’s Guide Performing the Tests
Zt.Net 2.6.1 User’s Guide / 2015-08 SZ / V1.1 Page 92 of 113
• Data table – a table in which bath temperature changes during the test run are shown in a tabular form:
• Statistics – statistical data including the current, average, minimum and maximum temperature values obtained during the test:
If you perform the test on the ZT32x instrument, you can also view the statistics for each sample by right-clicking its basket tube and selecting View statistics:
The statistics may look as follows:

Zt.Net User’s Guide Performing the Tests
Zt.Net 2.6.1 User’s Guide / 2015-08 SZ / V1.1 Page 93 of 113
The table contains the following information: Parameter Description Offset Conventional parameter that depends on the specified distance Calibrated Value received after basket calibration that should be obtained after full
disintegration Level Value assigned by the system to each sample due to its size within the
range from 0 to 255; the figure from the right separated by vertical bar (|) shows how much sample is left in the vial
Complete Time when the samples are disintegrated After the test has finished, click Next. The Batch ‘…’ Results page appears:
On this page, the detailed information about the tested batch and the results of the performed test are displayed. 3. Click OK to complete the test.

Zt.Net User’s Guide Performing the Tests
Zt.Net 2.6.1 User’s Guide / 2015-08 SZ / V1.1 Page 94 of 113
9.3.2 Performing the supplementary tests
A supplementary test is provided when one or two of the total of six tested samples failed to disintegrate completely during the first test run. In this case, the test is repeated on 12 additional samples (according to the USP requirements). In a supplementary test, not less than 16 of the total of 18 tested samples should disintegrate completely. A supplementary test can be performed immediately on completion of the first test run. In this case, the supplementary test is started from the Testing of Batch ‘…’ Finished page. For a recently performed test you may start a supplementary test by clicking next to the corresponding batch number in the Recent Tests task panel displayed on your home page. Otherwise, a supplementary test can be started from the Results page for any of the previously performed tests that need supplementary regardless of the time when they were performed. To perform a supplementary test: 1. Click Results, All Tests on the shortcut bar. The Tests (All Tests) page appears:

Zt.Net User’s Guide Performing the Tests
Zt.Net 2.6.1 User’s Guide / 2015-08 SZ / V1.1 Page 95 of 113
2. Select the test that needs a supplementary test and click Run Supplementary Test on the action bar. You may also right-click the necessary test and select Run Supplementary Test from the pop-up menu. The Test Start page appears:
You enter the test wizard again. All the fields with preparatory data are unavailable for editing as in the supplementary test you must use the data defined during the first test run. The only item that you can change is the instrument.
3. Go through the steps of the wizard and repeat the test as it is described in the
procedure in section 9.3.1 Performing the standard disintegration tests.
The supplementary test is performed on 12 samples; therefore you have to make sure that there are enough free baskets on your instrument. Otherwise, you can also perform two supplementary tests with six samples in each test one after another.

Zt.Net User’s Guide Performing the Tests
Zt.Net 2.6.1 User’s Guide / 2015-08 SZ / V1.1 Page 96 of 113
9.3.3 Performing the quick tests
A quick test is a direct measurement of product disintegration without specifying the general data about the tested product and batch. The quick test is used when there is a need to quickly determine the minimum, maximum and average disintegration time of a specific product (for example, a newly formulated dosage form) and measure the average distance between the sieve (sensor) and the cover disk at which the product is regarded as disintegrated. The obtained data may then be used as the reference for future testing of different batches of this product, for example, for creating disintegration methods.
To perform a quick test: 1. Start a quick test from the Instruments page by selecting the necessary instrument
and clicking the Quick Test shortcut on the action bar. The Quick Test page with the selected instrument appears:
To run a quick test, you do not have to create products, media or methods beforehand. The only entity that you need to specify is the instrument on which the quick test will be performed.

Zt.Net User’s Guide Performing the Tests
Zt.Net 2.6.1 User’s Guide / 2015-08 SZ / V1.1 Page 97 of 113
2. Under the Select baskets for test: heading click the basket you are going to
engage in a quick test. Pay attention to the apparatus type you are going to use indicated by the letters A or B next to the basket icon.
3. After you have selected the basket for a quick test, the main window will look as
follows:
4. In the Temperature field, set the temperature for the quick test. 5. In the Distance field, set the distance between the sieve (sensor) at the bottom of
the tube and the cover disk at which the product is regarded as disintegrated. 6. Click Apply to enable the specified settings. 7. Place the samples into the testing basket and click to start testing. As soon as
the instrument starts testing, the Instrument and the Distance fields are disabled for editing. You can, however, change the testing temperature during the test by setting the corresponding value in the Temperature field and clicking Apply.
You can abort testing by clicking .
You may engage only one basket in a quick test.
The look of the Quick Test page slightly differs for the ZT7x and the ZT32x disintegration testers.

Zt.Net User’s Guide Performing the Tests
Zt.Net 2.6.1 User’s Guide / 2015-08 SZ / V1.1 Page 98 of 113
8. As soon as the samples disintegrate, the quick test is automatically stopped and
its results are displayed.
• For the ZT7x instrument, in the Min. time and the Max. time fields, the minimum and maximum time of sample disintegration is displayed; in the Avg. time field the average disintegration time is calculated, and, in the Avg. distance field, the average distance of product disintegration is displayed (in conventional units).
• For the ZT32x instrument, the table with the following columns will be displayed:
Column Description Offset Conventional parameter that depends on the specified distance Calibrated Value received after basket calibration that should be obtained after
full disintegration Level Value assigned by the system to each sample due to its size within
the range from 0 to 255; the figure from the right separated by vertical bar (|) shows how much sample is left in the vial
Complete Time when the samples are disintegrated
The results of a quick test are not saved in the database. The main aim of this test is to serve as a preparatory mean for the user to formulate a method.

Zt.Net User’s Guide Result Management
Zt.Net 2.6.1 User’s Guide / 2015-08 SZ / V1.1 Page 99 of 113
10 Result Management All tests conducted in Zt.Net are recorded in the system regardless of whether they were completed successfully. The tests are grouped under the following headings: • All tests • Unapproved tests • Recent tests • Tests by product • Tests by instrument You can expand the Recent tests, Tests by Product and Tests by Instrument groups by clicking the expand button ( ). The recent tests are sorted by the time period. You can view tests from the current week, previous week, previous two weeks, current month and previous month by clicking the corresponding shortcuts. By clicking Tests by Product or Tests by Instrument, you can view the tests sorted according to the specific product or instrument. Expand the groups and click the product or instrument to view all the tests that were performed involving it. The list of completed tests may look as follows:

Zt.Net User’s Guide Result Management
Zt.Net 2.6.1 User’s Guide / 2015-08 SZ / V1.1 Page 100 of 113
The list may contain the following information depending on which columns you choose to display: Column Description Result Description of the test result Batch Identification code of the tested batch Batch Date Production date of the tested batch Method Name of the method used for testing Product Name of the tested product Referral Internal number of the product (test) Press Name of the press on which the tested batch was produced Approved by User who approved the test Last Test Run Date and time of the last test run
In the first column of the list the test status is indicated:
The test has passed successfully. Supplementary test is needed/not enough samples were tested to get results. The test has failed.
If the test has been approved, is displayed in the second column. You can view additional test information by clicking the expand buttons. This will open a sub-table containing the following information: Column Description Number of samples Number of tested samples Date/Time Date/time when the test was started Performed by Name of the person who performed the test Instrument Name of the instrument on which the test was performed
Under the Results shortcut, all tests are saved, including those which failed or were aborted. You can view the results of a particular test. To do so, double-click the test you want to view in the list. The Batch ‘…’ Results page appears and may look as follows:

Zt.Net User’s Guide Result Management
Zt.Net 2.6.1 User’s Guide / 2015-08 SZ / V1.1 Page 101 of 113
On this page, you can find the detailed information about the conducted test. The information is presented in groups as follows:
• General information: this is the topmost group of fields where you can find the name of the product, batch date, referral, name of the press, number of passed samples and the total number of tested samples, as well as the initial test comment, if there was any, test result and information.
• Product disintegration information: this group of fields is displayed under the Product Disintegration heading and here you can find the name of the method on which the test was performed, the distance, the apparatus type, the mesh size, the testing temperature, as well as the testing algorithm and the product form.
• Test run information: this group of fields is displayed under the Test Run of ... heading and here you can find the results of the performed test, including the time when the test was started and finished, the number of the tested samples, the name of the instrument, on which the test was performed, the final test comment, if there was any, the detailed basket results and the bath temperature data displayed in the graphical and tabular forms.
From this page you can also have a report about the performed test. To do so, click Show Report on the action bar (for more information, see chapter 11 Reports).
You can edit comments to the test on the Batch ‘…’ Results page at any time and save the changes by clicking Apply.
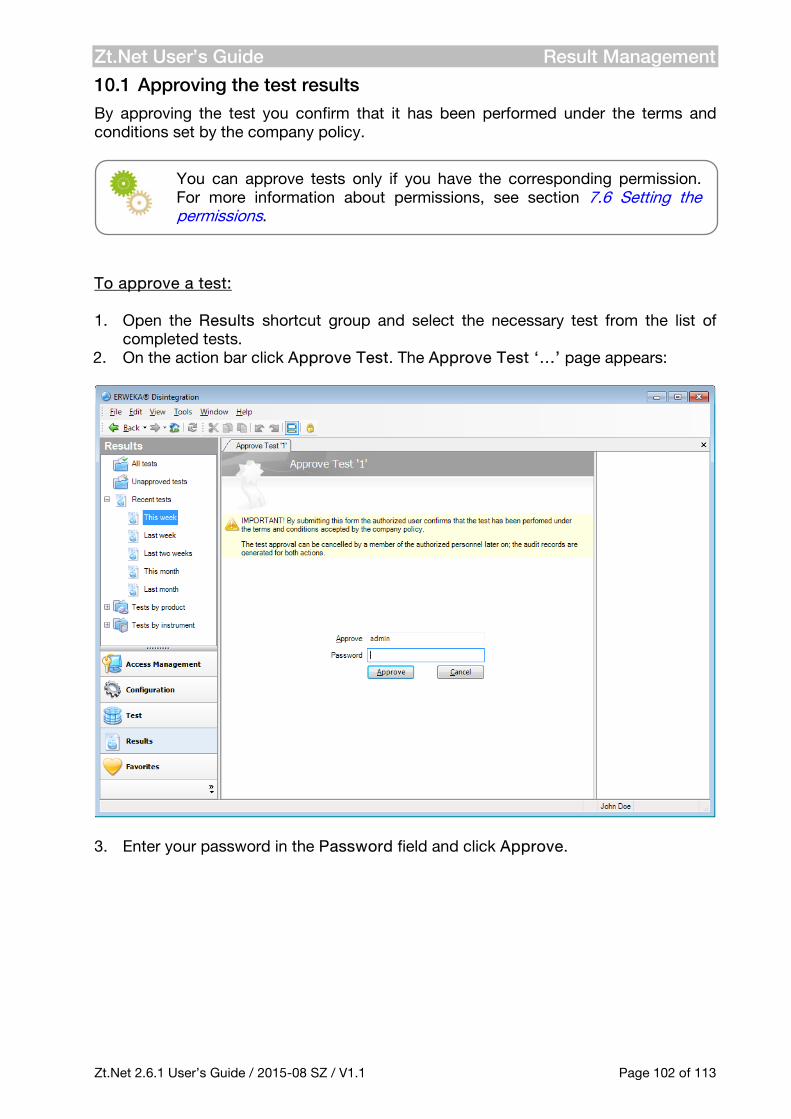
Zt.Net User’s Guide Result Management
Zt.Net 2.6.1 User’s Guide / 2015-08 SZ / V1.1 Page 102 of 113
10.1 Approving the test results
By approving the test you confirm that it has been performed under the terms and conditions set by the company policy.
To approve a test: 1. Open the Results shortcut group and select the necessary test from the list of
completed tests. 2. On the action bar click Approve Test. The Approve Test ‘…’ page appears:
3. Enter your password in the Password field and click Approve.
You can approve tests only if you have the corresponding permission. For more information about permissions, see section 7.6 Setting the permissions.

Zt.Net User’s Guide Result Management
Zt.Net 2.6.1 User’s Guide / 2015-08 SZ / V1.1 Page 103 of 113
The test is now approved, and you can see this in the Test action group of the Tests page that has appeared again.
You can also approve tests from the Batch ‘…’ Results page. To do so, select the necessary test from the list and double-click it. You can now view the detailed results of the selected test and approve it following the procedure described above. To leave the Approve Test ‘…’ page without approving the test, click Cancel.
10.2 Cancelling the test approval
In case the test has been approved by a member of the authorized staff, but you disagree with this decision, you can cancel test approval.
To cancel a test approval: 1. Open the Results shortcut group and select the necessary approved test from the
list of completed tests. 2. On the action bar, click Cancel Approval. The Cancel Approval of Test ‘…’ page
appears. 3. Enter your password in the Password field and click Unapprove. The approval of
the selected test is cancelled. To leave the Cancel Approval of Test ‘…’ page without cancelling the test approval, click Cancel.
You can cancel test approval only if you have the corresponding permissions. For more information about permissions, see section 7.6 Setting the permissions. In the Audit Trail, records for both events are made – test approval and cancelling of approval.

Zt.Net User’s Guide Reports
Zt.Net 2.6.1 User’s Guide / 2015-08 SZ / V1.1 Page 104 of 113
11 Reports Test reports can be generated for completed and aborted disintegration tests (both successful and failed) and saved in PDF and XML. If the test has been approved, the report will also contain the name of the person who approved test results and the date of approval. In this case, a printed report should also be signed by the person who approved the test in the Approved by: field. To generate a ready-to-print report:
1. Open the Results shortcut group and select the necessary test from the list. 2. On the action bar, click Show Report. The Report Generation dialog box appears,
in which the system informs you where the report has been saved. 3. Click Yes to open the generated report in the associated viewer.
The report obtained by clicking Show Report contains both the source information you supply before starting the test and the data which appears as a result of the test run. By clicking XML Export the report is saved in XML format. The report obtained by clicking Show List Report contains the list with information on all tests in PDF.
11.1 Report settings
All the test reports generated in Zt.Net can show information about the company; it will appear in the header of the report pages. You can specify the name of your company as you want it to appear on reports and insert your company’s logo. This is done on the Options page (see section 6.3 Options).
You can also generate a report for a recently performed test from your home page by clicking next to the selected test on the Recent Tests task panel. By clicking the same button on the action bar of the corresponding page you can generate a report for each entity.
If you need a report with the basket numbers, in the ZT.exe.Config file, set the value of “print_baskets_info_in_report” to “true”.
All the reports generated by the system are automatically named and saved according to the settings specified on the Options page. For more information, see section 6.3 Options.

Zt.Net User’s Guide Database Backup and Restore
Zt.Net 2.6.1 User’s Guide / 2015-08 SZ / V1.1 Page 105 of 113
12 Database Backup and Restore It is possible to access the Backup Databases and Restore Databases functions only if you have special permissions. The user logged on as administrator is granted with such permissions by default. For more information about user permissions and assigning necessary permissions to a user, refer to section 7.6 Setting the permissions.
12.1 Backing up the databases Database backup is one of the essential features of Zt.Net. Using this functionality you will be able to create a backup copy of all the data entered into the system. If you regularly maintain backup copies of your databases, you can restore the corrupted database at any time. The database can get corrupted after power outages, computer crashes or under other unexpected circumstances. The best way to prevent the loss of data is to back up your databases regularly. To back up the databases: 1. Log on to Zt.Net. The home page for the logged on user appears.
2. On the Tools menu, click Backup Databases. The Backup Databases page
appears:
You should verify the database server connection settings in order to be able to perform the backup (see section 6.2 Server connection settings). Note that if you are using Windows authentication you must be registered as administrator on the SQL Server computer.

Zt.Net User’s Guide Database Backup and Restore
Zt.Net 2.6.1 User’s Guide / 2015-08 SZ / V1.1 Page 106 of 113
The backup procedure is designed in form of a wizard. Follow the instructions of the wizard carefully to ensure that the backup is performed correctly. 3. On the Backup Databases page verify the suggested location on the SQL server
computer where the backup copies should be saved and change it, if necessary, by selecting the folder from the drop-down list.
4. Click Next to continue. The Backup Progress page appears:

Zt.Net User’s Guide Database Backup and Restore
Zt.Net 2.6.1 User’s Guide / 2015-08 SZ / V1.1 Page 107 of 113
The status of completed operations is shown under the Progress heading.
5. When all databases are successfully backed up, click Finish to close the wizard. Apart from manual backups, you can also customize the backup scheduler on the Options page, so that the program will automatically prompt you to back up the databases at the scheduled time. To view/change the backup options: 1. Click Tools, Options… on the menu bar. 2. On the Options page, click the Backup tab. The following page appears:
Do not close the application until the backup process is finished!

Zt.Net User’s Guide Database Backup and Restore
Zt.Net 2.6.1 User’s Guide / 2015-08 SZ / V1.1 Page 108 of 113
3. Go through the fields and specify the backup settings: • Under the Recurrence Pattern heading, set the frequency at which you want to
back up your data. In case you prefer to perform the backup manually, select the None option. To back up your data on a weekly basis, select the Weekly option; to perform the regular data backup on a monthly basis, select the Monthly option.
• If you have selected the Weekly option, specify the recurrence of the backup assignment by specifying the value in the Recur every field. Narrow the recurrence criteria by selecting check boxes next to the names of the days of week, on which you want to back up your data.
• If you have selected the Monthly option, set the recurrence of the backup
assignment by specifying the day number in the Day field and defining the frequency of backup in the of every … month(s) field.
• Under the Backup Files Location on SQL Server Computer heading, select the location from the Backup output folder drop-down list of folders where the backup copies will be saved. The default location is initially suggested in the field.
4. Click OK to save the changes you have made, close the current page and return to the previous page. To restore default settings, click Standards. To close the page without saving changes, click Cancel.
If you select the Weekly option but do not select any of the check boxes with the names of the days of week, this recurrence pattern will be treated as the None option.

Zt.Net User’s Guide Database Backup and Restore
Zt.Net 2.6.1 User’s Guide / 2015-08 SZ / V1.1 Page 109 of 113
12.2 Restoring the databases
In case of data loss you may successfully recover almost everything you had in the databases by using the restore functionality, provided that you have backed up your databases on a regular basis. Restoring a database from backups recreates the database and all of the associated files that were in the database when the backup was performed. However, any modifications made to the database after the backup files were created are lost. To restore the databases: 1. Log on to Zt.Net. The home page for the logged on user appears. 2. On the Tools menu, click Restore Databases. The Restore Databases page
appears:
The time for the recurrent backup is counted starting from the last backup, no matter whether it was performed as scheduled or at your discretion. If you have not backed up your data yet but you have defined a backup schedule, the system will prompt you to back up your databases as soon as you log off by displaying the Recurrent Backup notification on the action bar. Note that in this case it may not necessarily be the very date for this operation.

Zt.Net User’s Guide Database Backup and Restore
Zt.Net 2.6.1 User’s Guide / 2015-08 SZ / V1.1 Page 110 of 113
The restore procedure is designed in form of a wizard. Follow the instructions of the wizard carefully to ensure that the data is properly restored. 3. Under the Backup Location and Dates heading specify the folder on SQL Server
computer where the backup files are located and select the necessary backup date from the drop-down list.
4. Click Next to continue. The Restore Progress page appears:
The status of completed operations is shown under the Progress heading.
5. As soon as all the databases are successfully restored, click Finish to close the
wizard and return to the System Login page.
Do not close the application until the restore process is finished!

Zt.Net User’s Guide Favorites
Zt.Net 2.6.1 User’s Guide / 2015-08 SZ / V1.1 Page 111 of 113
13 Favorites
The Favorites shortcut group contains links that have been stored by the user. This functionality helps to group the menu items from any module into one menu according to your working preferences.
In Zt.Net, you may add basically any page to Favorites. To add a page to the list of favorite pages, go to the page that you want to add and click Add to Favorites on the action bar or, alternatively, select Add to Favorites on the Tools menu.
The Favorites shortcut group may look as follows:
To open one of your favorite pages, select Favorites and click the required page. By default, the Favorites shortcut contains one group – General. As your list of favorite pages grows, you can organize them by moving into subgroups.

Zt.Net User’s Guide Favorites
Zt.Net 2.6.1 User’s Guide / 2015-08 SZ / V1.1 Page 112 of 113
To organize a list of favorite pages: 1. In the Favorites shortcut group, right-click the General bar. The following pop-up
menu appears:
2. On the menu, click Add Group. The New Group bar appears in the Favorites shortcut group.
3. Change the default name of the new group (if necessary). To do so, right-click it
and select Rename group… from the pop-up menu. Type a new name for the created group. To add pages to the created group, you should have it open when adding new pages. Click the group name to open it. The group is considered open when its title goes up.
You can also delete groups from Favorites. To do so, right-click the group you want to delete and select Remove group… from the pop-up menu. The confirmation message appears. Confirm deletion of the group from the Favorites list by clicking Yes. Using the same pop-up menu you can select options to customize the view of page shortcuts in the groups. The currently selected view is checked in the menu. If you want to change the current view of pages shortcuts, select the necessary one from the pop-up menu and click it. You can rename your favorite pages and remove them from the list. To do so, right-click the necessary page shortcut. The following pop-up menu appears:
Select the necessary option.
To move an item from one group to another, just drag it to the title of the needed Favorites shortcut group.

Zt.Net User’s Guide Help
Zt.Net 2.6.1 User’s Guide / 2015-08 SZ / V1.1 Page 113 of 113
14 Help In case you have any further questions or you are seeking for advice on how to use ERWEKA Disintegration software, refer to the Help menu. Click Help, About… to see which program version you are using and familiarize yourself with the Zt.Net copyright notice. On this page, you will find useful information about the necessary updates of the third-party software and some useful links to the customer support service. The About ERWEKA® Disintegration page may look as follows:
Click Help, ERWEKA® on the Web…, to connect to the ERWEKA website. When you select this item, the system will open your default web browser and establish a connection with the ERWEKA website on the Internet.