user's manual€¦ · • after editing dicom patient orientation ... verify that your printer...
TRANSCRIPT

PG-DOC-GVQC2.1-UM-EN-REVB
User's ManualGEARView QC 2.1 Comprehensive QC Solution for PACS/EHR
PACSGEAR™
PACSGEAR4309 Hacienda Drive, Suite 500Pleasanton, CA 94588 USAT +1 925 225 6100F +1 925 225 [email protected]

Copyright © 2013 PACSGEAR, Inc.
All rights reserved. The information contained herein is confidential and is the sole property of PACSGEAR. None of the information may be reproduced, copied and/or redistributed electronically, manually, or otherwise to any person without advance written permission from PACSGEAR, except as may be expressly authorized by contracts or other agreements between PACSGEAR and its customers.
Trademarks
Media Server, MediaWriter, MediaUploader, ModLink, PacsConnect, PACSGEAR, PacsSCAN, PacsSCAN Film, PacsSCAN Video, PACSGEAR Image Exchange, Print2PACS, GEARView, ScopeCap and Sweeper are trademarks of PACSGEAR in the United States and/or other countries. Acrobat, Adobe, Bravo, Discproducer, DUET, eFilm Lite, Elesys, EPSON, Intelerad, MERGE, Microsoft, Primera, Windows, and other trademarks, registered trademarks, or service marks referred to in this document are the property of their respective owners. The publisher and the authors make no claim to these trademarks.
While every precaution has been taken in the preparation of this document, the publisher and the authors assume no responsibility for errors or omissions, or for damages resulting from the use of information contained in this document or from the use of programs and source code that may accompany it. In no event shall the publisher and the authors be liable for any loss of profit or any other commercial damage caused or alleged to have been caused directly or indirectly by this document.
Printed: 2013 in Pleasanton, CA, USA
Use of Fictitious Patient DataPatient demographics appearing in this manual are examples only. No actual patient study data were used in the preparation of this manual. Any similarities to persons living or deceased is purely coincidental.
WARNINGS and Indications
• GEARView QC is intended to be used by healthcare personnel to review and edit medical images and related results.
• After editing DICOM patient orientation information, PACSGEAR strongly recommends that you visually verify patient orientation tags for accuracy.
• GEARView QC is not labeled for diagnostic use.
• After editing DICOM demographic information, PACSGEAR strongly recommends that you visually verify patient information for accuracy.
• After adding a mask, shutter, or marker to an image, series or study, PACSGEAR strongly recommends that you visually verify their placement before saving the changes.
• After rotating or flipping an image, series, or study, PACSGEAR strongly recommends that you visually verify the orientation before saving the changes.
• PACSGEAR displays measurement values from the modality that is responsible for generating the images. If the modality is incorrectly configured or defective, measurements may not be correct.
• PACSGEAR does not recommend using printed film for clinical diagnosis and/or direct measurements.
• Before using the 1x1 TRUESIZE option, verify that your printer supports this option by printing and comparing measurements from the original and copied films.
CAUTION
• GEARView QC is not intended for the long-term storage or management of patient information or data. Please verify data integrity before deleting any original information from your PACS.
PACSGEAR
4309 Hacienda Dr. Ste. 500
Pleasanton, CA 94588 USA
2013-01
EMERGO EUROPEMolenstraat 152513 BH, The HagueThe NetherlandsT +31.70.345.8570F +31.70.346.7299
GEARView QC

GEARView QCContents
© 2013 PACSGEAR, Inc.
iii
PG-DOC-GVQC2.1-UM-EN-REVB
Contents
1 Welcome ...............................................................................................................11.1 Starting and exiting GEARView QC ................................................................................................... 41.2 Licensing GEARView QC..................................................................................................................... 41.3 Loggingonforthefirsttime ............................................................................................................... 4
2 Settings Menu .......................................................................................................52.1 Entering DICOM settings .................................................................................................................... 62.2 Setting up folders ................................................................................................................................112.3 Setting up users ................................................................................................................................ 132.4 Switching languages ......................................................................................................................... 182.5 Audit logs ............................................................................................................................................ 182.6 Other commands on the settings menu .......................................................................................... 192.7 Study locking ...................................................................................................................................... 19
3 QC Operations ................................................................................................... 203.1 Workflow ............................................................................................................................................. 203.2 Searching for studies ...................................................................................................................... 213.3 Retrieving studies .............................................................................................................................. 233.4 Editing studies from the Patient List tab ......................................................................................... 243.5 Editing studies in patient tabs .......................................................................................................... 333.6 Editing images and series ................................................................................................................. 383.7 Working in the Exceptions and Inbox folders ................................................................................. 53
4 Saving and Sending Studies ............................................................................ 554.1 Saving your changes ......................................................................................................................... 554.2 Sending studies ................................................................................................................................ 554.3 Deleting the original studies ............................................................................................................. 55
5 Help Menu .......................................................................................................... 56
6 Appendix ............................................................................................................ 576.1 Keyboard shortcuts ........................................................................................................................... 576.2 Audit entries ....................................................................................................................................... 586.3 Anonymizedfields ............................................................................................................................. 596.4 UID change rules ................................................................................................................................ 606.5 Logged events .................................................................................................................................... 61
7 Support .............................................................................................................. 62

1 Welcome
Congratulations on adding GEARView™ QC to your PACS/EHR system. GEARView QC gives healthcare personnel a simple way to edit medical images and study details.
For more information, please contact us:Americas,Asia-Pacific Europe,Middle-East,AfricaPACSGEAR PACSGEAR4309 Hacienda Drive, Suite 500 Balanstrasse 73Pleasanton, CA 94566 USA 81541 Munich, GermanyT +1 925 225 6100 T +49 (0)89 450 807 600F +1 925 225 6195 F +49 (0)89 450 807 [email protected] [email protected] www.pacsgear.com
GEARView QC
PG-DOC-GVQC2.1-UM-EN-REVB © 2013 PACSGEAR, Inc.
1

Glossary of Terms and SymbolsThe following terms and symbols are used in PACSGEAR manuals.
Consult instructions for use. Appears on the product CD.
Conformité Européenne. Indicates that the product complies with the requirements of the 93/42/EEC Medical Device Directive.
Symbol for manufacturer.
Symbol for European authorized representative.
Click to view a video tutorial.
Caution. Messages that alert you to conditions that could result in equipment failure, equipment damage, or data loss.
WARNING. Messages that alert you to conditions that could result in death or serious injury.
Accession number A tracking or order number for patient studies.
AE Application entity. A local or remote DICOM service.
AMD Automatic marker detection. Automatic detection of markers to identify mammography image orientation.
AST Auto segmentation technology. PACSGEAR’s proprietary technology for converting sectional films into a stack or cine loop.
Burner A digital recording device such as a CD recorder that stores data on media.
CR DICOM modality abbreviation for computed radiography.
DICOM Digital imaging and communications in medicine. A networking standard for the medical industry.
DOB Date of birth.
DCA Dynamic contrast algorithm. PACSGEAR’s proprietary technology for displaying mammography film priors with a digital “look and feel.”
DX DICOM modality abbreviation for digital radiography.
EMR Electronic medical records.
EHR Electronic health records.
HIPAA The Health Insurance Portability and Accountability Act. A law that stipulates transferability of health insurance coverage, standardizes aspects of electronic medical records, and protects patient confidentiality with regard to health information.
LDAP Lightweight directory access protocol. Used for looking up network services and addresses.
Media Electronic storage media, such as CD-ROM and DVD.
GEARView QC
© 2013 PACSGEAR, Inc.
2
PG-DOC-GVQC2.1-UM-EN-REVB

MG DICOM modality abbreviation for mammography.
Modality Sources of data, such as from ultrasonography, MRI, PET, and CT.
MRN Medical record number. Sometimes referred to as the “patient ID number.”
PACS Picture archival and communication system.
PacsSCAN General term for any of the PacsSCAN products (PacsSCAN Film, PacsSCAN Video, etc.)
PGMS PACSGEAR Media Server. Software that enables enhanced workflow, optimized for video/audio distribution.
PIE PACSGEAR Image Exchange
PIES PACSGEAR Image Exchange Server
QC Quality control. A process of correcting errors and inconsistencies in imaging studies.
RIS Radiology information system. A system used to order radiology studies.
UID Unique identifier. A manufacturer-specific identification string that is assigned by modalities to images, series, or studies.
WADO Web Access to DICOM Objects. A service that makes DICOM images and reports available via a Web browser.
Operating Procedure ConventionsOperating procedures employ the following conventions.
Convention Indicates
Boldface type Names of buttons.
Italic type Names of on-screen objects other than buttons (such as menu commands).
Courier font Text that the user types.
> Sequence of procedures.
GEARView QC
PG-DOC-GVQC2.1-UM-EN-REVB © 2013 PACSGEAR, Inc.
3

1.1 Starting and exiting GEARView QC Start and exit GEARView QC as you would any Windows program. When starting, a splash screen appears with the product name. If the splash screen does not appear, please contact PACSGEAR Support.
CAUTIONGEARView QC contains many configuration, settings, and other files that can be edited by the user (for example, the xml files in the config folder of the installation directory). However, as such files are critical to proper functioning of the program, editing them is only recommended for experienced users. Contact PACSGEAR support if you have any questions about making changes to xml or other files.
1.2 Licensing GEARView QCTo start using GEARView QC, you must obtain and enter a license key as follows.
1 Start GEARView QC. If a license key has not been previously entered (such as the first time you run the program), the license key entry dialog box appears. Write down the value that appears in the System ID box. To display the dialog box manually at any time you can click Help > About > Change.
2 Request a license key by contacting PACSGEAR support via e-mail at [email protected], telephone at +1 925 225 6100, or the support section of our Web site at www.pacsgear.com. Provide the following information to PACSGEAR:
Hospital Name, City, State, Country, Product Name, System ID, and Department/Workstation.
If your license is for Demo mode only, select the Activate demo check box.
3 Enter your license key and expiration date and click OK.
1.3 LoggingonforthefirsttimeAfter you have licensed the product, you will be prompted to log on the first time you start the program. The default logon is admin, with no password.
GEARView QC
© 2013 PACSGEAR, Inc.
4
PG-DOC-GVQC2.1-UM-EN-REVB

2 Settings MenuGEARView QC includes a settings menu for configuring DICOM sources, setting up users, and accessing other useful commands. In particular, DICOM settings must be entered via the settings menu before using the program. If your administrator has already set up DICOM sources and users, you can skip to chapter 3, “QC Operations.”
You can open the menu by clicking the settings button at the upper right of the main application window.
Figure 2.1 Settings menu
GEARView QC
PG-DOC-GVQC2.1-UM-EN-REVB © 2013 PACSGEAR, Inc.
5

2.1 Entering DICOM settings Before using the program, you must enter local settings for GEARView QC, and DICOM settings for data sources and/or worklist providers.
In order for your PACS to recognize GEARView QC, you may also be required to enter settings on your PACS such as AE Title, IP address, and port. Contact PACSGEAR technical support for details.
Procedure
1. On the settings menu, click DICOM. The DICOM Settings dialog box appears.
Local settingsLocal AE titleEnter an AE title for GEARView QC
Capture raw bytesSelect to capture raw bytes. This feature is only for advanced troubleshooting, and should only be enabled if requested by PACSGEAR service personnel.
Figure 2.2 DICOM settings dialog box
GEARView QC
© 2013 PACSGEAR, Inc.
6
PG-DOC-GVQC2.1-UM-EN-REVB

Adding or editing a listening portYou can also specify “listening” ports on which GEARView QC can receive studies that are sent to it from external sources. You can configure these ports so that incoming studies will be routed to specific folders such as the “Inbox” and “Exceptions” folders (see “3.7 Working in the Exceptions and Inbox Folders”). Note that an Exceptions folder does not need to be included in the listening port list (see the figure above). GEARView QC routes exceptions automatically.
1. In the Listening Port area, click Add. The Listening Port Configuration dialog box appears. Enter the settings described below and click OK.
NameEnter a name for the port.
PortType or select the port number.
ProtocolAt this time, only DICOM is supported.
Destination FolderSelect a folder from the list into which incoming studies will be placed.
Capture Raw BytesSelect to capture raw bytes. This feature is only for advanced troubleshooting, and should only be enabled if requested by PACSGEAR service personnel.
Figure 2.3 Listening Port Configuration dialog box
GEARView QC
PG-DOC-GVQC2.1-UM-EN-REVB © 2013 PACSGEAR, Inc.
7
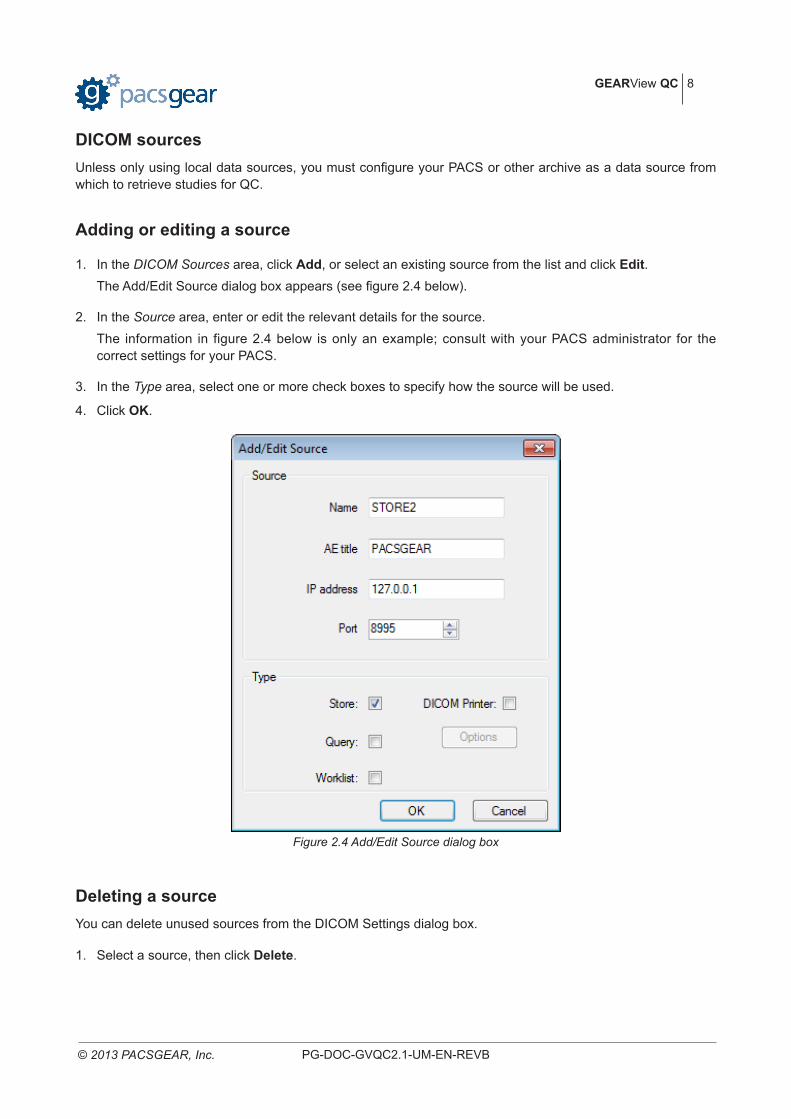
DICOM sourcesUnless only using local data sources, you must configure your PACS or other archive as a data source from which to retrieve studies for QC.
Adding or editing a source
1. In the DICOM Sources area, click Add, or select an existing source from the list and click Edit. The Add/Edit Source dialog box appears (see figure 2.4 below).
2. In the Source area, enter or edit the relevant details for the source. The information in figure 2.4 below is only an example; consult with your PACS administrator for the correct settings for your PACS.
3. In the Type area, select one or more check boxes to specify how the source will be used.
4. Click OK.
Deleting a sourceYou can delete unused sources from the DICOM Settings dialog box.
1. Select a source, then click Delete.
Figure 2.4 Add/Edit Source dialog box
GEARView QC
© 2013 PACSGEAR, Inc.
8
PG-DOC-GVQC2.1-UM-EN-REVB

Testing a connection to a sourceYou can test whether GEARView QC is able to connect with and query an existing source. In the DICOM Settings dialog box:
1. Select a source.
2. Click Test. The Test Results dialog box appears, indicating whether the test passed or failed.
3. Click OK. If the test failed, check to make sure you entered the correct settings, or consult with your PACS administrator.
Entering DICOM printer optional settingsIf you selected DICOM Printer for the type, you can enter optional settings for the printer.
1. Under Type, click Options. The Edit DICOM Printer Options dialog box appears.
2. Enter the settings described below, then click OK.
Figure 2.5 Edit DICOM Printer Options dialog box
GEARView QC
PG-DOC-GVQC2.1-UM-EN-REVB © 2013 PACSGEAR, Inc.
9

BasicLookup table
EnableSelect to have the printer reference a specific LUT (lookup table) for consistency between display and print.
SelectClick to browse for and select an LUT.
List: Send LUT to printerSelect to send the LUT to the target printer.
List: Apply LUT locallySelect to apply the LUT to the current display.
Optical densityMin/MaxEnter the minimum and maximum values of optical density to which pixel values can be mapped. Adjust this setting according to the print medium.
ScalingMagnification
NoneSelect to print images without magnification.
CubicSelect to magnify the image using a cubic interpolation algorithm. This method usually yields the highest image quality, but can be slower than bilinear scaling.
BilinearSelect to magnify the image using a bilinear interpolation algorithm. This method may not yield image quality as high as cubic scaling, but can be faster.
Printer DPIEnter the printer output resolution in dots per inch to ensure proper magnification.
AdvancedFilm orientationSelect Portrait or Landscape.
Medium typeLeave blank, or select Clear Film or Blue Film to match the print medium.
Border densityLeave blank for no border, or select Black or White for the desired border color.
Empty imageLeave blank, or select Clear Film or Blue Film to match the print medium.
Film destinationLeave blank, or select Magazine, Processor, or Bin_1 through Bin_5 (for sorters).
SmoothingEnabled when Magnification is set to Cubic or Bilinear. Select Sharp, Smooth, or Medium to control the amount of smoothing.
TrimSpecifies whether to print a trim box around the film. Leave blank to use the printer’s default setting, select Yes to include the trim box, or No to omit the trim box regardless of the printer’s default setting.
GEARView QC
© 2013 PACSGEAR, Inc.
10
PG-DOC-GVQC2.1-UM-EN-REVB
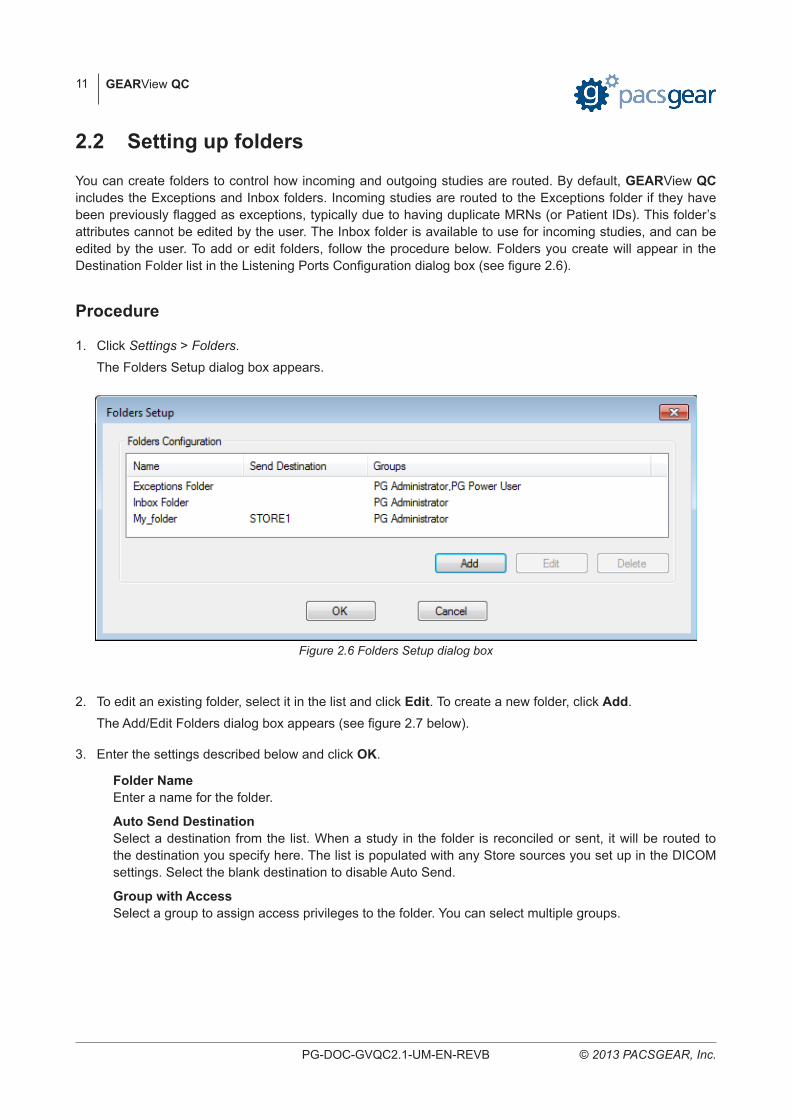
2.2 Setting up foldersYou can create folders to control how incoming and outgoing studies are routed. By default, GEARView QC includes the Exceptions and Inbox folders. Incoming studies are routed to the Exceptions folder if they have been previously flagged as exceptions, typically due to having duplicate MRNs (or Patient IDs). This folder’s attributes cannot be edited by the user. The Inbox folder is available to use for incoming studies, and can be edited by the user. To add or edit folders, follow the procedure below. Folders you create will appear in the Destination Folder list in the Listening Ports Configuration dialog box (see figure 2.6).
Procedure
1. Click Settings > Folders.The Folders Setup dialog box appears.
2. To edit an existing folder, select it in the list and click Edit. To create a new folder, click Add. The Add/Edit Folders dialog box appears (see figure 2.7 below).
3. Enter the settings described below and click OK.
Folder NameEnter a name for the folder.
Auto Send DestinationSelect a destination from the list. When a study in the folder is reconciled or sent, it will be routed to the destination you specify here. The list is populated with any Store sources you set up in the DICOM settings. Select the blank destination to disable Auto Send.
Group with AccessSelect a group to assign access privileges to the folder. You can select multiple groups.
Figure 2.6 Folders Setup dialog box
GEARView QC
PG-DOC-GVQC2.1-UM-EN-REVB © 2013 PACSGEAR, Inc.
11

Figure 2.7 Add/Edit Folders dialog box
GEARView QC
© 2013 PACSGEAR, Inc.
12
PG-DOC-GVQC2.1-UM-EN-REVB

2.3 Setting up users GEARView QC allows you to set up multiple program users, each with different logon passwords and administrator privileges. You can set up users either with Active Directory, or manually by entering local user information.
Procedure
1. On the settings menu, click Users.
2. Enter or select parameters based on the descriptions below, then click OK.
Figure 2.8 Users dialog box
GEARView QC
PG-DOC-GVQC2.1-UM-EN-REVB © 2013 PACSGEAR, Inc.
13

Active DirectoryActive Directory stores user information on a server and acts like a phone book, providing a centralized logon service for Windows-based clients. If your PACS has an Active Directory server, you can use the procedure below to configure users. Otherwise, GEARView QC lets you set up and maintain local users with encrypted passwords.
1. Select the Use Active Directory check box. 2. In the Server box, type the name of the Active Directory server. 3. In the Domain box, type the server’s domain name.
Backup ServersIf you have any backup servers for LDAP, you can click Backup Servers and enter their host names. GEARView QC will try each server in order if it fails to connect with the primary server entered above.
Use Domain GroupsIf users on your LDAP are set up as members of domain groups, you can select this check box to reference those groups instead of individual users. Group names on the LDAP server must match group names defined in GVQC. If these groups are not available, clear the Use Domain Groups check box and use local groups.
Adding an Active Directory user
1. In the Active Directory area, click Add. The Add/Edit user dialog box appears.
2. In the User name box, type the user name.
3. In the Group list, select a user group (see the next page for information about groups). Click OK.
Deleting an Active Directory userIn the Active Directory area, select a user to delete and click Delete. Note that this does not actually delete the user from the Active Directory server, but simply removes the QC group association.
Figure 2.9 Add/Edit User dialog box (for Active Directory)
GEARView QC
© 2013 PACSGEAR, Inc.
14
PG-DOC-GVQC2.1-UM-EN-REVB

Testing an Active Directory user’s password
1. In the Active Directory area, select the user whose password you wish to test.
2. Click Test.
3. In the Password box, type the password and click OK.A message appears indicating whether the password was entered and identified correctly.
*Note that the test does not apply to backup servers.
User groupsUser groups let you assign a predetermined set of privileges to each user. GEARView QC comes standard with the four user groups shown in figure 2.9 (PG Administrator, PG Power User, PG Light User, and PG View Only), but you can add to, edit, or delete any of these names and the privileges associated with them. Note that you must unify GEARView QC’s user groups with those set up on your LDAP server, if available.
Editing user groups
1. In Windows, navigate to Program Files > PACSGEAR > GEARView QC > Service > config.
2. Open the file, group_privileges.xml in Notepad or another XML editor.
3. Edit the file as needed according to the notes below.
Incorrectly editing this file, especially the tags, can result in improper operation of the program. Contact PACSGEAR support if you have any questions about how to edit this file.
Figure 2.10 Editing the group_privileges.xml file in Notepad
GEARView QC
PG-DOC-GVQC2.1-UM-EN-REVB © 2013 PACSGEAR, Inc.
15
<group_name>The group names that appear in the Group lists in GEARView QC. Edit the name to change it. To add a new group, highlight all text from and including a <group> tag through and including the next nearest </group> tag, copy the selection, click an insertion point just after the </group> tag, then paste. Edit the pasted text as desired for the new group.
<list_item>Each list item corresponds to a command in a shortcut menu. Copy or delete list items to add or remove privileges from the user group.
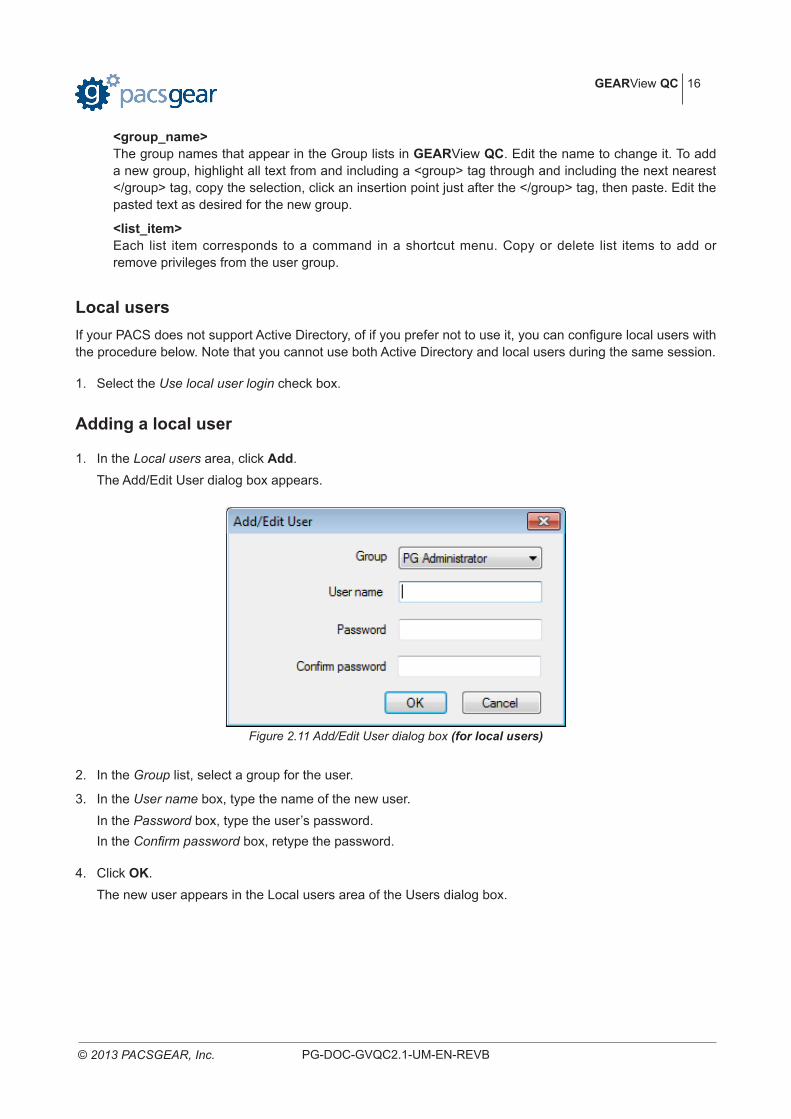
Local usersIf your PACS does not support Active Directory, of if you prefer not to use it, you can configure local users with the procedure below. Note that you cannot use both Active Directory and local users during the same session.
1. Select the Use local user login check box.
Adding a local user
1. In the Local users area, click Add. The Add/Edit User dialog box appears.
2. In the Group list, select a group for the user.
3. In the User name box, type the name of the new user. In the Password box, type the user’s password.In the Confirm password box, retype the password.
4. Click OK. The new user appears in the Local users area of the Users dialog box.
Figure 2.11 Add/Edit User dialog box (for local users)
GEARView QC
© 2013 PACSGEAR, Inc.
16
PG-DOC-GVQC2.1-UM-EN-REVB

Editing a local user
1. In the Local users area, under User name, select a user name and click Edit.
The Add/Edit dialog box above appears.
2. Edit the information in the boxes and click OK.
Deleting a local user
1. In the Local Users area, under User name, select a user name and click Delete.
Auto log off
Select the Enable check box to force a log off if the system remains idle for the specified number of minutes.
GEARView QC
PG-DOC-GVQC2.1-UM-EN-REVB © 2013 PACSGEAR, Inc.
17

2.4 Switching languages
The program’s user interface can be displayed in English, French, German, Portuguese, or Spanish.
1. On the Settings menu, click Language.
2. Select the desired language from the sub menu.
2.5 Audit logsPACSGEAR’s audit logs contain detailed information about the application and how it has been used. User messages contain time-stamped access and action information that can be used to address HIPAA concerns.
1. On the settings menu, click Audit log. To view a message in an audit log, simply click the log to view its contents.
Searching for audit logsYou can search for particular logs by entering or selecting one or more of the available search criteria then clicking Search. All logs matching the search criteria appear in the list in the lower part of the Audit Log screen.
Exporting audit logsAfter finding a particular log, you can export it by clicking the Export button. Logs are saved to a specified location in .csv format.
Figure 2.12 Audit Log dialog box
GEARView QC
© 2013 PACSGEAR, Inc.
18
PG-DOC-GVQC2.1-UM-EN-REVB

2.6 Other commands on the settings menu
Clear completed jobsClears all information from the jobs area of the main window.
Log off Logs off of the GEARView QC server without exiting the program.
ExitExits GEARView QC.
2.7 Study lockingGEARView QC “locks” studies that are opened in patient tabs to ensure that they cannot be opened or edited by more than one user at a time. If GEARView QC is prematurely shut down during an edit, the study remains locked and cannot be opened again when the client is restarted. However, in such cases GEARView QC adds a “Force Unlock To Edit” command to the shortcut menu of the locked study. Clicking the command unlocks the study, and allows you to edit it in the patient tab.
Figure 2.13 Unlock command added to the study shortcut menu
GEARView QC
PG-DOC-GVQC2.1-UM-EN-REVB © 2013 PACSGEAR, Inc.
19

3 QC Operations
3.1 WorkflowOnce DICOM sources have been configured, you are ready to begin using the program. The figure below shows a typical workflow that can be followed when using GEARView QC.
GEARView QC server
Inbox & Exceptions folders
Figure 3.1 Typical workflow
S o u r c e s l i s t
R e t r i e v e
Retrieved studies
GEARView QC
© 2013 PACSGEAR, Inc.
20
PG-DOC-GVQC2.1-UM-EN-REVB

3.2 Searching for studies When GEARView QC first opens, the Patient List tab is displayed. In this tab you will typically search for studies in PACS or other sources, retrieve them to the GEARView QC server, make any necessary edits (in this tab and in the patient tabs), return the changed studies back to their source of origin, and delete the old studies from the source of origin.
1. Select one of the following sources in the Source list.
[Userdefined]A storage or query source you configured in the DICOM Settings dialog box (as an example, the “PACS1” source in figure 3.2)
LocalDICOMfilesA local source such as the hard drive or CD-ROM drive . Note: The Exceptions Folder, Inbox Folder, and GEARView QC options are discussed elsewhere in this manual. Do not select them during this step.
2. Enter zero* or more search criteria in the Patient name, MRN, Date of birth, and/or Accession no. boxes. You can also select one or more criteria in the Modality and Study date/time lists. *Note: If you select All in the Modality and Study date/time lists, you must enter a criterion in at least one of the boxes.
3. Click Search or press Enter to search for patient studies. The search results are displayed in the Patient List tab.
Search Syntax
Patient name Enter one or more of the first characters in the last name (no asterisk required).
MRN Enter the exact number, or any number of the first characters followed by an asterisk.
Accession no. Enter the exact number, or any number of the first characters followed by an asterisk.
Date of birth Use the date picker to enter a date.
Figure 3.2 Source list
GEARView QC
PG-DOC-GVQC2.1-UM-EN-REVB © 2013 PACSGEAR, Inc.
21

Sorting studiesClick a column header to sort the information in ascending or descending order. A triangle appears next to the name of the column that currently determines the sort order. The triangle points up for ascending and down for descending.
Figure 3.3 Patient List tab
Figure 3.4 PDF displayed with context menu
GEARView QC
© 2013 PACSGEAR, Inc.
22
PG-DOC-GVQC2.1-UM-EN-REVB
Encapsulated PDFsDICOM compatible encapsulated PDFs can be opened from any source. When viewing encapsulated PDFs, GEARView QC displays scroll bars and paging buttons for navigating multipage files, as well as a context menu with the following commands.
ZoomZooms the image by the selected amount.
Image detailsOpens the image details window in figure 3.9.
ExportLets you export all or portions of the study to PDF or DICOM.

3.3 Retrieving studiesStudies from sources other than the GEARView QC server can be viewed but not edited. Therefore you must “retrieve” (copy) any studies that you intend to modify from the source of origin to the GEARView QC server.
1. In the Patient List tab, right-click the name of the study you wish to retrieve.
2. In the context menu, click Retrieve study. Alternately, you can right-click the patient name and click Retrieve patient in the context menu. This retrieves all studies for the patient. GEARView QC begins retrieving the studies, and the status is displayed in the job queue. Repeat this step until you have retrieved all studies of interest.
Viewing the contents of the GEARView QC server
Perform the following steps to view all of the studies you have retrieved onto the GEARView QC server.
1. In the Source list, select GEARView QC.
2. Click Clear to clear all search criteria, then click Search. (Or enter search criteria to search for specific studies.)The studies appear in the Patient List tab. You can now perform editing and other QC operations.
Figure 3.5 Retrieve study command in the study context menu
GEARView QC
PG-DOC-GVQC2.1-UM-EN-REVB © 2013 PACSGEAR, Inc.
23

3.4 Editing studies from the Patient List tabMany common QC tasks can be performed in the Patient List tab. Additional tasks can be performed in the patient tabs described in section 3.5.
Note: Any actions described in this chapter that affect studies or series of 200 or more images may require extended wait periods.
Reassigning studies and seriesYou can reassign studies and series simply by dragging them within the Patient List tab. Studies can be dragged to other studies, or series to other studies or patients. When dragging, a confirmation dialog box is displayed when you release the mouse button. Choose whether to move or copy the study or series. Note that the terms move and copy can be misleading because the DICOM tags of the moved or copied items are not identical to the original. That is, GEARView QC reats the series initially as “Unassigned,” and changes certain DICOM tags accordingly. You can assign the series by dragging it to another study within the patient list. If all series are moved out of an unassigned study, the study disappears. When series are reassigned, the associated DICOM tags are updated automatically. However, you can make additional edits if needed using the Edit patient/study details context menu.
Adding a patientYou can manually add a new patient study to the GEARView QC server.
1. On the main screen above the Source list, click the add button.
The Edit Details dialog box in figure 3.9 appears, except that the name field shows “New Patient Record” and the patient ID box is filled in automatically with a new, unused ID.
2. Follow the instructions below under Edit Patient Details to enter patient information.
Figure 3.6 Reassign confirmation dialog box
Figure 3.7 Add button
GEARView QC
© 2013 PACSGEAR, Inc.
24
PG-DOC-GVQC2.1-UM-EN-REVB
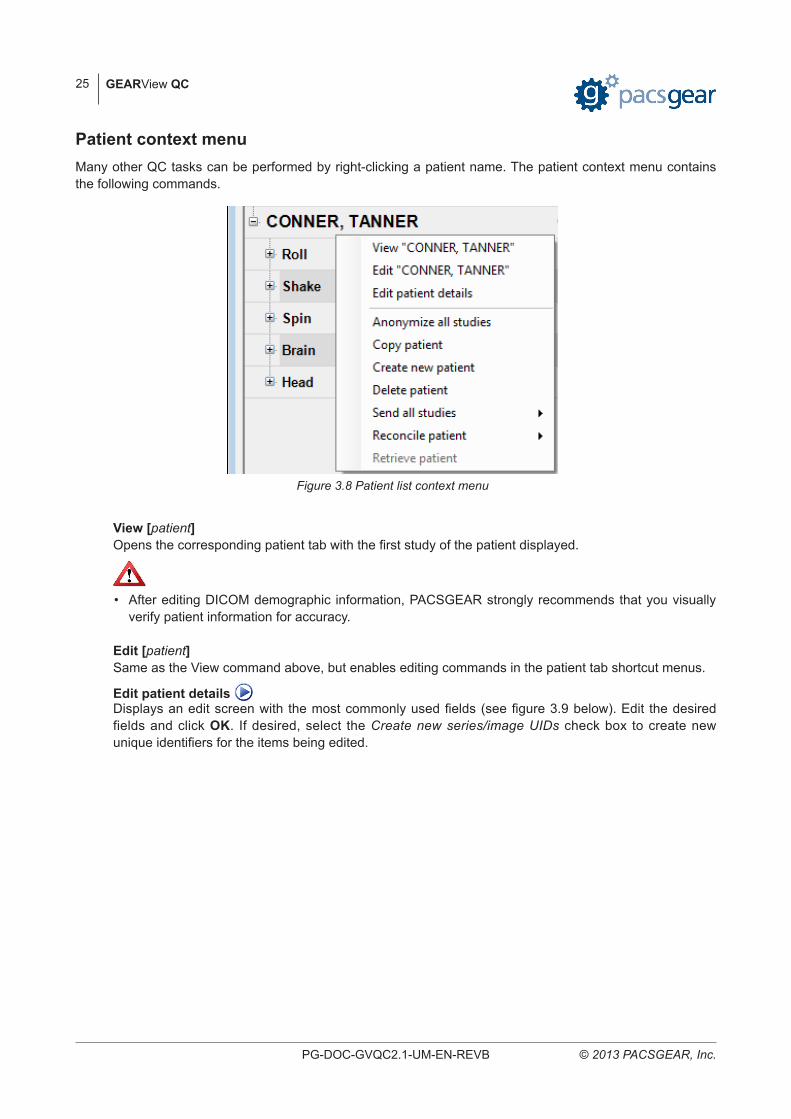
Patient context menuMany other QC tasks can be performed by right-clicking a patient name. The patient context menu contains the following commands.
View [patient]Opens the corresponding patient tab with the first study of the patient displayed.
• After editing DICOM demographic information, PACSGEAR strongly recommends that you visually verify patient information for accuracy.
Edit [patient]Same as the View command above, but enables editing commands in the patient tab shortcut menus.
Edit patient details Displays an edit screen with the most commonly used fields (see figure 3.9 below). Edit the desired fields and click OK. If desired, select the Create new series/image UIDs check box to create new unique identifiers for the items being edited.
Figure 3.8 Patient list context menu
GEARView QC
PG-DOC-GVQC2.1-UM-EN-REVB © 2013 PACSGEAR, Inc.
25

AdvancedClick Advanced to display an edit screen with all available fields (see figure 3.10 below). You can search for relevant information by entering a criterion in the Find box and clicking Find next. You can also right-click any row and click Edit tag or Delete tag in the context menu.
Edit tagOpens the Add/Edit Tag dialog box (see figure 3.11 below). Edit the tag values as desired and click OK. Note that the fields available for editing differ depending on the tag value selected.
Delete tagDeletes the tag from the patient details.
Figure 3.10 Edit details (advanced) dialog box
Figure 3.9 Edit details (simple) dialog box
GEARView QC
© 2013 PACSGEAR, Inc.
26
PG-DOC-GVQC2.1-UM-EN-REVB

Special Note: Editing Patient Orientation TagsGEARView QC displays patient orientation tags on image thumbnails differently than they appear in the Patient Details dialog box. In the example below, the value of the patient orientation tag is “P\F” (meaning, “the right edge of the image is toward the Posterior, and the bottom edge is toward the Foot”) but it appears in the thumbnail as “H\A” (meaning, “the top edge of the image is toward the Head, and the left edge is toward the Anterior,” see figure 3.13).
The standard tag value indicates the right and bottom edge of the image, but GEARView QC displays the complementary values in the left and top edges of the image. Therefore when editing the tag, you must remember to use the complementary values of what you wish to display.
After editing DICOM patient orientation information, PACSGEAR strongly recommends that you visually verify patient orientation tags for accuracy.
Figure 3.11 Add/Edit Tag dialog box
Figure 3.12 Patient Orientation tag with or value of "P\F", corresponding to the right and bottom edges of the image
GEARView QC
PG-DOC-GVQC2.1-UM-EN-REVB © 2013 PACSGEAR, Inc.
27

Complementary ValuesA → PP → AL → RR → LF → HH → F
Anonymize all studies Creates anonymized copies of all studies under the selected patient and displays them at the top of the patient list under the name “Anon[number].”
Copy patient Creates a copy of the patient and all studies of the patient in the Patient List tab. The copy is given a new MRN by the program.
Create new patientOpens the Edit Details dialog box in figure 3.9. Type or select patient details, then click OK. The new patient appears in the Patient List tab.
Delete patientDeletes the patient and all associated studies from the GEARView QC server. None of the original data on the source of origin is affected.
Send all studiesSends the patient and all associated studies to their DICOM source of origin. Use this command when you are finished with QC tasks for the patient on the GEARView QC server. If more than one store source exists in the Source list, a submenu becomes available for choosing the desired source.
Take care to choose the correct source: if you choose a different source than the source of origin, the original unedited study will remain on one source, with the newly edited study on a different source.
Reconcile patient Click to open the Reconcile Patient screen. In this screen, you can copy the patient information directly from a modality worklist server to simplify data entry and ensure accuracy.
Note: The Reconcile patient command is only available if a worklist source has been specified in the DICOM settings.
Figure 3.13 The tag's complementary values are displayed on the left and top edges of the image
GEARView QC
© 2013 PACSGEAR, Inc.
28
PG-DOC-GVQC2.1-UM-EN-REVB
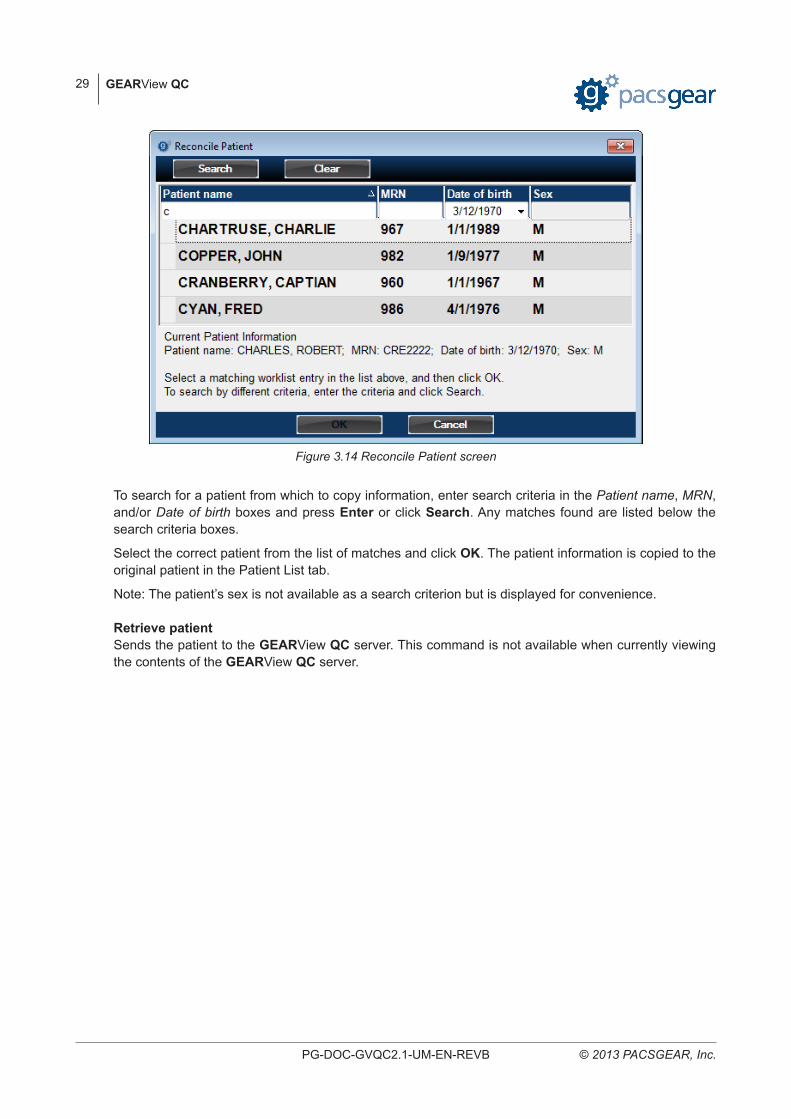
To search for a patient from which to copy information, enter search criteria in the Patient name, MRN, and/or Date of birth boxes and press Enter or click Search. Any matches found are listed below the search criteria boxes.
Select the correct patient from the list of matches and click OK. The patient information is copied to the original patient in the Patient List tab.
Note: The patient’s sex is not available as a search criterion but is displayed for convenience.
Retrieve patientSends the patient to the GEARView QC server. This command is not available when currently viewing the contents of the GEARView QC server.
Figure 3.14 Reconcile Patient screen
GEARView QC
PG-DOC-GVQC2.1-UM-EN-REVB © 2013 PACSGEAR, Inc.
29
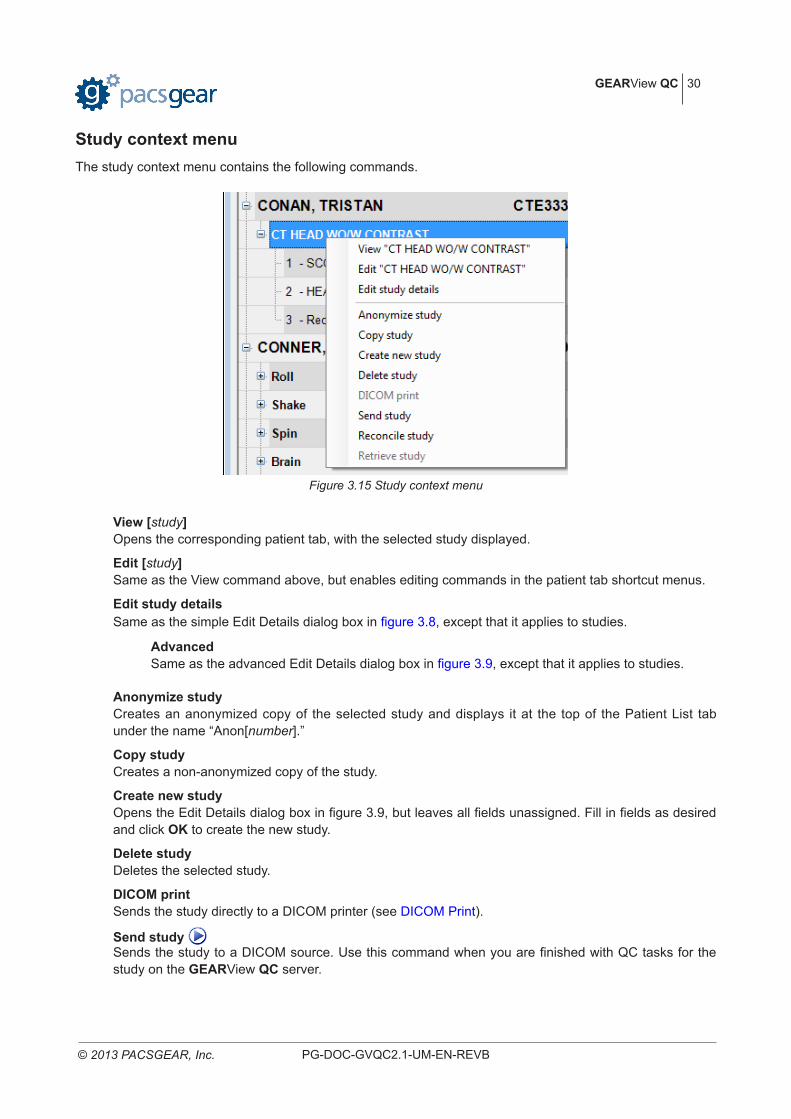
Study context menu The study context menu contains the following commands.
View [study]Opens the corresponding patient tab, with the selected study displayed.
Edit [study]Same as the View command above, but enables editing commands in the patient tab shortcut menus.
Edit study detailsSame as the simple Edit Details dialog box in figure 3.8, except that it applies to studies.
AdvancedSame as the advanced Edit Details dialog box in figure 3.9, except that it applies to studies.
Anonymize studyCreates an anonymized copy of the selected study and displays it at the top of the Patient List tab under the name “Anon[number].”
Copy studyCreates a non-anonymized copy of the study.
Create new studyOpens the Edit Details dialog box in figure 3.9, but leaves all fields unassigned. Fill in fields as desired and click OK to create the new study.
Delete studyDeletes the selected study.
DICOM printSends the study directly to a DICOM printer (see DICOM Print).
Send study Sends the study to a DICOM source. Use this command when you are finished with QC tasks for the study on the GEARView QC server.
Figure 3.15 Study context menu
GEARView QC
© 2013 PACSGEAR, Inc.
30
PG-DOC-GVQC2.1-UM-EN-REVB

Reconcile studySame as for Reconcile Patient, except that additional study-specific search fields are available.
Retrieve studySends the study to the GEARView QC server. This command is not available when currently viewing the contents of the GEARView QC server.
Figure 3.16 Reconcile Study screen
GEARView QC
PG-DOC-GVQC2.1-UM-EN-REVB © 2013 PACSGEAR, Inc.
31

Series context menuThe series context menu contains the following commands.
View [series]Opens the corresponding patient tab, with the selected series displayed.
Edit [series]Same as the View command above, but enables editing commands in the patient tab shortcut menus.
Edit series detailsSame as Edit study details, but with series-specific fields and tags displayed.
Copy seriesCreates a copy of the series.
Delete seriesDeletes the series from the study.
DICOM printSends the series directly to a DICOM printer (see DICOM Print).
Job queueThe job queue at the bottom of the Patient List tab displays details of jobs in progress. A job refers to a study that is being sent from a DICOM source to GEARView QC, or vice versa.
Figure 3.18 Job queue
Figure 3.17 Series context menu
GEARView QC
© 2013 PACSGEAR, Inc.
32
PG-DOC-GVQC2.1-UM-EN-REVB

3.5 Editing studies in patient tabs
Opening patient tabsDouble-click a series, study, or patient in the Patient List tab. The corresponding patient tab opens. Any number of patient tabs can be open at the same time, depending on your PC memory.
Parts of the patient tab and program screen
The contents of the patient tabs and other parts of the program screen are described as follows.
A Patient List tab. Click to display the patient list.
B Exam history icon. An icon is displayed for each exam (study) associated with the patient. Each icon shows the modality (VL, MR, CT, etc.) and date/time of the exam. The icons appear in order by date/time, with most recent studies first. Click an icon to display a new exam strip containing all series in the exam. If an opened exam strip is off screen, you can jump to it by clicking its exam history icon. You can also delete a study by clicking its exam history icon and pressing the Delete key on the PC.
C Patient tab. To switch between opened patient tabs, simply click the desired tab. If a particular exam strip is not displayed in the tab, click one or more of the exam history icons.
D An overlay of the number of the currently displayed image. If a series contains multiple images, you can scroll through the images using the mouse wheel.
E Tab scroll buttons. Click to move open tabs to the left or right.
F The settings menu. Click to view available commands.
A
HIJ
K
L
B C FED G
M
Figure 3.19 Patient tabs
GEARView QC
PG-DOC-GVQC2.1-UM-EN-REVB © 2013 PACSGEAR, Inc.
33

G Help menu. Click to view the user’s manual, view or change the license, or to switch display languages.
H Close button. Click to close the exam strip. At any time you can reopen the exam by clicking its exam history icon.
I An overlay of the main study information.
J Exam strip. The horizontal strip containing a header (K) and all series thumbnails (L) in an exam.
K Exam header. Contains exam information (the date/time and name of the exam). Right-click this area to open a context menu containing commands described elsewhere in this manual. Double-click to open the Image details window.
L Series thumbnail (hereinafter, thumbnail). Each exam contains one or more series, and each series contains one or more images. Each series is shown as a thumbnail in the exam strip.
M An overlay of the size of the currently displayed image (in pixels).
OverlaysThe text that is superimposed over images, such as in D, I, and M above, is called an overlay. To display or hide overlays, right-click a thumbnail and click Text On/Off, or click a thumbnail and press the A keyboard shortcut.
Figure 3.20 Exam strip context menu
GEARView QC
© 2013 PACSGEAR, Inc.
34
PG-DOC-GVQC2.1-UM-EN-REVB

Reassigning studies and seriesLike the Patient List tab, the patient tabs allow drag-and-drop reassigning of studies and series. You can drag series and studies in a variety of ways.
A You can drag exam history icons to other exam history icons, patient tabs, studies, and series.
A
Figure 3.21 Dragging exam history icons
GEARView QC
PG-DOC-GVQC2.1-UM-EN-REVB © 2013 PACSGEAR, Inc.
35

B You can drag entire studies to exam history icons, patient tabs, and other studies.
BFigure 3.22 Dragging studies
GEARView QC
© 2013 PACSGEAR, Inc.
36
PG-DOC-GVQC2.1-UM-EN-REVB

C You can drag series to exam history icons, patient tabs, studies, and other series.
Moving or copying a study or series in the patient tabs is equivalent to reassigning the study or series as described in section 3.4. The new series is initially “unassigned.”
Figure 3.24 Unassigned study
C
Figure 3.23 Dragging series
GEARView QC
PG-DOC-GVQC2.1-UM-EN-REVB © 2013 PACSGEAR, Inc.
37

3.6 Editing images and series
Viewing and manipulating imagesGEARView QC provides you with convenient tools to view and manipulate images. The tools available differ depending on the type of image.
Window controlsThe following window controls are available.
Full screenTo open an image in a full-screen viewport, double-click its thumbnail in the exam strip or click the Full screen button (figure 3.25 B).
CompareClick the Compare button (figure 3.25 A) to open the image in a half-screen viewport. Click the Compare button of a second image to open the second image in a half-screen viewport in the other half of the screen. This enables easy comparisons of two images.
Figure 3.25 A: Compare button; B: Full screen button; and C: Close button. The Close button is only visible if the image is displayed in Compare or Full Screen viewport.
A
B C
Figure 3.26 Compare view
GEARView QC
© 2013 PACSGEAR, Inc.
38
PG-DOC-GVQC2.1-UM-EN-REVB

Linking seriesWhen two series are opened in compare viewports, their scrolling behavior becomes linked by default if they satisfy two conditions: 1) the series are from the same exam; and 2) the series reside on the same plane (as determined by the relevant DICOM patient orientation tags). When two series are linked, scrolling performed by the user on one of the series is likewise applied, to the extent possible, in the other series. Linked series are identified by the word “Linked” appearing at the lower left of each series. When linking is enabled, a “Link “command appears in each series’ context menu that allows you to turn linking ON and OFF (see figure 3.27 below).
CloseAny time an image is opened in a full-screen or compare viewport you can return to thumbnail view by double-clicking the image again, or by clicking its Close button (see figure 3.25 C).
Cine imagesThis button is only available if the series contains more than one image (see figure 3.28 A below). Click to automatically cine through all images in the series. After clicking, the button changes to a Pause button. Click Pause to pause the cine. You can also press C on the keyboard to Cine/Pause images.
Cine sliderThis slider is only available if the series contains more than one image (see figure 3.28 B). Drag the slider to the right or left to manually cine forwards or backwards through images in the series. You can also rotate the mouse wheel.
MPEG controlsThese controls are available when viewing MPEG files (see figure 3.29).
Figure 3.27 Linked series
AB
Figure 3.28 A: Cine images button; and B: Cine slider
AC DB
Figure 3.29 A: Video playback; B: move back/forward one frame; C: time display; and D: scrub control
GEARView QC
PG-DOC-GVQC2.1-UM-EN-REVB © 2013 PACSGEAR, Inc.
39
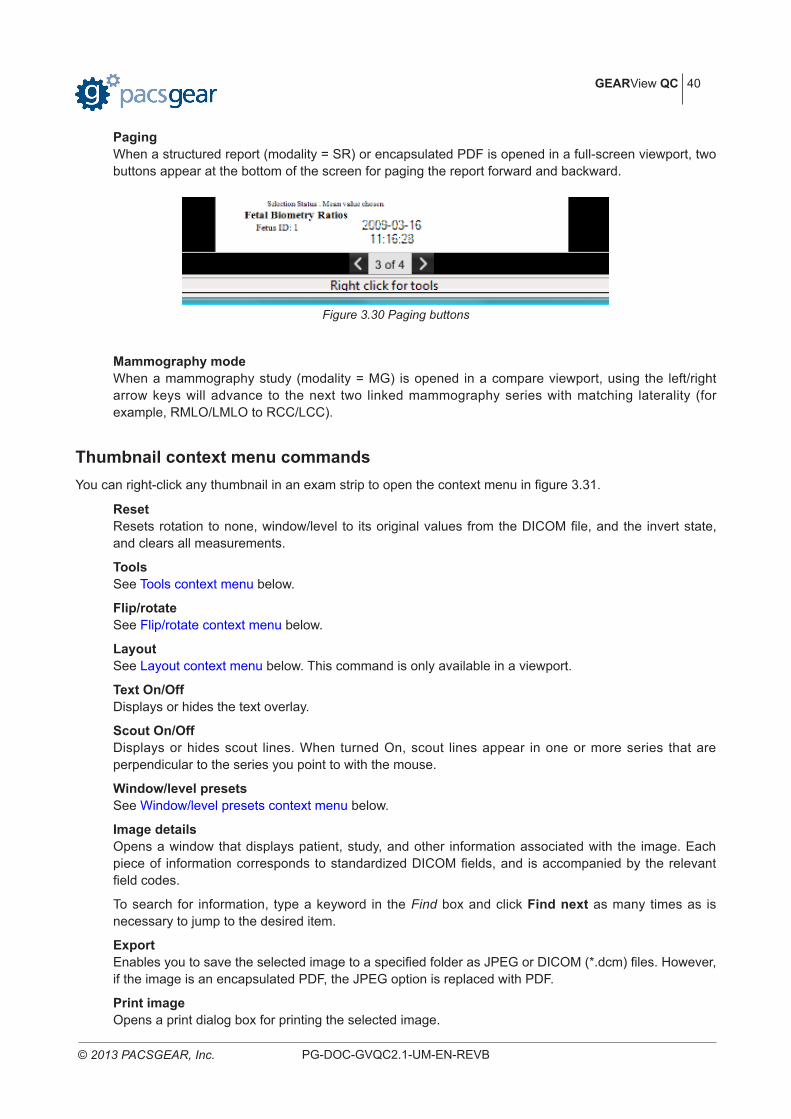
PagingWhen a structured report (modality = SR) or encapsulated PDF is opened in a full-screen viewport, two buttons appear at the bottom of the screen for paging the report forward and backward.
Mammography modeWhen a mammography study (modality = MG) is opened in a compare viewport, using the left/right arrow keys will advance to the next two linked mammography series with matching laterality (for example, RMLO/LMLO to RCC/LCC).
Thumbnail context menu commandsYou can right-click any thumbnail in an exam strip to open the context menu in figure 3.31.
ResetResets rotation to none, window/level to its original values from the DICOM file, and the invert state, and clears all measurements.
ToolsSee Tools context menu below.
Flip/rotateSee Flip/rotate context menu below.
LayoutSee Layout context menu below. This command is only available in a viewport.
Text On/OffDisplays or hides the text overlay.
Scout On/OffDisplays or hides scout lines. When turned On, scout lines appear in one or more series that are perpendicular to the series you point to with the mouse.
Window/level presetsSee Window/level presets context menu below.
Image detailsOpens a window that displays patient, study, and other information associated with the image. Each piece of information corresponds to standardized DICOM fields, and is accompanied by the relevant field codes.
To search for information, type a keyword in the Find box and click Find next as many times as is necessary to jump to the desired item.
ExportEnables you to save the selected image to a specified folder as JPEG or DICOM (*.dcm) files. However, if the image is an encapsulated PDF, the JPEG option is replaced with PDF.
Print imageOpens a print dialog box for printing the selected image.
Figure 3.30 Paging buttons
GEARView QC
© 2013 PACSGEAR, Inc.
40
PG-DOC-GVQC2.1-UM-EN-REVB

DICOM printSee DICOM Print below.
Copy seriesCreates a copy of the series.
Delete imageDeletes the current image. If deleting from a series, only the currently displayed image is deleted. If the series contains only one image, the Delete image command is unavailable.
Delete seriesDeletes the current series. Note that you can also delete series by clicking the series and pressing the Delete key on the PC.
Edit image detailsSame as the Advanced editing screen described in figure 3.9, with the following two features added.
Show private groupsSelect this check box to display only user specified details.
Add Click this button to display the Add/Edit Tag dialog box (the same as figure 3.10 except that the fields are blank until you enter new information).
Figure 3.31 Context menu for images and series in studies. Note: Some commands are only available if the image resides on the GEARView QC server.
GEARView QC
PG-DOC-GVQC2.1-UM-EN-REVB © 2013 PACSGEAR, Inc.
41

Adding Private TagsIf you need to associate information with studies that is not supported by standard DICOM tags, you can create a private tag. To distinguish a private tag from a standard one, you must use an odd number for the group number.
Reconcile seriesSame as Reconcile study, but with series-specific search criteria.
Split series Splits the current series at the current image. A new series thumbnail is created to the right of the original one. The original series contains all images up to and including the split point, and the new thumbnail contains all images after the split point.
Mask/textSee Mask/text below.
ShutterSee Shutter below.
Selection toolSwitches the cursor to the standard pointer to allow dragging.
Add markerSee Add marker below.
Save W/LLocally saves any unsaved window/level edits to the image.
Save all image editsLocally saves all edits to the image.
GEARView QC
© 2013 PACSGEAR, Inc.
42
PG-DOC-GVQC2.1-UM-EN-REVB

Tools context menu
Window/levelChanges the cursor to the window/level cursor. Drag the cursor horizontally or vertically over an image or thumbnail to adjust the window or level, respectively.
ZoomChanges the cursor to the zoom cursor. Drag the cursor vertically over an image or thumbnail to zoom in or out.
PanChanges the cursor to the pan cursor. Drag the pan cursor over an image or thumbnail to pan (drag) the image in any direction. Note that you can only pan left and right in the full-screen viewport. Note that the edges of images cannot be panned beyond the edges of the viewport.
CineSelect this command to cine through images in a series. This command only works if the series contains more than one image.
• PACSGEAR displays measurement values from the modality that is responsible for generating the images. If the modality is incorrectly configured or defective, measurements may not be correct.
MeasureAfter selecting this command, click two points on the image in succession: a start point and an end point. A line appears between the two points with the distance between them measured in units of millimeters. After the first line is displayed, you can move either of the two points to new locations in order to measure new distances. To delete a line, place the pointer over an endpoint so that the line turns yellow, then press the Delete key.
Figure 3.32 Tools context menu
GEARView QC
PG-DOC-GVQC2.1-UM-EN-REVB © 2013 PACSGEAR, Inc.
43

Measure pixelAfter selecting this command, click and hold down the mouse button over any point on the image to display the pixel value at that point. One value is shown for grayscale images, and three points are shown (R, G, and B) for color images.
Measure angleAfter selecting this command, click three points on the image in succession: a start point, a vertex, and an end point. Lines appear between the vertex and start and end points, and the resultant angle is displayed in units of degrees (see figure 3.34 below). After the first angle is displayed, you can move any of the three points to new locations in order to measure new angles.
Measure Cobb angleAfter selecting this command, click four points on the image in succession: a start and end point for line 1, and a start and end point for line 2. The two lines appear along with a third line between the first two lines, and the Cobb angle is displayed (the angle formed by the first two lines where the vertex is assumed).
Figure 3.34 Use the Measure Angle tool to measure angles in images
Figure 3.33 Use the Measure tool to measure portions of an image
GEARView QC
© 2013 PACSGEAR, Inc.
44
PG-DOC-GVQC2.1-UM-EN-REVB

Measure ROIAfter selecting this command, click and drag on the image to create, size, and shape an ellipse around the region of interest. The ellipse’s area is displayed along with that area’s average pixel value and standard deviation of pixel values.
InvertInverts black and white values on grayscale images. Has no effect on color images.
• After rotating or flipping an image, series, or study, PACSGEAR strongly recommends that you visually verify the orientation before saving the changes.
Figure 3.35 Use the Measure Cobb angle tool to measure angles in images
Figure 3.36 Measuring with the ROI tool
GEARView QC
PG-DOC-GVQC2.1-UM-EN-REVB © 2013 PACSGEAR, Inc.
45

Flip/rotate context menu Rotate right 90Rotates the image or thumbnail ninety degrees clockwise
Rotate left 90Rotates the image or thumbnail ninety degrees counterclockwise
Rotate 180Rotates the image or thumbnail one hundred and eighty degrees
Flip horizontalFlips the image horizontally (on its vertical axis)
Flip verticalFlips the image vertically (on its horizontal axis)
Layout context menu The Layout context menu is only available when the study is displayed in a viewport, and is useful only if there is more than one slice (image) in the series. Select 1 x 1, 2 x 2, or 3 x 3 from the submenu to display a “tiled” layout of slices. Use the Up/Down arrow keys or mouse wheel to scroll slices one-by-one through the tiles, or use the Page Up/Page Down keys to scroll them screen-by-screen.
If there are not enough slices to fill the layout, portions of the layout are left blank.
Figure 3.38 Layout command with submenu
Figure 3.37 Flip/rotate context menu
GEARView QC
© 2013 PACSGEAR, Inc.
46
PG-DOC-GVQC2.1-UM-EN-REVB

Window/level presets context menu The Window/level presets context menu contains a submenu with a selection of preset window/level values appropriate for different body parts or viewing objectives. The presets available differ depending on the image/modality, and they can be edited in the presets.xml file in the GEARView QC installation directory.
You can choose the preset most appropriate for your image, and then fine-tune the window/level setting as desired by using the Window/level tool described above. Notice that the menu includes lookup table (LUT) settings if the image is in color.
Image detailsDisplays the Image details screen (figure 3.41 below).
Show private groupsSelect this check box to display only “private” (user specified) tags.
Figure 3.39 A 3 x 3 layout
GEARView QC
PG-DOC-GVQC2.1-UM-EN-REVB © 2013 PACSGEAR, Inc.
47

Figure 3.41 Image details screen
Figure 3.40 An example of a possible Window/level preset submenu
GEARView QC
© 2013 PACSGEAR, Inc.
48
PG-DOC-GVQC2.1-UM-EN-REVB

• After adding a mask, shutter, or marker to an image, series or study, PACSGEAR strongly recommends that you visually verify their placement before saving the changes.
Mask/text Enables you to mask portions of images, for example to anonymize a study by hiding any patient demographics burned into the images. Select the command in the context submenu, and drag a rectangle on the portion of the image you wish to mask. A confirmation message appears prompting whether or not to apply the mask to all images in the series.
Annotating masks You can type annotations directly on masks. To enter text the first time, double-click the mask to switch to annotation mode, then type the desired text. To add to or edit existing text, single-click the mask then click anywhere in the text to specify an insertion point.
Note• Moving the cursor outside of the mask cancels annotation mode.
• Text does not wrap within the mask. Use carriage returns as needed.
• Text cannot be added to masks that have already been saved.
• The font size scales with the image zoom level.
Changing fontsClick a mask to select it, then right-click and select Choose font from the context menu. A dialog box appears in which you can adjust the font, style, and size of the annotations.
Figure 3.42 Mask applied to a CT image
GEARView QC
PG-DOC-GVQC2.1-UM-EN-REVB © 2013 PACSGEAR, Inc.
49

Shutter Similar to the mask, but typically used to “shutter” portions of images. Drag on the image to select the area of interest. All portions of the image outside of the selected area are shuttered. A confirmation message appears prompting whether or not to apply the shutter to all images in the series.
Add marker Displays markers that can be placed on an image, for example to correct a mistakenly placed Left/Right marker.
Creating custom markers
You can create your own markers and have them appear in the Add Marker dialog box. Simply create your marker in .gif format, and save the file in the ...GEARView QC/Client/config/markers/ directory.
Figure 3.44 Select a marker and click OK to place it on the image, then move or resize it as needed
Figure 3.43 Use the shutter to hide portions outside of the area of interest
GEARView QC
© 2013 PACSGEAR, Inc.
50
PG-DOC-GVQC2.1-UM-EN-REVB

• PACSGEAR does not recommend using printed film for clinical diagnosis and/or direct measurements.
• Before using the 1 x 1 TRUESIZE option, verify that your printer supports this option by printing and comparing measurements from the original and copied films.
DICOM printPrints all or part of a study on a DICOM printer configured according to the instructions in “Adding or editing a source.” When you click this command, the DICOM Print dialog box appears (see figure 3.45 below). Enter the following settings as needed and then click OK.
PrinterNameSelect the name of the desired printer from the list.
LayoutColumns x RowsSelect from various preset print layouts of up to six columns by six rows of frames. If there are fewer images in the series than cells in the selected layout, the excess cells remain blank. If the image(s) belong to a CR, DX, or MG study, the 1 x 1 TRUESIZE layout becomes available.
Figure 3.45 DICOM Print dialog box
GEARView QC
PG-DOC-GVQC2.1-UM-EN-REVB © 2013 PACSGEAR, Inc.
51

ContentStudySelect to print all images in the current study.
SeriesSelect to print all images in the current series.
ImageSelect to print only the current image.
OrientationPortrait/LandscapeSelect to print in portrait or landscape orientation. This setting overrides the portrait/landscape setting in the Add/Edit DICOM Source dialog box.
AutomaticSelect to use the setting in the Add/Edit DICOM Source dialog box.
GEARView QC
© 2013 PACSGEAR, Inc.
52
PG-DOC-GVQC2.1-UM-EN-REVB

3.7 Working in the Exceptions and Inbox foldersThe sources in the Source list (see figure 3.2) described up to now are sources from which you can actively retrieve studies onto the GEARView QC server. By contrast, the Exception and Inbox folders are views of studies that have been “pushed” onto the GEARView QC server either automatically or by external entities.
Opening a folderTo view the contents of a folder, simply click the Source list on the main screen and select either Exceptions Folder or Inbox Folder. Click Search to view all studies in the folder, or enter search criteria to narrow search results.
Exceptions folderWhen you retrieve studies, GEARView QC checks whether any of the incoming studies have been previously flagged as exceptions, typically due to having duplicate MRNs (or Patient IDs). If such studies are retrieved, they are placed in the GEARView QC server and highlighted in red to indicate that they are exceptions. Additionally, they appear in the Exceptions folder, giving you a centralized screen from which to perform QC operations specifically on exceptions.
The following actions can be performed using the context menu in both the Inbox and Exceptions folders.
View [patient/study/series]Same as View [patient/study/series] described earlier in this chapter.
Edit [patient/study/series]detailsSame as Edit [patient/study/series] details described earlier in this chapter.
Delete [patient/study/series]Deletes the item from the GEARView QC server and the Inbox/Exceptions folder.
Remove from FolderRemoves the study from the Inbox/Exceptions folder, but does not remove it from the GEARView QC server.
Move to FolderDisplays a submenu of folders to which you can move the patient, study, or series.
Figure 3.46 Exceptions folder
GEARView QC
PG-DOC-GVQC2.1-UM-EN-REVB © 2013 PACSGEAR, Inc.
53

Reconcile [patient/study/series]Displays a reconcile screen that contains similar fields as Reconcile [patient/study/series]described earlier in this chapter. Reconciliation of exceptions differs from normal reconciliation in that the studies that you reconcile against come only from the GEARView QC server rather than from a worklist. When reconciliation is complete, the item is removed from the folder but remains on the GEARView QC server.
Some PACS may require you to change all UIDs before sending studies back to their source of origin. Use the Edit study details command, then select the Create new image/series UIDs check box.
Inbox folderThe Inbox folder contains studies sent to it from modalities and other sources. For example, a physician might use PacsSCAN to import studies from an outside institution, then send those studies to the QC department for reconciliation with the new institution’s EHR system. The study context menu in the Inbox folder contains the actions described above, but reconciliation is performed against a worklist just as when reconciling in the GEARView QC server patient list tab.
When reconciliation is complete, the item is removed from the folder but remains on the GEARView QC server patient list tab unless the Inbox folder has been set up for Auto Send (see section 2.2), in which case the study is sent to the specified source.
Figure 3.47 Inbox folder
GEARView QC
© 2013 PACSGEAR, Inc.
54
PG-DOC-GVQC2.1-UM-EN-REVB

4 Saving and Sending StudiesOnce you have completed all editing and QC operations, save your changes on the GEARView QC server, then send the studies to a PACS or other source, typically their source of origin.
4.1 Saving your changesSome changes such as edits to demographics or moving and copying, are saved immediately by the program. However changes made directly to images themselves must be saved by the user according to the following procedure.
1. Right-click the thumbnail of the image or series you edited.
2. Click Save W/L (to save only Window/Level changes), or Save all image edits.
4.2 Sending studies It is important to remember that any changes you make to studies only affect data on GEARView QC. To reflect your changes on PACS or another source, you must send the edited studies back to the source using the Send Study/Send all studies commands available in various context menus (see chapter 3).
4.3 Deleting the original studiesWhen sending your changed studies back to the source of origin, the original studies still remain (they are not overwritten by the changed ones). To avoid unintentional duplication, you must delete the original studies using the functions of the source device itself—GEARView QC cannot delete studies from external sources.
GEARView QC
PG-DOC-GVQC2.1-UM-EN-REVB © 2013 PACSGEAR, Inc.
55

5 Help MenuClick the help button to display the help menu. The following two commands are available in the menu.
User’s Manual (PDF)Displays the user’s manual (this manual) in PDF format. Acrobat Reader 7.0 or later is required to view the manual.
AboutDisplays information about GEARView QC, and the license dialog box. In that dialog box, click Change to enter or edit the software license key and expiration date.
Figure 5.1 Help button... ...and help menu
Figure 5.2 GEARView QC information and license dialog box
GEARView QC
© 2013 PACSGEAR, Inc.
56
PG-DOC-GVQC2.1-UM-EN-REVB

6 Appendix
6.1 Keyboard shortcuts
Window/level preset shortcutsThe following are example keyboard shortcuts for window/level presets. The actual presets configured differ by modality, and can be edited in the presets.xml file located in the installation directory.
F4 AbdomenF5 BoneF6 BrainF7 LiverF8 LungF9 MediastinumF10 Myelogram
Other shortcuts
Page Up/Down Scrolls up/down one screen in layout viewUp/Down Scrolls up/down one image in layout viewRight/Left Jumps to the next/previous series in layout view
A Shows/hides overlaysB Switches to the measure Cobb angle toolC Starts/pauses the selected cine loopI Inverts the current image (grayscale only)M Switches to the measure line toolN Switches to the measure point toolO Measure ROIP Switches to the pan toolQ Reassign toolR Resets the current imageS Shows/hides scout linesV Switches to the measure angle toolW Switches to the window/level toolZ Switches to the zoom tool
Home Jumps to first image of the selected seriesEnd Jumps to last image of the selected series
Delete Deletes the highlighted measurement overlay
GEARView QC
PG-DOC-GVQC2.1-UM-EN-REVB © 2013 PACSGEAR, Inc.
57

6.2 Audit entries
Patient level audit entriesUpdate Patient, change all Series and Image UIDs
Update Patient, change all child UIDs
Update Patient (for example, change Patient Name)
Copy Patient
Delete Patient
Create Patient
Merge Patient
View Patient
Study level audit entriesUpdate Study, change all child UIDs
Update Study (for example, change Study Description)
Move Study
Copy Study
Delete Study
Series level audit entriesUpdate Series, change all child UIDs
Update Series (for example, change Series Date/Time)
Move Series
Copy Series
Delete Series
Image level audit entriesUpdate Image
Copy Image
Delete Image
Image editing audit entriesAdd Mask, Marker, Shutter
GEARView QC
© 2013 PACSGEAR, Inc.
58
PG-DOC-GVQC2.1-UM-EN-REVB

6.3 Anonymizedfields
When anonymizing studies, the following DICOM fields are made blank or changed to random values:
DICOM TAG NAME (0008,0050) Accession Number (0008,0080) Institution (0008,0081) Institution Address (0008,0090) Referring Physician (0008,0092) Referring Physician Address (0008,0094) Referring Physician Phone (0008,0096) Referring Physician ID Sequence (0008,1010) Station Name (0010,1040) Department (0008,1048) Physician of Record (0008,1049) Referring Physician Record ID Sequence (0008,1050) Performing Physician (0010,1060) Reading Physician (0008,1070) Operator (0010,0010) Patient Name (0010,0030) DOB (convert to YYYYMM01) (0010,0032) Birth Time (set to 12:00) (0010,1000) Other Patient IDs (0010,1002) Other Patient IDs Sequence (0008,1005) Patient’s Birth Name (0008,1040) Patient’s Address (0008,1060) Patient’s Mother’s Birth Name (0008,4000) Identifying Comments (0010,1001) Other Patient Names (0010,1090) Medical Record Locator (0010,2180) Occupation (0010,21B0) Additional Patient History (0010,4000) Patient Comments (0010,2154) Patient Phone Number (0032,1031) Requesting Physician ID Sequence (0032,1032) Requesting Physician (0032,4000) Study Comments
GEARView QC
PG-DOC-GVQC2.1-UM-EN-REVB © 2013 PACSGEAR, Inc.
59

6.4 UID change rulesWhen editing, GEARView QC will apply these rules to determine changes to unique identifiers (UIDs). Based on customer feedback, PACSGEAR may change these rules in future releases.
1. When the MRN is edited to match an existing MRN, GEARView QC will NOT change any UIDs.
2. When merging two patients, GEARView QC will change the Patient UID to the new patient and not change any other UIDs.
3. When copying a patent, GEARView QC will create new patient, study, series, and image UIDs.
4. When moving or copying a study, GEARView QC will create new study, series and image UIDs.
5. When moving or copying a series, GEARView QC will create new series and image UIDs.
6. When splitting a series, GEARView QC will create new series and image UIDs for the new series.
7. When deleting an image, GEARView QC will NOT change UIDs.
8. When reconciling a patient from MWL, GEARView QC will update the Patient Name, MRN, DOB and Sex fields. No UIDs are changed.
9. When reconciling a study from MWL, GEARView QC will update available MWL fields, such as Study Description, Study Date/Time, Accession Number, and Referring Physician. The Study UID will be taken from MWL. GEARView QC will create new series and image UIDs.
10. When a study-level tag (for example, Study Description) is edited, GEARView QC will NOT change any UIDs.
11. When a series-level tag (for example, Series Description) is edited, GEARView QC will NOT change any UIDs.
12. When one or more images are modified with a mask, shutter or marker, GEARView QC will create a new series UID for the series, and new UIDs for all images in the series.
13. When receiving an image with the same image, series and study UID, the original image will be retained and the new image will be silently ignored.
14. After receiving and changing a Patient Name with GEARView QC, subsequently retrieved studies with the same MRN will display the updated Patient Name. GEARView QC will display a warning message in the Job Queue indicating that one MRN is associated with two Patient Names. This workflow will be addressed in a future release.
GEARView QC
© 2013 PACSGEAR, Inc.
60
PG-DOC-GVQC2.1-UM-EN-REVB

6.5 Logged eventsThe following operations are recorded in the audit log.
• Update Patient Change All Series And Image UIDs
• Update Study Change All Child UIDs
• Update Series Change All Child UIDs
• Update Series UID
• Update Patient Change All Child UIDs
• Update Patient, Study, Series, or Image
• Move Study, Series, or Image
• Copy Image, Study, Series, or Patient
• Delete Series, Study, Image, or Patient
• Create Patient, or Study
• Merge Patient, Study or Series
• CMOVE
• CSTORE
• Viewed Series, Image Study, or Patient events for when users view patient data (User name, Patient ID, Patient Name, view date timestamp).
GEARView QC
PG-DOC-GVQC2.1-UM-EN-REVB © 2013 PACSGEAR, Inc.
61

7 SupportAt PACSGEAR, your success is our success. If you have any questions or problems, please do not hesitate to contact us.
CustomerSupport(Americas,Asia-Pacific):
+1 925 225 6100 (8:00 am to 5:00 pm Pacific Time). [email protected]
Customer Support (Europe, Middle East, Africa):
+49 (0)89 450 807 600 (08:00 to 17:00 Central European Time). [email protected]
GEARView QC
© 2013 PACSGEAR, Inc.
62
PG-DOC-GVQC2.1-UM-EN-REVB