users manual - classicreload.com fist 2 manual... · tronic manual has hypertext links. clicking on...
TRANSCRIPT
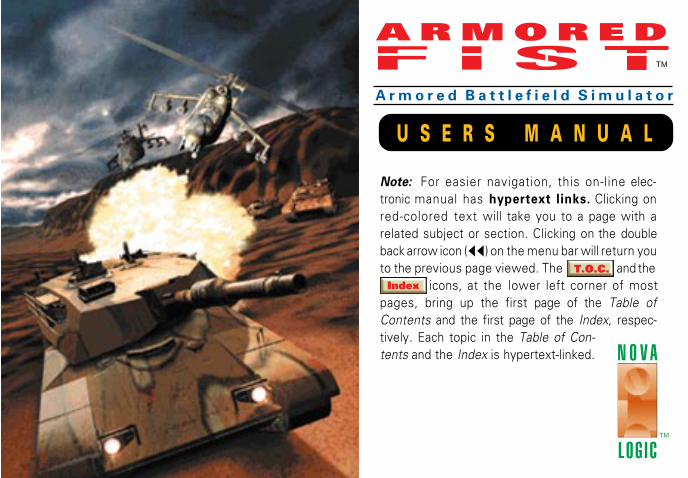
Note: For easier navigation, this on-line elec-tronic manual has hypertext links. Clicking onred-colored text will take you to a page with arelated subject or section. Clicking on the doubleback arrow icon ( . ...) on the menu bar will return youto the previous page viewed. The and the icons, at the lower left corner of mostpages, bring up the first page of the Table ofContents and the first page of the Index, respec-tively. Each topic in the Table of Con-tents and the Index is hypertext-linked.
U S E R S M A N U A L
A R M O R E DTM
A r m o r e d B a t t l e f i e l d S i m u l a t o r
TM
N O V A
LOGIC▲ ▲
T.O.C.Index
2IndexT.O.C.
Dear Armored Fist Player:
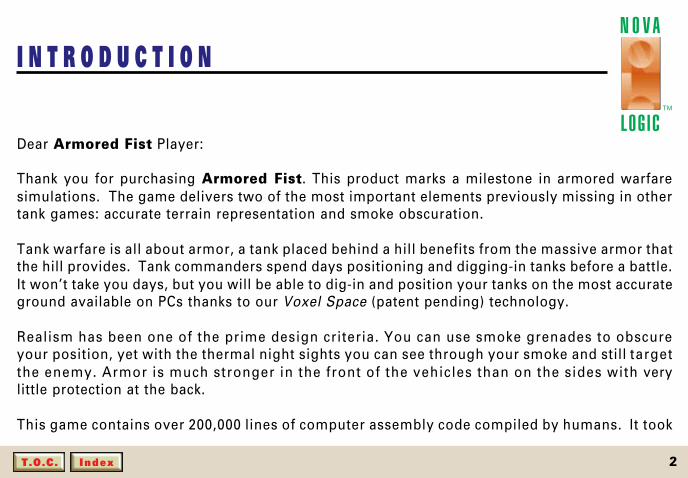
Thank you for purchasing Armored Fist. This product marks a milestone in armored warfaresimulations. The game delivers two of the most important elements previously missing in othertank games: accurate terrain representation and smoke obscuration.
Tank warfare is all about armor, a tank placed behind a hill benefits from the massive armor thatthe hill provides. Tank commanders spend days positioning and digging-in tanks before a battle.It won’t take you days, but you will be able to dig-in and position your tanks on the most accurateground available on PCs thanks to our Voxel Space (patent pending) technology.
Realism has been one of the prime design criteria. You can use smoke grenades to obscureyour position, yet with the thermal night sights you can see through your smoke and still targetthe enemy. Armor is much stronger in the front of the vehicles than on the sides with verylittle protection at the back.
This game contains over 200,000 lines of computer assembly code compiled by humans. It took
I N T R O D U C T I O NTM
N O V A
LOGIC

3IndexT.O.C.
over 8 man years to program Fist, with David Seeholzer putting in a superhuman effort inbringing it all together. John Butrovich and Kyle Freeman provided groundbreaking algorithmsalmost on demand. Joby Otero is responsible for the ultra-real animation.
Voice, music and truly interactive game play make this game one of the few real interactivemultimedia products.
We are very proud of the product that we created for you, we hope you like it as much as we do.
Sincerely,
John A. GarciaPresident

4IndexT.O.C.
C U S T O M E R S U P P O R T & I N F O R M A T I O N
If you have any questions or comments about this program or any of ourother exciting products, feel free to contact us at our Technical SupportLine by calling (818) 878-0325 between 9 AM and 5 PM Pacific Coast Time.You may also visit our website at http://www.novalogic.com.
Armored Fist, Voxel Space, NovaLogic and the NovaLogic logo aretrademarks of NovaLogic, Inc.
IBM, Intel, ADLib, 386MAX, Roland, Microsoft and Microsoft Windowsare registered trademarks of International Business Machines Corpora-tion, ADLib Inc., Qualitas, Roland Corporation and Microsoft Corpora-tion, respectively. Sound Blaster is a trademark of Creative Labs, Inc.
All terms mentioned in this book that are known to be trademarkshave been appropriately capitalized. NovaLogic cannot attest to theaccuracy of this information. Use of a term in this book should not beregarded as affecting the validity of any trademark or service mark.
All Rights Reserved.© 1994 NovaLogic, Inc.

5IndexT.O.C.
C R E D I T SDirection & ProgrammingDavid Seeholzer
Game DesignDavid SeeholzerJohn GarciaStewart Kosoy
Systems and SupportProgrammingJohn Butrovich
Sound and GraphicsProgrammingKyle Freeman
Executive ProducerJohn Garcia
AnimationJoby Otero
Music ComposerJeff Marsh
Music EditorGary Wilens
Sound EffectsRussel Brower
Voice ProducerKent Simon
VoicesRoger SteffensMarc Graue
Manual Writing & EditingDavid GerdingJohn GarciaShyam Tony Reyes
ArtPaul DrzewieckiJohn DuganJohn DugganRod ParongKeith RustEric Scharf
Technical ConsultantsColonel Marvin LeibstoneStewart KosoyPaul Robinson
Mission DesignPaul RobinsonStewart KosoyKyle Freeman
Music ProducerPatric McMenamin

6IndexT.O.C.
Special ThanksLes BernellJay BooneJason CheinJames KaspertJames LamorticelliLee MilliganTim MilliganKeith Rust
CD Package DesignWong and Yeo
Online Electronic ManualDesign & LayoutShyam Reyes
ManufacturingManagement ServiceVictory Bridge

7Index
T a b l e o f C o n t e n t sINTRODUCTION ............................................. 2
Customer Support & Information ................ 4
Credits ............................................................ 5
About Armored Fist .................................... 13
INSTALLATION & TECHNICAL NOTES ..... 16
QUICK START .............................................. 19
CONTROLLING THE GAME ........................ 21Mouse ........................................................ 21Keyboard Shortcut Keys ............................ 22Joystick ...................................................... 22
INPUT DEVICES ........................................... 23Normal Joystick .......................................... 23CH Joystick with Throttle ............................ 24Joystick with Throttle .................................. 24Thrustmaster FCS ...................................... 25Thrustmaster WCS Mark I .......................... 26Playing with Keyboard and Mouse ............. 27
PLAYING THE GAMEVehicle Controls and Displays ................... 28Switching Vehicles ..................................... 28Taking Command ....................................... 29Drivetrain Controls ..................................... 31
Gas and Brake Pedals ............................ 31Steering ................................................... 32Gear Shift ................................................ 33Speedometer ........................................... 34Fuel Gauge ............................................. 34
Viewport Display ........................................ 35Viewport Slew Left / Right ....................... 36Viewport / Turret Angle ........................... 37Viewport Magnify ..................................... 37Night Vision ............................................. 38
Tactical Map ............................................... 39Threat Indicator Display ............................. 40Weapon Select ........................................... 41Weapon Status Indicator ............................ 41Ordnance ................................................... 42
Target Lock ............................................. 44
8Index
Manual Aiming ........................................ 45Firing Weapons ....................................... 46Smoke Grenades .................................... 47
TURRET CONTROLAuto Turret Control ..................................... 48Manual Turret Control ................................ 48Turret Control Settings ............................... 49Engine Smoke ............................................ 49CCV ............................................................ 50Pause ......................................................... 50Air Support and Artillery ............................. 50Air Support ................................................. 51Artillery Support .......................................... 52
MAIN MENUSelect Player .............................................. 54Campaigns ................................................. 55Battles ........................................................ 56Review ....................................................... 57Settings ...................................................... 57About Fist ................................................... 58Quit ............................................................. 58
SETTINGS MENUControls ...................................................... 59
No Joystick .............................................. 60STD Joystick ........................................... 60Flightstick w/ Throttle .............................. 60Thrustmaster FCS ................................... 60CH Flightstick Pro ................................... 60Thrustmaster WCS.................................. 61
External Driver ........................................... 61Calibrate ..................................................... 61Auto Turret ................................................. 62Prompts ...................................................... 62Display ....................................................... 62Sky ............................................................. 63Low, Medium, High Detail .......................... 63Smoke Effects ............................................ 63Sound Settings ........................................... 63
Music On / Off ......................................... 63Sound FX Off, Medium, High .................. 63
CAMPAIGN MAP .......................................... 64Mission Orders ........................................... 65Color ........................................................... 65
COMMAND & CONTROL VEHICLE (CCV) . 66CCV Help ................................................... 67Strategic Map ............................................. 67
9Index
CCV Menu and Status Bar ......................... 69Exit Mission ................................................ 70
COMPANY STATUS SCREEN .................... 70Take Command .......................................... 71Mission Briefing .......................................... 71Map Zoom In/Out ....................................... 71Time Acceleration Switch ........................... 72Unit / Platoon Switch .................................. 72Editing Mode Button ................................... 73Status Bar .................................................. 74Message Window ....................................... 74Unit Information Window ............................ 75Find Platoon ............................................... 75Pause/Play Indicator .................................. 75
Floating Tool Kit (in CCV Mode) ................... 76Select ......................................................... 76Move Map .................................................. 77Set Way-points ........................................... 77Cut .............................................................. 78
EDIT MODE — INTRODUCTION ................. 79Creating Your Own Battle: ......................... 80Modifying an Existing Battle: ...................... 82
EDIT MODE — ADVANCED FEATURES .... 84Entering Edit Mode ..................................... 84Edit Icon ..................................................... 86Set Mission Time ........................................ 86Clear Battle ................................................ 87Terrain Selector .......................................... 87Save Battle ................................................. 88
EDIT MODE FLOATING TOOL KIT ............. 89Select Mission Goal ................................... 90Set Way-points (Enemy) ............................ 91Cut (Edit Mode) .......................................... 91Air Base Placement .................................... 92Artillery Base Placement ............................ 93Place Mine Field ......................................... 93Place Vehicle ............................................. 95Place Tree .................................................. 96Place Target ............................................... 97
COMPANY STATUS SCREEN .................... 98Commander ............................................... 99Advance ................................................... 100Formation ................................................. 101Speed ....................................................... 102

10Index
Setting the Enemy’s Parameters .............. 103
ARMORED COMBAT STRATEGIES ......... 104Preparation for Combat ............................ 107Command, Control, CommunicationsOffensive Operations ............................... 133Defensive Operations ............................... 135Retrograde Operations ............................. 137Combat Support ....................................... 138Combat Service Support .......................... 139
Appendix A: VEHICLES DESCRIPTIONM1A2 Abrams .......................................... 141T-80 .......................................................... 142Bradley IFV .............................................. 143BMP 2 ...................................................... 144AH-64 Apache .......................................... 145Mi-24 Hind ................................................ 146
Appendix B: QUICK REFERENCEM1A2 Controls ......................................... 147T80 Controls ............................................. 148M3 Controls .............................................. 149BMP2 Controls ......................................... 150External View Controls ............................. 151
CCV Map.................................................. 152Menu and Status Bar ............................... 153Floating Tool Kit ....................................... 153Company Status Screen .......................... 154
INDEX ......................................................... 155

11IndexT.O.C.
F i r s t C o n t a c t . . .Minutes before dawn at Hill 203. Hulldown. A rather anonymous place todie should it come to that.
You pop the hatch of the CCV andobserve the valley below, payingspecial attention to the ridge threeclicks north and to the east. Thewind shifts momentarily and youchoke on the fumes from the idlingturbine. The heat from the CCV’sexhaust plumes luminesces in yourdisplay, then vanishes, leaving afoul, coppery taste in your mouth.
According to ELINT and J-STARS,you’ll be facing an armored force of no fewer than four units. ThreeT-80s and at least one BMP are confirmed. Your orders are simple:advance, locate, engage.
You remind yourself that at least the odds are about equal. You’ve gottwo Abrams each escorting two Bradleys, inverted wedge, heading
12IndexT.O.C.
north. The Abrams are riding the safe side of the ridge on theirrespective sides of the valley, with the Bradley at the north-easttip of the wedge on Recon. Hell, no problem at all, you kidyourself.
The other Bradley is hanging back and moving straight and slowdown that alley for all the world to see. You’re hoping the otherside is hungry enough to take the bait. Jones volunteered forthat one. Should he draw first contact, he’ll have to move likehell to avoid going home the hard way. Optimally, he’ll tag theobjective with TOWs from a standoff while the remaining unitsflank and...
You catch yourself from reviewing the scenario yet another timeand drop back down into the CCV, button down. You signal thedriver to get rolling. “Bravo 2, Contact - 320,” comes the urgentsquawk in your ear moments later. It’s Rodriguez in the Recontrack. The reconnaissance is good.
First contact.
13IndexT.O.C.
A b o u t A R M O R E D F I S TBy combining sophisticated battlefield artificial intelligence withNovaLogic’s patent-pending Voxel Space technology,ARMORED FIST brings the intense experience of modern ar-mored combat to your computer screen. While full of adrenaline-pumping action, ARMORED FIST is more than a game of action.It will stump you with its tenacious combat stratagems and willconstantly demand that you tap every ounce of your creativeproblem-solving skills in order to emerge victorious.
In ARMORED FIST, you are given the role of Task Force Com-mander. In various campaigns and battles, you will commandfrom one to four platoons. Each platoon, in turn, can consist ofone to four vehicles, giving you a company of up to sixteenvehicles which you must coordinate effectively in order to meetyour objective. You orchestrate and observe the overall strategicside of your operations from your Command and ControlVehicle (CCV).
At any time you can jump into any one of the armored vehiclesunder your command and experience the heat of the battle firsthand, then jump back to the CCV for an overall picture of the action.
14IndexT.O.C.
There are two vehicle types which you can directly deploy andoperate: Main Battle Tanks (MBTs), which offer brute fire-power and survivability, and Infantry Fighting Vehicles(IFVs), which carry troops, perform reconnaissance and canmove more quickly than their heavily armored brethren. You canalso call in air and artillery support to assist you in completingyour task force objective.
In ARMORED FIST, you can choose to fight with U.S. or Russianhardware. While the geopolitical landscape has undergone anupheaval of epic proportions since the collapse of the SovietUnion, one of the legacies of the decades long Cold War armsbuildup is that for the foreseeable future, mechanized combat willinvolve U.S. machines pitted against Soviet-built machines.
Western forces are equipped with M1A2 Abrams Main BattleTanks and the M3 Bradley Cavalry Fighting Vehicles (CFVs).If you choose to fight from the Eastern perspective, you’ll havethe Russian-built T-80 MBTs and BMP-2 IFVs to work with.
The Western and Eastern systems chosen for ARMORED FISTrepresent battle-proven technologies which saw action in DesertStorm, the Soviet-Afghan conflict, and the Arab-Israeli wars. As asenior military officer observed, “The Abrams MBT, the Bradley
NOTE: For purposes ofsimplicity both IFVs andCFVs will be referred toas IFVs in this manual.
15IndexT.O.C.
vehicle and the T-80 and BMP-2 systems will be ̀ tomorrow’s metalcenturions,’ serving armies in trouble spots around the world.”
ARMORED FIST comes with several built-in Campaign Sce-narios. Each campaign is comprised of a variable number ofmissions. For each mission there are set objectives. Successfullyaccomplish the mission objectives and the overall campaign willbe won.
Introductory and training campaigns are also included withARMORED FIST. This manual is laid out to give players anorderly and thorough introduction to ARMORED FIST. It isstrongly recommended that players read on and learn the featuresand functions sequentially. Players who just can’t wait to getstarted can jump ahead to the “Quick Start” section.
In addition to the included campaigns, ARMORED FIST also letsyou design your own missions using a sophisticated missioneditor. This gives you the ability to test various strategies andplay out “what if” scenarios. Using the editor you can see what ittakes to win when hopelessly outnumbered. Conversely, youcan tilt the odds in your favor to get a flavor for total battlefieldsupremacy.

16IndexT.O.C.
I N S T A L L A T I O N & T E C H N I C A L N O T E S
CD INSTALLATION
Before you can run ARMORED FIST you need to install a few gamefiles onto your hard drive. First insert the ARMORED FIST-CD into yourCD-ROM drive. At the DOS prompt, enter the letter of that drivefollowed by a colon (“:”) and press ENTER. For example, if your CD-ROM unit is your E: drive, type “E:” at the DOS prompt and pressENTER.
Type “CDINSTAL” at the new prompt and press ENTER. Follow theon-screen installation instructions to proceed.
You first will be asked to provide a destination path for the Armored Fistfiles. The default path is C:\FISTCD\. You can change the path to anyvalid path description. You must include the drive letter in any path yougive. For example, if you keep your games in a separate directory onyour D: drive, your path description would be D:\GAMES\FISTCD\
Sound Hardware Configuration
The first time you run ARMORED FIST a file called SOUNDSET will
17IndexT.O.C.
automatically run for you. SOUNDSET creates the sound configura-tion file used by ARMORED FIST. SOUNDSET will prompt you forthe type of devices to use for sound effects and music.
If you subsequently run ARMORED FIST after altering your soundhardware, SOUNDSET must be run before running ARMORED FISTagain. To run SOUNDSET manually, simply type in SOUNDSET fromthe program directory.
SOUNDSET first prompts you for the digital sound device. ARMOREDFIST supports Sound Blaster compatible sound cards for digitalsounds. If you choose to have digital sounds, you will then beprompted for the PORT number, IRQ number, and DMA channelused by your sound card. SOUNDSET will then prompt you for thetype of music device to use.
In all cases, SOUNDSET will try to recommend the correct andbest choice for you. It does this by looking for the environment stringset when you installed your sound card. SOUNDSET will also showyou the current selection if the configuration file already exists.
If, in the future, you change the sound hardware in your computer, youwill need to run SOUNDSET again.
18IndexT.O.C.
HARD DISK MEMORY USAGE
To install the CD version of Armored Fist you will need at least 1megabyte of free space on your hard drive.
To run ARMORED FIST-CD your machine must meet the follow-ing minimum requirements:
❑ A fast 386 or better processor
❑ An IBM compatible VGA card
❑ Microsoft compatible mouse
❑ DOS 3.3 or later
❑ Microsoft CD-ROM extensions 2.21 or later
❑ Free conventional (DOS) memory: 512k
❑ Free extended (XMS) memory: 2500k
❑ 1 megabyte of free hard disk space.
19IndexT.O.C.
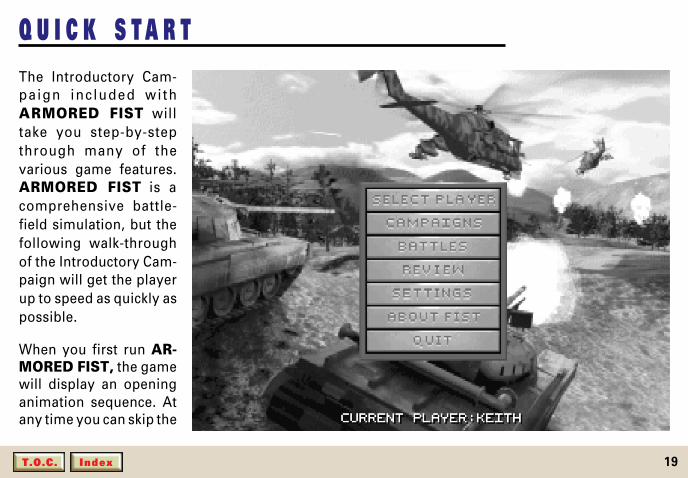
Q U I C K S T A R TThe Introductory Cam-paign inc luded withARMORED FIST willtake you step-by-stepthrough many of thevarious game features.ARMORED FIST is acomprehensive battle-field simulation, but thefollowing walk-throughof the Introductory Cam-paign will get the playerup to speed as quickly aspossible.
When you first run AR-MORED FIST, the gamewill display an openinganimation sequence. Atany time you can skip the

20IndexT.O.C.
animation and get to the Main Game Menu, by pressing ESC.
The Main Game Menu presents you with several options.
Using the mouse, click on the CAMPAIGNS menu choice andthe SELECT PLAYER dialog box will appear.
If this is the first time that you are playing the game you shouldtype in your name and click on “OK.” If you have played beforeyou can click on your name in the selection window and thenclick on “OK.” The next dialog box that will be displayed isSELECT A CAMPAIGN.
Select TRAINING with the mouse pointer and then click on“OK” and the Training Campaign Menu will appear.
Click on any of the four Mission choices and then on theACCEPT button and the Mission will start.
A “bullet” indicates a campaign that has been won.

21IndexT.O.C.
NOTE: Sometimes you willbe asked to click on the rightmouse button while mak-ing a selection. Clicking onthe right button will oftenexecute a variation of thecommand chosen with theleft mouse button. When you are asked to“click” without mentioningwhich button, you shouldclick on the left button.
C O N T R O L L I N G T H E G A M E
The entire game can be played with a mouse. This manual concen-trates on mouse commands. However, note that a joystick andkeyboard may also operate along with the mouse and in somesituations all three can be used at the same time.
The joystick alternatives are discussed in pages 23–26 and keyboard alterna-tives are covered in Appendix C, pages 136-139.
MOUSEClicking and Dragging
Certain passages will instruct you to “click” on an on-screen elementwith the mouse. Simply move the on screen pointer over the desiredelement and press the left mouse button. If you are instructed to“DRAG,” click on the relevant on screen element and HOLD DOWNthe left button. “Drag” the on-screen element to the appropriatelocation while continuing to depress the left button, then release.
22IndexT.O.C.
KEYBOARDShortcut Keys
The keyboard can be used along with the joystick and mouse. See theKeyboard Commands on page 136. For example, pressing “C” whenthe Main Menu is up takes you directly into the Campaigns Menu.Sometimes you will be asked to press two keys. For example, pressingthe “Alt” key first and then the “S” key will bring up the SettingsMenu during game play.
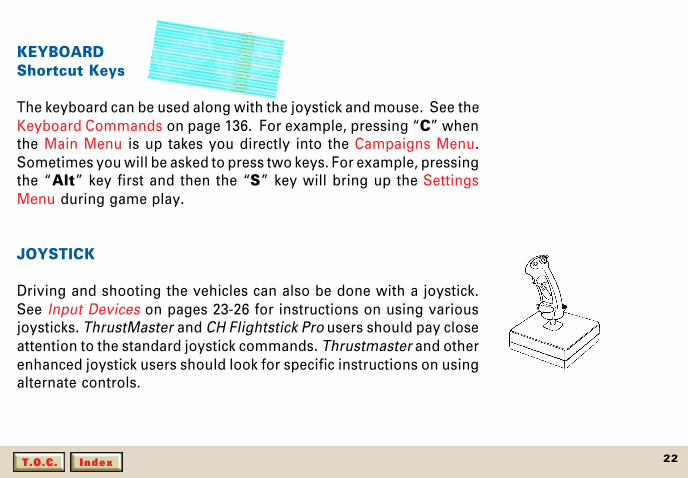
JOYSTICK
Driving and shooting the vehicles can also be done with a joystick.See Input Devices on pages 23-26 for instructions on using variousjoysticks. ThrustMaster and CH Flightstick Pro users should pay closeattention to the standard joystick commands. Thrustmaster and otherenhanced joystick users should look for specific instructions on usingalternate controls.

23IndexT.O.C.
I N P U T D E V I C E S
Normal JoystickAUTO TURRET CONTROL
Press button tofire main weapon
Press button once to lock on nearest targetPress button again to center turret
Press button tofire main weapon
Normal JoystickMANUAL TURRET CONTROL
Press button to lock on nearest target
24IndexT.O.C.
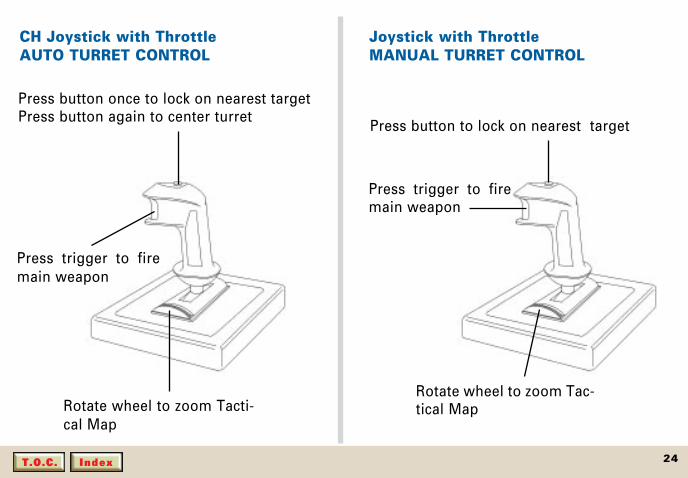
CH Joystick with ThrottleAUTO TURRET CONTROL
Rotate wheel to zoom Tacti-cal Map
Press trigger to firemain weapon
Press button once to lock on nearest targetPress button again to center turret
Press trigger to firemain weapon
Joystick with ThrottleMANUAL TURRET CONTROL
Press button to lock on nearest target
Rotate wheel to zoom Tac-tical Map

25IndexT.O.C.
Thrustmaster FCSAUTO TURRET CONTROL
Press button once to lock on nearest targetPress button again to center turret
Move “hat switch”to target manually.
Press trigger to firemain weapon
Press button to callartillery support
Press button tofire smoke gre-nade
Thrustmaster FCSMANUAL TURRET CONTROL
Press button to lock on nearest target
Move “hat switch”to target manually.
Press trigger to firemain weapon
Press buttonto center turret
Press button to cyclethrough weapons

26IndexT.O.C.
Press button to cyclethrough weapons
Move handle forwardand back to zoomviewport in and out
Press button to center turret
Press button to arm or fire SAMS (IFV)Arm machine gun (MBT)
Press button to fire smokegrenadesPress button
to call artillery
Press button tocall air support
Press switch to zoomtactical map in and out
Thrustmaster WCS Mark I
27IndexT.O.C.
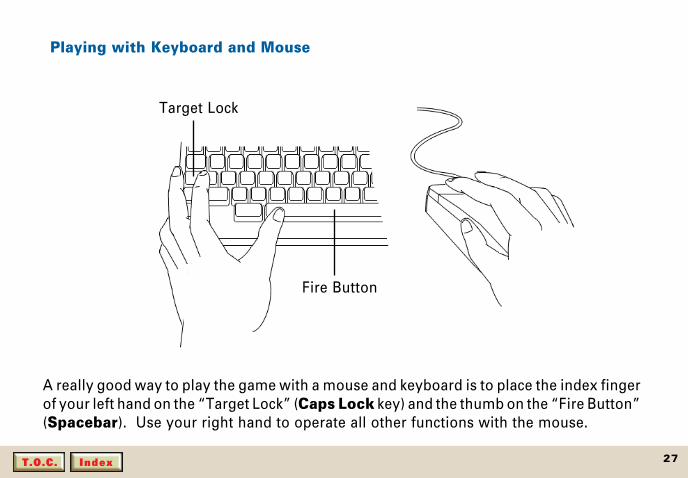
A really good way to play the game with a mouse and keyboard is to place the index fingerof your left hand on the “Target Lock” (Caps Lock key) and the thumb on the “Fire Button”(Spacebar). Use your right hand to operate all other functions with the mouse.
Playing with Keyboard and Mouse
Target Lock
Fire Button

28IndexT.O.C.
P L A Y I N G T H E G A M E
Vehicle Controls and Displays
Many of the weapons and control functions are common between allunits and they have been standardized to get players up to speedwith ARMORED FIST as quickly as possible. Though placement andresults of these various controls and functions will vary from vehicleto vehicle, the functional aspect of interacting with them is generallythe same.
Refer to the illustrations of the various vehicles below as you learnabout weapons controls and displays particular to a given vehicle.
Switching Vehicles
In many battles in ARMORED FIST you are in control of severalvehicles. You can be in charge of up to four platoons (a Company)each comprised of up to four vehicles.
Each platoon has a Platoon Leader. The rest of the units in the

29IndexT.O.C.
platoon follow their leader in a pre-determined formation which canbe reviewed and changed in the Company Status Screen (see Com-pany Status Screen below for more options and information). If thePlatoon Leader vehicle gets destroyed, then another vehicle in theplatoon will automatically become Platoon Leader.
You can jump from vehicle to vehicle by pressing TAB. This will moveyou from vehicle to vehicle across all of your active platoons. Press“Alt TAB” to cycle through the vehicles in reverse order.
If the unit that you are in is currently under User Control and thePrompts Mode is on, you will be asked: “Do you wish to re-engageAuto Control?” If you do, either click on the “Yes” button or press TABagain. Any of these actions will make sure that the AI takes overcontrol before you leave the unit.
Taking Command
Taking command of an operational field unit places you inside theMBT or IFV you’ve selected. When the simulation starts, the unitthat you are placed in will be the 1st Platoon Commander and theauto control logic will be on. If you do nothing, you will go along for
NOTE: If you prefer to beprompted when switchingvehicles, you can enablethis automatic prompt byclicking on “Prompts” fromthe Selection Menu.

30IndexT.O.C.
the ride and you can let the Artificial Intelligence (AI) do all thework. If you do this, you are likely to see some interesting action, butyou will probably lose the battle. The battles have been set-up insuch a way that they usually need some intervention from you inorder to win.
You can take control of your unit in a variety of different ways. Youcan click on the Auto/User Control switch/indicator and it will alter-nately change from Auto Control to Manual. Clicking on any controlbutton (e.g. Targeting Button) will also force your unit into manualcontrol. If you are using a joystick, pressing on the target buttonwill also put you into the User Control mode.
Once in the User Control mode, you have full control of your unit.You can set any of the units to Auto or Manual control. Any units leftin the Auto mode will follow the platoon leader whether he is set toAuto or User mode.
Movement and Control
When you first “take command” of a unit, the first thing you will needto know is how to “drive” the vehicle. Movement and control com-mands are essentially normalized within ARMORED FIST regardless
Click on Auto/User switchto select either Auto orManual control of vehicle.
NOTE: Many times youwill not want to revert toAuto control even if youleave the unit. This wayyou can position and con-trol your platoon more ef-fectively in demandingsituations.
31IndexT.O.C.
of the type of unit engaged. This means that learning how to pilot anM1 will enable you to easily adjust when you later take command ofa Bradley or T-80 in another battle.
The illustrations below will acquaint the user with the mouse opera-tion of the various movement related controls and functions par-ticular to a given unit. Again, while the screen placement of certainelements will change from one vehicle type to the next, allmovement and control functions are consistent between vehicletypes.
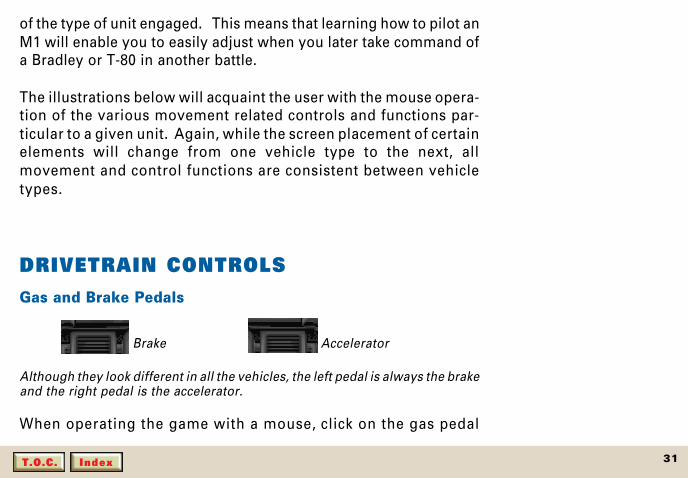
DRIVETRAIN CONTROLSGas and Brake Pedals
Brake Accelerator
Although they look different in all the vehicles, the left pedal is always the brakeand the right pedal is the accelerator.
When operating the game with a mouse, click on the gas pedal
32IndexT.O.C.
(right pedal) to set the vehicle’s speed. Once the tank hasreached a certain speed, it will try to maintain that speed untilsomething “changes its mind,” be it brakes, a hill... or anenemy missile. Simply taking your foot off the accelerator won’tbring your vehicle to a halt. You need to use the brakes (leftpedal) to slow down quickly and to make these heavy vehiclescome to a stop.
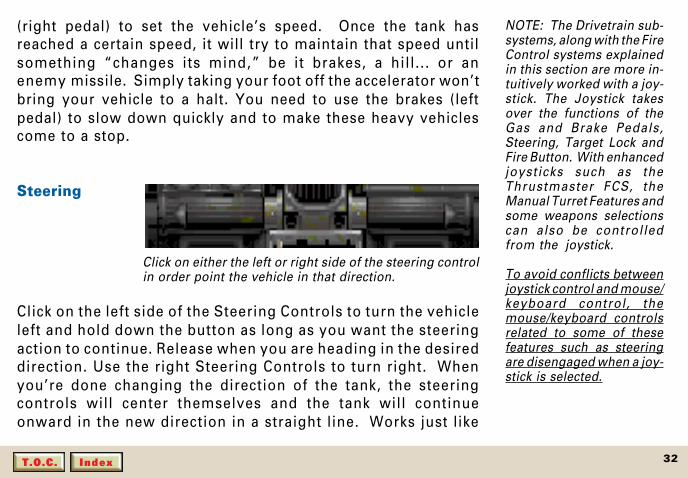
Steering
Click on either the left or right side of the steering controlin order point the vehicle in that direction.
Click on the left side of the Steering Controls to turn the vehicleleft and hold down the button as long as you want the steeringaction to continue. Release when you are heading in the desireddirection. Use the right Steering Controls to turn right. Whenyou’re done changing the direction of the tank, the steeringcontrols will center themselves and the tank will continueonward in the new direction in a straight line. Works just like
NOTE: The Drivetrain sub-systems, along with the FireControl systems explainedin this section are more in-tuitively worked with a joy-stick. The Joystick takesover the functions of theGas and Brake Pedals,Steering, Target Lock andFire Button. With enhancedjoysticks such as theThrustmaster FCS, theManual Turret Features andsome weapons selectionscan also be controlledfrom the joystick.
To avoid conflicts betweenjoystick control and mouse/keyboard control, themouse/keyboard controlsrelated to some of thesefeatures such as steeringare disengaged when a joy-stick is selected.

33IndexT.O.C.
a car... a 70-ton, heavily-armored, fire-breathing car.
Keyboard Command: Hold down the LEFT ARROW key to turn leftand hold it as long as you want the steering action to continue.Use the RIGHT ARROW key to turn right.
Gear Shift
The gear shift controls effect the kind of changes you’d expect ofthem. There is Drive, Low, Neutral and Reverse.
Click on the Gear Shift Indicator and hold down the button to“grab” the control. Drag the gear shift to the desired gear andrelease. Drive is the normal forward gear and works similarly tothat of an automatic transmission in a car. If the vehicle encoun-ters a hill that is too steep, the transmission will shift into Lowand proceed. The transmission will upshift into Drive if conditionschange. Shifting into Neutral will disengage the engine from thetracks, and shifting into Reverse will cause the vehicle to move
34IndexT.O.C.
NOTE: When using a joy-stick, the transmission willoperate in full automaticmode and the gearshiftknob will act only as a feed-back indicator.
backwards when the accelerator is depressed.
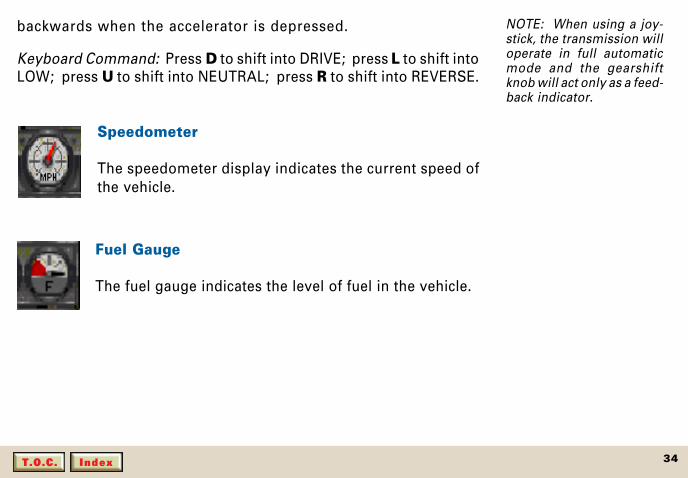
Keyboard Command: Press D to shift into DRIVE; press L to shift intoLOW; press U to shift into NEUTRAL; press R to shift into REVERSE.
Speedometer
The speedometer display indicates the current speed ofthe vehicle.
Fuel Gauge
The fuel gauge indicates the level of fuel in the vehicle.

35IndexT.O.C.
Viewport Display
The viewport display is your window to the outside world. For easeof game play, it integrates the various vision and targeting systemsavailable to the vehicle’s crew. It enables you to view the world atvarious magnifications and to see at night using the Viewport Mag-nify and TTS or IIT controls. It is important to remember that thisview is of the direction the turret is pointing and is not necessarilythe direction the tank is moving.
(See the AUTO / MANUAL TURRET CONTROL Section on page 48.)
36IndexT.O.C.
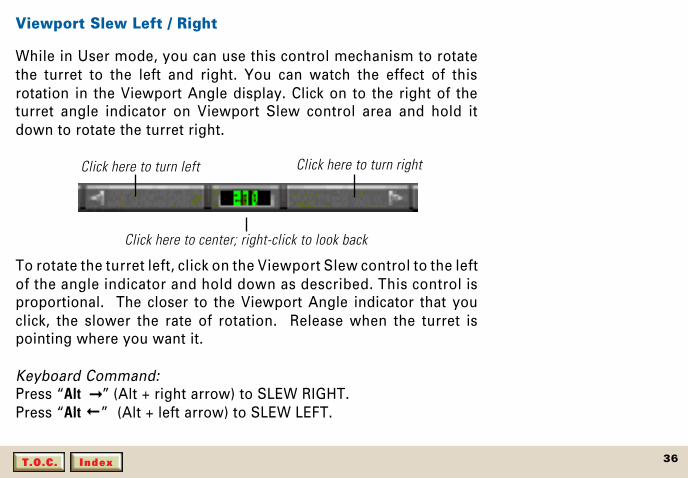
Viewport Slew Left / Right
While in User mode, you can use this control mechanism to rotatethe turret to the left and right. You can watch the effect of thisrotation in the Viewport Angle display. Click on to the right of theturret angle indicator on Viewport Slew control area and hold itdown to rotate the turret right.
To rotate the turret left, click on the Viewport Slew control to the leftof the angle indicator and hold down as described. This control isproportional. The closer to the Viewport Angle indicator that youclick, the slower the rate of rotation. Release when the turret ispointing where you want it.
Keyboard Command:Press “Alt ➞” (Alt + right arrow) to SLEW RIGHT.Press “Alt ” (Alt + left arrow) to SLEW LEFT.
Click here to turn left Click here to turn right
Click here to center; right-click to look back
➞
37IndexT.O.C.
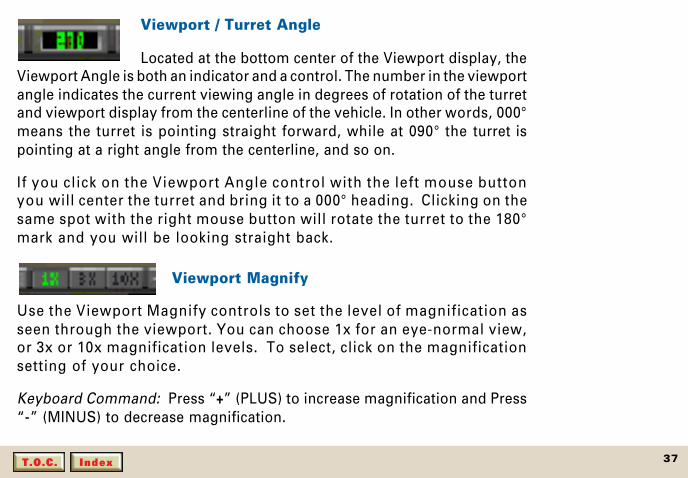
Viewport / Turret Angle
Located at the bottom center of the Viewport display, theViewport Angle is both an indicator and a control. The number in the viewportangle indicates the current viewing angle in degrees of rotation of the turretand viewport display from the centerline of the vehicle. In other words, 000°means the turret is pointing straight forward, while at 090° the turret ispointing at a right angle from the centerline, and so on.
If you click on the Viewport Angle control with the left mouse buttonyou will center the turret and bring it to a 000° heading. Clicking on thesame spot with the right mouse button will rotate the turret to the 180°mark and you will be looking straight back.
Viewport Magnify
Use the Viewport Magnify controls to set the level of magnification asseen through the viewport. You can choose 1x for an eye-normal view,or 3x or 10x magnification levels. To select, click on the magnificationsetting of your choice.
Keyboard Command: Press “+” (PLUS) to increase magnification and Press“-” (MINUS) to decrease magnification.
38IndexT.O.C.
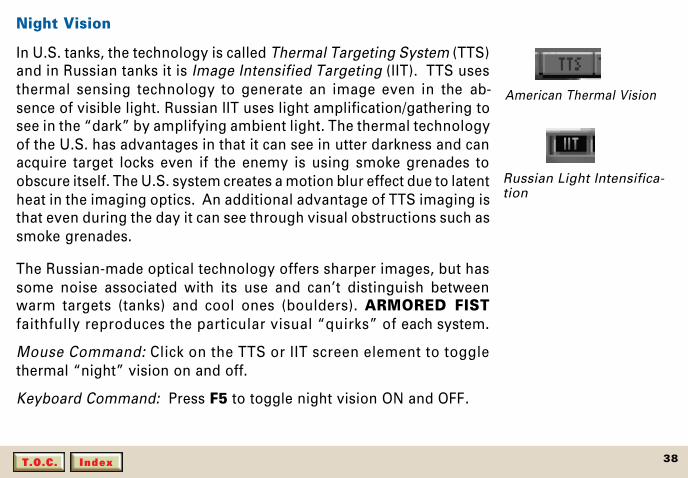
Night Vision
In U.S. tanks, the technology is called Thermal Targeting System (TTS)and in Russian tanks it is Image Intensified Targeting (IIT). TTS usesthermal sensing technology to generate an image even in the ab-sence of visible light. Russian IIT uses light amplification/gathering tosee in the “dark” by amplifying ambient light. The thermal technologyof the U.S. has advantages in that it can see in utter darkness and canacquire target locks even if the enemy is using smoke grenades toobscure itself. The U.S. system creates a motion blur effect due to latentheat in the imaging optics. An additional advantage of TTS imaging isthat even during the day it can see through visual obstructions such assmoke grenades.
The Russian-made optical technology offers sharper images, but hassome noise associated with its use and can’t distinguish betweenwarm targets (tanks) and cool ones (boulders). ARMORED FISTfaithfully reproduces the particular visual “quirks” of each system.
Mouse Command: Click on the TTS or IIT screen element to togglethermal “night” vision on and off.
Keyboard Command: Press F5 to toggle night vision ON and OFF.
American Thermal Vision
Russian Light Intensifica-tion

39IndexT.O.C.
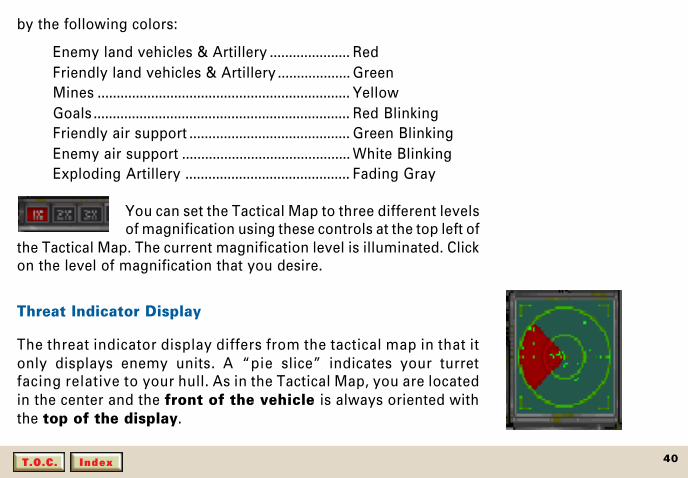
Tactical Map
The Tactical Map or Spin Mapgives you an overhead dis-play of your current locationand the surrounding topogra-phy. The Tactical Map dis-play moves as you move, al-ways keeping you in the cen-ter of the map (as a greendot). The front of your vehicleis always oriented with thetop portion of the display.There is a compass at the topof the Tactical Map. Liningup the small red triangle withthe “^” will keep the vehicleheaded towards the next way-point. In the absence of a way-point, the red triangle is replaced witha yellow triangle. Lining up the yellow triangle with the green “^”will point the way to the nearest mission goal.
Different units and game elements are indicated on the Tactical Map
NOTE: Neither of the “^”indicators assures that youare following the best pathto your destination. Theremay be obstacles such asmines or enemy patrolsthat can be avoided by se-lecting a different route. Agood look at the StrategicMap in the CCV and ex-perience with a particularmission will be the bestway to complete the mis-sion.
NOTE: You can select yourown way-points before orduring a battle from theCCV to sometimes executea more effective attack. Thenew way-points will thenguide you in the TacticalMap view.
Magnification ButtonsHeading
Compass
Your PositionWaypoint (red)
40IndexT.O.C.
by the following colors:
Enemy land vehicles & Artillery ..................... RedFriendly land vehicles & Artillery ................... GreenMines .................................................................. YellowGoals ................................................................... Red BlinkingFriendly air support .......................................... Green BlinkingEnemy air support ............................................ White BlinkingExploding Artillery ........................................... Fading Gray
You can set the Tactical Map to three different levelsof magnification using these controls at the top left of
the Tactical Map. The current magnification level is illuminated. Clickon the level of magnification that you desire.
Threat Indicator Display
The threat indicator display differs from the tactical map in that itonly displays enemy units. A “pie slice” indicates your turretfacing relative to your hull. As in the Tactical Map, you are locatedin the center and the front of the vehicle is always oriented withthe top of the display.
41IndexT.O.C.
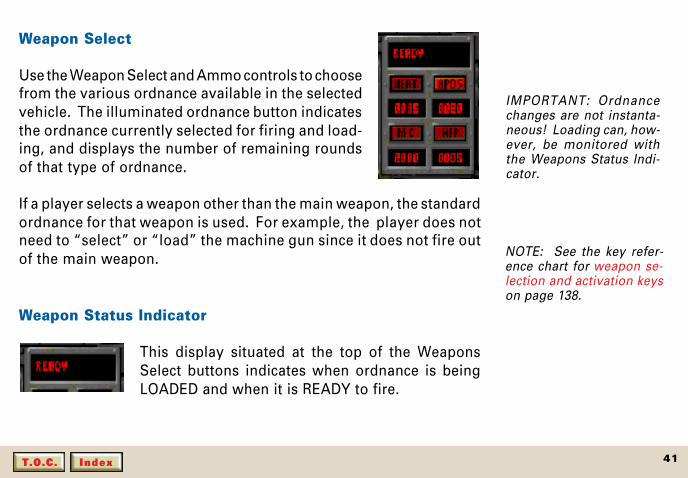
Weapon Select
Use the Weapon Select and Ammo controls to choosefrom the various ordnance available in the selectedvehicle. The illuminated ordnance button indicatesthe ordnance currently selected for firing and load-ing, and displays the number of remaining roundsof that type of ordnance.
If a player selects a weapon other than the main weapon, the standardordnance for that weapon is used. For example, the player does notneed to “select” or “load” the machine gun since it does not fire outof the main weapon.
Weapon Status Indicator
This display situated at the top of the WeaponsSelect buttons indicates when ordnance is beingLOADED and when it is READY to fire.
IMPORTANT: Ordnancechanges are not instanta-neous! Loading can, how-ever, be monitored withthe Weapons Status Indi-cator.
NOTE: See the key refer-ence chart for weapon se-lection and activation keyson page 138.

42IndexT.O.C.
ORDNANCE■ M1A2 and T-80 tank commanders have the following ordnanceavailable for their main gun:
1. Sabot/APDS: Also known as an Armor Piercing Disposable Sabot(APDS), this round consists of an extremely heavy depleted uraniumarrow-like bullet. It is contained in a shell “Sabot,” which guides it outthe smooth Main Battle Tank (MBT) barrel and then falls behind,allowing the hard projectile to travel with incredible force to itsdestination where it will penetrate any armor currently devised. Thisis the best weapon to use to take out an MBT, but like the heat rounddescribed below, is not very effective against large soft targets. Butperhaps the best reason not to use this weapon all the time is that youshould save them for MBTs.
2. Heat: A shaped charge explosive round which is designed to melta relatively small hole through the armor and then “inject” theinterior of the vehicle with lethal fragments. The heat round is veryeffective against Infantry Fighting Vehicles (IFVs) and somewhateffective against MBTs. Because of its small diameter blast, it is nota particularly good weapon against large targets such as satellitedishes.
Main Battle Tanks: M1A2Abrams for Western forcesand T-80 for the Easternforces.
Infantry Fighting Vehicles:M3 Bradley Cavalry Fight-ing Vehicles for Westernforces and BMP-2 for theEastern forces.
43IndexT.O.C.
3. HEP: High Explosive Plastic used in the M1 is especially useful against“soft targets” such as infantry, lightly-armored vehicles and missionobjective targets such as bunkers and satellite dishes. The high explo-sive round can take out an IFV and do real damage to an already disabledT-80.
4. HE: High Explosive used in the T-80 is functionally similar to the HEPround used in the M1.
5. MG: Machine gun. This is the co-axial machine gun for the variousvehicles. It is a good weapon for soft targets such as fuel tanks and LPGtanks. Since it is an independent weapon from the main gun, it can be usedwhile the main gun is loading without disturbing the process.
■ The IFVs main weapon system has the following ordnanceavailable:
1. TOW and AT-6: Anti-Tank Missiles (TOW for the Bradley and AT-6 forthe BMP)—Armor-piercing explosive missiles suitable for either MBT orIFV targets. These weapons are extremely effective against all groundtargets and with luck even helicopters. Their main limitation is that youcarry very few of them.
NOTE: The machine gunis also useful againstenemy air targets.

44IndexT.O.C.
2. HEI: High Explosive Incendiaries are particularly effective againstIFVs and are the weapon of choice against all ground targets exceptMBTs. These weapons are devastating against enemy air support, ifyou can hit them.
3. SAM: Surface-to-Air Missiles. These missiles arethe best way to take out enemy air support. If you geta lock on a helicopter you can be sure of a kill. Gener-ally, an IFV left on Auto Control will automatically lockand kill enemy aircraft and defend its platoon. So takecare of your IFVs, they will take care of you in case ofan air attack. To use them manually with a mouse you must first readythem by clicking on the safety cover and after you have acquired lock,click on the SAM fire button.
Target Lock
The Target Lock control activates the vehicle’s laser rangefinder and, if a target is found, locks on that target in theviewport display. The computer will maintain lock and
adjust rotation and elevation automatically as long as line of sight withthe acquired target remains unobstructed. Once target lock has been
NOTE: Be prepared.“Keep your caps up.”
45IndexT.O.C.
broken, the target must be re-acquired in order to deliver ordnance tothe target with any accuracy.
Mouse Command: Click on the Target Lock control to activate thelaser range finder and lock on to available targets.
Keyboard Command: Press ENTER or CAPS LOCK to acquire atarget.
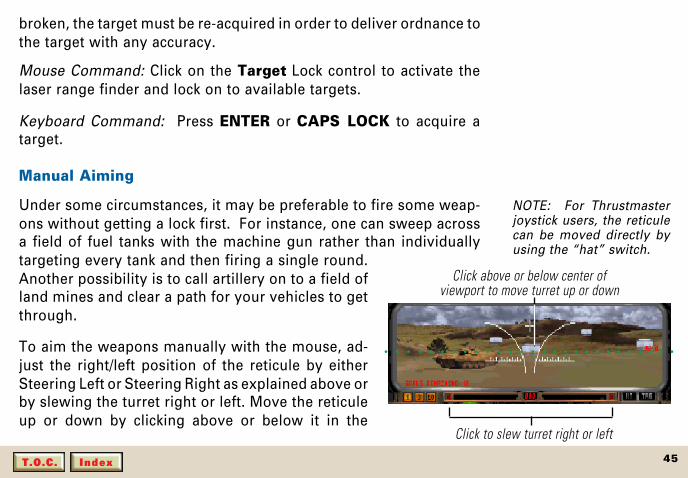
Manual Aiming
Under some circumstances, it may be preferable to fire some weap-ons without getting a lock first. For instance, one can sweep acrossa field of fuel tanks with the machine gun rather than individuallytargeting every tank and then firing a single round.Another possibility is to call artillery on to a field ofland mines and clear a path for your vehicles to getthrough.
To aim the weapons manually with the mouse, ad-just the right/left position of the reticule by eitherSteering Left or Steering Right as explained above orby slewing the turret right or left. Move the reticuleup or down by clicking above or below it in the
○ ○ ○ ○ ○ ○ ○ ○ ○ ○ ○ ○ ○ ○ ○ ○ ○ ○ ○ ○ ○ ○ ○ ○ ○ ○ ○
Click above or below center ofviewport to move turret up or down
NOTE: For Thrustmasterjoystick users, the reticulecan be moved directly byusing the “hat” switch.
Click to slew turret right or left
46IndexT.O.C.
Viewport area. This motion is proportional, the reticule movement will befaster the further you click from the current position of the reticule.
There is one drawback to aiming manually. Since it is sometimes difficult toestimate distances in a computer monitor, there may be some trial and errorinvolved in precise aiming. In the case of targeting artillery to blow up minefields, keep an eye on the Tactical Map and see where the artillery shells hitrelative to your target and adjust accordingly.
Keyboard Commands: To slew turret sideways:
Press “Alt ” (Alt + right arrow) to SLEW RIGHT.Press “Alt ” (Alt + left arrow) to SLEW LEFT.
To slew turret vertically:Press “Alt ” (Alt + up arrow) to SLEW UP.Press “Alt ” (Alt + down arrow) to SLEW DOWN.
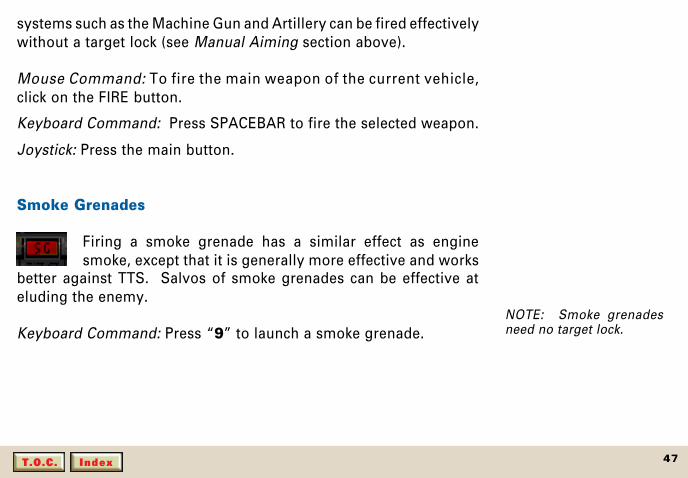
Firing Weapons
Bradley fire button M1 fire button
The fire button fires the main weapon of the current vehicle. Generally, youshould have a target lock before you fire the main weapon, but alternate
➞➞
➞ ➞
47IndexT.O.C.
systems such as the Machine Gun and Artillery can be fired effectivelywithout a target lock (see Manual Aiming section above).
Mouse Command: To fire the main weapon of the current vehicle,click on the FIRE button.
Keyboard Command: Press SPACEBAR to fire the selected weapon.
Joystick: Press the main button.
Smoke Grenades
Firing a smoke grenade has a similar effect as enginesmoke, except that it is generally more effective and works
better against TTS. Salvos of smoke grenades can be effective ateluding the enemy.
Keyboard Command: Press “9” to launch a smoke grenade.NOTE: Smoke grenadesneed no target lock.
48IndexT.O.C.
AUTO / MANUAL TURRET CONTROLThere are two ways that the Target Lock function can operate in the game.They are selected from the Settings screen:
Auto Turret Control
With Auto Turret Control once you have achieved a target lock your turretand main gun automatically track your target regardless of what directionyour target is moving. The turret will automatically align itself with thedirection of the tank travel as soon as you “break lock” either manually orif the target moves out of range.
This mode works particularly well if you are playing the game with anormal joystick. Pressing the target button will lock on the nearest target(if one is available). Pressing the target button again will break lock,center your gun and allow you to re-position your vehicle so that adifferent target can be acquired.
Manual Turret Control
When Auto Turret Control is turned off, the automatic repositioning of theturret is disabled. This means that you must keep track of the direction of
49IndexT.O.C.
your turret (same as your view) and the direction that you aremoving. This feature is useful for the sort of “on-the-fly” targetingthat occurs when a number of enemy units are present, but is harderto manage, particularly for the beginner.
When the Manual Turret Control Feature is activated, do either ofthe following to align the turret to zero:
Mouse Command: A LEFT click on the turret degree indicator willautomatically center turret forward at 000°, and a RIGHT CLICK willcenter the turret to the rear at 180°.
Keyboard: Press “ * ” or “ / ” to center the turret to a direction of 000°.Press “Alt * ” or “Alt / ” to look straight back at 180°.
Turret Control Settings
When you first enter ARMORED FIST, the turret control mode for theMBTs and IFVs is set to Auto. To change the setting to ManualTurret Control you must select the Settings Button on the Main Menuby either clicking on the icon with the mouse or pressing “S” on yourkeyboard (You can also access this menu from inside a vehicle at anytime by pressing “Alt S”).

50IndexT.O.C.
Engine Smoke
Engine Smoke (ENG SM) sprays fuel into the exhaust system ofthe vehicle, creating a cloud of viscous smoke which makes thevehicle harder to see at night. However, this makes your
vehicle more visible during the day. Engine smoke is not very effectiveagainst vehicles equipped with night vision. To activate on the T-80, youcan click on the engine smoke icon. When the control is illuminated,engine smoke is on. On other vehicles you can turn on/off engine smokewith the “F7” key.
Keyboard Command: Press “F7” to toggle ENG SM ON and OFF.
CCVMove the cursor to the upper left hand corner of the vehiclescreen and it will change to "CCV". If you now click the mouse,you will select the Command and Control Vehicle.
Pause
To temporarily pause the game, press “F1”. To resume the simula-tion, press “F1” again.

51IndexT.O.C.
AIR SUPPORT AND ARTILLERYAir Support and Artillery are two additional external weapons sys-tems that can sometimes be requested from your vehicle to greatadvantage.
Air Support
All battles have air bases although air bases may or may not havehelicopters available. Helicopters are called in as follows:
With a target lock, you may request Air Support by eitherclicking on the air support icon in your vehicle or by
pressing the “8” key. If air support is available, the helicopter willfly in from its base and will attack the location designated by thetarget lock. Once the target has been destroyed, the helicopter willattack other nearby enemies until it depletes its ammunition. If youask for air support and you do not have a target lock, the helicop-ter will fly towards your location and then attack enemy targets inyour vicinity.
The position of the air base relative to the helicopter’s destination willdetermine how long it takes for the help to get to the target. If you
52IndexT.O.C.
are constructing a battle, you should take Air Base distance intoconsideration.
Helicopters will return to their base once they have finished their runand re-load. However, if the helicopter is shot down during a sortie, it willno longer be available. There may also be a delay before choppers areready to be called. If air support is not available when you call it, it maybecome available later, so keep trying.
Keyboard Command: Press “8” to request Air Support.
Enemy helicopters work similarly, except that they are trying to destroyyou. If, for example, you are playing the Western side and you hear“Hind, Hind, Hind...”, it means that a Russian Hind is on its waytowards your area. If you are in an MBT, you should fire a smokegrenade, try to get a target lock and then fire the machine gun until heeither retreats or you take him down. If you take him down, thatparticular helicopter will not fly again.
IFVs will try to take helicopters down for you when in Auto mode. If youare in an IFV in Manual mode, you should try to get a lock on thechopper and fire a SAM at it. (See SAM on page 44.)
53IndexT.O.C.
Artillery Support
Artillery is one of the most powerful weapons systemsavailable to a commander and can be used to great
advantage. A battle may have up to three artillery bases available.Artillery is “called in” similarly to helicopters. Get a target lock andeither click on the Artillery icon or press “7”. If artillery is available,you will get confirmation and soon the shells will start falling. Makesure you are not to close to your target when calling for artillerysupport, or you could take a hit from “friendly fire”.
You may also call in artillery without a target lock. Shells will bedirected through the manual aiming method. (See Manual Aimingpage 45 for further information.) There may also be a delaybefore artillery is available. If at first it’s not available, keep ontrying.
Artillery is carried on large trucks. If you get a target lock on an enemyartillery unit, you should destroy it so that it can no longer be calledin. Likewise, you should protect your own artillery units from theenemy.
Keyboard Command: Press “7” to request Artillery Support.

54IndexT.O.C.
M A I N M E N U
After the opening animation sequence youare presented with the main menu and haveseveral choices to consider. You may select amenu choice by clicking on it with the mouse,or by pressing the first letter of the menu choiceon the keyboard.
Select Player
Player selection menu
Select Player allows the user to select a player from the existing rosterof logged-on players or log-on as a new player. Logged-on players maycontinue campaigns at the last battle played.
55IndexT.O.C.
Campaigns
In Campaign mode, you are choosing to embark on a series of interrelatedbattles which have an overall outcome that is dependent on your success ineach mission.
Click on the CAMPAIGNS button. If youhave not previously chosen or logged-inas a new player in the Select Player Menu,you will now see the Select Player menuwhere you select from a list of previouslycreated players or you can log-on with anew name. Once you click the OK button,the Select A Campaign menu will appear.
If you have already selected a player,clicking on the CAMPAIGNS button will take you directly to the Select aCampaign Menu, where you can sign up for a new campaign or resumeone already in progress. Make sure you have also selected the side,WESTERN or EASTERN, that you wish to call your own. Select a side byclicking on the WESTERN or EASTERN selections in the dialog box. Yourselected side will glow red when active.
Select A Campaign menu
Note: A “bullet” in frontof a campaign nameindicates a campaignthat has been won.
56IndexT.O.C.
Battles Battle selection menu
Battle mode is one good place for novicecommanders to learn the ropes. In theBattle mode, you fight a stand-alone mis-sion instead of an ongoing campaign.The battle menu choice takes you to theSelect Battle Screen where you can loadup individual battles. Select Battle lets you load any of the Campaignsyou have in your FISTDATA directory.
Battle selection is the only way to access battles that you have constructedusing the Edit mode. (See Edit Mode section on page 79.) It is also from herethat you can load pre-existing unlocked battles so that you will be able touse them as a starting point for your own battle designs.
Through this menu, you may also access battles which might otherwiserequire the successful completion of other battles were they accessed viathe Campaigns menu selection. This menu also lets the player selectbetween Eastern and Western hardware.

57IndexT.O.C.
Review
REVIEW lets you inspect thevarious hardware you will en-counter as a Task Force Com-mander. You can also read up onthe technical specifications ofthese deadly war machines inthe Vehicles Description sectionon page 141.
Settings
SETTINGS takes you to the Set-tings Menu, where you can ad-just numerous game and hard-ware variables. NOTE: Pressing both the
“Alt” and “S” or “F12”keys during game play willalso bring up the Settingsscreen.

58IndexT.O.C.
About Fist
Shows the game credits screen and additional information about AR-MORED FIST.
Quit
QUIT exits the ARMORED FIST program and returns you to the operatingsystem.

59IndexT.O.C.
S E T T I N G S M E N UThe various selections described below letyou tailor ARMORED FIST to your particularhardware and preferences. When you arecomfortable with the adjustments you’vemade to the game settings, use the mouseand click on ACCEPT. To abort thechanges you’ve made and return to themain menu, simply click on CANCEL.
Controls
In the controls column, you can choose from keyboard, joystick, en-hanced joysticks and other input devices by clicking on the button withthe name of your selection. Choose the input device connected to yoursystem that you wish to use.
Check the Input Devices section, pages 23-26, for notes concerningspecific joystick types.
Note: The red and black boxesto the left of the menu buttonsindicate your selection. Usingthe mouse, you select from theavailable options by clickingdirectly on the button of yourchoice.
60IndexT.O.C.
No Joystick
This is the default setting the first time that you play the game. Choose thisselection when you are going to use the game with a keyboard and mouseonly.
STD Joystick
Choose this selection when you have a standard IBM-type, two-buttonjoystick attached to your computer.
Flightstick w/ Throttle
Choose this selection when you have a CH Products Flightstick with throttlecontrol attached to your computer. This selection may also work withsimilar throttle-type joysticks.
Thrustmaster FCS
Choose this selection when you’re using a Thrustmaster FCS.
CH Flightstick Pro
Choose this selection when you have a CH Products Flightstick Pro attachedto your computer.
61IndexT.O.C.
Thrustmaster WCS
Choose this selection when you have a Thrustmaster Weapons ControlSystem (WCS) attached to your computer configured in its default DIPswitch settings (Dip Switch Position 1 is ON – towards the numbers ortowards the top of the joystick – with all other Dip Switches OFF).
External Driver
This button enables your computer’s BIOS (Basic Input/Output System) toread the joystick. You would activate this feature when using non-standard joystick devices like those available for laptop and notebookcomputers. This button will toggle between the internal ARMORED FISTjoystick code and the joystick support code in your computer’s BIOS. Fornormal operation, the internal driver code is set as the default. For use ofa non-standard joystick interface, refer to the manufacturer instructionsfor driver installation and enable the external driver type.
Calibrate
Regardless of which joystick type you have connected to the system, followthe on-screen instructions to calibrate your joystick for use with ARMOREDFIST prior to playing the game.
NOTE: Remember to cali-brate your joystick afterchoosing a new joystick ordriver type.

62IndexT.O.C.
Auto Turret
For advanced players, turning off this selection allows for independent turretand hull control (e.g., you can drive in one direction while looking at another)for all units. When this setting is turned off, the turret will function completelyindependently of the hull of any of the vehicles. (See the section on Auto/Manual Turret Control on page 48.)
Prompts
With the Prompts selection turned on, you will see thismessage whenever you attempt to jump from one ve-hicle to another. (See the section on Switching Vehicleson page 28.)
Display
The display settings let you set the level of visualrealism that ARMORED FIST will utilize during gameplay. With slower computers it may help to turn off thesky display or lower the detail to achieve a fastergraphics frame rate.
63IndexT.O.C.
Sky
This selection toggles sky details, such as clouds, ON or OFF.
Low, Medium, High Detail
These selections adjust detail to best match the speed of your computer.
Smoke Effects
This selection allows for full use of translucent smoke effects in the game.It can be turned off if your computer runs too slowly.
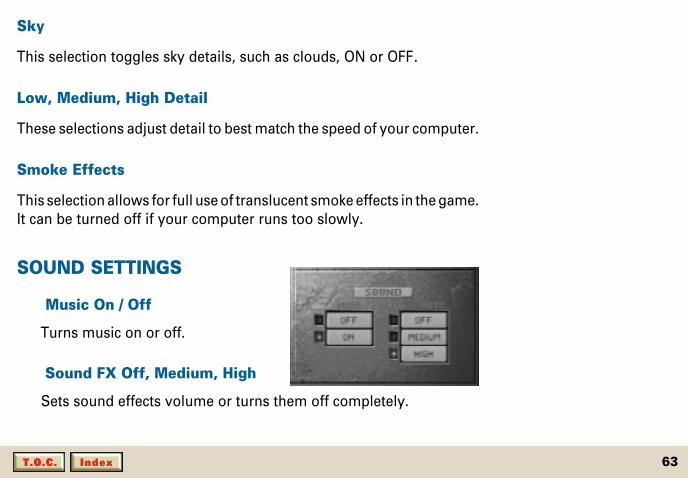
SOUND SETTINGS
Music On / Off
Turns music on or off.
Sound FX Off, Medium, High
Sets sound effects volume or turns them off completely.
64IndexT.O.C.
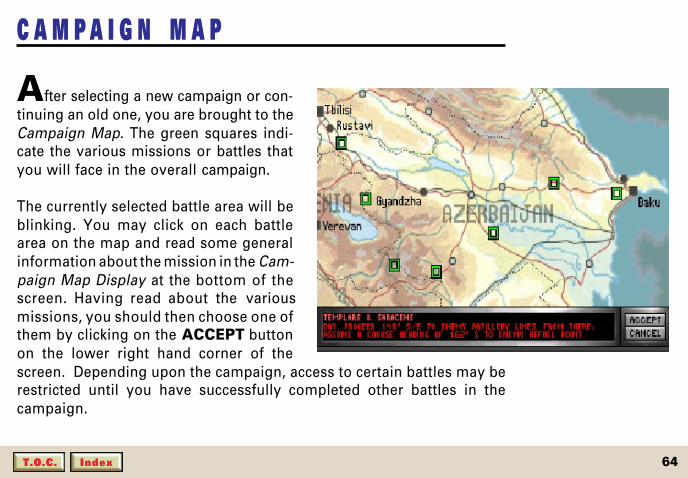
C A M P A I G N M A P
After selecting a new campaign or con-tinuing an old one, you are brought to theCampaign Map. The green squares indi-cate the various missions or battles thatyou will face in the overall campaign.
The currently selected battle area will beblinking. You may click on each battlearea on the map and read some generalinformation about the mission in the Cam-paign Map Display at the bottom of thescreen. Having read about the variousmissions, you should then choose one ofthem by clicking on the ACCEPT buttonon the lower right hand corner of thescreen. Depending upon the campaign, access to certain battles may berestricted until you have successfully completed other battles in thecampaign.

65IndexT.O.C.
The colors of the battle selection boxes indicate the following:
Clicking on the ACCEPT button will bring you to the Mission Orders screen.
Mission Orders
You will get the specific orders and any last minute intelligence in theMission Orders Screen.
When you are ready to begin the campaign, click on ACCEPT. Otherwise,click on CANCEL to return to the Campaign Map.
COLOR STATUS
Flashing Current selection
Green Not completed but ready to play
Blue Won and available for re-play
Red Not currently available

66IndexT.O.C.
C o m m a n d & C o n t r o l V e h i c l e ( C C V )
After you have started a mission, youcan at any time enter the Commandand Control Vehicle (CCV) by eitherclicking on the upper left hand cornerof the screen or by pressing the “Esc”key. The main feature of the CCV is alarge overhead Strategic Map or CCVMap shown at right. Also in the CCV,you will find various menus, controlsand displays.
The CCV remains behind friendly linesand out of “the action.” Unlike thetanks and personnel carriers, you can-not drive the CCV battle. From yourenemy’s perspective, however, the CCVis just as deadly; it provides the “com-mand and control” with which you or-chestrate the entire operation.
CCV Menu Bar Status Bar
Message Window
Air Support
Blue Friendly ForcesRed Opposing Forces
Way-point
Mine
Floating Tool Kit
Targets
Artillery Support
Game Limits
Map Scale
Unit I.D.
Edit Menu Bar
67IndexT.O.C.
The CCV operates in two modes: CCV and Edit. The CCV Mode allowsyou to change mission parameters for your side while the simulationremains running. The Edit Mode allows you to have total control of allavailable mission parameters for either side. The Edit Mode is fullydescribed in the Edit Mode-Advanced Features section on page 84.
CCV Help
Because the CCV screen provides many features, a help function hasbeen provided. Clicking on any CCV screen icon while holding downthe “Alt” key will display a description of the selected function in thetext area.
Strategic Map
The Strategic Map or CCV Map consists of a large area overhead mapwhich can be zoomed in and out. It uses icons to represent the variousbattlefield elements. Blue icons always represent the side you areplaying whether Western or Eastern, and red icons always representthe enemy.

68IndexT.O.C.
indicates Main Battle Tank or IFV
indicates an artillery unit
indicates an air support base
indicates a known mine field in CCV mode
indicates other enemy targets
Being in the CCV does not make you omniscient. As a commander, it isimportant to remember that what you see on the CCV is only a repre-sentation of the battlefield based upon available reconnaissance. Up-dating of the field intelligence is handled automatically, but you are
69IndexT.O.C.
dependent upon your field units to provide a constant flow ofinformation.
If your units make no visual contact with the enemy, and no newinformation is provided to confirm or deny enemy positions, thedata is eventually considered dated and these dated enemy posi-tions will disappear from the map. Unfortunately, this does notmean that units have been destroyed, but have merely been “forgot-ten.” In the end it is up to you to maintain a mental assessment of thenumber and type of opposing forces.
CCV Menu and Status Bar
At the top of theCCV Map screen isa series of iconswhich make up theCCV Menu and Sta-tus Bar. From leftto right the func-tions are as fol-lows:
Mission Briefing Status Bar
Message Window
Exit Mission
Company Status
Take Command
Map Zoom In / Out
Time Acceleration
Unit / Platoon
Edit Mode
Pause / PlayUnit Information Window Find Platton
70IndexT.O.C.
NOTE: Your progress in themission is not automaticallysaved while in Battle mode.In Campaign mode, yourprogress in the ongoingCampaign is automaticallysaved as of the last wonmission. This enables you tocontinue the Campaign atany time.
Exit Mission
Click on the Exit Mission icon to leave the CCV andterminate the current campaign or mission. A dialog boxwill appear asking the user to confirm the decision to
leave. Click on YES to leave or NO to cancel. Upon exiting, you areshown the current mission statistics. Once you have read the statsyou are taken back to the Main Menu.
To exit using the keyboard, press “Alt Q”.
Company Status Screen
The Company Status button takes you to the CompanyStatus Screen. Company Status lets you look at theroster of commanders and equipment in each platoon.
It is also the place where you can specify the formation, movementand behavior patterns of your troops. (See Company Status Screensection on page 98 for details.)
Click on the Company Status button to enter the Company StatusScreen. To get back to the CCV, click on the same button again.
71IndexT.O.C.
Take Command
Click on this button to take you out of the CCV and into themidst of the action, placing you immediately into theMBT or IFV that is currently selected in the Strategic Map
window below it.
To take command utilizing the keyboard, press the SPACEBAR.
Mission Briefing
The Mission Briefing button takes you to the MissionOrders Screen (see page 65) where you can review thestanding mission orders.
To access Mission Briefing utilizing the keyboard, press “Alt B”.
Map Zoom In/Out
The Zoom button zooms you in and out of the strategicmap. Watch the legend in the lower left corner of themap for a numerical indication of the current scale in
meters. Left-click on the Zoom button to zoom in. Right-click on theZoom button to zoom out. There are 3 levels of magnification eachzooming in and out.

72IndexT.O.C.
For keyboard use, press the PLUS key to Zoom In. Press the MINUSkey to Zoom Out.
Time Acceleration Switch
The time acceleration toggle tells you the current “rate”at which the simulation is running and lets you set thatrate. “1x” is the normal simulation “real time.” Arm-
chair generals who are impatient to the see the outcome of theirmaster strategy can accelerate the simulation up to 8 times thenormal speed and watch it play out on the strategic map.
Left-click on the Acceleration button to accelerate the simulation.Right-click on the Acceleration button to decrease the setting.
Keyboard: press “Alt +” to increase time (faster) or press “Alt -” todecrease time (slower).
Unit / Platoon Switch
The Unit / Platoon icons switchbetween the UNIT view, where allthe units in a platoon are shown individually, and the groupedPLATOON view where only the platoon leader is shown.
NOTE: The various speedsat which the simulation ex-ecutes will depend upon thespeed of your system. Addi-tionally, if you take com-mand of a unit, or a shot isfired by anyone, the accel-eration level is automaticallyreduced to normal time.
÷NOTE: This icon is a toggle.It reads “PL.” when in pla-toon mode and “UNIT” whenin unit mode.
73IndexT.O.C.
The UNIT view reveals the locations of every vehicle, while thePLATOON view shows only the location of the lead unit of eachplatoon.
Mouse Command: click on the Unit/Platoon Toggle to select betweenPlatoon and Unit views of the strategic situation.
Keyboard Command: press “Alt P” to toggle between UNIT andPLATOON.
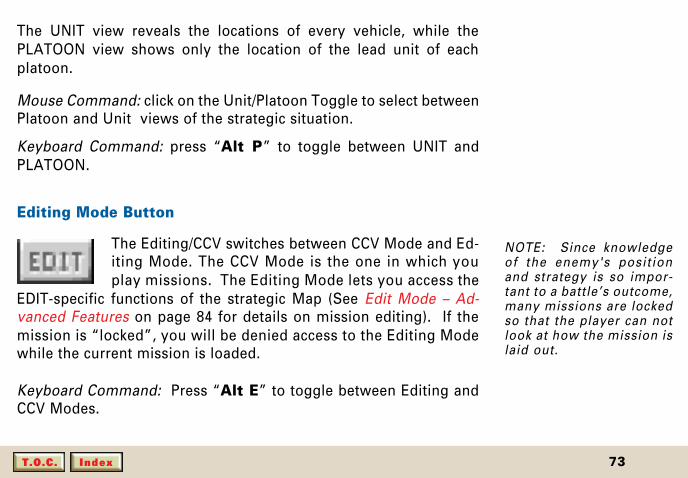
Editing Mode Button
The Editing/CCV switches between CCV Mode and Ed-iting Mode. The CCV Mode is the one in which youplay missions. The Editing Mode lets you access the
EDIT-specific functions of the strategic Map (See Edit Mode – Ad-vanced Features on page 84 for details on mission editing). If themission is “locked”, you will be denied access to the Editing Modewhile the current mission is loaded.
Keyboard Command: Press “Alt E” to toggle between Editing andCCV Modes.
NOTE: Since knowledgeof the enemy's positionand strategy is so impor-tant to a battle’s outcome,many missions are lockedso that the player can notlook at how the mission islaid out.

74IndexT.O.C.
Status Bar
At the far top right hand side of theMenu Bar, you find the Status Bar.The lock symbol on the Status Bar lets you know whether the missionis locked or unlocked. Alternately, you can lock an unlocked missionby clicking on the lock icon. If you are in Edit Mode, you can then savethe mission in the locked state.
The number on the right side of the Status Bar indicates the currenttime acceleration factor. It ranges from 1x to 8x. (See the TimeAcceleration Switch section on page 72.)
Beneath the row of tactical map controls are three status displayswhich help you both in CCV Mode and in Editing Mode.
Message Window
On the lower row of the Menu Bar, the left most display area isthe Message Window. It is here that you will receive informationrelated to the selected unit's status as well as other importantinformation.
NOTE: Once a game is savedas locked, it can never beunlocked again.

75IndexT.O.C.
Unit Information Window
The Unit Information Window is providedas a handy reference which tells you the
platoon and unit numbers, type of vehicle and control status (A forAuto and U For User) of the unit selected in the Strategic Map Window.
Find Platoon
Clicking on any of the highlighted buttons willcenter the platoon leader on the Strategic Map.The number of brighter buttons indicates the
number of platoons in play at this time.
Pause/Play Indicator
When this indicator reads IN ACTION, the simu-lation and mission are underway. If it reads
PAUSED or EDIT, it means the simulation is paused or in Edit mode,respectively. The simulation is always paused in both of thesemodes.

76IndexT.O.C.
F l o a t i n g T o o l K i t ( i n C C V M o d e )The “Floating” Tool Kit provides tools for working on the Strategic Map.The Tool Kit can be picked up and moved to any convenient locationwithin the Strategic Map Window. To move the Tool Kit,click on the bar at the top of the Tool Kit, hold down thebutton and then drag the Tool Kit to the desired location.
(See pages 89–97 for details of using its other tools acces-sible only in the Edit mode.)
In the CCV mode, the Tool Kit includes the following tools:
Select
Use the selector to select units and items in the Strategic Map display.
Mouse Command: Click on the Selector tool, then click on the unit or itemyou want to select with the Select cursor.
Keyboard Command: Press U to activate the tool, then use the Mouse asinstructed above.
Move Map Tool
Cut Tool Set Way-points Tool
Scroll Map Controls
Select Tool
77IndexT.O.C.
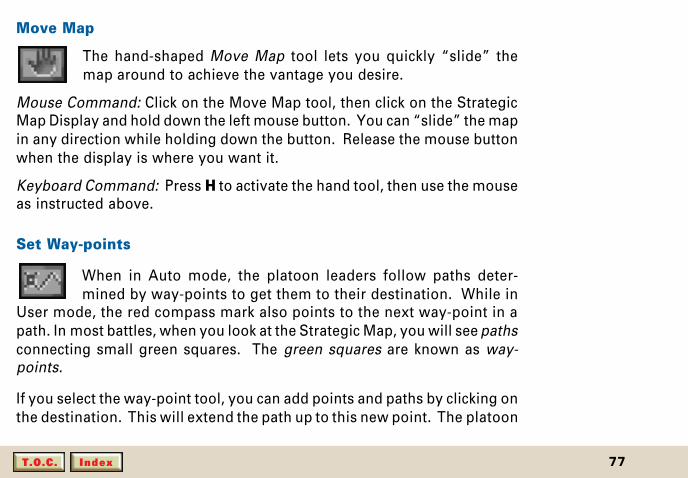
Move Map
The hand-shaped Move Map tool lets you quickly “slide” themap around to achieve the vantage you desire.
Mouse Command: Click on the Move Map tool, then click on the StrategicMap Display and hold down the left mouse button. You can “slide” the mapin any direction while holding down the button. Release the mouse buttonwhen the display is where you want it.
Keyboard Command: Press H to activate the hand tool, then use the mouseas instructed above.
Set Way-points
When in Auto mode, the platoon leaders follow paths deter-mined by way-points to get them to their destination. While in
User mode, the red compass mark also points to the next way-point in apath. In most battles, when you look at the Strategic Map, you will see pathsconnecting small green squares. The green squares are known as way-points.
If you select the way-point tool, you can add points and paths by clicking onthe destination. This will extend the path up to this new point. The platoon
78IndexT.O.C.
leader will now follow this path if he is in Auto mode, or the next way-point will always appear as a green pointer on the vehicle's TacticalMap compass.
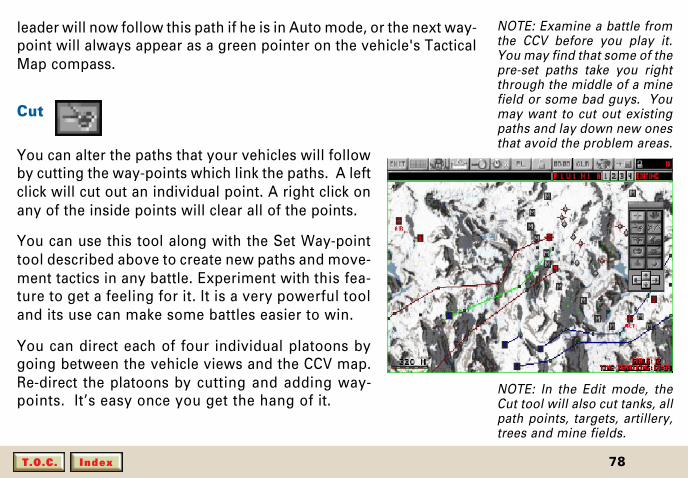
Cut
You can alter the paths that your vehicles will followby cutting the way-points which link the paths. A leftclick will cut out an individual point. A right click onany of the inside points will clear all of the points.
You can use this tool along with the Set Way-pointtool described above to create new paths and move-ment tactics in any battle. Experiment with this fea-ture to get a feeling for it. It is a very powerful tooland its use can make some battles easier to win.
You can direct each of four individual platoons bygoing between the vehicle views and the CCV map.Re-direct the platoons by cutting and adding way-points. It’s easy once you get the hang of it.
NOTE: Examine a battle fromthe CCV before you play it.You may find that some of thepre-set paths take you rightthrough the middle of a minefield or some bad guys. Youmay want to cut out existingpaths and lay down new onesthat avoid the problem areas.
NOTE: In the Edit mode, theCut tool will also cut tanks, allpath points, targets, artillery,trees and mine fields.

79IndexT.O.C.
E D I T M O D E — I n t r o d u c t i o n
The Edit Mode provides many advanced features that let the usereither edit pre-existing unlocked missions or create new missions.
To use the Edit Mode, you work within the CCV. You can enter EditMode by either clicking on the Edit button on the CCV Menu Barafter loading any unlocked mission or by loading any battle fromeither Battle or Campaign mode and then pressing “Alt N” to createa new mission.
Some major features distinguish the Edit Mode from the CCVMode:
1. You can place and edit enemy vehicles along with theirmovement paths and battle strategy.
2. You can set goals, air support, artillery and even plantdifferent types of trees.
3. You can select different terrain and determine whether thebattle will take place in day, dusk or night.
NOTE: In Edit Mode youuse the CCV screen, alongwith a selection of additionaltools which let you designyour own missions. Missiondesign and use of the toolsassociated is covered indetail in the “Edit Mode —Advanced Features” sectionon page 84.

80IndexT.O.C.
CREATING AND MODIFYING BATTLES
ARMORED FIST gives the player total control over mission build-ing. The built-in editor allows you to create everything from anextremely sophisticated battle to a small scenario.
Creating Your Own Battle:
Enter a battle either through the BATTLES or CAMPAIGNS selec-tions of the Main Menu. Immediately select the CCV by pressingthe Esc key. From the CCV press “Alt N”. This clears the units onthe map and unlocks the Edit Mode.
Click on the EDIT button once you have cleared the previousmission. This will make available all the Edit features.
Use the Edit features from the Floating Tool Kit and Menu bars toset up a battle.
After you have placed all of the friendly and enemy units, select the
Edit Features
81IndexT.O.C.
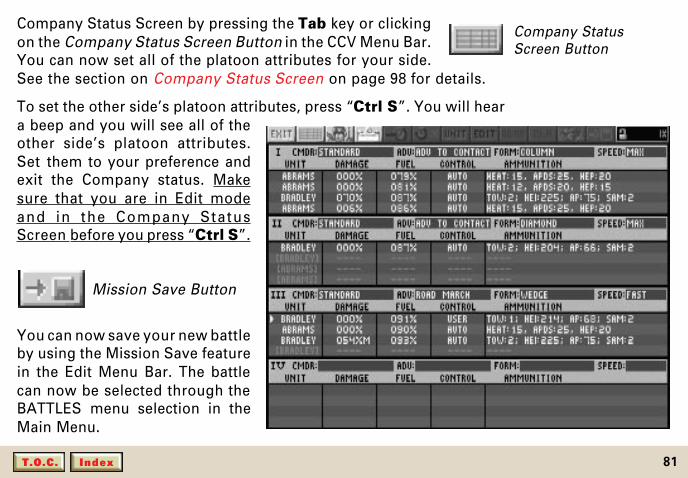
Company StatusScreen Button
Company Status Screen by pressing the Tab key or clickingon the Company Status Screen Button in the CCV Menu Bar.You can now set all of the platoon attributes for your side.See the section on Company Status Screen on page 98 for details.
To set the other side’s platoon attributes, press “Ctrl S”. You will heara beep and you will see all of theother side’s platoon attributes.Set them to your preference andexit the Company status. Makesure that you are in Edit modeand in the Company StatusScreen before you press “Ctrl S”.
You can now save your new battleby using the Mission Save featurein the Edit Menu Bar. The battlecan now be selected through theBATTLES menu selection in theMain Menu.
Mission Save Button
82IndexT.O.C.
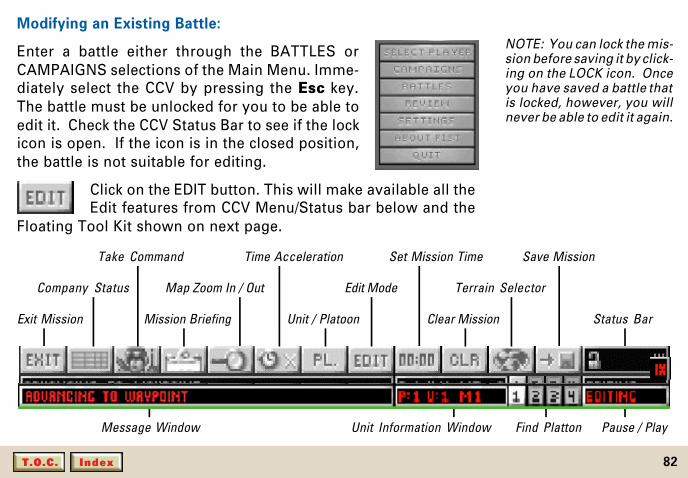
Modifying an Existing Battle:
Enter a battle either through the BATTLES orCAMPAIGNS selections of the Main Menu. Imme-diately select the CCV by pressing the Esc key.The battle must be unlocked for you to be able toedit it. Check the CCV Status Bar to see if the lockicon is open. If the icon is in the closed position,the battle is not suitable for editing.
Click on the EDIT button. This will make available all theEdit features from CCV Menu/Status bar below and the
Floating Tool Kit shown on next page.
Mission Briefing Status Bar
Message Window
Exit Mission
Company Status
Take Command
Pause / Play
Map Zoom In / Out
Time Acceleration
Unit / Platoon
Edit Mode
Set Mission Time
Clear Mission
Terrain Selector
Save Mission
Unit Information Window Find Platton
NOTE: You can lock the mis-sion before saving it by click-ing on the LOCK icon. Onceyou have saved a battle thatis locked, however, you willnever be able to edit it again.
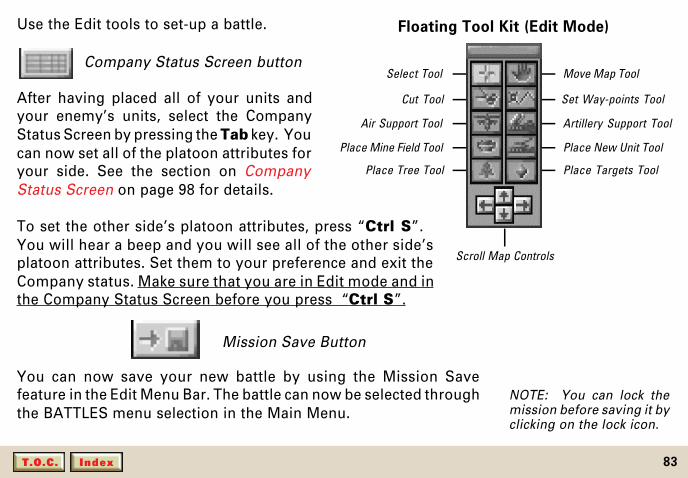
83IndexT.O.C.
Use the Edit tools to set-up a battle.
After having placed all of your units andyour enemy’s units, select the CompanyStatus Screen by pressing the Tab key. Youcan now set all of the platoon attributes foryour side. See the section on CompanyStatus Screen on page 98 for details.
To set the other side’s platoon attributes, press “Ctrl S”.You will hear a beep and you will see all of the other side’splatoon attributes. Set them to your preference and exit theCompany status. Make sure that you are in Edit mode and inthe Company Status Screen before you press “Ctrl S”.
Mission Save Button
You can now save your new battle by using the Mission Savefeature in the Edit Menu Bar. The battle can now be selected throughthe BATTLES menu selection in the Main Menu.
Company Status Screen button
Air Support Tool
Move Map Tool
Cut Tool Set Way-points Tool
Place Targets Tool
Artillery Support Tool
Scroll Map Controls
Place New Unit Tool
Select Tool
Place Mine Field Tool
Place Tree Tool
Floating Tool Kit (Edit Mode)
NOTE: You can lock themission before saving it byclicking on the lock icon.
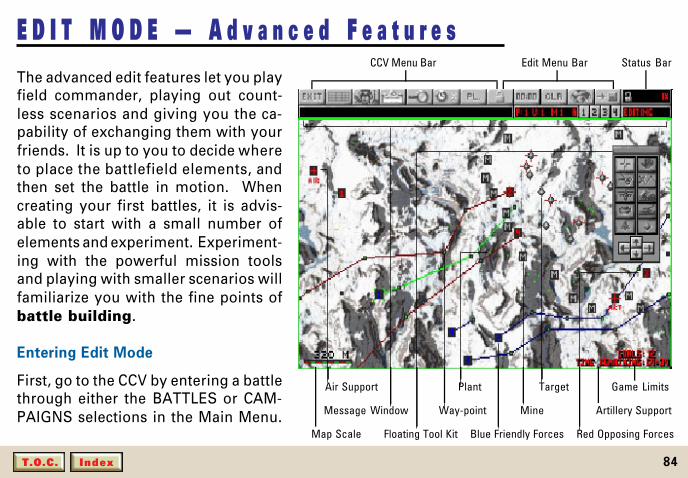
84IndexT.O.C.
E D I T M O D E — A d v a n c e d F e a t u r e sThe advanced edit features let you playfield commander, playing out count-less scenarios and giving you the ca-pability of exchanging them with yourfriends. It is up to you to decide whereto place the battlefield elements, andthen set the battle in motion. Whencreating your first battles, it is advis-able to start with a small number ofelements and experiment. Experiment-ing with the powerful mission toolsand playing with smaller scenarios willfamiliarize you with the fine points ofbattle building.
Entering Edit Mode
First, go to the CCV by entering a battlethrough either the BATTLES or CAM-PAIGNS selections in the Main Menu.
CCV Menu Bar Status BarEdit Menu Bar
Air Support Plant
Blue Friendly ForcesFloating Tool Kit
Way-point
Target
Red Opposing Forces
Message Window Artillery Support
Game Limits
Map Scale
Mine
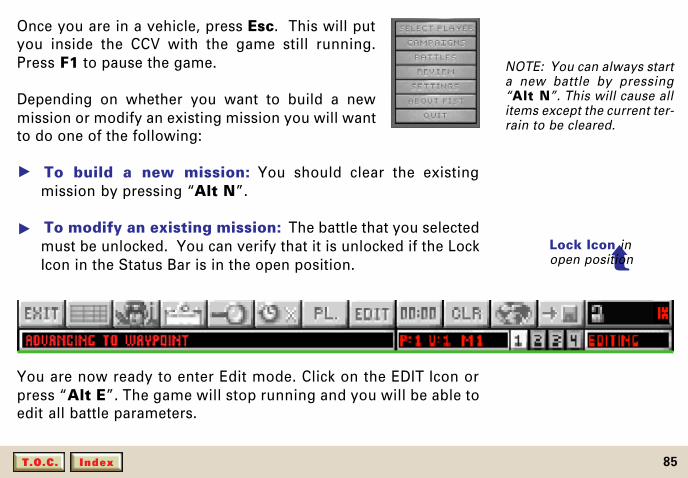
85IndexT.O.C.
Once you are in a vehicle, press Esc. This will putyou inside the CCV with the game still running.Press F1 to pause the game.
Depending on whether you want to build a newmission or modify an existing mission you will wantto do one of the following:
To build a new mission: You should clear the existingmission by pressing “Alt N”.
To modify an existing mission: The battle that you selectedmust be unlocked. You can verify that it is unlocked if the LockIcon in the Status Bar is in the open position.
You are now ready to enter Edit mode. Click on the EDIT Icon orpress “Alt E”. The game will stop running and you will be able toedit all battle parameters.
▲▲
➥Lock Icon inopen position
NOTE: You can always starta new battle by pressing“Alt N”. This will cause allitems except the current ter-rain to be cleared.
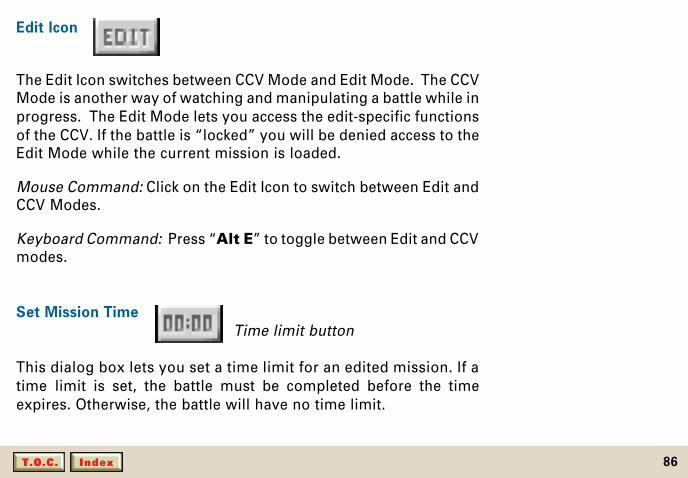
86IndexT.O.C.
Edit Icon
The Edit Icon switches between CCV Mode and Edit Mode. The CCVMode is another way of watching and manipulating a battle while inprogress. The Edit Mode lets you access the edit-specific functionsof the CCV. If the battle is “locked” you will be denied access to theEdit Mode while the current mission is loaded.
Mouse Command: Click on the Edit Icon to switch between Edit andCCV Modes.
Keyboard Command: Press “Alt E” to toggle between Edit and CCVmodes.
Set Mission Time
Time limit button
This dialog box lets you set a time limit for an edited mission. If atime limit is set, the battle must be completed before the timeexpires. Otherwise, the battle will have no time limit.

87IndexT.O.C.
Clear Battle
Clear button
If you want to create a battle from scratch, use the ClearMission (CLR) button. Clearing a mission will only re-move the battle elements and terrain features that youchose. It will not clear the terrain itself.
Clicking on CLR deletes some or all of the units andfeatures from the current map. A dialog box will appearasking you what elements you wish to clear. Proceeding will leave theterrain map plus whatever elements you chose not to clear.
Mouse Command: Clicking on the Clear Mission (CLR) button bringsup a dialog box which asks what items you want to clear. Click on yourchoice.
Keyboard Command: Press “Alt C” to Clear Mission.
Terrain Selector Terrain button
One of your first decisions in creating a battle is what type of terrainthis battle will take place in. Choose using the Terrain selection tool,
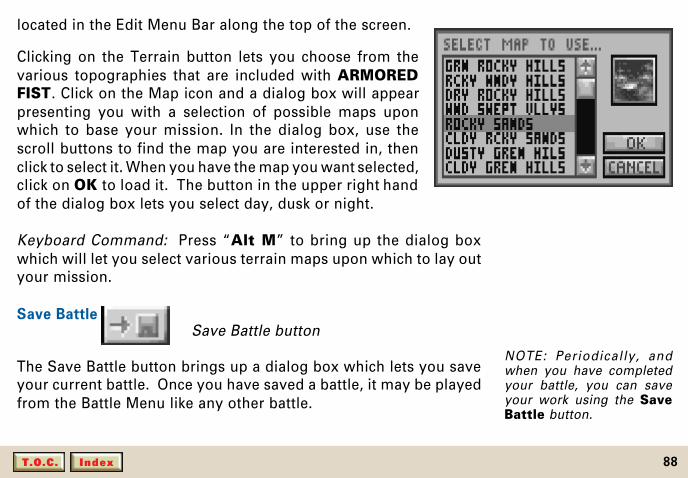
88IndexT.O.C.
located in the Edit Menu Bar along the top of the screen.
Clicking on the Terrain button lets you choose from thevarious topographies that are included with ARMOREDFIST. Click on the Map icon and a dialog box will appearpresenting you with a selection of possible maps uponwhich to base your mission. In the dialog box, use thescroll buttons to find the map you are interested in, thenclick to select it. When you have the map you want selected,click on OK to load it. The button in the upper right handof the dialog box lets you select day, dusk or night.
Keyboard Command: Press “Alt M” to bring up the dialog boxwhich will let you select various terrain maps upon which to lay outyour mission.
Save Battle Save Battle button
The Save Battle button brings up a dialog box which lets you saveyour current battle. Once you have saved a battle, it may be playedfrom the Battle Menu like any other battle.
NOTE: Periodically, andwhen you have completedyour battle, you can saveyour work using the SaveBattle button.
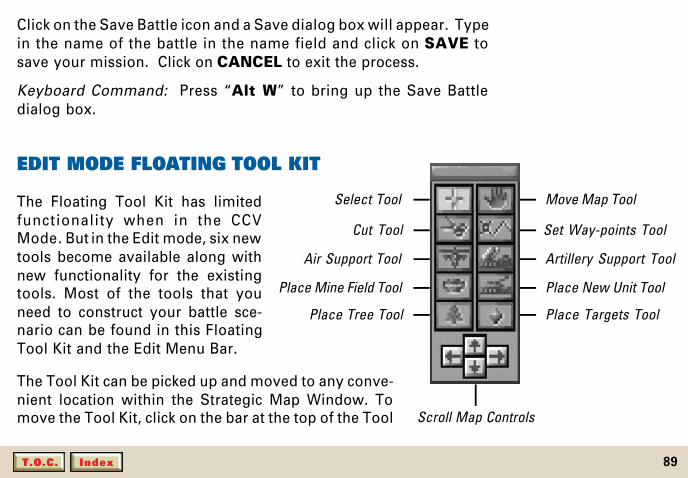
89IndexT.O.C.
Click on the Save Battle icon and a Save dialog box will appear. Typein the name of the battle in the name field and click on SAVE tosave your mission. Click on CANCEL to exit the process.
Keyboard Command: Press “Alt W” to bring up the Save Battledialog box.
EDIT MODE FLOATING TOOL KIT
The Floating Tool Kit has limitedfunctionality when in the CCVMode. But in the Edit mode, six newtools become available along withnew functionality for the existingtools. Most of the tools that youneed to construct your battle sce-nario can be found in this FloatingTool Kit and the Edit Menu Bar.
The Tool Kit can be picked up and moved to any conve-nient location within the Strategic Map Window. Tomove the Tool Kit, click on the bar at the top of the Tool
Air Support Tool
Move Map Tool
Cut Tool Set Way-points Tool
Place Targets Tool
Artillery Support Tool
Scroll Map Controls
Place New Unit Tool
Select Tool
Place Mine Field Tool
Place Tree Tool

90IndexT.O.C.
Kit, hold down the button and then drag the Tool Kit to the desiredlocation.
In Edit Mode, in addition to the normal tools described earlier, theFloating Tool Kit includes the following additional functions andtools:
1. Select Mission Goal
Select Mission Button
While in Edit mode, the Select Tool has an additional function.Once selected in the normal fashion, you can control-click on anyvehicle, artillery base or target and this will set them as MissionGoals. Mission Goals must be destroyed in order to successfullycomplete the mission.
You can tell that you have turned an object into a goal when aflashing cross appears over the object. Mission Goals also show upas flashing dots in the Unit Tactical Map and the Threat Indi-catorduring game play. If you control-click on an item that is already aMission Goal, it will no longer be a goal.
NOTE: To “control-click”Hold down the “Ctrl” keywhile clicking on the leftmouse button.

91IndexT.O.C.
NOTE: You must have atleast one Mission Goal tohave a mission that can bewon.
2. Set Way-points (Enemy)
Set Way-points Button
In Edit mode, the Set Way-points works the same as in CCV Mode butnow it allows you to also set points for the enemy.
Click on the desired enemy platoon leader unit with the Selecttool. Click on the Set Way-points tool and lay down paths asdescribed in the Set Way-points section on page 77.
3. Cut (Edit Mode)
Cut Tool Button
In Edit Mode, the Cut tool allows you to cut not only your Way-points, but also the enemy’s. It will now also cut out any vehicle,Target, Artillery Base, Trees or Mine Fields.
The Cut tool will cut whatever element is closest to the position ofthe click. If there are several cutable elements close together, itmay be wise to zoom in on the map as close as possible to avoidaccidentally cutting the wrong thing.
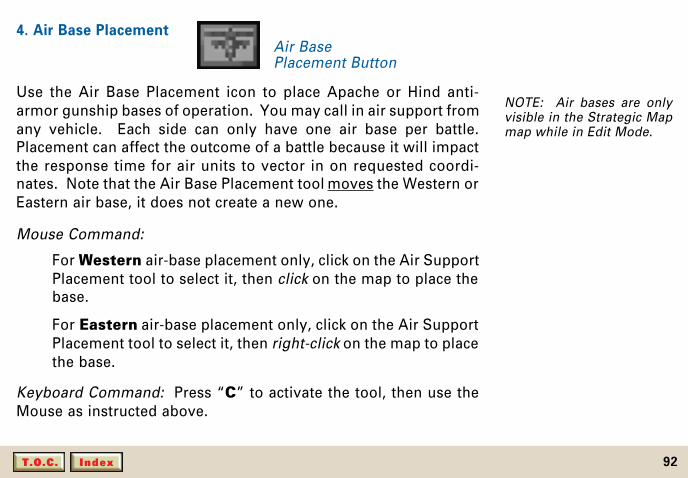
92IndexT.O.C.
NOTE: Air bases are onlyvisible in the Strategic Mapmap while in Edit Mode.
4. Air Base Placement Air Base
Placement Button
Use the Air Base Placement icon to place Apache or Hind anti-armor gunship bases of operation. You may call in air support fromany vehicle. Each side can only have one air base per battle.Placement can affect the outcome of a battle because it will impactthe response time for air units to vector in on requested coordi-nates. Note that the Air Base Placement tool moves the Western orEastern air base, it does not create a new one.
Mouse Command:
For Western air-base placement only, click on the Air SupportPlacement tool to select it, then click on the map to place thebase.
For Eastern air-base placement only, click on the Air SupportPlacement tool to select it, then right-click on the map to placethe base.
Keyboard Command: Press “C” to activate the tool, then use theMouse as instructed above.
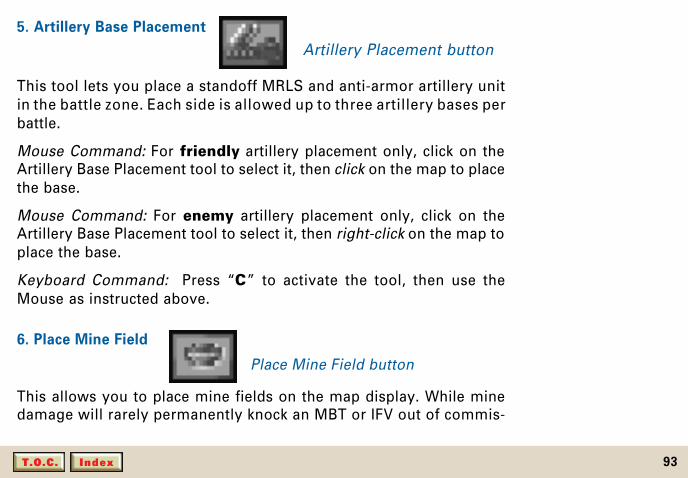
93IndexT.O.C.
5. Artillery Base Placement
This tool lets you place a standoff MRLS and anti-armor artillery unitin the battle zone. Each side is allowed up to three artillery bases perbattle.
Mouse Command: For friendly artillery placement only, click on theArtillery Base Placement tool to select it, then click on the map to placethe base.
Mouse Command: For enemy artillery placement only, click on theArtillery Base Placement tool to select it, then right-click on the map toplace the base.
Keyboard Command: Press “C” to activate the tool, then use theMouse as instructed above.
6. Place Mine Field
Place Mine Field button
This allows you to place mine fields on the map display. While minedamage will rarely permanently knock an MBT or IFV out of commis-
Artillery Placement button

94IndexT.O.C.
sion it will usually throw a track which will take some time to repair.
Click on the Place Mine Field button to select the tool then click onthe terrain in the Strategic Map in which you want the mine fieldplaced.
Right-click on the Place Mine Field button to choosethe type of mine that you will be placing from theChoose Mine dialog box.
Chose Mine Dialog Box
There are three types of mines. They are:
Mine Type Description
Enemy You cannot see it on your maps but it will explode if you goover it.
Friendly You can see them but they will not damage your side.
Rogue You can see them and they will damage either side.
Keyboard Command: Press “M” to activate the tool, then use themouse as instructed above.
NOTE: Mines are deadlyand can be very frustrat-ing particularly if youcannot see them. Whencreating your own mis-sions, consider usingonly Rogue or Friendlymines.
NOTE: Track repair isdone automatically, butit will take time.
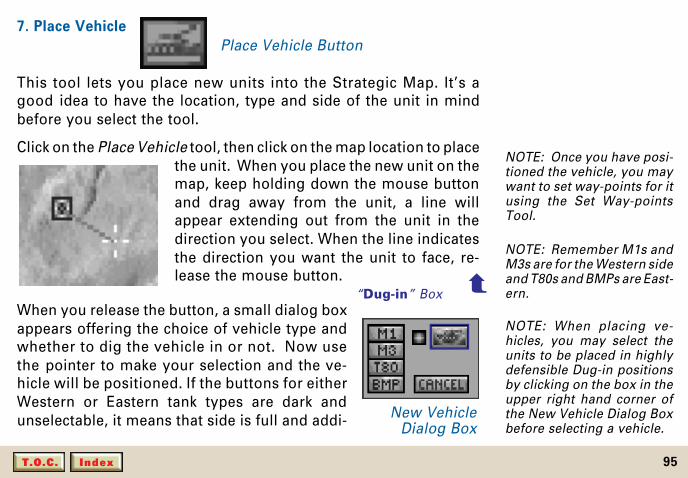
95IndexT.O.C.
7. Place Vehicle
Place Vehicle Button
This tool lets you place new units into the Strategic Map. It’s agood idea to have the location, type and side of the unit in mindbefore you select the tool.
Click on the Place Vehicle tool, then click on the map location to placethe unit. When you place the new unit on themap, keep holding down the mouse buttonand drag away from the unit, a line willappear extending out from the unit in thedirection you select. When the line indicatesthe direction you want the unit to face, re-lease the mouse button.
When you release the button, a small dialog boxappears offering the choice of vehicle type andwhether to dig the vehicle in or not. Now usethe pointer to make your selection and the ve-hicle will be positioned. If the buttons for eitherWestern or Eastern tank types are dark andunselectable, it means that side is full and addi-
NOTE: When placing ve-hicles, you may select theunits to be placed in highlydefensible Dug-in positionsby clicking on the box in theupper right hand corner ofthe New Vehicle Dialog Boxbefore selecting a vehicle.
NOTE: Once you have posi-tioned the vehicle, you maywant to set way-points for itusing the Set Way-pointsTool.
NOTE: Remember M1s andM3s are for the Western sideand T80s and BMPs are East-ern.
New VehicleDialog Box
“Dug-in” Box ➥
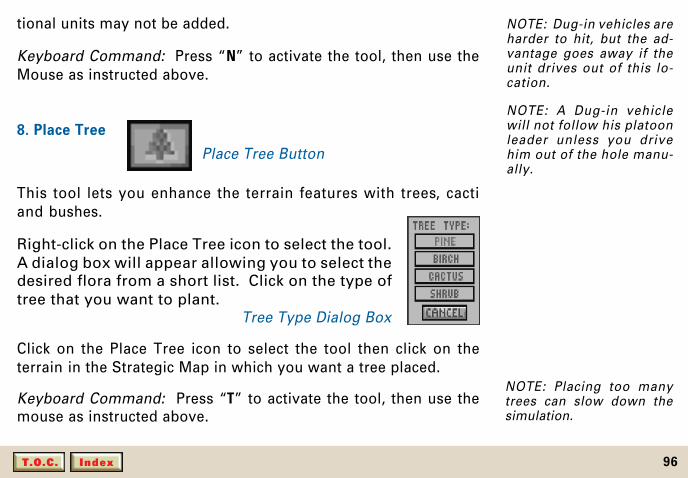
96IndexT.O.C.
NOTE: Dug-in vehicles areharder to hit, but the ad-vantage goes away if theunit drives out of this lo-cation.
NOTE: A Dug-in vehiclewill not follow his platoonleader unless you drivehim out of the hole manu-ally.
NOTE: Placing too manytrees can slow down thesimulation.
tional units may not be added.
Keyboard Command: Press “N” to activate the tool, then use theMouse as instructed above.
8. Place Tree
Place Tree Button
This tool lets you enhance the terrain features with trees, cactiand bushes.
Right-click on the Place Tree icon to select the tool.A dialog box will appear allowing you to select thedesired flora from a short list. Click on the type oftree that you want to plant.
Tree Type Dialog Box
Click on the Place Tree icon to select the tool then click on theterrain in the Strategic Map in which you want a tree placed.
Keyboard Command: Press “T” to activate the tool, then use themouse as instructed above.

97IndexT.O.C.
9. Place Target
Place Target Button
This tool lets you place various battlefield targets which can addvariety to your battle. They also can be designated as MissionGoals to add objectives to a given battle design.
Mouse Command: Right-Click on the Place Target iconto select the tool. A dialog box appears allowing you toselect a type of target from a short list.
Target Selection Dialog Box
Click on your selection, then click on the terrain location in theStrategic Map in which you want your target placed.
Keyboard Command: Press “T” to activate the tool, then use themouse as instructed above.
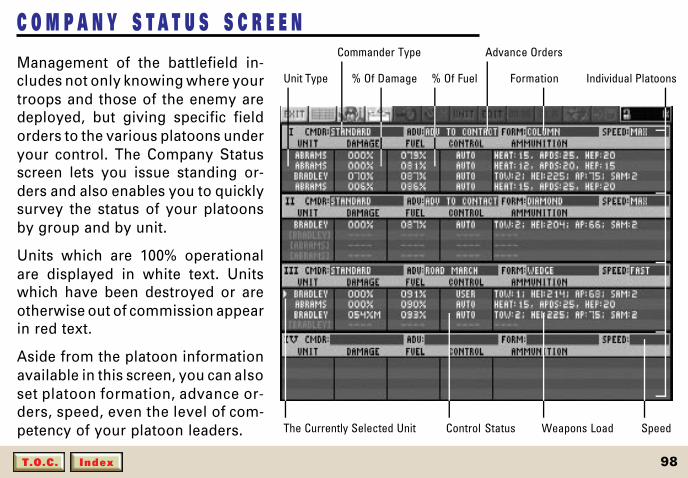
98IndexT.O.C.
C O M P A N Y S T A T U S S C R E E NManagement of the battlefield in-cludes not only knowing where yourtroops and those of the enemy aredeployed, but giving specific fieldorders to the various platoons underyour control. The Company Statusscreen lets you issue standing or-ders and also enables you to quicklysurvey the status of your platoonsby group and by unit.
Units which are 100% operationalare displayed in white text. Unitswhich have been destroyed or areotherwise out of commission appearin red text.
Aside from the platoon informationavailable in this screen, you can alsoset platoon formation, advance or-ders, speed, even the level of com-petency of your platoon leaders.
Unit Type
SpeedControl Status
Individual Platoons
Advance Orders
Weapons LoadThe Currently Selected Unit
Formation% Of Damage
Commander Type
% Of Fuel

99IndexT.O.C.
COMMANDER
This toggle lets you select from four different Commander types.You can select Experienced, Standard, Rookie or No Action.This selection affects the way this platoon leader will behave whenengaging the enemy.
Picking one of the commander types will greatly influence the levelof experience and thus the effectiveness of the particular platoon.For example, a Rookie will not find target locks as quickly as anExperienced or Standard Commander. An IFV operating under andExperienced Commander may be more effective against enemy airsupport.
In general, more experienced Commanders are also more adventur-ous. An Experienced Commander is more likely to let one of his unitsgo out and chase a target than a Rookie who will keep all the unitsin as tight a formation as possible.
Mouse Command: Click on the CMDR window repeatedly until thedesired setting appears.
NOTE: The No Action Com-mander will never take anyaction. This is a good way tohave a platoon wait out ofthe way in reserve or to setup the enemy for some tar-get practice.
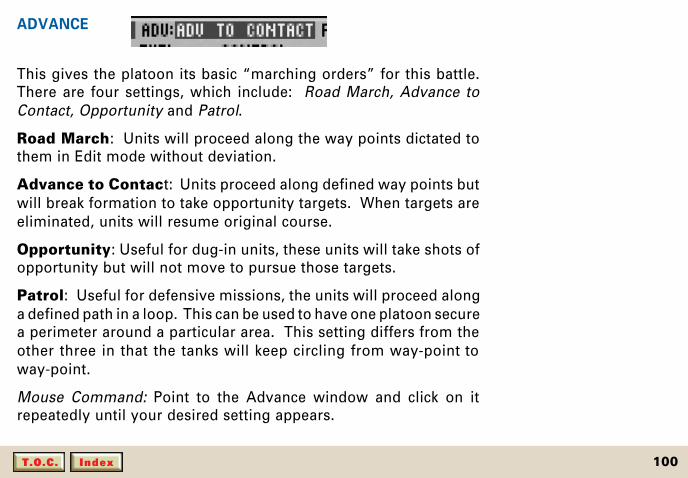
100IndexT.O.C.
ADVANCE
This gives the platoon its basic “marching orders” for this battle.There are four settings, which include: Road March, Advance toContact, Opportunity and Patrol.
Road March: Units will proceed along the way points dictated tothem in Edit mode without deviation.
Advance to Contact: Units proceed along defined way points butwill break formation to take opportunity targets. When targets areeliminated, units will resume original course.
Opportunity: Useful for dug-in units, these units will take shots ofopportunity but will not move to pursue those targets.
Patrol: Useful for defensive missions, the units will proceed alonga defined path in a loop. This can be used to have one platoon securea perimeter around a particular area. This setting differs from theother three in that the tanks will keep circling from way-point toway-point.
Mouse Command: Point to the Advance window and click on itrepeatedly until your desired setting appears.
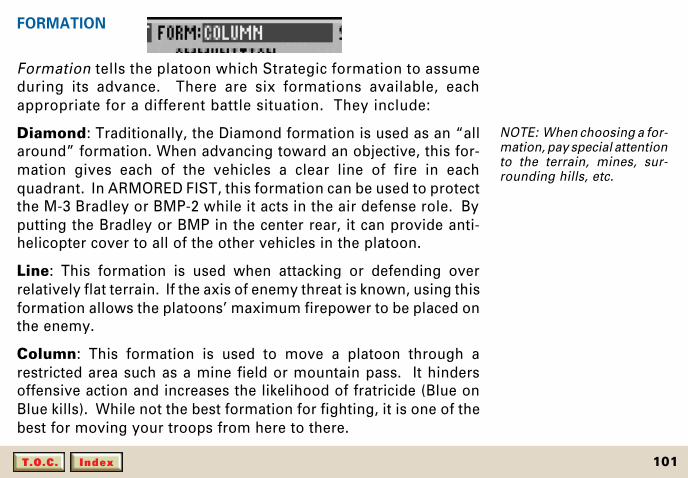
101IndexT.O.C.
FORMATION
Formation tells the platoon which Strategic formation to assumeduring its advance. There are six formations available, eachappropriate for a different battle situation. They include:
Diamond: Traditionally, the Diamond formation is used as an “allaround” formation. When advancing toward an objective, this for-mation gives each of the vehicles a clear line of fire in eachquadrant. In ARMORED FIST, this formation can be used to protectthe M-3 Bradley or BMP-2 while it acts in the air defense role. Byputting the Bradley or BMP in the center rear, it can provide anti-helicopter cover to all of the other vehicles in the platoon.
Line: This formation is used when attacking or defending overrelatively flat terrain. If the axis of enemy threat is known, using thisformation allows the platoons’ maximum firepower to be placed onthe enemy.
Column: This formation is used to move a platoon through arestricted area such as a mine field or mountain pass. It hindersoffensive action and increases the likelihood of fratricide (Blue onBlue kills). While not the best formation for fighting, it is one of thebest for moving your troops from here to there.
NOTE: When choosing a for-mation, pay special attentionto the terrain, mines, sur-rounding hills, etc.
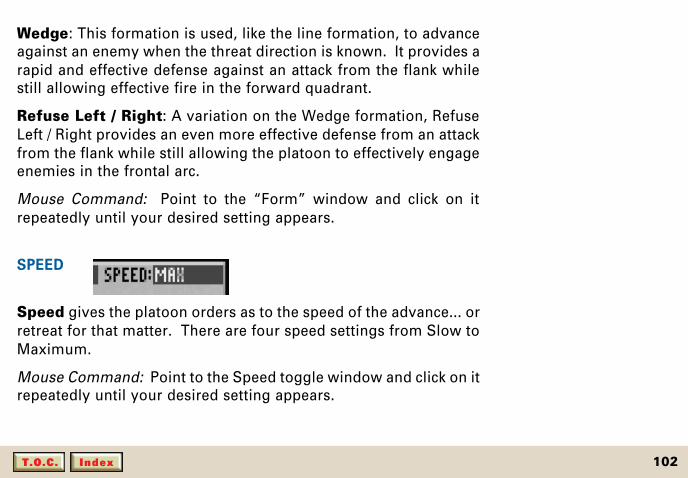
102IndexT.O.C.
Wedge: This formation is used, like the line formation, to advanceagainst an enemy when the threat direction is known. It provides arapid and effective defense against an attack from the flank whilestill allowing effective fire in the forward quadrant.
Refuse Left / Right: A variation on the Wedge formation, RefuseLeft / Right provides an even more effective defense from an attackfrom the flank while still allowing the platoon to effectively engageenemies in the frontal arc.
Mouse Command: Point to the “Form” window and click on itrepeatedly until your desired setting appears.
SPEED
Speed gives the platoon orders as to the speed of the advance... orretreat for that matter. There are four speed settings from Slow toMaximum.
Mouse Command: Point to the Speed toggle window and click on itrepeatedly until your desired setting appears.
103IndexT.O.C.
SETTING THE ENEMY’S PARAMETERS
When constructing or modifying battles in Edit Mode, you can set theother side’s platoon parameters by pressing “Ctrl S”. You will heara beep and you will then see all of the other side’s platoon attributes.Set them to your preference. Make sure that you are in Edit mode andin the Company Status Screen before you press “Ctrl S”.

104IndexT.O.C.
A R M O R E D C O M B A T S T R A T E G I E SWhen it comes to winning battles, it isnot so much the tactics employed buthow they are executed. Especially whenwell-equipped and technically-skilledunits engage each other. This is what thegame of chess and warfare have in com-mon. Sound tactics are derived from“doctrine” based on experience andfrom understandings of a fighting unit’scapabilities. Simply put, it’s important toknow what your units can and cannot do.
ARMORED FIST demands all of theabove from the moment its playersbe gin to organize their combinedfighting elements. It is helpful forARMORED FIST players to understand the basics of “tactics and tech-niques” for combined armor and mechanized infantry forces, espe-cially as they relate to commanders charged with employing MBTsand IFVs together against a formidable enemy.
105IndexT.O.C.
ARMORED FIST players should desire knowledge of the followingcombat categories:
● Preparation for combat● Command, Control, Communications and Intelligence (C3I)● Offensive Operations● Defensive Operations● Retrograde Operations● Combat Support● Combat Service Support
While not all aspects which affect a modern combat scenario are left to theplayer to control and execute in ARMORED FIST, a sense of the realworld tactical concerns and understanding of the above categories willenrich the player’s ability to win and will place the ARMORED FISTexperience in the larger framework of combat theory.
Preparation for combat includes the deployment of equipment andthe setting up of pre-operational assembly areas. It also includesrehearsals, deception plans, and the conduct of reconnaissance andsurveillance missions and of counter-reconnaissance. On a most grandscale, “Desert Shield” was a preparation phase for the combat thatbecame “Desert Storm.”
106IndexT.O.C.
Command, Control, Communications and Intelligence (C3I) in-volves command and control via inter- and intra-unit communications, andalso electronic warfare (EW) measures and, when possible, the develop-ment and updating of information about the enemy through electronicmeans.
Offensive, Defensive and Retrograde Operations are ways by whichcommanders employ combat personnel and equipment respectively in anattack, in a defense or during a deliberate withdrawal, respectively, so as toprevail against enemy forces.
Combat Support includes the artillery, fixed wing and helicopter closeair support (CAS), plus the airborne and ground intelligence, air defense,engineer and special operations elements that commanders call upon foradded firepower, enemy information and protection during combatoperations.
Combat Service Support comprises the logistics that make it possiblefor things to work in combat; for instance, fuel and water, ammunition, andtank and IFV recovery vehicles, and forward maintenance units.
ARMORED FIST includes elements of preparation for combat, C3I, andcombat support. As commander, you can utilize these elements in offen-sive, defensive or retrograde operations or missions.

107IndexT.O.C.
PREPARATION FOR COMBAT
In the U.S. Army, the armor units and the mechanized infantry whereIFV’s exist comprise, within a Corps jurisdiction, first divisions, thenbrigades/regiments, followed by battalions, companies and pla-toons. Armies using the old Soviet military organizational conceptorganize their armor and mechanized infantry into tank and motor-ized rifle divisions, brigades/regiments, battalions, companies andplatoons.
As the U.S./coalition force’s swift and successful Desert Storm armorand mechanized infantry attack against Iraqi forces showed in 1991,it is the company-size task force, essentially a combined force element,that closes with the enemy as a cutting edge and brings about thedecisive win in armored fighting. A task force of this type couldinclude a command element, that is, a commander and his tank, and amix of up to five armor and mechanized infantry (IFV) platoons. InARMORED FIST, you are given control of a task force of up to fourplatoons.
Only if an Army has cargo/troop aircraft the magnitude of which equalsthat of the U.S. Air Force C-5 and C-17 planes and their former SovietUnion counterpart aircraft, can heavy tanks and IFVs be brought to a
In ARMOREDFIST, you are
given control ofa task force of upto four platoons.

108IndexT.O.C.
scene of battle across the oceans quickly in significant numbers. That iswhy the U.S. military preferred to pre-position armor units in Europeduring the Cold War, and why sea-lift became so important duringpreparation for the Persian Gulf War.
Tactical Assembly Areas are pre-operational locations for any size com-bat unit forward of a Corps or regional warfare command headquarters.Ideally, a Tactical Assembly Area should provide:
● Concealment from enemy air and ground observation
● Cover from direct enemy fire
● Terrain masking of electromagnetic signals (Signatures)
● Wide dispersion of units and their vehicles within the area(Width between elements should be in accordance with knowledge ofenemy capabilities and type of tactical operation to be executed)
● Accessible and suitable entranceways and exit paths, butconcealed from enemy observation
● Terrain allowing for the best possible forward observation ofavenues of approach into the assembly area
● Best possible soil conditions and good drainage
“Tactical Assem-bly Areas are
pre-operationallocations for anysize combat unit
forward of aCorps or regionalwarfare command
headquarters.”
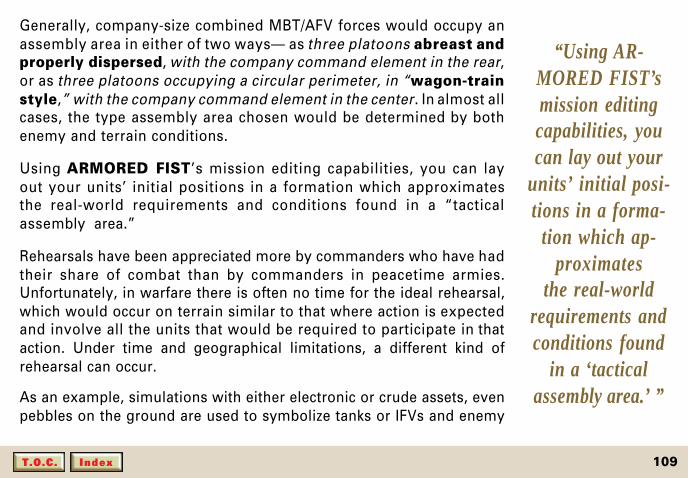
109IndexT.O.C.
Generally, company-size combined MBT/AFV forces would occupy anassembly area in either of two ways— as three platoons abreast andproperly dispersed, with the company command element in the rear,or as three platoons occupying a circular perimeter, in “wagon-trainstyle,” with the company command element in the center. In almost allcases, the type assembly area chosen would be determined by bothenemy and terrain conditions.
Using ARMORED FIST’s mission editing capabilities, you can layout your units’ initial positions in a formation which approximatesthe real-world requirements and conditions found in a “tacticalassembly area.”
Rehearsals have been appreciated more by commanders who have hadtheir share of combat than by commanders in peacetime armies.Unfortunately, in warfare there is often no time for the ideal rehearsal,which would occur on terrain similar to that where action is expectedand involve all the units that would be required to participate in thataction. Under time and geographical limitations, a different kind ofrehearsal can occur.
As an example, simulations with either electronic or crude assets, evenpebbles on the ground are used to symbolize tanks or IFVs and enemy
“Using AR-MORED FIST’smission editingcapabilities, youcan lay out your
units’ initial posi-tions in a forma-
tion which ap-proximates
the real-worldrequirements andconditions found
in a ‘tacticalassembly area.’ ”

110IndexT.O.C.
positions. Also, tank and IFV commanders and gunners can practiceoperational requirements together or alone, while a company commanderrehearses with platoon leaders as each leans over a map. ARMOREDFIST players have the luxury of rehearsing maneuvers and analyzingproblems through trial-and-error, counting early forays as “simula-tions” until they are ready to commit to the “real” encounter.
Deception planning should awaken a player’s shrewdness and knowl-edge of the enemy. It is designed to cause an enemy to believe that whichisn’t there, really IS... and that which isn’t going to happen, WILL... andvice-versa.
However, “the deceiver is often the person deceived,” claims an experi-enced commander. “Especially,” he adds, “when a player allows decep-tion to be the key element of a tactical operation, or when the time toexecute a deception plan eats into the extra time that should be giventhe primary operational tactic, or when a player has failed to have a planto execute should the deception activity fail.”
A deception activity might be the deliberate deployment of forces for-ward so that, while a retrograde operation or “retreat” operation isexecuted by some of the units, an enemy would expect an assault andmove forces into a defense position from which the enemy would have to
“ARMOREDFIST players
have the luxuryof rehearsing
maneuversand analyzing
problemsthrough trial-and-error...”
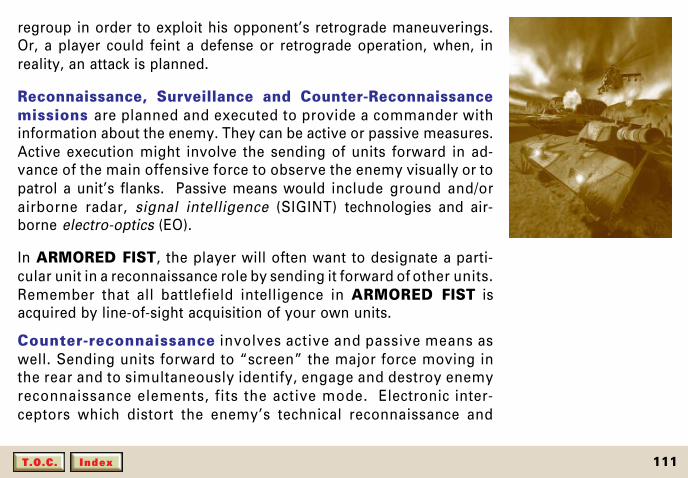
111IndexT.O.C.
regroup in order to exploit his opponent’s retrograde maneuverings.Or, a player could feint a defense or retrograde operation, when, inreality, an attack is planned.
Reconnaissance, Surveillance and Counter-Reconnaissancemissions are planned and executed to provide a commander withinformation about the enemy. They can be active or passive measures.Active execution might involve the sending of units forward in ad-vance of the main offensive force to observe the enemy visually or topatrol a unit’s flanks. Passive means would include ground and/orairborne radar, signal intelligence (SIGINT) technologies and air-borne electro-optics (EO).
In ARMORED FIST, the player will often want to designate a parti-cular unit in a reconnaissance role by sending it forward of other units.Remember that all battlefield intelligence in ARMORED FIST isacquired by line-of-sight acquisition of your own units.
Counter-reconnaissance involves active and passive means aswell. Sending units forward to “screen” the major force moving inthe rear and to simultaneously identify, engage and destroy enemyreconnaissance elements, fits the active mode. Electronic inter-ceptors which distort the enemy’s technical reconnaissance and

112IndexT.O.C.
data communications means, lies within the passive category.
In most armies, only battalions and higher echelon units have dedi-cated reconnaissance elements, for example, scout platoons. How-ever, it is not uncommon for company-size combined forces to obtainscout elements and passive means for specific operations.
COMMAND CONTROL COMMUNICATIONS & INTELLIGENCE (C3I)
Command and Control (C2) of tactical operations is a process thatconsists first of planning and coordination, then direct and indirect over-sight of the management and implementation of operational activity. Itis a process carried out through effective leadership, effective communi-cations and viable communications equipment and the gathering anddissemination of information about the enemy.
In ARMORED FIST, all C3I operations which the player has control overare accessible from within the Command and Control Vehicle (CCV).At the company-sized, combined armor/fighting vehicle force level, the C2element would comprise the commander’s tank, the executive officer’stank and the fire support officer’s tank, each equipped with state-of-the-art radio and other electronic communications and intelligence gather-ing systems and sub-systems. So effective are the electronic systems of
“In mostarmies, only
battalions andhigher echelon
units havededicatedreconnais-sance ele-
ments, for ex-ample, scoutplatoons.”
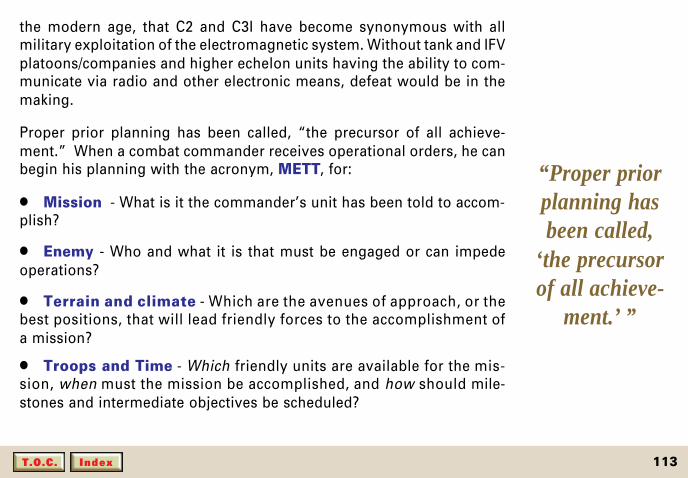
113IndexT.O.C.
the modern age, that C2 and C3I have become synonymous with allmilitary exploitation of the electromagnetic system. Without tank and IFVplatoons/companies and higher echelon units having the ability to com-municate via radio and other electronic means, defeat would be in themaking.
Proper prior planning has been called, “the precursor of all achieve-ment.” When a combat commander receives operational orders, he canbegin his planning with the acronym, METT, for:
● Mission - What is it the commander’s unit has been told to accom-plish?
● Enemy - Who and what it is that must be engaged or can impedeoperations?
● Terrain and climate - Which are the avenues of approach, or thebest positions, that will lead friendly forces to the accomplishment ofa mission?
● Troops and Time - Which friendly units are available for the mis-sion, when must the mission be accomplished, and how should mile-stones and intermediate objectives be scheduled?
“Proper priorplanning hasbeen called,
‘the precursorof all achieve-
ment.’ ”
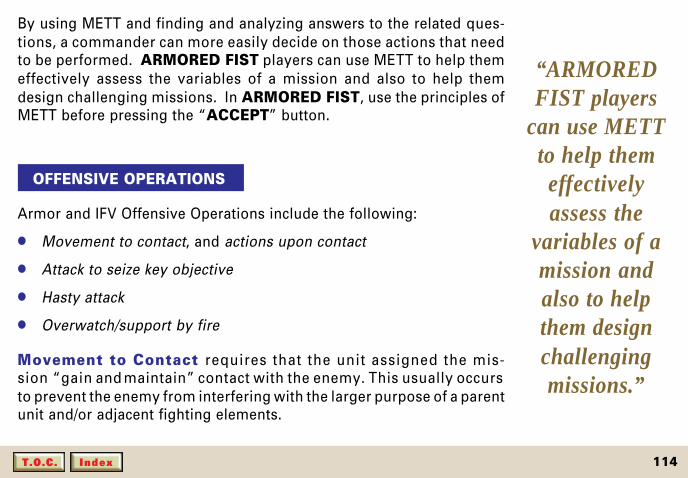
114IndexT.O.C.
By using METT and finding and analyzing answers to the related ques-tions, a commander can more easily decide on those actions that needto be performed. ARMORED FIST players can use METT to help themeffectively assess the variables of a mission and also to help themdesign challenging missions. In ARMORED FIST, use the principles ofMETT before pressing the “ACCEPT” button.
OFFENSIVE OPERATIONS
Armor and IFV Offensive Operations include the following:
● Movement to contact, and actions upon contact
● Attack to seize key objective
● Hasty attack
● Overwatch/support by fire
Movement to Contact requires that the unit assigned the mis-sion “gain and maintain” contact with the enemy. This usually occursto prevent the enemy from interfering with the larger purpose of a parentunit and/or adjacent fighting elements.
“ARMOREDFIST players
can use METTto help themeffectivelyassess the
variables of amission andalso to helpthem designchallengingmissions.”
115IndexT.O.C.
Attack to Seize Key Objective is used to neutralize a strongenemy position or mobile unit. It differs from the hasty attack in thatthe nature and power of the target is such that considerable planningand preparation must occur, followed by deliberate and phased ac-tions.
Hasty Attacks amount to the taking advantage of opportunities, forexample, the unexpected sighting of enemy forces that can be overrunwith immediate action. Such tactics require very fast advance plan-ning, or the automatic implementation that comes from a unit’s wellunderstood standing operational procedures (SOPs).
Overwatch/Support by Fire missions require that the assigned unitengage and “fix” the enemy, so that another organization can maneu-ver to attack a particular objective. In essence, it is the application of“back up” for a maneuver element.
Offensive Operations find combined MBT and IFV forces maneuveringfrom a tall list of options. Depending on terrain, the distance to anobjective, time and enemy firepower, a commander may order allfriendly vehicles to move in a single line, all abreast or some forwardand others back, that is, echeloned. In the attack, armored systems

116IndexT.O.C.
could leap frog, echelon to the right or left, or move scattered andindependently as they exploit enemy weaknesses.
In ARMORED FIST, use the Company Status Screen to select various“Advance” and “Form” options as described in this manual.
Important for both real commander and ARMORED FIST players is thatthe offensive operation’s “scheme of maneuver” insure that it exploitsexisting terrain and bypasses or neutralizes natural and man-made ob-stacles, allows for rapid closing with the enemy, maintains attack momen-tum, takes advantage of enemy weak points, and protects friendly flanksand rear while weakening the enemy’s flanks and rear.
DEFENSIVE OPERATIONS
Defensive Operations include:
● Defending within a sector
● Defending a battle position
● Defending a strong point
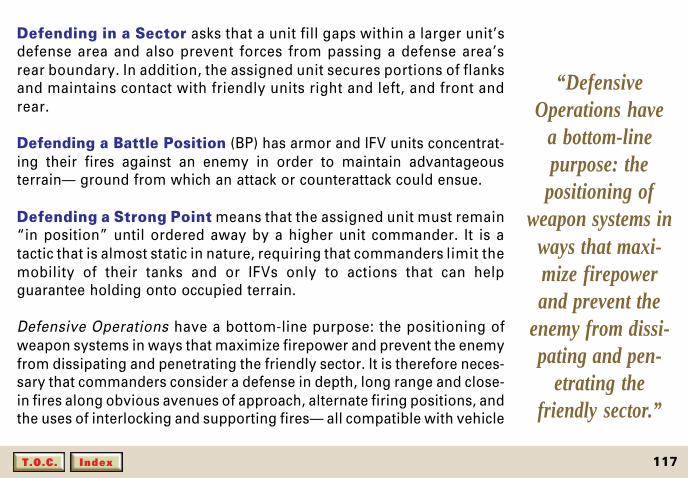
117IndexT.O.C.
Defending in a Sector asks that a unit fill gaps within a larger unit’sdefense area and also prevent forces from passing a defense area’srear boundary. In addition, the assigned unit secures portions of flanksand maintains contact with friendly units right and left, and front andrear.
Defending a Battle Position (BP) has armor and IFV units concentrat-ing their fires against an enemy in order to maintain advantageousterrain— ground from which an attack or counterattack could ensue.
Defending a Strong Point means that the assigned unit must remain“in position” until ordered away by a higher unit commander. It is atactic that is almost static in nature, requiring that commanders limit themobility of their tanks and or IFVs only to actions that can helpguarantee holding onto occupied terrain.
Defensive Operations have a bottom-line purpose: the positioning ofweapon systems in ways that maximize firepower and prevent the enemyfrom dissipating and penetrating the friendly sector. It is therefore neces-sary that commanders consider a defense in depth, long range and close-in fires along obvious avenues of approach, alternate firing positions, andthe uses of interlocking and supporting fires— all compatible with vehicle
“DefensiveOperations have
a bottom-linepurpose: the
positioning ofweapon systems in
ways that maxi-mize firepowerand prevent the
enemy from dissi-pating and pen-
etrating thefriendly sector.”

118IndexT.O.C.
dispersions and cover and concealment favoring survivability duringenemy assaults and mortar, artillery and missile attacks.
In ARMORED FIST, players should use the mission editing features todesignate selected units as “dug in” to assist in defensive operations.
RETROGRADE OPERATIONS
Retrograde Operations include:
● Delaying in Sector
● Withdrawal
● Retirement of Forces
Delaying in Sector has fighting units “trading space for time,” ineffect, allowing the enemy to move it backwards but to a more advanta-geous position where it could engage the enemy long enough forother friendly units to execute a counterattack.
Withdrawal is conducted so that a friendly unit can “free” itselffrom any engagement with enemy forces until ordered back to battle by
119IndexT.O.C.
a higher unit commander.
Retirement of Forces is an administrative move to the rear, wheredisengagement from the enemy is complete and engagement is perhapstaken up by a different friendly unit.
The intelligent application of the “Dug In” option, as well as hull-downdefensive positions will assist the ARMORED FIST player in success-ful retrograde operations. Additionally, a “diamond formation” for re-treating units may prove useful in retrograde operations.
COMBAT SUPPORT
Combat Support, as a tactic, becomes a unit’s on-call and far-reachingextension of firepower. In every lateral and vertical direction, a unit’sfirepower envelope expands from surface-to-surface, surface-to-air, air-to-ground and air-to-ground long-range guns, mortars, artillery and rock-ets, missiles and bombs. In addition, engineer units provide anti-minesupport for armor and IFV forces. Without question, maneuvering a unittoo far forward of fast access to indirect fire and aviation assets, puts it atrisk in the combat environment.
Therefore, when developing a “scheme of maneuver” for the offense,
120IndexT.O.C.
defense or retrograde, commanders are well advised to make certain ofwhen and how fire support becomes immediately available. Groundsupport fires could come from a large assortment of weapons— 60 mmand 80 mm mortars, and 105 mm, 107 mm and 155 mm Howitzerartillery systems.
In the close air support (CAS) category alone, there could be madeavailable A-7, A-10, F-16 and F-111 aircraft, depending on minimumceiling conditions, target acquisition, the needed time over target (ToT),range requirements and enemy surface-to-air weapons. For even closersupport, there may be AH-64 Apache helicopters firing Hellfire missiles,and for close-in and hasty air reconnaissance the Kiowa OH-58 helicopter.
In ARMORED FIST, the intelligent application of the air support andartillery support units made available in a particular mission constitutethe Combat Support options available to the player. Failure to utilizeCombat Support elements will likely lead to defeat.
COMBAT SERVICE SUPPORT
Combat Service Support elements operate well to the rear of forwardunits and include what could rightly be called life-supporting at-
121IndexT.O.C.
tributes, among them ammunition storage and delivery, a fuel and oilstorage delivery site, a weapons system/components replacementfunction, and communications equipment storage, maintenance anddelivery; plus, vehicle engine replacement and maintenance facility,medical and hygiene services, food and beverage service, also aprisoner of war (POW) processing location and graves registration.
Being cut off from and losing the services provided by these brigadeand battalion “logistics trains,” endangers company size elements byhastening the depletion of their combat effectiveness.
ARMORED FIST focuses its game play on the more exciting, forwardoperations aspect of the modern battlefield.
Conclusion
ARMORED FIST encompasses an extremely detailed rendering of themodern battlefield. ARMORED FIST emphasizes certain aspects of thegrand set of equations which is modern armored combat, providing theplayer an exciting mix of strategy and real-time action. In a real war nopart of this equation is insignificant, and every participant in a justconflict, a hero.
“ARMOREDFIST
encompassesan extremely
detailedrendering ofthe modernbattlefield.”
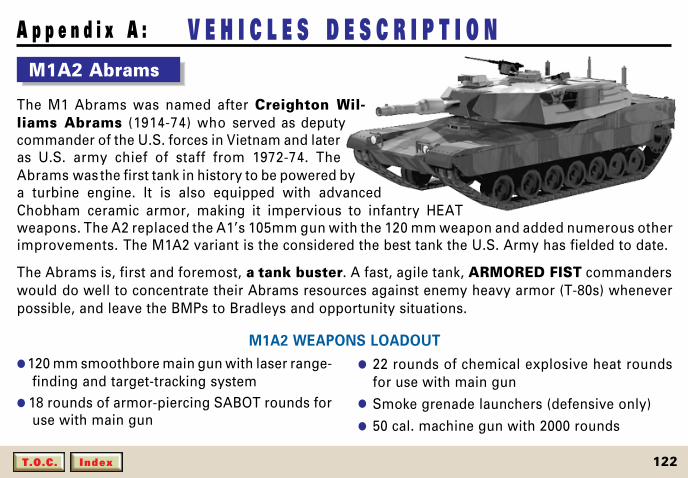
122IndexT.O.C.
A p p e n d i x A : V E H I C L E S D E S C R I P T I O N M1A2 Abrams
The M1 Abrams was named after Creighton Wil-liams Abrams (1914-74) who served as deputycommander of the U.S. forces in Vietnam and lateras U.S. army chief of staff from 1972-74. TheAbrams was the first tank in history to be powered bya turbine engine. It is also equipped with advancedChobham ceramic armor, making it impervious to infantry HEATweapons. The A2 replaced the A1’s 105mm gun with the 120 mm weapon and added numerous otherimprovements. The M1A2 variant is the considered the best tank the U.S. Army has fielded to date.
The Abrams is, first and foremost, a tank buster. A fast, agile tank, ARMORED FIST commanderswould do well to concentrate their Abrams resources against enemy heavy armor (T-80s) wheneverpossible, and leave the BMPs to Bradleys and opportunity situations.
M1A2 WEAPONS LOADOUT
● 120 mm smoothbore main gun with laser range-finding and target-tracking system
● 18 rounds of armor-piercing SABOT rounds foruse with main gun
● 22 rounds of chemical explosive heat roundsfor use with main gun
● Smoke grenade launchers (defensive only)● 50 cal. machine gun with 2000 rounds
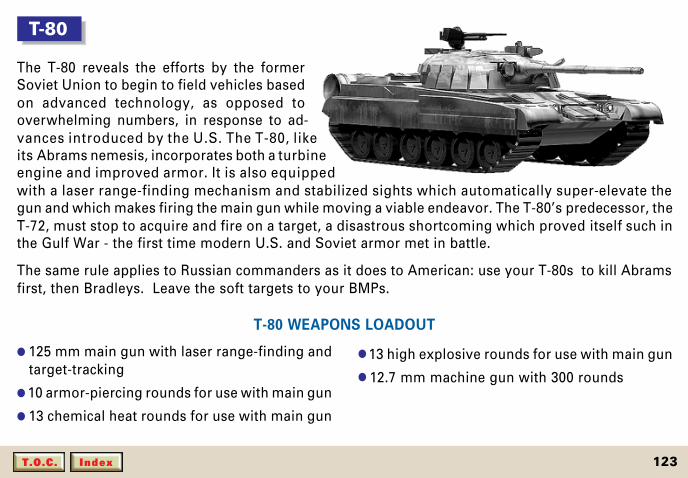
123IndexT.O.C.
T-80
The T-80 reveals the efforts by the formerSoviet Union to begin to field vehicles basedon advanced technology, as opposed tooverwhelming numbers, in response to ad-vances introduced by the U.S. The T-80, likeits Abrams nemesis, incorporates both a turbineengine and improved armor. It is also equippedwith a laser range-finding mechanism and stabilized sights which automatically super-elevate thegun and which makes firing the main gun while moving a viable endeavor. The T-80’s predecessor, theT-72, must stop to acquire and fire on a target, a disastrous shortcoming which proved itself such inthe Gulf War - the first time modern U.S. and Soviet armor met in battle.
The same rule applies to Russian commanders as it does to American: use your T-80s to kill Abramsfirst, then Bradleys. Leave the soft targets to your BMPs.
T-80 WEAPONS LOADOUT
● 125 mm main gun with laser range-finding andtarget-tracking
● 10 armor-piercing rounds for use with main gun
● 13 chemical heat rounds for use with main gun
● 13 high explosive rounds for use with main gun
● 12.7 mm machine gun with 300 rounds

124IndexT.O.C.
Bradley IFV
The Bradley Infantry Fighting Vehicle was originally created toprovide a highly mobile, defensible means of gettinginfantry to the battlefield. The system was also de-signed to be highly adaptable, with two main variants.The M-2 IFV and the M-3 model. The M-3 is used as ascouting vehicle, replacing the infantry squad with 10extra reloads for the potent TOW-2 heavy anti-tank missile.
The Bradley IFVs available to you as a commander in ARMORED FIST are the M-3 models, carryinga standardized loadout of equipment which suit them in an anti-armor capacity. If possible, find a hulldown position to fire the TOWS at long range and take out some of the enemy vehicles. Watch outhowever, Bradley’s were never intended to engage Main Battle Tanks for any extended period.
While your Bradley’s two TOW missile launchers can destroy heavy armor, ideally your Bradley’s willbe deployed in such a way as to gather usable reconnaissance. Smart commanders will also utilizeBradley’s to take out “softer” mission objective targets, freeing up available M1A2s to focus on heavyarmor and BMP’s.
BRADLEY WEAPONS LOADOUT
● 25 mm main gun with 900 rounds, dividedbetween APDS and HEI.
● TOW missile launcher with 2 missiles readyand 10 reloads.
● 300 anti-tank● 600 high explosive total available rounds● 50 caliber machine gun with 2000 rounds● Stinger (IR) SAM launcher with 2 rounds loaded

125IndexT.O.C.
BMP 2
The Soviet-built BMP 2 is a respected InfantryFighting Vehicle and serves as a formidablefoil to the Bradley IFV. Typical of Sovietcold war doctrine, the BMPs were massproduced, with Soviet commanders hopingto field ten BMPs for every one or two Brad-leys encountered. When the player finds himselfup against numerically overwhelming forces, chancesare the player has taken the U.S. side.
The same rules apply to the BMP as they do the Bradley. Deploy your T-80s to take out the enemyarmor and use the BMPs for reconnaissance and taking out softer targets. Don’t be a hero... yourBMP is Abrams-bait.
BMP-2 WEAPONS LOADOUT
● One Spandrel launch tube with 10 reloads
● 300 armor-piercing and 400 high explosive rounds
● 12.5 mm machine gun with 2000 rounds.
● 2 SA-14 (Gremlin) SAM launchers

126IndexT.O.C.
AH-64 Apache
The U.S. designers also looked closelyat the Vietnam experience. The defini-tive gunship model to come out of that conflictwas the Cobra. The mission of the attack helicop-ter was defined to be one of scouting, infantry support,and primarily tank busting or anti-tank work.
The Apache retained much of the basic design concepts introduced on the Cobra; a thin fuselageequipped with a cannon, short wings-mounting missiles/rockets, and retains the crew configurationwith the pilot sitting above and behind the gunner. The Apache has many improvements including: twinturbine engines with IR surpressors; thermal targeting and laser-designating systems; advancednavigation aids and FLIR for the pilot; and increased crew armor and crash protection.
AH-64 APACHE WEAPONS LOADOUT
● 30 mm chain gun with 1200 rounds
● 2.75 in. folding fin rockets: 2 / 4 pods holding 7 or 19 rockets in each pod
● Hellfire anti-tank missiles: 4 missiles per rack, up to 4 racks
● Sidewinder air-to-air missiles: 2
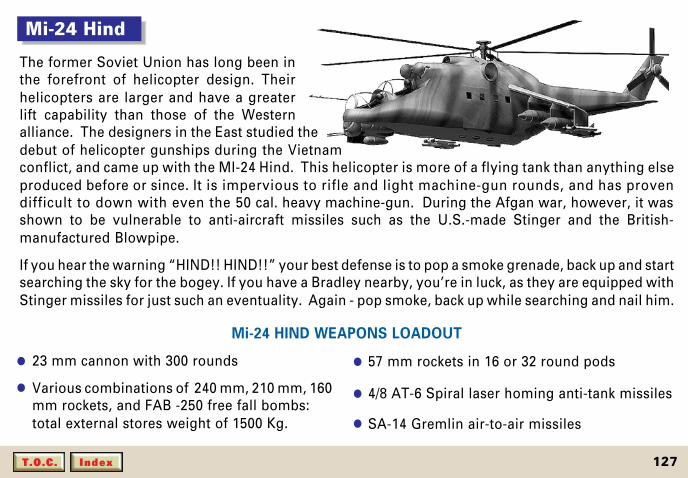
127IndexT.O.C.
● 23 mm cannon with 300 rounds
● Various combinations of 240 mm, 210 mm, 160mm rockets, and FAB -250 free fall bombs:total external stores weight of 1500 Kg.
● 57 mm rockets in 16 or 32 round pods
● 4/8 AT-6 Spiral laser homing anti-tank missiles
● SA-14 Gremlin air-to-air missiles
Mi-24 Hind
The former Soviet Union has long been inthe forefront of helicopter design. Theirhelicopters are larger and have a greaterlift capability than those of the Westernalliance. The designers in the East studied thedebut of helicopter gunships during the Vietnamconflict, and came up with the MI-24 Hind. This helicopter is more of a flying tank than anything elseproduced before or since. It is impervious to rifle and light machine-gun rounds, and has provendifficult to down with even the 50 cal. heavy machine-gun. During the Afgan war, however, it wasshown to be vulnerable to anti-aircraft missiles such as the U.S.-made Stinger and the British-manufactured Blowpipe.
If you hear the warning “HIND!! HIND!!” your best defense is to pop a smoke grenade, back up and startsearching the sky for the bogey. If you have a Bradley nearby, you’re in luck, as they are equipped withStinger missiles for just such an eventuality. Again - pop smoke, back up while searching and nail him.
Mi-24 HIND WEAPONS LOADOUT

128T.O.C. 128IndexT.O.C.
A p p e n d i x B : S C R E E N Q U I C K R E F E R E N C EA M1A2 Controls
J
PR
SUBJECT PAGEA. Exit to CCV 66, 50B. View Magnification 37C. Turret Control 36D. Support Weapons 51, 53E. Targeting Features 38, 44F. Auto/User Control 29, 30G. Tactical Map Features 39H. Speedometer 34I. Fire Button 46J. Threat Indicator 40K. Weapon Status 41L. Weapon Panel 41M. Smoke Grenade 47N. Turn Right 32O. Accelerator 31P. Gear Shift 33Q. Brake 31R. Turn Left 32S. Temperature/Fuel 34T. Overhead (Tactical) Map 39
K
L
M
Q
S
H I
B
F
C ED
G
N
O
T
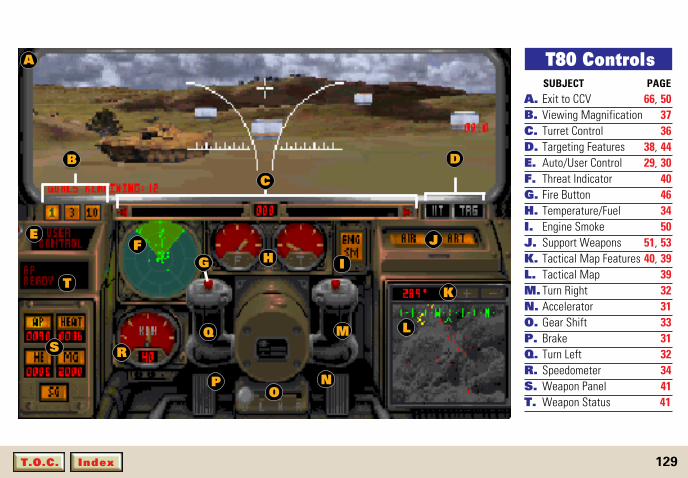
129T.O.C. 129IndexT.O.C.
T80 Controls T80 Controls SUBJECT PAGEA. Exit to CCV 66, 50B. Viewing Magnification 37C. Turret Control 36D. Targeting Features 38, 44E. Auto/User Control 29, 30F. Threat Indicator 40G. Fire Button 46H. Temperature/Fuel 34I. Engine Smoke 50J. Support Weapons 51, 53K. Tactical Map Features 40, 39L. Tactical Map 39M. Turn Right 32N. Accelerator 31O. Gear Shift 33P. Brake 31Q. Turn Left 32R. Speedometer 34S. Weapon Panel 41T. Weapon Status 41
A
B D
E
G H I
J
K
M
ONP
QRS
L
T
F
C

130T.O.C. 130IndexT.O.C.
M3 Controls SUBJECT PAGEA. Exit to CCV 66, 50B. Viewing Magnification 37C. Turret Control 36D. Targeting Features 38, 44E. Tactical Map 39F. Fuel 34G. SpeedometerH. Temperature/OilI. Auto/User Control 29, 30J. Weapons Status 41K. Weapons Panel 41L. Support Weapons 51, 53M. Fire Button 46N. Smoke Grenade 47O. Gear Shift 33P. Map Magnification 40Q. Threat Indicator 40R. Turn Right 32S. Accelerator 31T. Turn Left 32U. Brake 31
A
EFGHI
J
K
L
OP
QR
ST
U
BC D
M
N

131T.O.C. 131IndexT.O.C.
BMP 2 ControlsBMP2 Controls SUBJECT PAGEA. Exit to CCV 66, 50B. Viewing Magnification 37C. Turret Control 36D. Targeting Features 38, 44E. Auto/User Control 29, 30F. Weapon Status 41G. Weapon Panel 41H. Temperature/Fuel 34I. Turret Offset 48J. Speedometer 34K. Threat Indicator 40L. Indicator Range MagnificationM. SAMs 44N. Brake 31O. Smoke Grenade 47P. Turn Left 32Q. Gear Shift 33R. Turn Right 32S. Accelerator 31T. Support Weapons 51, 53U. Fire Button 46
A
E
F
G
H
IJ
K
M
L
NO
P
Q
R
S
T
U
BC D
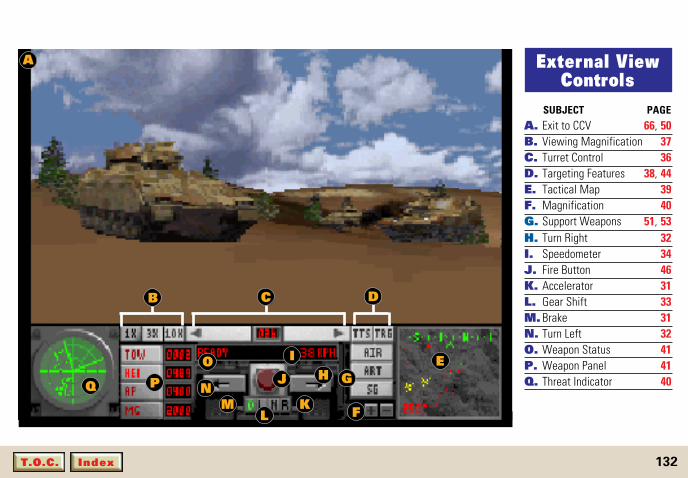
132T.O.C. 132IndexT.O.C.
BMP 2 ControlsExternal View
Controls SUBJECT PAGEA. Exit to CCV 66, 50B. Viewing Magnification 37C. Turret Control 36D. Targeting Features 38, 44E. Tactical Map 39F. Magnification 40G. Support Weapons 51, 53H. Turn Right 32I. Speedometer 34J. Fire Button 46K. Accelerator 31L. Gear Shift 33M. Brake 31N. Turn Left 32O. Weapon Status 41P. Weapon Panel 41Q. Threat Indicator 40
A
E
F
GH
LM
N
O
PQ
B C D
J
I
K

133T.O.C. 133IndexT.O.C.
CCV Map SUBJECT PAGEA. CCV Menu Bar 69B. Edit Menu Bar 86, 88C. Status Bar 74D. Message Window 74E. Floating Tool Kit 83, 89F. Air Support 68G. Artillery Support 68H. Way-point (Green dot) 77I. Target 68J. Friendly Forces (Blue) 67, 68K. Opposing Forces (Red) 67, 68L. Mine (Yellow dot) 68M.Map ScaleN. Game Limits
B
DE
F
A C
G
H
I
JK
L
N
M
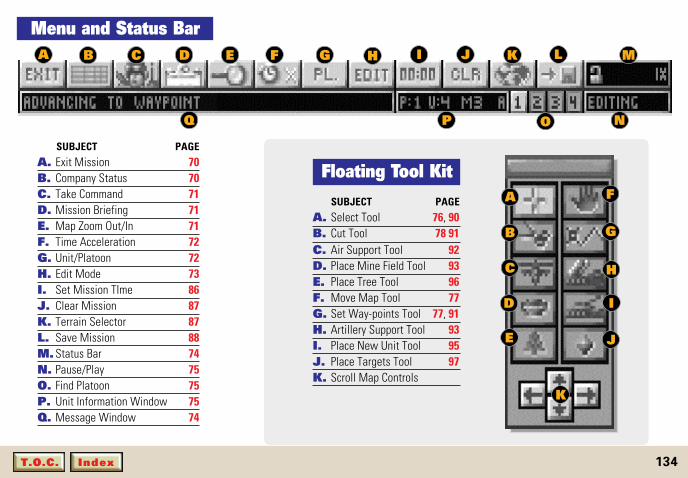
134T.O.C. 134IndexT.O.C.
Menu and Status BarA B C D E F G H J K LI M
NOPQ
SUBJECT PAGEA. Exit Mission 70B. Company Status 70C. Take Command 71D. Mission Briefing 71E. Map Zoom Out/In 71F. Time Acceleration 72G. Unit/Platoon 72H. Edit Mode 73I. Set Mission TIme 86J. Clear Mission 87K. Terrain Selector 87L. Save Mission 88M. Status Bar 74N. Pause/Play 75O. Find Platoon 75P. Unit Information Window 75Q. Message Window 74
A
B
C
D
E
F
G
H
I
J
K
Floating Tool Kit SUBJECT PAGEA. Select Tool 76, 90B. Cut Tool 78 91C. Air Support Tool 92D. Place Mine Field Tool 93E. Place Tree Tool 96F. Move Map Tool 77G. Set Way-points Tool 77, 91H. Artillery Support Tool 93I. Place New Unit Tool 95J. Place Targets Tool 97K. Scroll Map Controls

135T.O.C. 135IndexT.O.C.
Company StatusScreen
SUBJECT PAGEA. Commander Type 99B. Advance Orders 100C. Formation 101D. Speed 102E. Unit Type 95F. % of DamageG. % of Fuel Remaining 34H. Control Status 29, 30I. Weapons Load 42, 44J. Currently Selected Unit
B D
E F
A C
G H I
J

136T.O.C. 136IndexT.O.C.
A p p e n d i x C : K E Y B O A R D C O M M A N D SMAIN MENU SCREEN
Action Key Action Key
Select Player P Settings Menu SGet Campaigns Menu C About ARMORED FIST AGet Battles Menu B Quit the Game QGo to Unit Review Screen R
BATTLE MAP SCREEN (when playing via CAMPAIGN)
Action Key Action Key
Play currently selected battle Enter Return to the Main Menu EscSelect next available battle on map Tab
COMPANY STATUS SCREEN
Action Key Action Key
Switch sides (when EDIT is on) Ctl + S Menu: Back to regular CCV screen TAB
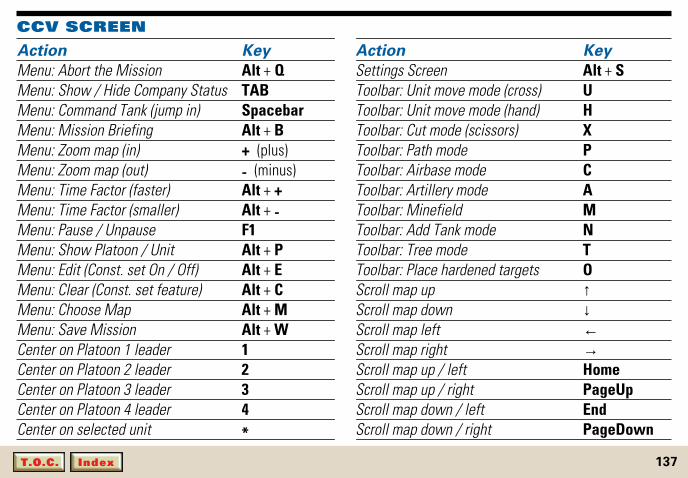
137T.O.C. 137IndexT.O.C.
CCV SCREEN
Action Key Action Key
Menu: Abort the Mission Alt + Q Settings Screen Alt + SMenu: Show / Hide Company Status TAB Toolbar: Unit move mode (cross) UMenu: Command Tank (jump in) Spacebar Toolbar: Unit move mode (hand) HMenu: Mission Briefing Alt + B Toolbar: Cut mode (scissors) XMenu: Zoom map (in) + (plus) Toolbar: Path mode PMenu: Zoom map (out) - (minus) Toolbar: Airbase mode CMenu: Time Factor (faster) Alt + + Toolbar: Artillery mode AMenu: Time Factor (smaller) Alt + - Toolbar: Minefield MMenu: Pause / Unpause F1 Toolbar: Add Tank mode NMenu: Show Platoon / Unit Alt + P Toolbar: Tree mode TMenu: Edit (Const. set On / Off) Alt + E Toolbar: Place hardened targets OMenu: Clear (Const. set feature) Alt + C Scroll map up ↑Menu: Choose Map Alt + M Scroll map down ↓Menu: Save Mission Alt + W Scroll map left ←Center on Platoon 1 leader 1 Scroll map right →Center on Platoon 2 leader 2 Scroll map up / left HomeCenter on Platoon 3 leader 3 Scroll map up / right PageUpCenter on Platoon 4 leader 4 Scroll map down / left EndCenter on selected unit * Scroll map down / right PageDown
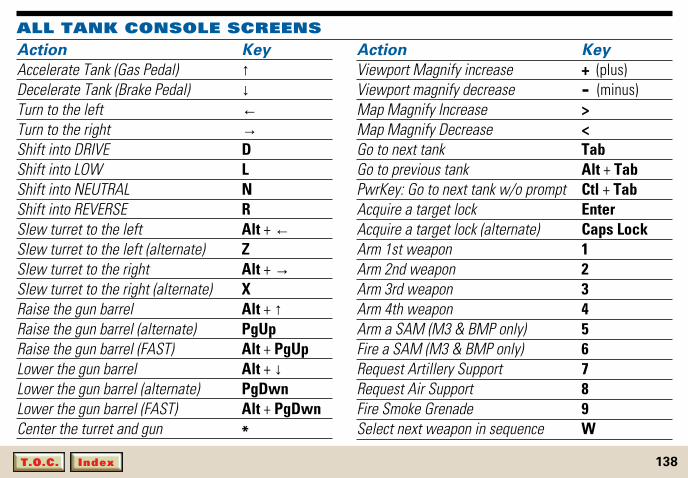
138T.O.C. 138IndexT.O.C.
ALL TANK CONSOLE SCREENSAction Key
Viewport Magnify increase + (plus)Viewport magnify decrease - (minus)Map Magnify Increase >Map Magnify Decrease <Go to next tank TabGo to previous tank Alt + TabPwrKey: Go to next tank w/o prompt Ctl + TabAcquire a target lock EnterAcquire a target lock (alternate) Caps LockArm 1st weapon 1Arm 2nd weapon 2Arm 3rd weapon 3Arm 4th weapon 4Arm a SAM (M3 & BMP only) 5Fire a SAM (M3 & BMP only) 6Request Artillery Support 7Request Air Support 8Fire Smoke Grenade 9Select next weapon in sequence W
Action Key
Accelerate Tank (Gas Pedal) ↑Decelerate Tank (Brake Pedal) ↓Turn to the left ←Turn to the right →Shift into DRIVE DShift into LOW LShift into NEUTRAL NShift into REVERSE RSlew turret to the left Alt + ←Slew turret to the left (alternate) ZSlew turret to the right Alt + →Slew turret to the right (alternate) XRaise the gun barrel Alt + ↑Raise the gun barrel (alternate) PgUpRaise the gun barrel (FAST) Alt + PgUpLower the gun barrel Alt + ↓Lower the gun barrel (alternate) PgDwnLower the gun barrel (FAST) Alt + PgDwnCenter the turret and gun *
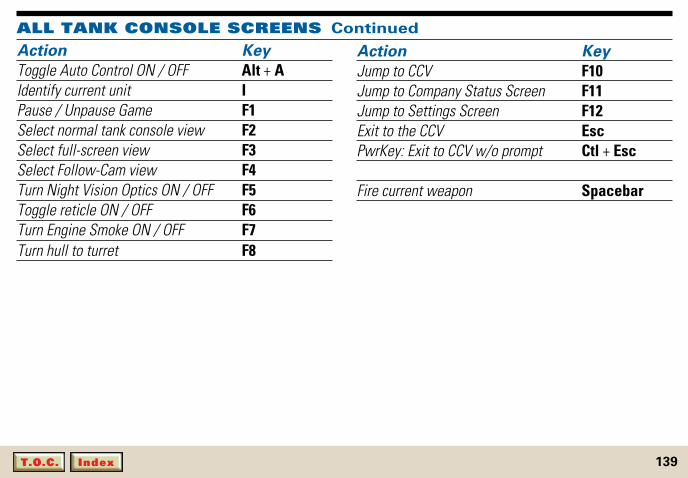
139T.O.C. 139IndexT.O.C.
Action Key
Toggle Auto Control ON / OFF Alt + AIdentify current unit IPause / Unpause Game F1Select normal tank console view F2Select full-screen view F3Select Follow-Cam view F4Turn Night Vision Optics ON / OFF F5Toggle reticle ON / OFF F6Turn Engine Smoke ON / OFF F7Turn hull to turret F8
ALL TANK CONSOLE SCREENS Continued
Action Key
Jump to CCV F10Jump to Company Status Screen F11Jump to Settings Screen F12Exit to the CCV EscPwrKey: Exit to CCV w/o prompt Ctl + Esc
Fire current weapon Spacebar
140T.O.C.
Sabot (APDS) 42, 122Armor piercing rounds 123Artificial Intelligence (AI) 30Artillery base placement 93
button/icon 93Artillery unit 68AT-6 Spiral laser homing anti-
tank missiles 43, 127Attack to seize key objective 115Auto control 29, 30Auto turret 62Auto Turret Control 35, 48
BBattle map screen 136Battle mode 56BIOS (Basic Input / Output
System) 61Blue icons 67BMP-2 Controls 131, 132
weapons loadout 125Bradley Infantry Fighting Vehicle
(IFV) 124
weapons loadout 124
C
Calibrate 61Campaign map 64Campaign menu 64Campaign mode 55Campaigns 55
button 55CCV 50, 66
Help 67Map 67Menu and Status Bar 69
CCV mode 73, 79, 86CCV screen 136CD installation 16CFV 14CH Flightstick Pro 22, 60Chemical heat rounds 123Chose Mine dialog box 94Clear 87
button (CLR) 87Close Air Support (CAS)
Symbols
12.5 mm machine gun 12523 mm cannon 12730 mm chain gun 12650 cal. machine gun 12257 mm rockets 127
A
About Fist 58Acceleration button 72Accelerator 31Accept 59Advance to contact 100AH-64 Apache 126
weapons loadout 126Air base placement 92Air support base 68All tank console screen
138, 139Ammo 41Apache 126Armor Piercing Disposable
I n d e x
141T.O.C.
106, 120Cobra 126Colors 40, 65Column 101Combat Service Support 120Combat Support 106, 119Command and Control (C2) 112Command and Control Vehicle
(CCV) 50, 66Command Control Communica-
tions and Intelligence (C3I)112
Commander 99Company 28Company status 98
button 70screen 70, 81, 116, 136
Control click 90Controlling the game 21Controls 59Controls column 59Counter-reconnaissance 111Creating your own and/or
modifying battles 80Customer support & info 4Cut 78
Cut (Edit Mode) 91Cut tool 91
D
Deception planning 110Defending a battle position 117Defending a strong point 117Defensive operations 116Delaying in sector 118Detail 63Diamond 101Display 62Drive 33Drivetrain controls 31Dug-in 95
E
Edit icon 86Edit mode 79, 84, 86Editing mode 73
button 73Enemy artillery placement 93Engine smoke 50Experienced 99External driver 61
F
FAB -250 Free Fall Bombs 127Find Platoon 75Firing weapons 46Flightstick w/ throttle 60Floating tool kit 76, 89Folding fin rockets 126Friendly artillery placement 93Fuel gauge 34
G
Gas and brake pedals 31Gear shift 33Green squares 77
H
Hand symbol 77Hard disk memory usage 18Heat round 42, 122Hellfire anti-tank missiles 126High explosive rounds 123
I
IFV 14, 68, 124
142T.O.C.
Image Intensified Targeting (IIT) 35, 38In action 75Introductory campaign 19
menu 20
J
Joystick 22, 60
K
Keyboard 22commands chart 136
Known mine field 68
L
Laser designating systems 126Left mouse button 21Line 101Lock symbol 74Locked 73
M
M-2 IFV 124M-3 124M1 Abrams 122
M1A1 Controls 128, 129, 130M1A2 122Main battle tank 68Main menu 54Manual aiming 45Manual turret control 48Map zoom in/out 71Message window 74METT 113Mi-24 HIND helicopter 127Mine fields 93Mines, types of 94Mission briefing 71Mission save 81
button 83Mission time setting 86Mouse 21Movement and control 30Movement to contact 114Music on / off 63
N
No-action commander 99Nonstandard joystick interface 61

143T.O.C.
O
Offensive, defensive & retrograde operations106
Offensive tactics 114Opportunity 100Ordnance 41Other enemy targets 68Overwatch/support by fire 115
P
Paths 77Patrol 100Pause 50Pause/play indicator 75Place mine field 93, 94Place target 97Place tree 96Place vehicle 95Platoon leader 28Platoon view 72Playing the game 28Preparation for combat 105Prompts 62Prompts Mode 29
Q
Quick start 19Quit 58
R
Reconnaissance 111Red icons 67Refuse left / right 102Retirement of forces 119Retrograde operations 118Right mouse button 21Road march 100Rookie 99
S
SA-14 Gremlin SAM launchers 125SA-14 Gremlin air-to-air missiles 127SABOT 42SAM 44SAM fire button 44Save battle 88Screen quick reference 122, 128, 136Select 76Select a campaign 20
144T.O.C.
Select a player dialog box 20Select mission button 90Select mission goal 90Select player 54Setting enemy’s parameters 103Sidewinder air-to-air missiles 126Smoke effects 63Smoke grenade launchers 122Smoke grenades 47Sound FX 63Sound settings 63Spandrel launch tube 125Speed 102Speedometer 34Spin map 39Standard 99Status bar 69STD joystick 60Steering 32Strategic map 67Surveillance 111Switching vehicles 28
T
T-80 123
controls 129Tactical assembly area 108Tactical map 39Taking command 29Target lock 44Technical support 4Terrain button 87Terrain selection 87thermal targeting 126Thermal Targeting System (TTS) 35, 38Threat indicator display (TID) 40ThrustMaster FCS 60Time acceleration switch 72Time limit 86TOW 43TOW Missile Launcher 124TOW-2 heavy anti-tank missile 124Track repair 94TTS. See Thermal Targeting SystemTurret Control Settings 49Twin turbine engines 126
U
Unit / platoon switch 72Unit view 72

145T.O.C.
User control 30
V
Vehicle controls and displays 28Vehicle descriptions 122Viewport / turret angle 37
display 36indicator 36
Viewport display 35Viewport magnify 35, 37
W
Way-point 39, 77setting 77, 91
Weapon status indicator 41Weapons Control System (WCS) 61Weapons status display 41Wedge 102Werewolf. See Kamov KA-50 WerewolfWilliams, Creighton Abrams 122Withdrawal 118
Z
Zoom button 71
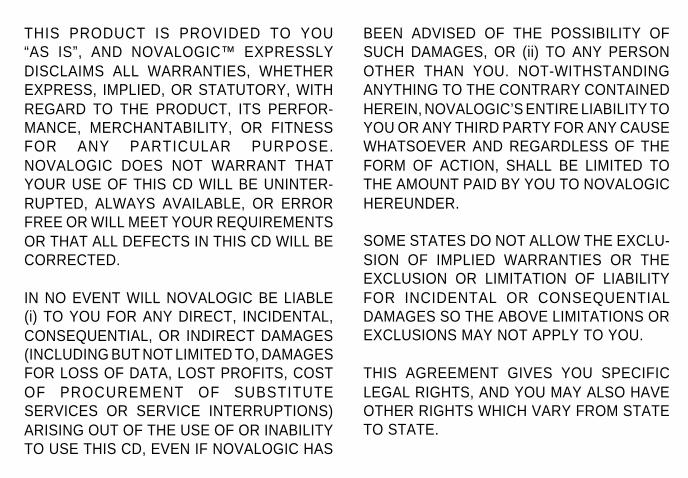
THIS PRODUCT IS PROVIDED TO YOU“AS IS”, AND NOVALOGIC™ EXPRESSLYDISCLAIMS ALL WARRANTIES, WHETHEREXPRESS, IMPLIED, OR STATUTORY, WITHREGARD TO THE PRODUCT, ITS PERFOR-MANCE, MERCHANTABILITY, OR FITNESSFOR ANY PARTICULAR PURPOSE.NOVALOGIC DOES NOT WARRANT THATYOUR USE OF THIS CD WILL BE UNINTER-RUPTED, ALWAYS AVAILABLE, OR ERRORFREE OR WILL MEET YOUR REQUIREMENTSOR THAT ALL DEFECTS IN THIS CD WILL BECORRECTED.
IN NO EVENT WILL NOVALOGIC BE LIABLE(i) TO YOU FOR ANY DIRECT, INCIDENTAL,CONSEQUENTIAL, OR INDIRECT DAMAGES(INCLUDING BUT NOT LIMITED TO, DAMAGESFOR LOSS OF DATA, LOST PROFITS, COSTOF PROCUREMENT OF SUBSTITUTESERVICES OR SERVICE INTERRUPTIONS)ARISING OUT OF THE USE OF OR INABILITYTO USE THIS CD, EVEN IF NOVALOGIC HAS
BEEN ADVISED OF THE POSSIBILITY OFSUCH DAMAGES, OR (ii) TO ANY PERSONOTHER THAN YOU. NOT-WITHSTANDINGANYTHING TO THE CONTRARY CONTAINEDHEREIN, NOVALOGIC’S ENTIRE LIABILITY TOYOU OR ANY THIRD PARTY FOR ANY CAUSEWHATSOEVER AND REGARDLESS OF THEFORM OF ACTION, SHALL BE LIMITED TOTHE AMOUNT PAID BY YOU TO NOVALOGICHEREUNDER.
SOME STATES DO NOT ALLOW THE EXCLU-SION OF IMPLIED WARRANTIES OR THEEXCLUSION OR LIMITATION OF LIABILITYFOR INCIDENTAL OR CONSEQUENTIALDAMAGES SO THE ABOVE LIMITATIONS OREXCLUSIONS MAY NOT APPLY TO YOU.
THIS AGREEMENT GIVES YOU SPECIFICLEGAL RIGHTS, AND YOU MAY ALSO HAVEOTHER RIGHTS WHICH VARY FROM STATETO STATE.
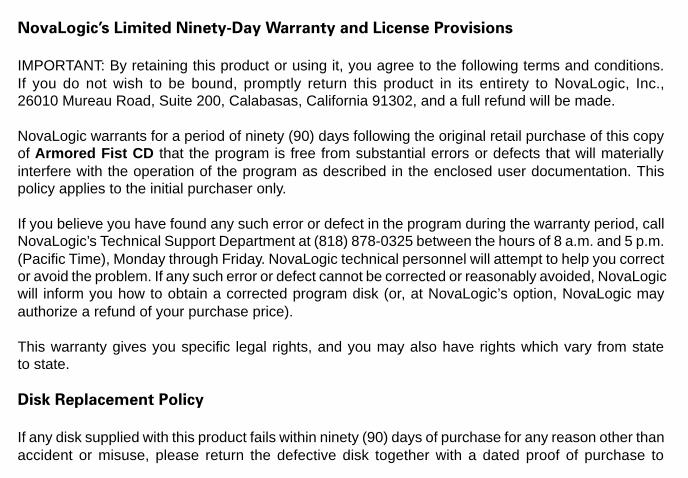
NovaLogic’s Limited Ninety-Day Warranty and License Provisions
IMPORTANT: By retaining this product or using it, you agree to the following terms and conditions.If you do not wish to be bound, promptly return this product in its entirety to NovaLogic, Inc.,26010 Mureau Road, Suite 200, Calabasas, California 91302, and a full refund will be made.
NovaLogic warrants for a period of ninety (90) days following the original retail purchase of this copyof Armored Fist CD that the program is free from substantial errors or defects that will materiallyinterfere with the operation of the program as described in the enclosed user documentation. Thispolicy applies to the initial purchaser only.
If you believe you have found any such error or defect in the program during the warranty period, callNovaLogic’s Technical Support Department at (818) 878-0325 between the hours of 8 a.m. and 5 p.m.(Pacific Time), Monday through Friday. NovaLogic technical personnel will attempt to help you corrector avoid the problem. If any such error or defect cannot be corrected or reasonably avoided, NovaLogicwill inform you how to obtain a corrected program disk (or, at NovaLogic’s option, NovaLogic mayauthorize a refund of your purchase price).
This warranty gives you specific legal rights, and you may also have rights which vary from stateto state.
Disk Replacement Policy
If any disk supplied with this product fails within ninety (90) days of purchase for any reason other thanaccident or misuse, please return the defective disk together with a dated proof of purchase to
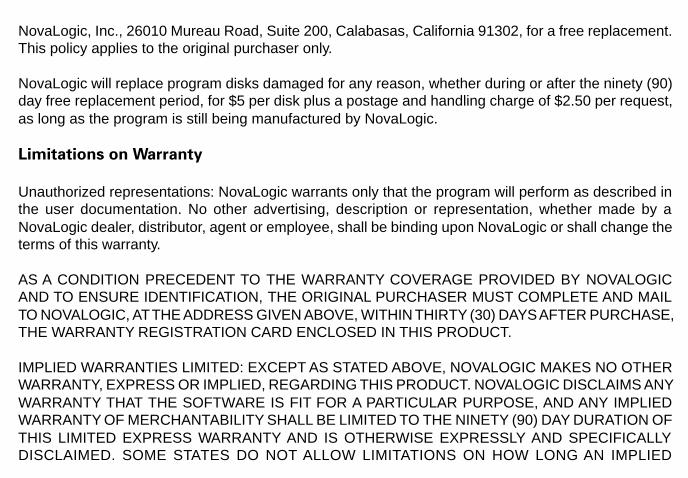
NovaLogic, Inc., 26010 Mureau Road, Suite 200, Calabasas, California 91302, for a free replacement.This policy applies to the original purchaser only.
NovaLogic will replace program disks damaged for any reason, whether during or after the ninety (90)day free replacement period, for $5 per disk plus a postage and handling charge of $2.50 per request,as long as the program is still being manufactured by NovaLogic.
Limitations on Warranty
Unauthorized representations: NovaLogic warrants only that the program will perform as described inthe user documentation. No other advertising, description or representation, whether made by aNovaLogic dealer, distributor, agent or employee, shall be binding upon NovaLogic or shall change theterms of this warranty.
AS A CONDITION PRECEDENT TO THE WARRANTY COVERAGE PROVIDED BY NOVALOGICAND TO ENSURE IDENTIFICATION, THE ORIGINAL PURCHASER MUST COMPLETE AND MAILTO NOVALOGIC, AT THE ADDRESS GIVEN ABOVE, WITHIN THIRTY (30) DAYS AFTER PURCHASE,THE WARRANTY REGISTRATION CARD ENCLOSED IN THIS PRODUCT.
IMPLIED WARRANTIES LIMITED: EXCEPT AS STATED ABOVE, NOVALOGIC MAKES NO OTHERWARRANTY, EXPRESS OR IMPLIED, REGARDING THIS PRODUCT. NOVALOGIC DISCLAIMS ANYWARRANTY THAT THE SOFTWARE IS FIT FOR A PARTICULAR PURPOSE, AND ANY IMPLIEDWARRANTY OF MERCHANTABILITY SHALL BE LIMITED TO THE NINETY (90) DAY DURATION OFTHIS LIMITED EXPRESS WARRANTY AND IS OTHERWISE EXPRESSLY AND SPECIFICALLYDISCLAIMED. SOME STATES DO NOT ALLOW LIMITATIONS ON HOW LONG AN IMPLIED
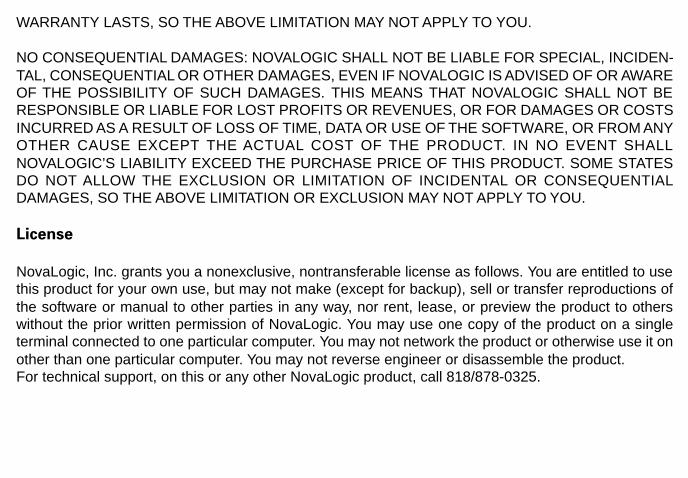
WARRANTY LASTS, SO THE ABOVE LIMITATION MAY NOT APPLY TO YOU.
NO CONSEQUENTIAL DAMAGES: NOVALOGIC SHALL NOT BE LIABLE FOR SPECIAL, INCIDEN-TAL, CONSEQUENTIAL OR OTHER DAMAGES, EVEN IF NOVALOGIC IS ADVISED OF OR AWAREOF THE POSSIBILITY OF SUCH DAMAGES. THIS MEANS THAT NOVALOGIC SHALL NOT BERESPONSIBLE OR LIABLE FOR LOST PROFITS OR REVENUES, OR FOR DAMAGES OR COSTSINCURRED AS A RESULT OF LOSS OF TIME, DATA OR USE OF THE SOFTWARE, OR FROM ANYOTHER CAUSE EXCEPT THE ACTUAL COST OF THE PRODUCT. IN NO EVENT SHALLNOVALOGIC’S LIABILITY EXCEED THE PURCHASE PRICE OF THIS PRODUCT. SOME STATESDO NOT ALLOW THE EXCLUSION OR LIMITATION OF INCIDENTAL OR CONSEQUENTIALDAMAGES, SO THE ABOVE LIMITATION OR EXCLUSION MAY NOT APPLY TO YOU.
License
NovaLogic, Inc. grants you a nonexclusive, nontransferable license as follows. You are entitled to usethis product for your own use, but may not make (except for backup), sell or transfer reproductions ofthe software or manual to other parties in any way, nor rent, lease, or preview the product to otherswithout the prior written permission of NovaLogic. You may use one copy of the product on a singleterminal connected to one particular computer. You may not network the product or otherwise use it onother than one particular computer. You may not reverse engineer or disassemble the product.For technical support, on this or any other NovaLogic product, call 818/878-0325.