using a projector w laptopsrev - broward county public … · training module version date: ... •...
TRANSCRIPT

Broward County Public Schools Digital Classrooms
Connect and Project: User Guide Revision Date: 7/2008
1
Connect and Project: Using a Video Projector in the Classroom
Apple and Dell Laptops User Guide Training Module
Version Date: 7/2008
Broward County Public Schools Digital Classrooms
Connect and Project: User Guide Revision Date: 7/2008
2
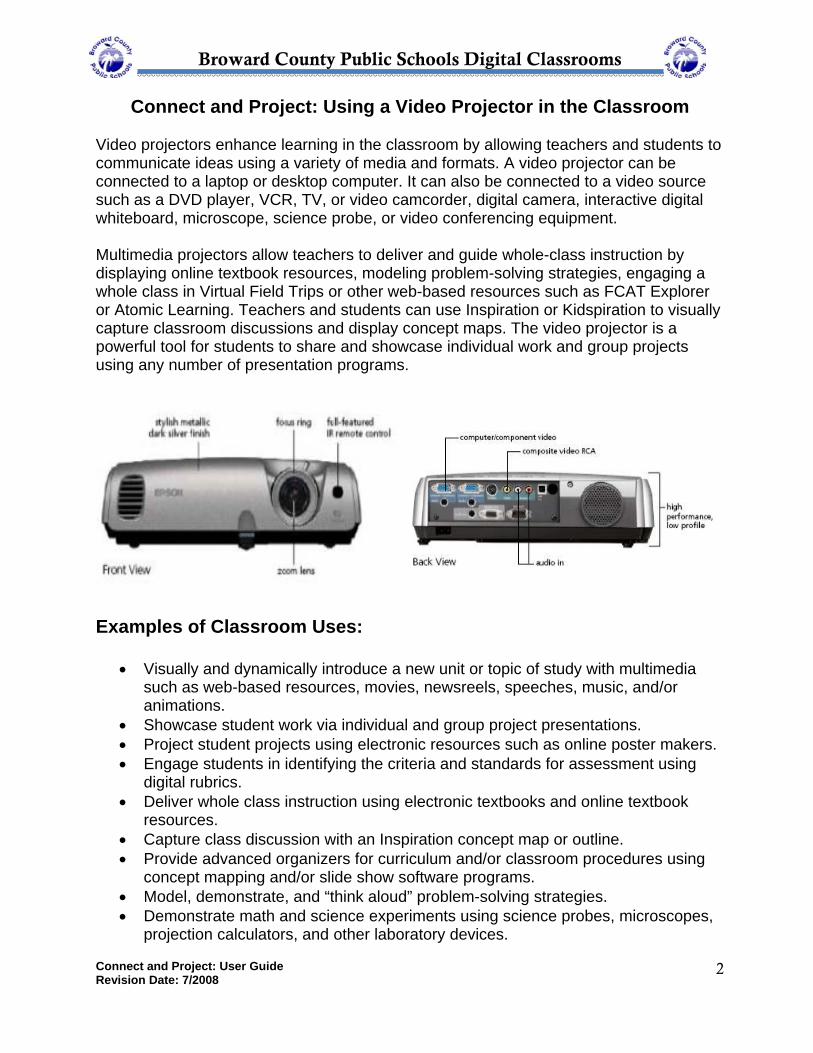
Connect and Project: Using a Video Projector in the Classroom Video projectors enhance learning in the classroom by allowing teachers and students to communicate ideas using a variety of media and formats. A video projector can be connected to a laptop or desktop computer. It can also be connected to a video source such as a DVD player, VCR, TV, or video camcorder, digital camera, interactive digital whiteboard, microscope, science probe, or video conferencing equipment. Multimedia projectors allow teachers to deliver and guide whole-class instruction by displaying online textbook resources, modeling problem-solving strategies, engaging a whole class in Virtual Field Trips or other web-based resources such as FCAT Explorer or Atomic Learning. Teachers and students can use Inspiration or Kidspiration to visually capture classroom discussions and display concept maps. The video projector is a powerful tool for students to share and showcase individual work and group projects using any number of presentation programs.
Examples of Classroom Uses:
• Visually and dynamically introduce a new unit or topic of study with multimedia such as web-based resources, movies, newsreels, speeches, music, and/or animations.
• Showcase student work via individual and group project presentations. • Project student projects using electronic resources such as online poster makers. • Engage students in identifying the criteria and standards for assessment using
digital rubrics. • Deliver whole class instruction using electronic textbooks and online textbook
resources. • Capture class discussion with an Inspiration concept map or outline. • Provide advanced organizers for curriculum and/or classroom procedures using
concept mapping and/or slide show software programs. • Model, demonstrate, and “think aloud” problem-solving strategies. • Demonstrate math and science experiments using science probes, microscopes,
projection calculators, and other laboratory devices.
Broward County Public Schools Digital Classrooms
Connect and Project: User Guide Revision Date: 7/2008
3
• Guide whole class online learning activities such as Virtual Field Trips, Web-Quests, and Scavenger Hunts.
• Facilitate interactive math, science, social studies, language arts and other online activities.
• Celebrate classroom events with student photo slide shows and movies. • Use interactive digital “white boards” to model and engage students in interactive
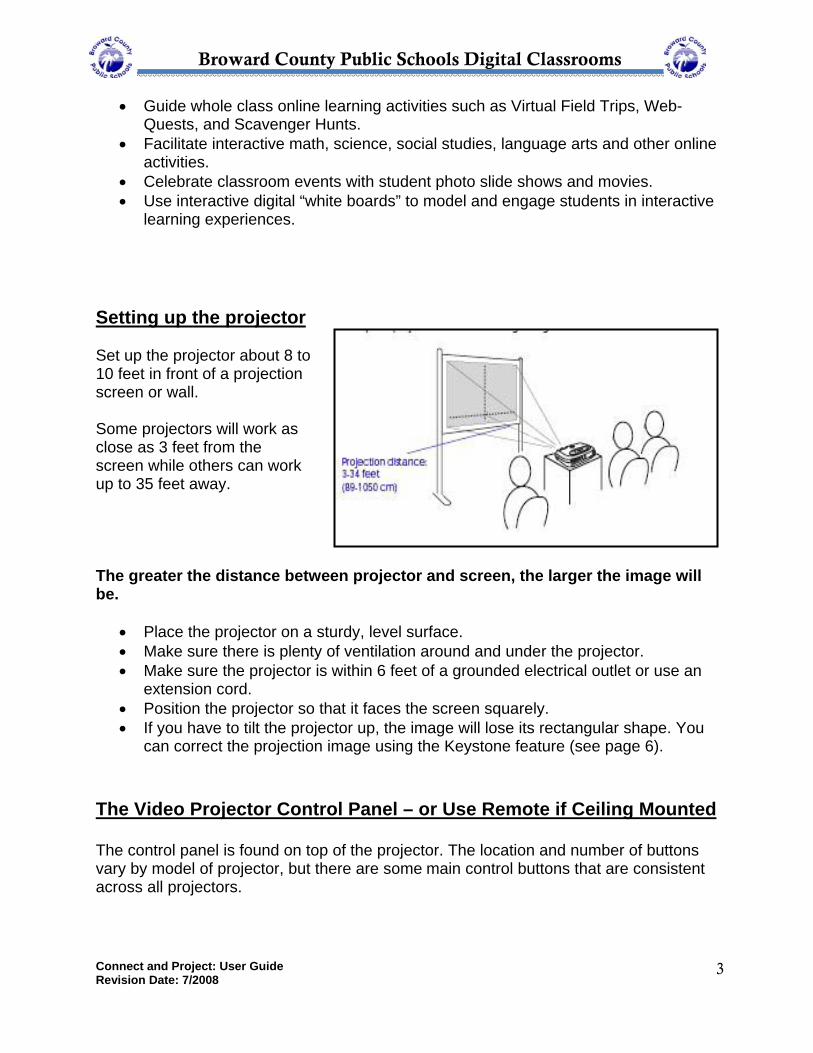
learning experiences. Setting up the projector Set up the projector about 8 to 10 feet in front of a projection screen or wall. Some projectors will work as close as 3 feet from the screen while others can work up to 35 feet away. The greater the distance between projector and screen, the larger the image will be.
• Place the projector on a sturdy, level surface. • Make sure there is plenty of ventilation around and under the projector. • Make sure the projector is within 6 feet of a grounded electrical outlet or use an
extension cord. • Position the projector so that it faces the screen squarely. • If you have to tilt the projector up, the image will lose its rectangular shape. You
can correct the projection image using the Keystone feature (see page 6). The Video Projector Control Panel – or Use Remote if Ceiling Mounted The control panel is found on top of the projector. The location and number of buttons vary by model of projector, but there are some main control buttons that are consistent across all projectors.
Broward County Public Schools Digital Classrooms
Connect and Project: User Guide Revision Date: 7/2008
4
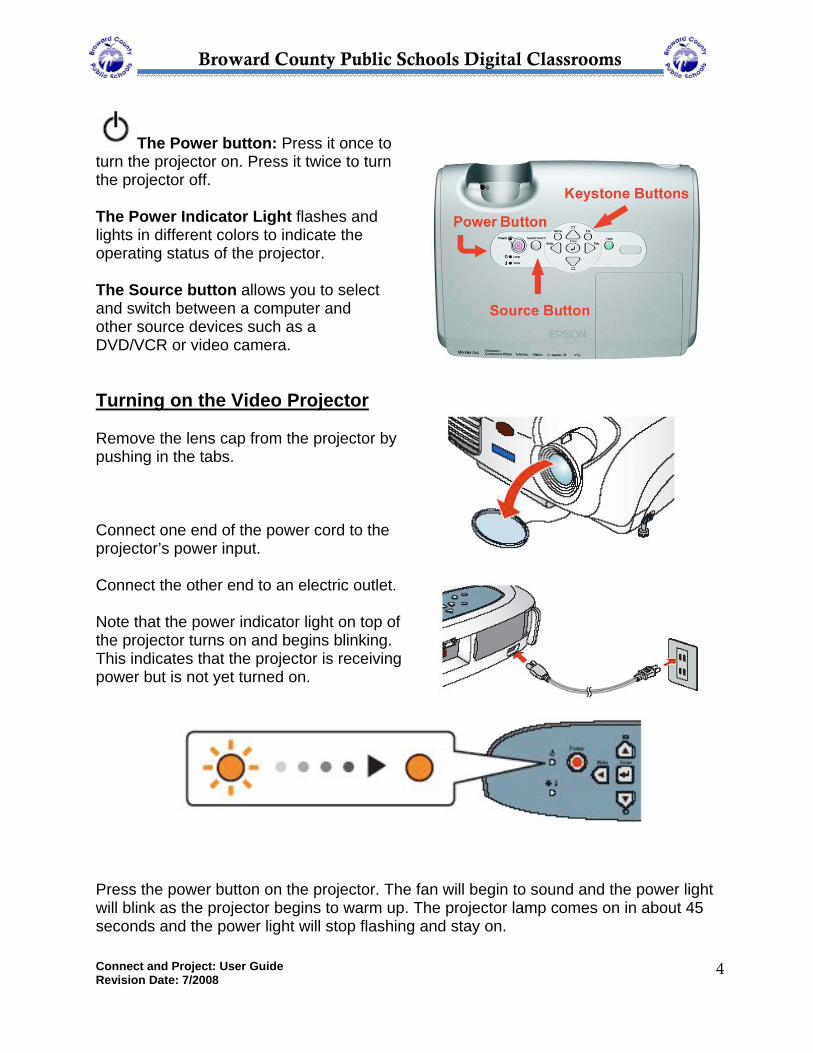
The Power button: Press it once to turn the projector on. Press it twice to turn the projector off. The Power Indicator Light flashes and lights in different colors to indicate the operating status of the projector. The Source button allows you to select and switch between a computer and other source devices such as a DVD/VCR or video camera. Turning on the Video Projector Remove the lens cap from the projector by pushing in the tabs. Connect one end of the power cord to the projector’s power input. Connect the other end to an electric outlet. Note that the power indicator light on top of the projector turns on and begins blinking. This indicates that the projector is receiving power but is not yet turned on.
Press the power button on the projector. The fan will begin to sound and the power light will blink as the projector begins to warm up. The projector lamp comes on in about 45 seconds and the power light will stop flashing and stay on.
Broward County Public Schools Digital Classrooms
Connect and Project: User Guide Revision Date: 7/2008
5
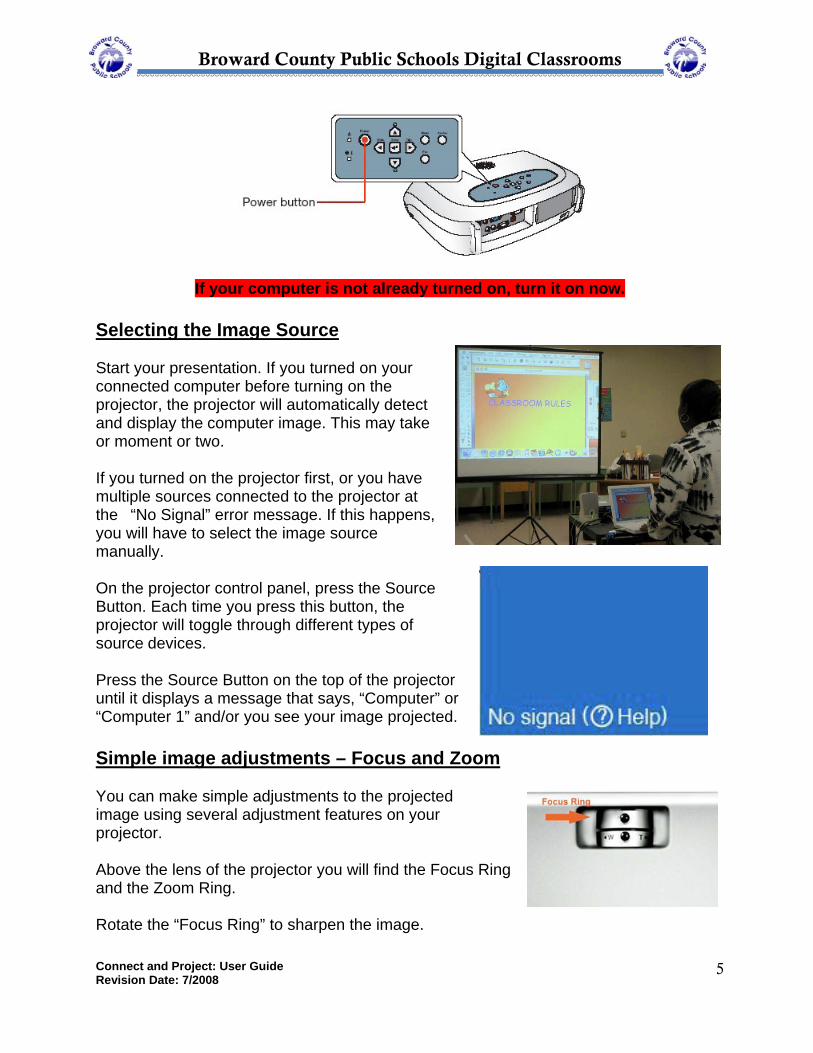
If your computer is not already turned on, turn it on now. Selecting the Image Source Start your presentation. If you turned on your connected computer before turning on the projector, the projector will automatically detect and display the computer image. This may take or moment or two. If you turned on the projector first, or you have multiple sources connected to the projector at the “No Signal” error message. If this happens, you will have to select the image source manually. On the projector control panel, press the Source Button. Each time you press this button, the projector will toggle through different types of source devices. Press the Source Button on the top of the projector until it displays a message that says, “Computer” or “Computer 1” and/or you see your image projected. Simple image adjustments – Focus and Zoom You can make simple adjustments to the projected image using several adjustment features on your projector. Above the lens of the projector you will find the Focus Ring and the Zoom Ring. Rotate the “Focus Ring” to sharpen the image.

Broward County Public Schools Digital Classrooms
Connect and Project: User Guide Revision Date: 7/2008
6
Rotate the “Zoom Ring” to reduce or enlarge the image. Turn to W (wide) to enlarge or T (tele) to reduce.
.
You can also move the projector closer or farther from the screen. The closer the projector is to your projection screen, the smaller the image. To raise the image, adjust the foot release levers and lift the front of the projector. Screw or unscrew the legs for fine-tuning. Advanced image adjustments – Keystone Corrections If your image is tilted to the left or right, make sure the projector is facing squarely front of the center of the screen. Your projector may have an automatic keystone correction. Try tilting the projector up. When you replace it on the table it will correct itself. You can also manually adjust the Keystone by pressing the Keystone buttons on the top of the projector. The Keystone DOWN (1) button makes the bottom of the image narrower. The Keystone UP (2) button makes the top of the image narrower. The optimal projection image is “O” keystone correction, but it doesn’t really matter what the value is, just adjust the image until it looks good given your projection screen or surface.
(1) (2)
Broward County Public Schools Digital Classrooms
Connect and Project: User Guide Revision Date: 7/2008
7
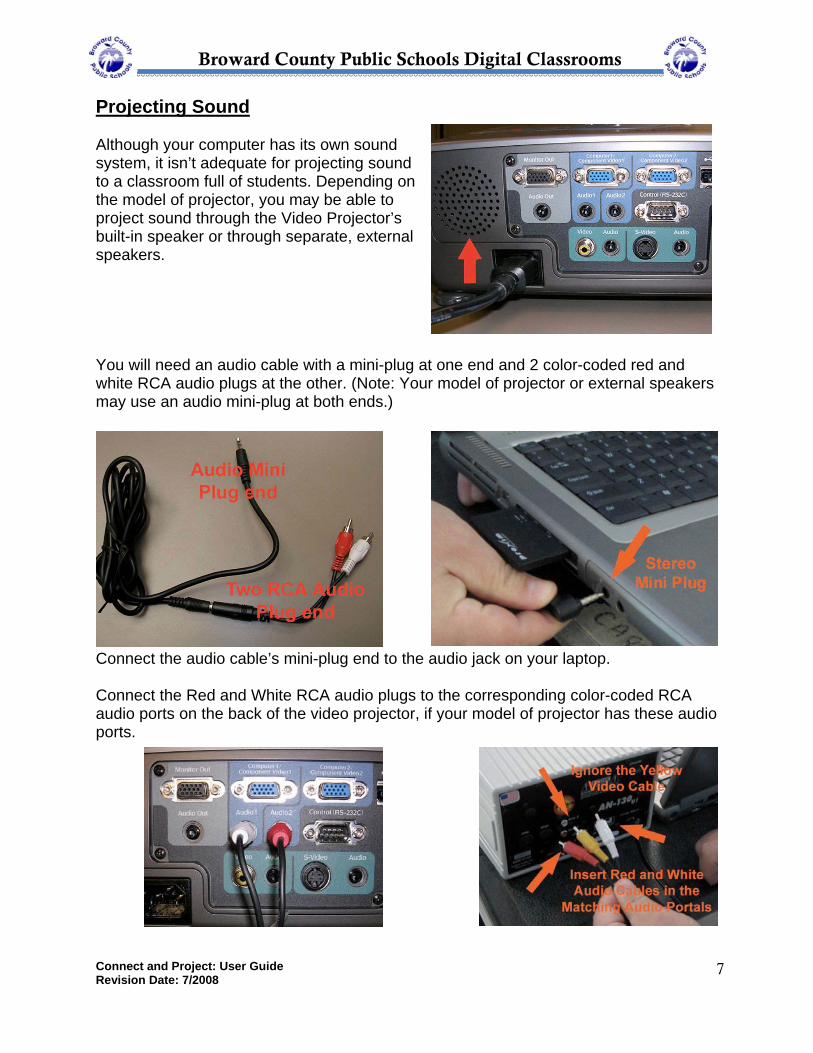
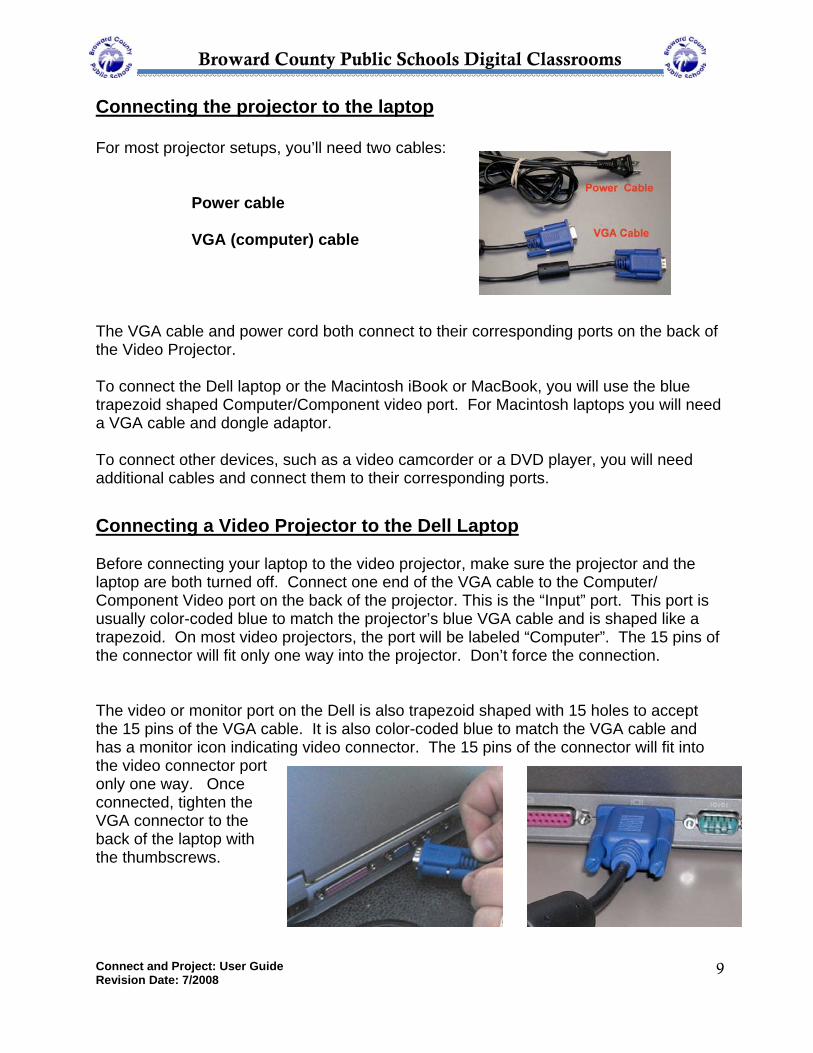
Projecting Sound Although your computer has its own sound system, it isn’t adequate for projecting sound to a classroom full of students. Depending on the model of projector, you may be able to project sound through the Video Projector’s built-in speaker or through separate, external speakers. You will need an audio cable with a mini-plug at one end and 2 color-coded red and white RCA audio plugs at the other. (Note: Your model of projector or external speakers may use an audio mini-plug at both ends.)
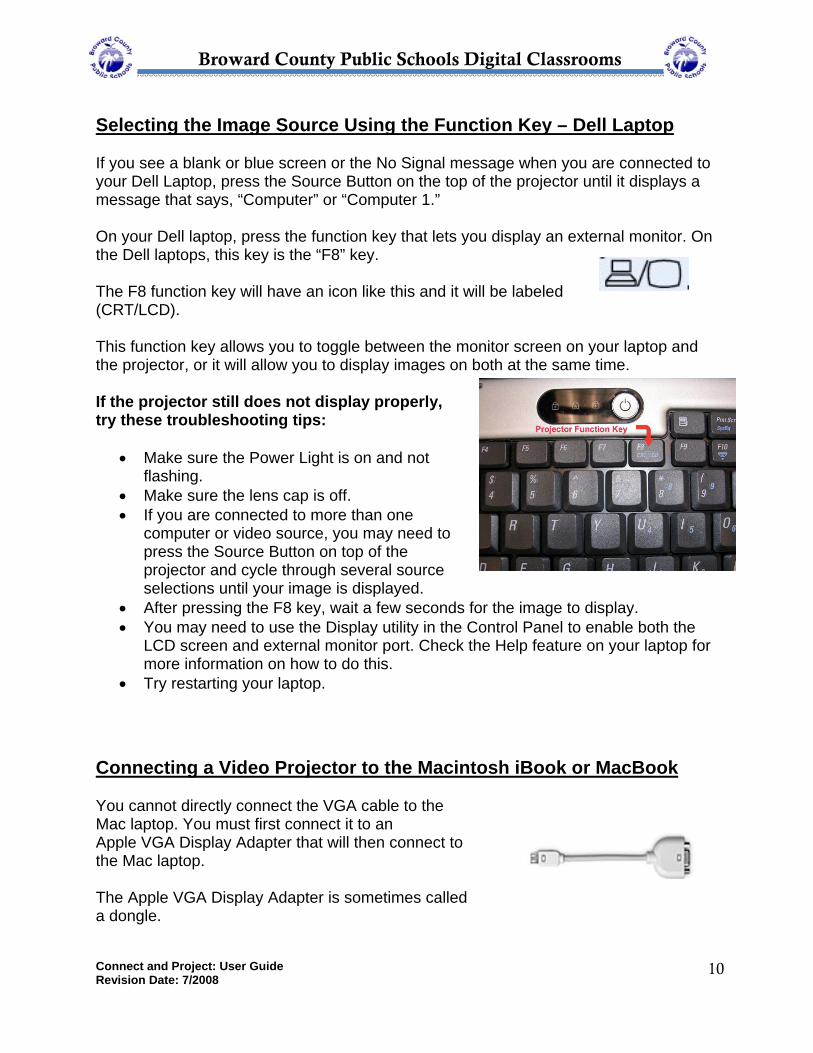
Connect the audio cable’s mini-plug end to the audio jack on your laptop. Connect the Red and White RCA audio plugs to the corresponding color-coded RCA audio ports on the back of the video projector, if your model of projector has these audio ports.

Broward County Public Schools Digital Classrooms
Connect and Project: User Guide Revision Date: 7/2008
8
If your audio cable has a third, yellow RCA plug, just ignore it for now and leave it unconnected. The yellow RCA plug is for video sources. If you don’t have sound, make sure the sound is not turned down on the laptop or the “Mute” button is not selected on the computer. Turning off the video projector It’s important to turn the projector off properly so that you don’t burn out the bulb, which can cost several hundred dollars to replace. To turn off the projector, press the power button on the projector once. A dialogue box will ask “Power off ?” Then it will prompt you to press the power button a second time to shut down the projector. The power indicator light will start blinking. DO NOT remove the power cord from the projector or from the wall until the light stops blinking. This is very important! When the light is solid again it is safe to unplug the projector. Make sure that you return all cables and devices to the projector case or cart so the next person to use the projector will have a successful multimedia classroom experience!
Broward County Public Schools Digital Classrooms
Connect and Project: User Guide Revision Date: 7/2008
9
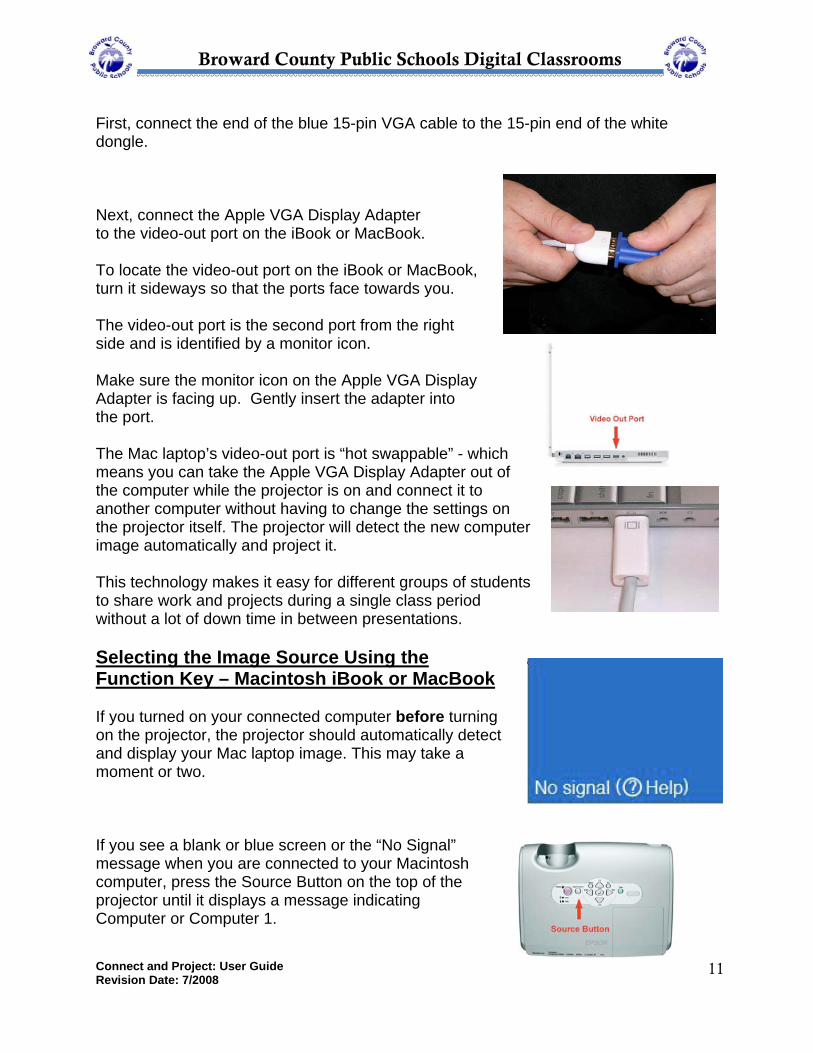
Connecting the projector to the laptop For most projector setups, you’ll need two cables:
Power cable
VGA (computer) cable
The VGA cable and power cord both connect to their corresponding ports on the back of the Video Projector. To connect the Dell laptop or the Macintosh iBook or MacBook, you will use the blue trapezoid shaped Computer/Component video port. For Macintosh laptops you will need a VGA cable and dongle adaptor. To connect other devices, such as a video camcorder or a DVD player, you will need additional cables and connect them to their corresponding ports. Connecting a Video Projector to the Dell Laptop Before connecting your laptop to the video projector, make sure the projector and the laptop are both turned off. Connect one end of the VGA cable to the Computer/ Component Video port on the back of the projector. This is the “Input” port. This port is usually color-coded blue to match the projector’s blue VGA cable and is shaped like a trapezoid. On most video projectors, the port will be labeled “Computer”. The 15 pins of the connector will fit only one way into the projector. Don’t force the connection. The video or monitor port on the Dell is also trapezoid shaped with 15 holes to accept the 15 pins of the VGA cable. It is also color-coded blue to match the VGA cable and has a monitor icon indicating video connector. The 15 pins of the connector will fit into the video connector port only one way. Once connected, tighten the VGA connector to the back of the laptop with the thumbscrews.
Broward County Public Schools Digital Classrooms
Connect and Project: User Guide Revision Date: 7/2008
10
Selecting the Image Source Using the Function Key – Dell Laptop If you see a blank or blue screen or the No Signal message when you are connected to your Dell Laptop, press the Source Button on the top of the projector until it displays a message that says, “Computer” or “Computer 1.” On your Dell laptop, press the function key that lets you display an external monitor. On the Dell laptops, this key is the “F8” key. The F8 function key will have an icon like this and it will be labeled (CRT/LCD). This function key allows you to toggle between the monitor screen on your laptop and the projector, or it will allow you to display images on both at the same time. If the projector still does not display properly, try these troubleshooting tips:
• Make sure the Power Light is on and not flashing.
• Make sure the lens cap is off. • If you are connected to more than one
computer or video source, you may need to press the Source Button on top of the projector and cycle through several source selections until your image is displayed.
• After pressing the F8 key, wait a few seconds for the image to display. • You may need to use the Display utility in the Control Panel to enable both the
LCD screen and external monitor port. Check the Help feature on your laptop for more information on how to do this.
• Try restarting your laptop. Connecting a Video Projector to the Macintosh iBook or MacBook You cannot directly connect the VGA cable to the Mac laptop. You must first connect it to an Apple VGA Display Adapter that will then connect to the Mac laptop. The Apple VGA Display Adapter is sometimes called a dongle.
Broward County Public Schools Digital Classrooms
Connect and Project: User Guide Revision Date: 7/2008
11
First, connect the end of the blue 15-pin VGA cable to the 15-pin end of the white dongle. Next, connect the Apple VGA Display Adapter to the video-out port on the iBook or MacBook. To locate the video-out port on the iBook or MacBook, turn it sideways so that the ports face towards you. The video-out port is the second port from the right side and is identified by a monitor icon. Make sure the monitor icon on the Apple VGA Display Adapter is facing up. Gently insert the adapter into the port. The Mac laptop’s video-out port is “hot swappable” - which means you can take the Apple VGA Display Adapter out of the computer while the projector is on and connect it to another computer without having to change the settings on the projector itself. The projector will detect the new computer image automatically and project it. This technology makes it easy for different groups of students to share work and projects during a single class period without a lot of down time in between presentations. Selecting the Image Source Using the Function Key – Macintosh iBook or MacBook If you turned on your connected computer before turning on the projector, the projector should automatically detect and display your Mac laptop image. This may take a moment or two. If you see a blank or blue screen or the “No Signal” message when you are connected to your Macintosh computer, press the Source Button on the top of the projector until it displays a message indicating Computer or Computer 1.
Broward County Public Schools Digital Classrooms
Connect and Project: User Guide Revision Date: 7/2008
12
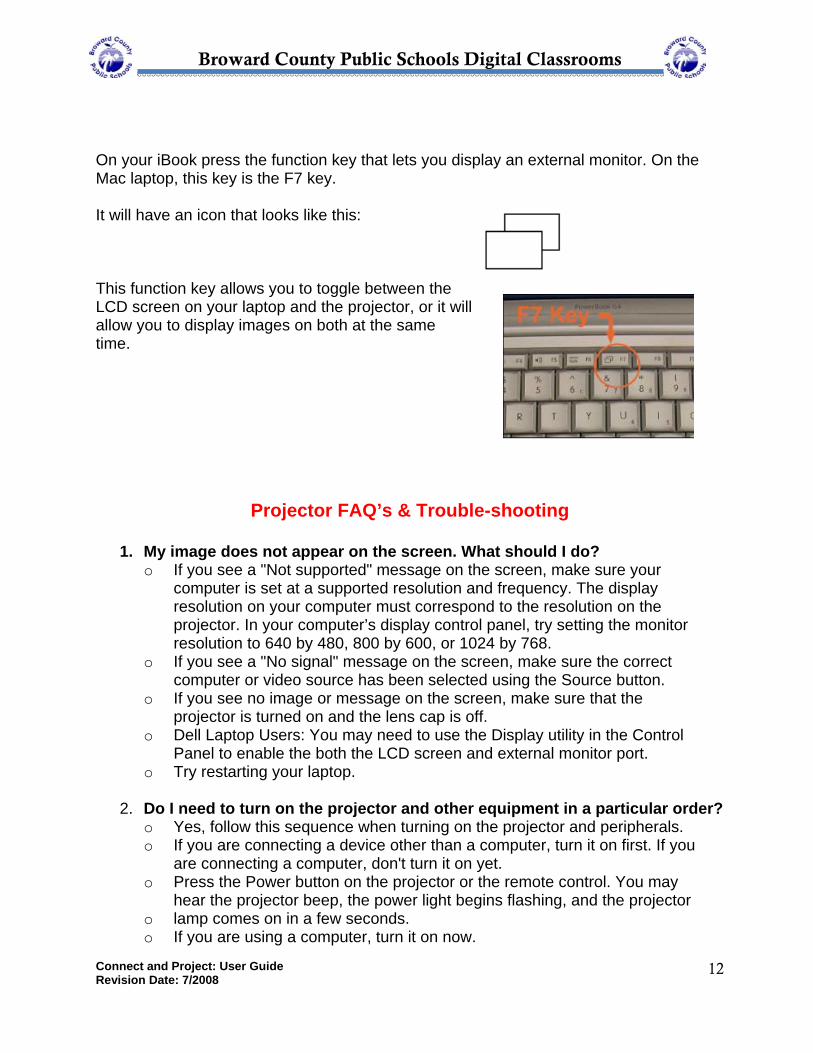
On your iBook press the function key that lets you display an external monitor. On the Mac laptop, this key is the F7 key. It will have an icon that looks like this: This function key allows you to toggle between the LCD screen on your laptop and the projector, or it will allow you to display images on both at the same time.
Projector FAQ’s & Trouble-shooting
1. My image does not appear on the screen. What should I do? o If you see a "Not supported" message on the screen, make sure your
computer is set at a supported resolution and frequency. The display resolution on your computer must correspond to the resolution on the projector. In your computer’s display control panel, try setting the monitor resolution to 640 by 480, 800 by 600, or 1024 by 768.
o If you see a "No signal" message on the screen, make sure the correct computer or video source has been selected using the Source button. o If you see no image or message on the screen, make sure that the
projector is turned on and the lens cap is off. o Dell Laptop Users: You may need to use the Display utility in the Control
Panel to enable the both the LCD screen and external monitor port. o Try restarting your laptop.
2. Do I need to turn on the projector and other equipment in a particular order? o Yes, follow this sequence when turning on the projector and peripherals. o If you are connecting a device other than a computer, turn it on first. If you are connecting a computer, don't turn it on yet. o Press the Power button on the projector or the remote control. You may hear the projector beep, the power light begins flashing, and the projector o lamp comes on in a few seconds. o If you are using a computer, turn it on now.

Broward County Public Schools Digital Classrooms
Connect and Project: User Guide Revision Date: 7/2008
13
3. When you're finished using the projector, follow this sequence: o Turn off the power to the computer/video equipment. o Press the Power button on the projector or remote control. o When you see the confirmation message, “Power Off?” press the Power
button again. The power light flashes as the projector cools down. o When the power light stops flashing and is steady, unplug the projector. o Caution: Never unplug the projector when the power light is flashing.
4. Can you project on a screen and a computer monitor simultaneously? o Yes. You can connect your monitor to the projector's Monitor Out port to
project simultaneously on a monitor/LCD and the projection screen. This feature can only be used when your input video source is a computer.
5. What do the projector’s lights indicate?
o The projector lights indicate when the projector is ready to use, warming up, in standby mode, or has an error.
6. How can I improve my fuzzy image?
o If the image is fuzzy, try adjusting the focus ring. If that doesn't help, the problem could be due to the projector's position, condition, or menu settings.
7. Why are the colors on the images wrong?
o The colors may not look right if projector settings need adjustment or if there is a problem with the lamp or VGA cable.
8. The power light is flashing and I can’t turn the projector on. What might be
wrong? o The projector has just been turned off and it is cooling down. You cannot
operate the projector during the cool-down period. Wait until the power light is solid (stops flashing). This should take about 20 seconds, and then press the Power button again to turn on the projector.
9. On my Mac, what do I do if the image on my monitor does not appear on the
screen? o Click the Systems Preferences icon in the Dock. o Under the Hardware section select the “Display”
pane. o If you do not see an “Arrangement button o at the top of the dialog box click the “Detect Displays’ button. o Click the “Mirror Displays’ checkmark box to see the same screen projected
that you see on your laptop. o Adjustments to your computer that may be required: adjust the resolution to
1024 x 768 or higher if screen appears too large. o Adjustments to your projector that may be required: adjust the lens if the
picture appears unclear.
10.5 10.4

Broward County Public Schools Digital Classrooms
Connect and Project: User Guide Revision Date: 7/2008
14