using adobe photoshop - o'neil€¦ · using adobe photoshop cc2017 image adjustments
TRANSCRIPT
Using Adobe Photoshop CC2017 Image Adjustments
© Steve O’Neil 2017 Page 1 of 12 http://www.oneil.com.au/pc/
Using Adobe Photoshop
7 – Image Adjustments One of Photoshop’s strengths has always been its ability
to assist in touching up photographs. Even photos taken
by the best of photographers can do with a little
touching up if they were taken in poor lighting or other
poor conditions. Additionally, old photos that have been
scanned often need some touching up due to fading
colours, scratches and other marks. Photoshop includes
a wide range of tools specifically aimed at improving
the way photos look. Of course many of these tools are
also useful for special graphical effects so it’s worthwhile experimenting with them when you are
familiar with their basic functionality.
Some of Photoshop’s adjustment tools, such as TLevelsT, TBrightness/Contrast T and THue/Saturation T
have been available since the earliest versions, though additional tools have been added to more
recent versions. The exercises which follow will introduce you to many of these tools. There are
other useful tools not covered here but these exercises will look at a selection of some of the most
useful.

Using Adobe Photoshop CC2017 Image Adjustments
© Steve O’Neil 2017 Page 2 of 12 http://www.oneil.com.au/pc/
Adjustment Tools
Brightness and Contrast
One of the oldest and most basic adjustment tools in Photoshop is the TBrightness/Contrast T tool.
As the name suggests, this tool allows you to adjust how bright an image is along with the amount
of contrast between light and dark tones in an image. It is suitable for quick touch ups but is not
recommended for high end output, as its use can result in a loss in image detail. One example of
where this can be useful is where a photograph has been taken poorly like in the examples below.
Picture of a bike taken with a good amount of light.
This photo is over exposed, meaning that the camera
lens allowed in too much light when the photo was
taken. This has resulted in the picture looking too
bright.
This photo is under exposed, meaning that the camera
lens allowed in too little light when the photo was
taken. This has resulted in the picture looking too
dark.
This photo is not too bright or too dark, but the colours
look less defined since there is not enough contrast
between the light and dark colours.
In each of the last three cases the photo could be improved by using the brightness/contrast tool.
You might not be able to get it looking as good as a photograph that was taken properly in the
first place and these examples are fairly extreme, but it can be used to improve a scanned photo
or one that’s ‘not quite right’.
Using Adobe Photoshop CC2017 Image Adjustments
© Steve O’Neil 2017 Page 3 of 12 http://www.oneil.com.au/pc/
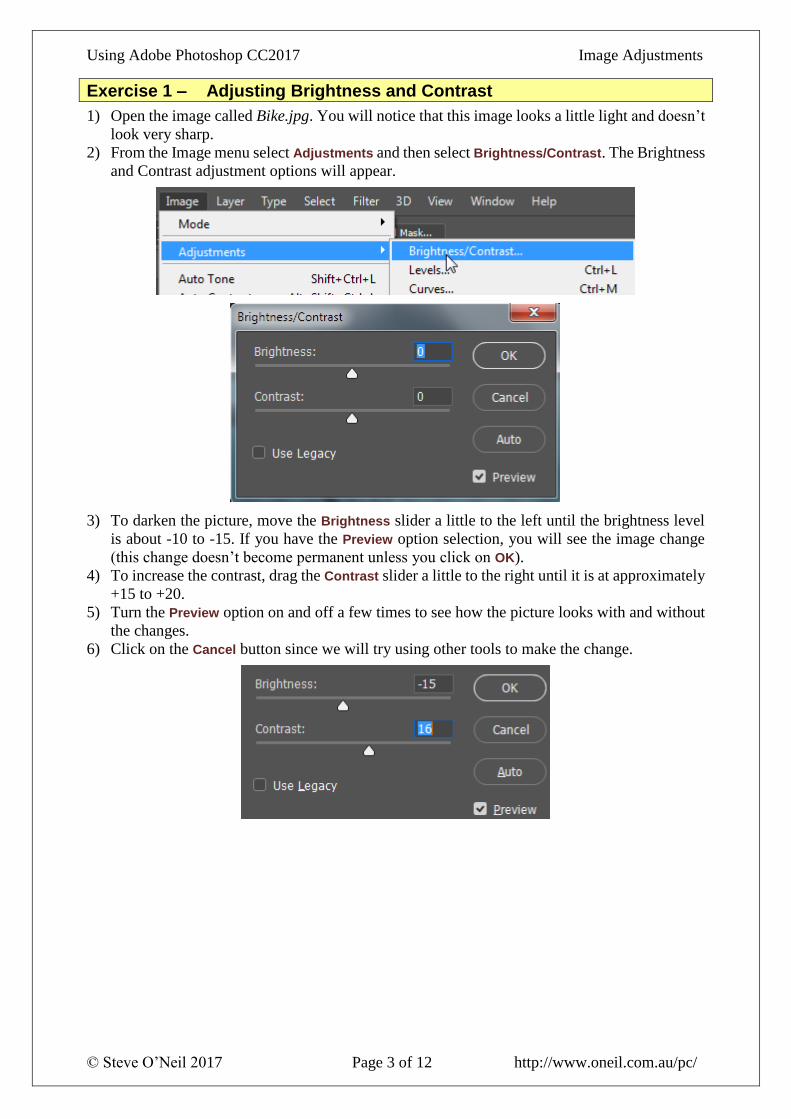
Exercise 1 – Adjusting Brightness and Contrast
1) Open the image called Bike.jpg. You will notice that this image looks a little light and doesn’t
look very sharp.
2) From the Image menu select Adjustments and then select Brightness/Contrast. The Brightness
and Contrast adjustment options will appear.
3) To darken the picture, move the TBrightness T slider a little to the left until the brightness level
is about -10 to -15. If you have the TPreview T option selection, you will see the image change
(this change doesn’t become permanent unless you click on TOK T).
4) To increase the contrast, drag the TContrast T slider a little to the right until it is at approximately
+15 to +20.
5) Turn the TPreview T option on and off a few times to see how the picture looks with and without
the changes.
6) Click on the TCancel T button since we will try using other tools to make the change.
Using Adobe Photoshop CC2017 Image Adjustments
© Steve O’Neil 2017 Page 4 of 12 http://www.oneil.com.au/pc/
Levels
In most cases you can get superior results by using Photoshop’s Levels adjustment tool. The
Levels options look complex for a new user but when you are familiar with how it works, you
may find it is easier and more intuitive than it looks.
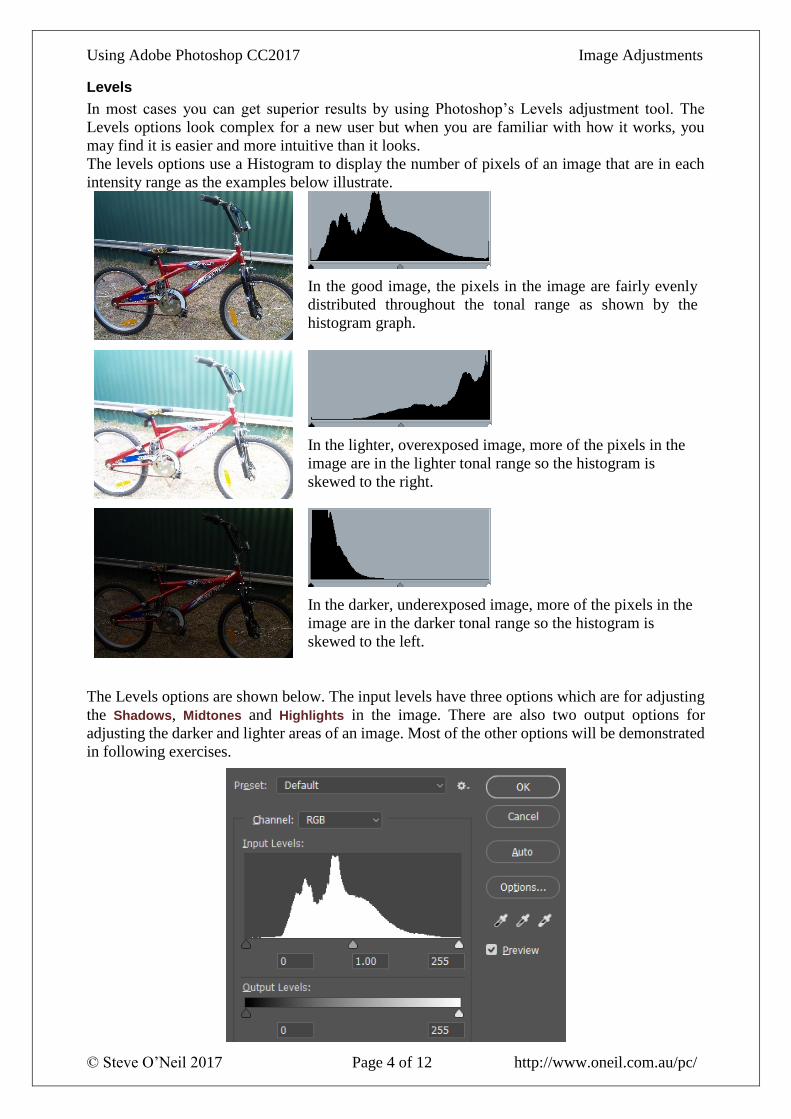
The levels options use a Histogram to display the number of pixels of an image that are in each
intensity range as the examples below illustrate.
In the good image, the pixels in the image are fairly evenly
distributed throughout the tonal range as shown by the
histogram graph.
In the lighter, overexposed image, more of the pixels in the
image are in the lighter tonal range so the histogram is
skewed to the right.
In the darker, underexposed image, more of the pixels in the
image are in the darker tonal range so the histogram is
skewed to the left.
The Levels options are shown below. The input levels have three options which are for adjusting
the Shadows, Midtones and Highlights in the image. There are also two output options for
adjusting the darker and lighter areas of an image. Most of the other options will be demonstrated
in following exercises.
Using Adobe Photoshop CC2017 Image Adjustments
© Steve O’Neil 2017 Page 5 of 12 http://www.oneil.com.au/pc/
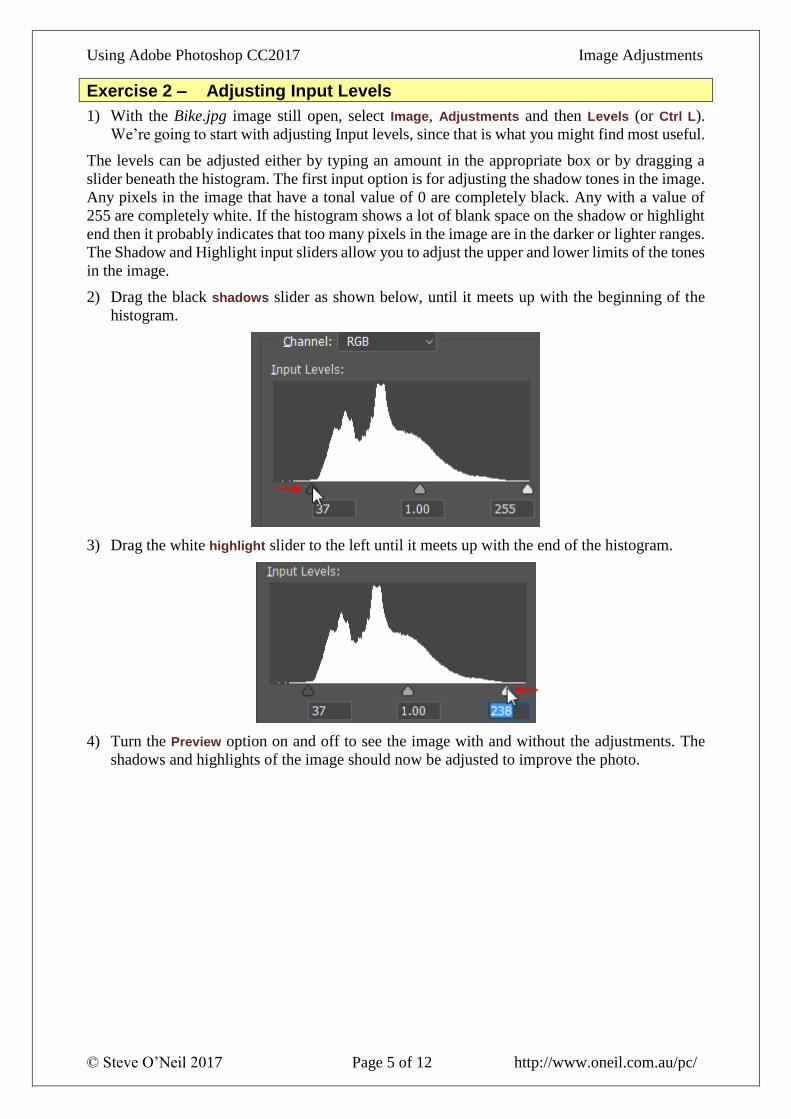
Exercise 2 – Adjusting Input Levels
1) With the Bike.jpg image still open, select TImageT, TAdjustments T and then TLevels (or Ctrl L).
We’re going to start with adjusting Input levels, since that is what you might find most useful.
The levels can be adjusted either by typing an amount in the appropriate box or by dragging a
slider beneath the histogram. The first input option is for adjusting the shadow tones in the image.
Any pixels in the image that have a tonal value of 0 are completely black. Any with a value of
255 are completely white. If the histogram shows a lot of blank space on the shadow or highlight
end then it probably indicates that too many pixels in the image are in the darker or lighter ranges.
The Shadow and Highlight input sliders allow you to adjust the upper and lower limits of the tones
in the image.
2) Drag the black shadows T slider as shown below, until it meets up with the beginning of the
histogram.
3) Drag the white Thighlight T slider to the left until it meets up with the end of the histogram.
4) Turn the Preview T option on and off to see the image with and without the adjustments. The
shadows and highlights of the image should now be adjusted to improve the photo.

Using Adobe Photoshop CC2017 Image Adjustments
© Steve O’Neil 2017 Page 6 of 12 http://www.oneil.com.au/pc/
Finally, if the image still looks a little too dark or light, we can adjust the levels for the midtones
of the image.
5) Drag the midtones slider left or right until the image looks about right. In this particular image
there might not be much need for adjusting midtones.
6) With the options still open, hold down the T[Alt] T key. The TCancelT button will change to a TReset T
button. Click it to reset the levels options.
7) Levels may also be set using the eyedropper icons to the right. Click on the black
eyedropper icon. With the eyedropper still selected, move your mouse over the darkest pixel
you can find in the image.
T
TipT Having the TInfo PanelT showing can help since it will show the colour values of the pixels your mouse is over. A darker pixel with have lower RGB values. If your info panel isn’t showing you can turn it on from the Window menu while the Levels options are still showing.
8) When you have your mouse over one of the darkest pixels you can find, you can click on it to
set that as the shadows limit for your histogram. Try adjusting the THighlights T and TMidtones T in
the same way.
9) Hold down T[Alt] T and click TReset T once you have tried the eyedropper levels options.
10) Click on the TUAUuto T button. This will make Photoshop select some suitable
input levels for your image. The results of this option are usually pretty good, though it’s
often worth taking the extra time to select the levels yourself.
11) Click TOK T when you think you have the best possible
levels for the image, either through the auto or
manual methods. You can also use the Auto option
without going in to the levels options by going to the
TImageT menu and selecting one of the adjustments
options as shown to the right.
12) Save the changes to the image when done.
Note If you have part of the image selected, the adjustments will only apply to the selected area.
Using Adobe Photoshop CC2017 Image Adjustments
© Steve O’Neil 2017 Page 7 of 12 http://www.oneil.com.au/pc/
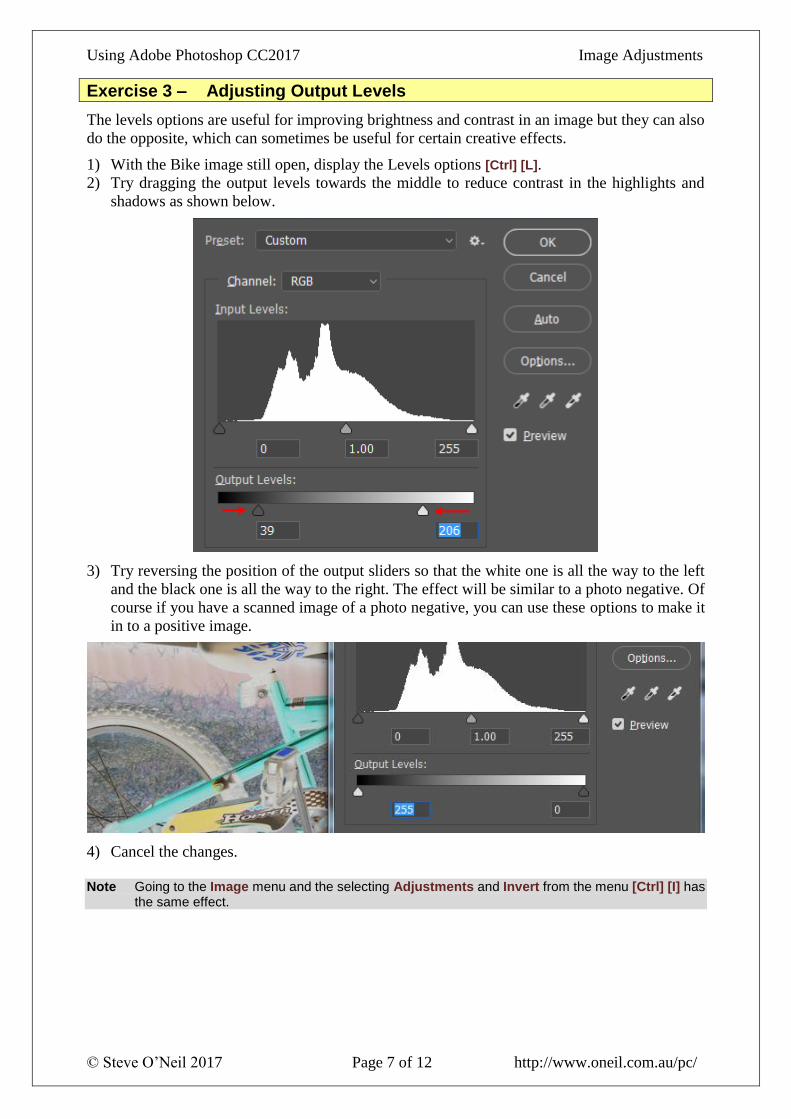
Exercise 3 – Adjusting Output Levels
The levels options are useful for improving brightness and contrast in an image but they can also
do the opposite, which can sometimes be useful for certain creative effects.
1) With the Bike image still open, display the Levels options T[Ctrl] [L] T.
2) Try dragging the output levels towards the middle to reduce contrast in the highlights and
shadows as shown below.
3) Try reversing the position of the output sliders so that the white one is all the way to the left
and the black one is all the way to the right. The effect will be similar to a photo negative. Of
course if you have a scanned image of a photo negative, you can use these options to make it
in to a positive image.
4) Cancel the changes.
Note Going to the TImage T menu and the selecting TAdjustments T and TInvert T from the menu T[Ctrl] [I] T has
the same effect.

Using Adobe Photoshop CC2017 Image Adjustments
© Steve O’Neil 2017 Page 8 of 12 http://www.oneil.com.au/pc/
Exercise 4 – Adjusting Colour Levels
1) Open the image called Tank.jpg.
Like many older photos that have been scanned, the colours
in this photo have faded. There is too much of some colours
and not enough of others. This imbalance in colours can be
corrected using levels. As this is an RGB image, you can
adjust the levels for red, green and blue separately.
2) Open the Levels options T[Ctrl] [L] T.
3) From the TChannelT list up the top, select Red.
You will notice from the histogram that in the red
shades in the image there is a large gap at the
shadow and highlight end. Drag the shadows and
highlight sliders inward until they match up with
the edge of the histogram.
It may also help to adjust the red midtones but it is
best to adjust the shadows and highlights of the
other channels first.
4) Select Green from the TChannelT list.
5) Adjust the shadows and highlights of the green channel.
6) Select Blue from the TChannel T list.
7) Adjust the shadows and highlights of the blue channel.
8) Try turning the Preview option on and off to see how it
looks with and without the adjustments. There should
be a significant improvement in the way the picture
looks. You may be able to improve it even further by
going back and fine-tuning the highlights, midtones and
shadows for each channel. Note You can also let Photoshop adjust the colour levels for
you by going to the TImageT menu and then selecting TAdjustments T, TAuto Color T. Like many things, this is a quick way to get good results, but you can often get better results from doing it yourself.

Using Adobe Photoshop CC2017 Image Adjustments
© Steve O’Neil 2017 Page 9 of 12 http://www.oneil.com.au/pc/
Hue / Saturation
The Hue/Saturation options in Photoshop are used to modify the colours in an image. The three
settings you can change are:
• Hue Adjust along a scale of varying colours
• Saturation Adjusts how intense/dull the colours are
• Brightness Adjusts the brightness of the colours
Exercise 5 – Adjusting Hue / Saturation
1) Open the image called hues.psd.
This image has a saved selection called Yellow.
2) Activate the saved selection (channel) by selecting the TLoad
Selection T option in the TSelect T menu, or by T[Ctrl] T clicking the
saved channel in the TchannelsT panel.
3) The adjustments might be easier to see while the edges of
the selection are not visible. To temporarily hide the edges,
select TExtras Tfrom the TSelect Tmenu or press T[Ctr] [H] T.
4) With the selection still active, go to the TImage T menu and select TAdjustments T, THue/Saturation
(Ctrl U)T.
5) Experiment with each of the three sliders to see the way they modify the colours in the selected
area.
6) Click TOK Twhen you are satisfied with the changes then redisplay the selection edges T[Ctrl] [H] T.
7) Open the Bike image if it is not still open.
Suppose we want to change the colour of the bike. If there is one part of the image which stands
out from the rest of the colours in the image, it may be possible to adjust the hue without making
a selection first.
8) Display the THue/Saturation T options while the Bike image is open.
Using Adobe Photoshop CC2017 Image Adjustments
© Steve O’Neil 2017 Page 10 of 12 http://www.oneil.com.au/pc/
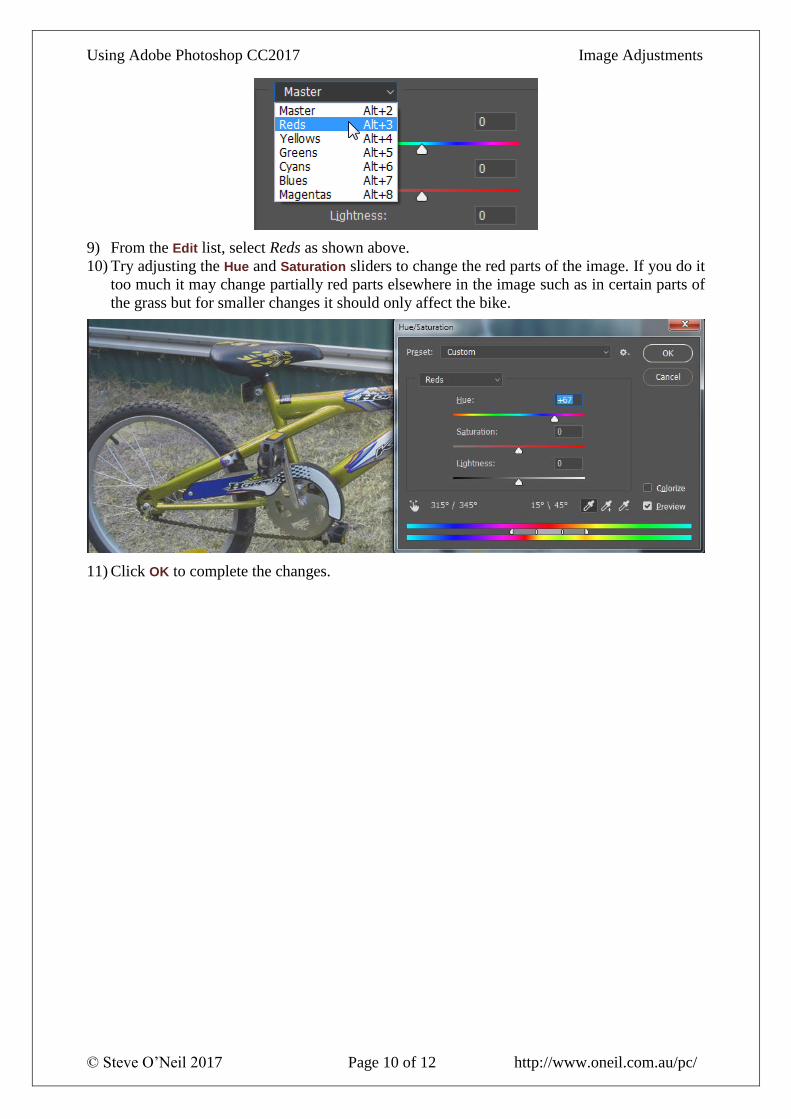
9) From the TEdit T list, select Reds as shown above.
10) Try adjusting the THue T and TSaturation T sliders to change the red parts of the image. If you do it
too much it may change partially red parts elsewhere in the image such as in certain parts of
the grass but for smaller changes it should only affect the bike.
11) Click TOK T to complete the changes.
Using Adobe Photoshop CC2017 Image Adjustments
© Steve O’Neil 2017 Page 11 of 12 http://www.oneil.com.au/pc/
Adjustment Layers
Instead of creating adjustments that permanently change an image, it is sometimes better to create
adjustments that can be added and removed at will. This can be done using an adjustment layer.
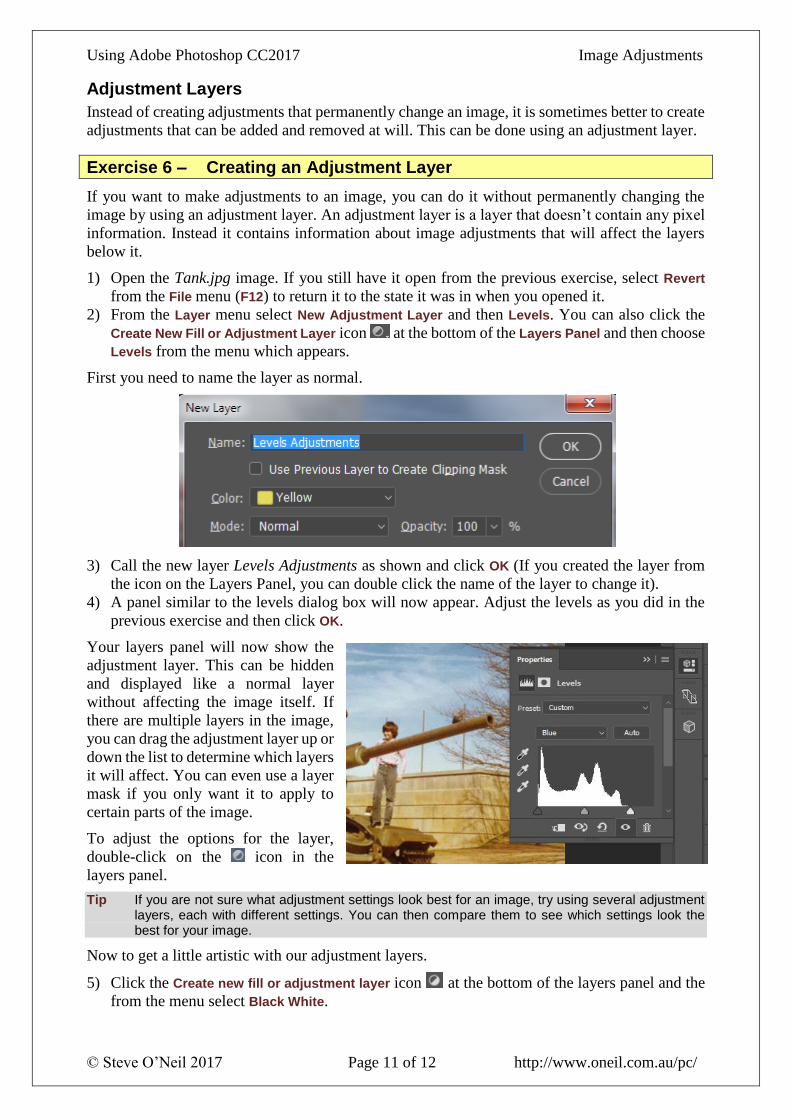
Exercise 6 – Creating an Adjustment Layer
If you want to make adjustments to an image, you can do it without permanently changing the
image by using an adjustment layer. An adjustment layer is a layer that doesn’t contain any pixel
information. Instead it contains information about image adjustments that will affect the layers
below it.
1) Open the Tank.jpg image. If you still have it open from the previous exercise, select Revert
from the File menu (F12) to return it to the state it was in when you opened it.
2) From the TLayer T menu select TNew Adjustment Layer T and then TLevels T. You can also click the
Create New Fill or Adjustment Layer icon at the bottom of the Layers Panel and then choose
Levels from the menu which appears.
First you need to name the layer as normal.
3) Call the new layer Levels Adjustments as shown and click TOK (If you created the layer from
the icon on the Layers Panel, you can double click the name of the layer to change it) T.
4) A panel similar to the levels dialog box will now appear. Adjust the levels as you did in the
previous exercise and then click TOK T.
Your layers panel will now show the
adjustment layer. This can be hidden
and displayed like a normal layer
without affecting the image itself. If
there are multiple layers in the image,
you can drag the adjustment layer up or
down the list to determine which layers
it will affect. You can even use a layer
mask if you only want it to apply to
certain parts of the image.
To adjust the options for the layer,
double-click on the icon in the
layers panel.
TTipT If you are not sure what adjustment settings look best for an image, try using several adjustment layers, each with different settings. You can then compare them to see which settings look the best for your image.
Now to get a little artistic with our adjustment layers.
5) Click the Create new fill or adjustment layer icon at the bottom of the layers panel and the
from the menu select Black White.
Using Adobe Photoshop CC2017 Image Adjustments
© Steve O’Neil 2017 Page 12 of 12 http://www.oneil.com.au/pc/
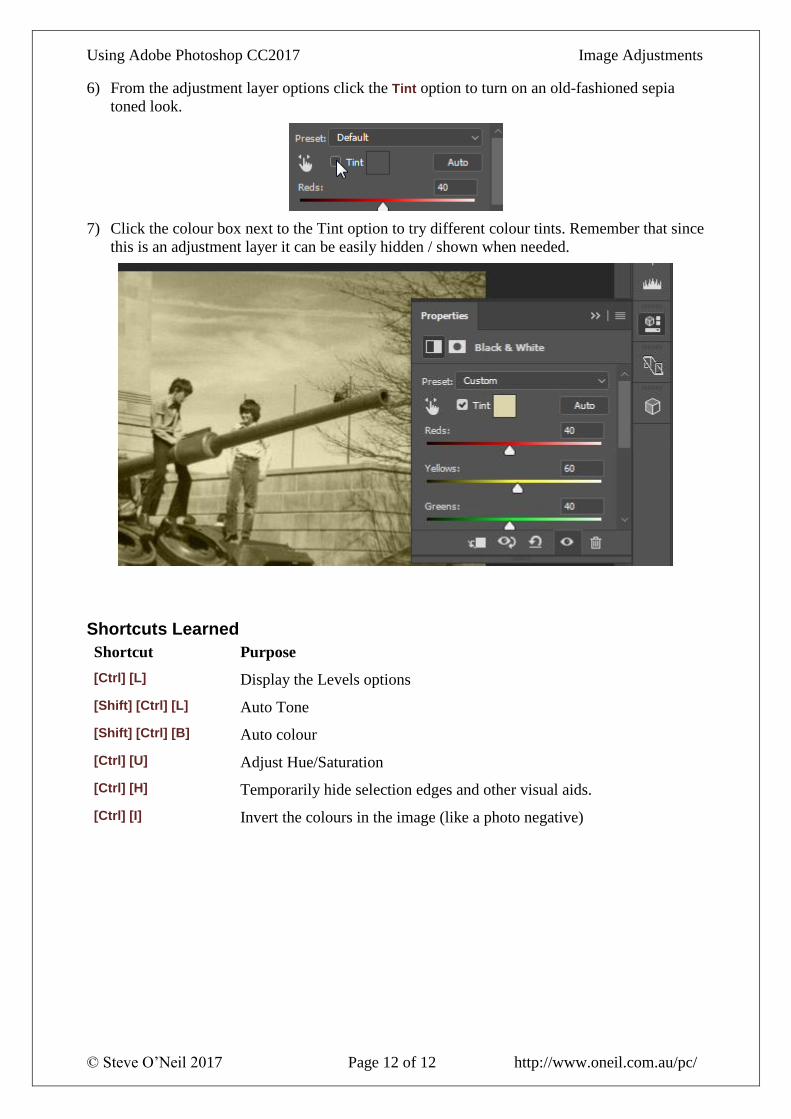
6) From the adjustment layer options click the Tint option to turn on an old-fashioned sepia
toned look.
7) Click the colour box next to the Tint option to try different colour tints. Remember that since
this is an adjustment layer it can be easily hidden / shown when needed.
Shortcuts Learned
Shortcut Purpose
T[Ctrl] [L] T Display the Levels options
[Shift] [Ctrl] [L] Auto Tone
T[Shift] [Ctrl] [B] T Auto colour
T[Ctrl] [U] T Adjust Hue/Saturation
T[Ctrl] [H] T Temporarily hide selection edges and other visual aids.
T[Ctrl] [I] TTT Invert the colours in the image (like a photo negative)