using - gscs-b2c.lge.com
TRANSCRIPT


1
Thank you for using the LG product.LG has manufactured and tested this product to provide you with a reliable computingenvironment.
Please read this manual carefully before using the computer.
This sign calls attention to features and operations that may be danger-ous to the user. Follow the instruction closely to reduce the risk of bodi-
ly harm or damage to the equipment.
Danger: Not following the instruction will r esult in im mediate death or serious
injury.
Warning: Not following the instruction could result in death or serious injury.
Caution: Not following the instruction could result in minor or moderate injuryand/or damage to the product.
Microsoft, MS, MS-DOS, and Windows are trademarks of Microsoft Corporation in the
United States and/or other countries.
is a trademark of LG.
Copyright 2003 LG Electronics, Inc., DigitalMate Co., Ltd.
Information in this manual may include technical inaccuracies or typographical errors.
Images in this manual are for illustrative purposes only and may be different from the
actual product.
LG reser ves the rights to make improvements and/or changes to the product without
notice.
Reproducing any or all of the information contained in this publication without written
permission is prohibited.
CYNOTE computer compl ies with the radio frequency and safety standards of any coun-
tr y or region in which it has been approved for wireless use.

2 Contents
Contents
Contents........................................................2
ImportantSafetyInstructions.........................................4
1.Packagecontents...............................................15
2.Components...................................................163.Statusindicators................................................21
1. Overview
1.UsingtheACadaptor............................................232.Usingthebatterypack...........................................25
3.Turningthepoweronandoff.......................................27
4.Attachingexternaldevices........................................30
5.UsingtheIrDAport..............................................33
2. Basics
1.Usingthekeyboard..............................................37
2.Hotkeys......................................................41
3.Usingthetouchpad.............................................41
3. Input/Output
1.Startingthesystemsetup.........................................472.Bootingwithastartupfloppydisk...................................49
3.Settingapassword..............................................504.Changingorremovingthepassword.................................535.Recoveringthefactorydefaultsettings...............................55
4. System Setup
1.AbouttheSoftwareinstallationCD..................................57
2.Installingdevicedrivers...........................................58
5. Installing Device Drivers
3Contents
1.Usingtheopticaldrive............................................59
2.PlayinganaudioCD.............................................633.Usingthefloppydiskdrive........................................65
4.Installingmemory...............................................67
6. Storage/Memory
1.Features......................................................71
2.Powerspecification..............................................74
3.Operatingenvironment...........................................74
Features/Specification

Important Safety Instructions
Following these safety instructions will help ensure many years of safe enjoyment from
the product. Set up your computer on a flat, stable surface.
(LG is not responsible for the problems and damages caused by incorrect use of the
computer or use of the computer in an unsafe environment.)
4 Important Safety Instructions
Selecting a place to work
Warning
Caution
Do not operate your computer near water; for example, in a bathroom or near a
swimming pool.The computer may not function correctly, and there is the risk of electric shock.
Operate the computer within a temperature range of 50 to 95 degrees F (10 to 35
degrees C) and 20 to 80% of relative humidity.
Safely dispose of the packing materials, such as desiccant and plastic bags.Children may swallow desiccant or suffocate from plastic bags.
Keep your computing environment clean and free of dust.
There is the risk of damage to the computer.
Keep your computer away from electromagnetic fields.
Keep your computer away from electrical devices, such as speakers, that can
generate strong electromagnetic fields. Exposure to the electromagnetic field may
result in loss of data in the hard disk drive and/or damage to the LCD.
Do not block the fan louvers and leave enough space around the computer for
ventilation.
The computer may overheat and result in fire or injuries.

Using the battery pack
Warning
Do not charge the battery pack with devices other than the adaptor that comes
with the computer.There is the risk of fire and/or damage to the battery pack.
Do not put the battery pack in trash that is disposed of in landfills.
Incorrectly disposed battery packs may result in explosion or fire. Comply with
local ordinances or regulation for safe disposal.
Do not throw or disassemble the battery pack.
Damage to the battery pack can result in injuries, explosion, and/or fire.
Use only a battery pack recommended by LG.
Using a battery pack of a different type may result in explosion.
Keep metallic objects, such as keys and clips, away from the battery pack.
Objects that conduct electricity can shor t-circuit the battery pack and result in fire
and/or injuries.
Keep the battery pack away from heat.
There is the risk of explosion or fire.
Do not short-circuit batter y terminals.
There is the risk of explosion.
Do not subject the battery pack to temperatures above 140 degrees F (60 degrees C).There is the risk of explosion or fire.
Keep the battery pack away from children.
There is the risk of injury and damage to the battery pack.
5Important Safety Instructions
Connecting to an AC power source
Warning
6 Important Safety Instructions
Do not use loose or damaged power plugs.There is the risk of electric shock or fire.
Use properly grounded outlet.
Connecting the computer to an outlet without proper grounding may result in
electric shock and damages to your computer.
Do not touch or gr ab the power plug with wet hands.
There is the risk of electric shock.
Hold the plug body when removing the power cord from an outlet.
There is the risk of fire and damages to the computer.
Use your computer at the proper voltage/current level indicated.
Supplying improper levels of voltage/current may result in electric shock, fire,and/or damage to the computer.
If you hear a noise from the power cord or outlet, unplug the power cord immedi-
ately, and contact the sales representatives for help.There is the risk of fire or electric shock.
Make sure the pow er plug fits snugly into the electrical outlet.
Loose fit may result in fire .
Do not bend or place a heavy object on top of the power cord. Keep children and
pets from damaging the power cord.
Damaged power cord may result in electric shock or fire.

Connecting to an AC power source
Warning
7Important Safety Instructions
Keep the power cord and plug clean and free of dust.
There is the risk of fire.
If an object or liquid enters the computer or adaptor, remove the power cord, battery,and any other cables from the computer, and then contact the sales representa
-
tives for help.There is the risk of an electric shock, fire, or damage to the computer.
Before cleaning the computer, disconnect the power cord, battery, and any other
cables from the computer.There is the risk of electric shock or damage to the computer.

Using the computer
Warning
8 Important Safety Instructions
For cleaning your computer, use mild detergent or computer cleaning products. Be
sure to dry completely before using the computer.
Using the computer without completely drying it may result in electric shock or fire.
During a lightning storm, disconnect the power cord, telephone line, and LAN
cable from the computer.There is the risk of electric shock or fire.
Do not place water, chemicals, or liquid of any kind on the computer.
Liquid of any kind entering inside the computer may result in an electric shock, fire,or damage to the computer.
Do not connect the modem directly to a multi-line telephone.There is the risk of fire or damage to the computer.
If you drop your computer, remove the power cord and battery pack, and then
contact the sales representatives for help.There is the risk of electric shock or fire.
Do not expose your computer to the direct sunlight in a closed area such as inside
a car.
Prolonged exposure to high temperatures may deform the computer and also
result in fire.
Do not place a bur ning candle or cigarette on the computer.There is the risk of fire.
If you see or smell smoke from the computer or adaptor, turn off the computer,remove the power cord, and then contact the sales representatives for help.There is the risk of fire.
Do not push foreign objects into the fan louvers.
There is the risk of electric shock.

Using the computer
Warning
Caution
The fluorescent lamp in the LCD contains mercury.If the LCD breaks and the inter nal liquid gets into your eyes or on your skin, imme-
diately wash the affected area with water. If any symptom arises, receive medical
care.
9Important Safety Instructions
Do not place an object, such as a pen or clip, on the keyboard.If you close the LCD cover with an object on the keyboard, you may damage or
break the LCD.
Do not touch or scratch the LCD with sharp objects.The LCD may be damaged.
Be sure to turn off the computer before closing the LCD cover.
The computer may overheat, and be damaged or deformed.
Do not exert excessive pressure on the LCD.
LCD is made of glass, and an excessive force can break the LCD.
Follow the instr uctions in the user's guide.There is the risk of damage to the computer.
Do not push objects into the PC Card slot.
There is the risk of electric shock or injur y.
Using the computer
Caution
10 Important Safety Instructions
Upon completion of any service or repairs, ask service technician to perform safetychecks.
Ignoring safety checks may result in electric shock or fire.
Use the Wireless LAN at least 5m away from a microwave oven or plasma lamp.When using the Wireless LAN near a plasma lamp, use the channel 11, 12, or 13.
You may not connect to the network or the connection may be slow.
Keep the computer away from heat.
The computer may deform and there is the risk of fire.
When attaching an external device, make sure the connector from the device and
the port on the computer are of the same type.There is the risk of damage to the computer.
Do not insert a damaged CD-ROM or floppy disk.
There is the risk of damage to the computer.

Upgrading the computer
Warning
Caution
Before disassembling the computer, turn off the power and remove the power cord,
phone line, and battery pack.There is the risk of electric shock or fire. Ask the sales representatives for helpbefore disassembling the computer.
Do not disassemble the power supply.There is the risk of electric shock.
Keep screws and other small parts away from children.
Children may choke on a screw or other small par t. If a child swallows a small part,receive a medical care.
11Important Safety Instructions
Do not attempt to disassemble or modify the computer without consulting sales
representatives.There is the risk of electric shock.
Replace only with the parts approved by LG.
There is the risk of fire and damage to the computer.
Ask the sales representatives before connecting and using the computer with any
non-LG product.There is the risk of damage to the computer.
Carrying and storing the computer
Preventing data lose (Handling the hard disk drive)
Caution
Caution
Before moving the computer, turn the pow er off and remove all the cables.
You may trip over the loose cables and fall.
When traveling on an airplane, follow the airline's instr uction.
Using the computer on an airplane may result in an airline accident.
12 Important Safety Instructions
Be gentle when handling the hard disk drive.
The hard disk drive is easily damaged from an impact. Always make backups for
your data.
LG is not responsible for the data lose due to user errors.
The data on the hard disk drive or the drive itself may be damaged in the followingsituations:
1. Exposure to a physical shock when disassembling the computer.2. The computer is reset (rebooted), for example by power outage, while the hard
disk drive is operating.3. Exposure to virus.
4. The computer is turned off during operation.5. Exposure to a physical shock while the hard disk drive is operating.
To minimize the lose of data due to hard disk drive damages, always backup your
data.
LG is not responsible for the lose of data.

Ergonomic information
Adjust the display position to avoid glare or reflections from overhead lighting.
The top of the display should be on or below the level of your eyes.
Keep your head and neck in an upright position.
Keep your forearms, wrists, and hands in a horizontal position.
Adjust your chair to keep your ar ms and hands in a comfor table position.
Using the computer in the same position for a prolonged period of time may cause
discomfort to your body.
Take short frequent breaks from working with your computer. No more than 2
hours of computing per day is recommended.
Stretch periodically to reduce muscular discomfor t.
Volume control
Warning
Warning
Check the volume level
Check if the volume level is not too high before listening through headphones.
Do not use the headphones for a prolonged period of time.
13Important Safety Instructions

14
15
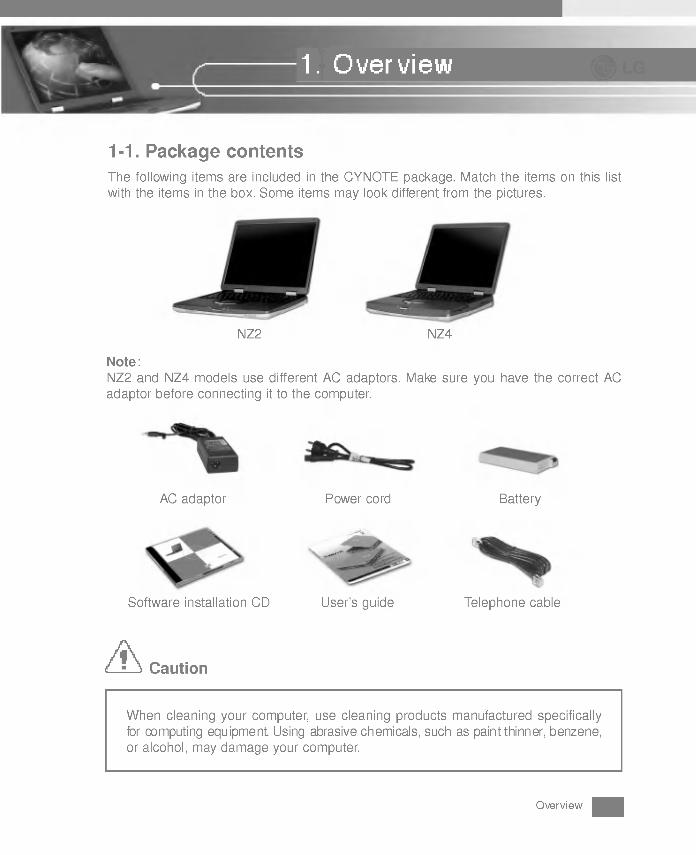
1-1. Package contents
The following items are included in the CYNOTE package. Match the items on this list
with the items in the box. Some items may look different from the pictures.
Overview
NZ2 NZ4
AC adaptor Power cord Battery
Telephone cableUser's guideSoftware installation CD
When cleaning your computer, use cleaning products manufactured specificallyfor computing equipment. Using abrasive chemicals, such as paint thinner, benzene,or alcohol, may damage your computer.
Caution
Note :
NZ2 and NZ4 models use different AC adaptors. Make sure you have the correct AC
adaptor before connecting it to the computer.

1-2. ComponentsYou will get the most out of using CYNOTE by learning the components and their func-
tions.
Front view
1. Latch : Locks the display panel.
2. Latch button: Press the latch button to open the display panel.
3. Power switch: Press the power switch to turn on the computer.
4. Keyboard : Use the keyboard as an input device.
5. Touch pad: Gently place your finger on the touch pad, and move your fingertip across
the touch pad to move the cursor. (The touch pad helps you use pro-
grams with graphical user-interfaces more easily)
6. Touch pad buttons: Wor ks just like the mouse buttons on your desktop computer.
16 Overview
1
2
3
45
6
7
8
9
101112
13

7. Scroll button: Press the top or bottom of the scroll button to scroll through a window.
8. Built-in speakers: Lets you hear sound when using audio applications.
9. Power-saving mode switch: If the power is on, closing the display panel puts your
computer into the power-saving mode . (You can set the power-savingmode in the Windows(R) Control Panel)
10. Volume down button: Decreases the sound level.
11. Volume up button: Increases the sound level.
12. Mute button: Mutes the sound. (Press again to turn on the sound)
13. LCD: Displays text and graphics. (The size of display depends on the model type)
Note: Opening the display panelPress and hold the latch button in the direction of the arrow 1, and lift the display panelin the direction of the arrow 2. Adjust the slope of the display panel for a comfortable
viewing angle.
17Overview
1
2 2

Rear view
Note: Some models may look different from the picture below.
1. USB connectors: Connects to USB devices.
2. Modem connector: Connects to a telephone cable.
3. Ethernet connector: Connects to a LAN cable.
4. S-Video connector: Connects to a VCR or TV with an S-Video connector.
5. Monitor connector: Connects to an external monitor.
6. Parallel connector : Connects to a parallel device such as printer or scanner.
7. Power jack: Connects to an AC adaptor.
8. IEEE 1394 connector: Connects to IEEE 1394 devices. IEEE 1394 is a ser ial bus
standard for high-speed/ high-capacity data transfer.
9. Fan louvers: Enables air to circulate inside the computer, and thus prevents over-
heating. Do not place any object in front of the fan louvers; blocking the
fan louvers may result in overheating and damage the computer.
18 Overview
1
23
4 5 6 7
8
9
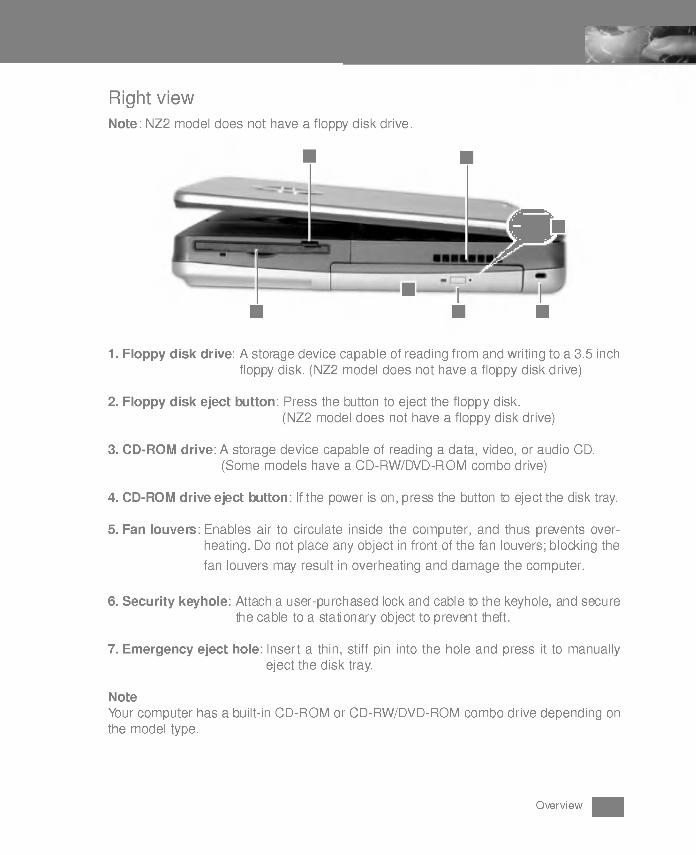
Right view
Note : NZ2 model does not have a floppy disk drive.
1. Floppy disk drive: A storage device capable of reading from and writing to a 3.5 inch
floppy disk. (NZ2 model does not have a floppy disk drive)
2. Floppy disk eject button: Press the button to eject the floppy disk.
(NZ2 model does not have a floppy disk drive)
3. CD-ROM drive: A storage device capable of reading a data, video, or audio CD.
(Some models have a CD-RW/DVD-ROM combo drive)
4. CD-ROM drive eject button: If the power is on, press the button to eject the disk tray.
5. Fan louvers: Enables air to circulate inside the computer, and thus prevents over-
heating. Do not place any object in front of the fan louvers; blocking the
fan louvers may result in overheating and damage the computer.
6. Security keyhole: Attach a user -purchased lock and cable to the keyhole, and secure
the cable to a stationary object to prevent theft.
7. Emergency eject hole: Insert a thin, stiff pin into the hole and press it to manually
eject the disk tray.
Note
Your computer has a built-in CD-ROM or CD-RW/DVD-ROM combo drive depending on
the model type.
19Overview
1
2 5
3
4 6
7

Left view
Note: NZ2 model has only one PC Card slot.
1. Fan louvers: Enables air to circulate inside the computer, and thus prevents over-
heating. Do not place any object in front of fan louvers. Blocking the fan
louvers may result in overheating and damage the computer.
2. PC Card slots:You can insert two type II PC Cards or one type III PC Card. (NZ2 model
has only one type II PC Card slot.)
3. PC Card eject button: Press the eject button to remove the PC Card.
4. IrDA(R) port: IrDA por t enables wireless data transfer between your computer and a
computer, printer, or any other devices supporting IrDA.
5. Audio jacks
Speaker jack: Connects to external speakers.
Line-in: Connects to an external audio source for sound input.
Microphone jack: Connects to a microphone.
20 Overview
1
2 345
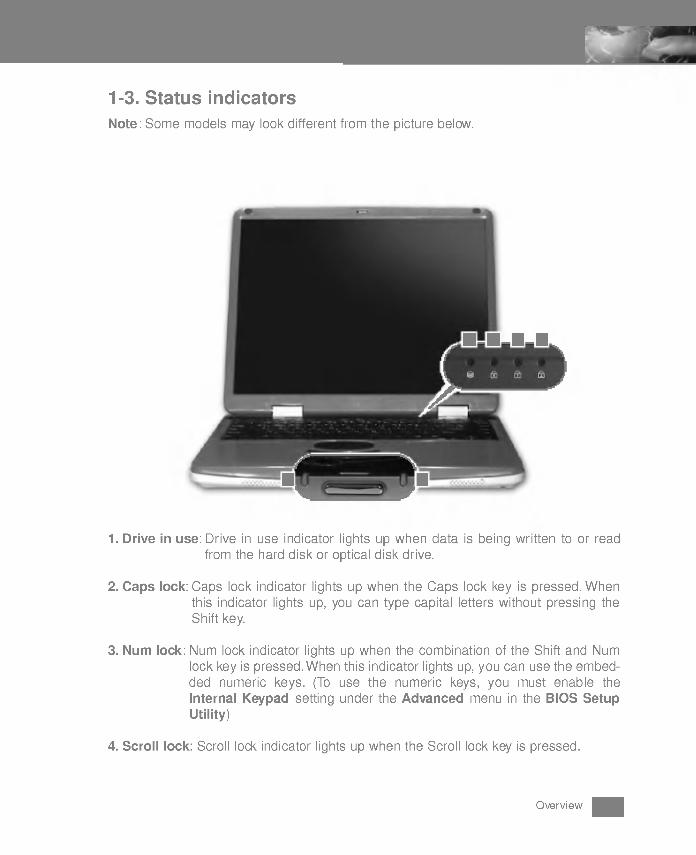
1-3. Status indicators
Note : Some models may look different from the picture below.
1. Drive in use: Drive in use indicator lights up when data is being written to or read
from the hard disk or optical disk drive.
2. Caps lock: Caps lock indicator lights up when the Caps lock key is pressed. When
this indicator lights up, you can type capital letters without pressing the
Shift key.
3. Num lock: Num lock indicator lights up when the combination of the Shift and Num
lock key is pressed. When this indicator lights up, you can use the embed-
ded numeric keys. (To use the numeric keys, you must enable the
Internal Keypad setting under the Advanced menu in the BIOS SetupUtility)
4. Scroll lock: Scroll lock indicator lights up when the Scroll lock key is pressed.
21Overview
1234
5 6

5. Power: Power status indicator indicates the following status of the computer.
Green: The computer is turned on.
Off: The computer is turned off or is in hibernation mode.
Blinking: The computer is in standby mode.
6. Battery: Battery status indicator indicates the following status of the battery.
Red: The computer is connected to an AC adaptor and is being charged.
Off: The battery is fully charged OR the computer is not connected to an AC
Adaptor.
Blinking: The battery pow er is under 10% of its maximum capacity.
22 Overview

23
This section describes how to use CYNOTE. Read this section before using your computer.
2-1. Using the AC adaptorAn AC adaptor or battery pack is needed to supply power to your computer. The AC
adaptor can be used with a 100~240VAC power source .Use only the AC adaptor that
comes with your computer. Using any other adaptor may cause damage to your com-
puter.
1. Connecting the AC adaptor to an AC outlet (100~240V)
Warning
Do not overload an electrical outlet with connections to multiple devices.
Overloading an electrical outlet may result in fire or electric shock.
Do not touch the power cord or plug with wet hands. Doing so may result in electric
shock.
Connect the power cord to the adaptor, and then plug the power cord into an AC outlet.
Basics
Note
NZ2 and NZ4 models use different AC adaptors. Make sure you have the correct AC
adaptor before connecting it to your computer.

3. Opening and positioning the LCD panelPress the latch button and open the display panel. Adjust the slope of the display panelfor comfortable viewing.
4. Power switch
Press the power switch to turn on the computer.
Note
You can switch from using 220V AC power to 110V by simply exchanging the 220V plugwith the 110V plug.For NZ4 models, if a floppy disk is in the drive when the computer is turned on,
Windows(R) will not start.
24 Basics
2. Connecting the AC adaptor to the computer
Plug the adaptor cable into the power jack.

2-2. Using the battery pack
1. Turn the computer over so that the battery slot faces up.
2. Align the two small protrusions on the side of the battery pack with the grooves on the
side of the battery slot; then insert the battery pack into the slot.
3. Gently push the battery pack into the slot until it clicks.
4. The batter y pack is inserted.
The batter y pack must be fully charged before first use.
25Basics
Caution: You must tur n off the computer before changing the battery pack.
Caution: Use only the battery pack that comes with the computer.

5. Connect the AC adaptor and open the LCD panel. Start charging the battery. (Referto Page 23 Using the AC adaptor)
26 Basics
Caution
6. Check the battery status indicator.
If the battery is fully charged, the indicator is turned off.
Red: The computer is connected to the AC adaptor and is being charged.
Off: The battery is fully charged OR the computer is not connected to the AC Adaptor.
Blinking: The battery power is under 10% of its maximum capacity.
When you are not using the computer, remove the batter y pack.
7. To remove the batter y pack, slide the battery latch in the direction of the arrow and
hold; then lift the battery pack from the slot.

Note: The battery pack has the following characteristics.
Self-dischargeThe battery gr adually loses its power over time without ever being used.
Periodic full discharg e/charge
Frequent recharging of the battery pack can reduce the capacity of the battery pack.When this happens, you can perform the full discharge/charge to restore the capacity of
the battery pack. To improve the capacity of the battery pack, periodic full discharge/
charge should be performed once ever y 30 ~60 days.You should use the battery until its power is low; then fully charge the battery.
To use the battery pack safely and effectively,Do not short-circuit the battery pack.
Keep the battery pack away from heat or fire .
Store the battery pack at room temperature. (32 ~140degrees F/0 ~60 degrees C)Do not disassemble the battery pack.Do not expose the battery pack to water.
Keep the battery pack away from children.
If the temperature of the battery pack drops below 50 degress F(10 degrees C), the
trickle charging begins. The tr ickle charging may take 16hours for the battery pack to be
fully charged.
If the temperature of the battery pack drops below 32 degrees F(0 degrees C), the
battery pack cannot be charged.
27Basics
2-3. Turning the power on and off
Before tur ning on the computer, make sure the AC adaptor is connected or the batter y
is charged.
Turning on the computer
1. Press and hold the latch button(1) and open the display panel(2).
1
2 2

Turning off the computer
1. Quit all running applications; click Start and choose Shut down from the start up
menu.
Caution
If the Drive in use indicator is on, do not tur n off the computer, as doing so may
damage the data being read from or written to the dr ive.
2. Press the power switch.
3. Pressing the power switch starts the self diagnostics; then Windows(R) XP startupscreen is displayed.
28 Basics

Warning
If Windows does not shut down correctly, press and hold the power switch for more
than 5 seconds; the system will shut down.
Turning off the computer this way may damage the system. It is recommended that
you always turn off the computer by choosing Shut down in the Start menu.
If the computer does not shut down correctly while running applications, the data
in the hard disk drive may be damaged.If a program does not respond, press the Ctrl+Alt+Delete combination to start the
Task manager; then quit the program or restart the system.If Windows or program file is damaged by shutting down the system incorrectly, re-
install the program. The user is responsible for the loss of data caused by incorrect
use of the computer.
2. In the Shut Down Windows , choose Shut down.
3. The computer is tur ned off automatically.
29Basics

2-4. Attaching external devices
Attaching a USB device
Attaching a television using an S-Video connector
30 Basics
USB mouse
(not included)
USB keyboard
(not included)
TV (not included)

Attaching an external monitor
Attaching a printer
Note
Tur n off the computer before attaching an external monitor.
31Basics
Exter nal monitor
(not included)
Printer (not included)
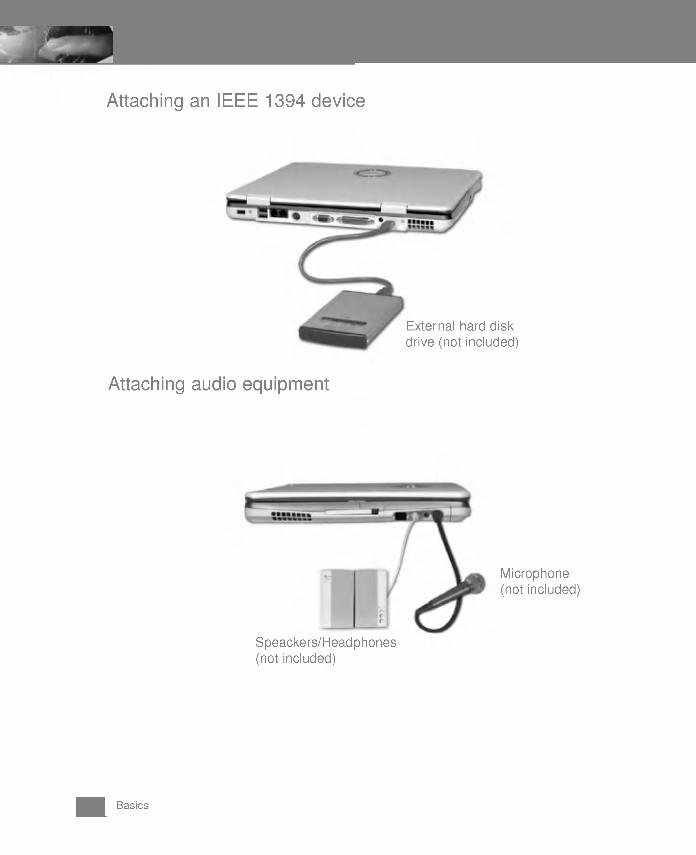
Attaching an IEEE 1394 device
Attaching audio equipment
32 Basics
Exter nal hard disk
drive (not included)
Speackers/Headphones(not included)
Microphone
(not included)

2-5. Using the IrDA port
Your computer supports IrDA (Infrared Data Association) standard for infrared commu-
nication.
About IrDA port
Using IrDA port
Your computer can communicate with another IrDA standard compatible device sup-
porting FIR data communication. IrDA communication provides useful wireless commu-
nication betw een your computer and other computer or devices. The following section
describes how to establish IrDA communication between 2 computers.
Rang e: 1m
T he range of communication is affected by its surroundings. Removing electronic devices,which may obstruct an IrDA communication, will increase the range of communication.
For IrDA communication to work, there cannot be an object between the computer and
the other IrDA device.
Beam angle: +-15
Data transmission speed: 4.0 MbpsYour computer has an IrDA V3.0 Fast Infrared por t allowing the data transmission speedof Serial Infr ared(115.2Kbps) and Fast Infrared(4Mbps). Transmission speed dependson programs and devices used in IrDA communication.
IrDA communication programs
General serial communication programs can be used, but programs specifically designedfor IrDA communication i s recommended.
Your computer is configured to use COM port for IrDA communication in FIR mode.
33Basics
1. Make sure Wireless Link program is installed in your computer.
1. Turn on the computer.2. Click Start button and right-click My computer to select Properties.3. On Hardware tab, click Device Manager.

34 Basics
4. Right-click IrDA Fast Infrared Port and select Properties. Click Advanced tab,and configure the device.

35Basics
2. Align 2 computers so that their IrDA ports point to each other.
3. The distance and the beam angle between the ports must be less than 1m and small-
er than +-15 degrees respectively.
4. Remove any obstruction between the por ts.
5. When the connection is established, Wireless Link program starts automatically.Wireless Link icon appears on the taskbar, and shortcut to Wireless link is creat-
ed on the desktop.
6. Double-click Wireless link icon on the taskbar; Wireless Link windows opens.
7. Select the file that you want to send, and click Send.
Shor tcut to Wireless link Wireless link icon

8. Sending and receiving computers show the following windows. Click Yes to star t a
data transfer.
9. The data transfer is complete.
Note
The default directory for the received data is C:\Documents and Settings\UserName\Desktop. To change the default directory, open Wireless Link and click Properties, and
then choose a new default directory.
36 Basics
Sender
Receiver

37
3-1. Using the keyboardThe keyboard is used for entering text and commands in the computer.
About the keyboard
The keyboard is composed of character, n umber, and other special function keys.
Function keys: Function keys enable you to perform different operations depending on
the operating system and application program you use.
Hot keys: Hot keys(shortcuts) ar e used in conjunction with Fn key to pr ovide shortcuts
for some of the predefined operations, such as entering power-saving mode.
Cursor control keys: You can move the cursor in the direction of the arrows .
Editing keys: You can move the cursor to the beginning or end of the current line, or up
and down the screen.
Input/Output

Character and number keys: consist of character keys, number keys, special charac-
ter keys, and spacebar. Spacebar is used for creating a
space between characters.
Embedded numeric keys: You can press the combination of Shift and ScrLk keys to
enable the embedded numeric keypad. Num Lock indicator lights up and enables you
to use the embedded numeric keypad shown below. You can press the combination of
Shift and ScrLk keys again to disable the embedded numeric keys. (To use the numer-
ic keys, you must set the Advanced -> Internal Keypad setting to Enabled in the BIOS
Setup Utility.)
Caution
Do not spill water, juice, coffee, etc on the keyboard as it may damage the com-
puter and cause an electric shock.
Note
In the middle of entering characters, if numbers are entered instead of characters, press
the combination of Shift and ScrLk to disable the embedded numeric keys.
38 Input/Output

Modifier and special function keys
Note
You can lock the keyboard in the upper/lower case position by pressing Caps Lock key.
Caps Lock indicator lights up in upper case position.You can use the combination of Shift and a character key to enter its upper/lower case
letter.
1. Shift key: Hold Shift key down and press another key to enter the upper case letter
for the key.
2. Caps Lock key: Press Caps Lock key to lock the keyboard in the upper case posi-tion. When the Caps Lock indicator lights up, you can press another
key in combination with Shift to enter the low er case letter for the
key.
39Input/Output
2
1
5
43
76
3. Esc key: Use Esc key to quit programs or cancel a operation in a program.
4. PrtSc (Print Screen) key: Press PrtSc key to take the snapshot of the entire area
visible on your screen and store it in the clipboard.
5. Enter key: Press Enter key to enter a command or to end a line.

7. Windows(R) key: Press Windows key to view the Start menu.
40 Input/Output
6. Shortcut menu key: Press Shortcut menu key to view shortcuts for the current pro-
gr am. (Shortcut menu key works the same as the right-clicking the mouse button).
3-2. Hot keysThe following Hot keys provide you with shortcuts to operations, such as adjustingthe brightness of the computer display.
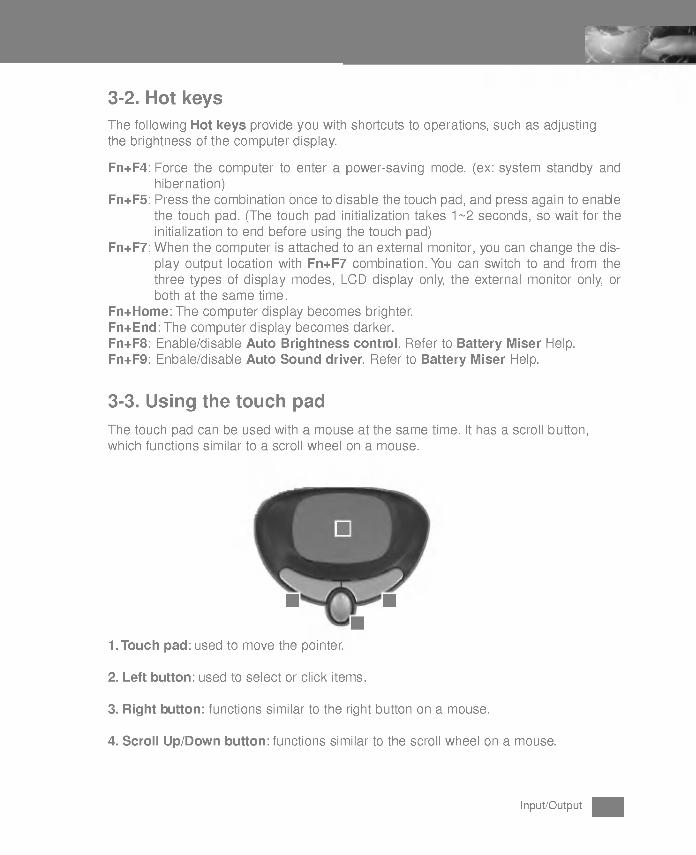
3-3. Using the touch pad
The touch pad can be used with a mouse at the same time. It has a scroll button,which functions similar to a scroll wheel on a mouse.
1. Touch pad: used to move the pointer.
2. Left button: used to select or click items.
3. Right button: functions similar to the right button on a mouse.
4. Scroll Up/Down button: functions similar to the scroll wheel on a mouse.
Fn+F4: Force the computer to enter a power-saving mode. (ex: system standby and
hiber nation)Fn+F5: Press the combination once to disable the touch pad, and press again to enable
the touch pad. (The touch pad initialization takes 1~2seconds, so wait for the
initialization to end before using the touch pad)Fn+F7: When the computer is attached to an external monitor, you can change the dis-
play output location with Fn+F7 combination. You can switch to and from the
three types of display modes, LCD display only, the external monitor only, or
both at the same time .
Fn+Home: The computer display becomes brighter.Fn+End: The computer display becomes darker.
Fn+F8: Enable/disable Auto Brightness control. Refer to Battery Miser Help.Fn+F9: Enbale/disable Auto Sound driver. Refer to Battery Miser Help.
41Input/Output
2
1
4
3

Caution
Moving the pointer on the screen
Gently place your finger on the touch pad and slide it in the direction in which you want
the pointer to move.
Making the selection (Click)To click a button, quickly press and release the left button. You can click the left button
or gently tap the touch pad once to select an item on a menu or an icon on the screen,
or position the cursor in a document.
Guidelines on using the touch padDo not touch the touch pad with a sharp or pointed object as doing so may dam-
age the touch pad.Do not remove the cover sheet of the touch pad as doing so may damage the
touch pad.Do not use the touch pad with two fingers, w earing gloves, or wet hand as it may
not function correctly. Using the touch pad with a dirty or oily finger may damagethe touch pad.Do not exert too much pressure on the touch pad as doing so may result in injuriesto your finger or wrist.
42 Input/Output
OR

Double-click (Run)To double-click a button, quickly press and release the left button twice. You can also tapthe touch pad twice to get the same result. To launch an application, you can select and
double-click the .exe file or the program icon.
Drag and dropTo drag an object, select and move the object by clicking and holding the left button and
sliding the finger across the touch pad without releasing the button.
To drop the object you have just dragged, release the left button.
You can use drag and drop to move files from one location to another.
For example, if you want to place a file in the recycle bin, place the pointer above the file
you want to move, press the left button and hold, slide your finger across the touch padto move the file and release the left button above the recycle bin.
43Input/Output
Drag: Move the icon without releasing the left button.
Drop: Release the left button above the recycle bin.

ClickLock
ClickLock enables you to select text or drag a file without having to continuously hold
down the mouse button or touch pad button.
Follow the instruction below to enable ClickLock. If ClickLock is enabled, you can hold
down the mouse button or touch pad button for a moment and then release it, and still
get the same effect as continuously holding down the button. You can drag an object with
ClickLock enabled and press again to release the button and drop the object.
1. Click and open the Mouse Properties window.
2. On the Buttons tab, under ClickLock, select Turn on ClickLock check box.
3. Click Settings and adjust how long you need to hold down a mouse or touch pad but-
ton to enable ClickLock, and then Select OK.
44 Input/Output

Using the scroll up/down button
Your computer has a built-in scroll up/down button. In a program window with a scroll
bar, you can move up and down the windows using the scroll up/down button. When you
scroll a window using the scroll up/down button, the pointer on the screen does not
move.
45Input/Output

46

47
The system setup saves your computer's hardware configurations in CMOS RAM. The
system setup provides you with information, such as the size and type of your hard disk,size of the installed memor y, date, and time.
4-1. Starting the system setup
Booting the system using a star tup floppy disk. (Page 49)
Setting a password. (Page 50)
Changing or removing the password. (Page 53)
Recovering the factor y default settings. (Page 55)
Caution
Do not change the system setup arbitrarily. Incorrect system setup may result in
errors while using the computer.The menu and default factory settings of the BIOS Setup Utility may look differ-
ent from this manual. They may have been changed to improve the performanceof the system.
Keys used in the system setup
Enter: Select the current item.
Esc: Close the current window or move to the previous window.
CursorControl Keys: Move up, down, left, and right.+ - : Increase and decrease the value.
Page Up: Move to the first item.
Page Down: Move to the last item.
F10: Save and exit the system setup.
Note
Cursor control keys (arrow keys) move the cursor up, down, to the left and right.
System Setup
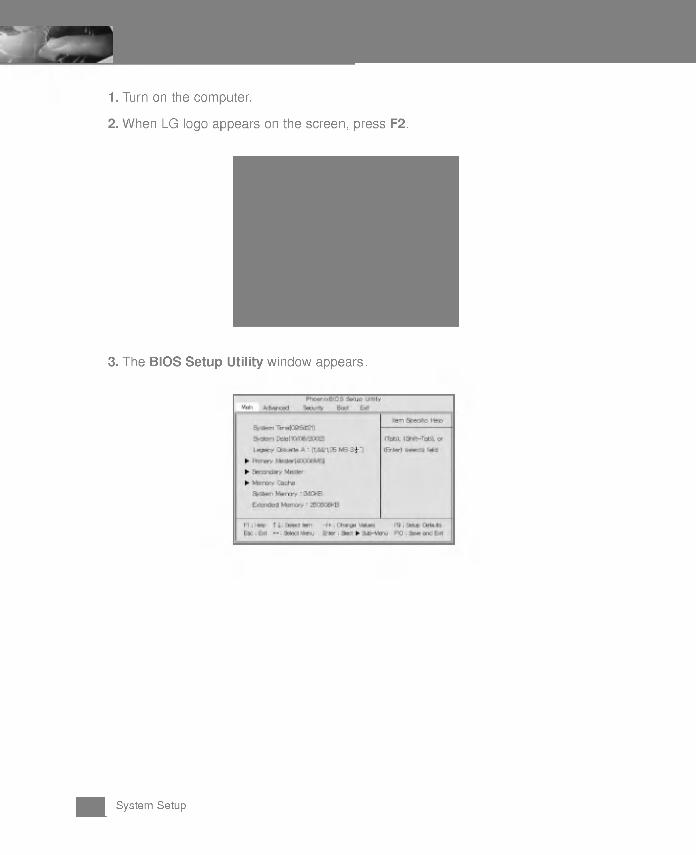
1. Turn on the computer.
2. When LG logo appears on the screen, press F2.
3. The BIOS Setup Utility window appears .
48 System Setup

4-2. Booting with a bootable floppy disk
To boot your system using a floppy disk, you can either change the boot order or remove
the bootable CD from the CD-ROM drive.
Follow the instructions below to set the floppy disk drive to the first on the boot order.
1. Open the BIOS Setup Utility and use arrow keys to select Boot menu.
2. Use arrow keys to select Removable Devices, and press Shift and + keys to move
the item to the top of the list.
3. Press F10 to save the new setting.
4. When the following message appears, select Yes and then press Enter to restart
the computer.
49System Setup

Caution
If you forget the password, you cannot gain access to your system. Make sure you
write down the password in a safe place only you can refer to in case you forgetthe password.
Setting a supervisor password
A password protects your computer from unauthoriz ed users. The factory default setupdoes not have a passw ord. A supervisor password prevents unauthorized users from
changing the system setup.
1. Start the BIOS Setup Utility.
2. Use arrow keys to select Set Supervisor Password under Security menu, and then
press Enter.
Note
You can use a supervisor password to gain access and change items in the BIOS SetupUtility, and select Power on Boot. If your computer is used by someone else, he or she
should only use a user password.
50 System Setup
4-3. Setting a password
If you want to protect the system setup from an unauthorized user, follow the instructions
below to set a password.You can set a password in the BIOS Setup Utility program.

4. If the following message appears , press Enter.
5. Press F10 to save the new settings.
6. If the following message appears, select Yes and press Enter to restart the computer.
Setting a user passwordA user password is a secondary compared to a supervisor passw ord. You must set a
super visor password in order to set a user password.
1. Start the BIOS Setup Utility and use arrow keys to select Security menu.
2. Use arrow keys to select Set User Password and press Enter.
51System Setup
3. If the following message appears , enter a new password and then press Enter. A
password must be consisted of character A~Zand numbers 0~9,and have the max-
imum length of 8.
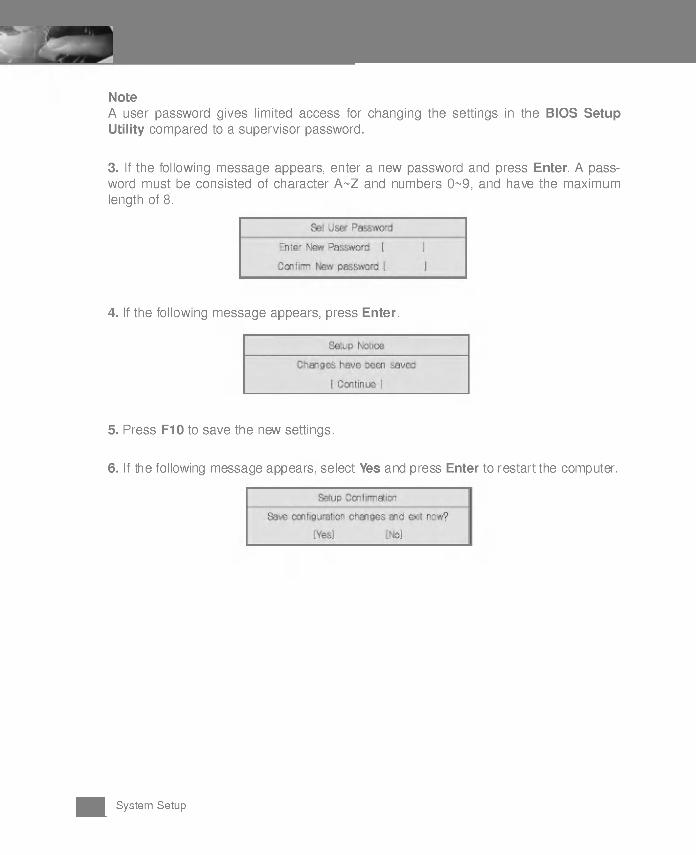
3. If the following message appears, enter a new password and press Enter. A pass-
word must be consisted of character A~Zand numbers 0~9,and have the maximum
length of 8.
4. If the following message appears, press Enter.
5. Press F10 to save the new settings.
6. If the following message appears, select Yes and press Enter to restart the computer.
52 System Setup
Note
A user password gives limited access for changing the settings in the BIOS SetupUtility compared to a supervisor password.

4-4. Changing or removing the passwordYou must know the password to change or remove it.
1. Start the BIOS Setup Utility , enter your password, and then press Enter.
To change the password, follow the instruction on Setting a password.
To remove the password, follow the instructions below.
2. Use arrow keys to select Security menu, and select a password you want to remove,
and then press Enter.
3. If the following message appears, enter the current password in the bracket next to
Enter Current Password, and then press Enter.
53System Setup

4. Press Enter without entering a password in the brackets next to Enter New Password
and Confirm New Password.
5. If the following message appears, press Enter.
6. Press F10 to save the new settings.
7. If the following message appears, select Yes and press Enter to restart the computer.
54 System Setup

4-5. Recovering the factory default settingsIf a user accidentally modifies the system setup, follow the instr uction below to recover
the factory default settings.
1. Start the BIOS Setup Utility , and use arrow keys to select Exit.
2. Use arrow keys to select Load Setup Defaults , and press Enter.
3. If the following message appears, select Yes and press Enter to recover the factorydefault settings.
4. Press F10 to save the new settings.
5. If the following message appears, select Yes and press Enter to restart the computer.
55System Setup

56
57
The Software installation CD enables you to install or restore device drivers and cer-
tain programs. Use this CD after you install Windows or if you experience frequent sys-
tem errors.
T he Software installation CD includes the following device drivers. Installing the device
drivers improves the functionality of your computer, and helps you get the most out of
your computing environment.
Intel(R) Chipset driver enables you to get the most out of Intel Chipset, and thus
improves the functionality of the computer.
ATI(R) Video driver enables the computer to display information on the LCD.
SoundMax driver enables the computer to play audio files and CDs.
Intel LAN driver enables Intel LAN controller to function correctly.
Cardbus driver enables Cardbus controller to function correctly.
TouchPad driver enables TouchPad controller to function correctly.
Battery Miser extends the life of the battery by shutting dow n the power on the periph-
The following optional device drivers may or may not be displayed when you open the
Software installation CD.
Windows(R) update cor rects problems that may occur during the use of Windows XP.
Note: Windows update is displayed only if Windows XP is installed in your system. It is
not displayed if Windows XP SP1 is installed.
Wireless LAN driver enables Wireless LAN controller to function cor rectly.
Installing Device Drivers
5-1. About the Software installation CD
Optional device drivers

58 Installing Device Drivers
5-2. Installing device drivers
Follow the instructions below to install device drivers:
1. Turn on the computer and insert the Software installation CD.
2. Select the device driver you want to install.
3. Follow the instructions to complete the installation.
Note: Some device drivers require you to restar t the computer after the installation.
Agere Systems AC'97 Modem driver enables the modem to function correctly.
Lucent Win Modem driver enables the modem to function cor rectly.Note: Wireless LAN, Agere Systems AC'97 Modem, and Lucent Win Modem drivers
are included only if you have purchased and installed an optional LGE Mini-PCI Card in
your system.
Intel SpeedStep Technology Applet enables the computer to function more efficiently
by changing the CPU clock according to the computing environment.
Note: Intel Speed Step Technology Applet is displayed only if Windows 2000 is
installed in your system.

59
6-1. Using the optical drive
Different model types provide different optical drives. (Some models have CD-ROM dr i-
ves and others have CD-RW/DVD-ROM combo dr ives)
Inserting a CD
1. Turn on the computer, and press the eject button on the CD-ROM drive.
2. Pull out the disk tray from the CD-ROM dr ive.
3. Place the CD in the middle of the tray. (Label on the CD must face upward)
Storage/Memory
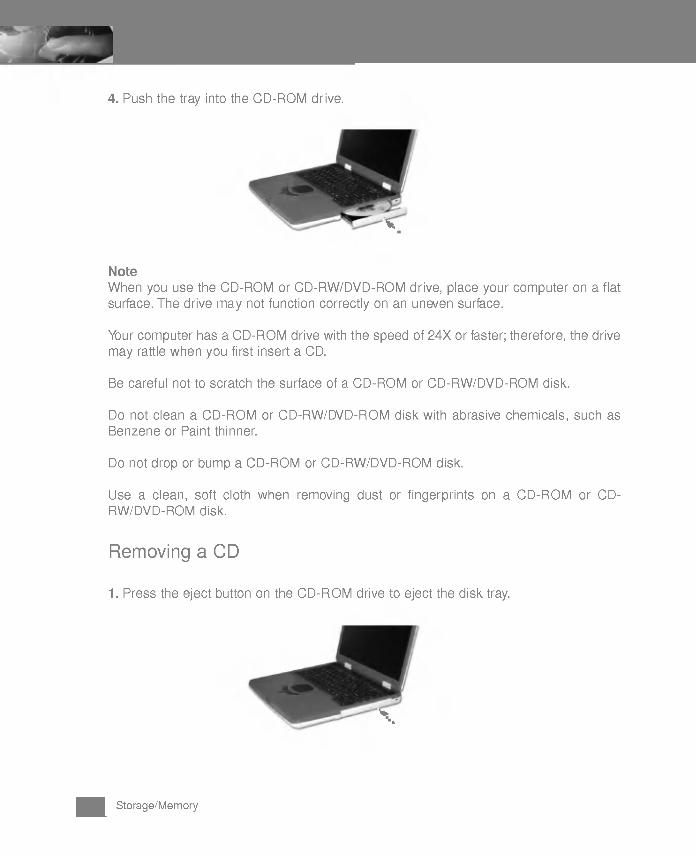
4. Push the tray into the CD-ROM dr ive.
Removing a CD
1. Press the eject button on the CD-ROM drive to eject the disk tray.
Note
When you use the CD-ROM or CD-RW/DVD-ROM drive, place your computer on a flat
surface. The drive may not function correctly on an uneven surface.
Your computer has a CD-ROM drive with the speed of 24X or faster; therefore, the drive
may rattle when you first insert a CD.
Be careful not to scratch the surface of a CD-ROM or CD-RW/DVD-ROM disk.
Do not clean a CD-ROM or CD-RW/DVD-ROM disk with abrasive chemicals, such as
Benzene or Paint thinner.
Do not drop or bump a CD-ROM or CD-RW/DVD-ROM disk.
Use a clean, soft cloth when removing dust or fingerprints on a CD-ROM or CD-
RW/DVD-ROM disk.
60 Storage/Memory
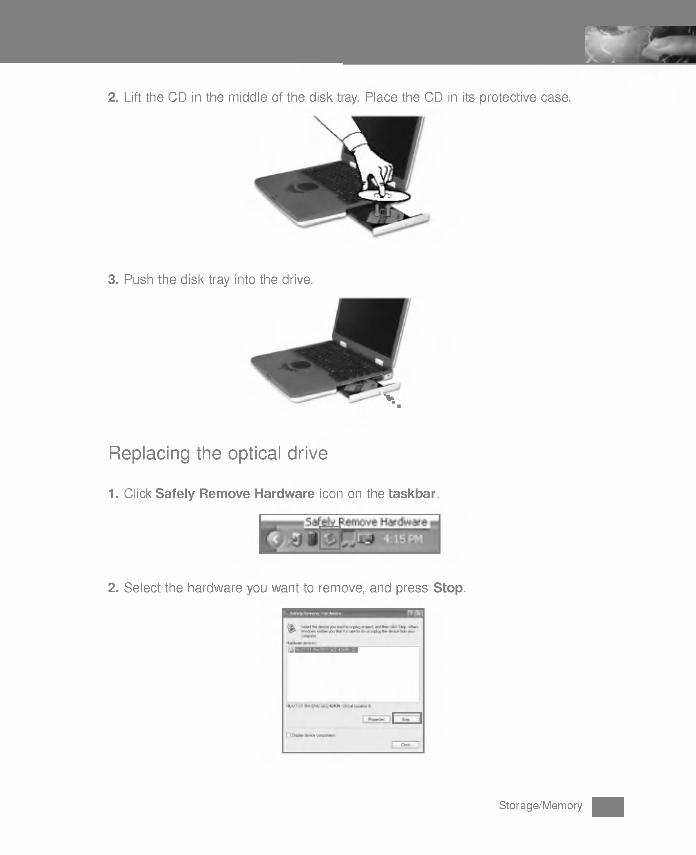
2. Lift the CD in the middle of the disk tray. Place the CD in its protective case.
3. Push the disk tray into the drive.
Replacing the optical drive
1. Click Safely Remove Hardware icon on the taskbar.
2. Select the hardware you want to remove, and press Stop.
61Storage/Memory

3. When the following screen appears, press OK.
4. When a message, Safe to Remove Hardware appears, push the latch toward the left
and hold.
5. Pull out the device from the computer.
62 Storage/Memory

6. Insert and push the new device until you hear a click.
6-2. Playing an audio CD
Using Windows Media Player
1. Turn on the computer.
2. Press the eject button on the drive to open the disk tray, and then inser t an audio CD
and close the tray.
You can use Windows(R) Media Player to play various types of audio and video files.
You can play and make a copy of an audio CD, listen to the Internet radio broadcast,
play movie clips, and listen to a music or watch a video on a web site. If you have a DVD
dr ive, you can play a DVD. If you have a CD-RW drive, you can use Windows Media
Player to make your own music CD.
Starting Windows Media Player 1
63Storage/Memory

3. Select the Windows Media Player and click OK. Windows Media Player starts play-
ing the audio CD. (If you select another audio CD program, that program will play the
CD instead of Windows Media Player)
1. Press Start -> All Programs -> Accessories -> Entertainment -> Windows Media
Player.
2. When Windows Media Player opens, press Open under File menu, and then select
an audio or video file you want to play.
Starting Windows Media Player 2
64 Storage/Memory

Backup your important data on a different floppy disk.
Store floppy disks safely in a protective case.
Hold your floppy disk by the plastic side where the label is.
Write on the label before attaching it to the floppy disk.
If you need to write on a label that is already attached to a disk, use a soft felt pen.
Do not hold a floppy disk by the metal side where the opening is.
Remove the old label before placing a new one.
Keep your floppy disks away from a TV and other electronic appliances that may gener-
ate magnetic fields.
Keep your floppy disks away from heat and direct sun light.
You can lock your floppy disk with the write-protect tab. Move the write-protect tab to
close and open the square hole. If the hole is open, the floppy disk is locked and you
can not write or erase data on the disk.
Closed: Read and Write Open: Read only
Note: Do not eject a floppy disk from the drive when the floppy disk drive indicator is on.
Write-protect tab
6-3. Using the floppy disk drive (NZ4 model only)Note : NZ2 model does not have a floppy disk drive. If your computer does not have a
built-in floppy disk drive, you can purchase a replaceable floppy disk drive that fits into
the optical disk drive bay of your computer.
A floppy disk drive does not store data on the drive. The actual data is stored in a flop-
py disk, and the drive reads and writes the data on the floppy disk.
A floppy disk can store only a small amount of data, but its small size and light weightmakes it easy to carry around.
Using a floppy disk
65Storage/Memory

Using the floppy disk drive
1. Turn the pow er on.
2. Insert a floppy disk into the disk drive.
Note
If you insert a bootable floppy disk and turn the power on, you can boot with the floppy disk.
If you inser t a floppy disk while Windows(R) is running, you can read and write data on
the disk.
3. Press the eject button to remove the floppy disk.
66 Storage/Memory
Caution
Insert a floppy disk with the label side facing up.
6-4. Installing memory
When you are using the computer, you may want to increase the memory capacity.
About memory
Your computer uses DDR(Double Data Rate) SDRAM SO-DIMM(Dual In-Line Memory
Module) with 200 pins.Each memory socket can support a memory module from 64MB to 512MB, and the
maximum memory capacity of the computer is 1024MB.
Before installing memory
When installing or removing the memory modules, be careful not to expose them to the
static electricity as it can damage the modules.
Make sure the type of memory installed in your computer is the same as the memory
you are about to install.
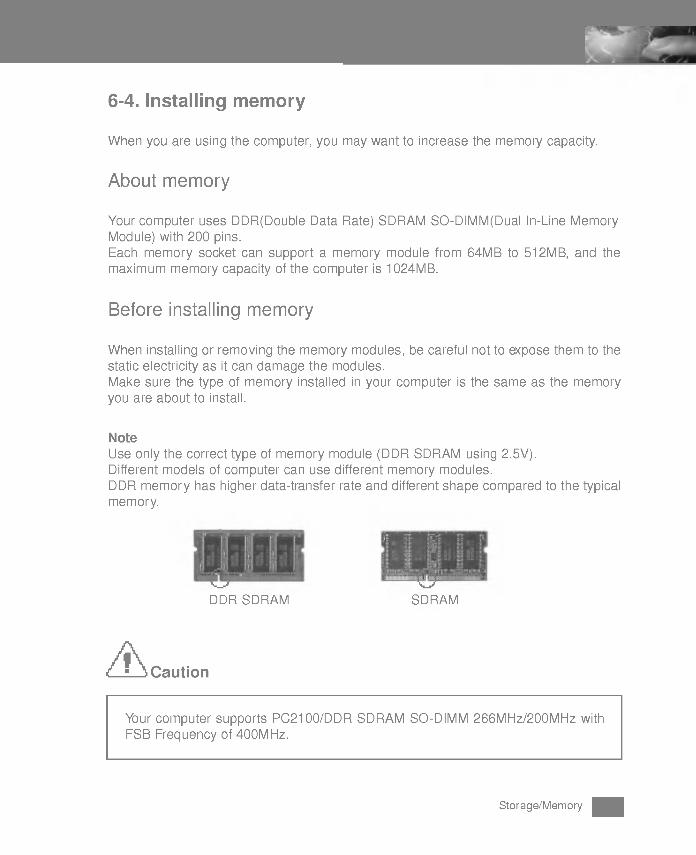
Note
Use only the correct type of memory module (DDR SDRAM using 2.5V).Different models of computer can use different memory modules.
DDR memor y has higher data-transfer rate and different shape compared to the typicalmemor y.
Caution
Your computer supports PC2100/DDR SDRAM SO-DIMM 266MHz/200MHz with
FSB Frequency of 400MHz.
67Storage/Memory
DDR SDRAM SDRAM
Purchasing memory
Be sure to buy the correct type of memory modules for your computer.
Type: PC2100 (200 pin DDR SDRAM SO-DIMM)Speed: 266MHz (133MHz X2), 200MHz (100MHz X2)Size: 128MB, 256MB, 512MB
Installing memory
Main board configuration, memory socket, and memory module may look different in dif-
ferent models of computer.
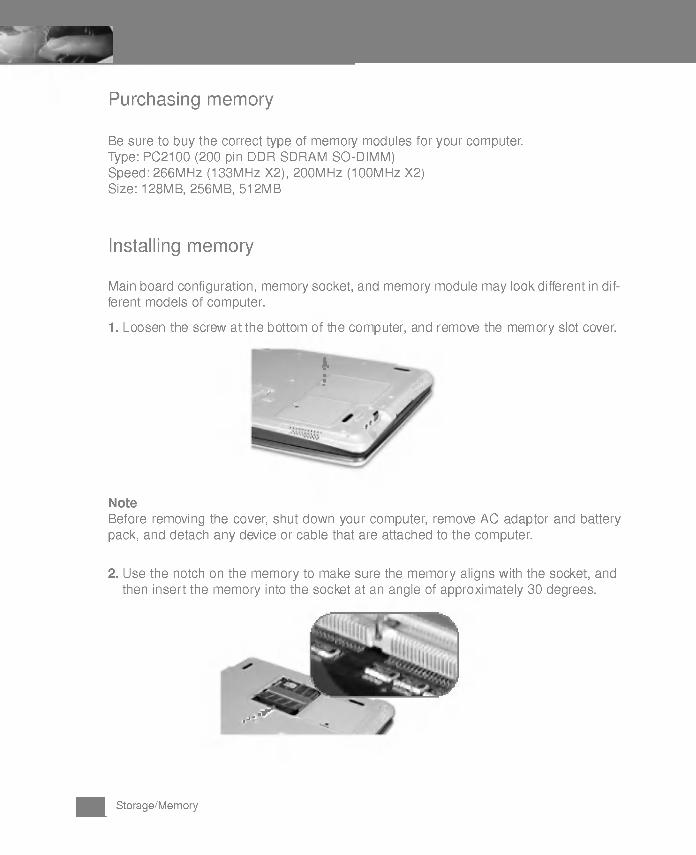
1. Loosen the screw at the bottom of the computer, and remove the memory slot cover.
Note
Before removing the cover, shut down your computer, remove AC adaptor and battery
pack, and detach any device or cable that are attached to the computer.
2. Use the notch on the memory to make sure the memory aligns with the socket, and
then inser t the memory into the socket at an angle of appro ximately 30 degrees.
68 Storage/Memory

3. Push down the memory until you hear a click
Attention
Use only the memory module sold by LG. Using other memory modules can dam-
age your computer.
4. Close the cover and tighten the screw.
5. After the installation, reboot the computer. If you see an error message regarding
memory capacity, click F2 to enter the BIOS Setup Utility and save the settings.
Note
When rebooting the computer, make sure the size of installed memory is correct.
If different, re-install the memory module.
69Storage/Memory
Note : Push down the memory until the latch firmly secures the memory on the socket.

70

71Features/Specification
MemoryBuilt-in: 256MB DDR SDRAM SO-DIMM
Maximum: 512MB on each slot and 1024MB combined
Memory Type: DDR SDRAM SO-DIMM (128MB, 256MB, and 512MB)
BIOS ROM
4MB of ROM
Features
Storage devices
2.5-inch hard disk drive (The capacity of the hard disk drive is different depending on the
model type.)PC Card slot
1.44MB 3.8-inch floppy diskette drive(NZ2 model does not have a floppy diskette drive)
Optical dr ive (CD-ROM or CD-RW/DVD combo drive)
Note : The specification for the optical drive depends on the model type)
Processor
NZ2:
Intel Mobile Pentium4 Processor-M
(L2 cache: 512KB, Micro-FCPGA package: 1.8GHz, 1.9GHz, 2.0GHz, 2.2GHz)Intel Mobile Celeron Processor
(L2 cache: 256KB, Micro-FCPGA package: 1.8GHz)
NZ4:
Intel Pentium4 Processor
(L2 cache: 512KB, Micro-FC-PGA2 package: 2.4GHz)
Note
The CPU cannot be replac ed or upgraded by the user. The computer is equippedwith a different CPU depending on the model type.
GraphicsATI Mobility Radeon M6-C Graphics Controller
4X AGP
16MB of Video memory
Sound
Analog Devices AC'97 SoundMax CODEC (AD1886A)Stereo speakers
External I/O Interfaces
NZ2:
External monitor connector
25-pin parallel connector
PC Card slot
Microphone jack
Speaker/Headphone jackAudio Line-in jackIrDA port3 Universal Serial Bus (USB) connectors
RJ11 telephone connector
RJ45 Ether net connector
IEEE 1395 connector
S-Video connector
NZ4:
External monitor connector
25-pin parallel connector
2 PC Card slots
Microphone jack
Speaker/Headphone jackAudio Line-in jackIrDA port3 Universal Serial Bus (USB) connectors
RJ11 telephone connector
RJ45 Ether net connector
IEEE 1395 connector
S-Video connector
72 Features/Specification

73Features/Specification
DisplayXGA (1024X768) TFT LCD
Note: The size of display is different depending on the model type.
LAN
Intel 82562 ET
RJ45 Ether net connector
Modem
Ambit JO7M040.05 (Mini PCI Card)RJ11 telephone connector

74 Features/Specification
Operating10 ~35 degrees C(50 ~95 degrees F), 20 ~80% relative humidity
Non-operating-10 ~60 degrees C(14 ~140 degrees F), 10 ~80% relative humidity
Operating environment
Power specification
AC Adaptor (Free Voltage)
NZ2:
Input: AC 100 ~240V, 1.6A, 50 ~60Hz
Output: DC 18.5V, 3.5A, 65W
NZ4:
Input: AC 100 ~240V, 1.5A, 50 ~60Hz
Output: DC 18.5V, 4.9A, 90W
Note: Use the correct adaptor for your computer.
Battery Pack(Li-Ion)DC 14.8V, 4400mAh (8-cell)
Charging time
Less than 3 hours with the power off in room temperature
(9.6~40 degrees C/ 49.28 ~104degrees F)
Less than 16 hours with the power off in low temperature
(0~9.6 degrees C/ 32 ~49.28 degrees F)
Note: The battery cannot be charged below 0 degrees C(32 degrees F).Note: The temperature indicated above is the temperature inside the battery pack;
therefore the actual temperature may be different.
Battery Life
NZ2 (Mobile CPU): More than 4hours (BatteryMark(TM) V4.0.1)NZ4 (Desktop CPU): More than 2hours (BatteryMark V4.0.1)