using illustrations and graphics
TRANSCRIPT
146
Using Illustrations and Graphics8
LESSON SKILL MATRIX
Skill Exam Objective Objective Number
Inserting and Formatting Pictures in a Document Insert pictures.
Format objects.
Apply a picture style.
Create a SmartArt graphic.
Apply picture effects.
Apply artistic effects.
Wrap text around objects.
Removing picture backgrounds.
Insert a screen shot or screen clipping
5.1.2
5.2.4
5.2.5
5.3.1
5.2.2
5.2.1
5.2.6
5.2.3
5.1.3
Inserting and Formatting Shapes, WordArt,
and SmartArt
Insert shapes.
Create a SmartArt graphic.
Format a SmartArt graphic.
Modify SmartArt graphic content.
Position objects.
5.1.1
5.3.1
5.3.2
5.3.3
5.2.7
SOFTWARE ORIENTATION
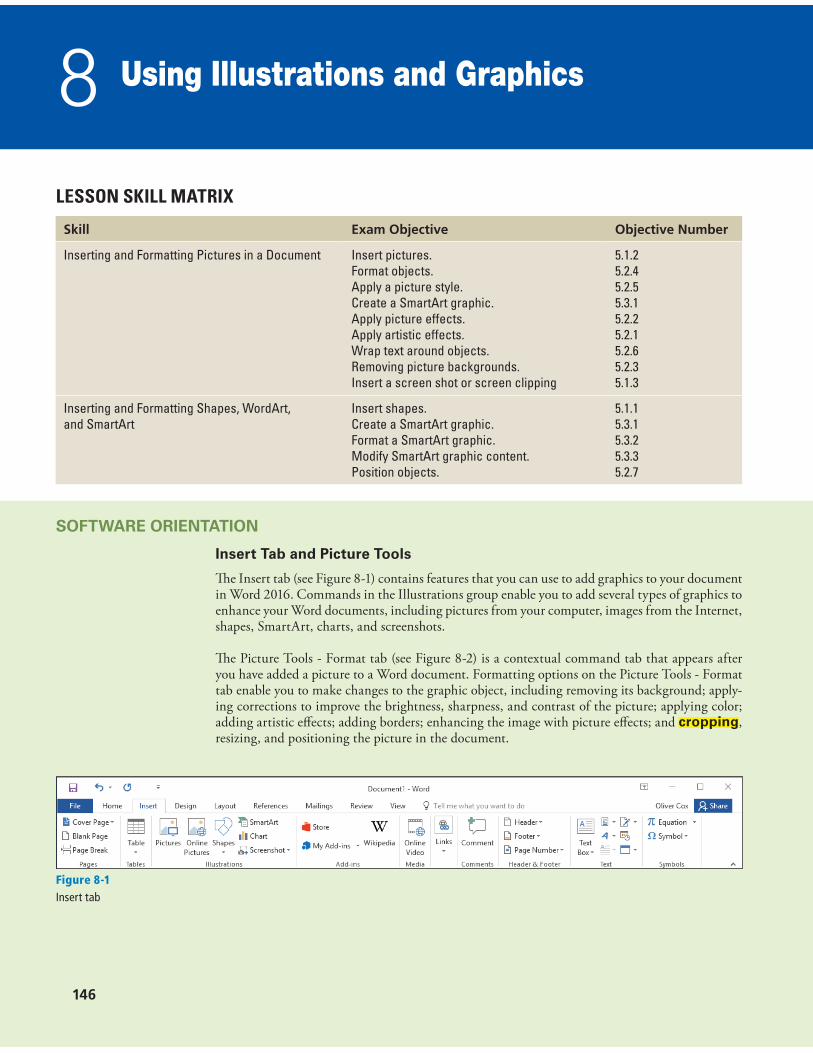
Insert Tab and Picture Tools
�e Insert tab (see Figure 8-1) contains features that you can use to add graphics to your document in Word 2016. Commands in the Illustrations group enable you to add several types of graphics to enhance your Word documents, including pictures from your computer, images from the Internet, shapes, SmartArt, charts, and screenshots.
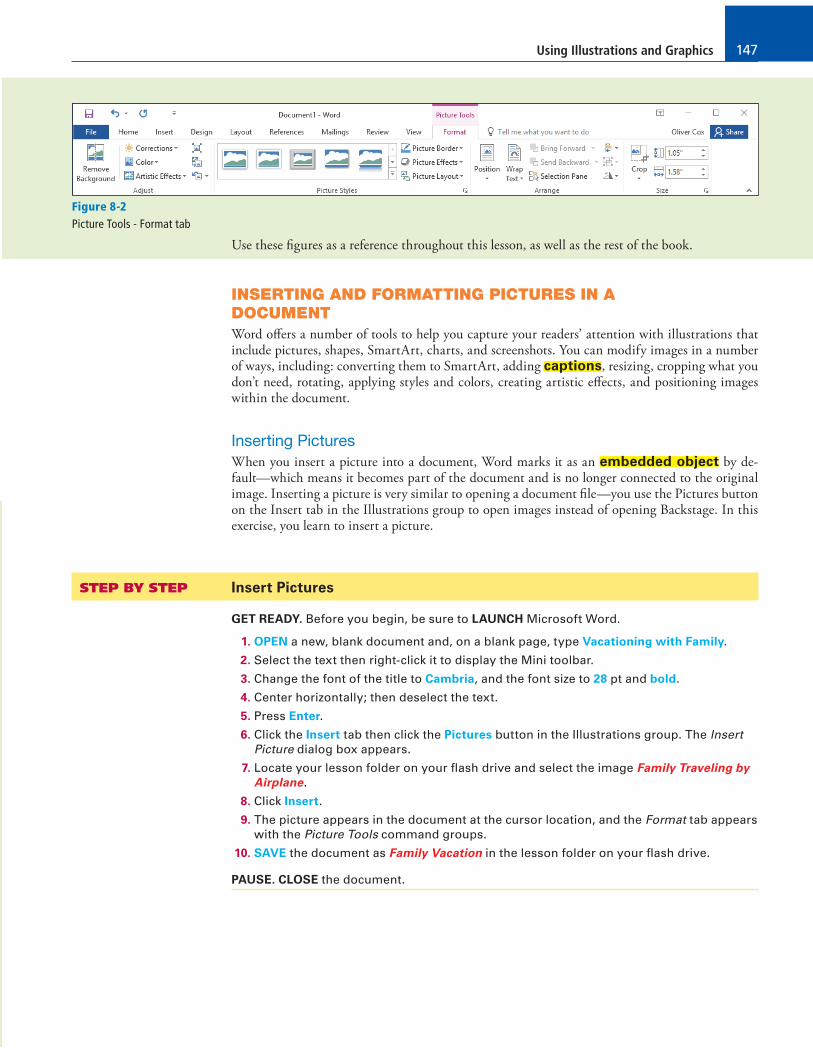
�e Picture Tools - Format tab (see Figure 8-2) is a contextual command tab that appears after you have added a picture to a Word document. Formatting options on the Picture Tools - Format tab enable you to make changes to the graphic object, including removing its background; apply-ing corrections to improve the brightness, sharpness, and contrast of the picture; applying color; adding artistic e�ects; adding borders; enhancing the image with picture e�ects; and cropping, resizing, and positioning the picture in the document.
Figure 8-1
Insert tab
Using Illustrations and Graphics 147
Figure 8-2
Picture Tools - Format tab
Use these !gures as a reference throughout this lesson, as well as the rest of the book.
INSERTING AND FORMATTING PICTURES IN A
DOCUMENT
Word o�ers a number of tools to help you capture your readers’ attention with illustrations that include pictures, shapes, SmartArt, charts, and screenshots. You can modify images in a number of ways, including: converting them to SmartArt, adding captions, resizing, cropping what you don’t need, rotating, applying styles and colors, creating artistic e�ects, and positioning images within the document.
Inserting Pictures
When you insert a picture into a document, Word marks it as an embedded object by de-fault—which means it becomes part of the document and is no longer connected to the original image. Inserting a picture is very similar to opening a document !le—you use the Pictures button on the Insert tab in the Illustrations group to open images instead of opening Backstage. In this exercise, you learn to insert a picture.
STEP BY STEP Insert Pictures
GET READY. Before you begin, be sure to LAUNCH Microsoft Word.
1. OPEN a new, blank document and, on a blank page, type Vacationing with Family.
2. Select the text then right-click it to display the Mini toolbar.
3. Change the font of the title to Cambria, and the font size to 28 pt and bold.
4. Center horizontally; then deselect the text.
5. Press Enter.
6. Click the Insert tab then click the Pictures button in the Illustrations group. The Insert
Picture dialog box appears.
7. Locate your lesson folder on your !ash drive and select the image Family Traveling by
Airplane.
8. Click Insert.
9. The picture appears in the document at the cursor location, and the Format tab appears
with the Picture Tools command groups.
10. SAVE the document as Family Vacation in the lesson folder on your !ash drive.
PAUSE. CLOSE the document.
Lesson 8148
Take Note Another option is to insert a picture as a linked object, which creates a connection between the document and the external picture !le, but doesn’t incorporate the image into the Word !le. Using linked objects can help minimize the !le size of your !nal document, while still including pictures, photographs, and other objects that can eat up storage space. However, if the picture !les are not available when you open the Word document, the images do not appear. �is option is not recommended when creating a document that will be shared with other users, because they may be unable to access the pictures.
Inserting Screenshots
In addition to inserting images from existing picture !les, Word also enables you to capture images of all or part of the current screen display and insert them directly into your documents. When you click the Screenshot button in the Illustrations group on the Insert tab, a menu appears containing thumbnails of the computer’s currently open windows. Selecting a thumbnail inserts an image of that window, or you can select Screen Clipping, which enables you to draw a box and capture an image of its contents.
STEP BY STEP Insert Screenshots
GET READY. OPEN a new, blank document.
1. On a blank page, type Hiker.
2. Select the text then right-click it to display the Mini toolbar.
3. Change the font of the title to Cambria, and the font size to 28 pt and bold.
4. Center horizontally; then deselect the text.
5. Press Enter.
6. Locate your lesson folder on your !ash drive and double-click the Tourist Hiker "le. A
Photos window appears, displaying the image in the "le.
7. Switch to the Word window, click the Insert tab, then click the Screenshot button in the
Illustrations group. The Screenshot menu appears.
8. On the Screenshot menu, select Screen Clipping. The Photos window appears, with a
gray cast over the entire screen. The pointer changes to a cross.
9. Use the point to draw a rectangle around the photograph in the Photos window. When
you release the mouse button, the selected photo is pasted into the Word document.
10. SAVE the document as Hiker in the lesson folder on your !ash drive and CLOSE the
document
PAUSE. LEAVE Word open for use in the next exercise.
Formatting Pictures
�e Picture Tools - Format tab appears whenever you insert a picture into a document or select an existing picture within the document. �is tab provides many options, such as cropping, resizing, scaling, and rotating the selected image. When you crop a picture, you trim the horizontal or vertical edges to remove unwanted areas. Scale increases or decreases the original picture’s height and width by a percentage. In this exercise, you will crop, resize, scale, and rotate a picture within a document.
Using Illustrations and Graphics 149
STEP BY STEP Crop, Resize, Scale, and Rotate a Picture
GET READY. OPEN the Family Vacation document that you created and saved in the Insert
Pictures exercise earlier in this lesson.
1. Select the picture if necessary and, on the Picture Tools - Format tab, in the Size group,
adjust the height by using the arrow keys. Change it to 4.9”.
2. As you increased the height, by default the Lock aspect ratio option is selected, so the
width of the image also changes to accommodate the new dimensions.
3. In the Size group, click the dialog box launcher to display the Layout dialog box. In the
Layout dialog box, you can resize a picture by changing the exact measurements of the
height and width or rescale it by changing the height and width percentages.
4. Type 3.5” in the Height Absolute text box and click OK. The height and width of the
picture are altered.
5. Open the Layout dialog box again. In the Scale section, make sure that both the Lock
aspect ratio and Relative to original picture size checkboxes are selected. When the
Lock aspect ratio box is selected, you will be able to scale the picture by height and
width using the same percentage. When the Relative to original picture size box is
selected, the Scale Height and Width are expressed as percentages of the original size.
The original size of the picture appears in the Original size section.
6. Under the Scale section, for the Height type 25% then press the Tab key. The Scale
Width of the active picture automatically changes to 25% because Lock aspect ratio is
selected. The Absolute Height and Absolute Width dimensions also change, but the
Original size remains the same.
7. Open the Layout dialog box again and change the Absolute Height value to 2.92”.
8. In the Rotate section, type 350 in the Rotation text box, so that the position of the
picture will rotate 350 degrees.
9. Press the Tab key to move to the next setting in the dialog box.
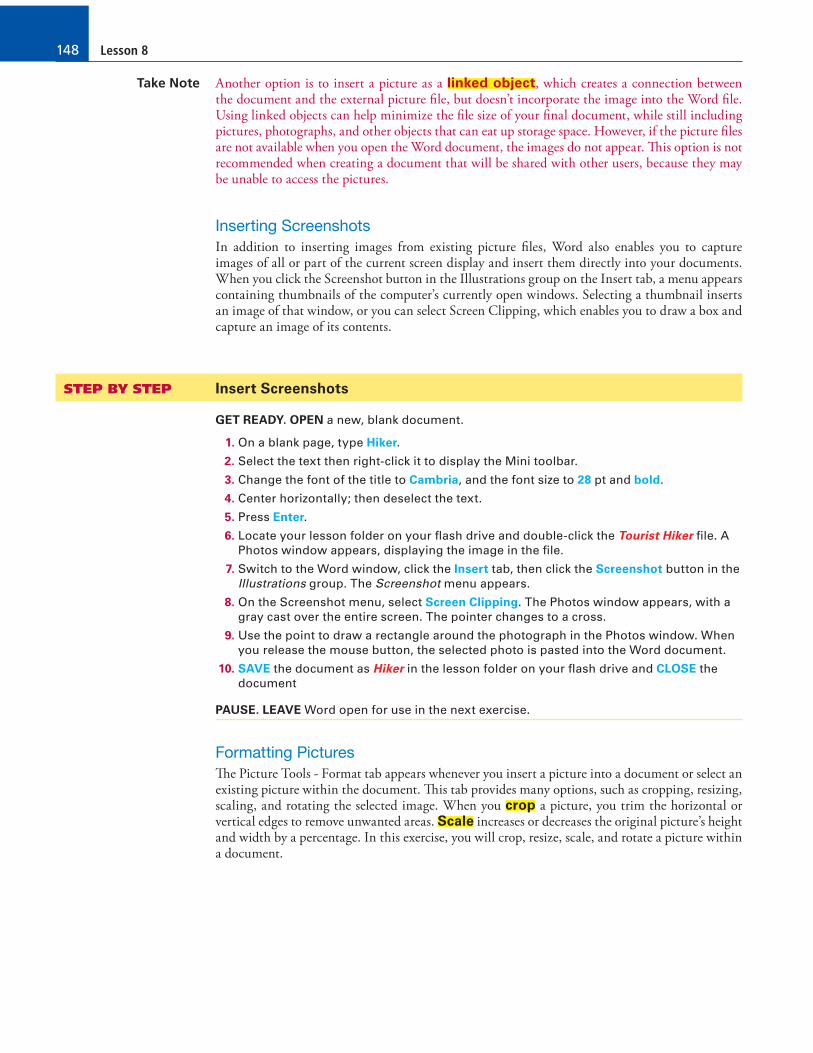
10. Click OK to apply your changes and close the dialog box. Deselect the picture. Your
image should resemble Figure 8-3.
©A
nd
resr
/iSto
ckp
hot
o
11. SAVE the document as Family Vacation 2 in the lesson folder on your !ash drive.
12. Select the picture. In the Size group, click the Crop button.
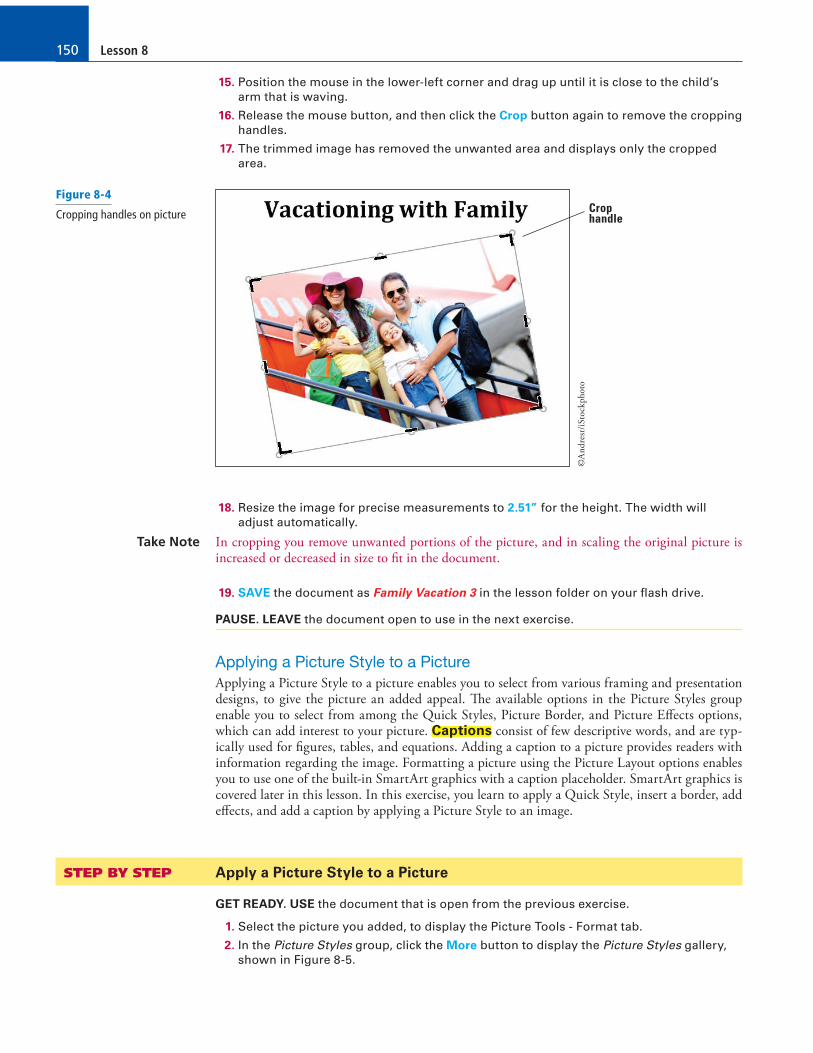
13. The insertion point becomes a cropping tool, and cropping handles appear on the
edges of the picture as shown in Figure 8-4.
14. Position the cropping tool over the top cropping handle. Then drag down until it is
slightly above the pink hat.
Figure 8-3
Document with image
Lesson 8150
15. Position the mouse in the lower-left corner and drag up until it is close to the child’s
arm that is waving.
16. Release the mouse button, and then click the Crop button again to remove the cropping
handles.
17. The trimmed image has removed the unwanted area and displays only the cropped
area.
©A
nd
resr
/iSto
ckp
hot
o
Crop handle
18. Resize the image for precise measurements to 2.51” for the height. The width will
adjust automatically.
Take Note In cropping you remove unwanted portions of the picture, and in scaling the original picture is increased or decreased in size to !t in the document.
19. SAVE the document as Family Vacation 3 in the lesson folder on your !ash drive.
PAUSE. LEAVE the document open to use in the next exercise.
Applying a Picture Style to a Picture
Applying a Picture Style to a picture enables you to select from various framing and presentation designs, to give the picture an added appeal. �e available options in the Picture Styles group enable you to select from among the Quick Styles, Picture Border, and Picture E�ects options, which can add interest to your picture. Captions consist of few descriptive words, and are typ-ically used for !gures, tables, and equations. Adding a caption to a picture provides readers with information regarding the image. Formatting a picture using the Picture Layout options enables you to use one of the built-in SmartArt graphics with a caption placeholder. SmartArt graphics is covered later in this lesson. In this exercise, you learn to apply a Quick Style, insert a border, add e�ects, and add a caption by applying a Picture Style to an image.
STEP BY STEP Apply a Picture Style to a Picture
GET READY. USE the document that is open from the previous exercise.
1. Select the picture you added, to display the Picture Tools - Format tab.
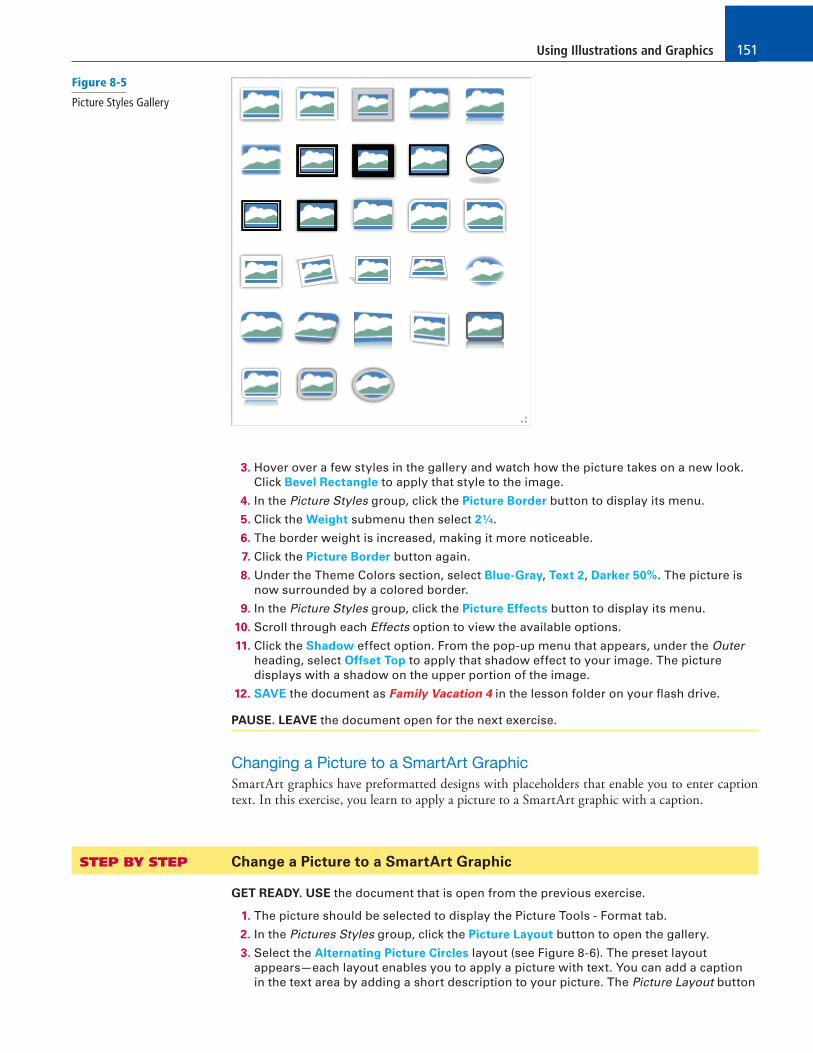
2. In the Picture Styles group, click the More button to display the Picture Styles gallery,
shown in Figure 8-5.
Figure 8-4
Cropping handles on picture
Using Illustrations and Graphics 151
3. Hover over a few styles in the gallery and watch how the picture takes on a new look.
Click Bevel Rectangle to apply that style to the image.
4. In the Picture Styles group, click the Picture Border button to display its menu.
5. Click the Weight submenu then select 2 ¼.
6. The border weight is increased, making it more noticeable.
7. Click the Picture Border button again.
8. Under the Theme Colors section, select Blue-Gray, Text 2, Darker 50%. The picture is
now surrounded by a colored border.
9. In the Picture Styles group, click the Picture Effects button to display its menu.
10. Scroll through each Effects option to view the available options.
11. Click the Shadow effect option. From the pop-up menu that appears, under the Outer
heading, select Offset Top to apply that shadow effect to your image. The picture
displays with a shadow on the upper portion of the image.
12. SAVE the document as Family Vacation 4 in the lesson folder on your !ash drive.
PAUSE. LEAVE the document open for the next exercise.
Changing a Picture to a SmartArt Graphic
SmartArt graphics have preformatted designs with placeholders that enable you to enter caption text. In this exercise, you learn to apply a picture to a SmartArt graphic with a caption.
STEP BY STEP Change a Picture to a SmartArt Graphic
GET READY. USE the document that is open from the previous exercise.
1. The picture should be selected to display the Picture Tools - Format tab.
2. In the Pictures Styles group, click the Picture Layout button to open the gallery.
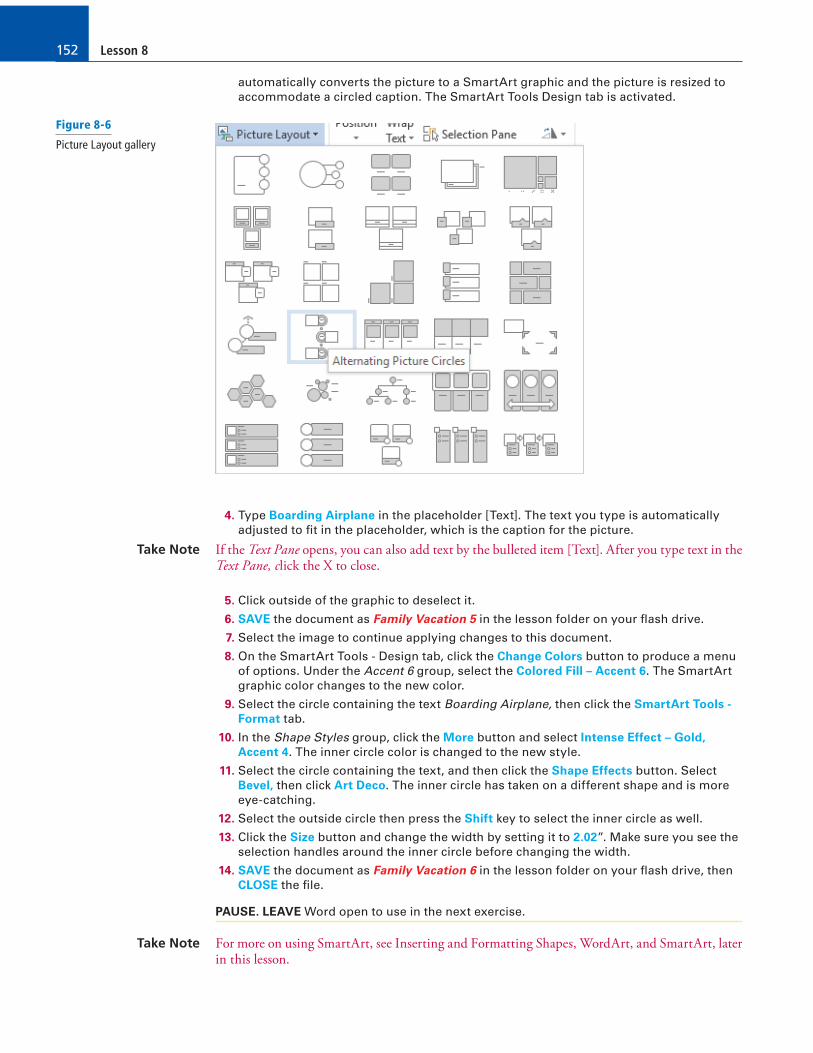
3. Select the Alternating Picture Circles layout (see Figure 8-6). The preset layout
appears—each layout enables you to apply a picture with text. You can add a caption
in the text area by adding a short description to your picture. The Picture Layout button
Figure 8-5
Picture Styles Gallery
Lesson 8152
automatically converts the picture to a SmartArt graphic and the picture is resized to
accommodate a circled caption. The SmartArt Tools Design tab is activated.
4. Type Boarding Airplane in the placeholder [Text]. The text you type is automatically
adjusted to "t in the placeholder, which is the caption for the picture.
Take Note If the Text Pane opens, you can also add text by the bulleted item [Text]. After you type text in the Text Pane, click the X to close.
5. Click outside of the graphic to deselect it.
6. SAVE the document as Family Vacation 5 in the lesson folder on your !ash drive.
7. Select the image to continue applying changes to this document.
8. On the SmartArt Tools - Design tab, click the Change Colors button to produce a menu
of options. Under the Accent 6 group, select the Colored Fill – Accent 6. The SmartArt
graphic color changes to the new color.
9. Select the circle containing the text Boarding Airplane, then click the SmartArt Tools -
Format tab.
10. In the Shape Styles group, click the More button and select Intense Effect – Gold,
Accent 4. The inner circle color is changed to the new style.
11. Select the circle containing the text, and then click the Shape Effects button. Select
Bevel, then click Art Deco. The inner circle has taken on a different shape and is more
eye-catching.
12. Select the outside circle then press the Shift key to select the inner circle as well.
13. Click the Size button and change the width by setting it to 2.02”. Make sure you see the
selection handles around the inner circle before changing the width.
14. SAVE the document as Family Vacation 6 in the lesson folder on your !ash drive, then
CLOSE the "le.
PAUSE. LEAVE Word open to use in the next exercise.
Take Note For more on using SmartArt, see Inserting and Formatting Shapes, WordArt, and SmartArt, later in this lesson.
Figure 8-6
Picture Layout gallery
Using Illustrations and Graphics 153
Adjusting a Picture’s Brightness, Contrast, and Color “and Adding Artistic Effects
Although Word 2016 does not have all the advanced features of a stand-alone photo-editing pro-gram, it does o�er many ways for you to adjust pictures using the Picture tools - Format tab—in-cluding correcting a picture’s brightness, contrast, and color, and adding an artistic e�ect. �e Artistic E!ects feature can give the picture the appearance of a drawing, sketch, or painting. In this exercise, you will adjust the picture’s brightness, contrast, and color, and apply an artistic e�ect.
STEP BY STEP Adjust a Picture’s Brightness, Contrast, and Color and Add Artistic Effects
GET READY. OPEN the Family Vacation document that you created and saved in the Insert
Pictures exercise earlier in this lesson.
1. Select the picture to display the Picture Tools - Format tab.
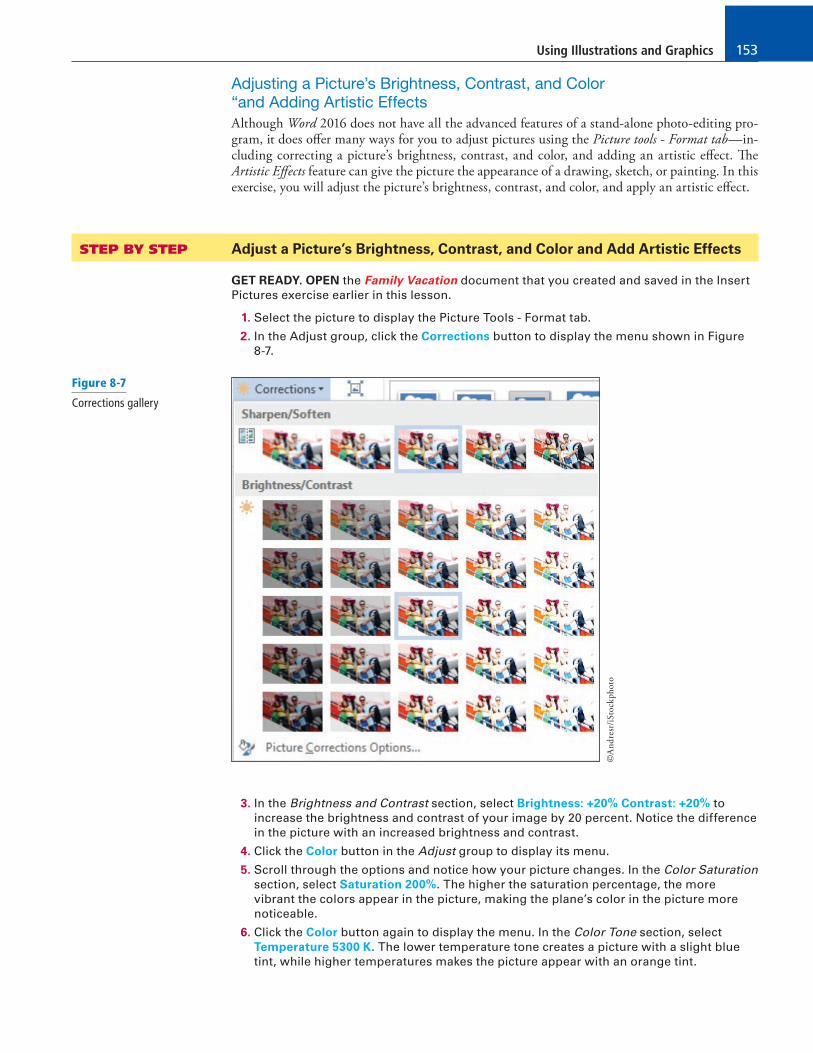
2. In the Adjust group, click the Corrections button to display the menu shown in Figure
8-7.
©A
nd
resr
/iSto
ckp
hot
o
3. In the Brightness and Contrast section, select Brightness: +20% Contrast: +20% to
increase the brightness and contrast of your image by 20 percent. Notice the difference
in the picture with an increased brightness and contrast.
4. Click the Color button in the Adjust group to display its menu.
5. Scroll through the options and notice how your picture changes. In the Color Saturation
section, select Saturation 200%. The higher the saturation percentage, the more
vibrant the colors appear in the picture, making the plane’s color in the picture more
noticeable.
6. Click the Color button again to display the menu. In the Color Tone section, select
Temperature 5300 K. The lower temperature tone creates a picture with a slight blue
tint, while higher temperatures makes the picture appear with an orange tint.
Figure 8-7
Corrections gallery
Lesson 8154
7. Click the Color button again to display the menu. Under Recolor, No Recolor is selected
by default. Hover over the Recolor options and you can see the changes in live preview.
Keep the selection on No Color.
8. SAVE the document as Family Vacation 7 in the lesson folder on your !ash drive.
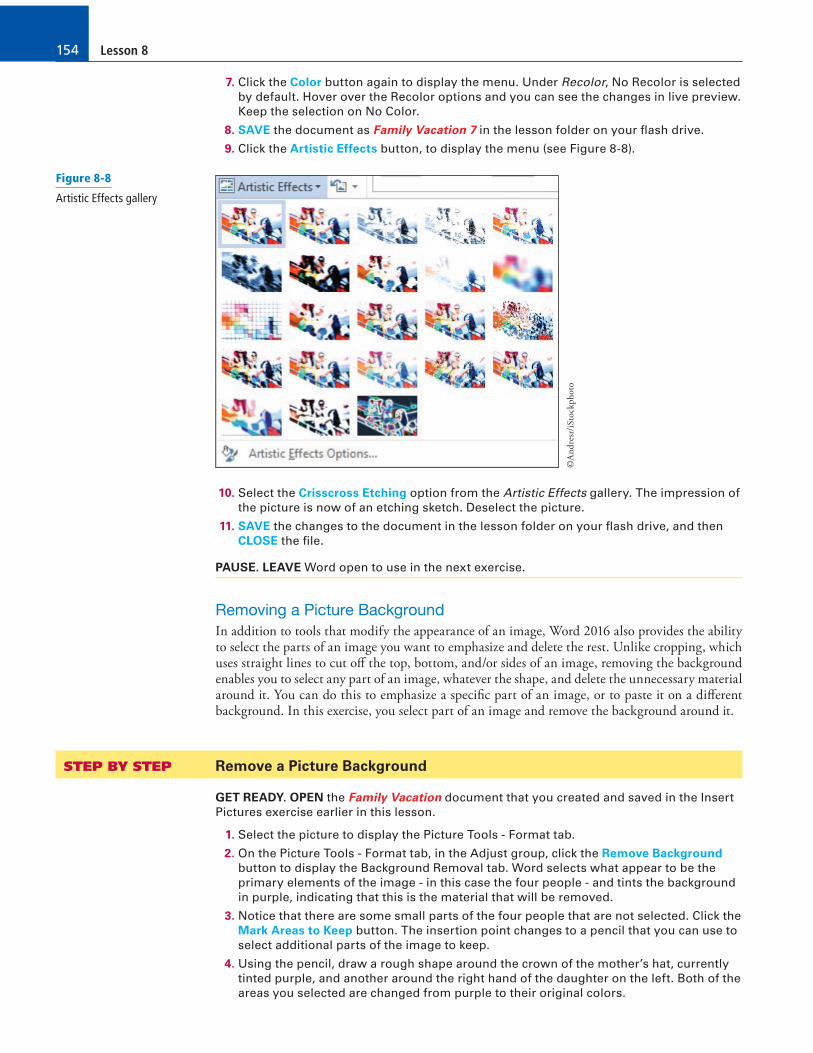
9. Click the Artistic Effects button, to display the menu (see Figure 8-8).
©A
nd
resr
/iSto
ckp
hot
o
10. Select the Crisscross Etching option from the Artistic Effects gallery. The impression of
the picture is now of an etching sketch. Deselect the picture.
11. SAVE the changes to the document in the lesson folder on your !ash drive, and then
CLOSE the "le.
PAUSE. LEAVE Word open to use in the next exercise.
Removing a Picture Background
In addition to tools that modify the appearance of an image, Word 2016 also provides the ability to select the parts of an image you want to emphasize and delete the rest. Unlike cropping, which uses straight lines to cut o� the top, bottom, and/or sides of an image, removing the background enables you to select any part of an image, whatever the shape, and delete the unnecessary material around it. You can do this to emphasize a speci!c part of an image, or to paste it on a di�erent background. In this exercise, you select part of an image and remove the background around it.
STEP BY STEP Remove a Picture Background
GET READY. OPEN the Family Vacation document that you created and saved in the Insert
Pictures exercise earlier in this lesson.
1. Select the picture to display the Picture Tools - Format tab.
2. On the Picture Tools - Format tab, in the Adjust group, click the Remove Background
button to display the Background Removal tab. Word selects what appear to be the
primary elements of the image - in this case the four people - and tints the background
in purple, indicating that this is the material that will be removed.
3. Notice that there are some small parts of the four people that are not selected. Click the
Mark Areas to Keep button. The insertion point changes to a pencil that you can use to
select additional parts of the image to keep.
4. Using the pencil, draw a rough shape around the crown of the mother’s hat, currently
tinted purple, and another around the right hand of the daughter on the left. Both of the
areas you selected are changed from purple to their original colors.
Figure 8-8
Artistic Effects gallery
Using Illustrations and Graphics 155
5. Click the Keep Changes button. The "gures of the four people remain, including the
mother’s hat and the daughter’s hand, but the background disappears.
6. SAVE the document as Family Vacation Foreground in the lesson folder on your !ash
drive, and CLOSE the document.
PAUSE. LEAVE Word open to use in the next exercise.
Arranging Text around a Picture
Arranging pictures and text together on the page is simple using Word’s Positioning and Text Wrap commands. �e Positioning command automatically positions the object in the location you select on the page. �e Wrap Text command determines the way text wraps around the pic-ture or other objects on the page, depending on the option you select. To con!gure the picture as an inline object that moves along with the text that surrounds it, select the In Line with Text option. If you choose to format the picture as a #oating object, Word positions the image precisely on the page, and allows the text to wrap around it in one of several available formats. In this exer-cise, you learn to position text around a picture, as you learned in Lesson 3.
STEP BY STEP Arrange Text around a Picture
GET READY. OPEN the Family Vacation 4 document that you completed earlier in the lesson.
1. If necessary, enable Show/Hide on the Home tab.
2. Place the insertion point before the paragraph mark that immediately follows the
picture and press Enter.
3. Type the following text:
If you are looking for adventure with lots of activities that you can do as a family, then call Margie’s Travel Agency. They will book all tours and outside activities, such as bike riding, rafting, or zipping. They planned our last vacation, and we had a WONDERFUL time together as a family.
4. Press Enter twice, and type the following text:
Don’t wait! Call!
5. Select the text and change the font size to 16 pt. Deselect the text.
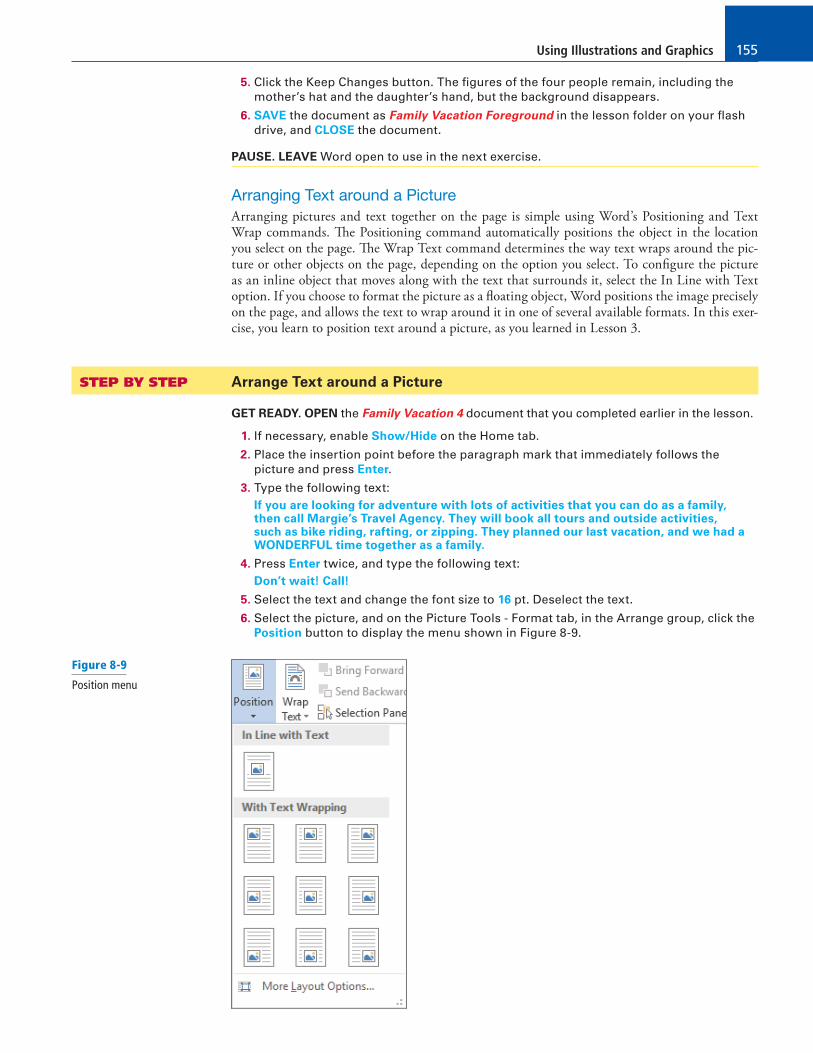
6. Select the picture, and on the Picture Tools - Format tab, in the Arrange group, click the
Position button to display the menu shown in Figure 8-9.
Figure 8-9
Position menu
Lesson 8156
7. Select Position in Top Right with Square Text Wrapping.
8. Delete the extra blank line below the heading.
9. Place your insertion point anywhere in the paragraph you keyed in step 3, and press
Ctrl+L to align text left.
10. Click the image and drag it until the title is centered to the left of the image and the text
is positioned at the left margin and wrapped around the picture at the top right.
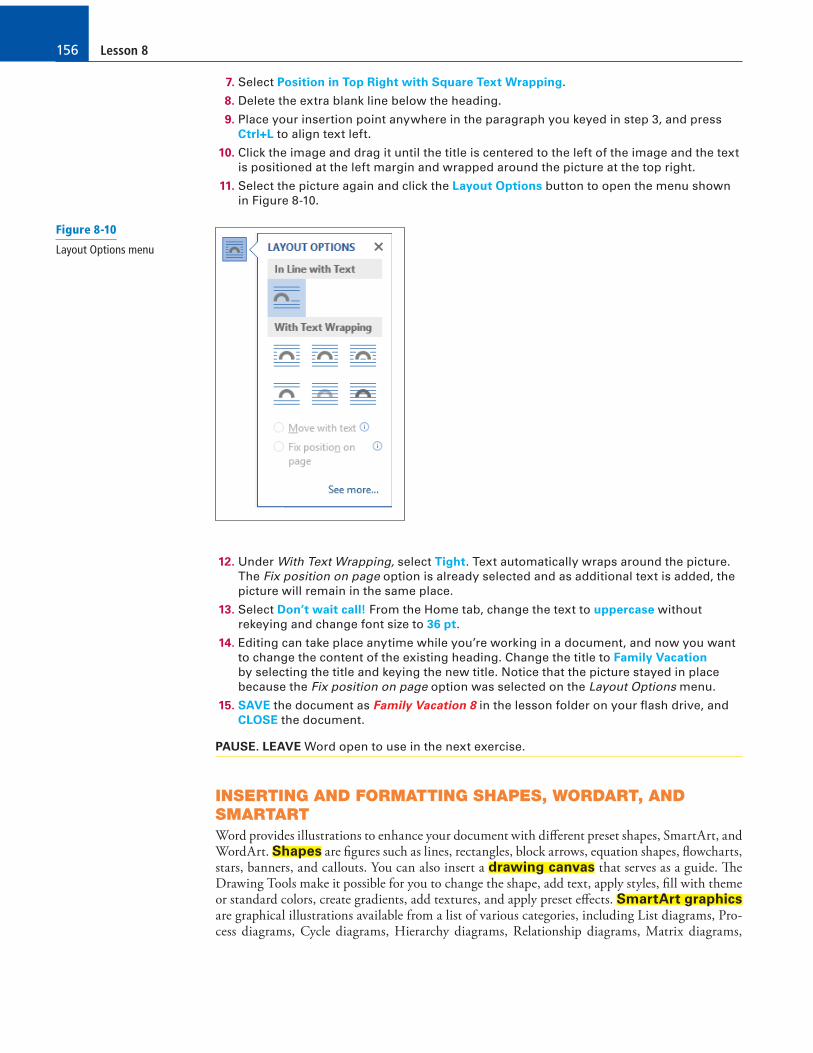
11. Select the picture again and click the Layout Options button to open the menu shown
in Figure 8-10.
12. Under With Text Wrapping, select Tight. Text automatically wraps around the picture.
The Fix position on page option is already selected and as additional text is added, the
picture will remain in the same place.
13. Select Don’t wait call! From the Home tab, change the text to uppercase without
rekeying and change font size to 36 pt.
14. Editing can take place anytime while you’re working in a document, and now you want
to change the content of the existing heading. Change the title to Family Vacation
by selecting the title and keying the new title. Notice that the picture stayed in place
because the Fix position on page option was selected on the Layout Options menu.
15. SAVE the document as Family Vacation 8 in the lesson folder on your !ash drive, and
CLOSE the document.
PAUSE. LEAVE Word open to use in the next exercise.
INSERTING AND FORMATTING SHAPES, WORDART, AND
SMARTART
Word provides illustrations to enhance your document with di�erent preset shapes, SmartArt, and WordArt. Shapes are !gures such as lines, rectangles, block arrows, equation shapes, #owcharts, stars, banners, and callouts. You can also insert a drawing canvas that serves as a guide. �e Drawing Tools make it possible for you to change the shape, add text, apply styles, !ll with theme or standard colors, create gradients, add textures, and apply preset e�ects. SmartArt graphics are graphical illustrations available from a list of various categories, including List diagrams, Pro-cess diagrams, Cycle diagrams, Hierarchy diagrams, Relationship diagrams, Matrix diagrams,
Figure 8-10
Layout Options menu
Using Illustrations and Graphics 157
and Pyramid diagrams. �e SmartArt Tools enable you to manipulate the SmartArt by adding shapes, bullets, and text; changing the layout and colors; and applying special e�ects using styles. WordArt is a feature that creates decorative e�ects with text. �e Drawing Tools enable you to format the WordArt by adding special e�ects to the text or outline, applying preset e�ects, and transforming the shape using one of the set styles.
SOFTWARE ORIENTATION
Shapes Menu and Drawing Tools
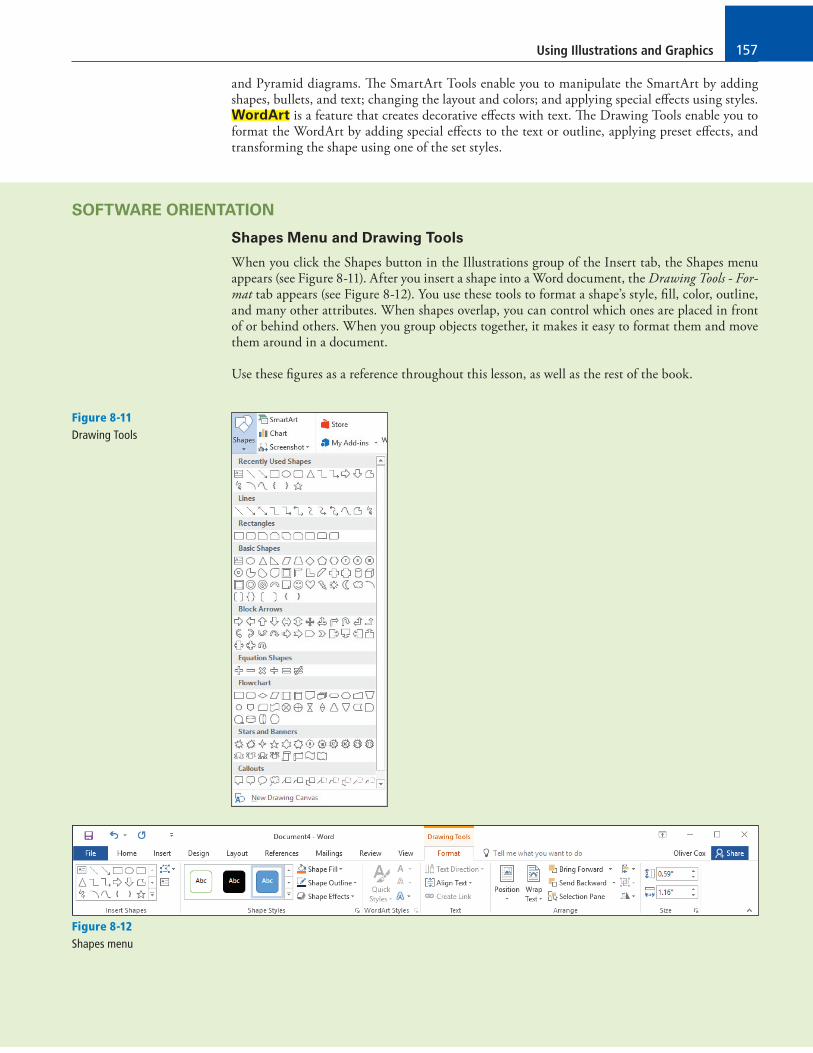
When you click the Shapes button in the Illustrations group of the Insert tab, the Shapes menu appears (see Figure 8-11). After you insert a shape into a Word document, the Drawing Tools - For-mat tab appears (see Figure 8-12). You use these tools to format a shape’s style, !ll, color, outline, and many other attributes. When shapes overlap, you can control which ones are placed in front of or behind others. When you group objects together, it makes it easy to format them and move them around in a document.
Use these !gures as a reference throughout this lesson, as well as the rest of the book.
Figure 8-12
Shapes menu
Figure 8-11
Drawing Tools
Lesson 8158
Inserting Shapes
Word provides pre-drawn shapes for you to choose from, such as lines, rectangles, arrows, equa-tion shapes, callouts, stars, banners, and more. Inserting a shape in a document opens the Draw-ing Tools - Format tab . You can use these tools to apply shape styles, add a shadow or 3-D e�ect to inserted shapes, arrange the shape on the page, and size it. In this exercise, you learn to insert a shape, add a style from the gallery, and add a 3-D e�ect to the shape.
STEP BY STEP Insert Shapes
GET READY. OPEN the Travel document from the data "les for this lesson.
1. On the View tab, change the view to 100%.
2. On the Insert tab, in the Illustrations group, click the Shapes button to display the
Shapes menu.
3. In the Block Arrows section, click the Curved Down Arrow shape. The insertion point
turns into a crosshair (+).
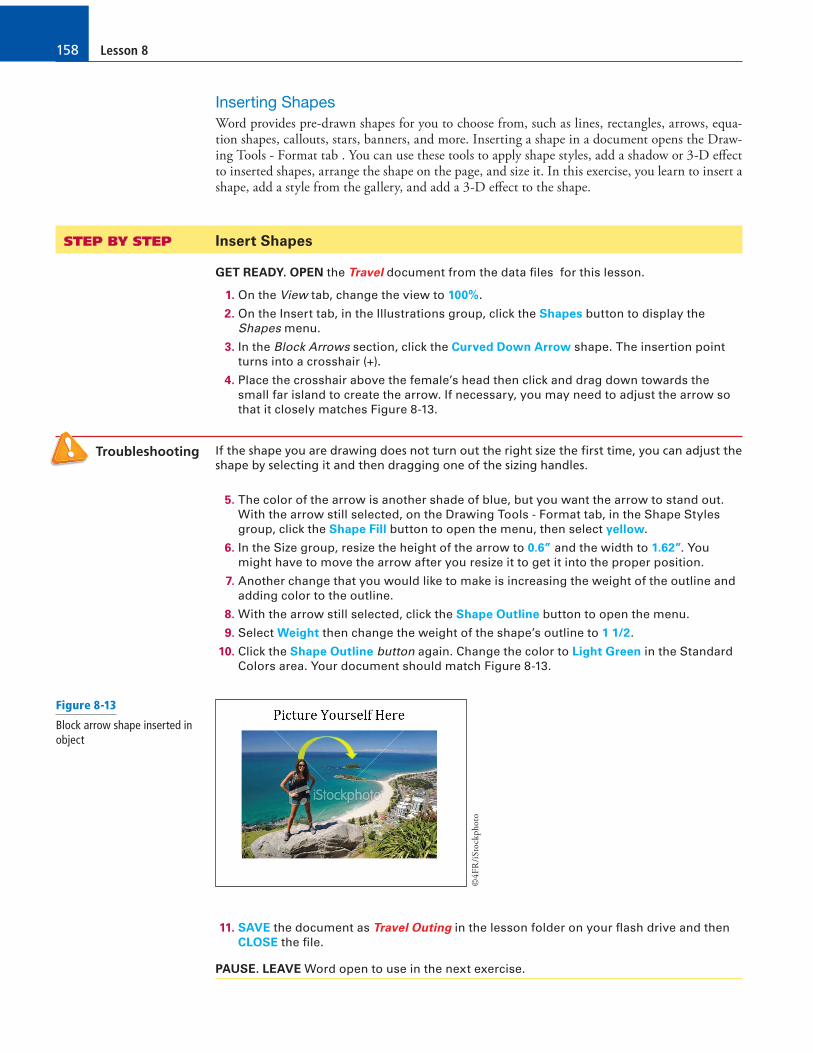
4. Place the crosshair above the female’s head then click and drag down towards the
small far island to create the arrow. If necessary, you may need to adjust the arrow so
that it closely matches Figure 8-13.
Troubleshooting If the shape you are drawing does not turn out the right size the !rst time, you can adjust the shape by selecting it and then dragging one of the sizing handles.
5. The color of the arrow is another shade of blue, but you want the arrow to stand out.
With the arrow still selected, on the Drawing Tools - Format tab, in the Shape Styles
group, click the Shape Fill button to open the menu, then select yellow.
6. In the Size group, resize the height of the arrow to 0.6” and the width to 1.62”. You
might have to move the arrow after you resize it to get it into the proper position.
7. Another change that you would like to make is increasing the weight of the outline and
adding color to the outline.
8. With the arrow still selected, click the Shape Outline button to open the menu.
9. Select Weight then change the weight of the shape’s outline to 1 1/2.
10. Click the Shape Outline button again. Change the color to Light Green in the Standard
Colors area. Your document should match Figure 8-13.
©4
FR
/iSto
ckp
hot
o
11. SAVE the document as Travel Outing in the lesson folder on your !ash drive and then
CLOSE the "le.
PAUSE. LEAVE Word open to use in the next exercise.
Figure 8-13
Block arrow shape inserted in object
Using Illustrations and Graphics 159
Formatting Shapes
�e Drawing Tools - Format tab includes a number of options for changing the appearance of shapes and positioning and wrapping text around shapes. In this exercise, you learn to use the shape styles, resize shapes, position shapes, and wrap text around shapes.
STEP BY STEP Format Shapes
GET READY. OPEN the Margie’s Excursions document from the data "les for this lesson.
1. Select the oval object.
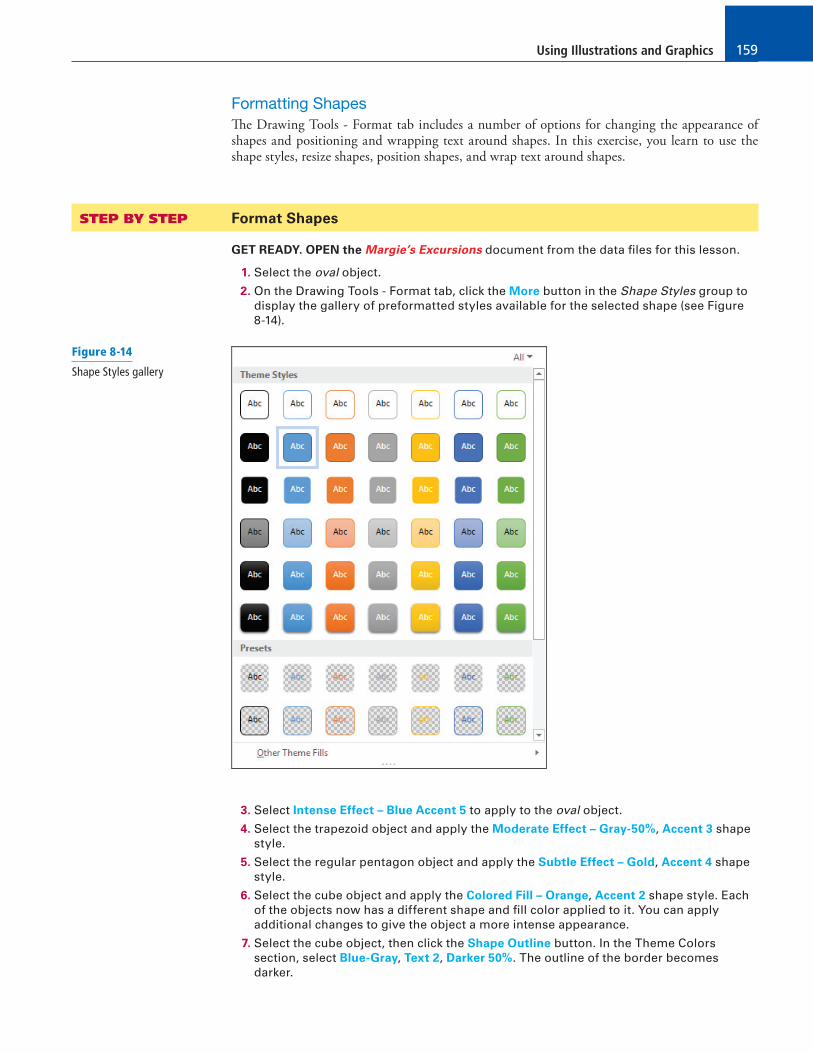
2. On the Drawing Tools - Format tab, click the More button in the Shape Styles group to
display the gallery of preformatted styles available for the selected shape (see Figure
8-14).
3. Select Intense Effect – Blue Accent 5 to apply to the oval object.
4. Select the trapezoid object and apply the Moderate Effect – Gray-50%, Accent 3 shape
style.
5. Select the regular pentagon object and apply the Subtle Effect – Gold, Accent 4 shape
style.
6. Select the cube object and apply the Colored Fill – Orange, Accent 2 shape style. Each
of the objects now has a different shape and "ll color applied to it. You can apply
additional changes to give the object a more intense appearance.
7. Select the cube object, then click the Shape Outline button. In the Theme Colors
section, select Blue-Gray, Text 2, Darker 50%. The outline of the border becomes
darker.
Figure 8-14
Shape Styles gallery
Lesson 8160
8. Click the Shape Outline button again, and change the Weight setting to 3 pt to change
the thickness of the box’s border.
9. Click the Shape Effects button and select Shadow. Then in the Outer group, select
the Offset Diagonal Top Right effect. In the top right of the object, you should see a
shadow background.
10. Click the Shape Effects button again. Then click 3-D Rotation and, in the Perspective
group, select Perspective Contrasting Left. The object is rotated to the left. You have
formatted each of the shapes with a different style (color), but only the cube got an
outline and effect.
11. SAVE the document as Margie’s Excursions 2 on your !ash drive in the lesson folder.
12. Select the rectangle containing the four shapes.
13. On the Drawing Tools - Format tab, in the Arrange group, click the Position button and
select Position in Middle Left with Square Text Wrapping. The caption moves above
the shapes.
14. For this step, OPEN the Family Vacation 8 document you completed earlier in the
lesson. Select the paragraph beginning with “If you are . . . as a family” and copy it to
the clipboard. Return to the previous document and place the insertion point above the
caption. Then click Paste. The shapes remain in their position with the text split above
and below them.
15. Select the rectangle containing the four shapes, select the Position button, and then
select Position in Bottom Right with Square Text Wrapping. The shapes are at the
bottom of the page while the text is at the top.
16. SAVE the document as Margie’s Excursions 3 on your !ash drive in the lesson folder.
17. CLOSE the Family Vacation 8 "le.
18. The Margie’s Excursions 3 "le should still be open. On the View tab, change the view to
100%. Delete all four shapes, the rectangle that contains them, and the caption above
it.
19. Position the insertion point at the beginning of the paragraph. Then, on the Insert tab,
in the Illustrations group, click the Shapes button and select the smiley face in the
Basic Shapes group.
20. With the smiley face shape selected, switch to the Drawing Tools - Format tab and, in
the Size group, set the height of the shape to 1.28” and width to 1.24”.
21. In the Shape Styles group, click the More button and select Light 1 Outline, Colored Fill
– Gold, Accent 4 to give the smiley face a new look.
22. In the Arrange group, click the Wrap Text button and select Tight. The text wraps
around the shape.
23. SAVE the document as Margie’s Excursions 4 on your !ash drive in the lesson folder
then CLOSE the "le.
PAUSE. LEAVE Word open to use in the next exercise.
Inserting WordArt
As you learned in Lesson 3, WordArt enhances text with more vibrant colors and shapes. In this exercise, you learn to insert WordArt in a document.
STEP BY STEP Insert WordArt
GET READY. OPEN the Margie’s Excursions 2 document completed earlier in the lesson.
1. Select the text Margie’s Travel Agency.
2. On the Insert tab click the Insert WordArt button to display the menu.
3. Select Fill – Gray-25%, Background 2, Inner Shadow. The lettering for the Margie’s
Travel Agency heading takes on a new appearance and style.
4. Remove the line break to move the paragraph mark by the heading.
Using Illustrations and Graphics 161
5. Select the WordArt, and on the Drawing Tools - Format tab, in the WordArt Styles
group, click the Text Effects button then select Transform. In the Warp group select
Wave 1. This changes the WordArt to a wavy text.
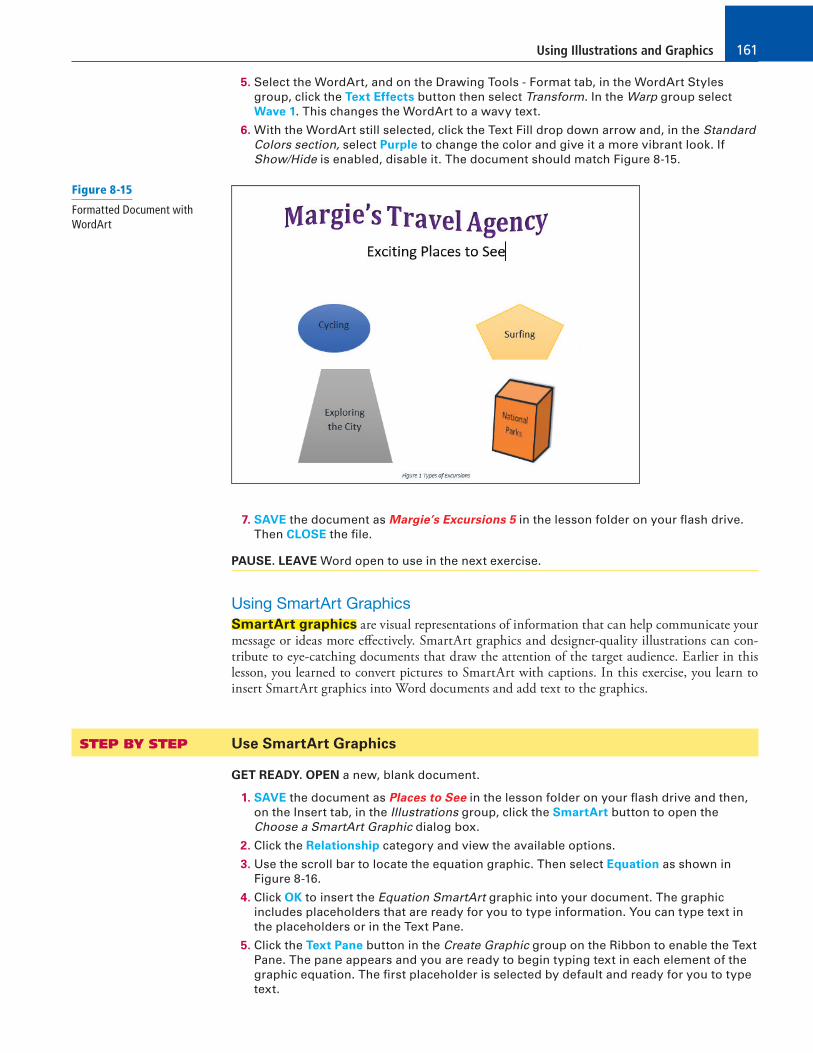
6. With the WordArt still selected, click the Text Fill drop down arrow and, in the Standard
Colors section, select Purple to change the color and give it a more vibrant look. If
Show/Hide is enabled, disable it. The document should match Figure 8-15.
7. SAVE the document as Margie’s Excursions 5 in the lesson folder on your !ash drive.
Then CLOSE the "le.
PAUSE. LEAVE Word open to use in the next exercise.
Using SmartArt Graphics
SmartArt graphics are visual representations of information that can help communicate your message or ideas more e�ectively. SmartArt graphics and designer-quality illustrations can con-tribute to eye-catching documents that draw the attention of the target audience. Earlier in this lesson, you learned to convert pictures to SmartArt with captions. In this exercise, you learn to insert SmartArt graphics into Word documents and add text to the graphics.
STEP BY STEP Use SmartArt Graphics
GET READY. OPEN a new, blank document.
1. SAVE the document as Places to See in the lesson folder on your !ash drive and then,
on the Insert tab, in the Illustrations group, click the SmartArt button to open the
Choose a SmartArt Graphic dialog box.
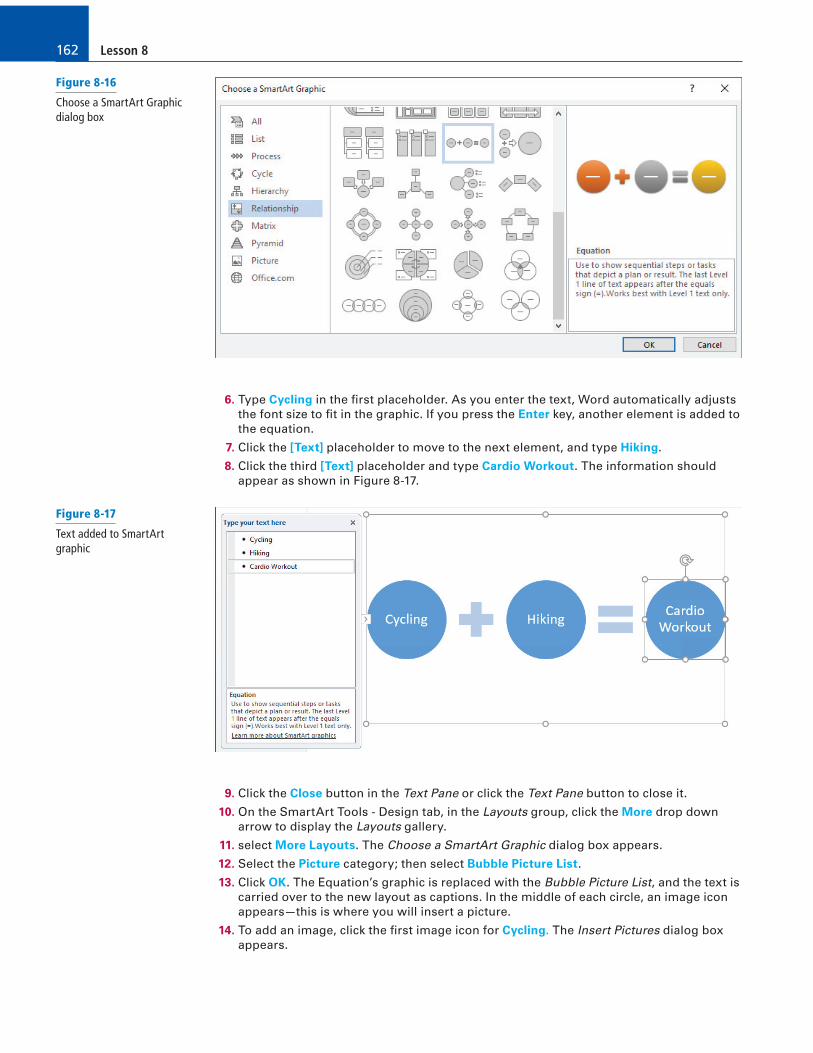
2. Click the Relationship category and view the available options.
3. Use the scroll bar to locate the equation graphic. Then select Equation as shown in
Figure 8-16.
4. Click OK to insert the Equation SmartArt graphic into your document. The graphic
includes placeholders that are ready for you to type information. You can type text in
the placeholders or in the Text Pane.
5. Click the Text Pane button in the Create Graphic group on the Ribbon to enable the Text
Pane. The pane appears and you are ready to begin typing text in each element of the
graphic equation. The "rst placeholder is selected by default and ready for you to type
text.
Figure 8-15
Formatted Document with WordArt
Lesson 8162
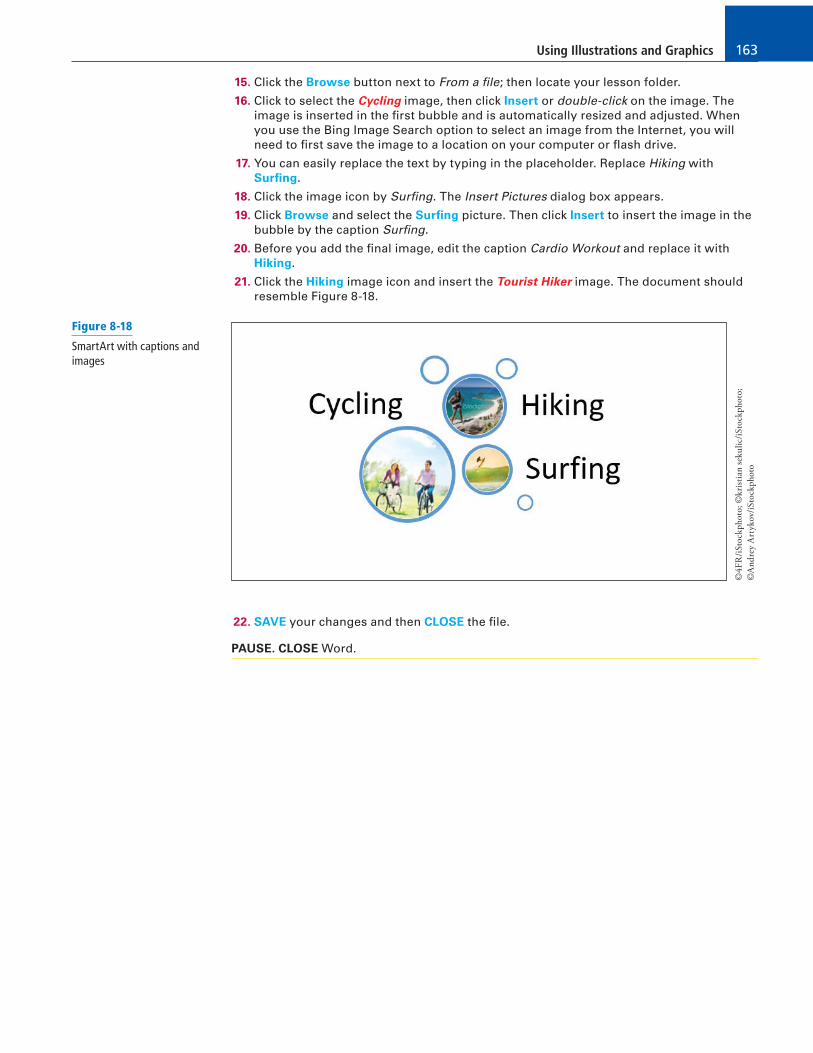
6. Type Cycling in the "rst placeholder. As you enter the text, Word automatically adjusts
the font size to "t in the graphic. If you press the Enter key, another element is added to
the equation.
7. Click the [Text] placeholder to move to the next element, and type Hiking.
8. Click the third [Text] placeholder and type Cardio Workout. The information should
appear as shown in Figure 8-17.
9. Click the Close button in the Text Pane or click the Text Pane button to close it.
10. On the SmartArt Tools - Design tab, in the Layouts group, click the More drop down
arrow to display the Layouts gallery.
11. select More Layouts. The Choose a SmartArt Graphic dialog box appears.
12. Select the Picture category; then select Bubble Picture List.
13. Click OK. The Equation’s graphic is replaced with the Bubble Picture List, and the text is
carried over to the new layout as captions. In the middle of each circle, an image icon
appears—this is where you will insert a picture.
14. To add an image, click the "rst image icon for Cycling. The Insert Pictures dialog box
appears.
Figure 8-16
Choose a SmartArt Graphic dialog box
Figure 8-17
Text added to SmartArt graphic
Using Illustrations and Graphics 163
15. Click the Browse button next to From a �le; then locate your lesson folder.
16. Click to select the Cycling image, then click Insert or double-click on the image. The
image is inserted in the !rst bubble and is automatically resized and adjusted. When
you use the Bing Image Search option to select an image from the Internet, you will
need to !rst save the image to a location on your computer or "ash drive.
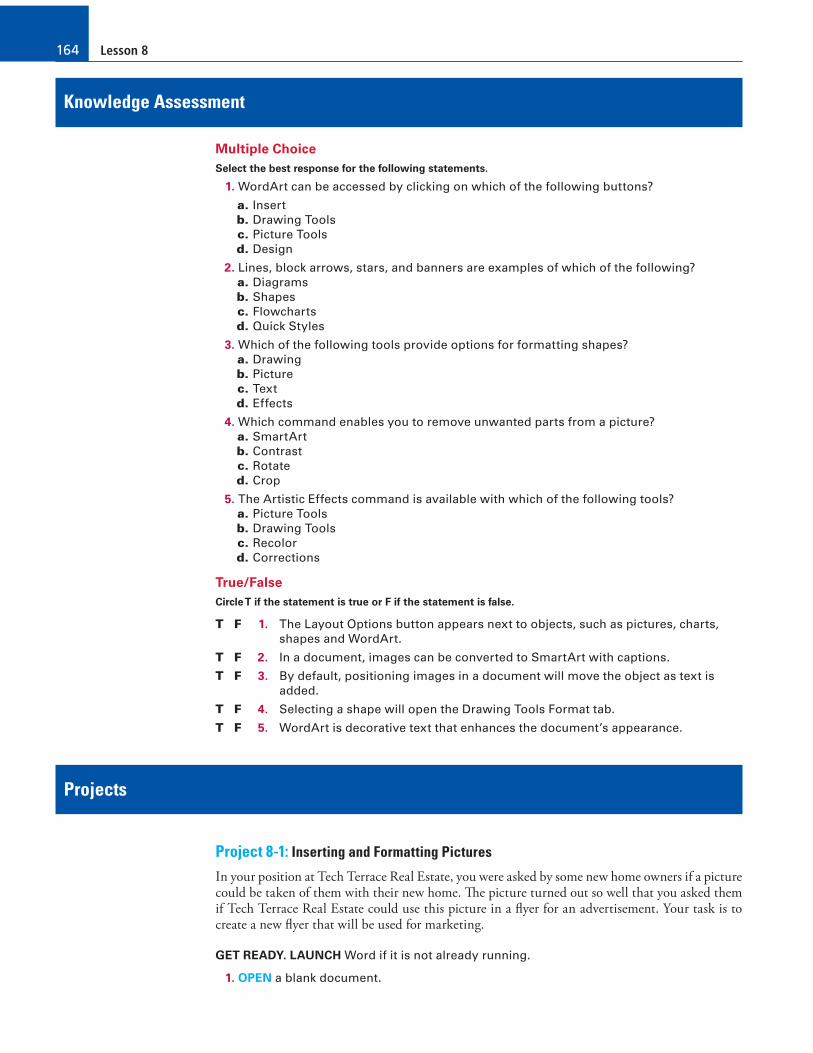
17. You can easily replace the text by typing in the placeholder. Replace Hiking with
Sur!ng.
18. Click the image icon by Sur�ng. The Insert Pictures dialog box appears.
19. Click Browse and select the Sur!ng picture. Then click Insert to insert the image in the
bubble by the caption Sur�ng.
20. Before you add the !nal image, edit the caption Cardio Workout and replace it with
Hiking.
21. Click the Hiking image icon and insert the Tourist Hiker image. The document should
resemble Figure 8-18.
©4
FR
/iSto
ckp
hot
o; ©
kri
stia
n s
eku
lic/
iSto
ckp
hot
o;
©A
nd
rey
Art
ykov
/iSto
ckp
hot
o
22. SAVE your changes and then CLOSE the !le.
PAUSE. CLOSE Word.
Figure 8-18
SmartArt with captions and images
Lesson 8164
Knowledge Assessment
Multiple Choice
Select the best response for the following statements.
1. WordArt can be accessed by clicking on which of the following buttons?
a. Insert
b. Drawing Tools
c. Picture Tools
d. Design
2. Lines, block arrows, stars, and banners are examples of which of the following?
a. Diagrams
b. Shapes
c. Flowcharts
d. Quick Styles
3. Which of the following tools provide options for formatting shapes?
a. Drawing
b. Picture
c. Text
d. Effects
4. Which command enables you to remove unwanted parts from a picture?
a. SmartArt
b. Contrast
c. Rotate
d. Crop
5. The Artistic Effects command is available with which of the following tools?
a. Picture Tools
b. Drawing Tools
c. Recolor
d. Corrections
True/False
Circle T if the statement is true or F if the statement is false.
T F 1. The Layout Options button appears next to objects, such as pictures, charts,
shapes and WordArt.
T F 2. In a document, images can be converted to SmartArt with captions.
T F 3. By default, positioning images in a document will move the object as text is
added.
T F 4. Selecting a shape will open the Drawing Tools Format tab.
T F 5. WordArt is decorative text that enhances the document’s appearance.
Projects
Project 8-1: Inserting and Formatting Pictures
In your position at Tech Terrace Real Estate, you were asked by some new home owners if a picture could be taken of them with their new home. !e picture turned out so well that you asked them if Tech Terrace Real Estate could use this picture in a "yer for an advertisement. Your task is to create a new "yer that will be used for marketing.
GET READY. LAUNCH Word if it is not already running.
1. OPEN a blank document.
Using Illustrations and Graphics 165
2. SAVE the document as 8-1 Marketing Flyer in the lesson folder on your "ash drive.
3. Type the following information and change the font size to 18 pt.
Look at who just purchased their new dream home. Tech Terrace Real Estate agents can assist you in !nding your next home or dream home. We’ll take care of all the necessary details for you and show you quality homes just like we did for our last
clients.
4. Press Enter twice.
5. On the Insert tab, in the Illustrations group, click the Pictures button.
6. Locate your lesson folder and insert the Realtor with Couple outside House image.
Then click Insert.
7. Resize the image height to 3.4”.
8. On the Picture Tools - Format tab, in the Picture Styles group, select Picture Layout,
then convert the picture to the SmartArt graphic Picture Accent Process.
9. In the placeholder, type We love our new home!
10. On the SmartArt Tools - Design tab. click the More button in the SmartArt Styles group
and select Metallic Scene from the 3-D group.
11. In the SmartArt Styles group, click the Change Colors button then select Colored Fill –
Accent 6 from the Accent 6 group.
12. Center the document vertically on the page.
13. SAVE the document in the lesson folder on your "ash drive then CLOSE the !le.
PAUSE. LEAVE Word open for the next project.
Project 8-2: Inserting and Formatting WordArt
You have returned from a two-week vacation with friends. You took a lot of pictures, and you want to surprise your friends with a copy of the pictures on a CD. Create an insert for the front of the CD case.
GET READY. LAUNCH Word if it is not already running.
1. OPEN a blank document.
2. SAVE the document as 8-2 CD Insert in your "ash drive in the lesson folder.
3. On the Layout tab, select the Size button. Change the paper size to 5” for both the
width and height. Click OK.
4. Change the Margins to Narrow.
5. On the Insert tab, in the Text group, click the Text Box button and draw a text box.
Draw a square box 4” × 4”, centered on the page, leaving approximately half an inch of
margin space on all sides.
6. With the box selected, on the Drawing Tools - Format tab, in the Arrange group, click
the Position button and select Position in Middle Center with Square Text Wrapping.
7. On the Insert tab, in the Illustrations group, click the Pictures button and locate your
lesson folder. Insert the Hiking the Columbia Gorge image and insert.
8. Use the selection handles and adjust the image size so that it !ts closely in the box.
9. Select the text box, and on the Drawing Tools - Format tab, in the Shape Styles group,
click the Shape Fill button and select the color, Green, Accent 6, Darker 50%.
10. Deselect the box and insert a WordArt, selecting Fill – Gray-50%, Accent 3, Sharp
Bevel. Type Vacation to Columbia.
11. Decrease the text size to 26 pt.
12. Center the WordArt below the image.
13. Apply a text !ll color and select Gray-25%, Background 2, Darker 90%.
14. Disable the Show/Hide command.
15. SAVE the document in the lesson folder on your "ash drive then CLOSE the !le.
CLOSE Word.