using .net and the ado.net managed provider with caché · using .net and the ado.net managed...
TRANSCRIPT

Using .NET and the ADO.NETManaged Provider with Caché
Version 2018.12020-03-13
InterSystems Corporation 1 Memorial Drive Cambridge MA 02142 www.intersystems.com

Using .NET and the ADO.NET Managed Provider with CachéCaché Version 2018.1 2020-03-13 Copyright © 2020 InterSystems CorporationAll rights reserved.
InterSystems, InterSystems IRIS, InterSystems Caché, InterSystems Ensemble, and InterSystems HealthShare are registered trademarksof InterSystems Corporation.
All other brand or product names used herein are trademarks or registered trademarks of their respective companies or organizations.
This document contains trade secret and confidential information which is the property of InterSystems Corporation, One Memorial Drive,Cambridge, MA 02142, or its affiliates, and is furnished for the sole purpose of the operation and maintenance of the products of InterSystemsCorporation. No part of this publication is to be used for any other purpose, and this publication is not to be reproduced, copied, disclosed,transmitted, stored in a retrieval system or translated into any human or computer language, in any form, by any means, in whole or in part,without the express prior written consent of InterSystems Corporation.
The copying, use and disposition of this document and the software programs described herein is prohibited except to the limited extentset forth in the standard software license agreement(s) of InterSystems Corporation covering such programs and related documentation.InterSystems Corporation makes no representations and warranties concerning such software programs other than those set forth in suchstandard software license agreement(s). In addition, the liability of InterSystems Corporation for any losses or damages relating to or arisingout of the use of such software programs is limited in the manner set forth in such standard software license agreement(s).
THE FOREGOING IS A GENERAL SUMMARY OF THE RESTRICTIONS AND LIMITATIONS IMPOSED BY INTERSYSTEMSCORPORATION ON THE USE OF, AND LIABILITY ARISING FROM, ITS COMPUTER SOFTWARE. FOR COMPLETE INFORMATIONREFERENCE SHOULD BE MADE TO THE STANDARD SOFTWARE LICENSE AGREEMENT(S) OF INTERSYSTEMS CORPORATION,COPIES OF WHICH WILL BE MADE AVAILABLE UPON REQUEST.
InterSystems Corporation disclaims responsibility for errors which may appear in this document, and it reserves the right, in its sole discretionand without notice, to make substitutions and modifications in the products and practices described in this document.
For Support questions about any InterSystems products, contact:
InterSystems Worldwide Response Center (WRC)+1-617-621-0700Tel:+44 (0) 844 854 2917Tel:[email protected]:

Table of Contents
About This Book .................................................................................................................................... 1
1 Introduction ........................................................................................................................................ 31.1 Installation and Configuration .................................................................................................... 3
1.1.1 Requirements ................................................................................................................... 31.1.2 Installation ........................................................................................................................ 31.1.3 Configuring Visual Studio ................................................................................................ 4
1.2 Caché .NET Binding Architecture ............................................................................................. 61.3 The Caché .NET Help File ......................................................................................................... 71.4 The Caché .NET Sample Programs ............................................................................................ 7
2 Connecting to the Caché Database ................................................................................................... 92.1 Creating a Connection ................................................................................................................ 92.2 Connection Pooling .................................................................................................................. 10
2.2.1 Using the CachePoolManager Class .............................................................................. 102.3 Caché Server Configuration ..................................................................................................... 112.4 Connection Parameters ............................................................................................................. 12
2.4.1 Required Parameters ...................................................................................................... 122.4.2 Connection Pooling Parameters ..................................................................................... 132.4.3 Other Connection Parameters ........................................................................................ 13
3 Using the Caché Object Binding for .NET ..................................................................................... 153.1 Introduction to Proxy Objects .................................................................................................. 153.2 Generating Caché Proxy Classes .............................................................................................. 17
3.2.1 Using the Caché Object Binding Wizard ....................................................................... 173.2.2 Running the Proxy Generator from the Command Line ................................................ 193.2.3 Generating Proxy Files Programmatically ..................................................................... 203.2.4 Adding Proxy Code to a Project ..................................................................................... 223.2.5 Methods Inherited from Caché System Classes ............................................................. 22
3.3 Using Proxy Objects ................................................................................................................. 233.3.1 Opening and Reading Objects ........................................................................................ 233.3.2 Creating and Saving Objects .......................................................................................... 243.3.3 Closing Proxy Objects ................................................................................................... 253.3.4 Deleting Persistent Objects from the Database .............................................................. 25
3.4 Using Caché Queries ................................................................................................................ 253.5 Using Collections and Lists ...................................................................................................... 263.6 Using Relationships .................................................................................................................. 273.7 Using I/O Redirection .............................................................................................................. 27
4 Using Caché ADO.NET Managed Provider Classes ..................................................................... 294.1 Introduction to ADO.NET Managed Provider Classes ............................................................ 304.2 Using CacheCommand and CacheDataReader ........................................................................ 314.3 Using SQL Queries with CacheParameter ............................................................................... 314.4 Using CacheDataAdapter and CacheCommandBuilder .......................................................... 324.5 Using Transactions ................................................................................................................... 33
5 Using the Caché Dynamic Binding ................................................................................................. 355.1 Using Dynamic Objects ........................................................................................................... 35
5.1.1 Using Method Signature Objects ................................................................................... 355.1.2 Calling Methods ............................................................................................................. 36
Using .NET and the ADO.NET Managed Provider with Caché iii

5.1.3 Accessing Properties ...................................................................................................... 365.2 Example: Accessing Sample.Person ........................................................................................ 375.3 CacheMethodSignature Methods and Properties ..................................................................... 38
6 Using the Caché Entity Framework Provider ............................................................................... 416.1 Setting Up Caché Entity Framework Provider ......................................................................... 41
6.1.1 System Requirements ..................................................................................................... 416.1.2 Run Setup and Set Variables .......................................................................................... 426.1.3 Copy Files to Visual Studio ............................................................................................ 426.1.4 Connect Visual Studio to Caché Server ......................................................................... 426.1.5 Configure Caché Nuget Local Repository ..................................................................... 42
6.2 Getting Started with Entity Framework .................................................................................. 436.2.1 Code First ....................................................................................................................... 436.2.2 Set Up a Sample Database ............................................................................................. 446.2.3 Database First ................................................................................................................ 456.2.4 Model First ..................................................................................................................... 47
iv Using .NET and the ADO.NET Managed Provider with Caché

List of Figures
Figure 1–1: Caché .NET Binding Client/Server Architecture ................................................................. 7
Using .NET and the ADO.NET Managed Provider with Caché v

List of Tables
Table 2–1: Required Parameters ............................................................................................................ 13Table 2–2: Connection Pooling Parameters ........................................................................................... 13Table 2–3: Other Connection Parameters .............................................................................................. 14
vi Using .NET and the ADO.NET Managed Provider with Caché

About This Book
This book is a guide to the Caché .NET Object Binding and the Caché implementation of the ADO.NET Managed Provider.
This book contains the following sections:
• Introduction — provides information on installation, project configuration, binding architecture, and sample programs.
• Connecting to the Caché Database — provides detailed information about database connections (including connectionpooling) relevant to both native Caché object access and ADO.NET Managed Provider relational access.
• Using the Caché Object Binding for .NET — provides instructions for creating proxy classes, and gives concreteexamples of how to use proxy objects in your code.
• Using ADO.NET Managed Provider Classes — gives concrete examples using the Caché implementation of theADO.NET Managed Provider API.
• Using the Caché Entity Framework Provider—describes how to setup and get started using the Caché implementationof Entity Framework Provider.
• Using the Caché Dynamic Binding — describes an alternate version of Caché native object access that allows anapplication to access Caché objects on the server without first generating proxy classes.
Web Services (SOAP) can also be used to exchange data between Caché and .NET client applications. For more information,refer to the following online documents:
• Creating Web Services and Web Clients in Caché in the Caché Language Bindings section.
• Caché Managed Provider for .NET Tutorial in the Caché Tutorials section.
There is also a detailed Table of Contents.
For general information, see Using InterSystems Documentation.
Using .NET and the ADO.NET Managed Provider with Caché 1


1Introduction
This book describes how to use the CacheClient .NET assembly, which provides two different but complimentary ways toaccess Caché from a .NET application:
• The Caché .NET Object Binding — provides high-performance native object access to data using auto-generated proxyclasses. These proxy classes correspond to persistent objects stored within the Caché database and provide object per-sistence, retrieval, data caching, and life-cycle management (see “Using the Caché Object Binding for .NET” ).
• The Caché implementation of the ADO.NET Managed Provider — provides easy relational access to data using thestandard ADO.NET Managed Provider classes (see “Using ADO.NET Managed Provider Classes” ).
This combination is unique in that it provides a .NET application with simultaneous relational and object access to data,using a common API and without requiring any object-to-relational mapping. The CacheClient assembly is implementedusing .NET managed code throughout, making it easy to deploy within a .NET environment. It is thread-safe and can beused within multithreaded .NET applications.
1.1 Installation and ConfigurationThis section provides specifies requirements and provides instructions for installing Caché and configuring Visual Studio.
1.1.1 Requirements
• The .NET Framework, versions 2.0, 3.0, 4.0, or 4.5.
• Caché 5.1 or higher
• Visual Studio 2008 or 2010. Visual Studio 2010 is required when using .NET 4.0 or 4.5.
Caché is not required on computers that run your Caché .NET client applications, but they must have a TCP/IP connectionto the Caché Server and must be running a supported version of the .NET Framework.
1.1.2 Installation
The CacheClient assembly (InterSystems.Data.CacheClient.dll) is installed along with the rest of Caché, and requires nospecial preparation.
• When installing Caché in Windows, select the Setup Type: Development option.
Using .NET and the ADO.NET Managed Provider with Caché 3

• If Caché has been installed with security level 2, open the Management Portal and go to System Administration > Security
> Services, select %Service_CallIn, and make sure the Service Enabled box is checked. If you installed Cachéwith security level 1 (minimal) it should already be checked.
To use the CacheClient assembly in a .NET project, you must add a reference to the assembly, and add the correspondingUsing statements to your code (as described in the following section, “Configuring Visual Studio” ).
There is a separate version of InterSystems.Data.CacheClient.dll for each supported version of .NET. In the current releaseof Caché, these files are located in the following subdirectories of <Cache-install-dir>\dev\dotnet\bin:
• .NET version 2.0: \bin\v2.0.50727
• .NET version 3.0: \bin\v3.0
• .NET version 4.0: \bin\v4.0.30319
• .NET version 4.5: \bin\v4.5
See “Caché Installation Directory” in the Caché Installation Guide for the location of <Cache-install-dir> on your system.
All Caché assemblies for .NET are installed to the .NET GAC (Global Assembly Cache) when Caché is installed.
1.1.3 Configuring Visual Studio
This chapter describes how to set up a Visual Studio project using the CacheClient assembly, and how to add the CachéObject Binding Wizard to Visual Studio. The following topics are covered:
• Configuring a Visual Studio Project — describes how to add a CacheClient assembly reference and Using statements.
• Adding the Caché Object Binding Wizard to Visual Studio — describes how to add the Caché proxy class creationwizard to the Visual Studio Tools menu.
1.1.3.1 Configuring a Visual Studio Project
To add a CacheClient assembly reference to a project:
1. From the Visual Studio main menu, select Project > Add Reference
2. In the Add Reference window, click on Browse...
3. Browse to the subdirectory of <Cache-install-dir>\dev\dotnet\bin that contains the assembly for the version of .NETused in your project (see “ Installation” ), select InterSystems.Data.CacheClient.dll, and click OK.
4. In the Visual Studio Solution Explorer, the InterSystems.Data.CacheClient assembly should now be listed under Refer-ences:
4 Using .NET and the ADO.NET Managed Provider with Caché
Introduction

Add Using Statements to the ApplicationAdd Using statements for the two main namespaces in the InterSystems.Data.CacheClient.dll assembly before the beginningof your application's namespace.
using InterSystems.Data.CacheClient; using InterSystems.Data.CacheTypes;
namespace DotNetSample { ... }
Both the CacheClient and CacheTypes namespaces are included in the InterSystems.Data.CacheClient.dll assembly.
1.1.3.2 Adding the Object Binding Wizard to Visual Studio
The Caché Object Binding Wizard is a program to generate Caché proxy objects (see “Using the Caché Object BindingWizard” ). It can be run from the command line, but will be more readily available if you integrate it into Visual Studio byadding it to the External Tools menu.
To add the Caché Object Binding Wizard to the Tools menu:
1. From the Visual Studio main menu, select Tools > External Tools...
2. In the External Tools window:
• Click Add
• In the Title field, enter : Cache Object Binding Wizard
Using .NET and the ADO.NET Managed Provider with Caché 5
Installation and Configuration

• In the Command field, browse to the <Cache-install-dir>\dev\dotnet\bin\v2.0.50727 directory and selectCacheNetWizard.exe. (Although this executable is located in the .NET 2.0 directory, it provides the BindingWizard for all supported versions of .NET. For the location of <Cache-install-dir> on your system, see “CachéInstallation Directory” in the Caché Installation Guide).
• Click OK
The Caché Object Binding Wizard now will be displayed as an option on the Visual Studio Tools menu.
1.2 Caché .NET Binding ArchitectureThe Caché .NET binding gives .NET applications a way to interoperate with objects contained within a Caché server. Theseobjects can be persistent objects stored within the Caché object database or they can be transient objects that performoperations within a Caché server.
The Caché .NET Binding consists of the following components:
• The Caché Object Server — a high performance server process that manages communication between .NET objectsand a Caché database server using standard networking protocols (TCP/IP). Caché uses a common server for .NET,C++, Java, Perl, Python, ODBC, and JDBC access.
• The InterSystems.Data.CacheClient assembly — a set of .NET classes that implement all the functionality of the .NETclasses created by the Caché Proxy Generator. It also provides a set of proxy classes for a few Object Server classesthat are projected differently to make them fit into the framework of the .NET standard library.
• The Caché Proxy Generator — a set of methods that generate .NET classes from classes defined in the Caché ClassDictionary. Several different interfaces are available (see “Generating Caché Proxy Classes” ).
The Proxy Generator can create .NET proxy classes for any class in the Caché Class Dictionary. The proxy classes containonly managed .NET code, which the Proxy Generator creates by inspecting the class definitions found in the Caché ClassDictionary. Instances of the .NET proxy classes on the client communicate at runtime (using TCP/IP sockets) with theircorresponding Caché objects on a Caché server. This is illustrated in the following diagram:
6 Using .NET and the ADO.NET Managed Provider with Caché
Introduction

Figure 1–1: Caché .NET Binding Client/Server Architecture
The basic mechanism works as follows:
• You define one or more classes within Caché. These can be persistent objects stored within the Caché database ortransient objects that run within a Caché server.
• The Caché Proxy Generator creates .NET proxy classes that correspond to your Caché classes. These classes containstub methods and properties that correspond to Caché object methods and properties on the server.
• At runtime, your .NET application connects to a Caché server. It can then create instances of .NET proxy objects thatcorrespond to objects within the Caché server. You can use these proxy objects as you would any other .NET objects.Caché automatically manages all communications as well as client-side data caching.
The runtime architecture consists of the following:
• A Caché database server (or servers).
• A .NET client application into which your generated and compiled .NET proxy classes have been linked.
At runtime, the .NET application connects to Caché using an object connection interface (provided by the CacheConnection
class). All communication between the .NET application and the Caché server uses the standard TCP/IP protocol.
1.3 The Caché .NET Help FileThe Caché .NET help file provides the most current and detailed documentation for both object and relational APIs. Althoughthe file is named CacheProvider.chm, it covers both ADO.NET Managed Provider classes (InterSystems.Data.CacheClient)and Object Binding classes (InterSystems.Data.CacheClient.ObjBind), as well as classes used by both bindings.CacheProvider.chm is available as a stand-alone help file in <Cache-install-dir>\dev\dotnet\help.
1.4 The Caché .NET Sample ProgramsCaché comes with a set of sample projects that demonstrate the use of the Caché .NET binding. These samples are locatedin the <Cache-install-dir>/dev/dotnet/samples/ subdirectory of the Caché installation (see “Caché Installation Directory”in the Caché Installation Guide for the location of <Cache-install-dir> on your system).
• adoform — A simple program to access and manipulate the Sample.Person database. The same program is presentedin three different Visual Studio languages: C#, Basic, and C++.
• bookdemos — Contains complete, working versions of the examples in this document. The project is a small, easilymodified test bed for short sample routines. All of the relevant sample code is in one file: SampleCode.cs. You may
Using .NET and the ADO.NET Managed Provider with Caché 7
The Caché .NET Help File
need to regenerate the ..\bookdemos\WizardCode.cs file, which contains proxy classes for the Sample package (see“Generating Caché Proxy Classes” for detailed instructions).
• console — A console program that demonstrates the bare minimum requirements for a Caché .NET project.
• mobiledevice — Similar to adoform, but demonstrates how the mobile version of the CacheClient assembly deals withtransient connections.
• objbind — Similar to adoform, but demonstrates how to write code that uses both ADO.NET Managed Provider classesand Caché Object Binding classes in a complementary fashion.
All of these projects use classes from the Sample package in the SAMPLES namespace. You can use Studio to examine theObjectScript code for these classes.
Note: Most of these samples are written only in C#. If you decide to convert a sample to Visual Basic, bear in mind thata new Visual Basic .NET project will have a default namespace that contains every class defined by the project.If this is ignored, code such as:
Dim p As New Sample.Person p = p.OpenId(CacheConnection, "1")
will fail because the root namespace has not been referenced. This can be easily corrected by disabling the "Rootnamespace" option in the Visual Studio project preferences.
8 Using .NET and the ADO.NET Managed Provider with Caché
Introduction

2Connecting to the Caché Database
This chapter describes how to create a connection between your client application and the Caché Server using aCacheConnection object. Such connections are used by both Caché Object Binding classes and ADO.NET Managed Providerclasses
2.1 Creating a ConnectionThe code below establishes a connection to the SAMPLES namespace used by most Caché sample programs (see “TheCaché .NET Sample Programs” for details). The connection object is usable by any class that requires a Caché connection,regardless of whether you are using Caché Object Binding classes, ADO.NET Managed Provider classes, or both. See“Connection Parameters” for a complete list of parameters that can be set when instantiating a connection object.
Add Code to Instantiate the Caché ConnectionThe following simple method could be called to start a connection:
public CacheConnection CacheConnect; private void CreateConnection(){ try { CacheConnect = new CacheConnection(); CacheConnect.ConnectionString = "Server=localhost; Port=1972; Namespace=SAMPLES;" + "Password=SYS; User ID=_SYSTEM;"; CacheConnect.Open(); } catch (Exception eConn){ MessageBox.Show("CreateConnection error: " + eConn.Message); } }
This example defines the CacheConnection object as a global that can be used anywhere in the program. Once the objecthas been created, it can be shared among all the classes that need it. The connection object can be opened and closed asnecessary. You can do this explicitly by using CacheConnect.Open() and CacheConnect.Close(). If you are using anADO.NET Dataset, instances of DataAdapter will open and close the connection automatically, as needed.
Use the CacheConnection.ConnectDlg() MethodYou can also prompt the user for a connection string. The previous example could be rewritten as follows:
private void CreateConnection(){ try { CacheConnect = new CacheConnection(); CacheConnect.ConnectionString = CacheConnection.ConnectDlg(); CacheConnect.Open(); } ...
Using .NET and the ADO.NET Managed Provider with Caché 9

The ConnectDlg() method displays the standard Caché connection dialog and returns the user's input as a connection string.
2.2 Connection PoolingConnection pooling is on by default. The following connection string parameters can be used to control various aspects ofconnection pooling:
• Pooling — Defaults to true. Set Pooling to false to create a connection with no connection pooling.
• Max Pool Size and Min Pool Size — Default values are 0 and 100. Set these parameters to specify the maximumand minimum (initial) size of the connection pool for this specific connection string.
• Connection Reset and Connection Lifetime — Set Connection Reset to true to turn on the pooledconnection reset mechanism. Connection Lifetime specifies the number of seconds to wait before resetting anidle pooled connection. The default value is 0.
For example, the following connect string sets the initial size of the connection pool to 2 and the maximum number ofconnections to 5, and activates connection reset with a maximum connection idle time of 3 seconds:
CacheConnect.ConnectionString = "Server = localhost;" + " Port = 1972;" + " Namespace = SAMPLES;" + " Password = SYS;" + " User ID = _SYSTEM;" + " Min Pool Size = 2;" + " Max Pool Size = 5;" + " Connection Reset = true;" + " Connection Lifetime = 3;";
The CacheConnection class also includes the following static methods that can be used to control pooling:
ClearPool(conn)
CacheConnection.ClearPool(conn);
Clears the connection pool associated with connection conn.
ClearAllPools()
CacheConnection.ClearAllPools();
Removes all connections in the connection pools and clears the pools.
2.2.1 Using the CachePoolManager Class
The CacheClient.CachePoolManager class can be used to monitor and control connection pooling programmatically. Thefollowing static methods are available:
ActiveConnectionCount
int count = CachePoolManager.ActiveConnectionCount;
Total number of established connections in all pools. Count includes both idle and in-use connections.
IdleCount()
int count = CachePoolManager.IdleCount();
10 Using .NET and the ADO.NET Managed Provider with Caché
Connecting to the Caché Database
Total number of idle connections in all the pools.
IdleCount(conn)
int count = CachePoolManager.IdleCount(conn);
Total number of idle connections in the pool associated with connection object conn.
InUseCount()
int count = CachePoolManager.InUseCount();
Total number of in-use connections in all pools.
InUseCount(conn)
int count = CachePoolManager.InUseCount(conn);
Total number of in-use connections in the pool associated with connection object conn.
RecycleAllConnections(Boolean)
CachePoolManager.RecycleAllConnections(bool remove);
Recycles connections in all pools
RecycleConnections(conn, Boolean)
CachePoolManager.RecycleConnections(conn,bool remove)
Recycles connections in the pool associated with connection object conn.
RemoveAllIdleConnections()
CachePoolManager.RemoveAllIdleConnections();
Removes idle connections from all connection pools.
RemoveAllPoolConnections()
CachePoolManager.RemoveAllPoolConnections();
Deletes all connections and removes all pools, regardless of what state the connections are in.
For a working example that uses most of these methods, see the Proxy_9_Connection_Pools() method in the bookdemos
sample program (see “The Caché .NET Sample Programs” ).
2.3 Caché Server ConfigurationVery little configuration is required to use a .NET client with a Caché Server process. The sample programs provided withCaché should work with no change following a default Caché installation. This section describes the server settings requiredfor a connection, and some troubleshooting tips.
Every .NET client that wishes to connect to a Caché Server needs the following information:
• A URL that provides the server IP address, port number, and Caché namespace.
• A case-sensitive username and password.
Using .NET and the ADO.NET Managed Provider with Caché 11
Caché Server Configuration
By default, the sample programs use the following connection information:
• connection string: "localhost[1972]:SAMPLES"
• username: "_SYSTEM"
• password: "SYS"
Check the following points if you have any problems:
• Make sure that the Caché Server process is installed and running.
• Make sure that you know the IP address of the machine on which the Caché Server process is running. The sampleprograms use "localhost". If you want a sample program to default to a different system you will need to changethe connection string in the code.
• Make sure that you know the TCP/IP port number on which the Caché Server is listening. The sample programs use"1972". If you want a sample program to default to a different port, you will need change the number in the samplecode.
• Make sure that you have a valid username and password to use to establish a connection. (You can manage usernamesand passwords using the Management Portal: System Administration > Security > Users). The sample programs use theadministrator username "_SYSTEM" and the default password "SYS". Typically, you will change the default passwordafter installing the server. If you want a sample program to default to a different username and password, you will needto change the sample code.
• Make sure that your connection URL includes a valid Caché namespace. This should be the namespace containing theclasses and data your program uses. The samples connect to the SAMPLES namespace, which is pre-installed withCaché.
2.4 Connection ParametersThe following tables describe all parameters that can be used in a connection string.
2.4.1 Required Parameters
The following five parameters are required for all connection strings (see “Creating a Connection” ).
12 Using .NET and the ADO.NET Managed Provider with Caché
Connecting to the Caché Database
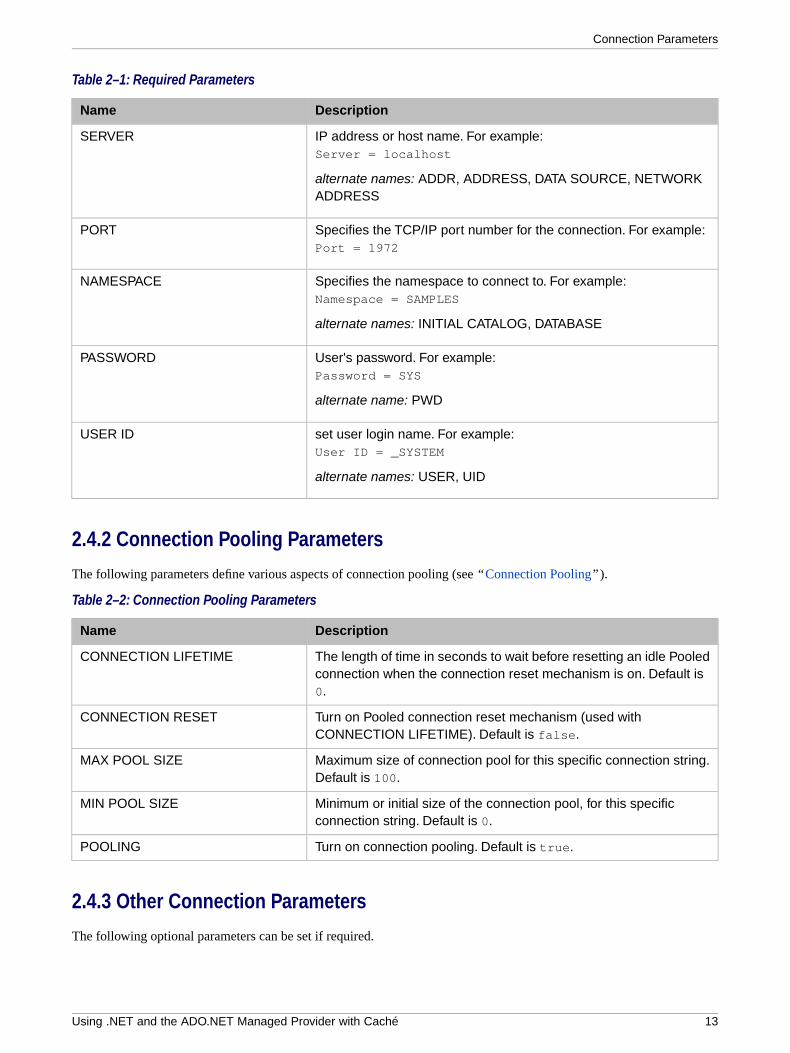
Table 2–1: Required Parameters
DescriptionName
IP address or host name. For example:Server = localhost
alternate names: ADDR, ADDRESS, DATA SOURCE, NETWORKADDRESS
SERVER
Specifies the TCP/IP port number for the connection. For example:Port = 1972
PORT
Specifies the namespace to connect to. For example:Namespace = SAMPLES
alternate names: INITIAL CATALOG, DATABASE
NAMESPACE
User's password. For example:Password = SYS
alternate name: PWD
PASSWORD
set user login name. For example:User ID = _SYSTEM
alternate names: USER, UID
USER ID
2.4.2 Connection Pooling Parameters
The following parameters define various aspects of connection pooling (see “Connection Pooling” ).
Table 2–2: Connection Pooling Parameters
DescriptionName
The length of time in seconds to wait before resetting an idle Pooledconnection when the connection reset mechanism is on. Default is0.
CONNECTION LIFETIME
Turn on Pooled connection reset mechanism (used withCONNECTION LIFETIME). Default is false.
CONNECTION RESET
Maximum size of connection pool for this specific connection string.Default is 100.
MAX POOL SIZE
Minimum or initial size of the connection pool, for this specificconnection string. Default is 0.
MIN POOL SIZE
Turn on connection pooling. Default is true.POOLING
2.4.3 Other Connection Parameters
The following optional parameters can be set if required.
Using .NET and the ADO.NET Managed Provider with Caché 13
Connection Parameters
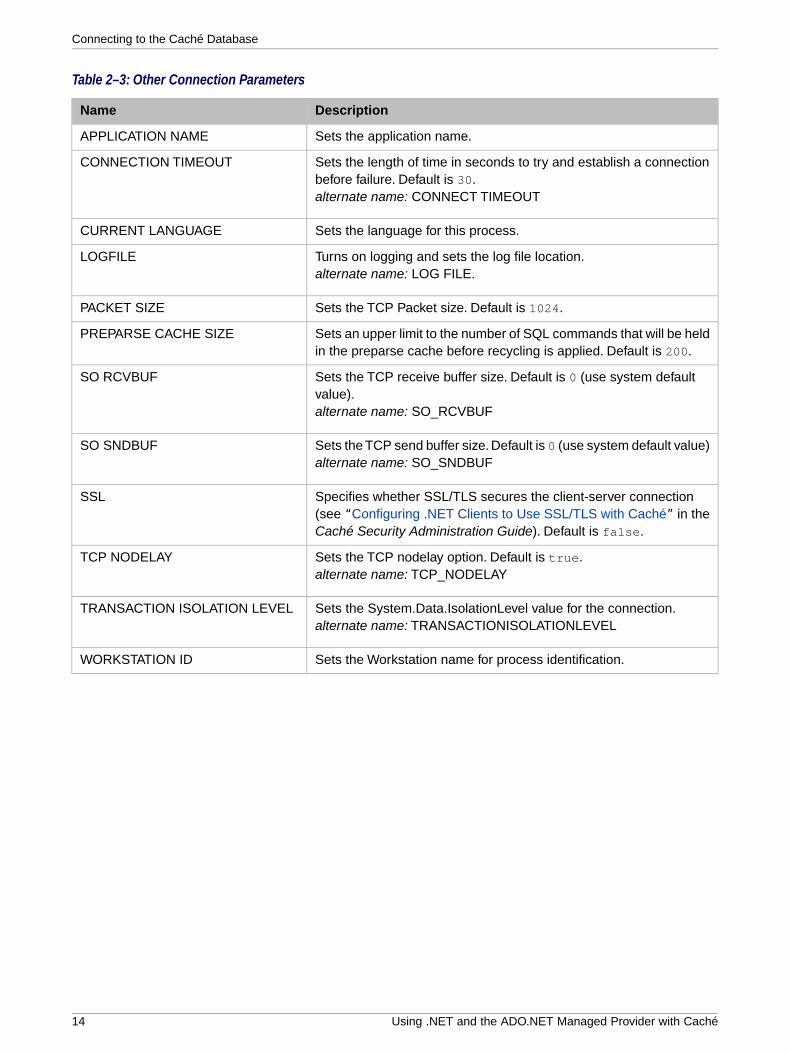
Table 2–3: Other Connection Parameters
DescriptionName
Sets the application name.APPLICATION NAME
Sets the length of time in seconds to try and establish a connectionbefore failure. Default is 30.alternate name: CONNECT TIMEOUT
CONNECTION TIMEOUT
Sets the language for this process.CURRENT LANGUAGE
Turns on logging and sets the log file location.alternate name: LOG FILE.
LOGFILE
Sets the TCP Packet size. Default is 1024.PACKET SIZE
Sets an upper limit to the number of SQL commands that will be heldin the preparse cache before recycling is applied. Default is 200.
PREPARSE CACHE SIZE
Sets the TCP receive buffer size. Default is 0 (use system defaultvalue).alternate name: SO_RCVBUF
SO RCVBUF
Sets the TCP send buffer size. Default is 0 (use system default value)alternate name: SO_SNDBUF
SO SNDBUF
Specifies whether SSL/TLS secures the client-server connection(see “Configuring .NET Clients to Use SSL/TLS with Caché ” in theCaché Security Administration Guide). Default is false.
SSL
Sets the TCP nodelay option. Default is true.alternate name: TCP_NODELAY
TCP NODELAY
Sets the System.Data.IsolationLevel value for the connection.alternate name: TRANSACTIONISOLATIONLEVEL
TRANSACTION ISOLATION LEVEL
Sets the Workstation name for process identification.WORKSTATION ID
14 Using .NET and the ADO.NET Managed Provider with Caché
Connecting to the Caché Database

3Using the Caché Object Binding for .NET
One of the most important features of Caché is the ability to access database items as objects rather than rows in relationaltables. In Caché .NET Binding applications, this feature is implemented using Caché proxy objects. Proxy objects areinstances of .NET classes generated from classes defined in the Caché Class Dictionary. Each proxy object communicateswith a corresponding object on the Caché server, and can be manipulated just as if it were the original object. The generatedproxy classes are written in fully compliant .NET managed code, and can be used anywhere in your project.
This section gives some concrete examples of code using Caché proxy classes.
• Introduction to Proxy Objects — a simple demonstration of how proxy objects are used.
• Generating Caché Proxy Classes — using various tools to generate proxy classes.
• Using Caché Proxy Objects — using proxy objects to create, open, alter, save, and delete objects on the Caché server.
• Using Caché Queries — using a pre-existing Caché query to generate and manipulate a result set.
• Using Collections and Lists — manipulating Caché lists and arrays.
• Using Relationships — using Caché relationship objects to access and manipulate data sets.
• Using I/O Redirection — redirecting Caché Read and Write statements.
Although the examples in this chapter use only proxy objects to access Caché data, it is also possible to access databaseinstances via ADO.NET classes and SQL statements (as described in “Using Caché ADO.NET Managed Provider Classes”).Both types of access can be used in the same program.
Note: The examples presented in this chapter are fragments from samples provided in the bookdemos project (see “TheCaché .NET Sample Programs” for details). It is assumed that you are familiar with standard coding practices,so the fragments omit error trapping (try/catch) statements and other code that is not directly relevant to theexamples. For complete, working versions of the code examples, see SampleCode.cs, located in<Cache-install-dir>\dev\dotnet\samples\bookdemos (see “Caché Installation Directory” in the Caché InstallationGuide for the location of <Cache-install-dir> on your system).
3.1 Introduction to Proxy ObjectsA Caché .NET project using proxy objects can be quite simple. Here is a complete, working console program that opensand reads an item from the Sample.Person database:
using System;using InterSystems.Data.CacheClient;using InterSystems.Data.CacheTypes;
Using .NET and the ADO.NET Managed Provider with Caché 15

namespace TinySpace { class TinyProxy { [STAThread] static void Main(string[] args) {
CacheConnection CacheConnect = new CacheConnection(); CacheConnect.ConnectionString = "Server = localhost; " + "Port = 1972; " + "Namespace = SAMPLES; " + "Password = SYS; " + "User ID = _SYSTEM;"; CacheConnect.Open();
Sample.Person person = Sample.Person.OpenId(CacheConnect, "1"); Console.WriteLine("TinyProxy output: \r\n " + person.Id() + ": " + person.Name ); person.Close(); CacheConnect.Close(); } // end Main() } // end class TinyProxy}
This project is almost identical to the one presented in “UsingCaché ADO.NET Managed Provider Classes” (which doesnot use proxy objects). Both projects contain the following important features:
• The same Using statements may be added:
using InterSystems.Data.CacheClient; using InterSystems.Data.CacheTypes;
• The same code is used to create and open a connection to the Caché SAMPLES namespace:
CacheConnection CacheConnect = new CacheConnection(); CacheConnect.ConnectionString = "Server = localhost; " + "Port = 1972; " + "Namespace = SAMPLES; " + "Password = SYS; " + "User ID = _SYSTEM;"; CacheConnect.Open();
• Both projects have code to open and read the instance of Sample.Person that has an ID equal to 1.
It differs from the ADO.NET project in two significant ways:
1. The project includes a file (WizardCode.cs) containing code for the generated proxy classes. See “Generating CachéProxy Classes” for a detailed description of how to generate this file and include it in your project.
2. The instance of Sample.Person is accessed through a proxy object rather than CacheCommand and CacheDataReader
objects.
No SQL statement is needed. Instead, the connection and the desired instance are defined by a call to the OpenId()class method:
Sample.Person person = Sample.Person.OpenId(CacheConnect, "1");
Each data item in the instance is treated as a method or property that can be directly accessed with dot notation, ratherthan a data column to be accessed with CacheReader:
Console.WriteLine("TinyProxy output: \r\n " + person.Id() + ": " + person.Name );
In many cases, code with proxy objects can be far simpler to write and maintain than the equivalent code using ADO.NETManaged Provider classes. Your project can use both methods of access interchangeably, depending on which approachmakes the most sense in any given situation.
16 Using .NET and the ADO.NET Managed Provider with Caché
Using the Caché Object Binding for .NET

3.2 Generating Caché Proxy ClassesThis section covers the following topics:
• Using the Caché Object Binding Wizard — a GUI program that leads you through the process of generating proxyclasses.
• Running the Proxy Generator from the Command Line — a DOS program that allows you to generate proxy classesfrom a batch file or an ANT script.
• Generating Proxy Files Programmatically — calling the Proxy Generator methods directly to create proxy classes fromwithin a .NET program.
• Adding Proxy Code to a Project — what to do with new proxy files once you've got them.
• Methods Inherited from Caché System Classes — a set of standard methods that the Proxy Generator adds to all proxyfiles.
3.2.1 Using the Caché Object Binding Wizard
The Caché Object Binding Wizard can be run either as a stand-alone program (CacheNetWizard.exe, located in<Cache-install-dir>\dev\dotnet\bin\v2.0.50727 by default) or as a tool integrated into Visual Studio (See “Adding the CachéObject Binding Wizard to Visual Studio” ).
When you start the Wizard, the following window is displayed:
Enter the following information:
1. Select the Caché server you wish to connect to:
Using .NET and the ADO.NET Managed Provider with Caché 17
Generating Caché Proxy Classes

Select the server containing the Caché classes for which you want to generate .NET classes. To select the server:
• Click Connect and select your server
• Enter your username and password at the prompt. The Cache Connection Manager is displayed:
• Select the namespace containing your class (this will be SAMPLES for the bookdemos project)
• Click OK.
2. Select language:
For the bookdemos project, you would select Language: C#.
3. Select where the Wizard output will go:
Generally, this will be the same folder that contains the .csproj file for your project. In this example, the file will benamed WizardCode.cs, and will be placed in the main bookdemos project directory.
4. Select the classes you wish to use:
For this exercise, you should select the Sample.Person and Sample.Company classes from the SAMPLES
namespace. The Sample.Address and Sample.Employee classes will be included automatically because theyare used by Sample.Person and Sample.Company. If you check Show System Classes, classes from %SYS
(the standard Caché Class Library) will be displayed along with those from SAMPLES.
5. Generator options:
For this exercise, check Methods with default arguments and leave the other fields empty. The options are:
• Use .Net Compact Framework — generate proxy code for mobile applications.
• Methods with default arguments — generates some optional overloads for certain system methods.
• Application Namespace — optional namespace that will be added to the names of all generated proxy classes. Forexample, if you entered MyNamespace, the generated code would contain references toMyNamespace.Sample.Person rather than just Sample.Person.
Note: The server will not know about this namespace. To ensure that proxy objects referenced through relationswill be generated properly, you should either use the name of your application's main assembly, or setCacheConnection.AppNamespace to the value you enter here (see “ Instantiating a Proxy Object byName” in “Using Caché Proxy Objects” for more information).
6. Press 'Generate' to create classes:
The generated file can now be added to your project (see “Adding Proxy Code to a Project” ).
18 Using .NET and the ADO.NET Managed Provider with Caché
Using the Caché Object Binding for .NET

3.2.2 Running the Proxy Generator from the Command Line
The command-line proxy generator program (dotnet_generator.exe, located in <Cache-install-dir>\dev\dotnet\bin\v2.0.50727
by default) is useful when the same set of proxy files must be regenerated frequently. This is important when the Cachéclasses are still under development, since the proxy classes must be regenerated whenever the interface of a Caché classchanges.
Required argumentsThe command-line generator always requires information about the connection string, output path and type of output file(cs or vb), and a list of the classes to be generated. The following arguments are used:
• -conn <connection string> — standard connection string (see “Creating a Connection” ).
• If generating a single output file for all classes, use -path:
– -path <full filename> — path and name of the output file for the generated code. Type of output file tobe generated is determined by extension of the filename (for example, C:\somepath\WizardCode.vb will generatea Visual Basic code file).
• If generating one output file for each class, use -dir and -src-kind:
– -dir <path> — directory where the generated proxy files will be placed.
– -src-kind <cs|vb> — type of proxy file to generate. For each class, a file named<namespace_classname>.<src-kind> will be generated in the directory specified by -dir. Options arecs or vb.
• -class-list <full filename> — path and name of a text file containing a list of the classes to be used. Eachclass name must be on a separate line.
Optional argumentsThe following optional arguments are also available:
• -gen-default-args <true | false> — switch that controls generation of optional overloads to certain gen-erated system methods. Options are true or false.
• -app-nsp<namespace> — optional namespace that will be added to the names of all generated proxy classes. Forexample, if you entered MyNamespace, the generated code would contain references toMyNamespace.Sample.Person rather than just Sample.Person..
• -use-cf <true | false> — switch that controls whether code is generated for mobile devices or standard PCs.Options are true or false.
ExampleThe DOS batch file in this example calls dotnet_generator twice, generating the following output:
1. The first call generates a single file containing several proxy classes. This command generates exactly the sameWizardCode.cs file as the Object Binding Wizard (see the example in “Using the Caché Object Binding Wizard” ).
2. The second call generates one proxy file for each class, and generates Visual Basic code rather than C#. The filenameswill be of the form <namespace_classname>.vb.
Both calls use the same connection string, output directory, and class list file.
Using .NET and the ADO.NET Managed Provider with Caché 19
Generating Caché Proxy Classes

set netgen=C:\Intersystems\Cache\dev\dotnet\bin\v2.0.50727\dotnet_generator.exeset clist=C:\Intersystems\Cache\dev\dotnet\samples\bookdemos\Classlist.txtset out=C:\Intersystems\Cache\dev\dotnet\samples\bookdemosset conn="Server=localhost;Port=1972;Namespace=SAMPLES;Password=SYS;User ID=_SYSTEM;"
rem CALL #1: Generate a single WizardCode.cs proxy file%netgen% -conn %conn% -class-list %clist% -path %out%\WizardCode.cs -gen-default-args true
rem CALL #2: Generate one <namespace_classname>.vb proxy file for each class%netgen% -conn %conn% -class-list %clist% -dir %out% -src-kind vb -gen-default-args true
The contents of the class list file, Classlist.txt, are:
Sample.CompanySample.Person
Although only two classes are listed, proxy classes for Sample.Address and Sample.Employee are generated automaticallybecause they are used by Sample.Person and Sample.Company.
3.2.3 Generating Proxy Files Programmatically
The CacheConnection class includes the following methods that can be used to generate proxy files from within a .NETprogram:
CacheConnection.GenSourceFile()
Generates a new CS or VB proxy file that may contain definitions for several classes.
CacheConnection.GenSourceFile(filepath, generator, classlist, options, errors);
Parameters:
• filepath — A string containing the path and filename of the file to be generated.
• generator — A CodeDomProvider object that generates either CS or VB code.
• classlist — An IEnumerator iterator pointing to the list of classes that will be generated.
• options — a CacheClient.ObjBind.GeneratorOptions object.
• errors — An IList array used to store any returned error messages.
CacheConnection.GenMultipleSourceFiles()
Generates a separate CS or VB proxy file named <classname>.<filetype> for each class in classlist.
CacheConnection.GenMultipleSourceFiles(dirpath, filetype, generator, classlist, options, errors);
Parameters:
• dirpath — A string containing the directory path for the files to be generated.
• filetype — A string containing either ".vb" or ".cs", depending on the code to be generated.
• generator — A CodeDomProvider object that generates either CS or VB code.
• classlist — An IEnumerator iterator pointing to the list of classes that will be generated.
• options — A CacheClient.ObjBind.GeneratorOptions object.
• errors — An IList array used to store any returned error messages.
For a working example that uses both methods, see the Proxy_8_MakeProxyFiles() method in the bookdemos sampleprogram (see “The Caché .NET Sample Programs” ).
20 Using .NET and the ADO.NET Managed Provider with Caché
Using the Caché Object Binding for .NET

3.2.3.1 Using the Proxy Generator Methods
The following code fragments provide examples for defining the method parameters, and for calling each of the proxygenerator methods.
generator parameterThe generator can be either a CSharpCodeProvider or a VBCodeProvider.
System.CodeDom.Compiler.CodeDomProvider CS_generator = new CSharpCodeProvider(); System.CodeDom.Compiler.CodeDomProvider VB_generator = new VBCodeProvider();
classlist parameterEach of the methods accepts an iterator pointing to the list of classes to be generated. Although only two classes are listedin the following example, proxy classes for Sample.Address and Sample.Employee are generated automatically becausethey are used by Sample.Person and Sample.Company.
ArrayList classes = new ArrayList(); classes.Add("Sample.Company"); classes.Add("Sample.Person");
System.Collections.IEnumerator classlist classlist = classes.GetEnumerator();
options parameterIn this example, no special namespace will be generated for the proxy code, a complete set of inherited methods will begenerated for each class, and no extra code will be generated for use by mobile applications.
InterSystems.Data.CacheClient.ObjBind.GeneratorOptions options options = new GeneratorOptions(); options.AppNamespace = ""; options.GenDefaultArgMethods = true; options.UseCF = false;
errors parameterThe errors parameter will store the error messages (if any) returned from the proxy generator method call. All three methodsuse this parameter.
System.Collections.IList errors errors = new System.Collections.ArrayList();
Example 1: Generate a new CS proxy fileThis example generates a C# proxy file named WizardCode.cs in directory C:\MyApp\. The file will contain code forSample.Person, Sample.Company, Sample.Address, and Sample.Employee.
string filepath = @"C:\MyApp\WizardCode.cs"; System.CodeDom.Compiler.CodeDomProvider generator = new CSharpCodeProvider(); conn.GenSourceFile(filepath, generator, classlist, options, errors);
Example 2: Generate a set of single-class VB proxy filesThis example generates a single VB proxy file for each class.
string dirpath = @"C:\MyApp\"; string filetype = ".vb"; System.CodeDom.Compiler.CodeDomProvider generator = new VBCodeProvider(); conn.GenMultipleSourceFiles(dirpath, filetype, generator, classlist, options, errors);
The following files will be generated in C:\MyApp\:
Person.vb Company.vb Address.vb Employee.vb
Using .NET and the ADO.NET Managed Provider with Caché 21
Generating Caché Proxy Classes

The proxy files for Sample.Address and Sample.Employee are generated automatically because they are used bySample.Person and Sample.Company.
3.2.4 Adding Proxy Code to a Project
After generating .NET proxy files, add the code to your project as follows:
• From the Visual Studio main menu, select Project > Add Existing Item...
• Browse to the generated proxy file (or files, if you chose to generate one file for each class) and click Add.
The file will be listed in the Visual Studio Solution Explorer.
You can now use proxy objects as described in the following sections.
Important: A generated proxy class is not updated automatically when you change the corresponding Caché class.The generated classes will continue to work as long as there are no changes in the signatures of the prop-erties, methods, and queries that were present when the proxy classes were generated. If any signatureshave changed, the proxy class will throw CacheInvalidProxyException with a description of what wasmodified or deleted.
3.2.5 Methods Inherited from Caché System Classes
The proxy file generators also provide proxy methods for certain classes inherited from the standard Caché Class Library.For example, the Sample classes inherit methods from Caché %Library.Persistent and %Library.Populate. Proxies for thesemethods are automatically added when you generate the proxy files. This section provides a quick summary of the mostcommonly used methods. For more detailed information on a method, see the entries for these classes in the Caché ClassReference. For a generic guide to the use of Caché objects, see “Working with Registered Objects” in Using Caché Objects.
%Library.Persistent MethodsThe following %Library.Persistent proxies are generated:
• Id() — Returns the persistent object ID, if there is one, of this object. Returns a null string if there is no object ID.
string ID = person.Id();
• Save() — Stores an in-memory version of an object to disk. If the object was stored previously (and thus, already hasan OID), Save() updates the on-disk version. Otherwise, Save() saves the object and generates a new OID for it.
CacheStatus sc = person.Save();
• Open() — Loads an object from the database into memory and returns an OREF referring to the object.
22 Using .NET and the ADO.NET Managed Provider with Caché
Using the Caché Object Binding for .NET

• OpenId() — Loads an object from the database into memory and returns an OREF referring to the object. OpenId()is identical in operation to the Open() method except that it uses an ID value instead of an OID value to retrieve aninstance.
Sample.Person person = Sample.Person.OpenId(CacheConnect, "1");
• ExistsId() — Checks to see if the object identified by the specified ID exists in the extent.
if (!(bool)Sample.Person.ExistsId(CacheConnect, ID)) { string Message = "No person with id " + ID + " in database."; };
• DeleteId() — Deletes the stored version of the object with the specified ID from the database.
CacheStatus sc = Sample.Person.DeleteId(CacheConnect, ID);
• Extent() — This is a system provided query that yields a result set containing every instance within this extent.
CacheCommand Command = Sample.Person.Extent(CacheConnect);
• KillExtent() — Deletes all instances of a class and its subclasses.
CacheStatus sc = Sample.Person.KillExtent(CacheConnect)
%Library.Populate MethodsThe following %Library.Populate proxies are generated:
• Populate() — Creates a specified number of instances of a class and stores them in the database.
long newrecs = (long)Sample.Person.Populate(CacheConnect, 100);
• OnPopulate() — For additional control over the generated data you can define an OnPopulate() method within yourclass. If an OnPopulate() method is defined then the Populate() method will call it for each object it generates.
• PopulateSerial() — Create a single instance of a serial object.
For a working example that uses the KillExtent() and Populate() methods, see the Proxy_6_Repopulate() method in thebookdemos sample program (see “The Caché .NET Sample Programs” ).
3.3 Using Proxy ObjectsCaché proxy objects can be used to perform most of the standard operations on instances in a database. This section describeshow to open and read an instance, how to create or delete instances, and how to alter and save existing instances.
3.3.1 Opening and Reading Objects
Use the OpenId() method to access an instance by ID (instances can also be accessed through SQL queries, as discussedlater in “Using Caché Queries” ). OpenId() is a static class method, qualified with the type name rather than an instancename:
Sample.Person person = Sample.Person.OpenId(CacheConnect, "1");
Once the object has been instantiated, you can use standard dot notation to read and write the person information:
Using .NET and the ADO.NET Managed Provider with Caché 23
Using Proxy Objects

string Name = person.Name string ID = person.Id();
person.Home.City = "Smallville"; person.Home.State = "MN";
In this example, person.Home is actually an embedded Sample.Address object. It is automatically created or destroyedalong with the Sample.Person object.
For a working example, see the Proxy_1_ReadObject() method in the bookdemos sample program (see “The Caché .NETSample Programs” ).
3.3.2 Creating and Saving Objects
Caché proxy object constructors use information in a CacheConnection object to create a link between the proxy object anda corresponding object on the Caché server:
Sample.Person person = new Sample.Person(CacheConnect); person.Name = "Luthor, Lexus A."; person.SSN = "999-45-6789";
Use the Save() method to create a persistent instance in the database. Once the instance has been saved, the Id() methodcan be used to get the newly generated ID number:
CacheStatus sc = person.Save(); Display.WriteLine("Save status: " + sc.IsOK.ToString()); string ID = person.Id(); Display.WriteLine("Saved id: " + person.Id());
The ExistsId() class method can be used to test whether or not an instance exists in the database:
string personExists = Sample.Person.ExistsId(CacheConnect, ID).ToString() Display.WriteLine("person " + ID + " exists: " + personExists)
For a working example, see the Proxy_2_SaveDelete() method in the bookdemos sample program (see “The Caché .NETSample Programs” ).
3.3.2.1 Instantiating a Proxy Object by Name
In some cases, an object that is returned from the server differs from the object that the client requested. For example, theclient may request an instance of Sample.Person, but the server returns Sample.Employee. In order to instantiate an objectof the desired class, the binding has to know the exact name of the proxy type, including the application namespace (ifany).
When a proxy class is generated, there is an option to specify the namespace that contains it. For example, if the applicationnamespace is MyAppNsp, the Sample.Person proxy class can be specified as MyAppNsp.Sample.Person. Alternatively, theobject could be generated as Sample.Person and then "MyAppNsp" could be assigned to the connection.AppNamespace
property. Either option allows the binding to deduce that the full name of the proxy type is "MyAppNsp.Sample.Person".
The binding tries to avoid instantiation by name as much as possible, so if a class is already loaded in memory, the bindinguses the type in memory to create an instance. In this case, the exact class name is not necessary. In the following example,Y() returns a proxy object that the client knows must be Sample.Person:
Sample.Person p = new Sample.Person(conn); Sample.Person q = x.Y();
The first line creates object p, and loads Sample.Person in memory. In this case, the binding does not need to the full name,and x.Y() will not throw an exception. When the first line is commented out, the second line will fail if the full name ofthe proxy class is actually something like "MyAppNsp.Sample.Person".
24 Using .NET and the ADO.NET Managed Provider with Caché
Using the Caché Object Binding for .NET
3.3.3 Closing Proxy Objects
The Close() method disconnects a proxy object and closes the corresponding object on the server, but does not change thepersistent instance in the database:
person.Close();
Important: Always use Close() to destroy a proxy object.
Object reference counts are not maintained on the client. Every time the server returns an object (either byreference or as a return value) its reference count is increased. When Close() is called, the reference countis decreased. The object is closed on the server when the count reaches 0.
Do not use code such as:
person = nothing; //Do NOT do this!
This closes the proxy object on the client side, but does not decrement the reference count on the server.This could result in a situation where your code assumes that an object has been closed, but it remainsopen on the server.
By default Close() calls are cached. Although the proxy object can no longer be used, it is not actually destroyed until thereference count can be decremented on the server. This does not happen until the server is called again (for example, whena different proxy object calls a method).
In some situations, caching may not be desirable. For example, if an object is opened with Concurrency Level 4 (ExclusiveLock), the lock will not be released until the next server call. To destroy the object immediately, you can call Close() withthe optional useCache parameter set to false:
person.Close(false);
This causes a message to be sent to the server immediately, destroying the proxy object and releasing its resources.
3.3.4 Deleting Persistent Objects from the Database
The DeleteId() class method deletes the instance from the database. You can use the ExistsId() method to make sure thatit is gone:
CacheStatus sc = Sample.Person.DeleteId(CacheConnect, ID); Display.WriteLine("Delete status: " + sc.IsOK.ToString()); Display.WriteLine("person " + ID + " exists: " + Sample.Person.ExistsId(CacheConnect, ID).ToString());
For a working example, see the Proxy_2_SaveDelete() method in the bookdemos sample program (see “The Caché .NETSample Programs” ).
3.4 Using Caché QueriesA Caché Query is an SQL query defined as part of a Caché class. For example, the Sample.Person class defines the ByNamequery as follows:
Using .NET and the ADO.NET Managed Provider with Caché 25
Using Caché Queries
Query ByName(name As %String = "") As %SQLQuery(CONTAINID = 1, SELECTMODE = "RUNTIME") [ SqlName = SP_Sample_By_Name, SqlProc ]{ SELECT ID, Name, DOB, SSN FROM Sample.Person WHERE (Name %STARTSWITH :name) ORDER BY Name}
Since queries return relational tables, Caché proxy objects take advantage of certain ADO.NET classes to generate queryresults. In the Sample.Person proxy class, ByName is a class method. It accepts a connection object, and returns anADO.NET Managed Provider CacheCommand object that can be used to execute the predefined SQL query:
CacheCommand Command = Sample.Person.ByName(CacheConnect);
In this example, the Command.Connection property has been set to CacheConnect, and Command.CommandText containsthe predefined ByName query string.
To set the Command.Parameters property, we create and add a CacheParameter object with a value of A (which will getall records where the Name field starts with A):
CacheParameter Name_param = new CacheParameter("name", CacheDbType.NVarChar); Name_param.Value = "A"; Command.Parameters.Add(Name_param);
The CacheParameter and CacheDataReader ADO.NET Managed Provider classes must be used to define parameters andexecute the query, just as they are in an ADO.NET SQL query (see “Using SQL Queries with CacheParameter” ). However,this example will use the query to return a set of object IDs that will be used to access objects.
A CacheDataReader object is used to get the ID of each row in the result set. Each ID is used to instantiate the correspondingSample.Person proxy object, which is then used to access the data:
Sample.Person person; string ID;
CacheDataReader reader = Command.ExecuteReader(); while (reader.Read()) { ID = reader[reader.GetOrdinal("ID")].ToString(); person = Sample.Person.OpenId(CacheConnect, ID);
Display.WriteLine( person.Id() + "\t" + person.Name + "\n\t" + person.SSN + "\t" + person.DOB.ToString().Split(' ')[0].ToString() ); };
For a working example, see the Proxy_3_ByNameQuery() method in the bookdemos sample program (see “The Caché.NET Sample Programs” ).
3.5 Using Collections and ListsCaché proxy objects interpret Caché collections and streams as standard .NET objects. Collections can be manipulated byiterators such as foreach, and implement standard methods such as add() and insert(). Caché lists ($List format) areinterpreted as CacheSysList objects and accessed by instances of CacheSysListReader (in the InterSystems.Data.CacheTypes
namespace).
Collections of serial objects are exposed as .NET Dictionary objects. Serial objects are held as global nodes, where eachnode address and value is stored as a Dictionary key and value.
The Person class includes the FavoriteColors property, which is a Caché list of strings. The foreach iterator can be usedto access elements of the list:
26 Using .NET and the ADO.NET Managed Provider with Caché
Using the Caché Object Binding for .NET

CacheListOfStrings colors = person.FavoriteColors int row = 0; foreach (string color in colors) { Display.WriteLine(" Element #" + row++ + " = " + color); }
The standard collection methods are available. The following example removes the first element, inserts a new first element,and adds a new last element:
if (colors.Count > 0) colors.RemoveAt(0); colors.Insert(0,"Blue"); colors.Add("Green");
For a working example, see the Proxy_4_Collection() method in the bookdemos sample program (see “The Caché .NETSample Programs” ).
Note: Caché does not support the creation of proxy classes that inherit from collections. For example, the Caché ProxyGenerator would throw an error when attempting to generate a proxy for the following ObjectScript class:
Class User.ListOfPerson Extends %Library.ListOfObjects{Parameter ELEMENTTYPE = "Sample.Person";}
3.6 Using RelationshipsIf a Caché database defines a relationship, the Caché Proxy Generator will create a CacheRelationshipObject class thatencapsulates the relationship. The Sample.Company class contains a one-to-many relationship with Sample.Employee
(which is a subclass of Sample.Person). The following example opens an instance of Sample.Employee, and then uses therelationship to generate a list of the employee's co-workers.
The employee instance is opened by the standard OpenId() method. It contains a Company relationship, which is usedto instantiate the corresponding company object :
Sample.Employee employee = Sample.Employee.OpenId(CacheConnect,ID) Sample.Company company = employee.Company;
Display.WriteLine("ID: " + (string)employee.Id()); Display.WriteLine("Name: " + employee.Name) Display.WriteLine("Works at: " + company.Name);
The company object contains the inverse Employees relationship, which this example instantiates as an object namedcolleagues. The colleagues object can then be treated as a collection containing a set of Employee objects:
CacheRelationshipObject colleagues = company.Employees;
Display.WriteLine("Colleagues: "); foreach (Sample.Employee colleague in colleagues) { Display.WriteLine("\t" + colleague.Name); }
For a working example, see the Proxy_5_Relationship() method in the bookdemos sample program (see “The Caché .NETSample Programs” ).
3.7 Using I/O RedirectionWhen a Caché method calls a Read or Write statement, the statement is associated with standard input or standard outputon the client machine by default. For example, the PrintPerson() method in the Sample.Employee class includes the fol-lowing line:
Using .NET and the ADO.NET Managed Provider with Caché 27
Using Relationships

Write !,"Name: ", ..Name, ?30, "Title: ", ..Title
The following example calls PrintPerson() from a Sample.Employee proxy object:
Sample.Employee employee = Sample.Employee.OpenId(CacheConnect, "102"); employee.PrintPerson();
By default, output from this call will be redirected to the client console using theCacheConnection.DefaultOutputRedirection delegate object, which is implemented in the following code:
public static OutputRedirection DefaultOutputRedirection = new OutputRedirection(CacheConnection.OutputToConsole);
static void OutputToConsole(string output) { Console.Out.Write(output); }
The default redirection delegates are defined when a CacheConnection object is created. The constructor executes codesimilar to the following example:
private void Init() { OutputRedirectionDelegate = DefaultOutputRedirection; InputRedirectionDelegate = DefaultInputRedirection; }
In order to provide your own output redirection, you need to implement an output method with the same signature asOutputToConsole, create an OutputRedirection object with the new method as its delegate, and then assign the new objectto the OutputRedirectionDelegate field of a connection object.
Example: Redirecting Output to a StreamThis example redirects output to a System.IO.StringWriter stream. First, a new output redirection method is defined:
static System.IO.StringWriter WriteOutput;
static void RedirectToStream(string output) { MyClass.WriteOutput.Write(output); }
The new method will redirect output to the WriteOutput stream, which can later be accessed by a StringReader. To use thenew delegate, the WriteOutput stream is instantiated, a new connection conn is opened, and RedirectToStream() is set asthe delegate to be used by conn:
WriteOutput = new System.IO.StringWriter(); conn = new CacheConnection(MyConnectString); conn.Open();
conn.OutputRedirectionDelegate = new CacheConnection.OutputRedirection(MyClass.RedirectToStream);
When PrintPerson() is called, the resulting output is redirected to WriteOutput (which stores it in an underlying StringBuilder).Now a StringReader can be used to recover the stored text:
ReadOutput = new System.IO.StringReader(WriteOutput.ToString()); string capturedOutput = ReadOutput.ReadToEnd();
The redirection delegate for the connection object can be changed as many times as desired. The following code sets conn
back to the default redirection delegate:
conn.OutputRedirectionDelegate = CacheConnection.DefaultOutputRedirection;
Input from Caché Read statements can be redirected in a similar way, using an InputRedirection delegate.
For a working example, see the Proxy_7_Redirection() method in the bookdemos sample program (see “The Caché .NETSample Programs” ).
28 Using .NET and the ADO.NET Managed Provider with Caché
Using the Caché Object Binding for .NET

4Using Caché ADO.NET Managed ProviderClasses
The Caché ADO.NET Managed Provider allows your .NET projects to access Caché databases with fully compliant versionsof generic ADO.NET Managed Provider classes such as Connection, Command, CommandBuilder, DataReader, andDataAdapter. The following classes are Caché-specific implementations of the standard ADO.NET Managed Providerclasses:
• CacheConnection — Represents the connection between your application and the databases in a specified Cachénamespace. See “Connecting to the Caché Database” for a detailed description of how to use CacheConnection.
• CacheCommand — Encapsulates an SQL statement or stored procedure to be executed against databases in thenamespace specified by a CacheConnection.
• CacheCommandBuilder — Automatically generates SQL commands that reconcile a Caché database with changesmade by objects that encapsulate a single-table query.
• CacheDataReader — Provides the means to fetch the resultset specified by a CacheCommand. A CacheDataReader
object provides quick forward-only access to the resultset, but is not designed for random access.
• CacheDataAdapter — Encapsulates a resultset that is mapped to data in the namespace specified by a CacheConnection.It is used to fill an ADO.NET DataSet and to update the Caché database, providing an effective random access connectionto the resultset.
This chapter gives some concrete examples of code using Caché ADO.NET Managed Provider classes. The followingsubjects are discussed:
• Introduction to ADO.NET Managed Provider Classes — provides a simple demonstration of how Caché ADO.NETManaged Provider classes are used.
• Using CacheCommand and CacheDataReader — demonstrates how to execute a simple read-only query.
• Using SQL Queries with CacheParameter — demonstrates passing a parameter to a query.
• Using CacheDataAdapter and CacheCommandBuilder — changing and updating data.
• Using Transactions — demonstrates how to commit or rollback transactions.
Although the examples in this chapter use only SQL statements to access Caché data, it is also possible to access databaseinstances as objects rather than rows in a relational database (as described in “Using the Caché Object Binding for .NET” ).Both types of access can be used in the same program.
Using .NET and the ADO.NET Managed Provider with Caché 29
Note: The examples presented in this chapter are fragments from samples provided in the bookdemos project (see “TheCaché .NET Sample Programs” for details). It is assumed that you are familiar with standard coding practices,so the fragments omit error trapping (try/catch) statements and other code that is not directly relevant to theexamples. For complete, working versions of the code examples, see the main code file, SampleCode.cs, locatedin <Cache-install-dir>\dev\dotnet\samples\bookdemos (see “Caché Installation Directory” in the Caché InstallationGuide for the location of <Cache-install-dir> on your system).
4.1 Introduction to ADO.NET Managed Provider ClassesA project using the Caché implementations of ADO.NET Managed Provider classes can be quite simple. Here is a complete,working console program that opens and reads an item from the Sample.Person database:
using System;using InterSystems.Data.CacheClient;using InterSystems.Data.CacheTypes;
namespace TinySpace { class TinyProvider { [STAThread] static void Main(string[] args) {
CacheConnection CacheConnect = new CacheConnection(); CacheConnect.ConnectionString = "Server = localhost; " + "Port = 1972; " + "Namespace = SAMPLES; " + "Password = SYS; " + "User ID = _SYSTEM;"; CacheConnect.Open();
string SQLtext = "SELECT * FROM Sample.Person WHERE ID = 1"; CacheCommand Command = new CacheCommand(SQLtext, CacheConnect); CacheDataReader Reader = Command.ExecuteReader(); while (Reader.Read()) { Console.WriteLine("TinyProvider output: \r\n " + Reader[Reader.GetOrdinal("ID")] + ": " + Reader[Reader.GetOrdinal("Name")]); }; Reader.Close(); Command.Dispose(); CacheConnect.Close(); } // end Main() } // end class TinyProvider}
This project contains the following important features:
• The Using statements provide access to the CacheClient assembly:
using InterSystems.Data.CacheClient; using InterSystems.Data.CacheTypes;
• The CacheConnection object is used to create and open a connection to the Caché SAMPLES namespace:
CacheConnection CacheConnect = new CacheConnection(); CacheConnect.ConnectionString = "Server = localhost; " + "Port = 1972; " + "Namespace = SAMPLES; " + "Password = SYS; " + "User ID = _SYSTEM;"; CacheConnect.Open();
• The CacheCommand object uses the CacheConnection object and an SQL statement to open the instance ofSample.Person that has an ID equal to 1.
string SQLtext = "SELECT * FROM Sample.Person WHERE ID = 1"; CacheCommand Command = new CacheCommand(SQLtext, CacheConnect);
• The CacheDataReader object is used to access the data items in the row:
30 Using .NET and the ADO.NET Managed Provider with Caché
Using Caché ADO.NET Managed Provider Classes

CacheDataReader Reader = Command.ExecuteReader(); while (Reader.Read()) { Console.WriteLine("TinyProvider output: \r\n " + Reader[Reader.GetOrdinal("ID")] + ": " + Reader[Reader.GetOrdinal("Name")]); };
4.2 Using CacheCommand and CacheDataReaderSimple read-only queries can be performed using only CacheCommand and CacheDataReader. Like all database transactions,such queries also require an open CacheConnection object.
In this example, an SQL query string is passed to a new CacheCommand object, which will use the existing connection:
string SQLtext = "SELECT * FROM Sample.Person WHERE ID < 10"; CacheCommand Command = new CacheCommand(SQLtext, CacheConnect);
Results of the query are returned in a CacheDataReader object. Properties are accessed by referring to the names of columnsspecified in the SQL statement.
CacheDataReader reader = Command.ExecuteReader(); while (reader.Read()) { Display.WriteLine( reader[reader.GetOrdinal("ID")] + "\t" + reader[reader.GetOrdinal("Name")] + "\r\n\t" + reader[reader.GetOrdinal("Home_City")] + " " + reader[reader.GetOrdinal("Home_State")] + "\r\n"); };
The same report could be generated using column numbers instead of names. Since CacheDataReader objects can onlyread forward, the only way to return to beginning of the data stream is to close the reader and reopen it by executing thequery again.
reader.Close(); reader = Command.ExecuteReader(); while (reader.Read()) { Display.WriteLine( reader[0] + "\t" + reader[4] + "\r\n\t" + reader[7] + " " + reader[8] + "\n"); }
For a working example, see the ADO_1_CommandReader() method in the bookdemos sample program (see “The Caché.NET Sample Programs” ).
4.3 Using SQL Queries with CacheParameterThe CacheParameter object is required for more complex SQL queries. The following example selects data from all rowswhere Name starts with a string specified by the CacheParameter value:
string SQLtext = "SELECT ID, Name, DOB, SSN " + "FROM Sample.Person " + "WHERE Name %STARTSWITH ?" + "ORDER BY Name"; CacheCommand Command = new CacheCommand(SQLtext, CacheConnect);
The parameter value is set to get all rows where Name starts with A, and the parameter is passed to the CacheCommand
object:
Using .NET and the ADO.NET Managed Provider with Caché 31
Using CacheCommand and CacheDataReader
CacheParameter Name_param = new CacheParameter("Name_col", CacheDbType.NVarChar); Name_param.Value = "A"; Command.Parameters.Add(Name_param);
Note: Be default, the SQL statement is not validated before being executed on the Server, since this would require twocalls to the Server for each query. If validation is desirable, call CacheCommand.Prepare() to validate the syntaxfor the SQL statement against the Cache Server.
A CacheDataReader object can access the resulting data stream just as it did in the previous example:
CacheDataReader reader = Command.ExecuteReader(); while (reader.Read()) { Display.WriteLine( reader[reader.GetOrdinal("ID")] + "\t" + reader[reader.GetOrdinal("Name")] + "\r\n\t" + reader[reader.GetOrdinal("DOB")] + " " + reader[reader.GetOrdinal("SSN")] + "\r\n"); };
For a working example, see the ADO_2_Parameter() method in the bookdemos sample program (see “The Caché .NETSample Programs” ).
The CacheCommand, CacheParameter, and CacheDataReader classes are also used to execute a Caché Query method froma proxy object. See “Using Caché Queries” for details.
4.4 Using CacheDataAdapter and CacheCommandBuilderThe CacheCommand and CacheDataReader classes are inadequate when your application requires anything more thansequential, read-only data access. In such cases, the CacheDataAdapter and CacheCommandBuilder classes can provide fullrandom read/write access. The following example uses these classes to get a set of Sample.Person rows, read and changeone of the rows, delete a row and add a new one, and then save the changes to the Caché database.
The CacheDataAdapter constructor accepts an SQL command and a CacheConnection object as parameters, just like aCacheCommand. In this example, the resultset will contain data from all Sample.Person rows where Name starts with A orB. The Adapter object will map the resultset to a table named Person:
string SQLtext = " SELECT ID, Name, SSN " + " FROM Sample.Person " + " WHERE Name < 'C' " + " ORDER BY Name "; CacheDataAdapter Adapter = new CacheDataAdapter(SQLtext, CacheConnect); Adapter.TableMappings.Add("Table", "Person");
A CacheCommandBuilder object is created for the Adapter object. When changes are made to the data mapped by theAdapter object, Adapter can use SQL statements generated by Builder to update corresponding items in the Cachédatabase:
CacheCommandBuilder Builder = new CacheCommandBuilder(Adapter);
An ADO DataSet object is created and filled by Adapter. It contains only one table, which is used to define thePersonTable object.
System.Data.DataSet DataSet = new System.Data.DataSet(); Adapter.Fill(DataSet); System.Data.DataTable PersonTable = DataSet.Tables["Person"];
A simple foreach command can be used to read each row in PersonTable. In this example, we save Name in the firstrow and change it to "Fudd, Elmer". When the data is printed, all names will be in alphabetical order except the first,
32 Using .NET and the ADO.NET Managed Provider with Caché
Using Caché ADO.NET Managed Provider Classes

which now starts with F. After the data has been printed, the first Name is reset to its original value. Both changes weremade only to the data in DataSet. The original data in the Caché database has not yet been touched.
if (PersonTable.Rows.Count > 0) { System.Data.DataRow FirstPerson = PersonTable.Rows[0]; string OldName = FirstPerson["Name"].ToString(); FirstPerson["Name"] = "Fudd, Elmer";
foreach (System.Data.DataRow PersonRow in PersonTable.Rows) { Display.WriteLine("\t" + PersonRow["ID"] + ":\t" + PersonRow["Name"] + "\t" + PersonRow["SSN"]); } FirstPerson["Name"] = OldName; }
The following code marks the first row for deletion, and then creates and adds a new row. Once again, these changes aremade only to the DataSet object.
FirstPerson.Delete();
System.Data.DataRow NewPerson = PersonTable.NewRow(); NewPerson["Name"] = "Budd, Billy"; NewPerson["SSN"] = "555-65-4321"; PersonTable.Rows.Add(NewPerson);
Finally, the Update() method is called. Adapter now uses the CacheCommandBuilder code to update the Caché databasewith the current data in the DataSet object's Person table.
Adapter.Update(DataSet, "Person");
For a working example, see the ADO_3_AdapterBuilder() method in the bookdemos sample program (see The Caché.NET Sample Programs).
4.5 Using TransactionsThe Transaction class is used to specify an SQL transaction (see “Transaction Processing” in Using Caché SQL for anoverview of how to use transactions with Caché). In the following example, transaction Trans will fail and be rolled backif SSN is not unique.
CacheTransaction Trans = CacheConnect.BeginTransaction(System.Data.IsolationLevel.ReadCommitted); try { string SQLtext = "INSERT into Sample.Person(Name, SSN) Values(?,?)"; CacheCommand Command = new CacheCommand(SQLtext, CacheConnect, Trans);
CacheParameter Name_param = new CacheParameter("name", CacheDbType.NVarChar); Name_param.Value = "Rowe, Richard"; Command.Parameters.Add(Name_param);
CacheParameter SSN_param = new CacheParameter("ssn", CacheDbType.NVarChar); SSN_param.Value = "234-56-3454"; Command.Parameters.Add(SSN_param);
int rows = Command.ExecuteNonQuery(); Trans.Commit(); Display.WriteLine("Added record for " + SSN_param.Value.ToString()); } catch (Exception eInsert) { Trans.Rollback(); WriteErrorMessage("TransFail", eInsert); }
For a working example, see the ADO_4_Transaction() method in the bookdemos sample program (see “The Caché .NETSample Programs” ).
Using .NET and the ADO.NET Managed Provider with Caché 33
Using Transactions


5Using the Caché Dynamic Binding
The Caché dynamic binding allows an application to access Caché objects on the server without first generating proxyclasses (described in “Using the Caché Object Binding for .NET” ). Instead, a dynamic proxy class, CacheObject, can becreated at runtime and used to access properties and call methods by name. Argument values and return types are specifiedby creating instances of the CacheMethodSignature class.
The dynamic binding can be useful for writing generic tools, and can be used as an alternative to regenerating proxy classeswhenever a Caché class changes on the server.
This chapter covers the following topics:
• Using Dynamic Objects — an overview of how to use the CacheObject and CacheMethodSignature classes.
• Example: Accessing Sample.Person — a simple demonstration of how the dynamic binding is used.
• CacheMethodSignature Methods and Properties — A quick reference to the CacheMethodSignature class.
5.1 Using Dynamic ObjectsThe examples in this chapter assume that a connection to the database has already been established through a CacheConnection
object named conn (see “Connecting to the Caché Database” for more information about CacheConnection). Beforedynamic objects can be used, the connection object's DynamicMode property must be set to true:
conn.DynamicMode = true;
A new InterSystems.Data.CacheTypes.CacheObject can be created with a statement such as the following:
CacheObject dynamicObj = new CacheObject(conn, className);
where conn is an open CacheConnection object, and className is a string containing the complete name of the class to beaccessed.
5.1.1 Using Method Signature Objects
Before you can use a CacheObject instance to call a method, you must create a CacheMethodSignature object. The methodsignature object is used to specify the values of any arguments that are to be passed to the method, and the datatype of themethod return value.
Use the GetMtdSignature() method of the connection object to create a CacheMethodSignature object:
CacheMethodSignature mtdSignature = conn.GetMtdSignature()
Using .NET and the ADO.NET Managed Provider with Caché 35

The Add() and SetReturnType() methods of the CacheMethodSignature object are used to define the signature:
• Use the Add() method to specify the values that will be passed as arguments to the method. Call Add() once for eachargument to be passed. The method is called as follows:
mtdSignature.Add(value, isByRef);
where value is a value of the appropriate type, and isByRef is a boolean that specifies whether or not the argument ispassed by reference.
• If the method returns a value, use the SetReturnType() method to specify the return type:
SetReturnType(conn, typeId)
where typeId is one of the constants of the ClientTypeId enumeration.
After the CacheMethodSignature object has been used to call a method, the ReturnValue and Arguments properties can beused to retrieve the results.
• The ReturnValue property will contain a value of the type specified by SetReturnType().
• The Arguments property will contain an array with one element for each argument specified by Add(). Each elementcontains the current value of an argument (including arguments passed by reference).
A method signature object can be used for more than one call. Use the Clear() method to reinitialize the object before usingAdd() and SetReturnType() again to define the new signature.
5.1.2 Calling Methods
The RunMethod() and RunClassMethod() methods of CacheObject are used to make method calls:
• For an instance method, the call is:
dynamicObj.RunMethod(methodName, mtdSignature);
• For a class method, the call is:
CacheObject.RunClassMethod(conn, className, methodName, mtdSignature);
After the method has been called, any returned values can be retrieved from the Arguments and ReturnValue properties ofthe CacheMethodSignature object (as described in “Using Method Signature Objects” ). The returned values must be castto the appropriate type for the container object. For example the following line gets an integer return value and casts it toclass CacheIntReturnValue:
long? mtdRes = ((CacheIntReturnValue)(mtdSignature.ReturnValue)).Value;
The following line accesses the Arguments array to retrieve the current value of a string argument passed by reference, andcasts it to class CacheStringArgument:
response = ((CacheStringArgument)(mtdSignature.Arguments[1])).Value;
A complete description of the available Cache(type)Argument and Cache(type)ReturnValue classes can be found in theInterSystems.Data.CacheTypes namespace section of the Caché .NET Help File.
5.1.3 Accessing Properties
CacheMethodSignature objects are also used to specify property signatures. Once the signature has been specified, theGetProperty() and SetProperty() methods of the CacheObject object can be used to access the property value. For
36 Using .NET and the ADO.NET Managed Provider with Caché
Using the Caché Dynamic Binding

example, the following code specifies a signature that will be used for the Name property of a Sample.Person object, andthen sets the property to the specified value:
CacheMethodSignature mtdSignature = conn.GetMtdSignature(); string value = "Smith, Wilbur" mtdSignature.Add(value, false);
string propertyName = "Name" person.SetProperty(propertyName, mtdSignature);
The following code redefines the method signature, and then retrieves the value of the property:
mtdSignature.Clear(); mtdSignature.SetReturnType(conn, ClientTypeId.tString); person.GetProperty(propertyName, mtdSignature); string newName = ((CacheStringReturnValue)(mtdSignature.ReturnValue)).Value;
5.2 Example: Accessing Sample.PersonThis section provides sample code that uses the dynamic interface to access a Sample.Person object.
GetMtdSignature()
The following code creates the CacheObject and CacheMethodSignature objects used by these examples:
CacheObject person = new CacheObject(conn, "Sample.Person"); CacheMethodSignature mtdSignature = conn.GetMtdSignature();
Add(), SetProperty()
The following code sets the Person.Name property to the value of valueOfName:
string valueOfName = "test"; mtdSignature.Add(valueOfName, false); person.SetProperty("Name", mtdSignature);
Clear(), SetReturnType(), GetProperty()
Now the method signature is cleared, the return type is set, and the new value of the Person.Name property isretrieved:
mtdSignature.Clear(); mtdSignature.SetReturnType(conn, ClientTypeId.tString); person.GetProperty("Name", mtdSignature); string returnedNameValue = ((CacheStringReturnValue)(mtdSignature.ReturnValue)).Value;
The .NET TestTools.UnitTesting.Assert class is used to compare the property value to the value in the originalvariable.
Assert.AreEqual(valueOfName, returnedNameValue);
Accessing an object property
The following code gets the Person.Home object property, tests the object to see if it is connected, then closes thePerson object and tests to see if the Person.Home object has been disconnected.
mtdSignature.Clear(); mtdSignature.SetReturnType(conn, ClientTypeId.tObject); person.GetProperty("Home", mtdSignature); ICacheObject home = ((CacheObjReturnValue)(mtdSignature.ReturnValue)).Value;
Assert.IsTrue(home.IsConnected); person.Close(); Assert.IsFalse(home.IsConnected);
Using .NET and the ADO.NET Managed Provider with Caché 37
Example: Accessing Sample.Person

RunClassMethod()
This example calls the StoredProcTest() class method, which is declared as follows in the Sample.Person serverclass:
classmethod StoredProcTest(name As %String, ByRef response As %String) as %Integer
StoredProcTest() concatenates two copies of name and returns the resulting string in response. It always sets thereturn value of the method to 29.
The following code sets the signature values and return type for the method:
string nameValue = "test"; string responseValue = "";
mtdSignature.Clear(); mtdSignature.Add(nameValue, false); mtdSignature.Add(responseValue, true); mtdSignature.SetReturnType(conn, ClientTypeId.tInt);
Now the method is called, and the results are retrieved and tested:
CacheObject.RunClassMethod(conn, "Sample.Person", "StoredProcTest", mtdSignature)
responseValue = ((CacheStringArgument)(mtdSignature.Arguments[1])).Value; string expectedValue = nameValue + "||" + nameValue; Assert.AreEqual(responseValue, expectedValue);
long? returnValue = ((CacheIntReturnValue)(mtdSignature.ReturnValue)).Value; Assert.AreEqual(returnValue, 29);
5.3 CacheMethodSignature Methods and PropertiesThis section provides a quick overview of the CacheMethodSignature class. It is not intended to be your primary referencefor the class, and therefore omits some items (such as methods inherited from System.Object) that are not used in thischapter.
Note: For the most complete and up to date information on this class and related enumerations, refer to the entry in theCaché .NET Help File.
The CacheMethodSignature class provides the following methods and properties:
• Add() — Specifies an argument value to be added to the method signature.
• Arguments — Field containing an array of method argument values.
• Clear() — Initializes this instance by deleting any previously specified argument values and method return settings.
• Get() — Gets the value of the argument at the specified index.
• ReturnValue — Field containing the method return value.
• SetColnReturnType() — Sets the method return type if a collection is to be returned.
• SetReturnType() — Sets the method return type.
The following related enumerations are also listed here:
• ClientTypeId Enumeration
• ClientObjTypeId Enumeration
38 Using .NET and the ADO.NET Managed Provider with Caché
Using the Caché Dynamic Binding

Add()
Adds the specified argument value to the method signature. This method has the following overloads:
public void Add(Object arg, CacheConnection conn, Type argType, ClientTypeId typeId, bool byRef)
public void Add(ICacheObject arg, CacheConnection conn, Type argType, bool byRef)
public void Add(CacheStatus arg, CacheConnection conn, bool byRef)public void Add(CacheSysList arg, CacheConnection conn, bool byRef)
public void Add(CacheDate arg, int typeId, bool byRef)
public void Add(Nullable<(long> arg, bool byRef)public void Add(Nullable<double> arg, bool byRef)public void Add(Nullable<DateTime> arg, bool byRef)public void Add(Nullable<bool> arg, bool byRef)public void Add(Nullable<decimal> arg, bool byRef)public void Add(byte[] arg, bool byRef)public void Add(string arg, bool byRef)public void Add(CacheTime arg, bool byRef)
• arg (various data types) — An argument value.
• conn (CacheConnection) — The connection object.
• argType (Type) — The argument type.
• typeId (ClientTypeId) — if arg is an object, specifies the object type as a constant from the ClientTypeIdenumeration.
• byRef (Boolean) — If set to true, the argument is passed by reference.
Arguments
Field containing an array of currently defined method arguments.
public ArrayList Arguments
Clear()
Initializes this instance by deleting any previously specified argument values and method return settings.
public void Clear()
Get()
Gets the argument at the specified index. This method has the following overloads:
public void Get(int idx, out ICacheObject arg)public void Get(int idx, out Nullable<long> arg)public void Get(int idx, out Nullable<double> arg)public void Get(int idx, out Byte[] arg)public void Get(int idx, out String arg)public void Get(int idx, out CacheStatus arg)public void Get(int idx, out CacheTime arg)public void Get(int idx, out CacheDate arg)public void Get(int idx, out Nullable<DateTime> arg)public void Get(int idx, out Nullable<bool> arg)public void Get(int idx, out Nullable<decimal> arg)public void Get(int idx, out CacheSysList arg)
• idx (Int32) — The index specifying which argument to return.
• arg (various data types) — The argument to be returned.
ReturnValue
Field containing a Server method return value.
public CacheReturnValue ReturnValue
Using .NET and the ADO.NET Managed Provider with Caché 39
CacheMethodSignature Methods and Properties

SetColnReturnType()
Sets the method return type if a collection is to be returned.
public void SetColnReturnType(CacheConnection conn, ClientObjTypeId objTypeId, ClientTypeId colnTypeId)
• conn (CacheConnection) — The connection object.
• objTypeId (ClientObjTypeId) — The data type id for the collection elements (from the ClientObjTypeIdenumeration).
• colnTypeId (ClientTypeId) — The collection type id (from the ClientTypeId enumeration).
SetReturnType()
Sets the method return type. This method has the following overloads:
public void SetReturnType(CacheConnection conn, int typeId)public void SetReturnType(CacheConnection conn, ClientTypeId typeId)public void SetReturnType(CacheConnection conn, Type clientType)public void SetReturnType(CacheConnection conn, int objTypeId , int colnTypeId )
• conn (CacheConnection) — The connection object.
• typeId (Int32 or ClientTypeId) — The type of the return value, specified as either an integer or a constantfrom the ClientTypeId enumeration.
• clientType (System.Type) — The type of the return value, specified as a type declaration.
• objTypeId (Int32) — If the return value is a collection, specifies the data type id for the collection elements(see the ClientTypeId enumeration).
• colnTypeId (Int32) — If the return value is a collection, specifies the collection type (see theClientObjTypeId enumeration).
ClientTypeId Enumeration
The InterSystems.Data.CacheTypes.ClientTypeId enumeration includes the following values:
tVoid = -1 tObject = 0 tInt = 1 tDouble = 2 tBinary = 3 tString = 4 tStatus = 5 tTime = 6 tDate = 7 tTimeStamp = 8 tBool = 9 tCurrency = 10 tList = 11 tLongString = 12 tLongBinary = 13 tDecimal = 14 tMVDate = 15
ClientObjTypeId Enumeration
The InterSystems.Data.CacheTypes.ClientObjTypeId enumeration includes the following values:
tUnknown = 0 tListOfDT = 1 tArrayOfDT = 2 tListOfObj = 3 tArrayOfObj = 4 tRelationship = 5 tBinStream = 6 tCharStream = 7
40 Using .NET and the ADO.NET Managed Provider with Caché
Using the Caché Dynamic Binding

6Using the Caché Entity FrameworkProvider
Entity Framework is an object-relational mapper that enables .NET developers to work with relational data using domain-specific objects. It eliminates the need for most of the data-access code that developers usually need to write. Caché includesthe Caché Entity Framework Provider which enables you to use Entity Framework 6 technology to access a Caché database.(If you are using Entity Framework 5, ask your Intersystems representative for instructions.) For more information on the.NET Entity Framework, see http://www.asp.net/entity-framework.
This chapter contains the following sections:
• Setting Up Caché Entity Framework Provider—Contains system requirements, install, and setup information.
• Getting Started with Entity Framework —Describes approaches to getting started using EF.
– Code First Start by defining data classes and generate a database from the class properties.
– Database FirstDatabase First — Start with an existing database. You can set one up by following the steps in thesection Set Up a Sample Database. Then use Entity Framework to generate code for a web application based onthe fields of that database.
– Model First Model First — Start by creating a database model showing entities and relationships. Then generatea database from the model.
This section describes three approaches to getting started with Entity Framework.
6.1 Setting Up Caché Entity Framework ProviderFollow the instructions in this section to install and set up Caché Entity Framework Provider.
6.1.1 System Requirements
To use Caché Entity Framework Provider, you need the following software:
• Visual Studio 2013 (Professional or Ultimate) with Update 5 (or later update)
• Caché Entity Framework Provider distribution, located in the directory installdir\dev\dotnet\bin\v4.0.30309. Thisdirectory includes the following files, which you use in the setup instructions:
Using .NET and the ADO.NET Managed Provider with Caché 41
– CacheEF.zip, installation files.
– CacheEF.zip\setup.cmd, which installs the DLLs InterSystems.Data.CacheClient.dll andInterSystems.Data.CacheVSTools.dll.
– CacheEF.zip\Nuget\InterSystems.Data.Entity6.4.5.0.0.nupkg which installs Caché Entity Framework Provider.
– CacheEF.zip\CreateNorthwindEFDB.sql which is used to create a sample database.
6.1.2 Run Setup and Set Variables
Follow these steps:
1. Extract the contents of installdir\dev\dotnet\bin\v4.0.30309\CacheEF.zip into a folder (in the same directory as the zipfile) called CacheEF. Run \CacheEF\setup.cmd.
2. In Windows, select All Programs > Visual Studio 2013 > Visual Studio Tools.
3. In the displayed Windows Explorer folder, right-click Developer Command Prompt for VS2013 > Run as Administrator
and enter:
devenv /setup
This command repopulates this key from HKEY_LOCAL_MACHINE:
HKEY_CURRENT_USER\Software\Microsoft\VisualStudio\12.0_Config //VS 2013
6.1.3 Copy Files to Visual Studio
Copy the two files from the CacheEF directory to Visual Studio:
• SSDLToCacheSQL.tt
• GenerateCacheSQL.Utility.ttinclude
from the directory <cacheinstalldir>\dev\dotnet\bin\v4.0.30319\CacheEF\Templates to the directory C:\Program Files
(x86)\Microsoft Visual Studio 1x.0\Common7\IDE\Extensions\Microsoft\Entity Framework Tools\DBGen
6.1.4 Connect Visual Studio to Caché Server
To connect Visual Studio to a Caché instance, follow the steps below:
1. Open Visual Studio and select View > Server Explorer.
2. Right-click Data Connections and select Add Connection. In the Add Connection Dialog:
a. Select Data source as Cache Data Source (.Net Framework Data Provider for Cache)
b. Select Server
c. Enter Username and password. Click Connect.
d. Select a namespace from the list. Click OK.
6.1.5 Configure Caché Nuget Local Repository
Follow these steps to configure the Package Manager to find the local Nuget repository:
42 Using .NET and the ADO.NET Managed Provider with Caché
Using the Caché Entity Framework Provider
1. Create a directory as a Nuget repository. You might call it Nuget Repository. You could put it anywhere – a goodchoice might be <yourdoclibraryVS2013>\Projects (where Visual Studio stores projects by default).
2. Copy the file <installdir>\dev\dotnet\bin\v4.0.30319\CacheEF\Nuget\InterSystems.Data.Entity6.4.5.0.0.nupkg and pasteit into your Nuget repository directory. Click OK.
3. In Visual Studio, select Project > Manage Nuget Packages > Settings > Package Manager > Package Sources.
4. Click the plus sign+. Enter the path that contains InterSystems.Data.Entity6.4.5.0.0.nupkg. Click OK
6.2 Getting Started with Entity FrameworkThis section describes three approaches to getting started with Entity Framework.
• Code First Start by defining data classes and generate a database from the class properties.
• Database FirstDatabase First — Start with an existing database. You can set one up by following the steps in the sectionSet Up a Sample Database. Then use Entity Framework to generate code for a web application based on the fields ofthat database.
• Model First Model First — Start by creating a database model showing entities and relationships. Then generate adatabase from the model.
The sections below show examples of each of these approaches.
6.2.1 Code First
This section shows an example of how to write code to define data classes and then generate tables from the class properties.The example in this section is based on the Entity Framework Tutorial from EntityFrameworkTutorial.net(http://www.entityframeworktutorial.net/code-first/simple-code-first-example.aspx).
1. Create a new project in Visual Studio 2013 with FILE > New > Project. With a Template of Visual C# and Console
Application highlighted, enter a name for your project, such as CodeStudents. Click OK
2. Add Caché Entity Framework Provider to the project: Click TOOLS > Nuget Package Manager > Manage Nuget Packages
for Solution. Expand Online > Package Source. Caché Entity Framework Provider 6 is displayed. Click Install > Ok > IAccept. Wait for the installation to complete and then click Close.
3. Compile the project with Build > Build Solution.
4. Tell the project which system to connect to by identifying it in the App.config file as follows. From the Solution Explorerwindow, open the App.config file. Add a <connectionStrings> section (like the example shown here) as the lastsection in the <configuration> section after the <entityFramework> section.
Note: Check that the server, port, namespace, username, and password are correct for your configuration.
<connectionStrings> <add name="SchoolDBConnectionString" connectionString="SERVER = localhost; NAMESPACE = USER; port=1972; METADATAFORMAT = mssql; USER = _SYSTEM; password = SYS; LOGFILE = C:\\Users\\Public\\logs\\cprovider.log; SQLDIALECT = cache;" providerName="InterSystems.Data.CacheClient" /></connectionStrings>
Using .NET and the ADO.NET Managed Provider with Caché 43
Getting Started with Entity Framework
5. In the Program.cs file, add
using System.Data.Entity;using System.Data.Entity.Validation;using System.Data.Entity.Infrastructure;
6. Define classes:
public class Student{ public Student() { } public int StudentID { get; set; } public string StudentName { get; set; } public DateTime? DateOfBirth { get; set; } public byte[] Photo { get; set; } public decimal Height { get; set; } public float Weight { get; set; } public Standard Standard { get; set; }}
public class Standard{ public Standard() { } public int StandardId { get; set; } public string StandardName { get; set; } public ICollection<Student> Students { get; set; }}
public class SchoolContext : DbContext{ public SchoolContext() : base("name=SchoolDBConnectionString") { } public DbSet<Student> Students { get; set; } public DbSet<Standard> Standards { get; set; }}
Check that class SchoolContext points to your connection in App.config.
7. Add code to Main.
using (var ctx = new SchoolContext()){ Student stud = new Student() { StudentName = "New Student" }; ctx.Students.Add(stud); ctx.SaveChanges();}
8. Compile and run.
Check the namespace (USER in this case). You see three tables created: dbo.Standards, dbo.Students (which has a newstudent added), and dbo._MigrationHistory (which holds information about table creation).
6.2.2 Set Up a Sample Database
If you want to set up a sample database for use with the Database First section, follow the steps in this section. These stepsset up and load the sample database CreateNorthwindEFDB.sql.
1. In the Management Portal, select System > Configuration > Namespaces and click Create New Namespace.
2. Name your namespace NORTHWINDEF.
a. For Select an Existing Database for Globals, click Create New Database. Enter NORTHWINDEF as the databaseand <installdir>\mgr\EFdatabase as the directory. Click Next and Finish
b. For Select an Existing Database for Routines, select NORTHWINDEF from the dropdown list.
44 Using .NET and the ADO.NET Managed Provider with Caché
Using the Caché Entity Framework Provider

c. Click Save.
3. In the Management Portal, select System > Configuration > SQL and Object Settings > General SQL Settings.
a. In the SQL tab, enter the Default SQL Schema Name as dbo.
b. In the SQL tab, select Support Delimited Identifiers (default is on)
c. In the DDL tab, select all items.
d. Click Save.
4. Select System > Configuration > SQL and Object Settings > TSQL Compatability Settings
a. Set the DIALECT to MSSQL.
b. Set QUOTED_IDENTIFIER to ON.
c. Click Save.
5. In a Terminal window, change to your new namespace with
zn “NORTHWINDEF”
6. If this is not the first time you are setting up the database, purge existing data with:
do $SYSTEM.OBJ.DeleteAll("e") d Purge^%apiSQL()
7. If you have not already done so, using an unzip program, extract files frominstalldir\dev\dotnet\bin\v4.0.30319\CacheEF.zip to a folder called CacheEF.
8. To load the ddl, enter
do $SYSTEM.SQL.DDLImport("MSSQL","_system","<installdir>\dev\dotnet\bin\v4.0.30319\CacheEF\CreateNorthwindEFDB.sql")
In the Server Explorer window, you can expand the Caché server entry to view NorthwindEF database elements: Tables,Views, Function, Procedures. You can examine each element, retrieve Data for Tables and Views, Execute Functions andProcedures. If you right-click an element and select Edit, Studio opens showing corresponding class and position on requestedelement if applicable.
6.2.3 Database First
To use the database first approach, start with an existing database and use Entity Framemaker to generate code for a webapplication based on the fields of that database.
1. Create a new project in Visual Studio 2013 with FILE > New > Project of type Visual C# > Console Application > OK.
2. Click TOOLS > Nuget Package Manager > Manage Nuget Packages for Solution. Expand Online > Package Source,which lists Caché Entity Framework Provider 6. Click Install > Ok > Accept the license > Close.
3. Compile the project with Build > Build Solution.
4. Select PROJECT > Add New Item > Visual C# Items > Ado.NET Entity Data Model. You can give your model a name.Here we use the default of Model1. Click Add.
5. In the Entity Data Model Wizard:
a. Select EF Designer from database > Next
b. In the Choose Your Data Connection screen, the data connection field should already be to your Northwind database.It doesn’t matter whether you select Yes, Include or No, exclude to the sensitive data question.
Using .NET and the ADO.NET Managed Provider with Caché 45
Getting Started with Entity Framework

c. On the bottom of screen you can define a connection settings name. The default is localhostEntities. Thisname is used later on.
d. In the Choose Your Database Objects and Settings screen, answer the question Which Database objects do you
want to include in your model? by selecting all objects: Tables, Views, and Stored Procedures andFunctions. This includes all Northwind tables.
e. Click Finish.
f. In several seconds, you’ll see a Security Warning. Click OK to run the template.
g. Visual Studio may display an Error List with many warnings. You can ignore these.
6. For a model name of Model1, Visual Studio generates multiple files under Model1.edmx – including a UI diagram asModel1.edmx itself, classes representing tables under Model1.tt, and context class localhostEntities inModel1.Context.tt->Model1.Context.cs.
In the Solution Explorer window, you can inspect Model1.Context.cs. The constructor Constructer publiclocalhostEntities() : base("name=localhostEntities") points to App.Config connection string:
<connectionStrings> <add name="localhostEntities" connectionString="metadata=res://*/Model1.csdl| res://*/Model1.ssdl| res://*/Model1.msl;provider=InterSystems.Data.CacheClient; provider connection string=" ApplicationName=devenv.exe; ConnectionLifetime=0; ConnectionTimeout=30; ConnectionReset=False; Server=localhost; Namespace=NORTHWINDEF; IsolationLevel=ReadUncommitted; LogFile=C:\Users\Public\logs\cprovider.log; MetaDataFormat=mssql; MinPoolSize=0; MaxPoolSize=100; Pooling=True; PacketSize=1024; Password=SYS; Port=1972; PreparseCacheSize=200; SQLDialect=cache; Ssl=False; SoSndBuf=0; SoRcvBuf=0; StreamPrefetch=0; TcpNoDelay=True; User=_SYSTEM; WorkstationId=DMITRY1"" providerName="System.Data.EntityClient" /></connectionStrings>
7. Compile your project with BUILD > Build Solution.
Below are two program samples that you can paste into Main() in Program.cs:
You can traverse a list of customers using:
using (var context = new localhostEntities()) { var customers = context.Customers; foreach (var customer in customers) { string s = customer.CustomerID + '\t' + customer.ContactName; }}
You can get a list of orders for CustomerID using:
using (var context = new localhostEntities()) { var customerOrders = from c in context.Customers where (c.CustomerID == CustomerID)
46 Using .NET and the ADO.NET Managed Provider with Caché
Using the Caché Entity Framework Provider
select new { c, c.Orders };
foreach (var order in customerOrders) { for (int i = 0 ; i < order.Orders.Count; i++) { var orderElement = order.Orders.ElementAt(i); string sProduct = ""; //Product names from OrderDetails table for (int j = 0; j < orderElement.OrderDetails.Count; j++) { var product = orderElement.OrderDetails.ElementAt(j); sProduct += product.Product.ProductName; sProduct += ","; } string date = orderElement.OrderDate.ToString(); } }}
6.2.4 Model First
Use the model first approach by generating a database model basd on the diagram you created in the Database First section.Then generate a database from the model.
This example shows you how to create a database that contains two entities,
1. Look at the Entity Framework UI edmx diagram Model1.edmx. In a blank area of the diagram, right-click and selectProperties.
2. Change DDL Generation Template to SSDTLtoCacheSQL.tt.
3. Compile Project.
4. In a blank area of the diagram, right-click and select Generate Database From Model. After the DDL is generated, clickFinish.
5. Studio creates and opens the file Model1.edmx.sql.
6. Import your table definitions into Caché by executing the following command in a terminal:
do $SYSTEM.SQL.DDLImport("MSSQL","_system","C:\\<myPath>\\Model1.edmx.sql")
Using .NET and the ADO.NET Managed Provider with Caché 47
Getting Started with Entity Framework
