using schedule builder to find and enroll for classes builder... · schedule builder page 1 of 9...
TRANSCRIPT
Schedule Builder
Page 1 of 9 Last Updated: March 2019
Using Schedule Builder to Find and Enroll for Classes
Schedule Builder helps students efficiently navigate the complex and often-frustrating schedule planning
and enrollment process by allowing you to graphically view schedule options based on your personal and
academic needs.
Using Schedule Builder is as easy as following these five steps:
1. Launch the Schedule Builder from your Enroll & Pay Student Center.
2. Select Your Courses
3. View Results and Refine Your Search
4. Save/Favorite Your Work
5. Proceed With Enrollment
Note: Students with disabilities can access all features of the Schedule Builder by clicking on the
icon at any time. This will render all features of Schedule Builder that is
accessible via a screen reader.
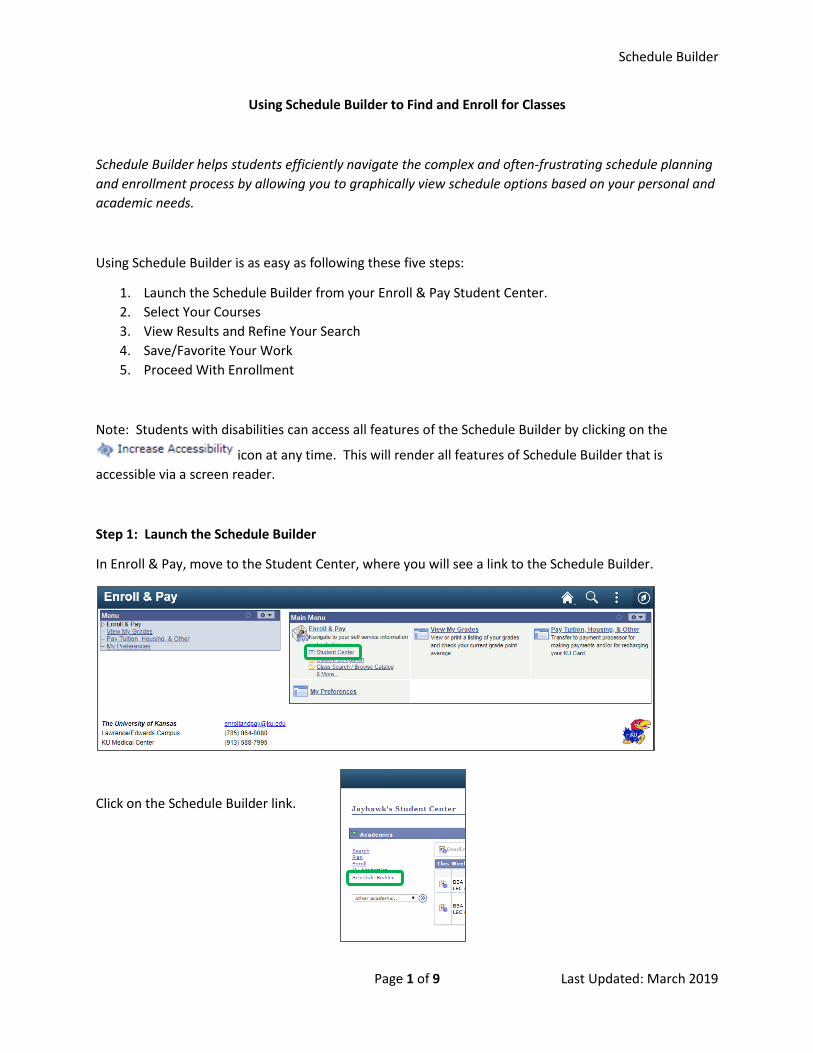
Step 1: Launch the Schedule Builder
In Enroll & Pay, move to the Student Center, where you will see a link to the Schedule Builder.
Click on the Schedule Builder link.
Schedule Builder
Page 2 of 9 Last Updated: March 2019
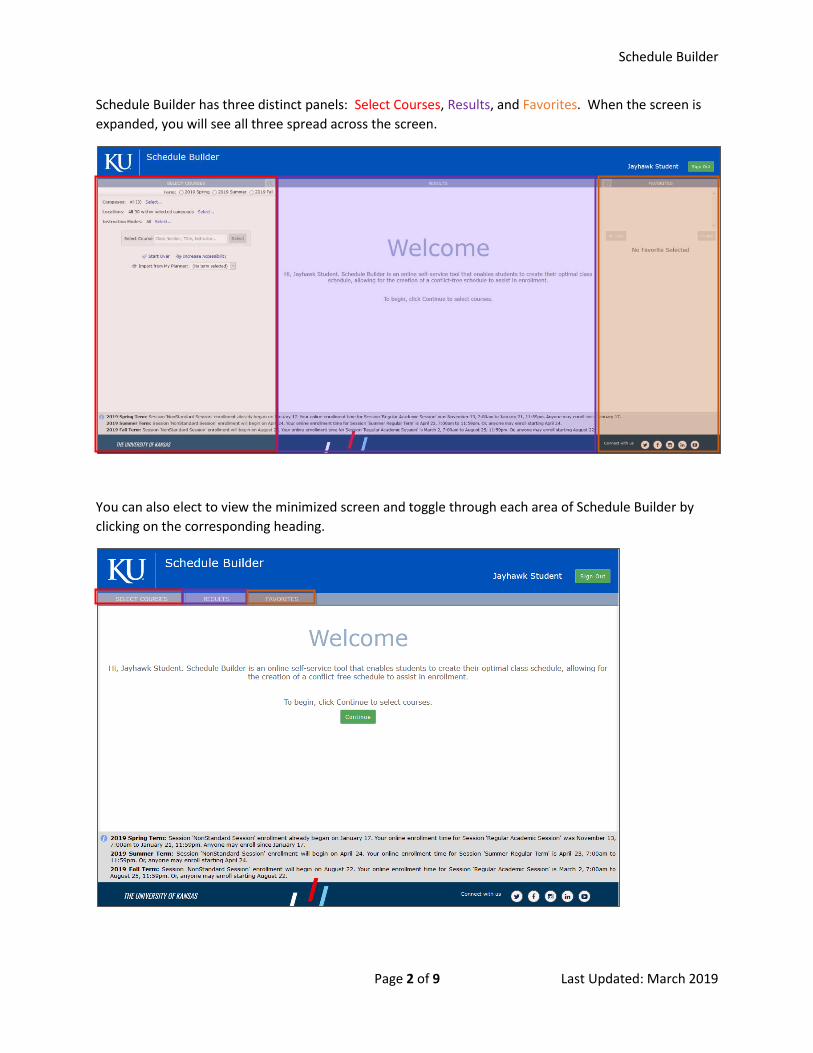
Schedule Builder has three distinct panels: Select Courses, Results, and Favorites. When the screen is
expanded, you will see all three spread across the screen.
You can also elect to view the minimized screen and toggle through each area of Schedule Builder by
clicking on the corresponding heading.

Schedule Builder
Page 3 of 9 Last Updated: March 2019
Step 2: Select Your Courses
Since your course selection is dependent on the term you wish to enroll in, you will be asked to select a
term using the corresponding radio button.
If you have previously enrolled in classes for that particular term, they will appear below the search box:
Previously Enrolled
Course
Filtering Options

Schedule Builder
Page 4 of 9 Last Updated: March 2019
Once you have selected a term and filtered your options (as appropriate), you can start to search for
courses in the search bar. You can search by course, course description, or instructor and the search bar
will display all courses that match your criteria. Once selected, the course is added to the possible list of
courses you wish to take. Repeat the course search and selection for all desired courses for the term.
Schedule Builder will generate schedules for the desired course(s) that have been
selected. To adjust which courses are checked in the system, you can check or uncheck
the box next to the course name.
To completely remove a course from your desired classes, click on the ‘x’ in the upper right hand corner
of the box for that section. When you have selected the courses you’re ready to view, select on the
button. You can clear your search by selecting at any time.
Desired
Courses for
Generated
Schedules
To Remove
a Course

Schedule Builder
Page 5 of 9 Last Updated: March 2019
Step 3: View Results and Refine Search
Once you have completed your course selection, you can turn your attention to viewing schedule
options, which are displayed in the Results Panel.
The results panel displays all schedule options in a list with detailed information as well as a graphical
timetable view so you can make the most informed decision about the schedule that will work best for
you. Students can also easily navigate through the generated schedule results by clicking on the left and
right arrows or by swiping left or right on a mobile device.
Schedule Builder
Page 6 of 9 Last Updated: March 2019
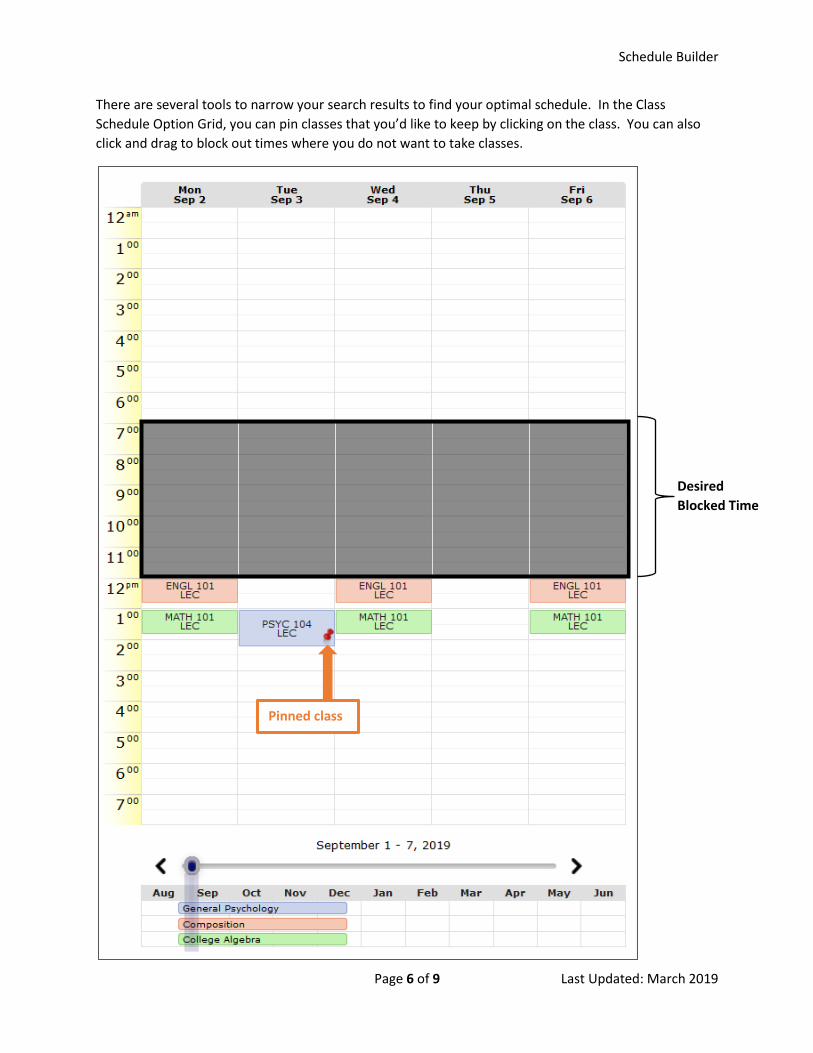
There are several tools to narrow your search results to find your optimal schedule. In the Class
Schedule Option Grid, you can pin classes that you’d like to keep by clicking on the class. You can also
click and drag to block out times where you do not want to take classes.
Desired
Blocked Time
Pinned class
Schedule Builder
Page 7 of 9 Last Updated: March 2019
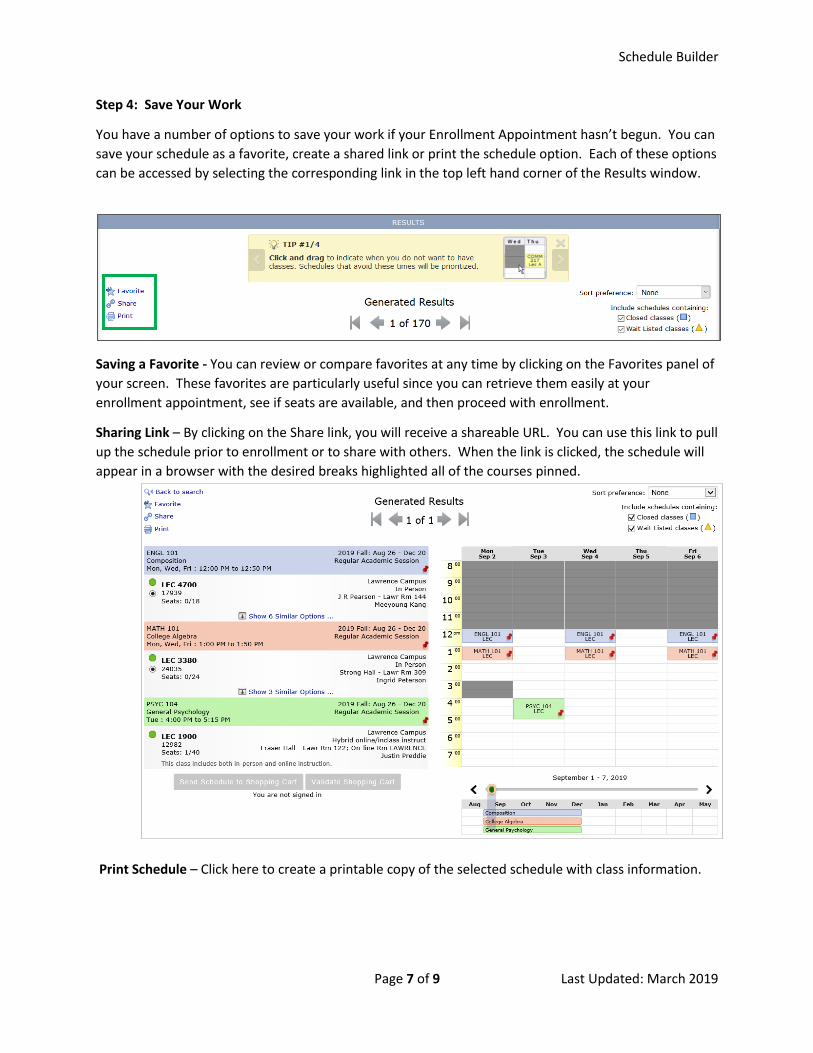
Step 4: Save Your Work
You have a number of options to save your work if your Enrollment Appointment hasn’t begun. You can
save your schedule as a favorite, create a shared link or print the schedule option. Each of these options
can be accessed by selecting the corresponding link in the top left hand corner of the Results window.
Saving a Favorite - You can review or compare favorites at any time by clicking on the Favorites panel of
your screen. These favorites are particularly useful since you can retrieve them easily at your
enrollment appointment, see if seats are available, and then proceed with enrollment.
Sharing Link – By clicking on the Share link, you will receive a shareable URL. You can use this link to pull
up the schedule prior to enrollment or to share with others. When the link is clicked, the schedule will
appear in a browser with the desired breaks highlighted all of the courses pinned.
Print Schedule – Click here to create a printable copy of the selected schedule with class information.

Schedule Builder
Page 8 of 9 Last Updated: March 2019
Step 5: Proceed With Enrollment
Students are able to transfer classes from Schedule Builder directly to the Shopping Cart in Enroll & Pay
when they are ready to enroll. Once you click on Send Schedule to Shopping Cart, the Schedule Builder
will validate your selection and check for open seats.
Click on the Do Actions button to add classes from Schedule Builder to the Enroll & Pay Shopping Cart.

Schedule Builder
Page 9 of 9 Last Updated: March 2019
Schedule Builder will give you additional notes on the class in the “Results” column.
In order to complete enrollment, the student will still need to go to Enroll & Pay and enroll using the
classes listed in their Shopping Cart.
Additional assistance for enrollment can be found here: http://sis.ku.edu/enrollpay-student.