using scratch to develop numeracy - pdst technology in education
TRANSCRIPT

USING SCRATCH TO DEVELOP
NUMERACY (NCTE/LERO)

©Lero, PDST Technology in Education (formerly NCTE), 2013 Page 2

©Lero, PDST Technology in Education (formerly NCTE), 2013 Page 3
Table of Contents
Page Number
Course Introduction page 4
Module 1: page 5
Module 2: page 22
Module 3: page 35
Module 4: page 47
Module 5: page 57

©Lero, PDST Technology in Education (formerly NCTE), 2013 Page 4
Course Introduction
Scratch is a free application, developed by the MIT Media Lab, which allows
users to create and share their own interactive stories, animations and games.
It is easier to use than traditional programming languages as it consists of
graphical blocks which snap together.
This course enables teachers to learn how to use Scratch and introduce it to
their pupils to help them explore aspects of the curriculum in an exciting and
engaging manner. The course focuses on using Scratch to create projects which
support the concepts, content and skills of the mathematics curriculum.
Participants completing this course will be enabled to:
Use Scratch programming to support teaching and learning in the primary
curriculum.
Develop projects using Scratch.
Plan effective lesson strategies for using Scratch in the classroom.
Develop an e-Learning action plan to outline how it will be used in your
classroom.

©Lero, PDST Technology in Education (formerly NCTE), 2013 Page 5
Using Scratch to Develop
Numeracy
Module 1

©Lero, PDST Technology in Education (formerly NCTE), 2013 Page 6
Module 1
Suggested Duration of Module
4 Hours
Objectives
Content of Module 1:
1. Download Scratch
2. Introduction to the Scratch Interface and Scratch projects
3. Introduction to the Scratch palettes
4. Movement in Scratch
5. Costume Changes and Background Changes
6. Registration for online resources
7. Sound in Scratch
8. Saving a Project Online
9. Discussion Time

©Lero, PDST Technology in Education (formerly NCTE), 2013 Page 7
1. Download Scratch
There are two versions of Scratch available. Scratch 2.0 is the newest version
which is entirely online at www.scratch.mit.edu.
This course will use Scratch 1.4, which can be downloaded at
http://info.scratch.mit.edu/Scratch_1.4_Download. Scratch 1.4 is used offline
which means it is not dependent on a fast broadband connection. Primary
school networks with poor or unreliable broadband may not handle Scratch 2.0
when several computers are running simultaneously.
A downloadable version of Scratch 2.0 is being released in summer 2013.
2. Introduction to the Scratch Interface and Scratch Projects
Once Scratch has been downloaded and opened, the following Scratch
interface will appear.
Stage – This is where your sprites and backgrounds appear. This is where you
see a program running.
Sprite List – Thumbnails of all your sprites

©Lero, PDST Technology in Education (formerly NCTE), 2013 Page 8
Scripts Area – This is where you will place code to create programs
Blocks Palette – The blocks of code are grouped into different categories;
motion, control, looks, sensing, sound, operators, pen and variables.
3. Introduction to the Scratch palettes
When working through the palettes, note that they are colour coded. This will
aid you with programming. To find out what a block does right click on the
block and select help.
Motion Palette enables the sprites to move around the stage. Movement is
based on the (x,y) coordinates.
Looks Palette is used to alter the sprites and backgrounds. This includes
switching between different costumes, changing colours and special effects.
Sound Palette enables the user to add sounds to specific sprites and
backgrounds. Blocks include a range of instruments, both tuned and untuned.
This palette also allows the user to import songs and sound effects.
Pen Palette facilitates drawing in Scratch. This can be particularly useful for 2D
shapes.
Control Palette is the brain of the piece of code. These blocks tell the code
when to start, when to stop and when to repeat. The control palette also
facilitates interaction between sprites.
Sensing Palette allows for further interaction between sprites and also
interaction between the user and the project.
Operators Palette includes blocks such as add, subtract, multiply and divide.
These blocks, when combined with other pieces of code, extend the
capabilities of a project. They are particularly useful in creating games and
explicit Maths tasks.
Variables Palette allows users to create variables, such as “score” and “lives”;
and lists, such as “questions” and “answers” for quizzes.

©Lero, PDST Technology in Education (formerly NCTE), 2013 Page 9
4. Movement in Scratch
Participant Activity
Work through the following tasks as your tutor completes them on the IWB.
1. Click on the sprite in the sprites area. Right click on it and delete it.
2. Click on “choose new sprite from file”. Choose a new sprite.
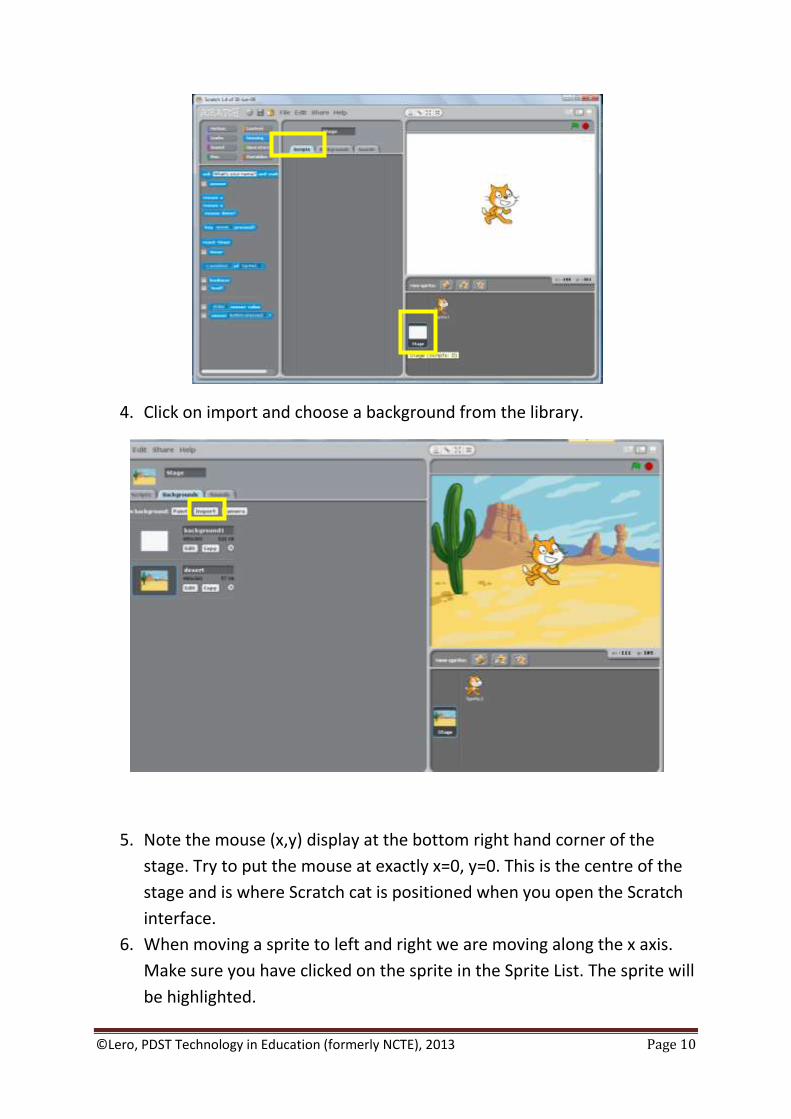
3. Click on stage in the Sprite List, and then click on Backgrounds.
©Lero, PDST Technology in Education (formerly NCTE), 2013 Page 10
4. Click on import and choose a background from the library.
5. Note the mouse (x,y) display at the bottom right hand corner of the
stage. Try to put the mouse at exactly x=0, y=0. This is the centre of the
stage and is where Scratch cat is positioned when you open the Scratch
interface.
6. When moving a sprite to left and right we are moving along the x axis.
Make sure you have clicked on the sprite in the Sprite List. The sprite will
be highlighted.

©Lero, PDST Technology in Education (formerly NCTE), 2013 Page 11
There are several ways to move left and right:
Use the “move 10 steps” block
This will move the sprite 10 steps to the right.
To increase the number of steps click on the number 10. This will be
highlighted in blue.
You can then type in how many steps the sprite will move.
Now, if +10 steps will move the sprite to the right, as above, how can we move
the sprite to the left? We type in -10 steps.
Use the “change x by 10” block
©Lero, PDST Technology in Education (formerly NCTE), 2013 Page 12
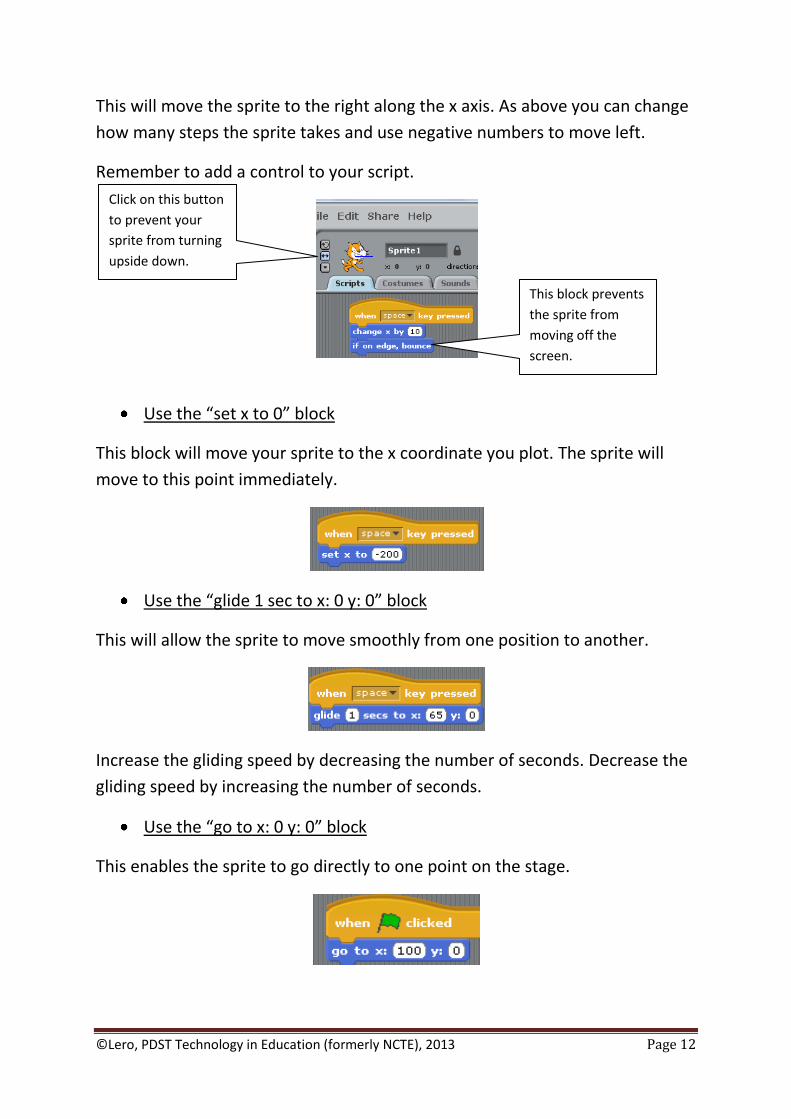
This will move the sprite to the right along the x axis. As above you can change
how many steps the sprite takes and use negative numbers to move left.
Remember to add a control to your script.
Use the “set x to 0” block
This block will move your sprite to the x coordinate you plot. The sprite will
move to this point immediately.
Use the “glide 1 sec to x: 0 y: 0” block
This will allow the sprite to move smoothly from one position to another.
Increase the gliding speed by decreasing the number of seconds. Decrease the
gliding speed by increasing the number of seconds.
Use the “go to x: 0 y: 0” block
This enables the sprite to go directly to one point on the stage.
Click on this button
to prevent your
sprite from turning
upside down.
This block prevents
the sprite from
moving off the
screen.

©Lero, PDST Technology in Education (formerly NCTE), 2013 Page 13
It is also possible to move up and down on the stage
When moving a sprite up and down we are moving along the y axis. Firstly,
make sure you have clicked on the sprite in the Sprite List.
Use the “change y by 10” block
This will move the sprite up along the y axis. As above you can change how
many steps the sprite takes and use negative numbers to move down.
Remember to add a control to your script.
Use the “set y to 0” block
This block will move your sprite to the y coordinate that you plot.
Use the “glide 1 sec to x: 0 y: 0” block
This will allow the sprite to move smoothly from one position to another.
Use the “go to x: 0 y: 0” block
©Lero, PDST Technology in Education (formerly NCTE), 2013 Page 14
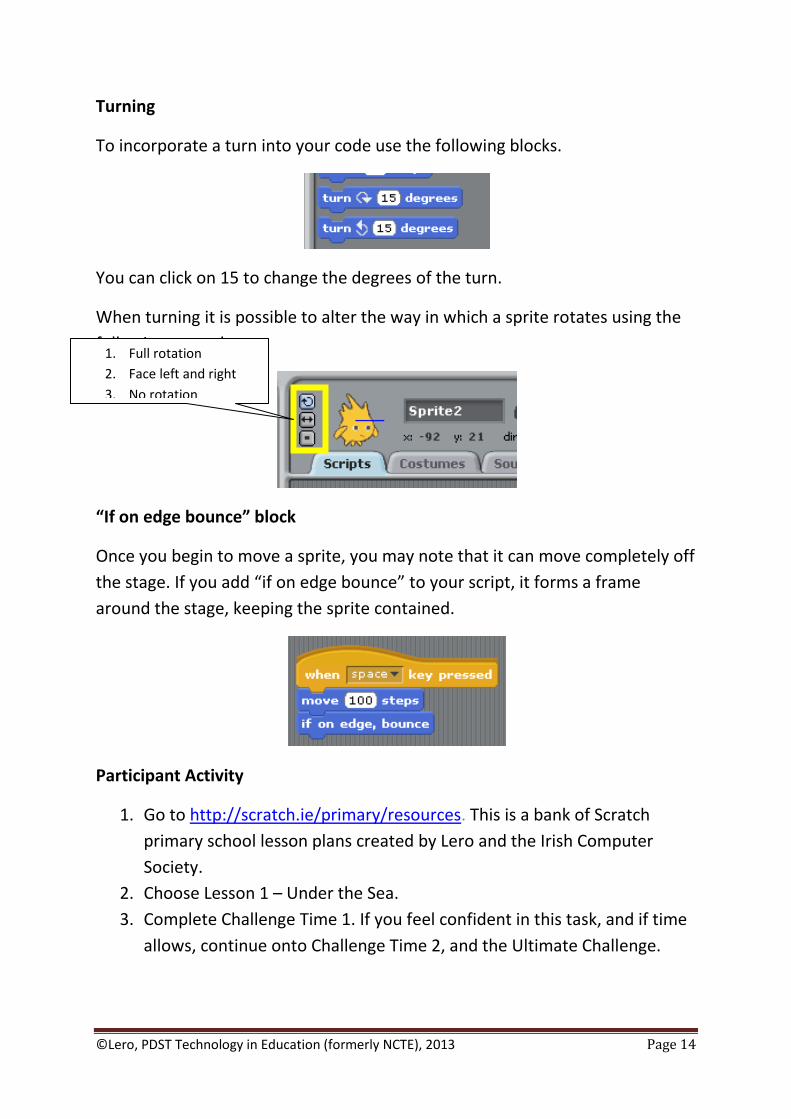
Turning
To incorporate a turn into your code use the following blocks.
You can click on 15 to change the degrees of the turn.
When turning it is possible to alter the way in which a sprite rotates using the
following controls.
“If on edge bounce” block
Once you begin to move a sprite, you may note that it can move completely off
the stage. If you add “if on edge bounce” to your script, it forms a frame
around the stage, keeping the sprite contained.
Participant Activity
1. Go to http://scratch.ie/primary/resources. This is a bank of Scratch
primary school lesson plans created by Lero and the Irish Computer
Society.
2. Choose Lesson 1 – Under the Sea.
3. Complete Challenge Time 1. If you feel confident in this task, and if time
allows, continue onto Challenge Time 2, and the Ultimate Challenge.
1. Full rotation
2. Face left and right
3. No rotation
©Lero, PDST Technology in Education (formerly NCTE), 2013 Page 15
* Debugging – To view your script in slow motion, with the code highlighted,
click on “Edit”, then “Start single stepping”. This will help when you are
looking for errors in your programs.
4. Saving work in Scratch is similar to Microsoft applications. Click on “File”
and “Save” and give the project a meaningful name. This will save it
within the Scratch projects folder. If you wish to save the project
somewhere else, click on “File” and “Save As”.
5. In the “About this Project” section, fill in details about the project that
includes a description of the project, what controls activate the program
and any other information you wish to include. You may also include an
author in the “Project author” field.
5. Costume Changes and Background Changes
Costume and background change enables users to create very effective
animations quite easily.
Participant Activity
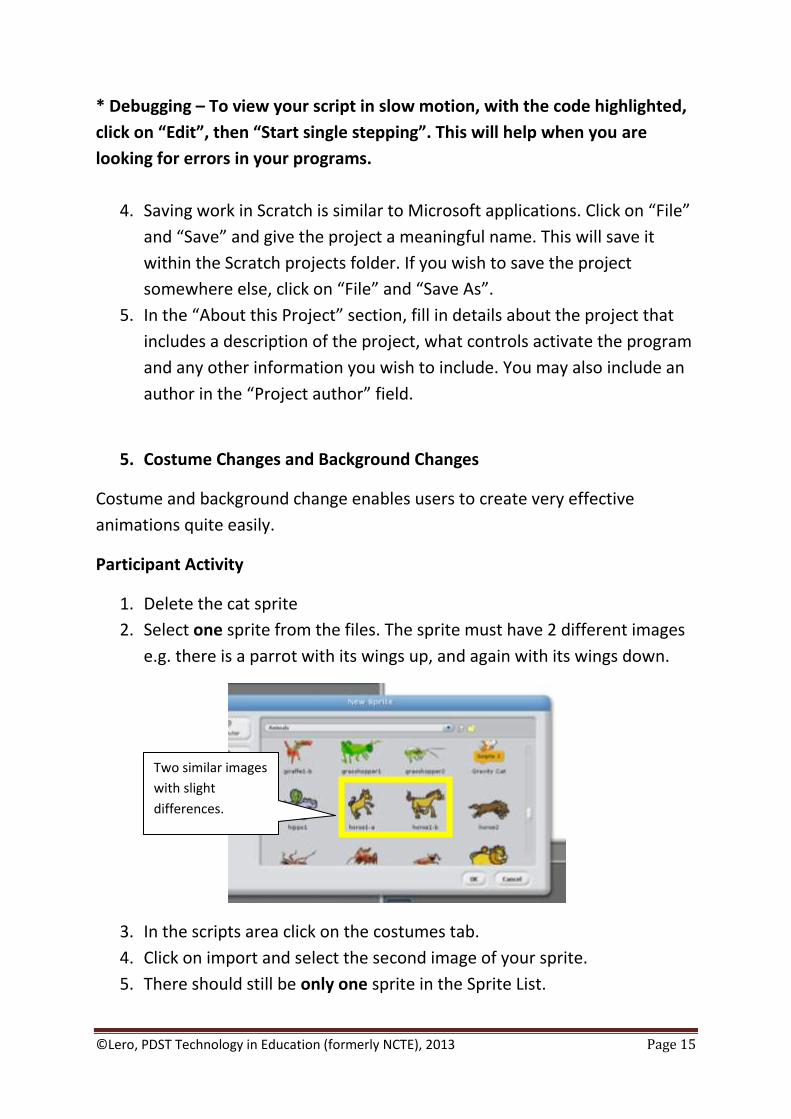
1. Delete the cat sprite
2. Select one sprite from the files. The sprite must have 2 different images
e.g. there is a parrot with its wings up, and again with its wings down.
3. In the scripts area click on the costumes tab.
4. Click on import and select the second image of your sprite.
5. There should still be only one sprite in the Sprite List.
Two similar images
with slight
differences.

©Lero, PDST Technology in Education (formerly NCTE), 2013 Page 16
6. Click back into the scripts tab and we will now code the costume change.
7. In the purple Looks Palette pull out the block “switch to costume”. With
the black drop down arrow on the block select the costume you wish to
appear first.
8. Pull out a second “switch to costume” block. Select the second costume.
9. Attach a control to start the script.
10. To repeat this code we use a loop. There are two options.
a. Repeat a specific number of times
We add the wait
blocks to slow down
the script. The wait
time can be edited
©Lero, PDST Technology in Education (formerly NCTE), 2013 Page 17
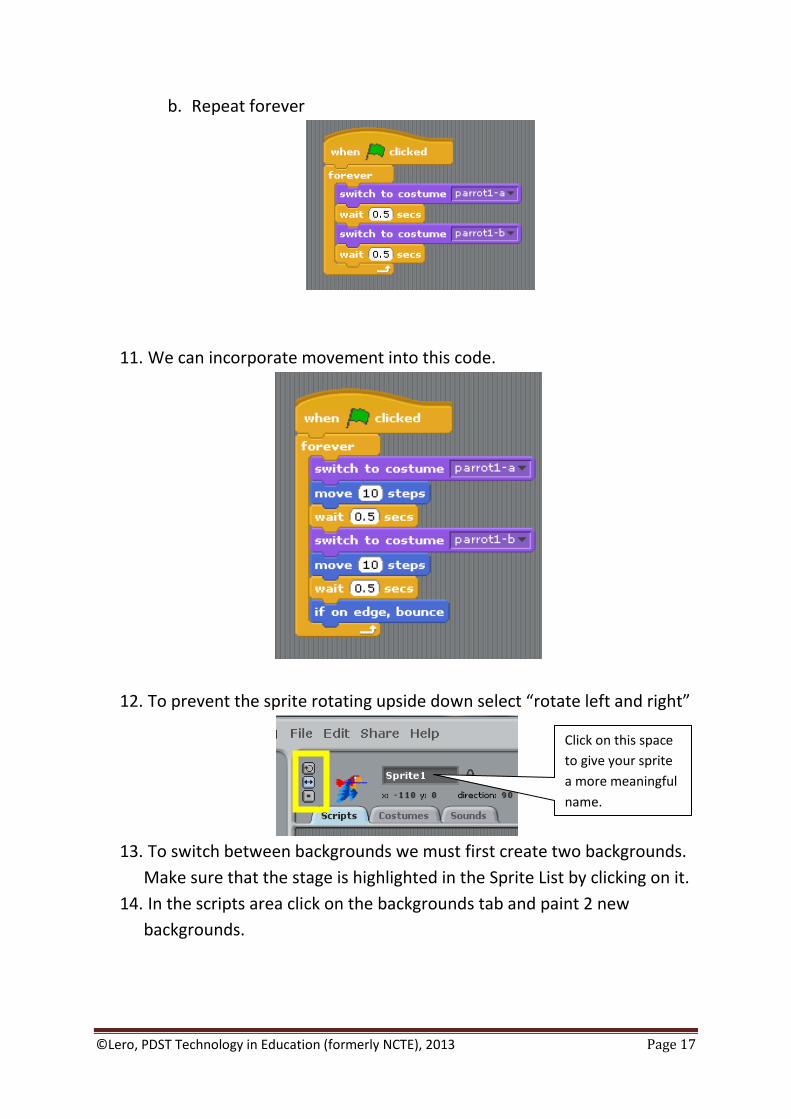
b. Repeat forever
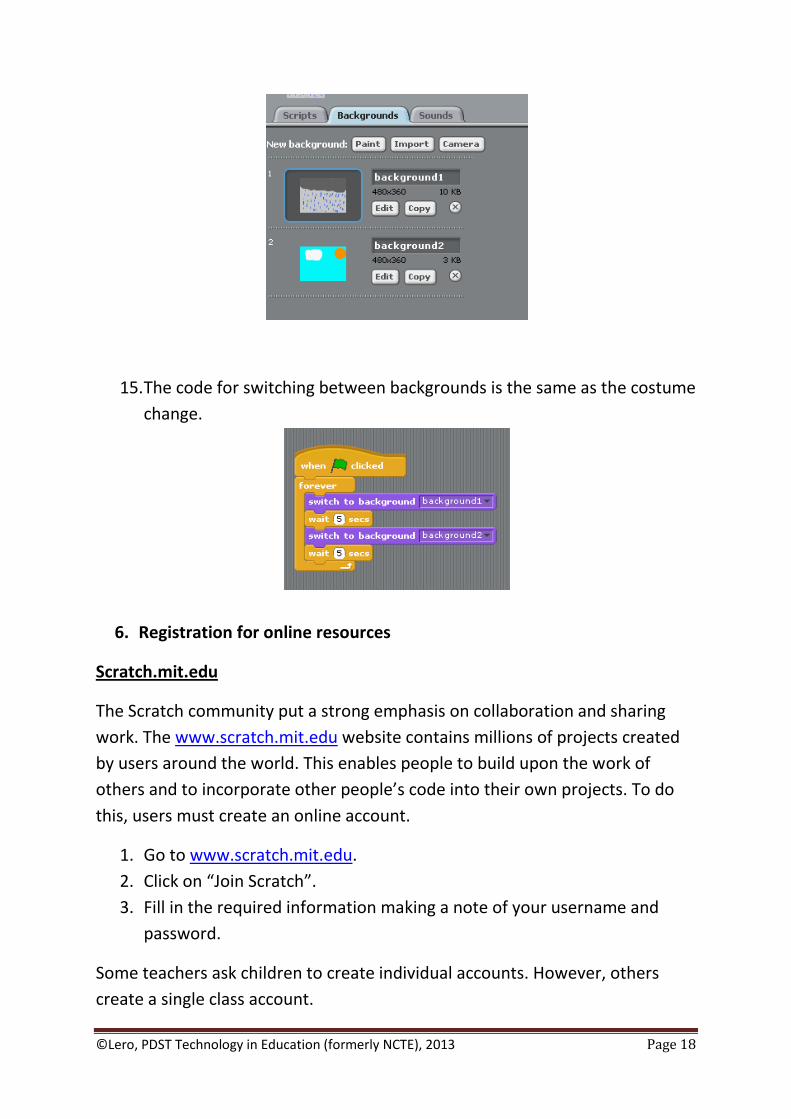
11. We can incorporate movement into this code.
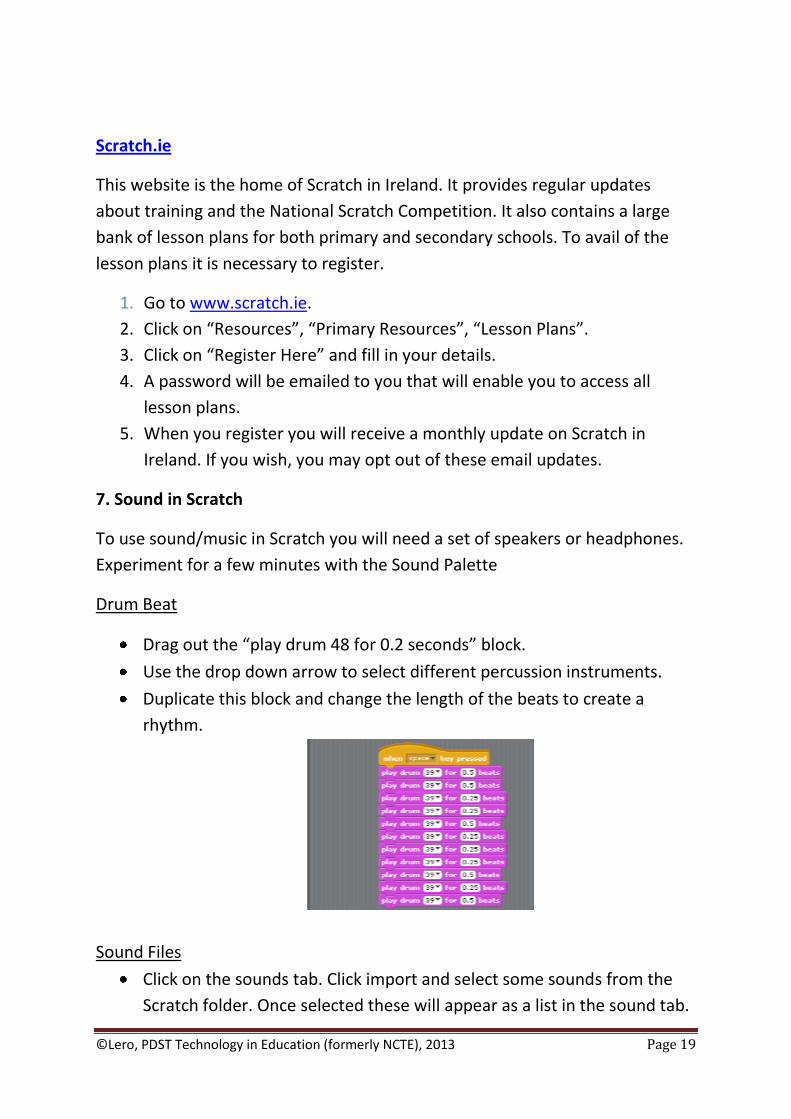
12. To prevent the sprite rotating upside down select “rotate left and right”
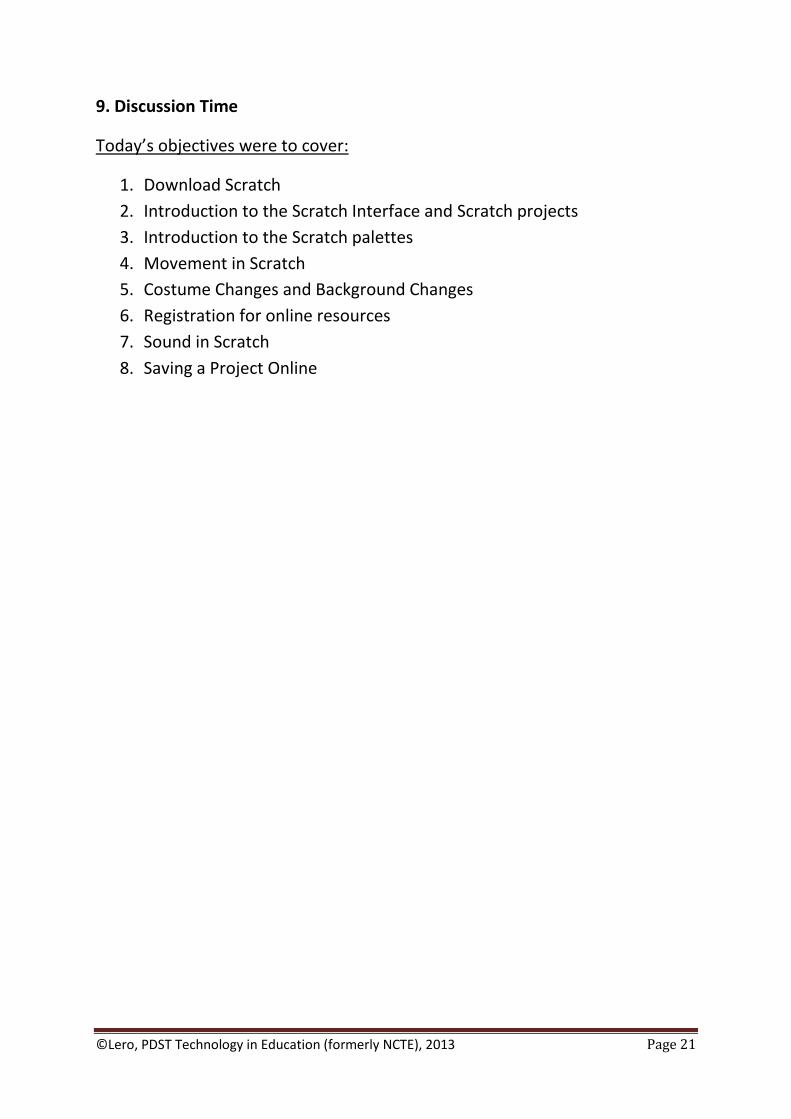
13. To switch between backgrounds we must first create two backgrounds.
Make sure that the stage is highlighted in the Sprite List by clicking on it.
14. In the scripts area click on the backgrounds tab and paint 2 new
backgrounds.
Click on this space
to give your sprite
a more meaningful
name.
©Lero, PDST Technology in Education (formerly NCTE), 2013 Page 18
15. The code for switching between backgrounds is the same as the costume
change.
6. Registration for online resources
Scratch.mit.edu
The Scratch community put a strong emphasis on collaboration and sharing
work. The www.scratch.mit.edu website contains millions of projects created
by users around the world. This enables people to build upon the work of
others and to incorporate other people’s code into their own projects. To do
this, users must create an online account.
1. Go to www.scratch.mit.edu.
2. Click on “Join Scratch”.
3. Fill in the required information making a note of your username and
password.
Some teachers ask children to create individual accounts. However, others
create a single class account.
©Lero, PDST Technology in Education (formerly NCTE), 2013 Page 19
Scratch.ie
This website is the home of Scratch in Ireland. It provides regular updates
about training and the National Scratch Competition. It also contains a large
bank of lesson plans for both primary and secondary schools. To avail of the
lesson plans it is necessary to register.
1. Go to www.scratch.ie.
2. Click on “Resources”, “Primary Resources”, “Lesson Plans”.
3. Click on “Register Here” and fill in your details.
4. A password will be emailed to you that will enable you to access all
lesson plans.
5. When you register you will receive a monthly update on Scratch in
Ireland. If you wish, you may opt out of these email updates.
7. Sound in Scratch
To use sound/music in Scratch you will need a set of speakers or headphones.
Experiment for a few minutes with the Sound Palette
Drum Beat
Drag out the “play drum 48 for 0.2 seconds” block.
Use the drop down arrow to select different percussion instruments.
Duplicate this block and change the length of the beats to create a
rhythm.
Sound Files
Click on the sounds tab. Click import and select some sounds from the
Scratch folder. Once selected these will appear as a list in the sound tab.

©Lero, PDST Technology in Education (formerly NCTE), 2013 Page 20
You may also import sounds that have been saved to desktop from
websites such as www.pacdv.com/sounds.
Click back into the scripts tab.
Use the “Play Sound” block to incorporate the sounds you have chosen.
In the sounds tab you can also record your own sounds. Most laptops
have an inbuilt microphone. If this is not present you must attach an
external microphone to record.
Sounds may also be added to the background.
Participant Activity
1. Go to http://scratch.ie/primary/resources. Choose Lesson 3 – Battle of
the Bands. You will need to enter the password to access this lesson.
2. Complete Challenge Time 2. If you feel confident in this task, and if time
allows, continue to the Ultimate Challenge.
8. Saving a Project Online
1. Select one of your completed projects.
2. Click on “Share”, beside “File”.
3. Select “Share this project online”
4. Enter the username and password you created for your scratch.mit.edu
account.
5. Ensure the Project Notes are completed. The Project Notes can be
viewed by other users to understand more about your project.
6. When you log into scratch.mit.edu your project will be visible in “My
Stuff”.
7. Upload all the projects you created today. This means you will be able to
access them at home and edit them online. You should continue to
upload your work throughout the week.
©Lero, PDST Technology in Education (formerly NCTE), 2013 Page 21
9. Discussion Time
Today’s objectives were to cover:
1. Download Scratch
2. Introduction to the Scratch Interface and Scratch projects
3. Introduction to the Scratch palettes
4. Movement in Scratch
5. Costume Changes and Background Changes
6. Registration for online resources
7. Sound in Scratch
8. Saving a Project Online
©Lero, PDST Technology in Education (formerly NCTE), 2013 Page 22
Using Scratch to Develop
Numeracy
Module 2
©Lero, PDST Technology in Education (formerly NCTE), 2013 Page 23
Module 2
Suggested Duration of Module
4 Hours
Objectives
Content of Module 2:
1. Broadcasts in Scratch
2. Variables in Scratch
3. Drawing with Scratch
4. Discussion Time
Participants are asked to bring a digital camera for Module 3 of this course
(tomorrow). If your computer does not have an SD card reader please bring the
USB connector for your camera.

©Lero, PDST Technology in Education (formerly NCTE), 2013 Page 24
1. Broadcasts in Scratch
A broadcast is used to send a message from one sprite to another. A broadcast
is like a radio signal. It is sent out from one sprite or background. It is received
by all the sprites and the stage. Once a sprite receives a broadcast it can be
programmed to react in a particular way.
Participant Activity
1. Select two Sprites from the folders or draw two sprites.
2. We are going to code a conversation between these sprites so have
them face each other.
a. If a sprite is turned the wrong way, click on the costumes tab and
click “Edit”. This brings you into the Paint Editor. The two
highlighted buttons allow you to flip the sprite.
3. Give your sprites meaningful names e.g. Clever Cat
4. We will code the first sprite’s first words. Ensure the sprite is highlighted
in blue in the Sprite List. Click on the Scripts tab.

©Lero, PDST Technology in Education (formerly NCTE), 2013 Page 25
5. Use the purple Looks Palette. Pull out “Say Hello for 2 secs”. Click on
Hello to edit the speech. Add a control block.
6. To get the second sprite to speak we must first send out a signal that the
first sprite is finished speaking. This is what a broadcast is for.
7. Click on the Control Palette. Pull out the “broadcast” block. Click on the
black dropdown arrow and create a new broadcast. Call it something
meaningful e.g. message 1.
8. Broadcasts work in the code but do not appear on the stage.
When you want to
create code for a
sprite, ensure that
the correct sprite is
highlighted in the
Sprite List.
©Lero, PDST Technology in Education (formerly NCTE), 2013 Page 26
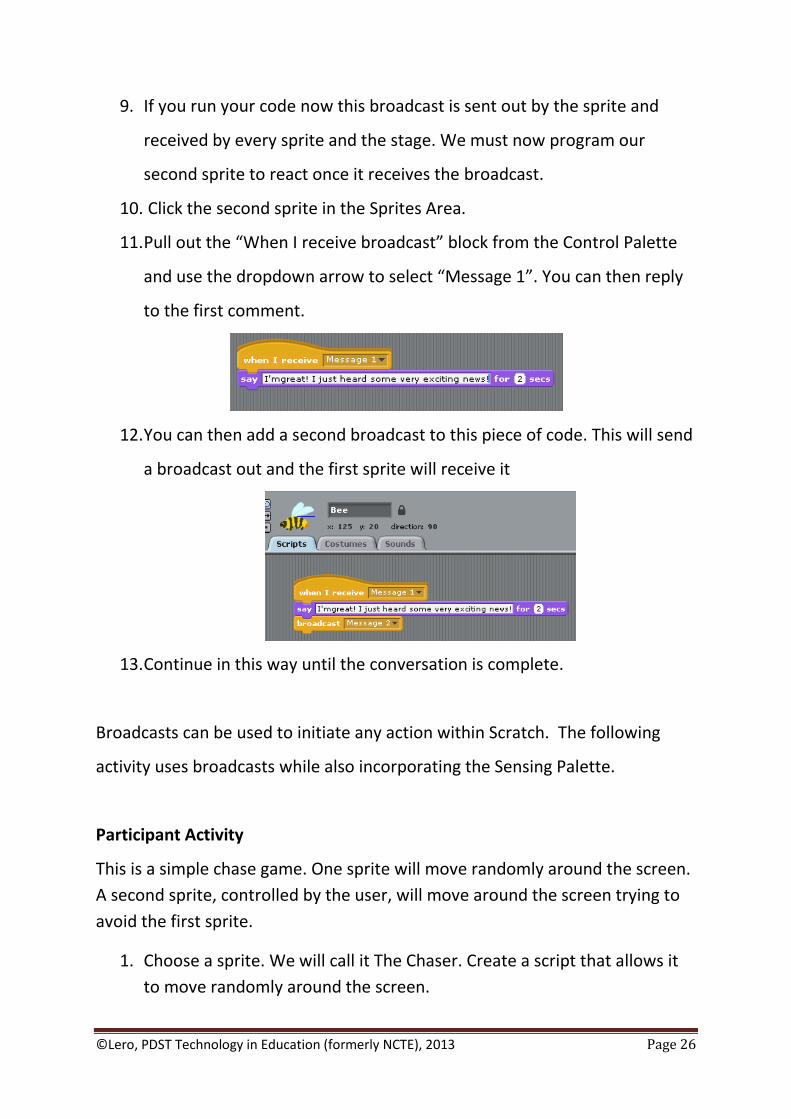
9. If you run your code now this broadcast is sent out by the sprite and
received by every sprite and the stage. We must now program our
second sprite to react once it receives the broadcast.
10. Click the second sprite in the Sprites Area.
11. Pull out the “When I receive broadcast” block from the Control Palette
and use the dropdown arrow to select “Message 1”. You can then reply
to the first comment.
12. You can then add a second broadcast to this piece of code. This will send
a broadcast out and the first sprite will receive it
13. Continue in this way until the conversation is complete.
Broadcasts can be used to initiate any action within Scratch. The following
activity uses broadcasts while also incorporating the Sensing Palette.
Participant Activity
This is a simple chase game. One sprite will move randomly around the screen.
A second sprite, controlled by the user, will move around the screen trying to
avoid the first sprite.
1. Choose a sprite. We will call it The Chaser. Create a script that allows it
to move randomly around the screen.

©Lero, PDST Technology in Education (formerly NCTE), 2013 Page 27
2. Choose a second sprite. We will call it The Runner. Create scripts that
allow it to move up, down, left and right.
3. We want a reaction when The Chaser catches The Runner. This requires
the “if” loop and the Sensing palette.
4. Create two backgrounds for your game. One will show while the game is
running. One will show when the sprites are touching.
Choose any reaction e.g.
movement/ sound etc.

©Lero, PDST Technology in Education (formerly NCTE), 2013 Page 28
5. The Chaser will send out a broadcast when it touches The Runner.
6. When the stage receives this broadcast it will switch backgrounds.
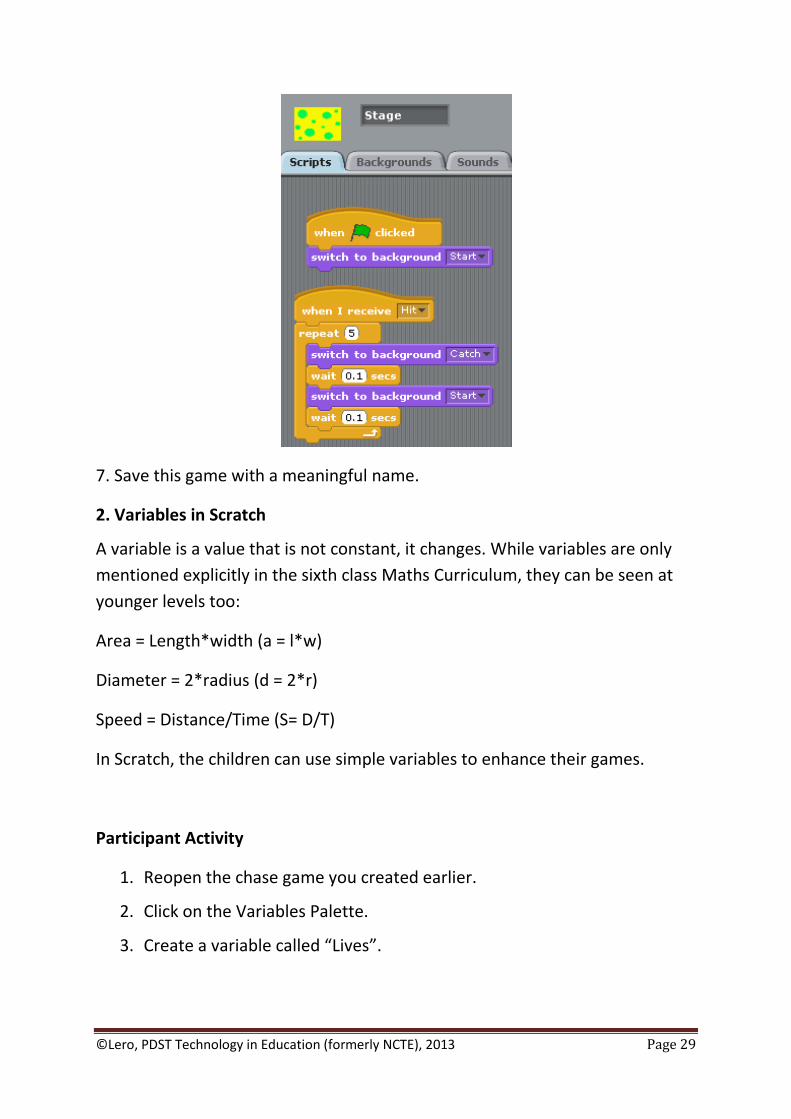
©Lero, PDST Technology in Education (formerly NCTE), 2013 Page 29
7. Save this game with a meaningful name.
2. Variables in Scratch
A variable is a value that is not constant, it changes. While variables are only
mentioned explicitly in the sixth class Maths Curriculum, they can be seen at
younger levels too:
Area = Length*width (a = l*w)
Diameter = 2*radius (d = 2*r)
Speed = Distance/Time (S= D/T)
In Scratch, the children can use simple variables to enhance their games.
Participant Activity
1. Reopen the chase game you created earlier.
2. Click on the Variables Palette.
3. Create a variable called “Lives”.

©Lero, PDST Technology in Education (formerly NCTE), 2013 Page 30
4. We want to start with five lives. Each time the sprites touch we will lose
a life.
5. What happens when the lives reach 0? We need to create a program to
tell the sprites what to do. This will require a broadcast.
6. The piece of code will constantly check the lives. If the lives are 0, it will
send out a broadcast. We can call this broadcast Game Over.

©Lero, PDST Technology in Education (formerly NCTE), 2013 Page 31
7. Create another background that will appear when the game ends.
8. We can hide the sprites at the end of the game.
3. Drawing with Scratch
Drawing in Scratch relies on very specific instructions. Scratch drawing works in
a similar way to the programming software, Logo.
It is as if your sprite is holding a pencil. Whenever the sprite moves it leaves a
line behind it. To draw a shape we must “walk” that shape.
If we hide the sprite
at the end of the
game we must
show it when we
begin again.
Stop the sprite
from moving.
©Lero, PDST Technology in Education (formerly NCTE), 2013 Page 32
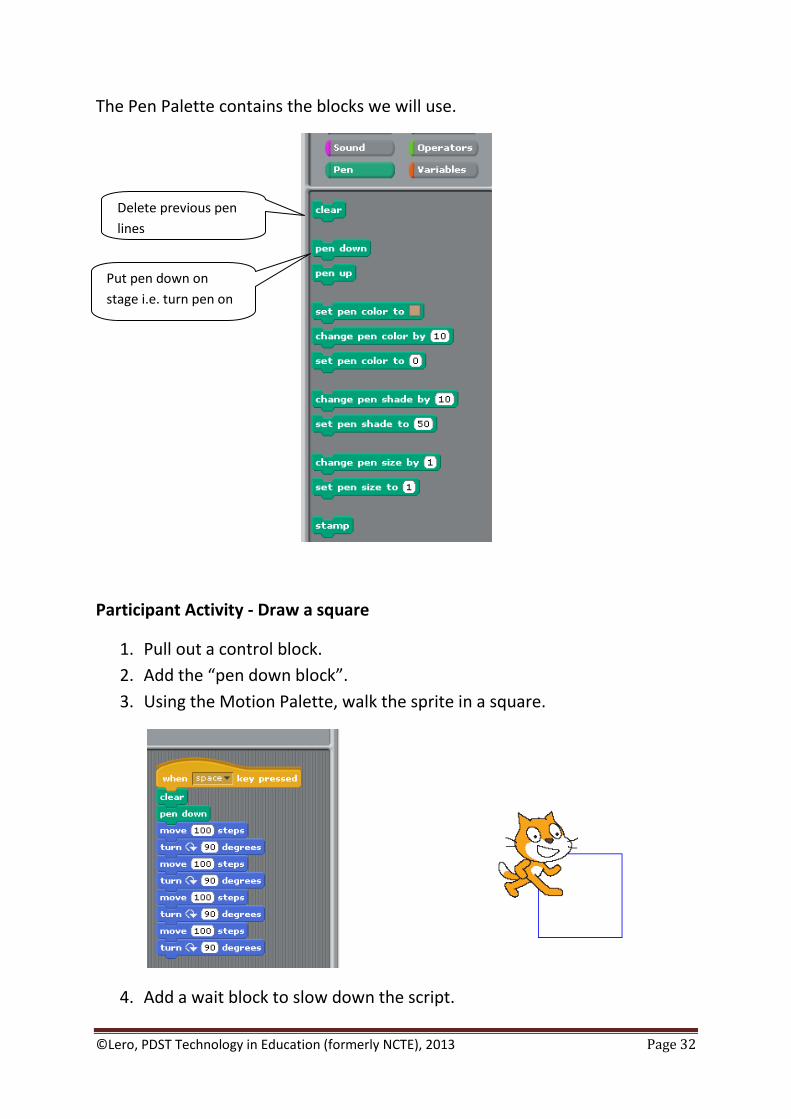
The Pen Palette contains the blocks we will use.
Participant Activity - Draw a square
1. Pull out a control block.
2. Add the “pen down block”.
3. Using the Motion Palette, walk the sprite in a square.
4. Add a wait block to slow down the script.
Put pen down on
stage i.e. turn pen on
Delete previous pen
lines

©Lero, PDST Technology in Education (formerly NCTE), 2013 Page 33
5. Save this project as “Square”.
6. Create a new project that draws a triangle. Continue with a pentagon
and a hexagon.
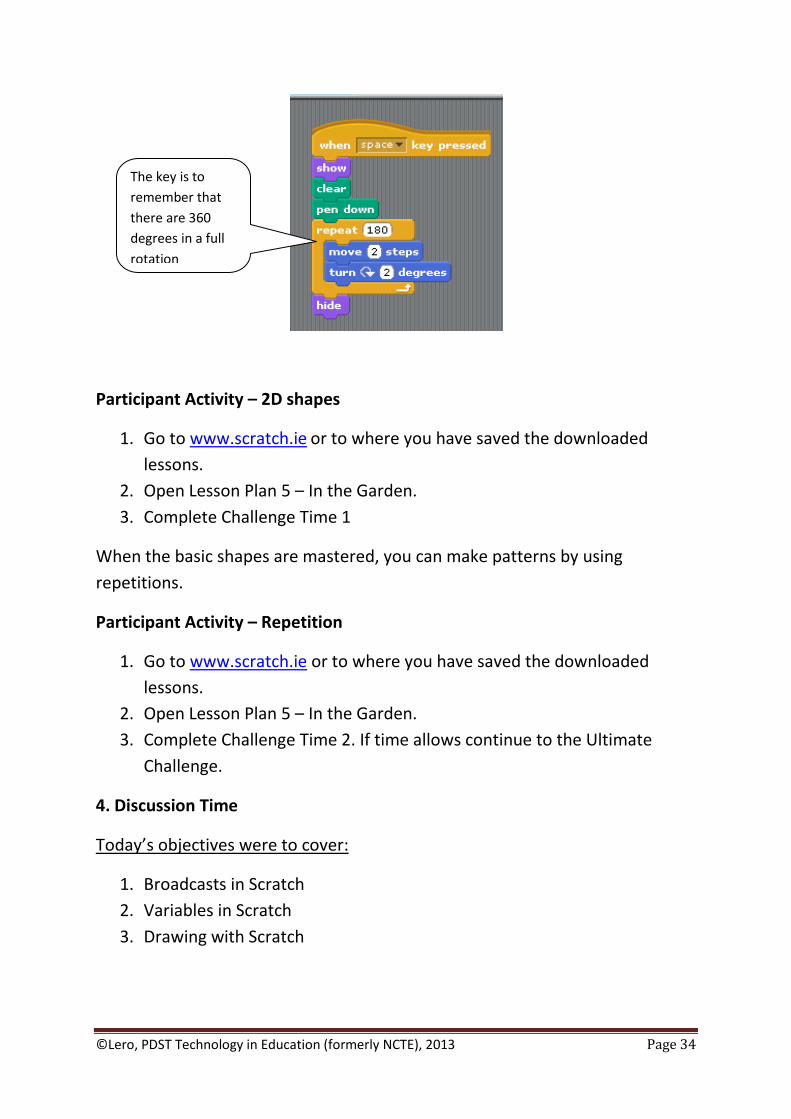
Did you notice this code is repetitive (Because the movements and turns are all
equal)? In Scratch we can use a repeat loop to create a shorter piece of code.
Use the same basic controls to draw a rectangle, triangle, pentagon and other
shapes. Can anyone draw a circle?
©Lero, PDST Technology in Education (formerly NCTE), 2013 Page 34
Participant Activity – 2D shapes
1. Go to www.scratch.ie or to where you have saved the downloaded
lessons.
2. Open Lesson Plan 5 – In the Garden.
3. Complete Challenge Time 1
When the basic shapes are mastered, you can make patterns by using
repetitions.
Participant Activity – Repetition
1. Go to www.scratch.ie or to where you have saved the downloaded
lessons.
2. Open Lesson Plan 5 – In the Garden.
3. Complete Challenge Time 2. If time allows continue to the Ultimate
Challenge.
4. Discussion Time
Today’s objectives were to cover:
1. Broadcasts in Scratch
2. Variables in Scratch
3. Drawing with Scratch
The key is to
remember that
there are 360
degrees in a full
rotation

©Lero, PDST Technology in Education (formerly NCTE), 2013 Page 35
Using Scratch to Develop
Numeracy
Module 3

©Lero, PDST Technology in Education (formerly NCTE), 2013 Page 36
Module 3
Suggested Duration of Module
4 Hours
Objectives
Module 3 will cover:
1. Variables and the Operators Palette
2. Problem Solving
3. Scratch 2.0
4. Internet Safety and Cyberbullying
5. Images in Scratch
6. Discussion Time

©Lero, PDST Technology in Education (formerly NCTE), 2013 Page 37
1. Variables and the Operators Palette
Variables can be used in conjunction with the Operator’s Palette for specific
maths tasks.
The Operator’s palette in Scratch is very useful and we can immediately see
applications for Mathematics tasks. The various blocks will instruct the
program to carry out addition, subtraction, multiplication, division and
rounding.
Participant Activity – Find the Product of two numbers
1. Create two variables where we will store numbers inputted by the user.
Here we have named them “Number 1” and “Number 2”.
2. Use the Sensing Palette to ask the user to type a number. The blue
question and blue answer enables people to add user interaction to their
projects.
3. These numbers will be saved as variables.
4. The green Operator’s Palette will allow us to multiply the two numbers
together.
5. Alter the above code to make addition, subtraction and division tasks.
6. Save your work.
Participant Activity – Find the Area of a Shape
This lesson uses Scratch to calculate the area of a square or rectangle.
1. Create 2 variables, one called Length, the other Width.
2. Allow the user to enter the values for length and width. You will use the
blue “ask” and “answer” block from the sensing palette.
3. Use the Operator’s palette to find the area.
4. Output the answer onto the screen.

©Lero, PDST Technology in Education (formerly NCTE), 2013 Page 38
Participant Activity – Rounding Numbers
1. Click on stage in the Sprite List, and then click on Backgrounds.
2. Choose a background from the Scratch folders.
3. Select a sprite. You may delete the cat if you use another sprite. This
sprite will ask the user to input a decimal and will give the rounded
answer.
4. The script will use a variable and operators. We will call the variable
“rounded answer” as this is what we are looking for. The first block, “set
rounded answer to 0” will ensure that, each time we run the script, the
initial value will be 0.
5. The sprite must ask the user to input a decimal.
1. Set the length and
width variables to
start at 0.
2. Use the sensing
palette to ask the
user for the length
and width.
at 0.
1. Set the Length
and width to start
at 0.
3. Set the length
and width variable
to these new
values.
4. This piece of
code calculates the
area and shows it
on the screen.
©Lero, PDST Technology in Education (formerly NCTE), 2013 Page 39
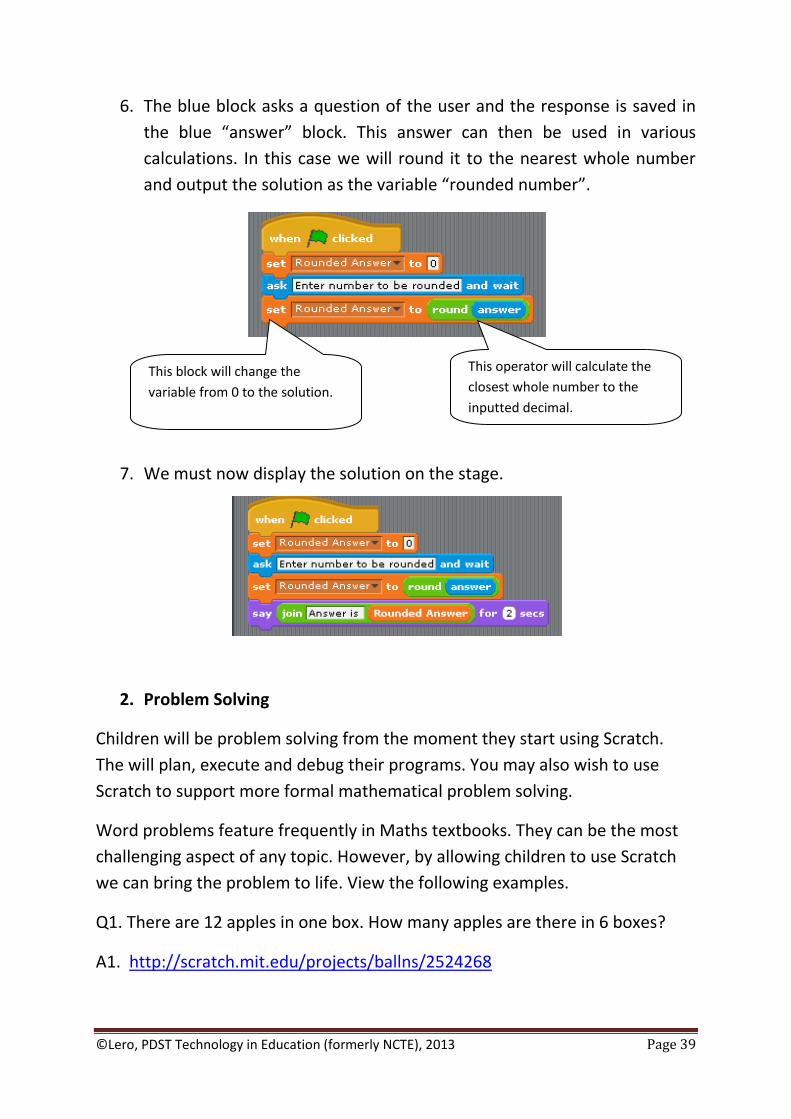
6. The blue block asks a question of the user and the response is saved in
the blue “answer” block. This answer can then be used in various
calculations. In this case we will round it to the nearest whole number
and output the solution as the variable “rounded number”.
7. We must now display the solution on the stage.
2. Problem Solving
Children will be problem solving from the moment they start using Scratch.
The will plan, execute and debug their programs. You may also wish to use
Scratch to support more formal mathematical problem solving.
Word problems feature frequently in Maths textbooks. They can be the most
challenging aspect of any topic. However, by allowing children to use Scratch
we can bring the problem to life. View the following examples.
Q1. There are 12 apples in one box. How many apples are there in 6 boxes?
A1. http://scratch.mit.edu/projects/ballns/2524268
This operator will calculate the
closest whole number to the
inputted decimal.
This block will change the
variable from 0 to the solution.
©Lero, PDST Technology in Education (formerly NCTE), 2013 Page 40
Q2. The monkey has 16 bananas. He eats 7. How many bananas are left?
A2. http://scratch.mit.edu/projects/ballns/2553431
Participant Activity – Use Scratch to demonstrate the solution of a word
problem
In Microsoft Word or on a piece of paper, create a word problem which is
suitable for your class level. Ask the person/group beside you to solve this
word problem in Scratch. They may create an animation that shows the
solution or a game that demonstrates understanding of the Maths concept.
3. Scratch 2.0
MIT have released a new version of Scratch, called Scratch 2.0, which allows you to create, edit, and view projects directly in your web browser. (You no longer have to download or upload projects or install any software.)
Here are some of the new features in Scratch 2.0. This information is taken from www.scratch.mit.edu (scratch.mit.edu/overview; 2013)
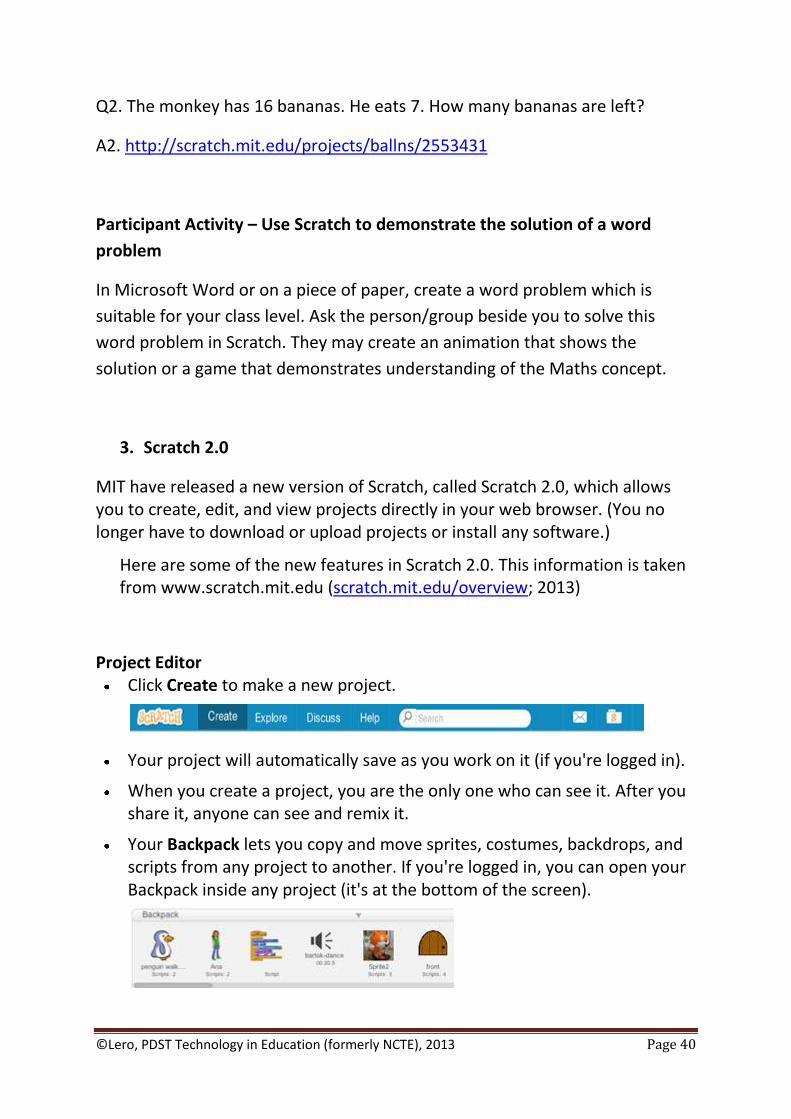
Project Editor Click Create to make a new project.
Your project will automatically save as you work on it (if you're logged in).
When you create a project, you are the only one who can see it. After you share it, anyone can see and remix it.
Your Backpack lets you copy and move sprites, costumes, backdrops, and scripts from any project to another. If you're logged in, you can open your Backpack inside any project (it's at the bottom of the screen).

©Lero, PDST Technology in Education (formerly NCTE), 2013 Page 41
You can use the webcam on your computer to interact with projects by moving your hands or body.
You can now make your own programming blocks.
Use clone blocks in your scripts to make copies of sprites.
Store numbers in cloud variables to create surveys and other projects.
Community Features On the home page, you can see what others have shared recently and
scroll to see many more projects.
When viewing a project, click to see how it works and experiment with the code.
Inside any project, click to save your own version and make changes. After you share it, the project page will highlight the original creators and links to their projects.
Discover interesting projects by clicking on the Related Projects bar at the bottom of any project page.
Click your username or icon to go to your Profile page, where you can feature one of your projects and tell others what you're working on.
People can post comments on your Profile page and your Scratch account to see updates.
Galleries are now called Studios, and can be curated by you and others you invite.

©Lero, PDST Technology in Education (formerly NCTE), 2013 Page 42
The Search features lets you find and preview projects more easily.
Upcoming Plans for Scratch 2.0 Download an off-line version of the Scratch project editor to use without
an Internet connection
Connect to external devices with new Scratch extensions (including LEGO WeDo and the ScratchBoard)
4. Internet Safety and Cyberbullying The purpose of this section is to provide an overview of Internet safety and its
importance in the classroom context. It also looks at the issue of cyber
bullying.
Webwise
The Webwise Primary School Programme has been developed for
primary school teachers who wish to introduce internet safety into their
teaching of the Social Personal and Health Education (SPHE) curriculum.
The first part of the resource focuses on skills needed for surfing the
web such as effective and safe searching, downloading images and
determining what online content can be trusted.
The second section deals with the skills required to safely and effectively
communicate online or by text message. It deals with issues relating to
sharing personal information online, treating others with respect,
cyberbullying, responding to media, in particular digital media and
dealing with spam.
The Webwise programme utilises a range of teaching methodologies
with particular emphasis on active learning, the principal learning and
teaching approach recommended for SPHE.
It provides opportunities for cross-curricula integration in particular with
Drama, Language and Visual Arts.
It is made up of paper-based classroom activities and digital interactive
lessons. The interactive cartoons are designed to be used as a whole-
class activity using a whiteboard or digital projector. The activities may
also be set up for a pair, an individual, or a small group to use at a
classroom computer.

©Lero, PDST Technology in Education (formerly NCTE), 2013 Page 43
Useful Links
Webwise http://www.webwise.ie
Internet Safety Advice Sheet http://www.webwise.ie/InternetSafety.pdf
Facebook Tips for Teachers http://www.webwise.ie/FacebookTipsForTeachers.pdf
Common Sense Media http://www.commonsensemedia.org/educators/cyberbullying-toolkit
Stop Cyberbullying http://www.stopcyberbullying.org
Stamp out Cyber bullying http://www.stpaulsbessbrook.org/students/stamp-out-cyber-
bullying/?utm_source=twitterfeed&utm_medium=twitter
Archdiocese of Dublin Education Secretariat http://education.dublindiocese.ie/safer-internet-day/
Beat Bullying http://www.beatbullying.org/
Advice and Guidance on Cyberbullying http://www.cybersmile.org/advice-help
Basic Internet Safety http://www.netsmartz.org/InternetSafety
Get with it – A Guide to Cyberbullying http://www.hotline.ie/documents/Cyberbullying.pdf
Cyberbullying http://childwatch.ie/CyberBullying.php
The Scratch Community Guidelines for the scratch.mit.edu website and
community can be viewed here:
http://scratch.mit.edu/community_guidelines/
5. The use of images in Scratch
In order to make Scratch projects personally meaningful to children, it may
help to use a greater range of images. These may be downloaded from the
Internet, uploaded from external devices such as digital cameras, or taken
from files already saved on the computer.
©Lero, PDST Technology in Education (formerly NCTE), 2013 Page 44
A great source of images which are available to use free of charge and under
creative commons licensing is www.imagebank.ie.
Imagebank.ie
ImageBank is a photo library website where people can search for and share
photos for educational use. ImageBank focuses on providing photos of Irish
places and spaces but other subjects are also included, such as animals, sports
and flowers.
ImageBank is intended as a supportive resource for students and teachers in
Irish education. More importantly, it is a growing resource and users are
encouraged to share any relevant photos. Creative Commons licensing is used
to allow you share your photos and specify how others may use them.
NB: Searches in Scoilnet find images from Imagebank - just enter your search
term in the Scoilnet search box and click on the Images tab in the results.
Participant Activity – Downloading images from the Internet
1. Create a folder on your desktop.
2. Label it “Scratch Resources”. This is where you will save all images and
sounds that you intend to use in Scratch.
3. Find an image you wish to use on www.imagebank.ie or www.scoilnet.ie
4. Save the image to your new folder, giving it a meaningful name.
Participant Activity - Save an image from a digital camera
1. Find an image you wish to use on the digital camera.
2. Open the “Scratch Resources” folder.
3. Drag the image into the “Scratch Resources” folder.
4. Once the image is saved to the folder you can open it in Scratch.
Participant Activity – Using Images in Scratch
1. Open Scratch interface.
2. Delete the cat sprite.
3. Click on “choose new sprite from file”.
4. On the left hand menu choose desktop.
©Lero, PDST Technology in Education (formerly NCTE), 2013 Page 45
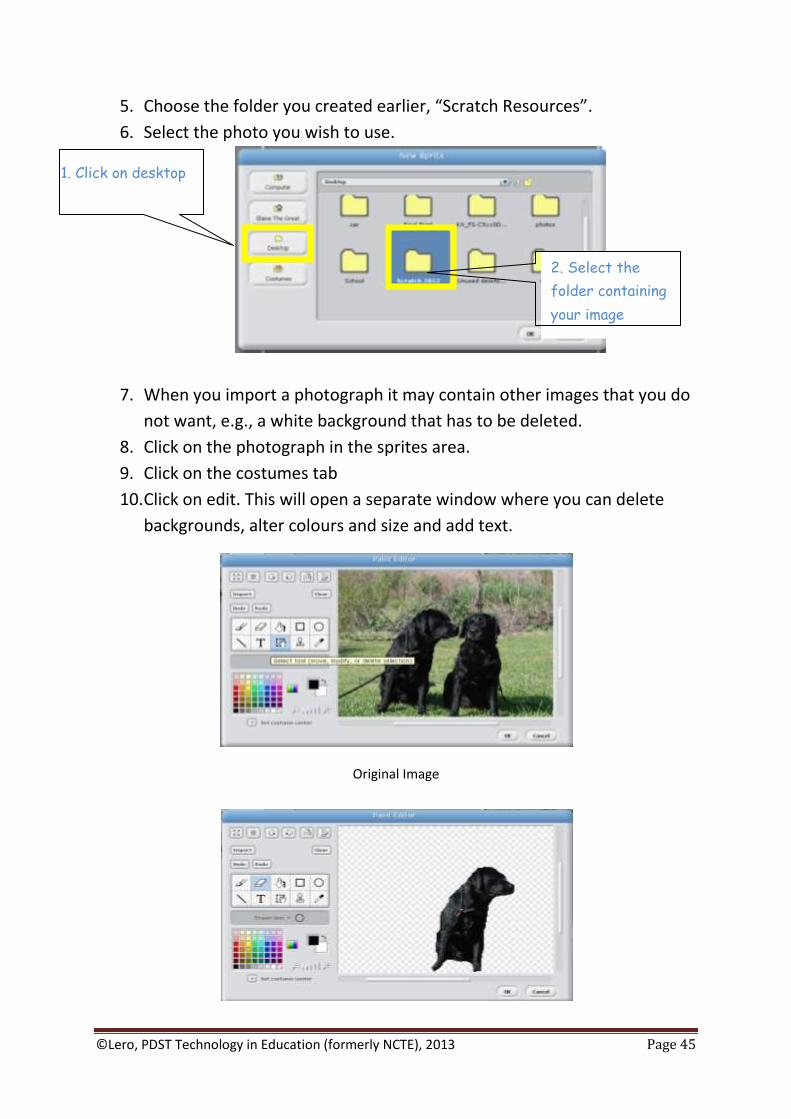
5. Choose the folder you created earlier, “Scratch Resources”.
6. Select the photo you wish to use.
7. When you import a photograph it may contain other images that you do
not want, e.g., a white background that has to be deleted.
8. Click on the photograph in the sprites area.
9. Click on the costumes tab
10. Click on edit. This will open a separate window where you can delete
backgrounds, alter colours and size and add text.
Original Image
2. Select the
folder containing
your image
1. Click on desktop

©Lero, PDST Technology in Education (formerly NCTE), 2013 Page 46
Edited Image
Participant Activity – Create a Scratch Project that Incorporates Images
1. View the example at http://scratch.mit.edu/projects/1904949/.
2. Working in pairs with the digital camera, spend approximately 15 or 20
minutes taking some images within the room or outside.
3. Incorporate sounds and images into a numeracy focused Scratch project.
Participant Activity – Upload an image to ImageBank
ImageBank is a store of images for teachers, by teacher. Teachers are
encouraged to upload any suitable images they may have.
1. Select one of the images you have on your digital camera.
2. Ensure it has a relevant and accurate title.
3. Go to www.imagebank.ie.
4. Click on “Add a photo”.
5. You will be asked to create a password.
6. The terms and conditions outline that you must be the copyright
holder of any images you add.
7. Click on “Browse” to find a photo on your computer.
8. Add photo.
Participant Activity - Images in Scratch
1. Go to www.scratch.ie or to where you have saved the downloaded
lessons.
2. Open Lesson Plan 4 – A Cartoon About Me!
3. Complete the Ultimate Challenge.
6. Discussion Time
Today’s objectives were to cover:
1. Variables and the Operators Palette
2. Problem Solving
3. Scratch 2.0
4. Internet Safety and Cyberbullying
5. Images in Scratch

©Lero, PDST Technology in Education (formerly NCTE), 2013 Page 47
Using Scratch to Develop
Numeracy
Module 4
©Lero, PDST Technology in Education (formerly NCTE), 2013 Page 48
Module 4
Suggested Duration of Module
4 Hours
Objectives
Module 4 will cover:
1. Using broadcasts and variables in a maze game
2. Quizzes in Scratch
3. Scoilnet, Scoilnet Maps and Encyclopaedia Britannica
4. The use of a timer in Scratch
5. Sensing and the Looks Palette
6. Discussion Time
©Lero, PDST Technology in Education (formerly NCTE), 2013 Page 49
1. Using broadcasts and variables in a maze game
A maze is a nice way to incorporate several features of Scratch. It also allows
for differentiation. Have a look at the following maze games.
http://scratch.mit.edu/projects/3195537/
http://scratch.mit.edu/projects/2542133/#player
Participant Activity
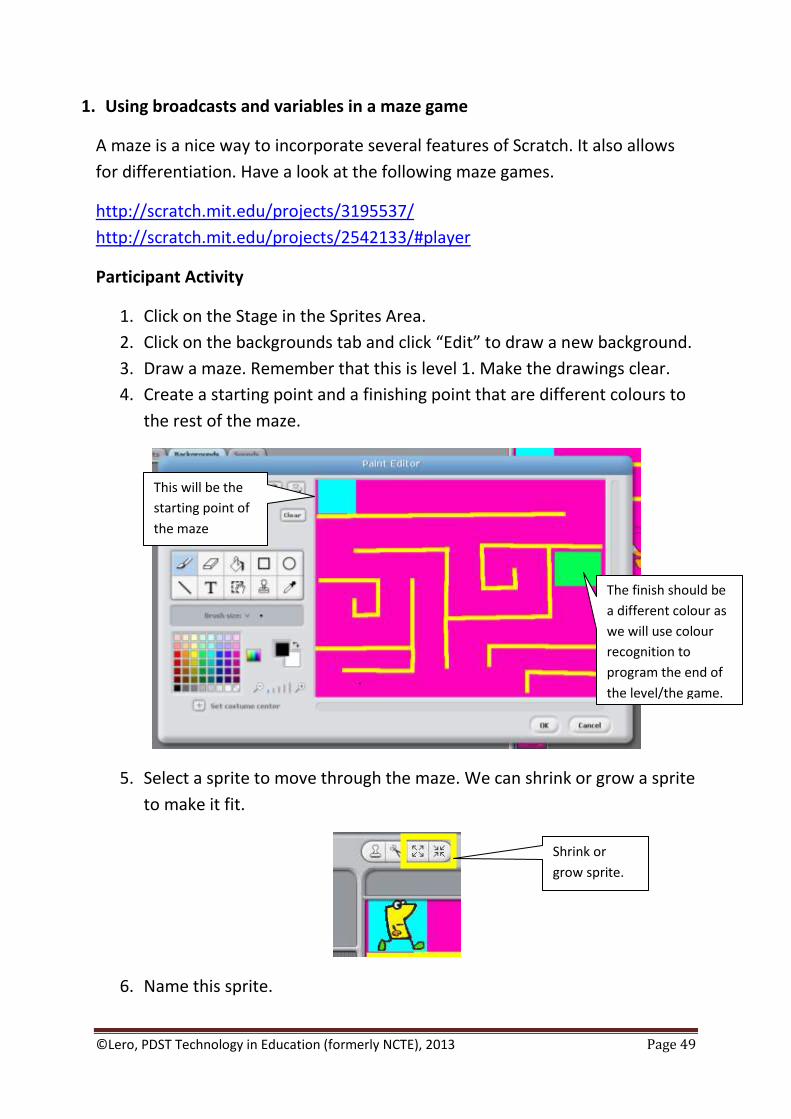
1. Click on the Stage in the Sprites Area.
2. Click on the backgrounds tab and click “Edit” to draw a new background.
3. Draw a maze. Remember that this is level 1. Make the drawings clear.
4. Create a starting point and a finishing point that are different colours to
the rest of the maze.
5. Select a sprite to move through the maze. We can shrink or grow a sprite
to make it fit.
6. Name this sprite.
This will be the
starting point of
the maze
The finish should be
a different colour as
we will use colour
recognition to
program the end of
the level/the game.
Shrink or
grow sprite.
©Lero, PDST Technology in Education (formerly NCTE), 2013 Page 50
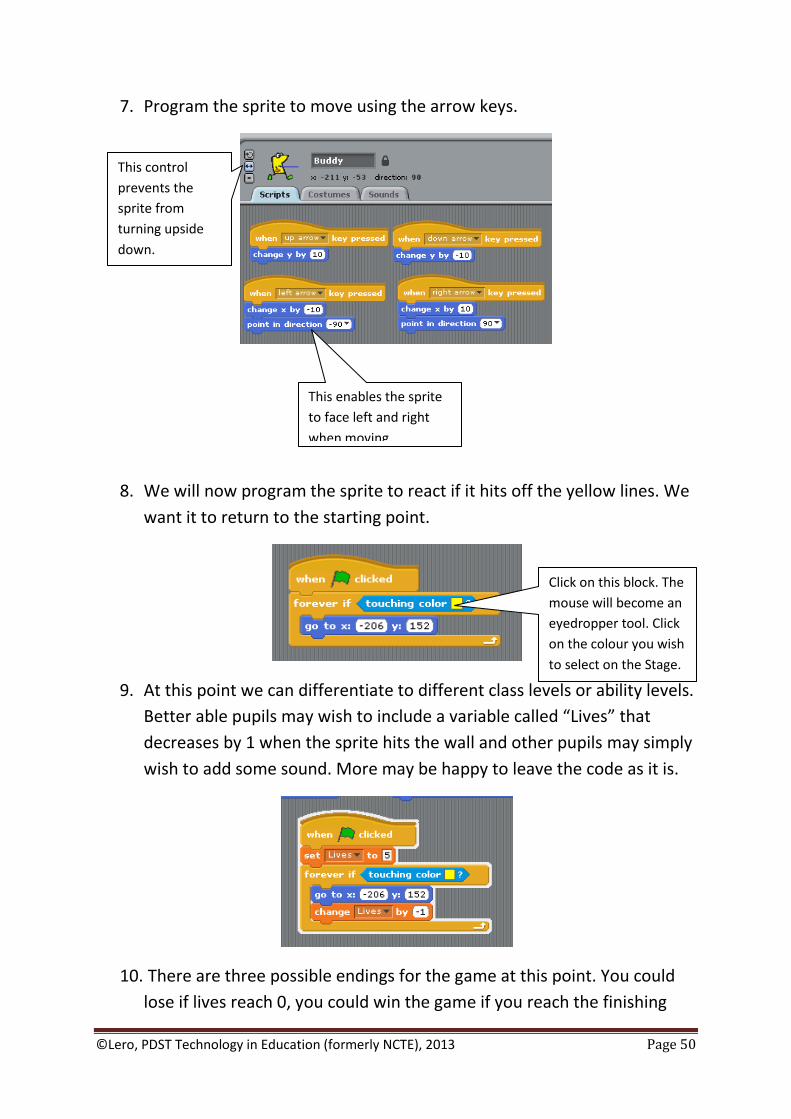
7. Program the sprite to move using the arrow keys.
8. We will now program the sprite to react if it hits off the yellow lines. We
want it to return to the starting point.
9. At this point we can differentiate to different class levels or ability levels.
Better able pupils may wish to include a variable called “Lives” that
decreases by 1 when the sprite hits the wall and other pupils may simply
wish to add some sound. More may be happy to leave the code as it is.
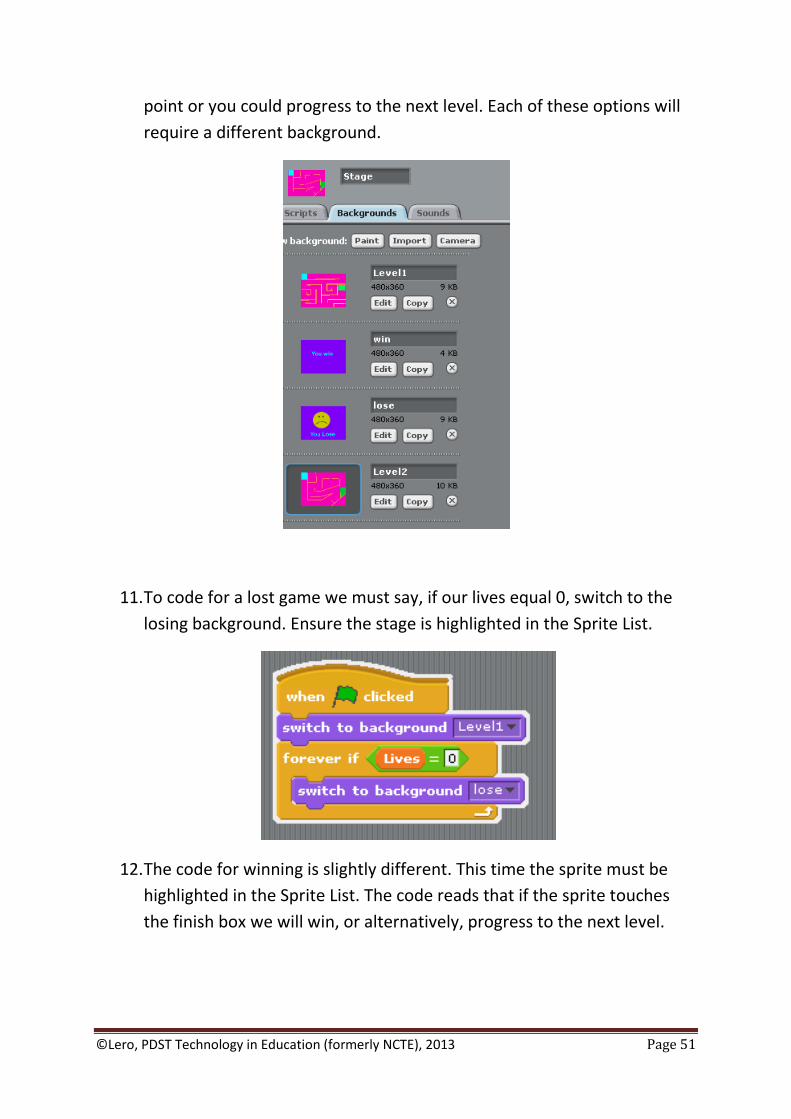
10. There are three possible endings for the game at this point. You could
lose if lives reach 0, you could win the game if you reach the finishing
This enables the sprite
to face left and right
when moving.
This control
prevents the
sprite from
turning upside
down.
Click on this block. The
mouse will become an
eyedropper tool. Click
on the colour you wish
to select on the Stage.
©Lero, PDST Technology in Education (formerly NCTE), 2013 Page 51
point or you could progress to the next level. Each of these options will
require a different background.
11. To code for a lost game we must say, if our lives equal 0, switch to the
losing background. Ensure the stage is highlighted in the Sprite List.
12. The code for winning is slightly different. This time the sprite must be
highlighted in the Sprite List. The code reads that if the sprite touches
the finish box we will win, or alternatively, progress to the next level.
©Lero, PDST Technology in Education (formerly NCTE), 2013 Page 52
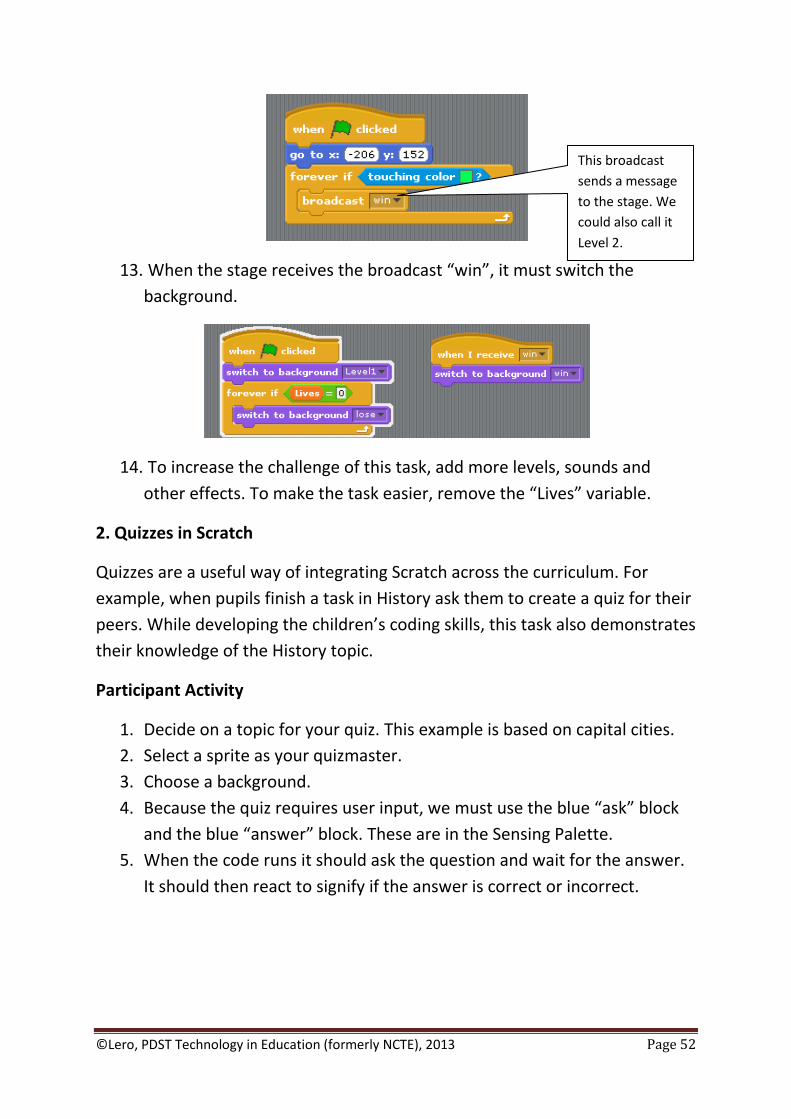
13. When the stage receives the broadcast “win”, it must switch the
background.
14. To increase the challenge of this task, add more levels, sounds and
other effects. To make the task easier, remove the “Lives” variable.
2. Quizzes in Scratch
Quizzes are a useful way of integrating Scratch across the curriculum. For
example, when pupils finish a task in History ask them to create a quiz for their
peers. While developing the children’s coding skills, this task also demonstrates
their knowledge of the History topic.
Participant Activity
1. Decide on a topic for your quiz. This example is based on capital cities.
2. Select a sprite as your quizmaster.
3. Choose a background.
4. Because the quiz requires user input, we must use the blue “ask” block
and the blue “answer” block. These are in the Sensing Palette.
5. When the code runs it should ask the question and wait for the answer.
It should then react to signify if the answer is correct or incorrect.
This broadcast
sends a message
to the stage. We
could also call it
Level 2.
©Lero, PDST Technology in Education (formerly NCTE), 2013 Page 53
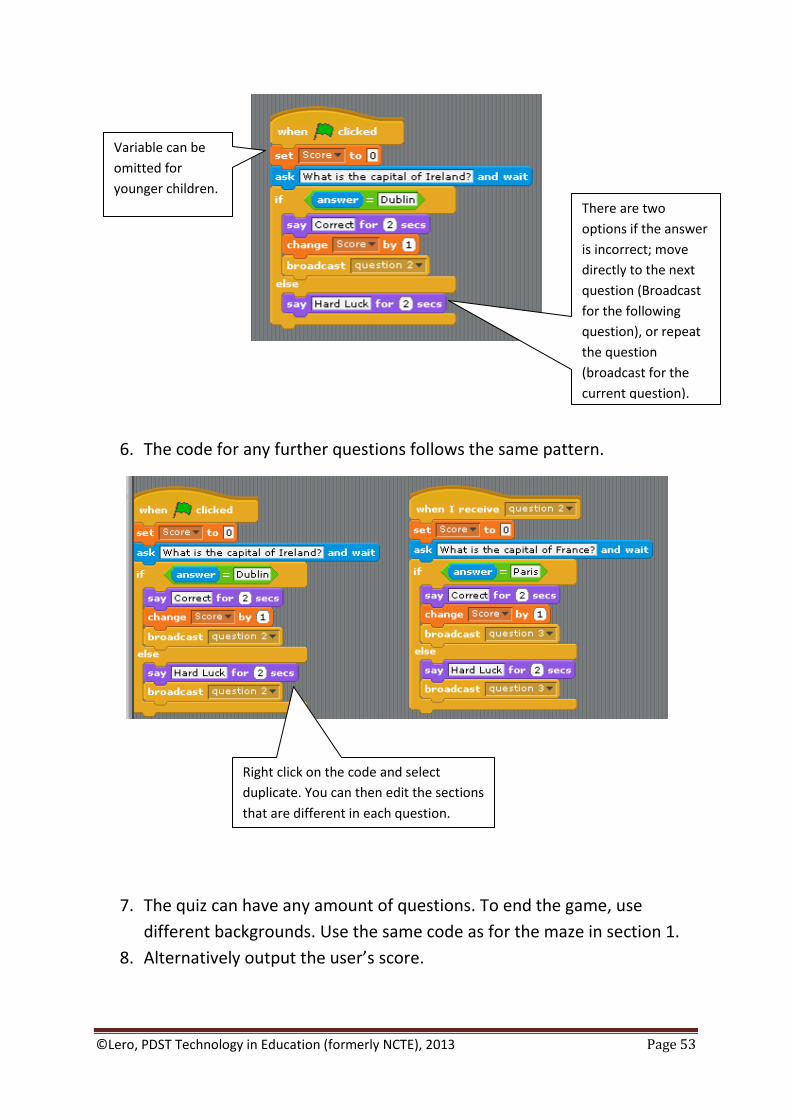
6. The code for any further questions follows the same pattern.
7. The quiz can have any amount of questions. To end the game, use
different backgrounds. Use the same code as for the maze in section 1.
8. Alternatively output the user’s score.
Variable can be
omitted for
younger children.
There are two
options if the answer
is incorrect; move
directly to the next
question (Broadcast
for the following
question), or repeat
the question
(broadcast for the
current question).
Right click on the code and select
duplicate. You can then edit the sections
that are different in each question.

©Lero, PDST Technology in Education (formerly NCTE), 2013 Page 54
9. Increase the challenge by repeating questions that are answered
incorrectly. Add in sound effects when questions are answered. Change
backgrounds for each question.
3. Scoilnet, Scoilnet Maps and Encyclopaedia Britannica
Tutors will introduce some of free ICT in education resources available, which
may be useful in the context of Scratch and are developed or supported by
PDST Technology in Education (formerly NCTE). Other participant materials in
support of these topics are available on the NCTE website at
www.ncte.ie/ICTTraining/TrainingMaterials.
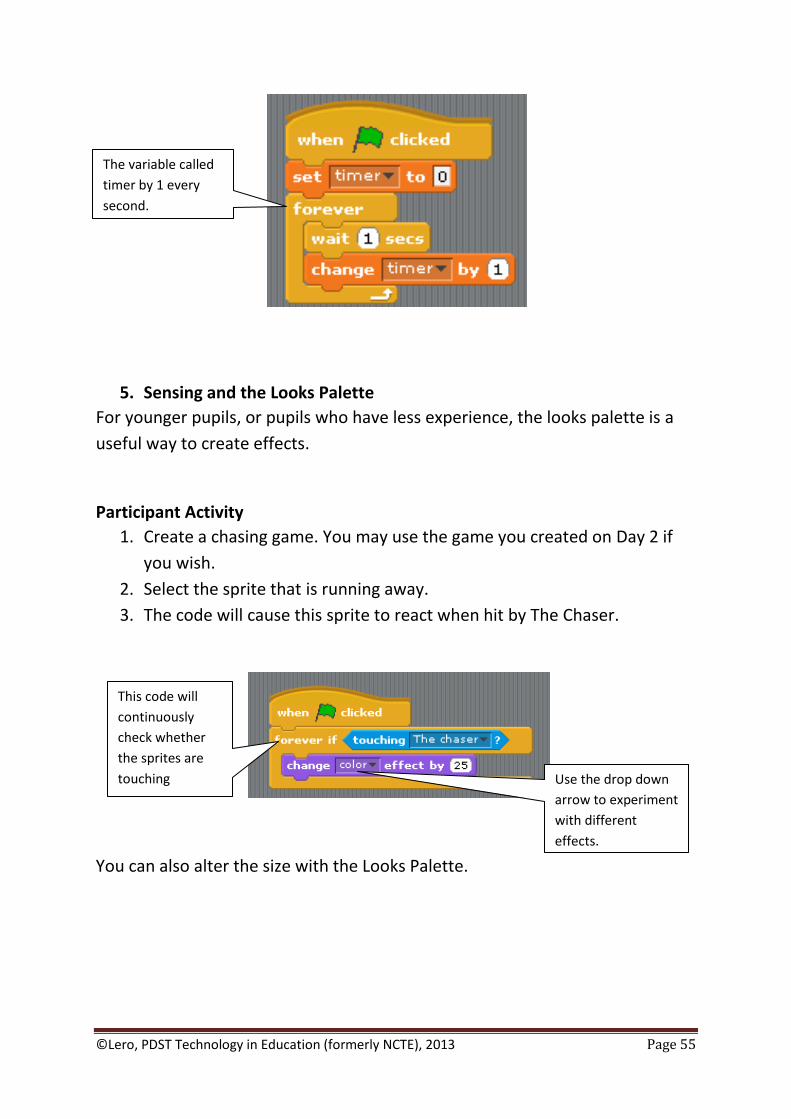
4. The use of a timer in Scratch
A timer can be a useful tool in Scratch. The following code shows a simple
timer that can be adapted for games and quizzes.
©Lero, PDST Technology in Education (formerly NCTE), 2013 Page 55
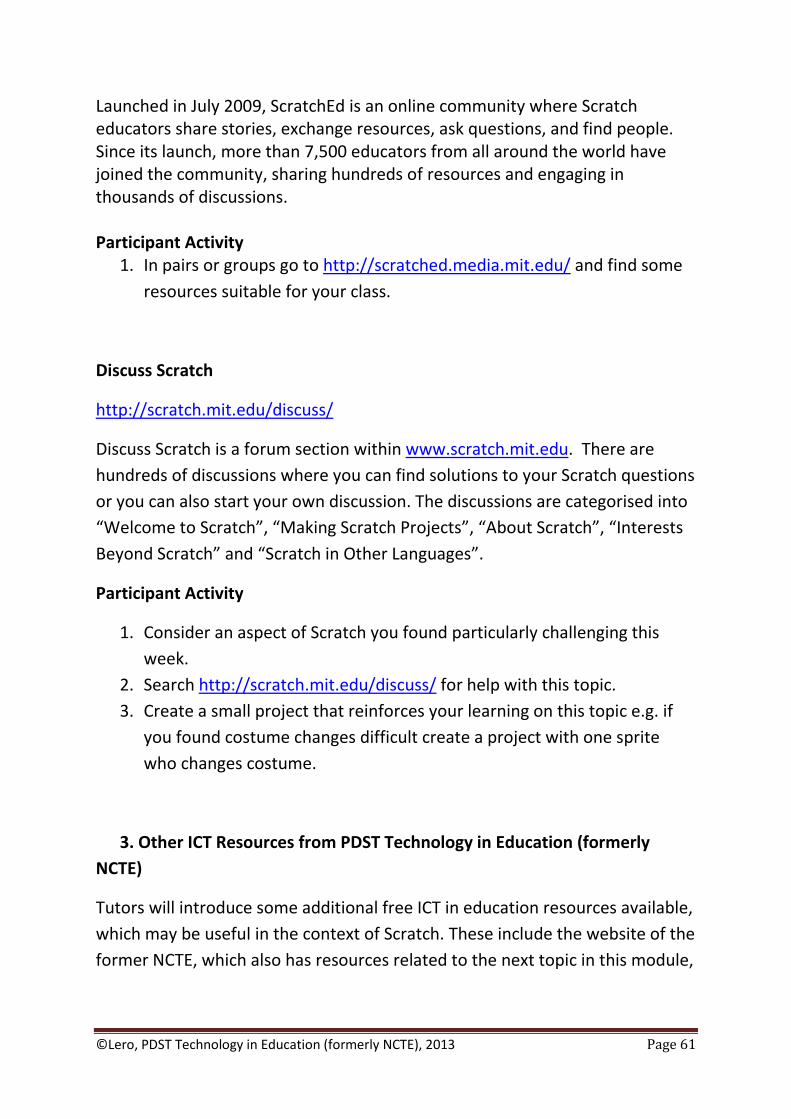
5. Sensing and the Looks Palette
For younger pupils, or pupils who have less experience, the looks palette is a
useful way to create effects.
Participant Activity
1. Create a chasing game. You may use the game you created on Day 2 if
you wish.
2. Select the sprite that is running away.
3. The code will cause this sprite to react when hit by The Chaser.
You can also alter the size with the Looks Palette.
The variable called
timer by 1 every
second.
This code will
continuously
check whether
the sprites are
touching Use the drop down
arrow to experiment
with different
effects.

©Lero, PDST Technology in Education (formerly NCTE), 2013 Page 56
6. Discussion time
Today’s objective was to cover:
1. Using broadcasts and variables in a maze game
2. The use of a timer in Scratch
3. Scoilnet and Encyclopaedia Britannica
4. Quizzes in Scratch
5. Sensing and the Looks Palette
It is important to
return the sprite
to its original size
each time you
restart the game. Experiment with
plus and minus
numbers.

©Lero, PDST Technology in Education (formerly NCTE), 2013 Page 57
Using Scratch to Develop
Numeracy
Module 5

©Lero, PDST Technology in Education (formerly NCTE), 2013 Page 58
Module 5
Suggested Duration of Module
4 Hours
Objectives
Content of Module 5:
1. Lists in Scratch
2. Support for Teaching Scratch
3. Other ICT Resources from PDST Technology in Education (formerly NCTE)
4. e-Learning Action Plan
5. Creating and Presenting a Scratch Project

©Lero, PDST Technology in Education (formerly NCTE), 2013 Page 59
1. Lists in Scratch
A list or array is a way of storing several variables. It can be used in many ways
but here we will use it to create a quiz. Lists can be quite challenging and
therefore more suited to older classes.
Participant Activity
1. Select a sprite
2. Select a topic for your quiz e.g. young animals. Decide on your questions.
It is better if your question has a one word answer as users must get it
exactly correct.
3. Create a list. Give it a meaningful name e.g. Questions.
4. For the list just enter the part of the sentence that changes. For
example, instead of entering “What is a young sheep called?”, “What is a
young cow called?” simply enter “sheep”, “cow”.
5. Create a second list called Answers. Enter the solutions to your
questions. It is very important that the order of the two lists matches
e.g. if sheep is your first question, lamb must be your first answer.
Each time you start
the program it will
add all the items to
your list. This block
deletes previous
questions so that you
don’t have duplicate
questions.
Untick these boxes to prevent
the lists appearing on the stage

©Lero, PDST Technology in Education (formerly NCTE), 2013 Page 60
6. Now we must code to ask the question and to ensure the program
associates the question with its correct answer. We will create a variable
that will act as a count.
2. Support for Teaching Scratch
ScratchEd
http://scratched.media.mit.edu/
The variable count starts at 1.
The variable selects item 1 from the
question list and then item 1 from
the answers list.
The variable changes to 2 and then selects item 2
from the “Questions” list and item 2 from the
“Answers” list and so on.
©Lero, PDST Technology in Education (formerly NCTE), 2013 Page 61
Launched in July 2009, ScratchEd is an online community where Scratch educators share stories, exchange resources, ask questions, and find people. Since its launch, more than 7,500 educators from all around the world have joined the community, sharing hundreds of resources and engaging in thousands of discussions. Participant Activity
1. In pairs or groups go to http://scratched.media.mit.edu/ and find some
resources suitable for your class.
Discuss Scratch
http://scratch.mit.edu/discuss/
Discuss Scratch is a forum section within www.scratch.mit.edu. There are
hundreds of discussions where you can find solutions to your Scratch questions
or you can also start your own discussion. The discussions are categorised into
“Welcome to Scratch”, “Making Scratch Projects”, “About Scratch”, “Interests
Beyond Scratch” and “Scratch in Other Languages”.
Participant Activity
1. Consider an aspect of Scratch you found particularly challenging this
week.
2. Search http://scratch.mit.edu/discuss/ for help with this topic.
3. Create a small project that reinforces your learning on this topic e.g. if
you found costume changes difficult create a project with one sprite
who changes costume.
3. Other ICT Resources from PDST Technology in Education (formerly
NCTE)
Tutors will introduce some additional free ICT in education resources available,
which may be useful in the context of Scratch. These include the website of the
former NCTE, which also has resources related to the next topic in this module,
©Lero, PDST Technology in Education (formerly NCTE), 2013 Page 62
i.e. e-Learning Planning. Participant materials in support of these topics are
available on the NCTE website at www.ncte.ie/ICTTraining/TrainingMaterials.
4. e-Learning Action Plan
www.ncte.ie/elearningplan
The e-Learning Plan area of the PDST Technology in Education (formerly NCTE)
website contains a number of useful resources to assist schools in developing
their e-Learning Plan, from the NCTE’s e-Learning Handbook and Roadmap to
case studies and video exemplars highlighting how teachers are integrating ICT
in their classrooms.
The purpose of this section is to provide an overview of the benefits of planning for e-Learning in the primary classroom. It also includes links to a number of useful resources to assist schools in developing their e-Learning plan.
Benefits
The benefits of using a school e-Learning plan include:
Assessing where the school is in terms of ICT development and where it would like to be
Identifying the ICT equipment, software and skills available in the school
Ensuring an agreed vision for ICT within the school aligned with the Whole School plan
Allowing the school to integrate ICT more effectively into their teaching and learning activities based on the particular circumstances of the school
Identifying SMART (Specific, Measurable, Achievable, Relevant, Timebound) tasks to integrate ICT more effectively into teaching and learning
Participant Activity
Using the template provided, develop an e-Learning plan for your class for the first term of the school year.
©Lero, PDST Technology in Education (formerly NCTE), 2013 Page 63
Tips
Aim to ensure that the e-Learning team includes a range of ICT skills and proficiency reflective of the staff as a whole.
Be realistic. Look at what task will be attainable by the staff as a whole. Once this has been achieved, you can start on the next goal. The journey of a thousand miles starts with a single step!
Useful Links
NCTE e-Learning Plan
http://www.ncte.ie/elearningplan/
NCTE e-Learning handbook http://www.ncte.ie/elearningplan/handbook/
NCTE e-Learning Roadmap http://www.ncte.ie/elearningplan/roadmap/
NCTE eLearning Plan templates http://www.ncte.ie/elearningplan/templates/
NCTE e-Learning Case Studies http://www.ncte.ie/elearningplan/casestudies/
NCTE CPD information http://www.ncte.ie/ICTTraining
5. Creating and Presenting a Scratch Project
Participant Activity
1. Create a project with Scratch.
2. Be as creative as you can. Use the resources you have seen throughout
the week.
3. Incorporate the following into your project:
a. Costume or Background Change
b. Broadcast
c. Variable
4. Upload your project to www.scratch.mit.edu.
5. Present your project to the group.

©Lero, PDST Technology in Education (formerly NCTE), 2013 Page 64
6. Discussion Time
Today’s objective was to cover:
1. Lists in Scratch
2. Support for Teaching Scratch
3. Other ICT Resources from PDST Technology in Education (formerly NCTE)
4. e-Learning Plan
5. Creating and Presenting a Scratch Project