download.oracle.comusing siebel tools version 7.7, rev. a 3 contents using siebel tools 1 chapter 1:...
TRANSCRIPT

Using Siebel Tools
Version 7.7, Rev. ASeptember 2004
Siebel Systems, Inc., 2207 Bridgepointe Parkway, San Mateo, CA 94404Copyright © 2004 Siebel Systems, Inc. All rights reserved.Printed in the United States of America
No part of this publication may be stored in a retrieval system, transmitted, or reproduced in any way, including but not limited to photocopy, photographic, magnetic, or other record, without the prior agreement and written permission of Siebel Systems, Inc.
Siebel, the Siebel logo, TrickleSync, Universal Agent, and other Siebel names referenced herein are trademarks of Siebel Systems, Inc., and may be registered in certain jurisdictions.
Other product names, designations, logos, and symbols may be trademarks or registered trademarks of their respective owners.
PRODUCT MODULES AND OPTIONS. This guide contains descriptions of modules that are optional and for which you may not have purchased a license. Siebel�s Sample Database also includes data related to these optional modules. As a result, your software implementation may differ from descriptions in this guide. To find out more about the modules your organization has purchased, see your corporate purchasing agent or your Siebel sales representative.
U.S. GOVERNMENT RESTRICTED RIGHTS. Programs, Ancillary Programs and Documentation, delivered subject to the Department of Defense Federal Acquisition Regulation Supplement, are �commercial computer software� as set forth in DFARS 227.7202, Commercial Computer Software and Commercial Computer Software Documentation, and as such, any use, duplication and disclosure of the Programs, Ancillary Programs and Documentation shall be subject to the restrictions contained in the applicable Siebel license agreement. All other use, duplication and disclosure of the Programs, Ancillary Programs and Documentation by the U.S. Government shall be subject to the applicable Siebel license agreement and the restrictions contained in subsection (c) of FAR 52.227-19, Commercial Computer Software - Restricted Rights (June 1987), or FAR 52.227-14, Rights in Data�General, including Alternate III (June 1987), as applicable. Contractor/licensor is Siebel Systems, Inc., 2207 Bridgepointe Parkway, San Mateo, CA 94404.
Proprietary Information
Siebel Systems, Inc. considers information included in this documentation and in Siebel eBusiness Applications Online Help to be Confidential Information. Your access to and use of this Confidential Information are subject to the terms and conditions of: (1) the applicable Siebel Systems software license agreement, which has been executed and with which you agree to comply; and (2) the proprietary and restricted rights notices included in this documentation.

Contents
Using Siebel Tools 1
Chapter 1: What�s New in This Release
Chapter 2: About the Siebel Tools User InterfaceAbout Siebel Tools 13
About Siebel Tools Application Windows 14
About Object Explorer 15The Project Drop-Down List of the Object Explorer 16The Types Tab of the Object Explorer 16The Detail Tab of the Object Explorer 17The Flat Tab of the Object Explorer 17
About the Object List Editor 18
About the Properties Window 20
About the Applets Window 21
About the Controls/Columns Window 21
About the Bookmarks Window 24
About the Web Template Explorer Window 25
About the Siebel Tools Menu Bar 25File Menu 26Edit Menu 27View Menu 28Screens Menu 30Go Menu 31Query Menu 32Reports Menu 32Format Menu 33Debug Menu 33Tools Menu 34Window Menu 36Help Menu 37
About Siebel Tools Toolbars 37Edit Toolbar 38History Toolbar 39
Using Siebel Tools Version 7.7, Rev. A ■ 3
Contents
List Toolbar 39Debug Toolbar 40Web Controls Toolbar 41Format Toolbar 43Configuration Context Toolbar 45
About Siebel Tools Right-Click Menus 45
About Layout Editors 46
About New Object Wizards 46
About the Entity Relationship Designer 46
About the Business Process Designer 47
About Script Editors 47
About the Command Line Interface 48
Chapter 3: Customizing Your Tools EnvironmentShowing and Hiding Confirmation Dialog Boxes 49
Setting Change Date Preferences 50
Selecting a Language Mode 50
Enabling Language Overrides 51
Process for Integrating With Third-Party Source Control 51Setting Source Control Options 52Configuring the srcctrl.bat File 52Example of Integrating with Microsoft Visual SourceSafe 56
Specifying Data Sources 57
Restarting Editors After Check Out 58
Setting Commit Options for Full Get 58
Defining Object List Editor Display Options 59
Setting Scripting Options 59
Defining the Web Template Editor 60
Setting Debug Options 61
Customizing Visualization Views 62
Showing and Hiding Object Types in the Object Explorer 63
Setting Database Options 65
Setting the Constrain Mode for Working With Symbolic Strings 65
Defining a Target Browser 66
Using Siebel Tools Version 7.7, Rev. A4 ■

Contents
Showing and Hiding Windows 66
Docking Windows 67
Showing and Hiding Editors 68
Showing Visualization Views 68
Showing and Hiding Debug Windows 68
Showing and Hiding Toolbars 69
Showing and Hiding the Status Bar 69
Showing and Hiding the Object Explorer 69
Chapter 4: Getting Projects From the Server RepositoryAbout the Get Process 71
Performing a Full Get 71
Getting Projects from the Server Repository 72
Getting Locale-Specific Data Only 73
Chapter 5: Checking Out and Checking In Projects and ObjectsAbout the Check Out and Check In Process 75
Setting Options for Check Out and Check In 75
Guidelines for Check Out and Check In 76
About the Project Check Out Dialog Box 77
About the Object Check Out Dialog Box 79
About the Check In Dialog Box 81
Checking Out and Checking In Projects 82Checking Out Projects from the Server Repository 82Checking In Projects to the Server Repository 83
Checking Out and Checking In Objects 84About Object Check Out and Check In 84Enabling Object Check Out and Check In 85Setting Projects to Allow Object Locking 85Checking Out Objects from the Server Repository 85Checking In Objects to the Server Repository 86Viewing Locked Objects Within Projects 86Locking Objects Locally 87Limitations of Object Check Out and Check In 87
Using Siebel Tools Version 7.7, Rev. A ■ 5

Contents
Viewing Object Differences 87
Undoing Check Out 88
Chapter 6: Working With ProjectsAbout Projects 89
Creating New Projects 90
Renaming Projects 90
Associating Objects with Different Projects 90
Locking Projects Directly in the Local Repository 91
Preventing Object Check in and Check out 92
Unlocking Projects Directly 92
Chapter 7: Working with ObjectsSummary of Tasks for Working with Objects 93
Creating Objects 95
Modifying Objects 96
Copying Objects 97
Deleting Objects 97
About Validating Objects 98
Validating Objects Using the Object List Editor 98
Validating Objects Using the Command-Line Interface 99
About the Validate Dialog Box 99
About the Validation Options Dialog Box 102
Using Queries to List Objects 104
About Simple Queries 105
About Compound Queries 105
Searching the Repository for Objects 106
Viewing Object Relationships 108
Generating Reports About Object Relationships 109
About Object Comparison and Synchronization 111About the Compare Objects Dialog Box 112Comparing Objects 113Synchronizing Objects 115
Using Siebel Tools Version 7.7, Rev. A6 ■

Contents
Determining When Records Were Last Created and Updated 115
Chapter 8: Compiling and TestingAbout Compiling 117
Compiling Projects 117
Compiling Single Objects or Groups of Objects 119
Compiling Using the Command-Line Interface 119
Testing Changes on Your Local Machine 121
Chapter 9: Working With Archive FilesAbout Archive Files 123
Exporting Objects to an Archive File 123
Exporting Objects to an Archive File Using the Command-Line Interface 124
Process of Importing Objects from an Archive File 125
Preparing the Target Repository for Import from an Archive File 125
Importing Objects from an Archive File 126
About the Import Wizard - Review Conflicts and Actions Dialog Box 128
Importing Objects From an Archive File Using the Command-Line Interface 131
Chapter 10: Managing RepositoriesAbout Repositories 133
Viewing Which Repository is Currently Open 134
Reviewing Information About the Current Repository 134
Guidelines for Naming Repositories 135
Renaming Repositories 136
Deleting Repositories 136
About Exporting and Importing Repositories 137
Exporting and Importing Repositories Using the Database Configuration Utility 137
About Repository Patch Files 141
Creating Repository Patch Files 142
Applying Repository Patch Files 144
Upgrading Repositories 145
Using Siebel Tools Version 7.7, Rev. A ■ 7

Contents
Chapter 11: Working With Strings and Other Locale-Specific DataAbout the Symbolic Strings Model 147
Creating Symbolic String References 149
Modifying Symbolic Strings to Globally Update Display Values 149
Using Symbolic String References 150
Entering String Overrides 151
About Converting and Consolidating Strings 151
About the Symbolic String Conversion Process 152
About the Symbolic String Consolidation Process 154
Running the String Conversion Utility 154Parameters for Running Consoleapps.exe to Convert Strings 155Exporting Candidates for Conversion 156Splitting Conversion Export Files into Smaller Files 157Importing Converted Symbolic Strings 157
Running the String Consolidation Utility 158Parameters for Running Consoleapps.exe to Consolidate Strings 159Exporting Matching Symbolic Strings 159Splitting Consolidation Export Files into Smaller Files 160Importing Consolidated Strings 161
Using Batch Files to Convert and Consolidate Strings 162
Working with Non-Translatable Locale-Specific Object Properties 164
Showing or Hiding Locale-Specific Items in Applet Layout 165
About the Locale Management Utility 166
Finding Untranslated Text Strings 166
Finding Existing Translations 167
Finding Modified Objects 168
Exporting Text Strings and Locale-Specific Attributes 169
Importing Text Strings and Locale-Specific Attributes 169
Identifying Objects Modified Since the Last Export 171
Replacing Strings 172
Running the LMU Using the Command Line Interface 172Exporting Strings and Locale-Specific Attributes 173Importing an LMU File 173
Using Siebel Tools Version 7.7, Rev. A8 ■

Contents
Exporting Strings to Be Translated 174
Index
Using Siebel Tools Version 7.7, Rev. A ■ 9

Contents
Using Siebel Tools Version 7.7, Rev. A10 ■

1 What�s New in This Release
Using Siebel Tools is a new book title for version 7.7 that covers how to use the Siebel Tools application. It describes the Siebel Tools user interface and includes tasks such as, customizing the Siebel Tools environment, working with objects, checking in and checking out, and compiling. Using Siebel Tools does not cover how to configure Siebel applications. For example, it does not cover how to extend the data model, define business logic, or build user interface objects. For configuration-related information, see Configuring Siebel eBusiness Applications.
The content covered in Using Siebel Tools came from the following documents:
■ Descriptions of menus and toolbars were previously published in Siebel Developer�s Reference.
■ Descriptions of windows, editors, and most tasks were previously published in Siebel Tools Reference.
NOTE: Siebel Tools Reference is no longer published. It has been replaced by Using Siebel Tools and Configuring Siebel eBusiness Applications.
What�s New in Using Siebel Tools, Version 7.7, Rev. ATable 1 lists changes described in this version of the documentation to support version 7.7 of the software.
Table 1. New Product Features in Using Siebel Tools, Version 7.7, Rev. A
Topic Description
�About the Check Out and Check In Process� on page 75
Added paragraph to introduce a new feature which allows you to check out and check in individual objects. This feature is new in Siebel Tools, version 7.7.2.
�About the Object Check Out Dialog Box� on page 79
Added new topic.
�Checking Out and Checking In Objects� on page 84
Added a series of new topics related to individual check out and check in of objects.
�Summary of Tasks for Working with Objects� on page 93
Added new topic.
�Showing or Hiding Locale-Specific Items in Applet Layout� on page 165
Added new topic.
�Working with Non-Translatable Locale-Specific Object Properties� on page 164
Added new information to existing topic.
�Finding Modified Objects� on page 168
Added new topic.
Using Siebel Tools Version 7.7, Rev. A ■ 11
What�s New in This Release ■
What�s New in Using Siebel Tools, Version 7.7Table 2 lists changes described in this version of the documentation to support version 7.7 of the software.
Table 2. New Product Features in Using Siebel Tools, Version 7.7
Topic Description
�About the Entity Relationship Designer� on page 46
Summary of Entity Relationship Designer.
�About the Business Process Designer� on page 47
Summary of Business Process Designer.
�Setting the Constrain Mode for Working With Symbolic Strings� on page 65
Topic added to support the 7.7 symbolic strings model.
�Working With Strings and Other Locale-Specific Data� on page 147
Added chapter about how to use the symbolic strings model, including converting to symbolic strings and consolidating duplicate strings.
�Working with Non-Translatable Locale-Specific Object Properties� on page 164
Added topic about working with locale-specific data and language overrides.
Using Siebel Tools Version 7.7, Rev. A12 ■
2 About the Siebel Tools User Interface
Topics in This Section�About Siebel Tools� on page 13
�About Siebel Tools Application Windows� on page 14
�About Object Explorer� on page 15
�About the Object List Editor� on page 18
�About the Properties Window� on page 20
�About the Applets Window� on page 21
�About the Controls/Columns Window� on page 21
�About the Bookmarks Window� on page 24
�About the Web Template Explorer Window� on page 25
�About the Siebel Tools Menu Bar� on page 25
�About Siebel Tools Toolbars� on page 37
�About Siebel Tools Right-Click Menus� on page 45
�About Layout Editors� on page 46
�About New Object Wizards� on page 46
�About the Entity Relationship Designer� on page 46
�About the Business Process Designer� on page 47
�About Script Editors� on page 47
�About the Command Line Interface� on page 48
About Siebel ToolsSiebel Tools is an integrated environment for configuring Siebel applications. You use Siebel Tools to modify standard Siebel objects and create new objects to meet your organization�s business requirements. For example, you use Siebel Tools to extend the data model, modify business logic, and define the user interface.
Siebel Tools is a declarative configuration tool, not a programming environment. You use Siebel Tools to create and modify the object definitions (metadata) that define Siebel applications. You do not modify the source code or directly write SQL.
NOTE: In the context of Siebel applications, the terms object and object definition are not equivalent to the terms �object,� �object class,� or �object instance� as they are used in the context of programming languages such as C++.
Siebel Tools allows you to develop a single configuration that can be:
■ Deployed across multiple types of clients
Using Siebel Tools Version 7.7, Rev. A ■ 13

About the Siebel Tools User Interface ■ About Siebel Tools Application Windows
■ Used to support multiple Siebel applications and languages
■ Easily maintained
■ Automatically upgraded to future Siebel product releases
About Siebel Tools Application WindowsYou navigate in Siebel Tools primarily using the following two windows:
■ Object Explorer, the left part of the application window shown in Figure 1
■ Object List Editor, the right part of the application window shown in Figure 1
The Object Explorer uses a hierarchical tree-structure (similar to that of the Microsoft Windows Explorer) that you use to browse the object types that are stored in the Siebel Repository.
Other Siebel Tools windows, like the Object List Editor and Properties windows, show you details about individual objects in the Siebel repository.
Figure 1. Example of Siebel Tools Application Window
Using Siebel Tools Version 7.7, Rev. A14 ■

About the Siebel Tools User Interface ■ About Object Explorer
About Object ExplorerThe Object Explorer, shown in Figure 2, appears when you start Siebel Tools. The Object Explorer shows a hierarchical representation of the major object types that you can use to browse the object types in the Siebel repository.
By default, the Object Explorer is visible when you start Siebel Tools. The Object Explorer has the following parts: the Project drop-down list, the Types tab, the Detail tab, and the Flat tab.
Topics in This Section�The Project Drop-Down List of the Object Explorer� on page 16
�The Types Tab of the Object Explorer� on page 16
�The Detail Tab of the Object Explorer� on page 17
�The Flat Tab of the Object Explorer� on page 17
Figure 2. Example of the Object Explorer Window
Using Siebel Tools Version 7.7, Rev. A ■ 15

About the Siebel Tools User Interface ■ About Object Explorer
The Project Drop-Down List of the Object ExplorerUse the Project drop-down list at the top of the Object Explorer to filter objects by project. For example, you can set the Project filter so that only the object types associated with the Account project appear in the Object Explorer. An example of the values in the drop-down list is shown in Figure 3.
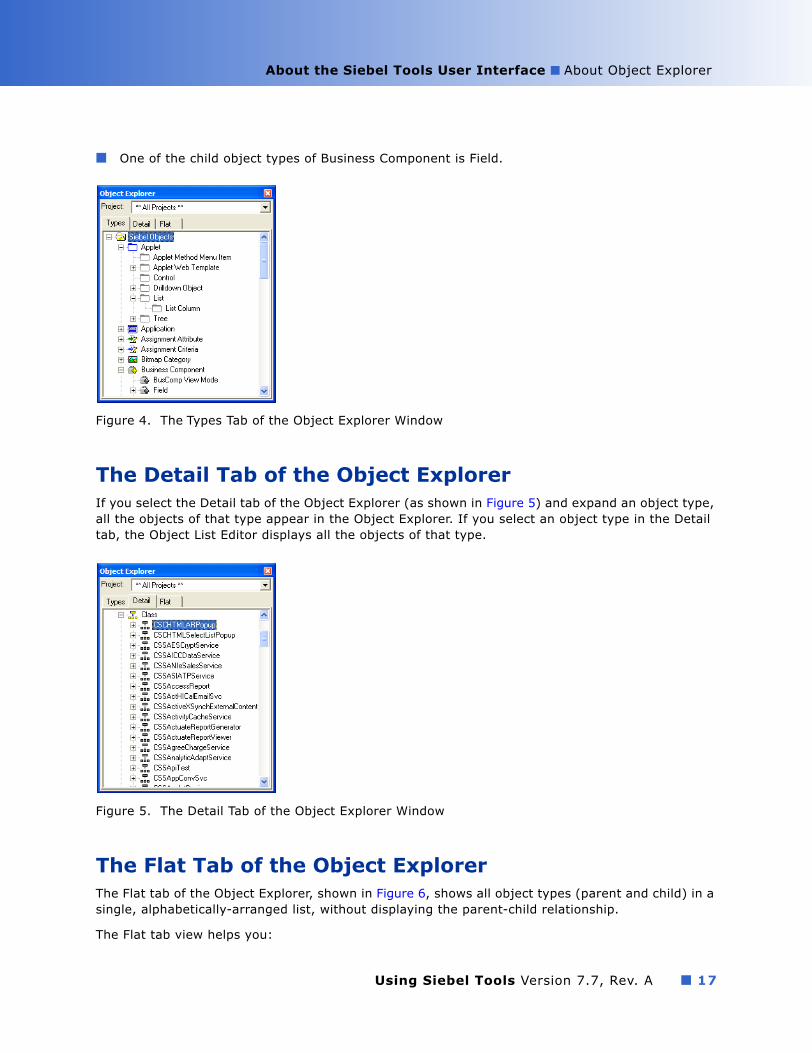
The Types Tab of the Object ExplorerThe Types tab is selected in the Object Explorer shown in Figure 4 on page 17.
The Types tab shows all top-level object types, listed alphabetically. The Types tab shows the object hierarchy�clicking the plus sign (+) to the left of an object type displays all the child object types of the top-level object type. Clicking the minus sign (�) to the left of an object type collapses all its child object types.
NOTE: By default, not all object types are visible in the Object Explorer. For information on how to show and hide objects types, see �Setting Database Options� on page 65.
Some object types have a hierarchy of multiple levels. For example (as shown in Figure 4 on page 17):
■ One of the child object types of Applet is List and, at the next lowest level, List Column.
Figure 3. The Project Drop-Down List in the Object Explorer Window
Using Siebel Tools Version 7.7, Rev. A16 ■
About the Siebel Tools User Interface ■ About Object Explorer
■ One of the child object types of Business Component is Field.
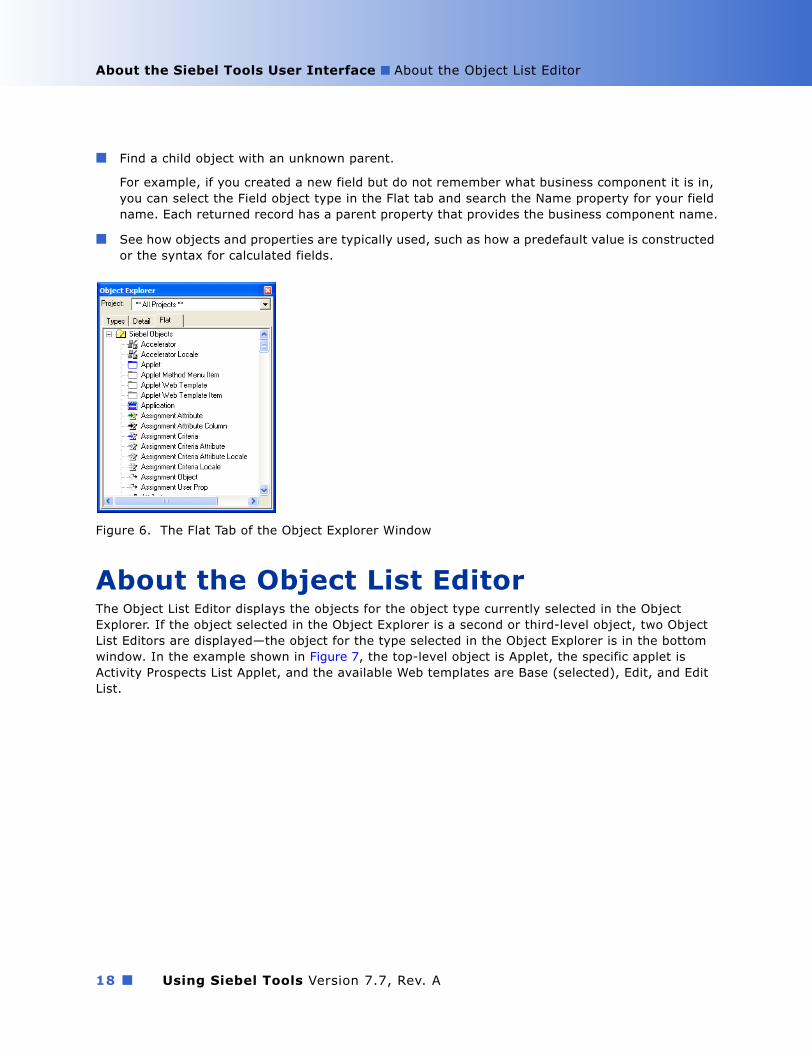
The Detail Tab of the Object ExplorerIf you select the Detail tab of the Object Explorer (as shown in Figure 5) and expand an object type, all the objects of that type appear in the Object Explorer. If you select an object type in the Detail tab, the Object List Editor displays all the objects of that type.
The Flat Tab of the Object ExplorerThe Flat tab of the Object Explorer, shown in Figure 6, shows all object types (parent and child) in a single, alphabetically-arranged list, without displaying the parent-child relationship.
The Flat tab view helps you:
Figure 4. The Types Tab of the Object Explorer Window
Figure 5. The Detail Tab of the Object Explorer Window
Using Siebel Tools Version 7.7, Rev. A ■ 17
About the Siebel Tools User Interface ■ About the Object List Editor
■ Find a child object with an unknown parent.
For example, if you created a new field but do not remember what business component it is in, you can select the Field object type in the Flat tab and search the Name property for your field name. Each returned record has a parent property that provides the business component name.
■ See how objects and properties are typically used, such as how a predefault value is constructed or the syntax for calculated fields.
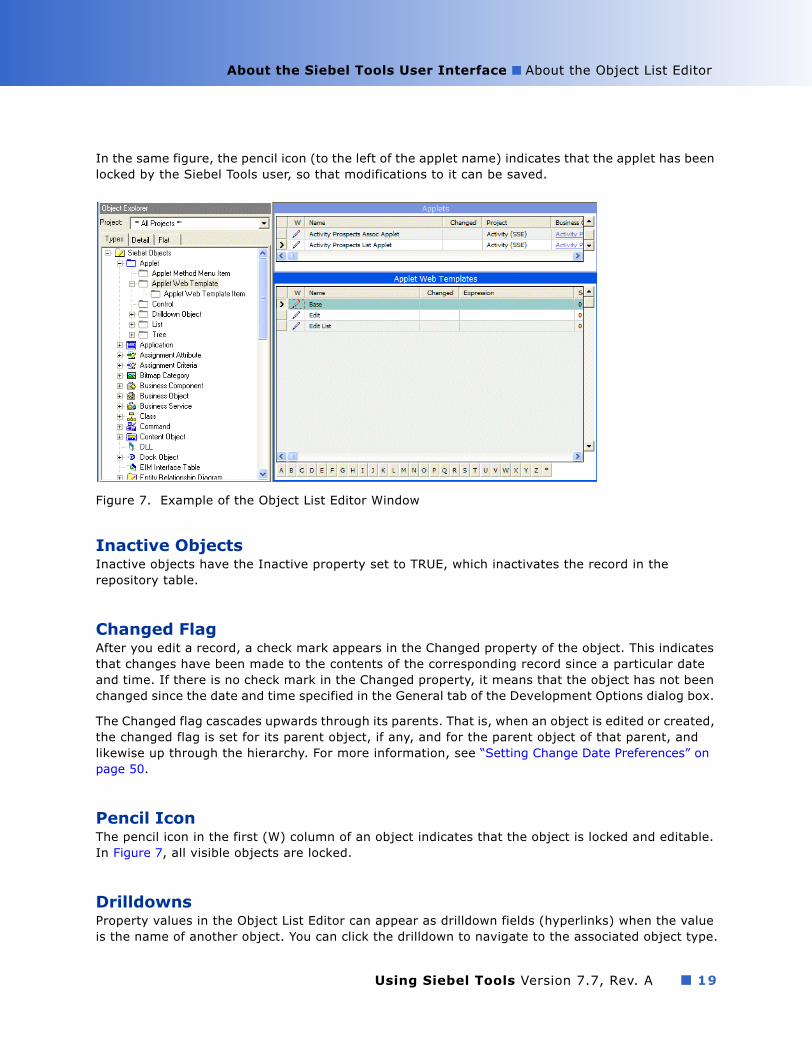
About the Object List EditorThe Object List Editor displays the objects for the object type currently selected in the Object Explorer. If the object selected in the Object Explorer is a second or third-level object, two Object List Editors are displayed�the object for the type selected in the Object Explorer is in the bottom window. In the example shown in Figure 7, the top-level object is Applet, the specific applet is Activity Prospects List Applet, and the available Web templates are Base (selected), Edit, and Edit List.
Figure 6. The Flat Tab of the Object Explorer Window
Using Siebel Tools Version 7.7, Rev. A18 ■
About the Siebel Tools User Interface ■ About the Object List Editor
In the same figure, the pencil icon (to the left of the applet name) indicates that the applet has been locked by the Siebel Tools user, so that modifications to it can be saved.
Inactive ObjectsInactive objects have the Inactive property set to TRUE, which inactivates the record in the repository table.
Changed FlagAfter you edit a record, a check mark appears in the Changed property of the object. This indicates that changes have been made to the contents of the corresponding record since a particular date and time. If there is no check mark in the Changed property, it means that the object has not been changed since the date and time specified in the General tab of the Development Options dialog box.
The Changed flag cascades upwards through its parents. That is, when an object is edited or created, the changed flag is set for its parent object, if any, and for the parent object of that parent, and likewise up through the hierarchy. For more information, see �Setting Change Date Preferences� on page 50.
Pencil IconThe pencil icon in the first (W) column of an object indicates that the object is locked and editable. In Figure 7, all visible objects are locked.
DrilldownsProperty values in the Object List Editor can appear as drilldown fields (hyperlinks) when the value is the name of another object. You can click the drilldown to navigate to the associated object type.
Figure 7. Example of the Object List Editor Window
Using Siebel Tools Version 7.7, Rev. A ■ 19

About the Siebel Tools User Interface ■ About the Properties Window
To be able to use drilldowns in the Object List Editor, you must be assigned the Developer responsibility. Users are assigned responsibilities in the Administration - Application > Reproducibilities screen of Siebel applications. For more information, see Security Guide for Siebel eBusiness Applications.
About the Properties WindowThe Properties window (shown in Figure 8) displays the property settings for the object currently highlighted in the Object List Editor. The name of the active object is shown at the top of the window (in Figure 8, Business Component Abs Result). For each property of the object, the Properties window shows the name of the property in the left column, and the property�s value in the right column. By default, the Properties window appears with the Alphabetic tab active; you can click the Categorized tab to see the properties grouped by category.
NOTE: The Properties window does not display the Project and Changed properties.
Figure 8. Example of the Properties Window
Using Siebel Tools Version 7.7, Rev. A20 ■
About the Siebel Tools User Interface ■ About the Applets Window
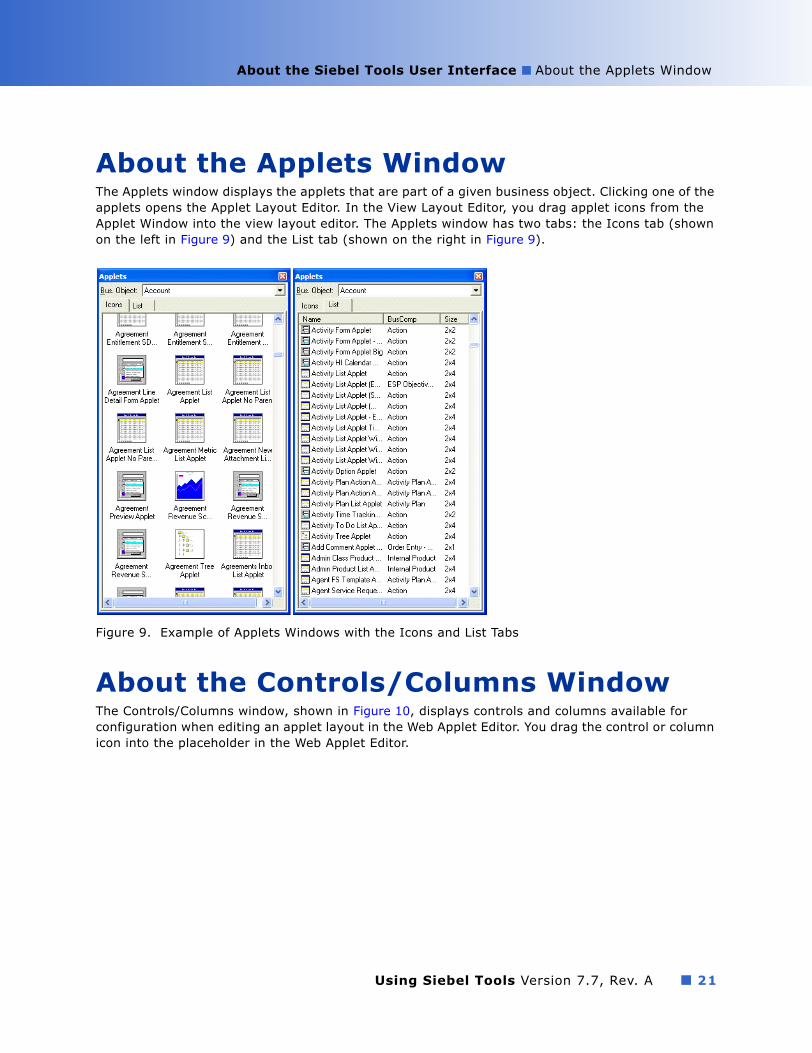
About the Applets WindowThe Applets window displays the applets that are part of a given business object. Clicking one of the applets opens the Applet Layout Editor. In the View Layout Editor, you drag applet icons from the Applet Window into the view layout editor. The Applets window has two tabs: the Icons tab (shown on the left in Figure 9) and the List tab (shown on the right in Figure 9).
About the Controls/Columns WindowThe Controls/Columns window, shown in Figure 10, displays controls and columns available for configuration when editing an applet layout in the Web Applet Editor. You drag the control or column icon into the placeholder in the Web Applet Editor.
Figure 9. Example of Applets Windows with the Icons and List Tabs
Using Siebel Tools Version 7.7, Rev. A ■ 21

About the Siebel Tools User Interface ■ About the Controls/Columns Window
When you select a control or a column object in the Controls/Columns window, the Properties window refreshes to show the properties of the selected object, as shown in Figure 10. If no object is selected in the Controls/Columns window, the Properties window shows the properties of the applet.
Figure 10. Example of the Controls/Columns Window
Using Siebel Tools Version 7.7, Rev. A22 ■

About the Siebel Tools User Interface ■ About the Controls/Columns Window
Figure 11. Example of the Controls/Columns Window with the Web Applet Editor
The control and column objects for this applet
The properties of the object selected in the Controls/Column window
The applet as it appears in the Web Applet Editor
Using Siebel Tools Version 7.7, Rev. A ■ 23

About the Siebel Tools User Interface ■ About the Bookmarks Window
About the Bookmarks WindowThe Bookmarks window (shown in Figure 12) lets you navigate to frequently used objects in the repository using shortcuts that you add using the buttons on the History toolbar.
Related Topic�History Toolbar� on page 39
Figure 12. Example of the Bookmarks Window
Using Siebel Tools Version 7.7, Rev. A24 ■
About the Siebel Tools User Interface ■ About the Web Template Explorer Window
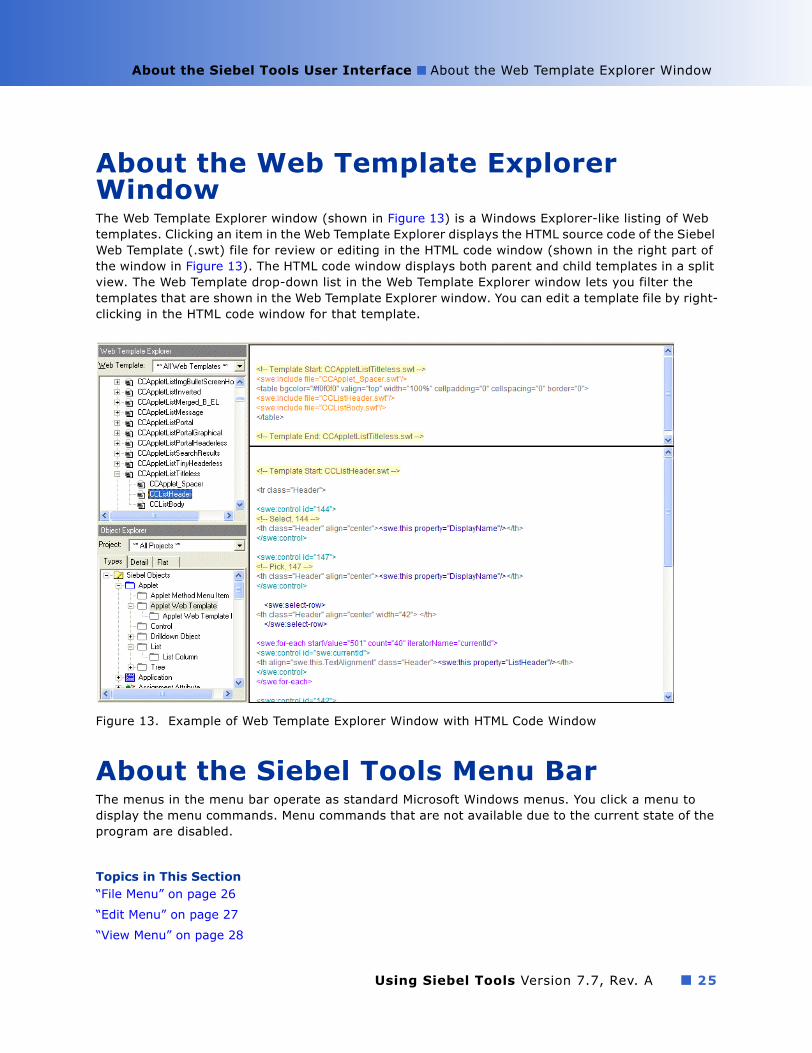
About the Web Template Explorer WindowThe Web Template Explorer window (shown in Figure 13) is a Windows Explorer-like listing of Web templates. Clicking an item in the Web Template Explorer displays the HTML source code of the Siebel Web Template (.swt) file for review or editing in the HTML code window (shown in the right part of the window in Figure 13). The HTML code window displays both parent and child templates in a split view. The Web Template drop-down list in the Web Template Explorer window lets you filter the templates that are shown in the Web Template Explorer window. You can edit a template file by right-clicking in the HTML code window for that template.
About the Siebel Tools Menu BarThe menus in the menu bar operate as standard Microsoft Windows menus. You click a menu to display the menu commands. Menu commands that are not available due to the current state of the program are disabled.
Topics in This Section�File Menu� on page 26
�Edit Menu� on page 27
�View Menu� on page 28
Figure 13. Example of Web Template Explorer Window with HTML Code Window
Using Siebel Tools Version 7.7, Rev. A ■ 25

About the Siebel Tools User Interface ■ About the Siebel Tools Menu Bar
�Screens Menu� on page 30
�Go Menu� on page 31
�Query Menu� on page 32
�Reports Menu� on page 32
�Format Menu� on page 33
�Debug Menu� on page 33
�Tools Menu� on page 34
�Window Menu� on page 36
�Help Menu� on page 37
Related Topics�About Siebel Tools Toolbars� on page 37
File MenuTable 3 describes the options available on the File menu for repository and object management.
Table 3. File Menu Options
Menu Option(Shortcut) Description
Open Repository When multiple repositories are present in the development directory, the menu option provides the means to open a repository other than the currently open one. The repository chosen using File > Open Repository becomes the default repository opened each time Siebel Tools is launched.
New Object Invokes the New Object Wizard for the creation of a list applet, form applet, chart applet, tree applet, business component, report, table, command, pick list, MVG, or view.
Close(CTRL+F4)
Closes the Object List Editor.
Save(CTRL+S)
Saves changes in the current editing window when you are editing Layout, Menu, or Basic Scripts.
Save All Saves changes in all open editing windows.
Import Imports text from an external text file into the Siebel VB Editor window. This text should be in an SBL file format. SBL format is generated when it is exported from the Siebel VB editor.
Export Allows you to create a text file in delimited or HTML format that lists the property values of an objects or all objects currently displayed in the Object List Editor.
Using Siebel Tools Version 7.7, Rev. A26 ■
About the Siebel Tools User Interface ■ About the Siebel Tools Menu Bar
Edit MenuThe Edit menu options apply to individual objects in the Object List Editor.
You can also display a menu of edit tools by selecting a field and right-clicking while the cursor is positioned over the Object List Editor. For more information, see �About Siebel Tools Right-Click Menus� on page 45.
Table 4 describes the options available on the Edit menu.
Print Setup Changes the printer and printing options for printing object visualization view diagrams.
Print Preview Opens a print preview window for display of an object visualization view.
Print(CTRL+P)
Prints the active object visualization view diagram.
Exit Closes Siebel Tools.
Table 4. Edit Menu Options
Menu Option(Shortcut) Description
Undo(CTRL+Z)
Reverses the last change to a property value in the Object List Editor or Property window before the object is committed.
Redo(CTRL+Y)
Reapplies changes after the Undo command has been executed.
Undo Record Reverses the creation of new objects or all modifications to existing objects, so long as the record has not yet been committed.
New Record(CTRL+N)
Creates a new object in the Object List Editor, with the cursor positioned in the first required property.
Copy Record(CTRL+B)
Creates a new object that is a copy of the currently selected object, and duplicates all child objects.
NOTE: Avoid using the Copy Record option, except when the reuse and extension of an existing object would be impractical.
Delete Record(CTRL+D)
Deletes the currently selected object and its child objects.
NOTE: Avoid using the Delete Record option. If you want to remove an object from use, set its Inactive property to TRUE.
Table 3. File Menu Options
Menu Option(Shortcut) Description
Using Siebel Tools Version 7.7, Rev. A ■ 27

About the Siebel Tools User Interface ■ About the Siebel Tools Menu Bar
View MenuThe View menu options are used to change display environment settings, such as which windows and toolbars appear. It also invokes visualization views, which are diagrams showing object relationships. Table 5 describes the View menu options and suboptions.
Cut(CTRL+X)
In a text property, copies the selected text to the clipboard and deletes the existing text. In the Applet Designer, copies the selected control to the clipboard and deletes the existing control.
Copy(CTRL+C)
In a text property, copies the selected text to the clipboard without deleting it. In the Applet Designer, copies the selected control to the clipboard without deleting it.
Paste(CTRL+V)
Inserts text from the clipboard into a text property at the insertion point. Inserts a control from the clipboard in the Applet Designer.
Delete(DEL)
In a text property, deletes the selected text. In the Applet Designer, deletes the selected control.
Select All(CTRL+A)
Selects the entire document. In the Applet Designer, selects all controls in the applet.
Change Records
Changes multiple records simultaneously.
Find(CTRL+F)
Finds the specified text in the Siebel Script Editor window.
Replace(CTRL+H)
Replaces the specified text with different text in the Siebel Script Editor window.
Table 5. View Menu Options
Option(Shortcut)
Suboption(Shortcut) Description
Windows Properties Window Shows or hides the Properties window.
Applets Window Shows or hides the Applets window.
Controls Window Shows or hides the Controls window.
Bookmarks Window Shows or hides the Bookmarks window.
Web Templates Window Shows or hides the Web Templates Explorer window.
Refresh Windows Requeries and updates the state of dockable windows.
Table 4. Edit Menu Options
Menu Option(Shortcut) Description
Using Siebel Tools Version 7.7, Rev. A28 ■

About the Siebel Tools User Interface ■ About the Siebel Tools Menu Bar
Editors Applet Editor Opens the selected applet in Applet Layout Editor, including the Controls/Columns window.
Server Script Editor Opens the Siebel Script Editor. Editor may be specifically defined or be set to a default.
Browser Script Editor Opens the Siebel Web Script Editor, which is used to access scripts that control the presentation and behavior of applet controls and list columns in a Web applet template.
Visualize View Details For more information, see �Viewing Object Relationships� on page 108.
View Relationships
View Descendents
View Web Hierarchy
Debug Windows
Calls(CTRL+L)
Opens the Calls window for display of the call stack of the Siebel VB or Siebel eScript script currently being debugged.
Watch(SHIFT+F9)
Opens the Watch window for display of the values of local variables in the Siebel VB or Siebel eScript script currently being debugged.
Errors Opens the Errors window for display of the run-time errors in the Siebel VB or Siebel eScript script currently being debugged.
Preview The preview of a Web view layout depicts the container page, screen bar, and view bar.
ActiveX Methods
Allows you to view the methods for the current ActiveX control in the Applet Designer.
Toolbars Displays or hides the various toolbars: Edit, History, List, Debug, Web Controls, and Configuration Context.
Status Bar Displays or hides the Status bar at the bottom of the Siebel Tools window.
Table 5. View Menu Options
Option(Shortcut)
Suboption(Shortcut) Description
Using Siebel Tools Version 7.7, Rev. A ■ 29

About the Siebel Tools User Interface ■ About the Siebel Tools Menu Bar
Screens MenuThe Screens menu is empty unless you log on to Siebel Tools as a system administrator. If you have system administrator rights, the options described in Table 6 appear.
Object Explorer(CTRL+E)
Displays or hides the Object Explorer.
Options Opens the Development Tools Options dialog box, in which you can set general preferences and settings for language, check-in and check-out, list views, scripting, Web template editor, debugging, visualization, Object Explorer, and database.
Siebel Tools options are stored in a user preference file, which is located in <Tools_install_root>\BIN. The user preference filename is login_ID&application_name.spf.
Table 6. Screens Menu Options
Option Suboption Description
Application Upgrader
Application Upgrade Attribute List The Application Upgrades and Attribute Differences lists appear in the Object List Editor.
Application Upgrade Database Version
For internal use by Siebel Systems.
Application Upgrade Object List The Application Upgrades, Object Differences, and Attribute Differences lists appear in the Object List Editor.
Table 5. View Menu Options
Option(Shortcut)
Suboption(Shortcut) Description
Using Siebel Tools Version 7.7, Rev. A30 ■

About the Siebel Tools User Interface ■ About the Siebel Tools Menu Bar
Go MenuThe Go menu contains options for moving through a records list. Primarily, you use the Go menu to create and navigate to bookmarks, which flag objects for easy return navigation. Bookmarks are a helpful navigation aid, allowing you to move around among the objects of different types you are working on. Table 7 describes the Go menu options.
System Administration
List of Values Displays lists of values in the development database.
Strings Siebel Systems internal use only
System Preferences Displays system preferences in the Object List Editor. This information is similar to the System Administrator View available from the Application Administration Screen in Siebel eBusiness Applications.
System Preferences is used by the src\server\sfs\common\locate_fulfill\cssconfigagent.cpp file. The system preference is used by fulfillment and part locator engines for cleaning the rows in a temporary table that is shared by the client and server components. The parameter is only used when you want to clean up the temporary table. In that case, you must explicitly submit a CleanUp request to fulfillment/part locator engines.
Table 7. Go Menu Options
Option(Shortcut) Description
Back Returns to the previously displayed screen.
Forward Returns to subsequently displayed screen.
Previous Record(CTRL+UP)
Goes to the objects above the current selection.
Next Record(CTRL+DOWN)
Goes to the objects below the current selection.
First Record(CTRL+PGUP)
Goes to the first objects in the list.
Table 6. Screens Menu Options
Option Suboption Description
Using Siebel Tools Version 7.7, Rev. A ■ 31

About the Siebel Tools User Interface ■ About the Siebel Tools Menu Bar
Query MenuThe Query menu options allow you to create and refine Object List Editor queries, which restrict the list of objects that appear in the current Object List Editor. An option is provided that lets you change the sort order of objects in the window. Table 8 describes the Query menu options.
Reports MenuThe Reports menu may be empty or may list one or more available reports about objects and properties, depending on which object type is currently active in the Object Explorer. Table 34 in �Generating Reports About Object Relationships� on page 109 describes the different reports you can generate using the Reports menu.
Two additional reports become available on this menu when the Application Upgrader is active:
■ Application Upgrade Object List. Generates a report listing all object differences between repository versions.
Last Record(CTRL+PGDN)
Goes to the last objects in the list.
Add Bookmark Invokes the Add Bookmark dialog box, for creation of a bookmark to the currently selected objects.
Bookmark List Opens the Bookmarks dialog box, for selection of an existing bookmark to navigate to. You can also use this dialog box to rename or delete existing bookmarks.
Table 8. Query Menu Options
Option(Shortcut) Description
New Query(CTRL+Q)
Allows you to specify restrictions on the set of objects to be displayed in the current Object List Editor.
Refine Query(CTRL+R)
Allows you to add additional restrictions to the query currently in effect.
Execute Query(ENTER)
Executes the query you have just specified, causing the restrictions to take effect. This has the same effect as pressing ENTER.
Sort Order Invokes the Sort Order dialog box, for specification of sort order criteria for the list of objects in the Object List Editor.
Table 7. Go Menu Options
Option(Shortcut) Description
Using Siebel Tools Version 7.7, Rev. A32 ■

About the Siebel Tools User Interface ■ About the Siebel Tools Menu Bar
■ Application Upgrade Attributes List. Generates a report listing all attribute differences between repository versions.
Format MenuThe Format menu options in the Applet Layout Editor allow you to align, resize, and reposition controls; configure the snap grid; and adjust tab or list column order. Options are also provided for performing an Applet Designer Preview. Table 9 describes the Format menu options.
Debug MenuThe Debug menu options control the Siebel VB or Siebel eScript debugger, for use when a script is open in the Siebel Script Editor. Table 10 describes the Debug menu options.
Table 9. Format Menu Options
Option Description
Align Aligns the selected items with the selected model.
Make Same Size Makes all selected items the same size as the selected model.
Horizontal Spacing Adjusts horizontal spacing between items.
Vertical Spacing Adjusts vertical spacing between items.
Center in Applet Centers the selected items horizontally or vertically.
Set Label Alignment Allows you to align labels in applets based on grid layout Web templates.
Set Tab Order Allows you to set the tab order for fields in a form applet. This option is not available for list applets.
Table 10. Debug Menu Options
Option(Shortcut) Description
Start(F5)
Starts the application. A dialog box with startup parameters also appears.
Break(CTRL+BREAK)
Stops the execution of the currently running script. If Siebel VB or Siebel eScript is not executing, no operation is performed.
End Stops the execution of the application and returns to the Siebel Script Editor window.
Restart(SHIFT+F5)
Restarts the application if a break has occurred.
Using Siebel Tools Version 7.7, Rev. A ■ 33

About the Siebel Tools User Interface ■ About the Siebel Tools Menu Bar
Tools MenuTable 11 describes the Tools menu options.
Step Into(F8)
Executes the next line of script code. If this is a subroutine or procedure call, then execution continues within that procedure.
Step Over(SHIFT+F8)
Advances the application to the script code line just after the current subroutine or procedure. Execution remains at the level of the current procedure.
Step To Cursor(CTRL+F8)
Executes all lines of code up to the line selected by the cursor.
Toggle Breakpoint(F9)
Sets or removes a breakpoint on a specific line of code.
Clear All Breakpoints(CTRL+SHIFT+F9)
Removes all breakpoints from the current script routine.
Check Syntax Compiles the current script and verifies syntax.
Table 11. Tools Menu Options
Option(Shortcut) Suboption Description
Compile (F7) Opens the Object Compiler dialog box to compile one or more projects, or all projects in the repository, into an SRF file.
Compile Selected Objects(CTRL+F7)
Opens the Object Compiler dialog box to compile the selected objects into an SRF file.
Check Out(F10)
Opens the Check Out dialog box, to copy one or more projects from the server to the local database.
Check In(CTRL+F10)
Opens the Check In dialog box, to copy one or more projects from the local database to the server.
Lock Project(ALT+L)
Locks the project that the currently selected object is assigned to.
Unlock Project(ALT+U)
Unlocks the project that the currently selected object is assigned to.
Add To Archive Opens the Export To Archive dialog box, for adding the selected top-level objects or projects to an archive file.
Table 10. Debug Menu Options
Option(Shortcut) Description
Using Siebel Tools Version 7.7, Rev. A34 ■

About the Siebel Tools User Interface ■ About the Siebel Tools Menu Bar
Import From Archive Initiates the Import wizard for importing objects from an archive file.
Compare Objects Selected Compares two selected objects and graphically displays similarities and differences (in object type and instance), with a list of object properties by name and value.
Selected vs. Repository
Compares the selected object against the corresponding object in the selected repository and graphically displays similarities and differences.
Selected vs. Archive
Compares the selected object against the corresponding object in the selected archive file and graphically displays similarities and differences.
Archive vs. Archive
Compares two selected archive files and graphically displays similarities and differences.
Convert to Grid Layout Converts non-grid layout form applets to grid layout.
Search Repository Opens the Search Repository dialog box for performing a search for objects based on the text in their names (or other properties) and their object types.
Validate Object From the Validate dialog box, runs validation on a selected object. Lists any errors by severity, rule number, object name, and error description. Allows changing of options for rules, severity, and enforcement.
Upgrade Prepare Repository
Used for upgrading from version 6.x to version 7.x. The Prepare Repository utility is run before performing a repository merge. It migrates strings from the S_MSG table, merges labels and fields, and merges templates to specified applets for selected languages.
Upgrade Application
Navigates to the Application Objects Upgrade List in the Application Upgrader screen of Siebel Tools, and opens the Merge Repositories dialog box. Used to merge standard and customized repositories.
Generate EIM Processing Columns
Opens the EIM Processing Column Generator dialog box, from which you create missing EIM processing columns and indexes after merging the repository.
Web Client Migration
Used when upgrading from version 6.x to version 7.x. It associates Web templates to a group of selected applets and views so that they can be used in the web client.
Table 11. Tools Menu Options
Option(Shortcut) Suboption Description
Using Siebel Tools Version 7.7, Rev. A ■ 35
About the Siebel Tools User Interface ■ About the Siebel Tools Menu Bar
Window MenuThe Window menu lists the currently open Object List Editor, Application Designer, visualization view, and other windows, and provides the means to navigate to windows that are currently hidden from view.
If one of the windows is open, the first option on the menu is Close. This closes the currently active window.
Utilities Check Labels Opens the Check Labels dialog box to check the labels in the currently selected applet for sufficient horizontal space when translated into a particular language.
Generate Actuate Report
When a Report object is selected, this menu option generates a data stream file for use in the creation of an Actuate report.
Generate Help IDs
Used internally by Siebel Systems to generate the sshelp.hm file, containing correspondences between context ID numbers and text help identifiers that have been specified in Help ID objects. This option is used for Tools Online Help.
Locale Management
Allows you to import and export translatable text strings and locale-specific attributes using the Local Management Utility.
Map Fax Properties
When the business component object type is selected in the Object Explorer, this option opens the Map Fax Properties dialog box for the current business component object. This dialog box is used to create mappings between fields in the business component and fax software property sheet properties. These mappings support customization of the fax cover sheet and message.
Export View Previews
Exports view from the Preview mode of the View Layout Editor to an HTML file.
Build Patch Initiates the Patch Builder wizard to create a patch file.
Apply Patch Opens the Apply Patch window to initiate the patch application process.
Table 11. Tools Menu Options
Option(Shortcut) Suboption Description
Using Siebel Tools Version 7.7, Rev. A36 ■

About the Siebel Tools User Interface ■ About Siebel Tools Toolbars
Help MenuTable 12 describes the Help menu options.
About Siebel Tools ToolbarsThere are several toolbars in Siebel Tools. The toolbars, like menu items, are active only when the object type or window that uses them is active. You can show and hide toolbars using the Toolbars option in the View menu. You can also rearrange the toolbars using drag-and-drop functionality.
Topics in This Section�Edit Toolbar� on page 38
�History Toolbar� on page 39
�List Toolbar� on page 39
�Debug Toolbar� on page 40
�Web Controls Toolbar� on page 41
�Web Controls Toolbar� on page 41
�Format Toolbar� on page 43
�Configuration Context Toolbar� on page 45
Table 12. Help Menu Options
Option Description
Contents Opens the Siebel Tools Online Help.
Using Help Opens the Siebel Tools Online Help.
Technical Support Displays the Technical Support Information dialog box and allows you to update license key information. The dialog box displays the phone numbers for calling or sending a fax to Siebel Technical Support. It also displays information that Technical Support needs, such as the version number of your Siebel Tools installation and the command line syntax used to open Siebel Tools.
About Record Opens a dialog box that displays information about the current object, including its creator and creation date.
About SRF Opens a dialog box that displays information about the most recent full incremental compilations.
About View Opens a dialog box that displays information about the current screen, business object, and view, including applet layout.
About Visible Views Displays the list of views in the repository and whether or not they are visible.
About Siebel Tools Opens a dialog box identifying the version of Siebel Tools.
Using Siebel Tools Version 7.7, Rev. A ■ 37

About the Siebel Tools User Interface ■ About Siebel Tools Toolbars
Related Topics�About the Siebel Tools Menu Bar� on page 25
�Showing and Hiding Toolbars� on page 69
Edit ToolbarThe Edit toolbar contains edit tools, the New Object wizard, and undo and redo options.
You can also display a menu of edit tools by selecting a field and right-clicking while the cursor is positioned over the Object List Editor. For more information, see �About Siebel Tools Right-Click Menus� on page 45.
Table 13 describes the Edit toolbar buttons.
Table 13. Edit Toolbar Buttons
Button Description
New Invokes the New Object Wizard, which allows you to create applets, views, charts, and other objects.
Save Saves changes in the current editing window when you are editing Layout, Menu, or Basic Scripts.
Save All Saves changes in all open editing windows.
Cut In a text property, copies the selected text to the clipboard and deletes the existing text. In the Applet Designer, copies the selected control to the clipboard and deletes the existing control.
Copy In a text property, copies the selected text to the clipboard without deleting it. In the Applet Designer, copies the selected control to the clipboard without deleting it.
Paste Inserts text from the clipboard into a text property at the insertion point. In the Applet Designer, inserts a control from the clipboard.
Undo Reverses the last change to a property value in the Object List Editor or Property window if the object has not been committed.
Redo Reapplies changes after the Undo command has been executed.
Using Siebel Tools Version 7.7, Rev. A38 ■

About the Siebel Tools User Interface ■ About Siebel Tools Toolbars
History ToolbarThe History toolbar contains buttons for retracing your steps and for creating and navigating to bookmarks, which flag objects for quick return navigation. Bookmarks are a helpful navigation aid, allowing you to move around quickly among the different object types with which you are working. Table 14 describes the History toolbar buttons.
List ToolbarThe List toolbar contains buttons that apply to objects in the Object List Editor. The buttons let you insert new records, move forward and backward, work with queries, and sort objects. Table 15 describes the List toolbar buttons.
Table 14. History Toolbar Buttons
Button Description
Go Back Returns to the previously displayed screen.
Go Forward Returns to the subsequent displayed screen.
Add Bookmark Opens the Add Bookmark dialog box, so you can add a bookmark for the currently selected object.
Bookmark List Opens the Bookmarks window, so you can select a bookmark to navigate to. You can also use this window to rename or delete existing bookmarks.
Table 15. List Toolbar Buttons
Button Description
Add New Record Creates a new object in the Object List Editor, with the cursor positioned in the first required property.
First Record Goes to the first object in the list.
Previous Record Goes to the object above the current selection.
Next Record Goes to the object below the current selection.
Last Record Goes to the last object in the list.
Using Siebel Tools Version 7.7, Rev. A ■ 39

About the Siebel Tools User Interface ■ About Siebel Tools Toolbars
Debug ToolbarThe Debug toolbar contains buttons, described in Table 16, that let you access Siebel VB and Siebel eScript debugging tools.
New Query Allows you to specify one or more restrictions on the set of objects to be displayed in the current Object List Editor.
Execute Query Executes the query you have just specified, causing the restrictions to take effect. This has the same effect as pressing ENTER.
Sort Ascending Changes the order in which objects appear by sorting them in ascending order on the currently selected property column.
Sort Descending Changes the order in which objects appear by sorting them in descending order on the currently selected property column.
Table 16. Debug Toolbar Buttons
Button Description
Check Syntax Compiles the current script and verifies syntax.
Start Starts the application. A dialog box with startup parameters also appears.
Break Stops the execution of the currently running script. If Siebel VB or Siebel eScript is not executing, no operation is performed.
End Stops the execution of the application and returns to the Siebel Script Editor window.
Toggle Breakpoint Sets or removes a breakpoint on a specific line of code.
Table 15. List Toolbar Buttons
Button Description
Using Siebel Tools Version 7.7, Rev. A40 ■

About the Siebel Tools User Interface ■ About Siebel Tools Toolbars
Web Controls ToolbarThe Web Controls toolbar allows you to create user interface controls in the Applet Layout Editor. You can reposition the toolbar as a floating window anywhere on the screen, or you can place it with the other toolbars at the top of the screen. The toolbar supports drag-and-drop behavior for the creation and placement of new controls. The Web Controls toolbar contains drop-down lists, fields, and buttons.
Drop-Down Lists and Fields■ Mode. This drop-down list lets you select the applet mode, such as Base or Edit. Values in the
drop-down list indicate whether a given mode is active or inactive.
■ Template. This field shows the Web template associated with the selected mode.
■ Control Type. This drop-down list lets you insert a custom control type into a template. Works together with the Custom Control button.
Watch The Tools menu establishes variable watches, so you can monitor the contents of program variables in the Variable window during execution of Siebel VB and Siebel eScript routines.
Calls Displays the list of Siebel VB or Siebel eScript routine calls executed up to the point where the application was stopped.
Step Into Executes the next line of script code. If this is a subroutine or procedure call, then execution continues within that procedure.
Step Over Advances the application to the script code line just after the current subroutine or procedure. Execution remains at the level of the current procedure.
Table 16. Debug Toolbar Buttons
Button Description
Using Siebel Tools Version 7.7, Rev. A ■ 41

About the Siebel Tools User Interface ■ About Siebel Tools Toolbars
ButtonsTable 17 describes the Web Controls toolbar buttons.
Table 17. Web Controls Toolbar Buttons
Button Description
Change Template. Displays the Choose Template dialog box that lets you select a different Web template.
Edit Template. Opens the template editor you defined as your external Web template editor in your options.
Select. Lets you select an object in the layout.
CheckBox. Creates a check box.
ComboBox. Creates a combo box.
Text. Creates a text box.
TextArea. Creates a text area.
Hidden. Creates hidden HTML.
Password. Creates a text box where the user enters a password during logon.
Link. Creates an HTML link control.
MailTo. Creates a mail-to link.
Button. Creates a button.
Label. Creates a label on templates.
URL. Creates a link to an external URL on templates.
Using Siebel Tools Version 7.7, Rev. A42 ■
About the Siebel Tools User Interface ■ About Siebel Tools Toolbars
Format ToolbarThe Format toolbar contains buttons, described in Table 18, that let you apply specific formatting to controls for applets based on grid-layout Web templates.
ActiveX. Creates an ActiveX control on templates.
Text List Column. Creates a list column that contains HTML text. Available for list applets only.
Checkbox List Column. Creates a list column that contains HTML check boxes. Available for list applets only.
Custom Control. Creates a custom control on a template. You can select a custom control from the Control Type drop-down list, and then drag the Custom Control button to the designer to create the custom control.
Shift to previous placeholder in applets based on non-grid Web templates. Moves the selected control to the previous placeholder.
Shift to next placeholder in applets based on non-grid Web templates. Moves the selected control to the next placeholder.
Table 18. Format Toolbar Buttons
Button Description
Aligns the left edges of controls
Aligns the centers of controls along a vertical axis
Aligns right edges of controls
Aligns the tops of controls
Aligns the middles of controls along a horizontal axis.
Aligns the bottom of controls
Table 17. Web Controls Toolbar Buttons
Button Description
Using Siebel Tools Version 7.7, Rev. A ■ 43

About the Siebel Tools User Interface ■ About Siebel Tools Toolbars
Makes controls the same width
Makes controls the same height
Makes controls the same size
Makes the horizontal spacing between controls equal
Increases the horizontal spacing between controls
Decreases the horizontal spacing between controls
Removes the horizontal spacing between controls
Makes vertical spacing between controls equal
Increases vertical spacing between control
Decreases vertical spacing between control
Removes vertical spacing between controls
Centers controls vertically
Center controls horizontally
Aligns labels to the left
Centers labels
Aligns labels
Table 18. Format Toolbar Buttons
Button Description
Using Siebel Tools Version 7.7, Rev. A44 ■
About the Siebel Tools User Interface ■ About Siebel Tools Right-Click Menus
Configuration Context ToolbarThe Configuration Context toolbar contains drop-down lists that let you define settings for Web browser layout and scripting.
About Siebel Tools Right-Click MenusRight-click menus in Siebel Tools allow you navigate and perform the following actions:
■ Launch the Web Applet editor from the applet list in the Object List Editor by right-clicking and choosing Edit Web Layout. If an applet Web template does not already exist, the Web Layout wizard appears.
■ Launch the Web View editor directly from the view list in the Object List Editor by right-clicking and choosing Edit Web Layout. If a view Web template does not already exist, the Web Layout wizard appears. In the first wizard, you need to choose a view Web template from a combo box.
■ The right-click menu in the Object List Editor for Web Template objects includes these choices:
■ View the template, which brings up the appropriate editor with no mappings.
■ Edit the template, which brings up the internal or external template editor.
■ Right-clicking a Siebel Tools toolbar displays the names and status of the toolbars (similar to using View > Toolbars).
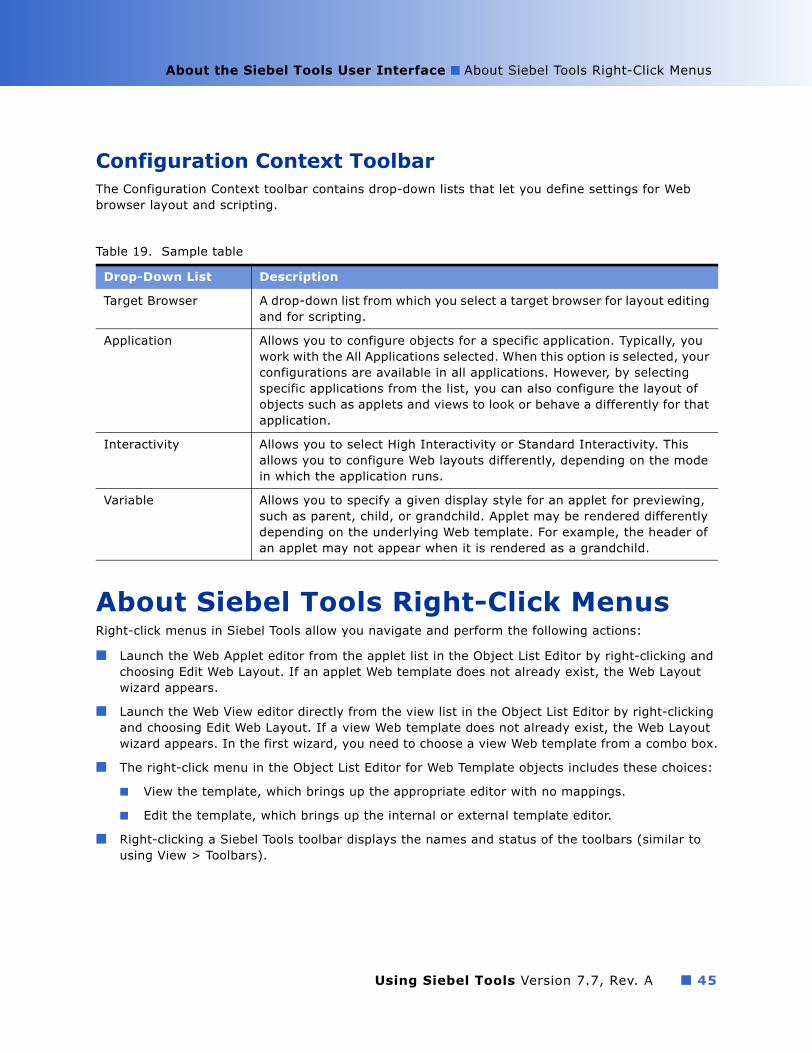
Table 19. Sample table
Drop-Down List Description
Target Browser A drop-down list from which you select a target browser for layout editing and for scripting.
Application Allows you to configure objects for a specific application. Typically, you work with the All Applications selected. When this option is selected, your configurations are available in all applications. However, by selecting specific applications from the list, you can also configure the layout of objects such as applets and views to look or behave a differently for that application.
Interactivity Allows you to select High Interactivity or Standard Interactivity. This allows you to configure Web layouts differently, depending on the mode in which the application runs.
Variable Allows you to specify a given display style for an applet for previewing, such as parent, child, or grandchild. Applet may be rendered differently depending on the underlying Web template. For example, the header of an applet may not appear when it is rendered as a grandchild.
Using Siebel Tools Version 7.7, Rev. A ■ 45
About the Siebel Tools User Interface ■ About Layout Editors
About Layout EditorsThere are several layout editors in Siebel Tools, Applet Layout Editor, View Layout Editor, Web Page Layout Editor, and the Applet Menu Layout Editor.
These layout editors let you:
■ Add and map controls and list columns to applet layouts. You can preview applets as they would be rendered at runtime.
■ Modify existing views and construct new ones by dragging and dropping applets onto the view layout window. You can view list and form applets and the container page in the Preview mode. No additional specification or code is required for defining the relationships between the applets.
■ Add and delete controls from Web page templates, modify control properties, and map controls to placeholders. You can also preview Web pages as they would appear at runtime.
■ Visually edit Siebel application menu structures. It is accessed by right-clicking an applet in the Object List Editor and selecting Edit Web Menus.
You can launch the Layout Editors directly from an applet, view, or Web page in the Object List Editor by right-clicking and choosing Edit Web Layout or Edit Web Menus.
For more information about using layout editors, see Configuring Siebel eBusiness Applications.
Related Topic�Defining a Target Browser� on page 66
About New Object WizardsVarious wizards in Siebel Tools step you through the process of creating objects. They prompt you for the required property values and configure any dependent object types. Wizards are available for many objects types, including:
■ General objects, such as Applet Method Menu Items, Business Components, Tables, and Views.
■ Applet objects, such as List Applets, Form Applets, MVG Applets, and Chart Applets.
■ EAI objects, such as Integration Objects.
You can access the New Object Wizards by choosing File > New Object.
NOTE: Use the new object wizards to create objects whenever possible.
For more information about using new object wizards, see Configuring Siebel eBusiness Applications.
About the Entity Relationship DesignerThe Entity Relationship Designer is a visual modeling tool that allows you to diagram your business entities, represent the relationships between them, and then map them to Siebel objects, such as business components, links, and joins.
Using Siebel Tools Version 7.7, Rev. A46 ■

About the Siebel Tools User Interface ■ About the Business Process Designer
The Entity Relationship Designer is typically used by both Business Analysts and Developers. Business analysts diagram a customer�s business and then developers or technical architects map the entities in the diagrams to Siebel objects in the repository.
When mapping entities and relationships in the diagram to Siebel objects, the choice of objects to choose includes only those that have characteristics that match the context described in the diagram.
For information on creating entity relationship diagrams and mapping them to Siebel objects, see Configuring Siebel eBusiness Applications.
About the Business Process DesignerThe Siebel Business Process Designer allows you to define, manage, and enforce your company's business processes. Defining business processes is typically a development task. The Workflow Designer and the Workflow Simulator are integrated with Siebel Tools, allowing you to define and test business processes and related repository objects in a single environment. For more detailed information about creating business processes and using Workflow Designer and Workflow Simulator, see Siebel Business Process Designer Administration Guide.
About Script EditorsScripting is used to implement functionality that cannot be achieved declaratively (that is, by changing object properties). The Server Script Editor and the Browser Script Editor are used to add scripts to Siebel objects. Scripting is supported through three features in Siebel applications: Siebel VB, Siebel eScript, and Browser Script.
Server Script EditorYou use the Server Script Editor to create and modify Siebel VB and eScript scripts. You can access the Server Script Editor in two ways:
■ Right-click a scriptable entry in the Object List Editor and choose Edit Server Scripts.
■ Choose View > Editors > Server Script Editor.
For more information, see Siebel eScript Language Reference and Siebel VB Language Reference.
Browser Script EditorThe Browser Script Editor allows you to write and edit Browser Script that runs within the client browser. You can access the Browser Script Editor in the following ways:
■ Right-click an Applet, Business Component, Application, or Business Service object in the Object List Editor and choose Edit Browser Scripts.
■ Choose View > Editors > Browser Script Editor.
Objects that support browser script, such as applets and business components, have a set of scriptable events, generally including InvokeMethod and PreInvoke Method, as well as object-type specific ones, such as ChangeRecord and ChangeFieldValue for applets.
Using Siebel Tools Version 7.7, Rev. A ■ 47

About the Siebel Tools User Interface ■ About the Command Line Interface
For for more information about scripting, including a list of scriptable events and callable methods on browser objects, see Siebel Object Interfaces Reference.
About the Command Line InterfaceYou can use the command-line interface to run various tasks, including:
■ �Compiling Using the Command-Line Interface� on page 119
■ �Validating Objects Using the Command-Line Interface� on page 99
■ Converting to grid-layout. For more information, see Configuring Siebel eBusiness Applications.
■ �Running the LMU Using the Command Line Interface� on page 172
■ �Exporting Objects to an Archive File Using the Command-Line Interface� on page 124
■ �Importing Objects From an Archive File Using the Command-Line Interface� on page 131
Using Siebel Tools Version 7.7, Rev. A48 ■
3 Customizing Your Tools Environment
Topics in This Section�Showing and Hiding Confirmation Dialog Boxes� on page 49
�Setting Change Date Preferences� on page 50
�Selecting a Language Mode� on page 50
�Enabling Language Overrides� on page 51
�Process for Integrating With Third-Party Source Control� on page 51
�Specifying Data Sources� on page 57
�Restarting Editors After Check Out� on page 58
�Setting Commit Options for Full Get� on page 58
�Defining Object List Editor Display Options� on page 59
�Setting Scripting Options� on page 59
�Defining the Web Template Editor� on page 60
�Setting Debug Options� on page 61
�Customizing Visualization Views� on page 62
�Showing and Hiding Object Types in the Object Explorer� on page 63
�Setting Database Options� on page 65
�Setting the Constrain Mode for Working With Symbolic Strings� on page 65
�Defining a Target Browser� on page 66
�Showing and Hiding Windows� on page 66
�Docking Windows� on page 67
�Showing and Hiding Editors� on page 68
�Showing Visualization Views� on page 68
�Showing and Hiding Debug Windows� on page 68
�Showing and Hiding Toolbars� on page 69
�Showing and Hiding the Status Bar� on page 69
�Showing and Hiding the Object Explorer� on page 69
Showing and Hiding Confirmation Dialog BoxesYou can choose to show or hide dialog boxes that pop up to confirm you want to perform a given action, such as delete.
Using Siebel Tools Version 7.7, Rev. A ■ 49

Customizing Your Tools Environment ■ Setting Change Date Preferences
To show or hide confirmation dialog boxes
1 Choose View > Options.
The Development Tools Options dialog box appears.
2 Click the General tab.
3 Under Editing confirmation dialogs, select the check boxes for the confirmation dialog boxes you want to see, and clear the check boxes for the confirmation dialog boxes you do not want to see.
4 Click OK.
Setting Change Date PreferencesRecords are marked as changed in the Object List Editor when they occur after the date defined under the General Tab of the Development Tools Options dialog box.
To set change date preferences
1 Choose View > Options.
The Development Tools Options dialog box appears.
2 Click the General tab.
3 Under Changed date, use the Date and Time fields to set your preferences, then click OK.
Selecting a Language ModeThe Siebel Tools language mode allows you to work with locale-specific data for languages other than English. For example, setting your language mode to German (DEU) allows you to view and edit DEU-specific data stored in Locale-Objects, such as translated strings. Language mode determines the set of locale-specific data that:
■ You can view and edit in the Object List Editor.
■ Is used when compiling the repository (SRF) file.
■ Is transferred during check in and check out processes.
NOTE: If additional languages (other than what are shipped with Siebel applications as seed data) are added to the Siebel database, the language code must be in all capital letters for the code to appear in the Language Mode drop-down list.
To set a language mode
1 Choose View > Options.
The Development Tools Options dialog box appears.
2 Click the Language Settings tab.
3 Under Tools Language Mode, select a value from the Language drop-down list, then click OK.
Using Siebel Tools Version 7.7, Rev. A50 ■
Customizing Your Tools Environment ■ Enabling Language Overrides
Related Topic�Enabling Language Overrides� on page 51
Enabling Language OverridesLanguage Overrides are non-translatable locale-specific attributes that may be configured differently for different locales. For example, you can configure an address field to appear one height in FRA (French) and another height in ENU (English). To be able to configure language overrides, you must be in Language Override mode.
NOTE: Enabling language overrides when it is not needed can create unnecessary locale records in the repository.
For more information about configuring UI layout, see Configuring Siebel eBusiness Applications.
To enable language overrides
1 Choose View > Options.
The Development Tools Options dialog box appears.
2 Click the Language Settings tab.
3 Under Language override, select the Enable and Use Language Override check box, then click OK.
NOTE: The Enable and Use Language Override check box is persistent. You must clear it to return to working in base mode.
Related Topics�Selecting a Language Mode� on page 50
�Working with Non-Translatable Locale-Specific Object Properties� on page 164
Process for Integrating With Third-Party Source ControlYou can integrate your repository check in/check out mechanism in Siebel Tools with a third-party source code-control system such as Microsoft Visual SourceSafe. When source control integration is enabled, each time a project is checked into the server repository, an archive file containing all the objects in the project is also checked into the source control system. As a result, successive versions of the project are maintained in the source control system.
To integrate your repository check in/ check out with a third-party source control system, perform the following tasks:
1 �Setting Source Control Options� on page 52
2 �Configuring the srcctrl.bat File� on page 52
Using Siebel Tools Version 7.7, Rev. A ■ 51

Customizing Your Tools Environment ■ Process for Integrating With Third-Party Source Control
Setting Source Control OptionsYou enable and partly configure the interface to an external source control system using the Development Tools Options dialog box.
To integrate Siebel Tools with a third-party source control product
1 Choose View > Options.
The Development Tools Options dialog box appears.
2 Click the Check In/Out tab.
3 Use the information in the following table to define your settings under Source control integration.
4 Click OK.
Configuring the srcctrl.bat FileThe srcctrl.bat batch file contains the sequence of commands to be executed in order to check the archived projects in to the source control system. You need to modify the batch file to reflect your current development environment and then distribute to all developers at your site.
The name of the archive file for the project to be checked in is specified as an argument to the batch file, in addition to other arguments. The syntax for the command line that executes the batch file is as follows:
SRCCTRL action dir comment_file project_file
Field/Check Box Description
Enable source control integration Select this check box and specify the location of the srcctrl.bat batch file in the Integration batch file text box if you want to generate an archive file for each project when performing repository check in, and at the conclusion of repository check in to run the batch file once for each project.
Show execution of the integration batch file
Select this check box to launch a DOS window in the foreground when the srcctrl.bat batch file is executed. This feature is for diagnosis purposes and facilitates debugging a customized batch file.
Integration batch file Specifies the location of the srcctrl.bat batch file used by Siebel applications to instruct the source control software to provide check in or check out of archive files.
Using Siebel Tools Version 7.7, Rev. A52 ■
Customizing Your Tools Environment ■ Process for Integrating With Third-Party SourceControl
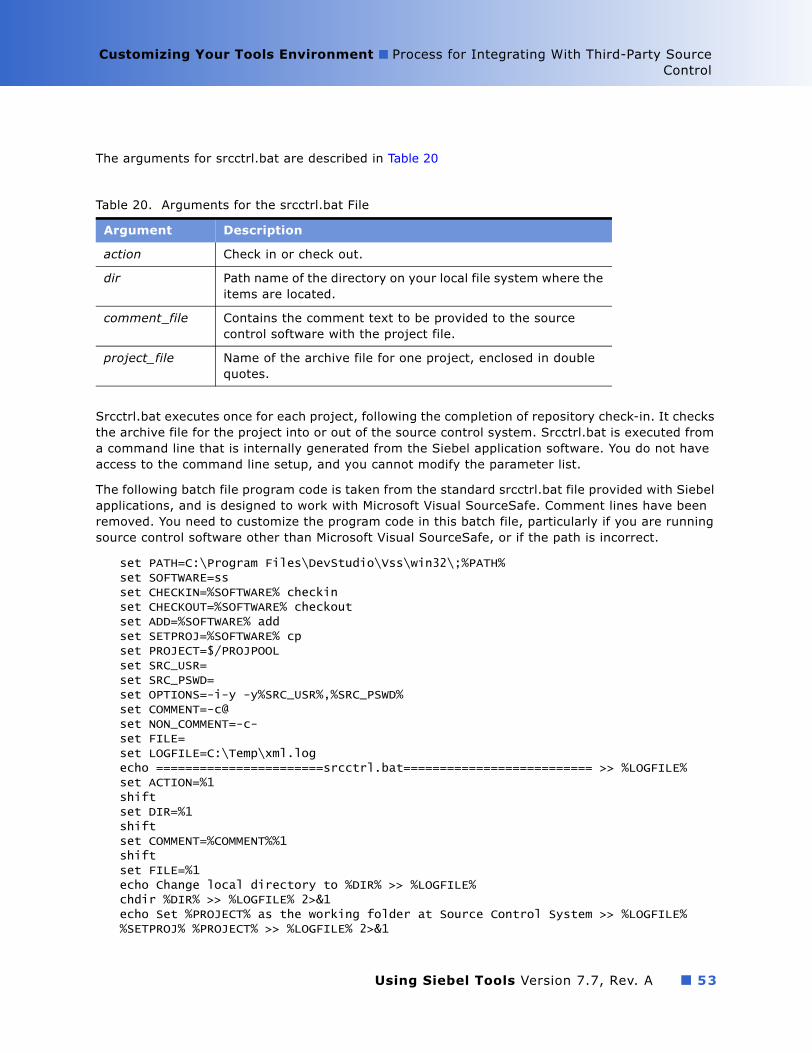
The arguments for srcctrl.bat are described in Table 20
Srcctrl.bat executes once for each project, following the completion of repository check-in. It checks the archive file for the project into or out of the source control system. Srcctrl.bat is executed from a command line that is internally generated from the Siebel application software. You do not have access to the command line setup, and you cannot modify the parameter list.
The following batch file program code is taken from the standard srcctrl.bat file provided with Siebel applications, and is designed to work with Microsoft Visual SourceSafe. Comment lines have been removed. You need to customize the program code in this batch file, particularly if you are running source control software other than Microsoft Visual SourceSafe, or if the path is incorrect.
set PATH=C:\Program Files\DevStudio\Vss\win32\;%PATH%set SOFTWARE=ssset CHECKIN=%SOFTWARE% checkinset CHECKOUT=%SOFTWARE% checkoutset ADD=%SOFTWARE% addset SETPROJ=%SOFTWARE% cpset PROJECT=$/PROJPOOLset SRC_USR=set SRC_PSWD=set OPTIONS=-i-y -y%SRC_USR%,%SRC_PSWD%set COMMENT=-c@set NON_COMMENT=-c-set FILE=set LOGFILE=C:\Temp\xml.logecho =======================srcctrl.bat========================== >> %LOGFILE%set ACTION=%1shiftset DIR=%1shiftset COMMENT=%COMMENT%%1shiftset FILE=%1echo Change local directory to %DIR% >> %LOGFILE%chdir %DIR% >> %LOGFILE% 2>&1echo Set %PROJECT% as the working folder at Source Control System >> %LOGFILE%%SETPROJ% %PROJECT% >> %LOGFILE% 2>&1
Table 20. Arguments for the srcctrl.bat File
Argument Description
action Check in or check out.
dir Path name of the directory on your local file system where the items are located.
comment_file Contains the comment text to be provided to the source control software with the project file.
project_file Name of the archive file for one project, enclosed in double quotes.
Using Siebel Tools Version 7.7, Rev. A ■ 53

Customizing Your Tools Environment ■ Process for Integrating With Third-Party Source Control
if errorlevel 100 goto ENDif %ACTION%==checkout goto CHECK_OUTif %ACTION%==checkin goto CHECK_IN:CHECK_OUTecho ============Check out file %FILE% from Source Control System============if not exist %FILE% echo "New File" >> %FILE%attrib +r %FILE%echo Add %FILE% in case it doesn't exist in Source Control System >> %LOGFILE%%ADD% %FILE% %NON_COMMENT% %OPTIONS% >> %LOGFILE% 2>&1echo Start checking out %FILE% from Source Control System >> %LOGFILE%%CHECKOUT% %FILE% %NON_COMMENT% %OPTIONS% >> %LOGFILE% 2>&1goto END:CHECK_INecho ============Check in file %FILE% into Source Control System============echo Check in %FILE% into Source Control System >> %LOGFILE%%CHECKIN% %FILE% %COMMENT% %OPTIONS% >> %LOGFILE% 2>&1attrib -r %FILE%goto END:ENDecho ===================End Of srcctrl.bat====================== >> %LOGFILE%
Using Siebel Tools Version 7.7, Rev. A54 ■

Customizing Your Tools Environment ■ Process for Integrating With Third-Party SourceControl
The variables used in the srcctrl.bat batch file are described in Table 21.
NOTE: The folder that SIF files are written to is specified by the TempDir parameter in the [Siebel] section of the tools.cfg file. By default it is set to the \Siebel\tools\7.7\temp folder of your Tools installation folder. change this parameter to write the PROJECT directory to another location.
The following MS-DOS limitations exist in Windows 95 and 98:
■ The default command-line character limitation is 127 characters. You can increase the global command-line character limit to its maximum by placing the following line in config.sys:
shell=c:\windows\command.com /u:255
■ The default environment space limitation is 256 bytes. You can increase it by placing the following line in config.sys:
Table 21. Variables in srcctrl.bat
Variable Description
PATH Identifies the directory where the source code control software is installed. Modify this setting to reflect its actual location on your machine.
SOFTWARE Source control system�s command line utility. The command line utility for Microsoft Visual SourceSafe is �ss�.
CHECKIN Command at the start of the command line that calls for check-in into the source control system.
CHECKOUT Command at the start of the command line that calls for check-out from the source control system.
ADD Command at the start of the command line that calls for adding files in the source control system.
SETPROJ Command at the start of the command line that calls for setting the working folder in the source control system.
PROJECT Project (working folder) in the source control system where the items will be checked in/checked out.
COMMENT Command-line Comments clause for each of the files being checked in or out. This is generated from the Comment argument to the batch file.
OPTIONS Text of the Options clause to include in a command line.
SRC_USR User logon name to include in the Options clause. This is a source control software user name, not the user name for a Siebel application.
SRC_PSWD User password to include in the Options clause. This is a source control software password.
FILE Filename of the archive file, obtained from the argument list of the batch file. This file needs to be checked in or out.
LOGFILE Path and filename of the log file that will be generated.
Using Siebel Tools Version 7.7, Rev. A ■ 55

Customizing Your Tools Environment ■ Process for Integrating With Third-Party Source Control
shell=c:\command.com /p /e:2048
or by placing the following line in the [NonWindowsApp] section in the system.ini file:
CommandEnvSize=2048
2048 is the size of the new environment space, so you might specify a different value here.
Example of Integrating with Microsoft Visual SourceSafeThe following sections provide you with examples for using Microsoft Visual SourceSafe.
Check In ExampleYou have two projects checked out that you want to simultaneously check in to the server and to the source control software. The projects selected are �Project A� and �Project B.� The latest version of Project A.sif in Visual SourceSafe is 6, and the latest version of Project B.sif is 5.
When you click the Check In button, the following sequence occurs:
1 Project A and Project B are checked in to the server repository.
2 C:\Siebel\7.7\tools\bin\srcctrl.bat is invoked. This carries out steps 3, 4, and 5.
3 Project A.sif and Project B.sif are checked out and locked in Visual SourceSafe.
4 Project A is exported to C:\Siebel\7.7\tools\temp\projects\Project A.sif, and Project B is exported to C:\Siebel\7.7\tools\projects\Project B.sif.
5 Project A.sif and Project B.sif are checked in to Visual SourceSafe. The version numbers are incremented so that the latest version of Project A.sif in Visual SourceSafe is version 7, while Project B.sif is version 6.
Revert to Previous Version ExampleConsider the situation in which an erroneous definition of Project A has been checked in to the server repository. This is stored in Microsoft Visual Source Safe as version 5 of Project A.sif. You want to revert to version 4 of Project A, since that does not contain the errors.
1 Check out version 4 of Project A.sif from Visual SourceSafe into C:\sea7xx\tools \temp.
2 Check out Project A from the server repository.
3 Import Project A.sif into the local repository using the Overwrite option to resolve object definition conflicts. This replaces the existing definition of Project A with the one in the archive file.
4 Check Project A in to the server repository. Project A.sif is automatically checked in to Visual SourceSafe as version 6.
Using Siebel Tools Version 7.7, Rev. A56 ■
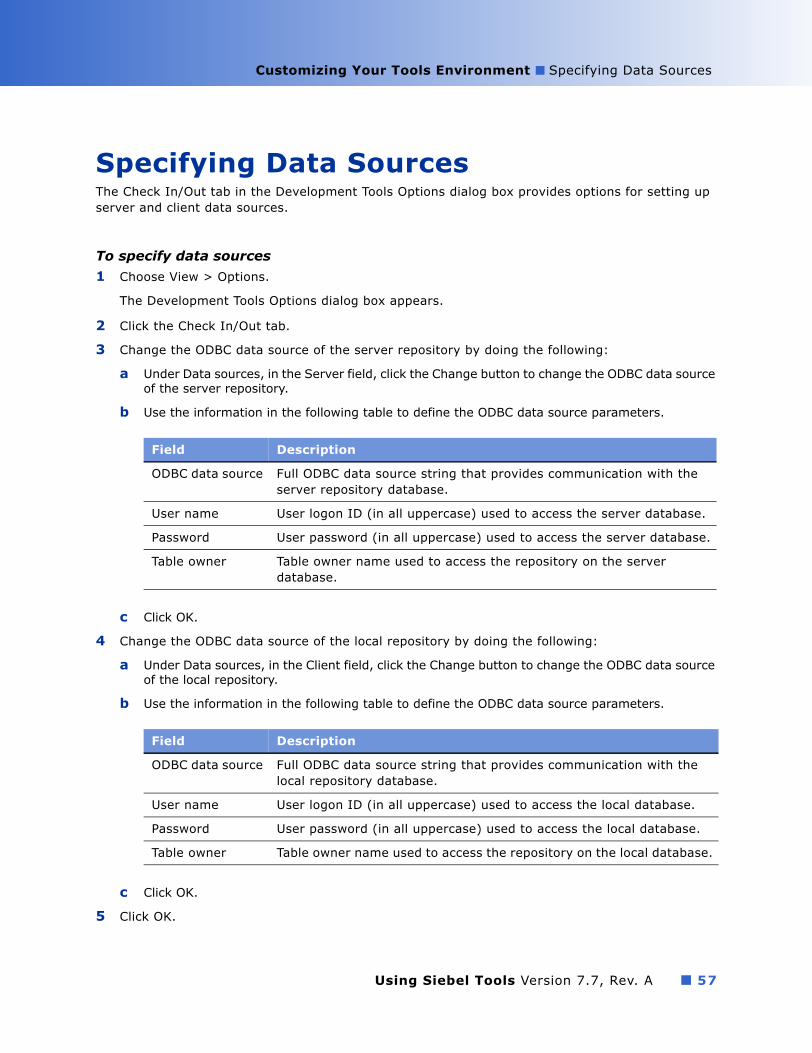
Customizing Your Tools Environment ■ Specifying Data Sources
Specifying Data SourcesThe Check In/Out tab in the Development Tools Options dialog box provides options for setting up server and client data sources.
To specify data sources
1 Choose View > Options.
The Development Tools Options dialog box appears.
2 Click the Check In/Out tab.
3 Change the ODBC data source of the server repository by doing the following:
a Under Data sources, in the Server field, click the Change button to change the ODBC data source of the server repository.
b Use the information in the following table to define the ODBC data source parameters.
c Click OK.
4 Change the ODBC data source of the local repository by doing the following:
a Under Data sources, in the Client field, click the Change button to change the ODBC data source of the local repository.
b Use the information in the following table to define the ODBC data source parameters.
c Click OK.
5 Click OK.
Field Description
ODBC data source Full ODBC data source string that provides communication with the server repository database.
User name User logon ID (in all uppercase) used to access the server database.
Password User password (in all uppercase) used to access the server database.
Table owner Table owner name used to access the repository on the server database.
Field Description
ODBC data source Full ODBC data source string that provides communication with the local repository database.
User name User logon ID (in all uppercase) used to access the local database.
Password User password (in all uppercase) used to access the local database.
Table owner Table owner name used to access the repository on the local database.
Using Siebel Tools Version 7.7, Rev. A ■ 57

Customizing Your Tools Environment ■ Restarting Editors After Check Out
Restarting Editors After Check OutYou can set an option that automatically restarts any open editors after the check out process finishes.
To restart editors after check out
1 Choose View > Options.
The Development Tools Options dialog box appears.
2 Click the Check In/Out tab.
3 Select the Restart the editors after Check Out check box.
Any editors that are open at the time you begin the Check Out process are restarted when the Check Out process finishes.
4 Click OK.
Setting Commit Options for Full GetBy default, the full get process performs database commits in regular intervals during the get process rather than a single commit at the end of the get process.
You can disable this option by choosing View > Options, selecting the Check In/Out tab, and then clearing the Enable incremental commit during Full Get check box.
To set commit options for full get
1 Choose View > Options.
The Development Tools Options dialog box appears.
2 Click the Check In/Out tab.
3 To request a single commit at the end of a full get, clear the Enable incremental commit during Full Get check box.
4 Click OK.
Related Topics�About the Get Process� on page 71
�Performing a Full Get� on page 71
Using Siebel Tools Version 7.7, Rev. A58 ■
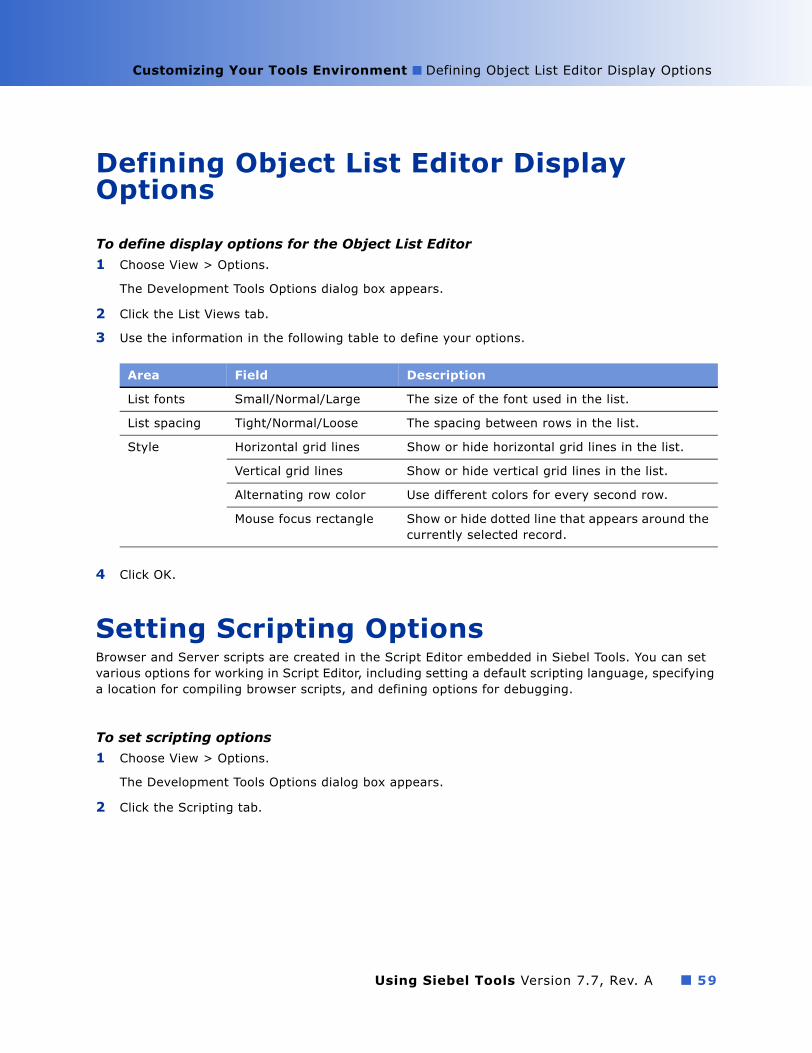
Customizing Your Tools Environment ■ Defining Object List Editor Display Options
Defining Object List Editor Display Options
To define display options for the Object List Editor
1 Choose View > Options.
The Development Tools Options dialog box appears.
2 Click the List Views tab.
3 Use the information in the following table to define your options.
4 Click OK.
Setting Scripting OptionsBrowser and Server scripts are created in the Script Editor embedded in Siebel Tools. You can set various options for working in Script Editor, including setting a default scripting language, specifying a location for compiling browser scripts, and defining options for debugging.
To set scripting options
1 Choose View > Options.
The Development Tools Options dialog box appears.
2 Click the Scripting tab.
Area Field Description
List fonts Small/Normal/Large The size of the font used in the list.
List spacing Tight/Normal/Loose The spacing between rows in the list.
Style Horizontal grid lines Show or hide horizontal grid lines in the list.
Vertical grid lines Show or hide vertical grid lines in the list.
Alternating row color Use different colors for every second row.
Mouse focus rectangle Show or hide dotted line that appears around the currently selected record.
Using Siebel Tools Version 7.7, Rev. A ■ 59

Customizing Your Tools Environment ■ Defining the Web Template Editor
3 Use the information in the following table to define your options.
4 Click OK.
Defining the Web Template EditorThe Web template editor is an external application that you define here and that you can open using a right-click menu in the Web template explorer. For example, in the Web template explorer, navigate to a given Web template, then right-click, and the application defined as the default editor opens with the selected Web template automatically displayed.
Area Field Description
Script editor Font Used to select the font name for display of scripts.
Size Used to select the font size for display of scripts.
Tab width Defines the number of spaces for a tab character. The default is four spaces.
Auto indent When checked, each succeeding line is indented to the position set by the current line.
Scripting language Used to specify the default scripting language for server side components.
Default language for new scripts
Select this check box if you do not want Siebel Tools to prompt you to pick a scripting language each time you edit a script.
Compiling Browser script compilation folder
Used to specify the folder where bscripts\all resides. This is where Browser Scripts are generated. For example, if the value is set to D:\sea750\client\PUBLIC\enu, then the Browser Script files are generated to D:\sea750\client\PUBLIC\enu\<genbscript
time stamped folder>\bscripts\all.
Debugging Adjust breakpoint to next valid line
When breakpoints are deleted on invalid lines, this option creates a breakpoint at the next valid line.
Make debugger window active when debugging
The Siebel Debugger window appears whenever you are in debug mode.
Always enter the debugger when an error occurs
The Siebel Debugger window appears whenever a script error occurs.
Using Siebel Tools Version 7.7, Rev. A60 ■

Customizing Your Tools Environment ■ Setting Debug Options
To define default path for Web template files
1 Choose View > Options.
The Development Tools Options dialog box appears.
2 Click the Web Template Editor tab.
3 In the Folder full path field, type the full path to location of your Web template files.
4 Under External Web template editor, do the following:
a Use the Browse button in the Executable full path field to navigate to and select the executable for the external Web editor.
b In the Optional parameters field, enter the parameters you want to pass to the executable when you launch the external editor.
5 Click OK.
Setting Debug OptionsThe debug options provide the run-time settings for opening an instance of the Siebel Web client in the following situations:
■ When the Auto-start web client option is selected in the object compiler.
For more information, see Chapter 8, �Compiling and Testing�.
■ When starting an instance of the Web client by selecting Debug > Start.
You typically use this option when debugging Siebel eScript or Siebel VB. For more information, see Siebel eScript Language Reference and Siebel VB Language Reference.
The settings defined the Debug tab of the Development Tools Options dialog are stored in a user preference file that is named login_ID&application_name.spf and located in tools_install\BIN.
To setup Tools to automatically open the Siebel Web client
1 Choose View > Options.
The Development Tools Options dialog box appears.
2 Click the Debug tab.
Using Siebel Tools Version 7.7, Rev. A ■ 61
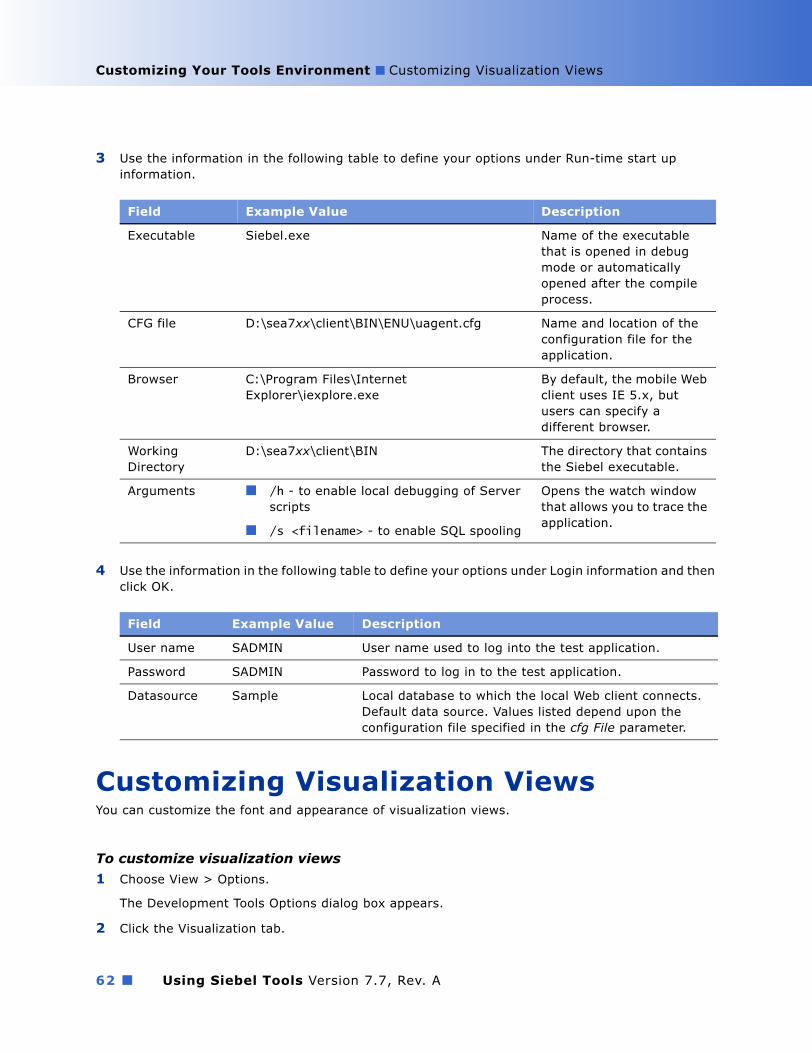
Customizing Your Tools Environment ■ Customizing Visualization Views
3 Use the information in the following table to define your options under Run-time start up information.
4 Use the information in the following table to define your options under Login information and then click OK.
Customizing Visualization ViewsYou can customize the font and appearance of visualization views.
To customize visualization views
1 Choose View > Options.
The Development Tools Options dialog box appears.
2 Click the Visualization tab.
Field Example Value Description
Executable Siebel.exe Name of the executable that is opened in debug mode or automatically opened after the compile process.
CFG file D:\sea7xx\client\BIN\ENU\uagent.cfg Name and location of the configuration file for the application.
Browser C:\Program Files\Internet Explorer\iexplore.exe
By default, the mobile Web client uses IE 5.x, but users can specify a different browser.
Working Directory
D:\sea7xx\client\BIN The directory that contains the Siebel executable.
Arguments ■ /h - to enable local debugging of Server scripts
■ /s <filename> - to enable SQL spooling
Opens the watch window that allows you to trace the application.
Field Example Value Description
User name SADMIN User name used to log into the test application.
Password SADMIN Password to log in to the test application.
Datasource Sample Local database to which the local Web client connects. Default data source. Values listed depend upon the configuration file specified in the cfg File parameter.
Using Siebel Tools Version 7.7, Rev. A62 ■
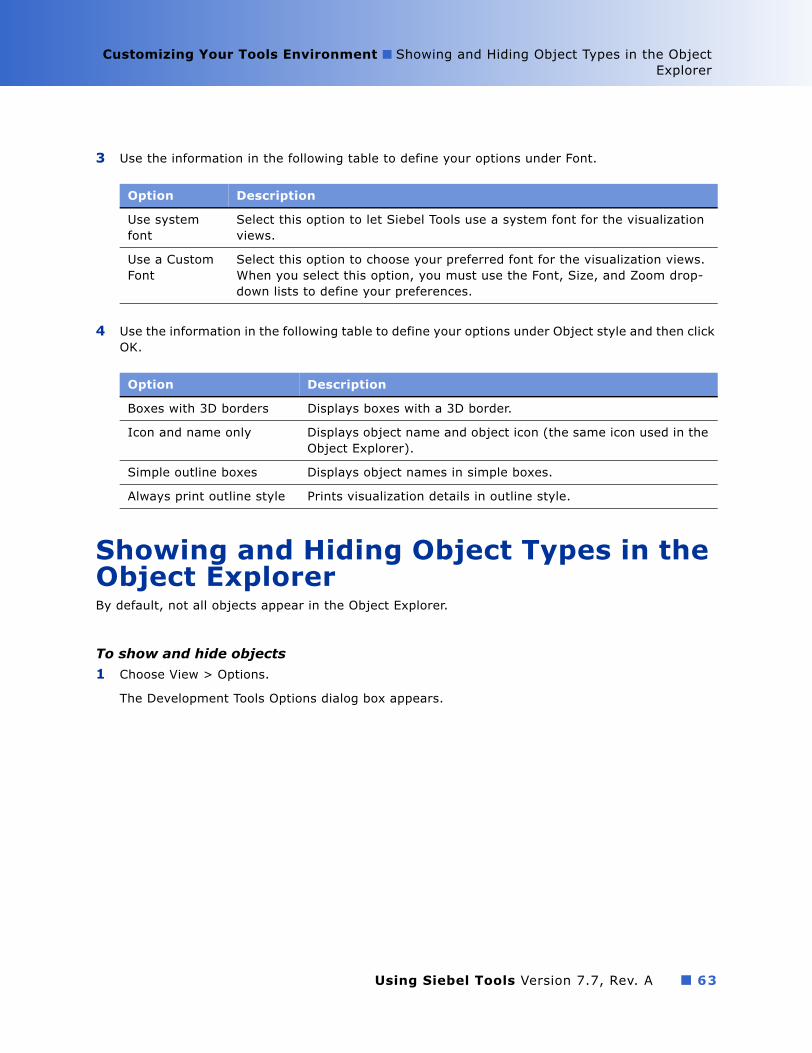
Customizing Your Tools Environment ■ Showing and Hiding Object Types in the ObjectExplorer
3 Use the information in the following table to define your options under Font.
4 Use the information in the following table to define your options under Object style and then click OK.
Showing and Hiding Object Types in the Object ExplorerBy default, not all objects appear in the Object Explorer.
To show and hide objects
1 Choose View > Options.
The Development Tools Options dialog box appears.
Option Description
Use system font
Select this option to let Siebel Tools use a system font for the visualization views.
Use a Custom Font
Select this option to choose your preferred font for the visualization views. When you select this option, you must use the Font, Size, and Zoom drop-down lists to define your preferences.
Option Description
Boxes with 3D borders Displays boxes with a 3D border.
Icon and name only Displays object name and object icon (the same icon used in the Object Explorer).
Simple outline boxes Displays object names in simple boxes.
Always print outline style Prints visualization details in outline style.
Using Siebel Tools Version 7.7, Rev. A ■ 63

Customizing Your Tools Environment ■ Showing and Hiding Object Types in the Object Explorer
2 Click the Object Explorer tab.
The Object Explorer hierarchy appears.
3 In the Object Explorer Hierarchy box, select the check boxes for the objects you want to show and clear the check boxes for the objects you want to hide.
When you select a top-level object such as Applet, all child objects are automatically selected. To hide child objects, you need to expand the parent object and remove the check marks from any child objects that you want to hide. The parent check box becomes shaded to indicate that it contains child objects that are not selected to show.
TIP: The state of the check box provides information about the show/hide state of the child objects.
4 To restore default settings, click the Default button, then click OK.
Check Box State Description
Current object shown, and all child objects shown.
Current object hidden, and all child objects hidden.
Current object shown, and some child objects shown.
Using Siebel Tools Version 7.7, Rev. A64 ■

Customizing Your Tools Environment ■ Setting Database Options
Setting Database Options
To set database options
1 Choose View > Options.
The Development Tools Options dialog box appears.
2 Click the Database tab.
3 Use the information in the following table to set your options and then click OK.
Setting the Constrain Mode for Working With Symbolic StringsSiebel Tools can run in either constrained mode or unconstrained mode.
■ When working in constrained mode, you must choose translatable text strings from the list of available string references. You cannot override the string reference by entering a value for a string override field and you cannot create new symbolic string references.
■ When working in unconstrained mode, you are not required to choose translatable text strings from the list of string references. You can override the string reference by entering a value in a string override field. You can also create new symbolic string references.
The constrain mode is determined by the following CFG file parameter, found in the [Siebel] section of the tools.cfg file:
EnableToolsConstrain = FALSE
The EnableToolsConstrain mode is binary and must be set to either TRUE or FALSE. It is set to FALSE by default.
Related Topics�About the Symbolic Strings Model� on page 147
Option Description
Developing for deployment on DB2 for zSeries
For information about this parameter, see Implementing Siebel eBusiness Applications on DB2 UDB for z/OS and OS/390
Allow to create column of type �Character� being greater than 1
Unconstrains columns of type CHAR so that they can be can greater than 1 character in length. Note that defining a column as CHAR when the data being stored can be variable in length causes the data to be padded with blank spaces in the database.
Using Siebel Tools Version 7.7, Rev. A ■ 65

Customizing Your Tools Environment ■ Defining a Target Browser
�Creating Symbolic String References� on page 149
�Creating Symbolic String References� on page 149
Defining a Target BrowserThe target browser group determines how applets appear in the preview mode of the Applet Layout Editor. You can include conditional tags in Web templates that are displayed for some browsers but not others. Defining a target browser determines how the these conditional tags are expressed in the Applet Layout Editor and allows you to preview an applet layout as it would look in a specific browser.
To define configuration context
1 Choose View > Toolbars > Configuration Context.
The Configuration Context toolbar appears.
2 From the Target Browser drop-down list, choose Target Browser Config.
The Target Browser Configuration dialog box appears. The following table describes the parts of the dialog box.
3 To add a browser group to the list of selected browsers, double-click the browser in the Available browsers list.
You can also use the right and left arrow buttons to move browsers between the Available and Selected lists.
4 Click OK.
The browser groups you added to the list of Selected browsers for layout editing now appear as values in the Target Browser drop-down list.
Showing and Hiding WindowsYou show and hide windows using toggles on the View menu.
Field Description
Available browsers List of available browser groups.
Selected browsers for layout editing
Specifies which browser groups are affected by subsequent layout editing in the Web Layout Editor.
Capability name and value
Specifies what capabilities or properties the currently selected virtual browser group has.
Using Siebel Tools Version 7.7, Rev. A66 ■

Customizing Your Tools Environment ■ Docking Windows
To show or hide a window using the View menu
1 Choose View > Windows.
A list of windows appears in a secondary pop-up menu. A visible window is identified with a check mark. A hidden window has no marker.
2 Select the window you want to show or hide.
If the window was hidden, it appears. If the window was visible, it is hidden.
NOTE: To show or hide the Bookmarks window, you can also use the Go menu (Go > Bookmarks List).
To hide a window using a right-click menu
1 Right-click the window title of the window you want to hide.
2 From the pop-up menu that appears, choose Hide.
The window no longer appears in the Siebel Tools application window.
Related Topics�Docking Windows� on page 67
�Showing and Hiding the Object Explorer� on page 69
Docking WindowsYou can let the Object Explorer or Properties, Applets, Controls, Web Template, or Bookmarks windows float, moving and sizing to fit your needs, or dock the window in a corner of the main window.
To dock a window■ Drag the window to the area of the main window where you want to dock.
To undock a window■ Right-click the window and choose Docked.
To prevent a window from docking when it is being moved■ Hold down the CTRL key during the move.
Related Topics�Showing and Hiding Windows� on page 66
�Showing and Hiding the Object Explorer� on page 69
Using Siebel Tools Version 7.7, Rev. A ■ 67
Customizing Your Tools Environment ■ Showing and Hiding Editors
Showing and Hiding Editors
To show or hide an editor
1 Choose View > Editors.
A list of editors appears in a secondary pop-up menu. A visible editor is identified with a check mark. A hidden editor has no marker.
2 Select the editor you want to show or hide.
If the editor was hidden, it appears. If the editor was visible, it is hidden.
Showing Visualization ViewsYou can use the Siebel Tools Visualization views to see how objects relate to one another.
To show a visualization view using the View menu
1 Choose View > Visualize.
A list of visualization views appears in a secondary pop-up menu. A visible view is identified with a check mark. A hidden view has no marker.
2 Select the view you want to show or hide.
If the editor was hidden, it appears. If the editor was visible, it is hidden.
To show a visualization view from the Object List Editor
1 Display the relevant object type in the Object List Editor.
2 Right-click an object and choose the Visualization view you want.
Not all Visualization views are listed for all objects.
Related Topics�Viewing Object Relationships� on page 108
Showing and Hiding Debug WindowsYou can show or hide the debug windows.
To show or hide the Calls window■ Choose View > Debug Windows > Calls.
-or-Press CTRL+L.
Using Siebel Tools Version 7.7, Rev. A68 ■
Customizing Your Tools Environment ■ Showing and Hiding Toolbars
To show or hide the Watch window■ Choose View > Debug Windows > Watch.
-or-Press SHIFT+F9.
To show or hide the Errors window■ Choose View > Debug Windows > Errors.
Showing and Hiding ToolbarsYou show and hide toolbars using toggles on the View menu.
To show or hide a toolbar
1 Choose View > Toolbars.-or-Right-click any of the toolbars.
A list of toolbars appears in a secondary pop-up menu. A visible toolbar is identified with a check mark. A hidden toolbar has no marker.
2 Select the toolbar you want to show or hide.
If the toolbar was hidden, it appears. If the toolbar was visible, it is hidden.
Showing and Hiding the Status Bar
To show or hide the status bar■ Choose View > Status Bar.
If the status bar was hidden, it appears. If the status bar was visible, it is hidden.
Showing and Hiding the Object ExplorerYou can show or hide the Object Explorer.
To show or hide the Object Explorer■ Choose View > Object Explorer.
-or-Press CTRL+E.
If the Object Explorer was hidden, it appears. If the Object Explorer was visible, it is hidden.
Using Siebel Tools Version 7.7, Rev. A ■ 69

Customizing Your Tools Environment ■ Showing and Hiding the Object Explorer
Related Topics�Showing and Hiding Windows� on page 66
�Docking Windows� on page 67
Using Siebel Tools Version 7.7, Rev. A70 ■
4 Getting Projects From the Server Repository
Topics in This Section�About the Get Process� on page 71
�Performing a Full Get� on page 71
�Getting Projects from the Server Repository� on page 72
�Getting Locale-Specific Data Only� on page 73
About the Get ProcessThe process of copying projects from the server database to your local database is known as performing a get. The get process differs from checking out in the following ways:
■ Getting projects does not lock them on the server database.
■ Getting projects overrides all the projects on your local database, whether they are locked or not locked.
NOTE: The sample database, unlike a local database, cannot receive projects from the server database during a get. The sample database is intended for instructional use only.
Typically you perform a get to initially populate your local database. This process is known as a full get. You can also get projects to override objects stored on your local database.
Related Topics�Performing a Full Get� on page 71
�About the Check Out and Check In Process� on page 75
�Getting Projects from the Server Repository� on page 72
Performing a Full GetFor a newly initialized local database, you need to copy all objects from the server repository to your local repository by running a process called a full get. You must perform full get before you compile, because the SRF file must be based on the comprehensive set of Siebel objects.
By default the full get process performs database commits in regular intervals, rather than a single commit at the end of the process. For information about changing this option, see �Setting Commit Options for Full Get� on page 58.
To perform a full get
1 Open Siebel Tools and connect to your local database.
Using Siebel Tools Version 7.7, Rev. A ■ 71
Getting Projects From the Server Repository ■ Getting Projects from the Server Repository
2 Choose Tools > Check Out.
3 Choose the name of your development repository from the Repository pick list.
NOTE: The repository that you select is not necessarily the one opened by Siebel Tools.
4 Select All Projects.
5 Click Options.
6 In the Development Tools Options window, make sure your Server Data Source is pointing to your server development database and your Client Data Source is pointing to the local database you previously initialized and are currently running against.
7 In the Check Out dialog box, click Get.
All objects from the server repository are copied to your local repository.
Getting Projects from the Server RepositoryYou can use the get process to overwrite projects stored in your local repository with versions of the projects from the server repository. You may need to do this after you have changed local copies of projects and you want to revert back to the versions stored on the server, or after other developers check in changes and you need to copy those changes to your local repository.
To overwrite projects stored in your local database
1 Open Siebel Tools and connect to your local database.
2 Choose Tools > Check Out.
3 Choose the name of your development repository from the Repository pick list.
NOTE: The repository that you select is not necessarily the one opened by Siebel Tools.
4 In the Projects list, select the projects you want to get.
5 Click Options.
6 In the Development Tools Options window, make sure your Server Data Source is pointing to your server development database and your Client Data Source is pointing to the local database you previously initialized and are currently running against.
7 In the Check Out dialog box, click Get.
All objects associated with the projects are copied from the server repository to your local repository.
Related Topics�About the Get Process� on page 71
Using Siebel Tools Version 7.7, Rev. A72 ■

Getting Projects From the Server Repository ■ Getting Locale-Specific Data Only
Getting Locale-Specific Data OnlyAfter you have performed a full get, you can get locale-specific data without having to get parent objects too. This is useful when you have been working in one language and then switch to another language. For example, suppose you have already populated your local repository with English (ENU) data, but now you want to switch to Japanese (JPN). After switching your language mode to JPN, you can use the Get Locale-Specific Data option to copy JPN records only from the server repository to your local repository.
To get locale-specific data only for projects
1 Open Siebel Tools and connect to your local database.
2 Choose Tools > Check Out.
3 Choose the name of your development repository from the Repository pick list.
NOTE: The repository that you select is not necessarily the one opened by Siebel Tools.
4 Select the Projects for which you want to get locale-specific data.
5 Click Options.
6 Make sure your Server Data Source is pointing to your server development database and your Client Data Source is pointing to the local database you previously initialized and are currently running against.
7 Click OK to close the Development Tools Options dialog box.
8 In the Check Out dialog box, select the Get Locale Specific Data Only check box.
9 Click Get.
Data stored in child locale objects of the selected projects are copied from the server repository to your local repository.
Using Siebel Tools Version 7.7, Rev. A ■ 73

Getting Projects From the Server Repository ■ Getting Locale-Specific Data Only
Using Siebel Tools Version 7.7, Rev. A74 ■
5 Checking Out and Checking In Projects and Objects
Topics in This Section�About the Check Out and Check In Process� on page 75
�Setting Options for Check Out and Check In� on page 75
�Guidelines for Check Out and Check In� on page 76
�About the Project Check Out Dialog Box� on page 77
�About the Object Check Out Dialog Box� on page 79
�About the Check In Dialog Box� on page 81
�Checking Out and Checking In Projects� on page 82
�Checking Out and Checking In Objects� on page 84
�Viewing Object Differences� on page 87
�Undoing Check Out� on page 88
About the Check Out and Check In ProcessCheck In and Check Out is a source control mechanism for multiple developers working in the same repository. It allows you to check out objects from the server and download them to your local repository for editing. When you check out objects, they are locked on the server. This prevents other developers from checking them out and avoids conflicts that could result from multiple developers working on the same objects simultaneously. When you check objects back to the server, the lock is removed and the objects are available for other developers to check out.
NOTE: Individual object check in and check out is available starting with version 7.7.2. You can also lock objects directly on your local repository, without checking them out. See �Locking Projects Directly in the Local Repository� on page 91.
Setting Options for Check Out and Check InYou use the Development Tools Options dialog box to define options related to the check in and check out processes. See the following topics for details about check in and check out options:
�Process for Integrating With Third-Party Source Control� on page 51
�Specifying Data Sources� on page 57
�Restarting Editors After Check Out� on page 58
�Setting Commit Options for Full Get� on page 58
Using Siebel Tools Version 7.7, Rev. A ■ 75

Checking Out and Checking In Projects and Objects ■ Guidelines for Check Out and Check In
Guidelines for Check Out and Check InBefore checking out or checking in projects or objects, consider the following:
■ Password encryption interferes with check out. If you are checking out projects, you need to disable password encryption in the client or CFG file when running Siebel Tools.
■ You check out projects and objects in the current Siebel Tools language mode only. For more information, see �Selecting a Language Mode� on page 50.
■ The sample database, unlike a local database, cannot receive checked-out objects, and its objects cannot be checked in to the server database. The sample database is strictly for instructional use.
■ Objects must be checked out and checked in to the server database from which the local database was extracted.
■ Before doing a check-in, make sure that the projects and objects you are checking in are in a stable state, that all dependent scripting is complete, and the configuration has been tested against your local repository.
■ Check in all dependent projects and objects at the same time to be sure that the configuration on the server remains consistent.
For example, if you create a new Pick List object in the Pick List project and reference that object in your Oppty project, check in both projects to the server at the same time.
■ Consider the timing of your check-in and its effect on the work of other developers.
CAUTION: Depending on the size of the project, the check-in process might require some time. Do not interrupt the process, as doing so can leave your repository in an unstable state. If for any reason the check-in process is interrupted, you must perform it again to complete any unfinished tasks and unlock the projects on the server.
Using Siebel Tools Version 7.7, Rev. A76 ■

Checking Out and Checking In Projects and Objects ■ About the Project Check OutDialog Box
About the Project Check Out Dialog BoxThe Check Out dialog box lists projects available for check out. It does not list individual objects within projects. Figure 14 shows an example of the Project Check Out dialog box.
Table 22 describes each user interface element of the dialog box.
Figure 14. Example Check Out Dialog Box
Table 22. Project Check Out Dialog Box User Interface Elements
Element Description
Repository drop-down list Available repositories on the server. The list of projects in the projects list reflects the list of projects in the selected server repository. If you select a different server repository from the one currently open in Siebel Tools locally, a warning appears, and you must either get all projects or change the repository selection.
Using Siebel Tools Version 7.7, Rev. A ■ 77

Checking Out and Checking In Projects and Objects ■ About the Project Check Out Dialog Box
Projects list Project Displays the name of each project in the server repository.
Updated A value of Yes appears if the server Locked By and Locked Date are different from the client version, indicating that your version of the project is out of sync with the server�s version.
Server Locked By Logon ID of the developer who currently has this project checked out on the server.
Server Locked Date
Date of check out.
Client Locked By Logon ID of the developer who currently has this project locked locally.
Client Language The language of the project currently locked on the client. Only one language can be locked at one time.
Option buttons
Selected projects When this option button is selected, you can select individual projects to check out or get.
All projects When this option button is checked, all projects in the repository are selected to check out or get.
Updated projects When this option button is active, only projects with an Updated value of Yes are selected. This allows you to check out or get only those projects on the server that are new or different from corresponding projects in the local repository. Normally you perform a get to bring your local repository up to date.
Get locale specific data only check box
Checking this box gets string translations and locale-specific attributes being stored in the locale objects only. It does not get data stored in the locale object�s parent object.
Buttons Get Selected projects are copied to the local repository, replacing pre-existing versions there, but not locking them on the server. You can get any projects on the server, including those locked by others.
Check Out Copies all objects in the selected projects to the local repository and locks them on the server (and client).
You cannot check out projects that are currently locked on the server by another user
Options Opens the Development Tools Options dialog box with the Check In/Out tab selected. This is the same dialog box that appears when you choose Tools > Options.
Cancel Cancels the check out and closes the Check Out dialog box.
Table 22. Project Check Out Dialog Box User Interface Elements
Element Description
Using Siebel Tools Version 7.7, Rev. A78 ■
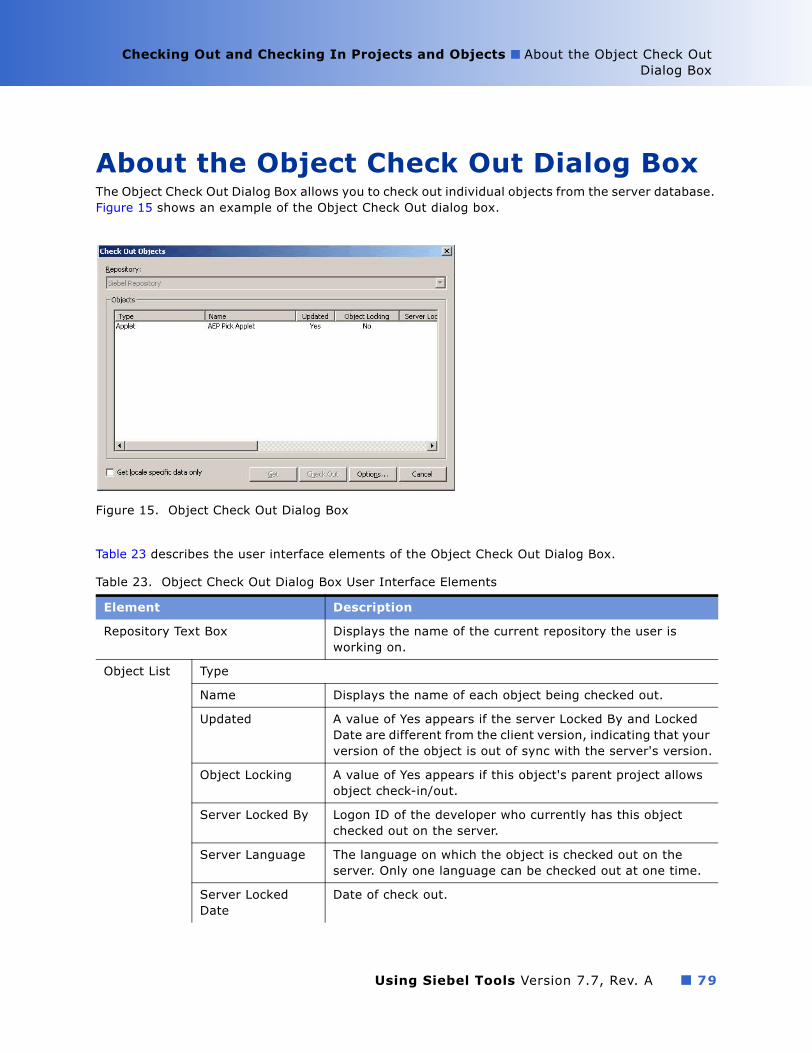
Checking Out and Checking In Projects and Objects ■ About the Object Check OutDialog Box
About the Object Check Out Dialog BoxThe Object Check Out Dialog Box allows you to check out individual objects from the server database. Figure 15 shows an example of the Object Check Out dialog box.
Table 23 describes the user interface elements of the Object Check Out Dialog Box.
Figure 15. Object Check Out Dialog Box
Table 23. Object Check Out Dialog Box User Interface Elements
Element Description
Repository Text Box Displays the name of the current repository the user is working on.
Object List Type
Name Displays the name of each object being checked out.
Updated A value of Yes appears if the server Locked By and Locked Date are different from the client version, indicating that your version of the object is out of sync with the server's version.
Object Locking A value of Yes appears if this object's parent project allows object check-in/out.
Server Locked By Logon ID of the developer who currently has this object checked out on the server.
Server Language The language on which the object is checked out on the server. Only one language can be checked out at one time.
Server Locked Date
Date of check out.
Using Siebel Tools Version 7.7, Rev. A ■ 79

Checking Out and Checking In Projects and Objects ■ About the Object Check Out Dialog Box
Client Locked By Logon ID of the developer who currently has this object locked locally.
Client Language The language of the object currently locked on the client. Only one language can be locked at one time.
Project Locked By Logon ID of the developer who currently has this object's parent project checked out on the server.
�Get locale specific data only� checkbox
Checking this box gets string translations and locale-specific attributes being stored in the locale objects only for the objects selected. It does not get data stored in the locale object's parent object.
Buttons Get Selected objects are copied to the local repository, replacing pre-existing versions there, but not locking them on the server. You can get any objects on the server, including those locked by others regardless of whether their parent projects have the "Allow Object Locking" field checked.
Check Out Copies all selected objects in the selected objects to the local repository and locks them on the server and client.
You cannot check out objects that are currently locked on the server by another user, because either their parent projects do not allow object locking or their parent projects are locked on the server.
Options Opens the Development Tools Options dialog box with the Check In/Out tab selected. This is the same dialog box that appears when you choose Tools > Options.
Cancel Cancels the check out and closes the Object Check Out dialog box.
Table 23. Object Check Out Dialog Box User Interface Elements
Element Description
Using Siebel Tools Version 7.7, Rev. A80 ■
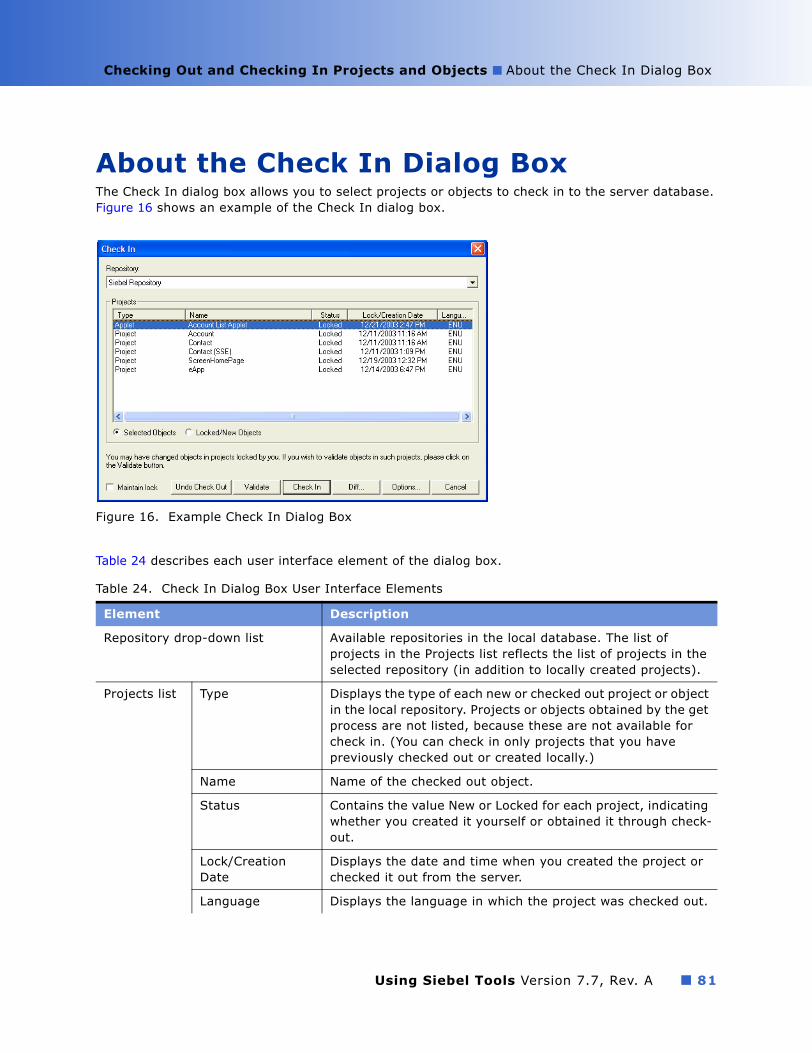
Checking Out and Checking In Projects and Objects ■ About the Check In Dialog Box
About the Check In Dialog BoxThe Check In dialog box allows you to select projects or objects to check in to the server database. Figure 16 shows an example of the Check In dialog box.
Table 24 describes each user interface element of the dialog box.
Figure 16. Example Check In Dialog Box
Table 24. Check In Dialog Box User Interface Elements
Element Description
Repository drop-down list Available repositories in the local database. The list of projects in the Projects list reflects the list of projects in the selected repository (in addition to locally created projects).
Projects list Type Displays the type of each new or checked out project or object in the local repository. Projects or objects obtained by the get process are not listed, because these are not available for check in. (You can check in only projects that you have previously checked out or created locally.)
Name Name of the checked out object.
Status Contains the value New or Locked for each project, indicating whether you created it yourself or obtained it through check-out.
Lock/Creation Date
Displays the date and time when you created the project or checked it out from the server.
Language Displays the language in which the project was checked out.
Using Siebel Tools Version 7.7, Rev. A ■ 81
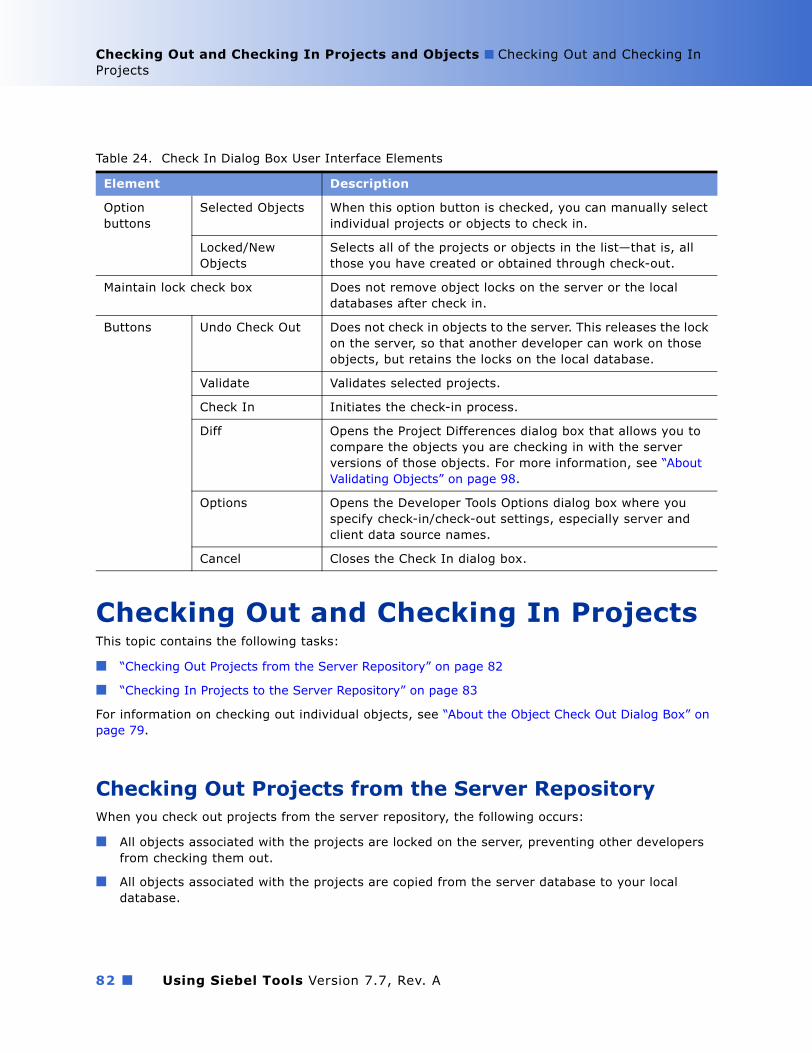
Checking Out and Checking In Projects and Objects ■ Checking Out and Checking In Projects
Checking Out and Checking In ProjectsThis topic contains the following tasks:
■ �Checking Out Projects from the Server Repository� on page 82
■ �Checking In Projects to the Server Repository� on page 83
For information on checking out individual objects, see �About the Object Check Out Dialog Box� on page 79.
Checking Out Projects from the Server RepositoryWhen you check out projects from the server repository, the following occurs:
■ All objects associated with the projects are locked on the server, preventing other developers from checking them out.
■ All objects associated with the projects are copied from the server database to your local database.
Option buttons
Selected Objects When this option button is checked, you can manually select individual projects or objects to check in.
Locked/New Objects
Selects all of the projects or objects in the list�that is, all those you have created or obtained through check-out.
Maintain lock check box Does not remove object locks on the server or the local databases after check in.
Buttons Undo Check Out Does not check in objects to the server. This releases the lock on the server, so that another developer can work on those objects, but retains the locks on the local database.
Validate Validates selected projects.
Check In Initiates the check-in process.
Diff Opens the Project Differences dialog box that allows you to compare the objects you are checking in with the server versions of those objects. For more information, see �About Validating Objects� on page 98.
Options Opens the Developer Tools Options dialog box where you specify check-in/check-out settings, especially server and client data source names.
Cancel Closes the Check In dialog box.
Table 24. Check In Dialog Box User Interface Elements
Element Description
Using Siebel Tools Version 7.7, Rev. A82 ■

Checking Out and Checking In Projects and Objects ■ Checking Out and Checking InProjects
■ All objects associated with the projects are locked on your local database, allowing you to edit them.
To check out projects from the server repository
1 Choose Repository > Check Out.
2 In the Check Out dialog box, make sure that the correct repository is selected.
3 Select the projects you want to check out.
4 Click Options.
5 In the Development Tools Options dialog box, make sure the Server and Client data sources are specified correctly.
6 Click OK.
The Development Tools Options dialog box closes.
7 In the Check Out dialog box, click Check Out.
8 After the check out is complete, select View > Refresh Windows to display updated information.
Related Topics�Guidelines for Check Out and Check In� on page 76
�About the Project Check Out Dialog Box� on page 77
�Setting Options for Check Out and Check In� on page 75
Checking In Projects to the Server RepositoryWhen you check in projects, the following actions occur:
■ Projects and their associated objects are copied from your local repository to the server repository, replacing those on the server.
■ Any new objects are added to the server repository.
■ Locks on the projects and all associated objects are removed.
To check in projects to the server repository
1 Choose Tools > Check In.
2 In the Check In dialog box, make sure that the correct repository is selected.
3 Click Options.
4 In the Development Tools Options dialog box, make sure the server and client Data Sources are are correct and then click OK.
5 Do one of the following:
Using Siebel Tools Version 7.7, Rev. A ■ 83

Checking Out and Checking In Projects and Objects ■ Checking Out and Checking In Objects
■ To check in selected projects, click the Selected Objects option, and then select the projects that you want to check in.
■ To check in all locked projects (new and modified), click the Locked/New Objects option.
6 Click Check In.
The selected projects and associated objects are copied from your local repository to the server repository and locks are removed.
Related Topics�Guidelines for Check Out and Check In� on page 76
�About the Check In Dialog Box� on page 81
�Setting Options for Check Out and Check In� on page 75
Checking Out and Checking In ObjectsThis topic contains the following tasks:
■ �About Object Check Out and Check In� on page 84
■ �Enabling Object Check Out and Check In� on page 85
■ �Setting Projects to Allow Object Locking� on page 85
■ �Checking Out Objects from the Server Repository� on page 85
■ �Checking In Objects to the Server Repository� on page 86
■ �Viewing Locked Objects Within Projects� on page 86
■ �Locking Objects Locally� on page 87
■ �Limitations of Object Check Out and Check In� on page 87
About Object Check Out and Check InWith object check out and check in, you can check out and check in only the objects that you need. That is, you do not have to check out and check in entire projects.
Checking out and checking in selected objects:
■ Allows multiple developers to work on objects within a single project.
■ Improves check-out and check-in times.
■ Reduces network traffic.
Using Siebel Tools Version 7.7, Rev. A84 ■
Checking Out and Checking In Projects and Objects ■ Checking Out and Checking InObjects
Enabling Object Check Out and Check InA configuration file parameter controls whether or not object check out and check in is enabled. To enable object check out and check in, add the following parameter to the [Siebel] section of the tools.cfg file and set it to TRUE:
EnableObjectCOCI=TRUE
NOTE: The EnableObjectCOCI is set to TRUE by default.
Setting Projects to Allow Object LockingFor each project you can specify whether or not developers are allowed to check out and check in individual objects within the project. To allow developers to check out and check in objects, you set the project's Allow Object Locking property to TRUE. To modify the Allow Object Locking property, you must use the SADMIN user ID to log in and you must be logged into a server data source. You cannot set the Allow Object Locking property in your local repository.
To set the Allow Object Locking property
1 In Siebel Tools, navigate to the project.
2 In the Object List Editor, right-click, and then choose Toggle Allow Object Locking.
NOTE: If a project has the Allow Object Locking configuration file parameter set to TRUE, and the user is logged in to the server using the SADMIN user ID, the Toggle Allow Object Locking menu option is enabled. When the SADMIN chooses this option for a project that is already set to allow object locking, a check is performed to determine whether any objects are locked on the server within the project. If there are objects locked within the project, SADMIN will receive an error message. If the project is locked on the server by someone else, the menu option for Toggle Allow Object Locking will not appear.
Checking Out Objects from the Server RepositoryWhen the Allow Object Locking property is set to TRUE, you can check out individual objects within the project. When you check out individual objects, the objects are:
■ Locked on the server, preventing other developers from checking them out.
■ Copied from the server database to your local database.
■ Locked on your local database, allowing you to edit them.
NOTE: You can check out top-level objects only.
To check out objects from the server repository
1 Open Siebel Tools and connect to your local database.
2 In the Object Explorer, navigate to the object type you want to check out.
Using Siebel Tools Version 7.7, Rev. A ■ 85
Checking Out and Checking In Projects and Objects ■ Checking Out and Checking In Objects
3 In the Object List Editor, select the object definition, and then right-click and choose Check Out.
The Check Out Object dialog box appears.
NOTE: If another developer has the objects checked out or if the parent project has the Allow Object Locking property set to FALSE, the Check Out button is disabled.
4 In the Check Out Object dialog box, select the objects to check out.
5 Click Check Out.
The object and all its child objects are locked on the server and then copied to your local repository.
Checking In Objects to the Server Repository You check in objects to the server repository the same way you check in projects. When you check in objects or projects, Siebel Tools does the following:
■ Copies object definitions from your local repository to the server repository.
■ Adds any new objects to the server repository.
■ Removes the locks from object definitions.
To check in projects or individual objects to the server repository
1 Open Siebel Tools and connect to your local database.
2 Choose Tools > Check In.
3 In the Check In dialog box, make sure that the correct repository is selected.
4 Do one of the following:
■ To check in selected projects or objects, click the Selected Objects option button and then select the projects and objects you want to check in.
■ To check in all locked projects and objects, click the Locked/New Objects option button.
5 Click Check In.
Siebel Tools copies the projects and objects from your local repository to the server repository and removes the locks.
Viewing Locked Objects Within ProjectsWhen the Allow Object Locking property of a project is set to TRUE, you can view any objects within the project that are locked. You can view locked objects in either the server repository or the local repository.
Using Siebel Tools Version 7.7, Rev. A86 ■

Checking Out and Checking In Projects and Objects ■ Viewing Object Differences
To view locked objects
1 In the Object Explorer, navigate to the Project object type.
2 In the Object List Editor, select the project that contains the objects to view.
3 Right-click and choose one of the following:
■ View Server Locked Objects
■ View Client Locked Objects
The Locked Objects dialog box displays any locked objects associated with the selected project.
Locking Objects LocallyWhen a project's Allow Object Locking is set to TRUE, you can lock individual objects within the project in your local repository without having to check them out from the server.
To lock objects locally■ Select the object, right-click, and then choose Lock Object.
Limitations of Object Check Out and Check InWhen a projects Allows Object Locking property is set to TRUE, you cannot perform the following tasks on objects checked out from the server repository:
■ Deleting objects.
■ Renaming objects.
■ Assigning objects to a different project.
Viewing Object DifferencesBefore you check in objects, you can compare the copies stored in your local database to those stored in the server database. Siebel Tools compares the current state of the objects to the version of these objects the time of checkout.
To view differences between objects
1 Choose Tools > Check In.
2 In the Check In dialog box, select the project you want to compare.
3 Click Diff.
The Object Comparison dialog box appears and displays the selected projects and any differences between objects in the local database and objects in the server database.
Using Siebel Tools Version 7.7, Rev. A ■ 87

Checking Out and Checking In Projects and Objects ■ Undoing Check Out
Undoing Check OutAfter checking out projects you can undo the check out, which does the following:
■ Removes locks on server objects.
■ Objects in the local repository remains locked and all changes since the objects were checked out are retained.
To undo a project check out
1 Choose Tools > Check In.
2 In the Check In dialog box, select the project or objects for which you want to undo check-out, and click the Undo Check Out button.
The project or object is unlocked on the server but not on your local database.
If one of the project or objects you select is new, the Undo Check Out button is disabled.
NOTE: You can also use the Get option to overwrite a project that you have checked out from the server database. Then check the project back in to the server to remove the lock for the project.
Related Topic�Getting Projects from the Server Repository� on page 72.
Using Siebel Tools Version 7.7, Rev. A88 ■

6 Working With Projects
Topics in This Section�About Projects� on page 89
�Creating New Projects� on page 90
�Renaming Projects� on page 90
�Associating Objects with Different Projects� on page 90
�Locking Projects Directly in the Local Repository� on page 91
�Preventing Object Check in and Check out� on page 92
�Unlocking Projects Directly� on page 92
About ProjectsProjects are sets of objects that reside in the Siebel repository. They are used group objects based on functional areas. Every object is associated with a project. The names of projects that are delivered with a standard Siebel application indicate the functional area with which they are associated. For example, Account contains objects that pertain to the Account functional area.
A project named without a suffix, such as Account, usually contains business object layer objects that span multiple Siebel applications. Project names that have a suffix (for example, Account(SSE)) contain user interface or business objects that are specific to the Siebel application indicated by the suffix. For example, the suffix SSE in Account(SSE) indicates an entry containing Account user interface data for the Siebel Sales application. Other examples of suffixes indicating user interface data only are SSV for Siebel Service and CC for Siebel Call Center.
The project structure supplied with the Siebel Repository is usually well suited to having several developers work on the same repository without contention for the same objects. However, when developers need access to the same set of objects simultaneously, changing the standard project structure may be necessary.
To determine if the standard project structure will work for your specific development project:
■ Create an application development plan that includes a PERT chart showing dependencies and parallel activities.
■ Analyze the plan to see if the project structure interferes with developers who need access to objects in the same projects at the same time. If so, break out groups of objects into separate projects to enable concurrent development.
Using Siebel Tools Version 7.7, Rev. A ■ 89

Working With Projects ■ Creating New Projects
Creating New ProjectsYou typically create new projects to group related sets of new objects or break large numbers of existing objects into more manageable groups.
NOTE: You cannot delete projects using Siebel Tools, but you can delete projects using SQL commands.
To create a new project
1 In the Object Explorer, select the Project object type.
2 In the Object List Editor, right-click and choose New Record.
3 Enter a Name for the project and then step off the record.
Renaming ProjectsYou can rename projects that you have created. However, you must rename the projects on the server, not on the local database. You cannot change the name of a top-level object that has been checked out.
CAUTION: Do not change the name of projects to which Siebel objects are associated.
To rename a project on the server
1 Make sure developers have checked in all checked-out projects.
2 Use Siebel Tools to log into the server database.
3 Choose File > Open Repository and then select the repository you want to modify.
4 Navigate to the project you want to modify.
5 Lock the project and then change the Name property.
6 Have developers perform a Get of all projects on the server repository.
7 Have developers perform a full compilation the next time they compile.
Associating Objects with Different ProjectsYou can associate objects with different projects. This can be useful, for example, when you want to break a large project into smaller projects.
Using Siebel Tools Version 7.7, Rev. A90 ■

Working With Projects ■ Locking Projects Directly in the Local Repository
To associate an object with a different project
1 Check out both the source and the target project from the server database.
For instructions on how to check out projects, see �Checking Out and Checking In Projects� on page 82.
2 Navigate to the object you want to modify and then change the Project property to the name of the new project.
For instructions on how to modify objects, see �Modifying Objects� on page 96.
3 Check in the project that was originally associated with the object and then check in the project that is currently associated with the object.
CAUTION: Trying to check in both projects at the same time can lead to errors.
For instructions on how to check in projects, see �Checking In Projects to the Server Repository� on page 83.
4 Inform other developers that they must do a simultaneous get of the two projects prior to doing any subsequent work on the object in either project.
Locking Projects Directly in the Local RepositoryYou can lock projects directly in the local repository, without checking them out from the server. This is useful when:
■ You want to test configurations on your local machine but do not want to prevent others from checking out the project from the server database.
■ You intend to discard your work when you are done and therefore, do not have a need to check modified objects back into the server.
When locking projects directly in the local repository, consider the following:
■ You cannot check in projects or objects that have been locked on the local database. Projects must have been checked out from the server for them to be checked in to the server.
■ Any projects you have locked locally, and all associated objects, will be overwritten the next time you get or check out those projects.
To lock projects directly
1 Log in to your local database.
2 Do one of the following:
■ Select an object, such as an applet or business component, and then choose Tools > Lock Project.
Using Siebel Tools Version 7.7, Rev. A ■ 91
Working With Projects ■ Preventing Object Check in and Check out
■ Navigate to the project that contains the objects that you want to modify, and click the Locked field to set it to TRUE.
All objects associated with the project become available for editing, indicated by a pencil icon that appears under the W field and the Locked property of the project object is set to TRUE.
Preventing Object Check in and Check outYou can prevent developers from checking out and checking in projects by locking the project directly on the server repository.
CAUTION: Modifying objects directly on the server repository for purposes other than preventing check in and check out is not recommended.
To lock projects directly
1 Log in to the server database.
2 Do one of the following:
■ Select an object, such as an applet or business component, and then choose Tools > Lock Project.
■ Navigate to the project that contains the objects that you want to modify, and click the Locked field to set it to TRUE.
The project and all objects associated with project are locked. They cannot be checked out.
Unlocking Projects DirectlyAfter you have locked projects directly, that is without checking them out, you can remove the locks on all associated objects by unlocking the projects.
To unlock projects
1 Log in to either the local database or server database, depending on where the locked objects reside.
2 Do one of the following:
■ Select the object you want to unlock, and then choose Tools > Unlock Project.
■ Navigate to the project that contains the objects that you want unlock, and then click the Locked field to clear the check mark (sets Locked to FALSE).
The locks are removed from the project and all objects associated with the project.
Using Siebel Tools Version 7.7, Rev. A92 ■
7 Working with Objects
Topics in This Section�Summary of Tasks for Working with Objects� on page 93
�Creating Objects� on page 95
�Modifying Objects� on page 96
�Copying Objects� on page 97
�About Validating Objects� on page 98
�Validating Objects Using the Object List Editor� on page 98
�Validating Objects Using the Command-Line Interface� on page 99
�About the Validate Dialog Box� on page 99
�About Simple Queries� on page 105
�About Compound Queries� on page 105
�Searching the Repository for Objects� on page 106
�Viewing Object Relationships� on page 108
�Generating Reports About Object Relationships� on page 109
�About Object Comparison and Synchronization� on page 111
�Determining When Records Were Last Created and Updated� on page 115
Summary of Tasks for Working with ObjectsThe process of working with objects varies depending on whether the Allow Object Locking property of the parent project is set to TRUE or FALSE. When the property is set to FALSE, you must check out the entire project to edit any object definitons within the project. However, if the Allow Object Locking property is set to TRUE, you can check out some of the objects in a project and leave other objects unlocked on the server, available for other developers to check out. For more information on setting this property, see �Setting Projects to Allow Object Locking� on page 85.
Using Siebel Tools Version 7.7, Rev. A ■ 93
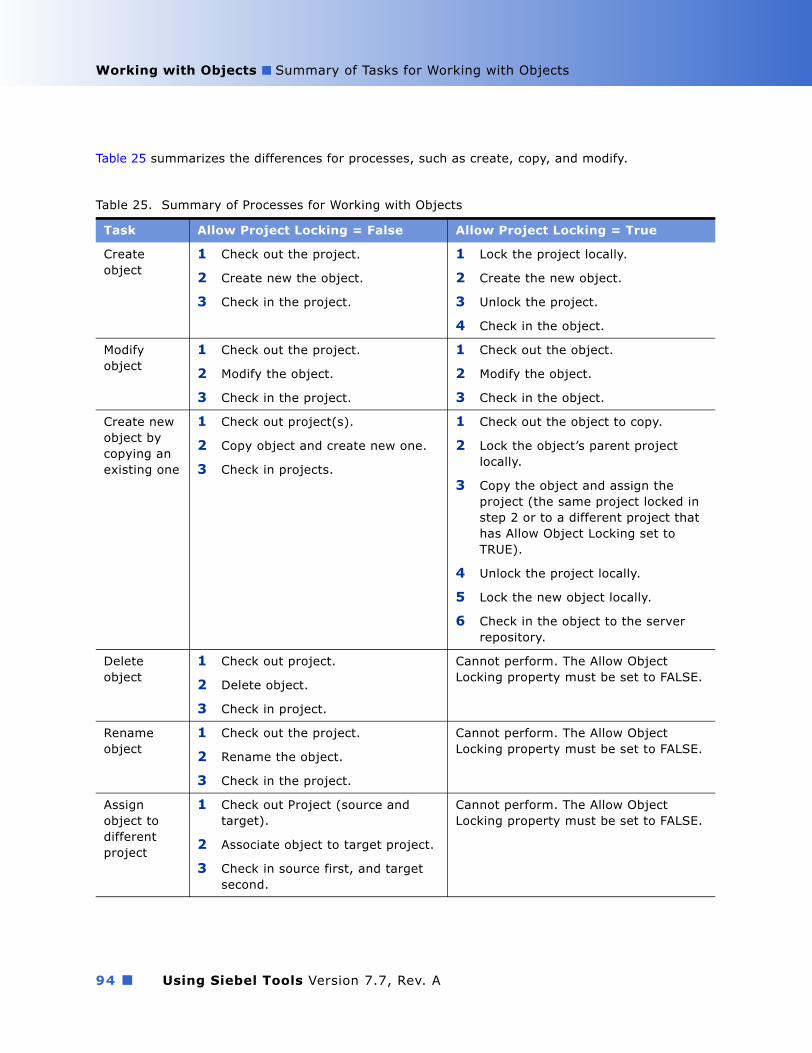
Working with Objects ■ Summary of Tasks for Working with Objects
Table 25 summarizes the differences for processes, such as create, copy, and modify.
Table 25. Summary of Processes for Working with Objects
Task Allow Project Locking = False Allow Project Locking = True
Create object
1 Check out the project.
2 Create new the object.
3 Check in the project.
1 Lock the project locally.
2 Create the new object.
3 Unlock the project.
4 Check in the object.
Modify object
1 Check out the project.
2 Modify the object.
3 Check in the project.
1 Check out the object.
2 Modify the object.
3 Check in the object.
Create new object by copying an existing one
1 Check out project(s).
2 Copy object and create new one.
3 Check in projects.
1 Check out the object to copy.
2 Lock the object�s parent project locally.
3 Copy the object and assign the project (the same project locked in step 2 or to a different project that has Allow Object Locking set to TRUE).
4 Unlock the project locally.
5 Lock the new object locally.
6 Check in the object to the server repository.
Delete object
1 Check out project.
2 Delete object.
3 Check in project.
Cannot perform. The Allow Object Locking property must be set to FALSE.
Rename object
1 Check out the project.
2 Rename the object.
3 Check in the project.
Cannot perform. The Allow Object Locking property must be set to FALSE.
Assign object to different project
1 Check out Project (source and target).
2 Associate object to target project.
3 Check in source first, and target second.
Cannot perform. The Allow Object Locking property must be set to FALSE.
Using Siebel Tools Version 7.7, Rev. A94 ■
Working with Objects ■ Creating Objects
Links to Tasks for Working with ObjectsThe following lists links to the summarized tasks listed in Table 25.
■ �Checking Out and Checking In Projects� on page 82
■ �Checking Out and Checking In Objects� on page 84
■ �Locking Projects Directly in the Local Repository� on page 91
■ �Creating Objects� on page 95
■ �Modifying Objects� on page 96
■ �Copying Objects� on page 97
■ �Compiling and Testing� on page 117
■ If you checked out the projects from the server, perform the task described in �Checking In Projects to the Server Repository� on page 83
■ If you locked the project directly, perform the task described in �Unlocking Projects Directly� on page 92
Creating ObjectsUse new object wizards to create objects whenever possible. For example, to create a new business component, use the Business Component Wizard.
Wizards step you through the process of configuring a given object, prompting you for the necessary property values and automatically configuring any necessary child objects.
When a wizard not availble for the object type you wan to create, you can create objects manually in the Object List Editor.
For information about using wizards and creating specific objects, see Configuring Siebel eBusiness Applications.
To create objects using a new object wizard
1 Choose File > New Object.
2 Choose the appropriate wizard to create the new object.
3 Follow the instructions in the wizard.
To create a new object manually
1 In the Object Explorer, select the relevant object type.
The Object List Editor opens, listing objects of this object type.
2 To make the Object list Editor active, click it.
3 Choose Edit > New Record, or right-click and choose New Record.
A new record appears.
Using Siebel Tools Version 7.7, Rev. A ■ 95

Working with Objects ■ Modifying Objects
4 Enter property values in the new row in the Object List Editor.
At a minimum, you must enter the object�s Name and Project properties.Typically other properties are also required. Before you can save the new objects, you must complete the required properties.
NOTE: You cannot use punctuation characters as part of an object name.
5 Click anywhere outside the new row or move outside of the row with the UP or DOWN arrow keys.
Siebel Tools saves the new object.
Modifying ObjectsYou can modify objects using either the Object List Editor or the Properties window.
For guidelines about when to modify objects and when to create new objects, see Configuring Siebel eBusiness Applications.
To modify objects in the Object List Editor
1 In the Object Explorer, select the object type you want to modify.
2 In the Object List Editor, select the object you want to modify.
3 Use the TAB key to move the cursor to the specific value you want to modify.
NOTE: It is recommended that you use the TAB key to move from property column to property column in the object�if you use the mouse you might unintentionally change the value of a Boolean property.
4 Type in a new value, or pick a value from the pick list (if one is provided).
5 To commit your changes, click anywhere outside the modified row or move outside the row with the UP or DOWN arrow.
A check mark appears in the Changed column.
To modify objects using the Properties window
1 In the Object Explorer, select the object type you want to modify.
2 In the Object List Editor, select the object you want to modify.
3 Choose View > Windows > Properties to open the Properties window.
4 In the Properties window, select the current value, and then type in a new one.
5 To commit your changes, select another property or click anywhere outside the Properties window.
A check mark appears in the Changed column in the Object List Editor.
Using Siebel Tools Version 7.7, Rev. A96 ■

Working with Objects ■ Copying Objects
Copying ObjectsOne method of creating an object is to copy an existing object and then rename and change properties of the copy as necessary.
For guidelines on copying objects and more information on the Upgrade Ancestor property, see Configuring Siebel eBusiness Applications.
To create new objects by copying existing objects
1 In the Object Explorer, select the relevant object type.
2 In the Object List Editor, locate the object to copy, and click anywhere in the row to select it.
3 Choose Edit > Copy Record.
A new row appears above the copied row, containing identical property values. The Changed column contains a check mark.
4 Enter a new value for the Name property.
5 In the Project field, click the drop-down arrow.
The Projects pick list appears.
6 Choose the name of the project to which to assign the new object.
NOTE: Only locked projects are displayed in the Projects pick list.
7 If necessary, modify any other relevant properties and child objects.
8 To commit your changes, click anywhere outside the new row or move outside the row with the UP or DOWN arrow keys.
Deleting ObjectsOccasionally, you will want to delete an object from a project. To delete an object, you must have the Allow Object Locking property set to FALSE.
To delete objects
1 Check out the Project from the server.
2 In the Object Explorer, select the desired object.
3 From the Edit menu, select Delete Record.
Using Siebel Tools Version 7.7, Rev. A ■ 97

Working with Objects ■ About Validating Objects
About Validating ObjectsAs you modify or create objects, you should also validate their definitions. Validating objects is one of the first things you should do if a configuration change produces a run-time error. Although the validation process can be time consuming, you can continue working in Siebel Tools while the validation is running.
Validation is based on a set of rules that help make sure that your configuration changes are logically consistent with other objects. Validating a parent object validates child objects as well.
There are many rules used to validate objects. The rule that checks for invalid object references is the most important. An invalid object reference occurs when one object (for example, an applet) references another object (for example, a business component) that has been inactivated or deleted. You can review all validation rules in the Validation Options dialog box.
Related Topics�Validating Objects Using the Object List Editor� on page 98
�Validating Objects Using the Command-Line Interface� on page 99
�About the Validate Dialog Box� on page 99
�About the Validation Options Dialog Box� on page 102
Validating Objects Using the Object List EditorSiebel Tools includes an option that reviews objects and validates them using a set of predefined rules, such as checking for invalid object references.
To validate an object
1 In the Object List Editor, select the object or objects you want to validate.
2 Right-click and then choose Validate, or choose Tools > Validate Object.
The Validate dialog box appears.
3 Click Options.
The Validation Options dialog box appears.
4 Select the validation rules to enforce by selecting a row and clicking Enforce or Ignore.
5 In the Time Filter area, limit the objects you want to validate by doing one of the following:
■ Select the Last validated check box. This option validates objects that have been changed since the last time validation was run.
■ Select the Custom check box and enter a date and time. This option validates objects that have been changed since the date and time entered.
Using Siebel Tools Version 7.7, Rev. A98 ■
Working with Objects ■ Validating Objects Using the Command-Line Interface
6 In the Action area, use the following check boxes to define the actions to take during the validation process:
■ Do not report warnings. When this is selected, only errors are reported, not warnings. The Enforce field for warnings is set to No.
■ Abort validation after. Use this option to abort the validation process after a specified number of errors.
7 Click OK.
The Validation Options dialog closes.
8 In the Validate dialog box, click Start.
The Errors list displays violations of the currently enforced rules, as shown in Figure 17 on page 100.
Related Topic�About Validating Objects� on page 98
�About the Validate Dialog Box� on page 99
�About the Validation Options Dialog Box� on page 102
Validating Objects Using the Command-Line InterfaceYou can use the command-line interface to validate objects. You invoke the command-line interface from the siebdev executable using the command switch /bv. The siebdev.exe is located in the Bin directory of the Siebel Tools installation directory.
The syntax of the /bv switch is:
siebdev.exe /bv
The /bv switch runs all validation rules for the entire repository.
About the Validate Dialog BoxThe Validate dialog box describes the results of validation rules applied to objects and shows the location of the validation log file.
Using Siebel Tools Version 7.7, Rev. A ■ 99
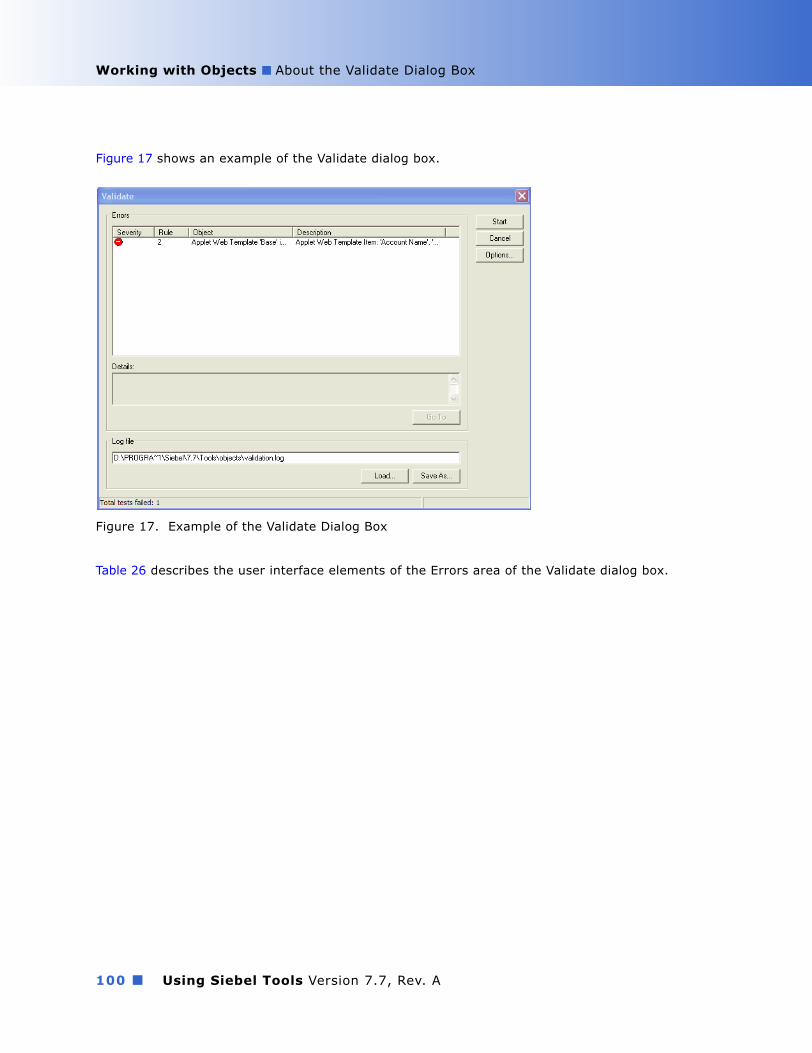
Working with Objects ■ About the Validate Dialog Box
Figure 17 shows an example of the Validate dialog box.
Table 26 describes the user interface elements of the Errors area of the Validate dialog box.
Figure 17. Example of the Validate Dialog Box
Using Siebel Tools Version 7.7, Rev. A100 ■
Working with Objects ■ About the Validate Dialog Box
Table 27 describes the user interface elements of the Log file area of the Validate dialog box.
Table 26. User Interface Elements of the Errors Area of the Validate Dialog Box
Field/Button Description
Errors list Displays the results of the validation process. Each row in the list identifies a rule violation for a specific object. To drill down to the object that contains the error, double click the error. To sort the rows, click a column heading. To resize columns, drag the right or left border of the heading cell.
Severity column
An icon appears in this column for each violation row. It indicates whether the violation is a warning (yellow icon with an exclamation mark) or an error (red icon with a minus sign). Errors cause the compiled application to generate run-time errors.
Rule column An integer value appears in this column, identifying the rule that has been violated. Rules are listed in order of the rule number in the Validation Options dialog box (shown in Figure 17 on page 100).
Object column
The name of the object that failed validation.
Description column
The description of the error or warning.
Details text box
Displays additional information about the error or warning message for the currently selected row in the Errors list.
Go To button To navigate to the corresponding object in the Object List Editor, select an error message row and click Go To. Alternatively, you can double-click the error message.
Table 27. User Interface Elements of the Log file Area of the Validate Dialog Box
Field/Button Description
Text box Path and filename of a log file containing the list of validation errors and warnings. To save a list of validation rows as a log file, click Save As, navigate to where you want to save the file, and then specify a filename. You can then reload the list of error and warning validations at a later time by using the Load button, rather than by repeating the validation process.
Load button Opens a previously saved log file and displays its list of validations in the Errors list.
Save As button
Saves the current list of validation rows as a log file.
Using Siebel Tools Version 7.7, Rev. A ■ 101
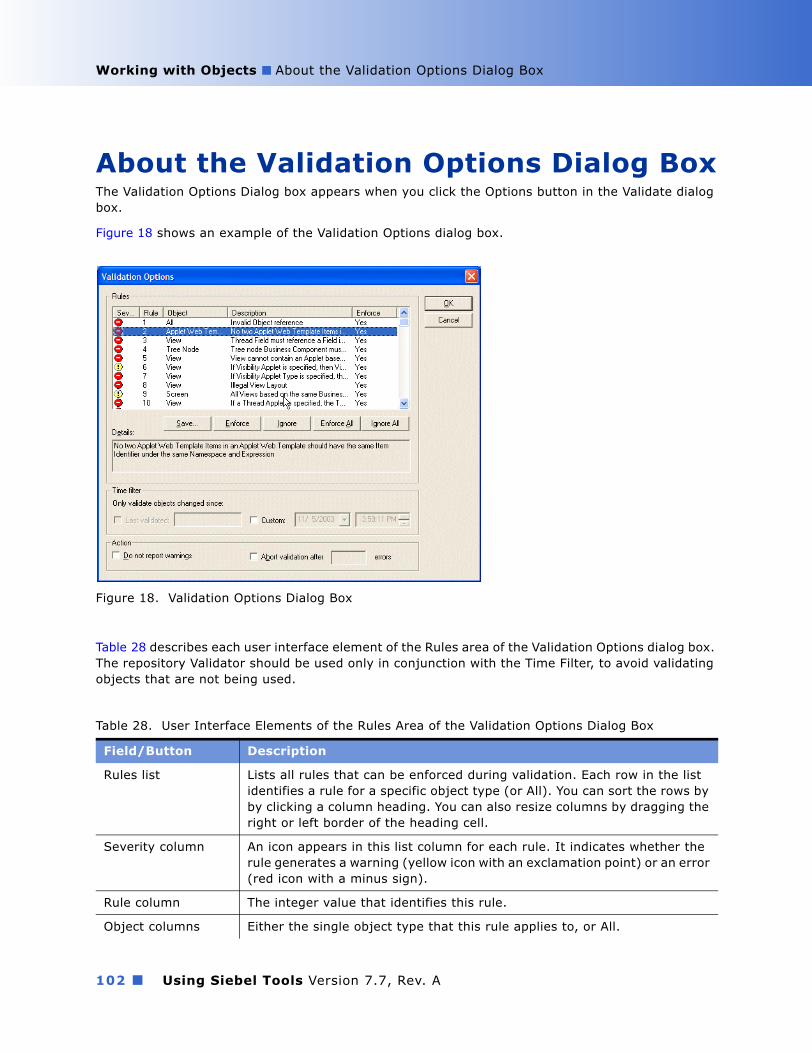
Working with Objects ■ About the Validation Options Dialog Box
About the Validation Options Dialog BoxThe Validation Options Dialog box appears when you click the Options button in the Validate dialog box.
Figure 18 shows an example of the Validation Options dialog box.
Table 28 describes each user interface element of the Rules area of the Validation Options dialog box. The repository Validator should be used only in conjunction with the Time Filter, to avoid validating objects that are not being used.
Figure 18. Validation Options Dialog Box
Table 28. User Interface Elements of the Rules Area of the Validation Options Dialog Box
Field/Button Description
Rules list Lists all rules that can be enforced during validation. Each row in the list identifies a rule for a specific object type (or All). You can sort the rows by by clicking a column heading. You can also resize columns by dragging the right or left border of the heading cell.
Severity column An icon appears in this list column for each rule. It indicates whether the rule generates a warning (yellow icon with an exclamation point) or an error (red icon with a minus sign).
Rule column The integer value that identifies this rule.
Object columns Either the single object type that this rule applies to, or All.
Using Siebel Tools Version 7.7, Rev. A102 ■
Working with Objects ■ About the Validation Options Dialog Box
Table 29 describes the Time Filters area of the Validation Options dialog box.
Table 30 describes the check boxes in the Action area of the Validation Options dialog box.
Description column The description of the rule.
Enforce A Yes or No value for each rule. Yes validates all objects of the object type identified in the Object column. Yes/No values in this list column are changed using the Enforce, Ignore, Enforce All, and Ignore All buttons.
Save button Saves the current set of rules and their state (enforced or ignored) to a text file you specify. Other settings are saved to the preferences file when you press ENTER.
Enforce button Changes the Enforce column value in the selected row from No to Yes.
Ignore button Changes the Enforce column value in the selected row from Yes to No.
Enforce All button Changes all values in the Enforce column to Yes.
Ignore All button Changes all values in the Enforce column to No. This has the effect in the next validation of not validating any objects.
Details text box The full text of the rule description for the currently selected row in the Rules list.
Table 29. User Interface Elements of the Time Filter Area of the Validation Options Dialog Box
Field Description
Last validated check box and date field
When selected, validates only objects changed since the date you enter into the corresponding date box.
Custom check box and date and time fields
When selected, validates only objects changed within the date range you enter into the corresponding date boxes.
Table 30. User Interface Elements of the Action Area of the Validation Options Dialog Box
Field Description
Do not report warnings check box
When selected, reports errors only, not warnings. It also changes the Enforced setting of all warning rules to No.
Abort validation after check box and text box
When selected and a number is entered in the text box, Siebel Tools stops validating after the specified number of errors is reached. By default, the validation process continues to run until it is completed or canceled.
Table 28. User Interface Elements of the Rules Area of the Validation Options Dialog Box
Field/Button Description
Using Siebel Tools Version 7.7, Rev. A ■ 103

Working with Objects ■ Using Queries to List Objects
Using Queries to List ObjectsYou can use query-by-example (QBE) to narrow the list of objects displayed in the Object List Editor. An Object List Editor query searches for objects based on values in one or more properties of the object. The queries can be simple, one-condition queries or compound, multiple-condition queries. You can create, refine, and activate queries from the Query menu or from the List toolbar. (Refine means to impose a further restriction on the current Object List Editor query by running it again with an additional constraint.)
To create and execute an Object List Editor query
1 Navigate to the list of objects that you want to query.
2 Choose Query > New Query.
In the Object List Editor, a single empty query row appears.
3 Define your search criteria in the property cells of the empty query row.
These values may be single literal values such as Opportunity List Applet, or they may include wildcard symbols. In TRUE/FALSE properties, a check mark represents TRUE.
4 Choose Query > Execute Query.
The list of objects in the Object List Editor is filtered to contain only those objects that meet your query criteria.
To restore the Object List Editor to its prequery state
1 Choose Query > New Query.
In the Object List Editor, a single empty query row appears.
2 Choose Query > Execute Query.
The list of objects in the Object List Editor is restored to its prequery state.
Related Topics�About Simple Queries� on page 105
�About Compound Queries� on page 105
Using Siebel Tools Version 7.7, Rev. A104 ■

Working with Objects ■ About Simple Queries
About Simple QueriesA simple query finds information based on one condition. Table 31 lists the operators you can use to create a simple query.
For more information on search specifications and operators and on Siebel data types, see Siebel Developer�s Reference.
About Compound Queries Compound queries enable you to find information based on two or more conditions. There are three ways to create compound queries:
■ Enter conditions in two or more property columns to find records that meet all the conditions. In other words, Siebel applications automatically connect these conditions with the operator AND. This method is the easiest way to create a compound query.
■ Enter a compound query within a property field using the operators OR, AND, and NOT to create two or more conditions for that property.
Table 31. Simple Query Operators
Operator Description
= Equal to
< Less than
> Greater than
<> Not equal to
<= Less than or equal to
>= Greater than or equal to
* Any number of characters (including none) may take the place of the asterisk (*)
? Any one character matches the question mark (?)
IS NOT NULL Searches for non-blank fields
IS NULL Searches for blank fields
LIKE Searches for values starting with the indicated string
NOT LIKE Searches for values not starting with the indicated string
� � Searches for strings that contain special characters, such as a comma (,)
EXISTS ( ) Searches for values in a multi-value group
[~] Forces the case of the text string to whatever follows the tilde (~)
Using Siebel Tools Version 7.7, Rev. A ■ 105
Working with Objects ■ Searching the Repository for Objects
■ Enter a compound query using more than one field and compound operators AND, OR, and NOT. You can enter this type of query in any field. You might find it convenient to use the Description or Comments field, because it is typically the longest on a given screen.
When you create a compound query, follow the same basic steps you use to create a simple query.
Use parentheses to control the order in which a compound search is conducted. Expressions inside parentheses are searched for first (as they appear left to right). Table 32 lists the unique operators for compound queries. Use these operators in addition to the operators you use to create a simple query.
For more information about compound operators, see Siebel Developer�s Reference.
Searching the Repository for ObjectsUse the search repository feature to search across all properties of multiple object types using a single set of search criteria. This provides a way to locate objects when you know that a given value appears in one or more properties. The search repository feature differs from querying in the Object List Editor because when querying you can only query on a single object type and have to define search criteria for each property.
NOTE: Searching the repository can be time-consuming.
To find an object using search
1 Choose Tools > Search Repository.
The Search Repository dialog box appears.
2 Under Parameters, in the Search value text box, type the search criteria.
3 If you want only those objects whose property values contain the search string with the same capitalization, select the Case sensitive check box.
4 If you want only those objects whose property values exactly match the entire search string, select the Exact match check box.
Table 32. Compound Query Operators
Operator Description
AND All the conditions connected by ANDs must be true for a search to retrieve a record.
OR At least one of the conditions connected by the OR must be true for a search to retrieve a record.
NOT The condition modified by this operator must be false for a search to retrieve a record.
Using Siebel Tools Version 7.7, Rev. A106 ■
Working with Objects ■ Searching the Repository for Objects
5 In the Types to search list box, select the object type or types to search for.
By default, all object types in this list are selected. You can choose a single object type to search by selecting it. Use CTRL-click and SHIFT-click to select multiple object types. For better performance, search only the object type or types you need.
Use the Select All and Clear All to select or deselect all object types in the Types to search list box.
6 Click Search Now.
Siebel Tools executes the search and lists the results in the list box at the bottom of the Search Repository dialog box. See Figure 19 for an example. The list box lists all the objects that match your search criteria, with the following columns for each object.
7 To show it in the Object List Edit, double-click an item in the results.
This has the same effect as running a query in the Object List Editor for the name of the object.
8 To export the search results to a file, click the Export button.
To cancel a search■ At any time during the execution of a search, click Cancel.
Siebel Tools stops the search process.
Column Description
Type Object type of the object returned by the search.
Name Name of the object returned by the search.
Property Name of the property of the object in which the search value was found.
Value Value of the property of the object in which the search value was found.
Using Siebel Tools Version 7.7, Rev. A ■ 107

Working with Objects ■ Viewing Object Relationships
Figure 19 shows an example of the Search Repository dialog box after a search execution.
Viewing Object RelationshipsYou can use the Siebel Tools Visualization views to see how objects relate to one another.
To invoke the Visualization views using the View menu■ Choose View > Visualize > View Details, View Relationships, View Descendents, or View Web
Hierarchy.
To invoke the Visualization views from the Object List Editor■ Right-click an object of the relevant object type in the Object List Editor, and choose the
Visualization view you want.
Not all Visualization views are listed for all objects.
Figure 19. Example of the Search Repository Dialog Box
Using Siebel Tools Version 7.7, Rev. A108 ■

Working with Objects ■ Generating Reports About Object Relationships
The Visualization views are described in Table 33.
Generating Reports About Object RelationshipsYou can generate reports about the relationships between certain object types in the repository. This section provides an introduction to using the reports facility; for more information, see Siebel Reports Administration Guide.
The list of records included in a repository report is not dependent on the currently selected object in the Object List Editor�for example, if you select the Contact business component in the Object List Editor and generate the business components and fields report, the report shows all business components, not just the Contact business component.
Generating Reports for a Single Object TypeTo restrict a report to a single object type�that is, one business component, business object, dock object, table, or workflow object�run a query in the Object List Editor (for the parent object type) that restricts the list to the one object.
The following example shows how to get the Tables report for S_ORG_EXT.
Table 33. Description of Visualization Views
View Description
Details Generates and displays a Details visualization view for the currently selected business component or business object.The diagram displays how the business component maps to underlying tables (directly or through joins) and maps to other business components (through links).
Relationships Generates and displays a Relationships visualization view for the currently selected business component or table.For business components, the diagram displays how the business component links to other business components using multi-value link objects. For tables, the diagram displays how the table joins to other tables by way of join objects.
Descendents Shows all objects which have the current object marked as their Upgrade Ancestor.
Web Hierarchy Generates and displays a Web Hierarchy visualization view for the currently selected applet, application, business component, screen, or view.The diagram displays the parent-child relationships between the selected object and its parent and child objects, as well as the parents of the parent objects and children of the child objects, up and down the hierarchy.
Using Siebel Tools Version 7.7, Rev. A ■ 109
Working with Objects ■ Generating Reports About Object Relationships
To get a Tables report for the S_ORG_EXT table (an example)
1 In the Object Explorer, select the Table object type.
2 In the Object List Editor, click anywhere to make it the active window.
3 Choose Query > New Query.
4 In the Name field, type S_ORG_EXT and press ENTER.
5 Choose Reports > Tables.
The generated report provides information only for the S_ORG_EXT table.
Generating Reports for Ranges of ObjectsYou can use a similar approach to restrict a report to a range of objects that have a property value in common. The report includes only those objects that match the current query criteria. For example, you can generate a Tables report of all extension tables, a business components report of all business components of a specific class, or any of the reports restricted to a single field.
Available ReportsThe current object type in the Object Explorer determines the list of reports in the Reports menu. Repository reports are listed by current object type in Table 34.
Table 34. Reports Available for Each Object Type
Object Selected in Object Explorer Report Menu Option Description
Applet Applets by BusComp Lists the applets assigned to each business component.
Business Component
Business Component and Fields
Lists the fields in each business component alphabetically. For each field, the base column and join table, if any, are identified.
Business Object Business Object and Components
Lists the business object components in each business object. For each business object component, the business component and link are identified.
Business Service Business Service Summary Lists a summary of all business services.
Business Service Detail Lists all business services with details.
Dock Objects Repository Dock Objects For each dock object, displays selected properties, and lists the member tables, visibility rules, and related dock objects.
Project Project List Lists all projects, and identifies the locking status, person locked by, and locked date for each.
Using Siebel Tools Version 7.7, Rev. A110 ■
Working with Objects ■ About Object Comparison and Synchronization
About Object Comparison and SynchronizationYou can view a side-by-side comparison of any two objects of the same type. Differences are visually highlighted through color-coded icons. You can select and copy properties and individual child objects from one object to the other.
Using this feature, you can propagate a change made to an ancestor object to its descendents or other objects of a similar types. You can assess and adjust differences between objects. You can also compare properties of checked-out objects with their counterparts on the server.
For more information about ancestor objects, see Configuring Siebel eBusiness Applications.
Topics in This Section�About the Compare Objects Dialog Box� on page 112
�Comparing Objects� on page 113
�Synchronizing Objects� on page 115
�Viewing Object Differences� on page 87
Table Tables For each table, displays selected properties, and lists the columns. The name, physical type, length, scale, comments, and various other properties are identified for each column.
Workflow Policy Object
Workflow Policy Objects Lists the workflow components in each workflow object, and within each workflow component lists the columns.
Table 34. Reports Available for Each Object Type
Object Selected in Object Explorer Report Menu Option Description
Using Siebel Tools Version 7.7, Rev. A ■ 111

Working with Objects ■ About Object Comparison and Synchronization
About the Compare Objects Dialog BoxTo display a side-by-side comparison of any two objects of the same type, Siebel Tools uses the Compare Objects dialog box, shown in Figure 20.
Figure 20. Example of the Compare Objects Dialog Box
Using Siebel Tools Version 7.7, Rev. A112 ■

Working with Objects ■ About Object Comparison and Synchronization
Table 35 describes the user interface elements of the Compare Objects dialog box.
Comparing ObjectsYou can compare two objects of the same type. The Object Comparison dialog box displays a line-by-line comparison between the two. You can compare objects defined in the current repository, in different repositories, and in archive files (SIF files).
Table 35. Compare Objects Dialog Box User Interface Elements
Field/Button/Control Description
First Selection The explorer controls in the upper left and right area of the dialog box are similar to what you see after clicking the Detail tab of the Object Explorer.
Both controls are always synchronized to show a line-by-line comparison between the objects. If you expand or collapse an object in one explorer control, its counterpart is automatically expanded or collapsed.
Child objects that do not exist in either object are represented with placeholders (a dashed line).
Second Selection
Properties By default, the properties shown in these list boxes are the properties that are different for the objects being compared. Which properties appear in these list boxes is determined by the settings in the Display area.
Display Determines which properties are shown in First Selection and Second Selection and in the Properties list boxes:
■ Show All Objects check box: select to show all child objects in the First Selection. Second Selection box: select to show all user properties in the Properties list boxes.
■ Show System Properties check box: select to show specific system properties such as Created, Created By, Updated, and Updated By in the Properties list boxes.
Use these two buttons to synchronize objects. See �Synchronizing Objects� on page 115 for more information.
Use this button to expand the entire tree in the First Selection and Second Selection explorer controls.
Use this button to collapse the entire tree in the First Selection and Second Selection explorer controls.
Delete buttons Use this button to delete objects after a comparison.
Using Siebel Tools Version 7.7, Rev. A ■ 113

Working with Objects ■ About Object Comparison and Synchronization
To compare two objects in the same repository
1 In the Object Explorer select an object type.
2 In the Object List Editor, select two top-level objects.
3 Choose Tools > Compare Objects > Selected.
The Compare Objects dialog box appears.
To compare an object in the current repository with an object in another repository
1 In the Object Explorer, select an object type.
2 In the Object List Editor, select one top-level object.
3 Choose Tools > Compare Objects > Selected vs. Repository.
The Open Repository dialog box appears.
4 Select the repository that contains the object you want to compare with the currently selected object.
The Object Comparison dialog box opens with the object in the current working repository displayed in the left applet and the corresponding object in the selected repository in the right applet.
You can update the current working repository or the selected repository from the Object Comparison dialog box if you have the appropriate projects locked in both repositories.
To compare an object in the current repository with an object in an archive file
1 In the Object Explorer, select an object type.
2 In the Object List Editor, select one top-level object.
3 Choose Tools > Compare Objects > Selected vs. Archive Option.
The Select Archive File to Compare Against dialog box opens.
4 Select a SIF file that to use for comparison and then click Open.
The comparison starts at the project level. If a corresponding object type is found in the archive file, the Object Comparison dialog box opens. If a corresponding object type is not found, it does not open.
To compare objects in two different archive files
1 In the Object Explorer, select an object type.
2 In the Object List Editor, select one top-level object.
3 Choose Tools> Compare Objects > Archive vs. Archive.
The Select Archive File for Left Side of Comparison dialog box opens.
Using Siebel Tools Version 7.7, Rev. A114 ■

Working with Objects ■ Determining When Records Were Last Created and Updated
4 Select an archive file, and then click Open.
The Select Archive File for Right Side of Comparison dialog box opens.
5 Select an archive file, and then click Open.
The Object Comparison dialog box opens with the left and right side populated with the contents of the selected archive files. During the comparison the two archive files, are read-only.
Related Topic�About the Compare Objects Dialog Box� on page 112
Synchronizing ObjectsAfter you compare two objects, you can use the Compare Objects dialog box controls to synchronize those objects.
To synchronize objects
1 Lock the projects that contain the objects you want to synchronize.
2 In the Object Explorer, select any two top-level objects of the same object type.
Make sure the objects are locked.
3 Choose Tools > Compare Objects > Selected.
The Compare Objects dialog box appears.
4 Select an object instance in the First Selection box and use the right arrow button to synchronize the objects selected in the First Selection box with the object in the Second Selection box.
If the objects do not exist in the Second Selection box, Siebel Tools creates them. If they do exist, Siebel Tools changes their properties to reflect those in the First Selection box.
When you copy an object from one tree applet to the other, the children of the object are copied as well.
Determining When Records Were Last Created and UpdatedYou can review the history for a record to see who made the last change and when the record was updated.
To determine by whom and when a record was created and last updated
1 Select a record in the Object List Editor.
Using Siebel Tools Version 7.7, Rev. A ■ 115

Working with Objects ■ Determining When Records Were Last Created and Updated
2 Choose Help > About Record.
The Siebel Tools dialog box appears, displaying when and by whom the record was created and last updated.
3 Click Details > to display additional information about the record in the repository.
Using Siebel Tools Version 7.7, Rev. A116 ■

8 Compiling and Testing
Topics in This Section�About Compiling� on page 117
�Compiling Projects� on page 117
�Compiling Single Objects or Groups of Objects� on page 119
�Compiling Using the Command-Line Interface� on page 119
�Testing Changes on Your Local Machine� on page 121
About CompilingAfter you have modified objects, you need to compile the changes to an SRF. The SRF file is updated with the new objects and they become available in any instances of the Web client reading that SRF file.
NOTE: An application�s configuration file (CFG) includes a parameter (RepositoryFile) that defines the SRF file to read at run time.
You can compile entire projects or individual top-level objects. Compiling projects is more efficient when you have many changes in one or more projects. Compiling objects is more efficient when changes are isolated to only a few objects.
NOTE: To be able to compile, Siebel Tools must be connected to a database that has the sort order set to binary.
Incremental Repository Upgrade KitsIf you are compiling an SRF file to create an incremental (delta) repository upgrade kit, you can minimize the size of the kit and the time required to upgrade by specifying a Reference SRF when you compile your new SRF. The Reference SRF is a previous (base) version of the SRF. The incremental repository upgrade contains the differences between the Reference SRF and the new SRF only. To specify a Reference SRF, click the Reference SRF button, and specify the path and file name of the previous SRF version. For more information about incremental SRF files and upgrades, see Siebel Anywhere Administration Guide.
Compiling ProjectsYou use the Object Compiler to compile all projects or selected projects only. To be able to compile selected projects, you must have compiled all projects at least once.
CAUTION: Avoid compiling a subset of projects into an SRF file, unless the SRF file was built from a full compilation from the same database.
Using Siebel Tools Version 7.7, Rev. A ■ 117

Compiling and Testing ■ Compiling Projects
When you select individual projects to compile, the Object Compiler does not remove inactive top-level objects from the SRF file, but it does remove inactive child objects. For example, if you inactivate the Name list column in the Account List Applet, and then compile the Account SSE project, the Name list column is removed from the SRF file. However, if you inactivate the Account List Applet, and then compile the Account SSE project, the Account List Applet is not be removed.
To compile projects
1 Choose Tools > Compile Projects.
The Object Compiler dialog box appears with the list of projects displayed.
2 Select the projects you want to compile.
3 In the Siebel Repository File field, click Browse and then select the appropriate SRF file.
Typically you compile to the SRF file used by the local instance of the Web client that you are using to test. The path to this SRF file is specified in the application�s CFG file.
CAUTION: Do not attempt to compile to or modify the default SRF file used by Siebel Tools that is displayed in the Object Compiler dialog box�usually in \tools\OBJECTS\siebel.srf. This file is locked because the Siebel Tools client is currently reading it. If you attempt to compile to this filename and path, you receive an error message.
4 Click the Auto-start Web client check box, if you want to automatically start a local instance of the Web client when the compile process finishes.
When this option is checked and the Web client is already open, the client is refreshed with changes and opens with same view that was displayed before the compilation.
To automatically start the Web client, you need to have specified the location of the Siebel executable, the application configuration file, and other relevant settings in the Development Tools Options dialog box. For information on how to do this, see �Setting Debug Options� on page 61.
5 Click Compile.
The objects in your repository are compiled to the SRF file you specified. The changes are immediately available in any instances of the Web client that are reading the SRF file. See �Testing Changes on Your Local Machine� on page 121.
Using Siebel Tools Version 7.7, Rev. A118 ■

Compiling and Testing ■ Compiling Single Objects or Groups of Objects
Compiling Single Objects or Groups of ObjectsYou can compile a single object or a group of top-level objects of the same type. For example, if you modify the UI for several applets, rather than compiling entire projects, you can compile only the applets that have changed.
NOTE: Some repository objects have to be in the production database to function correctly. By default, these objects have their no compile flag set to TRUE, thus, they do not get compiled into the .srf file. Of particular interest are those objects that can be configured. These include Assignment Objects and their children, Workflow Policy Objects and their children, Dock Objects and their children, and EIM Interface Table objects and their children. Other objects that are not configurable but still need to be present in the production database for customer to use various admin and batch processes include Schema Maintenance objects, Server Component objects and User Key Attribute objects.
To compile single objects or a group of objects
1 In the Object List Editor, select an object or group of objects of a given object type (for example, applet).
2 Right-click and then choose Compile.
The Object Compiler dialog box displays the list of selected objects.
3 In the Object Compilier dialog box, click Browse and then select the appropriate SRF file.
4 Click Compile.
The objects are compiled to the SRF file you specified. The changes are immediately available in any instances of the Web client that are reading the SRF file. For more information, see �Testing Changes on Your Local Machine� on page 121.
Compiling Using the Command-Line InterfaceYou can also compile projects using the command-line interface. You invoke the siebdev executable using the command switch /bc. This command switch performs a full compile. For multilingual deployments you can also set the Tools active language for the compile. The siebdev.exe is located in the Bin directory of the Siebel Tools installation directory.
The syntax for the /bc switch is:
siebdev.exe /c <config file> /d <data source> /u <user name> /p <password> /tl <language> /bc <Siebel Repository> <SRF file>
For example, the following command compiles the Siebel Repository into siebel SRF with the active language set to Japanese.
siebdev.exe /c tools.cfg /d sample /u sadmin /p sadmin /tl JPN/bc "Siebel Repository" siebel.srf
Using Siebel Tools Version 7.7, Rev. A ■ 119

Compiling and Testing ■ Compiling Using the Command-Line Interface
If no file path is specified for the SRF file, the file is compiled into the objects directory under the Tools installation directory. Otherwise, it is compiled into the specified directory.
NOTE: The Auto-start web client option that is available in the Object Compiler dialog box is not available when you compile using the command-line interface.
Using Siebel Tools Version 7.7, Rev. A120 ■
Compiling and Testing ■ Testing Changes on Your Local Machine
Testing Changes on Your Local MachineFor testing purposes, you must have an instance of the Siebel Mobile Web client installed on your machine. After compiling repository changes to an SRF file, local instances of the Mobile Web client that are open and are reading the SRF file automatically close and then reopen, displaying the updated configuration.
For more information on installing a local instance of the Mobile Web client, see Siebel Installation Guide for Microsoft Windows: Servers, Mobile Web Clients, Tools.
When compiling objects and testing the results locally, consider the following:
■ If a local instance of the Web client is installed but it is not open, you can select an option in the Object Compile dialog box to automatically open a local Web client and read the most current repository. For more information, see �Compiling Projects� on page 117.
■ For repository changes to appear in local instances of the Web client, the Web client must be reading the SRF file to which you compiled.
Using Siebel Tools Version 7.7, Rev. A ■ 121

Compiling and Testing ■ Testing Changes on Your Local Machine
Using Siebel Tools Version 7.7, Rev. A122 ■

9 Working With Archive Files
Topics in This Section�About Archive Files� on page 123
�Exporting Objects to an Archive File� on page 123
�Exporting Objects to an Archive File Using the Command-Line Interface� on page 124
�Process of Importing Objects from an Archive File� on page 125
�Preparing the Target Repository for Import from an Archive File� on page 125
�Importing Objects from an Archive File� on page 126
�About the Import Wizard - Review Conflicts and Actions Dialog Box� on page 128
�Importing Objects From an Archive File Using the Command-Line Interface� on page 131
About Archive FilesYou can export object objects from the repository to an archive file (SIF) and then import objects from the archive file back into the repository. Use archive files when you want to back up sets of objects or move sets objects to another environment that shares the same physical database schema as the source environment.
You can include individual objects or entire projects in archive files. However, the Project property of objects is not included in Siebel archive files.
Archive files can be controlled by source-control software. When importing objects from an archive file, you can specify conflict resolution rules at the object level, directing Siebel Tools to ignore an imported object, replace an existing object with an imported one, or merge the two on a property-by-property basis.
If you need to back up or move the entire repository to another environment, see �About Exporting and Importing Repositories� on page 137.
Exporting Objects to an Archive FileYou can use archive files to export top-level objects such as business components, applets, views, and projects to an archive file. Child objects are exported and imported along with their parents. You can select an entire project to export or individual objects within a project. When selecting individual objects to export, you select all objects of a given object type. For example, first you select all the applets you want export, then you can navigate to a second object type to select additional objects, and so on.
When exporting repositories, consider the following:
Using Siebel Tools Version 7.7, Rev. A ■ 123

Working With Archive Files ■ Exporting Objects to an Archive File Using the Command-Line Interface
■ Archive files can only be exported and imported among repositories with the same repository schema definition.
■ Do not export the Repository Object to export an entire repository. The resulting export file will be too large and performance will be slow. Instead use the task described in �Exporting and Importing Repositories Using the Database Configuration Utility� on page 137.
To export objects to an archive file
1 In the Object Explorer, navigate to the object type you want to export.
2 In the Object List Editor, select the object or objects you want to archive.
3 Choose Tools > Add To Archive.
The Export to Archive File dialog box appears.
Status messages appear showing which child objects are being included. When the process completes, the selected top-level objects appear in the Objects to Archive list in the Export to Archive File dialog box.
4 If you need to add objects of another object type, navigate to that object type in the Object Explorer without closing the Export to Archive File dialog box.
5 Repeat Step 2 through Step 4 for each object you want to archive.
6 When you are finished adding objects to the list, in the Export to Archive file dialog box, enter the path and filename of the archive file you want to create.
7 Click Save.
An SIF file (archive file) is created in the location you selected.
Exporting Objects to an Archive File Using the Command-Line InterfaceYou can export objects using the command-line interface. You invoke the command-line interface from the siebdev executable using the command switch /batchexport. The siebdev.exe is located in the Bin directory of the Siebel Tools installation directory.
The syntax of the /batchexport switch is:
siebdev.exe /c <config file> /d <database> /u <user name> /p <password> /batchexport <Repository Name> <Input File Name> <Log File>
The command-line interface provided by the /batchexport switch accepts an input file that specifies export objects. The input file takes a comma-delimited format of Object Type, Object Name Search Expression, and .sif file name. The search expression takes any Tools accepted query criteria. To specify the SIF file, you can use an absolute file path or a relative file path to the current directory.
You can place multiple lines in the input file, each requesting to export multiple objects into different SIF file. However, if you specify the same SIF export file in multiple lines, only the last export takes effect�the previous exports will be overwritten.
Using Siebel Tools Version 7.7, Rev. A124 ■

Working With Archive Files ■ Process of Importing Objects from an Archive File
For example, consider the following sample text from an input file. Using this file as input, the /batchexport switch would export all business components where the Name property is like �*Account*� into a repository file named exports.sif:
"Business Component,*Account*,export.sif"
NOTE: There should be no space before and after commas.
The following sample export command would export objects specified in the input file, obj.txt. It also logs results into export.log:
siebdev.exe /c tools.cfg /d sample /u sadmin /p sadmin /batchexport "siebel repository" obj.txt export.log
Process of Importing Objects from an Archive FileYou can import objects from an archive file into a local repository.
To import objects from an archive file, perform the following tasks:
1 �Preparing the Target Repository for Import from an Archive File� on page 125
2 �Importing Objects from an Archive File� on page 126
Preparing the Target Repository for Import from an Archive FileYou need to import into a checked-out project or projects on the local database of a client computer�do not import to the Server database. Make sure the following conditions exist before importing:
■ The import file is accessible to the local machine by way of the network or local drives.
■ The target repository is open in Siebel Tools and is the active repository.
■ The projects that will be affected by import have been checked out to the local database. This includes any project that any object in the export file is assigned to.
The only exception consists of projects (or their objects) that are in the archive file, but that do not exist yet in the target repository. These are not checked out because they do not exist in the target repository.
NOTE: In some cases it may be difficult to know in advance which projects need to be checked out. The Import wizard informs you of any projects that were not locked but need to be. This occurs on the second panel of the Import wizard, after the wizard has analyzed the objects in the archive file and compared them to the objects in your repository.
Using Siebel Tools Version 7.7, Rev. A ■ 125
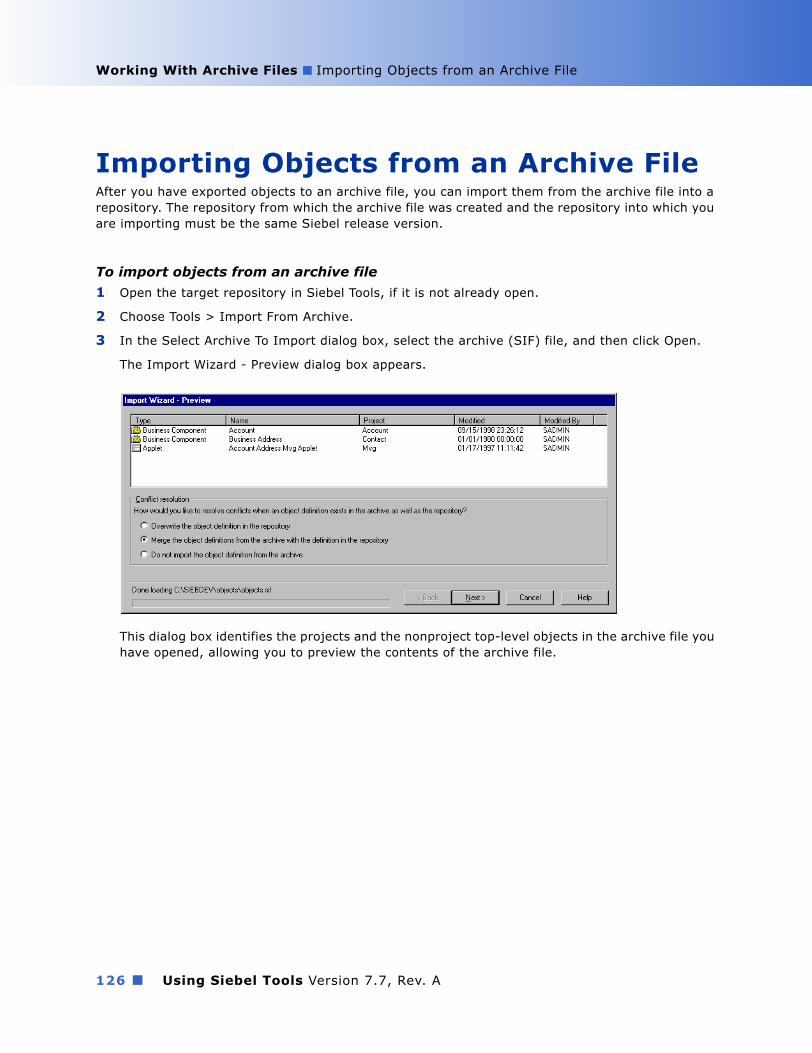
Working With Archive Files ■ Importing Objects from an Archive File
Importing Objects from an Archive File After you have exported objects to an archive file, you can import them from the archive file into a repository. The repository from which the archive file was created and the repository into which you are importing must be the same Siebel release version.
To import objects from an archive file
1 Open the target repository in Siebel Tools, if it is not already open.
2 Choose Tools > Import From Archive.
3 In the Select Archive To Import dialog box, select the archive (SIF) file, and then click Open.
The Import Wizard - Preview dialog box appears.
This dialog box identifies the projects and the nonproject top-level objects in the archive file you have opened, allowing you to preview the contents of the archive file.
Using Siebel Tools Version 7.7, Rev. A126 ■

Working With Archive Files ■ Importing Objects from an Archive File
4 Select an option button in the Conflict Resolution area.
To specifies the default resolution for conflicts between the archive file and the target repository. You will have the opportunity in subsequent dialog boxes in the Import Wizard to change this choice for individual objects.
Use the following table to determine your option.
5 Click Next.
One of the following happens:
■ If there are objects you will be replacing or modifying and whose projects are not locked, a warning message appears and you must cancel the import process, lock the projects, and then restart the Import Wizard.
■ If the objects in the SIF file already exist in the repository, and there are no conflicts found, no changes are made. A message appears saying that no conflicts were found and that no changes will be made to the repository. In this case, click OK.
■ If the objects in the SIF file already exist in the repository, and if conflicts are found, or if the objects do not yet exist in the repository, the Import Wizard - Review Conflicts and Actions dialog box appears with information about the differences displayed. In this case, go to Step 6 on page 128.
Option Button Description
Overwrite the object in the repository
If the same top-level object is found in the archive file and target repository, delete the version in the target repository, along with its children, and replace them with the object and children from the archive file.
Merge the object definitions from the archive with the definition in the repository
Merging is the default, and generally the safest option. When the same top-level object exists in both the target repository and the archive file:
■ Replace differing properties in the target top-level and child-level with those in the archive file.
■ Add new child objects to the target repository if they are not already present.
■ Do not change child objects in the target repository that are not also present in the archive file.
The resulting top-level object has the same properties and children as the object in the archive, plus any children that were already present in the repository definition.
Do not import the object definition from the archive
Do not change the objects in the target repository.
Using Siebel Tools Version 7.7, Rev. A ■ 127

Working With Archive Files ■ About the Import Wizard - Review Conflicts and Actions Dialog Box
6 In the Import Wizard - Review Conflicts and Actions dialog box, under Conflicting Objects, select an object to see the differences under Object Differences and Attribute Differences.
See �About the Import Wizard - Review Conflicts and Actions Dialog Box� on page 128 for details about the dialog box.
7 To make an adjustment, do the following:
a Select an object or attribute difference.
b Right-click and select the action you want to occur.
8 Click Next.
The Summary window appears and the import process starts.
9 When the import process is completed, click Finish.
A log file named importlog.txt is created in temp directory of your Siebel Tools installation directory. It contains the same list of messages that appeared in the Summary window. You may find it useful to store this file elsewhere for a record of what changes were made to the repository. It is also a good idea to change the filename so it reflects the date of the import.
About the Import Wizard - Review Conflicts and Actions Dialog BoxWhen the Import Wizard detects a difference between objects stored in the repository and those stored in the SIF file, the Import Wizard - Review Conflicts and Actions dialog box appears. You use this dialog box to review differences and to change the action used to resolve the conflict.
Using Siebel Tools Version 7.7, Rev. A128 ■

Working With Archive Files ■ About the Import Wizard - Review Conflicts and ActionsDialog Box
The dialog box is divided into three panes: the Conflicting Objects explorer control, the Object differences list, and the Attributes differences list.
Conflicting Objects ExplorerThe Conflicting Objects Explorer displays the hierarchy of objects for which there are differences. The hierarchy displayed mirrors the object type/object definition hierarchy in a Siebel repository, but shows only conflicts to resolve rather than all repository or archive objects.
Object Differences ListThe Object Differences list displays objects, one per row. For each object it shows whether it exists only in the archive file, only in the target repository, or in both, and what resolution is specified. You can change the resolution here.
The objects displayed in the Object Differences dialog box include those at all hierarchical levels, not just top-level objects. This lets you make adjustments to the resolution for any affected objects.
The File and Repository columns indicate whether each identified object is present in the archive file or target repository. An �X� indicating the object�s presence can appear in the File list column, the Repository list column, or both. These list columns are for information only; you cannot change the check marks.
Figure 21. Import Wizard - Review Conflicts and Actions
Using Siebel Tools Version 7.7, Rev. A ■ 129

Working With Archive Files ■ About the Import Wizard - Review Conflicts and Actions Dialog Box
The Action list column indicates the proposed resolution for each object in the list. This setting is initially generated for each object from the default behavior selected in the Conflict Resolution option buttons in the Preview pane. You can right-click on the value in the Action list column and select a different value from a shortcut menu. The available selections include the following:
■ File. Equivalent to the Overwrite the object definition in the repository selection in the previous dialog box.
■ Merge. Equivalent to the Merge the object definitions from the archive with the definition in the repository option in the previous dialog box.
The resulting top-level object has the same properties and children as the object in the archive, plus any children that were present in the repository definition.
■ Repository. Equivalent to the Do not import the object definition from the archive option in the previous dialog box.
For more information about these options, see �Importing Objects from an Archive File� on page 126.
Attribute Differences ListThe Attribute Differences list displays the property value conflicts for the currently selected object in the Object Differences dialog box. Those properties are listed only where there is a conflict.
Table 36 describes the columns in the list.
Table 36. Columns in the Attribute Differences List
Column Description
Attribute Name of the property.
File Value of the property in the archive file version of the object.
Repository Value of the property in the target-repository version of the object.
Resolution Value of either File or Repository for each property, depending on whether the archive-file or target-repository version of the object is to determine the value of the property in the final definition.
This list column can be updated only if the object whose properties are being displayed has an Action setting of Merge in the Object Differences list. Otherwise, the shortcut menu options are read-only and are unavailable, and the value displayed is the same as that in the Action column of the Object Differences list.
To change the Resolution value from Repository to File or the reverse, right-click on the Attribute row to change and then choose Repository or File from the shortcut menu.
Using Siebel Tools Version 7.7, Rev. A130 ■

Working With Archive Files ■ Importing Objects From an Archive File Using the Command-Line Interface
Importing Objects From an Archive File Using the Command-Line InterfaceYou can also import objects using the command-line interface. You invoke the command-line interface from the siebdev executable using the command switch /batchimport. The siebdev.exe is located in the Bin directory of the Siebel Tools installation directory.
The syntax of the /batchimport switch is:
siebdev.exe /c <config file> /d <database> /u <user name> /p <password> /batchimport <Siebel Repository name> <Import Mode> <.sif file1, .sif file2, .sif fileN; or directory where .sif files can be found> <log file>
NOTE: You can specify the SIF file and the log file by the full path or the relative path to the current directory.
For example, the following sample import command imports import1.sif, located in the parent directory, and import2.sif, located in the Tools directory, into the Siebel repository using the overwrite mode. It also logs the results to import.log:
siebdev.exe /c tools.cfg /d sample /u sadmin /p sadmin /batchimport "siebel repository" overwrite ..\import1.sif c:\Tools\import2.sif import.log
The following sample import command imports all files under c:\tools\importfiledir into the Siebel repository using the merge mode. It also logs the results to import.log.
siebdev.exe /c tools.cfg /d sample /u sadmin /p sadmin /batchimport "siebel repository" merge c:\tools\importfiledir import.log
Using Siebel Tools Version 7.7, Rev. A ■ 131

Working With Archive Files ■ Importing Objects From an Archive File Using the Command-Line Interface
Using Siebel Tools Version 7.7, Rev. A132 ■
10 Managing Repositories
Topics in This Section�About Repositories� on page 133
�Viewing Which Repository is Currently Open� on page 134
�Reviewing Information About the Current Repository� on page 134
�Guidelines for Naming Repositories� on page 135
�Renaming Repositories� on page 136
�Renaming Repositories� on page 136
�Deleting Repositories� on page 136
�About Exporting and Importing Repositories� on page 137
�Exporting and Importing Repositories Using the Database Configuration Utility� on page 137
�About Repository Patch Files� on page 141
�Creating Repository Patch Files� on page 142
�Applying Repository Patch Files� on page 144
�Upgrading Repositories� on page 145
About RepositoriesThe Siebel repository refers to the set of tables in which Siebel objects and server scripts are stored. The set of objects and server scripts stored in the repository define a Siebel application (such as Siebel Service or Siebel Sales) and are compiled into a compressed file called a Siebel repository file (SRF file). You use Siebel Tools to view data in the Siebel Repository.
The Siebel repository is populated with data during the installation process. For more information, see the Siebel Installation Guide for the operating system you are using.
The SRF file is a compressed, read-only file that contains compiled a version of the Siebel repository. Siebel applications read the SRF file at run time. It provides the Siebel applications with much of the metadata it needs to define interactions with the enterprise data and software users.
You cannot have multiple repositories in a production environment because some run time components read repository objects, such as workflow policies, directly from repository tables instead from the SRF file and they assume there is only one repository. However, you can have multiple SRF files, compiled from different repositories, as long as they do not diverge in ways that compromise data integrity.
NOTE: Browser scripts are compiled into the browser script compilation folder, which can be specified in Siebel Tools on the Scripting tab under View > Options. For more information on the browser script compilation folder, see �Setting Scripting Options� on page 59.
Using Siebel Tools Version 7.7, Rev. A ■ 133
Managing Repositories ■ Viewing Which Repository is Currently Open
Viewing Which Repository is Currently OpenUnder normal circumstances there is only one repository available on your local database, and one available on the server database for your development workgroup. Typically this repository (in either location) is called the Siebel repository and is opened by default when you open Siebel Tools and log on to the local or server database. However, there are circumstances�especially when your group is in the process of upgrading to a new version of Siebel eBusiness Applications�in which multiple repositories can be present, especially on the server.
To view which repository is currently open■ Choose File > Open Repository.
The Open Repository dialog box appears and lists all repositories in the database to which you are connected.
Reviewing Information About the Current RepositoryThe About SRF option on the Siebel Tools Help menu provides version, compilation, and path information about the current repository.
To review information about the current repository■ In Siebel Tools, choose Help > About SRF.
The About Repository File window appears and displays the following information.
Field/Button Description
Internal version Version number maintained internally at Siebel that changes only when the internal format of the SRF file changes, such as at the time of a major release. It has no significance for customer developers.
User version Reserved for use by Siebel Anywhere, which maintains this number when kits are created that upgrade the SRF file. The value is read when a version check occurs.
Full compile option button
Select to display information about the most recent full compilation in the Compile Information fields.
Last incremental compile option button
Select to display information about the most recent incremental compilation. If there have been no incremental compilations since the last full compilation, this option button is unavailable.
When Date of the last compilation�incremental or full, as specified in the option buttons.
Machine name Name of the client computer on which the SRF file was compiled.
Using Siebel Tools Version 7.7, Rev. A134 ■

Managing Repositories ■ Guidelines for Naming Repositories
Guidelines for Naming RepositoriesYou must establish and maintain a naming convention for all repositories in their respective environments. There are several dependencies on repository names�for example, Siebel servers point to a specific repository by name. Also, the procedures for upgrading to new versions of Siebel eBusiness Applications depend on repository names.
A consistent naming convention promotes successful configuration and testing while it minimizes the work required to migrate new repositories or perform upgrades. Follow these guidelines when determining the naming conventions for your repositories:
■ Use the default name, Siebel Repository, whenever possible. Change this only if you have a compelling reason, because the default configuration of Siebel eBusiness Applications and Siebel documentation assume this name is being used.
■ Use the same repository name for the active repository in your test environment and for the current working repository in your production environment. Using the same name simplifies the process of migrating repositories from development to test and from test to production. It also eliminates the need to change your client or application server configurations when you perform the migration process.
■ Use descriptive names for the other repositories in your development environment. Typically, your development environment has a number of repositories in addition to the current repository that is being configured. These may include the initial repository loaded with your Siebel application, other repository versions used in Siebel application upgrades, and repositories from previous versions of your custom configuration. Give these repositories unique and fully descriptive names�for example, Siebel v7.5.3 Original for the initial repository shipped with Siebel eBusiness Applications version 7.5.3.
Language Language code of the language specified for user interface translation.
User name User name (that is, the Microsoft Windows logon name) of the user who compiled the repository.
Repository Repository name of the repository that was current when the compilation was run, generally Siebel repository.
Tools version The version number and build number of the Siebel Tools software used to compile the repository. This is useful information for Siebel Technical Services if they are helping you in resolving a problem with your configuration.
Schema version Database schema version of the database from which the repository was compiled.
File name. Name and path of the SRF file being used internally to define the Siebel Tools application, generally located in C:\sea7xx\tools\objects.
Field/Button Description
Using Siebel Tools Version 7.7, Rev. A ■ 135
Managing Repositories ■ Renaming Repositories
Renaming RepositoriesSiebel Systems recommends that you name the repository in production Siebel Repository. However, in some situations you may need to name the repository something different. If you must rename the repository, follow the steps described in this topic.
To rename a repository
1 Have all developers check in all projects that have been checked out from the repository you are going to rename.
2 Log into Siebel Tools and connect to the server database.
3 In the Object Explorer, select the Repository object type.
If the Repository object type is not visible, see �Showing and Hiding Object Types in the Object Explorer� on page 63 for more information.
4 In the Object List Editor, click in the Name property of the repository you want to rename.
5 Enter the new name.
6 Click outside of the record to save your changes.
7 Let developers know what the name of the new repository is and have them perform a get of all projects.
8 After changing the name of the repository, you must change the value of the enterprise parameter Siebel Repository to the new name of the repository.
For information about changing enterprise parameters, see Siebel System Administration Guide
Deleting RepositoriesThe delete process remove all records associated with the repository. Be sure to back up the repository before you delete it.
CAUTION: Deleting a repository takes a long time and requires resources such as rollback segment, cursors, tablespace, and so on. Consult your DBA before deleting a repository.
To delete a repository
1 In the Object Explorer, navigate to the Repository Object type.
2 In the Object List Editor, click anywhere in the row for the repository you want to delete.
3 Choose Edit > Delete Record.
4 Click outside the record to commit the Delete action.
Related Topic�Exporting and Importing Repositories Using the Database Configuration Utility� on page 137
Using Siebel Tools Version 7.7, Rev. A136 ■

Managing Repositories ■ About Exporting and Importing Repositories
About Exporting and Importing RepositoriesYou can export and import the entire repository using Export/Import option in the Database Configuration Utility. Use this utility when you want to back up your repository, restore your repository, or move all repository objects to another environment that shares the same physical database schema as the source environment.
If you do not need to export and import the entire repository, but need to export and import sets of objects only, use Siebel archive files. For more information, see �Exporting Objects to an Archive File� on page 123.
If you need to migrate a customized repository and schema from one environment to another, use the Repository Migration utility (dev2prod). For more information on Repository Migration, see Going Live with Siebel eBusiness Applications.
Supported Source and Target Databases for Importing and Exporting RepositoriesThe source and target databases must be configured for the same Siebel version. Siebel Systems does not recommend migrating a repository between two databases that are on a different release or patch levels. Siebel applications support importing and exporting repository data from the source databases to the target databases listed in Table 37.
Exporting and Importing Repositories Using the Database Configuration UtilityTo export and import the entire repository, you use the Database Configuration Utility. This is typically used for backing up and restoring and for moving the contents of a repository to a repository in an another environment, when both the source and the target environment have the same physical database schema and Siebel release version.
When importing and exporting using the Database Configuration Utility, consider the following:
■ When you are importing a custom repository (not the standard Siebel Repository), all languages which were part of the original repository are restored during import. For example, if you archive repositories weekly and your development repository contains support for both ENU and DEU, then both ENU and DEU are included when one of the archived repositories is imported.
Table 37. Code Pages and Unicode Support for Repository Import and Export
Source Database Target Database
Code Page Code page
Unicode Unicode
Code Page Unicode
Using Siebel Tools Version 7.7, Rev. A ■ 137
Managing Repositories ■ Exporting and Importing Repositories Using the Database Configuration Utility
■ Whenever you make a change to the repository, compile all projects that belong to the latest version of the repository to create an updated SRF file. Keep a backup of the SRF file, so you can be sure the SRF file truly reflects the contents of the updated repository.
■ If you need to back up the entire content of the Siebel database, use the database utilities provided by your RDBMS vendor.
■ If your source repository is configured differently than the repository in the target system (both of which must be on the same Siebel release), use the Migrate option of the Database Configuration Utility.
For more information on migrating repositories, see Going Live with Siebel eBusiness Applications.
NOTE: When exporting a repository in a Windows or UNIX environment using the exprep Database Configuration Utility, the log files are placed in following directories:
■ Siebel_Server\log\exprep\output
■ Siebel_Server\log\exprep\state
NOTE: The value �exprep� is the default process name for the exprep utility. You can change this value to facilitate ease of use.
To import or export a repository in a Windows environment
1 Launch the Database Server Configuration Utility by choosing Start > Programs > Siebel Enterprise Server version_number > Configure DB Server.
The Gateway Name Server Address dialog box appears.
2 Specify your Gateway Server Address and Enterprise Server Name and then click Next.
The Installation and Configuration Parameters: Siebel Server Directory dialog box appears.
3 In the Siebel Server Directory dialog box, either accept the default value or click Browse to select a directory, and then click Next.
The Installation and Configuration Parameters: Siebel Database Server Directory dialog box appears.
4 Either accept the default value or click Browse to select a directory, and then click Next.
The Siebel Database Server Options: Siebel Database Operation dialog box appears.
5 In the list of operations, select Import/Export Repository and then click Next.
The Import Repository Parameters: Select Repository Operation dialog box appears.
6 Select Import Repository, and then click Next.
You can also choose the following options: Add language to an existing Repository, or Export Repository.
The Import Repository Parameters: Import Selection dialog box appears.
7 Select one of the following, and then click Next.
■ If you want to select languages to import, then select Import Standard Repository.
Using Siebel Tools Version 7.7, Rev. A138 ■
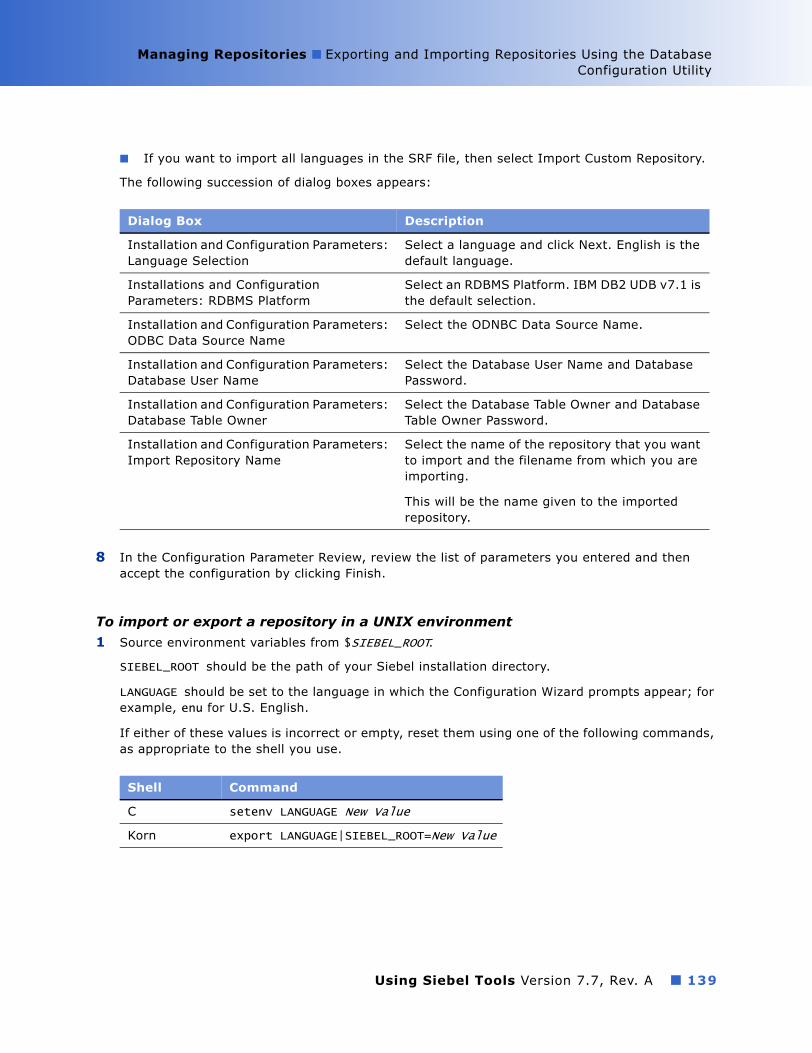
Managing Repositories ■ Exporting and Importing Repositories Using the DatabaseConfiguration Utility
■ If you want to import all languages in the SRF file, then select Import Custom Repository.
The following succession of dialog boxes appears:
8 In the Configuration Parameter Review, review the list of parameters you entered and then accept the configuration by clicking Finish.
To import or export a repository in a UNIX environment
1 Source environment variables from $SIEBEL_ROOT.
SIEBEL_ROOT should be the path of your Siebel installation directory.
LANGUAGE should be set to the language in which the Configuration Wizard prompts appear; for example, enu for U.S. English.
If either of these values is incorrect or empty, reset them using one of the following commands, as appropriate to the shell you use.
Dialog Box Description
Installation and Configuration Parameters: Language Selection
Select a language and click Next. English is the default language.
Installations and Configuration Parameters: RDBMS Platform
Select an RDBMS Platform. IBM DB2 UDB v7.1 is the default selection.
Installation and Configuration Parameters: ODBC Data Source Name
Select the ODNBC Data Source Name.
Installation and Configuration Parameters: Database User Name
Select the Database User Name and Database Password.
Installation and Configuration Parameters: Database Table Owner
Select the Database Table Owner and Database Table Owner Password.
Installation and Configuration Parameters: Import Repository Name
Select the name of the repository that you want to import and the filename from which you are importing.
This will be the name given to the imported repository.
Shell Command
C setenv LANGUAGE New Value
Korn export LANGUAGE|SIEBEL_ROOT=New Value
Using Siebel Tools Version 7.7, Rev. A ■ 139
Managing Repositories ■ Exporting and Importing Repositories Using the Database Configuration Utility
2 Set an appropriate level of detail in the log file for this activity.
3 Navigate to $SIEBEL_ROOT /bin and enter:
dbsrvr_config.ksh
This launches the Database Server Configuration Wizard.
4 Review the values of the following environment variables and confirm whether or not the settings are correct by entering either Y or N.
NOTE: If either the SIEBEL_ROOT or LANGUAGE value is not set or is incorrect, you must correct them before proceeding.
5 In the Siebel Server Directory dialog box, either accept the default value or click Browse to select a directory, and then click Next.
The Installation and Configuration Parameters: Siebel Database Server Directory dialog box appears.
6 Either accept the default value or click Browse to select a directory, and then click Next.
The Siebel Database Operation dialog box appears.
7 In the Siebel Database Operations dialog box, select Import/Export Repository.
The Import Repository Parameters: Select Repository Operation dialog box appears.
8 Choose Import Repository.
The Import Repository Parameters: Import Selection dialog box appears.
9 Choose Import Standard Siebel Repository or Import Custom Repository and click Next.
10 The following succession of dialog boxes appears.
Shell Command
C setenv SIEBEL_LOG_EVENTS trace3
Korn export SIEBEL_LOG_EVENTS trace3
Dialog Box Description
Language Selection Select a language and click Next. English is the default language.
RDBMS Platform Select an RDBMS Platform. IBM DB2 UDB v7.1 is the default selection.
ODBC Data Source Name Select the ODNBC Data Source Name.
Database User Name Select the Database User Name and Database Password.
Using Siebel Tools Version 7.7, Rev. A140 ■
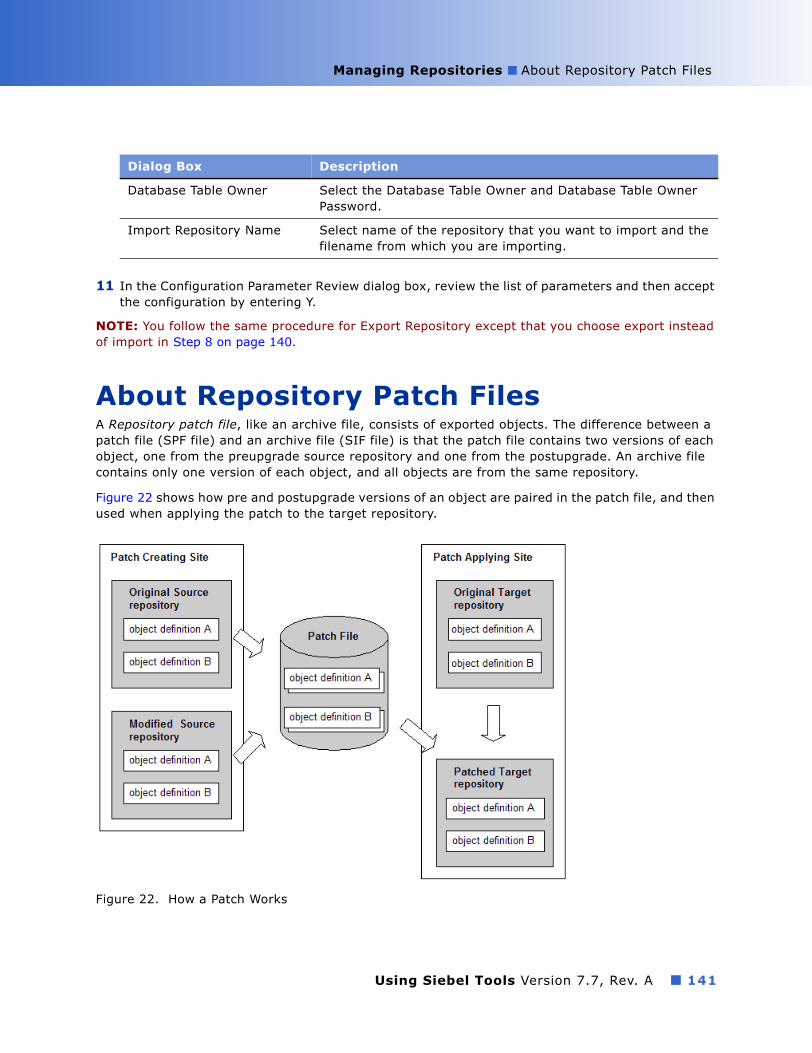
Managing Repositories ■ About Repository Patch Files
11 In the Configuration Parameter Review dialog box, review the list of parameters and then accept the configuration by entering Y.
NOTE: You follow the same procedure for Export Repository except that you choose export instead of import in Step 8 on page 140.
About Repository Patch FilesA Repository patch file, like an archive file, consists of exported objects. The difference between a patch file (SPF file) and an archive file (SIF file) is that the patch file contains two versions of each object, one from the preupgrade source repository and one from the postupgrade. An archive file contains only one version of each object, and all objects are from the same repository.
Figure 22 shows how pre and postupgrade versions of an object are paired in the patch file, and then used when applying the patch to the target repository.
Database Table Owner Select the Database Table Owner and Database Table Owner Password.
Import Repository Name Select name of the repository that you want to import and the filename from which you are importing.
Figure 22. How a Patch Works
Dialog Box Description
Using Siebel Tools Version 7.7, Rev. A ■ 141
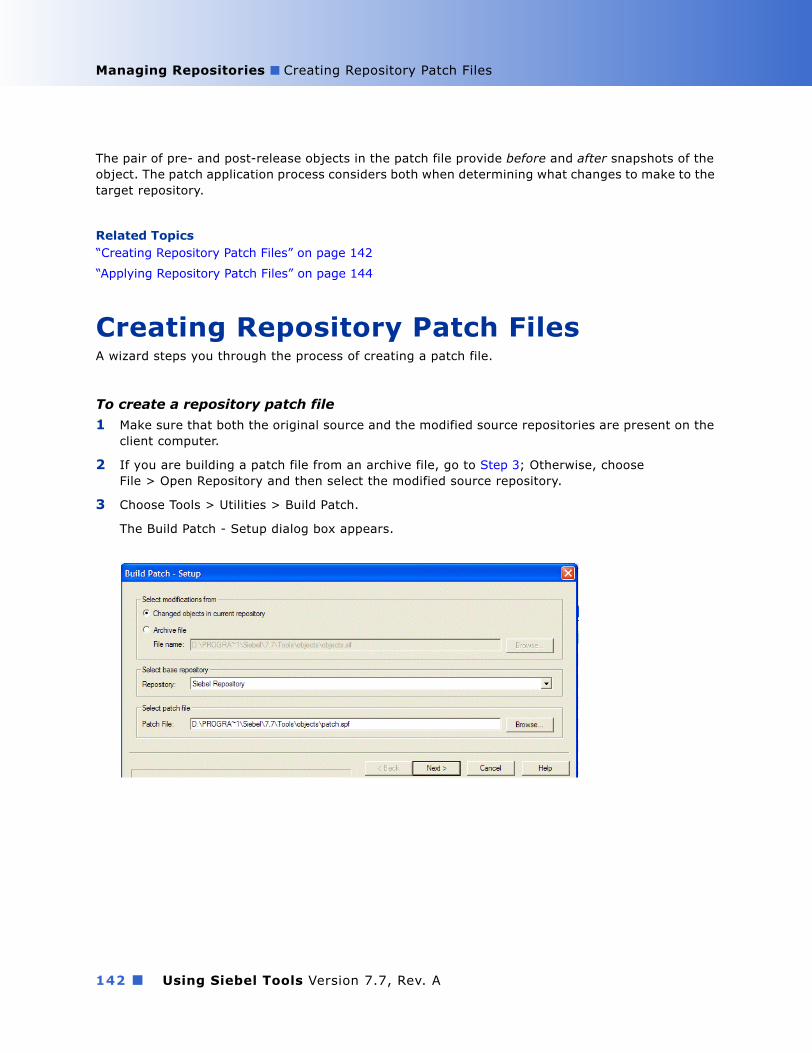
Managing Repositories ■ Creating Repository Patch Files
The pair of pre- and post-release objects in the patch file provide before and after snapshots of the object. The patch application process considers both when determining what changes to make to the target repository.
Related Topics�Creating Repository Patch Files� on page 142
�Applying Repository Patch Files� on page 144
Creating Repository Patch FilesA wizard steps you through the process of creating a patch file.
To create a repository patch file
1 Make sure that both the original source and the modified source repositories are present on the client computer.
2 If you are building a patch file from an archive file, go to Step 3; Otherwise, choose File > Open Repository and then select the modified source repository.
3 Choose Tools > Utilities > Build Patch.
The Build Patch - Setup dialog box appears.
Using Siebel Tools Version 7.7, Rev. A142 ■
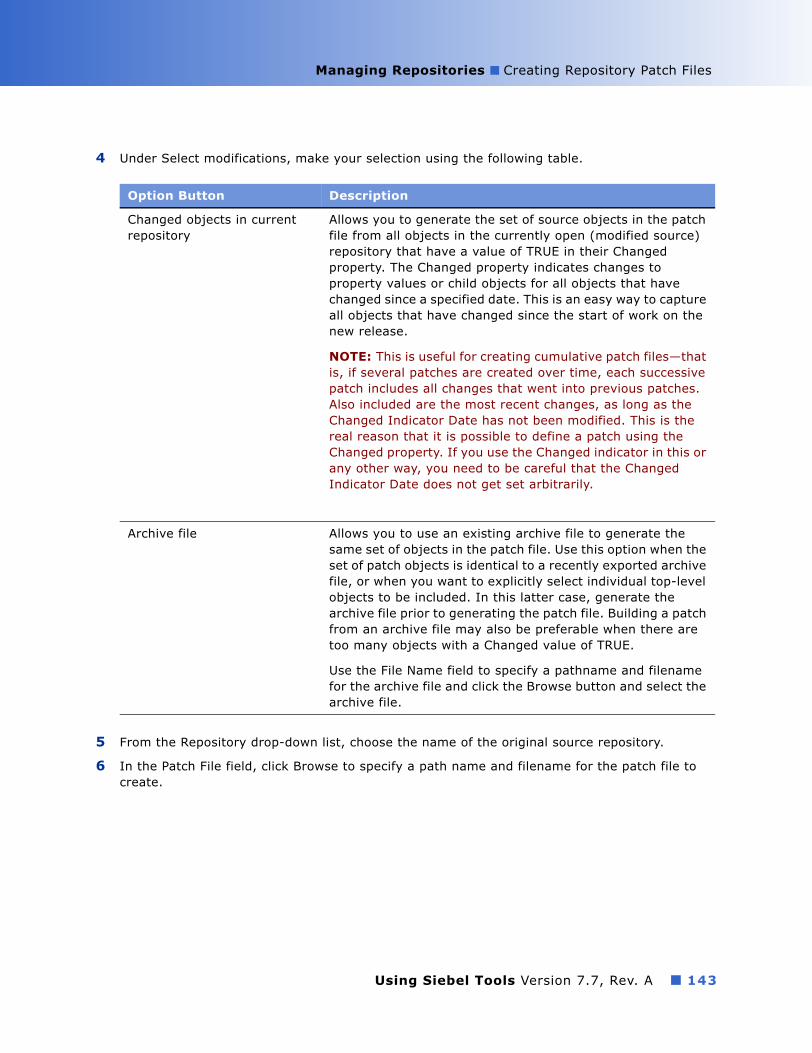
Managing Repositories ■ Creating Repository Patch Files
4 Under Select modifications, make your selection using the following table.
5 From the Repository drop-down list, choose the name of the original source repository.
6 In the Patch File field, click Browse to specify a path name and filename for the patch file to create.
Option Button Description
Changed objects in current repository
Allows you to generate the set of source objects in the patch file from all objects in the currently open (modified source) repository that have a value of TRUE in their Changed property. The Changed property indicates changes to property values or child objects for all objects that have changed since a specified date. This is an easy way to capture all objects that have changed since the start of work on the new release.
NOTE: This is useful for creating cumulative patch files�that is, if several patches are created over time, each successive patch includes all changes that went into previous patches. Also included are the most recent changes, as long as the Changed Indicator Date has not been modified. This is the real reason that it is possible to define a patch using the Changed property. If you use the Changed indicator in this or any other way, you need to be careful that the Changed Indicator Date does not get set arbitrarily.
Archive file Allows you to use an existing archive file to generate the same set of objects in the patch file. Use this option when the set of patch objects is identical to a recently exported archive file, or when you want to explicitly select individual top-level objects to be included. In this latter case, generate the archive file prior to generating the patch file. Building a patch from an archive file may also be preferable when there are too many objects with a Changed value of TRUE.
Use the File Name field to specify a pathname and filename for the archive file and click the Browse button and select the archive file.
Using Siebel Tools Version 7.7, Rev. A ■ 143
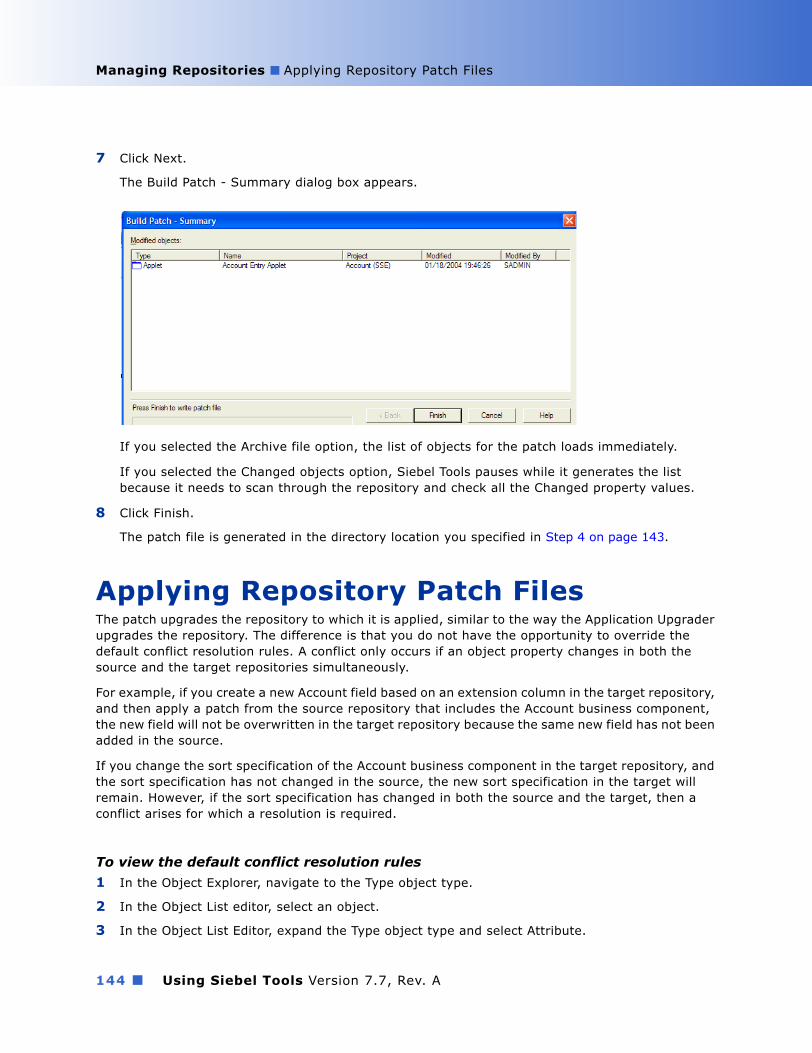
Managing Repositories ■ Applying Repository Patch Files
7 Click Next.
The Build Patch - Summary dialog box appears.
If you selected the Archive file option, the list of objects for the patch loads immediately.
If you selected the Changed objects option, Siebel Tools pauses while it generates the list because it needs to scan through the repository and check all the Changed property values.
8 Click Finish.
The patch file is generated in the directory location you specified in Step 4 on page 143.
Applying Repository Patch FilesThe patch upgrades the repository to which it is applied, similar to the way the Application Upgrader upgrades the repository. The difference is that you do not have the opportunity to override the default conflict resolution rules. A conflict only occurs if an object property changes in both the source and the target repositories simultaneously.
For example, if you create a new Account field based on an extension column in the target repository, and then apply a patch from the source repository that includes the Account business component, the new field will not be overwritten in the target repository because the same new field has not been added in the source.
If you change the sort specification of the Account business component in the target repository, and the sort specification has not changed in the source, the new sort specification in the target will remain. However, if the sort specification has changed in both the source and the target, then a conflict arises for which a resolution is required.
To view the default conflict resolution rules
1 In the Object Explorer, navigate to the Type object type.
2 In the Object List editor, select an object.
3 In the Object List Editor, expand the Type object type and select Attribute.
Using Siebel Tools Version 7.7, Rev. A144 ■

Managing Repositories ■ Upgrading Repositories
4 Review the Attribute property Siebel Wins (or Standard Wins in the Object List Editor).
If this is set to TRUE, the value in the source repository is accepted.
If FALSE, the value in the target repository is accepted.
To apply a patch
1 In Siebel Tools, choose Tools > Utilities > Apply Patch.
The Select Patch to Apply dialog box appears.
2 Select the Siebel Patch (SPF) file, and then click Open.
The Apply Patch - Preview dialog box appears, and the patch is opened.
3 Click Next.
The Apply Patch - Summary dialog box appears. The patch is loaded, the patch objects are compared to their corresponding repository objects, and then the patch is applied.
4 Click Finish to exit.
Upgrading RepositoriesThe Siebel Application Upgrader reduces the time and cost of version upgrades by allowing you to acquire new features from the latest release while preserving the custom configuration changes made to the current repository. It notifies system administrators about conflicts between object customizations and new releases, automatically merges differences between objects, and allows you to manually override and apply any changes.
The Siebel Application Upgrader allows you to upgrade custom configurations to new releases by merging them with a current Siebel eBusiness software release. This capability minimizes the cost of application upgrades and allows you to quickly deploy production versions of Siebel eBusiness Applications. For more information, see the upgrade guide for your operating system.
The Application Upgrader allows you to accomplish the following:
■ Determine what has changed with new releases of Siebel eBusiness Applications
■ Compare custom configurations with new changes delivered in a new Siebel release
■ Choose which changes to apply, whether made by your company�s developers or by Siebel Systems in the new release
NOTE: The Application Upgrader is for merging an entire customized repository with a standard one. To merge portions of repositories, use the Import/Export or Patch features.
For more information about the Application Upgrader, see the upgrade guide for your operating system.
Using Siebel Tools Version 7.7, Rev. A ■ 145

Managing Repositories ■ Upgrading Repositories
Using Siebel Tools Version 7.7, Rev. A146 ■

11 Working With Strings and Other Locale-Specific Data
Topics in This Section�About the Symbolic Strings Model� on page 147
�Creating Symbolic String References� on page 149
�Modifying Symbolic Strings to Globally Update Display Values� on page 149
�Using Symbolic String References� on page 150
�Entering String Overrides� on page 151
�About Converting and Consolidating Strings� on page 151
�About the Symbolic String Consolidation Process� on page 154
�Running the String Conversion Utility� on page 154
�Running the String Consolidation Utility� on page 158
�Using Batch Files to Convert and Consolidate Strings� on page 162
�Working with Non-Translatable Locale-Specific Object Properties� on page 164
�Showing or Hiding Locale-Specific Items in Applet Layout� on page 165
�About the Locale Management Utility� on page 166
�Finding Untranslated Text Strings� on page 166
�Finding Existing Translations� on page 167
�Exporting Text Strings and Locale-Specific Attributes� on page 169
�Importing Text Strings and Locale-Specific Attributes� on page 169
�Identifying Objects Modified Since the Last Export� on page 171
�Replacing Strings� on page 172
�Running the LMU Using the Command Line Interface� on page 172
About the Symbolic Strings ModelThe symbolic strings model centralizes translatable text strings stored in the repository. Translatable text strings are defined once and then referred to by multiple user interface objects. Having a centralized mechanism for storing and managing repository text strings:
■ Reduces redundancy because many objects can reference one symbolic string.
■ Results in a more consistent user interface.
■ Simplifies maintenance because you only have to maintain one string for a given word.
■ Simplifies translations by eliminating duplicated translations of the same word.
■ Reduces translation costs.
Using Siebel Tools Version 7.7, Rev. A ■ 147

Working With Strings and Other Locale-Specific Data ■ About the Symbolic Strings Model
Prior versions of Siebel Tools stored translatable text strings in the locale objects of a parent object type. For example, each applet had a set of child locale records that defined the text for the applet title that appears in the user interface.
How the Symbolic Strings Model Is ImplementedSymbolic strings are implemented using a top-level object in the Siebel repository called Symbolic Strings and a child object called Symbolic String Locale. Each symbolic string record represents a word or phrase, for example Account or Contact, and is language independent. All translations of that word or phrase, including English, are stored as child symbolic string locale records. User interface objects refer to symbolic string records for text strings. The literal display value is retrieved from one of the several translations stored as symbolic string locale records based on the current Tools language mode.
The Symbolic Strings object type stores its data in S_STRING_STR table and the Symbolic String Locale stores its data in S_SYM_STR_INTL table. Objects such as applets store foreign key references to the records stored in S_SYM_STR table.
Strings Not Included in the Symbolic Strings ModelThe symbolic strings model includes text strings stored in the repository and referenced by UI objects such as Control Captions, List Column Display Names, and Applet Titles. The symbolic string model does not include other types of strings typically supplied as seed data, such as LOVs, error messages, and predefined queries.
How Translatable String Values Are CalculatedObject properties that display translatable strings, such as the Title property of applets, are calculated dynamically.
■ If a value does not exist in the string override property (in most cases it does not) the value is calculated using the current language mode of Siebel Tools and the String Value property of the associated Symbolic String Locale object (child of Symbolic String).
■ If a value exists in the string override field, this value is stored in the corresponding child locale object, and the display value is calculated using the current language mode and the value in the string override field.
The calculated value for translatable text strings is the value that is displayed in the Object List Editor, wizards, and layout editors. It is also the value that is compiled to the SRF file.
Related Topic�Entering String Overrides� on page 151
Using Siebel Tools Version 7.7, Rev. A148 ■

Working With Strings and Other Locale-Specific Data ■ Creating Symbolic StringReferences
Creating Symbolic String ReferencesYou create new symbolic strings in Siebel Tools. Symbolic strings created by Siebel Systems are included in the Symbolic Strings project. It is recommended that you create a new project to hold all custom symbolic strings.
NOTE: To be able to create symbolic strings, the EnableToolsConstrain parameter in the tools.cfg file must be set to FALSE.
To create a symbolic string
1 Check out the project in which you want to create the Symbolic String.
2 Navigate to the Symbolic Strings object type.
3 In the Object List Editor, create a new record using the table below to complete the necessary fields.
Related Topic�Setting the Constrain Mode for Working With Symbolic Strings� on page 65.
Modifying Symbolic Strings to Globally Update Display ValuesYou can make global changes to UI display values by modifying child locale objects of symbolic strings. For example, your organiziation may require that all instances of the word Account be changed to Customer. Or suppose you are configuring an industry-specific application to be deployed in a locale other than English. Text strings may appear in the UI that are not appropriate for the given industry. In both cases, you need to make global changes to text strings.
To globally update user interface display values
1 Set your Tools Language mode to the language you want to configure.
For more information, see �Selecting a Language Mode� on page 50.
Property Description
Name Unique name of the symbolic string. Siebel Tools enforces a predefined prefix for the symbolic string name, such as X_. This helps you distinguish custom symbolic strings from those created by Siebel System (SBL_). The value used for the prefix is defined in the SymStrPrefix parameter in the tools.cfg file.
Current String Value
Calculated value based on the current Tools language mode and the String Value property of the corresponding child Symbolic String Locale object.
Definition Description of the symbolic string.
Using Siebel Tools Version 7.7, Rev. A ■ 149

Working With Strings and Other Locale-Specific Data ■ Using Symbolic String References
2 Navigate to the Symbolic String object type.
3 Select the symbolic string you want to modify.
4 Navigate to the Symbolic String Locale object you want to modify.
5 Change the value for the String Value property.
6 Compile the project associated with the Symbolic String.
Using Symbolic String References Symbolic string references allow you to select translatable strings for properties such as Applet Titles from a centralized list of strings. There are two ways you can associate objects to symbolic string references. You can use the String Reference pick applet or you can type directly into the field that displays a translatable text string value.
To select a symbolic string reference using the String Reference pick applet
1 Navigate to the object and property for which you want to define a string, such as Applet Title.
2 In the string reference field (for example, Title - String Reference), click the drop-down arrow.
The String-Reference pick list appears.
3 Search for the appropriate string reference, select it, and then click Pick.
After you associate the string reference, the display value is entered based on the current Tools language mode and the Current String Value of the corresponding symbolic string locale record.
To select a symbolic string reference by typing a value into a field
1 Navigate to the object and property for which you want to define a string, such as Applet Title.
2 Type a value into the field.
Siebel Tools searches for a string reference with a Current String Value that matches the value entered and one of the following occurs:
■ If a match exists, that string reference is associated with the object and the display value is entered based on the current Tools language mode and the Current String Value of the corresponding symbolic string locale record.
■ If a match does not exist, an error message appears instructing you to search for an existing string reference, create a new symbolic string reference, or enter a value in the string override field.
NOTE: To be able to create symbolic strings or enter values for string override properties, the EnableToolsConstrain parameter in the tools.cfg file must be set to FALSE.
Related Topics�Creating Symbolic String References� on page 149
�Entering String Overrides� on page 151
Using Siebel Tools Version 7.7, Rev. A150 ■

Working With Strings and Other Locale-Specific Data ■ Entering String Overrides
�Setting the Constrain Mode for Working With Symbolic Strings� on page 65
Entering String OverridesEach object property that stores a translatable text string, such as the Title property of an applet, has a corresponding String Override field, for example Title � String Override. In cases where the symbolic string for a given word or phrase does not meet your design requirements, you can override it by entering a value in the override field. Values entered into override fields are stored as child locale objects of the top-level object type (for example applet) for the current Tools language mode. Values stored in string override fields are language-specific and do not affect other references to the symbolic strings.
NOTE: To be able to enter string overrides, the EnableToolsConstrain parameter in the tools.cfg file must be set to FALSE.
To enter a string overrride
1 Navigate to the object and property for which you want to enter a translatable text string.
2 In the string override field, enter the string.
The value entered in the string override property is stored as a child locale record and the value automatically populates the translatable text string field, such as the Title property for an applet.
Related Topics�Setting the Constrain Mode for Working With Symbolic Strings� on page 65.
About Converting and Consolidating StringsThe string conversion and consolidation processes allows you to covert translatable strings stored as child locale records of top-level object types to the symbolic strings model. The symbolic strings model stores strings in a centralized table.
CAUTION: Conversion and consolidation operations are highly intensive processes, and thus require a 1 GHz computer or higher.
Convert and consolidate are useful for customers who:
■ Have upgraded to version 7.7 and have custom translatable text strings that the want to migrate to the symbolic strings model.
■ Use string overrides to store text strings and periodically want to convert and consolidate them to the symbolic strings model.
When considering whether to convert strings to the symbolic strings model consider the following:
■ Migrating to the symbolic string model reduces the size of repository, makes translations easier, and gives you more control over terminology consistency.
Using Siebel Tools Version 7.7, Rev. A ■ 151

Working With Strings and Other Locale-Specific Data ■ About the Symbolic String Conversion Process
■ The conversion and consolidation processes require that development be frozen and can require substantial processing time.
Related Topics�About the Symbolic Strings Model� on page 147
�Entering String Overrides� on page 151
�About the Symbolic String Conversion Process� on page 152
�About the Symbolic String Consolidation Process� on page 154
About the Symbolic String Conversion ProcessThe String Conversion process does the following:
■ Generates new symbolic string records and their corresponding symbolic string locale records using string values found in target objects.
NOTE: The conversion process runs on an object type by object type basis. Because of this, there are likely to be duplicate symbolic strings for a given display value. Duplicates are �de-duped� during the consolidation process.
■ Sets the String Reference fields of the target object records to the names of the new symbolic strings.
■ Nullifies the string fields in the locale records of the target objects and, where appropriate, deletes the locale records.
The conversion process occurs in two phases: the conversion export phase, in which data is prepared for conversion, followed by the conversion import phase, in which data changes actually occur.
NOTE: An SRF file compiled before the conversion process will be the same as an SRF file compiled after the conversion process. For example, suppose a given applet gets its Title property from a child Applet Locale record. When the conversion process is run, it creates a symbolic string, places the reference for that symbolic string in the applet's Title - String Reference field, and then removes the Applet's locale record(s). Now, after the conversion, the applet�s title is derived from the symbolic string. However, the Title itself, the display value that is complied to the SRF, is the same as it was before the conversion. The reason is that the strings are complied into object definitions and read from the SRF file, not referenced from the Symbolic String table during runtime.
Using Siebel Tools Version 7.7, Rev. A152 ■
Working With Strings and Other Locale-Specific Data ■ About the Symbolic StringConversion Process
Conversion ExportThe Conversion Export process identifies records that are candidates for Conversion, and then writes all the relevant information to a file. This process is run on an object type by object type basis, and can be run against any object type that has translatable strings (for example, controls, list columns, and applets).
NOTE: The Conversion process has to be executed once for each Object Type (both Top-Level and Sub-Level Object Types) in the repository that has properties that reference Symbolic Strings. In order to determine what Object Types refer to Symbolic Strings, click the Flat Tab in the Object Explorer, navigate to Attribute, and search for the string "*String Reference*" in the Name property. The Parent Type of the results set is the complete set of object types for which the conversion has to be run. Some object types have more than one attribute that refers to Symbolic Strings; for such object types, it is necessary to run the conversion process only once.
The conversion process begins by creating a sorted list of English (ENU) child records for each translatable string within a given object type. For those object types with multiple translatable strings (such as list columns that have a Display Name and Prompt Text), each is processed sequentially. This list is used to generate information about the new symbolic strings. Among sets of records with identical ENU translations, the non-ENU records are compared and, where possible, the same symbolic string is reused for subsequent records. The output file produced contains information about the new symbolic strings, including all the language translations for each, as well as which strings will be used as replacements.
NOTE: The Conversion Export file is not a log file so there is no need to review its contents.
Conversion ImportBased on the file produced by the conversion export process, the conversion import process performs the changes to the database (inserts, updates, and deletes) that convert the object records to use the new symbolic strings. Logically, the process consists of three operations, the end result of which is the production of symbolic string and symbolic string locale records, and the deletion of other types of locale records. The three operations are:
■ New symbolic string records are created in the database. The export file contains all the information about the string, including a unique name and information about each of its locale children.
■ References to the new symbolic string records are placed into the relevant fields of the original objects. For example, suppose you have 10 applets whose title is My Service Requests. Assuming the non-ENU values for all the titles are the same, then the export file contains information about one new symbolic string, and instructions for each of the 10 applets to use this new symbolic string as its title. After creating the symbolic string record for a string whose ENU value is My Service Requests, the Title - String Reference property for each of the 10 applets is set to the name of the new symbolic string. At this point, each of the Applets has a String Reference in addition to the String Override. The String Override is now superfluous and can be removed. This is done by clearing that value from the object Locale children.
■ Records are deleted for which there is no longer any information in the object locale records.
Using Siebel Tools Version 7.7, Rev. A ■ 153

Working With Strings and Other Locale-Specific Data ■ About the Symbolic String Consolidation Process
About the Symbolic String Consolidation ProcessThe consolidation process eliminates duplicate symbolic strings that may be created during the conversion process. Because the conversion process runs on an object type by object type basis, duplicate records can, and usually do, occur when the process creates different symbolic strings for a display value that occurs in multiple object types. Duplicate symbolic strings can have identical sets of locale records or one symbolic string may have more child locale records than the other, but the ones they have in common are identical.
Consolidation ExportThe Consolidation Export process scans all symbolic string records and identifies symbolic strings whose child records are identical and then writes this information to a file. For symbolic strings that have identical child records, one of the strings will be selected arbitrarily as the master record. For symbolic strings whose child records are a subset of another symbolic string, the string with the largest number of children is selected as the master record. The export process does not modify the database.
NOTE: The Consolidation Export file is not a log file so there is no need to review its contents.
Consolidation ImportBased on the file produced during consolidation export process, the redundant symbolic strings are eliminated, and all references to these strings from other object types are replaced with a reference to the master record. This is a time-consuming process, as there are approximately 80 translatable string attributes represented among the various object types in the repository. The end result, however, is that the symbolic string table is as compact as possible, and all redundancy has been removed.
Running the String Conversion UtilityThe conversion process is implemented as a business service. You run it using the Consoleapp.exe utility located in the BIN directory of your Siebel Tools installation directory.
Prior to running the conversion:
■ Make sure all of the projects are unlocked. While conversion and consolidation are running, no other users should be allowed to log on to the development environment.
■ Make sure that the DataSource parameter in the [Siebel] section is the desired database. The conversion utility uses this database.
■ Make sure that the EnableToolsConstrain parameter in the [Siebel] section is set to FALSE.
■ Make sure that the SymStrPrefix parameter in the [Siebel] section of the tools.cfg file is set to the desired prefix. This value is used as the prefix to the name of all newly created symbolic strings. It is set to X_ by default, to indicate that it was created by you and not by Siebel Systems (SBL_).
Using Siebel Tools Version 7.7, Rev. A154 ■

Working With Strings and Other Locale-Specific Data ■ Running the String ConversionUtility
Topics in This Section�Parameters for Running Consoleapps.exe to Convert Strings� on page 155
�Exporting Candidates for Conversion� on page 156
�Splitting Conversion Export Files into Smaller Files� on page 157
�Importing Converted Symbolic Strings� on page 157
Parameters for Running Consoleapps.exe to Convert StringsThe parameters for running Consoleapps.exe to convert existing locale strings to symbolic strings are:
Consoleapp.exe <Config file> <app lang> <uid> <pw> <Business Service> <Method Name: Parameters>
where:
Table 38. Parameters for Running Consoleapps.exe to Convert Strings
Parameter Description
Config file The Siebel configuration file, such as Tools.cfg. Note that the default data source be used
app lang Application language, such as ENU
uid User ID
pw Password
Business Service "String Conversion"
Method Name: Parameters
Business Service method and the input parameters
Using Siebel Tools Version 7.7, Rev. A ■ 155

Working With Strings and Other Locale-Specific Data ■ Running the String Conversion Utility
Exporting Candidates for Conversion
To export conversion candidates for a given object type■ Launch Consoleapps.exe as described in �Parameters for Running Consoleapps.exe to Convert
Strings� on page 155 and use the ConversionExport business service method with the parameters listed in Table 39.
For example:
"ConversionExport: Filename=Control.txt, Repository=Siebel Repository, Object=Control, LogFile=ControlExport.log, Language=ENU, MatchMin=1"
Table 39. Input Parameters for the ConversionExport Business Service Method
Parameter Required? Description
Filename Y The name of the export file.
Repository Y The Siebel Repository name.
Object Y The Siebel object type whose strings are exported, for example Control.
LogFile N The name of the log file.
Language N The language used as the primary language to match when searchng for duplicate symbolic strings. For example, suppose two symbolic strings each have 3 child records, an English (ENU), a French (FRA) and a German (DEU) record. If the Language parameter is set to ENU, then the conversion export process searches for matches between the ENU records. When it finds matches, it checks the other child records of the other languages. If all child records match (or if one has a superset of the other), they are considered matching symbolic strings.
MatchMin N The minimum number of matches in a set of matching symbolic strings before it is written to the file. The default value is 2.
SQLLog N The SQL log file name. When this parameter is set, the conversion process logs all SQL that is executed to the specified file.
ExcludeNull N True/False value. When set to true, it excludes null value for conversion consideration. Default value is True.
UseFullMatch N True/False value. When set to true, records are matched against all the other possible match candidates before they are discarded. Default is True.
Using Siebel Tools Version 7.7, Rev. A156 ■

Working With Strings and Other Locale-Specific Data ■ Running the String ConversionUtility
Splitting Conversion Export Files into Smaller FilesAfter you generate an export file, you can split the file into smaller, more manageable files. This is beneficial for object types such as Control because it could have up to 130,000 records. Note that an average desktop can typically only run about 10 simultaneous conversion import processes.
To split an export file into smaller files■ Launch Consoleapps.exe as described in �Parameters for Running Consoleapps.exe to Convert
Strings� on page 155 and use the SplitFile business service method with the parameters listed in Table 40.
For example,
"SplitFile: Filename=Control.txt, Lines=2000"
Importing Converted Symbolic Strings
To import symbolic strings■ Launch Consoleapps.exe as described in �Parameters for Running Consoleapps.exe to Convert
Strings� on page 155 and use the SplitFile business service method with the parameters listed in Table 41.
For example,
UseExactMatch N True/False value. When set to true, records are considered as match only when they all the same amount of language records and for each of the language, they have the same values. That's Conversion won't consider partial match. Default value is False.
SkipInactive N True/False value. When set to true, the conversion process skips all records with the Inactive property =Y. Default value is True.
Table 40. Input Parameters for the SplitFile Business Service Method
Parameter Required Description
Filename Y Export file
Lines Y Approximate number of lines in each file. The application does not break up a set of symbolic strings, so the number of lines may not match this parameter exactly.
Table 39. Input Parameters for the ConversionExport Business Service Method
Parameter Required? Description
Using Siebel Tools Version 7.7, Rev. A ■ 157

Working With Strings and Other Locale-Specific Data ■ Running the String Consolidation Utility
"ConversionImport: Filename=Control.txt, Repository=Siebel Repository, LogFile=ConversionImport.log, UnlockProjects=false, SkipParentUpdates=true,, Project=Symbolic Strings"
Running the String Consolidation UtilityAfter locale strings have been converted to symbolic strings, you can use the consolidation utility to find duplicate symbolic strings and merge them and their references into a single symbolic string.
The consolidation process is implemented as a business service. You run it using the Consoleapp.exe utility located in the BIN folder of your Siebel Tools installation.
Table 41. Input Parameters for the ConversionImport Business Service Method
Parameter Required Description
Filename Y Import file
Repository Y Siebel Repository name
LogFile N Log file
UnlockProjects N True/false value. When set to true, the conversion business service unlocks all projects when the process finishes. This is useful when there are multiple instances of the conversion service running against the same DB. The default value is true.
SkipParentUpdates N True/false value. When set to true, parent objects, such as the project of the top-level objects being updated, are not updated to use the symbolic string. The default value is false.
SQLLog N Log file name. When this parameter is set, the process logs all SQL that is executed to the specified file.
Project Y Name of the project in the Repository that contains the newly-created strings. Siebel-delivered strings are in the Symbolic Strings project. You may want to configure this for their custom strings
DeleteLocales N True/False value. When set to true, locale records are deleted if all translatable fields are NULL and no language override field is set. When set to false, the locale record is set to Inactive. Default value is True.
CheckTranslateFlag N True/False value. When set to true, the ConversionImport process does not convert objects that have the Translate field set to N. Default value is True.
LogErrorRecords N If set to true, all error records are be exported into a separate log file. Default is False.
Using Siebel Tools Version 7.7, Rev. A158 ■

Working With Strings and Other Locale-Specific Data ■ Running the StringConsolidation Utility
Topics in This Section�Parameters for Running Consoleapps.exe to Consolidate Strings� on page 159
�Exporting Matching Symbolic Strings� on page 159
�Splitting Consolidation Export Files into Smaller Files� on page 160
�Importing Consolidated Strings� on page 161
Parameters for Running Consoleapps.exe to Consolidate StringsThe parameters for running Consoleapps.exe to consolidate duplicate symbolic strings are:
Consoleapp.exe <Config file> <app lang> <uid> <pw> <Business Service> <Method Name:Parameters>
Exporting Matching Symbolic Strings
To export matching symbolic strings■ Launch Consoleapps.exe as described in �Parameters for Running Consoleapps.exe to Convert
Strings� on page 155 and use the ConsolidationExport business service method with the parameters listed in Table 43.
For example:
Table 42. Parameters for Running Consoleapps.exe to Consolidate Strings
Parameter Required Description
Config File Y Name of the Siebel Config file, such as Tools.cfg. Please note the default data source will be used.
App lang Y The application language, such as ENU
Uid Y User ID
Pw Y Password
Business Service Y "String Consolidation"
Method Name:Parameters
Y Business Service method and the input parameters.
Using Siebel Tools Version 7.7, Rev. A ■ 159

Working With Strings and Other Locale-Specific Data ■ Running the String Consolidation Utility
"ConsolidationExport:Filename=ConsExp.txt,Repository=Siebel Repository,LogFile=ConsolidationLog.txt,Language=ENU,MatchMin=2"
Splitting Consolidation Export Files into Smaller FilesWhen an export file is generated, you can split up into smaller, more manageable files. This is beneficial if you have exported a large number of symbolic strings and wish to import them in parallel running applications.
Table 43. Parameters for the ConsolidationExport Business Service Method
Parameter Required Description
Filename Y The name of the export file
Repository Y The Siebel Repository name
LogFile Y The name of the log file
Language Y The language used as the primary language to match when searching for duplicate symbolic strings. For example, suppose two symbolic strings each have 3 child records, an English (ENU), a French (FRA) and a German (DEU) record. If the Language parameter is set to ENU, then the consolidation export process searches for matches between the ENU records. When it finds matches, it checks the other child records of the other languages. If all child records match (or if one has a superset of the other) they are considered matching symbolic strings.
MatchMin Y The minimum number of matches in a set of matching symbolic strings before it is written to the file. The default value is 2.
SkipSBLStrings ? Possible values are True, False, or MasterOnly.
When set to True, all strings starting with SBL_ in the name are ignored.
When set to False Siebel strings can be considered as master or deprecated strings. All Siebel and customer strings are included in consolidation.
When set to MasterOnly, Siebel strings are not deprecated, but can be used as Master strings.
Default value is True.
Using Siebel Tools Version 7.7, Rev. A160 ■

Working With Strings and Other Locale-Specific Data ■ Running the StringConsolidation Utility
To split the consolidation export files into smaller files■ Launch Consoleapps.exe as described in �Parameters for Running Consoleapps.exe to Consolidate
Strings� on page 159 and use the SplitFile business service method with the parameters listed in Table 44.
For example:
"SplitFile:Filename=ConsExp.txt,Lines=100"
Importing Consolidated Strings
To import consolidated strings■ Launch Consoleapps.exe as described in �Parameters for Running Consoleapps.exe to Consolidate
Strings� on page 159 and use the ConsolidationImport business service method with the parameters listed in Table 45.
For example:
"ConsolidationImport:Filename=ConsExp.txt,Repository=Siebel Repository,LogFile=ConsolidationLog.txt,UnlockProjects=false,SkipParentUpdates=true�
Table 44. Parameters for the SplitFile Business Service Method
Parameter Required Description
Filename Y Export file
Lines Y Approximate number of lines in each file. The application does not break up a set of symbolic strings, so the exact number of lines may not match the value specified with this parameter.
Table 45. Parameters for ConsolidationImport Business Service Method
Parameter Required Description
Filename Y Import file name
Repository Y Siebel Repository name
LogFile Y Log file name
UnlockProjects N True/false value. When set to true, the consolidation business service unlocks all projects it had locked. This is useful if there are multiple instances of the consolidation service running against the same DB. The default value is True.
Using Siebel Tools Version 7.7, Rev. A ■ 161
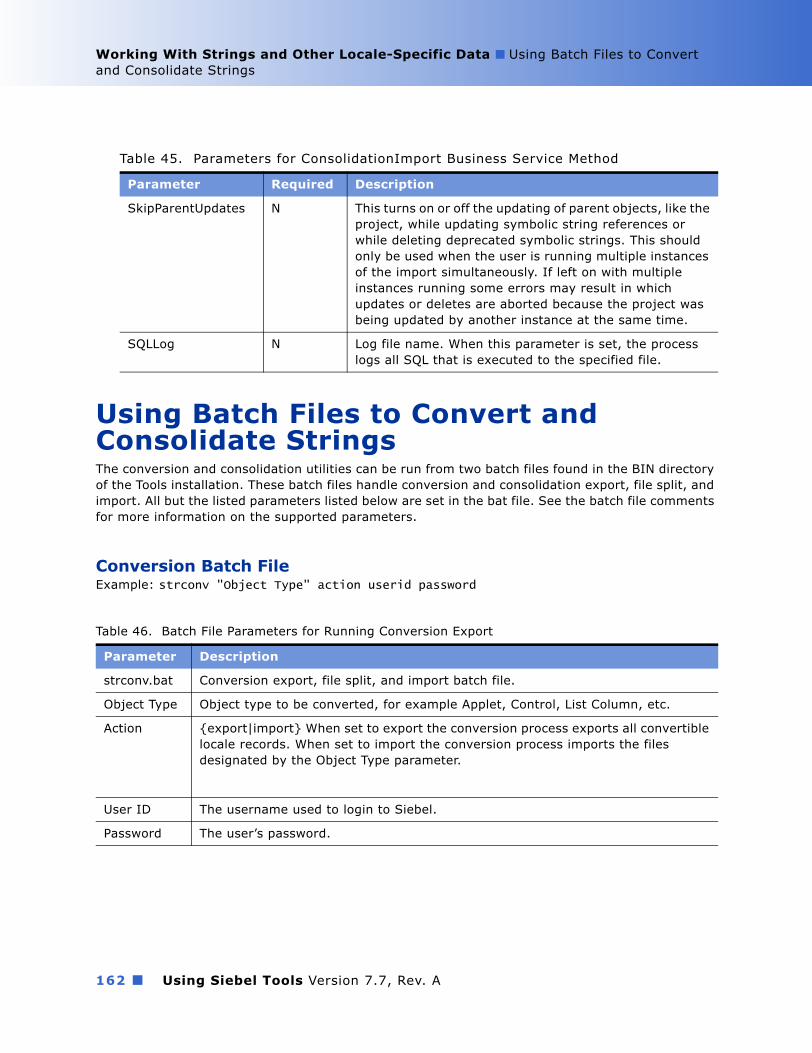
Working With Strings and Other Locale-Specific Data ■ Using Batch Files to Convert and Consolidate Strings
Using Batch Files to Convert and Consolidate StringsThe conversion and consolidation utilities can be run from two batch files found in the BIN directory of the Tools installation. These batch files handle conversion and consolidation export, file split, and import. All but the listed parameters listed below are set in the bat file. See the batch file comments for more information on the supported parameters.
Conversion Batch FileExample: strconv "Object Type" action userid password
SkipParentUpdates N This turns on or off the updating of parent objects, like the project, while updating symbolic string references or while deleting deprecated symbolic strings. This should only be used when the user is running multiple instances of the import simultaneously. If left on with multiple instances running some errors may result in which updates or deletes are aborted because the project was being updated by another instance at the same time.
SQLLog N Log file name. When this parameter is set, the process logs all SQL that is executed to the specified file.
Table 46. Batch File Parameters for Running Conversion Export
Parameter Description
strconv.bat Conversion export, file split, and import batch file.
Object Type Object type to be converted, for example Applet, Control, List Column, etc.
Action {export|import} When set to export the conversion process exports all convertible locale records. When set to import the conversion process imports the files designated by the Object Type parameter.
User ID The username used to login to Siebel.
Password The user�s password.
Table 45. Parameters for ConsolidationImport Business Service Method
Parameter Required Description
Using Siebel Tools Version 7.7, Rev. A162 ■
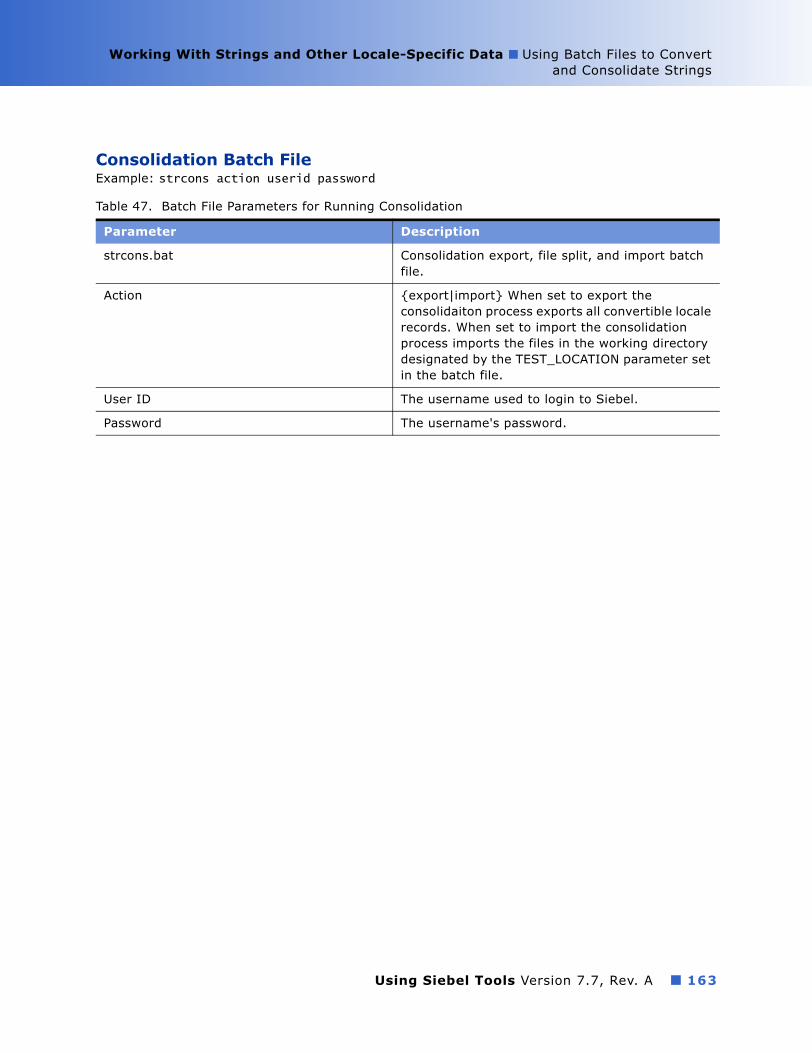
Working With Strings and Other Locale-Specific Data ■ Using Batch Files to Convertand Consolidate Strings
Consolidation Batch FileExample: strcons action userid password
Table 47. Batch File Parameters for Running Consolidation
Parameter Description
strcons.bat Consolidation export, file split, and import batch file.
Action {export|import} When set to export the consolidaiton process exports all convertible locale records. When set to import the consolidation process imports the files in the working directory designated by the TEST_LOCATION parameter set in the batch file.
User ID The username used to login to Siebel.
Password The username's password.
Using Siebel Tools Version 7.7, Rev. A ■ 163
Working With Strings and Other Locale-Specific Data ■ Working with Non-Translatable Locale-Specific Object Properties
Working with Non-Translatable Locale-Specific Object PropertiesUser interface conventions can vary by locale. For example, one locale may require a different sequence of fields than another locale.
Locale-specific object properties can be translatable, such as text strings, or non-translatable, such as the HTML Sequence, HTML Height, and HTML Width properties of controls. You can configure non-translatable object properties for specific locales by running Siebel Tools in Language Override mode. The Language Override mode allows you to store non-translatable, locale-specific properties as child locale records of the parent object.
For example, your Siebel Enterprise contains five languages: Japanese (JPN) and four Western European languages. As opposed to Western European, Japanese does not features middle names, and name order is last name first. In order to configure this, you would use Siebel Tools to set the language to JPN, then set Enable Language Override to ON, then hide the middle name (by setting the �Title-String Override� attribute to false), and then rearrange the first and last name to be last and first. After compiling into the JPN .srf file, the layout will match the requirement.
CAUTION: If you delete a control or a list column from a web template, it will be deleted from all languages, even if you are in Language Override Mode. You hide and show fields through the Properties window of the specific object. For information, see �Showing or Hiding Locale-Specific Items in Applet Layout� on page 165.
If, however, the Japanese user of Tools did all of the above, but did not enable language override, the next time a user compiled any of the Western European languages, the names would be formatted in the Japanese fashion, that is no middle name, and last name first.
NOTE: Siebel Tools does not need to be in Language Override mode to enter string overrides.
To configure non-translatable locale-specific object properties
1 Choose View > Options and then click the Language Settings tab.
2 Set the Tools Language Mode to the language you want to configure and select the Enable and use Language Override check box.
3 Navigate to the object type you want to modify.
4 Modify the object properties or work in the layout editor to define locale specific values.
Related Topics�Selecting a Language Mode� on page 50
�Enabling Language Overrides� on page 51
�Getting Locale-Specific Data Only� on page 73
�About the Symbolic Strings Model� on page 147
�Entering String Overrides� on page 151
�Showing or Hiding Locale-Specific Items in Applet Layout� on page 165
Using Siebel Tools Version 7.7, Rev. A164 ■

Working With Strings and Other Locale-Specific Data ■ Showing or Hiding Locale-Specific Items in Applet Layout
Showing or Hiding Locale-Specific Items in Applet LayoutWhen working with multiple languages, you may wish to show or hide certain fields based on the requirements of a particular locale. You hide controls or list columns using the Visible and Show in List properties of the Control and List Column object types, respectively, not in the web templates.
NOTE: Deleting a control or list column object from the applet layout in the Applet Layout Editor will cause that control or list column to be deleted across all languages, even if you are in Language Override Mode.
After setting up your parent language you can then determine the fields you wish to hide for your child languages. Table 48 lists the object types, the property names, and provides a description.
To hide an object for a specific locale
1 In the Object Explorer, choose Applet, then choose one of the following child objects:
■ Control
■ List > List Column
2 Select the specific object.
3 In the Properties window, navigate to one of the following properties:
■ For Control object: Visible-Language Override.
■ For List Column object: Show In List.
See Table 48 for property settings.
Table 48. Objects That Allow Show Override
Object Property Description
Applet > Control Visible Parent setting. Setting this property to TRUE will show this control to the user, in the parent language and in all other supported languages.
Visible-Language Override
Child setting. When operating in Language Override Mode, you set this property to:
■ FALSE to hide the column from the user.
■ TRUE to show the column to the user. Also, if the parent setting is TRUE you may just leave this setting blank, as it will default to the parent setting.
Using Siebel Tools Version 7.7, Rev. A ■ 165

Working With Strings and Other Locale-Specific Data ■ About the Locale Management Utility
About the Locale Management UtilityThe Locale Management Utility (LMU) in Siebel Tools helps you manage the process of localizing text strings, such as field labels, and other locale-specific attributes, such as the height and width of controls. This includes exporting the strings to a file, which is then translated and imported back into the repository. The LMU provides the export and import tools to do this.
You use the Locale Management Utility to:
■ Find strings that need to be translated.
■ Find existing translations to use for untranslated strings.
■ Export strings and locale-specific attributes to a file (.txt or .xliff) for localization.
■ Import strings and locale-specific attributes from a file back into the repository.
■ Search for strings and locale-specific attributes that have changed since the last export.
■ Compare objects in the repository to the objects stored in the export file.
Finding Untranslated Text StringsYou can use the Locale Management Utility to find text strings in the repository that have not been translated or need to be retranslated because the source string has changed since the last translation.
NOTE: The LMU performs search and comparison functions at the object level, not the attribute level. Therefore, if a locale object contains multiple string attributes, the search function returns all strings contained in the locale object, even if only one of them has been translated.
Applet > List > List Column
Show in List Parent setting. Setting this property to TRUE will show this list to the user, in the parent language and in all other supported languages.
Show in List-Language Override
Child setting. When operating in Language Override Mode, you set this property to:
■ FALSE to hide the column from the user.
■ TRUE to show the column to the user. Also, if the parent setting is TRUE you may just leave this setting blank, as it will default to the parent setting.
Table 48. Objects That Allow Show Override
Object Property Description
Using Siebel Tools Version 7.7, Rev. A166 ■
Working With Strings and Other Locale-Specific Data ■ Finding Existing Translations
To find and export untranslated strings
1 Choose Tools > Utilities > Locale Management.
The Locale Management dialog box appears.
2 In the Options tab, under Languages, select the source language and the target languages.
3 Under Objects, select the applications or projects that you want to localize.
4 Click the Untranslated Strings tab.
5 To display strings that have been marked as Redo, select the Report string attributes of objects marked with 'redo' flag check box.
The Redo flag is marked when a record in the repository has been changed since the last time export occurred and therefore may need to be translated again.
For more information about Redo, see �Identifying Objects Modified Since the Last Export� on page 171.
6 Click Find Strings.
The Locale Management Utility searches through the string attributes of objects in the selected applications or projects and displays the ones that have not been translated and, if the Report string attributes of objects marked with the 'redo' flag check box was selected, the strings that need to be retranslated are also displayed.
7 After you find untranslated strings you can perform the following tasks:
■ Find the views that the untranslated strings belong to by clicking the Find View button.
■ Go to the parent object of the string in the Object Explorer by selecting a string, and then clicking Go To.
■ Export all untranslated strings to a .txt or .xliff file by clicking Export.
Finding Existing TranslationsYou can search through objects in the repository to find existing translations for untranslated strings. This allows you to reuse existing translations for user interface objects that you have created or modified.
The LMU compares untranslated strings with string attributes of other objects in the repository. If it finds an object with the same string, it searches for a translation in the language that you have selected as the target language of the current LMU session. If a translation exists, the LMU displays the best candidate for translation and allows you to export it to a file.
For example, suppose you have selected English-American as your source language and Spanish as the target language. You have an applet with a title of Customer that has not been translated. After clicking the Find Translation button, the LMU searches through the repository for other objects with attributes of Customer. If it finds one, it looks for a Spanish translation of the string. If a translation already exists, the translation is displayed and you can export it to a file.
If the LMU finds more than one translation for a source string, the following rules apply:
Using Siebel Tools Version 7.7, Rev. A ■ 167
Working With Strings and Other Locale-Specific Data ■ Finding Modified Objects
■ If the source string is an attribute of an object that is related to a business component, such as Control Caption or List Column Display Name, then translations from the same business component are examined first. If multiple translations exist in the same business component, the string that occurs the most is selected. If none of the translations exist in the same business component, then the translation that occurs the most often from among all business components is selected.
For example, suppose Applet A is based on the Account business component. Applet A contains a control caption with the value of Account and this value has been translated to Account_FRA for French. Now suppose you create a new applet, Applet B, that is also based on the Account business component and that also contains a control caption with the value of Account. When you run Find Translations, the LMU would find Account_FRA as an existing translation and select it as the best candidate for this string.
■ If the source string is not an attribute related to a business component, such as Menu Item Caption, the translation that occurs the most is selected as the best candidate.
To find translated strings
1 Choose Tools > Utilities > Locale Management.
The Locale Management dialog box.
2 In the Options tab, under Languages, select the source language and the target language.
3 Under Objects, select the applications or projects that you want to localize.
4 Click the Untranslated Strings tab.
5 Click the Find Translations button.
The LMU compares untranslated strings with strings of other objects in the repository. If other objects use the same source string, the LMU looks for existing translations of the string and displays the best candidates for translation in the Results window.
Finding Modified ObjectsYou can locate previously modified objects in the repository by completing the following task.
To find modified objects
1 Choose Tools > Utilities > Locale Management.
The Locale Management dialog box appears.
2 Click the Options tab, and from the Source Language drop-down list, choose your source and target languages.
NOTE: Source and target language must be different from one another.
3 Click the appropriate radio button to indicate whether you want to search by application or by project, and select the projects or applications you would like to perform the query against.
4 Click the Modified Objects tab, and under Search criteria, click the Changed Since checkbox.
Using Siebel Tools Version 7.7, Rev. A168 ■
Working With Strings and Other Locale-Specific Data ■ Exporting Text Strings andLocale-Specific Attributes
5 Select the date from which you would like to search, then click Start.
Exporting Text Strings and Locale-Specific AttributesYou use the Locale Management Utility to export strings and other locale-specific attributes to an external file. The file type of the external file can be text (.txt) or XML Localization Interchange Field (.xliff).
To export strings and other locale-specific attributes
1 Choose Tools > Utilities > Locale Management.
The Locale Management Utility appears.
2 In the Options tab, under Languages, select the Source and Target Languages.
NOTE: When exporting strings and other locale-specific attributes, be sure that your Tools language mode and the LMU source language are the same.
3 Under Objects, select the applications or projects that you want to export.
4 Click the Export Tab.
5 Select whether you want to export Strings only or all localizable attributes.
All localizable attribute includes translatable strings and other locale-specific attributes, such as the width and height of controls. These attributes may be different for different locales.
6 Click Export.
The Save As dialog box appears set to the Tools/Objects directory of your Siebel installation.
7 Enter a file name, choose a file type, and then click Save.
If you have selected All localizable attributes, the available file type is .slf.
If you have selected String attributes only, the available file types are .txt file or a .xliff file.
Related Topic�Selecting a Language Mode� on page 50
Importing Text Strings and Locale-Specific AttributesYou use the Locale Management Utility to import translated strings and other locale-specific attributes back into the repository. Use the preview functionality to display the results of the import process before you actually import them into the repository.
Using Siebel Tools Version 7.7, Rev. A ■ 169
Working With Strings and Other Locale-Specific Data ■ Importing Text Strings and Locale-Specific Attributes
To preview the results of the import process
1 Choose Tools > Utilities > Locale Management.
The Locale Management dialog box appears.
2 In the Options tab, under Languages, select a source language and a target language.
3 Click the Import tab.
4 Enter the directory path and name of the file you are going to import.
5 Enter the path and name of the file where you want to store the results for previewing.
The default file name is �preview.log.�
6 Click Preview.
The Locale Management Utility writes the results of the import process to the log file rather than to the repository.
NOTE: LMU does not mark changed records with a Redo flag when running in Preview mode.
To import strings and other locale-specific attributes into the repository
1 Choose Tools > Utilities > Locale Management.
The Locale Management dialog box appears.
2 In the Options tab, under Languages, select What a source language and a target language.
3 Click the Import tab.
4 Enter the file name of the file from which you want to import locale-specific attributes.
You can also use the Browse button to find and select the file. The default file name is:
■ Results.txt if the file contains strings only
■ Results.slf if the file contains all locale-specific attributes
5 Select whether you want to mark records in the repository with the Redo flag that have changed since the export occurred.
When the import occurs, the LMU compares the source language records in the repository with the source language records in the import file. If the records in the repository have changed since the export occurred, the target language records are marked with the Redo flag. This helps you identify records that may need to be retranslated.
6 Click Import.
The locale-specific attributes are imported into the repository.
A log file (LMUImportTruncation.log) is created in the Objects directory of your Siebel Tools installation directory. This file provides details, including error messages, about records that were not imported into the repository.
Using Siebel Tools Version 7.7, Rev. A170 ■

Working With Strings and Other Locale-Specific Data ■ Identifying Objects ModifiedSince the Last Export
Identifying Objects Modified Since the Last ExportYou can use the Locale Management Utility to identify objects that have been modified in the repository since the last time you exported strings. This is useful when your development and localization efforts occur simultaneously. It helps you keep strings in the repository sychronized with the strings that have been exported to a file for localization.
You can search for modified objects using the following two methods:
■ Base your search on a specific date.
■ Compare objects in the repository with objects in a source file, such as results.txt.
NOTE: When you base your search on a specific date, and run the search by clicking the Start button, all records returned for a modified project are marked as �Redo,� regardless of whether a particular locale attribute has changed. This is because the LMU searches for changes at the object level (the base record), not the attribute level.
To identify modified objects
1 Choose Tools > Utilities > Locale Management.
The Locale Management Utility appears.
2 In the Options tab, under Languages, select a source language and a target language.
3 Click the Modified Objects tab.
4 Define the search criteria you want to use:
■ Select the Changed since check box and then specify a date after which you want to find modified objects.
■ Select the Different from file check box and then specify the file to compare the repository against.
5 Do one of the following:
■ Click Start to find records that match the search criteria, display the results, and flag records returned in the search as Redo. Redo indicates that a record has been changed since the last time export occurred and therefore may need to be retranslated.
■ Click Preview to find records that match the search criteria and display the results. Preview does not mark records as Redo.
6 After you have identified modified objects, you can perform the following tasks:
■ Click Save to save a result set in a log file.
■ Click Go To to open the Object Explorer and go to the parent object of the string or attribute.
NOTE: The Load button allows you to import a result set from a previously saved file. After loading the result set in the display window, you can perform Save or Goto operations on those records.
Using Siebel Tools Version 7.7, Rev. A ■ 171
Working With Strings and Other Locale-Specific Data ■ Replacing Strings
Replacing StringsYou can use the LMU to replace strings in a bulk mode. For example, suppose that you need to change occurrences of Accounts to Companies for the English locale. You can use the LMU to export the strings to a file, manipulate the file so that it only contains Companies instead of Accounts, and then import the strings back into the repository. Using the LMU to replace strings is most useful for strings stored in string-override fields.
NOTE: Using the LMU to replace strings is useful when working with string overrides. But when working with the symbolic strings, follow the procedure described in �Modifying Symbolic Strings to Globally Update Display Values� on page 149.
To use the LMU to replace strings
1 Identify the applications and/or projects to which the strings belong.
2 Export the strings you want to replace to an LMU file.
Use the procedure described in �Exporting Text Strings and Locale-Specific Attributes� on page 169.
NOTE: Source and target language cannot be the same.
3 In the LMU file, change the target language so that it is the same as the source language selected during the LMU export.
4 Remove strings from the LMU file that you do not want to replace.
5 In the Target String column of the LMU file, enter the string that you want to substitute for the original value.
6 Use the LMU to import the LMU file.
a In Siebel Tools, choose > Utilities > Locale Management.
b In the Options tab, select source and target language (both are the same).
c Select the Import tab and then specify the LMU file path.
d Click Import to replace the strings.
Running the LMU Using the Command Line InterfaceYou can run the LMU from the command line interface. Commands, syntax, usage, and examples are provided in the following sections.
The syntax for the commands below use these conventions:
■ <xxx> is a placeholder for a required parameter.
■ [xxx] is a placeholder for an optional parameter.
Using Siebel Tools Version 7.7, Rev. A172 ■
Working With Strings and Other Locale-Specific Data ■ Running the LMU Using theCommand Line Interface
■ xxx|yyy is an selection parameter (that is, xxx or yyy)
NOTE: When specifying file names, the absolute path must be provided. For example, if you specify LMU file as results.txt for export, it is created under the current directory. That is, assuming an installation directory of d:\siebel\7.7\tools, the file would created under d:\siebel\7.7\tools\bin, not d:\siebel\7.7\tools\objects.
Exporting Strings and Locale-Specific Attributes
Syntax/lmu <srclang> <trglang> export <proj|app> <all|string> [<file>]
UsageThis command allows you to export localizable attributes for all projects or for all applications. If you specify all, then all attributes (translatable and language override attributes) are exported to a file with the extension of .slf; if you specify string, then string attributes only are exported to a file with .txt or .xliff extension. If you do not specify a file name, you receive an error.
Examplesiebdev /u sadmin /p db2 /d server /lmu ENU FRA export proj all C:\temp\my_proj_results.txt
This example instructs LMU to export all attributes (string and language override attributes) for all projects to a LMU file located at C:\temp, called my_proj_results.txt. The source language is English-American and the target language is French.
Importing an LMU File
Syntax/lmu <srclang> <trglang> import <file>
UsageThis command allows you to import a LMU file and mark all target locale objects as 'Redo' if the source string from the import file and the repository differ. You must specify the file name (with absolute path) to the import file.
Examplesiebdev /u sadmin /p db2 /d server /lmu ENU FRA import D:\sea750\tools\objects\results.slf
Using Siebel Tools Version 7.7, Rev. A ■ 173

Working With Strings and Other Locale-Specific Data ■ Running the LMU Using the Command Line Interface
This example instructs the LMU to import a file called results.slf from the folder D:\sea750\tools\objects. The source language of the LMU file is English-American (ENU) and the target language is French (FRA). The LMU file contains all localizable attributes (string and language override attributes).
Exporting Strings to Be Translated
Syntax/lmu <srclang> <trglang> todo <proj|app> [<file>]
UsageThis command allows you to export all untranslated strings and strings marked with 'Redo' flag to an LMU file. You can specify whether you want to export for all projects or all applications. The exported LMU file contains the related View Names.
Examplesiebdev /u sadmin /p db2 /d server /lmu ENU FRA todo app D:\sea750\tools\objects\results.txt
This example instructs the LMU to find all untranslated strings and redo strings for all applications and export the results to D:\sea750\tools\objects\results.txt. The source language is English-American (ENU) and the target language is French (FRA).
Using Siebel Tools Version 7.7, Rev. A174 ■

Index
AApplet Designer
Controls toolbar, about 41Format menu options, using 33user interface tools, about 41
Applet layoutlocale-specific items, showing or hiding 165
Applet Layout Editorabout 46Format menu options, using 33opening 21
Applet Menu Layout Editor, about 46applets
Applets windows, using to list applets 21controls/columns for editing applets 21
Applets by BusComp report 110Applets window, about and example 21Application Upgrade Attributes List
report 32Application Upgrade Object List report 32archive files
comparing objects in archive files 114exporting objects to an archive file 123importing objects from 126preparing target repository for import
from 125process of importing objects from archive
file 125using a command-line interface to export
objects 124using the command-line interface to import
objects 131using to export/import objects 123
Archive versus Archive option 114attributes, locale-specific
exporting strings and locale-specific attributes 173
exporting text strings and attributes 169importing into the repository 170importing strings and attributes 169working with non-translatable locale
specific 164
Bbatch files
about using to convert and consolidate strings 162
consolidation batch file example 163conversion batch file example 162
bookmarksabout and Go menu 31Bookmarks window, about and example 24using History toolbar 39
Browser Script Editor, about using 47browser, defining target browser 66Business Component and Fields report 110business entities, about diagraming 46Business Object and Components
report 110Business Service Detail report 110Business Service Summary report 110
CCalls window, showing/hiding 68change date preferences, setting 50Changed field, about 19Check In dialog box
about using and elements 81Check Out dialog box
about using and elements 77checking in and checking out
guidelines 76options, setting 75process, about 75
checking in projectsdata source options 57
checking out and checking inAllow Object Locking, setting projects to
allow 85locked objects, viewing within projects 86locking objects locally 87objects, about checking in and out 84objects, check in and out limitations 87objects, checking from the server
repository 85objects, checking to the server repository 86objects, enabling check in and out 85server repository, projects from 82server repository, projects to 83
checking out projectsdata source options 57restarting editors after check out 58
checkout, undoing 88command-line interface
Using Siebel Tools Version 7.7, Rev. A ■ 175

Index ■ D
about using 48running Locale Management Utility 172using to compile 119using to export object to an archive file 124using to import objects from an archive
file 131using to validate objects 99
Compare Objects dialog boxabout 112comparing in archive files 114comparing in current repository and archive
file 114objects, comparing in another
repository 114objects, comparing in same repository 113synchronizing object definitions 115
compilingabout 117incremental repository upgrade kits 117single object or group of objects 119testing changes 121using the command-line interface 119
compiling projectsaccessing object compiler 117caution, about compiling or modifying .srf
file 117compound queries
about creating and table 105Configuration Context toolbar, about
using 45Confirmation dialog boxes, showing/
hiding 49conflict resolution
about object definitions, displaying hierarchy of differences 129
about objects definitions, displaying one to a row 129
object definitions, displaying property value conflicts for selected definitions 130
Consoleapps.exeabout running 154about running string consolidation utility 158exporting candidates for conversion 156exporting matching symbolic strings 159importing consolidated strings 161importing converted symbolic strings 157parameters for conversion 155splitting consolidation export files 160splitting export files into smaller files 157string consolidation parameters 159
constrained mode, running Tools in 65Control Type drop-down list 41Controls toolbar, about and buttons 41Controls/Columns window, about and
example 21customizing tools environment
customizing visualization views 62defining a target browser 66defining Object List Edit display options 59defining Web template editor 60docking/undocking windows 67enabling language overrides 51integrating with third-party source
control 51restarting editors after check out 58running in constrained or unconstrained
mode 65selecting language mode 50setting change date preferences 50setting commit options for full get 58setting database options 65setting debug options 61setting scripting options 59showing visualization views 68showing/hiding Confirmation dialog
boxes 49showing/hiding debug windows 68showing/hiding editor 68showing/hiding object definitions 63showing/hiding Object Explorer window 69showing/hiding status bar 69showing/hiding toolbars 69showing/hiding windows 66specifying data sources 57
Ddata
getting locale-specific data 73specifying data sources 57
databasedatabase commits, setting for full get 58overwriting projects stored on local
database 72setting options 65
Database Configuration Utilityusing to export/import repositories 137
date, setting change date preferences 50Debug menu, options 33Debug toolbar, about and buttons 40debugging
setting options 61showing/hiding debug windows 68
deleting objects 97Detail tab, about using 17Development Tools Options dialog box
checking in/out options 57docking a window 67
Using Siebel Tools Version 7.7, Rev. A176 ■

Index ■ E
drop-down lists, about 41
EEdit menu. options 27Edit toolbar, about and buttons 38edit tools
displaying from Edit menu 27displaying from Edit toolbar 38
editorsrestarting after check out 58showing/hiding 68
Entity Relationship Designer, about 46environment settings
applying using View menu 28Errors window, showing/hiding 68exporting
exporting objects to an archive file 123objects to an archive file using command-line
interface 124strings and locale-specific attributes 173strings to be translated 174text strings and attributes 169using archive files to export/import
objects 123
FFile menu, options 26Flat tab, about using 17Format menu, options 33Format toolbar, about and buttons 43full get, setting commit options 58
Gget process
about performing 71getting locale-specific data 73getting projects from the server
repository 72performing full get 71
Go menu, options 31
HHelp menu, options 37hidden windows, navigating to 36History toolbar, about and buttons 39HTML source code, displaying for
templates 25
IImport Wizard-Review Conflicts and Actions
about 128Attribute Differences pane 130
Conflicting Objects pane 129Object Difference pane 129
importingconsolidated strings 161Import Wizard-Review Conflicts and
Actions 128LMU file 173objects from archive file 126preparing target repository for import 125process of importing objects from archive
file 125symbolic strings 157text strings and attributes 169text strings and attributes into
repository 170using archive files to export/import
objects 123using Database Configuration Utility to
export/import repositories 137importlog.txt, about 128inactive objects, about 18incremental repository upgrade kits,
about 117
Llanguages
enabling language overrides 51selecting a language mode 50
Layout editors, about 46List tool bar, about and buttons 39LMU
See Locale Management Utilitylocal database, overwriting projects 72local projects, differences from server
projects 87Locale Management Utility
about using 166exporting strings and attributes 169finding existing translations 167finding untranslated text strings 166identifying modified objects since export 171importing strings and attributes 169importing strings and attributes into
repository 170note, about modified records for project
marked as Redo 171replacing strings 172running from command line 172
locale objectfinding untranslated text strings 166
locale-specific attributesexporting and strings 173exporting strings to be translated 174
Using Siebel Tools Version 7.7, Rev. A ■ 177
Index ■ M
exporting text strings and attributes 169importing into the repository 170importing LMU file 173importing strings and attributes 169
locale-specific itemsshowing or hiding 165
localizationSee Locale Management Utility
locking projects 91log file, list of Summary window
messages 128
Mmenu bar
Debug menu 33displaying menus 25Edit menu 27File menu 26Format menu 33Go menu 31help menu 37Query menu 32Reports menu 32Screen menu 30Tools menu 34View menu 28Window menu 36
Microsoft WindowsSee Windows
Mode drop-down list 41modified objects, finding 168
Nnavigating, using windows 14New Object wizard
about 38using to create objects 95
non-translatable locale-specific attributes 164
OObject Check Out dialog box
about using and elements 79object comparison
about 111about the Compare Objects dialog box 112comparing in another repository 114comparing in current repository and archive
file 114comparing in same repository 113comparing object definition in archive
files 114synchronizing object definitions 115
Object Compiler dialog boxaccessing 117caution, about compiling or modifying .srf
file 117object definition management
File menu options 26object definitions
about compound queries 105about object comparison and
synchronization 111about the Compare Objects dialog box 112about the Validate dialog box 99about the Validation Options dialog box 102about validating objects 98associating with a different project 90bookmarks 24comparing in archive files 114comparing in current repository and archive
file 114copying objects 97deleting objects 97determining when records were created and
updated 115Edit menu, about using to apply 27exporting to an archive file 123flagging with bookmarks 31List toolbar, about and buttons 39modifying 96Object List Editor window, using to
display 18objects, comparing in another
repository 114objects, comparing in same repository 113property settings, displaying 20renaming or reassigning 90reports about object relationships 109search the repository for objects 106showing/hiding 63synchronizing object definitions 115table of simple queries 105unlocking projects on local repository 92using queries to list objects 104validating objects 99validating objects procedure 98viewing object relationships 108wizards, about using 46
object definitions, working withabout compound queries 105about object comparison and
synchronization 111about simple queries 105about the Compare Objects dialog box 112about the Validate dialog box 99about the Validation Options dialog box 102
Using Siebel Tools Version 7.7, Rev. A178 ■
Index ■ O
about validating objects 98creating objects 95determining when records were created and
updated 115modifying objects 96process 93reports about object relationships 109searching the repository for objects 106unlocking projects on local repository 92using queries to list objects 104validating objects procedure 98viewing object relationships 108
Object Explorer windowabout and example 15about using 14Detail tab, about using 17Flat tab, about using 17Project drop-down list, about using 16showing/hiding 69Type tab, about using 16
Object List Editor windowabout and example 18about using and example 14Changed field, about 19defining display options 59Edit menu, applying object definitions 27Edit menu, applying objects 27inactive objects, about 18, 19invoking Visualization views 108List toolbar, about and buttons 39modifying object definitions 96pencil icon, about 19queries, about 32restoring to prequery state 104showing visualization views 68using queries to list objects 104
object managementFile menu options 26
object typesDetail tab, about using to expand 17Flat tab, using to display 17Object List Editor window, using to
display 18reports available for each object type 109Types tab, using to list 16
objectsabout comparison and synchronization 111about performing a get process 71about the Compare Objects dialog box 112associating with a different project 90bookmarks 24comparing in another repository 114comparing in archive files 114
comparing in current repository and archive file 114
comparing in same repository 113compiling single objects or group of
objects 119copying objects 97creating objects 95deleting objects 97determining when records were created and
updated 115Edit menu, about using to apply 27exporting to an archive file 123exporting to archive file using command-line
interface 124flagging with bookmarks 31identifying modified objects since export 171Import Wizard-Review Conflicts and
Actions 128importing from archive file 126importing from archive file using command-
line interface 131List toolbar, about and buttons 39modified objects, finding 168Object List Editor window, using to
display 18preparing target repository for import 125process for working with 93process of importing objects from archive
file 125property settings, displaying 20renaming or reassigning 90searching the repository for objects 106showing/hiding 63synchronizing object definitions 115unlocking projects on local repository 92using archive files to export/import 123using Database Configuration Utility to
export/import repositories 137using queries to list objects 104validating objects 99viewing object relationships 108
objects, checkout and check inabout 84Allow Object Locking, setting projects to
allow 85enabling 85limitations 87locked objects, viewing within projects 86locking objects locally 87object differences, viewing 87server repository, checking in objects to 86server repository, checking out objects
from 85
Using Siebel Tools Version 7.7, Rev. A ■ 179

Index ■ P
Ppencil icon, about 19Project drop-down list, about using 16Project List report 110projects
about performing a get process 71associating object definition with a different
project 90caution, about incremental compilations 117check in/check out options (data sources) 57checking in from the server repository 83compiling 117creating new projects 90defined and about 89renaming projects 90repository, doing full get of all projects 71suffix names, meaning of 89undoing checkout 88unlocking on local repository 92
propertiesProperties window, about and example 20property settings, displaying 20
QQBE
See queriesqueries
about compound queries 105table of simple queries 105using to list objects 104
Query menu, options 32query-by-example
See queries
Rrecords
determining when created and updated 115Redo
about Locale Management Utility marking projects 171
renaming projects 90replacing strings 172reports
getting Tables report for the S_ORG_EXT table 109
reports available for each object type 109restricting report to single parent object
definition 109Reports menu, about and reports 32repositories
about implementing symbolic strings model 148
full get of all projects, doing 71
importing strings and attributes 170initial get of all projects, doing 72management, File menu options 26navigating using bookmarks 24reviewing current info 134searching for objects 106symbolic strings model 147unlocking projects 92viewing which is open 134
repositories, managingexporting objects to an archive file 123,
124Import Wizard-Review Conflicts and
Actions 128importing objects from archive file 126importing objects using command-line
interface 131preparing target repository for import 125process of importing objects from archive
file 125using archive files to export/import
objects 123Repository Dock Objects report 110results.slf, about 169results.txt, about 169right-clicking
menus, about navigation 45using to hide a window 66
SScreen menu, options 30script editors, about 47scripting, setting options 59searching
for untranslated strings 167using to find an object 106using to find an object definition 106
server repositoryobjects, checking out from 85projects, checking out 82
Server Script Editor, about using 47Server scripting language
setting default 59Siebel eScript
Debug toolbar, accessing debugger 40debugger, Debug menu options 33
Siebel VBDebug toolbar, accessing debugger 40debugger, Debug menu options 33
Siebel Web client, automatically opening 61status bar, showing/hiding 69string consolidation utility
about running 158
Using Siebel Tools Version 7.7, Rev. A180 ■
Index ■ T
exporting matching symbolic strings 159importing consolidated strings 161parameters 159splitting export files into smaller files 160
string conversion utilityabout running 154exporting candidates for conversion 156importing converted symbolic strings 157parameters 155splitting export files into smaller files 157
string override, entering 151String Reference pick applet
symbolic string reference, selecting 150symbolic string reference, using to
select 150strings
about string conversion process 152conversion export 153conversion import 153exporting and locale-specific attributes 173exporting strings to be translated 174exporting text strings and attributes 169finding multiple attributes 166finding untranslated text strings 166guidelines for converting and
consolidating 151identifying modified objects since export 171importing text strings and attributes 169importing text strings and attributes into
repository 170Locale Management Utility, running from
command line 172replacing strings 172searching for untranslated strings 167using batch files to convert and
consolidate 162Summary window, containing contents of log
file 128symbolic string consolidation
about 154consolidation export 154consolidation import 154
symbolic stringsabout running string consolidation utility 158running string consolidation utility 159setting constrain mode 65
symbolic strings modelabout 147about calculating translatable string
values 148about implemented 148strings not included 148
symbolic strings referencecreating 149
selecting by typing value 150String Reference pick applet, using 150user interface display values, globally
update 149
TTables report
description 111getting report for S_ORG_EXT table 109
target browser, defining 66target repository, preparing for import from
archive file 125Template drop-down list 41testing changes 121text strings
See symbolic strings modelthird-party source control, integrating
with 51toolbars
about 37Configuration Context toolbar 45Controls toolbar 48Debug toolbar 40Edit toolbar, about and buttons 38Format toolbar 43History toolbar 39List toolbar 39showing/hiding 69Web Controls toolbar 41
Tools menu, options 34translations
finding existing 167strings, exporting for 174
Types tab, about using 16
Uunconstrained mode, running Tools in 65undocking a window 67unlocking projects on local repository 92untranslated strings, searching for 167untranslated text strings, finding 166
Vvalidate
about the Validate dialog box 99about the Validate Options dialog box 102object definitions procedure 98validating objects procedure 98
Validate Options dialog box, about 102View Layout Editor, about 46View menu
invoking Visualization views 108options 28
Using Siebel Tools Version 7.7, Rev. A ■ 181

Index ■ W
showing visualization views 68Visualization views
customizing 62invoking 108showing 68
WWatch window, showing/hiding 68Web browser, defining layout 45Web Controls toolbar
about and buttons 41buttons, using 42drop-down lists and fields 41
Web Page Layout Editor, about 46Web template editor, defining 60Web Template Explorer window
about and example 25Web templates, displaying list 25Window menu, options 36Windows
docking/undocking 67showing/hiding 66
wizardsusing to create objects 46
Workflow Policy Objects report 111
Using Siebel Tools Version 7.7, Rev. A182 ■