using the buyboard v · vendor discounts only―displays the percentage discounts offered by...
TRANSCRIPT

1

2
Using the BuyBoard V.5 The first screen that opens after logging in is the BuyBoard News page, an overview of new contracts and other helpful information regarding the BuyBoard.
BROWSING THE BUYBOARD Four options are available to shop or browse the BuyBoard:
1. Search―Enter a search term and select from the options listed: a. All (default) ―Returns all descriptions and pricing sheets containing the search term. b. Vendor Discounts Only―Displays the percentage discounts offered by vendors off their published
catalog or list price. c. Catalog Pricing Only―Displays a specific vendor’s catalog and unit pricing available through the
BuyBoard. Note: The Search feature will return any portion of the term found in the following:
• Vendor Name • Short Item Description • Full Description • Part Number • Brand • Pricing Sheet (These are PDF documents provided by the vendor that contain catalog or price pages.)

3
2. Search by Vendor―Select and view a specific vendor’s percentage discount or catalog pricing. Enter a search term to look up items by keyword.
3. Browse Contracts―Displays entire list of commodities with associated contract categories and contract number. Select the contract category to display the percentage discount offered by the vendors off their published catalog or list price.
4. Instructional Materials Please refer to page 16 for instructions on using the Instructional Materials features and functions on the BuyBoard.
4
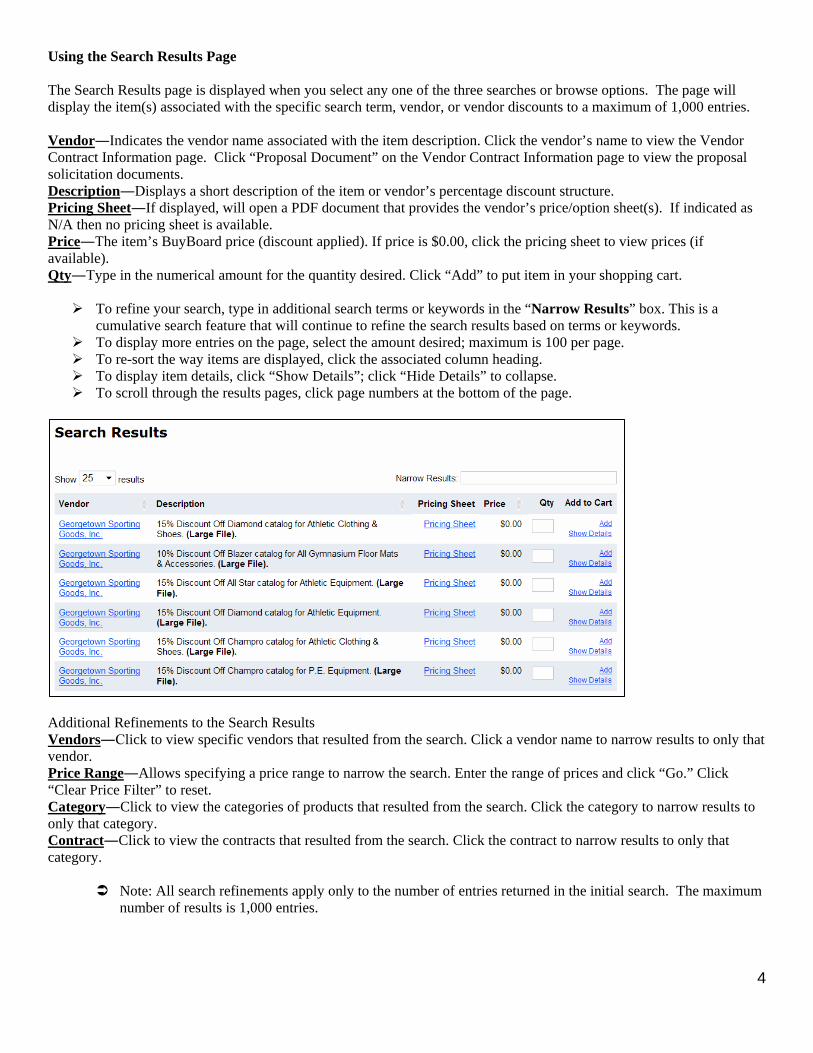
Using the Search Results Page The Search Results page is displayed when you select any one of the three searches or browse options. The page will display the item(s) associated with the specific search term, vendor, or vendor discounts to a maximum of 1,000 entries. Vendor―Indicates the vendor name associated with the item description. Click the vendor’s name to view the Vendor Contract Information page. Click “Proposal Document” on the Vendor Contract Information page to view the proposal solicitation documents. Description―Displays a short description of the item or vendor’s percentage discount structure. Pricing Sheet―If displayed, will open a PDF document that provides the vendor’s price/option sheet(s). If indicated as N/A then no pricing sheet is available. Price―The item’s BuyBoard price (discount applied). If price is $0.00, click the pricing sheet to view prices (if available). Qty―Type in the numerical amount for the quantity desired. Click “Add” to put item in your shopping cart. To refine your search, type in additional search terms or keywords in the “Narrow Results” box. This is a
cumulative search feature that will continue to refine the search results based on terms or keywords. To display more entries on the page, select the amount desired; maximum is 100 per page. To re-sort the way items are displayed, click the associated column heading. To display item details, click “Show Details”; click “Hide Details” to collapse. To scroll through the results pages, click page numbers at the bottom of the page.
Additional Refinements to the Search Results Vendors―Click to view specific vendors that resulted from the search. Click a vendor name to narrow results to only that vendor. Price Range―Allows specifying a price range to narrow the search. Enter the range of prices and click “Go.” Click “Clear Price Filter” to reset. Category―Click to view the categories of products that resulted from the search. Click the category to narrow results to only that category. Contract―Click to view the contracts that resulted from the search. Click the contract to narrow results to only that category.
Note: All search refinements apply only to the number of entries returned in the initial search. The maximum number of results is 1,000 entries.

5
ADMINISTRATION TAB To update your user profile information, click “Edit My Profile” under the Administration tab; to save changes, click the “Save” button. If your profile is set as a group administrator, see “Group Administration.” RFQ TAB (Request for Quotation) The Request for Quotation (RFQ) feature of the BuyBoard lets you request additional discounted pricing (based on volume purchases) or obtain a written quote from one or more vendors. This feature works best in the following situations:
(1) You plan to purchase large quantities of items or several expensive items. (2) You want a written quote for a specific item you’ve seen on the BuyBoard.
Because BuyBoard vendors already have gone through a competitive procurement process, they may offer the best prices for the items they are selling through the BuyBoard. Nevertheless, many vendors may still be willing to offer greater discounts when they see the quantities or types of items you plan to purchase.
Note: Pricing sent through the RFQ feature is completely confidential, and vendors will have no knowledge of other vendors’ price quotes.
Three options are available under the RFQ tab:
• Create RFQ―Used to create a new RFQ. • Active RFQs―Displays a list of all current RFQs. To view a specific RFQ, click “View”
from the RFQ List. • RFQ Status Report―Allows viewing or printing a report of all RFQs you have created,
including the details of each.
Creating an RFQ
1. Click “Create RFQ” under the RFQ tab. 2. Select the Commodity from the dropdown list.
3. Select the vendors to receive the RFQ individually, or check the box for the contract which selects all vendors. Click “Next.” 4. Contact Name, Phone, and E-mail―Pre-populated based on your profile information. To change, insert the correct name,
phone number, or e-mail address.

6
5. Due Date
Note: You must allow at least 24 hours for vendors to respond. As a courtesy to vendors it is common practice to allow 3-7 days for response.
―Select the due date from the calendar that appears when you place your cursor in the field. Select the time from the dropdown list.
6. Delivery Address7.
―Pre-populated based on your profile. To change, insert the correct delivery address. RFQ File
8.
―Allows you to attach a file from your PC to the RFQ. Click “Browse” to select the file. Examples include drawings, extensive specifications, terms and conditions, etc. RFQ Title
9.
―Enter the title of the RFQ. This title should be brief and should distinguish it among any RFQs you may have created. Vendor Notes
Note: All fields with an asterisk (*) are required fields and must be filled out. ―These are any special instructions to vendors, such as delivery instructions, freight requirements, etc.
10. Click one of the following buttons at the bottom of the page: • Add/Edit Items―Continue to the next page to add the specific items requested in the RFQ. • View Summary―To view the contact information. • Save―To save the contact information entered and continue the RFQ at a later date.
11. Add/Edit RFQ Items: 1) Quantity2)
―Enter the quantity of the first item. Unit of Measure
3) ―Select from the dropdown list.
Pack Weight/Count
4)
―Enter the package amount for the item (i.e., 100 per box). This is not a required field but helps the vendor confirm the amount requested. Manufacturer
5)
―Enter the manufacturer name, if applicable. Not a required field, and multiple manufacturers can be entered. Manufacturer Model #
6)
―Since this is a more universal identifier of an item, it may assist vendors in quoting the correct item. Not a required field. Vendor Part #
7) ―Generally specific to a vendor. Not a required field.
Item Description
Note: Item specifications can be copied and pasted in the item description field from another program.
―Enter the specifications of the item. Thorough descriptions help ensure that the vendor’s response meets your requirements. Be sure to include color, size, and other relevant and specific details.
8) Click “Save Item.” 9) Repeat steps 1-8 to add additional items. 10) Click “View Summary” once all items have been added.

7
To edit contact information, click “Edit Contacts.”
From the RFQ Summary page, you have the following options:
• RFQ List•
―To view a list of all current RFQs. To view a specific RFQ, click “View.” Print
• ―To print a copy of the RFQ.
Edit Contact
•
―Returns to the contact information page to make changes regarding the contact information, due date and time, delivery address, etc. Add/Edit Items
• ―To add new items or edit and delete existing items.
Change Vendors
•
―To add or delete vendors who will receive the RFQ. Click “Save” at the bottom to save any changes. Click “Back” to return to the RFQ Summary page. Delete
• ―To delete the RFQ.
Send to Vendors•
―To submit the RFQ to the vendors. View File –
To view the attachment that was included as part of the RFQ. If no attachment was included button will not display.

8
Once the RFQ is submitted to the vendors, the RFQ Summary page will have the following options: • RFQ List•
―To view a list of all current RFQs. To view a specific RFQ, click “View.” Print
• ―To print a copy of the RFQ.
Edit Contact
•
―Returns to the contact information page. If you receive no responses to the RFQ, you can change the due date and time (up to 7 days past the original RFQ expiration) as well as other contact information to extend the date and time of the RFQ. Re-send Notice
•
―If you made a change to the due date and time, this will send e-mail notice again to all the selected vendors. Retract
•
―Removes the RFQ from the BuyBoard so it is not visible to vendors to respond. Sends e-mail notice to vendors notifying them the RFQ has been retracted. View File
– To view the attachment included with the RFQ. If no attachment was included button will not display.
Note: Only RFQs that have no response can be retracted. If you receive any response from a single vendor―even a no response―the option to extend the due date and time is not available, nor is the option to retract the RFQ.
Reviewing Responses to an RFQ Prior to the RFQ Close Date
As vendors reply to your RFQ, you can review their responses:
1. On the RFQ tab, click “Active RFQs” to see the RFQ List.
2. From the RFQ List, click “View” next to the RFQ to see a specific RFQ. 3. Click “Tabulate RFQ.” The Tabulate RFQ page indicates the items to which vendors responded. The items are
grouped by item number from the lowest to highest price.

9
Note: If some items do not appear on the Tabulate RFQ screen, this means no vendors responded to those items. Not all items have to be awarded at the same time. You may return to the Tabulate RFQ page as many times as you need to award items.
Tabulating an RFQ After the RFQ Close Date
When you tabulate an RFQ, you have the ability to award items to any vendors that responded to your RFQ. If multiple vendors responded, and each offered the lowest price for certain items, you can award each vendor the items they bid on.
1. Click the “RFQ” tab and select “Active RFQs.” 2. Click “Tabulate RFQ.” The Tabulate RFQ page indicates the items to which vendors responded. The items are
grouped by item number from the lowest to highest price. • Export Items
3. To award an item, click the “Awarded” button. If the item is no longer available, you will see “Expired” in place of the award button. Click “Unaward Item” above each item to remove the award. Click the vendor’s name to see vendor details. To view the item details, click “Show Details”; to return, click “Hide Details.”
―This provides an export to an Excel worksheet of the responding vendors’ information and pricing.
• View Award Report
•
―Creates a PDF report of responding vendors’ information, item responses, and awarded items. View Awarded Items
4. Once items are awarded, issue your purchase order in accordance with your normal processing policy and fax or e-mail to the BuyBoard.
―Creates a PDF report of items awarded by vendor.
Active RFQs The RFQ List page displays all current RFQs and indicates the status as New, Responded, or Retracted. To view a specific RFQ, click “View.”
RFQ Status Report This creates a report based on the criteria entered. Enter Start Due Date and End Due Date, select a vendor from the dropdown list or default to all, and select the status from the dropdown list. Click “View Report.”
To change your selection criteria, click “Change Criteria.” To print the report, click “Print.” To view the RFQ details including the awarded items, click the title of the RFQ.
• View Award Report―Creates a PDF report of responding vendor’s information, item responses, and awarded items.
• View Awarded Items―Creates a PDF report of items awarded to the vendor. To view a vendor’s response, click the vendor’s name.

10
PURCHASE ORDER TAB Note: This tab is only available if you have the assigned role to view this tab. Contact your
organization’s BuyBoard administrator or the BuyBoard if your role needs to be changed.
Purchase orders can be processed in one of three options. In all cases the generation of the purchase order is dictated by your organization’s normal policy and procedures when issuing a purchase order. Generating a purchase order is not available in the BuyBoard. Purchase orders are issued in the name of the vendor and should never be issued in the name of the BuyBoard.
Once a PO has been issued, you can follow one of the three options below:
1) Submit the purchase order through the BuyBoard to the vendor by attaching a copy to the BuyBoard Purchase Order notice.
2) Fax the PO to the BuyBoard at 800.211.5454. BuyBoard staff will process and attach the PO to the BuyBoard transaction notice. If the PO has already been sent to the vendor, please mark the PO as “Record Only” or “Confirmation Only” so the PO is not duplicated. This type of PO will be shown as a “Record Only” when looking at the PO Status Report.
3) E-mail the PO to the BuyBoard at [email protected]. Again, BuyBoard staff will process and attach the PO to the BuyBoard transaction notice. If the PO has already been sent to the vendor, please mark the PO as “Record Only” or “Confirmation Only” so the PO is not duplicated. This type of PO will be shown as a “Record Only” when looking at the PO Status Report.
To submit a purchase order through the BuyBoard, follow the steps below:
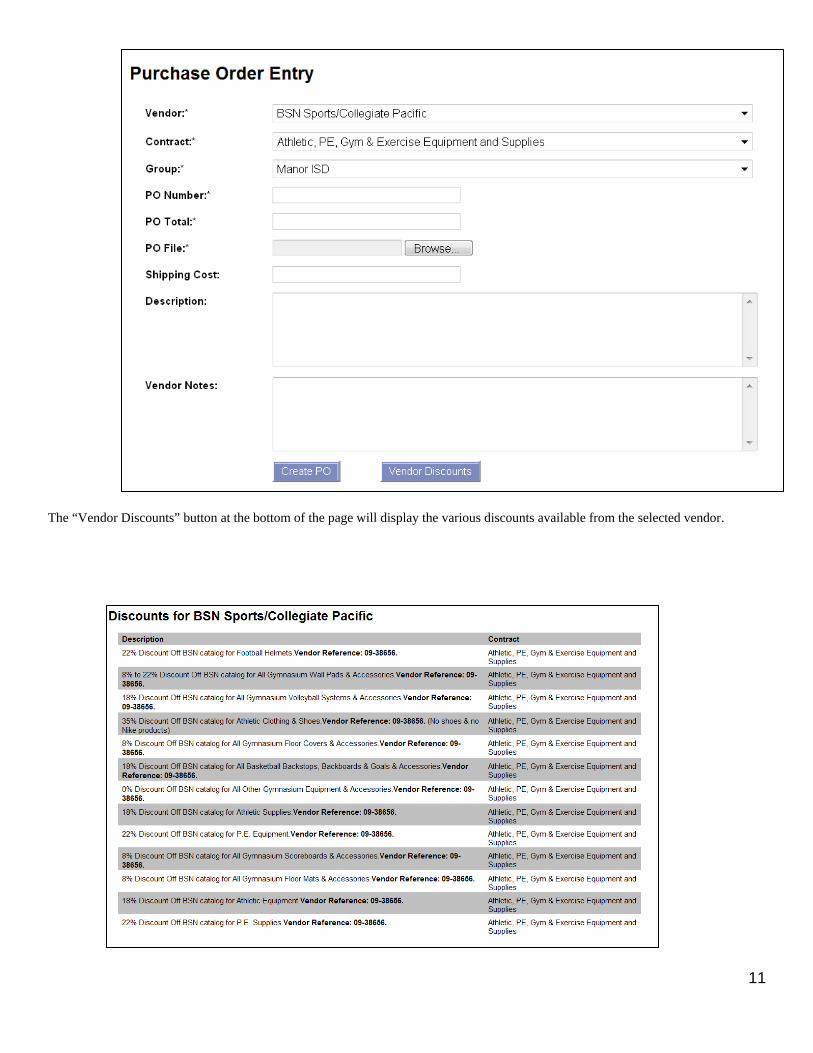
1. Click “Enter PO” from the Purchase Order tab. 2. Vendor―Select the vendor from the dropdown list. 3. Contract―Select the appropriate contract for the items being purchased. In some cases vendors have been
awarded multiple contracts. 4. Group―Defaulted to your group, based on your log-in profile. 5. PO Number―Enter the purchase order number. 6. PO Total―Enter the purchase order total. 7. PO File―Click “Browse” to attach a copy of the purchase order from your computer or network. 8. Shipping Cost―Not a required field, but you can enter any shipping cost associated with the purchase order.
Leave blank if none apply. 9. Description―Not a required field, but you can enter a general brief description of the purchase order (i.e., custodial
supplies for ABC school, patrol car for police department). 10. Vendor Notes―Not a required field, but you can enter any special instructions such as delivery or freight
requirements. 11. Click “Create PO” to submit to the vendor. The transaction information as well as your copy of the purchase order
will be sent via e-mail or fax to the vendor.
11
The “Vendor Discounts” button at the bottom of the page will display the various discounts available from the selected vendor.
12
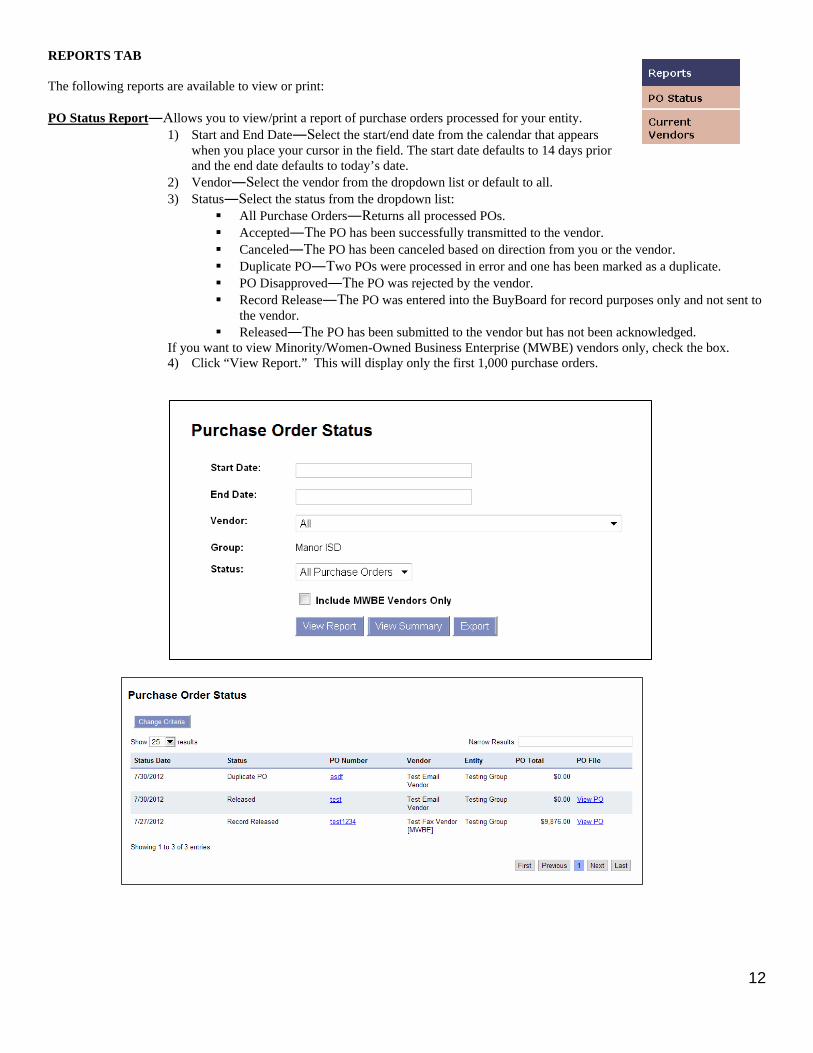
REPORTS TAB The following reports are available to view or print: PO Status Report
1) Start and End Date―Select the start/end date from the calendar that appears ―Allows you to view/print a report of purchase orders processed for your entity.
when you place your cursor in the field. The start date defaults to 14 days prior and the end date defaults to today’s date.
2) Vendor―Select the vendor from the dropdown list or default to all. 3) Status―Select the status from the dropdown list:
All Purchase Orders―Returns all processed POs. Accepted―The PO has been successfully transmitted to the vendor. Canceled―The PO has been canceled based on direction from you or the vendor. Duplicate PO―Two POs were processed in error and one has been marked as a duplicate. PO Disapproved―The PO was rejected by the vendor. Record Release―The PO was entered into the BuyBoard for record purposes only and not sent to
the vendor. Released―The PO has been submitted to the vendor but has not been acknowledged.
If you want to view Minority/Women-Owned Business Enterprise (MWBE) vendors only, check the box. 4) Click “View Report.” This will display only the first 1,000 purchase orders.

13
To search your results, you can use the Narrow Results field to search by date, status, PO number, vendor, or PO
total. This is a cumulative search feature that will continue to refine the search results based on terms or keywords. To search by PO total, be sure to use the $ sign.
To re-sort the status date, status, PO number, vendor, or PO total, click the column heading. To display more entries on the page, select the amount desired; maximum is 100 per page. Click the PO number to view the PO header, vendor, and status information. To page through the results, click the page numbers at the bottom of the page. To view the PO, click “View PO.” This will display the PO in a PDF.
View Summary―Provides a summary report by status and PO total based on the criteria selected. Export―Provides an Excel spreadsheet export based on the criteria selected.
Current Vendors Report
―Provides a PDF report of vendors by commodity/contract. Report can be run by all commodities/contracts or selected commodity/contract using the dropdown. If you want to view Minority/Women-Owned Business Enterprise (MWBE) vendors only, check the box. Click “View Report” to generate.

14
SHOPPING CART TAB Displays the items that you have added to your shopping cart.
Click the vendor’s name to display the Vendor Contract Information Page. Click “Proposal Document” to view the proposal solicitation documents.
To change an item quantity, just type in the new quantity. The extended price will automatically be updated. To delete the item entirely, click “Remove.” To view the item details, click “Show Details.” Click “Hide Details” to return. Click “Empty Cart” to delete all items in the Shopping Cart. Click “Print” to print the shopping cart page as displayed. Click “View Shopping Cart Report” to create a PDF report sorted and totaled by vendor.
Contact Us – Provides an e-mail to [email protected]. Resources
• Quick Reference Guide for Members
– The Resources page gives you access to a wide range of information and reports, including:
• Vendors List in PDF and Excel • How to refer a vendor to the BuyBoard • Current Proposals due dates • Contract Expiration Schedule • Conference Listing that BuyBoard staff are attending • Members Listing of current BuyBoard members • Cooperative Board of Trustees • Texas Region Map

15
GROUP ADMINISTRATION
If you are a designated group administrator for your organization, you will see additional options under the Administration and Reports tabs. Administration Tab
• Create User―Allows you to set up new users in the BuyBoard and select the appropriate security roles. The security role for Self-Registration can be used to create a general self-registration form that can be provided to staff to register themselves. If this is used, staff will only be assigned the Shopper security role. Additional security roles would have to be checked once the individual has established their user profile. The fields with * are required fields.
• Edit User―Allows you to edit or delete the profile of an existing user. • Edit My Profile―Allows you to edit your personal profile.
Reports Tab
• PO Status―Allows you to view/print a report of purchase orders processed for your entity. Follow the steps above in the Reports tab.
• Current Vendors―Provides a PDF report of vendors by commodity/contract. Follow the steps above in the Reports tab.
• Group Users―Provides a report on active user activity that includes Name, User Name, E-mail, Last Login, Group, and Security Role. To include any Inactive Users, check the box.
• Login Summary―Provides a report on user login information by date. Select the Start/End date from the calendar that appears when you place your cursor in the field. When the summary page appears, you can select a specific date by clicking on the date to view the user(s) who have logged in.

16
Instructional Materials Search Click on the Instructional Materials search link on the left.
Users will need to first select a product type (out of Instructional Materials, Technology Equipment, and Technology Services).
Depending on the selection in the first box, other pull-down options will appear. There will be different options for each type of search. Search #1 – Instructional Materials Instructional Materials are books, or sometimes software or an online resource. Due to the nature of the products, there are some built-in considerations in searching. The most efficient and accurate way to search is through the Multiple List Code (MLC). This is a 4-digit code that uniquely identifies the subject area, grade level, and grade for each product. In the absence of an MLC, a Subject/Grade combination should be used. In summary, the search requires 1) MLC –OR- 2) subject/grade –OR- 3) subject/grade level. Another option is to only search by vendor without selecting MLC or Subject Grade, or Subject Grade level.

17
Keyword search may be used alone, but has the potential to bring a large number of results. This type of search would be used to locate dictionaries or content not specific to a grade or subject. Keyword searches include the following fields: Vendor name Description ISBN# Related ISBN# Full Description Brand Part number Vendor Product Category Author Material type Media format
Clicking the “Show Details” link brings up additional information about the item that the vendor provided.

18
Search #2 – Technology Equipment When searching for Technology Equipment, the only field required to search is Category
. Category may be combined with the other optional pull-down and keyword options.
Search #3 – Technology Services The only required field for searching Technology Services is Category. Vendor or keyword may be selected in addition to Category.
19
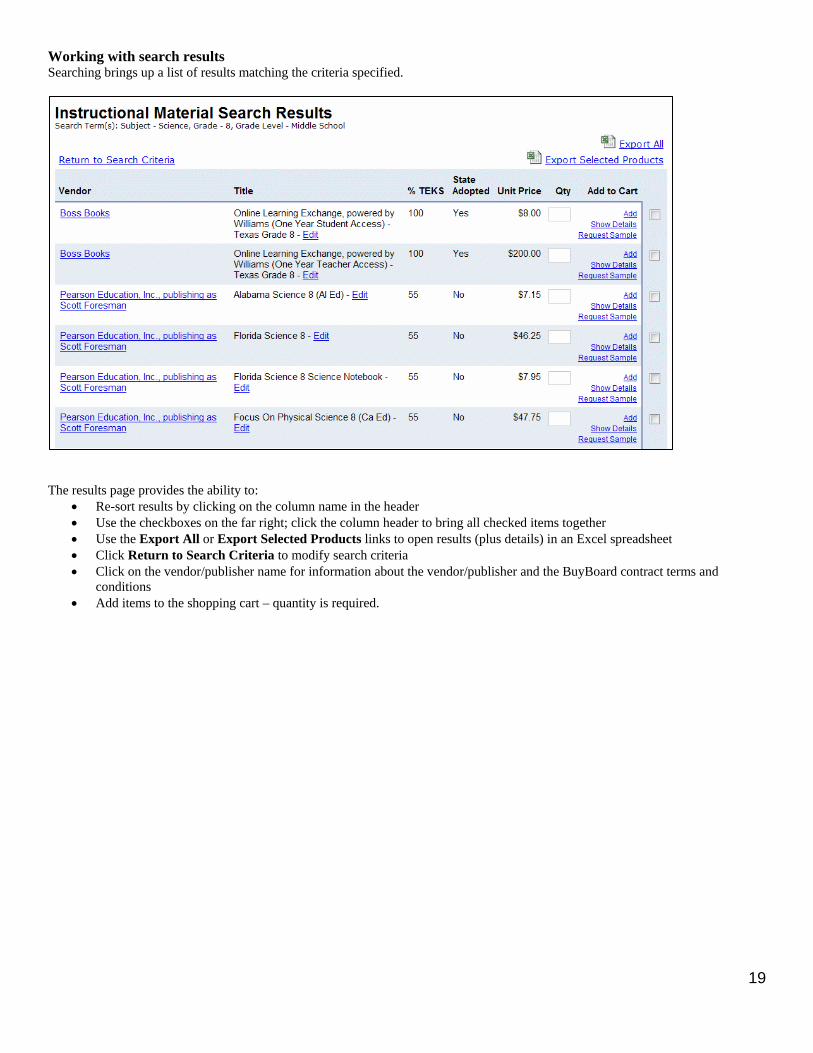
Working with search results Searching brings up a list of results matching the criteria specified.
The results page provides the ability to:
• Re-sort results by clicking on the column name in the header • Use the checkboxes on the far right; click the column header to bring all checked items together • Use the Export All or Export Selected Products links to open results (plus details) in an Excel spreadsheet • Click Return to Search Criteria to modify search criteria • Click on the vendor/publisher name for information about the vendor/publisher and the BuyBoard contract terms and
conditions • Add items to the shopping cart – quantity is required.
20
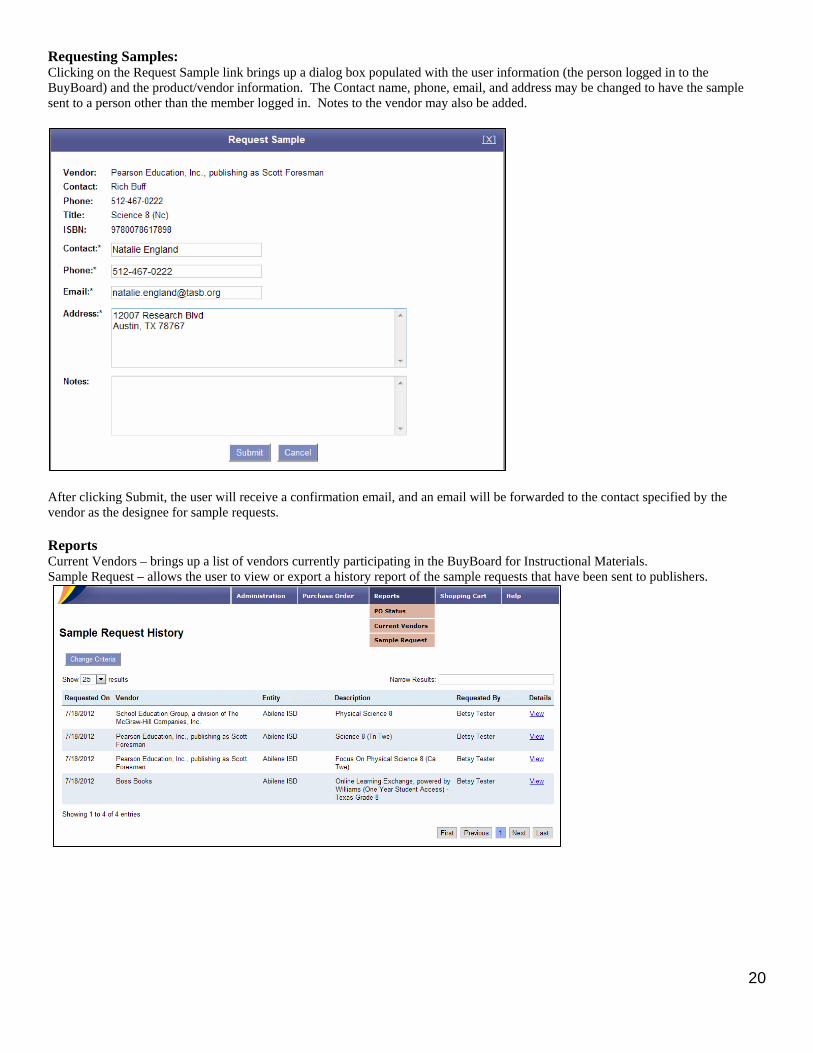
Requesting Samples: Clicking on the Request Sample link brings up a dialog box populated with the user information (the person logged in to the BuyBoard) and the product/vendor information. The Contact name, phone, email, and address may be changed to have the sample sent to a person other than the member logged in. Notes to the vendor may also be added.
After clicking Submit, the user will receive a confirmation email, and an email will be forwarded to the contact specified by the vendor as the designee for sample requests. Reports Current Vendors – brings up a list of vendors currently participating in the BuyBoard for Instructional Materials. Sample Request – allows the user to view or export a history report of the sample requests that have been sent to publishers.
21
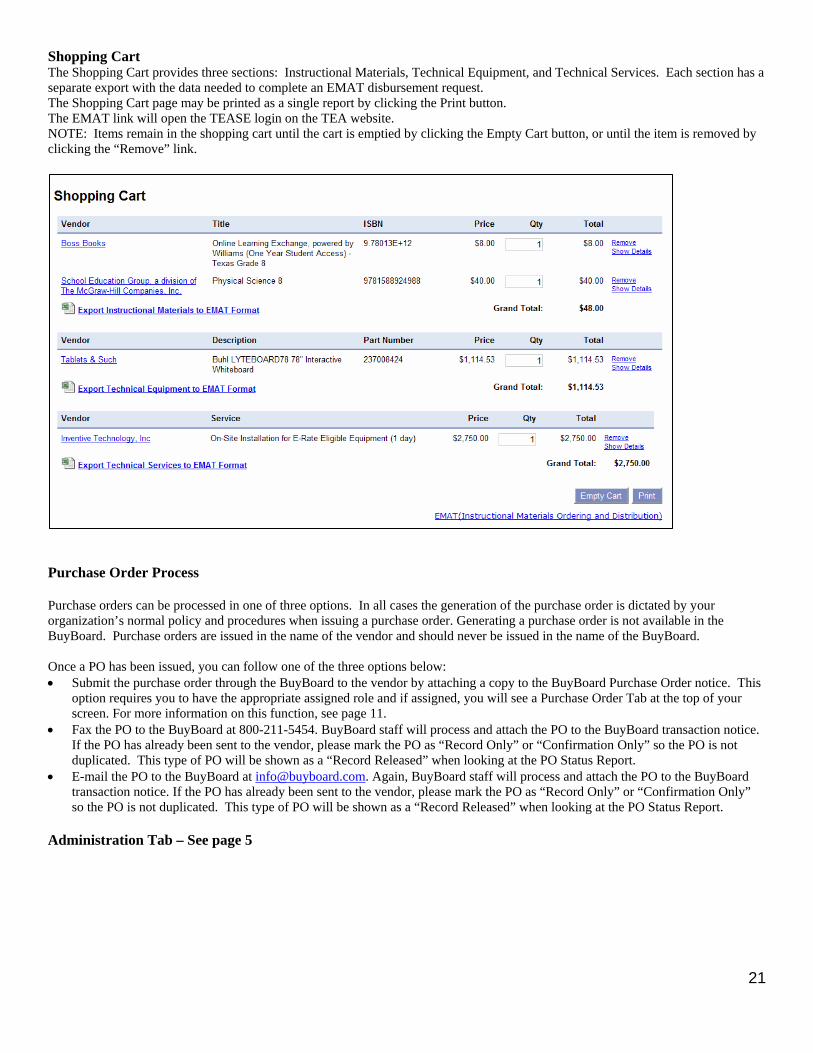
Shopping Cart The Shopping Cart provides three sections: Instructional Materials, Technical Equipment, and Technical Services. Each section has a separate export with the data needed to complete an EMAT disbursement request. The Shopping Cart page may be printed as a single report by clicking the Print button. The EMAT link will open the TEASE login on the TEA website. NOTE: Items remain in the shopping cart until the cart is emptied by clicking the Empty Cart button, or until the item is removed by clicking the “Remove” link.
Purchase Order Process Purchase orders can be processed in one of three options. In all cases the generation of the purchase order is dictated by your organization’s normal policy and procedures when issuing a purchase order. Generating a purchase order is not available in the BuyBoard. Purchase orders are issued in the name of the vendor and should never be issued in the name of the BuyBoard.
Once a PO has been issued, you can follow one of the three options below: • Submit the purchase order through the BuyBoard to the vendor by attaching a copy to the BuyBoard Purchase Order notice. This
option requires you to have the appropriate assigned role and if assigned, you will see a Purchase Order Tab at the top of your screen. For more information on this function, see page 11.
• Fax the PO to the BuyBoard at 800-211-5454. BuyBoard staff will process and attach the PO to the BuyBoard transaction notice. If the PO has already been sent to the vendor, please mark the PO as “Record Only” or “Confirmation Only” so the PO is not duplicated. This type of PO will be shown as a “Record Released” when looking at the PO Status Report.
• E-mail the PO to the BuyBoard at [email protected]. Again, BuyBoard staff will process and attach the PO to the BuyBoard transaction notice. If the PO has already been sent to the vendor, please mark the PO as “Record Only” or “Confirmation Only” so the PO is not duplicated. This type of PO will be shown as a “Record Released” when looking at the PO Status Report.
Administration Tab – See page 5