using vmware infrastructure for backup and restore · vmware best practices introduction backup,...
TRANSCRIPT
Using VMware Infrastructure for Backup and Restore
B E S T P R A C T I C E S
�
VMware BEST PRAC TICES
Table of Contents
Introduction ............................................................................................................ 3
VMware Infrastructure and VMware eSX Server ................................................... 3
Disk Structure of eSX Server .................................................................................. 4
Virtual Machine Disks ............................................................................................. 4
Disk Files and redo Log Files ................................................................................. 4
raw Device Mappings ............................................................................................. 4
VMware Consolidated Backup................................................................................ 5
accessing and Managing Virtual Disk Files ........................................................... 6
Backing Up eSX Server and Virtual Machines ....................................................... 6
Treating Virtual Machines as Physical Machines ................................................... 7
Treating Virtual Machines as Files on an eSX Server Host .................................... 7
Treating Virtual Machines as Files on Shared Storage .......................................... 8
Consolidated Backup: Moving the workload Off the Server ................................ 8
Backing Up Virtual Machines as Physical Machines .............................................. 9
Creating Backup Copies of Virtual Machine Files on an eSX Server Host ............. 10
Built-in VMware File Operations ............................................................................ 10
Using vmkfstools .................................................................................................... 10
Using vcbMounter and vcbrestore ........................................................................ 10
Using a Backup agent on the Service Console ...................................................... 11
Backup Off-Loading ................................................................................................ 13
SaN Image ............................................................................................................... 13
Using VMware Consolidated Backup ..................................................................... 13
appendix a: vcbMounter and vcbrestore ............................................................ 14
appendix B: Using vmkfstools ............................................................................... 18
Glossary .................................................................................................................. 19
references .............................................................................................................. 19
�
VMware BEST PRAC TICES
IntroductionBackup, restore, and disaster recovery are among the most crucial elements of datacenter management. VMware® ESX Server and VMware Infrastructure provide many different capa-bilities to improve these processes. Each approach has its own advantages and disadvantages, and different environments favor different solutions. The flexibility provided by VMware Infrastructure allows you to integrate ESX Server backup and restore procedures into your existing methodologies and pro-cedures. You may also find that the unique nature of VMware technology offers new and more advantageous ways of approaching these critical tasks.
This white paper describes what resources should be backed up on an ESX Server system and explains the options available for that backup, including advantages and disadvantages of each option. The paper also offers some recommendations based on these trade-offs.
Using VMware Infrastructure for Backup and restore
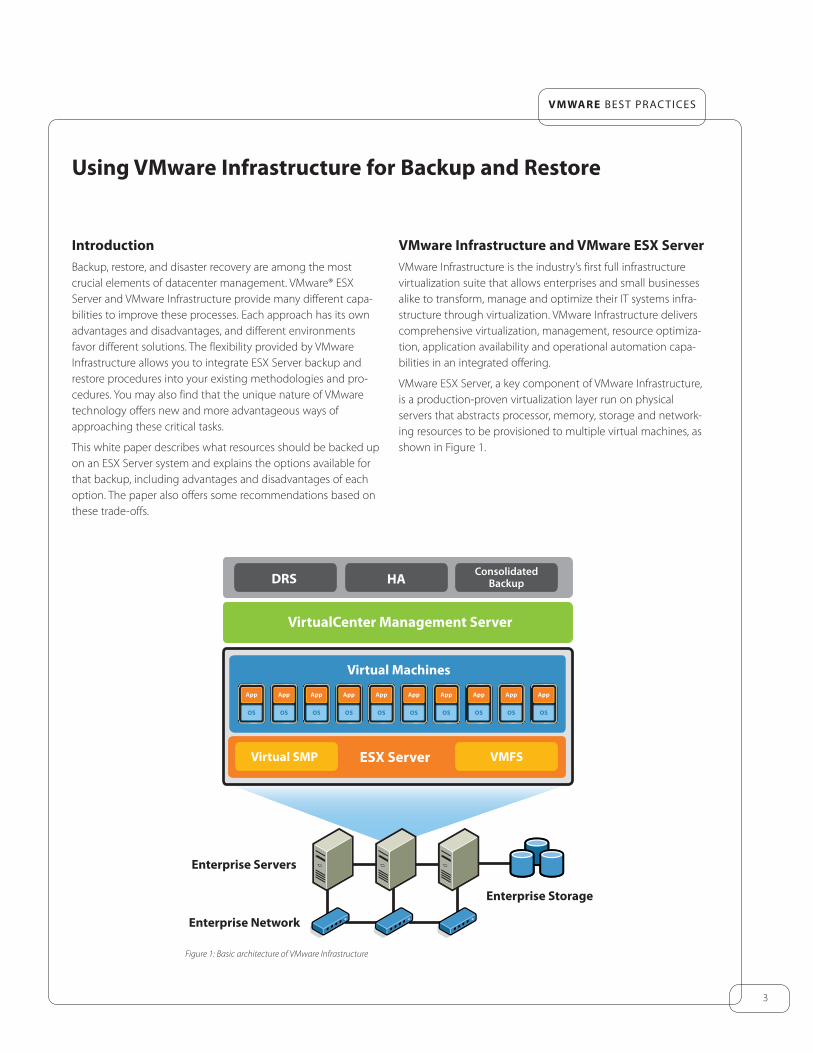
VMware Infrastructure and VMware eSX ServerVMware Infrastructure is the industry’s first full infrastructure virtualization suite that allows enterprises and small businesses alike to transform, manage and optimize their IT systems infra-structure through virtualization. VMware Infrastructure delivers comprehensive virtualization, management, resource optimiza-tion, application availability and operational automation capa-bilities in an integrated offering.
VMware ESX Server, a key component of VMware Infrastructure, is a production-proven virtualization layer run on physical servers that abstracts processor, memory, storage and network-ing resources to be provisioned to multiple virtual machines, as shown in Figure 1.
VMware Infrastructure
Enterprise Storage
Enterprise Servers
Enterprise Network
ESX ServerVirtual SMP VMFS
Virtual Machines
OS
App
OS
App
OS
App
OS
App
OS
App
OS
App
OS
App
OS
App
OS
App
OS
App
VirtualCenter Management Server
ConsolidatedBackup DRS HA
Figure 1: Basic architecture of VMware Infrastructure
�
VMware BEST PRAC TICES
Disk Structure of eSX ServerESX Server uses the VMware VMFS file system for storage of virtual machines. VMware VMFS is a high-performance file system on physical SCSI disks and partitions, including SAN and iSCSI storage systems. It is optimized for storing large files such as virtual disk images and the memory images of suspended virtual machines.
ESX Server � usesVMware VMFS �, an enhanced version of the file system used in earlier releases of ESX Server. One key feature of VMware VMFS � is support for subdirctories, allowing ESX Server to store multiple virtual machines separately in their own subdirectories.
Because files stored on the VMware VMFS file system may exceed �GB, they cannot always be accessed and manipulated using the same tools used for files on a standard ext�, ext�, FAT, or NTFS file system.
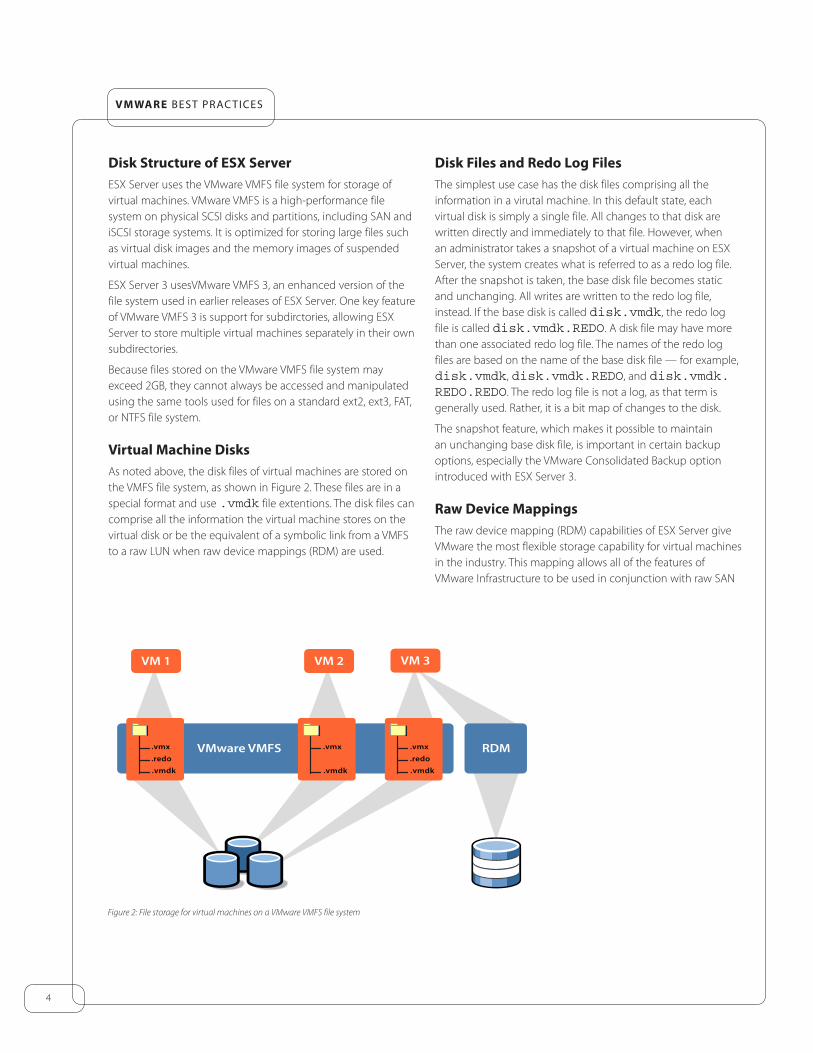
Virtual Machine DisksAs noted above, the disk files of virtual machines are stored on the VMFS file system, as shown in Figure �. These files are in a special format and use .vmdk file extentions. The disk files can comprise all the information the virtual machine stores on the virtual disk or be the equivalent of a symbolic link from a VMFS to a raw LUN when raw device mappings (RDM) are used.
Disk Files and redo Log FilesThe simplest use case has the disk files comprising all the information in a virutal machine. In this default state, each virtual disk is simply a single file. All changes to that disk are written directly and immediately to that file. However, when an administrator takes a snapshot of a virtual machine on ESX Server, the system creates what is referred to as a redo log file. After the snapshot is taken, the base disk file becomes static and unchanging. All writes are written to the redo log file, instead. If the base disk is called disk.vmdk, the redo log file is called disk.vmdk.REDO. A disk file may have more than one associated redo log file. The names of the redo log files are based on the name of the base disk file — for example, disk.vmdk, disk.vmdk.REDO, and disk.vmdk.REDO.REDO. The redo log file is not a log, as that term is generally used. Rather, it is a bit map of changes to the disk.
The snapshot feature, which makes it possible to maintain an unchanging base disk file, is important in certain backup options, especially the VMware Consolidated Backup option introduced with ESX Server �.
raw Device MappingsThe raw device mapping (RDM) capabilities of ESX Server give VMware the most flexible storage capability for virtual machines in the industry. This mapping allows all of the features of VMware Infrastructure to be used in conjunction with raw SAN
VM 2VM 1 VM 3
VMware VMFS RDM.vmx
.redo
.vmdk
.vmx
.redo
.vmdk
.vmx
.vmdk
Figure 2
Figure 2: File storage for virtual machines on a VMware VMFS file system
�
VMware BEST PRAC TICES
LUNs. The virtual machine’s configuration refers to the mapping file — the file that is used to connect the raw LUN to the virtual machine — rather than to a virtual disk file. The information about the the raw LUN is stored in the mapping file. Thus, the mapping file becomes a consistent location in which the virtual machine can find its disk even if the virtual machine is moved to a new ESX Server system and the LUN is presented differently to each of those ESX Server systems
There are two modes for RDM — virtual compatibility and physical compatibility. Virtual compatibility mode allows a mapping to act exactly like a virtual disk file, including the use of snapshots. Physical compatibility mode allows direct SCSI access to the device being mapped for those applications that need lower-level disk access and control — such as storage array-based replication products, for example. In both cases, data is stored on the LUN or SCSI device, not in a virtual disk file.
In both modes, an RDM file in a VMFS volume manages metadata for its mapped device. There is a one-to-one mapping between mapping files and mapped devices. The mapping file is presented to the VMware Service Console as an ordinary disk file, available for file system operations. To the virtual machine, ESX Server presents the mapped device as a locally attached SCSI device.
In physical compatibility mode, RDM provides minimal SCSI virtualization of the mapped device. In this mode, the VMkernel passes all SCSI commands to the device with one exception: the Report LUNs command is virtualized so the VMkernel can
isolate the LUN to the virtual machine that owns it. Otherwise, all physical characteristics of the underlying hardware are exposed. Physical compatibility mode is useful when there is a need to run SAN management agents or other SCSI target-based software in the virtual machine. This mode is also useful for virtual-to-physical clustering for cost-effective high avail-ability.
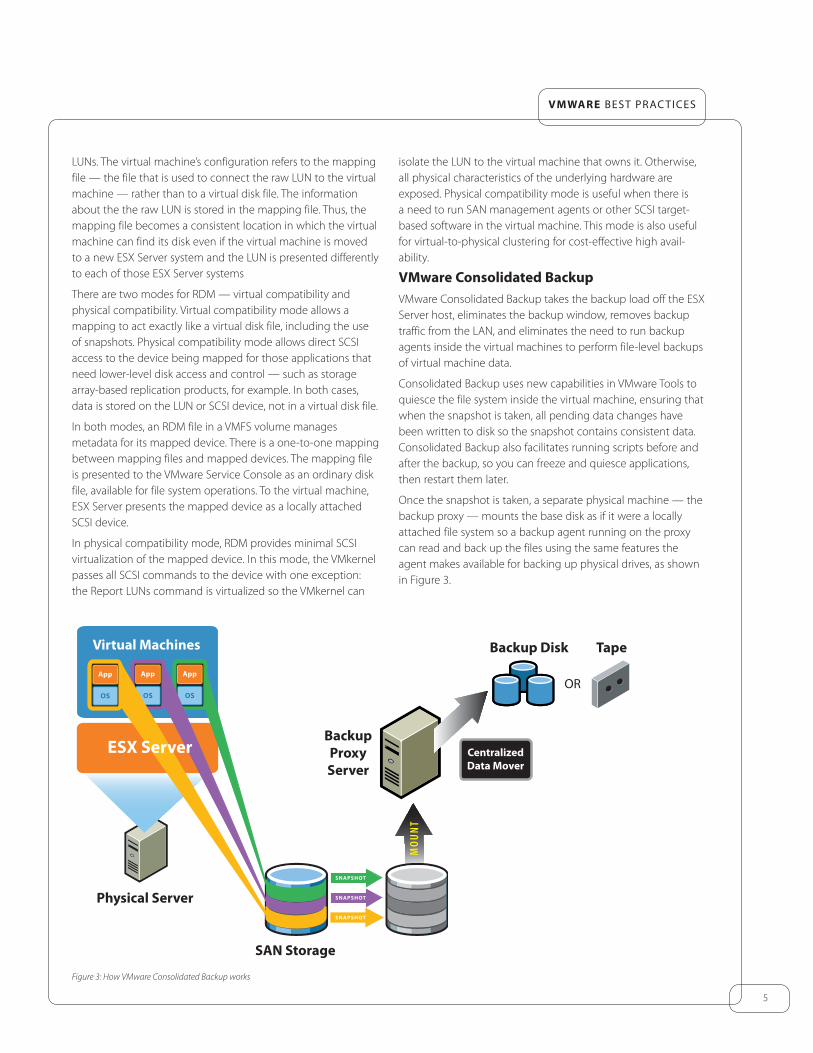
VMware Consolidated BackupVMware Consolidated Backup takes the backup load off the ESX Server host, eliminates the backup window, removes backup traffic from the LAN, and eliminates the need to run backup agents inside the virtual machines to perform file-level backups of virtual machine data.
Consolidated Backup uses new capabilities in VMware Tools to quiesce the file system inside the virtual machine, ensuring that when the snapshot is taken, all pending data changes have been written to disk so the snapshot contains consistent data. Consolidated Backup also facilitates running scripts before and after the backup, so you can freeze and quiesce applications, then restart them later.
Once the snapshot is taken, a separate physical machine — the backup proxy — mounts the base disk as if it were a locally attached file system so a backup agent running on the proxy can read and back up the files using the same features the agent makes available for backing up physical drives, as shown in Figure �.
Backup Disk Tape
BackupProxyServer
CentralizedData Mover
SAN Storage
OS
App
OS
App
Virtual Machines
OS
App
Physical Server
ESX Server
OR
Figure 3: How VMware Consolidated Backup works
�
VMware BEST PRAC TICES
accessing and Managing Virtual Disk FilesVirtual disk files on a VMFS are accessible through the ESX Server Service Console, VirtualCenter, the VMware SDK, and the backup proxy.
From the service console, files can be viewed and manipulated on VMFS volumes under the /vmfs directory with ordinary file commands. However, for various reasons, including speed and file integrity, it is better to use special-purpose commands built into ESX Server when you need to work with virtual disk files stored on a VMFS volume.
You can use the vmkfstools command to import and export .vmdk files. Most other operations provided by vmkfstools are available more conveniently through the Virtual Infrastructure Client.
The vcbMounter and vcbRestore utilities that automate many common backup and restore tasks are run from the service console. You can use vcbMounter, for example, to take a snapshot of a virtual machine, then export it. These two commands are discussed in a later section of this document.
Backing Up eSX Server and Virtual MachinesWhen thinking about what to backup on an ESX Server system, you may want to identify the items that need to be addressed for recovery. With ESX Server, there are three major components worth considering for backup:
• Virtual disks
• Virtual machine configuration files
• The configuration of the ESX Server system itself
Note that for a virtual machine, all the information normally backed up in the enterprise infrastructure, including the operat-ing system, applications, and data, is included in the virtual disks.
OptionsBecause a virtual machine is just like a physical machine, one possible approach is to back it up in the same manner as a physical machine, using backup software running inside a virtual machine. Backups run within a virtual machine allow for tradi-tional incremental and differential backups, though, as will be noted later, there are some disadvantages.
The newly introduced VMware Consolidated Backup approach provides the same flexibility of running traditional full, incre-mental, and differential backups in a Windows virtual machine but avoids the disadvantages of running a backup agent in the virtual machine.
Because an entire virtual machine is encapsulated in only a few files, it is very simple to back up all the files that make up a virtual machine. This approach makes it easy to get the entire virtual machine back to a previous known state at a known time.
Backing up the constituent files of the virtual machine also allows for easy checkpointing without any additional third-party software or hardware. Because you can create multiple levels of redo log files, you can maintain multiple snapshots. And by using redo log files, you can make true point-in-time copies without paying extra for SAN snapshot features.
Yet another possibility is off-line backups where files encapsulat-ing virtual machines are accessed and backed up without going through the ESX Server system on which the virtual machines normally run. You must use either the Consolidated Backup feature that supports export of a full virtual machine or storage replication if you use this approach.
Each approach to backing up virtual machines has its own advantages. Available backup methods also depend on the selected format of the virtual machine disks. In many cases, it is best to employ a combination of both methods for the best results.
�
VMware BEST PRAC TICES
Treating Virtual Machines as Physical MachinesVirtual machines provide complete guest operating systems on virtualized hardware. You can back up these operating system installations in the same ways as their physical counterparts. You may install a backup agent within each virtual machine and back up data over the network to other backup servers. You may copy data manually or with a script to another machine. Backing up a virtual machine in this way is precisely like backing up a physical machine. Finally, in very specific use cases, you may attach SCSI tape hardware to a virtual machine and run a media server within that virtual machine. See theVMware Infrastructure documentation for more details.
AdvantagesThe major advantage of this approach is that you can use consistent methodology to back up all the servers in your data center, whether physical or virtual. This approach also allows you to do a file-level backup and restoration and gives more flexibility in the choice of backup software. Backup software that has backup modules specific to the applications can be used to quiesce the applications for the duration of the backup. This method also makes incremental and differential backups easier.
DisadvantagesThe major disadvantage of this approach is that you cannot take advantage of the encapsulation of virtual machines into one or more discrete files. When you back up individual files within the guest operating system as files, you do not have the advantages of backing up and restoring the virtual machine
as a whole. Also, note that backup loads of � percent may be acceptable on one physical host, but multiply that by number of virtual machines and the load introduced by backups may be prohibitive.
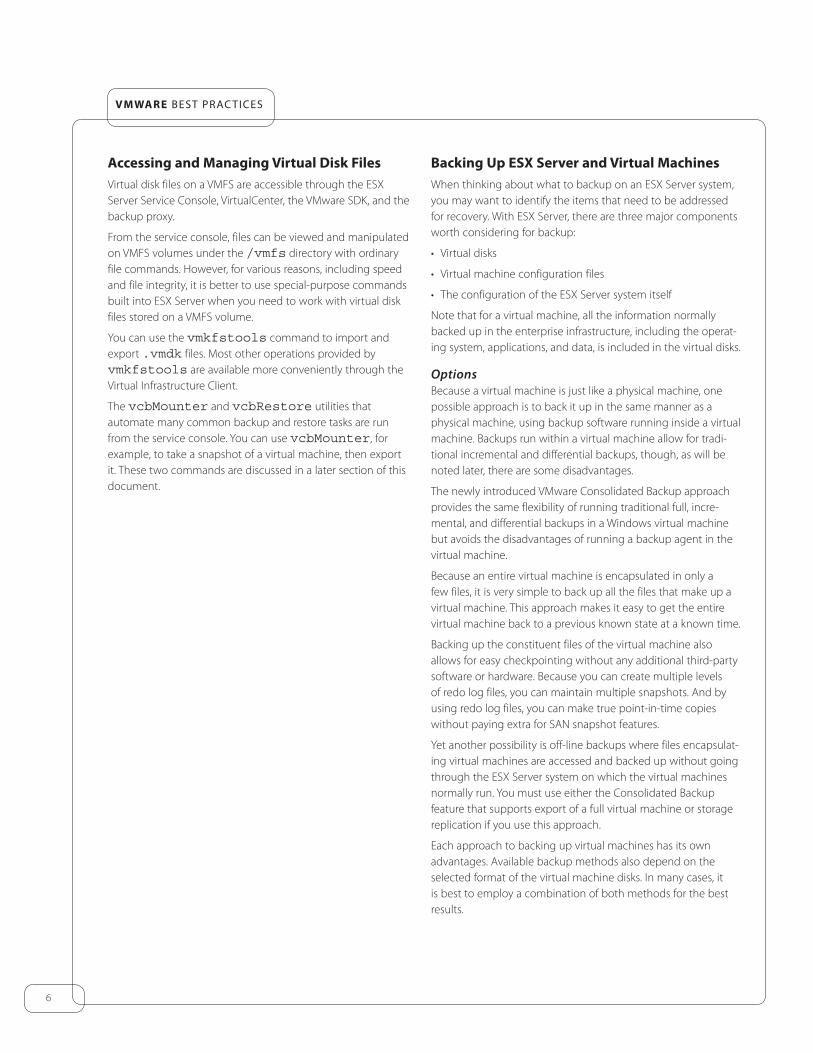
Treating Virtual Machines as Files on an eSX Server HostThis approach takes advantage of the service console’s ability to see each virtual machine’s virtual disk as a file. ESX Server creates one file per virtual disk (with redo logs stored separately). These .vmdk files can be backed up, essentially protecting an entire virtual hard drive in a single pass. This approach is not possible if you are using RDM disks for your virtual machines. To take advantage of this method while a virtual machine is running, you must use snapshots to back up the virtual machines, which use redo log files for writes while the backup is taking place. These redo log files are later commited and changes written to the .vmdk files.
AdvantagesThis approach allows you to back up or restore an entire vir-tualized server in one step. With disk snapshots and redo log manipulation, you can do near-line backups as explained in further detail in Appendix A.
DisadvantagesThe main disadvantages of this approach are that, although it is much simpler than a traditional file-level backup, it requires restoring the entire virtual machine even if you need to recover
VM 1
VMware VMFS RDM.vmx
.redo
.vmdk
.vmx
.redo
.vmdk
.vmx
.vmdk
Figure 4
VM 2 VM 3
Application
Operating System
BackupAgent
Application
Operating System
BackupAgent
Application
Operating System
BackupAgent
Figure 4: Key components to consider when implementing a backup agent on each virtual machine

�
VMware BEST PRAC TICES
only a single file. If you have extremely large virtual machines, you might have to restore tens of gigabytes of data to restore one needed file. Because this backup process treats the virtual disk as a whole and is not application aware, the backups created through this process are only file-system–consistent. Finally, the need to access large virtual disk files on VMFS — files that may be larger than �GB — may limit your choice of quali-fied backup software or necessitate additional intermediate processing. Note that all supported backup vendors can handle files larger than �GB. See Appendix B for details.
Treating Virtual Machines as Files on Shared StorageWhen virtual machine files reside on shared storage, it is possible to use storage-based imaging on storage such as SAN, NAS, or iSCSI, or an independent backup server (a proxy backup server or NDMP) to back up virtual machine files without creating an additional load on the ESX Server host that runs the virtual machines.
Consolidated Backup: Moving the workload Off the ServerAlthough the choice of backup and restore methods varies to suit different environments, many VMware customers, large and small, expressed great interest in certain common goals, such as reducing the time it takes to back up virtual machines, moving the workload off of production servers, and performing backups from a central server.
VMware developed the VMware Consolidated Backup feature to address these needs.
The approach used by Consolidated Backup is roughly analo-gous to removing the disk from a running computer, attaching it to a dedicated backup server, and backing up appropriate files from the disk — except that the original computer still sees the disk and can continue to run normally.
Note that the virtual disk can be identified by the same drive letter when it is attached to the backup server — the backup proxy — as it is when it is attached to the virtual machine. This preserves the drive letter identification a backup agent needs if it becomes necessary to restore files to the virtual disk. Most advanced clients from backup vendors also incorporate the concept of off-host backups and can accommodate that con-figuration easily.
AdvantagesThe key advantage of Consolidated Backup is that it removes the load of performing backups from the ESX Server system and places it on a dedicated computer, the backup proxy. Among other benefits, this approach effectively eliminates the need for a backup window.
Another major advantage of this approach is that you can use the same software and similar methodology to back up all the servers in your data center, whether those servers are physical or virtual. This approach also allows you to do file-level backups and restores, and it gives more flexibility in the choice of backup software. This method also supports incremental and differential backups. Backup software that has backup modules specific to your applications can be used to quiesce the applications when you prepare for the backup.
Consolidated Backup also offers the option of exporting a full virtual machine, allowing you to take advantage of the encapsu-lation of full virtual machines in a discrete set of files.
Consolidated Backup is aware of the VMware Distributed Resource Scheduler and VMware High Availability features in VMware Infrastructure. It can use the SAN network for backup rather than the main data network. In short, for most use cases Consolidated Backup provides the most efficient and consistent way to back up virtual machines.
Considering these advantages, most VMware Infrastructure users are likely to adopt Consolidated Backup. High customer interest is prompting further development, with an increasing number of vendors readying their products to work with this technology. Consolidated backup is fast becoming a dominant backup tech-nology to protect the virtual infrastructure.
DisadvantagesIf you choose to back up individual files within the guest operat-ing system as files, you do not have the advantages of backing up and restoring the virtual machine as a whole. Also note that to restore files backed up with Consolidated Backup, you must have a backup agent installed in the virtual machine and restore the files from within the running virtual machine.
Consolidated Backup brings many innovations to protecting virtual machines, but it may not be suitable in all situations.
• In VMware Infrastructure �, Consolidated Backup does not support file-level backup of guest operating systems other than Windows. Only image backups are supported. There is no incremental backup capability for systems other than Windows, either.
�
VMware BEST PRAC TICES
• If you need to perform frequent restores, Consolidated Backup does not save any cycles, because restores can be two-step process, especially when you need to restore only partial sets of files.
• Although few users of VMware Infrastructure � face this problem, Consolidated Backup does not work with Windows snapshot tools such as VSS.
Consolidated Backup must be implemented only after careful consideration of these factors.
Backing Up Virtual Machines as Physical MachinesCompatible with the following virtual driver formats:
• Virtual disks (all formats)
• RDM disks (all formats)
Issues to ConsiderThe following issues need to be considered before you decide on a backup method:
• The network configuration
• The type of long term storage
Implementation Steps1) Set up.
a) Install the backup agent of your choice on each virtual machine to be backed up.
b) Schedule the backups and manage the tapes as directed by the documentation for your backup program.
c) Configure your backup server or node. If the backup server is installed in a virtual machine on the ESX Server host, the following steps are required.
i) Attach the tape drive or library to a SCSI port on the ESX Server host.
ii) Use VirtualCenter to assign the tape drive to a virtual machine.
d) Configure the backup server to use the tape drive or library, installing the appropriate drivers and backup server software of choice.
�) Ensure that networking is configured for access between the backup server and virtual machines to be backed up. If both virtual machines to be backed up and the backup server are on the same ESX Server, you may use a private virtual network switch to connect them to each other.
�) Install the backup agent on all virtual machines to be backed up.
�) Backup and restore.
a) Follow the instructions for the backup software you installed.
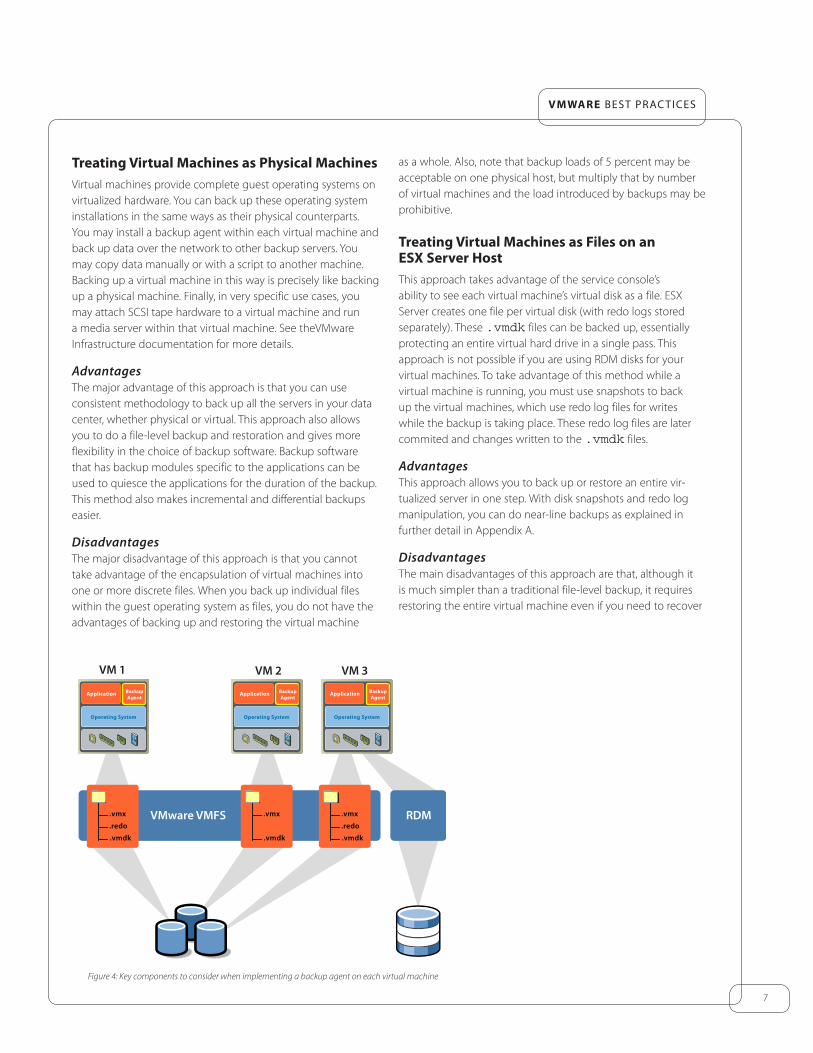
An example architecture for this backup method is shown in Figure �.
Figure 5: Example architecture for backing up virtual machines as physical machines
Operating System
Application Application
Operating System
VMware Virtualization Layer
x86 Architecture
C P U Memory N I C Disk
BackupAgent
Backupagent
Tape Array
BackupServer
10
VMware BEST PRAC TICES
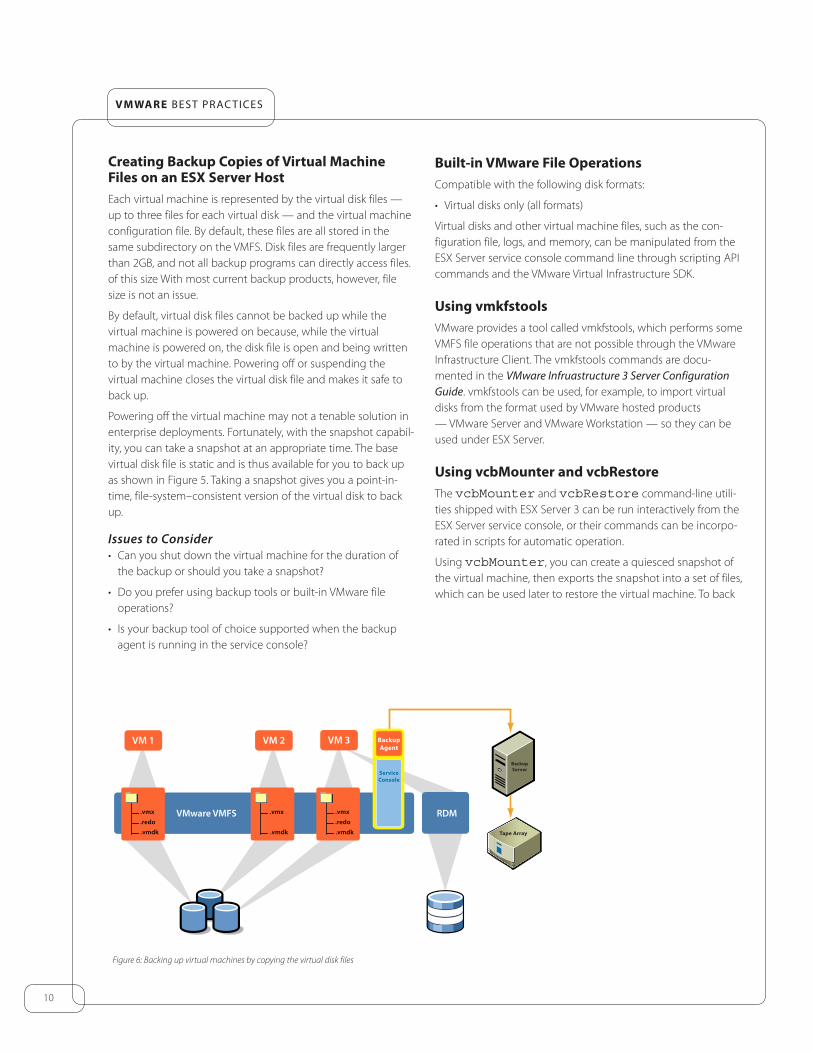
Creating Backup Copies of Virtual Machine Files on an eSX Server HostEach virtual machine is represented by the virtual disk files — up to three files for each virtual disk — and the virtual machine configuration file. By default, these files are all stored in the same subdirectory on the VMFS. Disk files are frequently larger than �GB, and not all backup programs can directly access files. of this size With most current backup products, however, file size is not an issue.
By default, virtual disk files cannot be backed up while the virtual machine is powered on because, while the virtual machine is powered on, the disk file is open and being written to by the virtual machine. Powering off or suspending the virtual machine closes the virtual disk file and makes it safe to back up.
Powering off the virtual machine may not a tenable solution in enterprise deployments. Fortunately, with the snapshot capabil-ity, you can take a snapshot at an appropriate time. The base virtual disk file is static and is thus available for you to back up as shown in Figure �. Taking a snapshot gives you a point-in-time, file-system–consistent version of the virtual disk to back up.
Issues to Consider• Can you shut down the virtual machine for the duration of
the backup or should you take a snapshot?
• Do you prefer using backup tools or built-in VMware file operations?
• Is your backup tool of choice supported when the backup agent is running in the service console?
Built-in VMware File OperationsCompatible with the following disk formats:
• Virtual disks only (all formats)
Virtual disks and other virtual machine files, such as the con-figuration file, logs, and memory, can be manipulated from the ESX Server service console command line through scripting API commands and the VMware Virtual Infrastructure SDK.
Using vmkfstoolsVMware provides a tool called vmkfstools, which performs some VMFS file operations that are not possible through the VMware Infrastructure Client. The vmkfstools commands are docu-mented in the VMware Infruastructure 3 Server Configuration Guide. vmkfstools can be used, for example, to import virtual disks from the format used by VMware hosted products — VMware Server and VMware Workstation — so they can be used under ESX Server.
Using vcbMounter and vcbrestoreThe vcbMounter and vcbRestore command-line utili-ties shipped with ESX Server � can be run interactively from the ESX Server service console, or their commands can be incorpo-rated in scripts for automatic operation.
Using vcbMounter, you can create a quiesced snapshot of the virtual machine, then exports the snapshot into a set of files, which can be used later to restore the virtual machine. To back
Figure 6: Backing up virtual machines by copying the virtual disk files
VMware VMFS RDM.vmx
.redo
.vmdk
.vmx
.redo
.vmdk
.vmx
.vmdk
Figure 6
Tape Array
BackupServer
ESX Server
BackupAgent
ServiceConsole
ESX ServerVM 2VM 1 VM 3
11
VMware BEST PRAC TICES
up the set of files, you can use any file-based third-party backup software.
A detailed description of the command options for vcbMounter and vcbRestore utilities is available in Appendix A.
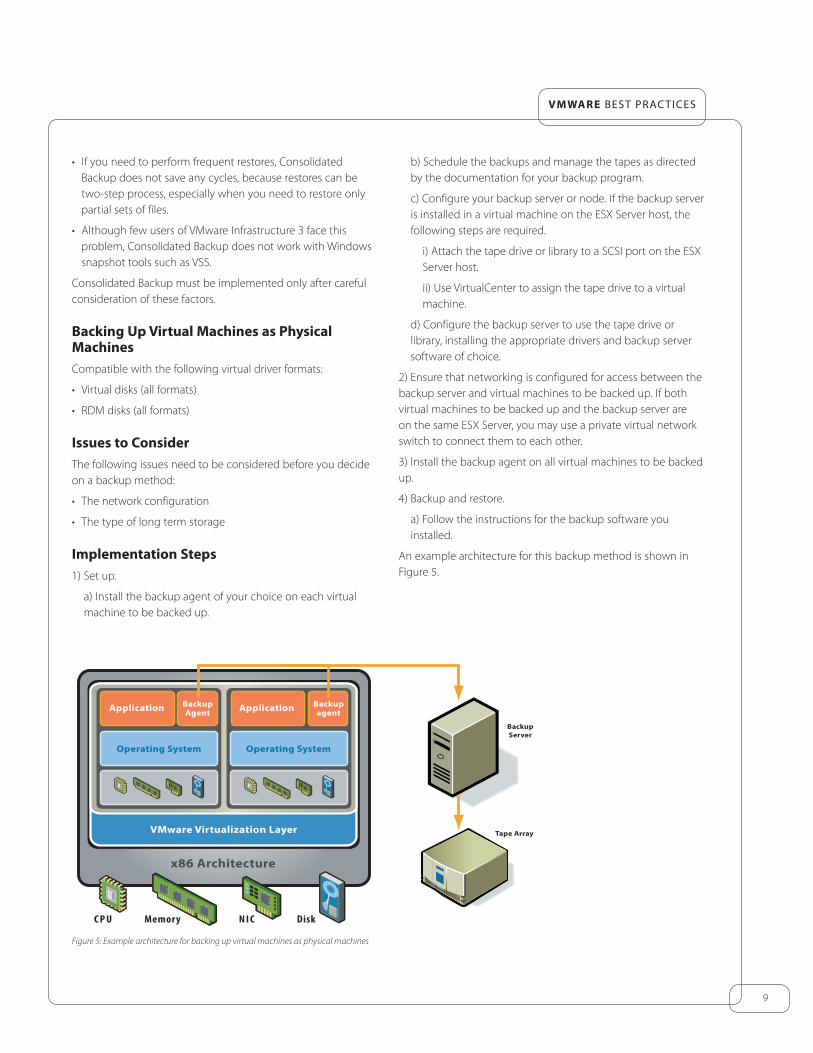
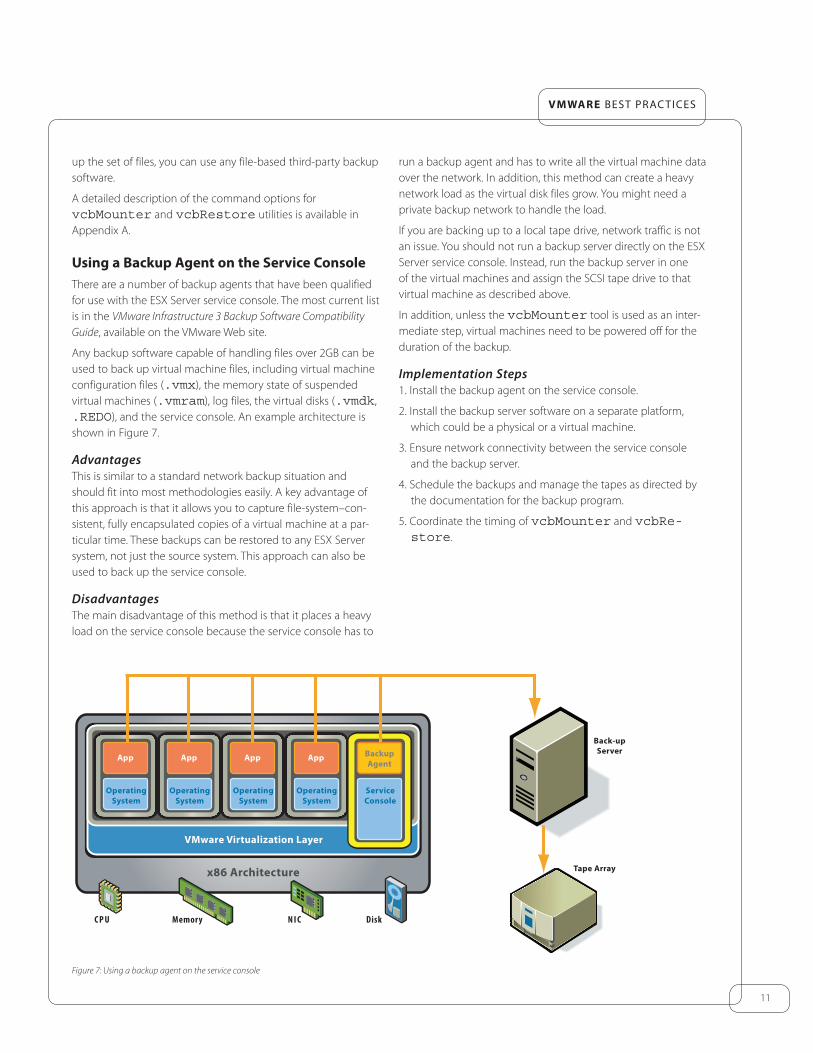
Using a Backup agent on the Service ConsoleThere are a number of backup agents that have been qualified for use with the ESX Server service console. The most current list is in the VMware Infrastructure 3 Backup Software Compatibility Guide, available on the VMware Web site.
Any backup software capable of handling files over �GB can be used to back up virtual machine files, including virtual machine configuration files (.vmx), the memory state of suspended virtual machines (.vmram), log files, the virtual disks (.vmdk, .REDO), and the service console. An example architecture is shown in Figure �.
AdvantagesThis is similar to a standard network backup situation and should fit into most methodologies easily. A key advantage of this approach is that it allows you to capture file-system–con-sistent, fully encapsulated copies of a virtual machine at a par-ticular time. These backups can be restored to any ESX Server system, not just the source system. This approach can also be used to back up the service console.
DisadvantagesThe main disadvantage of this method is that it places a heavy load on the service console because the service console has to
run a backup agent and has to write all the virtual machine data over the network. In addition, this method can create a heavy network load as the virtual disk files grow. You might need a private backup network to handle the load.
If you are backing up to a local tape drive, network traffic is not an issue. You should not run a backup server directly on the ESX Server service console. Instead, run the backup server in one of the virtual machines and assign the SCSI tape drive to that virtual machine as described above.
In addition, unless the vcbMounter tool is used as an inter-mediate step, virtual machines need to be powered off for the duration of the backup.
Implementation Steps1. Install the backup agent on the service console.
�. Install the backup server software on a separate platform, which could be a physical or a virtual machine.
�. Ensure network connectivity between the service console and the backup server.
�. Schedule the backups and manage the tapes as directed by the documentation for the backup program.
�. Coordinate the timing of vcbMounter and vcbRe-store.
App
Operating System
App
Operating System
App
Operating System
App
Operating System
ServiceConsole
VMware Virtualization Layer
x86 Architecture
BackupAgent
C P U Memory N I C Disk
Tape Array
Back-up Server
Figure 7: Using a backup agent on the service console
1�
VMware BEST PRAC TICES
You can create backups of virtual machines without shutting them down using the following procedure:
1. Make sure that the Netbackup DataCenter server is configured either in a physical machine or in a virtual machine and that there is network connectivity between the Netbackup server and the ESX Server service console.
�. Install Netbackup Linux RedHat �.� client from the Netbackup DataCenter Linux CD ROM.
�. Be sure you have set the appropriate parameters in /etc/vmware/backuptools.conf as described in Appendix A.
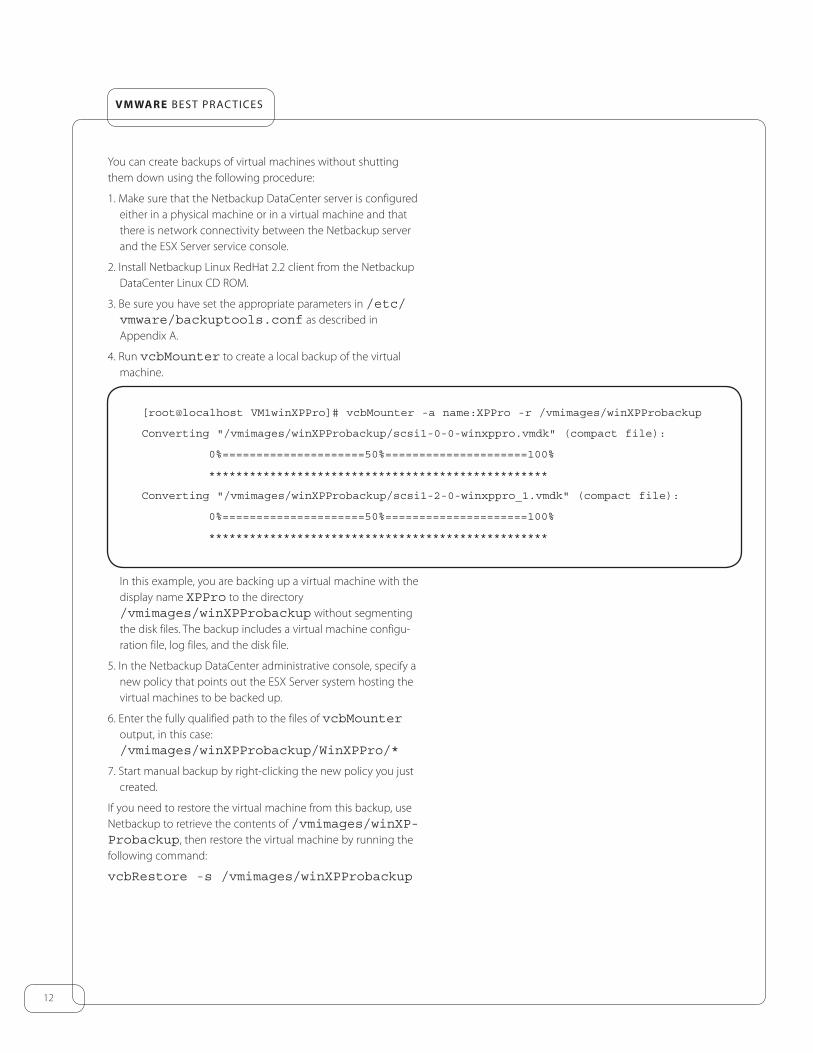
�. Run vcbMounter to create a local backup of the virtual machine.
In this example, you are backing up a virtual machine with the display name XPPro to the directory /vmimages/winXPProbackup without segmenting the disk files. The backup includes a virtual machine configu-ration file, log files, and the disk file.
�. In the Netbackup DataCenter administrative console, specify a new policy that points out the ESX Server system hosting the virtual machines to be backed up.
�. Enter the fully qualified path to the files of vcbMounter output, in this case: /vmimages/winXPProbackup/WinXPPro/*
�. Start manual backup by right-clicking the new policy you just created.
If you need to restore the virtual machine from this backup, use Netbackup to retrieve the contents of /vmimages/winXP-Probackup, then restore the virtual machine by running the following command:
vcbRestore -s /vmimages/winXPProbackup
[root@localhost VM1winXPPro]# vcbMounter -a name:XPPro -r /vmimages/winXPProbackup
Converting "/vmimages/winXPProbackup/scsi1-0-0-winxppro.vmdk" (compact file):
0%=====================50%=====================100%
**************************************************
Converting "/vmimages/winXPProbackup/scsi1-2-0-winxppro_1.vmdk" (compact file):
0%=====================50%=====================100%
**************************************************
1�
VMware BEST PRAC TICES
Backup Off-LoadingWhile each virtual machine is encapsulated in a few files that are visible and can be backed up from the ESX Server service console, doing so creates a noticeable load on the service console and can affect performance of the production server. It is possible to minimize impact on the production system by off-loading backup to specialized dedicated systems. This can be done with the snapshot functionality of storage area networks, using server-based replication, or using built-in snapshotting for virtual machine disks.
SaN ImageCompatible with the following drive formats:
• Virtual disks (all formats)
• RDM disks (all formats)
If your virtual disk files are stored on a SAN, you can use features supplied by your SAN vendor to create a copy of your produc-tion LUN, containing all virtual disks. These copies can then be sent to your backup media. Snapshotting and replicating SAN volumes requires the use of layered applications with the SAN. ESX Server is compatible with some SAN layered applications but not all, as standards are still evolving. Check the support matrix for the latest supported applications.
Using VMware Consolidated BackupCompatible with the following drive formats:
• Virtual disks (all formats)
Issues to ConsiderThe following issues need to be considered before you decide on a backup method:
• Can you provide one or more systems to serve as dedicated backup proxies?
• Do you want to keep backup data traffic off your network?
• Do you want to avoid the additional CPU load needed for backups on your ESX Server hosts?
• Do you want a backup method that does not require virtual machine downtime?
• Do you want to be able to back up powered-off virtual machines?
Implementation Steps1) Set up the backup proxy system. It must use the Windows Server �00� operating system.
�) Configure the backup proxy for access to the SAN on which the virtual machines you want to back up are stored.
�) Configure the backup proxy for access to the tape drive or library you will use to store your backups.
�) Install the backup agent for your backup software of choice on the backup proxy.
�) Install the Consolidated Backup software on the backup proxy.
�) Be sure VMware Tools is installed in each of the virtual machines you want to back up. In addition, to support restor-ing backed up files, install the backup agent for your backup software of choice in each of these virtual machines.
�) If special steps are required to quesce the files for particular programs running in a virtual machine, create the appropriate scripts to carry out those steps before each backup.
�) Follow the instructions in the VMware Infrastructure 3 Virtual Machine Backup Guide and the documentation for your backup software to perform the backup.
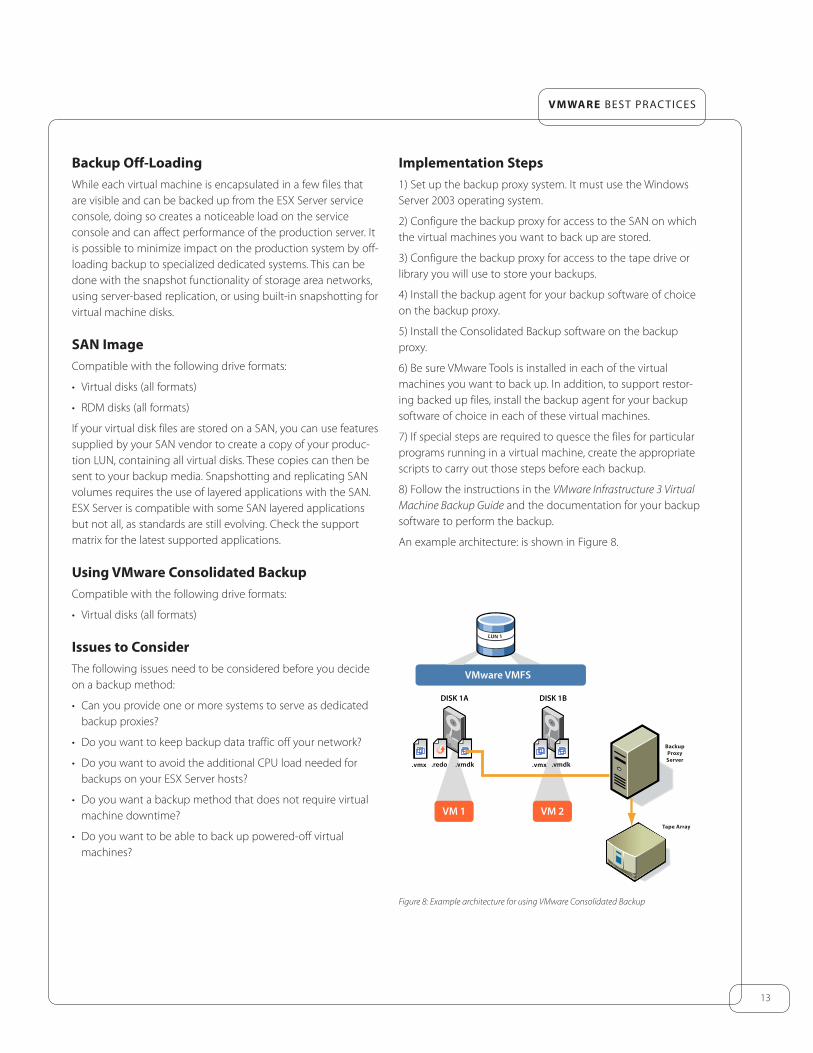
An example architecture: is shown in Figure �.
VM 2VM 1
DISK 1A
.vmdk .vmdk.vmx .vmx.redo
DISK 1B
VMware VMFS
Tape Array
BackupProxyServer
LUN 1
Figure 8: Example architecture for using VMware Consolidated Backup
1�
VMware BEST PRAC TICES
appendix a
vcbMounter and vcbRestore DescriptionWhile it is possible to specify all options for vcbMounter and vcbRestore using command line options, it is highly recommended that you use the configuration file /etc/vmware/backuptools.conf to set the most common parameters for these tools.
Because this configuration file is parsed as a Bourne shell script, you should follow general syntax conventions of the Bourne shell when editing the file:
Use the # character to indicate a comment.
Do not use spaces when entering variables. For example, FOO="bar" should have no spaces around the equals sign.
Use a backslash before entering any special characters, such as $. For example, \$erver.
Administrators familiar with Bourne shell script programming can use all the standard Bourne shell mechanisms, such as command execution — for example, `foo` — or use envi-ronment variables.
Configuration File SettingsUse the configuration file to set up the following options:
VCHOST
Specifies the URL of the Virtual Center instance that manages the ESX Server host being backed up or restored. VCHOST should point to the Virtual Center instance managing the host.
If you perform the backup or restore operations on a stand-alone host, use the localhost command.
You can use the -h command line option to override this setting.
USERNAME
Specifies the user name to log onto the VirtualCenter instance defined by VCHOST. The user must have privileges to be able to register or create virtual machines.
You can use the -u command line option to override this setting.
PASSWORD
Specifies the password corresponding to USERNAME. This option allows you to perform virtual machine backups in a non-interactive way.
Because specifying a password in a configuration file can present a security risk, make sure that the service console is not used by anyone except an ESX Server administrator.
You can use the -p command line option to override this setting.
VMNAMECACHE
The most common way of identifying a virtual machine for backup purposes is by its DNS name or by its IP address. However, when you back up a virtual machine from a stand-alone ESX Server host, the ESX Server host can recognize the IP address only when the virtual machine is powered on and running VMware Tools.
To be able to perform backups of the virtual machine on the stand-alone ESX Server host even when the virtual machine is powered off, you should maintain a cache file. The cache file records the IP address of the virtual machine each time the virtual machine is being backed up. This allows you to perform the future backups of this virtual machine regardless of its power state.
VMware recommends that you do not change the default setting.
You can use the -c command line option for vcbMounter to override this setting. vcbRestore does not use this setting.
TEMPDIR
If you are using the secure copy capabilities of the command line utilities, you can use this option to specify a temporary holding space for your virtual machine data.
This holding space must have enough free storage to hold the largest of your virtual machines.
This setting cannot be overridden from the command line.
Backing Up Virtual MachinesYou can use vcbMounter to back up an entire virtual machine in the service console. vcbMounter creates a quiesced snapshot of the virtual machine and exports the snapshot into a set of files, which can be used later to restore the virtual machine. To back up the set of files, you can use any file-based third-party backup software.
Before backing up a virtual machine using vcbMounter, determine the following:
• Which virtual machine to back up.
For information on identifying virtual machines, see the VMware Infrastructure 3 Virtual Machine Backup Guide.
• Where to store the backup data.
The command line backup utilities support different transport plug-ins to either back up the virtual machine to a local direc-tory or back it up to a remote directory using scp. For more information, see the VMware Infrastructure 3 Virtual Machine Backup Guide.
1�
VMware BEST PRAC TICES
Performing BackupsAfter setting up configuration options as described above, enter the following command at the command line:
vcbMounter -a <virtual_machine_identifier> -r <backup_destination>
where
<virtual_machine_identifier> is a unique identifier of the virtual machine that needs to be backed up. For information on identifying virtual machines, see the section Identifying Virtual Machines below.
<backup_destination> specifies the location for backup data. For information on how to specify a backup desti-nation, see the section Specifying Backup Destinations below.
Use the following examples when backing up virtual machines. Each command must be entered as a single line without carriage returns.
Backing up the virtual machine vm37.company.com to the local directory /home/VMs/vm37:
vcbMounter -a ipaddr:vm37.company.com -r /home/VMs/vm37
Backing up the virtual machine vm37.company.com to the directory /backups/VMs/vm37 on the remote server backups.company.com using the user ID vmware:
vcbMounter -a ipaddr:vm37.company.com -r scp://[email protected]: /backups/VMs/vm37
Note: There is no space between the colon (:) and /backups.
Backing up a virtual machine on a stand-alone ESX Server host. The virtual machine’s .vmx file is located in the /vmfs/volumes/vol0/ directory and is being backed up to the local directory /home/VMs/vm37:
vcbMounter -a moref:/vmfs/volumes-vol0/vm37.vmx -r /home/VMs/vm37
Identifying Virtual MachinesThe command line backup utilities can use different standards to specify a virtual machine.
Identifying Virtual Machines by DNS Name or IP Address The most common way of identifying a virtual machine is to use its DNS name or IP address. To identify the virtual machine, enter the following command:
ipaddr:<DNS name or IP address>
For example, to refer to the virtual machine vm37.company.com with the IP address 10.1�.�.1�, use either of the following commands :
ipaddr:vm37.company.com
ipaddr:10.17.5.12
Identifying Virtual Machines by BIOS UUID You can identify a virtual machine by its universally unique identifier (UUID). Use the following search specifier:
uuid:<uuid>
For example:
uuid:564d78a1-8c1c-59b4-fa02- be14138797be
Identifying Virtual Machines by MoRef Internally, VirtualCenter and ESX Server refer to objects by Managed Object References (MoRef ). To identify a virtual machine by MoRef, follow these examples:
• moref:vm-00027 – Use this format when accessing VirtualCenter Server.
• moref:248 – Use this format when accessing the ESX Server host.
Because MoRefs change every time the VirtualCenter server or the hostd instance to which Consolidated Backup connects is restarted, you should not use MoRefs to identify virtual machines. However, when running a shell script to back up virtual machines, you can use MoRefs to identify the virtual machines.
For example, you can write a script that uses vcbVmName with the any: search specifier to get a list of all virtual machines first, and then performs custom filtering to produce a list of only those virtual machines you want to back up. Virtual machines on this list can use MoRefs as their identifiers. Another part of your script can then call vcbMounter on each of these MoRefs to perform the backup operations.
In a case like this, using MoRefs rather than other identifiers, such as UUID, causes less search overhead because the entire list of all virtual machines does not need to be parsed each time the identifier is used.
Identifying Groups of Virtual Machines When you need to back up a group of virtual machines, you use the vcbSnapAll command instead of vcbMounter. You identify a specific group by using one of the following search specifiers:
• powerstate:on|off|suspended — Finds all virtual machines with the specified power state.
• any: — Finds all virtual machines.
• none: — Does not find any virtual machines. You can use this option for testing purposes.
1�
VMware BEST PRAC TICES
Displaying Virtual Machine Information To search for a particular virtual machine and get information about it, use vcbVmName.
Follow these examples:
• vcbVmName -s powerstate:on — Lists all powered on virtual machines.
• vcbVmName -s any: — Lists all known virtual machines.
• vcbVmName -s ipaddr:vm37.company.com — Displays information about the virtual machine with the specified address.
The following is the sample output you get after using vcbVmName:
bash #vcbVmName -s name:vm37.company.com Found VM:
moref:192
name:Virtual Machine 37
uuid:564d78a1-8c1c-59b4-fa02- be14138797be
ipaddr:10.17.5.31
Specifying Backup DestinationsYou can back up a virtual machine to a local directory or to a remote server using scp.
Backing Up to a Local Directory When backing up a virtual machine to a local directory, you can specify the path to the directory or use the file transport plug-in descriptor.
For example, to back up a virtual machine to the local directory /home/VMs/vm37, you can use one of the following speci-fiers:
/home/VMs/vm37
file:///home/VMs/vm37
You don’t need to create the destination subdirectory, such as /home/VMs/vm37, in advance because the backup opera-tion will create it. However, the directory that lists your destina-tion subdirectory, for example /home/VMs, should exist before you start a backup process.
Backing Up to a Remote Server When backing up a virtual machine to a remote server, you can use a corresponding scp plug-in. Use the following syntax:
scp://<user>@<host>:<path>
To automate the scp backup, use RSA key-based authentica-tion. In this case, scp will not prompt you for a password
during backup.
For example, you need to back up a virtual machine to the directory /backup/VMs/vm37 located on the remote server backups.company.com that uses the user ID vmware. Enter the following:
scp://[email protected]: /backups/VMs/vm37
Note: There is no space between the colon (:) and /backups.
Prior to backup, make sure that the /backups/VMs direc-tory already exists on the remote server. However, you do not need to create the /backups/VMs/vm�� directory because it will be created during the backup operation.
Restoring Virtual MachinesYou can restore a virtual machine to its original location or to another location of your choice.
Restoring Virtual Machines to Original Locations If you set up all configuration options as described in the Configuration File Settings section above, the following is the only command you need to pass to vcbRestore to restore a virtual machine:
vcbRestore -s <backup_directory>
For information on how to specify a backup directory, seethe section Specifying Backup Destinations above.
Follow these examples when restoring your virtual machines. Each command must be entered as a single line without carriage returns.
Restoring a virtual machine from a local backup directory named /home/VMs/vm37:
vcbRestore -s /home/VMs/vm37
Restoring a virtual machine from the remote server backup.company.com, directory /backups/VMs/vm37, and user ID vmware:
vcbRestore -s scp://[email protected]: /backups/VMs/vm37
Note: There is no space between the colon (:) and /backups.
1�
VMware BEST PRAC TICES
Restoring Virtual Machines to Alternative LocationsWhen you need to restore a virtual machine to a location other than its original location, or to a different ESX Server host, you use the virtual machine’s catalog file. vcbMounter creates this file for each virtual machine it backs up. The catalog file contains summary information about the virtual machine, such as its display name and its power state at the time of backup.
To be able to restore a virtual machine to an alternative location, follow these steps:
1. Make a copy of the virtual machine’s catalog file.
See the section Copying a Catalog File below.
�. In the copy of the catalog file, specify the new settings for datastores, folder path, and resource pool.
See the section Editing a Catalog File below.
�. Restore the virtual machine using vcbRestore.
See the section Restoring Virtual Machines Using an Alternate Catalog below.
Copying a Catalog FileWhen restoring a virtual machine to a location other than the original, you start by making a copy of the virtual machine’s catalog file.
For example, you need to make a copy of the catalog file of the virtual machine in /home/VMs/vm37. Enter the following:
cp /home/VMs/vm37/catalog /tmp/catalog-vm37
Editing a Catalog FileIn the copy of the catalog file you made, you need to change the following settings:
• Datastore — The datastore identifies where to store all the files that comprise a virtual machine.
• Folder path — The virtual machine’s folder path defines where the virtual machine will be placed in the VirtualCenter folder hierarchy.
• Resource pool — This host-specific configuration item deter-mines the virtual machine’s behavior with respect to DRS (Distributed Resource Scheduling). When you use multiple ESX Server hosts managed by VirtualCenter, this item also specifies the host that will run the virtual machine.
Note: If you change the name of the virtual machine in the catalog file, vcbRestore doesn’t pick up the new name from the file, but instead uses the original virtual machine name specified in the .vmx file.
You can change the name of the virtual machine later using the VMware Infrastructure Client.
Changing Datastore PathsThe datastore path in the catalog file identifies where to store all the files that comprise a virtual machine. Change datastore paths in the following entries:
• disk.scsi*.diskname — names and locations of all disks associated with this virtual machine.
• config.vmx — location for the virtual machine’s main configuration file.
• config.suspenddir — location for the memory snapshots taken when the virtual machine is suspended.
• config.logdir — location for the virtual machine’s log files.
By default, all these entries use the same path, which points to the same directory on the same datastore. It is highly recom-mended that you follow this standard when changing the path.
The datastore paths have the following syntax:
[<datastore_name>] <path_on_datastore>
You can obtain a list of valid datastore names from the datas-tore browser in your VirtualCenter client, or by looking at the file system labels of your VMFS volumes in the service console under /vmfs/volumes.
Changing Folder PathsThe virtual machine’s folder path in the catalog file specifies the folder within the VirtualCenter folder hierarchy where the restored virtual machine will be placed.
To change the folder path for the virtual machine
1. Identify the folder, which will store the virtual machine, by running the following command in the service console:
vcbUtil -c vmfolders
Running this command assumes that you have set up appropriate configuration options as described in the section Configuration File Settings above.
�. In the catalog file, set the folder path to one of the folder paths printed out by the command above.
Changing Resource PoolsThe resource pools entry in the catalog file determines the virtual machine’s behavior with respect to DRS (Distributed Resource Scheduling). When you use multiple ESX Server hosts managed by VirtualCenter, this item also specifies the host that will run the virtual machine.
To change the resource pool setting for the virtual machine
1. Identify the resource pool, which the virtual machine will use, by running the following command:
vcbUtil -c resourcepools
Running this command assumes that you have set up
1�
VMware BEST PRAC TICES
appropriate configuration options as described in the section Configuration File Settings above.
�. In the catalog file, set the resource pool to one of the options provided by the command above.
Restoring Virtual Machines Using an Alternate CatalogAfter modifying the settings in the virtual machine’s alternate catalog, use this file to restore the virtual machine.
To restore the virtual machine, use the -a option to specify the alternate catalog.
For example, to restore a virtual machine backed up under /home/VMs/vm37 using the alternate catalog file /tmp/catalog-vm37, enter:
vcbRestore -s /home/VMs/vm37 -a /tmp/catalog-vm37
Non-interactive Use of vcbRestoreBy default, vcbRestore prompts you, asking what to do when the restore operation detect a file that already exists or a virtual machine already known to VirtualCenter.
If vcbRestore is used by a script in a noninteractive way, use the -b command line entry to specify the default behavior. The following options are available:
prompt
Prompts the user, asking what to do before overwriting files or configurations of virtual machines already known to VirtualCenter.
overwrite
Overwrites any existing files and virtual machine configura-tions known to VirtualCenter during restore.
keep
Preserves existing files and configurations of virtual machines known to VirtualCenter without replacing them.
abort
Terminates the restore operation after detecting an existing file or a virtual machine configuration already known to VirtualCenter.
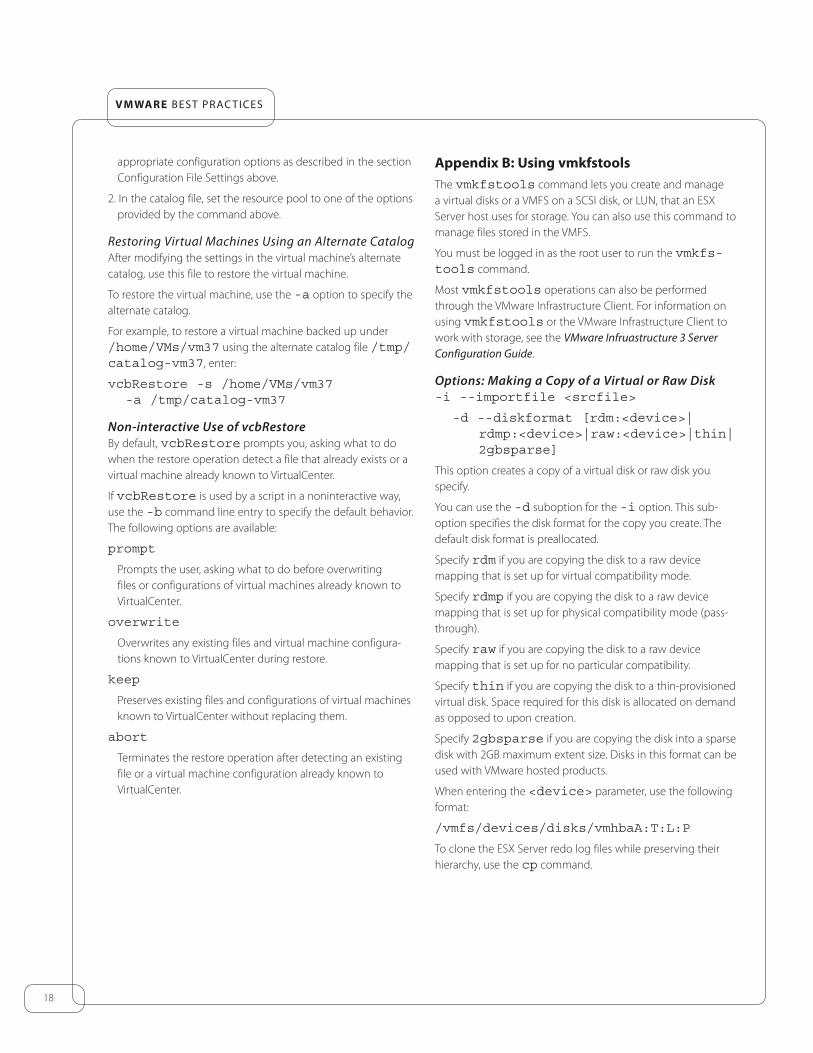
appendix B: Using vmkfstoolsThe vmkfstools command lets you create and manage a virtual disks or a VMFS on a SCSI disk, or LUN, that an ESX Server host uses for storage. You can also use this command to manage files stored in the VMFS.
You must be logged in as the root user to run the vmkfs-tools command.
Most vmkfstools operations can also be performed through the VMware Infrastructure Client. For information on using vmkfstools or the VMware Infrastructure Client to work with storage, see the VMware Infruastructure 3 Server Configuration Guide.
Options: Making a Copy of a Virtual or Raw Disk -i --importfile <srcfile>
-d --diskformat [rdm:<device>| rdmp:<device>|raw:<device>|thin| 2gbsparse]
This option creates a copy of a virtual disk or raw disk you specify.
You can use the -d suboption for the -i option. This sub-option specifies the disk format for the copy you create. The default disk format is preallocated.
Specify rdm if you are copying the disk to a raw device mapping that is set up for virtual compatibility mode.
Specify rdmp if you are copying the disk to a raw device mapping that is set up for physical compatibility mode (pass-through).
Specify raw if you are copying the disk to a raw device mapping that is set up for no particular compatibility.
Specify thin if you are copying the disk to a thin-provisioned virtual disk. Space required for this disk is allocated on demand as opposed to upon creation.
Specify 2gbsparse if you are copying the disk into a sparse disk with �GB maximum extent size. Disks in this format can be used with VMware hosted products.
When entering the <device> parameter, use the following format:
/vmfs/devices/disks/vmhbaA:T:L:P
To clone the ESX Server redo log files while preserving their hierarchy, use the cp command.

1�
VMware BEST PRAC TICES
Examplevmkfstools -i ~/vms/nt4.vmdk /vmfs/volumes/myVMFS/nt4.vmdk
This example illustrates cloning the contents of a virtual disk from the host file system to a file named nt4.vmdk on the volume named myVMFS. You can configure a virtual machine to use this virtual disk by adding lines to the virtual machine configuration file, as in the following example:
scsi0:0.present = TRUE
scsi0:0.fileName = /vmfs/volumes/ myVMFS/nt4.vmdk
Migrating VMware Workstation and VMware GSX Server Virtual MachinesYou cannot use VMware Infrastructure Client to migrate virtual machines created with VMware Workstation or VMware GSX Server into your ESX Server system. However, you can use the vmkfstools -i command to import the virtual disk into your ESX Server system, then attach this disk to a new virtual machine you create in ESX Server.
To migrate Workstation and GSX Server virtual machines:
1) Import a Workstation or GSX Server disk into your /vmfs/volumes/myVMFS/ directory.
�) In the VMware Infrastructure Client, create a new virtual machine using the Custom configuration option.
�) When configuring a disk, select Use an existing virtual disk and attach the Workstation or GSX Server disk you imported.
GlossaryTerminology
In other contexts, such as the VMware Infrastructure Client, raw device mapping may be described in terms such as “mapping a VMFS volume into a datastore,” “mapping a system LUN,” or “mapping a disk file to a physical disk volume.” These terms all refer to raw device mapping.
The following terms are used in this document or related docu-mentation:
Raw disk — A disk volume accessed by a virtual machine as an alternative to a virtual disk file; it may or may not be accessed through a mapping file This has been replaced with the intro-duction of RDM devices.
Raw device — Any SCSI device accessed through a mapping file.
Raw LUN — A logical disk volume located in a storage area network (SAN).
Mapping file — A VMFS file containing metadata used to map and manage a raw device.
Mapping — An abbreviated term for a raw disk mapping.
Mapped device — A raw device managed by a mapping file.
Metadata file — A mapping file.
Compatibility mode — Type of SCSI device access virtualization (physical or virtual).
referencesRDM: VMware Infrastructure 3 Server Configuration Guide
vmkfstools: VMware Infrastructure 3 Server Configuration Guide
Compatible backup software: VMware Infrastructure 3 Backup Software Compatibility Guide
VMware, Inc. 3145 Porter Drive Palo Alto CA 94304 USA Tel 650-475-5000 Fax 650-475-5001 www.vmware.com© 2006 VMware, Inc. All rights reserved. Protected by one or more of U.S. Patent Nos. 6,397,242, 6,496,847, 6,704,925, 6,711,672, 6,725,289, 6,735,601, 6,785,886, 6,789,156, 6,795,966, 6,880,022 6,961,941, 6,961,806 and 6,944,699; patents pending. VMware, the VMware “boxes” logo and design, Virtual SMP and VMotion are registered trademarks or trademarks of VMware, Inc. in the United States and/or other jurisdictions. Microsoft, Windows and Windows NT are registered trademarks of Microsoft Corporation. Linux is a registered trademark of Linus Torvalds. All other marks and names mentioned herein may be trademarks of their respective companies.
Revision: 20060922 Item: VI3-ENG-Q206-233