using yocto project with beaglebone black - sample chapter
TRANSCRIPT

C o m m u n i t y E x p e r i e n c e D i s t i l l e d
Unleash the power of the BeagleBone Black embedded platform with Yocto Project
Using Yocto Project with BeagleBone BlackH
M Irfan S
adiq
Using Yocto Project with BeagleBone Black
The Yocto Project produces tools and processes that enable the creation of Linux distributions for embedded software, independent of the architecture. BeagleBone Black is a platform that allows users to perform installation and customizations to their liking, quickly and easily.
Starting with a basic introduction to Yocto Project's build system, this book will take you through the setup and deployment steps for Yocto Project. You will develop an understanding of BitBake, learn how to create a basic recipe, and explore the different types of Yocto Project recipe elements. Moving on, you will be able to customize existing recipes in layers and create a home surveillance solution using your webcam, as well as creating other advanced projects using BeagleBone Black and Yocto Project.
By the end of the book, you will have all the necessary skills, exposure, and experience to complete projects based on Yocto Project and BeagleBone Black.
Who this book is written forThis book is ideal for system developers with knowledge and experience of embedded systems. Knowledge of BeagleBone Black is assumed, while no knowledge of Yocto Project build system is necessary.
$ 39.99 US£ 26.99 UK
Prices do not include local sales tax or VAT where applicable
H M Irfan Sadiq
What you will learn from this book
Develop a successful package or image with the help of the BitBake tool
Generate a recipe for some trendy console-based games
Boot up BeagleBone using images created with Yocto Project
Customize the root fi le system using a custom layer
Create a home surveillance solution using a webcam attached to the BeagleBone USB port
Turn BeagleBone into a Wi-Fi access point by attaching a USB dongle
Build different versions of the helloworld recipe
Using Yocto Project w
ith BeagleB
one Black
Foreword by Khula Azmi, Engineering Manager QA at Mentor GraphicsP U B L I S H I N GP U B L I S H I N G
community experience dist i l led
Visit www.PacktPub.com for books, eBooks, code, downloads, and PacktLib.
Free Sample

In this package, you will find: The author biography
A preview chapter from the book, Chapter 1 'Welcome to Yocto Project and
BeagleBone Black'
A synopsis of the book’s content
More information on Using Yocto Project with BeagleBone Black

About the Author
H M Irfan Sadiq was a Linux enthusiast as a graduate student. He started his career as an embedded system development engineer and has been working as an H.264 Decoder developer and optimizer for the VLIW architecture. He got an opportunity to work on multiple multimedia frameworks that are open source as well as proprietary. He tried to work in a start-up in the entirely different domain of web development. He has been working on OpenEmbedded and Yocto Project technologies since he joined Mentor Graphics as the technical lead back in 2010. He has been working on derivative technologies of Yocto Project and OpenEmbedded for quite some time now, spanning more than 4 years. He has also been working on various hardware platforms based on the ARM, PPC, and x86 architecture. The diverse nature of subsequent BSPs has challenges in the context of QA. One of the challenges was to keep the QA packages in one place in such a way that they could be applied to all different product/platform combinations. He addressed this by creating a Yocto Project-based layer for which he is a maintainer as well as a gatekeeper.

PrefaceUsing Yocto Project with BeagleBone Black is intended to be training material for newbies using Yocto Project. For this purpose, the hardware used is BeagleBone.
The book is written keeping reader engagement a top priority. By the end of the fi rst chapter, you will have a working Yocto Project build running on BeagleBone and ready for further experimentation on the host side. Initially, we used existing examples and projects created by Yocto Project scripts to avoid any duplication, save time, and get things functional quickly while performing rigorous changes to learn about multiple scenarios. We won't use graphical tools, even if they are available, in order to avoid making things misleading as well as to avoid a shallow understanding. Also, sometimes, they sometime create confusion by overriding user customizations.
By the end of the book, you will have the necessary skill set, exposure, and experience required to grab any professional grade project based on Yocto Project and BeagleBone.
What this book coversChapter 1, Welcome to Yocto Project and BeagleBone Black, enables the user to boot up BeagleBone with images built using Yocto Project through the use of simple instructions.
Chapter 2, What's BitBake All About?, provides a basic introduction to the BitBake tool.
Chapter 3, Creating the helloworld Recipe, talks about a helloworld recipe available in poky. In this chapter, we will use this recipe for the introduction of the basic elements of a recipe.
Chapter 4, Adding Multimedia to Your Board, explores the most common elements encountered in Yocto Project recipes. We will describe each of these elements and their usage.

Preface
Chapter 5, Creating and Exploring Layers, teaches you how to override functionalities of recipe fi les available in the existing layers. We will also look at various techniques used in different scenarios, along with the pros and cons of such techniques.
Chapter 6, Your First Console Game, helps with creating recipes for some of the popular console-based games—for example, MyMan.
Chapter 7, Turning BeagleBone into a Home Surveillance System, teaches you how to create an advanced project using BeagleBone and Yocto Project. We will create a home surveillance solution using a webcam attached to the BeagleBone USB port.
Chapter 8, BeagleBone as a Wi-Fi Access Point, guides you to create an advanced Project using BeagleBone and Yocto Project. We will turn our BeagleBone into a Wi-Fi access point by attaching a USB dongle.

[ 1 ]
Welcome to Yocto Project and BeagleBone Black
In this chapter, we will discuss how we can use Yocto Project to bring up BeagleBone. We will discuss the steps that are necessary to set up a host environment for Yocto Project, create images, and set up BeagleBone hardware. We will also discuss how to prepare a card and fi nally deploy images on the board. Fortunately, BeagleBone is one of the reference boards of Yocto Project, and it makes our lives easier. We can fi nd the core steps for hardware setup in README.hardware, under Poky. There is a lot of information in the Yocto Project Development Reference Manual. What will we be doing here then? The steps given under Poky assume a lot of previous knowledge and sometimes a great deal of generic approach is used there, which isn't very useful for us. We will simplify things here. During this journey, we will pay a visit to different confi guration fi les of Yocto Project and try to develop an understanding of these fi les. In this chapter, we will:
• Set up a host environment• Obtain Yocto Project• Build for BeagleBone• Learn about configuration files
Setting up a host environmentBefore we start getting sources for Yocto Project and building it, we need to prepare our host system. Yocto Project is supposed to work on any distribution of Linux known to us. There is a list of supported platforms available in the Yocto Project Reference Manual (http://www.yoctoproject.org/docs/current/ref-manual/ref-manual.html#intro-requirements).

Welcome to Yocto Project and BeagleBone Black
[ 2 ]
That is not to say that Yocto Project will not work on other distributions, but the given distributions are the ones on which it is verifi ed to work successfully.
• Ubuntu 12.04 (LTS)• Ubuntu 13.10• Ubuntu 14.04 (LTS)• Fedora release 19 (Schrödinger's Cat)• Fedora release 20 (Heisenbug)• CentOS release 6.4, 6.5• Debian GNU/Linux 7.0, 7.1, 7.2, 7.3, and 7.4 (Wheezy)• openSUSE 12.2, 12.3, and 13.1
For Poky Daisy 1.6.1, the list is long. We will stick to Ubuntu 14.04 (LTS) for the rest of the book. For this release, package dependencies that need to be taken care of are divided into the following four subcategories.
EssentialsThese are the core tools and packages that are required to build Yocto Project. These include a GNU compiler, versioning control system, and other packages that are required to build an environment on host. Here's the command to get the essentials:
$ sudo apt-get install gawk wget git-core diffstat unzip texinfo gcc-multilib \
build-essential chrpath
GraphicsIf you want to use graphics support or you intend to use Eclipse IDE, then you need to install these packages:
$ sudo apt-get install libsdl1.2-dev xterm
DocumentationThese packages are required if you want to build a Yocto Project documentation:
$ sudo apt-get install make xsltproc docbook-utils fop dblatex xmlto

Chapter 1
[ 3 ]
ADT Installer ExtrasThese packages are required only if you want to build an Application Development Kit (ADK):
$ sudo apt-get install autoconf automake libtool libglib2.0-dev
If you are using any distribution other than those previously listed, you will fi nd similar commands can be used on Debian distributions, as well. For other supported distributions, consult the Yocto Project Reference Manual.
Obtaining Yocto ProjectWe will use the daisy branch of Poky, which is a name for 1.6.1 version of Yocto Project. We will stick to this version throughout this book. These are the steps to follow while obtaining Yocto Project:
1. First, create a folder called yocto. Then, create a directory for it:$ mkdir yocto
2. Change the directory to this newly created directory:$ cd yocto
3. Fetch sources for Poky:$ git clone -b daisy git://git.yoctoproject.org/poky.git
4. Change the directory to poky:
$ cd poky
What is the next logical step? Have a look at the directory contents using the ls command to see what we got. Welcome! We are in good place. Let's enjoy our journey.
Let's build for BeagleBoneBy examining the contents of the poky directory, you will notice your terminal executables, as in most of the cases while working with new technologies/packages on *nix systems. Here, we have oe-init-build-env. This is the one responsible for creating our build environment. We will source this script and pass to it our build directory as an argument, as follows:
$ source oe-init-build-env build_bbb

Welcome to Yocto Project and BeagleBone Black
[ 4 ]
The build_bbb argument can be anything you want. I wanted to keep it simply bbb. However, I cannot do this as my Git Aware Prompt keeps complaining about new content. If you inspect .gitignore, you will see that it has build* in it. So, the directory prefi xed with build will be ignored. This command will land you in the newly created build directory. Before moving further, we need to examine this directory. Here, we have a subdirectory named conf and two fi les, bblayers.conf and local.conf. We will look into bblayers.conf in the upcoming chapters. For now, we will go through the contents of local.conf.
Local.confFirst, we will encounter the following two options, which are related to each other. These options are here to tune the level of parallelism used by BitBake, the actual driver behind Yocto Project. The two options are:
• BB_NUMBER_THREADS ?= "${@oe.utils.cpu_count()}"
• PARALL EL_MAKE ?= "-j ${@oe.utils.cpu_count()}"
You will fi nd these variables twice in this fi le: once in the preceding form and once in the following form:
#BB_NUMBER_THREADS ?= "4"#PARALLEL_MAKE ?= "-j 4"
We are telling BitBake about the maximum number of threads it should use for the job and the maximum of jobs run in parallel. Most of the Yocto Project manuals and blogs say both of these should be equal to the number of cores available on your system. However, my experience has proven that the following formula gives the maximum throughput, that is, the minimum time of execution:
BB_NUMBER_THREADS ?= "1.5 * Number of cores"PARALLEL_MAKE ?= "-j 2 * Number of cores"
On a 16-core server, we will use the combinations of 24 and 32, whereas on an 8-core machine we will use 12 and 16. For a 4-core machine, we will use 6 and 8 as follows:
BB_NUMBER_THREADS ?= "6"PARALLEL_MAKE ?= "-j 8"
While setting these variables, do not forget the difference of -j n for PARALLE_MAKE. Otherwise, you will encounter errors. Also, note that BitBake requires even numbers to be enclosed in "".

Chapter 1
[ 5 ]
Next, we need to select the machine. Here, we will set BeagleBone, which is already available to us. So, we will uncomment it and comment out the default selection, which is the qemux86 selection. Commenting out an existing selection is not strictly necessary since it is assigned using the ?? operator, which we will discuss in the upcoming chapters.
MACHINE ?= "beaglebone"#MACHINE ??= "qemux86"
Next, we will set our downloads directory. This directory will be used to download sources for packages. The available confi guration variable to set this confi guration is DL_DIR. If we don't set this, its default value would be used as our build directory. So, we will have this directory created under the build directory. We usually don't care much in case of Board Support Packages (BSPs) running rm-rf on our build directory to start a fresh build. In such cases, not caring about this variable can cause regrets, as it will download all the sources again and again, causing longer build times. We set it up in the top-level directory, which contains the poky directory itself, so that we don't ever accidentally delete it with other expendable stuff.
DL_DIR ?= "${TOPDIR}/../../downloads"
Next, we have SSTATE_DIR, TMPDIR, and DISTRO, which we will leave unchanged for now. SSTATE_DIR is related to the shared state feature of Yocto Project. Yocto Project has a mechanism to check whether some package is already built and available, it uses the existing package and doesn't build it. TMPDIR is the directory that contains a lot of build stuff. We will go through its contents in the upcoming chapters. Then, we have PACKAGE_CLASSES, as follow:
PACKAGE_CLASSES ?= "package_ipk"
We will leave the remaining variables unchanged.
We can use a lot other options in this fi le as well. We will learn about some of these options in the upcoming chapters.
While setting values for a variable, always remember to leave spaces on both sides of an operator in order to avoid a ny surprises.

Welcome to Yocto Project and BeagleBone Black
[ 6 ]
bblayers.confAs the name suggests, bblayers.conf is there to provide us with a mechanism to confi gure our Yocto Project layers. This fi le has confi gurations related to layers. We can add extra layers to this fi le to use the metadata available in these layers. This fi le further classifi es layers into removable and non-removable ones, as you can see in the following code snippet:
BBLAYERSBBLAYERSBBLAYERS ?= " \ /home/irfan/yocto/poky/meta \ /home/irfan/yocto/poky/meta-yocto \ /home/irfan/yocto/poky/meta-yocto-bsp \ "BBLAYERS_NON_REMOVABLE ?= " \ /home/irfan/yocto/poky/meta \ /home/irfan/yocto/poky /meta-yocto \ "
Since we are not using any extra layers, we will leave this fi le unchanged.
site.confThis fi le is optional. You won't fi nd it created by the build environment creation script. We mostly use system-wide or other confi gurations common across different builds and targets are put in this fi le. For example, we would use the toolchain path if we were using an external toolchain. Another option could be specifying mirror sites, we case it for this purpose. If we have this fi le created, BitBake looks for it and uses common confi gurations from this fi le. We override any confi guration that we want modifi ed in conf/local.conf.
auto.confThis is an optional fi le. Just like the previous fi le, you won't fi nd it created by the build environment creation script. We can use this fi le to set our custom options so that we don't have to modify local.conf manually. In most of the cases, this fi le is used by build systems such as Jenkins. For example, if we don't want our build directory size to explode due to space constraints, we could use the following code fi le in the local.conf or auto.conf fi le:
INHERIT += "rm_work"
For now, we don't need to set this. I am just mentioning it here to elaborate the preceding point. Since we will analyze the contents of the tmp/work directory in the upcoming chapters, I would suggest that you do not use this option for the time being.
Chapter 1
[ 7 ]
Trigger buildNow that we have set all the confi gurations, let's start our build. You can choose any of the images to build. I will prefer core-image-sato:
$ bitbake core-image-sato
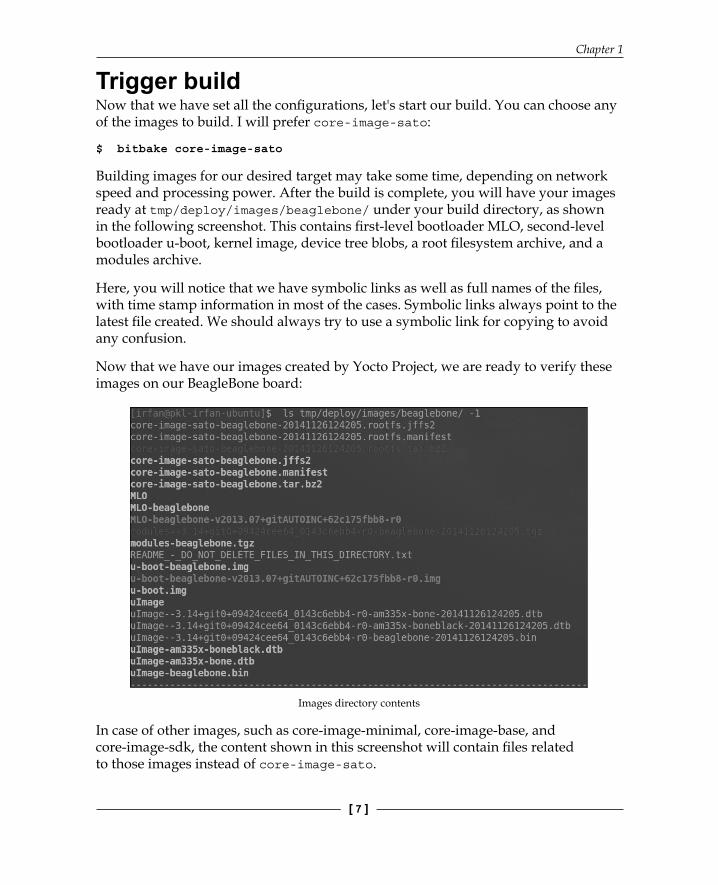
Building images for our desired target may take some time, depending on network speed and processing power. After the build is complete, you will have your images ready at tmp/deploy/images/beaglebone/ under your build directory, as shown in the following screenshot. This contains fi rst-level bootloader MLO, second-level bootloader u-boot, kernel image, device tree blobs, a root fi lesystem archive, and a modules archive.
Here, you will notice that we have symbolic links as well as full names of the fi les, with time stamp information in most of the cases. Symbolic links always point to the latest fi le created. We should always try to use a symbolic link for copying to avoid any confusion.
Now that we have our images created by Yocto Project, we are ready to verify these images on our BeagleBone board:
Images directory contents
In case of other images, such as core-image-minimal, core-image-base, and core-image-sdk, the content shown in this screenshot will contain fi les related to those images instead of core-image-sato.

Welcome to Yocto Project and BeagleBone Black
[ 8 ]
C reating partitions and formatting the SD cardBeagleBone Black is shipped with Angstrom images by default and partitioned as we require. However, if you have damaged it or don't want to erase the default images, then you should follow these instructions to prepare another BeagleBone for use.
If the card you have inserted has some partitions, they will be mounted automatically. To avoid any surprises like damaging the card, unmount these partitions. If you are using an SD card reader, the device for the card will be /dev/mmcblk*. If you are using some USB card reader, then the device will be something like /dev/sdX, where X is a number. X depends on the SCSI drives that are already connected to your system. We are using the fi rst option, that is, a built-in SD card reader. You can determine which device is created for your card by issuing the dmesg command as follows:
$ dmesg | tail
[27409.486378] mmc0: new high speed SDHC card at address 0007
[27409.486640] mmcblk0: mmc0:0007 SD04G 3.70 GiB
[27409.488506] mmcblk0: p1
You can also use fdisk -l to check what device is created for your card. Now, you can use the fdisk utility as root or with sudo to create our required partitions, using the following steps:
1. Unmount any mounted partition, using the umount command:$ umount /dev/mmcblk0p1
2. Launch the fdisk utitility and delete the previous partition(s); in our case, it is just one:$ sudo fdisk /dev/mmcblk0
Command (m for help): d
Selected partition 1
3. Create new partition called BOOT of 32 MB and type primary:Command (m for help): n
Partition type:
p primary (0 primary, 0 extended, 4 free)
e extended
Select (default p):
Using default response p

Chapter 1
[ 9 ]
Partition number (1-4, default 1):
Using default value 1
First sector (2048-7774207, default 2048):
Using default value 2048
Last sector, +sectors or +size{K,M,G} (2048-7774207, default 7774207): +32M
4. Create a second partition to hold rootfs. We will give all the remaining space to this partition:Command (m for help): n
Partition type:
p primary (1 primary, 0 extended, 3 free)
e extended
Select (default p):
Using default response p
Partition number (1-4, default 2):
Using default value 2
First sector (67584-7774207, default 67584):
Using default value 67584
Last sector, +sectors or +size{K,M,G} (67584-7774207, default 7774207):
Using default value 7774207
5. Make the fi rst partition bootable by setting the boot fl ag:Command (m for help): a
Partition number (1-4): 1
6. Set the fi rst partition as WIN95 FAT32 (LBA):Command (m for help): t Selected partition 1 Hex code (type L to list codes): c
7. We are done with the fi lesystem modifi cation. So, let's write it by issuing the w command:Command (m for help): w
The partition table has been altered!
Calling ioctl() to re-read partition table.
Syncing disks.

Welcome to Yocto Project and BeagleBone Black
[ 10 ]
Do not forget to set the first partition as WIN95 FAT32 (LBA); otherwise, BeagleBone won't be able to boot from it. In this case, you might end up wasting time figuring out what's going wrong.
8. Format the fi rst partition as FAT, using the following command. We will set the label as BOOT so that we know what directory it will be mounted to by udisks:$ sudo mkfs.vfat -n "BOOT" /dev/mmcblk0p1
9. Format the second partition as an ext4 fi lesystem, using the following command. The label for this is set to ROOT, as it will contain the extracted image of rootfs.
$ sudo mkfs.ext4 -L "ROOT" /dev/mmcblk0p2
I have created a simple script to perform all the preceding steps. I am listing these steps here for your understanding, so that you can do any adjustments if required.
Downloading the example codeMost of the implementation code is kept at https://github.com/YoctoForBeaglebone/ and can be pulled directly from there. If you have something to add, feel free to add it. While adding something to any repository, kindly avoid pushing directly to the repository and use Git pull request mechanism supported by GitHub.
Copying images to the cardWe have formatted our card, according to the requirements. Now, we are ready to populate images to it. The partitions are usually auto mounted under /media/$USER. If not, we can use the mount command to mount the partition to our desired location:
$ sudo mount /dev/sdb1 /media/$USER/BOOT
$ sudo mount /dev/sdb2 /media/$USER/ROOT

Chapter 1
[ 11 ]
Now, follow these steps to copy images to the card:
1. Copy the u-boot MLO and u-boot bootloader images into the FAT32 partition:$ sudo cp MLO /media/$USER/BOOT
$ sudo cp u-boot.img /media/$USER/BOOT
2. Copy the kernel image into the boot partition:$ sudo cp uImage /media/$USER/BOOT
3. Copy the .dtb fi le, am335x-boneblack.dtb, into the boot partition. This step is required only in the case of core-image-minimal. It is not required in our case, as we created core-image-sato, which already has this fi le placed at the desired location in rootfs:$ sudo cp am335x-boneblack.dtb /media/$USER/BOOT
4. As a root user, uncompress core-image-sato-beaglebone.tar.bz2 to the ext4 partition:$ sudo tar -xf core-image-sato-beaglebone.tar.bz2 -C /media/$USER/ROOT/
5. Unmount both partitions:
$ sudo umount /dev/mmcblk0p1
$ sudo umount /dev/mmcblk0p2
Remove the card from the host machine, and insert it into the SD card slot on BeagleBone Black. We have a simple script named copy_images.sh for these steps as well.
You can download the script for copying images the SD card from here:https://github.com/YoctoForBeaglebone/BeagleScripts
Hardware setupTo boot BeagleBone Black, we need the following hardware:
• An SD card with images flashed• BeagleBone Black

Welcome to Yocto Project and BeagleBone Black
[ 12 ]
• A power adapter that can supply 5V or a micro USB cable; we should use a 5V power adapter in order to avoid a decrease in the operating frequency
• USB TTL-2303(PL2303) for serial communication
USB-TTL is connected to the J1 connector of BeagleBone in the following formation:
J1 Pin USB TTL Function1 GND Ground 4 RXL5 TXL
A micro USB cable should be enough in most of the cases to provide power. However, for more resource-intensive tasks, for example, if additional peripherals are required, you will need to connect a power adapter.
Be careful when using PL2303 pins for current; otherwise, you may end up damaging your BeagleBone.
Serial setupBeagleBone Black uses a serial debug port to communicate with the host machine. We will use minicom as a serial terminal client to communicate over the serial port. To set up minicom, perform the following steps:
1. Run this setup command as a privileged user:$ sudo minicom -s
Mmicom main configuration dialogue

Chapter 1
[ 13 ]
A menu will appear on the terminal with nine different options, as shown in the preceding screenshot. We won't be changing many of these. The up and down arrow keys can be used to select these options. We will select the third option, Serial port setup. Choose this option by pressing the Enter key. You will enter into another menu in which each option is listed, along with a corresponding key on the keyboard on the left-hand side to choose the option. Press the A key on the keyboard to set your serial device to /dev/ttyUSB0, and then press Enter. If you are not sure which device is created in your case, you could find this out by using the following command combination on another terminal:
$ dmesg | grep "pl2303 converter"
[37532.385583] pl2303 3-3:1.0: pl2303 converter detected
[37532.386415] usb 3-3: pl2303 converter now attached to ttyUSB0
2. Press E to set the baud rate. Use the A and B keys to navigate the baud rate values. A corresponds to next and B to previous. Keep pressing B till you get 115200 8N1. Then, press Enter to choose this setting and go back to the previous menu.
3. Next, we need to press F and G to change enablement statuses of hardware fl ow control and software fl ow control. Both need to be set to No. Finally, the settings should look as shown in this screenshot:
Minicom Serial Port Setup dialogue
4. Choose Save setup as dfl to avoid reconfi guring every time and choose Exit to go to minicom. Don't exit from it if you want to observe whether there is any activity on the serial port.

Welcome to Yocto Project and BeagleBone Black
[ 14 ]
Booting BeagleBoneNow that we have everything set up, we are ready to boot. We can just insert this card, and our board should boot from it. There might be only one issue if you have the eMMC (embedded MultiMediaCard) boot selected by default. You will have to disable it by booting up the board from the images you already have and renaming the MLO fi le from the eMMC partition. Alternatively, you can simply execute the following two commands on the u-boot prompt. To stop at the u-boot prompt, simply press Enter after powering up the board before timeout:
# mmc dev 1
# mmc erase 0 512
The fi rst command will select the eMMC card, and the second one will do the erasing so that BeagleBone doesn't try to boot from eMMC.
Insert our prepared SD card and power up BeagleBone. You should get an output similar to the following one on minicom:
Booting from mmc ...
## Booting kernel from Legacy Image at 82000000 ...
Image Name: Linux-3.14.0-yocto-standard
Image Type: ARM Linux Kernel Image (uncompressed)
Data Size: 4985768 Bytes = 4.8 MiB
Load Address: 80008000
Entry Point: 80008000
Verifying Checksum ... OK
## Flattened Device Tree blob at 88000000
Booting using the fdt blob at 0x88000000
Loading Kernel Image ... OK
Loading Device Tree to 8fff5000, end 8ffff207 ... OK
Starting kernel …
Finally, we will land in our BeagleBone prompt:
Poky (Yocto Project Reference Distro) 1.6.1 beaglebone /dev/ttyO0
beaglebone login:
Enter root as user, and you are in as the root user:
root@beaglebone:~#

Chapter 1
[ 15 ]
More about confi guration fi lesWe have already visited some confi guration fi les during the build process. There are some more confi guration fi les that were not discussed during the build process in order to avoid making it lengthier. These are bitbake.conf and machine.conf. Let's look at them.
machine.confYou won't fi nd a fi le with this name. Here, machine is a placeholder for the target board we are preparing our images for. For example, in our case, this fi le is beaglebone.conf and in the preceding confi guration, it is available as beaglebone.conf in the poky/meta-yocto-bsp/conf/machine/ directory.
All of the machine- specifi c confi gurations are done in this fi le. We need to know about it and have some basic understanding of its contents so that we can modify it, if required. Let's go through it. The top-level header contains information in tags for documentation:
#@TYPE: Machine#@NAME: Beaglebone machine#@DESCRIPTION: Machine configuration for http://beagleboard.org/bone and http://beagleboard.org/black boards
The preferred xserver can be used:
PREFERRED_PROVIDER_virtual/xserver ?= "xserver-xorg"XSERVER ?= "xserver-xorg \ xf86-input-evdev \ xf86-input-mouse \ xf86-video-fbdev \ xf86-input-keyboard"
What extra recipes need to be built? These are built here:
MACHINE_EXTRA_RRECOMMENDS = " kernel-modules kernel-devicetree"
Set image dependencies:
EXTRA_IMAGEDEPENDS += "u-boot"
Architecture-specifi c confi gurations are found in tune fi les. Here, we will set the available one that will fulfi ll our requirements:
DEFAULTTUNE ?= "cortexa8hf-neon"include conf/machine/include/tune-cortexa8.inc

Welcome to Yocto Project and BeagleBone Black
[ 16 ]
These tune fi les are present under Poky on the path that we are using in include directive.
Here, we will specify the type of fi lesystem images we want to create for our machine. There are other options to choose from. Also, here, we will set extra image commands in the case of the jffs2 image:
IMAGE_FSTYPES += "tar.bz2 jffs2"EXTRA_IMAGECMD_jffs2 = "-lnp "
One of the most important options is the serial debug console. Here, we are defi ning our eyes with which to peek inside the board:
SERIAL_CONSOLE = "115200 ttyO0"
Here, we are tweaking our kernel options to see what recipe should be used for kernel compilation and what version of kernel needs to be built. For this, we will use the Yocto Project keywords, PREFERRED_PROVIDER and PREFERRED_VERSION:
PREFERRED_PROVIDER_virtual/kernel ?= "linux-yocto"PREFERRED_VERSION_linux-yocto ?= "3.14%"
We can also create another kernel image, zImage. Since this is a generic machine for BeagleBone Black and White versions, we will create device tree binary fi les for both of the target. You can opt not to build DTB for BeagleBone White, but this won't make much difference in terms of build time or cleanliness, if you are considering such things. Also, we can set any extra arguments that need to be passed to KERNEL:
KERNEL_IMAGETYPE = "uImage"KERNEL_DEVICETREE = "am335x-bone.dtb am335x-boneblack.dtb"KERNEL_EXTRA_ARGS += "LOADADDR=${UBOOT_ENTRYPOINT}"
Here, we will confi gure most of the aspects of our bootloaders. We will set MLO as the binary name for stage-one bootloader so that we will have it created as MLO, as we saw in the images directory. We will specify a u-boot suffi x, img, to be used so that we have the u-boot.img fi le created. Other options are also related to u-boot, such as these:
SPL_BINARY = "MLO"UBOOT_SUFFIX = "img"UBOOT_MACHINE = "am335x_evm_config"UBOOT_ENTRYPOINT = "0x80008000"UBOOT_LOADADDRESS = "0x80008000"

Chapter 1
[ 17 ]
Now, we will determine the features that we want our machine to support or, more precisely, the features it has the ability to support. We will also determine which features we want turn on:
MACHINE_FEATURES = "usbgadget usbhost vfat alsa"
bitbake.confAs the name signifi es, this fi le is related to BitBake, the real engine behind Yocto Project, which is responsible for the simplifi cation of our build process. This fi le is parsed fi rst and then the rest of the confi guration fi les listed in it are parsed. This fi le is found under poky/meta/conf/ as bitbake.conf. This is not a small fi le, so we cannot go through it line by line. It contains more than 700 lines of confi guration and metadata. Almost all the metadata used in our recipes is defi ned in this fi le.
It is not a standalone fi le. Instead, it includes other fi les from the conf directory. We can fi nd all the fi les that were described earlier in it. So, bitbake.conf uses these fi les and the metadata defi nitions in them. For example, if you remember, we used some variables such as DL_DIR, TOPDIR, and TMPDIR, You can fi nd all these variables in this fi le, along with their default values. This fi le has all the metadata arranged in different sections. It contains about 20 different sections. Variables defi ned in one section are used in other sections. Let's have a brief look at some of these sections.
Standard target fi lesystem pathsThese are standard fi lesystem paths extensively used in different recipes. This section has further subsections. You won't need to change these variables, but you should reference these while developing recipes.
Architecture-dependent build variablesThis is also a huge set of variables to defi ne architecture-dependent metadata. These variables are prefi xed with BUILD_, HOST_, TARGET_, and SDK_ so as to clarify their domain of affect.
Package default variablesVariables from this section are extensively used in recipes. These variables are used in every recipe. We will discuss most of these variables in the upcoming chapters.

Welcome to Yocto Project and BeagleBone Black
[ 18 ]
General work and output directories for the build systemWe have touched some of these variables while confi guring our build. These defi ne most of the build directory structure. This section contains a staging-related section. This section is very important for cross compilation, which is usually the case when using Yocto Project.
Specifi c image creation and rootfs population informationThese variables defi ne different properties of our root fi lesystem image. For example, from variables such as IMAGE_NAME, you can infer how the name of our image, core-image-sato-beaglebone-20141126124205, is created.
Build fl ags and optionsOf course, our build fl ags go into this section. You can see different fl ags related to compiler, linker, and Make in this section.
Download locations and utilitiesThis section contains mirror defi nitions for speeding up the build process. Since we are creating BSPs that contain a lot of packages, we face time constraints. Yocto Project tries to tackle such obstacles in this way. Also, you can see commands to fetch from different versioning systems in this section.
Including the rest of the confi g fi lesAs we already discussed, this fi le includes other confi guration fi les. Here, you can see the list of these fi les.
To avoid wasting time, I am skipping the other sections. You can have a look at them at your leisure.

Chapter 1
[ 19 ]
SummaryIn this chapter, you learned how to prepare our host system to use it as a Yocto Project development host. You also learned how to build BeagleBone images using Yocto Project, prepare an SD card, boot the board from this card, and set up serial communication to the board to take a sneak peek into it. We discussed most of the confi guration fi les in this chapter. We took a brief look at some extra confi guration fi les, as well. In the next chapter, you will learn about the core tool behind Yocto Project, which is BitBake, in detail. You will also learn about its various options and how we can use them to make our lives easier.

Where to buy this book You can buy Using Yocto Project with BeagleBone Black from the
Packt Publishing website.
Alternatively, you can buy the book from Amazon, BN.com, Computer Manuals and most internet
book retailers.
Click here for ordering and shipping details.
www.PacktPub.com
Stay Connected:
Get more information Using Yocto Project with BeagleBone Black