uso etc-220 inglese - stpats.com manuals/uso_etc-220_inglese.pdfread this addendum and the mep...
TRANSCRIPT

page �
MEP Labeler Addendum: Setup and Maintenance
Read this addendum and the MEP manual carefully before operating the labeler.One person should be assigned to maintain the labeler. Only this primary operator should make adjustments to the labeler. This primary operator should train additinal operators. However, adjustments should be made by, or under the careful supervision of the primary operator.
••
This manual and parts are available online.
Setup of the LabelerThe labeler has been setup and tested at St. Patrick’s of Texas prior to delivery. The labeler arrives with a roll of St. Patrick’s labels. All aspects of the labeler operation have been tested by St. Patrick’s, including the photocell and timer.The final adjustments, and the only adjustments, needed are
Bottle Diameter AdjustmentBottle Height AdjustmentPhotocell adjustment Timer adjustment (if doing front and back labels)
Do NOT make any other adjustments to the labeler. Contact St. Patrick’s in advance if you believe some other adjustment needs to be performed.
We recommned using the roll of St. Patrick’s labels to perform the initial bottle height and bottle diameter adjustments.
Bottle Diameter Adjustment: Position the moveable rollers such that there is ~�/4” gap between the rollers and the bottle.Bottle Height Adjustment: Raise or lower the bottle platform to change height of labels on bottle.
3. Now replace St. Patrick’s labels with your labels. Run unit. If labeler applies more labels than needed (for example 3 when ap-plying back and front), then photocell must be adjusted.
Adjusting Photocell. See Fig. �.Photocell adjustment is specific to label and backing paper and is influenced by room lighting. Do not operate in sunlight.The technique that will always work is the following:
Put labels on machine Turn photocell adjustment screw to ~3 o’clock position.Turn the labeller onTurn the photocell adjustment screw counterclockwise (small increments) until the machine stops when a label is passed in front of it.
4. Adjust timer. [when applying front and back labels]. Increase or decrease the timer delay to center back label.
�.�.3.4.
�.
�.
••••
Fig. 1. Photocell adjustment.

page �
Periodic MaintenanceKeep labeler clean and dry. Do not store in humid or wet area. Remove front cover and lubricate the chain annually. Aerosol spray of lithium grease works well.
DO NOTDO NOT use OZONE to clean a labeler. Ozone will destroy all rubber and plastic components and should NEVER be used on equipment with rubber or plastic components.DO NOT use a HOSE or PRESSURE WASHER to clean a labeler. Simply wipe down with clean damp cloth. Pressure washers should NEVER be used on equipment with bearings or electrical com-ponents. DO NOT use METABISULFITE (or any harsh chemicals) for cleaning or sanitizing. Metabisulfite is not a sanitizer nor a cleaner and should NEVER be used as such. Metabisulfite is corrosive to most metals including stainless steel.
�.�.
�.
�.
3.
Problems and Solutions
Problem: Nothing happens when bottle is placed on bottle stand. Solution �: Emergency Stop button is pushed in. Pull it out. Solution �: Turn off unit and wait 30 seconds before turning it back on.
Problem: Three or more labels are applied per cycle.Solution 1: Adjust photocell. If room lighting has changed, the pho-tocell may need to be readjusted.Solution �. Do not operate in direct sunlight---this blinds the photo-cell.
Problem: Bottle spins out from between the rollers.Solution: Moveable rollers must be moved closer to the bottle---gap ~�/4”.
Problem: Black rubber sleeve moves up (or down) on roller. Solution: See Fig. �. Place compressed air nozzle between sleeve and white roller. Pull up or down on rubber sleeve while applying compressed air to reposition the black rubber sleeve. Fig. 2. Use compressed air to
reposition black sleeve.

M.E.P. - operator's handbook - Etc 220 labelling machine
1
CONDITIONS OF SALE AND WARRANTY
1. Read carefully this operator's handbook before operating our Etc 220 labelling
machine.
2. M.E.P. guarantees his Etc 220 labelling machine in case of breakages caused by
faulty components or incorrect assembly.
3. Our Etc 220 labeling machine has a 12-month warranty. 12 month period begins on shipping
date from St. Patrick’s of Texas. This guarantee is valid only for the first owner of the
corking machine.
4. Warranty only consists in replacing the damaged parts and it does include neither
refunds for losses caused by the shutdown of the machine nor any cost of labour or
any transport cost to send the filling machine to a repair shop.
5. Any repair or modification made to the machine by unauthorized personnel will make
the warranty void.
6. We cannot be held responsible for damages due to incorrect use of the labeling
machine, or failure to carry out maintenance and lubrication, or problems or damage
incurred during transport.
7. M.E.P. reserves the right to introduce changes without previous notice to the Etc 220
labelling machine; however, the supply of spare parts of the previous models will be
guaranteed.
INDEX
1 ............................ Description of the Etc 220 labelling machine
2 ............................ Technical details
3 ............................ Instructions for use
4 ............................ Operating directions
5 ............................ Faults and remedies check list
6 ............................ Maintenance
Electric system of the Etc 220 labelling machine

M.E.P. - operator's handbook - Etc 220 labelling machine
2
1. DESCRIPTION OF THE Etc 220 LABELLING MACHINE
Our Etc 220 semi automatic labelling machine makes it possible to use self-sticking
labels and allows you to put front and back labels on cylindrical bottles.
Our Etc 220 labelling machine is almost entirely made of stainless steel or synthetic
materials (such as delrin or rubber) which are resistant to wear; the only parts made of
carbon steel are the internal mechanisms but they are galvanized.
All moving mechanisms are supported by ball-recirculating elements in order to
guarantee both a higher precision of functioning and a higher resistance to wear.
SAFETY SYMBOLS:
General danger
Caution: refer to the operator's handbook
Caution: 230 Volt tension.
M.E.P. - operator's handbook - Etc 220 labelling machine
3
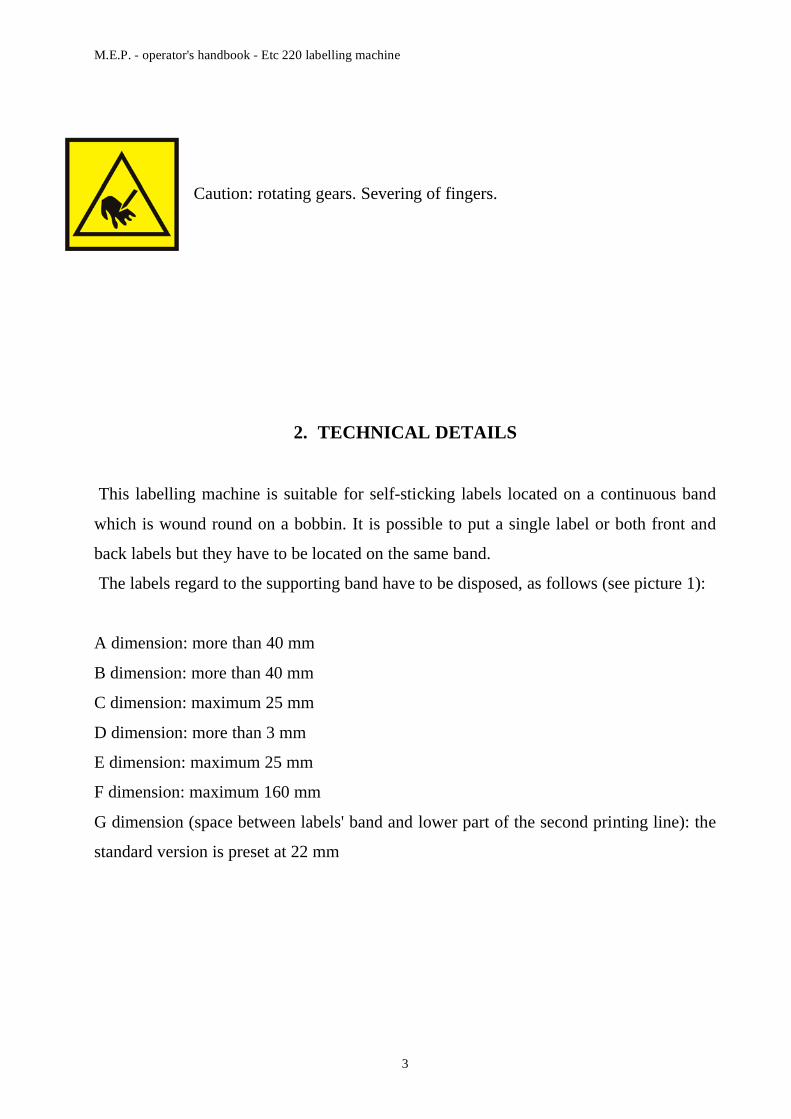
Caution: rotating gears. Severing of fingers.
2. TECHNICAL DETAILS
This labelling machine is suitable for self-sticking labels located on a continuous band
which is wound round on a bobbin. It is possible to put a single label or both front and
back labels but they have to be located on the same band.
The labels regard to the supporting band have to be disposed, as follows (see picture 1):
A dimension: more than 40 mm
B dimension: more than 40 mm
C dimension: maximum 25 mm
D dimension: more than 3 mm
E dimension: maximum 25 mm
F dimension: maximum 160 mm
G dimension (space between labels' band and lower part of the second printing line): the
standard version is preset at 22 mm

M.E.P. - operator's handbook - Etc 220 labelling machine
4
Picture 1.
Picture 2.
The stamp has the following lay-out (see picture 2):
types' height 3 mm (different types can be requested when placing the order)
possibility to print on 3 lines
H dimension and I dimension: preset at 6,25 mm (these dimensions are referred to the
printing lines' barycentre)
L dimension: preset at 35 mm
types' width: 3 mm
possibility to fit up to 11 types into each line
F
Etichetta
Retro- etichetta
Etichetta
Retro-
etichetta
A
C
E
D
B
G
I
H
L
M
G

M.E.P. - operator's handbook - Etc 220 labelling machine
5
M dimension: preset at 15,5 mm
When a types' height different from 3 mm is requested, the M dimension must be
recalculated on the basis of the new types' height.
Bobbin's maximum external diameter: 200 mm
Inner diameter of the spool's bobbin: 65 - 75 mm
Bobbin wound round counterclockwise (bobbin's unwinding on the machine
clockwise), labels on the external part of the bobbin
Cylindrical bottles
Bottles' diameter between 60 mm and 112 mm
Our Etc 220 labelling machine is supplied as a bench version; as an option, it can be
provided with a stainless steel wheeled support.
Etc 220 labelling machine:
height: 620 mm
width: 470 mm
front length: 850 mm
weight: 60 kg
Etc 220 labelling machine with a stainless steel wheeled support:
height: 1120 mm
width: 470 mm
front length: 850 mm
weight: 75 kg
Single-phase feeding: 110 Volt, 60 Hz

M.E.P. - operator's handbook - Etc 220 labelling machine
6
rotation speed (two motors): 1380 r.p.m.
power: 0.3 KW
The labelling time, that is the time between the bottle being located on the bottle platform
and the labelled bottle being taken back, is 3,5 seconds.
3. INSTRUCTIONS FOR USE
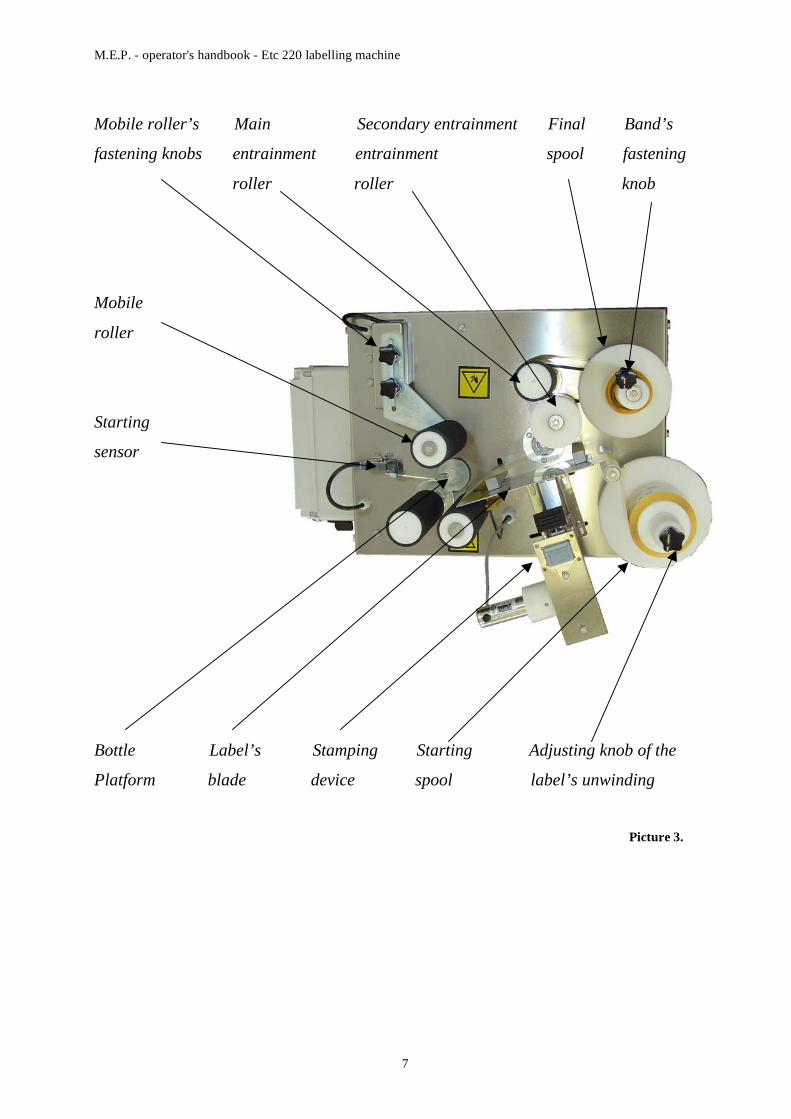
In our Etc 220 labelling machine bottles must be placed vertically, so that it starts a
sensor with a tongue which makes the machine start (see picture 3, starting sensor).
Functioning consists in the mobile roller coming near and closing the bottles inside three
rubber rollers. Bottles start rotating while the band where labels are located is drawn and
made pass on a blade which makes it turn 360°. This makes a label come off the band (or
a couple of labels, front-and back labels) and it being applied on the bottle. Now the
mobile roller goes back, the labelled bottle can be taken off and a new one inserted.
M.E.P. - operator's handbook - Etc 220 labelling machine
7
Mobile roller’s Main Secondary entrainment Final Band’s
fastening knobs entrainment entrainment spool fastening
roller roller knob
Mobile
roller
Starting
sensor
Bottle Label’s Stamping Starting Adjusting knob of the
Platform blade device spool label’s unwinding
Picture 3.

M.E.P. - operator's handbook - Etc 220 labelling machine
8
4. OPERATING DIRECTIONS
The Etc 220 labelling machine must be placed on an even ground, in a lit up room and
far enough from other machines.
This machine must be used by an operator at a time and when the machine is operating
nobody else should be near.
First of all, adjust the position of the mobile roller (see picture 3, mobile roller's
fastening knobs). To do this, loosen the knobs which keep it stationary (see picture 2,
mobile roller's fastening screws) and arrange this roller in a way that it is easy to put the
bottles in and take them off. It is advisable to place a bottle on the two fixed rollers and
move the third roller up to 3 mm near the bottle. To leave less space would make it
difficult to position the bottles and take them off, whereas a larger space would not assure
the right closing and labels could be applied irregularly.
Green/red light
PICTURE 4
Adjusting screw
Picture 4.
In order to avoid anomalies in functioning, check the right degree of sensitivity of the
photocell. To do this, insert the band's edge with a label on it into the photocell's fork.
When the band without any label on it is inserted, the green warning light located on the

M.E.P. - operator's handbook - Etc 220 labelling machine
9
lower part of the photocell turns on; whereas, when the band with labels on it is inserted,
the red warning light turns on (see picture 4). In case this does not happen, the adjusting
screw must be screwed or unscrewed. When it is turned clockwise, the photocell's degree
of sensitivity increases; so, if when inserting the band without any label on it the green
warning light does not turn on, then the adjusting screw must be screwed.
Fastening cone
Starting spool
Delay Green Quick stop Switch of the Switch of the General
warning push-button second label stamping device switch
light
Picture 5.

M.E.P. - operator's handbook - Etc 220 labelling machine
10
Afterwards, place the labels' band on the machine. To do this, remove the fastening cone
from the starting spool (see picture 5), insert the labels' bobbin and relocate this cone
again using some strength downwards so that the bobbin adheres to the shaft.
The band must be located on the machine so that it follows the way of picture 6.
Labels must pass between two rollers which are kept pressed one against the other by a
spring which is a little stiff (see picture 6, entrainment rollers).
To carry out this operation, the two rollers must be spaced out and the labels' band must
be put inside them, paying attention to keep it in line with the height of the starting-and
final spool as far as possible.
Main entrainment Secondary entrainment Final spool
roller roller
Bottle Photocell Blade Label Starting spool
Picture 6.

M.E.P. - operator's handbook - Etc 220 labelling machine
11
Now connect the machine to the current feeding and turn the main switch to position "1";
the green indicator will turn on (see picture 5). The machine is ready for work and it is
enough to put a bottle inside the three rollers to have it labelled.
CAUTION
Before starting work check that on the machine there aren't any spanners or other
fittings used to carry out the necessary adjustments. Once a bottle is placed on the
bottle platform keep your hands away from the machine and move them near only
once the bottle is labelled.
Back label
Bottle seen from above
Front label
Picture 7.
In case one wants to apply a second label too, one has to move the little lever located at
the front of the control box (see picture 5). Moving this lever makes a little green warning
light turn on (it is smaller than that of the main switch). Now lay a bottle and the second
label will be applied.
If you want to put both front-and back labels, and the two labels are not placed correctly,
adjust the special adjusting delay (see picture 5).
Refer to the plan of picture 7: by turning the delay's knob clockwise, the time between
the application of the two labels increases; so, the back label will be moved towards the
M.E.P. - operator's handbook - Etc 220 labelling machine
12
direction of the arrow, that is counterclockwise. In other words, if you look at the bottle
from the front and the space on the right between front-and back label is less than that on
the left, the delay's knob must be moved clockwise.
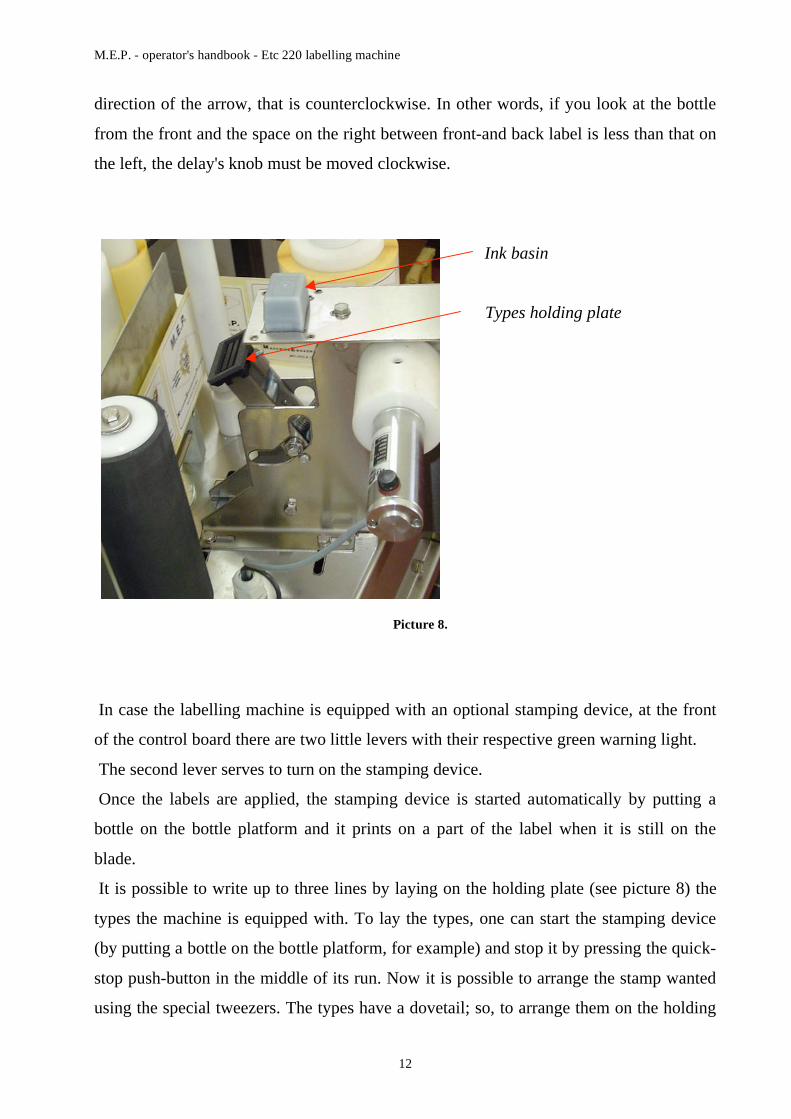
Ink basin
Types holding plate
Picture 8.
In case the labelling machine is equipped with an optional stamping device, at the front
of the control board there are two little levers with their respective green warning light.
The second lever serves to turn on the stamping device.
Once the labels are applied, the stamping device is started automatically by putting a
bottle on the bottle platform and it prints on a part of the label when it is still on the
blade.
It is possible to write up to three lines by laying on the holding plate (see picture 8) the
types the machine is equipped with. To lay the types, one can start the stamping device
(by putting a bottle on the bottle platform, for example) and stop it by pressing the quick-
stop push-button in the middle of its run. Now it is possible to arrange the stamp wanted
using the special tweezers. The types have a dovetail; so, to arrange them on the holding
M.E.P. - operator's handbook - Etc 220 labelling machine
13
plate, it is necessary to insert them sideways and drag them to the spot wanted using the
tweezers.
This labelling machine is equipped with five sets of numerical types from "0" to "9" and
two indelible ink basins.
Before starting work, open one of the two ink basins, place it in the upper part of the
stamping device (see picture 8) and insert it under the plate by pushing it until it gets
stuck.
In the rest position the types holding plate is in touch with the ink basin. During its
working run the types holding plate moves, rotates, stamps and goes back to its starting
position, so that it closes and prevents the ink form staying in touch with the air for a long
time. It is easier to place the basin when the stamping device is in the middle of its run
(see picture 8).
At the end of work, clean the stamp's types using blotting paper, take off the ink basin
and close it by means of the special ink-pad. This operation has to be carried out when
the stamping device is in the middle of its run, too.
The position of the stamping device can be adjusted in the same direction as the label's
blade by changing the position of its screws and moving it to a different one among the
four longitudinal longholes located on the machine's plane. This adjustment will probably
be necessary because if the label's width changes, the respective position between stamp
and label changes, too.
Eventually, it is possible to adjust up to 25 mm the height of the label on the bottle. To
do this, the bottle platform must be screwed down or unscrewed (see picture 3): this is
threaded and it will go up or down and make the label's height change.
CAUTION
Before intervening on the machine always bring the starting switch back to the "0"
position.

M.E.P. - operator's handbook - Etc 220 labelling machine
14
5. FAULTS AND REMEDIES CHECK LIST
In case labels are applied slightly oblique on the bottles, you must check that the band's
lower part is in contact with the edge of the label's blade (see picture 3). If it is not so,
separate a little the two rollers using some strength and adjust the band's position. The
white plastic roller can be moved, whereas the rubber one is fixed.
In case after placing a bottle on the bottle platform the machine does not start, check that
the quick-stop pushing button was not pressed (see picture 5). In that case, turn it
clockwise and try again. If the problem persists check that the starting sensor (see picture
3) is properly started by the bottle; if it is not so, move it upwards by loosening the
respective screws.
If after a bottle has been labelled the labels' band is not stretched, one can try to screw
down the fixing cone a little bit more (see picture 5). In case the problem persists, screw
down the adjusting knob of the labels' unwinding (see picture 3). It is better not to screw
down this knob too much; turn it once, then try to label again. Only afterwards, if
necessary, screw it down more.
If for whatever reason should come a strange noise from inside the machine, press
immediately the quick-stop push-button (see picture 5). You could try to spot the
problem by taking off the back panel of the machine, but it is better not to go on trying
too long and contact an authorized person.
6. MAINTENANCE
At the end of work it is advisable to remove from the rubber rollers any glue residual
products. They are unlikely to form, but if they are neglected, after some time, form
M.E.P. - operator's handbook - Etc 220 labelling machine
15
incrustations hard to be removed. At the end of work always turn the general switch to
the "0" position (see picture 5) and disconnect the current feeding cable.
When using the machine after a long stop, it is advisable to lubricate all moving parts.
To do this, remove the back panel of the machine and lubricate the drive chain, the linear
guides and all the moving parts using grease.

M.E.P. - operator's handbook - Etc 220 labelling machine
16
ELECTRIC SYSTEM OF THE Etc 220 LABELLING MACHINE
