v manual de instrucciones / gp-wkb5 - mgmi
TRANSCRIPT
2007 Sony Corporation / Printed in Japan
Wireless Keyboard
VGP-WKB5
3-271-911-01 (1)
Operating Instructions / Mode d’emploi /Bedienungsanleitung / Istruzioni per l’uso /Manual de instrucciones / Инструкция по эксплуатации
http://www.sony.net/

2 GB
English
WARNINGTo reduce the risk of fire orelectric shock, do not expose thisapparatus to rain or moisture.When connecting to the USB port, please connect tothe USB port with mark.
Owner’s RecordThe model number and the serial number are locatedon the bottom of the keyboard. Record the serialnumber in the space provided below. Refer to thisnumber whenever you call your Sony dealerregarding this product.
Model No. VGP-WKB5Serial No. ________________________________
This device contains the following wireless devices:Wireless keyboard (VGP-WKB5XX*) and Wirelessreceiver (VGP-WRC5)
* Model name of keyboard will be followed by asuffix No.
For customers in the U.S.A.(bundled keyboard, VGP-WKB5US)This equipment has been tested and found to complywith the limits for a Class B digital device, pursuantto Part 15 of the FCC Rules. These limits aredesigned to provide reasonable protection againstharmful interference in a residential installation. Thisequipment generates, uses, and can radiate radiofrequency energy and, if not installed and used inaccordance with the instructions, may cause harmfulinterference to radio communications. However,there is no guarantee that interference will not occurin a particular installation. If this equipment doescause harmful interference to radio or televisionreception, which can be determined by turning theequipment off and on, the user is encouraged to try tocorrect the interference by one or more of thefollowing measures:
– Reorient or relocate the receiving antenna.– Increase the separation between the equipment and
receiver.– Connect the equipment into an outlet on a circuit
different from that to which the receiver isconnected.
– Consult the dealer or an experienced radio/TVtechnician for help.
You are cautioned that any changes or modificationsnot expressly approved in this manual could voidyour authority to operate this equipment.
For questions regarding your product or for the SonyService Center nearest you, call 1-888-476-6972 inthe United States or 1-800-961-7669 in Canada.The number below is for FCC related matters only.Model No.: VGP-WKB5 (Wireless Keyboard)This device complies with part 15 of the FCC Rules.Operation is subject to the following two conditions:1) This device may not cause harmful interference,and 2) this device must accept any interferencereceived, including interference that may causeundesired operation.
Declaration of ConformityTrade Name: SONYModel No.: VGP-WRC5Responsible Party: Sony Electronics Inc.Address: 16530 Via Esprillo,
San Diego,CA 92127 U.S.A.
Telephone No.: 858-942-2230This phone number is for FCC-related mattersonly.
This device complies with Part 15 of the FCCRules. Operation is subject to the following twoconditions: (1) This device may not causeharmful interference, and (2) this device mustaccept any interference received, includinginterference that may cause undesired operation.
FCC Radiation Exposure Statement:These products comply with FCC radiationexposure limits set forth for uncontrolledequipment and meet the FCC radio frequency(RF) Exposure Guidelines in Supplement C toOET65. These products have very low levels ofRF energy that it is deemed to comply withouttesting of specific absorption ratio (SAR).
This device and its antenna(s) must not be co-located or operating with any other antenna ortransmitter.Users are not permitted to modify this transmitterdevice. Any unauthorized changes made to thisdevice could void your authority to operate thisdevice.
This device complies with part 15 of the FCCRules. Operation is subject to the following twoconditions: 1) This device may not cause harmfulinterference, and 2) this device must accept anyinterference received, including interference that
may cause undesired operation.

3 GB
For customers in Canada(bundled keyboard, VGP-WKB5US)This class B digital apparatus complies withCanadian ICES-003.The term “IC:” before the radio certificationnumber only signifies that the Industry Canadatechnical specifications were met.Operation is subject to the following twoconditions: (1) This device may not cause harmfulinterference, and (2) this device must accept anyinterference received, including interference thatmay cause undesired operation of the device.To prevent radio interference to the licensed service,this device is intended to be operated indoors andaway from windows to provide maximum shielding.Equipment (or its transmit antenna) that is installedoutdoors is subject to licensing.
IC Exposure of Humans to RF FieldsThe installer of this radio equipment must ensure thatthe antenna is located or pointed such that it does notemit RF field in excess of Health Canada limits forthe general population; consult Safety Code 6,obtainable from Health Canada’s website:www.hc-sc.gc.ca/rpb.
For customers in Europe(bundled keyboard, VGP-WKB5GB/VGP-WKB5FR/VGP-WKB5DE/VGP-WKB5IT/VGP-WKB5ES)Hereby, Sony, declares that this product is in compliancewith the essential requirements and other relevantprovisions of Directive 1999/5/EC.
To obtain a copy of the Declaration of Conformity (DoC)for R&TTE Directive, please access the following URLaddress.http://www.compliance.sony.de/
This product complies with European standardsEN55022 Class B and EN55024 for use in the followingareas: residential, commercial and light industrial.
This equipment has been tested and found to complywith the limits set out in the EMC Directive by using aconnection cables not longer than 3 meters.
GB
Disposal of AA batteries• This wireless device is powered by AA batteries.• For installing the batteries, please refer to the
“Inserting batteries into the keyboard” section of thismanual.
• Do not handle damaged or leaking batteries. Disposeof promptly and properly.
• Batteries may explode or leak if recharged, disposedof in fire, mixed with other types of battery orimproperly installed.
• Batteries used in these devices may present a fire orchemical burn hazard if mistreated. Do notdisassemble, heat above 60°C (140°F) or incinerate.
• Replace only with the same or equivalent typerecommended by the manufacturer.
• Keep away from children.• Dispose of properly at end-of-life.• In some areas, the disposal of batteries in household
or business waste may be prohibited. Please use theappropriate public collection system.
Disposal of Old Electrical& Electronic Equipment(Applicable in theEuropean Union and otherEuropean countries withseparate collectionsystems)
This symbol on the product or on its packaging indicatesthat this product shall not be treated as household waste.Instead it shall be handed over to the applicablecollection point for the recycling of electrical andelectronic equipment. By ensuring this product isdisposed of correctly, you will help prevent potentialnegative consequences for the environment and humanhealth, which could otherwise be caused by inappropriatewaste handling of this product. The recycling ofmaterials will help to conserve natural resources. Formore detailed information about recycling of thisproduct, please contact your local Civic Office, yourhousehold waste disposal service or the shop where youpurchased the product.
Voor de Klanten in NederlandGooi de batterij niet weg maarlever deze in als klein chemischafval (KCA).

4 GB
Table of ContentsBefore Use ............................................. 4
Features .......................................... 4
Compatible personal computers ..... 4
Checking the Supplied Contents ........... 5
Setting Up .............................................. 6
Inserting batteriesinto the keyboard .......................... 6
Connecting the receiver tothe computer ................................. 7
Enabling communication betweenthe keyboard and the receiver ...... 8
Location and Functions of Controls .... 10
Keyboard ...................................... 10
Receiver ........................................ 13
Unfolding the legson the keyboard .......................... 14
Palmrest ........................................ 15
Precautions .......................................... 16
Getting Help ........................................ 17
Specifications ...................................... 18
Troubleshooting ................................... 20
• VAIO and are trademarks of SonyCorporation.
• Microsoft, Windows, and Windows Vista areregistered trademarks of Microsoft Corporation in theUnited States and/or other countries.
• All other names of systems, products, and services aretrademarks of their respective owners. In this manual,the ™ or ® marks are not specified.
• In this manual, Microsoft® Windows® XP HomeEdition and Microsoft® Windows® XP Professionalare referred to as Windows XP.
• In this manual, Microsoft® Windows Vista® HomeBasic, Microsoft® Windows Vista® Home Premium,Microsoft® Windows Vista® Business and Microsoft®
Windows Vista® Ultimate are referred to as WindowsVista.
Before Use
Before using the keyboard, read thismanual thoroughly and retain it for futurereference.
Features
The Sony VGP-WKB5 is a wirelesskeyboard specially designed for SonyVAIO computers.
• New style wireless keyboard that employs fold-up palmrest which can be used as a palmrest oras a keyboard cover to prevent dust buildup.
• Stylish design and feel, made of aluminum
• 2.4 GHz digital wireless technology withmaximum communication range of 32.8 ft. (10m), which enables you to input charactersremotely.
Compatible personalcomputers
The Sony VGP-WKB5 can be used withthe following VAIO personal computers.Use of this keyboard with othercomputers is not supported.
• Sony VAIO notebook computers pre-installedwith Windows XP or Windows Vista.
Note
Do not use the keyboard with personalcomputers other than those designated.Otherwise, the keyboard may be damaged.

5 GB
Checking the Supplied Contents
Check to make sure the box includes the following items. If any of thefollowing items are damaged or missing, see “Getting Help” on page 17.
• Wireless keyboard (referred to as the keyboard) (1)
• Receiver (1)
• R6 (size AA) alkaline batteries (4)
• Operating Instructions (this document)
6 GB
Setting Up
Note
To prevent battery fluid leaks, explosion, and severe damage, observe the followingprecautions.
• Insert the batteries with the correct + – orientation.
• Do not mix old and new batteries or batteries of different types.
• Do not charge dry-cell batteries.
• If the keyboard is not used for a long period of time, remove the batteries.
• If a battery fluid leak occurs, carefully wipe the battery compartment, and insert newbatteries.
• Not compatible with commercially available rechargeable batteries. Use regular dry-cell batteries. Using rechargeable batteries may lead to injury or damage due to batteryfluid leaks.
z Hint
Check the remaining battery charge with the battery indicator.
Replace batteries when they run low.
When not using the keyboard, set the POWER switch to OFF. This will make thebatteries last longer.
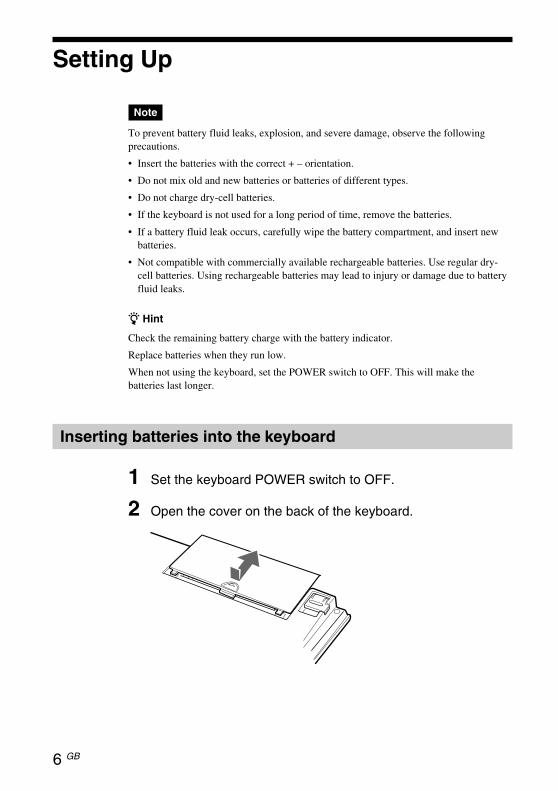
Inserting batteries into the keyboard
1 Set the keyboard POWER switch to OFF.
2 Open the cover on the back of the keyboard.

7 GB
Continued on next page
3 Insert the four supplied R6 (size AA) batteries with thecorrect eE orientation.
4 Close the cover.
Connecting the receiver to the computer
Connect the receiver to the computer using the receiver cable.
When connecting the receiver to the computer for the first time
The first time the receiver is connected to the computer, the Windowsoperating system automatically installs the standard USB device driver.
Notes
• Drivers for USB devices must be installed for each port used. If you connect thereceiver to a different USB port on your computer, the driver installation procedure willbe repeated for that USB port.
• Connect the receiver only to a built-in USB port. Do not connect the receiver to anexternal USB hub.
To the computer’s (USB) port

8 GB
Enabling communication between the keyboard andthe receiver
Note
To connect your wireless keyboard, it must be located within a range of 12 in. (30 cm) to3.3 ft. (1 m) from the computer.
1 Set the keyboard POWER switch to ON.
2 Press the CONNECT button on the receiver.
The receiver remains in standby to recognize the keyboard for about 10seconds.
3 Press the CONNECT button on the keyboard.
Communication between the keyboard and the receiver starts.
4 Make sure that the (Connect) indicator turns on in theLCD window on the keyboard.
If it does not turn on, the connection may have failed. Perform steps 2and 3 again.
CONNECT button
POWER switch
CONNECT button

9 GB
Note
If another VGP-WKB5 wireless keyboard is being used nearby, it may interfere withcommunication between the keyboard and the receiver. Enable communication atdifferent times or at a grater distance from the other wireless keyboard.
To stop using the keyboard
Disconnect the receiver cable from the USB port of the computer.You can disconnect and connect the receiver cable without turning off thecomputer. You can save battery power by turning off the keyboard whennot in use.

10 GB
Location and Functions of Controls
Keyboard*
* Keyboard layout and special characters may vary depending on your country or region.
Top
1 Function keys
The task assigned with each function key varies depending on thesoftware being used.
2% (muting) button
Silences the sound.
3 Volume control buttons
Control volume.
Note
When the volume is adjusted with the volume control buttons, the changes may notbe displayed on the screen. You can verify the changes by “Volume Control.”
11 GB
Continued on next page
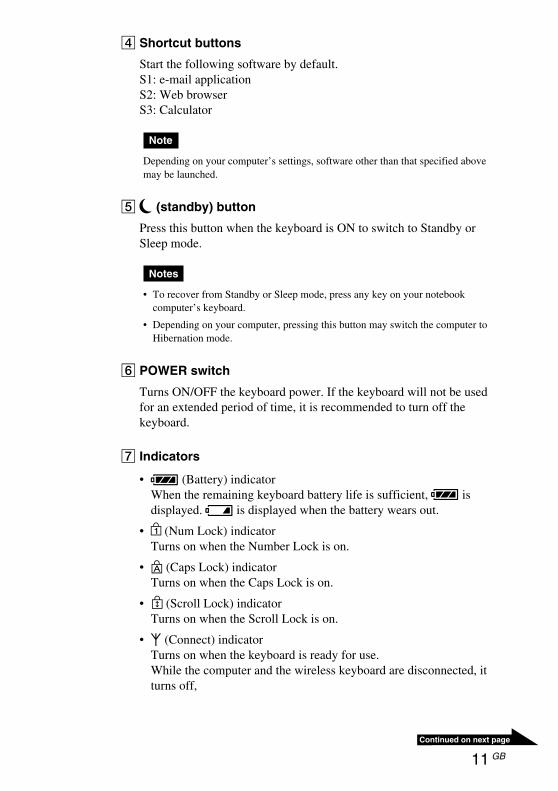
4 Shortcut buttons
Start the following software by default.S1: e-mail applicationS2: Web browserS3: Calculator
Note
Depending on your computer’s settings, software other than that specified abovemay be launched.
5 (standby) button
Press this button when the keyboard is ON to switch to Standby orSleep mode.
Notes
• To recover from Standby or Sleep mode, press any key on your notebookcomputer’s keyboard.
• Depending on your computer, pressing this button may switch the computer toHibernation mode.
6 POWER switch
Turns ON/OFF the keyboard power. If the keyboard will not be usedfor an extended period of time, it is recommended to turn off thekeyboard.
7 Indicators
• (Battery) indicatorWhen the remaining keyboard battery life is sufficient, isdisplayed. is displayed when the battery wears out.
• (Num Lock) indicatorTurns on when the Number Lock is on.
• (Caps Lock) indicatorTurns on when the Caps Lock is on.
• (Scroll Lock) indicatorTurns on when the Scroll Lock is on.
• (Connect) indicatorTurns on when the keyboard is ready for use.While the computer and the wireless keyboard are disconnected, itturns off,
12 GB
FunctionTurns SCROLL LOCK on.The task assigned with each key varies depending on thesoftware being used. For details, refer to the software’sHelp.
Used as the Pause key.The task assigned with each key varies depending on thesoftware being used. For details, refer to the software’sHelp.
Used as the Break key.The task assigned with each key varies depending on thesoftware being used. For details, refer to the software’sHelp.
PAGE UP function.Displays the page previous to the one currently displayed.
END function.Move the insert point to the end of a line or page.
Used as the PAGE DOWN key.Displays the page next to the one currently displayed.
HOME function.Move the insert point to the beginning of a line or page.
Notes
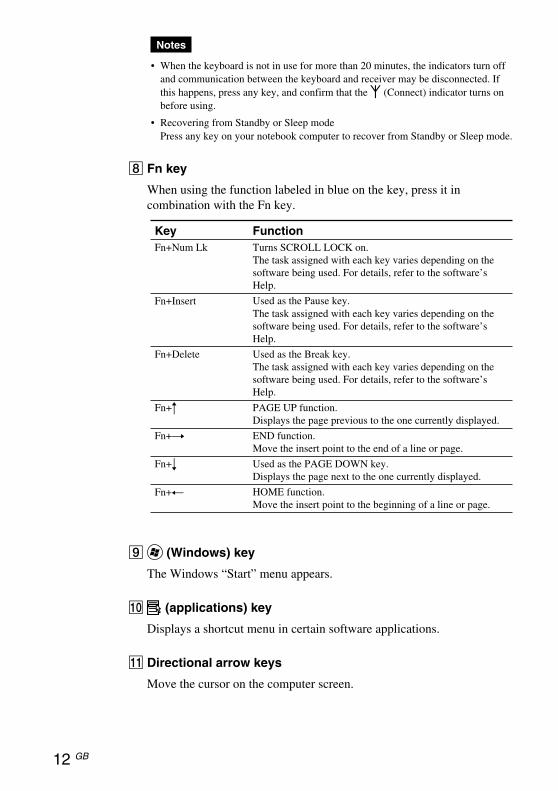
• When the keyboard is not in use for more than 20 minutes, the indicators turn offand communication between the keyboard and receiver may be disconnected. Ifthis happens, press any key, and confirm that the (Connect) indicator turns onbefore using.
• Recovering from Standby or Sleep modePress any key on your notebook computer to recover from Standby or Sleep mode.
8 Fn key
When using the function labeled in blue on the key, press it incombination with the Fn key.
KeyFn+Num Lk
Fn+Insert
Fn+Delete
Fn+R
Fn+t
Fn+r
Fn+T
9 (Windows) key
The Windows “Start” menu appears.
0 (applications) key
Displays a shortcut menu in certain software applications.
qa Directional arrow keys
Move the cursor on the computer screen.

13 GB
Continued on next page
qs Numeric keypad
If the Num Lk/Scr Lk key is pressed and the Numeric Lock is activated,use the numeric keypad to type numbers.
Bottom
1 CONNECT button
Used when enabling communication between the keyboard and thereceiver.
Receiver
Bottom
1 CONNECT button
Used when enabling communication between the keyboard and thereceiver.

14 GB
Unfolding the legs on the keyboard
Unfold the legs on the keyboard to make typing easier.
Note
Be careful not to break the tabs when folding and unfolding the legs on the keyboard.

15 GB
Palmrest
Unfold the palmrest towards you to relieve stress from your wrists whenusing the keyboard.
Fold the palmrest over the keyboard to be used as a cover to protect thekeyboard from dust or falling objects, when not in use.
Notes
• Do not force the palmrest too far when opening it.
• When using the palmrest on a flat surface, such as a desk, install the keyboard so thatthe palmrest does not extend over the edge.
• Do not carry the keyboard by the palmrest. Use both hands to hold the keyboard on thesides, as illustrated, when carrying it.

16 GB
Precautions
Operating range for thekeyboard
The maximum communication range forthe keyboard is 32.8 ft. (10 m) from thereceiver. Depending on the usageenvironment, sometimes the usabledistance may be shorter, preventingnormal operation. In such a case, take thefollowing measures:
• Ensure that the keyboard is at least 6 in.(15 cm) from the computer, display, andother electronic devices.
• Move the receiver closer to thekeyboard.
Safety
If any solid object or liquid falls onto thekeyboard, turn it off and have it checkedby qualified personnel before continuingits use.
Location
Do not place the keyboard in a locationwhere it is:
• On an unstable surface
• In very humid areas or where there is noventilation
• Subject to excessive dust
• Subject to direct sunlight or extremeheat
• Subject to extreme cold
Operation
If the keyboard is brought directly from acold to a warm location or placed in a verydamp room, moisture may condense onthe inside of the keyboard. If this occurs,the keyboard may not work properly.In this case, wait about 30 minutes for themoisture to evaporate. If the keyboarddoes not work properly after one hour,consult your nearest Sony dealer.
Carrying the keyboard
When carrying the keyboard, fold up thepalmrest. Do not carry the keyboard by thepalmrest.
Cleaning the outside of thekeyboard
• Clean the keyboard with a soft, drycloth or a soft cloth lightly moistenedwith a mild detergent solution. Do notuse any type of abrasive pad, scouringpowder, or solvent such as alcohol orbenzine.
• Always remove the batteries whencleaning the keyboard.

17 GB
Getting Help
This section provides information on howto get help and support from Sony, andtroubleshooting tips for your keyboard.
Sony support options
Sony provides several support options foryour keyboard. When you have questionsabout your keyboard, refer to thefollowing:
❑This guide explains how to use yourkeyboard.
For customers in the UnitedStates and Canada
❑The Sony Customer InformationService Center offers informationabout your VAIO computer and otherSony products that work with yourcomputer. To contact Sony CustomerInformation Service Center, call1-888-4SONYPC (1-888-476-6972).
❑Sony Computing Support providesinstant access to information oncommonly encountered problems. Typea description of the problem and theKnowledge Database searches forcorresponding solutions online. You canvisit Sony Online Support at:http://www.sony.com/pcsupport
For customers in Europe
❑VAIO-Link. For addresses and phonenumbers, refer tohttp://support.vaio.sony.eu
For customers in othercountries and regions
❑VAIO Website provides FrequentlyAsked Questions and solutions.vaio-online.sony.com/

18 GB
Wireless receiver
InterfaceUSB A
Cable lengthApprox. 27.6 in. (70 cm)
Wireless frequency band2.4 GHz
Communication rangeMax. 32.8 ft. (10 m), line of sight
MassApprox. 2.0 oz. (55 g)
DimensionsDiameter Approx. 3.0 in. (75.5 mm)Height Approx. 0.5 in. (12.7 mm)
Specifications
Wireless keyboard
InterfaceDigital wireless transmission
Key pitch0.75 in. (19.05 mm)
Keystroke0.11 in. (2.7 mm)
Power requirements3 V DC (four R6 [size AA] batteries)
Wireless frequency band2.4 GHz
Input deviceKeyboard
Communication rangeMax. 32.8 ft. (10 m), line of sight
MassApprox. 32.8 oz. (0.93 kg) (not including batteries)
DimensionsApprox. 15.3 × 1.3 × 6.3 in.(388 × 31.3 × 159 mm) (w × h × d)
19 GB
Miscellaneous
Supported modelsSony VAIO notebook computers pre-installedwith Windows XP or Windows Vista
Operating temperature41°F to 95°F (5°C to 35°C) (temperature gradientless than 18°F (10°C)/hour)
Operating humidity20% to 80% (not condensed), provided thathumidity is less than 65% at 95°F (35°C)(hygrometer reading of less than 84°F (29°C))
Storage temperature–4°F to +140°F (–20°C to +60°C) (temperaturegradient less than 18°F (10°C)/hour)
Storage humidity10% to 90% (not condensed), provided thathumidity is less than 20% at 140°F (60°C)(hygrometer reading of less than 95°F (35°C))
AccessoriesReceiver (1)R6 (size AA) alkaline batteries (4)Operating Instructions (this document)
Design and specifications are subject to changewithout notice.
20 GB
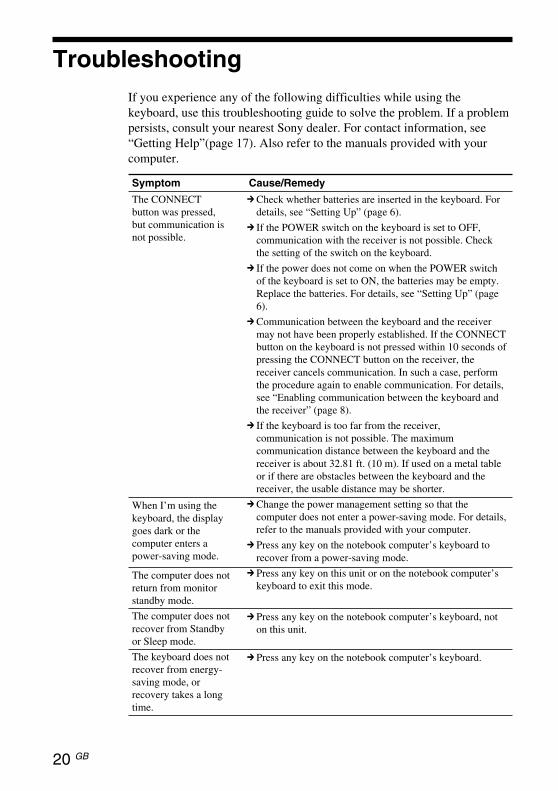
Symptom Cause/Remedy
The CONNECTbutton was pressed,but communication isnot possible.
When I’m using thekeyboard, the displaygoes dark or thecomputer enters apower-saving mode.
The computer does notreturn from monitorstandby mode.
The computer does notrecover from Standbyor Sleep mode.
The keyboard does notrecover from energy-saving mode, orrecovery takes a longtime.
cCheck whether batteries are inserted in the keyboard. Fordetails, see “Setting Up” (page 6).
c If the POWER switch on the keyboard is set to OFF,communication with the receiver is not possible. Checkthe setting of the switch on the keyboard.
c If the power does not come on when the POWER switchof the keyboard is set to ON, the batteries may be empty.Replace the batteries. For details, see “Setting Up” (page6).
cCommunication between the keyboard and the receivermay not have been properly established. If the CONNECTbutton on the keyboard is not pressed within 10 seconds ofpressing the CONNECT button on the receiver, thereceiver cancels communication. In such a case, performthe procedure again to enable communication. For details,see “Enabling communication between the keyboard andthe receiver” (page 8).
c If the keyboard is too far from the receiver,communication is not possible. The maximumcommunication distance between the keyboard and thereceiver is about 32.81 ft. (10 m). If used on a metal tableor if there are obstacles between the keyboard and thereceiver, the usable distance may be shorter.
cChange the power management setting so that thecomputer does not enter a power-saving mode. For details,refer to the manuals provided with your computer.
c Press any key on the notebook computer’s keyboard torecover from a power-saving mode.
c Press any key on this unit or on the notebook computer’skeyboard to exit this mode.
c Press any key on the notebook computer’s keyboard, noton this unit.
c Press any key on the notebook computer’s keyboard.
TroubleshootingIf you experience any of the following difficulties while using thekeyboard, use this troubleshooting guide to solve the problem. If a problempersists, consult your nearest Sony dealer. For contact information, see“Getting Help”(page 17). Also refer to the manuals provided with yourcomputer.

21 GB
Symptom Cause/Remedy
The keyboard entersenergy-saving modeand LCD indicatorsturn off.
After the receiver wasconnected, it takessome time until thekeyboard can be used.
The keyboard does notwork.
S1-S3 buttons do notwork as supposed.
c Press any key on this unit or turn ON/OFF the keyboardpower.
c If Windows, a software program, or another USB deviceis currently busy, it may take a while for the receiver to berecognized.
• The connection between keyboard and receiver fails.
cMake sure the (Connect) indicator turns on.
• The receiver is not connected to the computer.
cConnect the receiver to the computer.
• The receiver is not recognized by the computer.
cDisconnect the receiver cable from the computer’s USBport, then reconnect it.
cCheck the distance between the keyboard and the receiver.Place the keyboard and receiver within the communicationrange given in the specifications. If used on a metal tableor if there are metal objects near the keyboard, the usabledistance may be shorter.
cMake sure that there are batteries in the keyboard.Insert the batteries into the keyboard properly, and pressthe CONNECT button on the receiver. Then, within 10seconds, press the CONNECT button on the keyboard.Make sure that the keyboard is close to the receiver(within 11.8 in. or 30 cm) when you press the button.
c The functions of S1-S3 buttons on the notebookcomputer’s keyboard and those on this unit may vary.

2 FR
Français
AVERTISSEMENTAfin de réduire les risquesd’incendie ou de choc électrique,n’exposez pas cet appareil à lapluie ni à l’humidité.Lors du raccordement au port USB, veuillezbrancher l’appareil sur le port USB portant lamarque .
Cet appareil contient les équipements sans filsuivants :clavier (VGP-WKB5XX*) et récepteur (VGP-WRC5)* Le nom de modèle du clavier sera suivi d’un suffixe
sous forme de numéro.
Pour les clients au Canada(clavier fourni, VGP-WKB5US)Cet appareil numérique de la classe B estconforme à la norme NMB-003 du Canada.Le terme « IC : » avant le numéro d’homologationne signifie seulement que les normes d’IndustrieCanada ont été respectées.L’utilisation de ce dispositif est autoriséeseulement aux conditions suivantes : (1) il ne doitpas produire de brouillage et (2) l’utilisateur dudispositif doit être prêt à accepter tout brouillageradioélectrique reçu, même si ce brouillage estsusceptible de compromettre le fonctionnementdu dispositif.Pour empêcher que cet appareil cause dubrouillage au service faisant l’objet d’une licence,il doit être utilisé à l’intérieur et devrait être placéloin des fenêtres afin de fournir un écran deblindage maximal. Si le matériel (ou son antenned’émission) est installé à l’extérieur, il doit fairel’objet d’une licence.
Exposition humaine auxchamps radioélectriques -Industrie CanadaL’installateur du présent matériel radio doits’assurer que l’antenne est située ou pointée demanière à ce que cette dernière n’émette pas dechamps radioélectriques supérieurs aux limitesspécifiées par Santé Canada pour le grand public;consulter le Code de sécurité 6, disponible sur lesite Web de Santé Canada, à l’adresse suivante :www.hc-sc.gc.ca/rpb.
Pour les clients en Europe(clavier fourni, VGP-WKB5GB/VGP-WKB5FR/VGP-WKB5DE/VGP-WKB5IT/VGP-WKB5ES)Par la présente, Sony déclare que ce produit estconforme aux exigences de base et aux autresconditions applicables de la directive 1999/5/CE.
Pour obtenir une copie de la déclaration deconformité (DoC) à la directive R&TTE, rendez-vous à l’adresse URL suivante.http://www.compliance.sony.de/
Ce produit est conforme aux standards européensEN55022 Classe B et EN55024 pour une utilisationdans les environnements suivants: résidentiel,commercial et industries légères.
Cet appareil a été testé et s’est révélé conforme auxlimites définies par la directive CEM en casd’utilisation de câbles de raccordement d’unelongueur inférieure à 3 mètres.
Mise au rebut des piles AA• Ce périphérique sans fil fonctionne avec des
piles AA.• Pour l’installation des piles, reportez-vous à la
section du présent mode d’emploi « Insertiondes piles dans le clavier ».
• Ne manipulez jamais des piles qui sontendommagées ou présentent une fuite.Éliminez-les rapidement, dans le respect de lalégislation en vigueur.
• Les piles risquent d’exploser ou de couler sivous les rechargez, les jetez au feu, lesmélangez avec d’autres types de piles ouencore si vous ne les installez pascorrectement.
• Les piles utilisées dans ces dispositifs peuventprésenter un risque d’incendie ou de brûlurechimique en cas de mauvaise manipulation.Vous ne devez donc pas les démonter, lesporter à une température supérieure à 60°C(140°F) ou les brûler.
• Les piles ne peuvent être remplacées que pard’autres de même type ou d’un type équivalentrecommandé par le fabricant.
• Conservez-les hors de la portée des enfants.• Mettez-les correctement au rebut au terme de
leur vie utile.• Dans certains pays, il est interdit de jeter les
piles avec les ordures ménagères ou dans lespoubelles de bureau. Utilisez le système decollecte approprié.

3 FR
Table desmatièresAvant l’utilisation .................................. 4
Caractéristiques .............................. 4
Ordinateurs compatibles ................. 4
Vérification des pièces fournies ............ 5
Préparatifs .............................................. 6
Insertion des piles dans le clavier ... 6
Raccordement du récepteur àl’ordinateur ................................... 7
Activation de la communication entrele clavier et le récepteur ............... 8
Emplacement et fonctionnement descommandes ...................................... 10
Clavier .......................................... 10
Récepteur ...................................... 13
Déploiement des pattes du clavier 14
Repose-poignets ........................... 15
Précautions .......................................... 16
Aide ..................................................... 17
Spécifications ...................................... 18
Dépannage ........................................... 20
Traitement des appareilsélectriques etélectroniques en fin de vie(Applicable dans les paysde l’Union Européenne etaux autres payseuropéens disposant desystèmes de collectesélective)
Ce symbole, apposé sur le produit ou sur sonemballage, indique que ce produit ne doit pas êtretraité avec les déchets ménagers. Il doit être remisà un point de collecte approprié pour le recyclagedes équipements électriques et électroniques. Ens’assurant que ce produit est bien mis au rebut demanière appropriée, vous aiderez à prévenir lesconséquences négatives potentielles pourl’environnement et la santé humaine. Le recyclagedes matériaux aidera à préserver les ressourcesnaturelles. Pour toute information supplémentaireau sujet du recyclage de ce produit, vous pouvezcontacter votre municipalité, votre déchetterie oule magasin où vous avez acheté le produit.
• VAIO et sont des marquesdéposées de Sony Corporation.
• Microsoft, Windows et Windows Vista sontsoit des marques déposées de MicrosoftCorporation aux Etats-Unis et/ou dans d’autrespays.
• Les autres noms de système et de produitmentionnés dans le présent document sontgénéralement des marques déposées ou desmarques commerciales de leurs constructeursbien que les symboles ™ et ® ne soient pasutilisés.
• Dans ce manuel, Microsoft® Windows® XPÉdition Familiale et Microsoft® Windows® XPProfessionnel sont désignés par Windows XP.
• Dans le présent document, Windows Vista®
Édition Familiale Basique, Windows Vista®
Édition Familiale Premium, Windows Vista®
Professionnel et Windows Vista® ÉditionIntégrale sont désignés par Windows Vista.
FR
4 FR
Avant l’utilisation
Avant d’utiliser le clavier, veuillez lire attentivement ce manuel, àconserver pour référence ultérieure.
Caractéristiques
Le clavier VGP-WKB5 de Sony est un clavier sans fil spécialement conçupour être utilisé avec les ordinateurs VAIO de Sony.
• Clavier sans fil d’un nouveau style doté d’un repose-poignets repliablequi peut être utilisé comme tel ou comme protège-clavier afin d’éviterl’accumulation de poussière.
• Clavier au design élégant et agréable au toucher, fabriqué en aluminium
• Technologie numérique sans fil 2,4 GHz avec une portée decommunication maximale de 10 m (32,8 pieds), ce qui vous permet desaisir des caractères à distance.
Ordinateurs compatibles
Le clavier VGP-WKB5 de Sony peut être utilisé avec les ordinateurspersonnels VAIO suivants. L’utilisation de ce clavier avec d’autresordinateurs n’est pas prise en charge.
• Ordinateurs portables VAIO de Sony sur lesquels Windows XP ouWindows Vista est préinstallé.
Remarque
N’utilisez pas le clavier avec des ordinateurs personnels autres que ceux mentionnés.Sinon, vous risqueriez d’endommager le clavier.
5 FR
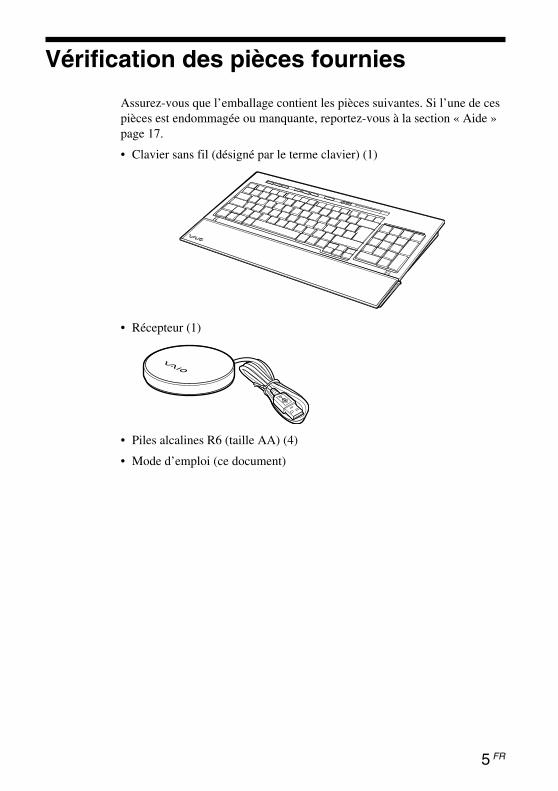
Vérification des pièces fournies
Assurez-vous que l’emballage contient les pièces suivantes. Si l’une de cespièces est endommagée ou manquante, reportez-vous à la section « Aide »page 17.
• Clavier sans fil (désigné par le terme clavier) (1)
• Récepteur (1)
• Piles alcalines R6 (taille AA) (4)
• Mode d’emploi (ce document)

6 FR
Préparatifs
Remarque
Afin d’éviter toute fuite de fluide des piles, toute explosion et tout dommage important,veillez à respecter les précautions suivantes.
• Insérez les piles en respectant la polarité +/–.
• N’utilisez pas simultanément des piles usagées et des piles neuves ou des piles d’untype différent.
• Ne rechargez pas les piles sèches.
• Si le clavier n’est pas utilisé pendant une période prolongée, retirez les piles.
• En cas de fuite de fluide des piles, essuyez soigneusement le compartiment à piles, puisinsérez des piles neuves.
• Cet appareil n’est pas compatible avec des piles rechargeables disponibles dans lecommerce. Utilisez des piles sèches classiques. L’utilisation de piles rechargeables peutentraîner des blessures ou des dommages causés par une fuite de fluide des piles.
z ConseilVérifiez l’autonomie restante des piles à l’aide de l’indicateur de piles.Remplacez les piles lorsqu’elles sont épuisées.Lorsque vous n’utilisez pas le clavier, réglez le commutateur POWER sur OFF. Cecipermettra aux piles de durer plus longtemps.
Insertion des piles dans le clavier
1 Réglez le commutateur POWER du clavier sur OFF.
2 Ouvrez le couvercle situé à l’arrière du clavier.
7 FR
suite
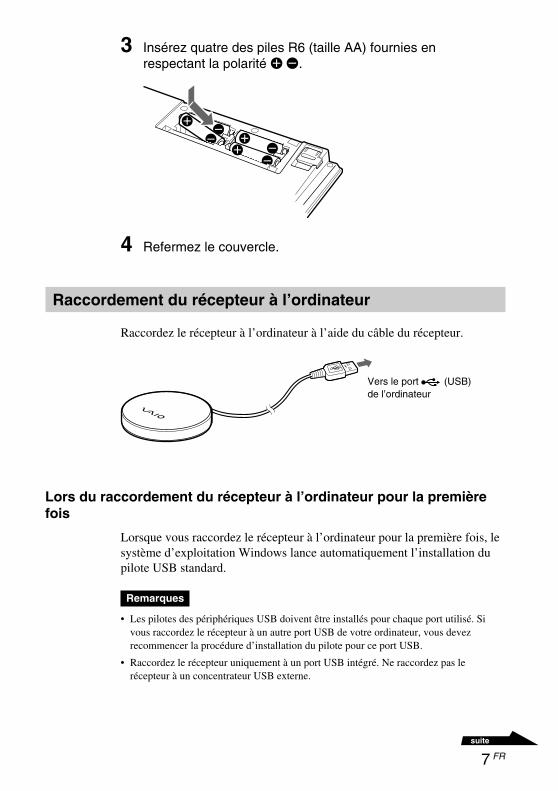
3 Insérez quatre des piles R6 (taille AA) fournies enrespectant la polarité eE.
4 Refermez le couvercle.
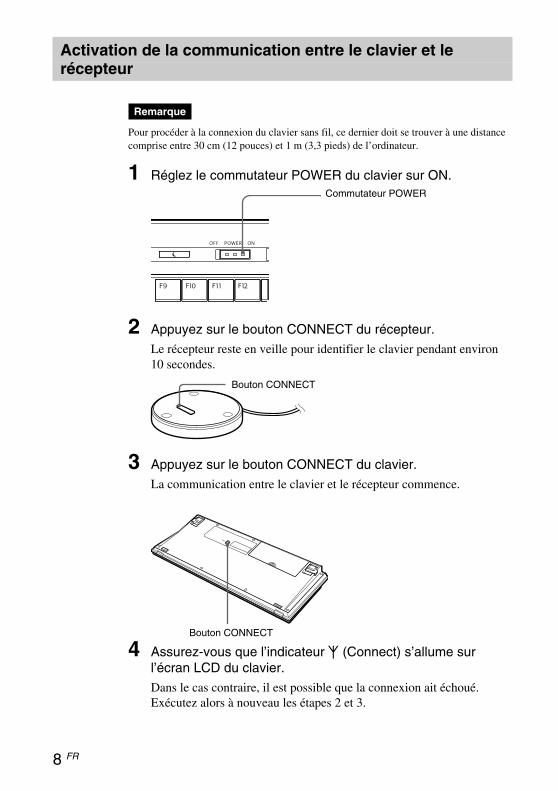
Raccordement du récepteur à l’ordinateur
Raccordez le récepteur à l’ordinateur à l’aide du câble du récepteur.
Lors du raccordement du récepteur à l’ordinateur pour la premièrefois
Lorsque vous raccordez le récepteur à l’ordinateur pour la première fois, lesystème d’exploitation Windows lance automatiquement l’installation dupilote USB standard.
Remarques
• Les pilotes des périphériques USB doivent être installés pour chaque port utilisé. Sivous raccordez le récepteur à un autre port USB de votre ordinateur, vous devezrecommencer la procédure d’installation du pilote pour ce port USB.
• Raccordez le récepteur uniquement à un port USB intégré. Ne raccordez pas lerécepteur à un concentrateur USB externe.
Vers le port (USB)de l’ordinateur
8 FR
Activation de la communication entre le clavier et lerécepteur
Remarque
Pour procéder à la connexion du clavier sans fil, ce dernier doit se trouver à une distancecomprise entre 30 cm (12 pouces) et 1 m (3,3 pieds) de l’ordinateur.
1 Réglez le commutateur POWER du clavier sur ON.
2 Appuyez sur le bouton CONNECT du récepteur.
Le récepteur reste en veille pour identifier le clavier pendant environ10 secondes.
3 Appuyez sur le bouton CONNECT du clavier.
La communication entre le clavier et le récepteur commence.
4 Assurez-vous que l’indicateur (Connect) s’allume surl’écran LCD du clavier.
Dans le cas contraire, il est possible que la connexion ait échoué.Exécutez alors à nouveau les étapes 2 et 3.
Commutateur POWER
Bouton CONNECT
Bouton CONNECT

9 FR
Remarque
Si un autre clavier sans fil VGP-WKB5 est utilisé à proximité, il risque d’interféreravec la communication entre le clavier et le récepteur. Activez la communication àdes moments différents ou tenez-les davantage éloignés.
Arrêt de l’utilisation du clavier
Débranchez le câble du récepteur du port USB de l’ordinateur. Vouspouvez débrancher et rebrancher le câble du récepteur sans mettrel’ordinateur hors tension. Vous pouvez économiser l’énergie des piles enmettant le clavier hors tension lorsque vous ne l’utilisez pas.
10 FR
Emplacement et fonctionnement descommandes
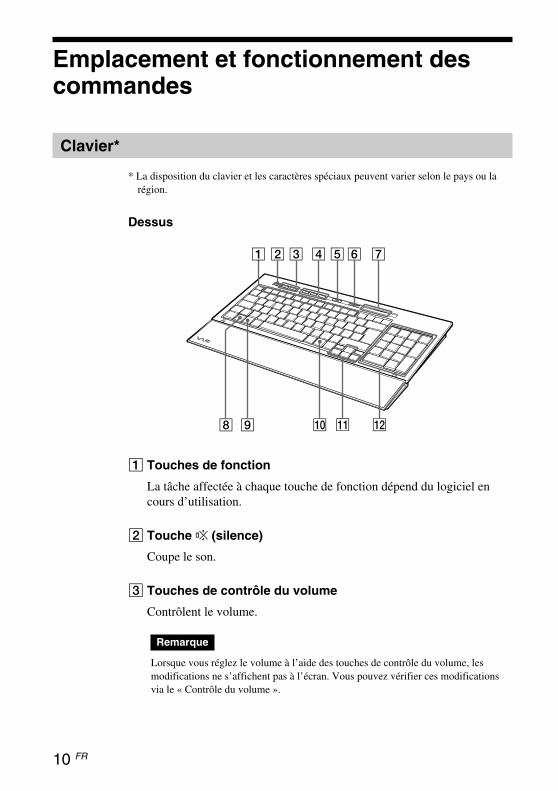
Clavier*
* La disposition du clavier et les caractères spéciaux peuvent varier selon le pays ou larégion.
Dessus
1 Touches de fonction
La tâche affectée à chaque touche de fonction dépend du logiciel encours d’utilisation.
2 Touche % (silence)
Coupe le son.
3 Touches de contrôle du volume
Contrôlent le volume.
Remarque
Lorsque vous réglez le volume à l’aide des touches de contrôle du volume, lesmodifications ne s’affichent pas à l’écran. Vous pouvez vérifier ces modificationsvia le « Contrôle du volume ».

11 FR
suite
4 Touches de raccourcis
Lancent les logiciels suivants par défaut.
S1 : Application de messagerie électronique
S2 : Navigateur Internet
S3 : Calculatrice
Remarque
Selon la configuration de votre ordinateur, il est possible que des logiciels autres queceux spécifiés ci-dessus soient lancés.
5 Touche (veille)
Appuyez sur cette touche lorsque le clavier est réglé sur ON pour passeren mode Veille ou Sommeil.
Remarques
• Pour quitter le mode Veille ou Sommeil, appuyez sur n’importe quelle touche duclavier de l’ordinateur portable.
• Selon l’ordinateur, il est possible que le fait d’appuyer sur cette touche fassepasser l’ordinateur en mode de veille prolongée.
6 Commutateur POWER
Règle le commutateur du clavier sur ON ou OFF. Si le clavier n’est pasutilisé pendant une période prolongée, il est recommandé de le mettrehors tension.
7 Indicateurs
• Indicateur (piles)Lorsque la durée de vie des piles du clavier est suffisante, s’affiche. s’affiche lorsque les piles sont presque épuisées.
• Indicateur (Ver num)S’allume lorsque le pavé numérique est activé.
• Indicateur ( )S’allume lorsque le verrouillage des majuscules est activé.
• Indicateur (Arr déf)S’allume lorsque l’arrêt du défilement est activé.
• Indicateur (Connect)S’allume lorsque le clavier est prêt à être utilisé.Lorsque l’ordinateur et le clavier sans fil sont déconnectés, il s’éteint.

12 FR
Active la touche SCROLL LOCK (arrêt du défilement).La tâche affectée à chaque touche dépend du logiciel en coursd’utilisation. Pour plus de détails, reportez-vous à l’aide dulogiciel.
Utilisée comme touche de pause.La tâche affectée à chaque touche dépend du logiciel en coursd’utilisation. Pour plus de détails, reportez-vous à l’aide dulogiciel.
Utilisée comme touche d’interruption.La tâche affectée à chaque touche dépend du logiciel en coursd’utilisation. Pour plus de détails, reportez-vous à l’aide dulogiciel.
Fonction PAGE UP.Affiche la page précédant de celle en cours d’affichage.
Fonction END.Déplace le point d’insertion à la fin d’une ligne ou d’une page.
S’utilise comme la touche PAGE DOWN.Affiche la page suivant de celle en cours d’affichage.
Fonction HOME.Déplace le point d’insertion au début d’une ligne ou d’unepage.
Remarques
• Si vous n’utilisez pas le clavier pendant plus de 20 minutes, les indicateurss’éteignent et la communication entre le clavier et le récepteur risque d’êtredéconnectée. Si cela se produit, appuyez sur n’importe quelle touche, puis vérifiezque l’indicateur (Connect) s’affiche avant l’utilisation.
• Annulation du mode Veille ou SommeilAppuyez sur n’importe quelle touche du clavier de l’ordinateur portable pourquitter le mode Veille ou Sommeil.
8 Touche Fn
Pour utiliser la fonction indiquée en bleu sur la touche, appuyez dessusen même temps que sur la touche Fn.
Touche FonctionFn+Ver num
Fn+Inser
Fn+Suppr
Fn+R
Fn+t
Fn+r
Fn+T
9 Touche (Windows)
Le menu « Démarrer » de Windows apparaît.
q; Touche (applications)
Affiche un menu de raccourcis dans certaines applications logicielles.
qa Touches de direction
Déplacent le curseur sur l’écran de l’ordinateur.

13 FR
suite
qs Pavé numérique
Si la touche Ver num/Arr déf est enfoncée et que le verrouillagenumérique est activé, utilisez le pavé numérique pour saisir desnombres.
Dessous
1 Bouton CONNECT
Utilisé lors de l’activation de la communication entre le clavier et lerécepteur.
Récepteur
Dessous
1 Bouton CONNECT
Utilisée lors de l’activation de la communication entre le clavier et lerécepteur.
14 FR
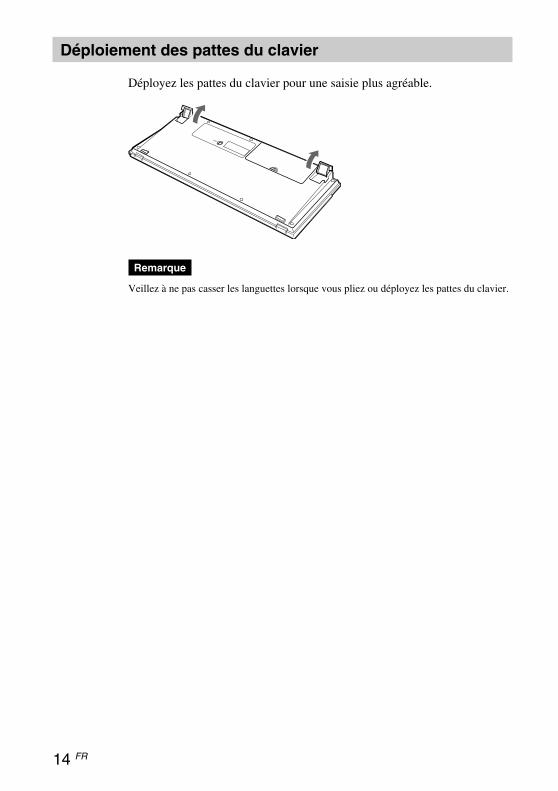
Déploiement des pattes du clavier
Déployez les pattes du clavier pour une saisie plus agréable.
Remarque
Veillez à ne pas casser les languettes lorsque vous pliez ou déployez les pattes du clavier.

15 FR
Repose-poignets
Déployez le repose-poignets vers vous pour vous détendre les poignetslorsque vos utilisez le clavier.
Repliez le repose-poignets sur le clavier pour l’utiliser comme protège-clavier, afin de protéger le clavier de la poussière ou des chutes d’objetslorsqu’il n’est pas utilisé.
Remarques
• N’étirez pas trop le repose-poignets lorsque vous le déployez.
• Lorsque vous utilisez le repose-poignets sur une surface plane, telle qu’un bureau,installez le clavier de sorte que le repose-poignets ne dépasse pas du bord.
• Ne tenez pas le clavier par le repose-poignets lorsque vous le transportez. Tenez leclavier des deux mains lorsque vous le transportez, ainsi qu’il est illustré.

16 FR
Précautions
Portée d’utilisation duclavier
La clavier peut être utilisé dans un rayonmaximum de 10 m (32,8 pieds) autour durécepteur. Selon l’environnementd’utilisation, il se peut que cette distancesoit réduite, empêchant ainsi uneutilisation normale. Dans ce cas, prenez lesmesures suivantes :
• Veillez à ce que le clavier soit situé à aumoins 15 cm de l’ordinateur, de l’écranou d’autres appareils électroniques.
• Rapprochez le récepteur du clavier.
Sécurité
Si des objets solides ou des liquidestombent sur le clavier, mettez-le horstension et faites-le vérifier par untechnicien qualifié avant de continuer àl’utiliser.
Emplacement
Ne placez pas le clavier dans les endroitssuivants :
• Sur une surface instable
• Dans des zones très humides ou nonventilées
• Particulièrement poussiéreux
• Exposés à la lumière directe du soleil outrès chauds
• Extrêmement froids
Fonctionnement
Si vous déplacez le clavier directementd’un endroit froid à un endroit chaud ou sivous le placez dans un endroit trèshumide, de la condensation risque de seformer à l’intérieur du clavier. Si cela seproduit, le clavier risque de ne pasfonctionner correctement.Dans ce cas, attendez environ 30 minutespour permettre à la condensation des’évaporer. Si le clavier ne fonctionne pascorrectement au bout d’une heure,consultez votre revendeur Sony le plusproche.
Transport du clavier
Lorsque vous transportez le clavier,repliez le repose-poignets. Ne tenez pas leclavier par le repose-poignets lorsque vousle transportez.
Nettoyage de l’extérieur duclavier
• Nettoyez le clavier à l’aide d’un chiffondoux et sec ou légèrement imprégnéd’une solution détergente douce.N’utilisez pas d’éponge abrasive, depoudre à récurer ou de solvant, tel quede l’alcool ou de l’essence.
• Retirez toujours les piles lors dunettoyage du clavier.
17 FR
Aide
Cette section fournit des informations surl’aide et l’assistance technique offertes parSony et apporte des conseils de dépannagepour votre clavier.
Options d’assistancetechnique de Sony
Sony offre plusieurs options d’assistancetechnique pour votre clavier. Si vous avezdes questions concernant votre clavier,consultez les références suivantes :
❑Ce guide explique comment utiliservotre clavier.
Pour les clients résidant auxEtats-Unis et au Canada
❑Le Sony Customer InformationService Center offre des informationsconcernant votre ordinateur VAIO etd’autres produits Sony compatibles avecvotre ordinateur. Pour contacter le SonyCustomer Information Service Center,appelez le1-888-4SONYPC (1-888-476-6972).
❑Sony Computing Support offre unaccès immédiat aux informationsconcernant les problèmes les plusfréquents. Saisissez une description duproblème et la base de donnéesKnowledge recherche la solutioncorrespondante en ligne. Vous pouvezvisiter le site Sony Online Support àl’adresse :http://www.sony.com/pcsupport
Pour les clients résidant enEurope
❑VAIO-Link. Rendez-vous sur le sitehttp://support.vaio.sony.eupour connaître nos adresses et numérosde téléphone.
Pour les clients résidant dansd’autres pays ou régions
❑ Le site Web de VAIO comporte unerubrique des Questions les plusfréquentes et les réponses à cesquestions.vaio-online.sony.com/

18 FR
Récepteur sans fil
InterfaceUSB A
Longueur du câbleApprox. 70 cm
Bande de fréquences sans fil2,4 GHz
Rayon d’utilisation10 m (32,8 pieds) max., champ de visibilité
PoidsApprox. 55 g (2,0 oz.)
DimensionsDiamètre Approx. 75,5 mmHauteur Approx. 12,7 mm
Spécifications
Clavier sans fil
InterfaceTransmission numérique sans fil
Pas de clavier19,05 mm (0,75 pouces)
Frappe2,7 mm (0,11 pouces)
Alimentation3 Vcc (quatre piles R6 [taille AA])
Bande de fréquences sans fil2,4 GHz
Dispositif d’entréeClavier
Rayon d’utilisation10 m (32,8 pieds) max., champ de visibilité
PoidsApprox. 0,93 kg (32,8 oz.) (sans les batteries)
DimensionsApprox. 388 × 31,3 × 159 mm (l × h × p)
(15,3 × 1,3 × 6,3 pouces)

19 FR
Divers
Modèles pris en chargeOrdinateurs portables VAIO de Sony sur lesquelsWindows XP ou Windows Vista est préinstallé.
Température de fonctionnement5°C à 35°C (41°F à 95°F) (gradient detempérature inférieur à 10 °C (18°F) /heure)
Humidité de fonctionnement20% à 80% (sans condensation), à condition quel’humidité soit inférieure à 65% à 35°C (95°F)(lecture hygrométrique inférieure à 29°C (84°F))
Température de stockage–20°C à +60°C (–4°F à +140°F) (gradient detempérature inférieur à 10°C (18°F) /heure)
Humidité de stockage10% à 90% (sans condensation), à condition quel’humidité soit inférieure à 20% à 60°C (140°F)(lecture hygrométrique inférieure à 35°C (95°F))
AccessoiresRécepteur (1)Piles alcalines R6 (taille AA) (4)Mode d’emploi (ce document)
La conception et les spécifications sont sujettes àmodification sans préavis.

20 FR
DépannageSi l’un des problèmes suivants survient lors de l’utilisation du clavier,reportez-vous à ce guide de dépannage pour y remédier. Si le problèmepersiste, consultez votre revendeur Sony le plus proche. Reportez-vous à lasection « Aide » (page 17) pour toute information relative aux contacts.Reportez-vous également aux manuels fournis avec votre ordinateur.
Symptôme Cause/solution
Vous avez appuyé surle bouton CONNECT,mais lacommunication estimpossible.
Pendant que j’utilise leclavier, l’écran devientnoir ou l’ordinateurpasse en moded’économie d’énergie.
L’ordinateur ne quittepas le mode de veilledu moniteur.
cVérifiez si des piles sont insérées dans le clavier. Pourplus de détails, reportez-vous à la section « Préparatifs »(page 6).
c Si le commutateur POWER du clavier est réglé sur OFF,la communication avec le récepteur est impossible.Vérifiez la position du commutateur du clavier.
c Si le clavier ne se met pas sous tension alors que lescommutateur POWER du clavier est réglé sur ON, lespiles sont peut-être épuisées. Remplacez les piles. Pourplus de détails, reportez-vous à la section « Préparatifs »(page 6).
c Il se peut que la communication entre le clavier et lerécepteur n’ait pas été établie correctement. Si vousn’appuyez pas sur la touche CONNECT du clavier dansles 10 secondes après avoir appuyé sur la toucheCONNECT du récepteur, le récepteur annule lacommunication. En pareil cas, recommencez la procédurepour activer la communication. Pour plus de détails,reportez-vous à la section « Activation de lacommunication entre le clavier et le récepteur » (page 8).
c Si le clavier est trop éloigné du récepteur, lacommunication est impossible. La distance decommunication maximale entre le clavier et le récepteurest d’environ 10 mètres. Sur une table métallique ou si desobstacles sont présents entre le clavier et le récepteur, ladistance d’utilisation peut être inférieure.
cModifiez les réglages de gestion de l’alimentation del’ordinateur afin d’éviter qu’il ne passe en moded’économie d’énergie. Pour plus de détails, consultez lesmanuels fournis avec votre ordinateur.
cAppuyez sur n’importe quelle touche du clavier del’ordinateur portable pour quitter le mode d’économied’énergie.
cAppuyez sur n’importe quelle touche de cet appareil ou duclavier de l’ordinateur portable pour quitter ce mode.

21 FR
Symptôme Cause/solution
L’ordinateur ne quittepas le mode Veille ouSommeil.
Le clavier ne permetpas de quitter le moded’économie d’énergieou il lui faut un longmoment avant d’yparvenir.
Le clavier passe enmode d’économied’énergie et lesindicateurs LCDs’éteignent.
Une fois le récepteurbranché, vous devezattendre quelquesinstants avant depouvoir utiliser leclavier.
Le clavier nefonctionne pas.
Les touches S1-S3 nefonctionnent pascomme ellesdevraient.
cAppuyez sur n’importe quelle touche du clavier del’ordinateur portable et non celui de cet appareil.
cAppuyez sur n’importe quelle touche du clavier del’ordinateur portable.
cAppuyez sur n’importe quelle touche de cet appareil ouréglez le commutateur d’alimentation du clavier sur ON/OFF.
cSi le système d’exploitation Windows, un logiciel ou unpériphérique USB fonctionne, l’identification du récepteurpeut prendre quelques instants.
• La connexion entre le clavier et le récepteur échoue.
cVérifiez que l’indicateur (Connect) s’allume.
• Le récepteur n’est pas raccordé à l’ordinateur.
cRaccordez le récepteur à l’ordinateur.
• Le récepteur ne reconnaît pas l’ordinateur.
cDébranchez le câble du récepteur du port USB del’ordinateur, puis rebranchez-le.
cVérifiez la distance entre le clavier et le récepteur. Placezle clavier et le récepteur dans la portée de communicationindiquée dans les spécifications. Sur une table métalliqueou si des objets métalliques sont présents entre le clavieret le récepteur, la distance d’utilisation peut êtreinférieure.
cVérifiez que des piles ont été insérées dans le clavier.Insérez correctement les piles dans le clavier, puisappuyez sur le bouton CONNECT du récepteur. Ensuite,dans les 10 secondes, appuyez sur le bouton CONNECTdu clavier. Assurez-vous que le clavier et le récepteur nesont pas trop éloignés (dans un rayon de 30 cm ou11,8 pouces) lorsque vous appuyez sur le bouton.
c Les fonctions des touches S1-S3 du clavier de l’ordinateurportable et celles de cet appareil peuvent varier.
2 DE
Deutsch
ACHTUNGUm die Gefahr eines Brands oderelektrischen Schlags zureduzieren, darf dieses Gerätweder Regen noch Feuchtigkeitausgesetzt werden.Wenn Sie das Gerät mit einem USB-Anschlussverbinden, verwenden Sie bitte einen USB-Anschlussmit der Markierung .
Dieses Produkt umfasst die folgenden Funkgeräte:Funktastatur (VGP-WKB5XX*) und Funkempfänger(VGP-WRC5)
* An den Modellnamen der Tastatur wird noch eineNummer angehängt.
Für Kunden in Europa (im Paketenthaltene Tastatur, VGP-WKB5GB/VGP-WKB5FR/VGP-WKB5DE/VGP-WKB5IT/VGP-WKB5ES)Hiermit erklärt die Sony Corporation, dass diesesProdukt die grundlegenden Anforderungen undsonstigen relevanten Bestimmungen der Richtlinie1999/ 5/EG erfüllt.
Eine Kopie der Konformitätserklärung (Declarationof Conformity (DoC)) für die R&TTE-Richtliniefinden Sie unter folgender URL-Adresse:http://www.compliance.sony.de/
Dieses Gerät erfüllt die folgenden europäischenRichtlinien:89/336/EWG, 92/31/EWG (EMV-Richtlinien) und93/68/EWG (Richtlinie zum CE-Zeichen)Dieses Produkt entspricht den europäischen NormenEN55022 Klasse B und EN55024 für dieVerwendung in folgenden Gebieten:Wohngebiete, Gewerbegebiete undLeichtindustriegebiete.
Dieses Gerät wurde geprüft und erfüllt die EMV-Richtlinie, sofern ein Verbindungskabel von maximal3 m Länge verwendet wird.
Entsorgung von AA-Batterien• Dieses drahtlose Gerät wird über AA-Batterien mit
Strom versorgt.• Wie Sie die Batterien einlegen, lesen Sie bitte im
Abschnitt „Einlegen von Batterien in die Tastatur“dieser Bedienungsanleitung nach.
• Fassen Sie beschädigte oder auslaufende Batteriennicht an. Entsorgen Sie sie unverzüglich unterBeachtung der örtlichen Vorschriften.
• Batterien können explodieren oder auslaufen, wennsie aufgeladen, ins Feuer geworfen, zusammen mitanderen Batterietypen verwendet oder falsch eingelegtwerden.
• Bei unsachgemäßem Umgang mit den verwendetenBatterien besteht Feuergefahr und die Gefahr vonVerätzungen. Zerlegen Sie die Batterien nicht,erhitzen Sie sie nicht über 60°C und versuchen Sienicht, sie zu verbrennen.
• Tauschen Sie die Batterien nur gegen einen gleichenoder vergleichbaren Batterietyp aus, der vomHersteller empfohlen wird.
• Halten Sie die Batterien von Kindern fern.• Entsorgen Sie verbrauchte Batterien ordnungsgemäß.• In einigen Regionen ist die Entsorgung von Batterien
im Haus- oder Industriemüll untersagt. Bitte nutzenSie das entsprechende öffentliche Sammelsystem.
Entsorgung vongebrauchtenelektrischen undelektronischen Geräten(anzuwenden in denLändern derEuropäischen Union undanderen europäischen
Ländern mit einem separatenSammelsystem für diese Geräte)Das Symbol auf dem Produkt oder seiner Verpackungweist darauf hin, dass dieses Produkt nicht als normalerHaushaltsabfall zu behandeln ist, sondern an einerAnnahmestelle für das Recycling von elektrischen undelektronischen Geräten abgegeben werden muss. DurchIhren Beitrag zum korrekten Entsorgen dieses Produktsschützen Sie die Umwelt und die Gesundheit IhrerMitmenschen. Umwelt und Gesundheit werden durchfalsches Entsorgen gefährdet. Materialrecycling hilft, denVerbrauch von Rohstoffen zu verringern.Weitere Informationen über das Recycling diesesProdukts erhalten Sie von Ihrer Gemeinde, denkommunalen Entsorgungsbetrieben oder dem Geschäft,in dem Sie das Produkt gekauft haben.
Für Kunden in DeutschlandEntsorgungshinweis: Bitte werfen Sie nur entladeneBatterien in die Sammelboxen beim Handel oder denKommunen. Entladen sind Batterien in der Regel dann,wenn das Gerät abschaltet und signalisiert „Batterie leer“oder nach längerer Gebrauchsdauer der Batterien „nichtmehr einwandfrei funktioniert“. Um sicherzugehen,kleben Sie die die Batteriepole z.B. mit einemKlebestreifen ab oder geben Sie Batterien einzeln ineinen Plastikbeutel.

3 DE
InhaltEinführung ............................................. 4
Merkmale ....................................... 4
Kompatible PCs .............................. 4
Überprüfen der mitgelieferten Teile ...... 5
Vorbereitungen ...................................... 6
Einlegen von Batterien in dieTastatur ........................................ 6
Anschließen des Empfängers an denComputer ...................................... 7
Aktivieren der Kommunikationzwischen Tastatur und Empfänger 8
Lage und Funktion der Teile undBedienelemente ................................ 10
Tastatur ......................................... 10
Empfänger .................................... 13
Aufklappen der Tastaturfüße ........ 14
Handauflage ................................. 15
Vorsichtsmaßnahmen .......................... 16
Hilfe und Support ................................ 17
Technische Daten ................................ 18
Störungsbehebung ............................... 20
• VAIO und sind eingetrageneWarenzeichen der Sony Corporation.
• Microsoft, Windows und Windows Vista sindeingetragene Markenzeichen der MicrosoftCorporation in den USA und/oder anderenLändern.
• Andere in dieser Anleitung erwähnte System- undProduktnamen sind in der Regel eingetrageneWarenzeichen oder Warenzeichen der jeweiligenUnternehmen, auch wenn sie in dieser Anleitungnicht mit ™ und ® gekennzeichnet sind.
• In dieser Anleitung werden Microsoft® Windows®
XP Home Edition und Microsoft® Windows® XPProfessional als Windows XP bezeichnet.
• In diesem Dokument werden Microsoft® WindowsVista® Home Basic, Microsoft® Windows Vista®
Home Premium, Microsoft® Windows Vista®
Business und Microsoft® Windows Vista®
Ultimate als Windows Vista bezeichnet.
DE

4 DE
Einführung
Lesen Sie diese Anleitung vor Inbetriebnahme der Tastatur bitte genaudurch und bewahren Sie sie zum späteren Nachschlagen sorgfältig auf.
Merkmale
Die Funktastatur VGP-WKB5 von Sony ist speziell für VAIO-Computervon Sony konzipiert.
• Funktastatur mit neuem Design und umklappbarer Handauflage, die auchals Tastaturabdeckung zum Schutz vor Staub dient.
• Elegantes Aluminium-Design
• Dank digitaler Funktechnologie mit 2,4 GHz und maximalerKommunikationsreichweite von 10 m können Sie die Tastatur auch ingrößerem Abstand zum Computer verwenden.
Kompatible PCs
Die VGP-WKB5 von Sony kann mit den folgenden VAIO-PCs verwendetwerden. Bei anderen Computern wird die Tastatur nicht unterstützt.
• VAIO-Notebook-Computer von Sony mit vorinstalliertem Windows XPoder Windows Vista.
Hinweis
Verwenden Sie die Tastatur ausschließlich mit den angegebenen PCs. Andernfalls kanndie Tastatur beschädigt werden.

5 DE
Überprüfen der mitgelieferten Teile
Überprüfen Sie bitte, ob folgende Teile mitgeliefert wurden. Sollte eins derunten aufgeführten Teile beschädigt sein oder fehlen, schlagen Sie unter„Hilfe und Support“ auf Seite 17 nach.
• Funktastatur (im Folgenden als Tastatur bezeichnet) (1)
• Empfänger (1)
• R6-Alkalibatterien (Größe AA) (4)
• Bedienungsanleitung (dieses Dokument)
6 DE
Vorbereitungen
Hinweis
Beachten Sie bitte folgende Sicherheitsmaßnahmen, um das Auslaufen vonBatterieflüssigkeit, das Explodieren von Batterien und andere schwere Schäden zuvermeiden.
• Legen Sie die Batterien polaritätsrichtig ein. Die Pole +/– müssen an den Markierungen+/– ausgerichtet sein.
• Verwenden Sie nicht alte und neue Batterien oder Batterien verschiedenen Typszusammen.
• Versuchen Sie nicht, Trockenbatterien aufzuladen.
• Wenn die Tastatur längere Zeit nicht verwendet werden soll, nehmen Sie die Batterienheraus.
• Ist eine Batterie ausgelaufen, wischen Sie das Batteriefach sorgfältig trocken undtauschen Sie die Batterien gegen neue aus.
• Handelsübliche Akkus können nicht verwendet werden. Verwenden Sie ausschließlichnormale Trockenbatterien. Bei Verwendung von Akkus können diese auslaufen und esbesteht die Gefahr von Verletzungen bzw. Sachschäden.
z Tipp
Überprüfen Sie die restliche Batterieladung anhand der Batterieanzeige.Tauschen Sie die Batterien aus, wenn sie schwach sind.Wenn Sie die Tastatur nicht benutzen, stellen Sie den Netzschalter POWER auf OFF. Sohalten die Batterien länger.
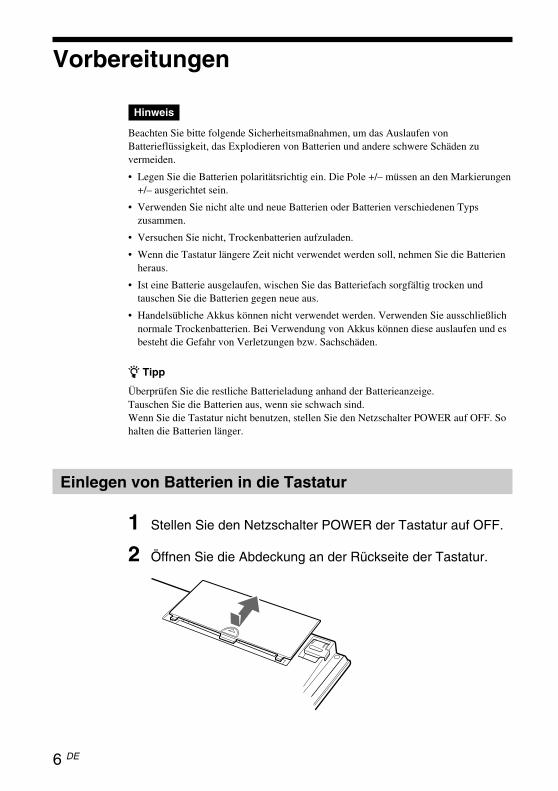
Einlegen von Batterien in die Tastatur
1 Stellen Sie den Netzschalter POWER der Tastatur auf OFF.
2 Öffnen Sie die Abdeckung an der Rückseite der Tastatur.

7 DE
Bitte wenden
3 Legen Sie die vier mitgelieferten R6-Batterien (Größe AA)polaritätsrichtig eE ein.
4 Schließen Sie die Abdeckung.
Anschließen des Empfängers an den Computer
Schließen Sie den Empfänger mit dem Empfängerkabel an den Computeran.
Wenn Sie den Empfänger zum ersten Mal an den Computeranschließen
Wenn Sie den Empfänger zum ersten Mal an den Computer anschließen,installiert das Windows-Betriebssystem automatisch den USB-Standardgerätetreiber.
Hinweise
• Treiber für USB-Geräte müssen für jeden verwendeten Anschluss installiert werden.Wenn Sie den Empfänger an einen anderen USB-Anschluss am Computer anschließen,wird die Treiberinstallation für diesen USB-Anschluss erneut ausgeführt.
• Schließen Sie den Empfänger ausschließlich an einen integrierten USB-Anschluss an.Schließen Sie den Empfänger nicht an einen externen USB-Hub an.
an den Anschluss (USB) am
Computer
8 DE
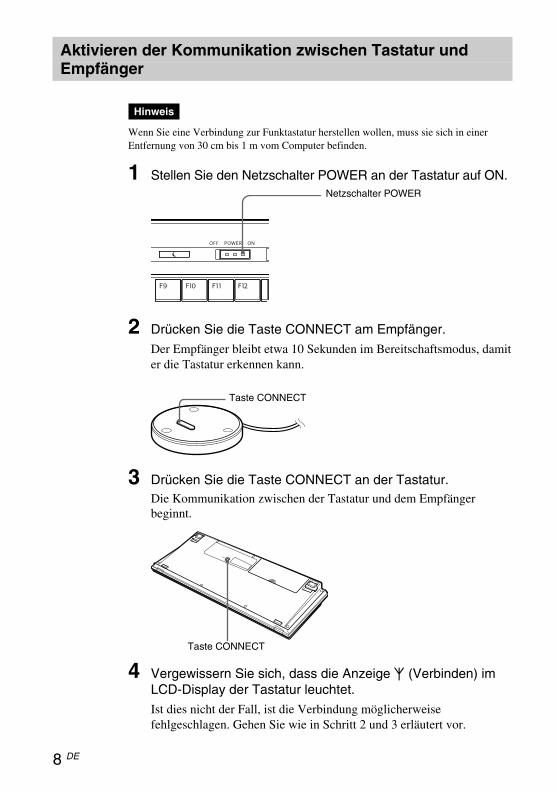
Aktivieren der Kommunikation zwischen Tastatur undEmpfänger
Hinweis
Wenn Sie eine Verbindung zur Funktastatur herstellen wollen, muss sie sich in einerEntfernung von 30 cm bis 1 m vom Computer befinden.
1 Stellen Sie den Netzschalter POWER an der Tastatur auf ON.
2 Drücken Sie die Taste CONNECT am Empfänger.
Der Empfänger bleibt etwa 10 Sekunden im Bereitschaftsmodus, damiter die Tastatur erkennen kann.
3 Drücken Sie die Taste CONNECT an der Tastatur.Die Kommunikation zwischen der Tastatur und dem Empfängerbeginnt.
4 Vergewissern Sie sich, dass die Anzeige (Verbinden) imLCD-Display der Tastatur leuchtet.
Ist dies nicht der Fall, ist die Verbindung möglicherweisefehlgeschlagen. Gehen Sie wie in Schritt 2 und 3 erläutert vor.
Netzschalter POWER
Taste CONNECT
Taste CONNECT
9 DE
Hinweis
Wenn in der Nähe eine weitere Funktastatur VGP-WKB5 verwendet wird, kann siedie Kommunikation zwischen der Tastatur und dem Empfänger stören. AktivierenSie die Kommunikation zu einem anderen Zeitpunkt oder weiter entfernt von deranderen Funktastatur.
So beenden Sie den Tastaturgebrauch
Lösen Sie das Empfängerkabel vom USB-Anschluss des Computers. Siekönnen das Empfängerkabel lösen und anschließen, ohne den Computerausschalten zu müssen. Um die Batterien zu schonen, sollten Sie dieTastatur ausschalten, wenn Sie sie nicht benutzen.

10 DE
Lage und Funktion der Teile undBedienelemente
Tastatur*
* Das Tastaturlayout und die Sonderzeichen variieren je nach Land oder Region.
Draufsicht
1 Funktionstasten
Die der jeweiligen Funktionstaste zugeordnete Funktion hängt von derverwendeten Software ab.
2 Taste % (Stummschalten)
Zum Stummschalten des Tons.
3 Lautstärketasten
Zum Einstellen der Lautstärke.
Hinweis
Wenn die Lautstärke mit den Lautstärketasten eingestellt wird, werden dieÄnderungen möglicherweise nicht auf dem Bildschirm angezeigt. Sie können dieÄnderungen mit „Lautstärkeregelung“ verifizieren.

11 DE
Bitte wenden
4 Verknüpfungstasten
Standardmäßig zum Starten der folgenden Software:
S1: E-Mail-Anwendung
S2: Web-Browser
S3: Taschenrechner
Hinweis
Je nach den Einstellungen an Ihrem Computer lässt sich auch andere Software alsdie oben angegebene starten.
5 Bereitschaftstaste
Drücken Sie diese Taste, wenn die Tastatur eingeschaltet ist, um in denBereitschafts- oder Energiesparmodus zu wechseln.
Hinweise
• Um das Gerät vom Bereitschafts- oder Energiesparmodus in den normalen Betriebzu schalten, drücken Sie eine beliebige Taste auf der Tastatur des Notebook-Computers.
• Bei manchen Computern wird der Computer mit dieser Taste in den Ruhezustandgeschaltet.
6 Netzschalter POWER
Zum Ein-/Ausschalten der Tastatur. Wenn Sie die Tastatur eine Zeitlang nicht verwenden wollen, empfiehlt es sich, sie auszuschalten.
7 Anzeigen
• BatterieanzeigeWenn die Batterien in der Tastatur über ausreichend Ladungverfügen, wird angezeigt. wird angezeigt, wenn dieBatterien fast erschöpft sind.
• Num-AnzeigeLeuchtet, wenn der Ziffernblock aktiviert ist.
• FeststellanzeigeLeuchtet, wenn der Modus für Großbuchstaben aktiviert ist.
• Rollen-AnzeigeLeuchtet, wenn der Rollen-Modus aktiviert ist.
• Anzeige (Verbinden)Leuchtet, wenn die Tastatur betriebsbereit ist.Wenn der Computer und die Funktastatur nicht verbunden sind,leuchtet die Anzeige nicht.

12 DE
Aktiviert den Rollen-Modus.Die der jeweiligen Taste zugeordnete Funktion hängt von derverwendeten Software ab. Näheres dazu finden Sie in derHilfe zur Software.
Fungiert als Pausetaste.Die der jeweiligen Taste zugeordnete Funktion hängt von derverwendeten Software ab. Näheres dazu finden Sie in derHilfe zur Software.
Fungiert als Unterbrechungstaste.Die der jeweiligen Taste zugeordnete Funktion hängt von derverwendeten Software ab. Näheres dazu finden Sie in derHilfe zur Software.
Bild-auf-Funktion.Die vorherige Seite wird angezeigt.
Ende-Funktion.Die nächste Seite wird angezeigt.
Fungiert als Bild-ab-Taste.Die Seite unter der zurzeit angezeigten wird angezeigt.
Pos1-Funktion.Bewegt den Einfügepunkt an den Anfang einer Zeile bzw.Seite.
Hinweise
• Wenn die Tastatur mehr als 20 Minuten nicht bedient wird, schalten sich dieAnzeigen aus und die Kommunikation zwischen der Tastatur und dem Empfängerwird getrennt. Ist dies der Fall, drücken Sie eine beliebige Taste und vergewissernSie sich vor dem Gebrauch, dass die Anzeige (Verbinden) leuchtet.
• Zurückschalten vom Bereitschafts- oder EnergiesparmodusDrücken Sie eine beliebige Taste am Computer, um vom Bereitschafts- oderEnergiesparmodus in den normalen Betrieb zurückzuschalten.
8 Taste Fn
Wenn Sie die auf einer Taste blau markierte Funktion verwendenwollen, drücken Sie die Taste in Kombination mit der Taste Fn.
Taste FunktionFn+Numr
Fn+Einfg
Fn+Entf
Fn+R
Fn+t
Fn+r
Fn+T
9 (Windows)-Taste
Das Windows-Menü „Start“ wird angezeigt.
q; Taste (Anwendungen)
Zum Anzeigen eines Kontextmenüs in bestimmtenSoftwareanwendungen.
qa Richtungspfeiltasten
Zum Bewegen des Cursors auf dem Computerbildschirm.

13 DE
Bitte wenden
qs Numerischer Tastenblock
Wenn Sie mit der Taste Numr/Rollenr die Ziffernfunktion aktivieren,können Sie mit dem numerischen Tastenblock Ziffern eingeben.
Unterseite
1 Taste CONNECT
Dient zum Aktivieren der Kommunikation zwischen der Tastatur unddem Empfänger.
Empfänger
Unterseite
1 Taste CONNECT
Zum Aktivieren der Kommunikation zwischen der Tastatur und demEmpfänger.

14 DE
Aufklappen der Tastaturfüße
Klappen Sie die Füße an der Tastatur auf, um das Schreiben auf derTastatur zu erleichtern.
Hinweis
Achten Sie darauf, die Laschen beim Auf- und Zuklappen der Tastaturfüße nichtabzubrechen.

15 DE
Handauflage
Klappen Sie die Handauflage auf sich zu, um die Handgelenke bei derArbeit mit der Tastatur zu entlasten.
Klappen Sie die Handauflage als Abdeckung über die Tastatur, wenn Siesie nicht verwenden. So wird die Tastatur vor Staub und herunterfallendenGegenständen geschützt.
Hinweise
• Klappen Sie die Handauflage nicht gewaltsam zu weit auf.
• Wenn Sie die Handauflage auf einer ebenen Oberfläche, wie z. B. einem Schreibtisch,verwenden, stellen Sie die Tastatur so auf, dass die Handauflage nicht über dieSchreibtischkante ragt.
• Halten Sie die Tastatur beim Tragen nicht an der Handauflage. Halten Sie die Tastaturbeim Tragen wie in der Abbildung dargestellt an beiden Seiten.

16 DE
Vorsichtsmaßnahmen
Reichweite der Tastatur
Die maximale Kommunikationsreichweiteder Tastatur (Abstand vom Empfänger)beträgt 10 m. Je nach Betriebsumgebungist die Reichweite unter Umständenkürzer, so dass ein normales Arbeitennicht möglich ist. Führen Sie in diesemFall folgende Maßnahmen durch:
• Achten Sie darauf, dass die Tastaturmindestens 15 cm vom Computer,Bildschirm und anderen elektronischenGeräten entfernt aufgestellt wird.
• Stellen Sie den Empfänger näher an dieTastatur heran.
Sicherheit
Wenn Flüssigkeiten oder Fremdkörper indie Tastatur gelangen, schalten Sie sie ausund lassen sie von qualifiziertemFachpersonal überprüfen, bevor Sie siewieder benutzen.
Aufstellung
Stellen Sie die Tastatur nicht an folgendenOrten auf:
• Auf einer instabilen Oberfläche
• An einem sehr feuchten Ort oder aneinem Ort ohne ausreichende Belüftung
• An einem Ort mit übermäßigerStaubentwicklung
• An einem Ort, der direktem Sonnenlichtoder großer Hitze ausgesetzt ist
• An einem Ort, der großer Kälteausgesetzt ist
Betrieb
Wird die Tastatur direkt von einem kaltenin einen warmen Raum gebracht oderbefindet sie sich in einem Raum mit hoherLuftfeuchtigkeit, kann sich in der TastaturFeuchtigkeit niederschlagen. In diesemFall funktioniert die Tastaturmöglicherweise nicht mehr richtig.Warten Sie ca. 30 Minuten, bis dieFeuchtigkeit verdunstet ist. Wenn dieTastatur nach einer Stunde nichtordnungsgemäß funktioniert, wenden Siesich an Ihren Sony-Händler.
Transportieren der Tastatur
Wenn Sie die Tastatur transportierenwollen, klappen Sie die Handauflage zu.Halten Sie die Tastatur beim Tragen nichtan der Handauflage.
Reinigen des Gehäuses derTastatur
• Reinigen Sie die Tastatur mit einemweichen, trockenen Tuch oder einemweichen Tuch, das Sie leicht mit einermilden Reinigungslösung angefeuchtethaben. Verwenden Sie keineScheuerschwämme, Scheuermittel oderLösungsmittel wie Alkohol oderBenzin. Diese könnten das Gehäuseangreifen.
• Nehmen Sie immer die Batterienheraus, wenn Sie die Tastatur reinigenwollen.

17 DE
Hilfe und Support
In diesem Abschnitt finden SieInformationen zu Hilfe und Support vonSony sowie Tipps zur Störungsbehebungan der Tastatur.
Sony-Supportoptionen
Sony bietet für die Tastatur verschiedeneMöglichkeiten zur Unterstützung. BeiFragen zur Tastatur finden Sie hier weitereInformationen:
❑Diese Anleitung erläutert denGebrauch der Tastatur.
Für Kunden in den USA undKanada
❑ Unter der Nummer des Sony-Kundeninformationscenterserhalten Sie Informationen zum VAIO-Computer und anderen Sony-Produkten,die mit dem Computer eingesetztwerden können. Das Sony-Kundeninformationscenter erreichen Sieunter1-888-4SONYPC (1-888-476-6972).
❑ Der Computer-Support von Sonyermöglicht den sofortigen Zugriff aufInformationen über Probleme, diehäufiger auftreten. Geben Sie eineProblembeschreibung an unddurchsuchen Sie die Wissensdatenbankonline nach passendenAbhilfemaßnahmen. Der Online-Support von Sony steht unter folgendemURL zur Verfügung:http://www.sony.com/pcsupport
Für Kunden in Europa
❑VAIO-Link. Adressen undTelefonnummern finden Sie unterhttp://support.vaio.sony.eu
Für Kunden in anderen Ländernund Regionen
❑ Auf der VAIO-Website finden SieAntworten auf häufig gestellte Fragen:vaio-online.sony.com/

18 DE
Funkempfänger
SchnittstelleUSB A
Kabellängeca. 70 cm
Funkfrequenzbereich2,4 GHz
Kommunikationsreichweitemax. 10 m, Sichtlinie
Gewichtca. 55 g
AbmessungenDurchmesser ca. 75,5 mmHöhe ca. 12,7 mm
Technische Daten
Funktastatur
SchnittstelleDigitale Funkübertragung
Tastenabstand19,05 mm
Tastenanschlag2,7 mm
Stromversorgung3 V Gleichstrom (vier R6-Batterien (Größe AA))
Funkfrequenzbereich2,4 GHz
EingabegerätTastatur
Kommunikationsreichweitemax. 10 m, Sichtlinie
Gewichtca. 0,93 kg (ohne Batterien)
Abmessungenca. 388 × 31,3 × 159 mm (B × H × T)

19 DE
Sonstiges
Unterstützte ModelleVAIO-Notebook-Computer von Sony mitvorinstalliertem Windows XP oder WindowsVista
Betriebstemperatur5°C bis 35°C (Temperaturschwankungen vonunter 10°C/Stunde)
Luftfeuchtigkeit bei Betrieb20% bis 80% (nicht kondensierend). Bei einerTemperatur von 35°C muss die Luftfeuchtigkeitunter 65% liegen (Hygrometerstand unter 29°C)
Lagertemperatur–20°C bis +60°C (Temperaturschwankungen vonunter 10°C/Stunde)
Luftfeuchtigkeit bei Lagerung10% bis 90% (nicht kondensierend). Bei einerTemperatur von 60°C muss die Luftfeuchtigkeitunter 20% liegen (Hygrometerstand unter 35°C)
ZubehörEmpfänger (1)R6-Alkalibatterien (Größe AA) (4)Bedienungsanleitung (dieses Dokument)
Änderungen, die dem technischen Fortschrittdienen, bleiben vorbehalten.

20 DE
StörungsbehebungSollten an Ihrer Tastatur Störungen auftreten, versuchen Sie, diese anhandder folgenden Checkliste zu beheben. Sollte eine Störung bestehen bleiben,wenden Sie sich an Ihren Sony-Händler. Kontaktinformationen finden Sieunter „Hilfe und Support“ (Seite 17). Schlagen Sie auch in der mit demComputer gelieferten Dokumentation nach.
Symptom Ursache/Abhilfemaßnahme
Die Taste CONNECTwurde gedrückt, aberes ist keineKommunikationmöglich.
Wenn die Tastaturverwendet wird, wirdder Bildschirm dunkeloder der Computerwechselt in einenStromsparmodus.
Der Computer schaltetnicht zurück aus demMonitorbereitschaftsmodus.
cÜberprüfen Sie, ob Batterien in die Tastatur eingelegtsind. Näheres dazu finden Sie unter „Vorbereitungen“(Seite 6).
cWenn der Netzschalter POWER an der Tastatur auf OFFgestellt ist, ist die Kommunikation mit dem Empfängernicht möglich. Überprüfen Sie die Position desNetzschalters an der Tastatur.
cWenn der Netzschalter POWER auf ON steht und sich dieTastatur dennoch nicht einschalten lässt, sind unterUmständen die Batterien erschöpft. Tauschen Sie dieBatterien aus. Näheres dazu finden Sie unter„Vorbereitungen“ (Seite 6).
cDie Kommunikation zwischen Tastatur und Empfängerwurde möglicherweise nicht richtig eingerichtet. Wenn dieTaste CONNECT an der Tastatur nicht innerhalb von 10Sekunden nach dem Drücken der Taste CONNECT amEmpfänger gedrückt wird, bricht der Empfänger dieKommunikation ab. Führen Sie in einem solchen Fall dasVerfahren zum Einrichten der Kommunikation erneut aus.Einzelheiten dazu finden Sie unter „Aktivieren derKommunikation zwischen Tastatur und Empfänger“ (Seite8).
cWenn die Tastatur zu weit vom Empfänger entfernt ist, istkeine Kommunikation möglich. Die maximaleKommunikationsreichweite zwischen Tastatur undEmpfänger beträgt etwa 10 m. Bei Verwendung auf einemMetalltisch oder bei Hindernissen zwischen Tastatur undEmpfänger verkürzt sich die Reichweite möglicherweise.
cÄndern Sie die Einstellungen für die Energieverwaltung,so dass der Computer nicht in einen Stromsparmoduswechselt. Erläuterungen dazu finden Sie in derDokumentation zu Ihrem Computer.
cDrücken Sie eine beliebige Taste auf der Tastatur desNotebook-Computers, um von einem Stromsparmodus inden normalen Betrieb zurückzuschalten.
cDrücken Sie an diesem Gerät oder auf der Tastatur desNotebook-Computers eine beliebige Taste, um diesenModus zu beenden.

21 DE
Symptom Ursache/Abhilfemaßnahme
Der Computer schaltetnicht zurück aus demBereitschafts- oderEnergiesparmodus.
Der Wechsel vomStromsparmodus inden normalen Betrieblässt sich mit derTastatur nichtauslösen oder dauertsehr lange.
Die Tastatur wechseltin denEnergiesparmodus unddie LCD-Anzeigenschalten sich aus.
Nach demAnschließen desEmpfängers dauert eseine Weile, bis dieTastatur verwendetwerden kann.
Die Tastaturfunktioniert nicht.
Die Tasten S1-S3funktionieren nichtwie erwartet.
cDrücken Sie eine beliebige Taste auf der Tastatur desNotebook-Computers, nicht an diesem Gerät.
cDrücken Sie auf der Tastatur des Notebook-Computerseine beliebige Taste.
cDrücken Sie eine beliebige Taste an diesem Gerät oderschalten Sie die Tastatur ein/aus (ON/OFF).
cWenn Windows, eine Anwendung oder ein anderes USB-Gerät zurzeit ausgelastet ist, dauert es möglicherweiseeine Weile, bis der Empfänger erkannt wird.
• Die Verbindung zwischen Tastatur und Empfänger kannnicht hergestellt werden.
cVergewissern Sie sich, dass die Anzeige (Verbinden)leuchtet.
• Der Empfänger ist nicht an den Computer angeschlossen.
c Schließen Sie den Empfänger an den Computer an.
• Der Empfänger wird vom Computer nicht erkannt.
c Lösen Sie das Empfängerkabel vom USB-Anschluss desComputers und schließen Sie es wieder an.
cÜberprüfen Sie die Entfernung zwischen der Tastatur unddem Empfänger. Stellen Sie die Tastatur und denEmpfänger innerhalb der in den technischen Datenangegebenen Kommunikationsreichweite auf. BeiVerwendung auf einem Metalltisch oder bei Hindernissenin der Nähe der Tastatur verkürzt sich die Reichweitemöglicherweise.
c Stellen Sie sicher, dass Batterien in die Tastatur eingelegtsind. Legen Sie die Batterien polaritätsrichtig in dieTastatur ein und drücken Sie die Taste CONNECT amEmpfänger. Drücken Sie dann innerhalb von 10 Sekundendie Taste CONNECT an der Tastatur. Stellen Sie sicher,dass sich die Tastatur nahe genug am Empfänger befindet(maximal 30 cm Abstand), wenn Sie die Taste drücken.
cDie Funktionen der Tasten S1-S3 auf der Tastatur desNotebook-Computers und der Tasten an diesem Gerätkönnen sich unterscheiden.

2 IT
Italiano
ATTENZIONEPer ridurre il rischio di incendi oscosse elettriche, non esporrequesto apparecchio alla pioggia oall’umidità.Per il collegamento alla porta USB, utilizzare laporta contrassegnata dal simbolo .
Il presente apparecchio contiene i seguentidispositivi senza fili: Tastiera wireless (VGP-WKB5XX*) e ricevitore senza fili (VGP-WRC5)* Il nome del modello della tastiera viene seguito
dal suffisso No.
Per i clienti in Europa (tastiera indotazione, VGP-WKB5GB/VGP-WKB5FR/VGP-WKB5DE/VGP-WKB5IT/VGP-WKB5ES)Con il presente documento Sony dichiara che questoprodotto è conforme ai requisiti essenziali e alle altrenorme pertinenti della Direttiva Europea 1999/5/CE.
Per leggere o scaricare una copia della Dichiarazione diConformità (DoC) alla Direttiva R&TTE, visitare laseguente pagina Web:http://www.compliance.sony.de/
Il presente prodotto è conforme agli standardeuropei EN55022 classe B ed EN55024 perl’utilizzo nelle seguenti aree: residenziale,commerciale e industriale leggera.
Il presente apparecchio è stato testato ed èrisultato conforme ai limiti stabiliti dalla DirettivaEMC utilizzando cavi di collegamento dilunghezza non superiore a 3 metri.
Smaltimento delle batterie AA• Questo dispositivo wireless è alimentato da pile AA.• Per l’inserimento delle pile fare riferimento al
paragrafo “Inserimento delle batterie nella tastiera”del presente manuale.
• Non maneggiare batterie danneggiate o da cuifuoriesce liquido. Smaltire la batteria con tempestivitàe in modo adeguato.
• Le batterie possono esplodere o perdere liquido sericaricate, gettate nel fuoco, mischiate con altri tipi dibatterie o installate in modo errato.
• Se utilizzate in modo improprio, le batterie utilizzatein questi dispositivi possono provocare incendi oustioni dovute a prodotti chimici. Non smontare, nonportare a temperature superiori a 60°C e nonincenerire.
• Sostituire unicamente con batterie uguali o equivalenticonsigliate dal produttore.
• Tenere fuori dalla portata dei bambini.• Smaltire in modo adeguato dopo l’esaurimento.• In alcune zone non è autorizzato lo smaltimento di
batterie insieme ai normali rifiuti domestici oaziendali. Servirsi delle strutture di smaltimentopubbliche appropriate.
Trattamento deldispositivo elettrico odelettronico a fine vita(applicabile in tutti i paesidell’Unione Europea e inaltri paesi europei consistema di raccoltadifferenziata)
Questo simbolo sul prodotto o sulla confezione indicache il prodotto non deve essere considerato come unnormale rifiuto domestico, ma deve invece essereconsegnato ad un punto di raccolta appropriato per ilriciclo di apparecchi elettrici ed elettronici.Assicurandovi che questo prodotto sia smaltitocorrettamente, voi contribuirete a prevenire potenzialiconseguenze negative per l’ambiente e per la salute chepotrebbero altrimenti essere causate dal suo smaltimentoinadeguato. Il riciclaggio dei materiali aiuta a conservarele risorse naturali. Per informazioni più dettagliate circail riciclaggio di questo prodotto, potete contattarel’ufficio comunale, il servizio locale di smaltimentorifiuti oppure il negozio dove l’avete acquistato.

3 IT
IndicePrima dell’uso ........................................ 4
Caratteristiche ................................. 4
PC compatibili ................................ 4
Verifica degli articoli in dotazione ........ 5
Impostazione .......................................... 6
Inserimento delle batterie nellatastiera .......................................... 6
Collegamento del ricevitore alcomputer ...................................... 7
Abilitazione della comunicazione trala tastiera e il ricevitore ................ 8
Posizione e funzione dei comandi ....... 10
Tastiera ......................................... 10
Ricevitore ..................................... 13
Apertura dei piedinidella tastiera ............................... 14
Poggiapolsi ................................... 15
Precauzioni .......................................... 16
Come ottenere supporto ....................... 17
Caratteristiche tecniche ....................... 18
Soluzione dei problemi ........................ 20 IT
• VAIO e sono marchi di fabbrica diSony Corporation.
• Microsoft, Windows e Windows Vista sonomarchi di fabbrica di Microsoft Corporationnegli Stati Uniti e/o in altri paesi.
• Tutti i nomi di altri sistemi, prodotti e servizisono marchi di fabbrica dei rispettiviproprietari. Nel presente manuale, i simboli ™e ® non sono specificati.
• Nel presente manuale, Microsoft® Windows®
XP Home Edition e Microsoft® Windows® XPProfessional sono indicati come Windows XP.
• In questo manuale, Microsoft® WindowsVista® Home Basic, Microsoft® WindowsVista® Home Premium, Microsoft® WindowsVista® Business e Microsoft® Windows Vista®
Ultimate vengono indicati con Windows Vista.

4 IT
Prima dell’uso
Prima di utilizzare la tastiera, leggere attentamente il presente manuale econservarlo per eventuali riferimenti futuri.
Caratteristiche
La tastiera wireless Sony VGP-WKB5 è appositamente progettata per l’usocon computer Sony serie VAIO.
• La nuova tastiera wireless è dotata di un poggiapolsi ripiegabile che puòessere utilizzato come poggiapolsi o come copri tastiera, onde evitare laformazione di polvere sulla tastiera stessa.
• Design elegante, con struttura in alluminio.
• Tecnologia digitale wireless da 2,4 GHz con raggio di comunicazionemassimo pari a circa 10 m, che consente l’immissione di caratteri adistanza.
PC compatibili
La tastiera Sony VGP-WKB5 può essere utilizzata con i PC serie VAIO.Non è supportato l’uso della presente tastiera con altri tipi di computer.
• Computer portatili Sony VAIO, con sistema operativo Windows XP oWindows Vista preinstallato.
Nota
Non utilizzare la tastiera con PC diversi da quelli per cui è stata progettata. Diversamente,la tastiera potrebbe danneggiarsi.
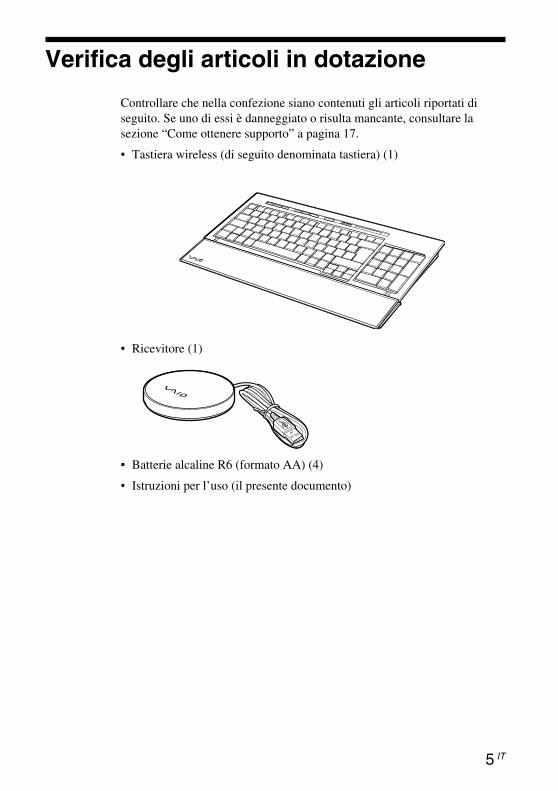
5 IT
Verifica degli articoli in dotazione
Controllare che nella confezione siano contenuti gli articoli riportati diseguito. Se uno di essi è danneggiato o risulta mancante, consultare lasezione “Come ottenere supporto” a pagina 17.
• Tastiera wireless (di seguito denominata tastiera) (1)
• Ricevitore (1)
• Batterie alcaline R6 (formato AA) (4)
• Istruzioni per l’uso (il presente documento)
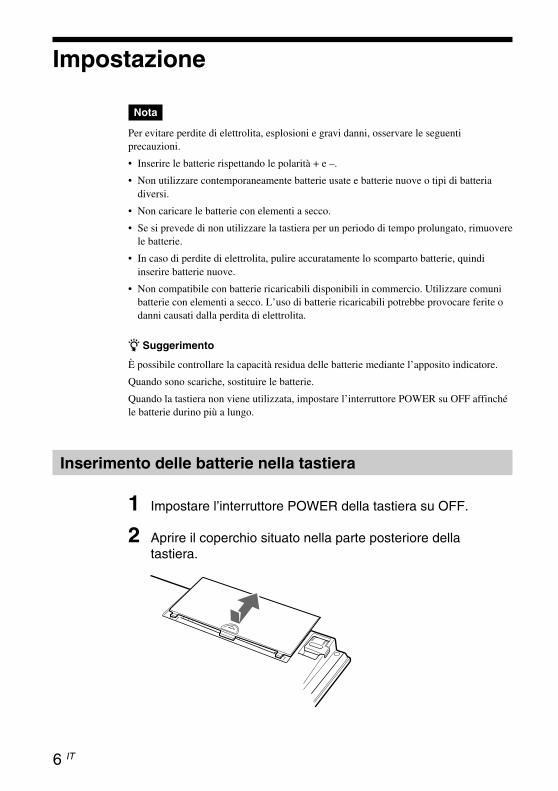
6 IT
Impostazione
Nota
Per evitare perdite di elettrolita, esplosioni e gravi danni, osservare le seguentiprecauzioni.
• Inserire le batterie rispettando le polarità + e –.
• Non utilizzare contemporaneamente batterie usate e batterie nuove o tipi di batteriadiversi.
• Non caricare le batterie con elementi a secco.
• Se si prevede di non utilizzare la tastiera per un periodo di tempo prolungato, rimuoverele batterie.
• In caso di perdite di elettrolita, pulire accuratamente lo scomparto batterie, quindiinserire batterie nuove.
• Non compatibile con batterie ricaricabili disponibili in commercio. Utilizzare comunibatterie con elementi a secco. L’uso di batterie ricaricabili potrebbe provocare ferite odanni causati dalla perdita di elettrolita.
z Suggerimento
È possibile controllare la capacità residua delle batterie mediante l’apposito indicatore.
Quando sono scariche, sostituire le batterie.
Quando la tastiera non viene utilizzata, impostare l’interruttore POWER su OFF affinchéle batterie durino più a lungo.
Inserimento delle batterie nella tastiera
1 Impostare l’interruttore POWER della tastiera su OFF.
2 Aprire il coperchio situato nella parte posteriore dellatastiera.
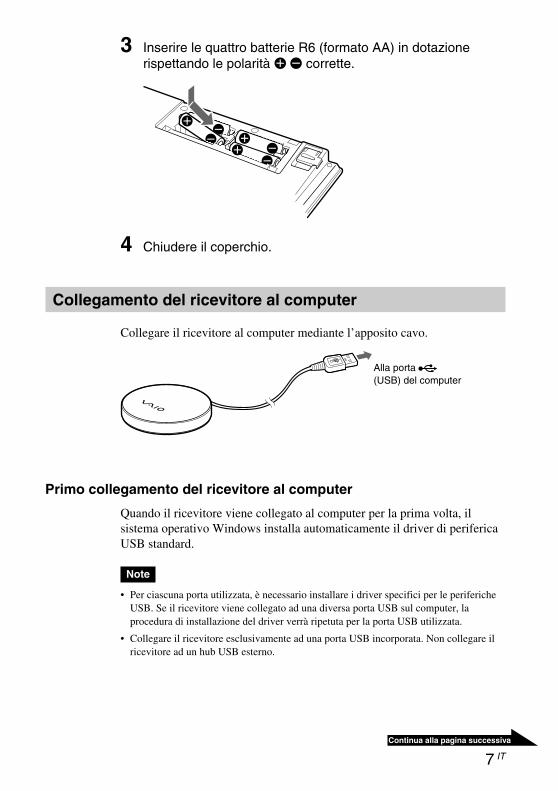
7 IT
Continua alla pagina successiva
3 Inserire le quattro batterie R6 (formato AA) in dotazionerispettando le polarità eE corrette.
4 Chiudere il coperchio.
Collegamento del ricevitore al computer
Collegare il ricevitore al computer mediante l’apposito cavo.
Primo collegamento del ricevitore al computer
Quando il ricevitore viene collegato al computer per la prima volta, ilsistema operativo Windows installa automaticamente il driver di perifericaUSB standard.
Note
• Per ciascuna porta utilizzata, è necessario installare i driver specifici per le perifericheUSB. Se il ricevitore viene collegato ad una diversa porta USB sul computer, laprocedura di installazione del driver verrà ripetuta per la porta USB utilizzata.
• Collegare il ricevitore esclusivamente ad una porta USB incorporata. Non collegare ilricevitore ad un hub USB esterno.
Alla porta (USB) del computer

8 IT
Abilitazione della comunicazione tra la tastiera e ilricevitore
Nota
Per collegare la tastiera wireless, è necessario che la stessa sia posizionata ad una distanzadal computer compresa tra 30 cm e 1 m.
1 Impostare l’interruttore POWER della tastiera su ON.
2 Premere il tasto CONNECT sul ricevitore.
Il ricevitore resta nel modo di attesa al fine di riconoscere la tastieraper circa 10 secondi.
3 Premere il tasto CONNECT sulla tastiera.Viene avviata la comunicazione tra la tastiera e il ricevitore.
4 Accertarsi che l’indicatore (connessione) sia acceso nelpannello LCD della tastiera.
Diversamente, è possibile che la connessione non sia stata stabilita.Eseguire di nuovo le operazioni descritte ai punti 2 e 3.
Tasto CONNECT
Interruttore POWER
Tasto CONNECT

9 IT
Nota
Se nelle vicinanze viene utilizzata un’altra tastiera wireless VGP-WKB5, è possibileche essa causi interferenze nella comunicazione tra la tastiera e il ricevitore.Abilitare la comunicazione in momenti diversi o ad una distanza superiore rispettoall’altra tastiera wireless.
Per interrompere l’uso della tastiera
Scollegare il cavo del ricevitore dalla porta USB del computer.Il cavo del ricevitore può essere scollegato e collegato senza spegnere ilcomputer. È possibile risparmiare l’energia della batteria spegnendo latastiera quando non viene utilizzata.
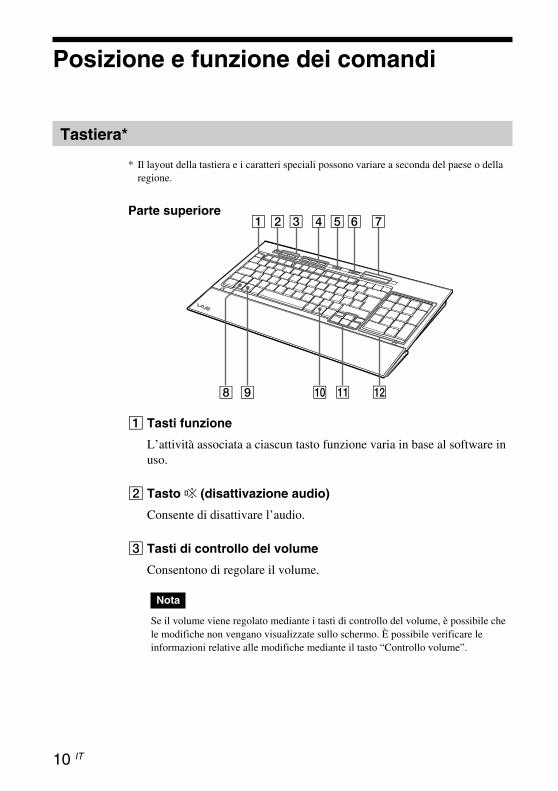
10 IT
Posizione e funzione dei comandi
Tastiera*
* Il layout della tastiera e i caratteri speciali possono variare a seconda del paese o dellaregione.
Parte superiore
1 Tasti funzione
L’attività associata a ciascun tasto funzione varia in base al software inuso.
2 Tasto % (disattivazione audio)
Consente di disattivare l’audio.
3 Tasti di controllo del volume
Consentono di regolare il volume.
Nota
Se il volume viene regolato mediante i tasti di controllo del volume, è possibile chele modifiche non vengano visualizzate sullo schermo. È possibile verificare leinformazioni relative alle modifiche mediante il tasto “Controllo volume”.

11 IT
Continua alla pagina successiva
4 Tasti di scelta rapida
Consentono di avviare i seguenti software, per impostazionepredefinita.S1: applicazione e-mail
S2: Browser Web
S3: Calcolatrice
Nota
A seconda delle impostazioni del computer, è possibile che vengano avviati softwarediversi da quelli specificati in precedenza.
5 Tasto (attesa)
Se la tastiera è impostata su ON, premere questo tasto per impostare ilmodo di attesa o di autospegnimento.
Note
• Per uscire dal modo di attesa o di autospegnimento, premere un tasto qualsiasidella tastiera del computer portatile.
• A seconda del computer, è possibile che premendo questo tasto il computer stessoentri nel modo di sospensione.
6 Interruttore POWER
Consente di accendere/spegnere (ON/OFF) la tastiera. Se si prevede dinon utilizzare la tastiera per un periodo prolungato, si consiglia dispegnerla.
7 Indicatori
• Indicatore (batteria)Se la capacità residua della batteria della tastiera è sufficiente, vienevisualizzato il simbolo . Quando la batteria si scarica, vienevisualizzato il simbolo .
• Indicatore (Bl Num)Si accende quando lo stato BLOC NUM è attivo.
• Indicatore ( )Si accende quando lo stato BLOC MAIUSC è attivo.
• Indicatore (Bl Scor)Si accende quando lo stato BLOC SCORR è attivo.
• Indicatore (connessione)Si accende quando la tastiera è pronta all’uso.Se il computer e la tastiera wireless sono scollegati, l’indicatore èspento.
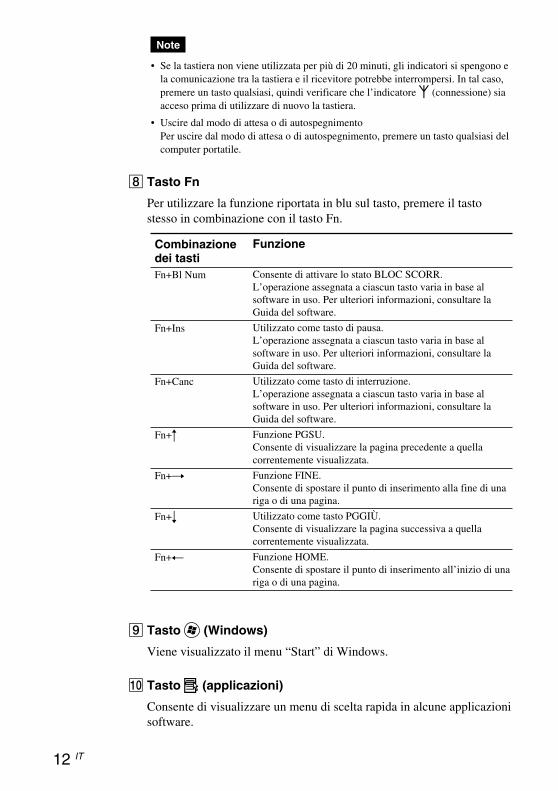
12 IT
Funzione
Consente di attivare lo stato BLOC SCORR.L’operazione assegnata a ciascun tasto varia in base alsoftware in uso. Per ulteriori informazioni, consultare laGuida del software.
Utilizzato come tasto di pausa.L’operazione assegnata a ciascun tasto varia in base alsoftware in uso. Per ulteriori informazioni, consultare laGuida del software.
Utilizzato come tasto di interruzione.L’operazione assegnata a ciascun tasto varia in base alsoftware in uso. Per ulteriori informazioni, consultare laGuida del software.
Funzione PGSU.Consente di visualizzare la pagina precedente a quellacorrentemente visualizzata.
Funzione FINE.Consente di spostare il punto di inserimento alla fine di unariga o di una pagina.
Utilizzato come tasto PGGIÙ.Consente di visualizzare la pagina successiva a quellacorrentemente visualizzata.
Funzione HOME.Consente di spostare il punto di inserimento all’inizio di unariga o di una pagina.
Note
• Se la tastiera non viene utilizzata per più di 20 minuti, gli indicatori si spengono ela comunicazione tra la tastiera e il ricevitore potrebbe interrompersi. In tal caso,premere un tasto qualsiasi, quindi verificare che l’indicatore (connessione) siaacceso prima di utilizzare di nuovo la tastiera.
• Uscire dal modo di attesa o di autospegnimentoPer uscire dal modo di attesa o di autospegnimento, premere un tasto qualsiasi delcomputer portatile.
8 Tasto Fn
Per utilizzare la funzione riportata in blu sul tasto, premere il tastostesso in combinazione con il tasto Fn.
Combinazionedei tastiFn+Bl Num
Fn+Ins
Fn+Canc
Fn+R
Fn+t
Fn+r
Fn+T
9 Tasto (Windows)
Viene visualizzato il menu “Start” di Windows.
0 Tasto (applicazioni)
Consente di visualizzare un menu di scelta rapida in alcune applicazionisoftware.

13 IT
Continua alla pagina successiva
qa Tasti delle frecce direzionali
Consentono di spostare il cursore sullo schermo del computer.
qs Tastierino numerico
Se si preme il tasto Bl Num/Bl Scor e lo stato BLOC NUM è attivo,utilizzare il tastierino numerico per digitare numeri.
Parte inferiore
1 Tasto CONNECT
Da utilizzare per l’abilitazione della comunicazione tra la tastiera e ilricevitore.
Ricevitore
Parte inferiore
1 Tasto CONNECT
Da utilizzare per l’abilitazione della comunicazione tra la tastiera e ilricevitore.

14 IT
Apertura dei piedini della tastiera
Aprire i piedini della tastiera per rendere più semplice le operazioni discrittura.
Nota
Durante l’apertura o la chiusura dei piedini della tastiera, prestare attenzione a nonrompere le linguette.

15 IT
Poggiapolsi
Durante l’uso della tastiera, estrarre il poggiapolsi tirandolo verso di sé inmodo tale da non affaticare troppo i polsi.
Se la tastiera non viene utilizzata, è possibile utilizzare il poggiapolsi comecopri tastiera estendendolo sopra la tastiera stessa, per proteggerla dallapolvere o dall’eventuale caduta di oggetti.
Note
• Al momento dell’apertura, non forzare il poggiapolsi oltre la posizione prevista.
• Durante l’uso del poggiapolsi su una superficie piana, quale una scrivania, posizionarela tastiera in modo tale che il poggiapolsi non oltrepassi il bordo della superficie stessa.
• Non spostare la tastiera tenendola per il poggiapolsi. Afferrare la tastiera dai latiutilizzando entrambe la mani, come illustrato.

16 IT
Precauzioni
Distanza di funzionamentodella tastiera
La distanza di comunicazione massimadalla tastiera al ricevitore è pari a circa 10m. In base all’ambiente d’uso, è possibileche la distanza di funzionamento si riducanotevolmente, impedendo il normalefunzionamento. In tal caso, osservarequanto riportato di seguito:
• Accertarsi che la tastiera si trovi ad unadistanza minima di 15 cm dal computer,dal display e da altri dispositivielettronici.
• Avvicinare il ricevitore alla tastiera.
Sicurezza
Nel caso in cui oggetti solidi o sostanzeliquide penetrassero all’interno dellatastiera, spegnerla e farla controllare dapersonale qualificato prima di utilizzarladi nuovo.
Posizione
Non collocare la tastiera:
• su superfici instabili
• in luoghi molto umidi o conventilazione insufficiente
• in luoghi soggetti a polvere eccessiva
• in luoghi esposti a luce solare diretta ocalore eccessivo
• in luoghi esposti a temperatureestremamente basse
Operazione
Se la tastiera viene spostata direttamenteda un luogo freddo ad uno caldo o seviene collocata in un ambienteestremamente umido, è possibile che siformi della condensa all’interno dellatastiera stessa. Se ciò dovesse verificarsi, èpossibile che la tastiera non funzionicorrettamente.In tal caso, attendere circa 30 minutiaffinché la condensa evapori. Se la tastieranon funziona correttamente dopo un’ora,rivolgersi ad un rivenditore Sony.
Trasporto della tastiera
Durante il trasporto della tastiera,ripiegare il poggiapolsi. Non spostare latastiera tenendola per il poggiapolsi.
Pulizia delle parti esternedella tastiera
• Pulire la tastiera con un panno morbidoasciutto o leggermente inumidito conuna soluzione detergente neutra. Nonutilizzare spugnette o polveri abrasivené solventi quali alcol o benzene.
• Durante le operazioni di pulizia dellatastiera, accertarsi di rimuovere lebatterie.

17 IT
Come otteneresupporto
In questa sezione vengono fornite leinformazioni necessarie per ottenereassistenza e supporto da Sony; sonoinoltre riportati alcuni suggerimenti per larisoluzione di eventuali problemi dellatastiera.
Opzioni di supporto Sony
Sony fornisce svariate opzioni di supportoper la tastiera. In caso di domande relativealla tastiera, consultare:
❑ Il presente manuale, che spiega lemodalità d’uso della tastiera.
Per i clienti negli Stati Uniti e inCanada
❑ Il centro di assistenza CustomerInformation Service (CSI) di Sony,che offre informazioni sul computerserie VAIO in uso e su altri prodottiSony che possono essere utilizzati con ilproprio computer. Per rivolgersi alcentro di assistenza CSI, chiamare ilnumero1-888-4SONYPC (1-888-476-6972).
❑Sony Computing Support consentel’accesso immediato a informazioni suproblemi comuni. Immettere unadescrizione del problema verificatosi; ilKnowledge Database esegue una ricercaper le corrispondenti soluzioni online. Èpossibile accedere al supporto online diSony visitando il seguente sito Web:http://www.sony.com/pcsupport
Per i clienti in Europa
❑VAIO-Link. Per indirizzi e numeritelefonici, accedere al seguenteindirizzohttp://support.vaio.sony.eu
Per i clienti in altri paesi/altreregioni
❑VAIO Website, che include unasezione di domande frequenti (FAQ)con le relative soluzioni.vaio-online.sony.com/

18 IT
Ricevitore senza fili
InterfacciaUSB A
Lunghezza del cavoCirca 70 cm
Banda di frequenza wireless2,4 GHz
Distanza di comunicazione10 m max., dispositivi posti uno di fronte all’altro
PesoCirca 55 g
DimensioniDiametro Circa 75,5 mmAltezza Circa 12,7 mm
Caratteristichetecniche
Tastiera wireless
InterfacciaTrasmissione wireless digitale
Distanza tra i tasti19,05 mm
Battuta2,7 mm
Requisiti di alimentazione3 V CC (quattro batterie R6 [formato AA])
Banda di frequenza wireless2,4 GHz
Periferica di ingressoTastiera
Distanza di comunicazione10 m max., dispositivi posti uno di fronte all’altro
PesoCirca 0,93 Kg (batterie escluse)
DimensioniCirca 388 × 31,3 × 159 mm (l × a × p)
19 IT
Informazioni aggiuntive
Modelli supportatiComputer portatili Sony VAIO, con sistemaoperativo Windows XP o Windows Vistapreinstallato
Temperatura di utilizzoDa 5 ˚C a 35 ˚C (gradiente termico inferiore a 10˚C/ora)
Umidità di utilizzoDal 20% al 80% (senza condensa), a condizioneche l’umidità sia inferiore al 65% a 35 ˚C (letturaigrometrica inferiore a 29 ˚C)
Temperatura di depositoDa –20 ˚C a +60 ˚C (gradiente termico inferiore a10 ˚C/ora)
Umidità di depositoDal 10% al 90% (senza condensa), a condizioneche l’umidità sia inferiore al 20% a 60 ˚C (letturaigrometrica inferiore a 35 ˚C)
AccessoriRicevitore (1)Batterie alcaline R6 (formato AA) (4)Istruzioni per l’uso (il presente documento)
Il design e le caratteristiche tecniche sono soggettia modifiche senza preavviso.

20 IT
Sintomo Causa/Rimedio
Premendo il tastoCONNECT, lacomunicazione non ècomunque possibile.
Durante l’uso dellatastiera, il display sioscura oppure ilcomputer passa almodo di risparmioenergetico.
Il computer non escedal modo di attesamonitor.
Il computer non escedal modo di attesa oautospegnimento.
cVerificare che le batterie siano state inserite nella tastiera.Per ulteriori informazioni, consultare la sezione“Impostazione” (pagina 6).
c Se l’interruttore POWER della tastiera viene impostato suOFF, la comunicazione con il ricevitore non ha luogo.Verificare l’impostazione dell’interruttore sulla tastiera.
c Se la tastiera non si accende impostando il relativointerruttore POWER su ON, è possibile che le batteriesiano scariche. Sostituirle. Per ulteriori informazioni,consultare la sezione “Impostazione” (pagina 6).
c È possibile che la comunicazione tra la tastiera e ilricevitore non sia stata stabilita correttamente. Se il tastoCONNECT della tastiera non viene premuto entro 10secondi dalla pressione del tasto CONNECT delricevitore, la comunicazione viene annullata dal ricevitorestesso. In tal caso, eseguire di nuovo la procedura diabilitazione della comunicazione. Per ulterioriinformazioni, consultare la sezione “Abilitazione dellacomunicazione tra la tastiera e il ricevitore” (pagina 8).
c Se la tastiera è eccessivamente distante dal ricevitore, lacomunicazione non è possibile. La distanza dicomunicazione massima tra la tastiera e il ricevitore è dicirca 10 m. Se la tastiera viene utilizzata su una superficiemetallica oppure se tra il ricevitore e la tastiera sonopresenti degli ostacoli, la distanza di funzionamentopotrebbe risultare inferiore.
cModificare l’impostazione relativa alla gestionedell’alimentazione affinché il computer non passi al mododi risparmio energetico. Per ulteriori informazioni,consultare i manuali forniti con il computer.
c Per uscire dal modo di risparmio energetico, premere untasto qualsiasi sulla tastiera del computer portatile.
c Premere un tasto qualsiasi sulla presente unità o sullatastiera del computer portatile per uscire da tale modalità.
c Premere un tasto qualsiasi sulla tastiera del computerportatile, non sulla presente unità.
Soluzione dei problemiSe durante l’uso della tastiera si dovesse verificare uno dei problemiriportati di seguito, consultare la presente guida per risolverlo. Se ilproblema persiste, rivolgersi ad un rivenditore Sony. Per ulterioriinformazioni, vedere la sezione “Come ottenere supporto” (pagina 17).Fare inoltre riferimento ai manuali forniti con il computer.

21 IT
Sintomo Causa/Rimedio
La tastiera non escedal modo di risparmioenergetico oppure taleoperazione richiedeuna notevole quantitàdi tempo.
La tastiera entra nellamodalità risparmioenergetico e gliindicatori LCD sispengono.
Una volta collegato ilricevitore, occorreattendere alcuni istantiprima che sia possibileutilizzare la tastiera.
La tastiera nonfunziona.
I tasti S1-S3 nonfunzionano nel modoprevisto.
c Premere un tasto qualsiasi sulla tastiera del computerportatile.
c Premere un tasto qualsiasi sulla presente unità oppureimpostare su ON/OFF l’interruttore di alimentazione dellatastiera.
c Se Windows, un programma software o un altrodispositivo USB sono occupati, è possibile che ilriconoscimento del ricevitore richieda alcuni istanti.
• Non è possibile stabilire la connessione tra la tastiera e ilricevitore.
cAccertarsi che l’indicatore (connessione) sia acceso.
• Il ricevitore non è collegato al computer.
cCollegare il ricevitore al computer.
• Il ricevitore non viene riconosciuto dal computer.
c Scollegare il cavo del ricevitore dalla porta USB delcomputer, quindi ricollegarlo.
cVerificare la distanza tra la tastiera e il ricevitore.Posizionare la tastiera e il ricevitore ad una distanza nonsuperiore a quella indicata nella sezione dellecaratteristiche tecniche. Se la tastiera viene utilizzata suuna superficie metallica o se sono presenti degli oggettimetallici in prossimità alla tastiera, la distanza difunzionamento potrebbe risultare inferiore.
cAssicurarsi che nella tastiera siano inserite le batterie.Inserire correttamente le batterie nella tastiera, quindipremere il tasto CONNECT sul ricevitore. Entro 10secondi, premere il tasto CONNECT sulla tastiera. Allapressione del tasto, accertarsi che la tastiera si trovi vicinoal ricevitore (entro 30 cm).
c Le funzioni assegnate ai tasti S1-S3 sulla tastiera delcomputer portatile e quelle assegnate sulla presente unitàpotrebbero variare.

2 ES
Español
AVISOPara reducir el riesgo deincendios o electrocución, noexponga el aparato a la lluvia ni ala humedad.Para realizar la conexión en un puerto USB,utilice el puerto USB identificado mediante elsiguiente símbolo .
El dispositivo contiene los siguientes dispositivosinalámbricos: El teclado inalámbrico (VGP-WKB5XX*)y el receptor inalámbrico (VGP-WRC5)
* El nombre del modelo del teclado irá seguido de unnúmero sufijo.
Para los clientes en Europa(teclado incluido, VGP-WKB5GB/VGP-WKB5FR/VGP-WKB5DE/VGP-WKB5IT/VGP-WKB5ES)Sony declara que este producto cumple con losrequisitos esenciales y otras normas importantesde la directiva europea 1999/5/CE.
Puede obtener una copia de la declaración deconformidad (DoC) con la Directiva R&TTE enla siguiente dirección URL:http://www.compliance.sony.de/
Este producto cumple con las normas europeasEN55022 Clase B y EN55024 para su utilizaciónen los siguientes ámbitos: residenciales,empresariales y de industria ligera.
Este equipo ha sido probado y se ha comprobadoque cumple con lo establecido por la DirectivaEMC mediante un cable de conexión de menos de3 metros de longitud.
Desecho de pilas AA• Este dispositivo inalámbrico utiliza pilas AA.• Para instalar las pilas, consulte la sección
“Inserción de las pilas en el teclado” de estemanual.
• No manipule pilas dañadas o con fugas.Deséchelas inmediatamente de la formacorrecta.
• Las pilas pueden explotar o tener fugas si serecargan, se tiran al fuego, se mezclan conotros tipos de pilas o se instalan de maneraincorrecta.
• Las pilas utilizadas en estos dispositivospueden provocar riesgos de incendio o dequemaduras por productos químicos si no semanipulan correctamente. No las desmonte nilas caliente a una temperatura superior a 60°C,ni las queme.
• Cambie las pilas sólo por unas del mismo tipoo equivalentes recomendadas por el fabricante.
• Manténgalas alejadas del alcance de los niños.• Deséchelas correctamente al final de su vida.• En algunas áreas puede estar prohibido
desechar las pilas en el sistema de desecho delhogar o de la oficina. Rogamos utilice unsistema público de recolección adecuado.
Tratamiento de losequipos eléctricos yelectrónicos al final de suvida útil (aplicable en laUnión Europea y enpaíses europeos consistemas de recogidaselectiva de residuos)
Este símbolo en el equipo o el embalaje indica que elpresente producto no puede ser tratado como residuosdomésticos normales, sino que debe entregarse en elcorrespondiente punto de recogida de equipos eléctricosy electrónicos. Al asegurarse de que este producto sedesecha correctamente, Ud. ayuda a prevenir lasconsecuencias negativas para el medio ambiente y lasalud humana que podrían derivarse de la incorrectamanipulación en el momento de deshacerse de esteproducto. El reciclaje de materiales ayuda a conservar losrecursos naturales. Para recibir información detalladasobre el reciclaje de este producto, póngase en contactocon el ayuntamiento, el punto de recogida más cercano oel establecimiento donde ha adquirido el producto.

3 ES
ÍndiceAntes del uso ......................................... 4
Características ................................ 4
Ordenadores personalescompatibles .................................. 4
Comprobación de los contenidossuministrados ..................................... 5
Configuración ........................................ 6
Inserción de las pilas en el teclado . 6
Conexión del receptor al ordenador 7
Comunicación entre el teclado y elreceptor ........................................ 8
Ubicación y funcionesde los controles ................................ 10
Teclado ......................................... 10
Receptor ....................................... 13
Abra las patillas del teclado ......... 14
Reposamanos ................................ 15
Precauciones ........................................ 16
Obtención de ayuda ............................. 17
Especificaciones .................................. 18
Solución de problemas ........................ 20
ES
• VAIO y son marcas comerciales deSony Corporation.
• Microsoft, Windows y Windows Vista sonmarcas comerciales registradas de MicrosoftCorporation en Estados Unidos y/u otrospaíses.
• Todos los demás nombres de sistemas,productos y servicios son marcas comercialesde sus respectivos propietarios. En este manualno se especifican las marcas ™ ni ®.
• En este manual se hace referencia a Microsoft®
Windows® XP Home Edition y Microsoft®
Windows® XP Professional como WindowsXP.
• En este manual, se hace referencia a Microsoft®
Windows Vista® Home Basic, Microsoft®
Windows Vista® Home Premium, Microsoft®
Windows Vista® Business y Microsoft®
Windows Vista® Ultimate como WindowsVista.
4 ES
Antes del uso
Antes de utilizar el teclado, lea detenidamente este manual y consérvelopara realizar consultas en un futuro.
Características
El dispositivo Sony VGP-WKB5 es un teclado inalámbrico especialmentediseñado para los ordenadores Sony VAIO.
• Nuevo estilo de teclado inalámbrico que dispone de un reposamanosplegable que, además, sirve como cubierta del teclado para evitar laacumulación de polvo.
• Diseño elegante realizado en aluminio
• Tecnología inalámbrica digital a 2,4 GHz con un rango de comunicaciónmáximo de 10 m que permite la introducción remota de caracteres.
Ordenadores personales compatibles
El dispositivo Sony VGP-WKB5 es compatible con los siguientesordenadores personales VAIO. No admite su utilización con otrosordenadores.
• Ordenadores portátiles Sony VAIO con Windows XP o Windows Vistapreinstalado.
Nota
No utilice este teclado con ordenadores personales distintos a los nombrados. Si lohiciera, esta unidad podría sufrir daños.

5 ES
Comprobación de los contenidossuministrados
Asegúrese de que en la caja se incluyen los siguientes elementos. Si algunode los elementos que se presenta a continuación está dañado o no seencuentra en el paquete, consulte el apartado “Obtención de ayuda” de lapágina 17.
• Teclado inalámbrico (en adelante, el teclado) (1)
• Receptor (1)
• Pilas alcalinas R6 (tamaño AA) (4)
• Manual de instrucciones (este documento)

6 ES
Configuración
Nota
Para evitar las fugas de líquido de las pilas, explosiones o que se produzcan daños graves,tome las siguientes precauciones.
• Inserte las pilas con la orientación + – correcta.
• No mezcle pilas nuevas con pilas viejas o pilas de distinto tipo.
• No cargue pilas secas.
• Si no va a utilizar el teclado durante un periodo de tiempo prolongado, extraiga laspilas.
• Si se produce la pérdida del líquido de una pila, limpie cuidadosamente elcompartimiento de las pilas e inserte pilas nuevas.
• Este dispositivo no es compatible con las pilas recargables disponibles en el mercado.Utilice pilas secas normales. El uso de pilas recargables puede producir lesiones odaños debido a las fugas de líquido de las pilas.
z Sugerencia
Compruebe la carga de batería restante mediante el indicador de batería.
Sustituya las pilas cuando se estén agotando.
Cuando no utilice el teclado, sitúe el interruptor POWER en OFF. Esto hará que las pilasduren más tiempo.
Inserción de las pilas en el teclado
1 Establezca el interruptor POWER en OFF.
2 Abra la cubierta situada en la parte posterior del teclado.

7 ES
Continuación
3 Inserte las cuatro pilas R6 suministradas (tamaño AA) con laorientación eE adecuada.
4 Cierre la cubierta.
Conexión del receptor al ordenador
Conecte el receptor al ordenador a través del cable del receptor.
Primera conexión del receptor al ordenador
La primera vez que el receptor se conecta al ordenador, el sistema operativode Windows instala automáticamente el controlador estándar deldispositivo USB.
Notas
• Los controladores de los dispositivos USB deben estar instalados en cada uno de lospuertos utilizados. Si conecta el receptor a otro puerto USB de su equipo, elprocedimiento de instalación del controlador se repetirá para dicho puerto USB.
• Conecte el receptor únicamente a un puerto USB integrado. No conecte el receptor a unconcentrador USB externo.
Al puerto (USB)del ordenador

8 ES
Comunicación entre el teclado y el receptor
Nota
Para conectar el teclado inalámbrico, éste debe estar situado a una distancia entre 30 cm y1 m del ordenador.
1 Establezca el interruptor POWER en ON.
2 Pulse el botón CONNECT del receptor.
El receptor permanece en espera unos 10 segundos para reconocer elteclado.
3 Pulse el botón CONNECT del teclado.Se inicia la comunicación entre el teclado y el receptor.
4 Asegúrese de que el indicador (Conexión) se enciende enla ventana LCD del teclado.
De no ser así, es posible que se haya producido un fallo en la conexión.Lleve a cabo de nuevo los pasos 2 y 3.
Botón CONNECT
Interruptor POWER
Botón CONNECT
9 ES
Nota
Si se está utilizando otro teclado inalámbrico VGP-WKB5 cerca, es posible que ésteinterfiera en la comunicación entre el teclado y el receptor. Permita elestablecimiento de la comunicación en momentos distintos o separe más los tecladosinalámbricos.
Dejar de utilizar el teclado
Desconecte el cable del receptor del puerto USB del ordenador.
Puede desconectar y conectar el cable del receptor sin apagar el ordenador.Puede ahorrar energía de la batería si apaga el teclado cuando no lo estéutilizando.

10 ES
Ubicación y funciones de los controles
Teclado*
* El diseño del teclado y los caracteres especiales pueden variar en función del país oregión.
Parte superior
1 Teclas de función
La tarea asociada a cada tecla de función varía en función del softwareutilizado.
2 Botón % (silenciador)
Silencia el sonido.
3 Botones de control de volumen
Permiten controlar el volumen.
Nota
Cuando se ajusta el volumen a través de los botones de control de volumen, esposible que los cambios no se muestren en la pantalla. Es posible verificar loscambios mediante el control de volumen.

11 ES
Continuación
4 Botones de acceso directo
Inician las siguientes aplicaciones de software de formapredeterminada.S1: Aplicación de correo electrónico
S2: Explorador Web
S3: Calculadora
Nota
En función de la configuración del equipo, es posible que se inicien otrasaplicaciones de software diferentes a las anteriormente especificadas.
5 Botón (suspender)
Pulse este botón cuando el teclado se encuentre en ON para establecerel modo de espera o suspender.
Notas
• Para desactivar estos modos, pulse cualquier tecla del teclado de su ordenadorportátil.
• En función del ordenador, es posible que se cambie al modo de hibernacióncuando pulse este botón.
6 Interruptor POWER
Enciende/apaga la alimentación del teclado. Si no va a utilizar elteclado durante un periodo de tiempo prolongado, es recomendableapagarlo.
7 Indicadores
• Indicador (Batería)Cuando la batería restante del teclado es suficiente, se muestra elsímbolo y cuando la batería se agota, cambia a .
• Indicador (Bl Num)Se enciende cuando el bloqueo de números está activado.
• Indicador (Bloq Mayús)Se enciende cuando Caps Lock está activado.
• Indicador (Bl Des)Se enciende cuando Scroll Lock está activado.
• Indicador (Conexión)Se enciende cuando el teclado está preparado para su uso.Cuando el ordenador y el teclado inalámbrico están desconectados, seapaga.

12 ES
FunciónEnciende SCROLL LOCK.La tarea asignada a cada tecla varía según el softwareutilizado. Para obtener más información, consulte la Ayudadel software.
Se utiliza como tecla de pausa.La tarea asignada a cada tecla varía según el softwareutilizado. Para obtener más información, consulte la Ayudadel software.
Se utiliza como tecla de interrupción.La tarea asignada a cada tecla varía según el softwareutilizado. Para obtener más información, consulte la Ayudadel software.
Función PAGE UP.Muestra la página anterior a la que se está mostrandoactualmente.
Función END.Desplaza el punto de inserción al final de una línea o página.
Se utiliza como tecla PAGE DOWN.Muestra la página siguiente a la que se está mostrandoactualmente.
Función HOME.Desplaza el punto de inserción al principio de una línea opágina.
Notas
• Cuando el teclado no se utiliza durante más de 20 minutos, los indicadores seapagan y se interrumpe la comunicación entre el teclado y el receptor. En estecaso, pulse cualquier tecla y confirme que el indicador (Conexión) se enciendeantes de utilizarlo.
• Desactivación del modo de espera o suspender.Pulse cualquier tecla de su ordenador portátil para desactivar el modo de espera osuspender.
8 Tecla Fn
Cuando utilice la función marcada en azul de la tecla, pulse dicha teclajunto con la tecla Fn.
TeclaFn+Bl Num
Fn+Insert
Fn+Supr
Fn+R
Fn+t
Fn+r
Fn+T
9 Tecla (Windows)
Aparece el menú “Inicio” de Windows.
0 Tecla (aplicaciones)
Muestra un menú de acceso directo en determinadas aplicaciones desoftware.
qa Teclas de flechas de dirección
Mueven el puntero por la pantalla del ordenador.
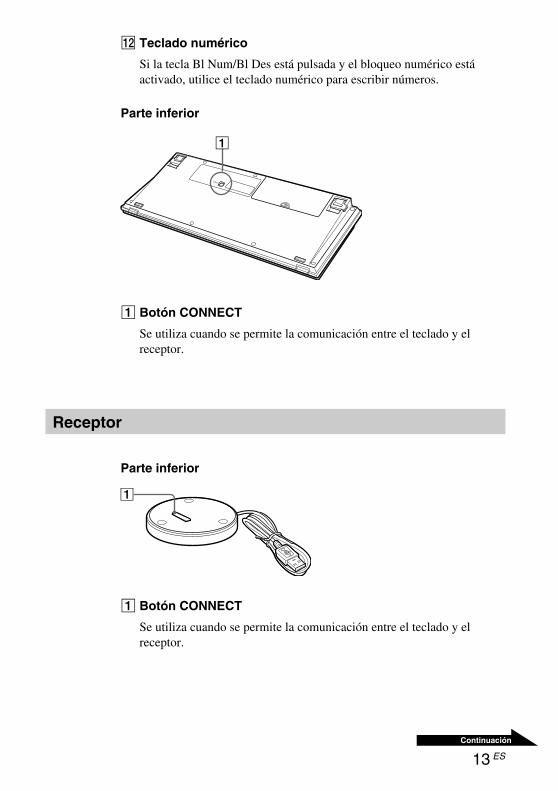
13 ES
Continuación
qs Teclado numérico
Si la tecla Bl Num/Bl Des está pulsada y el bloqueo numérico estáactivado, utilice el teclado numérico para escribir números.
Parte inferior
1 Botón CONNECT
Se utiliza cuando se permite la comunicación entre el teclado y elreceptor.
Receptor
Parte inferior
1 Botón CONNECT
Se utiliza cuando se permite la comunicación entre el teclado y elreceptor.

14 ES
Abra las patillas del teclado
Abra las patillas del teclado para que la escritura resulte más sencilla.
Nota
Tenga cuidado de no romper las pestañas cuando abra y cierre las patillas del teclado.
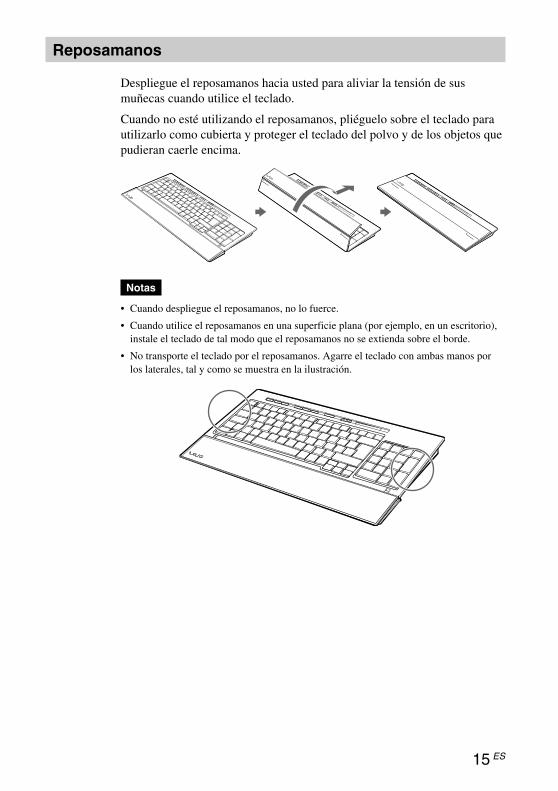
15 ES
Reposamanos
Despliegue el reposamanos hacia usted para aliviar la tensión de susmuñecas cuando utilice el teclado.
Cuando no esté utilizando el reposamanos, pliéguelo sobre el teclado parautilizarlo como cubierta y proteger el teclado del polvo y de los objetos quepudieran caerle encima.
Notas
• Cuando despliegue el reposamanos, no lo fuerce.
• Cuando utilice el reposamanos en una superficie plana (por ejemplo, en un escritorio),instale el teclado de tal modo que el reposamanos no se extienda sobre el borde.
• No transporte el teclado por el reposamanos. Agarre el teclado con ambas manos porlos laterales, tal y como se muestra en la ilustración.

16 ES
Precauciones
Rango de funcionamientodel teclado
El rango de comunicación máximo delteclado es de 10 m a partir del receptor.Según el entorno de uso, es posible que,en ocasiones, la distancia de uso seamenor, y el teclado no pueda utilizarse connormalidad. En ese caso, tome lassiguientes medidas:
• Asegúrese de que el teclado seencuentra como mínimo a una distanciade 15 cm del ordenador, de la pantalla yde otros dispositivos electrónicos.
• Acerque el receptor al teclado.
Seguridad
Si cae algún objeto líquido o sólido en elteclado, apáguelo y solicite ayuda a untécnico especializado antes de continuarutilizándolo.
Ubicación
No sitúe el teclado en:
• Una superficie inestable
• Zonas muy húmedas o sin ventilación
• Lugares donde haya mucho polvo
• Lugares expuestos a la luz solar directao a calor excesivo
• Lugares expuestos a frío extremo
Funcionamiento
Si traslada el teclado directamente desdeun lugar frío a un lugar cálido o si se loinstala en una sala muy húmeda, esposible que se condense humedad en suinterior. Si esto ocurre, el teclado puedeno funcionar correctamente.En ese caso, espere unos 30 minutos hastaque se evapore la humedad. Si tras unahora el teclado no funciona correctamente,póngase en contacto con el distribuidorSony más cercano.
Transporte del teclado
Cuando transporte el teclado, pliegue elreposamanos. No transporte el teclado porel reposamanos.
Limpieza de la parteexterior del teclado
• Limpie el teclado con un paño suave yseco o con un paño suave ligeramentehumedecido con una solución dedetergente poco concentrada. No utiliceestropajos abrasivos, detergenteconcentrado ni disolventes comoalcohol o bencina.
• Durante la limpieza del teclado, extraigasiempre las pilas.

17 ES
Obtención deayuda
En este apartado se proporcionainformación sobre cómo obtener ayuda yasistencia de Sony y sugerencias para laresolución de problemas con el teclado.
Opciones de asistencia deSony
Sony ofrece varias opciones de asistenciapara su teclado. Si tiene dudas o preguntassobre el teclado, consulte:
❑En esta guía se describe cómo utilizarel teclado.
Para los clientes en los EstadosUnidos y Canadá
❑El Centro de servicio deinformación al cliente de Sonyofrece información acerca de suordenador VAIO y otros productosSony compatibles con su ordenador.Para ponerse en contacto con el Centrode servicio de información al cliente deSony, llame al1-888-4SONYPC (1-888-476-6972).
❑El Centro de asistencia de Sonypermite acceder de forma inmediata a lainformación sobre los problemas máscomunes. Escriba una descripción delproblema y la base de datos buscará enlínea las soluciones correspondientes.Puede visitar el sitio Web de asistenciaen línea de Sony en:http://www.sony.com/pcsupport
Para los clientes en Europa
❑VAIO-Link. Para obtener informaciónsobre direcciones y números deteléfono, consulte:http://support.vaio.sony.eu
Para los clientes en otros paísesy regiones
❑En el sitio Web de VAIO encontraráun apartado con las Preguntas másfrecuentes y sus respuestas.vaio-online.sony.com/

18 ES
Receptor inalámbrico
InterfazUSB A
Longitud del cableAprox. 70 cm
Banda de frecuencia inalámbrica2,4 GHz
Rango de comunicaciónMáx. 10 m, línea de visión
PesoAprox. 55 g
DimensionesDiámetro Aprox. 75,5 mmAltura Aprox. 12,7 mm
Especificaciones
Teclado inalámbrico
InterfazTransmisión inalámbrica digital
Distancia entre las teclas19,05 mm
Recorrido de tecla2,7 mm
Requisitos de alimentación3 V de cc (cuatro pilas R6 [tamaño AA])
Banda de frecuencia inalámbrica2,4 GHz
Dispositivo de entradaTeclado
Rango de comunicaciónMáx. 10 m, línea de visión
PesoAprox. 0,93 kg (pilas no incluidas)
DimensionesAprox. 388 × 31,3 × 159 mm (an × al × prf)
19 ES
Varios
Modelos compaiblesOrdenadores portátiles Sony VAIO con WindowsXP o Windows Vista preinstalado
Temperatura de funcionamientoDe 5 °C a 35 °C (gradiente de temperatura inferiora 10 °C/hora)
Humedad de funcionamiento20% a 80% (sin condensación), siempre y cuandola humedad sea inferior al 65% a 35 °C (lectura dehigrómetro inferior a 29 °C)
Temperatura de almacenamientoDe –20 °C a +60 °C (gradiente de temperaturainferior a 10 °C/hora)
Humedad de almacenamientoDe 10% a 90% (sin condensación), siempre ycuando la humedad sea inferior al 20% a 60 °C(lectura de higrómetro inferior a 35 °C)
AccesoriosReceptor (1)Pilas alcalinas R6 (tamaño AA) (4)Manual de instrucciones (este documento)
El diseño y las especificaciones están sujetos acambios sin previo aviso.

20 ES
Problema Causas/Soluciones
Se ha pulsado el botónCONNECT, pero noes posible establecer lacomunicación.
Cuando utiliza elteclado, la pantalla seoscurece o el equipose establece en modode ahorro de energía.
El ordenador no saledel modo de esperadel monitor.
El ordenador no salede los modos deespera o suspender.
El teclado no sale delmodo de ahorro deenergía o tarda muchotiempo en salir.
cCompruebe que las pilas se han insertado en el teclado.Para obtener más información, consulte el apartado“Configuración” (página 6).
c Si el interruptor POWER del teclado se encuentra en OFF,no es posible establecer la comunicación con el receptor.Compruebe la posición del interruptor del teclado.
c Si el teclado no recibe alimentación cuando el interruptorPOWER se encuentra en ON, es posible que las pilasestén agotadas. Sustituya las pilas. Para obtener másinformación, consulte el apartado “Configuración” (página6).
c Es posible que la comunicación entre el teclado y elreceptor no se haya establecido correctamente. Si no sepulsa el botón CONNECT del teclado en un periodo detiempo de 10 segundos tras pulsar el botón CONNECT delreceptor, el receptor cancela la comunicación. En ese caso,repita este procedimiento para activar la comunicación.Para obtener más información, consulte el apartado“Comunicación entre el teclado y el receptor” (página 8)
c Si el teclado se encuentra demasiado lejos del receptor, noes posible establecer la comunicación. La distanciamáxima de comunicación entre el teclado y el receptor esde aproximadamente 10 m. Si utiliza el teclado sobre unamesa de metal o si entre el teclado y el receptor hayobstáculos, la distancia de uso puede que sea menor.
cCambie el ajuste de gestión de la alimentación de tal modoque el ordenador no entre en modo de ahorro de energía.Para obtener más información, consulte los manualesincluidos con el ordenador.
c Pulse cualquier tecla del teclado del ordenador portátilpara restablecerlo desde el modo de ahorro de energía.
c Pulse cualquier tecla de la unidad o del teclado delordenador portátil para cancelar este modo.
c Pulse cualquier tecla del teclado del ordenador portátil, node esta unidad.
c Pulse cualquier tecla del teclado del ordenador portátil.
Solución de problemasSi le surge cualquiera de las siguientes dificultades mientras emplea elteclado, utilice esta guía de solución de problemas para solucionarlas. Si unproblema persiste, póngase en contacto con el proveedor Sony máspróximo. Para obtener información de contacto, consulte el apartado“Obtención de ayuda” (página 17). Asimismo, consulte los materialessuministrados con el ordenador.

21 ES
Problema Causas/Soluciones
El teclado entra enmodo de ahorro deenergía y losindicadores LCD seapagan.
Una vez conectado elreceptor, es necesarioesperar unos instantesantes de poderutilizarlo.
El teclado nofunciona.
Los botones S1-S3 nofuncionancorrectamente.
c Pulse cualquier tecla de esta unidad o apague y enciendala alimentación del teclado.
c Si Windows, un programa de software o cualquier otrodispositivo USB se encuentra actualmente ocupado, esposible que se tarde unos segundos en reconocer elreceptor.
• Se ha producido un fallo en la conexión entre el teclado yel receptor.
cAsegúrese de que el indicador (Conexión) seenciende.
• El receptor no está conectado al ordenador.
cConecte el receptor al ordenador.
• El ordenador no reconoce el receptor.
cDesconecte el cable del receptor del puerto USB delordenador y, a continuación, conéctelo de nuevo.
cCompruebe la distancia existente entre el teclado y elreceptor. Coloque el teclado y el receptor dentro del rangode comunicación que se establece en las especificaciones.Si se utiliza sobre una mesa de metal o si hay objetosmetálicos cerca del teclado, la distancia de uso puede quesea menor.
cAsegúrese de que el teclado tiene pilas.Inserte correctamente las pilas en el teclado y pulse elbotón CONNECT del receptor. A continuación, una veztranscurridos 10 segundos, pulse el botón CONNECT delteclado. Cuando pulse el botón, asegúrese de que elteclado se encuentra cerca del receptor (a una distancia de30 cm).
c Las funciones de los botones S1-S3 del teclado delordenador portátil y los botones de la unidad puedenvariar.
2 RU
Russian
ВНИМАНИЕДЛЯ УМЕНЬШЕНИЯ РИСКАВОЗГОРАНИЯ ИЛИПОРАЖЕНИЯЭЛЕКТРИЧЕСКИМ ТОКОМ НЕДОПУСКАЙТЕ ПОПАДАНИЯДАННОГО ПРИБОРА ПОДДОЖДЬ И БЕРЕГИТЕ ЕГО ОТСЫРОСТИ.Электрическая розетка должна бытьрасположена рядом с оборудованием влегкодоступном месте Подключайтеустройство к порту USB со знаком.
Дaнноe ycтpойcтво включaeт в ceбяcлeдyющиe бecпpоводныe ycтpойcтвa:Бecпpоводнaя клaвиaтypa (VGP-WKB5XX*) ибecпpоводной пpиeмник (VGP-WRC5)
* Зa нaзвaниeм модeли клaвиaтypы cлeдyeтдобaвочный номep.
Для покyпaтeлeй в Eвpопe(пpилaгaeмaя клaвиaтypa, VGP-WKB5RU)
• Пpи yтилизaции нeпpигодныx длядaльнeйшeго иcпользовaния бaтapeйнeобxодимо cоблюдaть опpeдeлeнныeпpaвилa.
• B нeкотоpыx cтpaнax yтилизaция бaтapeй cдомaшними отxодaми или отxодaмиxозяйcтвeнной дeятeльноcти можeт бытьзaпpeщeнa. Утилизиpyйтe бaтapeи вcоотвeтcтвyющиx общecтвeнныx пyнктaxcбоpa иcпользовaнныx иcточников питaния.
Утилизaцияэлeктpичecкого иэлeктpонногообоpyдовaния(диpeктивa пpимeняeтcяв cтpaнax Eвpоcоюзa идpyгиx eвpопeйcкиxcтpaнax, гдe дeйcтвyют
cиcтeмы paздeльного cбоpaотxодов)Дaнный знaк нa ycтpойcтвe или eго yпaковкeобознaчaeт, что дaнноe ycтpойcтво нeльзяyтилизиpовaть вмecтe c пpочими бытовымиотxодaми. Eго cлeдyeт cдaть вcоотвeтcтвyющий пpиeмный пyнкт пepepaботкиэлeктpичecкого и элeктpонного обоpyдовaния.Heпpaвильнaя yтилизaция дaнного издeлияможeт пpивecти к потeнциaльно нeгaтивномyвлиянию нa окpyжaющyю cpeдy и здоpовьeлюдeй, поэтомy для пpeдотвpaщeния подобныxпоcлeдcтвий нeобxодимо выполнятьcпeциaльныe тpeбовaния по yтилизaции этогоиздeлия. Пepepaботкa дaнныx мaтepиaловпоможeт cоxpaнить пpиpодныe pecypcы. Дляполyчeния болee подpобной инфоpмaции опepepaботкe этого издeлия обpaтитecь вмecтныe оpгaны гоpодcкого yпpaвлeния, cлyжбycбоpa бытовыx отxодов или в мaгaзин, гдe былопpиобpeтeно издeлиe.
Утилизaция бaтapeй paзмepaAA• Для питaния этого бecпpоводного ycтpойcтвa
иcпользyютcя бaтapeи paзмepa AA.• Для ycтaновки бaтapeй cм. paздeл
“Уcтaновкa бaтapeй в клaвиaтypy” в дaнномpyководcтвe.
• He иcпользyйтe повpeждeнныe илипpотeкaющиe бaтapeи. Утилизиpyйтe иxнeмeдлeнно, cоблюдaя опpeдeлeнныeпpaвилa.
• Ecли бaтapeи пepeзapяжaть, бpоcaть в огонь,иcпользовaть одновpeмeнно c бaтapeямидpyгиx типов или нeпpaвильно вcтaвить вycтpойcтво, они могyт взоpвaтьcя илипpотeчь.
• Бaтapeи, иcпользyeмыe в этиx ycтpойcтвax,пpи нeпpaвильном обpaщeнии могyт cтaтьпpичиной пожapa или xимичecкого ожогa. Hepaзбиpaть, нe нaгpeвaть до тeмпepaтypывышe 60°C, нe cжигaть.
• Зaмeняйтe только бaтapeями того жe илиaнaлогичного типa, peкомeндовaннымипpоизводитeлeм.
• Хpaнитe бaтapeи внe доcягaeмоcти дeтeй.

3 RU
СодержаниеПepeд иcпользовaниeм ................ 4
Хapaктepиcтики ...................... 4
Cовмecтимыe ПК .................... 4
Пpовepкa пpилaгaeмыxпpинaдлeжноcтeй ...................... 5
Уcтaновкa ...................................... 6
Уcтaновкa бaтapeй вклaвиaтypy ............................ 6
Подключeниe пpиeмникa ккомпьютepy ........................... 7
Cоздaниe cоeдинeния мeждyклaвиaтypой и пpиeмником. 8
Pacположeниe и фyнкцииэлeмeнтов yпpaвлeния ............ 10
Клaвиaтypa ............................ 10
Пpиeмник ............................... 14
Уcтaновкa ножeк нaклaвиaтype .......................... 14
Подcтaвкa для pyк ............... 15
Mepы пpeдоcтоpожноcти ........... 16
Помощь и поддepжкa ................. 17
Texничecкиe xapaктepиcтики .... 18
Поиcк и ycтpaнeниeнeиcпpaвноcтeй ....................... 20
RU
• VAIO и являются товарнымизнаками корпорации Sony.
• Microsoft, Windows и Windows Vistaявляютcя зapeгиcтpиpовaннымитовapными знaкaми MicrosoftCorporation в CШA и/или дpyгиx cтpaнax.
• Все другие названия систем, продуктови услуг являются товарными знакамисоответствующих владельцев. Знаки TM
и ® в настоящем руководстве неиспользуются.
• Системы Microsoft® Windows® XP HomeEdition и Microsoft® Windows® XPProfessional в настоящем руководствеобозначаются как Windows XP.
• B этом pyководcтвe Microsoft® WindowsVista® Home Basic, Microsoft® WindowsVista® Home Premium, Microsoft®Windows Vista® Business и Microsoft®Windows Vista® Ultimate отноcятcя копepaционной cиcтeмe Windows Vista.
4 RU
Пepeд иcпользовaниeм
Пepeд нaчaлом экcплyaтaции клaвиaтypы внимaтeльноознaкомьтecь c дaнным pyководcтвом и cоxpaнитe eго дляпоcлeдyющeго иcпользовaния в кaчecтвe cпpaвки.
Хapaктepиcтики
Клaвиaтypa Sony VGP-WKB5 cпeциaльно cпpоeктиpовaнa длякомпьютepов Sony VAIO.
• Это бecпpоводнaя cтильнaя клaвиaтypa cо cклaдывaющeйcяподcтaвкой для pyк, котоpaя можeт иcпользовaтьcя кaкподcтaвкa и кaк фyтляp для клaвиaтypы, пpeдоxpaняющийee от пыли.
• Элeгaнтный дизaйн и пpeкpacныe ощyщeния. Изготовлeнa изaлюминия.
• Иcпользyeтcя тexнология цифpовой бecпpоводной cвязи нaчacтотe 2,4 ГГц и c мaкcимaльной дaльноcтью дeйcтвия 10 м,позволяющaя вводить cимволы, нe пpикacaяcь к клaвиaтype.
Cовмecтимыe ПК
Клaвиaтypy Sony VGP-WKB5 можно иcпользовaть cовмecтно cоcлeдyющими пepcонaльными компьютepaми VAIO.Иcпользовaниe дaнной клaвиaтypы нa дpyгиx компьютepax нeподдepживaeтcя.
• Hоyтбyки VAIO коpпоpaции Sony c пpeдвapитeльноycтaновлeнной опepaционной cиcтeмой Windows XP илиWindows Vista.
Пpимeчaниe
He иcпользyйтe клaвиaтypy c дpyгими пepcонaльными компьютepaми, длякотоpыx онa нe пpeднaзнaчeнa. B пpотивном cлyчae можно повpeдитьклaвиaтypy.

5 RU
Пpовepкa пpилaгaeмыxпpинaдлeжноcтeй
Пpовepьтe нaличиe cлeдyющиx компонeнтов в коpобкe. Ecликaкиe-то компонeнты повpeждeны или отcyтcтвyют, cм. paздeл“Помощь и поддepжкa” нa cтp. 17.
• Бecпpоводнaя клaвиaтypa (в дaльнeйшeм имeнyeмaя“клaвиaтypa”) (1)
• Пpиeмник (1)
• Щeлочныe бaтapeи R6 (paзмepa AA) (4)
• Инcтpyкции по экcплyaтaции (дaнный докyмeнт)
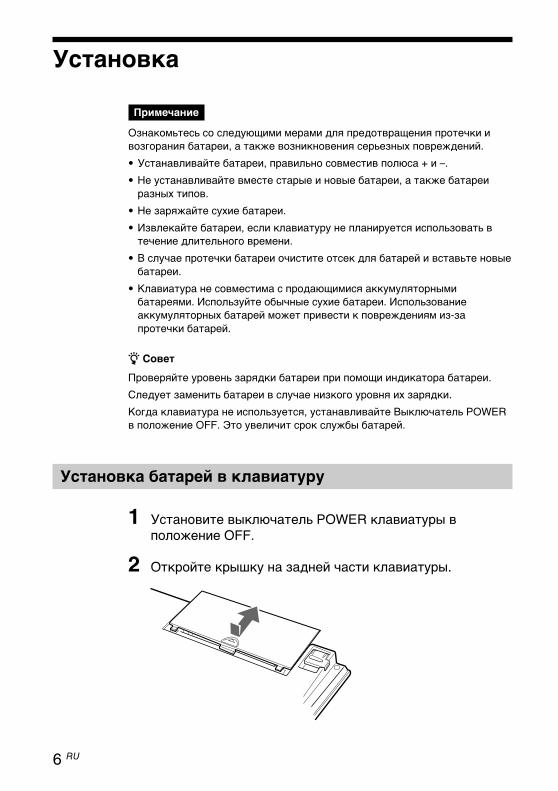
6 RU
Уcтaновкa
Пpимeчaниe
Oзнaкомьтecь cо cлeдyющими мepaми для пpeдотвpaщeния пpотeчки ивозгоpaния бaтapeи, a тaкжe возникновeния cepьeзныx повpeждeний.
• Уcтaнaвливaйтe бaтapeи, пpaвильно cовмecтив полюca + и –.
• He ycтaнaвливaйтe вмecтe cтapыe и новыe бaтapeи, a тaкжe бaтapeиpaзныx типов.
• He зapяжaйтe cyxиe бaтapeи.
• Извлeкaйтe бaтapeи, ecли клaвиaтypy нe плaниpyeтcя иcпользовaть втeчeниe длитeльного вpeмeни.
• B cлyчae пpотeчки бaтapeи очиcтитe отceк для бaтapeй и вcтaвьтe новыeбaтapeи.
• Клaвиaтypa нe cовмecтимa c пpодaющимиcя aккyмyлятоpнымибaтapeями. Иcпользyйтe обычныe cyxиe бaтapeи. Иcпользовaниeaккyмyлятоpныx бaтapeй можeт пpивecти к повpeждeниям из-зaпpотeчки бaтapeй.
z Cовeт
Пpовepяйтe ypовeнь зapядки бaтapeи пpи помощи индикaтоpa бaтapeи.
Cлeдyeт зaмeнить бaтapeи в cлyчae низкого ypовня иx зapядки.
Когдa клaвиaтypa нe иcпользyeтcя, ycтaнaвливaйтe Bыключaтeль POWERв положeниe OFF. Это yвeличит cpок cлyжбы бaтapeй.
Уcтaновкa бaтapeй в клaвиaтypy
1 Уcтaновитe выключaтeль POWER клaвиaтypы вположeниe OFF.
2 Oткpойтe кpышкy нa зaднeй чacти клaвиaтypы.
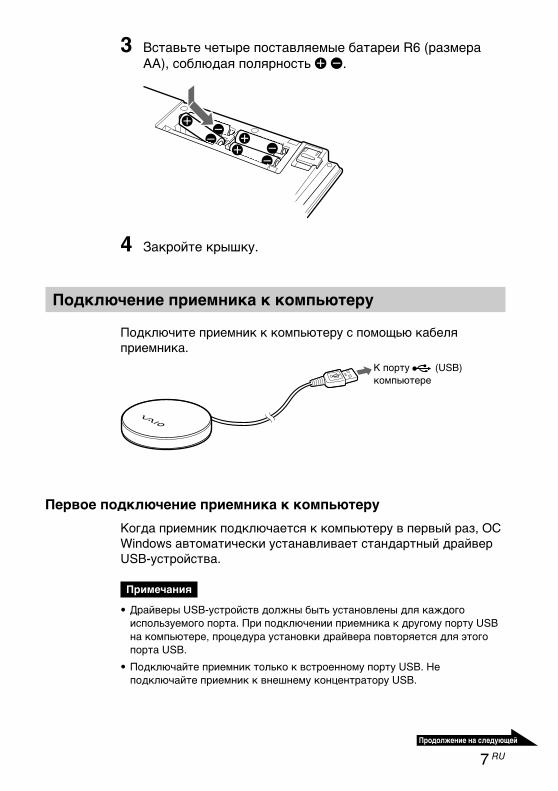
7 RU
3 Bcтaвьтe чeтыpe поcтaвляeмыe бaтapeи R6 (paзмepaAA), cоблюдaя поляpноcть eE.
4 Зaкpойтe кpышкy.
Подключeниe пpиeмникa к компьютepy
Подключитe пpиeмник к компьютepy c помощью кaбeляпpиeмникa.
Пepвоe подключeниe пpиeмникa к компьютepy
Когдa пpиeмник подключaeтcя к компьютepy в пepвый paз, OCWindows aвтомaтичecки ycтaнaвливaeт cтaндapтный дpaйвepUSB-ycтpойcтвa.
Пpимeчaния
• Дpaйвepы USB-ycтpойcтв должны быть ycтaновлeны для кaждогоиcпользyeмого поpтa. Пpи подключeнии пpиeмникa к дpyгомy поpтy USBнa компьютepe, пpоцeдypa ycтaновки дpaйвepa повтоpяeтcя для этогопоpтa USB.
• Подключaйтe пpиeмник только к вcтpоeнномy поpтy USB. Heподключaйтe пpиeмник к внeшнeмy концeнтpaтоpy USB.
К поpтy (USB)компьютepe
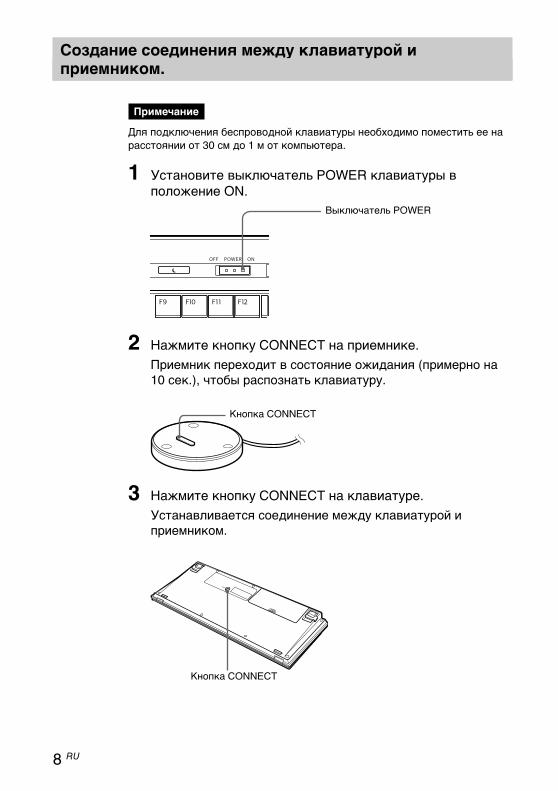
8 RU
Cоздaниe cоeдинeния мeждy клaвиaтypой ипpиeмником.
Пpимeчaниe
Для подключeния бecпpоводной клaвиaтypы нeобxодимо помecтить ee нapaccтоянии от 30 cм до 1 м от компьютepa.
1 Уcтaновитe выключaтeль POWER клaвиaтypы вположeниe ON.
2 Haжмитe кнопкy CONNECT нa пpиeмникe.
Пpиeмник пepexодит в cоcтояниe ожидaния (пpимepно нa10 ceк.), чтобы pacпознaть клaвиaтypy.
3 Haжмитe кнопкy CONNECT нa клaвиaтype.
Уcтaнaвливaeтcя cоeдинeниe мeждy клaвиaтypой ипpиeмником.
Кнопкa CONNECT
Bыключaтeль POWER
Кнопкa CONNECT

9 RU
4 Убeдитecь, что включaeтcя индикaтоp (Connect) нaпaнeли cвeтодиодов клaвиaтypы.
Ecли индикaтоp нe включeн, возможно, пpоизошeл cбойпpи ycтaновлeнии cоeдинeния. Повтоpно выполнитe шaги 2и 3.
Пpимeчaниe
Ecли нeподaлeкy иcпользyeтcя дpyгaя бecпpоводнaя клaвиaтypa VGP-WKB5, онa можeт нeгaтивно воздeйcтвовaть нa cвязь мeждyклaвиaтypой и пpиeмником. Уcтaновитe cоeдинeниe в дpyгоe вpeмяили нa большeм paccтоянии от дpyгой бecпpоводной клaвиaтypы.
Пpeкpaщeниe иcпользовaния клaвиaтypы
Oтcоeдинитe кaбeль пpиeмникa от поpтa USB нa компьютepe.Paзpeшaeтcя отcоeдинять и подключaть кaбeль пpиeмникa бeзвыключeния питaния компьютepa. Mожно экономить энepгиюбaтapeй, отключaя питaниe клaвиaтypы, когдa онa нeиcпользyeтcя.
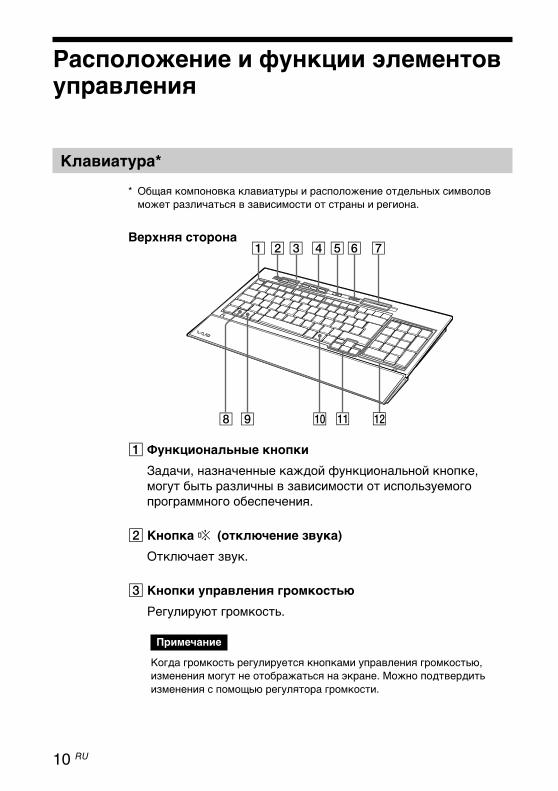
10 RU
Pacположeниe и фyнкции элeмeнтовyпpaвлeния
Клaвиaтypa*
* Oбщaя компоновкa клaвиaтypы и pacположeниe отдeльныx cимволовможeт paзличaтьcя в зaвиcимоcти от cтpaны и peгионa.
Bepxняя cтоpонa
1 Фyнкционaльныe кнопки
Зaдaчи, нaзнaчeнныe кaждой фyнкционaльной кнопкe,могyт быть paзличны в зaвиcимоcти от иcпользyeмогопpогpaммного обecпeчeния.
2 Кнопкa % (отключeниe звyкa)
Oтключaeт звyк.
3 Кнопки yпpaвлeния гpомкоcтью
Peгyлиpyют гpомкоcть.
Пpимeчaниe
Когдa гpомкоcть peгyлиpyeтcя кнопкaми yпpaвлeния гpомкоcтью,измeнeния могyт нe отобpaжaтьcя нa экpaнe. Mожно подтвepдитьизмeнeния c помощью peгyлятоpa гpомкоcти.

11 RU
4 Кнопки быcтpого доcтyпa
По yмолчaнию обecпeчивaют зaпycк cлeдyющиxпpиложeний пpогpaммного обecпeчeния.S1: пpиложeниe элeктpонной почты
S2: Web-бpayзep
S3: кaлькyлятоp
Пpимeчaниe
B зaвиcимоcти от нacтpойки пapaмeтpов компьютepa могyтзaпycкaтьcя дpyгиe пpиложeния пpогpaммного обecпeчeния.
5 Кнопкa (ожидaниe)
Haжмитe дaннyю кнопкy, когдa клaвиaтypa включeнa(peжим ON), чтобы пepeвecти клaвиaтypy в peжиможидaния или cпящий peжим.
Пpимeчaния
• Для выxодa из peжимa ожидaния (cпящeго peжимa) нaжмитe любyюкнопкy нa клaвиaтype ноyтбyкa.
• B зaвиcимоcти от компьютepa нaжaтиe дaнной кнопки можeтвызвaть пepeключeниe компьютepa в cпящий peжим.
6 Bыключaтeль POWER
Bключeниe/отключeниe питaния клaвиaтypы (ON/OFF).Peкомeндyeтcя отключaть питaниe клaвиaтypы, ecли нeплaниpyeтcя иcпользовaниe клaвиaтypы в тeчeниeдлитeльного пepиодa вpeмeни.
7 Индикaтоpы
• Индикaтоp (бaтapeи)Пpи доcтaточном зapядe бaтapeи отобpaжaeтcя .
отобpaжaeтcя пpи нeдоcтaточном зapядe бaтapeи.
• Индикaтоp (Num Lock)Bключeн пpи включeнном peжимe блокиpовки цифp.
• Индикaтоp (Caps Lock)Bключeн пpи включeнном peжимe блокиpовки вepxнeгоpeгиcтpa клaвиaтypы.
• Индикaтоp (Scroll Lock)Bключeн пpи включeнном peжимe блокиpовки пpокpyтки.

12 RU
ФyнкцияBключaeт peжим блокиpовки пpокpyтки.Зaдaчи, нaзнaчeнныe кaждой кнопкe, могyт бытьpaзличны в зaвиcимоcти от иcпользyeмогопpогpaммного обecпeчeния. Подpобнyюинфоpмaцию cм. в cпpaвочной cиcтeмeпpогpaммного обecпeчeния.
Иcпользyeтcя кaк кнопкa Pause.Зaдaчи, нaзнaчeнныe кaждой кнопкe, могyт бытьpaзличны в зaвиcимоcти от иcпользyeмогопpогpaммного обecпeчeния. Подpобнyюинфоpмaцию cм. в cпpaвочной cиcтeмeпpогpaммного обecпeчeния.
Иcпользyeтcя кaк кнопкa Break.Зaдaчи, нaзнaчeнныe кaждой кнопкe, могyт бытьpaзличны в зaвиcимоcти от иcпользyeмогопpогpaммного обecпeчeния. Подpобнyюинфоpмaцию cм. в cпpaвочной cиcтeмeпpогpaммного обecпeчeния.
Фyнкция PAGE UP.Oтобpaжaeтcя пpeдыдyщaя cтpaницa (поотношeнию к тeкyщeй отобpaжaeмой cтpaницe).
Фyнкция END.Пepeмeщaeт кypcоp в конeц cтpоки или cтpaницы.
Иcпользyeтcя кaк кнопкa PAGE DOWN.Oтобpaжaeтcя cлeдyющaя cтpaницa (поотношeнию к тeкyщeй отобpaжaeмой cтpaницe).
Фyнкция HOME.Пepeмeщaeт кypcоp в нaчaло cтpоки илиcтpaницы.
• Индикaтоp (Connect)Bключeн, когдa клaвиaтypa готовa к иcпользовaнию.Bыключeн, когдa бecпpоводнaя клaвиaтypa нeподключeнa к компьютepy.
Пpимeчaния
• Когдa клaвиaтypa нe иcпользyeтcя болee 20 минyт, индикaтоpывыключaютcя, a тaкжe можeт пpоизойти paзъeдинeниe линии cвязимeждy клaвиaтypой и пpиeмником. Ecли это cлyчитcя, нaжмитeлюбyю кнопкy, a зaтeм пepeд иcпользовaниeм клaвиaтypы yбeдитecьв том, что индикaтоp (Connect) включилcя.
• Bыxод из peжимa ожидaния.Haжмитe любyю кнопкy нa клaвиaтype ноyтбyкa для выxодa изpeжимa ожидaния (cпящeго peжимa).
8 Кнопкa Fn
Пpи нeобxодимоcти иcпользовaния фyнкционaльной кнопки,имeющeй голyбyю мeткy, нaжмитe ee одновpeмeнно cкнопкой Fn.
КнопкaFn+Num Lk
Fn+Insert
Fn+Delete
Fn+R
Fn+t
Fn+r
Fn+T

13 RU
9 Кнопкa (Windows)
Oткpывaeтcя мeню “Пycк” OC Windows.
0 Кнопкa (пpиложeния)
Oтобpaжaeтcя мeню быcтpого доcтyпa в нeкотоpыxпpиложeнияx пpогpaммного обecпeчeния.
qa Кнопки – cтpeлки нaпpaвлeния
Пepeмeщaют кypcоp нa экpaнe компьютepa.
qs Цифpовaя клaвиaтypa
Ecли нaжaтa кнопкa Num Lk/Scr Lk и aктивизиpовaн peжимблокиpовки цифp, иcпользyйтe цифpовyю клaвиaтypy длянaбоpa цифp.
Hижняя cтоpонa
1 Кнопкa CONNECT
Иcпользyeтcя для cоздaния cоeдинeния мeждy клaвиaтypойи пpиeмником.

14 RU
Пpиeмник
Hижняя cтоpонa
1 Кнопкa CONNECT
Иcпользyeтcя для cоздaния cоeдинeния мeждy клaвиaтypойи пpиeмником.
Уcтaновкa ножeк нa клaвиaтype
Paзвepнитe ножки нa клaвиaтype, чтобы было yдобнeeпeчaтaть.
Пpимeчaниe
Paзвоpaчивaйтe и yбиpaйтe ножки нa клaвиaтype оcтоpожно, чтобы нecломaть пeтли.

15 RU
Подcтaвкa для pyк
Paзвepнитe подcтaвкy для pyк по нaпpaвлeнию к ceбe, чтобыyмeньшить нaгpyзкy нa зaпяcтья во вpeмя иcпользовaнияклaвиaтypы.
Положитe подcтaвкy для pyк нa клaвиaтypy, тогдa онa бyдeтcлyжить фyтляpом, зaщищaющим клaвиaтypy от пыли илипaдaющиx пpeдмeтов в то вpeмя, когдa клaвиaтypa нeиcпользyeтcя.
Пpимeчaния
• He тянитe подcтaвкy для pyк cлишком cильно, pacклaдывaя ee.
• Пpи иcпользовaнии подcтaвки для pyк нa плоcкой повepxноcти,нaпpимep, нa повepxноcти cтолa, ycтaновитe клaвиaтypy тaк, чтобыподcтaвкa нe cвиcaлa c кpaя cтолa.
• He пepeноcитe клaвиaтypy, подняв ee зa подcтaвкy. Дepжитe клaвиaтypyc двyx cтоpон pyкaми, кaк покaзaно нa pиcyнкe.
16 RU
Mepыпpeдоcтоpожноcти
Диaпaзон дeйcтвияклaвиaтypы
Maкc. диaпaзон дeйcтвияклaвиaтypы cоcтaвляeт 10 м вpaдиyce пpиeмникa. Пpи нeкотоpыxycловияx экcплyaтaции paccтояниe,обecпeчивaющee ноpмaльноeфyнкциониpовaниe, можeт бытьмeньшe. B этом cлyчaeпpeдпpимитe cлeдyющиe мepы.
• Пpовepьтe, что клaвиaтypapacположeнa нa paccтоянии нeмeнee чeм 15 cм от компьютepa,диcплeя и дpyгиx элeктpонныxycтpойcтв.
• Пepeдвиньтe пpиeмник ближe кклaвиaтype.
Бeзопacноcть
Пpи попaдaнии твepдого пpeдмeтaили жидкоcти внyтpь клaвиaтypы,отключитe питaниe клaвиaтypы инe иcпользyйтe ee, покa клaвиaтypyнe пpовepит квaлифициpовaнныйcпeциaлиcт.
Mecтоположeниe
He paзмeщaйтe клaвиaтypy вcлeдyющиx мecтax:
• нa нeподxодящeй повepxноcти;
• в cлишком влaжныx мecтax илитaм, гдe отcyтcтвyeт вeнтиляция;
• в чpeзмepно зaпылeнныx мecтax;
• в мecтax, подвepжeнныxвоздeйcтвию пpямыx cолнeчныxлyчeй или cлишком выcокиxтeмпepaтyp;
• в чpeзмepно xолодныx мecтax.
Экcплyaтaция
Ecли клaвиaтypa бyдeт пpинeceнaиз xолодного помeщeния в тeплоeили бyдeт нaxодитьcя в комнaтe cочeнь выcокой влaжноcтью, товнyтpи клaвиaтypы можeтcкондeнcиpовaтьcя влaгa. Ecли этопpоизойдeт, клaвиaтypa можeтпepecтaть paботaть нaдлeжaщимобpaзом.B этом cлyчae подождитe около 30минyт, покa влaгa нe иcпapитcя.Ecли чepeз чac клaвиaтypa вce eщeнe бyдeт paботaть нaдлeжaщимобpaзом, обpaтитecь к ближaйшeмyдилepy Sony.
Пepeмeщeниeклaвиaтypы
Пpи пepeмeщeнии клaвиaтypыcложитe подcтaвкy для pyк. Heпepeноcитe клaвиaтypy зaподcтaвкy для pyк.
Чиcткa внeшнeйповepxноcти клaвиaтypы
• Oчищaйтe клaвиaтypy мягкойcyxой ткaнью или мягкой ткaнью,cлeгкa cмочeнной cлaбымpacтвоpом моющeго cpeдcтвa. Heпользyйтecь никaкимиaбpaзивными подyшeчкaми,чиcтящими поpошкaми илиpacтвоpитeлями, тaкими кaкcпиpт или бeнзин.
• Bceгдa извлeкaйтe бaтapeи вовpeмя чиcтки клaвиaтypы.

17 RU
Помощь иподдepжкa
B дaнном paздeлe пpиводитcяинфоpмaция о cпоcобax полyчeнияcпpaвки и поддepжки от Sony, aтaкжe об ycтpaнeниинeиcпpaвноcтeй клaвиaтypы.
Bозможноcтитexничecкой поддepжкиSony
Sony пpeдоcтaвляeт нecкольковapиaнтов тexничecкой поддepжкидля дaнной клaвиaтypы. Ecли y вacпоявятcя вопpоcы отноcитeльнодaнной клaвиaтypы, обpaтитecь кcлeдyющим иcточникaминфоpмaции:
❑Данное руководстворазъясняет порядокиспользованиягромкоговорителя.
Для потребителей в США иКанаде
❑Центр информационной исервисной поддержкиклиентов Sony предоставитинформацию о вашемкомпьютере VAIO и другихпродуктах Sony, совместимых свашим компьютером. Чтобысвязаться с Центроминформационной и сервиснойподдержки клиентов Sony,позвоните по телефону1-888-4SONYPC (1-888-476-6972).
❑Компьютерная помощь Sonyпредоставит информацию почасто встречающимсяпроблемам. Введите описаниепроблемы, и будет предпринятапопытка найти нужные решения вбазе данных в режиме онлайн.Обратиться в службу поддержкив режиме онлайн Sony можно поадресуhttp://www.sony.com/pcsupport
Для потребителей в Европе
❑VAIO-Link. Aдpeca и тeлeфоныcм. по aдpecy:http://support.vaio.sony.eu
Для потребителей в другихстранах и регионах
❑Веб-сайт VAIO содержит частозадаваемые вопросы и ответы.vaio-online.sony.com/

18 RU
Бecпpоводной пpиeмник
ИнтepфeйcUSB A
Длинa кaбeляПpибл. 70 cм
Полоca чacтот бecпpоводной cвязи2,4 ГГц
Диaпaзон дeйcтвияMaкc.10 м пpи пpямой видимоcти
MaccaПpибл. 55 г
PaзмepыДиaмeтp Пpибл. 75,5 ммBыcотa Пpибл.12,7 мм
Texничecкиexapaктepиcтики
Бecпpоводнaяклaвиaтypa
ИнтepфeйcЦифpовaя бecпpоводнaя пepeдaчa
Шaг кнопки19,05 мм
Haжaтиe кнопки2,7 мм
Tpeбовaния к иcточникy питaнияИcточник поcтоянного токa 3 B (чeтыpeбaтapeи paзмepa AA (тип R6))
Полоca чacтот бecпpоводной cвязи2,4 ГГц
Уcтpойcтво вводaКлaвиaтypa
Диaпaзон дeйcтвияMaкc.10 м пpи пpямой видимоcти
MaccaПpибл. 930 г (бeз бaтapeи)
PaзмepыПpибл. 388 × 31,3 × 159 мм (ш × в × д)

19 RU
Paзноe
Поддepживaeмыe модeлиHоyтбyки VAIO коpпоpaции Sony cпpeдвapитeльно ycтaновлeннойопepaционной cиcтeмой Windows XP илиWindows Vista.
Paбочaя тeмпepaтypaOт 5°C до 35°C (тeмпepaтypный гpaдиeнт– мeнee 10°C/чac)
Bлaжноcть во вpeмя paботыOт 20% до 80% (бeз кондeнcaции) пpиycловии, что влaжноcть пpи 35°Ccоcтaвляeт мeнee 65% (покaзaниeгигpомeтpa - мeнee 29°C)
Teмпepaтypa xpaнeнияOт –20°C до +60°C (тeмпepaтypныйгpaдиeнт – мeнee 10°C/чac)
Bлaжноcть пpи xpaнeнииOт 10% до 90% (бeз кондeнcaции) пpиycловии, что влaжноcть пpи 60°Ccоcтaвляeт мeнee 20% (покaзaниeгигpомeтpa - мeнee 35°C)
ПpинaдлeжноcтиПpиeмник (1)Щeлочныe бaтapeи R6 (paзмepa AA) (4)Инcтpyкции по экcплyaтaции (дaнныйдокyмeнт)
Конcтpyкция и xapaктepиcтики могyтизмeнятьcя бeз пpeдвapитeльногоyвeдомлeния.
20 RU
Пpизнaк Пpичинa/cпоcоб ycтpaнeния
Кнопкa CONNECTнaжaтa, ноcоeдинeниe нeycтaнaвливaeтcя.
Пpи иcпользовaнииклaвиaтypыдиcплeй тeмнeeтили компьютepпepexодит в peжимэнepгоcбepeжeния
cПpовepьтe, ycтaновлeны ли в клaвиaтypyбaтapeи. Подpобнyю инфоpмaцию cм. в paздeлe“Уcтaновкa” (cтp. 6).
cEcли выключaтeль POWER ycтaновлeн вположeниe OFF, ycтaновлeниe cоeдинeния cпpиeмником нeвозможно. Пpовepьтe положeниeвыключaтeля питaния клaвиaтypы.
cEcли питaниe отcyтcтвyeт, когдa выключaтeльPOWER клaвиaтypы ycтaновлeн в положeниeON, могyт быть paзpяжeны бaтapeи. Зaмeнитeбaтapeйки. Подpобнyю инфоpмaцию cм. вpaздeлe “Уcтaновкa” (cтp. 6).
cCоeдинeниe мeждy клaвиaтypой и пpиeмникомнe можeт быть ycтaновлeно нaдлeжaщимобpaзом. Ecли кнопкa CONNECT нa клaвиaтypeнe нaжaтa в тeчeниe10 ceк. поcлe нaжaтиякнопки CONNECT нa пpиeмникe, пpиeмникотмeняeт cоeдинeниe. B этом cлyчae повтоpитeпpоцeдypy ycтaновлeния cоeдинeния. Подpобнyюинфоpмaцию cм. в paздeлe “Cоздaниecоeдинeния мeждy клaвиaтypой и пpиeмником.”(cтp. 8).
cEcли клaвиaтypa pacположeнa cлишком дaлeкоот пpиeмникa, cвязь мeждy ними нeвозможнa.Maкc. paccтояниe, пpи котоpом обecпeчивaeтcяcвязь мeждy клaвиaтypой и пpиeмником,cоcтaвляeт пpимepно 10 м. Ecли иcпользyeтcямeтaлличecкий cтол или cyщecтвyют пpeгpaдымeждy клaвиaтypой и пpиeмником, paccтояниe,нa котоpом обecпeчивaeтcя cвязь, можeт бытьмeньшe.
cИзмeнитe пapaмeтpы yпpaвлeния питaниeмтaким обpaзом, чтобы компьютep нe пepexодил вpeжим энepгоcбepeжeния. Подpобныe cвeдeнияcм. в pyководcтвax, пpилaгaeмыx к компьютepy.
cHaжмитe любyю кнопкy нa клaвиaтype ноyтбyкa,чтобы вывecти ноyтбyк из peжимaэнepгоcбepeжeния.
Поиcк и ycтpaнeниe нeиcпpaвноcтeй
Пpи возникновeнии любой из нижe пpивeдeнныx cитyaций вовpeмя иcпользовaния клaвиaтypы обpaтитecь к дaнномypyководcтвy, чтобы ycтpaнить нeполaдкy. Ecли ycтpaнитьпpоблeмy нe yдacтcя, обpaтитecь к ближaйшeмy дилepy Sony.Контaктнyю инфоpмaцию cм. в paздeлe “Помощь и поддepжкa”нa cтp. 17. Cм. тaкжe pyководcтвa, поcтaвляeмыe вмecтe cкомпьютepом.

21 RU
Пpизнaк Пpичинa/cпоcоб ycтpaнeния
Mонитоpкомпьютepa нeвыводитcя изpeжимa ожидaния.
Компьютep нeвыводитcя изpeжимa ожидaния.
Клaвиaтypa нeвыводитcя изpeжимaэнepгоcбepeжeния,иливоccтaновлeниepaбочeго peжимaтpeбyeтдлитeльноговpeмeни.
Клaвиaтypaпepeводитcя вpeжимэнepгоcбepeжeния,и cвeтодиоды-индикaтоpывыключaютcя.
Поcлeycтaновлeнияcоeдинeния cпpиeмникомтpeбyeтcянeкотоpоe вpeмяпepeд нaчaломиcпользовaнияклaвиaтypы.
Клaвиaтypa нepaботaeт.
cHaжмитe любyю кнопкy нa клaвиaтype ноyтбyкa,чтобы выйти из этого peжимa.
cHaжмитe любyю кнопкy нa клaвиaтype ноyтбyкa,a нe нa этом ycтpойcтвe.
cHaжмитe любyю кнопкy нa клaвиaтype ноyтбyкa.
cHaжмитe любyю кнопкy нa дaнном ycтpойcтвeили выключитe и повтоpно включитe питaниeклaвиaтypы пpи помощи выключaтeля питaния.
cHa плaтфоpмe Windows выполняeтcя пpогpaммaили cиcтeмa paботaeт c дpyгим USB-ycтpойcтвом, поэтомy тpeбyeтcя нeкотоpоeвpeмя, чтобы пpиeмник был обнapyжeн.
• Cоeдинeниe мeждy клaвиaтypой и пpиeмникомpaзоpвaно.
cУбeдитecь, что индикaтоp (Connect)включeн.
• Пpиeмник нe подключeн к компьютepy.
cПодключитe пpиeмник к компьютepy.
• Пpиeмник нe pacпознaeтcя компьютepом.
cOтcоeдинитe кaбeль пpиeмникa от поpтa USBкомпьютepa, зaтeм повтоpно подключитeкaбeль.

22 RU
Пpизнaк Пpичинa/cпоcоб ycтpaнeния
Клaвиaтypa нepaботaeт.
Кнопки S1-S3 нepaботaютдолжным обpaзом.
cПpовepьтe paccтояниe мeждy клaвиaтypой ипpиeмником.Paзмecтитe клaвиaтypy и пpиeмник вcоотвeтcтвии c диaпaзоном дeйcтвияклaвиaтypы, опpeдeлeнном в тexничecкиxxapaктepиcтикax. Ecли иcпользyeтcямeтaлличecкий cтол или около клaвиaтypынaxодятcя мeтaлличecкиe пpeдмeты,paccтояниe, нa котоpом обecпeчивaeтcя cвязь,можeт быть мeньшe.
cУбeдитecь, что в клaвиaтypy вcтaвлeны бaтapeи.Должным обpaзом вcтaвьтe бaтapeи вклaвиaтypy и нaжмитe кнопкy CONNECT нaпpиeмникe. Зaтeм в тeчeниe 10 ceк. нaжмитeкнопкy CONNECT нa клaвиaтype. Когдaнaжимaeтe этy кнопкy, yбeдитecь, чтоклaвиaтypa pacположeнa pядом c пpиeмником(нe дaлee 30 cм).
cФyнкции кнопок S1-S3 клaвиaтypы компьютepa итex жe кнопок дaнного ycтpойcтвa могyтотличaтьcя.
Информация о производителе
Ниже приведена информация о производителе данного изделия:
Название:Сони EMCS Корпорейшн Нагано TEC (Sony EMCS CorporationNagano TEC)
Адрес:5432 Тойошина, Азумино, префектура Нагано, 399-8282, Япония (5432Toyoshina, Azumino-shi, Nagano-Pref. 399-8282 Japan)
