v.5 general ledger: tips & tricks - shelby systems
TRANSCRIPT

©2013 Shelby Systems, Inc.
Other brand and product names are trademarks or registered trademarks of the respective holders.
v.5 General Ledger:
Tips & Tricks
Presented by:
Ken Emert, Shelby Consultant

Objective
Uncover hidden tips and tricks to maximize the General Ledger.
What You Will Learn in This Session
• How to work with Utilities and Shelby Tools
• How to tag GL activity with Journal Types
• How to limit users to specific accounts with Account Rights
• How to change the numbering for Accounts, Departments, Funds, or even Companies
• How to use Inquiry tools
• How to use the Summary screen options
• How to use the various elements to track detail

Working with Utilities
You may have noticed, or even used, the Utility menu item at the top of the screen to access
the Company/Year Information when setting up a new company or year. If you use funds
and/or departments you may have used the Fund/Department Information utility to create
new funds and departments.
There are, however, several utilities that are designed to streamline, maximize, and reduce the
workload/workflow of maintaining the General Ledger. Let’s take a look at some of these
utilities and see what they can do for us.
Journal Type Information
Journal Types are used to identify which sub-ledger module generated the journal entry. The
sub-ledger modules use pre-defined journal types (i.e. PR, AP, CN, AR, CK etc.). However, there
are times when you need to make an entry directly to the General Ledger. The General Ledger
provides a journal type for making manual entries when the need arises. The journal type is JE
(Journal Entry).
Most people use the JE journal type whenever they make a manual entry to the General Ledger
for adjustments, transfers, recurring journal entries, and even entries resulting from an audit.
The problem with using the JE journal type for these entries occurs when you need to produce
a list of entries for the specific types of JE entries.

Creating new Journal Types for these specific entries will enable you to find these specific
entries for inquiry or reporting purposes.
• From the Journal Type screen, click the New button at the top of the screen to open the
Journal Type Maintenance screen.
• Enter AJ in the Journal Type field and Adjusting Entry in the description. This journal
type will be used for correcting/adjusting entries.
• Enter TR in the Journal Type field and Transfer Entry in the description. This journal type
will be used when transferring monies between accounts (use only when you are not
changing bank account balances).
• Enter RE in the Journal Type field and Recurring Monthly Entry in the description. This
journal type will be used for any recurring monthly entries that may be needed
(i.e. Monthly Depreciation, Outsourced Payroll, etc.).
• Enter AU in the Journal Type field and Auditor Entry in the description. This journal type
will be used when entering entries provided by the Auditor(s).

You now have a specific journal type for each of these entries. When creating a journal entry,
click on the Journal Type pick button and choose the appropriate journal type.
Now you can run the Journal History report for those types of entries or use the inquiry screen
in the same manner.

Account Rights
More than likely, you are bombarded with requests from individuals for reports. This requires
you to stop what you’re doing to produce the desired report for the individual making the
request. Although you can grant report-only rights to the individual in the General Ledger
through User Security Setup, you don’t want to grant rights to every account in your General
Ledger.
From the Account Rights screen, double-click on the individual’s name and enter the Company,
Fund(s), Department(s) and Account# range this person needs.
As you can see in the example, you can select several areas of your chart-of-accounts where the
individual has responsibility. The bottom portion of the screen shows to which area the
individual now has access.
With the appropriate User Account rights, individuals can now run reports for themselves
ensuring they only have access to the accounts you have designated.

Source Documents
Every sub-ledger module that interfaces with the General Ledger generates a journal entry with
the appropriate debits and credits and places it in the Journal Entry screen for posting. Along
with the journal entry, the system attaches a copy of the final report from the sub-ledger
module called the source document.
There are times when the information in a financial report doesn’t answer the question(s)
concerning a specific journal entry. Normally, individuals will reach for the large three-ring
binder that contains all the sub-ledger reports and thumb through page after page of reports
until they find the report that corresponds to the journal entry in question.
The Source Document utility enables you to locate the sub-ledger journal entry easily by Type,
Period, Start Date, End Date, and User.
From the Utility menu item:
• Click on Source Documents
• Filter by any combination of items
• Double-click on the journal entry
• Review or print source document
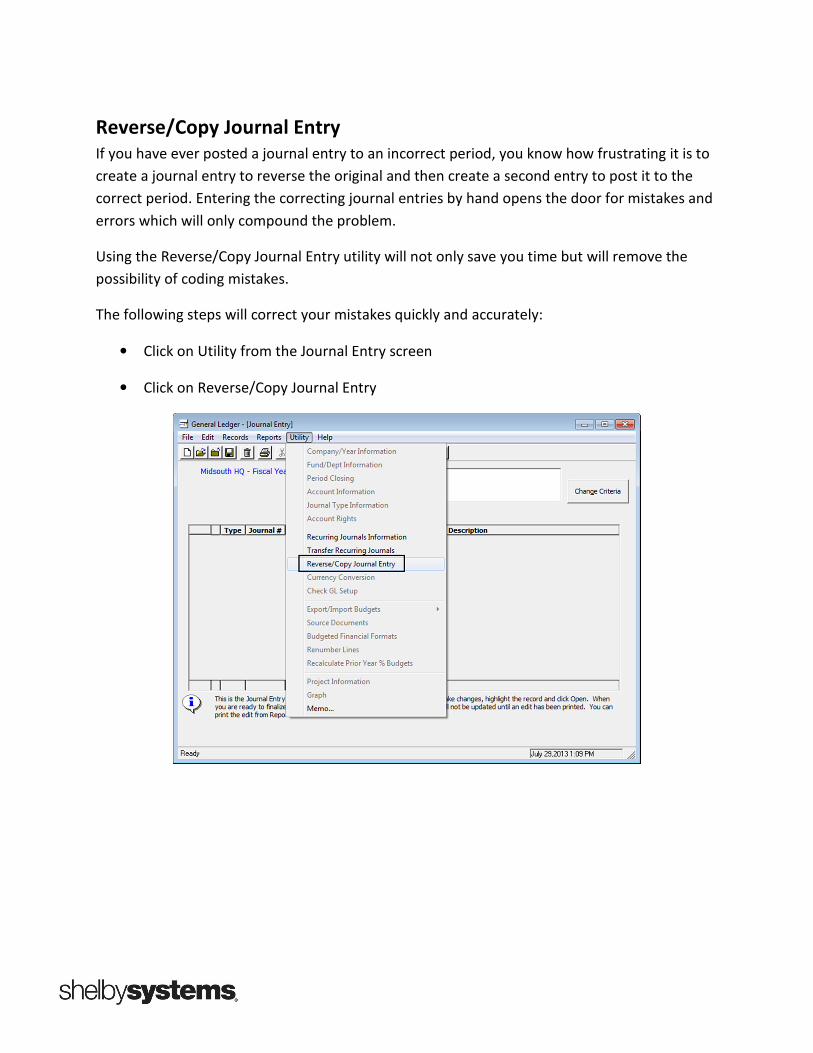
Reverse/Copy Journal Entry
If you have ever posted a journal entry to an incorrect period, you know how frustrating it is to
create a journal entry to reverse the original and then create a second entry to post it to the
correct period. Entering the correcting journal entries by hand opens the door for mistakes and
errors which will only compound the problem.
Using the Reverse/Copy Journal Entry utility will not only save you time but will remove the
possibility of coding mistakes.
The following steps will correct your mistakes quickly and accurately:
• Click on Utility from the Journal Entry screen
• Click on Reverse/Copy Journal Entry

• Locate the journal entry by using the filters at the top of the screen
• Click on the journal entry and then click the Reverse button at the bottom of the screen.

• Post the journal entry to the original period to reverse the entry
• Click on Reverse/Copy Journal Entry again and select the same journal entry and click on
the Copy button.

• Post the journal entry to the correct period
• Run the Edit report and save the journal entries to the General Ledger.

Recurring Journal Entries
Many times there are journal entries that need to be made each and every month. These may
consist of payroll entries from an outside company, amortized expenses, mission distributions
based on monthly giving, or a host of other scenarios.
With the Recurring Journal Entry utility you can create the journal entry one time and transfer
the entry for processing without having to manually enter the journal entry each and every
time the transaction occurs.
The following steps will guide you through creating the recurring journal entry and transferring
the entry for processing:
• From the Journal Entry screen, click on Utility and choose Recurring Journals
Information.
• Click on the New button to open the Recurring Journal entry screen.

• Enter the Journal Type, Journal Description, Accounts, Debits, and Credits. Then save the
entry.
• Your saved recurring journal entry is now added to the list of recurring journal entries.

• From the Journal Entry screen, click on Utility and choose Transfer Recurring Journals.
• Select the Period to post to, the journal date and the journal type to transfer. Leaving
the journal type field blank will transfer all journal types.
• The recurring journal entry or entries are now ready for processing.

Working with Shelby Tools
There are other utilities for the General Ledger that are typically used less frequently but
address some key areas.
• From your Shelby Dashboard, click on the General Tab and then click on the Utilities
module.

• From the Home Base screen click on ShelbyTools.
From the ShelbyTOOLS screen, click on the drop-down arrow next to the Choose a Module field
and select General Ledger.
Under the Utilities List you will see several utilities from which to choose. Notice the description
of the utility to the right of the screen.
Before running any utility make sure you make a backup of your data. I would recommend NOT
relying on the last backup. Make a new backup before proceeding in case something happens
on the server while running the utility.

We are going to make changes to our existing Chart-of-Accounts by changing the account
number of an existing account (this is how we restructure the existing Chart-of-Accounts).
• Click on the Change Company #, Fund # or Account # utility and then click on the Run
button at the bottom of the screen.

• From the Change Account Structure screen, choose the Scope of Change. Click on the
Account # radio button.
• Select the Fund, Department and Account # to change from the drop-down lists.
• Enter the Change to Department # (new department) and the Change to Account # (new
account #). Click the OK button at the bottom of the screen to proceed with the change.
• The following screen asks you to confirm that you want to proceed with the change
above. Click Yes to proceed.
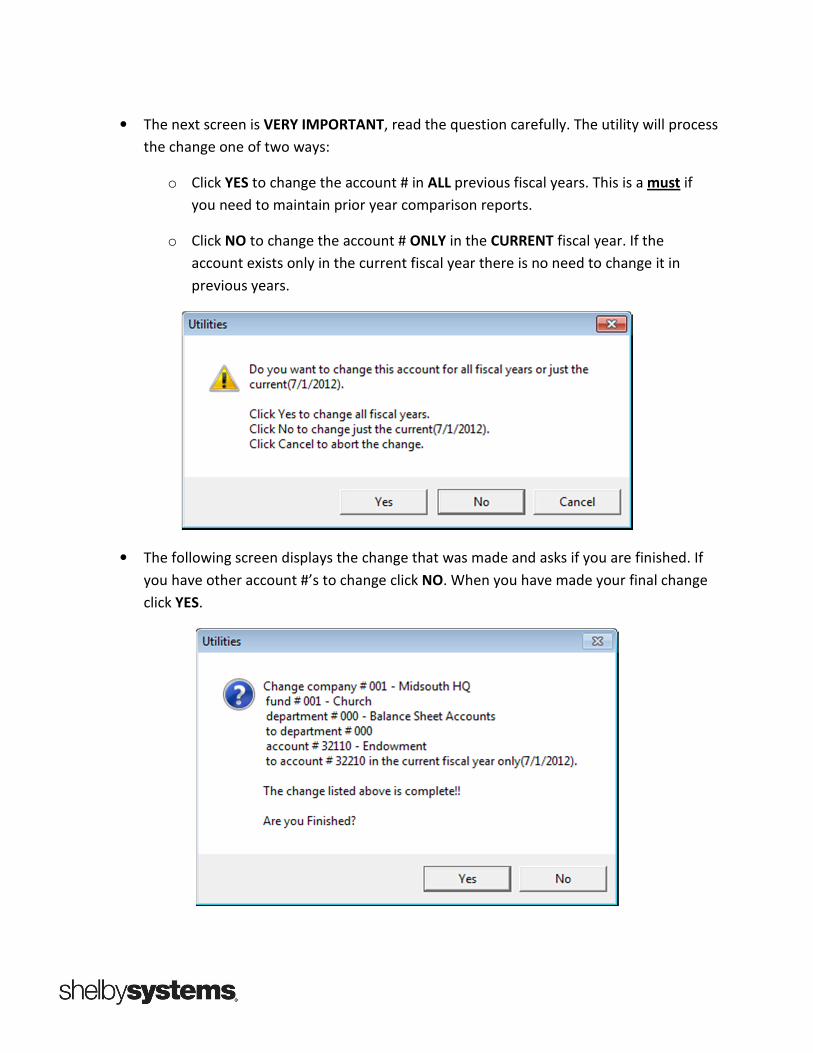
• The next screen is VERY IMPORTANT, read the question carefully. The utility will process
the change one of two ways:
o Click YES to change the account # in ALL previous fiscal years. This is a must if
you need to maintain prior year comparison reports.
o Click NO to change the account # ONLY in the CURRENT fiscal year. If the
account exists only in the current fiscal year there is no need to change it in
previous years.
• The following screen displays the change that was made and asks if you are finished. If
you have other account #’s to change click NO. When you have made your final change
click YES.

• The program will display a report reflecting all changes that have been made to your
Chart-of-Accounts, one account at a time. Print or Save the report for future reference.

INQUIRY OPTIONS
The Inquiries area of the General Ledger is a fantastic tool for accessing information and
displaying different aspects of that information without the need for running several reports. In
addition, the Inquiries area allows access to areas of information that normally would require
the user to run reports/inquiries from the original sub-ledger modules.
The Inquiry Criteria screen has two distinct areas for filtering the results that will be displayed.
• The top portion allows you to define the Fund, Department, Account # Range and
specific accounts by using the Include/Exclude button.
• The bottom portion allows you to select All Periods or a specific Period, a Start Date/End
Date range based on Journal Dates, specific Journal Type, Journal #, Project and Dollar
amount range.
• You can use any combination of fields from the top section and bottom section based
upon what information you need.
The results screen is divided into two areas, a Summary screen and a Detail screen. Each screen
offers different reporting options and utilities. We will explore each screen’s options as we
Inquire on the Operating Checking Account.
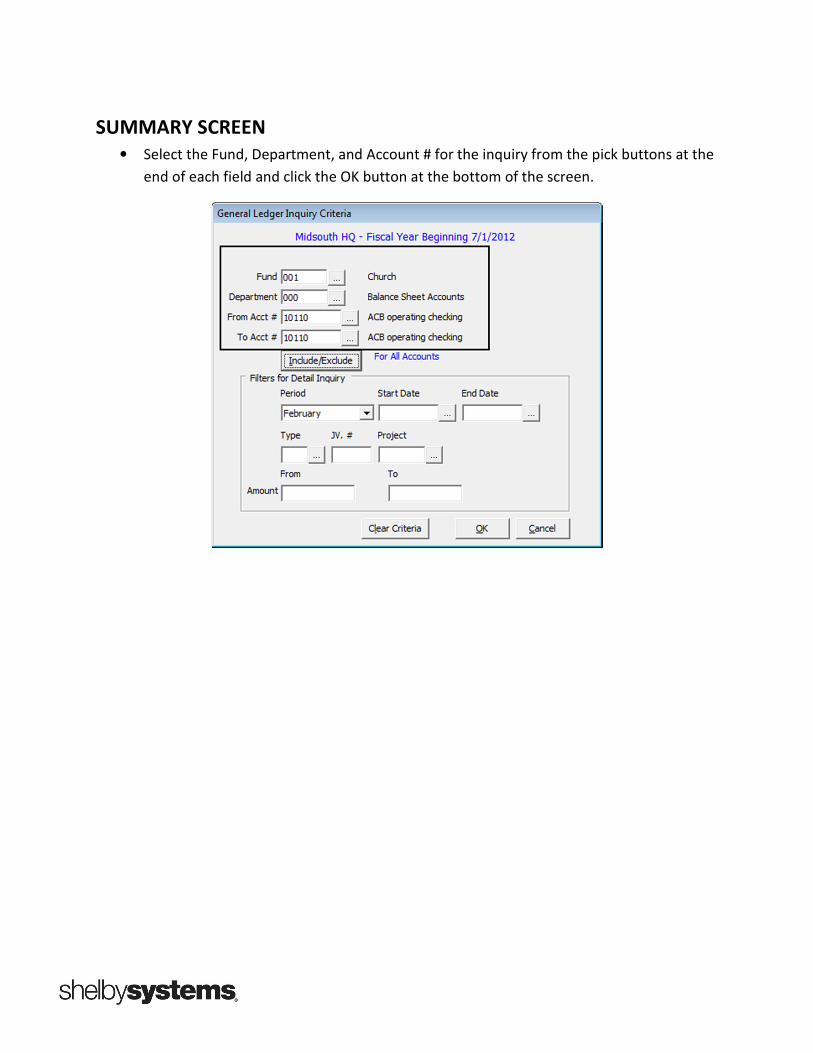
SUMMARY SCREEN
• Select the Fund, Department, and Account # for the inquiry from the pick buttons at the
end of each field and click the OK button at the bottom of the screen.

• Across the top of the Summary tab you will see four check boxes that will display the
selected information. The two display columns below show the Current Year Amount for
the Period and the Current Year Total at the end of each Period.

• By selecting the Show Prior Year and Show Variance from Prior Year check boxes, the
screen displays the amounts by period from the previous year (shown in RED) with the
variance (or difference shown in BLUE).
• At the top of the screen you will see a graph button that will allow you to create a graph
of the displayed information in Excel.
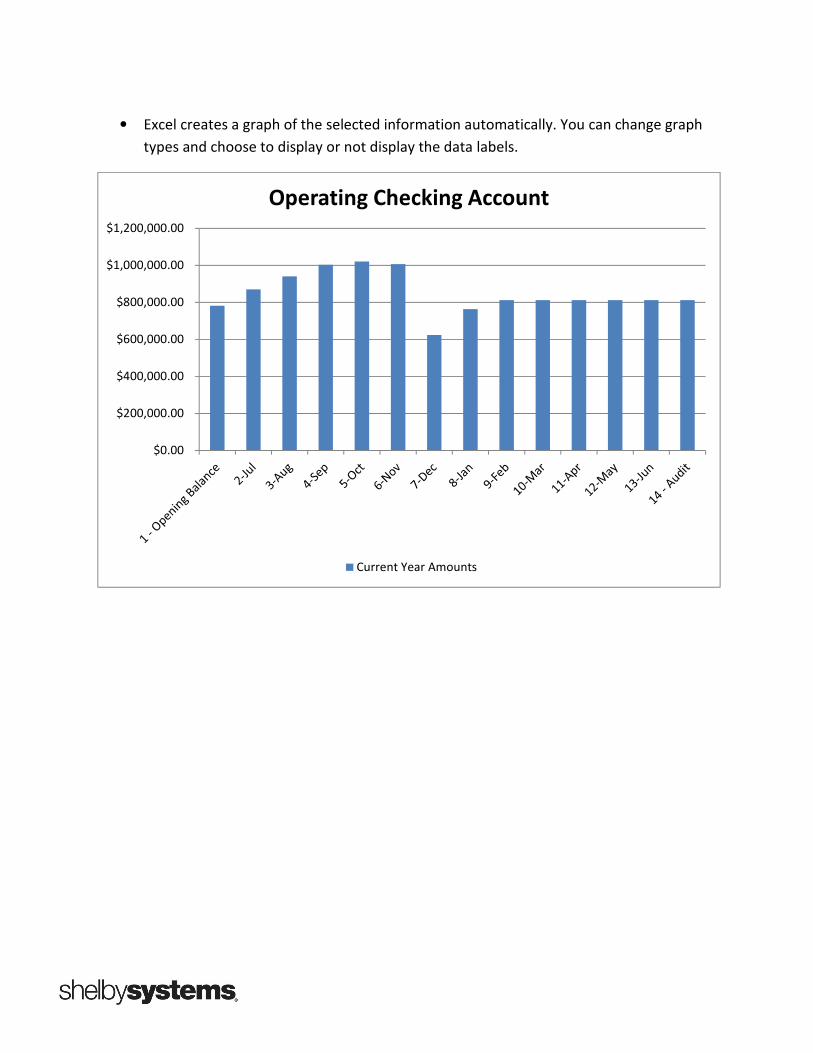
• Excel creates a graph of the selected information automatically. You can change graph
types and choose to display or not display the data labels.
$0.00
$200,000.00
$400,000.00
$600,000.00
$800,000.00
$1,000,000.00
$1,200,000.00
Operating Checking Account
Current Year Amounts

DETAIL TAB
Use the Period, Start Date, End Date, Journal Type, JV #, Project, and Amount From and To
fields to filter the results screen to the desired information.
• The results screen displays all the matching journal entries from the filters used on the
criteria screen. There are three buttons at the bottom of the screen that will allow you
to see more information for any journal entry that you select.

• Click on a specific journal entry then click on the Show Journal button at the bottom of
the screen. The results screen displays the entire journal entry on the results screen.
Notice that the Show Journal button now displays Show Inquiry which will return you to
the previous screen.
• Clicking on the View Source button will display the Source Document from the sub-
ledger module that created the journal entry. From this screen you may print the report
or save it in several different formats.

• Clicking on the Drill-down button will display the information in table format.
• By clicking on the drop-down arrow next to the name, the following screen will display
the detail information for the specific entry that was selected.
• Right-clicking on a detail line will display a menu of options for printing the information
or exporting. There are two options for Excel reports at the bottom of the menu.

Ken Emert
Shelby Consultant [email protected]
Ken Emert served for 21 years as Minister of Administration at Scottsdale Bible Church in
Scottsdale, AZ where he used Shelby software for tracking people and finances. In 2000 Ken felt
it was time for a change and became a certified Shelby Systems trainer. He currently serves
churches and other faith-based organizations as a Shelby Consultant. He has helped implement
Shelby in many organizations and enjoys working with staffs to aid them in promoting ministry
efficiently and effectively.