valve island vm10 with profinet interface 8, 10, 12 or 16 ...cdn.norgren.com/pdf/opm_manual vm10...
TRANSCRIPT
Operation & Service Manual
Valve island VM10 with PROFINET Interface 8, 10, 12 or 16 stations

2
Operational & Service Manual Valve islands VM10 PROFINET
Construction & Design is subject to change © 2017 Norgren GmbH 07/2017
Change history:
The Change history reflects all changes of the User Guide, which were done after the initial release.
Index Chapter Change description Date Name
001 All Set up initial version 30/05/2017
002 2 New chapter added 31/05/2017
003 All Revision 11/08/2017
This User Guide makes no claims of being complete as it doesn’t cover all variants of the VM10 valve islands series at the moment.
Therefore this document is subject to extensions or changes.
3
Operational & Service Manual Valve islands VM10 PROFINET
Construction & Design is subject to change © 2017 Norgren GmbH 07/2017
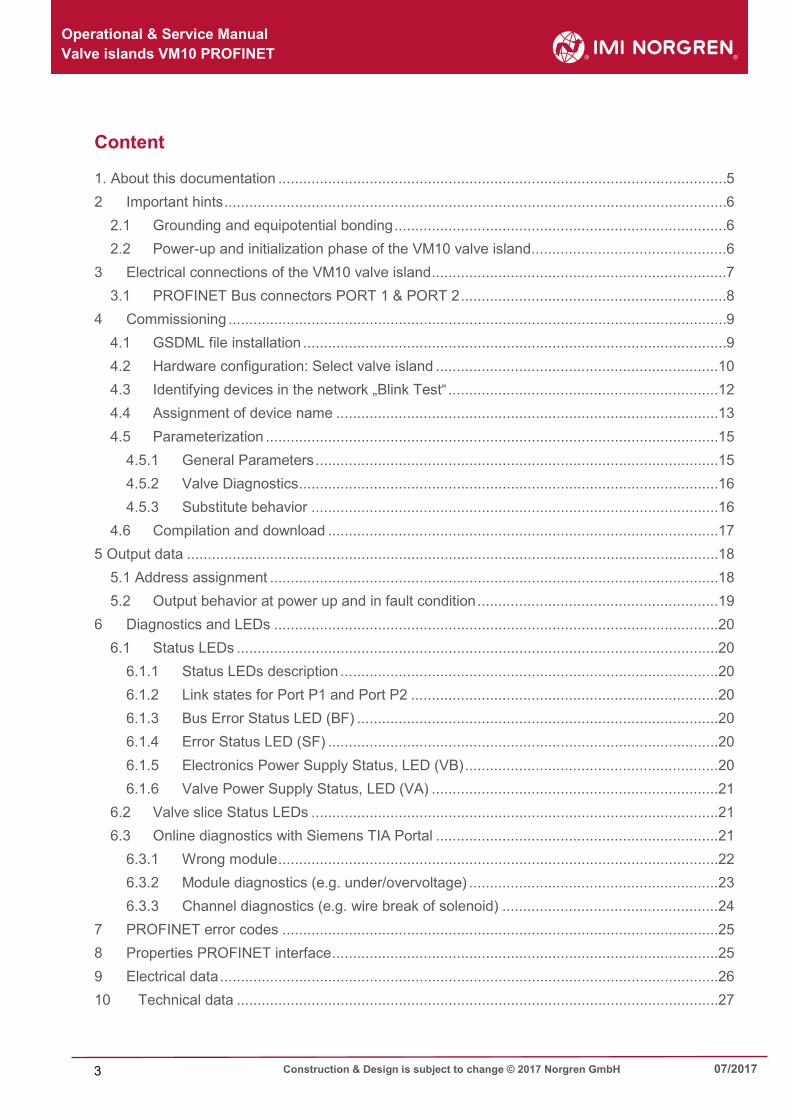
Content 1. About this documentation ............................................................................................................ 5 2 Important hints ......................................................................................................................... 6
2.1 Grounding and equipotential bonding ................................................................................ 6 2.2 Power-up and initialization phase of the VM10 valve island............................................... 6
3 Electrical connections of the VM10 valve island ....................................................................... 7 3.1 PROFINET Bus connectors PORT 1 & PORT 2 ................................................................ 8
4 Commissioning ........................................................................................................................ 9 4.1 GSDML file installation ...................................................................................................... 9 4.2 Hardware configuration: Select valve island .................................................................... 10 4.3 Identifying devices in the network „Blink Test“ ................................................................. 12 4.4 Assignment of device name ............................................................................................ 13 4.5 Parameterization ............................................................................................................. 15
4.5.1 General Parameters ................................................................................................. 15 4.5.2 Valve Diagnostics ..................................................................................................... 16 4.5.3 Substitute behavior .................................................................................................. 16
4.6 Compilation and download .............................................................................................. 17 5 Output data ................................................................................................................................ 18
5.1 Address assignment ............................................................................................................ 18 5.2 Output behavior at power up and in fault condition .......................................................... 19
6 Diagnostics and LEDs ........................................................................................................... 20 6.1 Status LEDs .................................................................................................................... 20
6.1.1 Status LEDs description ........................................................................................... 20 6.1.2 Link states for Port P1 and Port P2 .......................................................................... 20 6.1.3 Bus Error Status LED (BF) ....................................................................................... 20 6.1.4 Error Status LED (SF) .............................................................................................. 20 6.1.5 Electronics Power Supply Status, LED (VB) ............................................................. 20 6.1.6 Valve Power Supply Status, LED (VA) ..................................................................... 21
6.2 Valve slice Status LEDs .................................................................................................. 21 6.3 Online diagnostics with Siemens TIA Portal .................................................................... 21
6.3.1 Wrong module .......................................................................................................... 22 6.3.2 Module diagnostics (e.g. under/overvoltage) ............................................................ 23 6.3.3 Channel diagnostics (e.g. wire break of solenoid) .................................................... 24
7 PROFINET error codes ......................................................................................................... 25 8 Properties PROFINET interface ............................................................................................. 25 9 Electrical data ........................................................................................................................ 26 10 Technical data .................................................................................................................... 27

4
Operational & Service Manual Valve islands VM10 PROFINET
Construction & Design is subject to change © 2017 Norgren GmbH 07/2017
Contact information
Norgren GmbH Site Fellbach
Stuttgarter Straße 120
70736 Fellbach
Tel: +49 711 5209-0

5
Operational & Service Manual Valve islands VM10 PROFINET
Construction & Design is subject to change © 2017 Norgren GmbH 07/2017
1 About this documentation
This User Guide contains the information to set up and operate the VM10 valve island with PROFINET-Interface and to detect and resolve problems.
Note:
In addition to the specific information for the PROFINET variants, all data sheets for the VM10 valve island series are applicable and remain valid.
Refer also to the data sheets on the following web links
http://cdn.norgren.com/pdf/en_5_1_100_VM10.pdf
Further information about PROFINET is available on PI website.
http://www.profinet.com http://www.profibus.com/download/
Basic information about PROFINET could be found in the following document:
“PROFINET Technology and Application – System ”
Installation Guidelines could be found in the following documents:
“PROFINET Guideline for Cabling and Assembly” “PROFINET Guideline for Commissioning”

6
Operational & Service Manual Valve islands VM10 PROFINET
Construction & Design is subject to change © 2017 Norgren GmbH 07/2017
2 Important hints
2.1 Grounding and equipotential bonding Proper grounding and equipotential bonding are very important to protect against electromagnetic interferences in PROFINET networks. In order to reduce potential impact, grounding of the PROFINET cable screen should be done at both ends of every cable (i.e. at each device). Equipotential bonding ensures that the ground potential is identical throughout the entire PROFINET network and is essential to avoid equipotential bonding currents, which could otherwise flow through the PROFINET cable screen. Please refer for further details to the “PROFINET Installation Guideline for Cabling and Assembly” provided by the PROFINET user organization (http://www.profinet.com ).
2.2 Power-up and initialization phase of the VM10 valve island The valve island initializes automatically after power-up. During initialization the number of available valve stations is also evaluated, which requires that at this point also the power supply for the valves (VA) is already available during initialization start. Otherwise not all valve stations might be detected and initialization of the valve island fails. This failure case is indicated by the following permanent Status LED states:
P1 – off
P2 – off
BF – off
SF – red
VB – green
VA – green

7
Operational & Service Manual Valve islands VM10 PROFINET
Construction & Design is subject to change © 2017 Norgren GmbH 07/2017
3 Electrical connections of the VM10 valve island
1. Port 1 bus connector for PROFINET
(4 pins M12 D-coded female connector)
2. Port 2 bus connector for PROFINET
(4 pins M12 D-coded female connector)
3. Power supply connector
(5-pins M12 A-coded male connector)
4. Terminal for functional earth (M4)
5. Status LEDs
6. Valve status LEDs
1
2
5 4
3
6

8
Operational & Service Manual Valve islands VM10 PROFINET
Construction & Design is subject to change © 2017 Norgren GmbH 07/2017
3.1 PROFINET Bus connectors PORT 1 & PORT 2 M12 / 4 pins / female connector / D-coded Pin no. Function 1 Transmission Data + (TD+)
2 Receive Data + (RD+)
3 Transmission Data - (TD -)
4 Receive Data - (RD -)
Earth screw FE (functional earth)
3.2 POWER supply connector M12 / 5 pins / male connector / A-coded Pin no. Function 1 L1 (VB+) 24V electronics power supply
2 N2 (VA-) 0V valves power supply
3 N1 (VB-) 0V electronics power supply
4 L2 (VA+) 24V valves power supply
5 FE (functional earth)

9
Operational & Service Manual Valve islands VM10 PROFINET
Construction & Design is subject to change © 2017 Norgren GmbH 07/2017
4 Commissioning Note: The method of PROFINET module installation strongly depends on the configuration software. Please refer to the configuration software manual.
Note: All the examples in this document are made with Siemens TIA Portal V13.
4.1 GSDML file installation A device description file (GSD-file) is needed for configuration of the valve island. The GSD-file is in XML Format (GSDML) and could be used for all variants VM10:
GSDML-V2.32-IMI_Norgren-Vx_IMI-JJJJMMDD.XML
Note: ”JJJJMMDD”(JJJJ- year, MM-month, DD-day) is date of release
The GSDML file has to be installed inside the engineering tool of the PROFINET controller.
The symbol file is used to visualize the device in the engineering tool. XML files are provided by the device vendor and can be downloaded from:
https://www.imi-precision.com/us/en/technical-support/software
Open GSDML-file Import editor:
“Options” -> “Manage general station description files”
After the successful installation of the GSDML-file the VM10 is listed in the Hardware catalog.

10
Operational & Service Manual Valve islands VM10 PROFINET
Construction & Design is subject to change © 2017 Norgren GmbH 07/2017
4.2 Hardware configuration: Select valve island After successful GSDML installation the valve island appears in category „Other field devices >…> Vx_IMI“.
Drag the Vx_IMI valve island entry and drop it into the PROFINET-IO system.
Hardware catalogue after installation of the XML file
View after adding the valve island
As a next step the valve module has to be assigned to slot 1. The following table shows which valve module has to be chosen for which physical configuration.
Please check the correct number of valve slices on the valve island. An empty slice is also counted as a valve slice.
Number of valve slices Module Name 8 „VM10 with 08 slices“
10 „VM10 with 10 slices “
12 „VM10 with 12 slices “
16 „VM10 with 16 slices “

11
Operational & Service Manual Valve islands VM10 PROFINET
Construction & Design is subject to change © 2017 Norgren GmbH 07/2017
Table: Device name assignment
The device selection
View after adding VM10 device with 10 or 12 valve stations

12
Operational & Service Manual Valve islands VM10 PROFINET
Construction & Design is subject to change © 2017 Norgren GmbH 07/2017
4.3 Identifying devices in the network „Blink Test“ PROFINET devices are identified by using their MAC address and device type. Use the configuration tool to identify all PROFINET modules in the network.
“Online” -> “Accessible devices”
Mark an available valve island and enable checkbox “Flash LED”. This activates the LEDs: „BF“, „SF“, „VA“, „VB “flashing in green color for 3 seconds

13
Operational & Service Manual Valve islands VM10 PROFINET
Construction & Design is subject to change © 2017 Norgren GmbH 07/2017
4.4 Assignment of device name Before the PROFINET communication between PROFINET controller and valve island is able to start, a unique device name has to be assigned. The device name is stored on the valve island.
Note:
Several engineering- and service tools are able to assign PN device names (E.g. PROFINET Commander, PRONETA, TIA).
There are also different ways to assign the device name in TIA Portal.
Right Click on the valve island in the “Network View“ of TIA opens its context menu in “Online- mode”. Press “Assign device name” item to open the „Assign PROFINET device name“ dialog.
Enter a unique device name for the valve island in the “PROFINET device name” field. Push the “Assign name” button to assign the entered device name.

14
Operational & Service Manual Valve islands VM10 PROFINET
Construction & Design is subject to change © 2017 Norgren GmbH 07/2017
Assign PROFINET device name dialog
After successful name assignment the status of the valve island in the device list will change to OK.
List with accessible devices in the network

15
Operational & Service Manual Valve islands VM10 PROFINET
Construction & Design is subject to change © 2017 Norgren GmbH 07/2017
4.5 Parameterization During system startup a parameter set is loaded to the valve island by the PROFINET controller. The parameter set of the valve module is divided into the sections “General Parameters”, “Valve Diagnostics” and “Substitute behavior”.
Those parameters are accessible on the “Properties” page of the valve module using the “Device view” of TIA.
4.5.1 General Parameters It is possible to enable/disable the voltage monitor of the valve module.
If disabled, in case of over/under voltage no PROFINET diagnostic alarm appears and the relating LEDs on the valve island don’t change from green to red color as well. Otherwise, a PROFINET module diagnostic alarm appears (error code see chapter 7) and the relating LEDs on the valve island change to red (see also chapter 6.5 and 6.6).
Default configuration: Voltage diagnostic is enabled

16
Operational & Service Manual Valve islands VM10 PROFINET
Construction & Design is subject to change © 2017 Norgren GmbH 07/2017
4.5.2 Valve Diagnostics It is possible to enable/disable the valve diagnostics (channel diagnostic) in general or for each single solenoid. If disabled, in case of a wire break or a short circuit of a solenoid no PROFINET diagnostic alarm appears and the SF LED remains green as well. Otherwise a PROFINET channel diagnostic alarm appears (with error code and channel number) and the SF LED changes state (see also chapter 6.4).
Default configuration: Valve diagnostic is disabled
4.5.3 Substitute behavior It is possible to define the behavior of the outputs in case of “IOPS = Bad” (PLC stopped) or broken PROFINET communication. The following states could be defined by the outputs:
Clear output Set output Freeze output
Default configuration: All valves off

17
Operational & Service Manual Valve islands VM10 PROFINET
Construction & Design is subject to change © 2017 Norgren GmbH 07/2017
4.6 Compilation and download After finished configuration please compile the project and download it to the PROFINET controller (PLC).

18
Operational & Service Manual Valve islands VM10 PROFINET
Construction & Design is subject to change © 2017 Norgren GmbH 07/2017
5 Output data 5.1 Address assignment To calculate the length of the used output data (in bytes) for the VM10 valve configuration please use the following formula:
𝐵𝐵(𝐵𝐵𝐵𝐵𝐵𝐵𝐵𝐵𝐵𝐵) =𝑉𝑉 ∗ 2 + �(𝑉𝑉 ∗ 2)𝑀𝑀𝑀𝑀𝑀𝑀8�
8
𝑉𝑉 ∈ {8, 10, 12, 16}. Whereby ´V´= number of valve slices and ‘MOD’ = Modulo-Operator
𝐵𝐵 =10 ∗ 2 + (10 ∗ 2)𝑀𝑀𝑀𝑀𝑀𝑀8
8=
20 + 20𝑀𝑀𝑀𝑀𝑀𝑀88
=248
= 3
E.g. for a valve island with 10 valve slices
There are 3 bytes reserved for 10 valve slices
19
Operational & Service Manual Valve islands VM10 PROFINET
Construction & Design is subject to change © 2017 Norgren GmbH 07/2017
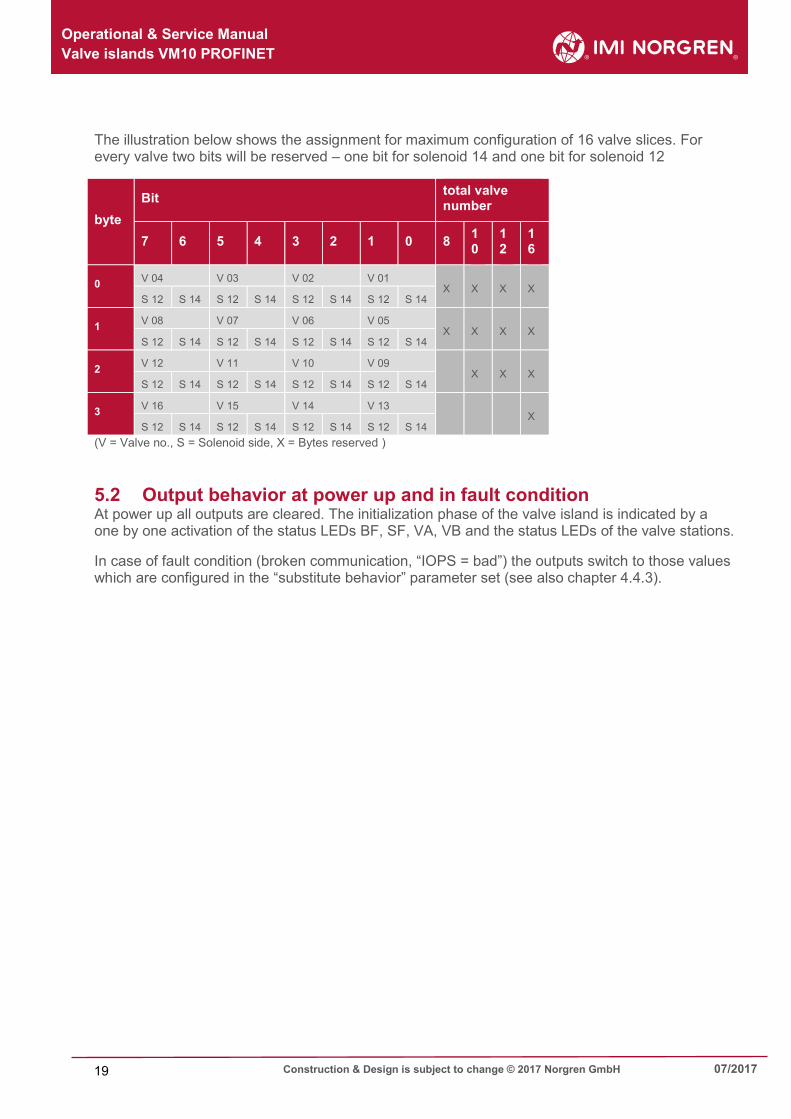
The illustration below shows the assignment for maximum configuration of 16 valve slices. For every valve two bits will be reserved – one bit for solenoid 14 and one bit for solenoid 12
byte Bit total valve
number
7 6 5 4 3 2 1 0 8 10
12
16
0 V 04 V 03 V 02 V 01 X X X X
S 12 S 14 S 12 S 14 S 12 S 14 S 12 S 14
1 V 08 V 07 V 06 V 05 X X X X
S 12 S 14 S 12 S 14 S 12 S 14 S 12 S 14
2 V 12 V 11 V 10 V 09 X X X
S 12 S 14 S 12 S 14 S 12 S 14 S 12 S 14
3 V 16 V 15 V 14 V 13 X
S 12 S 14 S 12 S 14 S 12 S 14 S 12 S 14 (V = Valve no., S = Solenoid side, X = Bytes reserved )
5.2 Output behavior at power up and in fault condition At power up all outputs are cleared. The initialization phase of the valve island is indicated by a one by one activation of the status LEDs BF, SF, VA, VB and the status LEDs of the valve stations.
In case of fault condition (broken communication, “IOPS = bad”) the outputs switch to those values which are configured in the “substitute behavior” parameter set (see also chapter 4.4.3).

20
Operational & Service Manual Valve islands VM10 PROFINET
Construction & Design is subject to change © 2017 Norgren GmbH 07/2017
6 Diagnostics and LEDs 6.1 Status LEDs 6.1.1 Status LEDs description
LED Name Description
P1 Link Port 1 (TX/RX & Link)
P2 Link Port 2 (TX/RX & Link)
BF Bus Error
SF System Error
VB Electronic Power Supply Status
VA Valve Power Supply Status
6.1.2 Link states for Port P1 and Port P2 Link Status LED State
Link connection established yellow
Link communication active flashing yellow / green
Link connection not established off
6.1.3 Bus Error Status LED (BF) Bus Status LED State
No error green
Device is offline red
Hardware configuration and parameterization is not plausible
flashing, red
IOPS = BAD tripple flashing, red
PROFINET Software is not initialized off
6.1.4 Error Status LED (SF) System-Status LED State
No error green
Solenoid, short circuit or open circuit flashing, red
Error, internal communication double flashing, red
Fatal error tripple flashing, red
Hardware configuration is not plausible red
Device is not initialized off
6.1.5 Electronics Power Supply Status, LED (VB) Status LED State
Voltage OK green
Undervoltage flashing red
Overvoltage permanent red

21
Operational & Service Manual Valve islands VM10 PROFINET
Construction & Design is subject to change © 2017 Norgren GmbH 07/2017
6.1.6 Valve Power Supply Status, LED (VA) Status LED State
Voltage OK green
Undervoltage flashing red
Overvoltage red
6.2 Valve slice Status LEDs
Each valve slice has one or two separate status LEDs depending on its configuration, which indicate the control states “14“ and “12” for the corresponding pilot valve solenoids.
Status LED State
Valve not powered off
Valve powered yellow
Valve in error state red
6.3 Online diagnostics with Siemens TIA Portal Use the “Network View“ or “Device View” and “Go online” for PROFINET diagnostics of the network or device.

22
Operational & Service Manual Valve islands VM10 PROFINET
Construction & Design is subject to change © 2017 Norgren GmbH 07/2017
6.3.1 Wrong module In case of a mismatch between configured module and physically module on slot 1 the module is marked with a parameter error symbol in the “Device overview” of the “Device view”.
Double click the symbol to change into diagnostics view of the module. Highlight the “Diagnostic status” line to get detailed information about the pending module diagnostics

23
Operational & Service Manual Valve islands VM10 PROFINET
Construction & Design is subject to change © 2017 Norgren GmbH 07/2017
6.3.2 Module diagnostics (e.g. under/overvoltage) In case of pending module diagnostics of the valve island (e.g. under/overvoltage) the module is marked with a red symbol in the “Device overview” of the “Device view”.
Double click the red symbol to change into diagnostics view of the module. Highlight the “Diagnostic status” line to get detailed information about the pending module diagnostics

24
Operational & Service Manual Valve islands VM10 PROFINET
Construction & Design is subject to change © 2017 Norgren GmbH 07/2017
6.3.3 Channel diagnostics (e.g. wire break of solenoid) In case of pending channel diagnostics of the valve island (e.g. wire break or short circuit of a solenoid) the module is marked with a red symbol in the “Device overview” of the “Device view”.
Double click the red symbol to change into diagnostics view of the module. The channel number and the error reason are shown in the “Channel diagnostics” table.
The allocation between channel number and solenoid is shown in the following table:
Valve 1…4 V04-12 V04-14 V03-12 V03-14 V02-12 V02-14 V01-12 V01-14
Channel number 8 7 6 5 4 3 2 1
Valve 5…8 V08-12 V08-14 V07-12 V07-14 V06-12 V06-14 V05-12 V05-14
Channel number 16 15 14 13 12 11 10 9
Valve 12…9 V12-12 V12-14 V11-12 V11-14 V10-12 V10-14 V09-12 V09-14
Channel number 24 23 22 21 20 19 18 17
Valve 13…16 V16-12 V16-14 V15-12 V15-14 V14-12 V14-14 V13-12 V13-14
Channel number 32 31 30 29 28 27 26 25
25
Operational & Service Manual Valve islands VM10 PROFINET
Construction & Design is subject to change © 2017 Norgren GmbH 07/2017
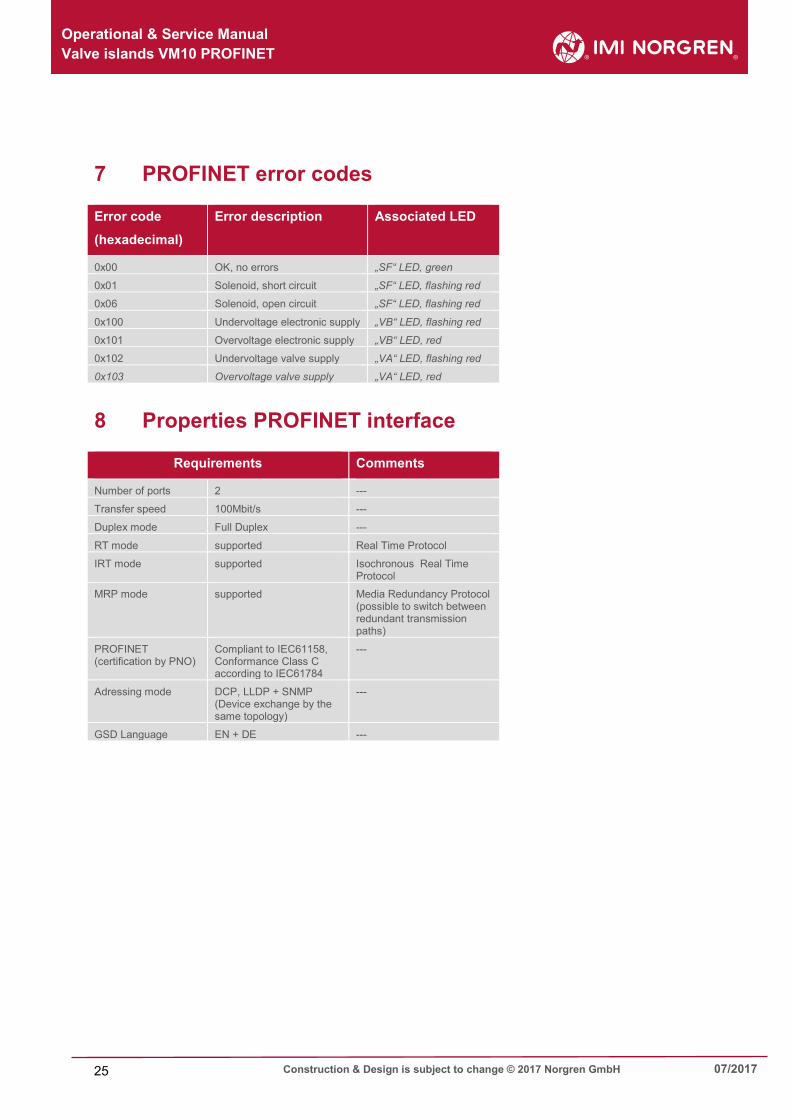
7 PROFINET error codes Error code
(hexadecimal)
Error description Associated LED
0x00 OK, no errors „SF“ LED, green
0x01 Solenoid, short circuit „SF“ LED, flashing red
0x06 Solenoid, open circuit „SF“ LED, flashing red
0x100 Undervoltage electronic supply „VB“ LED, flashing red
0x101 Overvoltage electronic supply „VB“ LED, red
0x102 Undervoltage valve supply „VA“ LED, flashing red
0x103 Overvoltage valve supply „VA“ LED, red
8 Properties PROFINET interface
Requirements Comments
Number of ports 2 ---
Transfer speed 100Mbit/s ---
Duplex mode Full Duplex ---
RT mode supported Real Time Protocol
IRT mode supported Isochronous Real Time Protocol
MRP mode supported Media Redundancy Protocol (possible to switch between redundant transmission paths)
PROFINET (certification by PNO)
Compliant to IEC61158, Conformance Class C according to IEC61784
---
Adressing mode DCP, LLDP + SNMP (Device exchange by the same topology)
---
GSD Language EN + DE ---
26
Operational & Service Manual Valve islands VM10 PROFINET
Construction & Design is subject to change © 2017 Norgren GmbH 07/2017
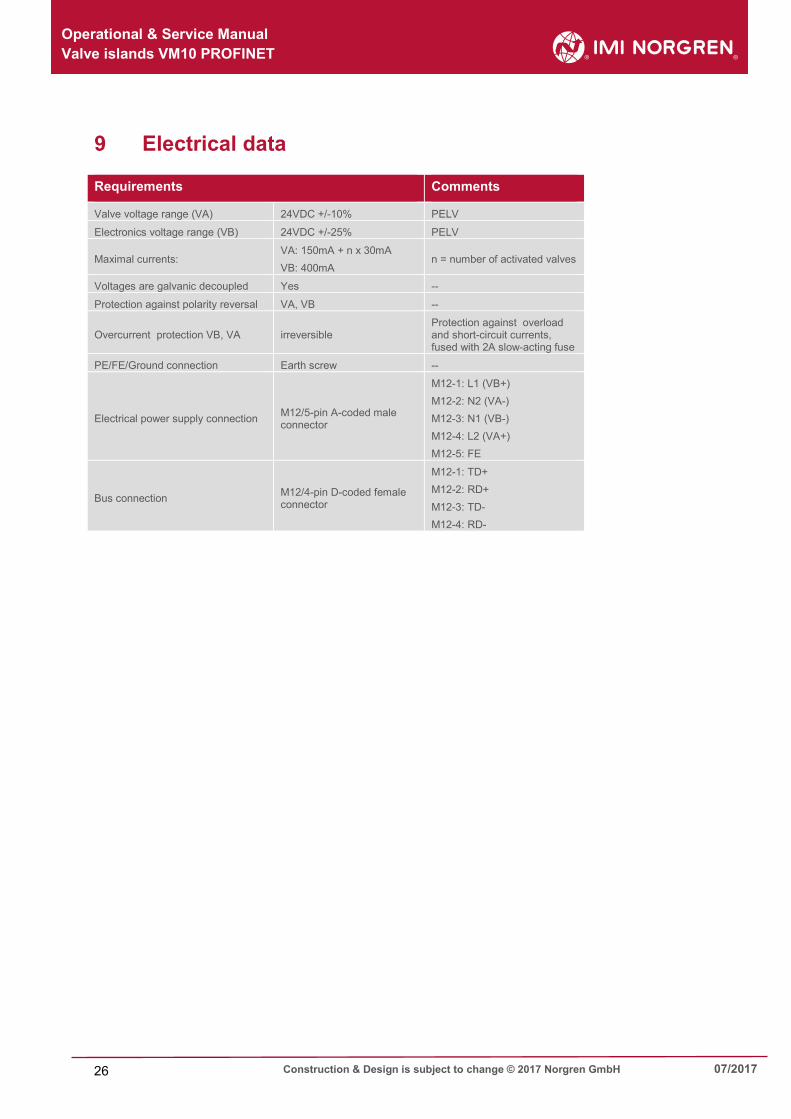
9 Electrical data Requirements Comments
Valve voltage range (VA) 24VDC +/-10% PELV
Electronics voltage range (VB) 24VDC +/-25% PELV
Maximal currents: VA: 150mA + n x 30mA VB: 400mA
n = number of activated valves
Voltages are galvanic decoupled Yes --
Protection against polarity reversal VA, VB --
Overcurrent protection VB, VA irreversible Protection against overload and short-circuit currents, fused with 2A slow-acting fuse
PE/FE/Ground connection Earth screw --
Electrical power supply connection M12/5-pin A-coded male connector
M12-1: L1 (VB+) M12-2: N2 (VA-) M12-3: N1 (VB-) M12-4: L2 (VA+) M12-5: FE
Bus connection M12/4-pin D-coded female connector
M12-1: TD+ M12-2: RD+ M12-3: TD- M12-4: RD-

27
Operational & Service Manual Valve islands VM10 PROFINET
Construction & Design is subject to change © 2017 Norgren GmbH 07/2017
10 Technical data Medium: Compressed air, filtered, lubricated and non-lubricated
Operational: Solenoid pilot spool valve
Port sizes: Ø 1/8, 5/32, 1/4 (3 mm, 4 mm, 6 mm )
Operating pressure: Maximum 116 psig (max. 8 bar )
Flow: Serie Function Cv
[dm³ / s * bar]
‘C’ ‘A’ QN
[l/min]
kv
VM10*5 5/2 port 1 to 2 & 4 0.44 1.77 7.1 430 0.36
VM10*5 5/2 ports 2 to 3 & 4 to 5 0.41 1.65 6.61 400 0.34
VM10*(A,B,C) 3/2 ports 1 to 2 & 1 to 4 0.36 1.44 5.78 350 0.29
VM10*(A,B,C) 3/2 ports 2 to 3 & 4 to 5 0.36 1.44 5.78 350 0.29
VM10*6 5/3 ports 1 to 2 & 4 0.36 1.44 5.78 350 0.29
VM10*6 5/3 ports 2 to 3 & 4 to 5 0.36 1.44 5.78 350 0.29
VM10*5 5/2 port 1 to 2 & 4 0.44 1.77 7.1 430 0.36
Ambient Media temperature: -5°… +50°C (+23…+122 °F)
Air supply must be dry enough to avoid ice formation at temperature +2°C (+35°F)
Degree of protection: NEMA 4 and IP65
Materials: Body, end plates: Engineered PPA co-polymer
Spool: Aluminium
Seals: NBR
28
Operational & Service Manual Valve islands VM10 PROFINET
Construction & Design is subject to change © 2017 Norgren GmbH 07/2017
Customer support
Email contact: [email protected]
Norgren GmbH
Werk Fellbach
Stuttgarter Straße 120
70736 Fellbach
Tel: +49 711 5209 -0
The data specified above only serve to describe the product.
No statements concerning a certain condition or suitability for a certain application can be derived from our information. The information given does not release the user from the obligation of exercising judgment and verification. It must be remembered that our products are subject to a natural process of wear and ageing.
© This document, as well as the data, specifications and other information presented in it are the sole property of Norgren GmbH. It may not be reproduced or given to third parties without their consent.
Subject to change without notice.
Printed in Germany
These instructions were originally written in German.
Order no: 750xxxx.04.15
EN