varioprint 6160 varioprint 6200 varioprint 6250...
TRANSCRIPT

Operation guide
Océ VarioPrint® 6000+ Line

Copyright© 2006-2013, Océ
All rights reserved. No part of this work may be reproduced, copied, adapted, or transmitted inany form or by any means without written permission from Océ.
Océ makes no representation or warranties with respect to the contents hereof and specificallydisclaims any implied warranties of merchantability or fitness for any particular purpose.
Furthermore, Océ reserves the right to revise this publication and to make changes from time totime in the content hereof without obligation to notify any person of such revision or changes.
Edition 2013-06 US

Contents
Chapter 1Preface.................................................................................................................................7
Trademarks.......................................................................................................................................................8Notes for the reader.........................................................................................................................................9Available documentation...............................................................................................................................10
Chapter 2Introduction.......................................................................................................................11
Introduction to the Océ VarioPrint® 6000+ Line..........................................................................................12
Chapter 3Power information............................................................................................................13
The power buttons and power modes.........................................................................................................14Turn on the system........................................................................................................................................16Shut down the system...................................................................................................................................17Restart the system..........................................................................................................................................18
Chapter 4Main parts..........................................................................................................................19
Introduction to the main system components.............................................................................................20The operator panel.........................................................................................................................................22The dashboard................................................................................................................................................24The paper modules........................................................................................................................................26The operator attention light...........................................................................................................................28The output locations......................................................................................................................................29
Chapter 5Adapt printer settings to your needs..............................................................................31
Access the Settings Editor.............................................................................................................................32Change a number of settings in the Settings Editor via the operator panel.............................................33Introduction to the Setup section..................................................................................................................36Work with the workflow profiles...................................................................................................................38Make an intermediate check print.................................................................................................................42Changing the language..................................................................................................................................43Change the warning time..............................................................................................................................44Disable the warning time...............................................................................................................................45Truncate the job name...................................................................................................................................46Adjust the brightness and contrast of the operator panel..........................................................................47
Chapter 6Media handling.................................................................................................................49
Introduction to the Schedule view................................................................................................................50Load the media...............................................................................................................................................53Load media via the Schedule view...............................................................................................................54Introduction to the Trays view......................................................................................................................56Assign the media to a paper tray - Load and assign the media to a paper tray.......................................59
Assign the media to a paper tray - Change the currently assigned media type.................................59Introduction to the Media section.................................................................................................................61
Contents
3

Introduction to the media handling..............................................................................................................63Add temporary media to the Media catalog................................................................................................64Perform a media registration for standard-size media - Print the test sheets and create the ruler........65
Perform a media registration for standard-size media - Adjust the Z-position of side 1...................66Perform a media registration for standard-size media - Adjust the X-length of side 1.....................68Perform a media registration for standard-size media - Adjust the Z-position of side 2...................69Perform a media registration for standard-size media - Adjust the X-position of side 1..................70Perform a media registration for standard-size media - Adjust the X-position of side 2..................71
Perform a media registration for large media - Print the test sheets and create the ruler......................72Perform a media registration for large media - Adjust the Z-position of side 1.................................73Perform a media registration for large media - Adjust the X-length of side 1...................................75Perform a media registration for large media - Adjust the Z-position of side 2.................................76Perform a media registration for large media - Adjust the X-position of side 1................................77Perform a media registration for large media - Adjust the X-position of side 2................................78
Change the advanced media settings...........................................................................................................79Change the advanced media settings - Enable the Low temperature mode......................................80Change the advanced media settings - Disable the double-sheet detection......................................81Change the advanced media settings - Enable the enhanced media mode.......................................82Change the advanced media settings - Change the Paper quality......................................................83Change the advanced media settings - Start the Paper quality test....................................................84
Chapter 7Carry out print jobs...........................................................................................................85
The print function...........................................................................................................................................86Introduction to the print function...........................................................................................................86Print a job using the printer driver - How to print a job using a Windows® driver...........................87
Print a job using the printer driver - How to print a job using an Apple Mac OS X® driver.......87Print a job using Océ PRISMAprepare (optional)..................................................................................88Print a file from a USB drive...................................................................................................................90Description of the print job settings.......................................................................................................91Contradiction handling..........................................................................................................................100Stop the printer......................................................................................................................................101Delete print jobs.....................................................................................................................................103
Print your jobs using the operator panel....................................................................................................104Introduction to the Jobs view...............................................................................................................104Schedule a waiting job for printing......................................................................................................110Print an urgent job immediately...........................................................................................................111Give priority to a print job.....................................................................................................................112Print a scheduled job later.....................................................................................................................113Reprint a job...........................................................................................................................................114Select more than one job for printing..................................................................................................115Bundle jobs in the list of Waiting jobs.................................................................................................116Print a job ticket......................................................................................................................................118Make a proof...........................................................................................................................................119
Change the Output settings.........................................................................................................................120Change 2-sided into 1-sided and vice versa........................................................................................120Select a different media for a job.........................................................................................................121Shift the image roughly to create binding space................................................................................122Shift the image precisely to create binding space or correct the layout...........................................123Change the print delivery settings........................................................................................................124Change the stacking method per job...................................................................................................126Change the number of staples..............................................................................................................127Punch the output....................................................................................................................................128
Change the Job settings..............................................................................................................................130Change the number of sets...................................................................................................................130Check the first set...................................................................................................................................131Change the page range you want to print...........................................................................................132Change the use of separator sheets.....................................................................................................133Enable or disable the use of trailer pages............................................................................................134
Contents
4

Rename a job..........................................................................................................................................135Automated workflows (access through the Settings Editor)....................................................................136
Introduction to automated workflows..................................................................................................136Add an automated workflow.................................................................................................................137Edit an automated workflow.................................................................................................................138Delete an automated workflow.............................................................................................................139Restore the factory default workflow...................................................................................................140
Use hotfolders..............................................................................................................................................141Introduction to hotfolders.....................................................................................................................141Activate the hotfolder function.............................................................................................................142Create a hotfolder..................................................................................................................................143Create a shared network folder on a workstation...............................................................................144Create a hotfolder default ticket ('default_ticket.jdf')..........................................................................145
The Transaction section (optional).............................................................................................................146Introduction to the Transaction section ..............................................................................................146Output recovery in case of an error......................................................................................................149Activate transaction printing.................................................................................................................152Deactivate transaction printing.............................................................................................................153Shift the image in the transaction printing mode...............................................................................154Handle the media messages - How to handle the Media message in the tray-to-tray mode.........155
Handle the media messages - How to handle the Media message in the tray-to-media mode....156
Create a transaction setup - How to create a new transaction setup................................................157Create a transaction setup - How to change the IPDS parameters.............................................157Create a transaction setup - How to change the PCL parameters...............................................159Create a transaction setup - How to modify a transaction setup................................................160Exchange all setups between printers...........................................................................................161
Chapter 8Remote Service (ORS) (optional)..................................................................................163
Remote Service.............................................................................................................................................164
Chapter 9Remote Monitor (optional)............................................................................................167
Remote Monitor............................................................................................................................................168
Chapter 10Optional finishers and other devices............................................................................169
iXDP (integrated eXchangeable Die Punch) - VarioPrint® 6160 only......................................................170Introduction............................................................................................................................................170Operating information...........................................................................................................................171
Main parts........................................................................................................................................171Die sets available.............................................................................................................................173Empty the chip tray.........................................................................................................................174Replace a die set..............................................................................................................................175
Service information...............................................................................................................................176Inspect the die sets..........................................................................................................................176Lubricate the die sets - Lubricate the punch pins.........................................................................177Troubleshooting..............................................................................................................................179Specifications...................................................................................................................................182
Form Assist Module.....................................................................................................................................183Form Assist Module...............................................................................................................................183
EasyLift..........................................................................................................................................................184EasyLift....................................................................................................................................................184
7" x 10" Statement Size Support.................................................................................................................1857" x 10" Statement Size Support...........................................................................................................185
Dual paper tray.............................................................................................................................................187
Contents
5

Chapter 11Counters..........................................................................................................................189
Introduction to the Maintenance section....................................................................................................190Reset the day counters.................................................................................................................................192Find the meter readings...............................................................................................................................193
Chapter 12Keeping the printer running..........................................................................................195
Introduction to the Printer section..............................................................................................................196Check the status of the toner reservoirs.....................................................................................................197Add toner......................................................................................................................................................198Check the status of the staple cartridges....................................................................................................199Finisher: Add staples....................................................................................................................................200
Get access to the staplers......................................................................................................................200Add staples.............................................................................................................................................201Close the doors and covers...................................................................................................................204
Check the status of the puncher waste box...............................................................................................205Troubleshooting...........................................................................................................................................206
Appendix AMiscellaneous..................................................................................................................209
Product specifications..................................................................................................................................210
Index.................................................................................................................................213
Contents
6

Chapter 1 Preface

Trademarks
List of trademarks
Océ, VarioPrint, PRISMAaccess, PRISMAprepare, PRISMAproduction and DPlink are registeredtrademarks of Océ-Technologies B.V.
Xerox, DocuTech, DigiPath and FreeFlow are registered trademarks of Xerox Corporation.
Adobe and PostScript are registered trademarks of Adobe Systems Incorporated.
Products in this publication are referred to by their general trade names. In most, if not all cases,these designations are claimed as trademarks or registered trademarks of their respectivecompanies.
Trademarks
8 Chapter 1 - Preface

Notes for the reader
Introduction
This manual helps you to use the Océ VarioPrint® 6000+ Line. The manual contains a descriptionof the product and guidelines to use and operate the Océ VarioPrint® 6000+ Line.
Definition
Attention-Getters
Parts of this manual require your special attention. These parts can provide the following:• Additional general information, for example, information that is useful when you perform a
task.• Information to prevent personal injuries or property damage.
Symbols used in this manual
The following symbols are used in this manual to explain procedures, restrictions, handlingprecautions, and instructions that should be observed for safety.
Overview of the attention-getters
Word Icon Indicates
WARNING Indicates a warning concerning operations that maylead to death or injury to persons if not performedcorrectly. To use the machine safely, always pay at-tention to these warnings.
CAUTION Indicates a caution concerning operations that maylead to injury to persons if not performed correctly.To use the machine safely, always pay attention tothese cautions.
IMPORTANT Indicates operational requirements and restrictions.Be sure to read these items carefully to operate themachine correctly and to avoid damaging the ma-chine or property.
NOTE Indicates a clarification of an operation or containsadditional explanations for a procedure. Readingthese notes is highly recommended.
Indicates an operation that must not be performed.Read these items carefully and make sure not toperform the described operations.
Notes for the reader
Chapter 1 - Preface 9

Available documentation
Introduction
This machine is delivered with the following items:• A 'Documentation and Driver Notice'• A 'Safety Information Sheet'.
NOTEPlease check global.oce.com for the latest version of the documentation.
Main Content of the User Manuals
The following table provides an overview of the main content of the user manuals.
Main Content of the User Manuals
User Manual Main content
Operating information • Overview of the main system components• Working with the operator panel• Handling and managing jobs on the operator panel• Optional finishers and other devices• Add media, toner and staples
Maintenance tasks • Replacing parts• Cleaning parts• Solve a paper jam in the engine module
Safety information • Instructions for safe use
Available documentation
10 Chapter 1 - Preface

Chapter 2 Introduction

Introduction to the Océ VarioPrint® 6000+ Line
Introduction
The Océ VarioPrint® 6000+ Line is a series of high-volume, cut-sheet printers. The printer areintended both for document printing and stream printing.
The key feature of the machine is the Océ Gemini Instant Duplex Technology. This technologyenables the machine to print the front side and back side of a sheet at the same time. Dependingon your version, the sustained print speed, including reconditioning, ranges from 170, 200, 250 to314 images per minute (A4 / Letter) when you print a 2-sided document.
The print speed for 1-sided documents (A4/Letter) ranges from 125 images per minute (for OcéVarioPrint® 6160, 6200 and 6250) to 157 images per minute (Océ VarioPrint® 6320 only).
This section gives a short description of the main features of the printer.
Overview of the main features
• Océ Gemini Instant Duplex Technology that enables the printing of both sides of a sheet at thesame time.
• Advanced scheduling concept on the operator panel to keep the machine running.• Load and assign the media while the printer prints.• Unload the media while the printer prints.• Assign the media while the printer warms up, after the printer is initialized.• Support of up to 12 paper trays (total input capacity up to 13,800 sheets) and a roll feeder.• Support of up to 3 stackers, a finisher and other external finishers.• Support of a large range of media, media sizes and media weights.• Support of PS/PCL/PDF and streaming PS.• Support of TP (IPDS, PCL/PJL)• Support of a large range of software products, for example the Océ PRISMA series, Xerox®
FreeFlow® .• Support of RDO files via Océ DP Link.
Introduction to the Océ VarioPrint® 6000+ Line
12 Chapter 2 - Introduction

Chapter 3 Power information

The power buttons and power modes
The power buttons
The printer has the following button to control the power supply.
Button Name Description
Sleep button The Sleep button is located at the right-hand side of theoperator panel. Using the Sleep button puts the printerinto sleep mode, wakes the printer up from the sleepmode or starts up the whole system, including the PRIS-MAsync controller.When you press the Sleep button• when the system is off, the whole system starts up, in-
cluding the PRISMAsync controller.• when the system is ready, the printer is put into sleep
mode. The operator panel will be turned off, ThePRISMAsync controller remains on.
• when the system is in sleep mode, the printer wakesup from the sleep mode.
The Sleep button allows you to switch between theReady mode and the Sleep mode.
The power modes
You can find the energy saving settings in the Settings Editor under [Preferences] -> [Systemsettings] -> [Energy save modes].
The power modes
Power mode Operator panel Description
Off Off The printer and the controller are completely off. Theprinter cannot receive or print any job.
Ready On The printer is ready to print jobs.
Low power mode Off The low power mode is an energy save mode.To use the low power mode, the [Low power mode tim-er enabled] setting in the Settings Editor must be set to[Yes]. When this setting is disabled, the printer skips thelow power mode and goes into the sleep mode after thetime set for this mode.When the printer has been idle for the time defined inthe [Low power mode timer] setting, the printer goes in-to low power mode automatically.Possible values: 1 - 15 minutes.Factory default: 15 minutes.The printer wakes up when a job arrives in the list of[Scheduled jobs] or when you touch the operator panel(either the screen or any button). 4
The power buttons and power modes
14 Chapter 3 - Power information

Power mode Operator panel Description
Sleep mode Off Once the printer has been idle for the time defined in the[Sleep mode timer] setting in the Settings Editor, theprinter goes into sleep mode automatically. Comparedto the low power mode, the printer uses less energy.Possible values: 16 - 240 minutes.Factory default: 30 minutes.The printer wakes up when:• You press the Sleep button on the operator panel, or• A wake-up timer expires, provided that the wake-up
timer is enabled in the Settings Editor, or• A job arrives in the list of [Scheduled jobs], provided
that the [Automatic wake-up enabled] setting in theSettings Editor is set to [Yes].
Press the Sleep button at the right-hand side of the op-erator panel to put the printer into the sleep mode man-ually. The printer goes into the sleep mode after all jobsare finished.
The power buttons and power modes
Chapter 3 - Power information 15

Turn on the system
Procedure
1. Press the Sleep button at the right-hand side of the operator panel.
The power switch must be turned on.
Turn on the system
16 Chapter 3 - Power information

Shut down the system
Illustration
[1] Shut down the system
Procedure
1. Touch [System] -> [Setup] -> [Shut down system].The operator panel displays the message [Are you sure you want to shut down?].
2. Press [Yes].A message indicates when the shut down will begin.When the shut down is complete, the operator panel will be off.
3. To shut down the system completely, switch the On/Off button of each connected finishing unitinto the "O" position.
Shut down the system
Chapter 3 - Power information 17

Restart the system
Introduction
You can restart the system via the Settings Editor (under [Support] -> [Troubleshooting]) or viathe printer operator panel.
Illustration
[2] Restart the system
Procedure
1. Touch [System] -> [Setup] -> [Shut down system].The operator panel displays the message [Are you sure you want to shut down?].
2. Press [Restart].
Restart the system
18 Chapter 3 - Power information

Chapter 4 Main parts

Introduction to the main system components
Introduction
The following illustration shows the main system components. The table describes the maincomponents. Please follow the links in the table for comprehensive information.
1
2
3
4
3
1
2
5 6 74
8
[3] The main system components
The main system components
Component Function
1 Operator panel The operator panel helps you with your daily work, forexample the scheduling of the jobs. Furthermore, theoperator panel helps you to solve errors or performmaintenance tasks (see The operator panel onpage 22).
2 Operator attentionlight
The operator attention light enables you to check thestatus of the system from a distance (see The operatorattention light on page 28).
3 Roll feeder (optional) A roll feeder is an optional device that adds paper inputcapacity to your printer. When you use a roll feeder, youcan only use 1 or 2 paper modules. A combination of 3paper modules and a roll feeder is not possible. The op-erator panel displays the roll feeder and gives feedbackabout the status of the roll feeder. For example whetherthe roll is full or empty. Please refer to the documenta-tion of the roll feeder manufacturer for more informa-tion, for example about replacing an empty roll.
4 Paper module The paper module contains 4 paper trays. The papertrays contain the media that will be printed. The defaultconfiguration of the system contains 1 paper module.You can add 1 or 2 more paper modules to the defaultconfiguration to increase the media input capacity (seeThe paper modules on page 26).
5 Engine module The engine module contains the components that printthe media. Access to the engine module is only requiredwhen a paper jam occurs or when maintenance is re-quired. The doors at the left-hand side and right-handside of the engine module give access to the toner units. 4
Introduction to the main system components
20 Chapter 4 - Main parts

Component Function
6 Puncher (optional) The puncher (iXDP) can make holes in the prints. Thenumber of holes depends on the die set that is installed(see Replace a die set on page 175).
7 Stacker The stacker is the output location of a default configura-tion. The system supports up to 3 stackers (see The out-put locations on page 29).
8 Finisher (optional) The finisher on top of the stacker is an optional outputlocation for the print jobs. The finisher can staple thejobs (see The output locations on page 29).
Introduction to the main system components
Chapter 4 - Main parts 21

The operator panel
Introduction
The operator panel helps you to carry out print jobs. This section describes the main componentsof the operator panel.
1
10
2
3
4
5 7 8
9
6
[4] The operator panel
The main components of the operator panel
Component Function
1 Sleep button Put the system into the sleep mode or wake up thesystem.
2 Stop button Stop the printing process after a set or as soon aspossible.
3 Paper tray button Get immediate access, after the printer is initialized,to the [Trays] section on the operator panel to dothe following (for example):• Check the content of all paper trays.• Load a new media type into a paper tray.• Change the media type which is available in one
of the paper trays.
4 USB port Insert a USB drive into the USB port to:• Print any documents on the USB drive.
5 [Schedule] button Access the [Schedule] view to manage the jobs inthe schedule.
6 [Jobs] button Manage and print the jobs in the lists of [Waitingjobs], [Scheduled jobs] and [Printed jobs].
7 [Trays] button Access the [Trays] section on the operator panel todo the following, for example:• Check the content of all paper trays.• Load a new media type into a paper tray, or• Change the media type which is available in one
of the paper trays. 4
The operator panel
22 Chapter 4 - Main parts

Component Function
8 [System] button Access the [System] section to do the following, forexample:• Check the status of the toner, staples and other
supplies.• Read counters.• Start maintenance.• Set up the preferred workflows.• Change a number of default system settings such
as the language.• Adjust the brightness and contrast of the LCD
panel.• Shut down the printer.• View the content of the media catalogue or add
temporary media to the media catalogue.
9 Dashboard The dashboard displays information about the sys-tem status such as:• Information about the current printing process.• Information about operator intervention that is
required soon.• Information about errors.• Information about the status of the toner reser-
voir and staple cartridges.
10 Status LED The status LED displays the status of the system:• Red LED
The machine has stopped, for example because arequired media type is not available or an errorhas occurred. Operator attention is required now.
• Orange LEDThe machine will stop soon, for example becausemore paper is required. Operator attention is re-quired soon.The orange light illuminates when the machinereaches the warning time. The warning time is atime you can set to determine when the orangelight must illuminate. You can set the warningtime in the [System] view of the operator panel.
• Green LEDThe machine is busy printing. The machine canprint longer than the set warning time. Operatorattention is not required.
• LED offThe machine is idle or off. There are no jobsscheduled for printing and no operator attentionis required.
The operator panel
Chapter 4 - Main parts 23

The dashboard
Introduction
The dashboard is the upper blue part of the operator panel. The dashboard is always visible,irrespective of the current view. The dashboard shows the following.• The status of the system• The current process• Instructions for the operator• The status of the supplies• The status of the external finisher, if applicable• Whether maintenance is required.• The [Resume] button after you stopped the printer.
Illustration
The following illustration shows the dashboard while the machine is busy. The vertical status baris green. No action is required.
[5] The dashboard - No action is required
The following illustration shows the dashboard while the machine is busy. The vertical status baris orange. Next to the status bar, the dashboard displays a message that indicates which action isrequired soon.
[6] The dashboard - Action is required soon
The parts of the dashboard
The dashboard
Number Function
1 Display the status of the machine, for example [Initializing...], [Print-ing...] or [Printing will stop...]. Each status message can have a sub-message with additional information. 4
The dashboard
24 Chapter 4 - Main parts

Number Function
2 Display the file name of the current job (for document printing) or cur-rent stream (for stream printing). Furthermore, the progress of the cur-rent job is displayed.For document printing, the counter can display the following informa-tion.• Set X of Y• Sheet X of Y or Sheet X.
X represents the current status of the print job. Y represents the totalnumber of sets or sheets of a print job.When the sorting method for a job is set to [By set], and a set containsat least 40 pages, then the dashboard displays the set count (Set X ofY) and the sheet count (Sheet X of Y) for the set. If a set contains lessthan 40 pages, then the dashboard only displays the set count (Set X ofY).If the sorting method for a job is set to [By page], or when you printstream jobs, the dashboard only displays a sheet count.
3 Display the action that you must do now or soon. The colors of the ver-tical status bar at the left-hand side match the colors of the LED on theoperator panel and the operator attention light. When the color is or-ange or red, a message indicates the required action.Orange means that action is required soon. How long before an up-coming action the operator panel starts to display the message de-pends on the defined warning time (Change the warning time onpage 44).Red means that action is required now.
NOTEThe operator panel can only display one message at a time.When there are more messages, the operator panel displaysthe first required or most important message.
4 • Display the status of the external finisher, if applicable.• Display the status of the staple cartridges (Check the status of the
stapler cartridges on page 199).• Display a warning that maintenance is required. When maintenance
is required soon, the maintenance icon becomes orange . Whenmaintenance is required now, the maintenance icon becomes red .
• Display the status of the toner reservoirs (Check the status of the to-ner reservoirs on page 197).
NOTEOnly key operators who received the special maintenancetraining are allowed to do maintenance tasks.
The dashboard
Chapter 4 - Main parts 25

The paper modules
Introduction
The paper trays contain the media that are required for the print jobs. The default configuration ofthe machine contains 1 paper module with 4 paper trays.• Two standard trays with a capacity of 600 sheets each.• Two bulk trays with a capacity of 1,700 sheets each (or 3,300 A4/Letter sheets each when the
optional dual paper trays are installed)
Contact your local authorized dealer for more information about the dual paper trays.
You can add 1 or 2 more paper modules to the machine. Then the total number of paper trays isextended to 8 or 12 respectively. You can find more information about the capacities of the papertrays and the supported media size in the appendix of this manual.
This section describes the control panel on each paper module.
NOTEYou can use the control panel on the paper modules to open the paper trays and load the media.However, the recommended way to open the paper trays and assign the media is via the[Schedule] view. You can also open the paper trays and/or assign the media via the [Trays] view(see Assign the media to a paper tray on page 59).
The control panel
1
2
3
4
1
2
3
4
1 3
2
5
4
[7] The control panel on the paper modules
Each paper module contains a control panel next to the upper paper tray. The control panelconsists of 4 sections that correspond with the 4 paper trays. Each section displays the currentfilling level of the corresponding paper tray. Furthermore, the control panel indicates whether themedia in the paper tray is assigned or not. The following table describes the various parts of thecontrol panel.
The parts of the control panel
Number Description
1 The LEDs indicate the current amount of sheets in the corresponding papertray. Each lit-up LED indicates the presence of about 100 sheets (based onmedia of 80 g/m2 or 20 lb bond).
2 Press the button to open the corresponding paper tray. You can only open 1paper tray at a time. 4
The paper modules
26 Chapter 4 - Main parts

Number Description
3 When the check mark is green, the media in the paper tray is defined. Thesystem knows which media is in the paper tray.
4 When the arrows are red, the media in the paper tray is not defined. Thesystem does not know which media is in the paper tray. The [Trays] view onthe operator panel indicates that no media is assigned to the paper tray.
5 The [Not assigned] button. This button applies to the paper tray where youjust put the media.You can press the [Not assigned] button when you load a new media typeinto a paper tray without defining this media type on the operator panelfirst. Then the printer cannot accidentally use the media in this paper traybefore the media is correctly defined on the operator panel. You can definethe media type in the [Trays] view on the operator panel later (see Assignthe media to a paper tray on page 59).
NOTEMake sure that the paper tray is open when you press the [Not as-signed] button.
The paper modules
Chapter 4 - Main parts 27

The operator attention light
Introduction
The operator attention light informs you about the status of the machine. To improve theproductivity, the operator attention light can warn you some time before the machine stops. Youcan set the warning time on the operator panel.
The colors of the lights match the status that is currently indicated on the operator panel (Thedashboard on page 24).
[8] The operator attention light
Status colors
The colors of the operator attention light
Color Description
Red The machine has stopped, for example because a required mediatype is not available or an error has occurred.Operator attention is required now.
Orange The machine will stop soon, for example because an output loca-tion is almost full. The orange light lights up when the machinereaches the warning time.Operator attention is required soon.
Green The machine is busy printing. The machine can print longer thanthe defined warning time.Operator attention is not required.
All lights off The machine is idle. There are no jobs scheduled for printing.
The operator attention light
28 Chapter 4 - Main parts

The output locations
Introduction
The machine supports several output locations for the printed jobs. The default configuration ofyour machine contains a stacker and the system output. The finisher is an optional outputlocation. Furthermore, you can connect several optional external finishers to the machine.
NOTEYou need the optional finisher or another optional external finisher to staple the jobs.
3
1
2
4
[9] The output locations
Overview of the output locations
Component Description
1 [Stacker] The stacker is the default output location of the machine. The stackercapacity is 6,000 sheets, in 2 stacks of 3,000 sheets each (80 g/m² or 20lb. bond).The stacker does not contain staple cartridges. Therefore, the stackercannot be the output location for jobs that require staples.
2 [System output] The system output is the output location for the following prints.• Error prints• Sample prints• Configuration reports• Job tickets• The test sheets for the media registration.• The test sheets for the media quality.
Make sure that you regularly remove the sheets from the system out-put.
3 [Finisher] (op-tional)
The optional finisher contains the following output trays.• 3 output trays• 1 upper output (see no. 4 below)
The finisher contains 2 staple cartridges to staple the jobs. The 3 outputtrays can receive A4, Letter and similar media sizes. Stapled jobs (A4,Letter and similar media sizes only) go into the output trays. The totalcapacity of the output trays is 3,700 sheets (80 g/m² or 20 lb bond).
NOTEThe output trays cannot receive tab sheets. 4
The output locations
Chapter 4 - Main parts 29

Component Description
4 [Finisher upperoutput]
The finisher upper output is part of the finisher. The upper output canreceive all formats. However, the upper output is mainly intended forlarge media or jobs with mixed size media. The maximum capacity ofthe upper output is 500 sheets (80 g/m² or 20 lb bond).
NOTEThe upper output does not contain staple cartridges. There-fore, the upper output cannot be the output location for jobsthat require staples.
The output locations
30 Chapter 4 - Main parts

Chapter 5 Adapt printer settings to yourneeds

Access the Settings Editor
Introduction
The Settings Editor is a web-based application and therefore accessible via an Internet browser.The Settings Editor enables you to manage settings or to display information in the followingareas.• [Media]• [Preferences]• [Workflow]• [Configuration]• [Support]• [Transaction printing] (optional)
Before you begin
Make sure you have the following information.• The IP address or host name of the PRISMAsync controller.• The key operator password to change all settings except for the settings in the [Configuration]
tab.• The system administrator password to change all settings including the settings in the
[Configuration] tab.
Procedure
1. Open your web browser.
NOTEWhen the Settings Editor does not display the correct language, you can change the preferredlanguage in the Internet options of your Internet browser. The desired language must be first inthe list of languages.
2. In the address bar, enter the IP address or host name of the PRISMAsync controller.The Settings Editor application appears.
You can now make the required changes.
Access the Settings Editor
32 Chapter 5 - Adapt printer settings to your needs

Change a number of settings in the Settings Editor viathe operator panel
Introduction
NOTEThe information contained in this section is primarily intended for key operators and systemadministrators.
The Settings Editor application on the PRISMAsync controller is a web based application thatallows key operators and system administrators to adapt the system to the situation in anorganization and production environment. The Settings Editor allows key operators and systemadministrators to manage settings regarding to network configuration, system preferences, jobpreferences and media, for example.
For convenience reasons, a subset of frequently used settings is accessible through the operatorpanel.
Settings available via the operator panel
Group of settings Available settings Short description
[About] • [Serial number](read-only)
• [Version of printersoftware] (read-on-ly)
• [Upgrade software(from USB)]
• [Upgrade software(from server)]
The [About] section allows you to look up theserial number and software version of theprinter.
[Software licenses] • [Upload license] When you have a new license to activate anew feature on the printer, you can upload thelicense through this section. After uploadingthe license, the feature becomes active.You can only use this section after you inser-ted an USB drive in an USB port of the PRIS-MAsync controller or on the operator panel.Follow the instructions on the operator panelwhen you upload the license. 4
Change a number of settings in the Settings Editor via the operator panel
Chapter 5 - Adapt printer settings to your needs 33

Group of settings Available settings Short description
[Logging] • [Save the data-dump file]
• [Save the trace file]• [Print the configura-
tion report]
When an error occurs, the help desk of yourprinter supplier can ask you to create and senda trace file and a datadump file. The datadumpfile is a .zip file that contains detailed technicalinformation about your system. Furthermore,the system can store trace log files in .zip files.You can save both .zip files to a USB drive.The configuration report contains informationabout the configuration of your printing sys-tem, for example information about the sys-tem configuration, controller configuration andnetwork settings. You can print the configura-tion report for backup purposes, for example.Follow the instructions on the operator panelwhen you save a file or print a report.
[Connectivity] • [MAC address](read-only)
• [Host name]• [Link speed and
connection type]• IPv4 settings• IPv6 settings• DNS settings• WINS settings• [Test the TCP/IP
connection]
The [Connectivity] section contains the mainsettings to integrate the printer into a network.After you have adapted the network settings,you can test the connection from here.Follow the instructions on the operator panelwhen you adapt the network settings.
[Remote connection](optional)
• [Remote connectionstatus] (read-only)
• [Remote connectionenabled]
• [Remote Servicecountry code]
• [Test Remote con-nection]
The [Remote connection] section (optional)contains the settings to enable the remote con-nection and to configure the Remote Service.See also Remote Service on page 164.
NOTEOnly Service can adapt the remoteconnection settings. After Serviceadapts the remote connection set-tings, you can test the remote con-nection with this setting. 4
Change a number of settings in the Settings Editor via the operator panel
34 Chapter 5 - Adapt printer settings to your needs

Group of settings Available settings Short description
[System settings] • [Date and time]• [System of meas-
urement]• [Time zone]
The [System settings] section contains settingsto change the date and time of the system, orthe system of measurement used. When youchange the system of measurement, all corre-sponding values on the system will bechanged. For example, when you change [Met-ric] into [Imperial], all length values will be dis-played in inches.
Procedure
NOTEThe key operator PIN or the system administrator password is required to make changes in thissection.
1. Touch [System] -> [Setup] -> [Local key operator settings] (under [Advanced]).2. Touch the button of the group that contains the setting you want to change or view.3. Touch the required setting.4. Look up the required information or make the required changes.5. If you make a change, touch [OK] to confirm.6. Press [Close].
Change a number of settings in the Settings Editor via the operator panel
Chapter 5 - Adapt printer settings to your needs 35

Introduction to the [Setup] section
Introduction
The [System] view gives access to system settings, system information, media information andmaintenance tasks.
This section gives an overview of the [Setup] section in the [System] view.
Overview of the [Setup] section
[10] Overview of the [Setup] section
The items of the [Setup] section
Item Function More information
[Workflow] Display the main settings of the cur-rent workflow profile. These settingsare read-only.
[Workflow profile] button Define a workflow profile that match-es your needs.
Work with the workflowprofiles on page 38
[Language] button Change the language of the operatorpanel.
Changing the language onpage 43
[Warning time] button Define the moment when the systemwarns you about an action that is re-quired soon, for example 10 minutesin advance.
Change the warning timeon page 44
[Job name truncation] but-ton
Define how the system truncates ajob name.
Truncate the job name onpage 46 4
Introduction to the [Setup] section
36 Chapter 5 - Adapt printer settings to your needs

Item Function More information
[Operator panel settings]button
Adjust the brightness and contrast ofthe operator panel.
Adjust the brightness andcontrast of the operatorpanel on page 47
[Shut down system] button Shut down the system in a controlledway.
Shut down the system onpage 17
[Advanced media settings]button
Define a number of special media-re-lated settings.
Change the advanced me-dia settings on page 80
[Intermediate check print]button
Print a test sheet of a running job tocheck the quality.
Make an intermediatecheck print on page 42
[PrintGuard module] but-ton
Enable or disable the use of thePrintGuard (optional).
[Local key operator set-tings] button
Get direct access to a number of im-portant key operator settings in theSettings Editor on the PRISMAsynccontroller.
Change a number of set-tings in the Settings Editorvia the operator panel onpage 33
Introduction to the [Setup] section
Chapter 5 - Adapt printer settings to your needs 37

Work with the workflow profiles
Introduction
The machine is used in different printing environments. Each environment requires other settingsto optimize the workflow or to meet your personal workflow preferences. The machine contains anumber of default workflow profiles to help you optimize your workflow. The default workflowprofiles are combinations of frequently used settings for print jobs ([Receive], [Print] and[Output]). However, the workflow profiles cannot cover all the possible workflows you may need.Therefore, you can also define the settings individually (custom workflow).
This section makes recommendations about when to use which workflow profile. Furthermore,this section describes the settings and the effects of the settings.
NOTEThe [Workflow profile] button in the [Setup] section of the [System] view displays the name ofthe selected workflow profile. When you customized the settings of a workflow profile, thebutton displays the text [Custom].
The workflow profiles
[11] The workflow profiles screen
The use of the default workflow profiles
The following table makes recommendations about when to use which default workflow profile.
When to use which workflow
Profile When to use
[Standard] You need a productive workflow but you still want to have sufficientcontrol over the jobs. 4
Work with the workflow profiles
38 Chapter 5 - Adapt printer settings to your needs

Profile When to use
[Job by job] You want to start the jobs one by one. Each time a job has been prin-ted, the machine goes on hold. Always touch [Resume] in the dash-board to start the next job.
[Check and print] You want to check the quality and layout of each first set of a job be-fore the remaining sets will be printed.
[Manual planning] The jobs are sent to the machine in a random order. You can manuallydefine the most productive order in which the machine will print thejobs.
[Unattended] You want to continue printing while you are absent, for example afterworking hours. Then the machine will print the scheduled jobs, provi-ded that all the required media, supplies and output locations are avail-able.
The default settings of each workflow profile
The following table gives an overview of the default [Receive] and [Print] settings of eachworkflow profile.
The [Receive] and [Print] settings
Workflow profile [Receive] settings [Print] settings
[Destination of printjob]
[Confirm start of job] [Check first set]
[Standard] [Scheduled jobs] [Off] [As in job]
[Job by job] [As in job] [On] [As in job]
[Check and print] [Scheduled jobs] [Off] [On]
[Manual planning] [Waiting jobs] [Off] [As in job]
[Unattended] [As in job] [Off] [Off]
The following table gives an overview of the default [Output] settings of each workflow profile.
The [Output] settings
Workflow profile [Output] settings
[Next output tray] [Offset stacking] [Link output loca‐tions]
[Standard] [After each job] [Sets (as in job)] [On]
[Job by job] [After each job] [Sets (as in job)] [On]
[Check and print] [After each job] [Sets (as in job)] [On]
[Manual planning] [After each job] [Sets (as in job)] [On]
[Unattended] [When tray is full] [Banners] [Off]
NOTEThe setting [Link output locations] is only visible when 2 or more equally configured stackers areavailable. For example, you cannot link the stackers when 1 stacker is configured for face-upmedia, while the other is configured for face-down media. Furthermore, it is not possible to linka stacker to a finisher.
Work with the workflow profiles
Chapter 5 - Adapt printer settings to your needs 39

Values and effects of the settings
The following table describes the effects of the various values of the settings.
Values and effects of the settings
Setting Values Effect
[Destination ofprint job]
[Scheduled jobs] The jobs are immediately sent to the list of [Scheduledjobs]. The machine will print the jobs in the ripped order.You can do the following to rearrange the order in whichthe jobs will be printed.• Move jobs to the list of [Waiting jobs] or• Use [To top] to move a job to the top of the list of
[Scheduled jobs] (Give priority to a scheduled job onpage 112).
[Waiting jobs] You can manually define the order in which the jobs willbe printed.
[As in job] The submitted jobs go to the destination that is indica-ted in the job ticket.
[Check first set] [On] The machine goes on hold after the first set of a job isprinted. You can check the quality and layout of the firstset before the machine prints the remaining sets.
[Off] The machine will print the whole job without stoppingafter the first set.
[As in job] The machine will print the jobs as indicated in the jobticket.
[Confirm start ofjob]
[On] The machine always stops before the next scheduledjob. You must press the Release key to start each job.
[Off] The machine prints the scheduled jobs one after the oth-er. The machine does not stop before the next scheduledjob, unless there is a reason to stop. For example whena media is not available.
[On conflict] The machine stops before a job when one or more set-tings are overruled by the controller.
[Next output tray] [After each job] Each job is sent to the next available output tray. In thiscontext, the second stack of the stacker is also definedas an output tray.
[When tray is full] All the jobs are stacked until an output tray is full. Whenan output tray is full, the next jobs are sent to the nextoutput tray. 4
Work with the workflow profiles
40 Chapter 5 - Adapt printer settings to your needs

Setting Values Effect
[Offset stacking] [Jobs] Each printed job that is delivered to an output location isstacked on top of the previous printed job with an offset.This helps you to identify the various jobs.
[Sets (always)] The offset stacking is defined per N sets. By default, thisnumber is 1. If a number is specified, this specified num-ber of printed sets of a job will be delivered to an outputlocation in one straight stack, the next number of printedsets are stacked with an offset. When the number of re-quested sets in a job is lower than or equal to N, the setsare not stacked with an offset. However, the whole job isstacked with an offset with respect to the previous job.
[Sets (as in job)] Each printed set is delivered to the output location as in-dicated in the job ticket. Therefore, the sets can bestacked in one straight line or with an offset.
[Banners] Each banner page of a job is delivered to the output lo-cation with an offset. This helps you to identify the sepa-rate jobs. The jobs themselves are stacked in onestraight line.
[Off] All the printed jobs or sets are stacked in one straightline. There is no offset between the jobs or sets.
Work with the workflow profiles
Chapter 5 - Adapt printer settings to your needs 41

Make an intermediate check print
Introduction
The machine has a function that enables you to make a check print while a job is printed. Thisfunction is called the intermediate check print. When you use this function, the machine prints acopy of the sheet that is printed at the moment you press the [Intermediate check print] button.You can use this sheet to check whether the quality and consistency of the prints still meet yourrequirements.
This section describes how to make an intermediate check print.
NOTEYou can also press the [Intermediate check print] button when a job has not yet started. As soonas you start printing, a copy of the first sheet of the job will be printed.
NOTEIn the Settings Editor, you can also set the [Interval of intermediate check print].
[12] Make an intermediate check print
Procedure
1. On the operator panel, press the [System] button.2. Press [Setup].3. Touch the [Intermediate check print] button in the [Advanced] section.
The intermediate check print is sent to the system output (see The output locations on page 29).
Make an intermediate check print
42 Chapter 5 - Adapt printer settings to your needs

Changing the language
Introduction
This section describes how to change the language of the operator panel.
Procedure
1. On the operator panel, press the [System] button.2. Press the [Setup] button.
[13] Changing the language
3. Press the [Language] button in the [Operator panel] section.An overview of the available languages appears.
[14] Overview of the available languages
4. Select your language, for example [English (UK)].5. Press [OK].
The language is changed.
Changing the language
Chapter 5 - Adapt printer settings to your needs 43

Change the warning time
Introduction
When operator interaction is required now or soon, the LED on the operator panel and theoperator attention light can warn you. This is a trigger that action is required now or soon, forexample load a required media type or empty an output location. You can define how long inadvance the warning message is displayed.
By factory default, the function [Warning in advance] is enabled and set to 10 minutes. Then thedashboard starts to display the warning 10 minutes before an action becomes inevitable. If youdo not respond to the warning message, the printer will stop. Depending on the urgency of thewarning message, the LED on the operator panel and the operator attention light are orange orred.
NOTEYou can only change the warning time when the [Warning in advance] function is enabled.
[15] Change the warning time
Procedure
1. Touch [System] -> [Setup] -> [Warning time].2. Touch the - or + button to decrease or increase the warning time in steps of 1 minute. You can set
a time from 1 - 60 minutes.3. Press [OK].
Change the warning time
44 Chapter 5 - Adapt printer settings to your needs

Disable the warning time
Introduction
When operator interaction is required now or soon, the dashboard and the operator attentionlight warn you. However, you can disable this warning function.
[16] Disable the warning time
Procedure
1. Touch [System] -> [Setup] -> [Warning time] (under [Operator panel]).When the box for [Warning in advance] has a check mark and states [On], the function is enabled.
2. Touch the [Warning in advance] button.The check mark disappears. The status [On] changes into [Off].
3. Press [OK].
Disable the warning time
Chapter 5 - Adapt printer settings to your needs 45

Truncate the job name
Introduction
In the [Jobs] view, the operator panel displays all jobs with their job names. If a job name is toolong, the systems truncates the job name. To enable you to identify your jobs in the lists moreeasily, you can define how the system truncates the job names. This allows you to keep theidentifying part of the job name. You can choose to truncate the job name at the beginning or atthe end of the name.
Illustration
[17] Job name truncation
Procedure
1. Touch [System] -> [Setup] -> [Job name truncation] (under [Operator panel]).2. For [Truncate job name at], select [Beginning] or [End].3. Touch the - or + button to indicate the number of characters before truncation.4. Press [OK].
Truncate the job name
46 Chapter 5 - Adapt printer settings to your needs

Adjust the brightness and contrast of the operatorpanel
Introduction
You can adjust the brightness and contrast of your monitor to improve the readability of theoperator panel. The required brightness and contrast settings can depend on the lighting in yourroom, for example.
Setting Description
[Auto adjust] The screen of the operator panel will automatically set the correctratio of brightness and contrast.
[Brightness] You can increase or decrease the brightness from level 20 to 100in steps of 1. The higher the value, the higher the brightness.
[Contrast] You can increase or decrease the contrast from level 10 to 100 insteps of 1. The higher the value, the higher the contrast.
Illustration
[18] Adjust brightness and contrast
Procedure
1. Touch [System] -> [Setup] -> [Operator panel settings].2. Touch [Auto adjust] to optimize the brightness and contrast of the screen automatically.3. Touch [OK] when the brightness and contrast are OK, or continue with the steps below when
these settings are not yet OK.4. Touch '-' to decrease or '+' to increase the [Brightness].
Adjust the brightness and contrast of the operator panel
Chapter 5 - Adapt printer settings to your needs 47

5. Touch '-' to decrease or '+' to increase the [Contrast].6. Press [OK].
Adjust the brightness and contrast of the operator panel
48 Chapter 5 - Adapt printer settings to your needs

Chapter 6 Media handling

Introduction to the [Schedule] view
Introduction
The [Schedule] is your daily planning board for print jobs. The [Schedule] helps you to keep themachine running.
This section shows and describes the main parts of the [Schedule].
NOTEThe descriptions of the colors of the bars and the indication of the required amount of sheets areonly valid for document printing. For streaming jobs , all the bars remain grey until the papertrays are empty or the output locations are full. Then the machine stops and the bars becomered. Furthermore, the media toolbar does not indicate the required amount of sheets.
The [Schedule] view
[19] The [Schedule] view
1. The Jobs Pane
The jobs pane shows the jobs on a timeline. The width of the job corresponds to the (remaining)print time. A vertical line separates the jobs. The vertical line moves to the left as the printing of ajob progresses.
An icon and the job name represent a job. The icon indicates the state of the job, for exampleprinting .
Furthermore, the icon indicates the stop moments of the machine. For example, when thesetting [Confirm start of job] in the workflow profiles (see list of references below) is set to [On] orwhen you use the [Stop after job] function.
Introduction to the [Schedule] view
50 Chapter 6 - Media handling

2. The [Required media] pane
The [Required media] pane displays the media that are required for each scheduled job. For eachrequired media, the media properties are displayed (see list of references below). The bars showthe availability of the media. The bars can have the following colors.
The colors of the bars
Color of the bar Description
Green The required media is available.
Orange The media is required in the future, but not available then. For examplebecause the paper trays do not contain sufficient sheets of the requiredmedia.
Yellow The system cannot determine the exact number of sheets that is availa-ble in the paper trays.
Red The media is required now, but not available. The job can only startwhen you load the required media.
When you print small jobs, the bars for these jobs may not be completely visible. To prevent thatyou do not see the status of these small jobs, the operator panel can show the following images.
When you set the zoom control (5) to a shorter time-scale, in most cases the operator panel willdisplay bars for these small jobs.
The possible display of small jobs
Image Description
Green. The required media is available.
Orange. The media is required in the future, but not available then. Forexample because the paper trays do not contain sufficient sheets of therequired media.
Red. The media is required now, but not available. The job can onlystart when you load the required media.
3. The Media Toolbar
The media toolbar displays the following information for the media that is selected in the[Required media] pane. Furthermore, the media type toolbar contains the [Load] button to loadand assign the required media.
The icons in the media toolbar
Icon Description
The list of [Required media] shows the required media for the sched-uled jobs. When the paper module indicator is completely grey, thismeans that not one of the required media is available in the papertrays.
The list of [Required media] shows the required media for the sched-uled jobs. When a paper tray is highlighted in green, the highlightedpaper tray contains a media that is required by one of the scheduledjobs. 4
Introduction to the [Schedule] view
Chapter 6 - Media handling 51

Icon Description
The list of [Required media] shows the required media for the sched-uled jobs. When a paper tray is highlighted in blue, the highlighted pa-per tray contains the media that is also highlighted in blue in the list of[Required media].
4. The Output Locations Pane
The output locations pane displays the output locations that are required for the scheduled jobs.The bars show the availability of the output locations. The bars can have the following colors.
The colors of the bars
Color of the bar Description
Green The output location is required and available.
Orange The output location is required in the future, but not available then. Forexample, because the output location will be full soon.
Red The output location is required now, but not available. For example, be-cause the output location is full.
Gray The output location is required, but availability is unknown.
5. The zoom control
The zoom control enables you to adjust the time scale visible in the [Schedule]. When you touchthe zoom button, a drop-down list appears. Then you can select the desired time scale (fiveminutes - eight hours).
Introduction to the [Schedule] view
52 Chapter 6 - Media handling

Load the media
Introduction
This section describes how to load the media into a paper tray.
When you load the media via the [Load] button in the [Schedule], the paper tray is automaticallyassigned to the correct media.
When you load and assign the media via the [Assign] button in the [Trays] view, you must assignthe paper tray to the loaded media manually.
When no external finisher is connected to the machine, you must put all the media types face upand header up into the paper trays. The tabs of tab sheets must be at the right-hand side. Whenan external finisher is connected to the machine, it is possible that you must put the media intothe paper trays in a different way. Refer to the documentation of the external finisher for moreinformation about how to place the media.
When to do
• The [Schedule] displays a red bar next to a required media. The red bar indicates that ascheduled job now requires a media that is not available in the paper trays.
• The [Schedule] displays an orange bar next to a required media. The orange bar indicates thata scheduled job requires media which is either not available in the paper trays or which isavailable, but not in sufficient quantity to finish the job.
• The current job requires more of the same media than is currently loaded in the paper trays.You can add more of the required media into another paper tray.
• You already want to load and assign media that are required for the next job (work ahead).
IMPORTANTAlways put the stack of media at the left-hand side of the paper guides inside the paper trays, asindicated on the sticker inside the paper trays.
Procedure
1. Put a small stack of the media into the paper tray.2. Pinch the green handle of the right-hand guide and push the guide against the edge of the media.3. Turn the green knob to adjust the front guide and the rear guide.4. Put the rest of the media on top of the small stack.
NOTEWhen you want to assign the media later you must press the [Not assigned] button.
Load the media
Chapter 6 - Media handling 53

Load media via the [Schedule] view
Introduction
When the [Schedule] view is available on your printer, you can load and assign the requiredmedia directly in the [Schedule] section.
NOTEWhen you load a different media size, you must also set the paper guides inside the paper trayto the correct dimensions.
Illustration
[20] Load the media
Procedure
1. Touch the button for the media you want to load, for example Special A4.2. Press [Load].
The [Trays] view appears.3. On the screen, touch the paper tray where you want to load the media.4. Touch [OK] to open the paper tray.5. Load the media into the paper tray.
The system assumes you loaded the selected media type, in this example Special A4. The systemwill automatically assign Special A4 to that paper tray.
NOTEYou can always change the assigned media type later by touching the [Assign] button.
6. Gently close the paper tray.
Load media via the [Schedule] view
54 Chapter 6 - Media handling

Related information
Introduction to the Schedule view on page 50
Load media via the [Schedule] view
Chapter 6 - Media handling 55

Introduction to the Trays view
Introduction
The [Trays] view has the following functions.• Display the current content and filling level of the paper trays.• Open the paper trays and assign the required media for the print jobs.• Change the media that is currently assigned to a paper tray.• Assign media to a paper tray when you already loaded the media and pressed the button for
[Not assigned] on the control panel of the paper module (The paper modules on page 26).• Unassign media from a paper tray.• Perform a media registration.
This section describes the items of the [Trays] view.
NOTEThe machine can have 1, 2 or 3 paper modules, possibly combined with a roll feeder. When themachine has more than 1 paper module, the [Trays] view displays all the available papermodules.
[21] Example of a configuration with 1 paper module
The items of the [Trays] view
Description of the [Trays] view
Item Function
Content of the paper trays Indicate the current content and filling level of the paper trays.The [Trays] view displays the parameters of the media that arecurrently in the paper trays. The parameters are a combinationof icons and texts (The paper tray information on page 57). 4
Introduction to the Trays view
56 Chapter 6 - Media handling

Item Function
[Assign] button Assign media from the media catalog (Assign the media to apaper tray on page 59).
[Unassign] Unassign media from the selected paper tray.
[Open] button Open the selected paper tray to load the media (Load the mediaon page 53).
[Registration] Perform a media registration for the selected media (Perform amedia registration for standard-size media - Print the testsheets and create the ruler on page 65, Perform a media reg-istration for large media - Print the test sheets and create theruler on page 72)
Arrow buttons When your configuration contains more paper modules thanthe [Trays] view can display in 1 screen, you can touch the ar-row buttons to change part of machine displayed.
The paper tray information
The [Trays] view displays the following textual information for each paper tray.• The media name, for example 'Normal paper'• The media size, for example A3 or A4• The media weight, for example 80 g• The media color• The special characteristics of the media, for example [cyclic] or [punched]. In brackets,
additional information is given about these media, for example the cycle count or the numberof holes for punched media.
The [Trays] view displays the following icons for each paper tray.
The meaning of the icons
Icon Description
The paper tray is empty
The paper tray is full
NOTEEach line indicates the presence of about 100 sheets
The paper tray is too full. Please remove sheets from the stack
The plate inside the paper tray is down
The paper tray is open
The paper guides inside the paper tray do not match the selected me-dia size. You must correct the paper guides or the selected media
or
The paper tray contains media that are fed over the long edge (LEF) or short edge (SEF) . The small icons indicate A4 or A4-like media.The large icons indicate A3 or A3-like media. When you defined a colorfor a media, the icon can have that color
The paper tray is in use for one or more scheduled jobs
The paper tray contains tab sheets 4
Introduction to the Trays view
Chapter 6 - Media handling 57

Icon Description
The paper tray contains tab sheets that must be processed as inserts
The paper tray contains inserts
The paper tray contains media that are fed over the long edge (LEF)
The paper tray contains media that are fed over the short edge (SEF)
Introduction to the Trays view
58 Chapter 6 - Media handling
Assign the media to a paper tray - Load and assign themedia to a paper tray
Introduction
The [Trays] view has several functions (see Introduction to the Trays view on page 56).
This section describes how to open the paper trays and assign the media in the [Trays] view.
NOTEThe preferred way to load the required media is via the [Schedule]. There you can select a mediaand use the [Load] button, or press the required media button 2 times.
Procedure
1. On the operator panel, select the [Trays] view.2. Touch the paper tray where you want to put the media, for example tray 2.3. Press [Open].4. Load the media (see Load the media on page 53).5. Close the paper tray.
NOTEThere is a risk that a job is printed on a wrong media.
6. Press [Assign].A window with media names appears. The previous media in the selected paper tray ishighlighted.
NOTEThe list displays all the media in the media catalog that match the position of the paper guidesinside the closed paper tray. When the list is empty, the media catalog does not contain mediathat match the position of the paper guides.
7. Touch the name of the loaded media, for example Premium Label.8. Press [OK].
Assign the media to a paper tray - Change the currently assignedmedia type
Procedure
1. On the operator panel, select the [Trays] view.2. Select the paper tray for which you want to change the assigned media type.3. Press [Assign].
A window with media names appears.
NOTEThe list displays all the media in the media catalog that match the current position of the paperguides inside the paper tray. When the list is empty, the media catalog does not contain mediathat match the position of the paper guides.
NOTEThere is a risk that a job is printed on a wrong media.
4. Touch the name of the new media type.
Assign the media to a paper tray - Load and assign the media to a paper tray
Chapter 6 - Media handling 59

5. Press [OK].
Assign the media to a paper tray - Change the currently assigned media type
60 Chapter 6 - Media handling

Introduction to the [Media] section
Introduction
The [System] view gives access to system settings, system information, media information andmaintenance tasks.
This section gives an overview of the [Media] section in the [System] view.
Overview of the [Media] section
[22] Overview of the [Media] section
The items of the [Media] section
Num‐ber
Item Function More information
1 List of all the media thatare available in the [Mediacatalog].
Display the current contentof the [Media catalog].
2 List of temporary media Display the temporary me-dia that are currently avail-able on the system .
What are temporary mediaon page 63
3 [To catalog] button Add temporary media tothe media catalogue .
Add temporary media tothe Media catalog onpage 64 4
Introduction to the [Media] section
Chapter 6 - Media handling 61

Num‐ber
Item Function More information
4 [Registration] button Print test sheets and per-form the registration for in-dividual media. You can doa media registration forstandard-size media andlarge media .
Perform a media registra-tion for standard-size me-dia on page 65Perform a media registra-tion for large media onpage 72
Introduction to the [Media] section
62 Chapter 6 - Media handling

Introduction to the media handling
Introduction
The machine supports a wide range of media, including tabs and inserts. The supported mediasizes range from 8 x 8 inch (minimum) to 12.5 x 19.2 inch (maximum). The supported mediaweights range from 33 - 202 lb bond for media that are recommended by the manufacturer, and40 - 135 lb bond for other media.
This section describes the following:• Media handling in general• The [Media catalog]• Temporary media.
NOTEYou can place all the supported media in any paper tray.
General introduction to the media handling
All the print jobs require media that you can assign to the paper trays via the operator panel. Theprint jobs can require media that are included in the [Media catalog]. However, the print jobs canalso require media that are not included in the [Media catalog]. These media become temporarymedia on the system.
What is the [Media catalog]
The [Media catalog] is a list of predefined media and media attributes which you can define in theSettings Editor application on the controller. The use of the [Media catalog] is onlyrecommended, not compulsory.
When you use the [Media catalog], the operator panel, the printer drivers and other applicationsall display the same list of predefined media. The operator panel and the printer driverautomatically retrieve and show the latest version of the [Media catalog].
NOTERefer to the Online Help of the Settings Editor for information about the media attributes thatyou can define. The Online Help also describes how to adapt the [Media catalog] (add, edit ordelete media).
What are temporary media
You can also use many other media that are not included in the [Media catalog]. These mediabecome temporary media. You can look up the currently used temporary media in the [Media]section of the [System] view. Furthermore, you can assign the temporary media to a paper tray.
The temporary media remain available on the system until:• No more waiting jobs need this media type• No more scheduled jobs need this media type• No more printed jobs need this media type• This media type is no longer available in the paper trays.
When you plan to use these media more often, you can add these temporary media to the [Mediacatalog] Add temporary media to the Media catalog on page 64.
Introduction to the media handling
Chapter 6 - Media handling 63

Add temporary media to the [Media catalog]
Introduction
When a job is submitted that requires media that are not included in the [Media catalog], thesemedia become temporary media. The operator panel displays the temporary media in thefollowing places.• In the list of [Required media] in the [Schedule] view, when the job is scheduled for printing.• In the list of [Temporary media] in the [Media] tab of the [System] view.
When you plan to use a temporary media more often, you can add the media to the [Mediacatalog].
This section describes how to add temporary media to the [Media catalog].
Procedure
1. Touch [System] -> [Media].The names of the temporary media are displayed in the section.
2. Select the media you want to add to the [Media catalog].3. Press [To catalog].
The media is added to the [Media catalog].
NOTEIf required, you can edit the attributes of the media in the [Media catalog] that is part of theSettings Editor.
Add temporary media to the [Media catalog]
64 Chapter 6 - Media handling

Perform a media registration for standard-size media -Print the test sheets and create the ruler
Introduction
The different properties of media can influence the alignment of images when the media areprinted. To ensure a correct alignment, you can perform a media registration for each individualmedia in the [Media catalog]. The following values will be measured.• The Z-position of side 1• The X-length of side 1• The Z-position of side 2• The X-position of side 1• The X-position of side 2.
For each media registration, a paper ruler and 3 test sheets will be printed. Depending on theregional setting in the Settings Editor, the paper ruler is printed on A4 or Letter. You can use thefirst printed sheet to create the paper ruler. However, you can also use a universal ruler of yourown. The ruler must be long enough to carry out the measurements. You must carry out eachmeasurement on all 3 test sheets. The system calculates the average value of the measurements.
This section describes how to perform a media registration for standard-size media (media with alength of less than 390 mm / 15.35").
NOTEIt is recommended to perform the media registration when the list of [Scheduled jobs] is empty.
Before you begin
1. On the operator panel, press the [System] button.2. Press [Media].3. Select a media from the [Media catalog] for which you want to perform a media registration.4. Press [Registration].
When a maintenance PIN is defined in the Settings Editor, a numerical keyboard appears.5. Enter the maintenance PIN to start the wizard.
NOTEThe following procedures often refer to the start of the ruler. The start of the ruler is the linewhere the shaft of the arrow starts.
Procedure
1. Read the introduction on the screen. Then press [Next].The printed test sheets go to the system output.
2. Take the first printed sheet.3. Fold the sheet along the line 'B-H' on side 1.
Perform a media registration for standard-size media - Print the test sheets and create the ruler
Chapter 6 - Media handling 65

Tes
t bit
map
: R
EG
IST
RA
TIO
N
Siz
e: 2
10 x
297 m
m
2006-1
0-0
9 /
14:0
8:3
6
Pag
e 1 1
Pri
mar
y i
mag
e
A G
05-
0
05+
3weksteehS-
B H
D
C
I
F
[23] Fold the sheet to create a ruler
This is your ruler.
Tes
t bit
map
: R
EG
IST
RA
TIO
N
Siz
e: 2
10 x
297 m
m
2006-1
0-0
9
/ 1
4:0
8:3
6
Pag
e 1 1
Pri
mar
y i
mag
e
A G
05-
0
05+
3weksteehS-
B H
D
Tes
t bit
map
: R
EG
IST
RA
TIO
N
Siz
e: 2
10 x
297 m
m
2006-1
0-0
9
/ 1
4:0
8:3
6
Pag
e 1 1
Pri
mar
y i
mag
e
A G
05-
0
05+
3weksteehS-
B H
D
1000
1050
1100 1150 1200
1250
1300
1350
1400
1450
1500
1550
1600
1650
1700
1750
1800
1850
1900
1950
2000
2050
2100
2150
2200
2250
2300
2350
2400
2450
2500
2550
2600
2650
2700
2750
2800
-50
0
+50
Primary X image position
Primary Z image position
Primary diamond shape
X length
L
[24] The ruler
Perform a media registration for standard-size media - Adjust theZ-position of side 1
Procedure
1. Take the first test sheet.2. Align the start of the ruler with point 'B' of the test sheet.
Test b
itmap
: RE
GIS
TR
AT
ION
Size: 2
10
x 2
97
mm
20
06
-10
-09
/ 14
:08
:36
Pag
e 1
1P
rimary
imag
e
AC
GI
05-
0
05+
3 weksteehS-
BH
DF
1000
1050
1100 1150 1200
1250
1300
1350
1400
1450
1500
1550
1600
1650
1700
1750
1800
1850
1900
1950
2000
2050
2100
2150
2200
2250
2300
2350
2400
2450
2500
2550
2600
2650
-50
0
+50
Primary X image position
Primary Z image position
Primary diamond shape
X length
L
B
-50
0
+50
[25] Align the ruler with 'B'
3. Read the value at the edge of the test sheet.4. Enter the value.
Perform a media registration for standard-size media - Adjust the Z-position of side 1
66 Chapter 6 - Media handling

5. Take the second test sheet.6. Repeat the steps 2 - 4.7. Take the third test sheet.8. Repeat the steps 2 - 4.
Perform a media registration for standard-size media - Adjust the Z-position of side 1
Chapter 6 - Media handling 67

Perform a media registration for standard-size media - Adjust theX-length of side 1
Procedure
1. Take the first test sheet.2. Put the ruler along the line 'D-F' of the test sheet.3. Align the start of the ruler with point 'D' of the test sheet.
Test bitmap: REGISTRATION
Size: 210 x 297 mm
2006-10-09 / 14:08:36
Page 1
1Primary image
A C
G I
05-
0 05
+
3w
ek
st
ee
hS
-
B
H
D F
1000
1050
1100 1150 1200
1250
1300
1350
1400
1450
1500
1550
1600
1650
1700
1750
1800
1850
1900
1950
2000
2050
2100
2150
2200
2250
2300
2350
2400
2450
2500
2550
2600
2650
2700
2750
2800
-50
0
+50
Primary X image position
Primary Z image position
Primary diamond shape
X length
L
F
1500
1550
1600
1650
1700
1750
1800
1850
1900
1950
2000
2050
2100
1D
-50
0
+50
[26] Align the ruler with 'D''
4. Read the value at point 'F'.5. Enter the value.6. Take the second test sheet.7. Repeat the steps 2 - 5.8. Take the third test sheet.9. Repeat the steps 2 - 5.
Perform a media registration for standard-size media - Adjust the X-length of side 1
68 Chapter 6 - Media handling

Perform a media registration for standard-size media - Adjust theZ-position of side 2
Procedure
1. Take the first test sheet.2. Align the start of the ruler with point 'K' of the test sheet.
Test b
itmap
: RE
GIS
TR
AT
ION
Size: 2
10
x 2
97
mm
20
06
-10
-09
/ 14
:08
:36
Pag
e 2
2S
econdary
imag
e
05-
0
05+
2 epahS dno mai D yradnoceS
2
05-
0
05+
1 epahS dno mai D yradnoceS
105-
0
05+
noiti sop ega mi X yradnoceS
5
-50
0
+50
Secondary Z image position
4-50
0
+50
Primary X image position
Primary Z image position
1000
1050
110011501200
1250
1300
1350
1400
1450
1500
1550
1600
1650
1700
1750
1800
1850
1900
1950
2000
2050
2100
2150
2200
2250
2300
2350
2400
2450
2500
2550
2600
2650
2700
2750
2800
Primary diamond shape
X length
K
NL
P
1000
1050
1100 1150 1200
1250
1300
1350
1400
1450
1500
1550
1600
1650
1700
1750
1800
1850
1900
1950
2000
2050
2100
2150
2200
2250
2300
2350
2400
2450
2500
2550
2600
2650
-50
0
+50
Primary X image position
Primary Z image position
Primary diamond shape
X length
L
Secondary Z image positio
-50
0
+50K
-50
0
+50
[27] Align the ruler with 'K'
3. Read the value at the edge of the test sheet.4. Enter the value.5. Take the second test sheet.6. Repeat the steps 2 - 4.7. Take the third test sheet.8. Repeat the steps 2 - 4.
NOTEAfter step 8, the machine prints another 3 test sheets to measure the X-position of side 1 andside 2.
Perform a media registration for standard-size media - Adjust the Z-position of side 2
Chapter 6 - Media handling 69

Perform a media registration for standard-size media - Adjust theX-position of side 1
Procedure
1. Take the first test sheet.2. Put the ruler along the line 'D-F' of the test sheet.3. Align the start of the ruler with the left edge of the test sheet.
Test bitmap: REGISTRATION
Size: 210 x 297 mm
2006-10-09 / 14:08:36
Page 1
1Primary image
A C
G I
05-
0 05
+
3w
eks
te
eh
S-
B
H
D F
1000
1050
1100 1150 1200
1250
1300
1350
1400
1450
1500
1550
1600
1650
1700
1750
1800
1850
1900
1950
2000
2050
2100
2150
2200
2250
2300
2350
2400
2450
2500
2550
2600
2650
2700
2750
2800
-50
0
+50
Primary X image position
Primary Z image position
Primary diamond shape
X length
L
1D
-50
0
+50
[28] Align the ruler with the edge of the sheet
4. Read the value at point 'D'.5. Enter the value.6. Take the second test sheet.7. Repeat the steps 2 - 5.8. Take the third test sheet.9. Repeat the steps 2 - 5.
Perform a media registration for standard-size media - Adjust the X-position of side 1
70 Chapter 6 - Media handling

Perform a media registration for standard-size media - Adjust theX-position of side 2
Procedure
1. Take the first test sheet.2. Align the start of the ruler with point 'N' of the test sheet.
Test bitmap: REGISTRATION
Size: 210 x 297 mm
2006-10-09 / 14:08:36
Page 2
2Secondary image
05-
0 05
+
2 e
pa
hS
dn
om
aiD
yra
dn
oc
eS
2
05-
005
+
1 e
pa
hS
dn
om
aiD
yra
dn
oc
eS
10
5-
0 05
+
noi
t is
op
eg
ami
X
y ra
dn
oc
eS
5
-50
0
+50
Secondary Z image position
4-50
0
+50
Primary X image position
Primary Z image position
1000
1050
1100
1150
1200
1250
1300
1350
1400
1450
1500
1550
1600
1650
1700
1750
1800
1850
1900
1950
2000
2050
2100
2150
2200
2250
2300
2350
2400
2450
2500
2550
2600
2650
2700
2750
2800
Primary diamond shape
X length
K
NL
P
-50
0
+50
Primary X image position
Primary Z image position
05-
0 05
+
t is
op
eg
ami
X
y ra
dn
oc
eS
5
N
-50
0
+50
[29] Align the ruler with 'N'
3. Read the value at the edge of the test sheet.4. Enter the value.5. Take the second test sheet.6. Repeat the steps 2 - 4.7. Take the third test sheet.8. Repeat the steps 2 - 4.
Result
A pop-up message appears. The message asks you whether you want to print an extra test sheetto verify the result of the registration. You can do one of the following.• Press [Yes] if you want to print an extra test sheet to verify the result.
Wait for the sheet and check the result. Another pop-up message appears. Press [Yes] if theregistration is correct. Press [No] if the registration is not correct. Then the registrationprocedure will start again.
• Press [No] if you do not want to print an extra test sheet. The registration procedure will befinished.
Perform a media registration for standard-size media - Adjust the X-position of side 2
Chapter 6 - Media handling 71

Perform a media registration for large media - Print thetest sheets and create the ruler
Introduction
The different properties of media can influence the alignment of images when the media areprinted. To ensure a correct alignment, you can perform a media registration for each individualmedia in the [Media catalog]. The following values will be measured.• The Z-position of side 1• The X-length of side 1• The Z-position of side 2• The X-position of side 1• The X-position of side 2.
For each media registration, a paper ruler and 3 test sheets will be printed. Depending on theregional setting in the Settings Editor, the paper ruler is printed on A4 or Letter. You can use thefirst printed sheet to create the paper ruler. However, you can also use a universal ruler of yourown. The ruler must be long enough to carry out the measurements. You must carry out eachmeasurement on all 3 test sheets. The system calculates the average value of the measurements.
This section describes how to perform a media registration for large media (media with a lengthof 390 mm / 15.35" or more).
NOTEIt is recommended to perform the media registration when the list of [Scheduled jobs] is empty.
Before you begin
1. On the operator panel, press the [System] button.2. Press [Media].3. Select a media from the [Media catalog] for which you want to perform a media registration.4. Press [Registration].
When a maintenance PIN is defined in the Settings Editor, a numerical keyboard appears.5. Enter the maintenance PIN to start the wizard.
NOTEThe following procedures often refer to the start of the ruler. The start of the ruler is the linewhere the shaft of the arrow starts.
Procedure
1. Read the introduction on the screen. Then press [Next].The printed test sheets go to the system output.
2. Take the first printed sheet.3. Fold the sheet along the line 'B-H' on side 1.
Perform a media registration for large media - Print the test sheets and create the ruler
72 Chapter 6 - Media handling

Tes
t bit
map
: R
EG
IST
RA
TIO
N
Siz
e: 2
10 x
297 m
m
2006-1
0-0
9 /
14:0
8:3
6
Pag
e 1 1
Pri
mar
y i
mag
e
A G
05-
0
05+
3weksteehS-
B H
D
C
I
F
[30] Fold the sheet to create a ruler
This is your ruler.
Tes
t bit
map
: R
EG
IST
RA
TIO
N
Siz
e: 2
10 x
297 m
m
2006-1
0-0
9
/ 1
4:0
8:3
6
Pag
e 1 1
Pri
mar
y i
mag
e
A G
05-
0
05+
3weksteehS-
B H
D
Tes
t bit
map
: R
EG
IST
RA
TIO
N
Siz
e: 2
10 x
297 m
m
2006-1
0-0
9
/ 1
4:0
8:3
6
Pag
e 1 1
Pri
mar
y i
mag
e
A G
05-
0
05+
3weksteehS-
B H
D
1000
1050
1100 1150 1200
1250
1300
1350
1400
1450
1500
1550
1600
1650
1700
1750
1800
1850
1900
1950
2000
2050
2100
2150
2200
2250
2300
2350
2400
2450
2500
2550
2600
2650
2700
2750
2800
-50
0
+50
Primary X image position
Primary Z image position
Primary diamond shape
X length
L
[31] The ruler
Perform a media registration for large media - Adjust the Z-position of side 1
Procedure
1. Take the first test sheet.2. Align the start of the ruler with point 'B' of the test sheet.
Test b
itmap
: RE
GIS
TR
AT
ION
Size: 4
20
x 2
97
mm
20
06
-10
-09
/ 14
:08
:22
Pag
e 1
1P
rimary
imag
e
-50 0
+50 3
- Sh
ee
t ske
w
BH ED
F
1000
-50
0
+50
Primary X image position
Primary Z image positionB
-50
0
+50
[32] Align the ruler with 'B'
3. Read the value at the edge of the test sheet.4. Enter the value.
Perform a media registration for large media - Adjust the Z-position of side 1
Chapter 6 - Media handling 73

5. Take the second test sheet.6. Repeat the steps 2 - 4.7. Take the third test sheet.8. Repeat the steps 2 - 4.
Perform a media registration for large media - Adjust the Z-position of side 1
74 Chapter 6 - Media handling

Perform a media registration for large media - Adjust the X-lengthof side 1
Procedure
1. Take the first test sheet.2. Align the start of the ruler with point 'D' and read the value at point 'E'.
Test bitmap: REGISTRATION
Size: 420 x 297 mm
2006-10-09 / 14:08:22
Page 1
1Primary image
-50
0
+50
3 - Sheet skew
B
H
ED F
1000
1050
1100 1150 1200
1250
1300
1350
1400
1450
1500
1550
1600
1650
1700
1750
1800
1850
1900
1950
2000
2050
2100
2150
2200
2250
2300
2350
2400
2450
2500
2550
2600
2650
2700
2750
2800
-50
0
+50
Primary X image position
Primary Z image position
Primary diamond shape
X length
L1D
-50
0
+50
E
1500
1550
1600
1650
1700
1750
1800
1850
1900
1950
2000
2050
2100
[33] Align the ruler with 'D' and read the value at 'E'
3. Open the [Calculator assistant], enter the 'DE' value and press [OK].4. Align the start of the ruler with point 'E' and read the value at point 'F'.
Test bitmap: REGISTRATION
Size: 420 x 297 mm
2006-10-09 / 14:08:22
Page 1
1Primary image
-50
0
+50
3 - Sheet skew
B
H
ED F
1000
1050
1100 1150 1200
1250
1300
1350
1400
1450
1500
1550
1600
1650
1700
1750
1800
1850
1900
1950
2000
2050
2100
2150
2200
2250
2300
2350
2400
2450
2500
2550
2600
2650
2700
2750
2800
-50
0
+50
Primary X image position
Primary Z image position
Primary diamond shape
X length
L
E
-50
0
+50
F
1700
1750
1800
1850
1900
1950
2000
2050
2100
2150
2200
2250
2300
[34] Align the ruler with 'E' and read the value at 'F'
5. Open the [Calculator assistant], enter the 'EF' value and press [OK].6. Take the second test sheet.7. Repeat the steps 2 - 5.8. Take the third test sheet.9. Repeat the steps 2 - 5.
Perform a media registration for large media - Adjust the X-length of side 1
Chapter 6 - Media handling 75

Perform a media registration for large media - Adjust the Z-position of side 2
Procedure
1. Take the first test sheet.2. Align the start of the ruler with point 'K' of the test sheet.
Test b
itmap
: RE
GIS
TR
AT
ION
Size: 4
20
x 2
97
mm
20
06
-10
-09
/ 14
:08
:22
Pag
e 2
2S
econdary
imag
e
KP ML
N
1000
1050
1100 1150 1200
1250
-50
0
+50
Primary X image position
Primary Z image position
Primary diamond shape
X length
L
K
-50
0
+50
[35] Align the ruler with 'K'
3. Read the value at the edge of the test sheet.4. Enter the value.5. Take the second test sheet.6. Repeat the steps 2 - 4.7. Take the third test sheet.8. Repeat the steps 2 - 4.
NOTEAfter step 8, the machine prints another 3 test sheets to measure the X-position of side 1 andside 2.
Perform a media registration for large media - Adjust the Z-position of side 2
76 Chapter 6 - Media handling

Perform a media registration for large media - Adjust the X-position of side 1
Procedure
1. Take the first test sheet.2. Put the ruler along the line 'D-F' of the test sheet.3. Align the start of the ruler with the left edge of the test sheet.
Test bitmap: REGISTRATION
Size: 420 x 297 mm
2006-10-09 / 14:08:22
Page 1
1Primary image
-50
0
+50
3 - Sheet skew
B
H
ED F
1000
1050
1100 1150 1200
1250
1300
1350
1400
1450
1500
1550
1600
1650
1700
1750
1800
1850
1900
1950
2000
2050
2100
2150
2200
2250
2300
2350
2400
2450
2500
2550
2600
2650
2700
2750
2800
-50
0
+50
Primary X image position
Primary Z image position
Primary diamond shape
X length
L1D
-50
0
+50
[36] Align the ruler with the edge of the sheet
4. Read the value at point 'D'.5. Enter the value.6. Take the second test sheet.7. Repeat the steps 2 - 5.8. Take the third test sheet.9. Repeat the steps 2 - 5.
Perform a media registration for large media - Adjust the X-position of side 1
Chapter 6 - Media handling 77

Perform a media registration for large media - Adjust the X-position of side 2
Procedure
1. Take the first test sheet.2. Align the start of the ruler with point 'N' of the test sheet.
Test bitmap: REGISTRATION
Size: 420 x 297 mm
2006-10-09 / 14:08:22
Page 2
2Secondary image
K
P
ML N
1000
1050
1100 1150 1200
1250
-50
0
+50
Primary X image position
Primary Z image position
Primary diamond shape
X length
L
N
-50
0
+50
[37] Align the ruler with 'N'
3. Read the value at the edge of the test sheet.4. Enter the value.5. Take the second test sheet.6. Repeat the steps 2 - 4.7. Take the third test sheet.8. Repeat the steps 2 - 4.
Result
A pop-up message appears. The message asks you whether you want to print an extra test sheetto verify the result of the registration. You can do one of the following.• Press [Yes] if you want to print an extra test sheet to verify the result.
Wait for the sheet and check the result. Another pop-up message appears. Press [Yes] if theregistration is correct. Press [No] if the registration is not correct. Then the registrationprocedure will start again.
• Press [No] if you do not want to print an extra test sheet. The registration procedure will befinished.
Perform a media registration for large media - Adjust the X-position of side 2
78 Chapter 6 - Media handling

Change the advanced media settings
Introduction
The advanced media settings enables you to print on certain special media.
When all the advanced media settings have their default value, the button for [Advanced mediasettings] displays the word [Default]. After you changed one or more settings, this buttondisplays the word [Custom].
[Default] means that the [Low temperature mode] is [Off], [Double-sheet detection] is [On], the[Enhanced media mode] is [Off] and the [Paper quality] is set to [Normal].
This section describes when it is recommended to change the advanced media settings.Furthermore, this section describes how to change the settings.
When to do
[Low temperature mode]• Pre-printed: The system is able to handle pre-printed media without problems if the guidelines
regarding pre-printed media and inks are taken into account. Contact your local Océrepresentative to get a copy of these guidelines. In case media or inks are used that are notlisted in the guidelines, the use of pre-printed media can lead to undesired print quality issues.To postpone print quality issues arising, a [Low temperature mode] is available on the printer.It is advised to enable the [Low temperature mode] when there are problems with processingpre-printed media. The interval between undesired print quality issues will then be increasedsignificantly (for some temperature sensitive inks, but no guarantee for all inks).It is advised to enable the [Low temperature mode] when you process pre-printed media.It takes several minutes until [Low temperature mode] is reached.The [Low temperature mode] should not be enabled when you use media heavier than 120 g/m2. This could lead to print problems.
• A secondary benefit (to pre-printed support) is to save energy. The preheater operates on alower temperature.
[Double-sheet detection]
Double-sheet detection warns you if 2 or more sheets have been separated from the media stackin a paper tray at the same time. However, it is not always convenient to have the double-sheetdetection enabled, for example when you use transparent media with a cover sheet. Then youcan set the [Double-sheet detection] to [Off]. By factory default, [Double-sheet detection] is [On].
[Enhanced media mode]
Glossy media can cause a collating or stapling error in the finisher. You can set the [Enhancedmedia mode] to [On] to prevent the error. This will decrease the productivity of the printer. Byfactory default, the [Enhanced media mode] is [Off]. When you set the [Enhanced media mode] to[On] and the printer status is [Printing...], the dashboard displays a message that the enhancedmedia mode is enabled.
The [Enhanced media mode] is only available on printers that are equipped with an optionalfinisher (see The output locations on page 29).
[Paper quality]
Good media is best run with the highest paper quality setting: [Normal].
Lower grade media with respect to paper dust, such as some book papers for example, can leavemore paper dust in the printer. This can lead to ghost images on prints directly after the blackimage cleaning procedure or to ghost images of previous pages on prints. When you use lower
Change the advanced media settings
Chapter 6 - Media handling 79

grade media, you can improve the print quality, with respect to these undesired ghost images, bychanging the value of the [Paper quality] setting to [Low] or even [Lower]. However, this affectsthe productivity by almost 5 and 10% respectively.
Please refer to the Troubleshooting chapter for more information (see Troubleshooting onpage 206).
[Paper quality test]
This test helps you to check if the correct [Paper quality] setting is set. In the Settings Editor, youcan select the media for this test. It is advised to choose the same media as used for the job. Or,in other cases, choose media which covers the width of the media used as a minimum. When youstart the [Paper quality test], the printer sends 5 empty sheets of the selected media to the systemoutput. This is done after each of the next 5 black image cleaning procedures. Keep in mind thatthis can last 2500, 1250 and 1000 sheets when the [Paper quality] setting is set to [Normal], [Low]and [Lower] respectively. Then the test stops and the print job continues without interruption.
Check the last set (fifth) of the empty sheets to see if the [Paper quality] setting is cleaning theprint process properly. The sheets should show no pollution.
NOTEWhen the system goes into standby mode before the [Paper quality test] has finished, the [Paperquality test] starts again.
Before you begin
1. On the operator panel, press the [System] button.2. Press [Setup].3. Touch the [Advanced media settings] button in the [Advanced] section.4. Enter the maintenance PIN when you change a setting.
NOTEThe operator panel will only ask you to enter the maintenance PIN when a maintenance PIN isdefined in the Settings Editor.
Change the advanced media settings - Enable the [Lowtemperature mode]
Procedure
1. Touch the [Low temperature mode] button.The text on the button changes from [Off] to [On].
NOTEEach time you touch the button, the setting changes from [On] to [Off] and the other way round.
2. Press [OK].When the [Low temperature mode] is [On], this is visible on the dashboard.
Change the advanced media settings - Enable the [Low temperature mode]
80 Chapter 6 - Media handling

Change the advanced media settings - Disable the double-sheetdetection
Procedure
1. Touch the [Double-sheet detection] button.The text on the button changes from [On] to [Off].
NOTEEach time you touch the button, the setting changes from [On] to [Off] and the other way round.
2. Press [OK].
Change the advanced media settings - Disable the double-sheet detection
Chapter 6 - Media handling 81

Change the advanced media settings - Enable the enhanced mediamode
IMPORTANTThis setting is only available on machines that are equipped with an optional finisher.
Procedure
1. Touch the [Enhanced media mode] button.The text on the button changes from [Off] to [On].
NOTEEach time you touch the button, the setting changes from [Off] to [On] and the other way round.
2. Press [OK].
Change the advanced media settings - Enable the enhanced media mode
82 Chapter 6 - Media handling

Change the advanced media settings - Change the [Paper quality]
Procedure
1. Touch the [Paper quality] button.A drop-down list appears.
2. Touch the desired value.3. Press [OK].
Change the advanced media settings - Change the [Paper quality]
Chapter 6 - Media handling 83

Change the advanced media settings - Start the [Paper quality test]
Procedure
1. Touch the [Paper quality test] button to start the test.
NOTEWhen the test is started, the progress of the test is displayed on the button and the text on thebutton changes from [Start] to [Stop].
NOTEThe test stops automatically after the fifth set. You do not have to stop the [Paper quality test]yourself.
NOTEWhen you touch the button again, the test is stopped.The text on the button changes from [Stop] to [Start].
Change the advanced media settings - Start the [Paper quality test]
84 Chapter 6 - Media handling

Chapter 7 Carry out print jobs

The print function
Introduction to the print function
Introduction
Print jobs can be sent from the following locations.• The printer driver.• PRISMAprepare.• From a USB drive.• From a hotfolder.• Via a printer protocol
Depending on the workflow settings, the print job will appear in one of the following destinations.• List of [Waiting jobs]• List of [Scheduled jobs]
The list of [Printed jobs] can store jobs temporarily.
The [Schedule] view enables you to plan your daily print jobs.
The [Jobs] view enables you to manage the print jobs in the different queues.
Introduction to the print function
[38] The jobs view
The print function
86 Chapter 7 - Carry out print jobs

Print a job using the printer driver - How to print a job using aWindows® driver
Main features of the printer drivers
Feature Description
Settings You can define a large number of settings for layout, paper, finish-ing and image.
Templates When you want to use a number of printer driver settings morethan one time, you can create a template. A template is a set ofdefault settings that describe a print job. You do not need tochange each individual setting. Simply select a template thatmatches your desires.
Secure printing You can add a PIN to your job to prevent unauthorized printing ofyour job.
Where to download the latest printer driver
• Via the Settings Editor on the PRISMAsync controller (navigate to [Support] -> [Software] ->[Download printer driver]).
• From the web site of the printer manufacturer.
NOTEThe online helps of the printer drivers contain detailed information about all functions of theprinter drivers.
Procedure
1. From the 'File' menu of the application, click 'Print'.2. Select the Océ VarioPrint® 6000+ Line in the 'Printer' area of the 'Print' dialog box.3. Click 'Properties'.4. Define the required settings.5. Click 'OK.'6. Click 'OK.'
Print a job using the printer driver - How to print a job using an Apple MacOS X® driver
Procedure
1. From the 'File' menu of the application, click 'Print'.2. Select the Océ VarioPrint® 6000+ Line in the 'Printer' area of the 'Print' dialogue box.
Print a job using the printer driver - How to print a job using a Windows® driver
Chapter 7 - Carry out print jobs 87

Print a job using Océ PRISMAprepare (optional)
Introduction
Océ PRISMAprepare enables you to prepare the print job completely on page level. You canpreview the result per page. Océ PRISMAprepare is an optional application.
This procedure describes the most important settings for daily use.
Procedure
1. Prepare the document.
[39] Lay out preparation with Océ PRISMAprepare
2. Use the media catalog to define the media.With Océ PRISMAprepare you can export the media catalog to Océ PRISMAsync controllers ofOcé black & white and color systems.
[40] The media catalog in Océ PRISMAprepare
Print a job using Océ PRISMAprepare (optional)
88 Chapter 7 - Carry out print jobs

3. Define the required finishing options.
NOTESee the online help of Océ PRISMAprepare for detailed information.
Print a job using Océ PRISMAprepare (optional)
Chapter 7 - Carry out print jobs 89

Print a file from a USB drive
Introduction
You can print documents (*.pdf, *.ps) on a USB drive.
Procedure
1. Insert the USB drive into the USB port at the left-hand side of the operator panel.2. Touch [Jobs] -> [USB].3. Touch to browse through the directories on the USB drive.4. Touch the file or files you want to print, or touch [Select] to select multiple files.5. Touch [Print] to send the file to the list of [Scheduled jobs] immediately, or6. Touch [Save] to save a copy of the file to another location on your printer such as the list of
[Waiting jobs]. Then you can edit the file first and print the file from the other locationThe locations you can select depend on your system configuration.
7. Touch to eject the USB drive.8. Remove the USB drive from the operator panel when the message [USB drive has been
successfully ejected.] is displayed.
Print a file from a USB drive
90 Chapter 7 - Carry out print jobs

Description of the print job settings
Introduction
With the [Properties] button you view and partly change the job settings of the jobs in thefollowing queues.• [Waiting jobs]• [Scheduled jobs]
You cannot change the settings of an active job.• [Printed jobs] (view settings only)
You can partly define the following settings for the jobs in the list of [Waiting jobs] and the list of[Scheduled jobs].• The characteristics of the output• Generic settings that apply to the whole job.
[41] The job properties
Number Pane Description
1 [Original] The [Original] pane shows information of the job.
2 [Output] The [Output] pane shows the generic settings youcan define for the whole job
3 [Job] The [Job] pane shows the settings you can definefor the job
4 Preview The preview displays the settings you defined forthe output. Furthermore, this pane gives access tothe templates
5 Action buttons The action buttons indicate the actions you can car-ry out.
Description of the print job settings
Chapter 7 - Carry out print jobs 91

Settings for the output
Setting Values Description
[1- or 2-sided] [1-sided]
The output contains an image on 1 side.
[2-sided]
The output contains an image on both sides.
[Binding edge] [Portrait left]
The output has a vertical format (height > width).The binding edge is at the left-hand side.When you turn a sheet over the binding edge the image is inreadable form.
[Portrait top]
The output has a vertical format (height > width).The binding edge of the original is at the top.When you turn a sheet over the binding edge the image onthe back side of the sheet is in readable form. This meansthat every back side of a 2-sided original is upside downcompared to the front side.
[Landscape left]
The output has a horizontal format (width > height).The binding edge of the original is at the left-hand side.When you turn a sheet over the binding edge, the text or im-age is in readable form.
[Landscapetop]
The output has a horizontal format (width > height).The binding edge of the original is at the top.When you turn a sheet over the binding edge, the image onthe back side of the sheet is in readable form. This meansthat every back side of a 2-sided original is upside downcompared to the front side.
[Media]
Names of themedia in themedia catalog
Here you can view the media for the job. The list displays allthe media that are available in the media catalog includingthe temporary media. The media catalog is a list of mediathat you can define in the Settings Editor. 4
Description of the print job settings
92 Chapter 7 - Carry out print jobs

Setting Values Description
[Cover] [Front]
Here you can indicate that the print job requires a front cov-er. When the setting is enabled the corresponding setting[Media] becomes enabled.
[Media] When the setting [Front] is enabled, you can select a mediafrom the media catalog.
[Print sides] Here you can select the sides of the front cover you want toprint on.• [Both sides]• [Front side]• [Back side]• [None]
[Back]
Here you can indicate that the print job requires a back cov-er. When the setting is enabled the corresponding setting[Media] becomes enabled.
[Media] When the setting [Back] is enabled, you can select a mediafrom the media catalog.
[Print sides] Here you can select the sides of the back cover you want toprint on.• [Both sides]• [Front side]• [Back side]• [None]
[Layout] [Normal]
The printer prints the pages with no special layout settings.
[Booklet]
The printer prints the pages in booklet order. The pages 1and 4 are printed on the front side of a sheet. The pages 2and 3 are printed on the back side of a sheet.
[Same up]
The printer prints the same image multiple times next toeach other. By default, the system keeps the size of the origi-nals.When you print A4 originals with the setting [Same up] and[Images per sheet] is 2, the machine will automatically printthe job on A3, for example. When you cut the A3 sheets intwo, you get 2 identical A4 copies of your document. To de-crease your A4 originals to A5 prints, you can use the zoomfunction or select another media type.
[Multiple up]
The printer prints multiple consecutive images on 1 side of asheet, with the images next to each other.
[Images persheet]
Here you can select the number of images you want to printwhen you select [Same up] and [Same-up flipped]. 4
Description of the print job settings
Chapter 7 - Carry out print jobs 93

Setting Values Description
[Zoom]
[Fit to page] You can select a media size for the output that differs fromthe media size of the original. When the [Fit to page] settingis enabled, the system scales the original in such a way thatthe image fits on the selected media size of the output.
[Percent] Use this setting to change the zoom manually within therange 25% to 400%.
[Align] [Top left]
An image on a sheet may be smaller than the media size ofthe output, for example because you scaled the image to70% of its original size. The [Align] setting allows you to in-dicate the position of the image on the sheet. [Top left]moves the image to the upper left corner of the sheet.
[Top center]
[Top center] moves the image to the center at the top of thesheet.
[Top right]
[Top right] moves the image to the upper right corner of thesheet.
[Center left]
[Center left] moves the image to center of the left side of thesheet.
[Center]
[Center] moves the image to the center of the sheet.
[Center right]
[Center right] moves the image to the center of the right sideof the sheet.
[Bottom left]
[Bottom left] moves the image to the lower left corner of thesheet.
[Bottom center]
[Bottom center] moves the image to the center of the bottomside of the sheet.
[Bottom right]
[Bottom right] moves the image to the lower right corner ofthe sheet.
4
Description of the print job settings
94 Chapter 7 - Carry out print jobs

Setting Values Description
[Shift]
[Margin shift] Use this setting to increase or decrease the margin. By de-fault, the values of the front side and the back side are inter-locked. This means that the values for the front side and theback side remain identical.If you want to define a different value for each side, press .The icon changes to the unlocked status. Now you can de-fine the values for the front side and the back side separate-ly.
[Image shift] Use this setting to shift the image horizontally or vertically.By default, the values of the front side and the back side areinterlocked. This means that the values for the front side andthe back side remain identical.If you want to define a different value for each side, press .The icon changes to the unlocked status. Now you can de-fine the values for the front side and the back side separate-ly. 4
Description of the print job settings
Chapter 7 - Carry out print jobs 95

Setting Values Description
[Print delivery]
[Output loca-tion]
Select the output location for the print job. Depending on thesettings for your print job, the printer automatically suggeststhe preferred output location for your job. However, you canmanually overrule this suggestion.
[Sort]
[By page]The output is sorted by page.
[By set]The output is sorted by set.
[Offset stack-ing]
[Each set]Each set that gets to an output location will be shifted on topof the previous set.This setting is only available when in the workflow profileoffset stacking is set to [Sets (as in job)].
[Off]All the sets or jobs that get to an output location will bestacked in one straight pile.
[Advanced set-tings] -> [Sheetorder]
[Face up]Deliver the prints face up, first sheet on top.
[Face up reverse]Deliver the prints face up, last sheet on top.
[Face down]Deliver the prints face down, first sheet on top.
[Face down reverse]Deliver the prints face down, last sheet on top. 4
Description of the print job settings
96 Chapter 7 - Carry out print jobs

Setting Values Description
[Print delivery]
[Advanced set-tings] -> [Sheetorientation]
[Header up LEF]Deliver the prints with the header on top side and in portraitposition (vertical).
[Header up SEF]Deliver the prints with the header on top side and in land-scape position (horizontal).
[Header down LEF]Deliver the prints with the header at the bottom side and inportrait position (vertical).
[Header down SEF]Deliver the prints with the header at the bottom side and inlandscape position (horizontal).
[Advanced set-tings] -> [Printorder]
• [Front/back]Default value. The front page on the front, the back pageon the back.
• [Back/front]Puts the front page on the back and the back page on thefront.
[Advanced set-tings] -> [Rota-tion]
• [0 degrees]• [180 degrees]
Rotates the prints 180 degrees. 4
Description of the print job settings
Chapter 7 - Carry out print jobs 97

Setting Values Description
[Punching]
[None]
[2 holes]
[3 holes]
[4 holes]
[Die set de-pendent]
Here you can define the amount and location of the punchholes.
Location• [Left]• [Top]• [Right]• [Bottom]
[Binding] [None]
[1 staple]
[2 staples]
Here you can define the required number of staples. Further-more you can define where you want the staples with the[Location] option.The available locations for the 1 staple option:• [Top left]• [Top right]• [Bottom left]• [Bottom right]
The available locations for the 2 staples option:• [Left edge]• [Top edge]• [Bottom edge]• [Right edge]
Check the preview for the result of the selection.
Settings for the whole job
Setting Values Description
[Job name] Displays the job name of the print job. You can change thejob name of a print job.
[Number ofsets]
Use this setting to define the number of copies. You can en-ter a value from 1 - 65,000. The default value is 1. 4
Description of the print job settings
98 Chapter 7 - Carry out print jobs

Setting Values Description
[Page range] Displays the pages to print. When [All] is selected, all pagesof the job will be printed. When you touch the [Page range]button a keyboard appears. You can define the page rangeyou want to print.
[Separatorsheets]
[On] When the Separator sheets setting is enabled, a separatesheet will be inserted automatically before each set of a jobto create a clear distinction between two sets. Separatorsheets are always empty. In the Settings Editor, you can se-lect a media from the Media catalog to be used as separatorsheets. There you can also indicate the feed direction of theseparator sheets (long-edge feed or short-edge feed).
[Off] No separator sheet will be inserted before each set.
Description of the print job settings
Chapter 7 - Carry out print jobs 99

Contradiction handlingBe aware that if you change settings you might make contradicting settings. If you makecontradicting settings, the preview pane informs you how to solve the contradictions.
The contradicting settings are marked. The system indicates, with a green check mark, whichsetting you need to change to resolve the contradiction. However, if required, you can change theother marked settings to resolve the contradiction.
Contradiction handling
100 Chapter 7 - Carry out print jobs

Stop the printer
Introduction
The printer can be stopped in 2 ways.• Manually
Use the Stop button or the [Stop after job] button to stop the printer.• Automatically
Define a corresponding setting in the workflow profiles.
Stop the printer manually
Manual stop
When to stop Action Description
After a set Press the Stopbutton 1x
• The printer stops when the currently printed set of theactive print job is completed.
• The dashboard displays the [Resume] button with avertical green bar, and the message [Stopping afterset...].
• When the set is completed, the vertical green barchanges into red and the message [On hold] appears.
• Touch the [Resume] button to continue printing.
NOTEIt depends on the set size and the moment youpress the Stop button when the printer willstop. For example, when you have a large setof 1,000 pages and you press the Stop button
after the first page, the printing will continuefor a couple of minutes.
As soon as possi-ble
Press the Stopbutton 2x
• The printer stops when the printer buffer is empty (assoon as possible).
• The dashboard displays the [Resume] button with avertical red bar, and the message [Stopping as soonas possible...].
• When the printer buffer is empty, the message [Onhold] appears.
• Touch the [Resume] button to continue printing.
NOTEThe buffer can contain up to 50 pages. Be-cause the printer stops when the buffer isempty, it is possible that the last printed set isnot complete. 4
Stop the printer
Chapter 7 - Carry out print jobs 101

When to stop Action Description
After a job Touch the [Stopafter job] button
• In [Jobs] -> [Queues] -> [Scheduled jobs] you must se-lect the job after which the printer must stop. Thentouch the [Stop after job] button.
• A horizontal, red and white stop bar indicates that thestop-after-job function is active.
• The printer stops when the last job before the stop baris completed.
• Touch the [Resume] button to continue printing.
NOTEThe [Stop after job] button is not availablewhen the [Confirm start of job] setting in theactive [Workflow profile] is set to [On]. Thenthe printer stops automatically after each job.
NOTEWhen you print streaming jobs or jobs that consist of 1 large set, you must press the Stopbutton 2x to stop the printer as soon as possible.
Automatic stop
When Then
• The [Check first set] setting in a [Workflowprofile] is [On], and
• The [Check first set] setting is also enabledin the job.
The printer stops each time the first set of aprint job is completed. You can check the firstset before you continue the print job.
The [Confirm start of job] setting in a [Work-flow profile] is [On].
The printer stops each time at the start of anew job. You must start each job manually.
Stop the printer
102 Chapter 7 - Carry out print jobs

Delete print jobs
Locations from which jobs can be deleted
You can delete jobs from the following locations.• List of [Printed jobs] (if this function is enabled in the Settings Editor).• List of [Scheduled jobs].• List of [Waiting jobs].
NOTEYou can only delete the active print job in the list of [Scheduled jobs] when the printer is onhold. If necessary, press the Stop button 2x to put the printer on hold.
Select the jobs you want to delete
The table below describes your options to select one or more jobs.
Select one or more jobs that you want to delete
What to delete? How to do?
One or more separate jobs Go to the correct location described above, then touch the jobsone by one.
All jobs Go to the correct location, then touch [Select] -> [All].
[Jobs with available media] Go to the correct location, then touch [Select] -> [Jobs with availa-ble media].
[Jobs with label] Go to the correct location, then touch [Select] -> [Jobs with label].
NOTEFor the list of [Printed jobs], you can indicate in the Settings Editor that the list must be cleanedautomatically at specified times. The factory default is 1 day. Furthermore, in the Settings Editoryou can manually clean up the jobs in the lists of [Printed jobs], [Scheduled jobs] and [Waitingjobs].
Procedure
1. Go to one of the following locations.• Touch [Jobs] -> [Queues]
If collapsed, first touch to expand the list of [Scheduled jobs] or [Waiting jobs].• Touch [Jobs] -> [Printed jobs]
2. Select the jobs you want to delete.3. Press [Delete].
A message appears.4. When you are sure that you want to delete the selected job(s), touch [Yes].
Delete print jobs
Chapter 7 - Carry out print jobs 103

Print your jobs using the operator panel
Introduction to the [Jobs] view
Introduction
The [Jobs] view enables you to manage the print jobs on the machine locally. The [Jobs] view isdivided in the [Queues] and [Printed jobs] views. This section describes the items of both views.
NOTEWhether a button is enabled depends on the number of selected jobs and the state of the jobs.Not all buttons are available for streaming jobs .
[42] The [Scheduled jobs] view
The items of the [Scheduled jobs] view of the [Jobs] view
Description of the [Scheduled jobs] view
Item Function More information
[Scheduled jobs] Display the active print job and thejobs that are scheduled for printing.
[Properties] button Check or change the properties of ajob. The button is only enabled whenyou select 1 job.
NOTEYou can also press a job 2times to check or changethe properties of that job. 4
Print your jobs using the operator panel
104 Chapter 7 - Carry out print jobs

Item Function More information
[To top] button Give priority to a scheduled job. Thejob is printed when the active printjob is ready. The button is only en-abled when you select 1 job.
Give priority to a sched-uled job on page 112
[Stop after job] button Stop the machine after a selectedjob. The button is only enabled whenyou select 1 job.
Stop the printer onpage 101
[Delete] button Delete the selected job of jobs. Thebutton is enabled when you select 1or more jobs.
Delete a job on page 103
[Move] button Move a job from the list of [Sched-uled jobs] to the list of [Waitingjobs].The button is enabled when you se-lect 1 or more jobs.
Schedule a waiting job forprinting on page 110
[Ticket] button Print an overview of the main jobsettings and job parameters. Thebutton is only enabled when you se-lect 1 job.
Print the job parameters onpage 118
[Select] button Select a number of jobs at the sametime. You can use one of the follow-ing:• [All]: select all the jobs in the list.• [None]: deselect all the jobs in the
list.• [Invert selection]: turn the selected
jobs into deselected jobs, and theother way round.
• [Jobs with available media]: selectall the jobs for which the mediaare currently available in the papertrays.
• [Jobs with label]: select all thejobs with a certain label.
Select more than one jobfor printing on page 115
[Print now] button Print an urgent job immediately. Thejob is printed when the current set ofthe active print job is ready. Thebutton is only enabled when you se-lect 1 or more jobs.
Print an urgent job immedi-ately on page 111
Introduction to the [Jobs] view
Chapter 7 - Carry out print jobs 105

[43] The [Waiting jobs] view
The items of the [Waiting jobs] view of the [Jobs] view
Description of the [Waiting jobs] view
Item Function More information
[Waiting jobs] Display the jobs that are not yetscheduled for printing.
[Properties] button Check or change the properties of ajob. The button is only enabled whenyou select 1 job.
NOTEYou can also press a job 2times to check or changethe properties of that job.
[Delete] button Delete the selected job or jobs . Thebutton is enabled when you select 1or more jobs.
Delete a job on page 103
[Bundle] or [Split] button Bundle: Combine a number of jobsinto 1 job, for example to create a setof documents that are required for ameeting.Split: Split a bundle job into the orig-inal jobs.
Bundle jobs in the list ofWaiting jobs on page 116
[Ticket] button Print an overview of the main jobsettings and job parameters. Thebutton is only enabled when you se-lect 1 job.
Print the job parameters onpage 118
4
Introduction to the [Jobs] view
106 Chapter 7 - Carry out print jobs

Item Function More information
[Select] button Select a number of jobs at the sametime. You can use one of the follow-ing:• [All]: select all the jobs in the list.• [None]: deselect all the jobs in the
list.• [Invert selection]: turn the selected
jobs into deselected jobs, and theother way round.
• [Jobs with available media]: selectall the jobs for which the mediaare currently available in the papertrays.
• [Jobs with label]: select all thejobs with a certain label.
Select more than one jobfor printing on page 115
[Proof] button Print 1 copy of a job to check wheth-er the result of the print job meetsyour expectation. The button is onlyenabled when you select 1 job.
NOTEThe proof print is not sub-tracted from the number ofsets you defined for thisjob.
Print a proof on page 119
[Print] button Move a job from the list of [Waitingjobs] to the list of [Scheduled jobs].The button is enabled when you se-lect 1 or more jobs.
Schedule a job for printingon page 110
Introduction to the [Jobs] view
Chapter 7 - Carry out print jobs 107

[44] The [Printed jobs] view
The items of the [Printed jobs] view of the [Jobs] view
Description of the [Printed jobs] view
Item Function More information
[Printed jobs] Display the jobs that were printedsuccessfully. The system only movesthe printed jobs to the [Printed jobs]list when you enable the [Printedjobs section on operator panel ena-bled] setting in the [Printed jobs] sec-tion in the Settings Editor.
[Properties] button Check or change the properties of ajob. The button is only enabled whenyou select 1 job.
NOTEYou can also press a job 2times to check or changethe properties of that job.
[Delete] button Delete the selected job or jobs . Thebutton is enabled when you select 1or more jobs.
Delete a job on page 103
[Copy] button Send a copy of a job that has beenprinted before to the list of [Waitingjobs] to reprint the job.The button is enabled when you se-lect 1 or more jobs.
Reprint a job on page 114
4
Introduction to the [Jobs] view
108 Chapter 7 - Carry out print jobs

Item Function More information
[Ticket] button Print an overview of the main jobsettings and job parameters. Thebutton is only enabled when you se-lect 1 job.
Print the job parameters onpage 118
[Select] button Select a number of jobs at the sametime. You can use one of the follow-ing:• [All]: select all the jobs in the list.• [None]: deselect all the jobs in the
list.• [Invert selection]: turn the selected
jobs into deselected jobs, and theother way round.
• [Jobs with available media]: selectall the jobs for which the mediaare currently available in the papertrays.
• Use [Jobs with label] to select allthe jobs with a certain label.
Select more than one jobfor printing on page 115
Introduction to the [Jobs] view
Chapter 7 - Carry out print jobs 109

Schedule a waiting job for printing
Introduction
The destination of jobs is determined by the selected workflow profile. When jobs go to the list of[Waiting jobs], you must manually send the jobs to the print queue (list of [Scheduled jobs]). Thisenables you to keep full control of all jobs that must be printed.
Procedure
1. Touch [Jobs] -> [Queues].2. If collapsed, first touch to expand the desired list of [Waiting jobs].3. Touch the job(s) you want to print or use the [Select] button to make a selection.
To undo the multiple selection and only select 1 job, you must touch that job for 2 seconds.4. Press [Print].
The job is moved to the bottom of the list of [Scheduled jobs].
Related information
Work with the workflow profiles on page 38
Schedule a waiting job for printing
110 Chapter 7 - Carry out print jobs

Print an urgent job immediately
Introduction
When a job must be printed urgently, you can give that print job priority over all other print jobs.The [Print now] button allows you to print a job immediately. When you use the [Print now]button, the active print job will be paused as soon as the current set is ready.
To print a job as soon as possible but not immediately, you can use the [To top] function.
Location of the [Print now] button
The [Print now] button is available in the [Scheduled jobs] view.
NOTETo give priority to a job in the list of [Waiting jobs], you must first touch [Print] to send the job tothe list of [Scheduled jobs]. There you can select the job and touch [Print now].To give priority to a job in the list of [Printed jobs], you must first reprint the job (see Reprint ajob on page 114). The job is sent to the list of [Waiting jobs]. From there, you must send the jobto the list of [Scheduled jobs]. There you can select the job and touch [Print now].
NOTEIf the output location of the priority print job is the same as the active print job, the priority printjob comes on top of the last printed set of the active job.
Procedure
1. Touch [Jobs] -> [Queues].2. If collapsed, first touch to expand the list of [Scheduled jobs].3. Touch the job which you want to print immediately.4. Press [Print now].
The urgent job appears at the top of the list of [Scheduled jobs].The active print job is paused as soon as the current set is ready and becomes second in thelist.
Related information
Give priority to a print job on page 112
Print an urgent job immediately
Chapter 7 - Carry out print jobs 111

Give priority to a print job
Introduction
When you want to print a job as soon as possible, but not necessarily immediately, you must usethe [To top] function. The [To top] function moves the selected job to the second position in thelist of [Scheduled jobs], below the active print job . The job will be printed when the active printjob is ready.
Procedure
1. Touch [Jobs] -> [Queues].2. If collapsed, first touch to expand the list of [Scheduled jobs].3. Touch the job to which you want to give priority.4. Press [To top].
Related information
Print an urgent job immediately on page 111
Give priority to a print job
112 Chapter 7 - Carry out print jobs

Print a scheduled job later
Introduction
The machine prints the jobs that are present in the list of [Scheduled jobs] jobs.
However, you can decide to print a job later, for example because:• The required media are out of stock, or• You first want to make a proof.
Then you must move the job back to the list of [Waiting jobs].
NOTETo select the active print job you must first press the Stop button 2x to stop the job.
Procedure
1. Touch [Jobs] -> [Queues].2. If collapsed, first touch to expand the list of [Scheduled jobs].3. Touch the job or jobs you want to print later or use the [Select] button to make a selection.
To undo the multiple selection and only select 1 job, you must touch that job for 2 seconds.4. Press [Move].
The job is moved to the list of [Waiting jobs].
Print a scheduled job later
Chapter 7 - Carry out print jobs 113

Reprint a job
Introduction
NOTEThe following description is only applicable when you enable the [Printed jobs section onoperator panel enabled] setting in the [Printed jobs] section in the Settings Editor.
Print jobs that have been completed are moved from the list of [Scheduled jobs] list to the list of[Printed jobs]. The [Printed jobs] list helps you to reprint jobs quicker and easier.
What you need to know about the list of Printed jobs
• When you want to reprint a job, the selected job is always copied to the list of [Waiting jobs]first.
• You cannot change the job settings in the list of [Printed jobs]. This is only possible in the listof [Waiting jobs].
• You cannot reprint streaming jobs and transaction print jobs.• The list of [Printed jobs] does not store proof prints, system jobs and jobs that were stopped or
deleted.• When you shut down the printer all jobs remain present in the list of [Printed jobs].• The list of [Printed jobs] can only store jobs. To prevent the disk of your system from becoming
full, jobs must be deleted manually or automatically on a regular basis. In the Settings Editor,you can indicate the cleaning period, then the clean-up is carried out at midnight or at the nextstart-up (in general the next morning).
• If E-shredding is enabled, the jobs will be shredded after removal from the list of [Printed jobs].
Procedure
1. Touch [Jobs] -> [Printed jobs].2. Touch the job(s) you want to reprint or use the [Select] button to make a selection.
To undo the multiple selection and only select 1 job, you must touch that job for 2 seconds.3. Press [Copy].4. Touch [Queues] -> [Waiting jobs].5. Touch the job you want to reprint.6. Touch [Properties] if you want to change the settings, for example the number of sets.7. Press [Print].
Reprint a job
114 Chapter 7 - Carry out print jobs

Select more than one job for printing
Introduction
The table below describes the possibilities to select more than one job for printing.
Select more jobs
Options Description
Select two or more jobsmanually
Touch the jobs you want to print one by one.
[Select] button - [All] All jobs in the list of [Waiting jobs] are printed. The order in the listof [Waiting jobs] determines the print order. However, in the list of[Scheduled jobs] you can give priority to a job.
[Select] button - [Jobs withavailable media]
All jobs for which the required media are currently available in thepaper trays, will be printed. This improves the productivity, be-cause you must not change the required media during printing.You may only need to add more of the currently available mediatypes.
[Select] button - [Jobs withlabel]
A label is a name or tag that helps you to identify certain jobs onthe operator panel. When a job is sent to the printer, the personwho submits the job can add a label to that job. The label can beany name that helps to identify certain jobs. A label is not connec-ted to job settings. The label can be defined in the printer driver, ina job ticket or via an automated workflow. For example, the label‘Customer XYZ’ can be added to jobs. Then you can select andprint all the jobs for 'Customer XYZ' at once.
NOTEAutomated workflows can be defined through the Settings Editor. You can find moreinformation in the online help of the Settings Editor.
Procedure
1. Touch [Jobs] -> [Queues].2. If collapsed, first touch to expand the list of [Waiting jobs].3. Touch the jobs you want to print one by one, or make a selection using the [Select] button.
The selected jobs are highlighted.4. Press [Print].
Related information
Give priority to a print job on page 112
Select more than one job for printing
Chapter 7 - Carry out print jobs 115

Bundle jobs in the list of [Waiting jobs]
Introduction
The bundle function allows you to combine two or more jobs into one new job. For example, thiscan be convenient when the participants of a meeting need several documents in a specific order.Often, the required documents are sent from several workplaces to the printer in advance.Normally, this means that you must print the documents first and sort or staple them later. Byusing the bundle function you can determine the order of the documents before printing andprint all documents in the correct order in only 1 print job.
Important information about the bundle function
• You can only bundle print jobs that are currently in the list of [Waiting jobs].• You can change a number of settings for the bundled job via the [Properties] window.• By default, the number of sets for a bundled job is 1. So before printing, you must first indicate
the required number of sets.• When you stop a job after a set, the printing stops after 1 copy of the complete bundle.• The jobs in a bundle are accounted separately under the account ID of the original jobs.• All the jobs in the bundle must have the same output location. Otherwise, the operator panel
displays a warning message. To change the output location, you must first split the bundledjob, then change the individual job settings and finally bundle the jobs again.
Main actions on the bundle function
The table below describes the main actions you can carry out with regard to the bundle function.
Main bundle functions
Main actions Description
[Bundle] When you touch [Bundle] after selecting 2 or more jobs, a new jobis created that contains the original jobs. The new job is added tothe bottom of the list of [Waiting jobs]. The original jobs are re-moved from the list. The new job gets a new name that is basedon the name of the first job in the bundle.
[Split] When you touch [Split] after selecting a bundled job, the job issplit into the original, separate jobs. The bundled job is removed.The separate jobs are added to the bottom of the list of [Waitingjobs]. You can use the [Split] function to correct mismatched set-tings, for example.
Change job settings The [Properties] window gives access to a pane where you can dothe following.• Change a number of job settings.• Change the order of the jobs in the bundle.
[Delete] Delete the job.
[Ticket] Print the job ticket of the job.
[Proof] Print 1 copy of the job first to check if the result meets your ex-pectations.
Procedure
1. Touch [Jobs] -> [Queues] -> [Waiting jobs].
Bundle jobs in the list of [Waiting jobs]
116 Chapter 7 - Carry out print jobs

2. Touch the jobs you want to combine, or use an option from the [Select] menu to select multiplejobs at once.
3. Press [Bundle].A [Create bundle] window appears that allows you to make some changes.
4. If necessary, use the [Up] and [Down] buttons to change the job order.5. If necessary, change the generic job settings, such as [Number of bundles].6. Press [OK].
Related information
Delete print jobs on page 103Print a job ticket on page 118Make a proof on page 119
Bundle jobs in the list of [Waiting jobs]
Chapter 7 - Carry out print jobs 117

Print a job ticket
Introduction
Job tickets are used to transfer settings from an application to the printer. It can be convenient toprint a job ticket before printing a job, to get an overview of the main job characteristics.
Job tickets can contain the following information, for example.• Job name.• Job owner.• Job destination.• Job settings such as the number of sets.• Required media.
Where to find the [Ticket] button
The [Ticket] button is available at the following locations.• List of [Printed jobs] (if this function is enabled in the Settings Editor).• List of [Scheduled jobs].• List of [Waiting jobs].
Procedure
1. Press [Jobs].2. Go to one of the locations mentioned above.3. Touch one or more jobs of which you want to print the job ticket.4. Press [Ticket].
The job is sent to the bottom of the list of [Scheduled jobs]. The job may not be immediatelyvisible in the list of [Scheduled jobs]. You can recognize the job by the prefix @_ in front of thejob name.
Print a job ticket
118 Chapter 7 - Carry out print jobs

Make a proof
Introduction
You can make a proof to check whether the quality and the layout of the output meet yourexpectations. When you use the [Proof] function, the machine prints 1 copy of the job. You canonly make a proof for a job in the list of [Waiting jobs].
This section describes how to make a proof.
NOTEWhen you make a proof, the printed set is not subtracted from the defined total number of setsfor a job. For example, if you need 10 sets the printer will still print 10 sets after you made theproof. This is different from the checking of the first set (see Check the first set on page 131).
Procedure
1. On the operator panel, press the [Jobs] button.2. In the list of [Waiting jobs], touch the job of which you want to make a proof.
NOTEYou can select more than 1 job at a time.
3. Press [Proof].A copy of the job goes to the bottom of the list of [Scheduled jobs].The original job remains in the list of [Waiting jobs].You can recognize a proof by the magnifying glass on the job icon .
Make a proof
Chapter 7 - Carry out print jobs 119
Change the [Output] settings
Change [2-sided] into [1-sided] and vice versa
Introduction
Jobs for which [1-sided] or [2-sided] printing was defined, will be printed on either 1 side or bothsides of a sheet. If required, you can change this setting.
When a job contains mixed settings ([1-sided] and [2-sided]), you can change this setting to [1-sided] or [2-sided] for the complete job.
NOTEYou cannot change this setting for the active print job .
Procedure
1. Touch [Jobs] -> [Queues] -> [Scheduled jobs] or [Waiting jobs].2. Touch the job you want to change.3. Touch [Properties] - or touch the job 2x to open the [Properties] window.4. Touch the [1- or 2-sided] button.5. Touch the desired value.6. Press [OK].
Change the [Output] settings
120 Chapter 7 - Carry out print jobs

Select a different media for a job
Introduction
If you want to print a job on other media than originally defined for that job, you can select adifferent media via the operator panel. Requirements regarding the new media:• The media must be available in the media catalog.• The media must have the same size as the original media.
NOTEYou cannot change this setting for the active print job .
Procedure
1. Touch [Jobs] -> [Queues] -> [Scheduled jobs] or [Waiting jobs].2. Touch the job you want to change.3. Touch [Properties] - or touch the job 2x to open the [Properties] window.4. In the preview pane at the right-hand side, touch the media you want to change.
When more than 1 media was defined for a job, the preview pane displays a separate button foreach media.
5. From the list, select the new media.6. Press [OK].
Select a different media for a job
Chapter 7 - Carry out print jobs 121

Shift the image roughly to create binding space
Introduction
If you want to create space for staples or punch holes, for example, you can use the [Align]function. The preview in the right-hand pane of the operator panel displays the consequences ofyour changes.
You can also shift the image or margin more precisely.
Procedure
1. Touch [Jobs] -> [Waiting jobs].2. Touch the job you want to change.
NOTEYou cannot change this setting for the active print job .
3. Touch [Properties], or touch the job twice to open the [Properties] window.4. Touch the [Align] button.5. Make the required changes.6. Press [OK].7. Press [OK].
Shift the image roughly to create binding space
122 Chapter 7 - Carry out print jobs

Shift the image precisely to create binding space or correct thelayout
Introduction
If you want to create space for staples or punch holes, for example, you can use the [Align]function. However, when the [Align] function is not precise enough, you can use the [Marginshift] and [Image shift] functions. These functions allow you to shift the image more precisely.The preview in the right-hand pane of the operator panel displays the consequences of yourchanges. If you shift the margin too much, you may loose part of the image.
The [Shift] function has 2 options.• [Margin shift] allows you to increase or decrease the margin to create more binding space, for
example. With [Margin shift], you can shift an image relative to the binding edge.• [Image shift] has basically the same function. However, [Image shift] also allows you to move
the image vertically. This gives you more freedom in moving the image exactly to the desiredposition.
NOTEBy default, the values of the front side and the back side are linked. To define different values foreach side, touch . The changes you make are valid for the whole document, not only for thecurrent page.
Procedure
1. Touch [Jobs] -> [Waiting jobs].2. Touch the job you want to change.
NOTEYou can only change the settings of the active print job after you stopped the printer (press the[Stop] button two times).
3. Touch [Properties], or touch the job twice to open the [Properties] window.4. Touch the [Shift] button.5. Make the required changes.6. Press [OK].7. Press [OK].
Shift the image precisely to create binding space or correct the layout
Chapter 7 - Carry out print jobs 123

Change the print delivery settings
Introduction
Usually the print delivery settings have been defined in the printer driver.
Overview of the print delivery settings
Setting Description
[Output location] Change the output location for the job. The list shows all the out-put locations that are available for your system.Make sure there is a match between the selected output locationand the job requirements. For example, when a job requires sta-ples, you must select an output location that allows stapling.
[Sort] Change the sorting method of the prints. You can select sort [Bypage] or [By set].
[45] Sort by page
[46] Sort by set
[Offset stacking] Stack the prints with an offset.This setting is only available when the [Offset stacking] setting ofthe active [Workflow profile] is set to [Sets (as in job)].
[Advanced settings] Finishing equipment often requires that the printed sheets are de-livered in a certain order. For finishers that are integrated in yourprinting system, the required settings are adapted automatically.However, sometimes it can be necessary to change a number ofsettings manually, for example when you want to finish the printsusing offline finishers. If required, you can change the [Sheet or-der], [Sheet orientation], [Print order] and [Rotation].
[Advanced settings]
Setting Description
[Sheet order] [Face up]Deliver the prints face up, first sheet on top.[Face up reverse]Deliver the prints face up, last sheet on top.[Face down]Deliver the prints face down, first sheet on top.[Face down reverse]Deliver the prints face down, last sheet on top. 4
Change the print delivery settings
124 Chapter 7 - Carry out print jobs

Setting Description
[Sheet orientation]
[Header up LEF]Deliver the prints with the header on top side and in portrait posi-tion (vertical).
[Header up SEF]Deliver the prints with the header on top side and in landscape po-sition (horizontal).
[Header down LEF]Deliver the prints with the header at the bottom side and in por-trait position (vertical).
[Header down SEF]Deliver the prints with the header at the bottom side and in land-scape position (horizontal).
[Print order] • [Front/back]Default value. The front page on the front, the back page on theback.
• [Back/front]Puts the front page on the back and the back page on the front.
[Rotation] • [0 degrees]• [180 degrees]
Rotates the prints 180 degrees.
NOTEYou cannot change this setting for the active print job .
Procedure
1. Touch [Jobs] -> [Queues] -> [Scheduled jobs] or [Waiting jobs].2. Touch the job you want to change.3. Press [Properties].4. Touch the [Print delivery] button.5. Make the required changes.6. Press [OK].
Related information
Change the stacking method per job on page 126Work with the workflow profiles on page 38
Change the print delivery settings
Chapter 7 - Carry out print jobs 125
Change the stacking method per job
Introduction
The [Offset stacking] function creates a visible distinction between sets or jobs in an outputlocation. The active workflow profile or the active automated workflow determines the defaulttype of offset stacking.
You can only change the type of [Offset stacking] per job when the [Offset stacking] setting of theactive [Workflow profile] is set to [Sets (as in job)].
NOTEYou cannot change this setting for the active print job .
NOTEAutomated workflows can be defined through the Settings Editor. You can find moreinformation in the online help of the Settings Editor.
Procedure
NOTERemember that you can only change the stacking method per job when the active [Workflowprofile] is set to [Sets (as in job)].
1. Touch [Jobs] -> [Queues] -> [Scheduled jobs] or [Waiting jobs].2. Touch the job you want to change.3. Touch [Properties] - or touch the job 2x to open the [Properties] window.4. Touch the [Print delivery] button.5. Touch the [Offset stacking] button to toggle between [On] and [Off].
The offset stacking is defined per N sets. By default, this number is 1. If a number is specified, thisspecified number of printed sets of a job will be delivered to an output location in one straightstack, the next number of printed sets are stacked with an offset.
6. Press [OK].
Related information
Work with the workflow profiles on page 38
Change the stacking method per job
126 Chapter 7 - Carry out print jobs

Change the number of staples
Introduction
When a job is sent to the machine, a desired number of staples for that job can be indicated.However, you can change the number of staples on the operator panel.
This section describes how to change the number of staples for a specific job.
NOTEThere must be a match between the selected output location and the job requirements. Forexample, when a job does not require staples, you can select any output location. When a jobrequires 1 or 2 staples, you can only select the output locations that can staple the jobs, forexample [Finisher] because the [Stacker] cannot staple the jobs. If you make a combination thatis not possible, the operator panel displays an error message.
Procedure
1. On the operator panel, press the [Jobs] button.2. In the list of [Waiting jobs] or [Scheduled jobs], touch the job you want to edit.3. Press [Properties].
NOTEYou can also press the job 2 times to access the [Properties] window. This function iscomparable to double-clicking with a mouse.
4. Touch the [Binding] button.5. Touch the desired number of staples.6. Touch the desired location of the staples.7. Press [OK].
The [Binding] button shows the currently selected number of staples.
Change the number of staples
Chapter 7 - Carry out print jobs 127

Punch the output
Introduction
If your machine is equipped with a puncher, you can punch holes in your documents. On theoperator panel you can indicate:• The number of holes punched
Puncher
The number of holes you can punch depends on the die set of the puncher.
NOTEYou can punch A4/Letter media.
Punch orientation
The punch orientation depends on how you place the media in the paper trays. The table belowgives an overview of the possible combinations and the resulting punch orientation.
Deposit header-up or left
Deposit header-up / left (Paper Logic)
Orientation Feed edge Punch example
Portrait Long-edge feed
Landscape Long-edge feed
Deposit header-down or right
Deposit header-down / right (not Paper Logic)
Orientation Feed edge Punch example
Portrait Long-edge feed
Landscape Long-edge feed
Procedure
1. On the operator panel, press the [Jobs] button.2. In the list of [Waiting jobs] or [Scheduled jobs], touch the job you want to edit.
Punch the output
128 Chapter 7 - Carry out print jobs

3. Press [Properties].
NOTEYou can also press the job 2 times to access the [Properties] window. This function iscomparable to double-clicking with a mouse.
4. Press [Punching].5. Select the desired number of holes punched6. If required, define the other settings for the output.7. Enter the generic parameters in the [Job] section.8. Press [OK].
Punch the output
Chapter 7 - Carry out print jobs 129

Change the [Job] settings
Change the number of sets
Introduction
When a job is sent to the machine, the desired number of sets will be indicated. However, youcan change the number of sets on the operator panel.
This section describes how to change the number of sets for a specific job.
NOTEYou can enter any value between 1 and 65,000 for all jobs except the active print job . Tochange the number of sets for the active print job , you must first press the Stop button 1time. Then you can change the number of sets. You cannot define a lower value than thenumber of sets that has already been printed.
Procedure
1. On the operator panel, press the [Jobs] button.2. In the list of [Waiting jobs] or [Scheduled jobs], touch the job you want to edit.3. Press [Properties].
NOTEYou can also press the job 2 times to access the [Properties] window. This function iscomparable to double-clicking with a mouse.
4. Touch the [Number of sets] button.A numerical keyboard appears.
5. Use the numerical buttons to enter the desired number of sets.
NOTETouch the arrow button <- to correct the previous entry or press [Cancel] to close the numericalkeyboard without saving the changes.
6. Press [OK].The numerical keyboard disappears.
7. Press [OK].
Change the [Job] settings
130 Chapter 7 - Carry out print jobs
Check the first set
Introduction
If you have a large print job and you want to check whether the job is printed correctly, it isadvised to check the first set before printing all other sets. When a job is sent to the printer, thesubmitter can indicate in the job submission application that the first set must be checked.However, the workflow profile that is selected on the operator panel determines how the printerhandles these requests.
Depending on the selected workflow profile, the [Check first set] setting can have the followingvalues:• [On]• [Off]• [As in job]
When you use the [Check first set] function, the printed set is subtracted from the indicated totalnumber of sets for a job. For example, when you need 10 sets, the printer will print the first setand then stop. When you continue the job, the 9 remaining sets are printed. This is different fromprinting a proof.
Methods to check the first set
You can use 1 of the following methods to indicate that you want to check the first set.• Use a workflow profile where [Check first set] is enabled. Then the printer stops after the first
set.• Enable the function [Check first set] in the [Properties] window for a specific job only. However,
you can only change the [Check first set] setting there when a workflow profile is selectedwhere the [Check first set] setting is [As in job].
NOTEYou cannot change this setting for the active print job .
Procedure
1. Touch [Jobs] -> [Queues] -> [Scheduled jobs] or [Waiting jobs].2. Touch the job you want to change.3. Touch [Properties] - or touch the job 2x to open the [Properties] window.4. Touch the [Number of sets] button.5. Touch [Check first set] when the button states [Off].
The text changes from [Off] to [On]. A check mark indicates that the checking of the first set isenabled.
6. Press [OK].The [Number of sets] button will now show a check mark.
7. Press [OK].
Related information
Work with the workflow profiles on page 38Make a proof on page 119
Check the first set
Chapter 7 - Carry out print jobs 131

Change the page range you want to print
Introduction
Usually, in the printer driver is defined whether all pages or only a range of pages must beprinted. However, you can also change this setting through the operator panel.
NOTEYou cannot change this setting for the active print job .
Procedure
1. Touch [Jobs] -> [Queues] -> [Scheduled jobs] or [Waiting jobs].2. Touch the job you want to change.3. Touch [Properties] - or touch the job 2x to open the [Properties] window.4. Touch the [Page range] button.5. Touch [Pages to print] -> [Pages].6. Touch the [From] button and enter the number of the first page you want to print.7. Touch the [To] button and enter the number of the last page you want to print.8. Press [OK].
Change the page range you want to print
132 Chapter 7 - Carry out print jobs

Change the use of separator sheets
Introduction
Separator sheets are empty sheets that are automatically inserted before each new set or job toseparate two sets or jobs. In the Settings Editor you can define the media that must be used asseparator sheets. The use of separator sheets can be enabled via the automated workflows in theSettings Editor. However, you can change this setting trough the operator panel.
Procedure
1. Touch [Jobs] -> [Waiting jobs] or [Scheduled jobs].2. Touch the job of which you want to change the settings.
NOTEYou can only change the settings of the active print job after you stopped the printer (press the[Stop] button two times).
3. Press [Properties].4. Touch the [Separator sheets] button to toggle between [On] and [Off].5. Press [OK].
Change the use of separator sheets
Chapter 7 - Carry out print jobs 133

Enable or disable the use of trailer pages
Introduction
A trailer page contains an overview of the job settings (for example used media and finishing). Atrailer page is printed at the end of a job. You can only enable this setting in the Settings Editor.Media for trailer pages are the same as for banner pages. You can specify this media in the mediacatalogue in the Settings Editor.
NOTEThis setting applies to all jobs from the moment it is enabled.
Procedure
1. In the Settings Editor, go to the [Preferences] / [Print job defaults] section.2. Change the setting for trailer pages: [Trailer page enabled].
Enable or disable the use of trailer pages
134 Chapter 7 - Carry out print jobs

Rename a job
Introduction
When you print a job, the job name is created in the application. The job name is displayed in the[Job name] field. However, you can rename the job.
Procedure
1. In the job window, touch [Job name].A keyboard appears.
2. Touch 'Backspace' until the current name is deleted.3. Touch the characters to enter a new name.4. Press [OK].
Rename a job
Chapter 7 - Carry out print jobs 135

Automated workflows (access through the SettingsEditor)
Introduction to automated workflows
Definition
The Settings Editor enables you to set up separate automated workflows. Automated workflowsare print queues that you can program to perform a range of operations. Automated workflowsare mostly used for legacy applications where jobs are printed automatically and certain settingsmust be set automatically. Every automated workflow represents a different virtual printer withits own specific attributes.
The selection of automated workflows is handled when the job is sent over LPR via the name ofthe automated workflow of the job ticket. Once the job is sent to a specified automated workflowon the printer, you cannot move the job to another workflow. The operator panel does not displaythe various automated workflows. However, jobs can get a label that you can use as a selectioncriterion for further processing and production.
The use of automated workflows has for example the following advantages.• The print workflow is automated even more, which improves the productivity.• The programming of individual jobs is eliminated, which optimizes the job throughput.• You can more easily distinguish, prioritize and produce jobs in different automated workflows
with different properties using less operator involvement.• You can easily assign legacy applications without job tickets to specific job profiles.
NOTEYou can define whether or not the settings of a job ticket overrule the settings of an automatedworkflow in the Settings Editor.
NOTEWhen the Settings Editor does not display the correct language, you can change the preferredlanguage in the Internet options of your Internet browser. The desired language must be first inthe list of languages.
Attributes
NOTEIt is not compulsory to define all the settings. When you put a check mark in front of a setting,that setting and its values become enabled.
Refer to the Settings Editor to get an overview of the settings.
Automated workflows (access through the Settings Editor)
136 Chapter 7 - Carry out print jobs

Add an automated workflow
Introduction
The Settings Editor contains 1 factory default automated workflow. However, it can be beneficialfor your productivity to add more automated workflows.
NOTEIt is not compulsory to define all the settings. When you put a check mark in front of a setting,that setting and its values become enabled.
Procedure
1. Go to [Workflow] -> [Automated workflows].2. Click the [Add] button.
A pop-up window displays the attributes you can specify for the new workflow.3. Put a check mark in front of the attributes you want to define.4. Specify or select the values of the attributes.5. Click [OK].
Add an automated workflow
Chapter 7 - Carry out print jobs 137

Edit an automated workflow
Introduction
You can change the attributes of an existing automated workflow.
NOTEIt is not compulsory to define all the settings. When you put a check mark in front of a setting,that setting and its values become enabled.
Procedure
1. Go to [Workflow] -> [Automated workflows].2. Put a check mark in front of the workflow you want to edit.3. Click the[Edit] button.
A pop-up window displays the attributes you can specify for your workflow.4. Change the attributes.5. Click [OK].
Edit an automated workflow
138 Chapter 7 - Carry out print jobs

Delete an automated workflow
Introduction
When you no longer need a certain automated workflow, you can delete that workflow.
NOTEYou cannot delete the factory default automated workflow.
Procedure
1. Go to [Workflow] -> [Automated workflows].2. Put a check mark in front of the workflow you want to delete.3. Click the [Delete] button.4. Click [OK].
Delete an automated workflow
Chapter 7 - Carry out print jobs 139

Restore the factory default workflow
Introduction
You can restore the factory default automated workflow. This has the following consequences.• All the automated workflows you added will be removed• All the changes in the default workflow will be lost.
Procedure
1. Go to [Workflow] -> [Automated workflows].2. Click the [Restore] button.
The factory default automated workflow is restored.
Restore the factory default workflow
140 Chapter 7 - Carry out print jobs

Use hotfolders
Introduction to hotfolders
Introduction
Technically, a hotfolder is a mapped network drive on a workstation that is linked to a sharedfolder on the PRISMAsync controller.
For an operator, a hotfolder is a folder on a workstation where printable files can be dropped forprinting.
Hotfolders are primarily aimed at recurring PDF workflows. In these workflows identical PDFs, orother printable files, with identical settings are printed on a regular basis. Hotfolders should notbe used in combination with print job tickets.
The job settings for hotfolders
The settings of a hotfolder can be defined by:• a hotfolder default ticket in the hotfolder itself, or• the automated workflow to which the hotfolder is linked.
It is advisable to use the hotfolder functionality in combination with the hotfolder default ticket.
However, if you want to use the settings of the automated workflow where the hotfolder is linkedto, it is advised not to place a hotfolder default ticket in the hotfolder, to prevent mixing upsettings. Furthermore, you must make sure that the [Overrule the job ticket] setting in thatautomated workflow is enabled (tick the checkbox).
Before you can use a hotfolder
To be able to use the hotfolder function, the following steps must be carried out first:• In the Settings Editor, the system administrator must activate the hotfolder function.• In the Settings Editor, the system administrator must create a hotfolder and link the hotfolder
to an automated workflow.• On a workstation, the key operator must create a shared network drive that is linked to the
hotfolder.• On the desktop of that workstation, the key operator can create a shortcut to the hotfolder, if
desired.
Use hotfolders
Chapter 7 - Carry out print jobs 141

Activate the hotfolder function
Introduction
The information in this section is intended for system administrators.
NOTE• By factory default, the hotfolder function is disabled. To use the hotfolder function, the system
administrator must activate this function once.• For this procedure, the System administrator password is required.
Procedure
1. Open the web browser and enter the host name or IP address of your PRISMAsync controller.2. Go to the [Workflow] -> [Hotfolders] section.3. Click [Configure].4. At [Enabled], select [Yes] to activate the hotfolder function.5. Enter a unique [User name] and [Password].
Make sure that you filled in the user name and password before you continue with the next step.6. Click [OK] to confirm the activation of the hotfolder function.
A confirmation window opens.7. Click [OK] to restart the controller now.
Activate the hotfolder function
142 Chapter 7 - Carry out print jobs

Create a hotfolder
Introduction
The information in this section is intended for system administrator.
Before you begin
The hotfolder function must be activated. Otherwise, the system administrator must activate thehotfolder function first.
Procedure
NOTEFor this procedure, the System administrator password is required.
1. Open your web browser and enter the host name or IP address of your PRISMAsync controller.2. Go to [Workflow] -> [Hotfolders].3. Click [Add].4. Give the hotfolder a logical name.
A logical name helps you to recognize the type of jobs you want to process using this hotfolder.5. Select the automated workflow to which you want to link the hotfolder.6. Click [OK].
Create a hotfolder
Chapter 7 - Carry out print jobs 143

Create a shared network folder on a workstation
Introduction
The information in this section is intended for key operators.
Before creating a shared network folder on a workstation, the following actions must be carriedout first:• Enable the hotfolder function.• Create an automated workflow (optional).• Create a hotfolder.
NOTEThis procedure describes the creation of a shared network folder on a workstation with aMicrosoft® Windows® XP operating system. Depending on the operating system of yourworkstation, the procedure can be different.
[47] Create a shared network drive
Procedure
1. Open Microsoft® Explorer.2. Click Tools -> Map Network Drive...3. Select a drive letter for the shared network folder.4. Enter the name of the shared network folder, for example \\12.34.56.78\Booklet, or click the
'Browse' button to navigate to the required location.
NOTEInstead of 12.34.56.78 you must enter the host name or IP address of the PRISMAsync controller.Booklet is the name you gave to the hotfolder when you created the automated workflow.
5. Click 'Finish'.A log in screen will appear.
6. Enter the user name and the password that were defined when the hotfolder function wasenabled in the Settings Editor.
7. Click 'OK.'The hotfolder is now ready for use.
8. If desired, you can create a shortcut to the shared network folder on the desktop of theworkstation.
Create a shared network folder on a workstation
144 Chapter 7 - Carry out print jobs

Create a hotfolder default ticket ('default_ticket.jdf')
Introduction
Hotfolders are primarily aimed at recurring PDF workflows. In these workflows identical PDFs, orother printable files, with identical settings are printed on a regular basis. A hotfolder defaultticket ('default_ticket.jdf') in the hotfolder determines the settings for the print jobs. The name ofthe hotfolder default ticket must not be changed, otherwise it will not be used in the hotfolder.
NOTEIf you want to use the hotfolder default ticket, make sure that the [Overrule the job ticket] settingof the automated workflow in which the hotfolder was created, is disabled (no check mark in thecheckbox). Otherwise, the settings of the automated workflow overrule the settings of thehotfolder default ticket.
Procedure
NOTEThis procedure is an example of the procedure on a Microsoft® Windows® XP operating system.For other operating systems, the procedure can vary.
1. Click [Start] - [Settings] - [Printers and Faxes].2. Right-click the printer driver of your Océ VarioPrint® 6000+ Line and select [Printing
preferences...].3. Define the required settings.4. Click the [Save] icon in the templates bar.5. Enter a name for the template.6. Click [OK].7. Right-click the template you just created and select 'Save as ticket'.8. Browse to the shared network folder and click [Save].
The template is saved as a hotfolder default ticket.Do not change the name of the hotfolder default ticket ('default_ticket.jdf').
Create a hotfolder default ticket ('default_ticket.jdf')
Chapter 7 - Carry out print jobs 145

The Transaction section (optional)
Introduction to the [Transaction] section
Introduction
NOTETransaction printing requires a license. The [System] view on the operator panel displays the[Transaction] section only when transaction printing is licensed.
Transaction printing enables you to print typical transactional documents like invoices, salaryslips or other variable data streams. Before you can start transaction jobs, you must first activatethe transaction mode via the operator panel. The [Transaction] section contains the settings thatyou need to use transaction printing. There you can also shift the image in case of amisalignment.
The following information is described below.• An overview of the items in the [Transaction] section on the operator panel.• The sequence of steps you must perform to print your transaction jobs.
Overview of the [Transaction] section
1
4
32
[48] Overview of the [Transaction] section
The Transaction section (optional)
146 Chapter 7 - Carry out print jobs

The items of the [Transaction] section
Description of the [Transaction] section
Num‐ber
Item Function
1 Dashboard The dashboard displays the following information fortransaction printing.• The connection status• The IP address of the host that sends the jobs• The name of the active transaction job• The progress of the active transaction job
2 [Connection] The [Connection] section gives access to the followingfunctions.• Turn the transaction printing mode on or off• Select the setup for the transaction jobs
You can define setups in the Settings Editor ([Transac-tion printing] -> [Setups]).
• Put the printer online or offline. The printer must beonline for the host to be able to connect to the printer.
3 [Print protocol] Display the active printer description language (read-on-ly).You can change the active PDL in the Settings Editor([Transaction printing] -> [Settings] -> [Requested activePDL]).When the requested active PDL is changed, the new PDLbecomes effective when you put the printer online.
4 [Image shift] Display and change the active image shift settings, forexample when the images on the front and back of asheet are not aligned correctly.
Sequence of steps to print transaction jobs
NOTEBefore you begin, the list of [Scheduled jobs] must be empty.
The following table describes the sequence of steps for transaction printing.
Step Actions on the print‐er
Actions on the host Remarks
1 Switch the printer in-to the transactionprinting mode.
Via the operator panel: [System] ->[Transaction] -> [Transaction print-ing mode] -> [On].
2 Select the active set-up that you need.
• Via the operator panel: [System]-> [Transaction] -> [Active trans-action setup], or
• Via the Settings Editor: [Trans-action printing] -> [Setups], or
• By the host via the data stream(when the printer is online andconnected). 4
Introduction to the [Transaction] section
Chapter 7 - Carry out print jobs 147

Step Actions on the print‐er
Actions on the host Remarks
3 Change the activePDL when currentlythe wrong PDL is ac-tive. This is only pos-sible when you havelicenses for morethan 1 PDL.
Via the Settings Editor: [Transac-tion printing] -> [Setups] -> [Re-quested active PDL].
4 Load the requiredmedia into the papertrays.
Only required when the active set-up has set the tray mode to tray totray.
5 Put the printer on-line.
• Via the operator panel: [System]-> [Transaction] -> [Transactiononline] -> [On], or
• Via the Settings Editor: [Trans-action printing] -> [Settings] ->[Switch the printer online or off-line].
6 Connect to the printer.
7 Submit the transactionprint jobs.
8 Print the transactionprint jobs.
You must perform all the regularactivities, for example load themedia, empty the output locations,add the supplies and solve errors.
9 Put the printer offline when the trans-action print jobs areready.
• Via the operator panel: [System]-> [Transaction] -> [Transactiononline] -> [Off], or
• Via the Settings Editor: [Trans-action printing] -> [Settings] ->[Switch the printer online or off-line].
10 Switch the printerback to the docu-ment printing mode.
• Via the operator panel: [System]-> [Transaction] -> [Transactionprinting mode] -> [Off].
Introduction to the [Transaction] section
148 Chapter 7 - Carry out print jobs

Output recovery in case of an error
Introduction
The Océ VarioPrint® 6000+ Line is equipped with an efficient, reliable output recovery in case ofan error. By factory default, the output recovery is set to [Normal]. After the error is solved, thejob continues at the page where the error occurred automatically.
However, some printing environments require that multiple copies must be avoided. Forexample, in transactions involving the printing of valuable documents such as cheques. In suchan environment, the [Output recovery] setting of your IPDS setup must be set to [Suppressed].
When the output recovery is suppressed, the printer will not automatically recover output. Allpending pages in the printer will be deleted and the stack will be ejected. The host system andthe operator are responsible for the recovery. The operator must restart the job manually on thecorrect page.
The tables below describe what happens when either the normal output recovery or thesuppressed output recovery is selected.
Normal output recovery in IPDS
Job Job progress states Normal output recov‐ery
End up in the outputlocation after error re‐covery
Sheets printed suc-cessfully.
Are stacked at one ofthe output locations.
Sheets are in outputlocation
Sheets copied to con-troller memory (in-cluding error pages).
Remain in controllermemory.
Once the error is re-solved, the printer re-starts by printing thefirst page in the con-troller memory. 4
Output recovery in case of an error
Chapter 7 - Carry out print jobs 149

Job Job progress states Normal output recov‐ery
End up in the outputlocation after error re‐covery
Sheets jammed in themachine.
The operator paneldisplays instructionson how to solve thepaper jam. The opera-tor has to removethese the jammedsheets manually.
These sheets stay inthe memory of thecontroller. Once theprinter resumes print-ing, these pages willbe printed again.
Sheets in host memo-ry.
Remain in host mem-ory.
These sheets stay inthe host memory.When the printerstarts printing, thesepages will be copiedand sent to the con-troller.
Suppressed output recovery in IPDS
Pages that are copied to the memory of the controller are deleted from the system. The operatormust send these missing pages as a new transaction print job to the printer.
Job Job progress states Suppressed output re‐covery
End up in the outputlocation after error re‐covery
Sheets printed suc-cessfully
Are stacked at one ofthe output locations.
Sheets are in outputlocation 4
Output recovery in case of an error
150 Chapter 7 - Carry out print jobs

Job Job progress states Suppressed output re‐covery
End up in the outputlocation after error re‐covery
Sheets copied to con-troller memory (in-cluding error pages).
Are deleted complete-ly.
These sheets are notdelivered to the out-put location.
Sheets jammed in themachine.
The operator paneldisplays instructionson how to solve thepaper jam. The opera-tor has to removethese the jammedsheets manually.
These sheets are notdelivered to the out-put location.
Sheets in host memo-ry.
Remain in host mem-ory.
Once the error is re-solved, the printer re-starts by printing thefirst page in the hostmemory.
Output recovery in case of an error
Chapter 7 - Carry out print jobs 151

Activate transaction printing
Before you begin
Make sure that the list of [Scheduled jobs] is empty.
Procedure
1. On the operator panel, touch [System] -> [Transaction] -> [Transaction printing mode].The text on the button changes from [Off] to [On].
2. If required, touch [Active transaction setup] and select the desired setup.The attributes of the transaction setup are defined in the Settings Editor on the PRISMAsynccontroller.
3. Load the required media into the paper trays if the setup selects the tray-to-tray mode.4. Touch [Transaction online] to put the printer online.
The text on the button changes from [Off] to [On].5. On the host or mainframe, connect to the printer and start the job.
NOTEYou can also select a setup and put the printer online via the [Transaction printing] section in theSettings Editor.
Activate transaction printing
152 Chapter 7 - Carry out print jobs

Deactivate transaction printing
Before you begin
Make sure that the list of [Scheduled jobs] is empty.
Procedure
1. On the operator panel, touch [System] -> [Transaction] -> [Transaction online] to put the printeroffline.The text on the button changes from [On] to [Off].Note that you can only switch the [Transaction online] function to offline when• The transaction print jobs are ready.• The printer contains no more print data.• The printer has stopped because all the jobs are ready, not because an error has occurred.
When you switch [Transaction online] to offline, the connection to the host is disconnectedautomatically.
2. Press [Transaction printing mode].The text on the button changes from [On] to [Off].
NOTEYou can also put the printer offline via the [Transaction printing] section in the Settings Editor.
Deactivate transaction printing
Chapter 7 - Carry out print jobs 153

Shift the image in the transaction printing mode
Introduction
When a misalignment occurs you can shift the image to correct the problem. You can shift theimage on the front side and back side horizontally and vertically. Examples of possiblemisalignments:• A name or address is not placed correctly in the right area.• Lines on the front side and back side of a sheet are not aligned correctly.
To keep the shift settings for future use, you must specify the shift settings in the setup via theSettings Editor. Each time that the setup is loaded, the shift settings included in the setup willbecome the active shift settings.
NOTEOnly use the image shift function if you want to shift the image of the whole job. The image shiftapplies to all the media in all the paper trays.
Procedure
1. On the operator panel, touch [System] -> [Transaction].2. Touch the - or + buttons to shift the image on the front side or back side of the sheet.
Shift the image in the transaction printing mode
154 Chapter 7 - Carry out print jobs

Handle the media messages - How to handle the [Media message]in the tray-to-tray mode
Introduction
The media catalog• contains a list of predefined media and their attributes• is an essential part of the system behavior of the Océ VarioPrint® 6000+ Line• helps you to print your jobs more easily while using the correct media
For transaction printing, the content of the paper trays (in terms of media from the media catalog)is translated into a format that the controller understands. However, the controller receives only alimited amount of information (name or size of the media). This can lead to miscommunicationwhere the controller misses a media requirement. The controller will then ask for the requiredmedia via a message on the operator panel. This [Media message] indicates the name or size ofthe missing media.
Your response to the [Media message] depends on the mode in which the printer works, either:• The tray-to-tray mode, or• The tray-to-media mode.
This section describes how to respond to the [Media message] for both modes.
NOTEA [Media message] will only occur when the printer description language is PCL.
[49] Example of a [Media message]
Procedure
1. A message on the operator panel indicates that a media is missing. Select one of the followingactions as a response to the message.• Press [Assign media].
Handle the media messages - How to handle the [Media message] in the tray-to-tray mode
Chapter 7 - Carry out print jobs 155

Continue with step 2 when you select this option.• Press [Continue].
The controller will use the PCL default media and continue the print job.Note that this might be an incorrect media.
• Press [Cancel stream].The print job is stopped. You can now solve the problem. It is most likely that you can solve theproblem on the host.
NOTESteps 2 and 3 apply only when you chose to assign a media.
2. From the list of media, select the media that will be used as the media the controller is asking forand press [OK].Note that this might be an incorrect media.The media will now be displayed with the name that is defined in the media catalog.
3. Select the paper tray where you want to load the required media and press [OK].4. Load the media.5. Close the paper tray.6. Press [OK].
Now you can assign other media or continue the print job.
Handle the media messages - How to handle the [Media message] in the tray-to-media mode
Procedure
1. A message on the operator panel indicates that a media is missing. Select one of the followingactions as a response to the message.• Press [Assign media].
Continue with step 2 when you select this option.• Press [Continue].
The controller will use the PCL default media and continue the print job.Note that this might be an incorrect media.
• Press [Cancel stream].The print job is stopped. You can now solve the problem. It is most likely that you can solve theproblem on the host.
NOTEThe following steps apply only when you chose to assign a media.
2. From the list of media, select the media that will be used as the media the controller is asking forand press [OK].Note that this might be an incorrect media.
3. Select one of the memory locations of the logical-tray table to be used for the required media.Note that the media that was previously allocated to that memory position in the setup will beoverwritten. Then that media will no longer be available to the transaction stream.Now you can assign other media or continue the print job.
Handle the media messages - How to handle the [Media message] in the tray-to-media mode
156 Chapter 7 - Carry out print jobs

Create a transaction setup - How to create a new transaction setup
Introduction
When you want to use transaction printing, you have to create the necessary transaction setups.You can create these setups in the Settings Editor.
NOTEWhen the Settings Editor does not display the correct language, you can change the preferredlanguage in the Internet options of your Internet browser. The desired language must be first inthe list of languages.
Procedure
1. Go to [Transaction Printing] - [Setups] .2. Click the [Add] button.
A pop-up window appears.3. Type in the name and the description of the transaction setup.4. Click [Ok].5. Place a checkmark in front of the transaction setup to select the setup.6. Change the settings (see Create a transaction setup - How to change the IPDS parameters on
page 157 or Create a transaction setup - How to change the PCL parameters on page 159).You can change the settings:• by group (click the pencil at the right-hand side of the group settings). This is the preferred
method.• by item (click the pencil behind the individual settings).
NOTEThe status of the setup is changed to modified. You have to load the setup to make thesemodifications available on the printer.Before you can load a transaction setup, you have to switch the transaction printing mode off-line.
7. Go to [Transaction Printing] - [Settings], and click [Toggle the transaction printing mode] toswitch the printer off-line.
8. Go to [Transaction Printing] - [Setups], and click [Load].The setup is now available on your operator panel.
Create a transaction setup - How to change the IPDS parameters
Procedure
1. Go to [Transaction Printing] - [IPDS setup].2. Make sure that the Tray selection mechanism is set to Tray to Media.
This is the preferred setting. This printer is a media-based machine. The Tray-to-media methodsupports this behavior.
3. Change the settings under the [IPDS setup] tab.You can change the settings:• by group (click the pencil at the right-hand side of the group settings). This is the preferred
method.• by item (click the pencil behind the individual settings).
4. For [IPDS Tray to media for media 1] assign the [Media catalog item] from the list. The listdisplays all the media in the media catalog. The system copies the media attributes from theselected media to the transaction setup.
Create a transaction setup - How to create a new transaction setup
Chapter 7 - Carry out print jobs 157

When you assign A3/Ledger-like media or want to use short-edge feed for other media, changethe feed direction to [Short-edge feed (SEF)].
NOTEThe settings editor displays only the media for which the media name is consistent with theIPDS media name definitions. Valid characters for an IPDS media name are: A-Z, a-z, 0-9, blank.
5. Repeat step 4 for all the logical trays in your setup.
Create a transaction setup - How to change the IPDS parameters
158 Chapter 7 - Carry out print jobs

Create a transaction setup - How to change the PCL parameters
Procedure
1. Go to [Transaction Printing] - [PCL setup].2. Make sure that the Tray selection mechanism is set to Tray to Media.
This is the preferred setting. This printer is a media-based machine. The Tray-to-media methodsupports this behavior.
3. Change the settings under the [PCL setup] tab.You can change the settings:• by group (click the pencil at the right-hand side of the group settings). This is the preferred
method.• by item (click the pencil behind the individual settings).
4. For [PCL Tray to media for media 1] assign the [Media catalog item] from the list. The list displaysall the media in the media catalog.When you assign A3/Ledger-like media or want to use short-edge feed for other media, changethe feed direction to [Short-edge feed (SEF)].
5. Repeat Step 4 for all the logical trays in your setup.
Create a transaction setup - How to change the PCL parameters
Chapter 7 - Carry out print jobs 159

Create a transaction setup - How to modify a transaction setup
NOTEWhen you have more than one printer, you can exchange transaction setups. Go to [TransactionPrinting] - [Setups] and use the [Import] and [Export] functions.
Procedure
1. Go to [Transaction Printing] - [Setups].2. Put a checkmark in front of the transaction setup to select the setup you want to modify.3. Click the [Edit] button, if you want to change the name of the setup.4. Change the settings under the [IPDS setup] tab (see Create a transaction setup - How to change
the IPDS parameters on page 157).You can change the settings:• by group (click the pencil at the right-hand side of the group settings). This is the preferred
method.• by item (click the pencil behind the individual settings).
5. Change the settings under the [PCL setup] tab (see Create a transaction setup - How to changethe PCL parameters on page 159).
6. Change the values under the [Settings] tab.
NOTEThe status of the setup is changed to modified. You have to load the setup to make thesemodification available on the printer.Before you can load a transaction setup, you have to switch the transaction printing mode off-line.
7. Go to [Transaction Printing] - [Settings], and click [Toggle the transaction printing mode] toswitch the printer off-line.
8. Go to back[Transaction Printing] - [Setups].9. Click [Load].
The setup is now available on your operator panel.
Create a transaction setup - How to modify a transaction setup
160 Chapter 7 - Carry out print jobs

Exchange all setups between printers
Introduction
If you have more than one printer, you can exchange the transaction setups between the printers,provided that the printer type and software version are identical. You can then use identicaltransaction setups on two or more printers.
Procedure
1. In the Settings Editor, click [Transaction printing] -> [Setups].2. Click [Export].3. Save the file.4. To import the setups, click [Import].5. Browse to the location where the setup file is stored.6. Choose either [Replace] or [Merge].
NOTEAfter you imported the setup file you must open and load the transaction setup you want to use.
Exchange all setups between printers
Chapter 7 - Carry out print jobs 161

Exchange all setups between printers
162 Chapter 7 - Carry out print jobs

Chapter 8 Remote Service (ORS) (optional)

Remote Service
Introduction
NOTERemote Service requires a license. Remote Service also requires a permission to an printerdealer site outside the customer domain, either via a proxy server or via IP white list. Contactyour local IT specialist to give you the permission.
Remote Service is an application that runs on a printer. Remote Service requires a workingInternet connection to establish a secure connection between the customer's site and printerdealer. In case a proxy server is present, Remote Service must be configured correctly.
Remote Service has the following functionality:
Functionality Description
Remote Assistance With this function, the printer dealer can take over the operatorpanel of the printer remotely to assist in case of a problem for ex-ample.
Remote Diagnostics When a customer contacts the printer dealer in the event of aproblem, the printer dealer can automatically retrieve service-rela-ted data from the printer for analysis and troubleshooting. Withthese data, the printer dealer can quickly identify the source of theproblem and possibly solve the problem by telephone.
Remote Meter Reading This function counter information needed for billing can be auto-matically sent to the printer dealer on a regular basis. Then thecustomer does not need to collect the meter readings manuallyand send these to the printer dealer. The customer can alwayscheck the sent data and approve the meter readings.
Remote Software Upgrade With this function, the customer can update the printer with thelatest software. The software is only retrieved from the printerdealer when the customer wants this.
Using Remote Service
• In the Settings Editor, all settings for the customer's proxy server must be set correctly([Configuration] -> [Connectivity] -> [Proxy server]).
• Via the operator panel, the remote connection must be enabled ([System] -> [Setup] ->[Localkey operator settings] -> [Remote connection] -> [Remote connection enabled] -> [Yes]).
• Via the operator panel, you can test the remote connection ([System] -> [Setup] ->[Local keyoperator settings] -> [Remote connection] -> [Test Remote connection]).The test can take up to 30 seconds. When the connection is not OK, a message indicates thereason for the failure.
• The dashboard of the operator panel displays a red icon (see figure) when the printer becomesdisconnected from the Internet. Make sure the connection is online; otherwise, the printerdealer cannot retrieve data from your printer.
• If required, you can change a number of connectivity settings via the operator panel ([System]-> [Setup] ->[Local key operator settings] -> [Connectivity]).
• You can verify the communication with the printer dealer by downloading the audit log filesvia the Settings Editor ([Support] -> [Logging] > [Save the audit log files]).
Remote Service
164 Chapter 8 - Remote Service (ORS) (optional)

The Settings Editor keeps up to 4 audit log files. Each log file can contain maximum 10 Mb ofdata. When all 4 files are full, the first file is overwritten. You can open the audit log files withany text editing application.
Remote Service
Chapter 8 - Remote Service (ORS) (optional) 165

Remote Service
166 Chapter 8 - Remote Service (ORS) (optional)

Chapter 9 Remote Monitor (optional)
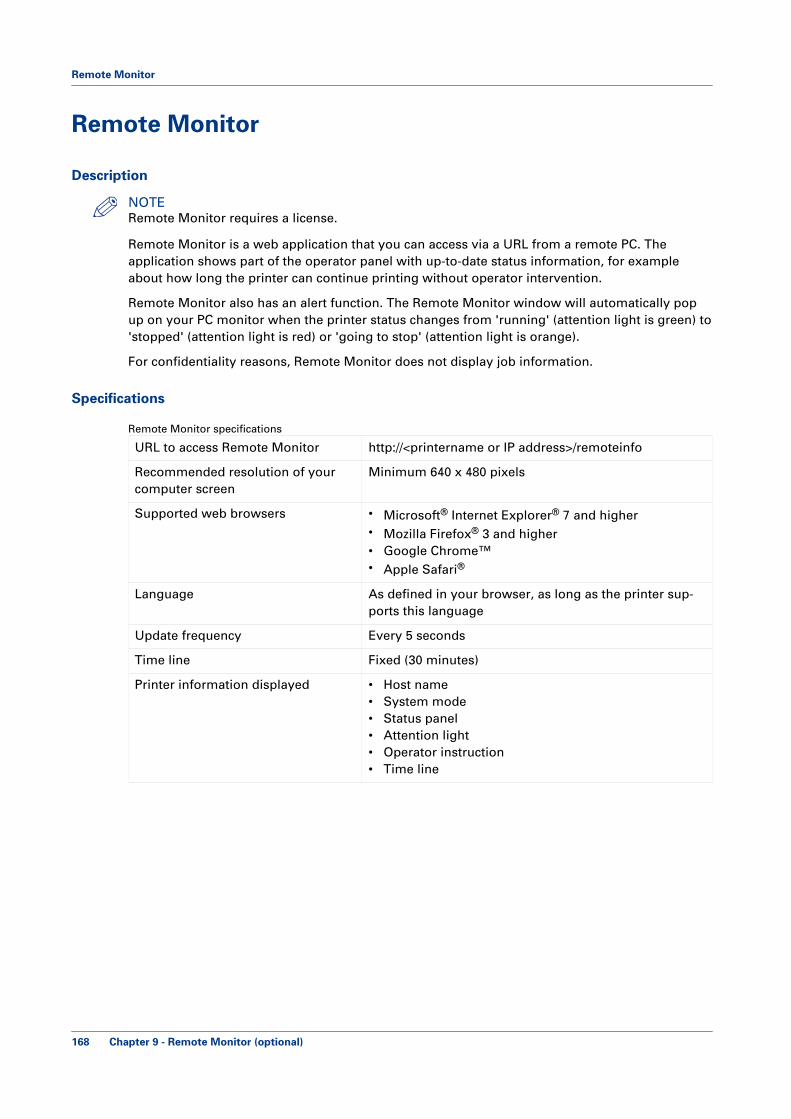
Remote Monitor
Description
NOTERemote Monitor requires a license.
Remote Monitor is a web application that you can access via a URL from a remote PC. Theapplication shows part of the operator panel with up-to-date status information, for exampleabout how long the printer can continue printing without operator intervention.
Remote Monitor also has an alert function. The Remote Monitor window will automatically popup on your PC monitor when the printer status changes from 'running' (attention light is green) to'stopped' (attention light is red) or 'going to stop' (attention light is orange).
For confidentiality reasons, Remote Monitor does not display job information.
Specifications
Remote Monitor specifications
URL to access Remote Monitor http://<printername or IP address>/remoteinfo
Recommended resolution of yourcomputer screen
Minimum 640 x 480 pixels
Supported web browsers • Microsoft® Internet Explorer® 7 and higher• Mozilla Firefox® 3 and higher• Google Chrome™• Apple Safari®
Language As defined in your browser, as long as the printer sup-ports this language
Update frequency Every 5 seconds
Time line Fixed (30 minutes)
Printer information displayed • Host name• System mode• Status panel• Attention light• Operator instruction• Time line
Remote Monitor
168 Chapter 9 - Remote Monitor (optional)

Chapter 10 Optional finishers and otherdevices

iXDP (integrated eXchangeable Die Punch) - VarioPrint®
6160 only
Introduction
Illustration
[50] The puncher (iXDP)
'The puncher enables you to finish documents for various types of binding. Simply replace thedie set inside the puncher to get another type of binding.
Information about the die sets.• The die sets are self-latching. You do not need tools or levers to replace a die set.• Each die set has an identification label that shows the hole pattern and name.• You can store 3 additional die sets in a storage area inside the puncher (see Main parts on
page 171).
iXDP (integrated eXchangeable Die Punch) - VarioPrint® 6160 only
170 Chapter 10 - Optional finishers and other devices

Operating information
Main parts
Illustration
K3
K7
K3
K7
1
0
K3
K7
6
1
2
3
4
5
[51] Main parts of the puncher
Operating information
Chapter 10 - Optional finishers and other devices 171

Description of the main parts
Description of the main parts
Part Description
1 Bypass The bypass is a short straight-through paper path for docu-ments that must not be punched.
2 Punch path Documents that must be punched follow the U-shaped punchpath. The puncher can handle media up to 216 g/m² (80 lb.cover).
3 Die set The puncher can use many different die sets (see Die setsummary on page 173). The various die sets make differenttypes of holes in your documents for different types of bind-ing. You do not need tools or levers to replace a die set (seeReplace a die set on page 175).
4 Chip tray The chip tray collects the paper chips that arise from thepunching process. You can easily access and empty the chiptray (see Empty the chip tray on page 174).
5 Storage area for diesets
The storage area K6 inside the puncher can keep 3 die sets.
6 Power switch The power switch turns the puncher on and off. The punch-er can only operate when the power switch is in the 'I' posi-tion.
Main parts
172 Chapter 10 - Optional finishers and other devices

Die sets available
Introduction
The puncher can use many different die sets to punch your documents. The punching pattern of adie set determines the binding style of your document. This section describes the die setsavailable for the puncher.
NOTEThe puncher is available in 2 versions: one version for A4 media and one version for Lettermedia. A4 punchers require an A4 die set. Letter punchers require a Letter die set. You cannotuse A4 die sets in Letter punchers, or the other way round.
Die set summary
Each punching style listed in the tables below requires a separate die set. All the die sets canhandle media up to 216 g/m² (80 lb. cover).
Die sets available for A4 punchers
Number of holes, shape Type of binding Type of die set
2, round Loose-leaf binding 2-Hole
4, round Loose-leaf binding 4-Hole
12, round VeloBind® binding VeloBind®
20, rectangular Plastic Comb binding Plastic Bind
21, rectangular Plastic Comb binding Plastic Bind
23, round Wire binding Wire 02:01 AM (2 holes/inch)
34, round Wire binding Wire 03:01 AM (3 holes/inch)
47, round Plastic Coil binding Color Coil
Die sets available for Letter punchers
Number of holes, shape Type of binding Type of die set
3, round Loose-leaf binding 3-Hole
11, round VeloBind® binding VeloBind®
19, rectangular Plastic Comb binding Plastic Bind
32, square Wire binding Wire 03:01 AM (3 holes/inch)
44, round Plastic Coil binding Color Coil
Die sets available
Chapter 10 - Optional finishers and other devices 173

Empty the chip tray
Introduction
The chip tray contains the paper chips that result from the punching process. The chip tray islocated at the lower left-hand side of the puncher (see Main parts on page 171).
When to do
The printer stops when the chip tray is full. The operator panel displays a message. The messageasks you to empty the chip tray of the puncher.
Illustration
[52] Empty the chip tray
Procedure
1. Open the front door of the puncher.
NOTEMake sure that you empty the chip tray while the power switch of the puncher is in the 'I'position. This enables the sensors to detect the action and automatically reset the punchcounter.
2. Grasp handle K8 and pull out the chip tray.3. Empty the chip tray.4. Slide the chip tray back into place.5. Close the front door of the puncher.
Empty the chip tray
174 Chapter 10 - Optional finishers and other devices

Replace a die set
Introduction
The puncher can use many different die sets to punch your documents (see Die sets available onpage 173). The die set determines the punching pattern.
Please contact your puncher supplier for additional or replacement die sets.
This section describes how to remove and install a die set.
NOTEOnly replace a die set when the printer is on hold.
Illustration
[53] Replace a die set
Procedure
1. Open the front door of the puncher.2. Grasp the finger hole of the die set and pull firmly. Slide the die set out of the slot. Make sure that
you support the die set with both hands.3. If possible, place the removed die set into the storage area inside the puncher cabinet.
CAUTIONThe next 2 steps include a possible pinching hazard! Keep your fingers and other body partsaway from the die set slot and the die set pins.
4. Support the die set with both hands and slightly slide the die set into the slot.5. Grasp the finger hole of the die set and push until the die set locks. A firm push can be required.6. Close the front door of the puncher.
Replace a die set
Chapter 10 - Optional finishers and other devices 175

Service information
Inspect the die sets
Introduction
Die sets have a life expectancy of approximately 500,000 punched sheets. The life expectancydepends partially on the used media types. The life expectancy of the die sets can increase, forexample:• When you observe the lubrication schedule (see Lubricate the die sets - Lubricate the punch
pins on page 177).• When you punch the same media type most of the time.• When you punch less cover stocks.
You must periodically inspect the die sets for wear. The result of the inspection can be one of thefollowing.• The die set is not worn. You can continue to use the die set.• The die set shows signs of wear. You must replace the die set.
NOTEWhen a die set reaches the end of life, the die set can cause paper jams.
When to do
Inspect the die sets after 500,000 punched sheets and consequently each time you lubricate thedie sets.
NOTESee Replace a die set on page 175 for information about how to remove and insert a die set intothe die set slot.
Illustration
[54] Inspect the die sets
Procedure
1. Put the die set on a table.2. Put your hands on both ends of the die set and push the top plate straight down.
Check if the die set functions smoothly. If not, the die set is worn.3. When the die set seems OK, insert the die set into the die set slot.4. Run a number of sheets through the machine and inspect the holes.
• The holes must be clean and even. Torn or frayed edges indicate wear.• The holes must be punched completely. Chips that are still attached to the holes indicate wear.• The holes must be straight, evenly spaced from the paper edge and correctly aligned. Skewed
holes indicate wear.
Service information
176 Chapter 10 - Optional finishers and other devices

Lubricate the die sets - Lubricate the punch pins
Introduction
The die sets have a life expectancy of approximately 500,000 punched sheets. However, whenyou lubricate the die sets on a regular basis, the life expectancy can increase. You must regularlylubricate the following parts.• The punch pins.• The shoulder bolts and springs.• The felt oil pad, if applicable.
Some die sets have a felt oil pad that must be lubricated. The following table indicates whichtypes of die set do or do not have a felt oil pad.
Types of die sets with and without a felt pad
Type Description Die sets
1 No felt oil pad 2-, 3-, 4-Hole and VeloBind®
2 A felt oil pad on 1 side, including amagnet and retaining plate
02:01 AM and 03:01 AM Wire (roundand square holes)
3 A felt oil pad surrounds the punchpins
19-, 20-, 21-Hole comb44-, 47-Hole coil
When to do
• Lubricate the punch pins every 50,000 punched sheets.• Lubricate the shoulder bolts and springs every 200,000 punched sheets.
Required tools
Use a high quality machine oil to lubricate the die sets.
IMPORTANTDo not use an aerosol (spray) type of oil. This type of oil leaves a sticky residue on the pins andattracts paper dust.
NOTESee Replace a die set on page 175 for information about how to remove and insert a die set intothe die set slot.
Illustration
1
2
3
[55] Lubrication points
Lubricate the die sets - Lubricate the punch pins
Chapter 10 - Optional finishers and other devices 177

Time
1. Punch pins
2. Shoulder bolts and springs
3. Felt oil pad
Procedure
1. Push the die set down until the punch pins protrude from the bottom plate.2. Apply a drop of oil to the end of each punch pin.3. Wipe down the punch pins.
Make sure that a thin layer of oil remains on the punch pins.
Lubricate the die sets - Lubricate the shoulder bolts and springs
Procedure
1. Apply a thin layer of oil on the shoulder bolts and springs.2. Wipe down the shoulder bolts and springs.
Make sure that a thin layer of oil remains on the shoulder bolts and springs.
Lubricate the die sets - Lubricate the felt oil pad
Procedure
1. Apply a thin layer of oil along the whole felt oil pad.Make sure that felt oil pad does not become oversaturated.
Lubricate the die sets - Lubricate the shoulder bolts and springs
178 Chapter 10 - Optional finishers and other devices

Troubleshooting
Introduction
When a paper jam occurs in the puncher, the printer will stop printing and go on hold. The printeroperator panel displays a message that asks you to remove the sheets from the puncher. Theprinter operator panel does not display the required actions step by step. Therefore, you mustcheck the following places for jammed media.• The bypass• The downward paper path• The die set• The bottom of the paper path• The upward paper path.
Besides a paper jam, there are other possible problems the puncher can face. This sectiondescribes the actions you must take to solve the problems.
Solve a problem
Solve a problem
Problem Solution
The puncher does not punch • Check if the power switch of the puncher is in the 'I' posi-tion.
• Check if the power cord is correctly attached to the back ofthe puncher.
• Check if the power cord is correctly plugged into the wallsocket.
You cannot easily pull out thedie set
The die set is in a partial cycle. Turn knob K3/K7 clockwise un-til the puncher is in the home position. Then the black lineson the knob (3) and the frame are aligned. The die set shouldnow slide out easily.
Troubleshooting
Chapter 10 - Optional finishers and other devices 179

Illustration
K3
K7
K3
K7
1
0
K3
K7
K5
K5
K4
K4
K1
1
2
3
K2
K2
[56] Clear a paper jam
Procedure
1. Open the front door of the puncher.2. Check if the chip tray is not too full.3. Follow the steps in the table.
Troubleshooting
180 Chapter 10 - Optional finishers and other devices

Area Description
Check the bypass:• Lift lever K1.• Check for jammed media in the bypass, the entrance guide (1) and
the diverter (2).
Check the downward paper path:• Open latch K2.• Check for jammed media.• If necessary, turn knob K2 anti-clockwise until the paper falls down.
Check the die set:• Turn knob K3/K7 clockwise until the puncher is in the home position.
Then the black lines on the knob (3) and the frame are aligned.• Slide the die set out.• Check for jammed media.• Put the die set back.
Check the bottom of the paper path:• Press lever K4 inward and lower the U-channel.• Check for jammed media.• If necessary, turn knob K4 until the paper falls down.
Check the upward paper path:• Open latch K5.• Check for jammed media.• If necessary, turn knob K5 clockwise until the paper falls down.
4. Close K1, K2, K4 and K5.5. Close the front door of the puncher.
Troubleshooting
Chapter 10 - Optional finishers and other devices 181

Specifications
Summary of the main specifications
Item Specifications for 115 V ma‐chines
Specifications for 230 V ma‐chines
Supported media sizes Letter (8.5" x 11") A4 (210 mm x 297 mm)
Supported media weights 20 lb. bond to 80 lb. cover 75 g/m² to 216 g/m²
Media through the bypass All media that the printer sup-ports
All media that the printer sup-ports
Punch edge 11" 297.4 mm
Punch capacity 1 sheet 1 sheet
Power supply 115 V, 60 Hz, single phase 230 V, 50 Hz, single phase
Electrical • BTUs/hour: 1160 BTU/HR• Watts: 300 W
• BTUs/hour: 1160 BTU/HR• Watts: 300 W
Safety certification TÜV according to UL 60950-1First Edition/CAN/CSA-C22.2 No.60950-1 IEC60950-1
TÜV/GS, CE according toEN60950-1:A11 IEC60950-1
Dimensions H x D x W 44.6" x 28.2" x 13.0" 1,134 mm x 716 mm x 330 mm
Weight 165 lbs. 75 kg
Shipped weight 254 lbs. 115.5 kg
Specifications
182 Chapter 10 - Optional finishers and other devices

Form Assist Module
Form Assist Module
Introduction
The printer allows you to print on special media with irregular thickness. Examples of such mediaare media with glued-on (membership or bank) passes, folded media, or media with a slipattached. When you load a stack of special media with irregular thickness into the paper tray, thestack will tilt. When the stack tilts too much, it may cause paper jams. Therefore, you can onlyload a limited amount of special media with irregular thickness into the paper tray.
The Form Assist Module is a device you can insert in your paper tray without modifying yourpaper tray. It allows you to increase the media input capacity. When you use the Form AssistModule, your stack of special media will stay straight. This allows you to load more media intothe paper tray and to increase your productivity. The Form Assist Module is delivered with'Installation instructions'.
IMPORTANTThe variety of special media makes it difficult to predict whether the printer can process thespecial media you want to use. Before you begin, test the special media and print a limitednumber of sheets.
Paper input capacity
Paper tray with Form Assist Module Paper tray without Form AssistModule
Paper with irregu-lar thickness (num-ber of sheets)
100 - 200 20 - 50
Form Assist Module
Chapter 10 - Optional finishers and other devices 183

EasyLift
EasyLift
Introduction
The EasyLift is a device that helps you to lift stacks of paper out of the stacker more easily. TheEasyLift is delivered with an 'Information sheet'.
CAUTIONThe maximum lifting weight is 15 kg / 33 lb.Caution: this is only a guideline, the amount may be lower/higher depending on your physicalstrength.
CAUTIONAvoid physical injury. Bend you knees and keep your back straight when you use the EasyLift.
Maximum weight
The following table gives you an indication of the weight of the most common media you can liftwith the EasyLift.
Media Number of sheets / weight in kg/lbs
100 sheets 500 sheets 1000 sheets 2000 sheets
A4 (80 gr) 0.5 kg / 1.1 lbs 2.5 kg / 5.5 lbs 5.0 kg / 11.0 lbs 10.0 kg / 22.0 lbs
A3 (80 gr) 1.0 kg / 2.2 lbs 5.0 kg / 11.0 lbs 10.0 kg / 22 lbs Too heavy!
Letter (20 lbs) 0.5 kg / 1.0 lbs 2.3 kg / 5.0 lbs 4.5 kg / 10.0 lbs 9.1 kg / 20.0 lbs
Legal (20 lbs) 0.6 kg / 1.3 lbs 2.9 kg / 6.4 lbs 5.8 kg / 12.7 lbs 11.6 kg / 25.5 lbs
Ledger (20 lbs) 0.9 kg / 2.0 lbs 4.5 kg / 10.0 lbs 9.1 kg / 20.0 lbs Too heavy!
EasyLift
184 Chapter 10 - Optional finishers and other devices

7" x 10" Statement Size Support
7" x 10" Statement Size Support
Introduction
The smallest media size that this machine supports is 203 x 203 mm / 7.9 x 7.9 inch. The 7" x 10"Statement Size Support device enables you to print on media with a size of 7 x 10 inches / 178 x254 mm and on JIS B5.
You can insert this device in your paper tray without modifying your paper tray. This device isdelivered with 'Installation instructions'.
NOTEIf you want to print on 7 x 10 inch media or on JIS B5, this media has to be available in themedia catalog. If the media catalog does not contain 7 x 10 inch media or JIS B5, you will haveto register this media first.
NOTEIf you are printing on 7 x 10 inch media or on JIS B5, it is important that the paper tray containenough media. The dashboard informs you when to load media.
NOTERemove the device from the paper tray when you want to load other media than the 7 x 10 inchmedia or JIS B5.
NOTEWhen you use the 7" x 10" Statement Size Support the dashboard informs you to load mediaeven though there is still a small amount of media present in the paper tray.
How to load the media with the 7" x 10" Statement Size Support
Action Illustration
1 Open the paper tray
2 Flip the metal plates over to the right-hand side.
3 Load the media. 4
7" x 10" Statement Size Support
Chapter 10 - Optional finishers and other devices 185

Action Illustration
4 Flip the metal plates over to the left-handside over the media.
5 Close the paper tray
7" x 10" Statement Size Support
186 Chapter 10 - Optional finishers and other devices

Dual paper tray
Introduction
The dual paper tray enables you to load 2 stacks of the same media in one paper tray. When thefirst stack of media becomes empty, the printing stops. The second stack is moved to the left-hand side and printing continues. A dual paper tray replaces a bulk tray.
Contact your local authorized dealer for more information about the dual paper tray.
The dual paper tray in the paper module
You can only load A4/Letter in the dual paper tray. The capacity of the dual paper tray is 3,300 A4/Letter sheets instead of 1,700 sheets (bulk tray).
The control panel of the paper module is described in The paper modules on page 26.
1
2
3
4
1
2
3
4
1
Number Description
1 If the LED is lit-up the dual paper tray is installed.
Load the media
See the media handling section for information on how to handle the media.
The [Trays] view displays the following icon for the dual paper tray.
Dual paper tray
Chapter 10 - Optional finishers and other devices 187

Icon Description
The left-hand stack of the dual paper tray is partly filled.
NOTEEach line of the left-hand stack indicates the presence ofabout 100 sheets.
The right-hand stack of the dual paper tray is partially or completely fil-led.
NOTEThe right-hand part of the dual paper tray is assumed to beeither full (independent of the actual filling level) or empty.Therefore the right-hand part of the icon for the dual papertray displays full or empty.
NOTEThe schedule assumes that the right-hand part of the dual paper tray is either full (although thestack may be partially filled) or empty. When the first stack becomes empty and the second stackis used, the schedule is updated with the actual filling level. You are advised to fill the right-handstack completely.
Dual paper tray
188 Chapter 10 - Optional finishers and other devices

Chapter 11 Counters

Introduction to the [Maintenance] section
Introduction
The [System] view gives access to system settings, system information, media information andmaintenance tasks.
This section gives an overview of the [Maintenance] section in the [System] view.
Overview of the [Maintenance] section
[57] Overview of the [Maintenance] section
The items of the [Maintenance] section
Description of the [Maintenance] section
Item Function More information
[Billing counters] Indicate the total number of printsthat have been made since the print-er was installed . You cannot resetthe billing counters.
General counter informa-tion on page 192
[Day counters] Indicates the number of prints thathave been made since the latest re-set. You can always reset the daycounters.
Reset the day counters onpage 192
[Toner counters] Indicates the amount of toner thathas been used since the printer wasinstalled. You cannot reset the tonercounter. 4
Introduction to the [Maintenance] section
190 Chapter 11 - Counters

Item Function More information
[Start maintenance] Open the list of the suggested or re-quired maintenance tasks.
NOTEOnly a trained and certifiedoperator is allowed to per-form the maintenancetasks.
Introduction to the [Maintenance] section
Chapter 11 - Counters 191
Reset the day counters
Introduction
The [Maintenance] section of the [System] view displays 3 types of counters. 2 of these countersprovide information about the number of sheets that have been printed. The other counterprovides information about the amount of toner that has been used.
This section first describes the 3 counters in the [Maintenance] section. Then it is described howto reset the day counters.
General counter information
The following table describes the counters in the [Maintenance] section of the [System] view.
Type of counter Description
[Billing counters] The [Billing counters] section displays the total number of prints thathave been made since the machine was installed. You cannot reset thebilling counters.
[Day counters] The [Day counters] section displays the number of prints that havebeen made since the counter was last reset to 0. You can, for example,reset the day counters at the beginning of a working day or before youstart a new job for a particular customer.
[Toner counters] The [Toner counters] section displays the amount of toner that hasbeen used since the machine was installed. You cannot reset the tonercounter.
The [Billing counters] and the [Day counters] provide information about the number of 1-sidedand 2-sided prints that have been made on standard-size and large media. The length of themedia determines whether a media is standard size or large. Media with a length of less than 390mm (15.35") are referred to and counted as standard-size media. Media with a length of 390 mm(15.35") or more are referred to and counted as large media.
The operator panel displays the media icon ( or ) as a small icon for standard-size media. Forlarge media, the media icon is big. The media icon is used in various places on the operatorpanel, for example in the [Counters] section, in the [Trays] view and in the job information.
Procedure
1. On the operator panel, press the [System] button.2. Press [Maintenance].3. Touch the [Reset day counters] button in the [Day counters] section.
A dialog box will ask you to confirm that you really want to reset the day counters.4. Touch [Yes] to reset the day counters to 0.
Reset the day counters
192 Chapter 11 - Counters

Find the meter readings
Introduction
The [Maintenance] section of the [System] view displays 3 types of counters.• The billing counters provide information about the number of sheets that have been printed
since the printer was installed. You cannot reset the billing counters.• The day counters provide information about the number of prints since the last reset. You do
not need the day counters for the meter reading. The day counters are only intended for yourown convenience.
• The toner counter provides information about the amount of toner that has been used sincethe machine was installed. You cannot reset the toner counter.
This section describes how to find the billing counters and the toner counter.
Procedure
1. On the operator panel, press the [System] button.2. Press [Maintenance].
You can find the required meter readings at the left-hand side of the screen.
Find the meter readings
Chapter 11 - Counters 193

Find the meter readings
194 Chapter 11 - Counters

Chapter 12 Keeping the printer running

Introduction to the [Printer] section
Introduction
The [System] view gives access to system settings, system information, media information andmaintenance tasks.
This section gives an overview of the [Printer] section in the [System] view.
The items of the [Printer] section
Description of the [Printer] section
Item Function More information
[Toner] Indicate the filling level of the left-hand and right-hand toner unit.
Check the status of the to-ner reservoirs on page 197
[Puncher] Indicate the status of the waste boxof the puncher.
Check the status of thepuncher waste box onpage 205
[Finisher] Indicate the number of staples thatthe stapler of the finisher has usedsince the last refill.
Check the status of the sta-pler cartridges onpage 199
[Stacker/stapler] Indicates the number of staples thatthe stapler of the stacker/stapler hasused since the last replacement.
Check the status of the sta-pler cartridges onpage 199
[External finisher] Indicate whether the optional exter-nal finisher is on-line or off-line.
Introduction to the [Printer] section
196 Chapter 12 - Keeping the printer running

Check the status of the toner reservoirs
Introduction
The machine has 2 toner reservoirs. The toner reservoirs are located at the left-hand side and theright-hand side of the engine module Introduction to the main system components on page 20.You can check the status of the toner reservoirs in the dashboard The dashboard on page 24 andin the [System] view. The [System] view also displays the current filling level of each tonerreservoir as a percentage. The icons in the following table indicate the status of the tonerreservoirs.
This section gives an overview of the possible toner statuses. Furthermore, this section describeshow to check the status.
The meaning of the toner icons
The toner icons
Toner icon Description
The toner icon is blue. All 3 blocks of the status bar are green. The to-ner reservoir is filled over 75%. Do not add toner.
The toner icon is blue. 2 Blocks of the status bar are green. The tonerreservoir is filled over 50%. You can add 1 bottle of toner.
The toner icon is blue. 1 Block of the status bar is green. The toner res-ervoir is filled over 25%. You can add 2 bottles of toner.
The toner icon is orange. The status bar contains no more greenblocks. The toner reservoir is filled less than 25%. The printer can printanother 600 sheets. You must add up to 3 toner bottles as soon as pos-sible.
The toner icon is red. The status bar has a red frame. The toner reser-voir is empty. The printing stops. You must add maximum 3 toner bot-tles to continue the printing.
The toner icon is grayed out. The status of the toner reservoir is un-known. This status is only displayed when the system is initializing.
The toner icon is grayed out and has a blue dotted frame. The statusbar is grayed out and has a red dotted frame. The status of the tonerreservoir is unknown. This status is only displayed when the toner ac-cess cover is open.
Procedure
1. Check the toner icons in the dashboard.
NOTEFollow the steps 2 and 3 to view the status of the toner reservoirs as a percentage.
2. Touch the [System] button.3. Press [Printer].
The [System] view displays the current filling level of the toner reservoirs as a percentage. Thepercentage matches the blocks that are indicated in the dashboard.
Check the status of the toner reservoirs
Chapter 12 - Keeping the printer running 197

Add toner
Introduction
This section describes how to add toner to the 2 toner reservoirs of the machine.
When to do
When a toner reservoir is empty or almost empty Check the status of the toner reservoirs onpage 197.
IMPORTANTOnly use the Océ VarioPrint 6000 toner.
IMPORTANTNever add more than 3 bottles at a time. The status bars of the toner indicators indicate theamount of bottles you are allowed to fill.
IMPORTANTThe printer must be switched on to add the toner. You can add toner while the printer is busy.
Procedure
1. Shake the toner bottle well (see the instructions on the bottle).2. Remove the screw cap from the bottle.
IMPORTANTDo not remove the seal from the bottle.
3. Open the front door of the toner reservoir you want to fill.
[58] Open the front doors
4. Open the lid of the toner reservoir.5. Put the toner bottle into the opening of the toner reservoir.
NOTEThe toner bottle only fits one way.
6. When the toner bottle is empty, carefully tilt the toner bottle into the horizontal position.Make sure that the opening of the toner bottle remains over the opening of the toner reservoir.
7. Rotate the toner bottle a half turn to the right to remove the residual toner.8. Remove the toner bottle.9. Close the lid of the toner reservoir.10. Close the front door of the toner reservoir.
Add toner
198 Chapter 12 - Keeping the printer running

Check the status of the staple cartridges
Introduction
The optional finishers The output locations on page 29 can contain staple cartridges to stapleyour jobs. You can check the status of the staple cartridges in the dashboard The dashboard onpage 24 and in the [System] view. The [System] view also displays the number of staples thathave been used since the last refill. The icons in the following table indicate the status of thestaple cartridges.
NOTEThe numbers 1 and 2 below the stapler icons indicate which of the staple cartridges of thefinisher is empty. When your configuration also contains the stacker/stapler or when yourconfiguration only contains the stacker/stapler, the numbers are not visible in the dashboard.
NOTEOnly when the staple level is low or when one of the staple cartridges is empty, the status isvisible in the dashboard.
The meaning of the stapler icons
The stapler icons
Stapler icon Description
The stapler icon is blue. The staple cartridges are filled.
The stapler icon is orange. The staple level in one of the staple cartridg-es is low Replace the stapler cartridges on page 200.
The stapler icon is red. One of the staple cartridges is empty. The print-er stops.
Procedure
1. Check the stapler icon in the dashboard.
NOTEFollow the steps 2 and 3 to view the number of staples that have been used since the last refill.
2. Touch the [System] button.3. Press [Printer].
The [System] view displays the status of the staple cartridges. The [System] view also displaysthe number of staples that have been used since the last refill.
Check the status of the staple cartridges
Chapter 12 - Keeping the printer running 199

Finisher: Add staples
Introduction
The optional finisher The output locations on page 29 on top of the stacker can staple your jobs.The finisher contains 2 staplers. Both staplers are located inside the finisher. Stapler 1 is locatedat the back side. Stapler 2 is located at the front side.
This section describes how to add staples.
NOTEYou can add short and long staples. It is important to add the correct staples. Use short staples ifyour documents contain fewer than 50 sheets. Use long staples when your documents containmore than 50 sheets. Only use staples of type S25 (long staples) or S37 (short staples).
When to do
When a staple cartridge is empty or almost empty Check the status of the stapler cartridges onpage 199.
Get access to the staplers
Procedure
1. Open the front door of the finisher.2. Open top cover E1.3. Open cover E5.4. Lock cover E5 with the locking mechanism E6.5. If required, slide stapler 1 to the centre. This makes the access to the cartridge holder in stapler 1
easier.
Finisher: Add staples
200 Chapter 12 - Keeping the printer running

Add staples
Procedure
1. Remove the cartridge holder from the stapler.2. Press the striped release buttons at both sides of the cartridge holder to unlock the lower cover.
[59] Press the 2 release buttons simultaneously
The lower cover opens.
[60] The lower cover opens
3. Remove the empty staple cartridge in the opposite direction of the arrow.
Add staples
Chapter 12 - Keeping the printer running 201

[61] Remove the staple cartridge
4. Slide a new staple cartridge into the cartridge holder, in the direction of the arrow.
[62] Place a new staple cartridge
5. Push the staple cartridge into the cartridge holder until the cartridge clicks into place.
Add staples
202 Chapter 12 - Keeping the printer running

[63] Firmly push the staple cartridge into the holder
6. Remove the paper ribbon that secures the staples in the staple cartridge.
[64] Remove the paper ribbon
7. Close the lower cover.8. Place the cartridge holder in the stapler.
Add staples
Chapter 12 - Keeping the printer running 203

Close the doors and covers
Procedure
1. Hold cover E5 while you unlock E6.2. Close cover E5.3. Close top cover E1.4. Close the front door of the finisher.
Close the doors and covers
204 Chapter 12 - Keeping the printer running

Check the status of the puncher waste box
Introduction
The optional puncher (see Introduction on page 170) contains a puncher waste box. The puncherwaste box contains the paper chips that result from the punching process. You can check thestatus of the puncher waste box in the dashboard (see The dashboard on page 24) and in the[System] view. The icons in the following table indicate the status of the puncher waste box.
NOTEOnly when the waste box is full, the status is visible in the dashboard.
The meaning of the waste box icons
The waste box icons
Waste box icon Description
The waste box icon is blue. The waste box inside the icon is grayedout. The waste box status is: [Absent].
The waste box icon is blue. The waste box is not full. The waste boxstatus is: [OK].
The waste box icon is red. The waste box status is: [Full]. The printerstops.To continue printing, empty the waste box (see Empty the chip tray onpage 174 for the puncher).
Procedure
1. Check the waste box icon in the dashboard.
NOTEOnly when the waste box is full, the status is visible in the dashboard.
2. Touch the [System] button.3. Press [Printer].
The [System] view displays the status of the puncher waste box.
Check the status of the puncher waste box
Chapter 12 - Keeping the printer running 205

Troubleshooting
Introduction
The main types of possible errors are the following.• Errors that relate to the machine• Errors that relate to the jobs• Toner problems that relate to the use of fiber-rich media.
This section gives an overview of the possible errors and the solutions to these errors.
NOTEOnly operators who received the special maintenance training are allowed to replace or cleanparts and solve paper jams in the process units.
Overview of the possible machine errors
Handle the machine errors
Error Solution Additional information
Paper jam Follow the instructions onthe operator panel.
After you solved the error, the machine startsfrom the point where the printing stopped dueto the error. Please check for double prints.
Software error Follow the instructions onthe operator panel.
A message on the operator panel will indicatethat you must restart the machine.
Service required Follow the instructions onthe operator panel.
A message on the operator panel will indicatethat you must call Service.
Maintenance re-quired
Follow the instructions onthe operator panel.
The maintenance wizard appears. You needthe maintenance PIN to access the mainte-nance mode. The machine is automaticallyswitched off.
NOTEOnly trained operators are allowedto perform maintenance tasks.
Unit recondition-ing
Follow the instructions onthe operator panel.
After an error was solved, the machine checksif the print job can continue from the pointwhere the printing stopped. When you use cy-clic media, you must probably remove a cou-ple of sheets.
The system can-not determine ifthe output iscomplete
Follow the instructions onthe operator panel andcheck the output.
The system can sometimes not determine ifthe output is complete. Then you must checkthe output. Touch the [OK] button when theoutput is complete.
Troubleshooting
206 Chapter 12 - Keeping the printer running

Overview of Possible Job Errors
Handle job errors
Error Solution Additional information
The required sup-plies are notavailable
Add the required supplies(media, toner and staples)before the machine stopsprinting.
The dashboard helps you to determine whenthe supplies are required.
The defined com-bination of jobsettings is notpossible
• The controller correctsthe settings.
• You must define a cor-rect combination of jobsettings in the [Proper-ties] section of the[Jobs] view on the con-trol panel.
The solution depends on the place where thejob settings are defined.• When the job settings are defined in an ap-
plication or printer driver, the controller au-tomatically corrects the settings.
• When you define the job settings on thecontrol panel, the control panel displays amessage that the defined combination is notpossible. The [OK] button is disabled.
Overview of the possible toner pollution problems using media with high amounts of paperdust
When you use media with a high amount of paper dust, you can have problems with tonerpollution of the prints right after the automatic black image cleaning procedure. Therefore it isadvised to enable the [Paper quality test] (see Change the advanced media settings - Start thePaper quality test on page 84) each time when a new batch of media is used. This is to be surethat the correct [Paper quality] setting is still at the right level for this new batch.
Toner pollution problem Solution
Toner pollution on the first sheets af-ter the automatic black image clean-ing procedure.
• Change the [Paper quality] setting from [Normal] to[Low] (see Change the advanced media settings -Change the Paper quality on page 83).
• Use the [Paper quality test] to determine if this newsetting is the right cleaning mode for this media.
• The sheets of the 5th set must be totally toner free, al-so at the edges of the media size width.
• When these sheets still show toner pollution, you canset the [Paper quality] setting to [Lower] (see Changethe advanced media settings - Change the Paper qual-ity on page 83).
• Use the [Paper quality test] to verify that this new set-ting is the right cleaning mode for this media. 4
Troubleshooting
Chapter 12 - Keeping the printer running 207

Toner pollution problem Solution
Toner pollution on the first sheetsalong the edge of the sheet (2-3 mm)after the automatic black imagecleaning procedure.
• Change the [Paper quality] setting from [Normal] to[Low] (see Change the advanced media settings -Change the Paper quality on page 83).
• Use the [Paper quality test] to determine if this newsetting is the right cleaning mode for this media.
• The sheets of the 5th set must be totally toner free, al-so at the edges of the media size width.
• When these sheets still show toner pollution, you canset the [Paper quality] setting to [Lower] (see Changethe advanced media settings - Change the Paper qual-ity on page 83).
• Use the [Paper quality test] to verify that this new set-ting is the right cleaning mode for this media.
NOTEWhen the peripheral pollution mainly occurs at1 side of the sheet, it is advised to rotate themedia in the paper tray by 180 degrees.
A combination of the above pollu-tions.
• Change the [Paper quality] setting from [Normal] to[Low] (see Change the advanced media settings -Change the Paper quality on page 83).
• Use the [Paper quality test] to determine if this newsetting is the right cleaning mode for this media.
• The sheets of the 5th set must be totally toner free, al-so at the edges of the media size width.
• When these sheets still show toner pollution, you canset the [Paper quality] setting to [Lower] (see Changethe advanced media settings - Change the Paper qual-ity on page 83).
• Use the [Paper quality test] to verify that this new set-ting is the right cleaning mode for this media.
Ghost images in mid and high tonercoverage areas.
• Change the [Paper quality] setting from [Normal] to[Low] (see Change the advanced media settings -Change the Paper quality on page 83).
• If the print quality is still not optimal with respect tomentioned ghost images, you can set the [Paper qual-ity] setting to [Lower] (see Change the advanced me-dia settings - Change the Paper quality on page 83).
Troubleshooting
208 Chapter 12 - Keeping the printer running

Appendix A Miscellaneous

Product specifications
NOTEThe media specifications in the following table are based on plain paper of 80 g/m² or 20 lbbond.
Overview of the main product specifications
Product specifications
Item Specification
Technology Océ Gemini Instant Duplex technology
Print speed (2-sided) Océ VarioPrint® 6160:• 170 images/minute (A4/Letter)• 88 images/minute (A3/Ledger)
Océ VarioPrint® 6200:• 200 images/minute (A4/Letter)• 106 images/minute (A3/Ledger)
Océ VarioPrint® 6250:• 250 images/minute (A4/Letter)• 132 images/minute (A3/Ledger)
Océ VarioPrint® 6320:• 314 images/minute (A4/Letter)• 168 images/minute (A3/Ledger)
NOTEFor 1-sided printing, the print speed of A4 orLetter like media is 125 images/minute for allmachine types except for the Océ VarioPrint®6320. This machine has a print speed of 157images/per minute for 1-sided printing.
Supported media sizes • Minimum 8 x 8 inch• Maximum 12.5 x 19.2 inch
Supported media weights • 50 - 300 g/m² for Océ recommended media• 40 - 135 lb. bond for other media
Printable area Long edge: maximum 19.1 inchesShort edge: maximum 12.5 inches
Active registration < .02 inches
Input capacity per paper module • Normal trays 1 and 2:600 sheets each
• Bulk trays 3 and 4:1,700 sheets each (or 3,300 A4/Letter sheets eachwhen the optional dual paper trays are installed) 4
Product specifications
210 Appendix A - Miscellaneous

Item Specification
Output capacity per output location • Stacker:6,000 sheets in 2 stacks of 3,000 sheets each
• Finisher:Finisher tray. The finisher tray consist of 3 physicaltrays. You cannot address these physical trays sepa-rately as an output location.• Top tray: 900 sheets (A4/Letter)• Middle tray: 1,000 sheets (A4/Letter)• Lower tray: 1,800 sheets (A4/Letter)
Upper output: 500 sheets (all sizes)
Supported media sizes per output lo-cation
• Stacker:All media sizes between 8 x 8 inch and 12.5 x 19.2 in-ches
• Finisher:Long edge: 10.8 - 12.04 inchesShort edge: 8.18 - 8.66 inches
Stapling capacity • Finisher: 100 sheets
Toner Océ VarioPrint 6000 toner
Resolution • 1200 dpi• 180 lpi
Warm-up time < 12 minutes
Network connectivity 10/100 Mbit and 1 Gbit Ethernet
Network protocols • TCP/IP• IPX• SMB
Higher level protocols • LPR/LPD for job submission• Socket printing• SNMP• IPP
Supported PDLs • Adobe® PostScript® 3™ / streaming PostScript®
• PCL 6 (combines PCL5e and PCL XL)• PDF 1.6• Xerox® PPP support
Supported applications • Océ VarioPrint® 6000+ Line printer driver• Océ PRISMAprepare (5.3.2 and higher)• Océ PRISMAaccess (5.2 and higher)• Océ PRISMAproduction (4.06 and higher)• Océ PRISMAspool 4.04• Océ PRISMAdrive 2.4• Océ VPconvert 7• Xerox® FreeFlow™ MakeReady (7 and higher)• EFI® Fiery Central 1.8.2• Kodak® Smartboard 5 (limited)
Online finishing (external finisher) Via DFD2 interface
Product specifications
Appendix A - Miscellaneous 211

Product specifications
212 Appendix A - Miscellaneous

Index
1
1-Sided printing....................................................120
2
2-Sided printing....................................................120
7
7" x 10" Statement Size Support.........................185
A
Add staplesFinisher...........................................200, 201, 204
Add temporary media to the Media catalog........64Add toner..............................................................198Add
Automated workflow.....................................137Advanced media settings....................79, 82, 83, 84Advanced media setting
Setup section....................................................37Advanced settings
Print delivery settings....................................124Alignment..............................................................122Applications
Supported.......................................................211Assign button..........................................................56Assign media to paper tray...................................59Automated workflow
Add..................................................................137Delete..............................................................139Edit..................................................................138Restore default...............................................140
Automated workflowsAttributes........................................................136Explanation.....................................................136
Available documentation.......................................10
B
Billing counters.............................................192, 193Maintenance section......................................190
Binding..................................................................127Bundle...................................................................106
Print jobs.........................................................116Bundled jobs
Change job settings.......................................116
C
CapacityInput................................................................210Output.............................................................211Stapling...........................................................211
Change media.........................................................59Change
Alignment.......................................................122Check first set.................................................131Image shift......................................................123Language..........................................................43Margin Shift....................................................123Media..............................................................121Number of sets...............................................130Number of staples..........................................127Offset stacking................................................124Output location...............................................124Page range......................................................132Print order.......................................................124Rotation...........................................................124Separator sheets............................................133Sheet order.....................................................124Sheet orientation............................................124Sort by page...................................................124Sort by set.......................................................124Warning time....................................................44
Check first set........................................................131Workflow...........................................................38
CheckPuncher waste box.........................................205Staple cartridges............................................199Toner level......................................................197Waste box.......................................................205
CombinePrint jobs.........................................................116
Configuration reportPrint...................................................................34
Confirm start of jobWorkflow...........................................................38
Connectivity DNS settings.....................................................34IPv6 settings.....................................................34WINS settings...................................................34
Connectivity
Index
213

Default gateway...............................................34DHCP.................................................................34DNS 1................................................................34DNS 2................................................................34DNS suffix follows domain.............................34Host name.........................................................34Link speed and connection type.....................34MAC address....................................................34Primary DNS suffix..........................................34Subnet mask.....................................................34TCP/IP................................................................34Test TCP/IP connection....................................34WINS 1..............................................................34WINS 2..............................................................34
Content of the manuals..........................................10Contradiction handling........................................100Controller
Missing media........................................155, 156Copy
Printed jobs.....................................................108Counters........................................................192, 193Create
Hotfolder.........................................................143Hotfolder default ticket..................................145
D
Dashboard...............................................................24Datadump file
Save...................................................................34Date and time..........................................................35Day counters.................................................192, 193
Maintenance section......................................190Reset................................................................192
Default gateway......................................................34Define job settings
Hotfolder.........................................................145Delete jobs
All jobs............................................................103Jobs with available media.............................103Jobs with label...............................................103List of Printed jobs.........................................103List of Scheduled jobs...................................103List of Waiting jobs........................................103New jobs.........................................................103One by one.....................................................103Printed jobs.....................................................103
DeleteAutomated workflow.....................................139Printed jobs.....................................................108Scheduled jobs...............................................104Waiting jobs....................................................106
Destination of print jobWorkflow...........................................................38
DFD........................................................................211DHCP........................................................................34Die sets
Die sets available...........................................173Inspect.............................................................176Lubricate the felt oil pad................................178Lubricate the punch pins...............................177Lubricate the shoulder bolts and springs....178Replace............................................................175
DisableWarning time....................................................45
DNS 1.......................................................................34DNS 2.......................................................................34DNS settings...........................................................34DNS suffix follows domain....................................34Double-sheet detection..............................79, 81, 83
Disable..............................................................81Enable...............................................................81
Dual paper tray.....................................................187icon..................................................................187
E
EasyLift..................................................................184Edit
Automated workflow.....................................138Enable remote connection...................................164Engine module........................................................20Enhanced media mode..............................79, 82, 83
Disable..............................................................82Enable...............................................................82
ErrorsJob errors.......................................................207Machine errors...............................................206
External finisher....................................................211Status..............................................................196
F
Face down.............................................................124Face up..................................................................124Features...................................................................12Finisher....................................................................21First set
Check...............................................................131Form Assist Module.............................................183
H
Header down.........................................................124Header up..............................................................124Host name...............................................................34Hotfolder
Activate...........................................................142Create..............................................................143
Index
214

Create shared network drive.........................144Default ticket...................................................145Define job settings.........................................145Drag & drop....................................................141General information.......................................141Job settings....................................................141Job ticket.........................................................141Link to automated workflow.........................143
I
Image shift............................................................123Transaction printing.......................................154
Inspect the die sets...............................................176Intermediate check print........................................42
Setup section....................................................37Interrupt.................................................................111IPDS
Output recovery.............................................149IPv6 settings............................................................34
J
JIS B5.....................................................................185Job name truncation
Setup section....................................................36Job name
Change............................................................135Truncate............................................................46
Job settingsHotfolder.........................................................141
JobChange alignment..........................................122Change number of sets.................................130Change the media..........................................121Change the number of staples......................127Check the first set...........................................131Give priority....................................................112Make a proof...................................................119Print later........................................................113Print the job parameters................................118Rename...........................................................135Reprint.............................................................114Separator sheets............................................133Shift the image...............................................123Shift the margin.............................................123Ticket...............................................................118To top..............................................................112
Jobs viewOverview.........................................................104
Jobs with available media...................................115Jobs with label......................................................115
K
Key operator settings.............................................33
L
Label......................................................................115Language
Setup section....................................................36Large media..........................................................192Licences
Software............................................................33Link speed and connection type............................34Load media.............................................................53
Schedule view..................................................54Local key operator settings....................................33
Setup section....................................................37Logging
Configuration report........................................34Datadump file...................................................34Trace file...........................................................34
Low power mode....................................................14Low temperature mode...................................79, 83
Disable..............................................................80Enable...............................................................80Pre-printed..................................................79, 83
M
MAC address...........................................................34Maintenance section............................................190
Billing counters..............................................190Day counters...................................................190Maintenance...................................................190Toner counters...............................................190
MaintenanceMaintenance section......................................190
Make a proof.........................................................119Margin Shift..........................................................123Media catalog.........................................................63
Océ PRISMAprepare........................................88Media catalogue.....................................................61Media handling
Description........................................................63Media message
General....................................................155, 156Tray-to-media mode......................................156Tray-to-tray mode..........................................155
Media registrationLarge media........................72, 73, 75, 76, 77, 78Standard-size media..........65, 66, 68, 69, 70, 71
Media sectionSystem view.....................................................61
Media settingsAdvanced........................................79, 82, 83, 84
Index
215

MediaAssign...............................................................59Change......................................................59, 121Icons..................................................................57Information.......................................................57Large...............................................................192Load...................................................................54Output location...............................................211Registration......................................................62Standard.........................................................192Supported size................................................210Supported weight..........................................210
Move......................................................................104Move a job from Scheduled jobs to Waiting jobs. . .113
N
NetworkConnectivity....................................................211Protocols.........................................................211
Next output trayWorkflow...........................................................38
Number of sets.....................................................130Number of staples
Change............................................................127Used................................................................196
O
Océ PRISMAprepareJob preparation................................................88
Offset stacking......................................................124Changes in the Properties window...............126Types...............................................................126
Online finishing....................................................211Open button............................................................56Operator attention light...................................20, 28
Status colors.....................................................28Operator panel........................................................20
Brightness.........................................................47Contrast.............................................................47Dashboard........................................................24Main components............................................22Overview...........................................................22
Operator panel settingsSetup section....................................................37
Output location.....................................................124Supported media...........................................211
Output locationsExternal finisher...............................................29Finisher.............................................................29Finisher upper output......................................30Stacker..............................................................29
System output..................................................29Output recovery....................................................149Output
Punch..............................................................128
P
Page rangeAll pages.........................................................132Indicate the range..........................................132
Paper module..........................................................20Control panel....................................................26Green check mark............................................26LEDs..................................................................26Not assigned button........................................26Red arrows........................................................26
Paper modules........................................................26Paper quality.........................................79, 82, 83, 84Paper quality test..................................79, 82, 83, 84
Start...................................................................84Stop...................................................................84
Paper tray................................................................56Dual paper tray...............................................187Media................................................................59
Paper tray icons......................................................57PDL
Supported.......................................................211Power modes
Low power mode.............................................14Off......................................................................14Ready................................................................14Sleep mode.......................................................15
Pre-printedLow temperature mode.............................79, 83
Primary DNS suffix.................................................34Print.......................................................................106
All jobs............................................................115Job parameters..............................................118Job settings....................................................118Jobs in list of Waiting jobs............................110Jobs with available media.............................115Jobs with label...............................................115Urgent job.......................................................111
Print a job from USB drive.....................................90Print a job
Printer driver.....................................................87Print a scheduled job later...................................113Print delivery settings
Advanced settings..........................................124Offset stacking................................................124Output location...............................................124Print order.......................................................124Rotation...........................................................124Sheet order.....................................................124
Index
216

Sheet orientation............................................124Sort by page...................................................124Sort by set.......................................................124
Print jobsBundle jobs.....................................................116Split bundled jobs..........................................116
Print jobGeneric job settings.........................................98Output settings.................................................92Settings.............................................................91Types of settings..............................................91
Print now.......................................................104, 111Print order.............................................................124Print speed............................................................210Printable area........................................................210Printed jobs
Overview.........................................................104Printer driver
Get the latest version.......................................87Printer section
External finisher.............................................196Number of used staples ...............................196Puncher waste box.........................................196Toner...............................................................196
Printer software Version..............................................................33
Priority for a job....................................................112Product specifications..........................................210Proof..............................................................106, 119Properties
Printed jobs.....................................................108Scheduled jobs...............................................104Waiting jobs....................................................106
Protocols...............................................................211Punch the output..................................................128Puncher
Chip tray..........................................................174Die sets available...........................................173iXDP...................................................................21Lubricate.................................................177, 178Main parts.......................................................171Replace die set...............................................175Specifications.................................................182Types of binding............................................173Waste box.......................................................205
PunchOrientation......................................................128Output.............................................................128
R
Registration...........................................................210Registration
Media................................................................62
Remote assistance................................................164Remote connection enabled..................................34Remote connection status.....................................34Remote connection
Remote connection enabled...........................34Remote connection status...............................34Remote Service country code.........................34Remote Service custom country code...........34Status..............................................................164Test..................................................................164Test Remote connection..................................34
Remote Diagnostics.............................................164Remote Meter Reading........................................164Remote Monitor....................................................168Remote Service.....................................................164Remote Service country code...............................34Remote Service custom country code..................34Remote Software Upgrade..................................164Rename
Job...................................................................135Reprint a job..........................................................114Resolution.............................................................211Restart the system..................................................18Restore
Default workflow............................................140Roll feeder...............................................................20Rotation.................................................................124
S
Save the audit log files.........................................164Schedule view
Introduction......................................................50Jobs pane.........................................................50load media........................................................54Media toolbar...................................................51Output locations pane.....................................52Required media pane.......................................51Streaming jobs.................................................50Zoom control....................................................52
Schedule waiting jobs..........................................110Scheduled jobs
Overview.........................................................104Select
Different media for job..................................121Select
All jobs............................................................115Job...................................................................115Jobs with available media.............................115Jobs with label...............................................115Printed jobs.....................................................108Scheduled jobs...............................................104Waiting jobs....................................................106
Separator sheets...................................................133
Index
217

Serial number.........................................................33Sets
Number...........................................................130Settings Editor
Access...............................................................32Access through operator panel.......................33Change settings................................................33View settings....................................................33
SettingsPrint job.............................................................91
Setup section..........................................................36Advanced media settings................................37Intermediate check print..................................37Job name truncation........................................36Language..........................................................36Local key operator settings.............................37Operator panel settings...................................37Shut down system...........................................37Warning time....................................................36Workflow...........................................................36Workflow profile...............................................36
Sheet order...........................................................124Sheet orientation..................................................124Shut down system
Setup section....................................................37Shut down the system...........................................17Sleep button............................................................14Sleep mode.............................................................15Software
Licences............................................................33upgrade.............................................................33
Sort by page..........................................................124Sort by set.............................................................124Split........................................................................106
Print jobs.........................................................116SRA controller
Missing media................................................155Stacker.....................................................................21Stacking method...................................................126Standard media....................................................192Staple cartridges...................................................199Stapler icons.........................................................199Staples...................................................................127
Finisher...........................................200, 201, 204Staple
Status..............................................................199Stapling
Capacity..........................................................211Status.......................................................................24Stop after job........................................................104Stop behavior
Stop after a job...............................................101Stop after a set...............................................101Stop as soon as possible...............................101
Stop the printerAfter a job.......................................................101After a set........................................................101As soon as possible.......................................101Automatic.......................................................102Manually.........................................................101
Subnet mask...........................................................34System administrator settings..............................33System components
Engine module.................................................20Finisher.............................................................21Operator attention light...................................20Operator panel.................................................20Paper module...................................................20Puncher (iXDP).................................................21Roll feeder.........................................................20Stacker..............................................................21
System of measurement........................................35System settings
Date and time...................................................35System of measurement.................................35Time zone.........................................................35
System viewMaintenance section......................................190Media section...................................................61Printer section................................................196Setup section....................................................36Transaction section........................................146
SystemRestart...............................................................18Shut down........................................................17Turn on..............................................................16
T
TCP/IP......................................................................34Technology...........................................................210Temporary media.......................................61, 63, 64Test Remote connection................................34, 164Test TCP/IP connection..........................................34Ticket.............................................................104, 118
Printed jobs.....................................................108Waiting jobs....................................................106
Time zone................................................................35To top............................................................104, 112Toner counter...............................................192, 193Toner counters
Maintenance section......................................190Toner indicator
Status bar........................................................198Toner icon.......................................................198
Toner pollution problems....................................207Toner.............................................................198, 211
Filling level..............................................196, 197
Index
218

Icon..................................................................197Level................................................................197
Trace fileSave...................................................................34
Trademarks...............................................................8Trailer page...........................................................134
Media..............................................................134Transaction printing.............................................146
Activate...........................................................152Deactivate.......................................................153Image shift......................................................154Printer offline..................................................153Printer online..................................................152
Transaction setupExport..............................................................161Import..............................................................161
Transaction setups...............................157, 159, 160Tray
Load media.......................................................53Trays view
Overview...........................................................56Troubleshooting...................................................206Truncate
Job name..........................................................46Turn on the system................................................16
U
Upgrade software server................................................................33USB...................................................................33
Urgent job.............................................................111USB drive
Print job.............................................................90Save a file to another location........................90
V
VersionPrinter software................................................33
W
Waiting jobsOverview.........................................................104
Warm-up time.......................................................211Warning time
Disable..............................................................45Setup section....................................................36
Waste boxIcon..................................................................205Puncher...........................................................205Status......................................................196, 205
WINS 1.....................................................................34WINS 2.....................................................................34
WINS settings.........................................................34Workflow profiles
Check and print................................................38Function............................................................38Job by job.........................................................38Manual planning..............................................38Standard...........................................................38Unattended.......................................................38
WorkflowCheck first set...................................................38Confirm start of job..........................................38Destination of print job....................................38Next output tray...............................................38Profile................................................................38Setup section....................................................36
Index
219

Index
220


CANON INC.www.canon.com
CANON U.S.A., INC.www.usa.canon.com
CANON CANADA, INC.www.canon.ca
CANON EUROPA INC.www.canon-europe.com
CANON LATIN AMERICA INC.ww.cla.canon.com
CANON AUSTRALIA PTY. LTDwww.canon.com.au
CANON CHINA CO., LTDwww.canon.com.cn
CANON SINGAPORE PTE. LTD.www.canon.com.sg
CANON HONGKONG CO., LTDwww.canon.com.hk
©CANON INC. & Océ N.V. 2013